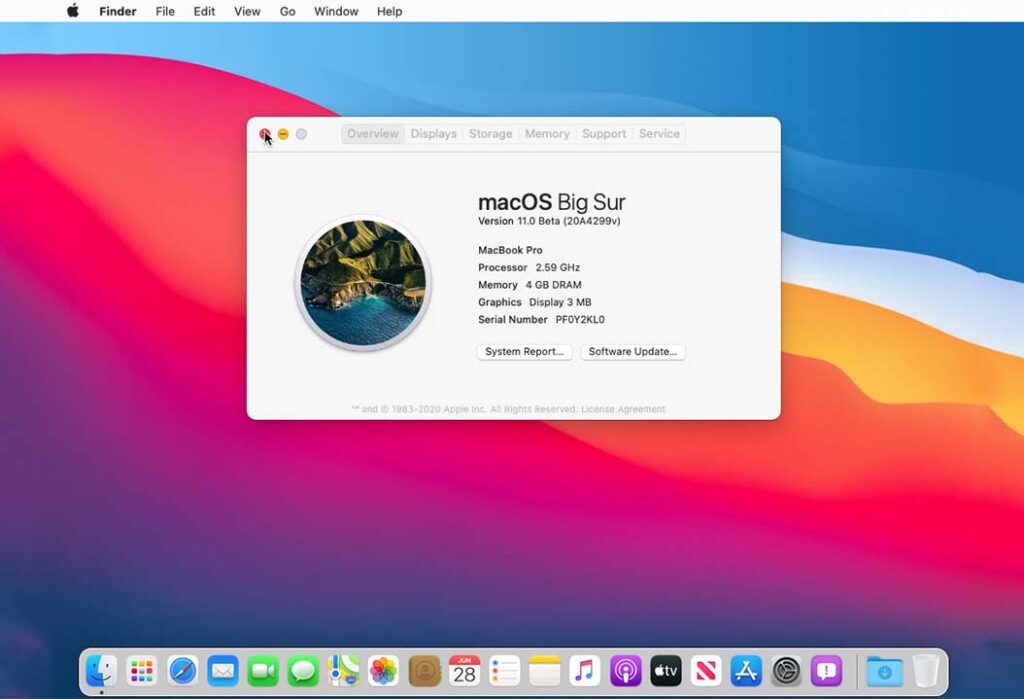
Apple has announced the next major release of macOS at WWDC 2020. Available today in developer beta and coming to all users in fall 2020. macOS Big Sur will be a free software update later this year. In the meantime, the developer beta is available on https://developer.apple.com/macos/ and for public beta in July.
This OS has new features that include an all-new iOS inspired design, Control Center arriving for Mac, a revamped Safari with greater privacy controls, Apple’s new translation software that uses on-device processing, and more.
Macs compatible with macOS Big Sur (macOS 11):
- 2015 and later MacBook
- 2013 and later MacBook Air
- Late 2013 and later MacBook Pro
- 2014 and later iMac
- 2017 and later iMac Pro
- 2014 and later Mac mini
- 2013 and later Mac Pro
And Accordingly, the following models capable of running macOS Catalina will not be able to be upgraded to macOS Big Sur:
- 2012 and Early 2013 MacBook Pro
- 2012 MacBook Air
- 2012 and 2013 iMac
- 2012 Mac mini
Tip: before reading the rest of the article, it’s recommended to navigate to the Required File section of this post and download macOS Big Sur then you’ve time to read the item until the downloading gets complete.
Steps to Install macOS Big Sur on VirtualBox on Windows
- Install VirtualBox on Windows PC
- Install/Update VirtualBox Extension
- Create a New Virtual Machine & Customize it
- Run VirtualBox Code to the Command Prompt
- Start the Virtual Machine
- Perform Clean Installation of macOS Big Sur
- Summary
Important Note:
Before we get started, make sure your system can support Virtualization Technology (VT), and it is enabled from BIOS so that you should be able to run Virtualization software like Virtualbox or VMware. Also, you should have a 64-bit Windows operating system with at least 2 GB Ram and 20 GB of free storage, however, we recommend you at least 4 GB of RAM or higher so you can store more files and install more apps on macOS Big Sur.
Furthermore, if you have an SSD, it’s highly recommended to use it as storage because SSD is much faster then mechanical hard drive (HDD ) and macOS run on SSD very smooth. Anyway, it is not 100% compulsory but if you have, don’t hesitate to use it.
Required Files
- Download Virtualbox
- Download Virtualbox Code
- macOS Big Sur Beta 11.0 (20A4299v) Dev Beta 1
- macOS Big Sur Beta 11.0 (20A4300b) Dev Beta 2
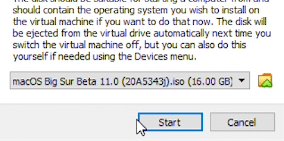
- macOS Big Sur Beta 11.0 (20A5343j) Dev Beta 4/Public Beta 1
- macOS Big Sur 11.0.1 (20B29) Initial public release Latest
Note: You can create macOS Big Sur ISO Image.
Recommendation: It’s highly recommended to create a new drive on your Windows PC and install macOS Big Sur on that drive.
Step 1: Install VirtualBox on Windows PC
From the “Required File” section of this post, you should have downloaded VirtualBox as well and if you didn’t, download VirtualBox’s latest version and install it on your Windows system. If you’ve already installed VirtualBox, then you can skip this step. Other than that, double click on VirtualBox Setup and click Next for a couple of times and you’re done with the installation.
This slideshow requires JavaScript.
Step 2: Install or Update VirtualBox Extension
This step is not 100% percent necessary but it’s highly recommended to do this step because macOS Big Sur might not be compatible with VirtualBox and for this reason, it will cause a problem during the installation. Download VirtualBox Extension and follow the steps below.
#1. Open up VirtualBox, navigate to Tools>Pereferences>Extensions.3
#2. Click on Plus icon and select VirtualBox extension which you’ve downloaded at the beginning of this section. Click Install or Upgrade and then click OK button.
#3. Finally, you should see something like the screenshot below.

Update Virtualbox Extension
Step 3: Create a New Virtual Machine & Customize it
Creating a virtual machine for macOS Big Sur is the same when you create a virtual machine for the Windows Operating system or Linux. We will use the ISO image of macOS Big Sur to do the installation process.
Note: We’ll make the VMDK as well if we receive lots of requests for that. Otherwise, there is no point because you can install macOS Big Sur with iso image as well.
#1. Open up your VirtualBox application and click New.
#2. Type a name for your Virtual Machine. Click Expert Mode and choose the following options then click Create.

Expert Mode
- Name the VM
- Virtual Machine Location (a separate drive is recommended)
- Type (Mac OS X)
- Version (Mac OS X 64-bit)
- Memory 4 GB (recommended 8 GB or higher)
- Create a virtual hard disk
Your setting should look something like the screenshot below.

Create New Virtual Machine
#3. Select where you want to save your virtual hard disk. Also, make sure to increase the size of the disk. From virtual hard disk, type make sure to select VHD. If you select dynamic allocated, your VM speed will not be good but it’s good that does not allocate the specified storage at once, unlike fixed-size type.

Create Virtual Hard Disk
#3. It’s time to customize some of the settings according to your choice. Click Settings and from the pane choose System. On the Motherboard, tab uncheck Floppy disk and move it down. If you’re not happy with your memory setting still, you can change it.
#4. Click the Processor tab and select a minimum of two processors or higher.

Increase the Processor
#5. Navigate to the Display menu then increase the Video memory to 128 MB.

Increase Video Memory
It’s time to select your macOS Big Sur ISO file. Click Storage and then select on Empty. Click on DVD icon and choose your macOS Big Sur ISO file.

Select ISO Image
Make sure your macOS Big Sur ISO file is on the top, not your Disk because if your disk is on the top, your VM might not boot. Just change the SATA port number to 0 for your iso image. It’s not 100% compulsory.

ISO Image SATA 0
Step 4: Run VirtualBox Code to the Command Prompt
Once you’ve created and customized your virtual machine, it’s time to run some codes in order to install macOS Big Sur on VirtualBox.
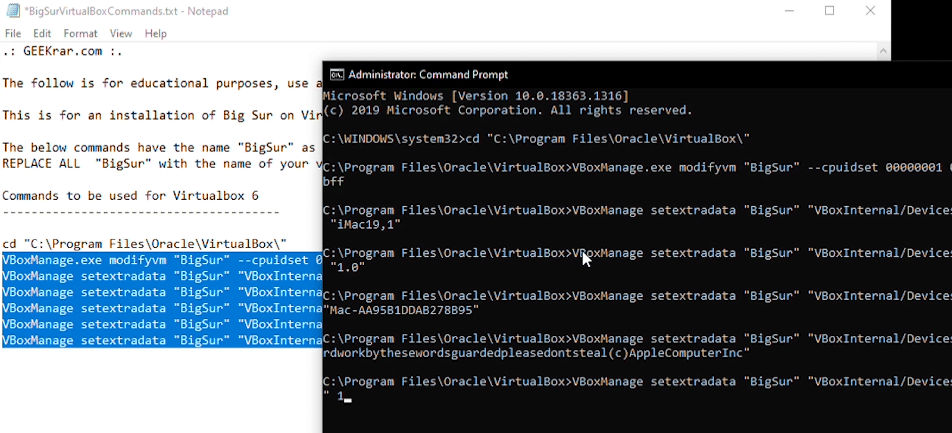
First, you should notice your virtual machine name because later on, we will use it. Open the VirtualBox code which you should have downloaded from the Required File section of this post.
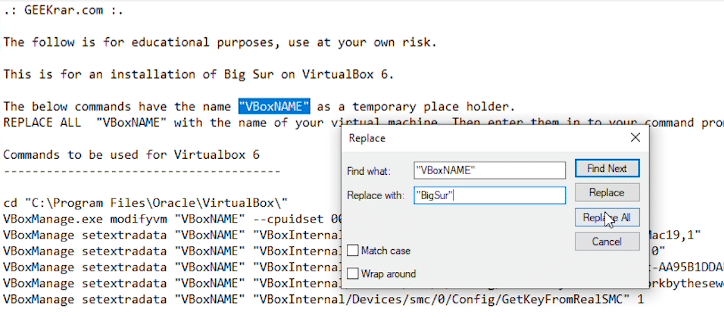
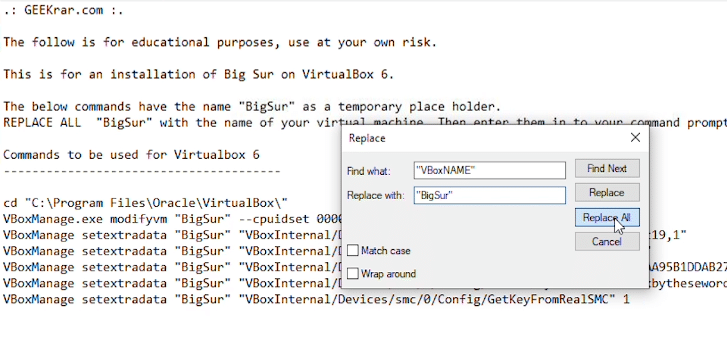
#1. When you opened VirtualBox code via notepad or any other text editor, use the replace function of the program to replace the VM Name to your virtual machine name. See the picture below to get an idea of how it’s done.
cd "C:Program FilesOracleVirtualBox"
VBoxManage.exe modifyvm "VM Name" --cpuidset 00000001 000106e5 00100800 0098e3fd bfebfbff
VBoxManage setextradata "VM Name" "VBoxInternal/Devices/efi/0/Config/DmiSystemProduct" "iMac19,1"
VBoxManage setextradata "VM Name" "VBoxInternal/Devices/efi/0/Config/DmiSystemVersion" "1.0"
VBoxManage setextradata "VM Name" "VBoxInternal/Devices/efi/0/Config/DmiBoardProduct" "Mac-AA95B1DDAB278B95"
VBoxManage setextradata "VM Name" "VBoxInternal/Devices/smc/0/Config/DeviceKey" "ourhardworkbythesewordsguardedpleasedontsteal(c)AppleComputerInc"
VBoxManage setextradata "VM Name" "VBoxInternal/Devices/smc/0/Config/GetKeyFromRealSMC" 1
Replace VM Name
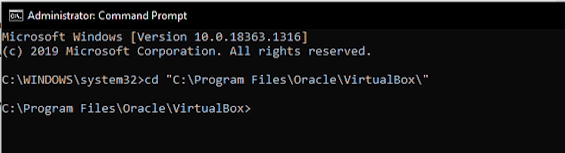
Tip: It’s highly important that you should quit the VirtualBox program before executing the code. If you don’t do it, your virtual machine might not proceed to the installation step.

Exit VirtualBox
#2. Once you replaced the “VM Name” with your virtual machine name, then run the code one by one to the command prompt (CMD). You can open the command prompt by pressing Windows+X key in Windows 10 or click windows key and type CMD and run command prompt as administrator.
This slideshow requires JavaScript.
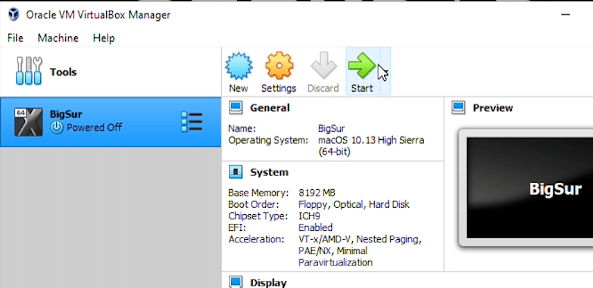
Step 5: Start the Virtual Machine
Starting macOS Big Sur with the older version of the Mac Operating system was a bit different, but with new macOS Big Sur still, it’s easy to set it up.
#1. Open the VirtualBox app then click the Start button. A black screen with a few yellow & white text will appear on the screen.

Start Virtual Machine
#2. Once you started the VM then you’ll see some code running in the background. Just wait until you see the Apple logo.
This slideshow requires JavaScript.
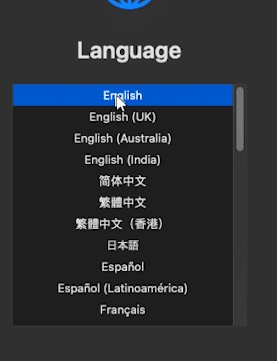
#3. Select a Language and click Continue arrow.

Select Language
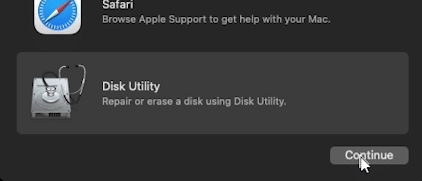
#4. Select Disk Utility and click Continue.

Select Disk Utility
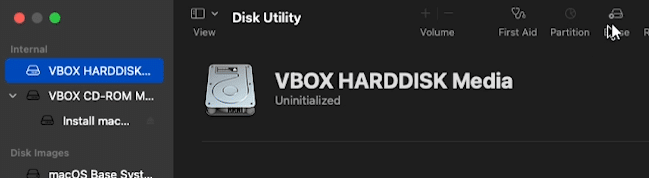
#5. Select your main Virtual Disk and click the Erase button. Make sure to check the size of the disk and you should not erase the wrong disk.

Erase Virtual Disk
#6. Name your Disk that you want to install macOS Big Sur on it. I’ll name here macOS HD. Once typed a name then click the Erase button.

Name the Virtual Disk
#7. Close Disk utility.

Close Disk Utility
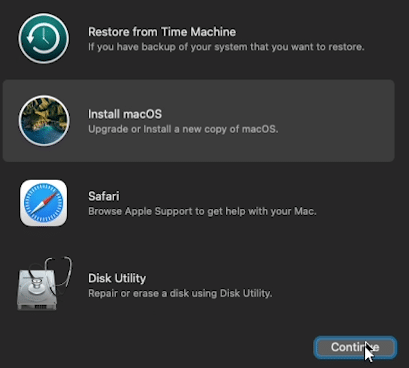
#8. Select Install macOS and click Continue.

Install macOS
#9. Click Continue.

macOS Big Sur Beta
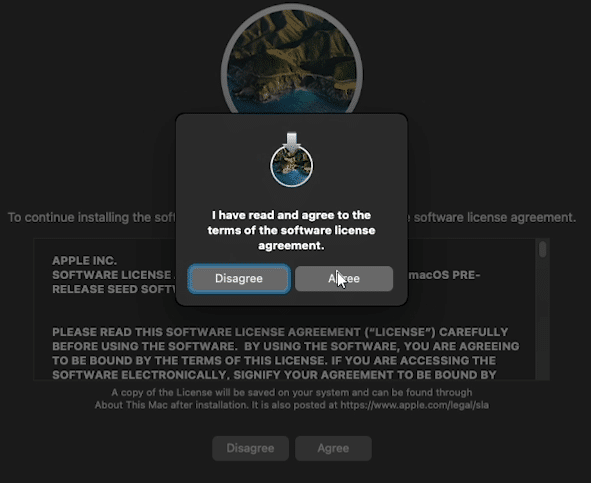
#10. Agree to terms and Conditions.

Agree to the Terms & Conditions
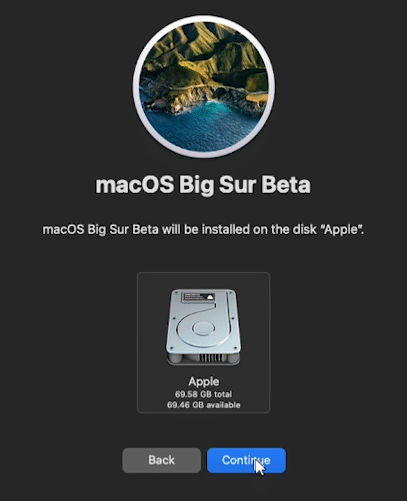
#11. Select the installation disk and click Continue. Once you click continue it’ll take around 29 minutes to complete the first part of the installation.
NOTE: If you get the Operation Couldn’t be Completed BiErrorDomain Error 3 then follow this step by step guide below.
Fix the Operation Couldn’t be Completed BiErrorDomain Error 3
This is a very common error with macOS Big Sur beta version 1 that most people have faced. Just use our VirtualBox code and it should work without any error.
- Fix the Operation Couldn’t be Completed BiErrorDomain Error 3

Installation Disk
Step 6: Perform Clean Installation of macOS Big Sur
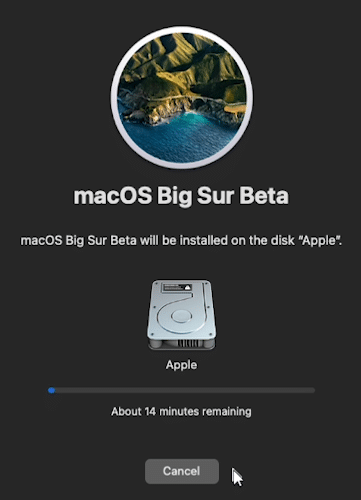
- Once you hit enter, a whole bunch of code will run on the screen, but you should not worry about it. Wait for a few minutes, and you should see the macOS Big Sur installation window. Have a cup of coffee until the installation complete because it’s going to take around 29 minutes to finish.
- Once the installation part complete, your system will reboot, and after the restart, you should see macOS Big Sur Welcome page.
- Select the following options. You can change most of the settings later on, so don’t worry about that for now.
- Select your Country and click Continue.
- Choose a Keyboard Layout and click Continue. If you don’t agree with preset options then you customize it. Just click Customize Settings.
- You can turn on the Accessibility features now with macOS Big Sur. You’ve several options with accessibility like vision, motor, hearing, and cognitive. If you don’t want to set up right now just click Not Now button to skip them.
- Read Data & Privacy and click Continue.
- Now, you can transfer your data from your previous Mac or from your Windows PC. If you don’t want to transfer anything right now, just click the Not Now button to continue.
- Click on Set Up Later then Don’t Sign In. You can add your Apple ID later.
- Click Agree to the Terms and Conditions and click Continue.
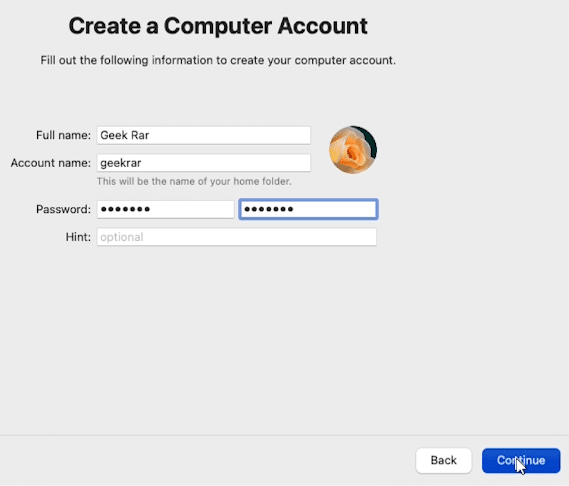
- Fill out the Full name, Account name, Password, and Hint then click Continue.
- If you want to customize Express Set Up, you can click on Customize Settings otherwise click on Continue.
- On the Analytics page click Continue.
- On-Screen Time, click Set up Later.
- Select an appearance theme and click Continue. Here you choose your dark mode if you want.
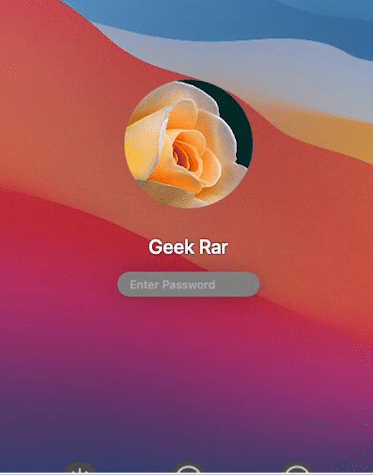
- Wait for a few seconds and you’ll see the login screen now.
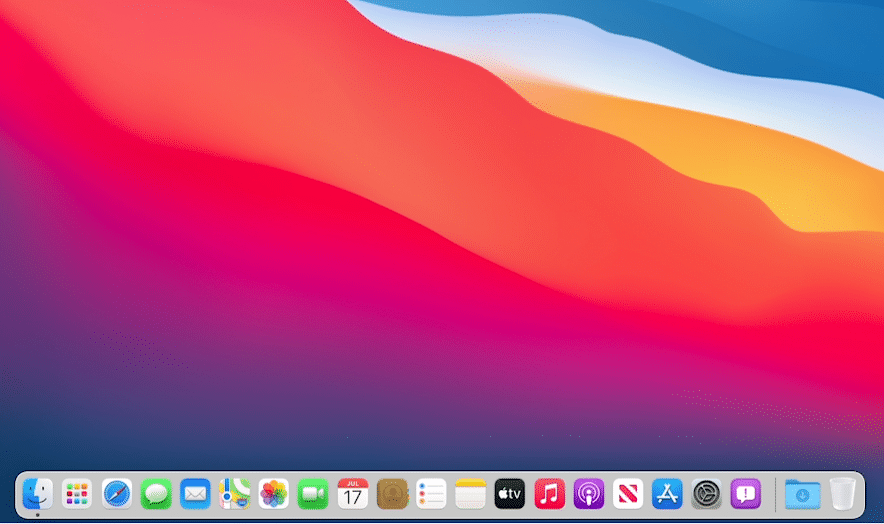
- Well done 👍👌😮 you’ve installed macOS Big Sur on VirtualBox Successfully.

Welcome to macOS Big Sur VBox
Click on the image below to see the full resolution
This slideshow requires JavaScript.
Summary
Basically, in this article, I’ve shown you the step by step pictorial guide on how to install macOS Big Sur on VirtualBox on Windows computer. After reading and following this guide, you should have done the following;
- Downloaded VirtualBox with its Extension
- Installed VirtualBox on your system
- Installed & upgraded VirtualBox extension
- Created a new virtual machine for macOS Big Sur
- Customized macOS Big Sur VM
- Executed the VirtualBox code to the CMD
- And finally performed a clean installation of macOS Big Sur.
Related: How to install macOS Big Sur on VMware on Windows.
We are ready to keep receiving your feedback about this article, and other posts on wikigain. Your suggestion and feedback are highly appreciated.
Warning: All the content of this site is copyright protected, and no-one has the right to copy-paste our materials.

Вы заинтересованы в запуске macOS Big Sur или Monterey на ПК с Windows? Если вы не хотите тратить деньги на Mac, вы можете использовать виртуальную машину и по-прежнему опробовать macOS благодаря VirtualBox.
Прежде чем вы начнете делать предположения, это не сверхсложная установка Hackintosh. Вместо этого вы будете запускать VirtualBox изначально на своем компьютере с Windows и устанавливать macOS в качестве гостевой операционной системы в VirtualBox. В отличие от Hackintosh, вам не нужно какое-либо специальное оборудование для установки и запуска macOS на вашем компьютере. С VirtualBox вы можете установить несколько операционных систем на один компьютер и легко переключаться между ними по своему желанию. Операционные системы в основном работают в приложении, которое виртуализирует оборудование, а сама ОС не знает разницы.
Если вы заинтересованы в запуске macOS Big Sur или macOS Monterey в Windows с помощью VirtualBox, прочтите эту статью.
Требования для запуска macOS в VirtualBox
Это будет довольно долгая процедура, но мы сделаем ее максимально простой. Однако, прежде чем вы начнете, вам необходимо загрузить VirtualBox и некоторые дополнительные важные файлы. Следующие ссылки могут быть полезны для загрузки файлов, необходимых для беспроблемного запуска macOS Big Sur на вашей виртуальной машине VirtualBox. Однако вам нужно будет получить файл ISO для последней версии macOS Big Sur самостоятельно. Вы также можете использовать другую версию macOS, при условии, что у вас тоже есть ISO этой версии.
Производительность будет зависеть от того, насколько быстрым будет компьютер, на котором запущен VirtualBox, поэтому, очевидно, чем лучше ПК, тем лучше, что macOS будет работать на нем виртуализировано.
Теперь, когда у вас есть все необходимые файлы, загруженные на ваш компьютер, вы готовы продолжить процедуру. Это руководство предназначено только для образовательных целей.
- Установите программное обеспечение VirtualBox на свой компьютер. После этого щелкните файл VirtualBox Extension Pack, который вы скачали.

- При нажатии на пакет расширений откроется VirtualBox в Windows со всплывающим окном, предлагающим установить. Нажмите «Установить», чтобы завершить этот шаг.

- Вы успешно установили пакет расширений. Теперь вы готовы создать свою виртуальную машину. Нажмите «Создать» в программном обеспечении VirtualBox.

- Здесь укажите допустимое имя для вашей виртуальной машины. Например, «macOS Big Sur», как показано ниже. Убедитесь, что выбран тип Mac OS X и выбрана 64-разрядная версия. Когда вы закончите, нажмите «Экспертный режим», чтобы перейти к следующему шагу.

- На этом шаге вы выберете размер памяти или RAM, которые будут выделены для вашей виртуальной машины. Рекомендуется установить половину общей системной оперативной памяти для гостевой ОС. Убедитесь, что выбрано «Создать виртуальный жесткий диск сейчас», а затем нажмите «Создать».

- Теперь используйте ползунок, чтобы установить размер виртуального жесткого диска в соответствии с вашими предпочтениями. Хотя это зависит от того, сколько свободного места на вашем компьютере имеется, мы рекомендуем выделить 100 ГБ для виртуальной машины. Выберите «VMDK (диск виртуальной машины)» в качестве типа файла жесткого диска и нажмите «Создать».

- Теперь нажмите «Настройки» в VirtualBox, как показано на скриншоте ниже.

- Перейдите в категорию «Система» и нажмите «Процессор» в верхнем меню. Вы сможете использовать ползунок для настройки распределения процессора. Рекомендуется выделить для виртуальной машины половину числа ядер вашего процессора. Имейте в виду, что если у вас 4-ядерный / 8-поточный процессор, он будет отображаться в VirtualBox как 8 ядер ЦП. В этом случае вы можете установить 4 ядра для распределения процессора.

- Затем нажмите «Display» на левой панели и переместите ползунок полностью вправо для «Video Memory».

- Теперь перейдите в категорию «Хранилище» и нажмите «Очистить» в разделе «Устройства хранения». Затем щелкните значок оптического диска справа и выберите «Создать виртуальный оптический диск» в раскрывающемся меню.

- Вы можете нажать «Добавить», чтобы найти ISO-файл macOS Big Sur, который вы загрузили с помощью проводника. Выберите файл ISO и нажмите «Выбрать».

- Теперь нажмите «ОК», чтобы выйти из настроек VirtualBox и закрыть приложение VirtualBox.

- Откройте «Командную строку» на вашем ПК. Обязательно запустите командную строку от имени администратора.

- Теперь откройте текстовый файл кода VBox в Блокноте. Скопируйте / вставьте первую командную строку в командную строку и нажмите «Enter».

- Затем вам нужно будет вставить оставшиеся строки, но перед этим вам нужно будет заменить «Имя вашей виртуальной машины» на имя, которое вы использовали при настройке своей машины в VirtualBox. Например, в данном случае это «macOS Big Sur». После его замены скопируйте / вставьте все оставшиеся строки в командной строке и нажмите «Enter».
- Теперь снова откройте VirtualBox и нажмите «Пуск». Подождите пару минут, пока VirtualBox выполнит операцию. Теперь вы должны увидеть прогресс установки macOS в VirtualBox. Это займет несколько минут, но как только это будет сделано, вы можете следовать инструкциям на экране, чтобы настроить свой Mac, что аналогично настройке любого нового устройства Apple.
- Хотя на вашем компьютере установлена и работает macOS, мы еще не закончили. Разрешение по умолчанию для macOS или любой гостевой ОС, которую вы устанавливаете на VirtualBox, составляет 1024 × 768, что, вероятно, не то, что вам нужно. Однако это можно изменить с помощью кода разрешения экрана macOS. Закройте VirtualBox, запустите командную строку от имени администратора и скопируйте / вставьте первую строку из файла кода разрешения экрана. Щелкните «Enter».

- Теперь убедитесь, что вы используете свое имя виртуальной машины и замените значение разрешения во второй строке кода в соответствии с разрешением вашего монитора или личными предпочтениями. Затем скопируйте / вставьте эту строку в командную строку. Нажмите «Enter» и выйдите из CMD.


В следующий раз, когда вы запустите виртуальную машину, VirtualBox загрузит macOS с более высоким разрешением экрана.
Вот проверка на реальность. Не ожидайте, что ваша виртуальная машина macOS будет работать где-либо почти так же быстро, как настоящий Mac или Windows, изначально работающая на компьютере. Ожидается вялый опыт. Производительность виртуальной машины также будет сильно зависеть от оборудования вашей системы.
При этом установка macOS на компьютер с Windows практически намного проще с таким программным обеспечением, как VirtualBox, и может значительно помочь вам решить, хотите ли вы переключиться на Mac. Вы можете подключить свои устройства iOS к своему виртуальному Mac, как настоящий Mac, опробовать различные программы, приложения и многое другое.
Эта процедура в первую очередь ориентирована на macOS Big Sur, но она работает так же и с другими последними выпусками macOS, при условии, что у вас есть файл ISO для этой конкретной версии. Если вы хотите обновить macOS, установленный на вашей виртуальной машине, до последней версии программного обеспечения, вы можете обновить системное программное обеспечение, как обычно на реальном Mac.
Аналогичным образом VirtualBox также можно использовать для виртуальной установки и запуска Windows на Mac. Процесс довольно похож, если у вас есть необходимые файлы, в основном Windows ISO и VirtualBox.
Вы запустили macOS в VirtualBox в Windows? Что вы думаете об этом процессе и о том, как все это работает? Расскажите нам о своем опыте и мыслях в комментариях.
Прежде чем углубляться в «инструкции», вам необходимо загрузить и установить основные инструменты. В руководстве подробно описано, как создавать виртуальные машины macOS с помощью Oracle VirtualBox Manager (VirtualBox) и VMware Workstation Player (VMware Player).
- Загрузите последнюю версию VirtualBox . В этом руководстве используется VirtualBox 6.1.22.
- Загрузите последнюю версию VMware Player . В этом руководстве используется VMware Player 16.
Вам также понадобится копия macOS. Big Sur — последняя версия macOS.
В этом руководстве основное внимание уделяется установке macOS Big Sur на виртуальной машине, работающей на оборудовании Intel, с использованием VirtualBox или VMware Player.
К сожалению, у меня нет доступа к какому-либо оборудованию AMD, поэтому я не могу предоставить руководство.
Однако есть фрагмент кода, который требуется любому, кто использует систему AMD, для загрузки macOS Big Sur с использованием VMware на оборудовании AMD.
Запуск виртуальной машины MacOS Big Sur такой же, как и для версии Intel, но использует немного другой фрагмент кода. Вы можете найти руководство и фрагмент кода в разделе ниже.
Загрузите виртуальный образ macOS Big Sur
Воспользуйтесь приведенными ниже ссылками для загрузки, чтобы загрузить образ MacOS Big Sur для VirtualBox и VMware.
Скачать: образ виртуальной машины macOS Big Sur
Скачать: VMware Player Patch Tool
Как создать виртуальную машину MacOS Big Sur с VirtualBox
Перед созданием виртуальной машины macOS вам необходимо установить VirtualBox Extension Pack. Он включает исправления для поддержки USB 3.0, мыши и клавиатуры, а также другие полезные патчи VirtualBox.
Скачать : VirtualBox Extension Pack для Windows (бесплатно)
Прокрутите вниз, выберите Все поддерживаемые платформы для загрузки, затем дважды кликните, чтобы установить.
1. Создайте виртуальную машину MacOS Big Sur.
Откройте VirtualBox. Выберите New . Введите macOS .
VirtualBox будет определять ОС по мере ввода и по умолчанию будет использовать Mac OS X. Вы можете оставить все как есть.
Что касается имени виртуальной машины, сделайте его чем-нибудь запоминающимся, но легким для ввода. Вам нужно будет ввести это имя в серии команд, и вводить сложное имя несколько раз очень неприятно!
Затем установите объем оперативной памяти, который может использовать виртуальная машина macOS. Я бы посоветовал минимум 4 ГБ, но чем больше вы можете отдать от хост-системы, тем лучше вам будет.
Помните, что вы не можете назначить больше оперативной памяти, чем доступно вашей системе, и вам нужно оставить некоторую память доступной для операционной системы хоста.
Теперь выберите «Создать жесткий диск сейчас» и выберите « Создать» . На следующем экране выберите Virtual Hard Disk , затем установите размер диска как минимум 50 ГБ, но в идеале больше, если вы можете сэкономить место. Для macOS Big Sur требуется не менее 35 ГБ дискового пространства.
2. Измените настройки виртуальной машины macOS Big Sur.
Пока не пытайтесь запускать виртуальную машину MacOS Big Sur. Перед запуском виртуальной машины вам необходимо внести некоторые изменения в настройки. Кликните правой кнопкой мыши виртуальную машину macOS и выберите «Настройки».
- В разделе «Система» удалите дискету из порядка загрузки. Убедитесь, что набор микросхем установлен на ICH9.
- Выберите вкладку «Процессор». Назначьте два процессора. Если у вас есть ЦП с запасом мощности (например, Intel Core i7 или i9 с несколькими дополнительными ядрами), подумайте о назначении большего количества. Однако это не жизненно важно.
- Убедитесь, что установлен флажок Включить PAE / NX .
- В разделе «Дисплей» установите для параметра «Видеопамять» значение 128 МБ.
- Теперь в разделе « Хранилище» выберите чистый диск в разделе «Устройства хранения». Затем выберите значок диска рядом с оптическими приводами. Найдите и выберите образ диска MacOS Big Sur.
- Наконец, перейдите на вкладку USB и выберите USB 3.0, затем нажмите OK.
3. Используйте командную строку для добавления пользовательского кода в VirtualBox.
Еще не время запускать виртуальную машину MacOS Big Sur. В своей текущей конфигурации VirtualBox не работает с образом вашего диска macOS.
Чтобы его запустить и запустить, вам нужно по существу пропатчить VirtualBox, прежде чем виртуальная машина macOS заработает. Для этого вам нужно ввести код с помощью командной строки. Все подробности ниже.
Начните с закрытия VirtualBox. Команды не будут выполняться должным образом, если VirtualBox или любой из связанных с ним процессов запущен.
После закрытия нажмите клавиши Win + X, затем выберите в меню Командная строка (администратор). Если в вашем меню отображается только параметр PowerShell, введите команду в строку поиска меню «Пуск». Затем кликните правой кнопкой мыши «Лучшее совпадение» и выберите «Запуск от имени администратора». Используйте следующую команду, чтобы найти каталог Oracle VirtualBox:
cd "C:Program FilesOracleVirtualBox"Теперь введите следующие команды одну за другой. Настройте команду в соответствии с именем вашей виртуальной машины. Например, моя виртуальная машина называется macOS Big Sur.
Вот команды:
VBoxManage.exe modifyvm "macOS Big Sur" --cpuidset 00000001 000106e5 00100800 0098e3fd bfebfbff
VBoxManage setextradata "macOS Big Sur" "VBoxInternal/Devices/efi/0/Config/DmiSystemProduct" "iMac19,1"
VBoxManage setextradata "macOS Big Sur" "VBoxInternal/Devices/efi/0/Config/DmiSystemVersion" "1.0"
VBoxManage setextradata "macOS Big Sur" "VBoxInternal/Devices/efi/0/Config/DmiBoardProduct" "Mac-AA95B1DDAB278B95"
VBoxManage setextradata "macOS Big Sur" "VBoxInternal/Devices/smc/0/Config/DeviceKey" "ourhardworkbythesewordsguardedpleasedontsteal(c)AppleComputerInc"
VBoxManage setextradata "macOS Big Sur" "VBoxInternal/Devices/smc/0/Config/GetKeyFromRealSMC" 1
После выполнения команд и предположения, что вы не обнаружили ошибок, закройте командную строку.
4. Загрузите виртуальную машину macOS Big Sur.
Снова откройте VirtualBox. Дважды кликните виртуальную машину macOS, чтобы запустить ее. Вы увидите длинный текстовый поток, за которым следует логотип Apple. На следующем экране выберите нужный язык, затем «Продолжить».
- Затем выберите Дисковую утилиту. Вы создаете чистый диск для установки macOS Big Sur.
- В Дисковой утилите выберите VBOX HARDDISK MEDIA в столбце Внутренний диск.
- После выбора диска перейдите к опции «Стереть» в верхней части утилиты.
- Дайте вашему диску имя, установите Формат на Mac OS Extended (с журналом), а схему — на карту разделов GUID.
- Выберите Стереть.
- После завершения вы можете выйти из Дисковой утилиты и вернуться к экрану восстановления Big Sur. Отсюда вы должны выбрать Установить macOS Big Sur.
- Выберите диск, который вы создали в Дисковой утилите, а затем нажмите «Продолжить».
Теперь установка говорит, что это займет несколько минут. Однако, по моему опыту, это было неправильно. Первоначальный этап установки занял около 15 минут, но затем вы попадаете на второй экран установки после перезапуска виртуальной машины macOS Big Sur.
Начальное время установки на этом экране начинается примерно с 29 минут. Однако, как только он достигнет Менее минуты, и у вас появится надежда — не надо.
Для завершения установки с этого момента потребовался еще час, но я также читал отчеты о людях, ожидающих более трех часов. Хуже того, невозможно определить, идет ли установка, вы просто зря теряете время.
Если у вас есть время, оставьте его на несколько часов, и, надеюсь, когда вы вернетесь, вы увидите приветственную страницу macOS Big Sur.
После завершения настройки macOS сделайте снимок в VirtualBox. Отправляйтесь машины -> Сделать снимок, дайте снимоку имя, и ждите его в процессе. Если что-то сломается или виртуальная машина Big Sur повредится, вы можете вернуться к моментальному снимку, чтобы восстановить ранее исправную установку.
Как создать виртуальную машину MacOS Big Sur с помощью VMware Workstation Player
Предпочитаете VMware VirtualBox? Вы можете создать виртуальную машину MacOS Big Sur с помощью VMware, которая работает точно так же, как VirtualBox. И, как и в случае с VirtualBox, VMware также требует установки исправлений, прежде чем виртуальная машина MacOS Big Sur заработает.
Эта часть руководства подходит для систем Intel и AMD. Пользователи AMD должны использовать второй фрагмент кода при редактировании файла VMX виртуальной машины. Прочтите руководство, чтобы понять, что именно это означает.
1. Патч VMware Workstation Player.
- В разделе «Загрузить виртуальный образ macOS Big Sur» находится средство исправления VMware Player. Прежде чем приступить к дальнейшим действиям, загрузите средство исправления.
- Перейдите в папку, в которую вы скачали средство исправления. Распакуйте содержимое архива. Этот процесс лучше всего работает, когда папки находятся на одном диске (например, корневая папка VMware и извлеченный архив находятся на диске C: ).
- Убедитесь, что VMware полностью закрыта. В папке Unlocker кликните правой кнопкой мыши командный сценарий win-install и выберите «Запуск от имени администратора». Сценарий откроет окно командной строки, и запустится сценарий исправления.
Обрати внимание. Сценарий пролетает незаметно, и вам нужно следить за любыми сообщениями «Файл не найден».
Наиболее частой причиной появления сообщения «файл не найден» или «система не может найти указанный файл» является установка VMware Workstation Player в другом месте, отличном от папки по умолчанию, и выполнение исправления из другого каталога.
По завершении установки патча вы можете открыть VMware.
2. Создайте виртуальную машину MacOS Big Sur с помощью VMware.
- Выберите «Создать новую виртуальную машину». Выберите «Я установлю операционную систему позже».
- Теперь выберите Apple Mac OS X и измените версию на macOS 10.16. Если вы не видите параметры macOS, значит, патч установился неправильно.
- Затем вам нужно выбрать имя для вашей виртуальной машины MacOS Big Sur. Выберите что-нибудь, что легко запомнить, затем скопируйте путь к файлу в удобное место — оно вам понадобится, чтобы мгновенно внести некоторые изменения.
- На следующем экране установите размер диска 50 ГБ или больше и выберите «Сохранить виртуальный диск как один файл». Завершите работу мастера создания виртуального диска, но пока не запускайте виртуальную машину.
3. Измените настройки виртуальной машины macOS Big Sur.
Прежде чем вы сможете загрузить виртуальную машину, вы должны отредактировать спецификацию оборудования.
- На главном экране VMware выберите виртуальную машину macOS Big Sur, затем кликните правой кнопкой мыши и выберите «Настройки».
- Увеличьте объем памяти виртуальной машины как минимум до 4 ГБ. Вы можете выделить больше, если у вас есть свободная оперативная память.
- В разделе «Процессоры» измените количество доступных ядер на 2 (или больше, если доступно).
- Теперь выберите Новый CD / DVD (SATA) —> Использовать файл образа ISO. Перейдите к ISO-файлу macOS Big Sur и выберите его.
- Закройте окно «Оборудование» и выберите «Готово».
Однако пока не запускайте виртуальную машину VMware Workstation Player macOS Big Sur. Осталось внести некоторые изменения в файлы конфигурации.
4. Отредактируйте файл MacOS Big Sur VMX для оборудования Intel.
Этот раздел предназначен для пользователей Intel и включает в себя последний набор изменений, которые необходимо внести перед включением виртуальной машины VMware macOS Big Sur!
Закройте VMware. Перейдите в место, где вы сохранили виртуальную машину MacOS. Местоположение по умолчанию:
C:UsersYOURNAMEDocumentsVirtual MachinesYOUR MAC OS X FOLDERПерейдите к macOS Big Sur.vmx, кликните правой кнопкой мыши и выберите Открыть с помощью -> Блокнот (или любой другой текстовый редактор). Прокрутите файл конфигурации до конца и добавьте следующую строку:
smbios.reflectHost = "TRUE"
hw.model = "MacBookPro14,3"
board-id = "Mac-551B86E5744E2388"
smc.version = "0"
Сохранить, затем выйти.
Теперь вы можете открыть VMware, выбрать виртуальную машину MacOS Big Sur и запустить ее!
5. Отредактируйте файл MacOS Big Sur VMX для оборудования AMD.
Этот раздел предназначен для пользователей AMD . Как и в предыдущем разделе, пользователи AMD также должны отредактировать файл VMX, прежде чем продолжить. Редактирование AMD включает на несколько строк больше, чем версия Intel, но вы можете скопировать и вставить данные в файл.
Закройте VMware. Перейдите в место, где вы сохранили виртуальную машину MacOS. Местоположение по умолчанию:
C:UsersYOURNAMEDocumentsVirtual MachinesYOUR MAC OS X FOLDERПерейдите к macOS Big Sur.vmx, кликните правой кнопкой мыши и выберите Открыть с помощью -> Блокнот (или любой другой текстовый редактор). Прокрутите файл конфигурации до конца и добавьте следующие строки:
smc.version = “0”
cpuid.0.eax = “0000:0000:0000:0000:0000:0000:0000:1011”
cpuid.0.ebx = “0111:0101:0110:1110:0110:0101:0100:0111”
cpuid.0.ecx = “0110:1100:0110:0101:0111:0100:0110:1110”
cpuid.0.edx = “0100:1001:0110:0101:0110:1110:0110:1001”
cpuid.1.eax = “0000:0000:0000:0001:0000:0110:0111:0001”
cpuid.1.ebx = “0000:0010:0000:0001:0000:1000:0000:0000”
cpuid.1.ecx = “1000:0010:1001:1000:0010:0010:0000:0011”
cpuid.1.edx = “0000:0111:1000:1011:1111:1011:1111:1111”
smbios.reflectHost = “TRUE”
hw.model = “MacBookPro14,3”
board-id = “Mac-551B86E5744E2388”Сохранить, затем выйти.
Теперь вы можете открыть VMware, выбрать виртуальную машину MacOS Big Sur и запустить ее!
6. Настройте и установите виртуальную машину MacOS Big Sur.
После запуска виртуальной машины MacOS Big Sur вам нужно будет настроить накопитель перед установкой.
- Затем выберите Дисковую утилиту. Вы создаете чистый диск для установки macOS Big Sur.
- В Дисковой утилите выберите VMware Virtual SATA Hard Drive Media в столбце Внутренний диск.
- После выбора диска перейдите к опции «Стереть» в верхней части утилиты.
- Дайте вашему диску имя, установите формат на APFS и схему на карту разделов GUID.
- Выберите Стереть.
- После завершения вы можете выйти из Дисковой утилиты и вернуться к экрану восстановления Big Sur. Отсюда вы должны выбрать Установить macOS Big Sur.
- Выберите диск, который вы создали в Дисковой утилите, а затем нажмите «Продолжить».
Процесс установки занимает некоторое время, но он быстрее, чем VirtualBox. После загрузки macOS Big Sur вы можете настроить операционную систему по своему усмотрению.
7. Установите VMware Tools на виртуальную машину MacOS Big Sur.
Теперь вам нужно установить VMware Tools, который представляет собой набор утилит и расширений, которые улучшают работу с мышью, производительность видео и другие полезные вещи.
Запустив виртуальную машину macOS, перейдите в Player -> Manage -> Install VMware Tools.
Установочный диск появится на рабочем столе macOS. Когда появится этот параметр, выберите «Установить VMware Tools», а затем разрешите ему доступ к съемному тому. Следуйте инструкциям установщика, который потребует перезапуска по завершении.
Поиск проблемы
При установке виртуальной машины macOS на VMware Player Workstation может произойти несколько ошибок.
- Если вы не видите «Apple Mac OS X» во время мастера создания виртуальной машины, вам необходимо повторно посетить процесс исправления. Убедитесь, что все процессы, связанные с VMware Player, отключены.
- Если при запуске виртуальной машины вы получаете сообщение «Mac OS X не поддерживается с двоичной трансляцией», есть большая вероятность, что вам нужно активировать виртуализацию в конфигурации BIOS / UEFI.
- Если вы получаете сообщение «Неустранимая ошибка VMware Player: (vcpu-0)» при запуске виртуальной машины, вам необходимо вернуться к файлу конфигурации macOS Big Sur.vmx, чтобы убедиться, что вы добавили дополнительную строку и сохранили правку.
- Если вы используете оборудование AMD и застряли на логотипе Apple, сначала выключите виртуальную машину. Теперь зайдите в Настройки -> Параметры -> Общие. Измените гостевую операционную систему на Microsoft Windows и версию на Windows 10 x64. Нажмите ОК, затем попробуйте снова включить виртуальную машину. После прохождения логотипа Apple выключите виртуальную машину, затем снова установите для параметра гостевой операционной системы значение Apple Mac OS X, выбрав правильную версию.
Виртуальные машины macOS для оборудования AMD
Apple использует оборудование Intel для питания настольных компьютеров и ноутбуков. Настроить виртуальную машину macOS с использованием оборудования Intel проще, поскольку спецификации оборудования очень похожи.
С AMD все наоборот. Поскольку Apple не разрабатывает macOS на оборудовании AMD, создание виртуальной машины macOS в системе AMD сложнее. Однако вы можете посмотреть следующий видеоурок, чтобы узнать, как установить macOS Big Sur на виртуальную машину VMware с использованием оборудования AMD.
Установка виртуальной машины macOS Big Sur завершена
У вас есть два варианта выбора виртуальной машины macOS Big Sur. Оба варианта отлично подходят, если вы хотите попробовать macOS, прежде чем переходить с Windows, и насладиться одними из лучших предлагаемых приложений Apple.
Установка MacOS Big Sur в VirtualBox на Windows 10
- Post category:Разное
- Post comments:0 комментариев
Вот так легко можно установить MacOS на ПК и посмотреть что же это такое.
Ссылка для скачивания с моего Synology NAS
Метки: разное
Добавить комментарий
Связан с:
Комментарий
Enter your name or username to comment
Enter your email address to comment
Enter your website URL (optional)
Сохранить моё имя, email и адрес сайта в этом браузере для последующих моих комментариев.
Пожалуйста, введите ответ цифрами:
4 × четыре =
Напишите мне, когда кто-нибудь ответит на мой комментарий
Вам также может понравиться
Мини приложения windows 11 грузят процессор
D-Link настройка интеллектуального распределения WIFI клиентов

Windows WSL ошибка 0x800701bc
In this guide, we will walk you through all the steps to install macOS Big Sur in VirtualBox Windows. We will show you each step with screenshots and have a video to walk you through visually. Because there may be issues with system compatibility with installations like this, check out our forum. The new GEEKrar forum is a great place to post questions or find fixed to frequently occurring issues.
What is macOS Big Sur
macOS Big Sur is the 17th release of the Mac operating system for Macintosh computers and is the successor to macOS Catalina. The OS was officially released to the public on November 12, 2020, and is available for a series of Mac computers and can also be installed virtually, like we are in this guide.
What you need for this installation:
– Windows 10
– 8 GB RAM
– 60 GB of free disk space
– VirtualBox Windows and Expansion Pack (found here)
– macOS Big Sur ISO image file (found here)
– A command file (download here)
Please Note: All image files are created only for educational purposes. Any misuse of any files is not our responsibility.
Step 1 – Creating a Virtual Machine
To begin, we need to install VirtualBox Windows. If you have done already, this article will walk you through the full process. Once VirtualBox is up and running, we want to ensure that you have your command file and Big Sur ISO file handy. We will need them to proceed.
1-a. In the Oracle VM VirtualBox Manager, like the blue ‘New’ icon at the top
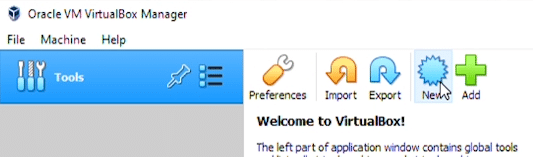
1-b. In the first window, we will be naming and identifying the type of virtual machine we’re creating. In the Name field, type in ‘BigSur.’ Machine Folder field can remain as the default unless you have a reason to change it. The Type will be Mac OS X. Version will be ‘macOS 10.13 High Sierra (64-bit).
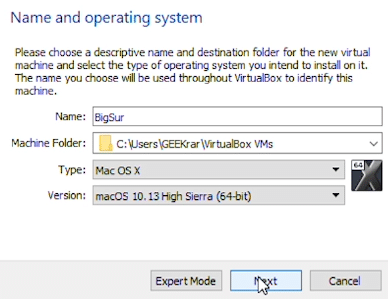
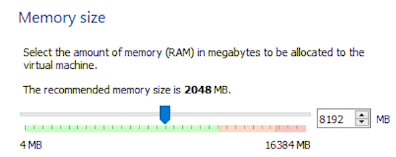
1-c. Under Memory size, we want to increase the available memory to at least 8GB of RAM. Click Next
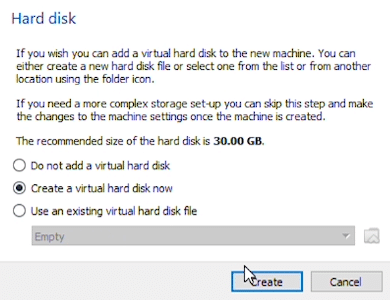
1-d. ‘Hard disk,’ we will leave the default ‘Create a virtual hard disk now’ and click ‘Create.’
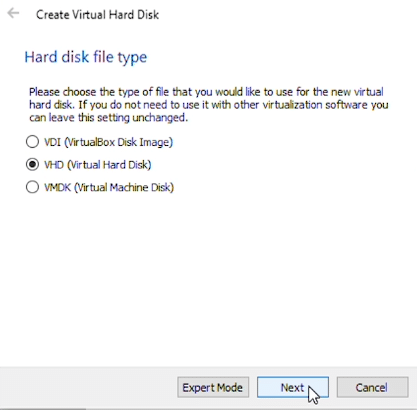
1-e. The ‘hard disk file type’ will also remain with the default VHD (Virtual Hard Disk). Click Next.
1-f. ‘Storage on physical hard disk’ will be Dynamically allocated.
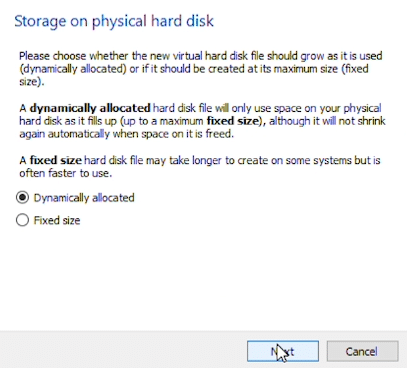
1-g. In ‘File location and size,’ we’re leaving the default folder path, but below in the disk size, we want to increase it to at least 60GB. I have tried 40GB and 50GB with many issues. So 60 or greater is strongly suggested. Once complete, click ‘Create’ and finish the first step.

Step 2 – Modifying VirtualBox with Command File
Now that the new VirtualBox is created, we need to run a few commands to modify it and proceed with running macOS Big Sur. If you haven’t downloaded the command file text, click here to get it.
2-a. Open the text file, go to the ‘Edit’ menu at the top, and then down to ‘Replace…” Here we want to type “VBoxNAME” in the ‘Find what’ field. In the ‘Replace with’ field, type in the name you called the VirtualBox (step2). Click the ‘Replace all’ button, and this should convert all items with the new file name.
2-b. Now head over the command prompt (Start, type ‘cmd’ hit enter), paste the first line, and hit enter. (run command prompt as administrator)
cd "C:Program FilesOracleVirtualBox"
2-c. This command will shift us to the VirtualBox windows directory, and we will be ready for the next commands.
2-d. Before proceeding, verify that you are in the above directory. If you are not there, you must navigate there now before proceeding.
Highlight and copy the next six lines, paste them in the command window, and hit enter.
2-e. Once done, we can close out all the windows and start to load macOS Big Sur in VirtualBox Windows.
Step 3 – Setup for install macOS Big Sur in VirtualBox Windows
During this step, we will need to have the macOS Big Sur ISO file available. If you haven’t already downloaded it, click here to get it.
3-a. First, open VirtualBox and select the newly created install macOS Big Sur virtual machine on the left, then click the ‘Start’ button at the top.
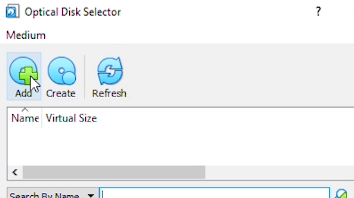
3-b. We will be prompted to ‘Select start-up disk,’ click on the folder icon to the right
3-c. At the ‘Optical Disk Selector,’ click the ‘Add’ icon, and navigate to the folder where you have the Big Sur ISO file downloaded. Once selected, click on ‘Open’ and back at the window with the Big Sur ISO selected, click on ‘Choose.’
3-d. Back at the ‘Select start-up disk window, we should now have the BigSur ISO populated in the field, and we are ready to click ‘Start.’
3-e. The macOS Big Sur operating system will begin to load. This step may take a few minutes, but a prompt will pop up to select a language to continue when it’s done.
3-f. We now want to prep the drive for installation. We will format the drive to allow macOS Big Sur to be installed. Click on ‘Disk Utility,’ then continue.
3-g. In the Disk Utility window, select the VBOX HARDDISK option on the left and the ERASE icon at the top.
3-h. In the Name field, give the drive a label, leave the other options as default, and click Erase. This will format the drive for macOS. When the formatting is complete, click on ‘Done,’ and you can close out of the Disk Utility window.

3-i. Now we are ready to start installing macOS Big Sur. Click on the option that says ‘Install macOS’ and click on the Continue button.
3-j. You will be prompted twice for the terms of the software license agreement. To proceed, click on ‘Agree’ for both.
3-k. We will select a drive, which should be the only drive available, and click on Continue.
3-l. Now the macOS Big Sur is going to copy over and install. This process will take 15-30m to complete.
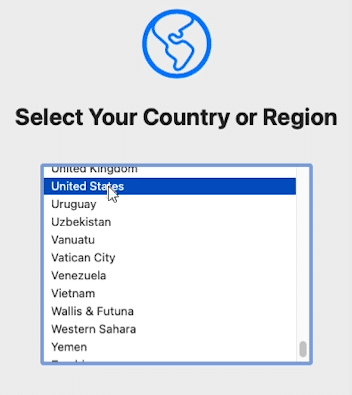
3-m. After the files have been copied over, we need to wrap up the installation with some customization details. Select Your Country or Region will prompt you to select your location, then click Continue.
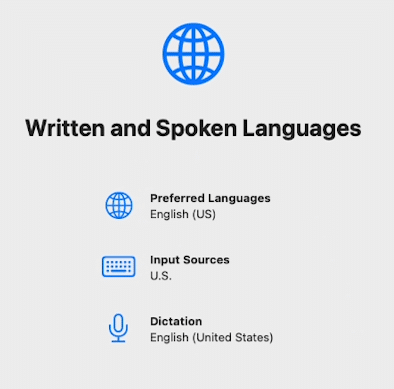
3-n. Under the Written and Spoken Languages, you can leave the default settings. If you want to change these, you can click the customize option at the bottom left, or click on Continue.
3-o. For Accessibility, Data & Privacy, and Migration Assistant options, you can click on Continue.
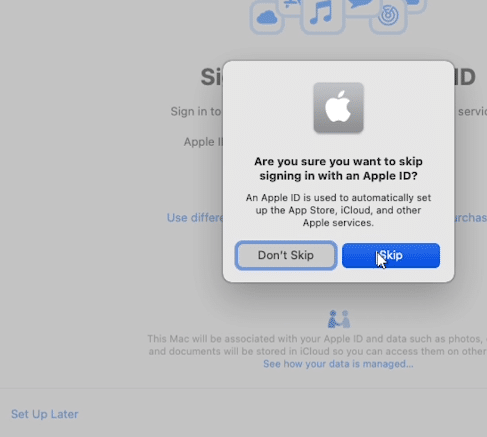
At the Sign In with Your Apple ID, select the option ‘Set Up Later’ at the bottom left and ‘Skip’ when prompted.
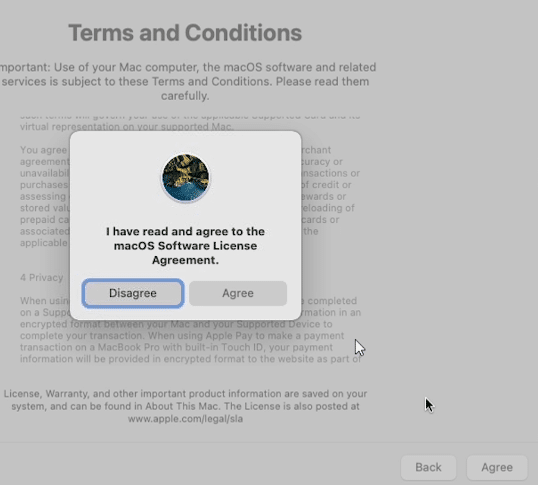
3-p. For Terms and Conditions, you will be prompted twice. Select ‘Agree’ both times to proceed.
3-q. At the Create a Computer Account window, enter a Name and password for your user profile and click on Continue.
3-r. Next, for Express Setup, Analytics, and Screen Time, we can click Continue. Your virtual machine will complete its setup and reboot. After starting, a login screen will appear—type in the password you have assigned when creating the user profile.
3-s. Lastly, a prompt for a Feedback Assistant will appear. You can either continue with it or close it out.
Now, you will see the macOS Big Sur desktop for the first time. The installation is complete! You can begin using the desktop and install any applications you’d like.
Any questions? Check out our forum some posted fixes and documentation
Visual Step by Step Guide – How to Install macOS Big Sur in VirtualBox Windows 2021
Apple makes new products, software, and updates every year and they introduce the updated version in WWDC(Apple Worldwide Developers). In this event people attend the show and watch the updates live, but this year the format was different. It was completely different due to coronavirus and the big incident of George Floyd. According to Apple, they value the health of customers over their enjoyment. But still, they managed the WWDC show so wonderful, entertaining, and at the same time educating. Some fans even tweeted that this year’s WWDC was better than the previous years and they didn’t have to pay money to watch the show. In this article, I’ll show how to install macOS Big Sur on VirtualBox on Windows PC.
Some of the biggest launches were, macOS Big Sur, iOS 14, iPadOS 14, WatchOS 7, tvOS 14, Apple Silicon Chips, AirPods, and many small improvements but there were changes that many fans didn’t like. Such as there was no hardware introduction and many fans were upset about that. Because all Apple lovers wait the entire year for WWDC to get introduced to new products and new updates but this year’s new products were not n the way. Anyway, let’s have a look at the updates WWDC brought this year. Let’s Have a look at macOS Big Sur. Within the next sections, we’ll not only show up the macOS Big Surs features but also show how to install macOS Big Sur on VirtualBox on Winows PC.
- Related: Install macOS Catalina on VirtualBox on Windows PC
What’s New in macOS Big Sur
In the new macOS Big Sur Apple especially focused on the small details and the need of customers. macOS Big Sur has powerful designs and its customization options have made,macOS Big Sur to the list of most advanced desktops operating systems in the world. This macOS is the newest version of macOS and its full version will release in fall this year. macOS Big Sur is huge improvements because Apple doesn’t use the number 10 for macOS Big Sur. macOS Big Sur is the 11.0 version of macOS.
As the version number has increased the best features, new changes, and easy to use formula has changed too. With macOS Big Sur Apple brought a huge update since the introduction of Mac OS X (many years ago). We have explained every detail from head to toe about macOS Big Sur in this Article. And we have a glance at WWDC too. After this,
With the previous macOS was named Catalina, Apple used a picture of Santa Catalina island as the desktop picture. Apple had wonderful pictures of Santa Catalina Island on the Desktop as the profile picture. and With the Time-shifting desktop feature, that looks way better. But with macOS Big Sur we don’t have a pic of Big Sur bridge as the desktop or profile picture. instead, we have wonderful and colorful paints on the profile picture that can match to mood and personality of everyone.
In macOS, Big Sur widgets can be customized in three different sizes. And users can select the size of widgets and get information easier than ever. In the new macOS, windows have a lighter appearance for a better look with additional translucency and rounded edges. App icons have updated and have a new uniform squircle shape which looks wonderful. In the new macOS, Big Sur menu bars in apps have been redesigned and have a bigger space with many better tools for editing. And with the new tools, you can be better able to blend in with your content, the sound system has been entirely redone. Also, there are new symbols in toolbars, sidebars, and controls to provide clarity and consistency across all the apps.
Another huge improvement in macOS Big Sur is the redesigned Notification Center. Notification Center has been redesigned with more interactive notifications grouped just like iOS 14. Safari has completely u[updated like never before and it has been redesigned. This new Safari is wonderful, let me explain it.
- Related: Install macOS Catalina on VirtualBox on Windows PC [New Method]
-
iOS14
iOS 14 is the new and updated version of iOS. According to Apple, they have spent time rethinking the most iconic elements of experience on the iPhone. And after thinking and trying hard enough, they brought 3 new major and fantastic changes in iOS 14. The first and one of the most iconic changes in iOS 14 is the Home screen, Appl library. As we get more storage space in new iPhone devices. We want o download new and more apps. but as apps increase and we get more and more apps. We end up with a lot of pages and we sometimes forget what was on the last or second last page.
Wouldn’t it be great if there were a way to organize all of those apps without doing hard work? Yes, Apple has excepted our request and they brought a new feature by the name of App Library. It has a new space at the end of or home screen pages that automatically organize all your apps in one simple and easy to navigate view. And you can hide app pages if you don’t need them right at the moment or if you want them to be secret. We have suggestions in App Library and all the apps are organized from A to Z in the search bar. Alongside this, I’ll explain and share step by step how to install macOS Big Sur on VirtualBox on Winows PC.
-
Widgets
Another special thing that Apple has brought major changes in is Widgets. Every iPhone user needs help of Widgets to get information at a glance. But a lot has changed since Apple first introduced Widgets and the first iPhones. And now the use of Widgets is less than ever because we have Apple watches. And we can get information in seconds from our wrists’ watch. This Year Apple has changed a lot in Widgets.
Widgets are now more beautiful and data-rich in different sizes that you can choose according to your self. And now they are even more accessible besides that you can drag that out of today’s news and see that on your home screen.
- Related: Download macOS Big Sur ISO Image
Before years iPhone users needed to download apps to watch a video and do work. But now with the new features of Picture in picture, iPhone users can do more than 2 jobs at the same time. For example, you can facetime with your friend and scroll through Instagram.
Siri has been completely redesigned and now it has many new updates like if you ask Siri question in iOS 14, your screen won’t go black and you won’t see spelling and conversation of you and Siri. Siri also helps you in dictation and translating speeches, phrases, conversations, and voice even offline. And this translating can be in 11 languages. such as English, Mandarin Chinese, French, German, Spanish, Italian, Japanese, Korean, Arabic, Portuguese, and Russian. There are many other changes in Messages, emojis, group messages, Maps that are now its available in 3new countries, CarPlay, App Store, AppClips, Safari, and many small and quick changes.
-
iPadOS
iPadOS builds on all the amazing features of iOS while having that deliver a distinct experience for iPad. This year iPadOS delivers unique made for iPad design that takes great advantage of iPad’s large, multi-touch display. ipadOS has over 1 million apps available in the App store and iPadOS has the storage to download all of those apps on your iPad. In iPadOS also you will find redesigned Widgets like iOS 14 and in the Photos editing your pictures and videos are easier than ever with the new sidebar. You can drag a picture to the editing section in the sidebar, and edit that however, you want. And tools are better than ever.
You also can add one picture to multiple albums. This sidebar is in many other apps like, Notes, Files, Calendar, and Music. And these apps have many more improvements. Also, Siri has been updated and redesigned in iPadOS too. Siri comes at the corner of your screen and you can watch and read while talking to Siri about your new meeting. Calls have improved in iPadOS and in iOS 14. And now it will come like a notification instead of covering all your screens. Search has also really changed and developed, and now you can search on Home Screen or any app. And now the suggestions developed with the search. And now you can find web answers by Search. Whether you’re a Windows lover or Mac, we have a pretty great option for you which is why not both so here’s how to install macOS Big Sur on VirtualBox on Winows PC.
- Related: How to Install macOS Big Sur on PC – Hackintosh
Including these apps and improvements, all the things that have been introduced in iOS 14, you can use on your iPadOS. Apple pencil has also developed and not can work just like text. Now even an unprofessional artist can draw and work very professionally with Apple pencil. Users said after we use Apple pencil, we don’t want to take that off. Now Apple has brought new features in Apple pencil and after the update, users can work on every app and software with Apple pencil. Apple has made huge improvements to handwriting recognition and now when a user writes, they can easily make a selection as they do for a text. You can double-tap to select a word or you can change the color and move writing anywhere you want.
Also, many amazing updates are coming and have come to Air pods. AirPods will now seamlessly move between your devices with the user having a manual switch. AirPods can switch automatically from an iOS to iPadOS and from iPadOS to Mac. AirPods Pro also has a new exciting feature by the name of Spatial audio. With the Spatial audio feature, you can experience a movie theater on your ipadOS or iOS at home.
macOS Big Sur (macOS 11)
macOS is one of the biggest inventions of Apple developers. Every year macOS gets updated and more developed in WWDC(Apple Worldwide Developers Conference). And this yar’s star is macOS Big Sur. macOS Big Sur introduces an entirely new design and major updates to some of the important apps and platforms. And just like its name, Big Sur brings unmatched levels of power and beauty. At WWDC 2020 Apple said, we have refined some of the most iconic elements of Mac experience. The first feature Apple talked about was Dock. Dock has an elegant new design that floats along the bottom of your desktop and you will notice gorgeous new apps icons. Finder has also a new gorgeous top to bottom design for its sidebar. And it has a compact space-efficient toolbar.
Mails also have got a wonderful update. Users will notice that mail has all new glyphs in the sidebar. And the colors are also back, each app uses its own key color. The new toolbar makes it really easy to get all your control.
Photos are wonderful now. Users can get to all their albums and media types from the sidebar, and the photo grid is backed by Metal. Apple has refused the design for all the apps on the system. And apps like Calendar, Notes, Podcasts, Music, and iWork have got wonderful and easy to use.
- Related: How to Install Android 8.1 Oreo on VirtualBox on Windows 10
The menu bar has developed and for controlling and doing all the things like Wifi, and sound you can use the new Control Center to Mac and macOS. All your controls will be there and it’s easy to make adjustments.
Your Notification Center has also reinvented and now with a single view it will bring your notifications and widgets. You can see the complete notification from your Notification Center and use the newly redesigned widgets. You also can edit those widgets.
In apps of Big Sur also, there are a lot of changes. Messages have many new updated features, and one of the most used ones is Powerful Search. This new feature he’s you find the right thing at the right moment. Massages have a redesigned photo picker too and with this, you can share pictures and videos easier. My favorite thing, memoji. Now I can create my memoji on my Mac and you also can.
Maps on macOS Big Sur is wonderful with the new edition of favorites. Now you won’t lose your favorite coffee shop or library. You also can create your own guides for the places you want to visit. And with an indoor map, you won’t be lost in any public place, such as Airpot. Features introduced in iOS 14 will be available on macOS Big Sur also.
Mac Catalyst is my second most favorite thing on macOS but this year it is even better. This year developers will be able to optimize their apps to fully utilize the native resolution of mac screen. Including powerful new menu and keyboard APIs and updated controls like checkboxes and date pickers. There’s a growing list of third party catalyst available.
Safari is the best app and we love safari for its speedy performance, power efficiency, and state of the art privacy protections. Safari is the world’s fastest desktop browser and this year Safari will be faster than any other browser. Safari will still be more private and you will not be tracked by any website on Safari. And you can see how that website treats users’ privacy. macOS Big Sur is wonderful and other many new features are on way such as customizable start page, redesigned taps, native translation, and many more. By this point, you’ve pretty much known about Big Sur and how great it is, however, let’s move into how to install macOS Big Sur on VirtualBox on Windows PC.
What is VirtualBox?
Before we jump into the process of installing, we need to know what is VirtualBox and how it works. Does VirtualBox have any harm to our computer or No? Before we talk about usages, goodness, and badness of VirtualBox and talk about its definition. We need to know what is virtualization? virtualization is the main job of VirtualBox. All the processes that a VirtualBox do are, called virtualization.
virtualization allows a single hardware computer to use different operating systems. Computers in the 20th century have high CPU and hardware power, But of that power isn’t used with a single operating system. That’s why virtualization was created. With virtualization, a single hard drive can work as multiple hard drives. And users can install and use different operating systems in one drive.
After understanding virtualization, Now we can understand VirtualBox too. VirtualBox is an open open-source advisor for x86 virtualization. VirtualBox is a virtualization program, which helps users use 2 or more than 2 operating systems in a single drive. VirtualBox is a huge program and it can create and run almost any operating system in it via virtual machine. But it completely doesn’t make it complicated nor expensive. Instead, it’s pretty easy to use and completely free, yes, without any cost. With that in mind, let’s jump into how to install macOS Big Sur on VirtualBox on Winows PC.
- Related: Download macOS Big Sur DMG File – Latest Version
How to Install macOS Big Sur on VirtualBox on Windows PC
As far as installing macOS Big Sur is concerned, you might be wondering how we and you would accomplish install macOS Big Sur on VirtualBox on Windows PC. The answer is, how we and specifically you would do is via the third-party app which we mentioned above. That is VirtualBox. Just like we introduced VirtualBox, it’s a great simple free tool which does the perfect job of letting us install macOS Big Sur on VirtualBox on Windows PC. How it actually does is, since it’s a free virtual machine app, different from VMware, it doesn’t restrict us to the operating system it has. What I mean by that is, it has all the operating system list we need, that includes macOS.
If you have install macOS Big Sur on VMware on Windows PC, you know VMware doesn’t give the macOS option in the operating system by default. For which, we would need to download and install Unlocker for VMware. But with VirtualBox, that’s definitely not the case, because it supports install macOS Big Sur on VirtualBox and as well as other versions of VirtualBox. This also means we now no need to install macOS Unlocker for VMware which is only for VMware as known from it’s name. So without installing the patch, you can easily accomplish with this installation and the steps and install macOS Big Sur on VirtualBox on Winows PC.
- Download macOS Big Sur ISO File – Latest Version
Step one – Create or Download macOS Big Sur ISO
The first and by far one of the most important steps to take and do is to whether create or download macOS Big Sur ISO. Don’t worry, we’ve both the option covered and by no means you’re supposed to accomplish this alone. Whichever option you choose, we’ll help you with that. And we’ve done via another article which has entirely shown the way to do it with the steps and whatever is needed.
If you’re assuming you would get it from the App Store or Apple’s beta program, you are totally wrong. The reason is, it isn’t the ISO file, means Apple has its own file format which is DMG and even though you download Big Sur from Apple’s beta program which doesn’t directly give you the Big Sur. Despite that, if you attempt to download Big Sur from there, you will likely end up with macOS Developer Beta Access Utility. In fact, if you proceed with it which will let you download macOS Big Sur, it won’t be ISO at the end of the day.
- Related: How to Install macOS Big Sur on VMware on Windows PC
So what we have done is we have made a complete step by step tutorial on how to create macOS Big Sur ISO. Check it out and you’ll find it as easy as copying and pasting commands as long as you’ve macOS Big Sur with you. And not to confuse you, it needs to be done within a Mac. So if you’ve a Mac and a reliable connection, you can probably create macOS Big Sur ISO pretty easily. The good thing is, it gives you the latest version of Big Sur, whether its in beta mode or final version.
But the problem is, not everyone has a reliable and speed internet connection or some might be suffering from a limited connection which is really difficult to achieve then. In this case, we’ve done the job beforehand and you don’t really need any work not minimal work even. You’ll only need to download Big Sur ISO and that’s the only thing you need to do.
macOS Big Sur Beta 11.0 Developer Beta 2 (20A4300b) July 7, 2020
So with all those things and hurdles, most of you would want to download macOS Big Sur ISO since I assume most of you doesn’t have access to macOS neither have a reliable connection. I mean if you have a Mac, means there wouldn’t be need to install macOS Big Sur on VirtualBox on Windows. So in this case, you can quite easily download it from here because that’s all you’ve to do. So when you have this option, you don’t really need to select the first option.
- Download macOS Big Sur ISO – latest version
Step Two – Install Oracle VM VirtualBox on Windows
With the file only, we can’t install macOS Big Sur on VirtualBox on Winows PC straightly. What we need is a platform or an environment to run in. So with this in mind, we need to install VirtualBox which is not our only option but definitely our preferred way to do. So we encourage you to first download and install VirtualBox on your Windows machine so we can proceed further. Both the download and installing process is as easy as you would imagine. It requires a minimal work of only getting the file and running it with a few wizards to fiddle with. Also, it isn’t heavy or should slow down your PC, instead it installs very quickly and won’t take much time and space.
- Download Oracle VM VirtualBox
In this case, download the Orcale VM VirtualBox from the link below and then install it once it’s finished downloading. Not to forget, download the VirtualBox extension pack also with it.

VirtualBox wizard
The best thing is, it desn’t required nothing more then simply download and install like signing up or asking questions or license or anything else. So once you’ve run the setup, it will look like this. Simply press Next.
Press Next a few times more and when this window appears, click Install.

Install VirtualBox
When it’s finished, click Finish.

Finish Installation
You can let it run and simply exit the installation.
Step Three – Install VirtualBox Extension Pack
So when you’ve installed the VirtualBox, it also requires installing VirtualBox extension pack. What it is, it is basically a pack of tools and features which enable us USBs that includes mouse and keyword working and a bunch of other things which it supports. But it’s not as necessary as it seems like or as VMware Tools. Despite that, we will install which might prevent some problems and errors that might occur when installing. And as well as, since Big Sur isn’t fully out yet, and is still in beta mode, it might have some problems or bugs and errors so it’s better to install VirtualBox extension pack so it can try to prevent or catch up with those errors. I recommend installing VirtualBox extension pack for a better experience. Here’s how to proceed with it to accomplish how to install macOS Big Sur on VirtualBox on Winows PC.
- Download Oracle VM VirtualBox Extension Pack
Not to worry, it’s also similar to installing VirtualBox, and can be obtained from the same page where you would get VirtualBox. So after you’ve get it, fire up the VirtualBox and simply open it up, and it will prompt you to install, so simply click on Install and it will be installed.

Install VirtualBox Extension Pack
It will show up some other windows, like terms and conditions and stuff like that. Simply proceed with them and let it install.

Agree with the Terms Conditions
Once it’s finished, click OK.

Installation Finished
Step Four – Create A Brand New Virtual Machine
Creating a virtual machine in VirtualBox is different from VMware. That means it’s pretty easy and just like we mentioned, it doesn’t require installing patch instead it supports installing macOS by default. Not only that, it also provides an option of expert option which will make the wizard all in one window so you can set up the machine within a window not going through options. So let’s see how it is and how it looks like. So let’s first create a new machine to install macOS Big Sur on VirtualBox on Windows PC as quickly as you can.
To create a new machine, open up the VirtualBox, and click on New.

Create Virtual Machine
The create virtual machine window will appear, simply click on Expert Mode.
Now fill up the blank with a name probably macOS Big Sur, and then specify a location where the files would be store. After then, it will automatically detect the OS and version. Next up, increase the memory size to as high as you can means 50-60% of your system’s memory and in the last section, select create a virtual machine disk now.

New Machine
Within this window, first, specify where you would like to save your machine’s disk and then also specify the disk size. For the disk size, make sure you assign at least 100 or more GBs of storage space. And last for the disk type, select VHD which will automatically expand the disk size by your usage and won’t use any extra space if you’re using not all of it. When you’re done, click on Create.

Create Hard Disk
Step Five – Set up The Virtual Machine Settings
At this point, we’re basically near to finalize the machine but without setting it up, it’s of no use. The customize is primiarly done in order to meet our needs and as well as run the machine according to our computer resources. Don’t take it funny because if you skip this part, it will seriously fail the installation and is definitely a game changer. Even if you get in trouble with some things you can assume you’ve done something wrong in this part maybe. That’s almost the last step to how to install macOS Big Sur on VirtualBox on Winows PC.
Goto the machine’s settings.

And on the System tab, uncheck floppy.

Uncheck Floppy
In the next tab which is processors, set the processor to the highest you can means 50-60% of your system resources at least 2 or more.

Increase Processors
Next to the display tab, set the video memory to the highest and also change the Graphics Controller to the VMSVGA.

Increase Video Memory
Heading to the next tab, which is Storage, click on the disc icon and then click on the disc icon on the left side and then choose macOS Big Sur ISO ISO. This will direct the machine to use the macOS Big Sur ISO for booting.
To change it to boot first, from the optical drive menu, set the macOS Big Sur ISO to SATA Port 0. Make sure it’s up not down the disk since it shows the machine will boot from what.

Add macOS Big Sur ISO
Step Six – Apply Commands on Command Prompt
Similar to running a command, it also requires running a simple command which is quite easy. These codes aren’t different from any other code and are very simple to apply. If you are wondering what it does is, it basically patches VirtualBox to install and run macOS Big Sur without any problem, even though VirtualBox supports installing macOS by itself. Don’t worry it won’t harm, neither the machine nor your computer.
Not to forget, find out and copy your virtual machine’s exact name. To do this, open up the VirtualBox then click on the settings icon and copy your machine name from there.

VM Name
The procedure is quite simple. All you’ve to do is first close VirtualBox with the machine which is very important.

Close VirtualBox
In this step, copy and paste the following code to the Notepad and then press Ctrl + H. Then write down the name of the machine, in this case, we will write “VM Name” and then in the next blank, write down the “macOS Big Sur” then press Replace All. It will simply replace all of the VM Name to the machine name which will be ready for the next step.

Manage Commands
Once that’s done, copy the whole commands and simply open up the command prompt from the start menu. No need to open it as an administrator.

Command Prompt
Once opened, paste the whole commands with a single right-click then press Enter.

Enter Commands
Step Seven – Install macOS Big Sur on VirtualBox on Windows PC
The machine’s got ready, yh!! And that’s all for creating and setting up the machine and there’s nothing more remaining or important to do. There it comes time to install macOS Big Sur on VirtualBox on Windows PC. A little different from VMware but in actual it’s pretty easy than what you had imagined. So let’s see how it goes.
Now fire up the VirtualBox and then start up the machine from the button. Since it’s the first time, it will take a considerable time.

Start Machine
Not different from the actual installation on Mac or installation on VMware, it simply is the same to how to install macOS Big Sur on VirtualBox on Windows PC. So after a long wait, it will come up the same installation you might have seen before. Select your preferred language and click Continue.

Then select Disk Utility and click Continue.

Go to Disk Utility
Now select the disk we created earlier on VirtualBox and then click on Erase.

Erase Disk
Give out a special name and click on Erase.

Erase Disk
Once finished, click on Done then close the window out.

Done
At this point, when the disk is ready click on the Install macOS and Continue with it.

Install macOS
With the macOS installation, Continue only. That’s the how-to install macOS Big Sur on VirtualBox on Windows PC.

Continue macOS
Agree with the terms and conditions and click on Agree.

Terms & Conditions
Last but not least, select the only disk we erased and click on Install.

Install macOS
The installation will begin in a minute so not to worry, it will do all itself. Means you can let it like this for some while and it will install all by itself with a few reboots and wait it will be all ready.

Installing macOS
Step Eight – Set up macOS Big Sur Settings on VirtualBox
The installation is pretty much done now. What’s remaining is to make and choose how you’d like to set up your Mac and what things you’d like to be in or out and what things you’d like your Mac to do for you and things like that. It’s a last tiny part of the installation which is super simple. And the good thing is, you can start testing up its settings, so whatever your choice, go for it.
So after a few time, when the installation is completed, it will be in this spot.
In this point, choose your region and Continue.

Select Your Language
Select your preferred keyboard and things and click Continue.

Written and Spoken language
If you have some physical problems or would like to set up those, it’s fine. Otherwise, no need for any of those, simply click Not Now.

Select Accessibility
If the data and privacy window comes up, agree with it.

Data and Privacy
Don’t transfer anything from your PC unless your want to use it as your primary operating system which we assume you won’t. However, if you need something to transfer in, you can do it later more easily so don’t choose it.

Migration Assisstant
Whether you want to sign in now or later you can do both. If you have an Apple ID, you can do it now, or if you don’t have an Apple ID, you can do it later also.

Sign In with Your Apple ID
Read or simply agree with the terms and conditions by clicking on Agree. Then click Agree on the pop up again.

Agree Terms Conditions
Just like Windows or any other operating system, you’ll need to create a user account at least one to work, however, as Mac is more secure due to it’s security, you need to create an account with a password in order to use your Mac. So fill up the details and click on Continue.

Create User Account
The express set up reminds and enables maps and other apps track and see your location in order to improve things.

Express Set up
Just like its name, the Analytics will send info and diagnostic data back to Apple in order to improve things up so Continue with it.

Analytics
Continue with the screen time by clicking on Set up later as I assume you don’t want to set it up and also because you might not be familiar with.

Screen Time
When the Siri pops up, you’re free to opt in or out with Siri, and simply click on Continue.
Choose your preferred look and click Continue.

Choose Your Look
And there you go! The installation is going to be finished soon completely, it is just preparing and setting up things in place to make it ready for use, so simply chill.

Setting Up Your Mac
Once it does so, it should be within the main area. And figure out how beautiful it is, how updated and how speed it is. And check whatever you’d like to, and know why its beating or challenging Windows and taking over the Windows day by day so by using it you will definitely get to know. That’s the procedure on how to install macOS Big Sur on VirtualBox on Windows PC.

Install macOS Big Sur on VirtualBox on Windows PC
Here’s another shot with the details.

Install macOS Big Sur on VirtualBox on Windows PC
Last Step – Fix macOS Big Sur Screen Resolution on VirtualBox
After installing Big Sur successfully on VirtualBox, you might be now confident to get your hands dirty with things. But actually that isn’t the case because there’s a problem, not actually huge but little small problem and that is the screen resolution. If you’ve used or even if you haven’t very much, still you might have the idea to do full-screen resolution, but when you do, you’ll see the black covered all around the screen except for the middle which is the wallpaper and that is pretty small.
And that is obviously not ignorebale and it does happen for all even for us, but luckily there’s a pretty easy fix to it. By default, the screen resolution is the small resolution you see which comes with VirtualBox and not only on VirtualBox, it’s also appears on VMware if you’ve installed before. But no worries, we can solve it with these steps.
These methods not only work for macOS Big Sur but also works for macOS Catalina, macOS Mojave and other versions just by changing their machine names and others all are the same, the steps and everything. While there are different ways and different methods to fix, but as you know us, we choose the one that works the best or at least which works better than others.
And if you have installed the previous versions of macOS on VirtualBox, you might have the idea of how we have done it and how we will accomplish with this. So get ready and let’s go.
First and foremost, close the machine and VirtualBox both.

Fix macOS Big Sur Screen Resolution
Then close VirtualBox.

Close VirtualBox
After its done, open up the macOS Big Sur Code for VirtualBox and then press Ctrl + H which will open the replace panel. After you do, write down VM Name at the first, and then your virtual machine name at the second which is macOS Big Sur for us. Once you do that, click Replace All.
If you don’t know your virtual machine name, head over to the VirtualBox and then the machine and you can see there or from the settings.
In this screen, open the Command Prompt (No need to do it as administrator) from the Start Menu.

Command Prompt
Now change the resolution or let it by default as it is 1920×1080 if your screen resolution is that. If it isn’t then you can change the screen resolution from the below. The resolutions are mentioned below and you can simply choose the one which fits your screen and replace the current resolution which is 1920×1080 it’s that easy.

macOS Big Sur Screen Resolution Code
Once that’s done, copy the one-line command and open the Command Prompt and paste the line on the Command Prompt by right-clicking and then press Enter.

Commands Entered
Once done, fire up the VirtualBox and switch on the machine.

Start VM
And there it is, the macOS Big Sur is there with the full resolution. Sign in and you will see the ultimate macOS Big Sur with all it’s features and full-screen resolution.

macOS Big Sur on VirtualBox – Full Screen Resolution
To check, head over to the Apple icon and click About this Mac and then from the Displays menu, you will see your screen resolution.

macOS Big Sur on VirtualBox – Full Screen Resolution
This is the easiest and most working way to do this. Except this, there are a lot of ways to do it but since they sometimes work and sometimes not, it makes them not compelling or very good to use. As well as, they aren’t very easy, instead they are a little or more complicated. Since all of them does the same job but the one we have picked is better so there’s no more thing to choose from.
Overall, this was all about installing and setting up macOS Big Sur on VirtualBox. So what we did was install macOS Big Sur on VirtualBox on Windows PC completely from scratch like from getting up the file or creating to fixing the small screen resolution problem and making it entirely ready to use. Other than this, we’re working on the video and will be out soon and we will keep you updated with that.
- How to Fix EFI Internal Shell on macOS Catalina on VirtualBox
- How to Speed Up Slow macOS Catalina
- How to Fix macOS Mojave Screen Resolution on VirtualBox on Windows
- How to Fix screen resolution of macOS Catalina on VirtualBox new method
Out of these, like previous versions of macOS, users might get some problems around and some nice users who know the solution also helps them but not to worry, we are also hearing and trying to catch up and throw out your problems into the fix machine. So whoever have a problem you can easily comment and we will reply, but whoever knows the solution, it’s appreciated to share the solution that have worked fo him.
In this post, we will learn How to Install macOS Big Sur on VirtualBox on Windows. Even the macOS Big Sur includes a distinctive design and looks than Hackintosh’s last functioning method. However, we can install macOS Big Sur on Mac, even in the developer beta version. It doesn’t matter which operating system you are using then it’s possible to test and utilize macOS Big Sur in your system.
If you are a Mac user, you can install macOS Big Sur from the App Store without any issues. It’s possible to experience all its features and improvements. Luckily, this time Apple worked hard on macOS Big Sur to make it more and more proper for the users. Moreover, macOS Big Sur has many outstanding and splendid features such as updates in Safari that will work 50% faster when you surf for something, iOS management center, improvements in Maps, upgrades on the message program, Widgit from the home display, Notification center in macOS Big Sur, and many more features which you will enjoy it.
If you are a Linux or Windows user and want to experience macOS Big Sur in your system, then you’re in the exact place. It is tough to immediately install macOS Big Sur on an Actual computer, and it’ll occasionally waste time; it will not work.
With the aim of this article, we will utilize VirtualBox. In VirtualBox, you can install various operating systems free of charge. However, it is comparable to a physical computer that needs an ISO image to install virtually any operating system. The setup procedure isn’t much complicated, but it’s somehow lengthy. Have a cup of java and start following the directions step by step.
I am sure the process isn’t easy and works for everyone. You might face these common errors when installing macOS X On VirtualBox On Windows- Here is a complete guide that will help you fix those errors. Complete Guide To Fix VirtualBox Errors While Installing Mac OS X and How to Speed Up macOS Big Sur? 7 Easy Methods
Which MAC is Compatible with macOS Big Sur?
2015 and later MacBook
2013 and afterward MacBook Air
Late 2013 and later MacBook Pro
2014 and after iMac
2017 and afterward iMac Guru
2014 and after Mac miniature
2013 and later Mac Guru
According to the rumors, the Mac that’s recorded below won’t be updated from the decrease model to macOS Big Sur.
2012 and Historical 2013 MacBook Pro
MacBook Air 2012
2012 and 2013 iMac
2012 Mac miniature
8 Easy Steps to Install macOS Big Sur on VirtualBox on Windows PC
The steps are straightforward to choose from. But first, you have to browse the necessary document that you will need while upgrading. Before we get started, you want to make sure your PC can support Virtualization Technology or maybe not. Otherwise, you won’t have the ability to install macOS Big Sur. Be sure to turn on from BIOS of your system so that you should install virtualization software such as VMware and VirtualBox on your PC. Your system has to have a 640-Bit working system with 4GB Ram or even more to get better functionality.
You can also read: How to Speed Up macOS Big Sur? 7 Easy Methods
1. Download Required File to Install macOS Big Sur on VirtualBox on Windows PC
VirtualBox Latest Version (Download)
Download macOS Big Sur VMDK File
VirtualBox Code for macOS Big Sur (Download)
VirtualBox Extension Pack (Download)
2. Install VirtualBox on Windows 10 PC
You need to download the newest version of VirtualBox from the preceding link. Wait for the downloading procedure and be patient. Once you’ve successfully downloaded VirtualBox on your PC, heed the instruction below and receive VirtualBox installed on your PC.
Double-click on the VirtualBox to start.
On the welcome window, then click on Next.
To go one step forward with setup, click on Next.
When the installation procedure is completed, click on End.
You can use this video tutorial:
3. Install VirtualBox Extension
VirtualBox Extension is a small and useful tool that solves almost all VirtualBox problems you confront while using any operating system. Most of the time whilst installing macOS Big Sur on VirtualBox, the mouse, and keyboard get stuck, which is a preeminent issue. To fix them quickly, you need to install the VirtualBox Extension correctly after you set up VirtualBox. Find the VirtualBox Extension Pack in the Required File section.
- Once you have installed VirtualBox Extension on your PC, right-click on it and click Open.

- The VirtualBox is going to be opened with a dialogue box. About the Welcome screen, you have to click the install.

- The terms & conditions screen will be opened, then scroll down until you see the I agree button. Click that.

- Now it takes some moments to be installed. Once it is done, then click Okay.

4. Create a New Virtual Machine for macOS Big Sur
Creating a new virtual server is pretty simple. It is the same when you make it for Windows and Linux. Every operating system needs an ISO image to set up. Therefore, if you have downloaded the macOS Big Sur ISO image in the above link, nothing will be worried about. To create a new system for macOS Big Sur, you need to go through the instruction, so you shouldn’t face any problems.
- Open the VirtualBox. Then You Need to click the New button.
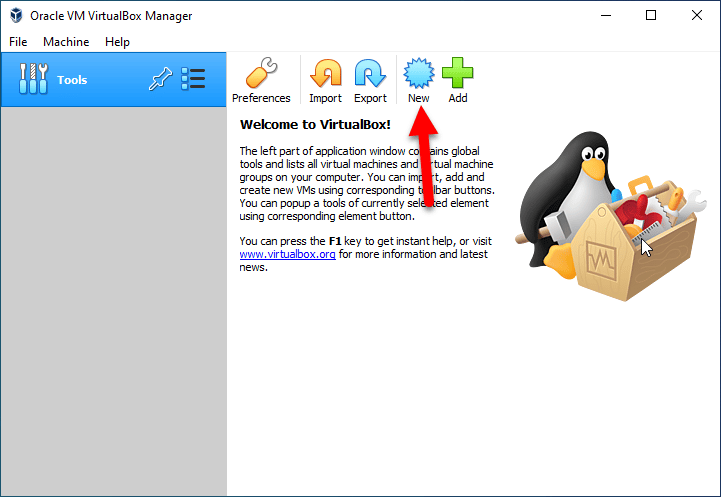
- On the Welcome screen, you have to click on Expert Mode.
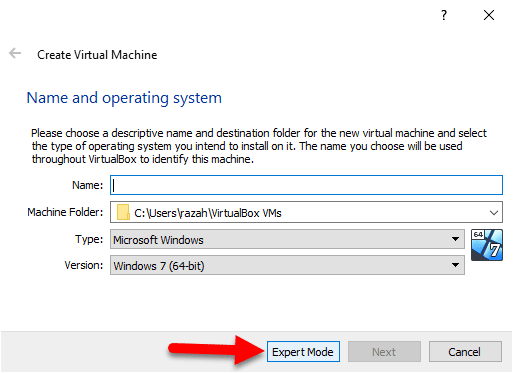
- Give a name to your virtual server, and choose a folder for installation. The kind ought to be Mac OS X, version ought to be Mac OS X (64-Bit). In the below, you need to choose the second choice, Create a digital hard disk now and eventually click on Create.
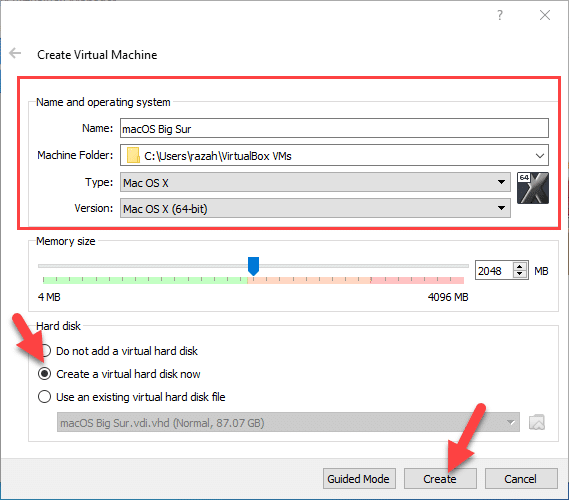
- Increase the memory size up to 100GB or greater than that to indeed have a more excellent performance. For the challenging disk file type segment, you need to select VHD (Virtual Hard Disk). You have to select Dynamically allocated on the right side and click on Create.
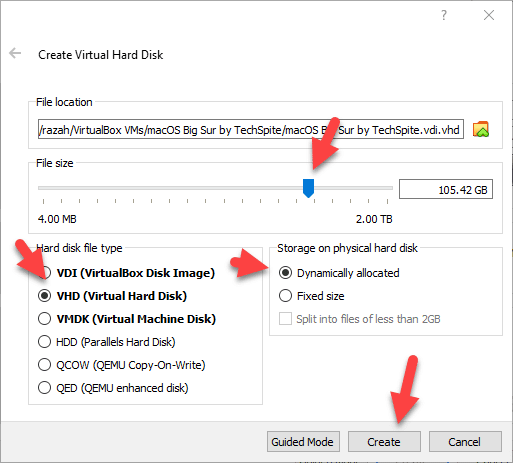
5. Customize Virtual Machine Settings
For better functionality in macOS Big Sur, you have to customize configurations of virtual machines you’ve created. Follow the instruction down below.
- Click on Settings. Make sure you choose System when the Setting opens from the perfect pane. There you have to uncheck the Floppy and move into the Processor tab, then raise the amount of Processor to 2GB or more than that for superior functionality.
- Head around the Display menu on the Ideal side and increase the Video Memory.
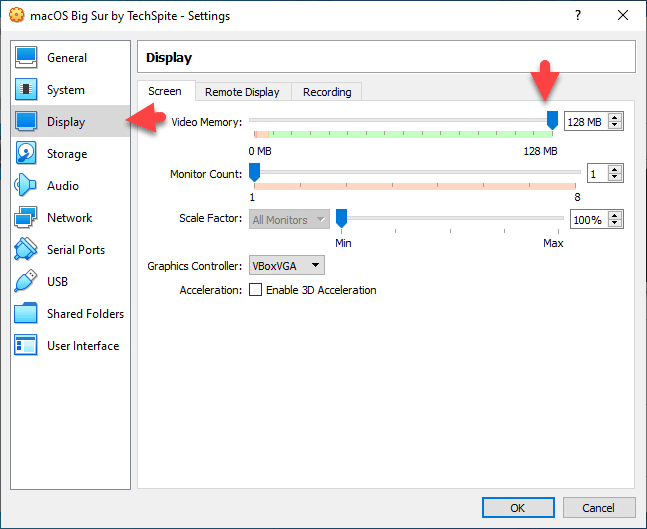
- Now, it’s time to add the macOS Big Sur ISO file to the virtual machine, browse to the Storage menu, and pick Empty. Then click the DVD icon and select the macOS Big Sur ISO File you downloaded.
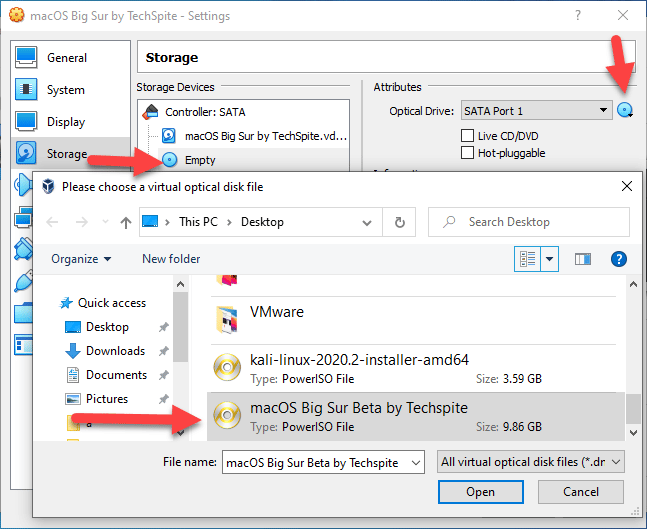
- Your macOS Big Sur ISO file must go on the top, and the disc has to in down. If your disk is on the top, it will not boot up macOS Big Sur. You have to change the SATA interface number to 0.

6. Run VirtualBox Code in Command Prompt
Whenever you have made a new virtual machine and customized it properly, it’s the right time to conduct a number of VirtualBox codes in the Command Prompt. It will help and allow the VirtualBox to set up macOS Big Sur on it.
Navigate into the Required files section above and make sure you download VirtualBox from there. And you have to remember the name of your virtual server since it’ll be required.
Once downloaded, you need to open the code with Notepad or other text editor software. Now you have to substitute the VM Title together with the name of your virtual server. It is possible to use the Replace tool to perform it.
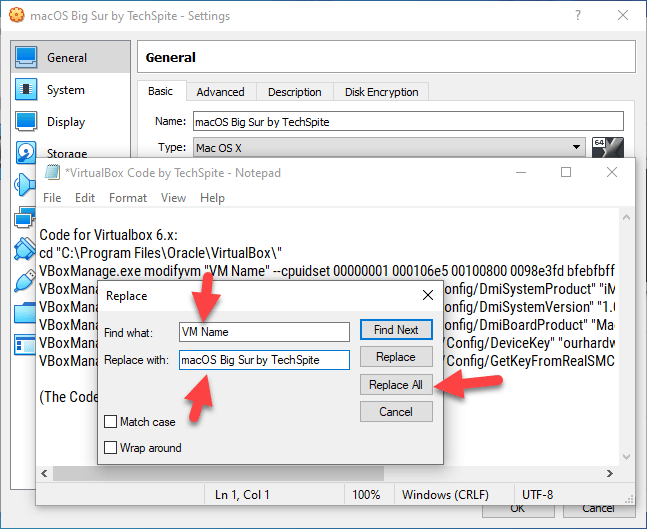
Therefore, you have to quit VirtualBox before conducting the VirtualBox code. If you don’t remember to close it, remember that you can’t process the installation steps.
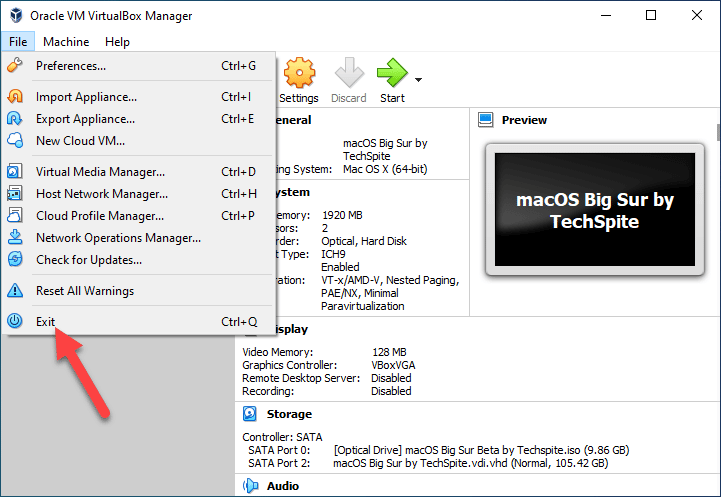
When you’ve replaced the VM Title with your virtual machine, you need to open the CMD (Command Prompt) by hunting on the search menu and operating as an administrator. You must copy and paste the code line by line to Command Prompt when it opens.
cd "C:Program FilesOracleVirtualBox"
VBoxManage.exe modifyvm “Virtual Machine Name” –-cpuidset 00000001 000106e5 00100800 0098e3fd bfebfbff
VBoxManage setextradata "Virtual Machine Name" VBoxInternal/Devices/efi/0/Config/DmiSystemProduct “MacBookPro15,1”
VBoxManage setextradata "Virtual Machine Name" "VBoxInternal/Devices/efi/0/Config/DmiBoardProduct" "Mac-551B86E5744E2388"
VBoxManage setextradata "Virtual Machine Name" "VBoxInternal/Devices/smc/0/Config/DeviceKey" "ourhardworkbythesewordsguardedpleasedontsteal(c)AppleComputerInc"
VBoxManage setextradata "Virtual Machine Name" "VBoxInternal/Devices/smc/0/Config/GetKeyFromRealSMC" 1
7. Start the Virtual Machine
- Finally, it would help if you started the virtual machine.
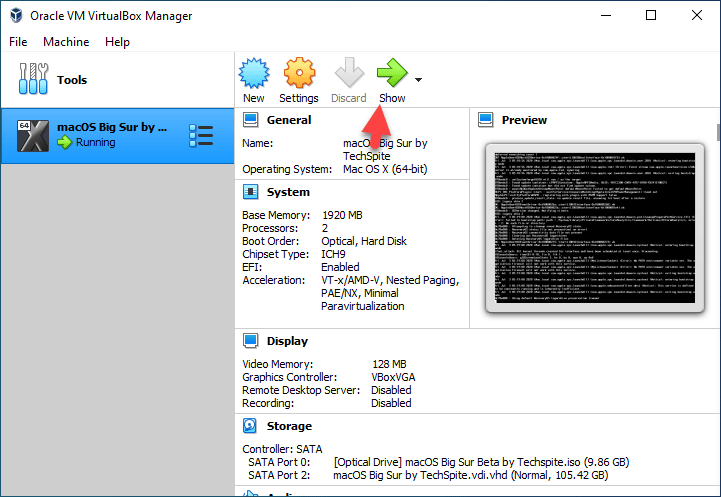
- Once the virtual machine began the virtual machine, you will see some code running in the background. You have to wait till the Apple logo pops up.
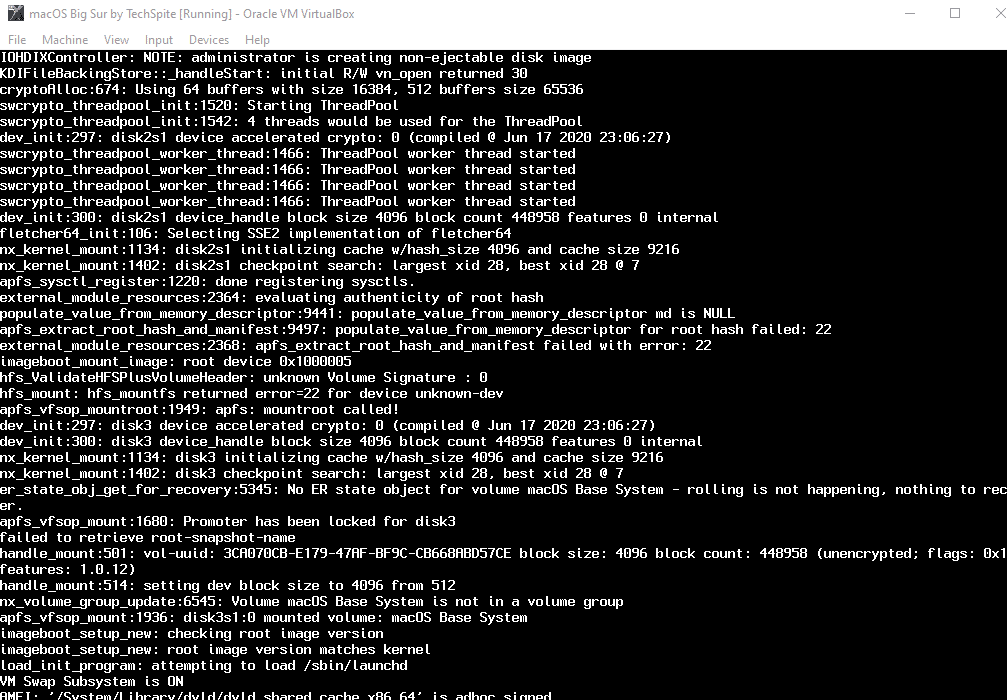
- You have to choose your favorite language and click on Continue.
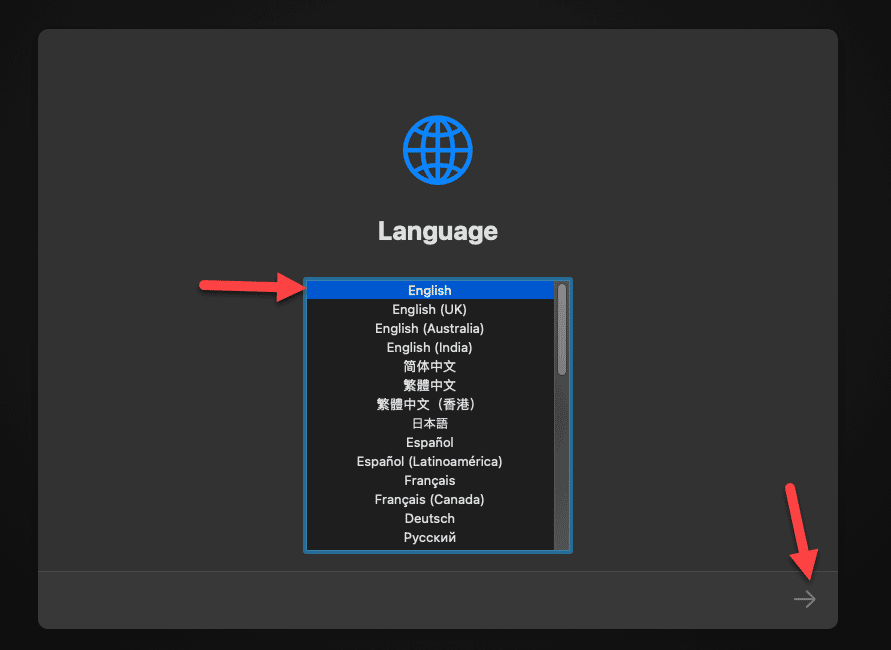
- From the boot recovery, be sure you choose Disk Utility and click on Continue.
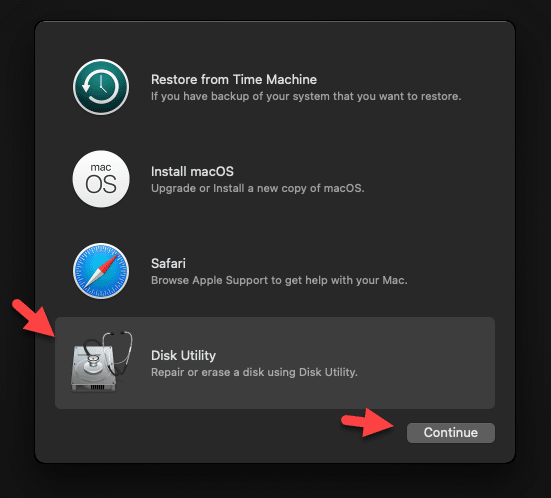
- Select your primary hard disk and click on the Erase button again. You have to inspect the disk’s dimensions and then erase it, don’t do the wrong virtual hard disk.
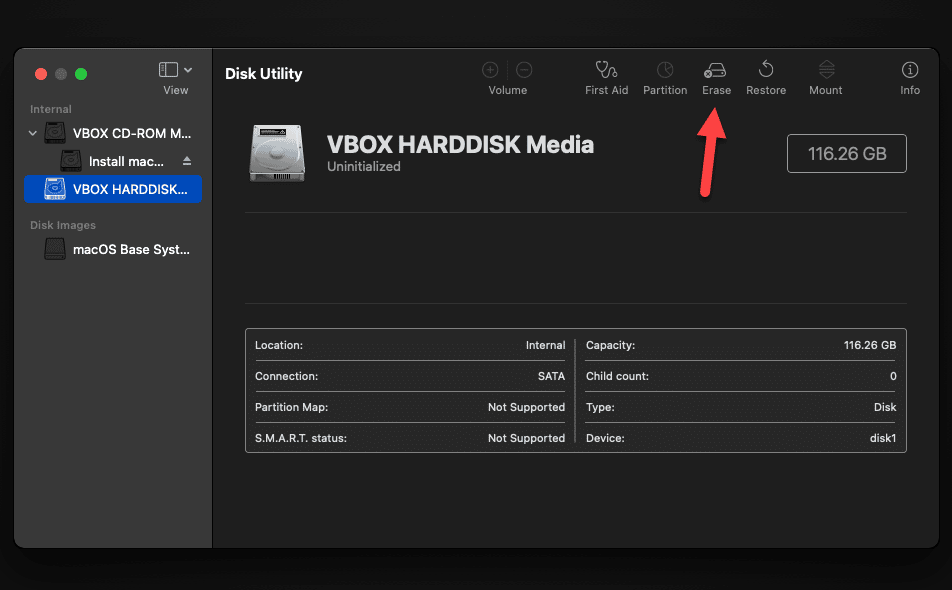
- Then title your virtual hard disk drive, which you’ll likely erase. I should write the name macOS Big Sur. If you typed it, then click the Erase button again.
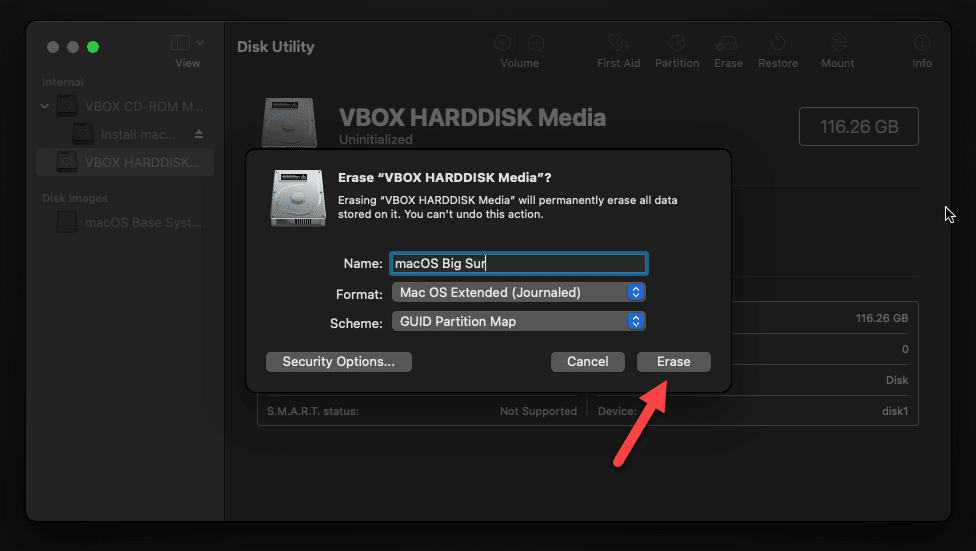
- Close the Disk Utility.
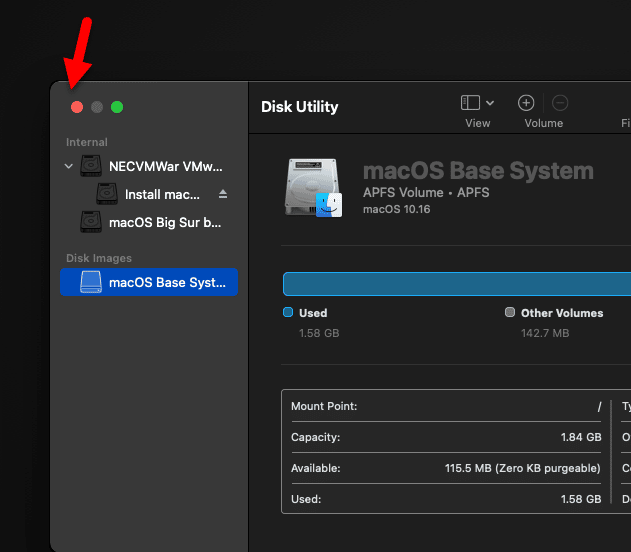
- Now click Install macOS and click Continue.
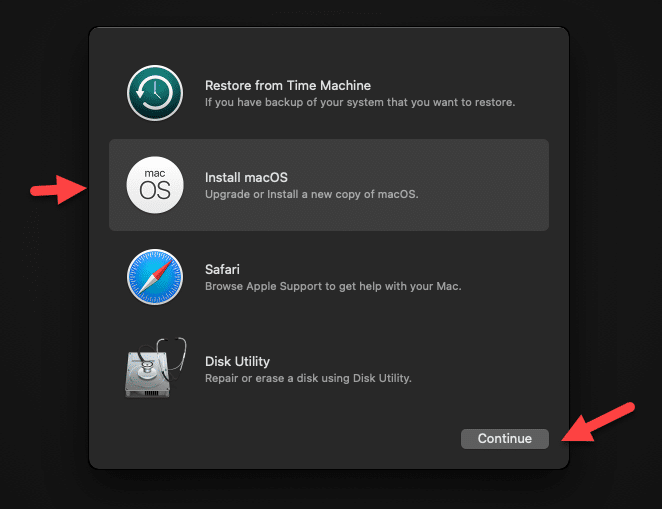
- Click on Continue.
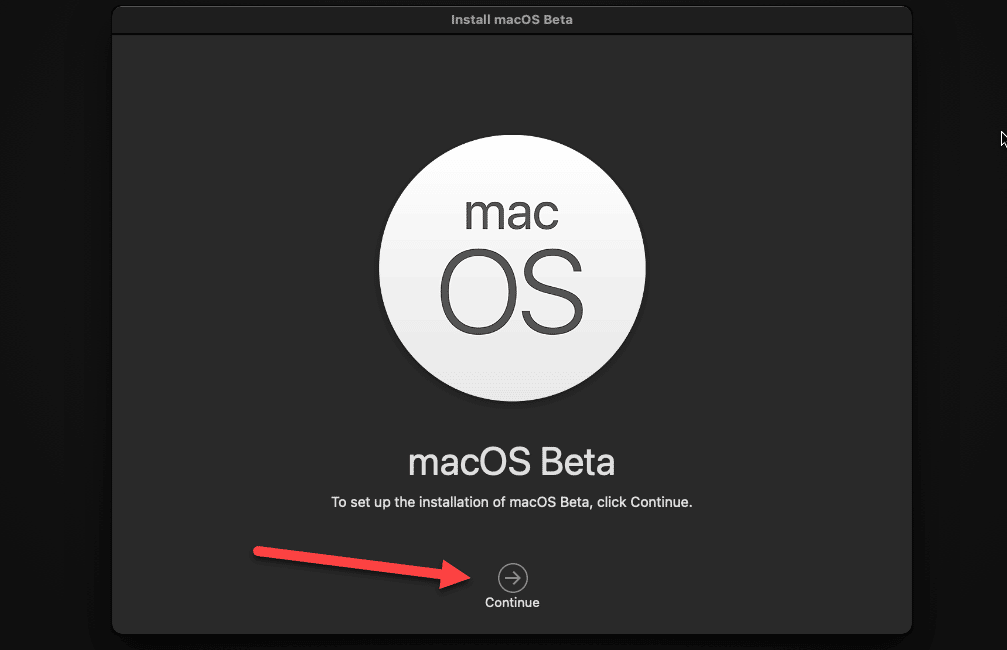
- Agree to terms and conditions.
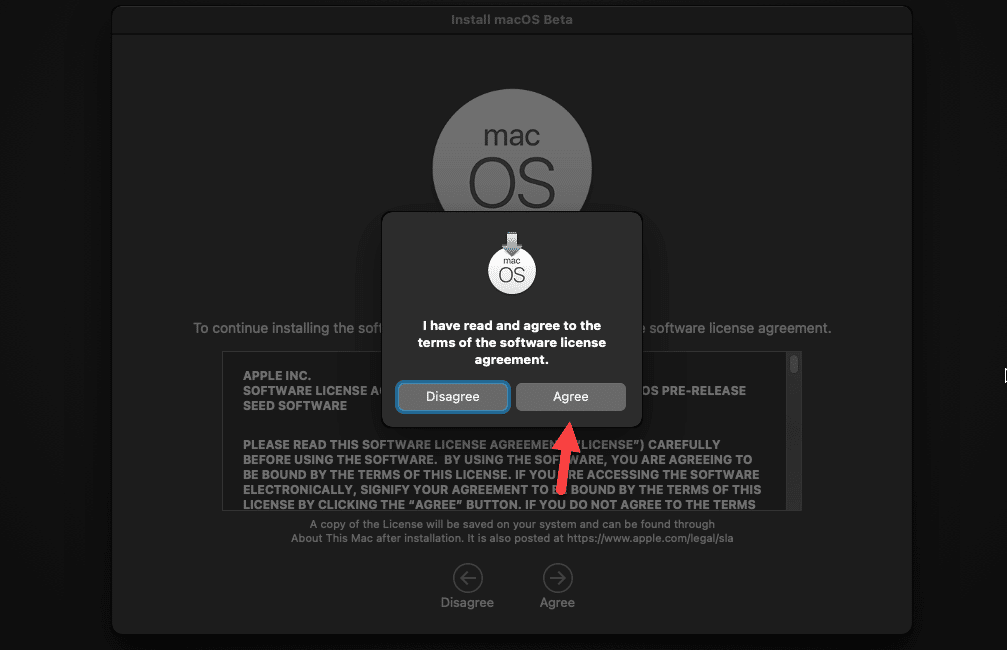
- Now you have to choose the setup disk and click Proceed. The setup will be started, taking some time to be patient.
You can also read: How to share folders on VirtualBox & Vmware? (Windows-MAC) Step by Step Guide
8. Clean Installation of macOS Big Sur on VirtualBox
- Once the setup procedure is completed, you can now have the installation measures of macOS Big Sur.
- On the welcome screen, choose your nation and click on Continue.
- Select a Keyboard design and click on Continue.
- You can also enable the Access attribute on macOS Big Sur. If you don’t need to install it right now, you must click the Not Now button to skip it.
- Agree to Terms & Privacy and click Continue.
- You could also transfer information from Mac and Windows PC. If you do not need to transfer your data, click on Not now and choose to go 1 step ahead.
- Click the Setup later and don’t sign in because you sign in once the installation is completed.
- Click the Agree to the terms and conditions and click Continue.
- You Need to enter your Full Name, Account Name, Password, and Tip and then click on Proceed.
- Click Continue on the Express setup window, as you can personalize it later.
- On the Analytics windows, you have to click Continue.
- After that, you can select your appearance and click on Continue. It’s possible to choose a dark style should you wish to utilize it.
- Wait for a few seconds, and you’ll get macOS Big Sur on VirtualBox.
- macOS Big Sur on VirtualBoxFix macOS Big Sur Screen Resolution on VirtualBox
When you fully Install macOS Big Sur on VirtualBox by following the above measures. Then you will notice that your screen resolution will appear small, that’s awkward. You can not expand into a giant screen to correct the screen resolution on VirtualBox. Consequently, you need to click on the link below and find the manual to correct the macOS Big Sur display resolution.
Install macOS Big Sur on VirtualBox: Bottom Line
In this article, I’ve discussed The Way To Install macOS Big Sur on VirtualBox on Windows PC. Now you can do anything you want on macOS Big Sur. If you find any problem, do not hesitate to comment in the comment section below. I’ll be happy to see your lovely comments and suggestion concerning macOS Big Sur.
Incoming Links:
How to Install macOS Big Sur on VirtualBox on Windows, Install macOS Big Sur on VirtualBox on Windows, How to Install macOS Big Sur on VirtualBox, Install macOS Big Sur on VirtualBox on Windows
You can also read: How to Speed Up macOS Big Sur? 7 Easy Methods
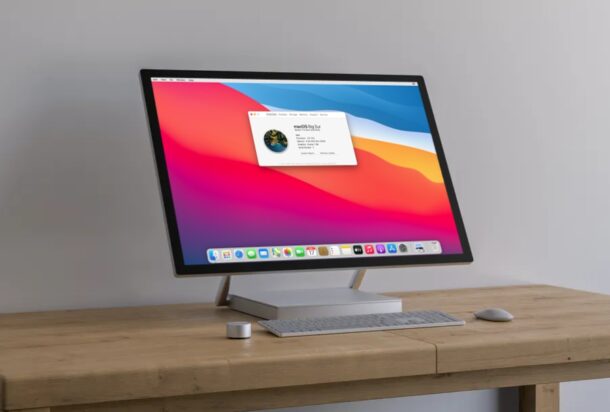
Are you interested in running macOS Big Sur or Monterey from a Windows PC? If you don’t want to spend money on a Mac, you can use a virtual machine and still try out macOS, thanks to VirtualBox.
Before you start making assumptions, this is not a super-complicated Hackintosh setup. Instead, you will be running VirtualBox natively on your Windows computer and installing macOS as a guest operating system within VirtualBox. Unlike a Hackintosh, you don’t need any special hardware to get macOS up and running on your computer. With VirtualBox, you can install multiple operating systems on a single computer and seamlessly switch between them as you desire. The operating systems basically run within an application, which virtualizes the hardware, and the OS itself doesn’t know the difference.
If you’re interested in running macOS Big Sur or macOS Monterey in Windows using VirtualBox, then read along.
Requirements for Running macOS in VirtualBox
This is going to be a pretty long procedure, but we’ll make it as simple as possible. However, before you get started, you’ll need to download VirtualBox and some additional essential files. The following links should be helpful to download the files necessary to get macOS Big Sur up and running on your VirtualBox virtual machine without any issues. However, you’ll need to obtain the ISO file for the latest version of macOS Big Sur by yourself. You can also use a different macOS version, provided you have an ISO of that release too.
- Download VirtualBox for Windows
- Download VirtualBox Extension Pack
- VirtualBox Code
- macOS Screen Resolution Code for VirtualBox
Performance will depend on how fast the computer is that is running VirtualBox, so obviously the better the PC the better that macOS will run virtualized on it.
How to Install macOS Big Sur Using VirtualBox on Windows
Now that you have all the necessary files downloaded to your computer, you’re ready to go ahead with the procedure. This tutorial is detailed for educational purposes only.
- Install the VirtualBox software on your computer. After that, click on the VirtualBox Extension Pack file that you downloaded.
- Clicking on the extension pack will open VirtualBox on Windows with a pop-up prompting you about the installation. Click on “Install” to finish this step.
- You’ve successfully installed the extension pack. Now, you’re ready to create your virtual machine. Click on “New” in the VirtualBox software.
- Here, give a valid name for your virtual machine. For example, “macOS Big Sur” as shown below. Make sure the type is set to Mac OS X and the 64-bit version is selected. Once you’re done, click on “Expert mode” to proceed to the next step.
- In this step, you’ll be selecting the memory size or RAM that will be allocated for your virtual machine. It’s recommended to set half of your total system RAM for the guest OS. Make sure, “Create a virtual hard disk now” is selected and then click on “Create”.
- Now, use the slider to set the virtual hard disk size according to your preference. Although this depends on how much free storage space you have on your computer, we recommend you to allocate 100 GB for the virtual machine. Select “VMDK (Virtual Machine Disk)” for the hard disk file type and click on “Create”.
- Now, click on “Settings” in VirtualBox as shown in the screenshot below.
- Head over to the “System” category and click on “Processor” from the top menu. You’ll be able to use the slider to adjust processor allocation. It’s recommended to allocate half of your processor’s core count for the virtual machine. Keep in mind that if you have a 4 core/8 thread processor, it will show up in VirtualBox as 8 CPU cores. In that case, you can set 4 cores for processor allocation.
- Next, click on “Display” from the left pane and move the slider all the way to the right for “Video Memory”.
- Now, go to the “Storage” category and click on “Empty” under Storage Devices. Then, click on the optical disk icon on the right and choose “Create a Virtual Optical Disk” from the dropdown menu.
- You can click on “Add” to browse for the macOS Big Sur ISO file that you download using File Explorer. Select the ISO file and click on “Choose”.
- Now, click on “OK” to exit VirtualBox settings and close the VirtualBox application as well.
- Open “Command Prompt” on your PC. Be sure to run Command Prompt as an administrator.
- Now, open the VBox Code text file in Notepad. Copy/Paste the first command line in Command Prompt and hit “Enter”.
- Next, you’ll need to paste the remaining lines, but before that, you will need to replace “Your Virtual Machine Name” with the name you used while setting up your machine in VirtualBox. For example, it’s “macOS Big Sur” in this instance. After replacing it, copy/paste all the remaining lines in Command Prompt and hit “Enter”.
- Now, open VirtualBox again and click on “Start”. Wait a couple of minutes for VirtualBox to perform the operation. You should be able to see the macOS installation progress in VirtualBox now. This is going to take several minutes to complete, but once it’s done, you can follow the on-screen instructions to set up your Mac, which is similar to setting up any new Apple device.
- Although you got macOS up and running on your computer, we’re not quite finished yet. The default resolution of macOS or any guest OS that you install on VirtualBox is 1024×768, which is probably not what you want. However, this can be changed using the macOS screen resolution code. Close VirtualBox, run Command Prompt as an administrator, and copy/paste the first line from the screen resolution code file. Click “Enter”.
- Now, make sure you use your VM name and replace the resolution value in the second line of code according to your monitor resolution or personal preference. Then, copy/paste this line in Command Prompt. Hit “Enter” and exit CMD.
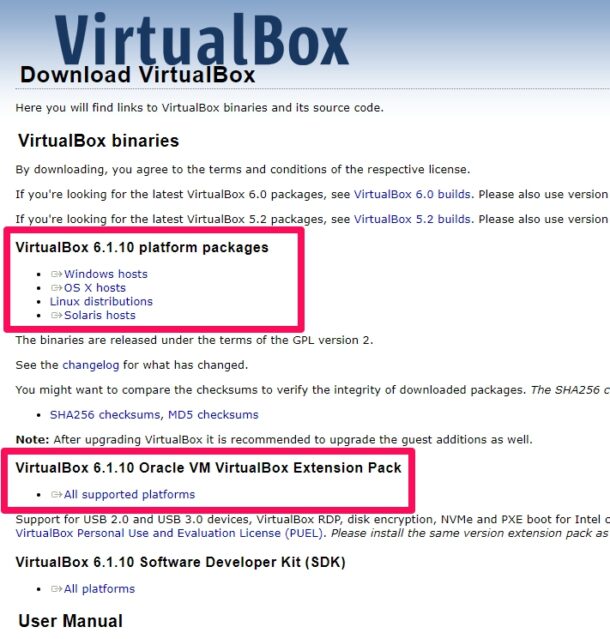
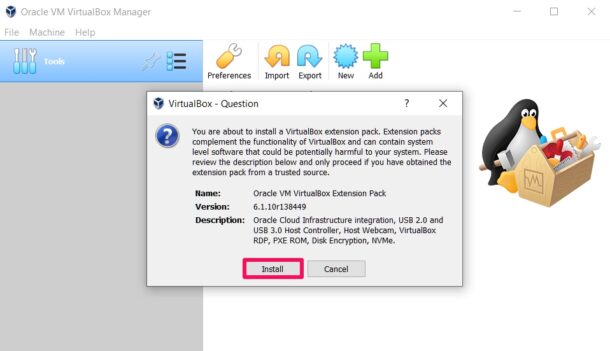
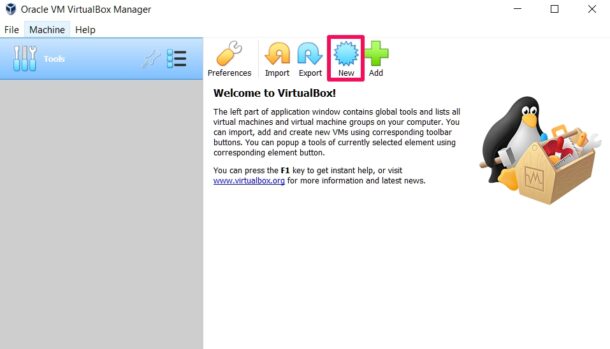
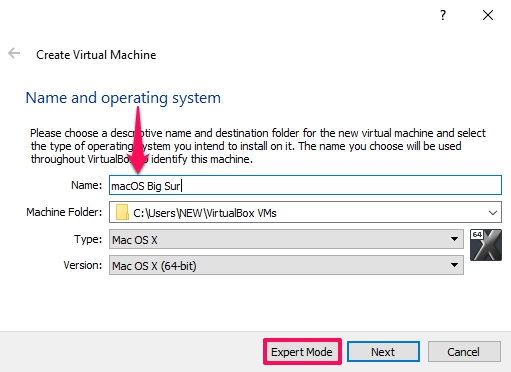
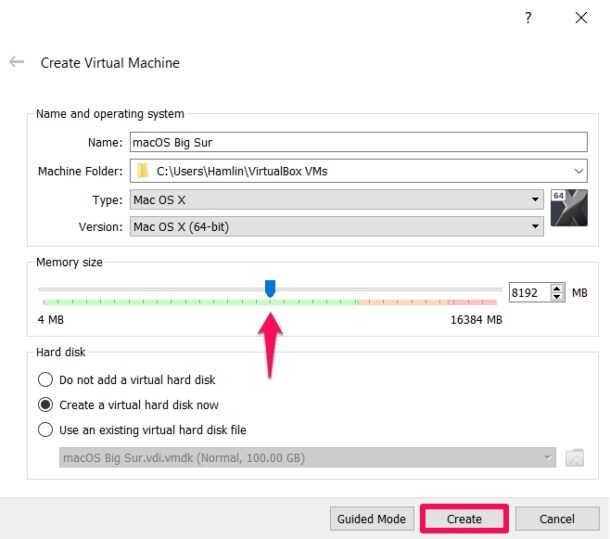
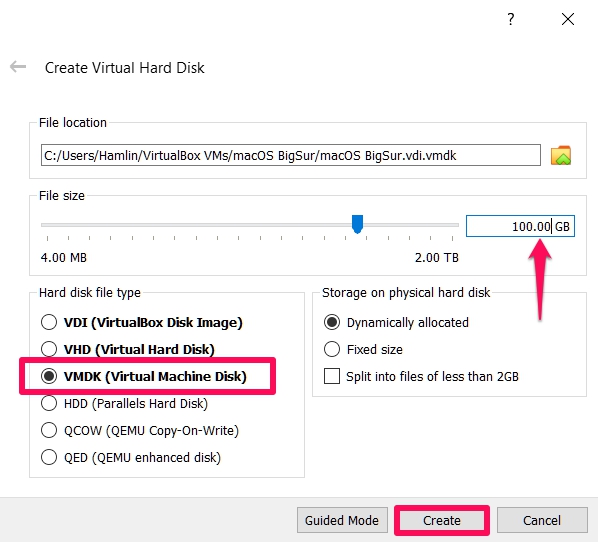
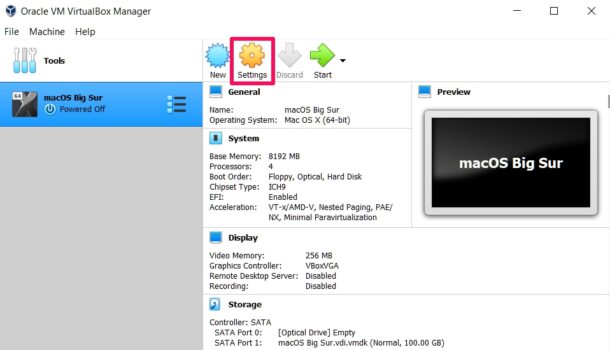
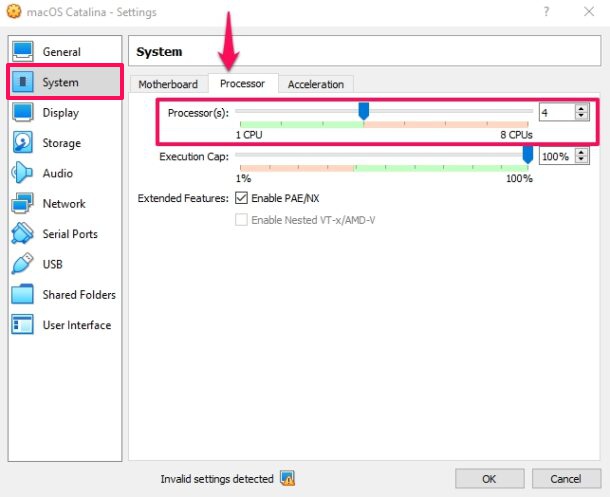
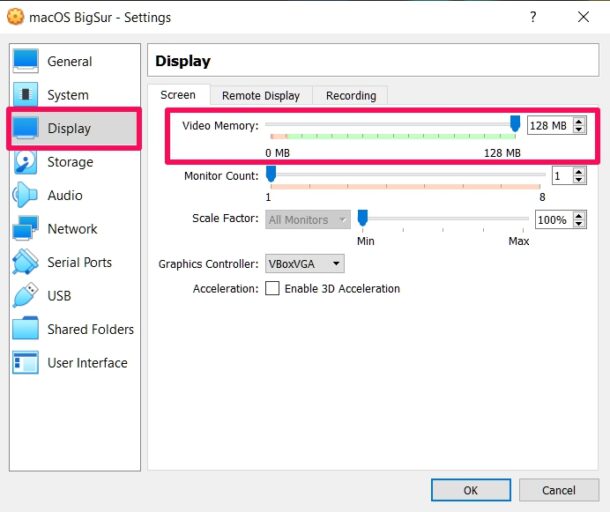
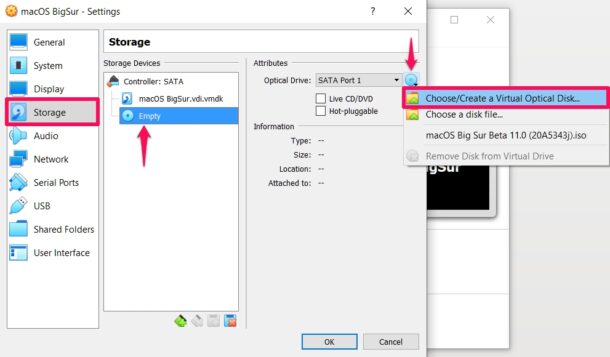
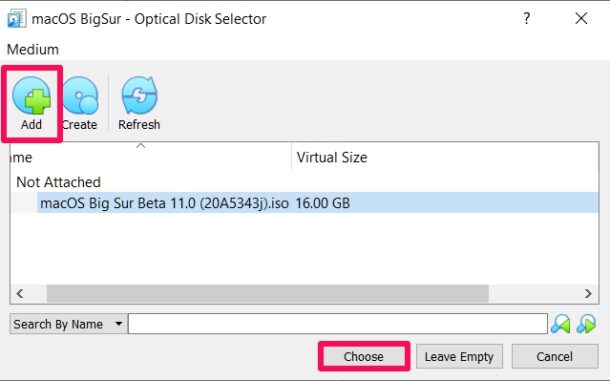
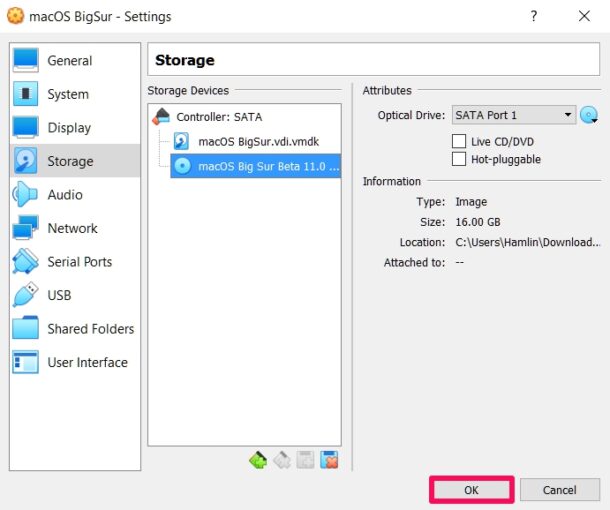
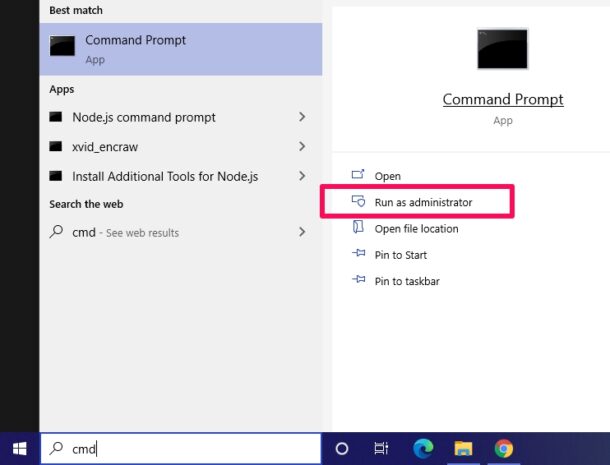


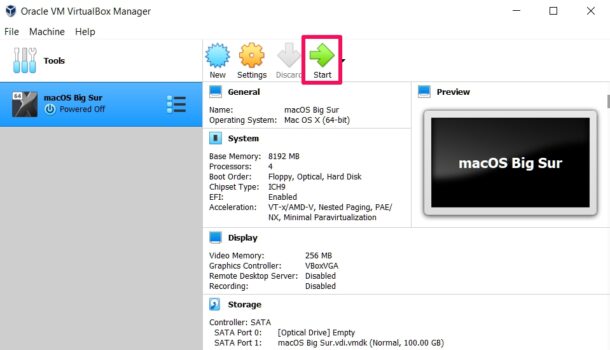
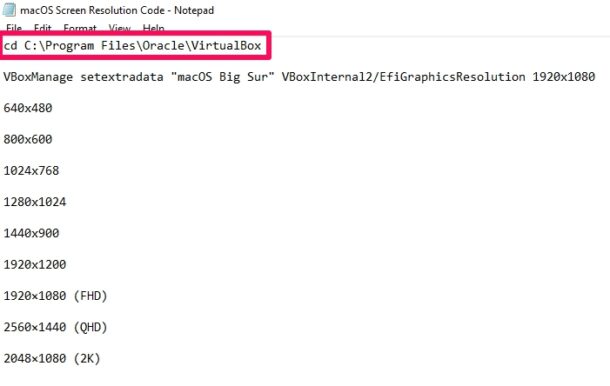
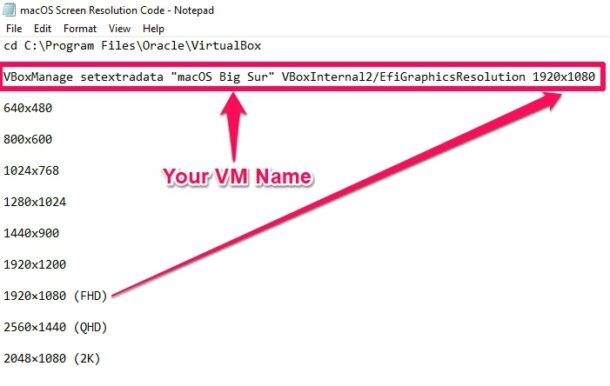
The next time you start your virtual machine, VirtualBox will load up macOS, and at a higher screen resolution.
Here’s a reality check. Don’t expect your macOS virtual machine to operate anywhere nearly as fast as an actual Mac, or Windows natively running on a computer. A sluggish experience is to be expected. The performance of the virtual machine will also be heavily dependent on your system hardware.
That being said, installing macOS on a Windows computer virtually is so much easier with software like VirtualBox and could come a long way in helping you decide if you want to switch to a Mac. You can connect your iOS devices to your Virtual Mac just like a real Mac, try out various software, apps, and a lot more.
This procedure primarily focuses on macOS Big Sur, but it works the same with other recent releases of macOS too, provided you have the ISO file for that particular version. If you want to update the macOS installed in your virtual machine to the latest software, you can update the system software just like you normally would on an actual Mac.
Likewise, VirtualBox can also be used to virtually install and run Windows on a Mac. The process is fairly similar if you have the required files, mainly the Windows ISO and VirtualBox.
Did you get macOS running in VirtualBox on Windows? What are your thoughts on this process and how it all works? Let us know your experiences and thoughts in the comments.
In this article, I will show you how to install macOS Big Sur on VirtualBox on Windows – VMDK. macOS Big Sur is the recent release of Apple in the year 2020. Alongside, macOS Big Sur is one of the advanced operating system which make your computer more beautiful with its interface look. The latest version of the macOS operating system is being inspired by the iOS 14. Now you can enjoy using iOS 14 Applications on macOS Big Sur which can give you a better experience of using Applications of iPhone and iPad on macOS Big Sur.
Since macOS Big Sur was in Beta we have created its ISO file for installing on Windows PC. On the other hand, and finally, Apple kicked out the final version of macOS Big Sur. In November 2020 Apple released the final version of macOS Big Sur, which includes lots of bug fixes and other critical issues.
Successfully Apple update the macOS Big Sur 11.0 to the latest version and that is 11.1. In macOS Big Sur 11.1 update Apple fixes a bunch of errors and other issues. More than that, its interface look is redesigned all the portion of macOS Big Sur is now completely fixed in the final update. If you are using macOS Big Sur 11.1 version then soon you will get the latest update notification of macOS Big Sur 11.2. Everyone can download and install macOS Big Sur on their MacBook, and that latest MacBook Pro & Air. On the other hand, if you own a Windows 10 PC then you can install macOS Big Sur on your PC as a guest OS.
However, while talking about guest OS it comes to the Virtualization platforms that access you to point to install macOS, Linux, Android OS, and Windows on the actual PC. Virtualization platforms give you the ability to install multiple operating systems on the physical PC. Installing the secondary operating system on the physical PC is having the same process. It means whenever you are installing macOS on your actual Mac or installing it on the Virtualization platform the both installations will have the same process.
Coming to Virtualization tools there are many Virtualization tools such as Hyper-V, VMware Workstation, VMware Player, and VirtualBox. We have tested all of them on Windows and macOS, but the best platforms come to VirtualBox and VMware. So, through this guide, you will learn how to install macOS Big Sur on Windows – VMDK.
This method might be new because you can’t find the ways of installing macOS Big Sur on VirtualBox on Windows using VMDK. As we have tested macOS Big Sur on VirtualBox on Windows PC using ISO file. You can find the installation process from the below downlink.
- How to Install macOS 11 Big Sur on VirtualBox on Windows PC
- How to Install macOS 11 Big Sur on VMware on Windows PC
Check the below link on how to install macOS Big Sur on VMware on Windows – VMDK.
- Install macOS Big Sur on VMware on Windows – VMDK
#Required Files:
As we have mentioned this point in our few articles, if you are installing macOS Big Sur on your Windows be sure that you have to follow the below down recommended settings.
- Enable the Virtualization option from the BIOS settings.
- Pre-installed Windows 10 64-Bit OS
- 16GB of RAM for installing macOS on VirtualBox on Windows.
- For installing macOS Big Sur on Windows you need at least 40GB of free space.
#Download macOS Big Sur VMDK File
For installing macOS Big Sur on Windows 10 PC using VMDK file, you need to download the macOS Big Sur VMDK file. We have created a macOS Big Sur VMDK file and uploaded it on Mediafire storage. And the macOS Big Sur is divided into several parts, each file is compressed with WinRAR. After the downloading, you need to extract its file using the WinRAR and 7Zip.
- Download macOS Big Sur VMDK
#Install VirtualBox on Windows
Once the VMDK file downloaded alongside you need to download and install the VirtualBox on your Windows PC.
- Head over to the VirtualBox official website and open it and download the latest version of VirtualBox for Windows host.
- When the VirtualBox setup file downloaded-go to the download folder, double-click on the setup to open. Once the installation wizard launched on the first screen press next.
- Click next on the first three pages
- Click yes when prompted
- Click Install
- Click Yes when prompted
- Click again on Install when prompted, click on install to allow the VirtualBox app on Windows.
- Once the installation successfully completed click Finish to close the window.
#Create macOS Big Sur Virtual Machine
Once the VirtualBox successfully installed on Windows, for installing macOS Big Sur on VirtualBox on Windows you need to create a new virtual machine. So, open up the VirtualBox to create a new virtual machine. On the welcome wizard of VirtualBox click on the New option.
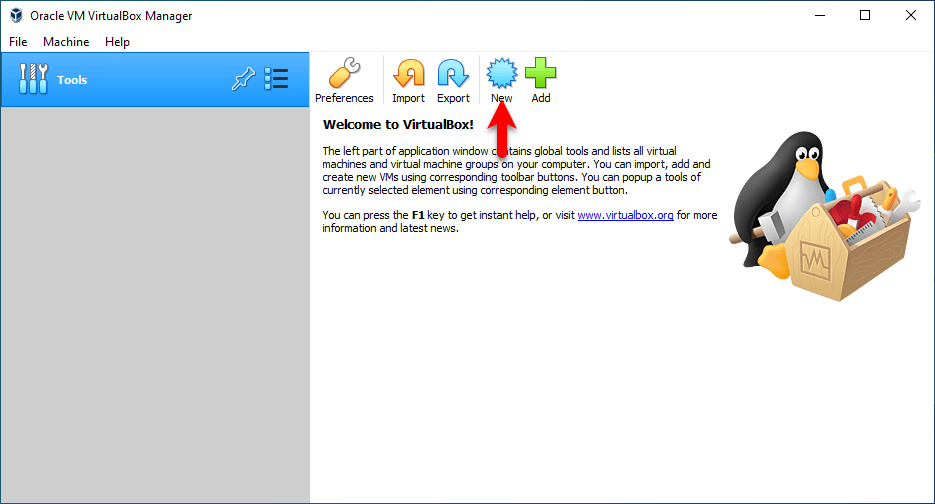
On the next window type the name macOS Big Sur, choose the machine folder, Type, Version then click Next. On the next window increase the Memory Size and click Next.
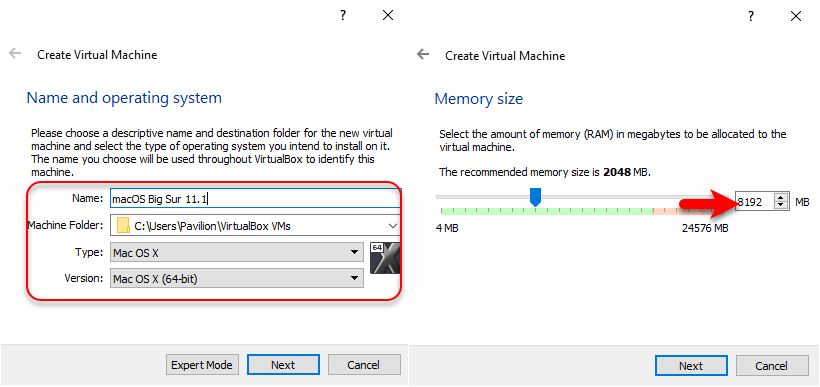
Now select the option “Use an existing virtual hard disk file” and click on the folder.

When this window opened click on the “Add” option.
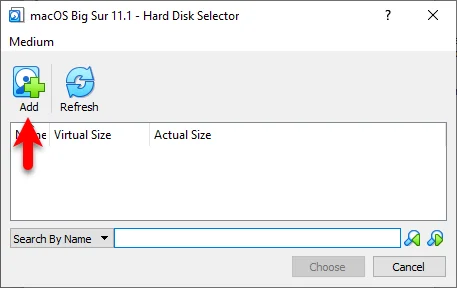
Now select the macOS Big Sur VMDK file and click open, once the VMDK file added click Choose.
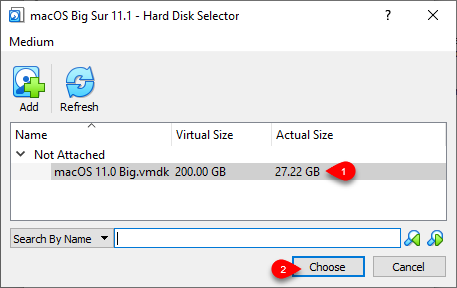
Here you can see the macOS Big Sur VMDK file added, so click on the Create option.
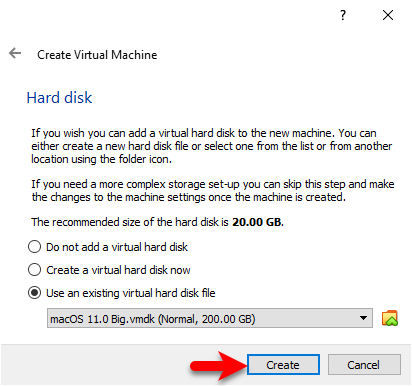
#Edit Virtual Machine Settings
For better performance of macOS Big Sur on VirtualBox on Windows, you need to configure some settings. On the virtual machine settings window, you can increase Memory Size, Processors. So, select the created virtual machine and click Settings.
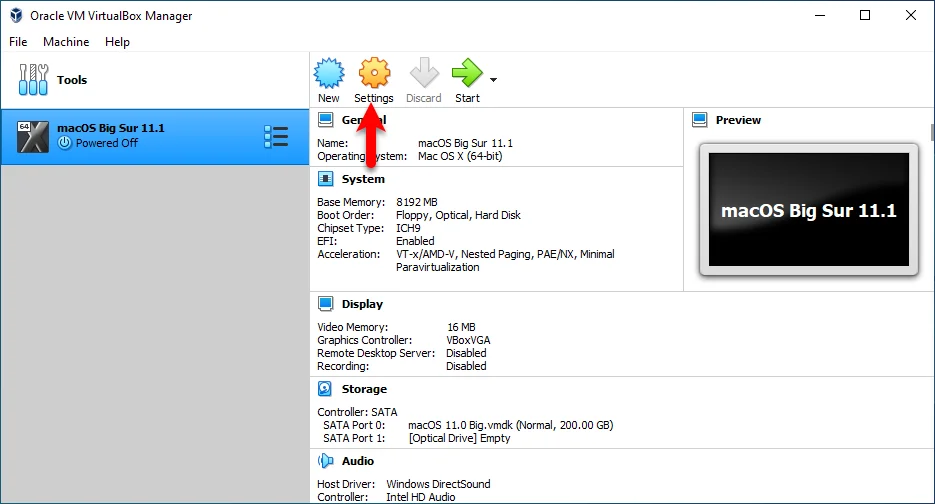
When the virtual machine settings window opened from the left-handed side select the “System” option. And on the system window select the “Motherboard” option and uncheck the Floppy disk. Select the “Processor” option and increase the processor’s number.
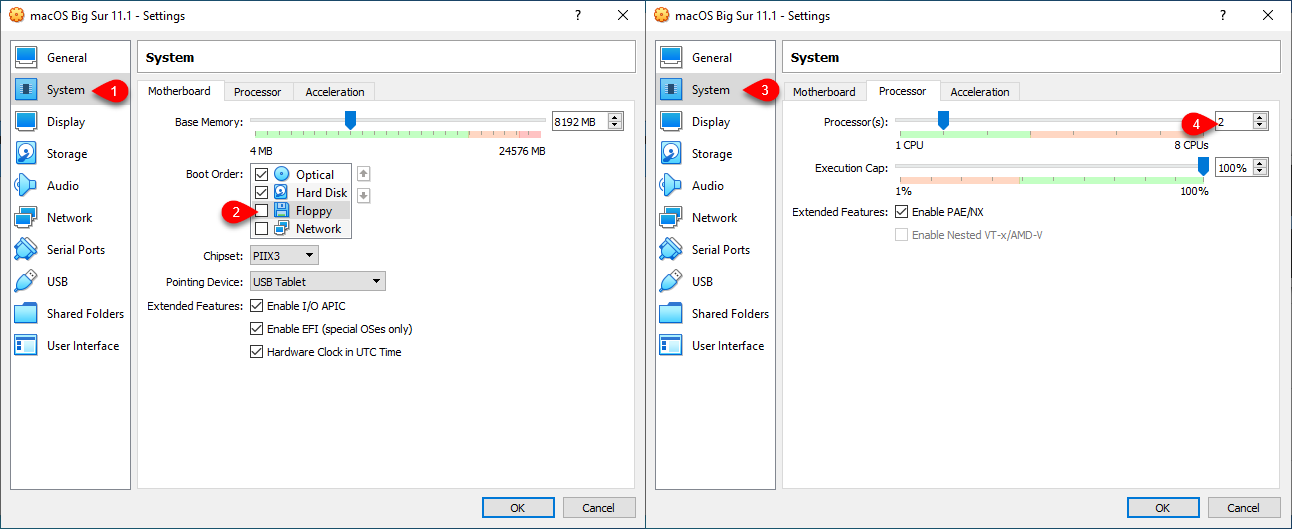
Select the “Display” option, and from the display window select the “Screen” option and increase the memory size up to 128MB. Select the USB option, then select the (USB 3.0 (xHCI) Controller) option. Once everything completed click OK to save changes.
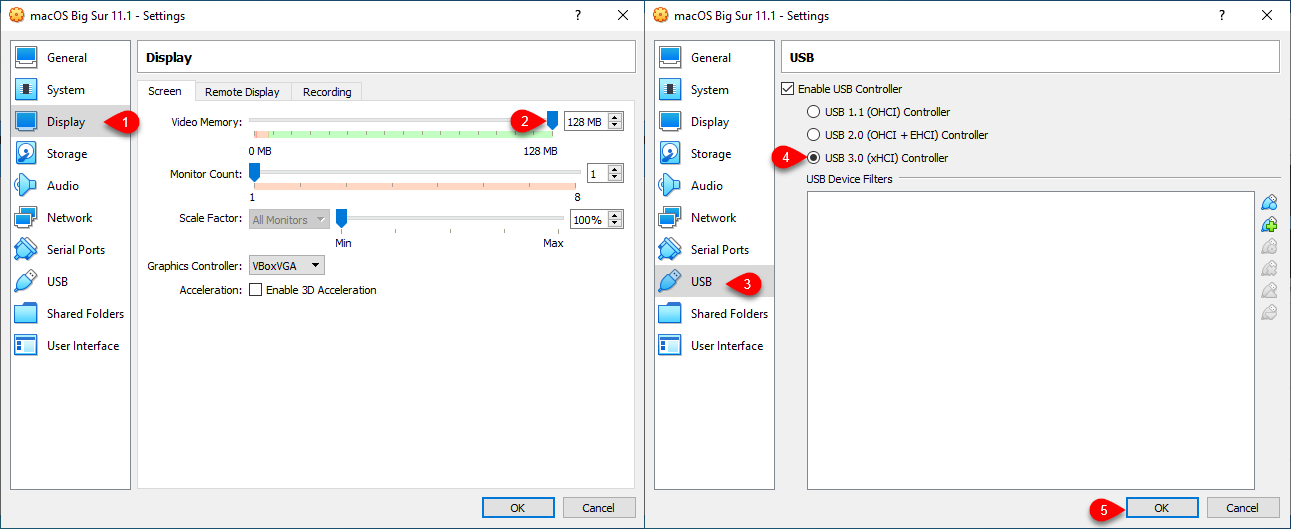
#Run VirtualBox codes to the Command Prompt
Once you have created a Virtual machine for macOS Big Sur and edited the settings. So, for configuring the macOS Big Sur on VirtualBox on Windows you need to add some codes into the command prompt. This command will able you to install the macOS Big Sur on Windows, without these codes you won’t be able to run macOS Big Sur on Windows on VirtualBox.
Before running the codes into the command prompt be sure to completely close the VirtualBox.

cd "C:Program FilesOracleVirtualBox"
VBoxManage.exe modifyvm "VM Name" --cpuidset 00000001 000106e5 00100800 0098e3fd bfebfbff
VBoxManage setextradata "VM Name" "VBoxInternal/Devices/efi/0/Config/DmiSystemProduct" "iMac19,1"
VBoxManage setextradata "VM Name" "VBoxInternal/Devices/efi/0/Config/DmiSystemVersion" "1.0"
VBoxManage setextradata "VM Name" "VBoxInternal/Devices/efi/0/Config/DmiBoardProduct" "Mac-AA95B1DDAB278B95"
VBoxManage setextradata "VM Name" "VBoxInternal/Devices/smc/0/Config/DeviceKey" "ourhardworkbythesewordsguardedpleasedontsteal(c)AppleComputerInc"
VBoxManage setextradata "VM Name" "VBoxInternal/Devices/smc/0/Config/GetKeyFromRealSMC" 1
Copy and paste the above commands into the Notepad window, then replace the “VM Name” with the name of macOS Big Sur virtual machine. For replacing all the VM Names on the commands click on Edit, In place of “Replace with” type the name of the virtual machine and click replace All.
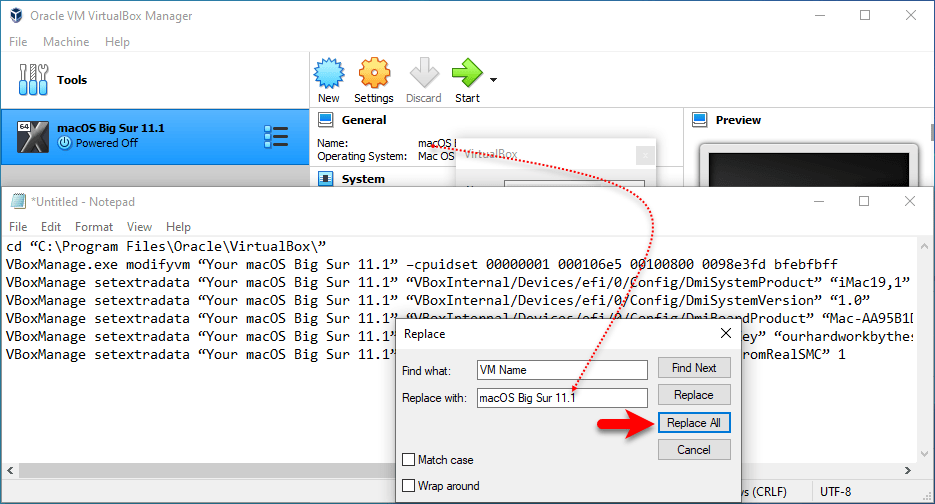
Now head over to the Windows start menu type CMD, once it appeared Run As Administrator.
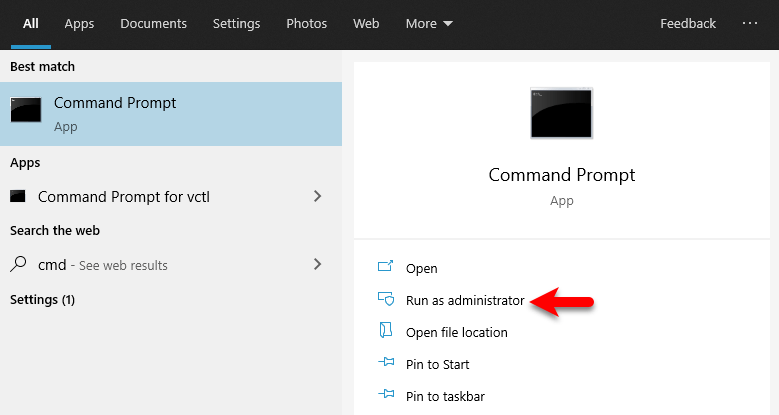
Copy the first line of command and paste it into the command prompt window, then select the rest of the commands copy it, and paste it into the command prompt, and press enter.

#Install macOS Big Sur
- When everything successfully completed open up the VirtualBox then select the created macOS Big Sur Virtual machine and click on the Start button.
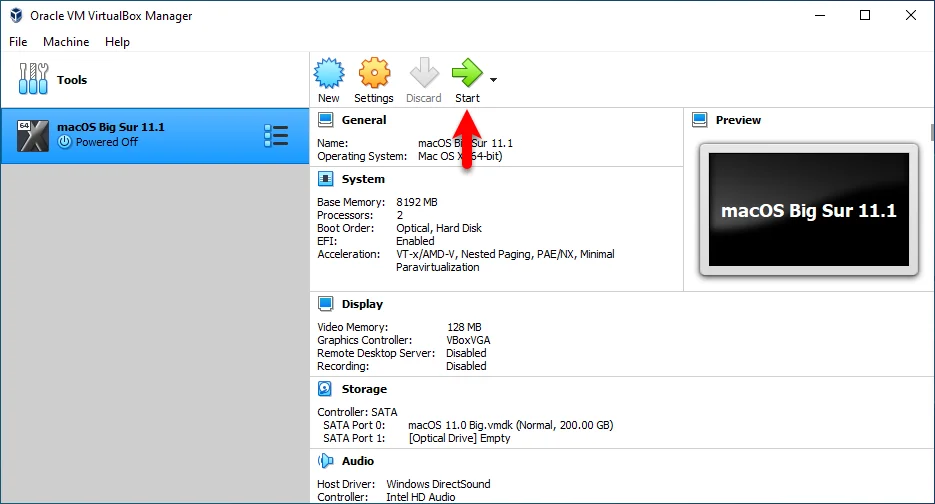
- When everything gets ready for a clean installation of macOS Big Sur open up the VMware Workstation. From the list select macOS Big Sur virtual machine and click Power on this virtual machine.
- Once the installation launched wait for the Apple logo
- Wait until the installation should be completed, once the installation successfully completed the virtual machine will restart automatically.
- When the virtual machine restarted at the first welcome screen select your country and click continue.
- Select your written and spoken language and click continue.
- On the Data & Privacy click continue.
- Select “Don’t transfer any information right now” and click continue.
- Click Sign up later and click Skip.
- Agree with the terms and conditions of macOS Big Sur.
- Create your computer account and click continue.
- On the express setup simply click continue.
- On the Analytics click continue
- And on the Screen time again click continue.
- Select your theme for macOS Big Sur.
- Wait until it should set up the macOS Big Sur for the first use.
- And finally, macOS Big Sur successfully installed on VMware.
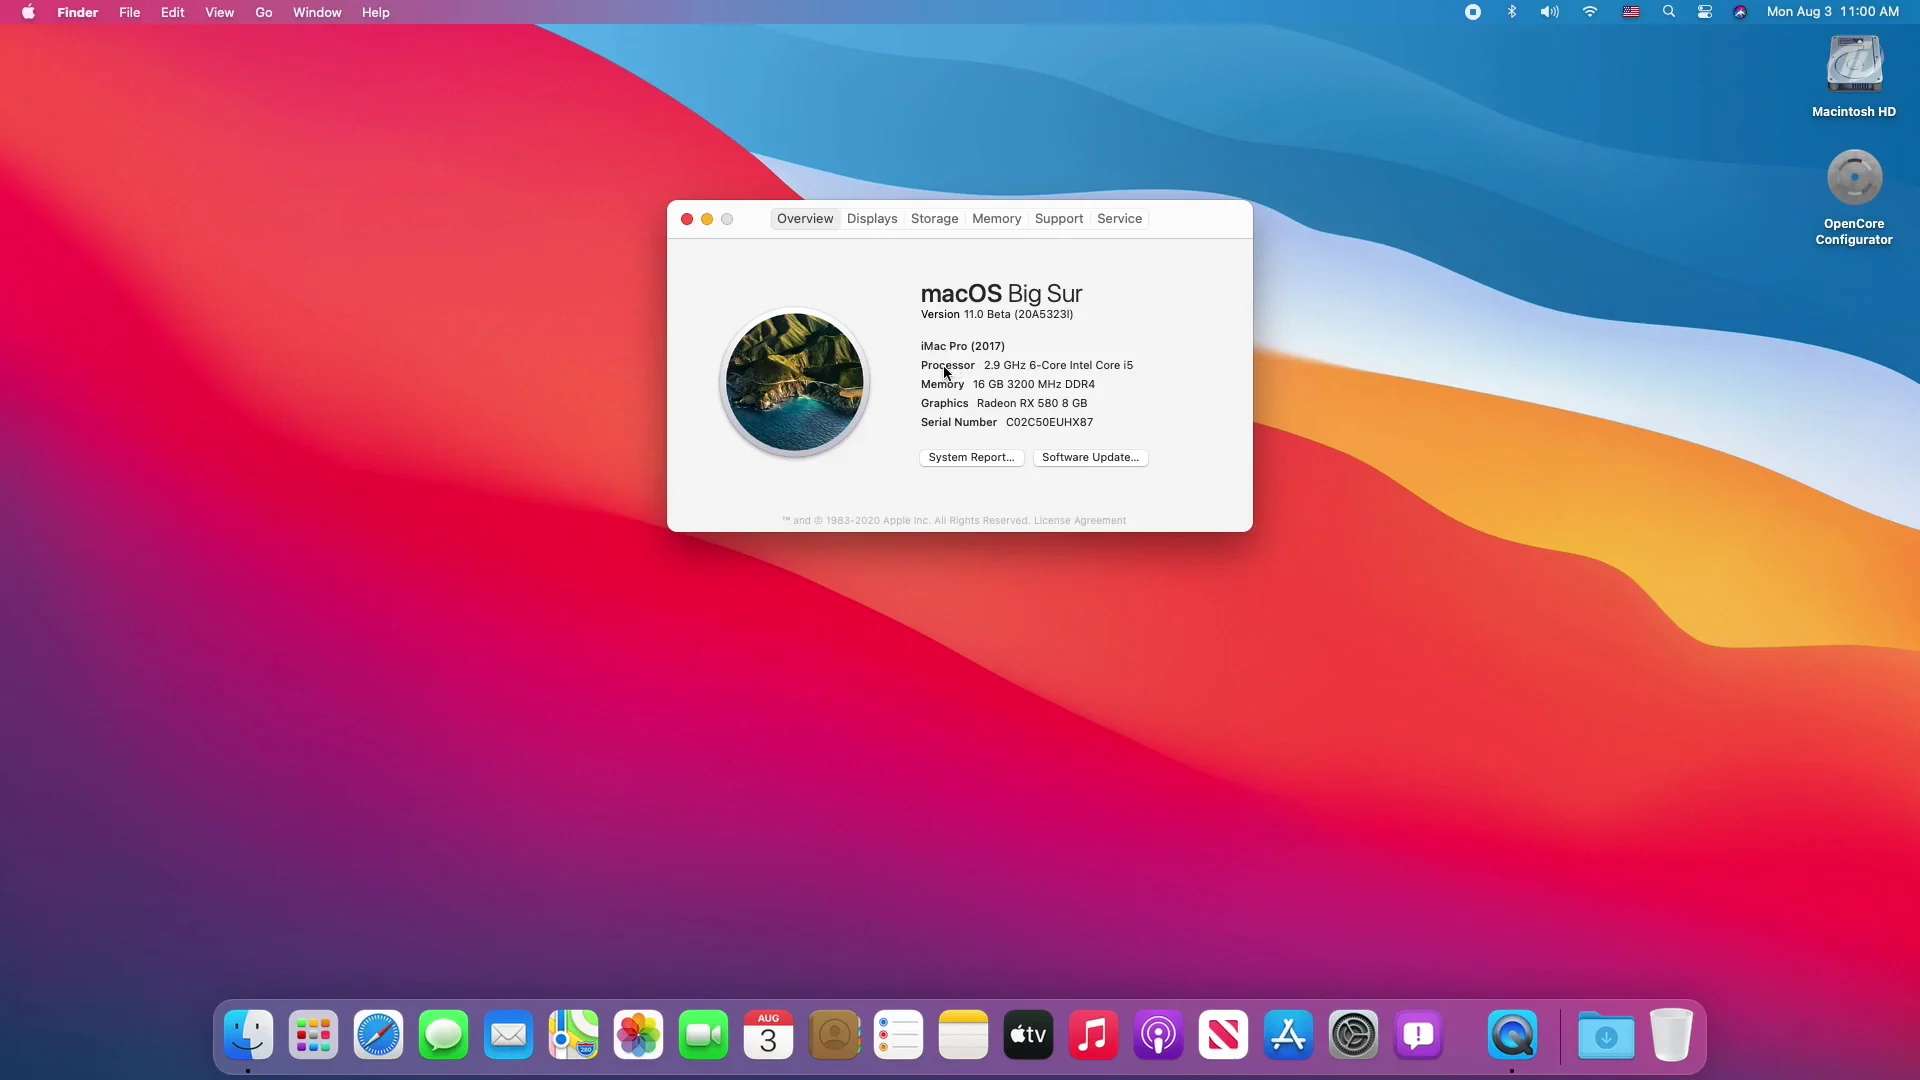
If you faced any kind of problem feel free to share with us via the comment section.
The name (macOS Big Sur) of the Mac is based on a popular coastline in central California, south of the San Francisco Bay Area. This version will probably be numerically called MacOS 11. In terms of appearance, it brings a relatively new design and new style to the Mac. And now we’re seeing more and more of Mac’s design language approach to the iPhone and iPad software platforms.
The most important aspect of the changes to Mac’s new software platform is the changes in its user interface in terms of appearance. Now the interface elements have higher transparency, more curvature in the corners, more space to display content instead of boring menus and settings, and it can be said that its appearance is exactly the same as the features of iOS 14 iPadOS 14.
The brightness of the Mac’s interface elements in the macOS Big Sur is brighter than ever. And of course for those who aren’t too fond of this white, the use of Dark Mode will be available. With the addition of widget support, shared symbols, new center control, automatic notifications, and, of course, the rounding of app icons (which have also been redesigned) are now more than ever synchronized between Apple’s various software platforms.
Install macOS Big Sur on VirtualBox on Windows
Step 1. Download the Required Files
1- VirtualBox: The very main important software is the virtualization software which you should download first. Many users, specially IT nerds and computer geeks, uses VirtualBox, because it is open source.
2- VirtualBox Extension Pack: Oracle has created this small piece of script to solve issues with USBs. In fact if you read the mano, it is not just for USB, it made for other reasons too. But we are using the VirtualBox Extension pack, in order to avoid error like mouse is stuck.
3- macOS Big Sur ISO File: Within the recent WWDC 2020 event, apple moved from the macOS 10.15 to macOS 11. You can say, that macOS Big Sur is the new era of operating system for Apple devices. Seems like Apple has followed Microsoft path of one core. The new design of macOS Big Sur is similar to iOS 14, the messages, notifcation, curve design, emojis and more.
Step 2. Install the required software
Once you left the first step, start the second step by installing the VirtualBox. Double on the setup to start the installation, You can install it yourself.
It is time to install the VirtualBox extension pack, either you can double on the setup, or import it on the VirtualBox. Agree to the terms and conditions and choose install, that’s all.
Step 3. Create a new Virtual machine
Create the New VM by choosing New on general window of VirtualBox, then on the next window, choose expert mode.
Expert mode is the window where you have to enter, name of your virtual machine, choose the location to save, macOS type and version. For the second part choose the memory size and create a New Virtual Hard Disk.
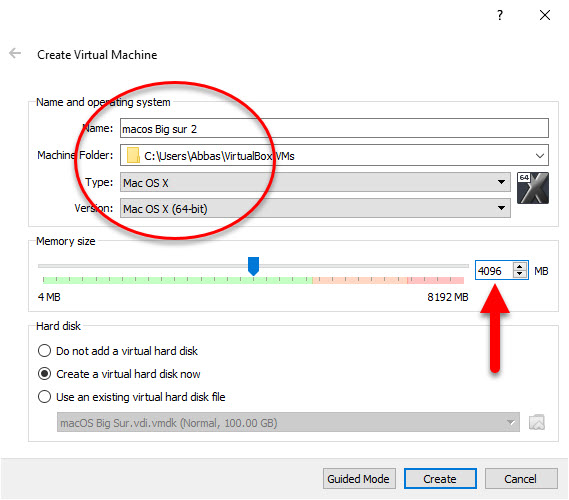
For the next step, choose the location to save to the VM and do not forget to specify the amount of storage for the VM. Leave the other settings as default.
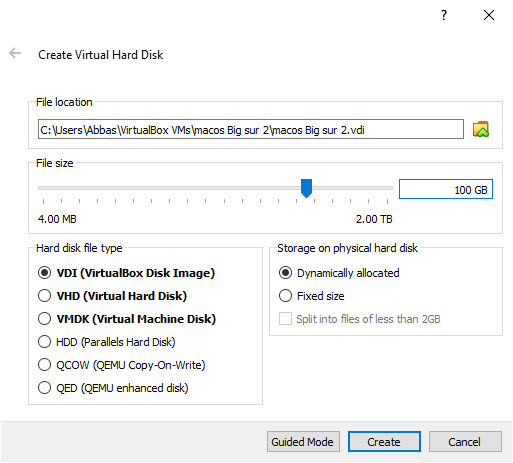
Step 4. Configure VM Settings
For my PC, these settings are optional, it is working totally fine except the floppy. But you have to try if it is working without these settings below or no.
The moment the Virtual machine is created, you will be on general window of VirtualBox. Choose the VM and click on the settings to bring change to the Virtual hardware of the VM.
uncheck floppy from system panel and leave the other settings as the below screenshot. Basically they are the default settings, just don’t touch anything.
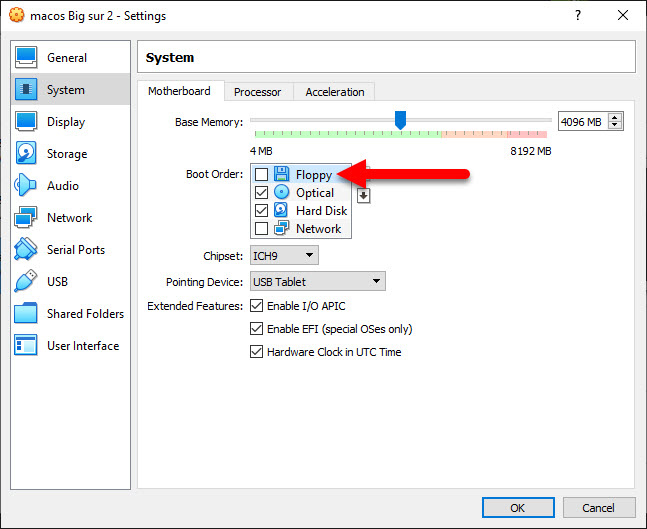
Move to processor tab, and add plus one the number of processor, which becomes two.
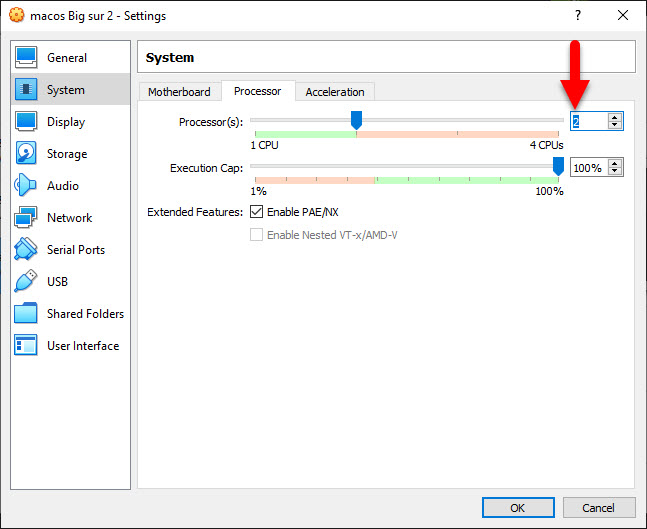
This is very important, go to the storage panel, choose empty and attach the macOS Big Sur ISO.
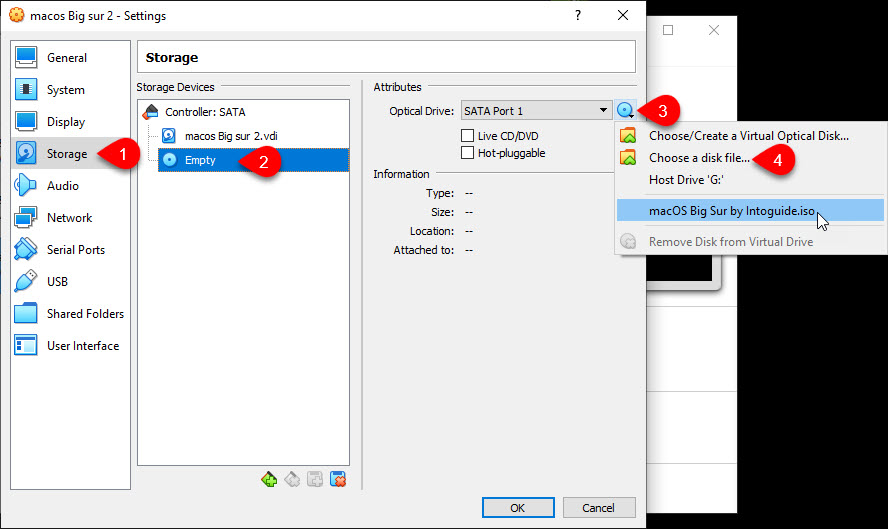
And finally, enable the USB 3.0.
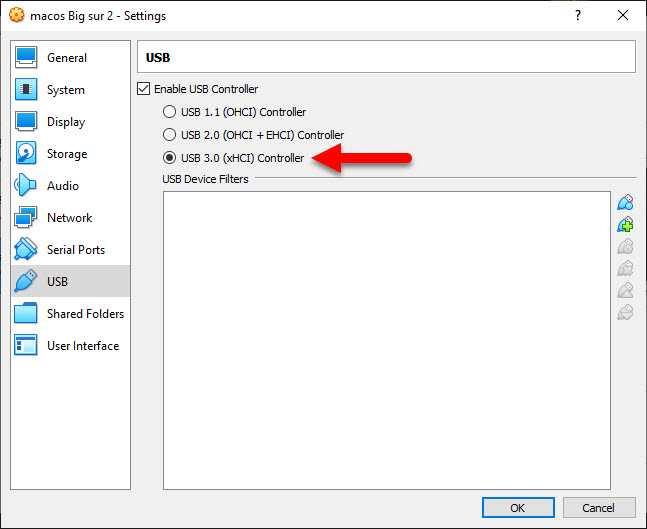
Apply the changes, and go to file menu and exit VirtualBox (Don’t close it from the X key, because it will be running in the backgroun.)
Copy these codes and paste them inside the Notepad, then replace the “Virtual machine name” with the name of the your VM. For better understanding look at the picture below the codes.
cd "C:Program FilesOracleVirtualBox"
VBoxManage.exe modifyvm “Virtual Machine Name” –-cpuidset 00000001 000106e5 00100800 0098e3fd bfebfbff
VBoxManage setextradata "Virtual Machine Name" VBoxInternal/Devices/efi/0/Config/DmiSystemProduct “MacBookPro15,1”
VBoxManage setextradata "Virtual Machine Name" "VBoxInternal/Devices/efi/0/Config/DmiBoardProduct" "Mac-551B86E5744E2388"
VBoxManage setextradata "Virtual Machine Name" "VBoxInternal/Devices/smc/0/Config/DeviceKey" "ourhardworkbythesewordsguardedpleasedontsteal(c)AppleComputerInc"
VBoxManage setextradata "Virtual Machine Name" "VBoxInternal/Devices/smc/0/Config/GetKeyFromRealSMC" 1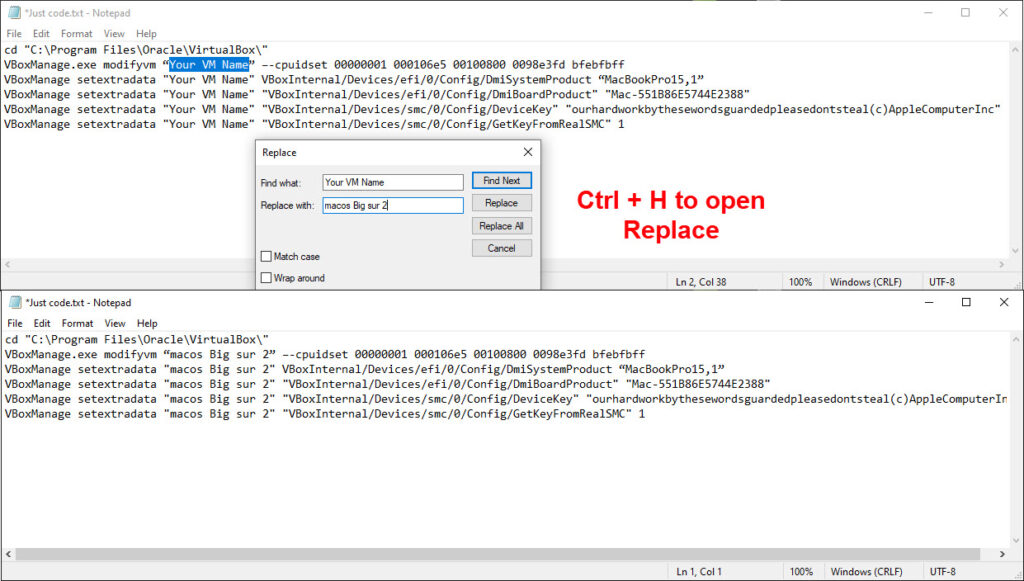
Open Command Prompt ad Administrator and apply all the codes line by line.
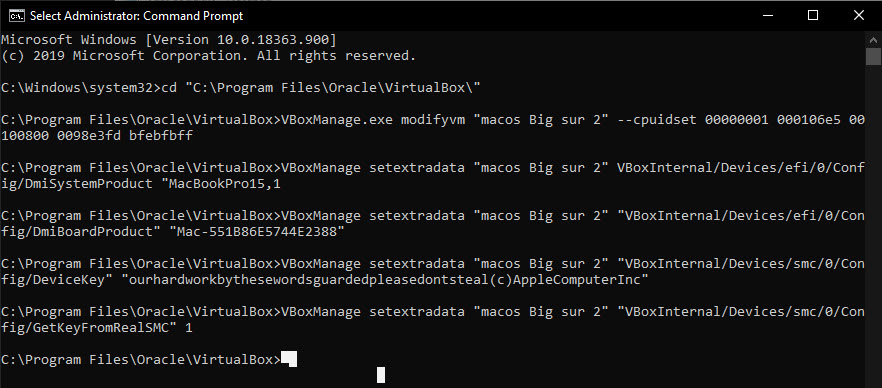
Step 5. Install macOS Big Sur on VirtualBox
You are certainly done with the settings of the Virtual machine, go on and play the virtual machine. A lot of code will appear, just don’t do anything, wait until you reach the language window. Choose your language, then you will be on the utility window.
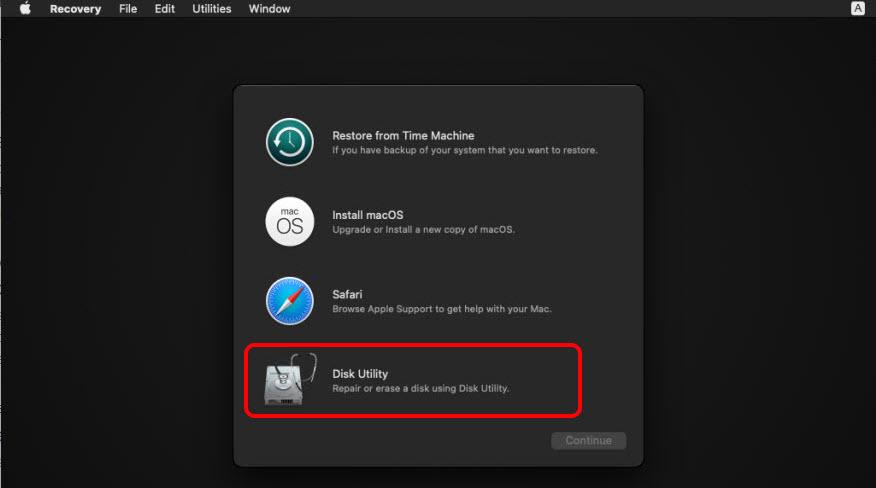
The very thing you have to do, is to partition the Hard Disk to Apple file system. To do that Choose Disk Utility and erase the Hard Disk with APFS or macOS Extended Journaled (Both will do fine).
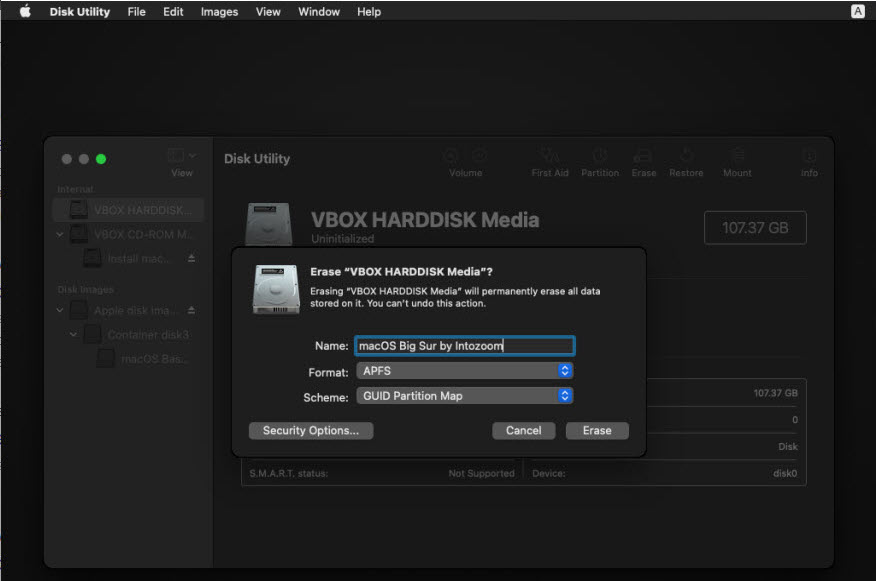
Close the Disk utility window, if you are done, now choose install macOS.
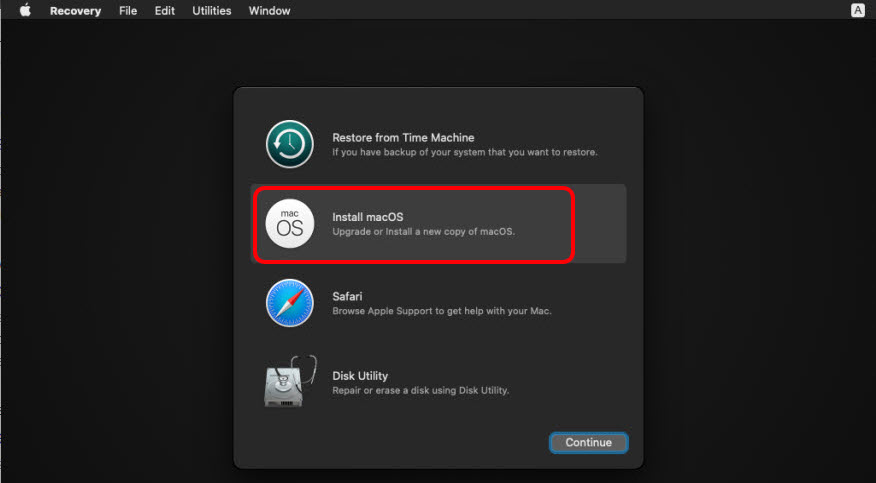
Click Contiune and agree to the terms and conditions, then choose the hard disk to install macOS Big Sur.
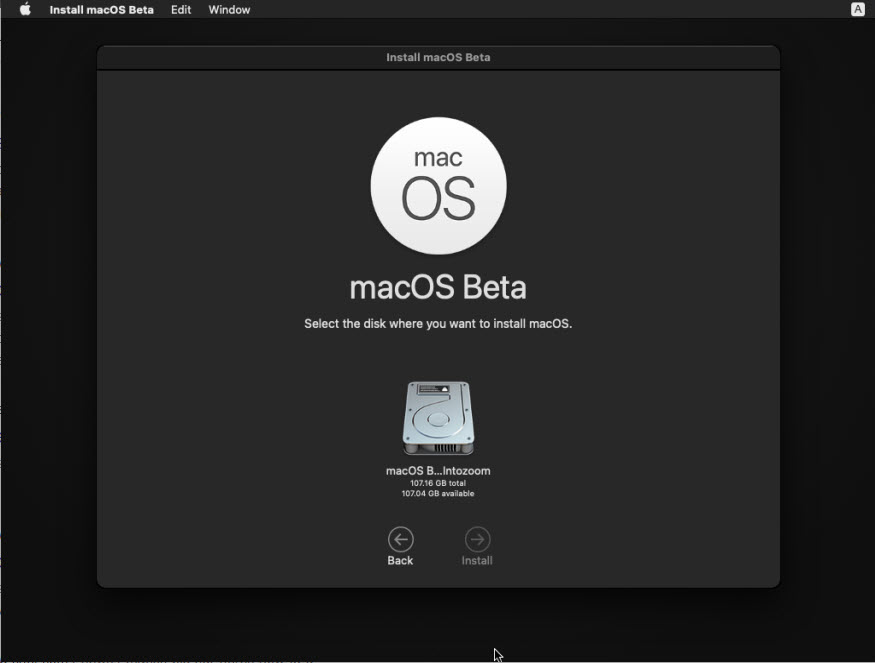
Wait until the VM restarts, and wait until the apple logo is gone. Once they are gone you will have to setup your Virtual machine mac.
The settings you will setup are listed below.
- Choose a language for your macOS Big Sur.
- Written and spoken settings.
- Accessibility functionalities.
- Agree to the data and privacy.
- Sign in with Apple ID or without and Apple ID.
- Again agree to the terms and conditions.
- Create a computer account.
- express setup, Analytics, and Screen Time.
- Enable Siri if you want.
- And finally, choose a theme.