MSI packages are available for both x86 (32 bit) and x64 (64 bit) processor
architectures. We’ll use screenshots from an x64 installation below (the 32 bit
installer is very similar).
Contents
- Installation UI
- Welcome
- License Agreement
- Custom Setup
- Database Authentication/Security Related Properties
- Other Database Properties
- Ready to Install
- End
- New Entries in Start Menu
- Uninstall UI
- Silent Installation
- Properties
- Features
- Silent Installation Examples
- Silent Uninstall
- Installation Logs
- Running 32 and 64 Bit Distributions on the Same Machine
Installation UI
This is the typical mode of installation. To start the installer, just click on
the mariadb-<major>.<minor>.<patch>.msi
Welcome

License Agreement
Click on «I accept the terms»
Custom Setup
Here, you can choose what features to install. By default, all features are
installed with the exception of the debug symbols. If the «Database instance»
feature is selected, the installer will create a database instance, by default
running as a service. In this case the installer will present additional
dialogs to control various database properties. Note that you do not
necessarily have to create an instance at this stage. For example, if you
already have MySQL or MariaDB databases running as services, you can just
upgrade them during the installation. Also, you can create additional database
instances after the installation, with the mysql_install_db.exe utility.
NOTE: By default, if you install a database instance, the data directory
will be in the «data» folder under the installation root. To change the data
directory location, select «Database instance» in the feature tree, and use the
«Browse» button to point to another place.
This dialog is shown if you selected the «Database instance» feature. Here, you
can set the password for the «root» database user and specify whether root can
access database from remote machines. The «Create anonymous account» setting
allows for anonymous (non-authenticated) users. It is off by default and it is
not recommended to change this setting.
Other Database Properties
- Install as service
- Defines whether the database should be run as a service. If it should be run as a service, then it also defines the service name. It is recommended to run your database instance as a service as it greatly
simplifies database management. In MariaDB 10.4 and later, the default service name used by the MSI installer is «MariaDB». In 10.3 and before, the default service name used by the MSI installer is «MySQL». Note that the default service name for the--installand--install-manualoptions formysqld.exeis «MySQL» in all versions of MariaDB.
- Enable Networking
- Whether to enable TCP/IP (recommended) and which port MariaDB should
listen to. If security is a concern, you can change the bind-address
parameter post-installation to bind to only local addresses. If the «Enable
networking» checkbox is deselected, the database will use named pipes for
communication.
- Optimize for Transactions
- If this checkbox is selected, the default storage engine is set to Innodb
(or XtraDB) and thesql_modeparameter is set to
«NO_ENGINE_SUBSTITUTION,STRICT_TRANS_TABLES«. You can also define the
Innodb/Xtradb buffer pool size. The default buffer pool size is 12.5% of RAM
and depending on your requirements you can give innodb more (up to 70-80% RAM).
32 bit versions of MariaDB have restrictions on maximum buffer pool size, which
is approximately 1GB, due to virtual address space limitations for 32bit
processes.
Ready to Install
At this point, all installation settings are collected. Click on the «Install»
button.
End
Installation is finished now. If you have upgradable instances of
MariaDB/MySQL, running as services, this dialog will present a «Do you want to
upgrade existing instances» checkbox (if selected, it launches the Upgrade
Wizard post-installation).
If you installed a database instance as service, the service will be running
already.
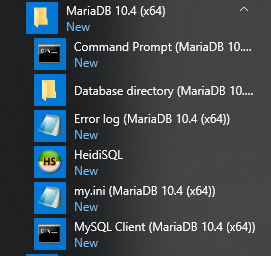
Installation will add some entries in the Start Menu:
- MariaDB Client — Starts command line client mysql.exe
- Command Prompt — Starts a command prompt. Environment is set such that «bin»
directory of the installation is included into PATH environment variable, i.e
you can use this command prompt to issue MariaDB commands (mysqldadmin, mysql
etc…)
- Database directory — Opens the data directory in Explorer.
- Error log — Opens the database error log in Notepad.
- my.ini — Opens the database configuration file my.ini in Notepad.
- Upgrade Wizard — Starts the Wizard to upgrade an existing MariaDB/MySQL
database instance to this MariaDB version.
Uninstall UI
In the Explorer applet «Programs and Features» (or «Add/Remove programs» on
older Windows), find the entry for MariaDB, choose Uninstall/Change and click
on the «Remove» button in the dialog below.
If you installed a database instance, you will need to decide if you want to
remove or keep the data in the database directory.
Silent Installation
The MSI installer supports silent installations as well. In its simplest form
silent installation with all defaults can be performed from an elevated command
prompt like this:
msiexec /i path-to-package.msi /qn
Note: the installation is silent due to msiexe.exe’s /qn switch (no user
interface), if you omit the switch, the installation will have the full UI.
Properties
Silent installations also support installation properties (a property would
correspond for example to checked/unchecked state of a checkbox in the UI, user
password, etc). With properties the command line to install the MSI package
would look like this:
msiexec /i path-to-package.msi [PROPERTY_1=VALUE_1 ... PROPERTY_N=VALUE_N] /qn
The MSI installer package requires property names to be all capitals and contain
only English letters. By convention, for a boolean property, an empty value
means «false» and a non-empty is «true».
MariaDB installation supports the following properties:
Features
Feature is a Windows installer term for a unit of installation. Features
can be selected and deselected in the UI in the feature tree in the «Custom
Setup» dialog.
Silent installation supports adding features with the special property
ADDLOCAL=Feature_1,..,Feature_N and removing features with
REMOVE=Feature_1,..., Feature_N
Features in the MariaDB installer:
Silent Installation Examples
All examples here require running as administrator (and elevated command line
in Vista and later)
- Install default features, database instance as service, non-default datadir
and portmsiexec /i path-to-package.msi SERVICENAME=MySQL DATADIR=C:mariadb5.2data PORT=3307 /qn
- Install service, add debug symbols, do not add development components (client
libraries and headers)msiexec /i path-to-package.msi SERVICENAME=MySQL ADDLOCAL=DEBUGSYMBOLS REMOVE=DEVEL /qn
Silent Uninstall
To uninstall silently, use the REMOVE=ALL property with msiexec:
msiexec /i path-to-package.msi REMOVE=ALL /qn
To keep the data directory during an uninstall, you will need to pass an
additional parameter:
msiexec /i path-to-package.msi REMOVE=ALL CLEANUPDATA="" /qn
Installation Logs
If you encounter a bug in the installer, the installer logs should be used for
diagnosis. Please attach verbose logs to the bug reports you create. To create a verbose
installer log, start the installer from the command line with the /l*v
switch, like so:
msiexec.exe /i path-to-package.msi /l*v path-to-logfile.txt
Running 32 and 64 Bit Distributions on the Same Machine
It is possible to install 32 and 64 bit packages on the same Windows x64.
Apart from testing, an example where this feature can be useful is a
development scenario, where users want to run a 64 bit server and develop both
32 and 64 bit client components. In this case the full 64 bit package can be
installed, including a database instance plus development-related features
(headers and libraries) from the 32 bit package.
Summary: in this tutorial, you will learn step by step how to download and install MariaDB on your system.
Download MariaDB
To download MariaDB, you go to the download page and select the latest version to download:
Download MariaDB
To install MariaDB on Windows, you follow these steps:
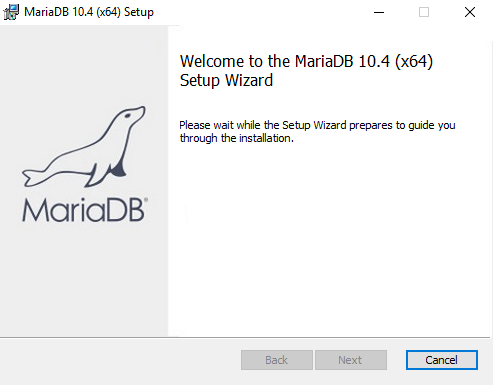
Step 1. Start installation
Double-click the installer to start the installation process.
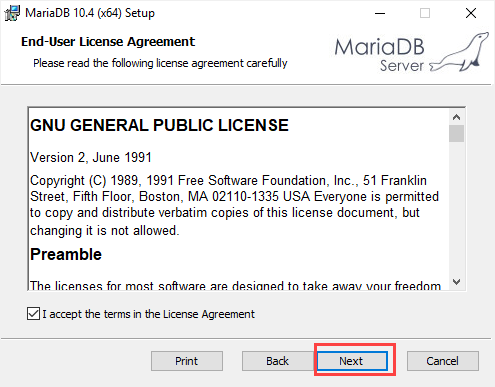
Step 2. Accept the end-user license agreement
Read the end-user license agreement and click the Next button:
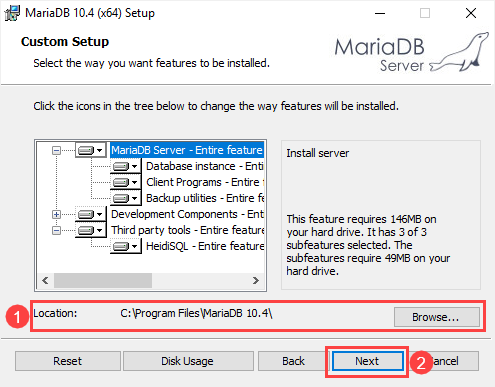
Step 3. Select features
Choose the directory that stores the MariaDB files and click the Next button. The default location on Windows is C:Program FilesMariaDB 10.4.
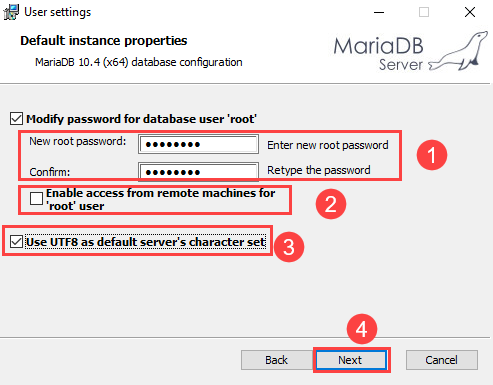
Step 4. Set root’s password
Type a password for the root user account. You will use this password to connect to MariaDB later. The root user is the default user of the MariaDB, which has all privileges.
If you don’t want the root user to login from a remote machine, you need to uncheck the Enable access from remote machines for 'root' user checkbox.
The Use UTF8 as the default server's character set option allows you to use the UTF8 as the default character set when you create new databases and tables.
Once you complete selecting all options, click the Next button to go to the next step.
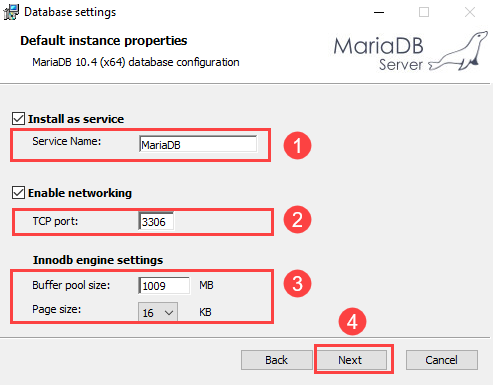
Step 5. Configure Database
In this step:
First, install MariaDB as a service by selecting the Install as service option. It allows you to rename the service name.
Second, configure the port for the MariaDB. By default, MariaDB uses 3306 port. However, you can change it to your port if you want.
Third, specify the parameters for the Innodb engine including buffer pool size and page size. 16KB page size is suitable for most databases.
Finally, click the Next button to go to the next step.
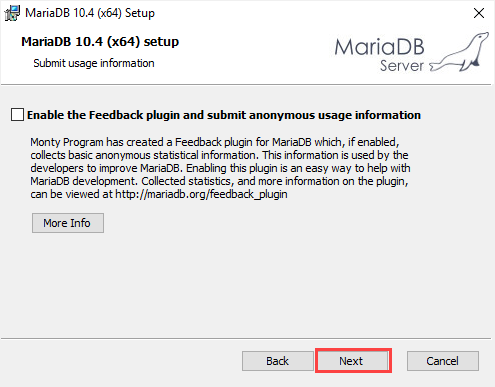
Step 6. Submit usage information
If you want to submit anonymous usage information so that MariaDB developers can improve the system, check the checkbox and click the Next button.
Step 7. Ready to install MariaDB
Click the Install button to start installing MariaDB
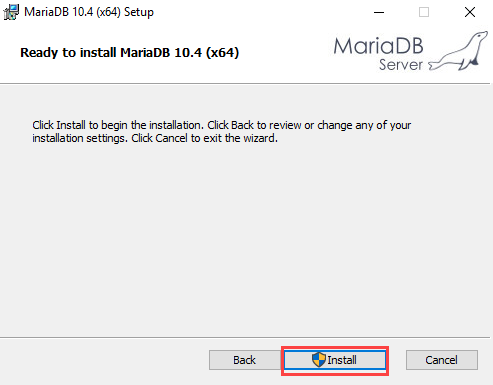
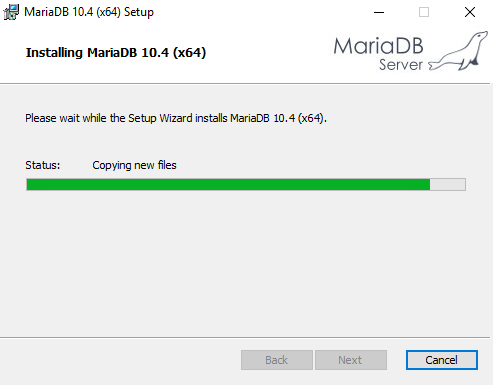
It will take a few minutes depending on the system.
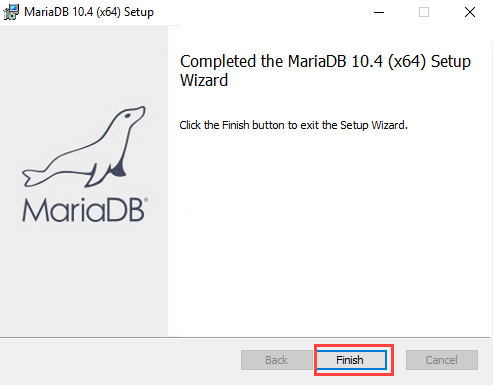
Step 8. Complete the MariaDB setup
Click the Finish button to complete MariaDB setup
You can find the MariaDB tools in the startup menu:
In this tutorial, you have learned step by step how to install MariaDB on Windows.
Was this tutorial helpful ?
In this MariaDB tutorial, we will learn, how to install MariaDB in windows, Linux, and Ubuntu. Also, we will see how to uninstall MariaDB step by step on different Operating Systems like Windows, Linus, Ubuntu, etc.
Additionally, we will cover the following topics
- Downloading MariaDB
- MariaDB Installation and Configuration on Windows
- MariaDB installation on Linux step by step
- MariaDB installation in Ubuntu
- Uninstall MariaDB from Windows
- Uninstall MariaDB from Linux
- Uninstall MariaDB from Ubuntu
- MariaDB Installation error setup wizard ended prematurely error
Downloading MariaDB
To download MariaDB, go to the official page and select the latest version to download: Download MariaDB
The MariaDB software is managed by the MariaDB Foundation whose headquarters is in Finland and the United States Of America.
MariaDB Installation and Configuration on Windows
Let us see step by step how to start the installation of MariaDB in Windows operating system.
To start the installation of MariaDB on Windows, you need to follow these steps:
Step 1 – Double-click on the installer to start the installation process.

Step 2 – Accept the End-User Agreement and click the Next button.

Step 3 – Select the way we want to start the installation of the features and choose the directory that stores the MariaDB files and click on the Next button. The default location on windows is C:Program Files MariaDB 10.6

Step 4 – Create a password for the Root user account. You will later use this password to access MariaDB Server. The root user is the default user which has all the privileges
If you don’t want the root user to log in from remote machines, uncheck the Enable access from remote machines for 'root' user
The Use UTF8 as default server's character set the option allows us for using the UTF8 character set while creating new databases and tables.
Once you select all the options, click on the Next button to go to the next step.

Step 5 – In this step:
Firstly, install MariaDB as a service by clicking on Install as service and it will allow you to change the name of the service.
Secondly, you need to configure the port for the MariaDB. By default, it uses 3306 but you can change the port if you want.
Thirdly, specify the parameters InnoDB engine including Buffer pool size and Page size. 16KB is suitable for most of the databases.
Finally, click on the Next button to go on to the next step.

Step 6 – Click Install to start the installation.

It may take a few minutes to complete depending upon the system.

Step 7 – Click on the Finish button to complete the MariaDB installation.

Now, you can find MariaDB tools in the Start menu.
This is how to start the installation of MariaDB on windows OS.
Read How to Create Table in MariaDB
MariaDB installation on Linux step by step
Now, let us see how to start the installation of MariaDB on Linux.
To start the installation of MariaDB on Linux, you need to follow these steps:
Step 1 – Check the Linux version by using the below command before we download MariaDB.
ALTER TABLE gadgets
ALTER COLUMN location TYPE VARCHAR,
ALTER COLUMN description TYPE VARCHAR;
Step 2 – Create or edit already existing MariaDB.repo using the below command.
# vi /etc/yum.repos.d/MariaDB.repoAfter running this command, we will see whether there is any content inside that repo if there is no content in it. Then, you need to copy the below commands in that file.
[mariadb]
name = MariaDB
baseurl = http://yum.mariadb.org/10.2/centos7-amd64
gpgkey=https://yum.mariadb.org/RPM-GPG-KEY-MariaDB
gpgcheck=1
Save the file with:wq!
Step 3 – Now, install the MariaDB Server and MariaDB Client using this command.
# sudo yum install MariaDB-server MariaDB-clientThis may take time depending upon the machine.
After the completion of the installation, if you want to check whether the service has started or not. To check this you need to use #cd/var and #cd/lib commands. If mysql is present then the installation went right.
Step 4 – To start the MariaDB service, use the below command.
# sudo systemctl start mysqlNow you can use the below command to see whether the service has started or not.
# sudo systemctl status mysqlStep 5 – Run the secure installation by using the below command to configure the root password and other features. Then, you can set a new root password and other features.
# sudo mysql_secure_installationStep 6 – Now, login to MariaDB using Root using the below command.
# mysql -uroot -pThe installation of MariaDB in Linux has been completed.
Read MariaDB Vs SQL Server
MariaDB installation in Ubuntu
Let us see, how to start the installation of MariaDB in Ubuntu.
There are two ways in Ubuntu by which we can install MariaDB
- Install MariaDB using Ubuntu Repository
- Install MariaDB using MariaDB Repository
Installing MariaDB using Ubuntu Repository
For installing MariaDB Server in Ubuntu using the Ubuntu repository, follow the given steps provided below:
Step 1 – In this, we need the package index to be updated. For that, you need to run the statement.
sudo apt updateYour packages are updated after executing this command.
Step 2 – After the list of packages has been up-to-date, you should now start installing MariaDB by running the statement.
sudo apt install mariadb-serverWe may be asked to enter the credentials for the user.
Step 3 – Service of MariaDB will automatically start. However, we can check the status after executing the below query.
sudo systemctl status mariadbThe status will be running and active.
To check the MariaDB version that is installed, you can execute the below statement.
mysql -VThe output of the statement will be the MariaDB version installed and it is the confirmation that we have installed MariaDB successfully on Ubuntu.
Install MariaDB using MariaDB Repository
MariaDB repositories have the latest MariaDB version. Before initiating the process of installation, we must have a look at the MariaDB official website and verify the latest MariaDB version.
To start the installation of MariaDB in Ubuntu using the MariaDB repository, follow the steps provided below:
Step I – In this step, you need to run the below command for adding the GPG key of MariaDB with Ubuntu.
sudo apt-key adv --recv-keys --keyserver hkp://keyserver.ubuntu.com:80 0xF1656F24C74CD1D8Step II – After the key is imported, execute the statement for adding the repository of MariaDB.
sudo add-apt-repository 'deb [arch=amd64,arm64,ppc64el] http://mirrors.accretive-networks.net/mariadb/repo/10.3/ubuntu bionic main'If we encounter an error stating “add-apt-repository command not found”, we need to start the installation of the “software-properties-common” packages.
Step III – Before the installation of any other packages present in the repositories of MariaDB, we should keep the package lists updated. For this, you need to execute the below statement.
sudo apt updateStep IV – After adding the repository, we need to execute the below command to start the installation of the package of MariaDB.
sudo apt install mariadb-serverStep V – Although, the service automatically starts, to check the status, execute the below statement.
sudo systemctl status mariadbThe status will be running and active.
Step VI – To verify the MariaDB version installed on our PC, we need to run the below command and it will also ensure that the installation is completed successfully.
mysql -VRead How to Grant User Access to a MariaDB Database
Uninstall MariaDB from Windows
There are several methods to uninstall MariaDB from Windows. Some of them are mentioned below.
Method 1
When any new piece of program is installed on your computer, that program is added to the list of Programs and Features. You can uninstall the program from that list. To uninstall MariaDB from your computer follow the steps
Step 1 – Press the Windows and X keys together to open a menu and click on Apps and Features at the top of the menu.

Step 2 – Then, Setting Window will open, and in that window, you need to click on Programs and Features present in the top-right corner.

Step 3 – You will see the list of programs installed on your computer. You need to select MariaDB and then click on Uninstall Button.

Method 2
In this method, you only need to go to the installation file of MariaDB and find uninstall.exe or unins000.exe. Then, you need to double-click on it and follow the wizard to uninstall MariaDB.
Method 3
In this method, you need not uninstall MariaDB manually as it does not remove it completely. So, it’s recommended that you uninstall MariaDB with a trusted third-party uninstaller that can identify and remove all files of MariaDB.
Note – If nothing works, then we can uninstall MariaDB via System restore by choosing a Restore point. But, you need to backup your data that was created or installed on your computer after the installation of MariaDB.
Read How to Create Database in MariaDB
Uninstalling MariaDB in Linux
Step 1 – For uninstallation of MariaDB in Linux CentOS, you need to run the below command
sudo yum remove MariaDB-server MariaDB-clientWhen you don’t have a MariaDB client, then you run the above command without MariaDB-client.
Step 2 – The process of uninstallation does not erase the data directory /var/lib/mysql. For future use, we can leave it for further use. Otherwise, we can remove it by using the below command.
sudo rm -r /var/lib/mysqlUninstall MariaDB from Ubuntu
To delete MariaDB completely from your computer, you need to follow these steps.
Step 1 – Before the process of uninstallation, you need to see the status of MariaDB and the version of MariaDB by running the statement.
systemctl status mariadbStep 2 – In this step, you need to run the purge command to erase the package of MariaDB.
apt purge "mariadb*" -yStep 3 – Now, run the autoremove command to completely delete the configuration files.
apt autoremove -yStep 4 – To verify that the uninstallation is successfully completed, you need to check the status of the MariaDB service.
systemctl status mariadbThe output of this command will ensure you the uninstallation of the MariaDB service.
Read: MariaDB Not Between
MariaDB Installation error setup wizard ended prematurely error
Here we will illustrate 2 methods to resolve the MariaDB Installation error setup wizard ended prematurely error.
First method
This kind of problem occurs in the system while installing the MariaDB application because some of the libraries don’t exist in the system that MariaDB uses. So before installing MariaDB make sure that the Microsoft Visual C++ 2015-2019 Redistributable existing in your system.
- If not, download the setup file from Microsoft’s official website. And install it before installing the MariaDB.

- Go to the installed app section of your windows system, check that the above application is installed or not as shown in the below images.

Now follow the below steps to install the MariaDB.
- First double-click on the MariaDB setup to begin the installation and as a window appear for installation click on
Nextbutton.

- Accept the
End-User License Agreementby checking the marked box and clicking onNextbutton.

- Leave everything as default and click on
Nextbutton.

- Now as a window appear for
User setting, then enter the new password for the user in the box in front of the fieldNew root password. - And again enter the same password to confirm that password in front of the field
Confirm. Click onNextbutton to proceed with the installation.

- A window
Database settingappears to set the service name and port. Make changes according to your need otherwise leave it as default and click on Next the button.

- Click on
Installbutton to install the MariaDB in the below picture.

- Click on
Finishthe button to complete the installation.

Second method
If the above steps don’t work then follow these steps.
- Press
Windows key + Rand type the below command in that box and hit Enter.
services.msc
- Then
Servicea window appears that contain all the running services on your system, then scroll down and search for the service nameWindows Installerand click onStartbutton to start this service.

- After starting the service
Windows Installer, open thecommand-lineas an administrator by clicking onRun as administrator.

- As the command-line opens, type the below command one by one and hit the
Entera button from your keyboard.
msiexec /unreg
msiexec /regserver
- After running the above command in the command line, restart your computer. Then again open the command-line as an administrator by clicking on
Run as administrator. Type the below command.
regsvr32 vbscript.dll
After running the above steps, Now install the MariaDB on your system.
This is how to solve the MariaDB installation error.
You may like the following MariaDB tutorials:
- How to create a user in MariaDB
- MariaDB DATEDIFF Function
- MariaDB Create Sequence
In this tutorial, we have learned about the installation and uninstallation of MariaDB. Additionally, we have covered the following topics
- Downloading MariaDB
- MariaDB Installation and Configuration on Windows
- MariaDB installation on Linux step by step
- MariaDB installation in Ubuntu
- Uninstall MariaDB from Windows
- Uninstall MariaDB from Linux
- Uninstall MariaDB from Ubuntu
- MariaDB Installation error setup wizard ended prematurely first method
- MariaDB Installation error setup wizard ended prematurely second method
I am Bijay having more than 15 years of experience in the Software Industry. During this time, I have worked on MariaDB and used it in a lot of projects. Most of our readers are from the United States, Canada, United Kingdom, Australia, New Zealand, etc.
Want to learn MariaDB? Check out all the articles and tutorials that I wrote on MariaDB. Also, I am a Microsoft MVP.

Update 06062021: Added php-fpm installation
MariaDB is an open-source relational database management system,
commonly used as an alternative for MySQL as the database portion of the
popular LAMP (Linux, Apache, MySQL, PHP/Python/Perl) stack. MariaDB is
developed and maintained by the original developers of MySQL and by the
open-source community. It is intended to be a drop-in replacement for
MySQL.
This time I’ll share how I install MariaDB server on Windows 10 using Windows Subsystem for Linux (WSL 2). The distribution used as an example is Ubuntu 20.04 LTS (Focal Fossa).
Note: This installation process assumes you never installed MariaDB or MySQL into your WSL 2 distribution. Otherwise, you might need to backup your existing database(s) first.
Prerequisites
First, make sure we have all dependencies satisfied. We need to Install software-properties-common and apt-transport-https packages:
$ sudo apt install software-properties-common apt-transport-https -yIf they’re already installed, your terminal should similar with below:
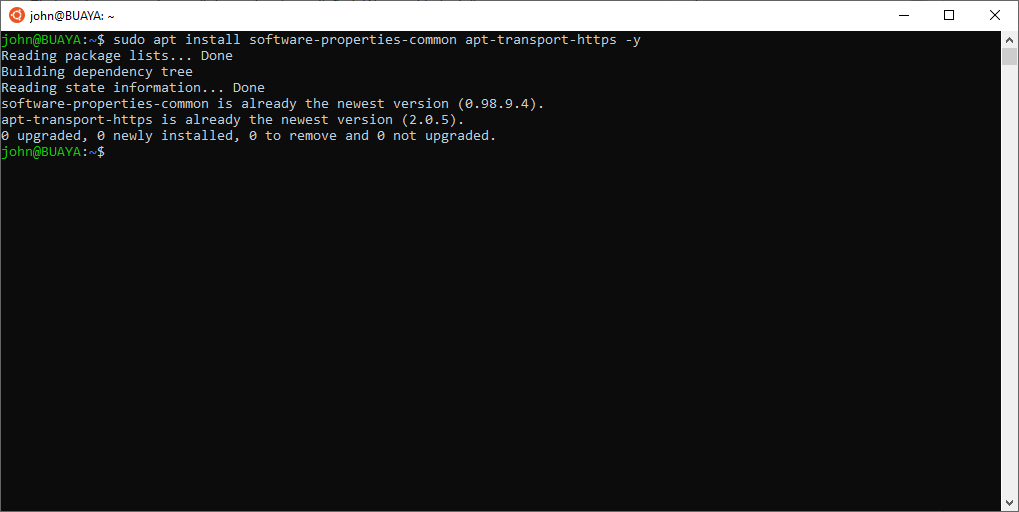
Now we’re ready to continue with next steps.
Add MariaDB apt Repository
Next step is to configure apt repository on our system. Basically, we’ll need to:
- Download MariaDB GPG public keys into our system and verify it’s validity.
- Import these GPG public keys into our system. This is necessary to verify the signature of MariaDB software packages.
- Create MariaDB repository file.
- Update your system’s package information.
- Installation process and verification.
Note: We’ll using MariaDB version 10.5. If you want to use another version, just change the version number.
Download MariaDB keyring GPG Public Keys
We’ll use curl to complete this step. On your terminal, enter command below:
$ curl -LsSO https://downloads.mariadb.com/MariaDB/mariadb-keyring-2019.gpg
After download process completed, let’s verify it:
$ curl -LsS https://downloads.mariadb.com/MariaDB/mariadb-keyring-2019.gpg.sha256 | sha256sum -c
mariadb-keyring-2019.gpg: OK
Next step is adding trusted package signing keys into our system. Make sure you are using sudo this time.
$ sudo mv mariadb-keyring-2019.gpg /etc/apt/trusted.gpg.d/ && chmod 644 /etc/apt/trusted.gpg.d/mariadb-keyring-2019.gpgCreate MariaDB Repository File
We’ll create a file called /etc/apt/sources.list.d/mariadb.list. Update the version below with your preferred version number.
# MariaDB Server# To use a different major version of the server, or to pin to a specific minor version, change URI below.
deb http://downloads.mariadb.com/MariaDB/mariadb-10.5/repo/ubuntu focal main
deb http://downloads.mariadb.com/MariaDB/mariadb-10.5/repo/ubuntu focal main/debug
MariaDB 10.5 Installation
Now we’re ready to continue with the installation process itself. On your terminal, enter this command:
$ sudo apt update
$ sudo apt upgrade
$ sudo apt install mariadb-server
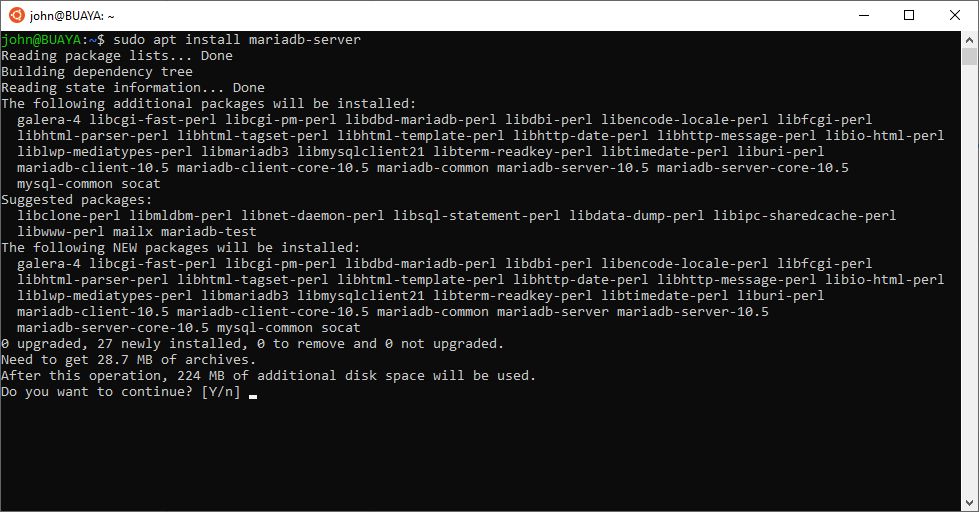
It will ask for confirmation. Press «Y» followed by «Enter» to continue with MariaDB 10.5 installation. It will take a few seconds to complete, depends on your internet connection.
After installation finished, let’s run the server using this command:
$ sudo service mariadb start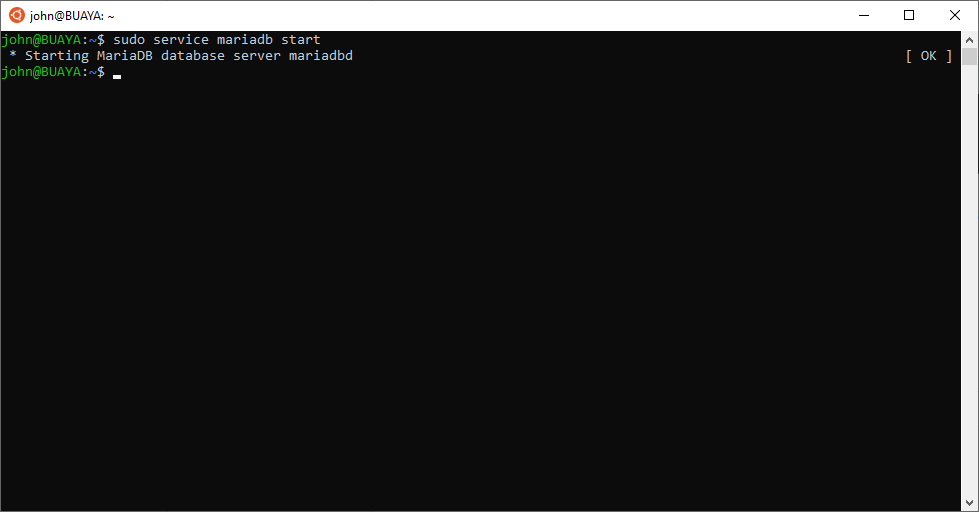
Verify Installation
Once the installation process finished, we should verify that we’ve correctly installed MariaDB 10.5. At your shell, type:
$ mysql --version
You should see something like this:

MariaDB configuration
Usually the first thing you would’ve done after MariaDB installation
is setting up a password for unprotected superuser account. This is not
the case now. But if you want to do it anyway, to set root password just
type this command:
$ sudo mysql
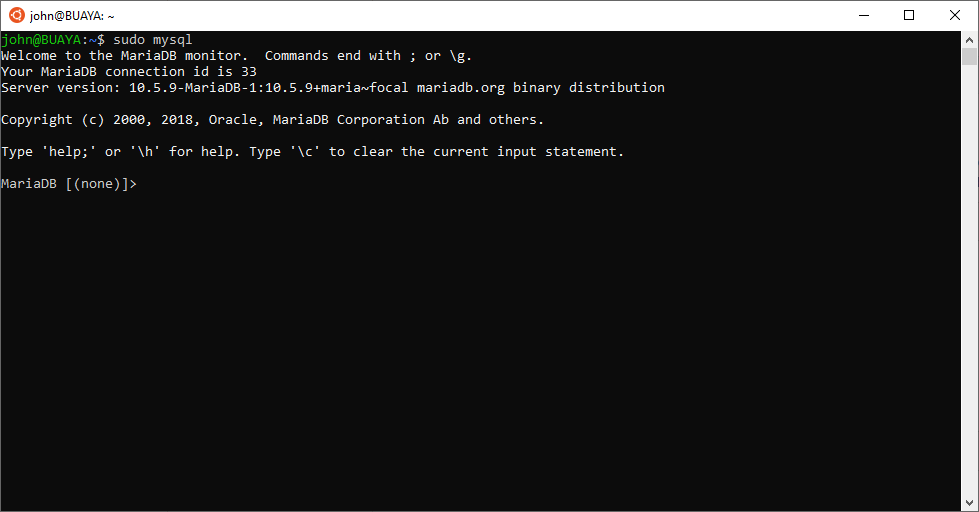
Your terminal will change to MariaDB terminal. It’s like a terminal
where you can enter your SQL commands there. To set root password, enter
this command:
MariaDB [(none)]> ALTER USER [email protected] IDENTIFIED VIA mysql_native_password USING PASSWORD("verysecret");
Change «verysecret» with your preferred password.
If you’ve forgotten your root password, no problem — you can still connect using sudo and change the password.
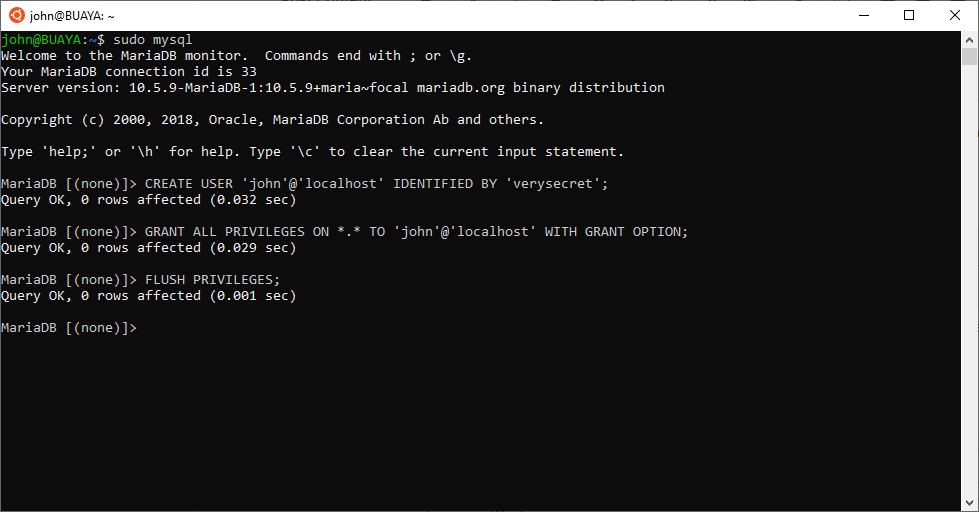
Add User
It’s better to add another user as an administrative user other than
root. Let’s back to our MariaDB terminal and enter below commands to
create one.
$ sudo mysql -p
Note that right now we’re using
-poption. This is a must because we have set a password for root user in previous step. MariaDB will ask for password then.
On MariaDB terminal, enter these command:
MariaDB [(none)]> CREATE USER 'john'@'localhost' IDENTIFIED BY 'verysecret';
MariaDB [(none)]> GRANT ALL PRIVILEGES ON *.* TO 'john'@'localhost' WITH GRANT OPTION;
MariaDB [(none)]> FLUSH PRIVILEGES;
As usual, change «verysecret» with your preferred password. To logout from MariaDB terminal, press Ctrl-D.
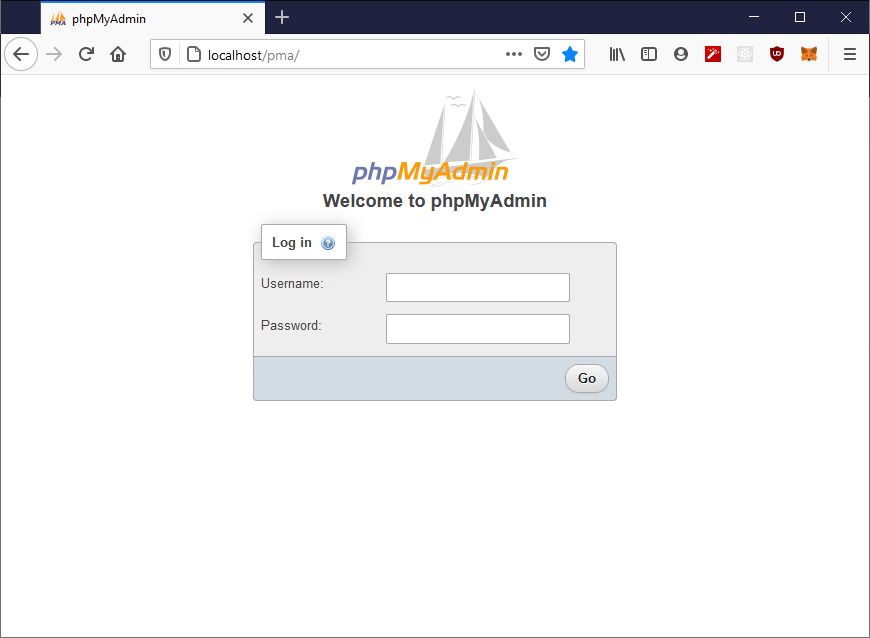
Bonus — Install PhpMyAdmin
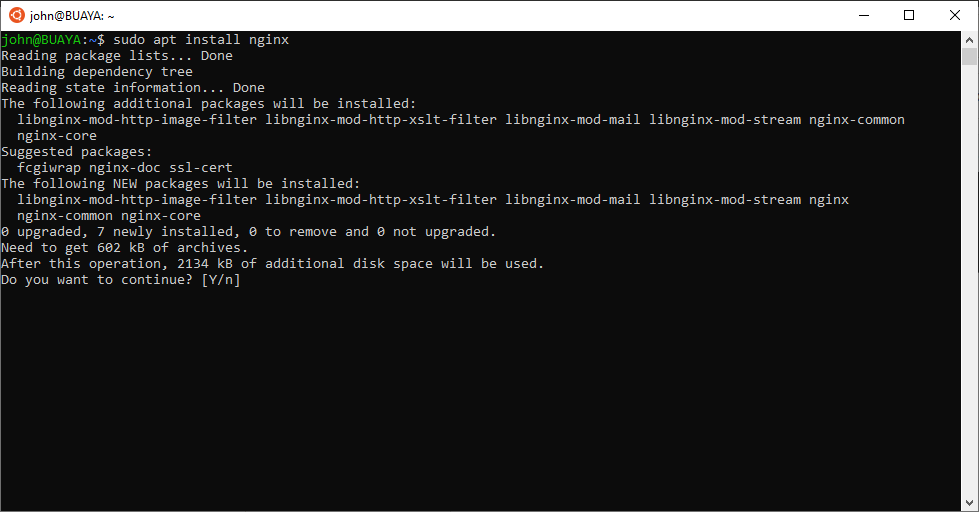
Install Nginx web server:
$ sudo apt install nginxPress «Y» followed by «Enter«. The installation process will started.
Once the download is done, we can start Nginx web server using this command:
$ sudo service nginx start
 * Starting nginx nginx                                                                    [ OK ]
Fire up your favorite web browser and open this url: http://localhost. You should see something like below:
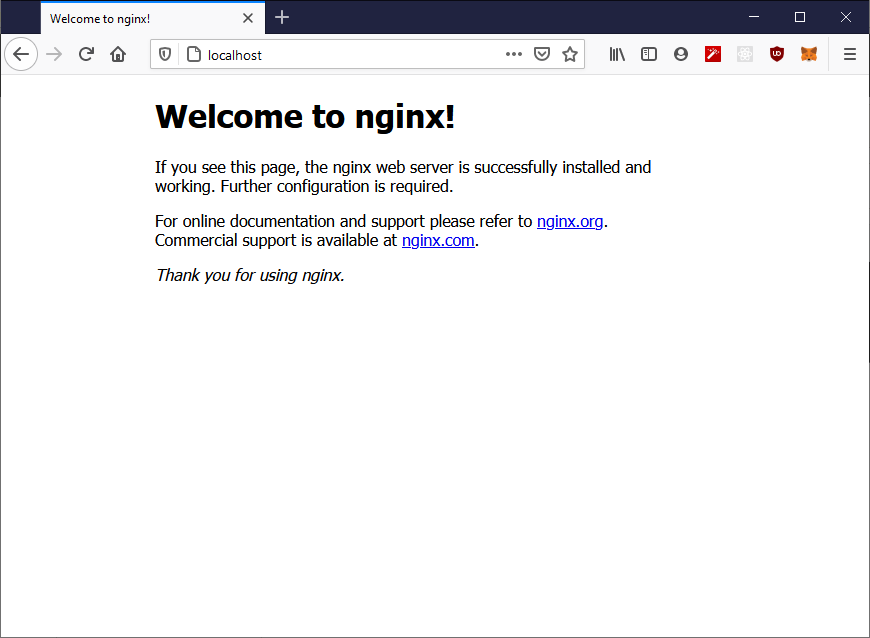
If you’re seeing similar output, you’re ready to continue with next steps.
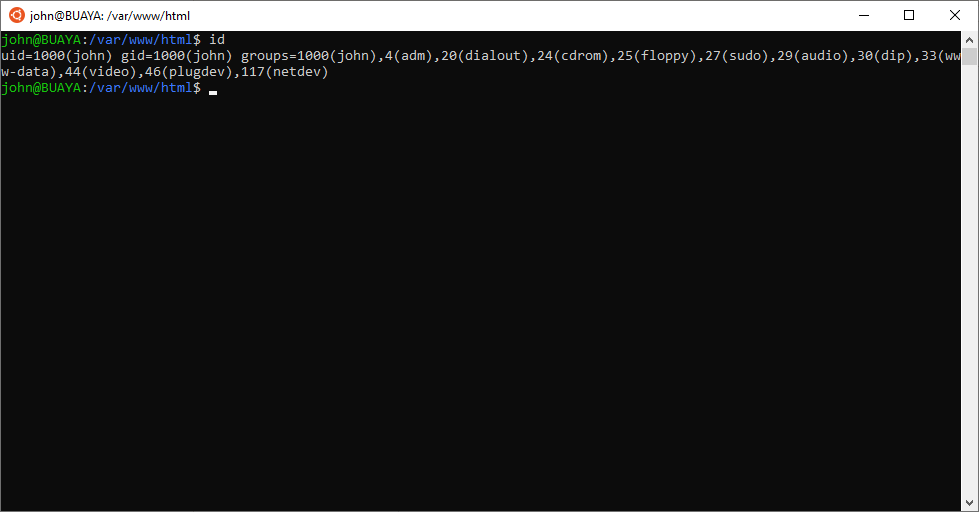
By default, Nginx on Ubuntu stores it’s html files under /var/www/html directory. To be able to write into this directory we must change this directory permission and ownership to www-data.
$ sudo chown www-data:www-data /var/www/html$ sudo chmod 775 /var/www/html
Next we should add ourselves into www-data group. Enter this command:
$ sudo usermod -aG www-data johnChange john with your username as necessary.
Close your current Ubuntu terminal and re-open it. Make sure we’re already on www-data group.
Next step is PHP-FPM installation. Type this command in your terminal:
$ sudo apt install php-fpmNow that we’ve installed:
— Nginx — web server
— PHP-FPM — our favorite scripting language
— MariaDB — database server
we’re ready to install PhpMyAdmin application. First, we need to download it first. Go to PhpMyAdmin’s website and choose your preferred version.
Once you have selected your preferred version, copy its download link. We’ll paste it into our terminal to download using curl. As the time of this writing, their latest version is 5.1.0.
$ cd /var/www/html
$ curl -LsSO https://files.phpmyadmin.net/phpMyAdmin/5.1.0/phpMyAdmin-5.1.0-english.zip
Once download process finished, we need to extract it and rename it into a more readable name.
$ unzip phpMyAdmin-5.1.0-english.zipIf you received an error message like «Command 'unzip' not found«, it means the unzip package hasn’t installed on your system yet. As usual, we can install a package using apt install .
$ sudo apt install unzip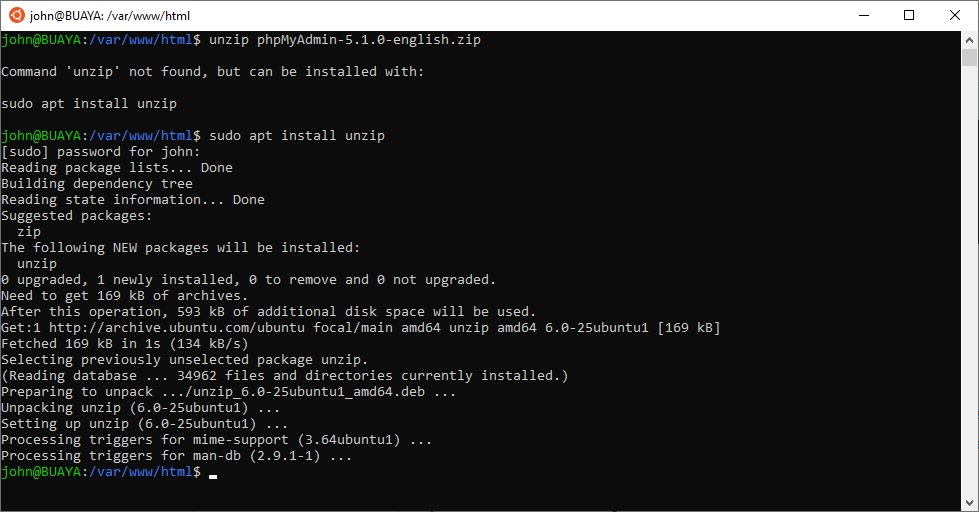
Once the installation process finished, we can re-run the unzip command:
$ unzip phpMyAdmin-5.1.0-english.zipIn this example, I’m renaming it to pma for easier typing in web browser’s address bar.
$ mv phpMyAdmin-5.1.0-english pmaLet’s test it to see whether we’ve successfully installed PhpMyAdmin or not. Back to our web browser, enter this URL: http://localhost/pma. If on previous step you’re using another name, you should adjust the URL too.
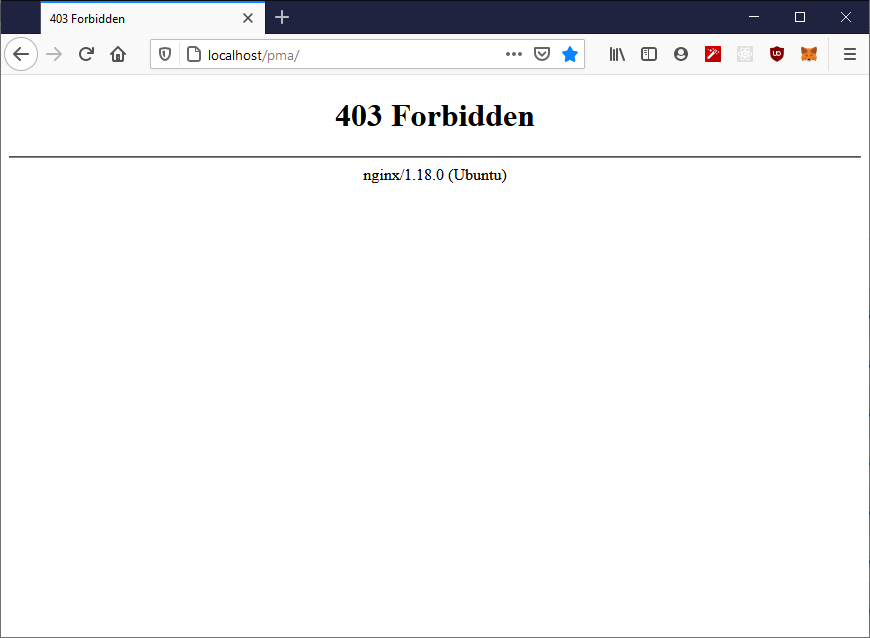
Whoops! 403 Forbidden error! It seems that we still need to change some configuration. For this particular case, Nginx cannot find index.html file and directory listing aren’t enabled.
Being a php application, we need Nginx to search for index.php in pma directory. To achieve this, let’s change Nginx’s configuration file here: /etc/nginx/sites-available/default
Find this line:
index index.html index.htm index.nginx-debian.html;and add index.php:
index index.php index.html index.htm index.nginx-debian.html;Next, search for these lines:
        #location ~ .php$ {
        #       include snippets/fastcgi-php.conf;
        #
        #       # With php-fpm (or other unix sockets):
        #       fastcgi_pass unix:/var/run/php/php7.4-fpm.sock;
        #       # With php-cgi (or other tcp sockets):
        #       fastcgi_pass 127.0.0.1:9000;
        #}
We need to remove some comments:
        location ~ .php$ {
                include snippets/fastcgi-php.conf;                # With php-fpm (or other unix sockets):
                fastcgi_pass unix:/var/run/php/php7.4-fpm.sock;
        #       # With php-cgi (or other tcp sockets):
        #       fastcgi_pass 127.0.0.1:9000;
        }
Save the file and reload Nginx web server daemon. You also need to start PHP-FPM and MariaDB daemons if it hasn’t started.
$ sudo service nginx reload$ sudo service php7.4-fpm start
$ sudo service mariadb start
Let’s refresh our web browser.

Whoops! It seems there’s still something need to be done. From the error, we need to install mysqli‘s PHP extension. Let’s install it:
$ sudo apt install php-mysqliWhen the installation finished, reload PHP-FPM daemon:
$ sudo service php7.4-fpm reloadNow let’s get back to our web browser and refresh it.
Voila! We’ve successfully installed PhpMyAdmin into our Ubuntu 20.04 in WSL 2.
Final Words
I hope that you now know how to install MariaDB Server 10.5 on Windows 10 using WSL 2. If you run into any issues or have any feedback feel free to drop a comment below.
Пакеты MSI доступны для процессорных архитектур x86 (32 бит)и x64 (64 бит).Ниже мы приведем скриншоты из установки x64 (32-битная программа установки очень похожа).
Installation UI
Это типичный режим установки. Чтобы запустить установщик, просто щелкните файл mariadb- <major>. <minor>. <patch> .msi
Welcome
License Agreement
Нажмите на кнопку «Я принимаю условия»
Custom Setup
Здесь вы можете выбрать, какие функции установить. По умолчанию установлены все функции, за исключением символов отладки. Если выбрана функция «Экземпляр базы данных», установщик создаст экземпляр базы данных, по умолчанию работающий как служба. В этом случае установщик представит дополнительные диалоговые окна для управления различными свойствами базы данных. Обратите внимание, что вам не обязательно создавать экземпляр на этом этапе. Например, если у вас уже есть базы данных MySQL или MariaDB, работающие как службы, вы можете просто обновить их во время установки. Кроме того, вы можете создать дополнительные экземпляры базы данных после установки с помощью утилиты mysql_install_db.exe .
ПРИМЕЧАНИЕ . По умолчанию, если вы устанавливаете экземпляр базы данных, каталог данных будет находиться в папке «data» в корне установки. Чтобы изменить расположение каталога данных, выберите «Экземпляр базы данных» в дереве функций и используйте кнопку «Обзор», чтобы указать другое место.
Этот диалог отображается,если выбрана функция «Экземпляр базы данных».Здесь вы можете установить пароль для пользователя базы данных «root» и указать,может ли root иметь доступ к базе данных с удаленных машин.Настройка «Создать анонимную учётную запись» позволяет анонимным (неавторизованным)пользователям.По умолчанию она выключена и менять данную настройку не рекомендуется.
Другие свойства базы данных
- Установить в качестве услуги
- Определяет, должна ли база данных запускаться как служба. Если он должен запускаться как служба, он также определяет имя службы. Рекомендуется запускать экземпляр базы данных как службу, поскольку это значительно упрощает управление базой данных. В MariaDB 10.4 и новее имя службы по умолчанию, используемое установщиком MSI, — «MariaDB». В версии 10.3 и ранее имя службы по умолчанию, используемое установщиком MSI, — «MySQL». Обратите внимание, что имя службы по умолчанию для параметров
--installи--install-manualдляmysqld.exe— «MySQL» во всех версиях MariaDB.
- Enable Networking
- Включать ли TCP / IP (рекомендуется) и какой порт должен прослушивать MariaDB. Если безопасность важна, вы можете изменить параметр bind-address после установки для привязки только к локальным адресам. Если флажок «Включить сеть» не установлен, база данных будет использовать именованные каналы для связи.
- Оптимизация для сделок
- Если этот флажок установлен, механизм хранения по умолчанию установлен на Innodb (или XtraDB), а параметр
sql_modeустановлен на «NO_ENGINE_SUBSTITUTION,STRICT_TRANS_TABLES». Вы также можете определить размер буферного пула Innodb / Xtradb. Размер пула буферов по умолчанию составляет 12,5% ОЗУ, и в зависимости от ваших требований вы можете предоставить innodb больше (до 70-80% ОЗУ). 32-разрядные версии MariaDB имеют ограничения на максимальный размер буферного пула, который составляет примерно 1 ГБ, из-за ограничений виртуального адресного пространства для 32-разрядных процессов.
Готов к установке
На этом этапе собраны все настройки установки.Нажмите на кнопку «Установить».
End
Установка завершена.Если у вас есть обновляемые экземпляры MariaDB/MySQL,запущенные как службы,в этом диалоге будет установлен флажок «Хотите обновить существующие экземпляры» (если он установлен,то запускается мастер обновления после установки).
Если вы установили экземпляр базы данных в качестве сервиса,то сервис уже будет запущен.
Установка добавит некоторые записи в меню «Пуск»:
- MariaDB Client-Запускает клиент командной строки mysql.exe
- Командная строка-запускает командную строку.Окружение настроено таким образом,что каталог «bin» установки входит в переменную окружения PATH,т.е.вы можете использовать эту командную строку для выдачи команд MariaDB (mysqldadmin,mysql и т.д…).
- Каталог базы данных-Открывает каталог данных в проводнике.
- Журнал ошибок-Открывает журнал ошибок базы данных в Блокноте.
- my.ini-Открывает файл конфигурации базы данных my.ini в Блокноте.
- Мастер обновления-запускает Мастер обновления для обновления существующего экземпляра базы данных MariaDB/MySQL до этой версии MariaDB.
Uninstall UI
В апплете Проводника «Программы и функции» (или «Добавить/Удалить программы» на старых Windows)найдите запись для MariaDB,выберите «Удалить/Изменить» и нажмите на кнопку «Удалить» в диалоговом окне ниже.
Если вы установили экземпляр БД,вам нужно будет решить,хотите ли вы удалить или оставить данные в каталоге БД.
Silent Installation
Установщик MSI также поддерживает бесшумные установки.В своей простейшей форме бесшумная установка со всеми настройками по умолчанию может быть выполнена из вышестоящей командной строки,подобной этой:
msiexec /i path-to-package.msi /qn
Примечание: установка происходит в автоматическом режиме из-за переключателя msiexe.exe / qn (без пользовательского интерфейса), если вы не укажете переключатель, установка будет иметь полный пользовательский интерфейс.
Properties
Бесшумные установки также поддерживают свойства установки (свойство будет соответствовать,например,проверенному/не проверенному состоянию флажка в пользовательском интерфейсе,паролю пользователя и т.д.).Со свойствами командная строка для установки пакета MSI будет выглядеть следующим образом:
msiexec /i path-to-package.msi [PROPERTY_1=VALUE_1 ... PROPERTY_N=VALUE_N] /qn
Инсталляционный пакет MSI требует,чтобы имена свойств были заглавными и содержали только английские буквы.По условию,для булевого свойства пустое значение означает «false»,а непустое-«true».
Установка MariaDB поддерживает следующие свойства:
| Property name | Default value | Description |
|---|---|---|
| INSTALLDIR | %ProgramFiles%MariaDB <version> | Installation root |
| PORT | 3306 | —port параметр для сервера |
| ALLOWREMOTEROOTACCESS | Разрешить удаленный доступ для корневого пользователя | |
| BUFFERPOOLSIZE | RAM/8 | Буферная пульсация для иннодбата |
| CLEANUPDATA | 1 | Удалить каталог данных (только удаление). |
| DATADIR | INSTALLDIRdata | Расположение каталога данных |
| DEFAULTUSER | Разрешить анонимным пользователям | |
| PASSWORD | Пароль корневого пользователя | |
| SERVICENAME | Имя службы Windows.Сервис не создается,если это значение пустое. | |
| SKIPNETWORKING | Skip networking | |
| STDCONFIG | 1 | Соответствует «оптимизации для транзакций» в GUI,стандартный движок innodb,строгий режим sql |
| UTF8 | если установлено,добавляет character-set-server=utf8 в файл my.ini | |
| PAGESIZE | 16K | размер страницы для innodb |
Features
Компонент — это термин установщика Windows для единицы установки. Функции можно выбирать и отменять в пользовательском интерфейсе в дереве функций в диалоговом окне «Выборочная установка».
Автоматическая установка поддерживает добавление функций с помощью специального свойства ADDLOCAL=Feature_1,..,Feature_N и удаление функций с помощью REMOVE=Feature_1,..., Feature_N
Особенности в установщике MariaDB:
| Feature id | Установлены по умолчанию? | Description |
|---|---|---|
| DBInstance | yes | Установить экземпляр базы данных |
| Client | yes | Клиентские программы командной строки |
| MYSQLSERVER | yes | Install server |
| SharedLibraries | yes | Установить разделяемую библиотеку клиентов |
| DEVEL | yes | установить заголовочные файлы на C/C++и клиентские библиотеки |
| HeidiSQL | yes | Installs HeidiSQL |
Примеры бесшумной установки
Все примеры здесь требуют запуска от администратора (и повышенной командной строки в Vista и более поздних версиях).
- Установить функции по умолчанию,экземпляр базы данных как службу,каталог данных и порт по умолчанию.
msiexec /i path-to-package.msi SERVICENAME=MySQL DATADIR=C:mariadb5.2data PORT=3307 /qn
- Установить службу,добавить отладочные символы,не добавлять компоненты разработки (клиентские библиотеки и заголовки)
msiexec /i path-to-package.msi SERVICENAME=MySQL ADDLOCAL=DEBUGSYMBOLS REMOVE=DEVEL /qn
Silent Uninstall
Чтобы удалить без вывода сообщений, используйте свойство REMOVE=ALL с msiexec:
msiexec /i path-to-package.msi REMOVE=ALL /qn
Чтобы сохранить каталог данных во время деинсталляции,необходимо передать дополнительный параметр:
msiexec /i path-to-package.msi REMOVE=ALL CLEANUPDATA="" /qn
Installation Logs
Если вы обнаружите ошибку в программе установки, для диагностики следует использовать журналы программы установки. Пожалуйста, прикрепляйте подробные журналы к создаваемым вами отчетам об ошибках. Чтобы создать подробный журнал программы установки, запустите программу установки из командной строки с ключом /l*v , например:
msiexec.exe /i path-to-package.msi /l*v path-to-logfile.txt
Запуск 32-х и 64-х битных распределений на одной машине.
Возможна установка 32-х и 64-х битных пакетов на одну и ту же Windows x64.
Помимо тестирования,примером,где эта возможность может быть полезна,является сценарий разработки,где пользователи хотят запустить 64-битный сервер и разработать как 32-битные,так и 64-битные клиентские компоненты.В этом случае может быть установлен полный 64-битный пакет,включающий экземпляр базы данных плюс возможности,связанные с разработкой (заголовки и библиотеки)из 32-битного пакета.
Содержание,воспроизводимое на этом сайте,является собственностью соответствующих владельцев,и это содержание не просматривается заранее компанией MariaDB.Взгляды,информация и мнения,выраженные в этом содержании,не обязательно представляют собой взгляды,информацию и мнения,выраженные MariaDB или любой другой стороной.
Структура директорий:
d:server — директория для хранения ПО и данных сервера
d:serverbin — программное обеспечение
d:serverbinnginx
d:serverbinphp
d:serverbinmariadb
d:serverdata — хранение данных (например логов)
Nginx
Скачиваем последнюю версию Nginx и размещаем в директории d:serverbinnginx.
Настройка
В файле конфигурации D:serverbinnginxconfnginx.conf нужно добавить строку внутри блока http
include vhosts/*.conf;и создать директорию D:serverbinnginxconfvhosts
Виртуальный хост
Для теста можно создать хост для фреймворка Laravel. Для этого нужно разместить в директории D:serverbinnginxconfvhosts файл laravel.conf
server {
	listen 80;
	server_name laravel.test;
	root D:/projects/php/laravel.test/public;

	add_header X-Frame-Options "SAMEORIGIN";
	add_header X-XSS-Protection "1; mode=block";
	add_header X-Content-Type-Options "nosniff";

	index index.php;

	charset utf-8;

	location / {
		try_files $uri $uri/ /index.php?$query_string;
	}

	location = /favicon.ico { access_log off; log_not_found off; }
	location = /robots.txt  { access_log off; log_not_found off; }

	error_page 404 /index.php;

	location ~ .php$ {
		fastcgi_pass   127.0.0.1:9000;
		fastcgi_param SCRIPT_FILENAME $realpath_root$fastcgi_script_name;
		include fastcgi_params;
	}

	location ~ /.(?!well-known).* {
		deny all;
	}
}
После этого добавляем строку
127.0.0.1 localhost laravel.testв файл C:WindowsSystem32driversetchosts
PHP
Скачиваем PHP (Non Thread Safe) и размещаем в директории d:serverbinphp. Также нужно установить компонент Visual C++ Redistributable for Visual Studio. Ссылку на эту программу можно найти в левой боковой колонке страницы
И подключаем необходимые модули расскоментируя строки extension=имя_модуля в файле D:serverbinphpphp.ini
MariaDB
Скачиваем последнюю версию MariaDB. Я обычно выбираю MSI-пакет и устанавливаю в директорию d:serverbinmariadb. Впрочем эту программу можно разместить где угодно.
Но можно скачать архивный вариант и использовать разные версии сервера. Только нужно будет в bat-файлах настроить запуск и остановку сервера.
Запуск, остановка и перезапуск сервера
Нужно скачать полезную программу RunHiddenConsole.exe, которая позволяет скрыть консоль после запуска программы. Можно сохранить в директории d:serverbin.
bat-файлы для управления сервером
start.bat
pushd d:serverbinnginx
start nginx.exe
popd
d:serverbinRunHiddenConsole.exe "d:serverbinphpphp-cgi.exe" -b 127.0.0.1:9000 -c "d:serverbinphpphp.ini"
stop.bat
taskkill /IM nginx.exe /F
taskkill /IM php-cgi.exe /F
restart.bat
call stop.bat
call start.bat
EXIT /b
Источник:
- Развертывание PHP, FastCGI, nginx, Windows
- PHP-FastCGI on Windows
Основная моя ОС для работы это Windows 10, в нем есть замечательный инструмент Windows Subsystem for Linux на котором можно легко настроить окружение для веб-разработки на PHP.
Зачем это надо когда есть Докер?
- Докер под Windows все-таки работает медленно.
- Раньше мне приходилось постоянно работать с разными версиями PHP, MySQL и постоянно переключаться между ними, но за последний год я работаю с одной и той же версией PHP и MariaDB, поэтому можно настроить LAMP один раз и забыть про него.
Что у нас получится в итоге:
- Ubuntu 20.04
- Apache
- PHP 7.4
- MariaDB
- PhpMyAdmin
- Composer
Установка Apache
Начнем с установки веб сервера Apache, но для начала обновим список пакетов. Выполним поочередно 3 команды:
sudo apt update
sudo apt upgrade
sudo apt install apache2
После установки, сразу попробуем запустить Апач и убедиться что все работает. Запускаем командой:
sudo service apache2 start
Далее переходим по адресу http://localhost/ и если видим приветственную страницу Apache, значит пока все делаем верно:

Далее создадим папку для наших веб-проектов. Эта папка должна быть за пределами файловой системы WSL. Например я создам ее по адресу d:lamp-wsl, для этого выполним команду:
sudo mkdir /mnt/d/lamp-wsl
Создайте символьную ссылку на эту папку.
sudo ln -s /mnt/d/lamp-wsl /var/www/devroot
С помощью редактора Nano откроем файл конфигурации виртуального хоста Apache по умолчанию:
sudo nano /etc/apache2/sites-enabled/000-default.conf
И заменим его содержимое на:
<VirtualHost *:80>
    ServerName localhost
    ServerAdmin webmaster@localhost
    DocumentRoot  /var/www/devroot
    <Directory /var/www/>
        Options Indexes FollowSymLinks
        AllowOverride All
        Require all granted
    </Directory>
    ErrorLog ${APACHE_LOG_DIR}/error.log
    CustomLog ${APACHE_LOG_DIR}/access.log combined
</VirtualHost>
Чтобы в редакторе Nano вырезать весь текст до конца файла, нужно нажать сочетание клавиш Alt + Shift + T
Чтобы вставить текст из буфера, нажмите правую кнопку мыши.
Чтобы сохранить изменения и выйти из редактора Nano используйте сочетанием клавиш:
Ctrl+X
Если вы изменяли файл, то появится вопрос: «Save modified buffer (ANSWERING No Will DESTROY CHANGES)?». Нажмите клавишу y. Появится вопрос на ввод имени файла. Введите новое имя файла или просто нажмите Enter, если не хотите менять имя.
Теперь переходим в нашу папку для веб проектов, в моем случае d:lamp-wsl и создадим файл для теста index.html:
<!DOCTYPE html>
<html lang="ru">
<head>
    <meta charset="UTF-8">
    <meta http-equiv="X-UA-Compatible" content="IE=edge">
    <meta name="viewport" content="width=device-width, initial-scale=1.0">
    <title>Document</title>
</head>
<body>
    <h1>Привет LAMP-WSL!</h1>
</body>
</html>
Теперь перезагружаем Apache командой:
sudo service apache2 restart
Обновляем http://localhost/ и теперь мы должны увидеть нашу тестовую страницу:

Пока не забыли, большинству проектов требуется модуль mod_rewrite поэтому включим его командой:
sudo a2enmod rewrite
И перезагрузим Апач
sudo service apache2 restart
Установка MariaDB
Можно вместо MariaDB установить MySQL, тем более она продолжает развиваться не смотря на те опасения, которые были, в результате чего и появилась MariaDB. Ниже я устанавливаю MariaDB из-за того, что про ее установку последнее время чаще спрашивают.
Итак, для установки выполним команду:
sudo apt install mariadb-server
После установки запустим MariaDB
sudo service mysql start
И на последок выполнил скрипт для начальной настройки безопасности:
sudo mysql_secure_installation
На первый вопрос просто нажмите Enter
Следуйте инструкциям на экране, здесь важно установить root пароль. Когда будет вопрос «Set root password?» ответьте Y и нажмите Enter.
На все остальные вопросы просто нажимайте Enter.
Установка PHP
Я установлю PHP версии 7.4 и несколько модулей к нему. Выполним команду:
sudo apt install php7.4 libapache2-mod-php7.4 php7.4-mysql php-common php7.4-cli php7.4-common php7.4-json php7.4-opcache php7.4-readline
Перезагружаем Apache
sudo service apache2 restart
Далее в нашей папке d:lamp-wsl и создадим файл info.php чтобы проверить работоспособность PHP, файл следующего содержания:
<?php
phpinfo();
Далее переходим по адресу http://localhost/info.php и, если не возникло никаких проблем, видим страницу с информацией о PHP:

На этом установка самого LAMP закончена, но добавим еще кое какие вещи для нашего удобства.
Устанавливаем phpMyAdmin
Выполняем команду:
sudo apt install phpmyadmin
Следуем указаниям:
На первом окне выбираем Apache (чтобы выбрать, нужно нажать пробел) и нажимаем Enter
На втором окне выбираем Yes и нажимаем Enter
Далее придумываем и вводим пароль для самого phpMyAdmin, кнопкой Tab выбираем Yes и нажимаем Enter
Установка завершена. Перезапускаем Apache
sudo service apache2 restart
Далее идем http://localhost/phpmyadmin/ и видим окно входа в phpMyAdmin
Возможная ошибка №1
Если вместо окна входа вы получили 404 ошибку, то скорее всего в первом шаге установки phpMyAdmin вы не выбрали Apache, исправить это можно следующими командами:
sudo ln -s /etc/phpmyadmin/apache.conf /etc/apache2/conf-available/phpmyadmin.conf
sudo a2enconf phpmyadmin
sudo systemctl reload apache2
Еще раз перезапустим Апач
sudo service apache2 restart
И пробуем еще раз зайти http://localhost/phpmyadmin/ , теперь должно сработать.
Возможная ошибка №2
Когда вы попытаетесь войти с логином root и паролем, которые вы установили на шаге инсталляции phpMyAdmin, то возможно вы получите следующую ошибку mysqli_real_connect(): (HY000/1698): Access denied for user ‘root’@’localhost’

Чтобы решить эту ошибку, необходимо в терминале запустить поочередно следующие команды:
sudo mysql -p -u root
CREATE USER 'pmauser'@'localhost' IDENTIFIED BY 'ваш пароль';
GRANT ALL PRIVILEGES ON * . * TO 'pmauser'@'localhost';
FLUSH PRIVILEGES;
exit

Теперь попробуйте зайти еще раз http://localhost/phpmyadmin, в качестве логина используем уже pmauser и пароль, которые вы ввели в командах выше.
Устанавливаем Composer
Установка Композера в WSL очень простая, в системе уже установлена утилита curl, поэтому воспользуемся ею:
curl -sS https://getcomposer.org/installer | php
Вот и все  Попробуйте узнать версию композера, выполнив команду:
php composer.phar --version
Если хотите, чтобы Composer был установлен глобально нужно выполнить следующую команду:
sudo mv composer.phar /usr/local/bin/composer
Теперь версию можно посмотреть так:
composer --version
Создание тестовых доменов в WSL
Когда работаешь с несколькими проектами, удобней работать с ними использую отдельные домены типа http://myapp.loc/
Сейчас я покажу как такое организовать.
Для начала в нашей папке d:lamp-wsl создадим каталог для проекта myapp. Это можно сделать или в обычном проводники или прямо из консоли WSL командой:
sudo mkdir /mnt/d/lamp-wsl/myapp
Далее с помощью редактора Nano добавим файл с настройкой виртуального хоста:
sudo nano /etc/apache2/sites-available/myapp.loc.conf
Добавим в него и сохраним следующее содержание:
<VirtualHost *:80>
	ServerName myapp.loc
	DocumentRoot /var/www/devroot/myapp
	<Directory /var/www/>
		Options Indexes FollowSymLinks
		AllowOverride All
		Require all granted
	</Directory>
	ErrorLog ${APACHE_LOG_DIR}/error.log
    CustomLog ${APACHE_LOG_DIR}/access.log combined
</VirtualHost>
Далее для подключения виртуального хоста используем команду:
sudo a2ensite myapp.loc
И перезапустим Апач
sudo service apache2 restart
И последним действием надо добавить запись в файл hosts расположенный в папке c:windowssystem32driversetc
127.0.0.1 myapp.loc
Пробуйем http://myapp.loc/ все должно работать.
UPD. Как выяснилось при добавлении в файл hosts просто строки
127.0.0.1 myapp.locне всегда делает работоспособным домен myapp.loc. После небольшого гугления нашел решение тут WSL 2 Linux host cannot be accessed by a custom domain name or 127.0.0.1
Чтобы все заработало вместо этой строчки добавить следующие 2 строки:
127.0.0.1 myapp.loc
::1 myapp.loc localhost
Что еще…
В принципе все готово, можно спокойно работать. Пока единственное неудобство то, что при запуске WSL приходится вручную запускать Apache и MariaDB. Как только придумаю как сделать запуск автоматически, сразу дополню. Если кто-то знает как это решить, поделитесь.
WSL
Содержание
- Установка MariaDB 10.3.8 на Windows Server 2016
- Ответвление
- Ссылки
- Дистрибутив
- Установка
- Installing MariaDB MSI Packages on Windows
- Contents
- Installation UI
- Welcome
- License Agreement
- Custom Setup
- Database Authentication/Security Related Properties
- Other Database Properties
- Ready to Install
- User Account Control (UAC) popup
- New Entries in Start Menu
- Uninstall UI
- Silent Installation
- Properties
- Features
- Silent Installation Examples
- Silent Uninstall
- Installation Logs
- Running 32 and 64 Bit Distributions on the Same Machine
- HackWare.ru
- Этичный хакинг и тестирование на проникновение, информационная безопасность
- Установка MariaDB в Windows. Переход с MySQL на MariaDB в Windows
- Оглавление
- Что такое MariaDB
- Чем MariaDB лучше MySQL
- Скачать MariaDB для Windows
- Установка MariaDB в Windows
- Переход с MySQL на MariaDB в Windows
- Переход с MySQL на MariaDB с сохранением баз данных
- Переход с MySQL на MariaDB без сохранения баз данных
- Install MariaDB
- Download MariaDB
- Install MariaDB
- Step 1. Start installation
- Step 2. Accept the end-user license agreement
- Step 3. Select features
- Step 4. Set root’s password
- Step 5. Configure Database
- Step 6. Submit usage information
- Step 7. Ready to install MariaDB
- Step 8. Complete the MariaDB setup
- mysql_secure_installation
- Contents
- Description
- Options
- Option Files
- Option Groups
- Use With Galera Cluster
Установка MariaDB 10.3.8 на Windows Server 2016


Инструкция по установке MariaDB 10.3.8 на Windows Server 2016. Вместе с MariaDB сервером поставим HeidiSQL. При желании можно дополнительно поставить клиентскую программу, утилиты для резервного копирования, компоненты разработчика.
Ответвление
MySQL теперь принадлежит компании Oracle. Я не вникал в тонкости политики лицензирования Oracle, но СУБД MariaDB появилась как ответвление от MySQL со статусом свободного ПО. MariaDB поддерживает высокую совместимость с MySQL, обеспечивая точное соответствие с API и командами MySQL.
На удивление в Oracle не похоронили СУБД, которая является их прямым конкурентом. Однако, разработка MySQL ведётся закрыто. А MariaDB ведёт разработку открыто, патчи принимаются от обычных пользователей, поэтому, в целом, MariaDB развивается активнее.
В состав MariaDB включена подсистемы хранения данных XtraDB для возможности замены InnoDB, как основной подсистемы хранения. Также включены подсистемы Aria, PBXT и FederateX.
Начиная с релиза MariaDB 5.2.7 в состав Windows-пакета MSI входит бесплатный инструмент HeidiSQL. HeidiSQL — это легковесный интерфейс для работы с базами данных MariaDB, MySQL, MS SQL, PostgreSQL и SQLite.
Ссылки
Дистрибутив

Находим нужный нам дистрибутив и скачиваем.

Установка
Запускаем скачанный дистрибутив.

Открывается мастер. Попадаем на страницу приветствия. Next.

Принимаем лицензионное соглашение. Next.

Выбираем компоненты для установки. Вместе с СУБД можно установить клиентскую программу, утилиты для резервного копирования, компоненты разработчика и HeidiSQL. Выбираю всё.
Кнопка «Browse» позволяет указать путь установки. По умолчанию ПО установится в «C:Program FilesMariaDB 10.3». Путь HeidiSQL не выбирается, клиент устанавливается в «C:Program Files (x86)Common FilesMariaDBSharedHeidiSQL».

Обращу внимание на кнопку «Disk Usage». Она открывает новое окно, в котором указывается размер установки. Next.

Указываем пароль пользователя root. Можно разрешить доступ пользователю root с удалённых машин.
Устанавливаем UTF8 в качестве набора символов по умолчанию. Next.

Предпочитаю устанавливать СУБД в Wndows как службу. По умолчанию MariaDB создаёт службу с названием MySQL. Это странно, переименовываю в MySQLMariaDB, потому что у меня на том же сервере есть уже MySQL.
Порт по умолчанию 3306, но у меня уже есть MySQL, меняю порт на 3307.
Можно настроить размер буферного пула и размер страницы движка Innodb. Ничего не меняю. Next.

Можно включить плагин обратной связи и слать статистику, не люблю включать такие галки. Next.

MariaDB готова к установке. Install.

Начинается процесс установки выбранных компонентов.

Установка завершена. Finish.
Команда netstat покажет, запустилась ли служба.
Да, порт 3307 работает.

MariaDB 10.3.8 установлена на Windows Server 2016.
На рабочем столе создаётся иконка HeidiSQL. Для подключения к текущему серверу нужно указать:

Клиент поддерживает несколько цветовых тем.
Источник
Installing MariaDB MSI Packages on Windows
MSI packages are available for both x86 (32 bit) and x64 (64 bit) processor architectures. We’ll use screenshots from an x64 installation below (the 32 bit installer is very similar).
Contents
Installation UI
Welcome
License Agreement
Click on «I accept the terms»
Custom Setup
Here, you can choose what features to install. By default, all features are installed with the exception of the debug symbols. If the «Database instance» feature is selected, the installer will create a database instance, by default running as a service. In this case the installer will present additional dialogs to control various database properties. Note that you do not necessarily have to create an instance at this stage. For example, if you already have MySQL or MariaDB databases running as services, you can just upgrade them during the installation. Also, you can create additional database instances after the installation, with the mysql_install_db.exe utility.
NOTE: By default, if you install a database instance, the data directory will be in the «data» folder under the installation root. To change the data directory location, select «Database instance» in the feature tree, and use the «Browse» button to point to another place.
This dialog is shown if you selected the «Database instance» feature. Here, you can set the password for the «root» database user and specify whether root can access database from remote machines. The «Create anonymous account» setting allows for anonymous (non-authenticated) users. It is off by default and it is not recommended to change this setting.
Other Database Properties
Ready to Install
At this point, all installation settings are collected. Click on the «Install» button.
If user account control is enabled (Vista or later), you will see this dialog. Click on «Yes».
Installation is finished now. If you have upgradable instances of MariaDB/MySQL, running as services, this dialog will present a «Do you want to upgrade existing instances» checkbox (if selected, it launches the Upgrade Wizard post-installation).
If you installed a database instance as service, the service will be running already.
Installation will add some entries in the Start Menu:
Uninstall UI
In the Explorer applet «Programs and Features» (or «Add/Remove programs» on older Windows), find the entry for MariaDB, choose Uninstall/Change and click on the «Remove» button in the dialog below.
If you installed a database instance, you will need to decide if you want to remove or keep the data in the database directory.
Silent Installation
The MSI installer supports silent installations as well. In its simplest form silent installation with all defaults can be performed from an elevated command prompt like this:
Note: the installation is silent due to msiexe.exe’s /qn switch (no user interface), if you omit the switch, the installation will have the full UI.
Properties
Silent installations also support installation properties (a property would correspond for example to checked/unchecked state of a checkbox in the UI, user password, etc). With properties the command line to install the MSI package would look like this:
The MSI installer package requires property names to be all capitals and contain only English letters. By convention, for a boolean property, an empty value means «false» and a non-empty is «true».
MariaDB installation supports the following properties:
| Property name | Default value | Description |
|---|---|---|
| INSTALLDIR | %ProgramFiles%MariaDB | Installation root |
| PORT | 3306 | —port parameter for the server |
| ALLOWREMOTEROOTACCESS | Allow remote access for root user | |
| BUFFERPOOLSIZE | RAM/8 | Bufferpoolsize for innodb |
| CLEANUPDATA | 1 | Remove the data directory (uninstall only) |
| DATADIR | INSTALLDIRdata | Location of the data directory |
| DEFAULTUSER | Allow anonymous users | |
| PASSWORD | Password of the root user | |
| SERVICENAME | Name of the Windows service. A service is not created if this value is empty. | |
| SKIPNETWORKING | Skip networking | |
| STDCONFIG | 1 | Corresponds to «optimize for transactions» in the GUI, default engine innodb, strict sql mode |
| UTF8 | if set, adds character-set-server=utf8 to my.ini file (added in MariaDB 5.5.29) | |
| PAGESIZE | 16K | page size for innodb |
Features
Feature is a Windows installer term for a unit of installation. Features can be selected and deselected in the UI in the feature tree in the «Custom Setup» dialog.
Silent installation supports adding features with the special property ADDLOCAL=Feature_1. Feature_N and removing features with REMOVE=Feature_1. Feature_N
Features in the MariaDB installer:
| Feature id | Installed by default? | Description |
|---|---|---|
| DBInstance | yes | Install database instance |
| Client | yes | Command line client programs |
| MYSQLSERVER | yes | Install server |
| SharedLibraries | yes | Install client shared library |
| DEVEL | yes | install C/C++ header files and client libraries |
| HeidiSQL | yes | Installs HeidiSQL |
| DEBUGSYMBOLS | no | install debug symbols |
Silent Installation Examples
All examples here require running as administrator (and elevated command line in Vista and later)
Silent Uninstall
To uninstall silently, use the REMOVE=ALL property with msiexec:
To keep the data directory during an uninstall, you will need to pass an additional parameter:
Installation Logs
If you encounter a bug in the installer, the installer logs should be used for diagnosis. Please attach verbose logs to the bug reports you create. To create a verbose installer log, start the installer from the command line with the /l*v switch, like so:
Running 32 and 64 Bit Distributions on the Same Machine
It is possible to install 32 and 64 bit packages on the same Windows x64.
Apart from testing, an example where this feature can be useful is a development scenario, where users want to run a 64 bit server and develop both 32 and 64 bit client components. In this case the full 64 bit package can be installed, including a database instance plus development-related features (headers and libraries) from the 32 bit package.
Источник
HackWare.ru
Этичный хакинг и тестирование на проникновение, информационная безопасность
Установка MariaDB в Windows. Переход с MySQL на MariaDB в Windows
Оглавление
Что такое MariaDB
MariaDB – это система управления базами данных (СУБД), которая основывается на MySQL и во многом с ней совместима.
MariaDB и MySQL полностью совместимы в синтаксисе SQL запросов. То есть, если ваша программа использует базы данных MySQL (например, веб-сайт на PHP), то при переходе на MariaDB не нужно ничего менять в программе.
MariaDB также бинарно совместима с коннекторами MySQL. Т.е. если вы используете коннекторы MySQL, то при переходе на MariaDB не нужно их менять.
MariaDB работает на Windows и Linux. Эта программа с полностью открытым исходным кодом. Она распространяется как в форме исходных кодов, так и скомпилированных исполнимых файлов для Windows и всех популярных дистрибутивов Linux.
Чем MariaDB лучше MySQL
MariaDB поддерживает больше систем хранения (Storage Engines).
В дополнении к стандартным MyISAM, BLACKHOLE, CSV, MEMORY, ARCHIVE, и MERGE движкам хранения, в MariaDB также имеются следующие:
MariaDB имеет множество различных улучшений и оптимизаций в скорости обработки данных.
MariaDB дополнена новыми расширениями и функциями.
Скачать MariaDB для Windows
MariaDB является бесплатной, настоятельно рекомендуется её скачивать с официального сайта. Страница для скачивания MariaDB: https://downloads.mariadb.org/
Вы увидите несколько серий – несколько мажорных версий программы. Если вам не нужна какая-то специфическая совместимость с MySQL, то просто выберите самую последнюю версию и нажмите кнопку с «Download»

Поскольку эта программа работает на разных операционных системах, то в следующем окне вы увидите большой выбор файлов для скачивания.

Файлы Windows x86_64 – это 64-битные версии, а Windows x86 – 32-битные.
.zip – это портативные версии, которые нужно устанавливать самостоятельно, но которые дают полную свободу в тонкой подстройке. А .msi – это установщик для Windows.
В этой инструкции я покажу на примере работы с версией .zip.
На следующей странице достаточно нажать кнопку: «No thanks, just take me to the download»:

Установка MariaDB в Windows
Для Windows СУБД MariaDB распространяется в виде установщика и ZIP архива. Я предпочитаю установку из ZIP архива, поскольку это позволяет полностью контролировать процесс.
Установку во всех примерах я выполняю в папку C:Serverbin, поскольку у меня MariaDB является частью веб-сервера, установленного по этой инструкции. Если у вас по-другому, то учитывайте это и делайте соответствующие поправки.
Распакуйте скаченный архив с MariaDB, переименуйте папку в mariadb и переместите в C:Serverbin.
Переместите папку C:Serverbinmariadbdata в папку C:ServerdataDB.
В папке C:Serverbinmariadb создайте файл my.cnf и скопируйте в него:
Для установки и запуска службы выполните команды:

Переход с MySQL на MariaDB в Windows
Переход с MySQL на MariaDB с сохранением баз данных
Можно выполнить переход разными способами. Я покажу самый универсальный метод, гарантирующий полную совместимость и отсутствие дальнейших проблем.
Необходимо начать с создания резервной копии баз данных. Мы выполним это в командной строке с помощью утилиты mysqldump (поставляется с MySQL и размещена в папке bin).
Откройте командную строку Windows. Для этого нажмите Win+x и выберите Windows PowerShell (администратор). В открывшем окне выполните
Перейдём в папку, где находится эта утилита (у вас может быть другой путь):
Сделайте дамп (резервную копию) всех баз данных следующей командой:
Теперь в папке C:Serverbinmysql-8.0bin появится файл all-databases.sql – обязательно скопируйте его в безопасное место!
Теперь остановите службу MySQL и удалите её из автозагрузки:
Теперь удалите папки C:Serverbinmysql-8.0 (бинарные файлы) и C:ServerdataDBdata (базы данных).
Распакуйте скаченный архив с MariaDB, переименуйте папку в mariadb и переместите в C:Serverbin.
Переместите папку C:Serverbinmariadbdata в папку C:ServerdataDB.
В папке C:Serverbinmariadb создайте файл my.cnf и скопируйте в него:
Для установки и запуска службы выполните команды:
Для развёртывания баз данных из резервной копии, перейдите в папку C:Serverbinmariadbbin:
И запустите команду вида:
Например, у меня файл all-databases.sql с резервной копией баз данных размещён в папке h:Dropbox!Backup, тогда моя команда такая:
Дождитесь завершения импорта – если файл большой, то процесс может затянуться.
Переход с MySQL на MariaDB без сохранения баз данных
Остановите службу MySQL и удалите её из автозагрузки:
Удалите папки C:Serverbinmysql-8.0 (бинарные файлы) и C:ServerdataDBdata (базы данных).
Распакуйте скаченный архив с MariaDB, переименуйте папку в mariadb и переместите в C:Serverbin.
Переместите папку C:Serverbinmariadbdata в папку C:ServerdataDB.
В папке C:Serverbinmariadb создайте файл my.cnf и скопируйте в него:
Для установки и запуска службы выполните команды:
Источник
Install MariaDB
Summary: in this tutorial, you will learn step by step how to download and install MariaDB on your system.
Download MariaDB
To download MariaDB, you go to the download page and select the latest version to download:
Install MariaDB
To install MariaDB on Windows, you follow these steps:
Step 1. Start installation
Double-click the installer to start the installation process.
Step 2. Accept the end-user license agreement
Read the end-user license agreement and click the Next button:
Step 3. Select features
Step 4. Set root’s password
Type a password for the root user account. You will use this password to connect to MariaDB later. The root user is the default user of the MariaDB, which has all privileges.
If you don’t want the root user to login from a remote machine, you need to uncheck the Enable access from remote machines for ‘root’ user checkbox.
The Use UTF8 as the default server’s character set option allows you to use the UTF8 as the default character set when you create new databases and tables.
Once you complete selecting all options, click the Next button to go to the next step.
Step 5. Configure Database
First, install MariaDB as a service by selecting the Install as service option. It allows you to rename the service name.
Second, configure the port for the MariaDB. By default, MariaDB uses 3306 port. However, you can change it to your port if you want.
Third, specify the parameters for the Innodb engine including buffer pool size and page size. 16KB page size is suitable for most databases.
Finally, click the Next button to go to the next step.
Step 6. Submit usage information
If you want to submit anonymous usage information so that MariaDB developers can improve the system, check the checkbox and click the Next button.
Step 7. Ready to install MariaDB
Click the Install button to start installing MariaDB
It will take a few minutes depending on the system.
Step 8. Complete the MariaDB setup
Click the Finish button to complete MariaDB setup
You can find the MariaDB tools in the startup menu:
In this tutorial, you have learned step by step how to install MariaDB on Windows.
Источник
mysql_secure_installation
MariaDB starting with 10.4.6
MariaDB starting with 10.5.2
From MariaDB 10.5.2, mysql_secure_installation is the symlink, and mariadb-secure-installation the binary name.
Contents
Description
mysql_secure_installation is a shell script available on Unix systems, and enables you to improve the security of your MariaDB installation in the following ways:
mysql_secure_installation can be invoked without arguments:
The script will prompt you to determine which actions to perform.
Options
mysql_secure_installation accepts some options:
| Option | Description |
|---|---|
| —basedir=dir | Base directory. |
| —print-defaults | Print the program argument list and exit. |
| —no-defaults | Don’t read default options from any option file. |
| —defaults-file=# | Only read default options from the given file #. |
| —defaults-extra-file=# | Read this file after the global files are read. |
Other unrecognized options will be passed on to the server.
Option Files
In addition to reading options from the command-line, mysql_secure_installation can also read options from option files. If an unknown option is provided to mysql_secure_installation in an option file, then it is ignored.
The following options relate to how MariaDB command-line tools handles option files. They must be given as the first argument on the command-line:
| Option | Description |
|---|---|
| —print-defaults | Print the program argument list and exit. |
| —no-defaults | Don’t read default options from any option file. |
| —defaults-file=# | Only read default options from the given file #. |
| —defaults-extra-file=# | Read this file after the global files are read. |
| —defaults-group-suffix=# | In addition to the default option groups, also read option groups with this suffix. |
Option Groups
mysql_secure_installation reads options from the following option groups from option files:
Use With Galera Cluster
This script is not 100% safe for use with Galera Cluster as it directly manipulates the mysql.user Table which is not transported by Galera to the other nodes.
You should run this script on the first node in the cluster before adding more nodes.
If you want to run this after the cluster is up and running you should find alternative ways.
Источник