Method to switch from MinGW-w32 to MinGW-w64
Download the executable file of MinGW-w64Refer the EDIT
(Executable file link may change for future releases, this is for Version 8.1.0, Kindly cross verify the latest version before installing from this link)
- Installation Process (In Settings):
Version: PICK LATEST
Architecture: x86_64
Threads: posix
Exception: seh
If anyone is trying to add MinGW-w64 as a PATH variable and is not able to find the gdb.exe in C:msys64mingw64bin, try looking for it in the Program files.
C:Program Filesmingw-w64x86_64-8.1.0-posix-seh-rt_v6-rev0mingw64bin
The gdb.exe and other files are located in this directory.
EDIT:
After making some changes in the launch.json file in VSCode, the MinGW-w64 GDB debugger started giving errors because there was 2 versions of MinGW in different folders i.e, MINGW and mingw64!
It is essential that the installation path does not contain any spaces
(i.e., space in «Program Files»), this will create conflicts later.
STEPS:
1. Uninstalled all the versions of GCC that was installed in the PC — Cygwin, MSYS2(32 bit) and mingw64(64 bit) and installed the MinGW-w64 again, this time using the MSYS2.
Please start afresh, if debugger is giving errors and if versions are clashing!
2. Download the MSYS2 installer from this link.
Install process is simple, follow the steps mentioned in the website!
It is essential that the installation path does not contain any spaces. Therefore, we cannot install MinGW-w64 in Program Files.
3. After Installation is complete: Open MSYS2 terminal (pink icon).
Update the package database and base packages using:
pacman -Syu
After this, Update rest of the base packages using:
pacman -Su
4. Now switch over to MSYS2 MinGW 64-bit terminal (blue icon).
To install gcc and g++ for C and C++.
For 64 bit:
pacman -S mingw-w64-x86_64-gcc
To install debugger (gdb).
For 64 bit:
pacman -S mingw-w64-x86_64-gdb
5. Now you’re all SET!
Check versions:
gcc --version
g++ --version
gdb --version
6. Finally, remove the old environment variables if any are left and add the new environment variable to the PATH!
BEFORE DEBUGGING FILES IN VSCode, MAKE SURE TO ADD -g tag while building, otherwise breakpoints will be ignored by the debugger!
Footnote:
It’s very important to keep all the versions in one folder, if folders are different, then life will get tough later!
Для работы над заданиями курса в Windows 10 рекомендуется использовать следующее программное окружение:
- Редактор Visual Studio Code
- Инструменты командной строки Git for Windows
- Среда разработки MinGW-w64 (Minimalist GNU for Windows), содержащая компилятор GCC (GNU Compiler Collection)
- Инструменты для сборки проектов CMake
- Система управления пакетами python Miniconda3
Рассмотрим процесс установки и настройки этих инструментов.
Установка VS Code
Установка VS Code не представляет сложностей. Достаточно скачать установочный файл со страницы загрузок и запустить его. Пока это все, что необходимо сделать. После установки остальных программ мы вернемся к настройке VS Code.
Установка и настройка Git for Windows
Скачайте установочный файл Git for Windows со страницы загрузок и запустите его. На момент написания этого текста актуальной версией является 2.28.0. В процессе установки Вам будут заданы вопросы по конфигурации. В большинстве случаев подойдут рекомендуемые варианты.
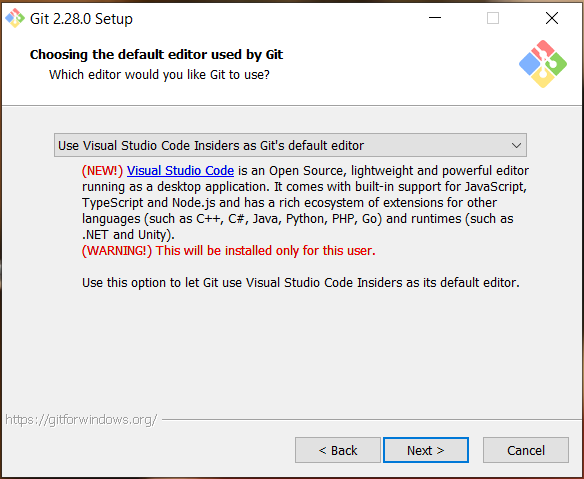
Если в системе уже установлен редактор VS Code, то его можно выбрать в качестве редактора по умолчанию для Git:
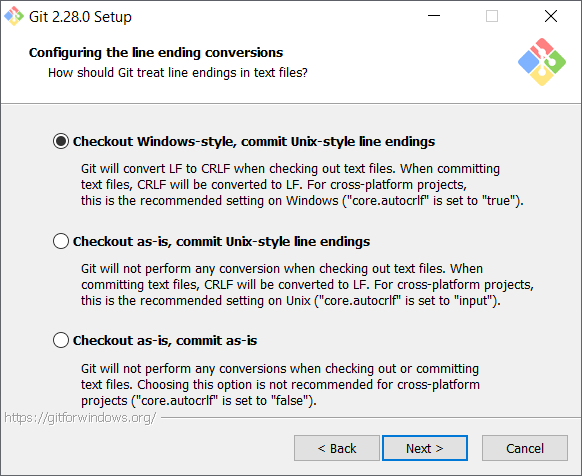
Важным моментом является настройка обработки конца строки в файлах. Чтобы с этим не возникало проблем, необходимо выбрать вариант, который уже отмечен по умолчанию:
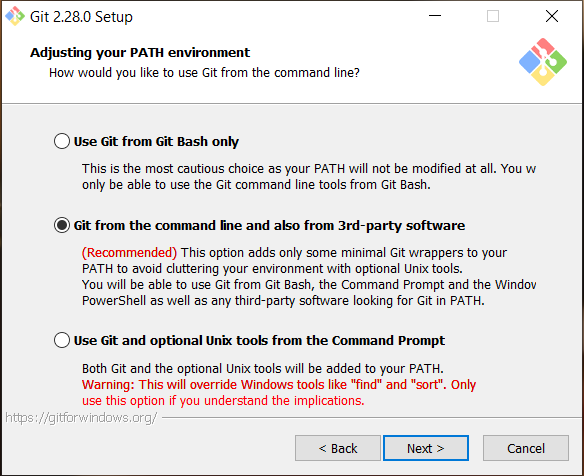
Чтобы команды git были доступны во всех терминалах, следует выбрать рекомендуемый вариант для изменения переменной окружения PATH:
Проверьте, что установка завершилась успешно, открыв терминал и исполнив команду git. Результат должен выглядеть так:
> git
usage: git [--version] [--help] [-C <path>] [-c <name>=<value>]
           [--exec-path[=<path>]] [--html-path] [--man-path]
           [--info-path] [-p | --paginate | -P | --no-pager]
           [--no-replace-objects] [--bare] [--git-dir=<path>]
           [--work-tree=<path>] [--namespace=<name>]
           <command> [<args>]
В качестве терминала в Windows 10 мы рекомендуем использовать PowerShell.
Теперь необходимо задать имя пользователя и адрес электронной почты:
> git config --global user.name "Ivan Petrov"
> git config --global user.email i.petrov@nsu.ru
Git хранит настройки в файле ~.gitconfig. У автора этот файл выглядит следующим образом:
[user]
    email = vit.vorobiev@gmail.com
    name = Vitaly Vorobyev
[core]
    editor = "[path-to-vscode]" --wait
На этом первоначальная конфигурация инструментов git завершена. Навык работы с git приходит с практикой. Действия с git, необходимые для выполнения заданий курса, всегда будут подробно описаны. Тем не менее, мы рекомендуем обращаться к документации, чтобы прояснять непонятные моменты.
Установка MinGW-w64
Установочный файл MinGW-w64 mingw-w64-install.exe можно найти на этой странице. При установке не нужно менять настройки по умолчанию, кроме пути установки. Путь установки не должен содержать пробелов, поэтому путь по умолчанию в директории Program Files не подходит.
После завершения установки, в директории mingw32bin будут расположены различные исполняемые файлы. Среди них нас интересует файл g++.exe, который запускает сборку программ C++. Сделаем так, чтобы этот файл был доступен в любой директории из командной строки. Если этого не сделать, то для использования команды g++ надо будет прописывать полный путь до файла g++.exe.
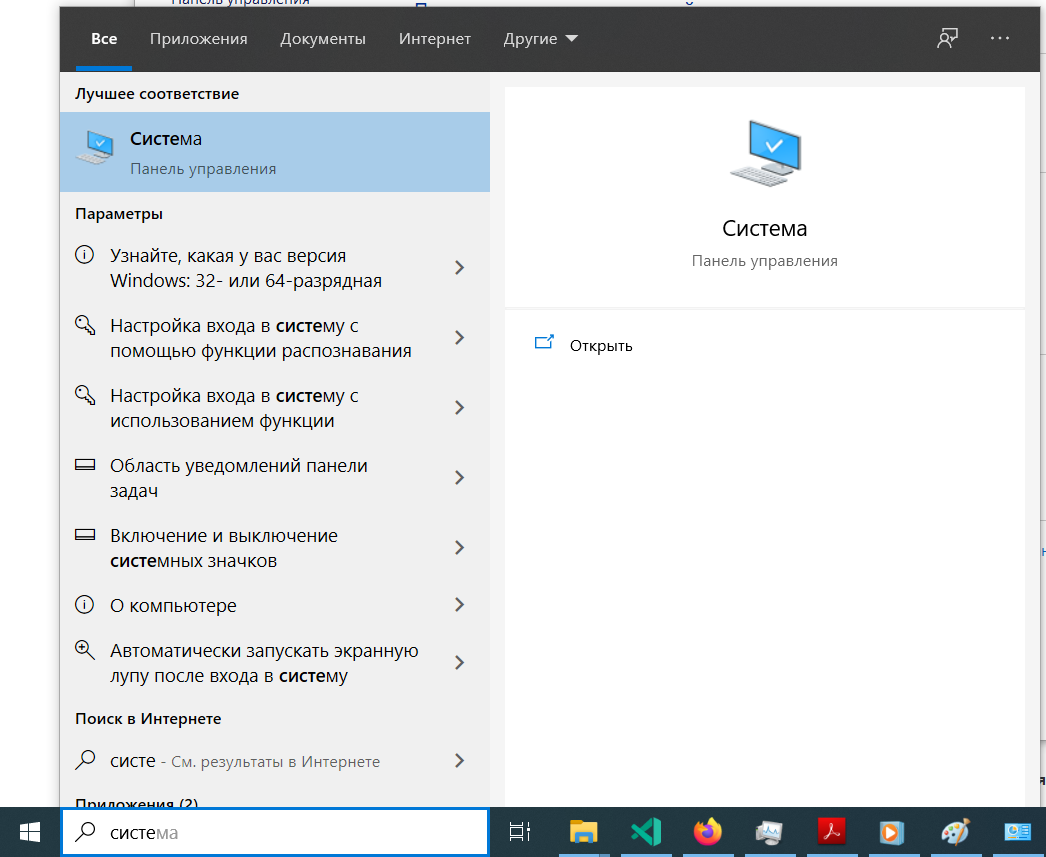
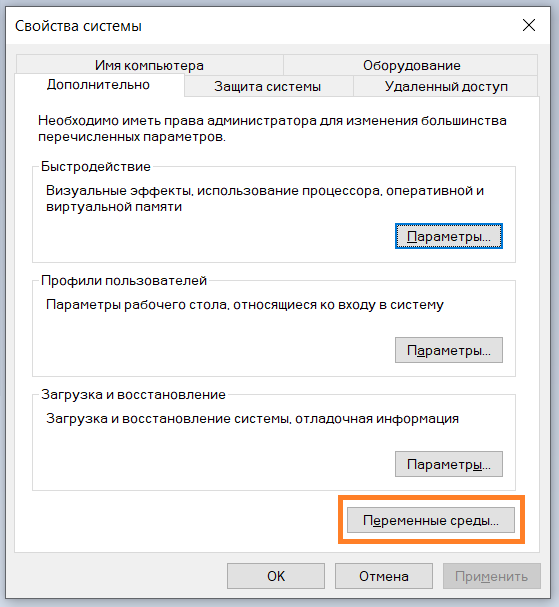
Откройте меню “Система” в “Панели управления”:
Из меню “Система” перейдите в “Дополнительные параметры системы”:

Выберите “Переменные среды”:
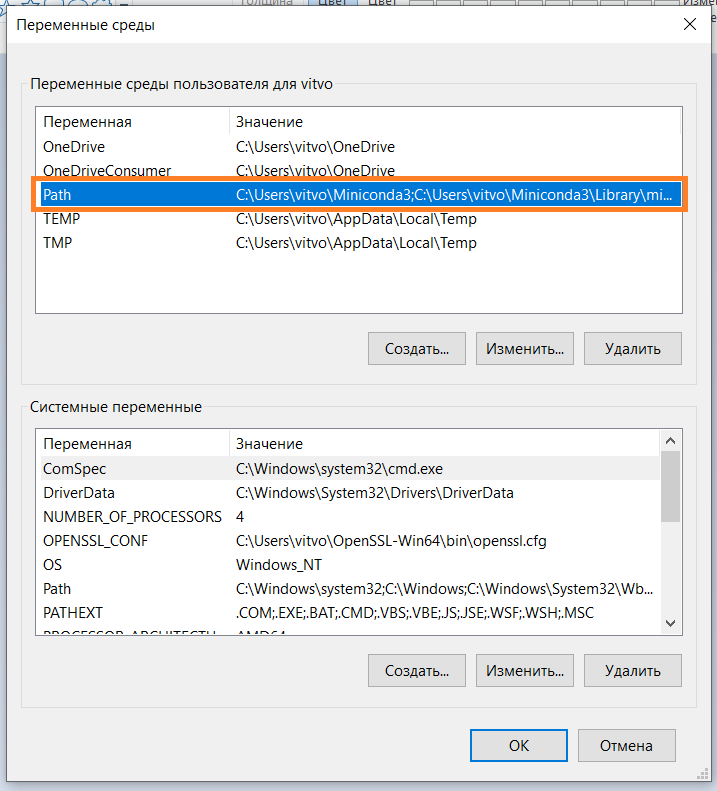
Выберите переменную Path и нажмите кнопку “Изменить…”:
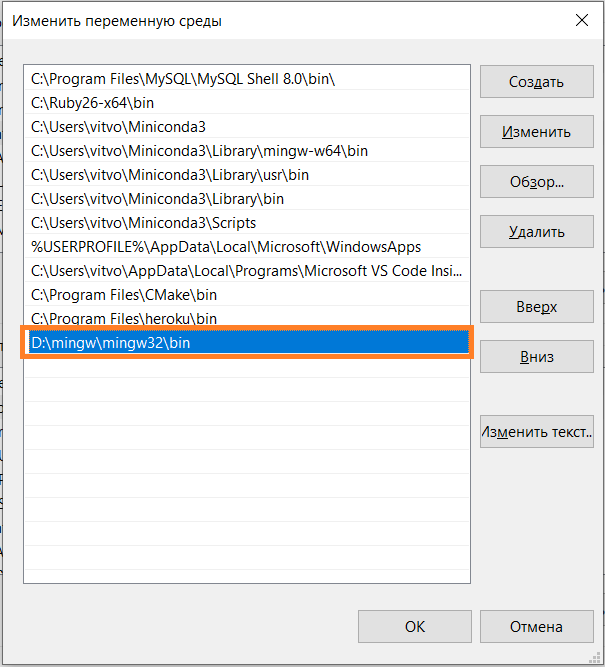
Добавьте в новую строку полный путь до директории mingw32bin и нажмите кнопку OK.
Чтобы проверить, что настройка выполнена успешно, откройте консоль (не в директории mingw32bin) и выполните команду g++ --help:
> g++ --help
Usage: g++.exe [options] file...
Ваша система теперь готова к сборке программ на языке C++.
Установка CMake
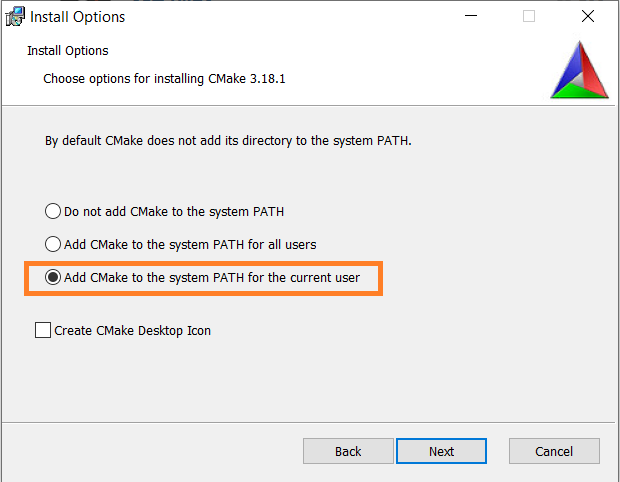
Скачайте со станицы загрузок установочный файл cmake-3.18.1-win64-x64.msi (на момент написания текста актуальная версия — 3.18.1). Для 32-разрядной системы вместо этого нужно скачать файл cmake-3.18.1-win32-x86.msi. Запустите файл и выполните установку. В ходе установки выберите изменение переменной окружения PATH:
Выполните в консоли команду cmake --help для проверки корректности установки CMake:
> cmake --help
Usage

  cmake [options] <path-to-source>
  cmake [options] <path-to-existing-build>
  cmake [options] -S <path-to-source> -B <path-to-build>

Specify a source directory to (re-)generate a build system for it in
the current working directory.  Specify an existing build directory to
re-generate its build system.
Код большинства заданий по C++ этого курса будет компилироваться с помощью CMake. Эта система значительно упрощает процесс сборки C++ проектов, особенно если они состоят из многих файлов.
Установка Miniconda3
Система Windows (в отличие от Linux) не имеет установленного по умолчанию интерпретатора python. Менеджер пакетов python Anaconda и его минимальная сборка Miniconda позволят нам установить в системы все необходимые инструменты для работы с python. Загрузите со страницы загрузки установочный файл Miniconda3 Windows 64-bit или Miniconda3 Windows 32-bit, в зависимости от разрядности системы. При установке отметьте галочку для добавления необходимых записей в переменную окружения PATH, несмотря на то что это действие не рекомендуется установщиком:

Убедитесь в том, что установка выполнена успешно, выполнив в консоли следующую команду:
>conda --help
usage: conda-script.py [-h] [-V] command ...

conda is a tool for managing and deploying applications, environments and packages.
Выполните инициализацию (необходимо выполнить один раз):
Создайте окружение для работы с заданиями этого курса:
>conda create -n nsu python=3
Conda вычислит набор пакетов, которые необходимо установить в новом окружении, и попросит подтвердить создание окружения:
После установки активируйте новое окружение и запустите консоль python:
>conda activate nsu
(nsu) >python
Python 3.8.5 (default, Aug  5 2020, 09:44:06) [MSC v.1916 64 bit (AMD64)] :: Anaconda, Inc. on win32
Type "help", "copyright", "credits" or "license" for more information.
>>>
Ваша система теперь готова для работы с заданиями курса “Программирование на C++ и python”. Нам осталось настроить редактор VS Code для максимально удобной работы.
Настройка VS Code
Установите следующие расширения VS Code:
- C/C++ for Visual Studio Code
- CMake Tools
- Python
Выбор интерпретатора python
При начале работы с кодом python (при открытии файла с расширением .py) VS Code предложит выбрать интерпретатор python, который будет использоваться для подсветки кода, проверки синтаксиса и вывода подсказок:
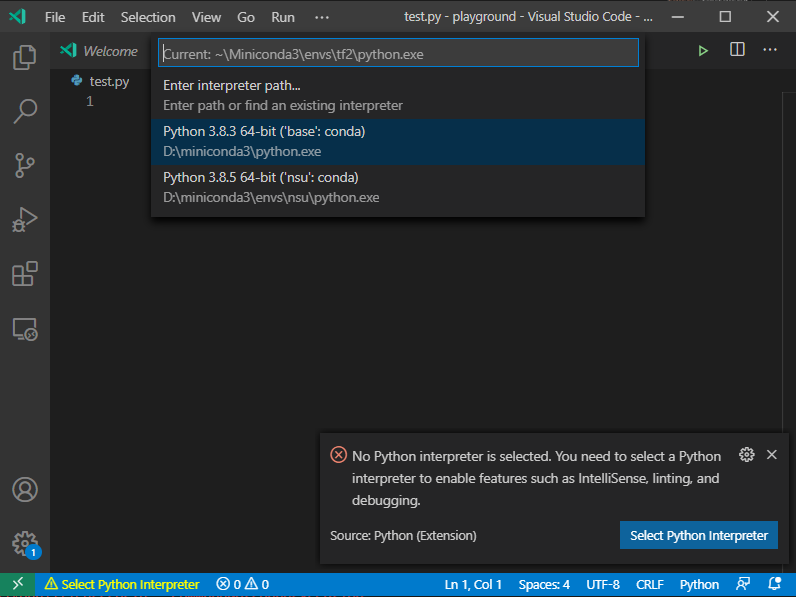
Можете, например, выбрать интерпретатор из недавно созданного окружения nsu.
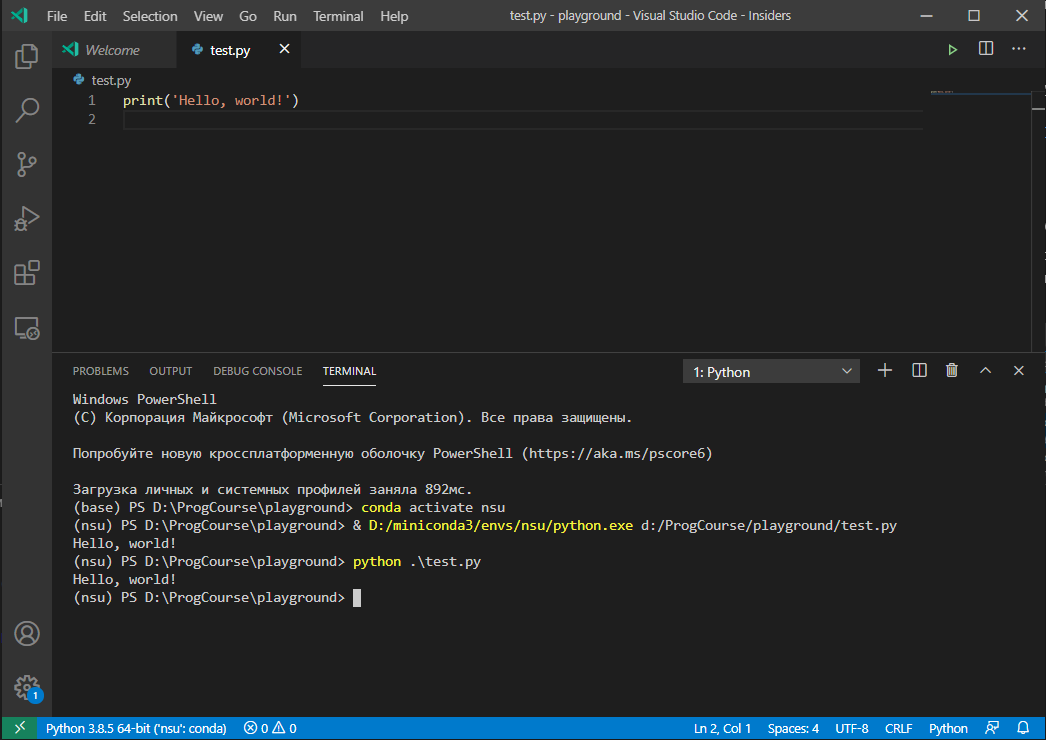
Создадим файл test.py, содержащий одну строку:
Исполнить этот скрипт можно, открыв консоль в VS Code с помощью сочетания клавиш Ctrl+J и набрав в ней
В правом верхнем углу окна находится кнопка с зеленым треугольником ▷, нажатие на которую приводит к тому же результату:
Настройка работы с GCC
Создайте файл test.cpp, содержащий следующий код:
#include <iostream>

int main() {
    std::cout << "Hello, world!" << std::endl;
    return 0;
}
Скомпилируем его с помощью компилятора GCC и командной строки. Откройте консоль в VS Code (Ctrl+J) и исполните команду
Компилятор создал исполняемый файл a.exe. Запустите его:
Работает. Настроим теперь VS Code для автоматизации этого действия. Выберите в меню пункт Terminal -> Configure Default Build Task...:
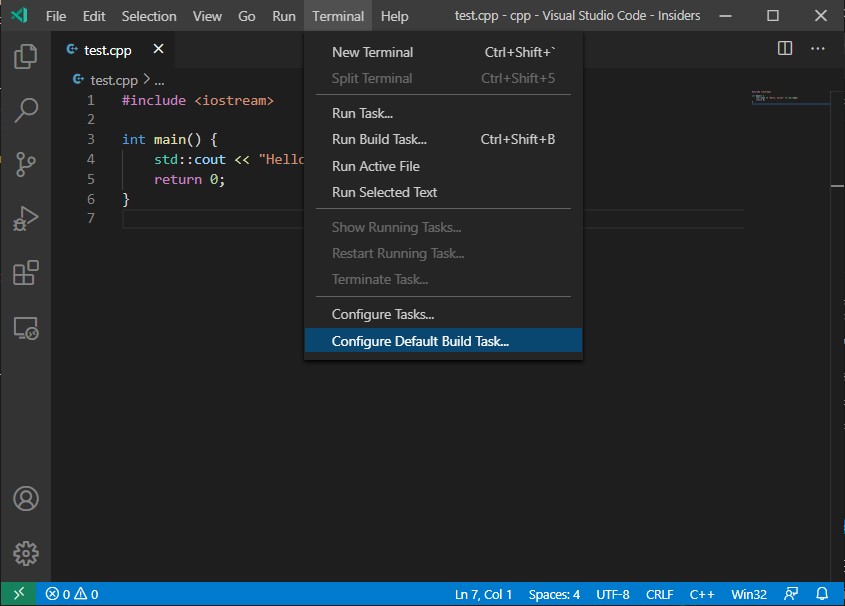
Выберите из выпавшего списка пункт g++.exe. В результате будет сгенерирован файл .vscode/tasks.json подобный такому:
{
    "version": "2.0.0",
    "tasks": [
        {
            "type": "shell",
            "label": "C/C++: cpp.exe build active file",
            "command": "D:\mingw\mingw32\bin\g++.exe",
            "args": [
                "-g",
                "${file}",
                "-o",
                "${fileDirname}\${fileBasenameNoExtension}.exe"
            ],
            "options": {
                "cwd": "${workspaceFolder}"
            },
            "problemMatcher": [
                "$gcc"
            ],
            "group": {
                "kind": "build",
                "isDefault": true
            }
        }
    ]
}
Теперь при нажатии клавиш Ctrl+Shift+B или выборе пункта меню Terminal -> Run Build Task будет выполняться компиляция открытого файла. Для файла test.cpp будет создан исполняемый файл test.exe.
Работа с CMake
Откройте новую рабочую директорию VS Code, создайте в ней файл main.cpp, содержащий следующий код:
#include <iostream>

int main() {
    std::cout << "Hello, world!" << std::endl;
    return 0;
}
и файл CMakeLists.txt со следующим содержанием:
cmake_minimum_required(VERSION 3.0.0)
add_executable(test main.cpp)
Эти два файла составляют минимальный CMake-проект. Выполним сначала сборку CMake-проекта через консоль: создайте в рабочей директории поддиректорию build, в которой будет осуществляться сборка, и перейдите в неё:
Выполните настройку проекта и запустите сборку:
> cmake -G "MinGW Makefiles" ..
> cmake --build .
В первой команде мы указали, что сборка будет осуществляться с помощью MinGW и что файлы проекта расположены в родительской директории (путь ..). Вторая команда осуществляет сборку в текущей директории (путь .). В директории build должен появиться исполняемый файл test.exe.
Расширение VS Code для работы с CMake позволяет автоматизировать сборку проекта. Выберите рабочую директорию VS Code (комбинация клавиш Ctrl+K+O), содержащую файлы main.cpp и CMakeLists.txt. Наберите комбинацию клавиш Ctrl+Shift+P и в строке сверху наберите команду >CMake: Configure. Это запустит настройку инструментов CMake. После завершения настройки в нижней части окна появятся инструменты управления сборкой:
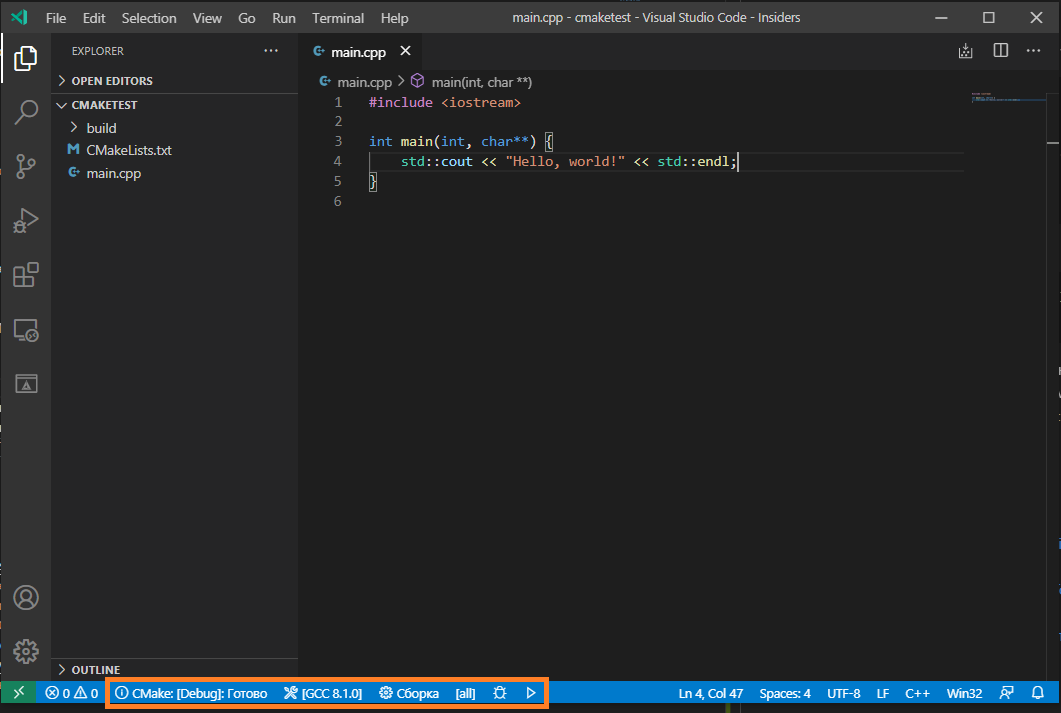
Кнопку “Сборка” запускает сборку, а кнопка ▷ — исполняемый файл.
Если автоматическая настройка CMake привела к ошибке, то, вероятно, инициализация CMake выполнилась без параметра -G "MinGW Makefiles". В этом случае выполните эту команду в консоли, как показано выше. Достаточно выполнить это действие один раз, после чего конфигурация этого и других проектов будет выполняться верно.
Работа с git
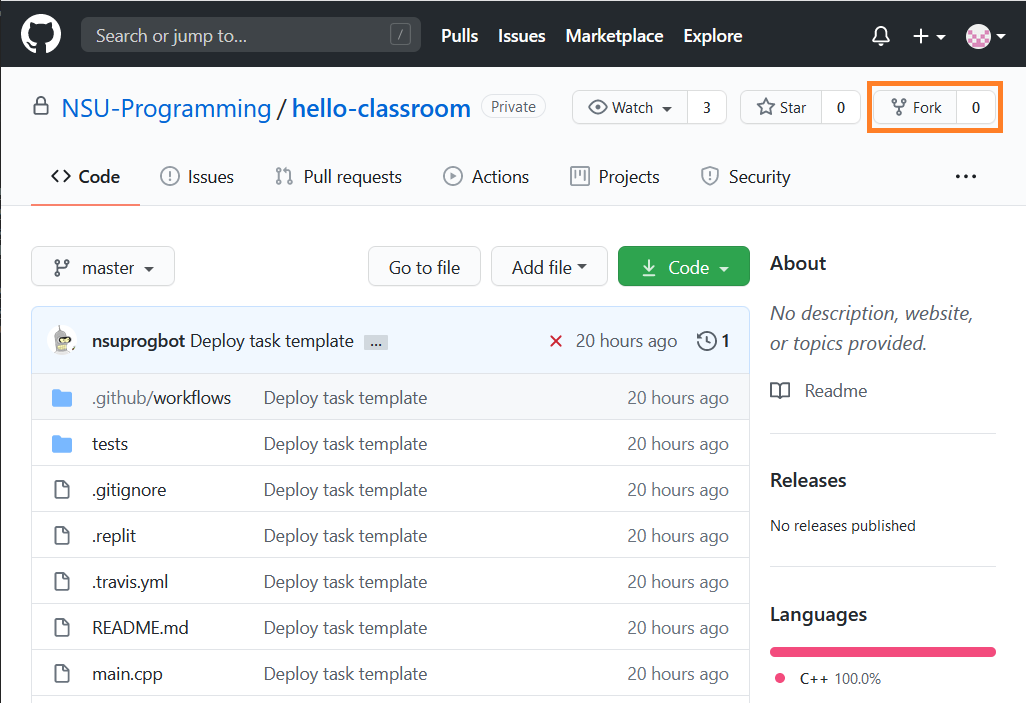
Покажем как можно работать с git-репозиторием через VS Code. Выполните fork репозитория задания Hello, Classroom на GitHub:
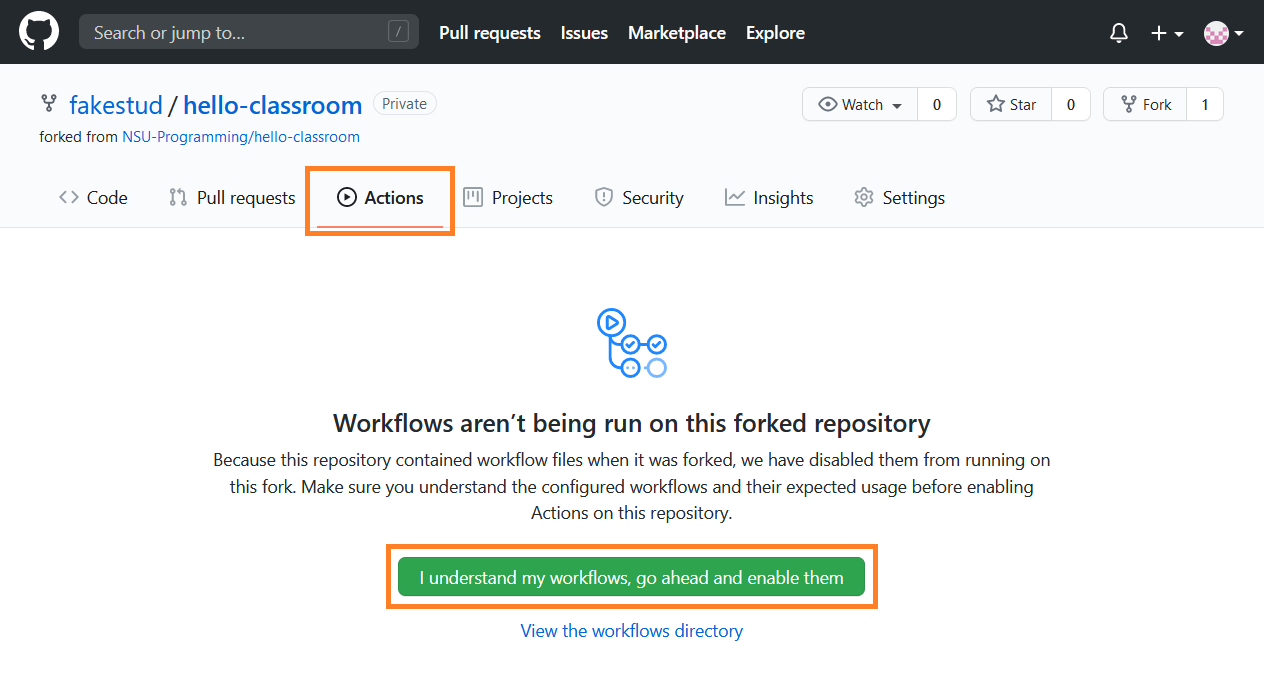
Это действие создает новый репозиторий в Вашем аккаунте. Разрешите автоматическое тестирование решения, нажав на большую зеленую кнопку во вкладке Actions:
Новый репозиторий необходимо клонировать на Вашу локальную систему. Удобнее всего это делать с помощью протокола ssh. Для этого сначала необходимо включить OpenSSH Client, который по умолчанию выключен.
Взаимодействие с GitHub репозиторием будет происходить по протоколу ssh с помощью техники шифрования с открытым ключом. Создать пару из приватного и публичного ключа можно в консоли:
>ssh-keygen
Generating public/private rsa key pair.
По умолчанию сгенерированные ключи будут расположены в директории ~.ssh. Файл с публичным ключом называется id-rsa.pub. Публичный ключ нужно добавить на GitHub. Для этого откройте раздел SSH and GPG keys в меню Settings и нажмите на кнопку New SSH key:

Заполните открывшуюся форму. В поле Key нужно скопировать содержимое файла id-rsa.pub. Проследите, чтобы при копировании не появились лишние переносы строк. Весь ключ должен быть расположен в одной строке.
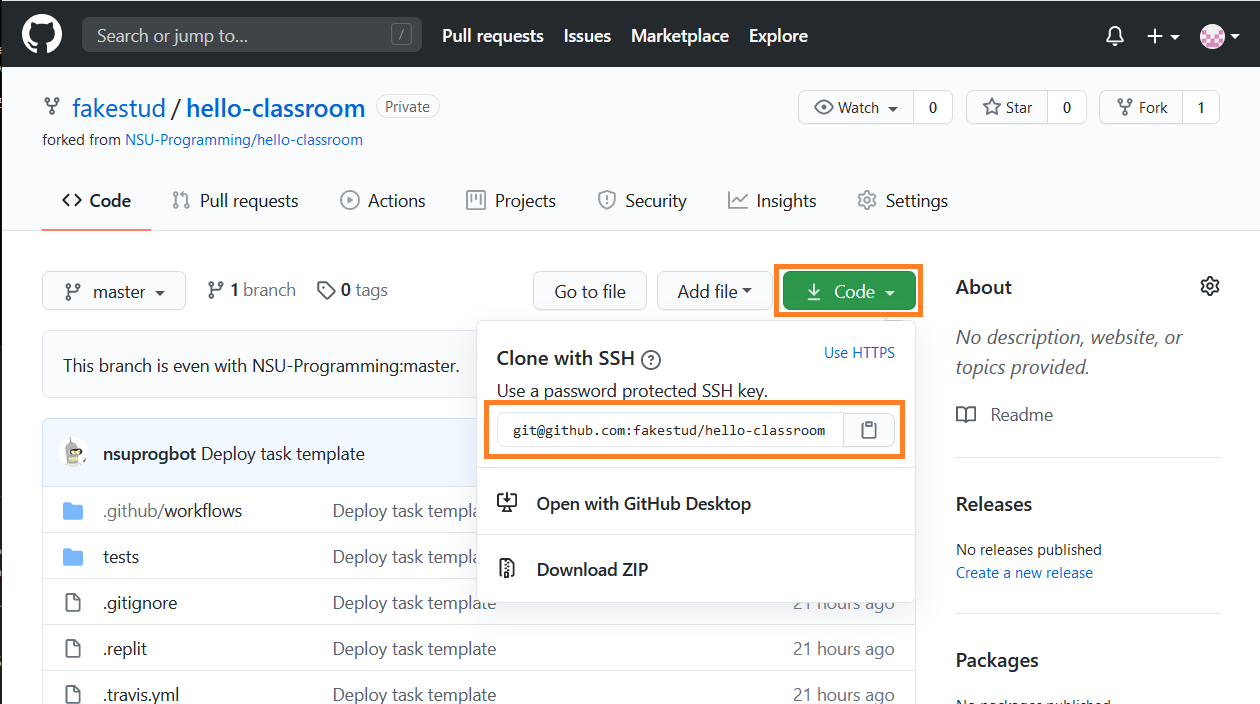
Теперь мы готовы к клонированию репозитория. Выберите на компьютере директорию, в которой Вы будете работать с заданиями курса и перейдите в неё. Откройте страницу репозитория hello-classroom в Вашем аккаунте GitHub и скопируйте строку для клонирования через ssh:
Выполните в консоли команду git clone:
> git clone git@github.com:fakestud/hello-classroom.git
Cloning into 'hello-classroom'...
remote: Enumerating objects: 15, done.
remote: Counting objects: 100% (15/15), done.
remote: Compressing objects: 100% (8/8), done.
remote: Total 15 (delta 0), reused 15 (delta 0), pack-reused 0
Receiving objects: 100% (15/15), done
Строка git@github.com:fakestud/hello-classroom.git есть скопированная выше строка. Репозиторий был клонирован в директорию hello-classroom. Выберите её в качестве рабочей директории VS Code. Прочитайте файл README.md, содержащий инструкции по решению задания. После решения задания выполните локальную проверку:
> conda activate nsu
> pip install -r .requirements.txt
> g++ -std=c++17 main.cpp -o a.out
> test_cmd tests/ .a.out
Running 1 tests on 4 CPUs...

test1
Command: .a.out
Success

All 1 tests passed.
Тесты пройдены успешны. Значит, мы готовы к синхронизации репозитория GitHub с нашей локальной версией. В командной строке для этого достаточно выполнить следующие команды:
git add main.cpp
git commit -m "Task solved"
git push -u origin master
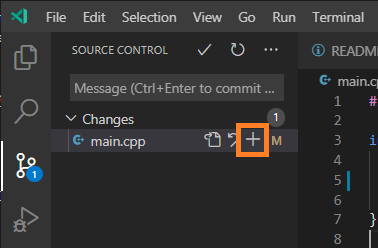
Редактор VS Code позволяет выполнить эти действия через графический интерфейс. VS Code отслеживает изменения локальной версии репозитория. Откройте вкладку контроля версий слева и посмотрите на список изменившихся файлов. В нашем случае это должен быть только файл main.cpp. Выполните команду git add, нажав на кнопку +:
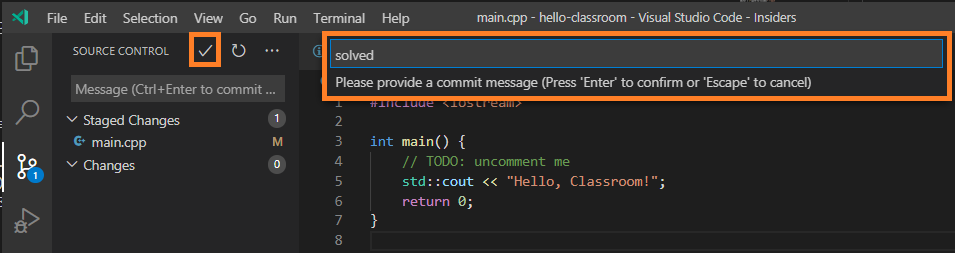
Затем команду git commit, нажав на кнопку ✓ и введя комментарий в текстовом поле:
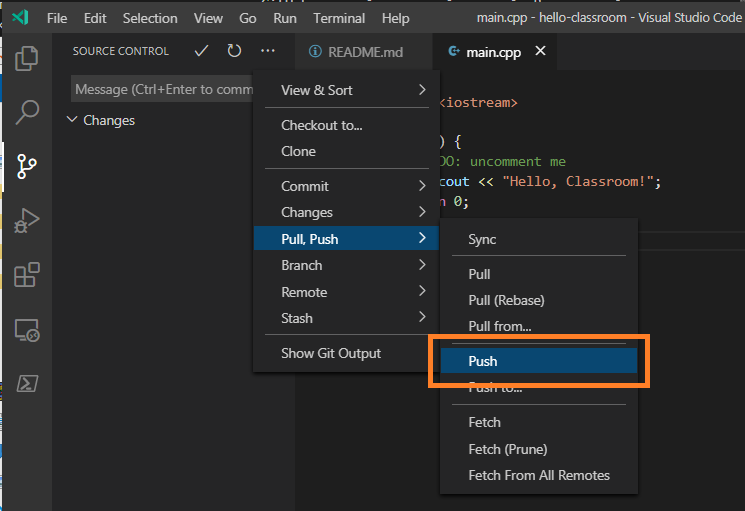
Наконец, выполните команду git push:
Источники
- First-Time Git Setup
- VS Code: User and Workspace Settings
- VS Code: Using GCC with MinGW
- VS Code: Get started with CMake Tools on Linux
- Git in Visual Studio Code
- Must-have плагины и несколько полезностей для СС++ разработки в VS Code
- Памятка пользователям ssh
0. Введение
MinGW (Minimalist GNU для Windows) — это минималистская среда разработки для приложений Microsoft Windows. MinGW предоставляет полный набор инструментов программирования с открытым исходным кодом, пригодных для разработки собственных приложений MS-Windows, и не зависит от какой-либо сторонней DLL-библиотеки времени выполнения C. MinGW в основном используется разработчиками, работающими на платформе MS-Windows, но также может использоваться на разных платформах.
- Порт GCC, включая компиляторы C, C ++, ADA и FORTRAN;
- GNU Binutils (например, as, ld, ar и т. Д.);
- Установщик командной строки с дополнительным интерфейсом GUI (mingw-get) для развертывания MinGW и MSYS в MS-Windows;
- Инструмент начальной настройки графического интерфейса (mingw-get-setup) может помочь запустить и запустить mingw-get.
Mingw-w64 является обновленной версией исходного проекта mingw.org, целью которого является поддержка компилятора GCC в системах Windows. Он разветвлен в 2007 году для обеспечения поддержки 64-битных и новых API. С тех пор он широко используется и распространяется.
1. Скачать
Требуется загрузкаsourceforge

установка
Для установки вы можете использовать Установщик или загрузить следующий сжатый пакет напрямую
Если вы устанавливаете с помощью установщика, загрузите и запуститеMinGW-W64-install.exe
, как показано ниже

installer
Вот несколько вариантов
- Версия формулирует номер версии, начиная с 4.9.1-8.1.0, выбирайте при необходимости, используйте последнюю версию без особых требований;
- Архитектура связана с операционной системой, 64-битные системы выбирают x86_64, 32-битные системы выбирают i686;
- Потоки устанавливают нить стандартного опционального posix или win32;
- Исключение устанавливает систему обработки исключений, x86_64 может быть seh и sjlj, i686 — dwarf и sjlj;
- Номер версии сборки сборки ревизии, выберите самую большую.
При загрузке сжатого пакета выберите подходящее место для его распаковки, добавьте mingw64 / bin в переменную окружения
- использование
После добавления переменных среды откройте CMD и выполните gcc -v
Если вы видите похожую информацию, это означает, что установка прошла успешно

info
Тогда вы можете счастливо использовать gcc и g ++.
0. Introduction
MinGW (Minimalist GNU for Windows) is a minimalist development environment for Microsoft Windows applications. MinGW provides a complete set of open source programming tools for the development of native MS-Windows applications and does not rely on any third-party C runtime DLLs. MinGW is primarily intended for developers working on the MS-Windows platform, but can also be used across platforms. MinGW includes:
- A port of GCC, including C, C++, ADA, and FORTRAN compilers;
- GNU Binutils (eg: as, ld, ar, etc.);
- A command line installer with an optional GUI front end, (mingw-get) for MinGW and MSYS deployments on MS-Windows;
- A GUI first-time setup tool (mingw-get-setup) that helps start and run mingw-get.
Mingw-w64 is an upgraded version of the original mingw.org project designed to support the GCC compiler on Windows systems. It was branched in 2007 to support 64-bit and new APIs. Since then, it has been widely used and distributed.
Download
Download is requiredsourceforge

installation
Installation can use the Installer or directly download the following zip package
Download and run with installerMinGW-W64-install.exe
is as follows

installer
The following gives an explanation of several options.
- Version to develop the version number, from 4.9.1-8.1.0, select as needed, use the latest version without special requirements;
- Architecture is related to the operating system, 64-bit system selects x86_64, 32-bit system selects i686;
- Threads set thread standard optional posix or win32;
- Exception sets the exception handling system, x86_64 can be selected as seh and sjlj, i686 is dwarf and sjlj;
- Build revision build version number, you can choose the largest.
To download the compressed package, select the appropriate location to decompress and add mingw64/bin to the environment variable.
- use
After adding the environment variable, open CMD and execute gcc -v
can see similar information, indicating that the installation is successful.

info
After that, you can use gcc and g++ happily.
На чтение 3 мин. Просмотров 340 Опубликовано 05.03.2021
Я просто хочу установить MinGW64, чтобы получить 64-битный компилятор C. Я знаю, что в Интернете есть множество руководств, но они не работают для меня.
-
Я зашел по адресу: https://sourceforge.net/projects /mingw-w64/и щелкнул кнопку загрузки.
-
Согласно учебникам, которые я видел, должен быть установщик, но все, что у меня есть, это папка с именем ‘mingw -w64-v7.0.0 ‘
внутри него находятся эти папки:
build-aux
COPYING.MinGW-w64
COPYING.MinGW-w64-runtime
mingw-w64-crt
mingw-w64 -doc
mingw-w64-headers
mingw-w64-библиотеки
mingw-w64-tools
но я нигде не нашел никаких исполняемых файлов или установщика, что мне делать дальше?
Обратите внимание, что у меня уже установлена 32-битная версия в c: MinGW, большое спасибо за любые помогите, так как я очень расстроен.
Загрузите веб-установщик отсюда: http://sourceforge.net/projects/mingw-w64/files/Toolchains%20targetting%20Win32/ Личный% 20Builds/mingw-builds/installer/mingw-w64-install.exe/download
Вы можете получить сборку MinGW-w64, которая не требует установка с http://winlibs.com/, просто распакуйте архив и начните им пользоваться. На сайте также объясняется, как использовать компилятор из Code :: Blocks IDE.
ответил 30 июня ’20 в 18:38

Вы можете получить сборку MinGW-w64, которая не требует установки с http://winlibs.com/, просто распакуйте архив и запустите используй это. На сайте также объясняется, как использовать компилятор из Code :: Blocks IDE.
Содержание
- Как установить MinGW в Windows 10 (GCC и G ++)
- Загрузка MinGW
- VideoToGifs.com
- EasyOnlineConverter.com
- SqliteTutorials.com
Как установить MinGW в Windows 10 (GCC и G ++)
MinGW, a сокращение от «Minimalist GNU for Windows», это минималистичная среда разработки для собственных приложений Microsoft Windows.
Загрузка MinGW
- открыть http:// www.mingw.org/
- Нажмите кнопку «Загрузить», как показано на рисунке ниже.

3. Как только вы нажмете кнопку загрузки на веб-сайте mingw, в вашем браузере откроется следующая страница (с веб-сайта SourceForge.net).

4. Следующий exe-файл будет загружен с именем mingw-get-setup.. exe

5. Щелкните mingw-get-setup.exe
6. Нажмите установить

7. Нажмите “Продолжить”

8. Нажмите “Продолжить”


9. Появится следующее всплывающее окно. Пожалуйста, убедитесь, что вы установили все флажки. например mingw32-base , mingw32-gcc = g ++ , msys-base и так далее.

10. Нажмите «Установка»> «Применить изменения», как показано на рисунке ниже.

11. дождитесь завершения процесса. как только вы увидите сообщение об успешной установке, закройте окно. Нажмите Закрыть .
12. Теперь мы установим переменную среды для использования команд gcc и g ++ из терминала.
Windows 10 и Windows 8
- В поиске выполните поиск, а затем выберите: Система (Панель управления)
- Щелкните ссылку Расширенные настройки системы .

- Щелкните Переменные среды . В разделе Системные переменные найдите переменную среды
PATHи выберите ее. Нажмите Изменить . Если переменная средыPATHне существует, щелкнитеNew.


- В окне Редактировать системную переменную (или Новая системная переменная ) укажите значение
PATHпеременная среды. - Скопируйте C: MinGW bin.
- Нажмите OK .
- Закройте все оставшиеся окна, нажав OK . .

- Снова откройте окно командной строки и введите
gcc. если вы видите следующий результат, как показано на рисунке ниже, mingw установлен успешно.

Видео : как установить MinGW в Windows 10 (GCC и G ++)
- MinGW
VideoToGifs.com
EasyOnlineConverter.com
SqliteTutorials.com
MinGW also called as Minimalistic GNU for Windows is a popular compiler for C and C++ and used for the development of native MS-Windows applications. It does not depend on any 3rd party tools or libraries but relies on the several DLLs provided by Microsoft as components of the operating system. Out of these DLLs, MSVCRT.DLL i.e. Microsoft C runtime library is the primary one. Apart from the system components, the threaded applications must use freely distributable thread support DLL, provided as part of MinGW itself. You may consider using Cygwin for POSIX application deployment.
Below listed are the features and components provided by MinGW. You may also refer MinGW for more details.
- A port of the GNU Compiler Collection (GCC), including C, C++, ADA and Fortran compilers;
- GNU Binutils for Windows (assembler, linker, archive manager)
- A command-line installer, with optional GUI front-end, (mingw-get) for MinGW and MSYS deployment on MS-Windows
- A GUI first-time setup tool (mingw-get-setup), to get you up and running with mingw-get.
In this tutorial, we will install MinGW on windows and write, compile, and execute our Hello World program in C++.
Step 1 — Download MinGW
Go to the Download Page to start downloading mingw-w64. It will show various download options as shown in Fig 1.

Fig 1
Download MinGW-W64-builds as highlighted in Fig 1.
You may also download and install MinGW Installation Manager in case you are planning only for the 32-bit compiler. The MinGW-W64 provides both 32-bit and 64-bit compilers.

Fig 2
Download MinGW Installation Manager as highlighted in Fig 2.
Step 2 — Install MinGW-W64
Now execute the MinGW-W64-builds executable downloaded by us in the previous step. It will show the welcome screen as shown in Fig 3.

Fig 3
Click on the Next Button to continue with the installation. It will show the settings screen as shown in Fig 4.

Fig 4
Note that I have selected x86_64 architecture in order to support 64-bit instructions. You may continue with i686 for 32-bit instructions. Also, I have selected the posix option of Threads settings for programs involving multithreading. You may select the win32 option based on your needs. Now click on the Next Button to continue with the installation. The next screen asks for the installation path as shown in Fig 5.

Fig 5
Make sure that you provide an installation path without any spaces. Now click on the Next Button to finish the installation.
It might show you error specific to fail to download. I tried a few times and got success in 3rd attempt. You may also continue with manual installation in case it failed multiple times. You can simply download the archive of MinGW-W64 and extract it to the desired location.
It will show the download progress and status as shown in Fig 6, Fig 7, and Fig 8.

Fig 6

Fig 7

Fig 8
Now click on the Next Button after download completes. It will show the success message as shown in Fig 9.

Fig 9
Click on the Finish Button to close the installer. Now add the bind directory of MinGW-W64 to the system path as shown in Fig 10.

Fig 10
Step 3 — Install MinGW
In this step, we will install the MinGW distributed by the official website as shown in Fig 2. Execute the installer downloaded in previous steps. It will show the welcome screen as shown in Fig 11.

Fig 11
Click on the Install Button to start the installation. It will ask for the installation directory as shown in Fig 12.

Fig 12
Click on the Continue Button to start the installation. It will show the progress as shown in Fig 13 and Fig 14.

Fig 13

Fig 14
Click on the Continue Button to launch the installation manger as shown in Fig 15.

Fig 15
Choose the package GCC as shown in Fig 16.

Fig 16
Click on the Apply Button to apply the changes as shown in Fig 17.

Fig 17
Click on the Apply Changes Button. It will show the confirmation message as shown in Fig 18.

Fig 18
Click on the Apply Button to install GCC. It will show the Package progress as shown in Fig 19 and Fig 20.

Fig 19

Fig 20
Click on the Close Icon and also close the installation manager to complete the installation of the compiler required to compile the programs.
You may add the MinGW path to bin directory which is C:cppmingwbin in my case to system path as we did for MinGW-W64. Make sure that you keep only one compiler path at a time among MinGW and MinGW-W64.
Step 4 — Getting started with C — Hello World
Write your first C program as shown below and save in a file hello.c.
#include<stdio.h>int main() {	printf( "Hello World" );
}
Compile and execute the program using the command as shown below.
# Compile and make executable
gcc hello.c -o hello.exe
It will compile the program and generate the executable i.e. hello.exe. We can simply type hello to execute the program. It will print Hello World on the console as shown in Fig 21.

Fig 21
Step 5 — Getting started with C++ — Hello World
We can repeat the previous step to write the Hello World program in C++. Write your first C++ program as shown below and save it to hello.cpp.
#include<iostream>using namespace std;
int main() {
cout << "Hello World";
return 0;
}
Compile and execute the program using the command as shown below.
# Compile and make executable
g++ hello.cpp -o hello.exe
It will compile the program and generate the executable i.e. hello.exe. We can simply type hello to execute the program. It will print Hello World on the console as shown in Fig 22.

Fig 22
This is how we can install MinGW and MinGW-W64 and configure the system path to access the executables from the command line. We also wrote our first C and CPP programs, compiled and executed them to print Hello World on the console.
Using GCC with MinGW
In this tutorial, you configure Visual Studio Code to use the GCC C++ compiler (g++) and GDB debugger from mingw-w64 to create programs that run on Windows.
After configuring VS Code, you will compile and debug a simple Hello World program in VS Code. This tutorial does not teach you about GCC, GDB, Mingw-w64, or the C++ language. For those subjects, there are many good resources available on the Web.
If you have any problems, feel free to file an issue for this tutorial in the VS Code documentation repository.
Prerequisites
To successfully complete this tutorial, you must do the following steps:
-
Install Visual Studio Code.
-
Install the C/C++ extension for VS Code. You can install the C/C++ extension by searching for ‘c++’ in the Extensions view (⇧⌘X (Windows, Linux Ctrl+Shift+X)).

-
Get the latest version of Mingw-w64 via MSYS2, which provides up-to-date native builds of GCC, Mingw-w64, and other helpful C++ tools and libraries. You can download the latest installer from the MSYS2 page or use this link to the installer.
-
Follow the Installation instructions on the MSYS2 website to install Mingw-w64. Take care to run each required Start menu and
pacmancommand. -
Install the Mingw-w64 toolchain (
pacman -S --needed base-devel mingw-w64-x86_64-toolchain). Run thepacmancommand in a MSYS2 terminal. Accept the default to install all the members in thetoolchaingroup. -
Add the path to your Mingw-w64
binfolder to the WindowsPATHenvironment variable by using the following steps:- In the Windows search bar, type ‘settings’ to open your Windows Settings.
- Search for Edit environment variables for your account.
- Choose the
Pathvariable in your User variables and then select Edit. - Select New and add the Mingw-w64 destination folder path to the system path. The exact path depends on which version of Mingw-w64 you have installed and where you installed it. If you used the settings above to install Mingw-w64, then add this to the path:
C:msys64mingw64bin. - Select OK to save the updated PATH. You will need to reopen any console windows for the new PATH location to be available.

Check your MinGW installation
To check that your Mingw-w64 tools are correctly installed and available, open a new Command Prompt and type:
gcc --version
g++ --version
gdb --version
- If you don’t see the expected output or
g++orgdbis not a recognized command, make sure your PATH entry matches the Mingw-w64 binary location where the compilers are located. If the compilers do not exist at that PATH entry, make sure you followed the instructions on the MSYS2 website to install Mingw-w64. - If
gcchas the correct output but notgdb, then you need to install the packages you are missing from the Mingw-w64 toolset.- Missing the
mingw-w64-gdbpackage is one cause of the «The value of miDebuggerPath is invalid.» message upon attempted compilation if your PATH is correct.
- Missing the
Create Hello World
From a Windows command prompt, create an empty folder called projects where you can place all your VS Code projects. Then create a sub-folder called helloworld, navigate into it, and open VS Code in that folder by entering the following commands:
mkdir projects
cd projects
mkdir helloworld
cd helloworld
code .
The «code .» command opens VS Code in the current working folder, which becomes your «workspace». Accept the Workspace Trust dialog by selecting Yes, I trust the authors since this is a folder you created.
As you go through the tutorial, you will see three files created in a .vscode folder in the workspace:
tasks.json(build instructions)launch.json(debugger settings)c_cpp_properties.json(compiler path and IntelliSense settings)
Add a source code file
In the File Explorer title bar, select the New File button and name the file helloworld.cpp.

Add hello world source code
Now paste in this source code:
#include <iostream>
#include <vector>
#include <string>

using namespace std;

int main()
{
    vector<string> msg {"Hello", "C++", "World", "from", "VS Code", "and the C++ extension!"};

    for (const string& word : msg)
    {
        cout << word << " ";
    }
    cout << endl;
}
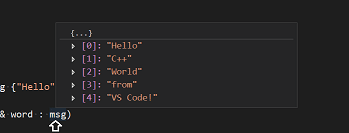
Now press ⌘S (Windows, Linux Ctrl+S) to save the file. Notice how the file you just added appears in the File Explorer view (⇧⌘E (Windows, Linux Ctrl+Shift+E)) in the side bar of VS Code:

You can also enable Auto Save to automatically save your file changes, by checking Auto Save in the main File menu.
The Activity Bar on the far left lets you open different views such as Search, Source Control, and Run. You’ll look at the Run view later in this tutorial. You can find out more about the other views in the VS Code User Interface documentation.
Note: When you save or open a C++ file, you may see a notification from the C/C++ extension about the availability of an Insiders version, which lets you test new features and fixes. You can ignore this notification by selecting the
X(Clear Notification).
Explore IntelliSense
In your new helloworld.cpp file, hover over vector or string to see type information. After the declaration of the msg variable, start typing msg. as you would when calling a member function. You should immediately see a completion list that shows all the member functions, and a window that shows the type information for the msg object:
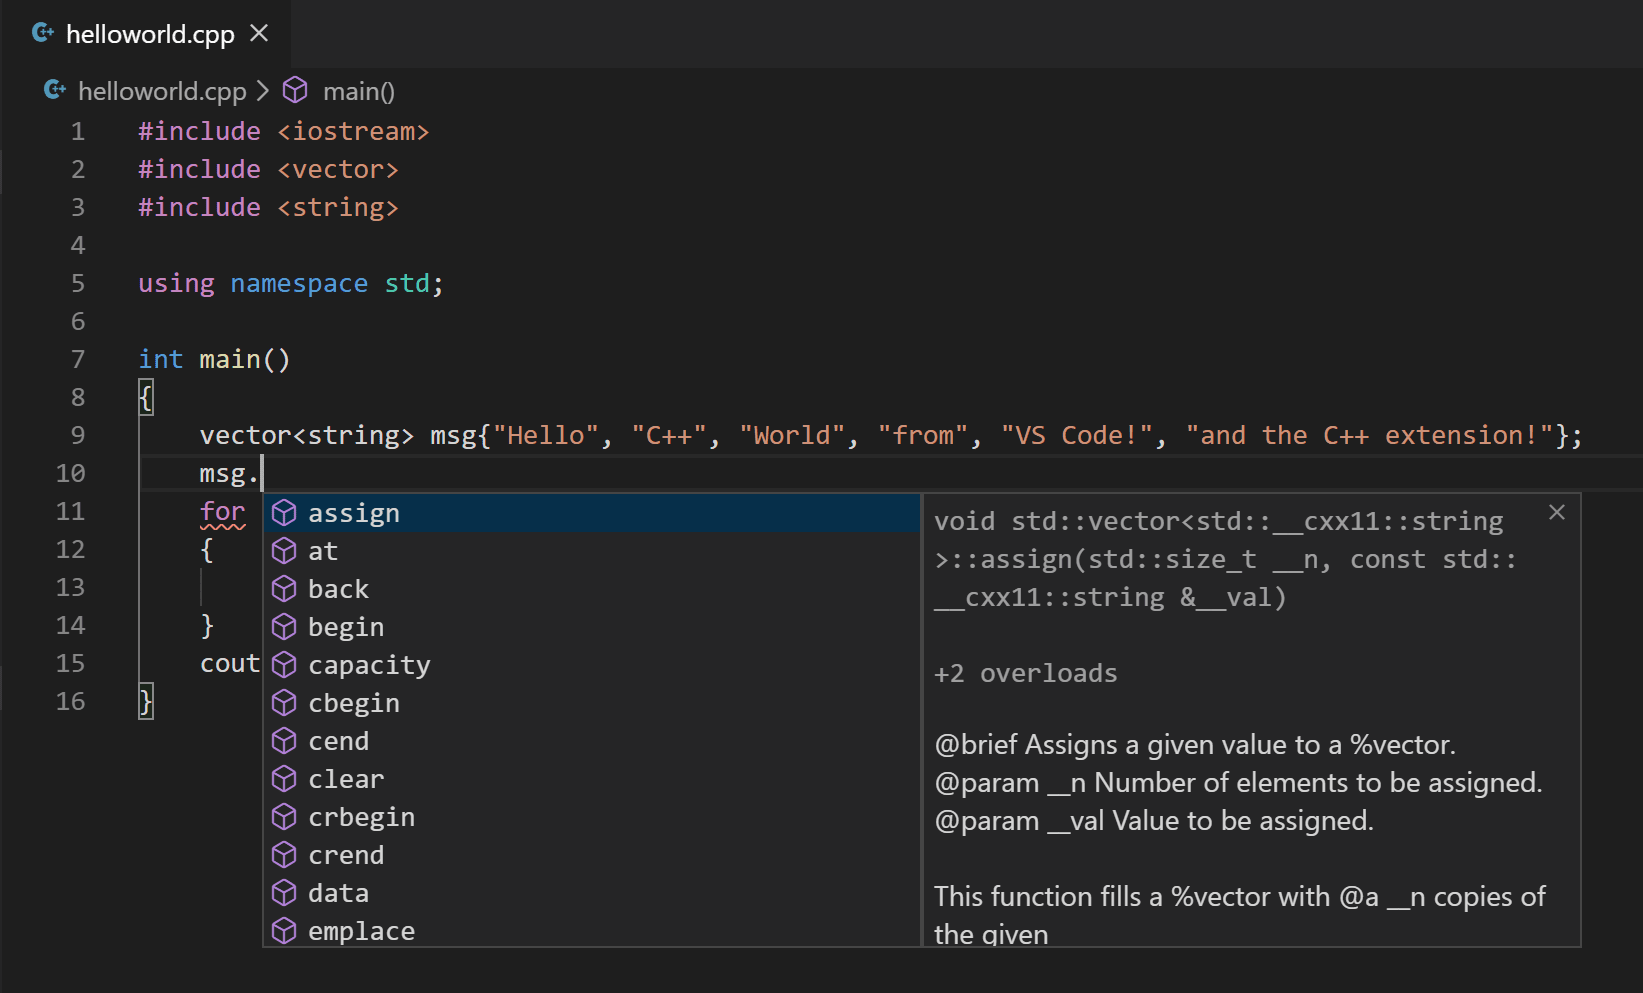
You can press the Tab key to insert the selected member; then, when you add the opening parenthesis, you will see information about any arguments that the function requires.
Run helloworld.cpp
Remember, the C++ extension uses the C++ compiler you have installed on your machine to build your program. Make sure you have a C++ compiler installed before attempting to run and debug helloworld.cpp in VS Code.
-
Open
helloworld.cppso that it is the active file. -
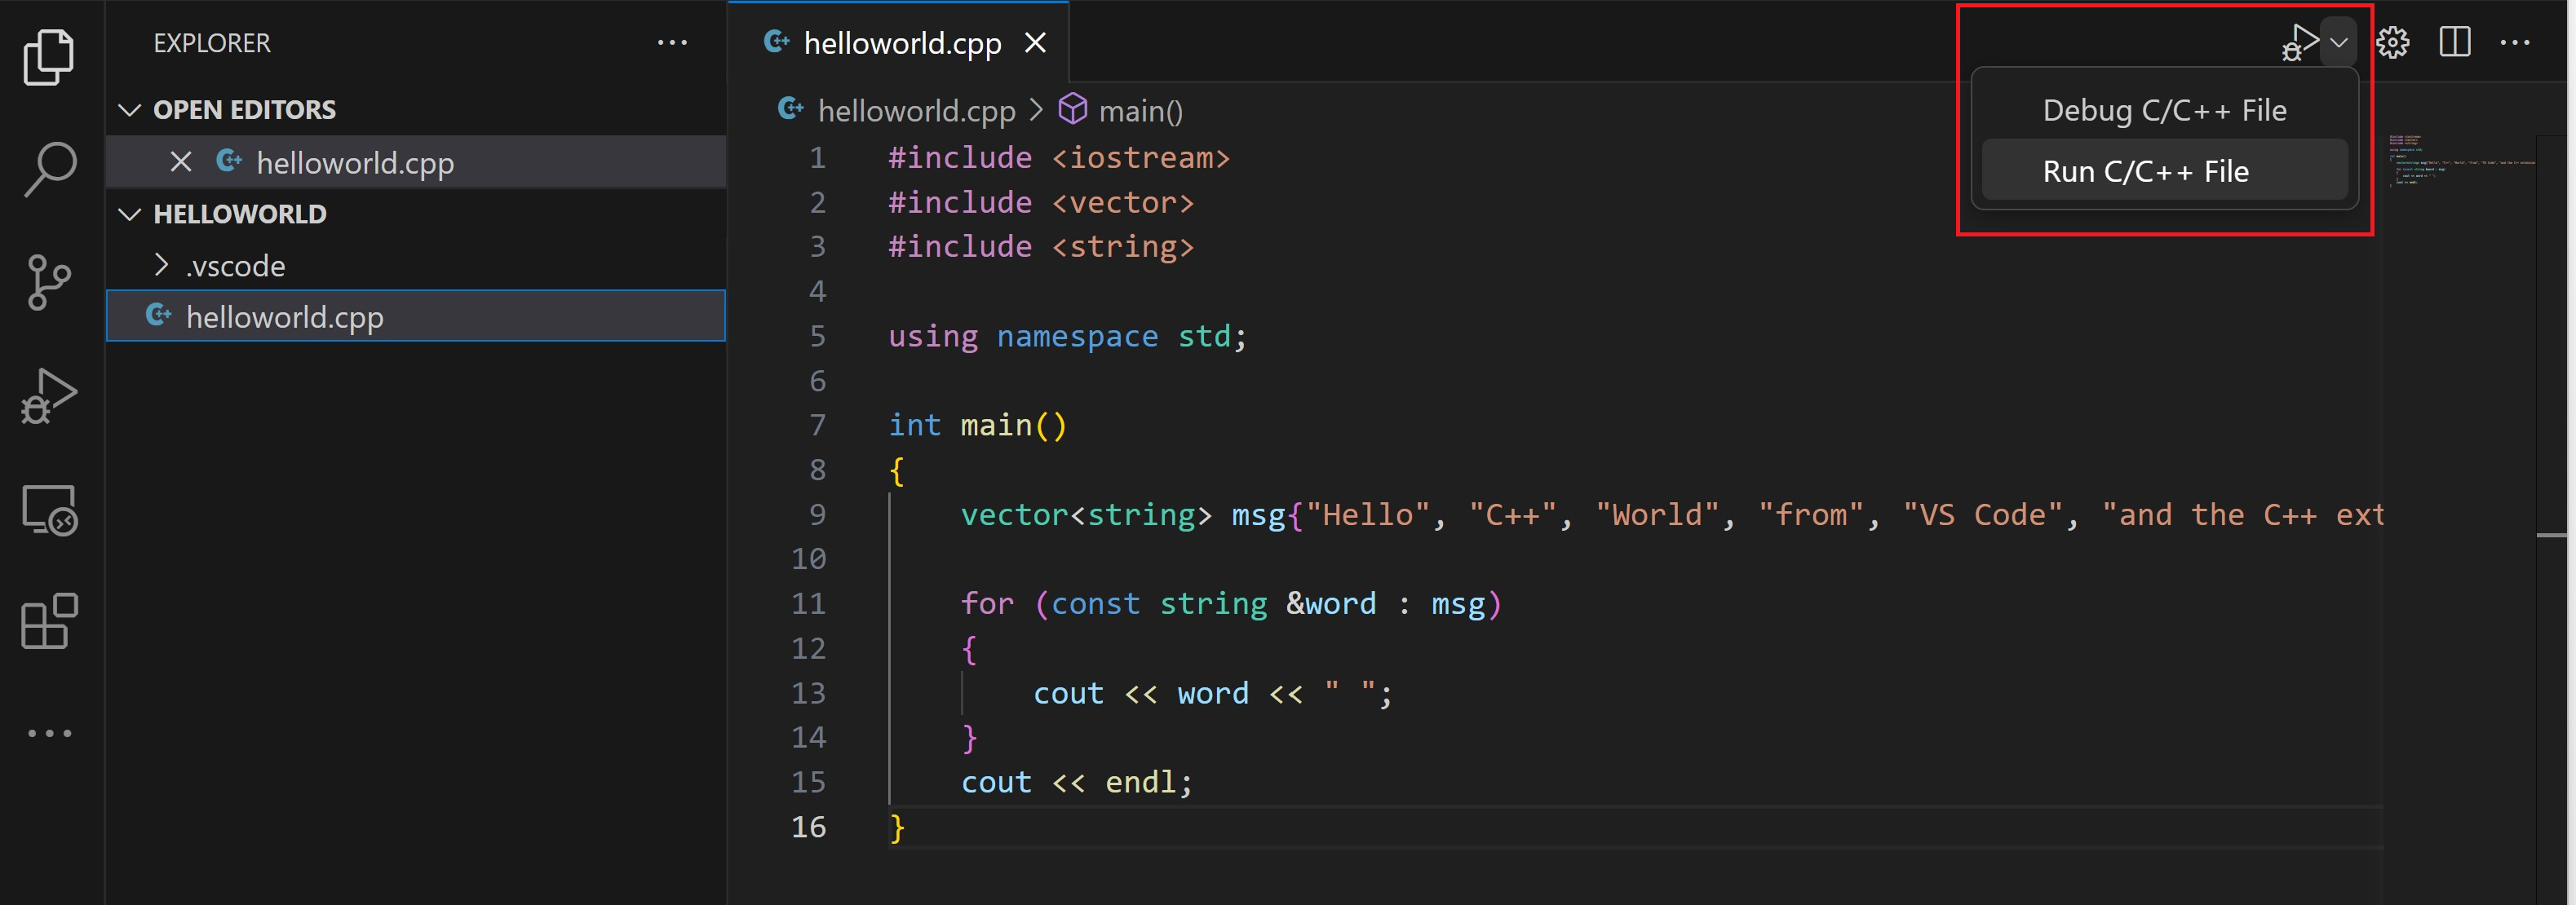
Press the play button in the top right corner of the editor.
-
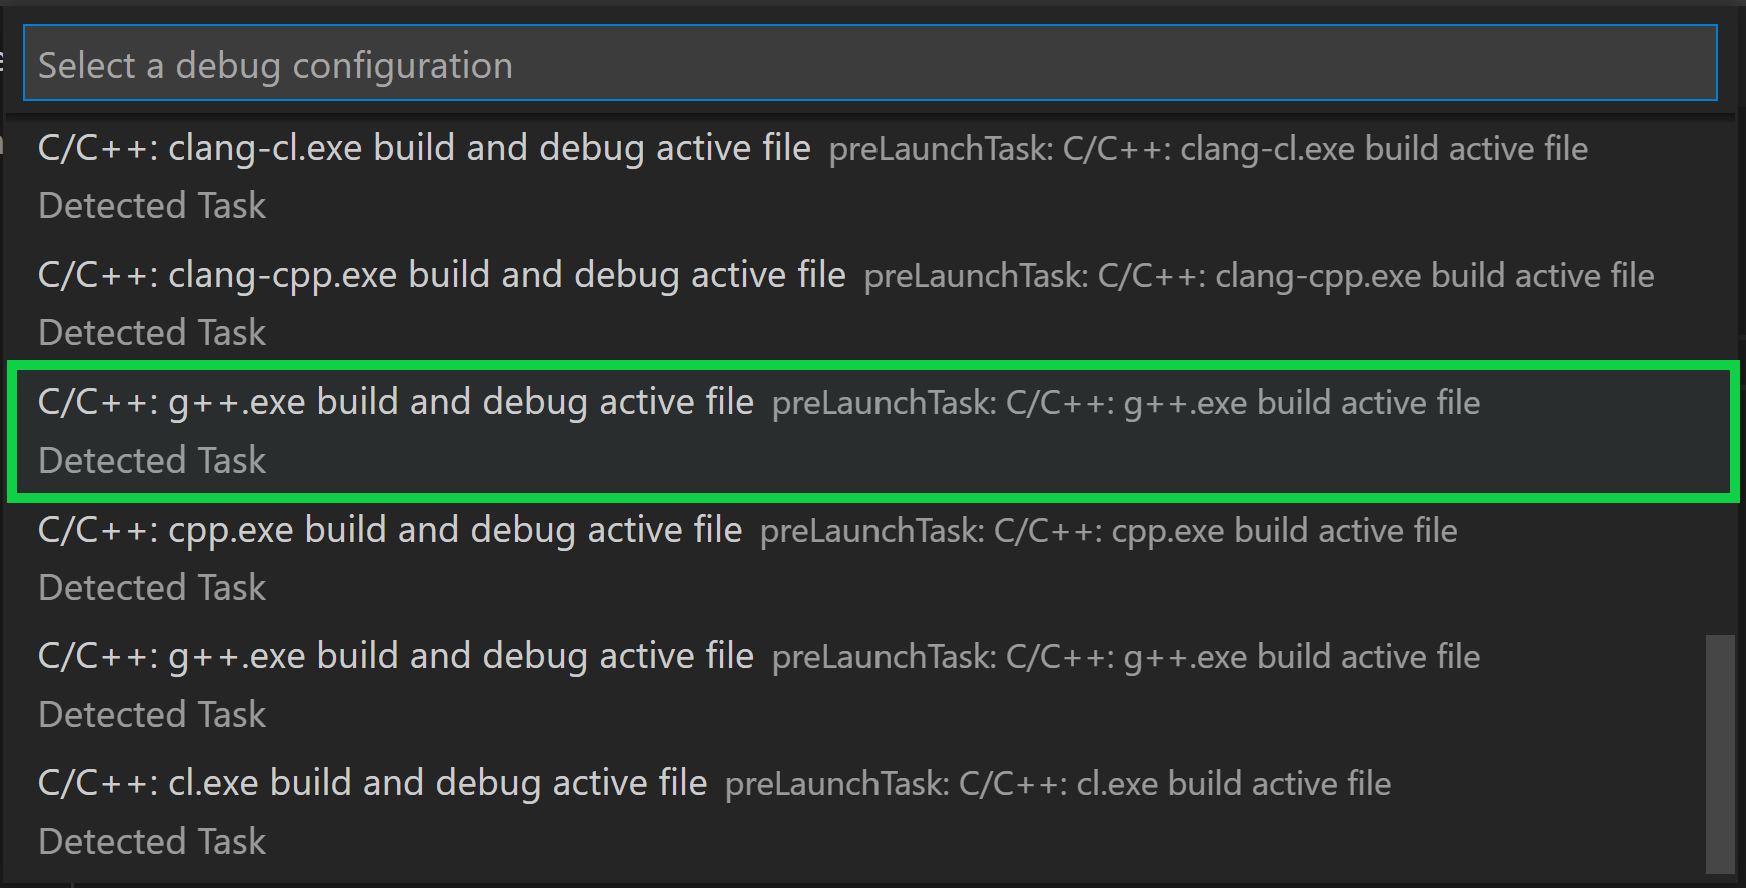
Choose C/C++: g++.exe build and debug active file from the list of detected compilers on your system.
You’ll only be asked to choose a compiler the first time you run helloworld.cpp. This compiler will be set as the «default» compiler in tasks.json file.
-
After the build succeeds, your program’s output will appear in the integrated Terminal.

The first time you run your program, the C++ extension creates tasks.json, which you’ll find in your project’s .vscode folder. tasks.json stores build configurations.
Your new tasks.json file should look similar to the JSON below:
{
  "tasks": [
    {
      "type": "cppbuild",
      "label": "C/C++: g++.exe build active file",
      "command": "C:\msys64\mingw64\bin\g++.exe",
      "args": [
        "-fdiagnostics-color=always",
        "-g",
        "${file}",
        "-o",
        "${fileDirname}\${fileBasenameNoExtension}.exe"
      ],
      "options": {
        "cwd": "${fileDirname}"
      },
      "problemMatcher": ["$gcc"],
      "group": {
        "kind": "build",
        "isDefault": true
      },
      "detail": "Task generated by Debugger."
    }
  ],
  "version": "2.0.0"
}
Note: You can learn more about
tasks.jsonvariables in the variables reference.
The command setting specifies the program to run; in this case that is g++.
The args array specifies the command-line arguments that will be passed to g++. These arguments must be specified in the order expected by the compiler.
This task tells g++ to take the active file (${file}), compile it, and create an executable file in the current directory (${fileDirname}) with the same name as the active file but with the .exe extension (${fileBasenameNoExtension}.exe), resulting in helloworld.exe for our example.
The label value is what you will see in the tasks list; you can name this whatever you like.
The detail value is what you will as the description of the task in the tasks list. It’s highly recommended to rename this value to differentiate it from similar tasks.
From now on, the play button will read from tasks.json to figure out how to build and run your program. You can define multiple build tasks in tasks.json, and whichever task is marked as the default will be used by the play button. In case you need to change the default compiler, you can run Tasks: Configure default build task. Alternatively you can modify the tasks.json file and remove the default by replacing this segment:
    "group": {
        "kind": "build",
        "isDefault": true
    },
with this:
"group": "build",
Modifying tasks.json
You can modify your tasks.json to build multiple C++ files by using an argument like "${workspaceFolder}/*.cpp" instead of ${file}.This will build all .cpp files in your current folder. You can also modify the output filename by replacing "${fileDirname}\${fileBasenameNoExtension}.exe" with a hard-coded filename (for example "${workspaceFolder}\myProgram.exe").
Debug helloworld.cpp
- Go back to
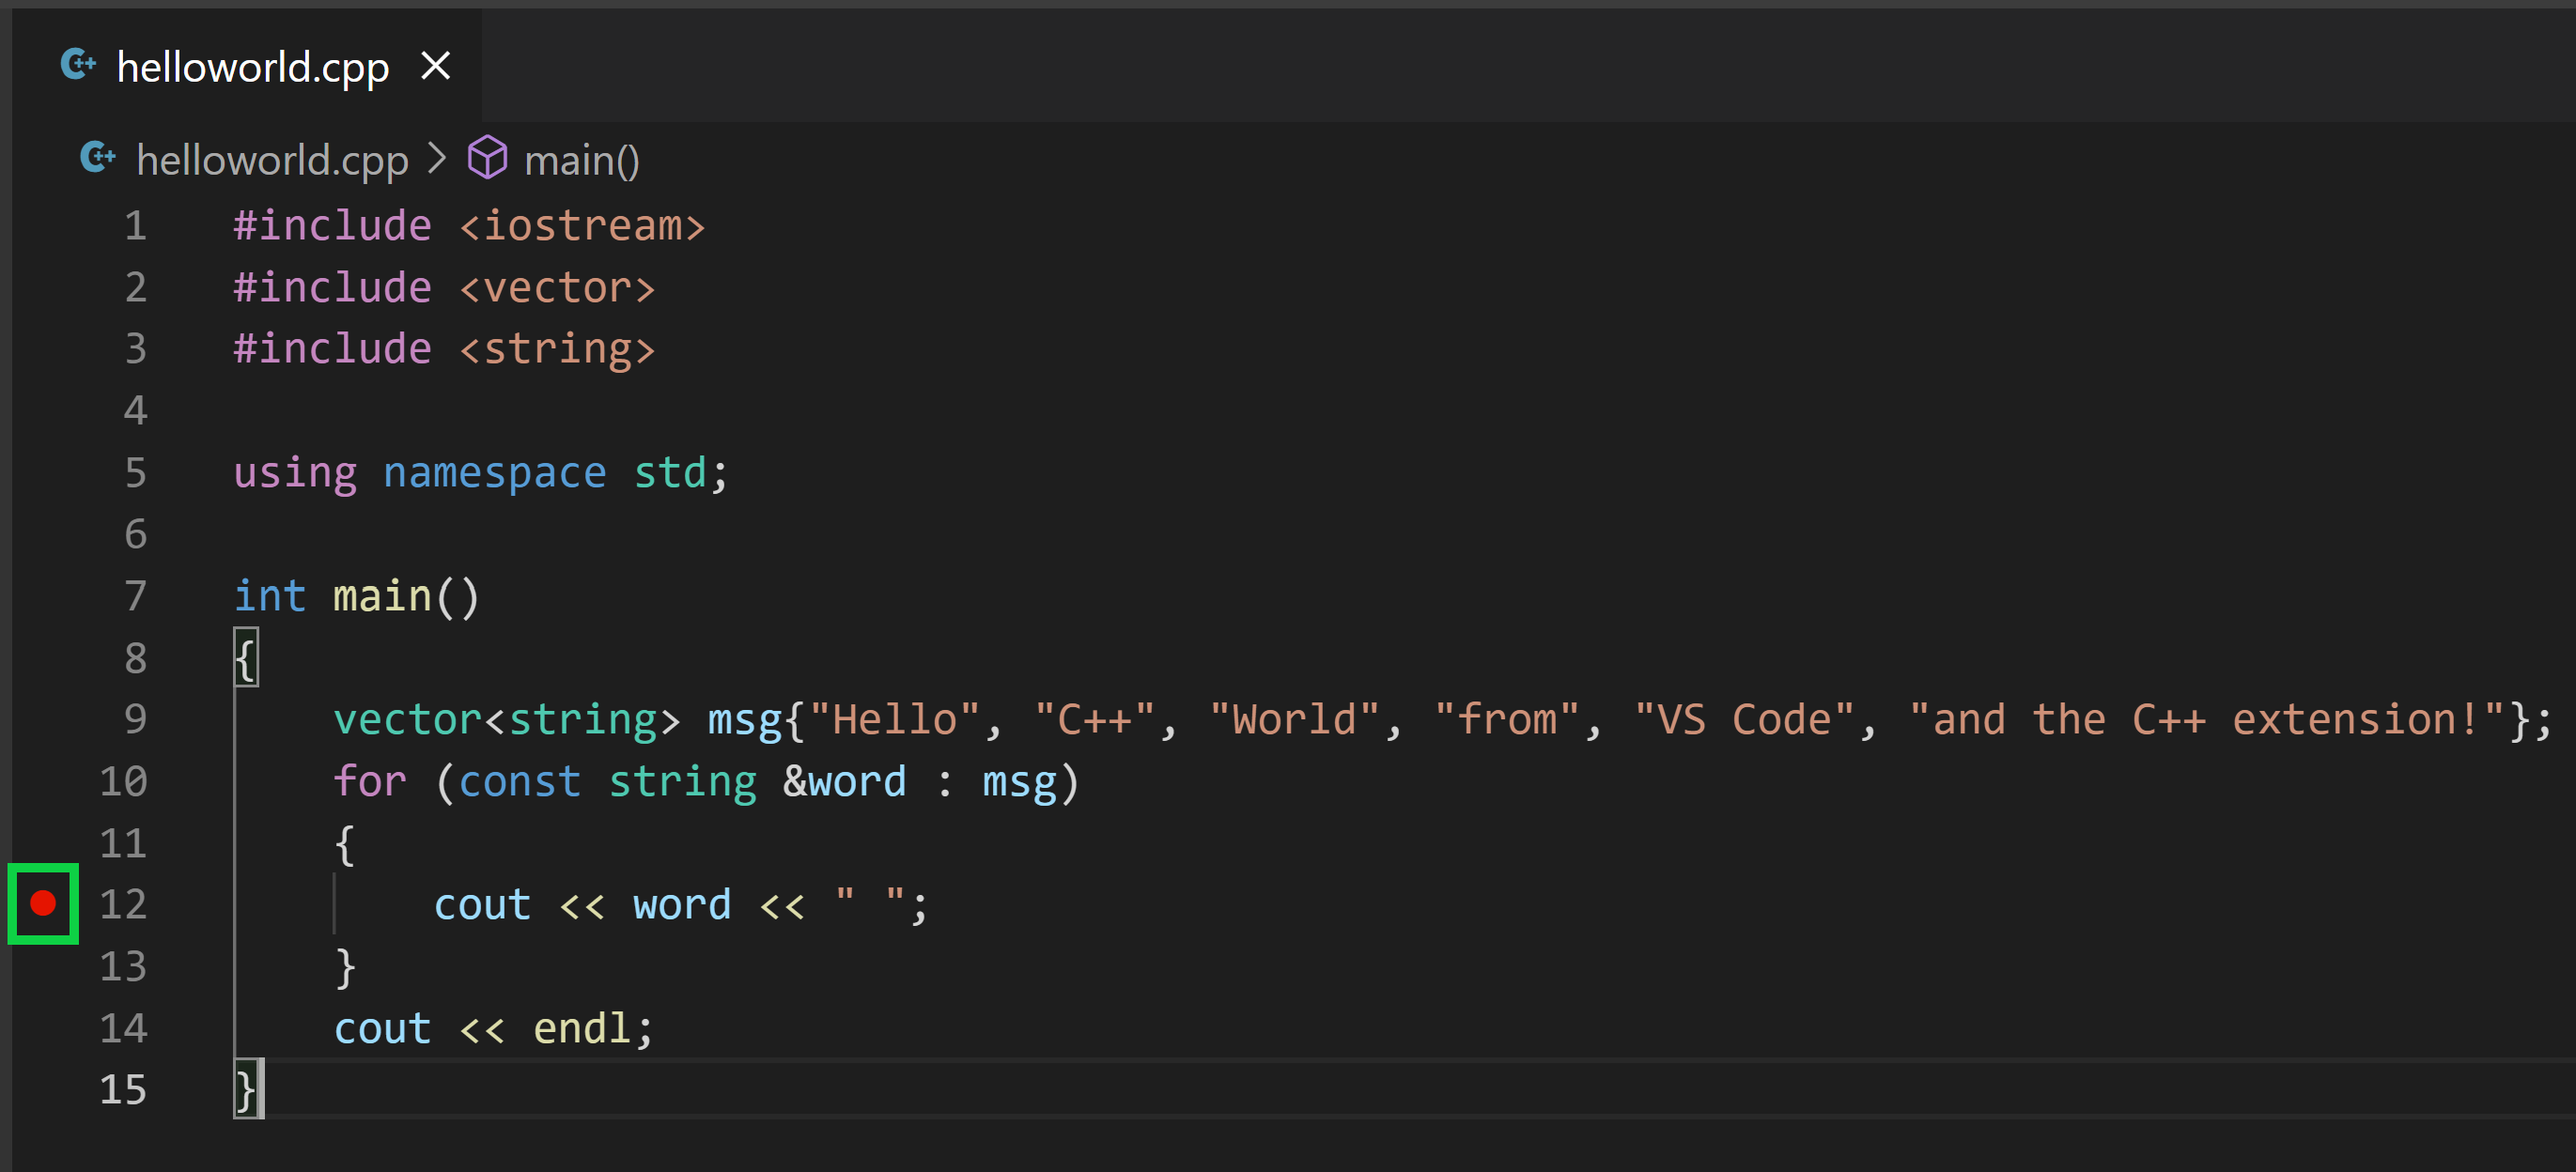
helloworld.cppso that it is the active file. - Set a breakpoint by clicking on the editor margin or using F9 on the current line.
- From the drop-down next to the play button, select Debug C/C++ File.
- Choose C/C++: g++ build and debug active file from the list of detected compilers on your system (you’ll only be asked to choose a compiler the first time you run/debug
helloworld.cpp).
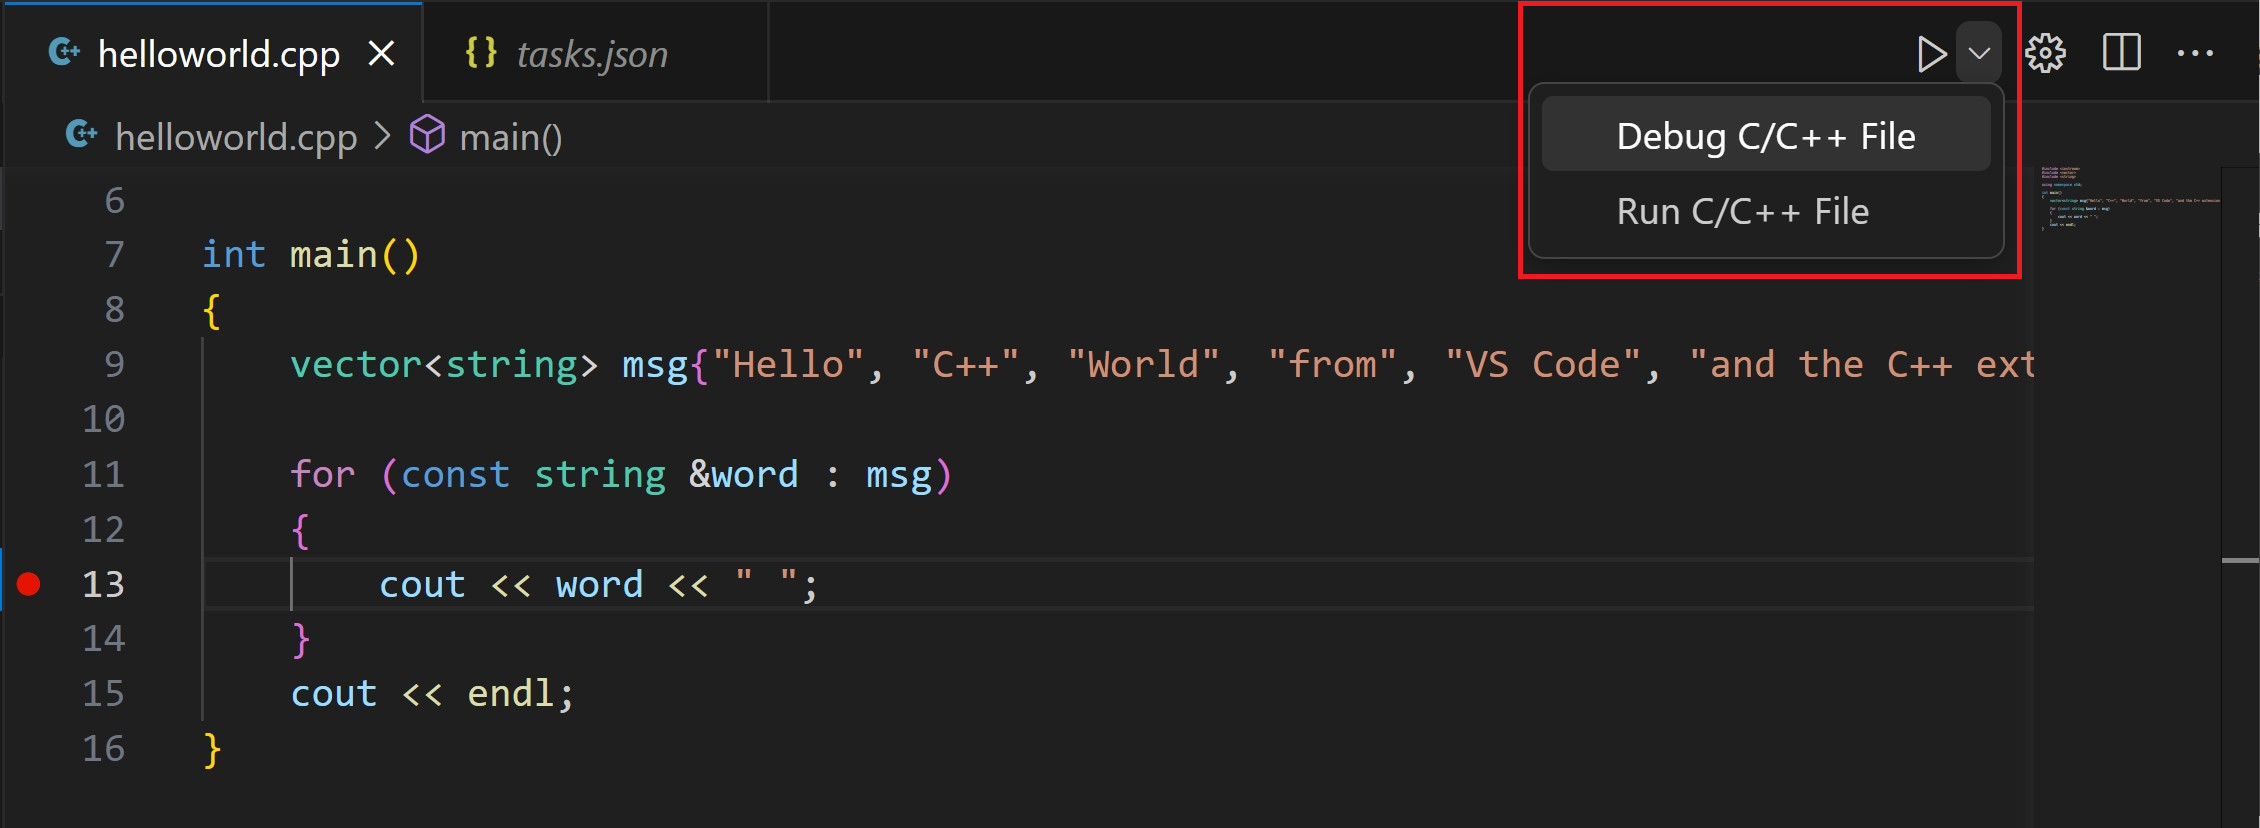
The play button has two modes: Run C/C++ File and Debug C/C++ File. It will default to the last-used mode. If you see the debug icon in the play button, you can just click the play button to debug, instead of using the drop-down.

Explore the debugger
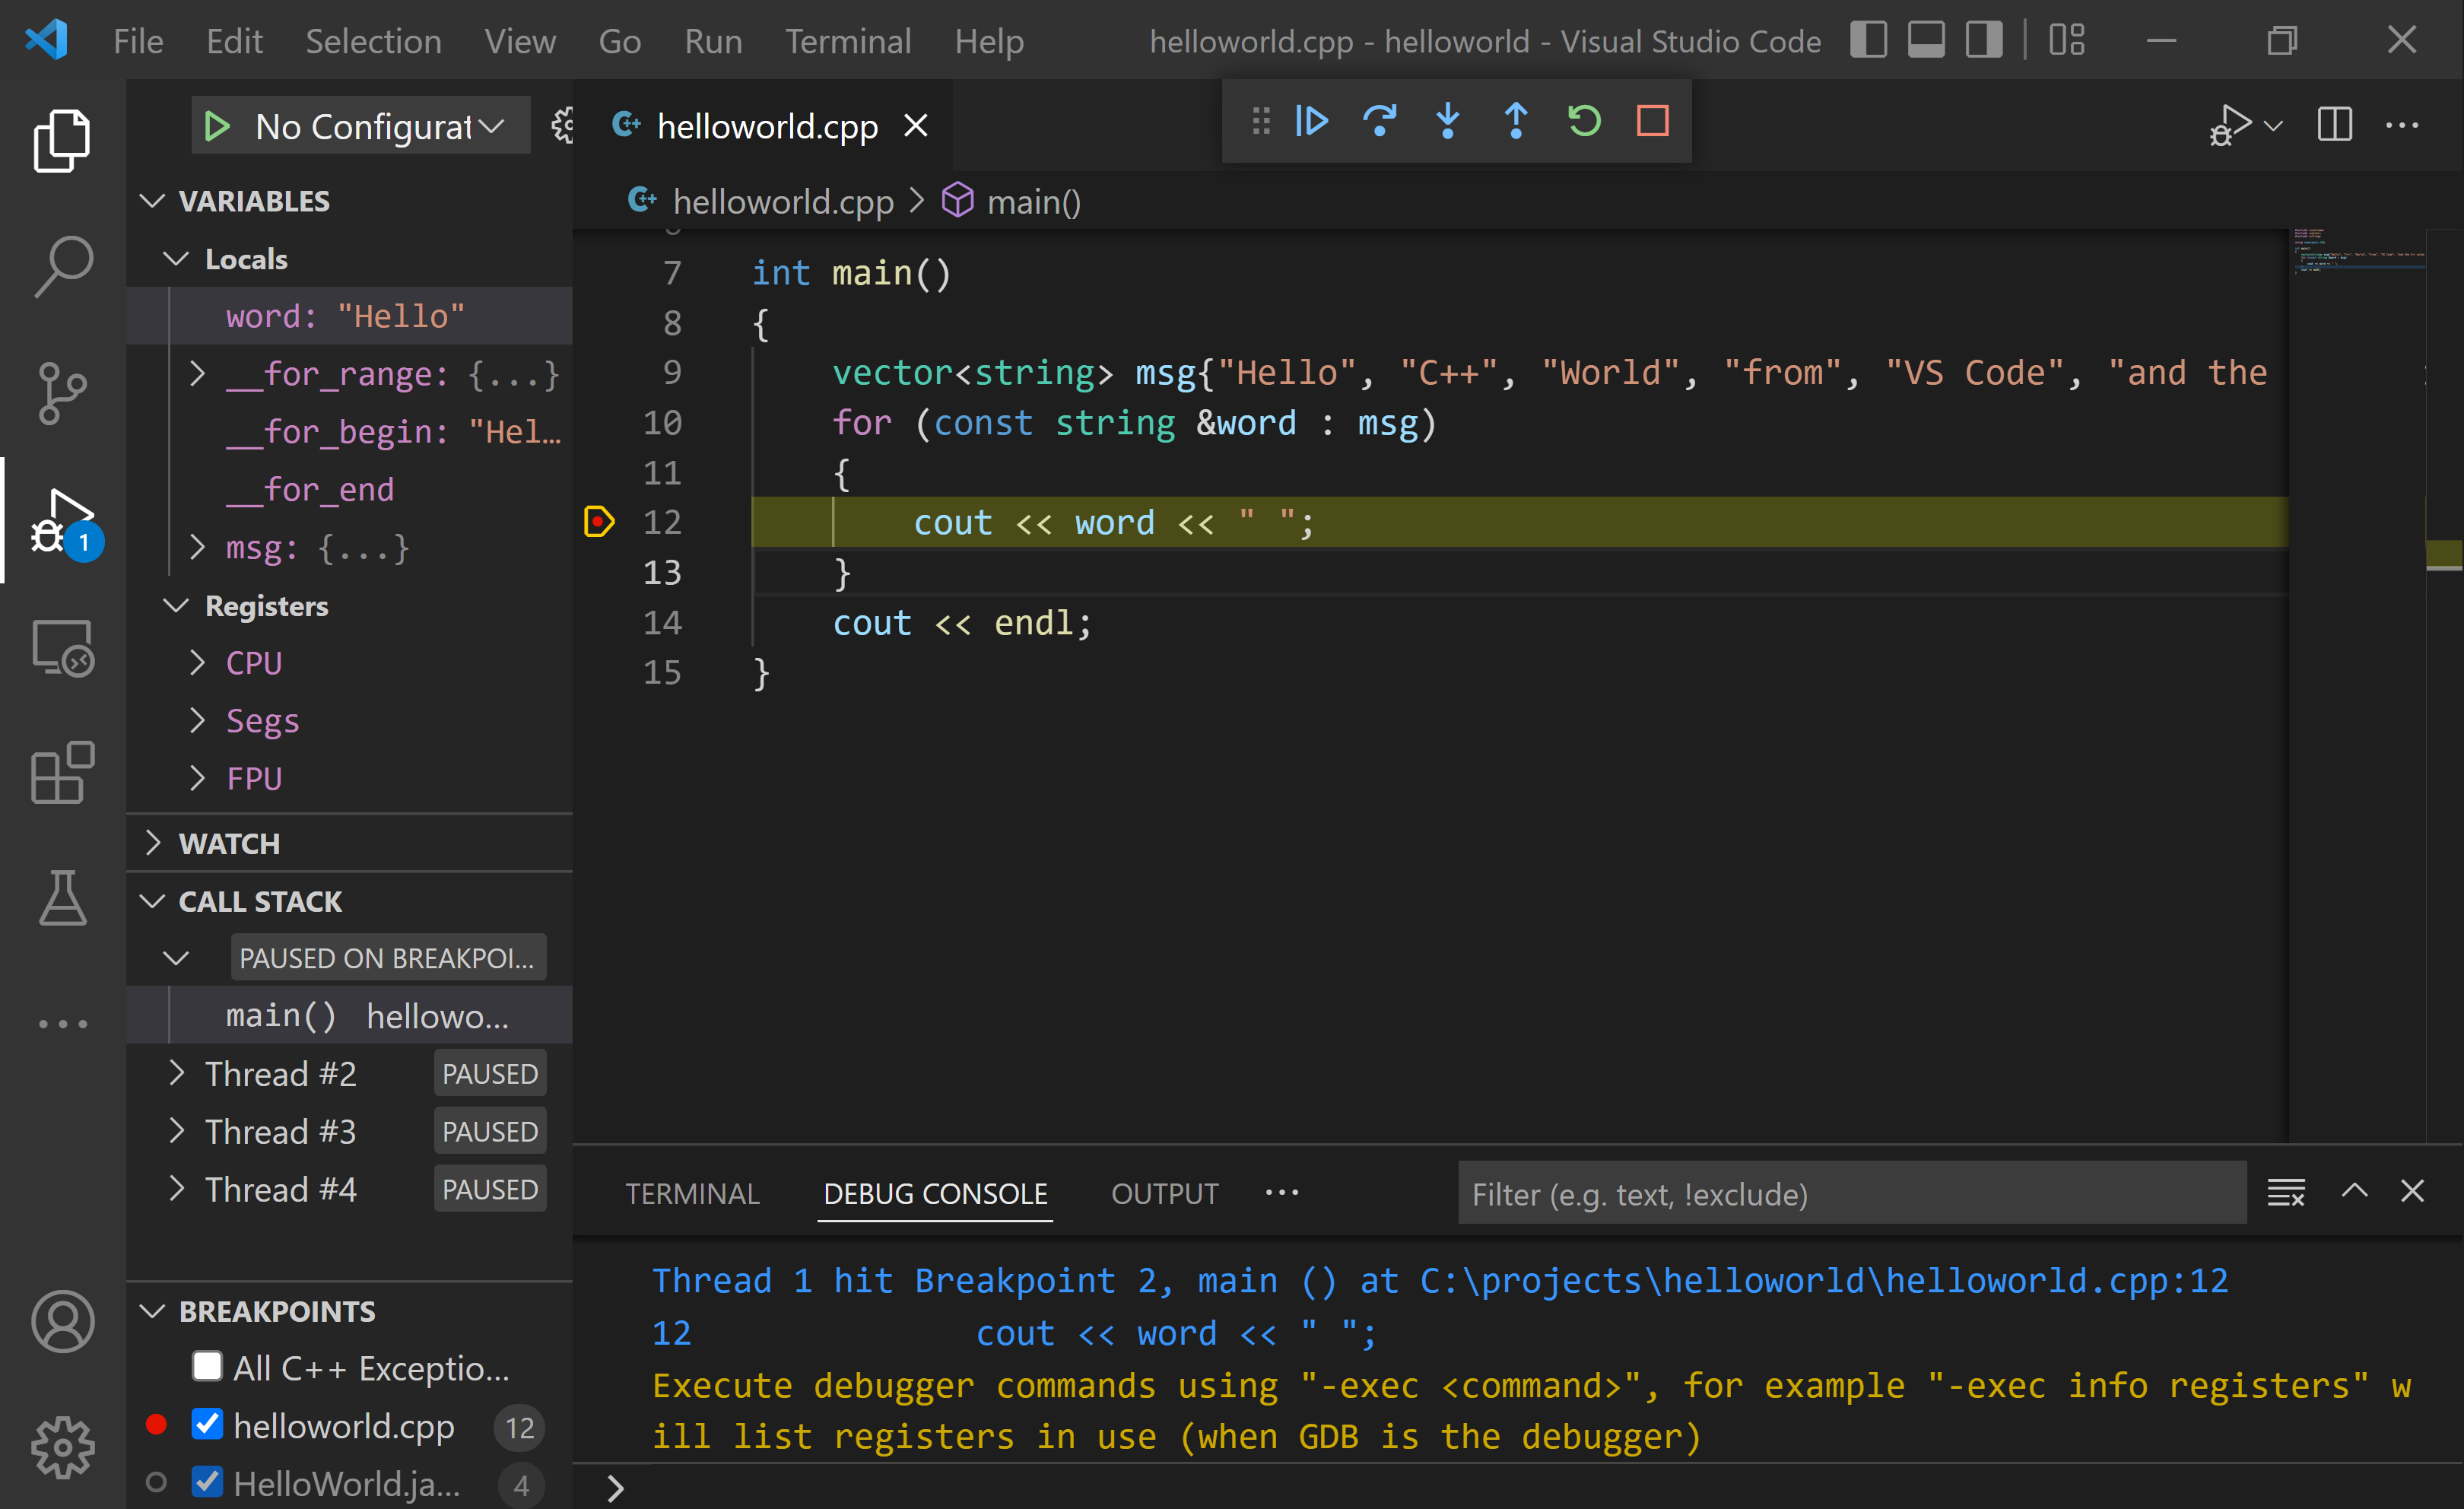
Before you start stepping through the code, let’s take a moment to notice several changes in the user interface:
-
The Integrated Terminal appears at the bottom of the source code editor. In the Debug Output tab, you see output that indicates the debugger is up and running.
-
The editor highlights the line where you set a breakpoint before starting the debugger:
-
The Run and Debug view on the left shows debugging information. You’ll see an example later in the tutorial.
-
At the top of the code editor, a debugging control panel appears. You can move this around the screen by grabbing the dots on the left side.

Step through the code
Now you’re ready to start stepping through the code.
-
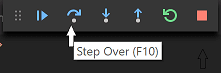
Click or press the Step over icon in the debugging control panel.
This will advance program execution to the first line of the for loop, and skip over all the internal function calls within the
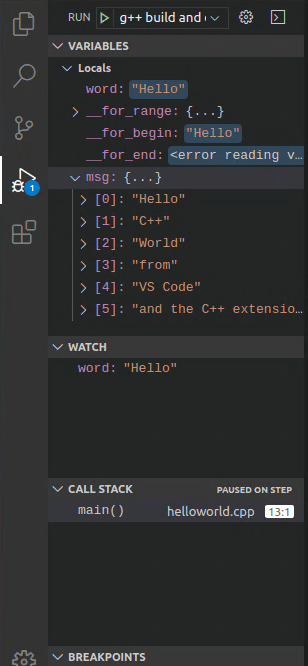
vectorandstringclasses that are invoked when themsgvariable is created and initialized. Notice the change in the Variables window on the left.In this case, the errors are expected because, although the variable names for the loop are now visible to the debugger, the statement has not executed yet, so there is nothing to read at this point. The contents of
msgare visible, however, because that statement has completed. -
Press Step over again to advance to the next statement in this program (skipping over all the internal code that is executed to initialize the loop). Now, the Variables window shows information about the loop variables.
-
Press Step over again to execute the
coutstatement. (Note that as of the March 2019 release, the C++ extension does not print any output to the Debug Console until the loop exits.) -
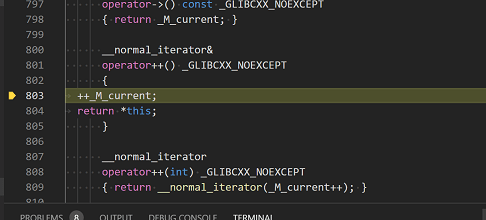
If you like, you can keep pressing Step over until all the words in the vector have been printed to the console. But if you are curious, try pressing the Step Into button to step through source code in the C++ standard library!
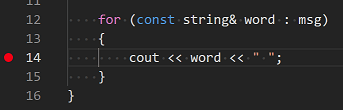
To return to your own code, one way is to keep pressing Step over. Another way is to set a breakpoint in your code by switching to the
helloworld.cpptab in the code editor, putting the insertion point somewhere on thecoutstatement inside the loop, and pressing F9. A red dot appears in the gutter on the left to indicate that a breakpoint has been set on this line.Then press F5 to start execution from the current line in the standard library header. Execution will break on
cout. If you like, you can press F9 again to toggle off the breakpoint.When the loop has completed, you can see the output in the Integrated Terminal, along with some other diagnostic information that is output by GDB.

Set a watch
Sometimes you might want to keep track of the value of a variable as your program executes. You can do this by setting a watch on the variable.
-
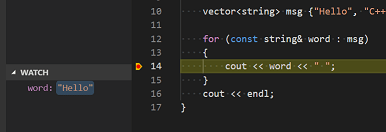
Place the insertion point inside the loop. In the Watch window, click the plus sign and in the text box, type
word, which is the name of the loop variable. Now view the Watch window as you step through the loop. -
Add another watch by adding this statement before the loop:
int i = 0;. Then, inside the loop, add this statement:++i;. Now add a watch forias you did in the previous step. -
To quickly view the value of any variable while execution is paused on a breakpoint, you can hover over it with the mouse pointer.
Customize debugging with launch.json
When you debug with the play button or F5, the C++ extension creates a dynamic debug configuration on the fly.
There are cases where you’d want to customize your debug configuration, such as specifying arguments to pass to the program at runtime. You can define custom debug configurations in a launch.json file.
To create launch.json, choose Add Debug Configuration from the play button drop-down menu.

You’ll then see a dropdown for various predefined debugging configurations. Choose C/C++: g++.exe build and debug active file.
VS Code creates a launch.json file, which looks something like this:
{
  "version": "0.2.0",
  "configurations": [
    {
      "name": "C/C++: g++.exe build and debug active file",
      "type": "cppdbg",
      "request": "launch",
      "program": "${fileDirname}\${fileBasenameNoExtension}.exe",
      "args": [],
      "stopAtEntry": false,
      "cwd": "${fileDirname}",
      "environment": [],
      "externalConsole": false,
      "MIMode": "gdb",
      "miDebuggerPath": "C:\msys64\mingw64\bin\gdb.exe",
      "setupCommands": [
        {
          "description": "Enable pretty-printing for gdb",
          "text": "-enable-pretty-printing",
          "ignoreFailures": true
        }
      ],
      "preLaunchTask": "C/C++: g++.exe build active file"
    }
  ]
}
In the JSON above, program specifies the program you want to debug. Here it is set to the active file folder (${fileDirname}) and active filename with the .exe extension (${fileBasenameNoExtension}.exe), which if helloworld.cpp is the active file will be helloworld.exe. The args property is an array of arguments to pass to the program at runtime.
By default, the C++ extension won’t add any breakpoints to your source code and the stopAtEntry value is set to false.
Change the stopAtEntry value to true to cause the debugger to stop on the main method when you start debugging.
From now on, the play button and F5 will read from your
launch.jsonfile when launching your program for debugging.
C/C++ configurations
If you want more control over the C/C++ extension, you can create a c_cpp_properties.json file, which will allow you to change settings such as the path to the compiler, include paths, C++ standard (default is C++17), and more.
You can view the C/C++ configuration UI by running the command C/C++: Edit Configurations (UI) from the Command Palette (⇧⌘P (Windows, Linux Ctrl+Shift+P)).

This opens the C/C++ Configurations page. When you make changes here, VS Code writes them to a file called c_cpp_properties.json in the .vscode folder.
Here, we’ve changed the Configuration name to GCC, set the Compiler path dropdown to the g++ compiler, and the IntelliSense mode to match the compiler (gcc-x64).

Visual Studio Code places these settings in .vscodec_cpp_properties.json. If you open that file directly, it should look something like this:
{
  "configurations": [
    {
      "name": "GCC",
      "includePath": ["${workspaceFolder}/**"],
      "defines": ["_DEBUG", "UNICODE", "_UNICODE"],
      "windowsSdkVersion": "10.0.18362.0",
      "compilerPath": "C:/msys64/mingw64/bin/g++.exe",
      "cStandard": "c17",
      "cppStandard": "c++17",
      "intelliSenseMode": "windows-gcc-x64"
    }
  ],
  "version": 4
}
You only need to add to the Include path array setting if your program includes header files that are not in your workspace or in the standard library path.
Compiler path
The extension uses the compilerPath setting to infer the path to the C++ standard library header files. When the extension knows where to find those files, it can provide features like smart completions and Go to Definition navigation.
The C/C++ extension attempts to populate compilerPath with the default compiler location based on what it finds on your system. The extension looks in several common compiler locations.
The compilerPath search order is:
- First check for the Microsoft Visual C++ compiler
- Then look for g++ on Windows Subsystem for Linux (WSL)
- Then g++ for Mingw-w64.
If you have Visual Studio or WSL installed, you may need to change compilerPath to match the preferred compiler for your project. For example, if you installed Mingw-w64 version 8.1.0 using the i686 architecture, Win32 threading, and sjlj exception handling install options, the path would look like this: C:Program Files (x86)mingw-w64i686-8.1.0-win32-sjlj-rt_v6-rev0mingw64bing++.exe.
Troubleshooting
MSYS2 is installed, but g++ and gdb are still not found
You must follow the steps on the MSYS2 website and use the MSYS CLI to install Mingw-w64, which contains those tools. You will also need to install the full Mingw-w64 toolchain (pacman -S --needed base-devel mingw-w64-x86_64-toolchain) to get the gdb debugger.
MinGW 32-bit
If you need a 32-bit version of the MinGW toolset, consult the Downloading section on the MSYS2 wiki. It includes links to both 32-bit and 64-bit installation options.
Next steps
- Explore the VS Code User Guide.
- Review the Overview of the C++ extension.
- Create a new workspace, copy your
.vscodeJSON files to it, adjust the necessary settings for the new workspace path, program name, and so on, and start coding!
5/13/2022