The Mosquitto or MQTT broker is an OASIS standard messaging protocol for IoT. The inculcation of IoT in modern-day lives has pulled MQTT in the picture. Being a lightweight messaging transport that can remotely connect devices, MQTT tutorials were in much demand. So, here we portray one tutorial for the installation of Mosquitto MQTT broker Windows.
There exist three different ways of installing Mosquitto broker on Windows.
- Standard install
- Quick install
- Windows PowerShell install
We will first see the basic one, i.e., the Standard Install. And then move on to the Quick and PowerShell installation methods.
Method 1: Standard or Manual Installation of MQTT Broker on Windows
When obeying this standard procedure, you will have to install certain other dependencies.
To start with the manual installation procedure, the pre-requisite is to download files from Eclipse as a part of the dependencies.
Mosquitto can be downloaded as a service since version 15.8. In this case, Mosquitto starts automatically.
But before these, you need to install the Windows installation files.
So now, let’s move on to the installation steps.
1: Double click on install script.
2: The “Dependencies” screen will appear, which will tell you about the required additional files.

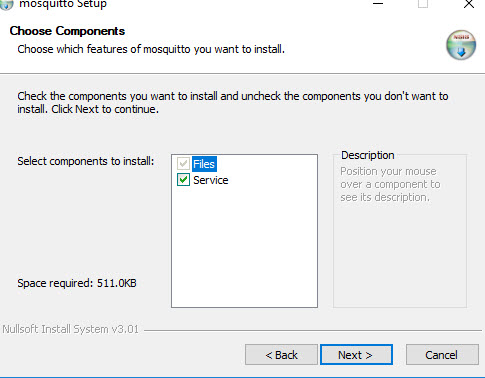
3: In the “Choose Components” page, tick the box that will install Mosquitto as a “Service.”

4: By default, the location of installation will be set at C: program filesmosquitto. If you want to install the service somewhere else, you can browse to that particular location.
5: Click on “Finish” to complete the process.
After the above steps get executed successfully, you now need to copy the additional files to the install directory.
Two additional files will be available for copying, as listed below:
- libcrypto-1_1_x64.dll
- libssl-1_1_x64.dll
Point to Note: These files are included in the 1.5.8 install package. And you can also get these files by installing OpenSSL.
Starting MQTT on Your Windows Device
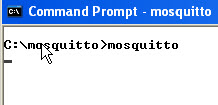
For manual starting of the MQTT broker, open “Command Window.” Navigate to the directory where you installed Mosquitto and type mosquitto.
If saved in C drive, the command will appear as: C:mosquitto>mosquitto

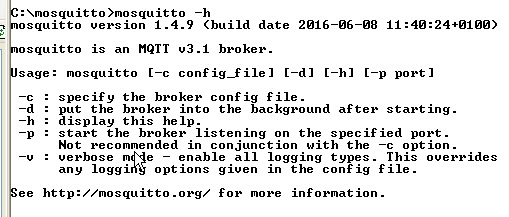
If you want to use command-line switches, type
mosquitto -h
It will open the “Help” section for you, as shown in the below-given snapshot.

The command mosquitto -v will let you start in verbose mode, and you can thus see the console messages.

Method 2: Quick Installation of MQTT Broker Windows
Many people don’t prefer the traditional manual way of installing an MQTT broker. It is because the manual process involves the installation of many other dependencies. To avoid the hectic process of copying files from here to there and finding sources to download the dependencies, many users have shifted to the Quick install process.
The mosquitto version 1.5.8 works well with WebSockets.
While Quick installation, you can take the help of online sites that offer quick links for downloading all the packages at one go. Then, you can unzip the folders in the directory where you have kept MQTT. Henceforth, follow the steps as discussed for standard installation.
Method 3: MQTT Installation via PowerShell
It is an alternative installation process involving Windows PowerShell.
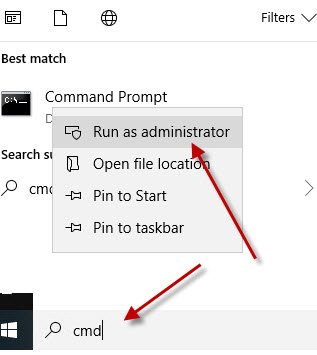
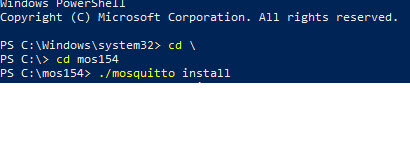
1: Open the PowerShell Command prompt by selecting “Run as Administrator” option.

2: Chose the directory where you want to install mosquitto and type the below command:
./mosquitto install

3: Mosquitto will get installed, but you won’t get any notification.
4: To start mosquitto, reboot your device, or start it manually.
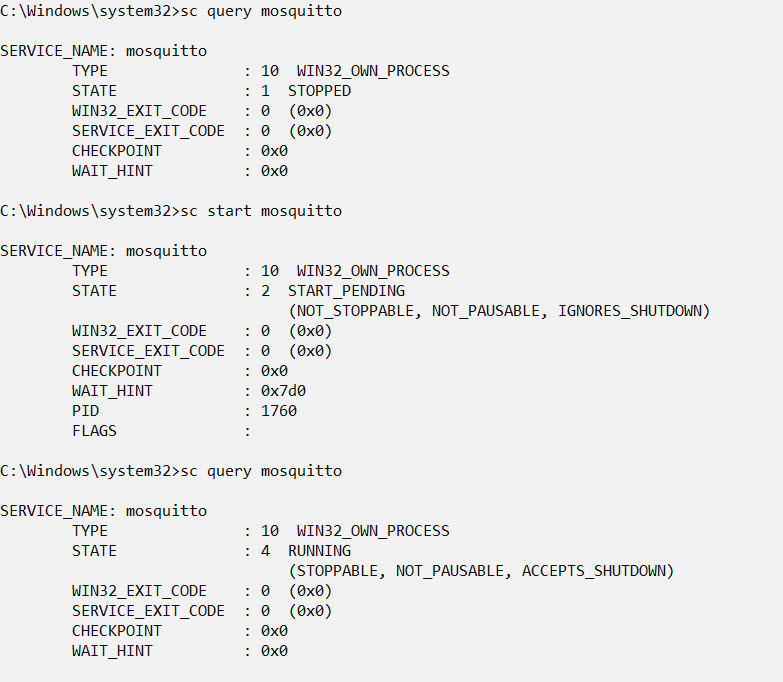
5: Open the regular command prompt as Administrator and type the following codes. Make sure it is in the same given sequence.
- sc query mosquitto, sc start mosquitto, sc query mosquitto
Testing the Installation
Now that you have done your part of the installation, how can you confirm whether the process got executed successfully?
Well, it is simple.
- Open command window
- Type down the below command
- netstat -a
The format should be as follows:
C: Users username> netstat -a
An instance is shown below.

Running the command should show you that the MQTT broker is running on port 1883.
So, these were some of the ways to install the Mosquitto MQTT broker Windows. I hope the tutorial will be beneficial for you.
![]() In this tutorial you will learn how to install the mosquitto MQTT broker (server) on Windows.
In this tutorial you will learn how to install the mosquitto MQTT broker (server) on Windows.
See the installing Mosquitto on Linux tutorial for how to install on a local Linux server and also a cloud server (AWS).
Installing The Mosquitto Broker on Windows
Note: The term server instead of broker as been adopted as of MQTT version 3.1.1
There are two possibilities:
- Quick Install
- Standard Install
Quick Windows Install
The problem with the standard install is that there are certain dependencies that need to be installed before you can do the mosquitto install.
This involves installing software and copying files from other installs into the Mosquitto install folder.
You should note that from version 1.5 on support for windows XP was dropped, so if you need to run mosquitto on XP the you need to use an older version.
The version will also run on Windows ,7,8 and 10. It doesn’t have web sockets support.
This tutorial cover the Install on XP and includes the download files
Quick Install Mosquitto v 1.5.8 and 1.6.9
This version of Mosquitto works with websockets.
Here is my download package for v2
Here is my download package (1.6.9)and includes the SSL files for encryption .
Here is my download package ( 1.5.8) and includes the SSL files for encryption .
Just unzip it go to the directory and run the broker manually as covered here.
Don’t forget to virus check it let me know if you have any problems with it.
Video – How to Install Mosquitto Broker on Windows
Websockets on Windows Notes
Since mosquitto 1.5.1 websockets support has been enabled on the windows binary files.
However when using 1.5.1., 1.52 and 1.53 when you start mosquitto it appears to be listening on the websocket port but doesn’t allow connections.
mosquitto v 1.5.4 and above works with websockets.
Manual Install Windows
To install manually you will need to download the files from Eclipse. Here is the link.
As mentioned earlier the big problem with the Windows Install is that there are lots of dependencies that you also need to install or have installed.
From version 1.5.8 the install script lets you install mosquitto as a service.
When Mosquitto is installed as a service it starts automatically.
However this is not important for a test environment.
First you will need to download the Windows install files from here.
Install Steps
1. Double Click on the install script
2. Note the dependencies screen which tells you what additional files are required. The screen is note very clear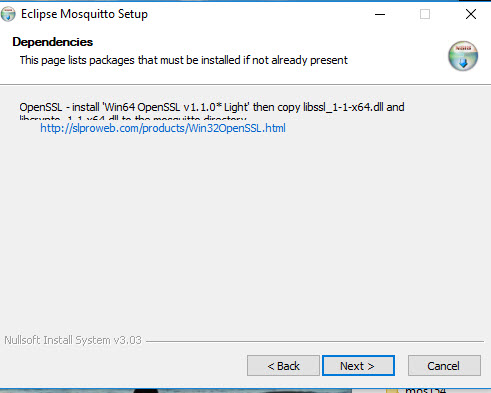
3. Select components check service to install as a service if you want mosquitto to start automatically when windows starts.
4. Choose a location it defaults to c:program filesmosquitto.
5. Finish
You then need to copy the additional files to the install directory after the install again.
The additional files are
- libcrypto-1_1_x64.dll
- libssl-1_1_x64.dll
Note 1: You can obtain these files by installing openssl using the files from here or by downloading my package.
Note2: They are now included in the 1.5.8 install package.
Starting Mosquitto on Windows
To start the broker manually open a command prompt and go to the mosquitto install directory and type mosquitto.
You can also use various command line switches. Type
mosquitto -h
for help.
To start in verbose mode so that you can see console messages use the -v option:

Running Mosquitto as a Service -Update 22-12-2018 -Notes version 1.5.4 and below
On production environments you will need mosquitto to auto start on a reboot.
To start mosquitto as a service the usual use of the sc command didn’t work as seen from the screen shots below.
However a reader pointed out the power shell option which does work
Here is a screen shot of my attempts using sc command
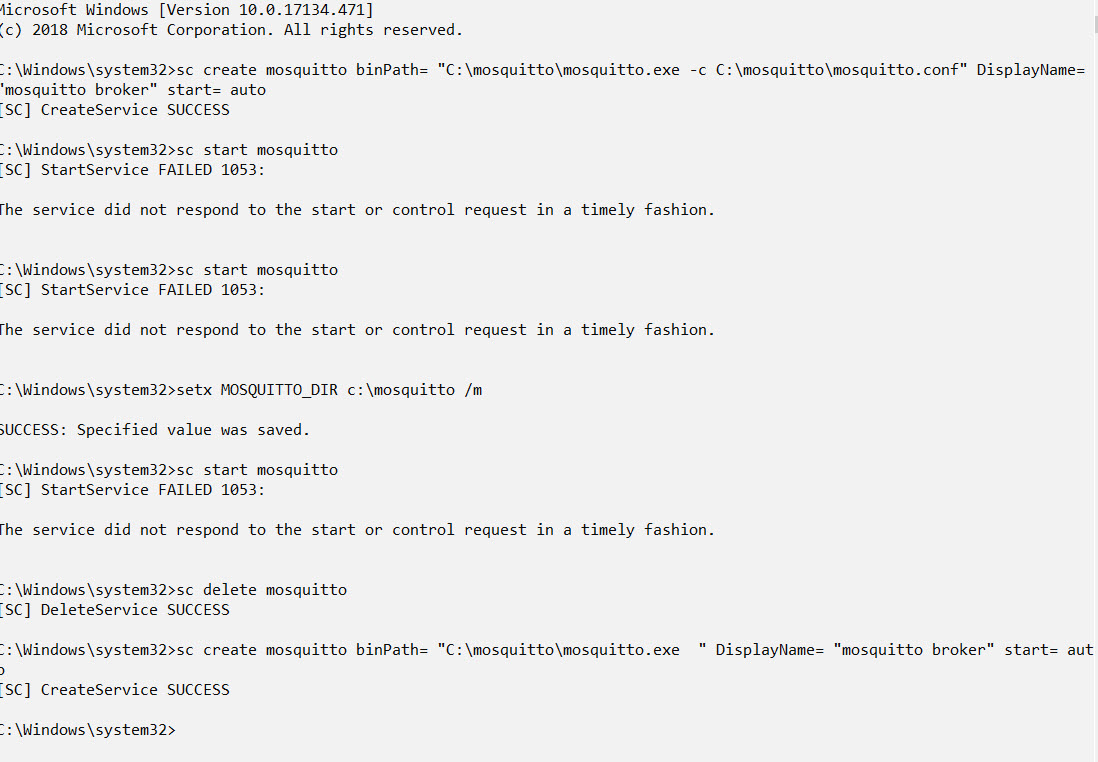
Note you need to open the command prompt as administrator.
Installing Mosquitto as a Service using Power Shell
Open a power shell command prompt as administrator.
Change to the directory where you have installed mosquitto (mos154 below) and type:
./mosquitto install
Mosquitto is added but you don’t get any confirmation and it isn’t started but will start on reboot. However you can now start it manually.
Now open a normal command prompt again as administrator and type the commands:
sc query mosquitto
sc start mosquitto
sc query mosquitto
Testing The Install
To test it is running use command:
- netstat -a
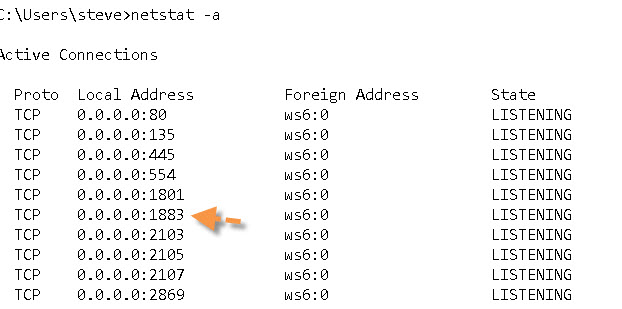
You should see the Mosquitto broker running on port 1883 as shown in the screen shot above.
Another quick test is to try to start it twice in two different command prompts.
You should get an error message complaining about the port being in use.
The Mosquitto.conf File
The configuration file (mosquitto.conf) that comes with the install is completely commented out, and the MQTT broker doesn’t need it to start.
However when Mosquitto runs as a service it uses this configuration file. .
Don’t use the commented out version and edit it as it is very long and difficult to navigate.
Instead create a blank file and add you entries to it using the commented out file as documentation.
See Quick Guide to The Mosquitto.conf File With Examples
Mosquitto Logging
If you enable logging in the mosquitto.conf file then when mosquitto runs it creates this file with restricted permissions, and locks the file while the broker is running.
If you stop the broker you can change the permissions on the file to access it.
See Understanding and Configuring Logging on Mosquitto
Mosquitto 2..0.2 and above
Mosquitto v2 introduced some important changes that affect first time users in particular.
By default it requires authentication and doesn’t listen on a network address.
The following simple configuration file will make mosquitto start like previous versions:
listener 1883
allow_anonymous true
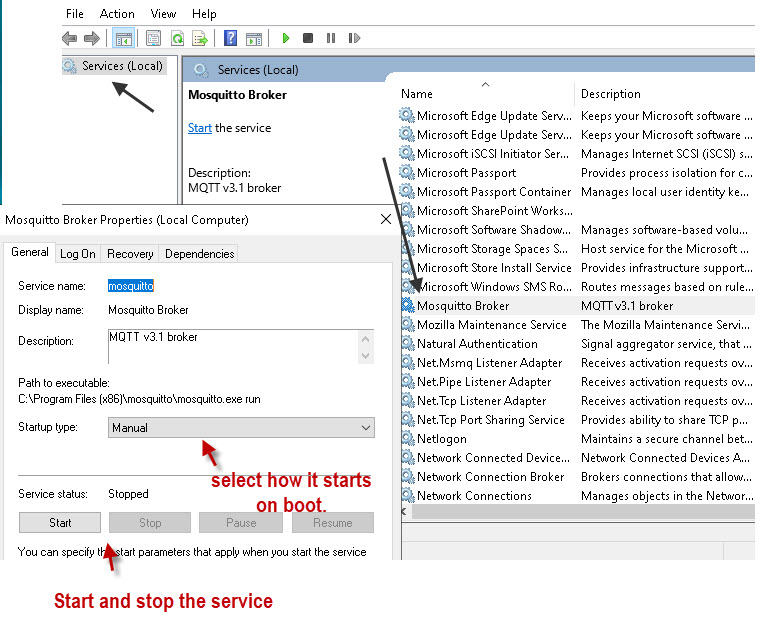
Stopping The Mosquitto Service
When testing it is better to start mosquitto manually from the command line. In order to do this you either need to use a different port than the running version or stop the running version.
I prefer to stop the running version and set it for manual start when working in a test environment. To Stop the service and set the start mode type services in the search bar (lower left) and select the services App.
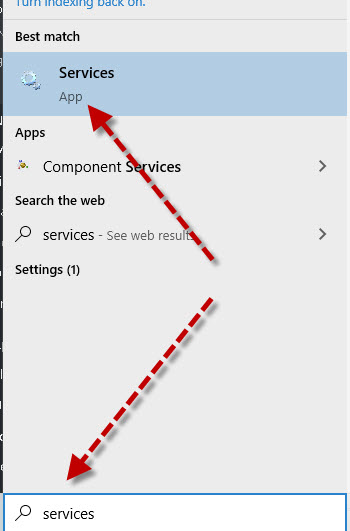
Locate the mosquitto service and stop it. I set mine to manual mode when working in a test environment.
Running Multiple Mosquitto Brokers
You can configure a broker to listen on several ports, but to create multiple brokers with their own configurations then you will need to start multiple instances of mosquitto. See Quick Guide to the Mosquitto.conf file and this video on running multiple brokers.
Examples:
Start mosquitto and listen on port 1883
mosquitto -p 1883
Start mosquitto and listen on port 1884
mosquitto -p 1884
Start mosquitto and use the mosquitti-2.conf file.
mosquitto -c c:mosquittomosquitto-2.conf
Note: starting as a daemon (-d) is not supported on windows.
Mosquitto Client Scripts
The windows install includes the client scripts.
There is a simple subscriber client
mosquitto_sub
and a publisher client
mosquitto_pub
Use
mosquitto_sub –help
They are useful for some quick tests. See Using The Mosquitto_pub and Mosquitto_sub Client Tools- Examples
Video
How to install the Mosquitto Broker on Windows
Common Questions and Answers
Q- What is the difference between a quick install and a standard manual install?
A- Using my install package you don’t need to install any other software as the package includes the necessary files. A standard manual install installs mosquitto as a service but a quick install doesn’t.
Q- I have Mosquitto broker installed on one Windows machine can I copy it to another machine?
A- If you have already installed Mosquitto on another windows machine e.g. XP and want to install it on another machine e.g. Windows 10 then you can just copy the directory containing the mosquitto files to the new machine.
I copied my windows XP install (32 bit) onto a windows 10 (64bit) machine and a Windows 7 machine and it worked OK.
You need to be aware of the versions as windows XP doesn’t support Mosquitto v 1.5 and above.
———————–
Other Tools
 MQTTlens is also very useful for troubleshooting and quick testing. It is an add-on for the chrome browser.
It lets you publish and subscribe to topics using a web interface, and is much easier to use than the command line clients.
![]() MQTT-Ping -Python Tool written by me that works like the traditional IP ping command tool.
MQTT-Ping -Python Tool written by me that works like the traditional IP ping command tool.
MQTT v5 Support
Note: Starting will mosquitto version 1.6 mosquitto now supports MQTT v5.
Was This Useful?
![]()
Notes
If you are using MQTT with websockets and mosquittov2 then it has problems and you will may need to go back to 1.6.9 (email from Keith)
I have a web page client that uses Windows Sockets to connect and a C# program that connects using MQTT. If I connect using the C# program everything works fine. As soon as I connect using Windows Sockets to the broker the C# program stops being able to connect. No error messages appear on the server but eventually the C# client times out. If I restart the server, the MQTT client can connect. However, as soon as the Windows Sockets program connects the MQTT client is not able to connect.
I did a little research on this and apparently it is a known issue with version 2 of the mosquitto broker on Windows. The solution appears to be to use an older version, in my case 1.6.9. That works perfectly.
Anyway, I didn’t know if you knew this and if not, maybe it is something you might want to mention on your web site.
Here is the link that I found from the Eclipse website that explains it.
https://github.com/eclipse/mosquitto/issues/1934
Mosquitto Configuration Tutorials
- Configuring and Testing MQTT Topic Restrictions
- Configuring Username and Password Authentication
- MQTT TLS Security – Mosquitto Broker Configuration
- Understanding and Configuring Bridging on Mosquitto
- Configure Mosquitto Bridge With SSL Encryption- Examples
Other Related Articles and Resources:
- MQTT for Beginners
- MQTT and Mosquitto WebSockets Working Notes
- MQTT Hosting,Brokers and Server
Please rate? And use Comments to let me know more
We use cookies on our website to give you the most relevant experience by remembering your preferences and repeat visits. By clicking “Accept All”, you consent to the use of ALL the cookies. However, you may visit «Cookie Settings» to provide a controlled consent.
Для чего нужен MQTT?
Если на примере, то предположим, что у вас есть устройство, которое считывает температуру в комнате. И вы хотите передавать данные с этого контроллера к себе на сервер, чтобы потом можно было удаленно проверять температуру. Для этого как раз идеально подойдет протокол MQTT.
Как работает MQTT?
У Mqtt есть понятие сервер или брокер, это главный объект, который получает и передает данные дальше. А все остальные, к примеру устройство которое считывает температуру и сервер, на который вы хотите эту температуру сохранять, это клиенты.
Клиент с температурой будет отправлять данные, брокер MQTT будет их ловить и передавать клиенту серверу, который будет их получать.
Все это в рамках локальной сети!
Как установить сервер MQTT?
Для того чтобы установить брокер MQTT , переходим по ссылке и скачиваем инсталлятор для вышей операционной системы и устанавливаем .
Как запустить брокер MQTT?
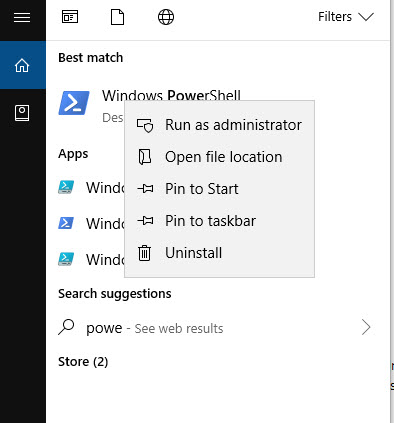
Для того, чтобы запустить брокер, запустите консоль (На Windows это Win+R, пишем cmd и нажимаем Enter).
После того, как открылась консоль, переходим в консоле в директорию, где вы установили Mosquitto. Если вы не знаете как пользоваться командной строкой, то вот небольшие подсказки:
- Перейти (к примеру) в папку Games — cd Games
- Вернуться обратно cd ..
- Поменять раздел диска D: или C:
- Посмотреть содержимое папки dir
Этого должно хватить, чтобы добраться до нужного раздела. После того как вы зашли в раздел mosquitto, напишите:
mosquitto.exe -v
Если вы все правильно сделали, то увидите следующее:
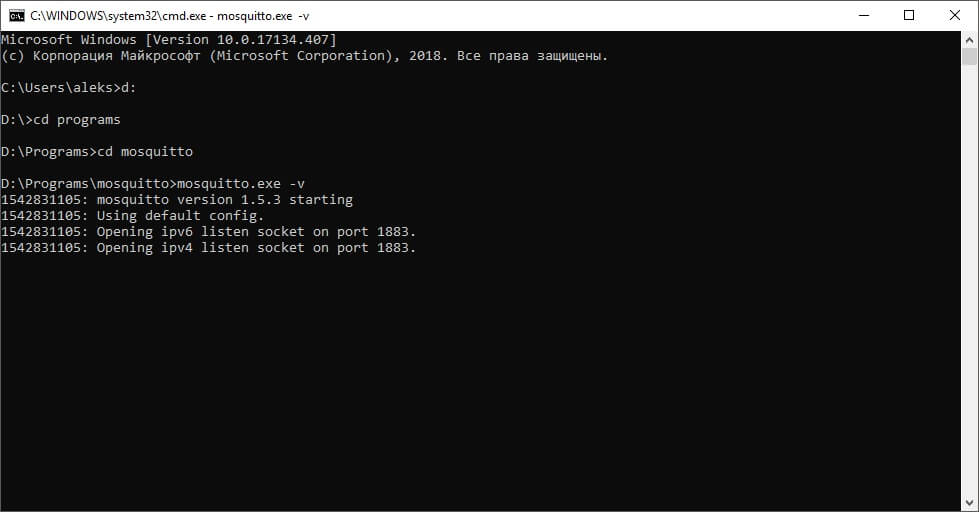
Теперь у вас запущен брокер MQTT. Успехов!
Introduction: Installing MQTT Broker (Mosquitto) on Windows
What is broker? The MQTT Broker is a data management center or commonly referred to as «server». The Mosquitto broker is responsible for handling all messages, filtering messages, deciding who is interested in them and then publishing the message to all subscribing clients.
Supplies
You only need computer with Windows OS
Step 1: Visit the Website
Click this link to download the installer : https://mosquitto.org/download/
Step 2: Download the Installer File
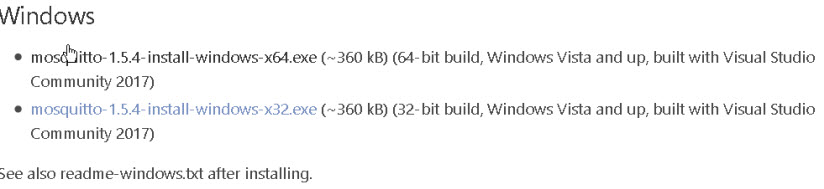
In the windows menu, there are 2 types of file options for download. Please choose based on your computer’s specifications.
Step 3: Open the Installer File
After downloading, please open the installer file and click next.
Step 4: Check Additional Files
Pay attention to the dependency screen that tells you what additional files are needed. Then click next.
Step 5: Check the Service Component
Make sure to checklist the service component to install as a service.
Step 6: Change the Installation Path (Optional)
If you want to change installation path, click on Browse and choose the path and click on Install. By defaults to c:program files(x86)mosquitto.
Step 7: Finalize the Install
Click on finish to complete the installation.
Be the First to Share
Recommendations
Eclipse Mosquitto
Mosquitto is an open source implementation of a server for version 5.0, 3.1.1,
and 3.1 of the MQTT protocol. It also includes a C and C++ client library, and
the mosquitto_pub and mosquitto_sub utilities for publishing and
subscribing.
Links
See the following links for more information on MQTT:
- Community page: http://mqtt.org/
- MQTT v3.1.1 standard: https://docs.oasis-open.org/mqtt/mqtt/v3.1.1/mqtt-v3.1.1.html
- MQTT v5.0 standard: https://docs.oasis-open.org/mqtt/mqtt/v5.0/mqtt-v5.0.html
Mosquitto project information is available at the following locations:
- Main homepage: https://mosquitto.org/
- Find existing bugs or submit a new bug: https://github.com/eclipse/mosquitto/issues
- Source code repository: https://github.com/eclipse/mosquitto
There is also a public test server available at https://test.mosquitto.org/
Installing
See https://mosquitto.org/download/ for details on installing binaries for
various platforms.
Quick start
If you have installed a binary package the broker should have been started
automatically. If not, it can be started with a basic configuration:
Then use mosquitto_sub to subscribe to a topic:
mosquitto_sub -t 'test/topic' -v
And to publish a message:
mosquitto_pub -t 'test/topic' -m 'hello world'
Documentation
Documentation for the broker, clients and client library API can be found in
the man pages, which are available online at https://mosquitto.org/man/. There
are also pages with an introduction to the features of MQTT, the
mosquitto_passwd utility for dealing with username/passwords, and a
description of the configuration file options available for the broker.
Detailed client library API documentation can be found at https://mosquitto.org/api/
Building from source
To build from source the recommended route for end users is to download the
archive from https://mosquitto.org/download/.
On Windows and Mac, use cmake to build. On other platforms, just run make
to build. For Windows, see also README-windows.md.
If you are building from the git repository then the documentation will not
already be built. Use make binary to skip building the man pages, or install
docbook-xsl on Debian/Ubuntu systems.
Build Dependencies
- c-ares (libc-ares-dev on Debian based systems) — only when compiled with
make WITH_SRV=yes - cJSON — for client JSON output support. Disable with
make WITH_CJSON=noAuto detected with CMake. - libwebsockets (libwebsockets-dev) — enable with
make WITH_WEBSOCKETS=yes - openssl (libssl-dev on Debian based systems) — disable with
make WITH_TLS=no - pthreads — for client library thread support. This is required to support the
mosquitto_loop_start()andmosquitto_loop_stop()functions. If compiled
without pthread support, the library isn’t guaranteed to be thread safe. - uthash / utlist — bundled versions of these headers are provided, disable their use with
make WITH_BUNDLED_DEPS=no - xsltproc (xsltproc and docbook-xsl on Debian based systems) — only needed when building from git sources — disable with
make WITH_DOCS=no
Equivalent options for enabling/disabling features are available when using the CMake build.
Credits
Mosquitto was written by Roger Light roger@atchoo.org
Master: 
Develop:
Fixes:
Зачем это нужно?
Локальный MQTT брокер на шлюзе нужен для работы собственных служб, таких как: zigbee2mqtt, lumimqtt, lumi. Все эти службы шлют топики на локальный MQTT брокер, а если есть необходимость пересылать топики на другой сервер, например на второй MQTT брокер, то нужно настроить MQTT мост.
Примечание
Не рекомендуется в службах указывать внешний MQTT брокер (стоит не на шлюзе, а на отдельном сервере, например аддон MQTT в Home Assistant). Такой подход неверный. Если по какой-то причине внешний MQTT брокер будет не доступен, то службы на шлюзе не будут работать. Именно по этой причине обязательно нужно поднимать на шлюзе локальный брокер, а пересылкой топиков будет заниматься MQTT мост.
Как установить и настроить mosquitto на OpenWRT?
Установить пакет mosquitto через LuCI. Делаем как на скриншоте.
- Обновить список пакетов
- В поиске ввести mosquitto
- Установить на выбор найденный пакет mosquitto
- mosquitto-nossl (без поддержки SSL)
- mosquitto-ssl (обеспечивает поддержку SSL для зашифрованных сетевых подключений и аутентификации. Требуется использовать сертификат). Подробнее про mosquitto-ssl читаем здесь

После установки mosquitto, в папке /etc появится папка mosquitto, где есть конфигурационный файлик mosquitto.conf.
По умолчанию доступ из внешних клиентов MQTT к MQTT брокеру на шлюзе будет закрыт из соображении безопасности. Доступ будет только внутри шлюза, т.е внутренние службы, такие как zigbee2mqtt, lumimqtt, home assistant будут иметь доступ к MQTT брокеру, а внешние клиенты — нет. Вот что пишется в официальной документации
В Mosquito 2.0 и выше теперь нужно настраивать параметры аутентификации, прежде чем клиенты смогут подключиться. В более ранних версиях по умолчанию клиентам разрешалось подключаться без проверки подлинности.
Чтобы получить доступ к MQTT, необходимо добавить две строчки. Добавить можно в самом верху.
listener 1883
allow_anonymous true
Как включить авторизацию?
Чтобы включить авторизацию в mosquitto, необходимо добавить следующие строки в конфигурационный файлик mosquitto.conf
Важно! Если у вас, при включенной авторизации и включенным MQTT мостом возникли проблемы при подключении к внешнему MQTT брокеру, например в логах аддона MQTT Home Assistant фиксируются цикличные логи connect и disconnect, то выключите авторизацию и предоставьте доступ для всех
allow_anonymous trueи закомментируйте#password_file /etc/mosquitto/passwordfile.
Закрываем доступ для всех, доступ только с пароля
allow_anonymous false
Включаем авторизацию. Указываем путь к файлику passwordfile, в котором хранятся логин и пароль
password_file /etc/mosquitto/passwordfile
Создаем файлик passwordfile
touch /etc/mosquitto/passwordfile
В файлик passwordfile добавить логин и пароль в таком виде логин:пароль
mqtt:123456