In this post, we will see the process to install windows server 2019 in Virtual Box. But before we start installation let’s check minimum system requirement to install windows server 2019.
Minimum system requirement to install windows server 2019.
- Processor: At least 1.4 GHz or faster 64-bit supported processor
- RAM: 512 MB
- Free Space: 32 GB of available free disk space.
How to install Windows Server 2019
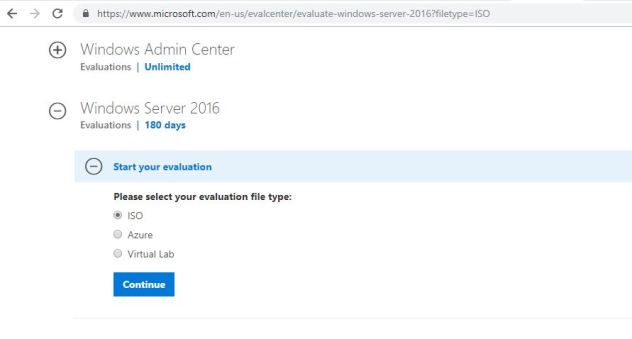
First download Windows server 2019 Evaluation edition ISO image from Microsoft TechNet Evaluation Center. https://www.microsoft.com/en-US/evalcenter/evaluate-windows-server-2019
Link to download Oracle VirtualBox: Click Here
Start your VirtualBox and create one VM with below configuration.
- Name: As you wish
- Type:- Microsoft Windows
- Version:- Windows 2016 (64-bit)
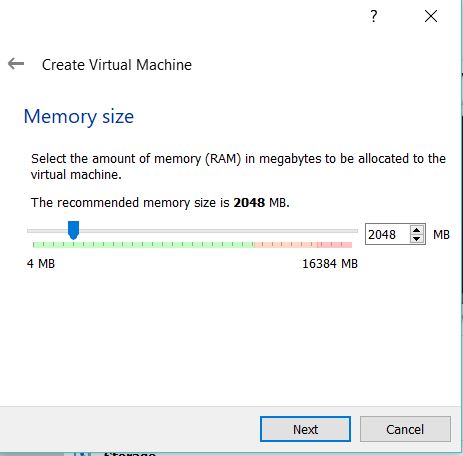
- RAM:- 2048 MB
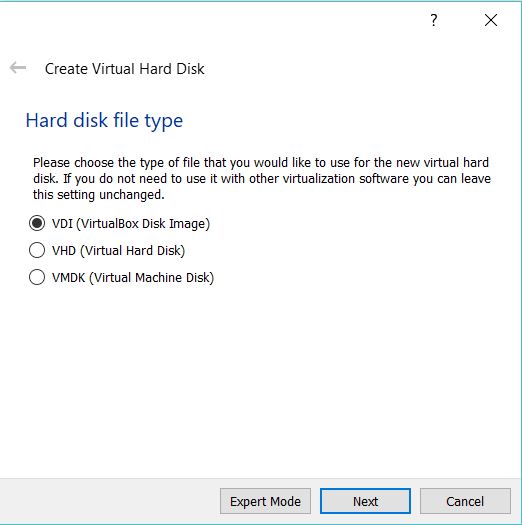
- Create Dynamically Expanding VDI with size 100 GB
After creating VM click on start.
Mount the ISO image which we have downloaded earlier.
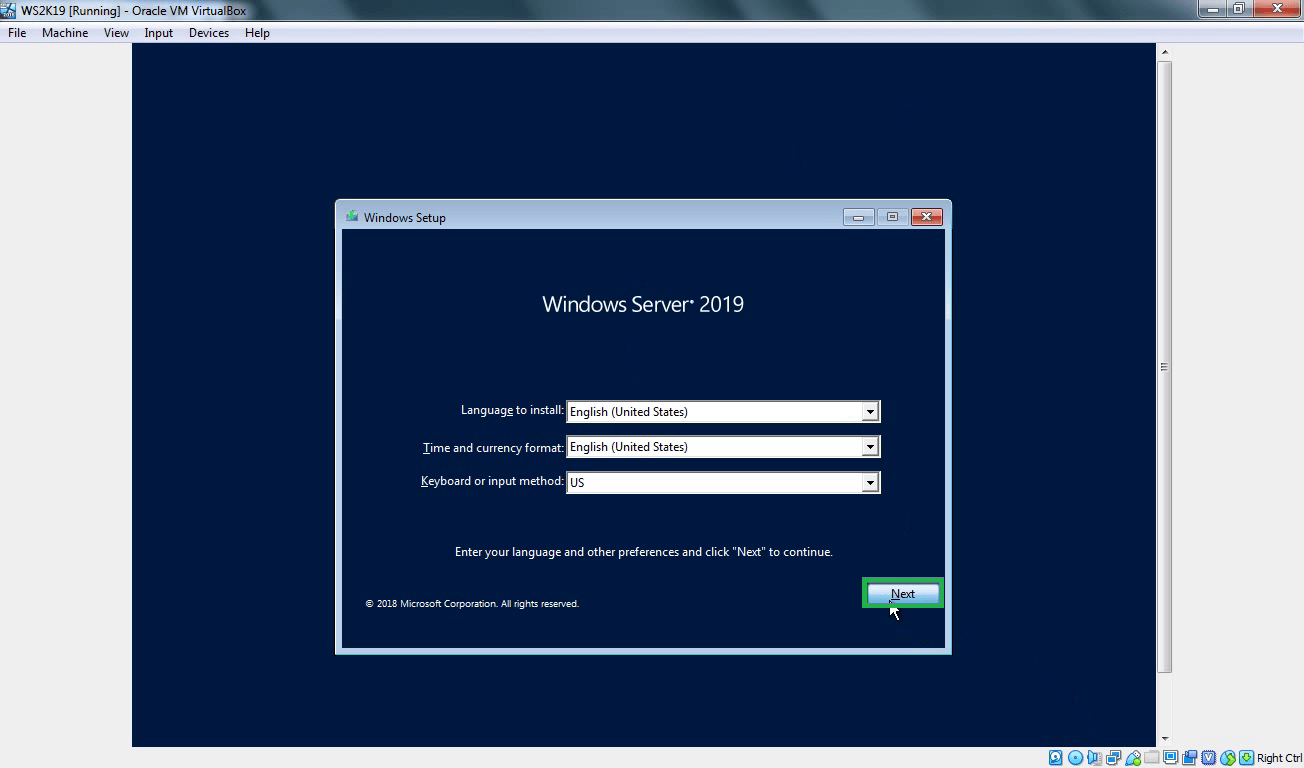
Step:1 On Windows Setup console select the installation language, time and currency format and keyboard layout. You can simply use default settings which will be OK.
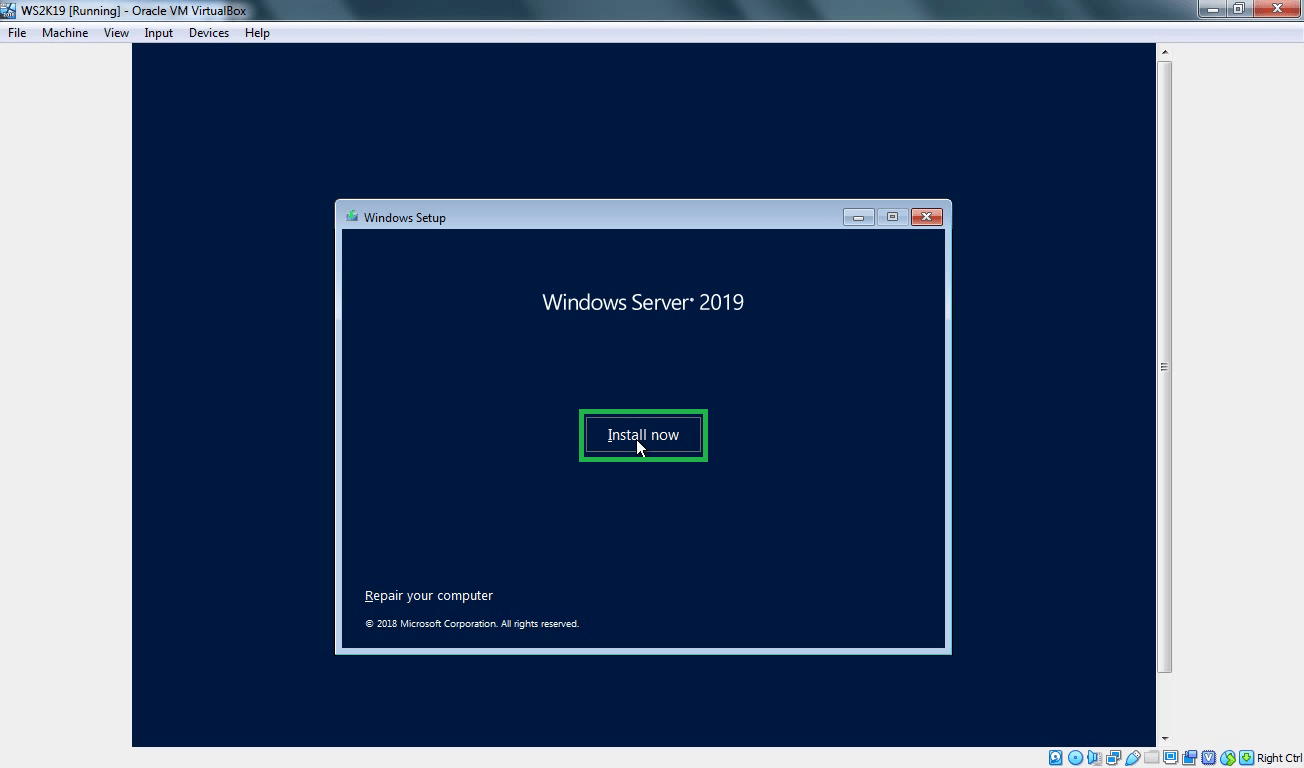
Step:2 Click on Install now to start the installation process.
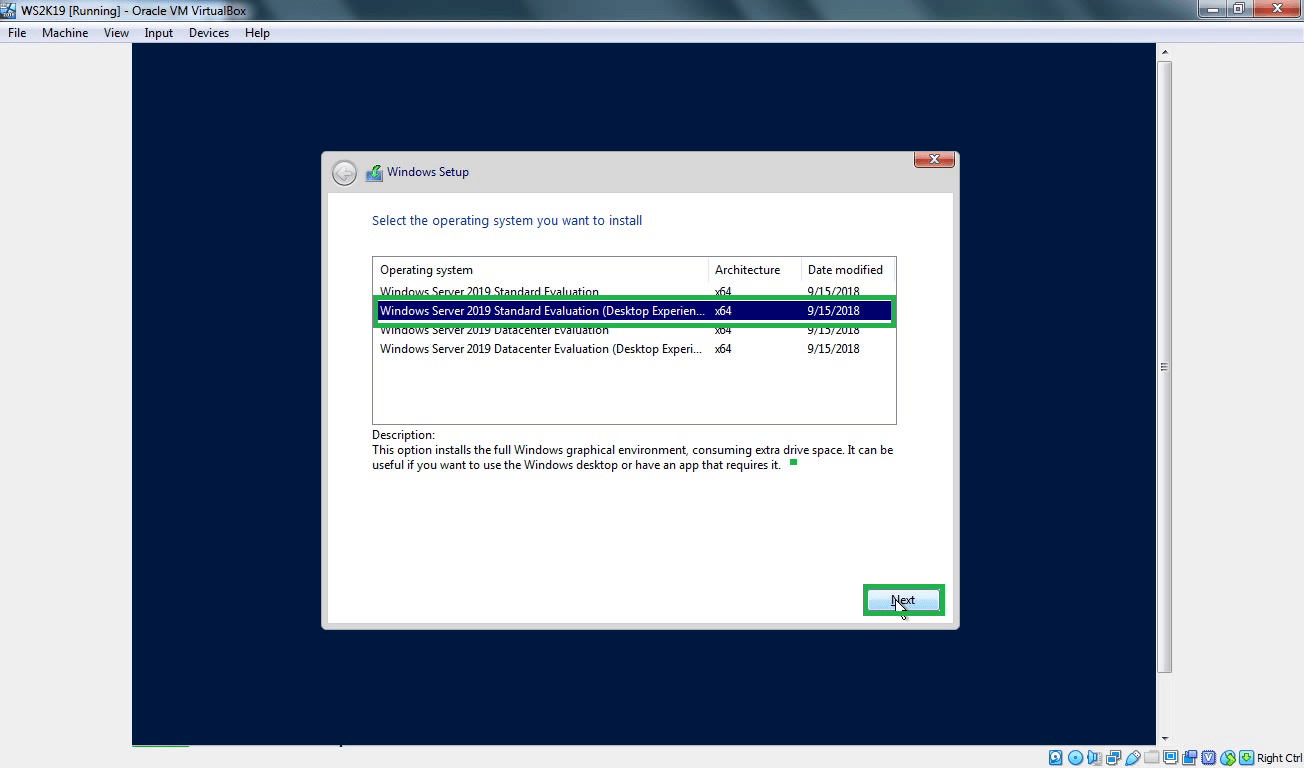
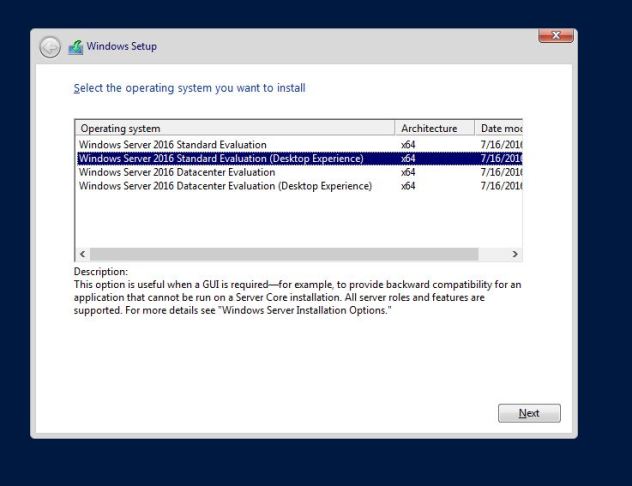
Step:3 Select the operating system which you want to install. (First option will install windows server without a graphical user interface.)
If you want GUI to manage server select second option i.e. Windows Server 2019 Standard Evaluation (Desktop Experience).
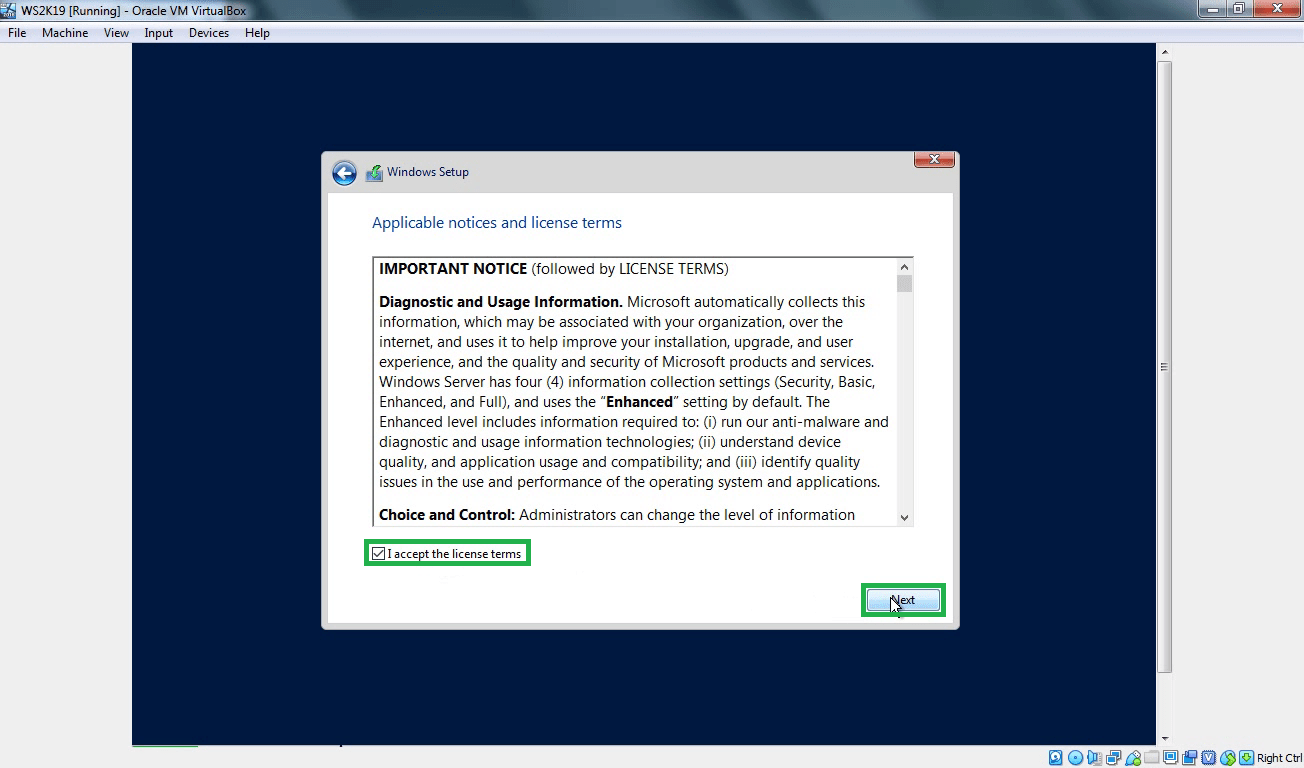
Step:4 Select Accept the license terms and click on next.
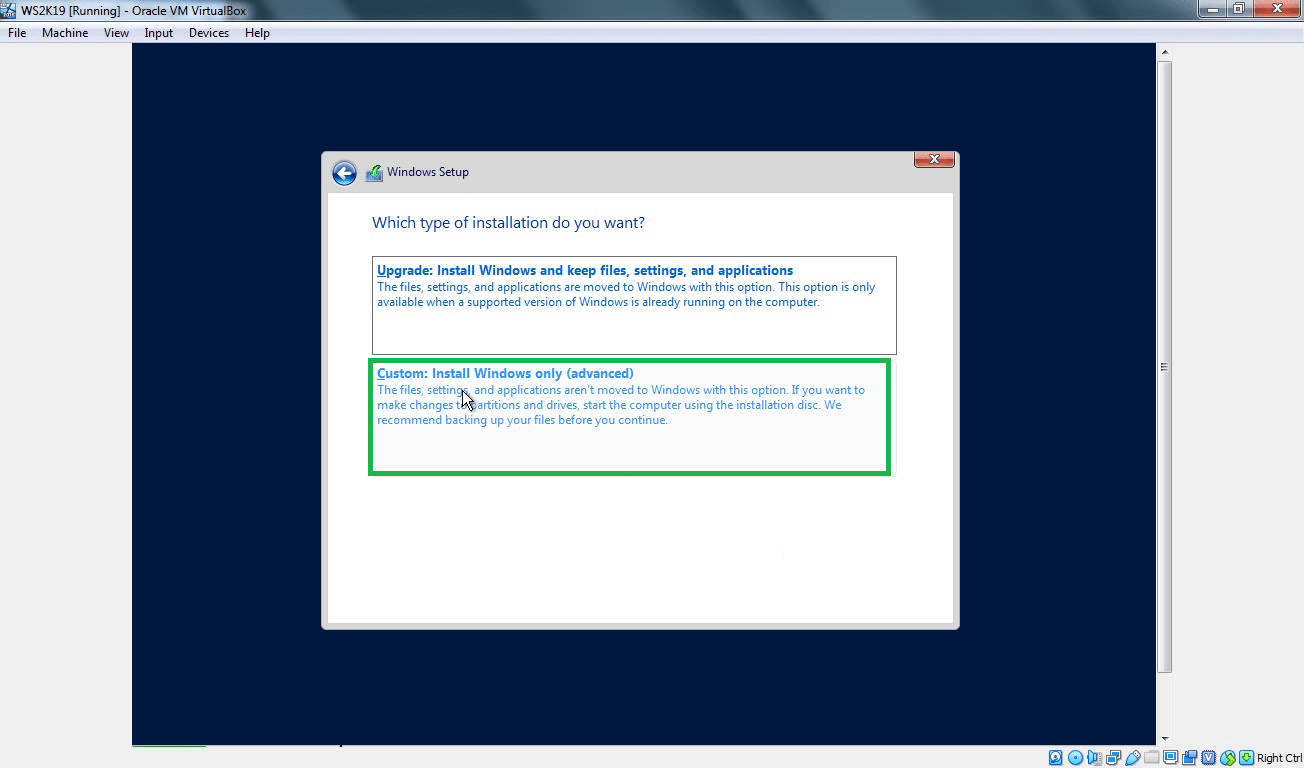
Step:5 For a fresh installation of server 2019 we need to select the second option, Custom: Install Windows Only and then click on next.
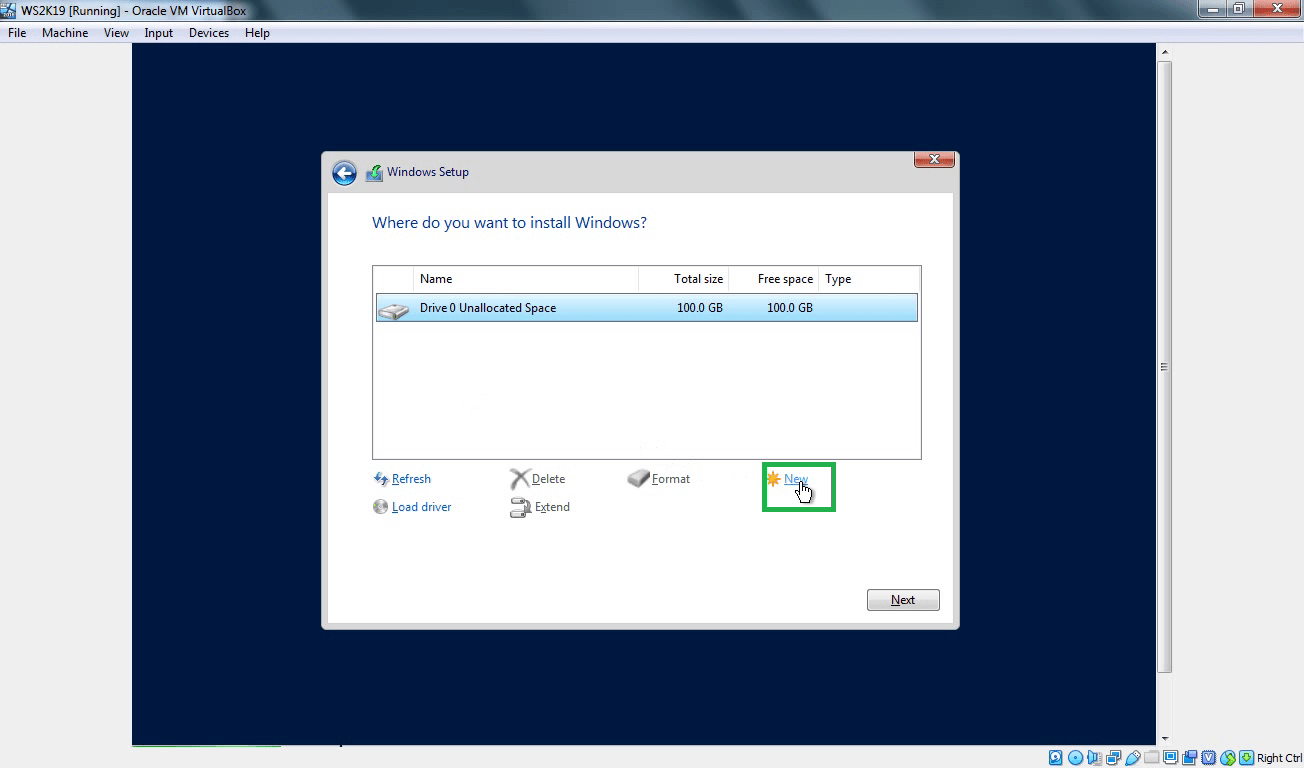
Step:6 Select your virtual hard disk and click on New to create a new partition to install server 2019.
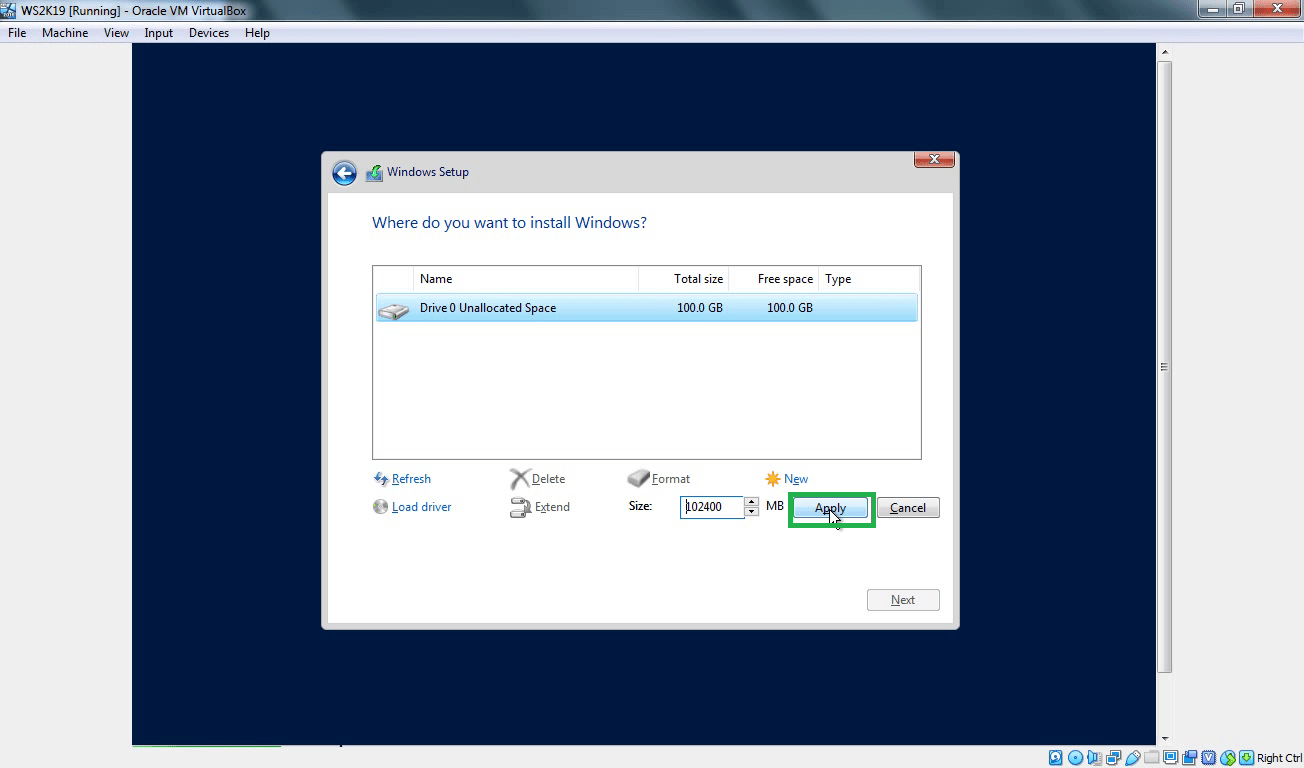
Step:7 For this demo, I am creating only one partition of 100 GB in size.
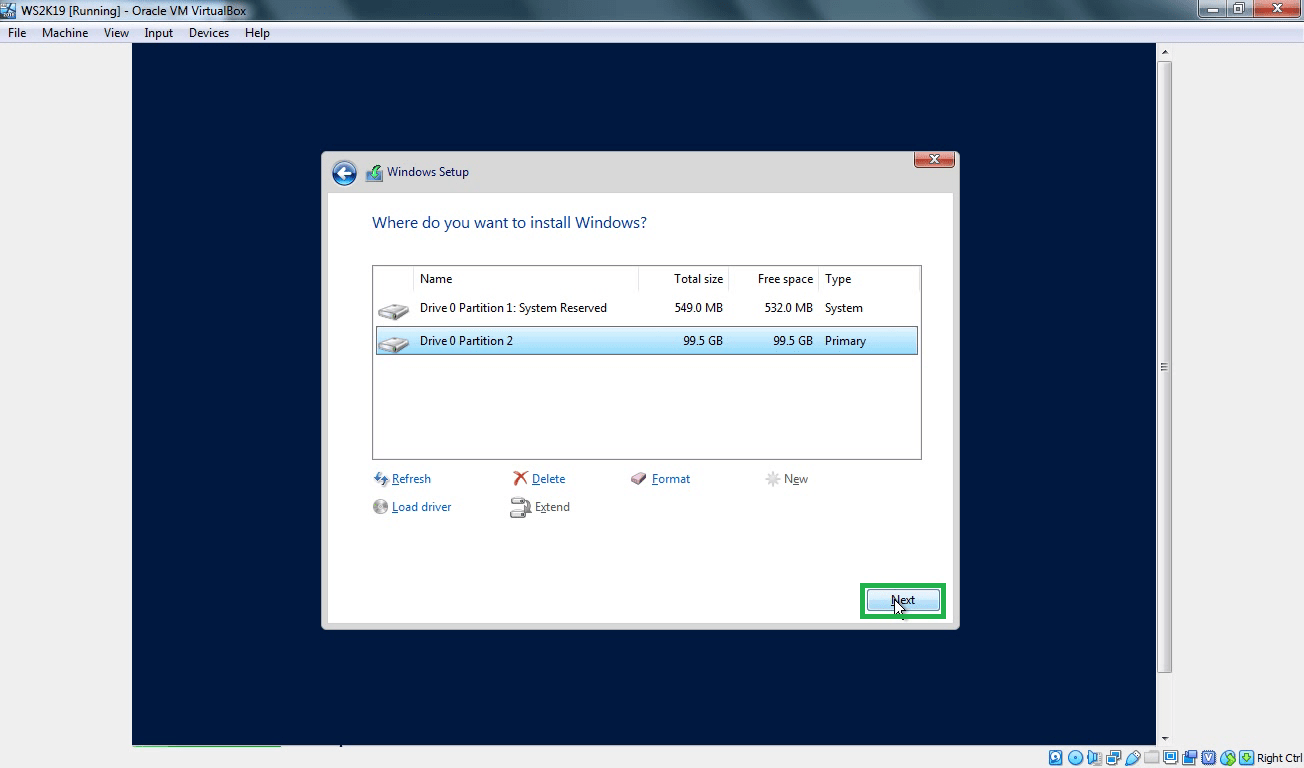
Step:8 After creating a partition, Click on Next to continue.
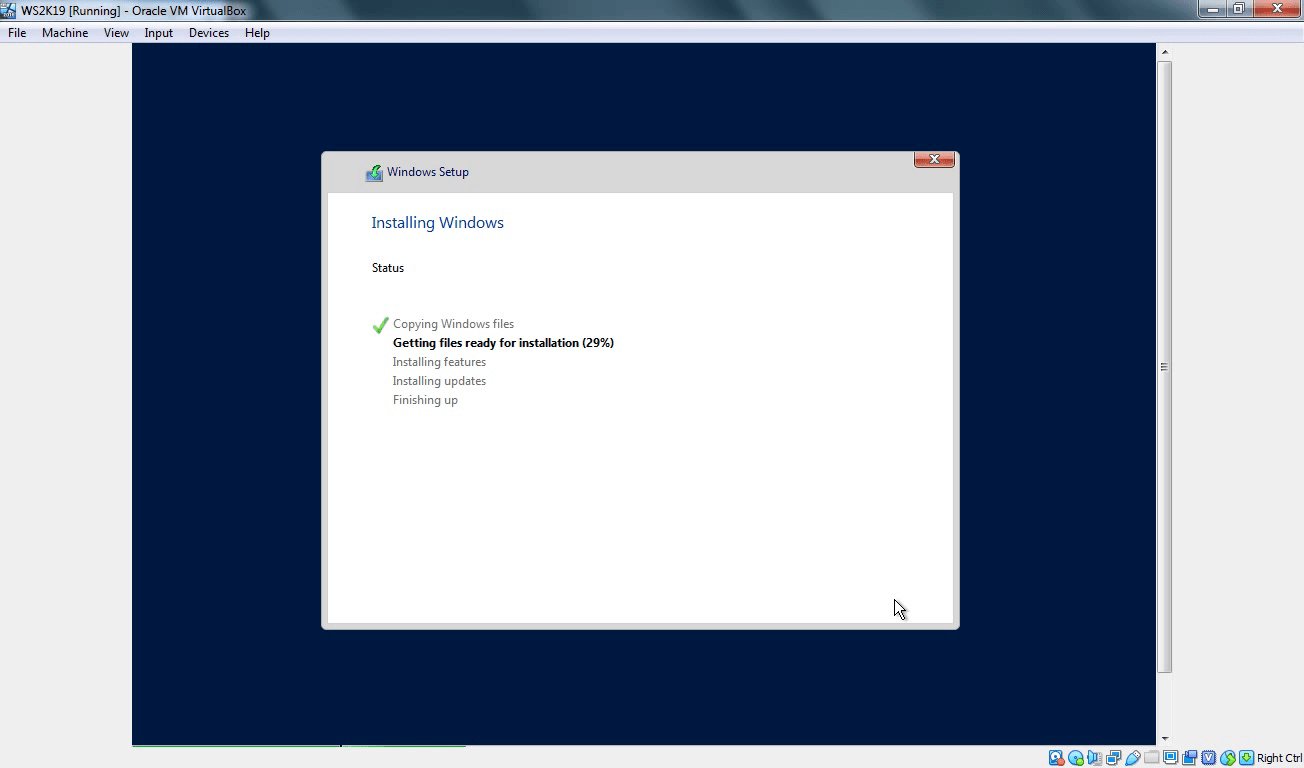
The installation process will take some time to complete the process. Once installation completes server will restart automatically.
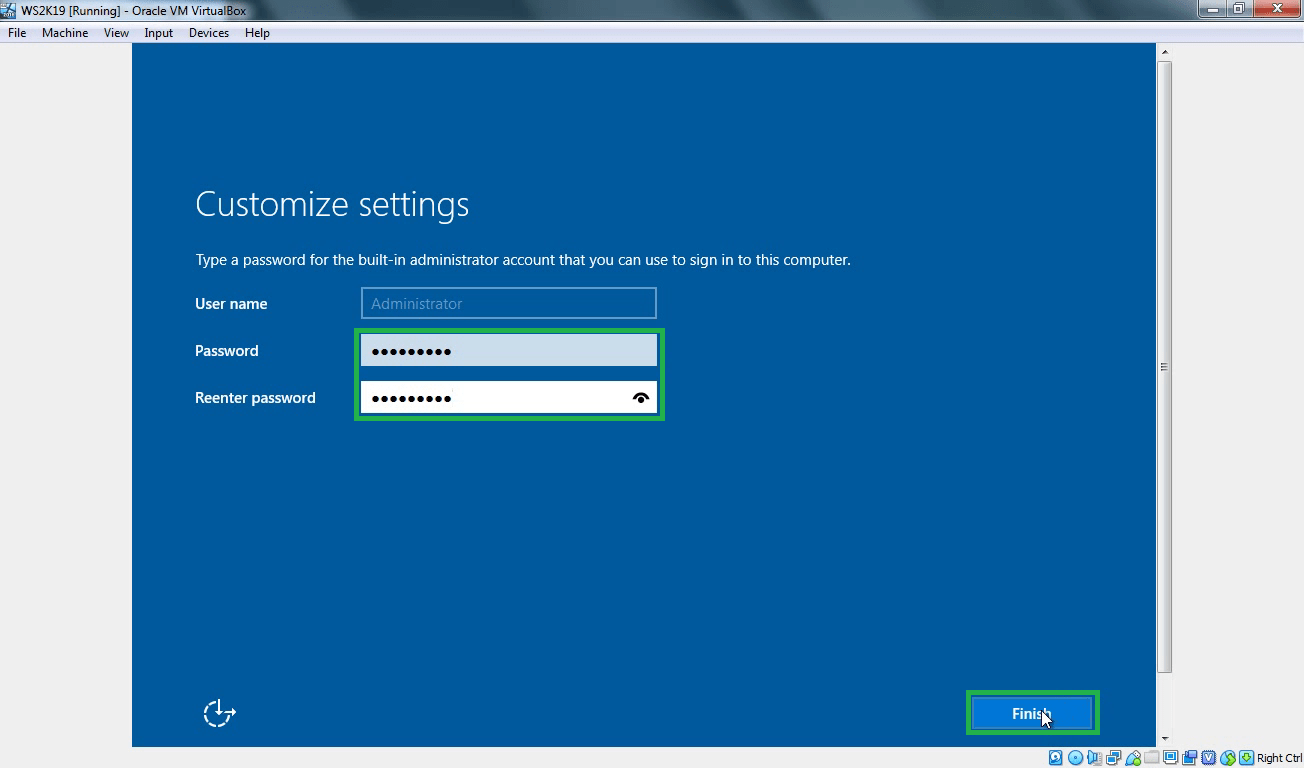
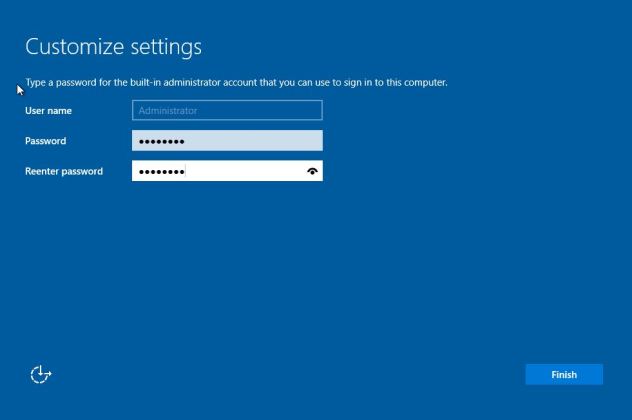
At next boot, you will see below screen asking to set Administrator account password for windows server 2019.
Step:9 Specify the password of your choice to protect Administrator account of Windows Server 2019.
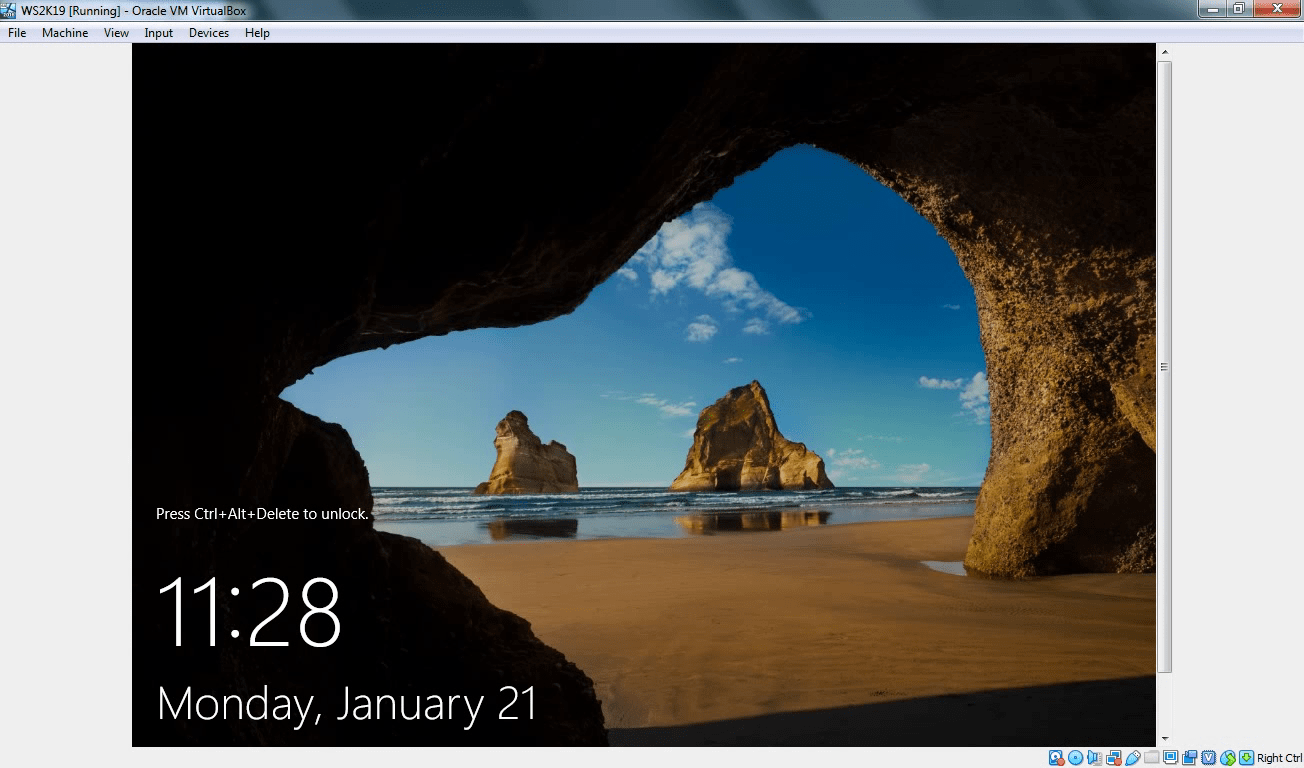
Congratulations! Now you are ready to log in first time on your newly installed Windows Server 2019.
Now press CTRL + ALT + Delete key combination.
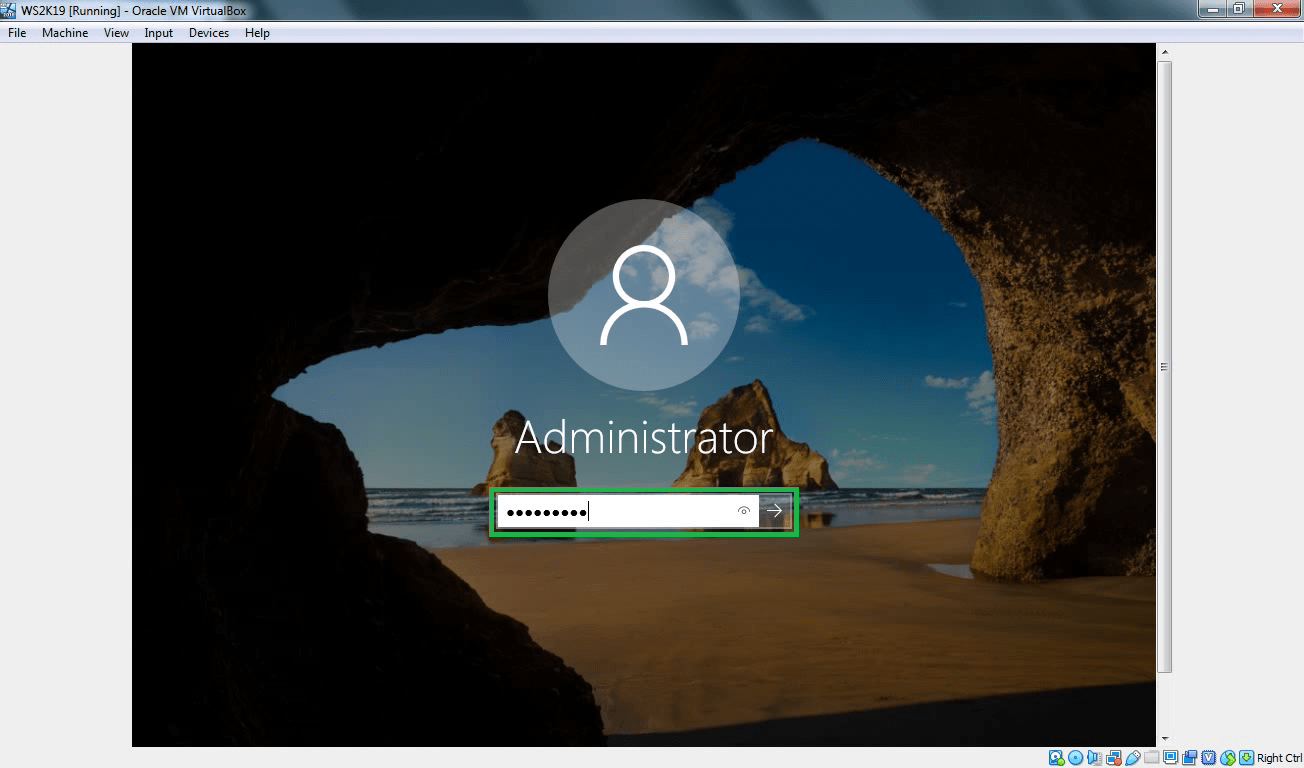
Specify the administrator account password and hit the enter key to login to Windows Server 2019.
Here we go.
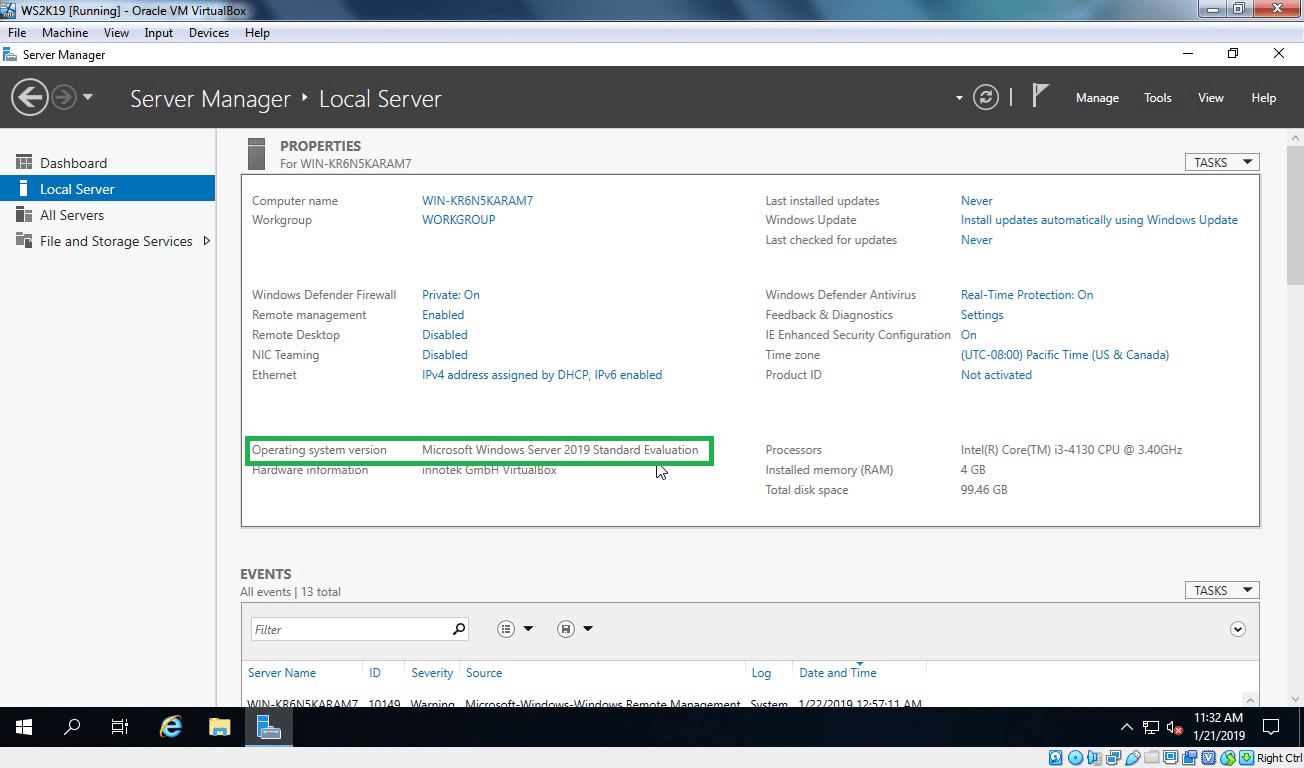
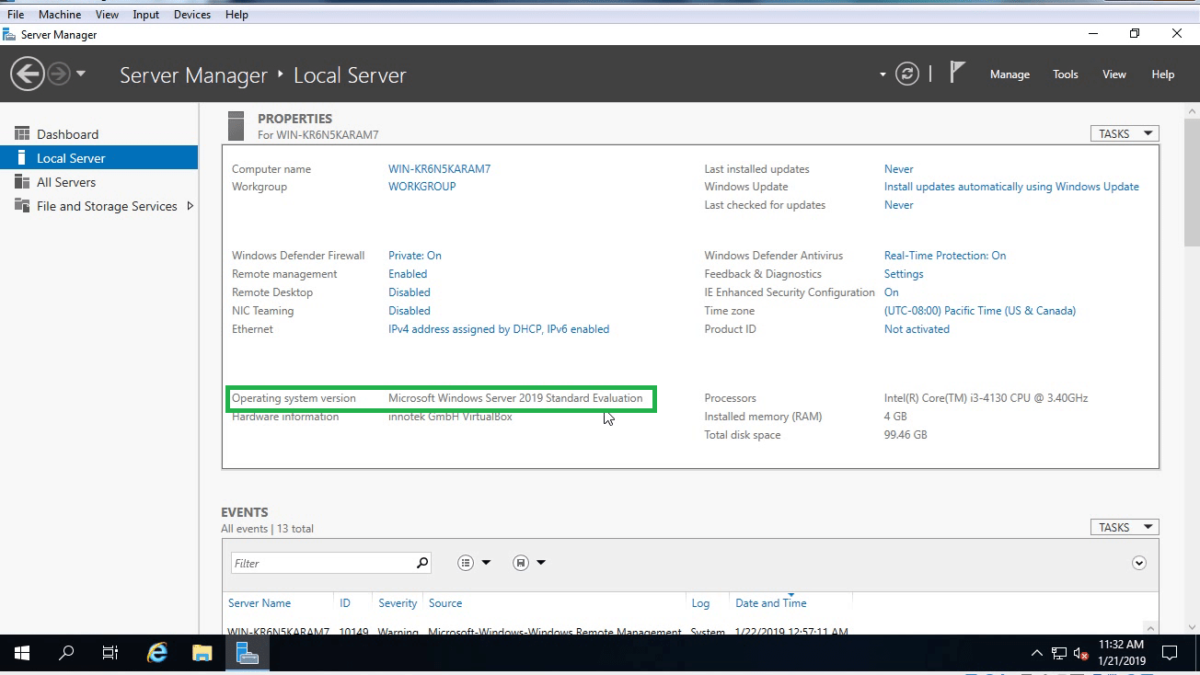
We have successfully installed Windows Server 2019 in Oracle Virtualbox.
Post Views: 5,828
Oracle VM VirtualBox is a free and open-source hosted hypervisor for x86 virtualization, developed by Oracle Corporation. You may want to run multiple VMs on your operating system, with the type 2 virtualization type, this is possible. To achieve this, the following steps below need to be performed. To proceed, ensure you have VirtualBox installed on your device. On how to perform Post OS Installation configuration of Windows Server 2019 Properties, how to install Windows Server 2016 Operating System. Also, you may be interested in my YouTube video on how to setup Windows Server 2019 on a VMware Workstation. On how to install and configure Ubuntu Linux, see the visit link.
Part A: Prepare the Virtualbox environment to hold the windows folders for the new VM. Click on “New” from the Oracle VM VirtualBox Manager. See this guide for how to install Windows Server 2022 on VMware Workstation.

Enter the name, version, desired path to host the VMs and click on continue

Select the memory size as shown below. You can type in the memory size or use the bar to increase it as well.

Click on “create a virtual hard disk now”

This will open the hard disk type window as shown below.
– I will select VDI (Virtual Disk image)

Choose if you wish the hard disk to dynamically increase or use a fixed hard disk file size. I will be using a fixed size which will be entered in the next page

Enter the Hard Disk size of your choice as shown below
– You can also change the file location if you wish from here.

Next, this will create the VM as shown below

Now the VM creation process is complate and VM successfull created.
Part B: To access and attached the Windows Server 2019 ISO file, the following steps should be followed.
Click on the Server and Click or settings or
– Right click on the server and select settings

Click on storage
– Click on Empty under the control IDE
– Select the Disk icon and choose the Operating system you wish to install as shown below

As you can see below, the ISO image has been selected. We can now proceed with our installation.

– Click on “ok”. Next, select the VM and click on start to continue the installation of Windows Server 2019.

This will load windows and prompt for the steps in Part C below.
Part C: This step is similar to installing Windows 10, Windows Server 2008, 2012, 2016 on Virtualbox. On the Windows Setup page,
– Select the language to install
– Time and currency format
– Keyboard or input method

Click on Next and Click on “Install now“

Note: Here you could click on repair your computer if this is the approach you need to take or use “Reset this PC”. See how to repair Windows 10 locally for similar steps. Select the operating system you wish to install and click on Next.

Accept the license agreement as shown below and click on next

Select custom install as shown below to install Windows
– Select Custom: Install Windows only (advanced)

Select the Drive to install Windows and click on Next
Note: You can create an additional drive and install Windows on it. You can also format, delete and extend drives in this window.

After this step, Windows will be installed unto the system.

When this step complete, the the device will reboot after few seconds
– Note: You can restart immediately

This will prepare and get windows ready as shown below

the customise settings window will be displayed. Enter the Password and click on finish to complete Windows Server 2019 Installation.

Now Windows Server 2019 setup is now complete as shown below.

To access the login windows, use the Contl+Alt+Del and enter your password to access Windows. Refer to this guide for the Post OS Installation and configuration of Windows Server 2019 Properties (Configure TCP/IP Parameters).

I hope you found this blog post helpful. If you have any questions, please let me know in the comment session.
Here we are going to install Windows Server 2022 LTSC preview version on VirtualBox virtual machine to try its latest features…
As per the virtual Ignite 2021 conference announcement done by Microsoft, they are planning to release the final version of Windows server 2022, later this year. Whereas the Trial versions of Windows Server 2022 preview are already available for Windows Insiders.
The upcoming Windows Server’s Long Term Servicing Channel Release (LTSC) will receive security updates for ten years. The current version is Windows Server 2019 LTSC. The innovations of Windows Server 2022 include multi-layer protection against threats, which can be activated via Secured Core Server. Besides, the new version enables HTTPS via TLS 1.3 ex works to support secure connections for business-critical data.
Furthermore, the updated version of Windows Admin Center and the possibility to manage Windows Server in your own data center with Azure Arc. As per the official blog, now it becomes easier to manage virtual machines. Besides, the Storage Migration Service receives a new scenario for migrating file servers from its own data center to Azure. For more information, the user can refer to the official announcement.
Windows Server 2022 installation on VirtualBox Virtual machine
1. Download Windows Server 2022 ISO
To get the preview ISO file of the Server 2022, the user can visit the official Windows Insider page of Microsoft. Or else see our step by step article on this – How to get Server 2022 ISO or VHDX image
2. Install VirtualBox
Although if you are here for this tutorial then you would already have VirtualBox installed on your system, if not, then download it from virtualbox.org. It is available for all popular platforms. Where for Linux see our tutorials such as Redhat and Ubuntu
3. Create a Virtual machine for Windows Server 2022
Run the installed VirtualBox and follow the below steps to create Microsoft Server 2022 virtual machine.
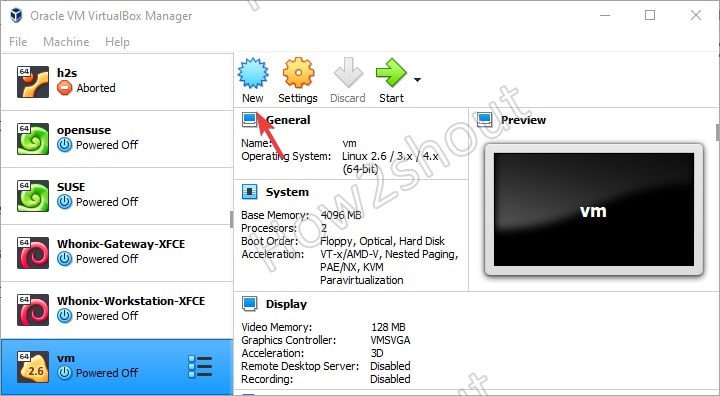
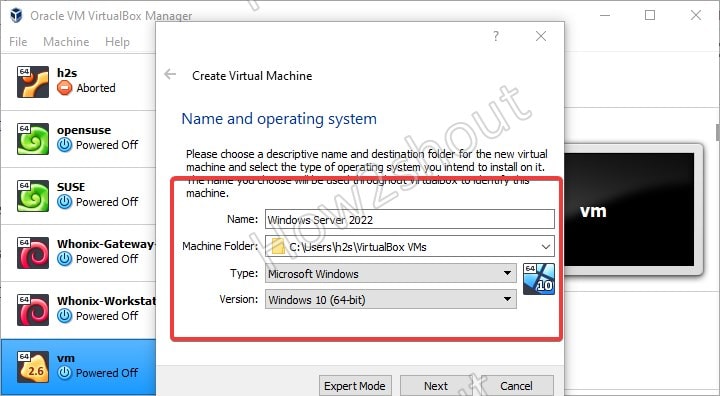
- Click on the New button.
- Give some name to your VM, here we are installing the server version, thus, we name it the same i.e Windows Server 2022.
- Select Microsoft Windows as OS type and Windows 10 64-bit as version.
- If you want to use the Desktop GUI version then at least 2GB RAM should be assigned, however, we recommend 4GB or more depending upon what are you planning to install for better performance.
- Create a Virtual Hard disk. When it asks for file type go for VHD so that later you can use the same virtual disk image in Hyper-V as well.
- Select Dynamic Allocated, this will not allocate all the assigned VHD space at once, instead steadily as our virtual disk starts growing.
- In the next steps, use the slider bar and allocate the amount of space for the VHD file. Here we are stipulating 50 GB but you can more if you are planning to deploy some enterprise features/applications.
- Finally, finish and you will have your Server 2022 Virtual machine on VirtualBox.
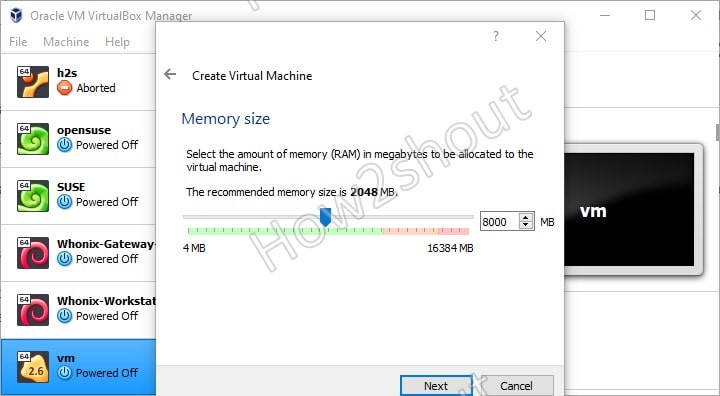
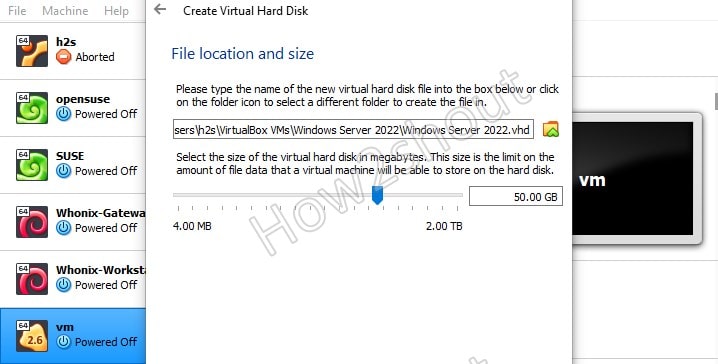
4. Start Virtual Machine
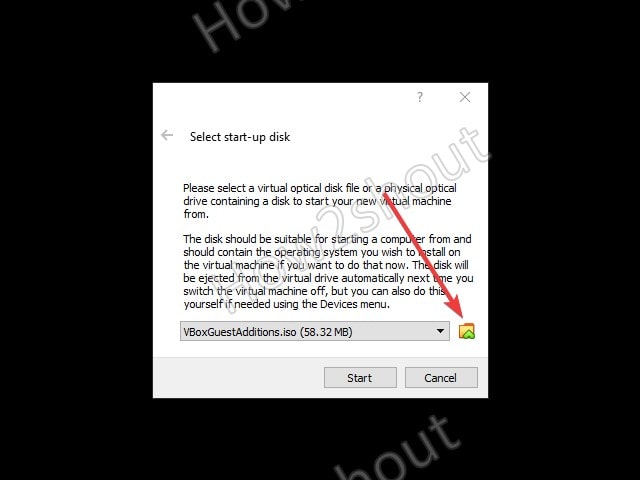
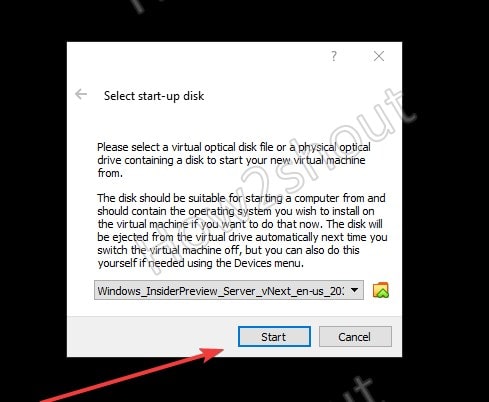
Now, select the created VM from the left panel of VirtualBox and click on the Start button given in the Menu… after that the Vbox will ask you to select the startup disk. Here we have to choose the ISO file we have downloaded for Windows Server 2022 at the first step of this article.
⇒ Select the folder icon to open the File Explorer window of your respective OS.
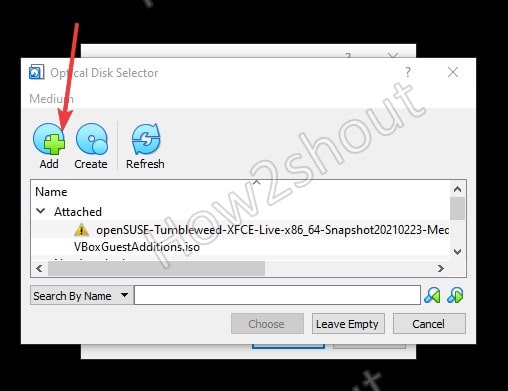
⇒ Click on the Add button to select the downloaded Microsoft Server 2022 ISO image as bootable or Startup disk medium.
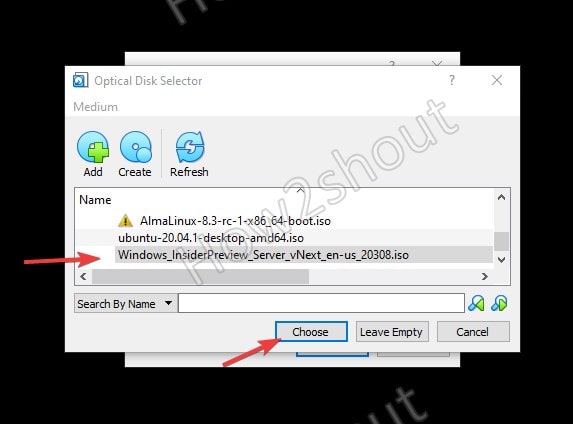
⇒ When the ISO image appears in the disk display area select it and then click on the Choose button.
⇒ Finally, hit the Start button to move forward for the installation of Microsoft Server 2022 on Virtualbox VM.
5. Install Microsoft Server 2022
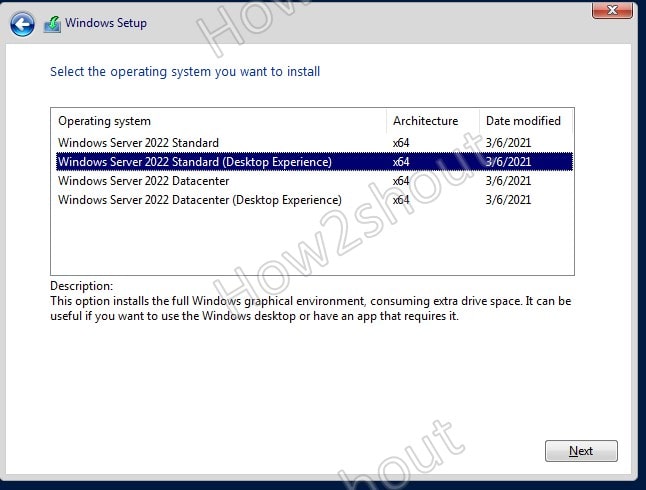
Select “I don’t have license key” when the installation setup asks for it. Moving forward, you will see multiple setups to install, that are:
- Windows Server 2022 Standard
- Windows Server 2022 Standard (Desktop Experience)
- Windows Serbger 2022 Datacenter
- Windows Server 2022 Datacenter (Desktop Experience)
If you have some application that requires Graphical User Interface or you want to experience the Server with GUI, then select the Desktop Experience one. Whereas those who want to manage their server (without GUI) installation using Windows Admin Center can go for the Standard or DataCenter option.
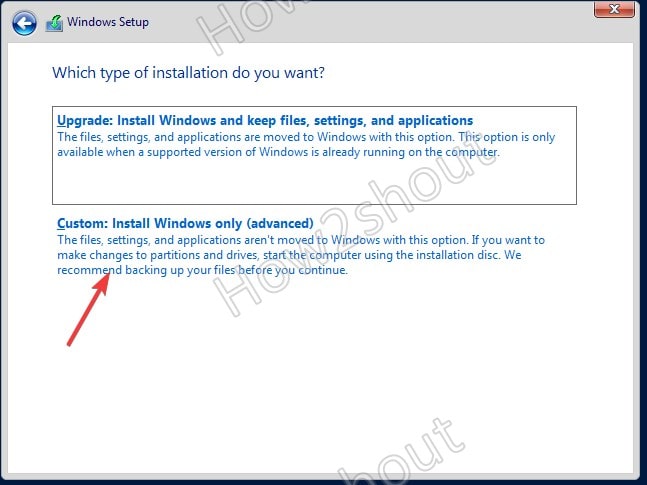
As here we are not upgrading any previous Windows server installation, thus select the Custom Install.
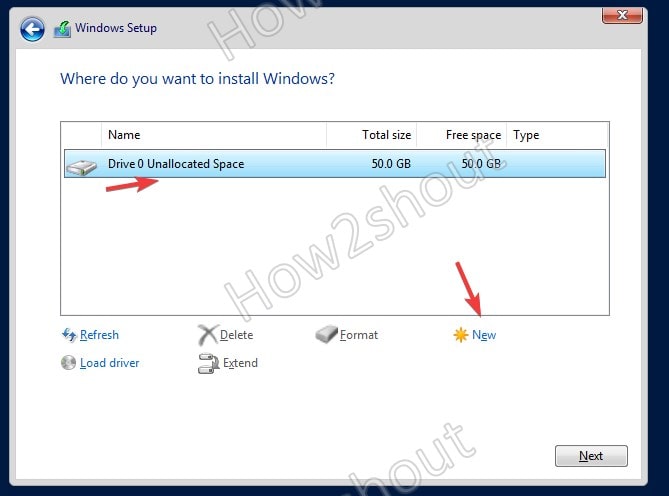
Select the available hard drive, we have created on VirtualBox. If you want to create partitions then select the NEW option otherwise click on the NEXT to let the Server use the whole drive to install the OS.
6. Set Admin Password
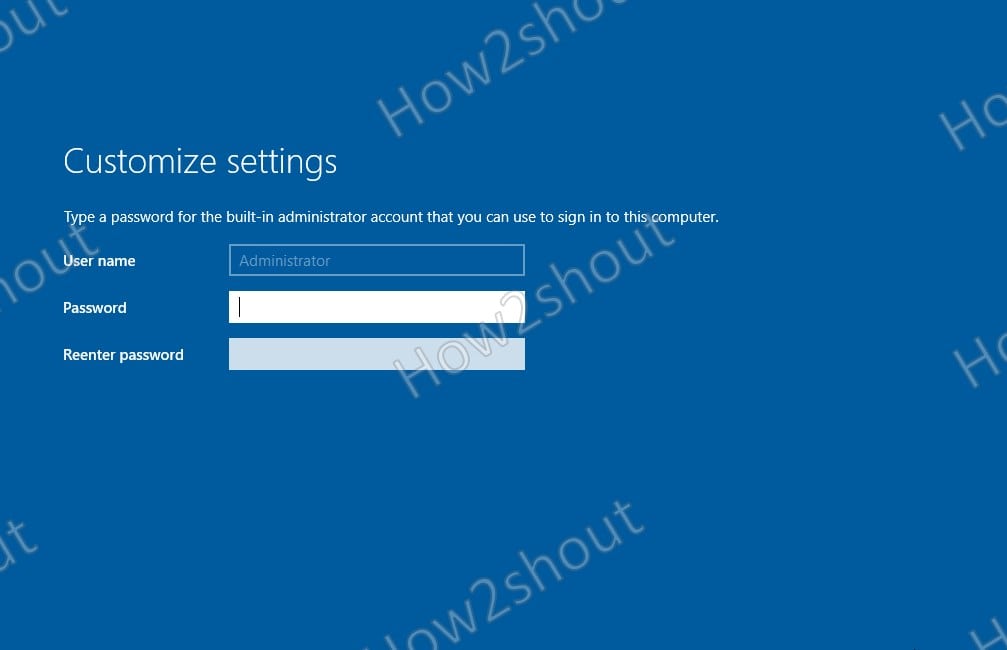
Once the installation is complete, the setup will ask you to type a password to secure a built-in Administrator account.
Later press – Ctrl+Alt+Del to login.
This post demonstrates how to install Windows Server 2012R2 evaluation version onto Oracle VirtualBox.
- First go to Windows Server 2012R2 evaluation downloading website “https://www.microsoft.com/en-in/evalcenter/evaluate-windows-server-2012-r2“
Choose ISO file type
Download ISO image of Windows Server 2012R2 evaluation

2. Start Oracle Virtual Manager, Select NEW.
Name: Windows Server 2012R2
Type: Microsoft Windows
Version: Windows 2012(64-bit)

3. Give 5120M memory size depending on availability.

4. Create an virtual hard disk.

5. Choose “VDI( VirtualBox Disk Image)“.

6. Choose “Dynamically allocated“.

7. Give size 30GB.

8. Also you can choose where the VDI image file located.

9. Click “create” to create “Windows Server 2012R2” virtual machine.

10. Now attach the ISO image to the virtual CD/DVD drive by :
a)Ensure the Windows Server 2012R2 VM is selected and click Settings.
b)Select Storage. Click on Empty under IDE Controller.
c)In the Attributes section, click on “+”sign for adding optimal disk.
d)Select “Choose a disk file”.
e)Browse to the location where you saved the Windows DVD ISO file and select it.
f)Click Open.
g)It should look similar to the following graphic.


11) Now we can install Windows 2012R2 .
a)Select the Windows Server 2012R2 VM in VirtualBox and click Start.
When the Install screen appears, click Next.

b)Click Install Now.

c)Select 2012 evalution Datacenter (Server with a GUI) and click Next. The Server Core installation includes a command prompt but not a graphical user interface (GUI).
d)Review the license terms, select the checkbox to accept the license terms, and click Next.

e) Select Custom: Install Windows only (advanced).

f) The 30 GB drive you created with the VM will be selected as Drive 0 Unallocated Space. Click Next.

g)The installation will begin .

h)When prompted, enter a password for the Administrator account in the Password and Retype password text boxes. Click Finish.

To log on Windows Server 2012R2, press the host key plus the Delete key to simulate the CTRL + ALT + DELETE key combination. The host key is the right-CTRL key by default.
In this note; I will show you how you can install Windows server 2016 on Oracle VM Virtual Box step by step. Actually all my notes about database security. But I will use this server to show you some security feature of SQL Server.
- First; you have create a blank Windows machine by Oracle VM Virtual Box Manager by clicking New in Machine menu.
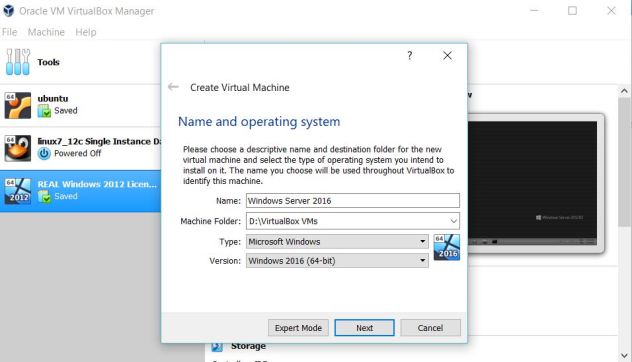
2.In the dialog box give a name for the virtual machine and choose Windows 2016 (64bit) as a version.
3. Now ; select the machine RAM , I chose 2 GB as you see in the picture below.
4. After pressing Next; you will come to Hard Disk configuration page; in my machine I decided to create a virtual disk.
5. Choose VDI as a hard disk type.
6. In the Storage on physical hard disk page choose your disk type and I chose dynamically allocated disk
7. In File location and size page; choose you hard disk size and location and press the Create button to create a blank machine. Now you blank Windows 2016 server is ready.
8. Now It is the time to download Windows 2016 Server ISO from Microsoft support page.
9. After downloading ISO page ; insert this file into previously created blank machine. You can do this from the setting page of the machine , choose storage section and Optical Drive part.
10. Now start the machine and press Install Now.
11. Choose Windows Server 2016 Standart Evaluation ( Desktop Experience)
12. This is a new installation for this reason ; choose Custom install
13. Now create you disk drive ; just choose Drive 0 and press Next.
14. Windows installation starts and you have to wait for a while
15. At the and you should enter your Administration password and you have make some regional setting.
16. And now you virtual Windows 2016 server is ready you can open your desktop by pressing Ctrl-Alt-Del from Input – keyboard menu .
I hope this note will be helpful for you.
Y. Anil Akduygu from Istanbul
Windows 2022 is an upcoming server OS from Microsoft with new features and plenty of security enhancements. As Microsoft is pushing harder on security by utilizing hardware chips in Windows 11, the same technique continues in Windows 2022 servers also.
The next question that comes to our mind is installing and testing this new OS on our normal PCs. Thanks to virtualization technology. We can do that with the Windows built-in Hyper-V feature or VMware and VirtualBox. In this guide, let me show you where to download the Windows 2022 server ISO/VHDX file and install it on VirtualBox using your normal Windows 10 or 11 computer.
Some key security improvements include secure-Core servers, TPM 2.0, Virtualization-based security, and firmware protection. Also, Microsoft implements HTTPS, and TLS 1.3 enabled connectivity by default. Improvements in DNS resolution also can be seen in this new OS which can prevent DNS hacks and poisoning.
Other considerable enhancements in monitoring Azure, on-premise and hybrid environments, networking, and Hyper-V improvements are available in the new server OS. To find out more new features, do check the official feature list.
Also, note that when we install Windows 2022 on VirtualBox (or any virtualization environment), we can’t check the all-new features. Some of these features will only work when we install the server OS on the physical hardware.
1) Download the Windows 2022 server from the official site here. You may need to provide your details to download the file.
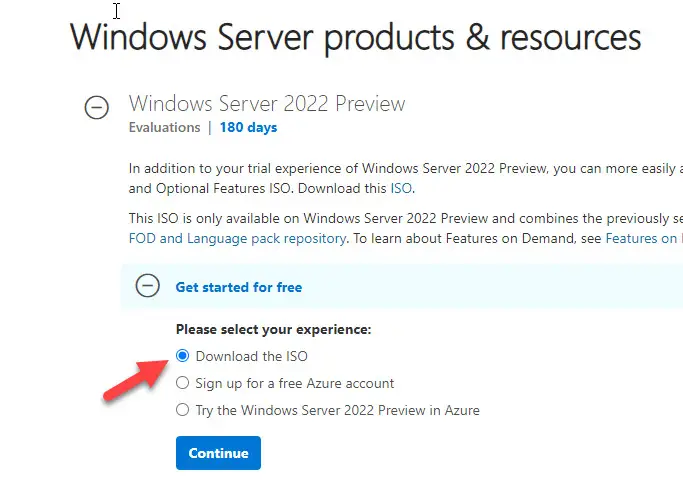
2) Download and install the latest Oracle VirtualBox software (if you don’t have it already on your host computer).
3) Make sure you have enough hardware resources to allocate. Minimum 2GB RAM, recommended is more than 4GB.
4) Create a new VM from the VirtualBox console. It is okay to select the Windows 2019 (64bit) server as the OS version since Server 2022 is not officially supported by VirtualBox (as of now)
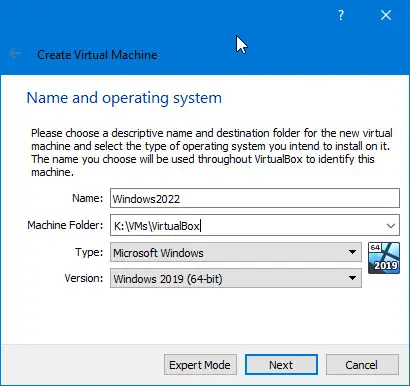
5) Set the RAM size based on your physical computer RAM availability. I configured 8GB in this example.
6) Create a new virtual hard disk, VDI type, 50GB size (or more) and select a dynamically allocated type to save disk space.
7) Click next to create the virtual machine.

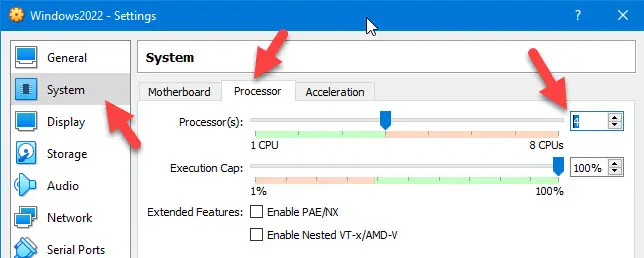
You can check the hardware requirements for the Windows 2022 server here at the official site.
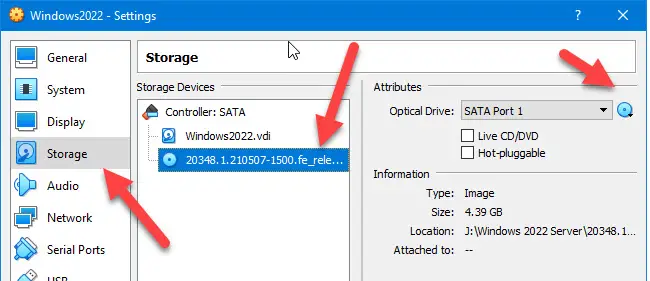
9) Open the Storage option and mount the downloaded 2022 ISO file to CD/DVD drive as shown below.
10) Power the virtual machine and select the mounted ISO file to boot the VM.
11) It is a normal Windows OS server installation process; nothing changed in this version. Select the Desktop Experience if you want to get the normal desktop and GUI interface. If you don’t select this option, you will get the Windows 2022 Server Core on the VirtualBox.
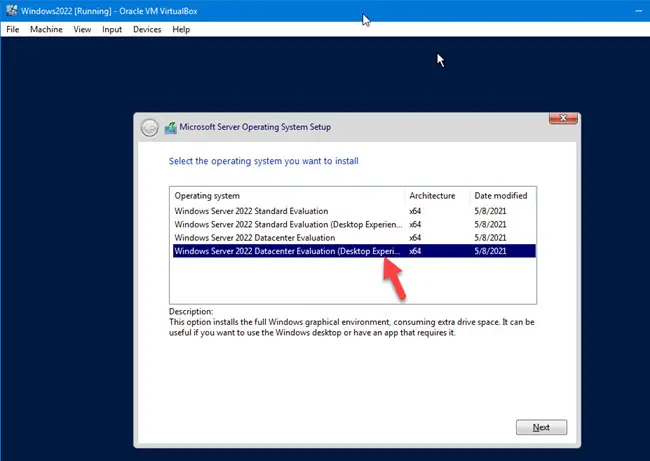
If you want to get experience on server core, you can install without Desktop Experience. You can always upgrade the server core to a Desktop experience or vice versa later.
In this example, I selected the desktop version.
12) Select the new Install option to do the fresh installation.
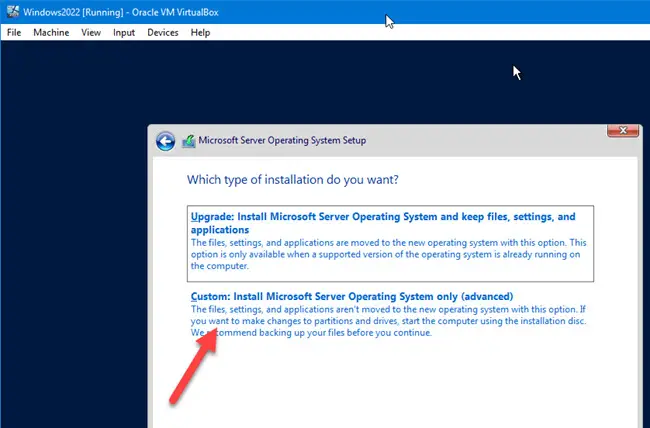
13) Select the hard disk you want to install and click Next. The installation process will create the required partitions and process to the next step.
14) After the installation is completed and VM is rebooted, you need to set up the Administrator password.
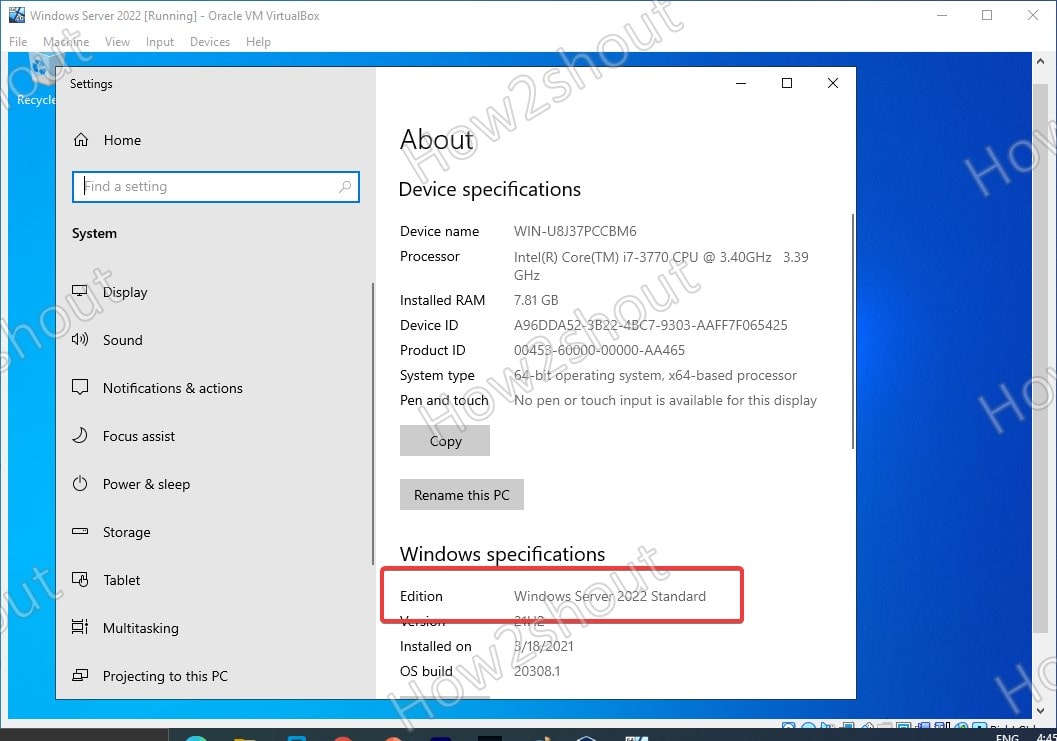
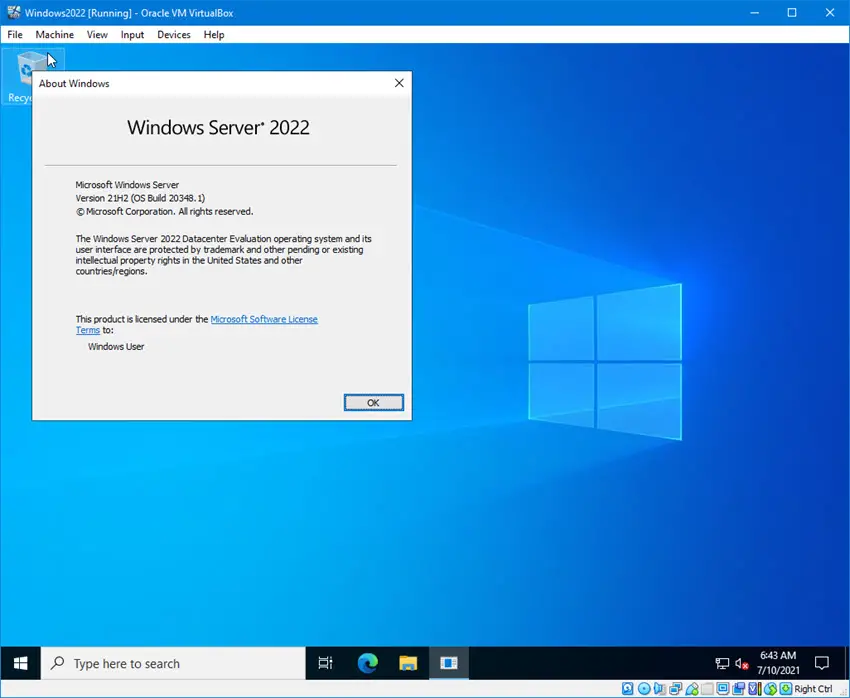
15) Here you go; you will land on the latest Windows 2022 server OS on VirtualBox as a virtual machine. It doesn’t matter which OS you have on your computer; it can be Windows 10, 11 or even the seven, Linux or macOS. As long as you have enough hardware resources on your physical computer with the latest VirtualBox, you can have Windows 2022 server as VM showed in these steps.
Read Also: Best Home Server OS you must know
What about VirtualBox Guest Additions for Windows 2022 Server?
As we mentioned earlier, Oracle VirtualBox doesn’t support Windows 2022 since this server version is still in preview mode (as of mid-July 2021). So, we do not have proper tested VirtualBox guest additions for server 2022.
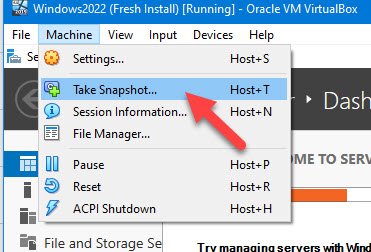
But, we can try the available guest additions for Windows OS (Server 2019). Before proceeding to the next steps, I highly recommend taking a snapshot of the virtual machine.
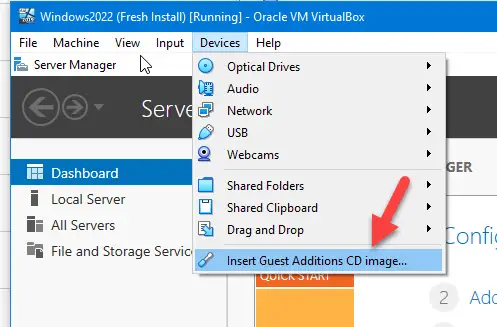
16) Click on Devices, and Insert Guest additions CD image of the virtual machine.
17) Once it is mounted successfully inside the VM, open the CD drive and execute the Windows version of guest additions.
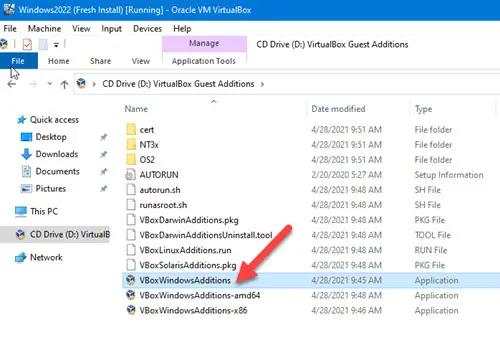
18) Select Install for required drivers and continue the installation. You need to reboot the VM at the end.
19) This Windows 2022 server VM should perform well with proper working display, mouse movements, full-screen mode, and other additional VirtualBox guess addition features.
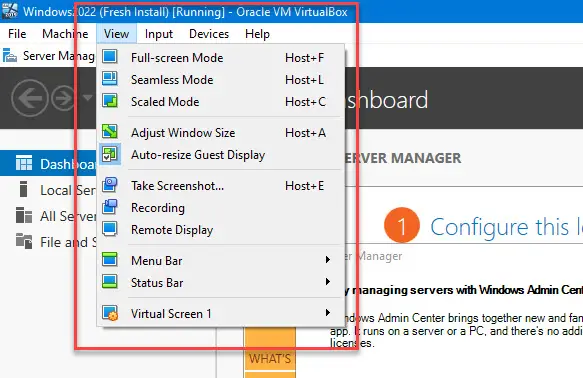
20) Take another snapshot before playing around with the new OS. Also, a full Windows update is highly recommended to get the latest updates and improvements.
Download Windows 2022 Server VHDX for VirtualBox or Hyper-V
Usually, Microsoft provides the preview and final versions of server Operating Systems in VHDX format, which natively supports Hyper-V. These pre-installed VHDX files can be easily imported to Hyper-V or VirtualBox to use the OS instantly.
You can download the Windows 2022 Server VHDX file from the Microsoft site here.
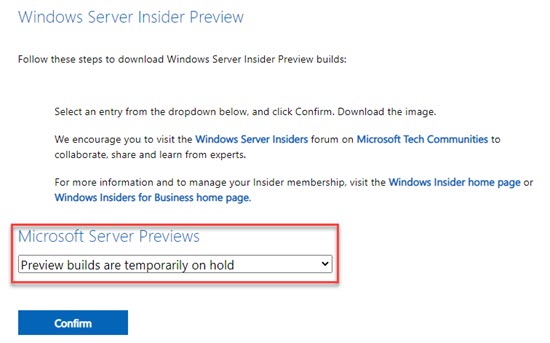
Unfortunately, at the moment, the preview builds are temporary on hold, and you can’t download them from the Microsoft site. When these images are available, you can download the VHDX file and simply import it to Oracle VirtualBox as described in our earlier guide on Windows 2012 R2 Server.
В этом видео вы научитесь устанавливать операционную систему Windows Server 2019 на VirtualBox.
-
Виктор Черемных -
16 января, 2021 -
No Comments
Добавить комментарий
Ваш адрес email не будет опубликован. Обязательные поля помечены *
Комментарий *
Имя *
Email *
Сайт
Группа в VK
Обнаружили опечатку?
Сообщите нам об этом, выделите текст с ошибкой и нажмите Ctrl+Enter, будем очень признательны!
Свежие статьи
Создание общего Samba ресурса на Astra Linux Special Edition 1.7
30.01.2023
Добавление общей smb папки на Astra Linux Special Edition 1.7
27.01.2023
Создание общей папки для Astra Linux Special Edition 1.7 на VirtualBox
25.01.2023
#10. Настройка оценок и отчетов в системе Moodle
23.01.2023
Программный комплекс ViPNet Client
23.01.2023
Облако меток
PrevМетоды психологического воздействия на человека | СИ
Лента задач в MS PowerPoint — вкладка «Главная»Next
Похожие статьи
Настройка файлового сервера на Windows Server 2019
В этом видео вы научитесь создавать и настраивать файловый сервер на Windows Server 2019.
Создание виртуальных машин в Hyper-V
В этом видео вы научитесь создавать виртуальные машины, коммутаторы и диски в Hyper-V.
Установка Windows Admin Center
В этом видео вы научитесь устанавливать Windows Admin Center для управления Windows Server.
Установка, настройка и обзор Hyper-V на Windows Server 2019
В этом видео вы научитесь устанавливать и настраивать гипервизор Hyper-V на Windows Server 2019.

