Installing Windows 10 as a Guest Operating System in VMware Fusion
Mac owners often need to run their favorite Windows applications that are not supported on macOS. However, it is possible to do so if Windows is installed on the Mac computer. There are three common methods to run Windows on a Mac computer: use Parallels Desktop, install Windows on the Boot Camp partition, or install Windows on a VirtualBox VM or VMware Fusion VM. This blog post explains how to install Windows 10 as a guest OS on a macOS virtual machine using VMware Fusion and combine the advantages of both Windows and macOS operating systems.
Requirements
Before proceeding with installing VMware Fusion, check system requirements. In this section, I list the requirements for VMware Fusion 12, the latest version at the time of writing this blog post. If your macOS version is older than 10.5 Catalina, install an older VMware Fusion version supported by your macOS.
Requirements for VMware Fusion 12:
- A Mac computer manufactured in 2011 or later (except 2012 Mac Pro Quad Core with the Intel Xeon W3565 Processor); 2010 Mac Pro Six Core, Eight Core, and Twelve Core with a graphics card that supports Metal.
- Processor (CPU) architecture must be Intel x86-64
- 4 GB of memory, but we recommend at least 8 GB of memory to install VMware Fusion on macOS. Keep in mind that you need more RAM to run VMware guest operating systems. Windows 10 running as a guest OS requires at least 4 GB of RAM.
- 750 MB of free disk space to install VMware Fusion and additional disk space to store virtual machine files.
- Your macOS must be compatible with the VMware Fusion version you are going to install. VMware Fusion 12 can be installed on macOS 10.15 Catalina and macOS 11.0 Big Sur.
- The ISO installation image of Windows 10.
Preparing the Environment
I’m using macOS 10.15 Catalina as the host operating system and Windows 10 20H2 Professional x64 as the guest operating system in the tutorial.
What is a guest operating system? The difference between host and guest operating systems is that a host OS is installed on the hardware, and a guest OS is running on a virtual machine that uses virtualized hardware. I’m using VMware Fusion 12.1.0 as a VMware hypervisor to run a Windows 10 VM on macOS.
You can download the VMware Fusion 12 installer from the official VMware website.
You can download the installation ISO image of Windows 10 from the Microsoft website.
In my case, I have a separate disk partition to store installation files and virtual machines on Mac. The name of this disk partition is disk_d. You can create a separate partition or create custom folders in your home user folder to store installation files and virtual machines.
For convenience, I’ve renamed installation files to avoid using long names. In my tutorial, the names of the installation files are:
VMware Fusion: VMwareFusion12-1-0.dmg
Windows 10: windows_10_20h2_x64.iso
Now we are ready to start installation and configuration.
Installing VMware Fusion
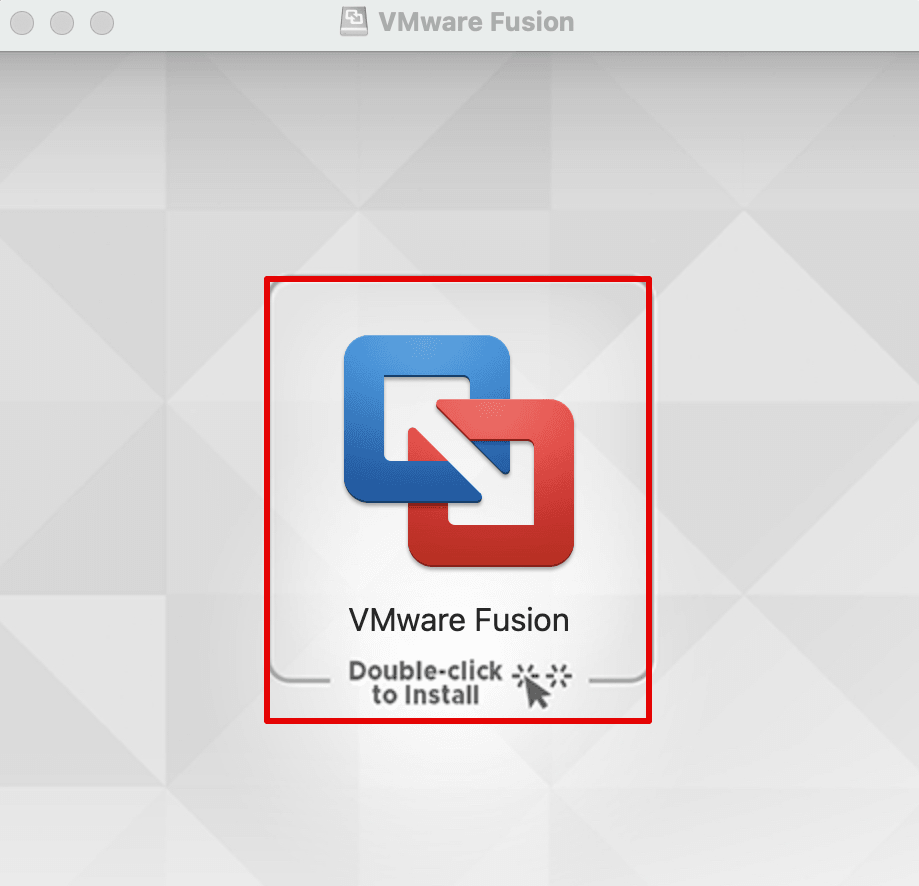
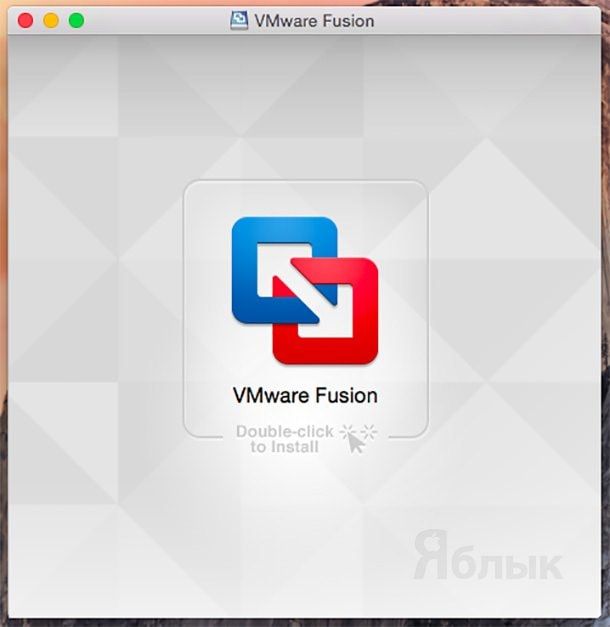
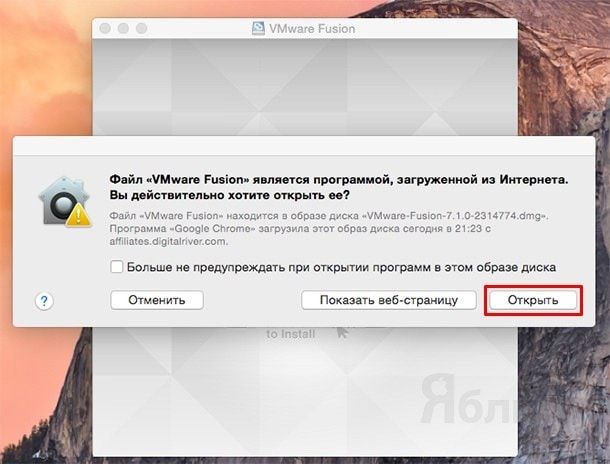
Boot macOS on your Mac. Locate the VMware Fusion installation file in Finder, and double click this file to open the installer (in my case – VMwareFusion12-1-0.dmg). Wait until the installer opens.

When you see the VMware Fusion installer window, double click the corresponding icon to install VMware Fusion.

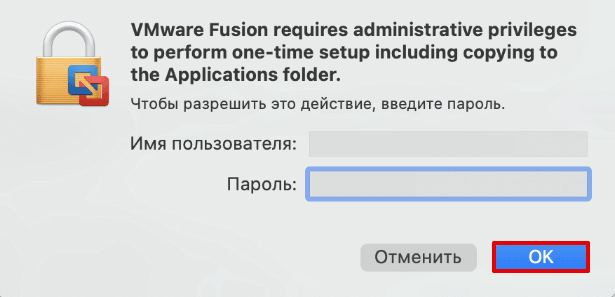
Enter the credentials of your macOS user account to grant administrative privileges to the installer, and hit OK to continue.

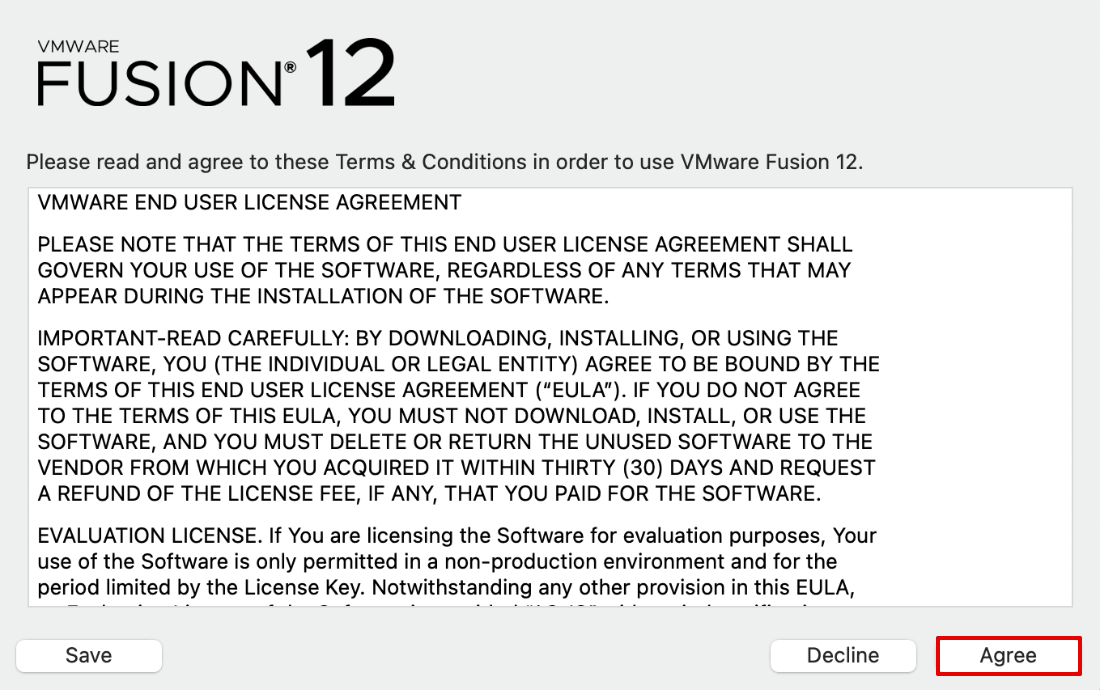
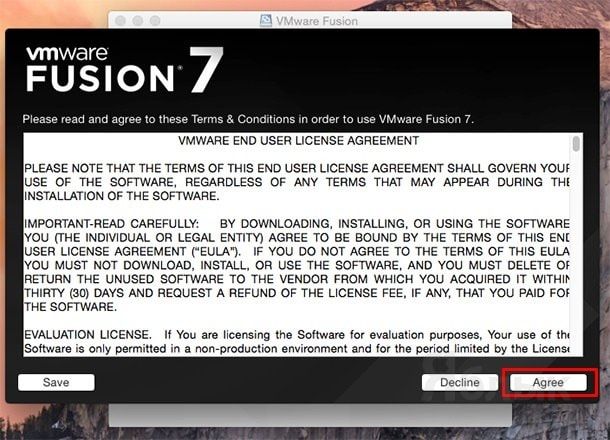
Read the End User License Agreement (EULA), and click Agree to continue.

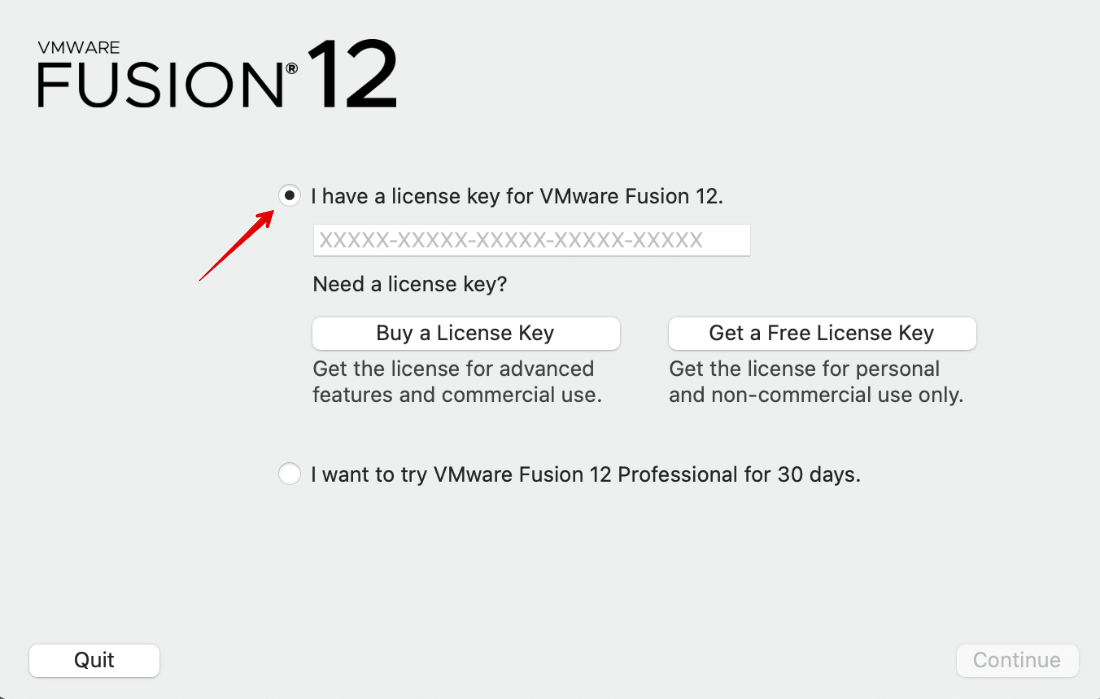
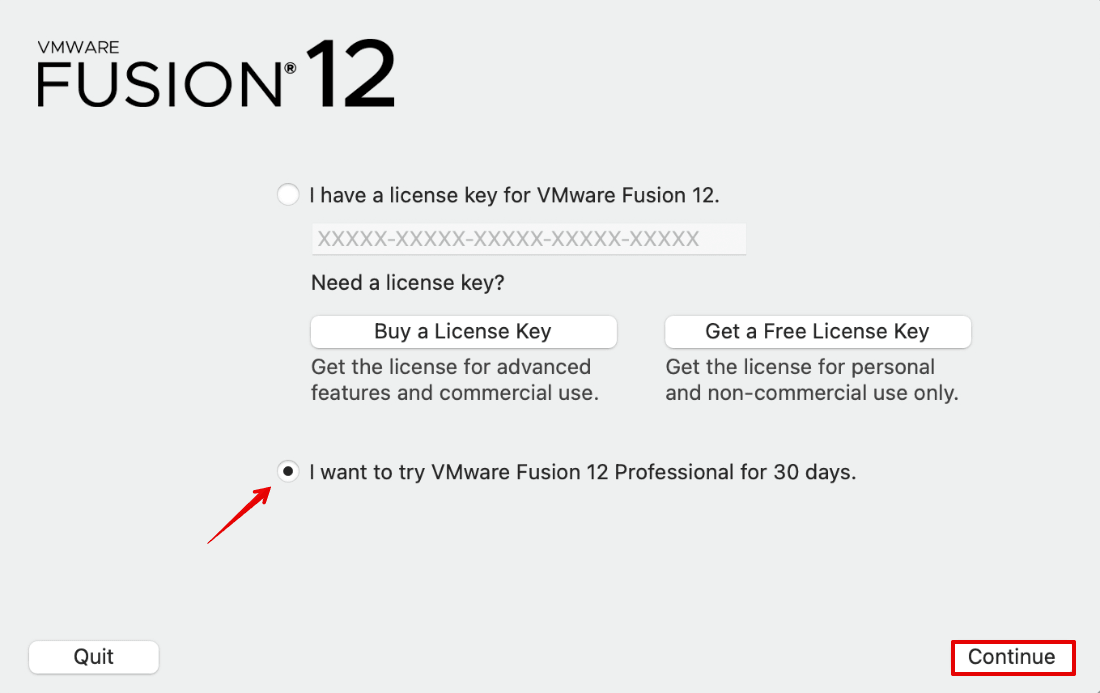
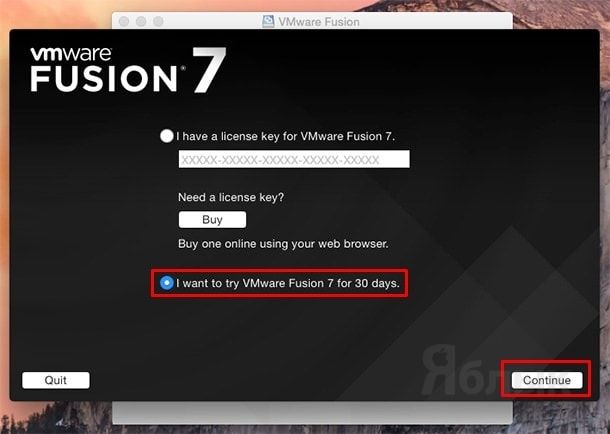
Define the license options to install VMware Fusion on macOS. If you don’t have a license key, select the second option: I want to try VMware Fusion 12 Professional for 30 days.
If you have a license key for VMware Fusion or VMware Fusion Pro, select the option I have a license key for VMware Fusion 12 and enter your license key. If the key is valid, the corresponding green icon appears. You can also enter a license key after finishing the installation in the graphical VMware Fusion user interface. In my case, I’m using a license key for VMware Fusion Pro.
Click Continue to proceed.

The macOS security notification messages pop up. You have to allow all access needed for macOS VMware Fusion to work properly.
“VMware Fusion” wants access to control “System Events”. Allowing control will provide access to documents and data in “System Events”, and to perform actions with that app.
Click OK.
Unable to access Accessibility. For optimal performance of your keyboard and mouse inside your virtual machine, give VMware Fusion access to your system’s accessibility features. If you do not give this access now, you can go to the Security & Privacy System Preferences later.
Click OK.
“VMware Fusion” would like to control this computer using accessibility features. Grant access to this application in Security & Privacy preferences, located in System Preferences.
Click Open System Preferences.

Once the Security & Privacy window opens, in the Privacy tab you can see that VMware Fusion is not selected in the list of allowed apps and is inactive. You should also see a request to enable VMware Fusion notifications. Click Allow because important information may be displayed in notifications when you work with VMware Fusion. In order to provide VMware Fusion with access, click the lock to make changes in the privacy settings (this icon is located in the bottom left corner of the window).

Now the privacy settings are unlocked. Select VMware Fusion in the list of allowed apps (select the corresponding checkbox). Now you can close the Security & Privacy settings window.

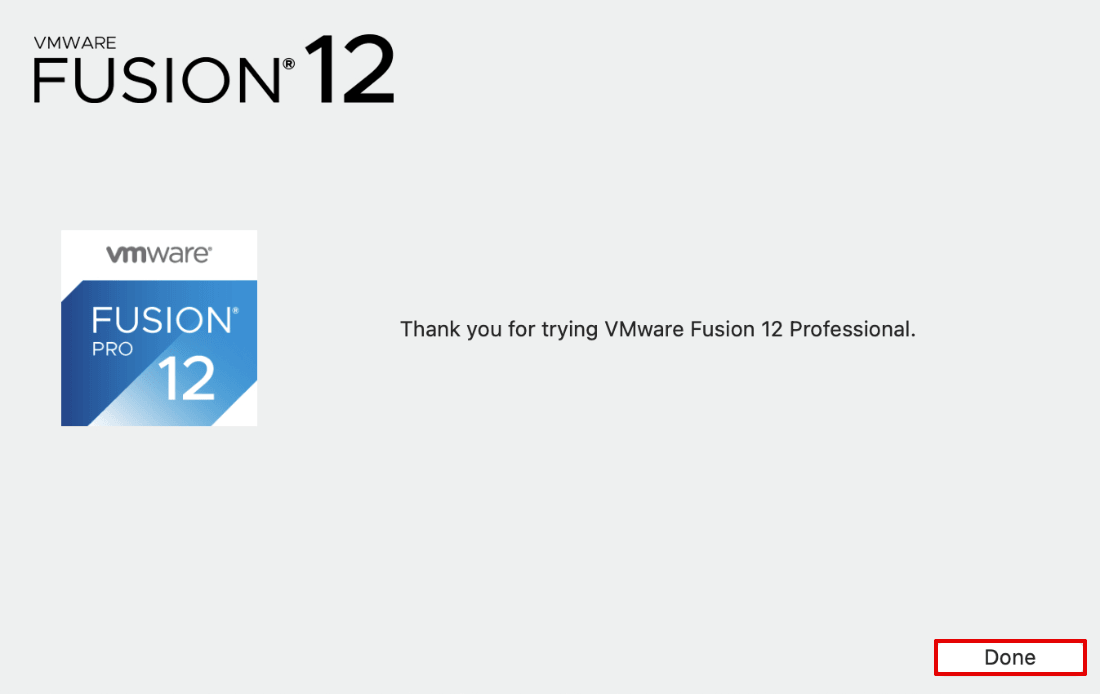
VMware Fusion is now installed, and you can run the application.
Creating a VM and Installing a VM Guest OS
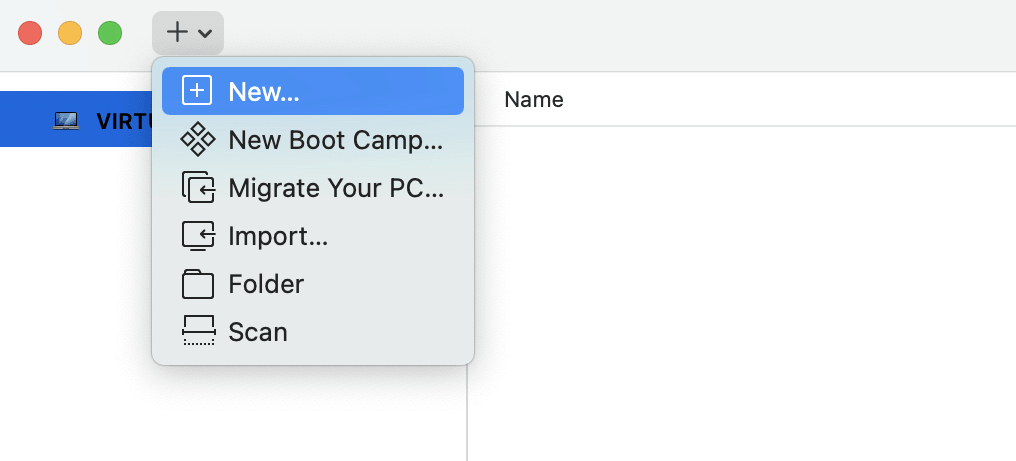
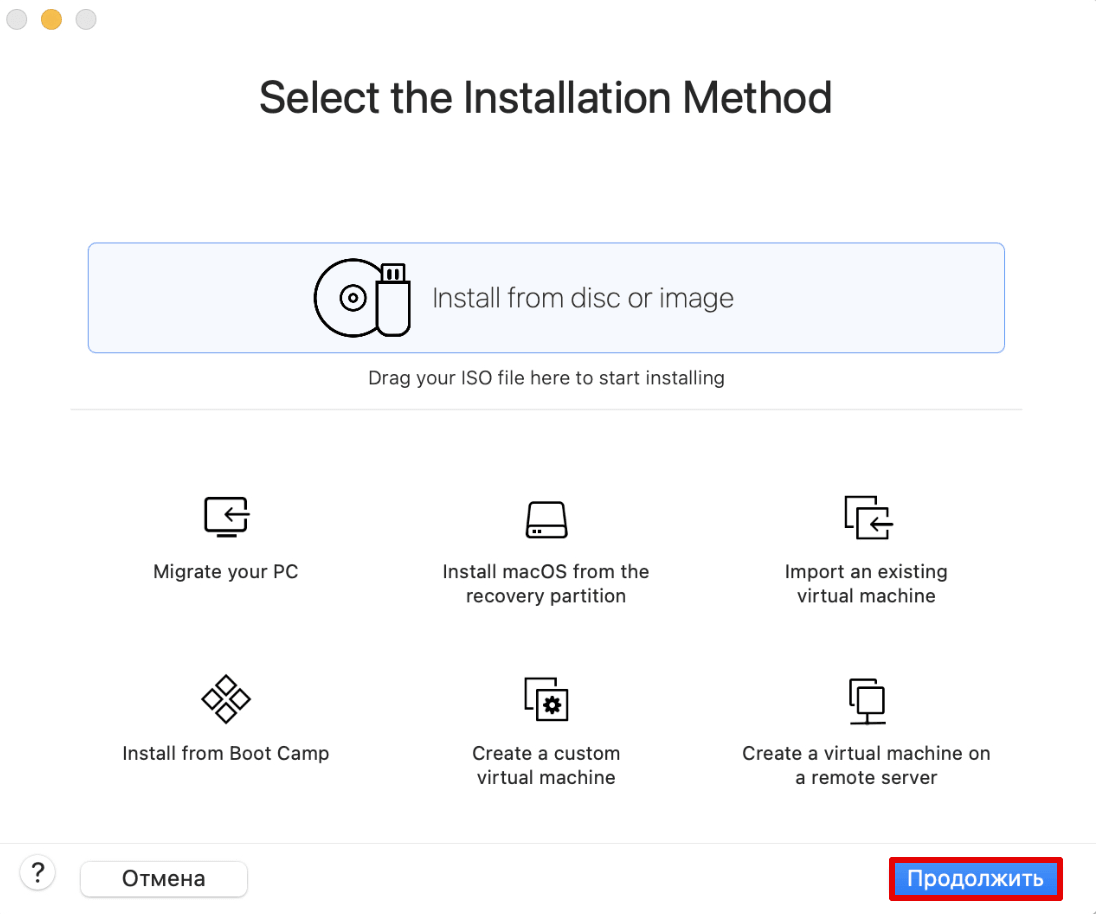
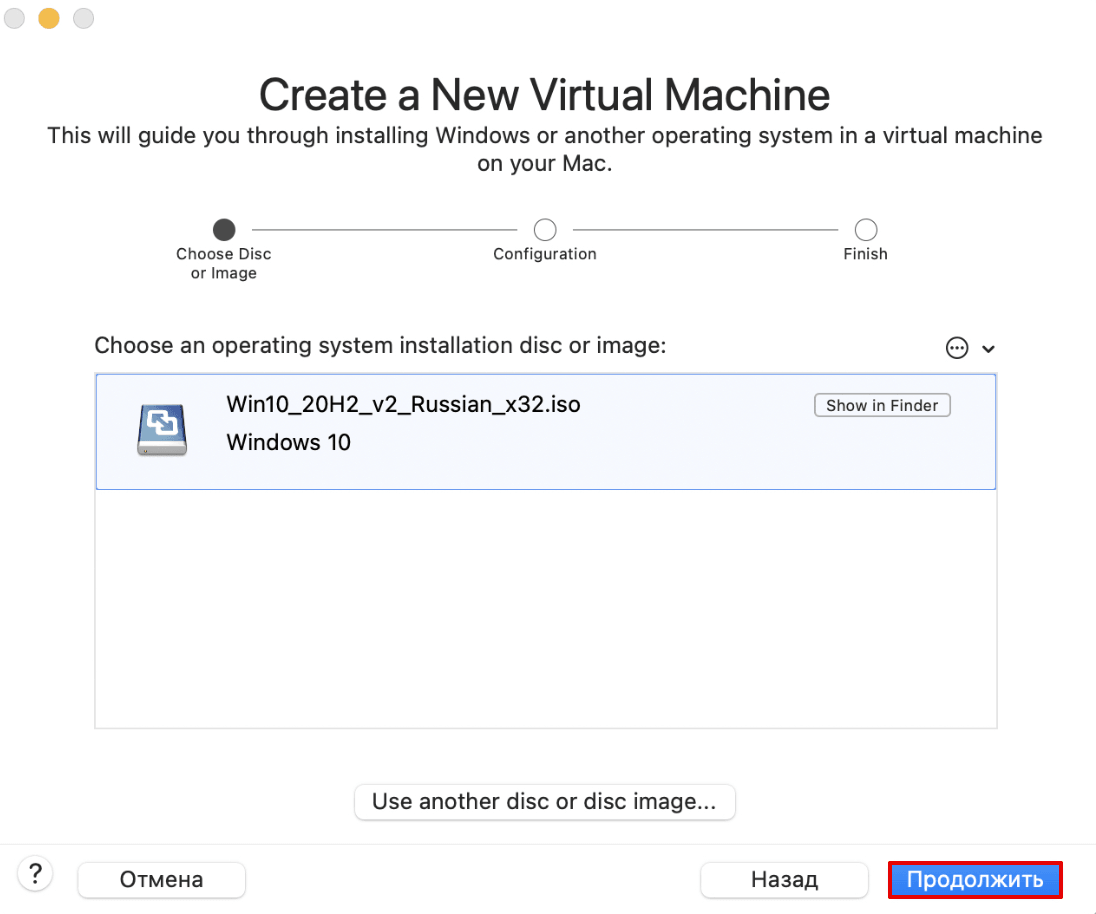
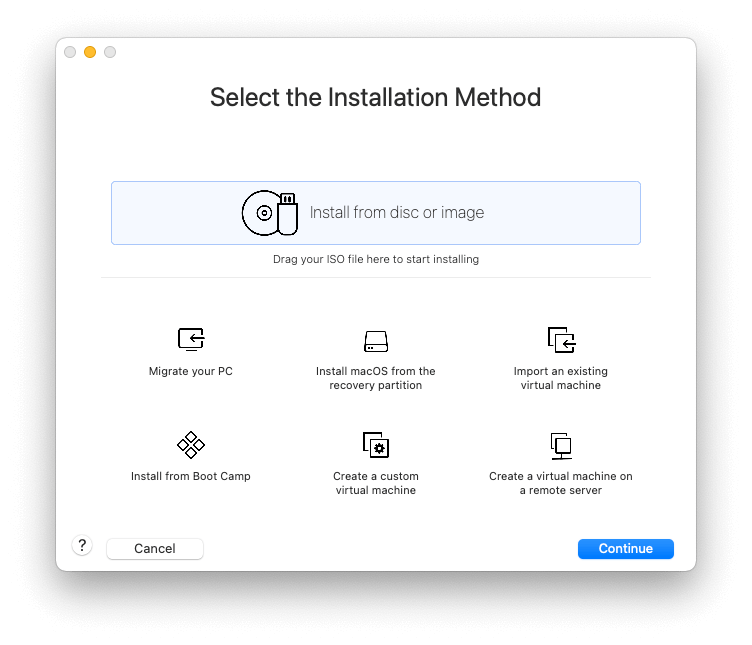
Open VMware Fusion in the Launchpad or click the icon in the Dock. In the main window of VMware Fusion, you can see a big area with the text: Install from disc or image. This is what you need to start creating a virtual machine and installing a guest operating system. Open the folder containing the Windows 10 installation image in Finder, then drag and drop the Windows 10 ISO image to this area of the VMware Fusion window.

Create a New Virtual Machine. A new VM installation wizard opens in VMware Fusion. The ISO installation image is already selected after the drag and drop.

System Extension Blocked. The alert message is displayed.
A program tried to load new system extension(s) signed by “VMware, Inc.”. If you want to enable these extensions, open Security & Privacy System Preferences.
Click Open Security Preferences to allow access for VMware Fusion. Otherwise, you cannot continue the configuration of a new VM.

Click the lock icon to unlock access to the settings just as you did before.
Enter your credentials to unlock Security & Privacy preferences, and click Unlock.

The following message is displayed: System software from developer “VMware, Inc.” was blocked from loading. Click the Allow button near this message to unlock VMware Fusion and allow the required access. Then you can close the Security & Privacy window.

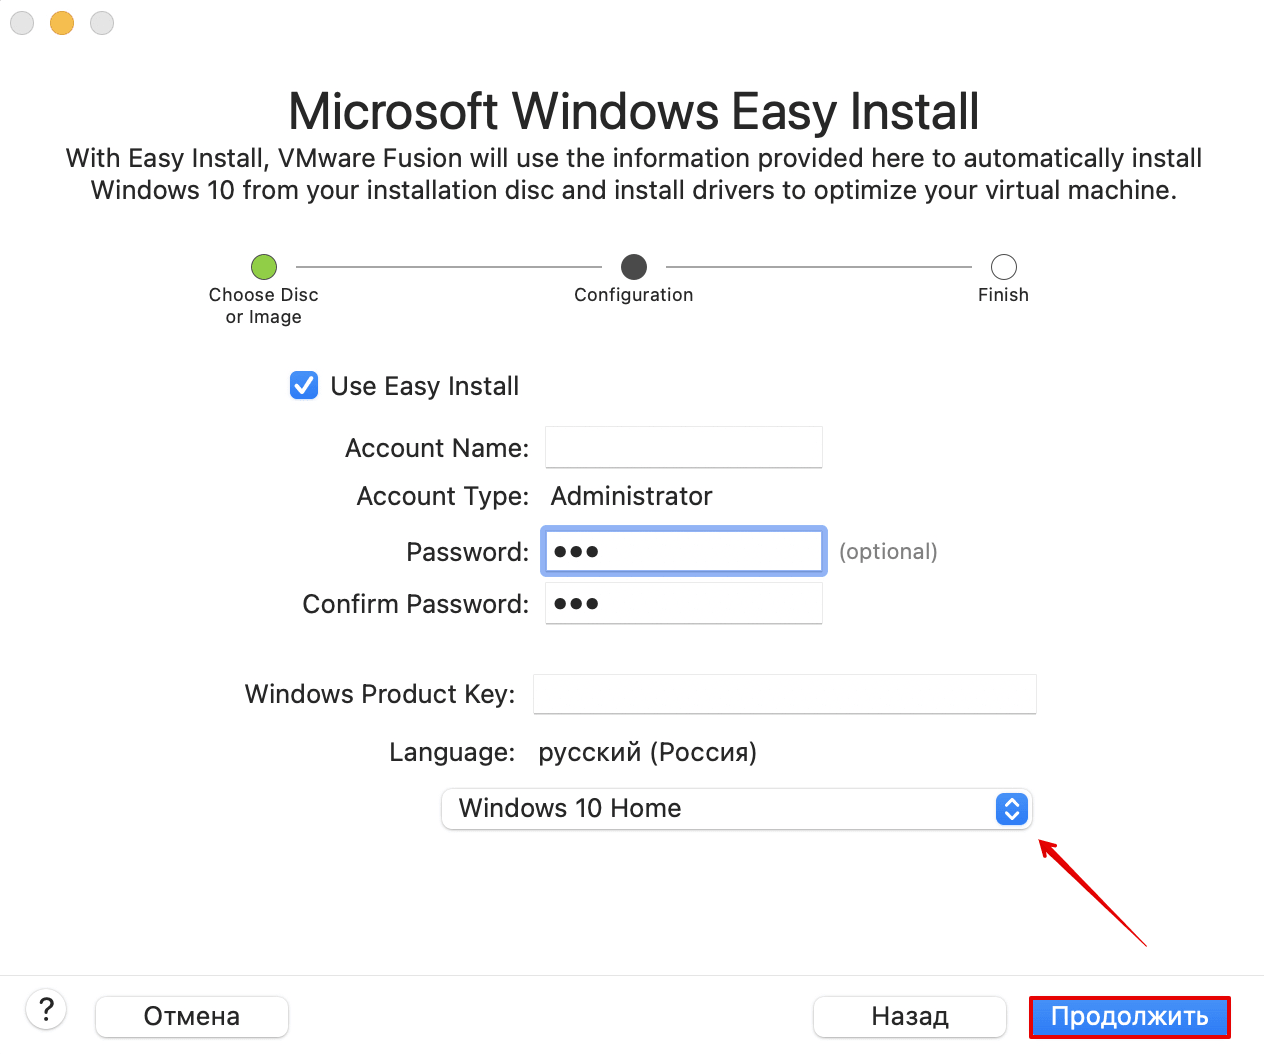
Now you can go back to the VMware Fusion window and the new VM installation wizard. By default, VMware Fusion suggests using Easy Install to create a VM and install a guest operating system. Easy Install requires minimum user interaction during the installation process, but in this case, a user has the lowest level of control. You can enter some settings such as a user name, password, the Windows product key, select the needed language. Then the entire process of VM creation and guest operating system installation is completed automatically by VMware Fusion.
In my example, I’m not using Easy Install to fully control the VM creation and guest operating system installation process (and for a better understanding of configuration). Once the needed option is selected (we unselect the Use Easy Install checkbox), click Continue.
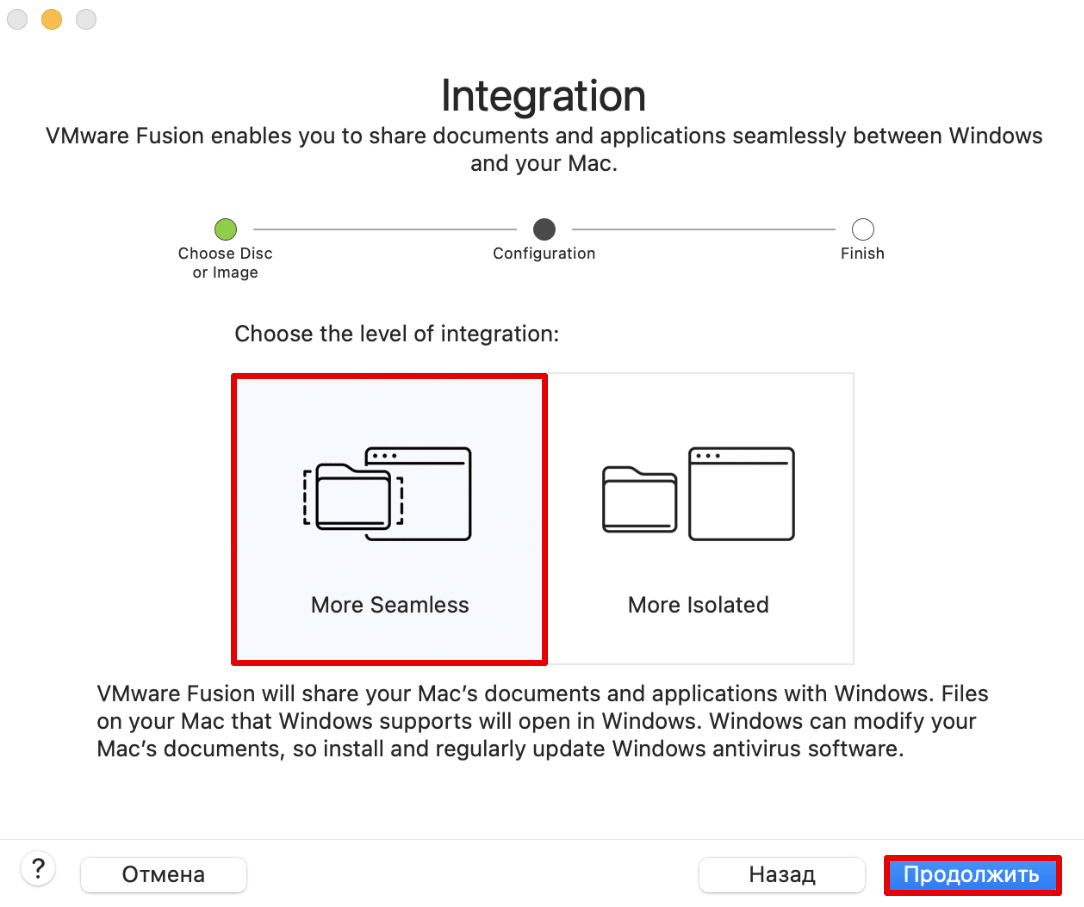
If you use Easy Install, then you can select one of the two provided options:
More Seamless. If you use this option, Mac user folders such as Desktop, Documents, and Downloads are shared between the host OS and guest OS with write permissions for guest Windows users. The Seamless option provides more convenience, including the ability to use the Unity mode. You should use antivirus software because if a guest OS is infected, the shared files can be corrupted on the host OS (and vice versa). Read about ransomware to learn more.
More Isolated. This option is better from the security point of view. User folders are not shared automatically, but you can drag and drop files between the host OS and guest OS without violating the isolation.
You can select one of these two options of Mac integration settings only at the step of creating a virtual machine. As I’m not using Easy Install, I explain how to configure a VM created with the More Isolated option.

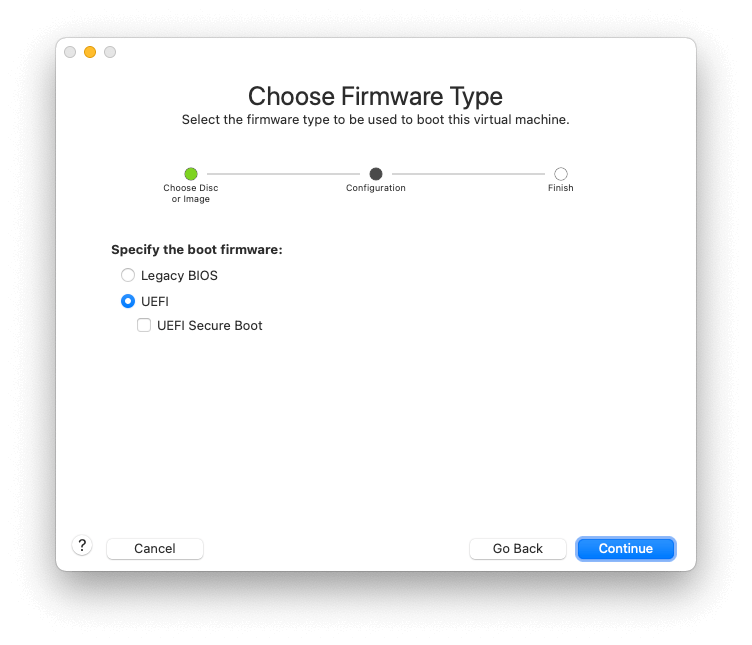
Choose Firmware Type. Select Legacy BIOS or UEFI depending on your needs. Select BIOS to use MBR (Master Boot Record) or select UEFI to use GPT (GUID Partition Table) for disk partitioning. We use BIOS for our Windows 10 VM we are creating now. Hit Continue.

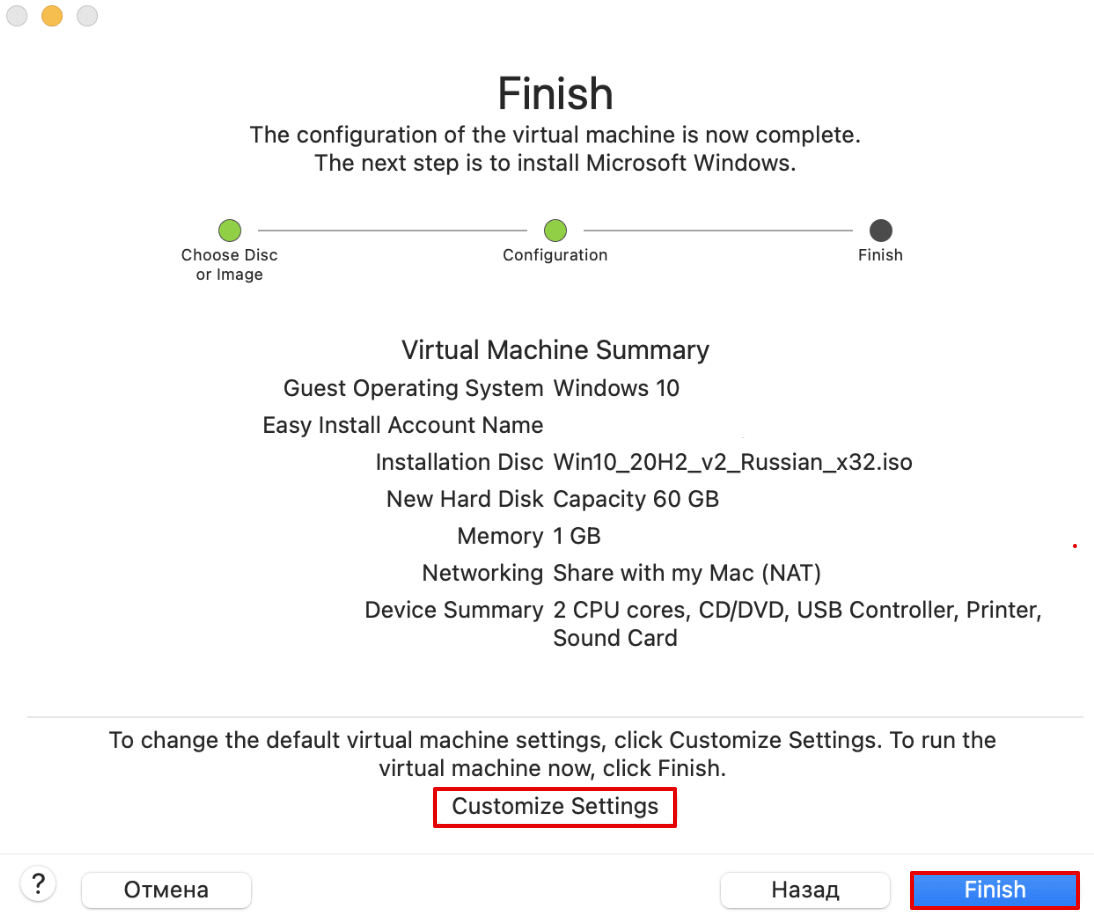
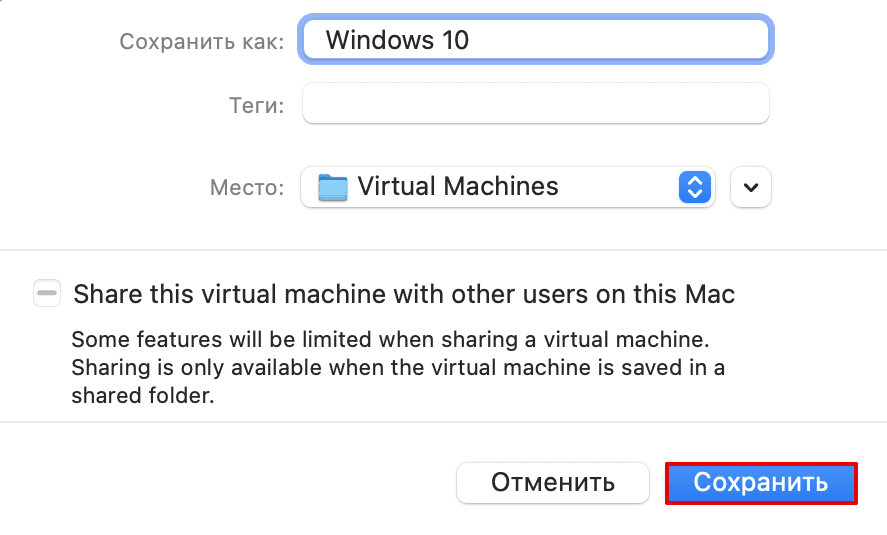
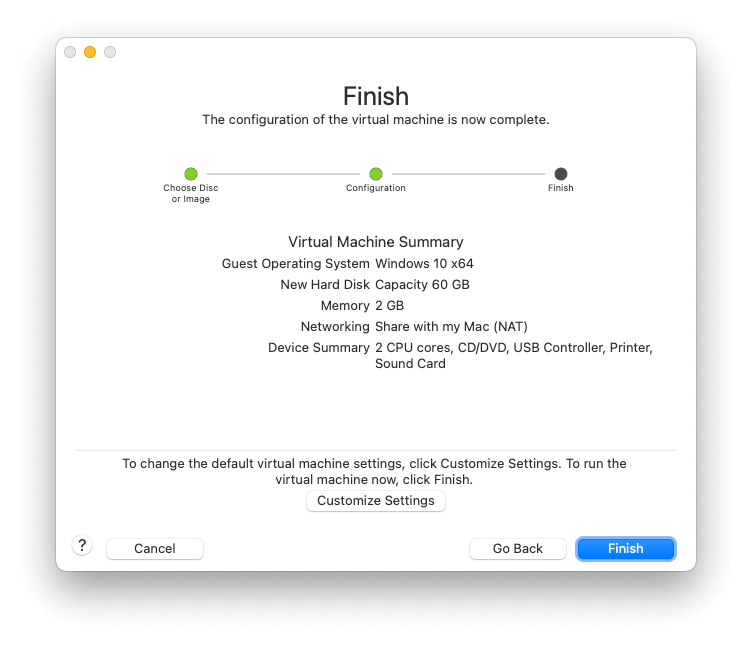
Finish. The configuration of the virtual machine is now complete. Click Customize settings to define the path to store VM files before you click the Finish button.

Select a folder to store your VM files. In my case, I will store VM files in /Volumes/disk_d/VM/
Note: In VMware Workstation, you can select a folder to store VM configuration files and virtual disk files at different steps of the new VM wizard with the ability to use different folders to store these files. However, in VMware Fusion, all VM files and virtual disks are automatically stored in one selected folder. The default location to store VM files in macOS is your_home_directory/Virtual Machines/
Hit Save to save VM location, and then click Finish to finish VM creation and close the wizard.

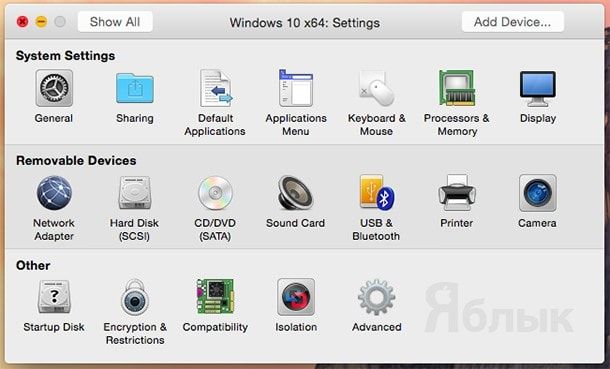
Probably you have noticed that unlike VMware Workstation and VMware ESXi, there were no virtual hardware configuration options in the new VM creation wizard. In order to configure VM settings, including virtual hardware, click Virtual Machine > Settings in VMware Fusion right after creating a new VM and closing the New VM wizard.

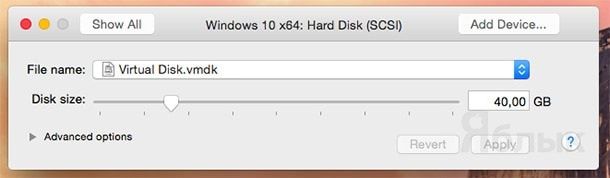
VM settings are displayed in a separate window. You can configure the virtual disk size (60 GB are provisioned for a Windows 10 VM by default). Let’s configure processor and memory settings for our Windows 10 VM by clicking the Processors & Memory icon.

Select 4096 MB of memory and 2 processor cores for a VM to run Windows 10 (this configuration may vary). You can expand advanced options to enable nested virtualization and other useful features for your VM. Close the window after finishing configuration.

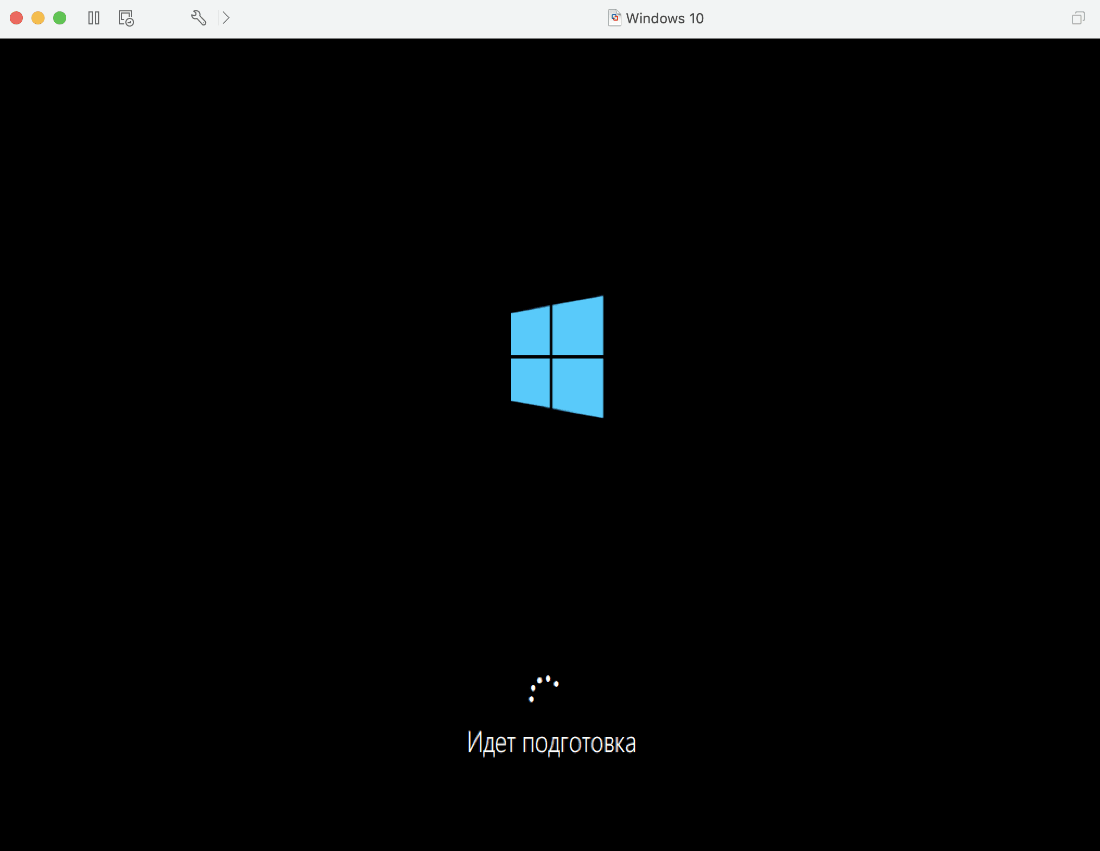
Once you have finished configuring a virtual machine, including virtual hardware, start the VM, boot from the Windows 10 installation ISO image selected automatically with the current configuration, and install Windows 10 as a guest operating system on the VM. Click the Play button to start a virtual machine.

You can see error messages after an attempt to start a VM.
Could not open /dev/vmmon: Broken pipe. Please make sure that the kernel module ‘vmmon’ is loaded.
Transport (VMDB) error – 14: Pipe connection has been broken.

These errors are displayed due to the security configuration of macOS. Issues related to macOS security settings require manual configuration. In order to fix this issue and avoid these errors when starting a VM, go to Security & Privacy settings once again. Click the Apple button, and click System Preferences.

In the Security & Privacy window, select the Privacy tab, then select Full Disk access in the left pane of the window. Click the lock icon to unlock settings (similarly as you did multiple times before).
Once settings become active, select the checkbox near VMware Fusion to allow full disk access for this virtualization application. If VMware Fusion is running now, a notification message is displayed:
“VMware Fusion” will not have full disk access until it is quit.
You can choose to quit “VMware Fusion” now or do it on your own later.
Click Quit Now to close VMware Fusion and apply security settings when running VMware Fusion next time.

Open VMware Fusion, and start your new VM once again. Now the VM should start correctly without displaying any errors.
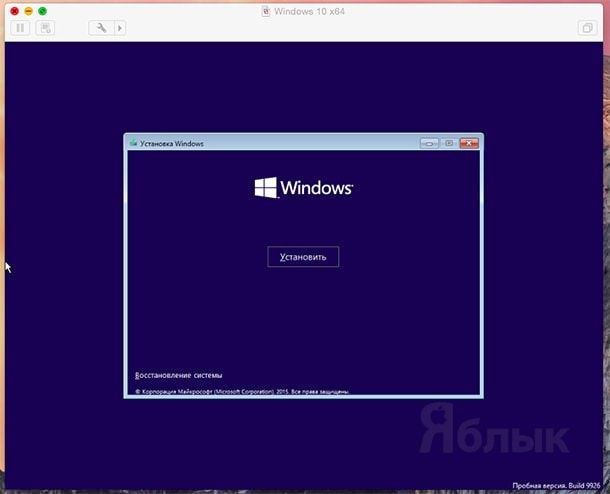
Once the VM is booted from the Windows 10 installation ISO image, you should see the Windows setup GUI (graphical user interface). Installation of Windows 10 as a guest operating system on VMware Fusion is similar to the installation of Windows 10 on a physical machine. We disconnect the machine from the internet until finishing the installation of Windows 10.
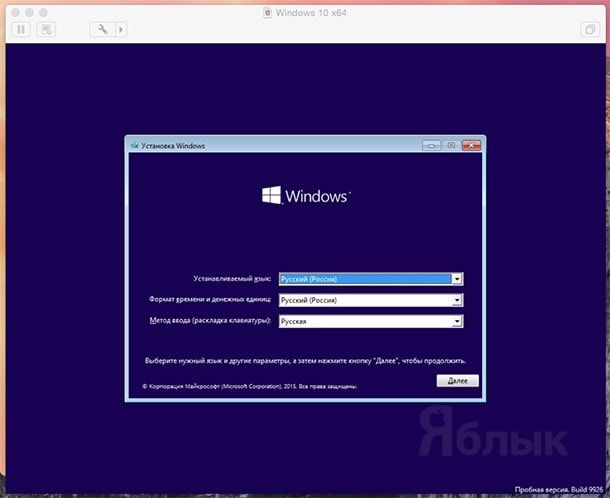
Select a language to install, time and currency format, and keyboard or input method. We use English (United States) in this example. Click Next at each step to continue.

Activate Windows. If you have bought the Windows 10 license, you can enter the product key now. If you don’t have a license key, click I don’t have a product key to select the trial mode and continue.
Select the Operating system you want to install. Select the needed Windows 10 edition. I select Windows 10 Pro in my case.

There is a difference between Windows 10 editions and Windows 10 N or KN editions (N – Europe, KN — Korea). Due to the European anti-competitive practices, Microsoft released special Windows 10 N editions for Europe marked with the N letter. These Windows 10 N editions don’t include Windows Media Player and related features. Windows 10 editions (without N in the name) include Windows Media Player, Voice Recorder, Music, Video, and Skype.
Windows 10 N and KN editions are provided without media technologies. You can download and install these multimedia components from the Microsoft website manually (a special Media Feature Pack is provided) after installing Windows 10 on your computer or virtual machine.
The product keys for Windows 10 Pro and Windows 10 Pro N are different (this rule is true for other Windows 10 and Windows 10 N editions).
Applicable notices and license terms. Read the license agreement and select the I accept the license terms checkbox.
Which type of installation do you want? Select Custom: Install Windows only (advanced) to perform a clean installation.

Where do you want to install Windows? Now you should create a partition table with the configuration that is suitable for you. You can see the 60 GB empty virtual hard disk (or another size virtual disk if you configured that in VM settings). Click New to create a new partition and enter the partition size, then click Apply. Windows automatically creates the first 50 MB service partition prior to your custom partition. If you don’t want to have this additional service partition on your disk, you can delete the service partition. It is especially useful when you use the MBR partition table with a limit of four partitions, but you need to use the same amount for your work without wasting one as the service partition. However, you cannot simply select the 50 MB partition and click Delete.
In order to delete the 50 MB partition, first, delete your custom partition (the size of my partition to install Windows 10 is 59.9 GB). The name of my custom partition is Drive 0 Partition 2.

Then select the service partition (Drive 0 Partition 1: System Reserved) and click Extend. We extend the first partition to the maximum possible size. Click Apply to save settings.
Now we have one 60 GB partition on our virtual disk to install Windows 10. Later you can create new virtual disks for a VM in VMware Fusion, create partitions, and format them in a guest operating system after finishing Windows 10 installation. Select the partition where Windows 10 must be installed, and hit Next. Wait until the installer copies all the needed files and installs Windows.

Let’s start with region. Select your location. I choose the United States.

Is this the right keyboard layout? Select the needed keyboard layout. I use the US keyboard layout for my Windows 10 installation.
Let’s connect you to a network. I disable the internet connection until I finish Windows 10 installation and click I don’t have internet. We can configure the internet connection and download needed updates later after completing the installation.

There’s more to discover when you connect to the internet. Windows 10 persistently asks you to enable an internet connection. However, we are not going to turn on the internet until finishing installing the VMware guest operating system. Click Continue with limited setup.
Who’s going to use this PC? Enter a name for your local user account on the Windows machine, for example, user1. We disconnected the internet and are not using the Microsoft account.

Create a super memorable password. Enter a strong password and remember the password. It is recommended that you use a password that contains at least 8 characters, including uppercase, lowercase letters, digits, and special characters.
Confirm your password. Enter your password once again. Then Windows 10 asks you to create three security questions for the user account.

Choose privacy settings for your device. Deselect all settings that collect your data and send the data to Microsoft.
Let Cortana help you get things done. Select Not now to disable Cortana.

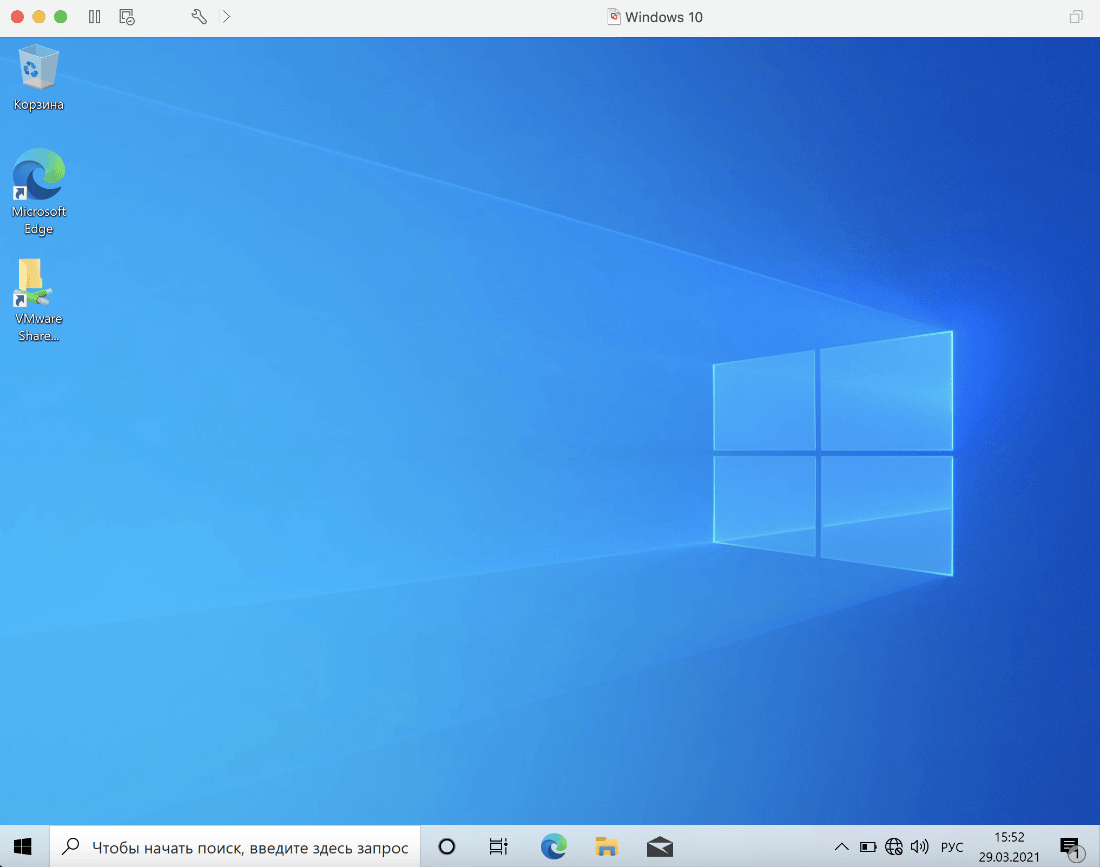
Windows 10 is now installed as the VMware guest operating system. You can see Windows desktop and other elements of the graphical user interface of Windows 10 in the window of VMware Fusion running on macOS. Now you have to install VMware Tools for higher performance and better guest OS user experience.
Installing VMware Tools
VMware Tools is a set of drivers and tools developed to improve VM performance and provide better user experience. Read more about VMware Tools in this blog post.
While the VM is powered on and Windows 10 is running as a guest OS in VMware Fusion, click Virtual Machine > Install VMware Tools.
The following message is displayed: Click Install to connect the VMware Tools installer CD to this virtual machine.
Click Install.

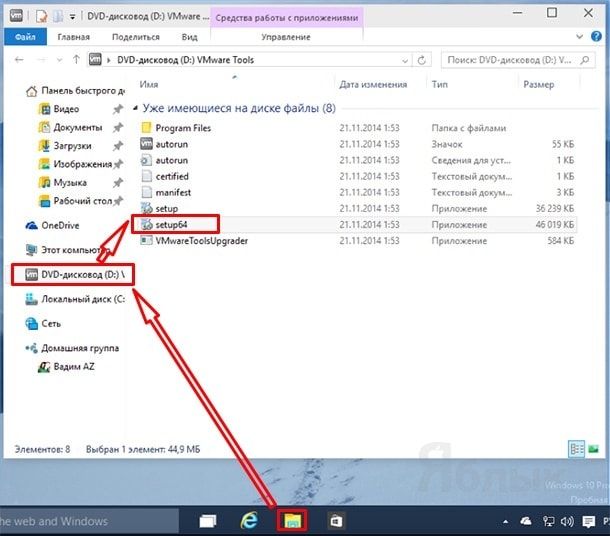
A virtual ISO CD image is mounted in a guest OS. Open the autorun or run setup64.exe on a virtual CD to launch the VMware Tools installer.

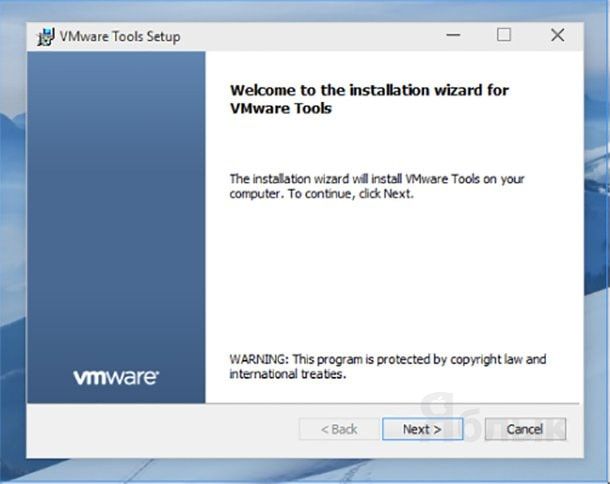
The installation wizard for VMware Tools opens. The welcome screen is displayed first. Hit Next at each step of the wizard to continue.
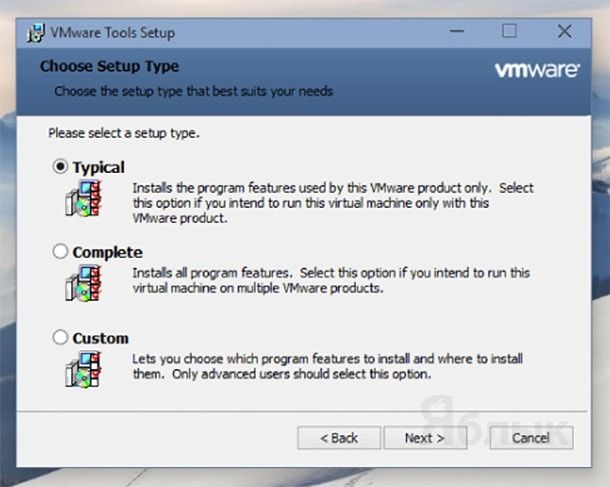
Choose Setup Type. Select Typical (the default option) that is suitable for most cases. You can perform the complete installation to install all program features of VMware Tools.

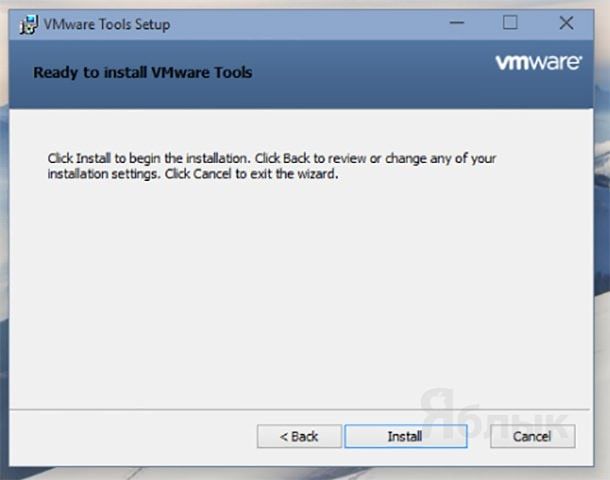
Ready to install VMware Tools. Click Install to start the process of VMware Tools installation.
Completed the VMware Tools Setup Wizard. You must restart your system for the VMware Tools configuration changes made to take effect. Click Finish, then click Yes to restart your Windows 10 guest OS now.

Configuring Shared Folders
Let’s configure Shared Folders to better integrate a host OS and guest OS in case we use the More Seamless mode of Easy Install. Shared Folders allow you to copy files from a host OS to a guest OS and vice versa more conveniently. In addition, you can use drag and drop without the need to share folders and configure permissions manually in the operating system.
In VMware Fusion, go to Virtual Machine > Settings, then click Sharing to open the configuration of Shared Folders.

Select the Enable Shared Folders checkbox. Click + and select a folder that is accessible from your Mac and that you want to share with your Windows guest. In the bottom of the window, go to a Mirrored Folders section. Here select the checkboxes near macOS user folders that you want to share and provide write access in your guest Windows system.

After configuring Shared Folders, you can see a shortcut to the VMware Shared Folders directory created on the Windows desktop of the guest operating system. The folders stored on the Mac desktop are now displayed on the Windows desktop of the guest OS.

You can expand the guest OS window to the Full Screen mode (View > Full Screen) or enter the Unity mode (View > Unity) to see Windows 10 application windows in the macOS GUI as if you were using one common desktop environment. Suspend or shut down a VM when you want to close the VM and VMware Fusion. VMware Fusion is a powerful virtualization application. It also supports running Windows 10 installed on a Boot Camp partition as a virtual machine when you work in macOS as a host OS. VMware Fusion supports nested virtualization allowing you to run a VM inside a VM. Another advantage of VMs in VMware Fusion is the ability to copy VM files and run VMs on other Mac computers with VMware Fusion; Windows and Linux computers – with VMware Workstation or Player installed. With VM snapshots, you can test applications and roll back changes to one of the previous snapshots. You can use VMware Fusion to connect to ESXi hosts and vCenter Servers by clicking File > Connect to Server. VMware Fusion supports many guest operating systems, including different versions of Windows, Linux, and FreeBSD.
If you use Windows or Linux as a host OS, you can use VirtualBox or VMware Workstation to run macOS as a VM on your computer. Read another blog post to learn how to run macOS on VMware ESXi as a VM and blog posts about VMware Workstation and VMware vs VirtualBox comparison. If you run virtual machines on VMware ESXi, don’t forget to back them up. To ensure comprehensive protection for your VMware vSphere VMs, download the Free Edition of NAKIVO Backup & Replication that includes licenses for 10 workloads and 5 Microsoft 365 accounts and is absolutely FREE for one year!
Conclusion
This blog post covers the installation of Windows 10 as a guest operating system running in VMware Fusion on Mac OS X. For this, you have to check system requirements, download installation images of VMware Fusion and Windows 10, install VMware Fusion, create a virtual machine, and install Windows 10 as a guest OS in VMware Fusion. If you want to use the default VM configuration for a Windows 10 VM, you can use Easy Install, which requires minimum user interaction, and automatically installs a guest OS. If you want full control over the installation process and to be able to configure everything manually, don’t use Easy Install. VMware Fusion is a powerful virtualization application that provides you with a lot of configurable features.
VMware ― это программное обеспечение для виртуализации. Прежде чем рассказать о VMware и показать процесс установки, разберёмся, что такое виртуализация.
Виртуализация — это создание изолированного окружения внутри одного физического устройства. То есть с помощью виртуализации можно создать на одном физическом устройстве (компьютере или сервере) несколько изолированных операционных систем. Подробнее о виртуализации читайте в статье Что такое виртуальная машина.
Использовать технологию виртуализации помогает виртуальная машина. Эту программу нужно установить на устройство перед настройкой виртуализации. С её помощью также можно управлять виртуализацией. ОС, на базе которой создаётся новая среда, называется хостовой системой, а дополнительная среда — гостевой.
Для чего используют виртуализацию и виртуальные машины
Современные ВМ просты в установке и эксплуатации, поэтому их используют не только в профессиональной деятельности, но и для бытовых нужд. Для чего используют ВМ:
- Для запуска программ, которые созданы для других операционных систем. Например, у вас macOS, а вы хотите использовать программу для Windows.
- Для создания резервных копий. Недоработанные программы могут нарушать работу системы. Если вы используете новые программы, позаботьтесь о том, чтобы у вас была возможность быстро вернуть все данные в то состояние, в котором они были до её использования. Резервную копию виртуальной машины сделать легко. Нужно только скопировать папку с её файлами.
- Для тестирования новых программ. Виртуальные машины работают изолированно от хостовой ОС. Это позволяет защитить основную систему от поломок, которые могут вызвать недоработанные программы. То есть, если вы загрузили на гостевую систему программу с ошибками, хостовая не пострадает. А так как резервные копии с виртуальных машин делаются легко, можно будет откатить гостевую систему до состояний, которое было до загрузки некачественной программы. Тоже самое происходит и с программами, которые заражены вирусом. Так как операционные системы изолированы, вирус не сможет выйти за рамки гостевой системы.
- Для тестирования разработанной программы на других операционных системах. Так как разные ОС отличаются по своим техническим характеристикам, при создании программного продукта разработчики тестируют его на разных системах. Это позволяет обнаружить возможные ошибки и проблемы для всех ОС и доработать продукт до выпуска.
- Для запуска игр, которые предназначены для других ОС и их старых версий. Например, вы захотели поиграть в игру десятилетней давности, а у вас Windows 10. Многие старые игры не идут на новых версиях ОС. В этой ситуации можно установить на виртуальную машину Windows более ранней версии и играть на ней.
Несмотря на преимущества использования этой технологии, есть несколько минусов:
- Программа требует много аппаратных ресурсов, чтобы одновременно запускать несколько OS. Гостевая система использует ресурсы устройства, на котором она установлена (процессор, память). Перед установкой виртуальной машины проверьте, что ресурсов основной системы хватит на обе ОС.
- ОС в виртуальных машинах могут работать медленнее. Разработчики стараются решить эту проблему с помощью новых современных программ, но разница в производительности между основной и гостевой системой есть до сих пор.
Первым продуктом для виртуализации стала программа VMware Workstation. Она позволяла любому пользователю установить на своём ПК одну или несколько виртуальных машин. Позже, для более требовательных проектов, появилась версия VMware Workstation Pro. Обе этих версии были предназначена для Windows и Linux.
Со временем всё больше пользователей стали использовать ПК на macOS. Для них подходила только программа для виртуализации Parallels Desktop. Создатели VMware не могли упустить растущий рынок. Чтобы удовлетворить потребности пользователей macOS, они разработали специальную программу для виртуализации — VMware Fusion.
Возможности VMware Fusion
- Поддерживает 32- и 64-битную гостевую систему.
- Поддерживает все версии Windows (с версии 3.11) и большинство распространённых дистрибутивов Linux и Solaris.
- Поддерживает высокоскоростной интерфейс USB 2.0.
- Поддерживает Drag&Drop файлов между хостовой и гостевой операционной системой (включая Linux). Можно создавать общие папки с основной ОС.
- Можно создавать снимки состояния виртуальной машины (снапшоты).
- Может отображать Windows-приложения как окна в основной системе macOS.
- Поддерживает механизм Boot Camp.
- Можно играть в 3D-игры для Windows с поддержкой DirectX 8.1.
- Поддерживает соединение AirPort и Wi-Fi. Каждая виртуальная машина может иметь до десяти виртуальных сетевых адаптеров.
В 2020 году вышла новая версия VMware Fusion 12. В отличие от старых версий, она включает в себя следующие возможности:
- Поддержка macOS Big Sur и Catalina.
- Для macOS Big Sur теперь не нужно устанавливать kernel extensions. Контейнеры и кластеры Kubernetes сразу находятся в Apple API.
- Улучшена работа с контейнерами и движком Kubernetes.
- Поддержка DirectX 11 и OpenGL 4.1.
- Работает с eGPU. Fusion 12 Player и Fusion 12 Pro поддерживают устройства eGPU.Теперь требовательные к графике задачи можно перенести с интегрированного или дискретного GPU на внешнюю графическую карту.
- Совместимость с vSphere 7.
- Поддержка USB 3.1 и прочие улучшения. В Fusion поддерживаются виртуальные устройства USB 3.1, их можно пробрасывать в виртуальные машины с полной поддержкой драйверов.
Чаще всего VMware Fusion используют для установки Windows. Ниже мы расскажем, как установить VMware Fusion на macOS и как развернуть на этой виртуальной машине Windows 10.
Как установить VMware Fusion
-
1.
Скачайте виртуальную машину VMWare Fusion с официального сайта.
-
2.
Чтобы запустить процесс загрузки, двойным щелчком кликните по иконке приложения:
 VMware Mac
 -
3.
Программа запросит пароль администратора. Введите его и нажмите ОК:
-
4.
Программа платная. Если вы уже приобрели её, выберите пункт I have a license key for VMware Fusion 12 и введите ключ, который вы получили после покупки. Нажмите Continue:
Если нет, вы можете перейти на сайт и купить продукт. Также у программы есть пробная версия на 30 дней. Чтобы использовать пробную версию, выберите пункт I want to try VMware Fusion 12 Professional for 30 days. Затем нажмите Continue:
-
5.
Ознакомьтесь с пользовательским соглашением и нажмите Agree:
-
6.
Снова введите пароль администратора.
-
7.
Нажмите Done:
Готово, вы установили VMware Fusion 12 на свой компьютер.
Как установить Windows 10 на VMware Fusion 12
-
1.
Скачайте образ Windows 10 в формате ISO с официального сайта. Загрузка может занять несколько часов.
-
2.
В верхнем меню нажмите на выпадающий список и выберите New:
-
3.
Выберите «Install from disc or image» и нажмите Продолжить:
-
4.
Перетащите в окно файл со скачанным образом Windows 10. Нажмите Продолжить:
-
5.
Придумайте пароль для входа в систему Windows. Выберите язык и версию Windows, например Windows 10 Home. Нажмите Продолжить:
-
6.
Выберите способ интеграции системы More Seamless или More Isolated.
More Seamless ― VMware Fusion будет предоставлять доступ к документам и приложениям вашего Mac в Windows. Файлы на вашем компьютере macOS, которые поддерживаются Windows, будут открываться на созданной виртуальной машине. Windows сможет изменять документы вашего Mac. При выборе такого способа интеграции нужно будет уделить много внимания безопасности, так как установленные программы на виртуальной машине будут влиять на основную OS.
More Isolated ― VMware Fusion не будет делиться документами и приложениями между macOS и Windows. Обе системы будут полностью изолированы друг от друга. Чтобы скопировать файлы, нужно будет перетаскивать файлы вручную.
Если вы планируете использовать виртуальную машину для тестирования новых программ, лучше выбрать More Seamless.
Нажмите Продолжить:
-
7.
Укажите параметры машины. Если вас устраивают настройки по умолчанию, нажмите Finish. Если вы хотите что-то изменить, например объём памяти виртуальной машины, нажмите Customize Setting. После настройки нажмите Finish:
-
8.
Введите имя виртуальной машины (любое). Нажмите Сохранить:
После этого запустится процесс установки ОС. Дождитесь его окончания.
Готово, Windows 10 на VMware Fusion установлена:
In this article, we will examine how to run Windows 7 on a new virtual machine using VMware Fusion 12 Pro on macOS operating system on a Mac computer.

How to Set Up Windows 7 on a Virtual Machine on Mac using VMware Fusion 12 Pro
The operating system that has left the biggest impression on users from past to present is Windows 7. This operating system, which Microsoft released on October 22, 2009, was quite ambitious compared to previous systems in terms of both performance and security.
With the increase of emerging system vulnerabilities and malicious software, Microsoft always offered new updates to keep its users safe. However, it ended the Windows 7 version on January 14, 2020, as it started developing Windows 8x versions.
Users who still use Windows 7 on their physical computers should update their systems to newer versions for safer computing.
Users who are curious about Microsoft’s old versions or want to experience nostalgia can run Windows 7 on virtual machines. Thus, they can achieve a more secure experience by isolating the VM’s Internet connection and its connection to the host.
If you have an Apple Mac computer and you plan to use this system in a VM, you can use the VMware Fusion virtualization program. Any operations you do on a Windows operating system that you run in a virtual machine on your Mac will not affect your host system.
So when you want to experience old versions of Windows or Linux, you can run them in virtual machines and delete them whenever you want with peace of mind.
You can also use the Boot Camp software, an integrated feature of the macOS operating system, to install Windows 7. However, when you want to switch to a system you have installed with Boot Camp, you will always have to restart your system.
We recommend using VMware Fusion software, which makes it easy for you to run a virtual operating system in a VM without rebooting.
How to Create a New VM for Windows 7
After installing VMware Fusion on your Mac, you can drag and drop the ISO file onto the program to quickly create a virtual computer. But it is recommended to use the custom option to create a more professional virtual PC.
Step 1
After running Fusion Pro, select Create a custom virtual machine in the installation method selection window, and then click the Continue button.

Step 2
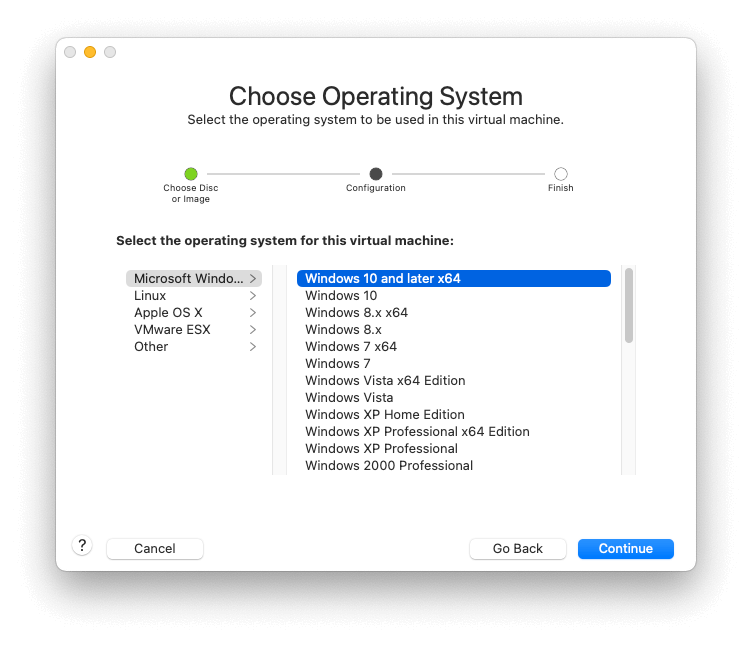
In the operating system selection window, you need to select the platform and version of the virtual operating system you will run on macOS. If you are going to run the x64 architecture of Windows 7, select Microsoft Windows / Windows 7 x64 and click Continue.

Step 3
Configure the virtual computer’s firmware type as Legacy BIOS and continue.

Step 4
If you have a disk of a virtual operating system that you have installed before in the virtual disk selection window, you can add it with the Add an existing disk option. Or you can create a new virtual disk and continue to install Windows 7 from scratch.

Step 5
In the summary window that shows the configuration information of the virtual machine, click Customize Settings to better edit the virtual hardware settings and click the Save button to confirm the default installation location of the VM.

Step 6
Click Processors & Memory in the settings of the Windows 7 guest machine and increase the number of virtual processors depending on the hardware performance of your host computer. Also, configure the virtual memory size in accordance with the RAM capacity of your host so that it does not force your system.
In addition, if you are going to use hypervisor virtualization software on your virtual computer, tick the Enable hypervisor applications option. You can also tick IOMMU for a better system experience by converting virtual memory addresses to physical addresses in the VM.

Step 7
In Network Adapter hardware settings, select Ethernet to connect your VM to your host’s local network. When you choose Ethernet, your virtual PC will get an IP address from the local DHCP server. This way you will be able to see your VM as an additional computer in your local network.

Step 8
The bus type of the virtual disk of the Windows 7 guest machine is SCSI by default. You can choose to use the SCSI or SATA bus type according to your personal purposes. If you are going to use SATA, you can select SATA instead of SCSI in the pop-up window from the Bus Type section and click the Apply button.

Step 9
To add the ISO image to the Windows 7 machine, click the CD/DVD (SATA) device and click Choose a disc or disc image from the pop-up window.

Step 10
Select the Windows 7 x64 Ultimate ISO image you downloaded to your computer from the table below the article and click the Open button.

Step 11
To use USB 3.0/3.1 devices in the virtual machine, open the USB & Bluetooth settings and click Advanced USB Options and change the USB Compatibility value to USB 3.1.

Step 12
If you are not going to use a printer on your Windows 7 machine, click the Printer device and then click Remove Printer Port / Remove.

Step 13
To improve system performance in the advanced settings of the virtual machine, change the Troubleshooting property to None and disable Side Channel Mitigations.

Step 14
Run the virtual computer that you prepared to start the Windows 7 installation.

How to Install Windows 7
After you create a virtual machine with Fusion on your Mac computer, run it and open the Windows wizard, you can continue as if you were installing on a physical PC.
Step 1
Select your system language, keyboard layout, and time format in the Windows 7 setup wizard and click Next.

Step 2
In this window, you can repair your system or click the Install Now button to start the Windows installation.

Step 3
Continue after reading and accepting the license terms of the Windows 7 Ultimate Service Pack 1 operating system.

Step 4
In the installation type selection window, click Custom as you will perform a clean system installation.

Step 5
You need to edit the virtual disk for installation, so click Drive Options.

Step 6
Click New to configure the unallocated disk space on the guest machine, and then click the Apply button to confirm the automatically determined disk size. Click OK in the window informing you that additional fields will be created for Windows features to work correctly.

Step 7
After partitioning the virtual disk, select the Primary partition and click Next.

Step 8
Wait while expanding Windows files for installation. At this stage, your virtual system may restart several times, so do not shut down your system.

Step 9
Type a different user and computer name to distinguish your guest machine from other computers in your local network.

Step 10
If you do not want unwanted users to access your virtual system, create a strong and memorable password.

Step 11
Type your Windows 7 x64 Ultimate product key and continue. If you do not have a product key, leave the relevant field blank and click Next.

Step 12
If you want to automatically install important and recommended updates, click on Use Recommended Settings.

Step 13
Configure the time zone according to where you live and click Next after checking the system time.

Step 14
Configure the current location of the guest machine as Home, Work, or Public network.

Step 15
Wait while your Windows 7 desktop environment and required system settings are configured.

Step 16
After installation, the Windows 7 desktop screen will be in the default view as below.

How to Install VMware Tools
After installing Windows 7 with VMware Fusion on macOS, you need to install VMware Tools in order to use the virtual computer with better performance or to transfer files between the host and the VM.
However, when you try to install the latest version of VMware Tools on the Win7 guest machine you installed with Fusion 12 Pro, you will get the following errors and the installation will not complete. So you can fix these problems by installing version 11 of VM Tools.
- Setup failed to install the Memory Control driver automatically. This driver will have to be installed manually.
- Setup failed to install the VSock Virtual Machine Communication Interface Sockets driver automatically. This driver will have to be installed manually.
- Setup failed to install the Host-Guest Shared Folders driver automatically. This driver will have to be installed manually.
Step 1
Click on https://packages.vmware.com/tools/releases/11.0.0/windows/VMware-tools-windows-11.0.0-14549434.iso to download VMware Tools 11. Then, click Virtual Machine / CD/DVD (SATA) / Choose Disc or Disc Image in the tool menu to add the downloaded ISO file to the virtual machine.

Step 2
Select the VMware-tools-windows-11.0.0-14549434.iso file and click Open.

Step 3
If the installation wizard does not start automatically, open My Computer and double-click the VMware Tools image file.

Step 4
Click Next to continue in the VMware Tools setup wizard.

Step 5
If you plan to use your Windows 7 virtual computer in other VMware products in the future, select Complete and click Next.

Step 6
If we have any changes to make, you can go back or click the Install button to start the installation.

Step 7
After installing VMware Tools on Windows 7, do not restart your virtual system and close your virtual system completely from the Start menu.

Step 8
When you restart your virtual computer after installing the old version of VM Tools, the Fusion software will try to install your virtual system’s tools automatically. Therefore, you need to edit the VMX file of the guest operating system to manually configure the automatic update process.
If you have installed your VM in the default location, click Home / Virtual Machines in the Finder and right-click / Show Package Contents on the guest machine.
You can see multiple virtual disk files and configuration files in the content of the guest machine. Right-click / Open With / TextEdit on the Windows 7 x64.vmx file.

Step 9
When you open the Windows 7 x64.vmx file, you can see that the tools.upgrade.policy value is upgradeAtPowerCycle. If you do not change this option, the Fusion software will automatically update VMware Tools when you start your virtual system.

Step 10
Change the tools.upgrade.policy value to manual in the VMX file and close the text editor. Then run your virtual computer and check that the VM Tools update wizard is not started.

Step 11
After successfully installing VMware Tools, you can transfer files between your Mac and guest machine by drag and drop.

Step 12
You can also click View / Full Screen to use the virtual machine in full-screen resolution.

How to Install USB 3.0/3.1 Driver
You can transfer files faster using your USB 3.0/3.1 devices in a Windows 7 VM. If you have changed the USB compatibility to 3.1 from the USB & Bluetooth settings of the Virtual PC, you need to install the USB drivers.
Step 1
After downloading the USB 3.0/3.1 drivers for Windows 7 x64 from the table at the bottom of the article to your computer, right-click My Computer and click Manage.
Click Device Manager in the Computer Management window and check the Universal Serial Bus (USB) Controller device under Other Devices, and you can see that the drivers are not installed automatically.
Double-click the USB device and click the Update Driver button from the pop-up window. In the Update Driver Software window, click Browse my computer for driver software.
 Controller Driver Installation")
Step 2
To specify the location of the USB driver folder, click Browse, select the USB 3.0 Driver folder, and click OK.

Step 3
After clicking Next to install the USB drivers from the specified location, you can see the Intel(R) USB 3.0 eXtensible Host Controller installed successfully.
 USB 3.0 eXtensible Host Controller")
Step 4
In Device Manager, Unknown Device appears because the USB Root Hub driver is not installed. To install the Root Hub driver, select the USB 3.0 Root Hub in the folder and click OK.
 USB 3.0 Root Hub Driver Installation")
Step 5
After installing the Root Hub driver, you can start using your USB 3.0/3.1 devices on the Windows 7 guest machine.

How to Use USB Flash Memory
You may want to consider transferring files on your Mac using a USB 3.0 supported flash drive in your Windows 7 virtual system.
Step 1
After enabling USB 3.0/3.1 support, plug your flash disk into your Mac. When the Fusion program asks you where you want to connect your USB stick, connect it to your Mac first.

Step 2
Before you can use your USB device on macOS, you need to change the file format. After opening Disk Utility, right-click on your device and then click Erase.

Step 3
Click the Erase button again to format your USB 3.0 flash memory with ExFAT file format.

Step 4
On your Mac, create a new folder called Backup on your flash drive.

Step 5
Click Virtual Machine / USB & Bluetooth / Connect (Name of Your USB) in the tool menu to connect your USB stick to the guest machine.

Step 6
You can now use your USB 3.0 flash disk on your Windows 7 machine without any problems.

How to Configure Shared Folder
Another method of file transfer between your Mac and your virtual machine is the Shared Folders feature. Thanks to this feature, you can use a folder that you specify or create as a shared folder between the host and the VM.
Step 1
After opening the settings of the Windows 7 guest machine, click Sharing.

Step 2
Enable Shared Folders and then click the + button. After selecting the relevant option, you can see that the VMware Shared Folders shortcut has been created on the desktop of your virtual system.

Step 3
Create a folder named Win7VM in the desktop location of your macOS system.

Step 4
Create a new folder in the Win7VM folder and check that you can access that folder on a Mac and guest machine.

How to Check Internet Connection
After installing a Windows or Linux operating system in the virtual machine, it is useful to check that your network connection is OK. Therefore, on Windows guest machines, you can test your connection by pinging any Internet site using the CMD command prompt.
Step 1
After pressing the Windows Key + R, execute the cmd command in the Run window. Test your connection by pinging the Google homepage using the ping 8.8.8.8 command at the command prompt.

Step 2
Also, check your connection by visiting Google using Internet Explorer or another web browser.

How to Connect to a Guest Machine from a Mac using Microsoft Remote Desktop
You can manage your work over LAN or WAN by making a remote desktop connection from your macOS computer to the VM. On Mac systems, you can configure remote connections using the Microsoft Remote Desktop application.
Step 1
After downloading the Microsoft Remote Desktop software from the App Store, double-click the setup file.

Step 2
Read and accept the license terms of the remote desktop application.

Step 3
In the window that states that the program will use 145 MB of disk space on your virtual computer, click Install to start the installation.

Step 4
To continue the installation, type your user account password and click Install Software.

Step 5
After installing the Microsoft Remote Desktop program on your macOS system, close the wizard.

Step 6
Open Applications in Finder and find and run Microsoft Remote Desktop.

Step 7
After running the program, allow access to use your computer’s camera and microphone device for remote connections.

Step 8
Open Computer Management on your Windows 7 machine and click Local Users and Groups / Users, then right-click / Set Password on User from the listed user accounts.
Click the Proceed button in the warning window that informs you to log in to your system with the password you created in the next session.

Step 9
In the password creation window, type the same password in both text boxes and click OK.

Step 10
To allow remote connections in Windows 7, open My Computer properties and click Remote Settings, then select Allow connections from computers running any version of the Remote Desktop option and click OK.

Step 11
Click the Add PC button in the Remote Desktop application.

Step 12
Type the IP address of your virtual computer in the PC name field and view the options in the User Account section and click Add User Account.

Step 13
Type your Windows 7 system login credentials and click the Add button.

Step 14
Right-click / Connect on the virtual system you have added to the Remote Desktop application. Click Continue when you receive a certificate error while connecting to the remote machine.

Step 15
After establishing a remote connection from your Mac to the Windows 7 VM, you can continue with your work.

Video
Download Windows 7 and USB Drivers
Windows 7 x64 Ultimate EN
Related Articles
♦ How to Install Windows 10 in Fusion
♦ How to Set Up Windows 10 on PC
♦ How to Set Up macOS in VirtualBox
♦ How to Set Up macOS in VMware
♦ How to Set Up Windows 8 in Fusion
In this hands-on video and step-by-step written walkthrough, I show you how to install Windows 11 via VMware Fusion on a Mac with Apple Silicon. With this tutorial, you’ll be able to run VMware Fusion on an M1 MacBook or M2 MacBook, or any other Mac that uses Apple Silicon, including the MacBook Air, MacBook Pro, iMac, or Mac Studio.
Interestingly enough, the VMware Fusion Technical Preview also works on Intel Macs, but you’ll of course need to download the x86_64 version of Windows in order to do that. For this tutorial, however, it’s all about running Windows 11 on Apple Silicon, and that’s exactly what this hands-on guide will show you how to do. Without any further ado, let’s get started.
Subscribe to Cellular on YouTube for more
Important: Please keep in mind that this is a tech preview, and as such, there will undoubtedly be bugs. Additional caveats include no 3D hardware acceleration support, and no shared folders/drag and drop between host and guest. Unity mode is also unsupported, and auto-fit guest resolution and auto-scaling is not supported either. Of course, these items could change in the future as development progresses.
Table of contents
- Download the Windows 11 Client ARM64 Insider Preview
- Install Homebrew
- Install QEMU using Homebrew
- Convert Windows 11 VHDX to VMDK
- Download and Install VMware Fusion Technology Preview
- Install Windows 11 ARM Preview with VMware Fusion
- Windows setup
- Installing VMware Tools
- Conclusion
Download the Windows 11 Client ARM64 Insider Preview
In order to download the Windows 11 Client ARM64 Insider Preview, you’ll first need a Microsoft Account that’s a member of the Windows Insider program. You can register a Microsoft account for free and sign up for the Windows Insider program for free as well.
Step 1: Visit Microsoft’s Windows Insider registration page and click Sign in now.
Step 2: If you already have a Microsoft account, sign in with your account. If you do not yet have a Microsoft account, click Create one and create a new account.
Step 3: Click the Register tab and click the Register now button.
Step 4: Click the checkbox next to I accept the terms of this agreement and click Register now.
Step 5: Visit the Windows 11 on ARM Insider Preview page and select the Windows 11 Client from the drop down box. I recommend selecting the build from the Beta Channel. Click Confirm.
Step 6: Select the product language from the drop down box and click Confirm.
Step 7: Click the Download Now button to initiate the Windows 11 Client ARM64 Insider Preview download. (Click Allow if you see a Safari pop-up to allow downloads).
Depending on your Internet connection, the Windows 11 ARM64 preview could take some time to download, as it’s around 10GB in size. Windows11_InsiderPreview_Client_ARM64.VHDX.
The VHDX extension stands for Virtual Hard Disk v2. VHDX is a disk image format that’s capable of storing the contents of a hard disk drive. VMware Fusion cannot natively read VHDX files so it will need to be converted to a Virtual Machine Disk, or VMDK. The good news is that converting a VHDX to VMDK can be done easily (and for free) using QEMU.
Thus, the next step is to install Homebrew on your Mac, which will then allow you to easily install QEMU.
Install Homebrew
If you’ve already installed Homebrew on your Mac, you can skip this step.
Step 1: Open Terminal.
Step 2: Paste the following command in Terminal and press Return on your keyboard:
/bin/bash -c "$(curl -fsSL https://raw.githubusercontent.com/Homebrew/install/HEAD/install.sh)"Whenever prompted, press Return on your keyboard. You will also be prompted to enter your administrator password. Once you do, press Return on your keyboard.
Step 3: Enter the following commands to add Homebrew to your PATH:
echo 'eval "$(/opt/homebrew/bin/brew shellenv)"' >> /Users/jeff/.zprofile

eval "$(/opt/homebrew/bin/brew shellenv)"
Install QEMU using Homebrew
Open Terminal and type/paste the following command and press the Return key.
brew install qemuThe QEMU installation may take a while depending on the speed of your Internet connection.
Convert Windows 11 VHDX to VMDK
Now we’ll use QEMU to convert the Windows 11 VHDX container to a VMDK container.
Open Terminal and type/paste the following (make sure ‘vmdk’ is in lower case):
qemu-img convert -O vmdkEnsure that a single space is inserted after vmdk, and drag the Windows 11 VHDX container from the Downloads folder into the Terminal. The result should look similar to the following, but obviously your user name will most likely be different:
qemu-img convert -O vmdk /Users/jeff/Downloads/Windows11_InsiderPreview_Client_ARM64_en-us_22598.VHDXEnsure that a single space is inserted after VHDX, and type/paste the following:
~/Desktop/Windows11.vmdkThe final command should look similar to the following:
qemu-img convert -O vmdk /Users/jeff/Downloads/Windows11_InsiderPreview_Client_ARM64_en-us_22598.VHDX ~/Desktop/Windows11.vmdkPress Return on your Keyboard. Once you do, you may see a pop-up stating that “VMware Fusion Tech Preview” would like to access files in your Desktop folder. Click OK to allow access.
QEMU will begin converting the VHDK container to VMDK, creating a separate file. The new file will be roughly the same size as the original VHDK, so you’ll want to ensure that you have enough space on your Mac to accommodate it. Conversion will take a few minutes. Once completed, you should see a new Windows11.vmdk file on your desktop.
Download and Install VMware Fusion Technology Preview
Before downloading the VMware Fusion Technology Preview, you’ll need to login with a VMware Customer Connect account.
Step 1: Visit VMware Customer Connect and click Login in the upper right-hand corner. If you do not have a VMware account yet, click Register in the upper right-hand corner to register.
Step 2: Once logged in, visit the product downloads area to download the latest VMware Fusion Technology Preview. If the download doesn’t start automatically, click the Download Now button next to the universal.dmg file. (Click Allow if you see a Safari pop-up requesting to allow downloads).
Step 3: Double click the VMware-Fusion.dmg to mount the image, then double-click the VMware Fusion Tech Preview icon.
Step 4: Click the Open button on the pop-up that appears, enter your macOS administrator password, and click OK.
Step 5: Click Agree on the VMware Technology Preview License Agreement.
Step 6: On the license key screen, the license key for VMware Fusion Preview should already be populated with a valid license. Click Continue and then click Done to complete the installation.
Step 7: Click OK on the VMware Fusion Tech Preview System Events permission pop-up.
Step 8: Click Not Now on the Accessibility pop-up. You can always change this later via Security & Privacy Preferences if you desire.
Once the install and configuration is completed, you will be presented with the Select the Installation Method window. If you don’t see this window, you can always open it by clicking File → Open in the menu bar.
Step 1: On the Installation Method window click Create a custom virtual machine and click Continue.
Step 2: Under Choose Operating System select Microsoft Windows > Windows 11 64-bit Arm and click Continue.
Step 3: Keep UEFI selected on the Firmware Type window and click Continue.
Step 4: On the Encryption Window, keep the default option — Only the files needed to support a TPM are encrypted — and click Auto Generate Password. Ensure that Remember Password and store it in Mac’s Keychain is selected and click Continue.
??? More details on TPM and writing down password ??
Step 5: On the Choose a Virtual Disk window, click the radio button next to Use an existing virtual disk and then click Choose virtual disk…
Navigate the pop-up Finder window to the desktop and select the Windows11.vmdk file created in the prior steps.
You may choose the default option Make a separate copy of the virtual disk. This will copy the contents of the Windows11.vmdk container to a new location in ~/Virtual Machines.
This option will take up more space, but will allow other virtual machines to use the original virtual hard disk. If you only plan on using a single virtual instance and wish to save space, you can select Share this virtual disk with the virtual machine that created it.
Personally, I usually stick to the default option, but the choice is yours. Once you’ve selected the desired option, click Choose, followed by Continue.
Step 6: On the Finish window, you’ll have the opportunity to customize settings. Click the Customize Settings button if you wish to configure how much memory is allocated to the virtual machine along with the number of CPU cores, etc. If you’re fine with the default settings presented, click Finish.
Whether or not you click Customize Settings or Continue, you’ll next be prompted to save the virtual machine to your Mac. The default location is ~/Virtual Machines and I recommend keeping the default setting. Click Save to confirm.
If you opted to make a separate copy of the virtual disk, VMware will copy the virtual hard disk to the new location, and then automatically boot into Windows setup.
If you see a permission dialogue requesting Screen Recording access, you may click Deny. You can always provide permissions later via the Security & Privacy section of System Preferences if needed.
Windows setup
Because the necessary VMXNet3 virtual network driver isn’t included with Windows Home or Pro for Windows on ARM, you’ll need to bypass the network enrollment during Windows setup.
Step 1: On your Mac’s keyboard, press Shift+F10. If you have your keyboard set up as default, and you’re using a MacBook or Magic Keyboard, you’ll need to press Fn+Shift+F10 instead. This will invoke the Windows Command Prompt.
Step 2: Enter the following on the Command Prompt:
OOBEBYPASSNROPress Return on your keyboard. This command lets you bypass network enrollment, but first it will restart Windows Setup.
Step 3: Select your country/region and click Yes.
Step 4: Choose your desired input method and click Yes.
Step 5: On the second keyboard layout page, click Skip.
Step 6: On the network page, click I don’t have Internet and click continue with limited setup.
Step 7: Click Accept on the License Agreement page.
Step 8: Enter your name and click Next.
Step 9: Enter a password (optional) and click Next.
Step 10: Disable all of the privacy settings and click Accept.
Windows will continue with the final configuration steps, and eventually the Windows desktop will appear.
Prior to installing VMware Tools, you will be unable to configure your network connection or adjust display resolution settings. In other words, instilling VMware Tools is a must.
Step 1: Click the Windows Start menu and type PowerShell in the search box. Click Run as Administrator, and click Yes on the User Access Control prompt. (If you don’t see Run as Administrator, right click on PowerShell and select Run as Administrator).
Step 2: Type the following inside the PowerShell prompt:
Set-ExecutionPolicy RemoteSignedPress Return on your keyboard to execute the command, and then type ‘Y’ and press Return to confirm the change to the execution policy. Type Exit and press Return to close the PowerShell.
Step 3: In the menu bar click Virtual Machine → Reinstall VMware Tools and click the Install button on the prompt that appears.
Step 4: Open Windows Explorer, navigate to the DVD drive, and ensure that VMware Tools setup is mounted. You should see a Setup.ps1 PowerShell script in the root of the DVD drive.
Step 5: Right click on the Setup PowerShell Script and click Run with PowerShell. Click Yes on the User Account Control pop-up.
VMware Tools will now install, along with the necessary VMXNet3 network drivers and SVGA display driver. After a short countdown, the PowerShell window will automatically close.
Network functionality should now be operational, and you will also be able to configure display settings via Start → Settings → Display. There should be no need to restart in order to enable this functionality.
Conclusion
Although this tutorial may seem like a lot of steps, it’s a fairly easy procedure to navigate through once you have the needed Windows 11 image and the VMware Fusion Technical Preview downloaded.

For general computing with apps with no Mac alternative, VMware Fusion Technical Preview has been a solid experience so far, and will only get better.
If you appreciated this tutorial, you can help out by subscribing to my YouTube channel, and liking the video. Stay tuned, because I have many more Mac-centric tutorials and walkthroughs in the pipeline.
Состоялся релиз Windows 10 Technical Preview, который явно будет интересен для тестирования не только любителям редмондовской платформы, но и поклонникам Mac. Оценить новые возможности, опробовать голосовой помощник Cortana, протестировать улучшенную многозадачность и многое другое можно при помощи виртуальной машины VMware Fusion.
![]()
В этом руководстве мы расскажем как от «А» до «Я» установить Windows 10 Technical Preview на Mac при помощи виртуальной машины VMware Fusion, тем более это не замёт много времени.
Что необходимо скачать:
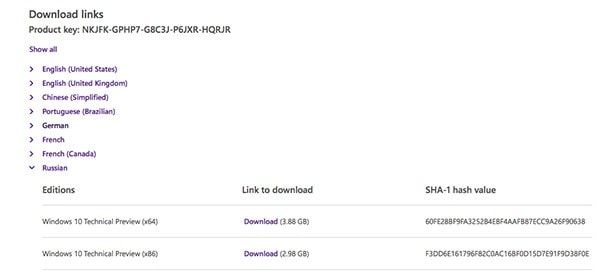
1. iOS-образ Windows 10 Technical Preview. Для этого пройдите на официальную страничку Microsoft, зарегистрируйтесь в программе Windows Insider Program (это легко и бесплатно) и скачайте 32- или 64-битный образ в зависимости от разрядности вашей системы. В среднем, размер iOS-файла будет равен 3—4 ГБ. Присутствует русскоязычная версия!
 2. DMG-файл виртуальной машины VMWare Fusion.
Предварительные шаги
1. Смонтируйте DMG-образ VMWare Fusion и двойным щелчком мыши кликните по иконке программы.
 2. Так как эта программа из интернета, то во всплывающем окне нажмите «Открыть», после чего введите имя пользователя и пароль администратора Mac.
 3. После инициализации согласитесь с пользовательским соглашением нажатием кнопки «Agree«.
 4. Воспользуйтесь бесплатной 30-дневной trial-версией программы, поставив точку напротив «I want to try VMware Fusion 7 for 30 days«.
 5. Введите свой E-mail (если не хотите, чтобы к вам приходила надоедливая рассылка, то впишите любой сторонний адрес почты) и выберите версию для домашних пользователей, далее нажмите «Continue» и введите логин и пароль ещё раз.
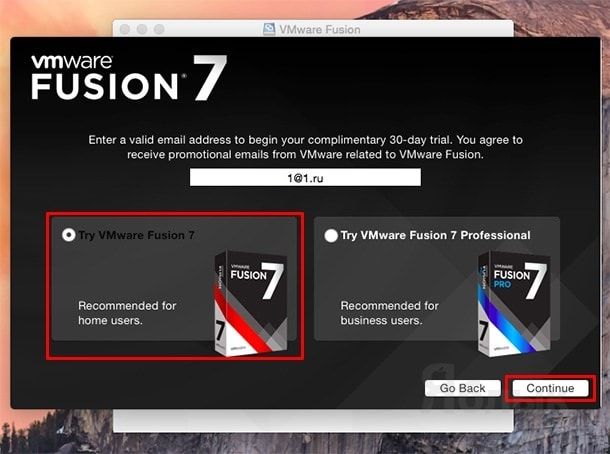 6. После того, как вы решите, хотите помогать разработчикам VMWare или нет нажмите «Done«.
Установка Windows 10 Technical Preview на виртуальную машину VMware Fusion 7
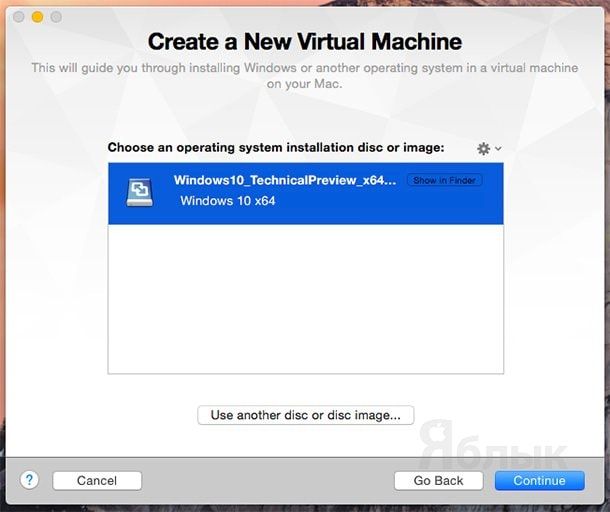
1. Выберите пункт «Install from disc or image» и нажмите «Continue«.
 2. Кликните по «Use another disc or disc image…» и укажите путь к скачанному образу Windows 10 —> Continue.
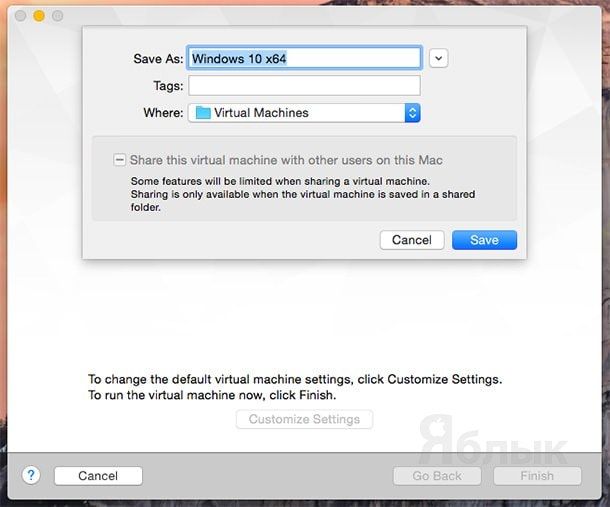
 3. Нажмите «Customize Settings» и сохраните *.vmwarevm-файл в папку ~/Documents/Virtual Machines.
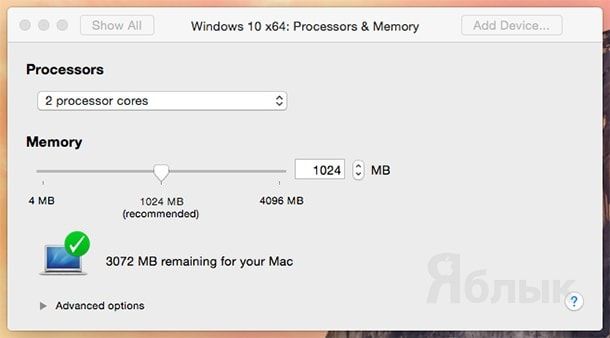
 4. После старта виртуальной машины откройте в разделе «System Settings» пункт «Processors & Memory«. Укажите количество процессоров на вашем Mac и количество оперативной памяти как минимум вдвое меньшее, чем стоит на компьютере.
 5. Нажмите «Show All» и выберите раздел «Hard Disk«. Рекомендуемый размер виртуального жёсткого диска — 60 ГБ, но допустимый минимум 40 ГБ (на самом деле вся установленная операционная система с утилитами займёт около 12 ГБ).
 6. Закройте окно настроек нажав на крестик.
 7. Нажмите кнопку воспроизведения для начала установки Windows 10.
 8. В параметрах выбора языка щёлкните «Далее».
 9. Нажмите «Установить».
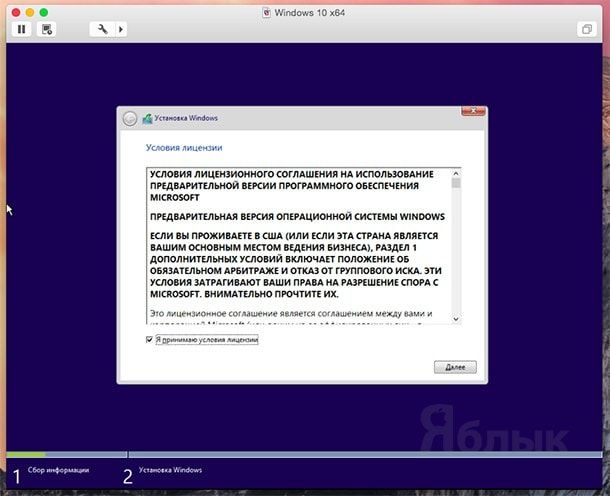
 10. Согласитесь с условиями лицензионного соглашения.
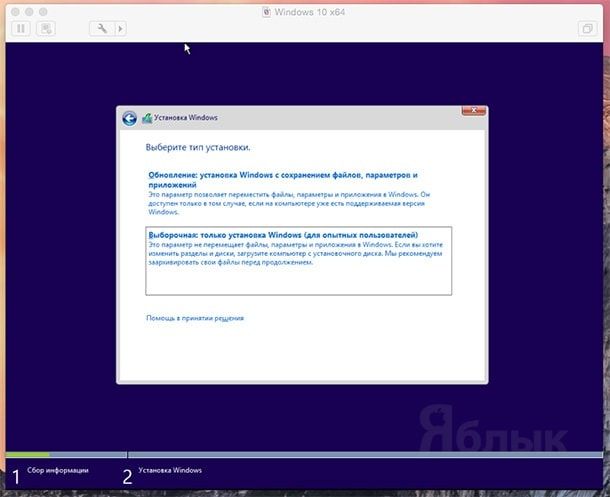
 11. Тип установки —> выборочная.
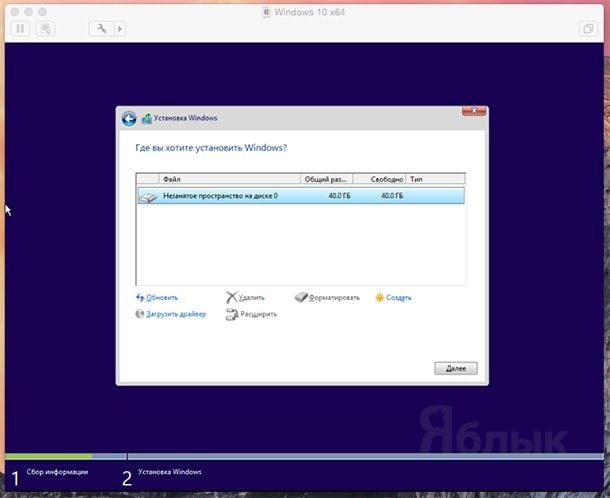
 12. Устанавливаем Windows в незанятое пространство — «Далее».
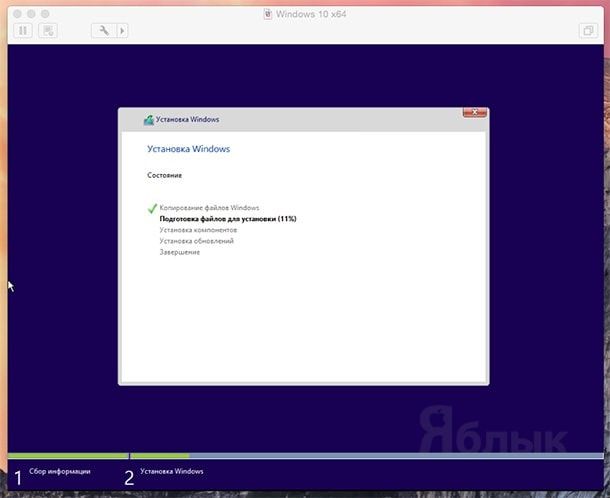
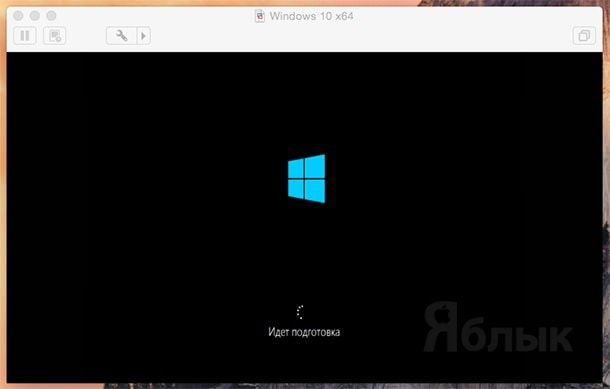
 13. Начнётся процесс установки Windows: копирование файлов, подготовка к инсталляции, установка компонентов и обновлений.
 14. После перезагрузки продолжится установка и подготовка устройств.
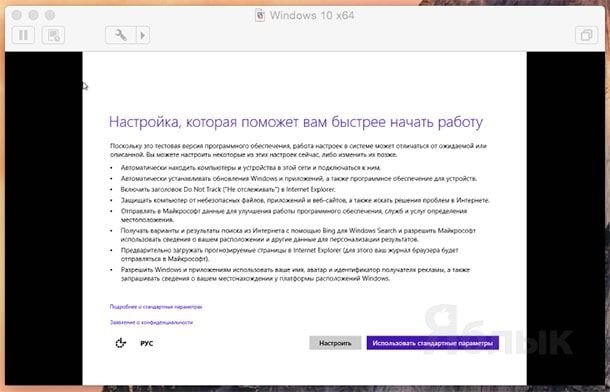
 15. Детальную настройку можно пропустить нажав кнопку «Использовать стандартные параметры».
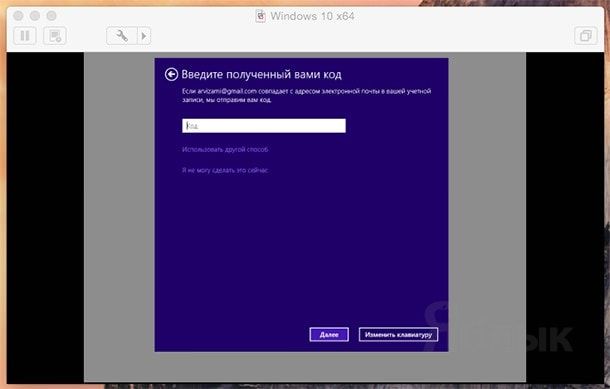
 16. Введите данные учётной записи и нажмите «Далее».
 17. Повторите ввод электронной почты и введите полученный на почтовый ящик код протекции.
Установка инструментов VMware Tools
Завершающим этапом настройки виртуальной машины под Windows 10 станет установка инструментов VMware Tools. Они содержат все необходимые драйвера и настройки, обеспечивающие максимальную оптимизацию и производительность в зависимости от имеющегося оборудования.
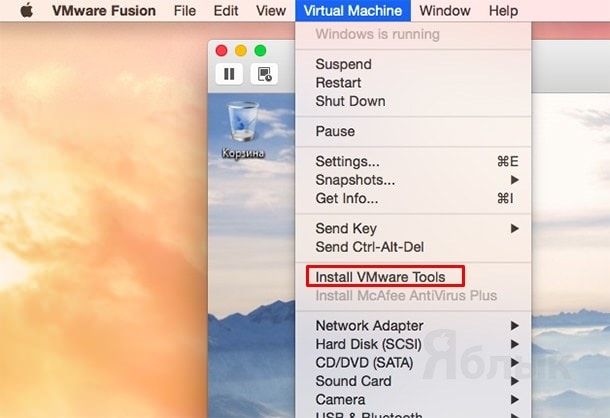
1. Для установки VMware Tools нажмите Virtual Machine —> Install VMware Tools —> Install.
 2. Откройте Проводник Windows —> DVD-дисковод и запустите файл установки «setup64«.
 3. В появившемся окне Контроля учётных записей пользователей разрешите вносить изменения нажатием кнопки «Да».
 4. В инсталляторе VMware Tools Setup нажмите «Next«.
 5. Тип установки «Typical» —> Next.
 6. Кликните по «Install«. По окончанию установки — «Finish«.
 7. Перезагрузите компьютер нажатием кнопки «Yes» в появившемся запросе.
 Вся установка длится 15—20 минут. Чиcтая Windows 10 Technical Preview занимает около 12 ГБ свободного места на жёстком диске. Даже на стоковом MacBook Air 13″ система работает довольно шустро.
Смотрите также:
- Как отключить автоматическую синхронизацию iPhone и iTunes.
- Как правильно и зачем отключать iMessage при переходе на Android, Windows Phone, BlackBerry.
- Как установить док-панель в стиле OS X на iPhone и iPad с твиком Harbor.
- Приложение зависло при скачивании. Как исправить? 7 способов.
Виртуальные машины — отличная альтернатива разбиению жесткого диска на разделы для установки Windows с помощью Boot Camp. Это означает, что вы можете использовать Windows в окне (извините за каламбур) или даже в полноэкранном режиме, если хотите, и вам не нужно сокращать объем места на жестком диске для ваших текущих вычислительных потребностей.
Недавно я объяснил, как установить виртуальную машину Parallels Desktop на ваш Mac. Если вас интересует Parallels, ознакомьтесь с моим руководством по установке:
Как запустить Windows 10 на Mac с помощью Parallels Desktop 15
Я расскажу обо всех основных виртуальных машинах для вашего удобства, и на этот раз речь пойдет о программном обеспечении виртуальных машин VMWare Fusion 11.5. Они похожи, но в процессе настройки есть несколько разных этапов.
Вот как получить VMWare Fusion 11.5 на свой Mac, а затем установить и запустить Windows 10 из операционной системы macOS без необходимости переключать разделы жесткого диска.
Проверьте требования к вашей системе и оборудованию
Прежде чем приступить к установке Fusion 11.5, убедитесь, что ваш Mac соответствует минимальным системным требованиям как для оборудования, так и для программного обеспечения.
Минимальные системные требования для установки и использования VMware Fusion 11.5:
Аппаратное обеспечение
- Поддерживаются все Mac, выпущенные в 2011 году или позже (за исключением Mac Pro «Quad Core» 2012 года с процессором Intel Xeon W3565. Архитектура ЦП несовместима).
- Также поддерживает модели Mac Pro 2010 года с шестью ядрами, восемью ядрами и двенадцатью ядрами.
- Минимум 4 ГБ ОЗУ
- 750 МБ свободного дискового пространства для VMware Fusion и не менее 5 ГБ для каждой виртуальной машины.
Программного обеспечения
- Mac OS X 10.13 или новее
- Установочный носитель операционной системы (диск или образ диска) для виртуальных машин.
- Microsoft Windows не входит в состав VMware Fusion.
- Рекомендуемое графическое оборудование для поддержки Windows DirectX 10 или OpenGL 3.3:
- NVIDIA 8600M или лучше
- ATI 2600 или лучше
- Минимальные требования для Металлическая опора.
Это одна из тех ужасных ошибок, которые совершают люди, думая, что им не нужно делать резервную копию своего Mac, прежде чем делать что-то важное. Во-первых, вы должны регулярно выполнять резервное копирование своего Mac, но даже если вы не делаете это несколько раз в день, вам обязательно нужно делать это прямо сейчас, прежде чем продолжить работу с этим руководством. Серьезно. Сделайте резервную копию.
Как сделать резервную копию вашего Mac
Как запустить Windows 10 на Mac с помощью Fusion 11.5
Вам понадобится копия Fusion 11.5 или Fusion 11.5 Pro, чтобы установить его на свой Mac. Fusion 11.5 стоит 79,99 долларов, а профессиональная версия — 159,99 долларов. Основные различия между ними заключаются в расширенных возможностях. Версия Pro включает дополнительные функции, специфичные для использования на нескольких компьютерах. Например, если вы хотите создавать связанные клоны на разных компьютерах Mac или вам нужно объединить свои компьютеры в сеть. Вы можете купить полную лицензию прямо сейчас или загрузить бесплатную 30-дневную пробную версию и сделать полную покупку позже. Если у вас более старая версия Fusion, вы можете обновить ее за меньшую плату.
Вам также понадобится копия Windows 10. Возможно, у вас уже есть полная копия, или вам может потребоваться купить копию. VMWare требует, чтобы у вас была копия на диске, накопителе или в файле образа ISO, чтобы запустить его на вашем Mac.
Скачать Windows 10
- Перейдите к Страница загрузки Microsoft Windows 10 ISO из вашего веб-браузера.
- Нажмите на Выбрать издание и выберите Windows 10.
- Нажмите Подтверждать.
Источник: iMore
- Нажмите на Выберите язык продукта и выберите свой язык.
- Нажмите Подтверждать.
Источник: iMore
- Нажмите на 64-битная загрузка.
- Нажмите Сохранять чтобы начать загрузку.
Источник: iMore
Это может занять некоторое время, поэтому выпейте чашку чая и посмотрите серию Черное зеркало пока вы ждете.
Загрузите и установите VMWare Fusion 11.5
Первым делом необходимо загрузить Fusion 11.5. Вы можете купить полную лицензию прямо сейчас или загрузить бесплатную 30-дневную пробную версию, чтобы начать работу.
Получите VMWare Fusion 11.5
После завершения загрузки программы выполните следующие действия, чтобы установить Fusion 11.5 на свой Mac.
- Дважды щелкните значок VMwareFusion.dmg файл, чтобы открыть его (он может быть в поисковике или на вашем рабочем столе. Если его нелегко найти, вы можете выполнить поиск в Spotlight).
- Дважды щелкните на Дважды щелкните, чтобы установить.
Источник: iMore
- Нажмите Открыть если будет предложено подтвердить, что вы хотите открыть приложение.
- Щелкните один из опции о том, как вы хотите установить Fusion 11.5, либо с лицензионным ключом, купив сейчас, либо используя бесплатную 30-дневную пробную версию.
- Нажмите Продолжать.
- Выберите, хотите ли вы установить Fusion 11.5 или же Fusion 11.5 Pro если у вас пробная версия.
- Нажмите Продолжать.
Источник: iMore
- Введите ваш Учетные данные для входа на Mac при появлении запроса.
- Нажмите Ok.
- Перетащите ISO файл Windows 10 в окно метода установки.
Если вы выполняете установку другим способом, выберите этот метод и следуйте инструкциям по установке.
- Нажмите Продолжать.
Источник: iMore
- Поставьте галочку напротив Использовать простую установку. Если вам удобно настраивать параметры установки вручную, снимите флажок.
- Создать Имя и пароль учетной записи для входа в Windows.
- Введите Ключ продукта Windows.
- Выберите Версия для Windows вы используете.
- Выберите уровень интеграции. Если вы хотите поделиться своими документами Mac с Windows, вам понадобится Более бесшовные. Если вы предпочитаете хранить данные Windows и Mac отдельно, используйте Более изолированные.
- Нажмите Продолжать.
Источник: iMore
- Нажмите Заканчивать.
- Нажмите Сохранять чтобы сохранить эту новую виртуальную машину в папке виртуальных машин.
Источник: iMore
После завершения установки Windows на виртуальной машине Windows 10 откроется в новом окне. Похоже, вы просто используете новую программу или веб-браузер, но у вас есть виртуальная симуляция Windows 10 прямо на вашем Mac!
Любые вопросы?
У вас есть вопросы о том, как запустить Windows 10 на Mac с помощью VMware Fusion 11.5? Поместите их в комментарии, и я вам помогу.
Мы можем получать комиссию за покупки, используя наши ссылки. Узнать больше.
![[Update] Apple прекратит выпуск iMac Pro, когда его запасы закончатся](https://www.imore.com/sites/imore.com/files/styles/w200h150crop/public/field/image/2018/03/imac-pro-birds-eye.jpg)
Пока запасы есть
[Update] Apple прекратит выпуск iMac Pro, когда его запасы закончатся
Apple изменила список iMac Pro на своем веб-сайте, чтобы заявить, что он продается «пока имеются в наличии», и доступна только одна конфигурация. Apple подтвердила, что прекратит выпуск iMac Pro, как только его запасы закончатся.

Видео лучшие подруги
Отличное программное обеспечение для редактирования видео для вашего Mac
Вам не нужно покупать дорогое программное обеспечение для редактирования видео, чтобы выполнить свою работу. Вот одни из самых популярных программ для редактирования видео для Mac на рынке сегодня.
You are here: Home / VMware / Fusion / Run Windows 11 using VMware Fusion
Windows 11 was is now released for the general public and I went and downloaded an evaluation on Windows 11 to see what all the fuss was about. I am a Mac user, so I have for years used VMware Fusion to run VMs on my Mac. I soon learned that if you want to run Windows 11 using VMware Fusion, you need to go through a few extra steps to make work.
Download the Windows 11 ISO
You can download a Windows 11 Eval ISO from Microsoft Evaluation Center.
Create the Windows 11 VM
Go to VMware Fusion and start the wizard to create a new VM. Select “Install from disc or image” and click “Continue”.
Choose “Windows 10 and later x64” as the operating system.
Choose “UEFI” as the firmware type.
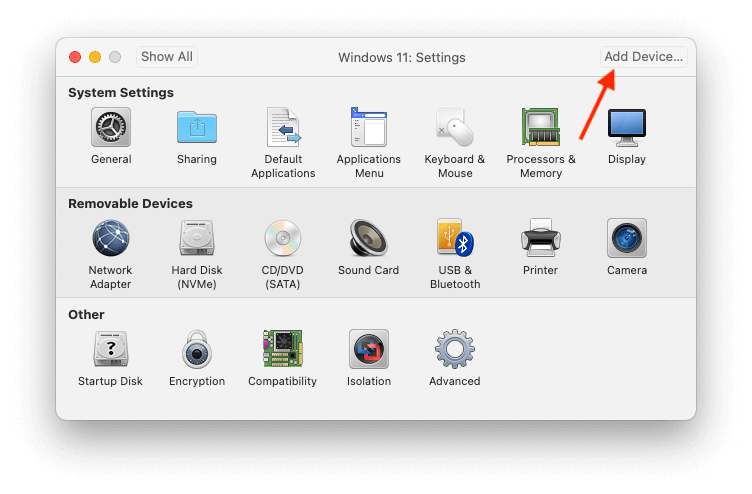
Click on “Customize Settings”.
Click on “Encryption” as shown below. Enable Encryption and choose a password. You will need this password every time you boot the VM.

The next step is to add the Trusted Platform Module. Click on “Add Device”.
Click on “Trusted Platform Module” and click on the “Add” button.
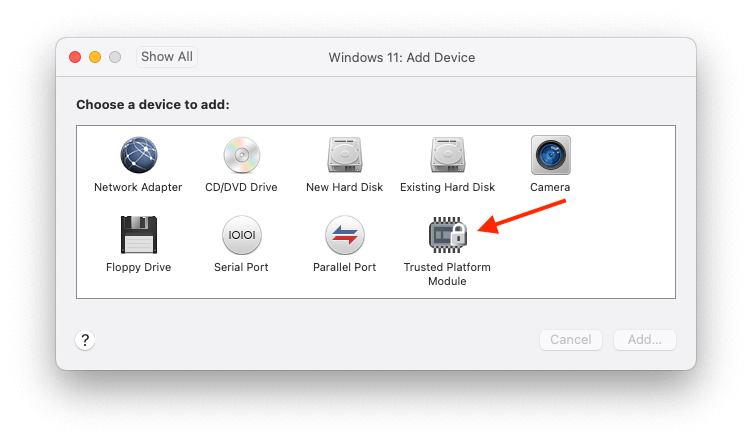
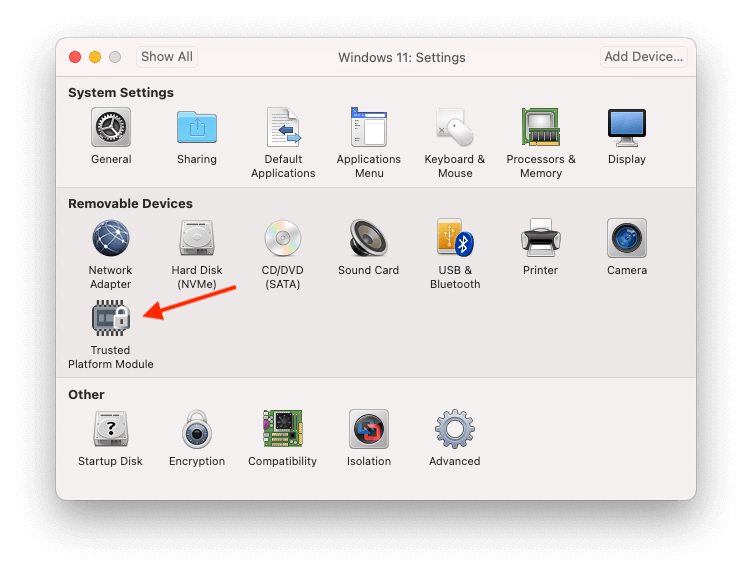
The Trusted Platform Module now appears in the settings. Add vCPUs and memory to your VM as need as well in this step. Windows 11 requires 2 vCPUs and 4096 MB of memory as a minimum.
You are now ready to install Windows 11 using VMware Fusion. Boot up the VM and go through the steps to start the installation process.
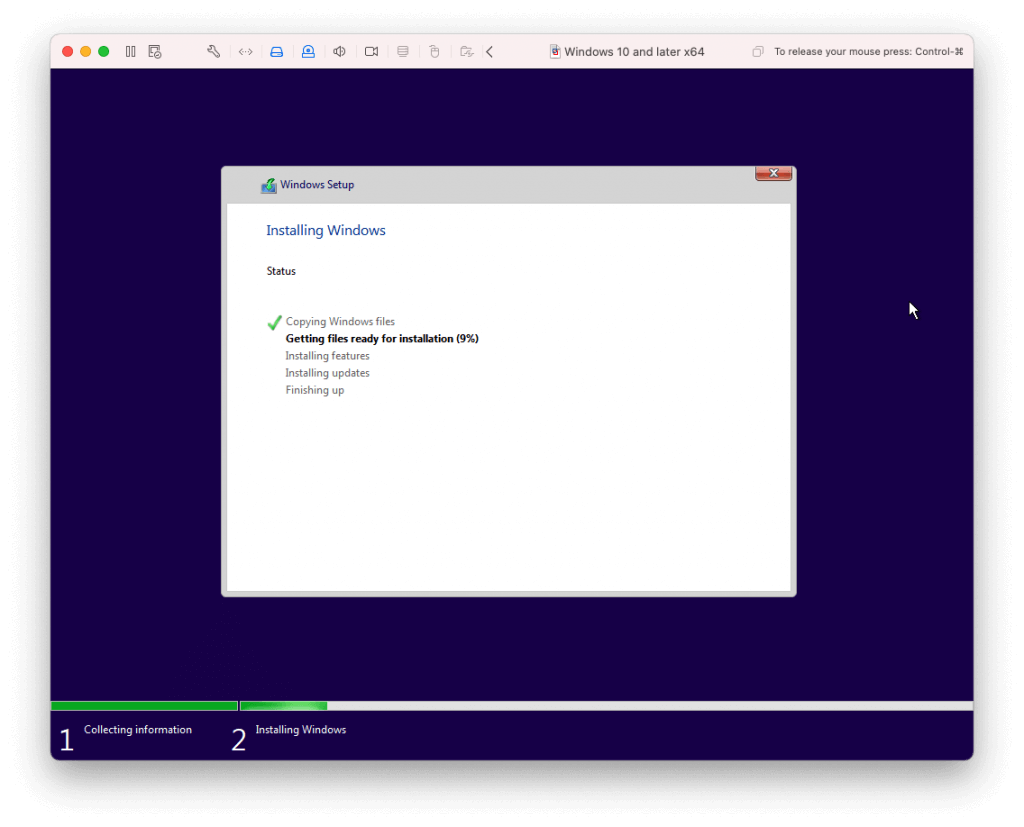
Let the installation finish and you are now ready to use Windows 11 using VMware Fusion.
Reader Interactions

If you own an Intel-based Macintosh, there are a number of ways you can run Windows 10 on your computer. Here’s how to use VMware Fusion 8 to run it.
If you own an Intel-based Macintosh, there are many ways you can run Windows 10 on it. We previously looked at setting up Windows 10 using Apple’s Boot Camp. It’s perfect for scenarios where you want the raw performance from your device’s hardware. A Boot Camp configuration has its trade-offs, though. Still, Boot Camp remains the best choice in regards to utilizing the full hardware experience of your Mac.
If you need to use a select group of apps, maybe an in-house line of the business app (LOB) or light productivity applications such as Microsoft Office or Adobe Photoshop, you can get away with using a Virtual Machine (VM). One leading solution in this category is VMware Fusion, which was among the first vendors to bring Windows virtualization to Intel Macs nearly 10 years ago.
I decided on trying out VMware Fusion, because of my great experience with the Windows version. I liked it so much, in fact, that I wrote an article on using VMware Workstation to install Windows 10. Before settling on VMware Fusion for my Mac, I tried out free solutions, but as you will find out, VMware is an entirely different experience; it is almost like having the near Boot Camp experience from within OS X.
Create Windows 10 Virtual Machine using VMware Fusion 8 Pro
There are few things you will need:
- VMware Fusion 8 Pro license, you can download a 30-day trial to give it a spin. There is an even cheaper VMware Fusion 8 license which should be more than suitable for most person’s needs.
- Compatible Intel Apple Macintosh computer
- Windows 10 license, see instructions on how to download a disc image.
Install VMware Fusion 8 Pro for Mac
Before you begin, you need to install the software, after downloading, double-click the DMG image. When the DMG is mounted, double-click VMware Fusion to start the installation.

Enter your password and accept the license agreement.
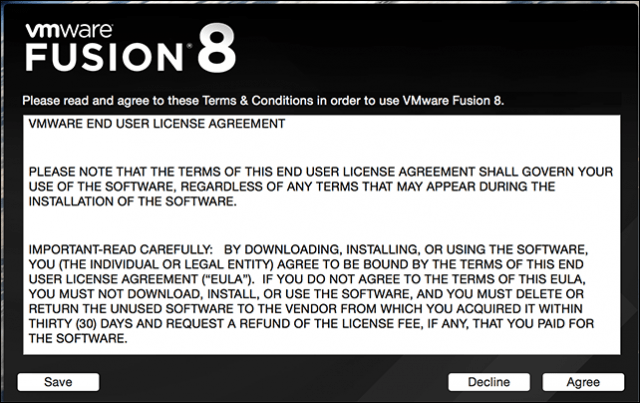
After that, enter your product key or try it out for free for 30 days.
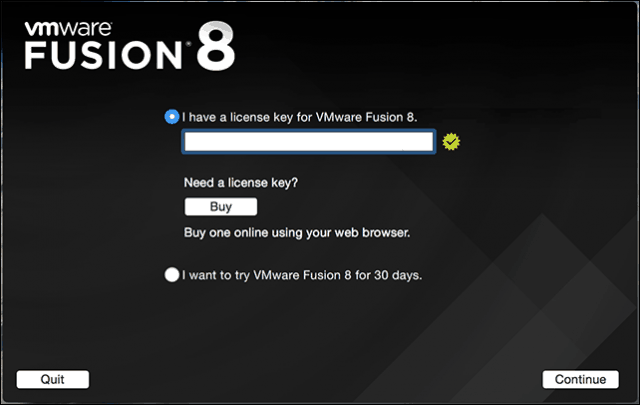
Launch and Install VMware Fusion
On your Mac keyboard hit Command + Spacebar and type: VMware and press Enter.
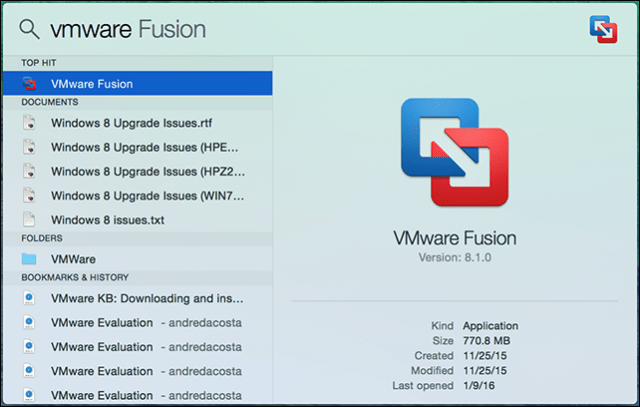
You have a few choices when it comes to selecting the install method. Since this article focuses on installing Windows 10, go with Install from a disc or image which should be the default selection.
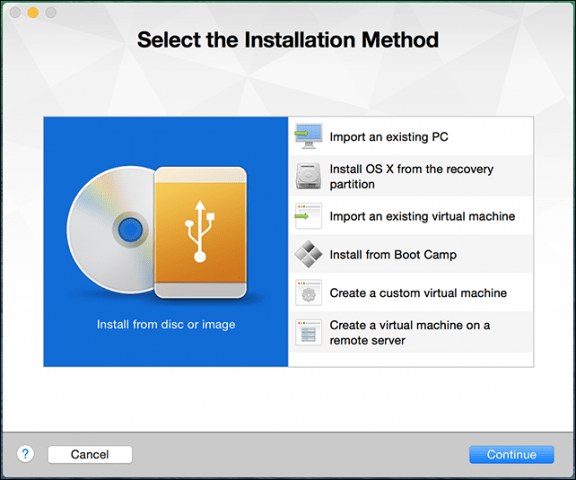
If you have your Windows Disc image ready, drag and drop it into the window and click Continue.

Click Finish if you’re satisfied with the Virtual Machine configuration. If not, click Customize Settings to go back and make adjustments.
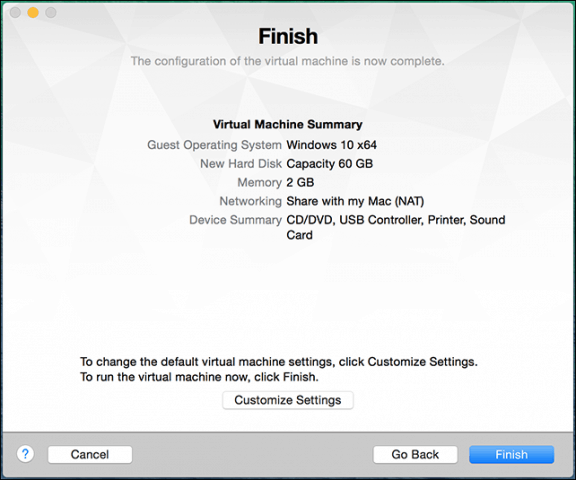
Customize your Virtual Machine Configuration
If you want to modify the virtual hardware configuration of your virtual machine, you can use the System Preferences-like interface to do so. Common areas of the system you should consider adjusting include Processors & Memory, Hard Disk, and Network.

Depending on what you plan to use the Virtual Machine for, you can increase the amount of memory and hard disk for satisfactory performance.
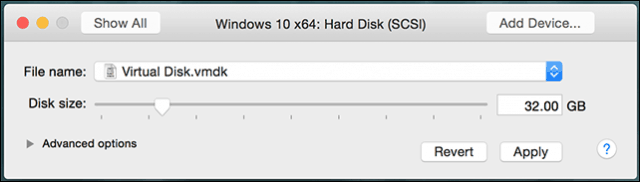
Hard disk settings in VMware Fusion 8
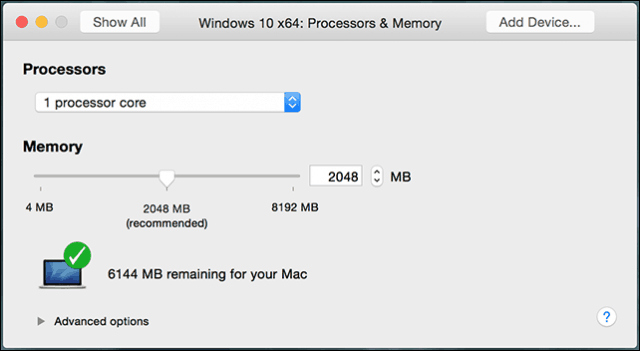
RAM and processor settings in VMware Fusion 8
Installing Windows 10
When you are ready to begin the installation, click the Play button in the Virtual Machine window.
Windows 10 setup will now begin. For instructions on how to perform a clean install, review our article here.

Installing VMware Tools
After installing Windows 10, the performance might be noticeably weak. One of the first pop-ups you will see within Windows is the need for a Display Driver, and this is where VMware Tools come in.
VMware Tools will install necessary software drivers that will take advantage of the hardware such as CPU and graphics enhancing the performance and experience of the virtual machine.

Click the Virtual Machine menu then click Install VMware Tools and kick off the installer.
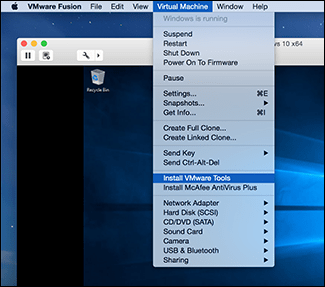
When AutoPlay comes up, select the option to run the tools.
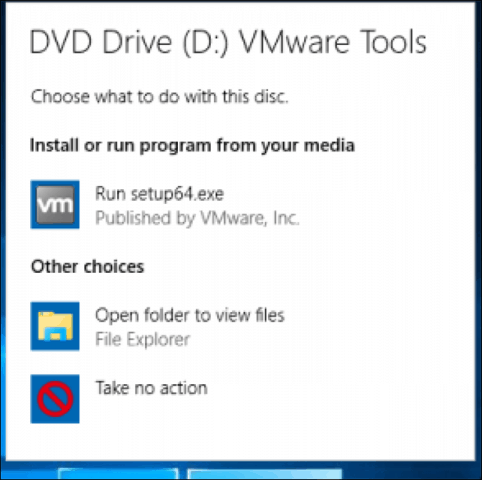
Follow the on-screen instructions to install VMware Tools, items might appear small on screen. You can resize the VM window to scale them. The size discrepancy is only temporary, after installation and restart, items will automatically appear larger based on the resolution you set.
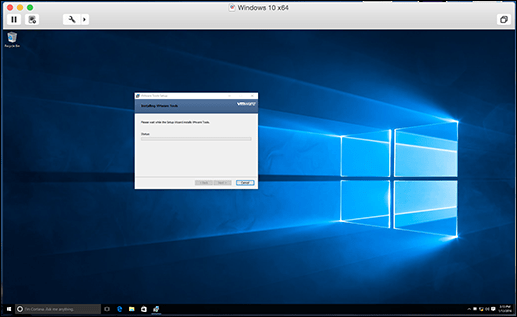
In our next article, we look at setting up a custom virtual machine, recommended if you want to install an alternative such as Linux or an older version of Windows.
![]()

(Image credit: iMore)
Virtual machines are a great alternative to partitioning your hard drive to install Windows using Boot Camp. It means you can use Windows in a window (excuse the pun) or even full screen if you want, and you don’t have to cut the amount of space your hard drive has for your current computing needs.
I recently explained how to get the Parallels Desktop virtual machine on your Mac. If you’re interested in Parallels, check out my installation guide:
How to run Windows 10 on your Mac using Parallels Desktop 15
I’m covering all the major virtual machines for your benefit and this time it’s all about VMWare’s Fusion 11.5 virtual machine software. They’re similar, but have a few different steps in the set up process.
Here’s how to get VMWare’s Fusion 11.5 on your Mac and then install and run Windows 10 from within your macOS operating system without having to switch hard drive partitions.
- Check your system and hardware requirements
- Before you start: Back up your Mac
- How to run Windows 10 on Mac using Fusion 11.5
Check your system and hardware requirements
Before you get started with installation of Fusion 11.5, make sure your Mac meets the minimum system requirements for both hardware and software.
The minimum system requirements for installing and using VMware Fusion 11.5 are:
Hardware
- All Macs launched in 2011 or later are supported (except the 2012 Mac Pro «Quad Core» using the Intel Xeon W3565 Processor. The CPU architecture is incompatible).
- Also supports the 2010 Mac Pro «Six Core», «Eight Core» and «Twelve Core» models.
- Minimum 4GB of RAM
- 750MB free disk space for VMware Fusion and at least 5GB for each virtual machine
Software
- Mac OS X 10.13 or later
- Operating system installation media (disk or disk image) for virtual machines.
- Microsoft Windows is not included with VMware Fusion.
- Recommended graphics hardware for Windows DirectX 10 or OpenGL 3.3 support:
- NVIDIA 8600M or better
- ATI 2600 or better
- Minimum requirements for Metal support (opens in new tab).
Before you start: Back up your Mac
This is one of those awful mistakes that people make, thinking that they don’t need to back up their Mac before doing something big. First off, you should be backing up your Mac on a regular basis, but even if you don’t do so multiple times per day, you should definitely do so right now, before you continue with this guide. Seriously. Back it up.
How to back up your Mac
How to run Windows 10 on Mac using Fusion 11.5
You’ll need a copy of Fusion 11.5 or Fusion 11.5 Pro in order to install it on your Mac. Fusion 11.5 costs $79.99 and the pro version costs $159.99. The main differences between them is in the advanced features. The Pro version includes extra features specific for multiple-computer use. For example, if you to be able to create linked clones on different Macs or if you need to network your computers together. You can buy the full license right now or download a free 30-day trial and make your full purchase later. If you have an older version of Fusion, you can upgrade for less.
- Buy Fusion 11.5 (opens in new tab)
- Buy Fusion 11.5 Pro (opens in new tab)
You’ll also need a copy of Windows 10. You might already have a full copy or you might need to buy a copy. VMWare requires that you have a copy on a disk, drive, or an ISO image file (opens in new tab) in order to run it on your Mac.
Download Windows 10
- Navigate to the Microsoft Windows 10 ISO download page from your web browser.
- Click on Select Edition and select Windows 10.
- Click Confirm.
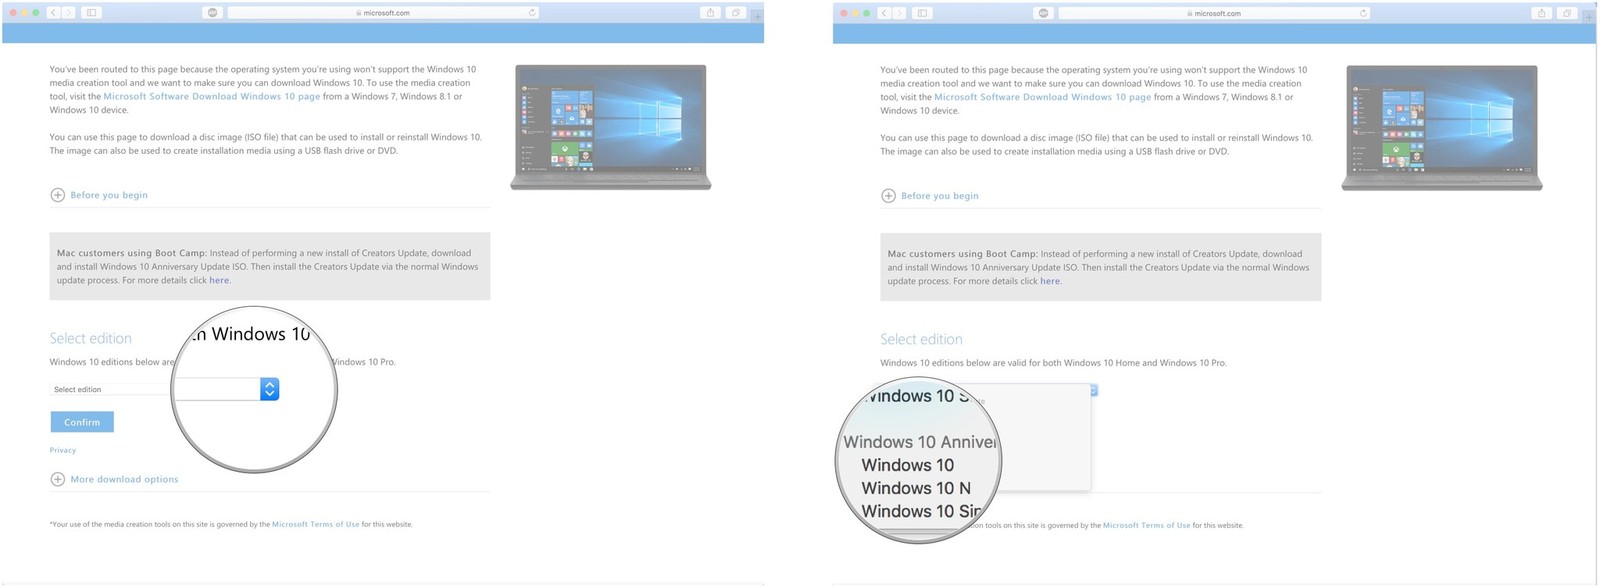
- Click on Select the product language and select your language.
- Click Confirm.
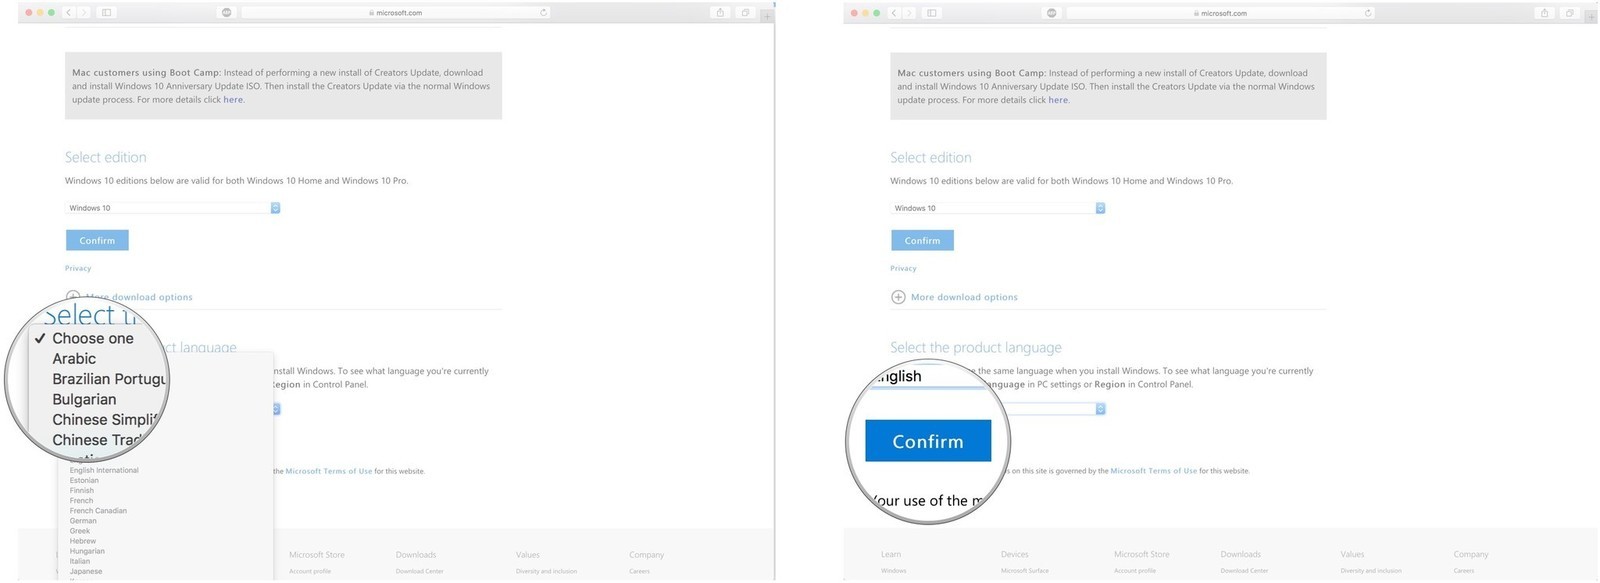
- Click on 64-bit Download.
- Click Save to start the download.
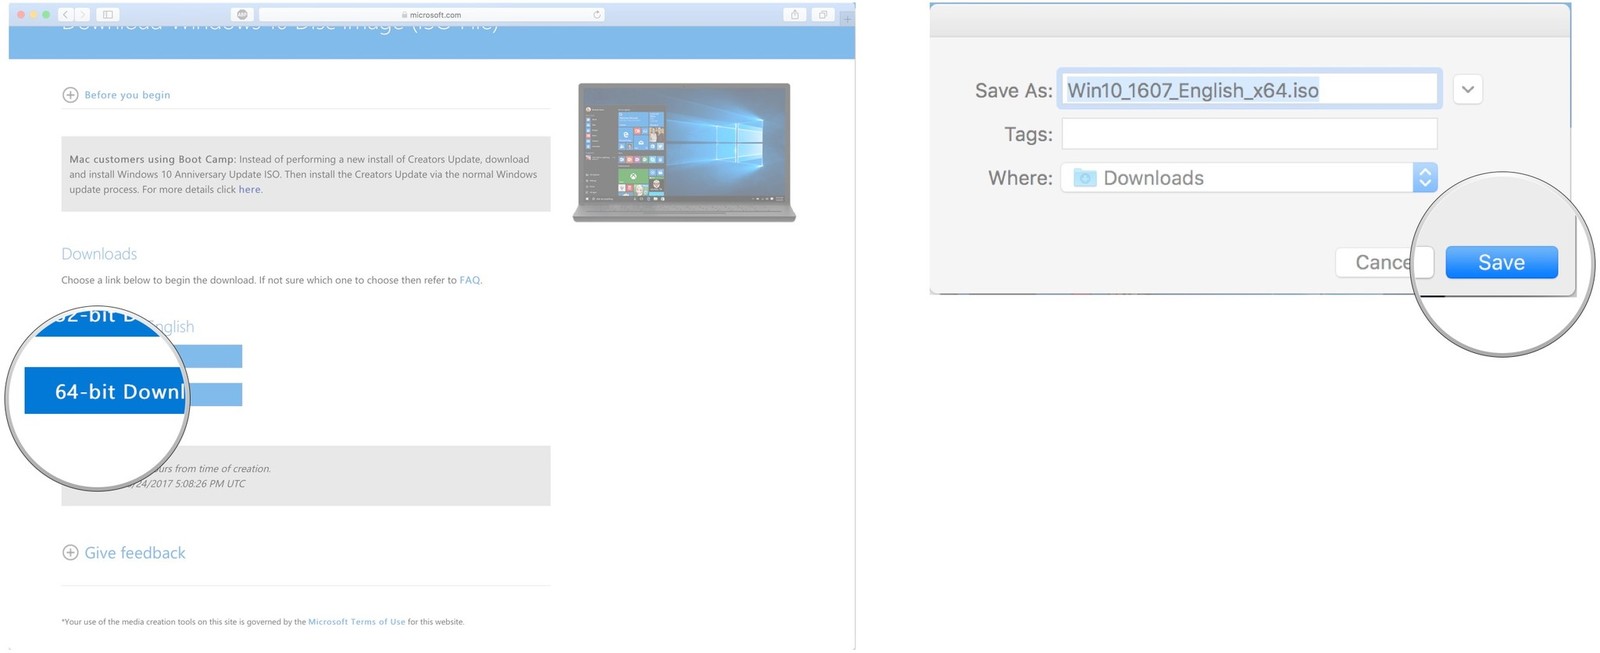
This may take a while, so have a cup of tea and watch an episode of Black Mirror while you wait.
Download and install VMWare Fusion 11.5
The first step is to download Fusion 11.5. You can buy a full license right now or download the free 30-day trial to get started.
Get VMWare’s Fusion 11.5 (opens in new tab)
Once the program download is complete, follow these steps to install Fusion 11.5 on your Mac.
- Double-click on the VMwareFusion.dmg file to open it (it might be in finder or on your desktop. You can search for it in Spotlight if its not easy to find).
- Double-click on Double-click to Install.
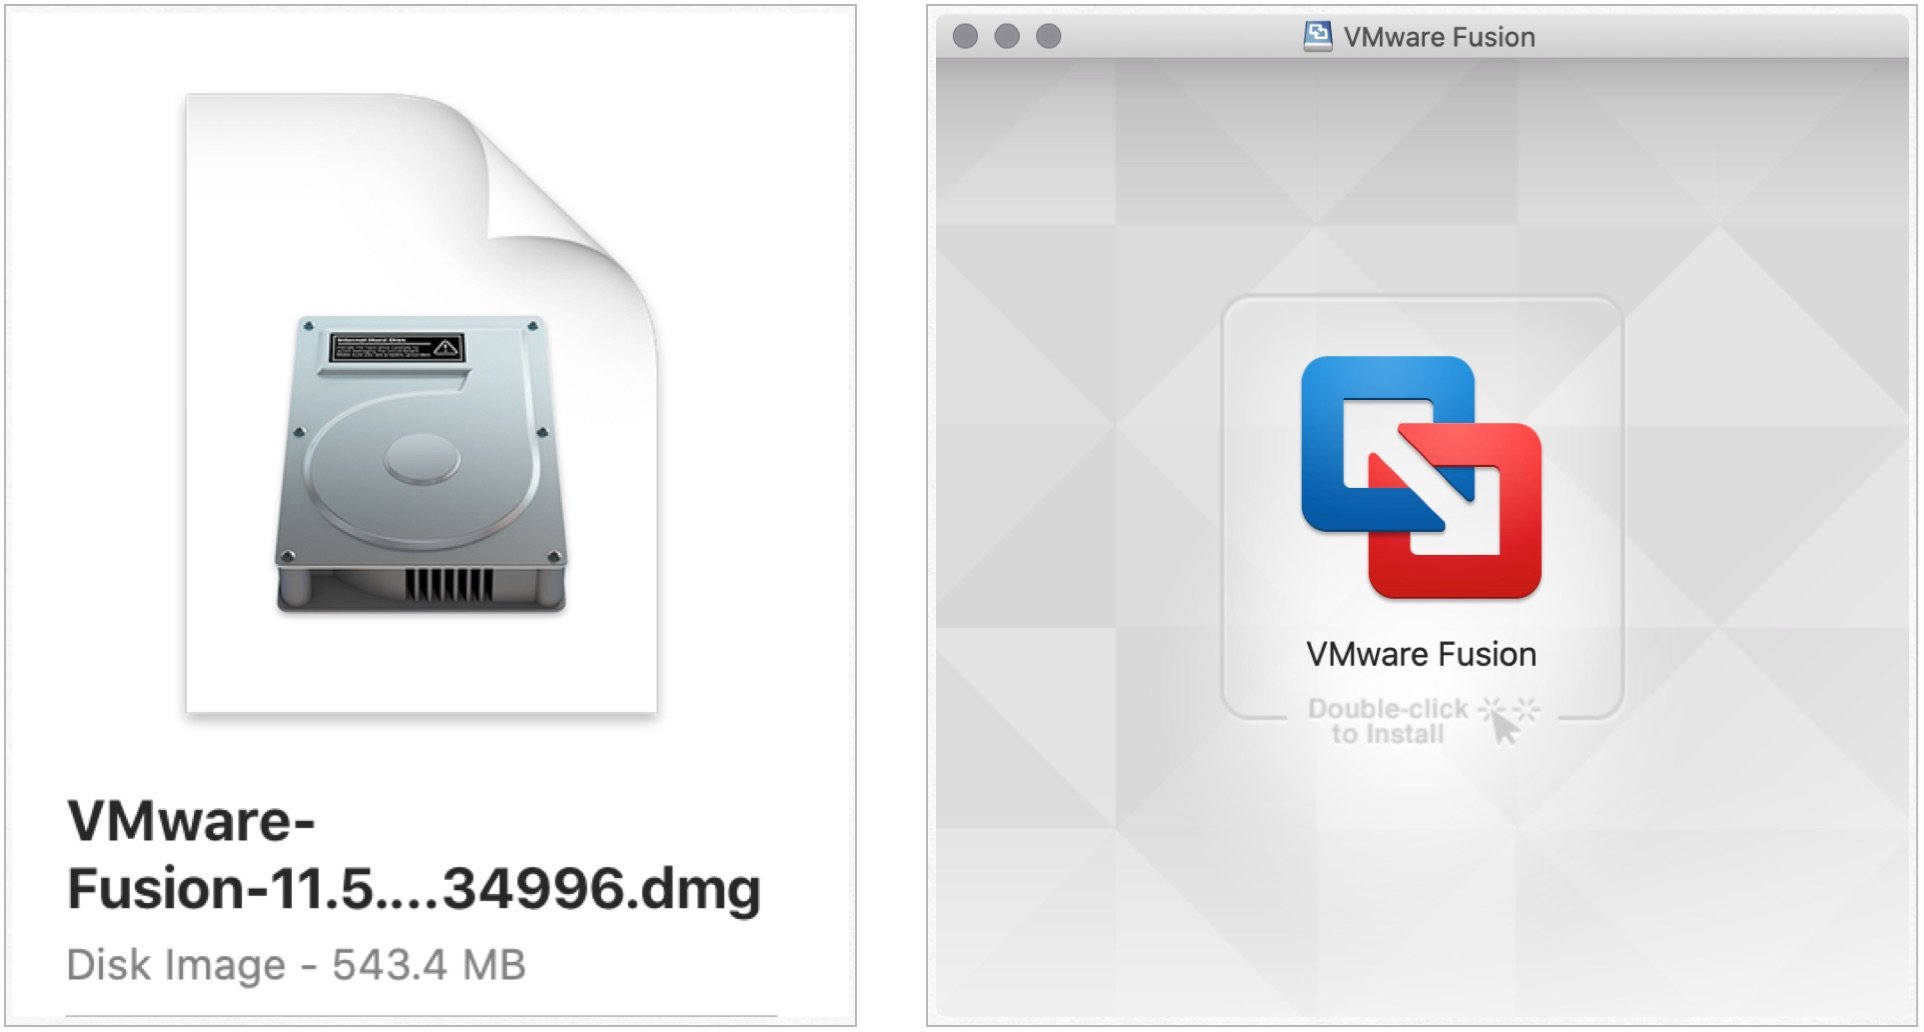
- Click Open if prompted to confirm that you want to open the application.
- Click one of the options for how you want to install Fusion 11.5, either with a license key, by purchasing now, or by using the free 30-day trial.
- Click Continue.
- Select whether you want to install Fusion 11.5 or Fusion 11.5 Pro if you’re running a trial version.
- Click Continue.
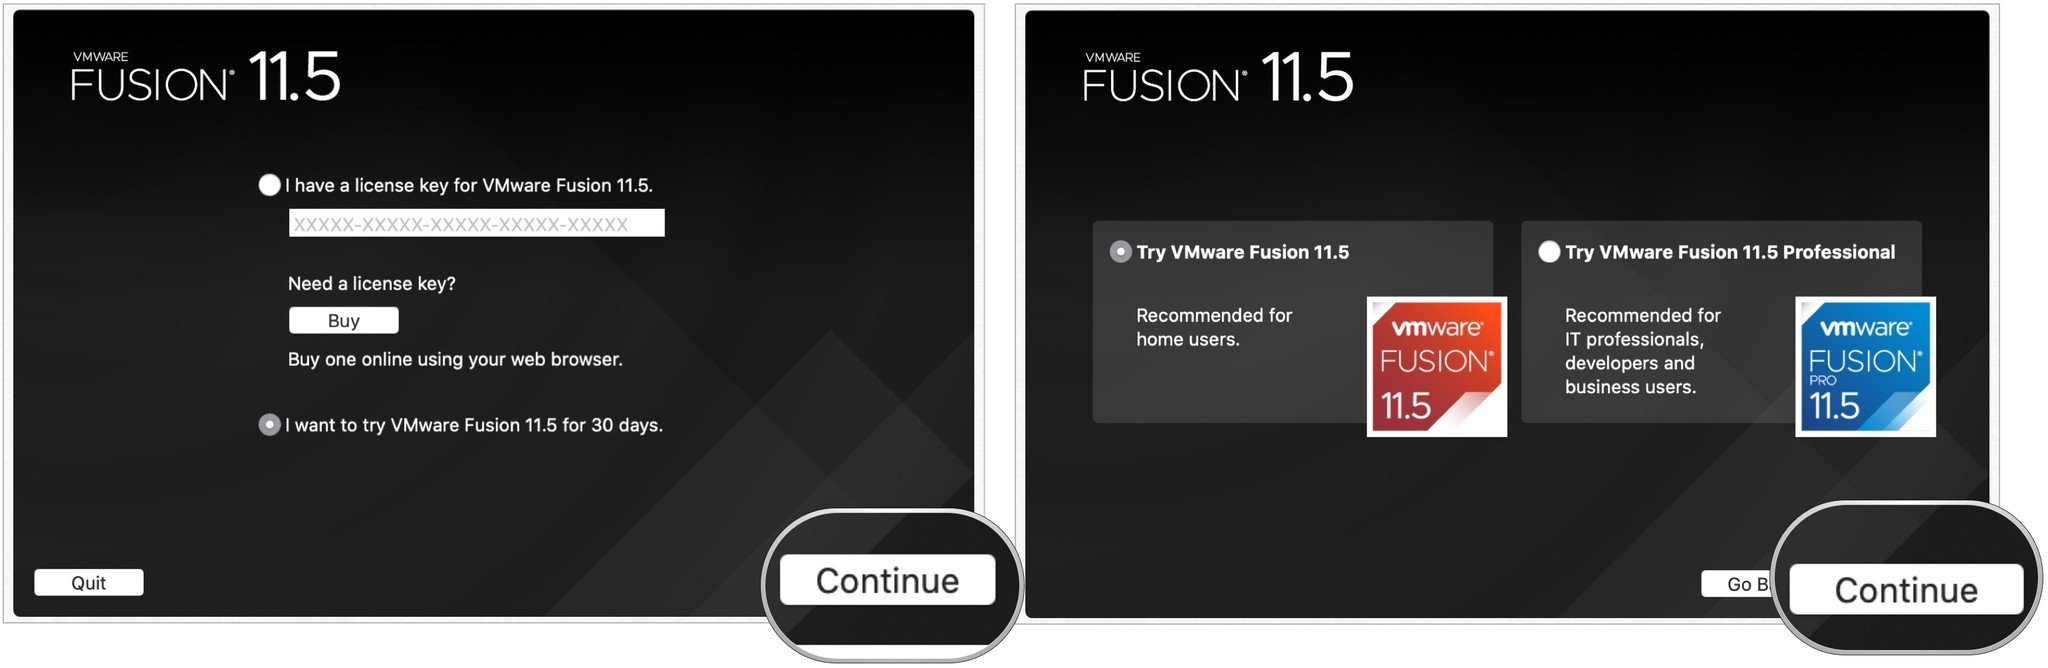
- Enter your Mac log in credentials when prompted.
- Click OK.
- Drag the ISO Windows 10 file to the Installation Method Window.If you’re installing from a different method, select that method and follow the steps to install.
- Click Continue.
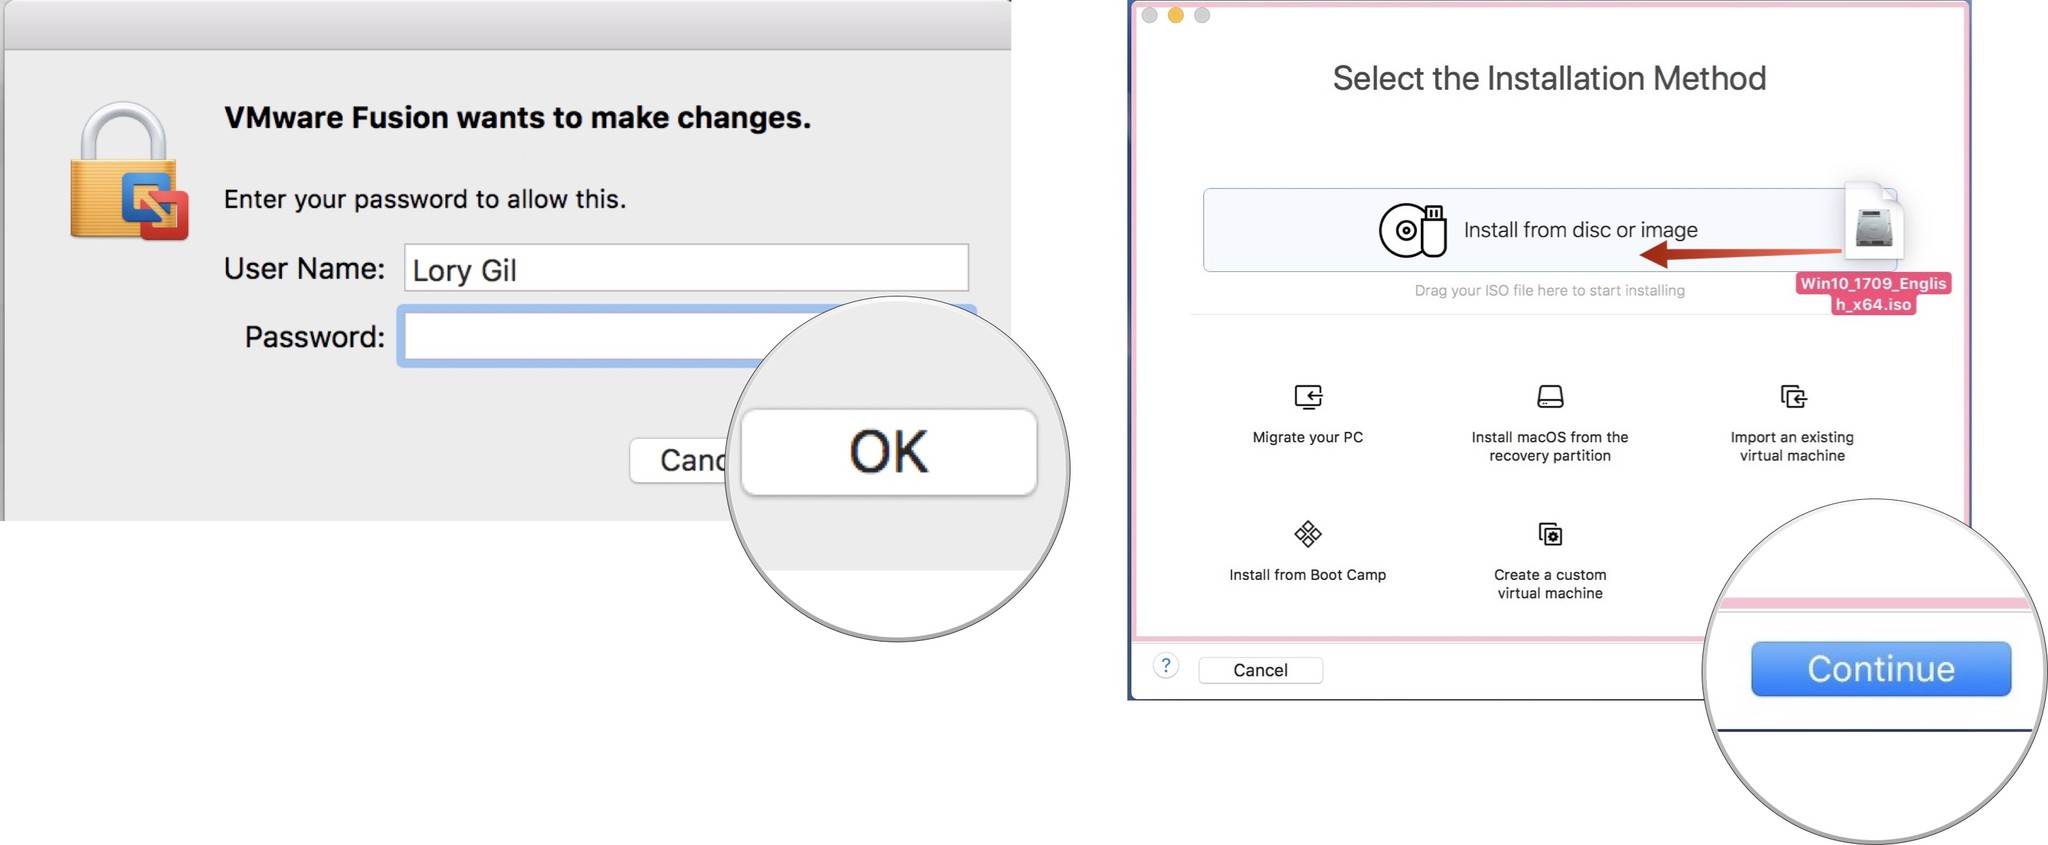
- Tick the box for Use Easy Install. If you feel comfortable setting up the installation settings manually, uncheck the box.
- Create a Windows login account name and password.
- Enter the Windows Product Key.
- Select the Windows version you’re using.
- Select the level of integration. If you want to share your Mac documents with Windows, you’ll want More Seamless. If you prefer to keep Windows and Mac data separate, use More Isolated.
- Click Continue.
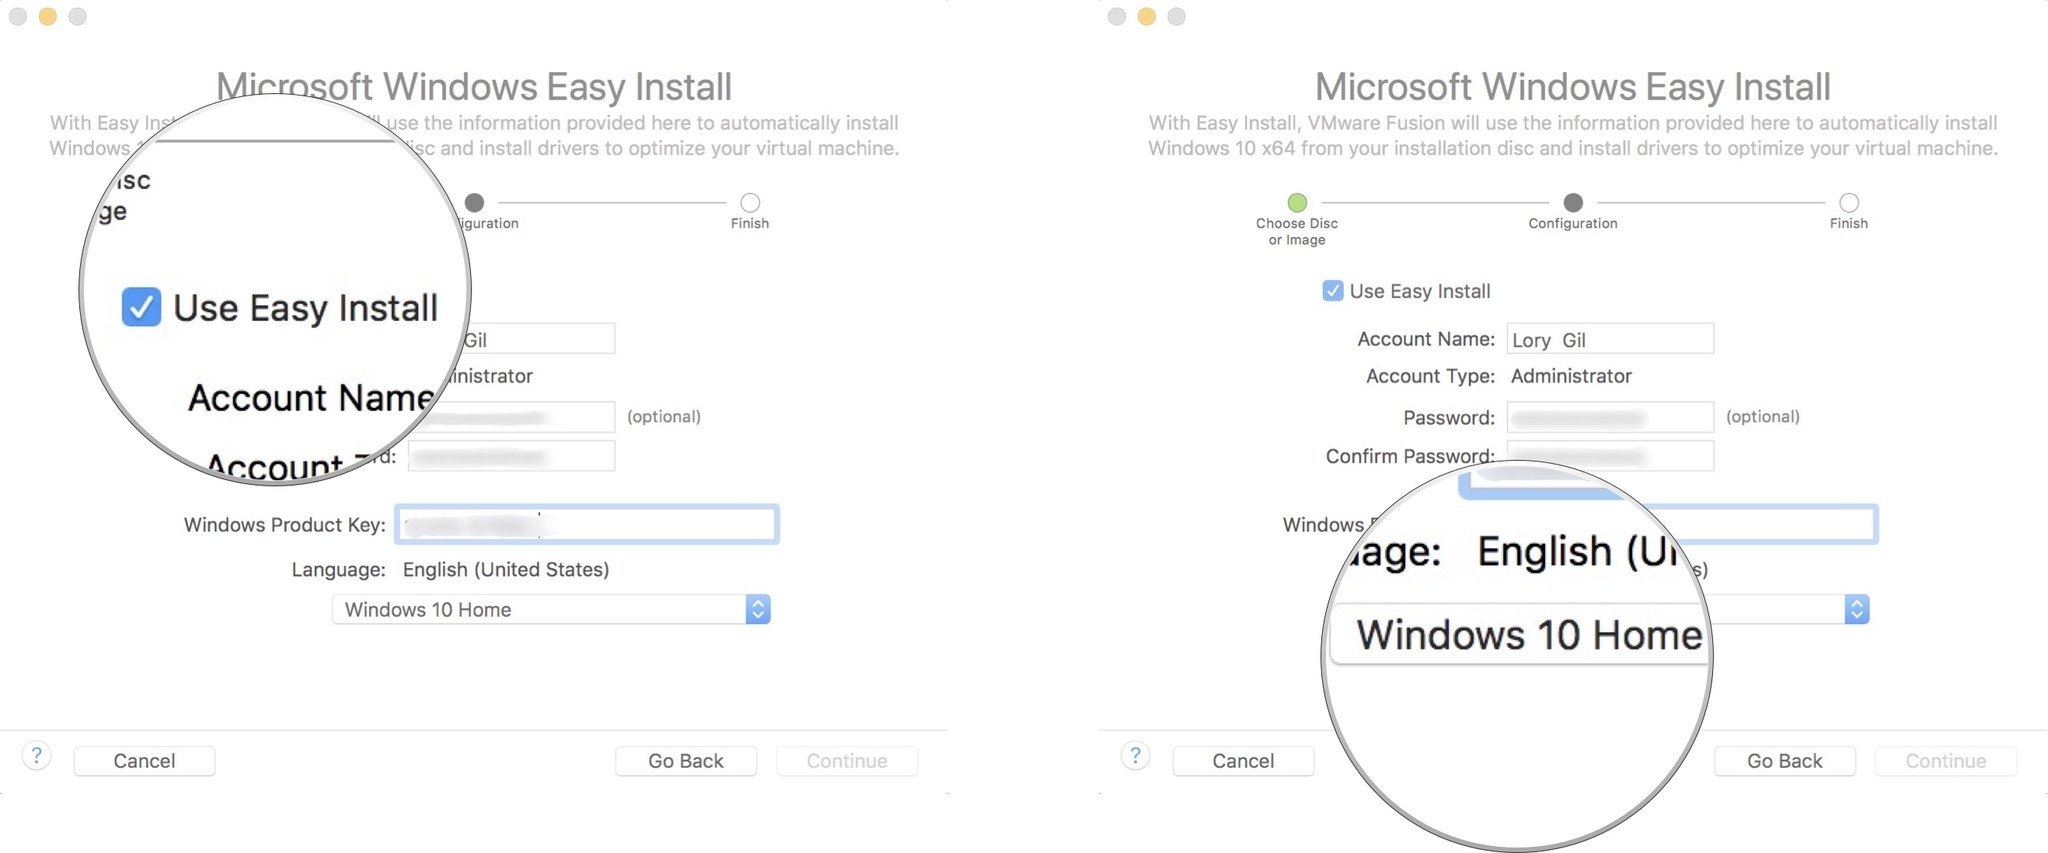
- Click Finish.
- Click Save to save this new virtual machine to your Virtual Machines folder.
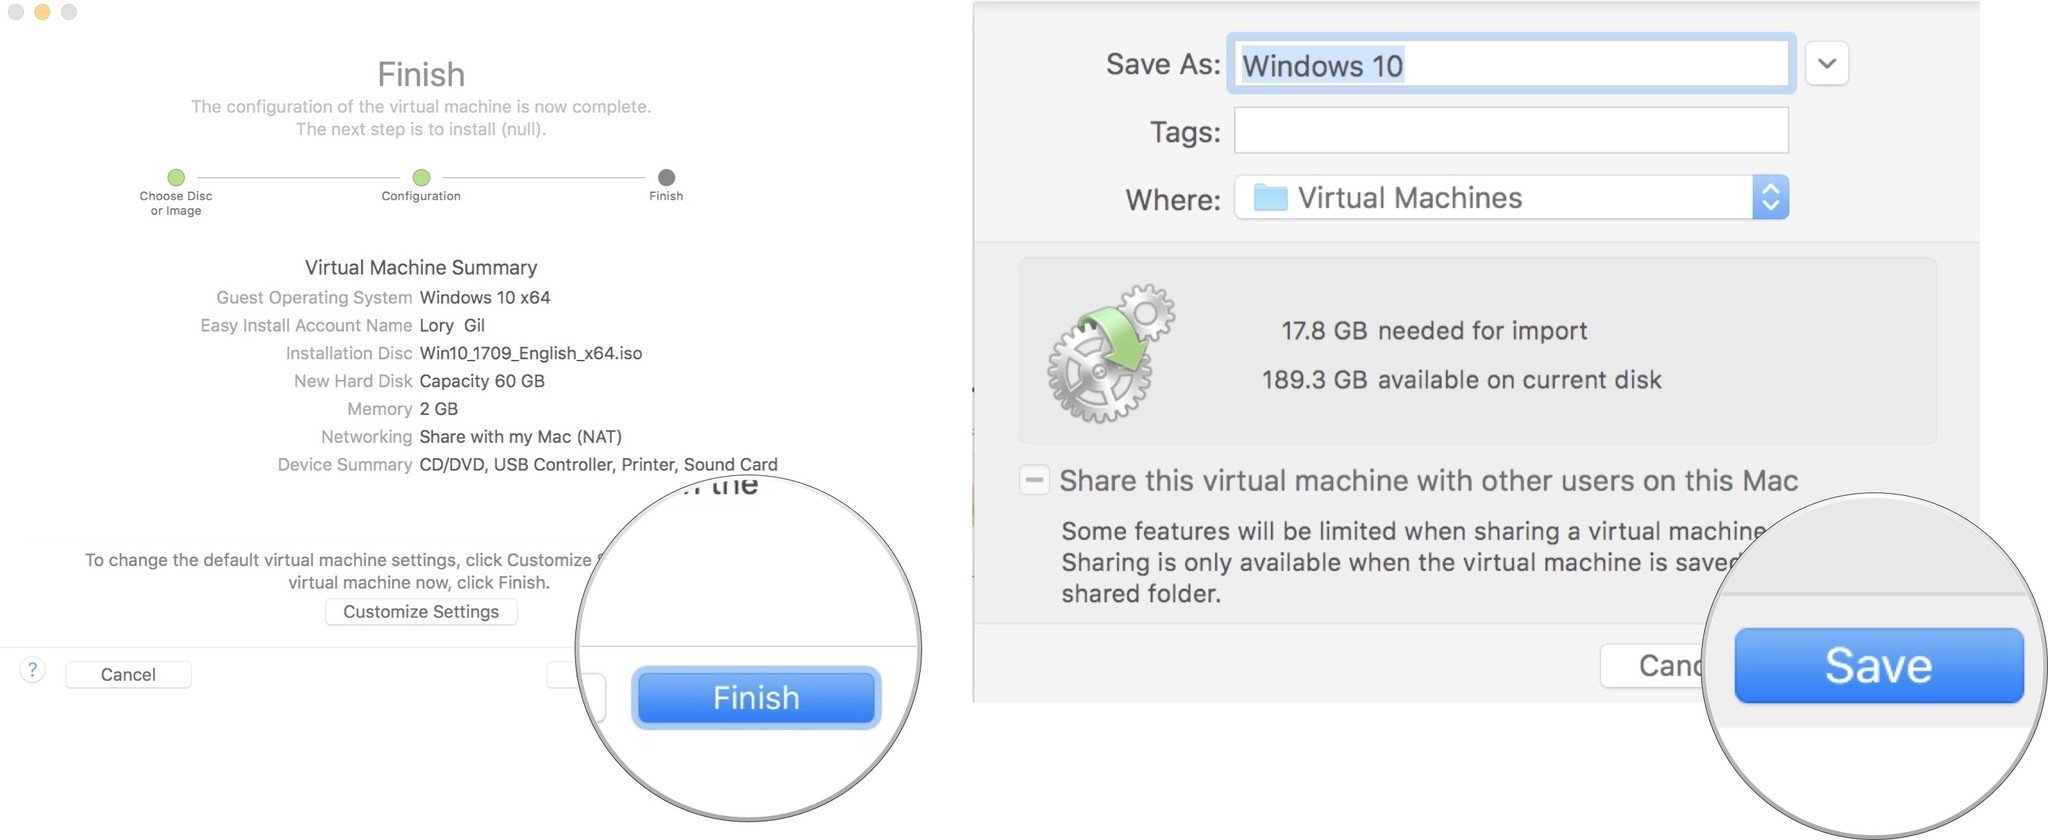
After Windows finishes installing in the virtual machine, Windows 10 will pop up in a new window. It sort of looks like you’re just using a new program or web browser, but you’ve got a virtual simulation of Windows 10, in its entirety right on your Mac!
Any questions?
Do you have any questions about how to run Windows 10 on your Mac using VMware’s Fusion 11.5? Put them in the comments and I’ll help you out.
Get the best of iMore in in your inbox, every day!
Lory is a renaissance woman, writing news, reviews, and how-to guides for iMore. She also fancies herself a bit of a rock star in her town and spends too much time reading comic books. If she’s not typing away at her keyboard, you can probably find her at Disneyland or watching Star Wars (or both).