Содержание
- Вступление
- Краткая информация о Nessus
- Основы сканера уязвимости Nessus
- 1. Установка на Linux
- 2. Установка в Windows
- Понимание пользовательского интерфейса
- 1. Страница Scans
- 2. Страница Settings
- Сканирование уязвимостей с помощью Nessus
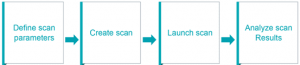
- Настройка сканирования Nessus
- Запуск сканирования Nessus
- Заключение
Вступление
Nessus является одним из многих сканеров уязвимостей, используемых во время оценок уязвимостей и тестирования на проникновение, включая вредоносные атаки.
В этой статье мы сосредоточимся на этом сканере уязвимостей, обсуждении основных принципов, которые необходимо выполнить перед началом работы с инструментом, различных возможностей сканирования, которые он предоставляет, что нужно для запуска инструмента и того, как результаты появляются после завершения сканирования.
Краткая информация о Nessus
Nessus продан Tenable Security.
Инструмент является бесплатным для некоммерческого использования; однако для использования предприятием существуют варианты, которые подешевели.
В вашем распоряжении доступны следующие варианты:
Tenable.io – это услуга на основе подписки, доступная здесь.
Он позволяет различным группам совместно использовать сканеры, расписания, политики сканирования и результаты сканирования.
Tenable также содержит то, что ранее называлось Nessus Cloud, которое раньше предназначалось для решения Tenable Software-as-a-Service.
Tenable.io также позволяет настраивать рабочие процессы для эффективного управления уязвимостями.
Nessus Agents предоставляют гибкий способ сканирования хостов в вашей среде без необходимости предоставления учетных данных хостам.
Агенты позволяют выполнять сканирование, даже если хосты находятся в автономном режиме.
Области применения этих агентов являются широкими.
Рассмотрите среду, в которой отсутствует традиционная защита от вредоносных программ, например антивирусные решения – накладные расходы, которые эти агенты оказывают на хосты, довольно малы.
Здесь агенты потребляют минимальные системные ресурсы на узлах, в которых они установлены, при этом обеспечивая адекватную защиту от вредоносных программ.
Nessus Professional – это наиболее распространенное решение для оценки уязвимости в отрасли системы.
Это решение позволяет выполнять высокоскоростное обнаружение активов, профилирование целевых объектов, аудит конфигурации, обнаружение вредоносных программ, обнаружение конфиденциальных данных и многое другое.
Nessus Professional работает на клиентских устройствах, таких как ноутбуки, и может эффективно использоваться вашими службами безопасности в вашей организации.
Nessus Manager используется для предоставления возможностей решения Nessus Professional, а также многочисленных дополнительных функций управления уязвимостями и совместной работы.
Тем не менее, Nessus Manager больше не продается с 1 февраля 2018 года.
Это решение использовалось в организациях для совместной работы и обмена информацией между различными отделами организации.
Он обеспечивал возможность мониторинга активов компании, а также устройств в труднодоступных средах.
Основы сканера уязвимости Nessus
Чтобы оценить возможности Nessus, нам нужно понять некоторые основы.
Сначала мы обсудим пользовательский интерфейс и посмотрим, как установить Nessus на Linux и Windows ОС.
1. Установка на Linux
Загружаемый установщик можно найти здесь для Linux-систем.
Вам нужно убедиться, что вы знаете дистрибутив Linux, который вы используете, чтобы выбрать, какой установщик загрузить.
Например, в этой статье описывается файловая система Debian, на которой основан Kali Linux, поэтому мы будем загружать файл установщика * .deb.
Мы также запускаем 64-разрядную версию Kali Linux; вам нужно будет узнать об архитектуре, в которой вы работаете.
На момент написания этой статьи последняя версия Nessus – 8.0.0.
После загрузки файла пакета вы можете установить его из терминала Linux с помощью следующей команды:
$ sudo dpkg -i Nessus-8.0.0-debian6_i386.deb
Если вы используете любую другую версию Linux, используйте следующие команды:
Для RedHat версии 6:
# rpm -ivh Nessus-<version number>-es6.x86_64.rpm
Для FreeBSD версии 10:
# pkg add Nessus-<version number>-fbsd10-amd64.txz
После установки в вашу Linux-систему обязательно запустите демон Nessus, как показано ниже:
Для Red Hat, CentOS, Oracle Linux, Fedora, SUSE и FreeBSD используйте следующую команду:
# service nessusd start
Для Debian / Kali и Ubuntu используйте следующую команду:
# /etc/init.d/nessusd start
2. Установка в Windows
Здесь вы можете получить установщик для Windows.
Не забудьте загрузить в соответствии с вашей архитектурой и операционной системой.
После загрузки дважды щелкните установщик и завершите установку, пройдя мастер установки.
Возможно, вам будет предложено установить WinPcap; если это так, приступайте к этой установке.
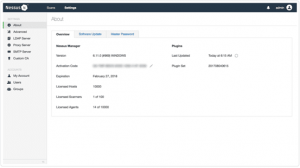
Понимание пользовательского интерфейса
После установки и во время вашего первого запуска вам будет необходимо активировать ваш продукт на основе типа лицензии, который вы собираетесь установить.
Точные шаги для каждого из продуктов можно найти здесь.
После активации лицензии пришло время перейти к запуску сканера Nessus.
Пользовательский интерфейс Nessus состоит в основном из двух основных страниц: страницы сканирования и страницы настроек.
Эти страницы позволяют управлять конфигурациями сканирования и настраивать сканер в соответствии с тем, как вы хотите, чтобы он выполнялся в вашей системе.
Вы получаете доступ к этим страницам с панели вкладок, показанной ниже.
![]()
Как вы можете видеть, пользователь, которого вы создали, и любые другие уведомления появляются в верхнем правом углу.
1. Страница Scans
Эта страница позволит вам создавать новые сканирование и управлять ими.
Вы также заметите, что в левом нижнем углу экрана есть разделы, которые позволяют настраивать политики, которые будут применяться к вашим проверкам, определять правила плагина и отслеживать ваши сканеры и агенты.
Когда вы создаете новое сканирование или политику, появляется шаблон сканирования или шаблон политики.

2. Страница Settings
Страница настроек будет содержать информацию о конфигурации, позволяющую вам определить настройки для вашего LDAP, Proxy и SMTP-сервера для дополнительной функциональности и интеграции в вашей сети.
В нижней части левого экрана вы также получите доступ к своим аккаунтам, пользователям и настройкам групп.
Сканирование уязвимостей с помощью Nessus
Nessus выполняет сканирование, используя плагины, которые работают на каждый хоста в сети, чтобы выявлять уязвимости.
Плагины можно рассматривать как отдельные фрагменты кода, которые использует Nessus для проведения отдельных типов сканирования по целям.
Плагины многочисленны и широки в своих возможностях.
Например, плагин может быть запущен и нацелен на хост:
- Определить, какие операционные системы и службы работают, какие порты
- Определить, какие программные компоненты уязвимы для атак (FTP, SSH, SMB и т. Д.)
- Определить, соблюдены ли требования соответствия на разных хостах
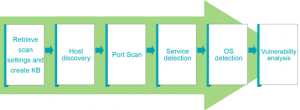
Шаги, которые выполняются во время сканирования, можно суммировать на изображении ниже:
Когда вы запускаете сканирование, Nessus проходит ряд шагов.
Шаг 1: Nessus восстановит настройки сканирования. В настройках будут определены сканируемые порты, включенные плагины и определения предпочтений политики.
Шаг 2: Затем Nessus выполнит обнаружение хоста, чтобы определить хосты, которые находятся наверху. Протоколы, используемые при обнаружении хоста, будут ICMP, TCP, UDP и ARP. Вы можете указать их по вашему желанию.
Шаг 3: Затем Nessus выполняет сканирование портов для каждого хоста, который, как обнаружено, работает. Вы также можете определить, какие порты вы хотите отсканировать. Порты могут быть определены в диапазонах или по отдельности, с допустимыми портами от 1 до 65535.
Шаг 4: Затем Nessus выполнит обнаружение службы, чтобы определить службы, которые работают за каждым портом на каждом обнаруженном хосте
Шаг 5: Затем Nessus выполняет обнаружение операционной системы.
Шаг 6: После того как все шаги завершены, Nessus запускает на каждом хосте соответствие с базой данных известных уязвимостей, пытаясь обнаружить, какой узел содержит уязвимости.
Настройка сканирования Nessus
Nessus дает вам возможность настроить сканирование на основе различных шаблонов сканирования и политики.
Описание каждого шаблона сканирования можно найти здесь.
Эти шаблоны будут определять параметры, которые будут найдены в настройках политики сканирования.
Ниже приведены общие настройки, к которым можно получить доступ:
Basic: С помощью этого параметра вы можете указать связанные с безопасностью и организационные аспекты проверки или политики. Эти аспекты будут включать имя сканирования, цели сканирования, независимо от того, запланировано ли оно или кто имеет доступ к нему. Разделы, доступные в основных настройках, можно найти здесь.
Discovery: здесь вы определяете сканируемые порты и методы, которые будут использоваться при проведении этого исследования. В этой настройке есть несколько разделов, на которые вы должны обратить внимание. Их можно найти здесь.
Assessment:Этот параметр позволяет определить тип сканирования уязвимости для выполнения и способы их выполнения. Nessus будет проверять уязвимость веб-приложений для атак и других систем для атак с грубой силой. Этот параметр имеет разделы, которые позволяют настраивать общие проверки для Windows, SCADA, веб-приложений и даже проверки грубой силы.
Report: Этот параметр позволит вам определить, как генерируются отчеты сканирования, и информацию, которая должна быть включена в них.
Advanced:здесь вы определяете эффективность сканирования и операции, которые должны выполнять сканирование. Вы также сможете включить отладку сканирования. Более подробную информацию о разделах, содержащихся в этом параметре, можно найти здесь.
Запуск сканирования Nessus
Чтобы выполнить сканирование уязвимостей, вам нужно будет перейти в вашем браузере по ссылке https://localhost:8834
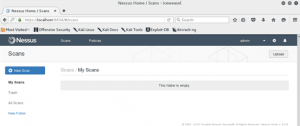
Нажмите кнопку «New Scan» затем выберите тип сканирования для выполнения многочисленных доступных шаблонов.

Шаблоны, показанные выше, будут ограничены в бесплатной версии Nessus.
Ваша лицензия определит версию Nessus, которую вы используете.
Эти шаблоны будут больше по количеству и возможностям в коммерческой версии.

Как видно из вышеизложенного, вы должны указать свои целевые машины.
Nessus способен выполнять сканирование по нескольким целям, разделенным запятыми или в формате CIDR.
После этого вы будете перенаправлены на экран ниже.
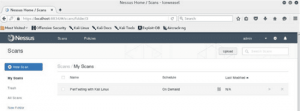
Нажмите на значок «play», чтобы запустить настроенное сканирование.
Можно выполнить несколько настроенных сканирований
На экране выше мы настроили только одно сканирование.
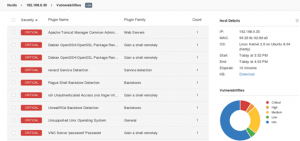
Ниже вы можете видеть результаты двух хостов, суммируя серьезность и обнаруженные уязвимости.
(Это было включено, чтобы продемонстрировать, как появляются результаты с нескольких хостов).
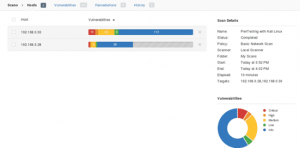
Nessus даже позволяет вам перейти к определенным узлам и уязвимостям и получить дополнительную информацию о том, как они были обнаружены, а также рекомендации по исправлению выявленных рисков.
Заключение
Сканер Nessus Vulnerability Scanner – один из самых распространенных сканеров уязвимостей в индустрии кибербезопасности сегодня.
Функциональность, которую вы получаете, особенно с коммерческой версией, является полной гарантией стоимости ваших денег.
Хотя важно также подтвердить свои найденные уязвимости, запустив другие сканеры уязвимостей на ваших целях, чтобы исключить возможность любых ложных срабатываний.
См. также:
- Установка сканера уязвимости Nessus Astra Linux 1.5 SE
- 6 Сканеров язвимостей для малого бизнеса

Содержание
- 1 Сканер уязвимостей Nessus
- 1.1 Установка Nessus в Windows
- 1.2 Установка WinPcap в Windows
- 1.3 Настройка Nessus в Windows
- 2 Заключение
Nessus — это сканер для поиска уязвимостей различных устройств. Nessus — один из самых популярных сканеров уязвимостей. В этой статье я покажу, как установить и настроить Nessus в Windows.
Еще по теме: Обзор и анализ лучших сканеров уязвимостей
Когда дело доходит до сетевой безопасности, большинство инструментов тестирования на проникновение сложны для понимания. Nessus же напротив упрощает процесс. Он легкий в использовании и работает довольно быстро.
Сканер уязвимостей Nessus
Если кто-то хочет взломать локальную сеть, первое, что он сделает — это сканирование на наличие уязвимостей устройств подключенных к сети и поиск потенциальных дыр, таких как: открытые порты, устаревшее программное обеспечение с известными уязвимостями или пароли по умолчанию. Затем он выполняет тестирование на проникновение, другими словами взлом.
Существует две версии Nessus — платная и бесплатная (домашняя), которая также предлагает множество инструментов, которые помогут улучшить безопасность своей локальной сети, а пентестеру найти уязвимости.
Установка Nessus в Windows
В этой главе я покажу, как установить Nessus в Windows.
Зайдите на официальный Nessus и скачайте подходящий файл установки:

В появившемся окне согласитесь с лицензионным соглашением нажав на «I Agree». Начнется загрузка файла установки.

Теперь начните установку запустив скаченный файл и пройдите весь процесс установки.

Nessus установлен в Windows.
Если вы еще не установили WinPcap, тогда идем устанавливать WinPcap.
Установка WinPcap в Windows
Приступим к установке WinPcap в Windows. Перейдите на официальную страницу приложения WinPcap.

Выберите версию для Windows нажав на «Installer for Window»:

Запустите скаченный файл.

Настройка Nessus в Windows
После установки Nessus, перейдем к настройке:
- После запуска выбираем бесплатную версию Nessus Essentials.
- Теперь идем на сайт и регистрируем бесплатный аккаунт.
- После регистрации вводим логин (почта) и пароль запущенный Nessus.
Заключение
В этой статье я показал, как установить Nessus в Windows. В следующий раз я покажу, как использовать Nessus для поиска уязвимостей правильно. А пока, рекомендую улучшить свои навыки, с помощью площадок для хакеров.
Nessus is a vulnerability scanner that can search for different types of vulnerabilities on any device. This scanner can detect a wide range of vulnerabilities in the fastest time, with reliability and accuracy. Nessus is currently one of the most popular and advanced vulnerability scanners in the world. In this article, we try to teach you to step by step How to Install and Configure Nessus on Windows. You can see the packages available in Eldernode if you want to buy a Windows VPS server.
Introduction to Nessus
When it comes to network security, most security testing tools are very sophisticated. Nessus is nothing new, but it certainly simplifies the process. It is very easy to use, works quickly, and can quickly provide you with network security reports.
If someone wants to hack your local network, the first thing they do is do a vulnerability scan. It then performs a penetration test. It scans for vulnerabilities on various devices on your network and looks for potential holes such as open ports, outdated software with known vulnerabilities, or default passwords on devices. If they find something, a hacker tests these vulnerabilities and then finds a way to exploit them. Testing for these vulnerabilities is a two-step process because the scan only shows the possibility of problems. A penetration test confirms that this is actually exploitable.
Nessus is a proprietary software built to explore vulnerabilities, but the free home version also offers many tools to help you discover and strengthen your network. This vulnerability scanner is developed and supported by Tenable Network Security. From its inception to date, Tenable Network Security offers Nessus tools for free only for personal and non-corporate environments.
Nessus Features
Some of the most important features of Nessus are:
1. High-speed asset discovery
2. Configuration auditing
3. Target profiling
4. Malware detection
5. Sensitive data discovery
6. Vulnerability analysis
Examples of vulnerabilities and exposures that Nessus can scan for include the following:
– Vulnerabilities that could have unauthorized control or access to sensitive data on a system.
– Wrong configuration
– Default passwords, some common passwords, and blank/absent passwords on some system accounts. Nessus can also contact Hydra (an external tool) to attack the dictionary.
– Deny service vulnerabilities!
– Nessus scans cover a wide range of technologies, including operating systems, network devices, applications, databases, web servers, and critical infrastructure.
Install Nessus on Windows
In this section, we are going to discuss how to Install Nessus on Windows. To do this, just follow the steps below.
First, you have to open one of your favorite browsers and go to the Nessus website to download Nessus:
Click I Agree in the window that opens to confirm the license agreement. Doing so will start downloading the installation file.
Now you need to go to the place where you downloaded the file and double-click on it to start the installation process. To start the installation in the window that opens, click on Run:
Click Next to start the installation:
In the next step, check the I accept the terms… option and click on Next:
Here you can click on Chang… to determine the installation location of Nessus. After doing this, click on Next:
Now you need to click on Install:
*
Finally, click on Finish to complete the Nessus installation process:
After clicking on the finish, you will see the following image in your browser:
Note: If you have not already installed WinPcap on your system, you should follow the steps below to install WinPcap.
How to Install WinPcap on Windows
In this section, we want to teach you how to install WinPcap on Windows to use Nessus. To download WinPcap, first, open one of the browsers you want and go to the WinPcap website. Click on the Download as shown below:
Then click on Installer for Windows:
Now go to the place where you downloaded the installation file and double-click on it in the window that opens and click on Run:
Click Next to start the installation process:
In the next step, click on I Agree:
Now click on Install:
*
Finally, click on Finish:
How to Configure Nessus on Windows
After you have successfully installed Nessus in the previous sections, we are now going to teach you how to configure it.
1_ The first step is to select how to install Nessus on the Welcome to Nessus page. (Nessus Essentials, Nessus Professional and Nessus Manager)
2_ In the next step, you must click Continue.
Note that if you selected Nessus Professional or Nessus Manager in the previous section, the Register Nessus page will appear.
Also, if you select Nessus Essentials, the activation code download screen will appear.
3_ Now if you have selected Nessus Essentials, do one of the following:
If you need an activation code, type your name and email address on the activation code download page. Then click on the Email. You can now check your email for your free activation code.
Note that if you already have the activation code, click Skip.
4_ After completing the above steps, you must now type your activation code on the Register Nessus page.
5_ Click on Continue to create an account page.
6_ You can now create a Nessus Admin account that you use to log in to Nessus. Here you have to click on Submit after entering a username and password.
Nessus completes the configuration process by doing the above.
Conclusion
Scan results can be reported in a variety of formats including plain text, XML, HTML, and LaTeX. Results can also be stored in a knowledge base for debugging. In UNIX, scanning can be automated using the command line client. There are various commercial, free, and open-source tools for both Unix and Windows to manage Nessus personal or distributed scanners. In this article, we tried to teach you How to Install and Configure Nessus on Windows. You can refer to the article Tutorial Setup And Configure Nessus On Ubuntu 20.10 if you wish.
Win10 install nessus8.10 series
- table of Contents
- Introduction to Ness
- Download and install software
- Initial configuration Nessus
- Get offline plugin package
- Update offline package
- Upgrade from Home Edition to Professional Edition
- license authorization file (optional)
- Restart service
- Effect picture
- to sum up
table of Contents
Since I want to learn about network security and use Nessus for scanning, I plan to install and test it on my own computer, operate it myself and write a more complete tutorial. In fact, the operation of Linux and Windos are almost the same here. For the Linux system It’s relatively simple, so here is a demonstration of Windows, so much nonsense, then go directly to the topic
Introduction to Ness
- What is it
Nessus is a system vulnerability scanning and analysis software. - Scanning function introduction
Asset discovery
Audit system
Vulnerability scan
Authentication scan detects local vulnerabilities and conditions
Web-based scanning
Certified SCAP vulnerability scanner
Download and install software
Initial configuration Nessus
On the page that pops up, directly click Connect via SSL. Because there is no certificate, Google Chrome will prompt «Your connection is not a private connection». Interested friends can configure a certificate. I will just do a demonstration and not configure it, just click Advanced, continue to visit

select Managed Scanner
Next

select Tenable.sc
Next

Enter account password

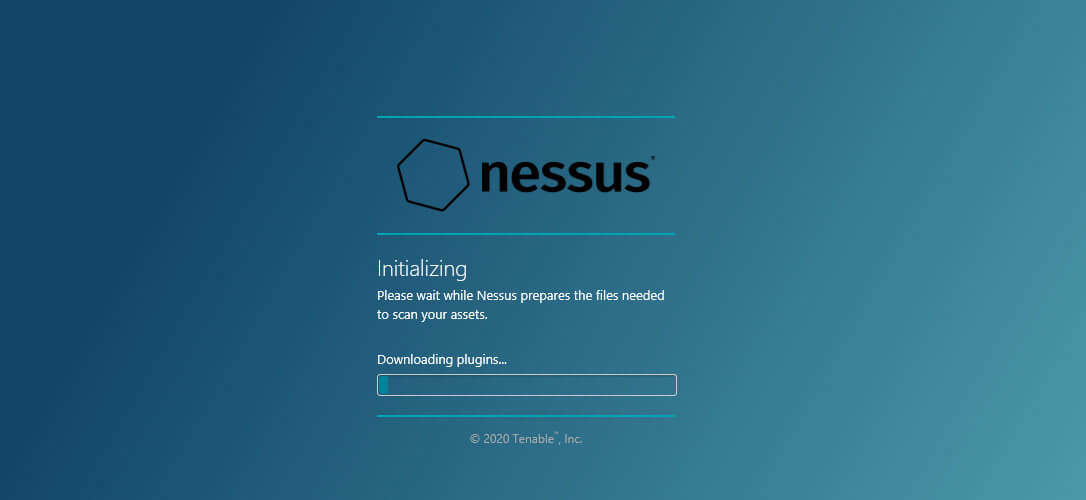
Then it will be initialized, wait for a while

You will enter the Nessus page, indicating that the initial stage has been completed

Get offline plugin package
Two things are needed here
-
Challenge Code
Let’s get the Challenge Code first. Here we run CMD with administrator privileges (guaranteed to run with the highest privilege), enter cmd->in the displayed result in the start menu bar, and thenRight click to run with administrator rights-> Then switch to the installation directory of nessus (Here the blogger is installed in the root directory of the E disk, so the operation is e:->cd nessus8->nessuscli.exe fetch —challenge), and then write down the Challenge Code

-
Free activation code Activation Code
nessus registration
Register here at this address, fill in the first name and last name, and then fill in an email (both domestic and foreign, QQ mailbox, etc.)
Fill in the two things obtained above into the following address to obtain all-2.0.tar.gz (offline plug-in package) and license (Nessus-license)nessus obtains offline plug-in and license address
There will be a download address after filling in
Click the download address and the license below to download these two things respectively and put them in the nessus installation root directory


Update offline package
Still run cmd as an administrator to enter the dos window, switch to the software installation directory and enter
nessuscli.exe update ./all-2.0.tar.gz
Here the blogger recommends entering nessuscli.exe update ./ and then entering a in a space and then pressing the Tab key to automatically complete (this ensures that the offline package file name is correct)


Upgrade from Home Edition to Professional Edition
(The home version has 16 maximum IP limits, and there is no limit when upgrading to the professional version)
Let’s create a new file named plugin_feed_info.inc with the name (including the suffix), and the content is
PLUGIN_ SET = "20********" ;
PLUGIN_ FEED = "ProfessionalFeed (Direct)";
PLUGIN_ FEED_ _TRANSPORT = "Tenable Network Security Lightning" ;
PLUGIN_ SET fill in the string of numbers starting with 20
Then put the file under the plugins/ directory under the software installation directory
license authorization file (optional)
If you do not import the authorization file, the authorization expiration time and activation code both show N/A. If you mind, you can try to import it here and not demonstrate it** (mainly it has no effect on the normal use of the software)**
Restart service
win+r enter services.msc to enter the service system service window to find the Tenable Nessus service item, then right-click to restart

Re-enter nessus in the browser
It will take some time to reload the configuration for the first time. After loading, enter the account password and you can use it

Effect picture
Here are a few renderings


to sum up
In order to write this tutorial, the blogger also repeated the operation several times and found more tutorials and some pits. Here is a summary
-
When installing on other disks, when you select the directory during the installation process, create a new folder under the specified drive letter and name it in English (the blogger here started by creating a new folder on the specified disk and then installing it, the result is that the installation is not successful)
-
It is relatively slow to visit the official website to register or download offline packages. After all, it is a foreign website. It is recommended that you always hang a proxy {–split–} when operating, it will be much faster
-
The ChallengeCode of each machine is unique, which means that it is the same code how many times your computer is reinstalled, but each software installation can only be registered once, so when you uninstall or reinstall the system, you need to Then use the email to register to receive the free registration code and then proceed
-
Relatively speaking, the performance of the blogger personally thinks that it is better to use the Linux system. When using the windows system, the computer will be more stuck, and the software release is as large as 8G.
In this tutorial we will be detailing installation and update of the Nessus Professional vulnerability scanner and its plugins using the Offline method.
Offline method is useful in situations where we are required to perform a vulnerability scan of an isolated environment, without having access to the Internet.
- New Nessus offline installation
- Overview and prerequisites
- 1. Install Nessus offline
- 2. Generate challenge code
- 3. Generate and download license
- 4. Activate Nessus offline
- 5. Install Nessus plugins offline
- Update Nessus plugins offline
- Overview and prerequisites
- 1. Generate challenge code
- 2. Download plugins
- 3. Update Nessus plugins offline
- Conclusion
This tutorial follows the official Tenable instructions for managing Nessus installations offline.
New Nessus offline installation
In order to demonstrate the installation process, we will be using Microsoft Windows as the target (offline) operating system which is deployed in an isolated environment.
We will be connecting to it over a secure channel (e.g. VPN) using Remote Desktop Protocol (RDP) interface. This will allow us to access the desktop and to transfer installation files.
Note that the selection of Microsoft Windows is purely arbitrary and solely for the demonstration purposes. The steps documented in this tutorial are applicable to all other supported operating systems:
- Linux
- FreeBSD
- Mac OS X
Overview and prerequisites
There are 2 important prerequisites for installing Nessus offline.
First, we need to have administrative privileges on the target offline system. This is needed in order to install the Nessus package on the system.
Secondly, we need to have access to at least one other computer connected to the Internet. This is because some steps of the installation process have to be performed on the Tenable website online.
Therefore, throughout this tutorial we will be differentiating between:
- Computer A – target / offline Nessus scanner
- Computer B – our online computer
Here’s an overview of the installation process in a nutshell and what needs to be done on which computer:
| Operation | Computer A (offline Nessus scanner) |
Computer B (online computer) |
| Download Nessus installer | X | |
| Install Nessus | X | |
| Generate challenge code | X | |
| Generate and download license | X | |
| Download latest plugins | X | |
| Activate Nessus offline | X | |
| Update plugins | X |
Let’s start.
1. Install Nessus offline
1.1. First we have to download the latest Nessus installation package from the official Downloads page:
- https://www.tenable.com/downloads/nessus
The latest Windows package is ‘Nessus-8.12.0-x64.msi’ at the time of writing of this article.
1.2. Transfer the installer onto the target offline computer (A).
If we are connecting from a Windows system, we can use the built-in RDP drive sharing functions to upload the installer package onto the target system. Here’s a quick illustration on how to enable it:
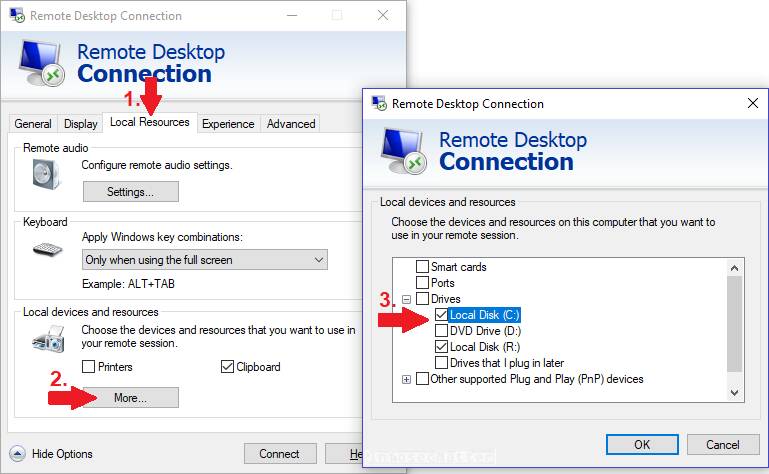
If we are connecting using Linux (e.g. Kali), we could use the xfreerdp client and its ‘/drive’ option to upload the installer. For instance:
cd /home/kali/Downloads
xfreerdp /d:ABC /u:admin /p:password /v:10.100.202.43 /drive:data,`pwd`
Using these methods we should be able to comfortably share files with the target offline system (A) and vice versa.
1.3. Install the package (Nessus-8.10.1-x64.msi) on the target system.
1.4. After the installation process is finished and the nessus service is started, we have to continue with the installation using the web interface.
1.5. Open a web browser (on the target offline system A) and navigate to the following URL:
- https://localhost:8834/
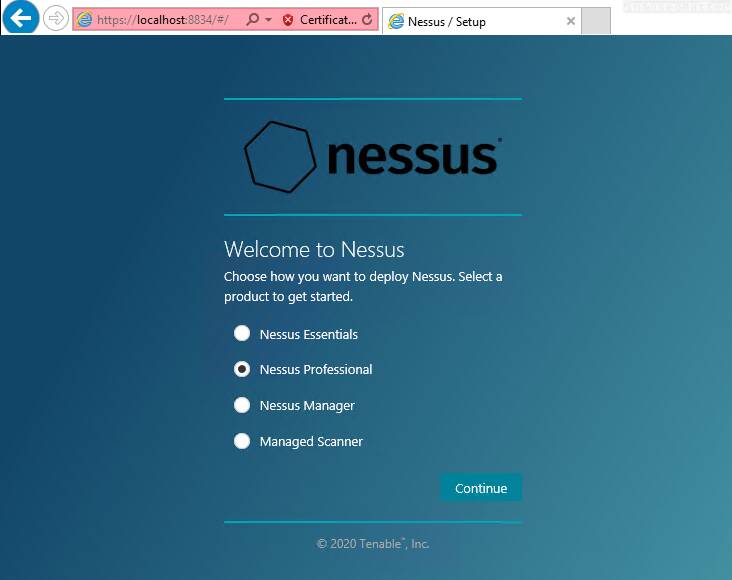
Select ‘Nessus Professional’ and click ‘Continue’.
2. Generate challenge code
In the next step we are presented with the Nessus activation page (Register Nessus):
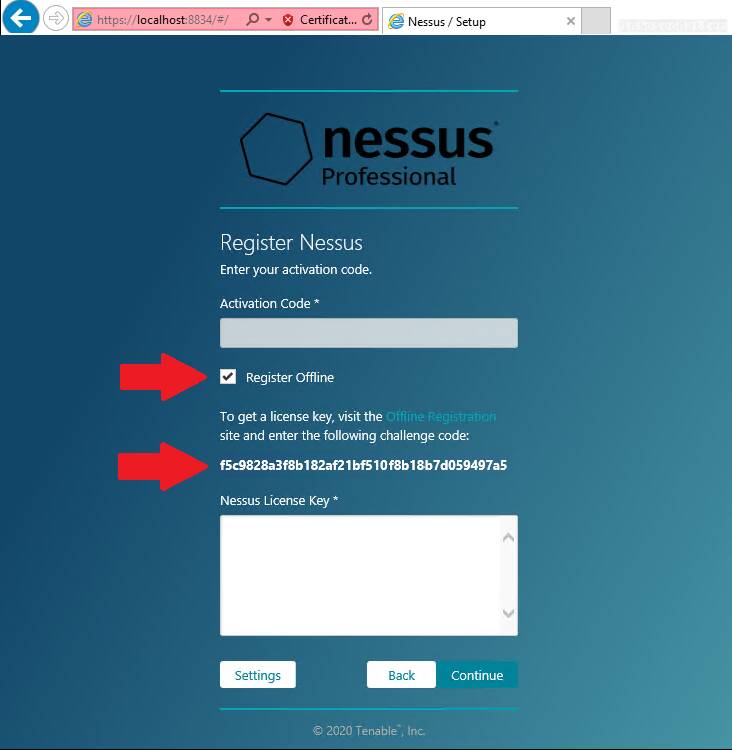
In order to install Nessus using the offline method, we have to select the ‘Register Offline’ option and make note of the challenge code.
We will need the challenge code in the next step which has to be performed on the online computer (B).
3. Generate and download license
On the online computer (B), open a web browser and navigate to the Tenable offline registration page on the following URL:
- https://plugins.nessus.org/v2/offline.php
Here on this page we have to provide the challenge code obtained from the target offline computer (A) and also provide our Nessus activation code (license) that we possess.
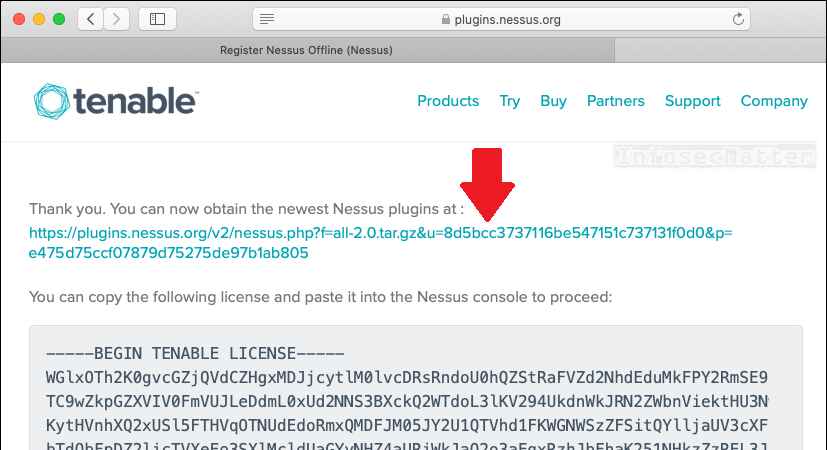
The following screenshot illustrates:
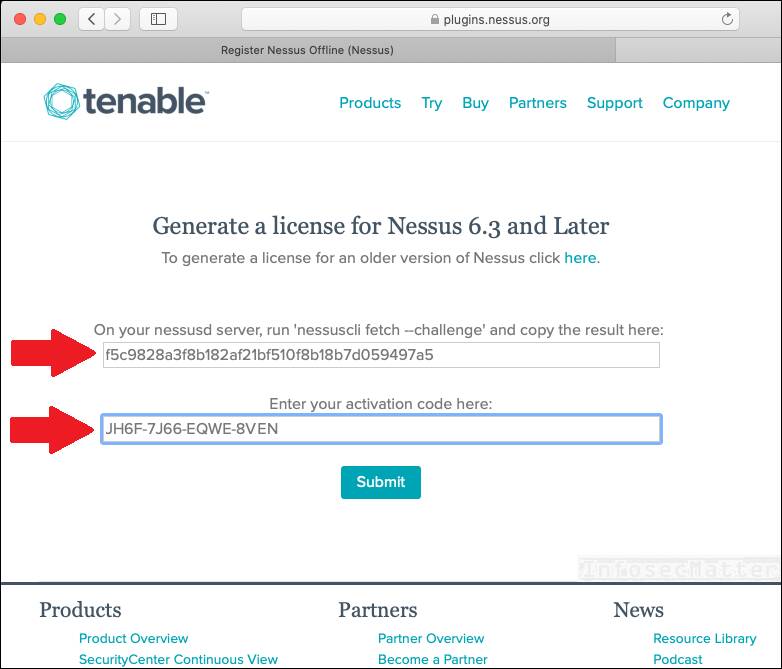
After submitting the activation codes, we should obtain:
- Tenable license file
- A link to the latest plugins
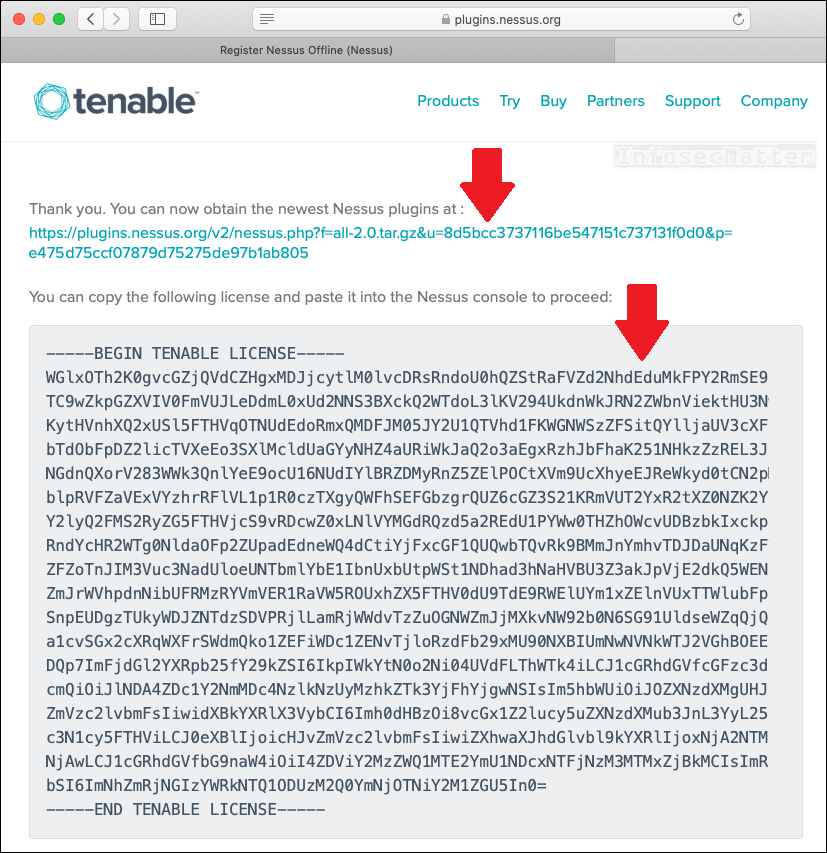
Now take the obtained license file along with the plugins archive all-2.0.tar-gz (approx. 239 MiB) and transfer them onto the target offline computer (A).
4. Activate Nessus offline
To complete the activation process on the offline computer (A), paste the license file to the ‘Nessus License Key’ text area and click ‘Continue’, similarly as in this screenshot:
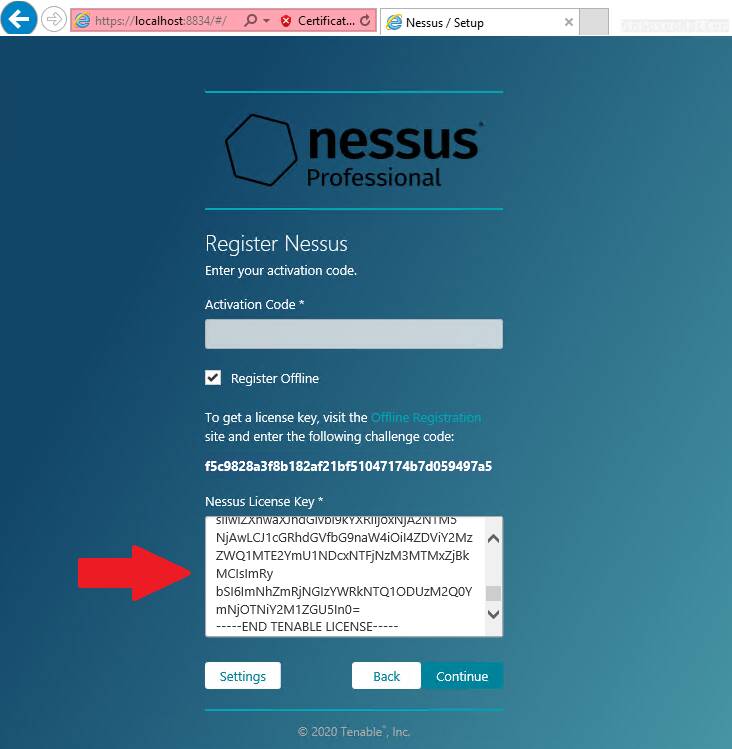
After the submit, we should have fully activated our Nessus scanner instance and we should now be able to create our administrative user.
5. Install Nessus plugins offline
Now when we can login and navigate through the Nessus web user interface, it’s time to upload the latest plugins that we downloaded in the step 3.
In the Nessus top navigation menu navigate to ‘My account’:
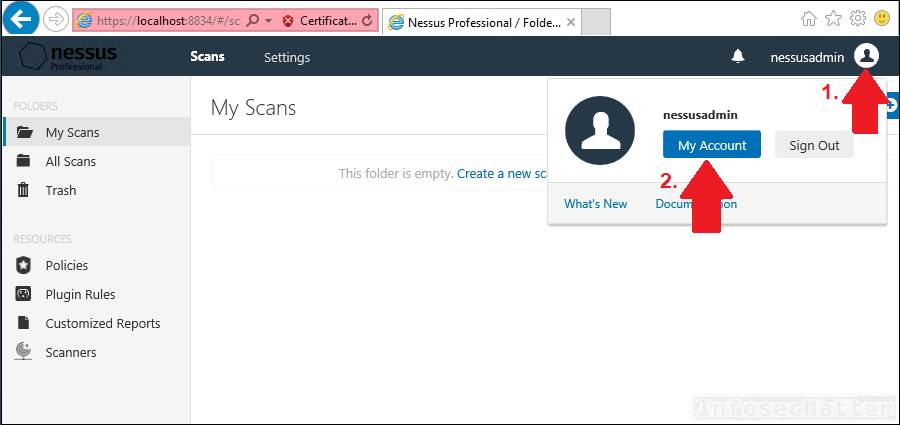
Click the ‘Software Update tab’. In the upper-right corner, click the ‘Manual Software Update’ button.
The Manual Software Update dialog box appears. Select ‘Upload your own plugin archive’, and then select ‘Continue’:
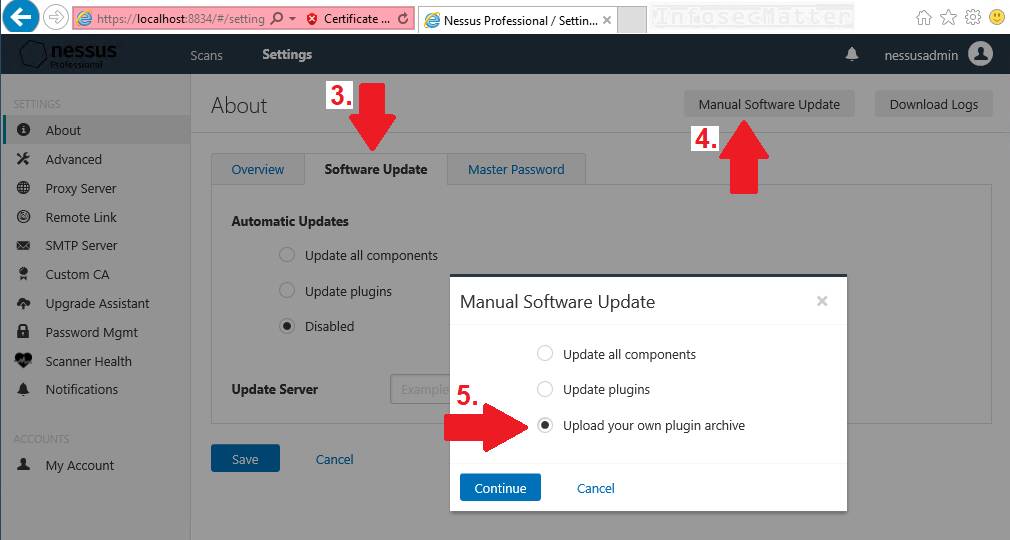
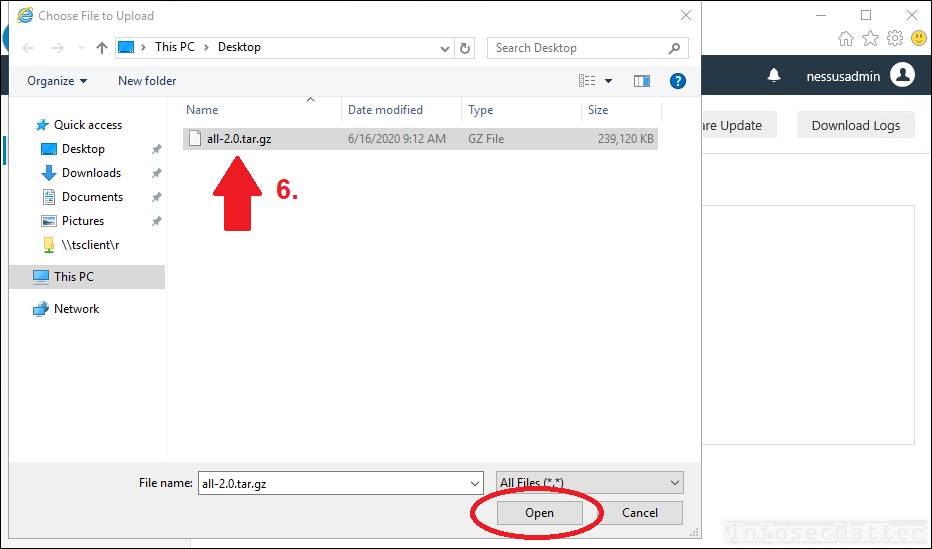
Navigate to the compressed TAR file that we have uploaded onto the system (all-2.0.tar.gz), select it and then click ‘Open’.
Now the plugin installation will begin.
Note that the plugin installation will probably take anywhere from 15-30 minutes to complete and we should wait for it to complete before doing any scanning.
Unfortunately we cannot directly see the progress, but in the Windows Task Manager we can see that the Nessus process (nessusd) is busy processing the plugins:
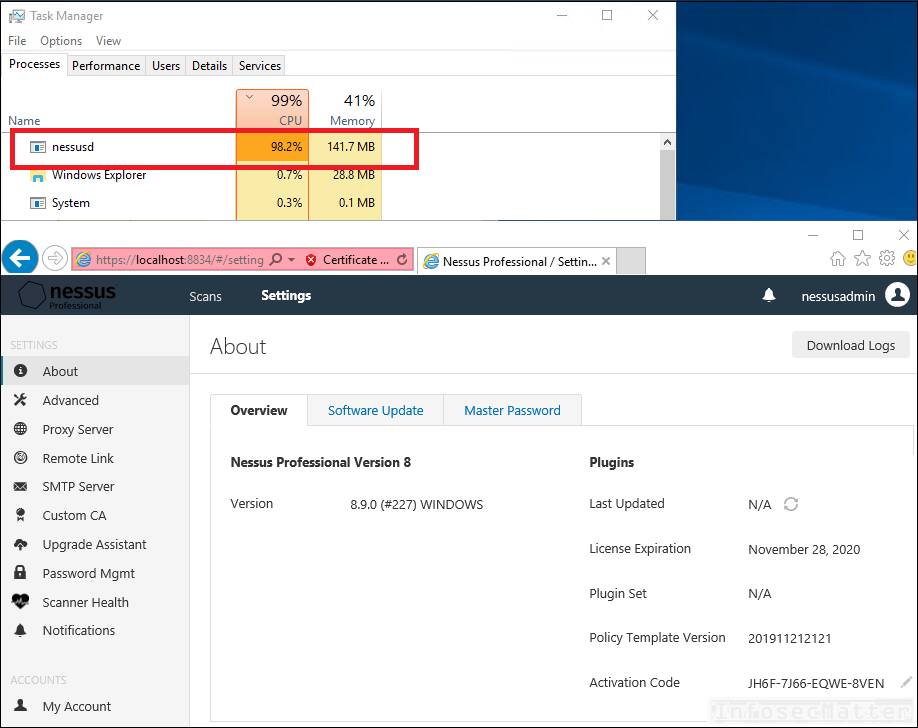
We simply have to wait.
Once the CPU load drops to 0%, it is an indication of completion. As a proof, check the Plugins “Last Updated” date in the web interface.
Once the date is refreshed, congratulations! You have successfully installed, activated and fully updated your Nessus scanner offline!
Go back to top.
This section applies to cases when we have an existing offline Nessus instance in an isolated environment which we would like to update with newest plugins.
Overview and prerequisites
In order to download latest plugins from the Tenable website, we are going to need the following information:
- Challenge code (e.g. aaaaaa11b2222cc33d44e5f6666a777b8cc99999)
- License key (e.g. AAAA-BBBB-CCCC-DDDD)
In the following sections, we will go in detail on how to get them from our existing Nessus installation.
Here’s an overview of the update process in a nutshell:
| Operation | Computer A (offline Nessus scanner) |
Computer B (online computer) |
| Generate challenge code | X | |
| Download latest plugins | X | |
| Update plugins | X |
1. Generate challenge code
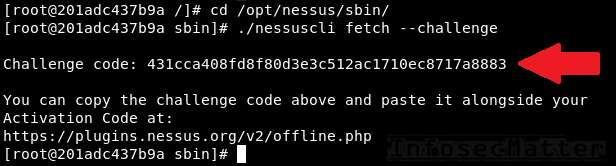
To generate challenge code from our existing Nessus installation (offline computer A), we have to run the following command:
nessuscli fetch --challengeThe ‘nessuscli’ command is typically located in these directories:
| OS | Location |
| Linux | /opt/nessus/sbin/nessuscli |
| FreeBSD | /usr/local/nessus/sbin/nessuscli |
| Mac OS X | /Library/Nessus/run/sbin/nessuscli |
| Windows | C:Program FilesTenableNessusnessuscli.exe |
Here’s an example of obtaining challenge code from Nessus installed on Kali Linux:
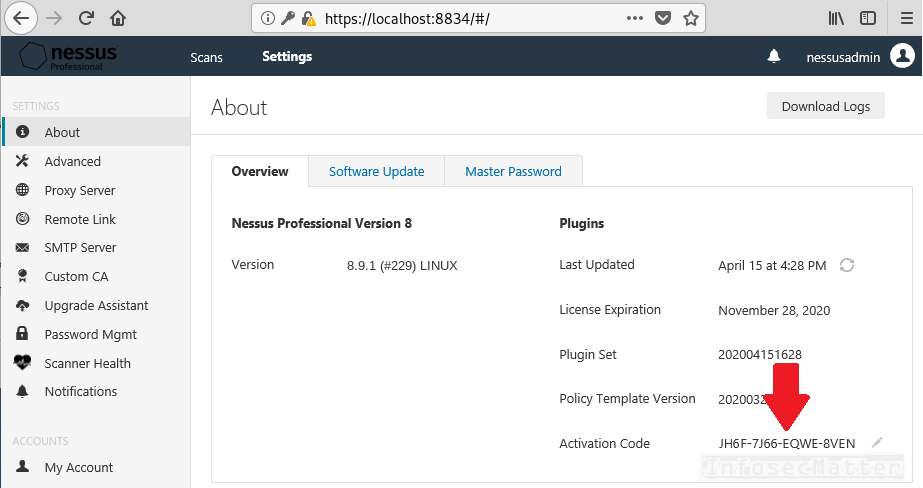
The current Nessus activation key (license) can be located in the Nessus web user interface:
With these 2 pieces of information, we can now download the latest plugins.
2. Download plugins
On the online computer (B), navigate to the Tenable offline registration page on the following URL:
- https://plugins.nessus.org/v2/offline.php
Provide the challenge code and the Nessus activation code (license).
Here’s an example:
After submitting the activation codes, we should obtain a link to the latest plugins:
Download the plugins archive all-2.0.tar-gz (approx. 239 MiB) and transfer it onto our offline Nessus instance (computer A).
3. Update Nessus plugins offline
Once we have the plugins archive transferred onto our target offline computer (A), we can use the same procedure as described in step 5 above to install them.
Alternatively, we could also just simply run the following command to install the plugins archive:
nessuscli update all-2.0.tar-gzAnd that’s it! Now we just have to wait 15-30 minutes for the plugins to be compiled and fully applied.
Make sure to check the ‘nessusd’ process once in a while and the Nessus web interface (https://localhost:8834) to find out whether the plugins has been already fully applied.
Go back to top.
Conclusion
In this article we have learned how to install Nessus Professional on a computer without Internet connection. We have also learned how to update Nessus plugins on an offline Nessus installation / without Internet connection.
If you would like to learn more about Nessus capabilities, please check out our detailed Nessus overview.
In this tutorial we will be detailing installation and update of the Nessus Professional vulnerability scanner and its plugins using the Offline method.
Offline method is useful in situations where we are required to perform a vulnerability scan of an isolated environment, without having access to the Internet.
- New Nessus offline installation
- Overview and prerequisites
- 1. Install Nessus offline
- 2. Generate challenge code
- 3. Generate and download license
- 4. Activate Nessus offline
- 5. Install Nessus plugins offline
- Update Nessus plugins offline
- Overview and prerequisites
- 1. Generate challenge code
- 2. Download plugins
- 3. Update Nessus plugins offline
- Conclusion
This tutorial follows the official Tenable instructions for managing Nessus installations offline.
New Nessus offline installation
In order to demonstrate the installation process, we will be using Microsoft Windows as the target (offline) operating system which is deployed in an isolated environment.
We will be connecting to it over a secure channel (e.g. VPN) using Remote Desktop Protocol (RDP) interface. This will allow us to access the desktop and to transfer installation files.
Note that the selection of Microsoft Windows is purely arbitrary and solely for the demonstration purposes. The steps documented in this tutorial are applicable to all other supported operating systems:
- Linux
- FreeBSD
- Mac OS X
Overview and prerequisites
There are 2 important prerequisites for installing Nessus offline.
First, we need to have administrative privileges on the target offline system. This is needed in order to install the Nessus package on the system.
Secondly, we need to have access to at least one other computer connected to the Internet. This is because some steps of the installation process have to be performed on the Tenable website online.
Therefore, throughout this tutorial we will be differentiating between:
- Computer A – target / offline Nessus scanner
- Computer B – our online computer
Here’s an overview of the installation process in a nutshell and what needs to be done on which computer:
| Operation | Computer A (offline Nessus scanner) |
Computer B (online computer) |
| Download Nessus installer | X | |
| Install Nessus | X | |
| Generate challenge code | X | |
| Generate and download license | X | |
| Download latest plugins | X | |
| Activate Nessus offline | X | |
| Update plugins | X |
Let’s start.
1. Install Nessus offline
1.1. First we have to download the latest Nessus installation package from the official Downloads page:
- https://www.tenable.com/downloads/nessus
The latest Windows package is ‘Nessus-8.12.0-x64.msi’ at the time of writing of this article.
1.2. Transfer the installer onto the target offline computer (A).
If we are connecting from a Windows system, we can use the built-in RDP drive sharing functions to upload the installer package onto the target system. Here’s a quick illustration on how to enable it:
If we are connecting using Linux (e.g. Kali), we could use the xfreerdp client and its ‘/drive’ option to upload the installer. For instance:
cd /home/kali/Downloads
xfreerdp /d:ABC /u:admin /p:password /v:10.100.202.43 /drive:data,`pwd`
Using these methods we should be able to comfortably share files with the target offline system (A) and vice versa.
1.3. Install the package (Nessus-8.10.1-x64.msi) on the target system.
1.4. After the installation process is finished and the nessus service is started, we have to continue with the installation using the web interface.
1.5. Open a web browser (on the target offline system A) and navigate to the following URL:
- https://localhost:8834/
Select ‘Nessus Professional’ and click ‘Continue’.
2. Generate challenge code
In the next step we are presented with the Nessus activation page (Register Nessus):
In order to install Nessus using the offline method, we have to select the ‘Register Offline’ option and make note of the challenge code.
We will need the challenge code in the next step which has to be performed on the online computer (B).
3. Generate and download license
On the online computer (B), open a web browser and navigate to the Tenable offline registration page on the following URL:
- https://plugins.nessus.org/v2/offline.php
Here on this page we have to provide the challenge code obtained from the target offline computer (A) and also provide our Nessus activation code (license) that we possess.
The following screenshot illustrates:
After submitting the activation codes, we should obtain:
- Tenable license file
- A link to the latest plugins
Now take the obtained license file along with the plugins archive all-2.0.tar-gz (approx. 239 MiB) and transfer them onto the target offline computer (A).
4. Activate Nessus offline
To complete the activation process on the offline computer (A), paste the license file to the ‘Nessus License Key’ text area and click ‘Continue’, similarly as in this screenshot:
After the submit, we should have fully activated our Nessus scanner instance and we should now be able to create our administrative user.
5. Install Nessus plugins offline
Now when we can login and navigate through the Nessus web user interface, it’s time to upload the latest plugins that we downloaded in the step 3.
In the Nessus top navigation menu navigate to ‘My account’:
Click the ‘Software Update tab’. In the upper-right corner, click the ‘Manual Software Update’ button.
The Manual Software Update dialog box appears. Select ‘Upload your own plugin archive’, and then select ‘Continue’:
Navigate to the compressed TAR file that we have uploaded onto the system (all-2.0.tar.gz), select it and then click ‘Open’.
Now the plugin installation will begin.
Note that the plugin installation will probably take anywhere from 15-30 minutes to complete and we should wait for it to complete before doing any scanning.
Unfortunately we cannot directly see the progress, but in the Windows Task Manager we can see that the Nessus process (nessusd) is busy processing the plugins:
We simply have to wait.
Once the CPU load drops to 0%, it is an indication of completion. As a proof, check the Plugins “Last Updated” date in the web interface.
Once the date is refreshed, congratulations! You have successfully installed, activated and fully updated your Nessus scanner offline!
Go back to top.
This section applies to cases when we have an existing offline Nessus instance in an isolated environment which we would like to update with newest plugins.
Overview and prerequisites
In order to download latest plugins from the Tenable website, we are going to need the following information:
- Challenge code (e.g. aaaaaa11b2222cc33d44e5f6666a777b8cc99999)
- License key (e.g. AAAA-BBBB-CCCC-DDDD)
In the following sections, we will go in detail on how to get them from our existing Nessus installation.
Here’s an overview of the update process in a nutshell:
| Operation | Computer A (offline Nessus scanner) |
Computer B (online computer) |
| Generate challenge code | X | |
| Download latest plugins | X | |
| Update plugins | X |
1. Generate challenge code
To generate challenge code from our existing Nessus installation (offline computer A), we have to run the following command:
nessuscli fetch --challengeThe ‘nessuscli’ command is typically located in these directories:
| OS | Location |
| Linux | /opt/nessus/sbin/nessuscli |
| FreeBSD | /usr/local/nessus/sbin/nessuscli |
| Mac OS X | /Library/Nessus/run/sbin/nessuscli |
| Windows | C:Program FilesTenableNessusnessuscli.exe |
Here’s an example of obtaining challenge code from Nessus installed on Kali Linux:
The current Nessus activation key (license) can be located in the Nessus web user interface:
With these 2 pieces of information, we can now download the latest plugins.
2. Download plugins
On the online computer (B), navigate to the Tenable offline registration page on the following URL:
- https://plugins.nessus.org/v2/offline.php
Provide the challenge code and the Nessus activation code (license).
Here’s an example:
After submitting the activation codes, we should obtain a link to the latest plugins:
Download the plugins archive all-2.0.tar-gz (approx. 239 MiB) and transfer it onto our offline Nessus instance (computer A).
3. Update Nessus plugins offline
Once we have the plugins archive transferred onto our target offline computer (A), we can use the same procedure as described in step 5 above to install them.
Alternatively, we could also just simply run the following command to install the plugins archive:
nessuscli update all-2.0.tar-gzAnd that’s it! Now we just have to wait 15-30 minutes for the plugins to be compiled and fully applied.
Make sure to check the ‘nessusd’ process once in a while and the Nessus web interface (https://localhost:8834) to find out whether the plugins has been already fully applied.
Go back to top.
Conclusion
In this article we have learned how to install Nessus Professional on a computer without Internet connection. We have also learned how to update Nessus plugins on an offline Nessus installation / without Internet connection.
If you would like to learn more about Nessus capabilities, please check out our detailed Nessus overview.
1. Скачайте установочный пакет:
Лучше всего загрузить nessus версии 8.2.1, более поздние версии не поддерживают метод инкапсуляции API.
Ссылка для загрузки версии Nessus:https://www.tenable.com/downloads
Ссылка для получения кода активации:
http://www.nessus.org/products/nessus/nessus-plugins/obtain-an-activation-code
2. Установка: установка типа дурака, после успешной установки перейдет на адрес
https://localhost:8834/#/settings/about После настройки учетной записи, учетной записи и пароля в интерфейсе введите проверочный код в электронном письме в поле ввода «Код активации», выберите «Управляется SecurityCenter» для регистрации, а затем нажмите «Продолжить», система настроена успешно.
Используя этот метод установки, вы должны обратиться к специалисту по интерфейсу безопасности, и администратор выполнит аутентификацию и обновит подключаемый модуль.
3. Установите Nessus под Linux.
Поскольку в некоторых местах сети требуется прокси-сервер, nessus, установленный в Windows, всегда не активируется. Я вижу, что есть способ установить подключаемый модуль вручную в Интернете, поэтому переустановите nessus в системе Linux
Redhat6 / CentOS6 / CGSLv4, пожалуйста, выберите пакет версии xxx-es6.xxx
Redhat7 / CentOS7 / CGSLv5, пожалуйста, выберите пакет версии xxx-es7.xxx
Учитывая, что Дженкинс запускает агент позже, лучше всего использовать систему CGSLv5, система v4 имеет низкую версию Java, и Дженкинс не может запустить агент.
В качестве примера в процессе установки используется Nessus-8.4.0-es5.i386.rpm.
Версия: Nessus-8.4.0-es5.i386.rpm
Поместите установочный пакет соответствующей версии в корневой каталог / системы.
выполнить команду: rpm -ivh Nessus-8.4.0-es5.i386.rpm
Успешное выполнение выглядит следующим образом:

Затем выполните команду: / opt / nessus / sbin / nessuscli fetch —challenge
Получить код запроса

Затем получите код активации, URL-адрес выглядит следующим образом:
http://www.nessus.org/products/nessus/nessus-plugins/obtain-an-activation-code
Почтовый ящик должен быть заполнен правильно, код активации будет отправлен на почтовый ящик
Получив код активации в почтовый ящик, авторизуйтесь по URLhttps://plugins.nessus.org/v2/offline.php
Отображается следующий интерфейс:

После ввода кода вызова и кода активации нажмите кнопку «Отправить», чтобы отобразить следующий интерфейс:


Щелкните две подчеркнутые ссылки, чтобы загрузить установочный пакет подключаемого модуля all-2.0.tar.gz и регистрационный код nessus.license, и поместите эти два файла в / opt / nessus / Каталог sbin И выполните командную строку ./nessuscli fetch —register-offline nessus.license в этом каталоге для регистрации. Результат после успешного выполнения будет следующим:
, а затем выполните командную строку ./nessuscli update all-2.0.tar.gz для установки подключаемого модуля, результат после успешного выполнения будет следующим:
Наконец, перезапустите службу nessus ./nessusd, результат успешного выполнения будет следующим:

В статье говорилось, что инструкции по завершению операции выполнены, но этого не произошло. После входа в систему по URL-адресу я все же позволил активировать его, поэтому прочитал другую статью и добавляли пользователей непосредственно под Linux с помощью командной строки. В каталоге / opt / nessus / sbin используйте командную строку ./nessuscli -h и просмотрите команду adduser, поэтому используйте командную строку ./nessuscli adduser admin, чтобы добавить пользователя с правами администратора , и пользователь успешно добавлен, как показано ниже:

Затем используйте службу командной строки nessusd restart, чтобы перезапустить службу,

После успешного перезапуска службы войдите в систему по URL-адресу в браузере системы Windows:https://10.85.156.93:8834, Где 10.85.156.93 — это IP-адрес сервера. После входа в систему отображается следующий интерфейс, указывающий, что это сделано. Просто введите заданное имя пользователя и пароль для входа в систему.
Отключите брандмауэр: iptables -F
Удалите программное обеспечение rpm -e Nessus
Удалить пользователя ./nessuscli rmuser admin

Справочная ссылка для процесса установки:
https://blog.csdn.net/qq_35983015/article/details/79325463
https://blog.csdn.net/njnujuly/article/details/88389801
https://blog.csdn.net/m0_37917446/article/details/81705058
Во-вторых, использование Nessus
Импортируйте политику в модуль Политики, метод импорта выглядит следующим образом:

Чтобы создать новую задачу сканирования, в модуле сканирования нажмите «Создать», как показано ниже:

Выберите «Расширенное сканирование», как показано ниже:

Настройте сканирование, как требуется. Требуется целевая машина для сканирования. Пожалуйста, используйте Baidu для других элементов конфигурации, как показано ниже:

После того, как все настроено, щелкните маленький треугольник после задачи сканирования, чтобы запустить сканирование, как показано ниже:

После завершения сканирования щелкните задачу, и «Экспорт» в правом верхнем углу позволяет экспортировать отчет о сканировании, как показано ниже:

После завершения сканирования вручную проанализируйте отчет самостоятельно.
Три, автоматизация
nessus8.2.1 и его предыдущие версии можно автоматизировать, инкапсулируя api. В частности, можно использовать python + request или python + selenium для достижения автоматизации путем управления браузером.
В-четвертых, установите задачу сканирования времени
1. Вы можете установить время начала сканирования для службы nessus, как показано на рисунке,
и автоматически отправлять электронные письма, как показано на рисунке,

Служба SMTP должна быть запущена перед отправкой почты
2. Вы также можете запустить обычную задачу сканирования через jenkins.