Install using WinGet
Starting with GitHub Release 8.9.1.0, OpenSSH Beta releases are available through WinGet.
With WinGet installed on the machine, use the following commands:
- Search:
winget search "openssh beta" - Install:
winget install "openssh beta" - Uninstall:
winget uninstall "openssh beta"
Install Win32 OpenSSH (test release)
-
Win32-OpenSSH Github releases can be installed on Windows 7 and up.
-
Note these considerations and project scope first.
-
Download the latest build of OpenSSH.
To get links to latest downloads this wiki page. -
Extract contents of the latest build to
C:Program FilesOpenSSH(Make sure binary location has the Write permissions to just to SYSTEM, Administrator groups. Authenticated users should and only have Read and Execute.) -
In an elevated Powershell console, run the following
powershell.exe -ExecutionPolicy Bypass -File install-sshd.ps1
-
Open the firewall for sshd.exe to allow inbound SSH connections
New-NetFirewallRule -Name sshd -DisplayName 'OpenSSH Server (sshd)' -Enabled True -Direction Inbound -Protocol TCP -Action Allow -LocalPort 22
Note:
New-NetFirewallRuleis for Windows 2012 and above servers only. If you’re on a client desktop machine (like Windows 10) or Windows 2008 R2 and below, try:netsh advfirewall firewall add rule name=sshd dir=in action=allow protocol=TCP localport=22 -
Start
sshd(this will automatically generate host keys under %programdata%ssh if they don’t already exist)net start sshd
-
Optional
- To configure a default shell, see here
- To setup
sshdservice to auto-startSet-Service sshd -StartupType Automatic
- To migrate sshd configuration from older versions (0.0.X.X), see here
Uninstall Win32 OpenSSH
- Start Windows Powershell as Administrator
- Navigate to the OpenSSH directory
cd 'C:Program FilesOpenSSH'
- Run the uninstall script
powershell.exe -ExecutionPolicy Bypass -File uninstall-sshd.ps1

Use SSH on Windows, how running/launching graphical programs on remote computer in the same user session logon on Windows OS.
Requirements:
– OpenSSH (you can download the binaries from the official repository on github https://github.com/PowerShell/Win32-OpenSSH/releases)
– PsTools (official useful tools from Microsoft https://docs.microsoft.com/en-us/sysinternals/downloads/pstools)
– PowerShell
Install Pstools (by microsoft)
- Download the tools
- Copy the content of the folder PSTools under “C:WindowsSystem32”.
- Open the cmd as administrator and run C:WindowsSystem32psexec.exe, accept the eula license.
Install SSH Server on Windows 7 / 10
- Download the latest OpenSSH for Windows binaries (package OpenSSH-Win64.zip or OpenSSH-Win32.zip)
- As the Administrator, extract the package to %PROGRAMFILES%OpenSSH
note: the folder must be named “OpenSSH” - Open PowerShell as the Administrator (right click on PowerShell icon, “run as administrator”), change directory to “C:Program FilesOpenSSH” install sshd and ssh-agent services with the command
> cd “%PROGRAMFILES%OpenSSH” > powershell.exe -ExecutionPolicy Bypass -File install-sshd.ps1
- Allow incoming connections to SSH server in Windows Firewall:
– Either run the following PowerShell command (Windows 8 and 2012 or newer only), as the Administrator:New-NetFirewallRule -Name sshd -DisplayName 'OpenSSH Server (sshd)' -Enabled True -Direction Inbound -Protocol TCP -Action Allow -LocalPort 22
– or go to Control Panel > System and Security > Windows Firewall> Advanced Settings > Inbound Rules and add a new rule for port 22.
- Start the service and/or configure automatic start:
◦ Go to Control Panel > System and Security > Administrative Tools and open Services. Locate sshd service.
◦ If you want the server to start automatically when your machine is started: Go to Action > Properties. In the Properties dialog, change Startup type to Automatic and confirm.
◦ Start the sshd service by clicking the Start the service. - Create the ~./.ssh folder under C:Users<user>.ssh
- Create the file “authorized_keys” under ~./.ssh
- Run the scrips to fix/check correct permission a PowerShell with administrator privilege.
> powershell.exe -ExecutionPolicy Bypass -File FixHostFilePermissions.ps1 > powershell.exe -ExecutionPolicy Bypass -File FixUserFilePermissions.ps1
- Personalize your SSH server settings editing the configuration file %PROGRAMDATA%sshsshd_config.
Install SSH Client on Windows 7 / 10
- Do the step from 1 to 2 from the above paragraph “Install SSH Server on Windows 7 / 10”
Enable public keys without using password on client
- Open cmd.exe as Administrator and run ssh-keygen.exe and press enter to all message for default configuration
> cd “%PROGRAMFILES%OpenSSH”
> ./ssh-keygen.exe
Enable public keys without using password on Server
- Copy the private and public key on the ~.ssh folder of the user that you want use on the server.Run ssh-add.exe to add you private and public key to the ssh-agent.
Note: ensure that ssh-agent is running.
> ./ssh-add.exe
Run graphical programs on remote computer with Windows using psexec.exe
Connect to the remote machine with ssh and run notepad.exe on the remote computer in the same user sessions opened.
> cd “%PROGRAMFILES%OpenSSH”
> ssh.exe [remote_local_user]@[remote_ip] -i “C:Users\.sshid_rsa”
user@remote_ip> psexec.exe \127.0.0.1 -d -i -s notepad.exe
Documentation » Using WinSCP » Guides » Other »
Recently, Microsoft has released a port of OpenSSH for Windows. You can use the package to set up an SFTP/SSH server on Windows.
- Installing SFTP/SSH Server
- On Windows 11 and Windows 10
- On earlier versions of Windows
- Configuring SSH server
- Setting up SSH public key authentication
- Connecting to the server
- Finding Host Key
- Connecting
- Further reading
Advertisement
Installing SFTP/SSH Server
On Windows 11 and Windows 10
- On Windows 11:
- Go to Settings > Apps > Optional features and click on View features.
- Locate “OpenSSH server” feature, select it, click Next, and then click Install.
- On Windows 10 (version 1803 and newer):
- Go to Settings > Apps > Apps & features > Optional features and click on Add a feature.
- Locate “OpenSSH server” feature, expand it, and select Install.
Binaries are installed to %WINDIR%System32OpenSSH. Configuration file (sshd_config) and host keys are installed to %ProgramData%ssh (only after the server is started for the first time).
You may still want to use the following manual installation if you want to install a newer version of OpenSSH than the one built into Windows.
On earlier versions of Windows
- Download the latest OpenSSH for Windows binaries (package
OpenSSH-Win64.ziporOpenSSH-Win32.zip) - As the Administrator, extract the package to
C:Program FilesOpenSSH - As the Administrator, install sshd and ssh-agent services:
powershell.exe -ExecutionPolicy Bypass -File install-sshd.ps1
Configuring SSH server
- Allow incoming connections to SSH server in Windows Firewall:
- When installed as an optional feature, the firewall rule “OpenSSH SSH Server (sshd)” should have been created automatically. If not, proceed to create and enable the rule as follows.
- Either run the following PowerShell command as the Administrator:
New-NetFirewallRule -Name sshd -DisplayName 'OpenSSH SSH Server' -Enabled True -Direction Inbound -Protocol TCP -Action Allow -LocalPort 22 -Program "C:WindowsSystem32OpenSSHsshd.exe"
Replace
C:WindowsSystem32OpenSSHsshd.exewith the actual path to thesshd.exe(C:Program FilesOpenSSHssh.exe, had you followed the manual installation instructions above). - or go to Windows Security > Firewall & network protection1 > Advanced Settings > Inbound Rules and add a new rule for port 22.
- Start the service and/or configure automatic start:
- Go to Control Panel > System and Security > Administrative Tools and open Services. Locate OpenSSH SSH Server service.
- If you want the server to start automatically when your machine is started: Go to Action > Properties (or just double-click the service). In the Properties dialog, change Startup type to Automatic and confirm.
- Start the OpenSSH SSH Server service by clicking the Start the service link or Action > Start in the menu.
Advertisement
These instructions are partially based on the official deployment instructions.
Setting up SSH public key authentication
Follow a generic guide for Setting up SSH public key authentication in *nix OpenSSH server, with the following difference:
- Create the
.sshfolder (for theauthorized_keysfile) in your Windows account profile folder (typically inC:Usersusername.ssh).2 - For permissions to the
.sshfolder and theauthorized_keysfile, what matters are Windows ACL permissions, not simple *nix permissions. Set the ACL so that the respective Windows account is the owner of the folder and the file and is the only account that has a write access to them. The account that runs OpenSSH SSH Server service (typicallySYSTEMorsshd) needs to have read access to the file. - Though, with the default Win32-OpenSSH configuration there is an exception set in
sshd_configfor accounts inAdministratorsgroup. For these, the server uses a different location for the authorized keys file:%ALLUSERSPROFILE%sshadministrators_authorized_keys(i.e. typicallyC:ProgramDatasshadministrators_authorized_keys).
Connecting to the server
Finding Host Key
Before the first connection, find out the fingerprint of the server’s host key by using ssh-keygen.exe for each file.
In Windows command-prompt, use:
for %f in (%ProgramData%sshssh_host_*_key) do @%WINDIR%System32OpenSSHssh-keygen.exe -l -f "%f"
Replace %WINDIR%System32 with %ProgramFiles%, if appropriate.
In PowerShell, use:
Get-ChildItem $env:ProgramDatasshssh_host_*_key | ForEach-Object { . $env:WINDIRSystem32OpenSSHssh-keygen.exe -l -f $_ }
Replace $env:WINDIRSystem32 with $env:ProgramFiles, if appropriate.
You will get an output like this:
C:WindowsSystem32OpenSSH>for %f in (%ProgramData%sshssh_host_*_key) do @%WINDIR%System32OpenSSHssh-keygen.exe -l -f "%f"
1024 SHA256:K1kYcE7GHAqHLNPBaGVLOYBQif04VLOQN9kDbiLW/eE martin@example (DSA)
256 SHA256:7pFXY/Ad3itb6+fLlNwU3zc6X6o/ZmV3/mfyRnE46xg martin@example (ECDSA)
256 SHA256:KFi18tCRGsQmxMPioKvg0flaFI9aI/ebXfIDIOgIVGU martin@example (ED25519)
2048 SHA256:z6YYzqGiAb1FN55jOf/f4fqR1IJvpXlKxaZXRtP2mX8 martin@example (RSA)
Connecting
Start WinSCP. Login dialog will appear. On the dialog:
- Make sure New site node is selected.
- On New site node, make sure the SFTP protocol is selected.
- Enter your machine/server IP address (or a hostname) into the Host name box.
- Enter your Windows account name to the User name box. It might have to be entered in the format
user@domainif running on a domain. - For a public key authentication:
- Press the Advanced button to open Advanced site settings dialog and go to SSH > Authentication page.
- In Private key file box select your private key file.
- Submit Advanced site settings dialog with the OK button.
- For a password authentication:
- Enter your Windows account password to the Password box.
- If your Windows account does not have a password, you cannot authenticate with the password authentication (i.e. with an empty password), you need to use the public key authentication.
- Save your site settings using the Save button.
- Login using Login button.
- Verify the host key by comparing fingerprints with those collected before (see above).
Advertisement
If you cannot authenticate to the server and use Windows 10 Developer mode, make sure that your OpenSSH server does not conflict with an internal SSH server used by the Developer mode. You may need to turn off the SSH Server Broker and SSH Server Proxy Windows services. Or run your OpenSSH server on a different port than 22.
Further reading
- Guide to Installing Secure FTP Server on Windows using IIS;
- Guide to uploading files to SFTP server;
- Guide to automating operations (including upload).
Last modified: 2022-10-24 by martin

For how to install OpenSSH on Windows 10, read How to install OpenSSH on Windows 10.
Occasionally I have to run an installation of Windows 7 or Windows 8 on one of my computers, which means having to copy files between it and the Linux computers on the network.
That’s when I realize how difficult it can be to use a default installation of Windows, especially from its command prompt (line), where I tend to spend most of my computing time.
For those times, I yearn for the versatility and simplicity of the Linux command line. Practically everything you need to use or manage a Linux system is installed out of the box. Just launch a shell terminal, type and go!
So early this morning I installed Windows 7 on a test machine and needed to copy files between it and a Linux computer on the network – from the command line. I had to look for a command-line SSH application to use for the task. One that does not require the installation of a complete Cygwin environment and is not an outdated and unmaintained package.
My search led me to the website of OpenSSH for Windows. And it is just what the doctor ordered. There I found 32- and 64-bit binaries of the latest and greatest version of OpenSSH for Windows. That means OpenSSH 6.7p1.

A few minutes after I found the project’s website, I had the OpenSSH for Windows client and server installed and was copying files between an installation of Windows 7 and a Fedora 20 KDE computer – from the Windows 7 command prompt. Hope somebody else finds it useful.
# Change to the Downloads folder

cd Downloads

# Copy a file from a Linux PC to the current working directory

C:UseskamitDownloads> scp kamit@192.168.1.101:/home/kamit/Downloads/Windows10.iso .

# Copy a file from the current working directory to a remote PC

C:UseskamitDownloads> scp sscp.txt kamit@192.168.1.101:/home/kamit/Documents/
Share:
Related posts
- Google’s Chromecast and the new Nexus 7
- Dark Mail Alliance aims to offer Email 3.0, with built-in end-to-end encryption
- How to install Fedora 21 Workstation Cinnamon on a Btrfs filesystem
- Your server is up for sale on xDedic, for as little as $6
- Building Rancher Catalog Templates from Scratch : Part 1
Partner links
- Join a huge party for NFT frens at NFT South
- Reasons to use control panel for your server
- DHgate Computers Electronics, Cell Phones & more
- Axo Finans
Newsletter: Subscribe for updates
Inline Feedbacks
View all comments

The title and the contents are mis-matched! The tile is “How to install the latest OpenSSH on Windows 7 and Windows 8” but the contents are your story about why and how to “use”, not how to install. The openSSH web site only provides the source codes, not the binary for Windows.

Reply to
Frank Lin
7 years ago

Thank you for the tutorial 🙂 I am trying to figure this out on my own Win10 box.
Can I ask an off-topic question? What plugin are you using to show your ‘shell’ box there? I like it.. very clean. Thanks 🙂
Reply to
Ipsum
7 years ago
Crayon Syntax Highlighter
How to install OpenSSH (ssh server) on win7 and win10
tags: OpenSSH ssh ssh server
Original address:
-
Download OpenSSH
github download is relatively slow, Baidu network disk download:
github:
https://github.com/PowerShell/Win32-OpenSSH/releases

-
installation:

-
Unzip the downloaded package to: C:Program Files and name the folder OpenSSH (the folder name and path must be like this)
-
Run powershell as an administrator and perform the installation.
cd "C:Program FilesOpenSSH"
powershell.exe -ExecutionPolicy Bypass -File install-sshd.ps1

-
Open firewall (if necessary)
-
Start the service and add self-startup


Other graphical SSH Server tools under Windows:
- **Bitvise SSH Server:** is a good thing, you can monitor session connections and traffic, etc., free for personal use, and copyright issues in commercial environments.
- **MobaSSH:** This is a rubbish if you don’t buy it
Intelligent Recommendation

How to install win10 or win7 in exsi virtual host
As the title, my virtual machine environment is not the workstation version, but the exsi host. When installing the Windows server version, it is smooth and simple, but if you install the version of w…

How to install and run Debug under Win10 or Win7
How to install and run Debug (detailed steps) 1. Install DOSBOX Recommended on the official website download installation https://www.dosbox.com/ Install the path to select the default path (this soft…

Ubuntu15.1 install openssh-server
The client computer accesses the Ubuntu server through SSH, and the server must have SSH-server installed. 1. If the Ubuntu system is not the latest system, you need to update apt-get: sudo apt-get up…
Install openssh-server
I used to install openssh-server on the server. I suddenly wanted to open the ssh service to the desktop. I forgot to make a fool of it. I got a little bit of Baidu and I made a note. I don’t ne…
More Recommendation

ubuntu install openssh-server
1. Check if ssh is installed ps -ef | grep ssh 2. Install ssh apt-get install openssh-server Note: The following error occurred during the installation, indicating that the system did not update, plea…

Install openssh-server on Ubuntu
ssh is a remote management tool under Linux, the default port is 22 Recently I installed Ubuntu in VirtualBox, but I found that there is no scroll bar on the right side of the window and multiple wind…
uos install openssh-server
The following operations use the root account By default, there is no penssh-server service after uos is installed, so we need to install it. May prompt: The following packages have unmet dependencies…
Прочитано:
5 658
Задача: Разобрать, как установить OpenSSH сервис на Windows 7 с применением Cygwin.
Для справки: В данном примере используется Windows 7 с архитектурой x64
В данном случае это заметка, как напоминалка для следующих заметок испо льзования особого инструмента целью которого является портирование утилит Linux систем на Windows в основе которых лежит динамическая библиотека без которой не было бы возможности запускать их. Пакет Cygwin обобщает различные инструменты разработки, прикладного обеспечения и их эквивалентные аналоги базовых программ. Если по простому, то привычные программы из Linux можно запускать в Windows получая в замен ту легкость и простоту создаваемых скриптов, а также совмещение использования консольных команд Windows редакций. Т.е. выигрыш на лицо, два в одном. Ниже я покажу, да и себе заметка на будущее,
- Как установить в систему Windows пакет Cygwin
- Как установить OpenSSH пакет
- Как настроить аутентификацию по ключу против по паролю
Устанавливаю в систему пакет Cygwin, скачав необходимый по следующей ссылке: http://cygwin.com/setup-x86_64.exe
если используется архитектура x86, то ссылка на скачиваемый пакет:
http://cygwin.com/setup-x86.exe
На заметку: для установки в системе должны быть права Администратора, и у меня UAC Отключён.
Для справки:
В конечном этоге в этой заметке рассматривается как для двух систем установить и настроить безпарольный доступ друг к другу по ключам.
W7X86 – 192.168.1.59
W7X64 – 192.168.1.40
Запускаю установщик (версия 2.852 (64 bit) — Далее – Install from Internet, Далее – каталог установки оставляю по умолчанию: C:cygwin64 и тип установки для всех пользователей: All Users (RECOMMENDED), Далее – следующим шагом оставляем путь предложенный установщиком где будет располагаться локальные пакеты: C:UsersekzorchikDownloads, Далее – предопределяем тип используемого соединений, Direct Connection (в моем случае, соединение прямой, прокси сервер не используется), Далее – на следующем шаге выбираем сервер загрузки из множества (любой), к примеру: http://mirrors—ru.go—parts.com, Далее – на следующем шаге выбираем пакет(ы) которые нужны в системе нам, в моем случаем мне нужен пакет:
В текущем примере моей заметки — это пакет для организации безопасного подключения к системе посредством SSH, т. е. Пакет OpenSSH, как серверная так и клиентская часть.
, Далее – в процессе установки мастер определит, какие зависимости сперва нужно до установить, соглашаемся, Далее – и начнется процесс скачивания зависимостей и самого приложений, просто ожидаем – после того, как установка пройдет успешно останется только проконтролировать, чтобы были поставлены галочки для создания ярлыков быстрого доступа к Cygwin:
- Create icon on Desktop
- Add icon to Start Menu
И нажать Готово.
На заметку: Если понадобится установить в эмулятор консоли еще какие либо утилиты, то данные шаги повторяются, запуск исполняемого файла, указания сайта с которого будем производить скачивание и установку утилит.
Далее запускаю терминал Cygwin:
Пуск – Все программы – Cygwin — Cydwin64 Terminal, окно консоли примет вид:
Copying skeleton files.
These files are for the users to personalise their cygwin experience.
They will never be overwritten nor automatically updated.
‘./.bashrc’ -> ‘/home/1//.bashrc’
‘./.bash_profile’ -> ‘/home/1//.bash_profile’
‘./.inputrc’ -> ‘/home/1//.inputrc’
‘./.profile’ -> ‘/home/1//.profile’
ekzorchik@srv-w7x64 ~
$ <это_консоль_ввода>
В консоли после приглашения курсора $ набираем ssh-host-config –y этим мы генерируем ключи доступа к данной машине по ssh и создаем нового пользователя cyg_server где в качестве его пароля нужно указать текущий пароль от пользователя (в моем случае пользователь ekzorchik с дефолтный паролем 712mbddr@) под которым происходит инсталляция пакета cygwin и дополнительных пакетов в систему:
$ ssh-host-config -y
Часть информации выводимая в консоли отвечающая за создание нового пользователя cyg_server от имени которого будет происходит запуск инсталлированной службы «CYDWIN sshd»
*** Query: Please enter the password:712mbddr@
*** Query: Reenter:712mbddr@
Как видно, созданный пользователь инсталлирует службу в систему запуск которой будет осуществляться от имени данного пользователя (cyg_server), по умолчанию она становится не запущенной, запускаю:
Win + R -> cmd.exe
C:Usersekzorchik>sc config sshd start= auto
SC] ChangeServiceConfig: успех
C:Usersekzorchik>net start sshd
Служба «CYGWIN sshd» запускается.
Служба «CYGWIN sshd» успешно запущена.
Либо через запущенную терминальную консоль Cygwin Terminal:
- -S, —start <svc_name> Starts a service named <svc_name>.
- -E, —stop <svc_name> Stops a service named <svc_name>.
ekzorchik@srv-w7x64 ~
$ cygrunsrv.exe -E sshd
ekzorchik@srv-w7x64 ~
$ cygrunsrv.exe -S sshd
Также важно открыть доступ к системе по порту 22 (порт по дефолту). Для этого нужно добавить правило в брандмауэр для всех профилей системы:
netsh avdfirewall firewall add rull name=”SSH Server” dir=in protocol=tcp localport=22 action=allow
Проверим, открыт ли порт на котором работает служба SSH в системе:
C:Usersekzorchik>netstat -an | findstr :22
TCP 0.0.0.0:22 0.0.0.0:0 LISTENING
TCP [::]:22 [::]:0 LISTENING
Из вывода ясно, что порт открыт.
По такому же принципу шагов описанных выше устанавливаю и на другую систему с осью Windows 7 но применительно к архитектуре x86, хотя разницы в шагах вообщем-то никакой. Просто мне нужно для тестирования и показа, как это работает в дальнейшем.
Следующим шагом перехожу к тестированию подключения к системе посредством SSH соединения, в роли клиента на подключение к системе может использоваться, как консольный вариант — это через Cygwin Terminal, так и отдельным приложением,к примеру утилита — Putty. Я же буду использовать Cygwin Terminal.
ekzorchik@srv-w7x86 ~
$ hostname
srv-w7x86
ekzorchik@srv-w7x86 ~
$ ssh -l ekzorchik 192.168.1.40 -p 22
The authenticity of host ‘192.168.1.40 (192.168.1.40)’ can’t be established.
ECDSA key fingerprint is 57:8b:b2:35:43:f5:18:22:c0:e7:61:9b:44:d4:56:fe.
Are you sure you want to continue connecting (yes/no)? yes
Warning: Permanently added ‘192.168.1.40’ (ECDSA) to the list of known hosts.
ekzorchik@192.168.1.40’s password:712mbddr@
ekzorchik@W7X64 ~ — подключение по SSH прошло успешно в другую систему.
$
Отлично, работает, теперь же надо сделать, чтобы авторизация шла только по ключам доступа.
Ниже практические шаги, как это сделать:
ekzorchik@W7X64 ~
$ mkdir -p ~/.ssh
Генерирую публичный и приватный ключ системы:
$ ssh-keygen -t dsa
Generating public/private dsa key pair.
Enter file in which to save the key (/home/ekzorchik/.ssh/id_dsa):
Enter passphrase (empty for no passphrase):
Enter same passphrase again:
Your identification has been saved in /home/ekzorchik/.ssh/id_dsa.
Your public key has been saved in /home/ekzorchik/.ssh/id_dsa.pub.
The key fingerprint is:
80:eb:01:02:af:a1:00:80:ad:63:38:53:87:50:59:3d ekzorchik@W7X64
The key’s randomart image is:
Далее копируем публичный(открытый ключ) на вторую систему:
ekzorchik@W7X64 ~
$ cat ~/.ssh/id_dsa.pub | ssh -p 22 ekzorchik@192.168.1.59 'umask 077;test -d .ssh | cat >> ~/.ssh/authorized_keys'
ekzorchik@192.168.1.59’s password:712mbddr@
Точно такие же шаги проделываем на второй системе по отношения к первой, но не забываем указать соответствующий IP адрес системы, в моем случае — это 192.168.1.40
ekzorchik@srv-w7x86 ~
$ cat ~/.ssh/id_dsa.pub | ssh -p 22 ekzorchik@192.168.1.40 'umask 077;test -d .ssh | mkdir .ssh ; cat >> .ssh/authorized_keys'
ekzorchik@192.168.1.40’s password:
mkdir: cannot create directory ‘.ssh’: File exists
ekzorchik@srv-w7x86 ~
$ cat ~/.ssh/id_dsa.pub | ssh -p 22 ekzorchik@192.168.1.40 'umask 077;test -d .ssh | cat >> .ssh/authorized_keys'
ekzorchik@srv-w7x86 ~
$ ssh -l ekzorchik 192.168.1.40 -p 22 Last login: Thu Nov 27 18:36:23 2014 from 192.168.1.59
ekzorchik@W7X64 ~
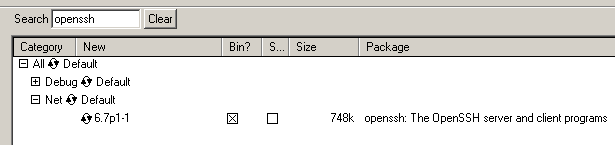
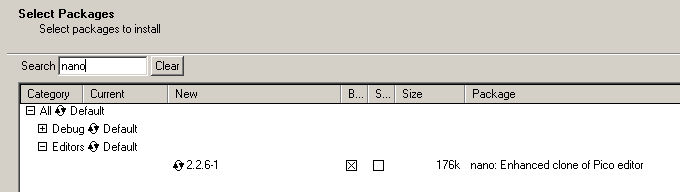
Но пока авторизация по ключам не заработает, в системах по умолчанию отключены все параметры настроек службы OpenSSH. Поэтому сперва произведу кое-какую настройку, в качестве редактора посредством которого буду изменять конфигурационные файлы выступит установленный по умолчанию — редактор vi: (советую познакомиться с его работой подробно, к примеру по моей заметке или по книгам посвященным Linux), но для быстро по первой настройке доустановлю пакет простого текстового редактора nano. Для этого снова запускаем setup-x86_64.exe – шаги до установки пакета точно такие же которые я проделывал выше когда устанавливал OpenSSH. Ниже скриншот поиска и установки необходимого бинарного пакета, исходники пакета не требуются поэтому их и не отмечаю.
Далее переходим к редактированию настроек сервиса SSHD:
ekzorchik@W7X64 ~
$ nano /etc/sshd_config
Port 22
Protocol 2
PubkeyAuthentication yes
AuthorizedKeysFile %h/.ssh/authorized_keys
PasswordAuthentication no
Сохраняем внесенные (Ctrl + O, Ctrl + X) изменения и перезапускаю службу для применения настроек.
ekzorchik@W7X64 ~
$ cygrunsrv.exe -E sshd
ekzorchik@W7X64 ~
$ cygrunsrv.exe -S sshd
Точно такие же действия проделываем и на другой системе.
Теперь пробует подключиться друг к другу посредством ключей, а не паролей:
Работает с 192.168.1.40 на 192.168.1.59
ekzorchik@W7X64 ~
$ !22
ssh ekzorchik@192.168.1.59 -p 22
Last login: Thu Nov 27 17:58:06 2014 from w7x64
ekzorchik@srv-w7x86 ~
Работает с 192.168.1.59 на 192.168.1.40
ekzorchik@srv-w7x86 ~
$ ssh -l ekzorchik 192.168.1.40 -p 22
Last login: Thu Nov 27 18:40:21 2014 from 192.168.1.59
ekzorchik@W7X64 ~
$
Отлично, все заработало, шаги один в один, как и на Ubuntu 12.04.5 Server/Desktop. Если же у Вас не заработает, то при подключении включите режим логирования, параметр —v, либо проверьте что содержимое authorized_keys удаленной системы содержит id_dsa.pub ключ первой, возможно в этом проблема, вообщем вот так сразу сложно сказать в чем может быть проблема, если работает по паролю, а не работает по ключу, скорое всего не добавлен ключ на удаленную систему. Будьте внимательнее, но раз столкнувшись с проблемами и решив их Вы будете более подкованными в дальнейшем. Свой опыт лучше, чем подсказка более опытных, хотя и знаешь что сэкономишь время, но это как в школе, мало того что можно списать решение из книги содержащей пошаговое решение, пока сам не повторишь и не разберешь ни будешь знать в общем-то ничего. Вот так. На этом задачу считаю выполненной и смею прощаться. До встречи в следующих реальных заметках — с уважением автор блога — ekzorchik.
Documentation » Using WinSCP » Guides » Other »
Recently, Microsoft has released a port of OpenSSH for Windows. You can use the package to set up an SFTP/SSH server on Windows.
- Installing SFTP/SSH Server
- On Windows 11 and Windows 10
- On earlier versions of Windows
- Configuring SSH server
- Setting up SSH public key authentication
- Connecting to the server
- Finding Host Key
- Connecting
- Further reading
Advertisement
Installing SFTP/SSH Server
On Windows 11 and Windows 10
- On Windows 11:
- Go to Settings > Apps > Optional features and click on View features.
- Locate “OpenSSH server” feature, select it, click Next, and then click Install.
- On Windows 10 (version 1803 and newer):
- Go to Settings > Apps > Apps & features > Optional features and click on Add a feature.
- Locate “OpenSSH server” feature, expand it, and select Install.
Binaries are installed to %WINDIR%System32OpenSSH. Configuration file (sshd_config) and host keys are installed to %ProgramData%ssh (only after the server is started for the first time).
You may still want to use the following manual installation if you want to install a newer version of OpenSSH than the one built into Windows.
On earlier versions of Windows
- Download the latest OpenSSH for Windows binaries (package
OpenSSH-Win64.ziporOpenSSH-Win32.zip) - As the Administrator, extract the package to
C:Program FilesOpenSSH - As the Administrator, install sshd and ssh-agent services:
powershell.exe -ExecutionPolicy Bypass -File install-sshd.ps1
Configuring SSH server
- Allow incoming connections to SSH server in Windows Firewall:
- When installed as an optional feature, the firewall rule “OpenSSH SSH Server (sshd)” should have been created automatically. If not, proceed to create and enable the rule as follows.
- Either run the following PowerShell command as the Administrator:
New-NetFirewallRule -Name sshd -DisplayName 'OpenSSH SSH Server' -Enabled True -Direction Inbound -Protocol TCP -Action Allow -LocalPort 22 -Program "C:WindowsSystem32OpenSSHsshd.exe"
Replace
C:WindowsSystem32OpenSSHsshd.exewith the actual path to thesshd.exe(C:Program FilesOpenSSHssh.exe, had you followed the manual installation instructions above). - or go to Windows Security > Firewall & network protection1 > Advanced Settings > Inbound Rules and add a new rule for port 22.
- Start the service and/or configure automatic start:
- Go to Control Panel > System and Security > Administrative Tools and open Services. Locate OpenSSH SSH Server service.
- If you want the server to start automatically when your machine is started: Go to Action > Properties (or just double-click the service). In the Properties dialog, change Startup type to Automatic and confirm.
- Start the OpenSSH SSH Server service by clicking the Start the service link or Action > Start in the menu.
Advertisement
These instructions are partially based on the official deployment instructions.
Setting up SSH public key authentication
Follow a generic guide for Setting up SSH public key authentication in *nix OpenSSH server, with the following difference:
- Create the
.sshfolder (for theauthorized_keysfile) in your Windows account profile folder (typically inC:Usersusername.ssh).2 - For permissions to the
.sshfolder and theauthorized_keysfile, what matters are Windows ACL permissions, not simple *nix permissions. Set the ACL so that the respective Windows account is the owner of the folder and the file and is the only account that has a write access to them. The account that runs OpenSSH SSH Server service (typicallySYSTEMorsshd) needs to have read access to the file. - Though, with the default Win32-OpenSSH configuration there is an exception set in
sshd_configfor accounts inAdministratorsgroup. For these, the server uses a different location for the authorized keys file:%ALLUSERSPROFILE%sshadministrators_authorized_keys(i.e. typicallyC:ProgramDatasshadministrators_authorized_keys).
Connecting to the server
Finding Host Key
Before the first connection, find out the fingerprint of the server’s host key by using ssh-keygen.exe for each file.
In Windows command-prompt, use:
for %f in (%ProgramData%sshssh_host_*_key) do @%WINDIR%System32OpenSSHssh-keygen.exe -l -f "%f"
Replace %WINDIR%System32 with %ProgramFiles%, if appropriate.
In PowerShell, use:
Get-ChildItem $env:ProgramDatasshssh_host_*_key | ForEach-Object { . $env:WINDIRSystem32OpenSSHssh-keygen.exe -l -f $_ }
Replace $env:WINDIRSystem32 with $env:ProgramFiles, if appropriate.
You will get an output like this:
C:WindowsSystem32OpenSSH>for %f in (%ProgramData%sshssh_host_*_key) do @%WINDIR%System32OpenSSHssh-keygen.exe -l -f "%f"
1024 SHA256:K1kYcE7GHAqHLNPBaGVLOYBQif04VLOQN9kDbiLW/eE martin@example (DSA)
256 SHA256:7pFXY/Ad3itb6+fLlNwU3zc6X6o/ZmV3/mfyRnE46xg martin@example (ECDSA)
256 SHA256:KFi18tCRGsQmxMPioKvg0flaFI9aI/ebXfIDIOgIVGU martin@example (ED25519)
2048 SHA256:z6YYzqGiAb1FN55jOf/f4fqR1IJvpXlKxaZXRtP2mX8 martin@example (RSA)
Connecting
Start WinSCP. Login dialog will appear. On the dialog:
- Make sure New site node is selected.
- On New site node, make sure the SFTP protocol is selected.
- Enter your machine/server IP address (or a hostname) into the Host name box.
- Enter your Windows account name to the User name box. It might have to be entered in the format
user@domainif running on a domain. - For a public key authentication:
- Press the Advanced button to open Advanced site settings dialog and go to SSH > Authentication page.
- In Private key file box select your private key file.
- Submit Advanced site settings dialog with the OK button.
- For a password authentication:
- Enter your Windows account password to the Password box.
- If your Windows account does not have a password, you cannot authenticate with the password authentication (i.e. with an empty password), you need to use the public key authentication.
- Save your site settings using the Save button.
- Login using Login button.
- Verify the host key by comparing fingerprints with those collected before (see above).
Advertisement
If you cannot authenticate to the server and use Windows 10 Developer mode, make sure that your OpenSSH server does not conflict with an internal SSH server used by the Developer mode. You may need to turn off the SSH Server Broker and SSH Server Proxy Windows services. Or run your OpenSSH server on a different port than 22.
Further reading
- Guide to Installing Secure FTP Server on Windows using IIS;
- Guide to uploading files to SFTP server;
- Guide to automating operations (including upload).
Last modified: 2022-10-24 by martin
OpenSSH is a freely available version of the Secure Shell (SSH) protocol family of tools for remotely controlling, or transferring files between, computers.
If you have a group of servers with Linux and Windows operating systems, then it is a good consideration to install and configure OpenSSH on Windows.
Because it would be easy to manage the servers using OpenSSH. Also, it encrypts traffic on both ends, eliminating security risks from hackers or eavesdroppers.
Moreover, we can use it for remote operations like file transfers and offers key-based password-less authentication.
Here at Ibmi Media, as part of our Server Management Services, we regularly help our Customers to resolve Windows related errors.
In this context, we shall look into the method to tackle this Windows error.
Method to Install and Configure OpenSSH on Windows ?
To install OpenSSH on Windows Server, follow the process given below:
1. Using Powershell as an Administrator User
i. First, we open Powershell as an Administrator User.
ii. We begin by clicking on the “Start” button and click on “All Apps”.
iii. Next, we expand the Powershell folder, and right-click on “Powershell” and select “Run as administrator.
iv. Depending on machine settings, we may receive a “UAC” or User Access Control prompt asking us to allow it. We go ahead and approve the access.
2. Install OpenSSH client
Next, we install the OpenSSH client by executing the necessary commands. The client is the software that we use to connect to the OpenSSH server. Here, we will connect from our local laptop or workstation, so we begin by opening Powershell. In the Powershell prompt, we run the below command.
# Install the OpenSSH Client
Add-WindowsCapability -Online -Name OpenSSH.Client~~~~0.0.1.0</code.
We can see a progress bar indicating the progress of the installation. Once the installation completes, we will receive the following output.
Path :
Online : True
RestartNeeded : False
3. Install the OpenSSH server
Now, we shall install the OpenSSH server. Here the server is the computer that runs in the sshd service. In the Powershell prompt, we execute the below command.
# Install the OpenSSH Server
Add-WindowsCapability -Online -Name OpenSSH.Server~~~~0.0.1.0;
Again, here can see a progress bar indicating the progress of the installation. Once the installation completes, we can see the below output.
Path :
Online : True
RestartNeeded : False
How to Uninstall OpenSSH on Windows ?
In case, if we wish to remove the client or the server, then we run the below respective commands to remove them.
# Uninstall the OpenSSH Client
Remove-WindowsCapability -Online -Name OpenSSH.Client~~~~0.0.1.0
# Uninstall the OpenSSH Server
Remove-WindowsCapability -Online -Name OpenSSH.Server~~~~0.0.1.0
How to configure OpenSSH on Windows ?
After the installation of OpenSSH software, we can now configure it. Now, we shall set the sshd service to start on boot. This action will ensure to automatically restart the service if a reboot or power failure occurs. Here is the command that we execute in the Powershell prompt. This will start the service and set it to start automatically:
Start-Service sshd
Set-Service -Name sshd -StartupType 'Automatic'
In order to allow a secure connection to our server, we need to add a firewall rule. This rule will allow inbound ssh traffic on port 22. To verify, we type this command at the Powershell prompt:
# Confirm the Firewall rule is present. It should be created automatically by setup.
Get-NetFirewallRule -Name *ssh*
Now, we can see an enabled firewall rule named “OpenSSH-Server-In-TCP.” In the event we do not see a firewall rule, we will need to create one. For that, we run the following command:
New-NetFirewallRule -Name sshd -DisplayName' OpenSSH Server (sshd)' -Enabled True -Direction Inbound -Protocol TCP -Action Allow -LocalPort 22
How to use OpenSSH ?
After having the OpenSSH server and client installed, we can now test the setup. now, we can check the connectivity from any Linux, Mac, or Windows device using an installed SSH Client. In Windows, we execute the following command in PowerShell:
ssh Administrator@ip_address
NOTE: Replace the IP above with the IP address of your server
If connecting for the first time, then we will be asked to confirm the connection. We type “yes” and hit Enter.
The authenticity of host’ ip_address (ip_address)’ can’t be established.
ECDSA key fingerprint is SHA256:aMmHNXmcgX2DHuFL0V9lSpY8AX45iHQeBxVD1oZgr4w.
Are you sure you want to continue connecting (yes/no/[fingerprint])? yes
Warning: Permanently added ‘ip_address’ (ECDSA) to the list of known hosts.
Next, we enter the user password after it prompts for it.
After successful authentication of the user, we will be greeted with a command shell prompt.
The remote SSH session or “secure shell” is now live, and we can begin sending remote commands.
How to Transfer Files with OpenSSH after we install and configure it ?
Now let’s see how we can transfer files using OpenSSH. Here we are making use of the SCP file transfer utility provided by OpenSSH to transfer a file named “FileOnMyClient.txt” to the Administrator’s folder on our OpenSSH server.
i. From any Linux, Mac, or Windows device with the SSH Client installed, we can navigate to the folder our file is in by using the «cd» command:
cd Documents
NOTE: This assumes the file is in the Documents folder on the client.
ii. In Powershell, we type the below command to transfer the file to the Administrators folder on the server:
scp ibmitest.txt Administrator@ip_address:/Users/Administrator/
iii. Then we enter the password when prompted for and hit enter. We will see output similar to the following information indicating the transfer percentage, transfer speed and timeframe of the transfer.
Administrator@ip_address’s password:
ibmimediatest.txt 100% 0 0.1KB/s 00:05
iv. Next, in order to verify that the file is transferred successfully, we must go back to our server and type in the dir command again which lists all the files in that particular folder. As we can see, we have successfully transferred our text file:
administrator@server C:UsersAdministrator>dir
Volume in drive C has no label.
Volume Serial Number is AEF3-9E8C
Directory of C:UsersAdministrator
01/25/2021 07:52 AM
01/25/2021 07:52 AM..
02/01/2021 12:45 PM3D Objects
02/01/2021 12:45 PMContacts
02/01/2021 12:45 PMDesktop
02/01/2021 12:45 PMDocuments
02/01/2021 12:45 PMDownloads
02/01/2021 12:45 PMFavorites
02/01/2021 12:45 PMLinks
02/01/2021 12:45 PMMusic
02/01/2021 12:45 PMPictures
02/01/2021 12:45 PMSaved Games
02/01/2021 12:45 PMSearches
02/01/2022 12:45 PMVideos
1 File(s) 15 bytes
14 Dir(s) 129,640,345,600 bytes free
We can also check the contents of our text file by using the built-in Windows command “type” command, followed by the name of the file:
administrator@server C:UsersAdministrator>type ibmimediatest.txt
Some common errors and fix relating to OpenSSH ?
Now let’s take a look at some of the common errors our customers came across and also let’s see how our Support Experts fix them.
1. Add-WindowsCapability failed. Error code = 0x800f0950
If the build of the system is older than 17763.194, we will see this error. The installation of the OpenSSH server fails on earlier builds of Windows Server 2019.
Solution:
From gpedit.msc (Group Policy), we select Computer Configuration >> Administrative Templates >> Windows Components >> Windows Update >> Specify intranet Microsoft update service location >> Finally, we set it to Disabled.
2. Error with “Add-WindowsCapability”. Error code: 0x8024002e
This error occurs if the server is updated via WSUS. Microsoft delivers features on-demand bypassing WSUS, so we do not get them via the internal update server.
In the event log, you will then find an entry with ID 1001 stating that the OpenSSH-Server-Package is not available.
Solution:
Allow Windows to load optional features directly from Microsoft Update via group policy. This setting is “Specify settings for optional component installation and component repair,” and we can find it under Computer Configuration >> Policies >> Administrative Templates > System.
At the same time, ensure that neither the setting “Do not connect to Windows Update Internet locations” nor “Remove access to use all Windows Update features” is in effect.
[Still not able to install and configure OpenSSH on Windows? – We are here to help you. ]
Introduction
Accessing machines remotely became a necessity a long time ago and we can barely imagine how it would be if we couldn’t control computers from remote locations. There are many ways to establish a connection with a remote machine depending on the operating system you are running, but the two most used protocols are:
- Secure Shell (SSH) for Linux-based machines
- Remote Desktop Protocol (RDP) for Windows-based machines
The two protocols use the client and server applications to establish a remote connection. These tools allow you to gain access and remotely manage other computers, transfer files, and do virtually anything you can do while physically sitting in front of the machine.
Prerequisites
Before you can establish a secure remote desktop protocol with a remote machine, there are a few basic requirements to meet:
- The remote computer must be turned on at all times and have a network connection.
- The client and server applications need to be installed and enabled.
- You need the IP address or the name of the remote machine you want to connect to.
- You need to have the necessary permissions to access the remote computer.
- Firewall settings need to allow the remote connection.
What is SSH?
Secure Shell, sometimes referred to as Secure Socket Shell, is a protocol which allows you to connect securely to a remote computer or a server by using a text-based interface.
When a secure SSH connection is established, a shell session will be started, and you will be able to manipulate the server by typing commands within the client on your local computer.
System and network administrators use this protocol the most, as well as anyone who needs to manage a computer remotely in a highly secure manner.
How Does SSH Work?
In order to establish an SSH connection, you need two components: a client and the corresponding server-side component. An SSH client is an application you install on the computer which you will use to connect to another computer or a server. The client uses the provided remote host information to initiate the connection and if the credentials are verified, establishes the encrypted connection.
On the server’s side, there is a component called an SSH daemon that is constantly listening to a specific TCP/IP port for possible client connection requests. Once a client initiates a connection, the SSH daemon will respond with the software and the protocol versions it supports and the two will exchange their identification data. If the provided credentials are correct, SSH creates a new session for the appropriate environment.
The default SSH protocol version for SSH server and SSH client communication is version 2.
How to Enable an SSH Connection
Since creating an SSH connection requires both a client and a server component, you need to make sure they are installed on the local and the remote machine, respectively. An open source SSH tool—widely used for Linux distributions— is OpenSSH. Installing OpenSSH is relatively easy. It requires access to the terminal on the server and the computer that you use for connecting. Note that Ubuntu does not have SSH server installed by default.
How to Install an OpenSSH Client
Before you proceed with installing an SSH client, make sure it is not already installed. Many Linux distributions already have an SSH client. For Windows machines, you can install PuTTY or any other client of your choice to gain access to a server.
To check if the client is available on your Linux-based system, you will need to:
- Load an SSH terminal. You can either search for “terminal” or press CTRL + ALT + T on your keyboard.
- Type in
sshand press Enter in the terminal. - If the client is installed, you will receive a response that looks like this:
[email protected]:~$ ssh

usage: ssh [-1246AaCfGgKkMNnqsTtVvXxYy] [-b bind_address] [-c cipher_spec]
[-D [bind_address:]port] [-E log_file] [-e escape_char]
[-F configfile] [-I pkcs11] [-i identity_file]
[-J [[email protected]]host[:port]] [-L address] [-l login_name] [-m mac_spec] [-O ctl_cmd] [-o option] [-p port] [-Q query_option] [-R address] [-S ctl_path] [-W host:port] [-w local_tun[:remote_tun]]
[[email protected]]hostname [command]

[email protected]:~$
This means that you are ready to remotely connect to a physical or virtual machine. Otherwise, you will have to install the OpenSSH client:
- Run the following command to install the OpenSSH client on your computer:
sudo apt-get install openssh-client - Type in your superuser password when asked.
- Hit Enter to complete the installation.
You are now able to SSH into any machine with the server-side application on it, provided that you have the necessary privileges to gain access, as well as the hostname or IP address.
How to Install an OpenSSH Server
In order to accept SSH connections, a machine needs to have the server-side part of the SSH software toolkit.
If you first want to check if OpenSSH server is available on the Ubuntu system of the remote computer that needs to accept SSH connections, you can try to connect to the local host:
- Open the terminal on the server machine. You can either search for “terminal” or press CTRL + ALT + T on your keyboard.
- Type in
ssh localhostand hit enter. - For the systems without the SSH server installed the response will look similar to this:
[email protected]:~$ ssh localhost
ssh: connect to host localhost port 22: Connection refused [email protected]:~$
If the above is the case, you will need to install the OpenSSH server. Leave the terminal open and:
- Run the following command to install the SSH server:
sudo apt-get install openssh-server ii.- Type in your superuser password when asked.
- Enter and Y to allow the installation to continue after the disk space prompt.
The required support files will be installed, and then you can check if the SSH server is running on the machine by typing this command:
sudo service ssh statusThe response in the terminal should look similar to this if the SSH service is now running properly:
[email protected]:-$ sudo service ssh status
• ssh.service - OpenBSD Secure Shell server
Loaded: loaded (/lib/systemd/system/ssh.service; enabled; vendor preset: enab
Active: active (running) since Fr 2018-03-12 10:53:44 CET; 1min 22s ago Process: 1174 ExecReload=/bin/kill -HUP $MAINPID (code=exited, status=0/SUCCES

Main PID: 3165 (sshd)
Another way to test if the OpenSSH server is installed properly and will accept connections is to try running the ssh localhost command again in your terminal prompt. The response will look similar to this screen when you run the command for the first time:
[email protected]:~$ ssh localhost

The authenticity of host 'localhost (127.0.0.1)' can't be established. ECDSA key fingerprint is SHA256:9jqmhko9Yo1EQAS1QeNy9xKceHFG5F8W6kp7EX9U3Rs. Are you sure you want to continue connecting (yes/no)? yes
Warning: Permanently added 'localhost' (ECDSA) to the list of known hosts.

[email protected]:~$
Enter yes or y to continue.
Congratulations! You have set up your server to accept SSH connection requests from a different
computer using an SSH client.
TIP
You can now edit the SSH daemon configuration file, for example, you can change the default port for SSH connections. In the terminal prompt, run this command:
sudo nano /etc/ssh/sshd_configThe configuration file will open in the editor of your choice. In this case, we used Nano.
If you need to install Nano, run this command:
sudo apt-get install nanoPlease note that you need to restart SSH service every time you make any changes to the sshd_config file by running this command:
sudo service ssh restartNow that you have the OpenSSH client and server installed on every machine you need, you can establish a secure remote connection with your servers. To do so:
- Open the SSH terminal on your machine and run the following command:
ssh [email protected]_ip_addressIf the username on your local machine matches the one on the server you are trying to connect to, you can just type:
ssh host_ip_addressAnd hit Enter. - Type in your password and hit Enter. Note that you will not get any feedback on the screen while typing. If you are pasting your password, make sure it is stored safely and not in a text file.
- When you are connecting to a server for the very first time, it will ask you if you want to continue connecting. Just type yes and hit Enter. This message appears only this time since the remote server is not identified on your local machine.
- An ECDSA key fingerprint is now added and you are connected to the remote server.
If the computer you are trying to remotely connect to is on the same network, then it is best to use the private IP address instead of the public IP address. Otherwise, you will have to use the public IP address only. Additionally, make sure that you know the correct TCP port OpenSSH is listening to for connection requests and that the port forwarding settings are correct. The default port is 22 if nobody changed configuration in the sshd_config file. You may also just append the port number after the host IP address.
Here is the example of a connection request using the OpenSSH client. We will specify the port number as well:
[email protected]:~$ ssh [email protected] –p7654 [email protected]’s password:

The authenticity of host '185.52.53.222 (185.52.53.222)' can't be established. ECDSA key fingerprint is SHA256:9lyrpzo5Yo1EQAS2QeHy9xKceHFH8F8W6kp7EX2O3Ps. Are you sure you want to continue connecting (yes/no)? yes
Warning: Permanently added ' 185.52.53.222' (ECDSA) to the list of known hosts.

[email protected]:~$
You are now able to manage and control a remote machine using your terminal. If you have trouble connecting to a remote server, make sure that:
- The IP address of the remote machine is correct.
- The port SSH daemon is listening to is not blocked by a firewall or forwarded incorrectly.
- Your username and password are correct.
- The SSH software is installed properly.
SSH Further Steps
Now that you are able to establish a connection to your server using SSH, we highly recommend a few further steps to improve SSH security. When you leave the setup with the default values, it is more likely to be hacked and your server can easily become a target of scripted attacks.
Some of the suggestions for hardening SSH by editing the sshd configuration file include:
- Change the default TCP port where SSH daemon is listening. Change it from 22 to something much higher, for example 24596. Make sure you do not use a port number that is easy to guess, such as 222, 2222 or 22222.
- Use SSH key pairs for authentication for passwordless SSH login. They are both safer and also allow logging in without the need to use your password (which is faster and more convenient).
- Disable password-based logins on your server. If your password gets cracked, this will eliminate the possibility of using it to log into your servers. Before you disable the option to log in using passwords, it is important to make sure that authentication using key pairs is working properly.
- Disable root access to your server and use a regular account with the su – command to switch to a root user.
You can also use TCP wrappers to restrict access to certain IP addresses or hostnames. Configure which host can connect using TCP wrappers by editing the /etc/hosts.allow and etc/hosts.deny files.
Note that allowed hosts supersede the denied hosts. For example, to allow SSH access to a single host you will first deny all hosts by adding these two lines in the etc/hosts.deny:
sshd : ALLALL : ALL
Then, in the etc/hosts.allow add a line with the allowed hosts for the SSH service. That can be a single IP address, an IP range, or a hostname: sshd : 10.10.0.5, LOCAL.
Make sure to keep your log in information secure at all times and to apply security at multiple layers. Use different methods to limit SSH access to your servers, or use services that will block anyone who tries to use brute force to gain access to your servers. Fail2ban is one example of such service.
VNC Over SSH
For users who are used to working in a graphical desktop environment with Virtual Network Computing (VNC), it is possible to completely encrypt connections using SSH tunneling. In order to tunnel VNC connections over SSH, you will need to run this command in the terminal on your Linux or UNIX machine:
$ ssh -L 5901:localhost:5901 -N -f -l username hostname_or_IPHere is the breakdown of the command above:
- ssh : this starts the SSH client program on your local machine and enables secure connection to the SSH server on a remote computer.
- -L 5901:localhost:5901 : states that the local port for the client on the local machine is to be forwarded to the specified host and port of the remote machine. In this case, local port 5901 on the local client is being forwarded to the same port of the given remote server.
- -N : instructs to only forward ports, and not to execute a remote command.
- -f : sends SSH to background after the password is provided, just before the command is executed. Then, you can freely use the terminal to type commands on the local machine.
- -l username : the username you insert here will be used for logging in to the remote server you specified.
- hostname_or_IP : this is the remote system with a VNC server. An example of an IP address would be 172.16.0.5 and the example of a hostname would be myserver.somedomain.com.
You can also connect to a remote server via SSH tunnel from a Windows machine by using PuTTY. In the PuTTY configuration window:
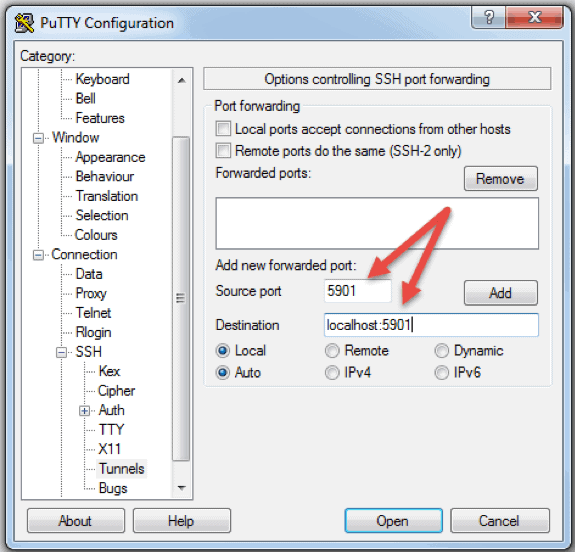
- Go to Connection -> SSH -> Tunnels
- In the Source port field type in 5901
- In the Destination field type in localhost:5901
- Start the SSH session as you normally would.
- Connect to your server with a VNC client of your choice.
What is RDP?
Remote Desktop Protocol (RDP) is a protocol developed by Microsoft. It is used to control and manage machines with a Windows operating system remotely.
Unlike Secure Shell, connections established using an RDP client provide a user with a graphical interface through which they can gain access to a remote computer and control it in the same manner as their local computer.
Using Remote Desktop services, formerly known as terminal services, allows network and system engineers to easily manipulate remote computers connected to a local network or the Internet.
This comes with a price. If you do not use a virtual private network (VPN), connecting via RDP is far less secure than SSH because you are directly exposed to the internet. There are many automated scripts constantly looking for weaknesses in your connection, especially for open ports that Windows Remote Desktop connections use. In that case, it is highly recommended to have strong, secure passwords and change them regularly. This does not make RDP connections safe, but less vulnerable.
How Does Remote Desktop Protocol Work?
Windows Remote Desktop connection is based on a rather simple client-server model using Remote Desktop Protocol (RDP). After you enable it, the Windows Remote Desktop server-side service starts listening for connection requests on port 3389. Whenever you try to connect to a Windows server, you will need to provide a valid username for the account you are using to gain access remotely. Once you gain access to the server, you will be able to manage applications, transfer files between the two computers, and virtually perform any task you can perform locally with the account in question.
No matter what version of the Windows operating system you have, you will be able to establish a secure remote connection to another computer since the Remote Desktop client is available by default. On the other hand, a computer can be remotely accessible only if it runs on a Pro, Enterprise, or Server edition of a Windows operating system. So, we can conclude that RDP connections are possible only between computers with a Windows OS on them.
How to Enable an RDP Connection
Establishing a Remote Desktop connection to another computer over network requires you to enable the Windows Remote Desktop server service. The Remote Desktop client is integrated into Windows systems, ready out of the box, and does not need any special setup before you can connect to another Windows-based machine. However, accepting Remote Desktop connections from another machines is disabled by default on all version of Windows OS.
If you want to remotely connect to a server over the Internet and not through the local network, you need to take a few things into consideration before you enable this service:
- Port forwarding. If you are not using a VPN you need to make sure the ports are forwarded properly to the remote host’s IP address. Check the router settings to see if the traffic on the default TCP port for Remote Desktop Protocol (port 3389) is going to the IP of the server with which you want to establish a Remote Desktop connection. Note that your Windows server is in this case directly exposed to the Internet and vulnerable.
- Using a VPN. This is a much safer option for Remote Desktop connection. When you create a virtual private network on a client computer, you will be able to access all services that are available only when you use local connection.
- Firewall settings. Make sure that the firewall you are using for the remote machine is not blocking Remote Desktop connection. You need to open the local port for RDP, whether it is the default or custom port number.
Enabling Remote Access in Windows 7, 8, 10 and Windows Server Versions
The procedure to configure remote desktop and allow secure remote connections to a server or a PC from a different computer is similar for all versions of Windows operating systems. I will list the basic steps to enable remote access to a desired machine. Before you begin, please make sure that you have taken into consideration the notes listed above concerning port forwarding, VPN, and firewall settings.
Step 1: Allow Remote Connections
Go to the computer information on the machine where you want to allow remote connections:
- Right Click on Computer or This PC depending on the Windows OS version.
- Click on Properties.
- Click on Remote settings on the left side of the window.
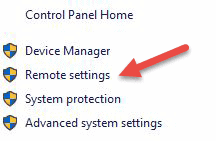
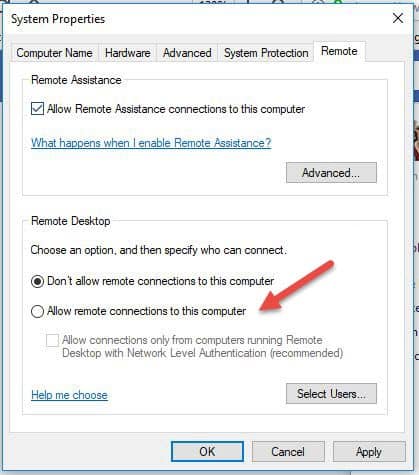
- Click on Allow remote connections to this computer. This should automatically add Remote Desktop Firewall exception. Additionally, you can check off the box that says “Allow connections only from computers running Remote Desktop with Network Level Authentication (recommended)” for additional security of your RDP sessions.
- Click Apply if you want to stay in the tab or OK to close it.
Step 2: Add Users to the List of Remote Users
You need to perform this step only if you want to allow users other than administrators to access the machine in question. If you are an administrator, your account is automatically included in the list of allowed users but you will not see it. To select more users:
- On the Remote settings screen shown above, click Select Users…
- Click on Add in the Remote Desktop Users box.
- The Select Users box will appear. You can select the location you want to search by clicking on Locations.
- In the Enter the Object Names to Select field, type a name of a user and click on Check Names.
- When you find a match, select the user account and click OK.
- Close the System Properties window by clicking OK again.
There are not many other options to change in order to configure Remote Desktop. Provided that other settings do not interfere with your Remote Desktop connection, you are now able to remotely connect and control this computer.
How to Use the Remove Desktop Connection Client
Using the Remote Desktop client is straightforward and you do not need to specifically configure Remote Desktop on the local computer. The steps below will work for all versions of Windows starting from Windows 7.
Step 1: Launch the Destkop Connection Unit
On your local Windows computer, locate the Remote Desktop Connection application. You can find it in a couple of different ways:
- For Windows 7, click on Start -> All Programs, go to the ‘Accessories’ folder and click on Remote Desktop Connection. For Windows 10, Click on Start and locate the ‘Windows Accessories’ folder where you can also find the Remote Desktop Connection app.
![]()
- Click on Start and type in Remote Desktop Connection in the search bar. You will receive search results as soon as you start typing. Click on the application when it shows up on the list.

- Press Windows + R keys on your keyboard to get the “Run” box. Type in mstsc and hit Enter in the ‘Open:’ field to run the Remote Desktop client.

Step 2: Enter the Remote Hosts IP Address or Name
Once you launch the Remote Desktop Connection application, you will get a window where you can enter the name or the IP address of a remote machine you want to access.
In the Computer field, type in the corresponding name or IP address and click Connect.
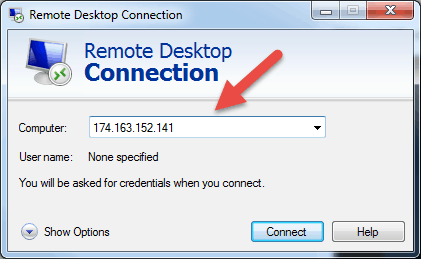
Note: If the default listening port for Remote Desktop connection (port 3389) has been changed on the remote host to a different value, you will have to specify it after the IP address.
Example: 174.163.152.141:6200
Depending on your circumstances, you will either need to enter the private or public IP address of the remote host. Here are the possible scenarios:
- If the client computer and the remote host connect to the same Local Area Network, you will use the host’s private IP address for Remote Desktop Connection.
- If you are using a virtual private network (VPN) on the client computer to access the remote host, you will use the host’s private IP address for Remote Desktop Connection.
- If the client computer is connecting to the remote host from another network over the Internet without a VPN, you will use the public IP address.
How to Find the IP Address and Host Name
There are many ways to locate the name, public or private IP address of a computer where you want to configure Remote Desktop service. Here are the quickest and easiest methods:
To determine a computer’s private IP address:
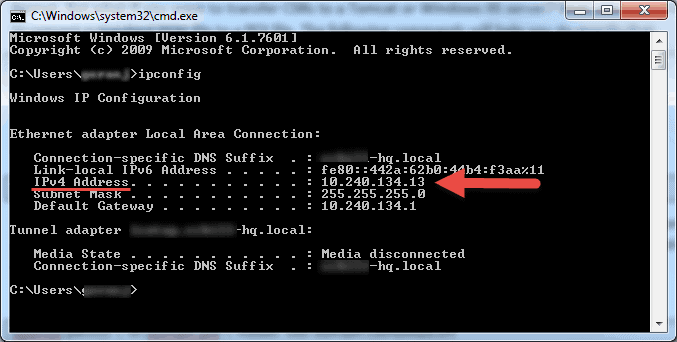
- Search for CMD from the start menu or press Windows + R on your keyboard, type in CMD and hit Enter to run the command prompt.
- Type ipconfig in the command prompt and hit Enter.
- Your will see your computer’s private IP address under the IPv4 Address line.
To determine which public IP address a computer is using:
- From your web browser, go to com or use its search bar.
- Type in “what is my IP” or simply “my IP” and hit Enter.
- At the top of the page, Google will show you the public IP address your computer is using. If this is not working for your region, you can visit the first webpage in the search results and it will show you the IP address. Some websites such as www.whatismyip.com will even show you your private (local) IP address.
To find a computer’s name:
- Right Click on Computer, or This PC, depending on the Windows OS version you are using.
- Click on
- You will find your full computer name under the “Computer name, domain, and workgroup settings” section.
Step 3: Entering the RDP Credentials and Finalizing the Connection
After you hit connect, the loading bar will appear. When it finishes initiating and configuring the remote session you will get a pop-up window that will look similar to this:
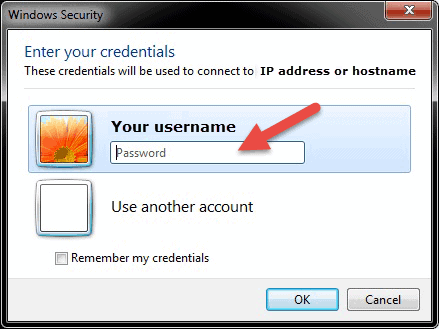
- Enter the password for the selected username. You can use another account, if needed, and provide a different username and password.
- Click OK when ready and you will get the security certificate warning.
- Click Yes to continue.
Note: Only one user can be logged in at the same time on a Windows computer. If someone else is using the machine you are trying to remotely access, that user has to disconnect. The warning logon message will appear in such cases.
You will not see the desktop of the remote machine. Depending on the user account permission settings, you can now perform any operation that you can while working directly in front of it.
Remote Desktop Protocol Further Steps
When setting up your remote server or machine to accept remote desktop connections, it is important to take precautions concerning securing RDP. Your server is especially vulnerable if you are accessing it over the Internet.
Here are a few pieces of advice to keep in mind if you are using remote desktop protocol to remotely connect to your machines:
- Use the built in VPN server on your Windows machine to additionally secure your traffic. This will provide more secure access to your Windows server and services.
- Set client connection encryption level. This option is set to “Not configured” by default. You can enable it and force high encryption level settings for all communications between clients and Remote Desktop Session Host servers. We do not recommended using the “Client Compatible” encryption level setting. Leaving the default “High” encryption level setting will force strong 128-bit encryption for data sent from the client to server and vice versa. You can edit this configuration using the Local Group Policy editor.
- Employ two-factor authentication using a third-party tool, such as Duo Security. By installing Duo Authentication for Windows Logon, you can add two-factor authentication to all Windows login attempts, or only for RDP sessions.
- Enforce firewall rules to limit exposure of open RDP ports to the Internet, especially if you are using the default RDP TCP port 3389. Windows has a built-in firewall which you can access from Control Panel and further configure it to restrict traffic to specific ports and IP addresses
These best practices for additionally securing RDP will help you tighten down remote desktop access. You will avoid most of the unauthorized login attempts without spending too much time making configuration changes to your machines.
Note: Learn how to use SSHFS to mount remote file systems over SSH.
Conclusion
The steps and processes listed in this guide will work for most users and most versions of Linux and Windows operating systems.
You should now be able to Connect to a Remote Server with Linux or Windows.
There are of course many other methods to establish a connection between two remote computers, but the ones covered here are most common.
Справочник статей
- 1. Установка OpenSSH на Win 7 / Win 8
- 2. Установка OpenSSH для Windows Server 2019 и Windows 10 после версии 1809
1. Установка OpenSSH на Win 7 / Win 8
На Win 7 или Win 8 нет PowerShell, официально рекомендованного MicrosoftOpenSSHКлиентGit for Windows。
Адрес загрузки:Git — Downloading Package
Добавить вручную после установкиC:Program FilesGitusrbinкPATHДюйм
Тогда вы можете использоватьssh

2… установка OpenSSH Windows Server 2019 и Windows 10 после версии 1809
Клиент OpenSSH и сервер OpenSSH являются компонентами, доступными только после Windows Server 2019 и Windows 10 1809.
Откройте PowerShell от имени администратора

Затем выполните команду:
PS C:Windowssystem32> Get-WindowsCapability -Online | ? Name -like 'OpenSSH*'


Name  : OpenSSH.Client~~~~0.0.1.0
State : NotPresent

Name  : OpenSSH.Server~~~~0.0.1.0
State : NotPresent
устанавливатьOpenSSH:
PS C:Windowssystem32> Add-WindowsCapability -Online -Name OpenSSH.Client~~~~0.0.1.0


Path          :
Online        : True
RestartNeeded : False
Тогда вы можете использоватьsshA:
PS C:Windowssystem32> ssh
usage: ssh [-46AaCfGgKkMNnqsTtVvXxYy] [-B bind_interface]
           [-b bind_address] [-c cipher_spec] [-D [bind_address:]port]
           [-E log_file] [-e escape_char] [-F configfile] [-I pkcs11]
           [-i identity_file] [-J [[email protected]]host[:port]] [-L address]
           [-l login_name] [-m mac_spec] [-O ctl_cmd] [-o option] [-p port]
           [-Q query_option] [-R address] [-S ctl_path] [-W host:port]
           [-w local_tun[:remote_tun]] destination [command]