Build and Install
This document describes installation on all supported operating
systems (the Unix/Linux family, including macOS), OpenVMS,
and Windows).
Table of Contents
- Prerequisites
- Notational Conventions
- Quick Installation Guide
- Building OpenSSL
- Installing OpenSSL
- Configuration Options
- API Level
- Cross Compile Prefix
- Build Type
- Directories
- Compiler Warnings
- Compression Algorithm Flags
- Seeding the Random Generator
- Setting the FIPS HMAC key
- Enable and Disable Features
- Displaying configuration data
- Installation Steps in Detail
- Configure
- Build
- Test
- Install
- Advanced Build Options
- Environment Variables
- Makefile Targets
- Running Selected Tests
- Troubleshooting
- Configuration Problems
- Build Failures
- Test Failures
- Notes
- Notes on multi-threading
- Notes on shared libraries
- Notes on random number generation
- Notes on assembler modules compilation
Prerequisites
To install OpenSSL, you will need:
- A «make» implementation
- Perl 5 with core modules (please read NOTES-PERL.md)
- The Perl module
Text::Template(please read NOTES-PERL.md) - an ANSI C compiler
- a development environment in the form of development libraries and C
header files - a supported operating system
For additional platform specific requirements, solutions to specific
issues and other details, please read one of these:
- Notes for UNIX-like platforms
- Notes for Android platforms
- Notes for Windows platforms
- Notes for the DOS platform with DJGPP
- Notes for the OpenVMS platform
- Notes on Perl
- Notes on Valgrind
Notational conventions
Throughout this document, we use the following conventions.
Commands
Any line starting with a dollar sign is a command line.
The dollar sign indicates the shell prompt and is not to be entered as
part of the command.
Choices
Several words in curly braces separated by pipe characters indicate a
mandatory choice, to be replaced with one of the given words.
For example, the line
$ echo { WORD1 | WORD2 | WORD3 }
represents one of the following three commands
$ echo WORD1
- or -
$ echo WORD2
- or -
$ echo WORD3
One or several words in square brackets separated by pipe characters
denote an optional choice. It is similar to the mandatory choice,
but it can also be omitted entirely.
So the line
$ echo [ WORD1 | WORD2 | WORD3 ]
represents one of the four commands
$ echo WORD1
- or -
$ echo WORD2
- or -
$ echo WORD3
- or -
$ echo
Arguments
Optional Arguments are enclosed in square brackets.
A trailing ellipsis means that more than one could be specified.
Quick Installation Guide
If you just want to get OpenSSL installed without bothering too much
about the details, here is the short version of how to build and install
OpenSSL. If any of the following steps fails, please consult the
Installation in Detail section below.
Building OpenSSL
Use the following commands to configure, build and test OpenSSL.
The testing is optional, but recommended if you intend to install
OpenSSL for production use.
Unix / Linux / macOS
$ ./Configure
$ make
$ make test
OpenVMS
Use the following commands to build OpenSSL:
$ perl Configure
$ mms
$ mms test
Windows
If you are using Visual Studio, open a Developer Command Prompt and
issue the following commands to build OpenSSL.
$ perl Configure
$ nmake
$ nmake test
As mentioned in the Choices section, you need to pick one
of the four Configure targets in the first command.
Most likely you will be using the VC-WIN64A target for 64bit Windows
binaries (AMD64) or VC-WIN32 for 32bit Windows binaries (X86).
The other two options are VC-WIN64I (Intel IA64, Itanium) and
VC-CE (Windows CE) are rather uncommon nowadays.
Installing OpenSSL
The following commands will install OpenSSL to a default system location.
Danger Zone: even if you are impatient, please read the following two
paragraphs carefully before you install OpenSSL.
For security reasons the default system location is by default not writable
for unprivileged users. So for the final installation step administrative
privileges are required. The default system location and the procedure to
obtain administrative privileges depends on the operating system.
It is recommended to compile and test OpenSSL with normal user privileges
and use administrative privileges only for the final installation step.
On some platforms OpenSSL is preinstalled as part of the Operating System.
In this case it is highly recommended not to overwrite the system versions,
because other applications or libraries might depend on it.
To avoid breaking other applications, install your copy of OpenSSL to a
different location which is not in
the global search path for system libraries.
Finally, if you plan on using the FIPS module, you need to read the
Post-installation Notes further down.
Unix / Linux / macOS
Depending on your distribution, you need to run the following command as
root user or prepend sudo to the command:
By default, OpenSSL will be installed to
More precisely, the files will be installed into the subdirectories
/usr/local/bin
/usr/local/lib
/usr/local/include
...
depending on the file type, as it is custom on Unix-like operating systems.
OpenVMS
Use the following command to install OpenSSL.
By default, OpenSSL will be installed to
Windows
If you are using Visual Studio, open the Developer Command Prompt elevated
and issue the following command.
The easiest way to elevate the Command Prompt is to press and hold down both
the <CTRL> and <SHIFT> keys while clicking the menu item in the task menu.
The default installation location is
for native binaries, or
C:Program Files (x86)OpenSSL
for 32bit binaries on 64bit Windows (WOW64).
Installing to a different location
To install OpenSSL to a different location (for example into your home
directory for testing purposes) run Configure as shown in the following
examples.
The options --prefix and --openssldir are explained in further detail in
Directories below, and the values used here are mere examples.
On Unix:
$ ./Configure --prefix=/opt/openssl --openssldir=/usr/local/ssl
On OpenVMS:
$ perl Configure --prefix=PROGRAM:[INSTALLS] --openssldir=SYS$MANAGER:[OPENSSL]
Note: if you do add options to the configuration command, please make sure
you’ve read more than just this Quick Start, such as relevant NOTES-* files,
the options outline below, as configuration options may change the outcome
in otherwise unexpected ways.
Configuration Options
There are several options to ./Configure to customize the build (note that
for Windows, the defaults for --prefix and --openssldir depend on what
configuration is used and what Windows implementation OpenSSL is built on.
For more information, see the Notes for Windows platforms.
API Level
Build the OpenSSL libraries to support the API for the specified version.
If no-deprecated is also given, don’t build with support
for deprecated APIs in or below the specified version number. For example,
adding
--api=1.1.0 no-deprecated
will remove support for all APIs that were deprecated in OpenSSL version
1.1.0 or below. This is a rather specialized option for developers.
If you just intend to remove all deprecated APIs up to the current version
entirely, just specify no-deprecated.
If --api isn’t given, it defaults to the current (minor) OpenSSL version.
Cross Compile Prefix
--cross-compile-prefix=<PREFIX>
The <PREFIX> to include in front of commands for your toolchain.
It is likely to have to end with dash, e.g. a-b-c- would invoke GNU compiler
as a-b-c-gcc, etc. Unfortunately cross-compiling is too case-specific to put
together one-size-fits-all instructions. You might have to pass more flags or
set up environment variables to actually make it work. Android and iOS cases
are discussed in corresponding Configurations/15-*.conf files. But there are
cases when this option alone is sufficient. For example to build the mingw64
target on Linux --cross-compile-prefix=x86_64-w64-mingw32- works. Naturally
provided that mingw packages are installed. Today Debian and Ubuntu users
have option to install a number of prepackaged cross-compilers along with
corresponding run-time and development packages for «alien» hardware. To give
another example --cross-compile-prefix=mipsel-linux-gnu- suffices in such
case.
For cross compilation, you must configure manually.
Also, note that --openssldir refers to target’s file system, not one you are
building on.
Build Type
Build OpenSSL with debugging symbols and zero optimization level.
Build OpenSSL without debugging symbols. This is the default.
Directories
libdir
The name of the directory under the top of the installation directory tree
(see the --prefix option) where libraries will be installed. By default
this is lib. Note that on Windows only static libraries (*.lib) will
be stored in this location. Shared libraries (*.dll) will always be
installed to the bin directory.
Some build targets have a multilib postfix set in the build configuration.
For these targets the default libdir is lib<multilib-postfix>. Please use
--libdir=lib to override the libdir if adding the postfix is undesirable.
openssldir
Directory for OpenSSL configuration files, and also the default certificate
and key store. Defaults are:
Unix:           /usr/local/ssl
Windows:        C:Program FilesCommon FilesSSL
OpenVMS:        SYS$COMMON:[OPENSSL-COMMON]
For 32bit Windows applications on Windows 64bit (WOW64), always replace
C:Program Files by C:Program Files (x86).
prefix
The top of the installation directory tree. Defaults are:
Unix:           /usr/local
Windows:        C:Program FilesOpenSSL
OpenVMS:        SYS$COMMON:[OPENSSL]
Compiler Warnings
This is a developer flag that switches on various compiler options recommended
for OpenSSL development. It only works when using gcc or clang as the compiler.
If you are developing a patch for OpenSSL then it is recommended that you use
this option where possible.
Compression Algorithm Flags
with-brotli-include
--with-brotli-include=DIR
The directory for the location of the brotli include files (i.e. the location
of the brotli include directory). This option is only necessary if
enable-brotli is used and the include files are not already
on the system include path.
with-brotli-lib
On Unix: this is the directory containing the brotli libraries.
If not provided, the system library path will be used.
The names of the libraries are:
- libbrotlicommon.a or libbrotlicommon.so
- libbrotlidec.a or libbrotlidec.so
- libbrotlienc.a or libbrotlienc.so
On Windows: this is the directory containing the brotli libraries.
If not provided, the system library path will be used.
The names of the libraries are:
- brotlicommon.lib
- brotlidec.lib
- brotlienc.lib
with-zlib-include
The directory for the location of the zlib include file. This option is only
necessary if zlib is used and the include file is not
already on the system include path.
with-zlib-lib
On Unix: this is the directory containing the zlib library.
If not provided the system library path will be used.
On Windows: this is the filename of the zlib library (with or
without a path). This flag must be provided if the
zlib-dynamic option is not also used. If zlib-dynamic is used
then this flag is optional and defaults to ZLIB1 if not provided.
On VMS: this is the filename of the zlib library (with or without a path).
This flag is optional and if not provided then GNV$LIBZSHR, GNV$LIBZSHR32
or GNV$LIBZSHR64 is used by default depending on the pointer size chosen.
with-zstd-include
The directory for the location of the Zstd include file. This option is only
necessary if enable-std is used and the include file is not
already on the system include path.
OpenSSL requires Zstd 1.4 or greater. The Linux kernel source contains a
zstd.h file that is not compatible with the 1.4.x Zstd distribution, the
compilation will generate an error if the Linux zstd.h is included before
(or instead of) the Zstd distribution header.
with-zstd-lib
On Unix: this is the directory containing the Zstd library.
If not provided the system library path will be used.
On Windows: this is the filename of the Zstd library (with or
without a path). This flag must be provided if the
enable-zstd-dynamic option is not also used.
If zstd-dynamic is used then this flag is optional and defaults
to LIBZSTD if not provided.
Seeding the Random Generator
--with-rand-seed=seed1[,seed2,...]
A comma separated list of seeding methods which will be tried by OpenSSL
in order to obtain random input (a.k.a «entropy») for seeding its
cryptographically secure random number generator (CSPRNG).
The current seeding methods are:
os
Use a trusted operating system entropy source.
This is the default method if such an entropy source exists.
getrandom
Use the getrandom(2) or equivalent system call.
devrandom
Use the first device from the DEVRANDOM list which can be opened to read
random bytes. The DEVRANDOM preprocessor constant expands to
"/dev/urandom","/dev/random","/dev/srandom"
on most unix-ish operating systems.
egd
Check for an entropy generating daemon.
This source is ignored by the FIPS provider.
rdcpu
Use the RDSEED or RDRAND command on x86 or RNDRRS command on aarch64
if provided by the CPU.
librandom
Use librandom (not implemented yet).
This source is ignored by the FIPS provider.
none
Disable automatic seeding. This is the default on some operating systems where
no suitable entropy source exists, or no support for it is implemented yet.
This option is ignored by the FIPS provider.
For more information, see the section Notes on random number generation
at the end of this document.
Setting the FIPS HMAC key
As part of its self-test validation, the FIPS module must verify itself
by performing a SHA-256 HMAC computation on itself. The default key is
the SHA256 value of «the holy handgrenade of antioch» and is sufficient
for meeting the FIPS requirements.
To change the key to a different value, use this flag. The value should
be a hex string no more than 64 characters.
Enable and Disable Features
Feature options always come in pairs, an option to enable feature
xxxx, and an option to disable it:
[ enable-xxxx | no-xxxx ]
Whether a feature is enabled or disabled by default, depends on the feature.
In the following list, always the non-default variant is documented: if
feature xxxx is disabled by default then enable-xxxx is documented and
if feature xxxx is enabled by default then no-xxxx is documented.
no-afalgeng
Don’t build the AFALG engine.
This option will be forced on a platform that does not support AFALG.
enable-ktls
Build with Kernel TLS support.
This option will enable the use of the Kernel TLS data-path, which can improve
performance and allow for the use of sendfile and splice system calls on
TLS sockets. The Kernel may use TLS accelerators if any are available on the
system. This option will be forced off on systems that do not support the
Kernel TLS data-path.
enable-asan
Build with the Address sanitiser.
This is a developer option only. It may not work on all platforms and should
never be used in production environments. It will only work when used with
gcc or clang and should be used in conjunction with the no-shared
option.
enable-acvp-tests
Build support for Automated Cryptographic Validation Protocol (ACVP)
tests.
This is required for FIPS validation purposes. Certain ACVP tests require
access to algorithm internals that are not normally accessible.
Additional information related to ACVP can be found at
https://github.com/usnistgov/ACVP.
no-asm
Do not use assembler code.
This should be viewed as debugging/troubleshooting option rather than for
production use. On some platforms a small amount of assembler code may still
be used even with this option.
no-async
Do not build support for async operations.
no-autoalginit
Don’t automatically load all supported ciphers and digests.
Typically OpenSSL will make available all of its supported ciphers and digests.
For a statically linked application this may be undesirable if small executable
size is an objective. This only affects libcrypto. Ciphers and digests will
have to be loaded manually using EVP_add_cipher() and EVP_add_digest()
if this option is used. This option will force a non-shared build.
no-autoerrinit
Don’t automatically load all libcrypto/libssl error strings.
Typically OpenSSL will automatically load human readable error strings. For a
statically linked application this may be undesirable if small executable size
is an objective.
enable-brotli
Build with support for brotli compression/decompression.
enable-brotli-dynamic
Like the enable-brotli option, but has OpenSSL load the brotli library dynamically
when needed.
This is only supported on systems where loading of shared libraries is supported.
no-autoload-config
Don’t automatically load the default openssl.cnf file.
Typically OpenSSL will automatically load a system config file which configures
default SSL options.
enable-buildtest-c++
While testing, generate C++ buildtest files that simply check that the public
OpenSSL header files are usable standalone with C++.
Enabling this option demands extra care. For any compiler flag given directly
as configuration option, you must ensure that it’s valid for both the C and
the C++ compiler. If not, the C++ build test will most likely break. As an
alternative, you can use the language specific variables, CFLAGS and CXXFLAGS.
—banner=text
Use the specified text instead of the default banner at the end of
configuration.
—w
On platforms where the choice of 32-bit or 64-bit architecture
is not explicitly specified, Configure will print a warning
message and wait for a few seconds to let you interrupt the
configuration. Using this flag skips the wait.
no-bulk
Build only some minimal set of features.
This is a developer option used internally for CI build tests of the project.
no-cached-fetch
Never cache algorithms when they are fetched from a provider. Normally, a
provider indicates if the algorithms it supplies can be cached or not. Using
this option will reduce run-time memory usage but it also introduces a
significant performance penalty. This option is primarily designed to help
with detecting incorrect reference counting.
no-capieng
Don’t build the CAPI engine.
This option will be forced if on a platform that does not support CAPI.
no-cmp
Don’t build support for Certificate Management Protocol (CMP)
and Certificate Request Message Format (CRMF).
no-cms
Don’t build support for Cryptographic Message Syntax (CMS).
no-comp
Don’t build support for SSL/TLS compression.
If this option is enabled (the default), then compression will only work if
the zlib or zlib-dynamic options are also chosen.
enable-crypto-mdebug
This now only enables the failed-malloc feature.
enable-crypto-mdebug-backtrace
This is a no-op; the project uses the compiler’s address/leak sanitizer instead.
no-ct
Don’t build support for Certificate Transparency (CT).
no-deprecated
Don’t build with support for deprecated APIs up until and including the version
given with --api (or the current version, if --api wasn’t specified).
no-dgram
Don’t build support for datagram based BIOs.
Selecting this option will also force the disabling of DTLS.
no-dso
Don’t build support for loading Dynamic Shared Objects (DSO)
enable-devcryptoeng
Build the /dev/crypto engine.
This option is automatically selected on the BSD platform, in which case it can
be disabled with no-devcryptoeng.
no-dynamic-engine
Don’t build the dynamically loaded engines.
This only has an effect in a shared build.
no-ec
Don’t build support for Elliptic Curves.
no-ec2m
Don’t build support for binary Elliptic Curves
enable-ec_nistp_64_gcc_128
Enable support for optimised implementations of some commonly used NIST
elliptic curves.
This option is only supported on platforms:
- with little-endian storage of non-byte types
- that tolerate misaligned memory references
- where the compiler:
- supports the non-standard type
__uint128_t - defines the built-in macro
__SIZEOF_INT128__
- supports the non-standard type
enable-egd
Build support for gathering entropy from the Entropy Gathering Daemon (EGD).
no-engine
Don’t build support for loading engines.
no-err
Don’t compile in any error strings.
enable-external-tests
Enable building of integration with external test suites.
This is a developer option and may not work on all platforms. The following
external test suites are currently supported:
- GOST engine test suite
- Python PYCA/Cryptography test suite
- krb5 test suite
See the file test/README-external.md
for further details.
no-filenames
Don’t compile in filename and line number information (e.g. for errors and
memory allocation).
enable-fips
Build (and install) the FIPS provider
no-fips-securitychecks
Don’t perform FIPS module run-time checks related to enforcement of security
parameters such as minimum security strength of keys.
enable-fuzz-libfuzzer, enable-fuzz-afl
Build with support for fuzzing using either libfuzzer or AFL.
These are developer options only. They may not work on all platforms and
should never be used in production environments.
See the file fuzz/README.md for further details.
no-gost
Don’t build support for GOST based ciphersuites.
Note that if this feature is enabled then GOST ciphersuites are only available
if the GOST algorithms are also available through loading an externally supplied
engine.
no-legacy
Don’t build the legacy provider.
Disabling this also disables the legacy algorithms: MD2 (already disabled by default).
no-makedepend
Don’t generate dependencies.
no-module
Don’t build any dynamically loadable engines.
This also implies no-dynamic-engine.
no-multiblock
Don’t build support for writing multiple records in one go in libssl
Note: this is a different capability to the pipelining functionality.
no-nextprotoneg
Don’t build support for the Next Protocol Negotiation (NPN) TLS extension.
no-ocsp
Don’t build support for Online Certificate Status Protocol (OCSP).
no-padlockeng
Don’t build the padlock engine.
no-hw-padlock
As synonym for no-padlockeng. Deprecated and should not be used.
no-pic
Don’t build with support for Position Independent Code.
no-pinshared
Don’t pin the shared libraries.
By default OpenSSL will attempt to stay in memory until the process exits.
This is so that libcrypto and libssl can be properly cleaned up automatically
via an atexit() handler. The handler is registered by libcrypto and cleans
up both libraries. On some platforms the atexit() handler will run on unload of
libcrypto (if it has been dynamically loaded) rather than at process exit. This
option can be used to stop OpenSSL from attempting to stay in memory until the
process exits. This could lead to crashes if either libcrypto or libssl have
already been unloaded at the point that the atexit handler is invoked, e.g. on a
platform which calls atexit() on unload of the library, and libssl is unloaded
before libcrypto then a crash is likely to happen. Applications can suppress
running of the atexit() handler at run time by using the
OPENSSL_INIT_NO_ATEXIT option to OPENSSL_init_crypto().
See the man page for it for further details.
no-posix-io
Don’t use POSIX IO capabilities.
no-psk
Don’t build support for Pre-Shared Key based ciphersuites.
no-rdrand
Don’t use hardware RDRAND capabilities.
no-rfc3779
Don’t build support for RFC3779, «X.509 Extensions for IP Addresses and
AS Identifiers».
sctp
Build support for Stream Control Transmission Protocol (SCTP).
no-shared
Do not create shared libraries, only static ones.
See Notes on shared libraries below.
no-sock
Don’t build support for socket BIOs.
no-srp
Don’t build support for Secure Remote Password (SRP) protocol or
SRP based ciphersuites.
no-srtp
Don’t build Secure Real-Time Transport Protocol (SRTP) support.
no-sse2
Exclude SSE2 code paths from 32-bit x86 assembly modules.
Normally SSE2 extension is detected at run-time, but the decision whether or not
the machine code will be executed is taken solely on CPU capability vector. This
means that if you happen to run OS kernel which does not support SSE2 extension
on Intel P4 processor, then your application might be exposed to «illegal
instruction» exception. There might be a way to enable support in kernel, e.g.
FreeBSD kernel can be compiled with CPU_ENABLE_SSE, and there is a way to
disengage SSE2 code paths upon application start-up, but if you aim for wider
«audience» running such kernel, consider no-sse2. Both the 386 and no-asm
options imply no-sse2.
no-ssl-trace
Don’t build with SSL Trace capabilities.
This removes the -trace option from s_client and s_server, and omits the
SSL_trace() function from libssl.
Disabling ssl-trace may provide a small reduction in libssl binary size.
no-static-engine
Don’t build the statically linked engines.
This only has an impact when not built «shared».
no-stdio
Don’t use anything from the C header file stdio.h that makes use of the FILE
type. Only libcrypto and libssl can be built in this way. Using this option will
suppress building the command line applications. Additionally, since the OpenSSL
tests also use the command line applications, the tests will also be skipped.
no-tests
Don’t build test programs or run any tests.
enable-tfo
Build with support for TCP Fast Open (RFC7413). Supported on Linux, macOS and FreeBSD.
enable-quic
Build with QUIC support. This is currently just for developers as the
implementation is by no means complete and usable.
no-threads
Don’t build with support for multi-threaded applications.
threads
Build with support for multi-threaded applications. Most platforms will enable
this by default. However, if on a platform where this is not the case then this
will usually require additional system-dependent options!
See Notes on multi-threading below.
no-thread-pool
Don’t build with support for thread pool functionality.
thread-pool
Build with thread pool functionality. If enabled, OpenSSL algorithms may
use the thread pool to perform parallel computation. This option in itself
does not enable OpenSSL to spawn new threads. Currently the only supported
thread pool mechanism is the default thread pool.
no-default-thread-pool
Don’t build with support for default thread pool functionality.
default-thread-pool
Build with default thread pool functionality. If enabled, OpenSSL may create
and manage threads up to a maximum number of threads authorized by the
application. Supported on POSIX compliant platforms and Windows.
enable-trace
Build with support for the integrated tracing api.
See manual pages OSSL_trace_set_channel(3) and OSSL_trace_enabled(3) for details.
no-ts
Don’t build Time Stamping (TS) Authority support.
enable-ubsan
Build with the Undefined Behaviour sanitiser (UBSAN).
This is a developer option only. It may not work on all platforms and should
never be used in production environments. It will only work when used with
gcc or clang and should be used in conjunction with the -DPEDANTIC option
(or the --strict-warnings option).
no-ui-console
Don’t build with the User Interface (UI) console method
The User Interface console method enables text based console prompts.
enable-unit-test
Enable additional unit test APIs.
This should not typically be used in production deployments.
no-uplink
Don’t build support for UPLINK interface.
enable-weak-ssl-ciphers
Build support for SSL/TLS ciphers that are considered «weak»
Enabling this includes for example the RC4 based ciphersuites.
zlib
Build with support for zlib compression/decompression.
zlib-dynamic
Like the zlib option, but has OpenSSL load the zlib library dynamically
when needed.
This is only supported on systems where loading of shared libraries is supported.
enable-zstd
Build with support for Zstd compression/decompression.
enable-zstd-dynamic
Like the enable-zstd option, but has OpenSSL load the Zstd library dynamically
when needed.
This is only supported on systems where loading of shared libraries is supported.
386
In 32-bit x86 builds, use the 80386 instruction set only in assembly modules
The default x86 code is more efficient, but requires at least an 486 processor.
Note: This doesn’t affect compiler generated code, so this option needs to be
accompanied by a corresponding compiler-specific option.
no-{protocol}
no-{ssl|ssl3|tls|tls1|tls1_1|tls1_2|tls1_3|dtls|dtls1|dtls1_2}
Don’t build support for negotiating the specified SSL/TLS protocol.
If no-tls is selected then all of tls1, tls1_1, tls1_2 and tls1_3
are disabled.
Similarly no-dtls will disable dtls1 and dtls1_2. The no-ssl option is
synonymous with no-ssl3. Note this only affects version negotiation.
OpenSSL will still provide the methods for applications to explicitly select
the individual protocol versions.
no-{protocol}-method
no-{ssl3|tls1|tls1_1|tls1_2|dtls1|dtls1_2}-method
Analogous to no-{protocol} but in addition do not build the methods for
applications to explicitly select individual protocol versions. Note that there
is no no-tls1_3-method option because there is no application method for
TLSv1.3.
Using individual protocol methods directly is deprecated. Applications should
use TLS_method() instead.
enable-{algorithm}
Build with support for the specified algorithm.
no-{algorithm}
no-{aria|bf|blake2|camellia|cast|chacha|cmac|
    des|dh|dsa|ecdh|ecdsa|idea|md4|mdc2|ocb|
    poly1305|rc2|rc4|rmd160|scrypt|seed|
    siphash|siv|sm2|sm3|sm4|whirlpool}
Build without support for the specified algorithm.
The ripemd algorithm is deprecated and if used is synonymous with rmd160.
Compiler-specific options
-Dxxx, -Ixxx, -Wp, -lxxx, -Lxxx, -Wl, -rpath, -R, -framework, -static
These system specific options will be recognised and passed through to the
compiler to allow you to define preprocessor symbols, specify additional
libraries, library directories or other compiler options. It might be worth
noting that some compilers generate code specifically for processor the
compiler currently executes on. This is not necessarily what you might have
in mind, since it might be unsuitable for execution on other, typically older,
processor. Consult your compiler documentation.
Take note of the Environment Variables documentation
below and how these flags interact with those variables.
Additional options that are not otherwise recognised are passed through as
they are to the compiler as well. Unix-style options beginning with a
- or + and Windows-style options beginning with a / are recognised.
Again, consult your compiler documentation.
If the option contains arguments separated by spaces, then the URL-style
notation %20 can be used for the space character in order to avoid having
to quote the option. For example, -opt%20arg gets expanded to -opt arg.
In fact, any ASCII character can be encoded as %xx using its hexadecimal
encoding.
Take note of the Environment Variables documentation
below and how these flags interact with those variables.
Environment Variables
Assign the given value to the environment variable VAR for Configure.
These work just like normal environment variable assignments, but are supported
on all platforms and are confined to the configuration scripts only.
These assignments override the corresponding value in the inherited environment,
if there is one.
The following variables are used as «make variables» and can be used as an
alternative to giving preprocessor, compiler and linker options directly as
configuration. The following variables are supported:
AR              The static library archiver.
ARFLAGS         Flags for the static library archiver.
AS              The assembler compiler.
ASFLAGS         Flags for the assembler compiler.
CC              The C compiler.
CFLAGS          Flags for the C compiler.
CXX             The C++ compiler.
CXXFLAGS        Flags for the C++ compiler.
CPP             The C/C++ preprocessor.
CPPFLAGS        Flags for the C/C++ preprocessor.
CPPDEFINES      List of CPP macro definitions, separated
                by a platform specific character (':' or
                space for Unix, ';' for Windows, ',' for
                VMS).  This can be used instead of using
                -D (or what corresponds to that on your
                compiler) in CPPFLAGS.
CPPINCLUDES     List of CPP inclusion directories, separated
                the same way as for CPPDEFINES.  This can
                be used instead of -I (or what corresponds
                to that on your compiler) in CPPFLAGS.
HASHBANGPERL    Perl invocation to be inserted after '#!'
                in public perl scripts (only relevant on
                Unix).
LD              The program linker (not used on Unix, $(CC)
                is used there).
LDFLAGS         Flags for the shared library, DSO and
                program linker.
LDLIBS          Extra libraries to use when linking.
                Takes the form of a space separated list
                of library specifications on Unix and
                Windows, and as a comma separated list of
                libraries on VMS.
RANLIB          The library archive indexer.
RC              The Windows resource compiler.
RCFLAGS         Flags for the Windows resource compiler.
RM              The command to remove files and directories.
These cannot be mixed with compiling/linking flags given on the command line.
In other words, something like this isn’t permitted.
$ ./Configure -DFOO CPPFLAGS=-DBAR -DCOOKIE
Backward compatibility note:
To be compatible with older configuration scripts, the environment variables
are ignored if compiling/linking flags are given on the command line, except
for the following:
AR, CC, CXX, CROSS_COMPILE, HASHBANGPERL, PERL, RANLIB, RC, and WINDRES
For example, the following command will not see -DBAR:
$ CPPFLAGS=-DBAR ./Configure -DCOOKIE
However, the following will see both set variables:
$ CC=gcc CROSS_COMPILE=x86_64-w64-mingw32- ./Configure -DCOOKIE
If CC is set, it is advisable to also set CXX to ensure both the C and C++
compiler are in the same «family». This becomes relevant with
enable-external-tests and enable-buildtest-c++.
Reconfigure
Reconfigure from earlier data.
This fetches the previous command line options and environment from data
saved in configdata.pm and runs the configuration process again, using
these options and environment. Note: NO other option is permitted together
with reconf. Note: The original configuration saves away values for ALL
environment variables that were used, and if they weren’t defined, they are
still saved away with information that they weren’t originally defined.
This information takes precedence over environment variables that are
defined when reconfiguring.
Displaying configuration data
The configuration script itself will say very little, and finishes by
creating configdata.pm. This perl module can be loaded by other scripts
to find all the configuration data, and it can also be used as a script to
display all sorts of configuration data in a human readable form.
For more information, please do:
$ ./configdata.pm --help # Unix
or
$ perl configdata.pm --help # Windows and VMS
Installation Steps in Detail
Configure OpenSSL
Automatic Configuration
In previous version, the config script determined the platform type and
compiler and then called Configure. Starting with this release, they are
the same.
Unix / Linux / macOS
$ ./Configure [options...]
OpenVMS
$ perl Configure [options...]
Windows
$ perl Configure [options...]
Manual Configuration
OpenSSL knows about a range of different operating system, hardware and
compiler combinations. To see the ones it knows about, run
$ ./Configure LIST # Unix
or
$ perl Configure LIST # All other platforms
For the remainder of this text, the Unix form will be used in all examples.
Please use the appropriate form for your platform.
Pick a suitable name from the list that matches your system. For most
operating systems there is a choice between using cc or gcc.
When you have identified your system (and if necessary compiler) use this
name as the argument to Configure. For example, a linux-elf user would
run:
$ ./Configure linux-elf [options...]
Creating your own Configuration
If your system isn’t listed, you will have to create a configuration
file named Configurations/YOURFILENAME.conf (replace YOURFILENAME
with a filename of your choosing) and add the correct
configuration for your system. See the available configs as examples
and read Configurations/README.md and
Configurations/README-design.md
for more information.
The generic configurations cc or gcc should usually work on 32 bit
Unix-like systems.
Configure creates a build file (Makefile on Unix, makefile on Windows
and descrip.mms on OpenVMS) from a suitable template in Configurations/,
and defines various macros in include/openssl/configuration.h (generated
from include/openssl/configuration.h.in.
If none of the generated build files suit your purpose, it’s possible to
write your own build file template and give its name through the environment
variable BUILDFILE. For example, Ninja build files could be supported by
writing Configurations/build.ninja.tmpl and then configure with BUILDFILE
set like this (Unix syntax shown, you’ll have to adapt for other platforms):
$ BUILDFILE=build.ninja perl Configure [options...]
Out of Tree Builds
OpenSSL can be configured to build in a build directory separate from the
source code directory. It’s done by placing yourself in some other
directory and invoking the configuration commands from there.
Unix example
$ mkdir /var/tmp/openssl-build
$ cd /var/tmp/openssl-build
$ /PATH/TO/OPENSSL/SOURCE/Configure [options...]
OpenVMS example
$ set default sys$login:
$ create/dir [.tmp.openssl-build]
$ set default [.tmp.openssl-build]
$ perl D:[PATH.TO.OPENSSL.SOURCE]Configure [options...]
Windows example
$ C:
$ mkdir temp-openssl
$ cd temp-openssl
$ perl d:PATHTOOPENSSLSOURCEConfigure [options...]
Paths can be relative just as well as absolute. Configure will do its best
to translate them to relative paths whenever possible.
Build OpenSSL
Build OpenSSL by running:
$ make                                           # Unix
$ mms                                            ! (or mmk) OpenVMS
$ nmake                                          # Windows
This will build the OpenSSL libraries (libcrypto.a and libssl.a on
Unix, corresponding on other platforms) and the OpenSSL binary
(openssl). The libraries will be built in the top-level directory,
and the binary will be in the apps/ subdirectory.
If the build fails, take a look at the Build Failures
subsection of the Troubleshooting section.
Test OpenSSL
After a successful build, and before installing, the libraries should
be tested. Run:
$ make test                                      # Unix
$ mms test                                       ! OpenVMS
$ nmake test                                     # Windows
Warning: you MUST run the tests from an unprivileged account (or disable
your privileges temporarily if your platform allows it).
See test/README.md for further details how run tests.
See test/README-dev.md for guidelines on adding tests.
Install OpenSSL
If everything tests ok, install OpenSSL with
$ make install                                   # Unix
$ mms install                                    ! OpenVMS
$ nmake install                                  # Windows
Note that in order to perform the install step above you need to have
appropriate permissions to write to the installation directory.
The above commands will install all the software components in this
directory tree under <PREFIX> (the directory given with --prefix or
its default):
Unix / Linux / macOS
bin/           Contains the openssl binary and a few other
               utility scripts.
include/openssl
               Contains the header files needed if you want
               to build your own programs that use libcrypto
               or libssl.
lib            Contains the OpenSSL library files.
lib/engines    Contains the OpenSSL dynamically loadable engines.

share/man/man1 Contains the OpenSSL command line man-pages.
share/man/man3 Contains the OpenSSL library calls man-pages.
share/man/man5 Contains the OpenSSL configuration format man-pages.
share/man/man7 Contains the OpenSSL other misc man-pages.

share/doc/openssl/html/man1
share/doc/openssl/html/man3
share/doc/openssl/html/man5
share/doc/openssl/html/man7
               Contains the HTML rendition of the man-pages.
OpenVMS
‘arch’ is replaced with the architecture name, ALPHA or IA64,
‘sover’ is replaced with the shared library version (0101 for 1.1), and
‘pz’ is replaced with the pointer size OpenSSL was built with:
[.EXE.'arch']  Contains the openssl binary.
[.EXE]         Contains a few utility scripts.
[.include.openssl]
               Contains the header files needed if you want
               to build your own programs that use libcrypto
               or libssl.
[.LIB.'arch']  Contains the OpenSSL library files.
[.ENGINES'sover''pz'.'arch']
               Contains the OpenSSL dynamically loadable engines.
[.SYS$STARTUP] Contains startup, login and shutdown scripts.
               These define appropriate logical names and
               command symbols.
[.SYSTEST]     Contains the installation verification procedure.
[.HTML]        Contains the HTML rendition of the manual pages.
Additional Directories
Additionally, install will add the following directories under
OPENSSLDIR (the directory given with --openssldir or its default)
for you convenience:
certs          Initially empty, this is the default location
               for certificate files.
private        Initially empty, this is the default location
               for private key files.
misc           Various scripts.
The installation directory should be appropriately protected to ensure
unprivileged users cannot make changes to OpenSSL binaries or files, or
install engines. If you already have a pre-installed version of OpenSSL as
part of your Operating System it is recommended that you do not overwrite
the system version and instead install to somewhere else.
Package builders who want to configure the library for standard locations,
but have the package installed somewhere else so that it can easily be
packaged, can use
$ make DESTDIR=/tmp/package-root install         # Unix
$ mms/macro="DESTDIR=TMP:[PACKAGE-ROOT]" install ! OpenVMS
The specified destination directory will be prepended to all installation
target paths.
Compatibility issues with previous OpenSSL versions
COMPILING existing applications
Starting with version 1.1.0, OpenSSL hides a number of structures that were
previously open. This includes all internal libssl structures and a number
of EVP types. Accessor functions have been added to allow controlled access
to the structures’ data.
This means that some software needs to be rewritten to adapt to the new ways
of doing things. This often amounts to allocating an instance of a structure
explicitly where you could previously allocate them on the stack as automatic
variables, and using the provided accessor functions where you would previously
access a structure’s field directly.
Some APIs have changed as well. However, older APIs have been preserved when
possible.
Post-installation Notes
With the default OpenSSL installation comes a FIPS provider module, which
needs some post-installation attention, without which it will not be usable.
This involves using the following command:
See the openssl-fipsinstall(1) manual for details and examples.
Advanced Build Options
Environment Variables
A number of environment variables can be used to provide additional control
over the build process. Typically these should be defined prior to running
Configure. Not all environment variables are relevant to all platforms.
AR
               The name of the ar executable to use.

BUILDFILE
               Use a different build file name than the platform default
               ("Makefile" on Unix-like platforms, "makefile" on native Windows,
               "descrip.mms" on OpenVMS).  This requires that there is a
               corresponding build file template.
               See [Configurations/README.md](Configurations/README.md)
               for further information.

CC
               The compiler to use. Configure will attempt to pick a default
               compiler for your platform but this choice can be overridden
               using this variable. Set it to the compiler executable you wish
               to use, e.g. gcc or clang.

CROSS_COMPILE
               This environment variable has the same meaning as for the
               "--cross-compile-prefix" Configure flag described above. If both
               are set then the Configure flag takes precedence.

HASHBANGPERL
               The command string for the Perl executable to insert in the
               #! line of perl scripts that will be publicly installed.
               Default: /usr/bin/env perl
               Note: the value of this variable is added to the same scripts
               on all platforms, but it's only relevant on Unix-like platforms.

KERNEL_BITS
               This can be the value `32` or `64` to specify the architecture
               when it is not "obvious" to the configuration. It should generally
               not be necessary to specify this environment variable.

NM
               The name of the nm executable to use.

OPENSSL_LOCAL_CONFIG_DIR
               OpenSSL comes with a database of information about how it
               should be built on different platforms as well as build file
               templates for those platforms. The database is comprised of
               ".conf" files in the Configurations directory.  The build
               file templates reside there as well as ".tmpl" files. See the
               file [Configurations/README.md](Configurations/README.md)
               for further information about the format of ".conf" files
               as well as information on the ".tmpl" files.
               In addition to the standard ".conf" and ".tmpl" files, it is
               possible to create your own ".conf" and ".tmpl" files and
               store them locally, outside the OpenSSL source tree.
               This environment variable can be set to the directory where
               these files are held and will be considered by Configure
               before it looks in the standard directories.

PERL
               The name of the Perl executable to use when building OpenSSL.
               Only needed if builing should use a different Perl executable
               than what is used to run the Configure script.

RANLIB
               The name of the ranlib executable to use.

RC
               The name of the rc executable to use. The default will be as
               defined for the target platform in the ".conf" file. If not
               defined then "windres" will be used. The WINDRES environment
               variable is synonymous to this. If both are defined then RC
               takes precedence.

WINDRES
               See RC.
Makefile Targets
The Configure script generates a Makefile in a format relevant to the specific
platform. The Makefiles provide a number of targets that can be used. Not all
targets may be available on all platforms. Only the most common targets are
described here. Examine the Makefiles themselves for the full list.
all
               The target to build all the software components and
               documentation.

build_sw
               Build all the software components.
               THIS IS THE DEFAULT TARGET.

build_docs
               Build all documentation components.

clean
               Remove all build artefacts and return the directory to a "clean"
               state.

depend
               Rebuild the dependencies in the Makefiles. This is a legacy
               option that no longer needs to be used since OpenSSL 1.1.0.

install
               Install all OpenSSL components.

install_sw
               Only install the OpenSSL software components.

install_docs
               Only install the OpenSSL documentation components.

install_man_docs
               Only install the OpenSSL man pages (Unix only).

install_html_docs
               Only install the OpenSSL HTML documentation.

install_fips
               Install the FIPS provider module configuration file.

list-tests
               Prints a list of all the self test names.

test
               Build and run the OpenSSL self tests.

uninstall
               Uninstall all OpenSSL components.

reconfigure
reconf
               Re-run the configuration process, as exactly as the last time
               as possible.

update
               This is a developer option. If you are developing a patch for
               OpenSSL you may need to use this if you want to update
               automatically generated files; add new error codes or add new
               (or change the visibility of) public API functions. (Unix only).
Running Selected Tests
You can specify a set of tests to be performed
using the make variable TESTS.
See the section Running Selected Tests of
test/README.md.
Troubleshooting
Configuration Problems
Selecting the correct target
The ./Configure script tries hard to guess your operating system, but in some
cases it does not succeed. You will see a message like the following:
$ ./Configure
Operating system: x86-whatever-minix
This system (minix) is not supported. See file INSTALL.md for details.
Even if the automatic target selection by the ./Configure script fails,
chances are that you still might find a suitable target in the Configurations
directory, which you can supply to the ./Configure command,
possibly after some adjustment.
The Configurations/ directory contains a lot of examples of such targets.
The main configuration file is 10-main.conf, which contains all targets that
are officially supported by the OpenSSL team. Other configuration files contain
targets contributed by other OpenSSL users. The list of targets can be found in
a Perl list my %targets = ( ... ).
my %targets = (
...
"target-name" => {
    inherit_from     => [ "base-target" ],
    CC               => "...",
    cflags           => add("..."),
    asm_arch         => '...',
    perlasm_scheme   => "...",
},
...
)
If you call ./Configure without arguments, it will give you a list of all
known targets. Using grep, you can lookup the target definition in the
Configurations/ directory. For example the android-x86_64 can be found in
Configurations/15-android.conf.
The directory contains two README files, which explain the general syntax and
design of the configuration files.
- Configurations/README.md
- Configurations/README-design.md
If you need further help, try to search the openssl-users mailing list
or the GitHub Issues for existing solutions. If you don’t find anything,
you can raise an issue to ask a question yourself.
More about our support resources can be found in the SUPPORT file.
Configuration Errors
If the ./Configure or ./Configure command fails with an error message,
read the error message carefully and try to figure out whether you made
a mistake (e.g., by providing a wrong option), or whether the script is
working incorrectly. If you think you encountered a bug, please
raise an issue on GitHub to file a bug report.
Along with a short description of the bug, please provide the complete
configure command line and the relevant output including the error message.
Note: To make the output readable, please add a ‘code fence’ (three backquotes
``` on a separate line) before and after your output:
 ```
 ./Configure [your arguments...]

 [output...]

 ```
Build Failures
If the build fails, look carefully at the output. Try to locate and understand
the error message. It might be that the compiler is already telling you
exactly what you need to do to fix your problem.
There may be reasons for the failure that aren’t problems in OpenSSL itself,
for example if the compiler reports missing standard or third party headers.
If the build succeeded previously, but fails after a source or configuration
change, it might be helpful to clean the build tree before attempting another
build. Use this command:
$ make clean                                     # Unix
$ mms clean                                      ! (or mmk) OpenVMS
$ nmake clean                                    # Windows
Assembler error messages can sometimes be sidestepped by using the no-asm
configuration option. See also notes.
Compiling parts of OpenSSL with gcc and others with the system compiler will
result in unresolved symbols on some systems.
If you are still having problems, try to search the openssl-users mailing
list or the GitHub Issues for existing solutions. If you think you
encountered an OpenSSL bug, please raise an issue to file a bug report.
Please take the time to review the existing issues first; maybe the bug was
already reported or has already been fixed.
Test Failures
If some tests fail, look at the output. There may be reasons for the failure
that isn’t a problem in OpenSSL itself (like an OS malfunction or a Perl issue).
You may want increased verbosity, that can be accomplished as described in
section Test Failures of test/README.md.
You may also want to selectively specify which test(s) to perform. This can be
done using the make variable TESTS as described in section Running
Selected Tests of test/README.md.
If you find a problem with OpenSSL itself, try removing any
compiler optimization flags from the CFLAGS line in the Makefile and
run make clean; make or corresponding.
To report a bug please open an issue on GitHub, at
https://github.com/openssl/openssl/issues.
Notes
Notes on multi-threading
For some systems, the OpenSSL Configure script knows what compiler options
are needed to generate a library that is suitable for multi-threaded
applications. On these systems, support for multi-threading is enabled
by default; use the no-threads option to disable (this should never be
necessary).
On other systems, to enable support for multi-threading, you will have
to specify at least two options: threads, and a system-dependent option.
(The latter is -D_REENTRANT on various systems.) The default in this
case, obviously, is not to include support for multi-threading (but
you can still use no-threads to suppress an annoying warning message
from the Configure script.)
OpenSSL provides built-in support for two threading models: pthreads (found on
most UNIX/Linux systems), and Windows threads. No other threading models are
supported. If your platform does not provide pthreads or Windows threads then
you should use Configure with the no-threads option.
For pthreads, all locks are non-recursive. In addition, in a debug build,
the mutex attribute PTHREAD_MUTEX_ERRORCHECK is used. If this is not
available on your platform, you might have to add
-DOPENSSL_NO_MUTEX_ERRORCHECK to your Configure invocation.
(On Linux PTHREAD_MUTEX_ERRORCHECK is an enum value, so a built-in
ifdef test cannot be used.)
Notes on shared libraries
For most systems the OpenSSL Configure script knows what is needed to
build shared libraries for libcrypto and libssl. On these systems
the shared libraries will be created by default. This can be suppressed and
only static libraries created by using the no-shared option. On systems
where OpenSSL does not know how to build shared libraries the no-shared
option will be forced and only static libraries will be created.
Shared libraries are named a little differently on different platforms.
One way or another, they all have the major OpenSSL version number as
part of the file name, i.e. for OpenSSL 1.1.x, 1.1 is somehow part of
the name.
On most POSIX platforms, shared libraries are named libcrypto.so.1.1
and libssl.so.1.1.
on Cygwin, shared libraries are named cygcrypto-1.1.dll and cygssl-1.1.dll
with import libraries libcrypto.dll.a and libssl.dll.a.
On Windows build with MSVC or using MingW, shared libraries are named
libcrypto-1_1.dll and libssl-1_1.dll for 32-bit Windows,
libcrypto-1_1-x64.dll and libssl-1_1-x64.dll for 64-bit x86_64 Windows,
and libcrypto-1_1-ia64.dll and libssl-1_1-ia64.dll for IA64 Windows.
With MSVC, the import libraries are named libcrypto.lib and libssl.lib,
while with MingW, they are named libcrypto.dll.a and libssl.dll.a.
On VMS, shareable images (VMS speak for shared libraries) are named
ossl$libcrypto0101_shr.exe and ossl$libssl0101_shr.exe. However, when
OpenSSL is specifically built for 32-bit pointers, the shareable images
are named ossl$libcrypto0101_shr32.exe and ossl$libssl0101_shr32.exe
instead, and when built for 64-bit pointers, they are named
ossl$libcrypto0101_shr64.exe and ossl$libssl0101_shr64.exe.
Notes on random number generation
Availability of cryptographically secure random numbers is required for
secret key generation. OpenSSL provides several options to seed the
internal CSPRNG. If not properly seeded, the internal CSPRNG will refuse
to deliver random bytes and a «PRNG not seeded error» will occur.
The seeding method can be configured using the --with-rand-seed option,
which can be used to specify a comma separated list of seed methods.
However, in most cases OpenSSL will choose a suitable default method,
so it is not necessary to explicitly provide this option. Note also
that not all methods are available on all platforms. The FIPS provider will
silently ignore seed sources that were not validated.
I) On operating systems which provide a suitable randomness source (in
form of a system call or system device), OpenSSL will use the optimal
available method to seed the CSPRNG from the operating system’s
randomness sources. This corresponds to the option --with-rand-seed=os.
II) On systems without such a suitable randomness source, automatic seeding
and reseeding is disabled (--with-rand-seed=none) and it may be necessary
to install additional support software to obtain a random seed and reseed
the CSPRNG manually. Please check out the manual pages for RAND_add(),
RAND_bytes(), RAND_egd(), and the FAQ for more information.
Notes on assembler modules compilation
Compilation of some code paths in assembler modules might depend on whether the
current assembler version supports certain ISA extensions or not. Code paths
that use the AES-NI, PCLMULQDQ, SSSE3, and SHA extensions are always assembled.
Apart from that, the minimum requirements for the assembler versions are shown
in the table below:
| ISA extension | GNU as | nasm | llvm |
|---|---|---|---|
| AVX | 2.19 | 2.09 | 3.0 |
| AVX2 | 2.22 | 2.10 | 3.1 |
| ADCX/ADOX | 2.23 | 2.10 | 3.3 |
| AVX512 | 2.25 | 2.11.8 | 3.6 (*) |
| AVX512IFMA | 2.26 | 2.11.8 | 6.0 (*) |
| VAES | 2.30 | 2.13.3 | 6.0 (*) |
(*) Even though AVX512 support was implemented in llvm 3.6, prior to version 7.0
an explicit -march flag was apparently required to compile assembly modules. But
then the compiler generates processor-specific code, which in turn contradicts
the idea of performing dispatch at run-time, which is facilitated by the special
variable OPENSSL_ia32cap. For versions older than 7.0, it is possible to work
around the problem by forcing the build procedure to use the following script:
#!/bin/sh
exec clang -no-integrated-as "$@"
instead of the real clang. In which case it doesn’t matter what clang version
is used, as it is the version of the GNU assembler that will be checked.
Here’s a solution that may delight those who have implemented WSL (Windows Subsystem for Linux). You can just use:
wsl openssl ...whatever_args...
The point is that many who’ve implemented WSL may not realize they can call upon ANY linux command (within their underlying WSL linux vm) right from the DOS or powershell command-line this way. (It’s easy to fall into thinking the point of WSL is to use it to «shell into the vm», which is indeed an option, but the power to just run linux commands from Windows is a real value-add of WSL.)
And to be clear, in doing the command as above, whatever file names or folders you may point to (or create) will be relative to the Windows folder from which you run the command. So doing for example, openssl req to create a self-signed cert, where you may name -keyout selfsigned.key -out selfsigned.crt, those two files will be created in the Windows folder where you ran the command.
That said, there are ways this could fall down for some openssl command examples one may find, such as if they tried to use various bash-specific arguments, in which case «shelling into wsl» to run the command may well be the better choice. You could still direct things to be found or placed on the host, but I don’t mean this answer to become overly-focused on such WSL aspects. I just wanted to propose it as another alternative to installing openssl.
What is OpenSSL?
OpenSSL is a single-system image clustering system that is open-source. It allows a group of computers to be viewed as a single colossal system, giving programs running on any one machine access to all of the cluster’s resources. [It is the culmination of a long development process that began with the development of LOCUS in the early 1980s.
OpenSSL allows a group of separate computers (nodes) to be regarded as one massive system. Processes running on any node have full access to all node resources.
Functionalities can be automatically transferred from node to node to balance system utilization. Alternatively, the cluster might be set up so that each node has direct access to the file system.
Step 1 Download OpenSSL Binaries
Link to Download OpenSSL binaries files: https://sourceforge.net/projects/openssl/files/
In our article, we are downloading
https://sourceforge.net/projects/openssl/files/openssl-1.0.2j-fips-x86_64/
Step 2 Unpack OpenSSL Zip files
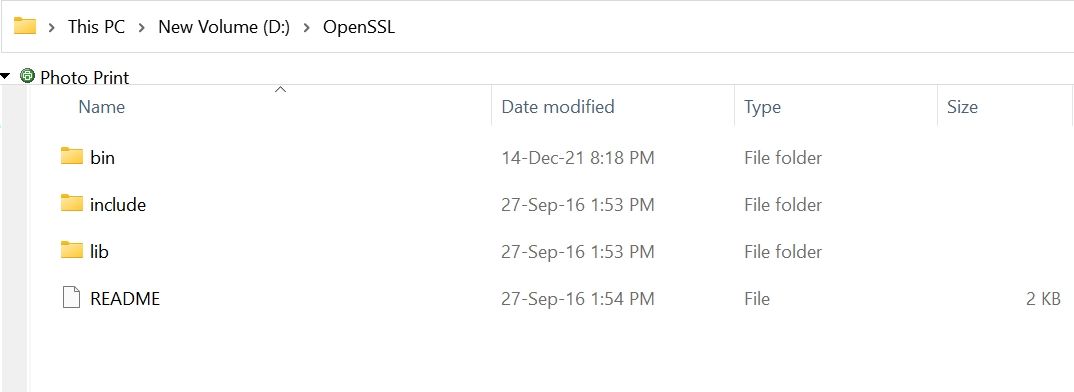
Unpack the content of (openssl-1.0.2j-fips-x86_64.zip) zip file into your desired location in our example we are using (D:OpenSSL) folder
This comes with three folders (bin, include & lib) as shown in the image
Step 3: Set OpenSSL Path in Windows path
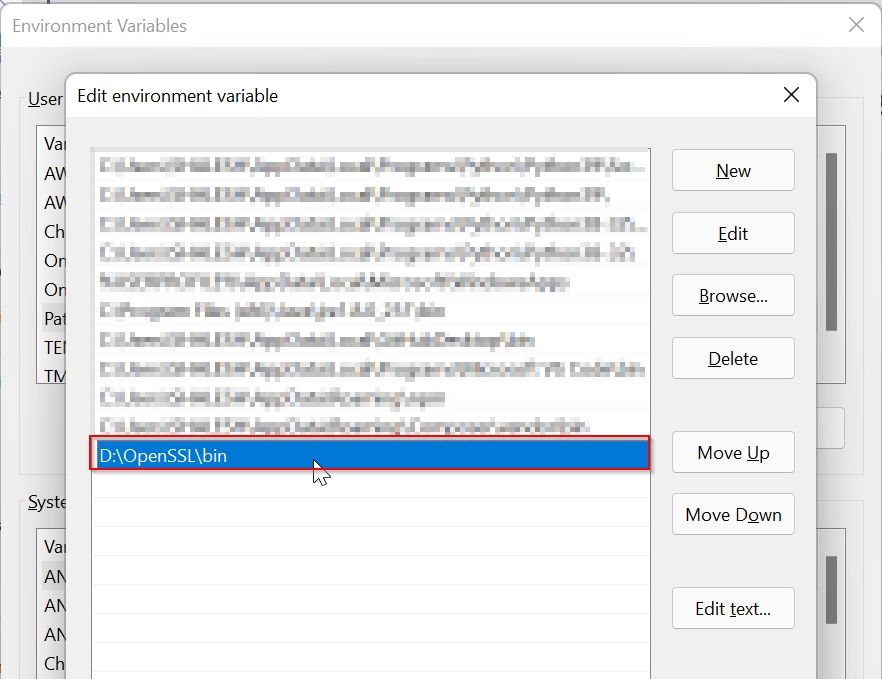
We have extracted OpenSSL files in directory D:OpenSSLbin
So our OpenSSL path is D:OpenSSLbin
Open explorer and right-mouse click on This PC icon as shown in the image
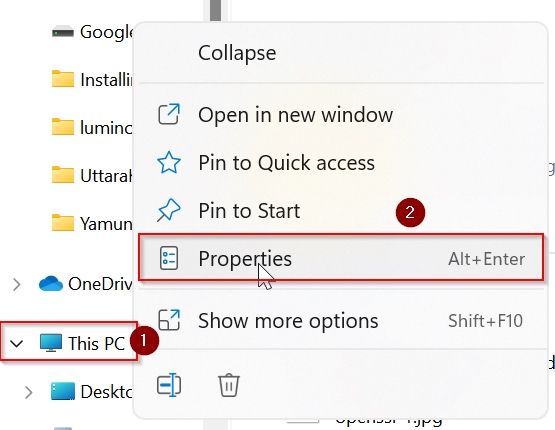
Under System About window click on the Advanced system settings button

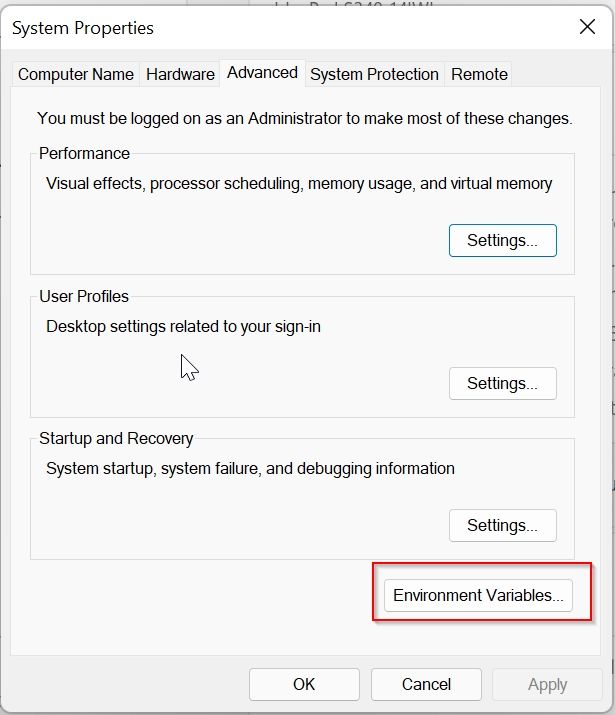
Under the System Property window click on the Environment Variables button
Under the Advanced Environment window select Path and then click on the Edit button
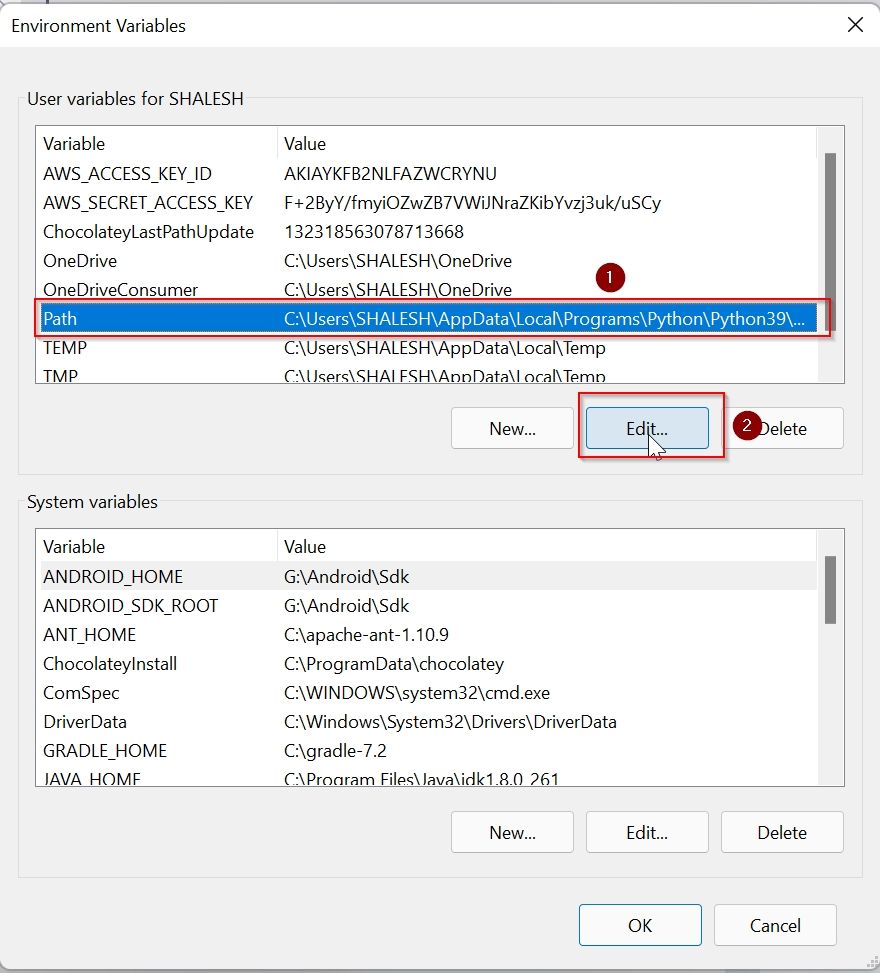
Under the Environment Variable window click on the New button
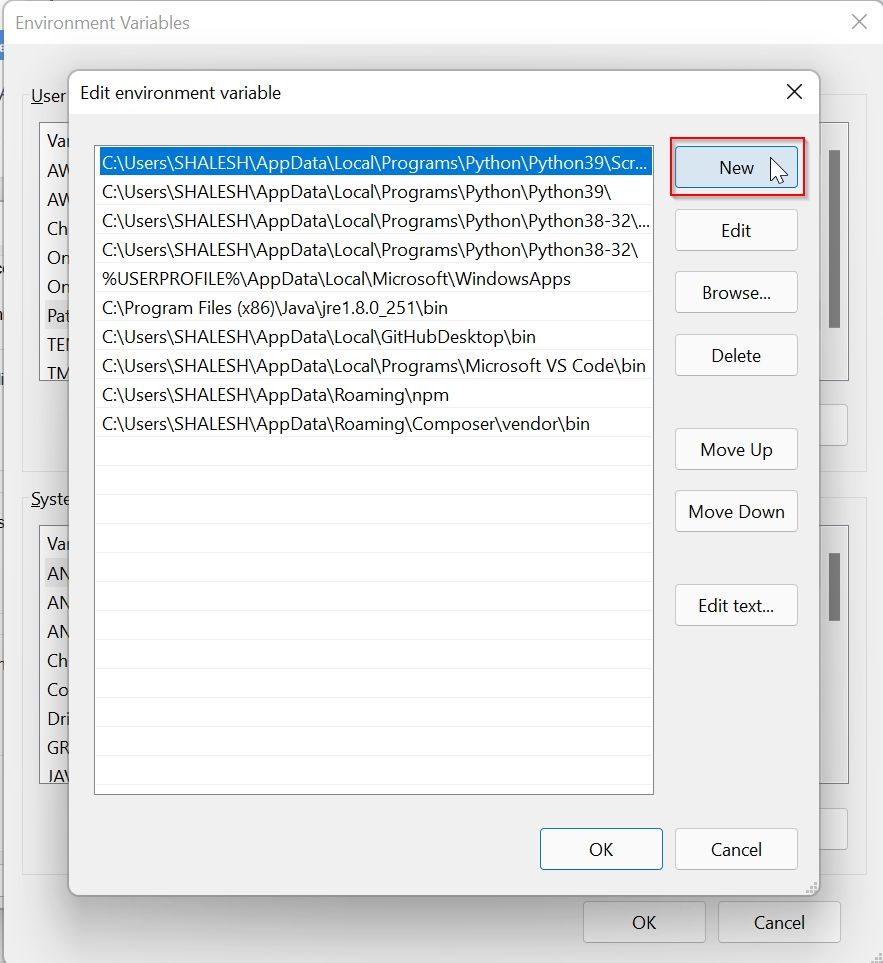
Paste the path of OpenSSL (D:OpenSSLbin) and click the OK button
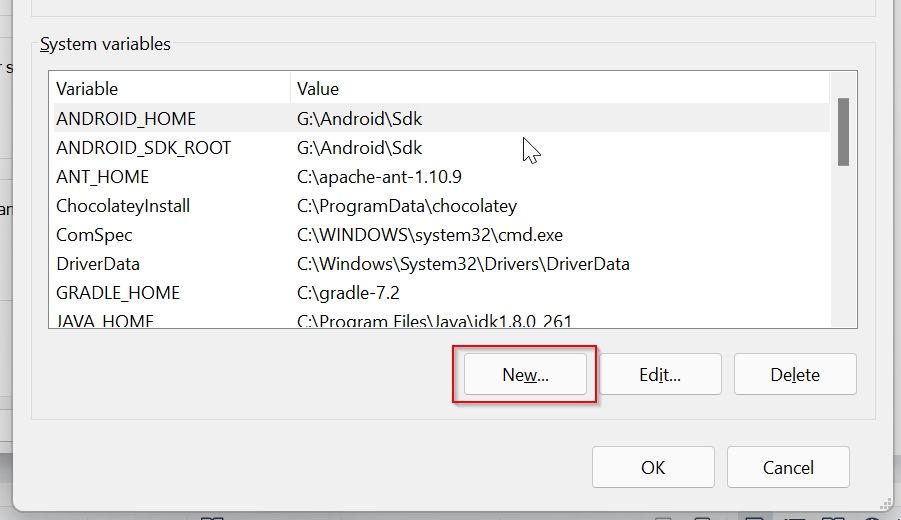
Step 4: Set System Variable for OPENSSL_CONF
Now to set system variable for OPENSSL_CONF
Click on the New button under the System Variable window
Now add system variable values as given, the path to your openssl.conf file location as shown below, and click on the OK button
Name: OPENSSL_CONF
Value: D:OpenSSLbinopenssl.cnf
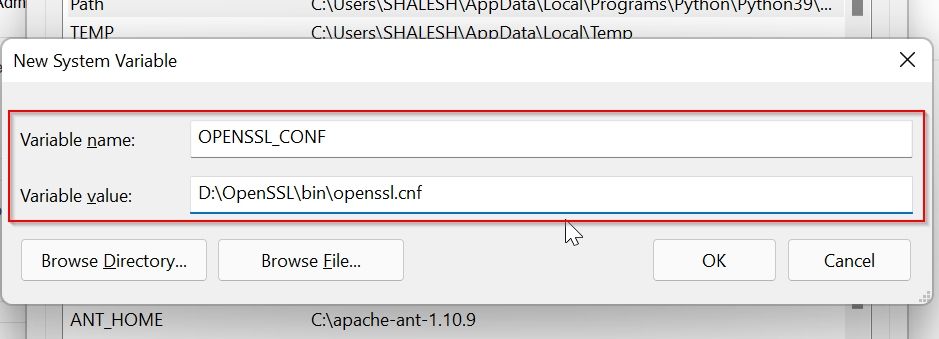
Now you can see that the system variable is set

For window 10 and 11 you don’t have to restart your system to effect changes, else you need to restart the system
Step5: Test OpenSSL
To test OpenSSL installed properly open the terminal and check the OpenSSL version
cmd: openssl version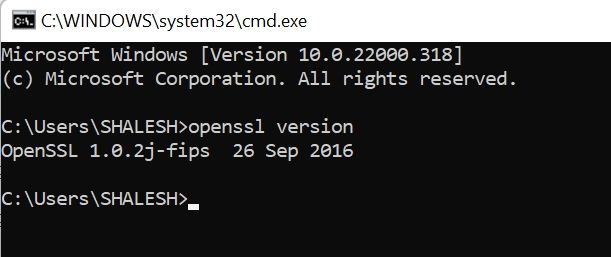
If it displays the OpenSSL version then OpenSSL is installed properly.
Important Commands for Open SSL
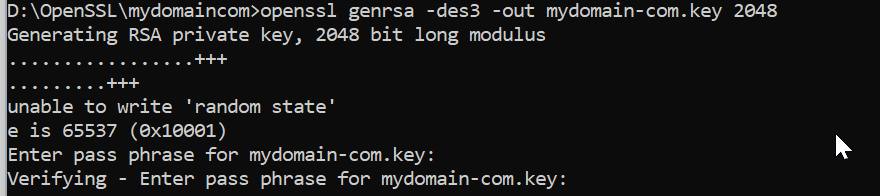
Creating a Private Key
Private Key is very important it is required for all operations in SSL, this Private key is required to create a CSR file.
openssl genrsa -des3 -out mydomain-com.key 2048It will ask for the password, please keep the password in a safe place because it is required in many places.
1. Create CSR Creating a Certificate Signing Request
CSR file is required to generate an SSL certificate.
This CSR file contains information about the certificate and private key
openssl req -key mydomain-com.key -new -out mydomain-com.csrInformation required by CSR:
Enter pass phrase for mydomain-com.key:
Country Name (2 letter code) [AU]:IN
State or Province Name (full name) [Some-State]:Haryana
Locality Name (eg, city) []:Gurgaon
Organization Name (eg, company) [Internet Widgits Pty Ltd]:myDomain
Organizational Unit Name (eg, section) []:IT
Common Name (e.g. server FQDN or YOUR name) []:www.mydomain.com
Email Address []:contact@mydomain.com
Please enter the following ‘extra’ attributes
to be sent with your certificate request
A challenge password []:
An optional company name []:
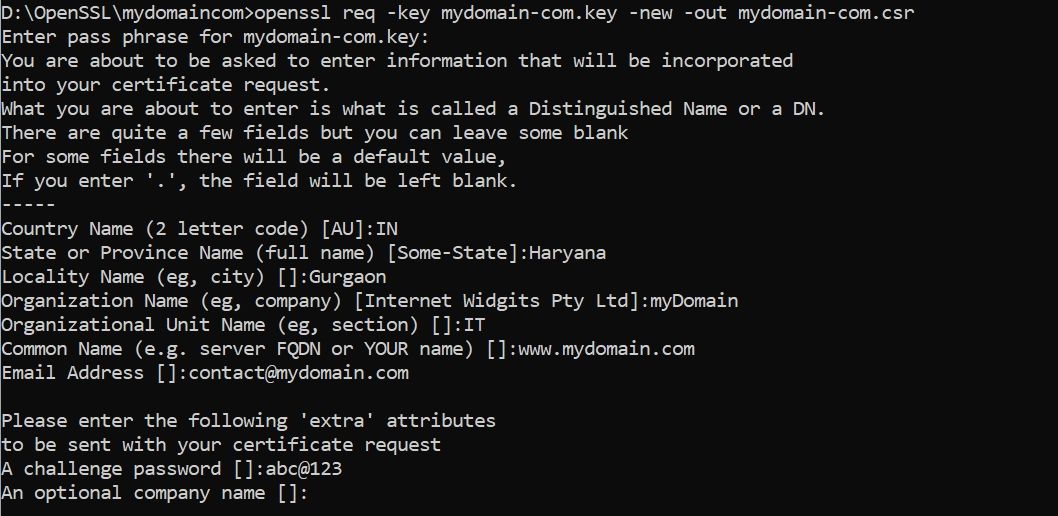
Important: Common Name is the Fully Qualified Domain Name for which you want an SSL certificate.
This CSR file is used by different SSL certificate companies to generate SSL Certificate
Generate Private key and CSR with Single command.
openssl req -newkey rsa:2048 -keyout mydomain-com.key -out mydomain-com.csrCreating a Self-Signed Certificate
A self-Signed Certificate is an SSL certificate is generated by using your own private key, it is not used for commercial purposes because it shows a warning that says the certificate is not trusted.
So self-signed certificate can be used for development and testing purposes.
openssl x509 -signkey mydomain-com.key -in mydomain-com.csr -req -days 365 -out mydomain-com.crt
Convert CRT file to PFX file
The .pfx file is required to install an SSL certificate in the windows system, this file contains Private Key and SSL certificate.
openssl pkcs12 -export -out mydomain-com.pfx -inkey mydomain-com.key -in mydomain-com.crtGenerate SHA265 Key from .crt file
openssl x509 -in mydomain.crt -pubkey -noout | openssl pkey -pubin -outform der | openssl dgst -sha256 -binary | openssl enc -base64Output:
XXXXXXxxXXXXXXXXXXXXXXXxXXXXxXXXX121XX=Generate PF12 file .crt file
openssl pkcs12 -export -out yourdomain.com.p12 -inkey yourdomain.com.key -in yourdomain.crt -certfile CACert.crtyourdomain.com.key: is the key file, it get generated when we create .CSR file
CACert.crt : root certificate, it comes with SSL certificate bundel file.
yourdomain.crt: is the main certificate file
В эпоху кибервойн единственная разумная позиция – быть параноиком, а это означает, помимо прочего, быть параноиком по поводу обновлений программного обеспечения.
Взять к примеру OpenSSL.
Эта криптографическая библиотека с открытым исходным кодом, которая реализует протоколы Transport Layer Security (TLS) и Secure Sockets Layer (SSL), разработана для «защиты связи по компьютерным сетям от перехвата», но угадайте, что?
С самого начала она была пронизана ошибками.
Это может быть неизбежно, в определенной степени – в конце концов, мы говорим о программном обеспечении.
Несмотря на то, что вы не можете ничего сделать с ошибками, которые еще предстоит идентифицировать, вы можете по крайней мере защитить свои системы от тех ошибок, которые уже исправлены и задокументированы.
Жаль, что официальный сайт OpenSSL предлагает только исходники для Linux.
Хотя дистрибутивы Linux обычно поставляются с OpenSSL, это не никак относится к Windows … или, скажем, «дистрибутивам Windows».
Если вы хотите запустить его, вам нужен бинарник под Windows, и если вы не хотите его собирать самостоятельно, вы должны найти другой вариант.
В этой статье я покажу,как можно настроить OpenSSL в Windows, не имея дело при этом дела со сборкой из исходников.
Содержание
- Шаг 1. Скачать бинарник
- Шаг 2. Запустите установщик
- Шаг 3. Запустите бинарный файл OpenSSL
Шаг 1. Скачать бинарник
Поиск бинарных файлов OpenSSL для Windows – непростая задача, но не отчаивайтесь.
Они существуют.
Чтобы загрузить нужный, перейдите по ссылке:
https://slproweb.com/products/Win32OpenSSL.html
Не дайте себя одурачить ни строкой Win32 в URL-адресе, ни навигацией, указывающей на казалось бы древнюю страницу загрузки еще с 2004 года.
Прокрутите страницу вниз до раздела «Download Win32 OpenSSL».
Теперь вам нужно выбрать правильный файл из этого списка.
Для каждой версии есть два основных типа: light и full.
Загрузите файл под названием «Win64 OpenSSL v1.1.0f» (или версию с более новой версией, как только она станет доступна), чтобы скачать фулл установщик.
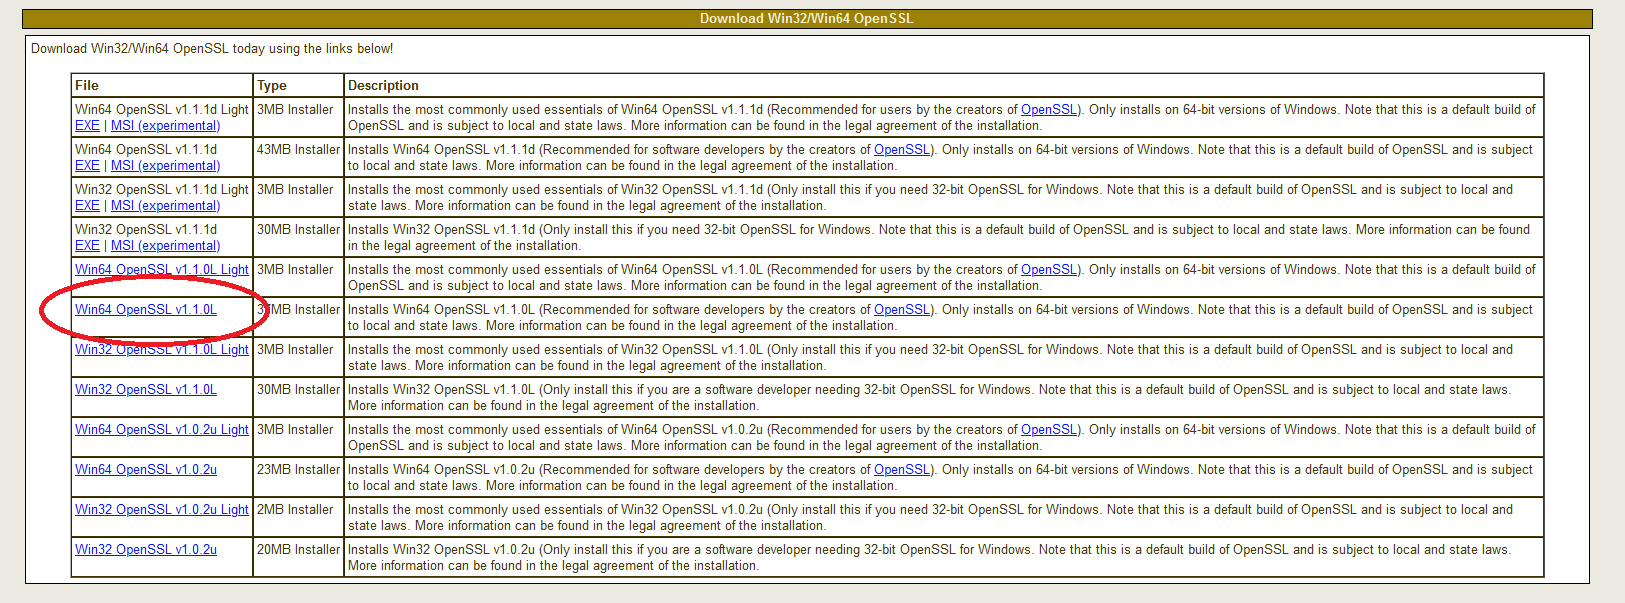
Текущая версия на момент написания этой статьи (OpenSSL 1.1.0h) сильно отличается от предыдущих версий.
Это совсем не одно и то же, поэтому обратите внимание на номера релизов!
Худшее, что вы можете сделать, – это использовать старую версию, в которой есть задокументированные ошибки.
Шаг 2. Запустите установщик
Мы рекомендуем установить OpenSSL вне вашей системной директории Windows.
Следуйте инструкциям по установке через GUI.
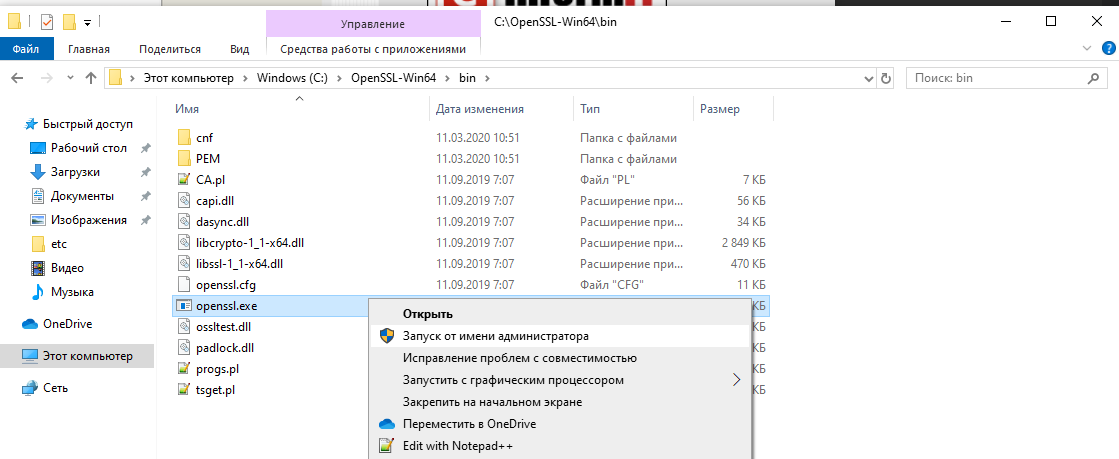
Шаг 3. Запустите бинарный файл OpenSSL
Чтобы начать работу с OpenSSL, вы можете просто щелкнуть по нему правой кнопкой мыши в проводнике Windows в месте его установки, например в моем случае:
C:OpenSSL-Win64bin
затем выберите «Запуск от имени администратора».
Откроется окно cmd с командной строкой OpenSSL:
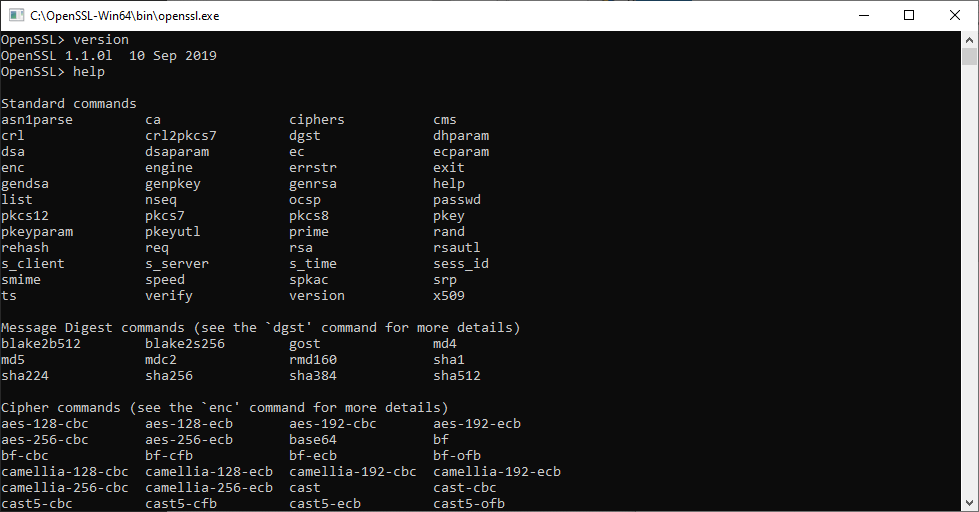
Теперь вы можете начать создавать ключи OpenSSL. (Кстати, пользователи утилиты удаленного доступа PuTTY могут экспортировать ключ OpenSSH из PuTTYgen.)
При использовании OpenSSL в Windows таким способом вы просто пропускаете команду openssl, которую видите в приглашении.
Например, чтобы создать пару ключей с помощью OpenSSL в Windows, вы можете ввести:
openssl req -newkey rsa:2048 -nodes -keyout key.pem -x509 -days 365 -out certificate.pem
и следуйте инструкциям на экране, как обычно.
Чтобы просмотреть сертификат:
openssl x509 -text -noout -in certificate.pem
In this post I explain how to install OpenSSL on Windows 10. OpenSSL is a full-featured toolkit for the Transport Layer Security (TLS) and Secure Sockets Layer (SSL) protocols. It is licensed under an Apache-style license. This tutorial will help you to install OpenSSL on Windows operating systems.
Download OpenSSL Binary
Download the latest OpenSSL windows installer file from the following download page. Click the below link to visit OpenSSL download page:
http://slproweb.com/products/Win32OpenSSL.html

Run OpenSSL Installer
Now run the OpenSSL installer on your system. The OpenSSL required Microsoft Visual C++ to be installed on your system. If your system doesn’t have Microsoft Visual C++ installed, the installer will show your message like:

Click Yes to download and install required Microsoft Visual C++ package on your system.

Then again run the OpenSSL installer and follow the wizard.

Setup Environment Variables
Now set the environment variables to function OpenSSL properly on your system. You are required to set OPENSSL_CONF and Path environment variables.
Firstly, start to open Settings from the menu Windows and search for environment.

Secondly, select the option “Edit the system environment variables“.

Thirdly, at the bottom of this window, click on Environment Variables…

So, in the section titled “System variables“, click to New to add a new variable. The first one is OPENSSL_CONF. Click on Browse Files to select openssl.cfg in the OpenSSL directory (by default C:Program FilesOpenSSL-Win64bin).

Now, double click on the variable called “Path“.

Finally, click on New and browse your computer to the OpenSSL directory and select bin folder. Click Ok and save.
Run OpenSSL Binary
Finally, open a command prompt or PowerShell and type openssl to get OpenSSL prompt. Then run version command on OpenSSL proper to view installed OpenSSL version.

Conclusion
In conclusion, this is how to install OpenSSL on Windows 10. If you have any question, please use our Forum.
Generating SSL certificates can be a daunting task, one filled with frustration and sorrow. But it doesn’t have to be that way! If you have Windows 10 and OpenSSL along with a little help from this tutorial, you will be well on your way.
Not a reader? Watch this related video tutorial!
Not seeing the video? Make sure your ad blocker is disabled.
In this article, you’re going to learn how to install OpenSSL on Windows 10. Once installed, you’ll then generate SSL certificates, troubleshoot and debug certificates, and convert between formats.
Let’s begin mastering OpenSSL on Windows 10 with PowerShell!
Related: Managing Certs with Windows Certificate Manager and PowerShell
Prerequisites
In this article, you are going to learn using a hands-on approach. While OpenSSL historically is a Linux OS utility, you can use it with Windows OS as well.
- A Windows system with Local Administrator rights – The tutorial will be using Windows 10
- Windows PowerShell 5.1 (comes with Windows) or PowerShell 7
- Chocolatey – A package manager for Windows installed.
- PowerShell ISE, Visual Studio Code or any text editor of your choice
All screenshots in this guide were taken from Windows 10 build 1909 and PowerShell 7.
Installing OpenSSL on Windows 10 with PowerShell and Chocolatey
Assuming you have installed Chocolatey using the installation instructions, your first task is to install OpenSSL on Windows 10. To do this, open up your PowerShell console and run choco install OpenSSL.Lightas shown below.

That’s it! You’ve now installed OpenSSL with PowerShell.
Set up a Working Directory
This tutorial will be creating a few certificates to learn from. To ensure all of the work you do here is confined to a single folder you can clean up later, go ahead and create one.
This tutorial will store all certificates and related files in the C:certs folder. You can create a folder with PowerShell by running the below command.
New-Item -ItemType Directory -Path C:certsNow it’s time to configure OpenSSL.
Configuring OpenSSL
By default, OpenSSL on Windows 10 does not come with a configuration file. This is intentional because there are a lot of configuration options that you can customize. For the purposes of this guide, you are going to use a sample configuration that you can customize later to best suit your security requirements.
Open up PowerShell and run the below command. This command downloads a sample configuration file from MIT and saves it as openssl.cnf in the current working directory.
You can now open up the openssl.cnf file and you should see something that looks like below.
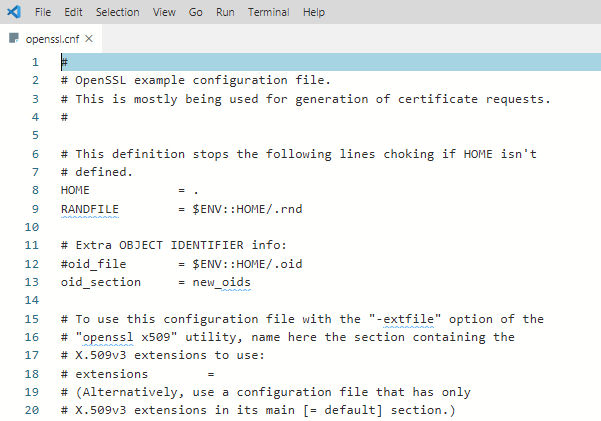
The downloaded configuration will work as-is for now. Do not use the defaults in a production environment!
Update PowerShell Profile Environment Variables
To make things go smoothly, you should modify your PowerShell profile on Windows 10. Setting up some environment variables allows you to easily switch between different versions of OpenSSL that you may have installed.
I suggest adding two environment variables to your PowerShell profile called path and OPENSSL_CONF. You will update the PATH environment variable to ensure you can run the openssl binary in any location while on the command line.
Below you’ll see a way to create a PowerShell profile if you don’t already have one. This command appends the OpenSSL binary path to your PATH and assign the configuration file path to OPENSSL_CONF.
# Add environment variables to PowerShell profile
# Test for a profile, if not found create one!
if (-not (Test-Path $profile) ) {
    New-Item -Path $profile -ItemType File -Force
}

# Edit profile to add these lines
'$env:path = "$env:path;C:Program FilesOpenSSLbin"' | Out-File $profile -Append
'$env:OPENSSL_CONF = "C:certsopenssl.cnf"' | Out-File $profile -Append
To use the environment variables, reload your profile typing . $profile or just close and reopen PowerShell.
Now you can easily invoke the openssl binary wherever you are in PowerShell as shown below.
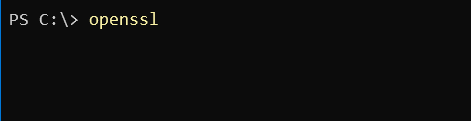
Using OpenSSL on Windows 10 to Generate a CSR & Private Key
Before you can create an SSL certificate, you must generate a certifiate-signing request (CSR). A CSR is an encoded file that provides you with a way to share your public key with a certificate authority (CA). This file contains identifying information, a signature algorithm, and a digital signature. Let’s create your first CSR and private key.
Related: Your Guide to X509 Certificates for Mortals
To create a CSR, run the below command. OpenSSL will then prompt you to enter some identifying information as you can see in the following demonstration.
openssl req -new -out MyFirst.csr
Once complete, you will have a valid CSR and private key which can be used to issue an SSL certificate to you.
The configuration file defaults can be edited further to streamline this process should you not want to enter data every time you generate a CSR.
You can read more about the available CSR options and view sample configurations in the man pages. OpenSSL also has an active GitHub repository with examples too.
Generating RSA Key Pairs
You can also create RSA key pairs (public/private) with OpenSSL. To do so, first, create a private key using the genrsa sub-command as shown below.
When you run the command below, OpenSSL on Windows 10 will generate a RSA private key with a key length of 2048 bits. This key is generated almost immediately on modern hardware. The resulting key is output in the working directory
# generate a private key using maximum key size of 2048
# key sizes can be 512, 758, 1024, 1536 or 2048.
openssl genrsa -out rsa.private 2048
Next, generate a public key using the private key that you just created using the rsa sub-command. The syntax below will create a public key called rsa.public in the working directory from the rsa.private private key.
# generate a public key using the private key
openssl rsa -in rsa.private -out rsa.public -pubout -outform PEM
Generating a Self-Signed Certificate
On occasion you may need to generate a self-signed certificate. Self-signed certificates are fine to use for lab use but not a secure practice to use in a production environment.
Let’s create a self-signed certificate before moving onto the next task. To do so, enter the command below to create an X509 SSL certificate. This certificate will use SHA256 cryptography that will be valid for 365 days using an RSA key length of 2048 bits. The certificate will be saved to the working directory.
openssl req -x509 -sha256 -nodes -days 365 -newkey rsa:2048 -keyout privateKey.key -out certificate.crtYou are now ready to import the certificate into a browser or server.
Validating CSRs, Certificates, and Keys with OpenSSL
Checking the information in a CSR, private key, certificate, or PKCS#12 can save you time troubleshooting SSL errors. Sometimes a wrong key may have been used to create a certificate, for example. You may have the wrong identifying information in the certificate.
Let’s start by checking a CSR using the req command and some parameters:
openssl req -text -noout -verify -in .MyFirst.csr
Details such as country name, organizational name, and the email address you entered when creating the CSR at the beginning of this guide, should match precisely.
You can also check a certificate using the x509 sub-command with a couple of parameters:
openssl x509 -in .certificate.crt -text -noout | more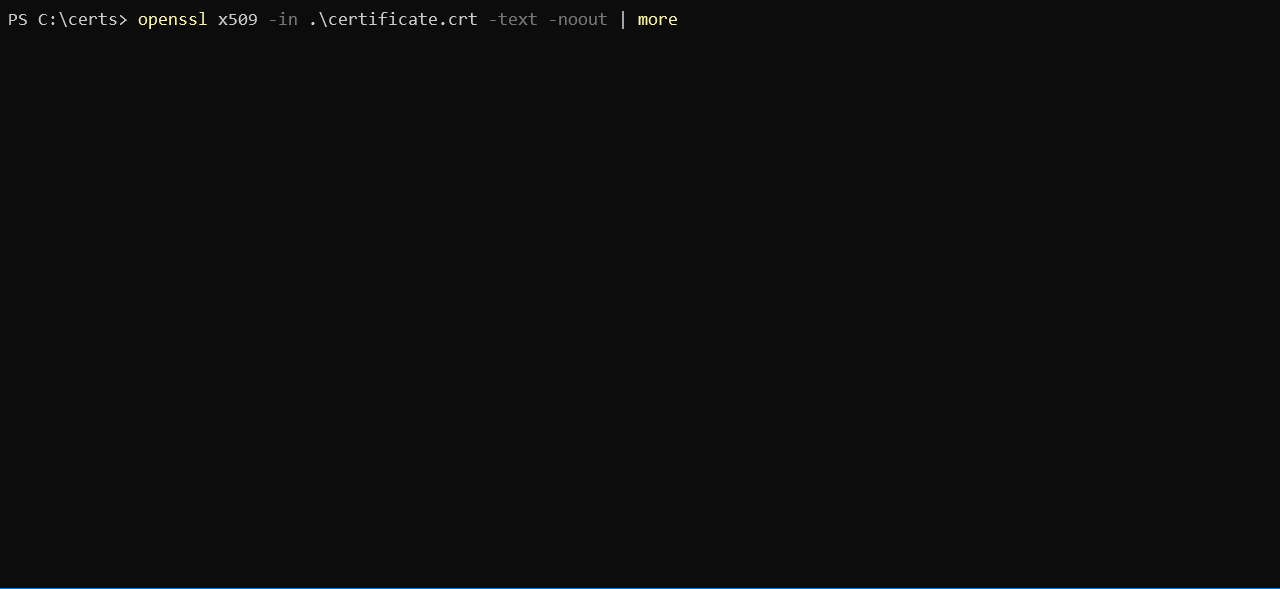
Converting Certificates with OpenSSL
There are occasions where an application does not use a particular certificate format. You can run into this issue with an application called HAproxy, for example that requires a PEM certificate when you may have a DER-formatted certificate (.crt .cer .der).
To demonstrate converting a certificate, let’s convert the self-signed certificate created earlier in a DER format (certificate.crt) to PEM. Use the code in the following code snippet to do so.
This command below uses the x509 sub-command with the parameter of -inform which should match the format of the -in file followed by the -out format.
openssl x509 -inform der -in .certificate.crt -out .certificate.pemYou can also reverse the order if you’d like to the DER format from PEM too as shown below.
openssl x509 -outform der -in .certificate.pem -out .certificate.derAnd last but not least, you can convert PKCS#12 to PEM and PEM to PKCS#12. This is a file type that contain private keys and certificates. To convert to PEM format, use the pkcs12 sub-command.
openssl pkcs12 -in .SomeKeyStore.pfx -out .SomeKeyStore.pem -nodesYou can convert a PEM certificate and private key to PKCS#12 format as well using -export with a few additional options. Below you are exporting a PKCS#12 formatted certificate using your private key by using SomeCertificate.crt as the input source. Using the -certfile option value MyCACert.crt allows you to validate SomeCertificate.crt.
openssl pkcs12 -export -out SomeCertificate.pfx -inkey SomePrivateKey.key -in SomeCertificate.crt -certfile MyCACert.crtTroubleshooting & Debugging
Now that you can create & convert CSR’s, certificates, and key pairs, it’s time to learn how to troubleshoot and debug them. OpenSSL comes with commands that make it a breeze to troubleshoot problems.
OpenSSL also allows you to check certificates for file integrity and test for possible data corruption. Using an MD5 checksum, you can use the following code examples to test certificates, keys and CSR’s:
# Certificates
openssl x509 -noout -modulus -in .certificate.crt | openssl md5

# Public / Private Keys
openssl rsa -noout -modulus -in .privateKey.key | openssl md5

# Certificate Server Request
openssl req -noout -modulus -in .MyFirst.csr | openssl md5

# Check an external SSL connection
openssl s_client -connect www.google.com:443
Once you have the original hash, you can then compare that original hash with a current hash to verify the certificate hasn’t been modified or corrupted.
Here’s a sample of what that code looks like when run in PowerShell:

Summary
In this article, you have learned how to install and configure OpenSSL on Windows 10, create a CSR, key pair, and SSL certificate. You have also learned how to convert between different certificate formats and do some basic troubleshooting using built-in sub-commands.
Additional Resources
- OpenSSL config man page
- OpenSSL commands
- Online SSL Checker
- Automating IIS SSL Certificate Installation with PowerShell
- How to Create Self-Signed Certificates with PowerShell
In the age of cyber warfare, being paranoid is the only reasonable attitude and that means, among other things, being paranoid about software updates.
Take for example OpenSSL. This open source cryptography library that implements the Transport Layer Security (TLS) and Secure Sockets Layer (SSL) protocols is designed to “secure communications over computer networks against eavesdropping”, but guess what: it has been riddled with bugs since its inception. This may be unavoidable, to a certain degree — after all, we are speaking about software. Even so, the inherent flaws of OpenSSL should not be an excuse for not keeping the version you use as bullet-proof as possible. Let’s not forget that your car is most likely hackable by a 15 year old and yet you still (presumably) lock the doors.
While you can’t do much about the yet-to-be-identified bugs, you can at least protect your systems from those bugs that have been already patched up and widely documented.
Too bad the official OpenSSL website offers Linux sources only.
While Linux distributions routinely come loaded with OpenSSL, this is not the case for Windows… or shall we say “Windows distributions”. (Didn’t Microsoft want to “Linuxify” its flaggship OS? Never mind.) If you want to run it, you need a Windows binary, and unless you are willing to compile it yourself, you have to to rely on someone else.
Here is how you can set up OpenSSL on Windows without having to deal with the code.
Step 1. Get hold of the binaries
Finding Windows binaries of OpenSSL is not an easy task, but don’t get discouraged. They do exist. To download them, navigate to:
https://slproweb.com/products/Win32OpenSSL.html
Don’t be fooled by the Win32 string in the URL nor by the navigation pointing you to a seemingly ancient download page from way back in 2004 (from the “Products” tab through the “Win32 OpenSSL link”). Scroll down the page to the section “Download Win32 OpenSSL”, ignoring the confusing string. Now you need to pick the right binary from the list. For each version, there are two basic types: the full installer and the light installer.
Download the one named “Win64 OpenSSL v1.1.0f” (or a higher-numbered version once it becomes available) to get the full installer.
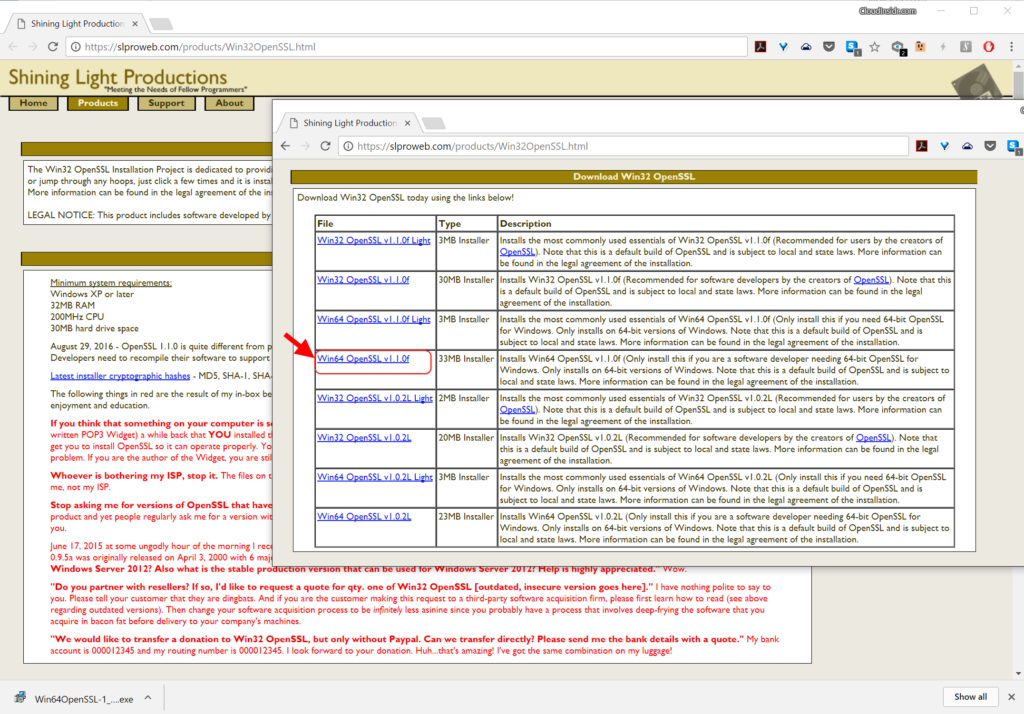
The current version as of this writing (OpenSSL 1.1.0h) is very different from previous releases. It is not the same thing at all so pay attention to the release numbers! The worst thing you can do is use an old version that has documented bugs that anyone could exploit following a howto!
Step 2. Run the installer
We recommend installing OpenSSL outside of your Windows system directory.
Step 3. Start the OpenSSL binary
To invoke OpenSSL, you can simply right-click on it in the Windows Explorer at its install location, for example in:
C:OpenSSL-Win64bin
then choose “Run as Administrator”.
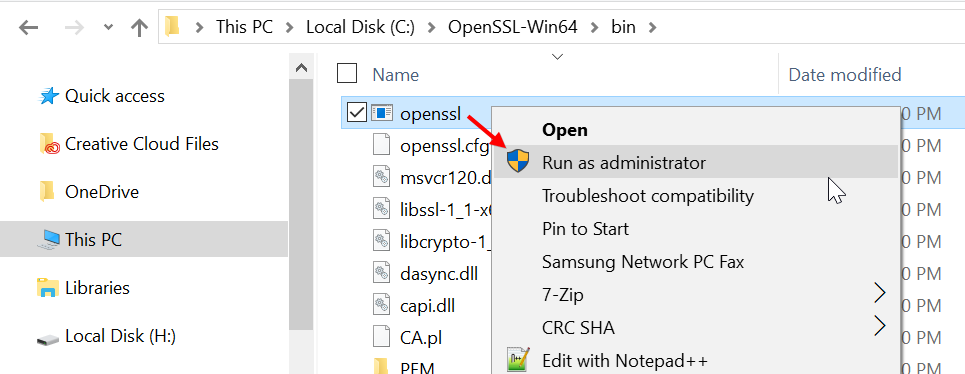
It will open a cmd window with the OpenSSL command prompt. Here is what to expect.

Now you are ready to start creating your OpenSSL keys. (Speaking of which: users of the remote access utility PuTTY can export an OpenSSH key from PuTTYgen.) When using OpenSSL on Windows in this way, you simply omit the openssl command you see at the prompt. For example, to generate your key pair using OpenSSL on Windows, you may enter:
openssl req -newkey rsa:2048 -nodes -keyout key.pem -x509 -days 365 -out certificate.pem
and follow the onscreen instructions as usual. To review the certificate:
openssl x509 -text -noout -in certificate.pem
and so forth.
Introduction
Open SSL project is open-source project that maintains the Open SSL software. It is a general-purpose cryptography library that is used to implement SSL and TLS protocols. Some of the uses of the Open SSL software is to
- Generate private keys
- Install self-signed or signed SSL/TLS certificates
- Identify certificate information
In one of my projects, I need to decrypt the private key information from a signed certificate. Using OpenSSL, you can verify the private key information to check the validity and legitimacy. In this article, we will see how to set up Open SSL software on Windows 10 machine. The same steps can be performed for Windows 11 too.
Download the Official Library Repository
Below steps tells how to download the required openssl files from GitHub repo.
Step 1
Validate if you have open SSL already configured. If there is no initial setup from the command prompt when you type in ‘OpenSSL’ you will be getting a message saying that
‘openssl’ is not recognized as an internal or external command, operable program or batch file’.

Step 2 — Create a folder for OpenSSL.
At first create a folder in local directory. In this case, I created it in C:InstallOpenSSLLibrary. The folder can be created anywhere.

Make sure there are no files existing.
Step 3
Clone the OpenSSL folder from the official Git page maintained by the OpenSSL project team. The official open SSL library is located at git.openssl.org.
For this step you need to have git installed on your windows machine. Please check the references section on how to install ‘Git’ on Windows machines. This Git install is a straightforward process as it has binary available, and it configures the required settings during the install.
Now go to the folder from the command prompt where the openssl folder is created. In my case it is c:InstallOpenSSLLibrary.

Now run the following command that copies the openssl library and files into this folder
git clone git://git.openssl.org/openssl.gityou should see message ‘Cloning into ‘openssl’ and should finish in sometime after that.

Now validate a subfolder ‘openssl’ is created and underneath it you have all the required files copied over from the git repository.
The above steps finishes downloading the required libraries to the folder.
Setup OpenSSL
Now we need to install the dependencies to configure the OpenSSL. The below steps need to be performed in following order
- Install PERL
- Install NASM
- Validating the PATH from the Environment variables.
- Configuring Openssl
Now we will perform the steps.
Step 1
Install the PERL. OpenSSL recommends to install Strawberry Perl from the below link
http://strawberryperl.com/. Since my windows OS is 64-bit, I have chosen to download the 64-bit MSI

Now you should have the required setup file downloaded to the local directory. In my case, it is ‘Downloads’ folder.

Double click on the set-up file and follow the steps. In my case, I have defaulted to the values from the install screens.

Accept the License Agreement.

Here I left the default. You can change to required folder if needed.


You should see below message

Once finished click on ‘Finish’. This confirms that PERL is downloaded and set up on your machine.
Install NASM
NASM stands for Net Assembler and is available at https://www.nasm.us/
Step 1
Download the latest version from the home page by clicking on version no.

Step 2
Now it will take to download page, with various builds. Since my OS is 64-bit, I am selecting Win64

Now click on the .exe file which should download to local directory. In my case, it got downloaded to ‘Downloads’ folder.

Step 3
Now go to the file and double click on the install.

If you get below message which prompts for privileged account, right click on setup and chose ‘Run as administrator’.


- It will ask for the user options I chose default.

- Next step is to choose components. I left it default.

- Next, it will ask for install path. Please make a note of this path, as this is required to set up PATH in environment variables.

- Next it will ask for start menu folder. Left it as default.

- The install should take less than 2 minutes and show status as ‘Completed’. Click on close

Setting up Environment Variables
Now the PERL and NASM software is configured, now it’s time to check the environment variables.
Step 1
For this from the windows start menu and search for ‘Environment Variables’ and click on ‘Edit the system environment variables.

Step 2
Click on the ‘Environment Variables’ in the ‘System Properties’ window.

Step 3
Look for Path under ‘System Variables’.

Step 4
If you observe the Environment Variables for Strawberry PERL has been configured, but not for NASM (Net Assembler).

For NASM the path value needs to be set up manually.
Step 5
Click on ‘New’ and enter the install location where NASM has been installed. In my case it is C:Program FilesNASM

Step 6
Click on Ok for 3 times and exit out of the Environment Variables window.
The above steps finish the configuration of Environment Variables.
Configuring Open SSL
Now we have all the pre-requisites set up for Openssl, now it’s time to finish the final steps.
Step 1
Open the cmd prompt as an administrator.

Step 2
Change the directory to the Openssl folder. In my case it is C:InstallOpenSSLLibraryopenssl

Step 3
Type In below command
perl Configure
At the end, you should get message ‘Open SSL has been successfully configured’.
Validation
Now close the admin command prompt and open the normal command prompt and type in ‘Openssl’. You should see Openssl command prompt.

Conclusion
Thus, in this article, we have seen what Openssl is and how this is configured on windows machines.
References
- https://github.com/openssl/openssl
- https://www.openssl.org/
- https://github.com/openssl/openssl/blob/master/NOTES-WINDOWS.md
- https://www.c-sharpcorner.com/blogs/how-to-install-git-for-windows