Oracle client 19c is an application which has full ability to connect to Oracle database server, but it requires to be installed and registered with Windows platform. That’s the biggest difference from Oracle instant client.
Here are steps to install Oracle client.
1. Unzip Oracle Client 19c
Here we use WINDOWS.X64_193000_client.zip from Oracle Database 19c Download for Microsoft Windows x64 (64-bit).
Please note that, the web page contains not only client packages, but also a lot of database server ones. You need to find the right one by pressing Ctrl + f and searching «client» keyword on the page.
Once you have downloaded the right one, you should unzip the package like this:

Oracle Client 19c Unzipped
2. Initiate Installation

Double Click on setup.exec to initiate Oracle Client 19c Installation
3. Select Administrator Type
To get the full power of Oracle client, we choose Administrator Type.

Oracle Client 19c Installation — Step 1 — Select Installation Type
4. Create Oracle Home Owner
We choose to create a new Windows user oracle to be the owner of Oracle software.

Oracle Client 19c Installation — Step 2 — Oracle Home User Selection
5. Select Oracle Home
We should find a proper directory to store Oracle software. In this case, we use the default.

Oracle Client 19c Installation — Step 3 — Specify Installation Location
6. Pass Prerequisite Check and Summary
As you can see, we passed the prerequisite checks and it summarize some information for us.

Oracle Client 19c Installation — Step 5 — Summary
7. Save Response File
It’s a good habit to save response file.

Oracle Client 19c Installation — Step 5 — Save Response File
8. Install the Product
If there’s nothing wrong, we can safely install the product.

Oracle Client 19c Installation — Step 6 — Install Product
9. Installation Finished
The installation is successful.

Oracle Client 19c Installation — Step 7 — Finish
10. Allow the App to Access Network
To access the network, we should put Oracle client in the white list of Windows firewall.

Windows Security Alert on Oracle Client 19c APP
To have a faster way to install Oracle client, please check: How to Install Oracle Client Home on Windows.
Install
<- Install
Overview
What follows is the most common way to install the Oracle 19 Windows 64-bit client.
- Procedure
- TNS Administration
- Environment Variables
- Validate Connection
- SQLPlus Changes
- Installing 32-bit Client with 64-bit
- Uninstall
- Uninstall (manually)
Prerequisites
 • Download Microsoft Windows x64 (64-bit) to your software dir (Ex: C:sw).
   Click the See All link then scroll down to find:
   Oracle Database 19c Client (19.3) for Microsoft Windows x64 (64-bit)
     Download this 🠊 WINDOWS.X64_193000_client.zip
     Not this      🠊 WINDOWS.X64_193000_client_home.zip
 • Unzip C:swWINDOWS.X64_193000_client.zip.
   It will create dir: C:swWINDOWS.X64_193000_clientclient
 • Set windows system to show file extensions:
   Windows-Key 🠊 File Explorer 🠊 View 🠊  [x] File name extensions
 • Unset the ORACLE_HOME if install prompts with a conflict then restart install.
If when unzippinig you get filename too long errors you can rename zip file ic.zip then try again.
Ensure This is Done
Set windows system to show file extensions:
Windows-Key 🠊 File Explorer 🠊 View 🠊 [x] File name extensions
Procedure
  1. Run C:swWINDOWS.X64_193000_clientclientsetup.exe As Administrator.
     Installer loads...

  2. Installation Type: (x) Administrator

  3. Oracle Home User Selection: (x) Use Windows Built-in Account

  4. Installation Location:
     Oracle base:       C:apporacleclient
     Software location: C:apporacleclientproduct19.0.0client_1

  5. Summary: Select [Install]
     Process runs...

     Press [Close] when completed.
- The installer adds this entry to the PATH environment var:
- C:apporacleclientproduct19.0.0client_1bin;
- Main registry additions:
- HKEY_CURRENT_USERSoftwareOracle
- HKEY_LOCAL_MACHINESOFTWAREODBC<OracleDrivers>
- HKEY_LOCAL_MACHINESOFTWAREORACLE
TNS Administration
 1. DetermineSet path to tnsnames.ora.
    If your system has multiple Oracle clients on it - try using the
    tnsnames.ora under the TNS_ADMIN path.

   Otherwise set TNS_ADMIN env value to:
     C:apporacleclientproduct19.0.0client_1networkadmin

 2. Create appropriate entry in the tnsnames.ora file if not already done.

 3. Make sure your Windows system does not name the file
    with a .txt extension: tnsnames.ora.txt
    GO CHECK!
Environment Variables
Recommended
 ORACLE_BASE: C:apporacle
 ORACLE_HOME: C:apporacleclientproduct19.0.0client_1
If Your Environment Requires
 ORACLE_SID: <YourOraSid>
 TNS_ADMIN: C:apporacleclientproduct19.0.0client_1networkadmin
Press Windows-Key then type env for option to edit environment vars.
Validate Connection
Ensure you can do the following to your Oracle database server.
 1. Ping IP: ping <OracleDBSrv or RACSCAN>
    Ex: ping 192.168.1.42
 2. Ping Port (via paping.exe etc.)
    Ex: paping -p 1521 192.168.1.42
 3. TNS Ping: tnsping <MyTnsnames.ora Service Name>
    Ex: tnsping MYDB1
SQLPlus
Create Windows Shortcut
%ORACLE_HOME%BINsqlplus.exe <Username>/<Password>@<tnsnames.ora Svc>
%ORACLE_HOME%BINsqlplus.exe scott/tiger@MYDB1
Set Global Profile
Add below values to: %ORACLE_HOME%sqlplusadminglogin.sql
 SET LINESIZE 240
 SET PAGESIZE 9999
 SET SQLPROMPT "_USER'@'_CONNECT_IDENTIFIER> "
These are the minimal recommended changes.
APPENDIX
tnsnames.ora Example
MYDB1 =
  (DESCRIPTION =
    (ADDRESS = (PROTOCOL = TCP)(HOST = 192.168.1.51)(PORT = 1521))
    (CONNECT_DATA =
      (SERVER = DEDICATED)
      (SERVICE_NAME = mydb1)
    )
  )

MYDB2 =
  (DESCRIPTION =
    (ADDRESS = (PROTOCOL = TCP)(HOST = 192.168.1.52)(PORT = 1521))
    (CONNECT_DATA =
      (SERVER = DEDICATED)
      (SERVICE_NAME = mydb2)
    )
  )
Uninstall Oracle Client Software
Prerequisites
- Ensure no 64-bit Oracle software is running on this machine and have no other apps needing 64-bit Oracle access.
Procedure
1. Find the universal installer and UNINSTALL the client
   a. Win-Key "universal Installer" run: Universal Installer.
   b. Press [Deinstatll Products].
   c. Select: [x] OraClient19Home1
   d.  Press [Remove].

   Command will be provided to uninstall for this system.
   Example: cd C:swWINDOWS.X64_193000_client_homedeinstall
            Run: deinstall.bat
		 Do you want to continue: y

   In 19c the relevant registry entries will be removed by this process.

2. Clean Environment Vars
   - rundll32.exe sysdm.cpl,EditEnvironmentVariables
   - If exist, remove: ORACLE_HOME, ORACLE_SID, TNS_ADMIN
   - From PATH remove any Oracle entries.

   Run "set" from console to confirm env clean.

3. Remove directory
   Delete dir: C:appclient (or corresponding client parent dir)
Completely Uninstalling Manually
Exercise extreme care when removing registry entries. Removing incorrect entries can severely impact your computer.
Prerequisites
- Ensure you are logged in as a user with Administrator privileges.
- Make sure you have complete backups of your system before you make any changes.
 1. Windows registry.
    HKEY_LOCAL_MACHINESOFTWAREORACLE
    - Delete the home (ex: KEY_OraClient19Home1).
    - Delete the key inst_loc.
    HKEY_LOCAL_MACHINESOFTWAREODBC
    Expand all subkeys and remove all keys related with the "Oracle ODBC Driver".
    HKEY_LOCAL_MACHINESYSTEMCurrentControlSetServices
    Remove all keys under here that begin with ORACLE or ORAWEB.
    HKEY_LOCAL_MACHINESYSTEMCurrentControlSetServicesEventLog...Application
    Remove all keys under here that begin with ORACLE.
    HKEY_LOCAL_MACHINESoftwareMicrosoftWindowsCurrentVersion...Uninstall
    Remove any entries related to Oracle.
    HKEY_CLASSES_ROOT
    Remove all keys that begin with Ora or ORCL
    (e.g. Oracle..., ORADC..., ORAMMC..., OraOLE..., OraPerf... and ORCL...).
    HKEY_LOCAL_MACHINESOFTWAREClasses
    Remove all keys that begin with Ora or ORCL
    (e.g. Oracle..., ORADC..., ORAMMC..., OraOLE..., OraPerf... and ORCL...).
    HKEY_CURRENT_USERSoftwareOracle
    Delete this ORACLE key.
    HKEY_USERS…SoftwareOracle
    Delete this ORACLE key.

 2. Environment
    a. PATH = Remove any path to Oracle client.
    b. Remove ORACLE_SID, ORACLE_BASE, ORACLE_HOME and TNS_ADMIN.

 3. Directories and Files
    • Remove "Oracle" Items.
    • Though some might be hidden, in placing the path in File Explorer they should open.
    C:Program FilesOracle
    C:ProgramDataMicrosoftWindowsStart MenuProgramsOracle - OraClient19Home1
    C:Users<UserName>AppDataRoamingMicrosoftWindowsStart Menu
    C:Users<UserName>AppDataRoamingMicrosoftWindowsStart MenuPrograms
    %SystemDrive%Temp
    %SystemDrive%Documents and Settings<username>Local SettingsTemp
 4. Misc
    Go to the drive where the Oracle software is installed on your machine
    and delete all ORACLE_BASE directories on your hard drive.
These steps have been derived from Doc ID 124353.1.
Installing 32-bit Client with 64-bit
 1. Install this 64-bit client first.
 2. Oracle 32-bit Client Install changes:
    a. If set, unset all Oracle environment vars: ORACLE_BASE, ORACLE_HOME.
    b. Run setup.exe passing: ORACLE_HOME_NAME=client_32
       C:swNT_193000_clientclient32setup.exe ORACLE_HOME_NAME=client_32
       Takes a few minutes to load.  We wait...
    c. Software location changes:
       Oracle base:       C:appclientoracle32
       Software location: C:appclientoracle32product19.0.0client_32
 3. Create a TNS_ADMIN System environment var. Set it to the 64-bit home network path:
    C:apporacleclientproduct19.0.0client_1networkadmin
 4. Create a TNS_ADMINtnsnames.ora entry(s) as needed.
 5. Create and test sqlplus shortcuts for both.
    64: C:appclientoracleproduct19.0.0client_1binsqlplus.exe scotttiger@MYSVC
    32: C:appclientoracle32product19.0.0client_32binsqlplus.exe scotttiger@MYSVC
 6. Create and test ODBC connections for both.
    64 ODBC Mgr: C:WindowsSystem32odbcad32.exe
    32 ODBC Mgr: C:WindowsSysWOW64odbcad32.exe
Notes:
- Yes crazily the 64-bit ODBC Mgr is in a directory showing 32 and vice-verse.
- Both ODBC managers see the name of the all 32 and 64 bit DSN names. So you may want to give 32-bit entries a _32 extension.
- The 32 bit would not recognize the TNS_ADMIN env var so I simply copied the tnsnames.ora to both net paths. I bet there is a registry entry that will resolve this though.
References:
- Considerations Using The Oracle Client With Microsoft Products on 64 bit Windows Operating System (Doc ID 781432.1).
- Cannot Install Oracle Client 11.2 64 Bit And Oracle Client 32 Bit On Same Windows 64 Bit Server (Doc ID 1530206.1).
- WINDOWS: Install Oracle Client 11.2 32-bit and 64-bit on Same System Overwrites Programs Menu Entry (Doc ID 1243374.1).

In the following article, I am going to show you how to install the latest Oracle instant client 19.5 on Windows 10. As you know, Oracle Instant Client is a set of tools you need to connect and manage the Oracle database server. With this tool, we can connect to both local or remote Oracle database. Not like many other software, it needs extra steps in order to install the instant client. But don’t worry, we will cover it shortly.
Steps to Install Oracle Instant Client on Windows 10
Step 1. Install Microsoft Visual Studio 2017 Redistributable
The Oracle Instant Client 19.5 requires the installation of the Microsoft Visual Studio 2017 Redistributable. Make sure you have this software installed on Windows 10.
Step 2. Create a new directory for the instant client
Create a new folder under C:/ or any other folder. This new folder will be used to store the oracle instant client files. In this example, I will create a new folder called C:oracle
Step 3. Download the Oracle Instant Client
Now download the latest version of Oracle Instant Client. Choose the correct architecture that match your system. Or, if you are using Windows 10 64 bit, you can use the link below to directly download it. Choose one of these below
Basic Package
https://download.oracle.com/otn_software/nt/instantclient/19500/instantclient-basic-windows.x64-19.5.0.0.0dbru.zip
Basic Light Package
https://download.oracle.com/otn_software/nt/instantclient/19500/instantclient-basiclite-windows.x64-19.5.0.0.0dbru.zip
You will also need to download the Instant Client SDK Package below
https://download.oracle.com/otn_software/nt/instantclient/19500/instantclient-sdk-windows.x64-19.5.0.0.0dbru.zip
Save these two files inside the folder we created earlier.
Step 4. Extract the package
I assume you have two files below:
- instantclient-basic-windows.x64-19.5.0.0.0dbru.zip
- instantclient-sdk-windows.x64-19.5.0.0.0dbru.zip
First, extract the file instantclient-basic-windows.x64-19.5.0.0.0dbru.zip. It will produce a new subfolder called instantclient_19_5. Next, extract the file instantclient-sdk-windows.x64-19.5.0.0.0dbru.zip. The second file should be extracted into the instantclient_19_5 directory. Here are the folder content result

Step 5. Modify the Environment Variable
In this section, we are going to edit the Environment Variable. We will include the Oracle Instant Client path into the environment variable. To do this, follow these steps:
- Open Control Panel >> Settings
- Click Advanced System Settings
- On the Advanced tab, click Environment variables
- Under System Variables, create OCI_LIB64 if it does not exist. Set the value OCI_LIB64 to C:oracleinstantclient_19_5
- Under System Variables, edit PATH and include C:oracleinstantclient_19_5


Содержание
- База данных Oracle Database для начинающих: основы базы данных
- Установка Oracle Client
- Использование переменной среды TWO_TASK
- Установка Oracle Client под Windows
- Для работы клиента требуются DLL
- Если требуется работа приложений через ODBC драйвер
- Если требуется работа x32 приложений через ODBC в Windows x64
- 3 Installing Oracle Database Client
- 3.1 Preinstallation Considerations Before Installing Oracle Database Client
- 3.1.1 Installation Consideration on Windows Vista and Later
- 3.1.2 Installing Oracle Database Client Installations in Silent or Response File Mode
- 3.1.3 Creating the Oracle Base Directory
- 3.1.4 Installing Oracle Database Client into Multiple Oracle Homes
- 3.1.5 Installing Oracle Database Client on a System with an Existing Oracle Software
- 3.1.6 Updating the Existing Software with the Current Version
- 3.2 Accessing the Installation Software
- 3.2.1 Installing from a Remote DVD Drive
- 3.2.1.1 Step 1: On the Remote Computer, Share the DVD Drive
- 3.2.1.2 Step 2: On the Local Computer, Map the DVD Drive
- 3.2.2 Installing on Remote Computers Through Remote Access Software
- 3.2.2.1 Installing on Remote Computers from a Hard Drive
- 3.2.2.2 Installing on Remote Computers from a Remote DVD Drive
- 3.2.3 Downloading Oracle Software
- 3.2.3.1 Downloading the Installation Archive Files from OTN
- 3.2.3.2 Downloading the Software from Oracle Software Delivery Cloud
- 3.2.3.3 Extracting the Installation Files
- 3.2.4 Copying the Oracle Database Client Software to a Hard Disk
- 3.3 Installing the Oracle Database Client Software
- 3.3.1 Guidelines for Installing Oracle Database Client
- 3.3.2 Procedure for Installing Oracle Database Client
- 3.3.3 Performing an In-place Oracle Database Client Upgrade
База данных Oracle Database для начинающих: основы базы данных
 Чтобы получить доступ к базе данных Oracle с ПК, вначале на нем необходимо инсталлировать программное обеспечение Oracle Client. Программное обеспечение Oracle Client поставляется вместе с программным обеспечением Oracle Server. Кроме того, его можно загрузить также из сайта OTN (http://technet.oracle.com). Программное обеспечение Oracle Client доступно для загрузки отдельно. Хотя версии Oracle Server и Oracle Client не обязательно должны совпадать, в Oracle рекомендуют применять соответствующие версии ПО, чтобы можно было полностью воспользоваться преимуществами новых функциональных возможностей.
Версию Oracle Client можно выяснить, просмотрев вывод при вызове утилиты SQL*Plus, как показано в следующем примере:
Приведенный вывод команды SQL*Plus показывает, что в системе установлено программное обеспечение Oracle Client версии 11.1.0.6.0.
При установке программного обеспечения Oracle Client можно выбрать одну из четырех опций.
На заметку! Новая опция Instant Client описана в наших блогах в статье “Мгновенный клиент Oracle”.
Установка Oracle Client
Чтобы установить программное обеспечение Oracle Client, выполните следующие действия.
Совет. При наличии нескольких установок Oracle на ПК система может содержать также несколько файлов tnsnames.ora. Пользователь может оказаться не в состоянии подключиться к новой базе данных после добавления информации о конфигурации сети в файл tnsnames.ora, если используется не этот файл. Убедитесь, что в пути ПО Oracle Client указан нужный файл tnsnames.ora.
Использование переменной среды TWO_TASK
Использование имени Oracle Net можно обойти, устанавливая переменную среды TWO_TASK (в системе UNIX/Linux) или переменную среды LOCAL (в системе Windows).
Переменная TWO_TASK указывает строку подключения для подключения к удаленному компьютеру. Программа SQL*Plus проверит значение переменной среды TWO_TASK и автоматически добавит его в строку подключения, как показано в следующем примере:
Как только переменная среды TWO_TASK установлена, к базе данных mydb можно подключаться следующим образом:
Обратите внимание, что применять спецификацию sqlplus scott/tiger@mydb не пришлось, поскольку используется переменная TWO_TASK.
На сервере Windows следующие команды эквивалентны установке переменной среды TWO_TASK:
Источник
Установка Oracle Client под Windows
Применимо для Windows XP x32 (Oracle Client Basic 10.2.0.4 + ODBC) и для Windows 7 x64 (Oracle Client Basic 11.1.0.6.0 x32).
В связи с участившимися вопросами «как ставить oracle client» опубликую что-то вроде инструкции из собственного опыта.
Первым делом нужно обзавестись самим клиентом, его можно скачать с сайта Oracle или еще где-то. Понадобится
Для работы PHP OCI8 и TOAD вполне будет достаточно только архива instantclient-basic. Приступим.
Распаковываем instantclient-basic-win32-10.2.0.4.zip в нужное место, в моем случае это C:Program FilesOracleinstantclient_10_2 (этот путь будет везде использоваться дальше по тексту, так что заменяйте на свой).
Под Windows 7 x64 клиент x32 работает вполне нормально и решает поставленные задачи, но никто не запрещает воспользоваться версией клиента x64.
Идем в Панель управления → Система → Дополнительно → Переменные среды. Там в разделе «Системные переменные» создаем следующие (имя переменной = значение)
LD_LIBRARY_PATH = C:Program FilesOracleinstantclient_10_2
NLS_LANG = RUSSIAN_CIS.CL8MSWIN1251
ORACLE_HOME = C:Program FilesOracleinstantclient_10_2
SQL_PATH = C:Program FilesOracleinstantclient_10_2
TNS_ADMIN = C:Program FilesOracleinstantclient_10_2networkADMIN
NLS_LANG может быть другой в зависимости от потребностей.
А к переменной PATH дописываем (не забываем про 😉
PATH += C:Program FilesOracleinstantclient_10_2
Для работы клиента требуются DLL
Путем долгих мучений мной было выяснено, что для того чтобы клиент заработал в системе должны присутствовать следующие DLL библиотеки (которых обычно нет):
Где их взять ответит гугль, скачиваем, распаковываем в C:WindowsSystem32 (можно ребутнуться для профилактики).
Если требуется работа приложений через ODBC драйвер
Распаковываем instantclient-odbc-win32-10.2.0.4.zip в нужное место, в моем случае это C:Program FilesOracleinstantclient_10_2 и запускаем оттуда odbc_install.exe
После всех этих операций у большинства все начинает работать, надеюсь и вам это поможет 🙂
Если требуется работа x32 приложений через ODBC в Windows x64
Вот тут начинается самая хитрость, тк в панели управления в источниках данных ODBC нет драйвера Oracle! Поэтому нужно запустить управление ODBC x32, который, на удивление, расположен в C:WindowsSysWoW64 (см. KB 942976 от M$). Для этого нужно выполнить команду:
И в открывшемся окне будет доступна возможность создать DSN с драйвером Oracle.
Источник
3 Installing Oracle Database Client
You can use 32-Bit media for installing Oracle Database Client on all supported operating systems. You can use 64-Bit media for installing Oracle Database Client on all supported 64-bit x64 operating systems. This guide is for both Windows 32-Bit and Windows x64. This chapter covers the following topics:
3.1 Preinstallation Considerations Before Installing Oracle Database Client
The Oracle Database Client software is available on the Oracle Technology Network (OTN) Web site. In most cases, you use the graphical user interface (GUI) provided by Oracle Universal Installer to install the software. However, you can also use Oracle Universal Installer to complete silent-mode installations using response files, without using the GUI.
Next, consider the following issues:
3.1.1 Installation Consideration on Windows Vista and Later
On Windows Vista, Windows Server 2008, Windows Server 2008 R2, Windows 7, Windows 8, Windows 8.1, Windows Server 2012, and Windows Server 2012 R2, command prompts should be opened with Administrator privileges.
3.1.2 Installing Oracle Database Client Installations in Silent or Response File Mode
If you need to perform multiple installations of Oracle Database Client, you may want to use silent or response file mode, with response files. In these modes, at each computer, you run Oracle Universal Installer from the command line using a response file. The response file is a text file containing the settings you normally enter in the Oracle Universal Installer GUI dialog boxes. This method lets you quickly perform multiple installations using similar settings for each computer.
Appendix B, «Installing Oracle Database Client Using Response Files» for instructions on performing silent or response file mode installations
3.1.3 Creating the Oracle Base Directory
If you install Oracle Database Client on a computer with no other Oracle software installed, Oracle Universal Installer creates an Oracle base directory for you. If Oracle software is already installed, one or more Oracle base directories already exist. In the latter case, Oracle Universal Installer offers you a choice of Oracle base directories into which you can install Oracle Database Client.
You are not required to create an Oracle base directory before installation, but you can do so if you want.
You can choose to create a new Oracle base directory, even if other Oracle base directories exist on the system.
3.1.4 Installing Oracle Database Client into Multiple Oracle Homes
You can install all Oracle components in multiple Oracle homes on the same computer. However, some components can only support one active instance at a time. This means that the current (latest) installation renders the previous one inactive. These components are:
Oracle Administration Assistant for Windows
Oracle Counters for Windows Performance Monitor
Oracle Objects for OLE on Windows 32-bit
Oracle Provider for OLE DB
Oracle Objects for OLE is not supported on Windows x64.
3.1.5 Installing Oracle Database Client on a System with an Existing Oracle Software
Oracle Database Client can be installed in the same Oracle Database home if both products are at the same release level. For example, you can install Oracle Database Client 10 g Release 2 (10.2) into an existing Oracle Database 10 g Release 2 (10.2) home. If you apply a patch set before installing the client, then you must apply the patch set again. Oracle Universal Installer will prompt you for an Oracle home directory, whether you have other Oracle software installed on the computer or not. You cannot install products from one release of Oracle Database Client into an Oracle home directory of a different release. For example, you cannot install Oracle Database 11 g release 1 (11.1) software into an existing Oracle9 i Oracle home directory.
You can install this release more than once on the same system as long as each installation is installed in a separate Oracle home directory.
3.1.6 Updating the Existing Software with the Current Version
Use the In-Place Upgrade feature to upgrade an existing client installation to the latest release by installing the new client software into an existing client home with the same installation type. For example, if release 11.2.0.1 is installed, then use Oracle Universal Installer to upgrade to release 11.2.0.2.
Consider the following before selecting this option:
This upgrade is only possible in a client home and not in any other Oracle home that contains non-client installations, such as Database installations.
This upgrade does not delete files in the client home that are commonly updated by other users. For example, configuration data files.
This upgrade cannot be performed if processes associated with the Oracle Database Client home are running.
This functionality is available starting with Oracle Database 11 g Release 2 (11.2.0.2).
3.2 Accessing the Installation Software
The Oracle Database Client software is available on installation media or you can download it from the Oracle Technology Network (OTN) Web site, or Oracle Software Delivery Cloud Web site. To install the software from the hard disk, you must either download it and unpack it, or copy it from the installation media, if you have it.
You can access and install Oracle Database Client by using the following scenarios:
3.2.1 Installing from a Remote DVD Drive
If the computer where you want to install Oracle Database Client does not have a DVD drive, you can perform the installation from a remote DVD drive. You must complete the following steps:
The remote DVD drive that you want to use must allow shared access. To set this up, perform these steps on the remote computer that has the DVD drive:
Log in to the remote computer as an Administrator user.
Start Windows Explorer.
Right-click the DVD drive letter and choose Sharing (or Sharing and Security ).
Click the Sharing tab and do the following:
Click OK when you are finished.
Insert the DVD labeled Oracle Database 11g Release 2 (11.2) into the DVD drive.
3.2.1.2 Step 2: On the Local Computer, Map the DVD Drive
Perform these steps on the local computer to map a remote DVD drive and to run Oracle Universal Installer from the mapped drive:
Map the remote DVD drive.
Start Windows Explorer on the local computer.
From the Tools menu, select Map Network Drive to display the Map Network Drive dialog.
Select a drive letter to use for the remote DVD drive.
remote_hostname is the name of the remote computer with the DVD drive.
share_name is the share name that you entered in step 4 of the previous procedure. For example
Run Oracle Universal Installer from the mapped DVD drive.
3.2.2 Installing on Remote Computers Through Remote Access Software
If you want to install and run Oracle Database Client on a remote computer (that is, the remote computer has the hard drive and will run Oracle Database Client components), but you do not have physical access to the computer, you still can perform the installation on the remote computer if it is running remote access software such as VNC or Symantec pcAnywhere. You also need the remote access software running on your local computer.
You can install Oracle Database Client on the remote computer in one of two ways:
If you have copied the contents of the Oracle Database Client DVD to a hard drive, you can install from the hard drive.
You can insert the DVD into a drive on your local computer, and install from the DVD.
3.2.2.1 Installing on Remote Computers from a Hard Drive
If you have copied the contents of the Oracle Database Client DVD to a hard drive, you can install from the hard drive.
The steps that must complete are:
Make sure that the remote access software is installed and running on the remote and local computers.
Share the hard drive that contains the Oracle Database Client DVD.
On the remote computer, map a drive letter to the shared hard drive. You would use the remote access software to do this on the remote computer.
Through the remote access software, run Oracle Universal Installer on the remote computer. You access Oracle Universal Installer from the shared hard drive.
3.2.2.2 Installing on Remote Computers from a Remote DVD Drive
You can insert the DVD into a drive on your local computer, and install from the DVD.
The steps that you need to complete are:
Make sure that the remote access software is installed and running on the remote and local computers.
On the local computer, share the DVD drive.
On the remote computer, map a drive letter to the shared DVD drive. You would use the remote access software to do this on the remote computer.
These steps are described in the «Installing from a Remote DVD Drive» section.
Through the remote access software, run Oracle Universal Installer on the remote computer. You access Oracle Universal Installer from the shared DVD drive.
3.2.3 Downloading Oracle Software
You can download the trial version of the installation files from the Oracle Technology Network (OTN) or Oracle Software Delivery Cloud Web site and extract them on your hard disk. Make sure that you completely review and understand the terms of the license. Most downloads include the Development License. This section contains the following topics:
3.2.3.1 Downloading the Installation Archive Files from OTN
To download the installation archive files from Oracle Technology Network:
Use any browser to access the software download page from Oracle Technology Network:
Navigate to the download page for the product that you want to install.
On the download page, identify the required disk space by adding the file sizes for each required file.
The file sizes are listed next to the filenames.
Select a file system with enough free space to store and expand the archive files.
In most cases, the available disk space must be at least twice the size of all the archive files.
Download all of the installation archive files to the directories that you created in step 5.
Verify that the files you downloaded are the same size as the corresponding files on Oracle Technology Network. Also verify the checksums are the same as noted on Oracle Technology Network.
Extract the files in each directory that you just created.
After you have extracted the required installation files, see the «Installing the Oracle Database Client Software» section.
3.2.3.2 Downloading the Software from Oracle Software Delivery Cloud
You can download the software from Oracle Software Delivery Cloud as Media Packs. A Media Pack is an electronic version of the software that is also available to Oracle customers on CD-ROM or DVD. To download the Media Pack:
Use any browser to access the Oracle Software Delivery Cloud Web site:
Complete the Export Validation process by entering information (name, company, e-mail address, and country) in the online form.
In the Media Pack Search page, specify the Product Pack and Platform to identify the Media Pack you want to download. If you do not know the name of the Product Pack, you can search for it using the License List.
Optionally, select the relevant product to download from the Results list.
In the search results page, click Readme to download and review the Readme file for download instructions and product information.
After you review the Readme, choose the appropriate Media Pack from the search results to download the individual zip files. Follow the Download Notes instructions in this page. Once you download and extract the contents of the required zip files, proceed with the installation of the software.
Print the page with the list of downloadable files. It contains a list of part numbers and their corresponding descriptions that you may need to refer during the installation process.
After you download the files, click View Digest to verify that the MD5 or SHA-1 checksum matches with what is listed in the media download page.
My Oracle Support note 549617.1 for information on how to verify the integrity of a software download at
Frequently Asked Questions section on the Oracle Software Delivery Cloud Web site for more information about Media Packs
To extract the installation archive files, perform the following steps:
If necessary, change to the directory that contains the downloaded installation archive files.
The Oracle Database software is available as a zip file. Ensure that you extract the zip file to the same directory.
3.2.4 Copying the Oracle Database Client Software to a Hard Disk
To copy the contents of the media to a hard disk:
Create a directory for the installation files on your hard drive. For example:
Copy the contents of the installation media to the directory that you just created.
When you have copied the required installation files, see the «Installing the Oracle Database Client Software» section.
3.3 Installing the Oracle Database Client Software
This section covers the following topics:
3.3.1 Guidelines for Installing Oracle Database Client
In most cases, you use the graphical user interface (GUI) provided by Oracle Universal Installer to install Oracle Database Client. However, you can also use Oracle Universal Installer to complete silent installations using a response file, without using the GUI. This method is particularly useful if you need to perform multiple installations of Oracle Database Client.
As you install Oracle Database Client, follow these guidelines:
Appendix B, «Installing Oracle Database Client Using Response Files» for information about silent or response file mode installations
Do not use Oracle Universal Installer from an earlier Oracle product release to install components from this release.
Use the same installation media to install Oracle Database Client on all supported Windows platforms.
If you reinstall Oracle software into an Oracle home directory where Oracle Database Client is already installed, you must reinstall any components that were installed before you began the reinstallation.
Do not modify the Java Runtime Environment (JRE) except by using a patch provided by Oracle Support Services. Oracle Universal Installer automatically installs the Oracle-supplied version of the JRE. This version is required to run Oracle Universal Installer and several Oracle assistants.
If you encounter errors during installation, click Help or see Appendix D, «Troubleshooting the Oracle Database Client Installation» for advice.
Products not installed by default, in case of Custom installation:
Oracle Connection Manager
Oracle Net Listener
Oracle Scheduler Agent
Oracle Services for Microsoft Transaction Server
Oracle Counters for Windows Performance Monitor
3.3.2 Procedure for Installing Oracle Database Client
Use Oracle Universal Installer to install the Oracle Database Client software.
To install Oracle Database Client perform the following steps:
Log on as a member of the Administrators group to the computer to install Oracle components.
If you are installing on a Primary Domain Controller (PDC) or a Backup Domain Controller (BDC), log on as a member of the Domain Administrators group.
Insert the Oracle Database Client installation media and navigate to the client directory. Alternatively, navigate to the directory where you downloaded or copied the installation files.
Use the same installation media to install Oracle Database on all supported Windows platforms.
Double-click setup.exe to start Oracle Universal Installer.
Starting with Oracle Database 11 g Release 2 (11.2.0.2), if you plan to run the installation in a secured data center, then you can download updates before starting the installation by starting Oracle Universal Installer on a system that has Internet access in update download mode. To start Oracle Universal Installer to download updates, enter the following command:
After you download updates, transfer the update file to a directory on the server where you plan to run the installation.
If you have an existing Oracle Database Client 11 g Release 2 (11.2) installed on your system, the Select Installation Mode screen is displayed. Select New Install to install Oracle Database Client software in to a new location.
Starting with Oracle Database 11 g Release 2 (11.2.0.2), if you want to upgrade an earlier release of Oracle Database Client, then select Upgrade and follow the instructions in «Performing an In-place Oracle Database Client Upgrade»
Starting with Oracle Database 11 g Release 2 (11.2.0.2), you can use the Software Updates feature to dynamically download and apply latest updates. In the Download Software Updates screen, select one of the following options, and click Next :
Use My Oracle Support credentials for download to download and apply the latest software updates.
Click Proxy Settings to configure a proxy for Oracle Universal Installer to use to connect to the Internet. Provide the proxy server information for your site, along with a user account that has access to the local area network through which the server is connecting. Starting with Oracle Database 11 g Release 2 (11.2.0.3), you can enter the Proxy Realm information. The proxy realm information is case-sensitive. If you do not have a proxy realm, then you do not need to provide an entry for the Proxy Username, Proxy Password, and Proxy Realm fields.
Click Test Connection to ensure that your proxy settings are correctly entered, and the installer can download the updates.
Use pre-downloaded software updates to apply previously downloaded software updates.
Skip software updates if you do not want to apply any updates.
The Select Product Languages screen enables you to select the language in which you want to run the product.
This screen is not displayed if you select Instant Client as the type of installation in step 5.
In the Specify Installation Location screen, enter the following details:
Oracle Base : This path appears by default. You can change the path based on your requirement.
The Oracle Base section is not displayed if you select Instant Client as the type of installation in step 5.
Starting with Oracle Database 11 g Release 2 (11.2), you can install Oracle Connection Manager, Oracle Net Listener, and Oracle Scheduler Agent using the Custom install option.
Oracle recommends that you use caution in checking the Ignore All option. If you check this option, then Oracle Universal Installer may not confirm that your system is able to install Oracle Database successfully.
Review the information displayed in the Summary screen, and click Install.
Starting with Oracle Database 11 g Release 2 (11.2), you can save all the installation steps into a response file by clicking Save Response File. Later, this file can be used for a silent installation.
If you are performing a Custom installation, and selected Oracle Net Listener from the list of components to install in step 10, then go to «Using Oracle Net Configuration Assistant» for instructions.
In the Finish screen, click Close to exit Oracle Universal Installer.
Using Oracle Net Configuration Assistant
During a Custom Oracle Database Client installation, if you select Oracle Net Listener from the list of components to install in step 10, then Oracle Universal Installer automatically starts Oracle Net Configuration Assistant as part of the Oracle Database Client installation. Perform the following to configure the listener and naming methods using Oracle Net Configuration Assistant:
The listener configuration is now complete, click Next to proceed.
Typically, Local Naming is sufficient.
Answer the remaining prompts to complete the configuration.
You can also run Oracle Net Configuration Assistant after the installation in standalone mode to configure the listener, naming methods, net service names, and directory server usage.
3.3.3 Performing an In-place Oracle Database Client Upgrade
Starting with Oracle Database 11 g Release 2 (11.2.0.2) you can perform an in-place upgrade of Oracle Database Client 11 g Release 2 (11.2) using the following instructions:
You can perform an in-place Oracle Database Client upgrade only if you have an existing Oracle Database Client 11 g Release 2 (11.2.0.1) or later client home installed on your system.
In the Download Software Updates screen, select one of the following options, and click Next :
Use My Oracle Support credentials for download
Use pre-downloaded software updates
Skip software updates
See Step 6 in «Procedure for Installing Oracle Database Client» for more information about the options in the Download Software Updates screen.
See Step 7 in «Procedure for Installing Oracle Database Client» for more information about the options in the Apply Software Updates screen.
The Select Product Languages screen enables you to select the language in which you want to run the product.
Select the product language from the Available Languages list, transfer it to the Selected Languages list. Click Next.
The Install Product screen displays the progress of the client upgrade.
Review the information in the Finish screen and click Close to exit Oracle Universal Installer.
Источник

![]()
На сервере с операционной системой Windows Server 2016 потребовалось установить Oracle Instant Client 12.2 с драйвером ODBC.
Ничего сложного в установке нет, но почему-то не всегда это получается сделать с первого раза.
Установка Oracle Instant Client 12.2
Внимательно читаем инструкцию:
https://www.oracle.com/ru/database/technologies/instant-client/winx64-64-downloads.html#ic_winx64_inst
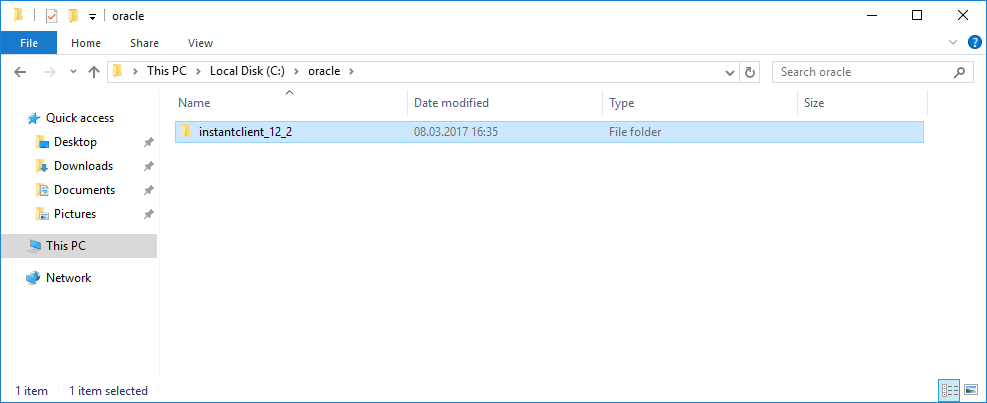
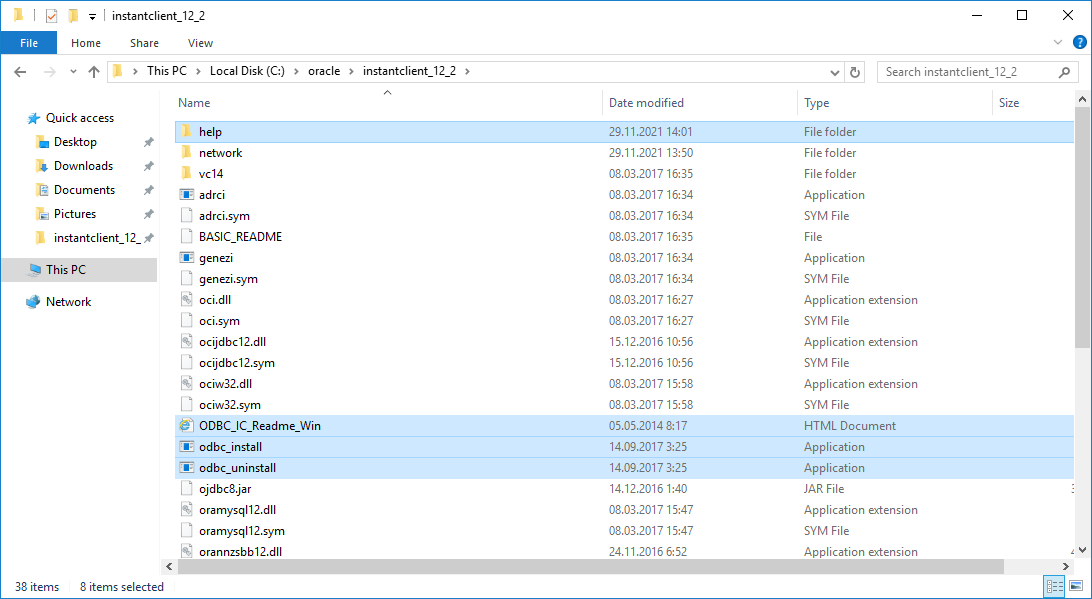
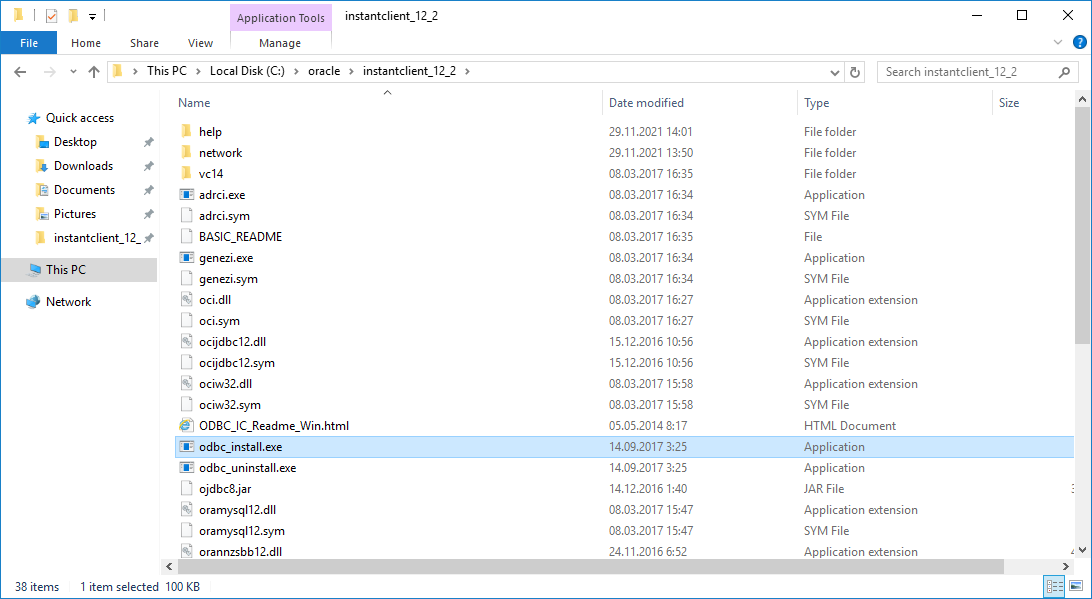
Скачиваем пакет instantclient-basic-windows.x64-12.2.0.1.0.zip. Распаковываем. Внутри находится папка instantclient_12_2. Копируем её на диск C: в папку oracle так, чтобы получился путь:
C:oracleinstantclient_12_2
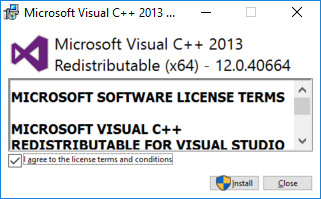
Для работы пакета 12.2 требуется Microsoft Visual Studio 2013 Redistributable. Скачиваем и устанавливаем.
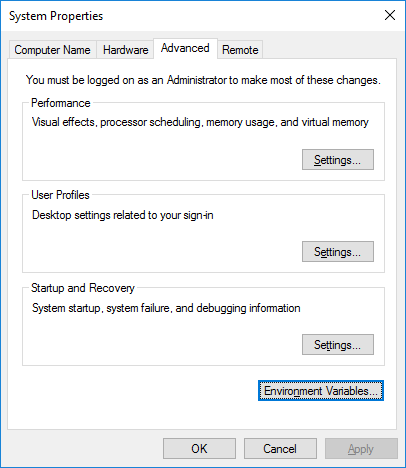
В переменную PATH добавляем путь C:oracleinstantclient_12_2. Для этого в свойствах компьютера нажимаем Environment Variables…
В нижней секции System variables находим переменную Path и редактируем, Edit…
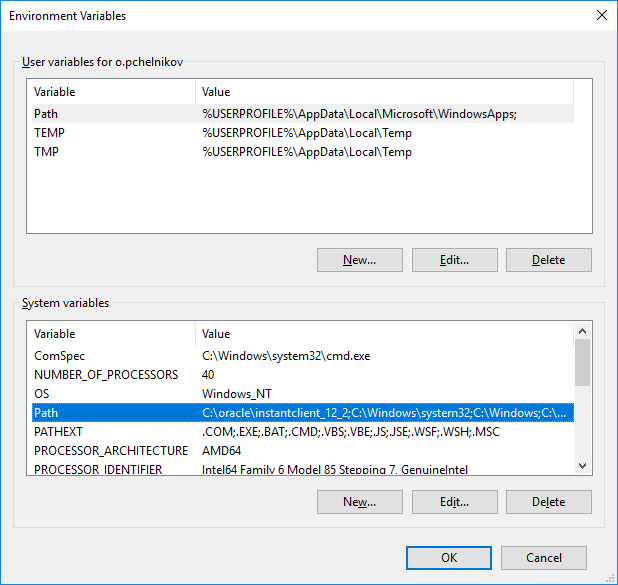
Добавляем путь C:oracleinstantclient_12_2 и кнопкой Move Up перемещаем его вверх.
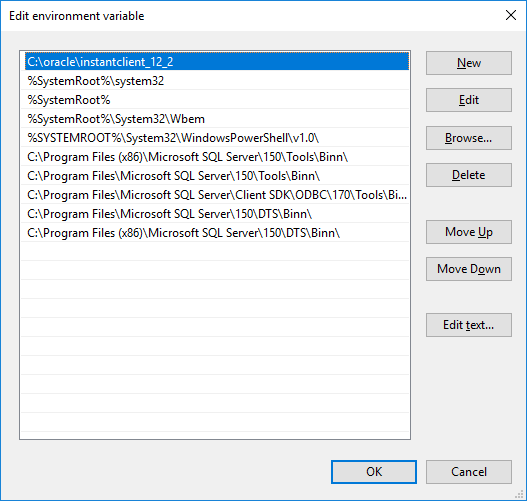
Ok.
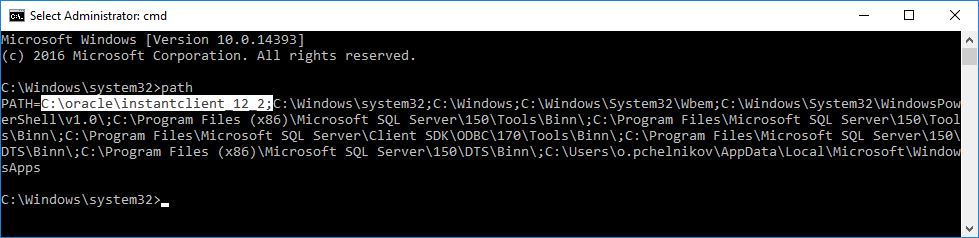
Проверим что получилось. В командной строке под администратором выполняем команду:
pathВ пути долен присутствовать элемент «C:oracleinstantclient_12_2;».
Если нам нужно использовать собственные конфигурационные файлы: tnsnames.ora, sqlnet.ora, ldap.ora, или oraaccess.xml; то создаём директорию:
C:oracleinstantclient_12_2networkadmin
и копируем эти файлы в неё. Если необходимо использовать конфигурационные файлы в другой директории, то укажите путь к ней в серверной переменной TNS_ADMIN.

Установка ODBC
Там же где скачивали Oracle Instant Client 12.2, находим для той же версии пакет ODBC instantclient-odbc-windows.x64-12.2.0.1.0-2.zip. Скачиваем, распаковываем.
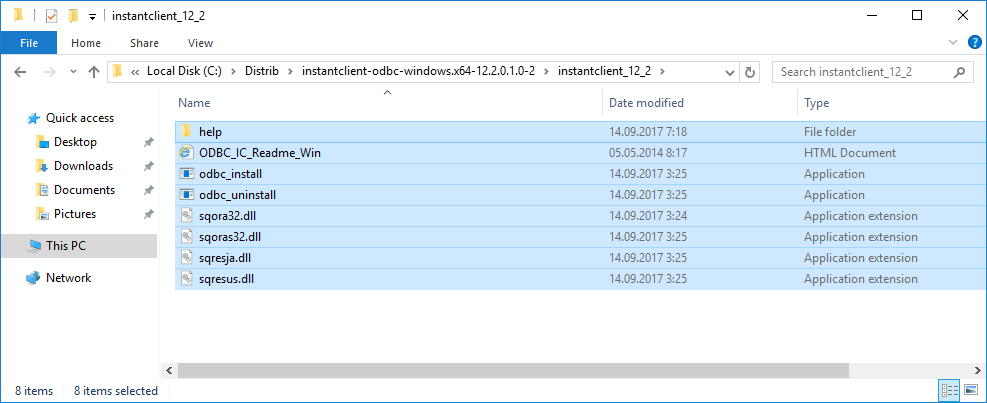
Содержимое копируем в C:oracleinstantclient_12_2.
ODBC устанавливается путём запуска файла odbc_install.exe.
Для удобства запускаем его из командной строки под администратором.
Oracle ODBC Driver is installed successfully.

При запуске можно увидеть ошибку:
Oracle ODBC driver with same name already exists

В этом случае добавляем пользователя под которым работаем в группу локальных администраторов и бэкап-операторов. После чего снова запускаем командную строку под администратором и устанавливаем ODBC. Недостаточно просто быть в доменной группе, которая добавлена в локальные администраторы. Пользователь должен явно числиться локальным админом.
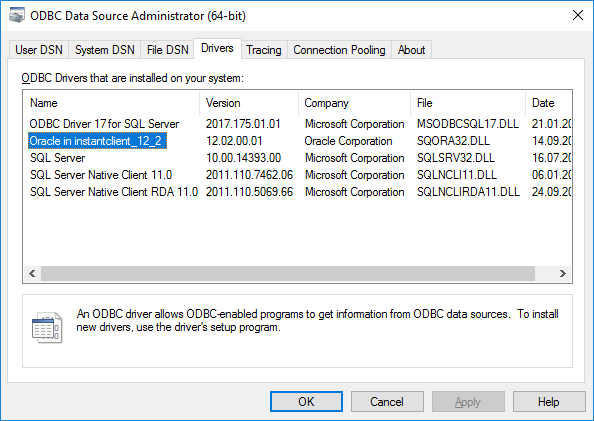
Проверяем в Administrative Tools. Запускаем ODBC Data Sources (64-bit).
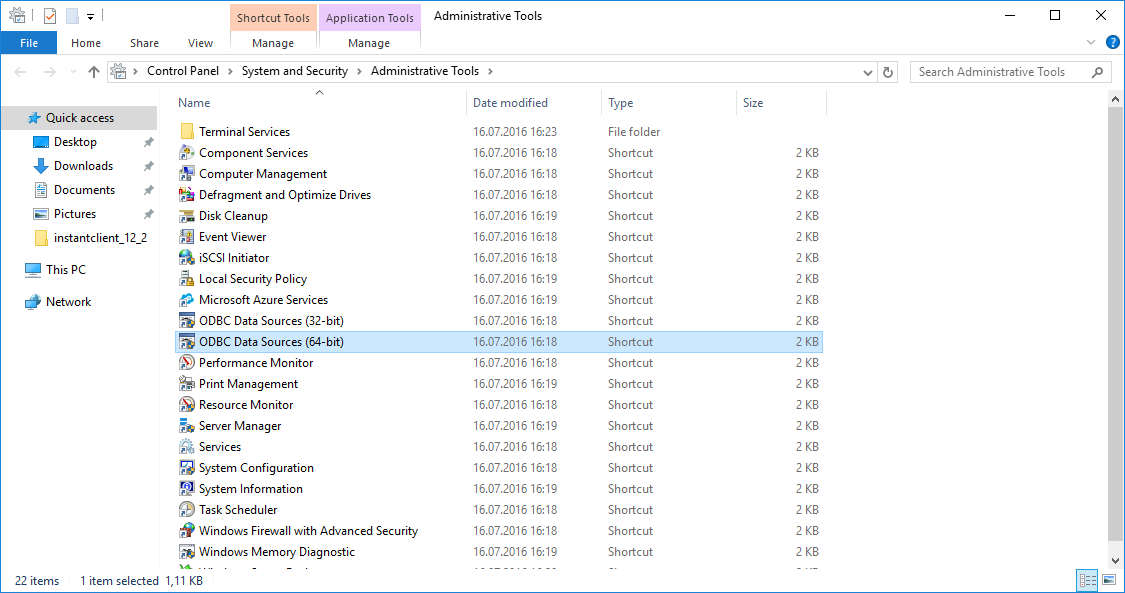
Во вкладке Drivers должен появится пункт «Oracle in instantclient_12_2».
Перезагружаем сервер, чтобы наши приложения подцепили новый PATH.
Ссылки
Установка Oracle Instant Client на Ubuntu
Чтобы получить доступ к базе данных Oracle с ПК, вначале на нем необходимо инсталлировать программное обеспечение Oracle Client. Программное обеспечение Oracle Client поставляется вместе с программным обеспечением Oracle Server. Кроме того, его можно загрузить также из сайта OTN (http://technet.oracle.com). Программное обеспечение Oracle Client доступно для загрузки отдельно. Хотя версии Oracle Server и Oracle Client не обязательно должны совпадать, в Oracle рекомендуют применять соответствующие версии ПО, чтобы можно было полностью воспользоваться преимуществами новых функциональных возможностей.
Версию Oracle Client можно выяснить, просмотрев вывод при вызове утилиты SQL*Plus, как показано в следующем примере:
$ sqlplus
C:>sqlplus
SQL*Plus: Release 11.1.0.6.0 - Production on Thu Mar 20 09:27:14 2008
Copyright (c) 1982, 2007, Oracle. All rights reserved.
Enter user-name:
Приведенный вывод команды SQL*Plus показывает, что в системе установлено программное обеспечение Oracle Client версии 11.1.0.6.0.
При установке программного обеспечения Oracle Client можно выбрать одну из четырех опций.
- Administrator (Администратор). Позволяет приложениям подключаться к локальным или удаленным базам данных Oracle и управлять ими.
- Runtime (Компоненты времени выполнения). Позволяет подключаться к локальным или удаленным базам данным Oracle.
- Custom (Пользовательская установка). Позволяет выбирать отдельные компоненты из числа устанавливаемых при вариантах установки Administrator и Runtime.
- Instant Client (Мгновенный клиент). Производится инсталляция только библиотек совместного использования, необходимых для OCI (Oracle Call Interface — Интерфейс вызова Oracle), OCCI (Oracle C++ Call Interface — Интерфейс вызова C++ Oracle) и приложениям Java Database Connectivity OCI (Java-OCI подключения к базе данных).
На заметку! Новая опция Instant Client описана в наших блогах в статье “Мгновенный клиент Oracle”.
Установка Oracle Client
Чтобы установить программное обеспечение Oracle Client, выполните следующие действия.
- Вставьте компакт-диск Oracle Database 11g Client в привод или запустите сценарий runInstaller из промежуточного каталога.
- Выберите пункт меню Install/Deinstall Products (Установка и удаление программных компонентов) и щелкните на кнопке Next (Далее).
- Откроется Welcome (Приветствие). Щелкните на кнопке Next.
- На странице Specify File Locations (Укажите расположение файлов) примите заданный по умолчанию каталог файлов или введите имя и путь домашнего каталога Oracle. Щелкните на кнопке Next.
- На экране Select Installation Type (Выберите тип инсталляции) можно выбрать один из четырех вариантов — Instant Client, Administrator, Runtime или Custom. Выберите из списка опцию Runtime Installation (Установка компонентов времени выполнения) и щелкните на кнопке Next.
- Просмотрите компоненты, которые будут инсталлированы в процессе этого типа установки и щелкните на кнопке Install (Установить).
- После завершения установки программного обеспечения Oracle Client откроется помощник Oracle Net Configuration Assistant. Выберите опцию No, I Will Create Service Names Myself (Нет, я создам имена служб самостоятельно) и щелкните на кнопке Next.
- В поле Database SID (Системный идентификатор базы данных) введите имя базы данных и щелкните на кнопке Next.
- В качестве протокола выберите TCP и щелкните на кнопке Next.
- В поле Host Name (Имя хоста) введите имя сервера своего хоста и выберите стандартный порт. Щелкните на кнопке Next.
- Щелкните на кнопке Yes (Да), чтобы протестировать возможность подключения, а затем щелкните на кнопке Next.
- После отображения сообщения Connecting . . . Test Successful (Подключение . . . Тестирование выполнено успешно) щелкните на кнопке Next.
- Отвечая на вопрос о том, нужно ли конфигурировать другую службу, выберите опцию No (Нет). Щелкните на кнопке Next.
- Подтвердите завершение настройки имени сетевой службы, щелкнув на кнопке Next.
- Щелкните на кнопках Finish (Готово) и Exit (Выход).
Совет. При наличии нескольких установок Oracle на ПК система может содержать также несколько файлов tnsnames.ora. Пользователь может оказаться не в состоянии подключиться к новой базе данных после добавления информации о конфигурации сети в файл tnsnames.ora, если используется не этот файл. Убедитесь, что в пути ПО Oracle Client указан нужный файл tnsnames.ora.
Использование переменной среды TWO_TASK
Использование имени Oracle Net можно обойти, устанавливая переменную среды TWO_TASK (в системе UNIX/Linux) или переменную среды LOCAL (в системе Windows).
Переменная TWO_TASK указывает строку подключения для подключения к удаленному компьютеру. Программа SQL*Plus проверит значение переменной среды TWO_TASK и автоматически добавит его в строку подключения, как показано в следующем примере:
$ export TWO_TASK=mydb
Как только переменная среды TWO_TASK установлена, к базе данных mydb можно подключаться следующим образом:
$ sqlplus scott/tiger
Обратите внимание, что применять спецификацию sqlplus scott/tiger@mydb не пришлось, поскольку используется переменная TWO_TASK.
На сервере Windows следующие команды эквивалентны установке переменной среды TWO_TASK:
$ SET LOCAL=
$ sqlplus scott/tiger
Вас заинтересует / Intresting for you:
Установка oracle client для HP Service Virtualization

Hello world! =)) С вами на связи Александр Глебов и я приветствую вас на своем IT Блоге. В этой статье я рассказываю как установить Oracle Data Access Components (oracle клиент по простому) на компьютер. Статья — установка Oracle Client, это, прежде всего подсказка для самого себя, но если кому-то пригодится, то я буду только рад. Итак, поехали…
Написание этой статьи меня сподвигла необходимость установки HP Service Virtualization. Там в требованиях к программному обеспечению необходимо наличие Oracle Client, вот собственно в этой статье и буду заниматься установкой оракл клиента.
Каких-то особых требований к установке оракл клиента нет, самая большая сложность это скачать оракл клиента. Привожу две ссылки на официальный сайт для 32 и 64 битных версий:
- Oracle Data Access Components 32-bit — ссылка на 32 битную версию Oracle Client
- Oracle Data Access Components 64-bit — ссылка на 64 битную версию Oracle Client
Выбираем нужную вам битность (для HP Service Virtualization Designer + Server нужен 32 и 64 битный клиент установленный в разные папки) , переходи по ссылке, и видим следующую страницу:
- Соглашаемся с лицензионным соглашением (1) (Accept License Agreement).
- Нажимаем на — ODAC121024Xcopy_x64.zip
- В результате вас перекинет на страницу с входом в аккаунт oracle, после входа начнется скачивание (если уже залогинены то сразу пойдет скачивание).
Если у вас нет логина в oracle и лень там регистрироваться, то можете скачать oracle client по ссылкам ниже:
- 64-bit ODAC 12c Release 4 (12.1.0.2.4) Xcopy for Windows x64;
- 32-bit ODAC 12c Release 4 (12.1.0.2.4) Xcopy for Windows x86;
После скачивания вы получите файл ODAC121024Xcopy_32bit.zip или ODAC121024Xcopy_x64.zip в зависимости от битности. Необходимо распаковать архив, например, на диск C в папку distr. В результате получим папку как на картинке ниже: На этом подготовительный этап установки закончили. Переходим к установке ODAC.
Установка Oracle client
Для установки клиента оракл выполним следующие шаги:
- Запускаем командную строку от имени администратора.
- Переходим в папку с клиентом C:distrODAC121024Xcopy_32bit.

- Вводим следующую команду: install.bat all C:ODAC_12.1_32bit odac и нажимаем Enter. Вместо C:ODAC_12.1_32bit можете указать любой удобный вам путь.
- Если все сделали правильно, то команда выполнится и на диске C появится папка с установленным клиентом, а также логом установки install.txt.


Вот в принципе и все, мы установили Oracle Client на компьютер Windows. Как видно это довольно просто, и ничего сложного. И по традиции прошу оставлять ваши отзывы, предложения, замечания в комментариях. Если понравилась данная статья, то ставим плюсики лайки, репосты. Буду вам благодарен.
![]() Загрузка…
Загрузка…
Интересные статьи по теме: