
Oracle Database 19c – the latest offering of Oracle corp. is now available for windows 10 operating system. Oracle has finally released the on-premises version of Oracle Database 19c for Windows operating system. Meaning now you can download and install it on your windows systems. That is exactly what we are going to learn today.
In this blog I will show you how to properly install Oracle Database 19c on Windows 10. Just to make the installation less complex and easy to understand I have divided this blog into three simple sections. These are –
- Prerequisite for Oracle 19c installation
- Download of the Oracle 19c software, and
- Installation of Oracle DB 19c on Windows 10.
Also, we will see at the end of this blog, what is the default URL of the Oracle Database 19c Enterprise Manager? Thus, I suggest you to read on till the end.
Prerequisite for Oracle 19c installation
The most important part is knowing a software before you deploy it on any machine. It could save you from various errors. Also solving them would be a time-consuming activity. Furthermore, if you are preparing for an interview then this could help you in nailing it.
Here I have explained all the important things related to Oracle DB 19c in Question Answer format. Check it out –
Is Oracle Database 19c available for all the Windows operating systems?
No, it is not. Oracle Database 19c is only available for –
- Windows 8.1 x64 – Pro and Enterprise editions
- Windows 10 x64 – Pro, Enterprise, and Education editions
- Windows Server 2012 R2 x64 – Standard, Datacenter, Essentials, and Foundation editions
- Windows Server 2016 x64 – Standard, Datacenter, and Essentials editions
- Windows Server 2019 x64 – Standard, Datacenter, and Essentials editions
Can we install Oracle DB 19c on x32 bit Windows operating system?
No, we cannot install Oracle Database 19c on x32bit Windows operating system. Oracle 19c is only compatible with x64bit Windows OS. Those who have x32bit Windows OS installed. I am sorry. You either need to upgrade your system to x64bit (But first make sure your CPU has x64 bit architecture. You cannot install x64bit OS on a x32 bit CPU) or configure a virtual box.
What are hardware requirements for Oracle 19c?
The minimum hardware requirement for installing Oracle Database 19c on Windows 10 are as follow—
- Minimum 2GB free RAM.
- 10GB of empty space on Hard Disk Drive
- A processor based on either Intel EM64T or AMD64 architecture.
- Display card with minimum resolution of 1024×768 pixels.
- 16 GB SWAP (virtual memory) space if RAM is more than 16 GB. If RAM is in between 2 GB and 16 GB, then 1 time the size of the RAM
Also make sure that your system is connected to the internet.
Free RAM for Oracle 19c.
Somebody commented on my 18c installation video and said that he has 3 or may 4 GB RAM installed but the Oracle Universal Installer (OUI) is still giving the minimum hardware compatibility error.
Therefore, let me clear the confusion here – No matter what size of RAM you have installed in your system, installation will not proceed unless 2GB of free space of RAM is available.
Consequently, 2GB of RAM must be free for Oracle 19c of whatever the size of RAM you have installed in your system.
Storage for Oracle 19c
As mentioned earlier that the installation of Oracle Database 19c requires at least 10GB of Free storage space. Thus, 10GB empty space on your hard disk drive is a sweet spot. Empty storage space depends on, which edition of Oracle Database 19c you are installing. For example –
- Oracle Database 19c Enterprise Edition requires at least 6.0 GB free storage space
- Oracle DB 19c Standard Edition 2 requires at least 5.5 GB free storage space
Furthermore you should also, at least have 7.0 GB for restart installation.
Oracle recommends that you allocate approximately 100 GB to allow additional space for applying any future patches on top of the existing Oracle home.
How many Edition of Oracle 19c are available?
So far, Oracle Database 19c is only available in 2 editions. These are –
- (EE) Oracle Database 19c Enterprise Edition, and
- (SE2) Oracle Database 19c Standard Edition 2
Now that I have given you all the basic information about the installation of Oracle Database 19c. It’s time to start the installation.
In order to install the Oracle Database 19c we first need to download its copy on our system. Similar to every other Oracle Database software, Oracle 19c is also available for Free to us.
Let’s see how you can do that –
The download of Oracle Database 19c is going to be about 3 GB in size. Therefore make sure you have sufficient hard disk space to store it along with a high-speed internet.
Currently Oracle Database 19c is only available for Microsoft OS, Linux x86 – 64, Oracle Solaris, IBM AIX, HP-UX and Linux on System Z. And you can download your copy of Oracle 19c from here.
Since the launch of Oracle DB 18c, Oracle has introduced a new installation process called image-based installation. And thanks to this new process we only have to download 1 ZIP file, which is unlike Oracle 12c and previous versions.
Oracle Database 19c Download Link
www.Oracle.com/Download
Currently there are only two editions of Oracle Database 19c that are available –
- Oracle Database 19c Enterprise Edition
- And, Oracle Database 19c Standard Edition 2
Both these editions are bundled within the single file that I mentioned earlier. But you don’t need to download them separately.
I have explained the download process of Oracle Database 19c in my Video tutorial. Thus, if you are still confused, then check out the video.
Extract Oracle 19c.
You must be wondering, what’s so special about extracting the files of Oracle 19c?
Perhaps you are right. But, I guess you will agree with me when I ask you this. Will you install your Oracle Database Server into your Download folder. I would never do that, would you?
Since the launch of image-based installation with Oracle 18c, the Oracle Universal installer (OUI) has become slightly strict with the Oracle Home location.
In image-based location the OUI takes the path of the directory where we have extracted the Oracle Database and assigns it as Oracle Home. Therefore, it becomes necessary for us to decide the location of our DB Home/Oracle Home beforehand and extract all the files from the ZIP folder onto that location.
What would I suggest you do?
First of all decide a location. Additionally, it’s recommended to locate your Oracle Home in any partition of your hard disk, except the one which contains your Operating system.
For example. I will create a folder in my D: Drive and name it ‘db_home’.
Once you’ve done that – copy the zip file which we downloaded earlier into that folder and extract its content there.
That’s all you have to do.
Now we are all set to start the installation process of Oracle Database 19c.
Launch the OUI
Once you have successfully extracted your Oracle 19c files and folders then you’re all set to launch the Oracle Universal Installer (OUI).
But before you do that, make sure you are logged on to your windows with an administrative user account. You have to follow this clause because it is mandatory. Consequently, failing to do so may cause mid installation error and crash the entire installation process.
Now that you have logged on to your windows with an administrative user, locate the directory where you have extracted your Oracle Database 19c. Thereafter you have to search the file with the name “setup.exe”.
Once you find the file right click on it and choose “Run as Administrator”.
That’s all you need to do to start the Oracle Universal Installer (OUI).
Screen 1: Configuration Option
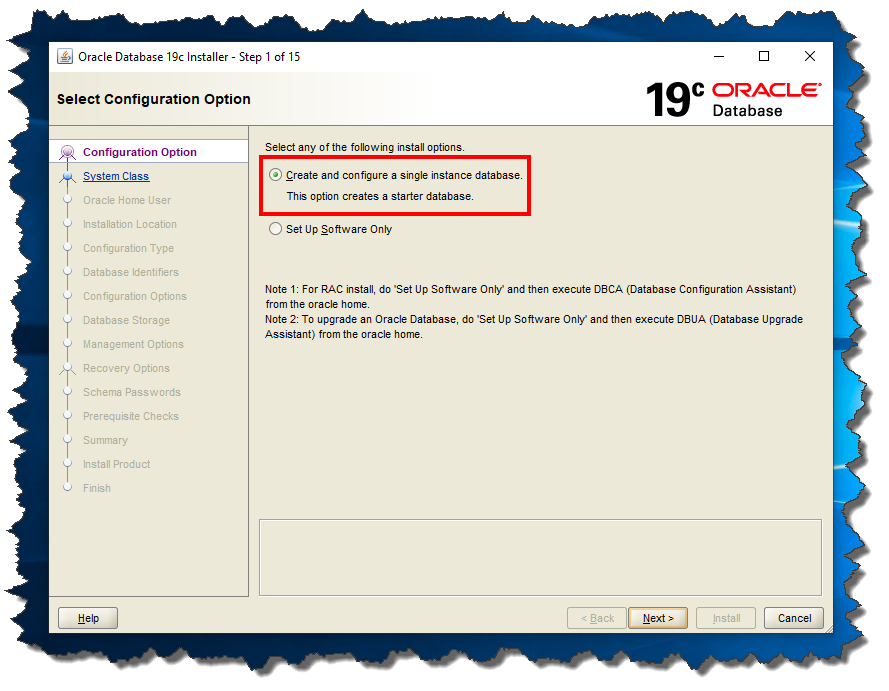
Here we are presented with two configuration options.
- Create and configure a single instance database.
- Setup software only
If you select the first option, the oracle universal installer will not only install and configure the Oracle server on your system. But it will also create a starter database for you. This option is good for learning and practice purposes.
But if you go with the second option which is “setup software only”. It will do exactly what its name suggests. It will install and configure the Oracle Database server on your system. However OUI, the oracle universal installer will not create or configure any database for you.
Additionally, this option is best suitable when you are configuring a RAC or planning to perform an upgradation.
Action: Select The First Option – Create and Configure A Single Instance Database.
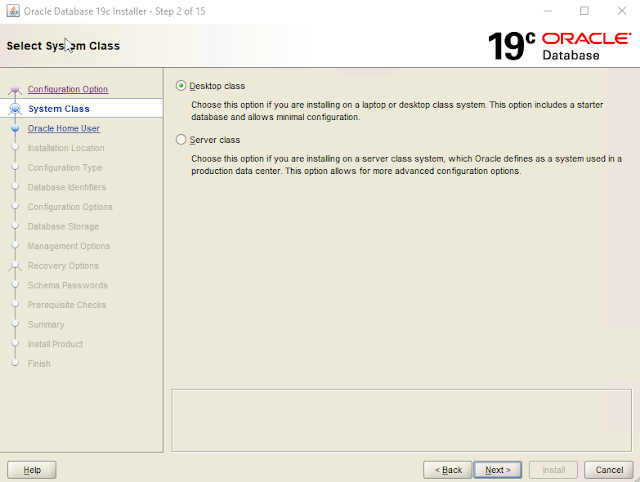
Screen 2: Select System Class.
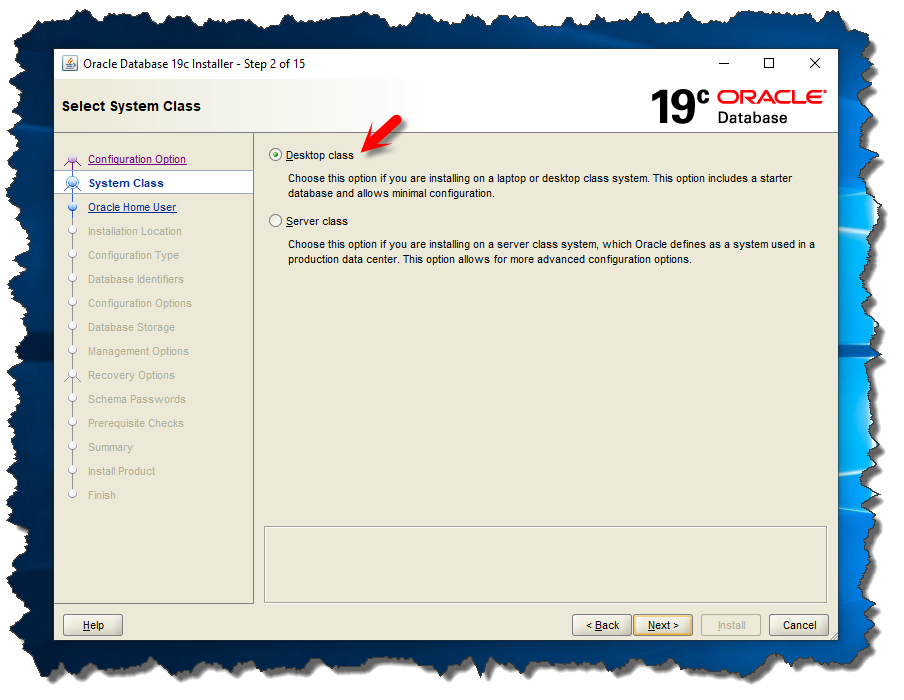
In this step we need to select what type of installation of Oracle 19c we want to perform. OUI gives us two options.
First one is “Desktop Class” – You choose this option when you are installing Oracle Database 19c on your desktop or laptop. Because this option will perform the basic installation of Oracle 19c on your system.
Second option is “Server Class” – This is advanced installation. As it is generally used when you are installing Oracle Database 19c or any other version on Server grade machine.
Action: Select The First Option “Desktop Class”
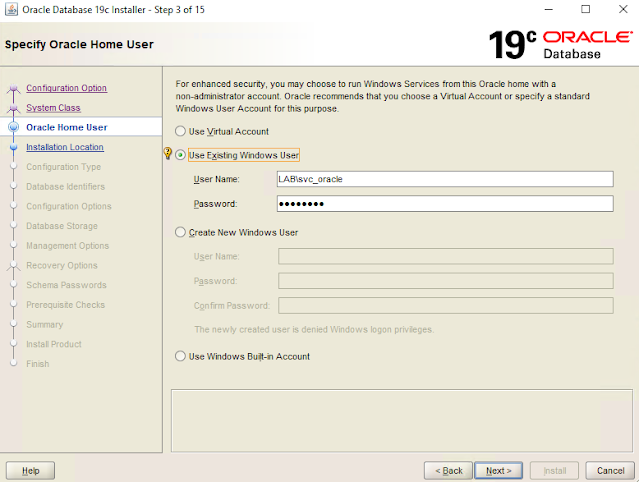
Screen 3: Specify Oracle Home User.
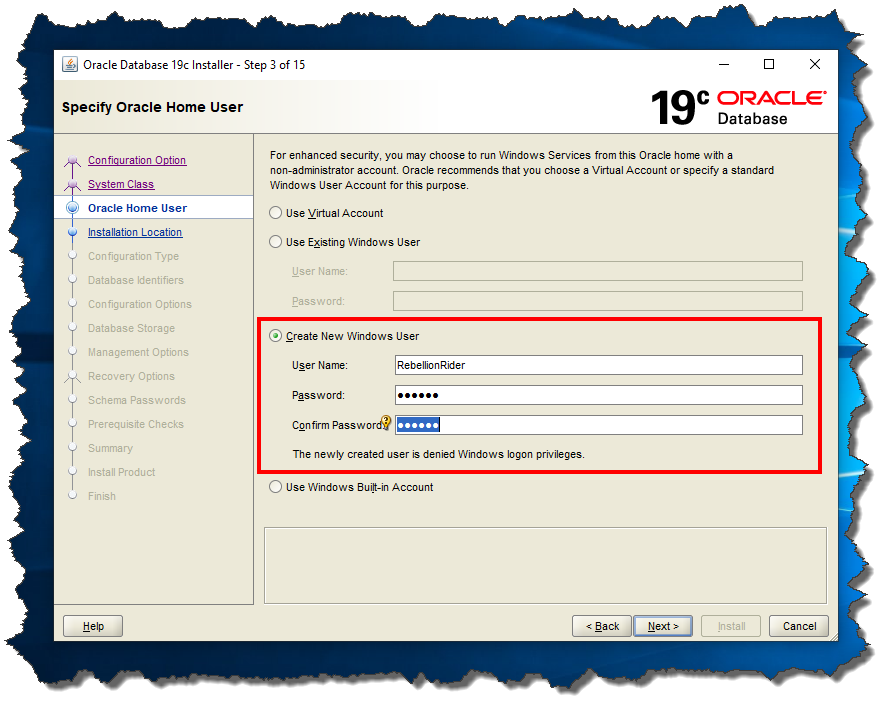
There are so many things which Oracle Database server does in the background to keep your system running. And to do those tasks it creates 14 windows groups. Furthermore to handle those groups Oracle server needs a dedicated windows user.
In this step OUI gives us four options for creating or configuring Windows 10 user. These four options are –
- Use Virtual Account
- Or, Use Existing Windows User
- Create New Windows User
- Use Windows Built-In Account
Use Virtual Account
Select this option if you neither want to create a new user nor want to use any built-in or existing user.
Use Existing Windows User
Choose this if you want to use an existing standard or administrative windows user which is already created.
Create New Windows User
Oracle universal installer gives you an option for creating a dedicated user for your Oracle Database 19c. Using this you can create a Standard Windows User which is completely dedicated to your Oracle requirements. However this user will not be allotted with logon privileges. Therefore logging in to your system with this user won’t be possible. But you can modify it like any other standard windows user.
Use Windows Built-in Account
Choose this if you want to use one of those user accounts which Windows 10 has created for you during its installation.
For enhanced security Oracle recommends either using Virtual Account or Standard Windows user instead of windows built-in account. Also, you cannot change this Oracle Home user once the installation is done thus be careful while creating it.
Action: I will suggest creating a new and completely dedicated Oracle Database 19c user. To do that you have to select the third option which is “Create Windows User”.
Screen 4: Typical Installation.

Perhaps this is the most important step in this entire installation process of Oracle Database 19c. Here I suggest you bring out your pen and paper and get ready to note down some information.
Oracle Base
This is an editable drop-down input field. Therefore you have the freedom to either choose from the option given in the drop-down list or enter your desired directory location.
Oracle Base is a base directory for all your Oracle Products. Consequently this will be the location where all the necessary files like Oracle Home of Oracle Database 19c will be stored.
Here you will get a drop-down input field with one or two options already filled. Choose from any of these if you want to. But, if you want to assign a location of your choice then hit the “Browse” button and select the desirable location.
Action: Specify a directory location which is secure and stable.
Software Location.
Software location is famously known as Oracle Home or DB Home. This directory will be placed inside the Oracle Base. Also, it will be the directory where all the files and folders of Oracle Database 19c are placed.
Since Oracle introduced image-based installation in Oracle 18c we were not allowed to change or modify this location. But prior to that we were free to set this location according to our preference. Now, the Oracle Universal installer (OUI) takes the location of the setup files and assigns it as the Oracle Home or software location.
That’s why I asked you guys to move your Oracle Database 19c files from download folder to another location, which is more secure and stable.
Anyways, you can read more about Oracle Home here
Database File Location
Important files of Oracle Database 19c like Data files, redo log files, control files, server parameter files and the password files will be saved onto this directory. Furthermore it will be placed inside the software location of your Oracle 19c.
These files are most important and required for the proper functioning of the Oracle 19c database. Therefore make sure not to delete the content of this directory.
Action: Let it be set on default
Database Edition.
This is another drop-down list. Here you will find all the editions of Oracle 19c which you have downloaded. Fortunately Oracle Database 19c is only available in two editions and both of them come within the bundle which you have downloaded.
These editions of Oracle 19c are –
- Oracle Enterprise Edition
- And, Oracle Standard Edition 2
Action: Select Enterprise Edition
Character Set
As the name suggests, using this field you set the character set for your Database.
Action: Let it be set on default.
Global Database Name (S.I.D.)
The Global Database Name will be the name of your database and will serve as your database SID. You will need it while making a connection with your database using tools such as SQL Developer. By default, it is set as ORCL. If you want, you can change it to any other name, but make sure to remember it. I suggest you write it down somewhere as your Database SID.
Password
This will be the password for your Administrative user. Administrative users are special user. Using them you can alter the core of your Database. So, it’s always advisable to set a strong password for them.
Now you asked what are the names(username) of those Administrative users?
Oracle 19c has four Administrative users just like every other variant of Oracle Database. These are –
- SYS
- SYSTEM
- SYSMAN, and
- DBSNMP
You can use the name of either of these users as username and the password which you have specified in the field to log on to your database.
As I said earlier, these can modify the core of your database thus be careful with them.
Create as Container Database
In most of the cases this checkbox is already checked, but if for some weird reason it isn’t, then check it. If OUI finds this checkbox enabled then it will create a root container database for you.
Pluggable Database Name
In this field you will specify a unique name for your pluggable database. By default, it is set on ‘orclpdb’. This Pluggable Database (PDB) will work as a template for those PDBs which you will create in future.
Action: Let it be set on its default value. If you decide to change it, then note it down somewhere.
Screen 5: Prerequisite Checks
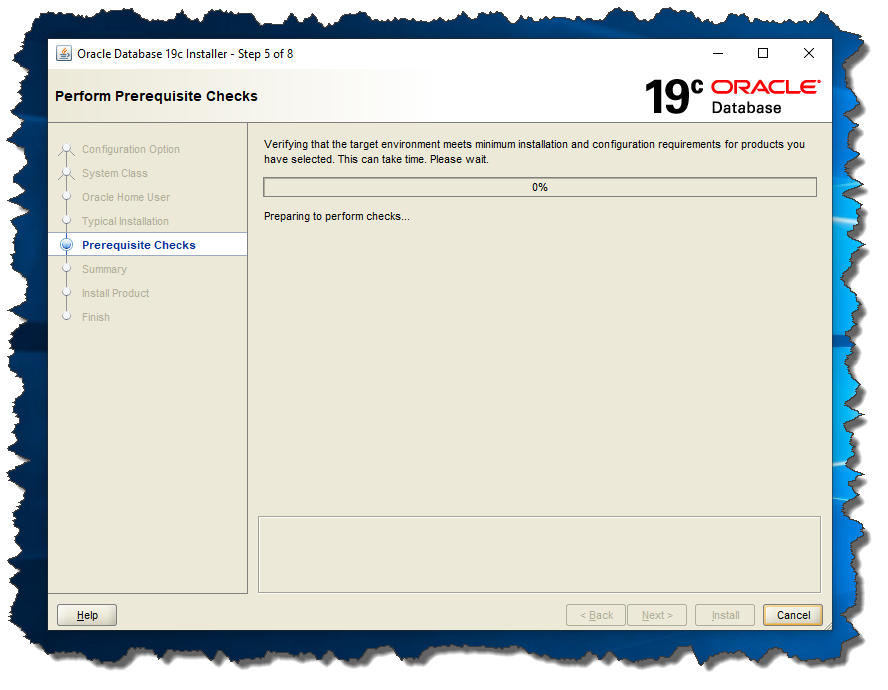
In this step the OUI will check the prerequisites. We will be good to install it if everything goes well. If there is any error, then the OUI will show you here.
Screen 6: Summary
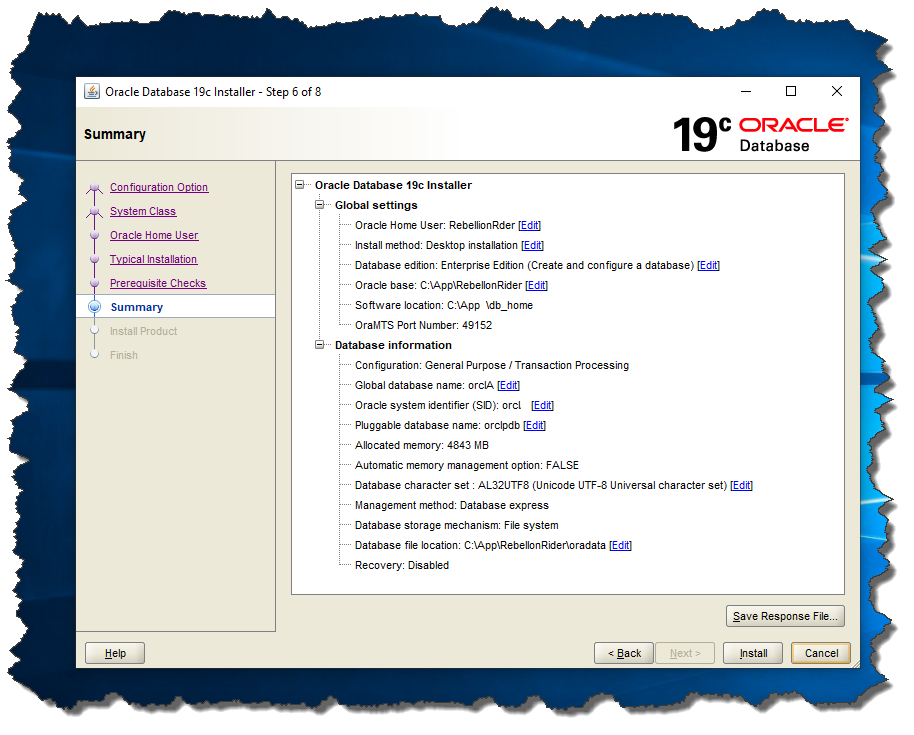
On this screen, the OUI will show the summary of the configuration which you just did for your Oracle Database 19c installation. Here go ahead and press the Install button.
If possible save this information somewhere for future use. It’s always better to be safe than sorry!
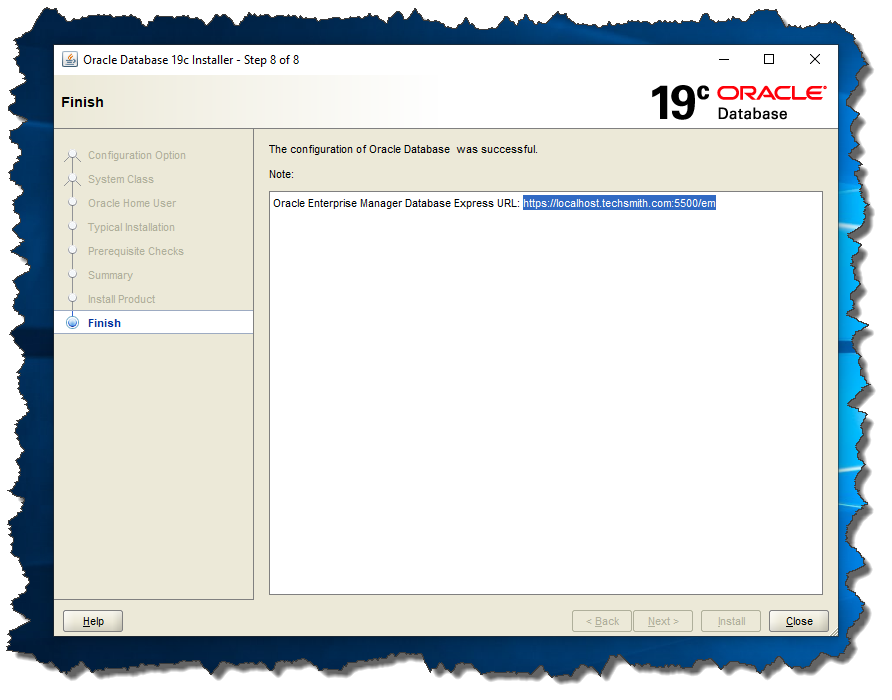
Unlike 11g and 12c in Oracle 19c you will not get a DBCA separately for your database configuration. Because this new Oracle 19c Universal Installer has simplified the process.
Once the installation is done the installer will show you the URL for your Oracle Database 19c Enterprise Manager. Enterprise manager is a web-based tool for managing Oracle Database 19c. Copy and save that link. I suggest you bookmark that link.
That’s how we install Oracle Database 19c on Windows 10. This was a detailed tutorial on installation of Oracle 19c. I have crafted this tutorial by taking the perspective of interview and certification in my mind.
Though the tutorial is very detailed but if you still have any doubts then feel free to leave me a message on my Facebook.
Thanks and have a great day!
In this Oracle tutorial, we will see a complete step-by-step on Oracle 19c installation on Windows 10. Also, we will see, how to install oracle database 21c on windows 10.
Also, we will cover these topics.
- Brief History of Oracle database & its versions
- System requirements for installing Oracle on Windows
- Oracle database installation steps for windows
- Uninstall Oracle Database from windows
- Reset password for sys as sysdba database
- Installing Oracle SQL Developer Tool
- how to install oracle database 21c on windows 10
Brief History of Oracle database & its versions
Oracle database is a powerful and safe relational database software created by Oracle corporation. It was developed in 1977 by three friends Larry Ellison, Bob Miner, and Ed Oates at SDL (Consultancy Software Development Lab).
| Year | Description |
|---|---|
| 1977 | the first version was released in the name RSI (Relational Software Inc.) |
| 1979 | Oracle version 2 was released as the first commercially based RDBMS |
| 1982 | A portable version of the oracle database was released as Oracle version 3. Company name changed from RSI to Oracle Systems Corporation |
| 1985 | Oracle V4, V5, V6 were released with Enhancements to concurrency control, data distribution, and scalability. |
| 1992 | Oracle V7 released with PL/SQL store program unit. |
| 1997 | Oracle V8 released with objects and partitioning |
| 1999 | Oracle V8i released with Internet computing |
| 2001 | Oracle V9i released with Oracle Real Application Clusters (Oracle RAC) |
| 2003 | Oracle V10g released with Grid Computing |
| 2007 | Oracle database 11g released with the following features: Manageability, diagnosability, and availability. |
| 2009 | Oracle database 11g release 2 with Edition Based Redefinition, Hybrid Columnar Compression, Replication, Database Appliance, Cluster File System, Golden Gate, Data Redaction. |
| 2013 | Oracle Database 12c Release 1 with features like Database Cloud Service, In-Memory Column Store, JSON, Native, SQL Pattern Matching, Multitenant architecture |
| 2017 | Oracle Database 12c Release 2 with features like Zero Data Loss Recovery Appliance, Native Sharding, etc. |
| 2018 | Oracle Database 18c released with features like Online Merging of Partitions and Subpartitions, Active Directory Integration, etc. |
| 2019 | Oracle Database 19c was released which is the latest stable version so far. It has Automated PDB Relocation, Automatic SQL Plan Management, , Zero-Downtime Grid Infrastructure Patching, etc. |
| 2021 | Oracle Database 21c is in innovation mode and it supports advanced features related to blockchain, machine learning, SQL Macros, etc. |
Read How to Get List all Tables in Oracle Database
System Requirements for Oracle 19c installation on windows 10
Let us check out the system requirements for installing Oracle 19c installation on Windows 10.
Here are the important components (software & hardware) required to install the oracle database in your system. In case your system didn’t meet these requirements please then please go with the minimum configuration setting.
Also, check: How to Install Oracle on Docker
Software Requirement for Installing Oracle Database on Windows
The following windows operating system can be used to install the oracle database on it. Windows 11 is still in the beta version we tried installing it on it & it worked for us but we do not guarantee that it will work for you as well. Once support is officially released we will update this section.
- Windows 8.1 x64- Pro and Enterprise editions
- Windows 10 x64- Pro, Education, and Enterprise editions.
- Windows Server 2012 R2 x64- Standard, Datacenter, Essential, and Foundation centers.
- Windows Server 2016 x64- Standard, Datacenter, and Essentials centers.
- Windows Server 2019 x64- Standard, DataCenter, and Essentials centers.
Read: Connect to oracle database
Hardware Requirement for Installing Oracle Database on Windows
In this section, we have mentioned the hardware required to install and run the oracle database on the windows operating system.
| System Architecture | Processor: AMD64 and Intel EM64T |
| RAM (random access memory) | 2 GB minimum |
| Virtual Memory | – If physical memory is between 2 GB and 16 GB, then set virtual memory to 1 times the size of the RAM – If physical memory is more than 16 GB, then set virtual memory to 16 GB |
| colors | 256 colors |
| Resolution | 1024 X 768 minimum |
| Disk space | 10 GB |
Read How to Check Oracle Database Version
In this section, we will walk you through the steps to download and install the oracle database 19c on your windows operating system (Windows 10).
- We highly encourage you to download the Oracle database from the official website. Click on the below button to navigate to the exact download page. Please note that you will need an Oracle account to download the file.
- Once downloaded, extract the file in the location of your choice. We have extracted the file in our download folder but we advise you to create a new folder ‘Oracle’ inside windows
C:/and then extract the zip file thereC:/Oracle - Navigate inside the WINDOWS.X64_193000_db_home folder and run the setup file as Administrator.

- ‘Select configuration Option’ wizard will open, choose the first option which says ‘create and configure a single instance database’ and click on Next button.

- Once configuration is selected then ‘System Class’ wizard will open. In this wizard, you can select between desktop class and server class.
- Desktop class povides starter database and allows minimal configuration.
- Server class provides all the tools & configurations to facilitate production data center work.

- ‘Specify Oracle Home User’ wizard will open, here you can choose any option as per your preferences. In our case, we have selected ‘create new windows user‘ and providednew user name & password. Once completed this step click on the next button.

- ‘Typical Install Configuration’ wizard contains the most important configurations please makea note of the credentials.
- Oracle base holds the path of extracted zip file. In our case, zip file is extracted in the downloads folder that is why downloads path is displayed.
- Database file location is the path where database is stored. New folder with the name oradata is created.
- Select Enterprise Edition in data base edition dropdown.
- Global database name is the important here please remember whatever name you are going to provide it.
- This password will be used to access orcl global database. The password must have uppercase, lowercase, number and special character to meet the oracle standard.
- Plugged database name is also important please keep a record of it to avoid trouble in future. Click on next button.

- Once the Typical install configuration is completed the system will perform prerequisite checks where it will check for various parameters and that will be step 5. Once all the checks are passed it will redirect you to the Summary wizard.
- In the ‘Summary’ wizard all the setting you have selected so far will be displayed and from here we will move to install the orace database 19c software, click on the install button to proceed.

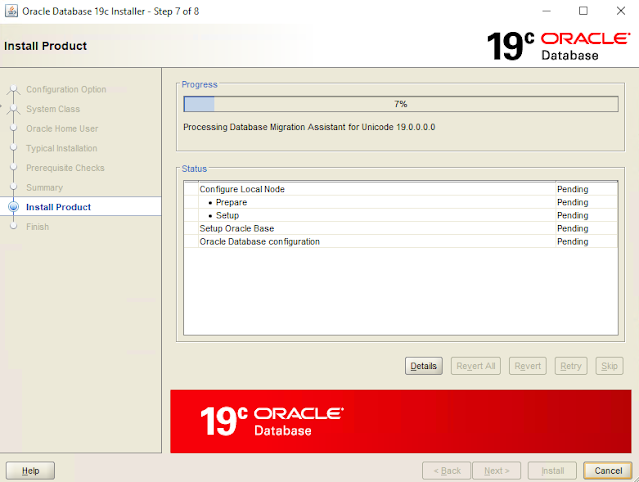
- Next wizard is ‘Install Product’, Here the product will be installed on the device, this may take some time. You will see green ticks for all the completed steps. Also, there will be a ‘windows security alert’ prompt. click on the allow access.


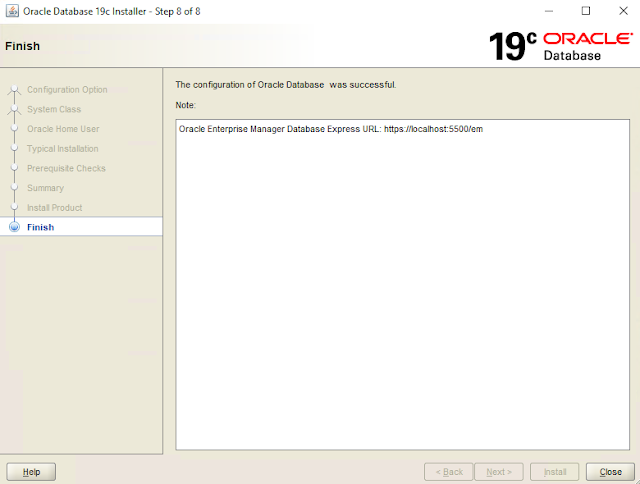
- Once the installation is complete ‘finish’ window will appear. The oracle database 19c is successfully installed in your system now.

- Once the installation is complete its time to use oracle database 19c. Open command prompt and type
sqlplus / as sysdbato connect with the system predefined database.

Read How to create a database in Oracle 19c
How to install oracle database 21c on windows 10
Here is a complete video tutorial on how to install oracle database 21c on windows 10.
Uninstall Oracle Database from windows
In this section, we have shared the steps to uninstall the Oracle 19c from the Windows operating system. These steps will remove all the programs and files of the oracle database from your system.
The steps shared are based upon the installation method we have taught in the above section – Oracle 19c installation on Windows 10
Uninstallation of Oracle database involves the following steps:
- Close all the instances of oracle running on the windows.
- Stop all the oracle services
- Remove the base folder from
C: - Remove Oracle folder from
C:Program Files - Remove Oracle folder from
C:UsersYouruser - Delete Environment Path
- Delete oracle database information from Registry
Close all the instances of oracle running on the windows
Open task manager and close all the running instances of the Oracle database and oracle SQL developer tool from your windows operating system.

Stop all the oracle services
- Open Run by pressing
WIN + Ron the keyboard and type services.msc - Stop all the running services of oracle as displayed in the below picture.

Remove the base folder from C:
The base folder is the one where all the oracle files are stored. It is recommended to create a base folder inside the C: drive directly. Delete the base folder of the oracle database permanently.
The below image shows the files inside the base folder.

Remove Oracle folder from C:Program Files
Navigate to C:Program Files and there you will find the oracle folder. If you do not have any other oracle program installed like Oracle virtual box, etc. then delete the entire folder otherwise delete the inventory folder only.
Remove Oracle folder from C:UsersYouruser
Navigate to C:UsersUsername in some cases it is inside the app data. Navigate there and delete the oracle folder from there even if the folder is empty.
Delete Environment Path of oracle database
After installing oracle, an oracle software path is created automatically on the System Environment Variable. This allows the use of sqlplus on the command prompt.
- To delete the Environment path search for Edit the System Environment Variables on the windows search.
- Click on the Environment Variables button on the bottom right of the window.
- Under the System Variables, in the Path section, you will see the path of oracle.
- Select the oracle path and click on the delete button. Don’t forget to click on the Ok buttons of the window.
The below diagram shows, the deletion of the environment path of the oracle database in windows.

Delete oracle database information from Registry
The registry keeps the information about all the software installed on the system. It is one of the crucial record keeper of the windows operating system.
Note: Please follow these steps carefully, any mistake could break your operating system.
- Open Run by pressing
WIN + Rand typeregedit. - Navigate to ComputerHKEY_LOCAL_MACHINESOFTWARE
- If there is no other oracle software installed then delete the entire oracle folder from there otherwise delete the folders mentioned in the below image.

- Navigate to ComputerHKEY_LOCAL_MACHINESYSTEMControlSet001Services and delete all the oracle services from there.
- Below image shows the oracle services on the registry of windows 10.

Reboot your computer and it will be free from all the files and folders of the oracle database. The system will treat the reinstallation as fresh installation on windows 10.
Read: Oracle 19c Installation on Windows 10
Reset password for sys as sysdba
Sys users do not require passwords while logging in if not changed manually. In this section, we will learn how to reset passwords for sys as sysdba database.
- After installing oracle database 19c on your system you can login to sysdba without any password and can create new database, grant permissions, etc.
- sysdba cannot left without password due to security reasons. Once you have logged in, set the password for sysdba to avoid unauthorised access.
- Sys password can be changed using Alter Command in oracle database.
# login to sysdba
sqlplus / as sysdba

# change password (here TOOR is the new password)
ALTER USER SYS IDENTIFIED BY TOOR;
Read Connect Excel to Oracle Database
In this section, we have demonstrated how to download and install the Oracle SQL developer tool on the windows operating system.
- Oracle SQL Developer tool is an open source tool that provides a workspace for the development of the databases using Graphical User Interface (GUI) and supports all the other tools from Oracle.
- This tool will help you while dealing with huge database as information displayed over the command-line is not as clear as it appear on the IDE.
- We encourage you to download oracle sql develper tool from the official website. Click on the above button and download Windows 64-bit with JDK 8 included.
- Once downloaded extract the zip file inside
C:Program Filesfolder of your windows machine. - Navigate to the sqldeveloper folder and click on the sqldeveloper application to start the progam.

Also, take a look at some more tutorials on the Oracle database.
- How to create table in Oracle
- Oracle to_char Date Format
- Oracle Add Foreign Key
- Oracle add primary key
- Oracle to_date Format
In this tutorial, we have learned how to install Oracle on the Windows operating system. Also, we have covered these topics.
- Brief History of Oracle database & its versions
- System requirements for installing Oracle on Windows
- Oracle database installation steps for windows
- Reset password for sys as sysdba database.
- Installing Oracle SQL Developer Tool
I am Bijay having more than 15 years of experience in the Software Industry. During this time, I have worked on MariaDB and used it in a lot of projects. Most of our readers are from the United States, Canada, United Kingdom, Australia, New Zealand, etc.
Want to learn MariaDB? Check out all the articles and tutorials that I wrote on MariaDB. Also, I am a Microsoft MVP.
This time let us see how to install Oracle database 19c on Windows 10. This installation is not much different from Oracle 18c installation.
You can download the 19c Installation media for Windows from the below link.
Database Software Downloads | Oracle

Once downloaded, you have to extract the package to a folder. Please note, the extracted folder or the folder from which you will execute “Setup.exe” is going to be 19c Oracle Home. So, name the folder wisely. For example, I have extracted the files to a folder D:Oracle19c
You can start the installation by right clicking the Setup.exe and running as “Administrator”.

This will kick start the installation.

We will not create a database along with the software installation. Hence select “Set Up Software Only”


I suggest you to create a normal user (no administrator privileges) “oracle”, that will be used for all your future Oracle software installations. If you don’t have an account explicitly created yet for Oracle, the installation gives you an interface to create one. It’s your choice.

Please remember, earlier I said, the folder where you have extracted the installation media is going to be Oracle 19c home, aka Oracle Home. Rename the folder with an appropriate name before going ahead with the installation.
You will be asked to provide a location for Oracle Base. To content within the Oracle Home, you can specify a path like “D:Oracle19cdatabase” or “D:Oracle19cdb” or a folder name of your choice.

After few basic checks, the installation will proceed now. I strongly suggest you to assign a STATIC IP for your computer, prior continuing.


That’s it. No hacks, no modifications to config files or anything such to get the software installed on Windows!.
You can use “Database Configuration Assistant” for creating new database. We will see how to create a new database now. This time we will be creating a CDB (Container Database) and one PDB (Pluggable Database). You may go ahead with creating a single instance database when asked to choose between.


Select “Advanced Configuration”


You can choose between a normal database or Container database with PDB at next step. If you don’t wish to create the database as a container, uncheck the option “Create as Container database”. If you chose to continue with creating your database as container, I suggest you to leave the defaults as it is, other than the PDB name. If you need more PDBs, may add later to the container.

Leave the defaults, unless you know what you are doing.

If you are setting up the database for the LAB/Learning purposes, you may ignore these. However, for production instances, you must configure the Recovery area & setup archiving.

You can create a LISTENER for your database now. If you other Oracle database LISTENERs already running, choose a port number that wouldn’t raise a conflict.

Optionally you can setup Database Vault & Label Security at this step 

Okay, we need your attention here. Oracle automatically allocates 40% of total available physical memory for the newly created database. As I mentioned in the previous step, if you have more than one database running from the same computer, you must adjust the available memory to avoid choking the resources.

You may leave the defaults untouched here & you can change this value as sys admin when needed.

WebLogic Repos insist upon “AL32UTF8” Character Set & unless you have specific reasons to change the Character set, leave the defaults. If you are planning to migrate a legacy application that uses a different character set like Arabic (AR8MSWIN1256), please read this post
As per the post, you can use a different character set for a PDB starting from Oracle database versions 12.2.


We do love Scott bit too much, if yes, go with sample schemas (Trust me, you need it)

Enterprise Manager configuration is totally optional. If you choose to, will install an Express edition of Oracle Enterprise Manager (means more resources)

As usual, for a LAB environment I will go with same password for all accounts.


I would suggest you to accept the defaults at next step & change the passwords and unlock accounts as and when needed.

That should complete the installation and creation of database for 19c. Have comments? Please post them to me.
Back to: Oracle Tutorials for Beginners and Professionals
In this article, I will show you how to download and install Oracle 19c Software on Windows 10 64-bit Operating System.
Download Oracle 19c Software on Windows 10 64-Bit Operating System:
To download the Oracle 19c software please visit the following website and based on your operating system, download the appropriate ZIP folder.
https://www.oracle.com/in/database/technologies/oracle19c-windows-downloads.html
Once you visit the above URL, you will get the following web page. I have installed Windows 64-bit Operating System on my machine, so I have downloaded the following ZIP folder from the above website. So, based on your operating system you have to download the appropriate zip folder.

Once you download the ZIP folder, then UNZIP or EXTRACT the folder. It will take some time to extract the files and folders. Once the zip file is extracted, you will get so many files and folders as shown in the below image.

As you can see in the above image, one file called setup is downloaded which is of type Application. Now rename the extracted folder as db_home and move this folder to the root of your C Drive for smooth installation.
Now, double click on the setup files to start oracle software installation or right-click on the setup.exe file and select the Run as Administrator option. It will open one popup asking for Do you want to allow this app to make changes to your device? Simple click yes.
Note: The installation wizard may take several minutes to open. So be patient. At this point, two windows are opened. One is launching Oracle database Setup wizard and the other one is Oracle Database 19c Installer as shown in the below image.

Configuration Option
This step is a very important step and this step allows us to choose the database installation options. We have two options.
- Create and configure a single instance database.
- Setup software only
If you select the first option, the Oracle Universal Installer (OUI) will not only install and configure the Oracle server on your system. But it also creates a starter database for you. This option is good for learning and practice purposes.
But if you go with the second option which is “setup software only”. It will do exactly what its name suggests. It will install and configure the Oracle Database server on your system. However, the oracle installer will not create or configure any starter database for you. This option installs the essential components for creating and administering a database.
Here, from the configuration options section, I am selecting Create and Configure a single instance database option radio button and then click on the Next button as shown in the below image.
Select System Class:
Once you click on the Next button, it will open the System class window. Here, we need to select what type of installation of Oracle 19c we want to perform. It gives us two options.
- The first option is Desktop Class – We need to choose this option when we are installing Oracle Database 19c on our desktop or laptop. Because this option will perform the basic installation of Oracle 19c on our system. This option also includes a starter database and allows minimal configuration.
- The second option is Server Class – This is the advanced installation and it is generally used when we are installing Oracle Database 19c or any other version on Server grade machine.
As I am installing Oracle 19c on My laptop, so I am choosing the first option i.e. Desktop class, and then click on the Next button as shown in the below image.
Specify Oracle Home User
Once you click on the Next button, it will open the Oracle Home User window. There are so many things that the Oracle Database server does in the background to keep our system running. And to do those tasks it creates 14 windows groups. Furthermore, to handle those groups Oracle server needs a dedicated windows user.
In this step, Oracle Universal Installer (OUI) gives us four options for creating and configuring Windows users. These four options are as follows.
- Use Virtual Account: We need to select this option if we neither want to create a new user nor want to use any built-in or existing user. Select this option to use Virtual Account as Oracle Home user.
- Use Existing Windows User: We need to select this option if we want to use an existing standard or administrative windows user which is already created. Select this option to use existing user credentials for Oracle Home user.
- Create New Windows User: Oracle universal installer (OUI) gives us an option for creating a dedicated user for our Oracle Database 19c. Using this option, we can create a Standard Windows User which is completely dedicated to our Oracle requirements. However, this user will not be allotted login privileges. Therefore, logging in to your system with this user won’t be possible. But you can modify it like any other standard windows user. Select this option to create a new local Windows user to be used as an Oracle Home user.
- Use Windows Built-In Account: We need to select this option if we want to use one of those user accounts which Windows 10 has created for you during its installation. Select this option to use Windows built-in account for Oracle Home user.
Note: For enhanced security, Oracle recommends either using a Virtual Account or Standard Windows user instead of windows built-in account. Also, you cannot change this Oracle Home user once the installation is done thus be careful while creating it.
Here, I am selecting the “Use Windows Built-in Account” option and then click on the Next button as shown in the below image.
Once you click on the Next button, one pop-up will open. Simply click on the Yes button as shown in the below image.
Typical Installation:
Once you click on the Yes button, it will open the Installation window. This is the most important step in the Oracle installation process. Let us discuss this step in detail.
Oracle Base
This is an editable drop-down input field. Therefore, you have the freedom to either choose from the option given in the drop-down list or enter your desired directory location.
Oracle Base is a base directory for all your Oracle Products. Consequently, this will be the location where all the necessary files like Oracle Home of Oracle Database 19c will be stored.
Here you will get a drop-down input field with one or two options already filled. Choose from any of these if you want to. But if you want to assign a location of your choice then hit the “Browse” button and select the desired location.
Software Location
Software location is famously known as Oracle Home or DB Home. This directory will be placed inside the Oracle Base. Also, it will be the directory where all the files and folders of Oracle Database 19c are placed.
Since Oracle introduced image-based installation in Oracle 18c we were not allowed to change or modify this location. But prior to that, we were free to set this location according to our preference. Now, the Oracle Universal installer (OUI) takes the location of the setup files and assigns it as the Oracle Home or software location.
Database File Location
The Important Oracle Database 19c files like Data files, redo log files, control files, server parameter files, and password files will be saved onto this directory. Furthermore, it will be placed inside the software location of your Oracle 19c.
These files are most important and required for the proper functioning of the Oracle 19c database. Therefore, make sure not to delete the content of this directory.
Database Edition
This is another drop-down list. Here you will find all the editions of Oracle 19c which you have downloaded. Fortunately, Oracle Database 19c is only available in two editions and both of them come within the bundle which you have downloaded. These editions of Oracle 19c are as follows.
- Oracle Enterprise Edition
- Oracle Standard Edition 2
Character Set
As the name suggests, using this field we can set the character set for our Database.
Global Database Name
The Global Database Name will be the name of your database and will serve as your database SID. You will need it while making a connection with your database using tools such as SQL Developer. By default, it is set as ORCL. If you want, you can change it to any other name, but make sure to remember it.
Password
This will be the password for our administrative user. Administrative users are the special users. Using them we can alter the core of our Database. So, it’s always advisable to set a strong password for them.
Now you may have one question, what are the usernames of those administrative users?
Oracle 19c has four administrative users just like every other variant of Oracle Database. These are as follows.
- SYS
- SYSTEM
- SYSMAN
- DBSNMP
You can use the name of either of these users as a username and the password which you have specified in the field to log on to your database.
Create as Container Database
In most cases, this checkbox is already checked, but if for some weird reason it isn’t, then check it. If OUI finds this checkbox enabled then it will create a root container database for you.
Pluggable Database Name
In this field, you will specify a unique name for your pluggable database. By default, it is set on ‘orclpdb’. This Pluggable Database (PDB) will work as a template for those PDBs which you will create in the future.
Here, I am setting the following.
- Oracle Base: D:app
- Database Location: D:apporadata
- Database Edition: Oracle Enterprise Edition
- Character Set: Unicode
- Global Database Name: orcl
- Password: abcd1988;
- Create as Container Database: Checked the check box
- Pluggable Database Name: orclpdb
Once you set the above settings, click on the Next button as shown in the below image.
Prerequisite Checks
Once you click on the Next button, the Prerequisite Checks window will open. Here, the OUI will check the prerequisites. We will be good to install it if everything goes well. If there is any error, then the OUI will show you here. Here, I don’t get any error, so it moves to the next window.
Summary
In this window, the OUI (Oracle Universal Installer) will show you the summary of the configuration which you just did for your Oracle Database 19c installation. Here go ahead and simply press the Install button as shown in the below image.
It will take some time to install the Oracle Software. Once the installation is done the installer will show you the URL for your Oracle Database 19c Enterprise Manager. Enterprise manager is a web-based tool for managing Oracle Database 19c. Copy and save that link for future use and finally click on the Close button.
This is how we can install Oracle Database 19c on Windows 10.
In the next article, I am going to discuss How to work with Oracle 19c Database. Here, in this article, I try to explain the step-by-step process to download and install the Oracle 19c Software on Windows 10 64-bit Operating System. I hope you enjoy this How to Install Oracle 19c on Windows 10 64-bit Operating System article.
This is a quick post about installing Oracle Database 19c (19.3) on my laptop (Windows 10). Procedure will be presented as screen cast.
As far as I remember, Oracle 19c was released during Mar-2019 for Linux, and during Apr-2019 for SPARC Solaris and during Jun-2019 for Windows,zLinux , HP and AIX
Software Download:
First of all download the software media file. You can download the media from:
https://www.oracle.com/technetwork/database/enterprise-edition/downloads/oracle19c-windows-5539283.html
Oracle Database 19c (19.3) for Microsoft Windows x64 (64-bit)
WINDOWS.X64_193000_db_home.zip (3,105,763,999 bytes)
(sha256sum – 64d92018207829833bd4d00f1a7fb40c531c8a4a68ded9e430a5d6fbaedaca95)

Oracle 19c Software Installation:
Extract the software:
cd d:app
mkdir db193
cd db193
unzip G:SoftwareoracleWindowsWINDOWS.X64_193000_db_home.zip


Install Oracle 19c:
Run setup.exe program


Database Creation:
Run the Database Configuration Assistant (dbca):


Run the Enterprise Manager Database Express:


You may notice that EM Database Express has smaller functionality in this release compared to the previous releases.
Also, it is java-based not flash-based.
SQL*Plus Connectivity:

sqlcl Connectivity:

Useful Links:
- Oracle Database 19c Documentation
- Database Installation Guide for Microsoft Windows
- Grid Infrastructure Installation and Upgrade Guide for Oracle on Microsoft Windows
Hopefully, I’ll write another post about the Oracle 19c key new features in the near future, enjoy !.

Donate to support our blogging work
$1.00
Thanks
Ahmed
Установка Oracle Database 19c на Windows Server 2019
Время от времени вам может потребоваться иметь экземпляр базы данных Oracle для целей тестирования, например для тестирования возможностей интеграции другого программного обеспечения или для работы со сценариями PL/SQL. Если вы работаете с платформой K2 вы вероятно захотите изучить возможности типа Oracle Service этой платформы, и для этого вы хотели бы начать с некоторого тестового экземпляра базы данных Oracle. В этом блоге мы рассмотрим, как установить Oracle Database на топовый Windows Server. Мы не будем говорить о лучших практиках настройки готовых к производству конфигураций Oracle, а вместо этого просто рассмотрим способы получения тестового локального экземпляра базы данных Oracle как можно скорее.
Существует возможность получения Oracle Database VM, которая является быстрым способом установки и настройки Oracle Database поверх Oracle Linux и запуска ее с помощью Oracle VM Virtual Box. Но это может занять немного времени, чтобы узнать свои способы работы с операционной системой Linux, когда у вас нет никакой необходимости или желания делать это. В случае, если вы в основном работаете со средами на базе Windows, вы можете отказаться от выполнения установки Oracle Database 19c на Windows Server machine, и именно это мы рассмотрим в этом блоге.
Oracle Database release 19 поддерживает установку поверх Windows Server 2019 в соответствии с документацией о выпуске, поэтому мы будем выполнять установку поверх этой версии Windows Server. В моем случае я развернул чистую виртуальную машину Hyper-V с оценкой центра обработки данных Windows Server 2019, чтобы использовать if для установки Oracle. Я использовал опцию установки Desktop Experience, которая завершается невероятно быстро по сравнению с предыдущими версиями этой ОС (особенно если вы используете быстрые SSD-диски).
Как только наша виртуальная машина Windows Server будет готова, мы сможем загрузить самую последнюю доступную версию базы данных Oracle. На момент написания этой статьи вы можете скачать Oracle Database 19.3 для Windows x64 с веб сайта Oracle по этой ссылке. ZIP-файл объемом 2,9 ГБ содержит множество файлов и каталогов, составляющих установочный носитель базы данных Oracle. Такая пестрая команда небольших файлов выглядит немного странно, особенно если вы больше привыкли к типичным установочным пакетам для Microsoft Windows, которые, как правило, связывают установочные файлы в CAB или какой-то другой тип формата пакета и имеют меньшее количество небольших файлов, которые вы можете видеть непосредственно на установочном носителе. В любом случае, как только мы извлекли содержимое ZIP-архива, мы готовы начать процесс установки, запустив программу установки.exe-файл находится в корне извлеченного архива.

После запуска программы установки.exe вас встретит мастер установки Oracle Database Installer wizard, предлагающий выбрать параметры установки, выбирая между “создать и настроить базу данных одного экземпляра” или “настроить только программное обеспечение” (см. скриншот ниже).

Когда дело доходит до установки базы данных Oracle, вы должны быть готовы увидеть некоторые пакетные файлы в действии наряду с опорой на командную строку и переменные среды здесь и там, что является чем-то ожидаемым для продукта, имеющего свой собственный вкус Linux в качестве основной платформы развертывания. В любом случае для наших целей здесь мы выберем опцию «Создать и настроить базу данных одного экземпляра» и нажмем кнопку Далее, чтобы перейти на страницу выбора системного класса:
Для наших целей здесь (установка тестового экземпляра) мы можем придерживаться опции класса Desktop, хотя и устанавливая ее в Windows Server box, так как эта опция упрощает процесс установки и настройки. Итак, давайте выберем опцию Desktop class option и нажмем на кнопку Next, чтобы перейти к шагу Oracle Home User wizard:

Самое простое, что можно сделать на этой странице,-это выбрать опцию Use Virtual Account или Use Windows Built-in Account option. Оба этих варианта приемлемы, поскольку оба позволяют запускать службы Windows для Oracle Home без создания новых учетных записей и ввода паролей. Но если вы заботитесь о безопасности и/или собираетесь установить Oracle RAC Database или Oracle Grid Infrastructure, то вам потребуется использовать учетную запись Windows. Я большой сторонник или придерживаюсь хороших практик безопасности даже в тестовых средах (особенно когда нет таких больших усилий, чтобы соответствовать им), поскольку гораздо лучше иметь хорошие привычки безопасности, сформированные на ранней стадии, и на основе этого я порекомендую вам сделать то же самое и предоставить и использовать учетную запись пользователя Windows для Oracle Home Windows services (этот пользователь может быть локальным пользователем Windows, пользователем домена Windows или учетной записью управляемых служб Windows (MSA)). Найдите время, чтобы создать учетную запись пользователя Windows и использовать ее на этом шаге установки, как показано ниже:
Поскольку мы выбрали мастер установки класса Desktop, он переходит на типичную страницу установки, избавляя вас от необходимости выполнять большее количество шагов, в противном случае мастер установки потребует от вас выполнения таких шагов, как тип конфигурации, идентификаторы баз данных, параметры конфигурации, хранилище баз данных, параметры управления, Параметры восстановления и пароли схем. Типичная установка позволяет нам выполнить полную установку базы данных с базовой конфигурацией, позволяющей нам только настроить расположение файлов Oracle base и database, выбрать выпуск базы данных и набор символов, настроить глобальное имя базы данных и пароль и создать ее в качестве контейнерной базы данных. На типичной странице установки мы просто вводим пароль, принимая параметры по умолчанию, и нажимаем на кнопку Далее:

На следующем шаге мастера будут запущены предварительные проверки, и если все они будут пройдены, мастер автоматически перейдет к следующему шагу (сводка), но вы всегда можете нажать на проверку предварительных условий в левой части окна мастера, чтобы вернуться к отчету о проверке предварительных условий и просмотреть результаты проверки, как показано ниже:

Если все проверки пройдены правильно, мы можем просмотреть выбранные настройки и параметры на сводной странице программы установки:

На этом шаге мы можем сохранить файл ответа (в случае, если мы хотим использовать if для автоматической установки позже) и просмотреть параметры установки. Если все выглядит хорошо, мы просто нажимаем на кнопку Установить, чтобы начать процесс установки.
Как обычно, вы можете сидеть сложа руки и созерцать индикатор выполнения в течение некоторого времени или пойти выпить кофе, пока этот процесс завершается. Последняя страница просто информирует вас об успешном завершении установки, а также показывает Ваш URL-адрес Oracle Enterprise Manager Express:
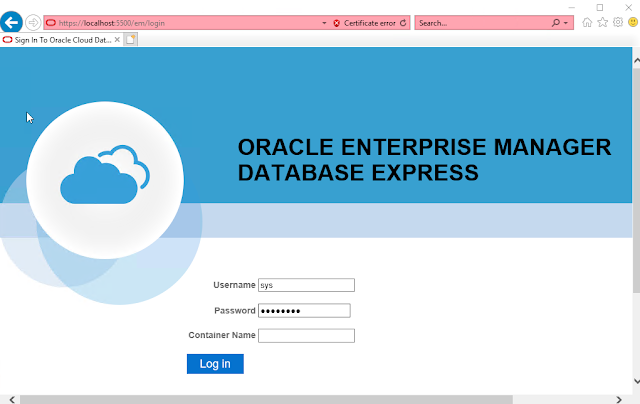
На этом процесс установки завершается. Теперь мы можем войти в Oracle Enterprise Manager Database Express (он же EM Express), используя его URL-адрес и порт по умолчанию – https://localhost:5500/em, указав sys в качестве имени пользователя и используя пароль, который мы устанавливаем во время установки (Шаг 4 мастера). Имя контейнера можно опустить для подключения к корневому контейнеру CDB по умолчанию.
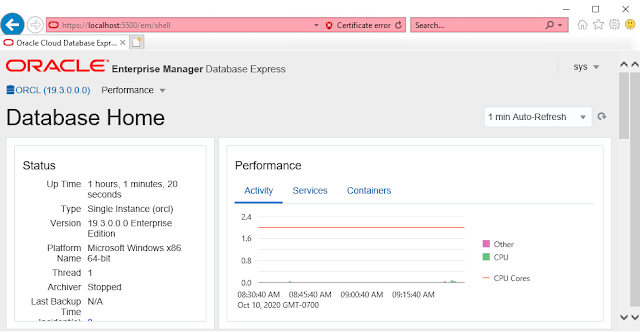
EM Express — это веб-инструмент управления базами данных, который поддерживает ключевые функции управления производительностью и основные функции администрирования баз данных. Ниже вы можете увидеть пример скриншота, показывающий его пользовательский интерфейс. Согласно документации Oracle, EM Express не имеет компонентов среднего уровня или промежуточного программного обеспечения, что приводит к минимальным накладным расходам на сервере баз данных.
Мы также можем подключиться к базе данных с помощью команды sqlplus, как показано ниже:

В качестве последнего штриха я бы рекомендовал вам приобрести Oracle SQL DEVELOPER для более удобной работы с базами данных Oracle. Для тех, кто работал с Microsoft SQL Server, вы можете подумать о Oracle SQL Developer как о аналоге Microsoft SQL Server Management Studio (SSMS). Вы можете скачать его последнюю версию с сайта Oracle по этой ссылке. Для наших целей здесь мы можем выбрать последнюю версию SQL Developer (20.2 на момент написания этой статьи) и скачать zip-пакет для Windows 64-bit с включенным JDK 8. После того, как вы загрузили около 500 МБ zip-файла, вам просто нужно извлечь его в выбранном вами месте и запустить sqldeveloper.exe – дополнительная установка не требуется.
При первом запуске вам будет предложено импортировать настройки из предыдущей установки разработчика SQL, что вы можете сделать, если они у вас были, но если вы устанавливаете if в самый первый раз, то не должно быть ничего, чтобы выбрать в разделе “доступные установки разработчика SQL”, и вам просто нужно нажать на кнопку No в этом всплывающем окне. Хотя можно сказать, что этот поп даже не должен появляться, когда нечего импортировать.

Как только Oracle SQL Developer запустится, вы увидите всплывающее окно отслеживания использования Oracle, запрашивающее ваше подтверждение для автоматической отчетности об использовании в Oracle – вы можете разрешить или запретить это в зависимости от ваших предпочтений и нажать на кнопку OK.

Далее вам просто нужно добавить новое соединение с базой данных Oracle, нажав на зеленую кнопку Плюс и выбрав пункт «новое соединение с базой данных…» в меню, как показано ниже.

Он откроет диалоговое окно «создать / выбрать подключение к базе данных», показанное ниже. Для нашей установки по умолчанию мы будем использовать параметры, указанные во время установки, в то время как имя соединения может быть любым значением, которое вам подходит.
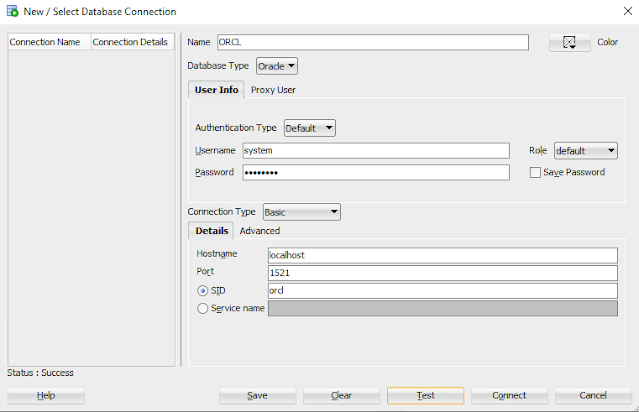
Как вы можете видеть на скриншоте выше, мы используем следующие параметры подключения:
Имя пользователя-система
Пароль – пароль, указанный на этапе установки (на шаге 4)
Имя хоста-localhost (если только вы не подключаетесь с другой машины)
Порт – 1521
SID-orcl
После того, как вы набрали все необходимые настройки, вы можете проверить свое соединение и сохранить его с помощью соответствующих кнопок. Теперь вы должны иметь возможность подключиться к базе данных и использовать Oracle SQL Developer UI для просмотра объектов базы данных и работы с запросами PL/SQL.

После завершения всех этих этапов у вас экземпляру базы данных Oracle, которая идеально подходит для обучения в Oracle на PL/SQL и основы или тестирования БД Oracle интеграция с приложением(ями), например он может быть использован для тестирования между базой данных Oracle и К2 платформы, используя классический К2 Oracle тип сервиса, который позволяет выставить таблиц, представлений, функций, пакетов и хранимых процедур в БД Oracle как К2 SmartObjects.
Я надеюсь, что этот пост был информативным для вас, и если у вас есть какие-либо вопросы или отзывы, не стесняйтесь оставлять их в разделе комментариев ниже.
Are you planning to install Oracle 19c on Windows Server or Windows 10? Then this step by step guide is for you.
The installation of Oracle Software is not always an obvious operation, as it is the case for many DBMS (SQL Server, MySQL, etc.). The steps are however simple, but If you read Oracle documentation, more than 190 pages, you can get lost pretty quickly. There is a lot of information.
In this guide, I’ll simplify theses processes for you. I’ll show you the key steps to successfully install Oracle 19c on Windows, from the first attempt. Upon completion of this installation, all of the components required to create and administer a database in Oracle Database 19c will be available.
So I assume that you already have your Windows server set up and running. To avoid issues during the installation process, make sure your environment meets Oracle 19c installation requirements.
Related: Install Oracle Database 19c Client on Windows Step by Step.
1. Download Oracle Database 19c software for Windows
Our first step is to get the Oracle 19c software for Windows from the official Oracle download page. On this page you will find many packages. In this guide, we will focus on the Oracle Database 19c (19.3) for Microsoft Windows x64 (64-bit) package. If you want to access your future Oracle database remotely, you can also download the Oracle Database 19c Client (19.3) for Microsoft Windows x64 (64-bit) or Oracle Database 19c Client (19.3) for Microsoft Windows (32- bit) according to the architecture of the client computer.
Downloading Oracle 19c software is free, however to use it in the production environment requires a license. Note also that downloading requires an Oracle account.
2. Launch the setup wizard
Once the download is complete
- unzip the package then copy it to the root of your disk;
- rename the folder, choose a shorter name (eg. db_home);
- then launch the setup.
Note: the installation wizard may take several minutes to open. So be patient.
3. Choose database installation options
This step is very important. It allows you to choose the database installation options. You can install Oracle software and create a database at the same time (Create and configure a single instance database).Since we only want to install the Oracle 19c software and its components, we will opt for “Set up Software Only”. This option installs the essential components for creating and administering a database. You can also use it to upgrade an older version of Oracle (example: 12c or 18c) or install RAC.
4. Select database installation type
The first option allows you to install a single instance database on your server. Oracle Database with the Oracle Real Application Clusters (RAC) option allows multiple instances running on different servers to access the same physical database stored on shared storage.As we want to install Oracle 19c on a single server, we select option 1.
You can create a database after installation by using Oracle Database Configuration Assistant (Oracle DBCA).
5. Choose database edition
The version of the database to install depends on your needs. For an application developer or and medium-size companies, the standard version covers practically all needs.To take full advantage of Oracle 19c, you can install the Enterprise version. Obviously, the Enterprise version requires more resources (storage, RAM, CPU).
6. Specify Oracle home user
During Oracle Database installation, you can specify an optional Oracle home user associated with the Oracle home. Oracle home user can be a Windows built-in account (LocalSystem for Server and LocalService for Client), virtual account, or a regular (not an administrator) Windows account. If you specify an existing user as the Oracle home user, then the Windows user account you specify can either be a Windows domain user or a Windows local user.
A Windows user account need not be created by the administrator if a virtual account or a Windows built-in account is used during installation. If you specify a non-existing user as the Oracle home user, then the Windows user account you specify must be a Windows local user. The installer creates this account automatically to run the Windows services for the Oracle home. Do not log in using this account to perform administrative tasks.
7. Specify the location of Oracle software
In a default Windows installation, the Oracle base directory appears as follows: DRIVE_LETTER:appusername where username is the Oracle installation user if you choose Windows built-in account, else it is the Oracle Home user (standard Windows user account). You can change this directory at your convenience or leave it as default.
8. Minimum requirements checks, summary and end of the installation
After these initial phases of configuration, let’s check the installation prerequisites. If, however, there are errors, try to readjust the minimum installation requirements and start again.
Click install if no error occurs.
That’s it. You can close the installation wizard now.
You can take a look at the different components of your installation from the Windows start menu.
Still having trouble installing Oracle 19c on Windows? Book me!
Next step : Create a Database in Oracle 19c on Windows