 Опубликовано: 28.11.2019
Используемые термины: IIS, PHP, MySQL.
Чаще всего, PHP и MySQL устанавливается на серверы с Linux. Однако, при необходимости, можно настроить запуск и обработку PHP скриптов на Windows. Версии последней могут быть разные, например, Server 2008/2012/2016/2019 или не серверные системы, такие как, 7/8/10. Данная инструкция подойдет как для чайника, так и опытного специалиста (в качестве шпаргалки).
Устанавливаем IIS
Публикация сайта для PHP
Работаем с PHP
Устанавливаем
Настраиваем IIS + PHP
PHP Manager для управления
Установка MySQL
Установка IIS
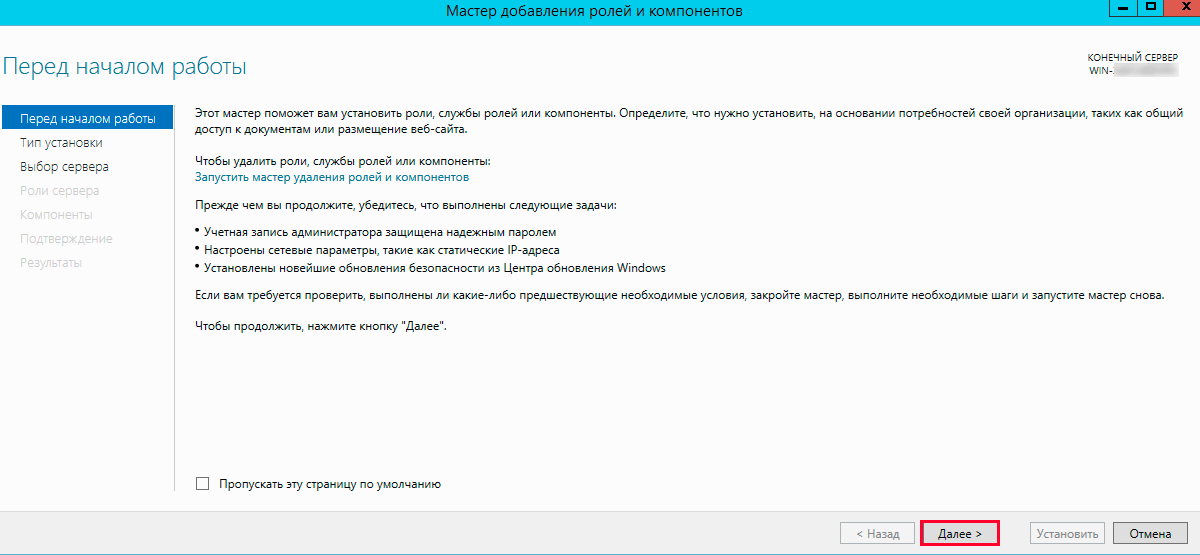
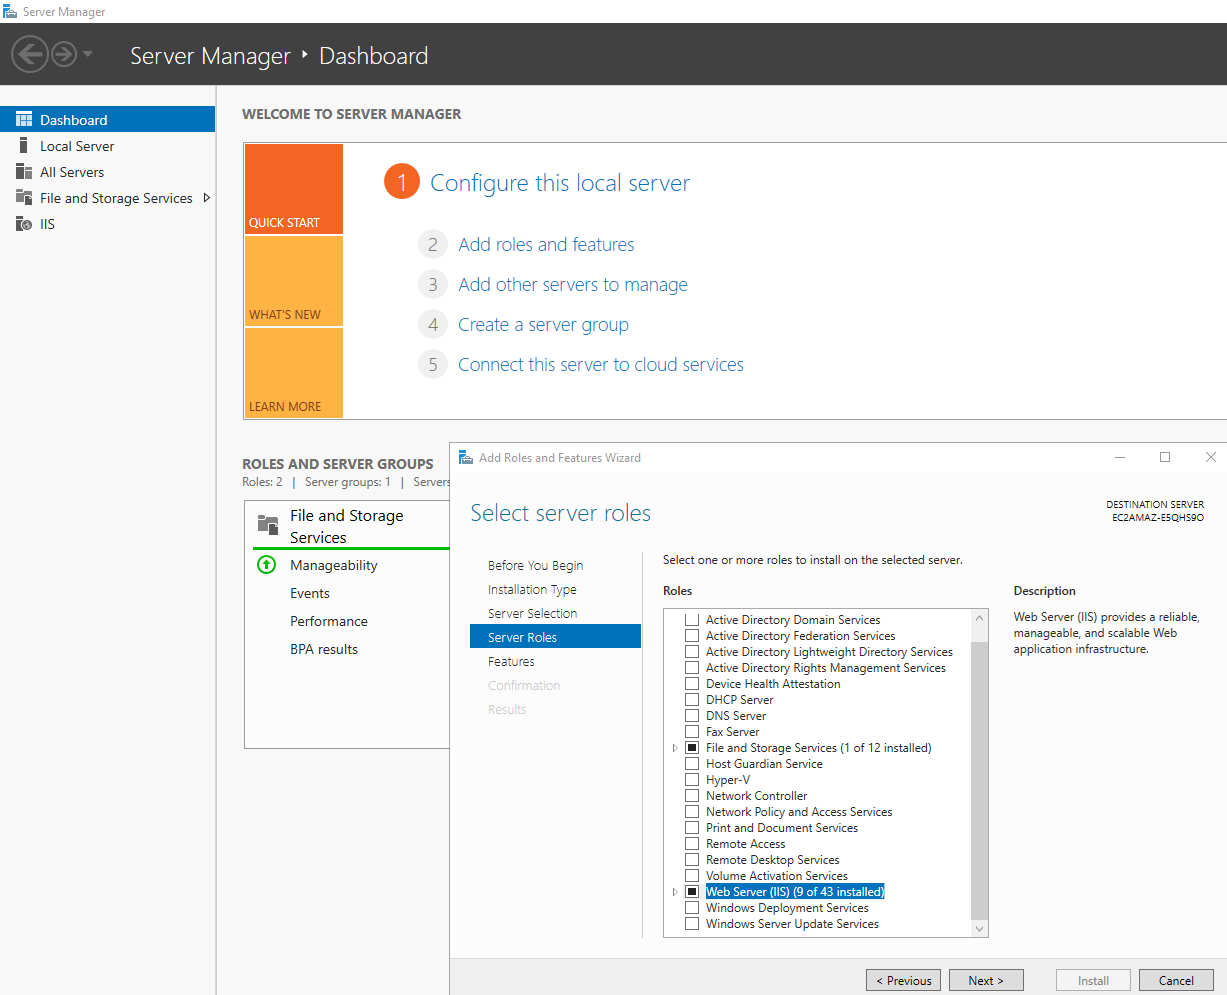
Для установки веб-сервера, открываем Диспетчер серверов — переходим в Управление — Добавить роли и компоненты:

Если откроется окно с приветствием, нажимаем Далее:

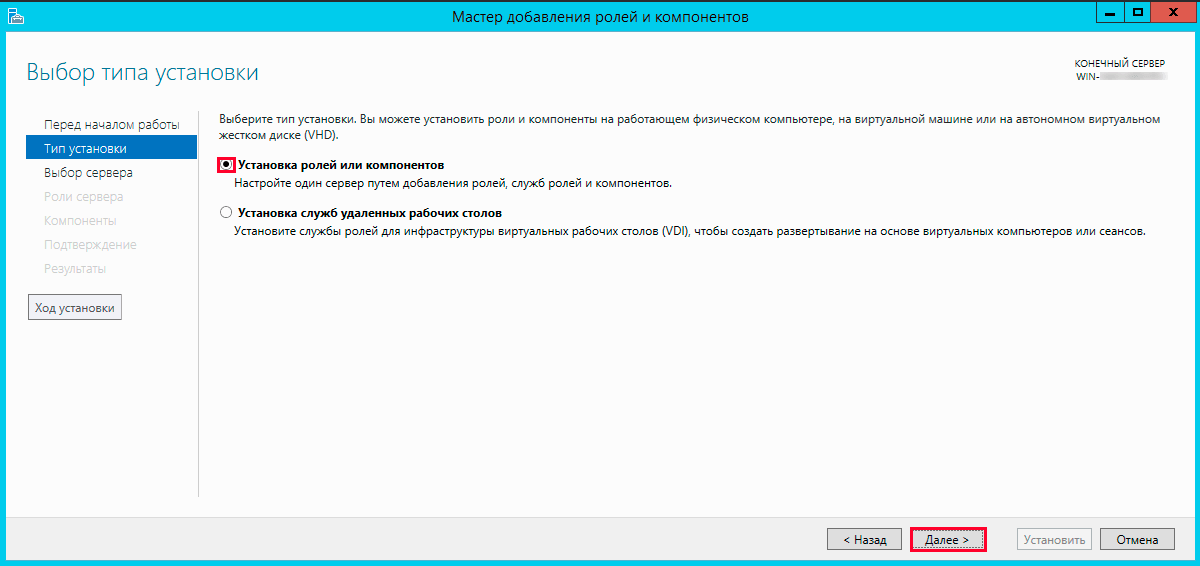
При выборе типа установки выбираем Установка ролей или компонентов:

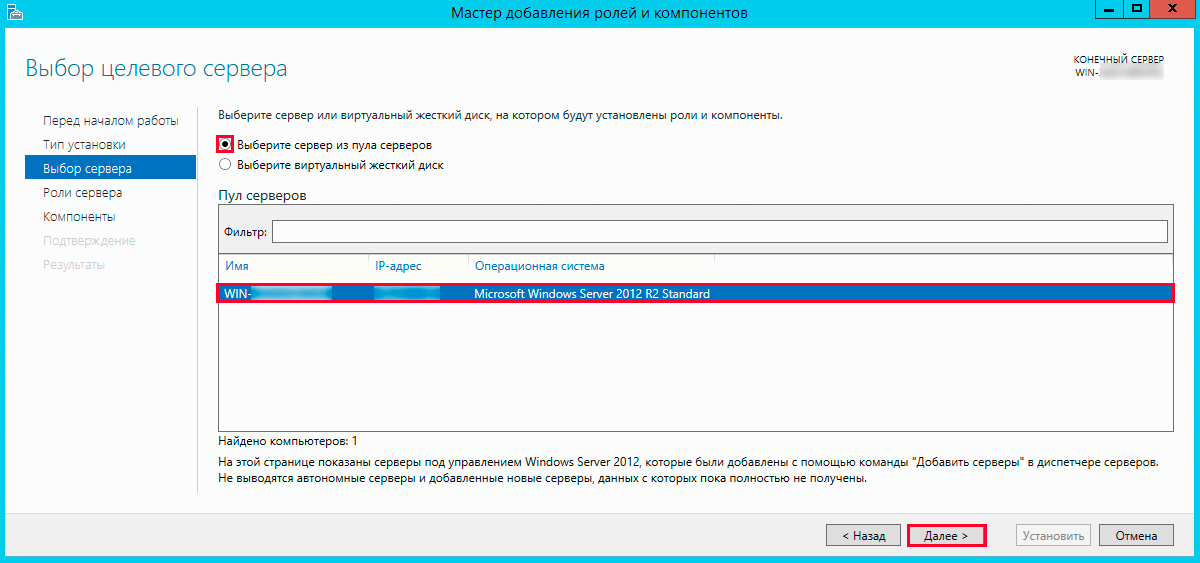
При выборе целевого сервера оставляем локальный сервер (или выбираем удаленный, если установка выполняется из удаленной консоли):

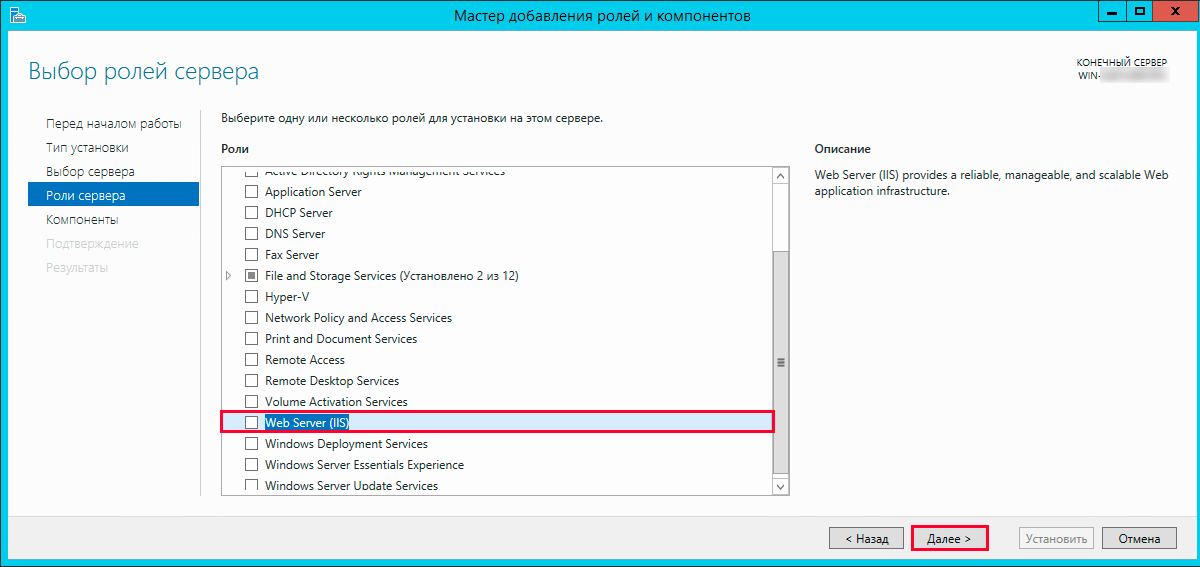
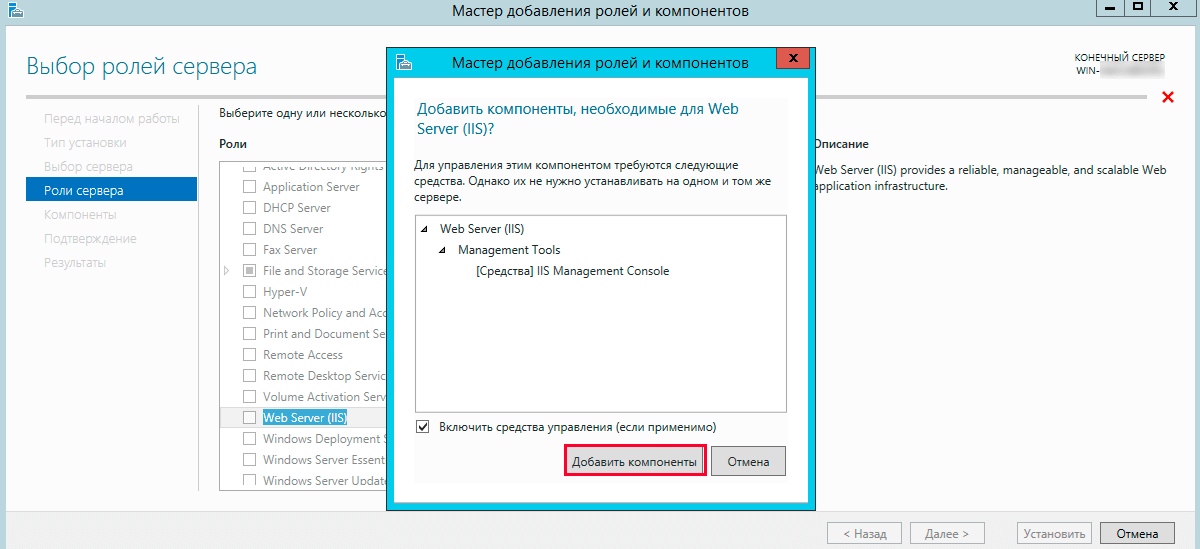
Среди ролей выбираем Веб-сервер (IIS) — во всплывающем окне кликаем по Добавить компоненты:

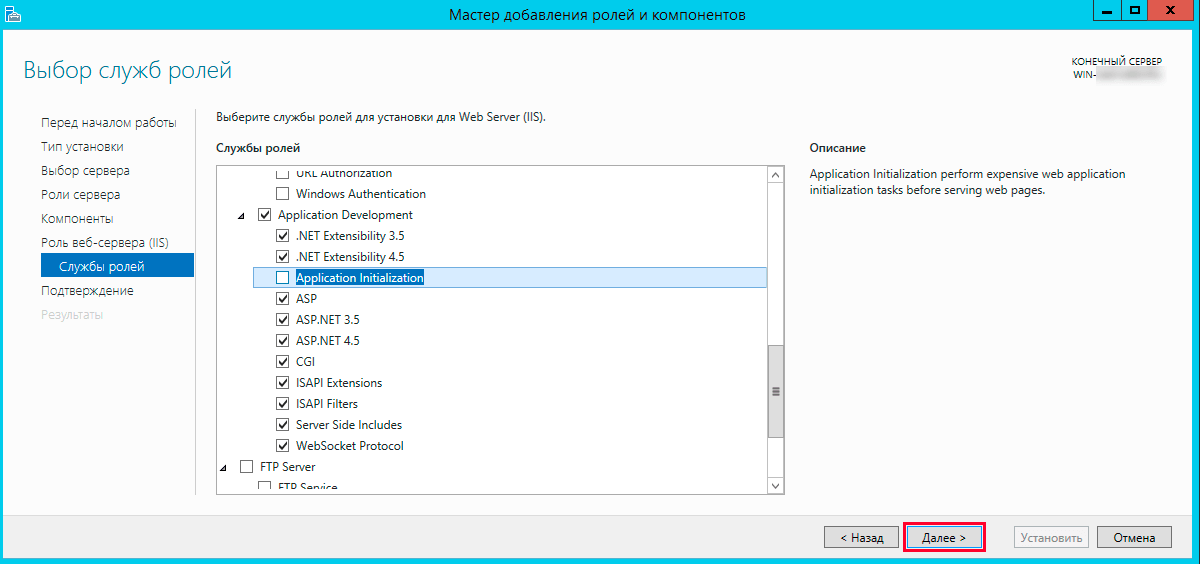
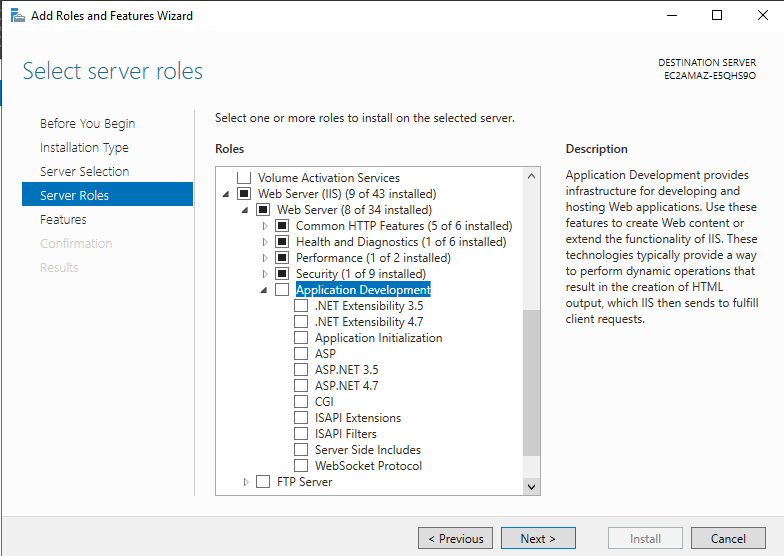
Также среди ролей в подразделе «Разработка приложений» ставим галочку для установки CGI — этот компонент нам нужен для работы PHP:

При выборе компонентов ничего не меняем — нажимаем Далее:

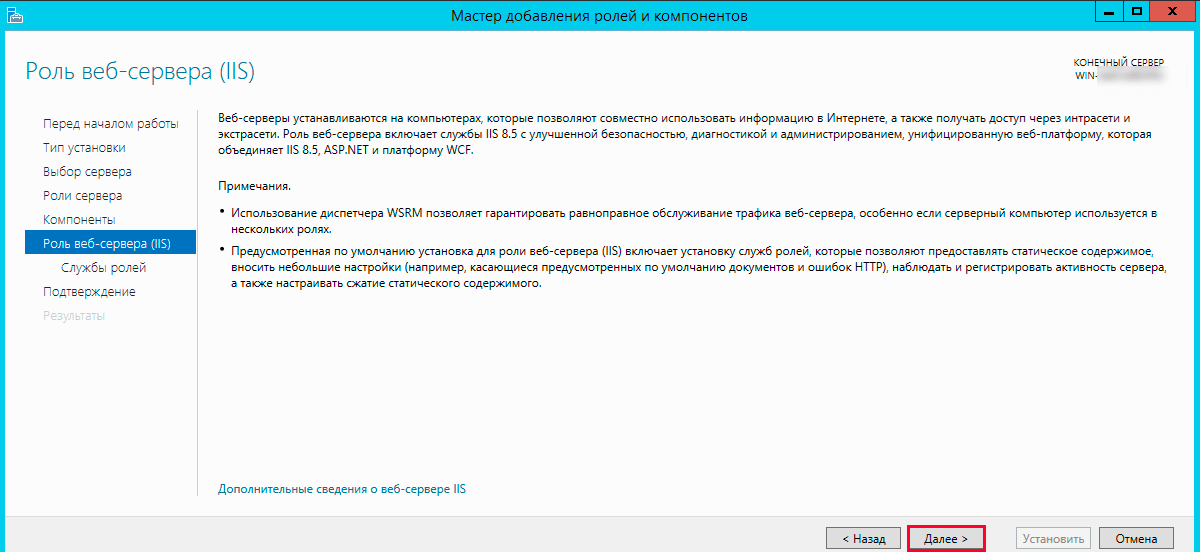
Откроется окно настройки роли веб-сервера — просто нажимаем Далее:

Выбор служб ролей — нажимаем далее или, при необходимости, выбираем FTP-сервер:

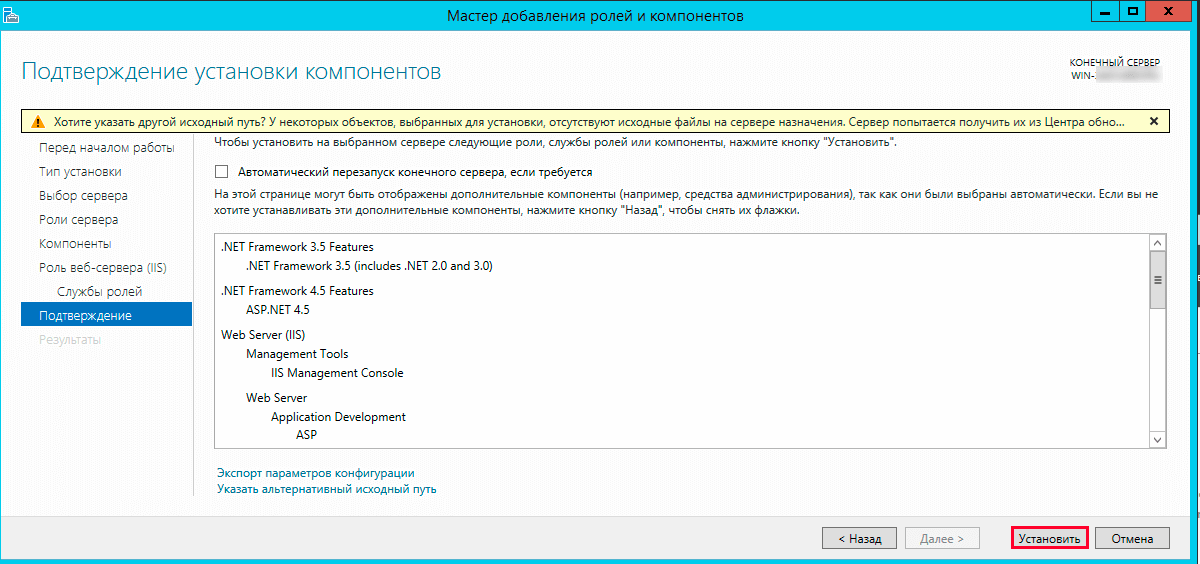
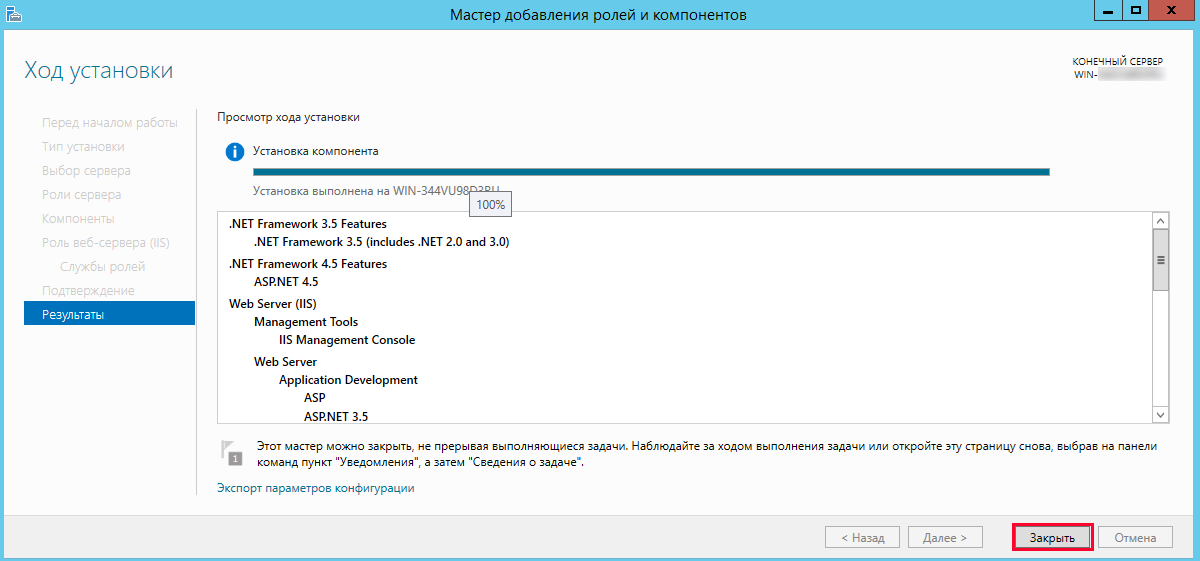
В следующем окне ставим галочку Автоматический перезапуск конечного сервера, если требуется и кликаем по Установить:

Дожидаемся окончания процесса установки.
Сразу после установки IIS запускается автоматически. Но, если что, его можно запустить с помощью команды iisreset:
iisreset /start
* если выполнить данную команду без опций, то она перезапустить веб-сервер.
Также мы можем открыть диспетчер служб (команда services.msc) и перезапустить Службу веб-публикаций:

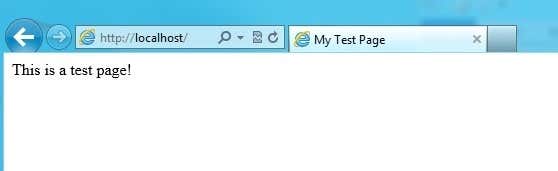
Открываем браузер и вводим адрес http://localhost — должен открыться стартовый портал:

Развертывание отдельного сайта
Мы можем пропустить данный пункт, если хотим использовать сайт по умолчанию. Однако, в данной инструкции мы разберем пример, когда для сайта на PHP будет создана отдельная настройка.
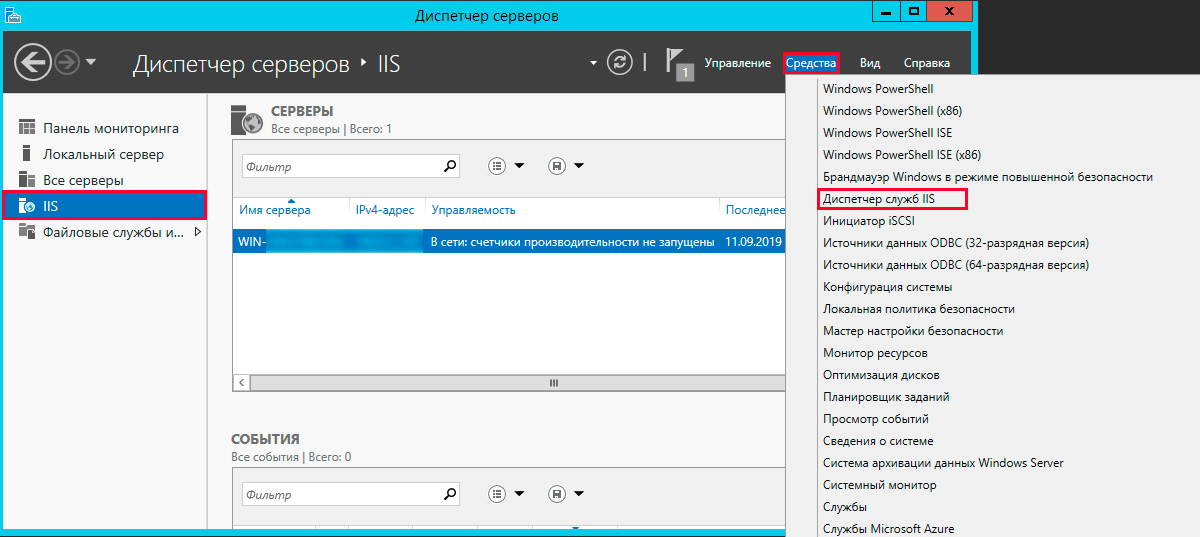
Открываем Диспетчер серверов — кликаем по Средства — Диспетчер служб IIS:

Находим раздел сайты — кликаем правой кнопкой мыши по Добавить веб-сайт…:

Заполняем данные для нового сайта:

* где:
- Имя сайта — произвольно имя будущего сайта.
- Физический путь — путь до папки на сервере, где будут расположены файлы сайта.
- Тип — тип соединения (http или https). Для первого запуска обойдемся http. При необходимости, его можно всегда поменять или использовать оба типа одновременно.
- IP-адрес — если на сервере много IP-адресов, то мы можем выбрать конкретный, на котором будет работать сайт.
- Порт — сетевой порт, на котором будет работать сайт. Как правило, это 80 для http или 443 для https.
- Имя узла — доменное имя сайта, при обращении по которому должен открываться создаваемый сайт.
После заходим в каталог с сайтом (в нашем примере, это C:inetpubwwwrootphp) и создадим в нем файл index.html со следующим содержимым:
<h1>Hello from PHP site</h1>
Открываем браузер и переходим на созданный сайт, например, как в нашей инструкции — http://php.dmosk.ru. Мы должны увидеть страницу с написанным нами текстом:

Тестовый сайт создан.
PHP
Установка PHP
Для установки php на Windows переходим на страницу загрузки PHP — выбираем нужную нам версию, например, последнюю стабильную и переходим по ссылке для загрузки версии для Windows:

Откроется страница с несколькими версиями пакета — там как мы ставим PHP как FastCGI, нам нужна версия «Non Thread Safe» (не потокобезопасная), так как она будет работать быстрее. И так, скачиваем zip-архив на сервер:

Для установка PHP на Windows достаточно просто распаковать содержимое архива в любой каталог, например, C:Program FilesPHP:

Делаем копию файла php.ini-production и переименовываем его в php.ini:

Открываем на редактирование данный файл и правим следующее:
open_basedir = C:inetpubwwwroot
…
cgi.force_redirect = 0
…
short_open_tag = On
* где open_basedir — директория, в которой будут разрешены PHP-скрипты; cgi.force_redirect — указывает будет ли скрипты обрабатываться при прямом запросе или только при запросе от веб-сервера. В IIS запросы контролируются самим веб-сервером, поэтому опция может оказать обратный эффект; short_open_tag — позволяет использовать короткий вид открывающих тегов для PHP.
Проверяем, что PHP работает. Открываем командную строку Windows — переходим в каталог с установленным PHP:
cd «C:Program FilesPHP»
Запускаем php с параметром -m:
php -m
Мы должны получить список подключенных модулей:
[PHP Modules]
bcmath
calendar
Core
ctype
…
Но если мы получим ошибку, связанную с отсутствием файла VCRUNTIME140.dll:

… необходимо установить Microsoft Visual C++ Redistributable. Переходим на страницу https://www.microsoft.com/ru-RU/download/details.aspx?id=52685 и скачиваем компонент:

После загрузки, устанавливаем его на сервер, после чего, снова пробуем вывести на экран модули php:
php -m
Настройка сайта на IIS для работы с PHP
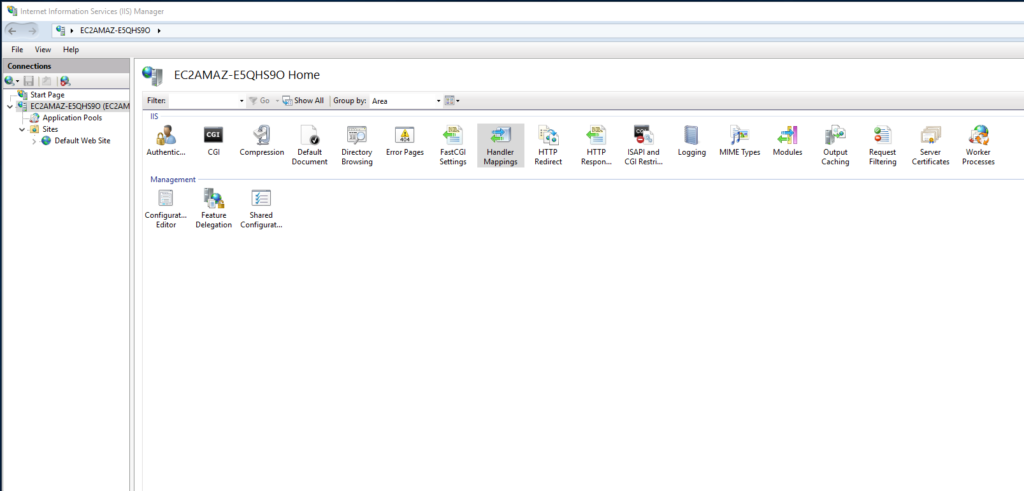
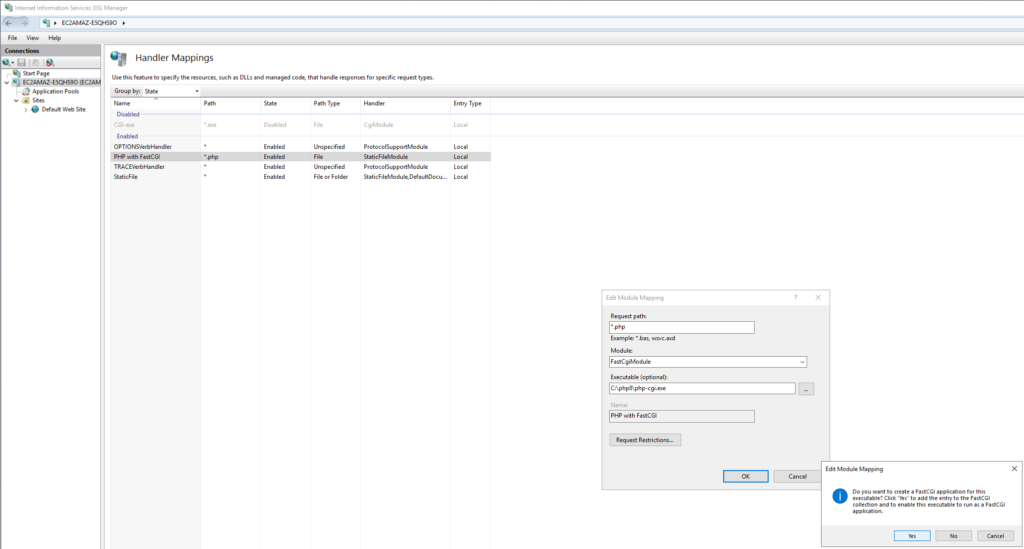
И так, веб-сервер поднят, PHP установлено, сайт работает. Настроим связку IIS + PHP. Открываем панель управления IIS — переходим к созданному сайту и кликаем по Сопоставления обработчиков:

В меню справа кликаем по Добавить сопоставление модуля:

Заполняем поля:

* где:
- Путь запроса — путь к файлам, при вызове которых действует сопоставление. В данном примере для всех файлов, заканчивающихся на php.
- Модуль — действующий модуль для обработки запроса.
- Исполняемый файл — файл, который будет выполнять обработку запроса. В данном примере мы выбрали файл из скачанного и распакованного нами архива PHP.
- Имя — произвольное имя для сопоставления.
Нажимаем OK и подтверждаем действие. Сопоставление создано.
Теперь заходим в Документ по умолчанию:

… и добавляем новый документ:

* в данном примете мы указываем, что по умолчанию сервер будет искать файл index.php, если таковой не указан явно в запросе.
Открываем в проводнике папку, в которой находятся файлы сайта (в нашем примере, C:inetpubwwwrootphp). Создаем файл index.php с содержимым:
Открываем браузер и снова переходим на наш сайт — мы должны увидеть страницу с информацией о php:

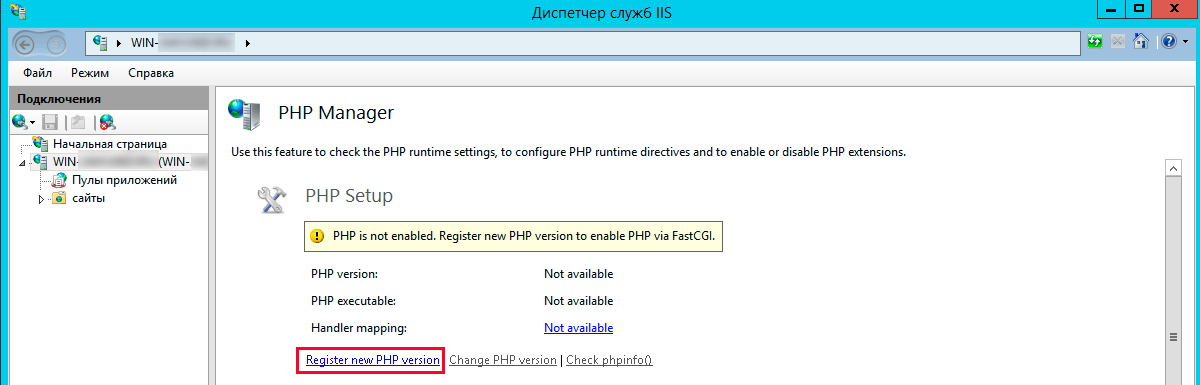
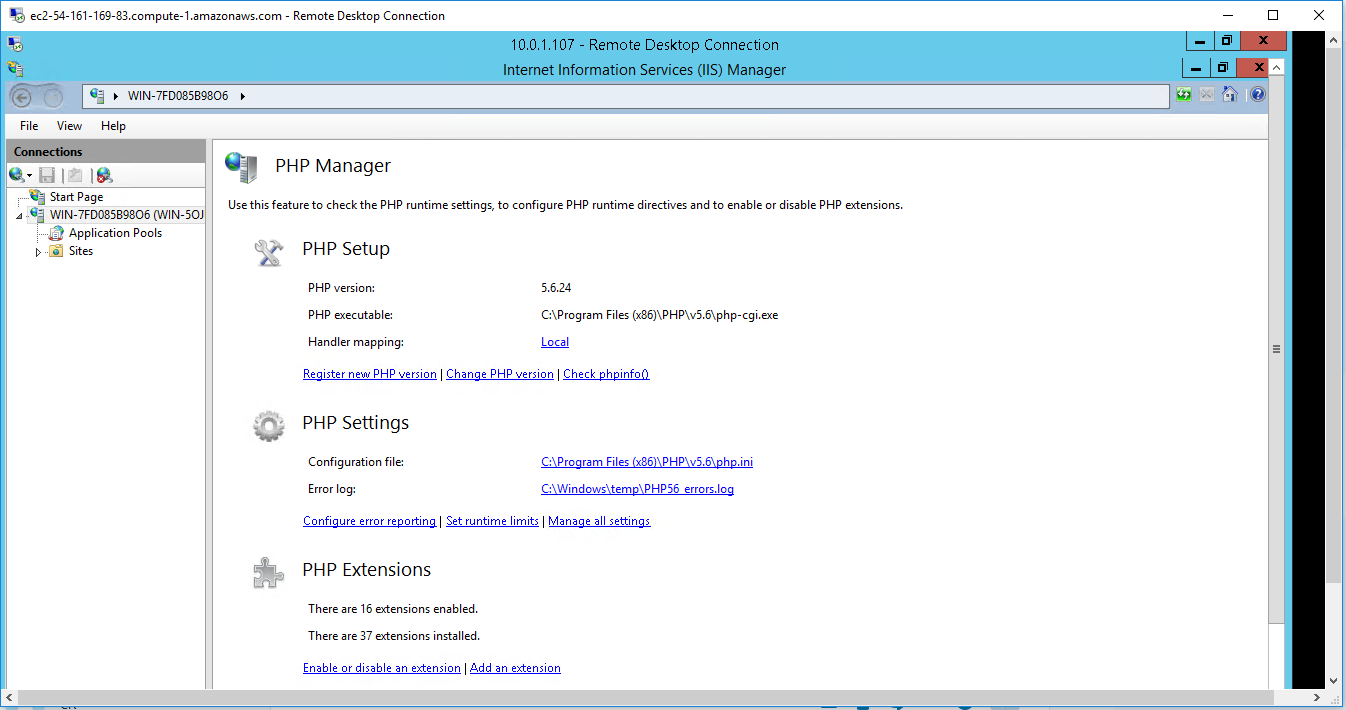
PHP Manager в IIS
Для того, чтобы упростить настройку PHP мы можем установить диспетчер PHP для IIS. Для этого переходим по ссылке https://www.iis.net/downloads/community/category/manage и переходим по ссылке для скачивания стабильной версии php-менеджера:

Скачиваем дополнение:

Выполняем установку на сервере, запустив загруженный файл. Открываем диспетчер управления IIS — мы должны увидеть PHP Manager:

Установка MySQL
MySQL для Windows можно скачать бесплатно. Переходим на страницу https://dev.mysql.com/downloads/mysql/ — выбираем операционную систему Microsoft Windows — кликаем по Go to Download Page:

На следующей странице выбираем для скачивания mysql-installer-community:

В открывшемся окне кликаем по No thanks, just start my download:

Начнется загрузка файла для установки MySQL. Дожидаемся скачивания и запускаем установочный файл — в открывшемся окне выбираем Server only:

В следующем окне кликаем по Execute:

… и дожидаемся установки СУБД:

Откроется окно конфигурации MySQL — нажимаем Next:

Выбираем установку одиночного сервера MySQL:

Оставляем все значения по умолчанию для настроек сети:

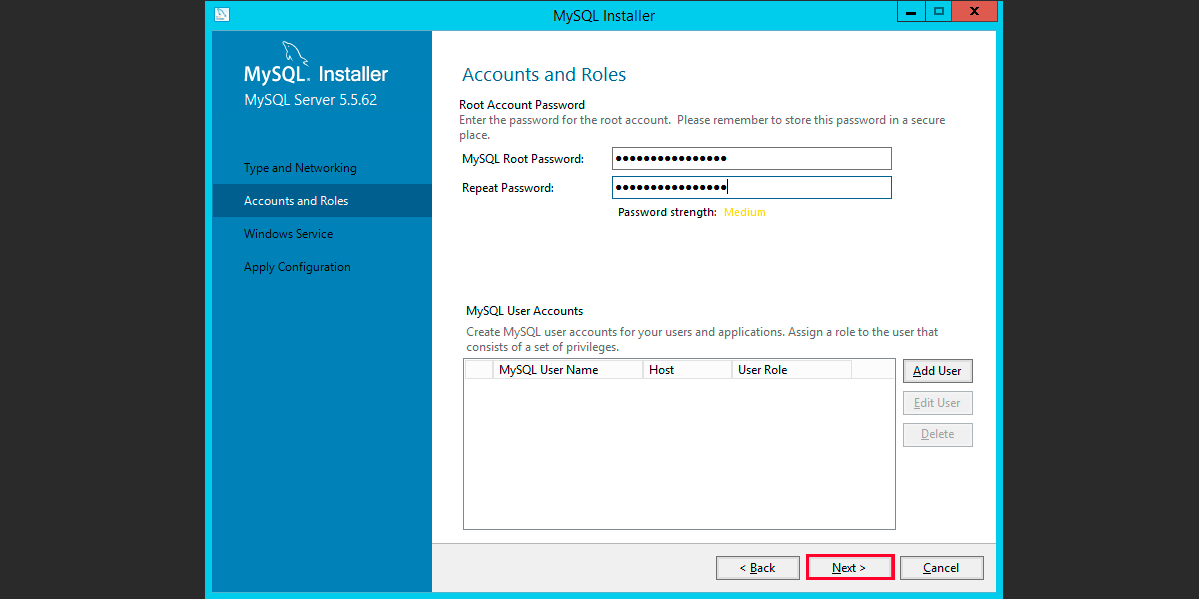
Требуем сложные пароли:

Вводим дважды пароль для пользователя root:

* также, на данном этапе мы можем сразу добавить новых пользователей.
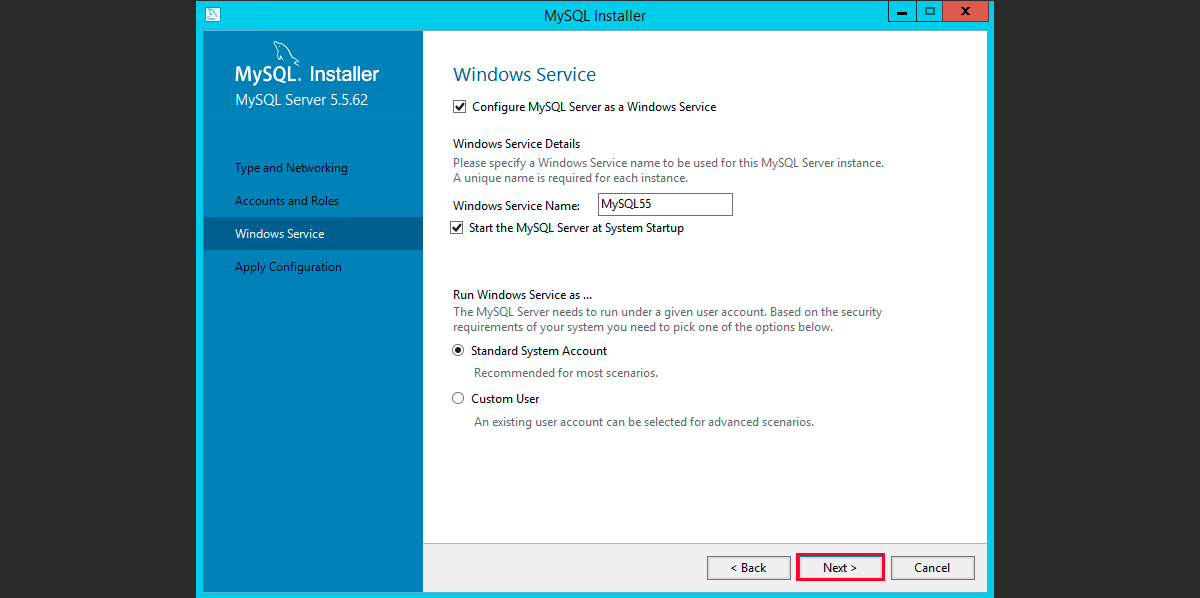
Устанавливаем СУБД как сервис и стартуем его:

Настройки готовы для применения — нажимаем Execute:

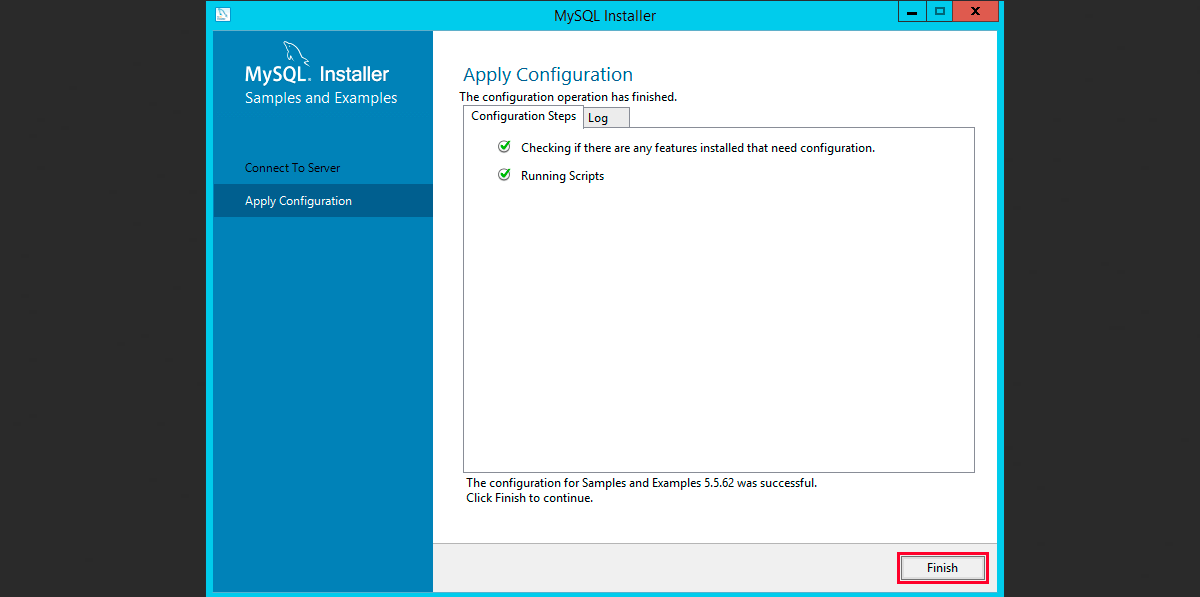
Дожидаемся применения настроек и кликаем по Next:

Настройка завершена:

Установка завершена — нажимаем Finish.

Сервер баз данных готов к использованию.
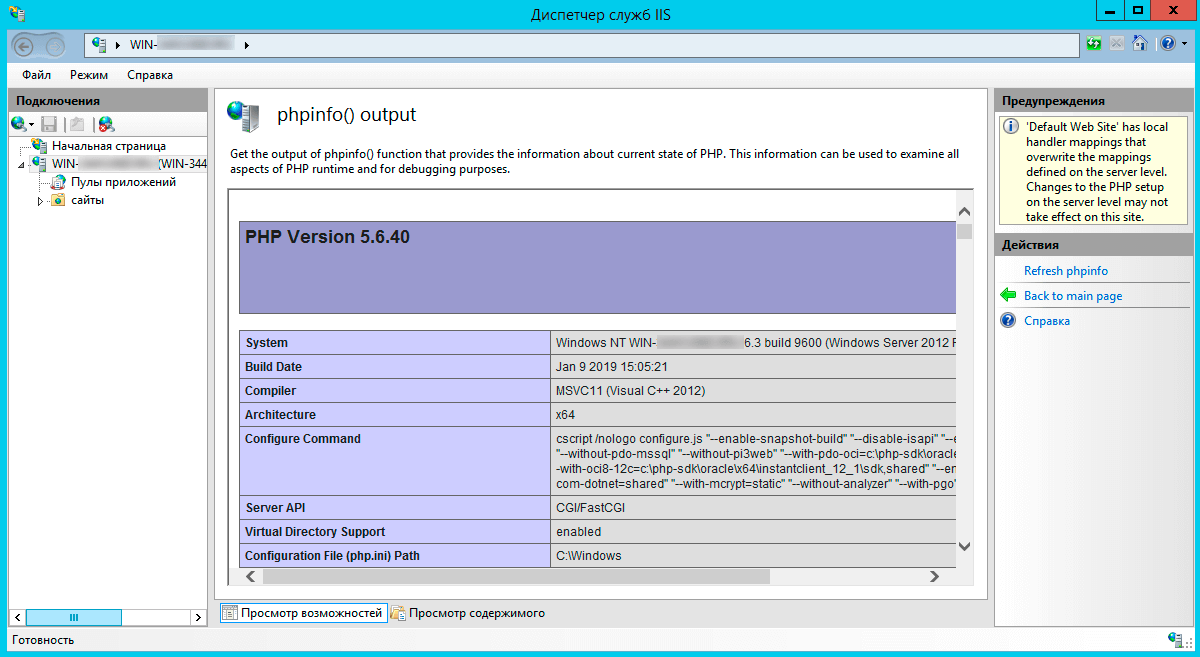
По умолчанию, PHP поддерживаем mysql — в этом можно убедиться на странице phpinfo, найдя раздел mysqlnd:

IIS — служба Microsoft Windows, предназначенная для развертывания web-сервера. Служба IIS является отдельной функцией ОС, и изначально она не установлена.
Установка для Windows Server 2012
Устанавливаем и настраиваем службу IIS
Заходим в «Диспетчер серверов», нажимаем на вкладку «Управление» и выбираем «Добавить роли и компоненты».

Откроется «Мастер добавления ролей и компонентов». В разделе «Перед началом работы» ознакомимся с информацией и нажмем кнопку «Далее».
В разделе тип «Тип установки» выбираем «Установка ролей или компонентов» и жмем «Далее»
Ставим флажок на «Выберите сервер из пула серверов», выбираем сервер и нажимаем «Далее».
Отмечаем «Веб-сервер (IIS)».
Появится окно, в нем необходимо нажать «Добавить компоненты». Затем нажимаем «Далее».
После этого откроется информационный раздел «Роль веб-сервера (IIS)», ознакомить с ним и нажмите «Далее».
Открываем «Службы ролей», и в «Разработке приложений» отмечаем все, кроме «Инициализация приложений».
После этого появится надпись об отсутствии исходников. Интернет должен быть включен, нажимаем «Установить», далее установка пройдет в автоматическом режиме.
По окончанию инсталляции настраиваем веб-сервер IIS.
Открываем «Диспетчер серверов» переходим в «IIS» нажимаем «Средства», и из списка выбираем «Диспетчер служб IIS».
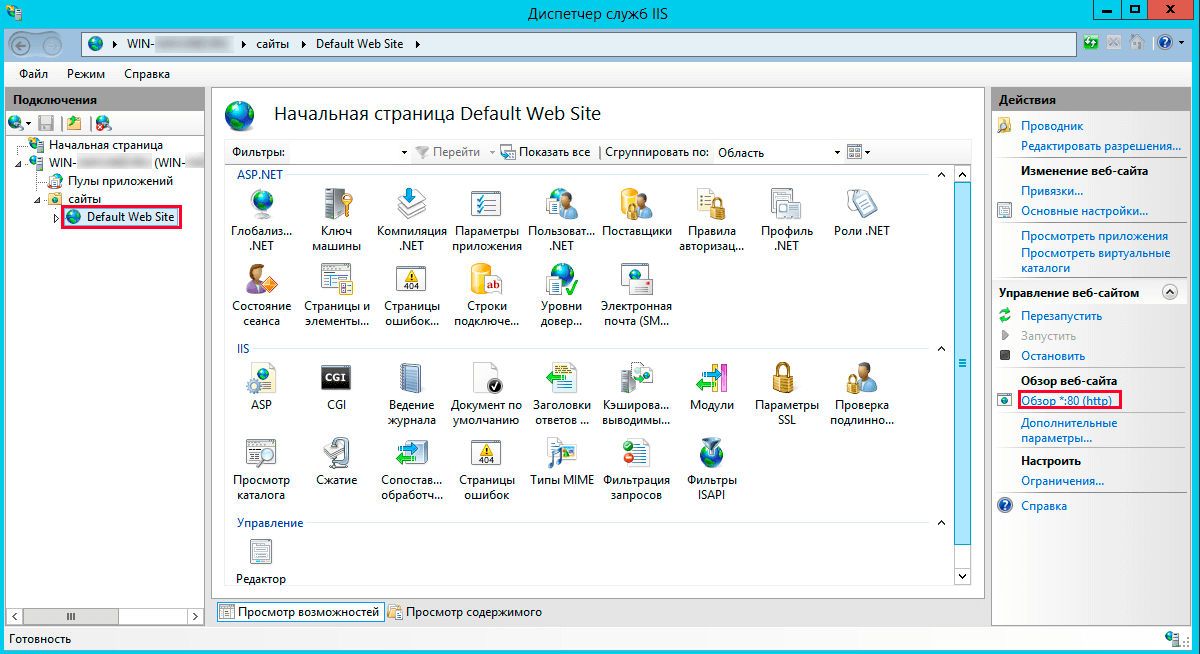
Мы видим созданный веб-сайт. Для его просмотра на правой панели нажимаем «Обзор *:80 (http)»
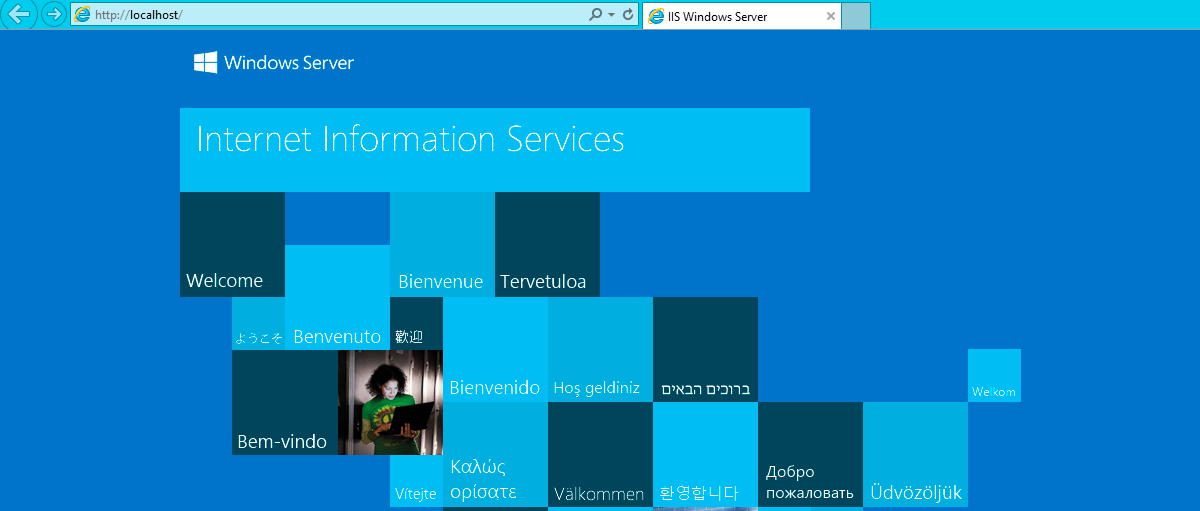
При его просмотре откроется приветственная страница.
Устанавливаем PHP
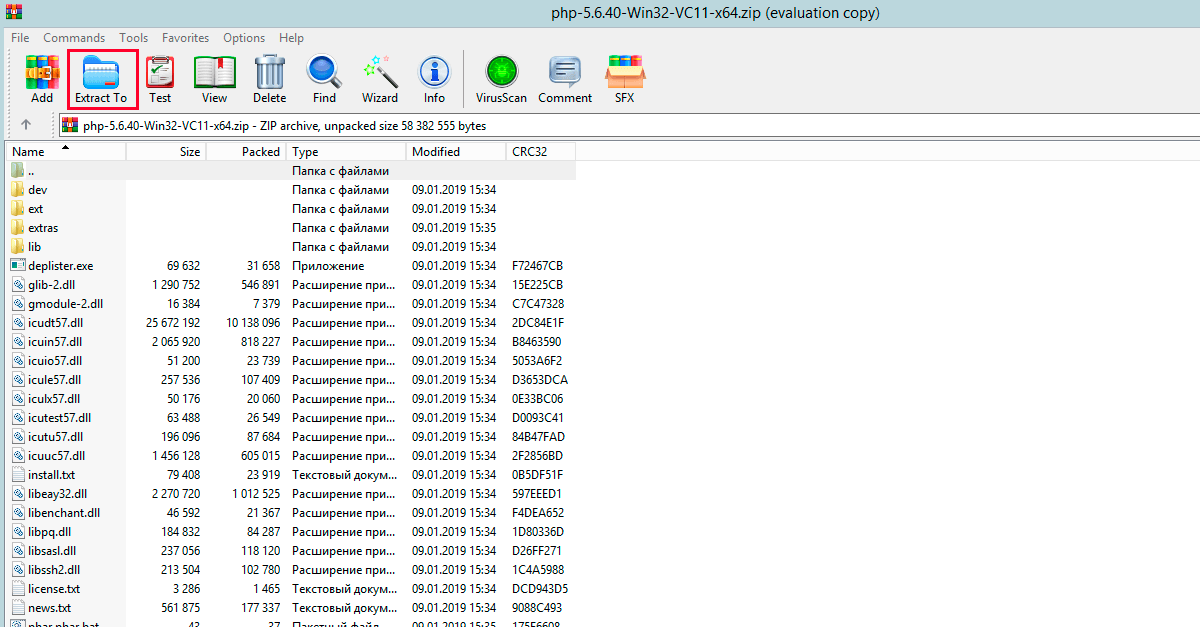
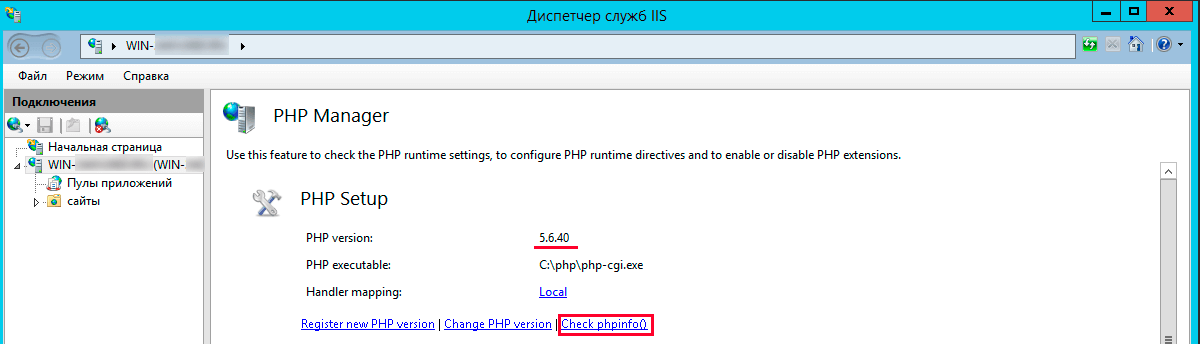
Для установки PHP потребуется скачать PHP Manager for IIS и необходимую вам версию PHP (рекомендуем 5.6.40).
Скачиваем архив с файлами PHP и распаковываем его в С:php.
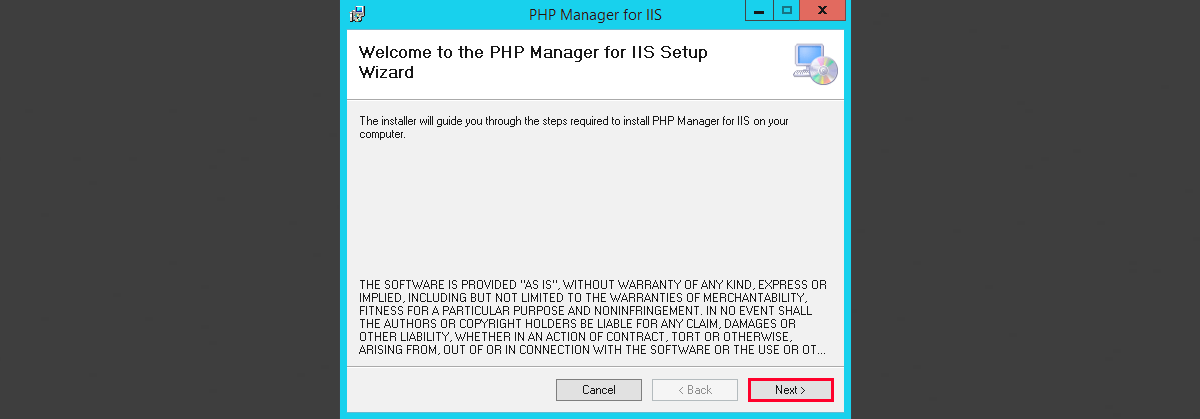
Затем скачиваем и устанавливаем PHP Manage For IIS. Дальше везде кликаем «Next».
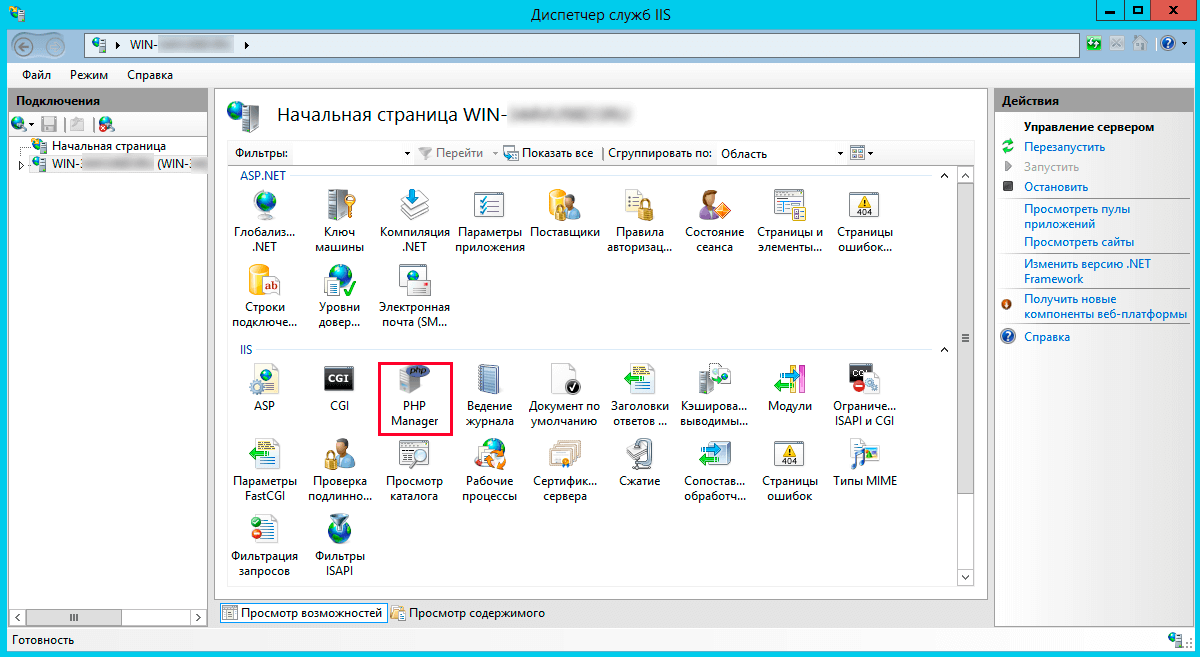
По окончанию инсталляции в Диспетчере служб IIS появится иконка «Администратор PHP». Кликаем по ней.
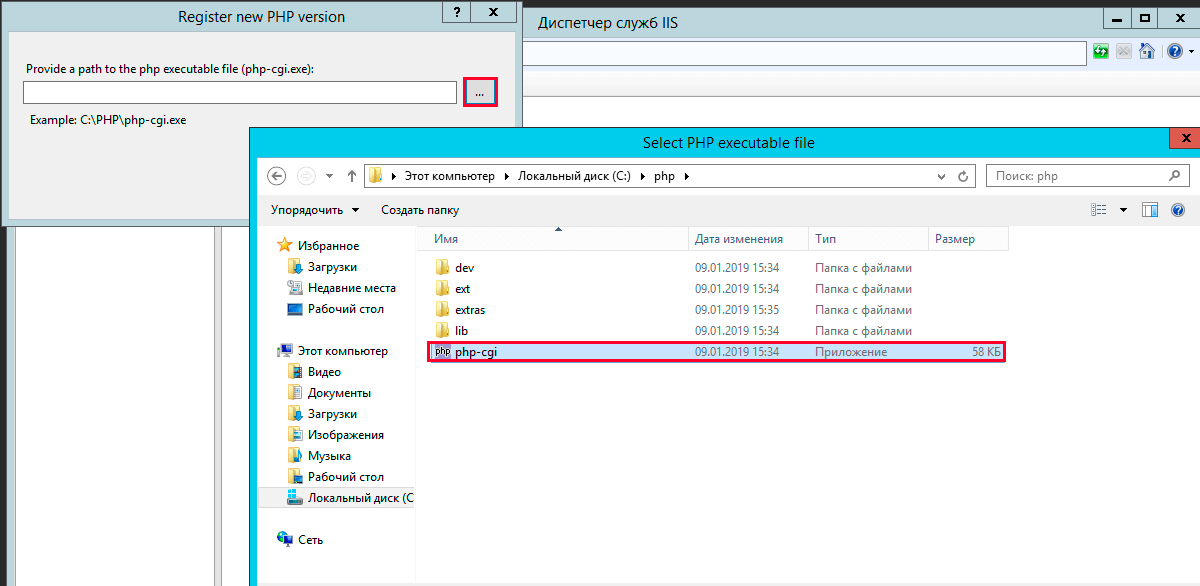
Далее нажимаем «зарегистрировать новую версию PHP».
При регистрации переходим в папку С:php и выбираем файл «php-cgi.exe».
Проверяем работоспособность РНР. В этой же вкладке кликаем «проверить phpinfo()».
Если при открытии тестовой страницы появилась ошибка «HTTP 500.0 — Internal Server Error», то нужно установить пакет Visual C++ для Visual Studio 2012.
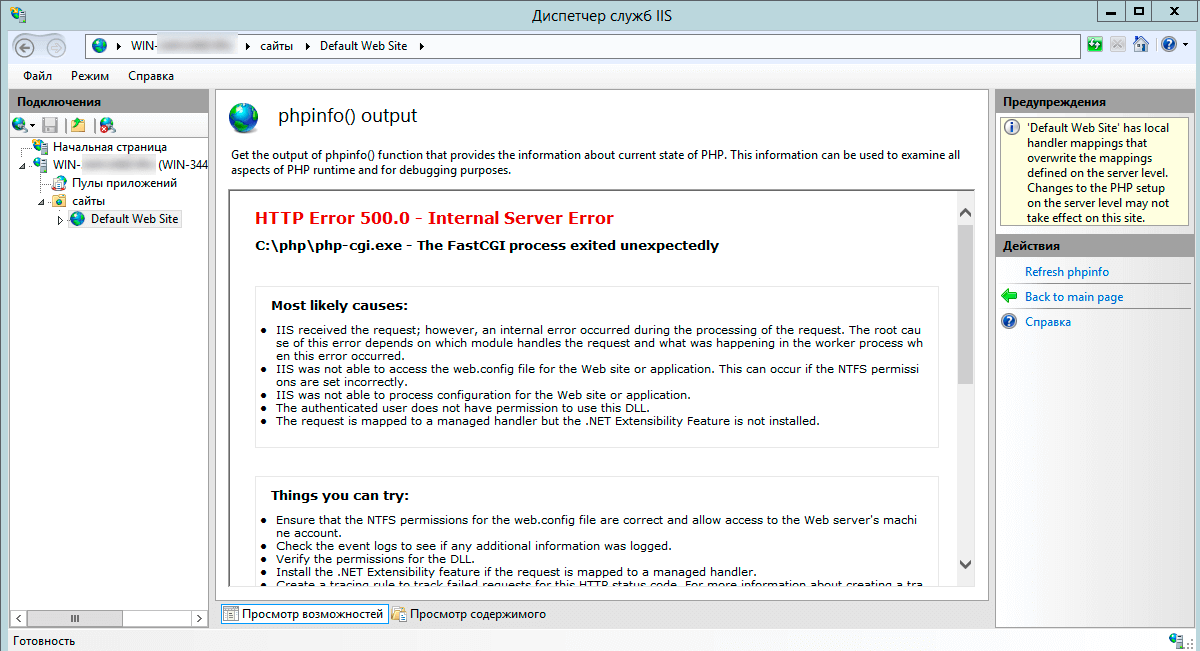
Для этого переходим на сайт Microsoft и скачиваем «Распространяемый пакет Visual C++ для Visual Studio 2012 Обновление 4».
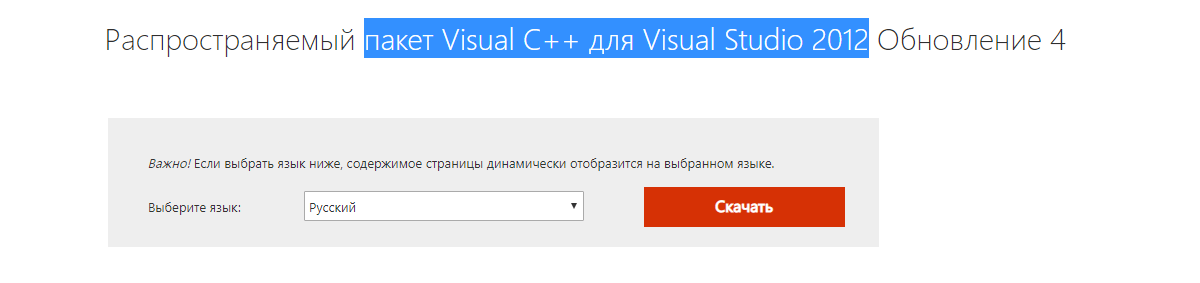
Выбираем VSU4vcredist_x64.exe.
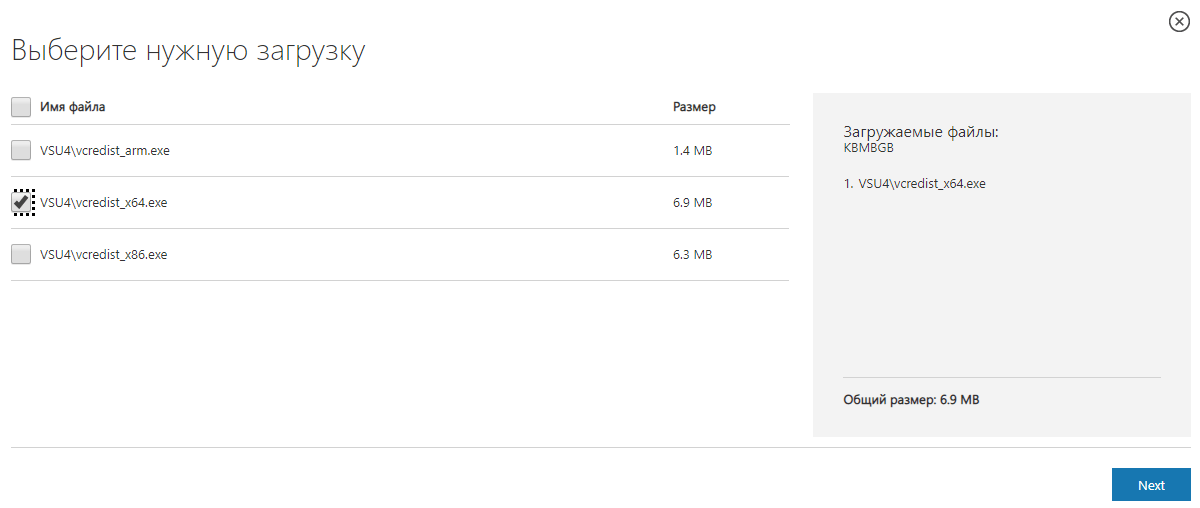
Затем устанавливаем его на сервере и снова нажимаем «проверить phpinfo()».
Устанавливаем MySQL
Скачиваем версию MySQL необходимую для вашего проекта и запускаем установщик.
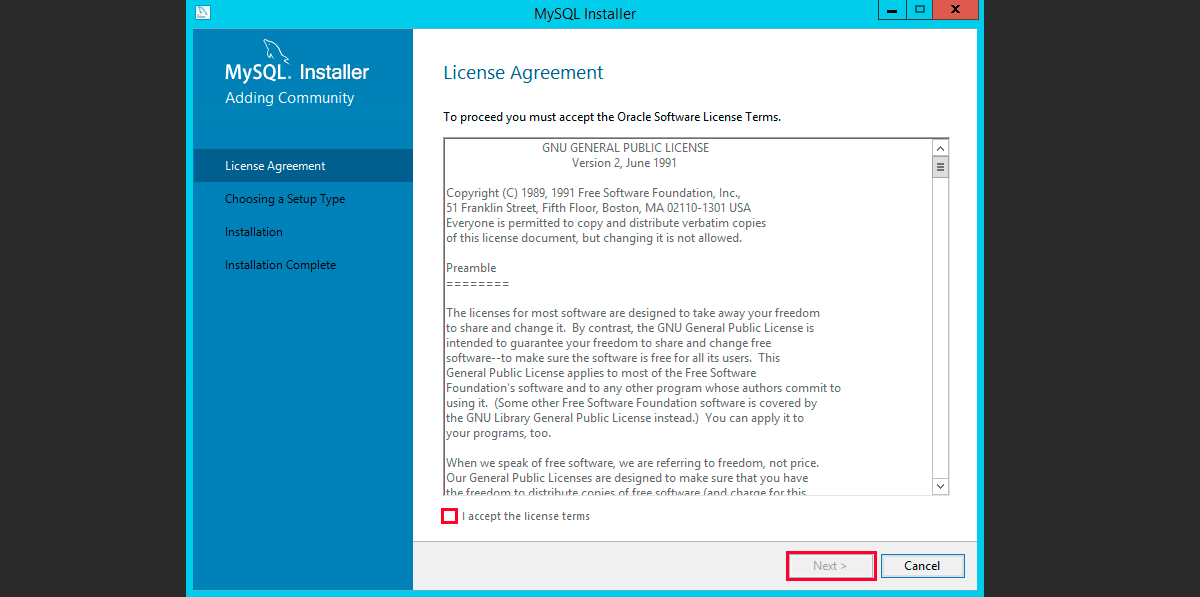
Читаем лицензионное соглашение, ставим галочку и нажимаем «Next».
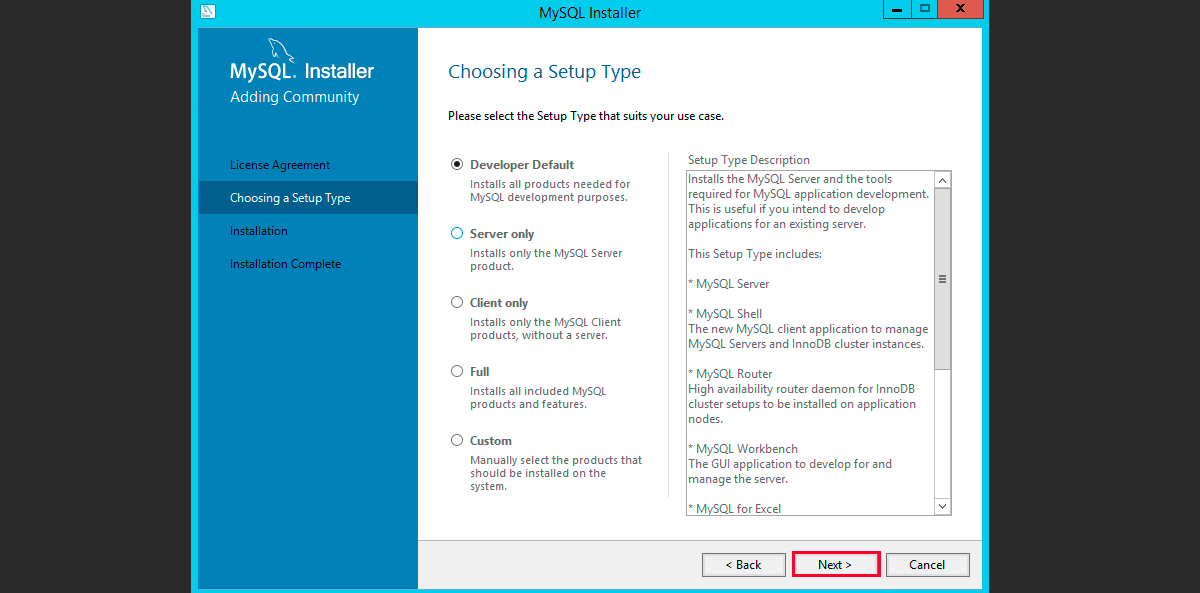
Выбираем «Developer Default» и нажимаем «Next».
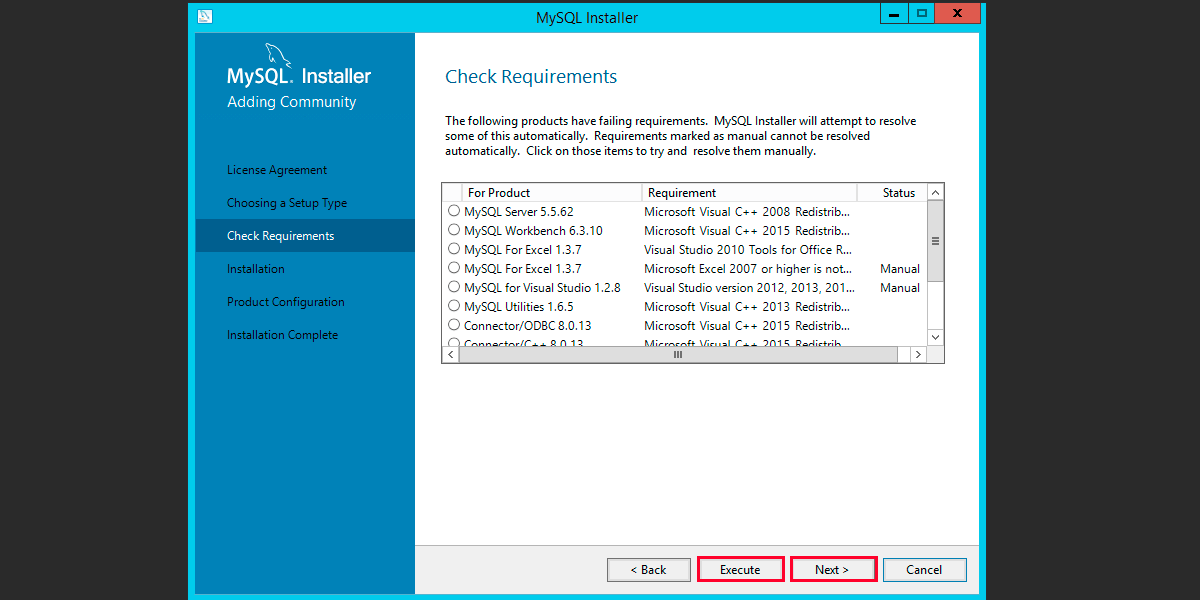
Затем нажимаем «Execute» и ждем пока установщик проверит конфигурацию, при необходимости загрузит недостающие компоненты, а затем нажмем «Next».
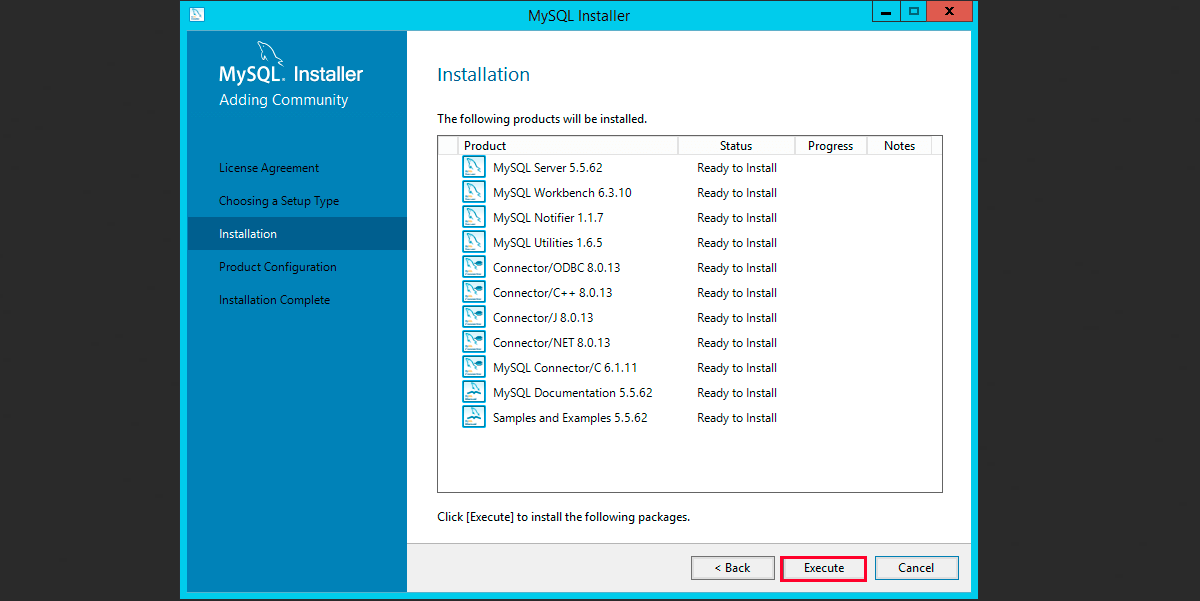
Соглашаемся с лицензией и запускаем установку.
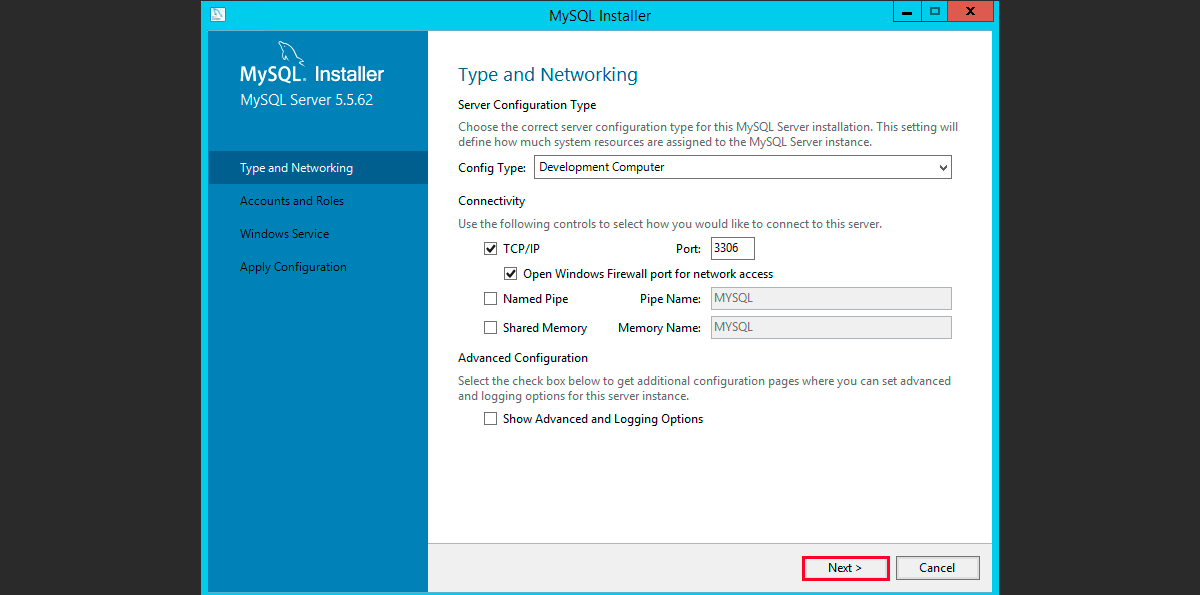
Параметры сети для MySQL сервера оставляем по умолчанию и нажимаем «Next».
Задаем пароль для root пользователя и нажимаем «Next».
Дальнейшие настройки оставляем по умолчанию и и нажимаем «Next».
Присоединяемся к серверу MySQL серверу.
Принимаем настройки и нажимаем «Finish».
Откроется MySQL Workbench нажмем на «Local instance MySQL» и в появившемся окне введем заданный ранее пароль.
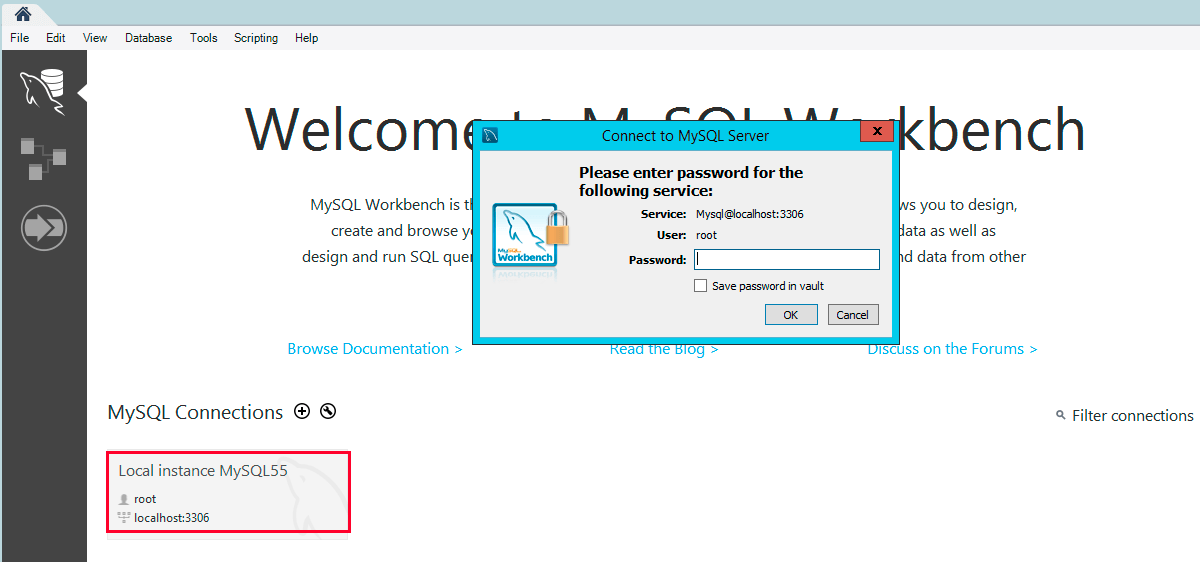
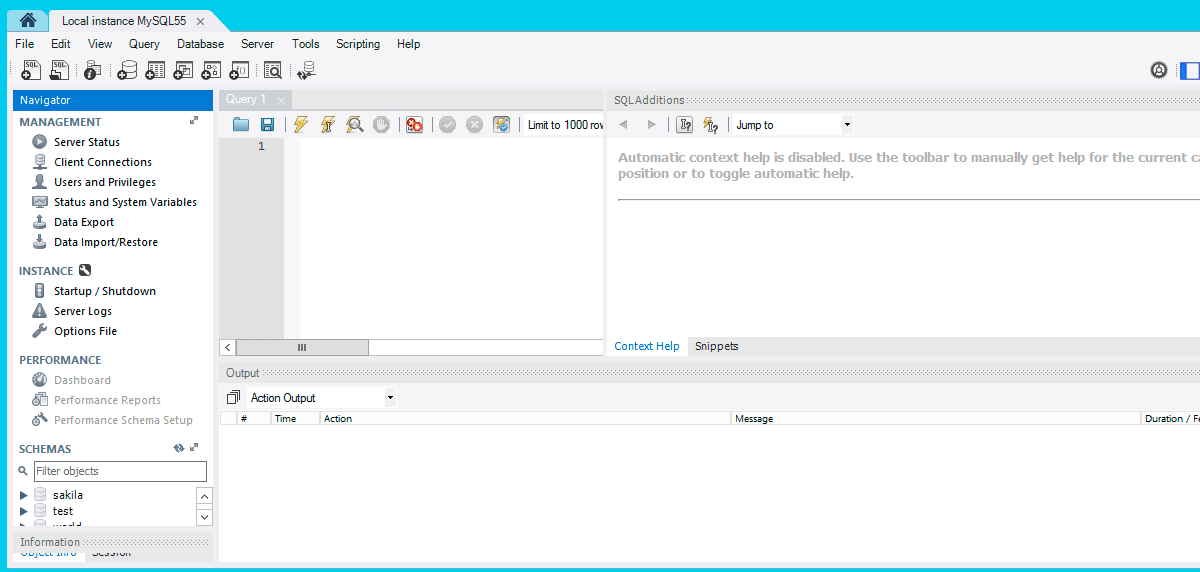
Откроется окно управления нашим MySQL-сервером.
Установка модуля rewrite
Скачиваем Модуль переопределения URL-адресов (URLRewriter) 2.0 для IIS с сайта Microsoft.
Запускаем установщик, читаем лицензионное соглашение, ставим галочку о согласии и нажимаем «Установить».
Ждем завершения установки и нажимаем «Готово»

Установка для Windows Server 2019
Установка для Windows Server 2019 не имеет значительных отличий, но при добавлении ролей и компонентов не нужно указывать «.NET Extensibility» 3.5 и «ASP.NET 3.5».
PHP is a server-side scripting language designed for web development but also used as a general-purpose programming language. Originally created by Rasmus Lerdorf in 1994,the PHP reference implementation is now produced by The PHP Group. PHP originally stood for Personal Home Page,[3] but it now stands for the recursive backronym PHP: Hypertext Preprocessor.
PHP code may be embedded into HTML code, or it can be used in combination with various web template systems, web content management system and web frameworks. PHP code is usually processed by a PHP interpreter implemented as amodule in the web server or as a Common Gateway Interface (CGI) executable. The web server combines the results of the interpreted and executed PHP code, which may be any type of data, including images, with the generated web page. PHP code may also be executed with a command-line interface (CLI) and can be used to implement standalone graphical applications.
The standard PHP interpreter, powered by the Zend Engine, is free software released under the PHP License. PHP has been widely ported and can be deployed on most web servers on almost every operating system and platform, free of charge.
The PHP language evolved without a written formal specification or standard until 2014, leaving the canonical PHP interpreter as a de facto standard. Since 2014 work has gone on to create a formal PHP specification.
PHP is a server-side scripting language designed for web development but also used as a general-purpose programming language. PHP code may be embedded into HTML code, or it can be used in combination with various web template systems, web content management system and web frameworks. PHP code is usually processed by a PHP interpreter implemented as amodule in the web server or as a Common Gateway Interface (CGI) executable. The web server combines the results of the interpreted and executed PHP code, which may be any type of data, including images, with the generated web page. PHP code may also be executed with a command-line interface (CLI) and can be used to implement standalone graphical applications.
The standard PHP interpreter, powered by the Zend Engine, is free software released under the PHP License. PHP has been widely ported and can be deployed on most web servers on almost every operating system and platform, free of charge.
The PHP language evolved without a written formal specification or standard until 2014, leaving the canonical PHP interpreter as a de facto standard. Since 2014 work has gone on to create a formal PHP specification.
What You Can Do with PHP
There are lot more things you can do with PHP.
- You can generate pages and files dynamically.
- You can create, open, read, write and close files on the server.
- You can collect data from a web form such as user information, email, phone no, etc.
- You can send emails to the users of your website.
- You can send and receive cookies to track the visitor of your website.
- You can store, delete, and modify information in your database.
- You can restrict unauthorized access to your website.
- You can encrypt data for safe transmission over internet.
The list does not end here, there are many other interesting things that you can do with PHP. You will learn about all of them in detail in upcoming chapters.
Advantages of PHP over Other Languages
If you’re familiar with other server-side languages like ASP.NET or Java, you might be wondering what makes PHP so special. There are several advantages why one should choose PHP.
- Easy to learn: PHP is easy to learn and use. For beginner programmers who just started out in web development, PHP is often considered as the preferable choice of language to learn.
- Open source: PHP is an open-source project. It is developed and maintained by a worldwide community of developers who make its source code freely available to download and use.
- Portability: PHP runs on various platforms such as Microsoft Windows, Linux, Mac OS, etc. and it is compatible with almost all servers used today such Apache, IIS, etc.
- Fast Performance: Scripts written in PHP usually execute or runs faster than those written in other scripting languages like ASP, Ruby, Python, Java, etc.
- Vast Community: Since PHP is supported by the worldwide community, finding help or documentation related to PHP online is extremely easy.
Internet Information Services (IIS, formerly Internet Information Server) is an extensible web server created by Microsoft for use with Windows NT family.IIS supports HTTP, HTTPS, FTP, FTPS, SMTP and NNTP. It has been an integral part of the Windows NT family since Windows NT 4.0, though it may be absent from some editions (e.g. Windows XP Home edition), and is not active by default.
IIS is a web server that runs on the Microsoft .NET platform on the Windows OS. While it’s possible to run IIS on Linux and Macs using Mono, it’s not recommended and will likely be unstable. (There are other options, which I’ll present later). It’s versatile and stable, and it’s been widely used in production for many years. Version 10 is the most current. Once it’s installed you’ll see this welcome page in your browser. “Tervetuloa!”
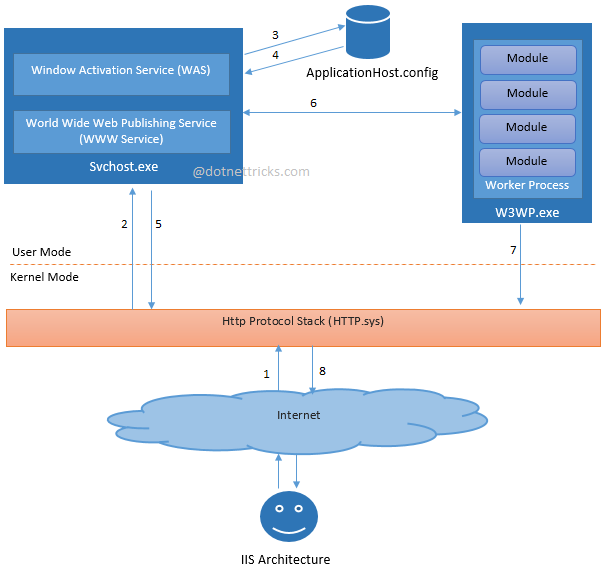
IIS Architecture
IIS has two main layers – Kernel Mode and User Mode. The Kernel Mode contains the HTTP.SYS and User Mode contains WAS and W3 service. The subsection of both are shown in fig.
INSTALLING IIS
- Open the Windows PowerShell and type the below command to install IIS service with CGI extension.
Install-WindowsFeature -name web-server,web-cgi –IncludeManagementTools
![]()
- It will take few minutes to complete the installation.


- Once the installation is completed, verify the CGI feature was installed in the server using the below command.
Get-WindowsFeature web-cgi

INSTALLING PHP
- Go to the below URL to download the PHP 7.1 version.
http://windows.php.net/download/

- Extract the ZIP file to C:program files folder.

- There will be two PHP.ini files are available in that folder. Rename the php-.ini-development to php.ini.

- Open the php.ini file Add the following line at the end of the file.
extension=php_wincache.dll

- Save and close the php.ini file.
- Right-click on the windows start menu and click on system.

- Click on Advanced system settings.

- Click on Environment Variables.

- Under System Variables, select path variable and click on Edit.

- Click on New button and add the PHP binary path.

- Click OK thrice to close the system properties window.
INSTALL WINCACHE EXTENSION
- Browse the below URL to download the Wincache extension for PHP.
https://www.iis.net/downloads/microsoft/wincache-extension

- Scroll down and download WinCache 2.0 for PHP 7.1 under download section.

Note : In this demo, we are installing PHP 7.1, so we are downloading corresponding wincache version
- Once you download, double-click on the wincache-2.0.0.8-dev-7.1-nts-vc14-x64.exe file and extract the files to a folder.


- Copy the php.wincache.dll file to C:Program Filesphp-7.1ext folder.

CONFIGURE PHP IN IIS
- Open IIS snap-in and click on the server name.

- Double click on Handler Mappings icon.

- Click on Add Module Mapping… under actions menu.

- Provide the below information as shown below. And click on Request Restrictions, under Mapping make sure you have select the File or Folder button.

- Click OK twice to close configuration window. Now the PHP will be listed under Handler Mappings List.

During the 2010s there have been increased efforts towards standardisation and code sharing in PHP applications by projects such as PHP-FIG in the form of PSR-initiatives as well as Composer dependency manager and the Packagist repository
Install IIS 10 on Windows 10
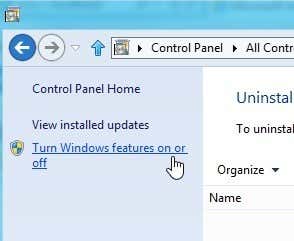
The first thing we’ll need to do is install IIS via the Control Panel. Once you are there, click on Programs and Features.
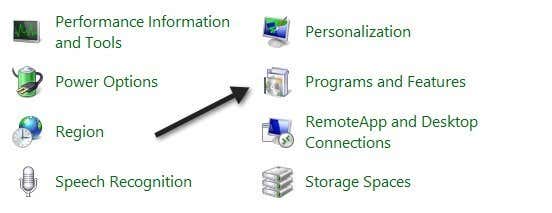
Next click on Turn Windows features on and off in the left-hand column.
Now scroll down until you see Internet Information Services in the list. Go ahead and click in the empty checkbox next to the title. It should turn into a small black square.
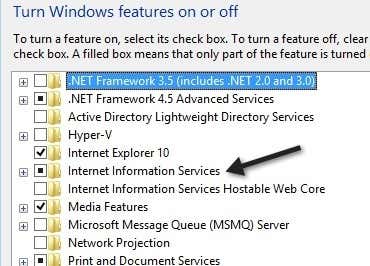
Note that having the black square instead of the checkmark just means that not all of the sub-items are being installed. For example, by default, checking IIS will not install the FTP server option. If you want to install FTP Server, you have to expand the + box and manually check it. Go ahead and click OK at this point and Windows 10 will install IIS. You shouldn’t need the DVD to install IIS.
Once it has finished, you should be able to load the default website by going to your IE and tying in //localhost. This should bring up the IIS 10 default web page.

Next, you can then go to Control Panel and click on Administrative Tools. Here you will see Internet Information Services (IIS) Manger. You’ll get the familiar IIS console screen:

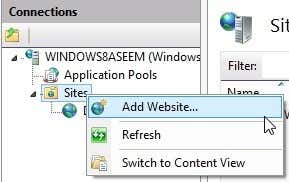
On the left hand side, you can expand out the server to see the list of sites. To start, you only have the Default Web Site, which is stored under C:inetpubwwwroot.

To setup a new website in IIS 10, right-click on Sites and choose Add Website.
Give your site a name and browse to the physical path where the web files are stored.
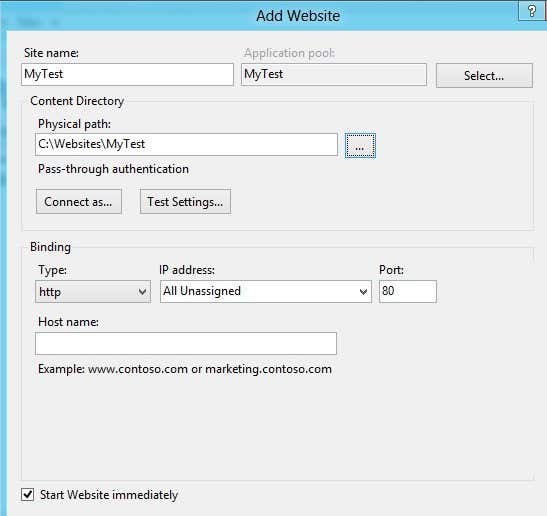
In the Binding section, you can specify what IP address the website should be listening on and which port. You can also specify a host name if your computer has a static public IP address with DNS records for the domain name pointing to that IP address. In this post, I won’t go into how to access your website from outside your local network.
Click OK and you’ll get a warning about how another site is already using the same settings and therefore it will conflict. That’s because the default website is also set to All Unassigned for the IP address and port 80. I just stopped the default website and started my test website. You can stop a website by selecting it in the left-hand pane and then clicking Stop in the far-right pane. Then when I visited //localhost again, my new index.html file came up:
That’s it, now you can start playing around with the settings to configure your website. A good place to start is the Microsoft Web Platform Installer, which is a tool that quickly sets you up with all the different Microsoft web components like SQL Server Express, .NET Framework, Visual Web Developer, and lots more. Also, check out the IIS.net home page to learn more about managing IIS. Enjoy!
How to Install PHP on Windows
The PHP Installer
Although an installer is available from php.net, I would recommend the manual installation if you already have a web server configured and running.
Manual Installation
Manual installation offers several benefits:
- backing up, reinstalling, or moving the web server can be achieved in seconds (see 8 Tips for Surviving PC Failure) and
- you have more control over PHP and Apache configuration.
Step 1: Download the files
Download the latest PHP 5 ZIP package from www.php.net/downloads.php
As always, virus scan the file and check its MD5 checksum using a tool such as fsum.
Step 2: Extract the files
We will install the PHP files to C:php, so create that folder and extract the contents of the ZIP file into it.
PHP can be installed anywhere on your system, but you will need to change the paths referenced in the following steps.
Step 3: Configure php.ini
Copy C:phpphp.ini-development to C:phpphp.ini. There are several lines you will need to change in a text editor (use search to find the current setting). Where applicable, you will need to remove the leading semicolon to uncomment these setting.
Define the extension directory:
extension_dir = "C:/php/ext"Enable extensions. This will depend on the libraries you want to use, but the following extensions should be suitable for the majority of applications:
extension=curl
extension=gd2
extension=mbstring
extension=mysql
extension=pdo_mysql
extension=xmlrpc
If you want to send emails using the PHP mail() function, enter the details of an SMTP server (your ISP’s server should be suitable):
[mail function]
; For Win32 only.
SMTP = mail.myisp.com
smtp_port = 25

; For Win32 only.
sendmail_from = my@emailaddress.com
Step 4: Add C:php to the path environment variable
To ensure Windows can find PHP, you need to change the path environment variable. Open Settings, type ‘environment variables’ into the search field and open the result. Select the “Advanced” tab, and click the “Environment Variables” button.
Scroll down the System variables list and click on “Path” followed by the “Edit” button. Click “Edit text” and add ;C:php to the end of the Variable value line (remember the semicolon).
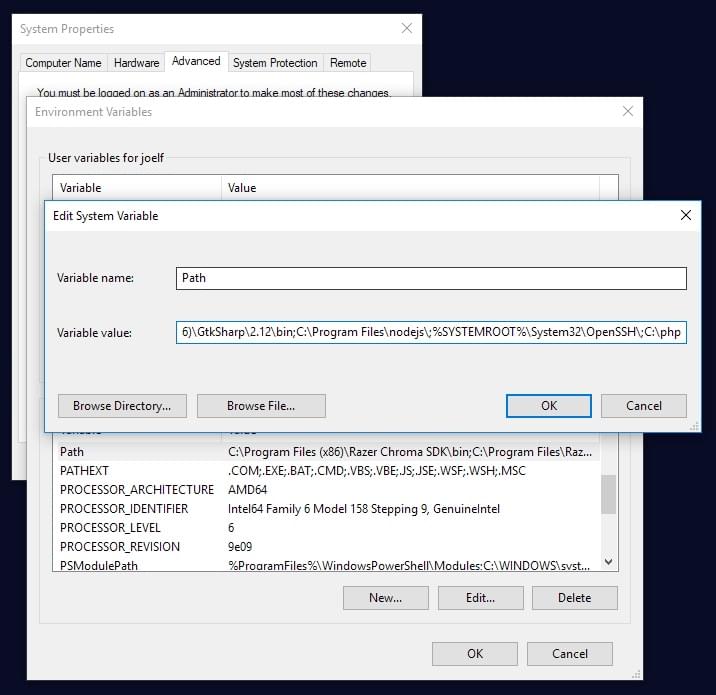
Now click OK until you’re out. You might need to reboot at this stage.
Step 5: Configure PHP as an Apache module
Ensure Apache is not running (use net stop Apache2.2 from the command line) and open its confhttpd.conf configuration file in an editor. The following lines should be changed:
On line 239, add index.php as a default file name:
DirectoryIndex index.php index.html
At the bottom of the file, add the following lines (change the PHP file locations if necessary):
# PHP5 module
LoadModule php5_module "c:/php/php5apache2_2.dll"
AddType application/x-httpd-php .php
PHPIniDir "C:/php"
Save the configuration file and test it from the command line (Start > Run > cmd):
cd Apache2bin
httpd -t
Step 6: Test a PHP file
Create a file named index.php in Apache’s web page root (either htdocs or D:WebPages) and add this code:
<?php phpinfo(); ?>During the 2010s there have been increased efforts towards standardisation and code sharing in PHP applications by projects such as PHP-FIG in the form of PSR-initiatives as well as Composer dependency manager and the Packagist repository.
Install and Configure IIS Web Server on Windows Server 2019
Installation Instructions for Windows
Note: How to find PublicDNS in AWS
Step 1) RDP Connection: To connect to the deployed instance, Please follow Instructions to Connect to Windows instance on AWS Cloud
1) Connect to the virtual machine using following RDP credentials:
- Hostname: PublicDNS / IP of machine
- Port : 3389
Username: To connect to the operating system, use RDP and the username is Administrator.
Password: Please Click here to know how to get password .
Step 2) Choose Start, expand All Programs, and then select PHP
Step 3) Other Information:
1.Default installation path: will be in your root folder “C:inetpubwwwroot”
2.Default ports:
- Windows Machines: RDP Port – 3389
- Http: 80
- Https: 443
Configure custom inbound and outbound rules using this link
AWS Step by Step Screenshots
Product Overview
How to install and configure php on iis 2008 R2
How to install and configure PHP Website on IIS 8 in Windows 2012
In Windows there are always multiple ways to install stuff like CGI
I will follow the installation steps of the PHP 8 Non Thread Safe version on a Windows Server 2019 Standard Evaluation (Desktop Experience) operating system what needs IIS and CGI to be installed. Install first the IIS (Internet Information Services) by opening Server Manager where we have Manage, Tools, View and Help menus. At Manage we click on Add Roles and Features and for IIS installation on Server Roles select Web Server (IIS), then Add Features and Next after selecting. At Role Services, expand Application Development and select CGI (Common Gateway Interface). We still have a final Next and then Install.
Php is built with C++ and needs the visual studio runtime installed.
Now Download and install Microsoft Visual C++ Redistributable Package by going to the latest supported Visual C++ downloads and download the latest version of the Microsoft Visual C++ 2015-2019 Redistributable (x64) – 14.22.278.21 (x64: vc_redist.x64.exe) and install it;
Download the latest php non thread safe 64 from https://windows.php.net/download/ , extract it to a dir like c:php8
In server manager choose
web Server (IIS)
I had installed the web server first without Adding CGI feature, thaen I couldn’t find the option to add the feature to IIS. After a day off my brains worked better, You need to press the little arrow in the add server roles for Web Server IIS, then Web Server, then application Development, under there , is CGI
Now finally, I I have the CGI option and FastCGI in the Add Handler mappings in the IIS Manager.
TO add php as fastcgi add a new handler and fill it out.
Request path: *.php
Module: FastCGIModule
Executable: C:php8php-cgi.exe
Name: PHP with FastCGI
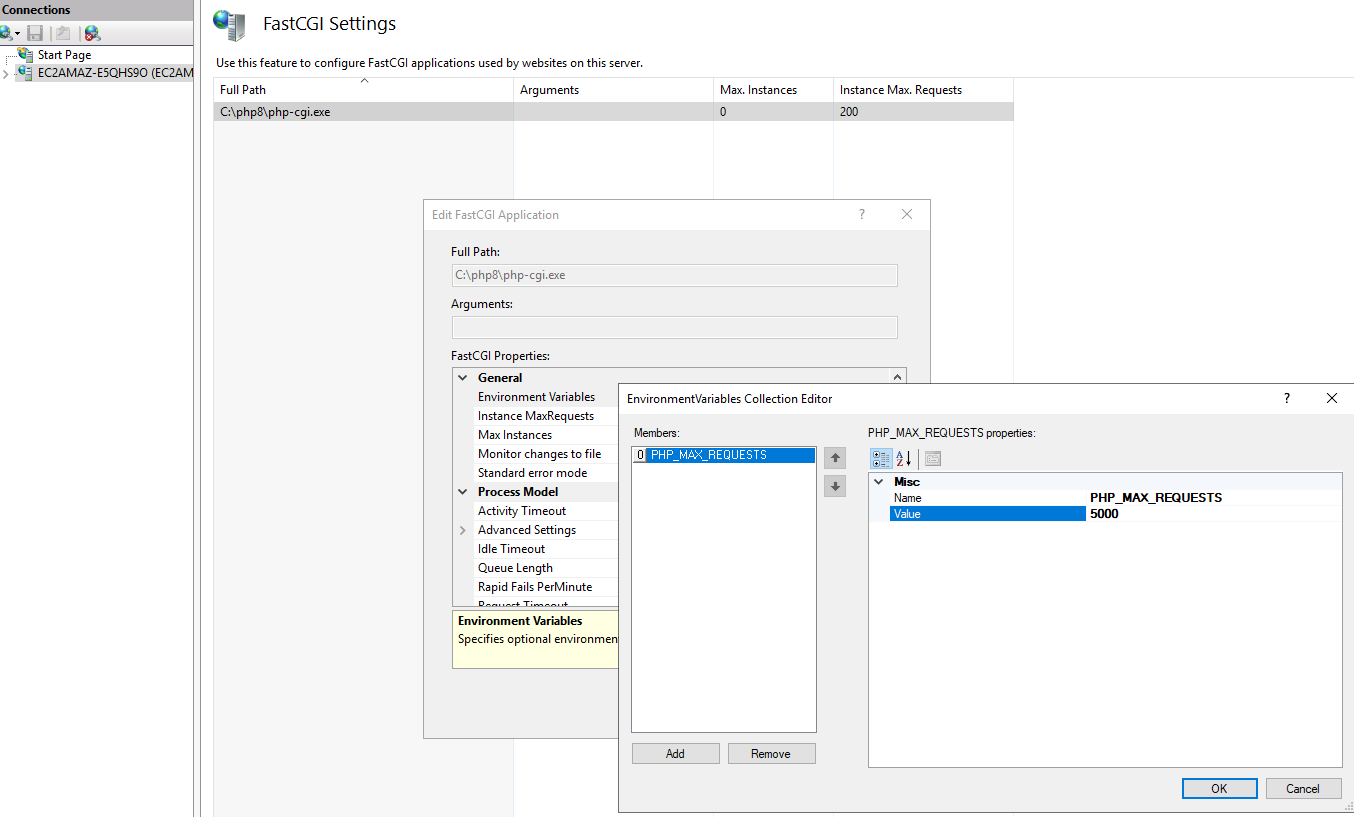
Now edit the fast cgi settings from the service manager, they miraculously should have appeared.
Click on the fastci php-cgi.exe that you previously added, now add
The Edit FastCGI Application was opened and at FastCGI Properties under GeneralEnvironment Variables (Collection) click on the three dots … next to the work “Collection”
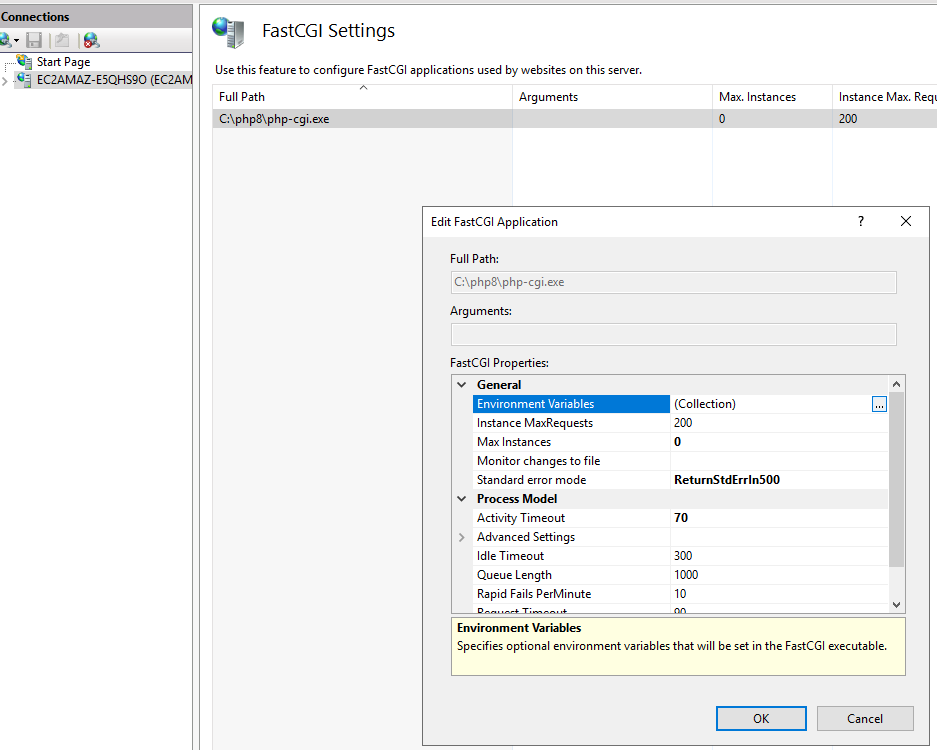
Now Add these values as follows:
Under Members click Add and for the Name Properties we change Name: PHP_MAX_REQUESTS and VALUE: 5000 then click OK to save the changes;
OK to exit from Edit FastCGI Application and come back to the FastCGI Settings and we can close Internet Information Services (ISS) Manager;
Now open a Powershell Window as Admin
To restart IIS open the Comand Prompt or PowerShell and type iisreset
C:UsersAdministrator>iisreset
Now go into the php dir and check if php is working on your server as a language. Run the following:
PS C:php8> .php.exe -info
You should see a ton of settings instead of an error.
You should also verify that PHP works with IIS. Create the following file, but delete when your finished as giving server information can invite attackers, if they see that your old version of php is vulnerable.
create a file called info.php and insert into it the following
the C:inetpubwwwroot directory and create info.php
Just this line of code in the file:
<?php phpinfo(); ?>
after you save it open http://localhost/info.php
The next project will be to do this totally in a script from ansible.
Выберите веб-сервер
IIS
IIS является встроенным в Windows.
На сервере Windows используйте Server Manager для добавления роли IIS. Убедитесь, что функция роли CGI включена.
На рабочем столе Windows используйте панель «Установка и удаление программ» для добавления IIS.
В документации Microsoft есть » подробные инструкции.
Для настольных веб-приложений и веб-разработки можно также использовать IIS/Express или рабочий стол PHP.
Пример #1 Командная строка для настройки IIS и PHP
@echo off

REM download .ZIP file of PHP build from http://windows.php.net/downloads/

REM path to directory you decompressed PHP .ZIP file into (no trailing )
set phppath=c:php


REM Clear current PHP handlers
%windir%system32inetsrvappcmd clear config /section:system.webServer/fastCGI
REM The following command will generate an error message if PHP is not installed. This can be ignored.
%windir%system32inetsrvappcmd set config /section:system.webServer/handlers /-[name='PHP_via_FastCGI']

REM Set up the PHP handler
%windir%system32inetsrvappcmd set config /section:system.webServer/fastCGI /+[fullPath='%phppath%php-cgi.exe']
%windir%system32inetsrvappcmd set config /section:system.webServer/handlers /+[name='PHP_via_FastCGI',path='*.php',verb='*',modules='FastCgiModule',scriptProcessor='%phppath%php-cgi.exe',resourceType='Unspecified']
%windir%system32inetsrvappcmd set config /section:system.webServer/handlers /accessPolicy:Read,Script

REM Configure FastCGI Variables
%windir%system32inetsrvappcmd set config -section:system.webServer/fastCgi /[fullPath='%phppath%php-cgi.exe'].instanceMaxRequests:10000
%windir%system32inetsrvappcmd.exe set config -section:system.webServer/fastCgi /+"[fullPath='%phppath%php-cgi.exe'].environmentVariables.[name='PHP_FCGI_MAX_REQUESTS',value='10000']"
%windir%system32inetsrvappcmd.exe set config -section:system.webServer/fastCgi /+"[fullPath='%phppath%php-cgi.exe'].environmentVariables.[name='PHPRC',value='%phppath%php.ini']"
Apache
Существует несколько версий Apache2 для Windows.
Мы поддерживаем ApacheLounge, но другие варианты включают XAMPP, WampServer и BitNami, которые предоставляют средства автоматической установки.
Вы можете использовать mod_php или mod_fastcgi для загрузки PHP на Apache.
Если вы используете mod_php, необходимо использовать TS-build Apache, Visual C той же версии и тот же процессор (x86 или x64).
Выберите сборку
Скачайте PHP-релизы с » http://windows.php.net/download/.
Все сборки оптимизированы (PGO), а выпуски QA и GA тщательно протестированы.
Есть 4 типа сборок PHP:
-
Thread-Safe(TS) — для одного процесса веб-служб, как Apache с mod_php
-
Non-Thread-Safe(NTS) — для служб IIS и других FastCGI веб-серверов (Apache с mod_fastcgi) рекомендуется и для сценариев командной строки
-
для x86 — для 32-разрядной версии
-
для x64 — для 64-разрядной версии
klaussantana at gmail dot com 
2 years ago
If you're installing PHP 8.0.1 as Apache http server module, in httpd.conf you must use "php_module" in "LoadModule" directive instead of versioned names like in previous versions (aka, php5_module, php7_module, ...). Make the directive as follow:
LoadModule php_module "/path/to/php8apache2_4.dll"
I cracked my head over this...
md dot shahin dot hawladar at gmail dot com 
1 year ago
when using apache we will add this php8apache2_4.dll module in httpd.config file
example: LoadModule php_module C:/php/php8apache2_4.dll
I extracted php in "C" drive
Motivation:
You want to understand how PHP works with IIS.
You want to prepare a PHP or WordPress development environment in Windows.
You want to update PHP to any version to address compatibility or security issues in Windows.
You may use Microsoft Web Platform Installer to install PHP for IIS. However the tool may restrict you from using only the supported versions.
Solution:
- Install CGI for IIS on Turn Windows features on or off > Internet Information Services > World Wide Web Services > Application Development Features > CGI.
- Download VC15 x86 Non Thread Safe package here or under PHP 7.4 section from http://windows.php.net/download/
- Extract the ZIP file to the C:Program Files (x86)php-7.4.9-nts-Win32-vc15-x86 folder.
- Rename the php-.ini-development file to php.ini.
- Open the php.ini file and add the following line at the end of the file.
extension=php_wincache.dll
- Uncomment the following lines
fastcgi.impersonate = 1;

cgi.fix_pathinfo=1;
cgi.force_redirect = 1 (and change the value to 0, i.e. cgi.force_redirect = 0)

extension_dir = "C:Program Files (x86)php-7.4.9-nts-Win32-vc15-x86ext"

extension=php_curl.dll
extension=php_fileinfo.dll
extension=php_mbstring.dll
extension=php_exif.dll
extension=php_mysqli.dll
extension=php_pdo_mysql.dll
extension=php_openssl.dll

error_log = "C:Program Files (x86)php-7.4.9-nts-Win32-vc15-x86php_errors.log"

error_log = syslog
- A sample php.ini file can be download here.
- Add C:Program Files (x86)php-7.4.9-nts-Win32-vc15-x86 to System Path.
- Download x86 package of WinCache 2.0 for PHP 7.4 here or from https://sourceforge.net/projects/wincache/.
- Extract and copy the php_wincache.dll file to C:Program Files (x86)php-7.4.9-nts-Win32-vc15-x86ext
folder. - Open IIS, click on Server name, double click on Handler Mappings, click on Add Module Mapping, and enter below information
Request path = *.php
Module = FastCgiModule
Executable = "C:Program Files (x86)php-7.4.9-nts-Win32-vc15-x86php-cgi.exe"
Name = PHP 7.4
Request Restrictions = File or folder
- Download and install VC_redist.x86.exe of Microsoft Visual C++ Redistributable for Visual Studio 2019 here or on https://visualstudio.microsoft.com/downloads/#microsoft-visual-c-redistributable-for-visual-studio-2019
- Open a Command Prompt, execute below command and ensure that NO WARNINGS APPEAR.
- Create phpinfo.php file with below content in the root website folder.
- Open http://localhost/phpinfo.php URL and verify PHP information.
(Visited 8,773 times, 6 visits today)
Software development and software engineering research
Installing PHP on IIS is fairly straight forward using Microsoft’s Web Platform Installer. Unfortuantely numerous resources available on the web as well as the Web Platform Installer’s prerequisite check overlook a few prerequisites when installing PHP on IIS running on Windows Server. I’ve developed a guide and a list of requirements that will make the process of installing PHP on IIS much easier.
Requirements
- Server 2012 R2/2016/2019
- IIS role with CGI feature
- .NET Framework 3.5
- Visual C++ Redistributable for Visual Studio 2012 Update 4 (32-bit)
- Web Platform Installer
Run Windows Update
Install all available updates via Windows Update before continuing. There have been multiple updates in the past that have affected specific components from smoothly installing, specifically .NET Framework. Save yourself the trouble now and install all updates before continuing.
Install IIS role with CGI
The first thing you should do is add the IIS role with FastCGI support. More information on installing IIS and FastCGI can be found on the official PHP website but I’ll cover the basics here.
- Click start and type “Server Manager” and then hit enter. This should launch the Server Manager application.
- Click Manage → Add Roles and Features.
- On the Before you being screen, click Next.
- Select Role-based or feature-based installation and click Next.
- Select the local server and then click Next.
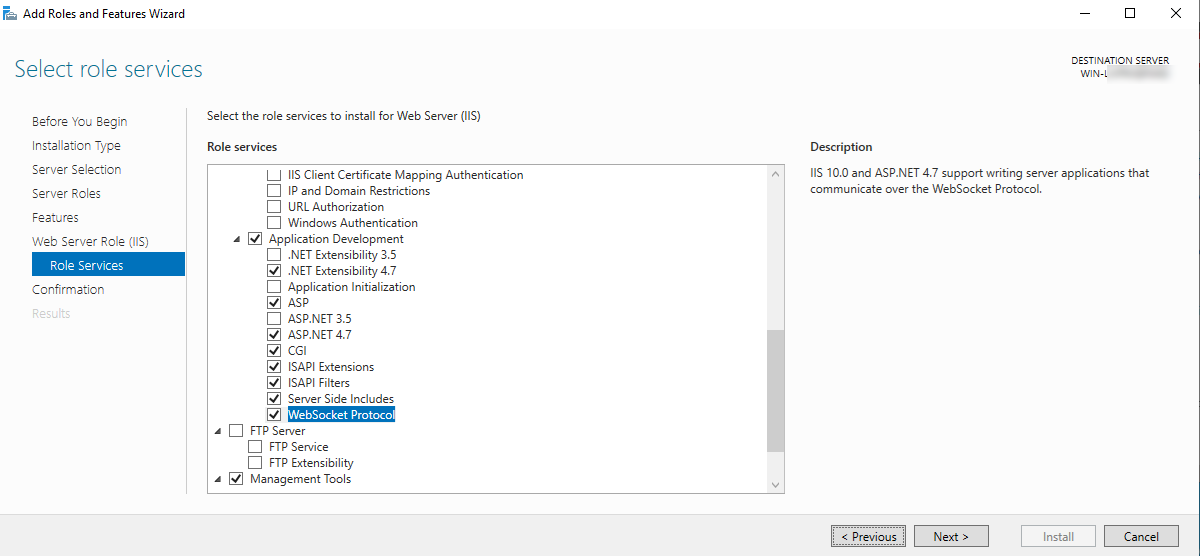
- On the Select server roles screen, select Web Server (IIS), click Add Features when prompted to add additional features, and click Next.
- On the Select features screen, click Next.
- On the Web Server Role (IIS) screen, click Next.
- On the Select role services screen, under Application Development, check off CGI. At this point I also recommend checking off any other IIS features that you may require or you’re interested in. I typically check off ASP, ASP.NET, HTTP Redirection and/or Windows Authentication (some of these options will also automatically select prerequisite features as well). Once you have everything you need selected, click Next.
- On the confirm installation selections screen, click Install.
- Wait for the installation to complete and then click Close. At this point I recommend rebooting the server.
Install .NET Framework 3.5
.NET Framework 3.5 is required for the PHP Manager for IIS application which will install by default when using the Web Platform Installer to install PHP. If you don’t have .NET Framework 3.5 installed on the server, PHP will still install but you’ll be presented with an error regarding PHP Manager – it’s safe to ignore if you don’t need it. With that said, the PHP Manager application can come in handy and I recommend installing it by completing this simple prerequisite.
Although .NET Framework 3.5 can be installed using the Add Roles and Features wizard on Server, it still requires the Windows Server installation media when installing the feature. Before you proceed, obtain the Windows Server installation media and attach it to the server either by physical media or mounting the ISO.
- Click start and type “Server Manager” and then hit enter. This should launch the Server Manager application.
- Click Manage → Add Roles and Features.
- On the Before you being screen, click Next.
- Select Role-based or feature-based installation and click Next.
- Select the local server and then click Next.
- On the Select server roles screen, click Next.
- On the Select features screen, select .NET Framework 3.5 Features and click Next.
- On the confirm installation selections screen, click Specify an alternate source path.
- At this point we’ll need the Server 2012 R2 installation media. For example, if you’ve mounted the Windows Server 2012 R2 installation media to D:, then the path would be D:sourcessxs. Enter the path to the sourcessxs directory, click OK and then click Install.
- Wait for the installation to complete and then click Close. At this point I recommend rebooting the server.
Install Visual C++ Redistributable
The Visual C++ Redistributable is required when installing a default installation of PHP. It will install DLL files that are required by numerous PHP extensions. Without it you will receive HTTP 500 errors and PHP will throw the error “The FastCGI process exited unexpectedly”.
You can download the Visual C++ Redistributable from here. Be sure to grab the 32-bit version (VSU_4vcredist_x86.exe) as the 64-bit version will not work (or maybe it’s not required?).
Install the Web Platform Installer
The Web Platform Installer is a small utility by Microsoft which is supposed to make it quicker and easier to deploy web services and deployment tools. But honestly it falls short of expectations. For example, when installing PHP it does not perform a prerequisites check for CGI, .NET Framework 3.5, or the required DLL files (installed by Visual C++ Redistributable). As long as these prerequisites are installed, PHP and the PHP Manager should install successfully.
You can download the Web Platform Installer from here. After the WPI is installed, it will automatically launch. Close it for now.
Once you’ve installed all the prerequisites you can go ahead and install PHP using the Web Platform Installer.
- Click Start and type “Server Manager” and then hit enter. This should launch the Server Manager application.
- Select Tools → Internet Information Services (IIS) Manager.
- Select your server’s name from the navigation tree.
- Double click Web Platform Installer under Management.
- Enter “PHP” in the search field and select the version of PHP you’d like to install. I recommend the latest version of PHP 7.
- Select Install and accept the terms and conditions. PHP and PHP Manager for IIS should now download and install successfully.
Congratulations. You now have a working IIS Server running PHP meeting all requirements of a default PHP installation. Enjoy!
Troubleshooting
PHP Manager won’t install
I’ve had trouble getting PHP Manager to install on Windows Server 2019. I’ve had much better success with PHP Manager 2. It can be downloaded from here, https://github.com/phpmanager/phpmanager/releases.
PHP Isn’t Working
Create a PHP test file, C:inetpubwwwroottest.php. The contents of the file should include the following:
<?php phpinfo(); ?>
Browse to http://localhost/test.php to see if PHP is loaded and working. If not, try running the script from the command prompt. For example:
"C:Program Files (x86)PHPv5.6php-cgi.exe" C:inetpubwwwroottest.php
Review and research any errors. I hope this helps!
Preparation
1. Environmental description:
Operating system:windows server 2019
php version:php 7.3.11
mysql version:mysql 8.0.18.0
2. Related software download:
3. visual c++ redistributable for visual studio 2015 (this plugin is required to install php and mysql)
Installation
First, install iis10.0
Control Panel-System and Security-Management Tools
Server manager
Add roles and features
Next step
Choice:role-based or feature-based installation
Next step
Select:Select the server from the server pool
Next step
Choice:web server (iis)
Add function
Next step
Next step
Next step
Make sure that cgi is selected, and other role services are selected as needed,If you do n’t know how to choose,It is recommended to select all functions.
Next step
installation
Shows that the installation was successful,Click Close.
You can see that iis is already in the role and server group
Open ie browser, input will see the following interface
iis10.0 has been installed.
Second, install php
1. Visual c++ redistributable for visual studio 2017 (x86, x64)
Install x86
Install x64
After all installations are completed,Click Close.
2. Install php-7.3.11-nts-win32-vc15-x64.zip
Unzip the php-7.3.11-nts-win32-vc15-x64.zip file
Rename the folder to php73, copy the php73 folder to the root directory of the C drive
Open c: php
Copy php.ini-production to php.ini
Open php.ini with notepad
Add and modify as follows:
extension_dir=»c: php73 ext» #Set php module path
date.timezone=prc#Set the time zone to Chinese time zone
cgi.force_redirect=0 #Enable to run PHP in cgi mode
fastcgi.impersonate=1;
cgi.rfc2616_headers=1
The following php extension module,Choose to open as needed,Cancel the preceding semicolon to start the corresponding expansion module
extension=curl
extension=gd2
extension=mbstring
extension=exif
extension=mysqli
extension=sockets
extension=php_xmlrpc
extension=php_pdo_mysql
After the modification is completed,Save and exit
3. Configure iis to support php
Open Control Panel-System and Security-Administrative Tools
Open the server manager
Double-click the computer name under «Start Page» on the left
Find the middle iis section and open «handler mapping».
Click «Add Module Mapping» on the right
Request path:* .php
Module:fastcgimodule
Executable file (optional):c: php73 php-cgi.exe
Name:fastcgi
Final confirmation
Yes
Double-click the computer name under «Start Page» on the left
Find the middle iis section and open «fastcgi settings»
Right-click to select:c: php73 php-cgi.exe and select Edit
Monitor changes made to the file:c: php73 php.ini
Environment variables,Click «…» next to
Click «Add»
name:php_fcgi_max_requests
value:1000
determine
Double-click the computer name under «Start Page» on the left
Find the middle iis section and open the «default document»
Click «Add» on the right
Name:index.php
determine
You can select the «Move up» option below to move the index.php to the top
4. Test whether the php program runs normally
turn on:
c: inetpub wwwroot
Create a new index.php file
The contents are as follows:
<?php
phpinfo ();
?>
Finally, save and exit
Open in browser
The following interface appears,Say the php program can run normally.
Three, install mysql
Double-click to open mysql-installer-community-8.0.18.0
Check «custom» (custom installation)
next
edit
Select mysql servers 64 bit
filter
Open mysql servers
Choose the version to install,Click the arrow to move to the right window
next
execute
next
next
Default, next
config type:
developer machine (development server)
server machine (common server)
dedicated machine
Choose the second item here:server machine (common server)
Tick »tcp/ip»
port number:3306
Check «open firewall port for network access» (open firewall port for network access)
next
Choose the second item,Use an encryption method compatible with versions prior to mysql5.7
next
mysql root password:Enter the password
repeat password:Repeat the password
After setting up,Point next
Check:Configure mysql system service
windows server name (windows service name):mysql80
Check:»start the mysql server at system startup» (start the mysql server at system startup)
Check:standard system account is run by system user by default
next
execute
finish
next
finish
Open the mysql installation path
c: program files mysql mysql server 8.0
New configuration file my.ini
[mysqld]
#Set port 3306
port=3306
#Set mysql installation directory
basedir=c: program files mysql mysql server 8.0
#Set the data storage directory of the mysql database
datadir=c: program files mysql data
#Maximum number of connections allowed
max_connections=1000
#The number of connection failures allowed.This is to prevent someone from this host trying to attack the database system
max_connect_errors=10
#The character set used by the server is utf8 by default
character-set-server=utf8
#The default storage engine that will be used when creating a new table
default-storage-engine=innodb
#Use «mysql_native_password» plugin authentication by default
default_authentication_plugin=mysql_native_password
[mysql]
#Set the default character set of the mysql client
default-character-set=utf8
[client]
#Set the default port used by the mysql client when connecting to the server
port=3306
default-character-set=utf8
save
Open c: programdata microsoft windows start menu programs mysql mysql server 8.0
Double-click mysql server 8.0 command line client
Enter the mysql root account password during installation,Enter, log in to the mysql console
mysql installation is complete
Four, configure iis10.0 to support pseudo-static
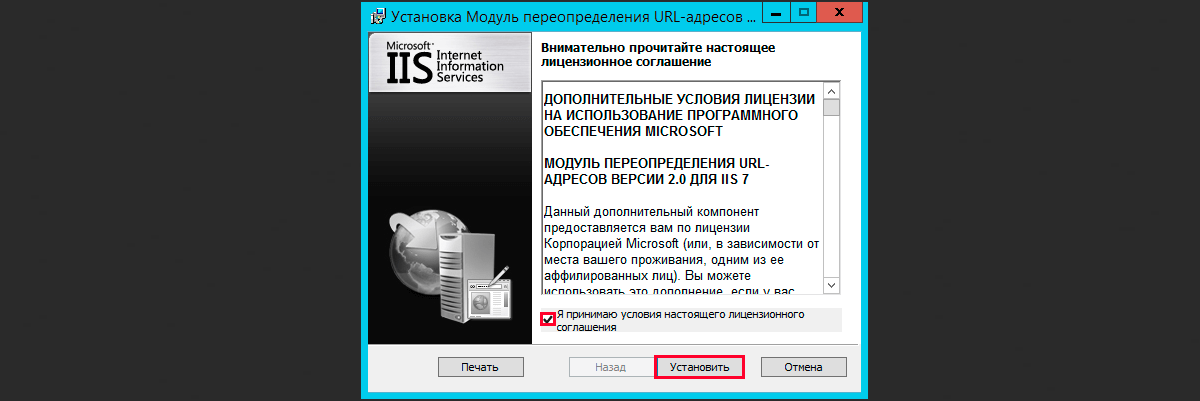
Double-click to install microsoft url rewrite module rewrite_x64_zh-cn.msi
An error message appears,determine
Search-Run
Enter regedit, OK, open the registry,turn up:
hkey_local_machine system currentcontrolset services w3svc parameters
The majorversion on the right is the dword value, and its value is 10 decimal. Change it to 9.
hkey_local_machine software microsoft inetstp
It is also the majorversion item, this is also the dword value of 10 (note that it is decimal), change it to 9
Then install it again,Remember to change it back after installation.
Install again
installation
carry out
In:Control Panel-System and Security-Administrative Tools-Internet Information Services (IIS) Manager, you can see «URL Rewriting»
In:create a new file web.config in the root directory of the website, add pseudo-static rule code to achieve website static.
At this point, the windows server 2019 iis10.0 + php (fastcgi) + mysql environment setup tutorial is complete.