Содержание
- Установка Pop OS
- Подготовка к установке
- Шаг 1. Загрузка образа
- Шаг 2. Запись на носитель
- Шаг 3. Настройка BIOS
- Установка Pop OS
- Шаг 4. Выбор языка
- Шаг 5. Выбор раскладки
- Шаг 6. Способ разметки дисков
- Шаг 7. Создание таблицы разделов
- Шаг 8. Создание разделов
- Шаг 9. Выбор точек монтирования
- Шаг 10. Установка
- Шаг 11. Перезагрузка
- Шаг 12. Приветствие
- Шаг 13. Раскладка клавиатуры
- Шаг 14. Приватность
- Шаг 15. Часовой пояс
- Шаг 16. Сетевые аккаунты
- Шаг 17. Создание пользователя
- Шаг 18. Готово
- Выводы
- Dual Boot Pop OS! and Windows 10
- Download Pop OS! 20.04
- Create Bootable USB stick
- Shrink Windows 10 partition
- Create Pop OS! partition
- Install Pop OS!
- Configure GRUB
- Final words
- Установка дистрибутива Linux Pop!_OS
- Скачиваем Pop!_OS
- Выбор языка установки
- Выбор раскладки клавиатуры
- Разметка жесткого диска
- Создание раздела Bios UEFI
- Создание корневого (/) раздела
- Раздел подкачки (Swap)
- Домашний каталог (home)
- Завершение разметки
- Установка Pop!_OS
- Базовая настройка
- Восстановление системы
- Две системы на одном П.К.
- Заключение
Установка Pop OS
Дистрибутив Pop OS разрабатывается компанией System76. Это известный производитель ноутбуков, который выпускает свои устройства с предустановленной системой Linux. Система основана на Ubuntu и в качестве окружения по умолчанию использует Gnome и спроектирована так, чтобы на рабочем столе было минимум лишних вещей.
Подготовка к установке
Минимальные системные требования Pop OS совсем небольшие. Это два гигабайта оперативной памяти, 16 гигабайт места на диске и процессор с поддержкой 64 битной архитектуры. В наше время таким требованиям удовлетворяют даже ноутбуки десятилетней давности. Рекомендуют же разработчики использовать для этой системы компьютер в 4 Гб оперативной памяти.
Шаг 1. Загрузка образа
Для загрузки образа надо перейти на официальный сайт дистрибутива. Там есть две версии образов, для видеокарт Nvidia и для всех остальных, выберите нужную вам версию и скачайте образ:

Шаг 2. Запись на носитель
Теперь необходимо записать полученный образ на носитель. Для этого в Linux можно использовать Etcher, а в Windows есть утилита Rufus. Всё это подробно описано в этой статье, поэтому не будем здесь на этом останавливаться.
Шаг 3. Настройка BIOS
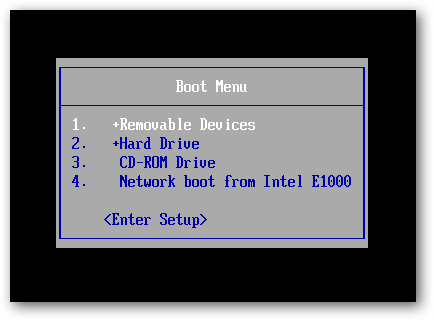
Дальше надо войти в интерфейс настройки BIOS с помощью сочетания клавиш Del, F2, Shift+F2 или других, а затем найти там раздел или вкладку Boot. Всё очень сильно зависит от версии BIOS вашего устройства и производителя. В современных платах от MSI, например, раздел Boot стоит искать в разделе Settings. Здесь надо найти пункт Boot option #1 и выбрать там вашу флешку:

В более старых версиях BIOS надо искать не раздел, а вкладку Boot, на которой есть либо пункт 1st boot device либо список Boot device priority, здесь тоже надо выставить вашу флешку на первое место, сохранить настройки и перезагрузиться.
Установка Pop OS
Шаг 4. Выбор языка
Сразу же после выхода из интерфейса BIOS компьютер перезагрузится и начнётся запуск Pop OS. После запуска системы автоматически откроется установщик, в котором надо выбрать язык будущей системы.

Затем выберите вариант языка:

Шаг 5. Выбор раскладки
Дальше система просит выбрать раскладку клавиатуры по умолчанию. Рекомендую выбрать английскую, так как эта настройка распространяется на процесс установки, и если во время разметки дисков вам надо будет что-то написать на английском, вас будет ждать сюрприз.

Если же вы всё таки выбрали русскую раскладку, то поменять её обратно на английскую можно выполнив в терминале команду:
Шаг 6. Способ разметки дисков
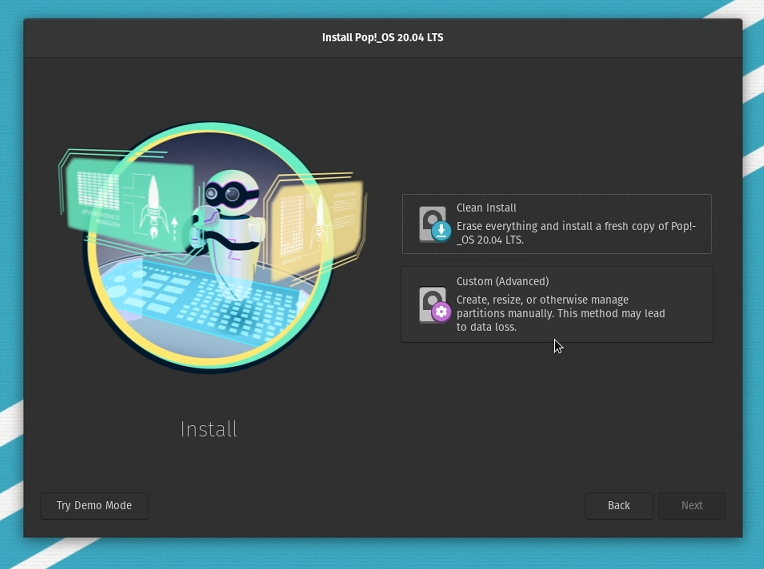
Утилита может автоматически разметить жёсткий диск или вы можете разметить всё вручную. В этой статье мы рассмотрим ручной вариант, поэтому выберите Custom (Advanced) и нажмите Next:

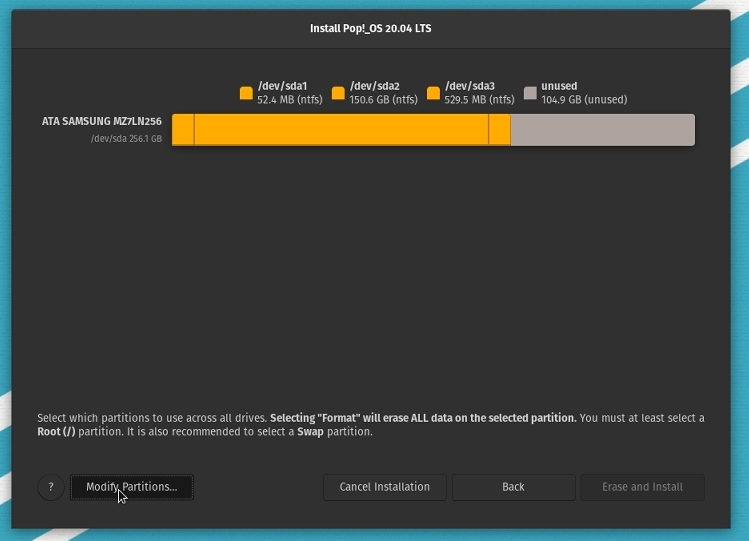
Далее нажмите Modify partitions внизу окна чтобы создать разделы для установки системы:

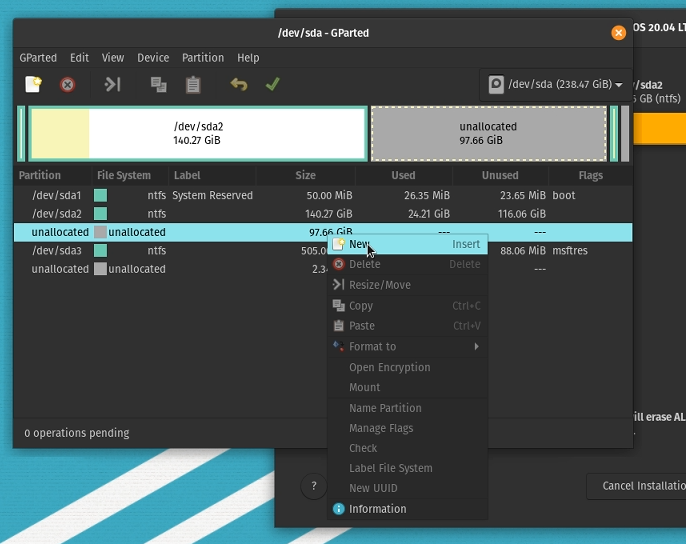
Перед вами откроется окно программы Gparted:

Шаг 7. Создание таблицы разделов
Если диск, на который вы собираетесь установить Pop OS чист, надо создать новую таблицу разделов. Для этого в открывшейся программе Gparted откройте меню Устройство и выберите Создать таблицу разделов:

Выберите тип таблицы разделов MSDOS или MBR и подтвердите, что вы согласны с тем, что все данные с диска будут стёрты:

Шаг 8. Создание разделов
Необходимо создать как минимум один раздел для корневой файловой системы. Но лучше файлы пользователя разместить на отдельном разделе, чтобы при переустановке системы или обновлении они не потерялись. Также желательно создать отдельный раздел для загрузчика.
Давайте сначала создадим раздел для загрузчика. Для этого нажмите на кнопку со значком + и выберите размер раздела, для этого раздела достаточно 500 мегабайт. Затем надо создать раздел для корневой файловой системы. Он должен занимать как минимум 16 гигабайт, потому что так сказано в системных требованиях:

Всё остальное место можно выделить под домашний раздел:

Когда всё будет завершено у вас должно получится три раздела. Нажмите на зеленую галочку чтобы сохранить изменения. После этого программу Gparted можно закрыть.
Шаг 9. Выбор точек монтирования
Далее уже в установщике вам необходимо выбрать точки монтирования. В нём появится зеленая строка, на которой будут отмечены три только что созданных раздела. Для этого сначала кликните по разделу и включите переключатель Use partition. Для загрузочного раздела выберите в поле Use as значение Boot (/boot) и отметьте галочку, что его надо форматировать:

Далее те же действия надо проделать для корневого раздела, только в Use as надо выбрать Root (/):

И для домашнего раздела:

После этого можно нажимать кнопку Erase and Install.
Шаг 10. Установка
Дождитесь завершения установки системы:

Шаг 11. Перезагрузка
Когда установка завершится, перезапустите систему. Для этого нажмите Reboot now:

Шаг 12. Приветствие
После перезагрузки вы увидите такое приветствие, просто нажмите Next:

Шаг 13. Раскладка клавиатуры
Затем система снова предложит выбрать раскладку клавиатуры для системы. Выберите и нажмите Next:

Шаг 14. Приватность
Выберите нужно ли разрешить приложениям определять ваше местоположение:

Шаг 15. Часовой пояс
Выберите ваш часовой пояс:

Шаг 16. Сетевые аккаунты
Привяжите сетевые аккаунты, если это необохдимо:

Шаг 17. Создание пользователя
Введите имя и логин и имя пользователя, от имени которого вы будете использовать систему:

Затем введите пароль для этого пользователя два раза:

Шаг 18. Готово
Почти готово, осталось ещё нажать Start using Pop OS:

После этого система снова перезагрузится и вы попадёте на рабочий стол:

Выводы
В этой статье мы рассмотрели как выполняется установка Pop OS. Как видите, это ненамного сложнее, чем установить ту же Ubuntu. Здесь ситуацию немного усложняет то, что весь интерфейс установщика на английском языке, но благодаря этой инструкции вы сможете во всём разобраться. А вы уже пользовались Pop OS? Как она вам? Напишите в комментариях!
Источник
Dual Boot Pop OS! and Windows 10
Hi all. So you tried Pop OS! 20.04 (https://bln364.com/how-to-try-system-76s-pop-os-on-windows-10-laptop/) and now you want to install Pop OS! alongside Windows 10. This will show you how to dual boot Pop OS! and Windows 10.
And I must add. Please be careful with this process. Formatting the wrong partition can cause you to lose all your data. Please be careful, back up your data and do next steps on your own risk.
If you are maybe not ready to install Linux on you hard drive maybe you can try linux inside Virtual Machine. If you are interested in something like that please check out my first online Udemy Course Virtualization with VirtualBox.

Download Pop OS! 20.04
Create Bootable USB stick
Shrink Windows 10 partition
Now, you have a bootable USB stick, and you need to boot from it. If you have a problem with booting from USB stick check out my blog for solution (https://bln364.com/how-to-try-system-76s-pop-os-on-windows-10-laptop/).
 Select a Language for Pop OS! Live Image
  Select Keyboard Layout for Pop OS! Live Image
  Pop OS! Installation Screen
On windows shown above we select do we want to continue with Demo Mode, or do we want to install Pop OS! 20.04 on your hard disk. I’m using for this example 120GB internal SSD disk (Kingston 120GB A400). If we want to install Pop OS! on your hard disk in this case select Custom (Advanced) install and you will get next window.
 Overview of hard drive partitions
Currently, we have only Windows 10 installed on our hard disk, so we have only two partitions, Windows Recovery and the main Windows NTFS partition. Next thing to do is to shrink our existing partition and create space for Linux partitions. Two do that we need to press Modify Partitions…
This will open Gparted Linux partition tool that will look something like this. In the top right corner important thing is to set your hard disk. In this example, I have selected /dev/sda.
 Gparted Linux Partition tool
When we have selected the right hard disk, we need to unmount our partitions. This will allow us to change existing partitions.
 Gparted — Unmount partition
Then we need to resize our existing partition. Let us use half a space for Windows and half for Linux.
 Gparted — Resize partition 1
  Gparted — Resize partition 2
Create Pop OS! partition
Now, we can create 3 partitions for Pop OS!, and that are root, boot, and swap. We can do that in the next way.
 Gparted — Create new partition
  Gparted — Create main root partition (leave space before for boot partition, and after for swap partition) and than format them
For this blog, I’m installing Pop OS! on a very old HP Compaq nc6400 laptop, so I’m setting the size of my /swap partition to 2GB, and 512MB for /boot. Everything else will be /root partition.
After creating and formatting new 3 partitions, click Apply All Operations and when all is done close Gparted . Now you should see updated hard disk preview with new partitions like on the image below.
 Pop OS! installation after Gparted
Now we need to use Pop OS! installer to define which partition will be allocated for Pop OS!.
 Pop OS installer — Partition Definition for Boot Partition
  Pop OS installer — Partition Definition for Root Partition
  Pop OS installer — Partition Definition for Swap Partition
Install Pop OS!
Now we can you press Erase and Install and wait for Pop OS! to be installed.
Configure GRUB
And we have Pop OS! installed beside our Windows 10. We can simply reboot and remove USB stick for PC and enjoy in two compliantly different Operating systems.
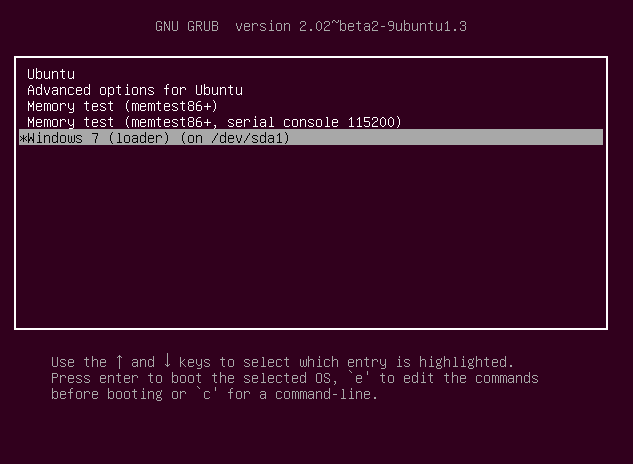
Now laptop boots directly to Pop OS!. This was very strange for me, because, usually, on other Linux distributions GRUB (Linux boot loader) will be automatically setup when installing and after powering on you will be greeted with something like this:
 GRUB example
In this case, GRUB was nowhere to be seen so we can not say that we have Dual boot Pop OS! and Windows 10 system? We went straight to Pop OS!. Windows 10 is still installed but we need to configure GRUB to know where to find Pop OS! and where to find Windows 10.
To update and setup GRUB lets first update the hole system. That can be done with two simple commands from terminal:
Now we need to install one packet, os-prober with:
We need this packet because without it GRUB will not be able to find Windows 10 partition.
Result from running the os-prober should be something like this:
Finally we can run:
to update and activate GRUB on Pop OS!.
And this is it. Now after powering on you will be greeted with GRUB screen in which you can select Pop OS! or Windows 10.
 GRUB welcome screen
Final words
This was a fun project for me and it brings life in my old laptop. Pop OS! 20.04 isn’t maybe the best option for low-end hardware, or there are maybe better Linux Distribution for low-end hardware, but said that it runs better than Windows 10.
Process of installing Pop OS! alongside Windows 10 went pretty much smooth, if we don’t count GRUB part, what was very strange for me.
Let finish. Did you find something missing in this tutorial? How do you like Pop OS!? Did you manage to Dual boot Pop OS!? Please comment down below and check out my other post at https://bln364.com/
Check out my other Pop OS 20.04 related posts:
Источник
Установка дистрибутива Linux Pop!_OS
Добрый день всем, кто оказался на данном сайте. Дистрибутива Linux Pop!_OS существует с 2017 года и разрабатывается компанией System76. Данная компания занимается сборкой серверных решений и десктопных, предустанавливая на них свой дистрибутив Pop!_OS. Данный дистрибутив основывается на базе Ubuntu, на данный момент это 20.04. Но, не смотря на это, дистрибутив Pop!_OS имеет некоторые отличия, например, в плане установки, а так же некоторые патчи, которые и отличают его от той же Ubuntu. Репозитории в дистрибутиве Pop!_OS используются от Ubuntu, но, имеются и свои, которые поддерживаются компанией System76. В Pop!_OS 20.04 используется рабочий стол GNOME 3.36 и версия ядра 5.4. При необходимости вы можете накатить свое ядро, как это сделать, читайте в этой статье. И так, переходим к установке.
Скачиваем Pop!_OS
Первым делом нам нужно скачать данный дистрибутив с официального сайта. Для этого вы можете перейти по данной ссылке и нажимаем на кнопку “DOWNLOAD”. Существуют две версии данного дистрибутива, для видеокарт AMD и Nvidia, выбирайте в зависимости от вашей карты. В случае если у вас ноутбук с гибридной графикой, процессором AMD и видеокартой Nvidia, качайте сборку для Nvidia:


Затем нужно создать загрузочный носитель, вы так же можете создать мультизагрузочную USB флешку, как это сделать, читайте тут. После чего перезагружаемся и в биосе нужно отключить функцию “Secure Boot”, об этом указано на сайте при скачивании данного дистрибутива. После загрузки с установочного носителя, перед вами появится экран установки, в котором будет всего один пункт. Что бы долго не ждать, нажимаете “Enter”:

Выбор языка установки
После непродолжительной загрузки в Live режим, перед вами появится окно с выбором языка установки. Выбираем нужный вам язык, щелкнув на нем мышкой:

После чего вам нужно будет еще раз выбрать язык, в случае с Русским языком, у вас будет выбор как Русского, так и Украинского, затем нажимаете кнопку “Select”:

Выбор раскладки клавиатуры
Далее выбираем раскладку клавиатуры, на этом этапе установки, крайне рекомендую выбрать Английскую. А именно, пролистав вверх найти пункт под названием “Английская (американская)”, далее нажимаем “Select” и оставляем пункт “Default”:


Разметка жесткого диска
Теперь настал черед разметить жесткий диск, выбрав пункт “Clean Install” система установки сама разметит вам жесткий диск. При этом, будет создать раздел восстановления системы, что весьма может быть полезным. Но, о том как можно восстановить систему мы поговорим позже:

Выбрав пункт “Custom (Advsnced)” нам придется разметить диск вручную использую утилиту GParted. После выбора нужного пункта, внизу появится кнопка с названием выбранного пункта, на которую следует нажать для подтверждения выбора пункта. В случае с пунктом Custom (Advsnced):

После выбора пункта Custom (Advsnced) вы увидите жесткий диск. Для продолжения установки, вам нужно будет запустить утилиту GParted, с помощью которой мы и разметим жесткий диск. Для этого нажимаем пункт “Modify Partitions” который расположен внизу экрана:

В случае если у вас диск абсолютно новый, вам нужно будет создать на нем раздел. Для этого нужно выбрать пункт “Устройства”, затем выбрать “Создать таблицу разделов”:

После чего в открывшемся окне создаем новую таблицу разделов. В том случае если у вас UEFI, выбираем GPT, если же у вас Bios без UEFI, выбираем msdos:

Создание раздела Bios UEFI
Теперь переходим к разметке диска, для этого нажимаем правой клавишей мышки на жестком диске и выбираем пункт “Новый”:

В случае если у вас Bios UEFI, то нужно создать для него раздел размеров не меньше 500 мегабайт. В поле “Новый размер” пишем 500, а в поле “Файловая система” выбираем “fst32” и жмем кнопку “Добавить”:

А вот если у вас Bios без UEFI, то данный раздел создавать не нужно.
Создание корневого (/) раздела
Теперь создадим корневой раздел. Куда и будет установлена сама система, щелкаем правой клавишей на неразмеченной области и выбираем пункт “Новый”. Под корневой раздел достаточно будет выделить 50 гигабайт (Пункт “Новый размер”). Файловую систему можно оставить “ext4”, а можно выбрать и btrfs в случае с ssd, тут уже на ваше усмотрение:

Раздел подкачки (Swap)
Создавать раздел подкачки или нет, это зависит в первую очередь от вашей конфигурации компьютера (Ноутбука). Если у вас более 8 гигабайт оперативной памяти, то можете не создавать данный раздел. А вот если у вас 4 или меньше гигабайт оперативной памяти, настоятельно рекомендую его создать. В любом случае, я его создаю. Для этого опять на неразмеченной области щелкаем правой клавишей мышки и выбираем пункт “Новый”. В поле “Новый размер” вписываем число равное вашей оперативной памяти. А в поле “Файловая система” выбираем пункт “linux-swap”:

Домашний каталог (home)
Теперь давайте создадим раздел “home” в котором будут хранится как настройки системы, сделанные вами так и документы и скаченные файлы. Для того что бы создать данный раздел, проделываем ту же операцию. На неразмеченной области щелкаем правой клавишей мышки и выбираем пункт “Новый”. Под этот раздел отводим все оставшееся место на жестком диске. А в пункте “Файловая система” выбираем либо “ext4” либо btrfs, все как в случае с корневым разделом:

Теперь давайте выставим так называемые “Флаги”. Для этого опять щелкаем правой клавишей мышки на созданном разделе и выбираем пункт “Управление флагами”:

Тут нам нужно отметить два пункта “esp” и “boot”, после чего закрываем данное окно нажав на соответствующую кнопку:

После чего нам нужно подтвердить разметку жесткого диска. Для этого в утилите GParted нужно нажать на зеленную галочку. Затем на кнопку “Применить”:


Завершение разметки
После чего выходим из утилиты GParted. И переходим к завершению настройке жесткого диска. Для этого щелкаем на первом пункте размеченной области правой клавишей мыши. Затем переводим ползунок в право и убеждаемся что система правильно определила область. В случае с UEFI это:

После чего переходим к следующей размеченной области. Проделываем то же самое, правой клавишей мыши и убеждаемся что это корневой раздел (/):

То же самое проделываем с разделом подкачки (swap) и с разделом (home):


Установка Pop!_OS
Теперь можно смело нажимать на кнопку “Erase and Install” выделенную красным цветом в низу экрана. После чего начнется установка дистрибутива Pop!_OS на ваше устройство:

Когда закончится установка, нажимаем кнопку “Rstart Device”, после чего система перезагрузится и перейдем к завершению установки:

После перезагрузки вы попадете в приветственное меню, тут нажимаем кнопку “Далее” расположению в верхнем углу экрана:

После чего можно выбрать раскладку клавиатуры, собственно, оставляем как есть и нажимаем клавишу “Далее”. Главное, убедитесь, что бы была отмечена Английская раскладка, все остальное можно будет настроить когда завершится установка:

По поводу пункта “Конфиденциальность” решайте сами, я же его отключаю. Не по тому что я беспокоюсь о том что система может например отследить мое место нахождения. А потому, что это лишние службы, которые грузят саму систему:

Теперь нужно выбрать часовой пояс, для этого просто набираем его в поле. В моем случае это Москва:

Далее можно подключить ваши учетные записи, смотрите сами, надо ли это вам или нет. Я же этот пункт всегда пропускаю, ибо, из всех учетных записей у меня только Google, который я подключаю уже в браузере:

После чего нужно придумать ваше имя и вписать его в соответствующее поле. После чего нажимаем кнопку “Далее” и придумав пароль дважды его вписываем в соответствующих полях:


На этом установка завершена и можно переходить к использованию данного дистрибутива, нажав на кнопку “Начать работу с Pop!_OS”:

Базовая настройка
После успешной установки всегда нужно настроить систему под свои нужды. Мне например всегда нравилась утилита под названием “Программы и обновления”. Эту утилиту вы могли видеть в Ubuntu. Давайте ее установим в Pop!_OS. Для этого открываем терминал и вводим команды:
При необходимости можно обновить и саму систему, если имеются обновления. Если обновлений нет, смело переходим к установки утилиты “Программы и обновления”. Для установки обновлений вводим команду:
Теперь можно установить утилиту “Программы и обновления” введя команду:
Найти ее можно сразу же в меню установленных приложений, называется она “Обновления приложений”. Запустив ее, она проверит обновления:

А после чего нажимаем кнопку настройки:

Теперь можно произвести некоторые настройки используя данную утилиту:

Например, перейдя к пункту “Программное обеспечение Pop” можно выбрать сервер для обновлений. В пункте “Другое ПО” можно добавить репозитории, или отключить не нужные. Так же можно установить необходимые драйвера, перейдя к пункту “Дополнительные драйвера”. Что касается настройки самого GNOME 3, читайте в этой статье. Так же вы можете изменить имя вашей системы, воспользовавшись этой статьей. Так как по умолчанию имя установленной системы будет “pop!_os”.
Восстановление системы
Бывают случаи, когда невозможно загрузиться в систему, можно попытаться восстановить ее, но, это может быть крайне сложно начинающим пользователям. Да и более опытным не всегда это удается. В случае с дистрибутивом Pop!_OS есть возможность восстановить систему, при этом, у вас сохранятся ваши настройки, которые хранятся в домашней директории. А так же будут сохранены расширения, которые вы устанавливали для GNOME 3. При этом, настройки самой системы будут сброшены к первоначальным. В этом случае вам не придется настраивать систему с нуля, а достаточно будет установить необходимое программное обеспечение.
Для того что бы восстановить систему, загружаемся с установочного носителя. После чего выбираем язык установки, раскладку клавиатуры и доходим до разметки диска. Когда дойдете до разметки жесткого диска, выбираем пункт “Refresh Install”, затем нажимаем кнопку внизу экрана с таким же названием:

После чего нужно будет выбрать уже установленную систему и нажать на кнопку “Refresh Install”:

Далее система все сделает сама, после чего можно будет перезагружаться и работать в восстановленой системе. Данная функция весьма полезна с точки зрения практичности использования. Так как в основном вся важная информация и некоторые настройки хранятся в домашней директории, а при восстановлении, данная директория не затрагивается.
Две системы на одном П.К.
Спасибо за совет Владимиру Макарову
Заключение
Ну и напоследок хотелось бы сказать несколько слов про этот дистрибутив. Первым делом, его можно устанавливать на ноутбуки с гибридной графикой. Именно тут он показал себя с положительной точки зрения. На мой ноутбук Asus fx505dt данный дистрибутив встал без проблем, гибридная графика завелась из коробки. А в меню появился пункт с дополнительными настройками гибридной графики:

Что касается стабильности данного дистрибутива, баги имеются. Но, они устраняются разработчиками данной системы. Да и давайте будем честны сами с собой, нет не одной системы, в которой нет багов. Они есть во всех системах, важно лишь то, насколько быстро они исправляются. В основном мне встречались мелкие баги, которые исправлялись буквально за несколько дней. Так же, хотелось бы заметить более быструю загрузку Pop!_OS в отличии от той же Ubuntu. Система в целом мне понравилась и на данный момент она прижилась на моем ноутбуке в качестве основной и единственной системы.
А на этом сегодня все. Надеюсь данная статья будет вам полезна.
С уважением Cyber-X
Источник
Dual Boot Pop!_OS with Windows using systemd-boot
The ultimate guide for any combination
EXTREMEY SHORT TL:DR: If you know what you’re doing — The absolute quickest:
sudo apt install os-probersudo os-prober. The output is/dev/sdb1@/efi/Microsoft/Boot/bootmgfw.efi:Windows Boot Manager:Windows:efisudo mount /dev/sdb1 /mnt(you can find your drive in the first part of the os-prober’s output)sudo cp -ax /mnt/EFI/Microsoft /boot/efi/EFI(you can find the folder after the wordefiin os-prober’s output. It’s alwaysMicrosoftbut you need capitalEFIwhen copying.- Reboot. Spam your spacebar for the menu. Select with arrows, add timeout with «t» or reduce with «T» (+/- also work), select default with «d». Hold «l» to boot linux after POST or «w» to boot Windows after POST without visiting the menu.
TL:DR: Dual boot from the same drive with Windows and Pop!_OS already installed: See 4. TL:DR at the end of this document.
Abstract
To dual boot Windows and Pop!_OS with a menu, both operating systems’ EFI files need to be in the same FAT32 partition. This guide elaborates on how to either install OS’s using the same EFI partition or copy Windows’s EFI Microsoft folder into Pop!_OS’s /boot/efi/EFI.
1. Introduction
Pop!_OS uses systemd-boot as its boot manager. Most new users don’t know how systemd-boot works and the fact that it is mostly transparent to the user (as a boot-manager should be), makes it hard for some users to understand. As such a common advice when new users want to dual boot with Windows is to install grub. Grub is better known as it is commonly used by other distributions, namely Ubuntu and has a visible menu at boot, which new users grow to expect. As such it is common advice between new users to install grub in order to dual boot Pop!_OS with Windows. This, is totally unecessary as not only it removes the ease and simplicity of systemd-boot and replaces it with the rather complex configuration of grub, but also grub has the tendency to break with Windows updates, while systemd-boot does not.
Check your system is in UEFI mode with mount | grep efivars and expect an ouput of efivarfs on /sys/firmware/efi/efivars type efivarfs (rw,nosuid,nodev,noexec,relatime).
1.1 Purpose
The purpose of this guide is to make it easy to install Pop!_OS and Windows in a system and easily select the OS to boot at start up. It covers:
- Dual boot using a single drive
- Dual boot using two drives with each OS on its own storage device
- Installing Pop!_OS first, then Windows
- Installing Windows first, then Pop!_OS
1.2 Disclaimer
While this is a guide tested many times, the procedures followed include creating/deleting/changing partitions, and as such your data, if you get something wrong, can be lost. Make sure you backup your data before you start, and you understand you do this at your own risk.
1.3 Prerequisites
Some basic skills are required before you move on. You need to be apt enough in linux to complete the following tasks:
- Use
lsblk - Mount a partition
- Copy files and folders from the terminal
- Create Live USB sticks from Windows and Linux
- Install Pop!_OS and Windows from USB
- Understand the difference between mbr and gpt and how to use
fdiskto change disks from one type to the other - Understand the difference between UEFI and legacy modes in BIOS and use your system’s bios to check/modify
- Use your system’s bios to change the boot order
- Use your system’s bios to disable secure boot and enable AHCI for storage
While these will all be used in this guide, they will be handy when setting up and/or troubleshooting your installation.
1.4 Not covered
This guide does not cover how to install Pop!_OS, Windows, how to create partitions on either OS, how to resize partitions.
This guide does not cover installation on Legacy/Bios systems. This is for UEFI only.
1.5 Basic concept
Systemd-boot is simple. It will boot any OS that has an EFI entry (with the boot file) in /boot/efi. All this guide does is describe the process of copying such files.
1.6 Basic use of systemd-boot menu
Here are all the options you have at the menu of systemd-boot at start-up. To bring the menu up at boot, you need to spam or hold the spacebar during POST (that’s when your PC’s logo appears on the screen. Once the menu appears you can press:
- d: this changes the default boot option. A
=>sign appears in front of the selection to show it’s default. - e: edit the boot parameters (if you want to add kernel parameters) and see the boot instruction.
- t: increase the menu timeout.
- T: decrease the menu timeout (Shift+T).
- v: shows the version of systemd-boot
Finally you can supersede the boot order and choose to boot Windows or Pop!_OS by holding or spamming at POST:
- w: this will boot Windows
- l: this will boot Linux (Pop!_OS)
2. Dual booting with separate drives
This is the simplest case. Each operating system is installed separately on its own drive. This requires a minimum of two drives (obviously) and the order of installation does not matter. It is advisable to only have one drive installed at a time of installing each OS, so that you avoid confusion. However with Pop!_OS not using systemd-boot rather than grub, there is no danger of misplacing the boot loader, so both drives can be connected while installing Pop!_OS, just make sure you select only the drive you want Pop!_OS installed before you install Pop!_OS.
2.1 OS installation
Install each OS to its own drive. At this point you can boot each OS by selecting the boot device from your BIOS.
At this point Pop!_OS may or many not provide you with a menu. But there is one:
With Pop!_OS selected to boot, when your system shows the manufacturers logo (i.e. during POST), you spam or hold the spacebar. This will bring up the menu. This menu does not include an option for Windows (yet).
2.2 How to add an option for Windows in Pop!_OS boot menu
This is the easiest case. All you need to do is to copy the EFI files of Windows to Pop!_OS’s EFI partition.
Steps:
- Boot Pop!_OS
- Start a terminal
- Run
lsblkand identify the drive with Pop!_OS and the drive with Windows. Sample output of two fresh installations looks like this:
otheos@pop-os:~$ lsblk
NAME          MAJ:MIN RM   SIZE RO TYPE  MOUNTPOINT
sda             8:0    0 119.2G  0 disk
├─sda1          8:1    0   498M  0 part  /boot/efi
├─sda2          8:2    0     4G  0 part  /recovery
├─sda3          8:3    0 110.8G  0 part  /
└─sda4          8:4    0     4G  0 part
  └─cryptswap 253:0    0     4G  0 crypt [SWAP]
sdb             8:16   0 111.8G  0 disk
├─sdb1          8:17   0   100M  0 part
├─sdb2          8:18   0    16M  0 part
├─sdb3          8:19   0 111.2G  0 part
└─sdb4          8:20   0   505M  0 part
In the example above, /dev/sda is the drive with Pop!_OS and /dev/sdb is the drive with Windows. You can tell from the mounted partitions of Pop!_OS on /dev/sda. You can also see here that Pop!_OS’s EFI partition is mounted at /boot/efi and its EFI files are located in /boot/efi/EFI.
- Identify the EFI partition of Windows. This is typically around 100MB for starnard installations and is typically the first partition in the drive. In the example above, this is partition
/dev/sdb1. Alternatively, you can runsudo os-prober(install it first withsudo apt install os-prober) and that will give you a line of where Window’s EFI is, such as/dev/sdb1@/efi/Microsoft/Boot/bootmgfw.efi:Windows Boot Manager:Windows:efi. You can see that/dev/sdb1is Windows EFI partition, and specifically the files you need are in theMicrosoftfolder insideefi(note, this isEFIbut in fat32 is not case sensitive). - Mount the EFI partition of Windows. Typically you can type
sudo mount /dev/sdb1 /mnt. - Copy the EFI files of Windows to Pop!_OS’s EFI partition. The EFI files of Windows are in the folder
/mnt/EFI/Microsoft. You will need the completeMicrosoftfolder copied in/boot/efi/EFI. So:
otheos@pop-os:~$ sudo mount /dev/sdb1 /mnt
otheos@pop-os:~$ cd /mnt
otheos@pop-os:/mnt$ ls
EFI
otheos@pop-os:/mnt$ cd EFI
otheos@pop-os:/mnt/EFI$ ls
Boot  Microsoft
otheos@pop-os:/mnt/EFI$ sudo cp -ax Microsoft /boot/efi/EFI
At this point you are done. You can check the folder is where it should be:
otheos@pop-os:/mnt/EFI$ sudo ls /boot/efi/EFI
BOOT   Microsoft				    Recovery-8138-A6FE
Linux  Pop_OS-eeacf7ce-54c4-47ac-a595-2c701aa28e2c  systemd
Note: You can only see the contents of this folder as root as such sudo is required. You can see the Microsoft folder is now present.
- You are done. You can now reboot your system and check in the menu that there is an option named Windows Boot Manager. Select it and you can boot to Windows.
Note: Your bios may re-read the EFI options offered in the boot manager and may place the new EFI entry for Windows first. If your system boots straight to Windows after restart, reboot to Bios and select Pop!_OS as the first choice to boot.
3. Dual booting from the same drive
3.1 Install Pop!_OS first, Windows second (easiest and recommended)
See my video here: https://www.youtube.com/watch?v=Fw3fQQmlXEs
If you’re installing on a fresh drive, installing Pop!_OS first is the easiest option. Follow these steps to get a dual boot menu.
- Install Pop!_OS as per normal. You can partition the drive before installation and do a custom installation. This will have the space for Windows alocated at this point and you do not need to move and resize partitions after. But you may end up without a recovery partition. Practice, see what works for you.
- If you installed the default way, do not reboot.
- Start
gpartedand resize/move as required to make space for Windows. The Windows installer will have to find empty space to install to. You can format that space to NTFS or leave it unformatted. If formatted, you get the benefit of Windows not creating the smaller partitions and as such you can then adjust space between Pop and Windows. If you don’t format, Windows will create two more smaller partitions which are impossible to move and as such you cannot adjust the space afterwards. See the video with formatting here and without formatting here. - Start the Windows installation, and select the empty space to install to. Windows will by default install its EFI folder in the pre-existing EFI partition that Pop!_OS uses. This means that all EFI files will now be in the same place as required for systemd-boot to show Windwos in the menu.
- Upon reboot (Windows requires several) you will need to manually select Windows. Either fire up the menu and make Windows default (see introduction), or hold w on every reboot, or make Windows the default in your bios at this stage.
- If you already have Pop!_OS as your only OS and want to install Windows, you will need to boot from USB and start at step 3 above.
- Once the Windows installation is complete, adjust your boot order in the bios to Pop!_OS, and use the menu as required.
3.2 Install Pop!_OS second, Windows installed first (most common case for people adding Pop to their systems)
This is the most common case for new users, and as such I will spend some time explaining with more detail.
3.2.1 Starting without OS
If you start with a clean drive, I would strongly suggest installing Pop!_OS first and follow the according steps. If you have to install Windows first, you have two options.
3.2.1.1. Install Windows with planning for Pop!_OS (hard and redundant as you should install Pop first)
All the planning is, is to install Windows with a larger EFI partition so that you can use it also for Pop!_OS. Windows’s EFI partition is by default only 100MB and it is as a result too small for more than OS to store its EFI files. If you make this larger, say 512MB (I would advise 1GB for extra space), you can then use this partition for all your OS’s. You can do that following this guide here.
Once you have Windows installed with a large EFI partition you can install Pop!_OS. Simple steps include:
- Boot from Live USB.
- Go through the step by step screens.
- Select custom and resize/move partitions to make as much room as needed for Pop!_OS.
- Go back to the installer and select partitions. Select the EFI partition of Windows and set it to
/boot/efibut DO NOT FORMAT. - Select your
/partition and install. If you need a recovery partition see the note in the next case. - Complete and reboot, you should have a menu with Windows as an option.
- Adjust your Bios to set Pop!_OS as the first boot option.
3.2.2.2. Install Windows without planning for Pop!_OS (easier and most common for users already having Windows installed)
Here you will end up with two separate EFI partitions and as such the procedure is similar to having two separate drives.
- Install Windows as normal
- Boot from Live USB
- Make space for Pop!_OS. You will need two* partition, a 512MB FAT32 partition and the rest as ext4 (or use as many partitions as you want for your custom installation). *You can addd a 4096MB FAT32 partition for the recovery (this is recommended but not required)
- Select the 512MB FAT32 partition as
/boot/efipartition and the rest as your/partition (or any other layout you want, but this is the minimum). If you added a partition for Recovery, then select it, set it to custom and type/recoveryfor the mount point (make sure fat32 is selected). - Install.
- Now you have two installations each with its own EFI partition.
- Follow the process used for dual booting from two drives to make your menu include Windows.
4. TL:DR Dual boot from the same drive with Windows and Pop!_OS already installed
Note: See the very short TL:DR at the very top if you know what you’re doing.
If you have managed to install Windows and Pop!_OS, read the introduction before you proceed.
To make Windows appear in the boot menu, you will need to copy its EFI folder to where Pop!_OS’s EFI folder is.
Steps:
- Boot Pop!_OS
- In the terminal, use
lsblkto identify Windows’s EFI partition. Typically it will be a partition with 100MB size.
otheos@pop-os:~$ lsblk
NAME          MAJ:MIN RM   SIZE RO TYPE  MOUNTPOINT
sda             8:0    0 119.2G  0 disk
├─sda1          8:17   0   100M  0 part
├─sda2          8:18   0    16M  0 part
├─sda3          8:19   0 111.2G  0 part
└─sda4          8:20   0   505M  0 part
├─sda5          8:1    0   498M  0 part  /boot/efi
├─sda6          8:3    0 110.8G  0 part  /
Note: My Pop!_OS installation is on /dev/sda5 and /dev/sda6. I do not have a recovery, nor a swap partition as I don’t use these, but your installation might be different. The important part here is /dev/sda1 as it has 100MB size and looks like the EFI partition of Windows.
- Mount the EFI partition of Windows. Typically you can type
sudo mount /dev/sda1 /mnt. - Check that this partition actually has the EFI files of Windows:
cd /mntand thenlsand look for a folderEFIin there. - Copy the EFI files of Windows to Pop!_OS’s EFI partition. The EFI files of Windows are in the folder
/mnt/EFI/Microsoft. You will need the completeMicrosoftfolder copied in/boot/efi/EFI. In detail:
otheos@pop-os:~$ sudo mount /dev/sda1 /mnt
otheos@pop-os:~$ cd /mnt
otheos@pop-os:/mnt$ ls
EFI
otheos@pop-os:/mnt$ cd EFI
otheos@pop-os:/mnt/EFI$ ls
Boot  Microsoft
otheos@pop-os:/mnt/EFI$ sudo cp -ax Microsoft /boot/efi/EFI
At this point you are done. You can check the folder is where it should be:
otheos@pop-os:/mnt/EFI$ sudo ls /boot/efi/EFI
BOOT   Microsoft				    Recovery-8138-A6FE
Linux  Pop_OS-eeacf7ce-54c4-47ac-a595-2c701aa28e2c  systemd
Note: You can only see the contents of this folder as root as such sudo is required. You can see the Microsoft folder is now present.
- You are done. You can now reboot your system and check in the menu that there is an option named Windows Boot Manager. Select it and you can boot to Windows.
Note: Your bios may re-read the EFI options offered in the boot manager and may place the new EFI entry for Windows first. If your system boots straight to Windows after restart, reboot to Bios and select Pop!_OS as the first choice to boot.
4.1 From Windows
This is work in progress but here it goes as a placeholder until completed (so use with caution):
You can copy Windows’ boot files to the new ESP from Windows. The steps are:
- Give Pop’s ESP a drive letter (this will be changed after some more work is done)
- Run the
bcdbootcommand
For the first part, you cannot do it using Windows Disk Management, so you will need the command line (as administrator)
diskpart
select disk 0
select partition 5
assign letter=y
exit
Assuming the drive and partitions are 0 and 5 respectively. This needs to adjusted for your case.
Then issue the command:
That’s it. Windows now copied the files to the new ESP. The best part about this method is now Windows doesn’t use the old ESP ever again, so technically you can remove it. (Work in progress as this has so far worked erratically).
Hi all. So you tried Pop OS! 20.04 (https://bln364.com/how-to-try-system-76s-pop-os-on-windows-10-laptop/) and now you want to install Pop OS! alongside Windows 10. This will show you how to dual boot Pop OS! and Windows 10.
Short overview:
- Download Pop!_OS 20.04
- Create Bootable USB stick
- Shrink Windows 10 partition
- Create Pop OS! partition
- Install Pop OS!
- Configure GRUB
And I must add. Please be careful with this process. Formatting the wrong partition can cause you to lose all your data. Please be careful, back up your data and do next steps on your own risk.
If you are maybe not ready to install Linux on you hard drive maybe you can try Linux inside Virtual Machine. If you are interested in something like that please check out my first online Udemy Course Virtualization with VirtualBox.

Also check out my other post on how easy it is to dual boot Ubuntu and Windows 10 in 2022 in next post https://blnlabs.com/dual-boot-ubuntu-and-windows-10-in-2022/
What is Dual Boot?
So, what is Dual boot Pop OS? What is good to know before we start. When we say dual boot we are saying that on our PC and/or laptop there are two Operating Systems installed. It can be Windows and Linux, Linux and Linux, Windows and Mac in some cases, and so on. Basically If you can install an OS on your machine, you can dual boot it with Another OS that can run on your machine.
To get more detailed with this we need to know a bit about the boot process, and how does our PC know to start our OS.
At the beginning PC doesn’t know anything about its hard drives, and the first thing is to perform something that is called Power On Self-Test or POST. Now, the firmware searches somewhere to find the entry point for your OS and that information can be found in Master Boot Record MBR for Legacy Boot or in GUID Partition Table (GPT) for UEFI boot. This is a bit too technical but don’t worry you only need to know that there is info where your OS is stored, and PC but need to have this info in order to boot your PC.
In these two places firmware will find the location of your installed OS and then give control to your OS.
But then how are we dual booting and as always there are a couple of ways (freedom :)).
If you are adding the second drive to your PC for the second OS, you can simply do the next thing. Power of your PC and unplug your first drive and then plug in the second drive and install a second OS on that drive. After install, simply plug back the first drive and you are done. Now, at the boot up of your PC you need to go inside the UEFI or BIOS and just choose the drive to boot from. This is not the optimal way, but if you don’t switch between the OSes frequently, maybe this solution can make your life easier because you don’t have to modify or change MBR or GPT.
The other way is to use GRUB, which is done in this post. Just to say there are a lot of ways to do dual boot, but in this post I will cover just those two. What is GRUB?
“GNU GRUB is a Multiboot boot loader. It was derived from GRUB, the GRand Unified Bootloader, which was originally designed and implemented by Erich Stefan Boleyn. Briefly, a boot loader is the first software program that runs when a computer starts. It is responsible for loading and transferring control to the operating system.” by WiKi.
So we can install GRUB in part of our hard drive and then point MBR or GPT to it. That instead of our OS grub will control, create GUI for us, scan drives for installed OSes and then give us a choice which OS we want to use. Below you can see a couple of GRUB examples that are themed by Linux distros Ubuntu and Manjaro.

The Grub way (or with programs like GRUB) is the only way if you are dual booting on the one hard drive. If you have only a hard drive you will need to install your second OS to separate the partition that your first OS and then install GRUB. In a lot of Linux distributions Grub is installed by default, but for some reason GRUB is not installed with Pop!_OS from the box. So, don’t worry if you don’t see windows after you installed Pop!_OS, maybe you just need to install GRUB in order to Dual boot Pop OS.
Intro to Pop!_OS
Pop!_Os is Linux distribution create and maintained by System76 and it’s based on other Linux distro Ubuntu. It’s very good for beginners because it’s easy to setup and start using it.
Download Pop!_OS 20.04
In order to download Pop!_Os go to system76 site and select download https://pop.system76.com/.

Now, we have couple of options in order to download Pop!_Os. There are two versions for Pop!_Os, normal release and something that is called LTS (Long Term Support). This follows the release cycle of Ubuntu, that is show below.

Basically, there should be new release of OS every 6 months, but every 2 years there is major release that is called LTS and that version will get much longer official support then normal release. Advantage for normal release is, if it’s after roiling release, that it might sooner have support for new hardware and/or some new feature, but because that it can be a bit unstable. If you are downloading Pop!_Os for the first time and trying Linux for the first time, maybe stick with LTS version at first.

When we have LTS selected now we can download Pop!_Os with NVidia or open source drivers. What this means. If you have NVidia graphics card download Pop!_Os LTS (NVIDIA) and this will download OS with NVidia drivers preinstalled. If you have AMD or Inter integrated graphics download Pop!_Os LTS.
Now, we have .ISO file with our OS. We need to create bootable USB or CD/DVD form our .ISO file and for that there is good program called balenaEtcher.
Create Bootable USB stick (Live USB)
In this post I will create bootable USB flash drive (Live USB) using balenaEtcher, but first go to https://www.balena.io/etcher/, download and install balena.

In order to create Live USB with Pop!_Os (on Windows) we need:
- Installed BalenaEtcher (done)
- Downloaded Pop!_OS ISO file (done)
- USB flash drive with at least 8GB
Insert USB stick into your PC and start balenaEtcher. Again, be careful. Back up your data from USB flash drive before this. USB Drive will be formatted for new OS and your current data will be gone.
Select Pop!_Os ISO file in section Flash from file and your USB flash drive at Select Drive section. Then press Flash.

Shrink Windows 10 partition
Now, you have a bootable USB stick, and you need to boot from it. If you have a problem with booting from USB stick check out my blog for solution (https://bln364.com/how-to-try-system-76s-pop-os-on-windows-10-laptop/).
On windows shown above we select do we want to continue with Demo Mode, or do we want to install Pop OS! 20.04 on your hard disk. I’m using for this example 120GB internal SSD disk (Kingston 120GB A400). If we want to install Pop OS! on your hard disk in this case select Custom (Advanced) install and you will get next window.
Currently, we have only Windows 10 installed on our hard disk, so we have only two partitions, Windows Recovery and the main Windows NTFS partition. Next thing to do is to shrink our existing partition and create space for Linux partitions. Two do that we need to press Modify Partitions…
This will open Gparted Linux partition tool that will look something like this. In the top right corner important thing is to set your hard disk. In this example, I have selected /dev/sda.
When we have selected the right hard disk, we need to unmount our partitions. This will allow us to change existing partitions.
Then we need to resize our existing partition. Let us use half a space for Windows and half for Linux.
Create Pop OS! partition
Now, we can create 3 partitions for Pop OS!, and that are root, boot, and swap. We can do that in the next way.
For this blog, I’m installing Pop OS! on a very old HP Compaq nc6400 laptop, so I’m setting the size of my /swap partition to 2GB, and 512MB for /boot. Everything else will be /root partition.
After creating and formatting new 3 partitions, click Apply All Operations and when all is done close Gparted. Now you should see updated hard disk preview with new partitions like on the image below.
Now we need to use Pop OS! installer to define which partition will be allocated for Pop OS!.
Install Pop OS!
Now we can you press Erase and Install and wait for Pop OS! to be installed.


Configure GRUB
And we have Pop OS! installed beside our Windows 10. We can simply reboot and remove USB stick for PC and enjoy in two compliantly different Operating systems.
Now laptop boots directly to Pop OS!. This was very strange for me, because, usually, on other Linux distributions GRUB (Linux boot loader) will be automatically setup when installing and after powering on you will be greeted with something like this:
In this case, GRUB was nowhere to be seen so we can not say that we have Dual boot Pop OS! and Windows 10 system? We went straight to Pop OS!. Windows 10 is still installed but we need to configure GRUB to know where to find Pop OS! and where to find Windows 10.
To update and setup GRUB lets first update the hole system. That can be done with two simple commands from terminal:
sudo apt update
sudo apt upgrade
Now we need to install one packet, os-prober with:
sudo apt install os-prober
We need this packet because without it GRUB will not be able to find Windows 10 partition.
Result from running the os-prober should be something like this:
/dev/sda1:Windows 10:Windows:chain
Finally we can run:
to update and activate GRUB on Pop OS!.
And this is it. Now after powering on you will be greeted with GRUB screen in which you can select Pop OS! or Windows 10.
Final words
This was a fun project for me and it brings life in my old laptop. Pop OS! 20.04 isn’t maybe the best option for low-end hardware, or there are maybe better Linux Distribution for low-end hardware, but said that it runs better than Windows 10.
Process of installing Pop OS! alongside Windows 10 went pretty much smooth, if we don’t count GRUB part, what was very strange for me.
Let finish. Did you find something missing in this tutorial? How do you like Pop OS!? Did you manage to Dual boot Pop OS!? Please comment down below and check out my other post at https://bln364.com/
Check out my other Pop OS 20.04 related posts:


Pop!_OS is one of, if not the best distributions based on Ubuntu to date. It has sparked the interest of the dedicated Linux community and new users alike. Dual-booting has helped with this!One major hesitation of the new Linux user is wiping Windows from their life completely. Luckily this is not a necessity. In this guide, we will go over step-by-step instructions on how to install Pop!_OS alongside windows and update the boot loader.
Getting Ready
First we will need to gather some resources. These instructions are assuming you’re doing this from a Windows machine. We will start by downloading Pop!_OS and installing a USB flashing tool.
1. Download Pop!_OS
Pop!_OS by System76
Imagine an OS for the software developer, maker and computer science professional who uses their computer as a tool to discover and create. Welcome to Pop!_OS.
When you download Pop!_OS make sure you download the right version. You can check your system to see if you need the version pre-loaded with the proper NIVIDA drivers. You can check by going into Device Manager and looking under ‘Display adapters’.
2. Download and Install Etcher
Download and Install the balenaEtcher tool. We will use this to flash the Pop!_OS ISO image to the USB to ensure that it is bootable.
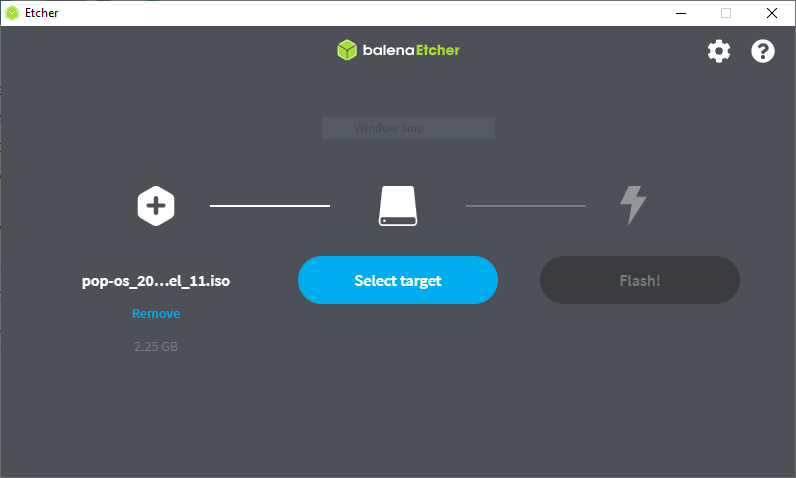
Once Etcher is installed, select the ISO file from the directory that you downloaded it. Insert a blank USB with at least 4gb of free space. Click on ‘Select target’ and pick the USB drive you’d like to use to install Pop!_OS.
Once everything is selected click on ‘Flash!’ and it will begin to burn the image onto the USB. Once it is done it will validate and give the finished prompt.
3. Free Up Some Space
This can be done though the live disk image, but doing this on the Windows side will prevent some issues from arising later.
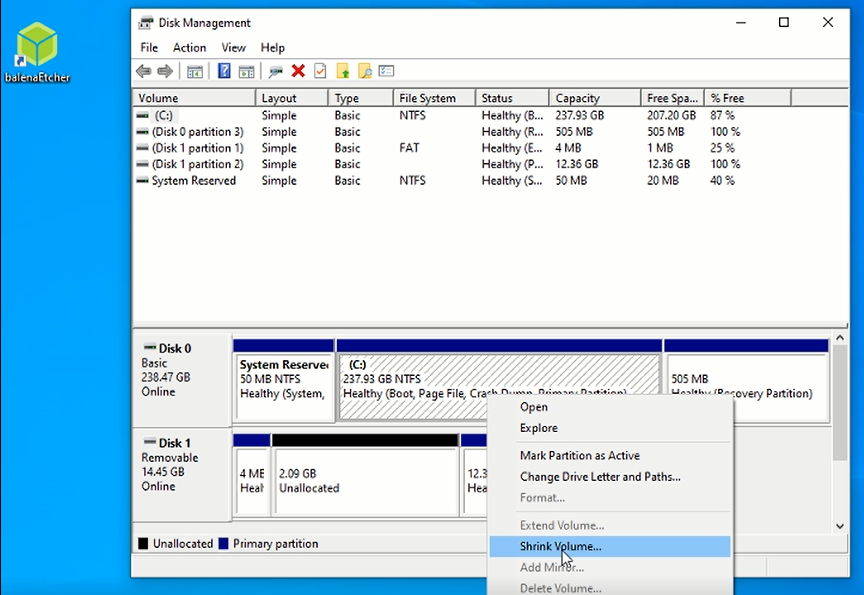
- Open the ‘Disk management’ tool
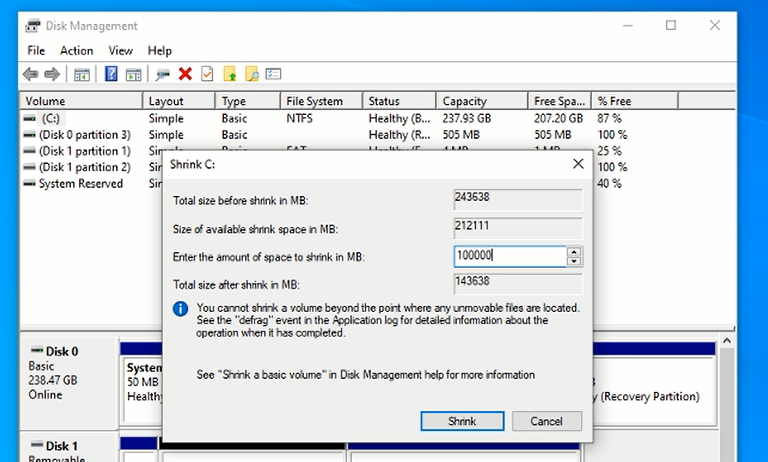
- Right click on your main boot partition that holds your Windows 10 operating system. Click on ‘Shrink Volume’
- Here is where you will select the amount of free space to make available for the new Pop!_OS installation. Make sure you leave enough space for Windows depending on the work you need to do within the operating system.
- Click on ‘Shrink’ and you’ll see the the new Unallocated space. This is where we will be installing the new Linux distro.
👉
Important: Ensure everything in your system that is important is completely backed by before performing any system changes.
Once you have everything backed up and all of your active programs are shut down run the command in the Windows terminal below. This will ensure your entire system is not in hibernation and ensures the system completely shuts down.
shutdown /s /f /t 0
All the prep work is done! Lets install Pop!_OS
Installing Pop!_OS
Now we get to the fun part. Lets boot into the live disk image we burnt on the the USB drive. See some tips below if you run into any issues booting.
- Enable Legacy Boot Sources. If you are installing on an older computer using BIOS, selecting the option under Legacy Boot Sources or Legacy USB will let you start Windows setup from a USB or CD drive.
- Disable Secure Boot. Security technologies included in UEFI such as Secure Boot can be a blocker and prevent the system from booting external storage sources. Disabling Secure Boot, temporarily—normally accessible under the security menu or tab—will often resolve this.
1. Boot to the USB
Enter your systems screen to boot to a temporary device. When you turn on your computer there will be an option to either enter BIOS or select a start-up device. Depending on your system this may be different. Checkout this article from Lifewire if you’re having issues finding the temp boot menu.
Select your USB HDD or Removable devices from the boot menu and it should boot into Pop!_OS.
2. Install Pop!_OS
Once you successfully boot to the new Pop!_OS USB you’ve created, run through the setup process selecting your language and keyboard layouts. When you arrive at the option for a clean or custom install, select custom.
From the custom installation menu, you should be able to see a preview of the partitions on the system, including the space you freed up. This will be called “unused” space. Click on ‘Modify Partitions…’ near the bottom.
A GParted window will open. Right click on the unallocated space and select ‘New’.
Now a window will come up allowing you to format the partition to the Linux file system. Ensure the the free space remaining is set to 0 and the file system will be formatted as ext4. Click Add.
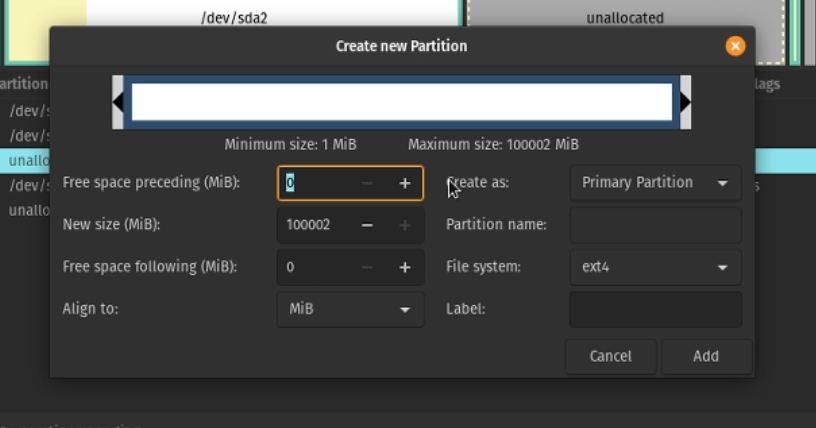
Now click the green check and click apply. Once the operation is done you can close out GParted.
Click on the new partition and make sure ‘Use partition’ is selected. Select it to format and ensure it is being used as the ‘Root (/)’ with the ext4 file system.
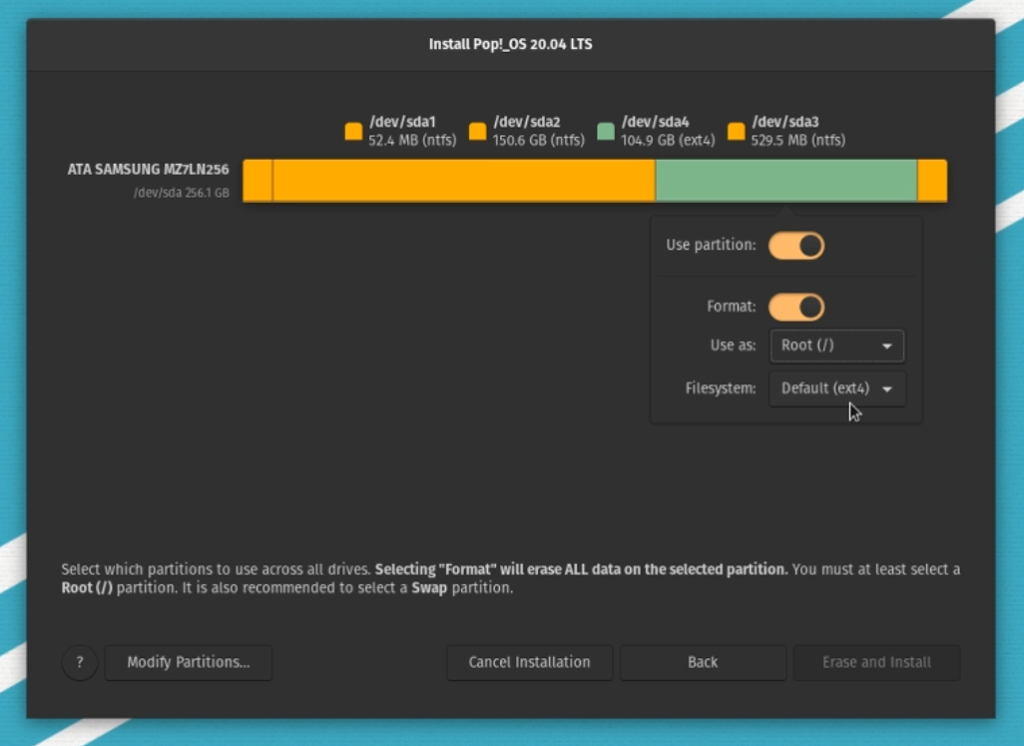
Now click on ‘Erase and Install’. Pop!_OS will install on your system alongside Windows. Once it is done restart your computer.
Important! Windows uses it’s /boot partition as a part of its update process. Your boot partitions available space may eventually be filled with Linux Kernels, this will prevent Windows from updating correctly. To fix this occasionally run the following commands after rebooting Linux, this will clean out older Kernels, freeing up space. sudo apt autoremove sudo apt auto clean
Updating GRUB
You may have noticed your system booted directly into the Linux partition without the Windows 10 option. Now we will update our system and help GRUB recognize the Windows partition.
1. Update Your System
Open a terminal and run the following commands:
sudo apt update sudo apt upgrade
2. Installing OS-Prober
Now we will install a tool to help Pop!_OS recognize the Windows partition.
Run the following commands:
sudo apt install os-prober sudo os-prober
You should see something similar to /dev/sda#:Windows 10:Windows;chain
Run this command so GRUB can update with the new partition data:
sudo update-grub
Dual Boot Complete!
Now when you restart your computer you will be greeted with the GRUB boot loader on start-up. You will be able to select the partition to boot into. By default it will be set to Pop!_OS so you will have a few seconds to select Windows before it automatically boots into Pop!_OS.
I would like to install pop!_os (basically a reskin of Ubuntu with some convenience features added) alongside windows 10. So far, I have installed windows 10, using about half the space on my ssd and leaving the rest unallocated, to be used by pop!_os.
If I remember correctly, the installation dialog of Ubuntu had some preconfigured option «install ubuntu alongside windows». Unfortunately, the pop!_os installation doesn’t offer this. They do have an official guide on how to properly format partitions for installation: https://pop.system76.com/docs/dual-booting-windows/
The guide says to:
- shrink the existing partition to make room for pop!_os (done)
- create a small 512mb partition for EFI, a big one for / and one at the end of the unused space, for swap.
- tell the installer how they should be used and continue with the installation
At this point I’m confused. My partitions look like this:

The OEM Partition is not mentioned in the guide, but the guide does say that EFI should be at the beginning of the drive. Should I remove the OEM partition?
Also, according to the pop!_os guide, EFI should be 512mb. Here it is just 100mb.
How should I proceed with the installation?
I was about to just allocate the unused space for root and swap and tell pop!_os to use the existing EFI as EFI. But to avoid losing the time invested in setting up windows, I thought I would ask here first.
UPDATE:
I tried to proceed with the installation by creating root and swap in the unused space and telling the installer to use the existing EFI as EFI. Unfortunately it complains that the partition is not big enough:

At this point it seems as if I have to resize the EFI partition, is that correct? I seem to remember reading somewhere that it should also be possible to just create a second EFI and use the startup boot menu to select the one you want to boot from.
Also, I read online that EFI needs to be extended at its back, which means shrinking the following partition. This shouldn’t be a problem in my case, since the Windows installation is followed by unused space. Should I just move the windows partition backwards and try to extend EFI?
I would like to install pop!_os (basically a reskin of Ubuntu with some convenience features added) alongside windows 10. So far, I have installed windows 10, using about half the space on my ssd and leaving the rest unallocated, to be used by pop!_os.
If I remember correctly, the installation dialog of Ubuntu had some preconfigured option «install ubuntu alongside windows». Unfortunately, the pop!_os installation doesn’t offer this. They do have an official guide on how to properly format partitions for installation: https://pop.system76.com/docs/dual-booting-windows/
The guide says to:
- shrink the existing partition to make room for pop!_os (done)
- create a small 512mb partition for EFI, a big one for / and one at the end of the unused space, for swap.
- tell the installer how they should be used and continue with the installation
At this point I’m confused. My partitions look like this:
The OEM Partition is not mentioned in the guide, but the guide does say that EFI should be at the beginning of the drive. Should I remove the OEM partition?
Also, according to the pop!_os guide, EFI should be 512mb. Here it is just 100mb.
How should I proceed with the installation?
I was about to just allocate the unused space for root and swap and tell pop!_os to use the existing EFI as EFI. But to avoid losing the time invested in setting up windows, I thought I would ask here first.
UPDATE:
I tried to proceed with the installation by creating root and swap in the unused space and telling the installer to use the existing EFI as EFI. Unfortunately it complains that the partition is not big enough:
At this point it seems as if I have to resize the EFI partition, is that correct? I seem to remember reading somewhere that it should also be possible to just create a second EFI and use the startup boot menu to select the one you want to boot from.
Also, I read online that EFI needs to be extended at its back, which means shrinking the following partition. This shouldn’t be a problem in my case, since the Windows installation is followed by unused space. Should I just move the windows partition backwards and try to extend EFI?
STEP 1: BOOTABLE USB
First make a bootable pendrive of appropriate intel or nvidia ISO from popOS official website using balena etcher .
STEP 2: DISK PARTITIONING
Make a 1GB fat32 partition and ext4 partition, you can also create different /root and /home (ext4) partitions if you want but I usually don’t use it. You can also create a swap partition if you have 4-8 Gb ram. After the above steps leave the amount of space you want for windows drive.
STEP 3: INSTALLATION
Then install it by the popOS installer by selecting fat32 as /boot/efi. and other drives as you wished them to make it.
STEP 4: POST INSTALLATION STEPS
After installing popOS do a full update by entering —
sudo apt update
in the terminal.
After updating upgrade it by using the command —
sudo apt upgrade -y
in the terminal. Then download balena etcher again for linux x64 appimage version. Then just go to downloads and unzip the file and then run appimage just by double clicking it. and then select the windows 10 ISO and then select your USB .
STEP 5: WINDOWS INSTALLATION
Press the key assigned for your motherboard company to get into bios and then prioritize the USB to the top. After that save the settings. Now your computer should bootup again. then just go to standard windows installation and select the empty disk which we didnot touch in STEP 2 . And then select next. After the installation your PC should boot into Pop!_OS.
STEP 6: POST WINDOWS INSTALLATION
Once you get into Pop!_OS. and type the command —
sudo os-prober.
It should display a single line showing something regarding windows 10 installation /dev/sda1 (or the partition where you installed the pop!_OS as /boot/efi.
If you get all the steps as shown above. Then just open the terminal and type —
sudo nano /boot/efi/loader/loader.conf
and Enter timeout 5 below the default Pop_OS-current as shown in the image.

Press ctrl+o and then press enter . And then press ctrl+x to exit.
STEP 7: ENJOY
Now just restart your PC and you’ll see windows boot manager as a option. Select it to boot into windows 10 or select the first option there to boot into popOS.
Pop!_OS это дистрибутив Linux, созданный System76 и основанный на Ubuntu. Поскольку System76 продает Linux-первые ноутбуки и настольные компьютеры, их дистрибутив Linux, даже несмотря на то, что он основан на Ubuntu, обеспечивает поддержку новейшего оборудования (только если более новое ядро Linux не создает конфликт для поддерживаемого в настоящее время оборудования).
Из всех новых дистрибутивов Linux пользовательская база Pop!_OS просто «выскочила» из ниоткуда. Учитывая, что это относительно новый дистрибутив среди множества других «хорошо зарекомендовавших себя дистрибутивов», таких как Ubuntu, Manjaro, Mint и т. д.; это большое достижение!
Это не статья с мнением о том, почему вы должны использовать Pop OS поверх Ubuntu, а руководство для вас, чтобы начать работу с Linux на вашем ПК, установив на нем Pop!_OS.
Выбор способа установки Pop OS
Существует несколько способов установки Pop!_OS (и всех других дистрибутивов Linux) на ваш компьютер.
- Установите Pop!_OS как виртуальную машину с помощью VirtualBox на вашем ПК не влияя на ваш текущий Windows устанавливать.
- Установите Pop!_OS рядом с Windows; АКА двойной загрузки (несмотря на то, что связанное руководство предназначено для Ubuntu, оно должно работать и для Pop!_OS; обязательно отключите «Безопасную загрузку»).
- Замените Windows 10/11 с Pop!_OS.
Я настоятельно рекомендую вам попробуйте Pop!_OS в VirtualBox перед установкой на свой компьютер, особенно если вы новичок в Linux.
В этом руководстве рассматривается установка Pop!_OS с заменой Windows, а ниже приведены требования к оборудованию для Pop!_OS.
- USB-накопитель емкостью 4 ГБ для создания Live USB-накопителя.
- Любой 64-разрядный процессор x86 (любой 64-разрядный процессор Intel или AMD)
- Рекомендуется не менее 4 ГБ оперативной памяти
- Минимум 20 ГБ памяти (для хранения ОС)
ПРЕДУПРЕЖДЕНИЕ. В этом руководстве предполагается, что вы хотите заменить Windows на вашем ПК с дистрибутивом Linux по вашему выбору (в данном случае Pop!_OS), и это приводит к очистке вашего диска. Прежде чем продолжить, убедитесь, что вы сделали резервную копию всех важных данных.

Как и Ubuntu, Pop!_OS поставляется в двух вариантах. Все выпуски LTS поддерживаются в течение 5 лет с даты выпуска. Canonical выпускает LTS-версию Ubuntu в апреле каждого четного года.
Новая версия Non-LTS выпускается каждые 6 месяцев (в апреле и сентябре каждого года), и эта конкретная версия поддерживается только в течение 9 месяцев с даты выпуска.
На момент написания этой статьи Pop!_OS доступна в двух (технически четырех, но об этом позже) версиях. Текущая версия LTS — «Pop!_OS 20.04 LTS» и «Pop!_OS 21.04». И достаточно скоро будет выпущена версия 21.10.
Поскольку у Nvidia нет драйверов с открытым исходным кодом, установка драйверов графического процессора Nvidia может привести к проблемам с установкой Linux, если она не будет выполнена правильно. Поэтому System76 предлагает два варианта для каждой версии Pop!_OS.
Pop!_OS 20.04 LTS есть доступен в двух вариантах (подробнее в следующем разделе).
- Для пользователей с графическим процессором Nvidia на компьютере
- Для пользователей с AMD (и/или Intel для iGPU и для предстоящий dGPU) пользователи.
Если вы не уверены, проверьте видеокарту в вашей системе и выберите подходящую версию при загрузке.
Установка Pop!_OS
В этом руководстве я буду использовать версию Pop!_OS 20.04 LTS не от Nvidia (но шаги установки будут одинаковыми для всех вариантов одной и той же версии).
Шаг 1: Создайте живой USB
Посетите веб-сайт System76, чтобы загрузить копию Pop!_OS.
Скачать Поп!_OS

Выберите «Pop!_OS 20.04 LTS» (#1), а затем щелкните либо обычный ISO-образ (#2), либо ISO-образ, специфичный для Nvidia (#3), чтобы начать его загрузку.
После того, как вы загрузили копию ISO, которая подходит для вашего варианта использования и машины, следующим шагом будет создание живого установщика для Pop!_OS. Живой установщик — это полная копия ОС, с которой вы можете поработать, прежде чем вы почувствуете, что ОС вам нравится, а также совместима с вашим оборудованием.
Иногда выбранный вами дистрибутив может не иметь хорошей поддержки проприетарных компонентов, таких как WiFi, GPU и т. д., включенных в ваш ноутбук/рабочий стол. Настало время проверить совместимость вашего оборудования.
ПРИМЕЧАНИЕ. На этом этапе все данные, хранящиеся на USB-накопителе, будут удалены. Убедитесь, что на флэш-накопителе нет ничего важного.
У вас есть доступ к многочисленным инструментам для создания живого USB-накопителя. Некоторые из них:
- BalenaEtcher (доступно на Mac, Windows и Linux)
- UNetbootin (доступно на Mac, Windows и Linux)
- Руфус (доступно только на Windows)
- Вентой (доступен на Windows и Linux)
On Windows, вы можете использовать Rufus для создать живой USB из Windows. Вы также можете использовать Etcher для Windows, Linux и macOS. Это очень просто. Просто запустите приложение, просмотрите загруженный ISO-образ и нажмите кнопку вспышки.

Шаг 2: Загрузка с живого USB-накопителя Pop OS
После того, как вы создали живой USB, вам нужно сказать нашему компьютеру, чтобы он загружался с USB-накопителя, а не с диска, на котором Windows установлен.
Для этого перезагрузите компьютер. И как только вы увидите логотип поставщика вашего компьютера (HP, Dell, Asus, Gigabyte, ASRock и т. д.), нажмите либо клавишу F2, либо F10, либо F12, либо клавишу Delete, чтобы войти в BIOS/UEFI вашего компьютера. Эта клавиша зависит от поставщика вашего компьютера, для большинства настольных компьютеров это обычно клавиша Delete, а для большинства ноутбуков — клавиша F2. Если вы все еще сомневаетесь, быстрый веб-поиск подскажет вам, какую клавишу нажать для вашей системы.

На современных компьютерах с UEFI даже не нужно заходить в UEFI. Вы можете напрямую нажать определенную клавишу, например F12 (у моего поставщика компьютеров есть F12), и вы увидите меню загрузки. Оттуда напрямую выберите USB-накопитель.

Для людей, у которых более старая версия BIOS/UEFI, перейдите в раздел, где написано «Загрузка» (обратите внимание, шаги будут различаться от поставщика к поставщику), и выберите свой USB-накопитель вместо твердотельного/жесткого диска. И перезагрузиться.

Теперь ваш компьютер должен загрузиться с только что созданного USB-накопителя.
Шаг 4: Начните установку Pop!_OS
Теперь вы должны быть в живой среде Pop!_OS. На экране вашего компьютера вы увидите установщика, запрашивающего у вас детали настройки, такие как предпочитаемый язык, страна и раскладка клавиатуры.

После выбора языка, страны и раскладки клавиатуры вы увидите этот экран. Технически у вас есть 3 варианта.

- Чистая установка (#1): Этот вариант сотрет весь диск и установит на него Pop!_OS.
- Custom (Advanced) (#2): этот параметр позволит вам указать такие вещи, как корневой раздел, если вам нужен другой домашний раздел, использовать другую файловую систему для вашего корневого раздела, изменить размер разделов, использовать раздел подкачки другого размера и т. д.
- Попробуйте демо-режим (#3): параметр в левом нижнем углу установщика, который позволяет вам протестировать Pop!_OS, как если бы она была действительно установлена на вашем компьютере, не касаясь содержимого вашего диска.
В рамках данного руководства выберите «Чистая установка».
Затем укажите диск, на который вы хотите установить Pop!_OS. Если на вашем компьютере несколько дисков, вы увидите, что каждый диск помечен вместе с его размером, поэтому вы можете быть уверены, что выбранный вами диск является тем, на который вы решили установить Pop!_OS.

Вам будет предложено указать ваше имя и имя пользователя для вашего пользователя. Ваше имя пользователя будет именем вашей домашней папки.

Далее установите пароль для вашего пользователя.

Последний шаг включает в себя настройку Drive Encryption. Если кто-то имеет физический доступ к вашему компьютеру, ваши данные на диске могут быть доступны с помощью действующей операционной системы (например, созданного вами живого USB-накопителя).
Шифрование диска предотвращает это. Однако вы никогда не должны забывать пароль, иначе вы больше никогда не сможете использовать диск.
Вам решать, хотите ли вы зашифровать диск.

Установщик предложит вам три варианта шифрования.
- Не шифровать (#1): Не шифрует ваш диск. Не рекомендуется для пользователей, заботящихся о безопасности
- Использовать пароль пользователя для шифрования диска (№ 2): Это укажет установщику использовать один и тот же пароль для вашего пользователя и для шифрования диска. Если вы используете эту опцию, убедитесь, что у вашего пользователя надежный пароль.
- Установить пароль (#3): Используйте другой пароль для шифрования диска.
Что бы вы ни выбрали, установка должна начаться сейчас. Ниже приведен скриншот, показывающий экран установщика.

На всякий случай, если вы обнаружите какие-либо ошибки на этом этапе, нажмите кнопку, расположенную в правом нижнем углу установщика, с «$_» (обозначенной как «Журнал» на скриншоте выше). Это журнал установки. Публикация нескольких строк из нижней части этого журнала должна помочь другим из наш форум сообщества или любые другие форумы помогут вам диагностировать проблему, вызывающую ошибки установки.
Подождите несколько минут, пока установщик завершит установку, и он предоставит вам два варианта: перезагрузка или завершение работы. Выключите компьютер и извлеките USB-накопитель.
Поздравляем! Вы только что установили Pop!_OS на свой компьютер! Дайте мне знать, если у вас возникнут какие-либо проблемы.
Оригинал статьи
If you are currently coding or used to code or just interested in computers, there’s a very high chance that you thought to yourself, «I should also try Linux.» but then it hit you that things might go wrong, and you were worried that you might somehow break your system. This tutorial will also show how to fix something if you somehow break some software (meager chances).
There are many Distributions (flavors) when it comes to Linux. Some are very hard to install (Vanilla Arch, Gentoo). Some are very beginner-friendly (Ubuntu, Pop OS!, Elementary OS).
Pop OS! is the most beginner-friendly distribution I have found yet. It will have all the drivers, including Nvidia’s drivers. So all you need to do is follow the following guide, and everything would be working fine.
There are many guides and videos over the internet, but somehow, they all miss some crucial steps. You can find the solution if you search a little. But as a beginner, it can be very overwhelming. That’s why I decided to write this very comprehensive guide.
So here’s the guide. I suggest you read steps 4 and 5 multiple times and keep them open while installing if you are a newbie/beginner.
Some of the guides I found showed a way to install windows on the side, i.e., pop OS was already installed on the system. But that’s not very user-friendly. Windows is not flexible and has to manage partitions and its bootloader on its own terms. As this is a beginner’s guide, we will assume that you have only windows installed on your system as it came out of the box.
I also assume that your system runs on UEFI boot mode. If you don’t know what that is and have bought your laptop in the last ten years, there’s a 99.9999% chance that you do run UEFI
So here are the steps you need to go through:
- Manage partitions.
- Create a bootable USB.
- Add bios settings to show bootable USB first.
- Boot up the flash drive and setting up the installer.
- Set up the bootloader.
- Enjoy.
1. Managing partitions:
Some basic things.
- Linux will need a root partition and a boot partition.
- The root partition must have at least 10 GB and stores the operating system, and the boot partition should be given 500 MB.
- There are two extra optional partitions. The Home partition and the swap partition.
- The home partition is where your extra files can be stored.
- The swap partition is the slower version of ram. It keeps the passive background processes running without loading them on the ram, but on the storage drive—Suggested:4 to 8 GB, OPTIONAL.
- Here are some optional but essential suggestions. Keep your Root, Boot, and Swap partitions on an SSD if you have one. Otherwise, everything can be done on a Hard Disk.
-
Boot is boot/efi. EFI requires FAT32 type viz known as ESP(EFI system partition) which tells the ram which OS to load.
Now the steps.
-
Search for «create and format hard disk partitions» in the windows search bar.

-
You will see your drives(C, D, E…) and some extra partitions.
Do NOT touch the extra partitions. -
shrinking image


Now there are two ways to go about this:
A. If you have SSD+HDD setup
-
Here’s what you do, Right-click on the SSD drive(C:) and shrink it. Set the shrinking space to be anything from 20 GB (Root And Boot) to as much as possible. If you have extra storage, shrink an additional 2 to 8 GB for the swap partition. The rest of it will be kept for your C drive. Make sure you do not shrink the C drive too much, or your windows will start to lag.
-
(Optional but suggested) Shrink the HDD drive and give it whatever storage you like. (Home)
-
My scheme- I gave 50 GB from C drive and 50 GB from HDD. I have 256GB SSD and 1 TB HDD.
B. If you only have SSD or HDD:
- Shink the combined storage (Boot, Root, Home, Swap)
Now you will have some unallocated space; leave it that way. We will set this up in step 4.
2. Creating a bootable device:
Some things to understand:
- Flash drives(or pen drives) must be flashed with proper file formats. (iso, img…)
- This can be done using multiple softwares. (rufus, balenaEtcher, Ventoy)
- Usually, only one iso can be flashed at once. (windows, pop, or any but only 1)
- Not everyone has multiple flash drives lying around. So we take care of this issue using Ventoy.
Download links
-
Ventoy
-
Pop OS! 21.04 iso without nvidea drivers
-
Pop OS! 21.04 iso with Nvidia drivers
-
Windows Tool. Make sure you do select the iso option and not the write to USB, or it will remove pop and ventoy from it. Optional. In case you ever want to remove everything and clean install windows. comes in handy
Side Note: Use latest isos if available using Pop OS
Steps:
-
Extract the zip of ventoy, run Ventoy2Disk.exe, select your drive and click Install.
Running this step will erase all data from your flash drive.
-
After completing the above step successfully, you will see your drive names as Ventoy. Transfer the isos to it.


As you can see, there are multiple isos on my drive, but you only need to transfer the pop os iso.
3. bios settings
This step will take some research of your own. You will have to find out what key is required to go into bios settings. Each brand has its own. Just google «{laptop model} UEFI settings». Don’t worry if you can’t find it; leave a comment below, and I will reply with the key.
Assuming that the key is F12
- Turn off fast startup.
To disable Fast Startup, press the Windows Key + R to bring up the Run dialog, type powercfg.cpl, and hit Enter. The Power Options window should appear. Click «Choose what the power buttons do» from the column on the left.

Scroll down to «Shutdown settings» and uncheck the box for «Turn on fast startup.»
Note: If these options are greyed out, then you may need to click «Change settings that are currently unavailable.»
- Shut down and start your machine. When it is starting, spam F12(your key).
- You should now enter UEFI settings.
- Find safe boot option and disable it.
- Find boot menu settings and put your flash drive above windows boot manager.
- Save settings and restart.
- Ventoy should boot now. Select Pop OS!…iso
4. Setting up the installer

This is the screen you will be greeted with. It might take a lil for the first time, do not worry.
After selecting Language and keyboard, you will be given two options:
-
Clean install. This is for those who do not want windows. It will format your storage drive and install it without choosing any partitions.
-
For dual-booting, you need to select the 2nd (advanced) option.

After selecting this, you will see your different drives with your windows partitions and the unallocated space.
As I am using VMware, you will only see unallocated space, but you only have to use the unallocated space and not touch the windows partitions. So just do what I am doing with your drives.

Select the modify partitions option on the bottom left of the installer.
Now GParted will open. If you have multiple drives(HDD+SSD), you can select them from the drop-down list.

In GParted, you will see multiple partitions. Don’t worry about them; just let them be.
-Right-click on the unallocated space and select new.

Use the slider and select the space for your partition.
- I am giving ~20 GB to root. label it as /. [Ext4]
- 1 GB for boot (ESP) and label it as boot/efi. [Fat32] select file-system as fat32 instead of Ext4
- 4 GB for the swap partition. [linux-swap]. Make sure you select file-system as Linux swap
- rest for /home. [Ext4]

Use the green tick to confirm changes.
Some points to note.
- In this image, there are no other partitions, but if you are dual booting, there will be other windows partitions as well. Make sure you do NOT confuse them for the ones you created. Use labels.
- There is only one drive used in this screenshot as it is VMware. Your scheme can have multiple drives. Make sure you keep your Root, Swap, and Boot on SSD and Home on HDD if you have multiple drives.
- The above sizes are just for example. You can change them however as you like. They don’t need to be proportionate. Just keep your root>20 GB and boot>500MB. Rest 2 can also be 0.
I add my own partitioning system for better clarification in the below images.

See the last 3 partitions in my SSD in the above image.


- First Drive(HDD) —> Green(50 gb) is home(ext4)
- Last drive(SSD)—>Green (57 gb) is root(ext4), Red(8 gb) is swap(linux-swap) and yellow is ESP(fat32)
- Click on different partitions. and select the partitions as above images. Again, sizes can be different and you can skip swap and home. Ignore the rest of the windows partitions.
- Click on erase and install.
- Set username and password.
- Install.
- Re-boot after installing. Remove flash drive only after installation is complete.
Setting Up Boot-Loader
After rebooting, did it just boot into Pop OS! without asking about which OS to boot? This is because Pop OS! uses systemd bootloader. It has 0 seconds time out, so it does not ask for any OS options and chooses the default OS (Pop-OS).
Now, we can edit the configuration file of the systemd bootloader and change the time out to 10 sec or 20 sec but we are not going to as it is not for beginners.
EDIT: after consulting with some good folks at r/pop_os, it is to be noted that grub might not be the best choice as it can break in the future updates, instead we’ll use rEFInd.
- Open up Terminal.
- Type the following command
sudo apt update
sudo apt install -y refind
- Select yes and hit enter when it asks for it to be added automatically to esp. If yes or no is not highlighted, please use the tab key to select.
- Wait for an error-free installation.
for an advanced guide of multibooting, please refer to Linux Multi-boot
with refind
DO NOT INSTALL GRUB IF YOU HAVE INSTALLED rEFInd
Very Important: Do not skip any step or reboot in between. DO NOT DO ANY OF THIS IF YOU HAVE DONE THE FOUR STEPS(rEFInd) ABOVE. THIS IS FOR ADVANCED USERS WHO WANT TO USE GRUB KNOWING THAT IT MIGHT BREAK.
Same thing, more details
- Open terminal.
- Type
sudo apt update && sudo apt upgrade -y - Enter your password. It will not show anything typed, but it will work if you type the correct password and hit enter.
- Type
sudo apt install grub-efi grub2-common grub-customizer - Type
sudo grub-install - Make sure it says no errors.
- Type
sudo cp /boot/grub/x86_64-efi/grub.efi /boot/efi/EFI/pop/grubx64.efi - Open grub-customizer (it will be available in the app drawer ), go to file (top bar), and select change environment.
- In the OUTPUT_FILE, change value to
/boot/efi/EFI/pop/grub.cfg - Save this.
- Open a terminal again and type
sudo update-grub
You are all done now.
When you reboot now, you will be given the option to choose the OS you want to boot.
Thank you for reading.
Special thanks to wisdomy folks at r/pop_os and Rishabh Nayaran from the pop_OS telegram group.
If you have any doubts or suggestions or any discussion, don’t hesitate to comment.
Дистрибутив Pop OS разрабатывается компанией System76. Это известный производитель ноутбуков, который выпускает свои устройства с предустановленной системой Linux. Система основана на Ubuntu и в качестве окружения по умолчанию использует Gnome и спроектирована так, чтобы на рабочем столе было минимум лишних вещей.
Одна из самых ярких возможностей Pop OS, которая будет многим полезна — это автоматический тайлинг окон. Очень удобно, если вы привыкли пользоваться тайлинговым оконным менеджером. Кроме того, у дистрибутива своя очень красивая тема оформления интерфейса. В этой статье мы рассмотрим как установить Pop OS на ваш компьютер.
Подготовка к установке
Минимальные системные требования Pop OS совсем небольшие. Это два гигабайта оперативной памяти, 16 гигабайт места на диске и процессор с поддержкой 64 битной архитектуры. В наше время таким требованиям удовлетворяют даже ноутбуки десятилетней давности. Рекомендуют же разработчики использовать для этой системы компьютер в 4 Гб оперативной памяти.
Шаг 1. Загрузка образа
Для загрузки образа надо перейти на официальный сайт дистрибутива. Там есть две версии образов, для видеокарт Nvidia и для всех остальных, выберите нужную вам версию и скачайте образ:
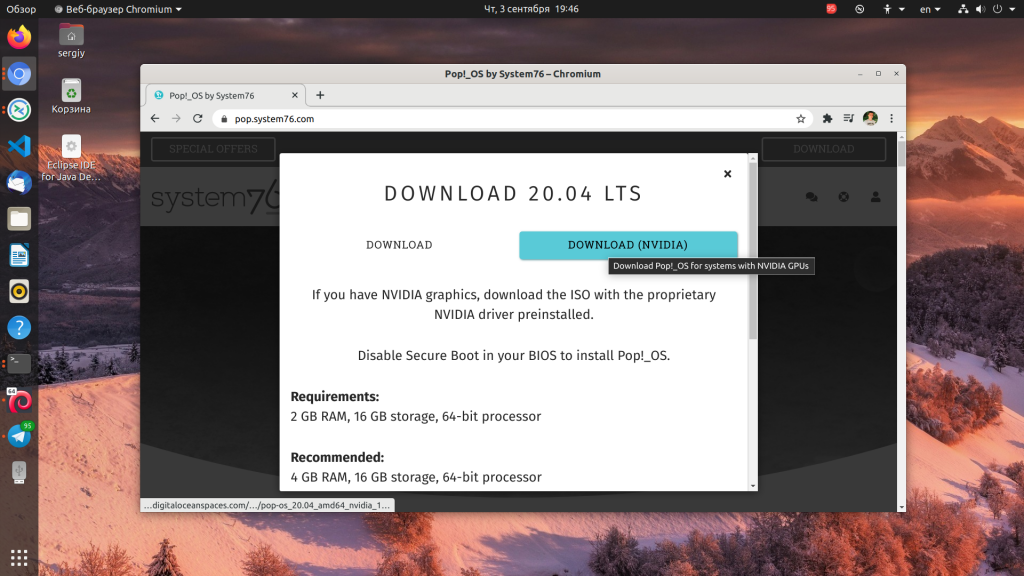
Шаг 2. Запись на носитель
Теперь необходимо записать полученный образ на носитель. Для этого в Linux можно использовать Etcher, а в Windows есть утилита Rufus. Всё это подробно описано в этой статье, поэтому не будем здесь на этом останавливаться.
Шаг 3. Настройка BIOS
Дальше надо войти в интерфейс настройки BIOS с помощью сочетания клавиш Del, F2, Shift+F2 или других, а затем найти там раздел или вкладку Boot. Всё очень сильно зависит от версии BIOS вашего устройства и производителя. В современных платах от MSI, например, раздел Boot стоит искать в разделе Settings. Здесь надо найти пункт Boot option #1 и выбрать там вашу флешку:
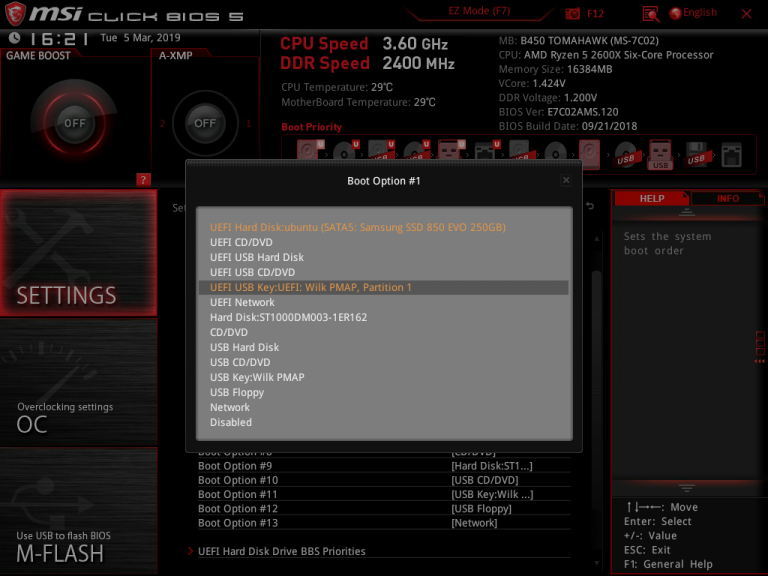
В более старых версиях BIOS надо искать не раздел, а вкладку Boot, на которой есть либо пункт 1st boot device либо список Boot device priority, здесь тоже надо выставить вашу флешку на первое место, сохранить настройки и перезагрузиться.
Шаг 4. Выбор языка
Сразу же после выхода из интерфейса BIOS компьютер перезагрузится и начнётся запуск Pop OS. После запуска системы автоматически откроется установщик, в котором надо выбрать язык будущей системы.
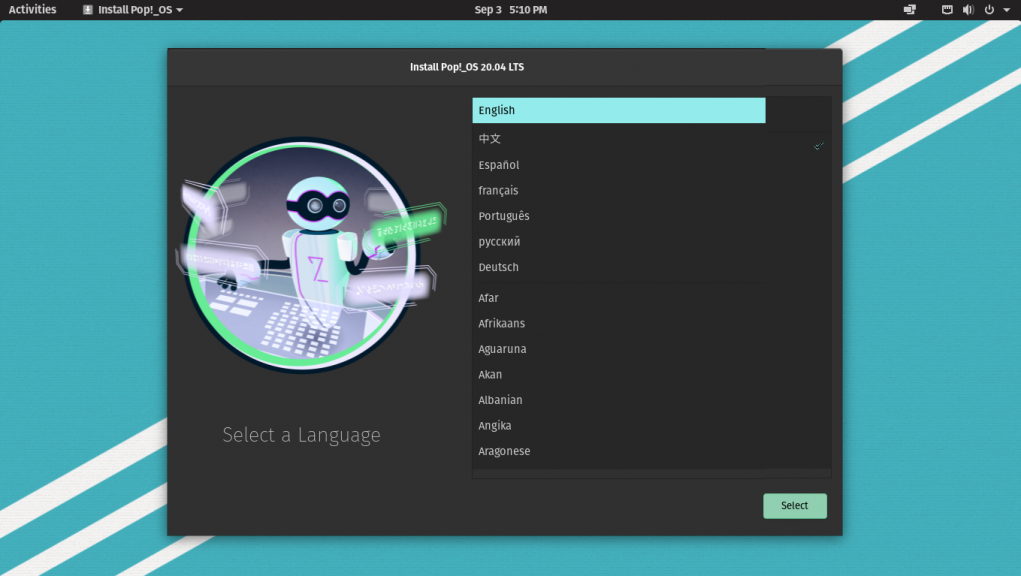
Затем выберите вариант языка:

Шаг 5. Выбор раскладки
Дальше система просит выбрать раскладку клавиатуры по умолчанию. Рекомендую выбрать английскую, так как эта настройка распространяется на процесс установки, и если во время разметки дисков вам надо будет что-то написать на английском, вас будет ждать сюрприз.
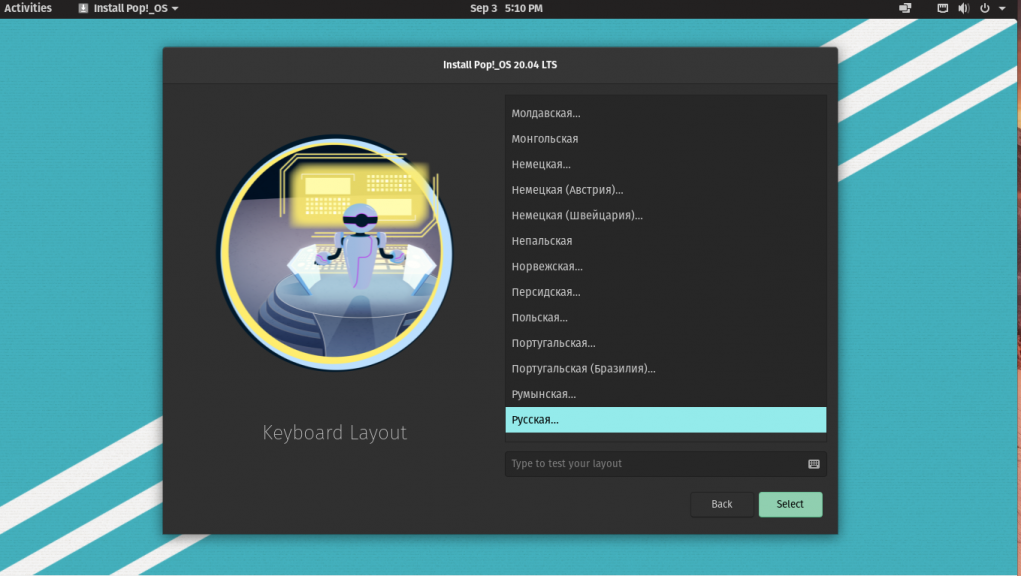
Если же вы всё таки выбрали русскую раскладку, то поменять её обратно на английскую можно выполнив в терминале команду:
setxkbmap us
Шаг 6. Способ разметки дисков
Утилита может автоматически разметить жёсткий диск или вы можете разметить всё вручную. В этой статье мы рассмотрим ручной вариант, поэтому выберите Custom (Advanced) и нажмите Next:
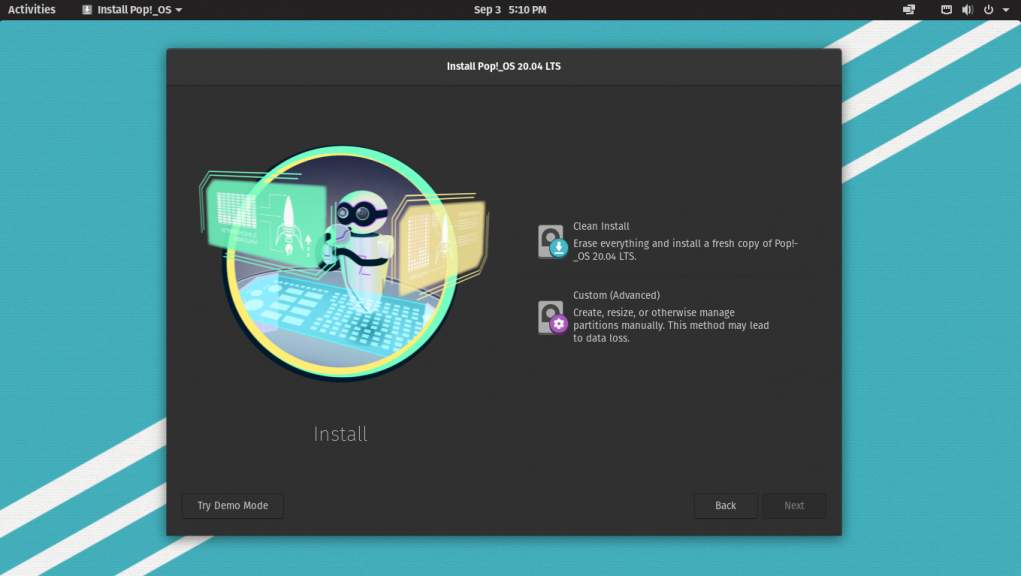
Далее нажмите Modify partitions внизу окна чтобы создать разделы для установки системы:
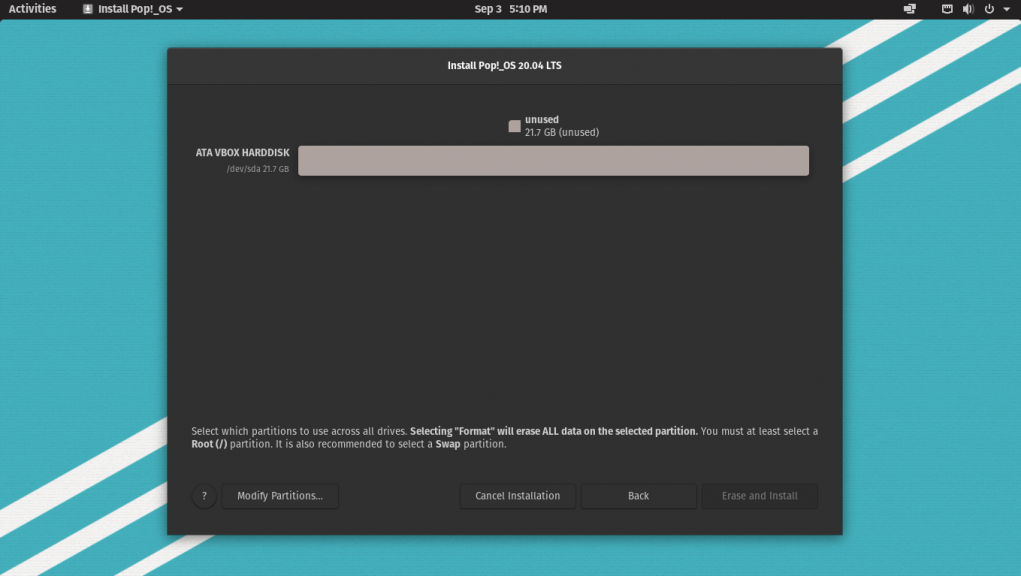
Перед вами откроется окно программы Gparted:
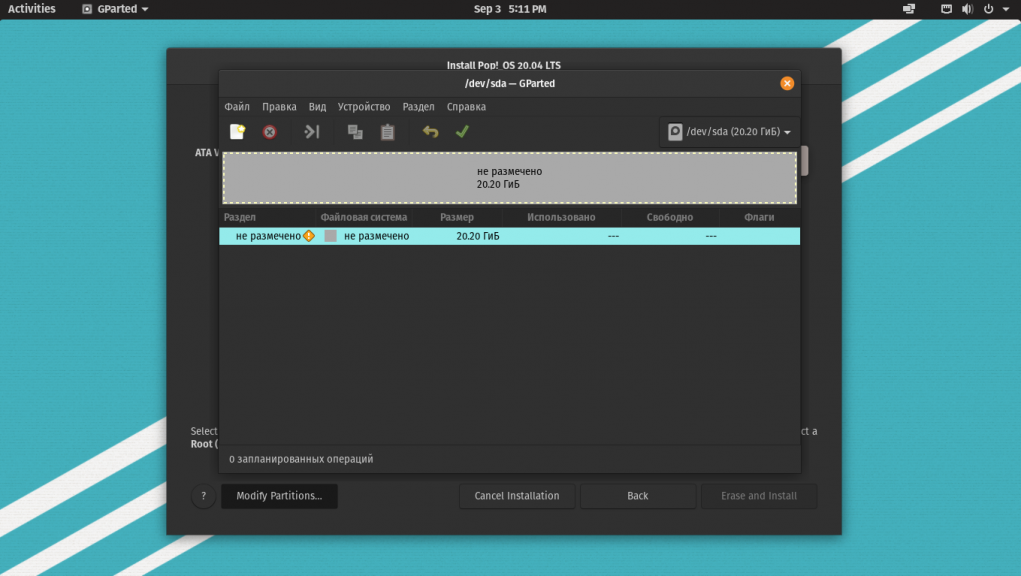
Шаг 7. Создание таблицы разделов
Если диск, на который вы собираетесь установить Pop OS чист, надо создать новую таблицу разделов. Для этого в открывшейся программе Gparted откройте меню Устройство и выберите Создать таблицу разделов:
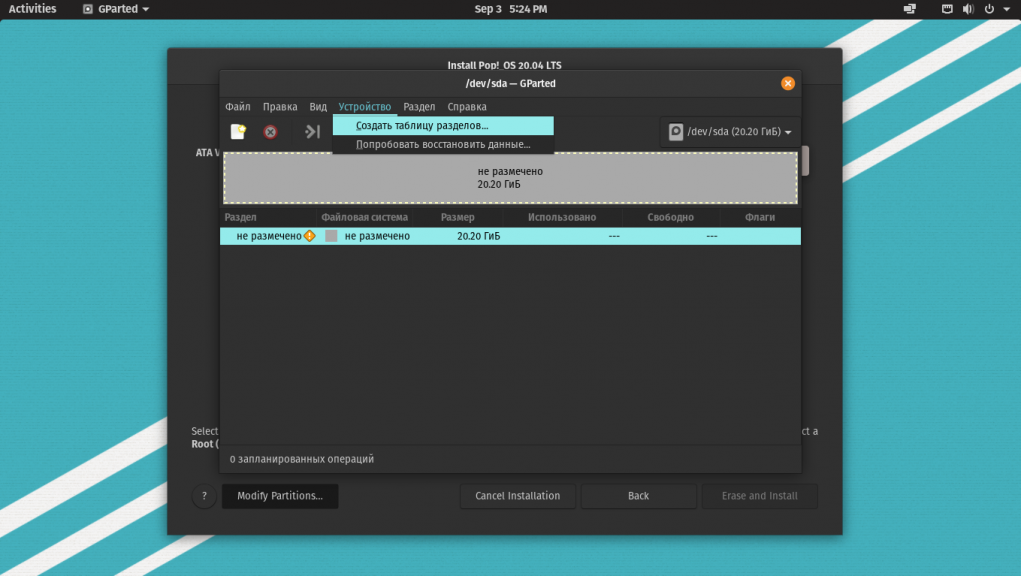
Выберите тип таблицы разделов MSDOS или MBR и подтвердите, что вы согласны с тем, что все данные с диска будут стёрты:
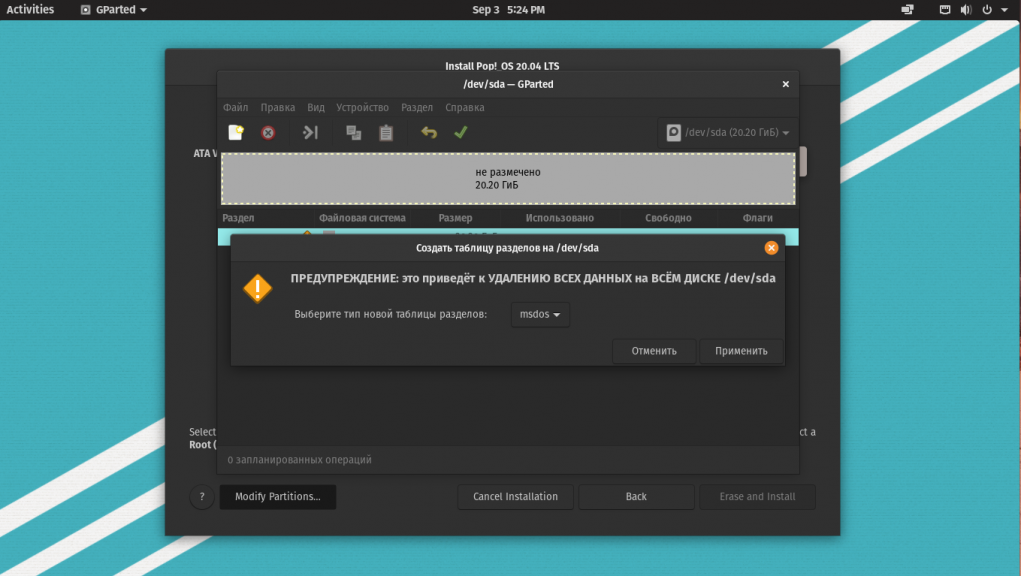
Шаг 8. Создание разделов
Необходимо создать как минимум один раздел для корневой файловой системы. Но лучше файлы пользователя разместить на отдельном разделе, чтобы при переустановке системы или обновлении они не потерялись. Также желательно создать отдельный раздел для загрузчика.
Давайте сначала создадим раздел для загрузчика. Для этого нажмите на кнопку со значком + и выберите размер раздела, для этого раздела достаточно 500 мегабайт. Затем надо создать раздел для корневой файловой системы. Он должен занимать как минимум 16 гигабайт, потому что так сказано в системных требованиях:
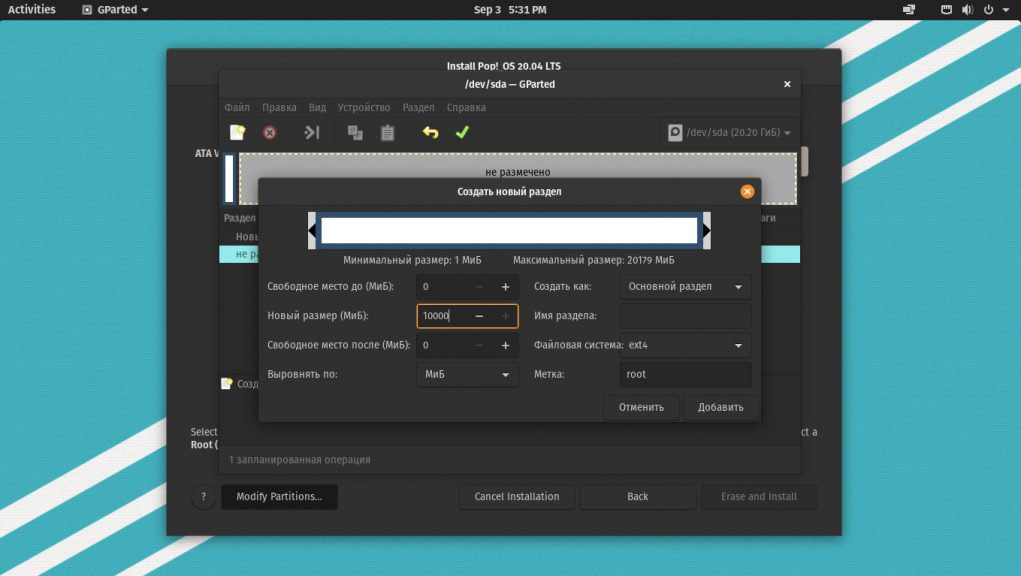
Всё остальное место можно выделить под домашний раздел:

Когда всё будет завершено у вас должно получится три раздела. Нажмите на зеленую галочку чтобы сохранить изменения. После этого программу Gparted можно закрыть.
Шаг 9. Выбор точек монтирования
Далее уже в установщике вам необходимо выбрать точки монтирования. В нём появится зеленая строка, на которой будут отмечены три только что созданных раздела. Для этого сначала кликните по разделу и включите переключатель Use partition. Для загрузочного раздела выберите в поле Use as значение Boot (/boot) и отметьте галочку, что его надо форматировать:
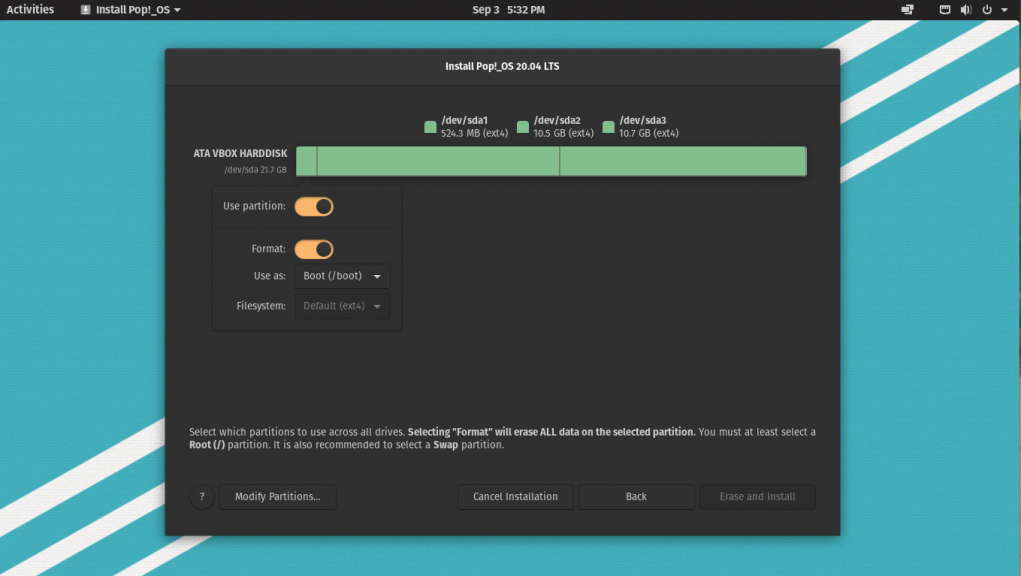
Далее те же действия надо проделать для корневого раздела, только в Use as надо выбрать Root (/):
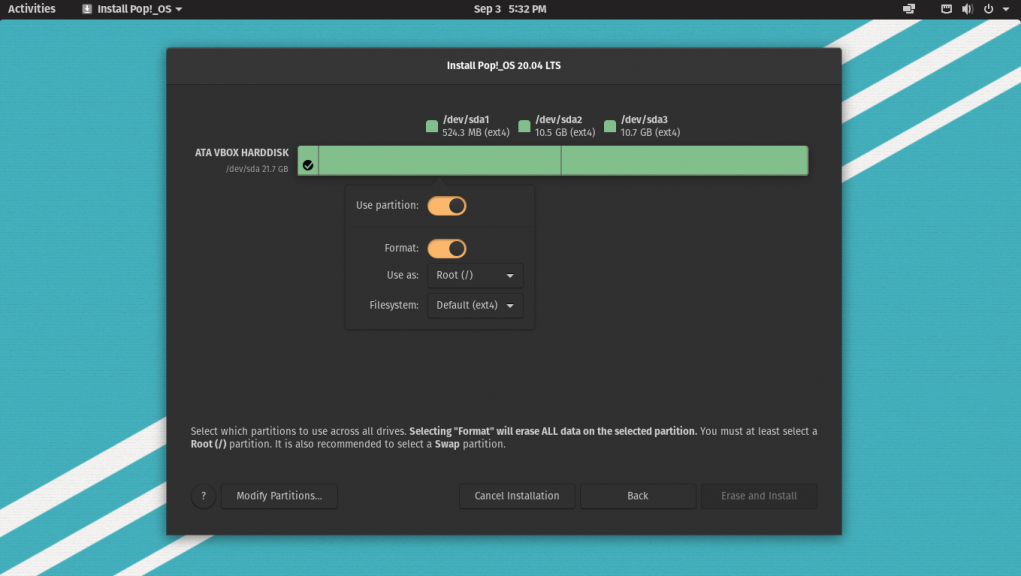
И для домашнего раздела:
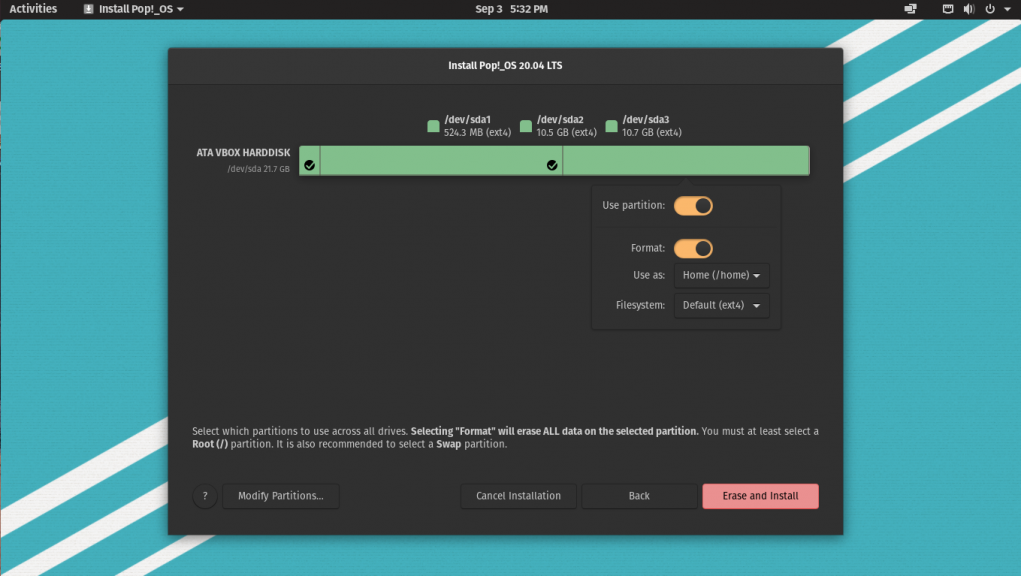
После этого можно нажимать кнопку Erase and Install.
Шаг 10. Установка
Дождитесь завершения установки системы:
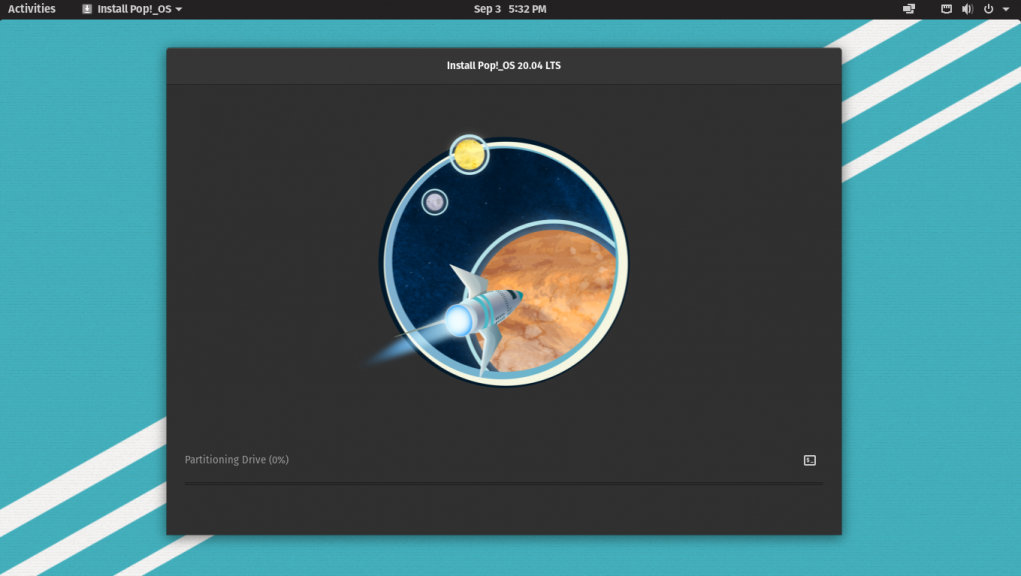
Шаг 11. Перезагрузка
Когда установка завершится, перезапустите систему. Для этого нажмите Reboot now:
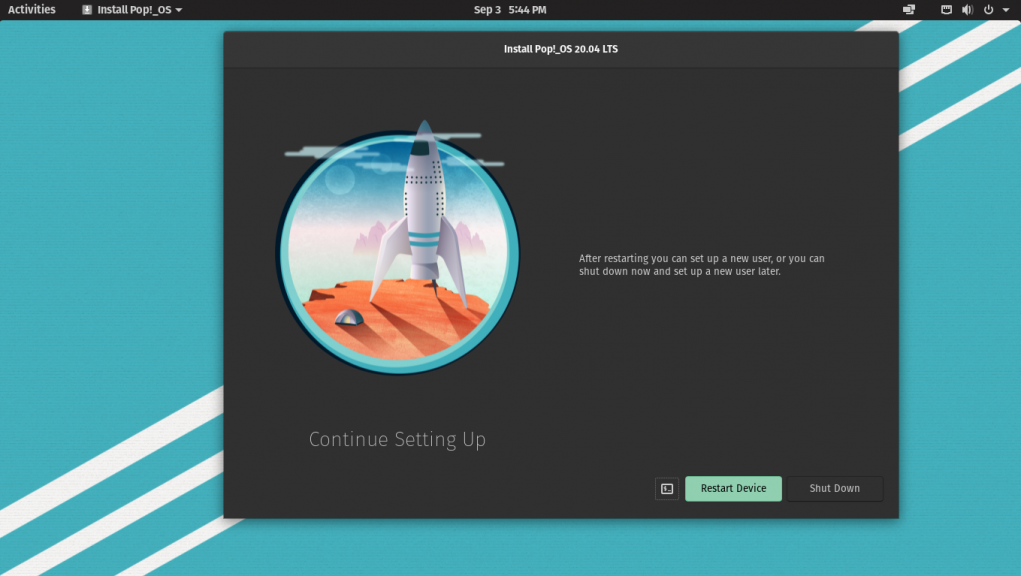
Шаг 12. Приветствие
После перезагрузки вы увидите такое приветствие, просто нажмите Next:
Шаг 13. Раскладка клавиатуры
Затем система снова предложит выбрать раскладку клавиатуры для системы. Выберите и нажмите Next:
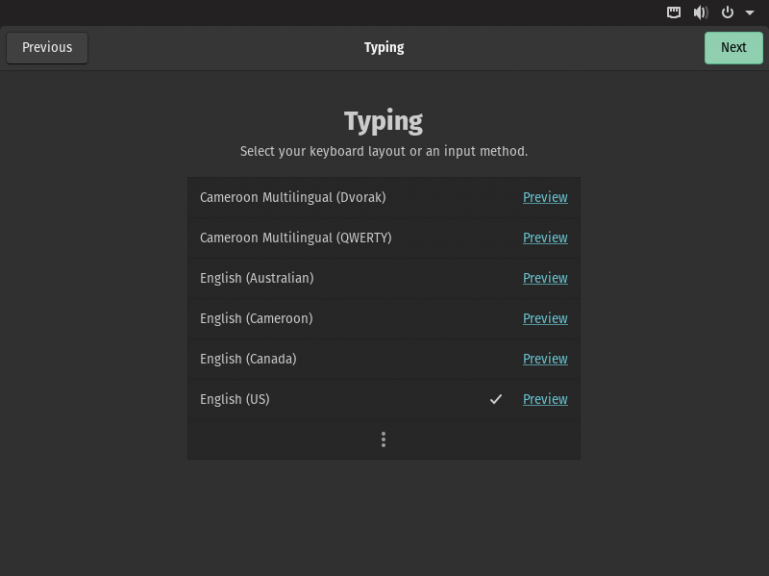
Шаг 14. Приватность
Выберите нужно ли разрешить приложениям определять ваше местоположение:
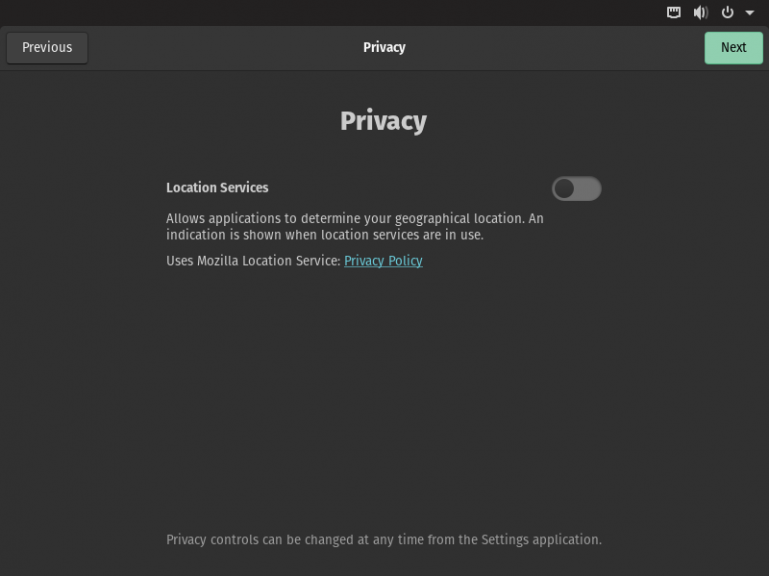
Шаг 15. Часовой пояс
Выберите ваш часовой пояс:
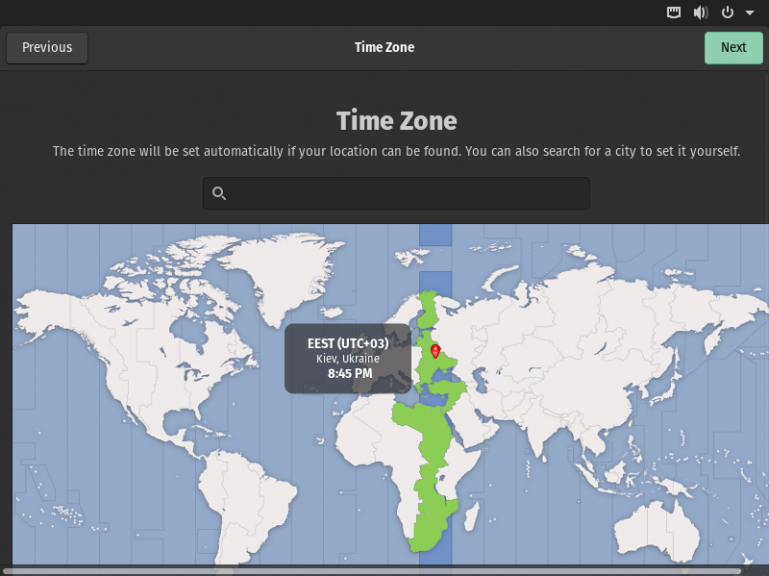
Шаг 16. Сетевые аккаунты
Привяжите сетевые аккаунты, если это необохдимо:
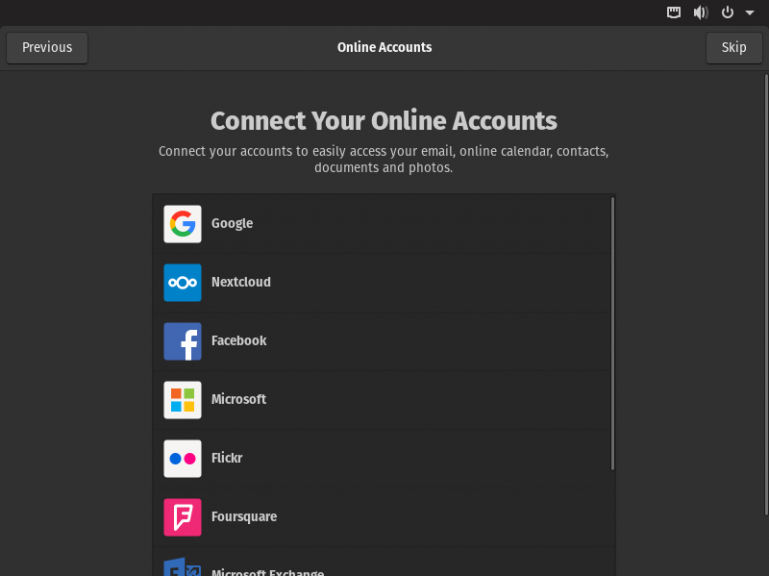
Шаг 17. Создание пользователя
Введите имя и логин и имя пользователя, от имени которого вы будете использовать систему:
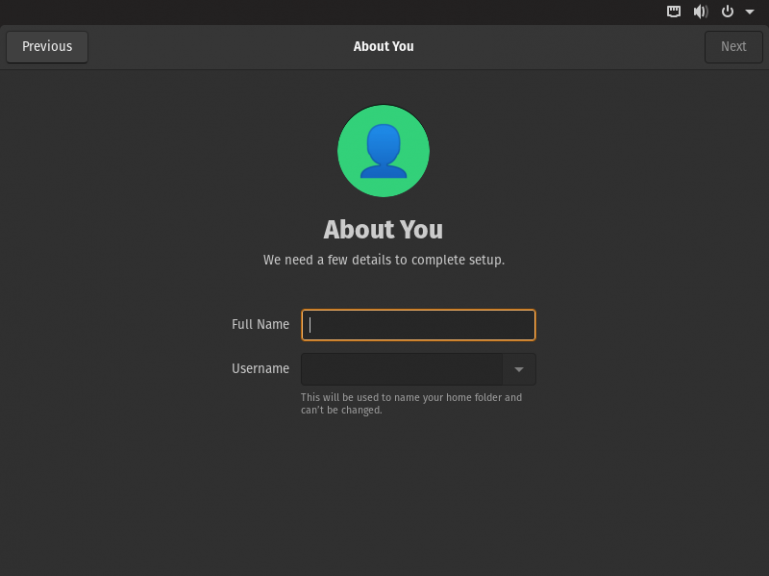
Затем введите пароль для этого пользователя два раза:
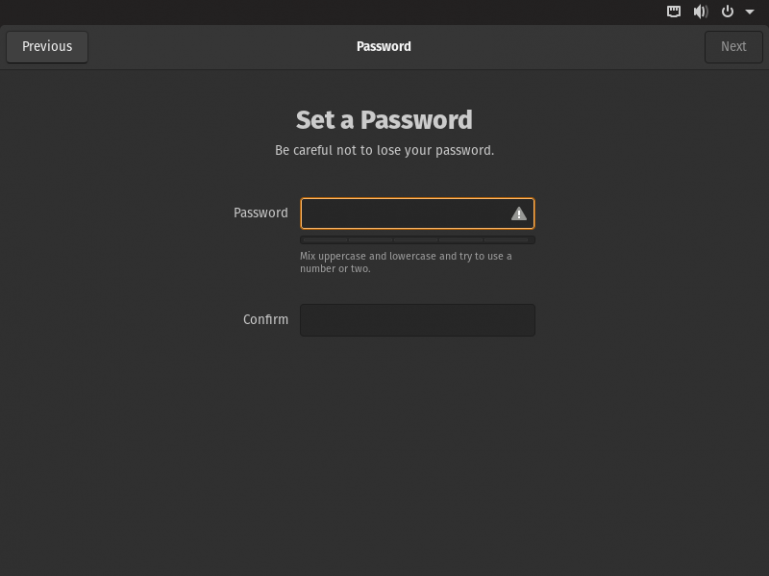
Шаг 18. Готово
Почти готово, осталось ещё нажать Start using Pop OS:
После этого система снова перезагрузится и вы попадёте на рабочий стол:
Выводы
В этой статье мы рассмотрели как выполняется установка Pop OS. Как видите, это ненамного сложнее, чем установить ту же Ubuntu. Здесь ситуацию немного усложняет то, что весь интерфейс установщика на английском языке, но благодаря этой инструкции вы сможете во всём разобраться. А вы уже пользовались Pop OS? Как она вам? Напишите в комментариях!

Статья распространяется под лицензией Creative Commons ShareAlike 4.0 при копировании материала ссылка на источник обязательна .