| title | updated | contextual_links | |||||||||||||||||||||||||||||||||||||||||||||||||||||||||||||||||||
|---|---|---|---|---|---|---|---|---|---|---|---|---|---|---|---|---|---|---|---|---|---|---|---|---|---|---|---|---|---|---|---|---|---|---|---|---|---|---|---|---|---|---|---|---|---|---|---|---|---|---|---|---|---|---|---|---|---|---|---|---|---|---|---|---|---|---|---|---|---|
|
Installing and updating Postman |
2022-09-02 |
|
Postman is available on the web at go.postman.co/home and as a native desktop app for Mac (Intel or Apple silicon), Windows (Intel 32-bit or 64-bit), and Linux (64-bit) operating systems.
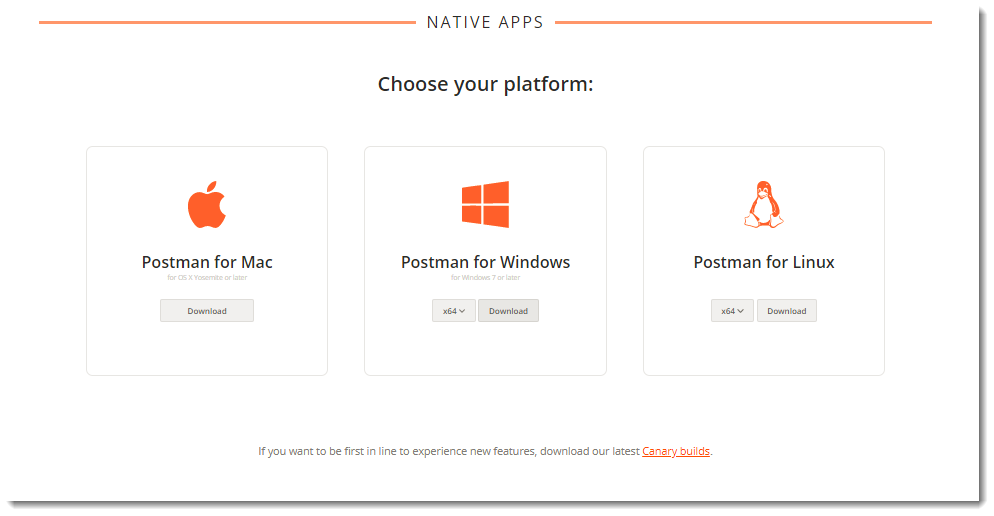
To get the latest version of the Postman desktop app, visit the download page and select Download for your platform.
To get an earlier version of the Postman desktop app, see Installing earlier versions of Postman.
Contents
- Installing Postman on the desktop
- Windows
- Mac
- Linux
- Using the Postman web app
- Browser requirements
- Installing the Postman Desktop Agent
- Web limitations
- Updating Postman
- Chrome app (deprecated)
- Migrating to the native app
- Using Postman behind a firewall
- Troubleshooting your Postman installation
Installing Postman on Windows
Postman is available for Windows 7 and later.
- Download the latest Postman version.
- Select and run the
.exefile to install Postman.
Postman v9.4 is the last version of Postman that supports both 32-bit and 64-bit Windows. All versions of Postman following v9.4 will only work on 64-bit x86 Windows. You can continue to use Postman v9.4 and earlier on 32-bit Windows.
Installing Postman on Mac
Postman is available for macOS 10.11 (El Capitan) and later.
-
Download the latest Postman version.
Make sure to download the Mac Apple Chip version if you have a Mac with an Apple silicon processor.
-
If your browser downloads the file as a zip file, find the file in the Downloads folder and unzip it.
-
In the Downloads folder, double-click the
Postmanfile to install it. -
When prompted, move the file to your Applications folder. This will ensure that future updates can be installed correctly.
You may encounter a «Library not loaded» error if you unzip and install Postman using a third-party archiving app. Use the default Archive Utility for Mac to unzip the file.
You can also install Postman using the Homebrew package manager:
brew install --cask postman
Installing Postman on Linux
You can install Postman on Linux by manually downloading it, using the Snap store link, or with the command snap install postman.
To install manually, download and unzip the app, for example into the Downloads directory.
To start the app from a launcher icon, create a desktop file. Name the file Postman.desktop and save it in the following location:
~/.local/share/applications/Postman.desktop
Enter the following content in the file, replacing /path/to/Downloads with the location of the file, and save it:
[Desktop Entry]
Encoding=UTF-8
Name=Postman
Exec=/path/to/Downloads/Postman/app/Postman %U
Icon=/path/to/Downloads/Postman/app/resources/app/assets/icon.png
Terminal=false
Type=Application
Categories=Development;
Postman supports the following distributions on x86-64 hardware:
- Ubuntu 14.04 and newer
- Fedora 24
- Debian 8 and newer
The support of certain Linux distributions depends on if they’re supported by Electron. Refer to Electron’s documentation.
It’s recommended you install Snap as it includes all the libraries that the app needs and they’re bundled with the app itself.
Avoid starting Postman using the
sudocommand, as it will create permission issues on the files created by Postman.Make sure you have read/write permission for the
~/.configfolder where Postman stores information.If you are an Ubuntu 18 user, you will also need to install the
libgconf-2-4package with the commandapt-get install libgconf-2-4
Using the Postman web app
You can use Postman in your web browser to carry out your API development and testing tasks in conjunction with the Postman Agents. To access the Postman web app, visit go.postman.co/home.
If you are using the Postman web app, Postman recommends using the Postman Desktop Agent for the best experience. See About the Postman Agent for more information.
Browser requirements
The Postman web app is optimized for the following browsers:
- Chrome (78 and higher)
- Firefox (76 and higher)
- Edge (79 and higher)
- Safari (13.1.1 and higher)
Installing the Postman Desktop Agent
If you are using the Postman web app, Postman recommends downloading and installing the Postman Desktop Agent, a micro-application that runs locally on your desktop. The Desktop Agent overcomes the Cross Object Resource Sharing (CORS) limitations of browsers and acts as your agent for making API requests from the Postman web app.
Web limitations
The Postman web app is under active development. There are features you can only access in the Postman desktop app, not in your browser:
- Find and replace — The Postman desktop app supports finding and replacing values in a workspace, but this function isn’t available on the Postman web app yet.
- Certificates and proxy — The Postman desktop app enables you to customize certificates and proxy configurations. On the Postman web app, these take the browser defined value and can’t be overridden by Postman.
- Postman Interceptor — Interceptor syncs cookies from your browser to the Postman desktop app and captures network requests directly from the browser. It’s not possible to use Interceptor with the Postman web app.
- Scratch Pad — The Postman desktop app supports working in Postman offline using the Scratch Pad.
Updating Postman
The Postman desktop app notifies you when a major update is available. For other updates, there is a dot on the settings icon  . If the indicator is red instead of orange, it indicates a failed update.

Select the update option to download or install the latest update. If you are using Postman v9.13 or later, Postman automatically downloads updates. Postman notifies you when the download is complete and prompts you to restart Postman to apply the updates.

Postman Chrome app (deprecated)
The Postman Chrome app is deprecated. If you use the Chrome app, you can keep your data when you switch to using Postman either by syncing with your Postman account or by exporting from Chrome and importing into Postman.
The Postman desktop app is built on Electron, and overcomes a number of restrictions of the Chrome platform.
- The native apps let you work with cookies directly.
- Unlike the Chrome app, the Interceptor doesn’t need a separate extension.
- The native apps come with a built-in proxy that you can use to capture network traffic.
- The native apps aren’t restricted by the Chrome standards for the menu bar. You can check for updates, create Postman Windows and tabs, and edit preferences.
- The native apps let you send headers like
OriginandUser-Agent. These are restricted in the Chrome app. - The «don’t follow redirects» option exists in the native apps to prevent requests that return a 300-series response from being automatically redirected—doing this in the Chrome app requires the Interceptor extension.
- The native app has a built-in console, which enables you to view the network request details for API calls.
Migrating to the native app
To switch from the Chrome app to native, download Postman and sign in to your account. Start the native app, and your history and collections will be automatically synced.
Alternatively, if you don’t want to sign in to your Postman account, you can bulk export your Postman data from the Chrome app, and then bulk import into the new native app at Settings > Data.
Note that importing will overwrite your existing data. For more on bulk import, see Importing Postman data.
Using Postman behind a firewall
Postman’s infrastructure runs on Amazon’s AWS platform. If you are operating behind a network firewall, you will need to allow the following domains to make WebSocket connections for Postman:
*.getpostman.com*.postman.co*.pstmn.io*postman.com
By default, WebSocket connections use the same ports as HTTP (80) and HTTPS (443).
Postman doesn’t have a fixed IP range that can be provided. If necessary, refer to the current AWS IP ranges and allow the broad range provided.
Troubleshooting your Postman installation
If you encounter any issues installing and running Postman, check out the following tips. If these don’t help, refer to the installation posts on the community forum and create a new post if your issue isn’t already covered. You can also contact Postman support.
Update failed error
If you get an Update Failed notification in Postman, you can use the DevTools to investigate.
Open the DevTools using View > Developer > Show DevTools (Current View).
Some known errors are as follows:
-
Error message —
Cannot update while running on a read-only volume- This error means that the app user doesn’t have write permission in the directory where Postman is installed. To resolve the problem, move Postman to a directory where the user has write permissions, for example the
/Applicationdirectory for Mac, and to thehomedirectory for Linux.
- This error means that the app user doesn’t have write permission in the directory where Postman is installed. To resolve the problem, move Postman to a directory where the user has write permissions, for example the
-
Error message —
Code signature at URL file:///... did not pass validation: code object is not signed at all- This error means that there are multiple updates running at the same time. This can happen when the app is opened before the earlier update could finish. To resolve the problem, quit and reopen the app.
-
Error message —
EACCES: permission denied, open '/opt/Postman/Postman-1620288011421.tar.gz- This error means that the app user doesn’t have write permission in the directory where Postman is installed. To resolve the problem, move Postman to a directory where the user has write permissions, for example the
homedirectory for Linux.
- This error means that the app user doesn’t have write permission in the directory where Postman is installed. To resolve the problem, move Postman to a directory where the user has write permissions, for example the
Update not available
If you are using Postman for Linux, and installed the app with the Ubuntu Software Center or Snap Store, you may not have the Check for updates option. This is because the updates are handled by the store, which automatically updates Postman on a regular cadence.
Download the app to get started using the Postman API Platform today. Or, if you prefer a browser experience, you can try the web version of Postman.
The Postman app
Download the app to get started with the Postman API Platform.
To experience the best the Postman app has to offer, please download it on your desktop.
Not your OS? Download for Windows (x64) or Linux (x64)
Postman on the web
Access the Postman API Platform through your web browser. Create a free account, and you’re in.
Postman Enterprise
Postman Enterprise is designed for organizations who need to deploy Postman at scale.
Learn more →


Postman desktop agent
If you are using the Postman web client, you will need to also download the Postman desktop agent. The Postman agent overcomes the Cross Object Resource Sharing (CORS) limitations of browsers, and facilitates API request sending from your browser version of Postman. Read the blog post.

Postman CLI
New!
The Postman CLI is the command-line companion that is developed, supported, and signed by Postman. It enables you to run collections, lint API schemas, run security and governance checks, and log in and out. All test results will be automatically pushed to the app.
Windows installation
powershell.exe -NoProfile -InputFormat None -ExecutionPolicy AllSigned -Command "[System.Net.ServicePointManager]::SecurityProtocol = 3072; iex ((New-Object System.Net.WebClient).DownloadString('https://dl-cli.pstmn.io/install/win64.ps1'))"Mac (Apple silicon) installation
curl -o- "https://dl-cli.pstmn.io/install/osx_arm64.sh" | shMac (Intel) installation
curl -o- "https://dl-cli.pstmn.io/install/osx_64.sh" | shLinux installation
curl -o- "https://dl-cli.pstmn.io/install/linux64.sh" | sh
Postman Canary
Be the first to experience new Postman features
If you want to be first in line to experience new features, download our latest Canary builds available for OSX (Intel and Apple chips) / Windows (x64) / Linux (x64) for a sneak peek. Our Canary builds are designed for early adopters, and may sometimes break.

Newman is a command-line collection runner for Postman. It allows you to effortlessly run and test a Postman Collection directly from the command-line. It is built with extensibility in mind so that you can easily integrate it with your continuous integration servers and build systems.
npm install -g newmanInstalling the Postman app
Postman native apps
Postman is available as a native app for Mac, Windows, and Linux operating systems.
To install Postman, go to the apps page and click Download for Mac / Windows / Linux depending on your platform.

macOS installation
Once you’ve downloaded app, you can drag the file to the “Applications” folder. Double click on Postman to open the application.
Windows installation
- Download the setup file
- Run the installer
Linux installation
- Installation on Linux can vary between distributions. Check out this guide for installing the Postman app on Ubuntu 16.04.
Postman Chrome app
We recommend using the Postman native apps, but Postman is also available as a Chrome app. Read more about why support for the Postman Chrome app is being deprecated.
The Postman Chrome app can only run on the Chrome browser. To use the Postman Chrome app, you will first need to install Google Chrome.
If you already have Chrome installed, head over to Postman’s page on the Chrome Web Store, and click ‘Add to Chrome’.
The download should take a few minutes depending on your internet connection. Once you’ve downloaded the app, you can launch Postman.
Differences between Chrome and native apps
Postman’s native apps are built on Electron, and overcome a number of restrictions of the Chrome platform.
A few features exclusive to the native apps are listed here:
Cookies
The native apps let you work with cookies directly. Unlike the Chrome app, no separate extension (Interceptor) is needed.
Built-in proxy
The native apps come with a built-in proxy that you can use to capture network traffic.
The native apps are not restricted by the Chrome standards for the menu bar. With the native apps, you can create collections, switch to history requests, and more.
The latest versions of the native apps let you send headers like Origin and User-Agent. These are restricted in the Chrome app.
Don’t follow redirects option
This option exists in the native apps to prevent requests that return a 300-series response from being automatically redirected. Previously, users needed to use the Interceptor extension to do this in the Chrome app.
Postman console
The latest version of the native app also has a built-in console, which allows you to view the network request details for API calls.
Migrating to the native app
It’s simple. Sign in to your Postman account after you download and start the new native app, and all your history and collections will be automatically synced.
Alternatively, if you don’t want to sign in to your Postman account, you can bulk export your Postman data from the Chrome app, and then bulk import into the new native app.

Bulk export
From the Postman settings, select the Data tab and click the Download button to export all your collections, environments, globals and header presets to a single dump file.
Bulk import
From the same area in Postman settings, you can initiate a bulk import from a Postman data dump file. This will overwrite your existing data so be a little careful.
Updating Postman
Native app (Mac, Windows and Linux)
Postman’s native apps will check for updates whenever the app reloads, or is launched. The app will display the changelog prompting you to update the app.

Mac and Windows
Click Update to download the latest update. You will be notified when the download is complete prompting you to restart the Postman app to apply the updates. If you’re not ready to update yet, click Remind me later to prompt you again after the next app reload or launch.
You can also configure your preferences to automatically download updates under the Update tab within the SETTINGS modal.
- All
- Minor fixes
- None
All — Downloads all updates automatically and will show a small notification at the top prompting you to restart the app to apply the updates.
Minor fixes — You will be notified of all major updates, and other minor fixes will automatically download prompting you to restart the app to apply the updates.
None — This will show up the update version every time it finds a update for your current version.

Troubleshooting updates in macOS Sierra
We have received user feedback that the Mac update does not complete successfully, even after downloading the update for macOS Sierra.
This can be solved by moving the app out of the Downloads directory. The Postman updater is unable to switch the downloaded version on the read-only memory, initially assigned for the downloaded apps by macOS Sierra.
If you continue experiencing difficulty with the update, fetch the logs from ~/Library/Caches/com.postmanlabs.mac.ShipIt in your system and let us know.
Linux
Postman’s native app on Linux will notify you whenever an update is available. If an update is available, you need to download the latest version of the application, remove the current application directory, and extract the new version. Postman stores all user data outside of the application directory, so you can safely remove the current application directory and install the new version.
Since Postman’s native apps check for updates only on app reload or launch, at any time, you can force a check for updates under the Update tab in the SETTINGS modal of the app.

Chrome
Postman’s Chrome app is usually updated automatically. However, Postman doesn’t control the Chrome app update flow, and Chrome sometimes doesn’t update the app for long periods of time.
The latest version is visible on Postman’s Web Store listing.
To manually force an update, here’s what you need to do in Chrome:
- In the address bar, type
chrome://extensions. - At the top of the page, check and enable Developer Mode.
- Click the Update extensions now button beneath Developer Mode.

Что такое Postman? (дословный перевод «почтальон»)
Postman — это масштабируемый инструмент тестирования API, который быстро интегрируется в конвейер CI/CD.
Он был создан индийским программистом Abhinav Asthana (сейчас живет и работает в Силиконовой долине) в 2012 году как побочный проект для упрощения рабочего процесса при разработке и тестировании API.
В разработке ПО, CI (continuous integration)/CD (continuous delivery или continuous deployment) или CICD — это комбинация непрерывной интеграции и непрерывного развертывания программного обеспечения в процессе разработки.
CI/CD объединяет разработку, тестирование и развёртывание приложения.
В настоящий момент DevOps-программисты стремятся применять CI/CD практически для всех задач.
В этом руководстве вы узнаете:
- Зачем использовать Postman?
- Как использовать Postman для выполнения запросов к API
- Работа с GET запросами
- Работа с POST запросами
- Как параметризовать запросы
- Как создавать тесты
- Как создавать коллекции
- Как запускать коллекции с помощью программы запуска коллекций
- Как запускать коллекции с помощью Newman
Зачем использовать Postman?
Более чем 4 миллиона программистов в настоящее время используют программное обеспечение Postman по следующим причинам:
- Доступность – Чтобы использовать инструмент Postman, нужно просто войти в свою учетную запись, что облегчает доступ к файлам в любое время и в любом месте.
- Использование коллекций – Postman позволяет пользователям создавать коллекции для своих вызовов API Postman. Каждая коллекция может создавать вложенные папки и несколько запросов. Это помогает в организации ваших наборов тестов.
- Совместная работа – Коллекции и среды могут быть импортированы или экспортированы, что упрощает обмен файлами. Прямая ссылка также может быть использована для обмена коллекциями.
- Создание сред – Наличие нескольких сред способствует меньшему повторению тестов, так как можно использовать одну и ту же коллекцию, но для другой среды. Именно здесь будет происходить параметризация, которую мы обсудим в дальнейшем.
- Создание тестов – Контрольные точки тестирования, такие как проверка статуса успешного ответа HTTP, могут быть добавлены к каждому вызову API Postman, что помогает обеспечить тестирование.
- Автоматизированное тестирование – С помощью программы сбора данных или Newman тесты можно выполнять в несколько итераций, экономя время на повторяющиеся тесты.
- Отладка – Консоль Postman помогает проверить, какие данные были получены, что упрощает отладку тестов.
- Непрерывная интеграция – Благодаря своей способности поддерживать непрерывную интеграцию поддерживаются методы разработки.
Как скачать и установить POSTMAN
Будучи инструментом с открытым исходным кодом, Postman можно легко скачать. (Также возможно работать в онлайн версии системы, но по опыту в ней возможны зависания и проблемы с ответами сервера).
Вот шаги по установке:
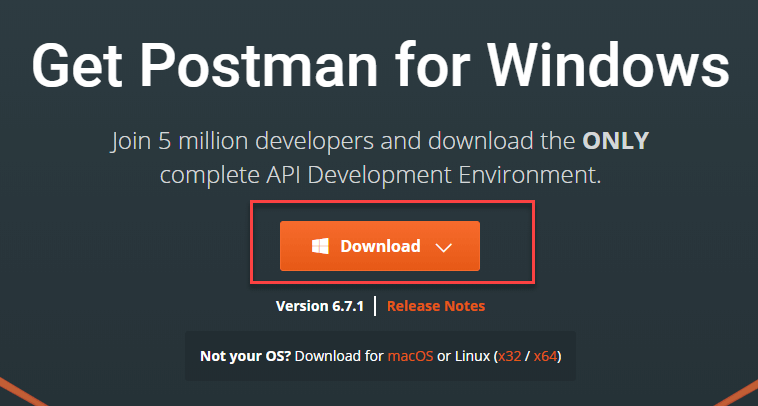
Шаг 1) Перейдите на https://www.postman.com/downloads/ и выберите желаемую платформу Mac, Windows или Linux. Нажмите кнопку Загрузить.

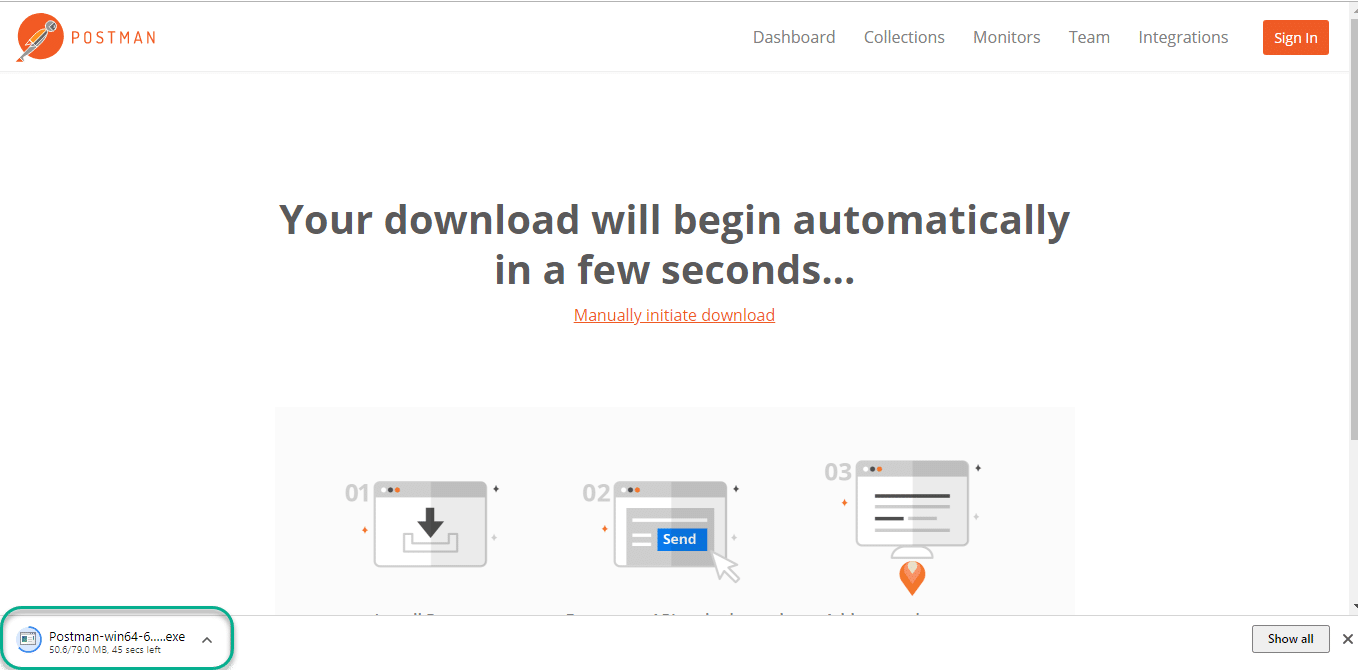
Шаг 2) Индикатор загрузки будет отображаться на странице Apps. Когда Postman будет загружен, нажмите Установить.

Шаг 3) Начнется установка

Шаг 4) В следующем окне, Signup или войдите в аккаунт Postman

ПРИМЕЧАНИЕ: Есть два способа зарегистрировать учетную запись Postman. Один из них — создать собственную учетную запись Postman, а другой — использовать учетную запись Google. Хотя Postman позволяет пользователям использовать инструмент без входа в систему, регистрация гарантирует, что ваша коллекция сохранена и доступна для последующего использования.
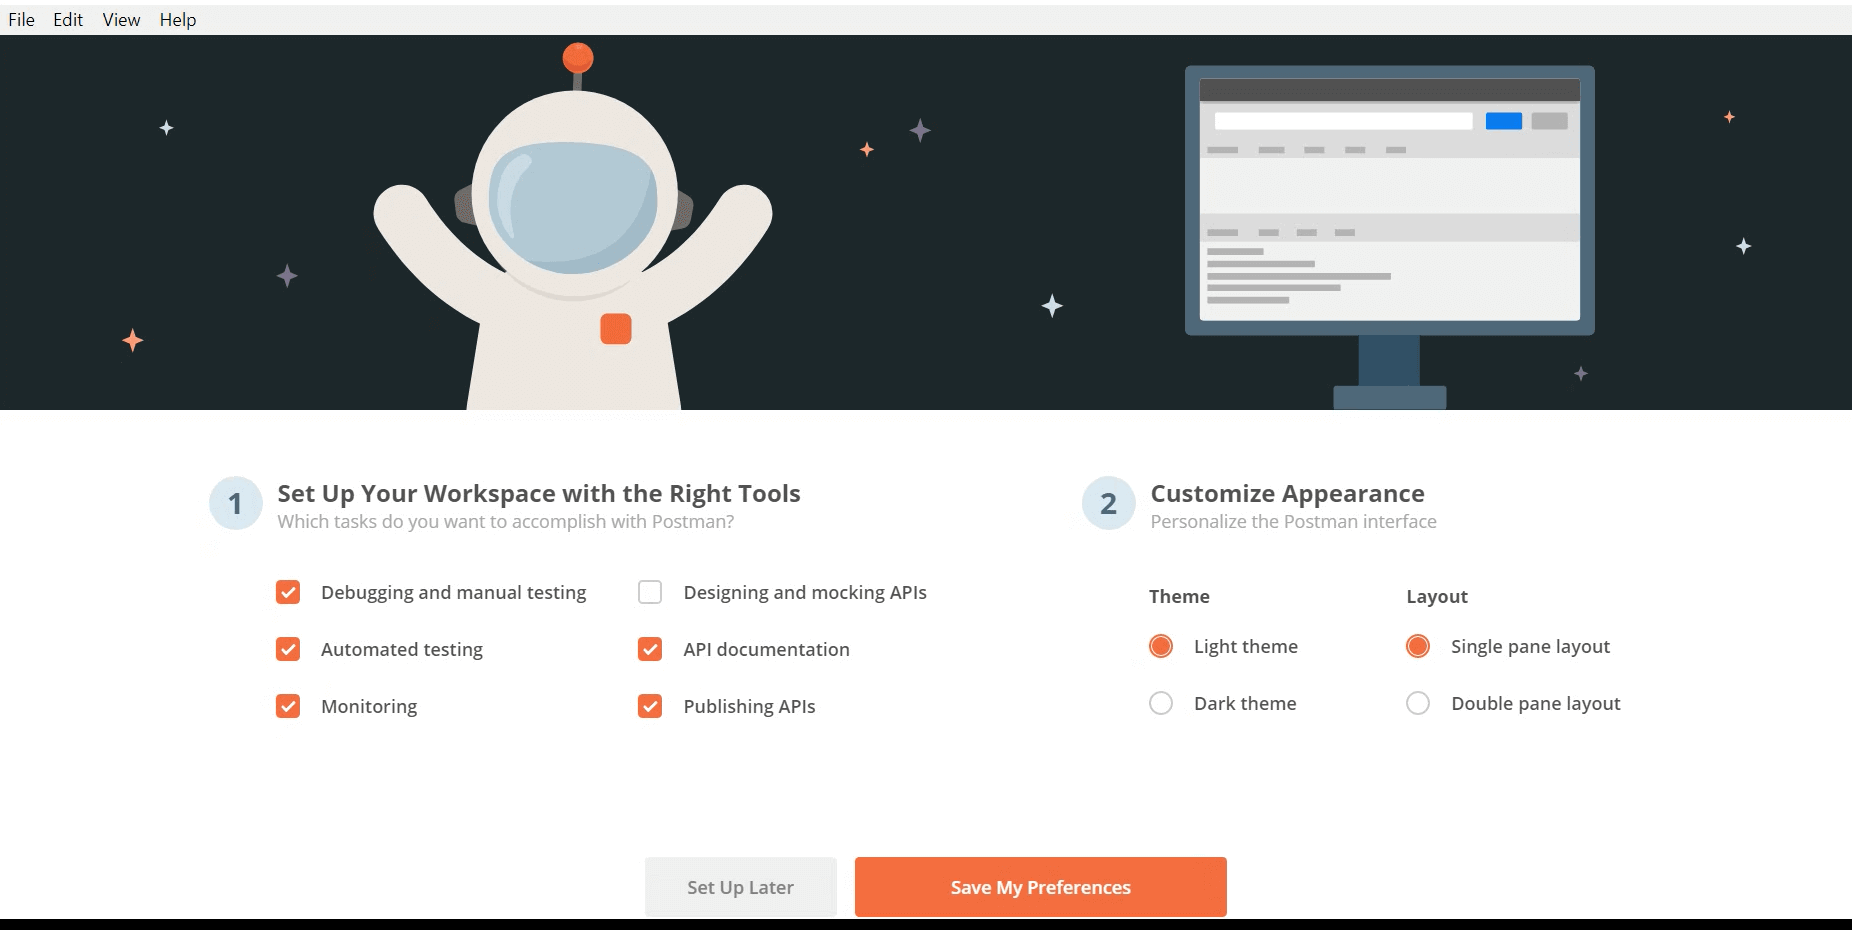
Шаг 5) Выберите необходимые инструменты рабочей области и нажмите Save My Preferences

Шаг 6) Вы увидите экран запуска

Как использовать Postman для выполнения запросов к API
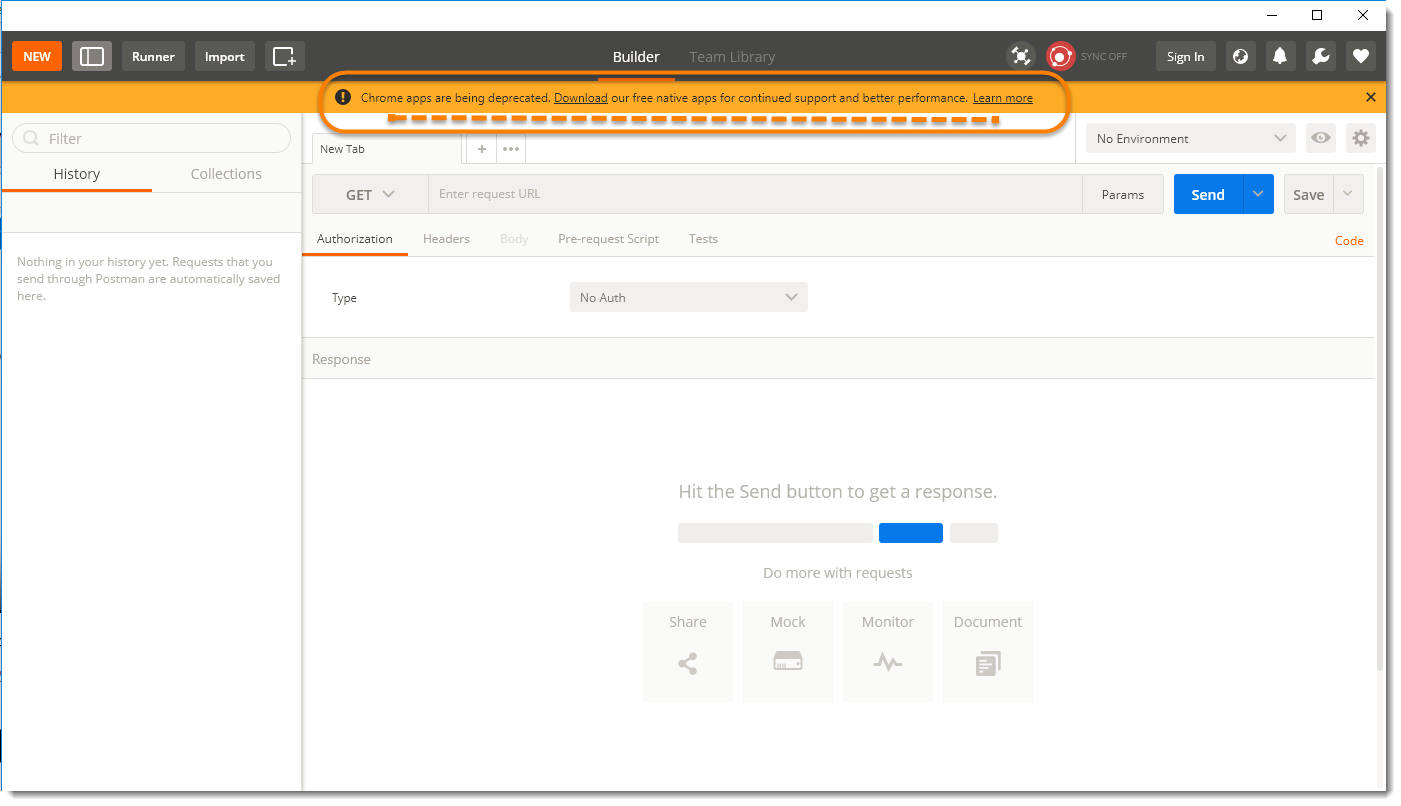
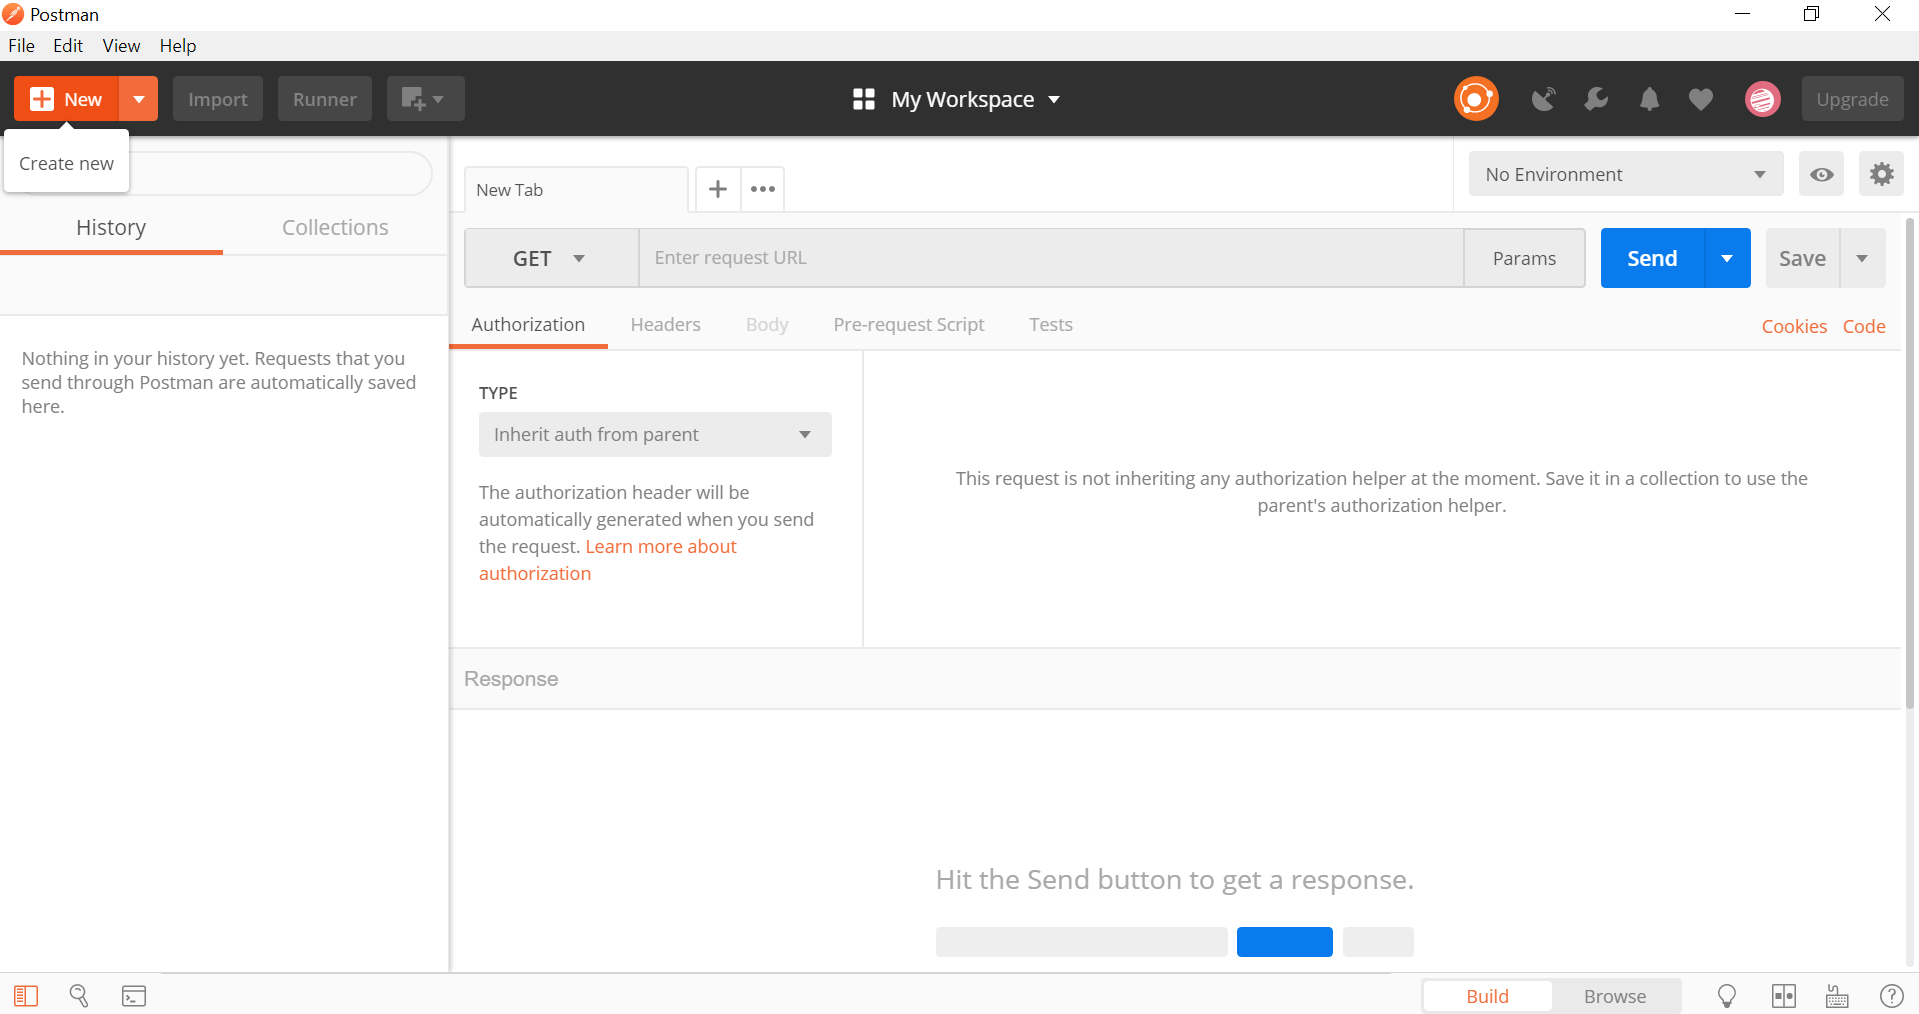
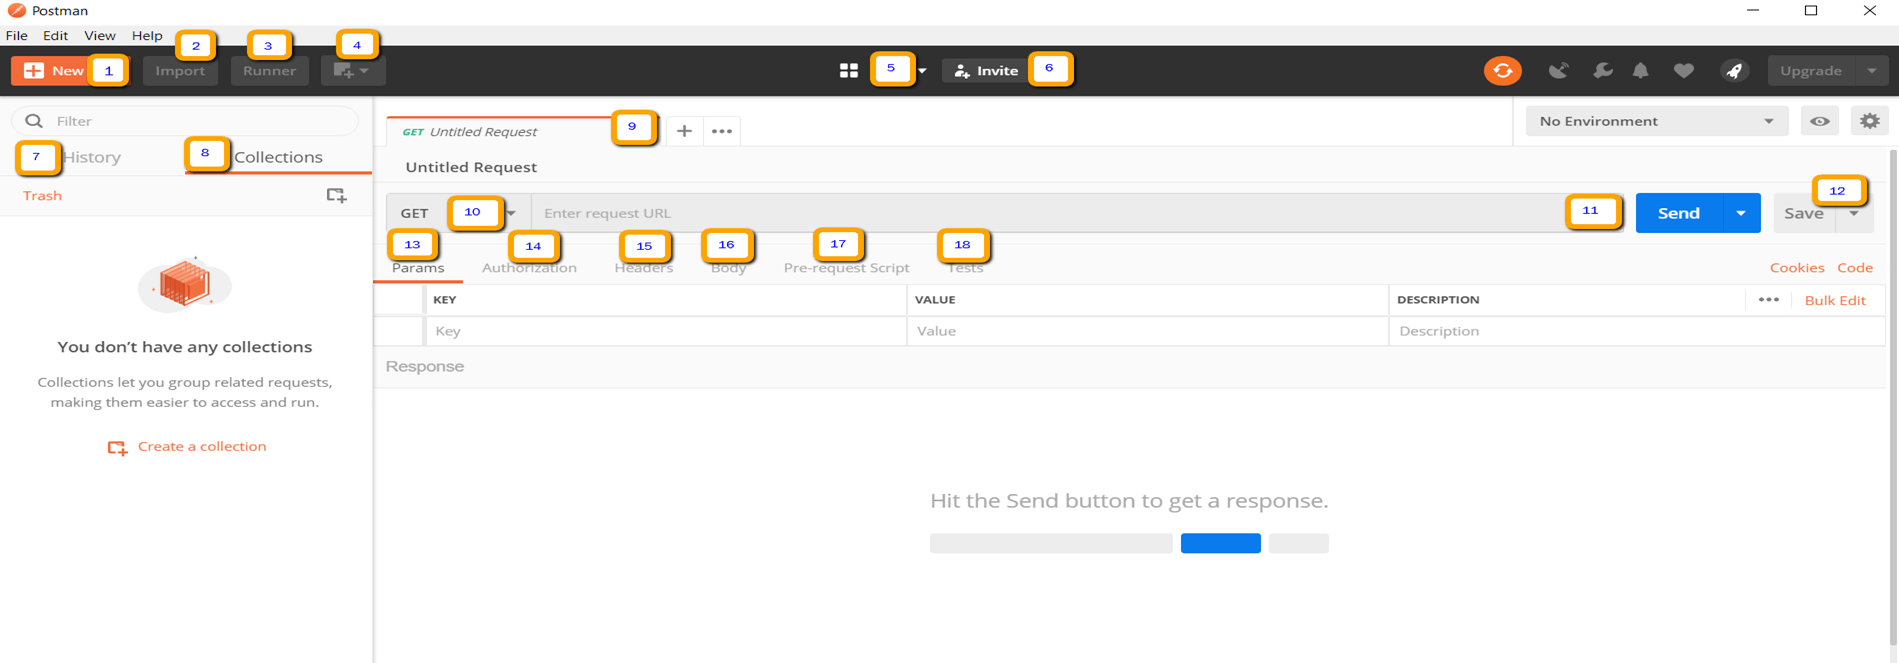
Ниже представлено рабочее пространство Postman. Давайте рассмотрим пошаговый процесс использования Postman и различные функции инструментов Postman!

- New – Здесь вы создадите новый запрос, коллекцию или среду.
- Import – Это используется для импорта коллекции или среды. Существуют такие опции, как импорт из файла, папки, ссылка или вставка необработанного текста.
- Runner – Тесты автоматизации могут быть выполнены с помощью программы сбора данных. Это будет обсуждаться далее в следующем блоке.
- Open New – Откройте новую вкладку, Окно Postman или Окно Runner, нажав эту кнопку.
- My Workspace – Вы можете создать новое рабочее пространство индивидуально или в команде
- Invite – Сотрудничайте в рабочей области, приглашая членов команды.
- History – Прошлые запросы, которые вы отправляли, будут отображаться в истории. Это позволяет легко отслеживать выполненные вами действия.
- Collections – Организуйте свой набор тестов, создавая коллекции. Каждая коллекция может содержать вложенные папки и несколько запросов. Запрос или папка также могут быть продублированы.
- Request tab – Здесь отображается заголовок запроса, над которым вы работаете. По умолчанию “Untitled Request” будет отображаться для запросов без названий.
- HTTP Request – При нажатии на эту кнопку отобразится раскрывающийся список различных запросов, таких как GET, POST, COPY, DELETE, etc. В Postman API тестировании, наиболее часто используемые запросы — GET и POST.
- Request URL – Также известный как конечная точка, это место, где вы определите ссылку, с которой будет взаимодействовать API.
- Save –Если в запросе есть изменения, необходимо нажать кнопку Сохранить, чтобы новые изменения не были потеряны или перезаписаны.
- Params – Здесь вы напишете параметры, необходимые для запроса, такие как значения ключей.
- Authorization – Для доступа к API-интерфейсам необходима авторизация. Это может быть в виде имени пользователя и пароля, токена на предъявителя (bearer token) и т.д.
- Headers – Вы можете задать заголовки, такие как тип контента JSON, в зависимости от запроса.
- Body – Именно здесь можно настроить детали в запросе, обычно используемом в запросе POST.
- Pre-request Script – Это сценарии, которые будут выполняться перед запросом. Обычно сценарии предварительного запроса для среды настройки используются для обеспечения того, чтобы тесты выполнялись в правильной среде.
- Tests – Это сценарии, выполняемые во время запроса. Важно иметь тесты, поскольку он устанавливает контрольные точки, чтобы проверить, в порядке ли статус ответа, получены ли ожидаемые данные и другие тесты.
Working with GET Requests
Get requests are used to retrieve information from the given URL. There will be no changes done to the endpoint.
We will use the following URL for all examples in this Postman tutorial
https://jsonplaceholder.typicode.com/users
In the workspace
- Set your HTTP request to GET.
- In the request URL field, input link
- Click Send
- You will see 200 OK Message
- There should be 10 user results in the body which indicates that your test has run successfully.

*Note: There may be cases that Get Postman request may be unsuccessful. It can be due to an invalid request URL or authentication is needed.
Working with POST Requests
Post requests are different from Get request as there is data manipulation with the user adding data to the endpoint. Using the same data from the previous tutorial in Get request, let’s now add our own user.
Step 1) Click a new tab to create a new request.

Step 2) In the new tab
- Set your HTTP request to POST.
- Input the same link in request url: https://jsonplaceholder.typicode.com/users
- switch to the Body tab

Step 3) In Body,
- Click raw
- Select JSON

Step 4) Copy and paste just one user result from the previous get request like below. Ensure that the code has been copied correctly with paired curly braces and brackets. Change id to 11 and name to any desired name. You can also change other details like the address.
[ { «id»: 11, «name»: «Krishna Rungta», «username»: «Bret», «email»: «Sincere@april.biz», «address»: { «street»: «Kulas Light», «suite»: «Apt. 556», «city»: «Gwenborough», «zipcode»: «92998-3874», «geo»: { «lat»: «-37.3159», «lng»: «81.1496» } }, «phone»: «1-770-736-8031 x56442», «website»: «hildegard.org», «company»: { «name»: «Romaguera-Crona», «catchPhrase»: «Multi-layered client-server neural-net», «bs»: «harness real-time e-markets» } } ]

*Note: Online Post request should have the correct format to ensure that requested data will be created. It is a good practice to use Get first to check the JSON format of the request. You can use tools like https://jsonformatter.curiousconcept.com/

Step 5) Next,
- Click Send.
- Status: 201 Created should be displayed
- Posted data are showing up in the body.

How to Parameterize Requests
Data Parameterization is one of the most useful features of Postman. Instead of creating the same requests with different data, you can use variables with parameters. These data can be from a data file or an environment variable. Parameterization helps to avoid repetition of the same tests and iterations can be used for automation testing.
Parameters are created through the use of double curly brackets: {{sample}}. Let’s take a look at an example of using parameters in our previous request:

Now let’s create a parameterize get request.
Step 1)
- Set your HTTP request to GET
- Input this link: https://jsonplaceholder.typicode.com/users. Replace the first part of the link with a parameter such as {{url}}. Request url should now be {{url}}/users.
- Click send.
There should be no response since we have not set the source of our parameter.

Step 2) To use the parameter you need to set the environment
- Click the eye icon
- Click edit to set the variable to a global environment which can be used in all collections.

Step 3) In variable,
- set the name to the url which is https://jsonplaceholder.typicode.com
- click Save.

Step 4) Click close if you see the next screen

Step 5) Go back to your Get request then click send. There should now be results for your request.

*Note: Always ensure that your parameters have a source such as an environment variable or data file to avoid errors.
How to Create Postman Tests
Postman Tests are JavaScript codes added to requests that help you verify results such as successful or failed status, comparison of expected results, etc. It usually starts with pm.test. It can be compared to asserts, verify commands available in other tools.
Let’s do some basic API testing using Postman for our parameterize requests from the previous lesson.
Step 1) Go to your GET user request from the previous tutorial.
- Switch to the tests tab. On the right side are snippet codes.
- From the snippets section, click on “Status code: Code is 200”.
The pane is auto-populated

Step 2) Now click Send. The test result should now be displayed.

Step 3) Go back to the test tab and let’s add another test. This time we will compare the expected result to the actual result.
From the snippets section, click on “Response body:JSON value check”. We will be checking if Leanne Graham has the userid 1.

Step 4)
- Replace “Your Test Name” from the code with “Check if user with id1 is Leanne Graham” so that the test name specifies exactly what we want to test.
- Replace jsonData.value with jsonData[0].name. To get the path, check the body in Get result earlier. Since Leanne Graham is userid 1, jsonData is in the first result which should start with 0. If you want to get the second result, use jsonData[1] and so on for succeeding results.
- In to eql, input “Leanne Graham”
pm.test(«Check if user with id1 is Leanne Graham», function () { var jsonData = pm.response.json(); pm.expect(jsonData[0].name).to.eql(«Leanne Graham»); });

Step 5) Click send. There should now be two passed test results for your request.

*Note: There are different kind of tests that can be created in Postman. Try to explore the tool and see what tests will fit your needs.
How to Create Collections
Collections play an important role in organizing test suites. It can be imported and exported making it easy to share collections amongst the team. In this tutorial, we will learn how to create and execute a collection.
Let’s start in creating a collection:
Step 1) Click on the New button at the top left corner of the page.

Step 2) Select Collection. Create collection window should pop up.

Step 3) Input the desired collection name and description then click create. A collection should now be created.

Step 4) Go back to the previous Get request. Click Save

Step 5)
- Select Postman Test Collection.
- Click Save to Postman Test Collection

Step 6) Postman test collection should now contain one request.

Step 7) Repeat steps 4-5 for the previous Post request so that collection will now have two requests.

How to Run Collections using Collection Runner
There are two ways to run a collection which is the Collection Runner and Newman. Let’s begin by executing the collection in Collection Runner.
Step 1) Click on the Runner button found at the top of the page next to the Import button.

Step 2) Collection Runner page should appear such as below. Following is the description of various fields

Step 3) Run your Postman Test Collection by setting up the following:
- Choose Postman test collection- Set iterations as 3
- Set delay as 2500 ms
- Click on Run Postman Test… button

Step 4) Run Results page should be displayed after clicking the Run button. Depending on the delay, you should see the tests as they execute.
- Once tests have finished, you can see the test status if it is Passed or Failed and the results per iteration.
- You see Pass status for the Get Requests
- Since we did not have any tests for Post, there should be a message that the request did not have any tests.

You can see how important it is that there are tests in your requests so that you can verify HTTP request status if successful and the data is created or retrieved.
How to Run Collections using Newman
Another way to run a collection is via Newman. The main differences between Newman and Collection Runner are the following:
- Newman is an add-on for Postman. You will need to install it separately from the Native App.
- Newman uses the command line while Collection Runner has a GUI.
- Newman can be used for continuous integration.
To install Newman and run our collection from it, do the following:
Step 1) Install nodejs using this link: http://nodejs.org/download/
Step 2) Open the command line and enter
npm install -g newman
Newman should now be installed on your computer.

Step 3) Once Newman has been installed, let’s go back to our Postman workspace.In the Collections box, click on the three dots. Options should now appear. Select Export.

Step 4) Choose Export Collection as Collection v2.1 (Recommended) then click Export.

Step 5) Select your desired location then click Save. It is advisable to create a specific folder for your Postman tests. A collection should now be exported to your chosen local directory.
Step 6) We will also need to export our environment. Click on the eye icon beside the environment dropdown in Global, select Download as JSON. Select your desired location then click Save. It is advisable that the environment should be in the same folder as your collection.

Step 7) Environment should now be exported to the same local directory as Collection.
Step  Now go back to command line and change the directory to where you have saved the collection and environment.
cd C:UsersAsusDesktopPostman Tutorial
Step 9) Run your collection using this command:
newman run PostmanTestCollection.postman_collection.json -e Testing.postman_globals.json
Run results should now appear such as below.

For guide is a reference to some basic Newman codes for execution:
- Run a collection only. This can be used if there is no environment or test data file dependency.newman run <collection name>
- Run a collection and environment. The -e indicator is for environment.newman run <collection name> -e <environment name>
- Run a collection with desired no. of iterations.newman run <collection name> -n <no.of iterations>
- Run with data file.newman run <collection name> —data <file name> -n <no.of iterations> -e <environment name>
- Set delay time. This is important as tests may fail if it is run without delay due to requests being started without the previous request completing processing on the endpoint server.
newman run <collection name> -d <delay time>
Summary
- API Testing using Postman: Postman is an application for testing APIs. Postman is one of the most popular tools used in API testing by sending requests to the webserver and getting the response back
- Accessibility, Use of Collections, Collaboration, Continuous Integration, are some of the Key features to learn in Postman
- It’s recommended you create an account in Postman, so your collections are available online
- You can parameterize request in Postman
- You can create Tests to verify a postman request
- Collections can be run using Newman or Collection Runner
Подписывайтесь на новости Цифровой фабрики в Telegram:
Журнал Цифровая фабрика — всё об использовании новых технологий в жизни, культуре и продажах
Обложка: Midjourney
- Код машин
Download and Install Postman
Since you now know about the application and have become familiar with its working, it’s time to install the application on your system. In this chapter, we will cover How to Download and Install Postman on Windows Machine.
Postman is available for Windows, Linux, and Mac as a standalone application. You can install the application in two ways.
- As a Standalone Application.
- As a Chrome Extension
We will be discussing both methods in detail.
You may also go through the recording of the Postman Tutorial where our experts have explained the concepts in depth.
Download POSTMAN as a Standalone Application
A native application means the application will not be supportive of any particular application on an operating system. For example if you install an extension from chrome webstore then that application or extension will only run on chrome and no other browser. A native application is like any software that you install like a game or IDM or any antivirus for instance. A native application takes the support of just your operating system and not another application because they are written system specific and not application specific.
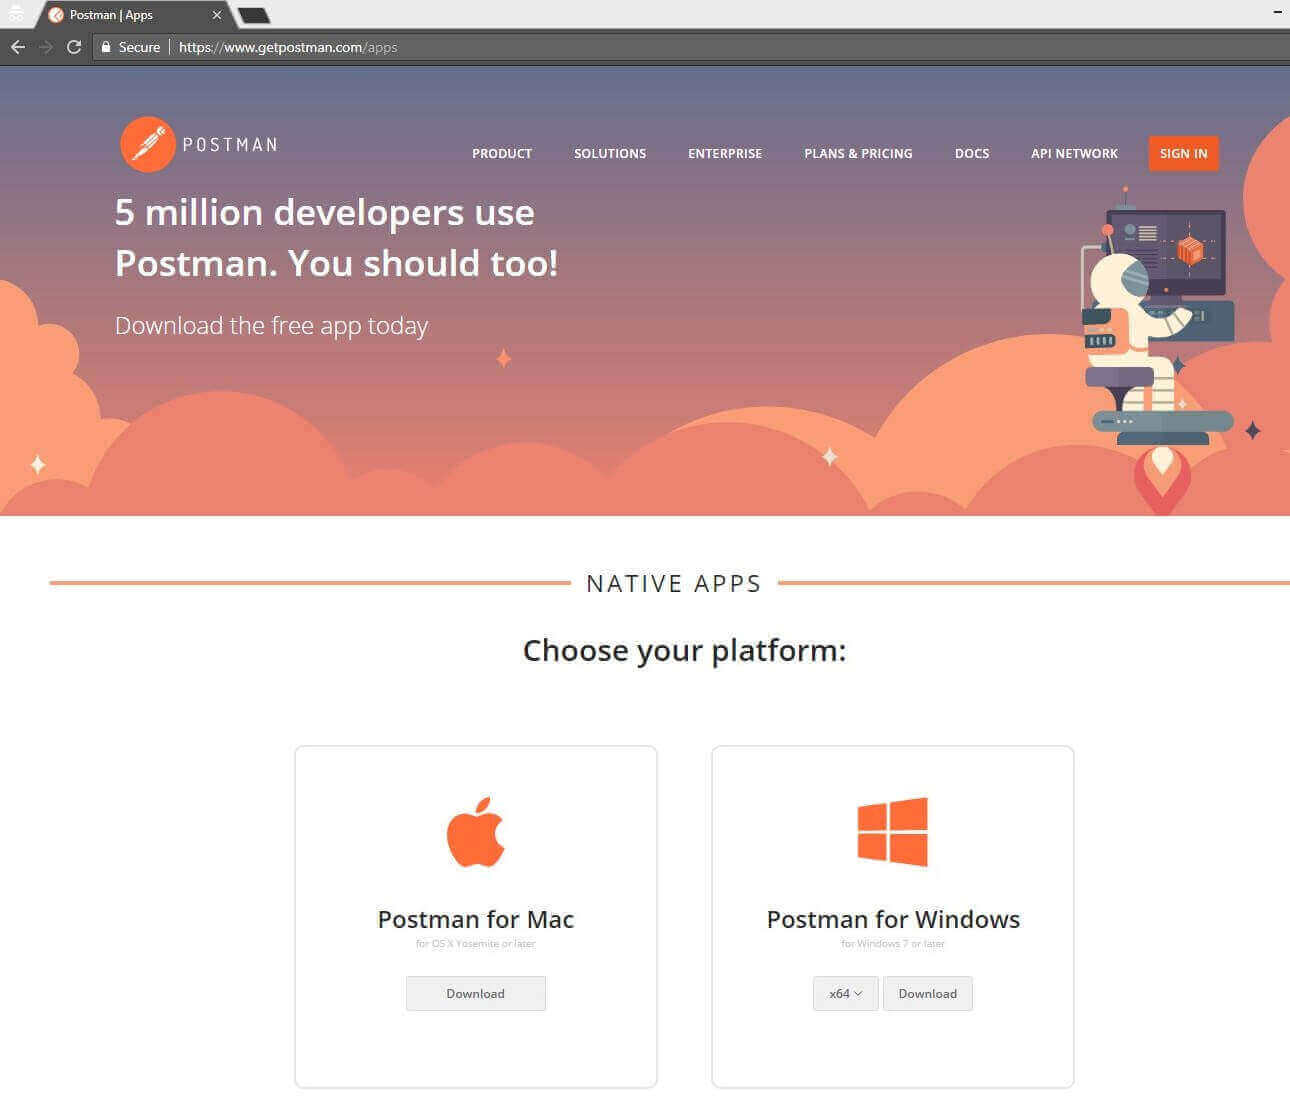
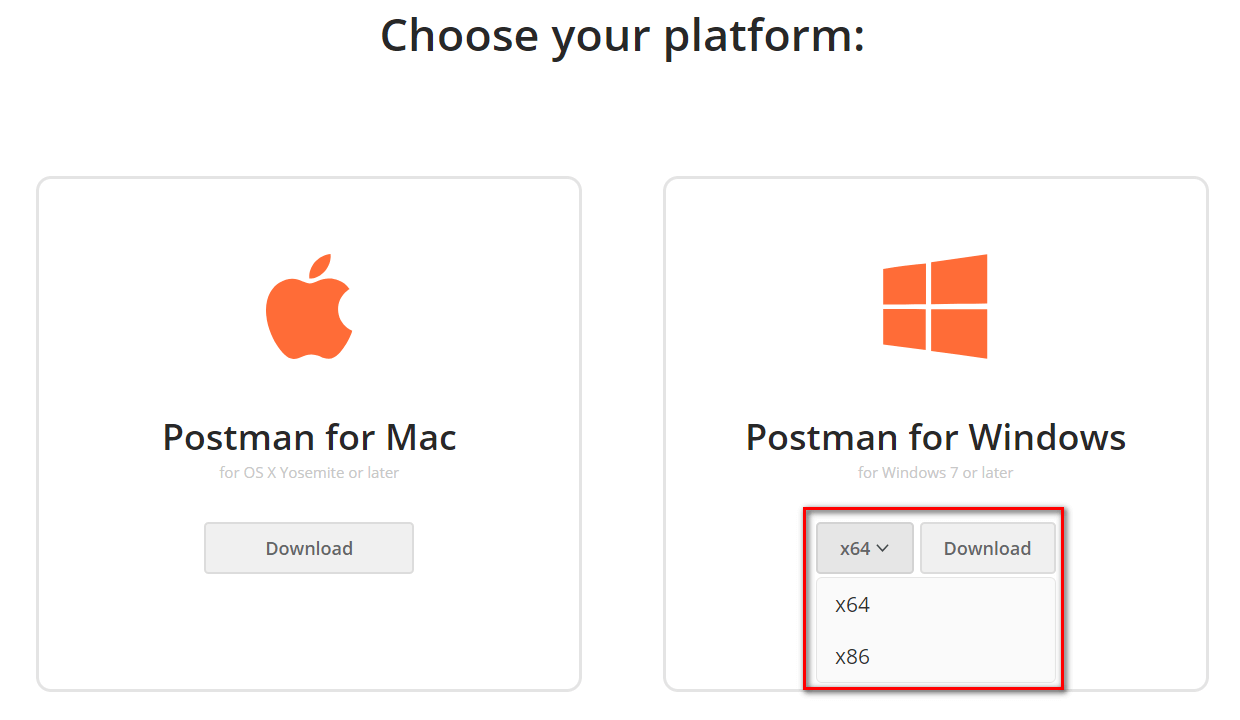
1.Go to https://www.getpostman.com/apps
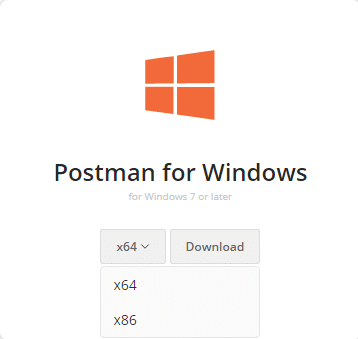
Note: If you are using windows then there is an option for downloading for 32-bit system and 64-bit system. If you are using 64-bit windows then select x64 and if you are using a 32-bit system then select x86. The default value is x64.
- Choose the Operating System on which you want to download PostMan and click on «Download» button. Since I have got Windows 64-bit machine, I am going to install x64-Windows.
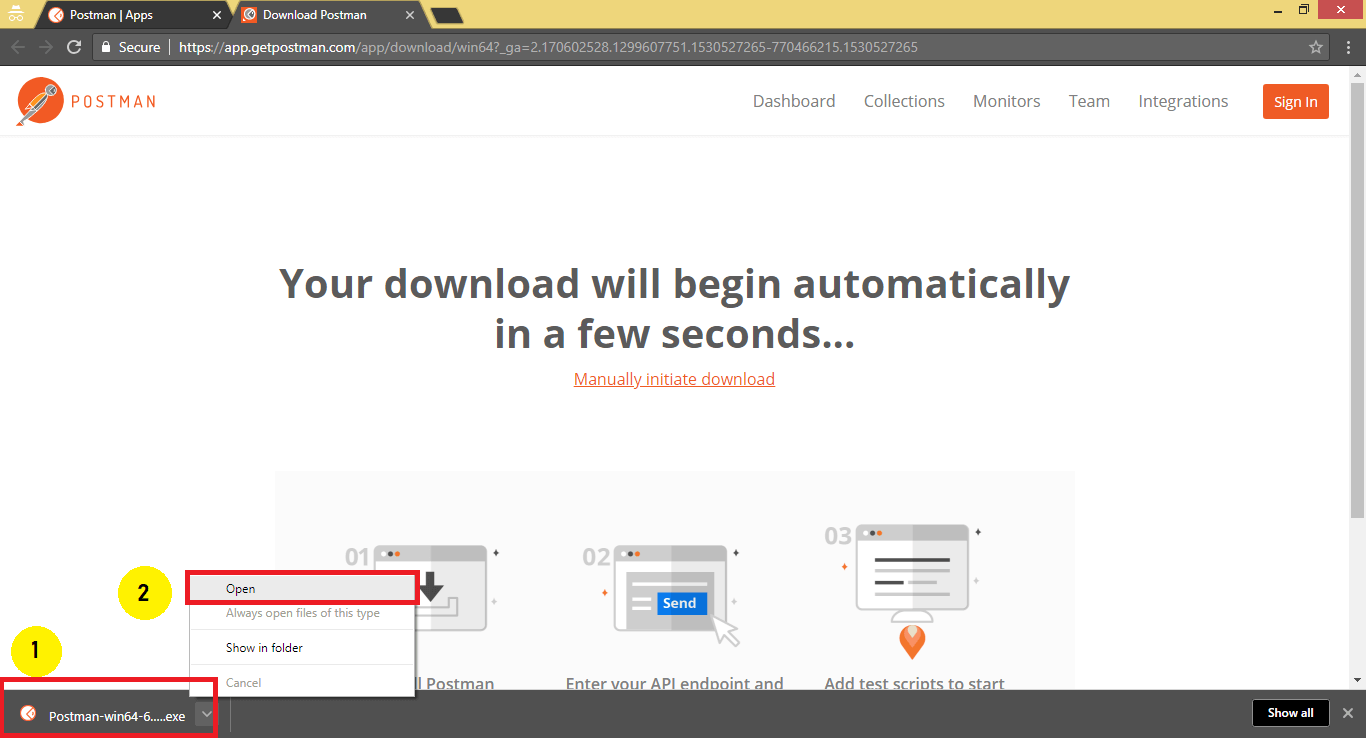
3. Once you download the .exe file, you will need to install the application. Since I am using the Chrome browser, the downloaded .exe will appear at the bottom left of the browser.
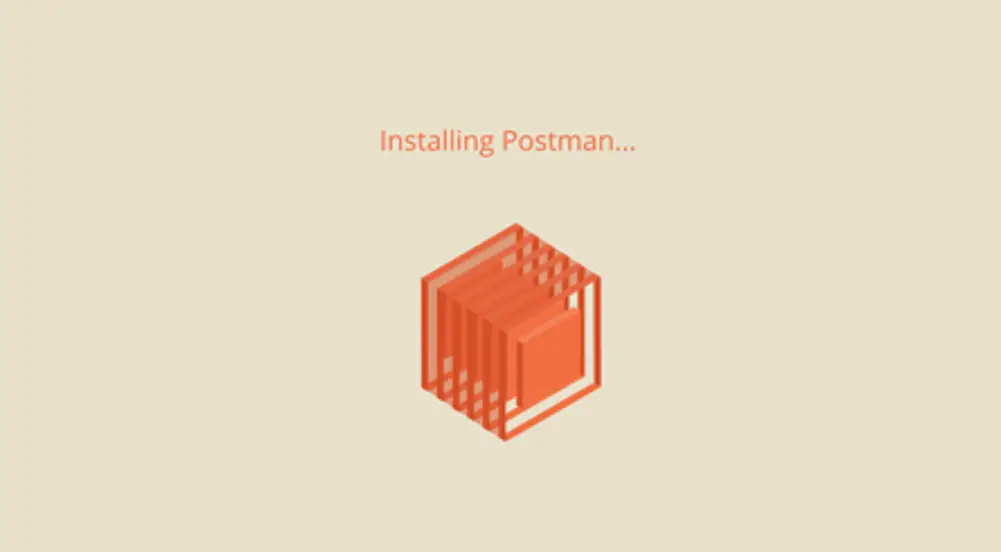
- Click on the exe file to install it on the system. First, it will install the POSTMAN application.
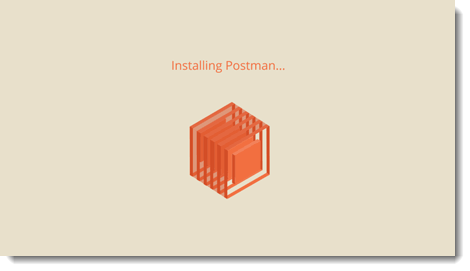
- There are no further steps for installing. After completion, it will automatically start opening the PostMan tool.
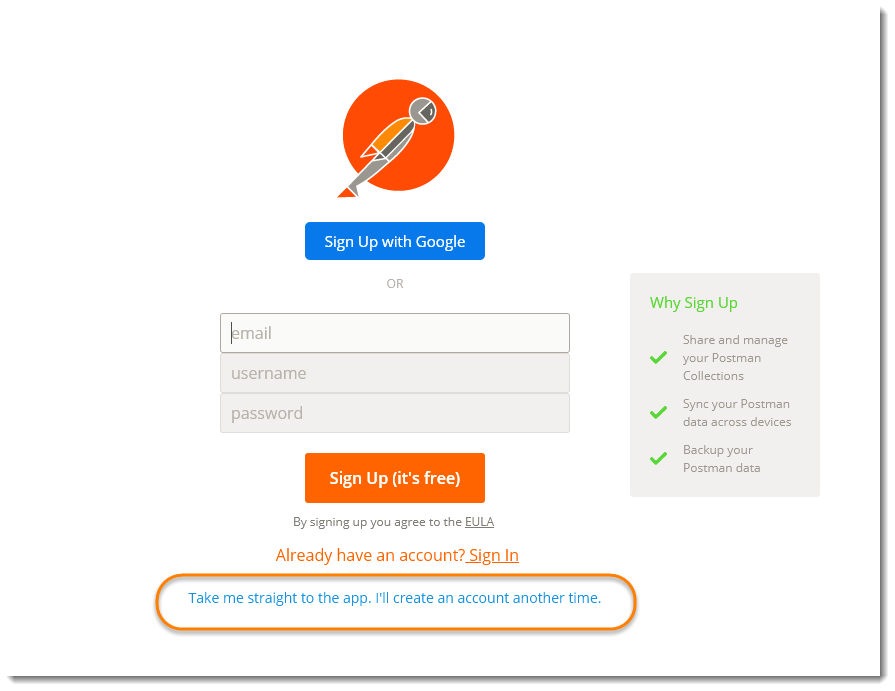
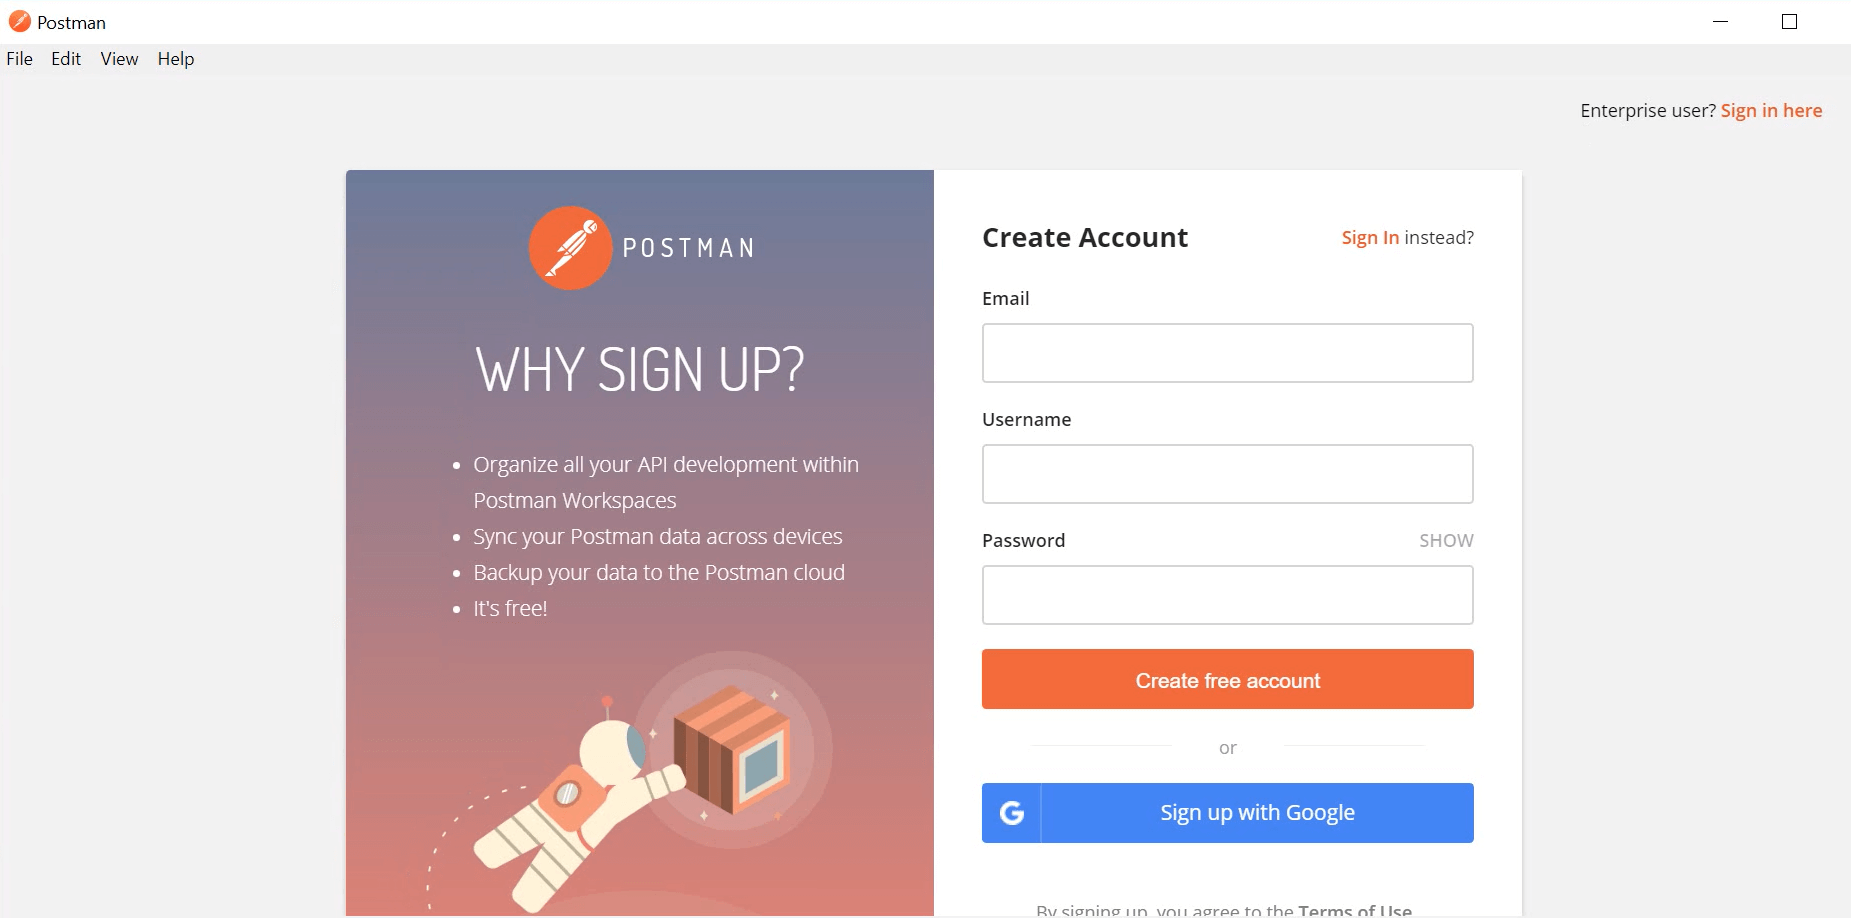
- Once you have the application window up, click on Take me straight to the app. I’ll create an account another time as highlighted. Alternatively, you can sign up with google but it does not matter at present.
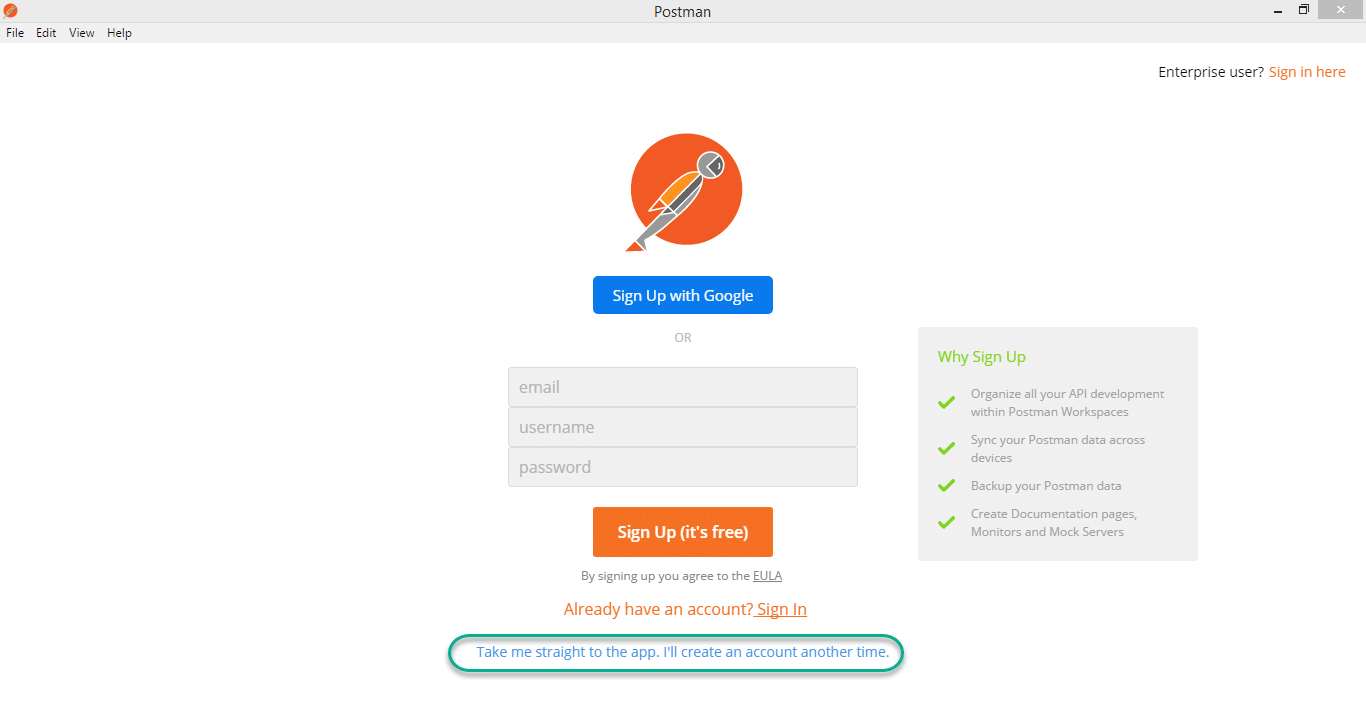
If you see this page then you have successfully installed Postman on your system.
Download POSTMAN as a Chrome Extension
1)Go to Chrome WebStore — PostMan Tool and click on Add To Chrome.
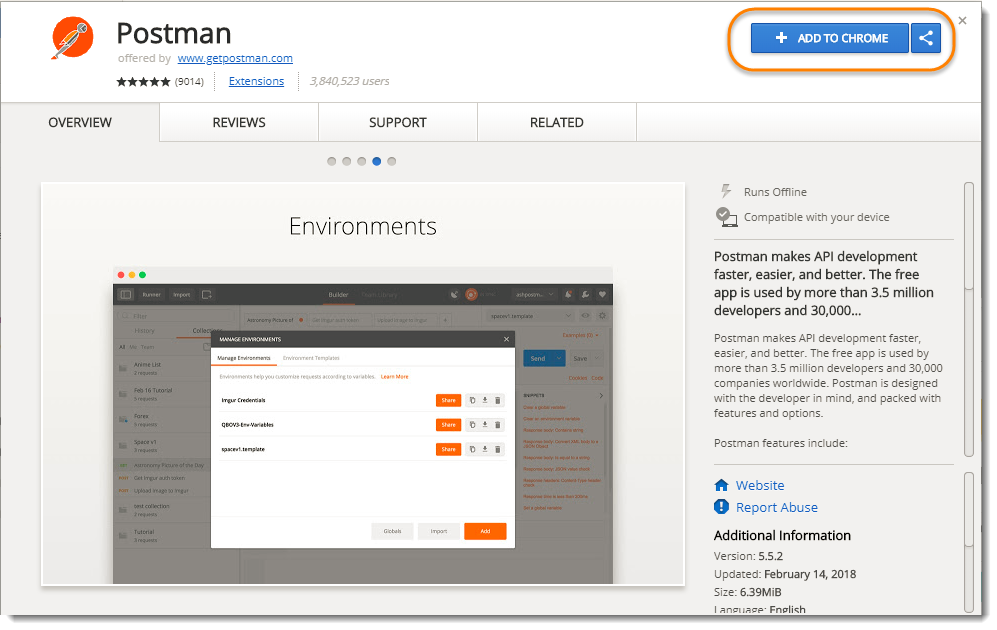
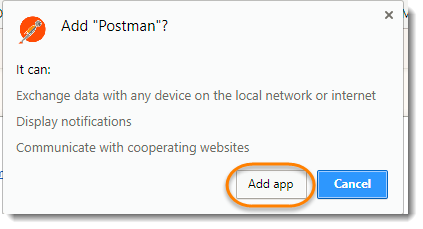
- This will display a pop up to add extension, click on Add app.
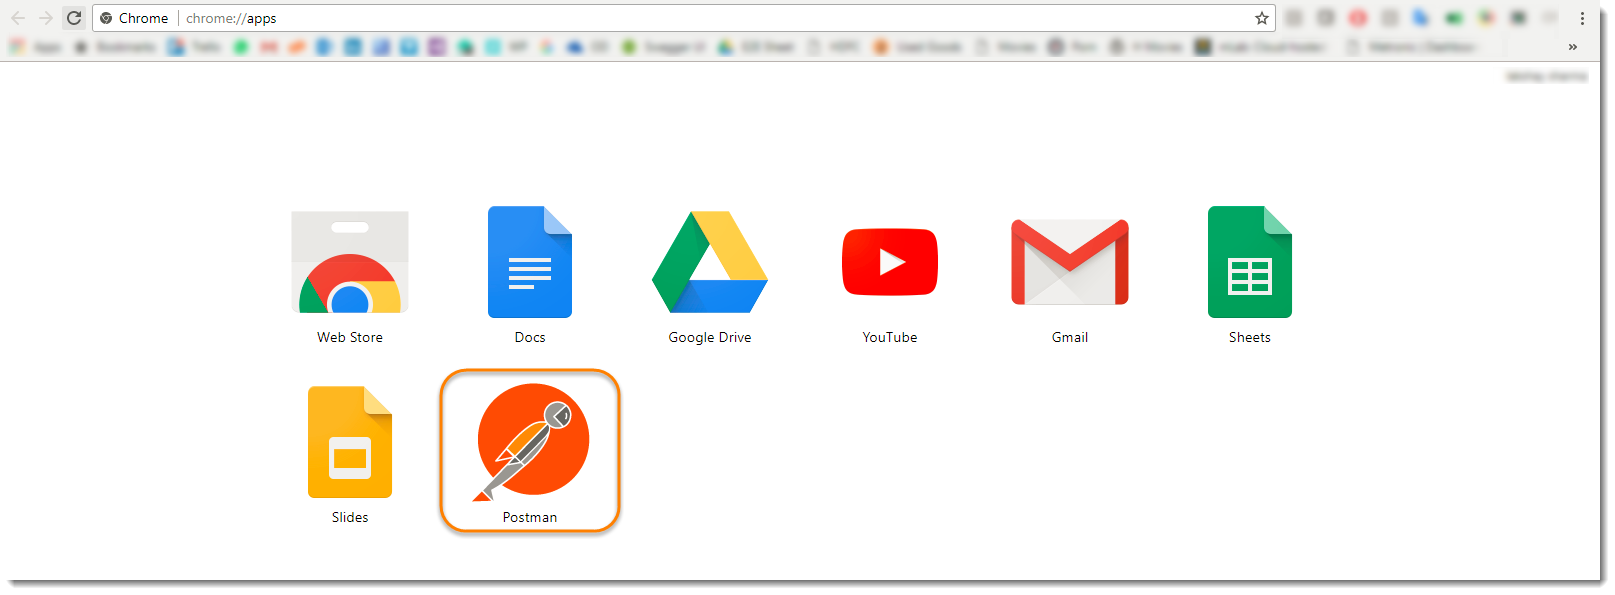
- Now it will automatically open a Chrome Apps page, where it will display all the installed apps on your chrome browser. Simply click on the PostMan application.
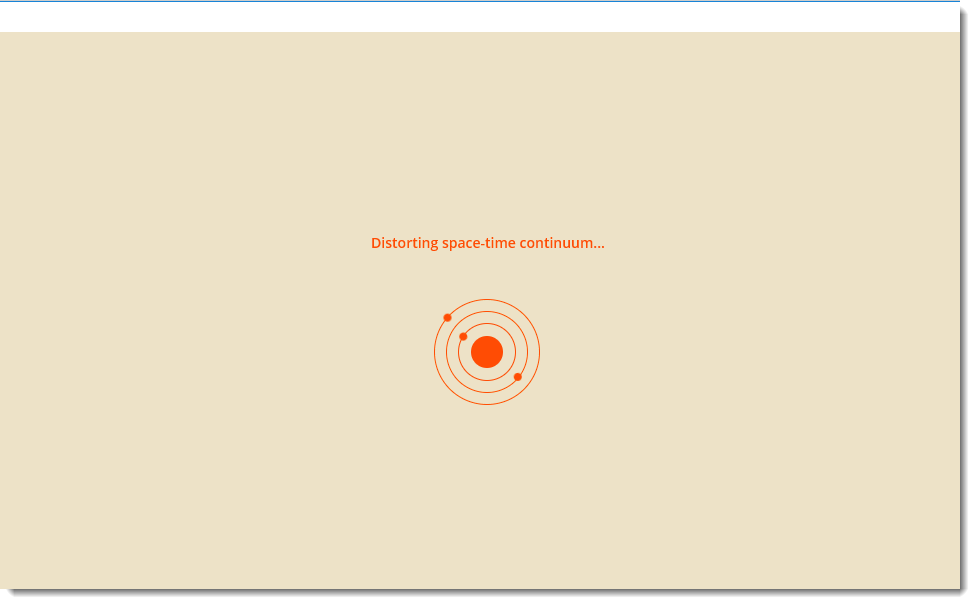
- It will take a few seconds to start, hold on till then

- Once done, you would see the PostMan application registration page. As mentioned above, we will ignore registration as of now but not to avoid it, *Registration has its own benefits, as it always stores your data and can be accessed from different machines and locations. *But we will cover that later.
Why to prefer PostMan as a Stand Alone application
Although Postman was introduced first as a chrome application and was powerful earlier on, we highly recommend downloading postman as an application for your operative system(native application) rather than as an extension for chrome.
There are two main reasons for this.
- First of all, postman as an application for chrome does not support all the features that the native app has. For example, a proxy cannot be captured in the chrome app. You need to install another extension called postman interceptor in order to work the proxy through the browser. A proxy server acts as an intermediary that captures the requests that you send through your browser to the server. Requests are anything like any web address any search query or anything that asks for a response from server. For example, when you hit «Search» in google after writing something in the search bar, it is an API request or you type www.google.co.in in the address bar, it is an API request. After installing the postman interceptor only you can capture the requests that you send. Moreover, Postman features fewer menu options in its chrome app, only those which adhere to the chrome standards. Therefore you won’t be able to enjoy every feature of Postman while using it as a chrome application.
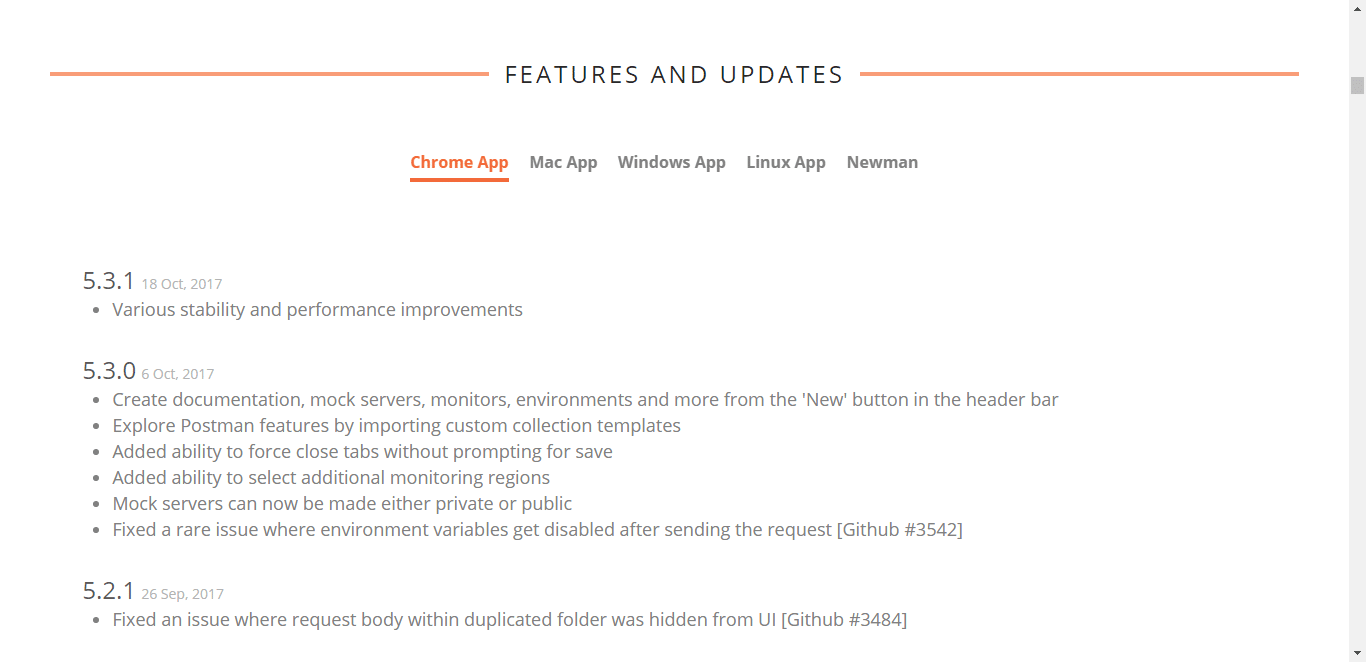
- The second reason is the main concern for us to not recommend you, download postman, for chrome. As stated on the Postman website, Postman builders have stopped the support for the chrome application. This in simple terms means that from January 2018 onwards, there will be no updates, no bug fixes, no improvements in the chrome application. The app that is currently available on the web-store is the final application. Moreover, if you are stuck on any issue, there will be no one to resolve it from Postman. This step is taken by Postman after Google announced that it will be ending support for the Chrome apps for Windows, Linux and Mac.
As it can be seen in the below image taken from the postman website, the last update for the Chrome app was on 18 Oct, 2017. So, it is better that you install the Standalone application and the same will be used by us for this course.
In the next chapter, we will run through some basics and terminologies about the Postman.
Welcome to the Postman docs! This is the place to find official information on how to use Postman in your API projects.
If you’re just starting to learn about APIs and Postman, you can use a variety of channels both in and outside Postman:
-
Use the Bootcamp to work through lessons inside Postman—open it at the bottom right of the app.
-
-
Student Program
–Take the Student Expert training, covering request configurations and test scripting.
-
What are you here to learn about?
What are you here to learn about?
If you’re learning to carry out a specific task or workflow in Postman, check out the following topics to find resources:
If you’re building a client app or just need to connect to an API, check out some Postman essentials:
If you’re testing an API, you can use Postman to automate various parts of the process:
Building and managing APIs
Building and managing APIs
If you’re developing a back-end, working API-first, or need to monitor API performance, Postman utilities can streamline your workflows:
If you’re exposing an API for public use, Postman can support developer onboarding:
Collaborating with your team
Collaborating with your team
If you’re using Postman in your company or team, check out these guides to maximize your collaboration:
If you’re integrating Postman with your CI/CD workflow or are developing with Postman APIs or libraries, check out these resources:
To get the latest version of the Postman desktop app, visit the
download page
and select Download for your platform.
-
Installing Postman on the desktop
Note that the Postman team only tests, fixes bugs, and provides support for the app on Mac, Windows, Linux, and the web.
Installing Postman on Mac
Installing Postman on Mac
Download
and unzip the app using the built-in Archive Utility app. Double-click Postman. When prompted, move the file to your Applications folder—this will ensure that future updates can be installed correctly.
The minimum OS version supported is macOS 10.11 (El Capitan).
You may encounter a «Library not loaded» error if you attempt to unzip and install Postman using a third-party app—using the default Archive Utility for Mac should resolve this.
Installing Postman on Windows
Installing Postman on Windows
Download
the app. Double-click the exe file to install it.
Postman supports Windows 7 and above. Both
ia32 (x86)andx64 (amd64)installers are available for Windows. Windows for ARM devices is possible by using the ia32 binary.
Installing Postman on Linux
Installing Postman on Linux
You can install Postman on Linux by manually downloading it, using the
Snap
store link, or with the command snap install postman.
To install manually,
download
and unzip the app, for example into the opt directory. You will need sudo privileges.
To start the app from a launcher icon, create a desktop file, naming it Postman.desktop and saving it in the following location:
~/.local/share/applications/Postman.desktop
Enter the following content in the file—replacing opt if you extracted the file somewhere else—and save it:
Exec=/opt/Postman/app/Postman %U
Icon=/opt/Postman/app/resources/app/assets/icon.png
Postman supports the following distributions:
The support of certain Linux distributions depends on if they are supported by Electron. Refer to
Electron’s documentation
.
It is recommended you install
Snap
as it includes all the libraries that the app needs and they are bundled with the app itself.
Avoid starting Postman using the
sudocommand, as it will create permission issues on the files created by Postman.Make sure you have read/write permission for the
~/.configfolder where Postman stores information.If you are an Ubuntu 18 user, you will also need to install the
libgconf-2-4package with the commandapt-get install libgconf-2-4
You can use Postman in your web browser to carry out your API development and testing tasks in conjunction with the Postman Agent. To access Postman on the web, visit
go.postman.co/home
.
Postman’s web application is optimized for the following browsers:
-
Safari (13.1.1 and higher)
Installing the Postman desktop agent
Installing the Postman desktop agent
If you are using the Postman web client, you will need to also download the Postman desktop agent. You will be prompted to download and install the agent so that you can make requests from the web. You can also download the agent directly from
the Downloads page
.
The Postman agent overcomes the Cross Object Resource Sharing (CORS) limitations of browsers, and facilitates API request sending from your browser version of Postman. Once you have the agent installed you will be able to use it with web requests.
You can either enable Auto-select option or manually select the agent (Cloud, Desktop, or Browser) you would like to use for your requests.
Once you enable the option for Auto-select, Postman will automatically select the best agent for your requests.
You can select the Cloud Agent if you want to send HTTP requests via Postman’s secure cloud servers. While using the locally running Postman, it is recommended you use the Desktop Agent. Using the Browser Agent for your web requests has some
limitations
.
If you try to send a request and it isn’t successful because the agent is not selected, you will see a link in the response area which you can select to switch to the agent and try your request again. Read
more about the agent
.
Postman on the web is under active development, but there are a few features you can currently only access in the desktop app and not in your web browser:
-
Live preview: You will not see all of your request headers update live as you enter your request configurations as you do in the desktop Postman app—you will only see Authorization headers update as you edit.
-
Certificates and Proxy: These will take the browser defined value and cannot be overridden by Postman.
The native Postman apps will notify you when a major update is available. For other updates you will see a dot on the settings icon. If the indicator is red instead of orange, it indicates a failed update.
Select the update option to download or install the latest update. You will see a notification when the download is complete, prompting you to restart the Postman app to apply the updates. If you’re not ready to update yet, choose Later to auto-update the next time you launch the app.
You can configure your preferences to enable automatic download for major updates in Settings > Update. Postman automatically downloads minor updates and bug fixes.
Postman Chrome app (deprecated)
Postman Chrome app (deprecated)
The Postman Chrome app is deprecated—if you’re using the Chrome app, you can
retain your data when you switch to the native app
either by syncing with a Postman account you’re signed into, or by exporting from Chrome and importing into the native app.
-
The native apps let you work with
cookies
directly.
-
Unlike the Chrome app, no separate extension for the
Interceptor
is needed.
-
The native apps are not restricted by the Chrome standards for the menu bar. You can check for updates, create Postman Windows and tabs, and edit preferences.
-
The native apps let you send headers like
OriginandUser-Agent. These are restricted in the Chrome app. -
The «don’t follow redirects» option exists in the native apps to prevent requests that return a 300-series response from being automatically redirected—doing this in the Chrome app requires the Interceptor extension.
-
The native app has a built-in
console
, which allows you to view the network request details for API calls.
Migrating to the native app
Migrating to the native app
To switch from the Chrome app to native,
download
Postman and
sign in to your account
. Start the native app, and your history and collections will be automatically synced.
Alternatively, if you don’t want to sign in to your Postman account, you can bulk export your Postman data from the Chrome app, and then bulk import into the new native app at Settings > Data.
Using Postman behind a firewall
Using Postman behind a firewall
Postman’s infrastructure runs on Amazon’s AWS platform. If you are operating behind a network firewall, you will need to allow the following domains to make WebSocket connections for Postman:
By default, WebSocket connections use the same ports as HTTP (80) and HTTPS (443).
Postman does not have a fixed IP range that can be provided. If necessary, please refer to the
current AWS IP ranges
and allow the broad range provided.
Troubleshooting your Postman installation
Troubleshooting your Postman installation
If you encounter any issues installing and running Postman, check out the following tips. If these do not help, please refer to the installation posts on the
community forum
and create a new post if your issue is not already covered.
If you see an Update Failed notification in Postman, you can use the DevTools to investigate.
Open the DevTools using View > Developer > Show DevTools (Current View). Some known errors are as follows:
-
Error message:
Cannot update while running on a read-only volume-
This error means that the app user does not have write permission in the directory where Postman is installed. To resolve the problem, move Postman to a directory where the user has write permissions, for example the
/Applicationdirectory for Mac, and to thehomedirectory for Linux.
-
Write Permission Issue in DevTools
-
Error message:
Code signature at URL file:///... did not pass validation: code object is not signed at all-
This error means that there are multiple updates running at the same time. This can happen when the app is opened before the previous update could finish. To resolve the problem, quit and reopen the app.
-
Update button not available
Update button not available
If you are using Postman for Linux, and installed the app with the Ubuntu Software Center or Snap Store, you may not see a Check for updates button. This is because the updates are handled by the store, which should automatically update Postman on a regular cadence.
Postman JavaScript reference
Postman JavaScript reference
Postman provides JavaScript APIs that you can use in your request scripts. The pm object provides most of the functionality for testing your request and response data, with the postman object providing some additional workflow control.
You will carry out most of the Postman JavaScript API functionality using pm.*, which provides access to request and response data, and variables.
Using variables in scripts
Using variables in scripts
You can access and manipulate
variables
at each scope in Postman using the pm API.
Postman supports a variety of variable
scopes
. The pm object provides methods for accessing global, collection, and environment variables specifically, and pm.variables methods for accessing variables at different scopes as well as setting local variables.
-
Check if there is a Postman variable in the current scope:
pm.variables.has(variableName:String):function → Boolean
-
Get the value of the Postman variable with the specified name:
pm.variables.get(variableName:String):function → *
-
Set a local variable with the specified name and value:
pm.variables.set(variableName:String, variableValue:*):function
-
Return the resolved value of a dynamic variable inside a script using the syntax
{{$variableName}}:
pm.variables.replaceIn(variableName:String):function: → *
const stringWithVars = pm.variables.replaceIn(«Hi, my name is {{$randomFirstName}}»);
console.log(stringWithVars);
-
Return an object containing all variables with their values in the current scope. Based on the order of precedence, this will contain variables from multiple scopes.
pm.variables.toObject():function → Object
Variable scope determines the precedence Postman gives to variables when you reference them, in order of increasing precedence:
The variable with the closest scope overrides any others. For example, if you have variables named score in both the current collection and the active environment, and you call pm.variables.get('score'), Postman will return the current value of the environment variable. When you set a variable value using pm.variables.set, the value is local and will only persist for the current request or collection run.
//collection var ‘score’ = 1
//environment var ‘score’ = 2
console.log(pm.variables.get(‘score’));//outputs 2
console.log(pm.collectionVariables.get(‘score’));//outputs 1
console.log(pm.environment.get(‘score’));//outputs 2
pm.variables.set(‘score’, 3);//local var
console.log(pm.variables.get(‘score’));//outputs 3
console.log(pm.variables.get(‘score’));//outputs 2
Using environment variables in scripts
Your scripts can use the pm.environment methods to access and manipulate variables in the active (currently selected) environment.
-
The name of the active environment:
pm.environment.name:String
-
Check whether the environment has a variable with the specified name:
pm.environment.has(variableName:String):function → Boolean
-
Get the variable with the specified name in the active environment:
pm.environment.get(variableName:String):function → *
-
Set the variable with the specified name and value in the active environment:
pm.environment.set(variableName:String, variableValue:*):function
-
Return the resolved value of a dynamic variable inside a script using the syntax
{{$variableName}}:
pm.environment.replaceIn(variableName:String):function → *
//environment has vars firstName and age
const stringWithVars = pm.environment.replaceIn(«Hi, my name is {{firstName}} and I am {{age}}.»);
console.log(stringWithVars);
-
Return all variables with their values in the active environment in a single object:
pm.environment.toObject():function → Object
-
Remove a variable from the active environment, specifying the variable by name:
pm.environment.unset(variableName:String):function
-
Clear all variables in the active environment:
pm.environment.clear():function
Note that your ability to edit variables depends on your
access level
in the workspace.
Using collection variables in scripts
Your scripts can use the pm.collectionVariables methods to access and manipulate variables in the collection.
-
Check whether there is a variable in the collection with the specified name:
pm.collectionVariables.has(variableName:String):function → Boolean
-
Return the value of the collection variable with the specified name:
pm.collectionVariables.get(variableName:String):function → *
-
Set a collection variable with the specified name and value:
pm.collectionVariables.set(variableName:String, variableValue:*):function
-
Return the resolved value of a dynamic variable inside a script using the syntax
{{$variableName}}:
pm.collectionVariables.replaceIn(variableName:String):function → *
//collection has vars firstName and age
const stringWithVars = pm.collectionVariables.replaceIn(«Hi, my name is {{firstName}} and I am {{age}}.»);
console.log(stringWithVars);
-
Return all variables with their values in the collection in an object:
pm.collectionVariables.toObject():function → Object
-
Remove the specified variable from the collection:
pm.collectionVariables.unset(variableName:String):function
-
Clear all variables from the collection:
pm.collectionVariables.clear():function
Using global variables in scripts
Your scripts can use the pm.globals methods to access and manipulate variables at global scope within the workspace.
-
Check where there is a global variable with the specified name:
pm.globals.has(variableName:String):function → Boolean
-
Return the value of the global variable with the specified name:
pm.globals.get(variableName:String):function → *
-
Set a global variable with specified name and value:
pm.globals.set(variableName:String, variableValue:*):function
-
Return the resolved value of a dynamic variable inside a script using the syntax
{{$variableName}}:
pm.globals.replaceIn(variableName:String):function → String
//globals include vars firstName and age
const stringWithVars = pm.globals.replaceIn(«Hi, my name is {{firstName}} and I am {{age}}.»);
console.log(stringWithVars);
-
Return all global variables and their values in an object:
pm.globals.toObject():function → Object
-
Remove the specified global variable:
pm.globals.unset(variableName:String):function
-
Clear all global variables in the workspace:
pm.globals.clear():function
Note that your ability to edit variables depends on your
access level
in the workspace.
Using data variables in scripts
-
Check whether a variable with the specified name exists in the current iteration data:
pm.iterationData.has(variableName:String):function → boolean
-
Return a variable from the iteration data with the specified name:
pm.iterationData.get(variableName:String):function → *
-
Return the iteration data variables in an object:
pm.iterationData.toObject():function → Object
-
Convert the iterationData object to JSON format:
pm.iterationData.toJSON():function → *
-
Remove the specified variable:
pm.iterationData.unset(key:String):function
Scripting with request and response data
Scripting with request and response data
Scripting with request data
The pm.request object provides access to the data for the request the script is running within. For a Pre-request Script this is the request that is about to run, and for a Test script this is the request that has already run.
You can use the pm.request object pre-request scripts to alter various parts of the request configuration before it runs.
The pm.request object provides the following properties and methods:
pm.request.headers:HeaderList
-
The data in the
request body
. This object is immutable and cannot be modified from scripts:
pm.request.body:RequestBody
-
Add a header with the specified name and value for the current request:
pm.request.headers.add(header:Header):function
-
Delete the request header with the specified name:
pm.request.headers.remove(headerName:String):function
-
Insert the specified header name and value (if the header does not exist, otherwise the already existing header will update to the new value):
pm.request.headers.upsert({key: headerName:String, value: headerValue:String}):function)
Scripting with response data
The pm.response object provides access to the data returned in the response for the current request in scripts added to the Tests.
The pm.response object provides the following properties and methods:
-
The response status code:
pm.response.status:String
pm.response.headers:HeaderList
-
The time the response took to receive in milliseconds:
pm.response.responseTime:Number
-
The size of the response received:
pm.response.responseSize:Number
pm.response.text():Function → String
-
The response JSON, which you can use to drill down into the properties received:
pm.response.json():Function → Object
Scripting with request info
The pm.info object provides data related to the request and the script itself, including name, ID, and iteration count.
The pm.info object provides the following properties and methods:
-
The event, which will be either «prerequest» or «test» depending on where the script is executing within the request:
-
The total number of iterations that are scheduled to run:
pm.info.iterationCount:Number
-
The saved name of the request running:
pm.info.requestName:String
-
A unique GUID that identifies the running request:
Scripting with request cookies
The pm.cookies object provides access to the list of cookies associated with the request.
The pm.cookies object provides the following properties and methods:
-
Check whether a particular cookie (specified by name) exists for the requested domain:
pm.cookies.has(cookieName:String):Function → Boolean
-
Get the value of the specified cookie:
pm.cookies.get(cookieName:String):Function → String
-
Get a copy of all cookies and their values in an object. Returns any cookies that are defined for the request domain and path:
pm.cookies.toObject():Function → Object
You can also use pm.cookies.jar to specify a domain for access to request cookies.
To enable programmatic access via the pm.cookies.jar methods, first
whitelist
the cookie URL.
-
Access the cookie jar object:
pm.cookies.jar():Function → Object
const jar = pm.cookies.jar();
-
Set a cookie using name and value:
jar.set(URL:String, cookie name:String, cookie value:String, callback(error, cookie)):Function → Object
jar.set(URL:String, { name:String, value:String, httpOnly:Bool }, callback(error, cookie)):Function → Object
const jar = pm.cookies.jar();
jar.set(«httpbin.org», «session-id», «abc123», (error, cookie) => {
console.error(`An error occurred: ${error}`);
console.log(`Cookie saved: ${cookie}`);
-
Get a cookie from the cookie jar:
jar.get(URL:String, cookieName:String, callback (error, value)):Function → Object
-
Get all the cookies from the cookie jar. The cookies are available in the callback function:
jar.getAll(URL:String, callback (error, cookies)):Function
jar.unset(URL:String, token:String, callback(error)):Function → Object
-
Clear all cookies from the cookie jar:
jar.clear(URL:String, callback (error)):Function → Object
Sending requests from scripts
Sending requests from scripts
You can use the pm.sendRequest method to send a request asynchronously from a Pre-request or Test script. This allows you to execute logic in the background if you are carrying out computation or sending multiple requests at the same time without waiting for each to complete. You can avoid blocking issues by adding a callback function so that your code can respond when Postman receives a response. You can then carry out any additional processing you need on the response data.
You can pass the pm.sendRequest method a URL string, or can provide a complete request configuration in JSON including headers, method, body,
and more
.
// Example with a plain string URL
pm.sendRequest(‘https://postman-echo.com/get’, (error, response) => {
// Example with a full-fledged request
url: ‘https://postman-echo.com/post’,
‘Content-Type’: ‘application/json’,
raw: JSON.stringify({ key: ‘this is json’ })
pm.sendRequest(postRequest, (error, response) => {
console.log(error ? error : response.json());
// Example containing a test
pm.sendRequest(‘https://postman-echo.com/get’, (error, response) => {
pm.test(‘response should be okay to process’, () => {
pm.expect(error).to.equal(null);
pm.expect(response).to.have.property(‘code’, 200);
pm.expect(response).to.have.property(‘status’, ‘OK’);
The postman object provides the setNextRequest method for building request workflows when you use the
collection runner
or
Newman
.
Note that
setNextRequesthas no effect when you run requests using the Send button, it only comes into effect when you run a collection.
When you run a collection (using the collection runner or Newman), Postman will run your requests in a default order or an order you specify when you set up the run. However, you can override this execution order using postman.setNextRequest to specify which request should run next.
-
Run the specified request after this one (the request name as defined in the collection e.g. «Get customers»):
postman.setNextRequest(requestName:String):Function
-
Run the specified request after this one (the request ID returned by
pm.info.requestId):
postman.setNextRequest(requestId:String):Function
//script in another request calls:
//pm.environment.set(‘next’, pm.info.requestId)
postman.setNextRequest(pm.environment.get(‘next’));
pm.visualizer.set(layout:String, data:Object, options:Object):Function
-
-
JSON object that binds to the template and you can access it inside the template string
-
var template = `<p>{{res.info}}</p>`;
pm.visualizer.set(template, {
Building response data into visualizations
Building response data into visualizations
Use pm.getData to retrieve response data inside a visualization template string.
pm.getData(callback):Function
The callback function accepts two parameters:
pm.getData(function (error, data) {
var value = data.res.info;
-
pm.test(testName:String, specFunction:Function):Function
You can use pm.test to write test specifications inside either the Pre-request or Tests scripts. Tests include a name and assertion—Postman will output test results as part of the response.
The pm.test method returns the pm object, making the call chainable. The following sample test checks that a response is valid to proceed.
pm.test(«response should be okay to process», function () {
pm.response.to.not.be.error;
pm.response.to.have.jsonBody(»);
pm.response.to.not.have.jsonBody(‘error’);
An optional done callback can be passed to pm.test, to test asynchronous functions.
pm.test(‘async test’, function (done) {
pm.expect(pm.response.code).to.equal(200);
-
Get the total number of tests executed from a specific location in code:
pm.test.index():Function → Number
The pm.expect method allows you to write assertions on your response data, using
ChaiJS expect BDD
syntax.
pm.expect(assertion:*):Function → Assertion
You can also use pm.response.to.have.* and pm.response.to.be.* to build your assertions.
require(moduleName:String):function → *
The require method allows you to use the sandbox built-in library modules. The list of available libraries is listed below with links to the corresponding documentation.
-
lodash
(The built-in
_object v3.10.1 exists in the sandbox by default. Userequireto load the latest version.)
A number of NodeJS modules are also available to use in the sandbox:
In order to use a library, call the require method, pass the module name as a parameter, and assign the return object from the method to a variable.
You can use tests to build Postman into your development projects in a variety of ways using
Postman utilities
.
In this post, we will see how to download and install Postman tool on Windows. Postman is available as a native app for Mac, Windows, and Linux operating systems.
Related Posts:
- Postman Tutorial
- API Testing Tutorial
- API Testing Interview Questions
- SOAP Interview Questions
We can install postman in two ways
- As a Native App
- As a Chrome Extension
In this post, I will show you how to install Postman as a Native App (Standalone Application). Let’s see how to install Postman native app.
Do you have a question that why we just presenting installation of Postman tool as a native app and not as a Chrome Extension here.
We recommend using the Postman native app. Chrome apps are being deprecated. The last update for Chrome app was released on 26 Jun’18. Postman developers stopped supporting the Postman Chrome App. So we prefer using Postman native app. So in this post, we will show download and install postman as a native app.
Postman is available as a Chrome app (last updated on Jun’18). The Postman Chrome app can only run on the Chrome browser. To use the Postman Chrome app, you need to install Google Chrome. If you already have Chrome installed, head over to Postman’s page on the Chrome Web Store, and click ‘Add to Chrome’.
Install Postman Native Application:
Step 1: To install Postman, go to the this link and click Download for Mac / Windows / Linux depending on your platform.
Here I am going to download Windows 64 bit version, since I have Windows 64 bit machine. If you have Windows 32 bit machine, you can download Postman for Windows 32 bit as shown in the below image.
Once it is downloaded, you can find your downloaded file in the default downloads location of your system. If you are using Chrome browser, the downloaded file will appear at the bottom of the browser as shown in the below image.
Step 2: Open Postman windows 64 bit exe file to install it on your system.
Step 3: Once installation of Postman is completed, you will be asked to create an account. You can create an account later time by clicking on “Take me straight to the app, I’ll create an account another time” link.
Note: I highly recommend you to create an account in the beginning itself. If you have an account, it will allow you to save your work that you do inside postman. You wont lose any of your work.
Step 4: After Sign in, choose your preferred settings and click on Save.
It will automatically opens Postman Tool. After successful installation and registration (register with your Gmail), you could see the below Postman toolkit.
Troubleshooting Postman Updates:
You may encounter issues updating in the Windows version of Postman 6.1. To resolve you must set the environmental variable as mentioned below.
- Go to ‘Control Panel’ – ‘System’
- Click on ‘Advanced System Settings’
- Click on ‘Advanced’ and then click on ‘Environment Variables’
- Click on ‘New’ under ‘System Variable’
- Add a ‘Variable name’ as ‘POSTMAN_DISABLE_GPU’ and ‘Variable value’ as ‘true’ and click on OK to save.
This is all about installation of Postman tool on windows system.
Related Posts:
- Postman Tutorial
- API Testing Tutorial
- API Testing Interview Questions
- SOAP Interview Questions
Rajkumar SM is a founder of SoftwareTestingMaterial. He is a certified Software Test Engineer by profession and a blogger & a YouTuber by a choice. He has extensive experience in the field of Software Testing. Furthermore, he loves to be with his wife and a cute little kid ‘Freedom’.
What is Postman?
Postman is a scalable API testing tool that quickly integrates into CI/CD pipeline. It started in 2012 as a side project by Abhinav Asthana to simplify API workflow in testing and development. API stands for Application Programming Interface which allows software applications to communicate with each other via API calls.
In this training course, you will learn:
- Why Use Postman?
- How to use Postman
- Working with GET Requests
- Working with POST Requests
- How to Parameterize Requests
- How to Create Postman Tests
- How to Create Collections
- How to Run Collections using Collection Runner
- How to Run Collections using Newman
Why Use Postman?
With over 4 million users nowadays, Postman has become a tool of choice for the following reasons:
- Accessibility – To use Postman, one would just need to log-in to their own accounts making it easy to access files anytime, anywhere as long as a Postman application is installed on the computer.
- Use of Collections – Postman lets users create collections for their API calls. Each collection can create subfolders and multiple requests. This helps in organizing your test suites.
- Collaboration – Collections and environments can be imported or exported making it easy to share files. A direct link can also be used to share collections.
- Creating Environments – Having multiple environments aids in less repetition of tests as one can use the same collection but for a different environment. This is where parameterization will take place which we will discuss in further lessons.
- Создание тестов. К каждому вызову API можно добавлять контрольные точки, такие как проверка на успешное состояние ответа HTTP, что помогает обеспечить покрытие тестами.
- Автоматическое тестирование – с помощью Collection Runner или Newman тесты можно запускать в несколько итераций, экономя время для повторяющихся тестов.
- Отладка – консоль Postman помогает проверить, какие данные были получены, что облегчает отладку тестов.
- Непрерывная интеграция – благодаря своей способности поддерживать непрерывную интеграцию поддерживается практика разработки.
Как скачать и установить POSTMAN
Postman – инструмент с открытым исходным кодом, который можно легко загрузить. Вот шаги для установки:
Шаг 1) Перейдите на https://www.postman.com/downloads/ и выберите нужную платформу среди Mac, Windows или Linux. Нажмите Скачать.
Шаг 2) Ваша загрузка идет, сообщение должно теперь отображаться на странице приложений. После завершения загрузки нажмите «Выполнить».

Шаг 3) Установка начинается

Шаг 4) В следующем окне зарегистрируйтесь для учетной записи почтальона
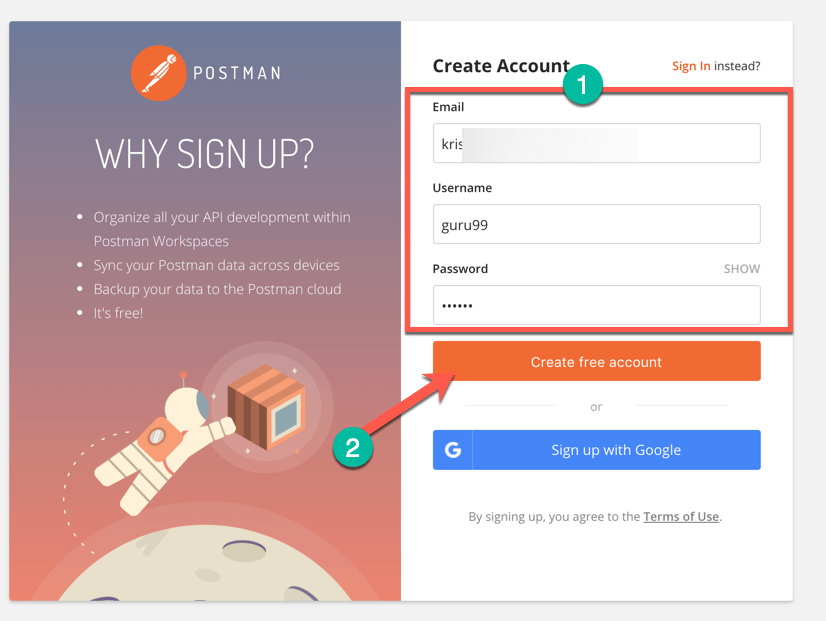
ПРИМЕЧАНИЕ. Существует два способа регистрации учетной записи Почтальона. Одним из них является создание собственной учетной записи Postman, а другой – использование учетной записи Google. Несмотря на то, что Postman позволяет пользователям использовать инструмент без входа в систему, регистрация гарантирует, что ваша коллекция будет сохранена и доступна для последующего использования.
Шаг 5) Выберите необходимые инструменты рабочей области и нажмите «Сохранить мои настройки».
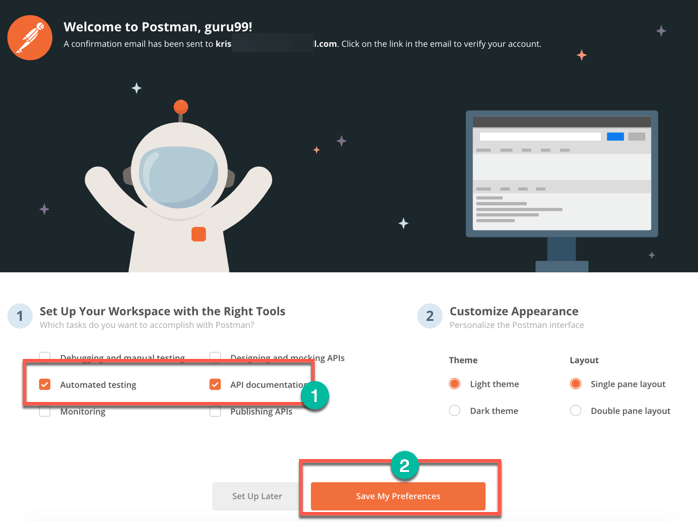
Шаг 6) Вы увидите стартовый экран
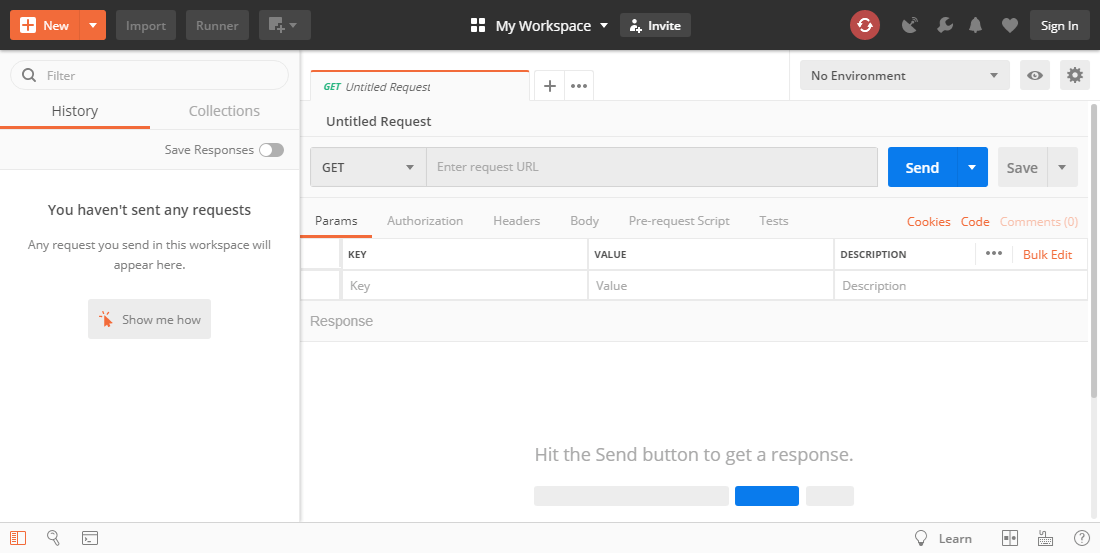
Как пользоваться почтальоном
Ниже находится рабочее место почтальона. Давайте рассмотрим различные возможности инструмента!
- Новый – здесь вы создадите новый запрос, коллекцию или среду.
- Импорт – используется для импорта коллекции или среды. Есть такие опции, как импорт из файла, папки, ссылки или вставка необработанного текста.
- Runner – Автоматизированные тесты могут быть выполнены через Collection Runner. Это будет обсуждаться далее на следующем уроке.
- Открыть новое – нажмите эту кнопку, чтобы открыть новую вкладку, окно почтальона или окно бегуна.
- Моя рабочая область – вы можете создать новую рабочую область индивидуально или в команде.
- Пригласить – Сотрудничайте в рабочей области, приглашая членов команды.
- История – прошлые запросы, которые вы отправили, будут отображаться в истории. Это позволяет легко отслеживать действия, которые вы сделали.
- Коллекции – организуйте свой набор тестов, создав коллекции. Каждая коллекция может иметь подпапки и несколько запросов. Запрос или папка также могут быть продублированы.
- Вкладка «Запрос» – отображает заголовок запроса, над которым вы работаете. По умолчанию «Untitled Request» будет отображаться для запросов без заголовков.
- HTTP-запрос – при нажатии на него отобразится раскрывающийся список различных запросов, таких как GET, POST, COPY, DELETE и т. Д. В тестировании наиболее часто используемые запросы – это GET и POST.
- URL-адрес запроса – также известный как конечная точка, здесь вы можете указать ссылку, с которой будет взаимодействовать API.
- Сохранить – если в запросе есть изменения, необходимо нажать «Сохранить», чтобы новые изменения не были потеряны или перезаписаны.
- Params – Здесь вы будете записывать параметры, необходимые для запроса, такие как значения ключей.
- Авторизация – для доступа к API необходима надлежащая авторизация. Он может быть в форме имени пользователя и пароля, токена на предъявителя и т. Д.
- Заголовки – Вы можете установить заголовки, такие как тип содержимого JSON, в зависимости от потребностей организации.
- Тело. Здесь можно настроить детали в запросе, обычно используемом в запросе POST.
- Сценарий предварительного запроса – это сценарии, которые будут выполнены перед запросом. Обычно сценарии предварительного запроса для среды настройки используются, чтобы гарантировать, что тесты будут выполняться в правильной среде.
- Тесты – это скрипты, выполняемые во время запроса. Важно иметь тесты, так как он устанавливает контрольные точки, чтобы проверить, в порядке ли статус ответа, полученные данные соответствуют ожидаемым, и другие тесты.
Работа с GET-запросами
Запросы на получение используются для получения информации с данного URL. В конечную точку не будет внесено никаких изменений.
Мы будем использовать следующий URL для всех примеров в этом руководстве
https://jsonplaceholder.typicode.com/users
В рабочем пространстве
- Установите ваш HTTP-запрос на GET.
- В поле URL запроса введите ссылку
- Нажмите Отправить
- Вы увидите 200 ОК Сообщение
- В теле должно быть 10 пользовательских результатов, что указывает на успешное выполнение теста.
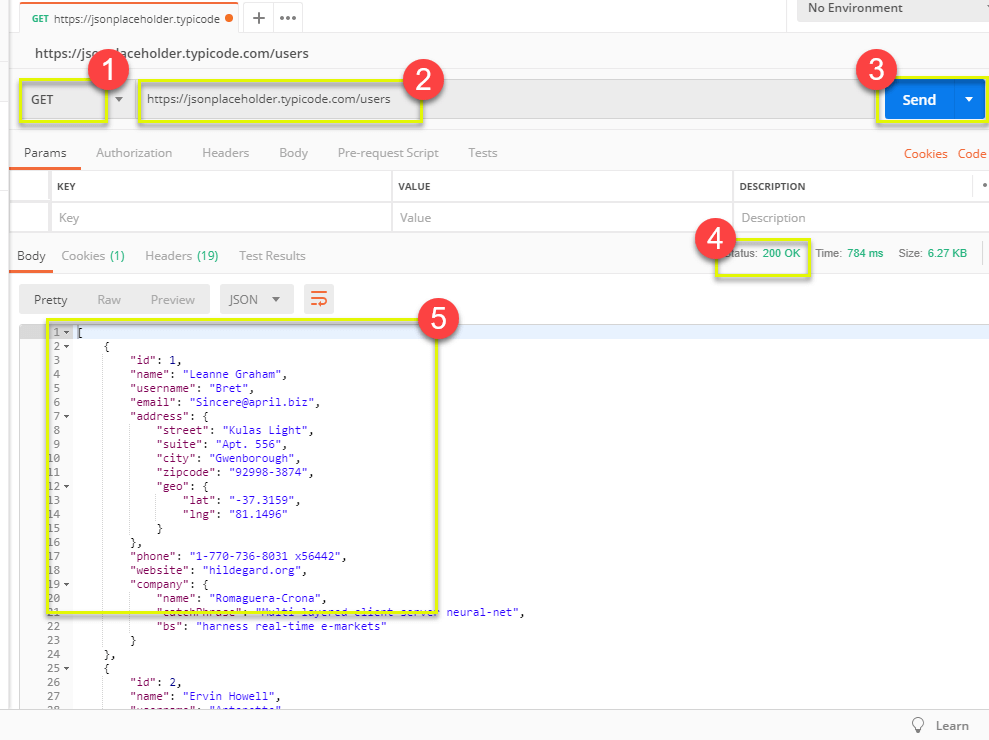
* Примечание. В некоторых случаях запрос Get может быть неудачным. Это может быть связано с неправильным URL-адресом запроса или необходима аутентификация.
Работа с POST-запросами
Запросы на отправку отличаются от запроса на получение, поскольку пользователь обрабатывает данные, добавляя данные в конечную точку. Используя те же данные из предыдущего урока в запросе Get, давайте теперь добавим нашего собственного пользователя.
Шаг 1) Нажмите на новую вкладку, чтобы создать новый запрос.
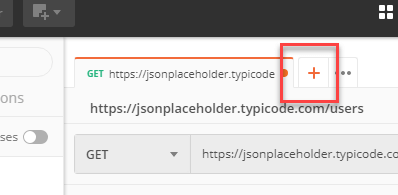
Шаг 2) В новой вкладке
- Установите ваш HTTP-запрос на POST.
- Введите ту же ссылку в URL запроса: https://jsonplaceholder.typicode.com/users
- переключиться на вкладку Body
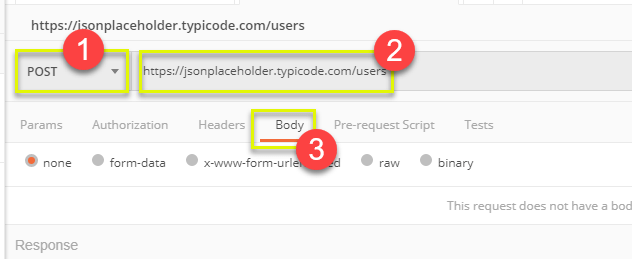
Шаг 3) В теле,
- Нажмите сырье
- Выберите JSON

Шаг 4) Скопируйте и вставьте только один пользовательский результат из предыдущего запроса get, как показано ниже. Убедитесь, что код был правильно скопирован с помощью парных фигурных скобок и скобок. Измените id на 11 и имя на любое желаемое имя. Вы также можете изменить другие детали, такие как адрес.
[
    {
        "id": 11,
        "name": "Krishna Rungta",
        "username": "Bret",
        "email": "Sincere@april.biz",
        "address": {
            "street": "Kulas Light",
            "suite": "Apt. 556",
            "city": "Gwenborough",
            "zipcode": "92998-3874",
            "geo": {
                "lat": "-37.3159",
                "lng": "81.1496"
            }
        },
        "phone": "1-770-736-8031 x56442",
        "website": "hildegard.org",
        "company": {
            "name": "Romaguera-Crona",
            "catchPhrase": "Multi-layered client-server neural-net",
            "bs": "harness real-time e-markets"
        }
    }
]
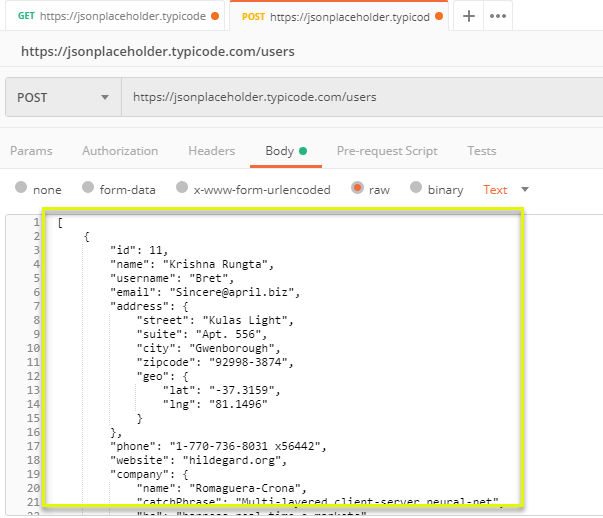
* Примечание: пост-запрос должен иметь правильный формат, чтобы гарантировать, что запрашиваемые данные будут созданы. Рекомендуется использовать Get first для проверки формата запроса в формате JSON. Вы можете использовать такие инструменты, как https://jsonformatter.curiousconcept.com/

Шаг 5) Далее
- Нажмите Отправить.
- Статус: 201 Создан должен отображаться
- Опубликованные данные отображаются в теле.
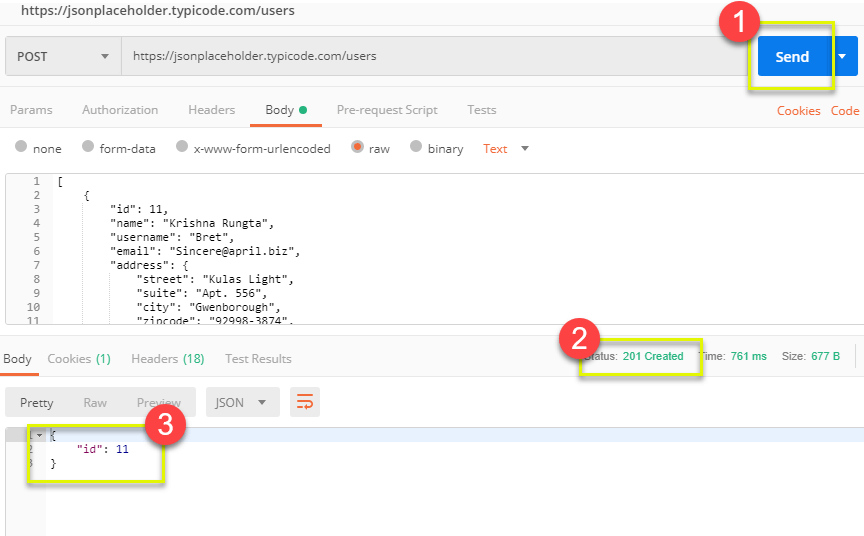
Как параметризовать запросы
Параметризация данных — одна из самых полезных функций Почтальона. Вместо того, чтобы создавать одинаковые запросы с разными данными, вы можете использовать переменные с параметрами. Эти данные могут быть из файла данных или переменной среды. Параметризация помогает избежать повторения одних и тех же тестов, и итерации можно использовать для автоматизации тестирования.
Параметры создаются с помощью двойных фигурных скобок: {{sample}}. Давайте посмотрим на пример использования параметров в нашем предыдущем запросе:
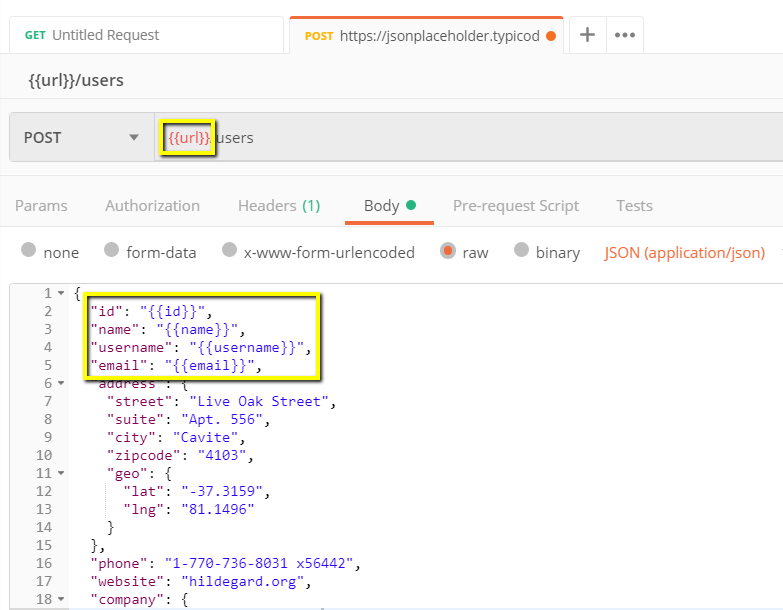
Теперь давайте создадим запрос на получение параметров.
Шаг 1)
- Установите ваш HTTP-запрос на GET
- Введите эту ссылку: https://jsonplaceholder.typicode.com/users . Замените первую часть ссылки параметром, например {{url}}. URL запроса теперь должен быть {{url}} / users.
- Нажмите отправить.
Не должно быть никакого ответа, так как мы не установили источник нашего параметра.
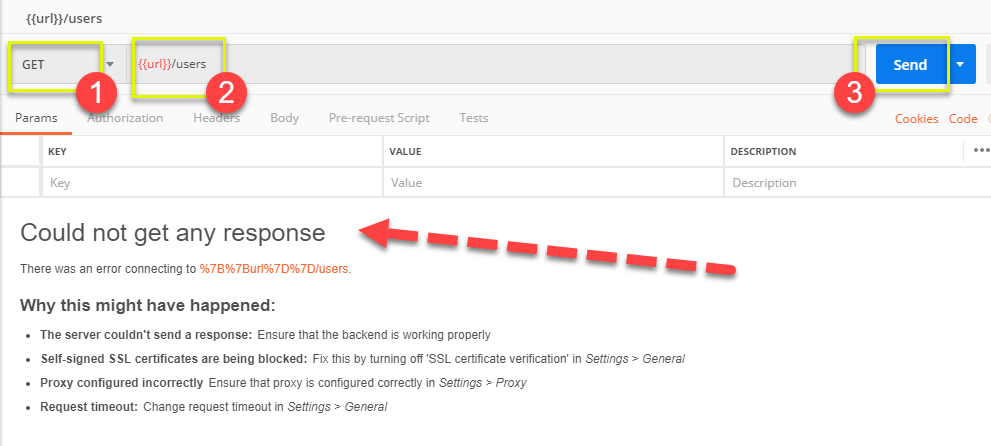
Шаг 2) Для использования параметра необходимо установить среду
- Нажмите значок глаза
- Нажмите edit, чтобы установить переменную в глобальную среду, которая может использоваться во всех коллекциях.
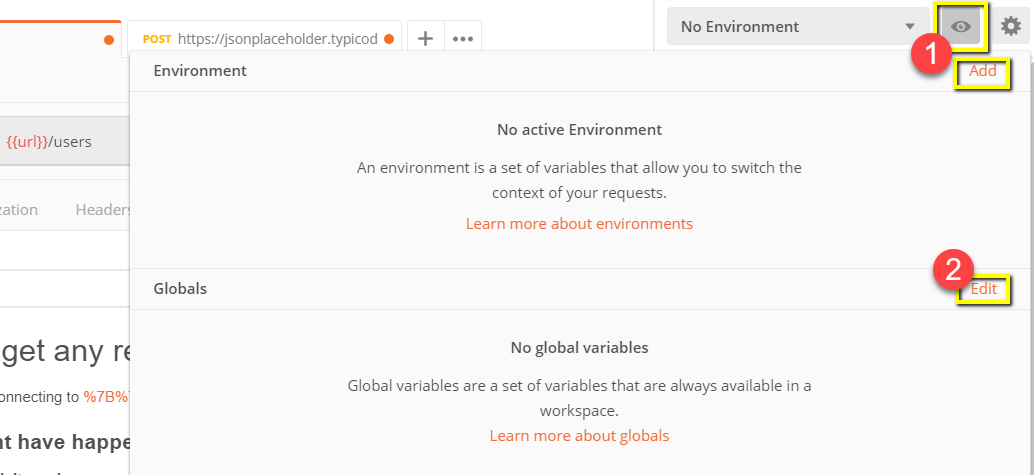
Шаг 3) В переменной,
- установите имя для URL, который является https://jsonplaceholder.typicode.com
- нажмите Сохранить.
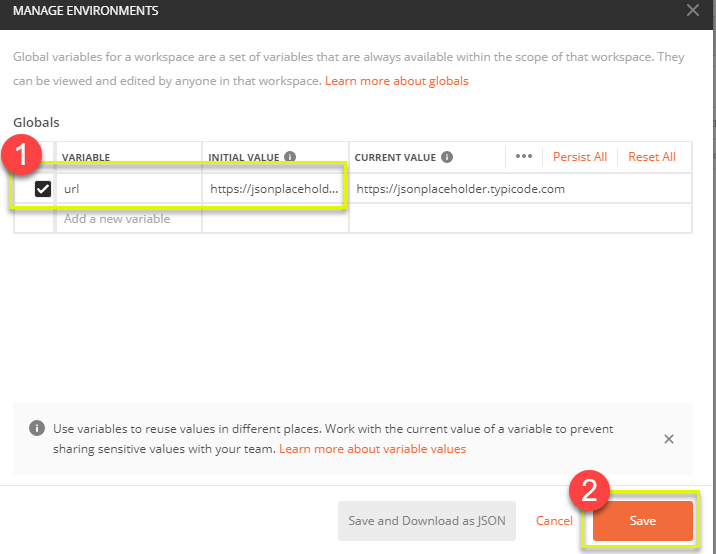
Шаг 4) Нажмите закрыть, если вы видите следующий экран

Шаг 5) Вернитесь к вашему запросу на получение и нажмите «Отправить». Теперь должны быть результаты для вашего запроса.

* Примечание: всегда гарантируйте, что ваши параметры имеют источник, такой как переменная среды или файл данных, чтобы избежать ошибок.
Как создавать тесты почтальона
Тесты Почтальона — это коды JavaScript, добавленные к запросам, которые помогают вам проверить результаты, такие как успешный или неудачный статус, сравнение ожидаемых результатов и т. Д. Обычно начинается с pm.test. Это можно сравнить с утверждениями, проверить команды, доступные в других инструментах.
Давайте создадим несколько базовых тестов для наших параметризованных запросов из предыдущего урока.
Шаг 1) Перейдите к вашему запросу пользователя GET из предыдущего урока.
- Перейдите на вкладку «Тесты». На правой стороне находятся фрагменты кода.
- В разделе фрагментов нажмите «Код состояния: Код — 200».
Панель автоматически заполняется

Шаг 2) Теперь нажмите «Отправить». Результат теста должен теперь отображаться.

Шаг 3) Вернитесь на вкладку «Тест» и давайте добавим еще один тест. На этот раз мы сравним ожидаемый результат с фактическим результатом.
В разделе фрагментов нажмите «Тело ответа: проверка значения JSON». Мы будем проверять, есть ли у Линн Грэм идентификатор пользователя 1.
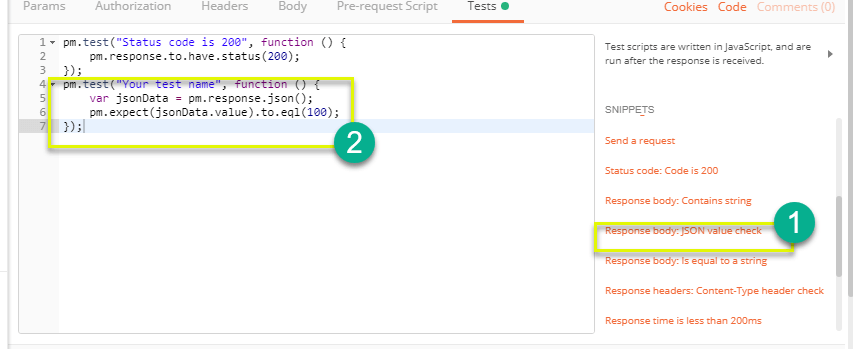
Шаг 4)
- Замените «Ваше имя теста» из кода на «Проверьте, является ли пользователь с id1 Линн Грэм», чтобы имя теста точно указывало, что мы хотим проверить.
- Замените jsonData.value на jsonData [0] .name. Чтобы получить путь, проверьте тело в разделе Получить результат ранее. Поскольку Линн Грэм является идентификатором пользователя 1, jsonData находится в первом результате, который должен начинаться с 0. Если вы хотите получить второй результат, используйте jsonData [1] и т. Д. Для последующих результатов.
- В eql, введите «Leanne Graham»
pm.test("Check if user with id1 is Leanne Graham", function () {
    var jsonData = pm.response.json();
    pm.expect(jsonData[0].name).to.eql("Leanne Graham");
});
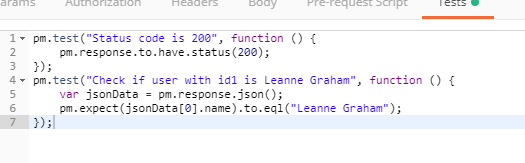
Шаг 5) Нажмите отправить. Теперь должно быть два пройденных теста по вашему запросу.
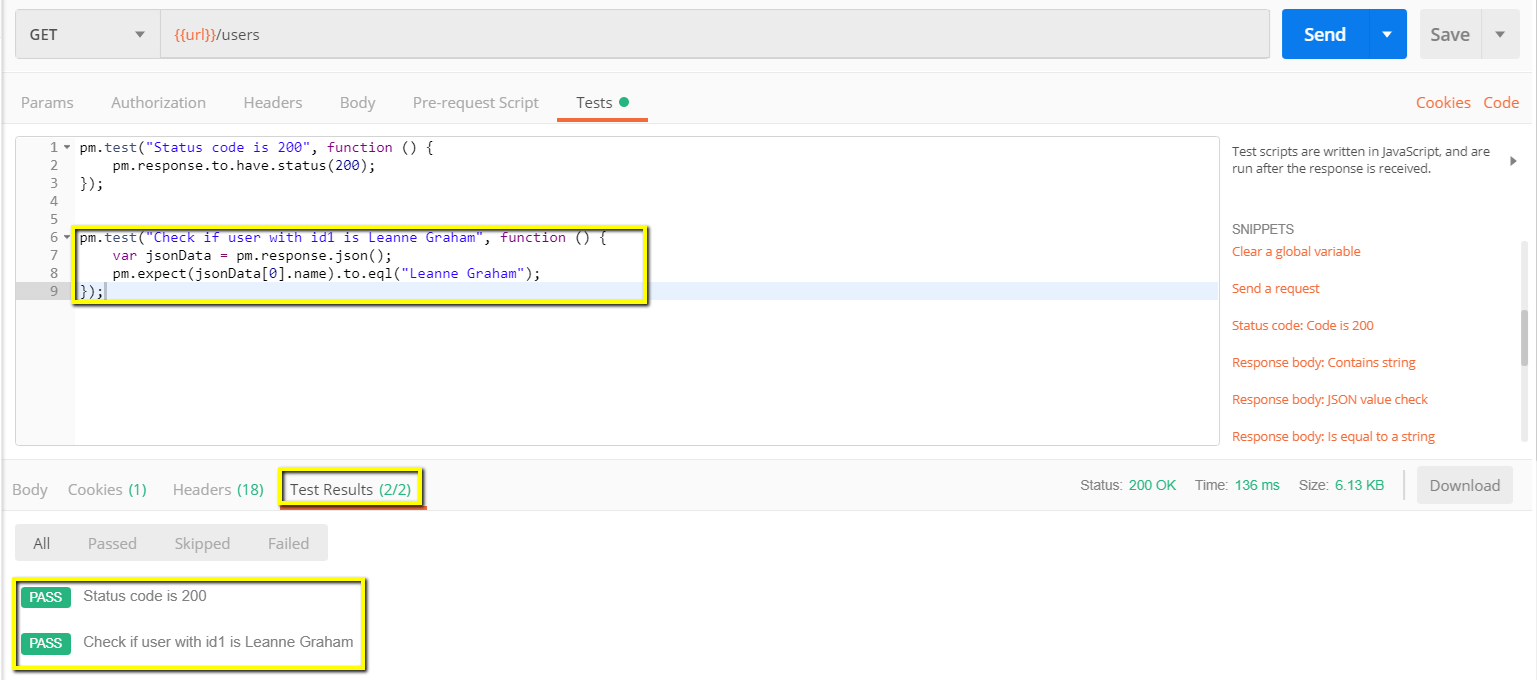
* Примечание: в Postman можно создавать различные виды тестов. Попробуйте изучить инструмент и посмотреть, какие тесты будут соответствовать вашим потребностям.
Как создавать коллекции
Коллекции играют важную роль в организации тестовых наборов. Его можно импортировать и экспортировать, что облегчает обмен коллекциями среди команды. В этом уроке мы узнаем, как создать и выполнить коллекцию.
Давайте начнем с создания коллекции:
Шаг 1) Нажмите на кнопку «Новый» в верхнем левом углу страницы.
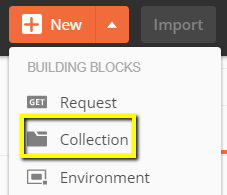
Шаг 2) Выберите Коллекция. Окно создания коллекции должно появиться.

Шаг 3) Введите название и описание нужной коллекции, затем нажмите «Создать». Коллекция должна быть создана.
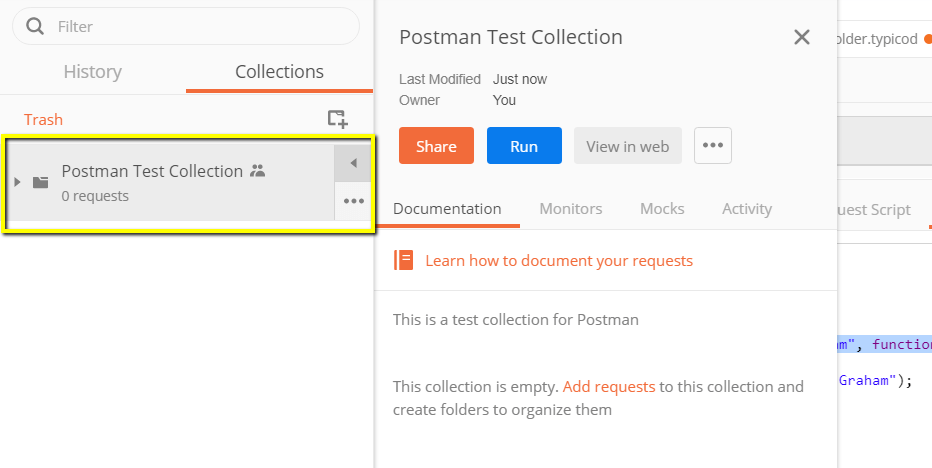
Шаг 4) Вернитесь к предыдущему запросу Get. Нажмите Сохранить

Шаг 5)
- Выберите Тестовая коллекция почтальона.
- Нажмите Сохранить в тестовой коллекции почтальона
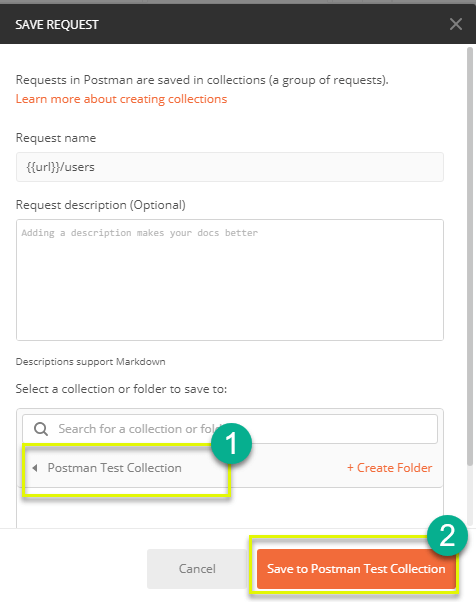
Шаг 6) Теперь тестовая коллекция почтальона должна содержать один запрос.
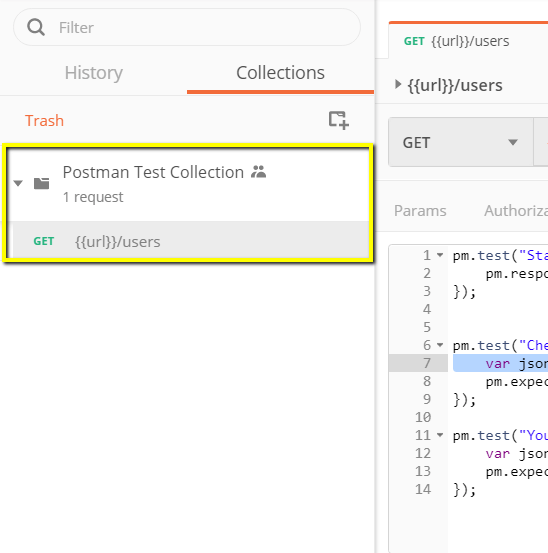
Шаг 7) Повторите шаги 4-5 для предыдущего запроса Post, чтобы в коллекции теперь было два запроса.
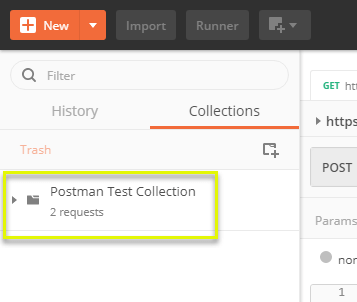
Как запускать коллекции с помощью Collection Runner
Есть два способа запустить коллекцию, которая является Runner Collection и Newman. Давайте начнем с выполнения коллекции в Collection Runner.
Шаг 1) Нажмите кнопку Runner, расположенную в верхней части страницы рядом с кнопкой Import.
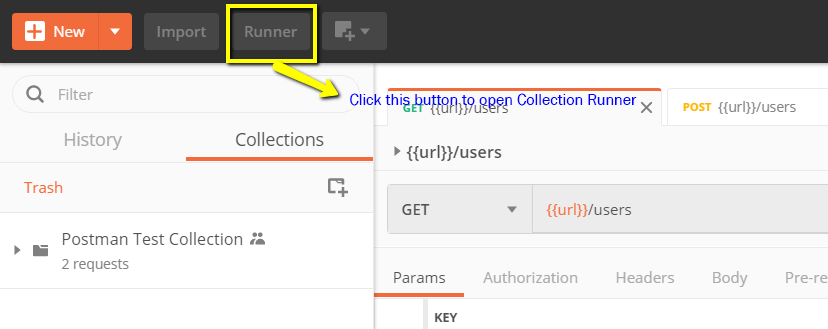
Шаг 2) Должна появиться страница Runner Collection, как показано ниже. Ниже приведено описание различных полей
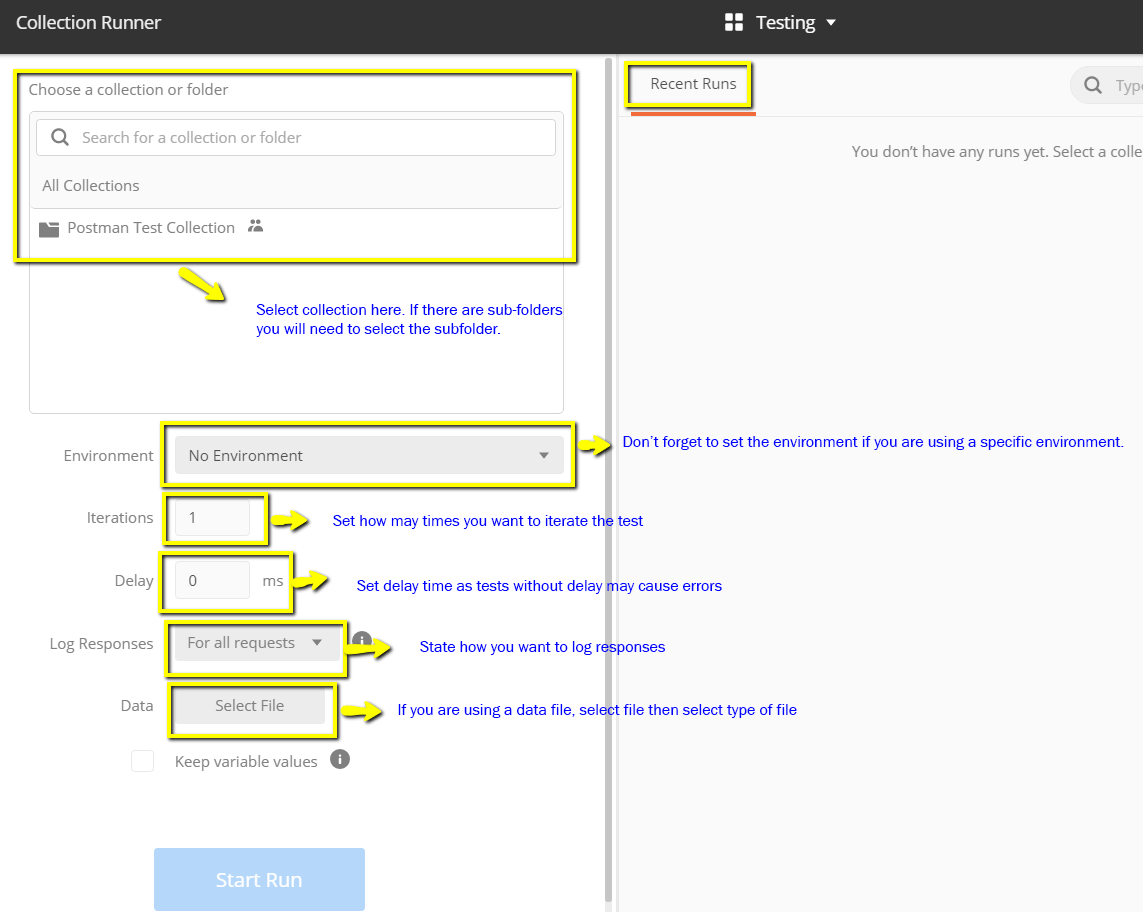
Шаг 3) Запустите свою коллекцию тестов Почтальон, настроив следующее:
- Выберите набор тестов Почтальон — Установите итерации как 3
- Установите задержку 2500 мс
- Нажмите на кнопку Run Postman Test …
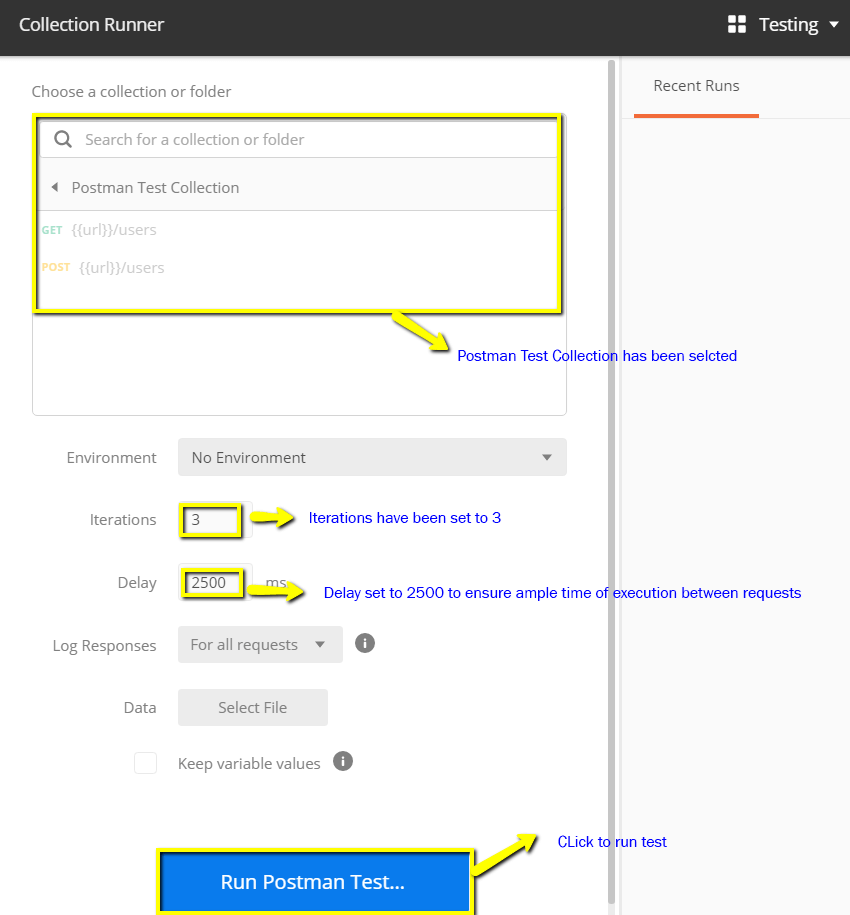
Шаг 4) Страница «Результаты выполнения» должна отображаться после нажатия кнопки «Выполнить». В зависимости от задержки вы должны увидеть тесты по мере их выполнения.
- После завершения тестов вы можете увидеть статус теста, если он пройден или не пройден, и результаты за итерацию.
- Вы видите статус прохождения для получения запросов
- Поскольку у нас не было никаких тестов для Post, должно появиться сообщение о том, что в запросе не было никаких тестов.

Вы можете увидеть, насколько важно, чтобы в ваших запросах были тесты, чтобы вы могли проверить статус HTTP-запроса, если он успешен, а данные созданы или получены.
Как запускать коллекции с помощью Newman
Другой способ запустить коллекцию — через Ньюмена. Основные различия между Newman и Collection Runner заключаются в следующем:
- Ньюман это дополнение для Почтальона. Вам нужно будет установить его отдельно от родного приложения.
- Newman использует командную строку, в то время как Collection Runner имеет графический интерфейс.
- Ньюман может быть использован для непрерывной интеграции.
Чтобы установить Newman и запустить нашу коллекцию из него, сделайте следующее:
Шаг 1) Установите nodejs по этой ссылке: http://nodejs.org/download/
Шаг 2) Откройте командную строку и введите
npm install -g newman
Теперь Newman должен быть установлен на вашем компьютере.

Шаг 3) После того, как Newman будет установлен, давайте вернемся к нашему рабочему пространству Postman. В окне Коллекции нажмите на три точки. Опции должны появиться. Выберите Экспорт.
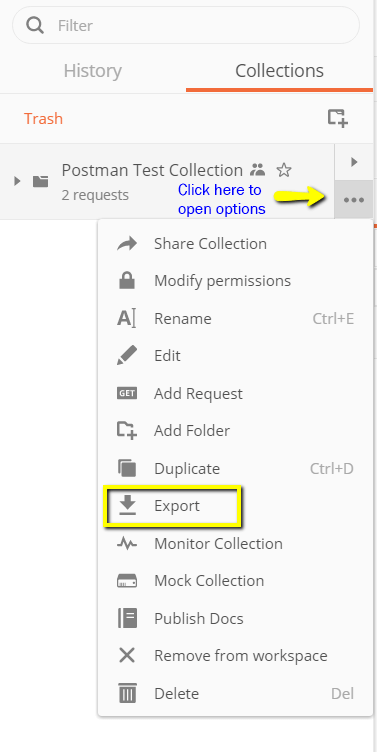
Шаг 4) Выберите Export Collection as Collection v2.1 (рекомендуется), затем нажмите Export.

Шаг 5) Выберите нужное место, затем нажмите «Сохранить». Желательно создать специальную папку для ваших тестов почтальона. Теперь коллекция должна быть экспортирована в выбранный вами локальный каталог.
Шаг 6) Нам также нужно будет экспортировать нашу среду. Нажмите значок глаза рядом с раскрывающимся списком «Глобальная среда» и выберите «Загрузить как файл JSON». Выберите нужное место, затем нажмите «Сохранить». Желательно, чтобы среда находилась в той же папке, что и ваша коллекция.
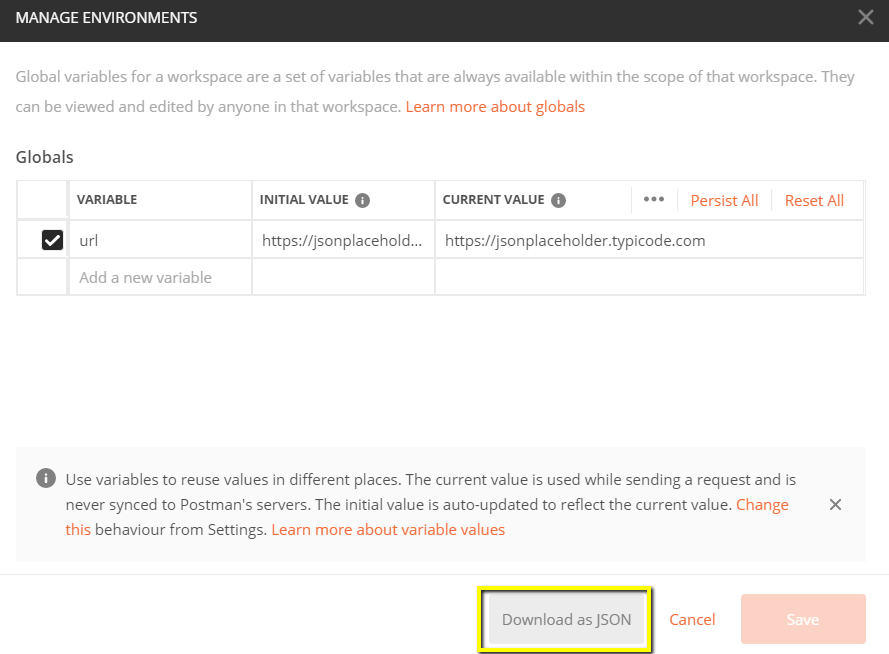
Шаг 7) Теперь окружение должно быть экспортировано в тот же локальный каталог, что и коллекция.
Шаг Теперь вернитесь в командную строку и измените каталог, в который вы сохранили коллекцию и среду.
cd C:UsersAsusDesktopPostman Tutorial
Шаг 9) Запустите вашу коллекцию с помощью этой команды:
newman run PostmanTestCollection.postman_collection.json -e Testing.postman_globals.json
Результаты запуска должны появиться, как показано ниже.
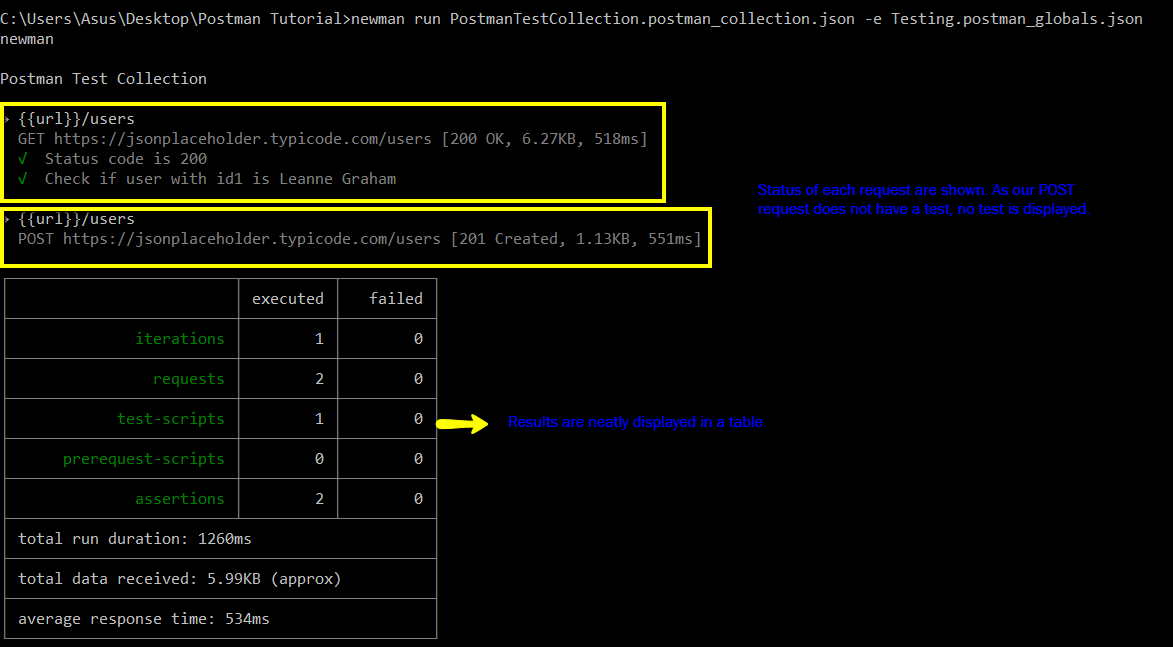
Для руководства приведена ссылка на некоторые основные коды Ньюмена для исполнения:
- Запустить только коллекцию. Это можно использовать, если нет среды или зависимости файла данных теста.
- Запустите коллекцию и среду. Индикатор -e предназначен для окружающей среды.
- Запустите коллекцию с желаемым номером. итераций.
- Запустить с файлом данных.
- Установите время задержки. Это важно, поскольку тесты могут не пройти, если они выполняются без задержки из-за того, что запросы запускаются без обработки предыдущего запроса на сервере конечной точки.
newman run <collection name>
newman run <collection name> -e <environment name>
newman run <collection name> -n <no.of iterations>
newman run <collection name> --data <file name> -n <no.of iterations> -e <environment name>
newman run <collection name> -d <delay time>
Резюме
- Почтальон в настоящее время является одним из самых популярных инструментов, используемых в тестировании API
- Доступность, использование коллекций, совместная работа, непрерывная интеграция — вот некоторые из ключевых функций, которые необходимо изучить в Postman.
- Рекомендуется создать учетную запись в Почтальоне, чтобы ваши коллекции были доступны в Интернете.
- Вы можете параметризировать запрос в Почтальоне
- Вы можете создать тесты для проверки запроса почтальона
- Коллекции можно запускать с помощью Newman или Collection Runner.