Protocol Buffers (Protobuf) is a free and open-source cross-platform library used to serialize structured data. It is useful in developing programs to communicate with each other over a network or for storing data. The method involves an interface description language that describes the structure of some data and a program that generates source code from that description for generating or parsing a stream of bytes that represents the structured data. Google developed Protocol Buffers for internal use and provided a code generator for multiple languages under an open-source license.
Features:
- Protocol buffers currently support generated code in Java, Python, Objective-C, and C++. With the new proto3 language version, you can also work with Dart, Go, Ruby, and C#, with more languages to come.
- Protocol buffers, usually referred as Protobuf, is a protocol developed by Google to allow serialization and deserialization of structured data. Google developed it with the goal to provide a better way, compared to XML, to make systems communicate
Downloading & Installing:
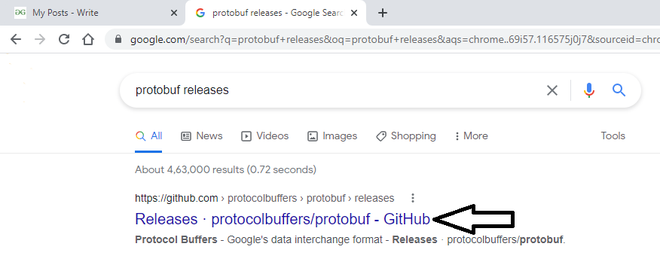
Step 1: At first, we have to search “protobuf releases” in the browser.

Step 2: Then we have to click on the first link by Github.
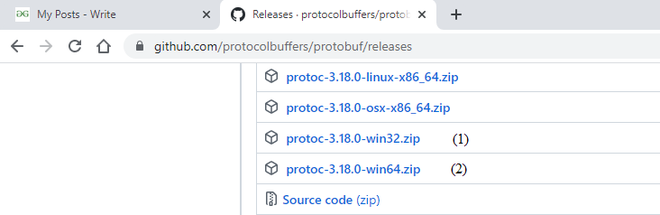
Step 3: Then we have to scroll down. There we will find all zip files for all operating systems. Based on your operating system bit version (64 bit or 32 bit). You have to download the specific one.
Step 4: Then the downloaded file has to copy first.
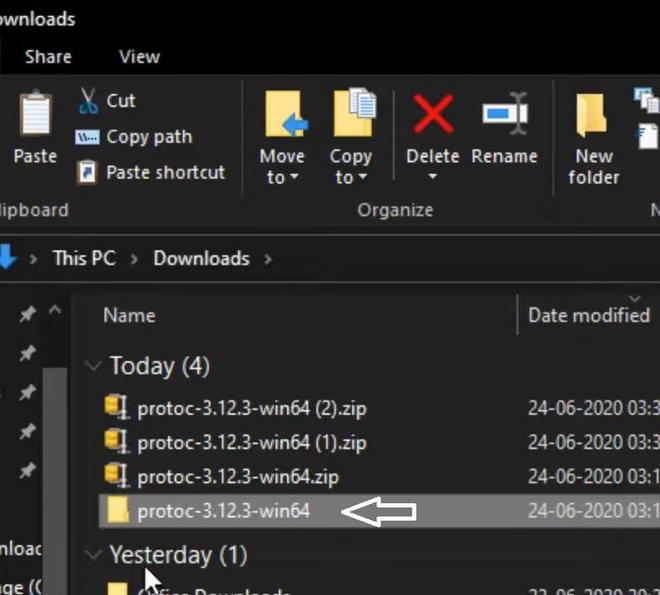
Step 5: Then the copied file has to be paste on the C drive of your pc.
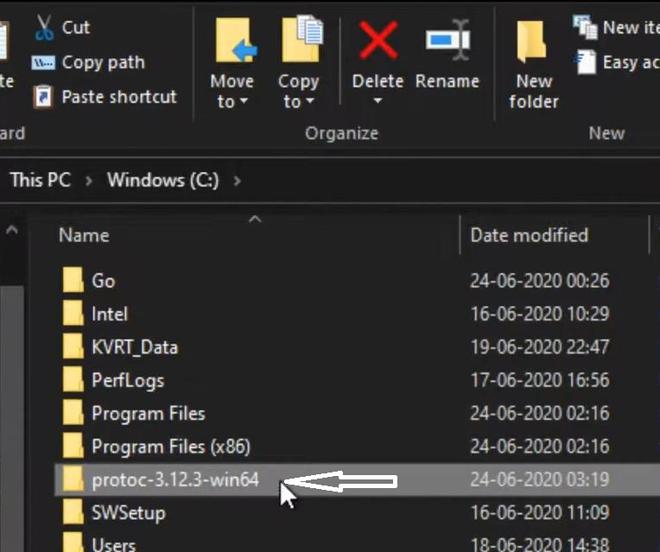
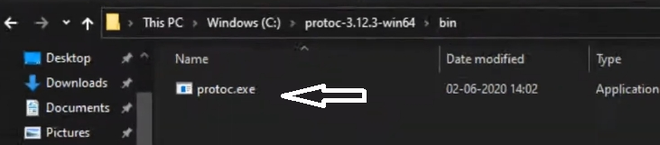
Step 6: Then you have to enter the folder & then enter it in the bin folder. There you will find protoc.exe file.
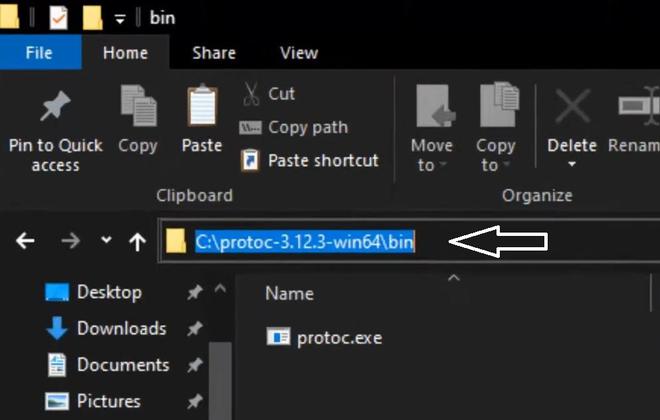
Step 7: Then you have to copy the path.
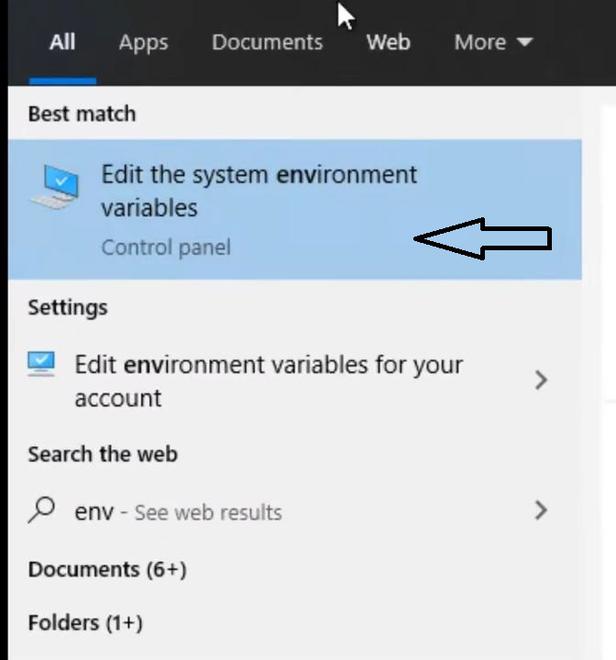
Step 8: Then in the search bar of your computer you have to search for “Edit the system environment variable”.
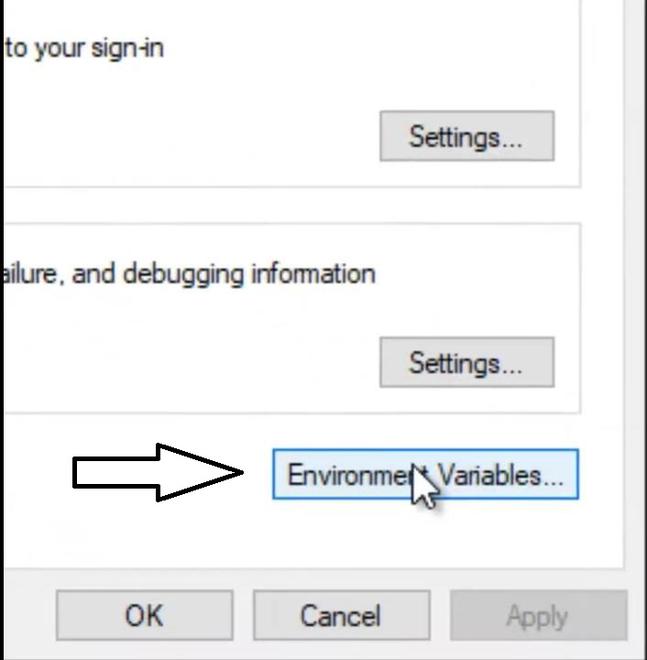
Step 9: Then you have to go for the “Environment Variable” button. Look down at the ‘System variables’ box and double click on ‘Path’ to add a new path.
Step 10: Then you have to click on the “New” button & paste the path here.
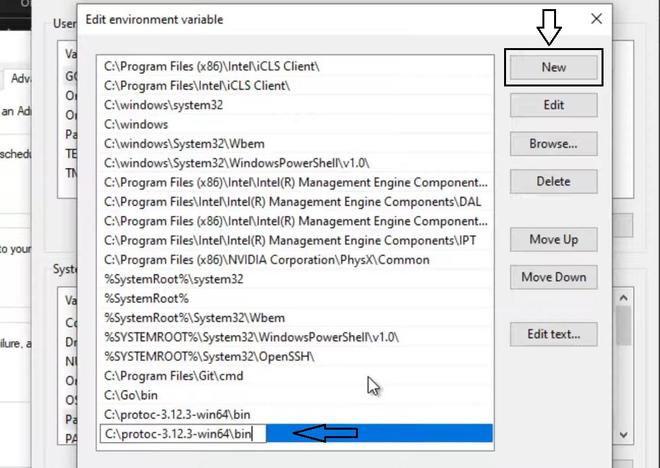
Step 11: Then you have to click “Ok” every time & close it.
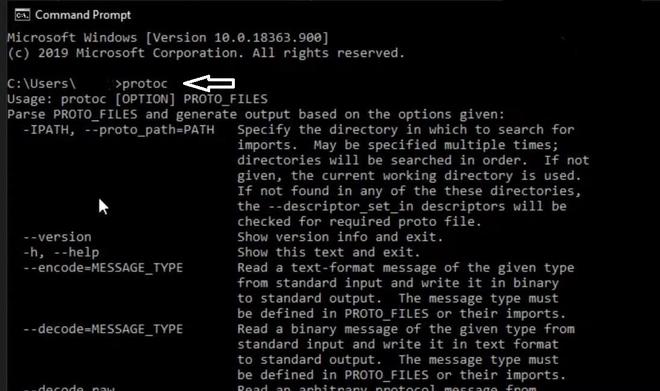
Step 12: Then, at last, we will check that it works or not. Open the command prompt & you have to write “protoc” command. Then all details will be shown on the command prompt. Then it is ready to use.
Protocol Buffers — Google’s data interchange format
Copyright 2008 Google Inc.
https://developers.google.com/protocol-buffers/
CMake Installation
To compile or install protobuf from source using CMake, see
cmake/README.md.
C++ Protobuf — Unix
To build protobuf from source, the following tools are needed:
- bazel
- git
- g++
On Ubuntu/Debian, for example, you can install them with:
sudo apt-get install g++ git bazel
On other platforms, please use the corresponding package managing tool to
install them before proceeding. See https://bazel.build/install for further
instructions on installing Bazel, or to build from source using CMake, see
cmake/README.md.
To get the source, download the release .tar.gz or .zip package in the
release page:
https://github.com/protocolbuffers/protobuf/releases/latest
For example: if you only need C++, download protobuf-cpp-[VERSION].tar.gz; if
you need C++ and Java, download protobuf-java-[VERSION].tar.gz (every package
contains C++ source already); if you need C++ and multiple other languages,
download protobuf-all-[VERSION].tar.gz.
You can also get the source by «git clone» our git repository. Make sure you
have also cloned the submodules and generated the configure script (skip this
if you are using a release .tar.gz or .zip package):
git clone https://github.com/protocolbuffers/protobuf.git
cd protobuf
git submodule update --init --recursive
To build the C++ Protocol Buffer runtime and the Protocol Buffer compiler
(protoc) execute the following:
bazel build :protoc :protobuf
The compiler can then be installed, for example on Linux:
cp bazel-bin/protoc /usr/local/bin
For more usage information on Bazel, please refer to http://bazel.build.
Compiling dependent packages
To compile a package that uses Protocol Buffers, you need to setup a Bazel
WORKSPACE that’s hooked up to the protobuf repository and loads its
dependencies. For an example, see WORKSPACE.
Note for Mac users
For a Mac system, Unix tools are not available by default. You will first need
to install Xcode from the Mac AppStore and then run the following command from
a terminal:
sudo xcode-select --install
To install Unix tools, you can install «port» following the instructions at
https://www.macports.org . This will reside in /opt/local/bin/port for most
Mac installations.
sudo /opt/local/bin/port install bazel
Alternative for Homebrew users:
Then follow the Unix instructions above.
C++ Protobuf — Windows
If you only need the protoc binary, you can download it from the release
page:
https://github.com/protocolbuffers/protobuf/releases/latest
In the downloads section, download the zip file protoc-$VERSION-win32.zip.
It contains the protoc binary as well as public proto files of protobuf
library.
Protobuf and its dependencies can be installed directly by using vcpkg:
>vcpkg install protobuf protobuf:x64-windows
If zlib support is desired, you’ll also need to install the zlib feature:
>vcpkg install protobuf[zlib] protobuf[zlib]:x64-windows
See https://github.com/Microsoft/vcpkg for more information.
To build from source using Microsoft Visual C++, see cmake/README.md.
To build from source using Cygwin or MinGW, follow the Unix installation
instructions, above.
Binary Compatibility Warning
Due to the nature of C++, it is unlikely that any two versions of the
Protocol Buffers C++ runtime libraries will have compatible ABIs.
That is, if you linked an executable against an older version of
libprotobuf, it is unlikely to work with a newer version without
re-compiling. This problem, when it occurs, will normally be detected
immediately on startup of your app. Still, you may want to consider
using static linkage. You can configure this in your cc_binary Bazel rules
by specifying:
Usage
The complete documentation for Protocol Buffers is available via the
web at:
https://protobuf.dev/
I am unable to find clear instructions to install Google Protocol Buffers (including compiler) on Windows x64 platform.
I went through the instructions README file for compiler and source:
For Compiler: To install, simply place this binary somewhere in your PATH
I added system variable to Path:
PROTOC 'C:dev_toolsprotoc-2.4.1-win32'
I am stuck on installing Protocol Buffers source using Cygwin. I tried following
Unix instructions provided in the readme file:
To build and install the C++ Protocol Buffer runtime and the Protocol
Buffer compiler (protoc) execute the following:$ ./configure $ make $ make check $ make installIf
make checkfails, you can still install, but it is likely that
some features of this library will not work correctly on your system.
Proceed at your own risk.
make installmay require superuser privileges.For advanced usage information on configure and make, see INSTALL.txt.
** Hint on install location **
By default, the package will be installed to /usr/local. However, on many platforms, /usr/local/lib is not part of LD_LIBRARY_PATH. You can add it, but it may be easier to just install to /usr> instead. To do this, invoke configure as follows:
./configure --prefix=/usr
I get
-bash: ./configure: No such file or directory'
Can some one provide clear and detailed steps to make this work?
UPDATE
I switched to using MSYS/MINGW32 instead and
I followed instructions given in this link. Now I am stuck with following:
When I run the ‘./configure’ command I get following error:
checking how to run the C++ preprocessor… /lib/cpp
configure: error: C++ preprocessor «/lib/cpp» fails sanity check’
As a result, none of the make, make install commands work. For eg:
make: No targets specified and no makefile found. Stop.
I’m currently converting a few Google App Engine projects from Python 2.7 to Python 3. This includes a bunch of changes to the the code since Google is moving away from the built in Google App Engine classes. During the first few steps of converting the app you start changing out the dependencies still on Python 2.7. During the first step of the guide Overview of migrating bundled App Engine Services I ran into trouble.
After completing the step with pip installing the required libraries and adding the grpcio library to app.yaml the local dev environment wouldn’t start.
INFO     2020-05-17 17:45:51,872 admin_server.py:150] Starting admin server at: http://localhost:8000
Traceback (most recent call last):
File "C:UserskrikalAppDataLocalGoogleCloud SDKgoogle-cloud-sdkplatformgoogle_appengine_python_runtime.py", line 96, in <module>
_run_file(file, globals())
File "C:UserskrikalAppDataLocalGoogleCloud SDKgoogle-cloud-sdkplatformgoogle_appengine_python_runtime.py", line 90, in run_file
execfile(PATHS.script_file(script_name), globals)
File "C:UserskrikalAppDataLocalGoogleCloud SDKgoogle-cloud-sdkplatformgoogle_appenginegoogleappenginetoolsdevappserver2pythonruntimeruntime.py", line 206, in <module>
main()
File "C:UserskrikalAppDataLocalGoogleCloud SDKgoogle-cloud-sdkplatformgoogle_appenginegoogleappenginetoolsdevappserver2pythonruntimeruntime.py", line 177, in main
sandbox.enable_sandbox(config)
File "C:UserskrikalAppDataLocalGoogleCloud SDKgoogle-cloud-sdkplatformgoogle_appenginegoogleappenginetoolsdevappserver2pythonruntimesandbox.py", line 317, in enable_sandbox
THIRD_PARTY_C_MODULES.get_importable_module_names(config))
File "C:UserskrikalAppDataLocalGoogleCloud SDKgoogle-cloud-sdkplatformgoogle_appenginegoogleappenginetoolsdevappserver2pythonruntimesandbox.py", line 867, in init
dep_lib = import(dep_lib_name)
File "C:UserskrikalAppDataLocalGoogleCloud SDKgoogle-cloud-sdkplatformgoogle_appenginegoogleprotobuf_init.py", line 42, in <module>
protobuf_paths)
ImportError: No module named protobuf
After some digging around I realized that the protobuf-3.11.3.dist-info downloaded by pip didn’t really contain any code. Looking at the Cloud SDK protobuf_init.py i realized it’s looking through all the system paths for the actual code. It looped through all the paths adding google and then trying to load the protobuf module from there.
After some Googeling about how to run it on windows I tested out the drop-in binary in the path to get it to run. The protoc.exe didn’t seem to be picked up so I downloaded the “all” package and dropped in the python folder into AppDataLocalGoogleCloud SDKgoogle-cloud-sdkbingoogle.
Protocal Buffers for Windows can be downloaded from github: https://github.com/protocolbuffers/protobuf/releases
Сборка libprotobuf под Windows
Сборка сей библиотеки из исходников под Windows не такая уж простая задача, как
может показаться на первый взгляд. Ее можно осуществлять при помощи Visual
Studio (cl.exe) или компилятора mingw.
Вариант с mingw мне показался более родной и простой, поэтому начнем с установки MSYS2.
После установки в открывшейся консоле устанавливаем все необходимое. Protobuf
из пакетов нужен потому, что при сборке из исходных кодов будет использоваться
утилита protoc.exe.
$ pacman -S vim binutils base-devel unzip
$ pacman -S mingw-w64-i686-toolchain mingw-w64-i686-protobuf
Пропишем компилятор в окружение и симлинк на protoc.exe.
$ PATH=/mingw32/bin/:$PATH
$ ln -s /mingw32/bin/protoc.exe /usr/bin/protoc.exe
Готовый пакет для pacman’а позаимствуем у ArchLinux из AUR
(https://aur.archlinux.org/packages/mingw-w64-protobuf/).
$ wget https://aur.archlinux.org/cgit/aur.git/snapshot/mingw-w64-protobuf.tar.gz
$ tar -zxf mingw-w64-protobuf.tar.gz
$ cd mingw-w64-protobuf
$ vim PKGBUILD
Закомментим зависимости из файла сборки PKGBUILD и переименуем
${_arch}-strip в strip.
PKGBUILD
# Contributor: Benoit Favre <benoit.favre@gmail.com>

pkgname=('mingw-w64-protobuf')
_pkgname=protobuf
pkgver=3.3.1
pkgrel=1
pkgdesc="Protocol Buffers - Google's data interchange format (mingw-w64)"
arch=('any')
url='https://developers.google.com/protocol-buffers/'
license=('BSD')
#depends=('mingw-w64-crt' 'mingw-w64-zlib')
#makedepends=('mingw-w64-configure' 'protobuf')
options=(!strip !buildflags staticlibs)
source=("https://github.com/google/protobuf/archive/v${pkgver}.tar.gz")
md5sums=('20c685147753b515ce380421442044b5')

_architectures="i686-w64-mingw32 x86_64-w64-mingw32"

build() {
  cd ${srcdir}/${_pkgname}-${pkgver}
  ./autogen.sh
  for _arch in ${_architectures}; do
    mkdir -p build-${_arch} && pushd build-${_arch}
    ${_arch}-configure --with-protoc=/usr/bin/protoc ..
    make
    popd
  done
}

package() {
  for _arch in ${_architectures}; do
    cd "${srcdir}"/${_pkgname}-${pkgver}/build-${_arch}
    make DESTDIR="$pkgdir" install
    rm "${pkgdir}"/usr/${_arch}/bin/*.exe
    strip --strip-unneeded "$pkgdir"/usr/${_arch}/bin/*.dll
    strip -g "$pkgdir"/usr/${_arch}/lib/*.a
  done
}
Собираем пакет утилитой makepkg.
$ CARCH=i686 makepkg -Acs
==> Сборка пакета mingw-w64-protobuf 3.3.1-1 (10 авг 2017 г. 19:03:34)
==> Проверка зависимостей для запуска...
==> Проверка зависимостей для сборки...
==> Получение исходных файлов...
  -> Найден v3.3.1.tar.gz
==> Проверка файлов source с использованием md5sums...
    v3.3.1.tar.gz ... Готово
==> Распаковка исходных файлов...
  -> Распаковка 'v3.3.1.tar.gz' с помощью bsdtar
==> Удаление директории '$pkgdir/'...
==> Запускается build()...
Google Mock not present.  Fetching gmock-1.7.0 from the web...
  % Total    % Received % Xferd  Average Speed   Time    Time     Time  Current
                                 Dload  Upload   Total   Spent    Left  Speed
100   129    0   129    0     0    153      0 --:--:-- --:--:-- --:--:--   163
100  362k  100  362k    0     0   160k      0  0:00:02  0:00:02 --:--:--  603k
  % Total    % Received % Xferd  Average Speed   Time    Time     Time  Current
                                 Dload  Upload   Total   Spent    Left  Speed
100   129    0   129    0     0    145      0 --:--:-- --:--:-- --:--:--   145
100  618k  100  618k    0     0   195k      0  0:00:03  0:00:03 --:--:--  355k
+ autoreconf -f -i -Wall,no-obsolete
libtoolize: putting auxiliary files in AC_CONFIG_AUX_DIR, 'build-aux'.
libtoolize: copying file 'build-aux/ltmain.sh'
libtoolize: putting macros in AC_CONFIG_MACRO_DIRS, 'm4'.
libtoolize: copying file 'm4/libtool.m4'
libtoolize: copying file 'm4/ltoptions.m4'
libtoolize: copying file 'm4/ltsugar.m4'
libtoolize: copying file 'm4/ltversion.m4'
libtoolize: copying file 'm4/lt~obsolete.m4'
configure.ac:27: installing 'build-aux/compile'
configure.ac:30: installing 'build-aux/config.guess'
configure.ac:30: installing 'build-aux/config.sub'
configure.ac:24: installing 'build-aux/install-sh'
configure.ac:24: installing 'build-aux/missing'
Makefile.am: installing 'build-aux/depcomp'
parallel-tests: installing 'build-aux/test-driver'
libtoolize: putting auxiliary files in AC_CONFIG_AUX_DIR, 'build-aux'.
libtoolize: copying file 'build-aux/ltmain.sh'
libtoolize: Consider adding 'AC_CONFIG_MACRO_DIRS([m4])' to configure.ac,
libtoolize: and rerunning libtoolize and aclocal.
libtoolize: Consider adding '-I m4' to ACLOCAL_AMFLAGS in Makefile.am.
configure.ac:22: installing 'build-aux/compile'
configure.ac:25: installing 'build-aux/config.guess'
configure.ac:25: installing 'build-aux/config.sub'
configure.ac:19: installing 'build-aux/install-sh'
configure.ac:19: installing 'build-aux/missing'
Makefile.am: installing 'build-aux/depcomp'
parallel-tests: installing 'build-aux/test-driver'
libtoolize: putting auxiliary files in '.'.
libtoolize: copying file './ltmain.sh'
libtoolize: putting macros in AC_CONFIG_MACRO_DIRS, 'm4'.
libtoolize: copying file 'm4/libtool.m4'
libtoolize: copying file 'm4/ltoptions.m4'
libtoolize: copying file 'm4/ltsugar.m4'
libtoolize: copying file 'm4/ltversion.m4'
libtoolize: copying file 'm4/lt~obsolete.m4'
configure.ac:66: installing './ar-lib'
configure.ac:61: installing './compile'
configure.ac:46: installing './config.guess'
configure.ac:46: installing './config.sub'
configure.ac:48: installing './install-sh'
configure.ac:48: installing './missing'
benchmarks/Makefile.am: installing './depcomp'
parallel-tests: installing './test-driver'
+ rm -rf autom4te.cache config.h.in~
+ exit 0
~/mingw-w64-protobuf/src/protobuf-3.3.1/build-i686-w64-mingw32 ~/mingw-w64-protobuf/src/protobuf-3.3.1
/home/user/mingw-w64-protobuf/PKGBUILD: line 24: i686-w64-mingw32-configure: команда не найдена
==> ОШИБКА: Произошел сбой в build().
    Прерывание...
Для сборки требуется скрипт configure как его поставить в MinGW из оф. реп
я не знаю, поэтому ставим по тому же принципу из исходников (https://aur.archlinux.org/packages/mingw-w64-configure/).
Перед сборкой также важно закомментировать зависимости:
PKGBUILD
pkgname=mingw-w64-configure
pkgver=0.1
pkgrel=1
arch=(any)
pkgdesc="configure wrapper for MinGW (mingw-w64)"
#depends=('mingw-w64-gcc' 'mingw-w64-pkg-config')
license=("GPL")
url="http://fedoraproject.org/wiki/MinGW"
source=("mingw-configure.sh")
md5sums=('SKIP')

_architectures="i686-w64-mingw32 x86_64-w64-mingw32"

build() {
  for _arch in ${_architectures}; do
    sed "s|@TRIPLE@|${_arch}|g" mingw-configure.sh > ${_arch}-configure
  done
}

package() {
  install -d "${pkgdir}"/usr/bin
  for _arch in ${_architectures}; do
    install -m 755 ${_arch}-configure "${pkgdir}"/usr/bin/
  done
}
Сборка configure:
$ cd ../
$ wget https://aur.archlinux.org/cgit/aur.git/snapshot/mingw-w64-configure.tar.gz
$ tar -zxf mingw-w64-configure.tar.gz
$ cd mingw-w64-configure/
$ CARCH=i686 makepkg -Acs
$ pacman -U mingw-w64-configure-0.1-1-any.pkg.tar.xz
Теперь все готово для сборки Protobuf:
$ cd ../mingw-w64-protobuf/
$ CARCH=i686 makepkg -Acs
В результате получим архив с dll-ками и заголовочными файлами. Вот так просто и
лаконично, хотя лучше поставить ArchLinux в виртуалку и собрать там тоже самое
без лишних хлопот.
pip install protobuf
The Python protobuf library is among the top 100 Python libraries, with more than 62,163,331 downloads. This article will show you everything you need to get this installed in your Python environment.
- Library Link
Alternatively, you may use any of the following commands to install protobuf, depending on your concrete environment. One is likely to work!
💡 If you have only one version of Python installed:pip install protobuf💡 If you have Python 3 (and, possibly, other versions) installed:pip3 install💡 If you don't have PIP or it doesn't workprotobufpython -m pip install💡 If you have Linux and you need to fix permissions (any one):protobufpython3 -m pip installprotobufsudo pip3 install💡 If you have Linux with aptprotobufpip3 installprotobuf--usersudo apt install💡 If you have Windows and you have set up theprotobufpyaliaspy -m pip install💡 If you have Anacondaprotobufconda install -c anaconda💡 If you have Jupyter Notebookprotobuf!pip installprotobuf!pip3 installprotobuf
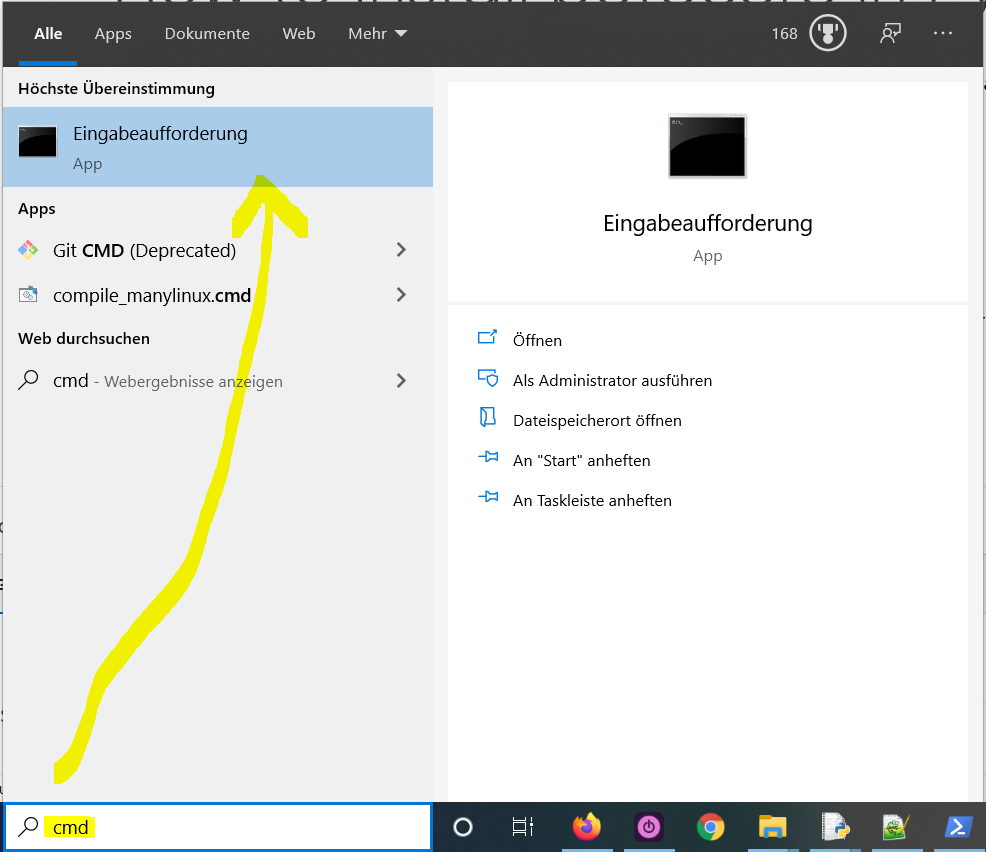
How to Install protobuf on Windows?
- Type
"cmd"in the search bar and hitEnterto open the command line. - Type “
pip install protobuf” (without quotes) in the command line and hitEnteragain. This installs protobuf for your default Python installation. - The previous command may not work if you have both Python versions 2 and 3 on your computer. In this case, try
"pip3 install protobuf"or “python -m pip install protobuf“. - Wait for the installation to terminate successfully. It is now installed on your Windows machine.
Here’s how to open the command line on a (German) Windows machine:
First, try the following command to install protobuf on your system:
pip install protobuf
Second, if this leads to an error message, try this command to install protobuf on your system:
pip3 install protobuf
Third, if both do not work, use the following long-form command:
python -m pip install protobuf
The difference between pip and pip3 is that pip3 is an updated version of pip for Python version 3. Depending on what’s first in the PATH variable, pip will refer to your Python 2 or Python 3 installation—and you cannot know which without checking the environment variables. To resolve this uncertainty, you can use pip3, which will always refer to your default Python 3 installation.
How to Install protobuf on Linux?
You can install protobuf on Linux in four steps:
- Open your Linux terminal or shell
- Type “
pip install protobuf” (without quotes), hit Enter. - If it doesn’t work, try
"pip3 install protobuf"or “python -m pip install protobuf“. - Wait for the installation to terminate successfully.
The package is now installed on your Linux operating system.
How to Install protobuf on macOS?
Similarly, you can install protobuf on macOS in four steps:
- Open your macOS terminal.
- Type “
pip install protobuf” without quotes and hitEnter. - If it doesn’t work, try
"pip3 install protobuf"or “python -m pip install protobuf“. - Wait for the installation to terminate successfully.
The package is now installed on your macOS.
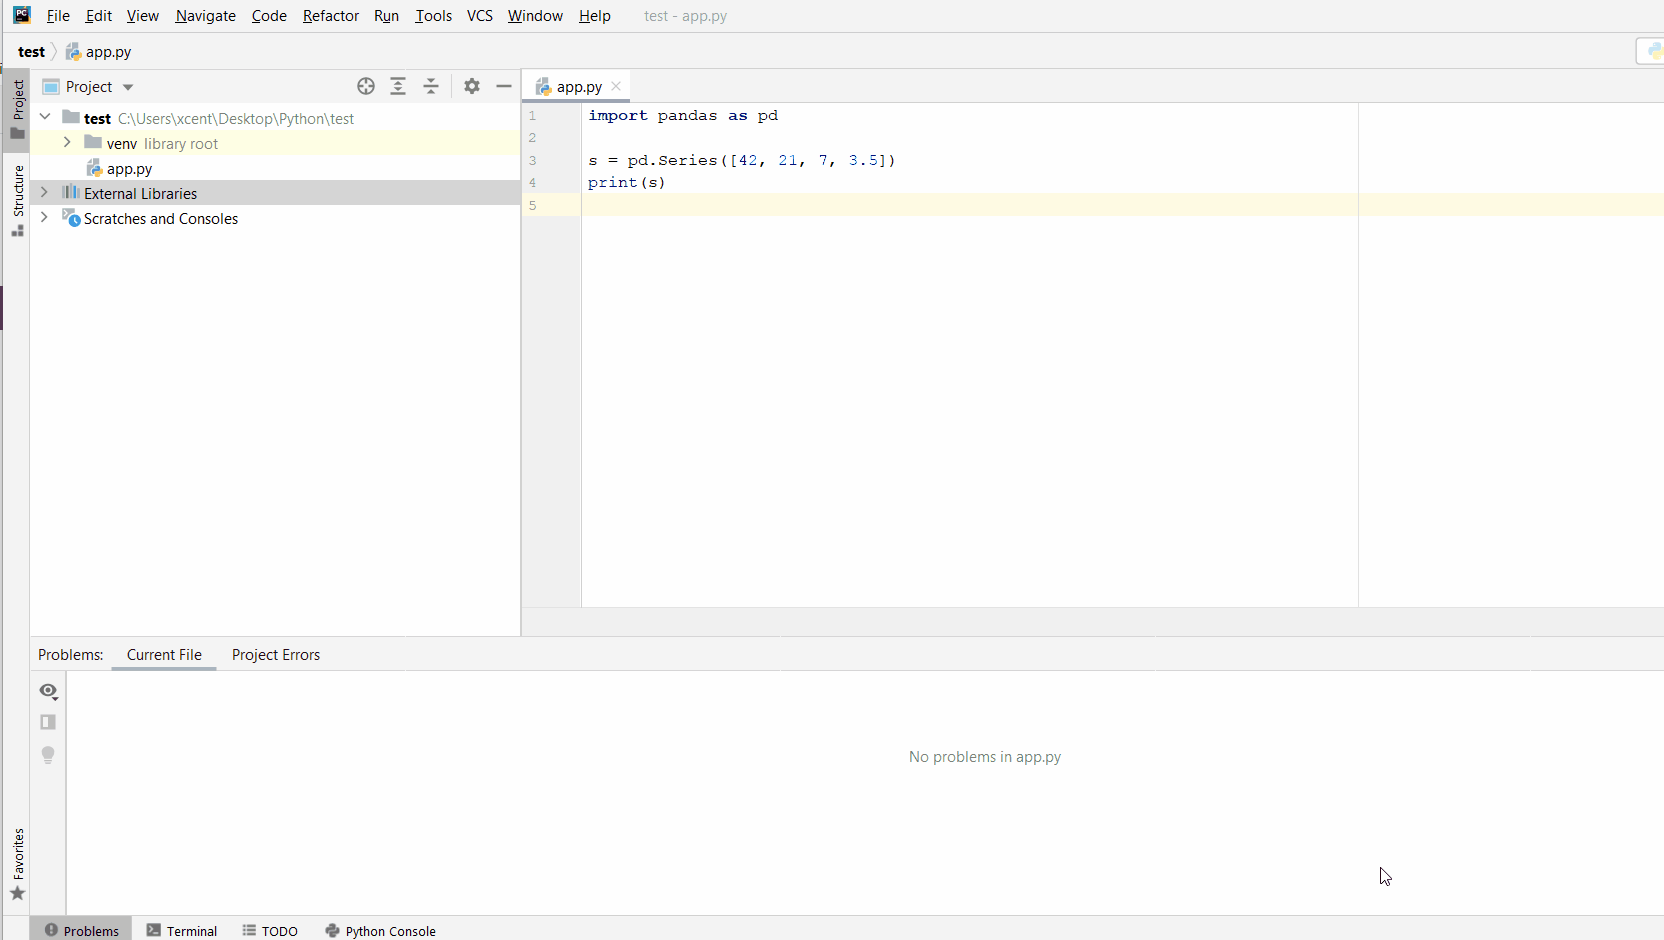
Given a PyCharm project. How to install the protobuf library in your project within a virtual environment or globally? Here’s a solution that always works:
- Open
File > Settings > Projectfrom the PyCharm menu. - Select your current project.
- Click the
Python Interpretertab within your project tab. - Click the small
+symbol to add a new library to the project. - Now type in the library to be installed, in your example
"protobuf"without quotes, and clickInstall Package. - Wait for the installation to terminate and close all pop-ups.
Here’s the general package installation process as a short animated video—it works analogously for protobuf if you type in “protobuf” in the search field instead:
Make sure to select only “protobuf” because there may be other packages that are not required but also contain the same term (false positives):
How to Install protobuf in a Jupyter Notebook?
To install any package in a Jupyter notebook, you can prefix the !pip install my_package statement with the exclamation mark "!". This works for the protobuf library too:
!pip install my_package
This automatically installs the protobuf library when the cell is first executed.
How to Resolve ModuleNotFoundError: No module named ‘protobuf’?
Say you try to import the protobuf package into your Python script without installing it first:
import protobuf
# ... ModuleNotFoundError: No module named 'protobuf'
Because you haven’t installed the package, Python raises a ModuleNotFoundError: No module named 'protobuf'.
To fix the error, install the protobuf library using “pip install protobuf” or “pip3 install protobuf” in your operating system’s shell or terminal first.
See above for the different ways to install protobuf in your environment.
Improve Your Python Skills
If you want to keep improving your Python skills and learn about new and exciting technologies such as Blockchain development, machine learning, and data science, check out the Finxter free email academy with cheat sheets, regular tutorials, and programming puzzles.
Join us, it’s fun! 🙂

While working as a researcher in distributed systems, Dr. Christian Mayer found his love for teaching computer science students.
To help students reach higher levels of Python success, he founded the programming education website Finxter.com. He’s author of the popular programming book Python One-Liners (NoStarch 2020), coauthor of the Coffee Break Python series of self-published books, computer science enthusiast, freelancer, and owner of one of the top 10 largest Python blogs worldwide.
His passions are writing, reading, and coding. But his greatest passion is to serve aspiring coders through Finxter and help them to boost their skills. You can join his free email academy here.