The latest PyQt5 wheels (which can be installed via pip) only contain what’s necessary for running applications, and don’t include the dev tools. This applies to PyQt versions 5.7 and later. For PyQt versions 5.6 and earlier, there are binary packages for Windows that also include the dev tools, and these are still available at sourceforge. The maintainer of PyQt does not plan on making any further releases of such binary packages, though — only the runtime wheels will now be made available, and there will be no official wheels for the dev tools.
In light of this, someone has created an unofficial pyqt5-tools wheel (for Windows only). This appears to be in it’s early stages, though, and so may not keep up with recent PyQt5 releases. This means that it may not always be possible to install it via pip. If that is the case, as a work-around, the wheel files can be treated as zip files and the contents extracted to a suitable location. This should then allow you to run the designer.exe file that is in the pyqt5-tools/designer folder.
Finally, note that you will also see some zip and tar.gz files at sourceforge for PyQt5. These only contain the source code, though, so will be no use to you unless you intend to compile PyQt5 yourself. And just to be clear: compiling from source still would not give you all the Qt dev tools. If you go down that route, you would need to install the whole Qt development kit separately as well (which would then get you the dev tools).
PyQt5 является одним из наиболее часто используемых модулей для создания GUI приложений в Python, и это связанно с его простотой, о которой вы узнаете далее.
Еще одна замечательная особенность, которая вдохновляет разработчиков пользоваться PyQt5 – это PyQt5 Designer, благодаря которому можно создавать сложные GUI приложения достаточно быстро. Вам нужно только перетаскивать свои виджеты для создания собственной формы. У нас есть готовый сборник 54 уроков по другому фреймворку wxPython.
- Создаем простой калькулятор в PyQt5
- Создаем игру Сапёр на PyQt5
- История курса рубля на PyQt5 + XML от ЦБ РФ
Другие фреймворки
- wxPython
- Tkinter
- PyCairo
В данном руководстве по PyQt5, я буду использовать Python 3.6 на Ubuntu и предположение, что вы уже имеете базовое представление о Python.
Есть вопросы по Python?
На нашем форуме вы можете задать любой вопрос и получить ответ от всего нашего сообщества!
Telegram Чат & Канал
Вступите в наш дружный чат по Python и начните общение с единомышленниками! Станьте частью большого сообщества!
Паблик VK
Одно из самых больших сообществ по Python в социальной сети ВК. Видео уроки и книги для вас!
Звучит замечательно! Начнем с установки PyQt5, и затем перейдем к тому, как разрабатывать GUI приложение с примерами.
Краткое содержание
- 1 Установка PyQt5
- 1.1 Установка PyQt5 через pip
- 1.2 Установка PyQt5 из исходников на Linux
- 1.3 Установка PyQt5 из исходников на Windows
- 2 Устанавливаем PyQt5 Designer
- 2.1 Где находится дизайнер PyQt5?
- 3 Как использовать дизайнер PyQt5
- 4 Разница между QDialog, QMainWindow, и QWidget
- 5 Загрузка .ui против конвертации .ui в .py
- 5.1 Загрузка файла .ui в ваш код Python
- 5.2 Конвертация файла .ui в .py file при помощи pyuic5
- 6 Виджет QLabel
- 6.1 Меняем шрифт QLabel
- 6.2 Меняем размер QLabel
- 6.3 Меняем текст в QLabel
- 7 Виджет QLineEdit
- 7.1 Метод setStyleSheet()
- 8 Виджет QPushButton
- 9 Визуальный редактор signal/slot
- 10 Как испускать сигналы в PyQt5
- 10.1 Как использовать сигнал в PyQt5
- 10.2 Переопределение сигнала (события) в PyQt5
- 11 Виджет QComboBox
- 11.1 Получаем все элементы из QComboBox
- 11.2 Выбор одного элемента из QCombobox
- 12 QTableWidget
- 12.1 Очистка содержимого QTableWidget
- 12.2 Заполнение QTableWidget из кода
- 12.3 Делаем QTableWidget нередактируемым (только для чтения)
- 12.4 Заголовок для столбцов в QTableWidget
- 12.5 Как сортировать QTableWidget
- 12.6 Добавляем QComboBox в QTableWidget
- 12.7 QProgressBar в QTableWidget
- 13 Компиляция Python приложения
Установка PyQt5
Существует две версии PyQt5: коммерческая и бесплатная версия GPL, которой мы будем пользоваться в этом руководстве.
Есть два способа установки PyQt5:
- Установка PyQt5 через pip
- Установка PyQt5 из исходников на Linux
Установка PyQt5 через pip
Чтобы установить PyQt5 при помощи pip, выполните следующую команду:
Чтобы убедиться в том, что установка прошла успешно, запустите следующий код:
Если не возникло ни одной ошибки, это значит, что вы успешно установили PyQt5. В случае, если ошибки возникли, возможно это связанно с тем, что вы используете версию Python, которая не поддерживается.
Установка PyQt5 из исходников на Linux
Для установки PyQt5 из исходника, вам нужно сделать следующее:
- Установить SIP;
- Скачать исходник PyQt5;
- Настроить и установить.
Как вы возможно знаете, PyQt5 связывает Python с популярной библиотекой Qt, которая написана на С++.
Инструмент, который создает эту связь, называется SIP. Так что для установки PyQt5 из исходника, вам для начала нужно установить SIP.
Для установки SIP, запустите следующую команду:
|
sudo pip3 install pyqt5—sip |
Теперь вы можете загрузить и установить исходник PyQt5.
Исходники
Скачать исходник PyQt5 можно отсюда: https://www.riverbankcomputing.com/software/pyqt/download5
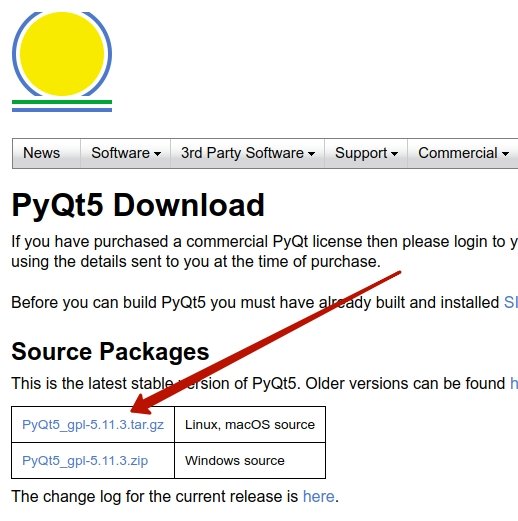
Внимание: На момент прочтения статьи возможно появилась новая версия которая отличается от той что в скрине. Версия на текущий момент 5.11.3, вы должны самостоятельно скопировать ссылку с сайта и предоставить её в wget. Заметьте, что обновить версию придется во всех ниже предоставленных командах.
|
wget https://sourceforge.net/projects/pyqt/files/PyQt5/PyQt—5.11.3/PyQt5_gpl—5.11.3.tar.gz tar —xvzf PyQt5_gpl—5.11.3.tar.gz cd PyQt5_gpl—5.11.3 |
Мы распаковали сжатый исходник, теперь запустите следующие команды внутри корня папки:
|
sudo python3 configure.py sudo make sudo make install |
Чтобы убедиться в том, что все прошло гладко, попробуйте импортировать модуль PyQt5 так же, как мы делали все раньше. Все должно пройти хорошо.
Установка PyQt5 из исходников на Windows
Скачивайте и распакуйте архив с сайта которого мы указали выше.
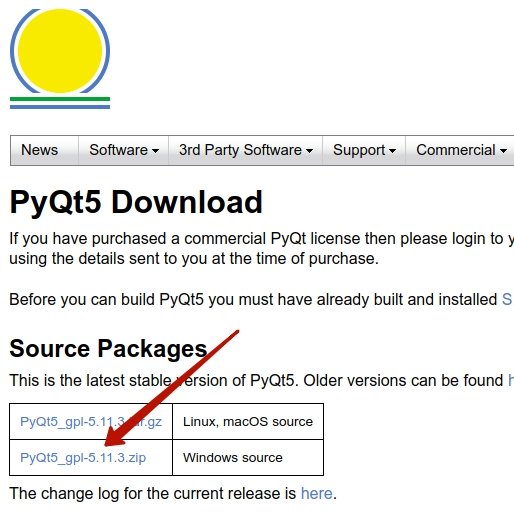
Так как SIP требует компилятор GCC, вам нужно установить MinGW, который является портом Windows для компилятора Linux, GCC.
Единственное, что нужно поменять — это момент конфигурации. Вам нужно сообщить Python о платформе.
Это можно выполнить следующим образом:
|
python configure.py —platform win32—g++ make make install |
Поздравляем! Вы успешно установили PyQt5 из исходника.
Установка PyQt5 Designer
Есть два способа создания GUI приложений при помощи PyQt5:
- Дизайн виджетов при помощи кода;
- Использование PyQt5 Designer.
В этом руководстве мы используем PyQt5 Designer, который упрощает процесс на столько, что вы можете выполнить большой объем работы за секунды.
Недорого заказать услуги SMM продвижения более чем в 9 социальных сетях можно на https://doctorsmm.com/. С помощью этого сервиса можно раскрутить свою группу, страницу, сообщество или канал и набрать нужное количество подписчиков, лайков, репостов и других соцсигналов.
Дизайнер PyQt5 поставляется вместе с набором инструментов. Для его установки, вам нужно установить эти инструменты.
|
$ pip3 install pyqt5—tools |
Где находится дизайнер PyQt5?
После удачной установки, вы можете найти дизайнер PyQt5 здесь:
|
C:Program FilesPython36Libsite—packagespyqt5—tools |
Кстати, если вы установили только для своего текущего пользовательского аккаунта, вы найдете дизайнер PyQt5 вот здесь:
|
C:UsersPythonUserAppDataLocalProgramsPythonPython36—32Libsite—packages pyqt5—tools |
Вы можете создать короткий путь для него, вместо того, чтобы постоянно переходить к этому расположению для запуска дизайнера PyQt5.
Как использовать дизайнер PyQt5
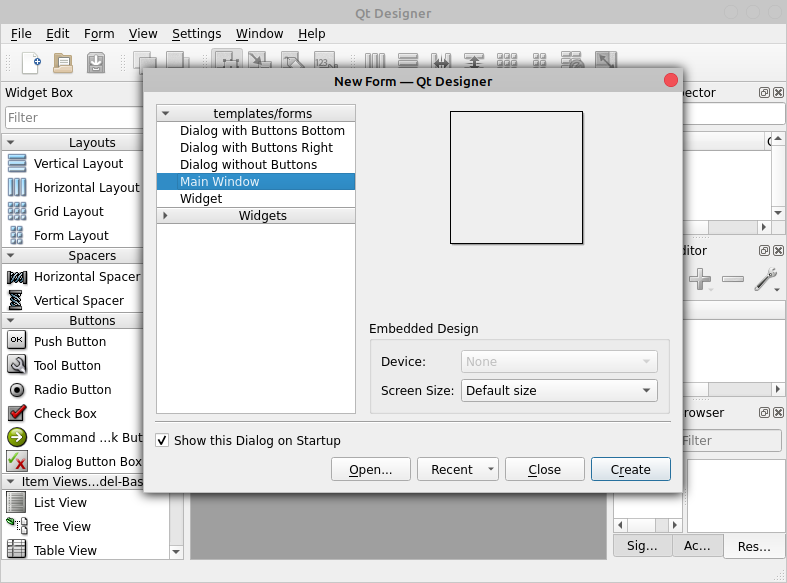
Откройте designer.exe и увидите диалоговое окно, спрашивающее о том, какую форму шаблона вы предпочитаете.
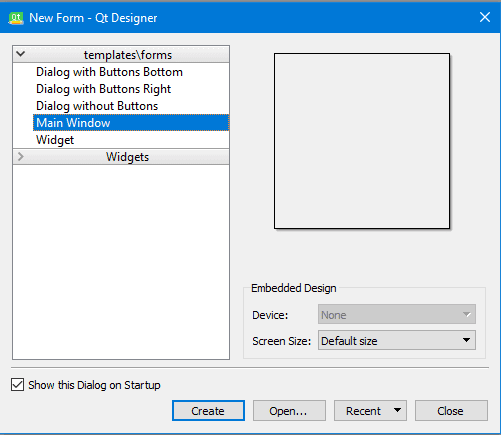
Существует пять видов доступных шаблонов:
- Диалоговое окно с кнопками внизу (Dialog with Buttons Bottom): создает форму с кнопками ОК и Cancel в правом нижнем углу формы.
- Диалоговое окно с кнопками справа (Dialog with Buttons Right): создает форму с кнопками OK и Cancel в верхнем правом углу формы.
- Диалоговое окно без кнопок (Dialog without Buttons): создает пустую форму;
- Главное окно (Main Window): создает окно с панелью меню и набором инструментов. Унаследовано из QmainWindow;
- Виджет (Widget): создает виджет, наследуемый из класса Qwidget. Отличается от диалоговых шаблонов тем, что они наследуются из класса QВialog
Итак, у нас есть три типа шаблонов. В чем между ними разница?
Разница между QDialog, QMainWindow, и Qwidget
- QWidget – это базовый класс для всех GUI Элементов в PyQt5;
- QDialog используется при запросе чего-либо у пользователя, например, запросы о принятии или отклонении чего-нибудь. Основан на Qwidget.
- QMainWindow – самый большой шаблон, где вы можете разместить вашу панель инструментов, меню, статус и другие виджеты. Не имеет встроенных кнопок разрешения, таких как в QDialog.
Загрузка .ui против конвертации .ui в .py
В данном руководстве мы используем PyQt5 Designer, но перед тем, как мы пойдем дальше, давайте рассмотрим, как еще мы можем использовать сгенерированный файл из PyQt5 Designer.
Нам нужно открыть PyQt5 Designer, выбрать шаблон Main Window и нажать кнопку create.
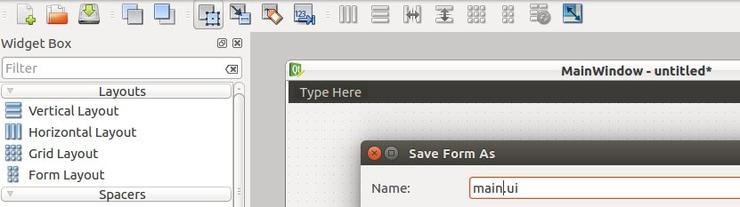
Далее в файловом меню (File), нажимаем сохранить. PyQt5 Designer экспортирует вашу форму в XML с расширением .ui.
Для использования этого дизайна, у вас есть два способа:
- Загрузить файл .ui в ваш код Python;
- Конвертировать файл .ui в файл .py при помощи pyuic5;
Загрузка .ui файла в ваш код Python
Чтобы загрузить файл .ui в ваш код Python, вы можете использовать функцию loadUI() из uic вот так:
|
from PyQt5 import QtWidgets, uic import sys app = QtWidgets.QApplication([]) win = uic.loadUi(«mydesign.ui») # расположение вашего файла .ui win.show() sys.exit(app.exec()) |
Если вы запустите код, вы увидите окно, в котором есть только ярлык.
Это значит, что ui файл успешно загрузился!
Мы используем sys.exit(app.exec()) вместо использования app.exec() напрямую, чтобы выслать правильный код статуса, родительский процесс, или процесс вызова.
Если вы использовали app.exec() напрямую, приложение отправит ноль, что говорит об успехе, и это произойдет даже если приложение упадет.
Конвертация файла .ui в файл .py при помощи pyuic5
Давайте попробуем еще один способ и конвертируем файл .ui в код Python:
|
$ pyuic5 mydesign.ui —o mydesign.py |
Да! Был создан новый файл под названием mydesign.py. Теперь, импортируем этот файл, чтобы показать его в окне.
|
1 2 3 4 5 6 7 8 9 10 11 12 13 14 15 16 17 |
from PyQt5 import QtWidgets from mydesign import Ui_MainWindow # импорт нашего сгенерированного файла import sys class mywindow(QtWidgets.QMainWindow): def __init__(self): super(mywindow, self).__init__() self.ui = Ui_MainWindow() self.ui.setupUi(self) app = QtWidgets.QApplication([]) application = mywindow() application.show() sys.exit(app.exec()) |
Если запустите этот код, вы должны увидеть то же окно, что было в первом методе.
Преимущество использования второго метода — это автоматическое завершение, которое выполнит IDE, так как все ваши виджеты импортированы. В то же время, пользуясь первым методом, вы просто загружаете файл .ui и вам нужно обращать внимание на названия ваших виджетов.
Еще одно преимущество использования второго метода. Скорость: вам не нужен парсинг XML для загрузки UI.
Так что мы можем сказать, что конвертация файла .ui в файл .py – безопаснее для кодинга и быстрее для загрузки.
Настало время закатить рукава и поиграть с виджетами PyQt5.
Для внесение виджета QLabel в вашу форму, выполните следующее:
- Откройте PyQt5 Designer и выберите шаблон Main Window;
- Перетяните виджет ярлыка из бокса слева;
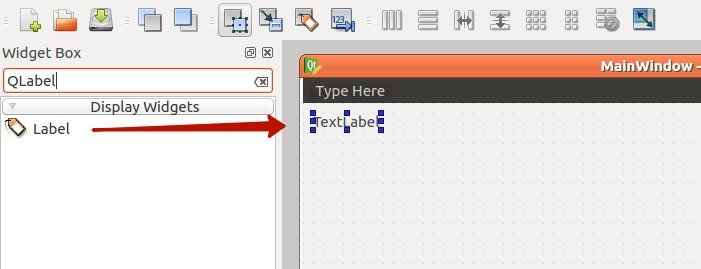
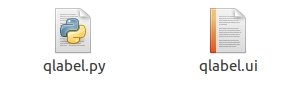
Сохраните дизайн в файл как qlabel.ui и конвертируйте его в файл qlabel.py. Теперь поработаем с ярлыком виджета при помощи кода.
|
pyuic5 qlabel.ui —o qlabel.py |
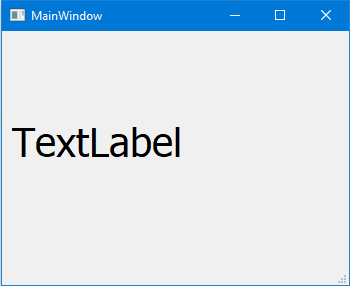
Результат:
Меняем шрифт QLabel
Чтобы поменять шрифт QLabel, используйте метод setFont() и передайте ему QFont следующим образом:
|
1 2 3 4 5 6 7 8 9 10 11 12 13 14 15 16 17 18 19 20 21 22 |
from PyQt5 import QtWidgets, QtGui from mydesign import Ui_MainWindow import sys class mywindow(QtWidgets.QMainWindow): def __init__(self): super(mywindow, self).__init__() self.ui = Ui_MainWindow() self.ui.setupUi(self) self.ui.label.setFont( QtGui.QFont(‘SansSerif’, 30) ) # Изменение шрифта и размера app = QtWidgets.QApplication([]) application = mywindow() application.show() sys.exit(app.exec()) |
После того, как запустите этот код, обратите внимание на то, что ярлык возникает некорректно, так как размер — меньше, чем размер шрифта, который мы используем. Так что нам нужно установить размер ярлыка.
Меняем размер QLabel
Чтобы поменять размер QLabel, вам нужно указать его геометрию при помощи метода setGeometry(), вот так:
|
1 2 3 4 5 6 7 8 9 10 11 12 13 14 15 16 17 18 19 20 21 22 23 24 25 |
from PyQt5 import QtWidgets, QtGui,QtCore from mydesign import Ui_MainWindow import sys class mywindow(QtWidgets.QMainWindow): def __init__(self): super(mywindow, self).__init__() self.ui = Ui_MainWindow() self.ui.setupUi(self) self.ui.label.setFont( QtGui.QFont(‘SansSerif’, 30) ) self.ui.label.setGeometry( QtCore.QRect(10, 10, 200, 200) ) # изменить геометрию ярлыка app = QtWidgets.QApplication([]) application = mywindow() application.show() sys.exit(app.exec()) |
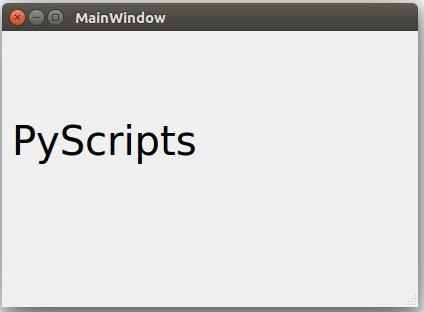
Меняем текст в QLabel
Чтобы изменить текст в QLabel, вы можете использовать метод setText(), вот так:
|
1 2 3 4 5 6 7 8 9 10 11 12 13 14 15 16 17 18 19 20 21 22 23 24 25 26 27 |
from PyQt5 import QtWidgets, QtGui,QtCore from qlabel import Ui_MainWindow import sys class mywindow(QtWidgets.QMainWindow): def __init__(self): super(mywindow, self).__init__() self.ui = Ui_MainWindow() self.ui.setupUi(self) self.ui.label.setFont( QtGui.QFont(‘SansSerif’, 30) ) self.ui.label.setGeometry( QtCore.QRect(10, 10, 200, 200) ) self.ui.label.setText(«PyScripts») # Меняем текст app = QtWidgets.QApplication([]) application = mywindow() application.show() sys.exit(app.exec()) |
Именно на столько все просто! Давайте рассмотрим другие виджеты.
Виджет QLineEdit – это редактируемое поле, где вы можете принимать данные от пользователя. LineEdit содержит множество методов, с которыми можно работать.
Я создам новый дизайн qline.ui, используя дизайнер PyQt5 и внесу шесть виджетов QLineEdit и экспортирую его в файл qline.py.
|
pyuic5 qline.ui —o qline.py |
Cодержимое файла qline.py после конвертации:
|
1 2 3 4 5 6 7 8 9 10 11 12 13 14 15 16 17 18 19 20 21 22 23 24 25 26 27 28 29 30 31 32 33 34 35 36 37 38 39 40 41 42 43 44 45 46 47 48 49 |
# -*- coding: utf-8 -*- # Form implementation generated from reading ui file ‘qline.ui’ # # Created by: PyQt5 UI code generator 5.11.3 # # WARNING! All changes made in this file will be lost! from PyQt5 import QtCore, QtGui, QtWidgets class Ui_MainWindow(object): def setupUi(self, MainWindow): MainWindow.setObjectName(«MainWindow») MainWindow.resize(785, 600) self.centralwidget = QtWidgets.QWidget(MainWindow) self.centralwidget.setObjectName(«centralwidget») self.lineEdit = QtWidgets.QLineEdit(self.centralwidget) self.lineEdit.setGeometry(QtCore.QRect(10, 10, 291, 31)) self.lineEdit.setObjectName(«lineEdit») self.lineEdit_2 = QtWidgets.QLineEdit(self.centralwidget) self.lineEdit_2.setGeometry(QtCore.QRect(10, 50, 291, 31)) self.lineEdit_2.setObjectName(«lineEdit_2») self.lineEdit_3 = QtWidgets.QLineEdit(self.centralwidget) self.lineEdit_3.setGeometry(QtCore.QRect(10, 90, 291, 31)) self.lineEdit_3.setObjectName(«lineEdit_3») self.lineEdit_4 = QtWidgets.QLineEdit(self.centralwidget) self.lineEdit_4.setGeometry(QtCore.QRect(10, 130, 291, 31)) self.lineEdit_4.setObjectName(«lineEdit_4») self.lineEdit_5 = QtWidgets.QLineEdit(self.centralwidget) self.lineEdit_5.setGeometry(QtCore.QRect(10, 170, 291, 31)) self.lineEdit_5.setObjectName(«lineEdit_5») self.lineEdit_6 = QtWidgets.QLineEdit(self.centralwidget) self.lineEdit_6.setGeometry(QtCore.QRect(10, 210, 291, 31)) self.lineEdit_6.setObjectName(«lineEdit_6») MainWindow.setCentralWidget(self.centralwidget) self.menubar = QtWidgets.QMenuBar(MainWindow) self.menubar.setGeometry(QtCore.QRect(0, 0, 785, 25)) self.menubar.setObjectName(«menubar») MainWindow.setMenuBar(self.menubar) self.statusbar = QtWidgets.QStatusBar(MainWindow) self.statusbar.setObjectName(«statusbar») MainWindow.setStatusBar(self.statusbar) self.retranslateUi(MainWindow) QtCore.QMetaObject.connectSlotsByName(MainWindow) def retranslateUi(self, MainWindow): _translate = QtCore.QCoreApplication.translate MainWindow.setWindowTitle(_translate(«MainWindow», «MainWindow»)) |
Давайте познакомимся с методами QLineEdit:
|
1 2 3 4 5 6 7 8 9 10 11 12 13 14 15 16 17 18 19 20 21 22 23 24 25 26 27 28 29 30 31 32 33 34 35 |
from PyQt5 import QtWidgets, QtCore # Импортируем наш файл from qline import Ui_MainWindow import sys class mywindow(QtWidgets.QMainWindow): def __init__(self): super(mywindow, self).__init__() self.ui = Ui_MainWindow() self.ui.setupUi(self) # Меняем текст self.ui.lineEdit.setText(«Добро пожаловать на PythonScripts») # указать максимальную длину self.ui.lineEdit_2.setMaxLength(10) # ввод пароля self.ui.lineEdit_3.setEchoMode(QtWidgets.QLineEdit.Password) # только чтение без изменения содержимого. self.ui.lineEdit_4.setReadOnly(True) # меняем цвет вводимого текста self.ui.lineEdit_5.setStyleSheet(«color: rgb(28, 43, 255);») # изменение цвета фона QLineEdit self.ui.lineEdit_6.setStyleSheet(«background-color: rgb(28, 43, 255);») app = QtWidgets.QApplication([]) application = mywindow() application.show() sys.exit(app.exec()) |
Результат:
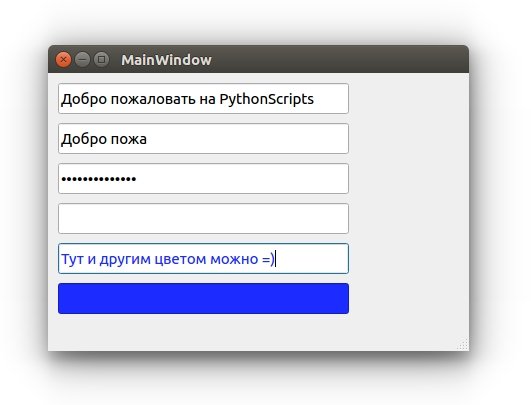
- Для 1-го QLineEdit, мы изменили текст, при помощи метода setText().
- Для 2-го QLineEdit, мы установили максимум доступных 10-и символов, так что более 10-и приниматься не будут.
- Для 3-го QLineEdit, мы установили режим пароля, так ваши введенные данные отображаются как звездочки;
- Для 4-го QLineEdit, мы установили режим «только для чтения», так что редактировать контент не представляется возможным.
- Для 5-го QLineEdit мы изменили цвет шрифта при помощи метода setStyleSheet() и указали нужный цвет с помощью CSS (как и для обычной веб страницы).
- Для 6-го QLineEdit мы изменили цвет фона при помощи метода setStyleSheet() и CSS.
Метод setStyleSheet()
Метод setStyleSheet() может быть использован с виджетами PyQt5 для изменения стилей.
Вы можете изменить следующие параметры, пользуясь методом setStyleSheet():
- Размер и тип шрифта;
- Цвет текста;
- Цвет заднего фона;
- Цвет верхней границы;
- Цвет нижней границы;
- Цвет левой границы;
- Цвет правой границы;
- Цвет выделения;
- Цвет выделения заднего фона.
Это наиболее важные значения, которые можно передать методу setStyleSheet().
Большая часть ваших программ Python будут содержать виджет QPushButton. Вы нажимаете кнопку, и какой-нибудь код выполняется.
Если у вас имеется опыт в программировании, вы могли слышать об обработке событий, где вы взаимодействуете с виджетом и функция выполняется.
Суть идеи сохранилась такой же и в PyQt5, только определения немного отличаются.
Событие клика в PyQt5 называется сигналом, и метод, который будет выполняться, называется слот.
Так что при нажатии на QPushButton, сигнал издается. Названием сигнала в данном случае, является clicked().
Чтобы связать сигнал со слотом, вам нужно использовать метод connect(), что вы сейчас и увидите.
Этот процесс обработки события продолжает работать до тех пор, пока вы не закроете вашу форму, или главный виджет.
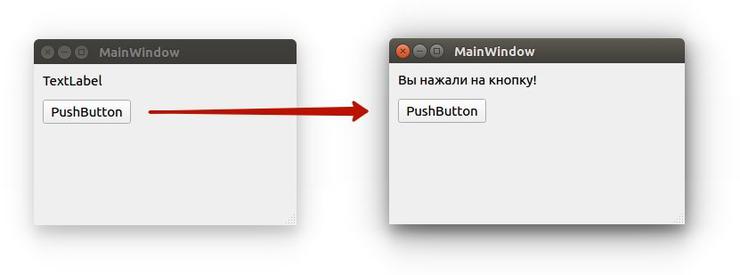
Давайте создадим форму myform.ui при помощи QLabel и QPushButton и экспортируем её в файл myform.py.
Экспортируем myform.ui в myform.py
|
pyuic5 myform.ui —o myform.py |
Сейчас, мы подключим сигнал clicked() к слоту при помощи метода connect(), вот так:
|
self.ui.pushButton.clicked.connect(self.btnClicked) |
Здесь, btnClicked – это слот, или функция, которая будет выполнена после того, как вы кликните на QPushButton.
Итак, ваш код будет выглядеть следующим образом:
|
1 2 3 4 5 6 7 8 9 10 11 12 13 14 15 16 17 18 19 20 21 22 23 24 25 26 |
from PyQt5 import QtWidgets # Импортируем наш шаблон. from myform import Ui_MainWindow import sys class mywindow(QtWidgets.QMainWindow): def __init__(self): super(mywindow, self).__init__() self.ui = Ui_MainWindow() self.ui.setupUi(self) # подключение клик-сигнал к слоту btnClicked self.ui.pushButton.clicked.connect(self.btnClicked) def btnClicked(self): self.ui.label.setText(«Вы нажали на кнопку!») # Если не использовать, то часть текста исчезнет. self.ui.label.adjustSize() app = QtWidgets.QApplication([]) application = mywindow() application.show() sys.exit(app.exec()) |
Результат:
Замечательно!
Визуальный редактор слота/сигнала
Мы видели, как подключать сигнал виджета к слоту при помощи метода connect(), но это не единственный способ.
На самом деле, для каждого виджета есть предопределенные слоты. Вы можете связать сигнал с любым предопределенным слотом, без необходимости кодить в дизайнере PyQt5.
Перетяните QPushButton и QLineEdit в вашу форму.
Нажмите F4 и перетяните курсор из QPushButton и отпустите его в верхней части QLineEdit. Чтобы вернуться в обычный режим, нажмите на F3.
Благодаря этому появится редактор сигнала/слота.
Слева находятся предопределенные сигналы, справа — предопределенные слоты. Скажем, нам нужно подключить сигнал clicked() с слотом «очистки содержимого«.
Выберите сигнал clicked слева и выберите clear слот справа и нажмите OK.
После выполнения подключений ваших сигналов и слотов, вы можете выйти из этого режима, нажав ESC, или F3.
Сейчас, если вы запустите эту форму, и нажмете QPushButton, то любой текст в QLineEdit будет очищен. Вы можете редактировать или удалять эти связи в панели редактора сигналов и слотов.
Сохраните форму как signaledit.ui и конвертируем её в signaledit.py:
|
pyuic5 signaledit.ui —o signaledit.py |
Полученный файл импортируем в наш код:
|
1 2 3 4 5 6 7 8 9 10 11 12 13 14 15 16 17 18 19 20 |
from PyQt5 import QtWidgets # Импортируем наш шаблон. from signaledit import Ui_MainWindow import sys class mywindow(QtWidgets.QMainWindow): def __init__(self): super(mywindow, self).__init__() self.ui = Ui_MainWindow() self.ui.setupUi(self) app = QtWidgets.QApplication([]) application = mywindow() application.show() sys.exit(app.exec()) |
Результат:
Как выпускать сигналы в PyQt5
Мы увидели, как работают сигналы и слоты. Все сигналы, с которыми мы работали, являются предопределенными для нас.
Но что на счет выпуска собственного сигнала?
Это очень просто! Вы можете сделать это, просто использовав класс pyqtSignal, как показано ниже:
- Определите ваше событие типом pyqtSignal;
- Вызовите метод emit() в том месте, где вы хотите, чтобы произошло событие.
Скажем, у нас есть класс nut, и мы хотим, чтобы сигнал cracked был выпущен.
|
from PyQt5.QtCore import pyqtSignal, QObject class nut(QObject): cracked = pyqtSignal() def __init__(self): QObject.__init__(self) def crack(self): self.cracked.emit() |
Как использовать сигнал
Сейчас мы сделаем наш пример более практичным, создаем экземпляр класса nut и выпуская сигнал cracked:
|
1 2 3 4 5 6 7 8 9 10 11 12 13 14 15 16 17 18 19 20 21 |
from PyQt5.QtCore import pyqtSignal, QObject class nut(QObject): cracked = pyqtSignal() def __init__(self): QObject.__init__(self) def crack(self): self.cracked.emit() def crackit(): print(«hazelnut cracked!») hazelnut = nut() # подключение сигнала cracked к слоту crackit hazelnut.cracked.connect(crackit) hazelnut.crack() |
Сигнал cracked успешно выпущен.
Переопределение сигнала (события) в PyQt5
Иногда нам может понадобиться переопределить поведение по умолчанию для особенных событий или сигналов.
Давайте рассмотрим практичный пример для этого случая. Если вы хотите закрыть окно, когда пользователь нажимает на определенную клавишу, вы можете переопределить keyPressEvent внутри вашего главного окна следующим образом:
|
def keyPressEvent(self, e): if e.key() == Qt.Key_F12: self.close() |
Теперь, если пользователь нажмет клавишу F12, главное окно будет закрыто.
Здесь мы переопределили основной сигнал нажатия в главном окне и закрыли это окно.
Вместо того, чтобы разрешить пользователю вводить свои данные в QLineEdit, или любом другом редактируемом виджете, мы можем использовать виджет QCombobBox, чтобы дать список данных, из которого он сможет выбирать.
Давайте перетянем QComboBox в нашу форму и взглянем на её методы.
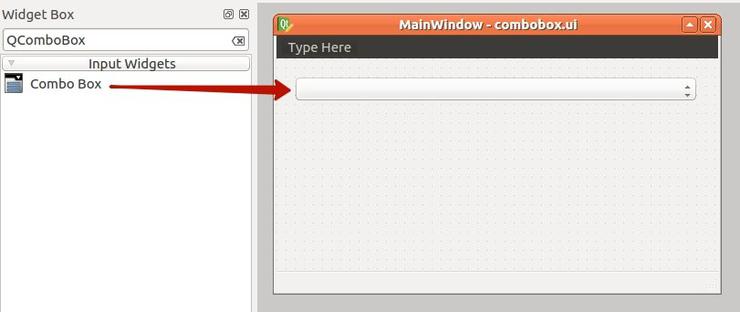
Сохраняем файл как combobox.ui и конвертируем его в combobox.py:
|
pyuic5 combobox.ui —o combobox.py |
Если вы запустите приложение сейчас, обратите внимание на то, что QComboBox — пустой. Чтобы вносить объекты в QComboBox, используйте метод addItem():
|
1 2 3 4 5 6 7 8 9 10 11 12 13 14 15 16 17 18 19 20 21 |
from PyQt5 import QtWidgets from combobox import Ui_MainWindow import sys class mywindow(QtWidgets.QMainWindow): def __init__(self): super(mywindow, self).__init__() self.ui = Ui_MainWindow() self.ui.setupUi(self) # Добавляем новые значения self.ui.comboBox.addItem(«Программист») self.ui.comboBox.addItem(«Дизайнер») app = QtWidgets.QApplication([]) application = mywindow() application.show() sys.exit(app.exec()) |
Получаем все элементы из QComboBox
Нет прямого способа получить все значения из QComboBox, но вы можете применить цикл Python для этой цели. Для этого подойдет функция range.
|
for i in range(self.ui.comboBox.count()): print(self.ui.comboBox.itemText(i)) |
Выбор одного элемента из QCombobox
Чтобы выбрать элемент из QComboBox, у вас есть два метода:
|
# по индексу, который начинается с нуля self.ui.comboBox.setCurrentIndex(1) #выбор по тексту self.ui.comboBox.setCurrentText(«Second item») |
Обратите внимание на то, что при выборе элемента по тексту, следует убедиться в том, что вы вводите правильный текст. В противном случае, QComboBox останется на первом элементе.
Если вы хотите просмотреть вашу базу данных в формате таблицы, в PyQt5 предоставляется QTableWidget как раз для этой цели.
QTableWidget состоит из клеток, каждая клетка — экземпляр класса QTableWidgetItem.
Давайте создадим форму, которая содержит QTableWidget и QPushButton.

Перетяните QTableWidget и QPushButton из PyQt5 Designer. После этого, сохраните форму как qtable.ui и конвертируйте дизайн в qtable.py.
|
pyuic5 qtable.ui —o qtable.py |
Чтобы добавлять ряды в QTableWidget, вы можете использовать метод setRowCount().
Для внесения столбцов в QTableWidget, воспользуйтесь методом setColumnCount().
|
1 2 3 4 5 6 7 8 9 10 11 12 13 14 15 16 17 18 19 20 21 22 |
from PyQt5 import QtWidgets # Импортируем нашу форму. from qtable import Ui_MainWindow import sys class mywindow(QtWidgets.QMainWindow): def __init__(self): super(mywindow, self).__init__() self.ui = Ui_MainWindow() self.ui.setupUi(self) self.ui.tableWidget.setColumnCount(2) self.ui.tableWidget.setRowCount(4) app = QtWidgets.QApplication([]) application = mywindow() application.show() sys.exit(app.exec()) |
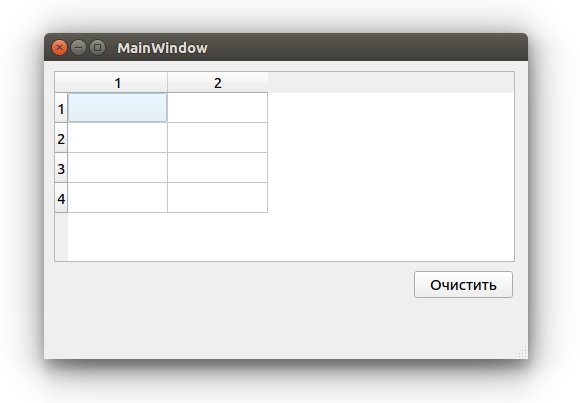
Теперь вы можете писать текст вручную внутри клеток QTableWidget.
Очистка содержимого QTableWidget
Чтобы очистить содержимое QTableWidget, вы можете использовать метод clear, вот так:
|
1 2 3 4 5 6 7 8 9 10 11 12 13 14 15 16 17 18 19 20 21 22 23 24 25 26 27 28 |
from PyQt5 import QtWidgets # Импортируем нашу форму. from qtable import Ui_MainWindow import sys class mywindow(QtWidgets.QMainWindow): def __init__(self): super(mywindow, self).__init__() self.ui = Ui_MainWindow() self.ui.setupUi(self) self.ui.tableWidget.setColumnCount(2) self.ui.tableWidget.setRowCount(4) # очистка таблицы при клике на кнопку. self.ui.pushButton.clicked.connect(self.clear) def clear(self): self.ui.tableWidget.clear() app = QtWidgets.QApplication([]) application = mywindow() application.show() sys.exit(app.exec()) |
Заполнение QTableWidget из кода
Чтобы заполнить QtableWidget программно, вам нужно использовать метод setItem() для каждого объекта QtableWidgetItem.
|
1 2 3 4 5 6 7 8 9 10 11 12 13 14 15 16 17 18 19 20 21 22 23 24 25 26 27 28 29 30 31 32 33 34 35 36 37 38 39 40 41 42 43 44 |
from PyQt5.QtWidgets import QTableWidgetItem from qtable import * import sys data = [] data.append((‘Заполнить’, ‘QTableWidget’)) data.append((‘с данными’, ‘в Python’)) data.append((‘очень’, ‘просто’)) class mywindow(QtWidgets.QMainWindow): def __init__(self): super().__init__() self.ui = Ui_MainWindow() self.ui.setupUi(self) self.ui.tableWidget.setRowCount(3) self.ui.tableWidget.setColumnCount(2) # очистка таблицы при клике на кнопку. self.ui.pushButton.clicked.connect(self.clear) row = 0 for tup in data: col = 0 for item in tup: cellinfo = QTableWidgetItem(item) self.ui.tableWidget.setItem(row, col, cellinfo) col += 1 row += 1 def clear(self): self.ui.tableWidget.clear() app = QtWidgets.QApplication([]) win = mywindow() win.show() sys.exit(app.exec()) |
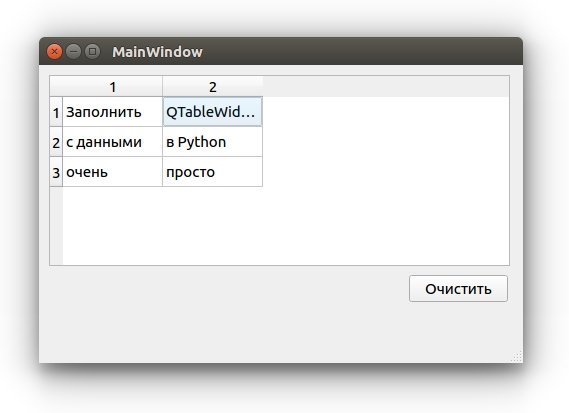
- Сначала мы создали список трех кортежей Python;
- Внутри конструктора главного окна, мы установили количество столбцов и рядов;
- Далее мы перебираем список и получаем каждый кортеж в списке, для заполнения клеток таблицы, при помощи метода setItem()
- Наконец, мы показываем главное окно.
Делаем QTableWidget нередактируемым (только для чтения)
Вам может не понравится то, что клетки в вашей таблице могут быть отредактированы пользователем в том или ином случае. Например, при отображении нередактируемых данных. В этом случае возможность редактирования не имеет никакого смысла.
Чтобы сделать QTableWidget нередактируемым, вы можете использовать метод setFlags(), чтобы сделать каждый QTableWidgetItem доступным только для чтения.
|
# Только для чтения cellinfo.setFlags( QtCore.Qt.ItemIsSelectable | QtCore.Qt.ItemIsEnabled ) |
Вам нужно установить флажки, перед тем как настраивать содержимое вашей клетки.
Таким образом, ваш код будет выглядеть вот так:
|
1 2 3 4 5 6 7 8 9 10 11 12 13 14 15 16 17 18 19 20 21 22 23 24 25 26 27 28 29 30 31 32 33 34 35 36 37 38 39 40 41 42 43 44 45 46 47 48 49 50 |
from PyQt5.QtWidgets import QTableWidgetItem from qtable import * import sys data = [] data.append((‘Заполнить’, ‘QTableWidget’)) data.append((‘с данными’, ‘в Python’)) data.append((‘очень’, ‘просто’)) class mywindow(QtWidgets.QMainWindow): def __init__(self): super().__init__() self.ui = Ui_MainWindow() self.ui.setupUi(self) self.ui.tableWidget.setRowCount(3) self.ui.tableWidget.setColumnCount(2) # очистка таблицы при клике на кнопку. self.ui.pushButton.clicked.connect(self.clear) row = 0 for tup in data: col = 0 for item in tup: cellinfo = QTableWidgetItem(item) # Только для чтения cellinfo.setFlags( QtCore.Qt.ItemIsSelectable | QtCore.Qt.ItemIsEnabled ) self.ui.tableWidget.setItem(row, col, cellinfo) col += 1 row += 1 def clear(self): self.ui.tableWidget.clear() app = QtWidgets.QApplication([]) win = mywindow() win.show() sys.exit(app.exec()) |
Теперь, если вы попробуете отредактировать какую-либо клетку — у вас не выйдет, так как QtableWidgetItem теперь нельзя редактировать
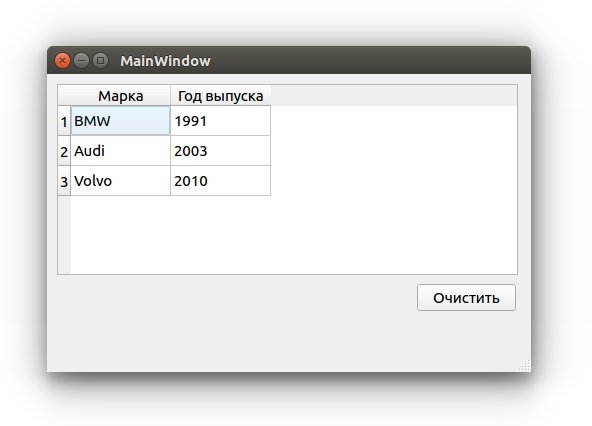
До этого момента, названия столбцов QTableWidget были числами. Как на счет того, чтобы поменять названия столбцов на что-нибудь другое?
Чтобы задать текст заголовкам QTableWidget, вы можете использовать метод setHorizontalHeaderLabels(), вот так:
|
1 2 3 4 5 6 7 8 9 10 11 12 13 14 15 16 17 18 19 20 21 22 23 24 25 26 27 28 29 30 31 32 33 34 35 36 37 38 39 40 41 42 43 44 45 46 47 48 |
from PyQt5.QtWidgets import QTableWidgetItem from qtable import * import sys data = [] data.append((‘BMW’, ‘1991’)) data.append((‘Audi’, ‘2003’)) data.append((‘Volvo’, ‘2010’)) class mywindow(QtWidgets.QMainWindow): def __init__(self): super().__init__() self.ui = Ui_MainWindow() self.ui.setupUi(self) self.ui.tableWidget.setRowCount(3) self.ui.tableWidget.setColumnCount(2) # очистка таблицы при клике на кнопку. self.ui.pushButton.clicked.connect(self.clear) # заголовки для столбцов. self.ui.tableWidget.setHorizontalHeaderLabels( (‘Марка’, ‘Год выпуска’) ) row = 0 for tup in data: col = 0 for item in tup: cellinfo = QTableWidgetItem(item) self.ui.tableWidget.setItem(row, col, cellinfo) col += 1 row += 1 def clear(self): self.ui.tableWidget.clear() app = QtWidgets.QApplication([]) win = mywindow() win.show() sys.exit(app.exec()) |
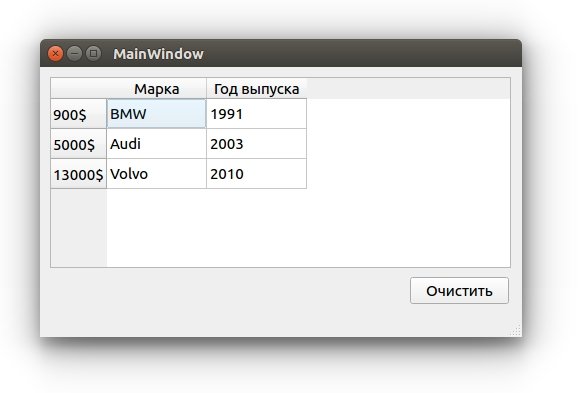
Таким же образом, вы можете менять заголовок ряда, при помощи метода setVerticalHeaderLabels():
|
1 2 3 4 5 6 7 8 9 10 11 12 13 14 15 16 17 18 19 20 21 22 23 24 25 26 27 28 29 30 31 32 33 34 35 36 37 38 39 40 41 42 43 44 45 46 47 48 49 50 51 52 53 |
from PyQt5.QtWidgets import QTableWidgetItem from qtable import * import sys data = [] data.append((‘BMW’, ‘1991’)) data.append((‘Audi’, ‘2003’)) data.append((‘Volvo’, ‘2010’)) class mywindow(QtWidgets.QMainWindow): def __init__(self): super().__init__() self.ui = Ui_MainWindow() self.ui.setupUi(self) self.ui.tableWidget.setRowCount(3) self.ui.tableWidget.setColumnCount(2) # очистка таблицы при клике на кнопку. self.ui.pushButton.clicked.connect(self.clear) # заголовки для столбцов. self.ui.tableWidget.setHorizontalHeaderLabels( (‘Марка’, ‘Год выпуска’) ) # названия рядов. self.ui.tableWidget.setVerticalHeaderLabels( (‘900$’, ‘5000$’, ‘13000$’) ) row = 0 for tup in data: col = 0 for item in tup: cellinfo = QTableWidgetItem(item) self.ui.tableWidget.setItem(row, col, cellinfo) col += 1 row += 1 def clear(self): self.ui.tableWidget.clear() app = QtWidgets.QApplication([]) win = mywindow() win.show() sys.exit(app.exec()) |
Как сортировать QTableWidget
Вы можете сделать ваш QTableWidget сортируемым, при помощи метода setSortingEnabled().
|
self.ui.tableWidget.setSortingEnabled(True) |
Теперь, если пользователь нажмет на любой заголовок столбца, он может сортировать данные в порядке убывания, или возрастания.
Вы можете использовать этот метод перед, или до наполнения QTableWidget данными.
Что на счет сортировки в QTableWidget, но только для определенного столбца?
Вы можете использовать метод sortByColumn(), и указать индекс столбца и порядок сортировки, вот так:
|
1 2 3 4 5 6 7 8 9 10 11 12 13 14 15 16 17 18 19 20 21 22 23 24 25 26 27 28 29 30 31 32 33 34 35 36 37 38 39 40 41 42 43 44 45 46 47 48 49 50 51 52 53 54 55 56 57 58 59 60 61 62 63 64 |
from PyQt5.QtWidgets import QTableWidgetItem from qtable import * import sys data = [] data.append((‘BMW’, ‘2005’)) data.append((‘Audi’, ‘2003’)) data.append((‘Volvo’, ‘1990’)) data.append((‘Toyota’, ‘2018’)) class mywindow(QtWidgets.QMainWindow): def __init__(self): super().__init__() self.ui = Ui_MainWindow() self.ui.setupUi(self) # Кол-во рядов меняется в зависимости от значений в data. self.ui.tableWidget.setRowCount( len(data) ) # Кол-во столбцов меняется в зависимости от data. self.ui.tableWidget.setColumnCount( len(data[0]) ) # очистка таблицы при клике на кнопку. self.ui.pushButton.clicked.connect(self.clear) # заголовки для столбцов. self.ui.tableWidget.setHorizontalHeaderLabels( (‘Марка’, ‘Год выпуска’) ) row = 0 for tup in data: col = 0 for item in tup: cellinfo = QTableWidgetItem(item) self.ui.tableWidget.setItem(row, col, cellinfo) col += 1 row += 1 # Сортировка по году выпуска. # 0 — Марка # 1 — Год выпуска self.ui.tableWidget.sortByColumn( 1, QtCore.Qt.AscendingOrder ) def clear(self): self.ui.tableWidget.clear() app = QtWidgets.QApplication([]) win = mywindow() win.show() sys.exit(app.exec()) |
Кстати, вы можете использовать метод sortItems() для сортировки QTableWidget в возрастающем порядке по умолчанию.
|
self.ui.tableWidget.sortItems(0) |
Или вы можете определить свой порядок сортировки:
|
self.ui.tableWidget.sortItems(1, QtCore.Qt.DescendingOrder) |
Помните, что если вы хотите сортировать ваши столбцы программно, вам нужно использовать методы сортировки после заполнения QTableWidget данными, иначе они не будут в нужном вам порядке.
Добавляем QComboBox в QTableWidget
У вас может появится задача, чтобы пользователь выбирал значение внутри QTableWidget, вместо ввода текста.
Как на счет того, чтобы добавить QComboBox в QTableWidgetItem?
Чтобы добавить QComboBox внутрь QTableWidgetItem, вы можете использовать метод setCellWidget():
|
1 2 3 4 5 6 7 8 9 10 11 12 13 14 15 16 17 18 19 20 21 22 23 24 25 26 27 28 29 30 31 32 33 34 35 |
from PyQt5.QtWidgets import QTableWidgetItem from qtable import * import sys data = [‘Python’, ‘PHP’, ‘Java’] class mywindow(QtWidgets.QMainWindow): def __init__(self): super().__init__() self.ui = Ui_MainWindow() self.ui.setupUi(self) self.ui.tableWidget.setRowCount(3) self.ui.tableWidget.setColumnCount(2) row = 0 for item in data: cellinfo = QTableWidgetItem(item) combo = QtWidgets.QComboBox() combo.addItem(«Изучить») combo.addItem(«Забыть») combo.addItem(«Удалить») self.ui.tableWidget.setItem(row, 0, cellinfo) self.ui.tableWidget.setCellWidget(row, 1, combo) row += 1 app = QtWidgets.QApplication([]) win = mywindow() win.show() sys.exit(app.exec()) |
Отлично!
Не ограничивайте себя в воображении и попробуйте вставлять различные виджеты, такие как QСheckbox, или даже QProgressBar.
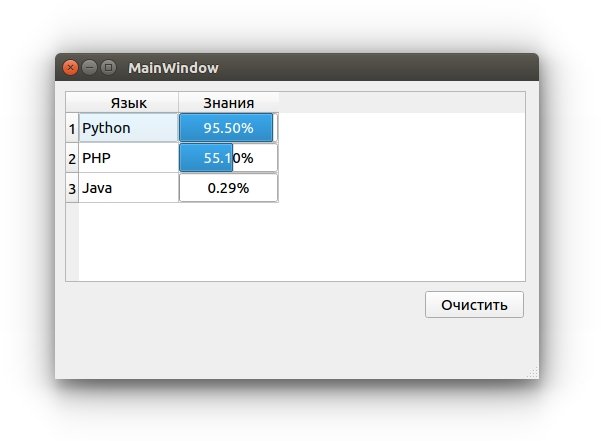
QProgressBar в QTableWidget
|
1 2 3 4 5 6 7 8 9 10 11 12 13 14 15 16 17 18 19 20 21 22 23 24 25 26 27 28 29 30 31 32 33 34 35 36 37 38 39 40 41 42 43 44 45 46 47 48 49 |
from PyQt5.QtWidgets import QTableWidgetItem from qtable import * import sys data = ( (‘Python’, 95.5), (‘PHP’, 55.1), (‘Java’, 0.29) ) class mywindow(QtWidgets.QMainWindow): def __init__(self): super().__init__() self.ui = Ui_MainWindow() self.ui.setupUi(self) self.ui.tableWidget.setRowCount(3) self.ui.tableWidget.setColumnCount(2) self.ui.tableWidget.setHorizontalHeaderLabels( (‘Язык’, ‘Знания’) ) line = 0 for item in data: cellinfo = QTableWidgetItem(item[0]) self.ui.tableWidget.setItem(line, 0, cellinfo) # Создаем QProgressBar progress = QtWidgets.QProgressBar() progress.setMinimum(0) progress.setMaximum(100) # Формат вывода: 10.50% progress.setValue(item[1]) progress.setFormat(‘{0:.2f}%’.format(item[1])) # Добавляем виджет в ячейку. self.ui.tableWidget.setCellWidget(line, 1, progress) line += 1 app = QtWidgets.QApplication([]) win = mywindow() win.show() sys.exit(app.exec()) |
Указанный выше код будет таким же, за исключением строки, где вы создаете QСomboBox, здесь вы внесете тот виджет, который вам нужен.
Единственное ограничение — это ваше собственное воображение!
Компиляция Python приложения
Вы можете конвертировать ваши программы Python в бинарные исполняемые, и для этого имеется множество инструментов.
Лично я предпочитаю pyinstaller, который подходит для упаковки кода Python в исполняемый файл под Windows, Mac OS X, Solaris, Linux и FreeBSD. Все это будет поддерживаться 32 и 64-битной архитектурой.
Лучшая в pyinstaller для нас — это наличие полной поддержки для PyQt5.
Отлично! Для начала, установим pyinstaller:
|
$ pip3 install pyinstaller |
После проведения установки, вы можете конвертировать программы Python следующим образом:
Ваш исполняемый файл будет создан в папке под названием dist в директории вашей программы Python.
Как вы могли догадаться, вместе с исполняемым файлом будет генерироваться множество зависимостей. Как сделать из этого один файл?
Вы можете создать один исполняемый файл. Вот так:
|
$ pyinstaller —onefile test.py |
Каждый раз, когда вы запускаете ваш исполняемый файл, будет возникать окно, как его спрятать?
Вы можете использовать флажки -w или –noconsole, чтобы спрятать окно консоли:
Эта опция доступна только для Windows и Mac OS X.
Pyinstaller предоставляет множество вариантов для упаковки вашего приложения, чтобы увидеть полный список, используйте –help:
Я старался сделать все на столько простым, на сколько это возможно. Надеюсь, это руководство оказалось для вас полезным.
Спасибо.

Являюсь администратором нескольких порталов по обучению языков программирования Python, Golang и Kotlin. В составе небольшой команды единомышленников, мы занимаемся популяризацией языков программирования на русскоязычную аудиторию. Большая часть статей была адаптирована нами на русский язык и распространяется бесплатно.
E-mail: vasile.buldumac@ati.utm.md
Образование
Universitatea Tehnică a Moldovei (utm.md)
- 2014 — 2018 Технический Университет Молдовы, ИТ-Инженер. Тема дипломной работы «Автоматизация покупки и продажи криптовалюты используя технический анализ»
- 2018 — 2020 Технический Университет Молдовы, Магистр, Магистерская диссертация «Идентификация человека в киберпространстве по фотографии лица»
To create a GUI for your windows and dialogs in PyQt, you can take two main paths: you can use Qt Designer, or you can hand code the GUI in plain Python code. The first path can dramatically improve your productivity, whereas the second path puts you in full control of your application’s code.
GUI applications often consist of a main window and several dialogs. If you’re looking to create these graphical components in an efficient and user-friendly way, then Qt Designer is the tool for you. In this tutorial, you’ll learn how to use Qt Designer to create your GUIs productively.
In this tutorial, you’ll learn:
- What Qt Designer is and how to install it on your system
- When to use Qt Designer vs hand coding for building your GUIs
- How to build and lay out the GUI of an application’s main window using Qt Designer
- How to create and lay out the GUI of your dialogs with Qt Designer
- How to use Qt Designer’s
.uifiles in your GUI applications
For a better understanding of the topics in this tutorial, you can check out the following resources:
- Python and PyQt: Building a GUI Desktop Calculator
- Python and PyQt: Creating Menus, Toolbars, and Status Bars
- PyQt Layouts: Create Professional-Looking GUI Applications
You’ll put all this knowledge together by using the GUIs that you’ll build with Qt Designer in a sample text editor application. You can get the code and all the required resources to build this application by clicking the link below:
Getting Started With Qt Designer
Qt Designer is a Qt tool that provides you with a what-you-see-is-what-you-get (WYSIWYG) user interface to create GUIs for your PyQt applications productively and efficiently. With this tool, you create GUIs by dragging and dropping QWidget objects on an empty form. After that, you can arrange them into a coherent GUI using different layout managers.
Qt Designer also allows you to preview your GUIs using different styles and resolutions, connect signals and slots, create menus and toolbars, and more.
Qt Designer is platform and programming language independent. It doesn’t produce code in any particular programming language, but it creates .ui files. These files are XML files with detailed descriptions of how to generate Qt-based GUIs.
You can translate the content of .ui files into Python code with pyuic5, which is a command-line tool that comes with PyQt. Then you can use this Python code in your GUI applications. You can also read .ui files directly and load their content to generate the associated GUI.
Installing and Running Qt Designer
There are several ways to get and install Qt Designer depending on your current platform. If you use Windows or Linux, then you can run the following commands from your terminal or command line:
$ python3 -m venv ./venv
$ source venv/bin/activate
(venv) $ pip install pyqt5 pyqt5-tools
Here, you create a Python virtual environment, activate it, and install pyqt5 and pyqt5-tools. pyqt5 installs PyQt and a copy of the required Qt libraries, while pyqt5-tools installs a set of Qt tools that includes Qt Designer.
The installation will place the Qt Designer executable in a different directory according to your platform:
- Linux:
...lib/python3.x/site-packages/qt5_applications/Qt/bin/designer - Windows:
...Libsite-packagespyqt5_toolsdesigner.exe
On Linux systems, such as Debian and Ubuntu, you can also install Qt Designer by using the system package manager with the following command:
$ sudo apt install qttools5-dev-tools
This command downloads and installs Qt Designer and other Qt tools on your system. In other words, you’ll have a system-wide installation and you’ll be able to run Qt Designer by clicking its icon in a file manager or system menu.
On macOS, if you’ve installed Qt from Homebrew using the brew install qt command, then you should have Qt Designer already installed on your system.
Finally, you can download the Qt installer for your current platform from the official download site and then follow the on-screen instructions. In this case, to complete the installation process, you need to register a Qt account.
If you’ve already installed Qt Designer using one of the options discussed so far, then go ahead and launch the application. You should get the following two windows on your screen:
The window in the foreground is Qt Designer’s New Form dialog. The window in the background is Qt Designer’s main window. In the next two sections, you’ll learn the basics of how to use these components of the Qt Designer interface.
Using Qt Designer’s New Form Dialog
When you run Qt Designer, you’re presented with the application’s main window and the New Form dialog. In this dialog, you can select from five available GUI templates. These templates include options to create dialogs, main windows, and custom widgets:
| Template | Form Type | Widgets | Base Class |
|---|---|---|---|
| Dialog with Buttons Bottom | Dialog | OK and Cancel buttons laid out horizontally on the bottom-right corner | QDialog |
| Dialog with Buttons Right | Dialog | OK and Cancel buttons laid out vertically on the top-right corner | QDialog |
| Dialog without Buttons | Dialog | No | QDialog |
| Main Window | Main Window | A menu bar at the top and a status bar at the bottom | QMainWindow |
| Widget | Widget | No | QWidget |
By default, when you run Qt Designer, the New Form dialog appears in the foreground. If it doesn’t, then you can click New on Qt Designer’s toolbar. You can also click File → New in the main menu or press Ctrl+N on your keyboard.
In the New Form dialog, you can select the form template that you want to start with and then click Create to generate a new form:
To create a new and empty form using a Qt Designer template, you just need to select the desired template from the New Form dialog and then click Create or press Alt+R on your keyboard.
Note that the first two dialog templates have their own default buttons. These are standard buttons included in a QDialogButtonBox. This class automatically handles the position or order of buttons across different platforms.
For example, if you use a Cancel button and an OK button, then the standard on Linux and macOS is to display those buttons in this same order. But on Windows, the order of buttons will be swapped, with OK appearing first, followed by Cancel. QDialogButtonBox handles this issue for you automatically.
Working With Qt Designer’s Main Window
Qt Designer’s main window provides a menu bar with options for saving and managing forms, editing forms and changing the edit mode, laying out and previewing forms, and also for tuning the application’s settings and accessing its help documentation:
The main window also provides a toolbar that displays commonly used options. You’ll use most of these options when you’re editing and laying out your forms. These options are also available in the main menu, especially in the File, Edit, and Form menus:

Qt Designer’s main window also includes a few dock windows that provide a rich set of features and tools:
- Widget Box
- Object Inspector
- Property Editor
- Resource Browser
- Action Editor
- Signal/Slot Editor
The Widget Box provides a selection of layout managers, spacers, standard widgets, and other objects that you can use to create a GUI for your dialogs and windows:
The Widget Box provides a filter option at the top of the window. You can type the name of a given object or widget and get quick access to it. The objects are grouped into categories that reflect their specific use. You can show or hide all the available objects in a category by clicking the handle next to the category label.
When you’re creating your forms, you can take objects from the Widget Box with your mouse pointer and then drag and drop them onto the form to build its GUI.
The Widget Box also provides a Scratchpad section at the bottom of the window. In this section, you can group frequently used objects in a separate category. You can fill the Scratchpad category with any widget currently placed on a form by dragging and dropping them back onto the Widget Box. You can remove widgets from the Scratchpad category by right-clicking them and selecting Remove in the context menu.
The Object Inspector provides a tree view of all the objects on the current form. The Object Inspector also has a filter box at the top to allow you to find objects in the tree. You can use the Object Inspector to set the name and other properties of the form and its widgets. You can also right-click any widget to access a context menu with additional options:
With the Object Inspector, you can manage the widgets on your form. You can rename them, update some of their properties, remove them from the form, and so on. The tree view in the Object Inspector reflects the parent-child relationship of the widgets and objects on the current form.
The Property Editor is another dock window that appears in Qt Designer’s main window. This window holds a two-column table with the active object’s properties and their values. You can use the Property Editor to edit the value of an object’s properties, as the name implies:
The Property Editor provides a user-friendly way to access and edit the values of the active object’s properties, such as its name, size, font, icon, and so on. The properties listed on the editor will change depending on which object you select on your form.
The properties are listed from top to bottom according to class hierarchy. For example, if you select a QPushButton on the form, then the Property Editor shows the properties of QWidget, followed by the properties of QAbstractButton, and finally the properties of QPushButton itself. Note that the rows on the editor show different colors to visually differentiate the underlying class.
Finally, you have three dock windows that commonly appear as tabs in the bottom-right corner:
- Resource Browser provides a quick way of adding resources, such as icons, translation files, images, and other binary files to your applications.
- Action Editor provides a way to create actions and add them to your forms.
- Signal/Slot Editor provides a way to connect signals and slots in your forms.
Here are some of the options that these tools provide:
That’s it! These three dock windows round out the set of tools and options that Qt Designer provides for you to create and customize the GUIs for your dialogs and windows.
Using Qt Designer vs Hand Coding Your GUIs
With PyQt, you have at least two options for creating the GUI of a window or dialog: You can use Qt Designer, or you can hand code the GUI in plain Python code. Both options have their pros and cons. Sometimes it’s hard to decide when to use one or the other.
Qt Designer provides a user-friendly graphical interface that allows you to quickly create GUIs. This can boost your productivity as a developer and shorten your development cycles.
Hand coding your GUIs, on the other hand, can give you much more control over them. With this approach, adding new components and features doesn’t require any extra tools beyond your code editor or IDE, which can be quite convenient in some development environments.
Whether you use Qt Designer or hand code your GUIs is a personal decision. Here are some general considerations on both approaches:
| Feature | Qt Designer | Hand Coding |
|---|---|---|
| Developer’s productivity | High | High if you’re familiar with PyQt, but low otherwise |
| Separation of GUI logic from business logic | High | Low |
| Control over GUI components | Low | High |
| Capability for adding and removing widgets dynamically | Low | High |
| Flexibility for exploration, learning, prototyping, and sketching | High | Low |
| Flexibility for using custom widgets | Low | High |
| Amount of boilerplate code | High | Low |
Beyond these concerns, if you’re just starting with PyQt, then Qt Designer can help you discover available widgets, layout managers, base classes, properties and their typical values, and so on.
One last difference between using Qt Designer and hand coding a GUI is that you need to run an extra step when using Qt Designer: translating .ui files into Python code.
Building Main Windows With Qt Designer and Python
With PyQt, you can build main window–style and dialog-style applications. Main window–style applications often consist of a main window with a menu bar, one or more toolbars, a central widget, and a status bar. They can also include several dialogs, but those are independent of the main window.
Qt Designer enables you to quickly build the GUI of your main windows using the predefined Main Window template. Once you’ve created a form based on that template, you’ll have tools to perform the following actions:
- Creating a main menu
- Adding and populating toolbars
- Laying out widgets
Qt Designer’s Main Window template also provides a default central widget and a status bar at the bottom of the window:
Qt Designer saves its forms in .ui files. These are XML files that contain all the information you’ll need to later recreate the GUI in your applications.
To save your forms, go to File → Save, enter main_window.ui in the Save Form As dialog, select a directory to save the file in, and click Save. You can also get access to the Save Form As dialog by pressing Ctrl+S on your keyboard.
Don’t close your Qt Designer session—stay there to continue adding menus and toolbars to the main window you just created.
Creating the Main Menu
Qt Designer’s Main Window template provides an empty menu bar at the top of the form. You can add menus to that menu bar using the Menu Editor. Menus are pull-down lists of options that provide quick access to the application’s options. Go back to Qt Designer and your newly created main window. At the top of the form, you’ll see a menu bar with the placeholder text Type Here.
If you double-click or press Enter on this placeholder text, then you can type the name of your first menu. To confirm the menu name, just press Enter.
Say you want to create your own text editor. Typically, this kind of application has a File menu with at least some of the following options:
- New for creating a new document
- Open for opening an existing document
- Open Recent for opening recently viewed documents
- Save for saving a document
- Exit for exiting the application
Here’s how you can use Qt Designer to create this menu:
Qt Designer’s Menu Editor allows you to add menus to the menu bar in a user-friendly way. When you enter the name of a menu or menu option, you can use an ampersand symbol (&) before a given letter to provide a keyboard accelerator.
For example, if you add an ampersand before the F in the File menu, then you can access this menu by pressing Alt+F. Likewise, if you add an ampersand before the N in New, then once you’ve launched the File menu, you can access the New option by pressing N.
With the Menu Editor, you can also add separators to your menus. This is a good way to visually separate menu options and group them logically. To add a separator, double-click the Add Separator option at the end of the active menu in the Menu Editor. You can remove an existing separator by right-clicking it and then selecting Remove Separator in the context menu. This menu also allows you to add new separators.
If you need to move a separator to another place in a given menu, then you can drag the separator to the desired position and drop it there. A red line will indicate the position where the separator will be placed.
You can also add a submenu to a given menu option. To do this, click the icon on the right side of the menu option to which you want to attach the submenu, just like you did with the Open Recent option in the above example.
To run a preview of your form, go to Form → Preview, or hit the key combination Ctrl+R on your keyboard.
When you create a menu like the File menu in your sample text editor, a new QMenu object is automatically added to your menu bar. When you add a menu option to a given menu, you create an action. Qt Designer provides an Action Editor for creating, customizing, and managing actions. The tool provides a few handy options that you can use to fine-tune your actions:
With the Action Editor, you can fine-tune, update, or set the following options:
- The text of the action, which will be shown on menu options and toolbar buttons
- The object name, which you’ll use in your code to reference the action object
- The icons that will be shown on your menu options and toolbar buttons
- The checkable property of the action
- The keyboard shortcuts, which will provide the user with a quick way to access the action
The final ellipsis (...) in the text of your menu options is a widely used convention for naming options that don’t perform an immediate action but launch a pop-up dialog for performing further actions.
In the case of the icons, you need to pack those icons with your application as independent files, or you can create a resources file, also known as a .qrc file. For this example, you can download the required icons and other resources by clicking the link below:
Once you’ve downloaded the icons, create a resources directory beside your main_window.ui file and copy the icons there. Then get back to the Action Editor and add icons to your actions like this:
Note that your menu options now display an icon on the left margin. This provides extra visual information to your users and helps them find the desired option. Now go ahead and add an Edit menu with the following options:
- Copy for copying some text
- Paste for pasting some text
- Cut for cutting some text
- Find and Replace for finding and replacing text
Next, add a Help menu with an About option for launching a dialog with general information about your text editor. Finally, go to the Property Editor and set the title of your window to Sample Editor. After these additions, your main window should look something like this:
With these additions, your sample text editor’s main menu is starting to look like the menu of a real text editor!
Creating a Toolbar
You can add as many toolbars as you need to your main window’s GUI using Qt Designer. To do that, right-click on the form and select Add Tool Bar from the context menu. This adds an empty toolbar at the top of the window. Alternatively, you can predefine the toolbar area where you want to place a given toolbar by selecting Add Tool Bar to Other Area:
Once you have your toolbars in place, you can populate them with buttons. To do this, you use actions rather than specific toolbar buttons from the Widget Box. To add actions to your toolbars, you can use the Action Editor:
Actions can be shared between menu options and toolbar buttons, so in this case, you reuse the actions that you created when you populated your menus in the preceding section. To populate the toolbar, click on an action on the Action Editor, then drag and drop it onto the toolbar. Note that by right-clicking on the toolbar, you can add separators to visually separate the tool buttons.
Laying Out a Single Central Widget
Qt Designer uses QMainWindow for building its Main Window template. This class provides a default layout that allows you to create a menu bar, one or more toolbars, one or more dock widgets, a status bar, and a central widget. By default, Qt Designer uses a QWidget object as the central widget on the Main Window template.
Using a bare-bones QWidget object as the central widget on a main window’s GUI is a good choice because, on top of that widget, you can place either a single widget or multiple widgets in a coherent layout.
For example, in your sample text editor, you might want to use a single widget that provides your users with a work area to type, copy, paste, and edit their text. For this purpose, you can use a QTextEdit object and then add a vertical (or horizontal) layout as the central widget’s layout:
In this example, you first drag a QTextEdit onto the form. Then you click on the form to select your central widget. Finally, you apply a vertical layout to your central widget by clicking Lay Out Vertically on Qt Designer’s toolbar.
Since the spacing around the QTextEdit doesn’t look right, you use the Object Inspector to change the margins of the layout from 9 pixels to 1 pixel.
With Qt Designer, you can use different layout managers to arrange your widgets quickly. Arguably, the most accessible way of laying out your GUIs with Qt Designer is using the layout-related section on the main toolbar:

From left to right, you’ll find the following options to create different types of layouts:
| Option | Widget Arrangement | Layout Class | Keyboard Shortcut |
|---|---|---|---|
| Lay Out Horizontally | Horizontally in one row and several columns | QHBoxLayout |
Ctrl+1 |
| Lay Out Vertically | Vertically in one column and several rows | QVBoxLayout |
Ctrl+2 |
| Lay Out Horizontally in Splitter | Horizontally in a resizable splitter | QSplitter |
Ctrl+3 |
| Lay Out Vertically in Splitter | Vertically in a resizable splitter | QSplitter |
Ctrl+4 |
| Lay Out in a Grid | Tabularly in a grid with several rows and columns | QGridLayout |
Ctrl+5 |
| Lay Out in a Form Layout | Tabularly in a two-column table | QFormLayout |
Ctrl+6 |
The last two options in the toolbar are related to layouts but don’t create them:
-
Break Layout allows you to break an existing layout. Once widgets are arranged in a layout, you can’t move or resize them individually because their geometry is controlled by the layout. To modify individual widgets, you might need to break the layout and redo it later. To access this option, you can press Ctrl+0 on your keyboard.
-
Adjust Size adjusts the size of the layout to accommodate contained widgets and to ensure that each has enough space to be visible. To access this option, you can press Ctrl+J on your keyboard.
You can also access all these layout-related options through Qt Designer’s main menu bar, under the Form menu:

In the Form menu, you have access to all the layout-related options, with a complete reference of the keyboard shortcuts to access them. You can also access these options through the form’s context menu, under the Lay Out option.
Laying Out a Compound Central Widget
When you’re creating your main windows, you might face situations in which you need to use multiple widgets in a given layout as your central widget. Since Qt Designer’s Main Window template ships with a QWidget object as its central widget, you can take advantage of this to create your own custom arrangement of widgets and then set it as the top-level layout of that central widget.
With Qt Designer, you can lay out your widgets using layout managers, as you already saw in the above section. If you need a compound layout of widgets for your main window’s GUI, then you can build it by running the following steps:
- Drag and drop the widgets onto your form and try to place them near their desired position.
- Select the widgets that should be managed together by a given layout.
- Apply the appropriate layout using Qt Designer’s toolbar or main menu, or with the form’s context menu.
Although you can drag layouts onto a form and then drag widgets onto the layouts, the best practice is to drag all the widgets and spacers first and then repeatedly select related widgets and spacers to apply layouts to them.
For example, suppose you’re building a calculator application. You need a QLineEdit object on the top of your form to display the operations and their results. Under the line edit, you need a few QPushButton objects for the numbers and operations. That gives you a window like this:
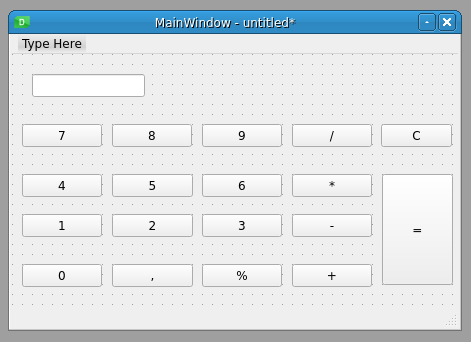
This looks something like a calculator, but the GUI is messy and cluttered. To arrange this into a more polished calculator GUI, you can use a grid layout for the buttons and a vertical box layout as the calculator’s top-level layout:
Your calculator still needs some extra polishing, but it looks a lot better now. To get a more finished version, you can use the Property Editor to tweak the values of some properties on your buttons, such as their maximum and minimum size. You can also set a fixed size for your calculator’s main window, and so on. Go ahead and give it a try!
Having a Status Bar
Qt Designer’s Main Window template provides a status bar by default. A status bar is a horizontal panel that’s usually placed at the bottom of the main window in a GUI application. Its primary purpose is to display information about the current status of the application.
You can divide a status bar into several sections and show different information on each section. The information on the status bar can be temporary or permanent, and most of the time it comes as text messages. The purpose of the information displayed on the status bar is to keep your users updated about what the application is currently doing and what its general status is at a given time.
You can also use the status bar to display help tips, which are short help messages that describe what a given button or menu option does. This kind of message appears on the status bar when the user hovers the mouse pointer over a toolbar button or menu option.
Creating a Dialog With Qt Designer and Python
Dialogs are small-sized windows that you commonly use to provide auxiliary functionalities, such as a Preferences dialog, or to communicate with your users by showing error messages or general information about a given operation. You can also use dialogs to ask the user for some required information or to confirm an operation that’s about to take place.
PyQt offers a rich set of built-in dialog that you can use in your applications directly. You just need to import them from PyQt5.QtWidgets. Here’s a summary:
All these built-in dialogs are ready for you to use in your code directly. Most of them provide class methods to build specific types of dialogs depending on your needs. Along with these dialogs, PyQt provides the QDialog class. You can use this class to create your own dialogs in code, but you can also use Qt Designer to create your dialogs quickly.
In the next few sections, you’ll learn how to create, lay out, and customize your dialogs using Qt Designer and its dialog templates.
Creating a Dialog GUI
To create a custom dialog with Qt Designer, select the appropriate template for the dialog from the New Form dialog. Drag and drop the required widgets onto the form, lay out them correctly, and save the form in a .ui file for later use in your application.
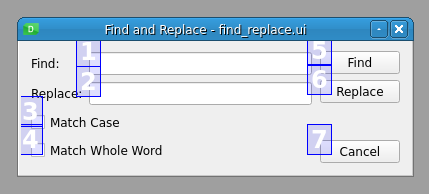
Go back to your sample text editor and suppose you want to add a Find and Replace dialog like this:
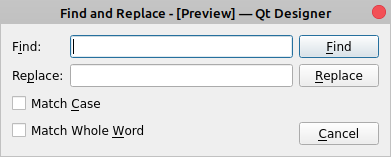
To create this dialog, start with the Dialog without Buttons template and add the required widgets to the form:
Here, you first create an empty dialog using the Dialog without Buttons template and set the window title to Find and Replace in the Object Inspector. Then you drag and drop two QLabel objects onto the form using the Widget Box. These labels ask the users for the words they need to find and replace. Those words will be entered in the corresponding QLineEdit objects near the labels.
Next, you drag and drop three QPushButton objects onto the form. These buttons will allow your users to find and replace words in their current document. Finally, you add two QCheckBox objects to provide Match Case and Match Whole Word options.
Once you have all the widgets on the form, make sure to place them in a position that’s similar to what you want to achieve in your final dialog. Now it’s time to lay out the widgets.
Laying Out the Dialog GUI
As you saw before, to arrange the widgets in a form, you can use several layout managers. To lay out your Find and Replace dialog, use a grid layout for the labels, line edits, and checkboxes. For the buttons, use a vertical layout. Finally, use a horizontal layout as your dialog’s top-level layout manager:
Here, you select the labels, line edits, and checkboxes with your mouse pointer and apply a grid layout to them. After that, you add a vertical spacer between the Replace and Cancel buttons to keep them visually separated.
The final step is to set the dialog’s top-level layout. In this case, you use a horizontal layout manager. That’s it! You’ve built the GUI of your Find and Replace dialog with Qt Designer. Save it with the filename find_replace.ui.
There are a bunch of other properties and features that you can tweak in your dialogs using Qt Designer. For example, you can set the tab order of your input widget to improve the experience of users navigating your dialogs with their keyboard. You can also provide keyboard accelerators, connect signals and slots, and so on.
Connecting Signals and Slots
So far, you’ve used Qt Designer in the Edit Widgets mode, which is its default mode. In this mode, you can add widgets to your forms, edit widget’s properties, lay out the widgets on the form, and so on. However, Qt Designer has up to four different modes to allow you to work on different features of your forms:
| Mode | Purpose | Menu Option | Keyboard Shortcut |
|---|---|---|---|
| Edit Widgets | Editing widgets | Edit → Edit Widgets | F3 |
| Edit Signals/Slots | Connecting built-in signals and slots | Edit → Edit Signals/Slots | F4 |
| Edit Buddies | Setting up keyboard accelerators | Edit → Edit Buddies | No |
| Edit Tab Order | Setting up the tab order of widgets | Edit → Edit Tab Order | No |
You can also access these modes by clicking their corresponding buttons in the mode-related section of Qt Designer’s toolbar, which looks like this:

To be able to edit the built-in signals and slots of your widgets and forms, you first need to switch to the Edit Signals/Slots mode.
User actions on widgets and forms, such as a click or a keypress, are known as events in PyQt. When an event occurs, the widget at hand emits a signal. This mechanism allows you to run actions in response to events. These actions are known as slots, which are methods or functions.
To execute a slot in response to an event, you need to select one of the signals emitted by the widget in response to an event and connect it to the desired slot.
Most widgets, including dialogs and windows, implement built-in signals that are emitted when a given event occurs on the widget. Widgets also provide built-in slots that allow you to perform certain standardized actions.
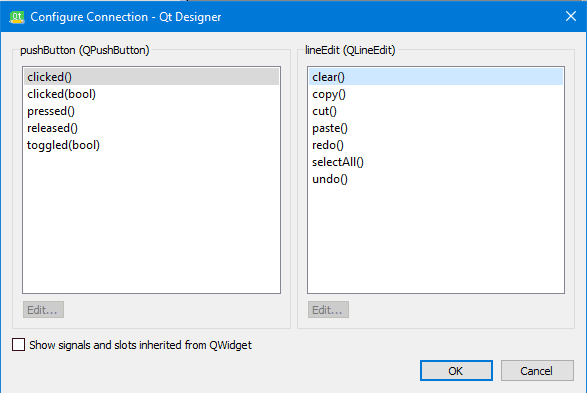
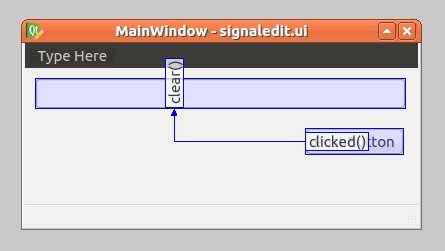
To establish a signal-and-slot connection between two widgets using Qt Designer, you need to select the signal-provider widget with your mouse and then drag and drop it over the slot-provider widget. This launches Qt Designer’s Configure Connection dialog. Now go back to the Find and Replace dialog and switch to Qt Designer’s Edit Signals/Slots mode. Then drag and drop the Cancel button onto the form:
The Configure Connection dialog has two panels. On the left panel, you can select a signal from the signal-provider widget, and on the right panel, you can select a slot from the slot-provider widget. To create the connection, press OK:
The connection appears as an arrow from the signal-provider widget to the slot-provider widget, indicating that the connection is established. You’ll also see the name of the signal and the slot that you just connected.
In this case, you connected the clicked() signal of the Cancel button with the reject() slot of the dialog. Now when you click Cancel, your action will be ignored, and the dialog will close.
To modify a connection, double-click the arrow or one of the labels. This displays the Configure Connection dialog, in which you can change the signal or the slot involved in the connection according to your needs.
To delete a connection, select the arrow that represents the connection or one of the labels that identify the signal and slot, then press Del.
Setting the Tab Order of Widgets
To improve the usability of your dialogs, you can set a coherent tab order for your input widgets. The tab order is the order in which the widgets on your form come into focus when you press Tab or Shift+Tab on your keyboard.
If you’re using Qt Designer to create your forms, then the default tab order of your widgets is based on the order in which you place each widget on the form. Sometimes this order isn’t right, and when you hit Tab or Shift+Tab, the focus jumps to an unexpected widget. Take a look at the tab order behavior in your Find and Replace dialog:
The focus starts on the Find line edit, then it goes through the Replace line edit, then through the checkboxes, and finally through the buttons. What if you want the focus to jump from the Find line edit to the Replace line edit and then to the Find button? In this case, you can change the tab order of the input widgets on the dialog. Switch to Edit Tab Order mode in Qt Designer. You’ll see something like this:
In Edit Tab Order mode, each input widget in the form shows a number that identifies its position in the tab-order chain. You can change that order by clicking on the numbers in the desired order:
You change the tab order of the input widgets by clicking the numbers in the desired order. Note that when you select a number, it changes to red, indicating that this is the currently edited position in the tab-order chain. Numbers you haven’t set are shown in blue, and the numbers you have set are shown in green. If you make a mistake, then you can restart the ordering by choosing Restart from the form’s context menu.
Providing Keyboard Accelerators
A keyboard accelerator is a key combination that you can press on your keyboard to quickly move the focus onto a given widget on a dialog or window. Normally, keyboard accelerators consist of the Alt key and a letter that identifies the widget or option that you want to access. This can help you improve the usability of your applications.
To define a keyboard accelerator on a widget that includes a label, such as a button or a checkbox, you just need to place an ampersand symbol (&) before the letter in the label text that you want to use in the accelerator. For example, place an ampersand before the C on the Cancel button of your Find and Replace dialog, run a preview, and press Alt+C like in the following example:
By placing an ampersand before the letter C in the text of the Cancel button, you create a keyboard accelerator. If you press Alt+C on your keyboard, then the Cancel button is selected and the dialog closes.
To define a keyboard accelerator on a widget that doesn’t include a label, such as a line edit, you need to make that widget a buddy of a label object. There are four steps that you need to take if you want to create a buddy connection:
- Select a letter in the text of the label to identify the buddy connection and provide the keyboard accelerator.
- Place an ampersand (
&) before the selected letter in the text of the label. - Switch to Edit Buddies mode in Qt Designer.
- Drag and drop the label onto the buddy widget.
Here’s how you can create a buddy relationship between the Find label and its related line edit:
To create a buddy relationship between a label and a widget, select the label with your mouse and drag it onto the input widget that you want to set as its buddy. The label and the input widget will become buddies. From this point on, you can press Alt plus the selected letter in the label text to move the focus to the related widget.
It’s important to note that you shouldn’t have two widgets with the same keyboard accelerator in a given form. This means that you need to select a unique letter for each keyboard accelerator.
Go ahead and use Qt Designer to set keyboard accelerators for the widgets on your Find and Replace dialog. The final result should look like the dialog you saw at the beginning of the section Creating a Dialog GUI.
Integrating Windows and Dialogs in an Application
Up to this point, you’ve learned how to create a GUI for your main windows and dialogs with Qt Designer. In this section, you’ll learn how to integrate those GUIs into your Python code and build a real application. There are two main approaches to do that in PyQt:
- Translating the content of your
.uifiles into Python code usingpyuic5 - Loading the content of the
.uifiles dynamically usinguic.loadUi()
The first approach uses pyuic5, which is a tool included in the PyQt installation that allows you to translate the content of a .ui file into Python code. This approach is widely used because of its efficiency. However, it has one drawback: every time you modify the GUI with Qt Designer, you need to generate the code again.
The second approach takes advantage of uic.loadUi() to dynamically load the content of a .ui file into your application. This approach is suitable when you’re working with small GUIs that don’t involve substantial loading time.
Setting Up Windows and Dialogs for Use
Now it’s time to set up your windows and dialogs for use in a real application (in this case, a sample text editor). If you’ve been following this tutorial, then you should have at least two .ui files:
main_window.uiwith the GUI of a sample text editor applicationfind_replace.uiwith the GUI of a Find and Replace dialog
Go ahead and create a new directory called sample_editor/. Inside this directory, create another directory called ui/ and copy your .ui files into it. Also, copy the resources/ directory that contains the icons for your menu options and toolbar buttons to the sample_editor/ui/ directory. So far, the structure of your application should look like this:
sample_editor/
│
└── ui/
    ├── resources/
    │   ├── edit-copy.png
    │   ├── edit-cut.png
    │   ├── edit-paste.png
    │   ├── file-exit.png
    │   ├── file-new.png
    │   ├── file-open.png
    │   ├── file-save.png
    │   └── help-content.png
    │
    ├── find_replace.ui
    └── main_window.ui
Since the main-window GUI is relatively complex, you can use pyuic5 to translate the content of main_window.ui into Python code.
You can download all the required code and resources to build your sample text editor by clicking the link below:
Now open a terminal and navigate to the sample_editor/ directory. Once you’re there, run the following command:
$ pyuic5 -o main_window_ui.py ui/main_window.ui
This command generates a Python module called main_window_ui.py from the ui/main_window.ui file and places it in your sample_editor/ directory. This module contains the Python code for your main window’s GUI. Here’s a small sample of the code:
# -*- coding: utf-8 -*-

# Form implementation generated from reading ui file 'ui/main_window.ui'
#
# Created by: PyQt5 UI code generator 5.15.1
#
# WARNING: Any manual changes made to this file will be lost when pyuic5 is
# run again.  Do not edit this file unless you know what you are doing.

from PyQt5 import QtCore, QtGui, QtWidgets

class Ui_MainWindow(object):
    def setupUi(self, MainWindow):
        MainWindow.setObjectName("MainWindow")
        MainWindow.resize(413, 299)
        self.centralwidget = QtWidgets.QWidget(MainWindow)
        # Snip...

    def retranslateUi(self, MainWindow):
        _translate = QtCore.QCoreApplication.translate
        MainWindow.setWindowTitle(_translate("MainWindow", "Sample Editor"))
        self.menu_File.setTitle(_translate("MainWindow", "&File"))
        # Snip...
Ui_MainWindow has all the code for generating the GUI of the sample editor’s main window. Note that .setupUi() contains the code to create all the required widgets and lay them out on the GUI. .retranslateUi() contains code for internationalization and localization, but this topic is beyond the scope of this tutorial.
Now your working directory should look like this:
sample_editor/
│
├── ui/
│   ├── resources/
│   │   ├── edit-copy.png
│   │   ├── edit-cut.png
│   │   ├── edit-paste.png
│   │   ├── file-exit.png
│   │   ├── file-new.png
│   │   ├── file-open.png
│   │   ├── file-save.png
│   │   └── help-content.png
│   │
│   ├── find_replace.ui
│   └── main_window.ui
│
└── main_window_ui.py
Since your Find and Replace dialog is quite small, you can load its GUI directly from your .ui file using uic.loadUi(). This function takes a string with the path to a .ui file as an argument and returns a QWidget subclass that implements the GUI.
This way of loading .ui files dynamically is rarely used in practice. You can use it with small dialogs that don’t require too much effort to load. With this approach, you don’t need to generate the Python code for the dialog’s GUI every time you modify the .ui file with Qt Designer, which can be a productivity and maintainability win in some cases.
Now that you’ve chosen a strategy for building each of your GUIs, it’s time to put everything together in a real application.
Putting Everything Together in an Application
With all the pieces in place for your sample text editor, you can create the application and write the required code to use the main window and the Find and Replace dialog. Fire up your favorite code editor or IDE in your sample_editor/ directory and create a new file called app.py. Add the following code to it:
 1import sys
 2
 3from PyQt5.QtWidgets import (
 4    QApplication, QDialog, QMainWindow, QMessageBox
 5)
 6from PyQt5.uic import loadUi
 7
 8from main_window_ui import Ui_MainWindow
 9
10class Window(QMainWindow, Ui_MainWindow):
11    def __init__(self, parent=None):
12        super().__init__(parent)
13        self.setupUi(self)
14        self.connectSignalsSlots()
15
16    def connectSignalsSlots(self):
17        self.action_Exit.triggered.connect(self.close)
18        self.action_Find_Replace.triggered.connect(self.findAndReplace)
19        self.action_About.triggered.connect(self.about)
20
21    def findAndReplace(self):
22        dialog = FindReplaceDialog(self)
23        dialog.exec()
24
25    def about(self):
26        QMessageBox.about(
27            self,
28            "About Sample Editor",
29            "<p>A sample text editor app built with:</p>"
30            "<p>- PyQt</p>"
31            "<p>- Qt Designer</p>"
32            "<p>- Python</p>",
33        )
34
35class FindReplaceDialog(QDialog):
36    def __init__(self, parent=None):
37        super().__init__(parent)
38        loadUi("ui/find_replace.ui", self)
39
40if __name__ == "__main__":
41    app = QApplication(sys.argv)
42    win = Window()
43    win.show()
44    sys.exit(app.exec())
Here’s what this code does:
- Line 3 imports the required PyQt classes to build the application and the GUI.
- Line 6 imports
loadUi()from theuicmodule. This function provides a way of loading the content of a.uifile dynamically. - Line 8 imports
Ui_MainWindow, which contains the GUI for your main window. - Line 10 defines
Window, which will provide your application’s main window. In this case, the class uses multiple inheritance. It inherits the main window functionality fromQMainWindowand the GUI functionality fromUi_MainWindow. - Line 13 calls
.setupUi(), which creates the whole GUI for your main window. - Line 16 defines
.connectSignalsSlots(), which connects the required signals and slots. - Line 21 defines
.findAndReplace(). This method creates an instance of your Find and Replace dialog and execute it. - Line 25 defines
.about(), which creates and launches a small dialog to provide information about the application. In this case, you use a built-in dialog based onQMessageBox. - Line 35 defines
FindReplaceDialog, which provides the Find and Replace dialog. - Line 38 calls
loadUi()to load the dialog’s GUI from the filesui/find_replace.ui.
Finally, on lines 41 to 44, you create the application, create and show the main window, and run the application’s main loop by calling .exec() on the application object.
It’s important to note that Qt Designer can name your actions a bit differently from what you saw in the above code. For example, you might find the name .actionE_xit instead of .action_Exit to refer to the Exit action. So, for this example to work properly, you need to make sure you’re using the right names.
If you want to use your own names instead of the names that Qt Designer generates, then you can go to the Property Editor and change the .objectName property to the name that seems right for you.
If you run this application, then you’ll get the following window on your screen:
That’s it! You’ve created a sample text editor with minimal functionality using Qt Designer. Note that to code this application, you wrote only forty-four lines of Python code, which is substantially less than what you’d need to write to hand code the GUI of an equivalent application from scratch.
Conclusion
When you create applications in PyQt, you commonly build a main window and several dialogs. Building the GUI of those windows and dialogs can take a lot of time if you hand code them. Luckily, Qt provides Qt Designer, which is a powerful tool intended to create GUIs fast and productively using a user-friendly graphical interface.
With Qt Designer, you can drag and drop all the required widgets onto an empty form, lay them out, and create your GUIs in almost no time. Those GUIs are saved in .ui files that you can translate into Python code and use in your applications.
In this tutorial, you learned how to:
- Install Qt Designer on your system
- Decide when to use Qt Designer vs hand code your GUIs
- Build the GUI of an application’s main window using Qt Designer
- Create and lay out the GUI of your dialogs with Qt Designer
- Use Qt Designer’s
.uifiles in your GUI applications
Finally, you put all this knowledge into action by using Qt Designer to create the GUIs of the windows and dialogs required to build a sample text editor application. You can get all the required code and resources to build this application by clicking the link below:
I installed PyQt5 using Windows command window and pip3 install PyQt5 as described in the download page, it was installed successfully. but I didn’t found PyQt Designer in the Windows Start Menu so I thought I need to install it separately. After searching various forums, I tried adding it using pip3 install pyqt5-tools it shows Successfully installed pyqt5-tools-5.9.0.1.2 but PyQt Designer wasn’t installed.
Is there any way to install PyQt Designer?
My Python version:
>>> python --version
Python 3.5.2 :: Anaconda custom (64-bit)
asked Oct 19, 2017 at 14:45
![]()
On windows 10, with Python3.5, and pyqt5, I installed pyqt5-tools using pip:
pip install pyqt5-tools
and the designer was automatically install in the following folder:
"Python directory"Python35Libsite-packagespyqt5-tools
answered Jul 18, 2018 at 13:52
![]()
A.J.A.J.
317 bronze badges
6
try this:
pip install pyqt5
pip install pyqt5-tools
Now you’d find the designer in site-packages/pyqt5-tools.
Libsite-packagesqt5_applicationsQtbin
answered Mar 3, 2021 at 4:37
![]()
1
I think I found a workaround, first I uninstalled PyQt5 and pyqt5-tools-5.9.0.1.2
pip3 uninstall PyQt5
pip3 uninstall pyqt5-tools-5.9.0.1.2
I went to this page, downloaded the PyQt5-5.6-gpl-Py3.5-Qt5.6.0-x64-2.exe file and installed it normally.
answered Oct 19, 2017 at 15:32
![]()
BilalBilal
2,6355 gold badges34 silver badges56 bronze badges
1
In most cases, due to updates of the packages or some other reasons, «designer tool» will not be in the default location.
If so, you can find it here:
C:Program Files (x86)Python37-32Libsite-packagespyqt5_toolsQtbin
![]()
answered Jan 2, 2020 at 12:24
![]()
try
pip install PyQt5Designer It will then be under lib/QtDesigner/designer.exe
answered Apr 29, 2021 at 20:30
![]()
this is might be not much helpful but i just wanted to share, I install pyqt5 using pip with the tools as well and couldn’t find PyQt Designer in the Windows Start as well coz I searched «pyqt designer». I could find it when i searched «designer» only.
answered Jul 26, 2020 at 2:50
![]()
pip install pyqt5-tools
….venvLibsite-packagesqt5_applicationsQtbin
answered Jun 23, 2022 at 11:34
![]()
Introduction
Qt is a robust cross-platform framework that works on Windows, Linux, Mac, Android, and more.
It allows you to create GUI applications as well as provides libraries
for networking,
In this tutorial, we will focus on some of the very core aspects of using PyQt5
and how to package it for distribution.
Here is an example project I created using Pyqt5:
https://github.com/DevDungeon/PyQt5-Bitcoin-Price-Checker
and the live coding of that project https://www.devdungeon.com/content/live-coding-pyqt5-guis-w-python.
Install pyqt5
You need the pyqt5 package for Python and Qt Designer. You can get
both of these by running:
# The primary package with all dependencies
pip install pyqt5
# Optional; In Windows, you can get the designer tools from this package
pip install pyqt5-tools
You will find the designer in the site-packages/pyqt5_tools directory of
your Python environment and should be available in your PATH as designer or pyqt5designer.
On Mac, I found it can be run from your venv with venv/bin/qt5-tools designer.
These packages will also provide pyuic5 for converting Designer files to Python
files. It also includes many other utilities like qdbus, qdoc, qmlscene, linguist, and more.
If you are using Linux or a system that doesn’t have the packages
for pyqt5-tools you can usually find the Designer and other apps
in your system’s package repositories. For example, in Fedora
there is a package named qt5-designer.
You can test your installation by attempting to run the Hello World application
in the next section.
Documentation
You can get the local documentation on your computer by running the
pydoc server and visiting it in your browser.
python -m pydoc -p 8888
Alternatively, you can read the online documentation at
https://www.riverbankcomputing.com/static/Docs/PyQt5.
Hello World
Here is a simple example that demonstrates how to initialize a PyQt5 application.
It also includes a simple window with nothing in it. A window is not technically
required for a PyQt5 application, but generally the primary reason Qt is
used is to create GUI windows.
# hello.py
import sys
from PyQt5.QtWidgets import QApplication, QWidget

# Create the main Qt app, passing command line arguments
app = QApplication(sys.argv)

win = QWidget()
win.setWindowTitle('Hello')
win.resize(250, 250)
win.show()

# Run the app, passing it's exit code back through `sys.exit()`
# The app will exit when the close button is pressed on the main window.
sys.exit(app.exec_())
Run the application like normal using Python:
python hello.py
In Windows, you can use the .pyw extension or use pythonw to run the application without the command prompt showing.
Using Qt Designer and .ui files
Using the Designer is optional, but it can be a very helpful way to layout
interfaces. I highly recommend using the Designer.
Once you have created a .ui file in the Designer, you can either
convert it to a Python file which will create the interface programmatically,
or you can load the .ui file directly. The next sections will cover both options.
Convert UI file to Python code
From the terminal, you can convert a QtDesigner .ui file to
a Python file. This method works fine, however it becomes difficult
to iterate rapidly on changes with this extra step. You also cannot
modify the .py file if you ever want to regenerate it. I recommend
using the method in the next section, where you load the .ui file
directly.
pyuic5 my_design.ui -o my_window.py
python my_window.py
The Python file output will have all the code needed to recreate
the interface created in Designer.
Load the UI file in Python
My preferred option for loading interfaces, is to the load the .ui file
directly. This means you will need to include the .ui file with your
distribution, but it means you can easily make changes in the Designer
and quickly test them in Python w/o the extra step of converting the file.
import sys
from PyQt5 import uic
from PyQt5.QtWidgets import QApplication

app = QApplication(sys.argv)

# If you saved the template in `templates/main_window.ui`
ui = uic.loadUi("templates/main_window.ui")
ui.show()

# Then you can access the objects from the UI
# For example, if you had a label named label1
ui.label1.setText('new text')

sys.exit(app.exec_())
Signals
Signals are a critical concept to understand when using the Qt framework.
Signals and events are similar to channels in Go.
Every signal you create must have a data type associated with it.
The signal can then emit events that contain data of that type.
For example, if you create a string signal, you can emit strings
to anyone listening for the events. You can create an integer
signal that spits out integers to listeners. Signals are thread safe.
Alternatively, you can use a decorator @pyqtSlot(). You can learn more
about that method at
https://www.riverbankcomputing.com/static/Docs/PyQt5/signals_slots.html.
Some widgets come with signals already.
For example, a button comes with a clicked signal that can be connected.
The next section on threading will provide a working example of how to
create a custom signal, connect it to a callback function, and emit events.
Threading
To use QThreads, you can create a subclass of QThread.
Be sure to call the parent class constructor, and create
any signals that will be used to pass data.
from PyQt5.QtWidgets import QApplication
from PyQt5.QtCore import pyqtSignal, QThread
import sys


class MyTask(QThread):
    done_signal = pyqtSignal(str)

    def __init__(self):
        QThread.__init__(self)

    def run(self):
        # Do some work here
        self.done_signal.emit('some string')


def process_done_signal(result):
        print(result)
        sys.exit()


if __name__ == '__main__':
    app = QApplication(sys.argv)

    task = MyTask()
    task.done_signal.connect(process_done_signal)
    task.start()

    # This will continue to run forever, except we are killing the app
    # in the process_done_signal() function.
    sys.exit(app.exec_())
Button clicks
Buttons provide some signals out of the box.
For example, the clicked event is a signal that can be connected
to a callback. For example:
# Assuming you have loaded a `.ui` and stored it in an object named `ui`
# and there is a button named `button1`
ui.button1.clicked.connect(some_function)
One important thing to keep in mind is that the callback function will
block your main application thread, unless it runs the operations in
its own thread. See the section above about how to create QThreads.
In this example, some_function should kick off a thread to perform
operations.
System Tray and Notifications
Creating a system tray icon for your application can be
very useful. A common task is to keep an application
running even when the main window is closed while leaving
an icon in the system tray.
This example will demonstrate how to:
- Create a system tray icon
- Add a right-click context menu
- Add custom action handlers to the context menu items
- Capture window close event, ignore, and hide window (exit to system tray)
- Add an Exit option to the context menu of the system tray
- Generate a desktop notification
# Example modified from https://evileg.com/en/post/68/
# https://www.youtube.com/watch?v=1_4jfqYOi6w
import sys
from PyQt5.QtWidgets import QApplication, QMainWindow, QSystemTrayIcon, QAction, QMenu, QStyle, qApp
from PyQt5 import QtGui


class MainWindow(QMainWindow):

    def __init__(self):
        QMainWindow.__init__(self)

        self.tray_icon = QSystemTrayIcon(self)

        # Set icon to a standard or custom icon
        self.tray_icon.setIcon(self.style().standardIcon(QStyle.SP_ComputerIcon))
        # self.tray_icon.setIcon(QtGui.QIcon("icons/devdungeon32x32.png"))

        exit_action = QAction("Exit", self)
        exit_action.triggered.connect(self.exit_app)

        tray_menu = QMenu()
        tray_menu.addAction(exit_action)
        self.tray_icon.setContextMenu(tray_menu)  # Set right-click menu
        self.tray_icon.show()

    def notify(self, message):
        """Generate a desktop notification"""
        self.tray_icon.showMessage("Pssst!",
                                   message,
                                   QSystemTrayIcon.Information,
                                   3000)

    def exit_app(self):
        self.tray_icon.hide()  # Do this or icon will linger until you hover after exit
        qApp.quit()

    def closeEvent(self, event):
        """
        By overriding closeEvent, we can ignore the event and instead
        hide the window, effectively performing a "close-to-system-tray"
        action. To exit, the right-click->Exit option from the system
        tray must be used.
        """
        event.ignore()
        self.hide()
        self.notify("App minimized to system tray.")


if __name__ == "__main__":
    app = QApplication(sys.argv)

    main_window = MainWindow()
    main_window.show()

    sys.exit(app.exec())
You can also create application that doesn’t have a main window
at all and lives entirely in the sytem tray. In that case,
don’t make your main widget a QMainWindow or a QWidget.
Instead, make it a QSystemTray
# Example modified from https://evileg.com/en/post/68/
# https://www.youtube.com/watch?v=1_4jfqYOi6w
import sys
from PyQt5.QtWidgets import QApplication, QSystemTrayIcon, QAction, QMenu, QStyle, qApp
from PyQt5 import QtGui


class TrayOnlyApp(QSystemTrayIcon):

    def __init__(self):
        QSystemTrayIcon.__init__(self)

        self.setIcon(QtGui.QIcon("icons/devdungeon32x32.png"))

        exit_action = QAction("Exit", self)
        exit_action.triggered.connect(self.exit_app)

        tray_menu = QMenu()
        tray_menu.addAction(exit_action)
        self.setContextMenu(tray_menu)  # Set right-click menu
        self.show()
        self.notify('Now running...')

    def notify(self, message):
        """Generate a desktop notification"""
        self.showMessage("Pssst!",
                         message,
                         QSystemTrayIcon.Information,
                         3000)

    def exit_app(self):
        self.tray_icon.hide()  # Do this or icon will linger until you hover after exit
        qApp.quit()


if __name__ == "__main__":
    app = QApplication(sys.argv)
    tray_app = TrayOnlyApp()
    sys.exit(app.exec())
Packaging
You can package your PyQt5 app in a number of ways including:
- Python setuputils packaging (for
pipand pypi.org). - PyInstaller to create an
.exe,.app, or Linux executable
We will only look at using PyInstaller here since regular Python packaging
is already well documented. You can also check out my
PyInstaller Tutorial.
PyInstaller can be used to create .exe files for Windows, .app
files for Mac, and distributable packages for Linux.
Optionally, it can create a single file which is more convenient for
distributing, but takes slightly longer to start because it unzip itself.
Use pyi-makespec to generate a .spec file based on your .py application.
You can find more details about spec files at https://pythonhosted.org/PyInstaller/spec-files.html.
# Create a spec file that specifies no console and custom icon
# The icon is optional
pyi-makespec myapp.py --noconsole --icon=path/to/icon.ico
# Or, if you want to create a single file use:
pyi-makespec myapp.py --onefile --noconsole --icon=path/to/icon.ico
After generating the spec file, you can customize it to suit your needs.
For example, to add template files, modify the datas variable.
# Modify the line in the .spec file that has datas=[]
# and include the files to copy over. Put each pair in a tuple.
    datas=[('templates/*.ui', 'templates')],
Note that starting in PqyQt 5.13.0 there is an additional build step
for the .dll files to be found. When packaging, it expects
the libraries to be in PyQt5Qtbin but they get put in the root
directory. You can manually move the files in to that directory after
build or you can set it in the --add-data flag or datas object.
If you add it in the datas object, it will put the .dll files
in the right spot, but it still ALSO leave the same files in the root
of the output directory. You will need to clean up the duplicates.
For example:
datas=[
  ('templates', 'templates'),
  ('C:\opt\python37\Lib\site-packages\PyQt5\Qt\bin', 'PyQt5/Qt/bin')
],
Then, after the spec file is complete, you can build it using PyInstaller.
pyinstaller myapp.spec
Alternatively, instead of using a .spec file, you can specify
all the options at the command line. For example:
pyinstaller myapp.py --windowed --add-data "templates;templates" --add-data "C:\opt\python37\Lib\site-packages\PyQt5\Qt\bin;PyQt5/Qt/bin"
When a Hello World type application is packaged with PyInstaller,
it comes out to about 100MB on disk, and uses about 13MB or RAM
when running.
More examples
You can find many examples in this GitHub repository: https://github.com/baoboa/pyqt5/tree/master/examples/ and a few examples in the DevDungeon Cookbook.
Conclusion
After working through this tutorial you should have an understanding of how
to make basic PyQt5 applications and package them for distribution.
PyQt5 is capable of a whole lot more, like system tray icons, dialogs,
taking screenshots, drag-and-drop and much more. This tutorial should be enough
to just get you started and able to explore more of the available widgets
and tools.
References
- Official Qt C++ Documentation
- PyQt5 Reference Guide
- PtQt5 Class Documentation
- https://www.qt.io/
- https://github.com/DevDungeon/PyQt5-Bitcoin-Price-Checker
- https://www.devdungeon.com/content/live-coding-pyqt5-guis-w-python
- https://www.qt.io/download
- https://github.com/baoboa/pyqt5/tree/master/examples
- https://www.riverbankcomputing.com/static/Docs/PyQt5
- https://www.riverbankcomputing.com/static/Docs/PyQt5/signals_slots.html
- https://github.com/baoboa/pyqt5/tree/master/examples/
- https://github.com/DevDungeon/Cookbook/tree/master/python/pyqt5_examples
- https://setuptools.readthedocs.io/en/latest/
- https://www.pyinstaller.org/

От автора: что такое PyQt? PyQt — это привязка Python с открытым исходным кодом для виджет-инструментария Qt, который также функционирует как кросс-платформенная среда разработки приложений. Qt — это популярная среда C ++ для написания приложений с помощью графического интерфейса для всех основных настольных, мобильных и встраиваемых платформ (поддерживает Linux, Windows, MacOS, Android, iOS, Raspberry Pi и многие другие).
PyQt разрабатывается и поддерживается Riverbank Computing, компанией, базирующейся в Англии, а Qt — финской фирмой The Qt Company.
В этом руководстве по PyQT мы рассмотрим:
Что такое PyQt?
Функции PyQT

Хотите узнать, что необходимо для создания сайта?
Посмотрите видео и узнайте пошаговый план по созданию сайта с нуля!
Смотреть видео
Версии PyQt
Как установить PyQt
Основные понятия и программы PyQt
Компоненты и виджеты
Темы
Функци PyQT
PyQt состоит из более чем шести сотен классов, охватывающих ряд функций, таких как:
Графические пользовательские интерфейсы
Базы данных SQL
Веб-инструментарий
Обработка XML
Сети
Эти функции можно комбинировать для создания расширенных пользовательских интерфейсов, а также автономных приложений. Многие крупные компании из различных отраслей используют PyQt: LG, Mercedes, AMD, Panasonic, Harman и т. д.
Версии PyQt
PyQt доступен в двух редакциях: PyQt4 и PyQt5. PyQt4 предоставляет связующий код для привязки версий Qx 4.x и 5.x, в то время как PyQt5 обеспечивает привязку только для версий 5.x. В результате PyQt5 не имеет обратной совместимости с устаревшими модулями более ранней версии. В этом руководстве будет использоваться для демонстрации примеров PyQt5. Помимо этих двух версий, Riverbank Computing также предоставляет PyQt3D — привязки python для инфраструктуры Qt3D. Qt3D — это прикладная среда, используемая для создания систем моделирования в реальном времени с 2D / 3D рендерингом.
Как установить PyQt
Есть два способа установки PyQt.
Использование файлов Wheel
Сборка и установка из исходного кода
Qt (произносится «кьют») — сложная система, а база кода PyQt содержит скомпилированный код C ++ и Python. В результате по сравнению с другими библиотеками Python это сложный процесс для сборки и установки из исходного кода. Тем не менее, вы можете легко установить PyQt5 с помощью Wheel.
Установка с помощью Wheel
Wheel — это новый стандартный формат упаковки и распространения Python. Проще говоря, Wheel — это ZIP-архив со специальным названием и расширение файла. Wheel можно установить с помощью pip (менеджер пакетов Python), который включен по умолчанию в последние версии Python.
Итак, если у вас установлен Python 3.4 или более поздней версии, у вас уже есть pip. Однако, если вы используете более старую версию Python, вам нужно скачать и установить pip, прежде продолжать. Вы можете найти инструкции по установке по этой ссылке: //pypi.org/project/pip/.
Чтобы установить PyQt5:
Шаг 1) Откройте командную строку или PowerShell на компьютере с Windows.

Шаг 2) Введите следующее:
Этот шаг загрузит пакет PyQt5 whl (около 50 МБ) и установит его в вашей системе.

Кроме того, вы также можете загрузить двоичный файл Windows для версии Python, установленной на вашем компьютере. После завершения перейдите к следующему разделу, чтобы написать свое первое приложение с помощью графического интерфейса.
Основные понятия и программы PyQt
Теперь, когда вы успешно установили PyQt5 на компьютер, вы готовы писать приложения на python с помощью графического интерфейса. Давайте начнем с простого приложения, которое будет отображать пустое окно на экране. Запустите Python IDLE и введите следующее:
|
import sys from PyQt5.QtWidgets import QApplication, QWidget if __name__ == «__main__»: app = QApplication(sys.argv) w = QWidget() w.resize(300,300) w.setWindowTitle(‘Guru99’) w.show() sys.exit(app.exec_()) |
Сохраните его как app.py (имя не имеет значения) и нажмите F5, чтобы запустить программу. Или просто дважды кликните на сохраненном файле, чтобы запустить приложение. Если вы все сделали правильно, откроется новое окно с заголовком Guru99, как показано ниже.

Здорово! Работает. Это не так много, но достаточно, чтобы понять основы. Теперь давайте рассмотрим подробно, что делает каждая из строк в программе.
|
from PyQt5.QtWidgets import QApplication, QWidget |
Этот оператор импортирует все модули, необходимые для создания GUI, в текущее пространство имен. Модуль QtWidgets содержит все основные виджеты, которые вы будете использовать в этом руководстве.
|
app = QApplication(sys.argv) |
Здесь вы создаете объект класса QApplication. Этот шаг необходим для PyQt5; каждое приложение пользовательского интерфейса должно создавать экземпляр QApplication в качестве своего рода точки входа в приложение. Если вы не создадите его, будут выданы ошибки.
sys.argv — это список параметров командной строки, которые вы можете передать приложению при запуске через оболочку или при автоматизации интерфейса.
В этом примере вы не передали аргументы QApplications. Следовательно, вы также можете заменить его приведенным ниже кодом и даже не импортировать модуль sys.
|
app = QApplication([]) w = QWidget() |
Далее мы создаем объект класса QWidget. QWidget является базовым классом всех объектов пользовательского интерфейса в Qt, и практически все, что вы видите в приложении, является виджетом. Это включает в себя диалоговые окна, тексты, кнопки, панели и так далее. Функция, которая позволяет проектировать сложные пользовательские интерфейсы, основывается на том, что виджеты могут быть вложенными, то есть вы можете иметь виджет внутри виджета, который находится внутри еще одного виджета. Вы увидите это в действии в следующем разделе.
Метод resize класса QWidget позволяет устанавливать размеры любого виджета. В этом случае вы изменили размер окна на 300 * 300 пикселей. Здесь вы должны помнить, что виджеты могут быть вложены вместе, внешний виджет (т. е. виджет без родителя) называется окном.
|
w.setWindowTitle(‘Guru99’) |
Метод setWindowTitle () позволяет передать строку в качестве аргумента, который установит заголовок окна переданной вами строке. В этом примере в строке заголовка будет отображаться Guru99.
show() просто отображает виджет на экране монитора.
Метод app.exec_() запускает цикл событий Qt / C ++. Как вы знаете, PyQt в основном написан на C ++ и использует механизм цикла событий для реализации параллельного выполнения. app.exec_() передает управление Qt, который выходит из приложения только тогда, когда пользователь закроет его графический интерфейс. Вот почему Ctrl + C не выполняет выход из приложения, как в других программах Python. Поскольку Qt контролирует приложение, события Python не обрабатываются, пока мы не настроим их внутри приложения. Также обратите внимание, что у метода exec есть подчеркивание в имени; это потому, что exec() уже является ключевым словом в python, а подчеркивание разрешает конфликт имен.
Заполнение окон
В предыдущем разделе мы рассмотрели, как в Qt создать базовый виджет. Теперь пришло время сделать несколько более сложных интерфейсов, с которыми пользователи могут по-настоящему взаимодействовать. Снова, запустите IDLE и напишите следующее.
|
1 2 3 4 5 6 7 8 9 10 11 12 13 14 15 16 17 18 19 20 21 22 23 24 25 26 27 28 29 30 31 32 |
import sys from PyQt5.QtWidgets import QApplication, QWidget, QLabel, QPushButton, QMessageBox def dialog(): mbox = QMessageBox() mbox.setText(«Your allegiance has been noted») mbox.setDetailedText(«You are now a disciple and subject of the all-knowing Guru») mbox.setStandardButtons(QMessageBox.Ok | QMessageBox.Cancel) mbox.exec_() if __name__ == «__main__»: app = QApplication(sys.argv) w = QWidget() w.resize(300,300) w.setWindowTitle(‘Guru99’) label = QLabel(w) label.setText(«Behold the Guru, Guru99») label.move(100,130) label.show() btn = QPushButton(w) btn.setText(‘Beheld’) btn.move(110,150) btn.show() btn.clicked.connect(dialog) w.show() sys.exit(app.exec_()) |
Сохраните файл как appone.py или как угодно и нажмите F5, чтобы запустить программу. Если вы не допустили ошибок, IDLE откроет новое окно с текстом и кнопкой, как показано ниже.

Как только вы нажмете кнопку в первом окне, откроется новое окно сообщения с текстом, который вы написали. Теперь вы можете нажать кнопку Hide Details/Show Details, чтобы переключить видимость дополнительного текста.
Как вы можете видеть, поскольку мы не установили заголовок окна текста, заголовок по умолчанию был предоставлен самим python. Теперь, когда это работает, давайте взглянем на дополнительный код, который вы добавили в предыдущий пример.
|
from PyQt5.QtWidgets import QApplication, QWidget, QLabel, QPushButton, QMessageBox |
Это импортирует еще несколько виджетов, которые вы использовали в этом примере, а именно QLabel, QPushButton и QMessageBox.
|
def dialog(): mbox = QMessageBox() mbox.setText(«Your allegiance has been noted») mbox.setDetailedText(«You are now a disciple and subject of the all-knowing Guru») mbox.setStandardButtons(QMessageBox.Ok | QMessageBox.Cancel) mbox.exec_() |
Здесь вы определили метод с именем dialog, который создает виджет окна сообщения и устанавливает некоторый текст для кнопок и других полей.
Метод dialog вызывается из основного блока программы, когда кнопка нажимается в определенном виджете (в данном случае, btn PushButton). Событие клика, запущенное этой кнопкой, вызывает выполнение этой функции. Такая функция называется в Qt слотом, вы узнаете больше о сигналах и слотах в следующих разделах.
|
if __name__ == «__main__»: app = QApplication(sys.argv) w = QWidget() w.resize(300,300) w.setWindowTitle(‘Guru99’) |
Это основной раздел приложения, и, как и в предыдущем примере, вы начинаете с создания экземпляра QApplication, за которым следует простой виджет, это экземпляр QWidget.
|
label = QLabel(w) btn = QPushButton(w) |
Мы добавили два новых виджета в это приложение: QLabel и QPushButton. QLabel используется для вывода нередактируемого текста или заполнителей внутри виджета, тогда как QPushButton используется для создания кликабельной кнопки.
Здесь важно заметить, что при создании объектов label и btn вы передаете объект окна (w) конструкторам QLabel и QPushButton. Вот как работает вложение в PyQt5. Чтобы создать виджет внутри другого виджета, вы передаете ссылку на родительский виджет в конструктор дочернего элемента.
|
label.move(100,130) btn.move(110,150) |
move() используется для установки позиции виджета относительно его родительского виджета. В первом случае метка будет перемещена на 100 пикселей с левой стороны и на 130 пикселей сверху окна.
Точно так же кнопка будет размещена на 110 пикселей слева и на 150 пикселей сверху окна. Этот пример является грубым способом создания макетов и обычно не используется в производстве; он включен только для учебных целей. Qt поддерживает различные макеты, которые мы детально рассмотрим в следующих разделах этого руководства.
|
btn.clicked.connect(dialog) |
Наконец, это пример сигналов и слотов в Qt. В приложениях на основе графического интерфейса функции выполняются на основе действий, запускаемых пользователем, таких как наведение на элемент или нажатие кнопки. Эти действия называются событиями. Напомним, что метод app.exec_() передает управление в цикл обработки событий Qt. Для этого и предназначен цикл событий: прослушивать события и выполнять в ответ действия.
Каждый раз, когда происходит событие, например, когда пользователь нажимает кнопку, соответствующий виджет Qt генерирует сигнал. Эти сигналы могут быть подключены к функциям Python (например, к функции диалога в этом примере), чтобы функция выполнялась при срабатывании сигнала. Эти функции в Qt lingo называются слотами. Основной синтаксис для запуска функции слота в ответ на сигнал от события выглядит следующим образом:
|
widget.signal.connect(slot) |
Это означает, что всякий раз, когда сигнал запускается виджетом , будет выполняться функция подключенного слота. Таким образом, Qt использует сигналы и слоты для связи между объектами и облегчения повторного использования и интерактивности компонентов.
Теперь, когда вы знаете, как вкладывать виджеты и реализовывать взаимодействия с помощью сигналов и слотов, вот список полезных виджетов и других классов, которые вы можете использовать в приложениях PyQt.
Компоненты и виджеты
В PyQt доступно большое количество виджетов для создания приложений с помощью графического интерфейса. Однако в PyQt5 была произведены реорганизация классов в другие модули и ревизии в лицензиях.
Поэтому очень важно иметь общее представление о структуре PyQt5. В этом разделе мы рассмотрим, как PyQt5 организован внутри, и вы узнаете о различных модулях, библиотеках и классах API, предоставляемых PyQt5.
Структура каталогов PyQt5

Хотите узнать, что необходимо для создания сайта?
Посмотрите видео и узнайте пошаговый план по созданию сайта с нуля!
Смотреть видео
Это фундаментальные модули, используемые связыванием Qt в Python, в частности в PyQt5.
Qt: Он объединяет все классы / модули, упомянутые ниже, в один модуль. Это значительно увеличивает объем памяти, используемой приложением. Однако управлять инфраструктурой проще, импортируя только один модуль.
QtCore: Содержит основные неграфические классы, используемые другими модулями. Именно здесь реализуются цикл событий Qt, сигналы, возможность подключения к слотам и т. д.
QtWidgets: Содержит большинство виджетов, доступных в Pyqt5.
QtGui: Содержит компоненты графического интерфейса и расширяет модуль QtCore.
QtNetwork: Содержит классы, используемые для реализации сетевого программирования через Qt. Он поддерживает TCP-серверы, TCP-сокеты, UDP-сокеты, обработку SSL, сетевых сеансов и поиск DNS.
QtMultimedia: Предоставляет низкоуровневый мультимедийный функционал.
QtSql: реализует интеграцию базы данных для баз данных SQL. Поддерживает ODBC, MySQL, Oracle, SQLite и PostgreSQL.
Виджеты PyQt5
Вот список наиболее часто используемых виджетов PyQt5:
QLineEdit: Это поле ввода, которое позволяет пользователю вводить одну строку текста.
QRadioButton: Это поле ввода с выбираемой кнопкой, аналогичное переключателям в html.
|
rad = QRadioButton(«button title») rad.setChecked(True) #to select the button by default. |
QComboBox: Используется для отображения выпадающего меню со списком выбираемых элементов.
|
drop = QComboBox(w) drop.addItems([«item one», «item two», «item three»]) |
QCheckBox: Отображает выбираемое квадратное поле перед меткой, которая отмечена, если выбрана, аналогично переключателям.
|
check = QCheckBox(«button title») |
QMenuBar: Отображает горизонтальную строку меню в верхней части окна. Вы можете добавить в эту панель только объекты класса QMenu. Эти объекты QMenu могут дополнительно содержать строки, объекты QAction или другие объекты QMenu.
QToolBar: Это горизонтальная панель или панель, которую можно перемещать в пределах окна. Может содержать кнопки и другие виджеты.
QTab: Используется для разбиения содержимого окна на несколько страниц, к которым можно получить доступ через разные вкладки в верхней части виджета. Он состоит из двух разделов: панель вкладок и страница вкладок.
QScrollBar: Используется для создания полос прокрутки, которые позволяют пользователю прокручивать вверх и вниз в пределах окна. Он состоит из подвижного ползунка, дорожки ползунка и двух кнопок для прокрутки ползунка вверх или вниз.
QSplitter: Разделители используются для разделения содержимого окна, чтобы виджеты были сгруппированы правильно и не выглядели нагроможденными. QSplitter является одним из основных обработчиков макетов, доступных в PyQt5, и используется для разделения содержимого как по горизонтали, так и по вертикали.
QDock: виджет-док — это подокно с двумя свойствами: оно может быть перемещено в главное окно и его можно закрепить за пределами родительского окна в другом месте на экране.
Макеты и темы
В предыдущих примерах мы использовали только методы move() и resize() для установки позиций виджетов в графическом интерфейсе.
Тем не менее, PyQt имеет мощный механизм управления компоновкой, который можно использовать для создания расширенных пользовательских интерфейсов приложений. В этом разделе вы узнаете о двух важных классах, которые используются в Qt для создания и управления макетами: QBoxLayout и QGridLayout.
QBoxLayout
QBoxLayout используется для выравнивания дочерних виджетов макета в горизонтальной или вертикальной строке. Два основных класса, которые наследуются от QBoxLayout, это:
QHBoxLayout: используется для выравнивания дочерних виджетов по горизонтали.
QVBoxLayout: используется для выравнивания дочерних виджетов по вертикали.
Например, так будут выглядеть три кнопки, выровненные по QHBoxLayout.

|
1 2 3 4 5 6 7 8 9 10 11 12 13 14 15 16 17 18 19 20 21 22 |
import sys from PyQt5.QtWidgets import * if __name__ == «__main__»: app = QApplication([]) w = QWidget() w.setWindowTitle(«Musketeers») btn1 = QPushButton(«Athos») btn2 = QPushButton(«Porthos») btn3 = QPushButton(«Aramis») hbox = QHBoxLayout(w) hbox.addWidget(btn1) hbox.addWidget(btn2) hbox.addWidget(btn3) w.show() sys.exit(app.exec_()) |
А вот как они будут выглядеть в QVBoxLayout.

|
1 2 3 4 5 6 7 8 9 10 11 12 13 14 15 16 17 18 19 20 21 22 |
import sys from PyQt5.QtWidgets import * if __name__ == «__main__»: app = QApplication([]) w = QWidget() w.setWindowTitle(«Musketeers») btn1 = QPushButton(«Athos») btn2 = QPushButton(«Porthos») btn3 = QPushButton(«Aramis») vb = QVBoxLayout(w) vb.addWidget(btn1) vb.addWidget(btn2) vb.addWidget(btn3) w.show() sys.exit(app.exec_()) |
Единственная функция, которая нуждается в каком-либо объяснении на данный момент, это метод addWidget(). Он используется для вставки виджетов в макет HBox или VBox. Он также используется в других макетах, где принимает другое количество параметров, как вы увидите в следующем разделе. Виджеты отображаются внутри макета в том порядке, в котором вы их вставляете.
QGridLayout
QGridLayout используется для создания интерфейсов, в которых виджеты расположены в виде сетки (например, матрицы или 2D-массива). Чтобы вставить элементы в сетку, вы можете использовать матричное представление, чтобы определить количество строк и столбцов в сетке, а также положение этих элементов.
Например, чтобы создать сетку 3 * 3 (т.е. сетку с тремя строками и тремя столбцами), вы пишите следующий код:
|
1 2 3 4 5 6 7 8 9 10 11 12 13 14 15 16 17 |
import sys from PyQt5.QtWidgets import * if __name__ == «__main__»: app = QApplication([]) w = QWidget() grid = QGridLayout(w) for i in range(3): for j in range(3): grid.addWidget(QPushButton(«Button»),i,j) w.show() sys.exit(app.exec_()) |
Вывод будет следующий:

Метод addWidget() в макете сетки принимает следующие аргументы:
Объект виджета, который вы хотите добавить в сетку
X-координата объекта
Y-координата объекта
Диапазон строк (по умолчанию = 0)
Col-span (по умолчанию = 0)
Чтобы лучше это понять, вы можете вручную вставить каждый виджет, как показано ниже:
|
1 2 3 4 5 6 7 8 9 10 11 12 13 14 15 16 17 |
import sys from PyQt5.QtWidgets import * if __name__ == «__main__»: app = QApplication([]) w = QWidget() grid = QGridLayout(w) grid.addWidget(QPushButton(«Button one»),0,0) grid.addWidget(QPushButton(«Button two»),0,1) grid.addWidget(QPushButton(«Button three»),1,0) grid.addWidget(QPushButton(«Button four»),1,1) w.show() sys.exit(app.exec_()) |
Вот как будет выглядеть сетка:

Вы также можете передать параметры rowspan и colspan в addWidget(), чтобы охватить более одной строки или столбца.
|
grid.addWidget(QPushButton(«Button five»),2,0,1,0) |
Это создаст кнопку, которая растягивается на оба столбца.

Темы
PyQt5 поставляется с некоторыми встроенными темами, которые вы можете использовать в приложениях. Метод setStyle(), вызываемый в экземпляре QApplication, используется для установки определенной темы для вашего приложения. Например, добавление следующей строки кода изменит тему приложения по умолчанию на Fusion:
Так будет выглядеть предыдущий пример в теме Fusion.

Еще одна полезная функция для создания тем приложений — это метод setPalette(). Вот код для изменения цвета различных виджетов с помощью setPalette().
|
1 2 3 4 5 6 7 8 9 10 11 12 13 14 15 16 17 18 19 20 21 22 23 24 25 26 |
import sys from PyQt5.QtCore import Qt from PyQt5.QtWidgets import * from PyQt5.QtGui import QPalette if __name__ == «__main__»: app = QApplication([]) app.setStyle(«Fusion») qp = QPalette() qp.setColor(QPalette.ButtonText, Qt.black) qp.setColor(QPalette.Window, Qt.black) qp.setColor(QPalette.Button, Qt.gray) app.setPalette(qp) w = QWidget() grid = QGridLayout(w) grid.addWidget(QPushButton(«Button one»),0,0) grid.addWidget(QPushButton(«Button two»),0,1) grid.addWidget(QPushButton(«Button three»),1,0) grid.addWidget(QPushButton(«Button four»),1,1) w.show() sys.exit(app.exec_()) |
Вот результат:

Чтобы использовать метод setPalette(), сначала нужно определить палитру. Это делается путем создания объекта класса QPalette.
Обратите внимание, что класс QPalette принадлежит модулю QtGui, и вам нужно будет импортировать его, чтобы это работало. Создав объект QPalette, используйте метод setColor(), чтобы передать имя виджета, цвет которого вы хотите изменить, и цвет, который вы хотите установить.
|
qp.setColor(QPalette.Window, Qt.black) |
Это изменит цвет окна на черный. После того, как вы определили цветовую схему, используйте функцию setPalette(), чтобы применить палитру к приложению.
Это все, что вам нужно сделать, если вы хотите создать базовые темы для своего приложения. PyQt также позволяет использовать таблицы стилей для определения внешнего вида виджетов. Если вы знакомы с CSS, вы можете легко определить расширенные стили для приложения, используя таблицы стилей Qt.
Заключение
PyQt — это привязка Python для инфраструктуры пользовательского интерфейса C ++, Qt.
PyQt4 и PyQt5 — две основные версии, разработанные Riverbank Computing.
Основными модулями платформы PyQt являются: Qt, QtCore, QtWidgets, QtGui, QtSql, QtNetwork
PyQt поддерживает различные виджеты, такие как: Кнопки, Текстовые метки, Текстовые поля, Переключатели и чек-боксы, Панели инструментов и строки меню, Webkit, Вкладки, Доки
В PyQt интерактивность реализована с использованием сигналов и слотов.
Событие это действие, которое выполняется пользователем в графическом интерфейсе (например, нажатие кнопки).
Сигнал передается в соответствующий виджет, когда в нем происходит событие.
Слот является функцией, которая подключается к сигналу и выполняет при повышении сигнала.
PyQt имеет надежный механизм компоновки и поддерживает расширенный дизайн макета и управление им. Это две часто используемые схемы компоновки в PyQt: Макет блока, Макет сетки
PyQt позволяет создавать собственные темы для приложения с графическим интерфейсом и имеет встроенную поддержку таблиц стилей.
PyQt может использоваться для создания пользовательских интерфейсов, а также автономных приложений.
Источник: //www.guru99.com
Редакция: Команда webformyself.
Хотите узнать, что необходимо для создания сайта?
Посмотрите видео и узнайте пошаговый план по созданию сайта с нуля!
Смотреть видео

Хотите узнать, что необходимо для создания сайта?
Посмотрите видео и узнайте пошаговый план по созданию сайта с нуля!
Смотреть
Эта статья предназначена для тех, кто только начинает своё знакомство с созданием приложений с графическим интерфейсом (GUI) на Python. В ней мы рассмотрим основы использования PyQt в связке с Qt Designer. Шаг за шагом мы создадим простое Python GUI приложение, которое будет отображать содержимое выбранной директории.
Что нам потребуется
Нам понадобятся PyQt и Qt Designer, ну и Python, само собой.
В этой статье используется PyQt5 с Python 3, но особых различий между PyQt и PySide или их версиями для Python 2 нет.
Windows: PyQt можно скачать здесь. В комплекте с ним идёт Qt Designer.
macOS: Вы можете установить PyQt с помощью Homebrew:
$ brew install pyqt5
Скачать пакет с большинством компонентов и инструментов Qt, который содержит Qt Designer, можно по этой ссылке.
Linux: Всё нужное, вероятно, есть в репозиториях вашего дистрибутива. Qt Designer можно установить из Центра Приложений, но PyQt придётся устанавливать через терминал. Установить всё, что нам понадобится, одной командой можно, например, так:
# для Fedora:
$ sudo dnf install python3-qt5 qt-creator
# для Debian/Ubuntu:
$ sudo apt install python3-qt5 pyqt5-dev-tools qtcreator
После того как вы закончили с приготовлениями, откройте командную строку/терминал и убедитесь, что вы можете использовать команду pyuic5. Вы должны увидеть следующее:
$ pyuic5
Error: one input ui-file must be specified
Если вы видите сообщение, что такой команды нет или что-то в таком роде, попробуйте загуглить решение проблемы для вашей операционной системы и версии PyQt.
Если вы используете Windows, то, скорее всего, путь C:Python36Scripts (измените 36 на вашу версию Python) не прописан в вашем PATH. Загляните в этот тред на Stack Overflow, чтобы узнать, как решить проблему.
Дизайн
Основы
Теперь, когда у нас всё готово к работе, давайте начнём с простого дизайна.
Откройте Qt Designer, где вы увидите диалог новой формы, выберите Main Window и нажмите Create.
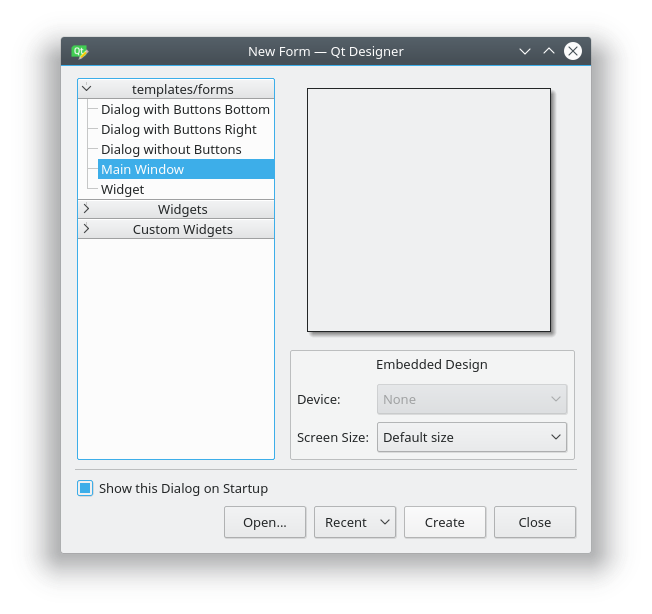
После этого у вас должна появиться форма — шаблон для окна, размер которого можно менять и куда можно вставлять объекты из окна виджетов и т.д. Ознакомьтесь с интерфейсом, он довольно простой.
Теперь давайте немного изменим размер нашего главного окна, т.к. нам не нужно, чтобы оно было таким большим. А ещё давайте уберём автоматически добавленное меню и строку состояния, поскольку в нашем приложении они не пригодятся.
Все элементы формы и их иерархия по умолчанию отображаются в правой части окна Qt Designer под названием Object Inspector. Вы с лёгкостью можете удалять объекты, кликая по ним правой кнопкой мыши в этом окне. Или же вы можете выбрать их в основной форме и нажать клавишу DEL на клавиатуре.

В итоге мы имеем почти пустую форму. Единственный оставшийся объект — centralwidget, но он нам понадобится, поэтому с ним мы ничего не будем делать.
Теперь перетащите куда-нибудь в основную форму List Widget (не List View) и Push Button из Widget Box.
Макеты
Вместо использования фиксированных позиций и размеров элементов в приложении лучше использовать макеты. Фиксированные позиции и размеры у вас будут выглядеть хорошо (пока вы не измените размер окна), но вы никогда не можете быть уверены, что всё будет точно так же на других машинах и/или операционных системах.
Макеты представляют собой контейнеры для виджетов, которые будут удерживать их на определённой позиции относительно других элементов. Поэтому при изменении размера окна размер виджетов тоже будет меняться.
Давайте создадим нашу первую форму без использования макетов. Перетащите список и кнопку в форме и измените их размер, чтобы вышло вот так:
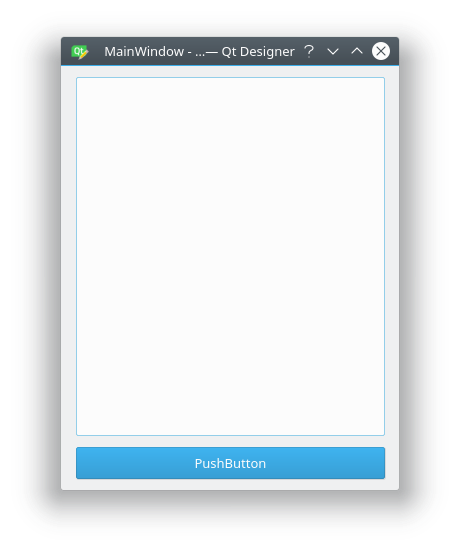
Теперь в меню Qt Designer нажмите Form, затем выберите Preview и увидите что-то похожее на скриншот выше. Выглядит хорошо, не так ли? Но вот что случится, когда мы изменим размер окна:

Наши объекты остались на тех же местах и сохранили свои размеры, несмотря на то что размер основного окна изменился и кнопку почти не видно. Вот поэтому в большинстве случаев стоит использовать макеты. Конечно, бывают случаи, когда вам, например, нужна фиксированная или минимальная/максимальная ширина объекта. Но вообще при разработке приложения лучше использовать макеты.
Основное окно уже поддерживает макеты, поэтому нам ничего не нужно добавлять в нашу форму. Просто кликните правой кнопкой мыши по Main Window в Object Inspector и выберите Lay out → Lay out vertically. Также вы можете кликнуть правой кнопкой по пустой области в форме и выбрать те же опции:
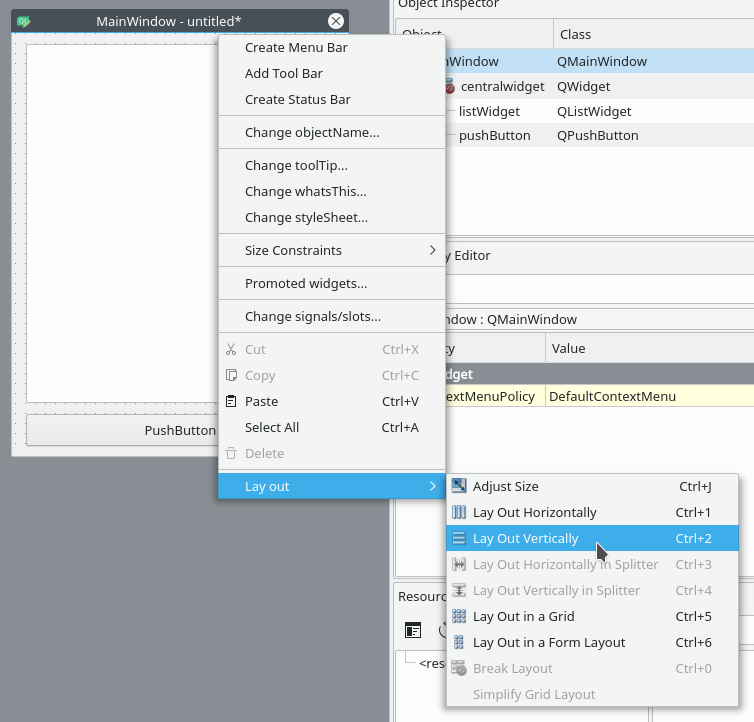
Ваши элементы должны быть в том же порядке, что и до внесённых изменений, но если это не так, то просто перетащите их на нужное место.
Так как мы использовали вертикальное размещение, все элементы, которые мы добавим, будут располагаться вертикально. Можно комбинировать размещения для получения желаемого результата. Например, горизонтальное размещение двух кнопок в вертикальном будет выглядеть так:
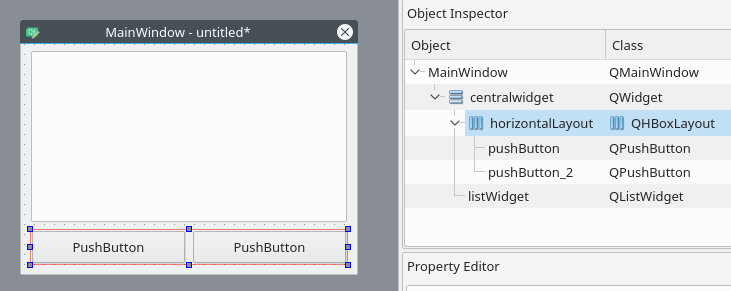
Если у вас не получается переместить элемент в главном окне, вы можете сделать это в окне Object Inspector.
Последние штрихи
Теперь, благодаря вертикальному размещению, наши элементы выровнены правильно. Единственное, что осталось сделать (но не обязательно), — изменить имя элементов и их текст.
В простом приложении вроде этого с одним лишь списком и кнопкой изменение имён не обязательно, так как им в любом случае просто пользоваться. Тем не менее правильное именование элементов — то, к чему стоит привыкать с самого начала.
Свойства элементов можно изменить в разделе Property Editor.
Подсказка: вы можете менять размер, передвигать или добавлять часто используемые элементы в интерфейс Qt Designer для ускорения рабочего процесса. Вы можете добавлять скрытые/закрытые части интерфейса через пункт меню View.
Нажмите на кнопку, которую вы добавили в форму. Теперь в Property Editor вы должны видеть все свойства этого элемента. В данный момент нас интересуют objectName и text в разделе QAbstractButton. Вы можете сворачивать разделы в Property Editor нажатием по названию раздела.
Измените значение objectName на btnBrowse и text на Выберите папку.
Должно получиться так:

Именем объекта списка является listWidget, что вполне подходит в данном случае.
Сохраните дизайн как design.ui в папке проекта.
Превращаем дизайн в код
Конечно, можно использовать .ui-файлы напрямую из Python-кода, однако есть и другой путь, который может показаться легче. Можно конвертировать код .ui-файла в Python-файл, который мы потом сможем импортировать и использовать. Для этого мы используем команду pyuic5 из терминала/командной строки.
Чтобы конвертировать .ui-файл в Python-файл с названием design.py, используйте следующую команду:
$ pyuic5 path/to/design.ui -o output/path/to/design.pyПишем код
Теперь у нас есть файл design.py с нужной частью дизайна нашего приложения и мы начинать работу над созданием его логики.
Создайте файл main.py в папке, где находится design.py.
Другие интересные статьи по Python.
Используем дизайн
Для Python GUI приложения понадобятся следующие модули:
import sys  # sys нужен для передачи argv в QApplication
from PyQt5 import QtWidgets
Также нам нужен код дизайна, который мы создали ранее, поэтому его мы тоже импортируем:
import design # Это наш конвертированный файл дизайнаТак как файл с дизайном будет полностью перезаписываться каждый раз при изменении дизайна, мы не будем изменять его. Вместо этого мы создадим новый класс ExampleApp, который объединим с кодом дизайна для использования всех его функций:
class ExampleApp(QtWidgets.QMainWindow, design.Ui_MainWindow):
    def __init__(self):
        # Это здесь нужно для доступа к переменным, методам
        # и т.д. в файле design.py
        super().__init__()
        self.setupUi(self)  # Это нужно для инициализации нашего дизайна
В этом классе мы будем взаимодействовать с элементами интерфейса, добавлять соединения и всё остальное, что нам потребуется. Но для начала нам нужно инициализировать класс при запуске кода. С этим мы разберёмся в функции main():
def main():
    app = QtWidgets.QApplication(sys.argv)  # Новый экземпляр QApplication
    window = ExampleApp()  # Создаём объект класса ExampleApp
    window.show()  # Показываем окно
    app.exec_()  # и запускаем приложение
И чтобы выполнить эту функцию, мы воспользуемся привычной конструкцией:
if __name__ == '__main__':  # Если мы запускаем файл напрямую, а не импортируем
    main()  # то запускаем функцию main()
В итоге main.py выглядит таким образом:
import sys  # sys нужен для передачи argv в QApplication
from PyQt5 import QtWidgets
import design  # Это наш конвертированный файл дизайна

class ExampleApp(QtWidgets.QMainWindow, design.Ui_MainWindow):
    def __init__(self):
        # Это здесь нужно для доступа к переменным, методам
        # и т.д. в файле design.py
        super().__init__()
        self.setupUi(self)  # Это нужно для инициализации нашего дизайна

def main():
    app = QtWidgets.QApplication(sys.argv)  # Новый экземпляр QApplication
    window = ExampleApp()  # Создаём объект класса ExampleApp
    window.show()  # Показываем окно
    app.exec_()  # и запускаем приложение

if __name__ == '__main__':  # Если мы запускаем файл напрямую, а не импортируем
    main()  # то запускаем функцию main()
Если запустить этот код: $ python3 main.py, то наше приложение запустится!
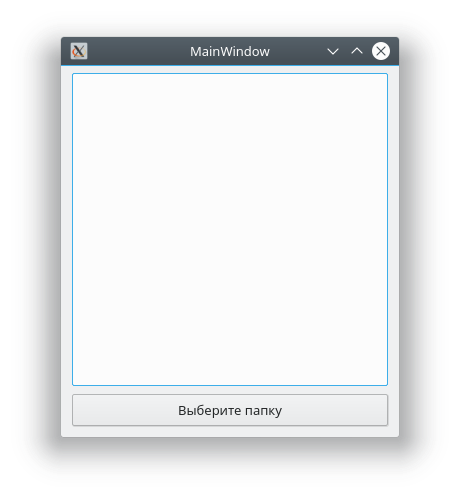
Но нажатие на кнопку ничего не даёт, поэтому нам придётся с этим разобраться.
Добавляем функциональность в наше Python GUI приложение
Примечание Весь дальнейший код пишется внутри класса ExampleApp.
Начнём с кнопки Выберите папку. Привязать к функции событие вроде нажатия на кнопку можно следующим образом:
self.btnBrowse.clicked.connect(self.browse_folder)Добавьте эту строку в метод __init__ класса ExampleApp, чтобы выполнить привязку при запуске приложения. А теперь взглянем на неё поближе:
self.btnBrowse: здесьbtnBrowse— имя объекта, который мы определили в Qt Designer.selfговорит само за себя и означает принадлежность к текущему классу;clicked— событие, которое мы хотим привязать. У разных элементов разные события, например, у виджетов списка естьitemSelectionChangedи т.д.;connect()— метод, который привязывает событие к вызову переданной функции;self.browse_folder— просто функция (метод), которую мы описали в классеExampleApp.
Для открытия диалога выбора папки мы можем использовать встроенный метод QtWidgets.QFileDialog.getExistingDirectory:
directory = QtWidgets.QFileDialog.getExistingDirectory(self, "Выберите папку")Если пользователь выберет директорию, переменной directory присвоится абсолютный путь к выбранной директории, в противном случае она будет равна None. Чтобы не выполнять код дальше, если пользователь закроет диалог, мы используем команду if directory:.
Для отображения содержимого директории нам нужно импортировать os:
import osИ получить список содержимого следующим образом:
os.listdir(path)Для добавления элементов в listWidget мы используем метод addItem(), а для удаления всех элементов у нас есть self.listWidget.clear().
В итоге функция browse_folder должна выглядеть так:
def browse_folder(self):
    self.listWidget.clear()  # На случай, если в списке уже есть элементы
    directory = QtWidgets.QFileDialog.getExistingDirectory(self, "Выберите папку")
    # открыть диалог выбора директории и установить значение переменной
    # равной пути к выбранной директории

    if directory:  # не продолжать выполнение, если пользователь не выбрал директорию
        for file_name in os.listdir(directory):  # для каждого файла в директории
            self.listWidget.addItem(file_name)   # добавить файл в listWidget
Теперь, если запустить приложение, нажать на кнопку и выбрать директорию, мы увидим:
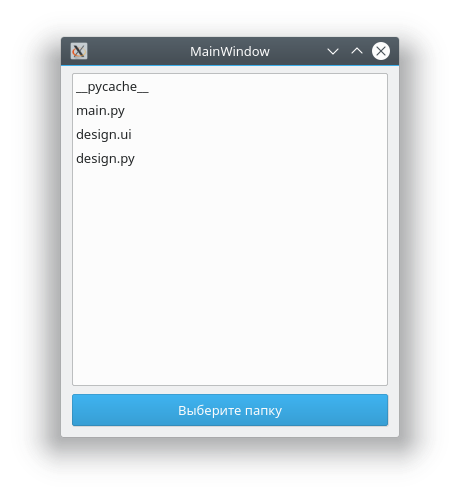
Так выглядит весь код нашего Python GUI приложения:
import sys  # sys нужен для передачи argv в QApplication
import os  # Отсюда нам понадобятся методы для отображения содержимого директорий

from PyQt5 import QtWidgets

import design  # Это наш конвертированный файл дизайна

class ExampleApp(QtWidgets.QMainWindow, design.Ui_MainWindow):
    def __init__(self):
        # Это здесь нужно для доступа к переменным, методам
        # и т.д. в файле design.py
        super().__init__()
        self.setupUi(self)  # Это нужно для инициализации нашего дизайна
        self.btnBrowse.clicked.connect(self.browse_folder)  # Выполнить функцию browse_folder
                                                            # при нажатии кнопки

    def browse_folder(self):
        self.listWidget.clear()  # На случай, если в списке уже есть элементы
        directory = QtWidgets.QFileDialog.getExistingDirectory(self, "Выберите папку")
        # открыть диалог выбора директории и установить значение переменной
        # равной пути к выбранной директории

        if directory:  # не продолжать выполнение, если пользователь не выбрал директорию
            for file_name in os.listdir(directory):  # для каждого файла в директории
                self.listWidget.addItem(file_name)   # добавить файл в listWidget

def main():
    app = QtWidgets.QApplication(sys.argv)  # Новый экземпляр QApplication
    window = ExampleApp()  # Создаём объект класса ExampleApp
    window.show()  # Показываем окно
    app.exec_()  # и запускаем приложение

if __name__ == '__main__':  # Если мы запускаем файл напрямую, а не импортируем
    main()  # то запускаем функцию main()
Это были основы использования Qt Designer и PyQt для разработки Python GUI приложения. Теперь вы можете спокойно изменять дизайн приложения и использовать команду pyuic5 без страха потерять написанный код.
Перевод статьи «PyQt: Getting started with PyQt and Qt Designer»