
This is the readme for the Python for Win32 (pywin32) extensions, which provides access to many of the Windows APIs from Python.
See CHANGES.txt for recent notable changes.
Only Python 3 is supported. If you want Python 2 support, you want build 228.
Docs
The docs are a long and sad story, but there’s now an online version
of the helpfile that ships with the installers (thanks @ofek!).
Lots of that is very old, but some is auto-generated and current. Would love help untangling the docs!
Support
Feel free to open issues for
all bugs (or suspected bugs) in pywin32. pull-requests
for all bugs or features are also welcome.
However, please do not open github issues for general support requests, or
for problems or questions using the modules in this package — they will be
closed. For such issues, please email the
python-win32 mailing list —
note that you must be subscribed to the list before posting.
Binaries
Binary releases are deprecated.
While they are still provided, find them here
Installing via PIP
You should install pywin32 via pip — eg,
python -m pip install —upgrade pywin32
If you encounter any problems when upgrading (eg, «module not found» errors or similar), you
should execute:
python Scripts/pywin32_postinstall.py -install
This will make some small attempts to cleanup older conflicting installs.
Note that if you want to use pywin32 for «system wide» features, such as
registering COM objects or implementing Windows Services, then you must run
that command from an elevated (ie, «Run as Administrator) command prompt.
For unreleased changes, you can download builds made by github actions —
choose any «workflow» from the main branch and download its «artifacts»)
The specified procedure could not be found / Entry-point not found Errors?
A very common report is that people install pywin32, but many imports fail with errors
similar to the above.
In almost all cases, this tends to mean there are other pywin32 DLLs installed in your system,
but in a different location than the new ones. This sometimes happens in environments that
come with pywin32 pre-shipped (eg, anaconda?).
The possible solutions are:
-
Run the «post_install» script documented above.
-
Otherwise, find and remove all other copies of
pywintypesXX.dllandpythoncomXX.dll
(whereXXis the Python version — eg, «39»)
Running as a Windows Service
Modern Python installers do not, by default, install Python in a way that is suitable for
running as a service, particularly for other users.
-
Ensure Python is installed in a location where the user running the service has
access to the installation and is able to loadpywintypesXX.dllandpythonXX.dll. -
Manually copy
pythonservice.exefrom thesite-packages/win32directory to
the same place as these DLLs.
Building from source
Building from source has been simplified recently — you just need Visual Studio
and the Windows 10 SDK installed (the free compilers probably work too, but
haven’t been tested — let me know your experiences!)
setup.py is a standard distutils build script. You probably want:
python setup.py install
or
python setup.py —help
You can run setup.py without any arguments to see
specific information about dependencies. A vanilla MSVC installation should
be able to build most extensions and list any extensions that could not be
built due to missing libraries — if the build actually fails with your
configuration, please open an issue.
Release process
The following steps are performed when making a new release — this is mainly
to form a checklist so mhammond doesn’t forget what to do 
-
Ensure CHANGES.txt has everything worth noting, commit it.
-
Update setup.py with the new build number.
-
Execute build.bat, wait forever, test the artifacts.
-
Upload .whl artifacts to pypi — we do this before pushing the tag because they might be
rejected for an invalidREADME.md. Done viapy -3.5 -m twine upload dist/*XXX*.whl. -
Commit setup.py (so the new build number is in the repo), create a new git tag
-
Upload the .exe installers to github.
-
Update setup.py with the new build number + «.1» (eg, 123.1), to ensure
future test builds aren’t mistaken for the real release. -
Make sure everything is pushed to github, including the tag (ie,
git push --tags) -
Send mail to python-win32
Pywin32 is a Python extension for windows that is used to access Windows API. In this article, we will look into the process of installing Pywin32 on a windows machine.
Pre-requisites:
The only thing that you need for installing Numpy on Windows are:
- Python
- PIP or Conda (depending upon user preference)
Installing Pywin32 on Windows using Conda:
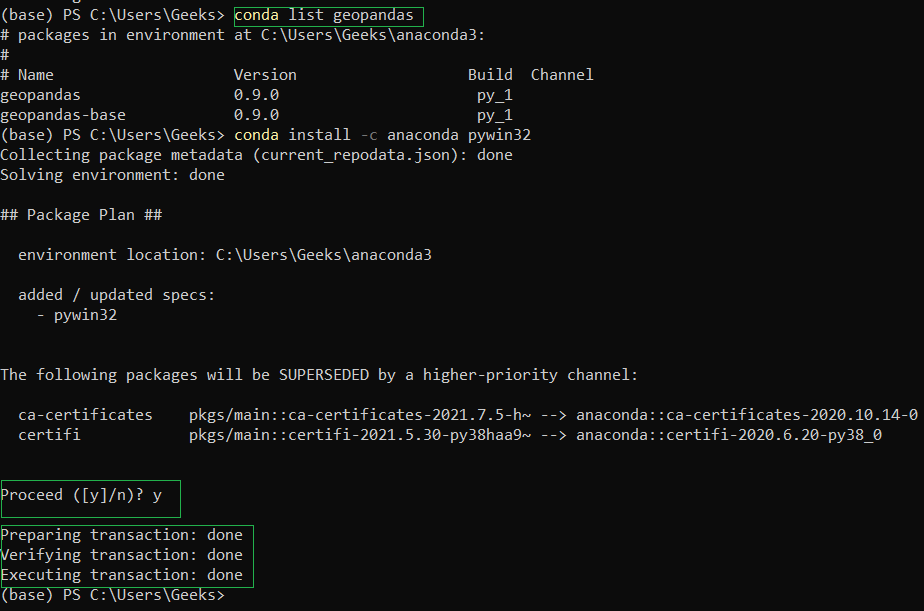
If you want the installation to be done through conda, open up the Anaconda Powershell Prompt and use the below command:
conda install -c anaconda pywin32
Type y for yes when prompted.
You will get a similar message once the installation is complete:
Make sure you follow the best practices for installation using conda as:
- Use an environment for installation rather than in the base environment using the below command:
conda create -n my-env
conda activate my-env
Note: If your preferred method of installation is conda-forge, use the below command:
conda config --env --add channels conda-forge
Verifying Pywin32 Installation on Windows using Conda:
To verify if Pywin32 has been successfully installed in your system run the below command in Anaconda Powershell Prompt:
conda list pywin32
You’ll get the below message if the installation is complete:

Installing Pywin32 on Windows using PIP:
If you want the installation to be done through PIP, open up the Command Prompt and use the below command:
pip install pywin32
You will get a similar message once the installation is complete:

Verifying Pywin32 Installation on Windows using PIP:
To verify if the Pywin32 has been successfully installed in your system run the below command in Command Prompt:
python -m pip show pywin32
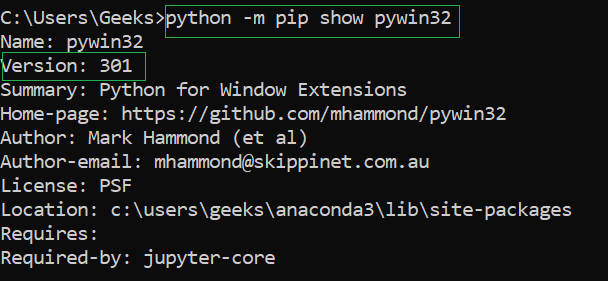
You’ll get the below message if the installation is complete:
pywin32
![]()
This is the readme for the Python for Win32 (pywin32) extensions, which provides access to many of the Windows APIs from Python.
See CHANGES.txt for recent notable changes.
Only Python 3 is supported. If you want Python 2 support, you want build 228.
Docs
The docs are a long and sad story, but there’s now an online version
of the helpfile that ships with the installers (thanks @ofek!).
Lots of that is very old, but some is auto-generated and current. Would love help untangling the docs!
Support
Feel free to open issues for
all bugs (or suspected bugs) in pywin32. pull-requests
for all bugs or features are also welcome.
However, please do not open github issues for general support requests, or
for problems or questions using the modules in this package — they will be
closed. For such issues, please email the
python-win32 mailing list —
note that you must be subscribed to the list before posting.
Binaries
Binary releases are deprecated.
While they are still provided, find them here
Installing via PIP
You should install pywin32 via pip — eg,
python -m pip install —upgrade pywin32
If you encounter any problems when upgrading (eg, «module not found» errors or similar), you
should execute:
python Scripts/pywin32_postinstall.py -install
This will make some small attempts to cleanup older conflicting installs.
Note that if you want to use pywin32 for «system wide» features, such as
registering COM objects or implementing Windows Services, then you must run
that command from an elevated (ie, «Run as Administrator) command prompt.
For unreleased changes, you can download builds made by github actions —
choose any «workflow» from the main branch and download its «artifacts»)
The specified procedure could not be found / Entry-point not found Errors?
A very common report is that people install pywin32, but many imports fail with errors
similar to the above.
In almost all cases, this tends to mean there are other pywin32 DLLs installed in your system,
but in a different location than the new ones. This sometimes happens in environments that
come with pywin32 pre-shipped (eg, anaconda?).
The possible solutions are:
-
Run the «post_install» script documented above.
-
Otherwise, find and remove all other copies of
pywintypesXX.dllandpythoncomXX.dll
(whereXXis the Python version — eg, «39»)
Running as a Windows Service
Modern Python installers do not, by default, install Python in a way that is suitable for
running as a service, particularly for other users.
-
Ensure Python is installed in a location where the user running the service has
access to the installation and is able to loadpywintypesXX.dllandpythonXX.dll. -
Manually copy
pythonservice.exefrom thesite-packages/win32directory to
the same place as these DLLs.
Building from source
Install Visual Studio 2019 (later probably works, but options might be different),
select «Desktop Development with C++», then the following options:
- Windows 10 SDK (latest offered I guess? At time of writing, 10.0.18362)
- «C++ for MFC for …»
- ARM build tools if necessary.
(the free compilers probably work too, but haven’t been tested — let me know your experiences!)
setup.py is a standard distutils build script, so you probably want:
python setup.py install
or
python setup.py —help
Some modules need obscure SDKs to build — setup.py should succeed, gracefully
telling you why it failed to build them — if the build actually fails with your
configuration, please open an issue.
Release process
The following steps are performed when making a new release — this is mainly
to form a checklist so mhammond doesn’t forget what to do
-
Ensure CHANGES.txt has everything worth noting, commit it.
-
Update setup.py with the new build number.
-
Execute build.bat, wait forever, test the artifacts.
-
Upload .whl artifacts to pypi — we do this before pushing the tag because they might be
rejected for an invalidREADME.md. Done viapy -3.? -m twine upload dist/*XXX*.whl. -
Commit setup.py (so the new build number is in the repo), create a new git tag
-
Upload the .exe installers to github.
-
Update setup.py with the new build number + «.1» (eg, 123.1), to ensure
future test builds aren’t mistaken for the real release. -
Make sure everything is pushed to github, including the tag (ie,
git push --tags) -
Send mail to python-win32
-
pywin32 is an open source python library that can be used to access Windows COM.
Access to COM means that we can control and modify windows programs using python.
This helps us to implement almost any thing a windows program can do, like working with excel data, sending outlook email,
track session lock/unlock events, mouse pointer data, screen information, etc.pywin32 is a huge library and forms the foundation of many other libraries.
For example, any python GUI libraries that supports Windows OS implements pywin32,
as this already has components related to windows GUI.This article lists some of the most important modules of pywin32 with sample usages.
Complete documentation here.
-
Contents
- Install pywin32
- To check if pywin32 installed successfully
- Important pywin32 modules
- win32clipboard
- win32api
- odbc
- timer
- win32evtlog
- win32file
- win32gui
- win32ts
- pywintypes
-
Install pywin32
Download and install the latest version of python from Python Website.
Set up virtual environment also if needed.
Install pywin32 using the command: pip install pywin32
-
To check if pywin32 installed successfully
Type command pip freeze
Should give an output like:pywin32==302
-
Important pywin32 modules
pywin32 has many sub modules, which handles specific functions.
When working with pywin32 in our python code, we will be importing these modules mostly, rather than
importing pywin32. Below are list of some of the most used modules and its functionalities.Module Name Description win32 clipboard Access and modify clipboard data. win32api Enables implementing functions like shutdown or restart, log off, beep from speaker, copy file, delete file, search file
get computer name, current user name, local time, windows OS details etc.odbc To manage an odbc connection timer Start a timer to execute a function. Stop timer. win32evtlog Actions like retrieving and reading through a list of events, clearing event logs, backing it up, etc win32file Create directories, create/copy/ move/delete files, get/set filename, get file size, read/write strings to file, etc win32gui Working with windows GUI like, creating and modifying a GUI window, dialog boxes, writing text to window,
creating images in window, draw shapes like, ellipse, rectangle, polygons, lines, etcwin32ts Actions like, listing all the sessions in a server, get information about a session, logging off a session, etc pywintypes Create GUID, time object etc. -
win32clipboard samples
Helps to work with clipboard data.
import win32clipboard as w print("Number of formats currently on clipboard : ", w.CountClipboardFormats())#'Should have some copied data before executing this line' w.OpenClipboard(None) str = w.GetClipboardData(1) print("Clipboard data : ", str) w.SetClipboardText("New data in clipboard", 1) str = w.GetClipboardData(1) print("New clipboard data : ", str) print("Empty clipboard : ", w.EmptyClipboard()) #str = w.GetClipboardData(1)#'Will throw an error because clipboard emptied - Specified clipboard format is not available.' -
win32api samples
Enables implementing functions like shutdown or restart, log off, beep from speaker, copy file, delete file, search file
get computer name, current user name, local time, windows os details etc.import win32api as w str = w.Beep(100, 1000)#'Frequency and duration in ms' w.CopyFile('src_file_name', 'dest_file_name', 0)#'Provide right path for it to work' w.DeleteFile('file_name') w.ExitWindows(0, 0)#'Log off current user' w.FindFiles('srchkey')#'Keyword should be a file or directory name. Wild cards * and ? allowed' w.FindExecutable(filename, dir)#'Retrieves details of exe associated with file specified' w.GetUserName()#'Current user name' w.GetLocalTime() w.GetSystemInfo() w.GetTickCount()#'Milliseconds since start of the system' w.mouse_event(0, 10, 200, 0, 0)#'Simulate mouse event' -
odbc Samples
To list out all the ODBC data sources available, use below code. Will return None, if nothing is available.
import odbc
print(odbc.SQLDataSources(1))
-
timer samples
Start a timer to execute a function. Stop timer.
import timer as t def func(timer_id, time): print('Timer function called every second') t.kill_timer(id) id = t.set_timer(1, func) print(id) -
win32evtlog samples
Read through windows event logs of the specified server, clear it, backup, etc.
import win32evtlog as w

hdle = w.OpenEventLog(None,'Information')#'Server name and log name'
flags = w.EVENTLOG_SEQUENTIAL_READ | w.EVENTLOG_BACKWARDS_READ
ev=w.ReadEventLog(hdle,flags,0)
print (ev)
ev=w.CloseEventLog(hdle)
-
win32file samples
Create directories, create/copy/move/delete files, get/set filename, get file size, read/write strings to file, etc.
import win32file as w w.CreateDirectory('New Dir', None) hdle = w.CreateFile('NewFile.txt', w.GENERIC_READ, 0, None, w.CREATE_NEW, 0, None) print(w.GetFileSize(hdle)) print(w.ReadFile(hdle, 1000, None)) #w.WriteFile(hdle, 'New Text', None)#'While creating file use w.GENERIC_WRITE for this to work' hdle.close() w.DeleteFile('NewFile.txt') -
win32gui samples
Working with windows GUI like, creating and modifying a GUI window, dialog boxes, writing text to window,
creating images in window, draw shapes like, ellipse, rectangle, polygons, lines, etc.
This is a big topic. Below example just shows creating a window with a specified size.import win32api as api import win32con as con import win32gui as gui import win32ts as ts cname = "Test" hndle = api.GetModuleHandle(None) wc = gui.WNDCLASS() wc.hInstance = hndle wc.lpszClassName = cname cl = gui.RegisterClass(wc) s = con.WS_OVERLAPPEDWINDOW w = gui.CreateWindow(cl, cname, s, 100, 100, 500, 500, 0, 0, hndle, None) gui.UpdateWindow(w) gui.ShowWindow(w, con.SW_SHOW) ts.WTSRegisterSessionNotification(w, ts.NOTIFY_FOR_ALL_SESSIONS) if __name__ == '__main__': gui.PumpMessages() -
win32ts
Actions like, listing all the sessions in a server, get information about a session, logging off a session, etc.
Refer sample application
Sedentary Reminder
for usage details. -
pywintypes samples
Create GUID, time object etc.
import pywintypes
print("New GUID : ", pywintypes.CreateGuid())
print("Check Unicode : ", pywintypes.IsTextUnicode("1", 1))#Result is non zero if test passes
print("New Time : ", pywintypes.Time(1000000000))
Some time back, we’ve talked about how to build a speech recognition system in Python. Now let’s look in to the other end of it: how to make a Python program that talks. More specifically, let’s looks at building a text-to-speech system.
There are several libraries out there that would let you build a text-to-speech model: gTTS, tts_watson, Pyttsx, etc. But today, we’ll be talking about using PyWin32 on Windows 10.
Windows 10 has a built-in speech engine, and you can access it through the PyWin32 library. As it uses the built-in system, it’s quite efficient than other TTS methods on Windows, and does not require any external tools to playback the audio.
The PyWin32 library gets installed automatically if you’re using Anaconda Python. If it’s not installed, you can install it using either `conda install pywin32` or `pip install pywin32`.
 |
| Text-to-speech with PyWin32 |
Once PyWin32 is installed, you can import the win32com package in Python.
# Start by importing the win32com package
import win32com.client as wincom
You can then create the voice dispatcher object,
speak = wincom.Dispatch("SAPI.SpVoice")
, and send it the text you want to read,
text = "Python text-to-speech test. using win32com.client"
speak.Speak(text)
PyWin32 will directly speak the text using the built-in Microsoft speech engine. (unlike many other TTS libraries, it won’t open up a player program to get the output)
If you want to read a longer text, and want to insert a gap/pause in the reading, you can insert a sleep() call for the required duration.
import win32com.client as wincom

# you can insert gaps in the narration by adding sleep calls
import time

speak = wincom.Dispatch("SAPI.SpVoice")

text = "Python text-to-speech test. using win32com.client"
speak.Speak(text)

# 3 second sleep
time.sleep(3)

text = "This text is read after 3 seconds"
speak.Speak(text)
You can check the code in action in the video below,
You can do longer narrations with PyWin32 also, as I have done in the following video,
Creating a Windows executable using PyInstaller is reasonably straightforward:
pyinstaller.exe myservice.py
however, this will A) create a folder with the executable and supporting files, and B) not actually work!
The reason it won’t work is that PyInstaller, while very clever, can’t find all imports to include, and in this case will miss including win32timezone in the package. To fix this issue we can tell PyInstaller to include it:
pyinstaller.exe --hidden-import win32timezone myservice.py
Testing is important here – the build will succeed and then the program will fail in run time, so for complex application it becomes a case of trial and error – building, running to find any missing imports, then re-building after adding new --hidden-imports.
With this, the service works and we could install it with myservice.exe install, but I find I’d rather have a single file, which can be accomplished using the --onefile flag:
pyinstaller.exe --onefile --hidden-import win32timezone myservice.py
This creates a single executable, easy to distribute, and it will look like it works. However, it will unpack files in the Windows temp folder, which normally gets periodically wiped – this is likely to break any non-trivial service running on Windows for a long time. The fix for this issue is to unpack it somewhere where Windows will leave it alone, for example the current folder whatever that may be:
pyinstaller.exe --runtime-tmpdir=. --onefile --hidden-import win32timezone myservice.py
This should work – but due to issue 4579 on PyInstaller (fix incoming here), can break unexpectedly depending on what you set the runtime-tmpdir to – my solution has been to install PyInstaller from the PR until it is merged and released.