В этой статье мы покажем, как настроить сервер централизованной аутентификации, авторизации и аккаунтинга (RADIUS) на операционной системе Windows Server 2016, а также как настроить Radius-аутентификацию на Cisco устройствах с помощью службы Политики сети и доступа (Network Policy Server).
RADIUS (англ. Remote Authentication in Dial-In User Service) — протокол для реализации аутентификации, авторизации и сбора сведений об использованных ресурсах, разработанный для передачи сведений между центральным севером и различными сетевым оборудованием и клиентами.
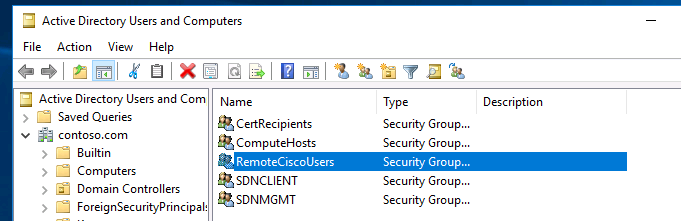
В первую очередь создайте в домене Active Directory группу безопасности AllowRemoteCiscoUsers, в которую нужно добавить пользователей, которым будет разрешена аутентификации на маршрутизаторах и коммутаторах Cisco.
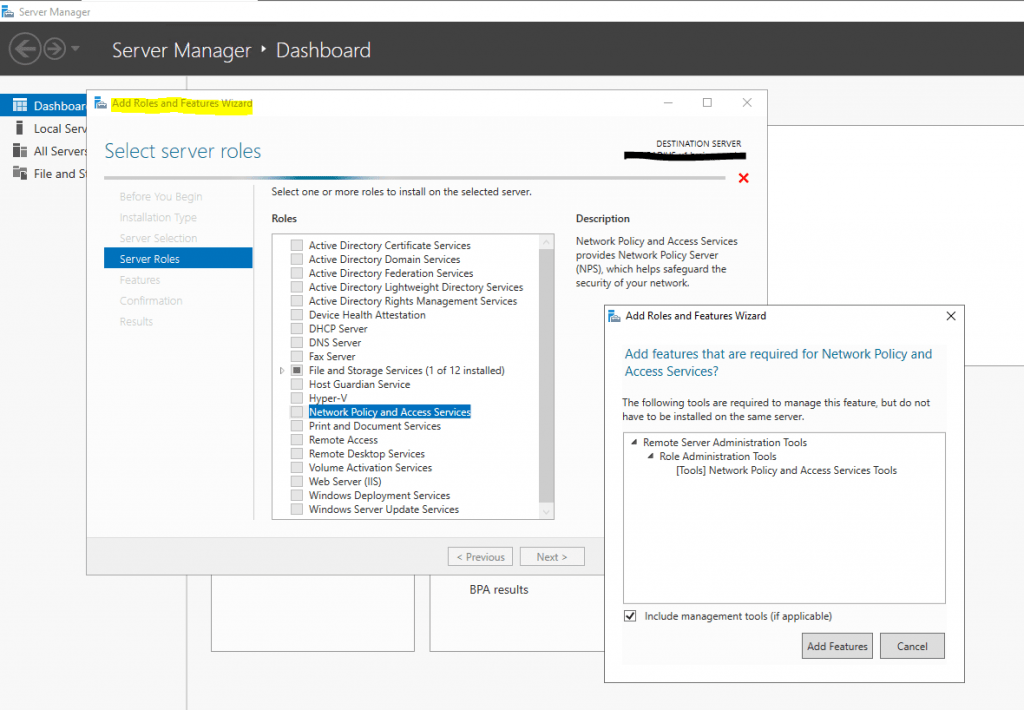
Далее нужно установить на сервере, с помощью которого будет выполнятся аутентификация клиентов и назначаться права доступа, роль RADIUS сервера. Для этого на сервере Windows Server 2016 откройте оснастку Server Manager и вызовите мастер добавления ролей — Add Roles and features.
В открывшемся мастере на шаге выбора ролей отметьте роль Network Policy and Access Services. На шаге выбора служб роли в нашей ситуации достаточно будет выбрать только службу Network Policy Server.
Протокол Remote Authentication Dial In User Service (RADIUS) в Windows Server 2016 включен в состав роли Network Policy Server.
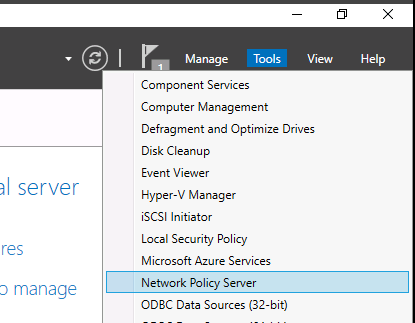
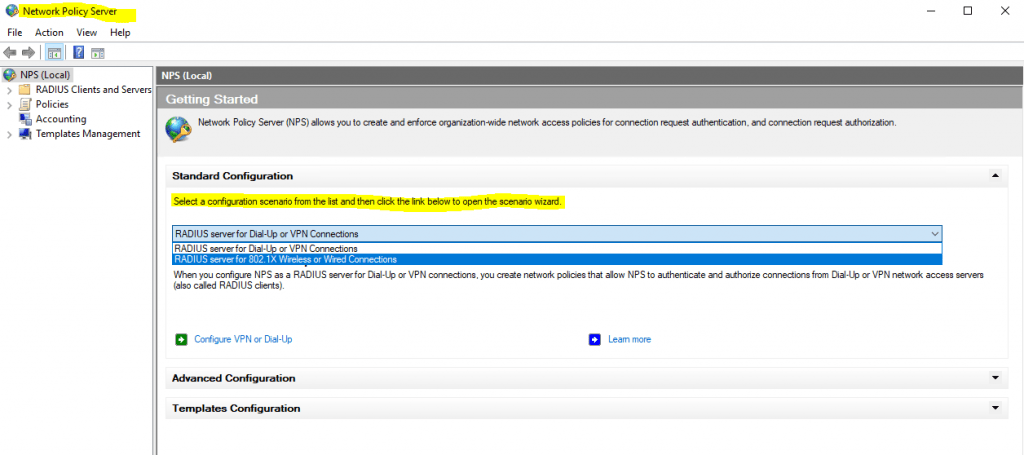
В консоли Server Manager выберите меню Tools и откройте консоль Network Policy Server (nps.msc).
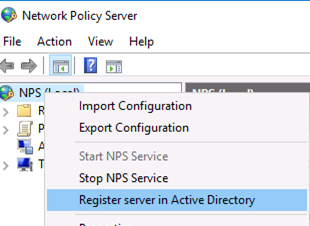
Для полноценного использования NPS-сервера в домене необходимо зарегистрировать его в домене Active Directory. В оснастке на NPS, щелкните ПКМ по вашему NPS узлу и выберите Register server in Active Directory.
Подтвердите регистрацию сервера в Active Directory:
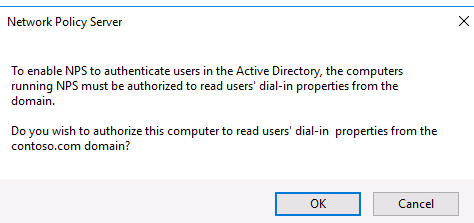
При этом мы должны предоставите серверу полномочия на чтение свойств учётных записей пользователей, касающихся удалённого доступа. Сервер при этом будет добавлен во встроенную доменную группу RAS and IAS Servers.
![]()
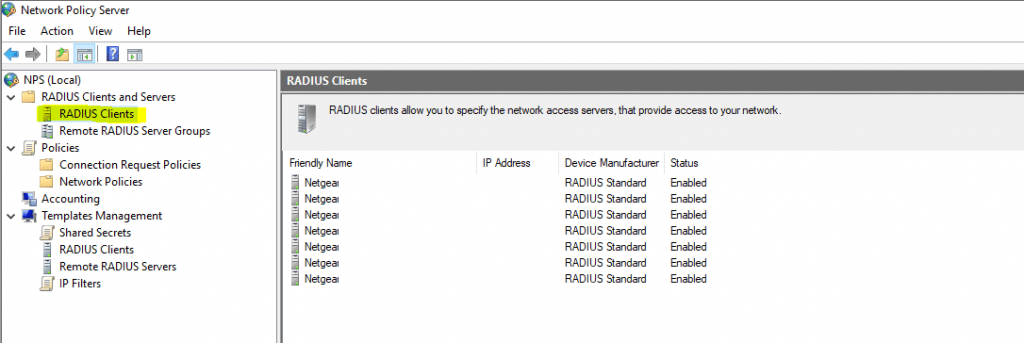
Теперь можно добавить клиента Radius. Для этого в дереве консоли NPS разверните раздел RADIUS Clients and Servers и на элементе RADIUS Clients выберите пункт New. 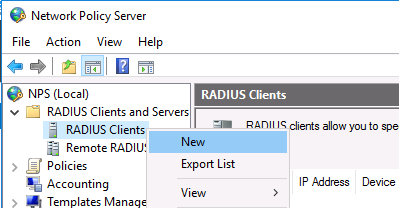
На вкладке Settings заполните поля Friendly name, Client address (можно указать IP адрес или DNS имя подключающегося сетевого устройства) и пароль — Shared Secret + Confirm shared (этот пароль вы будете использовать в настройках коммутатора или маршрутизатора Cisco для установления доверительных отношений с Radius сервером).
Во вкладке Advanced выберите в поле Vendor name — Cisco.
Теперь нужно создать политики доступа на сервере RADIUS. С помощью политик доступа мы свяжем клиента Radius и доменную группу пользователей.
Раскройте ветку Policies —> Network Policies, и выберите пункт меню New:
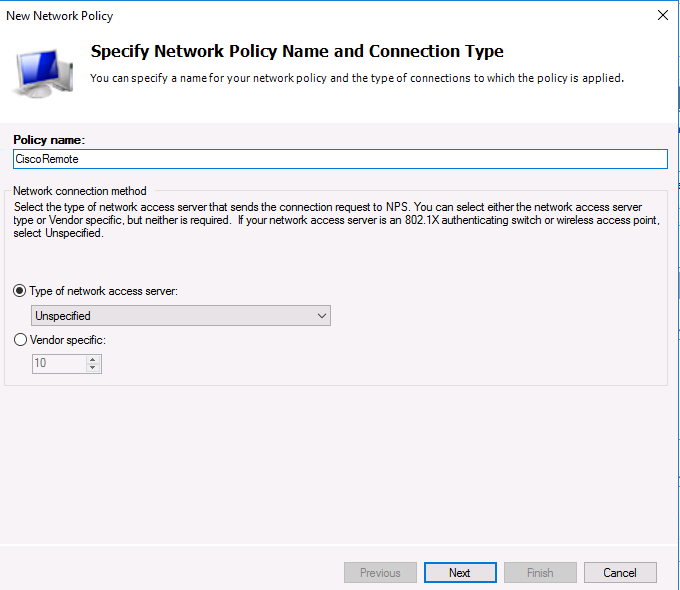
Укажите Имя политики (Policy name). Тип сервера доступа к сети (Type of network access server) оставьте без изменения (Unspecified):
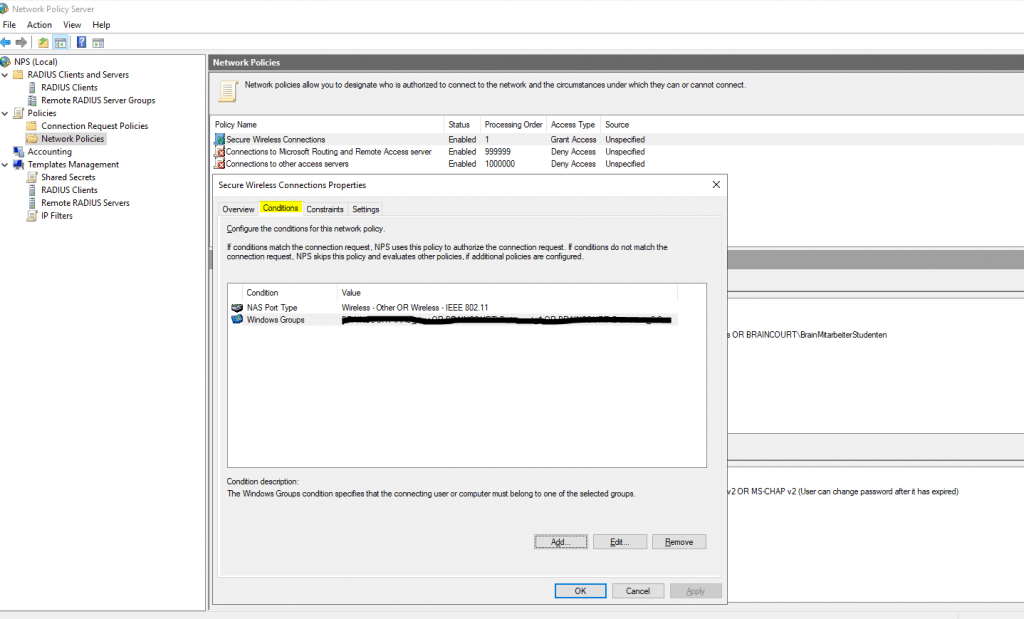
На следующем шаге Specify conditions нам нужно добавить условия, при которых будет применяться данная политика RADIUS. Добавим два условия: вы хотите, что для успешной авторизации пользователь входил в определенную доменную группу безопасности, и устройство, к которому осуществляется доступ, имело определённое имя. С помощью кнопки Add добавим сначала условие, выбрав тип Windows Group (добавьте группу RemoteCiscoUsers) и укажите Client Friendly Name (Cisco_*).
На следующем выберите значение Доступ разрешен (Access Granted).
Т.к. наш коммутатор Cisco поддерживает только метод аутентификации Unencrypted authentication (PAP, SPAP), снимите все остальные флажки. 
Следующий шаг настройки ограничений (Constraints) мы пропустим.
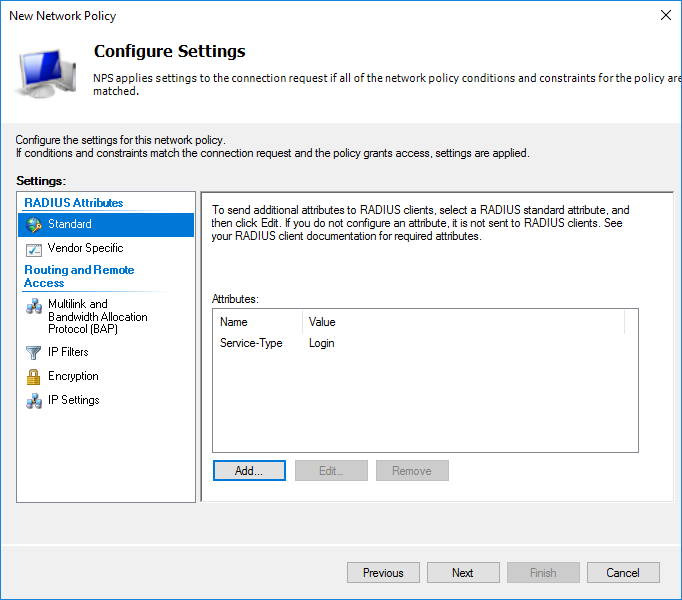
В разделе Configure Settings перейдите секцию RADIUS Attributes -> Standard. Удалите имеющиеся там атрибуты и нажмите кнопку Add.
Выберите Access type -> All, затем Service-Type->Add. Укажите Others=Login. 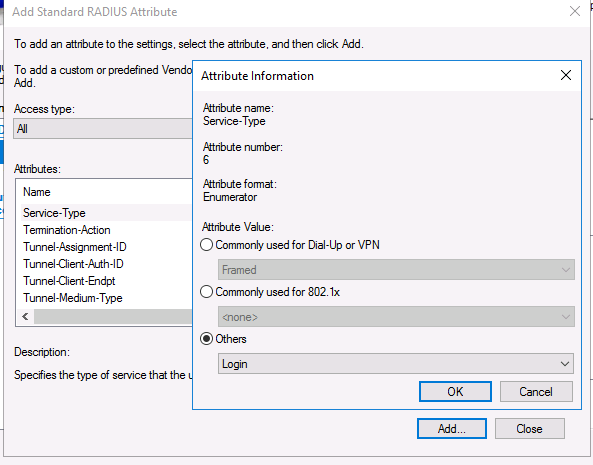
Теперь в секции RADIUS Attributes -> Vendor Specific добавьте новый атрибут. В пункте Vendor, найдите Cisco и нажмите Add. Здесь нужно добавить сведения об атрибуте. Нажмите Add и укажите следующее значение атрибута:
shell: priv-lvl = 15
На последнем экране будут указаны все созданные вами настройки политики NPS. Нажмите Finish:
При создании и планировании политик обратите внимание на то, что имеет значение их порядок. Политики обрабатываются сверху вниз, и все условия очередной политике соблюдены, эта политика применяется к клиенту, а дальнейшая обработка других политик прекращается. То есть с точки зрения безопасности и разрешения конфликтов между политиками правильнее будет располагать политики в порядке возрастания административных полномочий.
После создания политики, можно переходить к настройке маршрутизаторов и коммутаторов Cisco для аутентификации на сервере Radius NPS.
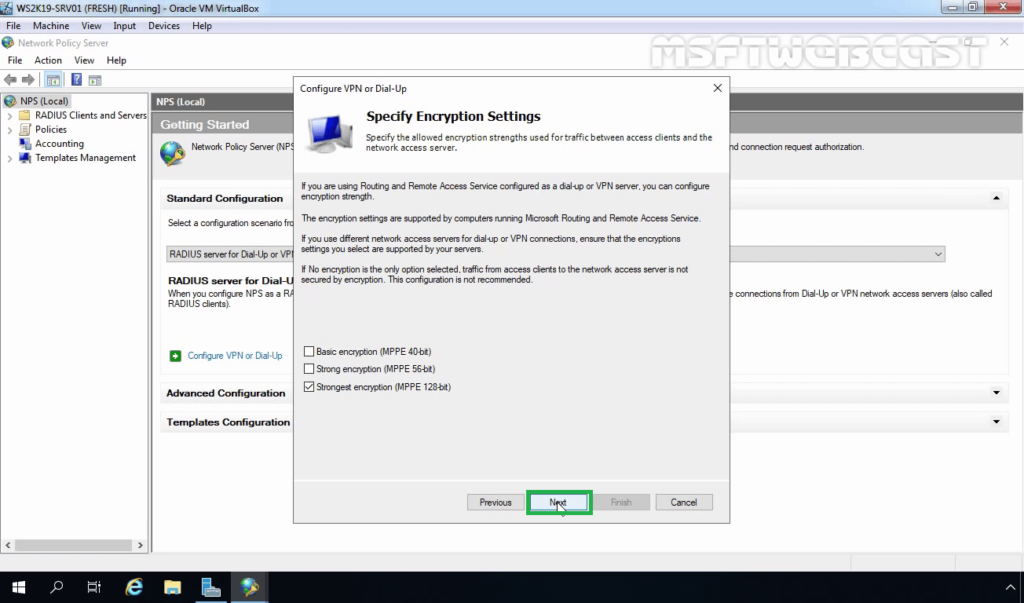
AAA работает таким образом, что, если не получен ответ от сервера, клиент предполагает, что аутентификация не выполнена. Чтобы не потерять доступ к своим сетевым устройствам, которые вы переключаете на авторизацию на Radius сервера, обязательно создайте локальных пользователей на случай если RADIUS сервер станет недоступен по какой-либо причине.
Ниже пример конфигурации для авторизации на Radius (NPS) сервере для коммутатора Cisco Catalyst:
aaa new-model
aaa authentication login default group radius local
aaa authorization exec default group radius if-authenticated
radius-server host 192.168.1.16 key R@diu$pa$$
service password-encryption
На этом минимальная настройка коммутатора закончена и можно испытать новый механизм аутентификации и авторизации в действии.
Создайте сервер RADIUS на компьютере Windows и реализуйте сертификацию 802.1x
тестовая среда:
- Серверная сторона: компьютер Windows 10, как сервер RADIUS
- Сторона доступа к устройству: Huawei Switch, Model S1730S-S24T4S-A
- Клиент: Win7 Computer, Open 802.1x сертификация
Конфигурация сервера
- Установите сервер RADIUS и переключайте в той же сети локальной области. Win10 PC Machine IP -адрес


- Установите Winradius, программное обеспечение — это бесплатная версия установки, адрес загрузки:https://download.csdn.net/download/leideleide/12462142

- Получить конфигурацию Radius на компьютере Win10, где ключ: Turnel, сертификационный порт 1812

- Добавить пользователь myuser, пароль на сервер RADIUS: user123456

На этом этапе конфигурация сервера RADIUS завершена.
———————————————————————————————————————————
Сторона оборудования: конфигурация переключения
- Я использую сериал Huawei S1730S-S24T4S с функцией веб-конфигурации. Конкретная конфигурация относится к рисунку ниже:

- Настройте порт коммутатора, настройте метод аутентификации конкретного порта на сертификацию 802.1x

На этом этапе конфигурация переключателя завершена
Конфигурация клиента
- Computer Computer Open Open 802.1x сертификация, введите мой компьютер- «Управление-» Service- »Wired AutoConfig, включите сервис

- Введите атрибут сетевого адаптера, вы можете увидеть опцию «Проверка личности»

- Выберите Аутентификацию IEEE 802.1x Identity, выберите MD5-Challenge в сетевой аутентификации. Стоит отметить, что компьютер Win7 стоит. Проверка MD5 не установлена по умолчанию. Вам нужно загрузить и установить его самостоятельно.https://download.csdn.net/download/leideleide/12462180
- В то же время выберите ограниченный режим идентификации в других настройках-> Проверка идентификации пользователя

На этом этапе настройка клиента завершена
Проверка сертификации 802.1x
- Практика 8 в сетевой кабельный кабельный порт Win7, введите имя пользователя Myuser, пароль пользователь123456 в соответствии с требованиями

- Успешно видение проверки Myuser на сервере RADIUS

In this post I will show how to set up a RADIUS server on Windows Server 2019 to provide 802.1X Wireless Connections through wireless access points.
Actually I want to set up a RADIUS server for IEEE 802.11 wireless networks, but its nearly the same as for wired (Ethernet) networks besides the NAS Port Type (type of media used) is IEEE 802.11 wireless instead of wired Ethernet.
IEEE 802.1X is an IEEE Standard for port-based Network Access Control (PNAC). It is part of the IEEE 802.1 group of networking protocols. It provides an authentication mechanism to devices wishing to attach to a LAN or WLAN.
Source: https://en.wikipedia.org/wiki/IEEE_802.1X
https://en.wikipedia.org/wiki/IEEE_802
Microsoft’s implementation of a Remote Authentication Dial-In User Service (RADIUS) server is for Windows Server operating systems later than Windows Server 2003 the Network Policy and Access Services (NPAS) server role.
NPAS replaces the Internet Authentication Service (IAS) from Windows Server 2003.
Source: https://en.wikipedia.org/wiki/Network_Policy_Server
So first I will install the Network Policy and Access Services (NPAS) server role either on a domain controller or member server.

Now as the Network Policy and Access Services (NPAS) server role is installed you will have a new console named Network Policy Server.
Open the Network Policy Server console and select the RADIUS server for 802.1X Wireless or Wired Connections template to configure NPS by using the wizard.
Click on Configure 802.1X to start the wizard.
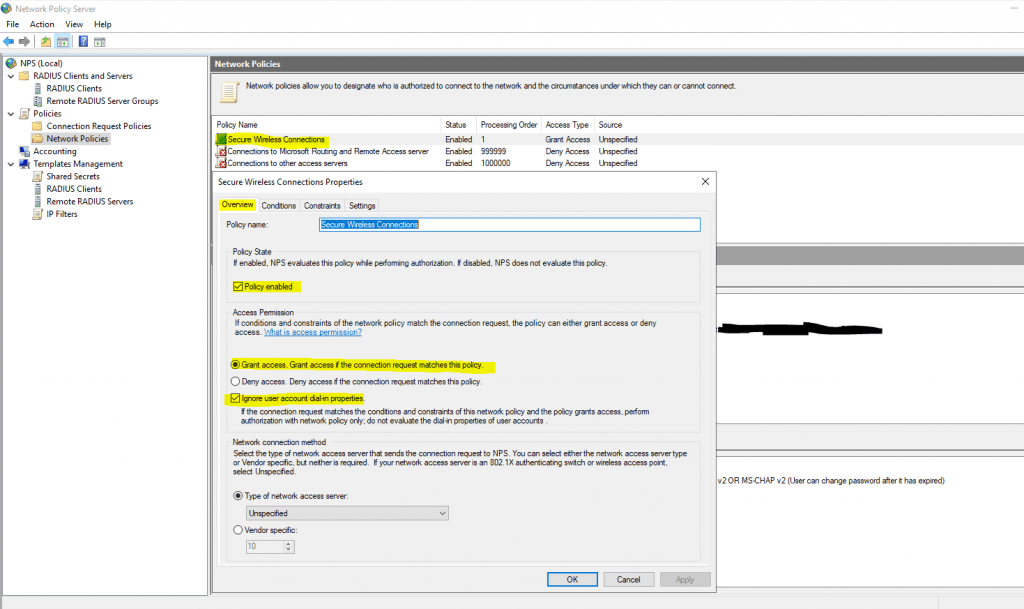
Select Secure Wireless Connections
Here I need to add all my wlan access points as RADIUS clients.
- Friendly name
- IP address or FQDN
- Shared secret
Use a unique RADIUS shared secret for each wireless AP unless you are planning to configure APs as RADIUS Clients in NPS by group. If you plan to configure APs by group in NPS, the shared secret must be the same for every member of the group. In addition, each shared secret you use should be a random sequence of at least 22 characters that mixes uppercase and lowercase letters, numbers, and punctuation.
Source: https://docs.microsoft.com/en-us/windows-server/networking/core-network-guide/cncg/wireless/e-wireless-access-deployment#to-configure-your-wireless-aps
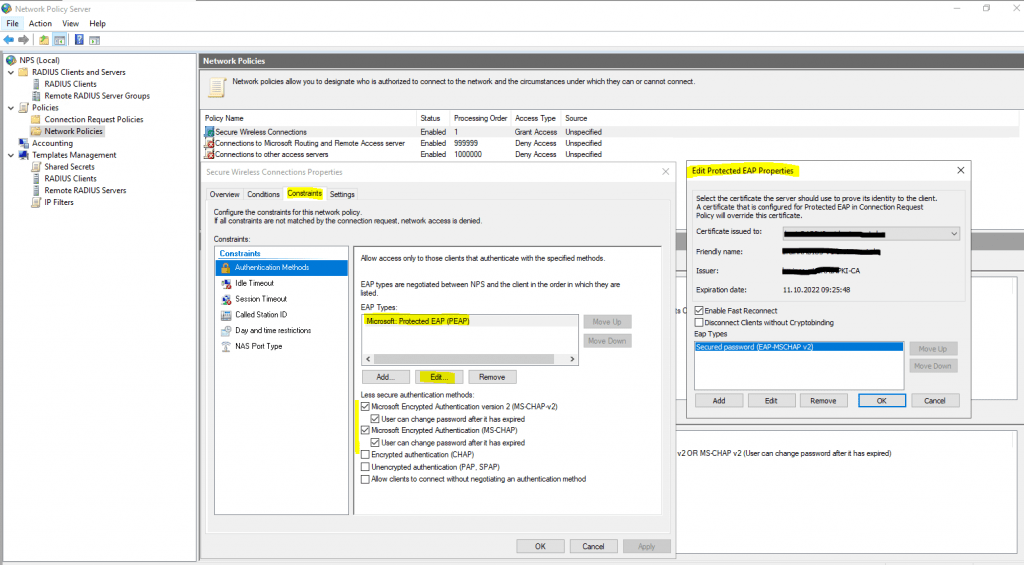
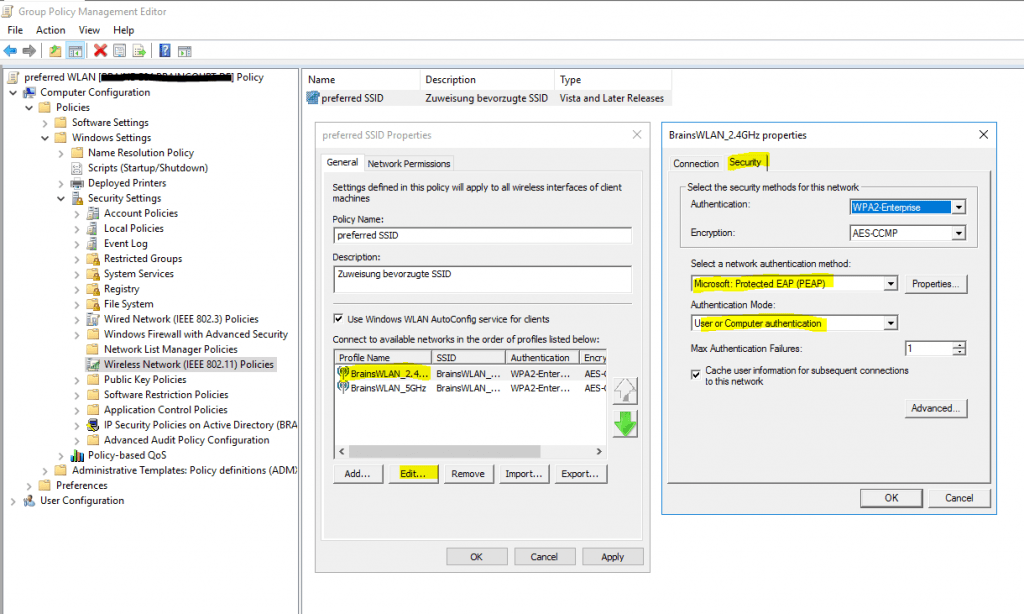
For authentication I will use the Protected EAP (PEAP) protocol.
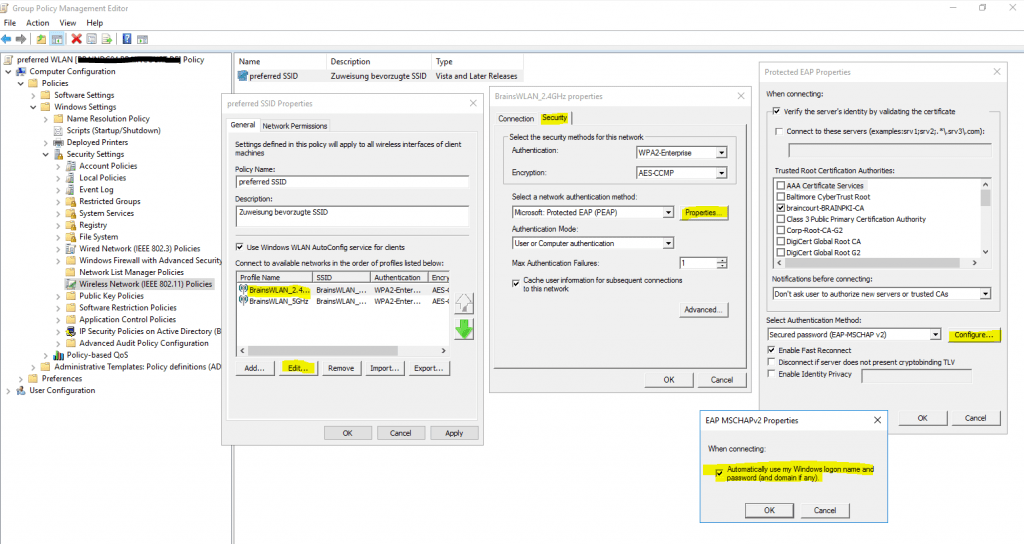
Click on Configure to select a certificate to prove the identity of the RADIUS server to the clients. You can use here the default computer certificate from your internal PKI.
The clients needs to trust that certificate, otherwise the user’s wont be able to connect to the wireless network.
It then creates an encrypted TLS tunnel between the client and the authentication server. In most configurations, the keys for this encryption are transported using the server’s public key. The ensuing exchange of authentication information inside the tunnel to authenticate the client is then encrypted and user credentials are safe from eavesdropping.
Simplifying WPA2-Enterprise and 802.1x
Client / Supplicant
In order for a device to participate in the 802.1x authentication, it must have a piece of software called a supplicant installed in the network stack. The supplicant is necessary as it will participate in the initial negotiation of the EAP transaction with the switch or controller and package up the user credentials in a manner compliant with 802.1x. If a client does not have a supplicant, the EAP frames sent from the switch or controller will be ignored and the switch will not be able to authenticate.Fortunately, almost all devices we might expect to connect to a wireless network have a supplicant built-in. SecureW2 provides a 802.1x supplicant for devices that don’t have one natively.
Thankfully, the vast majority of device manufacturers have built-in support for 802.1x. The most common exceptions to this might be consumer gear, such as game consoles, entertainment devices or some printers. Generally speaking, these devices should be less than 10% of the devices on your network and are best treated as the exception rather than the focus.
Switch / Access Point / Controller
The switch or wireless controller plays an important role in the 802.1x transaction by acting as a ‘broker’ in the exchange. Until a successful authentication, the client does not have network connectivity, and the only communication is between the client and the switch in the 802.1x exchange.The switch/controller initiates the exchange by sending an EAPOL-Start packet to the client when the client connects to the network. The client’s responses are forwarded to the correct RADIUS server based on the configuration in the Wireless Security Settings. When the authentication is complete, the switch/controller makes a decision whether to authorize the device for network access based on the user’s status and possibly the attributes contained in the Access_Accept packet sent from the RADIUS server.
Successful mutual PEAP-MS-CHAP v2 authentication has two main parts:
- The client authenticates the NPS. During this phase of mutual authentication, the NPS sends its server certificate to the client computer so that the client can verify the NPS’s identity with the certificate. To successfully authenticate the NPS, the client computer must trust the CA that issued the NPS certificate. The client trusts this CA when the CA’s certificate is present in the Trusted Root Certification Authorities certificate store on the client computer.
- The NPS authenticates the user. After the client successfully authenticates the NPS, the client sends the user’s password-based credentials to the NPS, which verifies the user’s credentials against the user accounts database in Active Directory Domain Services (AD DS).
If the credentials are valid and authentication succeeds, the NPS begins the authorization phase of processing the connection request. If the credentials are not valid and authentication fails, NPS sends an Access Reject message and the connection request is denied.
The behavior requiring the client to validate the server certificate can be disabled, but disabling server certificate validation is not recommended in production environments.
Source: https://docs.microsoft.com/en-us/windows-server/networking/core-network-guide/cncg/wireless/a-deploy-8021x-wireless-access#authentication
The server running NPS performs authorization as follows:
- NPS checks for restrictions in the user or computer account dial-in properties in AD DS. Every user and computer account in Active Directory Users and Computers includes multiple properties, including those found on the Dial-in tab. On this tab, in Network Access Permission, if the value is Allow access, the user or computer is authorized to connect to the network. If the value is Deny access, the user or computer is not authorized to connect to the network. If the value is Control access through NPS Network Policy, NPS evaluates the configured network policies to determine whether the user or computer is authorized to connect to the network.
- NPS then processes its network policies to find a policy that matches the connection request. If a matching policy is found, NPS either grants or denies the connection based on that policy’s configuration.
If both authentication and authorization are successful, and if the matching network policy grants access, NPS grants access to the network, and the user and computer can connect to network resources for which they have permissions.
Source: https://docs.microsoft.com/en-us/windows-server/networking/core-network-guide/cncg/wireless/a-deploy-8021x-wireless-access#authorization
Keep in mind regarding the communication between the NPS server and client as described in both Microsoft articles about authentication and authorization above.
As mentioned further above in the great article from SECUREW2, the client cannot communicate directly with the RADIUS server to authenticate himself and the server, as it does not have network connectivity until a successful authentication. The communication between the client and RADIUS server is established through the access points (switches for wired networks), which will acting as a broker in the exchange between both.
Here I will add all groups which are allowed to access the network through my wlan access points.
For computer authentication you should create a security group which includes all computer accounts they should be able to authenticate against NPS and add it to your network policy (Conditions tab) as windows group. NPS uses then this policy to authorize the connection request.
Further each of those computers needs a computer certificate installed from your internal PKI (CA), which is by default published to the Enterprise NTAuth store.
The computers wlan profile also needs to be configured to enable computer authentication, I will show this further below in the section about configuring a group policy.
Btw. you can also use certificates from a third-party CA, but in that case you need to import the CA certificate into your Enterprise NTAuth store and the computer certificate needs to mapped to the computer account in Active Directory. About how you will find in the following article from Microsoft:
https://docs.microsoft.com/en-us/troubleshoot/windows-server/windows-security/import-third-party-ca-to-enterprise-ntauth-storeThe Enterprise NTAuth store is used by your Active Directory domain to determine which certification authorities to trust for issuing certificates that are used to authenticate and authorize a user or computer.
To check which CAs are stored in the Enterprise NTAuth store, you can use the PKI Tool (PKIVIEW). On your CA server open the tool pkiview.msc, right click on Enterprise PKI and select Manage AD Containers… . Here you will see in the tab NTAuthCertificates which CAs are still trusted.
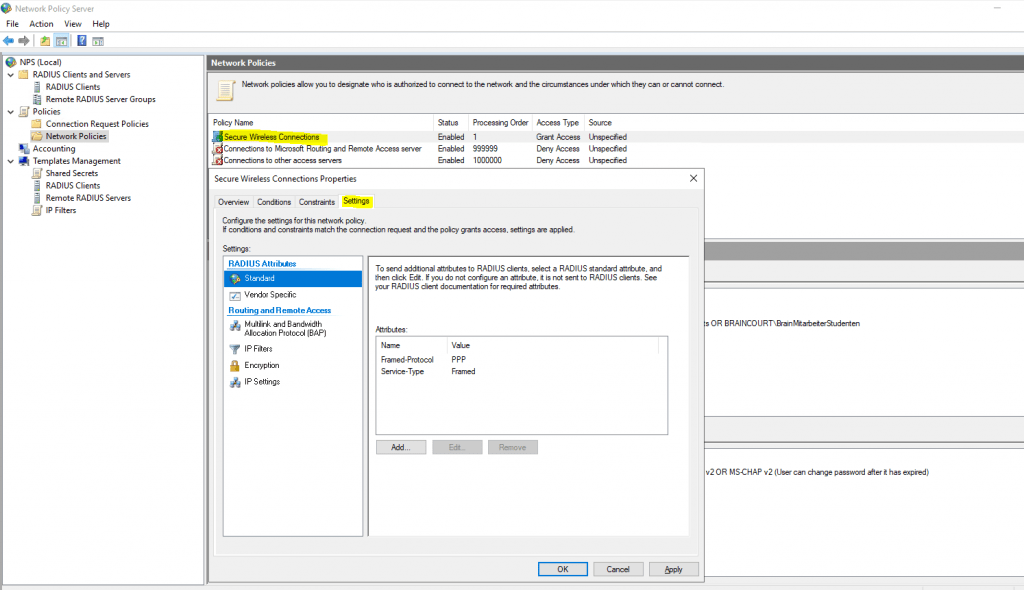
In the next dialog you can configure traffic control attributes (RADIUS tunnel attributes) to allow and deny traffic to user’s based on their assigned VLANs.
You can change all of theses settings later directly in the NPS console.
Here you can modify the RADIUS clients.
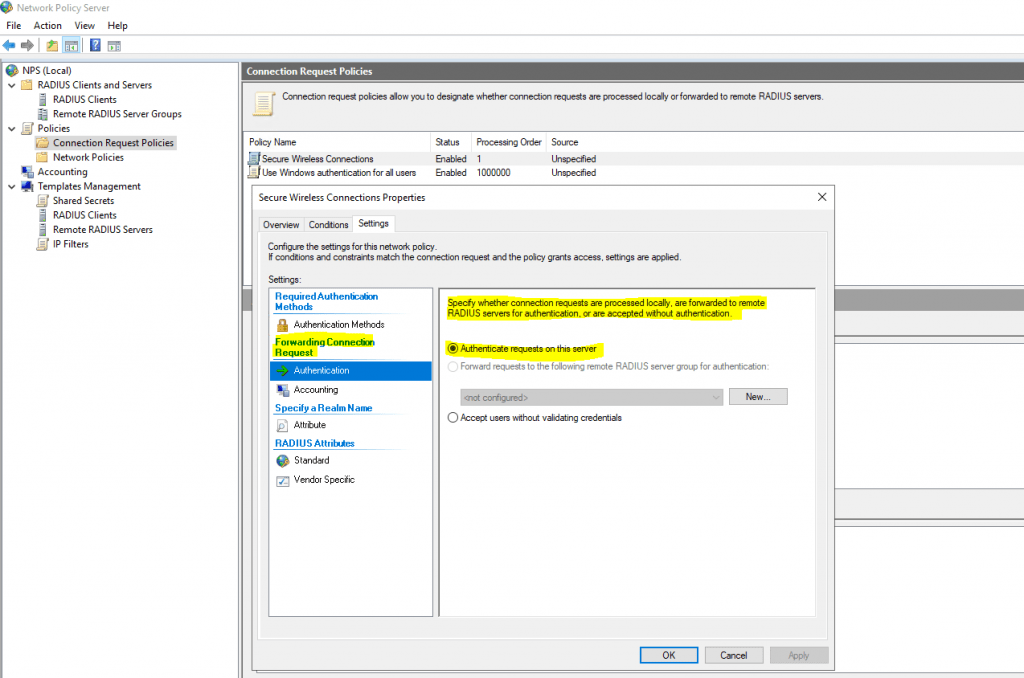
The wizard will create a Connection Request Policy and a Network Policy.
Connection Request Policies
https://docs.microsoft.com/en-us/windows-server/networking/technologies/nps/nps-crp-crpoliciesConnection request policies are sets of conditions and settings that allow network administrators to designate which Remote Authentication Dial-In User Service (RADIUS) servers perform the authentication and authorization of connection requests that the server running Network Policy Server (NPS) receives from RADIUS clients. Connection request policies can be configured to designate which RADIUS servers are used for RADIUS accounting.
By default the wizard will set to process the authentication request locally on the server.
Network Policy
You can also configure Accounting for the NPS server.
Configure Network Policy Server Accounting
https://docs.microsoft.com/en-us/windows-server/networking/technologies/nps/nps-accounting-configure

The wizard created our Network Policy and we do not need to change here anything.
By adding Windows Groups, it doesn’t matter if they were local groups on the server itself or domain groups, NPS will process both of them.
As mentioned further above you can use here the default computer certificate on the NPS server from your internal PKI.
The clients needs to trust that certificate, otherwise the user’s wont be able to connect to the wireless network.
It then creates an encrypted TLS tunnel between the client and the authentication server. In most configurations, the keys for this encryption are transported using the server’s public key. The ensuing exchange of authentication information inside the tunnel to authenticate the client is then encrypted and user credentials are safe from eavesdropping.
Configure your WLAN Access Points
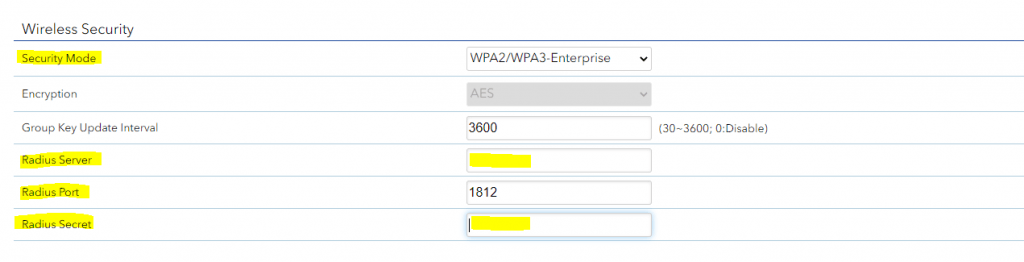
On the wlan access points we have to configure the IP address from the NPS (RADIUS) server, port and shared secret.
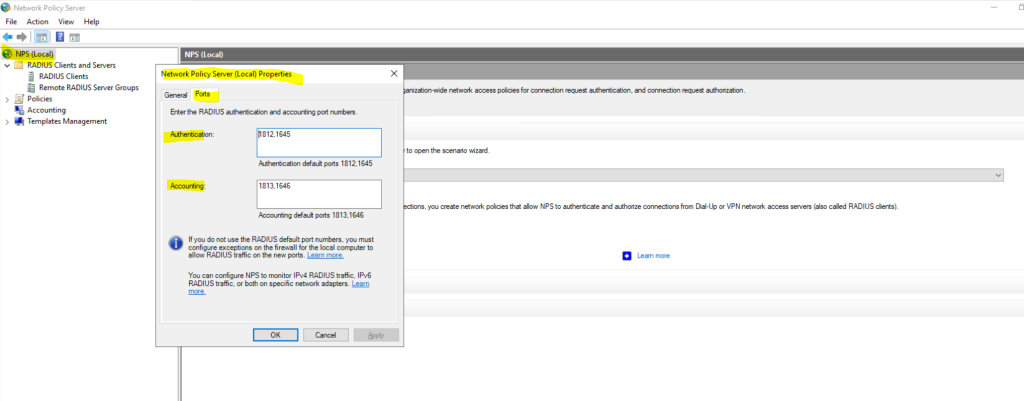
The Radius Port for authentication by default is UDP 1812 or 1645.
Further we need to select a security mode our access points will use to authenticate users or devices (computer authentication as mentioned further above). When using a RADIUS server we want that users authenticate themselves by using their username and password for the network, therefore we need to select WPA2 or WPA3-Enterpise, also for computer authentication.
Keep in mind that even in the year 2022 not all devices support WPA3.
You can check the ports in the NPS console by right clicking on NPS(Local) and select properties. Here within the tab Ports, you can see on what ports the NPS server is listening for authentication and if used accounting.
The Radius Port for accounting by default is UDP 1813 or 1646.
Optionally we can also configure Radius Accounting as mentioned.
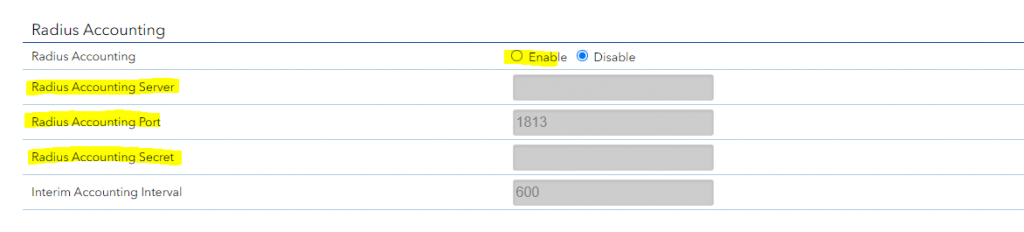
The RADIUS server also collects a variety of information sent by the NAS that can be used for accounting and for reporting on network activity. The RADIUS client sends information to designated RADIUS servers when the User logs on and logs off. The RADIUS client may send additional usage information on a periodic basis while the session is in progress. The requests sent by the client to the server to record logon/logoff and usage information are generally called accounting requests.
For more information on RADIUS accounting, see RFC 2866.
Source: https://learn.microsoft.com/en-us/windows/win32/nps/ias-radius-authentication-and-accounting
Configure Wireless Network (IEEE 802.11) Policies | Wi-Fi profiles
You can configure group policies in your network to define preferred networks and settings for the WLAN connection to your clients.
To activate default Wireless Network (IEEE 802.11) Policies
https://docs.microsoft.com/en-us/windows-server/networking/core-network-guide/cncg/wireless/e-wireless-access-deployment#to-activate-default-wireless-network-ieee-80211-policies
Computer Configuration -> Policies -> Windows Settings -> Security Settings -> Wireless Network (IEEE 802.11) Policies
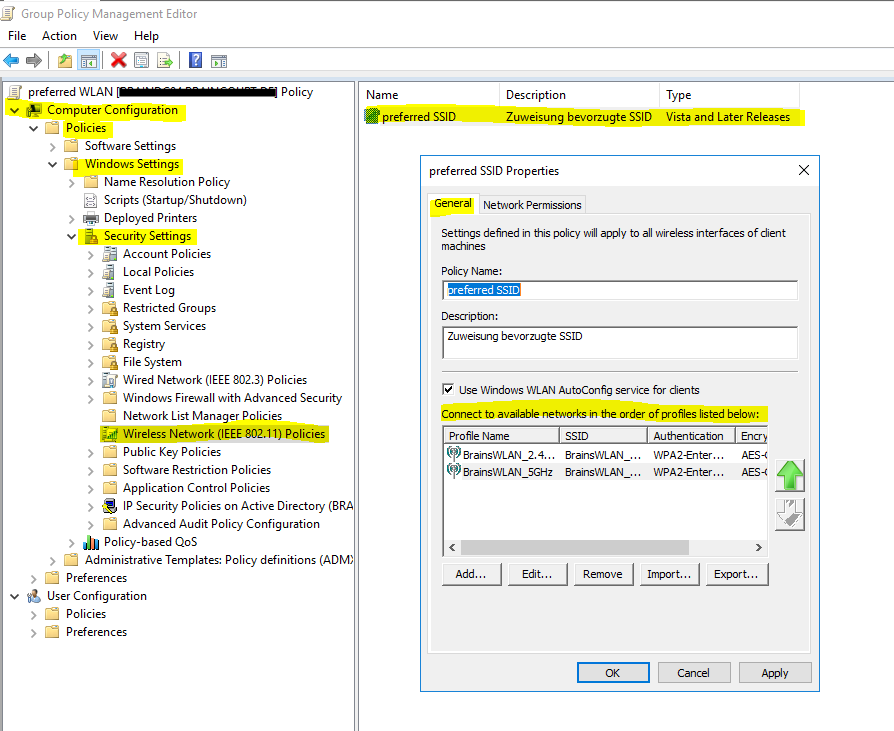
Clients should connect automatically to this network when it is in range.
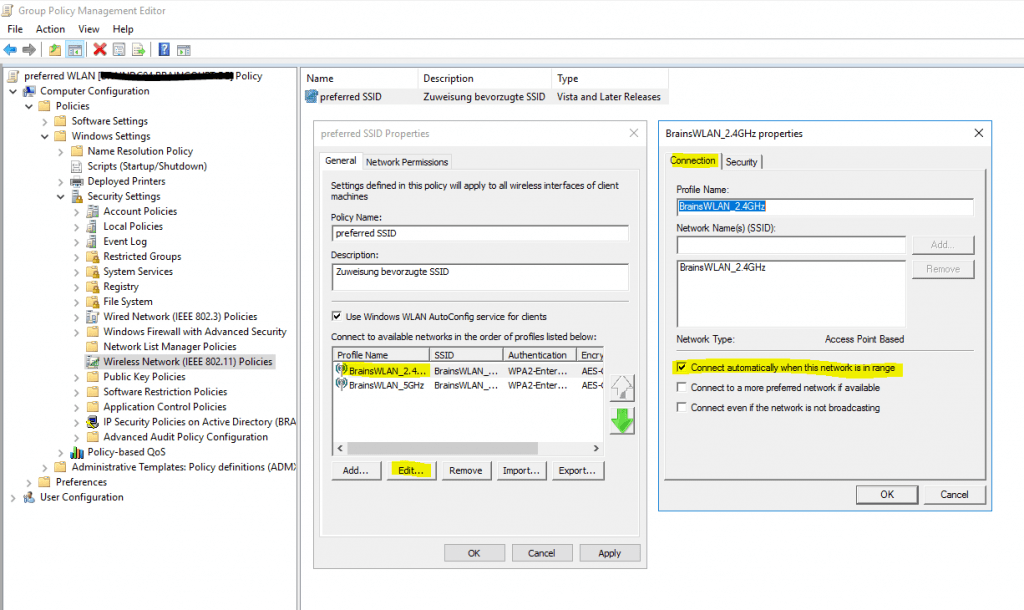
For the network authentication method I have to select Protected EAP (PEAP) as used on the NPS server and for the authentication mode I will use User or Computer authentication.
Even the most common method of authentication with PEAP-MSCHAPv2 is user auth, in which clients are prompted to enter their domain credentials, the Windows NPS server role also supports computer authentication by using the PEAP-MSCHAPv2 protocol.
In order to use computer authentication, you also have to install a computer certificate on the clients and issued from your internal PKI as mentioned further above.
For computer authentication you can configure certificate auto-enrollment for the client computers as shown in my following post: https://blog.matrixpost.net/configure-certificate-auto-enrollment/

In the advanced settings you can enable single sign-on for the wireless network, by checking this your password to logon to your computer will also be passed and used to establish the wireless connection with the access points.
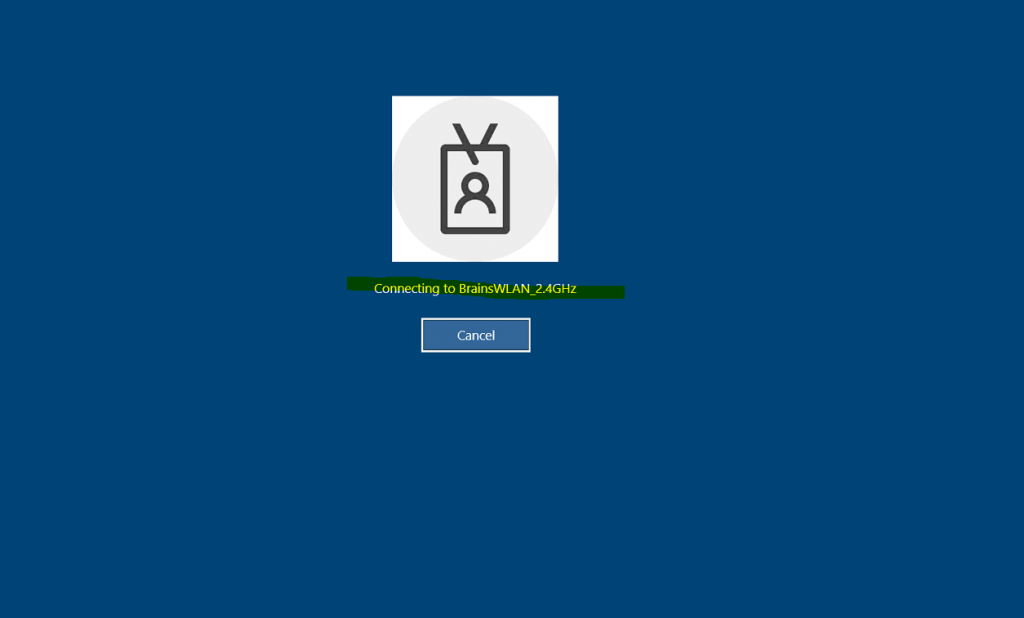
Further if you select Perform immediately before User Logon as show in the figure below, the computer will first try to connect to the wireless access points when the user is entering its password and then subsequently will get logged on to its computer after the wireless connection is established.
In case computer authentication will be performed, the computer already connects at the logon screen to the network, as it doesn’t matter which user will get logged on.
Therefore in both cases the computer can perform a network login against the domain controllers and logon scripts and group policies will be applied to the computer.
If the wireless connection couldn’t be established, the user will get logged on to its computer by using the local cached credentials as usual but without processing the logon scripts and applying the group policies from the domain controller.
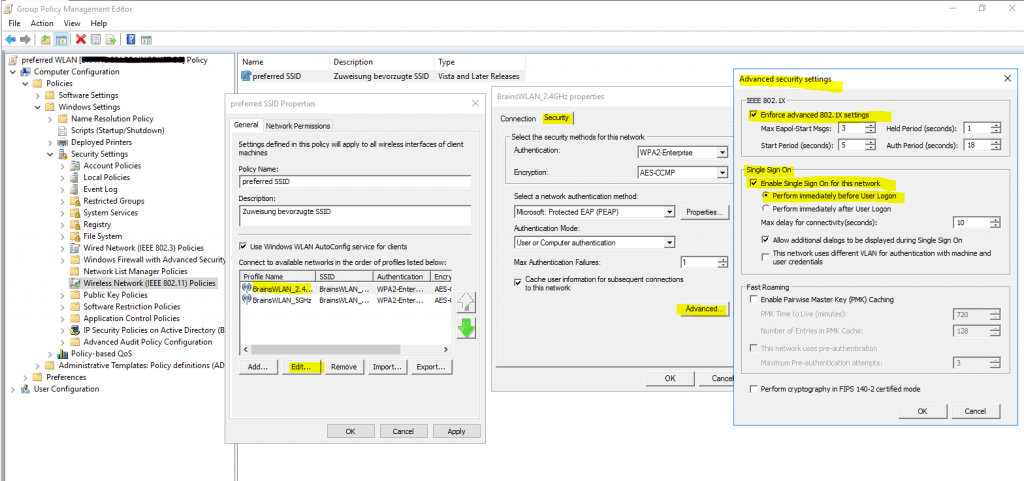
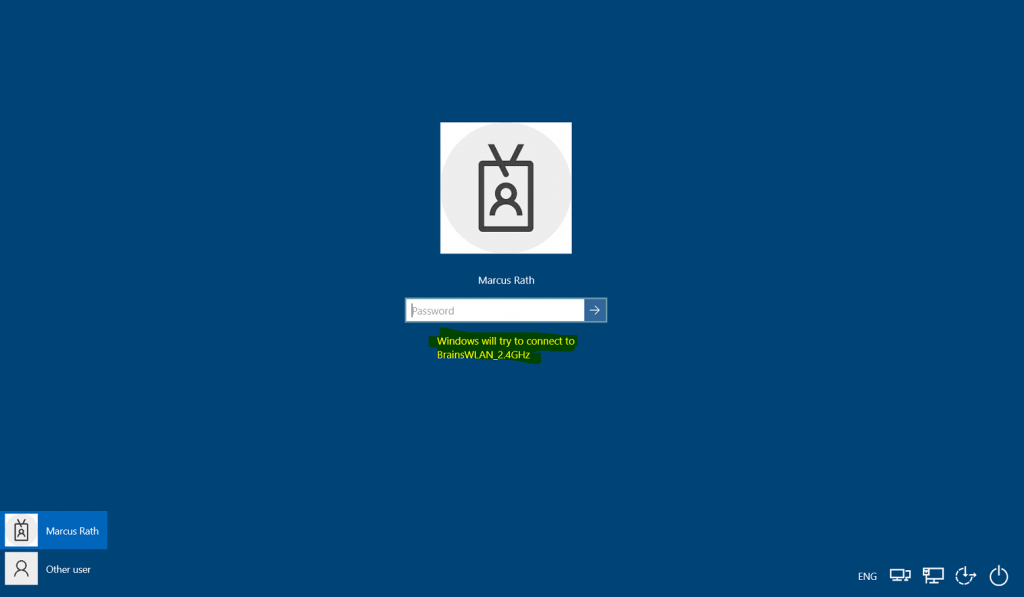
At the logon screen you will see the wireless network to which Windows tries to connect after providing your password for the logon.
User vs. Machine Authentication
The most common method of authentication with PEAP-MSCHAPv2 is user auth, in which clients are prompted to enter their domain credentials. It is also possible to configure RADIUS for machine authentication, in which the computers themselves are authenticated against RADIUS, so the user doesn’t need to provide any credentials to gain access. Machine auth is typically accomplished using EAP-TLS, though some RADIUS server options do make it simple to accomplish machine auth using PEAP-MSCHAPv2 (including Windows NPS, as outlined in the example config below).
The following example configuration outlines how to set up Windows NPS as a RADIUS server, with Active Directory acting as a userbase:Add the Network Policy Server (NPS) role to Windows Server.
Add a trusted certificate to NPS.
Add APs as RADIUS clients on the NPS server.
Configure a policy in NPS to support PEAP-MSCHAPv2.
(Optional for machine auth) Deploy PEAP-MSCHAPv2 wireless network settings to domain member computers using Group Policy.Source: https://documentation.meraki.com/MR/Encryption_and_Authentication/Configuring_RADIUS_Authentication_with_WPA2-Enterprise
Create Wi-Fi profiles using the System Center Configuration Manager (SCCM) or Microsoft Intune.
You can also use SCCM or Microsoft Intune to configure Wi-Fi profiles. This topic is well documented from Microsoft in the following articles.
Manage Wi-Fi profiles on local computer by using the netsh command
You can also use the netsh command line tool to manage the Wi-Fi profiles on a local computer.
- netsh wlan show profile -> list profiles located on the local computer
- netsh wlan show profiles interface=”wi-fi” -> list profile for specific interface
- netsh wlan show drivers -> list driver information about the wireless adapter
- netsh wlan show wirelesscapabilities -> list capabilities of the wireless adapter
- netsh wlan show interfaces -> list all wireless interfaces on the local computer
- netsh wlan show profile name=”myAP” key=clear -> will display the security key in plaintext
- netsh wlan set profileparameter name=”myAP” connectionmode=manual -> will disable connect automatically
- netsh wlan set profileparameter name=”myAP” connectionmode=auto -> will enable connect automatically
- netsh wlan delete profile name=”myAP” -> will delete the myAP wlan profile
- netsh wlan delete profile name=* -> will delete all wlan profiles on the local computer
- netsh wlan export profile name=”WiFiNetwork” key=clear folder=”C:path” key=clear -> Export a wlan profile
- netsh wlan add profile filename=”C:pathprofileFile.xml” user=all -> Import a wlan profile for all user’s -> user=current only for the current user
- netsh wlan show wlanreport -> will create a wireless adapter report will ->
Analyze the wireless network report
https://support.microsoft.com/en-us/windows/analyze-the-wireless-network-report-76da0daa-1db2-6049-d154-7bb679eb03ed
Troubleshooting
In case something went wrong and your clients won’t connect to the the wireless network, you can investigate several logs to get more details about the problem.
You can search in two locations for logs to investigate the reason why clients can’t connect to the network.
For general configuration problems between the NPS server and the RADIUS clients, you can investigate the Event Viewer.
Custom Views -> Server Roles -> Network Policy and Access Services
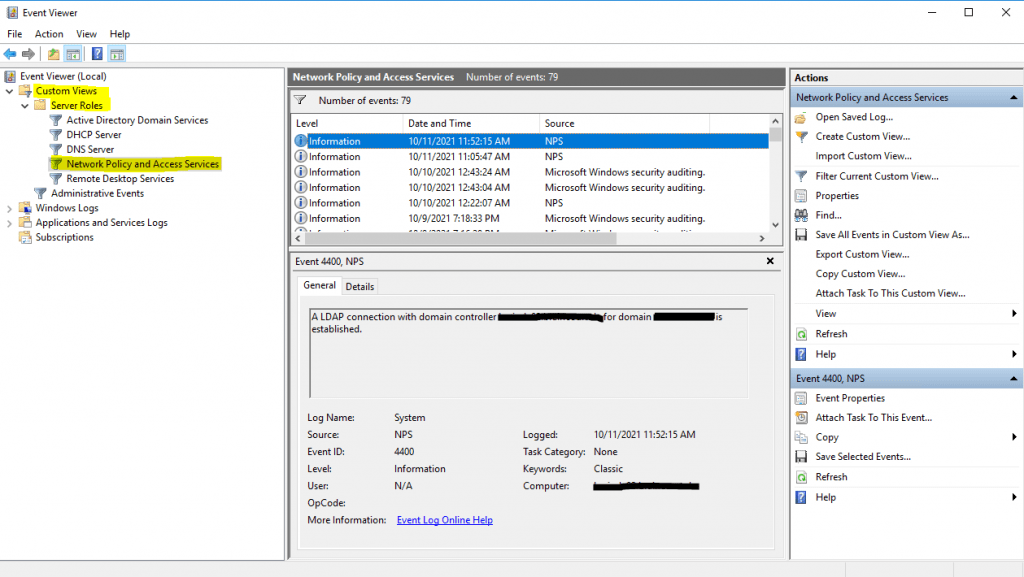
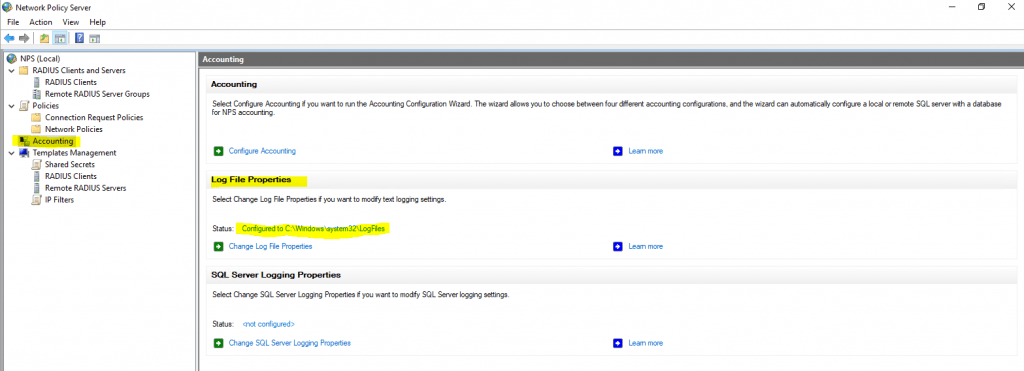
For problems regarding authentication from the user’s itself, you should use the Accounting logs. Here you can see the default path from them.
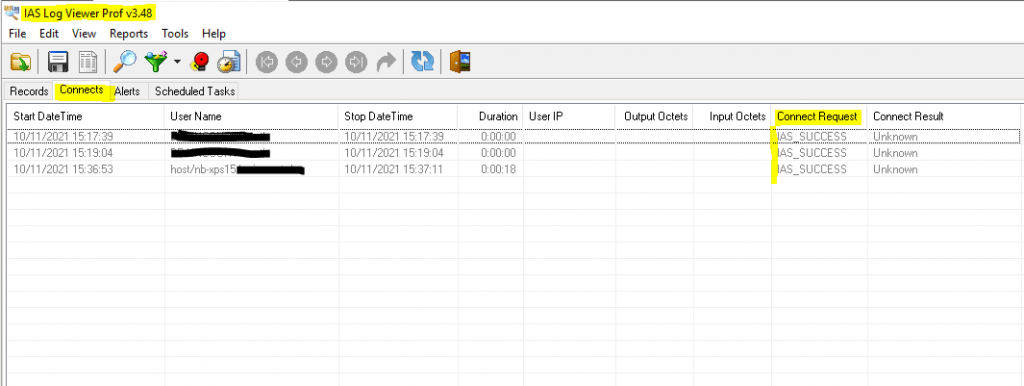
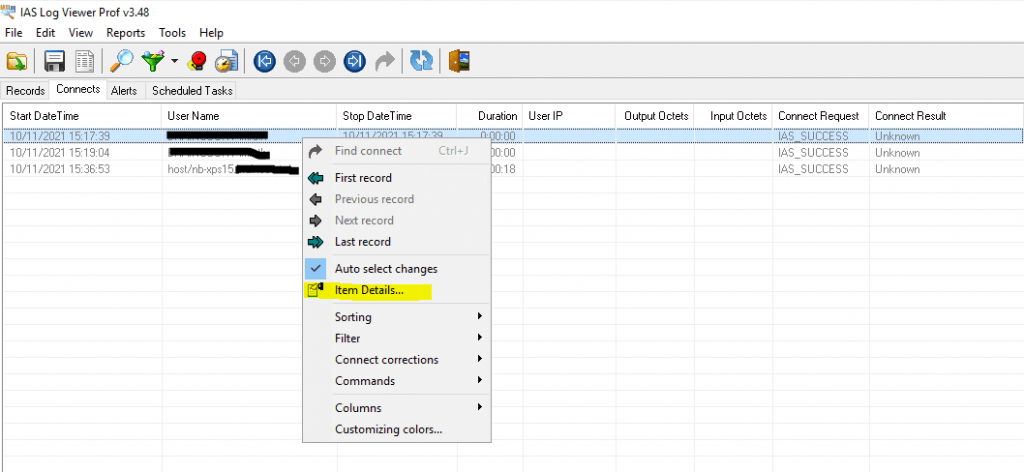
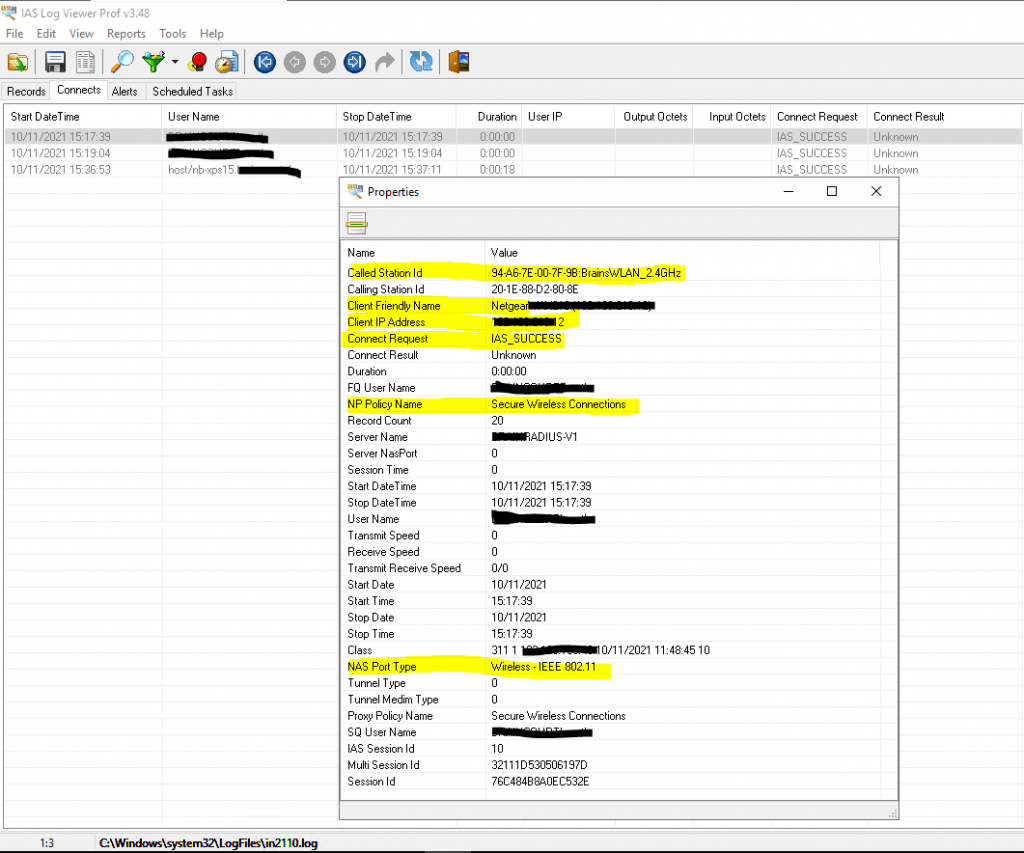
To investigate them I would suggest to use a specific log viewer like the IAS Log Viewer from DeepSoftware LLC. You can use this viewer also to investigate VPN logging from the Windows Routing and Remote Access servers.
IAS Log Viewer
https://www.deepsoftware.com/iasviewer/
IAS_SUCCESS -> the user or computer authenticated successfully against the NPS server, formerly Internet Authentication Service (IAS)
NPAS replaces the Internet Authentication Service (IAS) from Windows Server 2003.
Therefore you will see IAS_SUCCESS messages in the logs from NPS.
Source: https://en.wikipedia.org/wiki/Network_Policy_Server
Reason for rejecting a user. Can be:
Field (26) Reason-Code Number
- 0 = IAS_SUCCESS
- 1 = IAS_INTERNAL_ERROR
- 2 = IAS_ACCESS_DENIED
- 3 = IAS_MALFORMED_REQUEST
- 4 = IAS_GLOBAL_CATALOG_UNAVAILABLE
- 5 = IAS_DOMAIN_UNAVAILABLE
- 6 = IAS_SERVER_UNAVAILABLE
- 7 = IAS_NO_SUCH_DOMAIN
- 8 = IAS_NO_SUCH_USER
- 16 = IAS_AUTH_FAILURE
- 17 = IAS_CHANGE_PASSWORD_FAILURE
- 18 = IAS_UNSUPPORTED_AUTH_TYPE
- 32 = IAS_LOCAL_USERS_ONLY
- 33 = IAS_PASSWORD_MUST_CHANGE
- 34 = IAS_ACCOUNT_DISABLED
- 35 = IAS_ACCOUNT_EXPIRED
- 36 = IAS_ACCOUNT_LOCKED_OUT
- 37 = IAS_INVALID_LOGON_HOURS
- 38 = IAS_ACCOUNT_RESTRICTION
- 48 = IAS_NO_POLICY_MATCH
- 64 = IAS_DIALIN_LOCKED_OUT
- 65 = IAS_DIALIN_DISABLED
- 66 = IAS_INVALID_AUTH_TYPE
- 67 = IAS_INVALID_CALLING_STATION
- 68 = IAS_INVALID_DIALIN_HOURS
- 69 = IAS_INVALID_CALLED_STATION
- 70 = IAS_INVALID_PORT_TYPE
- 71 = IAS_INVALID_RESTRICTION
- 80 = IAS_NO_RECORD
- 96 = IAS_SESSION_TIMEOUT
- 97 = IAS_UNEXPECTED_REQUEST
Source: https://www.radiusreporting.com/IAS-DB-Attribute-Format-Table.html
EAP authentication exchange for wireless clients through the access point and RADIUS server stuck by using a route-based IPSec in pfSense during the SSL handshake and here exactly after the Client Hello
If you ran into that issue, you can read my following post about how to set up a lean Branch Office Network without any Servers and DCs inside by using an IPSec S2S VPN Tunnel connected with the Headquarters Network.
Links
RADIUS (Remote Authentication in Dial-In User Service) is a network protocol for the implementation of authentication, authorization, and collecting information about the resources used. It is designed to transfer information between the central platform and network clients/devices. Your remote access (RADIUS) server can communicate with a central server/service (for example, Active Directory domain controller) to authenticate remote dial-in clients and authorize them to access some network services or resources. Thanks to this, you can use a single centralized authentication system in your domain.
In this article, we’ll show how to configure the centralized RADIUS server based on Windows Server 2022, 2019, or 2016 OSs, and how to configure RADIUS authentication on Cisco devices using the Network Policy Server (NPS) service. In this example, the RADIUS will use the AD to authenticate remote users and authorize them to access Cisco and Mikrotik switches/routers (act as RADIUS clients) command-line interface.
Installing Radius Server (NPS) Role on Windows Server 2022/2019/2016
At first, create a new security group in the Active Directory domain (for example, RemoteCiscoUsers) in which you will need to add all users that will be allowed to authenticate on Cisco routers and switches (How to add AD user to group with PowerShell?).

Starting with Windows Server 2008 R2, the RADIUS server functionality was implemented with the Network Policy Services (NPS) role. With the NPS role, you can authenticate remote clients against Active Directory using the Radius protocol.
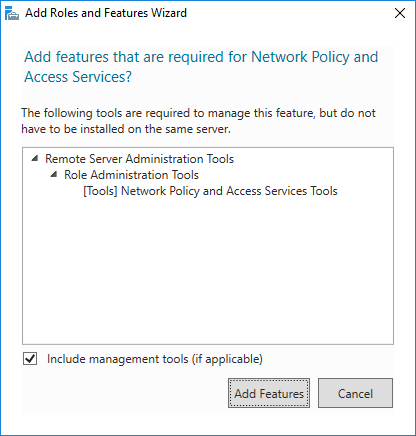
So, you need to install the RADIUS server role on your Windows Server 2022/2019/2016. Open the Server Manager console and run the Add Roles and Features wizard. The Remote Authentication Dial-In User Service (RADIUS) protocol in Windows Server is a part of the Network Policy Server role. In the wizard that appears, select the Network Policy and Access Services role in the role selection step.
Note. Also, you can install NPS role and management tools from an elevated PowerShell console:
Install-WindowsFeature NPAS –IncludeManagementTools
Check if the NPAS role is installed on your Windows Server host:
Get-WindowsFeature -Name NPAS

After the role installation is completed, open the Network Policy Server (nps.msc) in the Tools menu.

To use the NPS server in the domain, you must register it in the Active Directory. In the NPS snap-in, right-click on a root and select Register server in Active Directory.

Confirm the registration of the server in Active Directory.

Also, you can register your NPS server in Active Directory with a command:
netsh ras add registeredserver
In this case, the server will be given the authority to read the properties of Active Directory user accounts to authenticate users. The server will be added to the built-in domain group RAS and IAS Servers.
![]()
Now you can add the Radius client. Radius client is the device from which your server will receive authentication requests. In this example, it could be a Cisco router, switch, Wi-Fi access point, etc.
To add the new Radius client, expand the RADIUS Clients and Servers section in the NPS console tree and select New on the RADIUS Clients item.

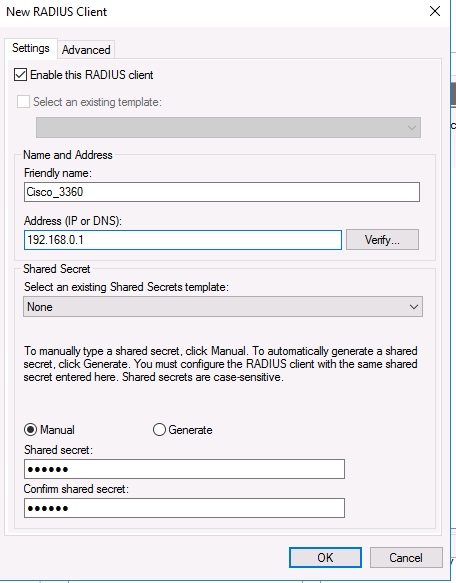
On the Settings tab, fill the fields Friendly name, client Address (you can specify IP address or DNS name), and Shared Secret + Confirm shared password (you will use this password in the configuration of the Cisco switch/router).
Note. The shared secret password is rarely used in huge corporate networks due to the problems with the distribution of shared keys. Instead of shared passwords, it is recommended to use certificates. If you have a corporate Certification Authority deployed to implement PKI infrastructure, you can request and import a *.p12 certificate for the Radius/NPS server. Just add the certificate to the personal certification store of the Local Machine.

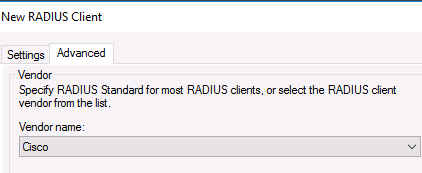
In the Advanced tab, select Vendor name – Cisco.

You can use the PowerShell command instead of the NPS GUI to add a new RADIUS client. In this case, you can use the New-NpsRadiusClient PowerShell cmdlet:
New-NpsRadiusClient –Address "192.168.31.1" –Name "cisco2960" –SharedSecret "Zb+kp^JUy]vePb-h.Q*d=weya2AY?hn+npRRp[/J7d"
Configuring NPS Policies on the RADIUS Server
NPS policies allow you to authenticate remote users and grant them access permissions configured in the NPS role. Using NPS access policies, you can make a link to the RADIUS client records and the domain security group that determines the level of access to CISCO devices.
There are two types of policies on a RADIUS server:
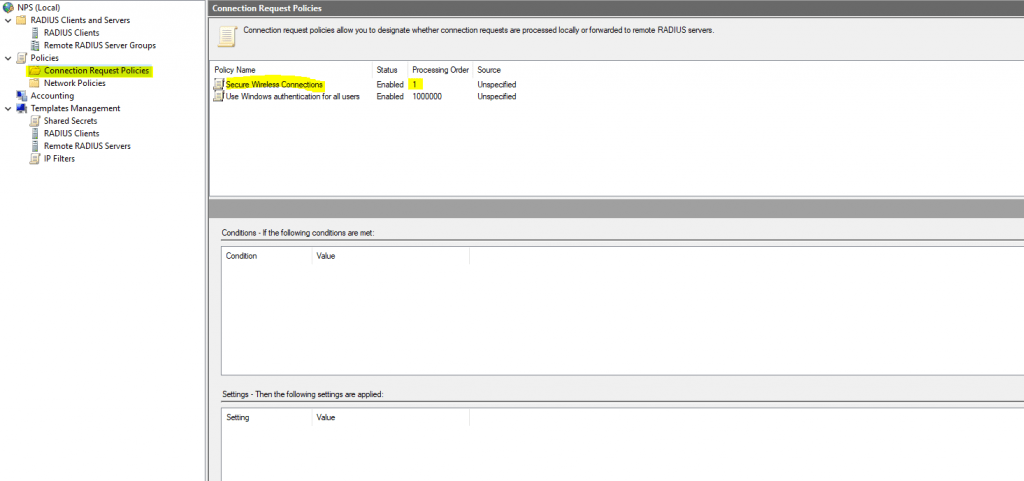
- Connection request policies — these policies define a set of conditions that determines which RADIUS servers should authenticate and authorize connection requests received from RADIUS clients;
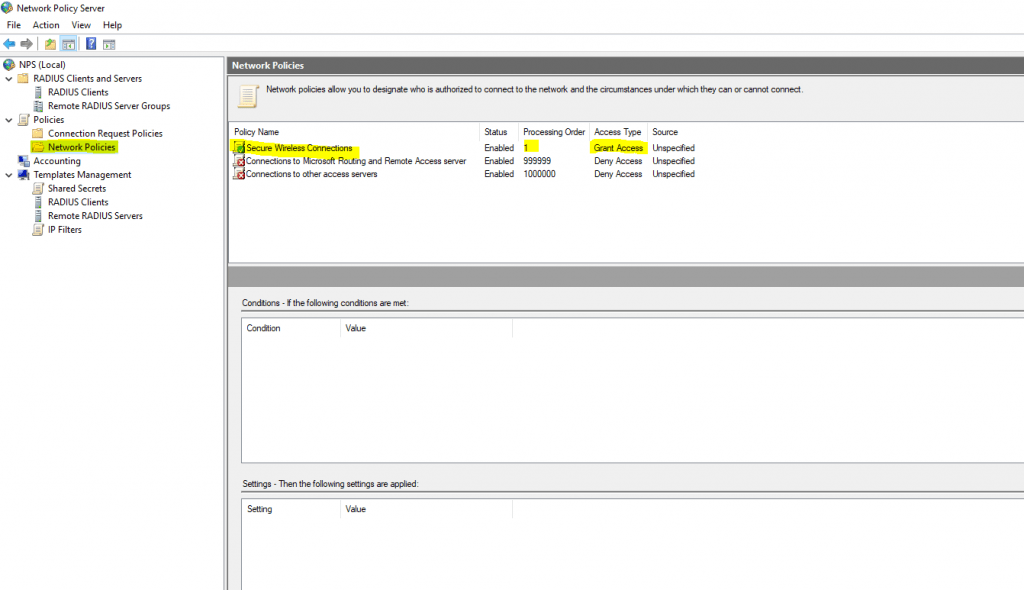
- Network policies — a set of conditions and settings that allow you to specify who is authorized to connect to your network and a list of assigned access permissions. These policies are processed sequentially from the top to down;
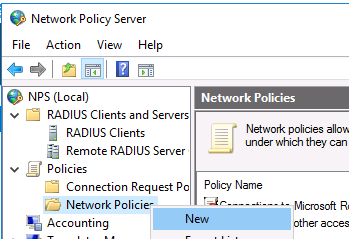
In our case, we will use only the NPS Network policies. Expand the Policies > Network Policies branch and select New:

Specify the Policy name, the type of network access server should remain unchanged (Unspecified).

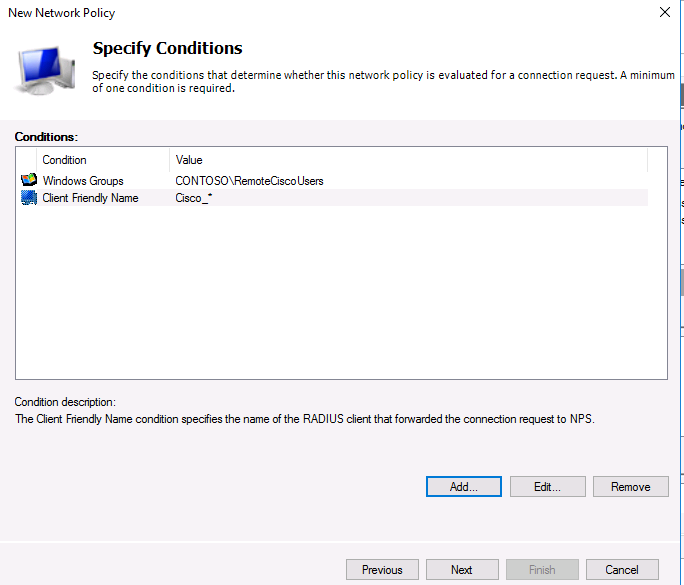
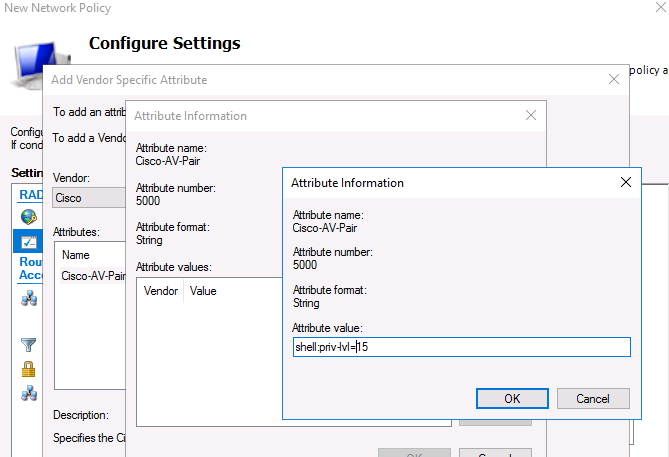
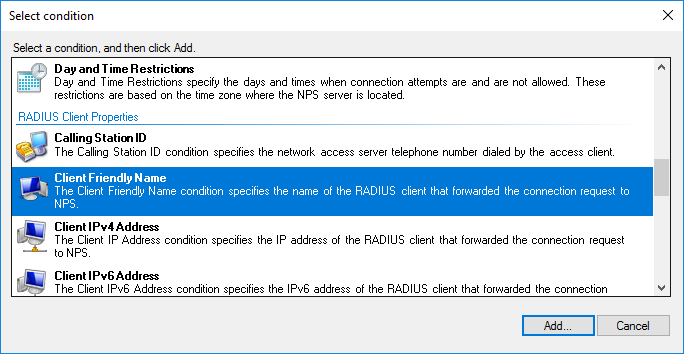
In the next step Specify conditions, you need to add the conditions under which this RADIUS policy will be applied. Let’s add two conditions — the authorized user must be a member of a specific domain security group, and the device you want to access has a certain name. Use the Add option to create a new condition by selecting the Windows Group type (add the RemoteCiscoUsers group) and specifying the Client Friendly Name (Cisco_*).
Note. The Client Friendly Name field may differ from the DNS name of your device. We will need it in the further steps to identify a specific network device when creating a Remote Access Policy. Using this name, you can specify, for example, a mask by which several different RADIUS clients will be processed by a single access policy.

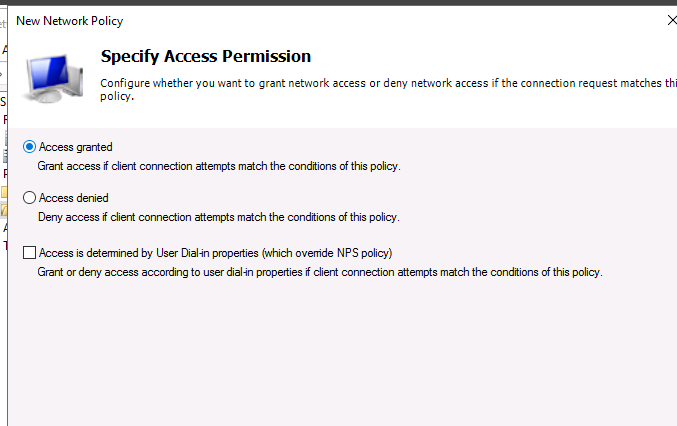
On the next screen, select Access Granted.

Our Cisco switch supports only the Unencrypted authentication method (PAP, SPAP), so that’s why we’ll uncheck all other options.

Skip the next configuration Constraints step.
In the Configure Settings section, go to the RADIUS Attributes > Standard section. Delete the existing attributes there and click the Add button.
Select Access type > All, then Service-Type > Add. Specify Others = Login.

Now add a new attribute in the RADIUS Attributes > Vendor Specific section. Under Vendor, select Cisco, and click Add. Here you need to add information about the attribute. Click Add and specify the following value:
shell: priv-lvl = 15
This value means that the user authorized by this policy will be granted a maximum (15) administrative access permission on the Cisco device.

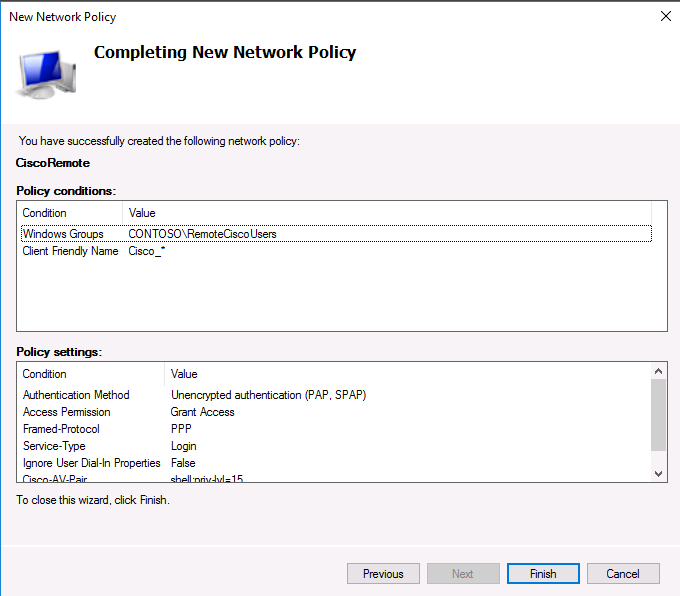
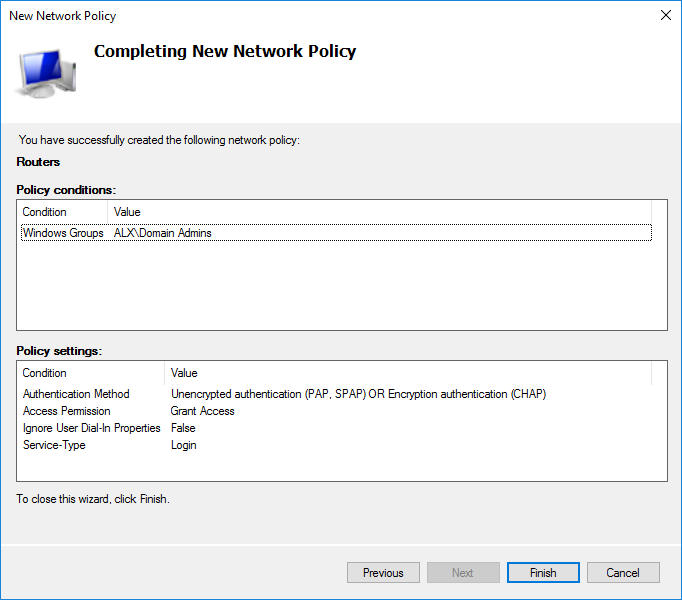
The last screen displays all selected NPS policy settings. Click Finish.

Hint. You can back up the current NPS server configuration to the XML file using the command:
Export-NpsConfiguration -Path c:psbackup_nps.xml
If you need to restore the NPS configuration from a previously created backup file, run:
Import-NpsConfiguration -Path c:psbackup_nps.xml
When creating and planning RADIUS policies, pay attention to what matters in their order. Policies are processed from the top to down, and when it turns out that all the conditions in the next policy are met, their further processing is terminated. You can change the priorities of policies in the NPS console using the Processing Order value.

To enable the user account to be used for Radius authentication, open the Active Directory Users and Computers snap-in (dsa.msc), find the user, open its properties, go to the Dial-In tab and select the Control access through NPS Network Policy option in the Network Access Permission section.

Also, you can check the current option value using PowerShell:
Get-ADUser richard.doe -Properties msNPAllowDialin -Server dc1.theitbros.com
If the above command did not return any result (empty), this means that the default value “Control access through NPS Network Policy” is used.
If you want to reset this user attribute to the default state, use the command:
Set-ADUser richard.doe -Clear msNPAllowDialin -Server dc1.theitbros.com
Or you can reset this attribute for all users in the specific Active Directory OU using the LDAP filter:
Get-ADUser -SearchBase "ou=Users,ou=Paris,dc=theitbros,dc=com" -LDAPFilter "(msNPAllowDialin=*)" | % {Set-ADUser $_ -Clear msNPAllowDialin}
Configuring RADIUS Setting on Cisco Devices
After creating the policy, you can proceed to configure your Cisco routers or switches for authentication on the newly installed Radius NPS server.
Because we use domain accounts for authorization, the user credentials must be transmitted over the network in an encrypted form. To do this, disable the telnet protocol on the switch and enable SSHv2 on Cisco using the following commands in configuration mode:
configure terminal
crypto key generate rsa modulus 1024
ip ssh version 2
AAA works in such a way: if the response from the server is not received, the client assumes unsuccessful authentication. Be sure to create a local user in case the RADIUS server is unavailable for some reason.
You can create a local user with the following command:
username cisco_local password $UPerrP@ssw0rd
To make the use of SSH mandatory and disable remote access using Telnet, execute the following commands:
line vty 5 15
transport input ssh
Below is an example of the configuration for authorizing a Radius server for the Cisco Catalyst Switch:
aaa new-model

aaa authentication login default group radius local

aaa authorization exec default group radius if-authenticated

radius-server host 192.168.1.16 key Sfs34e#sf

#Specify your RADIUS server IP address and key for encryption (the shared secret that we specified on the RADIUS server)

service password-encryption

# Enable password encryption
If you have several Radius servers, add them to the group:
aaa group server radius radius_srv_group

server 192.168.1.16

server 192.168.101.16
This completes the minimum switch configuration and you can try to check Radius authentication on your Cisco device.
How to Configure RADIUS Authentication on Microtik (RouterOS) Devices?
In this part, we will show you how to configure RADIUS authentication for VPN user connections via a Mikrotik router (RouterOS based).
Open the Network Policy Server console (nps.msc) and create a new Radius client.
Select New RADIUS Client and configure the following settings:
- Enable this RADIUS Client;
- Friendly Name — enter the name of your Mikrotik router here;
- Address — specific the IP address of the Mikrotik router;
- Specify your Preshared secret key.

Create a new Network Policy with the following settings:
- User Groups — specify the name of the domain user group that is allowed to authenticate on your Mikrotik router;
- Authentication Type — MS-CHAPv2;
- Tunnel Type — Point-to-Point Tunneling Protocol (PPTP);
- Access Permissions — Access granted;
- In the Configure Authentication Methods window, leave only MS-CHAPv2 and allow users to change expired passwords (User can change password after it has expired option);
- Multilink and Bandwidth Allocation Protocol (BAP) – Do not allow Multilink connections;
- In the Standard section, remove Service-Type – Framed and leave only Framed-Protocol PPP;
- Encryptions — leave only the Strongest encryption (MPP 128-bit) method.

Once you have created a new policy, open the Network Policy Server settings.
Leave only the following UDP ports for the RADIUS server communications:
- Authentication — 1812;
- Accounting — 1813.

Check if these UDP ports are open in Microsoft Defender Firewall Rules. If not, open them manually.
Now you need to configure the connection settings for Windows Server RADIUS in the Mikrotik configuration (we assume that PPP VPN Server is already configured on RouterOS to connect users).
Check in the PPTP server settings that only mschap2 is allowed to use for authentication.

Now we need to configure the connection to Radius NPS server. Select New Radius Server and specify the following options:
- Service: ppp;
- Address: IP address of the RADIUS server;
- Secret: preshared key that you specified in the network policy settings;
- Src/ Address: Mikrotik IP address from which traffic will be sent to NPS;
- Authentication Port: 1812;
- Accounting Port: 1813.

Add appropriate access rules to Mikrotik Firewall.
Then go to Secrets > PPP Authentication and Accounting and enable the Use Radius option.

It remains to configure a PPTP VPN connection to your Mikrotik VPN on users’ computers. To authenticate to Mikrotik, users can use their Active Directory accounts (accounts must be added to the AD group that you have specified when creating the Miktotik Network Policy on NPS).
How to Check the NPS/RADIUS Logs on Windows?
To enable NPS Server Radius Authentication logging, you need to enable the Network Policy Server audit policy. You can enable this policy via the local Group Policy Editor or with the following commands:
auditpol /get /subcategory:"Network Policy Server"

auditpol /set /subcategory:"Network Policy Server" /success:enable /failure:enable

Now you can open the Event Viewer console (eventvwr.msc), go to the Windows Logs > Security, and filter the event by the Event ID 6272.
Network Policy Server granted access to a user.

If you need to find all NPS authorizations events for the specific user (Richard.Doe in this example), use the next PowerShell script:
$Query = @"
<QueryList>
<Query Id="0" Path="Security">
<Select Path="Security">
*[EventData[Data[@Name='SubjectUserName'] and (Data=theitbrosrichard.doe')]] and
*[System[(EventID='6272')]]
</Select>
</Query>
</QueryList>
"@
$events = Get-WinEvent -FilterXML $Query
$ipaddr = @{ label="IP"; Expression={$_.properties[9].value} }
$events | select $ipaddr | group "IP" | format-table Count, Name -autosize
- About
- Latest Posts

I enjoy technology and developing websites. Since 2012 I’m running a few of my own websites, and share useful content on gadgets, PC administration and website promotion.
Время прочтения
4 мин
Просмотры 56K
Как быстро и просто настроить авторизацию через RADIUS от Microsoft? Думаю, это поможет тем, кто захочет иметь возможность заходить на устройства MikroTik через дружелюбный WinBox и простой SSH.
План:
Установка роли NPS;
Добавление RADIUS клиента;
Создание политики подключения;
Создание политики сети;
Добавление сервера авторизации на MikroTik;
Проверка через SSH и WinBox.
Установка роли NPS
Имеем Windows Server 2016 Datacenter с уже установленным доменом.

Выбираем сервер, на котором будет разворачиваться роль. Microsoft не рекомендует делать это на контроллере домена, но в некоторых best practices для уменьшения задержек дают совет ставить именно на него. Добавляем роль Network Policy and Access Server вместе с management tools для настройки.
Install-WindowsFeature NPAS -IncludeManagementTools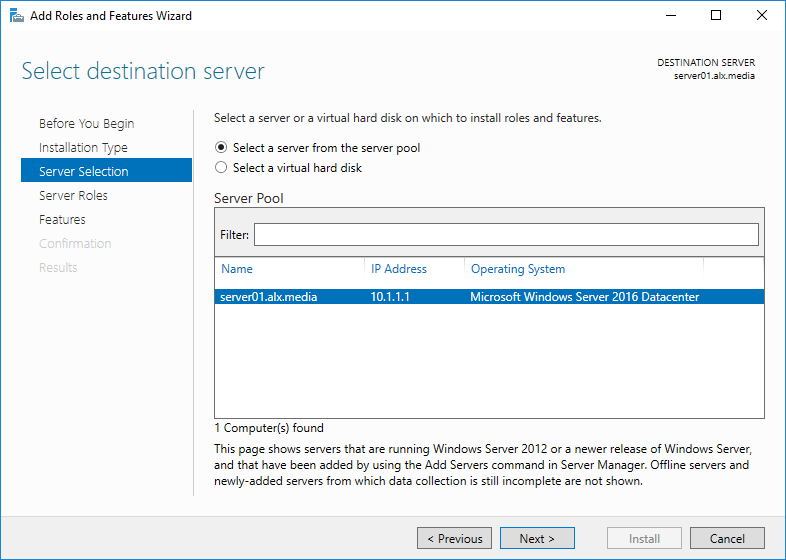


Запускаем любым удобным способом админку NPS. Например, через менеджер серверов.

Регистрируем сервер NPS в AD.
netsh ras add registeredserver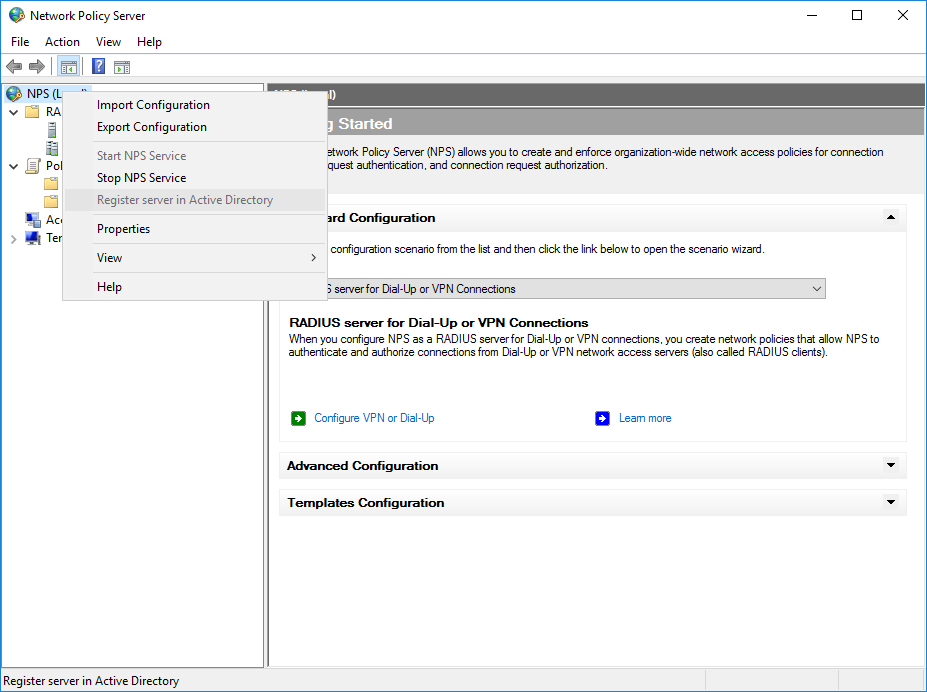
Добавление RADIUS клиента
Для того, чтобы сервер знал с какими устройствами налаживать общение нужно добавить их в RADIUS Clients.

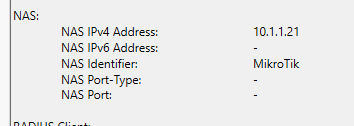
Для примера, добавляю свой MikroTik wAP. Friendly name установил как Identity на устройстве и IP заданный на его единственном проводном интерфейсе. Для того, чтобы устройство смогло авторизоваться на сервере нужно ввести ключ. Он создается на сервере либо вручную, либо генерируется автоматически. Я предпочел второй вариант.
New-NpsRadiusClient –Address "10.1.1.21" –Name "router01" –SharedSecret "egEcM4myJCptphGlZ1UymS#qLh^urp@fJ1hF8dE6dwb27NI^oIJtTWKKp^MEsU6p"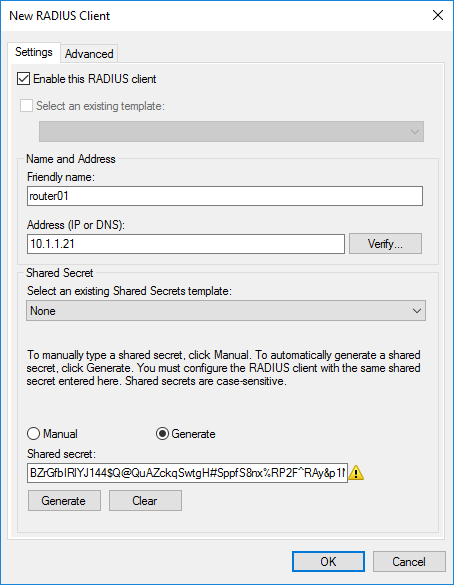
Vendor name остановим на стандартном RADIUS.

Устройство добавлено.
Создание политики подключения

Подбираем подходящее название для политики.

Определяем наше устройство с которым будет работать сервер.

Я выбрал только Client Friendly Name со значением Router01. Это четко привязывает данный пункт политики к устройству через созданного клиента. Можно идентифицировать устройство Mikrotik по Identity выбрав NAS Identifier.
Без предварительной конфигурации устройства Identity = MikroTik.
Дальнейшая настройка политики.

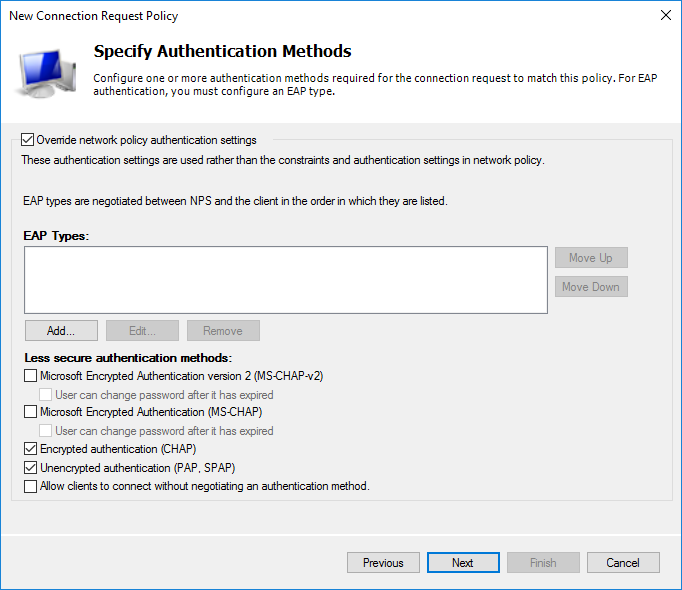
На этапе выбора протокола аутентификации достаточно выбрать нешифрованный (о чем получите предупреждение) PAP для SSH или шифрованный CHAP для WinBox. Я выбрал оба. Если есть необходимость использовать web версию, то достаточно включить MS-CHAPv2, в остальном всё аналогично.
Собственно, предупреждение о выборе небезопасного способа. Предлагают почитать пошаговый справочный материал.

На данном этапе я не стал ничего трогать.

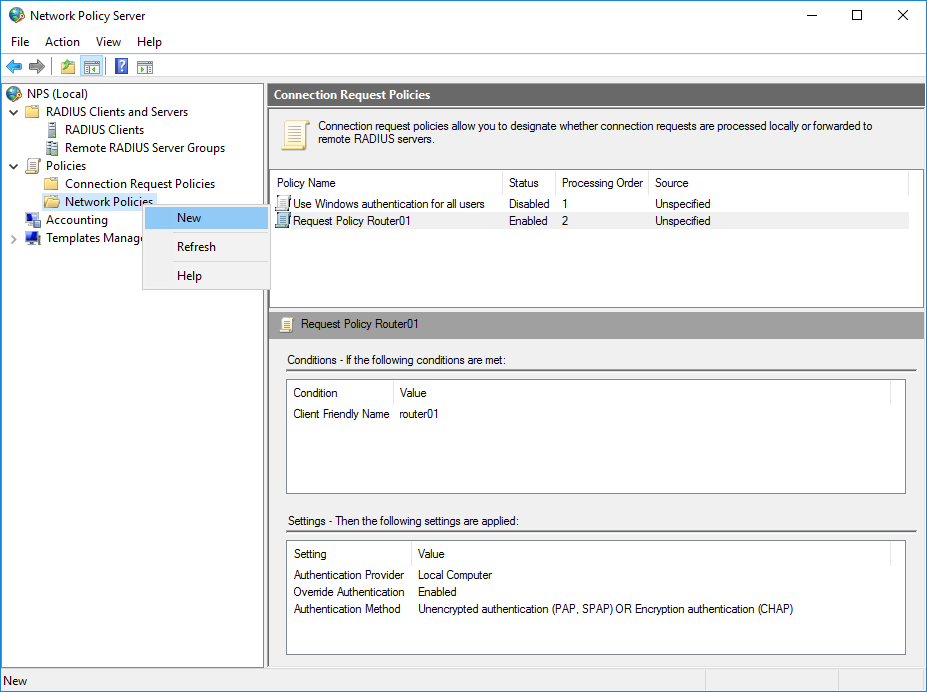
Итоговые установки политики.
У меня не получилось воспроизвести это через PowerShell, даже стандартный example с technet’а. Буду признателен, если подскажете почему.
netsh nps add crp name = "Request Policy Router01" state = "ENABLE" processingorder = "1" policysource = "0" conditionid ="0x1020" conditiondata = "router01" profileid = "0x1025" profiledata = "0x1" profileid = "0x1009" profiledata = "0x1" "0x2" profileid = "0x1fb0" profiledata = "TRUE"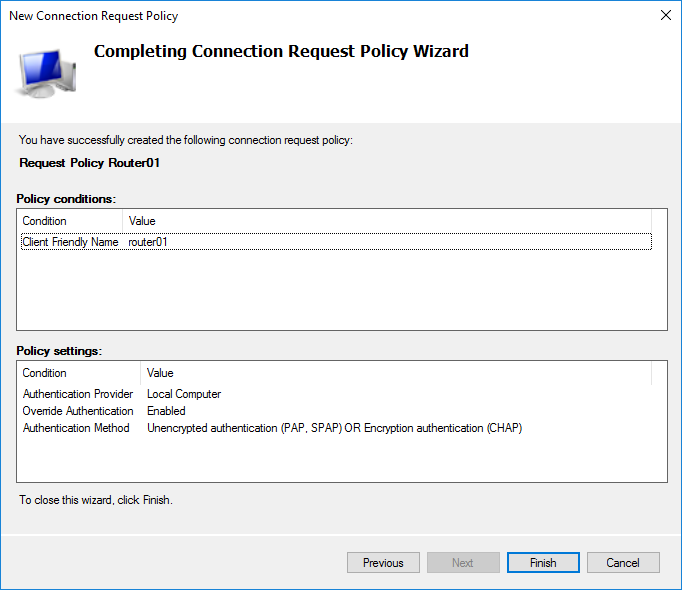
Выбираем нужный приоритет двигая выше или ниже пункт политики.
Создание политики сети
Назовем её Routers.
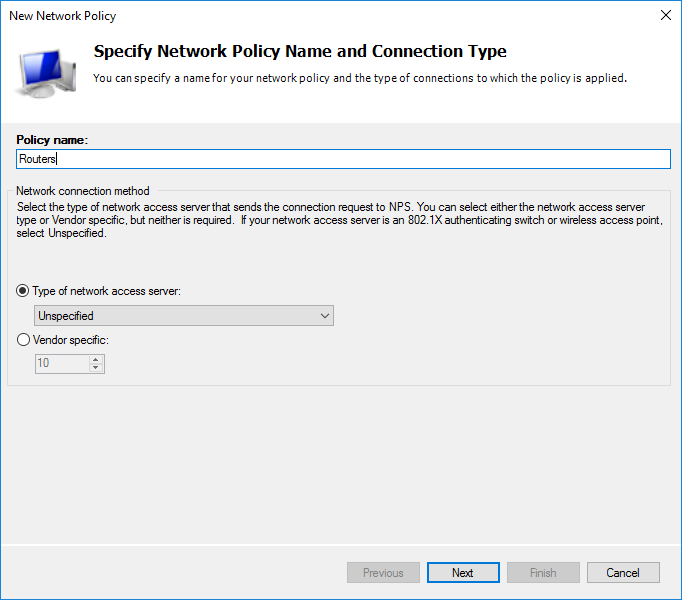
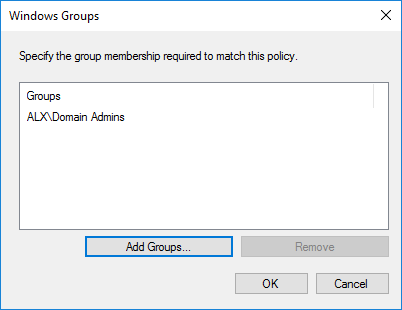
Как и прежде, нужно определить условия.

В AD у меня создан дополнительный пользователь состоящий в группе Domain Admins. Выбираю условие Windows Group исходя из того, чтобы все администраторы домена смогли получать доступ к MikroTik.

Разрешительное или запретительное правило. Мы будем разрешать всем, кто попал под условие.

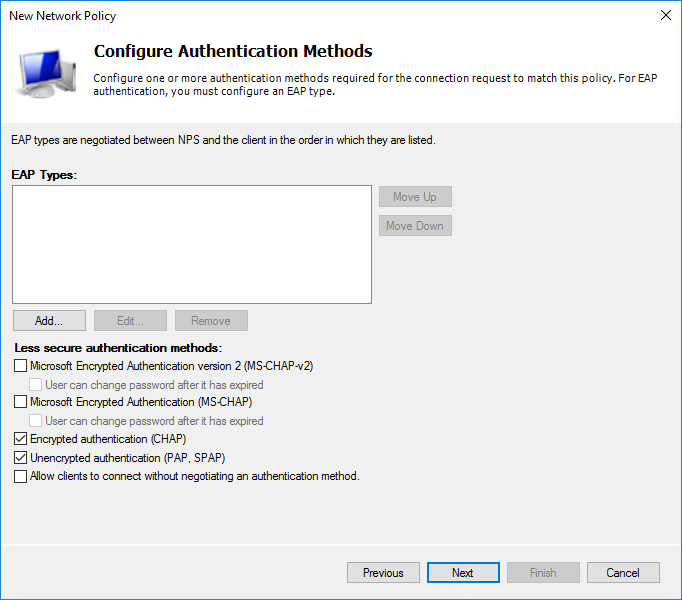
Способ аутенификации выбираем аналогичный прошлой политике.
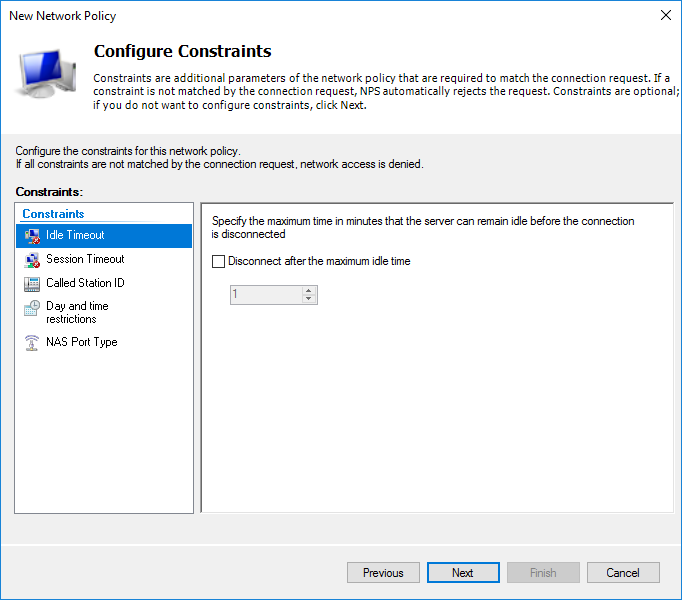
Исходя из необходимости можно настроить дополнительные настройки. Я оставил без изменений.
Далее необходимо выбрать что будет отправляться на сервер.
Итоговые настройки политики сети.
Выбираем необходимый приоритет среди других политик, если необходимо.

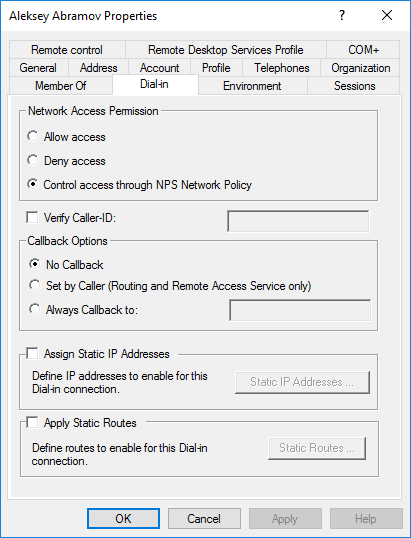
Чтобы учетная запись проверялась через NPS в AD у этого пользователя на вкладке Dial-in в разделе Network Access Permission должен быть отмечен пункт Control access through NPS Network Policy.
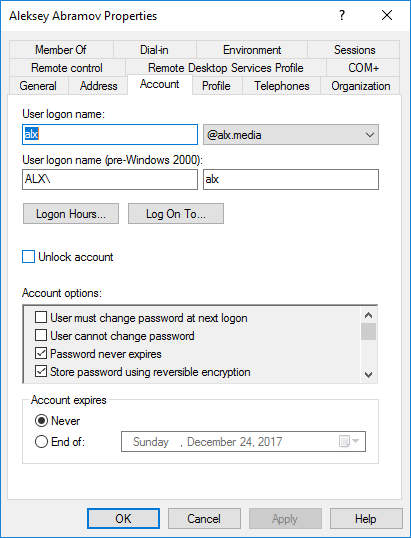
Для возможности авторизовываться через WinBox нужно включить обратимое шифрование в профиле пользователя.
Добавление сервера авторизации на MikroTik
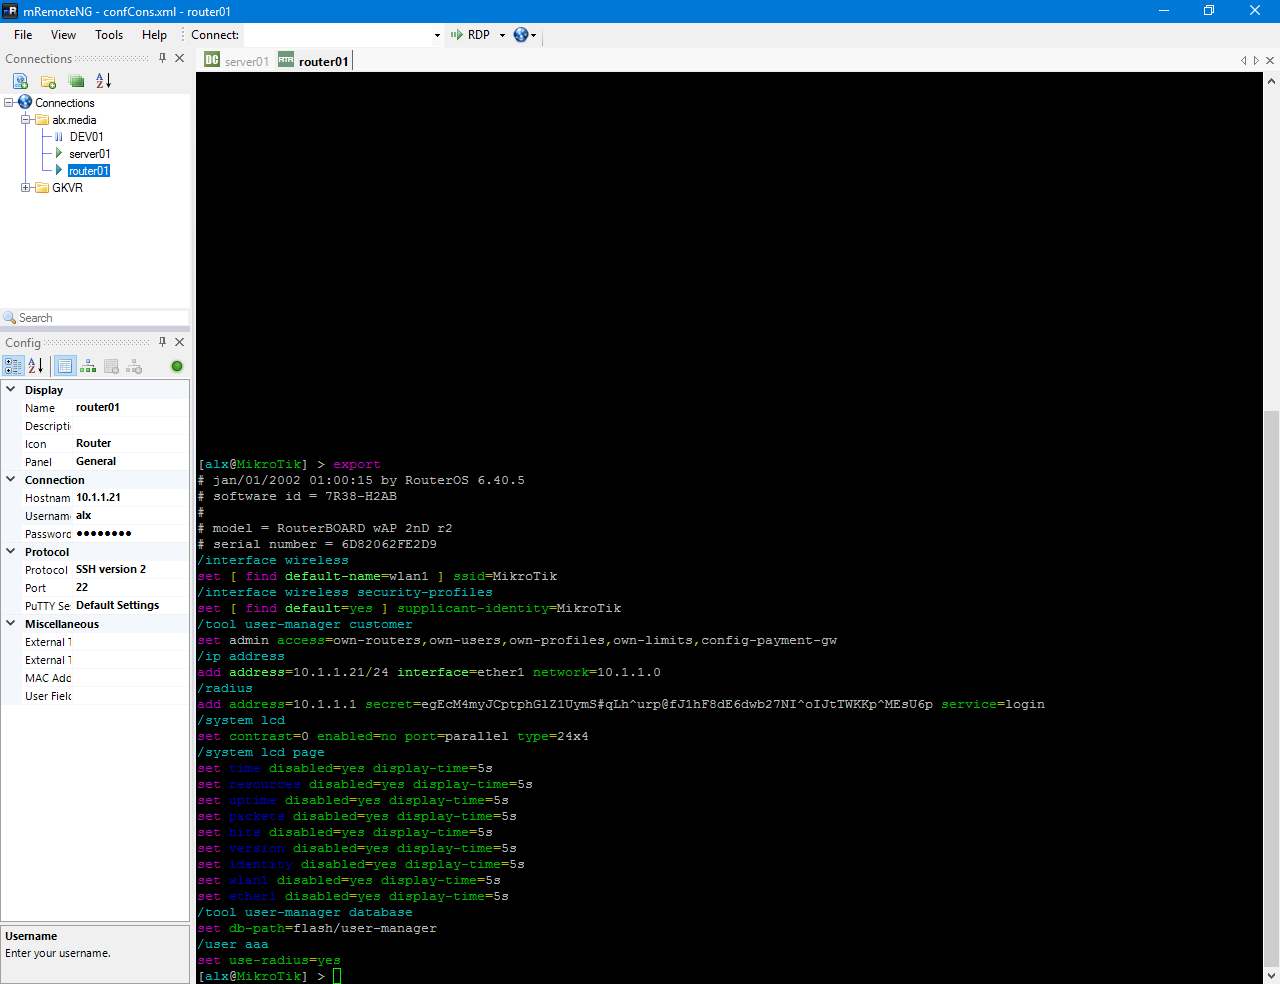
Первым делом присвоим System/Identity равным router01 и IP с маской для интерфейса.
/system identity set name=router01
/ip address add address=10.1.1.21/24 interface=ether1 network=10.1.1.0
В System/Users и на вкладке Users включаем пункт Use RADIUS. По умолчанию выбран доступ только для чтения.
/user aaa set use-radius=yes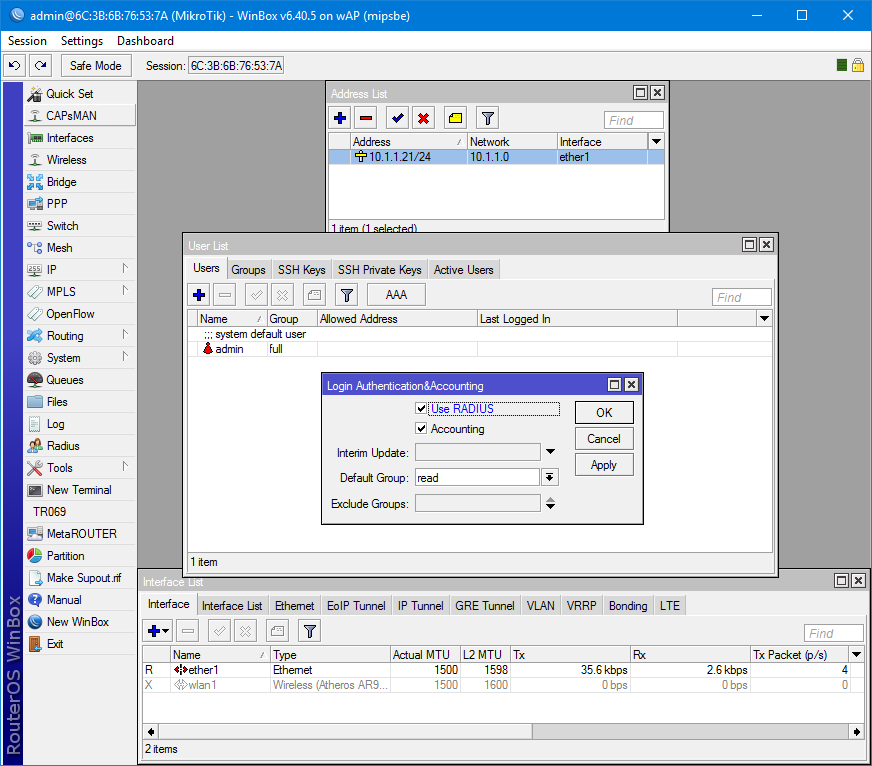
Открываем настройки Radius и добавляем новый сервер. Сервис выбирается исходя из назначения. Лучше, конечно же, делить доступ между ними. Address — адрес сервера на котором установлен NPS.
Secret — ключ, который был сгенерирован на стадии добавления клиента на сервере.
/radius add address=10.1.1.1 secret=egEcM4myJCptphGlZ1UymS#qLh^urp@fJ1hF8dE6dwb27NI^oIJtTWKKp^MEsU6p service=login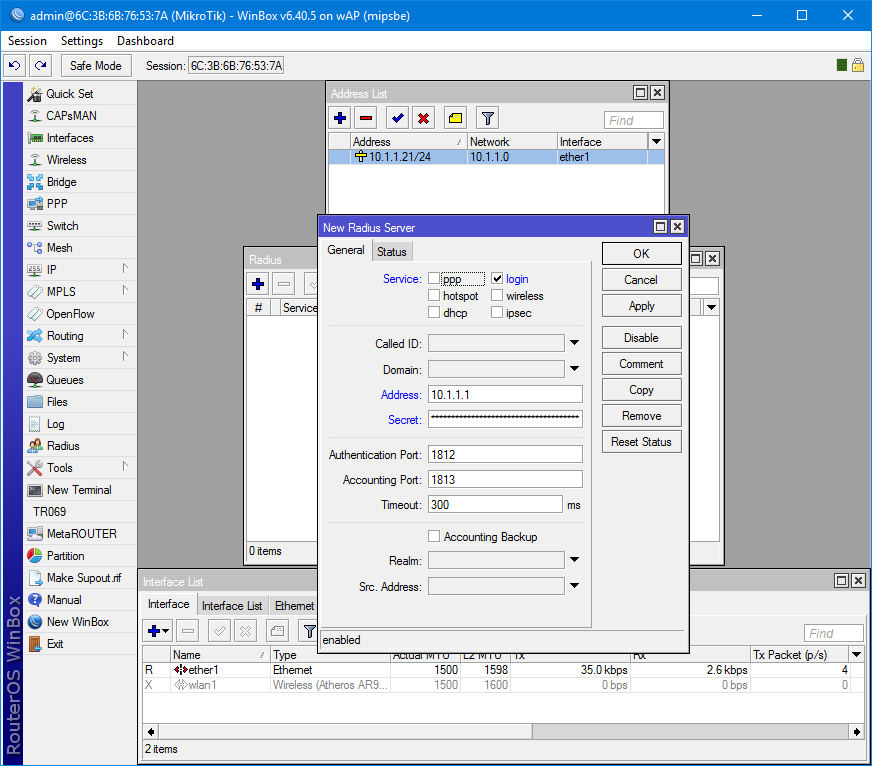
Проверка через SSH и WinBox
Проверка подключения через SSH и экспорт конфигурации.
И проверяем авторизацию в Winbox.

Как видим, в активных пользователях висят системный admin и оба подключения доменного юзера с доступом для чтения через SSH и Winbox.
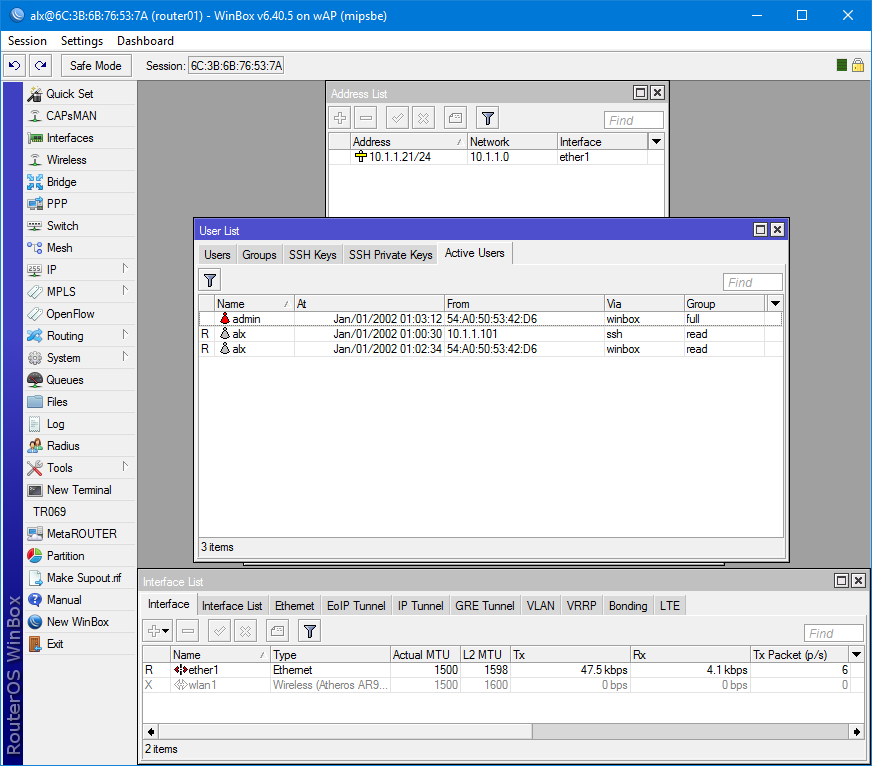
Всё работает.
Спасибо за внимание.
Overview:
Remote Authentication Dial-In User Service (RADIUS) is a client/server networking protocol that provides centralized authentication, authorization, and accounting (AAA) management for computers that connect and use a network service.
In Windows Server 2019, Network Policy Server is the Microsoft implementation of the RADIUS standard specified by the Internet Engineering Task Force (IETF).
NPS role will install automatically with the installation of Remote Access Service as a prerequisite on Windows Server 2019.
Network Policy Server (NPS) allows you to create and enforce organization-wide network access policies for connection request authentication and authorization.
NPS allows you to centrally configure and manage network access authentication, authorization, and accounting with these three following features:
- RADIUS Server: NPS performs centralized authentication, authorization, and accounting for wireless, remote access dial-up and virtual private network (VPN) connections.
- RADIUS-Proxy: NPS acts as a RADIUS proxy to forward connection requests to a remote NPS or other RADIUS servers for load balancing.
- RADIUS accounting: You can configure NPS to log events to a local log file or to a local or remote instance of Microsoft SQL Server.
In this guide, we will learn the steps to configure the Radius Server on Windows Server 2019. We will configure one NPS as a RADIUS server for VPN connection authentication and authorization.
Test Lab Setup:
Note: For this guide, we will use the virtual test lab created in VirtualBox.
- WS2K19-DC01: Domain Controller and DNS Server.
- WS2K19-RADIUS01: Member Server acts as a RADIUS Server.
- WS2K19-SRV02: Standalone Server acts as a VPN Server.
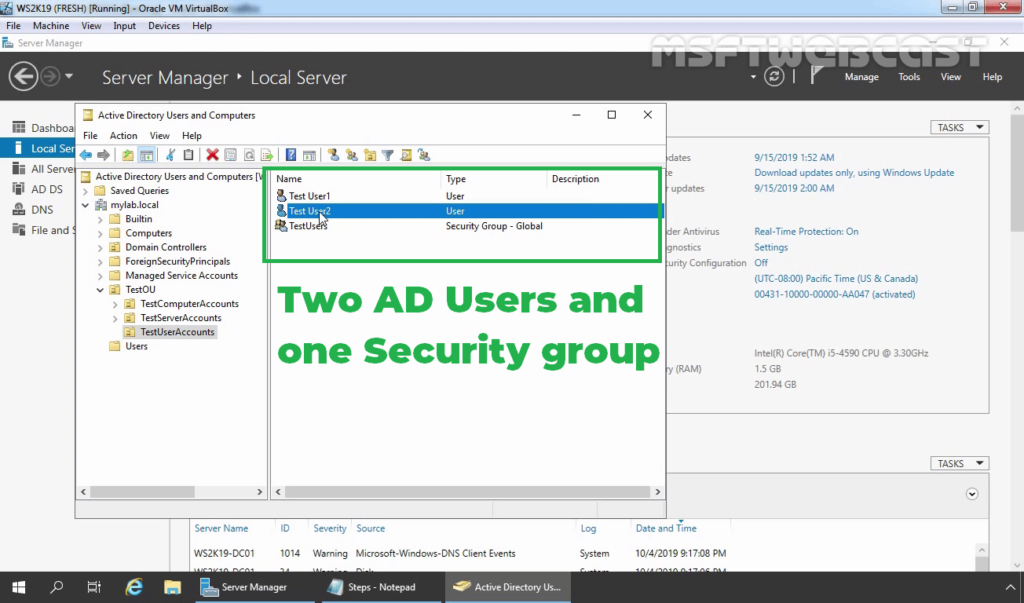
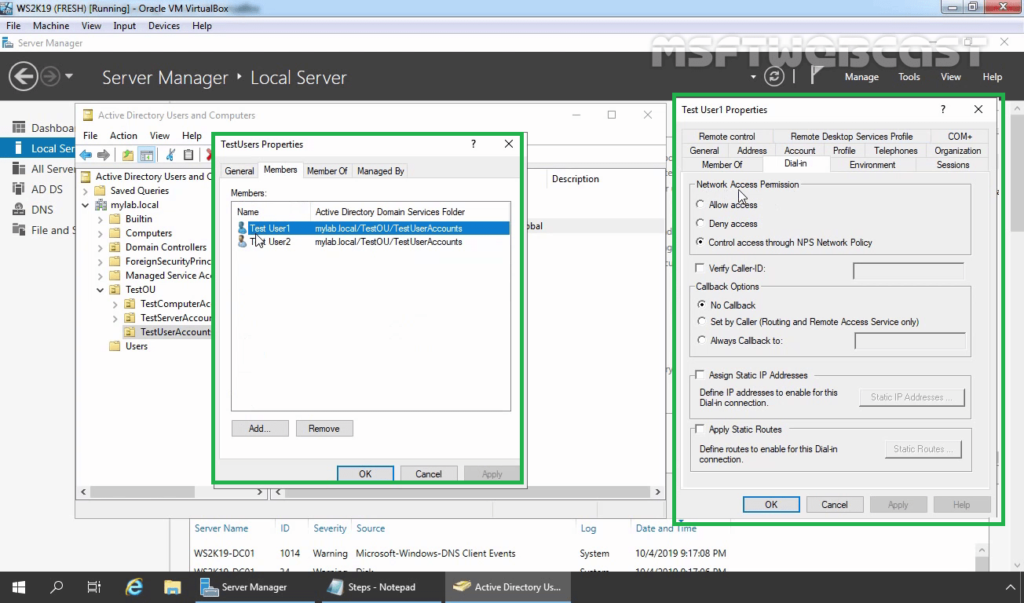
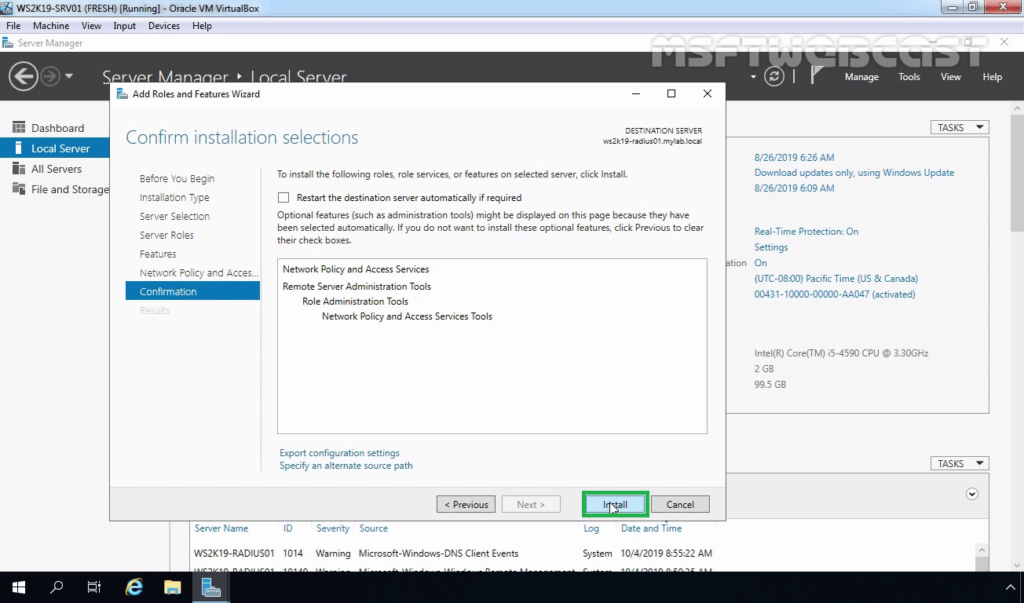
1. At first, we need to create a new security group in the Active Directory domain (for example, TestUsers) in which we will need to add all users that will be allowed to authenticate on VPN Server.
2. Check the users dial-in properties settings.
Install NPS server role on Windows Server 2019:
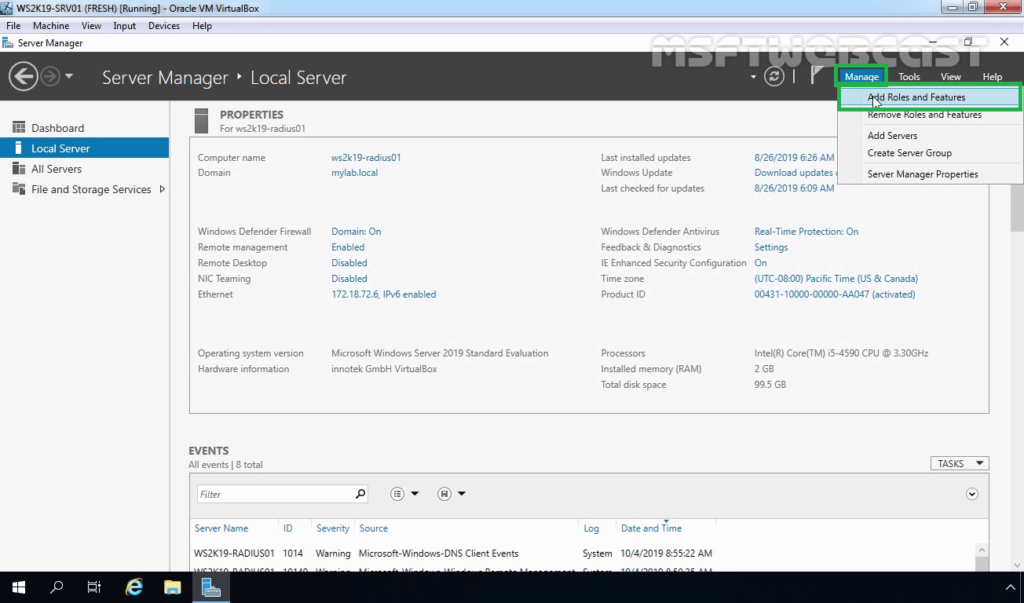
3. Logon to WS2K19-RADIUS01 server with a domain administrator account. Open Server Manager Console.
4. Click on Manage and select Add Role and Features.
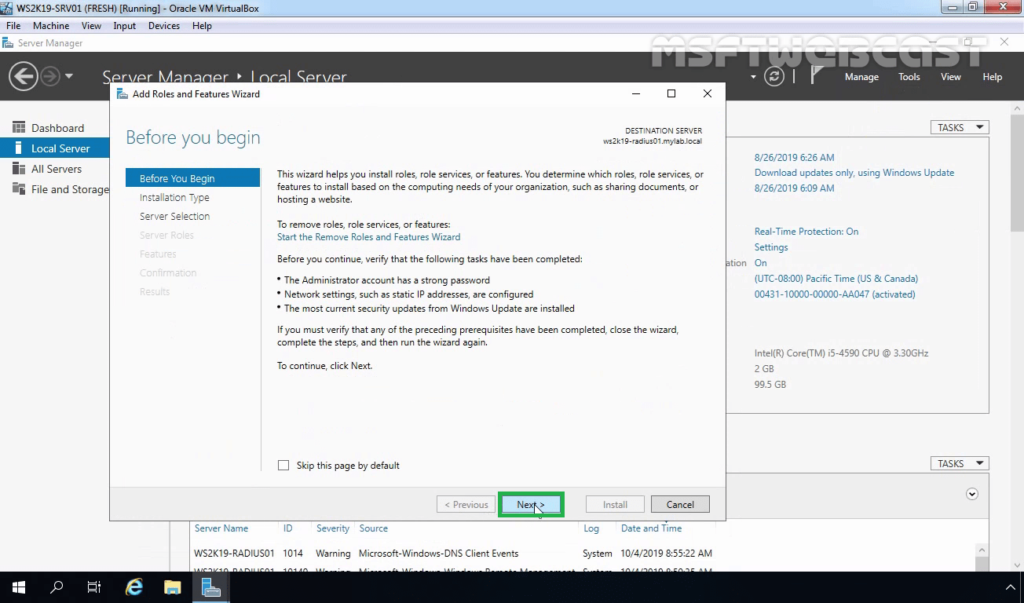
5. On the Before you begin page, click Next.
6. Select Role-based or feature-based installation and click Next.
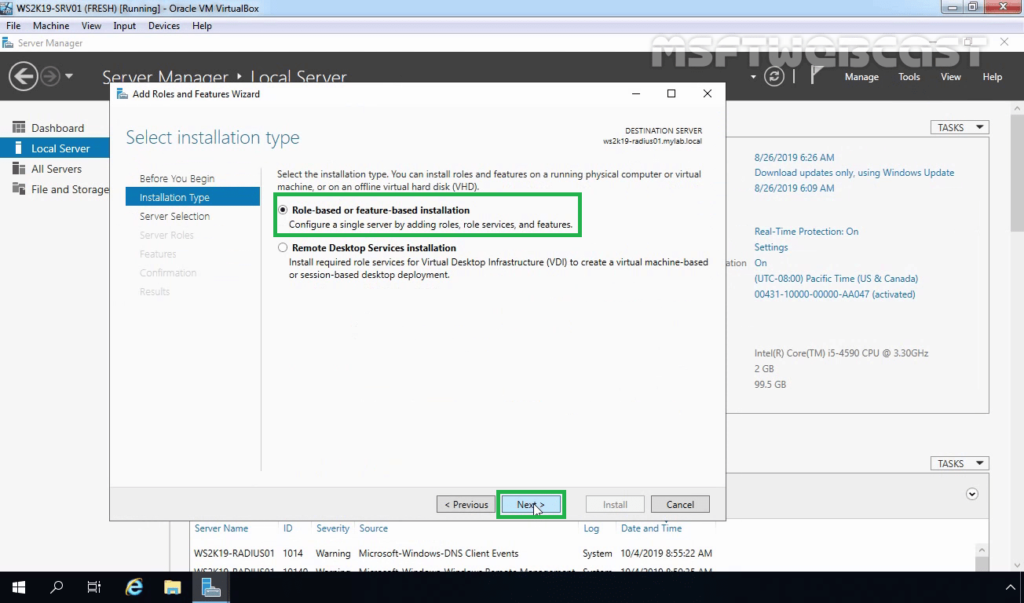
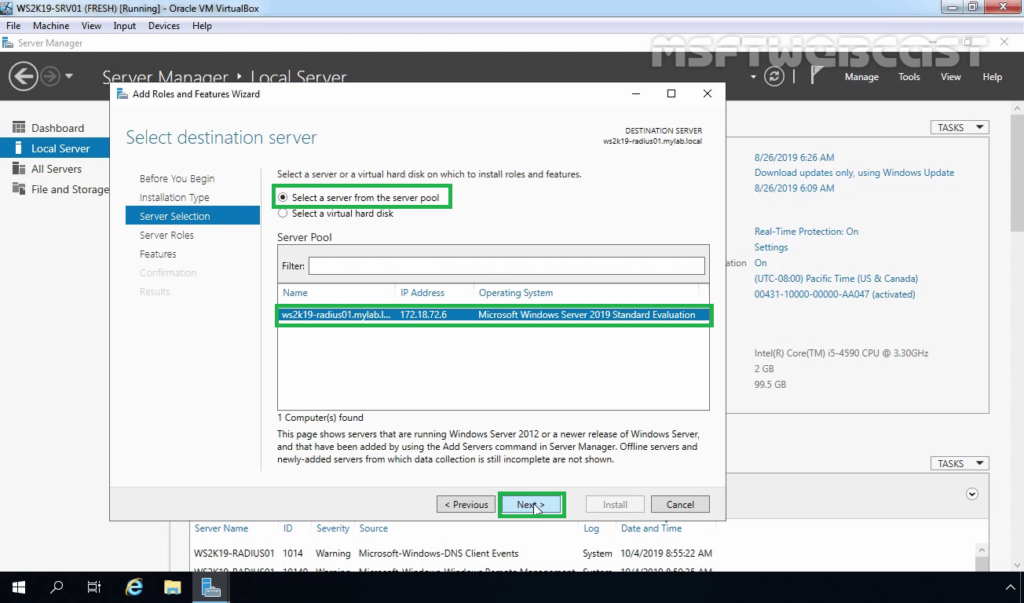
7. Select a server from the server pool on which you want to install the Network Policy and Access Service role, click Next.
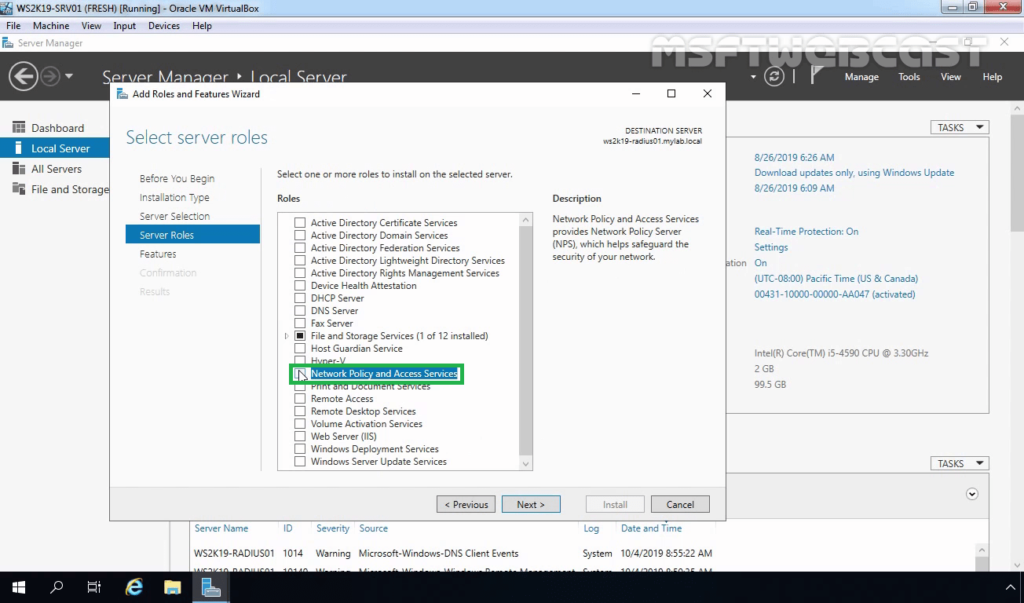
8. On select server roles page, select the Network Policy and Access Services checkbox. Click Next.
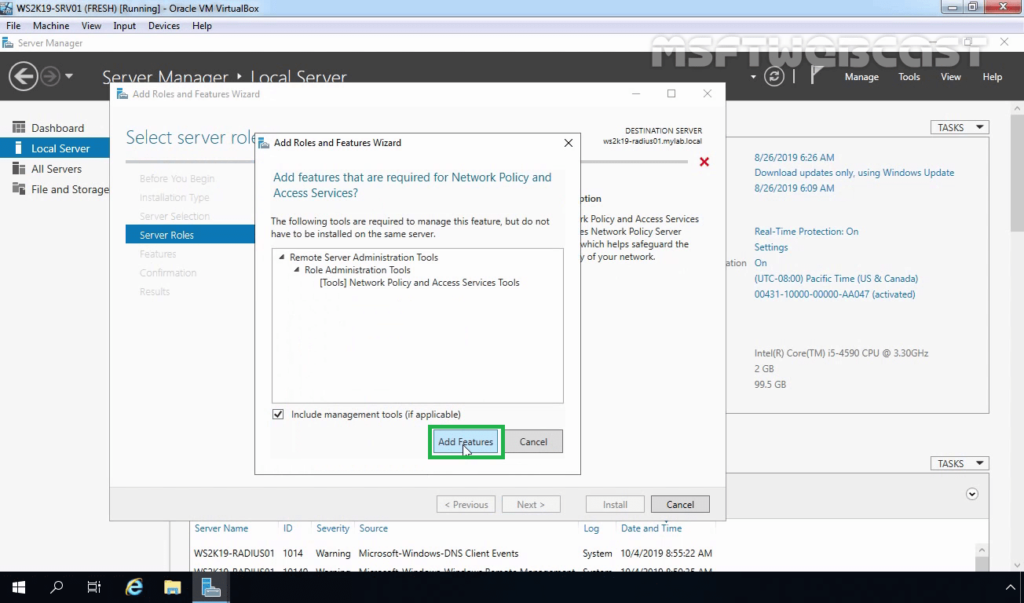
9. Click the Add Features button to add the required feature for NPS. Click Next to continue.
10. On select features, click Next.
11. Read overview information about Network Policy and Access Services and click Next.
12. Click Install and complete the installation process.
Configure RADIUS Server on Server 2019:
Step:1 Register NPS Server in Active Directory:
13. Click Close to finish the installation.
14. After the Network Policy and Access Services role installation is complete, open the Network Policy Server in the Tools menu.
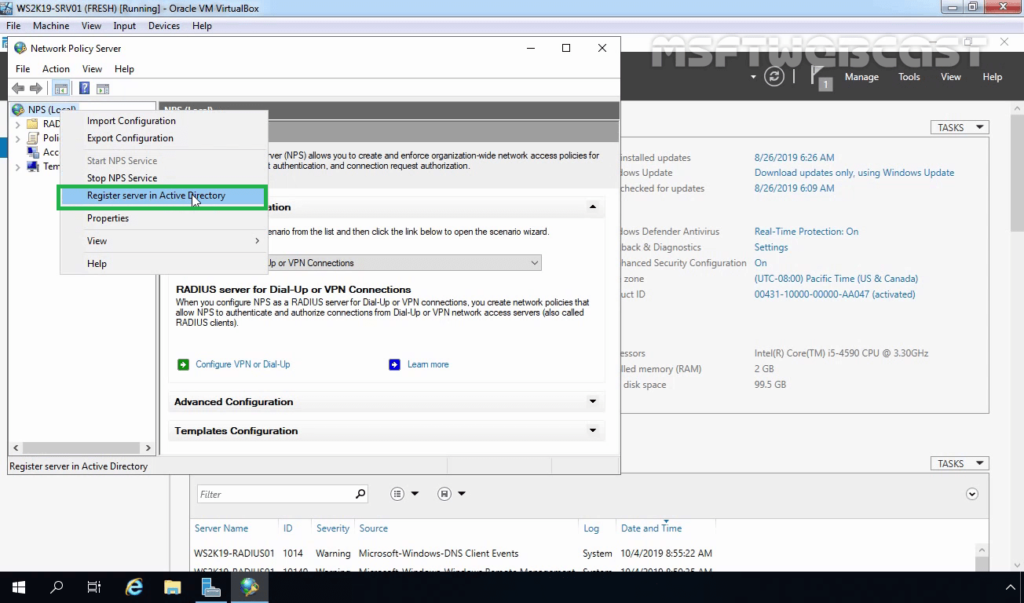
To use the RADIUS server in the Active Directory Domain, we must register it first in the Active Directory.
15. In the NPS management console, right-click on NPS and select Register server in Active Directory.
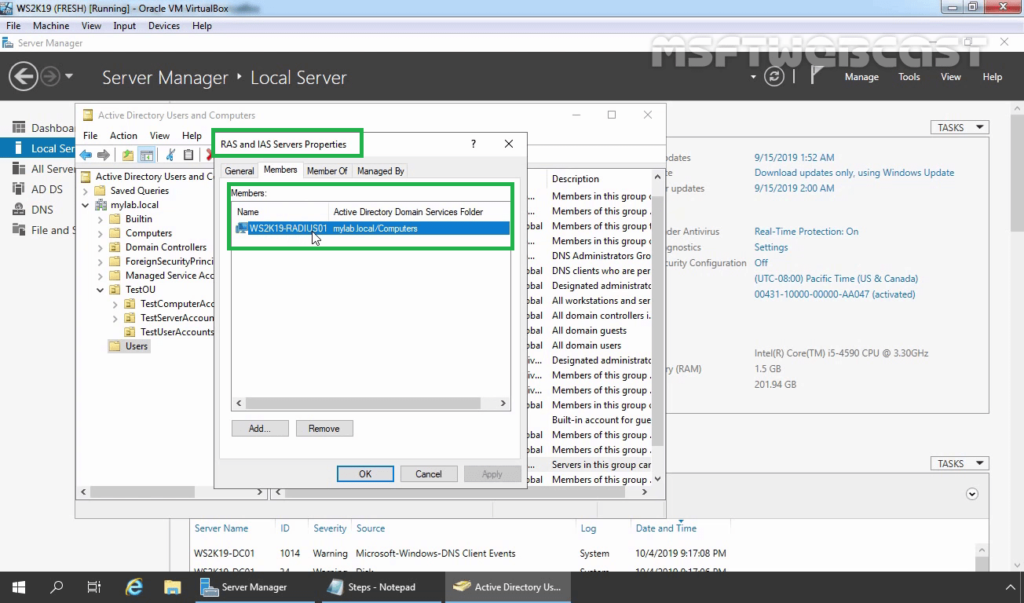
16. Click OK to confirm the successful registration of the RADIUS server in Active Directory.
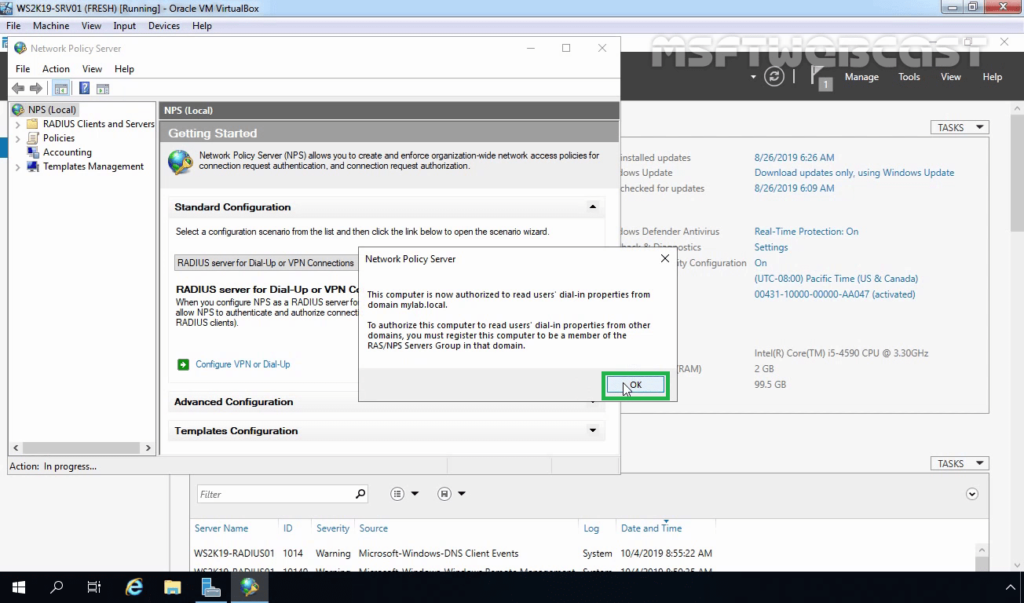
17. Now the RADIUS server has the authority to read the properties of user accounts related to the remote access. The RADIUS server will be added to the built-in domain group RAS and IAS Servers.
Step:2 Add RADIUS Client (VPN) Entry and Create NPS Policies for RADIUS Server:
18. Under Getting Started, select RADIUS Server for Dial-Up or VPN Connection from the drop-down menu. Click on Configure VPN or Dial-Up link to add a new RADIUS client.
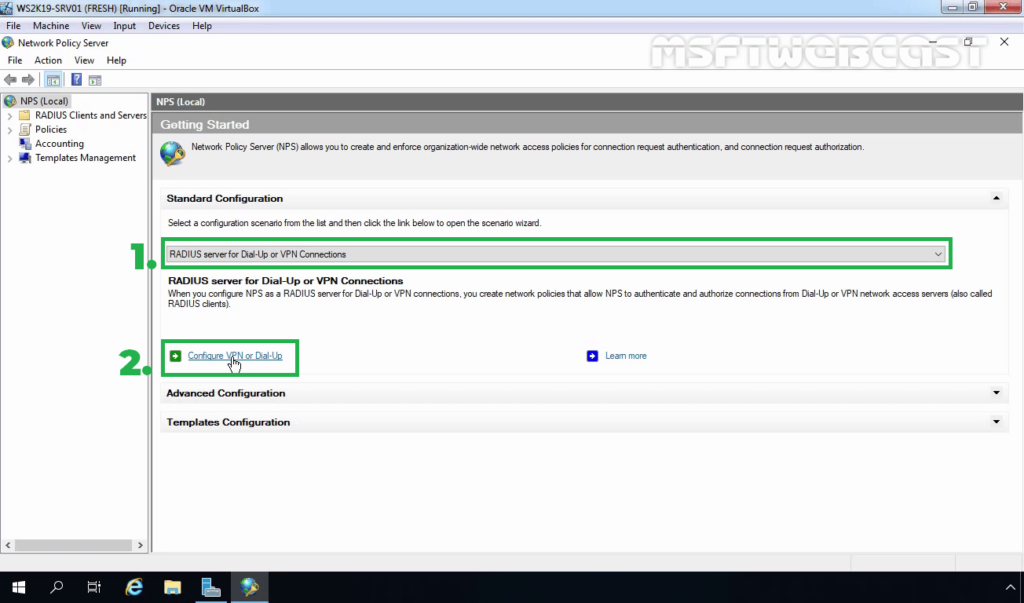
19. Select VPN Connections and specify a meaningful name. Click Next.

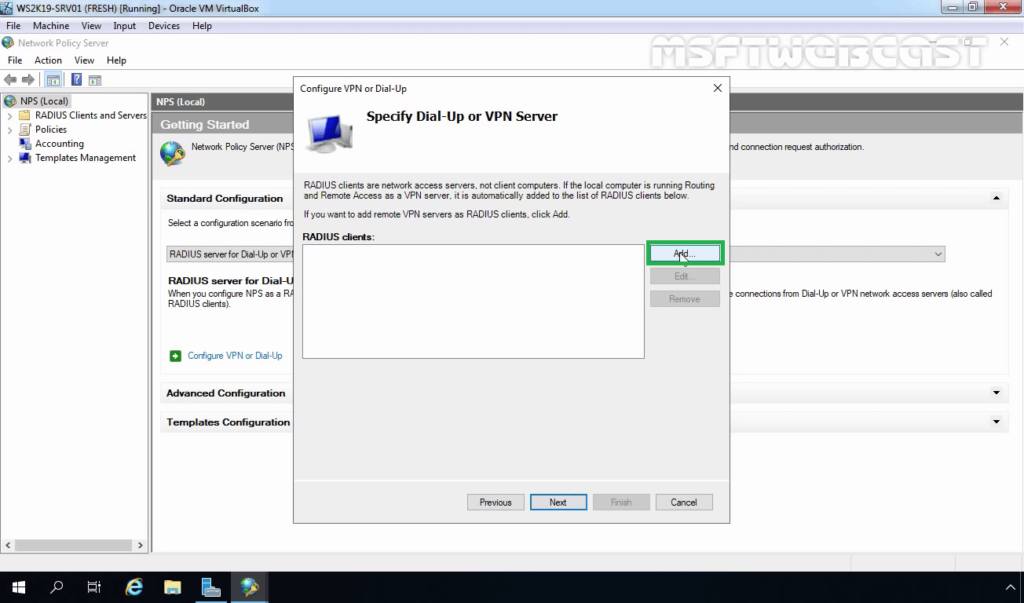
20. Click on the Add button to add remote VPN servers as RADIUS clients.
21. On New Radius Client console, specify the details as mentioned below:
- Friendly Name: To identify the RADIUS client.
- Address: IP Address or FQDN of VPN Server.
- Manual Shared Secret: Type the shared secret password and re-enter to confirm the password.
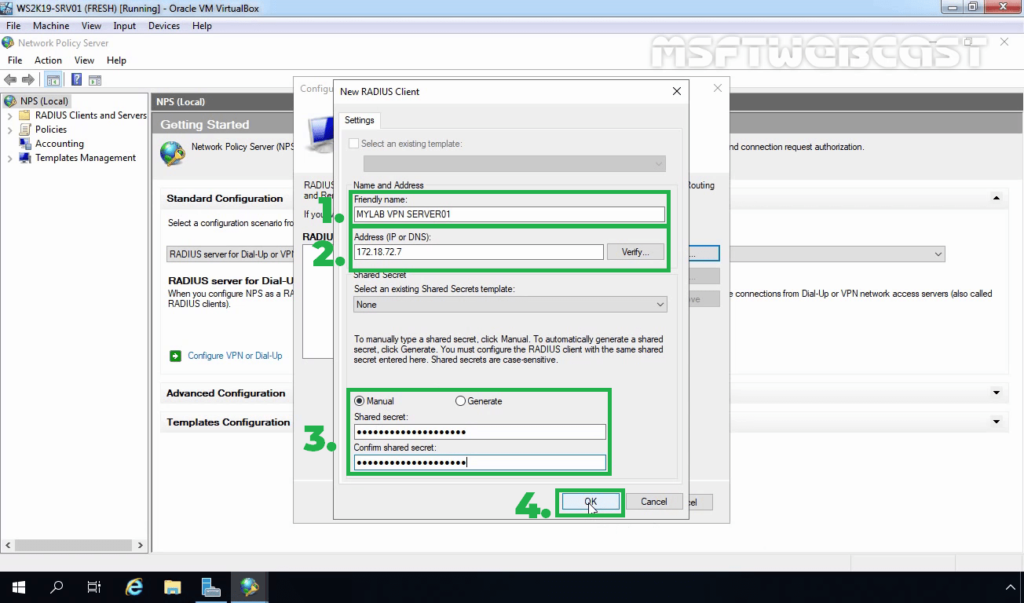
22. Click OK to save the changes.
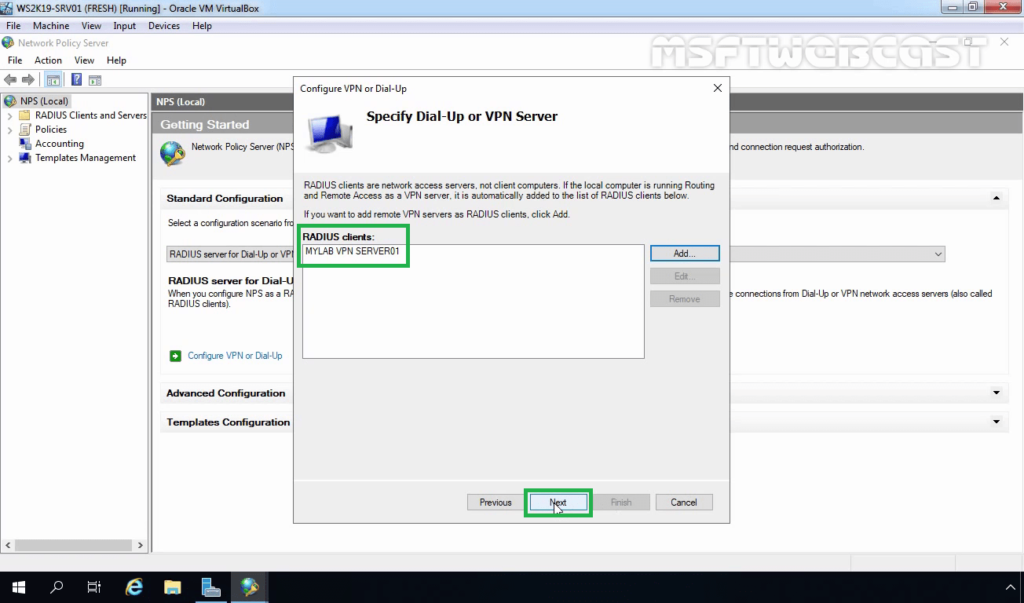
23. Verify Radius client entry and click Next.
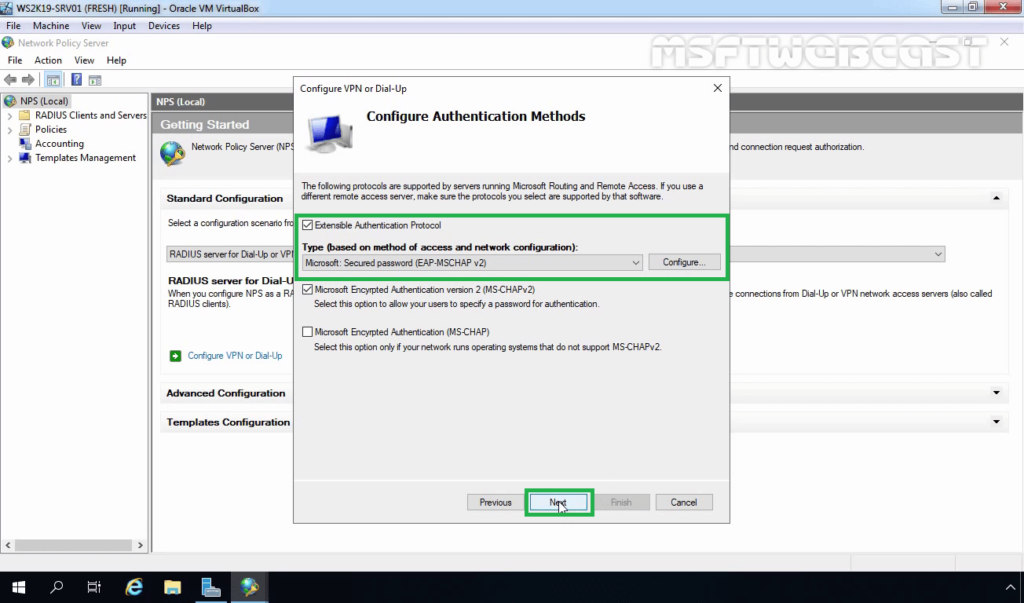
24. Select Extensible Authentication Protocol checkbox and from the drop-down menu select Microsoft: Secured password (EAP-MSCHAP v2). Click Next.
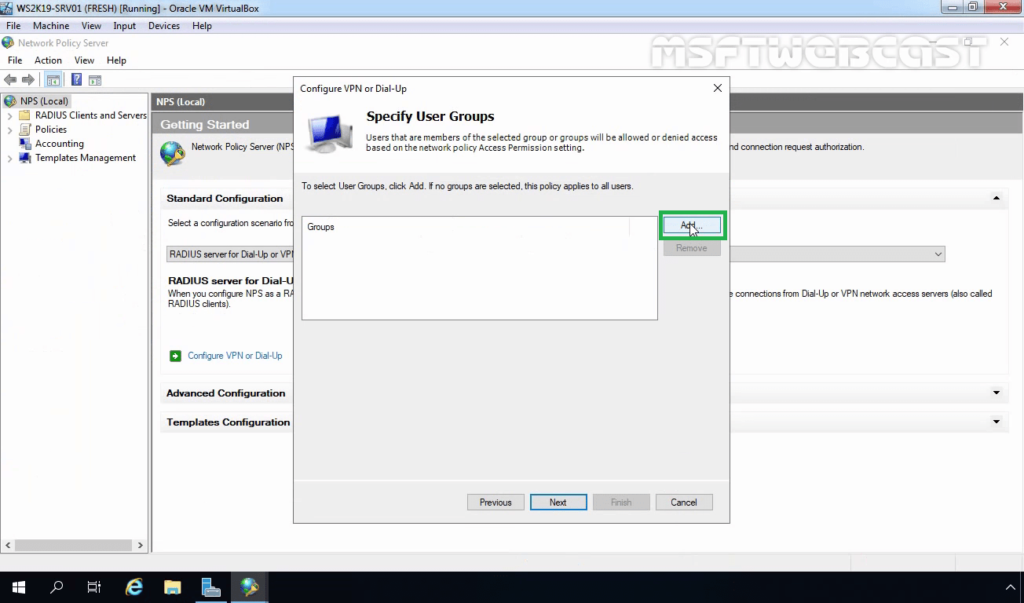
25. Click on Add to specify User Groups as a condition to apply this policy.
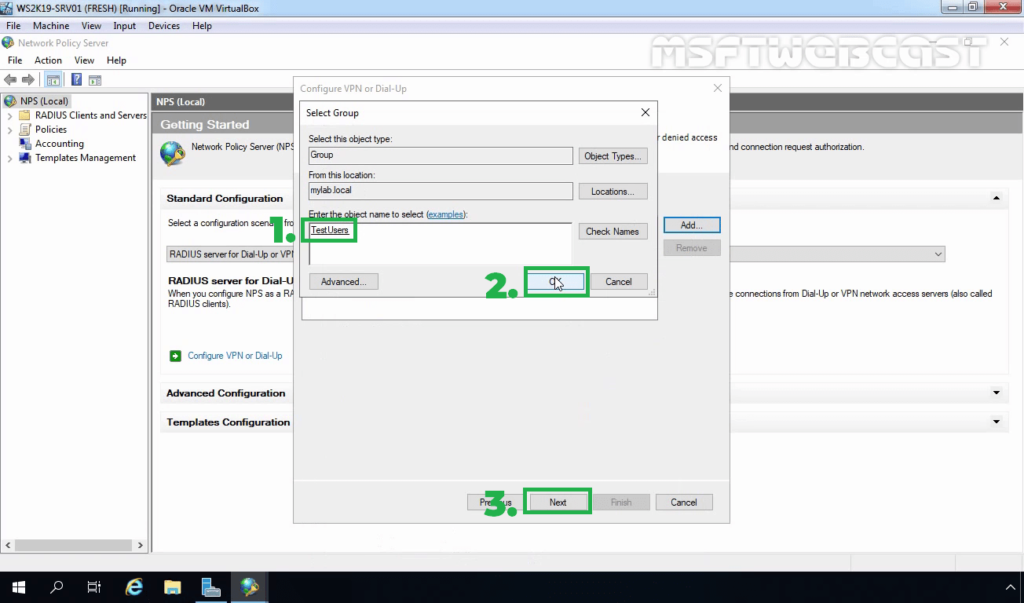
26. Add the security group TestUsers. Click on Next.
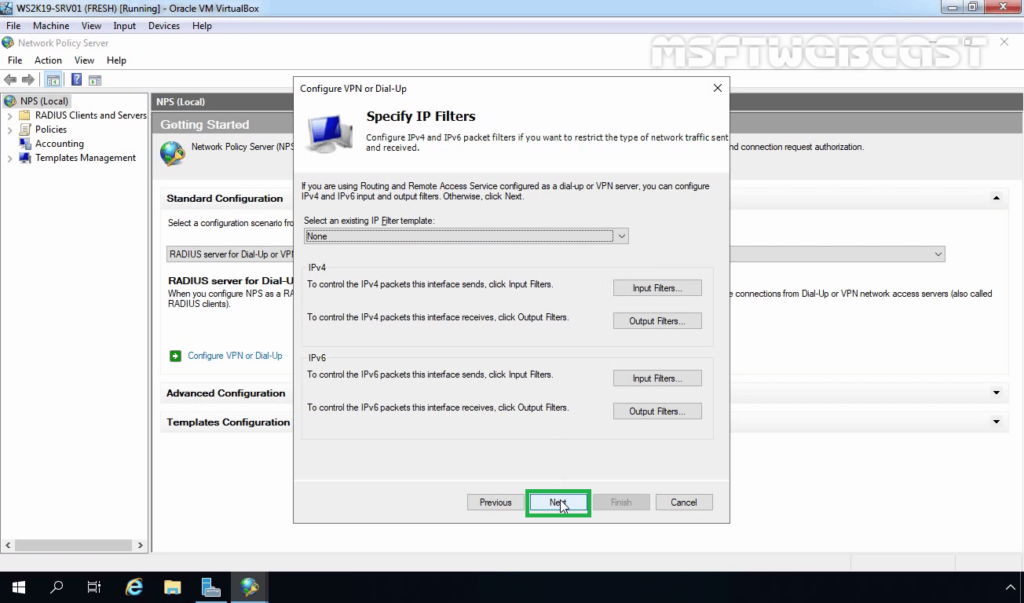
27. On Specify IP Filters console, click Next.
28. Choose the Strongest encryption (128 bit) and click Next.
29. Click Next.
30. Click Finish to add create NPS Policies on the RADIUS Server.
Step:3 Configure RADIUS Server Settings on VPN Server:
After creating the NPS policy, we can proceed to configure our VPN server for authentication on the newly installed RADIUS NPS server.
Already we have configured the VPN server role on Windows Server 2019. You can follow this post for How to Install and Configure the VPN server role on Windows Server 2019.
31. On VPN Server, open Server Manager Console. Click on Tools and select Routing and Remote Access.
32. Right-click on the server name and select Properties.
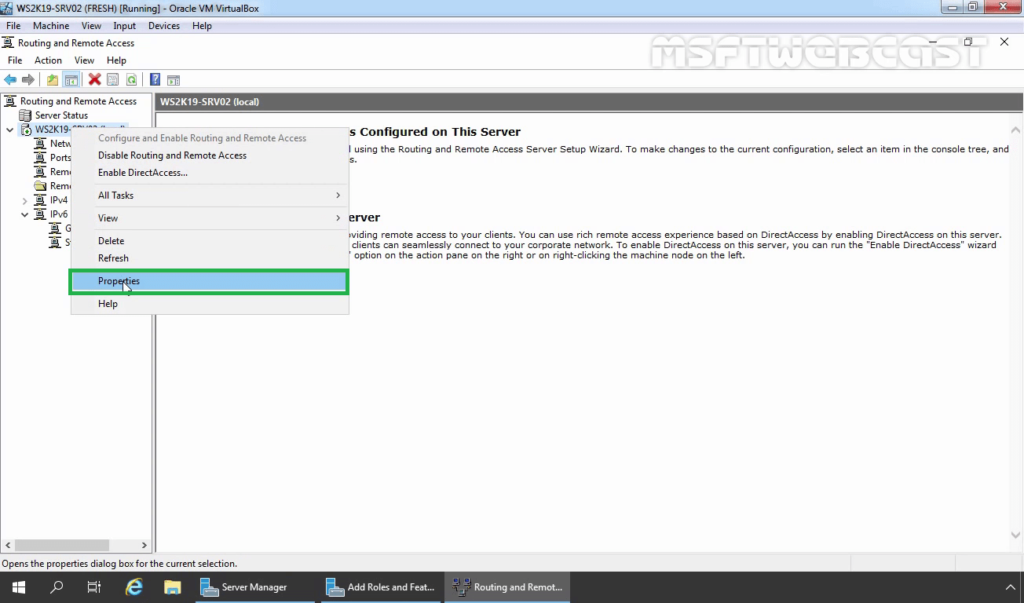
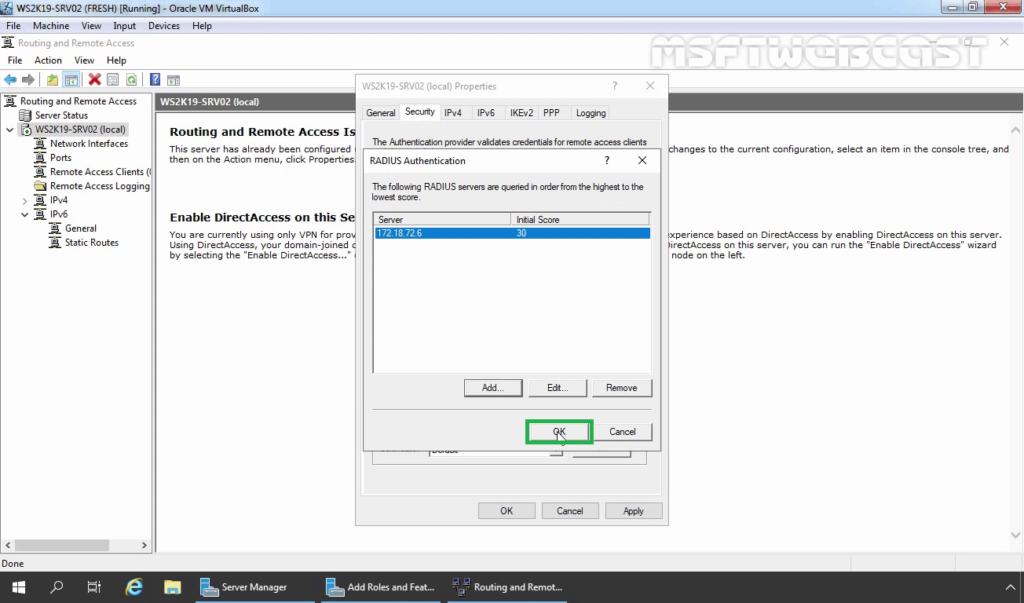
33. Click on Security Tab. Under the Authentication provider, select RADIUS authentication and then click on Configure.
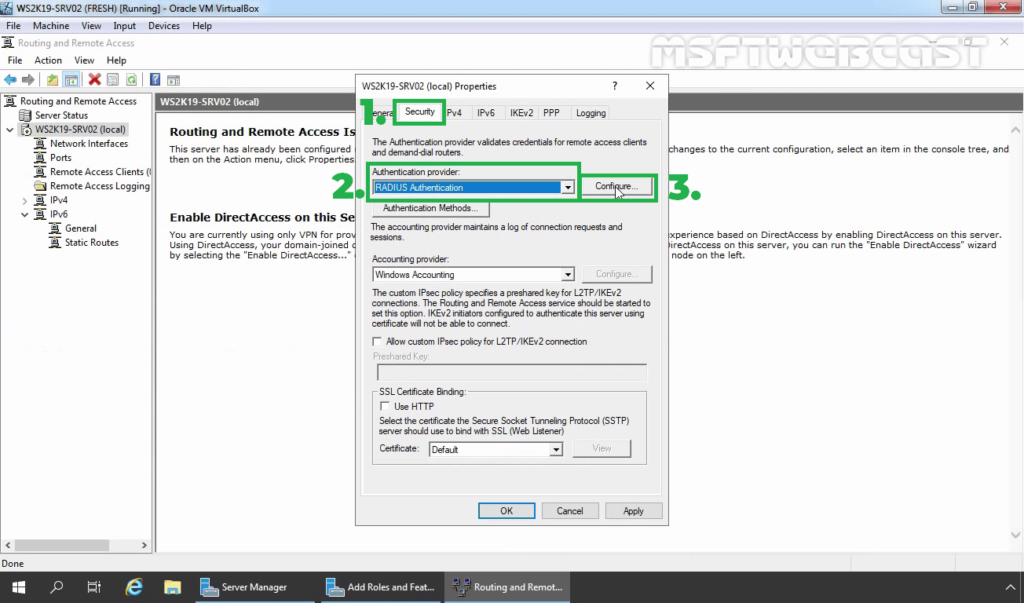
34. Click Add.
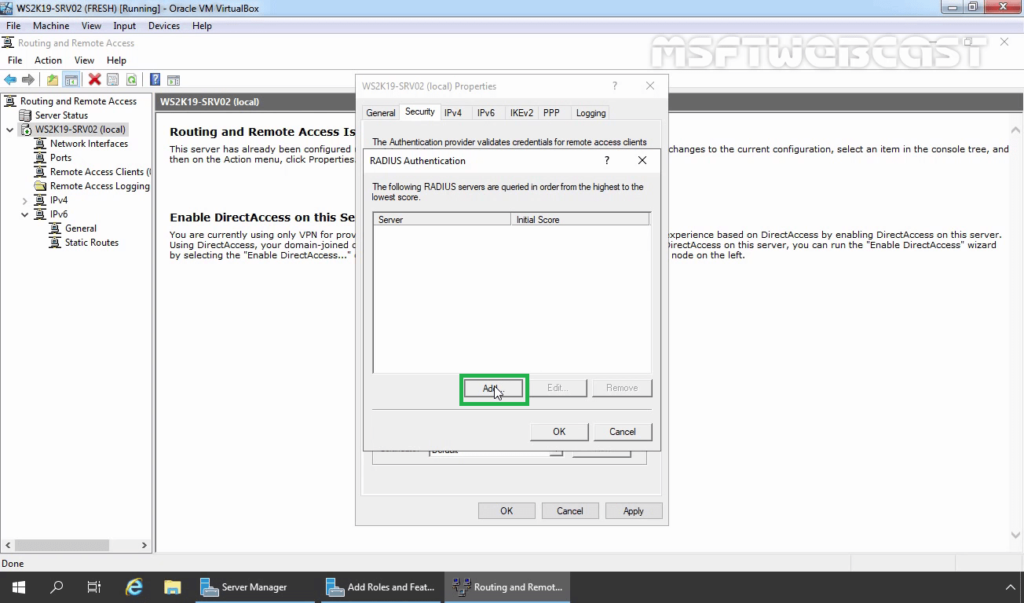
35. Specify RADIUS Server IP Address. Click on Change
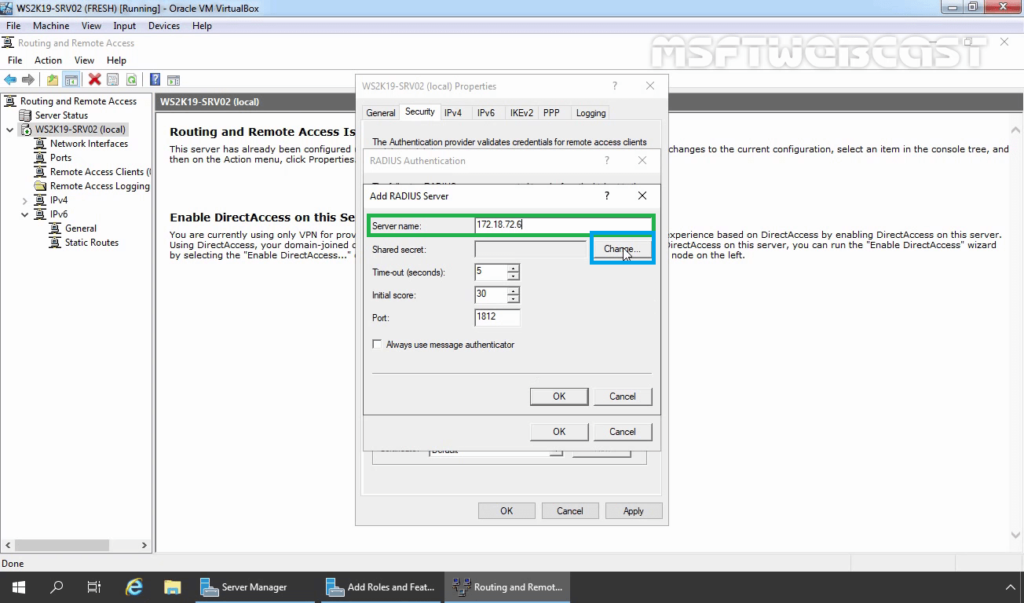
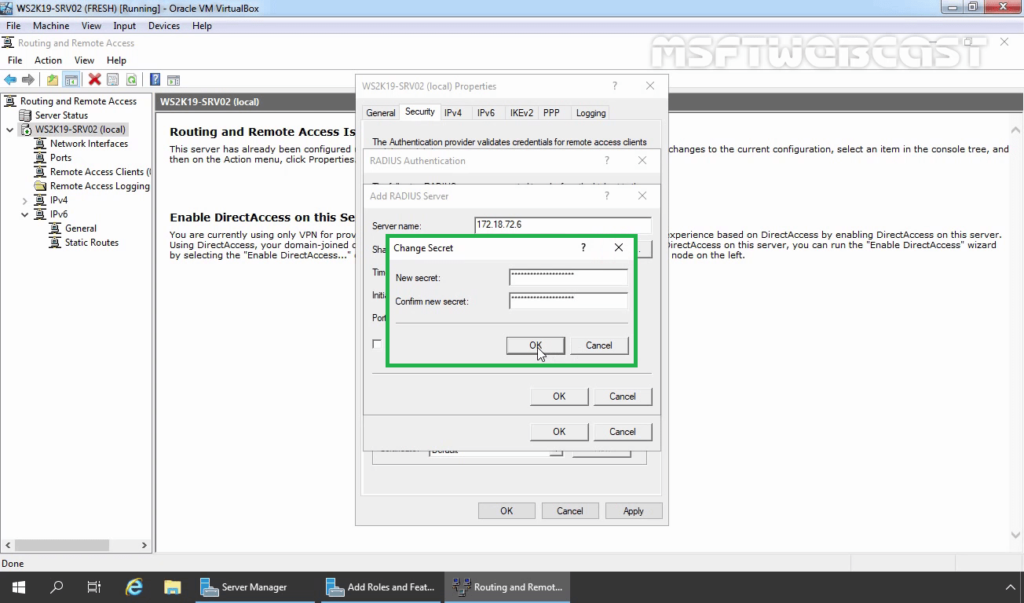
36. Specify Shared Secret password (which we have specified during adding radius client). Click OK.
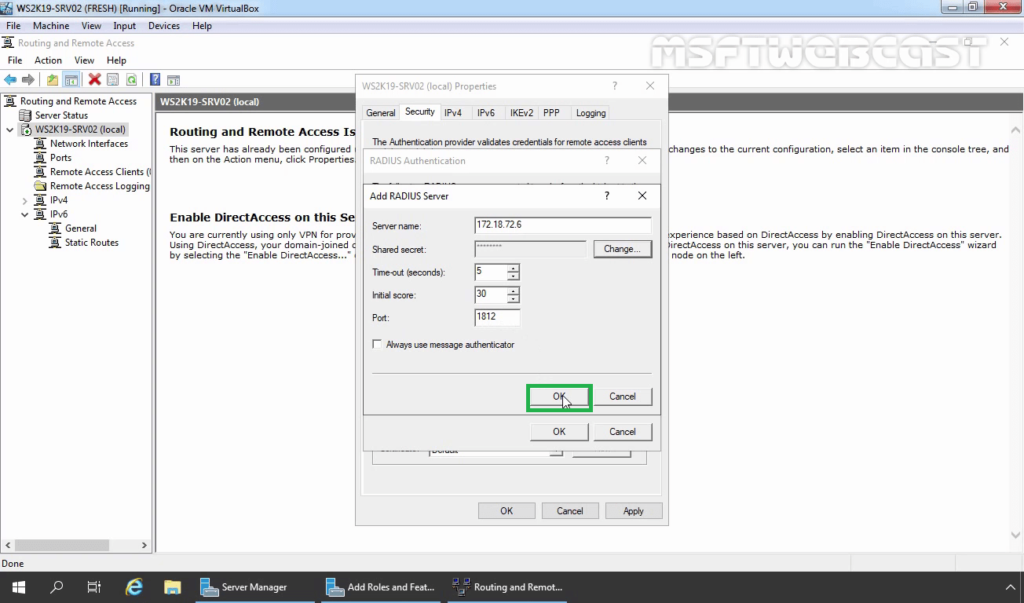
37. Click OK.
38. Click OK.
39. Under the Accounting provider, select RADIUS Accounting and then click on Configure.
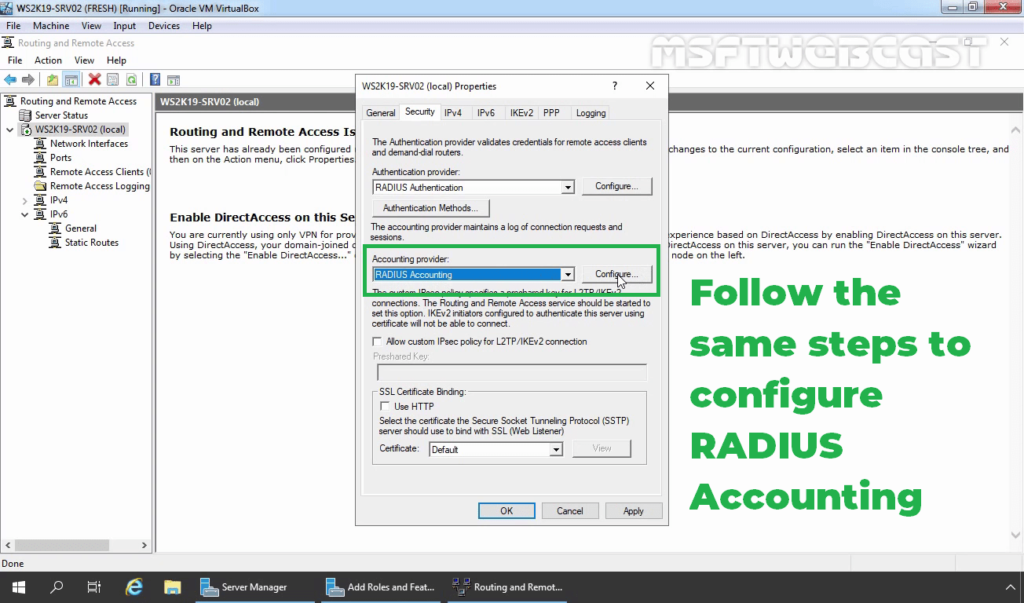
40. Follow the same steps again to specify the RADIUS Server IP Address and Shared Secret password.
41. Click on Apply and OK to save the changes.
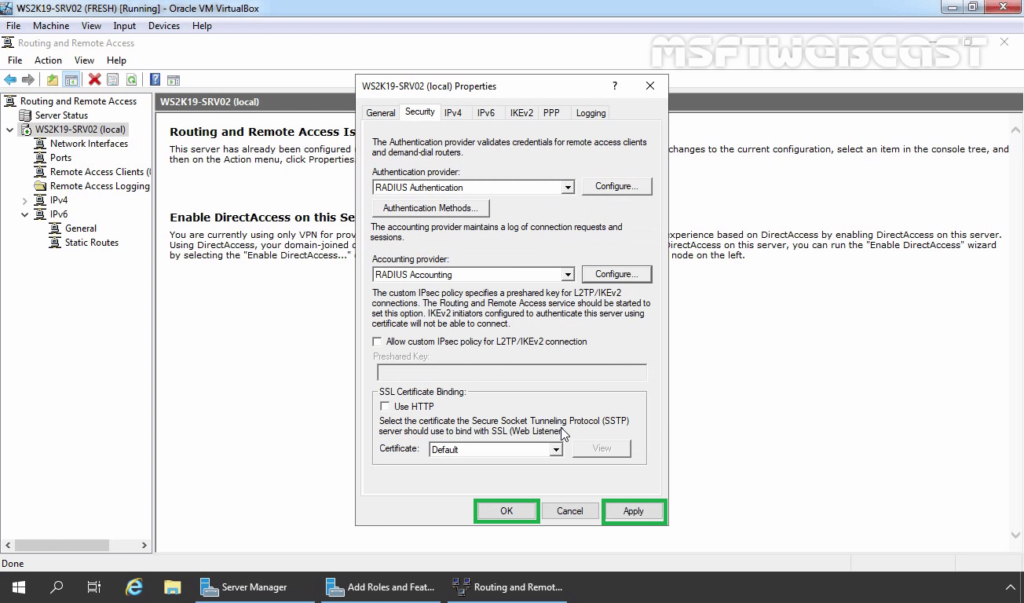
Now our VPN server can use Windows Server 2019 NPS RADIUS server for authentication and accounting without any issue.
That completes the steps on how to configure NPS RADIUS Server for VPN Authentication on Windows Server 2019.
Related Articles:
- How to Install Remote Access Service on Windows Server 2019 Part-1
- How to Install and Configure VPN in Windows Server 2019 Part-2
- Configure NPS for VPN in Windows Server 2019 Part-3
- Configure Port Forwarding and Test VPN Connection on Windows 10 Part-4
Post Views: 4,047

In this tutorial you will be shown how to configure Unifi Controller and Windows Server for RADIUS Wifi access. Why is this useful? Well this allows us to just disable a user account in Active Directory after a termination and the previous employee will no longer have Wifi access. This will prevent Tech Support having to change the Wifi password every time an employee is terminated.
Prerequisites for this tutorial.
- Internal Unifi Controller, I myself am using a UDM-PRO for that function.
- You can use a Cloud Hosted Unifi Controller but you will need to open radius ports on your firewalls wan. Your network firewall should be configured to only allow incoming traffic from your Unifi Hosted Controllers IP address to access the Radius ports.
- Your Unifi equipment should be assigned static IP addresses outside your DHCP Scope. Once done write down the IP addresses alongside their model or unique name.
- Stand up a new physical or virtual server with Windows Server 2019.
- I called my new virtual server HDN-RADIUS. 1vcpu 4GBram 60GB HDD
- Install all updates on new Radius server
- Assign static IP address.
- Join new Radius server to the domain.
- At this point create a Backup or a Virtual Snapshot before moving forward with the tutorial.
- I am a firm believer on keeping ADDC server clean. So do not configure these roles on that server.
Lets get started with installing the required Windows Server Roles!
We will be starting with the newly created Windows Server 2019 and installing the roles we need for radius to work with your Unifi Controller and its Wifi Access Points.
- Open your Windows Server Manager > Click Manage > Click Add Roles and Features.

- Click Next until you reach Server Roles. Enable The following.
- Active Directory Certificate Services
- Network Policy and Access Services
- Remote Access

- Once the items are selected and the prerequisites are approved click Next until you reach AD CS / Roles Services.
- Under Role Services select Certification Authority and click Next.
- Now within Remote Access and Role Services, select DirectAccess and VPN (RAS) and click Next.
- Now click Next all the way through and then Install the Roles and wait until you receive the message that all your roles are installed successfully. Once successful you can close the window.


Lets open up the firewall ports needed.
Here we are going to open up the firewall ports that we need for RADIUS to work with the Unifi Controller.
- From the RADIUS server search for Advanced in the task bar search menu and select Windows Defender Firewall with Advanced Security.

- Locate Inbound Rules > Right Click Inbound Rules > Select New Rule…

- Select Port and click Next.

- Select UDP and provide the Specific Local Ports you want opened which is Port 1812 and then click Next.

- Select Allow the connection and click Next.
- Check mark: Domain, Private and Public. Afterwards click Next.
- Give your Rule a name, I used Radius UDP 1812. Afterwards click Finish.


Lets Configure Active Directory Certificate Services
We are making progress. Here we will be configuring Active Directory Certificate Services, this will be needed for the desktops / laptops that connect to the RADIUS Wifi.
- Open up Window Server Manager. Click on the Flag and then locate Configure Active Directory Certificate Services.

- Under Credentials you will want to specify a Domain Admin Account, then click Next

- Within Role Services check the box for Certification Authority and click Next

- For Setup Type we will want to select the radio button for Enterprise CA, then click Next.
- Within CA Type select the radio button for Root CA and click Next.

- For Private Key we will be providing our own key so we can document it and have it handy. Select the radio button for Create a new private key and then click Next.

- Under Cryptography the defaults can stand as is. Go ahead and click Next.

- Double check your CA Name Settings. They should be similar to mine besides the domain name and server name that I am using of course. Afterwards click Next.

- Under Validity Period you can set your certificate to expire whenever. However my personal preference is 100 years so we do not have to bother with certificate expirations any time soon. Afterwards click Next.
- In Certificate Database section leave these paths the same and click Next.
- Review the Confirmation and select the Configure button.
- Once configured your Results should be Configuration Succeeded. Afterwards click close and we are done with the certification creation.


Lets configure our Network Policy Server
Here we will be configuring the security policies required for our Unifi Controller and Wifi Equipment to communicate with the Radius server and Active Directory / Domain Controller.
- Open Windows Server Manager click Tools > Select Network Policy Server.

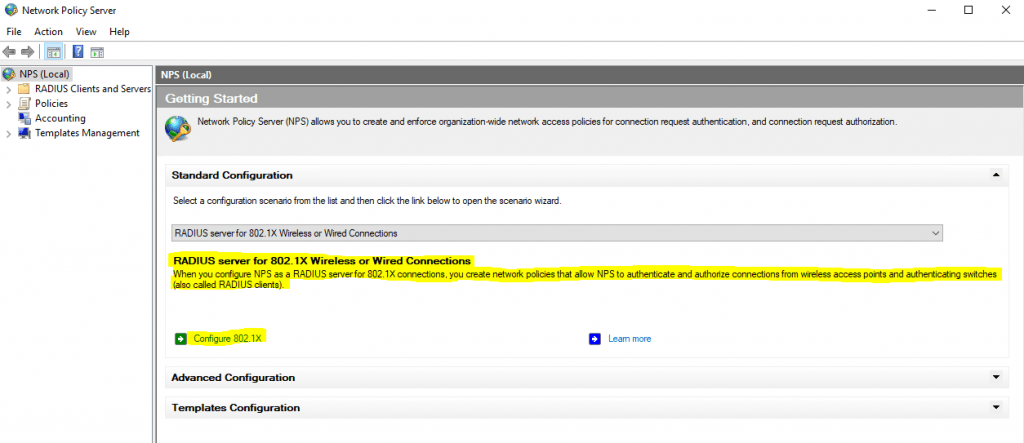
- Now that we have Network Policy Server open click on NPS (Local). You should now see the option to change your Standard Configuration from the dropdown select RADIUS server for 802.1X wireless or Wired Connections. Move forward with clicking on Configure 802.1.X.

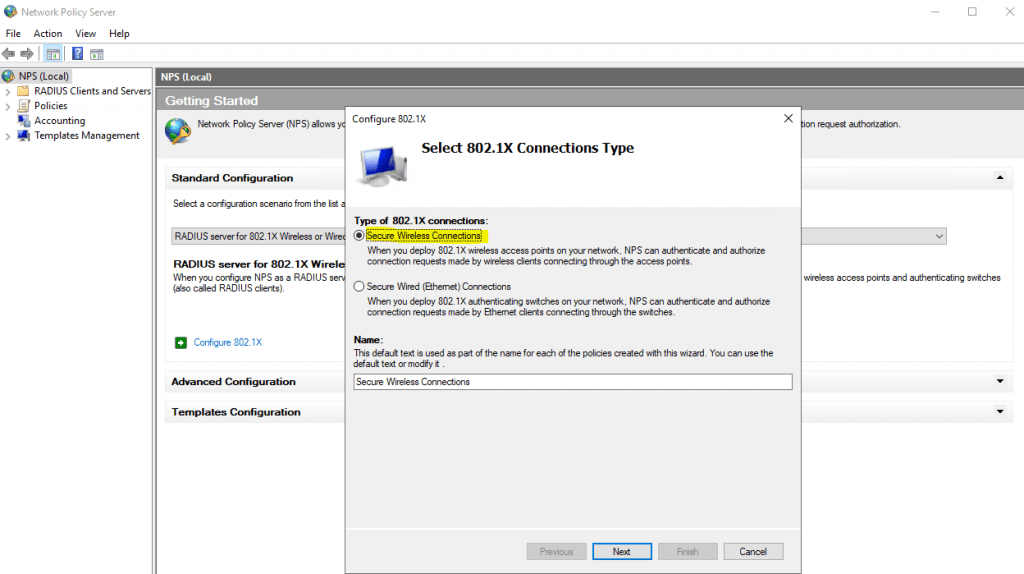
- Once the Configure 802.1X window is open select the Radio button for Secure Wireless Connections. Then click Next.

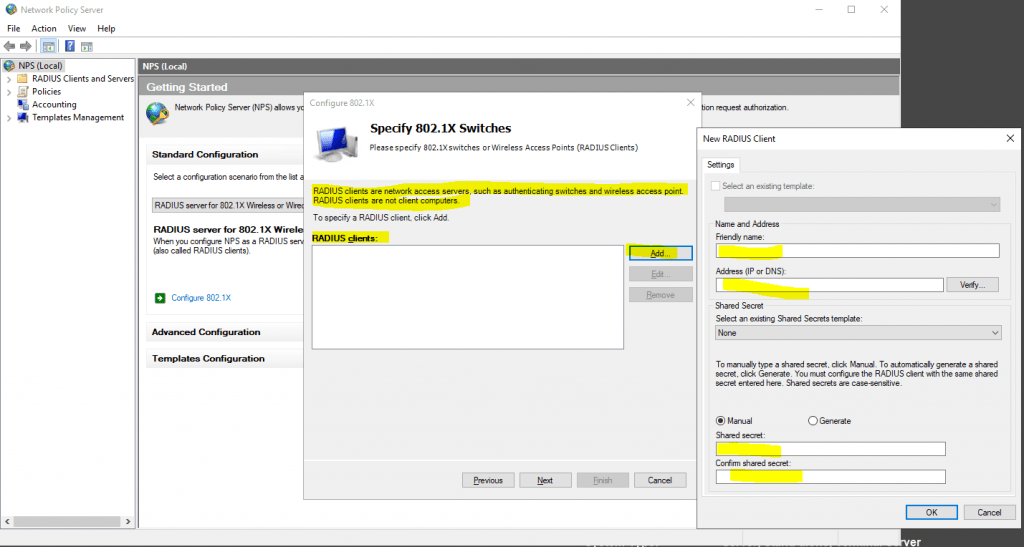
- You will be prompted with a screen to add your New RADIUS Client and here you will want to refer back to your list of equipment’s IP Addresses and Device Names.
- Friendly name use your Unifi Equipment’s model or unique name.
- For Address use the assigned static IP address you gave to the equipment.
- Now for Shared Secret, select the radio button for Manual. Type in a strong password and write it down. This password will be used in the Unifi Controller as well. Afterwards click OK.

- You will have to add all your Unifi Devices as clients to the RADIUS server. This will allow Authentication between the server and the Unifi Devices. Once done adding devices click Next.

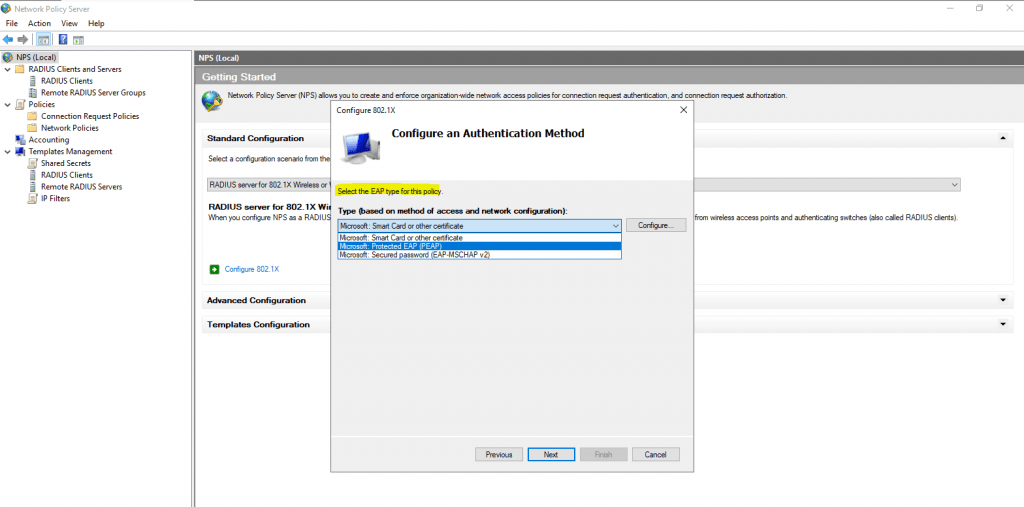
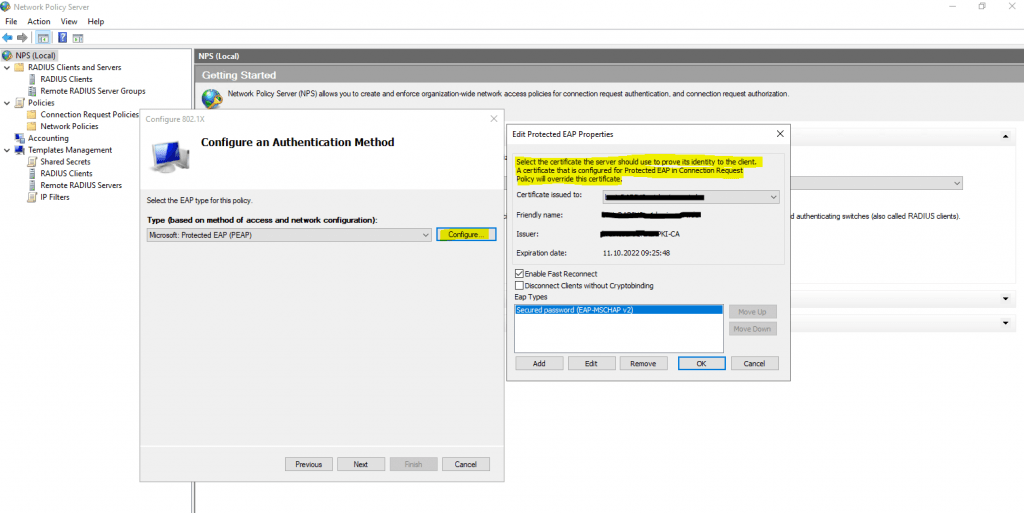
- For Configure an Authentication Method, click on the dropdown window and select Microsoft: Protected EAP (PEAP) afterwards click Next.
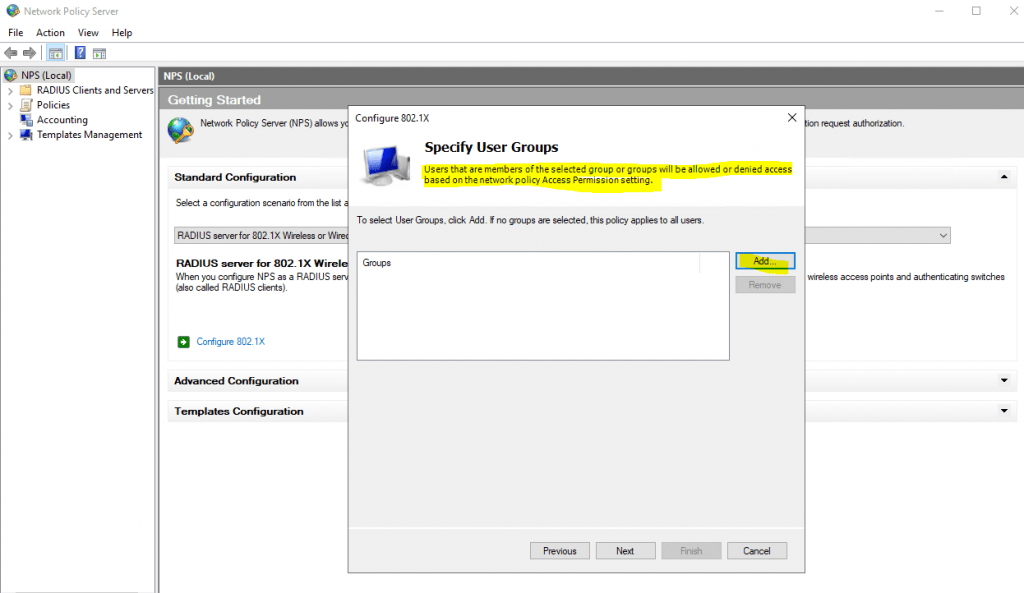
- Under Specify User Groups I am going to add Domain Users to be allowed to access to the RADIUS Authentication. This gives permissions to every domain user to access the Unifi Wireless SSID. You can also create a security group in your AD server and add specific users for access under that group. Once you decide what your preference is click Next.

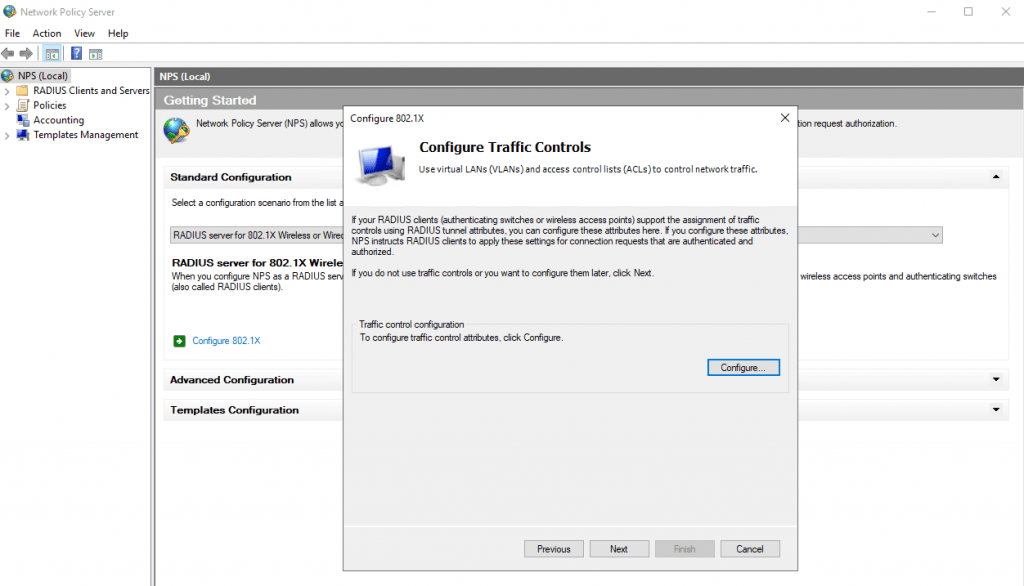
- All can remain the same under Configure Traffic Controls so continue through and click Next.
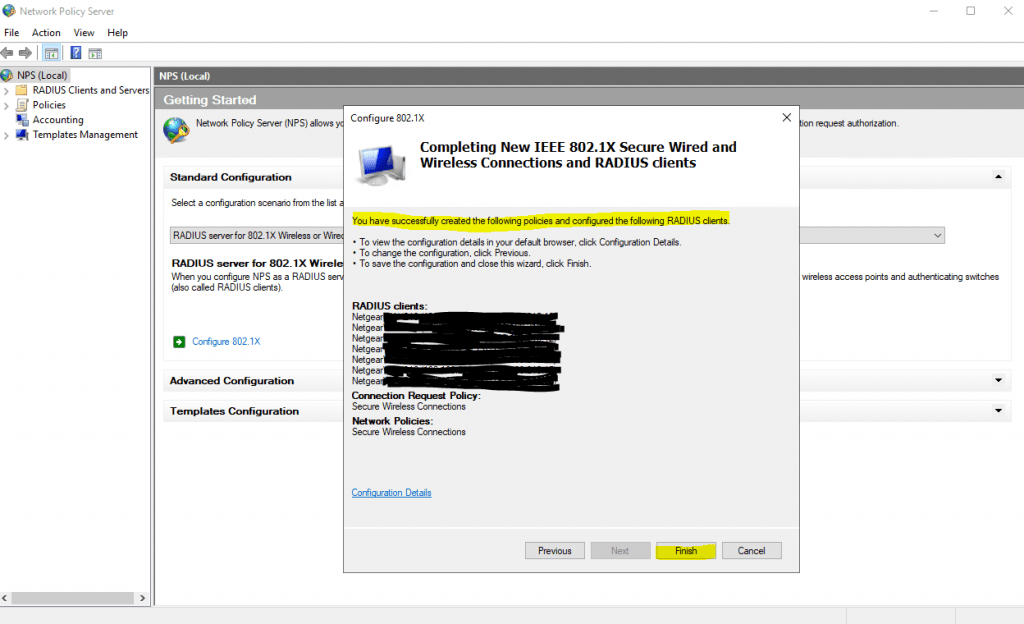
- With the following window you can click Finish.

- We are almost done with Network Policy Server. We will now have to register this new RADIUS server with Active Directory. Open Network Policy Server, right click on NPS (Local) and from the menu select Register server in Active Directory. Now we are finished with this section!


Lets create a Group Policy in your AD/DC server
Now this may vary from everyone AD configuration. I always have an OU where my users and computers would reside in and not within the default locations.
- Log into your AD/DC server and open up Group Policy Management. Right click on the OU where your domain users reside in and from the menu select New GPO. Afterwards Name that GPO with an identifiable name. I will be using Radius. then click the OK button.

- Locate and select your new Radius Policy. Under Security Filtering select the Add button and add Domain Users.

- Right click and Edit your new Radius Policy. Drill down this path Computer Configuration > Policies > Windows Settings > Security Settings > Public Key Policies.
- Within Public Key Policies locate Certificate Services Client – Auto-enrollment. Right click the policy and click Properties.

- In the Certificate Services Client – Auto-enrollment Properties window change the Configuration Model to Enabled form the dropdown window. Afterwards check both boxes and click the OK button.

- Drill down this path Computer Configuration > Windows Settings > Security Settings > Public Key Policies. Locate the folder Automatic Certificate Request Settings. Right click it > find New > select Automatic Certificate Requests.

- You will be prompted to start the Wizard, just click Next.
- Select Computer and then click Next.

- Now click Finish. We have now completed the GPO for domain desktop and laptops to properly obtain a security certificate when they connect to the Unifi Wireless SSID.


Configuring your Unifi Controller and Wireless SSID to use Windows RADIUS Server.
We finally made it to the last few steps which are to configure the Unifi Controller and a Wireless SSID to use the Windows RADIUS Server.
- Log into your Unifi Controller. Locate and click the Gear Icon and then click Advanced Features.

- Scroll down and locate RADIUS section. Now click on Add RADIUS Profile.

- To keep it simple I am group to name this RADIUS profile my server name.

- Scroll down until you find RADIUS Settings and select the expand arrow button.

- Here you will add your RADIUS server’s static IP address and the Shared Secret you wrote down when configuring the Unifi Devices in the Network Policy Server. Keep the ports the same for both Authentication Servers and RADIUS Accounting Servers. Once done click Apply Changes button.

- Now we will move forward with configuring a new Wireless SSID. Locate and click on WiFi in the Unifi Controller.

- Locate the Wifi Section and click the Add New WiFi Network button.

- Name your SSID. Select your Internal network from the dropdown and then expand Advanced Tab by clicking the dropdown arrow.

- Scroll down until you find the Security section and expand it by clicking the drop down arrow.

- Here you will first select your security protocol WPA-2 Enterprise. Afterwards under RADIUS Profile, from the dropdown select the profile you recently named and created. Select PMF is Required and finally click the Apply Changes button.


That was exciting! We are finally finished. Your Unifi wireless access points should now be transmitting an SSID. To connect to this SSID you will have to use your domain User Name and Password. Go ahead and give it a shot.
How To Auto Deploy RADIUS WiFi With Group Policy
Windows devices can’t connect to RADIUS 802.1X Wifi
Advanced VPN Configuration: How to configure Windows Server and UDM-PRO UniFi Controller for RADIUS VPN access