React JS -React is an open-source component-based front-end JavaScript library. It is used to create fast and interactive user interfaces for web and mobile applications. It is easy to create a dynamic application in React because it requires less coding and offer more functionality. It is used by big MNC and fresh new startups
Features of React:
- Reusable Components: A single React app consists of many components each component have their own logic and code but we can easily reuse components any number of time hence reducing the developers time and increasing the efficiency of work
- Debugging: React app can be easily debug using “react developer tools”.It’s a browser extension that can be used for both chrome as well as Firefox.
Installation Reactjs on Windows:
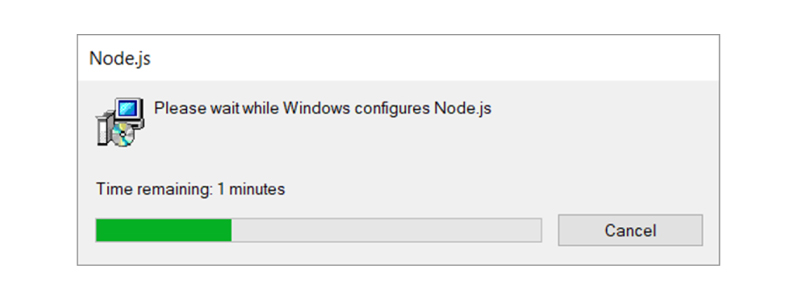
Step 1: Install Node.js installer for windows. Click on this link. Here install the LTS version (the one present on the left). Once downloaded open NodeJS without disturbing other settings, click on the Next button until it’s completely installed.
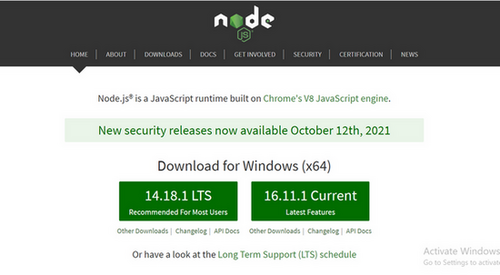
Install the 14.18.1 LTS
Step 2: Open command prompt to check whether it is completely installed or not type the command –>
node -v
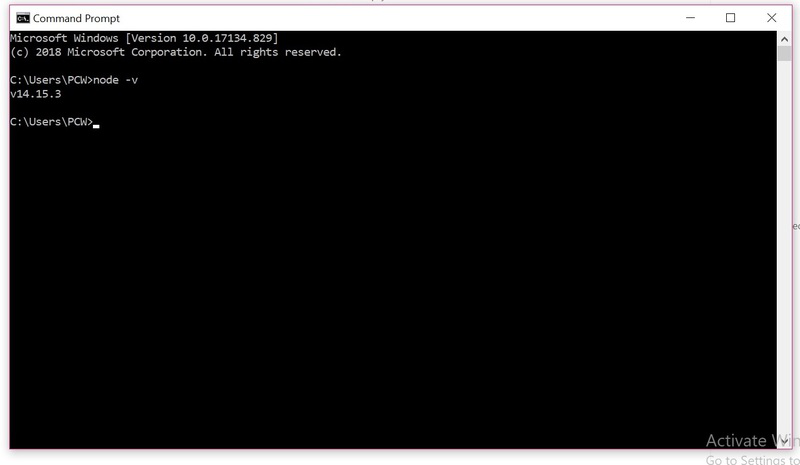
Node Version is v14.15.3
If the installation went well it will give you the version you have installed
Step 3: Now in the terminal run the below command:
npm install -g create-react-app
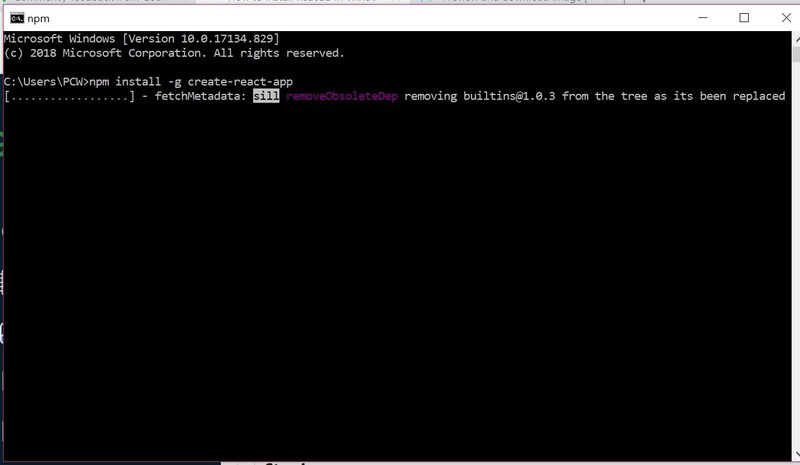
Installation will take few seconds
It will globally install react app for you. To check everything went well run the command
create-react-app --version
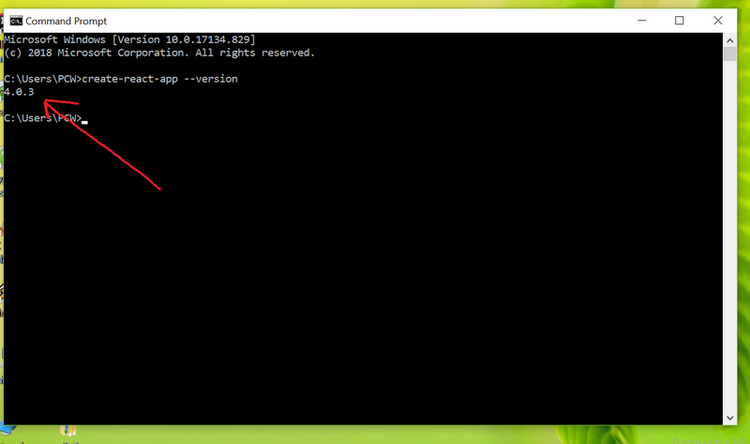
version 4.0.3
If everything went well it will give you the installed version of react app
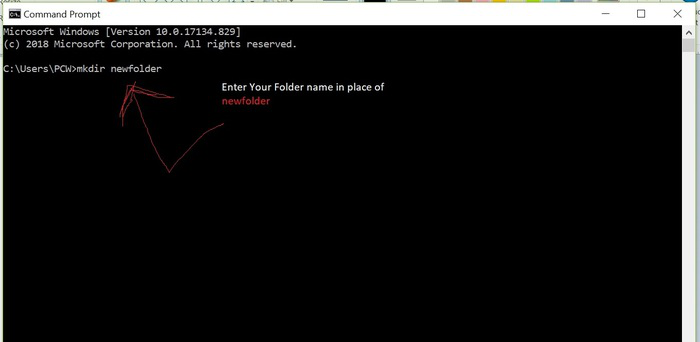
Step 4:Now Create a new folder where you want to make your react app using the below command:
mkdir newfolder
Note: The newfolder in the above command is the name of the folder and can be anything.
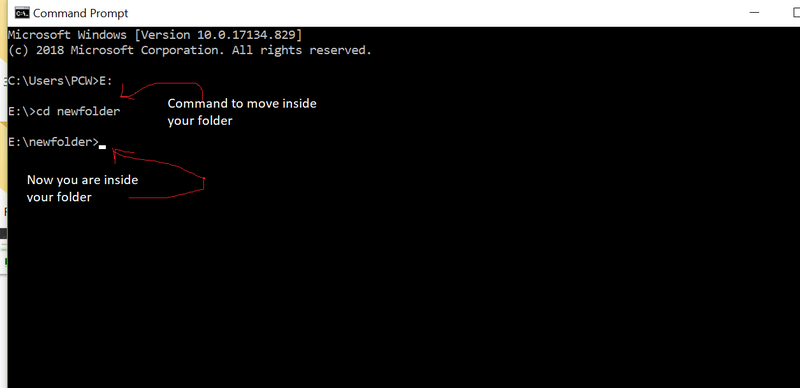
Move inside the same folder using the below command:
cd newfolder (your folder name)
Step 5: Now inside this folder run the command –>
create-react-app reactfirst YOUR_APP_NAME
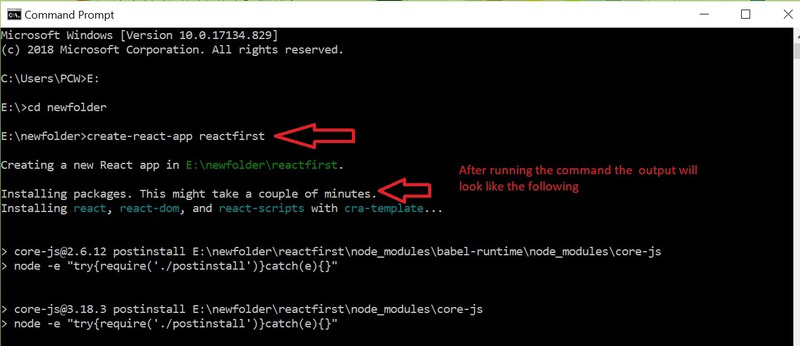
It will take some time to install the required dependencies
NOTE: Due to npm naming restrictions, names can no longer contain capital letters, thus type your app’s name in lowercase.

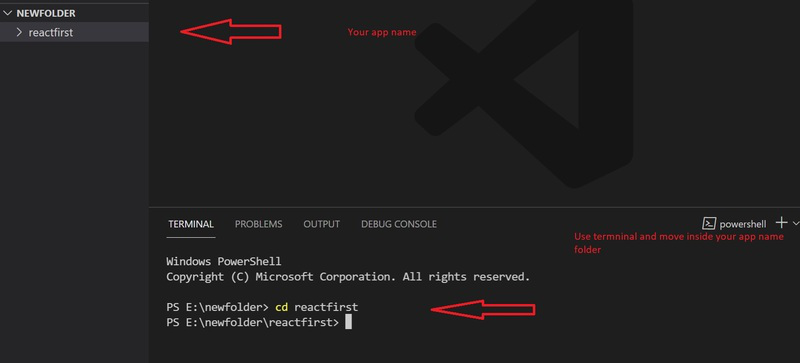
Step 6: Now open the IDE of your choice for eg. Visual studio code and open the folder where you have installed the react app newfolder (in the above example) inside the folder you will see your app’s name reactapp (In our example). Use the terminal and move inside your app name folder.Use command cd reactapp (your app name)
Step 7: To start your app run the below command :
npm start
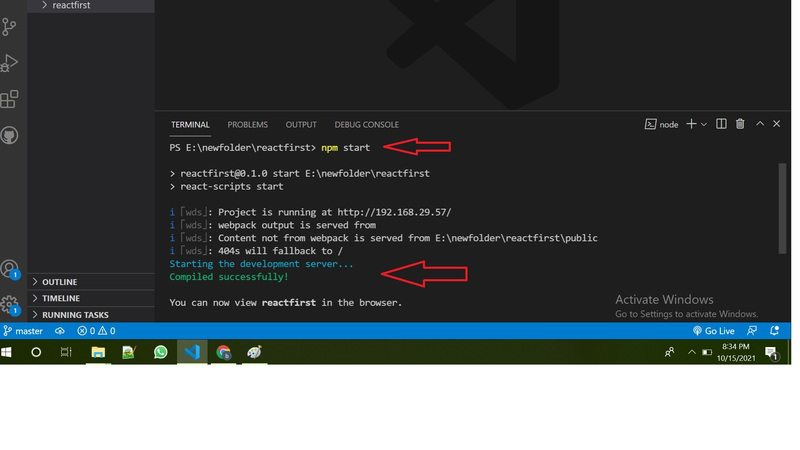
Once you run the above command a new tab will open in your browser showing React logo as shown below :
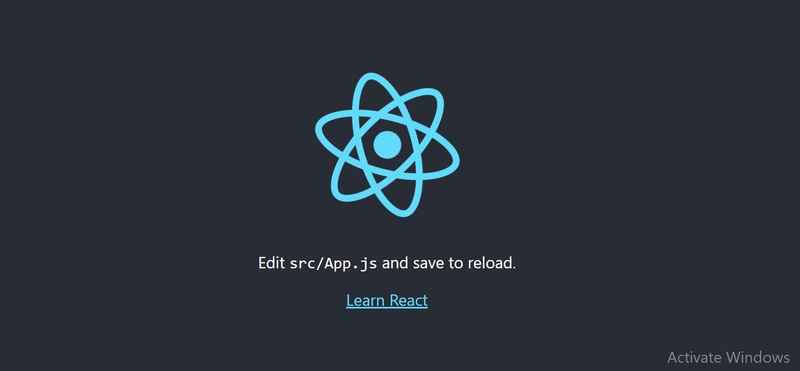
Congratulation you have successfully installed the react-app and are ready to build awesome websites and app
React JS -React is an open-source component-based front-end JavaScript library. It is used to create fast and interactive user interfaces for web and mobile applications. It is easy to create a dynamic application in React because it requires less coding and offer more functionality. It is used by big MNC and fresh new startups
Features of React:
- Reusable Components: A single React app consists of many components each component have their own logic and code but we can easily reuse components any number of time hence reducing the developers time and increasing the efficiency of work
- Debugging: React app can be easily debug using “react developer tools”.It’s a browser extension that can be used for both chrome as well as Firefox.
Installation Reactjs on Windows:
Step 1: Install Node.js installer for windows. Click on this link. Here install the LTS version (the one present on the left). Once downloaded open NodeJS without disturbing other settings, click on the Next button until it’s completely installed.
Install the 14.18.1 LTS
Step 2: Open command prompt to check whether it is completely installed or not type the command –>
node -v
Node Version is v14.15.3
If the installation went well it will give you the version you have installed
Step 3: Now in the terminal run the below command:
npm install -g create-react-app
Installation will take few seconds
It will globally install react app for you. To check everything went well run the command
create-react-app --version
version 4.0.3
If everything went well it will give you the installed version of react app
Step 4:Now Create a new folder where you want to make your react app using the below command:
mkdir newfolder
Note: The newfolder in the above command is the name of the folder and can be anything.
Move inside the same folder using the below command:
cd newfolder (your folder name)
Step 5: Now inside this folder run the command –>
create-react-app reactfirst YOUR_APP_NAME
It will take some time to install the required dependencies
NOTE: Due to npm naming restrictions, names can no longer contain capital letters, thus type your app’s name in lowercase.
Step 6: Now open the IDE of your choice for eg. Visual studio code and open the folder where you have installed the react app newfolder (in the above example) inside the folder you will see your app’s name reactapp (In our example). Use the terminal and move inside your app name folder.Use command cd reactapp (your app name)
Step 7: To start your app run the below command :
npm start
Once you run the above command a new tab will open in your browser showing React logo as shown below :
Congratulation you have successfully installed the react-app and are ready to build awesome websites and app
React is one of the popular JavaScript libraries for building user interfaces. It is maintained by Facebook and a community of individual developers and companies. In this article, we will discuss the steps to install React on Windows 10.
React can be used as a base for the development of single-page or mobile applications. It is a powerful library to deal with complex projects in an easy manner.
React Native, one of the most lovable hybrid mobile application development frameworks is also based on React.
Here I am going to explain the installation and set up of a React App on Windows 10 platform. As React is a library, we can start using it inside our project just by importing it.
But here we are going to install the create-react-app tool(a tool built for us to create react applications) and build a react app using it on Windows 10 Operating System.
For visual learners, the video below will help you to do this installation faster. It is completely based on this blog post.
For others, please follow the below steps to install React on Windows 10.
Prerequisites
To continue with this article, the reader must know the basics of working with the Command Prompt/ Powershell in a Windows 10 system.
What we will learn?
Here in this article, we will learn the following things:-
- Install Node.js on a Windows 10 system
- Creating a new React project using create-react-app tool
- Running the React app we created
Install Nodejs
Node.js actually provides a runtime environment to execute JavaScript code from outside a browser. NPM, the default package manager for Nodejs is used for managing and sharing the packages for any JavaScript project. React uses Node.js and NPM for the management of dependencies and runtime.
In this tutorial, we are going to install the create-react-app tool using the Node Package Manager(NPM). Create-react-app is a tool developed by the React.js team that makes React’s setting up easier.
So first, it needs to install Nodejs on our system. NPM will be installed with Nodejs. The current stable version of Node.js can be downloaded and installed from the official website that is given below.
https://nodejs.org
Download the latest version and install it. Here we can choose the LTS or the latest version. Because both of the version supports React.
After the installation, check the versions using the below commands.
node -v
npm -v
This will show the installed versions of Node.js and NPM.
Note:- If you are really a beginner in this field, the guide Steps to install Node.js and NPM on Windows 10 will help you.
Create a New React Project
After the successful installation of Nodejs and NPM, we can create a new React project by temporarily installing the create-react-app tool. Execute the below command on the Command prompt window.
npx create-react-app awesome-project
Here NPX will temporarily install create-react-app and create a new react project named awesome-project. Note that the awesome-project is the name I have chosen for my react project.
Running the Application
So the app we created can run locally on our system with the npm start command.
cd awesome-project
npm start
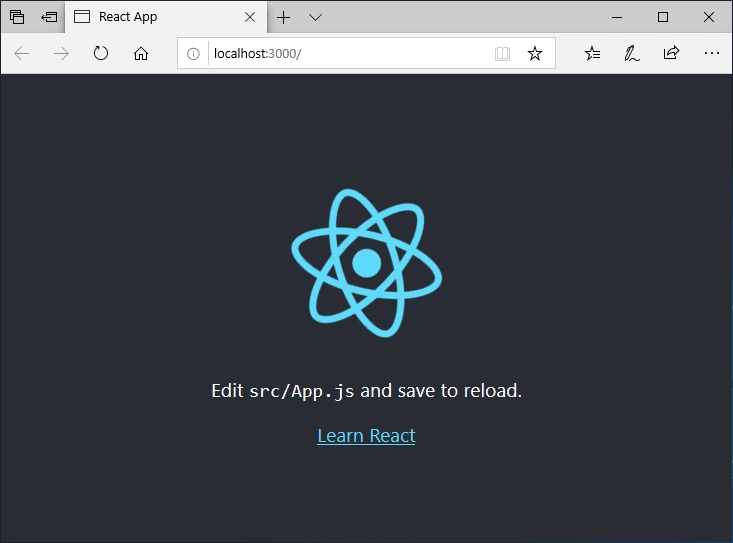
This will open up the react application in a new tab of our browser with the below URL.
http://localhost:3000

Note:- If port 3000 is busy with another process, the app will start in port 3001 or any other port available.
Note: We recommend using Visual Studio code as the source-code editor for working with React projects.
Summary
So, in this article, we have discussed the steps to Install React on a Windows 10 system. These steps are verified by our team and 100% working.

В этом примере руководства вы узнаете, как установить приложение React и создать первое приложение в Windows 10.
В этом руководстве вы шаг за шагом узнаете, как установить инструмент create-react-app с помощью Node Package Manager (NPM). Create-react-app — это инструмент, разработанный командой React.js, который упрощает настройку React в нашей системе.
Прежде всего, необходимо установить Node.js в нашей системе Windows 10. Итак, следуйте инструкциям по загрузке установщика Node.js для Windows 10. Давайте воспользуемся последней версией долгосрочной поддержки (LTS) для Windows и выберем 64-разрядную версию с помощью иконки установщика Windows.
Текущую стабильную версию Node.js можно загрузить и установить с официального сайта node.js, который указан ниже.
https://nodejs.org/
Скачайте последнюю версию и установите ее. Вы можете выбрать LTS или последнюю версию.
После завершения установки node js откройте свой терминал и выполните следующую команду, чтобы проверить версии node js и npm:
node -v
npm -v
Как установить React JS с помощью приложения Create React в Windows 10
Есть два способа установить React и создать проекты. Вы можете поступить следующим образом:
Способ 1
Шаг 1 — Создайте каталог
Прежде всего, откройте свой терминал и выполните следующую команду, чтобы создать каталог проекта:
mkdir first-react-app
Шаг 2 — Перейдите в папку проекта
Затем перейдите в каталог, откройте терминал и выполните следующую команду:
cd first-react-app
Шаг 3 — Создайте файл package.json
На этом этапе следующая команда проведет вас через создание файла package.json
npm init
Шаг 4 — Установите React и другие модули
На этом шаге выполните следующие команды, чтобы установить React в вашем приложении Windows 10:
npm install --save reactnpm install --save react-domСпособ 2
Шаг 1. Установите инструмент Create-React-App
Нам нужно установить инструмент с именем create-response-app, использующий NPM как глобальный. Этот инструмент используется для простого создания приложений React из нашей системы.
npm install -g create-react-app
Шаг 2 — Создание нового проекта React
После успешной установки create-react-app мы можем создать наше первое приложение.
create-react-app first-react-project
Здесь first-react-project — это имя, которое я выбрал для своего нового проекта.
Шаг 3 — Запуск приложения
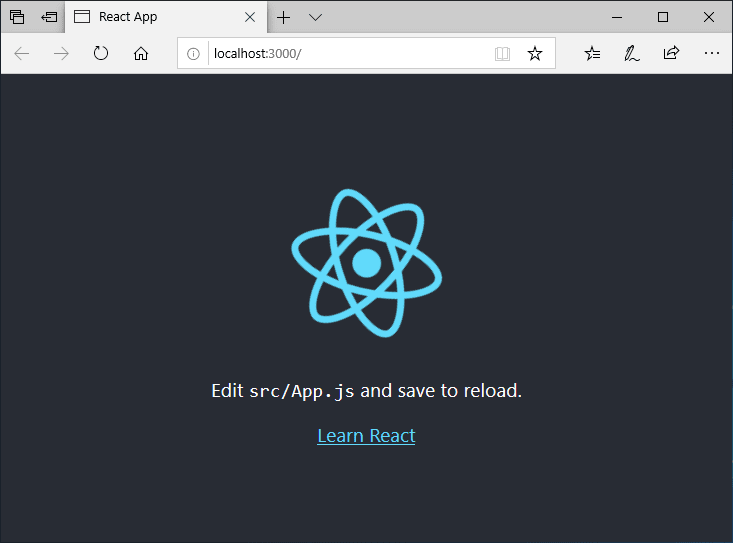
Созданное нами приложение может запускаться локально в нашей системе с помощью команды npm start.
cd first-react-project
npm start
Это откроет приложение для React на новой вкладке нашего браузера с указанным ниже URL-адресом.
http://localhost:3000/
React has been designed from the start for gradual adoption. You can use as little or as much React as you need. Whether you want to get a taste of React, add some interactivity to an HTML page, or start a complex React-powered app, this section will help you get started.
Try React
You don’t need to install anything to play with React. Try editing this sandbox!
You can edit it directly or open it in a new tab by pressing the “Fork” button in the upper right corner.
Most pages in the React documentation contain sandboxes like this. Outside of the React documentation, there are many online sandboxes that support React: for example, CodeSandbox, StackBlitz, or CodePen.
Try React locally
To try React locally on your computer, download this HTML page. Open it in your editor and in your browser!
Add React to a page
If you’re working with an existing site and need to add a little bit of React, you can add React with a script tag.
Start a React project
If you’re ready to start a standalone project with React, you can set up a minimal toolchain for a pleasant developer experience. You can also start with a framework that makes a lot of decisions for you out of the box.
Next steps
Head to the Quick Start guide for a tour of the most important React concepts you will encounter every day.
In this tutorial, we will learn how to install React JS in Windows.
React is a library that helps us to build and create front-end interfaces for Single page applications and it utilizes the power of virtual DOM. usereducer in react will make you understand better about React hooks.
React was an in-house project of Facebook, and it was made open to the public in the year 2013. The adoption of ReactJS has seen an upward curve since its advantages have been realized. Various startups and established organizations are now adopting the technology and upgrading their technology stack. For information, check out Full Stack Developer courses.
1. Prerequisite for Windows
To install React on Windows, your system will require the minimum configuration as below:
- Windows XP, Windows 7 (32/64 bit) or higher
- Minimum 4 GB RAM and higher
- 10 GB available space on the hard disk
- At least one Internet Browser e.g. Chrome, Firefox, Microsoft Edge etc.
- Node.js
- Active internet connection minimum speed 512kbps and above.
- At least one installed code Editor to test and debug your code e.g.
- Atom
- Sublime
- Visual studio code
2. Introduction to React.js
ReactJS is a library written in TypeScript. It utilises the syntax of the modern version of JavaScript as described by ES6 and its higher version.
Applications built using ReactJS use the Single reusability principle. This advocates the idea of building web pages and applications using components and unidirectional flow. In React we have the concept of states and the concept of immutability. Components have hierarchy in terms of Parent and Child components. A component in case of React can be thought of as a piece of code which is based on the principle of pure functions. We will look into the pure component later. First, let’s understand what a state is. For e.g. To become a member of a service, the user fills his information on the registration page. While filling the details there can be many states of the form, for e.g. When the form field is empty or when the form field has witnessed some error on some particular field, which needs to be corrected; or when after correction, the form data has been validated and is ready for submission. So, at a broad level, the registration form has been through various states. These states represent at which level the application is, in terms of interacting with the end-user. Each level of interaction for this form is represented by the state, from an empty form to being a fully filled form with a display of an error for certain fields and the validated form. In React, we have the component based on the pure function. A pure function can be memorised as a piece of code, which does one task and does it pretty well. For a certain input, it always returns the same output, so this means we are increasing predictability of the code. Since React.js follows a certain code pattern and principles in order to work, it lowers the curve of the knowledge gap; whether you are one-person or a team of developers working mutually.
3. Introduction to Node.js and NPM on Windows 10
To run ReactJS we will require Node.js on our system.Node.js is a server which will help us to run the React code. It is based on non-blocking input and output and the Chrome V8 JavaScript engine. The Node.js code is open source.
NPM which is an abbreviation of Node package manager, npmjs.com is supported by various developers around the world. It has various node modules, using which developers can host and publish their modules on the open-source community. It hosts modules in private and public visibility. A module carries code which exists to serve high or low level functionalities. In terms of code adoption and availability of various modules it gives an edge and tries to make the developer more productive.
We can plug in and plug out the module. Some modules are dependent on other modules; which is defined as dependency among modules.
While building an application, a developer can pick the module, tweak and remix it to suit the application needs, and can then release to the open-source community. So, instead of reinventing the wheel, it is like picking a wheel (npm module) from npmjs.com, giving it further momentum and giving it back to the open source community.
4. Download and Install Node.js
To install Node.js we need to go to the URL
.jpg&w=3840&q=75)
Depending upon our Windows OS version in terms of 32 Bit or 64 Bit, we can pick the installer and install that version.
In this tutorial I am using Windows 8, 64 Bit.
The Node.js installer includes NPM. It is best to install the even numbered version of NPM.
Depending upon your operating system, the Nodejs.org home page will show the Download button and recommended LTS version.
After the download is complete we will go to the downloads folder and run the installer.
The installer will show the below Setup Wizard. Click next.
.jpg&w=3840&q=75)
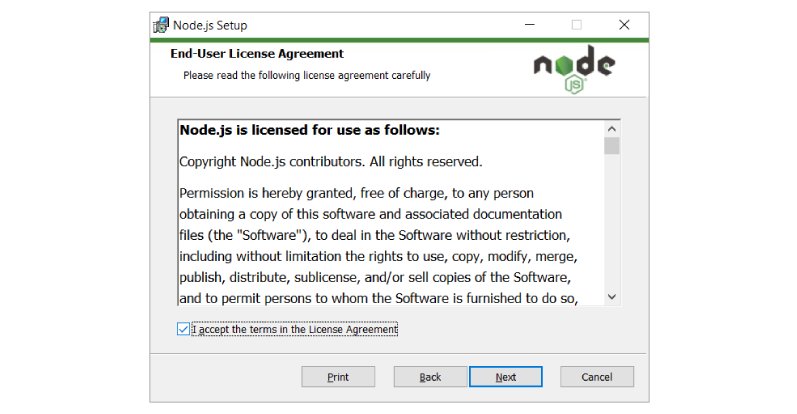
The next screen will ask for the End-user License Agreement. Select the checkbox at the bottom right to provide your consent and click on Next to proceed with the installation.
.jpg&w=3840&q=75)
The installer will ask for Destination folder and the default path set by installation is C:Program Filesnodejs
Click on Next button
.jpg&w=3840&q=75)
.jpg&w=3840&q=75)
The above screen is an important step in the installation process. And if you see closely it also sets the environmental path variables to command prompt on Windows. To begin your journey in web development, learn Web Development.
Click on Next to continue with the installation.
The Windows OS may ask you to allow Node.js installation and make changes.Click on Yes button.
.jpg&w=3840&q=75)
During the installation, if you have allowed for Chocolatey and required modules installation for C++ and Python, you will see the UI below in the command prompt. This installation requires 3 Gb of free disk space. In this tutorial this step is not required, so we are skipping this step by closing the window.
If you are interested in installing it, press Enter to continue.
.jpg&w=3840&q=75)
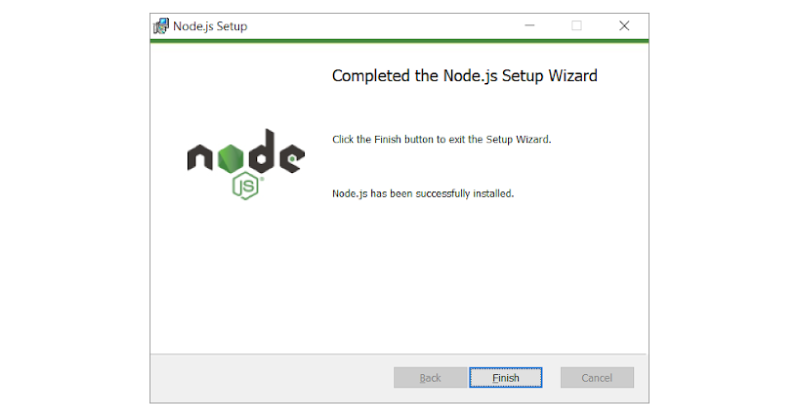
Once the installation is complete you need to verify the Node.js installation.
For this, we will use the command prompt.
To run command prompt
Press keys Win+R
And type cmd in the window below.
Next Click on Ok or Press Enter on the keyboard.
.jpg&w=3840&q=75)
5. Installation of React
After installation of Node.js, we need to install React. To check the Node.js version, open the Windows command prompt.
Press Win+R and type cmd.
In the command line, type
node -v to see its version.
We can also check for npm version, which is installed with Node.js, with the following command
npm -v
After running these commands, we can check the node version v14.15.1 and npm version 6.14.8
.jpg&w=3840&q=75)
As we have confirmed the Node.js installation we can proceed to the next steps.
While in the command prompt, we have navigated to a folder called Codefactory by following the command cd Codefactory
In this folder, we have created a folder called react-windows by using the command mkdir react-windows.
.jpg&w=3840&q=75)
After the folder react-windows has been created, we will change the directory to react-windows with the command
cd react-windows
ReactJS can be installed in various ways.
Now, we will type npm init. It will ask for the below configuration line by line.
Insert your input, followed by Enter keypress to proceed with the next configuration.
At the end of the configuration it will confirm for the inputs you have entered. If you are happy with the configuration data, type yes and enter to continue.
.jpg&w=3840&q=75)
The npm init will help us to create a package.json file.
.jpg&w=3840&q=75)
Now, the next step to install React requires us to go to the command prompt and type the following command in the react-windows directory.
npm install —save react
.jpg&w=3840&q=75)
.jpg&w=3840&q=75)
And after the above command npm install —save react-dom
.jpg&w=3840&q=75)
Behind the scene, these commands fetch the specified module from npmjs.com and download it in the local codebase.
Let’s have a look at the react-windows folder. Here we can see some newly created directories in node_modules.
.jpg&w=3840&q=75)
So, in this tutorial, we have learned to install React and reactDOM.
But to see the ReactJS SPA (single page app) there is more work to be done in the above code.
As an alternative and fast approach we can do it via create-react-app
Let us move to Codefactory folder and with the command cd.. create another folder react-cli
Next, type the following command mkdir react-cli
.jpg&w=3840&q=75)
Now we will use create-react-app module and type the following command
Please note that my-fast-app is the name of your app. This is an example and you can be creative in choosing your own name.
npx create-react-app my-fast-app
If we see closely it will take care of the rest of the installation steps, and react, react-dom and other related modules are installed automatically.
This process is a little data intensive, so please be patient while the download and installation happens
.jpg&w=3840&q=75)
When the above step gets completed the command prompt displays the below output.
.jpg&w=3840&q=75)
Now, let us run our first react app, by navigating to my-fast-app directory as below
cd my-fast-app
And enter the next command as npm start
%20(1).jpg&w=3840&q=75)
The npm command will show the application in the browser. http://localhost:3000
And if you are running node.js for the first time using npm command, it will ask for permission to allow access and we need to allow access to run.
As we are using a code editor we can have a look at the directory structure and some of the important files, such as index.html in the public folder, in src folder the index.js and App.js. The src folder contains the react component which we can build further on this codebase.
index.js is the js invocation point for react app.This index.js is linked with the App.js, which is responsible for showing the content in the browser. That’s what we see on the demo page.
.jpg&w=3840&q=75)
Let’s edit the App.js by going to line 10 and adding the following code
Talk is cheap, show me the <code>Code</code>
Once you save the file by Ctrl+S
The code will be auto refreshed in the browser, after compiling.
.jpg&w=3840&q=75)
It will show us the following output.
So, now feel free to change messages and alter the page layout and structure for experimentation.
If you are familiar with CSS, you may also change the page style using App.css and tinker with the code as well.
.jpg&w=3840&q=75)
Summary
In this tutorial, we have introduced you to React JS. Its impact in terms of building modern front end interfaces using component-based architecture is significant. We have also touched upon the concept of states, immutability and pure functions.
We have got a brief introduction to the Node.js server and NPM modules, the capabilities of Node.js server and the power of the open source community in the npmjs.com.
To install React in Windows, Node.js installation is a prerequisite.
There are various methods for installation. Once we have installed Node.js, React can be installed either by npm commands or by using the create-react-app module.
Install React JS in Windows 11/10. In this example tutorial, you will learn how to install react and create first react app in windows 11/10.
This tutorial will show you step by step on how to install create-react-app tool using the Node Package Manager(NPM). Create-react-app is a tool developed by React.js team that makes the setting up of React in our system easier.
First of all, it needs to install Nodejs on our windows 10 system. So, please follow the step is to download the Node.js installer for Windows 10. Let’s use the latest Long Term Support (LTS) version for Windows and choose the 64-bit version, using the Windows Installer icon.
The current stable version of Node.js can be downloaded and installed from the official website of node.js that is given below.
https://nodejs.org
If you want to know how to install node js in windows 10, you can visit How To Install Node Js In Windows 10(with Images).
Download the latest version and install it. You can choose LTS or latest version.
After the node js installation finished, open your terminal and execute the following command to check versions of node js and npm:
node -v
npm -v
There are two ways to install React and create projects. You can follow the following ways:
Option 1 – Install React js on Windows
Step 1 – Create a Directory
First of all, open your terminal and execute the following command to create project directory:
mkdir first-react-app
Step 2 – Move to the project folder
Then, navigate to directory, so open your terminal and execute the following command:
cd first-react-app
Step 3 – Create a package.json file
In this step, The following commandwill walk you through creating a package.json file
npm init
Step 4 – Install React and other modules
In this step, execute the following the following commands to install react in your windows 10 application:
 npm install --save react
 npm install --save react-dom
Option 2 – Install React js on Windows
Step 1 – Install Create-React-App Tool
Now we need to install a tool named create-react-app using NPM as global. This tool is used to create react applications easily from our system.
npm install -g create-react-app
Step 2 – Creating a New React Project
After the successful installation of create-react-app, we can create our first react application using it.
create-react-app first-react-project
Here first-react-project is the name I have chosen for my react project.
Step 3 – Running the Application
The app we created can run locally on our system with npm start command.
cd first-react-project
npm start
This will opens up the react application in a new tab of our browser with the below URL.
http://localhost:3000
Recommended React JS Tutorials

My name is Devendra Dode. I am a full-stack developer, entrepreneur, and owner of Tutsmake.com. I like writing tutorials and tips that can help other developers. I share tutorials of PHP, Python, Javascript, JQuery, Laravel, Livewire, Codeigniter, Node JS, Express JS, Vue JS, Angular JS, React Js, MySQL, MongoDB, REST APIs, Windows, Xampp, Linux, Ubuntu, Amazon AWS, Composer, SEO, WordPress, SSL and Bootstrap from a starting stage. As well as demo example.
View all posts by Admin
How to Install React on Windows
React is an open-source, front-end library to develop web applications, it is JavaScript-based and led by the Facebook Team and by a community of individuals and corporations.In this document, we will cover installation procedure of react on windows 10 operating systemPrerequisitesThis guide assumes that you are using Windows 10. Before you begin, you should have a user account with installation privileges and should have unrestricted access to all mentioned web sites in this document.Audience:This document can be referred by anyone who wants to install latest nodejs on windows 10 System requirementsWindows 10 OS4 GB RAM10 GB free spaceInstallation ProcedureTo install react tooling we need nodejs and npm. First let’s understand what these are and why we need them.What is Nodejs and Why you need for react development?Node.js is an open-source, cross-platform JavaScript run-time environment that executes JavaScript code outside of a browser. Node.js lets developers use JavaScript to develop wide variety of applications like network applications, command line tools, web api, web applications. You need nodejs for dev tooling (like local web server with live reloading features) and dev experience, you do not need nodejs to run react in production.What is npm and Why you need for react development?Npm stands for node package manager, it is a dependency management tool for javascript applications. This tool will help to install and the libraries and other tools to support react development.Let’s start with nodejs installation post completion on nodejs we will install create-react-app command line and will create a new react project1.Download nodejsVisit nodejs download page hereClick on windows Installer to download the latest version of node installer.2.Install nodejsClick on the downloaded node-vxx.xx.xx.msi (for example node-v10.15.0.msi) in previous step to start the installation which brings up below screen. Please click NextBy clicking next in previous step, you will be asked to accept license, please accept by clicking checkbox and click Next Click NextClick NextClick Install, this may need elevated permissions, provide necessary rights requested. This step would take several minutes to finish installationClick Finish3.Testing InstallationOpen command prompt and run below command to test nodenode -vYou should see an output like below (Note: Your version may vary depending on your date of installing as nodejs team make an aggressive release but make sure your node version is > v10.0.0)Open command prompt and run below command to test npmnpm -vYou should see an output like below (Note: Your version may vary depending on your date of installing as nodejs team make an aggressive release but make sure your npm version is >5 )Install create react appSetting up productive react development environment would need to configure tools like babel, webpack which are complex to configure for a newbie in react world. There are several tools that help to alleviate this problem out of which create react app is the easiest and finest tool with production grade configurations pre-built. The goodness of this tool is, it does not lock in and allows you to alter the configuration by ejecting the create react app. We will install create-react-app using npm. On terminal run the install command shown belownpm install -g create-react-appOn successful installation you should see the output like above (note your create-react-app version may be different by the time you run this install command)Test create-react-app To test the create-react-app, run below commandcreate-react-app —versionCongratulations, you have successfully installed create-react-appRunning the first Hello World applicationCreate react application using create-react-app command line using below commandcreate-react-app hello-reactThis command creates a new folder named hello-react and creates all the files and setups the necessary libraries within this folder and makes the react project ready to be executed without any additional configurationOnce project is created change into project directory and run application using npm start command as shown belownpm start command starts webpack development server which in turn performs all the build process and opens a browser window and loads application url which runs at http://localhost:3000 by default.You will see a beautiful window like below one which show you the react icon and some text.As discussed, create react app comes with great tooling, one of the productive features is webpack hot reloading, which deploys the change on live and saves developer lot of time to redeploy and reload work.Let’s open the project and make some changes to see the experience of this great feature. We will go through the project structure to understand the importance of the file create by create react app.Open the project which was created in previous step in any JS editor, here you see the project is open in vscode editor. On to the left in explorer section you see file explorer which shows you several folders and files which were created by create-react-app. Let’s walkthrough themnode_modules: This folder is managed by package manager (npm) and contains all the project library dependencies. Files in this folder should not be modified as the changes made are not guaranteed to be safe as updating/installing any other library can overwrite the changes made.public: This folder contains the assets that should be served publicly without any restrictions and contains files like index.html, favicon, manifest.jsonsrc: This is the folder that contains all your development effort. As a react developer you spent lot of time in this folder creating components and other sources of code.Now let’s get into the files inside this folder. To start with index.js is the starting file of this project where the execution on your code starts, this file injects App component which is exported from App.js. All the output you see in the browser is resultant on this file, lets make some change to this file, we will edit the existing code with new changes as shown in below screenshot.Save the file and switch back to browser to see the changes deployed and loaded as discussed, this one of the features of create-react-app to tooling setup. With new changes your browser window should look like belowUninstall create-react-app You can uninstall any library or tool setup via npm install can be uninstalled using npm uninstall. Perform below step to remove create-react-app installed previouslyOn command prompt run npm uninstall -g @angular/cliUninstall nodejsTo uninstall previously installed nodejs follow below stepsPress windows + R to open run and type appwiz.cpl and press ok. This will open Programs and Features the look for node.jsDouble click node.js or right click and select uninstall which will prompt as below and then choose, YesNodejs uninstallation process will initiate and would ask you to authorize the same via user control. Choose Yes, this will take a while and complete

Rated 4.5/5
based on 30 customer reviews
- Home
- Magazine
- How to Install React on Windows
How to Install React on Windows
By Susan May
11th Feb, 2019
-
Category:
Tutorials -
859
React is an open-source, front-end library to develop web applications, it is JavaScript-based and led by the Facebook Team and by a community of individuals and corporations.
In this document, we will cover installation procedure of react on windows 10 operating system
Prerequisites
This guide assumes that you are using Windows 10. Before you begin, you should have a user account with installation privileges and should have unrestricted access to all mentioned web sites in this document.
Audience:
This document can be referred by anyone who wants to install latest nodejs on windows 10
System requirements
- Windows 10 OS
- 4 GB RAM
- 10 GB free space
To install react tooling we need nodejs and npm. First let’s understand what these are and why we need them.
What is Nodejs and Why you need for react development?
Node.js is an open-source, cross-platform JavaScript run-time environment that executes JavaScript code outside of a browser. Node.js lets developers use JavaScript to develop wide variety of applications like network applications, command line tools, web api, web applications. You need nodejs for dev tooling (like local web server with live reloading features) and dev experience, you do not need nodejs to run react in production.
What is npm and Why you need for react development?
Npm stands for node package manager, it is a dependency management tool for javascript applications. This tool will help to install and the libraries and other tools to support react development.
Let’s start with nodejs installation post completion on nodejs we will install create-react-app command line and will create a new react project
1.Download nodejs
- Visit nodejs download page here

- Click on windows Installer to download the latest version of node installer.
2.Install nodejs
- Click on the downloaded node-vxx.xx.xx.msi (for example node-v10.15.0.msi) in previous step to start the installation which brings up below screen. Please click Next

- By clicking next in previous step, you will be asked to accept license, please accept by clicking checkbox and click Next
- Click Next

- Click Next

- Click Install, this may need elevated permissions, provide necessary rights requested. This step would take several minutes to finish installation

- Click Finish
3.Testing Installation
- Open command prompt and run below command to test node
node -v
You should see an output like below (Note: Your version may vary depending on your date of installing as nodejs team make an aggressive release but make sure your node version is > v10.0.0)

- Open command prompt and run below command to test npm
npm -v
You should see an output like below (Note: Your version may vary depending on your date of installing as nodejs team make an aggressive release but make sure your npm version is >5 )

Install create react app
Setting up productive react development environment would need to configure tools like babel, webpack which are complex to configure for a newbie in react world. There are several tools that help to alleviate this problem out of which create react app is the easiest and finest tool with production grade configurations pre-built. The goodness of this tool is, it does not lock in and allows you to alter the configuration by ejecting the create react app.
We will install create-react-app using npm. On terminal run the install command shown below
npm install -g create-react-app

On successful installation you should see the output like above (note your create-react-app version may be different by the time you run this install command)
Test create-react-app
To test the create-react-app, run below command
create-react-app --version

Congratulations, you have successfully installed create-react-app
Running the first Hello World application
- Create react application using create-react-app command line using below command
create-react-app hello-react

This command creates a new folder named hello-react and creates all the files and setups the necessary libraries within this folder and makes the react project ready to be executed without any additional configuration
- Once project is created change into project directory and run application using npm start command as shown below

npm start command starts webpack development server which in turn performs all the build process and opens a browser window and loads application url which runs at http://localhost:3000 by default.
You will see a beautiful window like below one which show you the react icon and some text.

As discussed, create react app comes with great tooling, one of the productive features is webpack hot reloading, which deploys the change on live and saves developer lot of time to redeploy and reload work.
Let’s open the project and make some changes to see the experience of this great feature. We will go through the project structure to understand the importance of the file create by create react app.

Open the project which was created in previous step in any JS editor, here you see the project is open in vscode editor. On to the left in explorer section you see file explorer which shows you several folders and files which were created by create-react-app. Let’s walkthrough them
node_modules: This folder is managed by package manager (npm) and contains all the project library dependencies. Files in this folder should not be modified as the changes made are not guaranteed to be safe as updating/installing any other library can overwrite the changes made.
public: This folder contains the assets that should be served publicly without any restrictions and contains files like index.html, favicon, manifest.json
src: This is the folder that contains all your development effort. As a react developer you spent lot of time in this folder creating components and other sources of code.
Now let’s get into the files inside this folder. To start with index.js is the starting file of this project where the execution on your code starts, this file injects App component which is exported from App.js. All the output you see in the browser is resultant on this file, lets make some change to this file, we will edit the existing code with new changes as shown in below screenshot.

Save the file and switch back to browser to see the changes deployed and loaded as discussed, this one of the features of create-react-app to tooling setup.
With new changes your browser window should look like below

Uninstall create-react-app
You can uninstall any library or tool setup via npm install can be uninstalled using npm uninstall. Perform below step to remove create-react-app installed previously
- On command prompt run npm uninstall -g @angular/cli
Uninstall nodejs
To uninstall previously installed nodejs follow below steps
- Press windows + R to open run and type appwiz.cpl and press ok.

- This will open Programs and Features the look for node.js
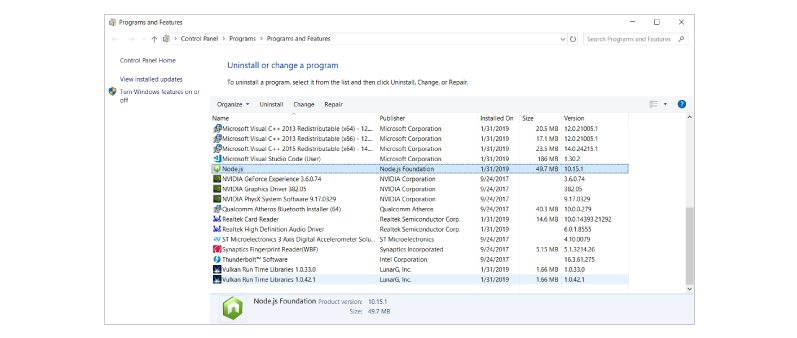
- Double click node.js or right click and select uninstall which will prompt as below and then choose, Yes
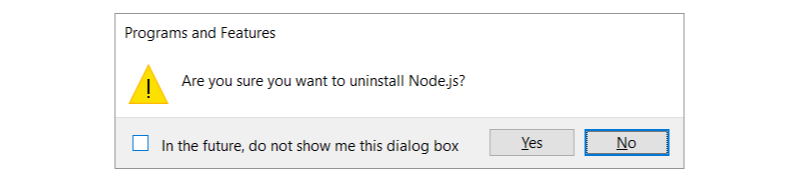
- Nodejs uninstallation process will initiate and would ask you to authorize the same via user control. Choose Yes, this will take a while and complete
- Web Development
REQUEST A FREE DEMO CLASS
SUBSCRIBE OUR BLOG
TRENDING BLOG POSTS
Python in a Nutshell: Everything That You Need to Know
By Susan May
Python is one of the best known high-level programming languages in the world, like Java. It’s steadily gaining traction among programmers because it’s easy to integrate with other technologies and offers more stability and higher coding productivity, especially when it comes to mass projects with volatile requirements. If you’re considering learning an object-oriented programming language, consider starting with Python.A Brief Background On Python It was first created in 1991 by Guido Van Rossum, who eventually wants Python to be as understandable and clear as English. It’s open source, so anyone can contribute to, and learn from it. Aside from supporting object-oriented programming and imperative and functional programming, it also made a strong case for readable code. Python is hence, a multi-paradigm high-level programming language that is also structure supportive and offers meta-programming and logic-programming as well as ‘magic methods’.More Features Of PythonReadability is a key factor in Python, limiting code blocks by using white space instead, for a clearer, less crowded appearancePython uses white space to communicate the beginning and end of blocks of code, as well as ‘duck typing’ or strong typingPrograms are small and run quickerPython requires less code to create a program but is slow in executionRelative to Java, it’s easier to read and understand. It’s also more user-friendly and has a more intuitive coding styleIt compiles native bytecodeWhat It’s Used For, And By WhomUnsurprisingly, Python is now one of the top five most popular programming languages in the world. It’s helping professionals solve an array of technical, as well as business problems. For example, every day in the USA, over 36,000 weather forecasts are issued in more than 800 regions and cities. These forecasts are put in a database, compared to actual conditions encountered location-wise, and the results are then tabulated to improve the forecast models, the next time around. The programming language allowing them to collect, analyze, and report this data? Python!40% of data scientists in a survey taken by industry analyst O’Reilly in 2013, reported using Python in their day-to-day workCompanies like Google, NASA, and CERN use Python for a gamut of programming purposes, including data scienceIt’s also used by Wikipedia, Google, and Yahoo!, among many othersYouTube, Instagram, Quora, and Dropbox are among the many apps we use every day, that use PythonPython has been used by digital special effects house ILM, who has worked on the Star Wars and Marvel filmsIt’s often used as a ‘scripting language’ for web apps and can automate a specific progression of tasks, making it more efficient. That’s why it is used in the development of software applications, web pages, operating systems shells, and games. It’s also used in scientific and mathematical computing, as well as AI projects, 3D modelers and animation packages.Is Python For You? Programming students find it relatively easy to pick up Python. It has an ever-expanding list of applications and is one of the hottest languages in the ICT world. Its functions can be executed with simpler commands and much less text than most other programming languages. That could explain its popularity amongst developers and coding students.If you’re a professional or a student who wants to pursue a career in programming, web or app development, then you will definitely benefit from a Python training course. It would help if you have prior knowledge of basic programming concepts and object-oriented concepts. To help you understand how to approach Python better, let’s break up the learning process into three modules:Elementary PythonThis is where you’ll learn syntax, keywords, loops data types, classes, exception handling, and functions.Advanced PythonIn Advanced Python, you’ll learn multi-threading, database programming (MySQL/ MongoDB), synchronization techniques and socket programming.Professional PythonProfessional Python involves knowing concepts like image processing, data analytics and the requisite libraries and packages, all of which are highly sophisticated and valued technologies.With a firm resolve and determination, you can definitely get certified with Python course!Some Tips To Keep In Mind While Learning PythonFocus on grasping the fundamentals, such as object-oriented programming, variables, and control flow structuresLearn to unit test Python applications and try out its strong integration and text processing capabilitiesPractice using Python’s object-oriented design and extensive support libraries and community to deliver projects and packages. Assignments aren’t necessarily restricted to the four-function calendar and check balancing programs. By using the Python library, programming students can work on realistic applications as they learn the fundamentals of coding and code reuse.
Rated 4.5/5
based on 12 customer reviews

Python in a Nutshell: Everything That You Need to Know
Blog
The Ultimate Guide to Node.Js
By Susan May
IT professionals have always been in much demand, but with a Node.js course under your belt, you will be more sought after than the average developer. In fact, recruiters look at Node js as a major recruitment criterion these days. Why are Node.js developers so sought-after, you may ask. It is because Node.js requires much less development time and fewer servers, and provides unparalleled scalability.In fact, LinkedIn uses it as it has substantially decreased the development time. Netflix uses it because Node.js has improved the application’s load time by 70%. Even PayPal, IBM, eBay, Microsoft, and Uber use it. These days, a lot of start-ups, too, have jumped on the bandwagon in including Node.js as part of their technology stack.The Course In BriefWith a Nodejs course, you learn beyond creating a simple HTML page, learn how to create a full-fledged web application, set up a web server, and interact with a database and much more, so much so that you can become a full stack developer in the shortest possible time and draw a handsome salary. The course of Node.js would provide you a much-needed jumpstart for your career.Node js: What is it?Developed by Ryan Dahl in 2009, Node.js is an open source and a cross-platform runtime environment that can be used for developing server-side and networking applications.Built on Chrome’s JavaScript runtime (V8 JavaScript engine) for easy building of fast and scalable network applications, Node.js uses an event-driven, non-blocking I/O model, making it lightweight and efficient, as well as well-suited for data-intensive real-time applications that run across distributed devices.Node.js applications are written in JavaScript and can be run within the Node.js runtime on different platforms – Mac OS X, Microsoft Windows, Unix, and Linux.What Makes Node js so Great?I/O is Asynchronous and Event-Driven: APIs of Node.js library are all asynchronous, i.e., non-blocking. It simply means that unlike PHP or ASP, a Node.js-based server never waits for an API to return data. The server moves on to the next API after calling it. The Node.js has a notification mechanism (Event mechanism) that helps the server get a response from the previous API call.Superfast: Owing to the above reason as well as the fact that it is built on Google Chrome’s V8 JavaScript Engine, Node JavaScript library is very fast in code execution.Single Threaded yet Highly Scalable: Node.js uses a single threaded model with event looping, in which the same program can ensure service to a much larger number of requests than the usual servers like Apache HTTP Server. Its Event mechanism helps the server to respond promptly in a non-blocking way, eliminating the waiting time. This makes the server highly scalable, unlike traditional servers that create limited threads to handle requests.No buffering: Node substantially reduces the total processing time of uploading audio and video files. Its applications never buffer any data; instead, they output the data in chunks.Open source: Node JavaScript has an open source community that has produced many excellent modules to add additional capabilities to Node.js applications.License: It was released under the MIT license.Eligibility to attend Node js CourseThe basic eligibility for pursuing Node training is a Bachelors in Computer Science, Bachelors of Technology in Computer Science and Engineering or an equivalent course.As prerequisites, you would require intermediate JavaScript skills and the basics of server-side development.CertificationThere are quite a few certification courses in Node Js. But first, ask yourself:Do you wish to launch your own Node applications or work as a Node developer?Do you want to learn modern server-side web development and apply it on apps /APIs?Do you want to use Node.js to create robust and scalable back-end applications?Do you aspire to build a career in back-end web application development?If you do, you’ve come to the right place!Course CurriculumA course in Node JavaScript surely includes theoretical lessons; but prominence is given to case studies, practical classes, including projects. A good certification course would ideally train you to work with shrink-wrap to lock the node modules, build a HTTP Server with Node JS using HTTP APIs, as well as about important concepts of Node js like asynchronous programming, file systems, buffers, streams, events, socket.io, chat apps, and also Express.js, which is a flexible, yet powerful web application framework.Have You Decided Yet? Now that you know everything there is to know about why you should pursue a Node js course and a bit about the course itself, it is time for you to decide whether you are ready to embark on a journey full of exciting technological advancements and power to create fast, scalable and lightweight network applications.
Rated 4.5/5
based on 6 customer reviews

The Ultimate Guide to Node.Js
Blog
MIT’s new automated ML runs 100x faster than human Data Scientists
By Ruslan Bragin
According to Michigan State University and MIT, automated machine learning system analyses the data and deliver a solution 100x faster than one human. The automated machine learning platform which is known as ATM (Auto Tune Models) uses cloud-based, on demand computing to accelerate data analysis.
Researchers of MIT tested the system through open-ml.org, a collaborative crowdsourcing platform, on which data scientists collaborate to resolve problems. They found that ATM evaluated 47 datasets from the platform and the system was capable to deliver a solution that is better than humans. It took nearly 100 days for data scientists to deliver a solution, while it took less than a day for ATM to design a better-performing model.
«There are so many options,» said Ross, Franco Modigliani professor of financial economics at MIT, told MIT news. «If a data scientist chose support vector machines as a modeling technique, the question of whether she should have chosen a neural network to get better accuracy instead is always lingering in her mind.»
ATM searches via different techniques and tests thousands of models as well, analyses each, and offers more resources that solves the problem effectively. Then, the system exhibits its results to help researchers compare different methods. So, the system is not automating the human data scientists out of the process, Ross explained.
«We hope that our system will free up experts to spend more time on data understanding, problem formulation and feature engineering,» Kalyan Veeramachaneni, principal research scientist at MIT’s Laboratory for Information and Decision Systems and co-author of the paper, told MIT News.
Auto Tune Model is now made available for companies as an open source platform. It can operate on single machine, on-demand clusters, or local computing clusters in the cloud and can work with multiple users and multiple datasets simultaneously, MIT noted. «A small- to medium-sized data science team can set up and start producing models with just a few steps,» Veeramachaneni told MIT News.
Source: MIT Official Website
Rated 4.0/5
based on 20 customer reviews

MIT’s new automated ML runs 100x faster than human Data Scientists
What’s New