This reference covers version: latest
Selenoid is a powerful Golang implementation of original Selenium hub code.
It is using Docker to launch browsers. Please refer to GitHub repository if you need source code.
1. Getting Started
1.1. Quick Start Guide
1.1.1. Start Selenoid
-
Make sure you have recent Docker version installed.
-
Download Configuration Manager (Selenoid quick installation binary) for your platform from releases page.
-
On Linux or Mac give execution permissions to binary:
-
Run one command to start Selenoid:
$ ./cm selenoid start --vnc
Running this command with
sudocan lead to broken installation. Recommended way is running Selenoid as regular user. On Linux to have permissions to access Docker you may need to add your user todockergroup:$ sudo usermod -aG docker $USER -
Optionally run one more command to start Selenoid UI:
1.1.2. Run Your Tests
-
Run your tests against Selenoid like you do with regular Selenium hub:
Tests Endpoint
http://localhost:4444/wd/hub
If something does not work, you can easily check that Selenoid is running with opening status url:
Current Selenoid Status
http://localhost:4444/status
A successful request should return a JSON with browser usage statistics.
-
To open Selenoid UI navigate to the following page in your browser:
1.2. Starting Selenoid Manually
|
1.2.1. Prepare Configuration
-
Create
config/browsers.jsonconfiguration file with content:config/browsers.json
{
    "firefox": {
        "default": "57.0",
        "versions": {
            "57.0": {
                "image": "selenoid/firefox:88.0",
                "port": "4444",
                "path": "/wd/hub"
            }
        }
    }
}
For Chrome and Opera images «path» is «/» instead of «/wd/hub» -
Pull browser Docker image:
$ docker pull selenoid/firefox:88.0.
1.2.2. Browser Images
We maintain a set of prebuilt Docker container images for different browsers including:
-
Android
-
Firefox
-
Google Chrome
-
Opera
All these images are free to use. See image tags for a list of supported versions. Build files are stored in selenoid-images repository.
Feel free to create issues or request images for new versions.
{
    "chrome": {
        "default": "64.0",
        "versions": {
            "64.0": {
                "image": "selenoid/chrome:90.0",
                //...
                "env" : ["LANG=ru_RU.UTF-8", "LANGUAGE=ru:en", "LC_ALL=ru_RU.UTF-8"]
            }
        }
    }
}
|
1.2.3. Start Selenoid
Option 1: start Selenoid binary
-
Download binary for your operating system from releases page
and save it asselenoid(orselenoid.exeon windows).Add execution permission in case of *nix os-type with chmod +x selenoid. -
Then run:
-
It should write to console something like:
2017/11/26 21:23:43 Loading configuration files...
2017/11/26 21:23:43 Loaded configuration from [config/browsers.json]

...

2017/11/26 21:23:43 Listening on :4444
Option 2: start Selenoid container
If you have Docker installed you can omit downloading binary and run it inside container.
Prepare config, pull browser image, then run:
*nix
docker run -d
--name selenoid
-p 4444:4444
-v /var/run/docker.sock:/var/run/docker.sock
-v /your/directory/config/:/etc/selenoid/:ro
aerokube/selenoid:latest-release
Windows PowerShell
> $current = $PWD -replace "\", "/" -replace "C", "c"  (1)
> docker run -d                                         `
--name selenoid                                         `
-p 4444:4444                                            `
-v //var/run/docker.sock:/var/run/docker.sock           `
-v ${current}/config/:/etc/selenoid/:ro                 `
aerokube/selenoid:latest-release| 1 | Simple macros to get $PWD with compatible form assumed your directory located on C: drive |
1.2.4. Selenoid under Windows
While we normally recommend to start Selenoid using Configuration Manager on any platform,
it is possible to start it under Windows manually.
| Most of the differences are related to Docker, so please refer to Docker documentation on any errors first. |
The main difference from Unix operating systems is how volumes are mounted.
In any Windows paths back slashes () should be replaced by forward slashes (/) and drive letter should be lower cased.
Also start with forward slash and remove colon.
Example 1. Mount directory
C:Usersadmin becomes /c/Users/admin
Another story with docker.sock, which should be mounted as -v //var/run/docker.sock:/var/run/docker.sock (note two forward slashes at the beginning)
|
So assuming that configuration file is located at C:Usersadminselenoid a typical startup command can look like:
docker run -d --name selenoid                   `
-p 4444:4444                                    `
-v //var/run/docker.sock:/var/run/docker.sock   `
-v /c/Users/admin/selenoid:/etc/selenoid:ro                 `
aerokube/selenoid:latest-release
|
You can use simple Powershell macros to automatically get correct > $current = $PWD -replace "\", "/" -replace "C", "c" |
1.3. Frequently Asked Questions
1.3.1. Selenoid in Kubernetes
We are very frequently asked whether it is possible to run Selenoid in Kubernetes cluster. The answer is — it is possible but we do not recommend doing this:
-
Selenoid can only work directly with Docker API and was created to be run on a workstation or a virtual machine with Docker installed.
-
Kubernetes contrarily has a completely different API and can be using Docker as a container runtime backend. In some clusters rkt is used instead of Docker and in that case Selenoid will not work.
-
Even if Selenoid works — all browser containers will be started on the same Kubernetes node where it is running.
-
So far as Selenoid is using Docker API directly — Kubernetes will not be aware of additional containers started by Selenoid. This is dangerous and can potentially lead to overloaded Kubernetes nodes.
-
You can only have one Selenoid replica maximum. This is because Selenoid internally stores a list of running sessions in memory.
If you need Selenium in Kubernetes or Openshift, we have a separate solution called Moon.
1.3.2. Logs and Dirs
Where are Selenoid logs?
Selenoid outputs its logs to stdout. Selenoid launched as a binary should output logs to the screen. To see Selenoid logs launched as Docker container type:
To follow the logs add one more flag:
$ docker logs -f selenoid
Where are recorded videos stored?
Default location when installed with cm is ~/.aerokube/selenoid/video or C:Users<user>.aerokubeselenoidvideo.
1.3.3. Limits and Timeouts
How can I limit overall browsers consumption?
You have to use -limit flag to specify total number of parallel sessions. Default value is 5. See Resources Consumption section on how to determine total number of parallel sessions.
Can I limit per-version browser consumption?
No, this is not supported. We consider the only reasonable limitation should be the overall browsers consumption. This is important to not overload the hardware.
How can I adjust Selenoid timeouts?
The main timeout flag is -timeout, specified as 60s or 2m or 1h. It means maximum amount of time between subsequent HTTP requests to Selenium API. When there are no requests during this time period — session is automatically closed. Selenoid also has more subtle timeouts like:
-
-service-startup-timeout— container or driver process startup timeout -
-session-attempt-timeout— new session HTTP request timeout, applied when container or driver has started -
-session-delete-timeout— container or process removal timeout, applied afterdriver.quit()call
1.3.4. Resources Consumption
How many resources browser containers consume?
This depends on your tests. We recommend to start with 1 CPU and 1 Gb of memory per container as a rough estimate and then increase -limit checking that your tests work stably.
Do VNC and non-VNC browser images memory and CPU consumption differ?
The only difference between these images — is a running VNC server (x11vnc) consuming approximately 20 Megabytes of RAM in idle state which is negligible compared to browser memory consumption.
1.3.5. Features not Working
Selenoid does not start: open config/browsers.json: no such file or directory
This usually happens when Selenoid is started in Docker container with custom command-line arguments, e.g.:
$ docker run <some-args> aerokube/selenoid:some-version -limit 10
In that case you have to specify path to configuration file explicitly (cm tool does this automatically):
$ docker run <some-args> aerokube/selenoid:some-version -limit 10 -conf /etc/selenoid/browsers.json
Getting error: create container: Error response from daemon: client version 1.36 is too new
You have to run Selenoid binary container with DOCKER_API_VERSION variable specifying your Docker API version. cm tool does this automatically for you. To determine API version type:
$ docker version | grep API
Then run Selenoid like the following:
$ DOCKER_API_VERSION=1.32 ./selenoid <rest-of-args> # As a binary
$ docker run -e DOCKER_API_VERSION=1.32 <rest-of-args> aerokube/selenoid:some-version # As Docker container
Video feature not working
When running Selenoid as Docker container video feature can be not working (because of misconfiguration). If your video files are named like selenoid607667f7e1c7923779e35506b040300d.mp4 and you are seeing the following log message…
2018/03/20 21:06:37 [9] [VIDEO_ERROR] [Failed to rename /video/selenoid607667f7e1c7923779e35506b040300d.mp4 to /video/8019c4bc-9bec-4a8b-aa40-68d1db0cffd2.mp4: rename /video/selenoid607667f7e1c7923779e35506b040300d.mp4 /video/8019c4bc-9bec-4a8b-aa40-68d1db0cffd2.mp4: no such file or directory]… then check that:
-
You are passing an
OVERRIDE_VIDEO_OUTPUT_DIRenvironment variable pointing to a directory on thehost machinewhere video files are actually stored -
When passing custom arguments to Selenoid container (such as
-limitor-timeout) you also have to pass-video-output-dir /opt/selenoid/videoand mount host machine video dir to/opt/selenoid/video
Can’t get VNC feature to work: Disconnected
Please check that you have enableVNC = true capability in your tests
Seeing black screen with a cross in VNC window
You are using driver.close() instead of driver.quit() and just closed the last browser tab instead of removing the session.
Can Selenoid pull browser images automatically?
No, we did not implement this feature intentionally. We consider that all such cluster maintenance tasks can influence performance and stability when done automatically.
Is it possible to run Selenoid in Docker macvlan network?
Yes, this is possible. See the following Github issue for possible solutions.
2. Main Features
2.1. Video Recording
|
Selenoid can capture browser screen and save it to MPEG-4 video file using H264 codec.
Video recording works by attaching a separate container with video capturing software to running browser container.
To use this feature you should:
-
Pull video recorder image once:
$ docker pull selenoid/video-recorder:latest-release -
When running Selenoid in Docker container:
-
Mount a directory from the host machine (e.g.
~/.aerokube/selenoid/video) to store video files to/opt/selenoid/video. -
Pass an additional
OVERRIDE_VIDEO_OUTPUT_DIRenvironment variable with absolute path to video directory on host machine. This is required because video recorder container, automatically created by Selenoid should save video to host machine video storage directory.
-
-
When running Selenoid as a binary — videos will be stored in
videodirectory inside current working directory.Example Docker Command
$ docker run -d
--name selenoid
-p 4444:4444
-v /var/run/docker.sock:/var/run/docker.sock
-v /your/directory/config/:/etc/selenoid/:ro
-v /your/directory/video/:/opt/selenoid/video/
-e OVERRIDE_VIDEO_OUTPUT_DIR=/your/directory/video/
aerokube/selenoid:latest-release
All these actions are automatically done when starting Selenoid via Configuration Manager selenoid start command.
|
2.1.1. On Windows
With absolute path your command will look like:
Windows PowerShell
> docker volume create selenoid-videos
> $current = $PWD -replace "\", "/" -replace "C", "c"    (1)
> docker run -d                                         `
--name selenoid                                         `
-p 4444:4444                                            `
-v //var/run/docker.sock:/var/run/docker.sock           `
-v ${current}/config/:/etc/selenoid/:ro                 `
-v /c/selenoid/video/:/opt/selenoid/video/              ` (2)
-e OVERRIDE_VIDEO_OUTPUT_DIR=/c/selenoid/video/         ` (3)
aerokube/selenoid:latest-release| 1 | Simple macros to get $PWD with compatible form assumed your directory located on C: drive |
| 2 | Should be absolute path in compatible form |
| 3 | Should be same as in (2) |
2.1.2. Downloading Video Files from Selenoid
You can access recorded video files using the following URL:
Direct Link to File
http://selenoid-host.example.com:4444/video/<filename>.mp4
Direct link will work only after session has finished because Selenoid renames temporary filename to <session-id>.mp4 (by default) at the session close.
|
To see all available files use:
Listing All Video Files
http://selenoid-host.example.com:4444/video/
2.1.3. Deleting Video Files
Selenoid intentionally has no built-in logic to automatically remove old video files. To limit storage space consumption you have two alternatives:
-
Schedule scripts automatically removing files older than desired date and time. An example command under Unix operating systems can look like:
Shell Command to Remove Old Video Files
$ find /path/to/video/dir -mindepth 1 -maxdepth 1 -mmin +120 -name '*.mp4' | xargs rm -rf
Notice
-mmin +120argument meaning to only process files older than 2 hours (120 minutes). -
Send video removal requests (e.g. from passed test cases). Just use
DELETEHTTP method and Selenoid video URL:Deleting Video File via HTTP API
$ curl -X DELETE http://selenoid-host.example.com:4444/video/<filename>.mp4
2.2. Saving Session Logs
|
An additional |
Selenoid can save log files for every running session to a separate file. By default log files are saved as <session-id>.log but you can alter file name via logName capability.
To enable this feature you only need to add -log-output-dir </path/to/some/dir> flag to Selenoid:
$ ./selenoid -log-output-dir /path/to/some/dir
When running Selenoid in Docker container — don’t forget to mount logs directory from the host machine:
Example Docker Command
$ docker run -d
--name selenoid
-p 4444:4444
-v /var/run/docker.sock:/var/run/docker.sock
-v /your/directory/config/:/etc/selenoid/:ro
-v /your/directory/logs/:/opt/selenoid/logs/
aerokube/selenoid:latest-release -log-output-dir /opt/selenoid/logs
This feature is automatically enabled when starting Selenoid via Configuration Manager selenoid start command.
|
2.2.1. Downloading Log Files from Selenoid
You can access saved log files using the following URL:
Direct Link to Log File
http://selenoid-host.example.com:4444/logs/<filename>.log
Direct link will work only after session has finished because Selenoid renames temporary filename to <session-id>.log (by default) at the session close.
|
To see all available files use:
Listing All Log Files
http://selenoid-host.example.com:4444/logs/
2.2.2. Deleting Log Files
Similarly to video files it’s up to you when to delete old log files. Either remove log files from the directory using a scheduled job or send log removal requests:
Deleting Log File via HTTP API
$ curl -X DELETE http://selenoid-host.example.com:4444/logs/<filename>.log
2.3. Uploading Files To Browser
Some tests require to upload files. This feature works out of the box in the majority of Selenium clients. A typical Java code snippet look like the following:
Uploading files with Java
// Find file input element
WebElement input = driver.findElement(By.cssSelector("input[type='file']"));

// Make sure element is visible
((JavascriptExecutor) driver).executeScript("arguments[0].style.display = 'block';", input);

// Configure your client to upload local files to remote Selenium instance
driver.setFileDetector(new LocalFileDetector());

// Specify you local file path here (not path inside browser container!)
input.sendKeys("/path/to/file/on/machine/which/runs/tests");
Uploading files with Python
from selenium.webdriver.remote.file_detector import LocalFileDetector

# ...

input = driver.find_element_by_css_selector("input[type='file']")
driver.execute_script("arguments[0].style.display = 'block';", input)
driver.file_detector = LocalFileDetector()
input.send_keys("/path/to/file/on/machine/which/runs/tests")
Uploading files with Webdriver.io
var filePath = path.join('/path/to/file/on/machine/which/runs/tests');
var remoteFilePath = browser.uploadFile(filePath);
$("input[type='file']").setValue(remoteFilePath);
Read the following note if you are using Selenoid without Docker.
This feature is supported in WebDriver protocol by sending zipped file contents to /file handle. However not all driver binaries support this feature. For example this is not implemented in Geckodriver or IEDriver. When proxying requests directly to these drivers (i.e. when not using Docker) you need to start Selenoid with -enable-file-upload flag. In that case Selenoid will provide required API to tests. Firefox container images already include this parameter where needed.
|
2.4. Downloading Files From Browser
2.4.1. Downloading Files in Different Browsers
Chrome
Downloading files with Java
ChromeOptions chromeOptions = new ChromeOptions();
chromeOptions.setExperimentalOption("prefs", new HashMap<String, Object>(){
    {
        put("profile.default_content_settings.popups", 0);
        put("download.default_directory", "/home/selenium/Downloads");
        put("download.prompt_for_download", false);
        put("download.directory_upgrade", true);
        put("safebrowsing.enabled", false);
        put("plugins.always_open_pdf_externally", true);
        put("plugins.plugins_disabled", new ArrayList<String>(){
            {
                add("Chrome PDF Viewer");
            }
        });
    }
});

WebDriver driver = new RemoteWebDriver(new URL("http://localhost:4444/wd/hub"), chromeOptions);
driver.navigate().to("http://example.com/myfile.odt");
Firefox
Downloading files with Java
FirefoxOptions firefoxOptions = new FirefoxOptions();
firefoxOptions.setCapability("moz:firefoxOptions", new HashMap<String, Object>(){
    {
        put("prefs", new HashMap<String, Object>(){
            {
                put("browser.helperApps.neverAsk.saveToDisk", "application/octet-stream");
            }
        });
    }
});


WebDriver driver = new RemoteWebDriver(new URL("http://localhost:4444/wd/hub"), firefoxOptions);
driver.navigate().to("http://example.com/myfile.odt");
2.4.2. Accessing Files Downloaded with Browser
|
Your tests may need to download files with browsers. To analyze these files a common requirement is then to somehow extract downloaded files from browser containers. A possible solution can be dealing with container volumes. But Selenoid provides a /download API and dramatically simplifies downloading files. Having a running session f2bcd32b-d932-4cdc-a639-687ab8e4f840 you can access all downloaded files using an HTTP request:
GET http://selenoid-host.example.com:4444/download/f2bcd32b-d932-4cdc-a639-687ab8e4f840/myfile.txtIn order for this feature to work an HTTP file server should be listening inside browser container on port 8080. Download directory inside container to be used in tests is usually ~/Downloads.
Similarly to delete downloaded files replace GET request with DELETE:
DELETE http://selenoid-host.example.com:4444/download/f2bcd32b-d932-4cdc-a639-687ab8e4f840/myfile.txt2.5. Accessing Clipboard
| Clipboard is accessible only when browser session is running. |
Sometimes you may need to interact with the clipboard to check that your application copy-paste feature works. Selenoid has a dedicated API to interact with the clipboard. To use it:
-
Start a new session, for example with ID
f2bcd32b-d932-4cdc-a639-687ab8e4f840. -
To get clipboard value send the following HTTP request:
$ curl http://selenoid-host.example.com:4444/clipboard/f2bcd32b-d932-4cdc-a639-687ab8e4f840 some-clipboard-value -
To update clipboard value:
$ curl -X POST --data 'some-clipboard-value' http://selenoid-host.example.com:4444/clipboard/f2bcd32b-d932-4cdc-a639-687ab8e4f840
2.6. Accessing Browser Developer Tools
|
Selenoid is proxying Chrome Developer Tools API to browser container. For every running Selenium session to access the API just use the following URL:
<ws or http>://selenoid.example.com:4444/devtools/<session-id>/<method>Here <method> is one of the following:
|
Method |
Protocol |
Meaning |
|
/browser |
WebSocket |
Developer Tools browser websocket |
|
/ |
WebSocket |
An alias for /browser |
|
/page |
WebSocket |
Developer Tools current page (target) websocket — mainly useful when only one browser tab is open |
|
/page/<target-id> |
WebSocket |
Developer Tools specified page (target) websocket — allows to connect to concrete browser tab |
|
/json/protocol |
HTTP |
A list of supported Developer Tools protocol methods in JSON format (some client libraries are using it) |
For example an URL to connect to current page websocket would be:
ws://selenoid.example.com:4444/devtools/<session-id>/pageAccessing Developer Tools API with Webdriver.io and Puppeteer
const { remote } = require('webdriverio');
const puppeteer = require('puppeteer-core');
const host = 'selenoid.example.com';
(async () => {
    const browser = await remote({
        hostname: host,
        capabilities: {
            browserName: 'chrome',
            browserVersion: '75.0'
        }
    });

    const devtools = await puppeteer.connect(
        { browserWSEndpoint: `ws://${host}:4444/devtools/${browser.sessionId}` }
    );
    const page = await devtools.newPage();
    await page.goto('http://aerokube.com');
    await page.screenshot({path: 'screenshot.png'});
    const title = await page.title();

    console.log(title);

    await devtools.close();
    await browser.deleteSession();

})().catch((e) => console.error(e));
2.7. Special Capabilities
Selenoid can improve some automation aspects with custom capabilities.
You can pass it in tests to enable/disable some features.
2.7.1. Live Browser Screen: enableVNC
Selenoid supports showing browser screen during test execution.
This works with containers having VNC server installed (VNC column of Browser Image information).
To see browser screen:
This works by proxying VNC port from started container to http://localhost:4444/vnc/<session-id>; to WebSocket, where <session-id> is Selenium session ID.
2.7.2. Custom Screen Resolution: screenResolution
Selenoid allows you to set custom screen resolution in containers being run:
Type: string, format: <width>x<height>x<colors-depth>
screenResolution: "1280x1024x24"
|
2.7.3. Video Recording: enableVideo, videoName, videoScreenSize, videoFrameRate, videoCodec
| This feature requires some preparation. Please refer to Video Recording section for more details. |
To enable video recording for session, add:
-
By default saved video files are named
<session-id>.mp4where<session-id>is a unique identifier of Selenium session.
To provide custom video name specify:Type: string
videoName: "my-cool-video.mp4"
It is important to add mp4file extension. -
By default the entire screen picture is being recorded.
SpecifyingscreenResolutioncapability changes recorded video size (width and height) accordingly.
You can override video screen size by passing a capability. In case ofvideoScreenSize
resolution is less than actual, screen on video will be trimmed starting from top-left corner:Type: string
videoScreenSize: "1024x768"
-
Default video frame rate is
12frames per second. SpecifyingvideoFrameRatecapability changes this value: -
By default Selenoid is using
libx264codec for video output. If this codec is consuming too much CPU, you can change it usingvideoCodeccapability:$ docker run -it --rm --entrypoint /usr/bin/ffmpeg selenoid/video-recorder -codecs
2.7.4. Saving Session Logs: enableLog, logName
| This feature requires some preparation. Please refer to Saving Session Logs section for more details. |
To enable saving logs for a session, add:
If you wish to automatically save logs for all sessions, you can enable this behavior globally with Selenoid -save-all-logs flag.
By default saved log files are named <session-id>.log where <session-id> is a unique identifier of Selenium session.
To provide custom log file name specify:
Type: string
logName: "my-cool-log.log"
It is important to add log file extension.
|
2.7.5. Custom Test Name: name
For debugging purposes it is often useful to give a distinct name to every test case.
When working with Selenoid you can set test case name by passing the following capability:
The main application of this capability — is debugging tests in the UI which is showing specified name for every running session.
2.7.6. Custom Session Timeout: sessionTimeout
Sometimes you may want to change idle timeout for selected browser session. To achieve this — pass the following capability:
Timeout is specified Golang duration format e.g. 30m or 10s or 1h5m and can be no more than the value set by -max-timeout flag.
2.7.7. Per-session Time Zone: timeZone
Some tests require particular time zone to be set in operating system.
To achieve this with Selenoid use:
Type: string
timeZone: "Europe/Moscow"
You can find most of available time zones here.
Without this capability launched browser containers will have the same timezone as Selenoid one.
2.7.8. Per-session Environment Variables: env
Sometimes you may want to set some environment variables for every test case (for example to test with different default locales). To achieve this pass one more capability:
Type: array, format: <key>=<value>
env: ["LANG=ru_RU.UTF-8", "LANGUAGE=ru:en", "LC_ALL=ru_RU.UTF-8"]
Environment variables from this capability are appended to variables from configuration file.
2.7.9. Links to Application Containers: applicationContainers
Sometimes you may need to link browser container to application container running on the same host machine.
This allows you to use cool URLs like http://my-cool-app/ in tests.
To achieve this simply pass information about one or more desired links via capability:
Type: array, format: <container-name>[:alias]
applicationContainers: ["spring-application-main:my-cool-app", "spring-application-gateway"]
2.7.10. Hosts Entries: hostsEntries
Although you can configure a separate list of /etc/hosts entries for every browser image in Browsers Configuration File
sometimes you may need to add more entries for particular test cases. This can be easily achieved with:
Type: array, format: <hostname>:<ip-address>
hostsEntries: ["example.com:192.168.0.1", "test.com:192.168.0.2"]
Entries will be inserted to /etc/hosts before entries from browsers configuration file.
Thus entries from capabilities override entries from configuration file if some hosts are equal.
2.7.11. Custom DNS Servers: dnsServers
By default Selenoid browser containers are using global DNS settings of Docker daemon. Sometimes you may need to override used DNS servers list for particular test cases. This can be easily achieved with:
Type: array, format: <dns-ip-address>
dnsServers: ["192.168.0.1", "192.168.0.2"]
2.7.12. More Docker Networks: additionalNetworks
By default Selenoid browser containers are started in Docker network specified by -container-network flag. If you tested application is running in another network you may need to connect browser container to this network:
Type: array, format: <network-name>
additionalNetworks: ["my-custom-net-1", "my-custom-net-2"]
2.7.13. Container Labels: labels
In big clusters you may want to pass additional metadata to every browser session: environment, VCS revision, build number and so on. These labels can be then used to enrich session logs and send them to a centralized log storage. Later this metadata can be used for more efficient search through logs.
Type: map, format: «<key>»: «<value>»
labels: {"environment": "testing", "build-number": "14353"}
Labels from this capability override labels from browsers configuration file. When name capability is specified — it is automatically added as a label to container.
2.7.14. Android Skin: skin
For [Android] containers you can select emulator skin with capabilities. List of available skins:
| Skin | Screen Resolution | DPI |
|---|---|---|
|
QVGA |
240×320 |
120 |
|
WQVGA400 |
240×400 |
120 |
|
WQVGA432 |
240×432 |
120 |
|
HVGA |
320×480 |
160 |
|
WVGA800 |
480×800 |
240 |
|
WVGA854 |
480×854 |
240 |
|
WSVGA |
1024×600 |
160 |
|
WXGA720 |
720×1280 |
320 |
|
WXGA800 |
1280×800 |
160 |
|
WXGA800-7in |
800×1280 |
213 |
To select a skin — set skin capability:
Type: string, format: <desired-skin>
You can also pass desired screen resolution as follows:
Type: string, format: <desired-screen-resolution>
2.7.15. S3 Key Pattern: s3KeyPattern
This capability allows to override S3 key pattern (specified by -s3-key-pattern flag) used when uploading files to S3.
Type: string
s3KeyPattern: "$quota/$fileType$fileExtension"
The same key placeholders are supported. Please refer to Uploading Files To S3 section for more details.
2.7.16. Specifying Capabilities via Protocol Extensions
Some Selenium clients allow passing only a limited number of capabilities specified in WebDriver specification. For such cases Selenoid supports reading capabilities using WebDriver protocol extensions feature. The following two examples deliver the same result. Usually capabilities are passed like this:
Passing Capabilities as Usually
{"browserName": "firefox", "version": "57.0", "screenResolution": "1280x1024x24"}
Selenoid is using selenoid:options key to read protocol extension capabilities:
Passing Capabilities using Protocol Extensions
{"browserName": "firefox", "version": "57.0", "selenoid:options": {"screenResolution": "1280x1024x24"}}
3. Advanced Features
3.1. Usage Statistics
Selenoid calculates usage statistics that can be accessed with HTTP request:
Request
$ curl http://localhost:4444/statusResult
{
    "total": 80,
    "used": 10,
    "queued": 0,
    "pending": 1,
    "browsers": {
      "firefox": {
        "46.0": {
          "user1": {
            "count":1,
            "sessions":[
                {
                    "id": "a7a2b801-21db-4dae-a99b-4cbc0b81de96",
                    "vnc": false,
                    "screen": "1920x1080x24"
                 }
            ]
          },
          "user2": {
            "count":6,
            "sessions":[
                //...
            ]
          },
        },
        "48.0": {
          "user2": {
            "count":3,
            "sessions":[
                //...
            ]
          }
        }
      }
    }
}
Users are extracted from basic HTTP authentication headers.
3.1.1. What Statistics Mean
A typical session lifecycle looks like the following:
Typical Session Lifecycle
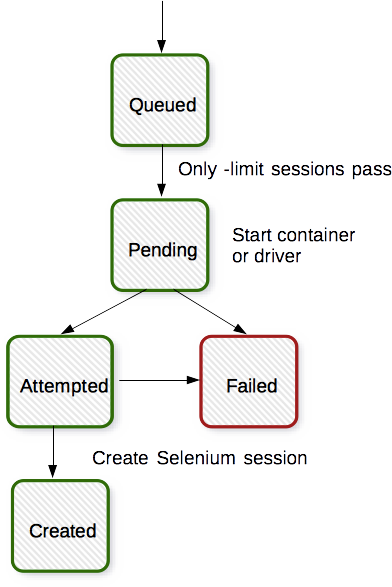
-
A new session request arrives to Selenoid.
-
Selenoid
-limitflag specifies how many sessions can be created simultaneously. It is shown astotalin statistics. When requests reach the limit — subsequent requests are placed in queue.Queuedrequests just block and continue to wait. -
When there is a free slot for request Selenoid decides whether a Docker container or standalone driver process should be created. All requests during startup are marked as
pending. Before proceeding to next step Selenoid waits for required port to be open. This is done by sending HEAD requests to the port. -
When a container or driver is started (ping is successful) Selenoid does a new session request just in the same way as standard Selenium client.
-
Depending on what is returned as response on the previous step session is marked as
createdorfailed. Created and running sessions are also included tousedvalue. -
When a session is created Selenoid just proxies the rest of session requests to the same container or driver.
-
New session request can fail because of Selenium errors or issues with container driver startup. In that case an error is returned to user.
3.1.2. Sending Statistics to External Systems
To send Selenoid statistics described in previous section you can use Telegraf. For example to send status to Graphite:
-
Pull latest Telegraf Docker container:
# docker pull telegraf:alpine -
Generate configuration file:
# mkdir -p /etc/telegraf # docker run --rm telegraf:alpine --input-filter httpjson --output-filter graphite config > /etc/telegraf/telegraf.conf -
Edit file like the following:
[agent]
interval = "10s" (1)

[[outputs.graphite]]
servers = ["my-graphite-host.example.com:2024"] (2)
prefix = "one_min" (3)
template = "host.measurement.field"

[[inputs.httpjson]]
name = "selenoid"
servers = [
"http://localhost:4444/status" (4)
]
1 adjust interval if needed 2 adjust host and port 3 something before hostname, can be blank 4 this is localhost only if Telegraf is run on Selenoid host -
Start Telegraf container:
# docker run --net host -d
    --name telegraf
    -v /etc/telegraf:/etc
    telegraf:alpine --config /etc/telegraf.conf
Metrics will be sent to my-graphite-host.example.com:2024. Metric names will be like the following:
one_min.selenoid_example_com.httpjson_selenoid.pending
one_min.selenoid_example_com.httpjson_selenoid.queued
one_min.selenoid_example_com.httpjson_selenoid.total
telegraf+influxdb+graphana
3.2. Uploading Files To S3
|
This feature only becomes available when Selenoid is compiled with |
Selenoid can upload recorded video and log files for every running session to S3-compatible storage.
To enable this feature you need to specify S3 access information as follows:
$ ./selenoid -s3-endpoint https://s3.us-east-2.amazonaws.com -s3-region us-east-2 -s3-bucket-name my-bucket -s3-access-key <your-access-key> -s3-secret-key <your-secret-key>
If you omit -s3-access-key and -s3-secret-key flags then environment variables and shared credentials file are automatically tried as a fallback.
|
By default uploaded file name is preserved, i.e. S3 path is /<session-id>.log or /myCustomVideo.mp4. You can optionally provide your custom key pattern using -s3-key-pattern flag and a set of placeholders:
| Placeholder | Meaning |
|---|---|
|
$browserName |
Replaced by Selenium browser name capability value |
|
$browserVersion |
Replaced by Selenium browser version capability value |
|
$date |
Replaced by current date, e.g. |
|
$fileName |
Replaced by source file name |
|
$fileExtension |
Replaced by source file extension |
|
$fileType |
Replaced by |
|
$platformName |
Replaced by Selenium platform capability value |
|
$quota |
Replaced by quota name (usually coming from Ggr) |
|
$sessionId |
Replaced by Selenium session ID |
For example, when launching Selenoid with -s3-key-pattern $browserName/$sessionId/log.txt files will be accessible as firefox/0ee0b48b-e29b-6749-b4f1-2277b8f8d6c5/log.txt. You can also override key pattern for every session with s3KeyPattern capability.
Sometimes you may want to upload only video files or files matching some complicated pattern or to not upload some files. To achieve this use -s3-include-files and -s3-exclude-files flags. These flags accept globs such as *.mp4.
3.3. Saving Session Metadata
This feature only becomes available when Selenoid is compiled with metadata build tag (missing by default).
|
Selenoid can save session metadata to a separate JSON file. Main use case is to somehow post-process session logs, e.g. send them to map-reduce cluster. No additional configuration is needed to enable this feature. When enabled and -log-output-dir flag is set — Selenoid will automatically save JSON files <log-output-dir>/<session-id>.json with the following content:
Example metadata JSON file
{
    "id": "62a4d82d-edf6-43d5-886f-895b77ff23b7",
    "capabilities": {
        "browserName": "chrome",
        "version": "70.0",
        "name": "MyCoolTest",
        "screenResolution": "1920x1080x24"
    },
    "started": "2018-11-15T16:23:12.440916+03:00",
    "finished": "2018-11-15T16:23:12.480928+03:00"
}
3.4. Using Selenoid without Docker
Selenoid is using containers to start browsers. However cases exist when running browser in container is not possible. For example on Windows you have Internet Explorer which can not be run inside container. Selenoid can be used as a lightweight Selenium server replacement to run IE, Firefox or Chrome on Windows. For example to use Selenoid with IE:
-
Download latest IEDriverServer archive and unpack it to some directory (
C: -
Download latest Selenoid binary.
-
Create
browsers.json{ "internet explorer": { "default": "11", "versions": { "11": { "image": ["C:\IEDriverServer.exe", "--log-level=DEBUG"] } } } }Notice that backslashes in Windows paths should be escaped as
\
In this example we define a browser with nameinternet explorer11 -
Start Selenoid:
./selenoid_win_amd64.exe -conf ./browsers.json -disable-docker -
Run your tests against …
http://localhost:4444/wd/hub… with the following capabilities:
browserName = internet explorer version = 11 -
To start Chrome instead just download Chromedriver binary and modify
browsers.json -
By default Selenoid does not process launched driver logs. Launch Selenoid with
-capture-driver-logsflag to append driver logs for every session to main log.
4. Configuration
4.1. Recommended Docker Settings
-
We recommend to use latest Docker release and Linux core 4.x and above. Older kernels and Docker releases have known bugs.
-
Use modern OverlayFS Docker storage driver. AUFS is also fast but has some bugs that can lead to orphaned containers. Never use Device Mapper — it is very slow. See this page on how to adjust Docker storage driver. To check your currently used driver type:
# docker info | grep Storage -
Total number of simultaneously running containers (adjusted via
-limit1.5-2.0 x numCoresnumCores -
In some Docker installations you can see random Selenium commands failing because of the timeout. This is mainly caused by low bridged networking (aka
docker0) performance. To avoid this we recommend to setdocker0network Mac-address to the same value aseth0has:# ifconfig | grep eth0 eth0 Link encap:Ethernet HWaddr 00:25:90:eb:fb:3e
Now we are setting this Mac-adress for
docker0virtual interface:# ip link set docker0 address 00:25:90:eb:fb:3e
To make these settings permanent we need to adding the following line to
docker0section in/etc/network/interfaces:iface docker0 inet static # ... the rest of lines post-up ip link set docker0 address 00:25:90:eb:fb:3e -
You may also want to limit memory and CPU consumption for each started container. To do this use
-mem-cpuHere values are specified in Docker format. Similarly to limit CPU comsumption specify total number of CPUs per container as a float:
-
We use the same client as
dockercommand does. This is why all environment variables likeDOCKER_API_VERSIONorDOCKER_CERT_PATHare applicable. See full list of supported variables in Docker documentation. For example you may encounter the following error when running Selenoid:[SERVICE_STARTUP_FAILED] [unknown] [create container: Error response from daemon: client is newer than server (client API version: 1.30, server API version: 1.24)]
This is because your Docker server version is older than Selenoid client version. To fix this you need to switch Selenoid to use supported API version —
1.24. This can be done by settingDOCKER_API_VERSIONenvironment variable:# docker run -e DOCKER_API_VERSION=1.24 -d --name selenoid -p 4444:4444 -v /etc/selenoid:/etc/selenoid:ro -v /var/run/docker.sock:/var/run/docker.sock aerokube/selenoid:latest-release
4.2. Browsers Configuration File
Selenoid requires a simple JSON configuration file of the following format:
browsers.json
{
    "firefox": {                                     (1)
      "default": "46.0",                             (2)
      "versions": {                                  (3)
        "46.0": {                                    (4)
          "image": "selenoid/firefox:46.0",          (5)
          "port": "4444",                            (6)
          "tmpfs": {"/tmp": "size=512m"},            (7)
          "path" : "/wd/hub",                        (8)
          "volumes" : ["/from:/to:ro"],              (9)
          "env" : ["TZ=Europe/Moscow"],              (10)
          "hosts" : ["example.com:192.168.0.1"],     (11)
          "shmSize" : 268435456,                     (12)
          "cpu" : "1.0",                             (13)
          "mem" : "512m",                            (14)
        },
        "50.0" :{
            // ...
        }
      }
    },
    "chrome": {
        // ...
    }
}| 1 | Browser name |
| 2 | Default browser version |
| 3 | A list of available browser versions |
| 4 | Version name |
| 5 | Image name or driver binary command |
| 6 | Containers only. Port to proxy connections to, see below |
| 7 | Optional. Containers only. Add in-memory filesystem (tmpfs) to container, see below |
| 8 | Optional. Path relative to / where we request a new session, see below |
| 9 | Optional. Containers only. Mount path from host machine to created container |
| 10 | Optional. Environment variables to be passed to browser container or driver process |
| 11 | Optional. Custom /etc/hosts entries to be passed to browser container in hostname:ip format. |
| 12 | Optional. Shared memory size in bytes to be set for container. Some browsers (e.g. Chrome) may work unstable when having insufficient shmSize. Default value is 256 megabytes. |
| 13 | Optional. Containers only. Container CPU limit in Docker units. |
| 14 | Optional. Containers only. Container memory limit in Docker units. |
This file represents a mapping between a list of supported browser versions and Docker container images or driver binaries.
|
To use custom browsers configuration file — use $ ./selenoid -conf /path/to/browsers.json |
4.2.1. Browser Name and Version
Browser name and version are just strings that are matched against Selenium desired capabilities:
-
browserName -
version
If no version capability is present default version is used. When there is no exact version match we also try to match by prefix.
That means version string in JSON should start with version string from capabilities.
Example 2. Matching Logic
Version capability that will match:
version = 46 (46.0 starts with 46)
Will not match:
version = 46.1 (46.0 does not start with 46.1)
4.2.2. Image
Image by default is a string with container specification in Docker format (hub.example.com/project/image:tag).
Example 3. Valid images
Pulled from internal docker registry:
my-internal-docker-hub.example.com/selenoid/firefox:46.0
Pulled from hub.docker.com
selenoid/firefox:46.0
Standalone Binary
If you wish to use a standalone binary instead of Docker container, then image field should contain command specification in square brackets:
"46.0": {
    "image": ["/usr/bin/mybinary", "-arg1", "foo", "-arg2", "bar", "-arg3"],
    "port": "4444"
},
Selenoid proxies connections to either Selenium server or standalone driver binary. Depending on operating system both can be packaged inside Docker container.
4.2.3. Other Optional Fields
"46.0": {
    //...
    "port": "",
    "tmpfs": {"/tmp": "size=512m", "/var": "size=128m"},
    "path" : "",
    "volumes": ["/from:/to", "/another:/one:ro"],
    "env" : ["TZ=Europe/Moscow", "ONE_MORE_VARIABLE=itsValue"],
    "hosts" : ["one.example.com:192.168.0.1", "two.example.com:192.168.0.2"],
    "labels" : {"component": "frontend", "project": "my-project"},
    "sysctl" : {"net.ipv4.tcp_timestamps": "2", "kern.maxprocperuid": "1000"},
    "shmSize" : 268435456,
},-
port (only for containers) — You should use
portfield to specify the real port inside container that container process (Selenium server, Selenoid or driver) will listen on. -
tmpfs (optional) — You may probably know that moving browser cache to in-memory filesystem (Tmpfs)
can dramatically improve its performance.
Selenoid can automatically attach one or more in-memory filesystems as volumes to Docker container being run.
To achieve this define one or more mount points and their respective sizes in optionaltmpfsfield. -
path (optional) —
pathfield is needed to specify relative path to the URL where a new session is created (default is/).
Which value to specify in this field depends on container contents.
For example, most of Firefox containers have Selenium server inside — thus you need to specify/wd/hub.
Chrome and Opera containers use web driver binary as entrypoint application which is accepting requests at/.
We recommend to use our configuration tool to avoid errors with this field. -
volumes (optional) — This field allows to mount volumes from host machine to browser container. Should be specified as an array of Docker volume expressions:
/host/dir:/container/dir[:mode]. -
env (optional) — This field allows to set any environment variables in running container. Specified as an array of
NAME=valuepairs. -
hosts (optional) — This field allows to add custom
/etc/hostsentries to running container. Specified as an array ofhostname:ippairs. -
labels (optional) — This field allows to add custom labels to running container. Specified as an object of
"key": "value"pairs. -
sysctl (optional) — This field allows to adjust kernel parameters of running container. Specified as an object of
"key": "value"pairs. -
shmSize (optional) — Use it to override shared memory size for browser container.
4.2.4. Syncing Browser Images from Existing File
In some usage scenarios you may want to store browsers configuration file under version control and initialize Selenoid from this file. For example this is true if you wish to have consistently reproducing infrastructure and using such tools as Amazon Cloud Formation.
|
Why this is not the part of Selenoid? Well, this is easy to implement, but under heavy load the result can be unpredictable. For example after updating the file and reloading Selenoid it should pull new images. How long will you wait for new sessions then? What to do if Docker Registry is inaccessible? So for maintenance reasons it is easier to delegate such simple logic to external script. |
In order to pull browser images use on of the following options:
Option 1: using CM
Recent CM tool versions are able to configure Selenoid from existing browsers.json file as follows:
# ./cm selenoid start --browsers-json /path/to/your/browsers.json
This way is mainly useful when installing Selenoid from scratch or updating it i.e. as a part of CI build job.
Option 2: using jq
-
Install jq — a small tool to query data from JSON files.
-
Extract image names from JSON and automatically pull them:
# cat /path/to/browsers.json | jq -r '..|.image?|strings' | xargs -I{} docker pull {}
This way can be applied to a running cluster with tests with no downtime.
4.3. Logging Configuration File
By default Docker container logs are saved to host machine hard drive. When using Selenoid for local development that’s ok.
But in big Selenium cluster you may want to send logs to some centralized storage like Logstash
or Graylog.
Docker provides such functionality by so-called logging drivers.
An optional Selenoid logging configuration file allows to specify which logging driver to use globally for all started Docker
containers with browsers. Configuration file has the following format:
config/container-logs.json
{
    "Type" : "<driver-type>",   (1)
    "Config" : {                (2)
      "key1" : "value1",
      "key2" : "value2"
    }
}| 1 | is a supported Docker logging driver type like syslog, journald or awslogs. |
| 2 | Config is a list of key-value pairs used to configure selected driver. |
For example these Docker logging parameters:
--log-driver=syslog --log-opt syslog-address=tcp://192.168.0.42:123 --log-opt syslog-facility=daemon… are equivalent to the following Selenoid logging configuration:
config/container-logs.json
{
    "Type" : "syslog",
    "Config" : {
      "syslog-address" : "tcp://192.168.0.42:123",
      "syslog-facility" : "daemon"
    }
}|
To specify custom logging configuration file — use $ ./selenoid -log-conf /path/to/logging.json ... |
4.4. Reloading Configuration
To reload configuration without restart send SIGHUP:
# kill -HUP <pid>
# docker kill -s HUP <container-id-or-name>| Use only one of these commands. |
To check Selenoid instance health use /ping:
Request
$ curl -s http://example.com:4444/pingResult
{
    "uptime": "2m46.854829503s",
    "lastReloadTime": "2017-05-12 12:33:06.322038542 +0300 MSK",
    "numRequests": 42
}
It returns 200 OK when Selenoid operates normally. Additionally server uptime, last quota reload time and overall number of session requests from service startup are returned in JSON format.
4.5. Updating Browsers
One of the most frequent Selenoid maintenance tasks is updating browser versions. To modify the list of available browsers you need to:
-
Update browsers configuration file (aka
browsers.json) by adding or deleting desired browser versions -
When adding new browsers in containers — pull respective container images, e.g.:
$ docker pull selenoid/chrome:62.0
-
Restart Selenoid or hot reload its configuration.
4.5.1. The Short Way
This approach is mainly convenient for personal usage because Selenoid is restarted i.e. any running browser sessions are interrupted. Just type one Configuration Manager command:
This command will download latest Selenoid release, browser images, generate new browsers.json and restart Selenoid. You may want to add --vnc flag to download images with VNC support:
$ ./cm selenoid update --vnc
Another useful flag is total number of last browser versions to download (default is 2):
$ ./cm selenoid update --last-versions 5
If you wish to pull new images and regenerate configuration without restarting Selenoid then type:
$ ./cm selenoid configure --vnc --last-versions 5
4.5.2. A Bit Longer Way
We recommend to use this approach on production clusters because Selenoid configuration is reloaded without restart.
-
Edit
browsers.jsonfile and pull new browsers containers manually or using Syncing Browser Images from Existing File. Alternatively configure Selenoid without restarting it like shown in previous section. -
Reload Selenoid configuration (see Reloading Configuration for more details):
$ docker kill -s HUP selenoid
-
To verify that configuration was reloaded you can check Selenoid health:
$ curl -s http://example.com:4444/ping
{"uptime":"<some-value>","lastReloadTime":"2017-05-12 12:33:06.322038542 +0300 MSK","numRequests":<some-number>}
Here
lastReloadTimefield shows when browsers configuration was reloaded for the last time.
4.6. Setting Timezone
When used in Docker container Selenoid will have timezone set to UTC.
To set custom timezone pass TZ environment variable to Docker:
$ docker run -d --name selenoid
    -p 4444:4444
    -e TZ=Europe/Moscow
    -v /etc/selenoid:/etc/selenoid:ro
    -v /var/run/docker.sock:/var/run/docker.sock
    aerokube/selenoid:latest-release
4.7. Selenoid with Docker Compose
In example Docker Compose configurations below we assume that:
-
You created a directory
/path/to/configwith Browsers Configuration File inside namedbrowsers.json.$ mkdir -p /path/to/config
-
You created empty configuration directories for logs and videos:
$ mkdir -p /path/to/config/logs
$ mkdir -p /path/to/config/video
4.7.1. Option 1. Running Selenoid in default Docker network
In that case bridge network mode should be used for all services:
version: '3'
services:
  selenoid:
    network_mode: bridge
    image: aerokube/selenoid:latest-release
    volumes:
      - "/path/to/config:/etc/selenoid"
      - "/var/run/docker.sock:/var/run/docker.sock"
      - "/path/to/config/video:/opt/selenoid/video"
      - "/path/to/config/logs:/opt/selenoid/logs"
    environment:
      - OVERRIDE_VIDEO_OUTPUT_DIR=/path/to/config/video
    command: ["-conf", "/etc/selenoid/browsers.json", "-video-output-dir", "/opt/selenoid/video", "-log-output-dir", "/opt/selenoid/logs"]
    ports:
      - "4444:4444"
4.7.2. Option 2. Running Selenoid in custom Docker network
In that case you have to add -container-network flag to Selenoid as follows:
-
Create custom Docker network:
$ docker network create selenoid
-
Start Selenoid:
version: '3'
networks:
  selenoid:
    external:
      name: selenoid # This assumes network is already created
services:
  selenoid:
    networks:
      selenoid: null
    image: aerokube/selenoid:latest-release
    volumes:
      - "/path/to/config:/etc/selenoid"
      - "/var/run/docker.sock:/var/run/docker.sock"
      - "/path/to/config/video:/opt/selenoid/video"
      - "/path/to/config/logs:/opt/selenoid/logs"
    environment:
      - OVERRIDE_VIDEO_OUTPUT_DIR=/path/to/config/video
    command: ["-conf", "/etc/selenoid/browsers.json", "-video-output-dir", "/opt/selenoid/video", "-log-output-dir", "/opt/selenoid/logs", "-container-network", "selenoid"]
    ports:
      - "4444:4444"
4.8. Log Files
A typical log file looks like the following:
2017/11/01 19:12:38 [-] [NEW_REQUEST]
2017/11/01 19:12:38 [-] [NEW_REQUEST_ACCEPTED]
2017/11/01 19:12:38 [41301] [LOCATING_SERVICE] [firefox-45.0]
2017/11/01 19:12:38 [41301] [USING_DOCKER] [firefox-45.0]
2017/11/01 19:12:38 [41301] [CREATING_CONTAINER] [selenoid/firefox:45.0]
2017/11/01 19:12:38 [41301] [STARTING_CONTAINER] [selenoid/firefox:45.0] [19760edf330a87531eb2109cfbf1bd4b14c739afa08fe133eb1b9813b2ac6c31]
2017/11/01 19:12:39 [41301] [CONTAINER_STARTED] [selenoid/firefox:45.0] [19760edf330a87531eb2109cfbf1bd4b14c739afa08fe133eb1b9813b2ac6c31] [896.680954ms]
2017/11/01 19:12:40 [41301] [SERVICE_STARTED] [selenoid/firefox:45.0] [19760edf330a87531eb2109cfbf1bd4b14c739afa08fe133eb1b9813b2ac6c31] [605.184606ms]
2017/11/01 19:12:40 [41301] [PROXY_TO] [selenoid/firefox:45.0] [19760edf330a87531eb2109cfbf1bd4b14c739afa08fe133eb1b9813b2ac6c31] [http://172.17.0.3:4444/wd/hub]
2017/11/01 19:12:40 [41301] [SESSION_ATTEMPTED] [test-quota] [http://172.17.0.3:4444/wd/hub] [1]
2017/11/01 19:12:42 [41301] [SESSION_CREATED] [test-quota] [345bb886-7026-46d7-82d4-4788c0460110] [http://172.17.0.3:4444/wd/hub] [1] [4.155712239s]
....
2017/11/01 19:14:30 [SESSION_DELETED] [345bb886-7026-46d7-82d4-4788c0460110]
Every line contains:
| Field | Example | Notes |
|---|---|---|
|
Time |
2017/11/01 19:12:42 |
— |
|
Request counter |
[41301] |
So far as session ID is unknown when doing attempts this counter is used to find all session attempts for each new session request. |
|
Status |
[SESSION_ATTEMPTED] |
See table below for complete list of statuses. |
|
Browser |
[firefox-45.0] |
Name and version. Only present for new session requests. |
|
Attempt number |
[1] |
For SESSION_ATTEMPTED entries means current attempt number. For SESSION_CREATED entries means total number of attempts to create this session. |
|
Session ID |
[345bb886-7026-46d7-82d4-4788c0460110] |
This value is unique for every browser session |
|
Session start time |
[4.15s] |
— |
The following statuses are available:
| Status | Description |
|---|---|
|
ALLOCATED_PORT |
Successfully allocated port for driver process |
|
ALLOCATING_PORT |
Trying to allocate random free port for driver process |
|
BAD_JSON_FORMAT |
User request does not contain valid Selenium data |
|
BAD_SCREEN_RESOLUTION |
User requested to set wrong custom screen resolution |
|
BAD_TIMEZONE |
User requested to set wrong custom time zone inside container |
|
BAD_VIDEO_SCREEN_SIZE |
User requested to capture video with wrong screen size |
|
CLIENT_DISCONNECTED |
User disconnected and session was interrupted |
|
CONTAINER_LOGS |
User requested container logs |
|
CONTAINER_LOGS_ERROR |
User requested container logs |
|
CONTAINER_LOGS_DISCONNECTED |
User logs client disconnected |
|
CONTAINER_REMOVED |
Docker container was successfully removed |
|
CONTAINER_STARTED |
Docker container has successfully started |
|
FAILED_TO_COPY_LOGS |
Failed to copy logs from Docker container |
|
CREATING_CONTAINER |
Docker container with browser is creating |
|
DEFAULT_VERSION |
Selenoid is using default browser version |
|
DELETED_LOG_FILE |
Log file was deleted by user |
|
DELETED_VIDEO_FILE |
Video file was deleted by user |
|
DEVTOOLS_CLIENT_DISCONNECTED |
User devtools client disconnected |
|
DEVTOOLS_DISABLED |
An attempt to access browser devtools when it is not enabled with capability |
|
DEVTOOLS_ERROR |
An error occurred when trying to send devtools traffic |
|
DEVTOOLS_SESSION_CLOSED |
Sending devtools traffic was stopped |
|
DOWNLOADING_FILE |
User requested to download file from browser container |
|
ENVIRONMENT_NOT_AVAILABLE |
Browser with desired name and version does not exist |
|
FAILED_TO_REMOVE_CONTAINER |
Failed to remove Docker container |
|
FAILED_TO_TERMINATE_PROCESS |
An error occurred while terminating driver process |
|
INIT |
Server is starting |
|
LOG_LISTING |
Received a request to list all log files |
|
LOG_ERROR |
An error occurred when post-processing session logs |
|
METADATA |
Metadata processing messages |
|
NEW_REQUEST |
New user request arrived and was placed to queue |
|
NEW_REQUEST_ACCEPTED |
Started processing new user request |
|
PROCESS_STARTED |
Driver process successfully started |
|
PROXY_TO |
Starting to proxy requests to running container or driver process |
|
REMOVING_CONTAINER |
Docker container with browser or video recorder is being removed |
|
SERVICE_STARTED |
Successfully started Docker container or driver binary |
|
SERVICE_STARTUP_FAILED |
Failed to start Docker container or driver binary |
|
SESSION_ATTEMPTED |
Started Docker container or driver binary and trying to create a new session with it |
|
SESSION_ATTEMPT_TIMED_OUT |
An attempt to create a new session timed out |
|
SESSION_CREATED |
A new session was created and returned to user |
|
SESSION_TIMED_OUT |
Existing session was terminated by timeout |
|
SESSION_DELETED |
Existing session was deleted by user request |
|
SESSION_FAILED |
An attempt to create a new session failed — user receives an error |
|
SESSION_NOT_FOUND |
Requested VNC or logs for unknown session. |
|
STARTING_CONTAINER |
Docker container with browser was created and is starting |
|
STARTING_PROCESS |
Starting driver process |
|
SHUTTING_DOWN |
Server is stopping |
|
TERMINATING_PROCESS |
Stopping driver process |
|
TERMINATED_PROCESS |
Driver process was successfully stopped |
|
UPLOADING_FILE |
An issue occurred while uploading file |
|
UPLOADED_FILE |
File successfully uploaded |
|
VIDEO_LISTING |
Received a request to list all videos |
|
VIDEO_ERROR |
An error occurred when post-processing recorded video |
|
VNC_CLIENT_DISCONNECTED |
User VNC client disconnected |
|
VNC_ENABLED |
User requested VNC traffic |
|
VNC_ERROR |
An error occurred when trying to send VNC traffic |
|
VNC_SESSION_CLOSED |
Sending VNC traffic was stopped |
|
VNC_NOT_ENABLED |
User requested VNC traffic but did not specify |
4.9. Selenoid CLI Flags
The following flags are supported by selenoid command:
-capture-driver-logs
    Whether to add driver process logs to Selenoid output
-conf string
    Browsers configuration file (default "config/browsers.json")
-container-network string
    Network to be used for containers (default "default")
-cpu value
    Containers cpu limit as float e.g. 0.2 or 1.0
-disable-docker
    Disable docker support
-disable-privileged
    Whether to disable privileged container mode
-disable-queue
    Disable wait queue
-enable-file-upload
    File upload support
-graceful-period duration
    graceful shutdown period in time.Duration format, e.g. 300s or 500ms (default 5m0s)
-limit int
    Simultaneous container runs (default 5)
-listen string
    Network address to accept connections (default ":4444")
-log-conf string
    Container logging configuration file
-log-output-dir string
    Directory to save session log to
-max-timeout duration
    Maximum valid session idle timeout in time.Duration format (default 1h0m0s)
-mem value
    Containers memory limit e.g. 128m or 1g
-retry-count int
    New session attempts retry count (default 1)
-save-all-logs
    Whether to save all logs without considering capabilities
-service-startup-timeout duration
    Service startup timeout in time.Duration format (default 30s)
-session-attempt-timeout duration
    New session attempt timeout in time.Duration format (default 30s)
-session-delete-timeout duration
    Session delete timeout in time.Duration format (default 30s)
-timeout duration
    Session idle timeout in time.Duration format (default 1m0s)
-version
    Show version and exit
-video-output-dir string
    Directory to save recorded video to (default "video")
-video-recorder-image string
    Image to use as video recorder (default "selenoid/video-recorder:latest-release")
For example:
$ ./selenoid -conf ~/.aerokube/selenoid/browsers.json -limit 10When using Selenoid inside Docker container these flags are passed like the following:
# docker run -d --name selenoid
    -p 4444:4444
    -v ~/.aerokube/selenoid/:/etc/selenoid/:ro
    -v /var/run/docker.sock:/var/run/docker.sock
    aerokube/selenoid:latest-release
    -conf /etc/selenoid/browsers.json -limit 10 -video-output-dir /opt/selenoid/video/
4.9.1. S3 CLI Flags
The following flags are supported by selenoid command when compiled with S3 support:
-s3-access-key string
    S3 access key
-s3-bucket-name string
    S3 bucket name
-s3-endpoint string
    S3 endpoint URL
-s3-exclude-files string
    Pattern used to match and exclude files
-s3-force-path-style
    Force path-style addressing for file upload
-s3-include-files string
    Pattern used to match and include files
-s3-keep-files
    Do not remove uploaded files
-s3-key-pattern string
    S3 bucket name (default "$fileName")
-s3-reduced-redundancy
    Use reduced redundancy storage class
-s3-region string
    S3 region
-s3-secret-key string
    S3 secret key
5. Contributing & Development
To build Selenoid:
-
Install Golang 1.12 and above.
-
Setup
$GOPATHproperly -
Clone Selenoid source:
$ git clone https://github.com/aerokube/selenoid.git
-
Go to project directory:
-
Build source:
This will also fetch build dependencies.
-
Run Selenoid:
|
To build Docker container type: |
5.1. Documentation
Locally can be generated with:
$ docker run --rm -v ./docs/:/documents/
    asciidoctor/docker-asciidoctor
    asciidoctor -D /documents/output/ index.adoc
Appendix A: Browser Image information
Время прочтения
6 мин
Просмотры 37K
Представляю вам перевод моей статьи на Medium.com.
Впервые выпущенная более 30 лет назад Microsoft Windows сегодня является неоспоримым лидером среди настольных операционных систем. Это просто нельзя игнорировать при разработке веб-приложений. В этой статье я хотел бы обсудить некоторые особенности использования Selenium под Windows и предложить простое и проверенное в боевых условиях решение, значительно упрощающее жизнь.

Чем Windows отличается от Linux
В своих предыдущих статьях (первая, вторая, третья) я описал подходы и инструменты с открытым кодом, позволяющие организовать масштабируемый кластер Selenium. Мы также поговорили о том, как при помощи тех же инструментов эффективно запускать тесты на машине разработчика. Во всех статьях в качестве операционной системы использовался Linux. Чем же Windows отличается от Linux с точки зрения Selenium?
- Наличие браузеров, не существующих на других платформах. В зависимости от версии, Windows поставляется с предустановленным Internet Explorer (IE) или Microsoft Edge. Единовременно может быть установлена только одна версия каждого браузера. Для обоих браузеров имеются готовые исполняемые файлы web-драйверов (IEDriverServer и EdgeDriver соответственно), которые используют вызовы Windows API для запуска и управления браузером. С этой стороны Windows браузеры архитектурно ничем не отличаются от браузеров на Linux.
- Графический интерфейс встроен в операционную систему. Большинство версий Windows (кроме последних версий Windows Server) имеют встроенный графический интерфейс, который нельзя ни отключить ни заменить другим графическим сервером. Интерфейс автоматически стартует вместе с операционной системой и постоянно потребляет ресурсы. Кроме того графический интерфейс Windows по-умолчанию отображает все открываемые окна (в том числе и окна браузеров) в одном и том же рабочем столе и только одно из этих окон может быть в фокусе в заданный момент времени. Из-за этого попытки запустить несколько IE или Edge параллельно часто приводят к различным проблемам с фокусом окна: отличающиеся CSS-стили (например, при наведении на ссылки), не срабатывающие события DOM и так далее. Эта проблема очень мешает работе.
- Практически полное отсуствие поддержки Docker. Последние версии Windows Server поддерживают большинство функций Docker нативно, но на интересующих нас настольных версиях нет такой поддержки. Поэтому единственный способ запустить Docker на этих версиях — при помощи виртуальной машины с Linux, в которую установлен Docker.
Как видите многие современные подходы при работе с Selenium: использование X сервера без монитора и запуск браузеров в контейнерах не работают в Windows. Но можно ли достичь сходной с Linux производительности и обойти известные ограничения Windows? Да, и это проще, чем вы могли бы подумать! В следующих разделах я расскажу как это сделать.
Создаем порядок из хаоса
Мы будем двигаться к поставленной цели шаг за шагом. Для начала сделаем решение как можно проще. Как известно, обычная схема установки Selenium на Windows выглядит так:
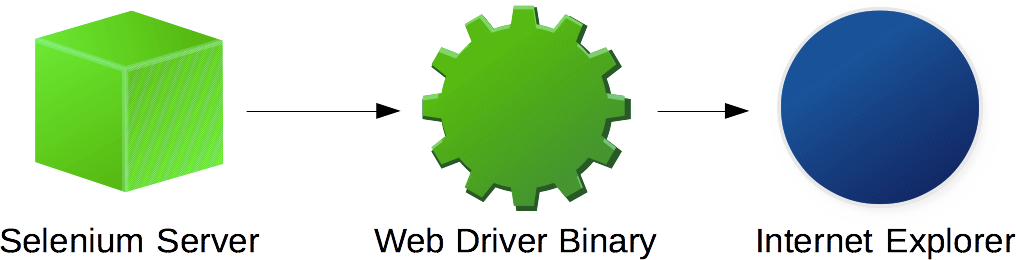
Схема состоит из Selenium сервера, запущенного при помощи виртуальной машины Java (JRE), затем исполняемый файл IEDriverServer или EdgeDriver и, наконец, сам браузер — IE или Edge. В этой цепочке есть как минимум одно слабое звено — Selenium сервер и Java. Все потому, что Selenium здесь выступает в роли простого прокси-сервера, который запускает процесс драйвера на случайном порту и затем отправляет все запросы на этот порт. Проксирование сетевого трафика — простейшая задача в любом языке программирования, потому что основная работа выполняется сетевой подсистемой операционной системы. Именно поэтому установка Java (50 и более Мб) и скачивание Selenium server (20 и более Мб) для простого проксирования выглядит чересчур громоздким решением. Более того Selenium сервер плохо работает под нагрузкой:
- Он потребляет слишком много памяти и иногда даже течет.
- Проксирование выполняется «вручную» — на каждый запрос создается новый экземпляр HTTP клиента и входящий запрос копируется в него. Такой подход очень неэффективен и в некоторых случаях вызывает странные таймауты при проксировании.
Мы можем значительно улучшить ситуацию, просто заменив тяжелый Selenium сервер легковесным Selenoid.
Как заменить Selenium сервер на Selenoid
Selenoid — это легковесная замена Selenium сервера, написанная на языке Go. Selenoid поставляется в виде одного маленького (около 7 Мб) исполняемого файла и не имеет внешних зависимостей. Для начала использования нужно просто скачать и запустить этот файл. В моей предыдущей статье я кратко описал насколько удобным может быть Selenoid для запуска браузеров в Docker контейнерах — основного его назначения. Второй поддерживаемый режим — это запуск исполняемых файлов вместо контейнеров и проксирование сетевого трафика в них — также, как Selenium сервер делает это с IEDriverServer и EdgeDriver. Заменить Selenium сервер на Selenoid очень просто. Для примера, запустим Internet Explorer при помощи Selenoid:
- Скачиваем исполняемый файл Selenoid со страницы релизов. Исполняемый файл обычно называется
selenoid_windows_386.exeдля 32-битной Windows иselenoid_windows_amd64.exeдля Windows 64 bit. Насколько мне известно настольные версии Windows не имеют встроенной консольной программы для скачивания файлов. Но, если у вас установлен Cygwin и curl, то скачать файл можно так:$ curl -o selenoid.exe https://github.com/aerokube/selenoid/releases/download/1.2.1/selenoid_windows_386.exe - Скачиваем и распаковываем архив с
IEDriverServer.exeсо страницы загрузок Selenium. К примеру сохранимIEDriverServer.exeвC:. - Настраиваем Internet Explorer как описано в вики.
- Создаем простой файл конфигурации для Selenoid —
browsers.json:{ "internet explorer": { "default": "11", "versions": { "11": { "image": ["C:\IEDriverServer.exe"] } } } } -
Запускаем Selenoid вместо Selenium сервера (порт 4444 должен быть свободен) при помощи вот такого файла
selenoid.bat:C:selenoid.exe -conf C:browsers.json -disable-docker -limit 4 > C:selenoid.log 2>&1Здесь мы предполагаем, что все файлы из предыдущих шагов были сохранены в
C:. Логи Selenoid будут сохранены вC:selenoid.log. Обратите внимание на параметр-limit— он определяет сколько сессий можно запустить одновременно. Когда указанное количество сессий запущено — новые запросы становятся в очередь точно также, как в Selenium сервере. - Готово! Можно запускать тесты на тот же самый URL:
http://localhost:4444/wd/hub - Чтобы оставаться легковесным, Selenoid не имеет встроенного графического интерфейса. Мордочка сделана в виде отдельного исполняемого файла: Selenoid UI. Просто скачайте скомпилированный файл со страницы релизов и запустите его, затем откройте
http://localhost:8080/в браузере.
Запускаем тесты на нескольких рабочих столах
После замены Selenium сервера на Selenoid вы увидите значительное снижение потребления памяти и CPU. Этот простой шаг может даже позволить вам запускать больше браузеров параллельно. Тем не менее простая замена не лечит проблемы с открытием нескольких окон браузеров одновременно. Окна по-прежнему показывается на одном рабочем столе и продолжают терять фокус. Для того, чтобы обойти это препятствие требуется научиться запускать браузеры в отдельных рабочих столах. Хорошая новость — внутренние API Windows даже в настольных версиях имеют поддержку виртуальных рабочих столов — можно переключаться между рабочими столами и запускать окна в этих рабочих столах независимо друг от друга. Но есть новость получше — не нужно погружаться во внутренности Windows, чтобы получить такое поведение для Selenium — нужная функциональность уже реализована в проекте headless-selenium-for-win. Скачав релиз, вы получите архив с двумя исполняемыми файлами: desktop_utils.exe и headless_ie_selenium.exe.
Первый из них — это консольная утилита для ручного переключения между рабочими столами. Команда выглядит примерно так:
C:> desktop_utils.exe -s desktop1Для работы с Selenium нам потребуется вторая утилита — headless_ie_selenium.exe. Она является надстройкой к IEDriverServer.exe, обрабатывающей запросы на сессии и автоматически запускающей IEDriverServer.exe в новом рабочем столе. headless_ie_selenium.exe должна лежать в одном каталоге с IEDriverServer.exe. Для того, чтобы использовать утилиту с Selenoid нужно просто заменить пусть до исполняемого файла в browsers.json и перезапустить Selenoid:
{
"internet explorer": {
"default": "11",
"versions": {
"11": {
"image": ["C:\headless_ie_selenium.exe"]
}
}
}
}Теперь все проблемы с фокусом окон должны уйти.
Немного магии с Selenium capabilities
Простой заменой Selenium на Selenoid и IEDriverServer.exe на headless_ie_selenium.exe мы решили наиболее острые проблемы Selenium под Windows. Давайте сделаем из алмаза бриллиант, выставив несколько полезных capabilities в тестах.
-
По-умолчанию Internet Explorer использует системные настройки HTTP прокси. Это приводит к тому, что настройки прокси, выставленные в одной сессии «пролезают» и в другие сессии. Для того, чтобы исправить это, выставьте:
ie.usePerProcessProxy = true -
Ваше веб-приложение может использовать cookies для хранения важной информации. В Windows эти файлы хранятся отдельно для каждого пользователя и поведение по-умолчанию — переиспользовать выставленные куки между параллельными сессиями. Это может приводить к плавающим тестам. Чтобы избежать переиспользование cookie можно стартовать IE в анонимном режиме:
ie.browserCommandLineSwitches = "-private"Также не забудьте выставить:
ie.ensureCleanSession = true - Для того, чтобы избежать странных ошибок с фокусом окна, также убедитесь, что указанная нижу capability не выставлена или равна false:
requireWindowFocus = false
Заключение
В этой статье я коротко описал основные проблемы, с которыми вы можете столкнуться при запуске Selenium тестов под Windows и предложил простое решение. Я продолжаю утверждать — тесты в Selenium могут не доставлять боли. Нужно только правильно уметь его готовить.
I don’t understand how can I install selenoid on Windows 10.
I’m using this tutorial:
https://github.com/aerokube/selenoid/blob/master/docs/selenoid-without-docker.adoc
I’ve downloaded last version of selenoid (v1.7.1) for Windows here
https://github.com/aerokube/cm/releases/tag/1.7.1
cm_windows_amd64.exe
I’ve dovnloaded chromedriver.eve (v 77)
I’ve created browsers.json configuration file:
{
"chrome": {
"default": "77",
"versions": {
"77": {
"image": ["C:\Users\AnastasiiaBondarenko\Downloads\chromedriver.exe", "--log-level=DEBUG"]
}
}
}
}
I’ve put next command into PowerShell:
./selenoid_windows_amd64.exe -conf ./browsers.json -disable-docker
When I’m trying now to open selenoid hub page it shows me 404 error:

I expected to see smth like this:

asked Oct 15, 2019 at 15:39
![]()
1) This 404 error comes from Selenoid, meaning there is no such API / in Selenium protocol. In the next release opening / will be showing Selenoid version (as this behavior is frequently confusing new users).
2) On Windows with installed Docker you don’t have to create configuration files manually. Just download CM binary and run it as follows:
> cm selenoid start
This command will download and generate the rest.
Feel free to contact us in Telegram channel if something does not work.
answered Oct 16, 2019 at 5:52
![]()
1
Download latest Selenoid binary from
https://github.com/aerokube/selenoid/releases
Download some IEDriverServer archive from
http://selenium-release.storage.googleapis.com/index.html
and unpack it to some directory (i.e on C disk)
Create browsers.json configuration file in the folder with name config:
{
"internet explorer": {
"default": "11",
"versions": {
  "11": {
    "image": ["C:\IEDriverServer.exe"]
  }
}
}
}
From command line execude command :
selenoid_windows_amd64.exe -conf config/browsers.json -disable-docker
Don’t forget to add some changes in your code see :
DesiredCapabilities capabilities = new DesiredCapabilities();
capabilities.setBrowserName("internet explorer");
capabilities.setVersion("11");
driver = new RemoteWebDriver(
URI.create("http://localhost:4444/wd/hub").toURL(),
capabilities
);
answered Dec 1, 2020 at 17:30
![]()
Selenoid Home Work
Подготовка
Для запуска тестов в многопоточном режиме было решено использовать два проекта: OtusJDI и OtusTestNG.
- В одном из проектов конфигурация многопоточного режима производилась через pom.xml (OtusJDI)
- Во втором — через testng.xml (OtusTestNG).
После чего можно было бы сравнить два таймлайна в отчёте Allure.
В проект OtusTestNG пришлось интегрировать Allure, т.к. ранее данный проект его не использовал.
- Оба данных проекта пришлось подготовить к корректной работе в многопоточном режиме.
- В оба проекта были добавлены RemoteWebDriver, расчитанные на работу с Selenoid.
- Также для наглядности в оба проекта были добавлены фиктивные тесты.
Подробно все изменения внесенные в данные проекты можно посмотреть по ссылкам ниже (Описания изменений есть в коммитах).
OtusJDI:
Подготовка проекта к запуску в многопоточном режиме
https://github.com/MariaOskar/OtusJDI/commit/791bfa3500268b3c17d08a50a3a578df6e93ef20
Внедрение Selenoid
https://github.com/MariaOskar/OtusJDI/commit/ee9cfcceae665301e407a17678f2be42fdf76726
Демонстрация работы многопоточного режима
https://github.com/MariaOskar/OtusJDI/commit/7a48dae6d03df9173c82f72a2af9df8a95513de8
OtusTestNG:
Подготовка тестов к использованию в многопоточном режиме
https://github.com/MariaOskar/OtusTestNG/commit/c96fdd557914f4c5196b4d201a6d19c97e1673d3
Интеграция отчетов Allure
https://github.com/MariaOskar/OtusTestNG/commit/1884d6118cd1aefe490dddaa04979013f768a333
Внедрение Selenoid
https://github.com/MariaOskar/OtusTestNG/commit/49ea8c3fa7c21be3685797fa2389593073e88373
Демонстрация работы многопоточного режима
https://github.com/MariaOskar/OtusTestNG/commit/9b572285d77e85671b90489e447716e69bd68ba5
SELENOID
Установка Docker на Windows
На Windows Docker установить получилось, однако, при запуске он выдавал ошибку.

https://github.com/MariaOskar/OtusSelenoidHW/raw/master/docker_windows.JPG
Для выполнения задания было решено использовать Linux.
Для этого:
- был установлен VirtualBox
- была создана виртуальная машина
- на виртуальную машину была установлена последняя стабильная версия Ubuntu
Установка Selenoid на Linux
Установка docker на Linux не вызвала никаких проблем.
Инсталяция производилась согласно руководству: https://docs.docker.com/install/linux/docker-ce/ubuntu/
Замечание:
При установке Configuration Manager, возникли проблемы из-за блокировки ряда запросов к GitHub антивирусом Kaspersky.
На время установки экраны антивируса пришлось отключить.
Ниже показан запуск Selenoid и загрузка браузеров.

https://github.com/MariaOskar/OtusSelenoidHW/raw/master/selenoid_install.JPG
Проброс портов в VirtualBox
Для обращения к Selenoid из родительской ОС (Windows) пришлось «прокинуть порты» в настройках сети виртуальной машины.
После чего можно было бы обратиться к Selenoid, расположенному в гостевой ОС(Ubuntu).
Это необходимо т.к. Jenkins установлен на Windows, а также на Windows ведётся разработка тестов.
- Т.к. на Windows порт 8080 уже был занят сервисом Jenkins, для Selenoid в Windows был указан порт 8787, после чего при переходе по адресу http://127.0.0.1:8787/ в Windows мы могли увидеть веб-интерфейс Selenoid.
- Порт 4444 оставили нетронутым. И в Windows и в Linux по адресу http://127.0.0.1:4444/wd/hub отвечал один и тот же сервис.

https://github.com/MariaOskar/OtusSelenoidHW/raw/master/ports.JPG
Запуск тестов в многопоточном режиме
Выполнение тестов в 3 потока на Selenoid

https://github.com/MariaOskar/OtusSelenoidHW/raw/master/selenoid.JPG
VNC
Подключение по протоколу VNC к контейнеру и просмотр хода выполнения теста.

https://github.com/MariaOskar/OtusSelenoidHW/raw/master/selenoid-vnc.JPG
Отчёт проекта OtusTestNG
Отчёт Allure проекта OtusTestNG
В данный отчёт помимо оформления заказа на blazedemo.com также входят фиктивные тесты и тесты написанные на основе сайта http://automationpractice.com

https://github.com/MariaOskar/OtusSelenoidHW/raw/master/testng.JPG
Таймлайн проекта OtusTestNG
В данном проекте многопоточный режим конфигурировался с помощью testng.xml.

https://github.com/MariaOskar/OtusSelenoidHW/raw/master/timeline1.JPG
Таймлайн проекта OtusJDI
В данном проекте многопоточный режим конфигурировался с помощью pom.xml.

https://github.com/MariaOskar/OtusSelenoidHW/raw/master/timeline2.JPG
Замечание:
- При запуске в многопоточном режиме имеет значение каким образом распараллеливаются тесты и как инициализируются тесты ( когда именно создаётся и уничтожается экземпляр вебдрайвера ).
При неправильной инициализации может случится так, что драйвер может достаться только первому потоку или драйвер уничтожится раньше времени. - Запись видео ранее указанным способом не имеет смысла при работе в многопоточном режиме, т.к. для всех тестов будет записываться один и тот же экран.
- Также запись видео ранее указанным способом не имеет смысла при работе с удаленным сервером, т.к. экран записывается на машине, на которой запускаются тесты, а не на удаленной машине.
Автор: Олег Малышев
Решил снова начать вести блог по тестированию и для привлечения внимания надо было сделать кликбейтный заголовок для статьи….
На самом деле мой коллега сделал внутренний доклад по Selenoid в нашей компании. Я позаимствовал этот заголовок и часть материала для статьи.
В далеком 2017 году я писал про настройку Selenium Grid тут. И весь 2017 — 2018 мы использовали обычный Selenium Grid без каких-либо надстроек.
Как у нас всегда выглядело распараллеливание
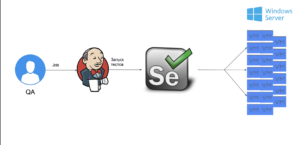
У нас была тачка на котрой был запущен selenium hub. У нас были 20 тачек, на которых были запущены selenium nod-ы. Обычные 20 виртуалок с windows, в которых в автозапуске был настроен bat файл, в котором запускался selenium server в режиме node и коннектился к запущенному хабу. На тачке с хабом также было настроено, что при каждом запуске стартовал selenium server в режиме hub.
Соответственно, если нужно было обновить драйвера для браузеров, нужно было заходить на каждую из 20 виртуалок, качать драйвер, точно такая же ситуация была с браузерами. Плюс сам процесс отладки автототестов на удаленной тачке был тем еще весельем.
Но обо всем этом мы забыли, когда перешли на Selenoid. Слышали мы про Selenoid давно, жаль раньше не стали использовать. Теперь весь процесс у нас выглядит так:
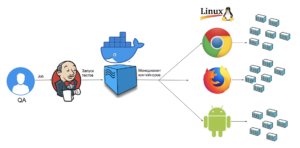
Запускается джоба на дженкинсе, на одной тачке с селенойдом создаются в параллель пул docker контейнеров, в которых старуют браузеры с автотестами.
Selenoid — это сервер, который позволяет запускать браузеры в docker контейнерах.
curl -s https://aerokube.com/cm/bash | bash && ./cm selenoid start —vnc
Или скачать configuration manager с сайта aerokube и использовать команду: ./cm selenoid start —vnc ./cm selenoid start —browsers
‘firefox:51.0;firefox:55.0;chrome:66.0’ — если требуются определенные браузеры
После выполнения одной из команд сверху начнется скачивание образов браузеров, создание browsers.json и selenoid автоматически запустится.
Лимит сессий в этом случае будет равен пяти.
Если требуется задать большее количество сессий, требуется явно указать лимит: ./cm selenoid start —args «-limit 10» Также поднимаем UI: ./cm selenoid-ui start Selenoid работает на порту 4444. Selenoid-UI — 8080
Обновление Selenoid
./cm selenoid update
Конфигурация Selenoid
Selenoid конфигурируется посредством внесения изменений в файл browsers.json
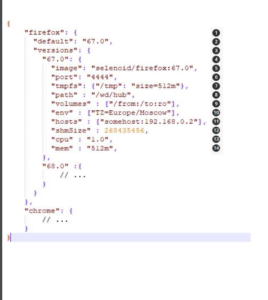
1.Название браузера
2. Дефолтная версия браузера
3. Лист доступных версий браузеров
4. Версия браузера
5. Имя образа
6. Порт для прокси соединений
7. Добавление tmpfs к контейнеру (переносим кэш браузера в in-memory файловую систему, ускоряет работу)
8. URL, где создается новая сессия (в нашем случае хаб)
9. Параметр, позволяющий указать том, который будет монтироваться в контейнер из хостмашины
10. Environmental Variables (в данном случае таймзона)
11. Параметр позволяет добавить кастомную запись в /etc/hosts к запущенному контейнеру
12. Размер Shared Memory
13. Лимит ядер на контейнер
14. Лимит оперативной памяти на контейнер
UI Selenoid
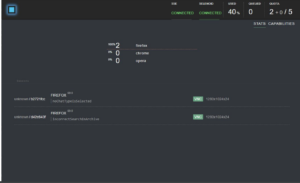

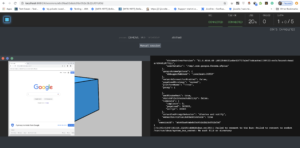
Через Selenoid UI можно подключаться в реальном времени к работающему контейнеру для отладки. Также можно смотреть логи вебдрайвера и браузера. Браузером в этот момент можно управлять, без попыток угадать, на какой конкретно машине в данный момент проходит тест. (Слезно вспоминаю работу с Selenium Grid без Selenoid).
И того, следюуще плюсы Selenoid
● Установка в пару команд
● Гибкая работа с браузерами
● Легкое масштабирование
● Удобный UI и логирование
● Готовые образы контейнеров вместе с вебдрайвером
● Легкое обновление, одна команда и у вас на всех новых создаваемых контейнерах последние версии браузеров, драйверов.
● Каждый браузер изолирован от системы
● Каждый браузер запускается чистым
● 60мб потребление RAM
● Golang
Еще куча разных возможностей есть у selenoid, о которых можно прочитать на сайте разработчика https://aerokube.com/selenoid/
Итог
Сложно даже представить насколько нам упростил работу Selenoid, учитывая что ui автотесты на selenium мы используем каждый день очень активно. С Grid-ом это было непросто, нужно было постоянно заходить на каждую из 20 тачек, обновлять браузеры, драйвера, отладка тестов была сложна.
Сейчас же у нас одна мощная така для Selenoid, на которой при запуске джобы в дженкинсе создаются 40-80 контейнеров параллельно и на них ходят автотесты. Более того, стабильность тестов тоже стала выше, так как повторюсь, что создается новый контейнер, запускается чистый браузер, в нем проходит автотест, для другого автотеста создается другой контейнер и т д. То есть автотест запускается в максимально изолированной среде. Всем, кто до сих пор использует обычный Selenium Grid и у кого уже прилично автотестов, всячески рекомендую переходить на Selenoid.
Обсудить в форуме
Я не понимаю, как установить селеноид в Windows 10. Я использую этот учебник:
https://github.com/aerokube/selenoid/blob/master/docs/selenoid-without-docker.adoc
Я скачал последнюю версию selenoid (v1.7.1) для Windows здесь
https://github.com/aerokube/cm/releases/tag/1.7.1
cm_windows_amd64.exe
Я загрузил chromedriver.eve (v 77). Я создал файл конфигурации browsers.json:
{
  "chrome": {
    "default": "77",
    "versions": {
      "77": {
        "image": ["C:\Users\AnastasiiaBondarenko\Downloads\chromedriver.exe", "--log-level=DEBUG"]
      }
    }
  }
}
Я поместил следующую команду в PowerShell:
./selenoid_windows_amd64.exe -conf ./browsers.json -disable-docker
Когда я сейчас пытаюсь открыть страницу Selenoid Hub, появляется ошибка 404:
Я ожидал увидеть нечто подобное:
2 ответа
1) Эта ошибка 404 исходит от Selenoid, что означает, что в протоколе Selenium нет такого API /. В следующем выпуске открытие / будет показывать версию Selenoid (поскольку такое поведение часто сбивает с толку новых пользователей).
2) В Windows с установленным Docker вам не нужно создавать файлы конфигурации вручную. Просто скачайте двоичный файл CM и запустите его следующим образом:
> cm selenoid start
Эта команда загрузит и сгенерирует остальные.
Не стесняйтесь обращаться к нам в канале Telegram, если что-то не работает.
0
vania-pooh
16 Окт 2019 в 08:52
Загрузить последний двоичный файл Selenoid из
https://github.com/aerokube/selenoid/релизы
Скачать архив IEDriverServer из
http://selenium-release.storage.googleapis.com/index.html
И распакуйте его в какой-нибудь каталог (например, на диск C)
Создайте файл конфигурации browsers.json в папке с именем config:
{
      "internet explorer": {
      "default": "11",
       "versions": {
       "11": {
       "image": ["C:\IEDriverServer.exe"]
        }
       }
      }
     }
Из командной строки выполнить команду:
selenoid_windows_amd64.exe -conf config/browsers.json -disable-docker
Не забудьте внести некоторые изменения в свой код, см. :
DesiredCapabilities capabilities = new DesiredCapabilities();
          capabilities.setBrowserName("internet explorer");
          capabilities.setVersion("11");

          driver = new RemoteWebDriver(
            URI.create("http://localhost:4444/wd/hub").toURL(),
            capabilities
        );
0
Pavel Dovgan
1 Дек 2020 в 20:30
Open source, Go, Тестирование IT-систем
Рекомендация: подборка платных и бесплатных курсов 3D-моделирования — https://katalog-kursov.ru/
Представляю вам перевод моей статьи на Medium.com.
Selenium сегодня является стандартом де-факто для автоматизации выполнения тестов в браузерах. Все популярные браузеры поддерживаются из коробки, а архитектура хорошо известна. Существуют даже компании, предоставляющие Selenium за деньги. Но удобен ли обычный Selenium сервер для локальной отладки тестов?
Проблема
Как веб-разработчик или инженер по автоматизации тестирования вы можете столкнуться со следующими неудобствами при работе со стандартным Selenium сервером:
- Нужно устаналивать несколько разных браузеров себе на компьютер. В обычной жизни вы, как правило, используете один браузер, например, Chrome, но вам приходится устанавливать себе Firefox и Opera, чтобы отлаживать в них Selenium-тесты.
- Трудно устанавливать и использовать несколько версий одного браузера. Если вы устанавливаете браузер из пакетов, то вообще можно иметь только одну установленную версию. Кроме того Selenium и его веб-драйверы обычно ищут исполняемый файл браузера по определенному пути. Поэтому, поверьте, использовать несколько версий может быть трудной задачей.
- Если вы запускаете браузер, установленный в вашей операционной системе — он забивает место на диске своими временными файлами и содержимым кеша.
- Нельзя гарантировать, что настройки браузера всегда останутся в том же состоянии, как после чистой установки. Например, вы можете случайно изменить адрес прокси-сервера или настройки безопасности. Это может привести к падению ранее работавших тестов.
- Трудно запускать несколько тестов в разных браузерах параллельно. Попытка сделать это как правило приводит к различным проблемам: окна начинают конкурировать за фокус, не срабатывающие события, не ожидаемые CSS стили и так далее.
- Нужно знать какая версия Selenium совместима с какой версией браузера. То же самое верно для исполняемых файлов веб-драйверов (например, Chromedriver).
Приведенный выше список недостатков далеко не полный. Но давайте остановимся на этом и попробуем гораздо более удобный способ отладки Selenium-тестов локально.
Selenoid
В моей предыдущей статье (часть I, часть II) я коротко описал новые открытые инструменты для работы с Selenium: Ggr и Selenoid. Ggr в основном нужен для больших Selenium кластеров и не нужен для отладки тестов на вашей машине. Сегодня я более подробно расскажу о Selenoid — альтернативной реализации Selenium хаба, которая запускает браузеры в Docker контейнерах.
Но почему же запуск браузеров в контейнерах так удобен? И в чем разница между запуском браузеров из контейнеров, поставляемых разработчиками Selenium и Selenoid? — Основная идея Selenoid состоит в том, чтобы запускать новый контейнер для каждой Selenium сессии (т.е. запроса нового браузера) и останавливать их сразу же после закрытия сессии. Такой подход сразу же решает все проблемы связанные с залипанием состояния в кешах и использования одних настроек браузера в разных сессиях. В каждом контейнере находится конкретная версия браузера, правильная версия веб-драйвера или Selenium сервера, поддерживающая этот браузер и все зависимости наподобие шрифтов, графических библиотек и так далее. Более того, контейнеры обеспечивают достаточный уровень изоляции процессов браузеров. Это позволяет запускать неограниченное количество разлиных версий браузеров параллельно и забыть о проблемах с фокусом. Безусловно, эти же проблемы решаются и обычными Selenium контейнерами. Но для того, чтобы получить поведение, аналогичное Selenoid, в дополнение к Docker как правило требуется использовать сложные админские инструменты наподобие Ansible или Salt.
Установка
Немного порекламировав Selenoid, настало время показать как просто с ним работать. Для того, чтобы получить работающий Selenium нужно выполнить 3 коротких шага:
-
Установить Docker. Обычно это делается при помощи стандартного менеджера пакетов вашей операционной системы такого как APT, Yum или Homebrew. Подробности можно найти в документации Docker.
-
Создать каталог для хранения конфигурации Selenoid и сгенерировать конфигурационный файл:
# mkdir -p /etc/selenoid
# docker run --rm -v /var/run/docker.sock:/var/run/docker.sock aerokube/cm:1.0.0 selenoid   --last-versions 2 --tmpfs 128 --pull > /etc/selenoid/browsers.json
Последняя команда также скачает образы Docker-контейнеров двух последних версий Firefox, Chrome и Opera и сгенерирует правильный файл конфигурации для Selenoid.
- Запустить Selenoid:
# docker run -d --name selenoid -p 4444:4444 -v /etc/selenoid:/etc/selenoid:ro -v /var/run/docker.sock:/var/run/docker.sock aerokube/selenoid:1.1.1Все — прошло 60 секунд и Selenoid готов к работе. Не нужно устанавливать Java и скачивать Selenium руками. Просто запустите свои тесты, используя тот же самый URL, что и у обычного Selenium server:
http://localhost:4444/wd/hubМордочка и сбор статистики
Selenoid может использоваться совместно с Ggr для настройки большого Selenium кластера, поэтому у него нет графического интерфейса наподобие Grid Console в обычном Selenium. Посмотреть потребление браузеров можно двумя способами:
I. Запустить дополнительный легковесный контейнер с Selenoid UI. Это делается командой:
# docker run -d --name selenoid-ui --net host aerokube/selenoid-ui:1.0.0Мордочка будет доступна в браузере по адресу http://localhost:8080/:
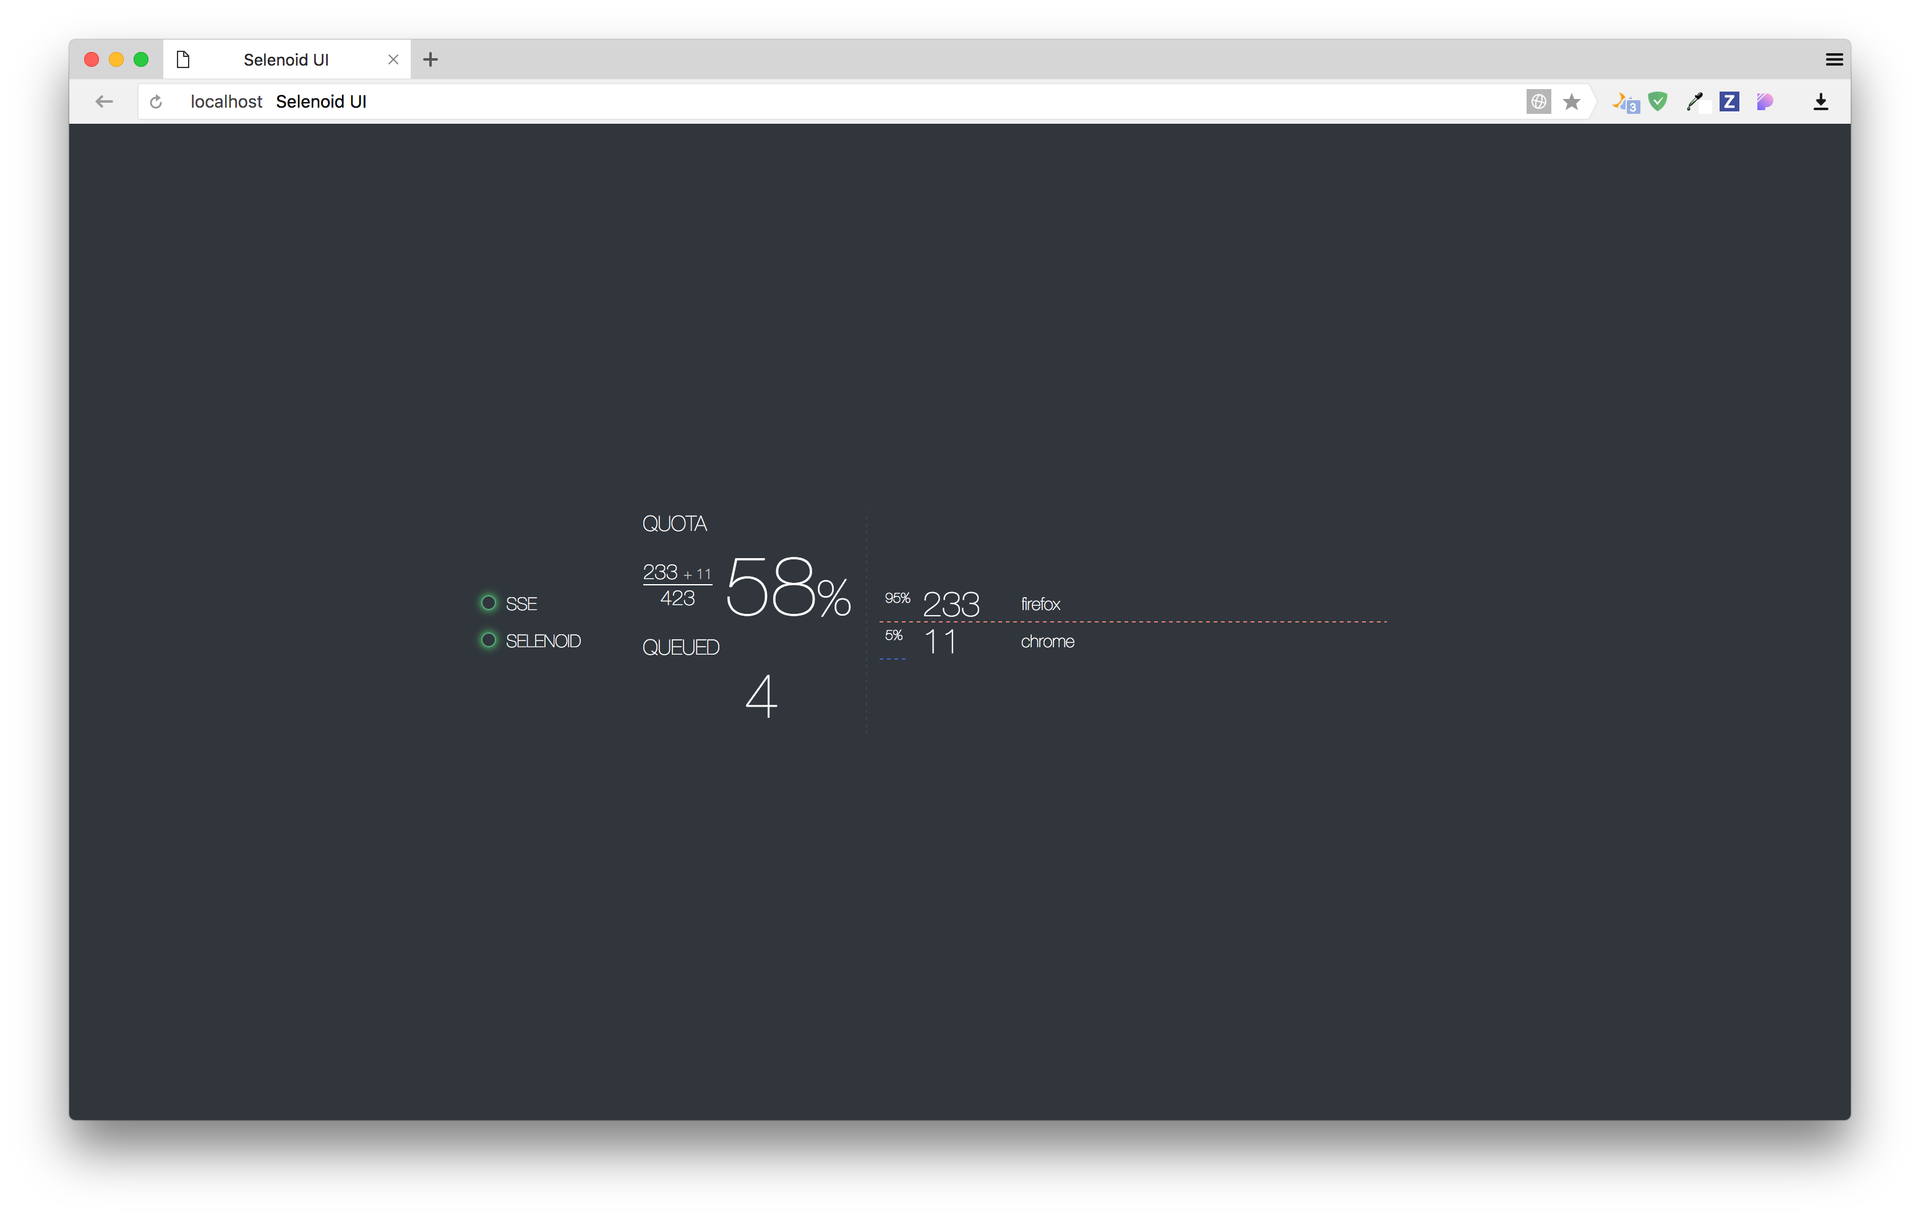
II. Отправлять статистику Selenoid во внешнюю систему: Graphite, InfluxDB, ElasticSearch и так далее. Статистика Selenoid может быть получена по следующему URL:
http://localhost:4444/statusДанные отправляются в виде JSON следующего формата:
  $ curl http://localhost:4444/status
  {
    "total": 80,
    "used": 14,
    "queued": 0,
    "pending": 1,
    "browsers": {
      "firefox": {
        "46.0": {
          "user1": 5,
          "user2": 6
        },
        "48.0": {
          "user2": 3
        }
      }
    }
  }
Selenoid возвращает сколько контейнеров может быть запущено одновременно (total), сколько запущено в данный момент (used), сколько запросов ожидают в очереди (queued) и сколько контейнеров еще стартуют (pending). Элемент browsers содержит информацию о потреблении браузеров различными пользователями. Имя пользователя извлекается из Basic HTTP headers, если они выставлены или выставляется в unknown, если нет. Хотя вы можете разбирать показанный JSON вручную при помощи скрипта, мы рекомендуем использовать для этой цели Telegraf. Больше информации о том, как использовать Telegraf изложено в этом разделе нашей документации.
Готовые контейнеры с браузерами
Согласитесь, круто иметь инструмент, автоматически запускающий контейнеры с разными браузерами. Но еще круче иметь набор готовых контейнеров с разными версиями популярных браузеров. Мы проделали много работы и подготовили образы контейнеров с разными версиями Firefox, Chrome и Opera. Полный список можно посмотреть на selenoid@DockerHub.
Чтобы всегда иметь набор свежих версий браузеров нужно лишь время от времени выполнять команду:
# docker run --rm -v /var/run/docker.sock:/var/run/docker.sock aerokube/cm:1.0.0 selenoid --last-versions 2 --tmpfs 128 --pull > /etc/selenoid/browsers.jsonЭта команда автоматически скачивает последние версии контейнеров и генерирует новую JSON-конфигурацию для Selenoid. Чтобы начать использовать новые браузеры отправьте Selenoid команду на перечитывание конфигурации (можно делать под нагрузкой):
# docker kill -s HUP selenoidНаши контейнеры также поддерживают возможность установки произвольно разрешения экрана (по-умолчанию 1920x1080x24). Чтобы выставить разрешение просто передайте capability screenResolution:
screenResolution: "1280x1024x24"Заключение
В этой статье я рассказал как эффективно управлять различными браузерами при помощи Selenoid. Поверьте — работа с Selenium может быть комфортной. Если вам интересны вопросы построения эффективной инфраструктуры тестирования, вы можете взглянуть на другие открытые инструменты в нашей организации на Github или подпишитесь на наш Твиттер @aerokube.
В благодарность автору замечательной картинки, посмотрите как ее рисовали.
aerokube / selenoid
Goto Github
PK
View Code? Open in Web Editor
NEW
97.0
310.0
7.03 MB
Selenium Hub successor running browsers within containers. Scalable, immutable, self hosted Selenium-Grid on any platform with single binary.
Home Page: https://aerokube.com/selenoid/latest/
License: Apache License 2.0
Go 98.18%
Shell 1.59%
Dockerfile 0.23%
selenium
hub
docker
vnc
selenium-server
grid
selenium-grid
selenium-webdriver
selenoid’s Introduction
selenoid’s People
selenoid’s Issues
Ability to show binary version
Something like: selenoid -v or selenoid -version.
Capture driver process logs
We need to somehow capture webdriver process logs to file.
Add ability to proxy VNC port
Should be able to proxy vnc port by session ID like the following:
The request like this…
… should return a list of currently available videos.
How to upload files with current browsers?
With docker service of browsers, it really eliminate a lot of processes issues. But how to upload files with browser? I don’t know where to put my local files. How to map volumes in browser docker service?
Build Docker container with latest tag automatically
Travis can do this. Need to configure correctly.
Capability to start custom process instead of container
For IEDriver we need to start its process instead of Docker container as Windows does not support LXC.
phantomJS
Please add phantomJS
Describe logging config
Need to specify config format.
Add howto about using Selenoid with driver binaries
As described.
Add graceful restart
Just use Facebook graceful restart.
Add statistics information
As decided during discussion.
Remove volume after tmpfs
After each container with browser there is a dangling volume. It remains on the local disk and reduces free space.
Use docker rm option:
| Name, shorthand | Default | Description |
|---|---|---|
| —volumes, -v | false | Remove the volumes associated with the container |
here service/docker.go#L103
Unable to create internal browser container
Hi @aandryashin @vania-pooh,
On MacOS I’ve faced with an issue that selenoid container can’t internally raise chrome container.
Here’s how I start a root container:
docker run -d --name selenoid-1 -p 4444:4444 -v /etc/selenoid:/etc/selenoid:ro -v /var/run/docker.sock:/var/run/docker.sock aandryashin/selenoid:latest
Here are container’s logs:
2017/03/27 08:57:31 Loading configuration files...
2017/03/27 08:57:31 Loaded configuration from [/etc/selenoid/browsers.json]
2017/03/27 08:57:31 Using default containers log configuration because of: read error: open config/container-logs.json: no such file or directory
2017/03/27 08:57:31 Timezone: Local
2017/03/27 08:57:31 Listening on :4444
2017/03/27 08:58:20 [NEW_REQUEST]
2017/03/27 08:58:20 [NEW_REQUEST_ACCEPTED]
2017/03/27 08:58:20 Locating the service for chrome latest
2017/03/27 08:58:20 Using docker service for chrome latest
2017/03/27 08:58:20 Creating Docker container selenoid/chrome:latest ...
2017/03/27 08:58:21 Starting container...
2017/03/27 08:58:21 Container 0fe4e8516085455e922a2eb74fd03248e8206c9f124af073d4157310e31f490a started
Removing container 0fe4e8516085455e922a2eb74fd03248e8206c9f124af073d4157310e31f490a
Container 0fe4e8516085455e922a2eb74fd03248e8206c9f124af073d4157310e31f490a removed
2017/03/27 08:58:32 [SERVICE_STARTUP_FAILED] [error: http://172.17.0.1:32774 does not respond in 10s]
The most interesting thing is that it has worked well for some fixed period of time. But now it doesn’t.
Any ideas about the root cause?
Selenoid tries to remove previous session
Please see the logs:
2017/04/05 13:18:45 [NEW_REQUEST]
2017/04/05 13:18:45 [NEW_REQUEST_ACCEPTED]
2017/04/05 13:18:45 Locating the service for chrome 56.0
2017/04/05 13:18:45 Using docker service for chrome 56.0
2017/04/05 13:18:45 Creating Docker container selenoid/chrome:latest ...
2017/04/05 13:18:45 Starting container...
2017/04/05 13:18:46 Container 4db81d8f8a782471ea636b1827cfaa1e4bc4519ed004255b10dfd77089a90735 started
2017/04/05 13:18:46 52.986115ms
2017/04/05 13:18:46 proxying requests to: http://172.17.0.1:33749
2017/04/05 13:18:46 [SESSION_ATTEMPTED] [http://172.17.0.1:33749]
2017/04/05 13:18:47 [SESSION_CREATED] [f6a6c44a5a06667b07853fc3e42bea84] [http://172.17.0.1:33749]
2017/04/05 13:18:47 [SESSION_DELETED] [bef618bcfe72275ac1b884642d50e538]
2017/04/05 13:18:47 http: proxy error: context canceled
Removing container f09a782da7ff0f627726c8a494bf995fa998e86d1214e0672f20db63280fcd68
error: unable to remove container f09a782da7ff0f627726c8a494bf995fa998e86d1214e0672f20db63280fcd68 Error response from daemon: No such container: f09a782da7ff0f627726c8a494bf995fa998e86d1214e0672f20db63280fcd68
Container 4db81d8f8a782471ea636b1827cfaa1e4bc4519ed004255b10dfd77089a90735 was created but Selenoid tries to remove the previous one f09a782da7ff0f627726c8a494bf995fa998e86d1214e0672f20db63280fcd68 as well as previous session bef618bcfe72275ac1b884642d50e538.
Add close notifier
Should immediately stop container on connection close.
Selenoid status returns unknown username while proxying via ggr
@vania-pooh @aandryashin hi,
Just curious how we could force Selenoid displaying real username we used for authorization via ggr?

I have added users.htpasswd and used valid credentials in connection URL:
http://skorol:[email protected]:4444/wd/hub
However, selenoid status request always returns unknown. Any idea about the root cause?
Here’s the log from ggr container:

Failed to build for Windows architecture
Some dependencies should be added to govendor:
vania-pooh:/selenoid$ GOOS=windows GOARCH=386 go build -o selenoid.exe
vendor/github.com/docker/go-connections/sockets/sockets_windows.go:7:2: cannot find package "github.com/Microsoft/go-winio" in any of:
	/src/testing/go/src/github.com/aandryashin/selenoid/vendor/github.com/Microsoft/go-winio (vendor tree)
	/usr/local/Cellar/go/1.7.1/libexec/src/github.com/Microsoft/go-winio (from $GOROOT)
	/src/testing/go/src/github.com/Microsoft/go-winio (from $GOPATH)
However:
$ go get github.com/Microsoft/go-winio
# github.com/Microsoft/go-winio
../../Microsoft/go-winio/file.go:45: undefined: syscall.Overlapped
This is when building under Mac.
Selenoid does not refuse nonexistent vnc connection immediately
And writes to log only:
2017/05/13 14:08:14 Listening on :4444
2017/05/13 14:12:36 [VNC_CLIENT_DISCONNECTED] [1]
2017/05/14 00:25:17 [VNC_CLIENT_DISCONNECTED] [2]
should write to log something like «VNC_SESSION_NOT_FOUND»
Starting Geckodriver fails
2017/03/14 20:48:37 Starting process: [/usr/local/lib/node_modules/selenium-standalone/.selenium/geckodriver/0.15.0-x64-geckodriver --log-level=DEBUG --port=59269]
2017/03/14 20:48:47 Terminating process 3046
2017/03/14 20:48:47 Process 3046 terminated
2017/03/14 20:48:47 [SERVICE_STARTUP_FAILED] [error: http://127.0.0.1:59269 does not respond in 10s]
browserconfig:
{
  "firefox": {
    "default": "latest",
    "versions": {
      "latest": {
        "image": ["/usr/local/geckodriver/0.12.0-x64-geckodriver", "--log-level=DEBUG"],
        "port": "4444"
      }
    }
  },
  "chrome": {
    "default": "latest",
    "versions": {
      "latest": {
        "image": ["/usr/local/chromedriver/2.28-x64-chromedriver", "--log-level=DEBUG"],
        "port": "4444"
      }
    }
  }
}
BTW Chrome works great
Ability to set custom screen resolution
When screenResolution capability is passed — need to check its format: 1024x768 and set SCREEN_RESOLUTION environment variable to 1024x768x24 when launching container. It’s up to containers to handle this variable.
Add capability to send container logs to S3 API
Needed to save logs somewhere using minio project.
Add documentation about using cm
As described.
Use client.NewEnvClient() in Docker client init code
As described. No need to parse DOCKER_HOST manually as other vars like DOCKER_CERT_PATH and so on exist.
Add documentation about VNC and updated /status
As described.
Add auto-pull capability
Two modes should be supported:
- Always pull images from config on restart
- Pull images only when missing
IE does not close session on timeout
Start new session:
PS C:UsersAdministrator> curl -Method Post -Body ‘{«desiredCapabilities»:{«browserName»:»internet explorer»}}’ http://
localhost:4444/wd/hub/session
StatusCode : 200
StatusDescription : OK
Content : {«sessionId»:»4d4b7e58-4669-427b-a0d6-7640a55dfe9b»,»status»:0,»value»:{«browserAttachTimeout»:0,»b
rowserName»:»internet
explorer»,»elementScrollBehavior»:0,»enableElementCacheCleanup»:true,»enablePer…
RawContent : HTTP/1.1 200 OK
Content-Length: 701
Content-Type: text/plain; charset=utf-8
Date: Wed, 16 Nov 2016 05:52:31 GMT
{"sessionId":"4d4b7e58-4669-427b-a0d6-7640a55dfe9b","status":0,"value":{"browserAt...
Forms : {}
Headers : {[Content-Length, 701], [Content-Type, text/plain; charset=utf-8], [Date, Wed, 16 Nov 2016
05:52:31 GMT]}
Images : {}
InputFields : {}
Links : {}
ParsedHtml : System.__ComObject
RawContentLength : 701
Wait when session timeout occurs:
2016/11/16 05:52:05 Process 3784 terminated
2016/11/16 05:52:31 [NEW_REQUEST]
2016/11/16 05:52:31 [NEW_REQUEST_ACCEPTED]
2016/11/16 05:52:31 Locating the service for internet explorer
2016/11/16 05:52:31 Using default version: latest
2016/11/16 05:52:31 Using driver service for internet explorer latest
2016/11/16 05:52:31 Trying to allocate port
2016/11/16 05:52:31 Available port is: 50336
2016/11/16 05:52:31 Starting process: [IEDriverServer —port=50336]
2016/11/16 05:52:31 Process 3088 started in: 57.0233ms
2016/11/16 05:52:31 Proxying requests to: http://127.0.0.1:50336
2016/11/16 05:52:31 [SESSION_ATTEMPTED] [http://127.0.0.1:50336]
2016/11/16 05:52:31 [SESSION_CREATED] [4d4b7e58-4669-427b-a0d6-7640a55dfe9b] [http://127.0.0.1:50336]
2016/11/16 05:53:31 [SESSION_TIMED_OUT] [4d4b7e58-4669-427b-a0d6-7640a55dfe9b] — Deleting session
2016/11/16 05:53:31 [DELETE_FAILED]
2016/11/16 05:53:31 Terminating process 3088
2016/11/16 05:53:31 Process 3088 terminated
2016/11/16 05:53:31 [FORCED_SESSION_REMOVAL] [4d4b7e58-4669-427b-a0d6-7640a55dfe9b]
When proxying to localhost to delete session get this error:
http: proxy error: dial tcp [::]:4444: connectex: The requested address is not valid in its context.
Starting IEdriver does not work
This is my browsers.json:
[email protected] ~
$ cat ./browsers.json
{
  "internet explorer": {
    "default": "10",
    "versions": {
      "10": {
        "image": ["C:\cygwin\lib\selenium\iedriver.exe", "--log-level=DEBUG"]
      }
    }
  }
}
Here are Selenoid logs:
[email protected] ~
$ ./selenoid.exe -conf ./browsers.json -disable-docker
2016/11/15 14:49:03 Listening on :4444
2016/11/15 14:55:36 [NEW_REQUEST]
2016/11/15 14:55:36 [NEW_REQUEST_ACCEPTED]
2016/11/15 14:55:36 Locating the service for internet explorer 10
2016/11/15 14:55:36 Using driver service for internet explorer 10
2016/11/15 14:55:36 Trying to allocate port
2016/11/15 14:55:36 Available port is: 62884
2016/11/15 14:55:36 Starting process: [C:cygwinlibseleniumiedriver.exe --log-level=DEBUG --port=62884]
2016/11/15 14:55:36 Process 3728 started in: 52.7343ms
2016/11/15 14:55:36 Proxying requests to: http://127.0.0.1:62884
2016/11/15 14:55:36 [SESSION_ATTEMPTED] [http://127.0.0.1:62884] <==== Freezes at this line!
But the process gets created and works:
[email protected] ~
$ curl -s -I http://127.0.0.1:62884
HTTP/1.1 200 OK
Content-Length: 136
Content-Type: text/html; charset=UTF-8
Vary: Accept-Charset, Accept-Encoding, Accept-Language, Accept
Accept-Ranges: bytes
Connection: close


[email protected] ~
$ ps -W | grep iedriver
     3728       0       0       3728  ?          0 15:55:37 C:cygwinlibseleniumiedriver.exe
I think there’s either an issue with blocking on channels or some Windows proxying particularity.
Add configuration mode
Add the following command:
$ selenoid config [ -lastVersions 5]
This should automatically pull last X browser versions from http://hub.docker.com/u/selenoid/ and output updated Selenoid config to stdout.
Verify that working with external Docker API works
# docker run -d --name selenoid -p 4444:4444 -v /etc/selenoid:/etc/selenoid:ro -e DOCKER_HOST=tcp://example.com:4243 aandryashin/selenoid:1.1.0
Selenoid should work with Docker API example.com:4243.
Migrate to Aerokube
Proxy container logs
By default containers output logs to stdout. It would be great to access currently running container logs via url: /logs/<session_id>. This will allow to show logs in face and proxy running session logs via ggr.
404 page not found within wdhub page
Hi!
I am trying to use selenoid with readme manual, but when Im opening hub page http://localhost:4444/wd/hub there is only 404 page not found message 
I did all steps from your manual, but still getting error
curl http://localhost:4444/wd/hub -L
404 page not found
docker ps

CONTAINER ID        IMAGE                                               COMMAND                  CREATED             STATUS              PORTS                    NAMES
ba2dc8adf39b        aandryashin/selenoid:1.1.0                          "/usr/bin/selenoid -l"   12 minutes ago      Up 12 minutes       0.0.0.0:4444->4444/tcp   selenoid
docker logs selenoid

2017/04/13 13:04:58 Loading configuration files...
2017/04/13 13:04:58 Loaded configuration from [/etc/selenoid/browsers.json]
2017/04/13 13:04:58 Using default containers log configuration because of: read error: open config/container-logs.json: no such file or directory
2017/04/13 13:04:58 Timezone: Local
2017/04/13 13:04:58 Listening on :4444
What I am doing wrong?(
How can I mount directory to node containers ?
Hi,
I have several tests with upload and download files. Usually, I mount directories with required files to the container with browser but it this case I did not find the way how to configure selenoid to start containers and mount directories to them. Also, It is nice to know how to set dns and dns-search for containers which were started by selenoid.
Validation elements displaying in Chrome breaks selenoid
Trying to validate elements displaying. To do this I complete elements request to get all elements that path selector and then for each element complete /session/:sessionId/element/:elementId/displayed’ async request (this requests sends in the same time). When trying to complete 23 displayed selenoid breaks with this error
2017/03/17 13:36:51 Process 23529 started in: 57.337089ms
2017/03/17 13:36:51 Proxying requests to: http://127.0.0.1:59373
2017/03/17 13:36:51 [SESSION_ATTEMPTED] [http://127.0.0.1:59373]
2017/03/17 13:36:52 [SESSION_CREATED] [c763e80c0377b8e02fa9fc57c8fa56ca] [http://127.0.0.1:59373]
2017/03/17 13:37:00 http: proxy error: read tcp 127.0.0.1:59609->127.0.0.1:59373: read: connection reset by peer
2017/03/17 13:37:00 http: proxy error: dial tcp 127.0.0.1:59373: getsockopt: connection reset by peer
2017/03/17 13:37:00 http: proxy error: read tcp 127.0.0.1:59615->127.0.0.1:59373: read: connection reset by peer
2017/03/17 13:37:00 http: proxy error: read tcp 127.0.0.1:59617->127.0.0.1:59373: read: connection reset by peer
panic: close of closed channel

goroutine 241 [running]:
main.proxy.func1.3(0xc4204a2600)
	/Users/a.pshenkin/go/src/github.com/aandryashin/selenoid/selenoid.go:164 +0x1d6
net/http/httputil.(*ReverseProxy).ServeHTTP(0xc42047ff70, 0x145e640, 0xc4204981c0, 0xc42000be00)
	/usr/local/Cellar/go/1.8/libexec/src/net/http/httputil/reverseproxy.go:159 +0x1be
main.proxy.func1(0xc420489020, 0x145e640, 0xc4204981c0, 0xc42000be00)
	/Users/a.pshenkin/go/src/github.com/aandryashin/selenoid/selenoid.go:179 +0x117
created by main.proxy
	/Users/a.pshenkin/go/src/github.com/aandryashin/selenoid/selenoid.go:180 +0x7f
selenoid exits in panic while running
Running selenoid with default of 5 images or limit 10 using chromebrowser always exits with a panic.
This happens when directing my tests against selenoid directly bypassing ggr.
I’ve used the setup provided by another user:
docker run -d --name selenoid -p 4445:4444 -v /private/etc/selenoid:/etc/selenoid:ro -v /var/run/docker.sock:/var/run/docker.sock aandryashin/selenoid:latest -limit 10
ip=`docker inspect --format {{.NetworkSettings.IPAddress}} selenoid`
xml ed --inplace -u '//host/@name' -v "$ip" /etc/grid-router/quota/test.xml
docker run -d --name ggr -p 4444:4444 -v /private/etc/grid-router/:/etc/grid-router:ro aandryashin/ggr:latest
The error:
2017/04/11 11:35:58 [SESSION_CREATED] [107178798f7afca475e3d7866ff76c54] [http://172.17.0.1:32817]
2017/04/11 11:35:58 [SESSION_CREATED] [1323325895d1276f25a92593122bb40d] [http://172.17.0.1:32818]
2017/04/11 11:35:58 [SESSION_CREATED] [4b47890c76cd26751c3d147625a1a65b] [http://172.17.0.1:32819]
panic: close of closed channel

goroutine 4286 [running]:
main.proxy.func1.3(0xc4202d6500)
	/home/travis/gopath/src/github.com/aandryashin/selenoid/selenoid.go:181 +0x1d6
net/http/httputil.(*ReverseProxy).ServeHTTP(0xc420391f70, 0x85d280, 0xc420404000, 0xc4202d6300)
	/home/travis/.gimme/versions/go1.8.linux.amd64/src/net/http/httputil/reverseproxy.go:159 +0x1be
main.proxy.func1(0xc4204ea780, 0x85d280, 0xc420404000, 0xc4202d6300)
	/home/travis/gopath/src/github.com/aandryashin/selenoid/selenoid.go:196 +0x117
created by main.proxy
	/home/travis/gopath/src/github.com/aandryashin/selenoid/selenoid.go:197 +0x7f
browsers.json:
{
  "chrome": {
    "default": "latest",
    "versions": {
      "latest": {
        "image": "selenoid/chrome:latest",
        "port": "4444"
      }
    }
  }
}
Selenoid did not delete running containers when exits with panic
I use GGR 1.1.3 and Selenoid 1.1.1
And periodically Selenoid stops with this error:
panic: send on closed channel

goroutine 426219 [running]:
github.com/aerokube/selenoid/service.wait.func1(0xc4201df940, 0x16, 0xc42041b080)
	/home/travis/gopath/src/github.com/aerokube/selenoid/service/service.go:62 +0x115
created by github.com/aerokube/selenoid/service.wait
	/home/travis/gopath/src/github.com/aerokube/selenoid/service/service.go:68 +0x8c
After this Selenoid stops and left all containers with browsers as is.
As i understand, this could happen because of network issues.
Expected behavior:
- Selenoid delete all browser containers after it exits with error.
If you need some more information, please ask.
I will try to provide as much information as needed.
Consider total number of available cores and ram
Need to limit resources for each container by considering available cores.
Try to automatically match correct path in container
Currently if Path from config is not correct we get 404. If not set need to sequentially try /, then /wd/hub. If both failed — return 404. If Path is set — need to try it first and then others.
Create container demonstrating how to upload data to Grafana
Grafana + InfluxDB + Telegraf + our config
Container is not removed on proxied request cancel
Seeing the following in the logfile:
2017/01/12 18:00:30 http: proxy error: net/http: request canceled
For each such error a container is not stopped:
822cff76b6f2 selenium/firefox_48.0:standalone "/bin/sh -c /entrypoi" 16 hours ago Up 16 hours 0.0.0.0:32912->4444/tcp jolly_sammet
Pull specific browser version
Is there any way to pull a specific browser version for chrome or firefox? Or would that require updating the dockerfiles and maintaining my own images on dockerhub? When I tried the following it failed:
$ docker pull selenoid/firefox:48.0
Error response from daemon: manifest for selenoid/firefox:48.0 not found
I tried to find a gitter or slack channel for your work but didn’t see anything. Is issues the best way to ask questions. I have a lot of interest in using this for some of my scenarios but I can’t seem to get my chimp.js or webdriverio configurations correct. I can see the selenoid browser spinning up but it fails with the following error:
[22:35:29] COMMAND POST «/wd/hub/session»
[22:35:29] DATA {«desiredCapabilities»:{«javascriptEnabled»:true,»locationContextEnabled»:true,»handlesAlerts»:true,»rotatable»:true,»maxInstances»:1,»browserName»:»firefox»,»loggingPrefs»:{«browser»:»ALL»,»driver»:»ALL»},»requestOrigins»:{«url»:»http://webdriver.io»,»version»:»4.6.2″,»name»:»webdriverio»}}}
ERROR: [object Object]
firefox
Error
I have been struggling with this for a few days and decided it was time to break down and ask the experts.
/r
Describe config.json syntax
Need to describe each parameter of config.json.
Add documentation about recommended Docker storage driver
- Use aufs or overlayfs
- More about path parameters
Improve logging
Need to use square brackets everywhere.
Chrome container don’t deleted if test was failed
log in container selenoid/chrome:latest
[305.992][SEVERE]: Timed out receiving message from renderer: 299.331
[305.993][INFO]: Timed out. Stopping navigation...
[305.993][DEBUG]: DEVTOOLS COMMAND Runtime.evaluate (id=31) {
   "expression": "window.stop();",
   "returnByValue": true
}
[305.997][DEBUG]: DEVTOOLS EVENT Page.frameStoppedLoading {
   "frameId": "104.1"
}
[305.997][DEBUG]: DEVTOOLS RESPONSE Runtime.evaluate (id=31) {
   "result": {
      "type": "undefined"
   }
}
[305.997][DEBUG]: DEVTOOLS COMMAND Runtime.evaluate (id=32) {
   "expression": "1"
}
[305.997][SEVERE]: Timed out receiving message from renderer: -0.006
[305.998][INFO]: Done waiting for pending navigations. Status: timeout: cannot determine loading status
from timeout: Timed out receiving message from renderer: -0.006
[305.998][INFO]: RESPONSE Navigate timeout: cannot determine loading status
from timeout: Timed out receiving message from renderer: -0.006
  (Session info: chrome=56.0.2924.87)
my file browser.json:
{
  "firefox": {
    "default": "latest",
    "versions": {
      "latest": {
        "image": "selenoid/firefox:latest",
        "port": "4444"
      }
    }
  },
  "chrome": {
    "default": "latest",
    "versions": {
      "latest": {
        "image": "selenoid/chrome:latest",
        "port": "4444"
      }
    }
  }
}
2f21c1fae754 — faild container
Lines from log in aandryashin/selenoid:latest which consist text «2f21c1fae754»:
2017/04/10 08:26:17 [CONTAINER_STARTED]
[2f21c1fae754985be1d061e5fb05a3033e8cb0508df4ee4241783962d01e3c49] [458.85045ms]
2017/04/10 08:26:18 [SERVICE_STARTED] [2f21c1fae754985be1d061e5fb05a3033e8cb0508df4ee4241783962d01e3c49] [665.877333ms]
and dont exist [CONTAINER_REMOVED]
Use server timezone in containers
Need to set containers TZ variable equal to server’s one.
Do several attempts to start container on failure
Just sleep a bit and try again. Total number of attempts should be fixed. Later we could add more sophisticated logic with exponential delay growth and so on.
screenResolution example
There is no clear understanding how to pass screenResolution: 1280x1024x24 value. Should I pass them via desired capabilities or put them in config.json file. The same with enableVNC
How can I change max instances in docker container?
Add capability to mount tmpfs inside container
Use volumes API. With such functionality we can e.g. mount tmpfs directory as container’s /tmp.
Recommend Projects
-

React
A declarative, efficient, and flexible JavaScript library for building user interfaces.
-
Vue.js
🖖 Vue.js is a progressive, incrementally-adoptable JavaScript framework for building UI on the web.
-
Typescript
TypeScript is a superset of JavaScript that compiles to clean JavaScript output.
-
TensorFlow
An Open Source Machine Learning Framework for Everyone
-
Django
The Web framework for perfectionists with deadlines.
-
Laravel
A PHP framework for web artisans
-
D3
Bring data to life with SVG, Canvas and HTML. 📊📈🎉
Recommend Topics
-
javascript
JavaScript (JS) is a lightweight interpreted programming language with first-class functions.
-
web
Some thing interesting about web. New door for the world.
-
server
A server is a program made to process requests and deliver data to clients.
-
Machine learning
Machine learning is a way of modeling and interpreting data that allows a piece of software to respond intelligently.
-
Visualization
Some thing interesting about visualization, use data art
-
Game
Some thing interesting about game, make everyone happy.
Recommend Org
-
Facebook
We are working to build community through open source technology. NB: members must have two-factor auth.
-
Microsoft
Open source projects and samples from Microsoft.
-
Google
Google ❤️ Open Source for everyone.
-
Alibaba
Alibaba Open Source for everyone
-
D3
Data-Driven Documents codes.
-
Tencent
China tencent open source team.