1 Зачем нужно защищать свой интернет
Расскажу об интересной штуке — Shadowsocks. Это средство для обеспечения защищённой связи с шифрованием и авторизацией по паролю.
Shadowsocks пригодится:
- для защиты ваших данных в ненадёжных сетях (при подключении к публичным точкам Wi-Fi),
- для реализации права на свободу информации, если вы столкнулись с недоступностью сайтов по какой-либо причине,
- для защиты от перехвата трафика и внедрения на страницы сайтов рекламы (так любят поступать мобильные операторы),
- для защиты от несанкционированных подписок на платные услуги, когда пользуетесь мобильным интернетом.
Если первые два пункта не нуждаются в пояснениях, это избитая тема, то ситуация с мобильными операторами требует пояснений. Пользователей мобильных операторов преследует проблема: провайдер может изменять странички как угодно, на лету внедряя скрипты отслеживания действий или рекламу. А ещё может перенаправить браузер на сайт, посещение которого автоматически включит платную подписку на какой-нибудь контент и с мобильного счёта начнут испаряться деньги. Насколько всё серьёзно, можете узнать в статье на Хабре «Как Мегафон спалился на мобильных подписках».
В условиях, когда доверять провайдерам интернета ну просто не получается из-за таких вот инцидентов, приходится защищать свои устройства и кошельки. Нужно шифровать трафик ПК, мобильных телефонов и планшетов. Бесплатные VPN сервисы, в том числе встроенный в браузер Opera, я не считаю безопасными, потому что нет точных сведений, что именно владельцы делают с историей сетевой активности. Утечки данных о пользователях таких сервисов подтверждают мои подозрения.
Поэтому, по моему мнению, надёжнее купить собственный сервер и с его помощью шифровать трафик. Обсуждаемый в статье проект родом из Китая, исходный код открыт, всё бесплатно (кроме аренды сервера и вашего времени, потраченного на настройку).
Это две софтины. Первая ставится на сервер для работы в качестве шифрующего прокси-сервера. На компьютеры и мобильники ставится вторая — клиент Shadowsocks, благодаря которому все передаваемые данные будут надёжно зашифрованы между сервером и используемым устройством.
Преимущество данного способа проксирования передачи данных — скорость. На выбор доступно несколько алгоритмов, среди них не требовательные к процессору. За счёт быстрого шифрования и отсутствия каких-то довесков отклик получается быстрым. Даже онлайн-игры работают неплохо, пинг в играх типа Battlefield увеличивается на 5-10 мс, что весьма хороший результат.
Может быть, OpenVPN и Wireguard в чём-то лучше, тут спорить не собираюсь. Просто мне возможностей героя данной заметки хватает с лихвой.
- Мощное шифрование — есть. Настолько мощное, что китайцам помогает (помогало?) обходить Великий Китайский Файрвол. Я не призываю ставить эту софтину для обхода чего-либо, но сам факт-то каков!
- Авторизация по паролю — есть. Нельзя назначать разным устройствам по паролю, но какая разница, если вся аппаратура — личная?
- Настройка по QR-коду — есть. Это мега-удобно.
- Низкая нагрузка на процессор — есть. Работе сервера не мешает, а батарея телефона не садится сильно быстрее.
- Клиенты для всех популярных операционных систем тоже есть. И эти программы довольно удобные.
Самое замечательное то, что серверная утилита shadowsocks-libev очень-очень легковесная и совсем не мешает работе других программ на сервере. Пускай на VDS лишь 512 Мб ОЗУ и какой-нибудь скромненький ARM процессор — проксирование будет работать нормально.
3 Что потребуется для Shadowsocks
Во-первых, собственный VPS. Лучше на Ubuntu, так настройка пройдёт проще. Сойдёт любой дешёвый виртуальный сервер. Кстати, я когда-то писал гайд по выбору сервера. Также вы можете зарегистрировать аккаунт на Digital Ocean по моей реферальной ссылке, привязать карту и вам на счёт упадёт несколько бонусных долларов. Учтите — в какой-то момент правила реферальной программы DO поменялись, поэтому читайте все надписи в админке, чтобы случайно не пополнить счёт реальными деньгами. Лучшим решением, imho, будет привязка карты с не более чем сотней рублей.
Во-вторых, требуется умение заходить по SSH. Впрочем, это можно сделать прямо через админку облачного провайдера, благо много команд вводить не придётся.
В-третьих, нужно поставить программы-клиенты на ПК и телефоны. Про устройства от Apple рассказать не смогу, так как у меня таковых нет, а настройка Shadowsocks на Windows и Android будет ниже.
4 Настройка сервера с Shadowsocks
Выбрали, где получить виртуальный сервер? Надеюсь, что с этим не было проблем. Далее все настройки будут на примере Digital Ocean
(я не навязываю пользоваться DO!).
В DO дроплет (виртуальный сервер) создаётся через меню Create — Droplets:
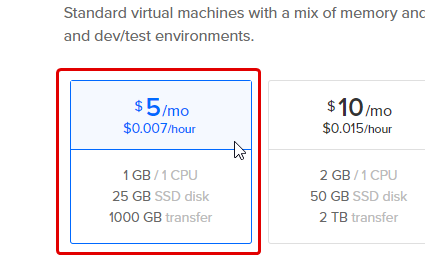
Подчеркну — достаточно самого дешёвого варианта. В DO это конфигурация с 1 Гб RAM и одноядерным ЦП c 25 Гб диском за 5$ в месяц:
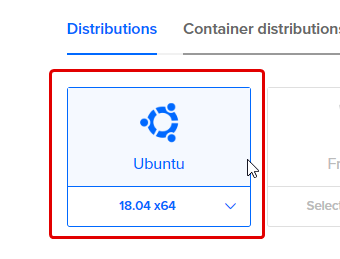
Операционной системой лучше ставить Ubuntu 18.04. Это наиоптимальнейший вариант, благо управляется просто, наличествует нужный набор софта.
Выбор дата-центра для VPS будет на той же странице создания сервера в Digital Ocean. У других хостингов выбор местоположения может отсутствовать либо появится на другом шаге. На DO, пожалуй, лучше размещать в Амстердаме, там провайдеры пока что не занимаются активной фильтрацией трафика, поэтому проблем с сетью ожидается меньше всего. Однако за счёт нагруженности тамошнего дата-центра скорость сети будет не шибкой высокой — 30-60 Мбит.
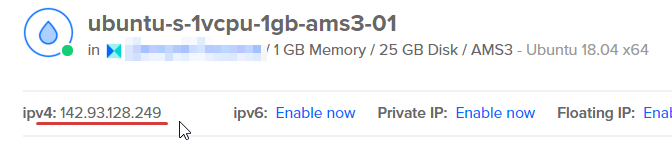
После создания сервера обязательно проверьте его цифровой адрес на блокировку, так как IPv4 адресов в мире мало, а нехороших и глупых людей — много:
Помимо госсайтов для проверки IP на наличие санкций (спрашивается — что адреса сделали плохого?), в интернете живёт удобный сервис zapret.info:
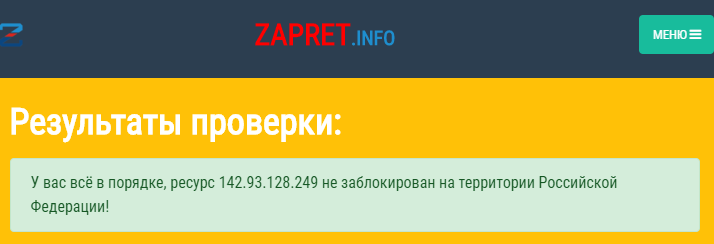
К сожалению, реальность такова, что в 1 случае из 5 в Digital Ocean и у других популярных облачных провайдеров нужно пересоздавать сервер несколько раз, чтобы получить не заблокированный цифровой адрес. Мой «рекорд» — 31 неудачная попытка создания сервера подряд. Только после этого дроплет получил не заблокированный адрес.
Далее зайдите в терминал под пользователем root (пароль к нему придёт письмом). В DO для этого есть вебклиент, вызываемой кнопкой справа вверху панели управления VPS:
Хотя вы можете использовать Putty, Kitty или любую другую. При входе на сервер, может быть, он попросит сменить пароль — do it, благо это легко. После выполните следующую команду:
apt update && apt upgrade -y && apt install -y shadowsocks-libev
Репозиторий linux-софта обновится, сама Убунта проапгрейдится тоже, установится сервер Shadowsocks. После успешного выполнения вывод в терминале будет такой:

В отличии от прокси, к которому может подключиться любой желающий, в shadowsocks-libev можно и нужно поставить пароль. Также метод шифрования по умолчанию не оптимален. Поэтому обязательно отредактируйте файл конфигурации:
nano /etc/shadowsocks-libev/config.json
По умолчанию выглядеть config.json будет выглядеть так:
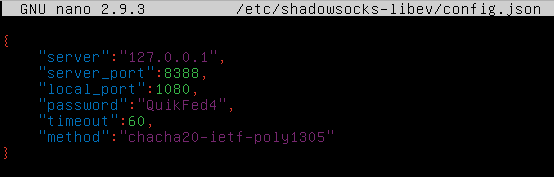
Нужно поправить файл конфигурации, добавив пару опций, приведя к такому виду:
{
    "server":"0.0.0.0",
    "server_port":ТУТ_СЛУЧАЙНЫЙ_ПОРТ,
    "local_port":1080,
    "password":"ТУТ_ВАШ_ПАРОЛЬ",
    "timeout":10,
    "method":"chacha20-ietf-poly1305",
    "fast_open":true,
    "workers":1,
    "mode":"tcp_and_udp"
}
Пройдусь по опциям.
- IP в поле «server» должно быть именно 0.0.0.0 — это не ошибка, так shadowsocks-libev будет прослушивать все сетевые интерфейсы.
- В качестве «server_port» нужно указать любой порт для доступа, отличный от стандартных 22, 80, 443 и 8388.
- «local_port» оставляйте 1080, это для связи внутри сервера и в нашем случае не нужно.
- «password» — конечно же, делайте пароль подлиннее да позаковыристее.
- «timeout» — время, после которого софтина разрывает соединение, если не поступило никаких данных. Вместо 60 секунд лучше ввести 10, ну максимум 20. Большее значение клиент Shadowsocks для Windows не поддерживает, ни к чему рассогласовывать опции.
- «method» — алгоритм шифрования. Стандартный «chacha20-ietf-poly1305» очень надёжен, такой трафик никакой злоумышленник не расшифрует. Однако если ваш телефон после установки Shadowsocks клиента начнёт быстро съедать батарею, переключите на «aes-256-cfb» и перезагрузите сервер. Этот алгоритм менее надёжен, но поможет снизить нагрузку на ЦП и сэкономить заряд аккумулятора, если процессор мобильного имеет поддержку аппаратного ускорения AES шифрования. Кстати, на моём дешёвом MTK6580 разница заметна.
- «fast_open» — быстрое открытие соединений, если поддерживается ядром ОС.
- «workers» — количество процессов shadowsocks-libev. Советую поставить соответственно количеству ядер у ЦП.
- «mode»:»tcp_and_udp» включает передачу данных по UDP. Честно говоря, разницы не заметил, но люди в конфигах указывают. Хуже точно не будет.
После внесения правок жмите Ctrl+O и Enter для сохранения, Ctrl+X для закрытия.
Следующие команды включат сервис Shadowsocks на сервере с Ubuntu, чтобы он включался автоматически:
systemctl enable shadowsocks-libev
systemctl restart shadowsocks-libev
И финальный штрих — тюнинг настроек ядра сервера для максимальной производительности:
Листайте этот конфиг до самого низа и вставляйте вот этот набор твиков:
fs.file-max = 51200
net.core.rmem_max = 67108864
net.core.wmem_max = 67108864
net.core.rmem_default = 65536
net.core.wmem_default = 65536
net.core.netdev_max_backlog = 4096
net.core.somaxconn = 4096
net.ipv4.tcp_syncookies = 1
net.ipv4.tcp_tw_reuse = 1
net.ipv4.tcp_fin_timeout = 30
net.ipv4.tcp_keepalive_time = 1200
net.ipv4.ip_local_port_range = 10000 65000
net.ipv4.tcp_max_syn_backlog = 4096
net.ipv4.tcp_max_tw_buckets = 5000
net.ipv4.tcp_fastopen = 3
net.ipv4.tcp_rmem = 4096 87380 67108864
net.ipv4.tcp_wmem = 4096 65536 67108864
net.ipv4.tcp_mtu_probing = 1
net.core.default_qdisc=fq
net.ipv4.tcp_congestion_control=bbr
Сохраните так же, как и предыдущий конфиг, введите «sysctl -p» для применения настроек, перезагрузите машину командой «reboot» и… всё, ваш персональный супер-быстрый прокси-сервер настроен! Осталось задействовать его на устройствах.
Конечно, можно закрыть лишние порты файрволлом, включить fail2ban и сделать кучу других полезных действий, но в контексте создания прокси-сервера на Ubuntu — перечисленного выше достаточно. Остальное — по вашему усмотрению.
5 Настройка Shadowsocks в Windows
Утилита для компьютеров отличается простотой в установке. Она портативная, её можно носить с собой на флешке или распространить на все домашние ПК. Каких-то специфичных дополнительных настроек для отдельных машин нет, настройки всегда одинаковые.
Зайдите на страницу релизов shadowsocks-windows и скачайте zip-архив с именем Shadowsocks-[тут_версия].zip.
Распакуйте этот архив в любую папку. Например, C:Shadowsocks.
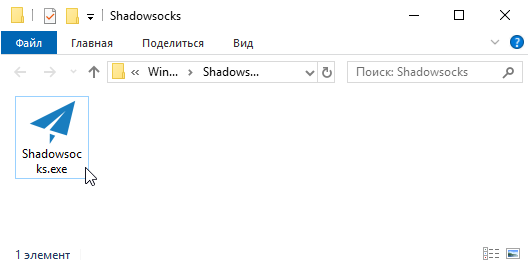
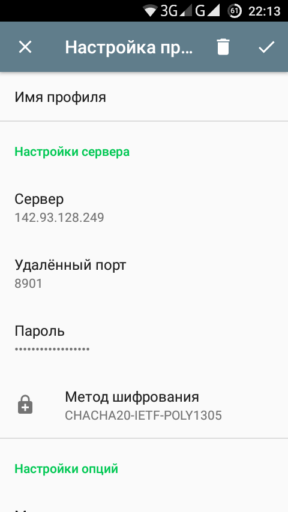
Запустите исполняемый файл Shadowsocks.exe. Раз это первый запуск, появится окно добавления сервера, где нужно ввести IP, порт, пароль и алгоритм шифрования.
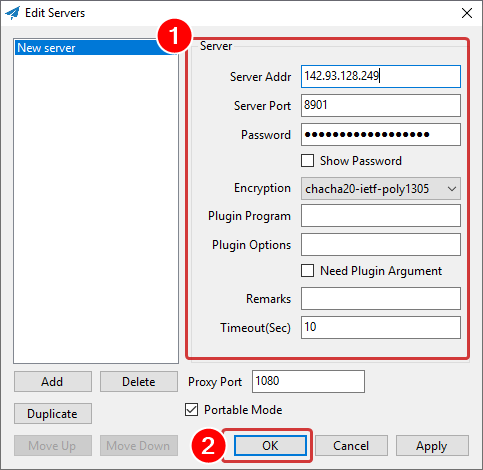
После нажатия ОК сервер добавится в список слева и окно скроется. При необходимости его можно вызвать нажатием правой кнопкой мыши по значку Windows-клиента Shadowsocks в трее — Servers — Edit Servers.
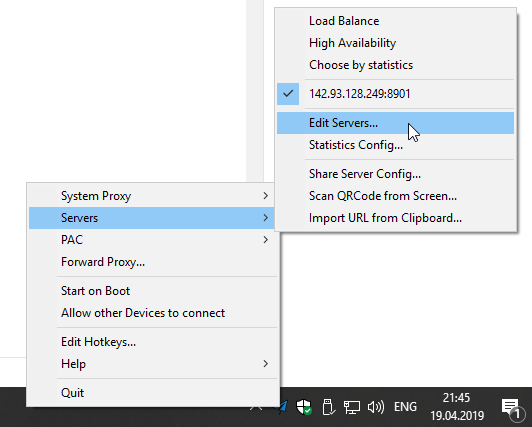
Чтобы инициировать подключение к настроенному серверу, нужно переключить системный прокси: в меню System-Proxy — Global. Пункт Disable выключает проксирование. Также советую, чтобы не запускать программу каждый раз при включении ПК, отметить галкой пункт Start on Boot.

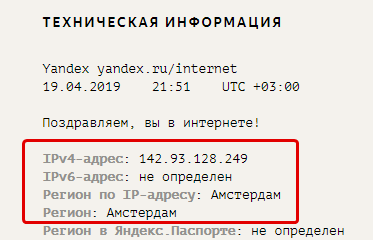
На этом с настройкой в Windows всё. Теперь, если зайти через любой браузер на сервис определения IP адреса (yandex.ru/internet/), окажется, что вы сидите не из дома:
Также я протестировал получившуюся скорость интернета. К сожалению, входящую скорость больше 50 Мбит на тестовом сервере получить не удалось:
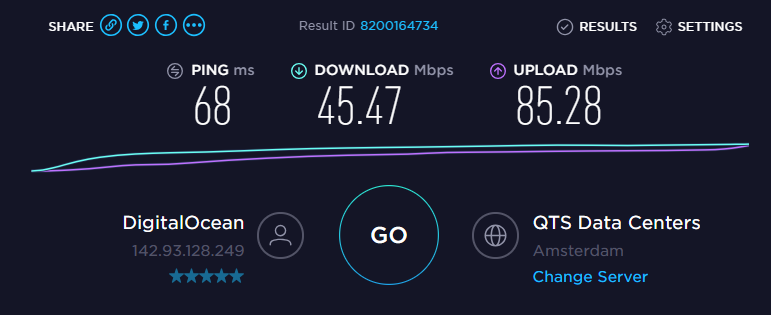
В действительности дела обстоят лучше и потери в скорости составляют не более 10% от тарифа интернета. Наверное, тестируемый VPS работает с соседстве с чересчур нагруженными проектами.
Ещё один момент: не все программы в Windows учитывают системные настройки прокси. Например, Магазин приложений может пойти в обход. Для решения этой проблемы существует SocksCap64. Однако, скорее всего, такая утилита вам не понадобится — браузеры с прокси работают нормально.
6 Настройка Shadowsocks на Android
С телефонами на Andoid всё просто — есть клиент Shadowsocks. Абсолютно бесплатный.
В телефонной программе можно точно так же заполнить поля, указав сервер и мучительно набрав сложный пароль на экранной клавиатуре, а можно выбрать «Сканировать QR-код» и навести камеру на экран компьютера.

На компьютере в Windows-версии настройки генерируются через пункт меню Servers — Share Server Config. Это удобно.
После настройки нужно лишь нажать кнопку в главном меню, чтобы на телефоне создалось VPN-соединение.
В зависимости от производительности процессора телефона и качества связи скорость получается сильно разной. К сожалению, пинг сильно страдает, поэтому во время звонков по WhatsApp собеседник услышит вас на полсекунды позже обычного, незащищённого разговора. Комфорт снижается, зато никакие мобильные подписки вам не подключится, реклама от оператора исчезнет.
7 Подчеркну
Этот или подобный софт не обязательно использовать ради доступа к запрещённым ресурсам. В конце концов, если арендовать сервер на территории необъятной, в этом плане ничего не изменится. Зато провайдер не сможет вмешаться в трафик. Если вас также, как и меня, беспокоит факт того, что мобильные операторы считают нормальным вешать на сайтах рекламу, которую владельцы не ставили, то различные прокси и VPN сервисы — это технологичный способ защититься. Так что ставьте Shadowsocks на здоровье.
Here is to build the Shadowsocks server on windows, using githublibQtShadowsocksproject.
project address:https://github.com/shadowsocks/libQtShadowsocks
ready
A windows that can be turned over the wall.
Download libQtShadowsocks
Fromhttps://github.com/shadowsocks/libQtShadowsocks/releasesDownload a compiled version, here is shadowsocks-libqss-v1.10.0-win64.7z, the original download is the latest version 2.0, the result can not be used.
After downloading, unzip it to any location, there is a shadowsocks-libqss.exe file.
Configuration file
Create 2 files in the unzipped directory, one config.json and one shadowsocks-server.bat.
config.json Place configuration information.
The content is as follows:
{
    "server":"0.0.0.0",
    "server_port":8023,
    "local_address":"127.0.0.1",
    "local_port":1080,
    "password":"aaabbbb",
    "timeout":600,
    "method":"aes-256-cfb",
    "http_proxy": false,
    "auth": false
}
Configuration instructions:
server
the address your server listens (server IP)
local_address
the address your local listens (local proxy address)
local_port
local port (local proxy port) (write the ss port created before)
port_password
password used for encryption (the server port and password set by yourself) (you can set it yourself)
timeout
in seconds (disconnected in timeout, in seconds)
method
default: «aes-256-cfb», see Encryption (encryption method)
fast_open
use TCP_FASTOPEN, true / false (whether to use TCP)
workers
number of workers, available on Unix / Linux (this is only useful under Unix and Linux, can not be set).
The contents of shadowsocks-server.bat are as follows:
@echo off
shadowsocks-libqss.exe -c config.json -S
Run the Shadowsocks service
Run Shadowsocks-server.bat directly to run the Shadowsocks service. You can also enter the software directory at the command prompt and runshadowsocks-libqss.exe -c config.json -SThis line of commands.
Client configuration
The client used here is Shadowsocks, github address:https://github.com/shadowsocks/shadowsocks-windows。

Note: To run in PAC mode, if you select global mode, all access will use shadowsocks; if you select PaC mode, only the URL in pac.txt will use shadowsocks.

Note that the firewall opens the corresponding port.
Custom rules
Reference:
http://honglu.me/2015/06/26/ShadowSocks%E8%87%AA%E5%AE%9A%E4%B9%89%E8%A7%84%E5%88%99/
Information retrieved from the Internet
Edit FGWList user rules


But when I update the local pac from FGWList, I get an error

So I am directly modifying the pac.txt file, add the URL you want to use shadowsocks to access, and finally choose to use the PAC mode.
Multi-user
If you want multiple users to use the shadowsocks service, use the following configuration replacementpassword:xxxsection.
"port_password": {
   "8381": "foobar1",
   "8382": "foobar2",
   "8383": "foobar3",
   "8384": "foobar4"
 },
problem
Updated on 2018-05-31.
One day the shadowsocks service is unavailable.
Server log:
2018-05-31 16:15:41.382 INFO: Connecting clients1.google.com:443 from 183.62.174.53:48977
2018-05-31 16:15:44.649 INFO: Connecting clients1.google.com:443 from 183.62.174.53:49021
2018-05-31 16:15:44.665 INFO: Connecting clients1.google.com:443 from 183.62.174.53:49032
2018-05-31 16:15:50.803 INFO: Connecting clients1.google.com:443 from 183.62.174.53:49103
2018-05-31 16:15:56.177 INFO: Connecting www.google.com:443 from 183.62.174.53:49199
2018-05-31 16:15:56.185 INFO: Connecting www.google.com:443 from 183.62.174.53:49200
2018-05-31 16:16:11.364 DEBUG: Local socket: The remote host closed the connection
2018-05-31 16:16:14.637 DEBUG: Local socket: The remote host closed the connection
2018-05-31 16:16:14.654 DEBUG: Local socket: The remote host closed the connection
2018-05-31 16:16:20.794 DEBUG: Local socket: The remote host closed the connection
2018-05-31 16:16:26.164 DEBUG: Local socket: The remote host closed the connection
2018-05-31 16:16:26.172 DEBUG: Local socket: The remote host closed the connection
After changing the algorithm and the port, it still doesn’t work, and the updated version of the client does not work. Finally, after updating the server version, it works. The version used here is: shadowsocks-libqss-v2.0.2-win64.7z.
PS: If you have any questions, please take a look at the related Issues on github.
Вот сервер Shadowsocks на Windows, используя GitHublibQtShadowsocksПроект.
Адрес проекта:https://github.com/shadowsocks/libQtShadowsocks
готовый
Окно, которое можно перевернуть через стену.
Скачать libQtShadowsocks
отhttps://github.com/shadowsocks/libQtShadowsocks/releasesЗагрузите скомпилированную версию, вот shadowsocks-libqss-v1.10.0-win64.7z, оригинальная загрузка — последняя версия 2.0, но результат недоступен.
После загрузки распакуйте его в любое место, и там будет файл shadowsocks-libqss.exe.
Файл конфигурации
Создайте два файла в разархивированном каталоге, config.json и shadowsocks-server.bat.
config.json размещает информацию о конфигурации.
гласит:
{
    "server":"0.0.0.0",
    "server_port":8023,
    "local_address":"127.0.0.1",
    "local_port":1080,
    "password":"aaabbbb",
    "timeout":600,
    "method":"aes-256-cfb",
    "http_proxy": false,
    "auth": false
}
Инструкции по настройке:
server
адрес, который слушает ваш сервер (IP-адрес сервера)
local_address
адрес, который слушает ваш местный житель
local_port
локальный порт (локальный порт прокси)
port_password
пароль, используемый для шифрования (порт сервера и пароль, которые вы установили) (вы можете установить его самостоятельно)
timeout
в секундах (отключение по тайм-ауту, в секундах)
method
по умолчанию: «aes-256-cfb», см. Шифрование
fast_open
использовать TCP_FASTOPEN, true / false (использовать ли TCP)
workers
количество рабочих, доступных в Unix / Linux (это полезно только в Unix и Linux, но может быть оставлено неустановленным).
Содержимое shadowsocks-server.bat выглядит следующим образом:
@echo off
shadowsocks-libqss.exe -c config.json -S
Запустить службу Shadowsocks
Запустите shadowsocks-server.bat напрямую, чтобы запустить службу Shadowsocks. Вы также можете ввести каталог программного обеспечения в командной строке и запуститьshadowsocks-libqss.exe -c config.json -SЭто команда.
Конфигурация клиента
Здесь используется клиент Shadowsocks, адрес github:https://github.com/shadowsocks/shadowsocks-windows。

Примечание. Для запуска в режиме PAC, если вы выберете глобальный режим, при любом доступе будут использоваться теневые чулки, а если вы выберете режим PaC, только тени в pac.txt будут использовать теневые чулки.

Обратите внимание, что брандмауэр открывает соответствующие порты.
Пользовательские правила
Ссылка:
http://honglu.me/2015/06/26/ShadowSocks%E8%87%AA%E5%AE%9A%E4%B9%89%E8%A7%84%E5%88%99/
Информация, просматриваемая онлайн
Изменить правила пользователя для FGWList


но я получил ошибку, когда последний раз обновлял свой локальный pac из FGWList

Поэтому я напрямую изменяю файл pac.txt, добавляю URL, к которому вы хотите получить доступ, используя shadowsocks, и, наконец, выбираю режим PAC.
Многопользовательская
Если вы хотите, чтобы несколько пользователей использовали службу shadowsocks, замените ее следующей конфигурациейpassword:xxxРаздел.
"port_password": {
   "8381": "foobar1",
   "8382": "foobar2",
   "8383": "foobar3",
   "8384": "foobar4"
 },
проблема
Обновлено 2018-05-31.
Однажды служба shadowsocks недоступна.
Журнал на стороне сервера:
2018-05-31 16:15:41.382 INFO: Connecting clients1.google.com:443 from 183.62.174.53:48977
2018-05-31 16:15:44.649 INFO: Connecting clients1.google.com:443 from 183.62.174.53:49021
2018-05-31 16:15:44.665 INFO: Connecting clients1.google.com:443 from 183.62.174.53:49032
2018-05-31 16:15:50.803 INFO: Connecting clients1.google.com:443 from 183.62.174.53:49103
2018-05-31 16:15:56.177 INFO: Connecting www.google.com:443 from 183.62.174.53:49199
2018-05-31 16:15:56.185 INFO: Connecting www.google.com:443 from 183.62.174.53:49200
2018-05-31 16:16:11.364 DEBUG: Local socket: The remote host closed the connection
2018-05-31 16:16:14.637 DEBUG: Local socket: The remote host closed the connection
2018-05-31 16:16:14.654 DEBUG: Local socket: The remote host closed the connection
2018-05-31 16:16:20.794 DEBUG: Local socket: The remote host closed the connection
2018-05-31 16:16:26.164 DEBUG: Local socket: The remote host closed the connection
2018-05-31 16:16:26.172 DEBUG: Local socket: The remote host closed the connection
После изменения алгоритма и порта он все равно не работает, и версия обновления клиента также не работает. После обновления версии сервера все в порядке. Используемая версия: shadowsocks-libqss-v2.0.2-win64.7z.
PS: Если у вас есть какие-либо вопросы, пожалуйста, посмотрите соответствующие вопросы на github.
Shadowsocks Setup Guide for Windows
About Shadowsocks
- Shadowsocks is an open-source encrypted proxy project, Typically, the client software will open a socks5 proxy on the machine it is run, which internet traffic can then be directed towards, similarly to an SSH tunnel.
- Shadowsocks uses a self-designed protocol for secure communications. The encryption algorithms include AES, Blowfish, IDEA, and RC4. No handshaking is needed except for creating a TCP connection. Each request only forwards one connection and does not need to maintain the state of “always connected”, so it is relatively power-efficient on mobile devices. All traffic is algorithmically encrypted, allowing you to choose your own algorithm.
- Clients are available on multiple major operating systems and platforms, including Windows, OSX, Android, Linux, and iOS systems and routers (OpenWrt).
System Requirements
Before you install, always make sure that your system meets the minimum system requirements.
You need Windows 7 SP1 or later to run Shadowsocks. If your operating system is older, upgrade to Windows 7 SP1 or later.
Installing Shadowsocks
Follow the instructions below to download and install Shadowsocks on Windows.
1. Download the client
Go to Shadowsocks download page.
Click on the latest version of Shadowsocks-x.x.x.zip to download (x.x.x is the version number).

Or download form Client Portal
2. Unzip the client
Right-click on Shadowsocks-x.x.x.zip compressed file > «Extract all».
Click on «Browse» to select the directory where you want to unzip to> «Show extracted files when complete > «Extract».
Double-click on Shadowsocks.exe.

3. Install the .NET Framework
After trying to run Shadowsocks.exe, you may see a dialog on your computer similar to the following one::

It means that your computer needs to install the .NET Framework.
Please click here to download the latest version of the .NET Framework.
Configure Shadowsocks Account
Log in to our website (https://portal.shadowsocks.ch) and do the following:
- Click Services > My Services.
- Select your available products & services> «Configuration file» > «Downloads» > «Download configuration file for Shadowsocks Windows».
- You will get a
gui-config.jsonfile.

On your computer, do the following:
- Drag
gui-config.jsonto the same directory asShadowsocks.exe.

Double-click on Shadowsocks.exe to see that the node information and account have been automatically filled.
- On your system tray, right click
 > «Enable System Proxy».

You can also add nodes individually by QR code. On your computer, do the following:
This QR code also applies to other clients.
- On your system tray, right click > «Servers»> «Scan QR Code from Screen».
- Click «Enable System Proxy».

Configure System Proxy Mode
- On your system tray, right click > «Mode» > «PAC Mode».

- If you cannot access the website using the PAC mode, click here to download the «pac configuration file» and drag
pac.txtin the same directory asShadowsocks.exe.

Attention
-
Global mode means that most of the traffic in the computer will go through a proxy, and it is not recommended for daily use, because it will easily let the torrent downloads through our proxy, and causing a serious consequence by receiving ISP complaints.
-
Load Balance and High Availability are used to spread traffic and improve usability. It is not for speeding up yor internet. If a node has better connection quality, it is recommended to select that server directly.
-
It is recommended to use PAC mode, which allows automatic proxy and access to non-blocked websites without proxying. (But in the Shadowsocks Win 2.x version, the built-in GFWList link has expired, causing the PAC regulations cannot be updated.)
-
You can choose to download the PAC file from our website, or when you encounter a website that cannot be accessed, edit the local PAC file to add that website address.
Shadowsocks Setup Guide for Windows
About Shadowsocks
- Shadowsocks is an open-source encrypted proxy project, Typically, the client software will open a socks5 proxy on the machine it is run, which internet traffic can then be directed towards, similarly to an SSH tunnel.
- Shadowsocks uses a self-designed protocol for secure communications. The encryption algorithms include AES, Blowfish, IDEA, and RC4. No handshaking is needed except for creating a TCP connection. Each request only forwards one connection and does not need to maintain the state of “always connected”, so it is relatively power-efficient on mobile devices. All traffic is algorithmically encrypted, allowing you to choose your own algorithm.
- Clients are available on multiple major operating systems and platforms, including Windows, OSX, Android, Linux, and iOS systems and routers (OpenWrt).
System Requirements
Before you install, always make sure that your system meets the minimum system requirements.
You need Windows 7 SP1 or later to run Shadowsocks. If your operating system is older, upgrade to Windows 7 SP1 or later.
Installing Shadowsocks
Follow the instructions below to download and install Shadowsocks on Windows.
1. Download the client
Go to Shadowsocks download page.
Click on the latest version of Shadowsocks-x.x.x.zip to download (x.x.x is the version number).
Or download form Client Portal
2. Unzip the client
Right-click on Shadowsocks-x.x.x.zip compressed file > «Extract all».
Click on «Browse» to select the directory where you want to unzip to> «Show extracted files when complete > «Extract».
Double-click on Shadowsocks.exe.
3. Install the .NET Framework
After trying to run Shadowsocks.exe, you may see a dialog on your computer similar to the following one::
It means that your computer needs to install the .NET Framework.
Please click here to download the latest version of the .NET Framework.
Configure Shadowsocks Account
Log in to our website (https://portal.shadowsocks.ch) and do the following:
- Click Services > My Services.
- Select your available products & services> «Configuration file» > «Downloads» > «Download configuration file for Shadowsocks Windows».
- You will get a
gui-config.jsonfile.
On your computer, do the following:
- Drag
gui-config.jsonto the same directory asShadowsocks.exe.
Double-click on Shadowsocks.exe to see that the node information and account have been automatically filled.
- On your system tray, right click > «Enable System Proxy».
You can also add nodes individually by QR code. On your computer, do the following:
This QR code also applies to other clients.
- On your system tray, right click > «Servers»> «Scan QR Code from Screen».
- Click «Enable System Proxy».
Configure System Proxy Mode
- On your system tray, right click > «Mode» > «PAC Mode».
- If you cannot access the website using the PAC mode, click here to download the «pac configuration file» and drag
pac.txtin the same directory asShadowsocks.exe.
Attention
-
Global mode means that most of the traffic in the computer will go through a proxy, and it is not recommended for daily use, because it will easily let the torrent downloads through our proxy, and causing a serious consequence by receiving ISP complaints.
-
Load Balance and High Availability are used to spread traffic and improve usability. It is not for speeding up yor internet. If a node has better connection quality, it is recommended to select that server directly.
-
It is recommended to use PAC mode, which allows automatic proxy and access to non-blocked websites without proxying. (But in the Shadowsocks Win 2.x version, the built-in GFWList link has expired, causing the PAC regulations cannot be updated.)
-
You can choose to download the PAC file from our website, or when you encounter a website that cannot be accessed, edit the local PAC file to add that website address.
ShadowSocks is used to encrypt the data between client and server communication. ShadowSocks server is a proxy server that will communicate with ShadowSocks client use the specified encryption method. It is not a VPN, but it can act like a VPN to protect you by encrypting your internet data. So this article will tell you how to set up and configure the ShadowSocks server in Ubuntu and how to set up and use the ShadowSocks client tool in macOS, Windows, and Linux.
1. Setup ShadowSocks Server In Ubuntu.
- Use SSH client to connect to the Ubuntu server.
- Execute
sudo -ito switch to the root user. - Update and upgrade the OS packages with the below command.
# apt update
# apt upgrade
- Enable BBR by edit /etc/sysctl.conf file with gedit. Enable BBR can improve the ShadowSocks proxy performance by maximizing network bandwidth usage.
~# gedit /etc/sysctl.conf
- Add below two lines at end of file /etc/sysctl.conf and save.
net.core.default_qdisc=fq
net.ipv4.tcp_congestion_control=bbr
- Execute command
rebootto reboot the ubuntu os. - After reboot, run
lsmod | grep bbrcommand to verify the bbr configurations. If you see the tcp_bbr line in the console output that means bbr is enabled correctly.~#lsmod | grep bbr tcp_bbr 20480 11
- Now you can install the ShadowSocks server by executing either of the below commands.
~# apt install shadowsocks
or
~# apt install python-pip
~# pip install shadowsocks
- After that, you can run the command
ssserverin the terminal to verify that the ShadowSocks server has been installed.
2. Configure And Start ShadowSocks Server.
- Create a directory /etc/shadowsocks if the folder does not exist.
$ sudo mkdir /etc/shadowsocks
- Create a ShadowSocks configuration file in the above folder if the file does not exist.
$ sudo gedit /etc/shadowsocks/config.json
- Add below JSON data in the above file. Use your own server IP, port number, etc in the below JSON data.
{ "server":"0.0.0.0", ## Proxy server external ip address. "server_port":8888, ## Proxy server listening port number. "local_address":"127.0.0.1", "local_port":1080, ## Local listening port number. "password":"888888", ## Proxy server connect password "timeout":300, "method":"aes-256-cfb",## Data encryption method "dast_open":false } - Start ShadowSocks server with the below command. To make sure the ShadowSocks server can be started without error, remove the
-dcommand argument to show the server log in the console.~$ sudo ssserver -c /etc/shadowsocks/config.json -d start
- If you meet error messages like below.
AttributeError: /usr/lib/x86_64-linux-gnu/libcrypto.so.1.1: undefined symbol: EVP_CIPHER_CTX_cleanup - You need to edit /usr/local/lib/python2.7/dist-packages/shadowsocks/crypto/openssl.py file.
Change line 52 from libcrypto.EVP_CIPHER_CTX_cleanup.argtypes = (c_void_p,) to libcrypto.EVP_CIPHER_CTX_reset.argtypes = (c_void_p,),
Change line 111 from libcrypto.EVP_CIPHER_CTX_cleanup(self._ctx) to libcrypto.EVP_CIPHER_CTX_reset(self._ctx). - Then start the ShadowSocks server again, the error will disappear.
- If you meet socket.error: [Errno 99] Cannot assign requested address error when you startup the ShadowSocks server like below. To fix it, just change the server ip to “0.0.0.0” in the /etc/shadowsocks/config.json file.
[email protected]:~# ssserver -c /etc/shadowsocks/config.json start
INFO: loading config from /etc/shadowsocks/config.json
2019-02-06 09:47:00 INFO loading libcrypto from libcrypto.so.1.1
2019-02-06 09:47:00 INFO starting server at 34.73.193.214:9090
Traceback (most recent call last):
File "/usr/bin/ssserver", line 11, in <module>
load_entry_point('shadowsocks==2.9.0', 'console_scripts', 'ssserver')()
File "/usr/lib/python2.7/dist-packages/shadowsocks/server.py", line 74, in main
tcp_servers.append(tcprelay.TCPRelay(a_config, dns_resolver, False))
File "/usr/lib/python2.7/dist-packages/shadowsocks/tcprelay.py", line 733, in __init__
server_socket.bind(sa)
File "/usr/lib/python2.7/socket.py", line 228, in meth
return getattr(self._sock,name)(*args)
socket.error: [Errno 99] Cannot assign requested address
3. Setup ShadowSocks Client Tool.
You can download the ShadowSocks client tool from the official download page.
3.1 For macOS.
- Download ShadowsocksX-NG from GitHub.
- It is a zip file, after unzip, you can use it directly.
- When you click it to start, it will appear at the top right corner of the macOS Finder bar. The first little plane icon is just the ShadowSocks client tool icon.

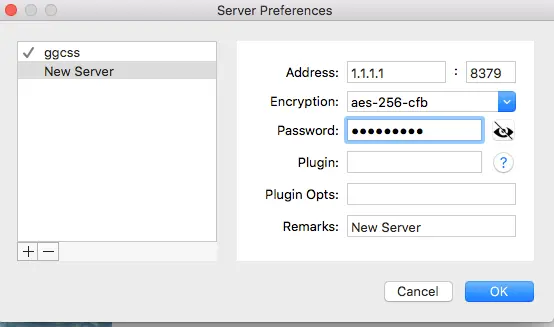
- Click the little plane icon, it will popup a menu list, click Servers —> Server Preferences… menu item to open server manager dialog.
- Click the + button in the server list to add a new ShadowSocks server, input related server information such as server address, port number, Encryption method, Password, etc, and click the OK button to save it.

- Now you can use the ShadowSocks server by clicking the ShadossocksX-NG icon( a little plane on macOS top right toolbar) —> Servers menu item, then you can select a ShadowSocks server from the popup server list.
- Open a web browser, then you can find the web traffic go through the ShadowSocks server.
3.2 For Windows.
ShadowSocks windows client tool is similar to macOS client tool, you can download shadowsocks-win from GitHub, and the configuration is also easy like macOS.
3.3 For Linux.
3.3.1 Setup ShadowSocks Client Tool.
This tool will communicate with the ShadowSocks server use encrypted communication data.
- Install ShadowSocks in your Linux follows Section 1, 2 in this article.
- ShadowSocks installation can be used as a server, but it can also be used as a client tool. When you use it as a server you use the command ssserver to start it, and when you run the command sslocal, it will start the client tool.
- Run the below command to install ShadowSocks software.
~$ sudo apt install shadowsocks
- After install, the /etc/shadowsocks/config.json file has been created. Just edit its content to your own.
~$ sudo gedit /etc/shadowsocks/config.json { "server":"1.2.1.2", "server_port":8888, "local_address":"127.0.0.1", "local_port":1080, "password":"888888", "timeout":300, "method":"aes-256-cfb", "dast_open":false } - Run the command sslocal to start the ShadowSocks client tool. When you see the below message, it means the client tool has been started successfully.
[email protected]:~$ sslocal -c /etc/shadowsocks/config.json
INFO: loading config from /etc/shadowsocks/config.json
2018-10-01 21:28:25 INFO loading libcrypto from libcrypto.so.1.1
2018-10-01 21:28:25 INFO starting local at 127.0.0.1:1080
3.3.2 Setup Local HTTP Proxy Server.
The polipo is a caching web proxy, it can redirect your HTTP request to socks5 proxy server. Or you can use another HTTP proxy tool which has the same feature that you are familiar with.
- Install polipo in ubuntu using the below command.
~$ sudo apt-get install polipo
- Stop polipo and add below proxy configuration code in polipo configuration file /etc/polipo/config
~$ sudo service polipo stop
~$ sudo gedit /etc/polipo/config

# Add below polopo settings data
socksParentProxy = localhost:1080
proxyPort = 8787
- Start polipo service again.
~$ sudo service polipo start
- Run
ps -ef | grep polipoto ensure the polipo proxy server has started.[email protected]:~$ ps -ef|grep polipo proxy 641 1 0 15:37 ? 00:00:00 /usr/bin/polipo -c /etc/polipo/config pidFile=/var/run/polipo/polipo.pid daemonise=true
- Add
export http_proxy=http://127.0.0.1:8787at the end of the current user$HOME/.bashrcfile. - Run
source $HOME/.bashrccommand to make the above configuration effective.
3.3.3 Configure Firefox To Use polipo Local HTTP Proxy Server.
- Open Firefox web browser. Click the Open Menu button at the top right corner, then click the Preferences menu item, input proxy in the top search box, click the Settings… button behind Network Proxy configuration, then it will popup the Connection Settings configuration dialog.
- In the Connection Settings pop-up window, choose the Manual proxy configuration radio button, and input 127.0.0.1 after the HTTP Proxy address input box, and 8787 in the Port number input box ( our polipo caching proxy just run at localhost and listen on port 8787.). Check the checkbox Use this proxy server for all protocols.
3.3.4 Set Chrome Use polipo Local HTTP Proxy Server.
- Open the google chrome Settings dialog by clicking the three-vertical-dot icon on the chrome browser top right corner, then click the Settings menu item in the drop-down menu list.
- Search the keyword proxy in the google chrome settings dialog.
- Click Open your computer’s proxy settings item to open the Ubuntu Linux Network configuration dialog.
- Click Network Proxy item to manually change proxy server IP to 127.0.0.1 and port number to 8787 which the polipo HTTP proxy server is using.
3.3.5 Set ShadowSocks Android App.
- Download ShadowSocks android app from google play store.
- Install it on an android device.
- Click the ShadowSocks icon to start the android app.
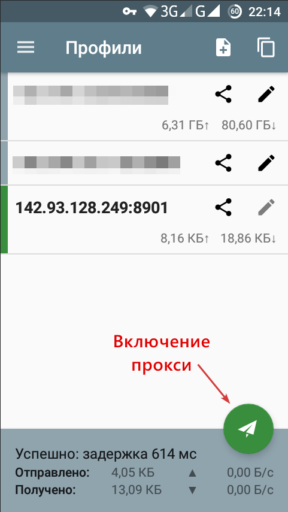
- Click the + icon at the app top right corner to add a ShadowSocks server profile in the app.
- Input the profile name, server IP, server port number, password, encrypt method, click the checkmark( √ ) to save the server profile.
- Select a ShadowSocks server in the profiles list, then click the little plane button at the app bottom right to connect to the ShadowSocks server.
- When you see a key icon displayed at the top status bar, the ShadowSocks server has been connected.
4. Question & Answer.
4.1 How to connect to company network secure through the internet.
- I use macOS in daily work from home, and I want to connect to my company network through the internet, can I use the ShadowSocks client & server tool to achieve the goal? Thanks a lot.
- Yes, you can follow this article to install the ShadowSocks server-side on your company machine ( the server machine should have a public IP address ), and install the ShadowSocks macOS client tool on your macOS at home, then you can connect to your company machine through the ShadowSocks.
Reference
- Ubuntu SSH Remote Login Installation And Configuration Example