Spyder is relatively easy to install on Windows, Linux and macOS.
Just make sure to read and follow these instructions with care.
If you run into problems, before posting a report, please consult our comprehensive troubleshooting guide and search the issue tracker for your error message and problem description.
These methods generally fix or isolate the great majority of install-related difficulties.
Thanks!
Note
For most users on Windows and macOS, we recommend our Standalone installers as the most straightforward and robust option to obtain Spyder.
For users needing Linux support, third-party Spyder plugins or Variable Explorer compatibility with custom-installed packages—all capabilities which the standalone installers currently do not yet provide—we advise using a Conda-based distributions.
Linux, plugin and package/environment management support in the standalone installers are currently under active development for future Spyder versions.
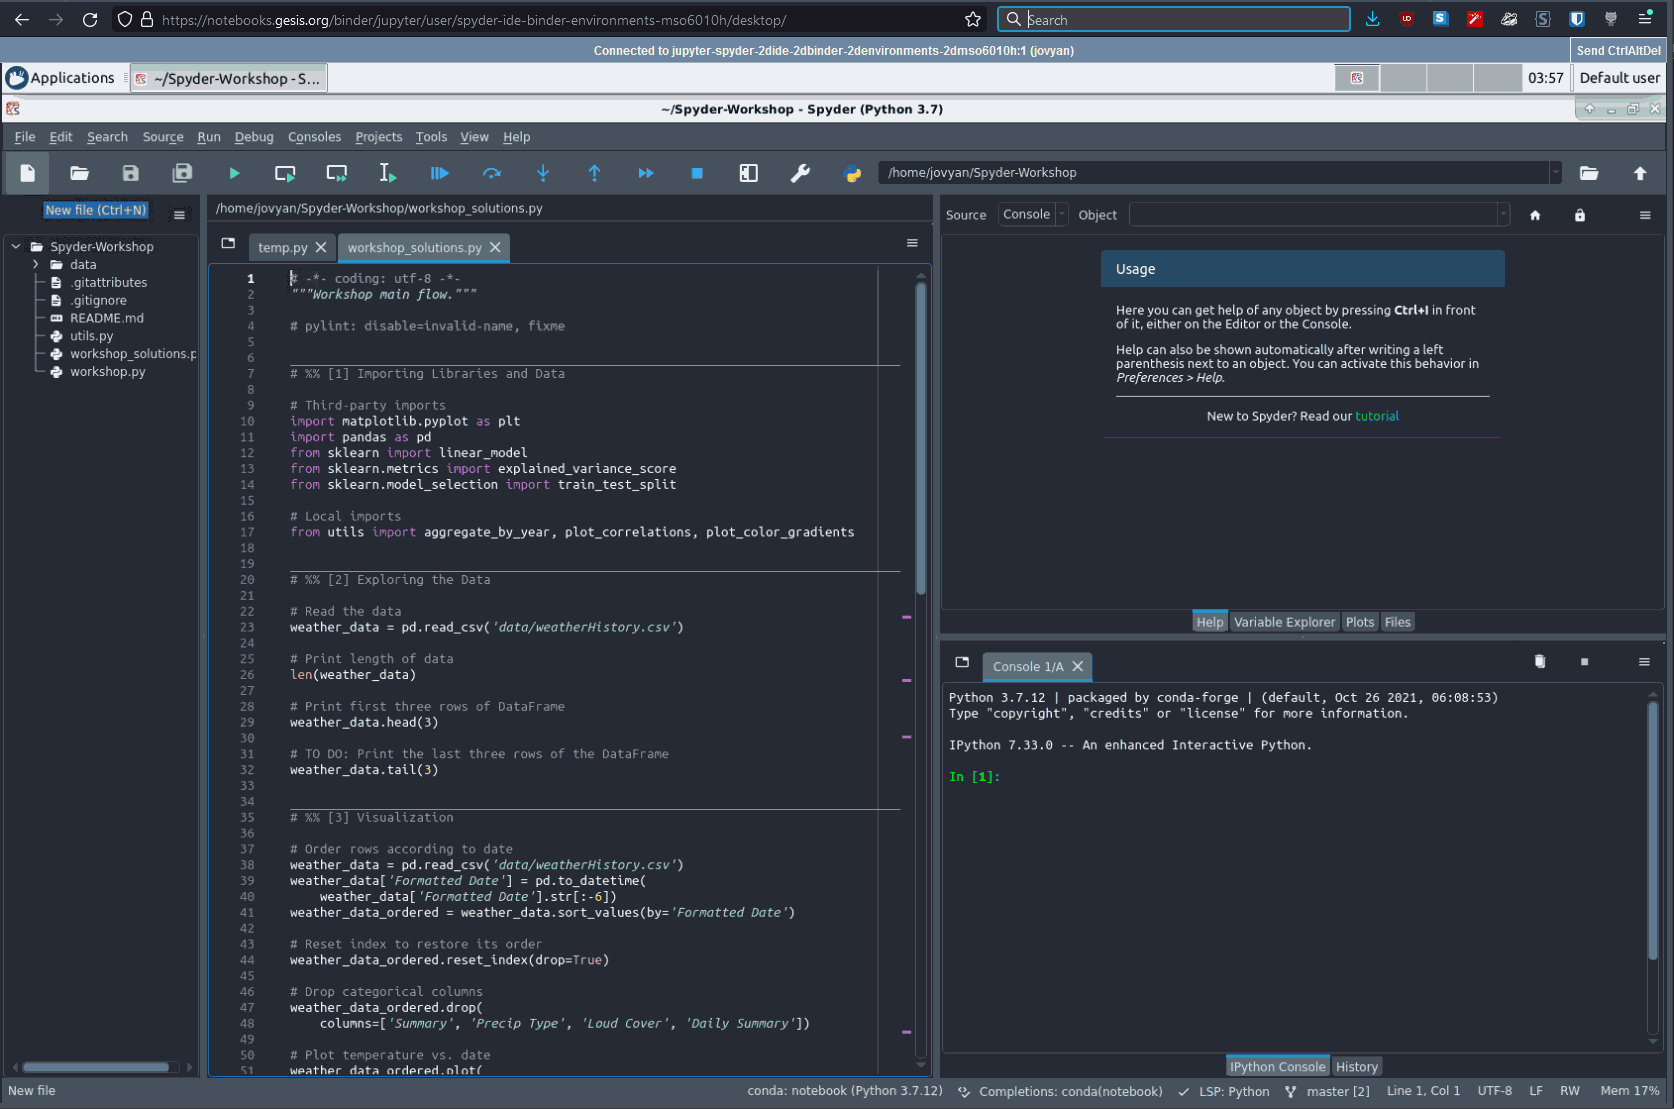
Try Spyder online
Want to try out Spyder without installing it?
With Binder you can work with a fully functional copy of Spyder online that runs right in your web browser, no installation needed.
Visit the Spyder Binder to get started using Spyder.
Standalone installers
The standalone installers are our recommended method for most users on Windows and macOS, with experimental Linux support under active development.
They work like any other IDE, where Spyder can be installed and updated independently of the Python environments you use to run your code.
This avoids the problems with incompatible packages and broken installations users often face when mixing Spyder with the (Conda, etc) environments they use to run their code.
The installers include a built-in Python environment with the most common scientific libraries (e.g. NumPy, Pandas, Matpotlib, etc), which can be used out of the box for basic data analysis tasks.
However, to manage your own packages and environments, you’ll currently need to connect an external Python distribution (such as Anaconda, Miniconda, Miniforge/Mambaforge, WinPython or Python.org) to your standalone copy of Spyder.
For more information on this, see our FAQ entry on the subject.
Note
The standalone installers do not yet support installing third-party Spyder plugins not already bundled with them, though this feature is currently under development.
For now, if you need this capability, we recommend a Conda-based distributions.
Downloading and installing
To download the supported Spyder installer for your platform, simply click the appropriate link below (for Linux, see the Conda-based distributions section).
Then, double-click the downloaded file to open the installer.
If a security warning pops up, you may need to click Yes, OK, Open, Allow or similar.
On Windows, if a “SmartScreen” dialog appears, click More info followed by Run anyway, and then proceed through the steps in the installer.
On macOS, open the disk image and drag Spyder to your Applications folder.
|
Windows Installer |
macOS Installer |
Note
“Lite” versions of both installers are also available from the releases page, which are somewhat smaller than the full installers.
These lack a number of optional but recommended dependencies, such as NumPy, SciPy and Pandas, meaning that a few Variable Explorer features, including graphical data import wizards and support for rich display and editing of NumPy arrays and Pandas DataFrames, will not be available.
Given this only saves a modest amount of space while missing out on significant features, we recommend using the full installers unless minimizing download/install size and memory usage is a priority.
Running from a standalone install
To run Spyder when installed standalone, you can simply use your operating system’s typical method of launching applications, such as opening it from the Start menu on Windows (or the Taskbar, if you’ve pinned it there), or from Launchpad, Spotlight or the Applications folder on macOS (or the Dock, if you’ve added it there).
Updating a standalone install
By default, Spyder checks for updates automatically on startup, and you can also check manually with .
The standalone installers for Spyder 5.4.0+ include update functionality built right into Spyder, which after checking for updates will display a prompt to automatically download and install the current version.
On earlier versions, you’ll need to manually download and install the latest release (if on Windows, make sure to remove the old version first from Control Panel/System Settings).
Conda-based distributions
Spyder is included by default in the Anaconda Python distribution, which comes with everything you need to get started in an all-in-one package.
It can also be easily installed in the much lighter-weight Miniconda and Miniforge/Mambaforge, which include just Python and the Conda/Mamba package and environment manager by default (with Miniforge defaulting to the Conda-Forge channel, and Mambaforge using Mamba, a much faster alternative to Conda).
This is our recommended installation method on Linux and for users with third-party Spyder plugins, as support for both of these in our standalone installers is still under active development.
Conda environment
With Miniconda/Miniforge/Mambaforge, or to get a more reliable and up-to-date Spyder version with Anaconda, we strongly recommend installing Spyder into its own dedicated Conda environment.
Note
If using Mamba/Mambaforge, substitute mamba for conda in the following commands.
Installing with Conda
For a full install of Spyder and all optional dependencies, run the following command in your Anaconda Prompt (Windows) or terminal:
conda create -c conda-forge -n spyder-env spyder numpy scipy pandas matplotlib sympy cython
For a minimal install without the optional functionality and integration with the above packages, you can instead run:
conda create -c conda-forge -n spyder-env spyder
This installs Spyder into a new environment called spyder-env, using the more up-to-date, community-run Conda-Forge channel.
To make sure future installs/updates in this environment also use Conda-Forge and are faster and more reliable, make sure to set it as your environment’s default channel with strict channel priority enabled, if this isn’t the case already (as it is with Miniforge/Mambaforge or if you’ve manually configured it):
conda activate spyder-env
conda config --env --add channels conda-forge
conda config --env --set channel_priority strict
Here’s a summary of the main steps.
Running with Conda
You can then run Spyder by the same methods as with Anaconda, except that you need to make sure to launch the Start menu shortcut with (spyder-env) in the name, select the spyder-env environment on the left before launching it with Navigator, or type conda activate spyder-env before launching it on the command line.
See our FAQ question for more information about how to use Spyder with your existing Conda environments.
Updating with Conda
With any Conda-based distribution and Spyder installed in its own environment (recommended), update Conda itself, active the environment, and finally update Spyder.
In your system terminal (or Anaconda Prompt if on Windows), run:
conda update -n base conda
conda activate spyder-env
conda update spyder
In case you get an error trying to update, just remove the existing environment (if using one other than base):
conda remove -n spyder-env --all
And then recreate a fresh one.
Anaconda base
While we recommend always using a dedicated environment, with Anaconda you can also run the bundled copy of Spyder from the built-in base environment.
Caution
The bundled Spyder version can often be quite out of date, missing new features and bug fixes from the latest version, and if you install, change or remove other packages, there is a significant chance of dependency conflicts or a broken Spyder installation.
Therefore, we recommend installing Spyder into a new Conda environment to avoid all these issues.
Running with Anaconda
To run the bundled version of Spyder after installing it with Anaconda, the recommended method on Windows is to launch it via the Start menu shortcut.
On other platforms, open Anaconda Navigator, scroll to Spyder under Home and click Launch.
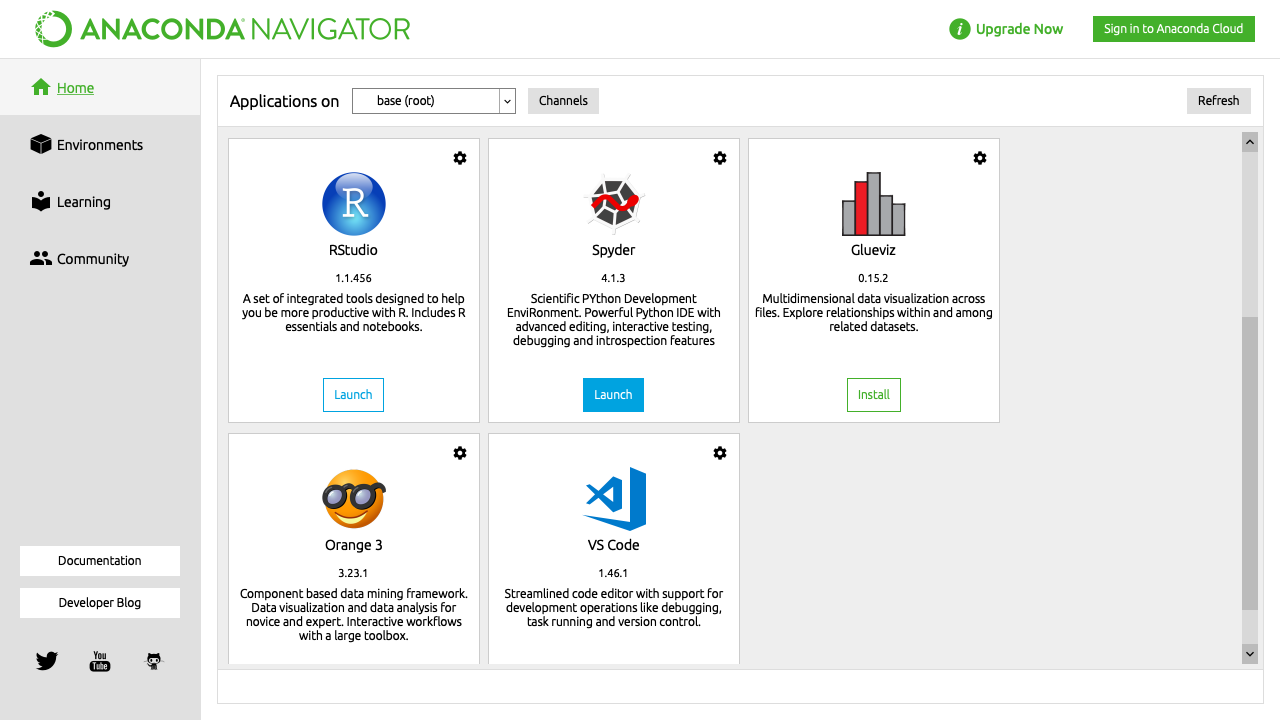
If Spyder does not start via this method or you prefer to use the command line, open Anaconda Prompt (Windows) or your terminal (other platforms), type conda activate base then spyder.
Updating with Anaconda
With Spyder installed in Anaconda’s base environment, first update the anaconda meta-package, and then Spyder itself (in case there is a newer version than that pinned to the anaconda metapackage).
In your system terminal (or Anaconda Prompt if on Windows), run:
conda update anaconda
conda install spyder=5.3.3
Note
These commands also update all your other packages, which is one reason we strongly recommend you use an isolated conda environment to avoid any potential unintended effects on other installed packages.
In case you get an error resolving dependencies, try uninstalling Spyder and re-installing it:
conda remove spyder
conda install spyder
Using pip
Caution
While this installation method is a viable option for experienced users, installing Spyder (and other PyData-stack packages) with pip can sometimes lead to tricky issues, particularly on Windows and macOS.
While you are welcome to try it on your own, we are typically not able to provide individual support for installation problems with pip, except to recommend our Standalone installers (Windows and macOS) or a Conda-based distributions.
You can install Spyder with the pip package manager, which is included by default with most Python installations.
Before installing Spyder itself by this method, you need to download the Python programming language.
Note
Due to a known issue with some DEB-based Linux distributions (Debian, Ubuntu, Mint), you might also need to install the pyqt5-dev-tools package first, with sudo apt install pyqt5-dev-tools.
You’ll first want to create and activate a virtual environment in which to install Spyder, via one of the following methods.
With virtualenvwrapper:
mkvirtualenv spyder-env
workon spyder-env
Otherwise, on macOS/Linux/Unix:
python3 -m venv spyder-env
source spyder-env/bin/activate
or on Windows:
python -m venv spyder-env
spyder-envScriptsactivate.bat
After activating your environment, to install Spyder and its optional dependencies, run:
pip install spyder numpy scipy pandas matplotlib sympy cython
Or for a minimal installation, run:
To launch Spyder after installing it, ensure your environment is activated and run the spyder or spyder3 command.
And to update Spyder, with your Spyder environment activated, run:
pip install --upgrade spyder
Alternative methods
Caution
While we describe alternative Spyder installation options for users who prefer them, as these are third-party distributions that we have no direct involvement in, we are usually not able to offer useful individual assistance for problems specific to installing via these alternative methods.
Also, the Spyder versions they install may be out of date relative to the current release, and thus be missing the latest features and bug fixes.
Therefore, we recommend you switch to our Standalone installers (Windows and macOS) or a Conda-based distributions if you encounter installation issues you are unable to solve on your own.
Windows
Spyder is included in the WinPython scientific Python distribution, along with many other common numerical computing and data analysis packages.
You can use Spyder immediately after installing, similar to Anaconda.
macOS
Spyder is available as a cask through Homebrew.
To install it using the brew package manager, run:
brew install --cask spyder
It is also available as a a port through MacPorts.
To install it using the port package manager, run:
sudo port install py39-spyder
Linux
Spyder can be installed via third-party distro packages on most common Linux distributions.
Running Spyder installed this way will generally be the same as any other distro-installed application.
Alternatively, it can be launched from the terminal with spyder (or spyder3, on older versions of some distros).
Other distributions
Spyder is also available in other GNU/Linux distributions, including:
-
Arch Linux
-
Fedora
-
Gentoo
-
openSUSE
Please refer to the links or your distribution’s documentation for how to install Spyder.
Development builds
If you want to try the next Spyder version before it is released, you can!
You may want to do this for fixing bugs in Spyder, adding new features, learning how Spyder works or just getting a taste of what the IDE can do.
For more information, please see the Contributing Guide included with the Spyder source or on Github, and for further detail consult the Spyder development wiki.
Additional help
Run in to a problem installing or running Spyder? Read our Troubleshooting Guide and FAQ.
Looking for general information about Spyder and its ecosystem? See our main website.
Need to submit a bug report or feature request? Check out our Github repository.
Want development-oriented help and information? Consult our Github wiki.
Have a help request or discussion topic? Subscribe to our Google Group.
Seeking personalized help from expert Spyder consultants? Visit OpenTeams.
It is always necessary to have interactive environments to create software applications and this fact becomes very important when you work in the fields of Data Science, engineering, and scientific research. The Python Spyder IDE has been created for the same purpose. In this article, you will be learning how to install and make use of Spyder or the Scientific Python and Development IDE.
Before moving on, let’s take a look at all the topics that are discussed over here:
- What is Python Spyder IDE?
- Features of Spyder
- Python Spyder IDE Installation
- Creating a file/ Starting a Project
- Writing the Code
- Variable Explorer
- File Explorer
- Configuring Spyder
- Help
Let’s begin.
What is Python Spyder IDE?
Spyder is an open-source cross-platform IDE. The Python Spyder IDE is written completely in Python. It is designed by scientists and is exclusively for scientists, data analysts, and engineers. It is also known as the Scientific Python Development IDE and has a huge set of remarkable features which are discussed below.
Features of Spyder
Some of the remarkable features of Spyder are:
- Customizable Syntax Highlighting
- Availability of breakpoints (debugging and conditional breakpoints)
- Interactive execution which allows you to run line, file, cell, etc.
- Run configurations for working directory selections, command-line options, current/ dedicated/ external console, etc
- Can clear variables automatically ( or enter debugging )
- Navigation through cells, functions, blocks, etc can be achieved through the Outline Explorer
- It provides real-time code introspection (The ability to examine what functions, keywords, and classes are, what they are doing and what information they contain)
- Automatic colon insertion after if, while, etc
- Supports all the IPython magic commands
- Inline display for graphics produced using Matplotlib
- Also provides features such as help, file explorer, find files, etc
Python Spyder IDE Installation ( Installing with Anaconda – Recommended)
The Python Spyder IDE comes as a default implementation along with Anaconda Python distribution. This is not just the recommended method but also the easiest one. Follow the steps given below to install the Python Spyder IDE:
Creating a file/ Starting a Project:
- To start a new file, navigate through as follows:
File–>New File
- For creating a new project:
Projects–>New Project
Writing the code:
Writing code in Spyder becomes very easy with its multi-language code editor and a number of powerful tools. As mentioned earlier, the editor has features such as syntax highlighting, real-time analysis of code, style analysis, on-demand completion, etc. When you write your code, you will also notice that it gives a clear call stack for methods suggesting all the arguments that can be used along with that method.
Take a look at the example below:
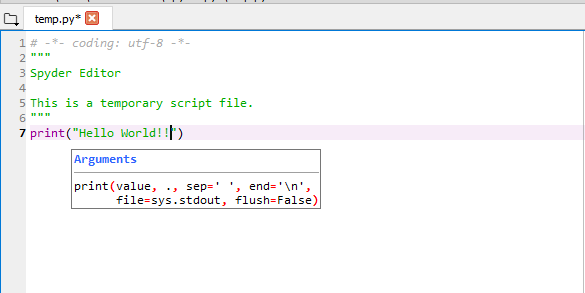
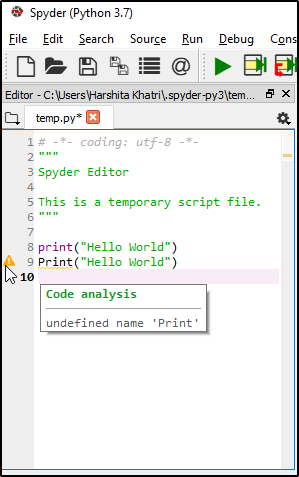
In the above example, you can notice that the editor is showing the complete syntax of the print function. Not just this, in case you have made an error in any line, you will be notified about it before the line number with a message describing what the issue is. Take a look at the image below:
 To run any file, you can select the Run option and click on run. Once executed, the output will be visible on the Console as shown in the image below:

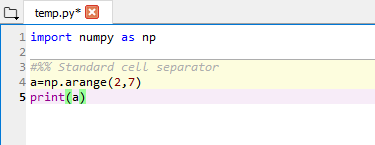
Code cells:
You can define code cells easily using the following:
| Type | Description |
|
#%% |
Standard cell separator |
|
# %% |
Standard cell separator, when the file has been edited with Eclipse |
|
# <codecell> |
IPython notebook cell separator |
For example, when you use the Standard cell separator, you will see that the code has been separated as follows:
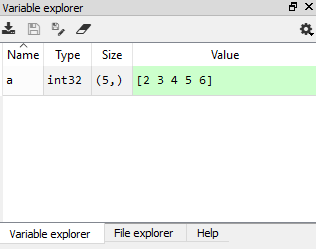
Variable Explorer:
The Variable Explorer shows all the global objects references such as modules, variables, methods, etc of the current IPython Console. Not just this, you can also interact with these using various GUI based editors.
File Explorer:
The File Explorer is basically a filesystem and directory browser that allows you to browse, open, and perform other management tasks on the files and folders. You can make use of the context menus functions for operating with them.

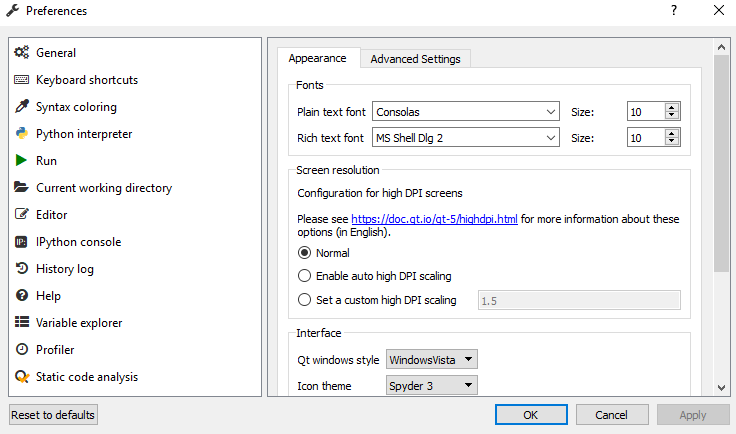
Configuring Spyder:
Python Spyder IDE can be configured conveniently using the options present in the preferences menu. You can change anything such as themes, syntax colors, font size, etc. To do this, navigate to Tools menu and then select the Preferences option. You will see the following window which will allow you to configure Spyder according to your choice:
Help:
The help pane allows you to find and display documentation of any object you desire. When you choose the help option, you will be able to see the following options:
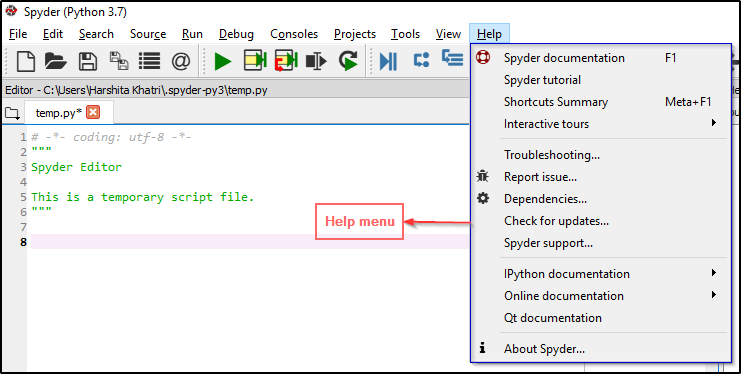 As you can see, it has many options that will help you solve any issue you encounter while using the Python Spyder IDE.
Hope you are clear with all that has been shared with you in this tutorial. This brings us to the end of our article on Python Sypder IDE. Make sure you practice as much as possible and revert your experience.
Got a question for us? Please mention it in the comments section of this “Python Spyder IDE” blog and we will get back to you as soon as possible.
To get in-depth knowledge on Python along with its various applications, you can enroll for live Python online training with 24/7 support and lifetime access.
It is always necessary to have interactive environments to create software applications and this fact becomes very important when you work in the fields of Data Science, engineering, and scientific research. The Python Spyder IDE has been created for the same purpose. In this article, you will be learning how to install and make use of Spyder or the Scientific Python and Development IDE.
Before moving on, let’s take a look at all the topics that are discussed over here:
- What is Python Spyder IDE?
- Features of Spyder
- Python Spyder IDE Installation
- Creating a file/ Starting a Project
- Writing the Code
- Variable Explorer
- File Explorer
- Configuring Spyder
- Help
Let’s begin.
What is Python Spyder IDE?
Spyder is an open-source cross-platform IDE. The Python Spyder IDE is written completely in Python. It is designed by scientists and is exclusively for scientists, data analysts, and engineers. It is also known as the Scientific Python Development IDE and has a huge set of remarkable features which are discussed below.
Features of Spyder
Some of the remarkable features of Spyder are:
- Customizable Syntax Highlighting
- Availability of breakpoints (debugging and conditional breakpoints)
- Interactive execution which allows you to run line, file, cell, etc.
- Run configurations for working directory selections, command-line options, current/ dedicated/ external console, etc
- Can clear variables automatically ( or enter debugging )
- Navigation through cells, functions, blocks, etc can be achieved through the Outline Explorer
- It provides real-time code introspection (The ability to examine what functions, keywords, and classes are, what they are doing and what information they contain)
- Automatic colon insertion after if, while, etc
- Supports all the IPython magic commands
- Inline display for graphics produced using Matplotlib
- Also provides features such as help, file explorer, find files, etc
Python Spyder IDE Installation ( Installing with Anaconda – Recommended)
The Python Spyder IDE comes as a default implementation along with Anaconda Python distribution. This is not just the recommended method but also the easiest one. Follow the steps given below to install the Python Spyder IDE:
Creating a file/ Starting a Project:
- To start a new file, navigate through as follows:
File–>New File
- For creating a new project:
Projects–>New Project
Writing the code:
Writing code in Spyder becomes very easy with its multi-language code editor and a number of powerful tools. As mentioned earlier, the editor has features such as syntax highlighting, real-time analysis of code, style analysis, on-demand completion, etc. When you write your code, you will also notice that it gives a clear call stack for methods suggesting all the arguments that can be used along with that method.
Take a look at the example below:
In the above example, you can notice that the editor is showing the complete syntax of the print function. Not just this, in case you have made an error in any line, you will be notified about it before the line number with a message describing what the issue is. Take a look at the image below:
To run any file, you can select the Run option and click on run. Once executed, the output will be visible on the Console as shown in the image below:
Code cells:
You can define code cells easily using the following:
| Type | Description |
|
#%% |
Standard cell separator |
|
# %% |
Standard cell separator, when the file has been edited with Eclipse |
|
# <codecell> |
IPython notebook cell separator |
For example, when you use the Standard cell separator, you will see that the code has been separated as follows:
Variable Explorer:
The Variable Explorer shows all the global objects references such as modules, variables, methods, etc of the current IPython Console. Not just this, you can also interact with these using various GUI based editors.
File Explorer:
The File Explorer is basically a filesystem and directory browser that allows you to browse, open, and perform other management tasks on the files and folders. You can make use of the context menus functions for operating with them.
Configuring Spyder:
Python Spyder IDE can be configured conveniently using the options present in the preferences menu. You can change anything such as themes, syntax colors, font size, etc. To do this, navigate to Tools menu and then select the Preferences option. You will see the following window which will allow you to configure Spyder according to your choice:
Help:
The help pane allows you to find and display documentation of any object you desire. When you choose the help option, you will be able to see the following options:
As you can see, it has many options that will help you solve any issue you encounter while using the Python Spyder IDE.
Hope you are clear with all that has been shared with you in this tutorial. This brings us to the end of our article on Python Sypder IDE. Make sure you practice as much as possible and revert your experience.
Got a question for us? Please mention it in the comments section of this “Python Spyder IDE” blog and we will get back to you as soon as possible.
To get in-depth knowledge on Python along with its various applications, you can enroll for live Python online training with 24/7 support and lifetime access.
This spyder python tutorial will teach you «How to install Spyder Python in Windows without Anaconda. As a matter of fact, Spyder is already part of Anaconda packages. So, if you have installed Anaconda in your system, then you will have Spyder also. But what if, you want to install Spyder independently? Because You know installing Anaconda may conflict with your other already installed software or packages. So no worries on this part anymore. Spyder provides standalone installers to achieve that.
I will use Spyder and Spyder Python terms. Please don’t get confused with the interchanging of these terms. Spyder comes with Python by default. So sometimes, people refer to it as Spyder Python. Always remember, Spyder made in Python and made for Python (Scientific) programming.
Let’s checkout some quick details about Spyder Python first.
Table of Contents
- 1 What is Spyder Python?
- 2 Try Spyder Online
- 3 Download Spyder Python
- 4 The requirement to install Spyder 4
- 5 How to install Spyder Python in Windows 10
- 6 How to check the Spyder Python version?
- 7 How to use Spyder Python
- 8 How to Disable «Reloaded modules» (UMR) messages in Spyder
- 9 How to Uninstall Spyder 4 in Windows 10
- 10 Fix: Assertion failed: Protocol wrong type for socket [10041], python stopped working
- 11 Video Tutorial
- 12 Conclusion
What is Spyder Python?
The Spyder stands for «Scientific PYthon Development EnviRonment«. Spyder is an open-source python-based Integrated development environment (IDE) for scientific programming. Pierre Raybaut developed Spyder in 2009 and later community and scientific developer team maintained and improved it. Spyder uses cute (QT) for it’s GUI and designed to use either of the PyQt or PySide Python bindings. It provides enhanced editing, debugging, awesome visualization and interactive testing to developers.
Features of Spyder Python —
- Advance editor for code completion, syntax highlighting and introspection
- Edit variables from GUI also
- Code benchmarking can be done using a run-time profiler
- Inbuilt file explorer to manage the filesystem
- Regular expression search
- Audit user commands with the help of History logs
- Pylint’s static code analyser for debugging and many more features.
Try Spyder Online
If you want to take a feel before installing Spyder 4.2.3. Click on the Try Spyder 4 online button.
it will take a couple of seconds to Launch with the help of Binder. You will reach on Ubuntu 18.04 with Xfce desktop.
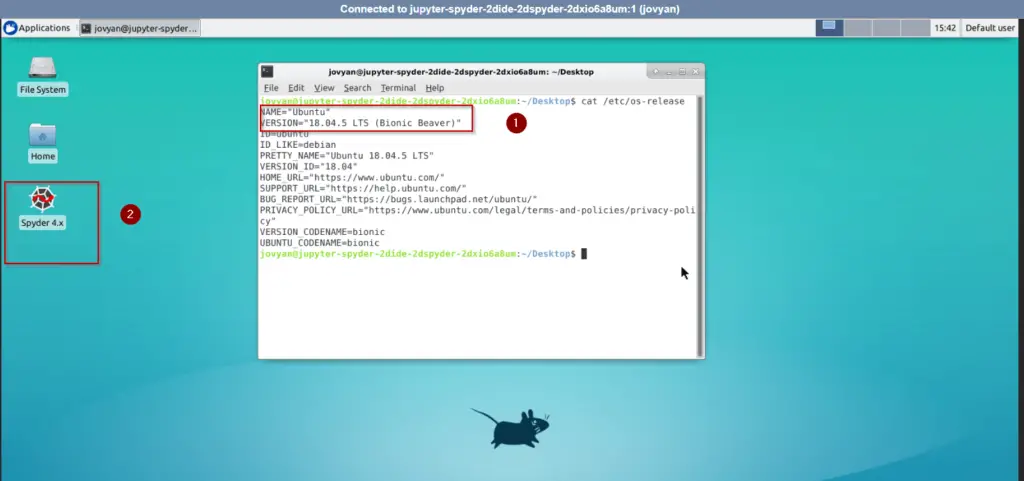
There you can <double click> on Spyder 4.x icon and try/test Spyder before installing it on your PC. Here Spyder version shows 4.3.0 and Python 3.7.
Download Spyder Python
Follow these steps to download Spyder Python for Windows 10.
Step1.1 — Visit the Spyder-ide.org website to download Spyder 4
Visit https://docs.spyder-ide.org/ and scroll down a bit for the Spyder Python download section. Select your Operating system either Windows or Mac.
Or Alternatively, Just click on Download button for Spyder_64bit_full installer for Windows 10.
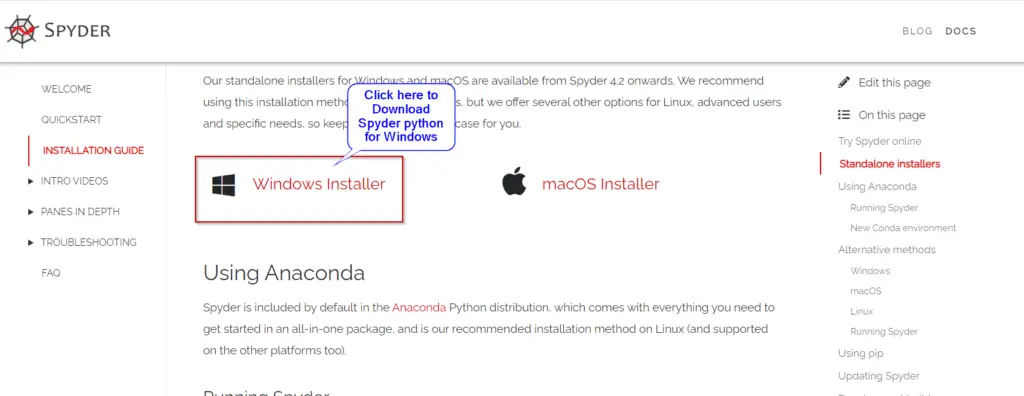
The size will be approx. 173MB. So it may take few seconds depending upon your internet speed.
The requirement to install Spyder 4
- Installation of Python program — It will install default python 3.7.9 while installation.
- Internet connection
- ~ 650MB of disk space
Checkout these simple steps to install Spyder 4 Python —
Step2.1 — Visit your Download directory and run Spyder installer
Go to your Download directory. Double click and Run Spyder_64bit_full installer. It will start Spyder setup wizard.

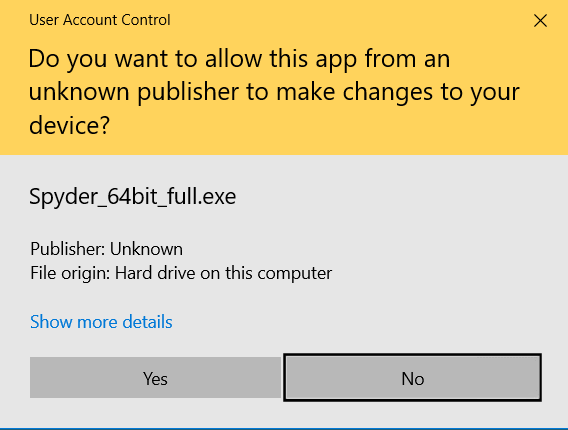
Step2.2 — Permit user access control
Like all software in Windows 10. Press «Yes» to allow Spyder app to make changes to your device.
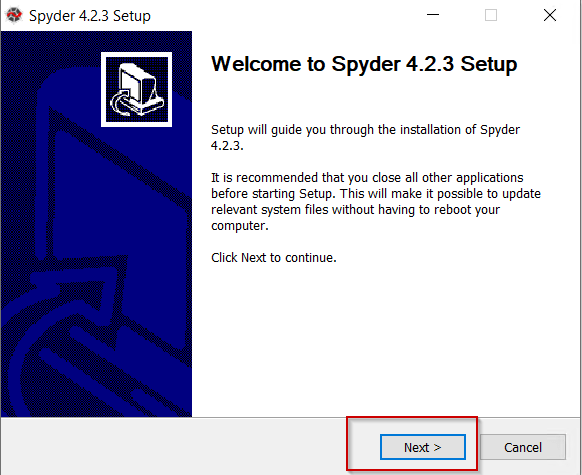
Step2.3 — Click «Next» on Spyder 4.2.3 Setup welcome page
On Spyder 4.2.3 welcome page, Select Next. It’s always recommended to close all other applications, while installation of Spyder 4 in Windows 10.
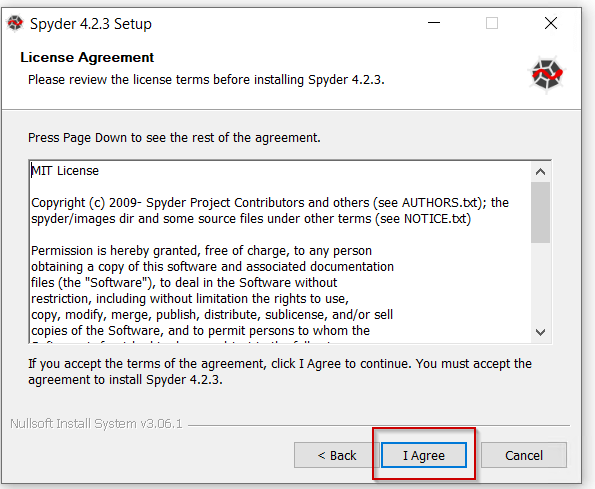
Step2.4 — Accept License agreement of Spyder 4.2.3
Please review and Click on «I Agree» button to move further in Spyder installation. By the way, Not sure who read all these License agreements before accepting 😉
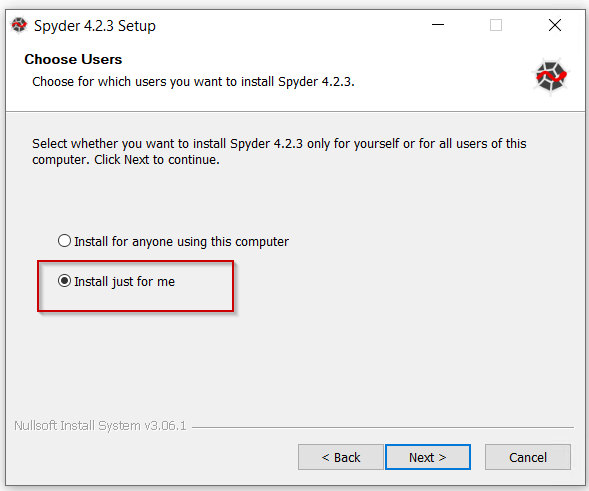
Step2.5 — Choose Users preference
Here you need to choose for which user you want to install Spyder 4.2.3. I am the only one who is using my system. So I will go with the «Install just for me» option. If you have multiple users using your system, you can select «Install for anyone using this computer«.
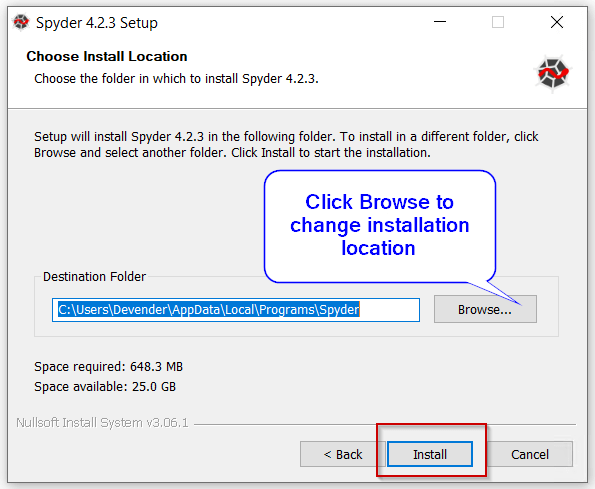
Step2.6 — Choose Spyder 4 installation location
Spyder requires around 650 MB of space to install all software like Python, QT and Spyder itself. The default installation directory would be C:Users»username»AppDAtaLocalProgramsSpyder. But if you want to customize the installation folder. Click on Browse and select your preferred directory or drive to install Spyder 4.2.3.
Select <Install>.
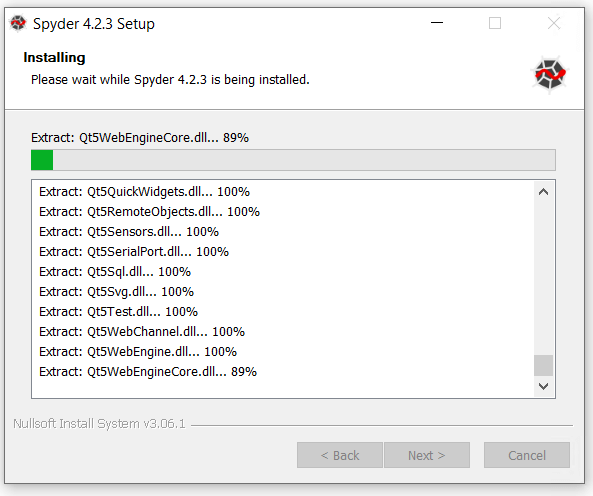
Step2.7 — Wait for Spyder installation to complete
Generally Spyder installation take 5-10 minutes to complete. If you computer is slow, then it may few take few more minutes.
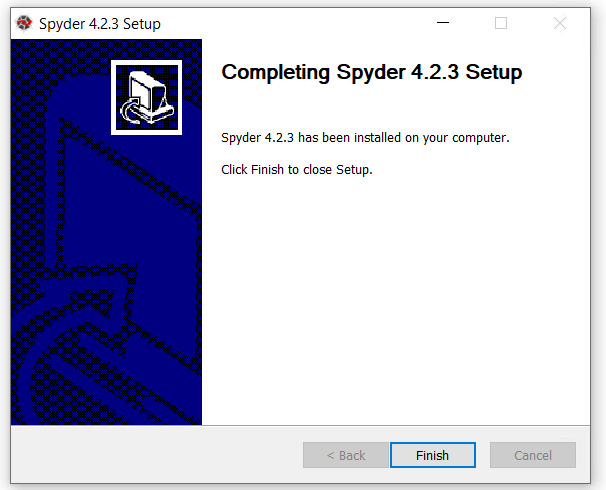
Step2.8 — Click Finish
Click Finish to complete installation wizard.
Step2.9 — Launch Spyder IDE
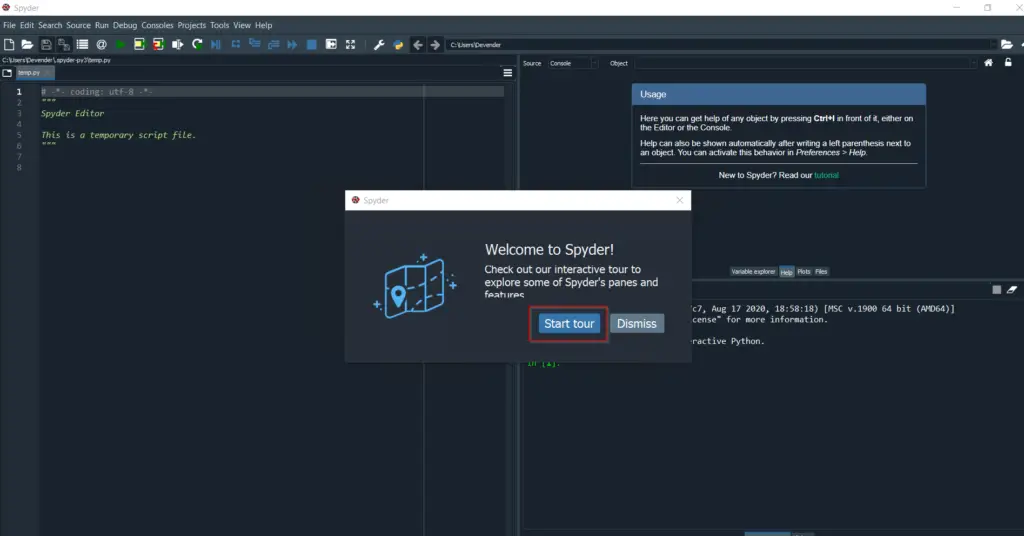
- Type «Spyder» in the <Windows search> bar and click «open«
It will take a couple of seconds to Launch, so be patient. Once Spyder will Launch, you can click on the <Start tour> button to explore pane and features of Spyder IDE. It will be helpful if you are using Spyder 4 console first time.
How to check the Spyder Python version?
Checking the Spyder version is fairly simple. Once you will Launch Spyder GUI, follow these steps —
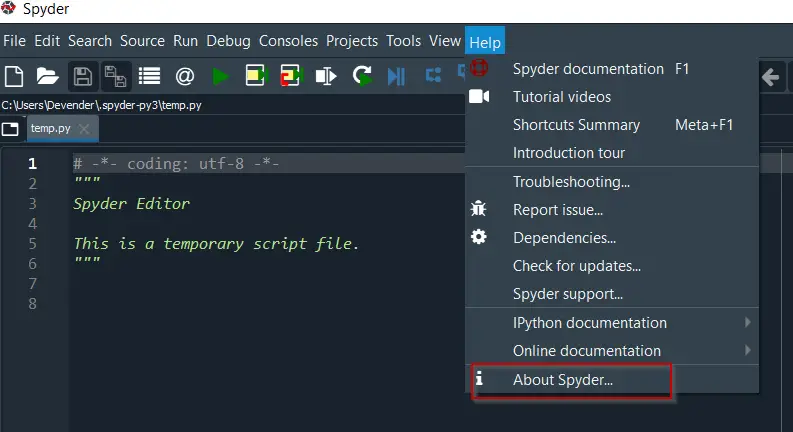
Step2.10 — Choose «About Spyder» in «Help» menu
- Select «Help» in the menu
- Click «About Spyder«
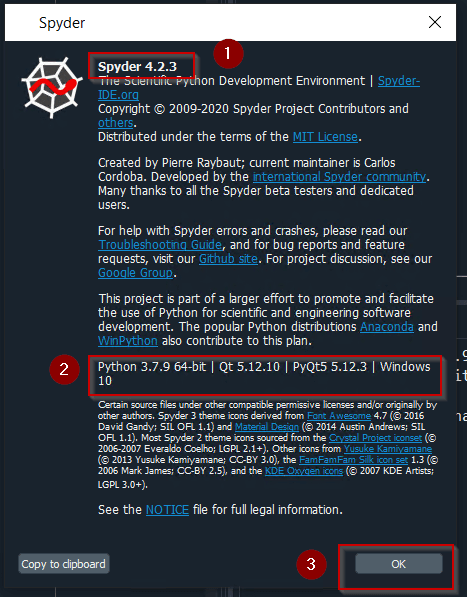
Step2.10 — Check Spyder and Python version
If you will see Spyder version is 4.2.3. Python version is 3.7.9, Qt 5.12.10 an d PyQt version is 5.12.3 installed as bundle with spyder 4.2.3.
Click «OK» to close it.
How to use Spyder Python
Let me show you «How to use Spyder» by running a sample program. After this, you need to move further on your own.
Step2.11 — Create a new «file» and save it
- Select File > New file or Press <Ctrl + N> on your keyboard
- Click on File > «Save As» or Press <Ctrl + Shift + S>. Provide a user-friendly file name and save. I will give the name «hello-world».
Step2.12 — Write your first «Hello World» program in Spyder
If you are a Python programmer or developer. You can write any code you want. But if you are a novice, then you can paste this code as your first program.
# Test Spyder Program
def hello():
    """Print "Hello World" and return None."""
    print("Hello World")

# Main program begins here
hello()
- Press <Ctrl + S> to save file again. Now press F5 on your keyboard else click «Run» in the menu and then «Run» again in the drop-down to execute the program.
- You can change or Leave <Run settings> default.
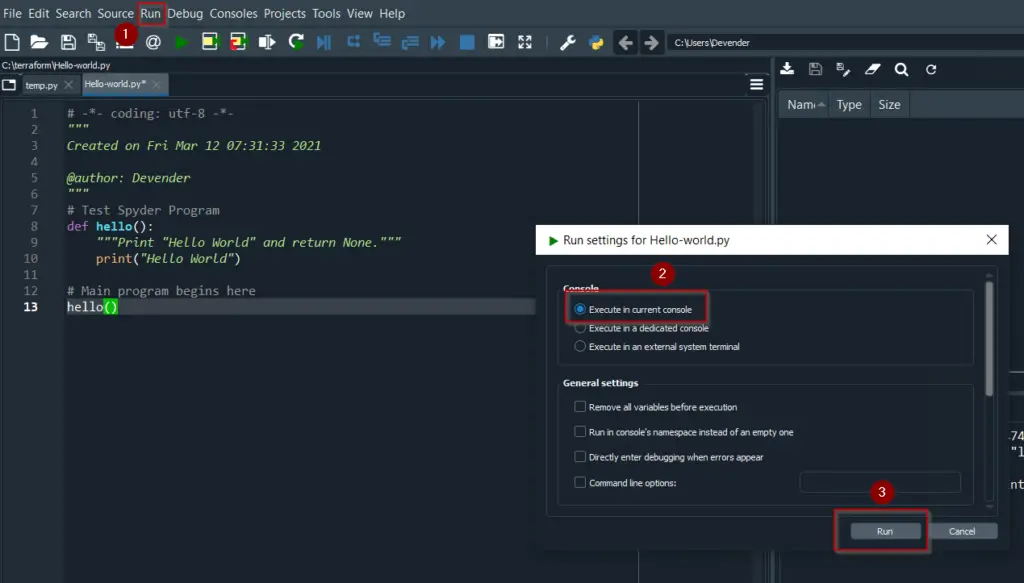
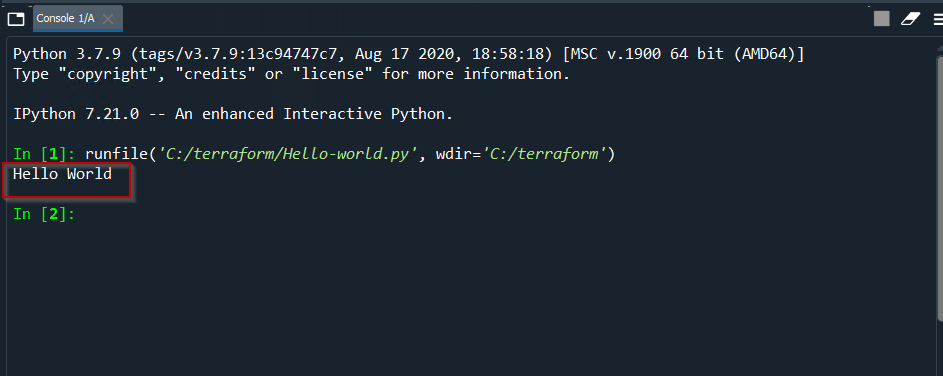
Once you will click on «Run«. It will print «Hello World» in output as shown in image.
Python 3.7.9 (tags/v3.7.9:13c94747c7, Aug 17 2020, 18:58:18) [MSC v.1900 64 bit (AMD64)]
Type «copyright», «credits» or «license» for more information.IPython 7.21.0 — An enhanced Interactive Python.
runfile(‘C:/terraform/Hello-world.py’, wdir=’C:/terraform’)
Hello World
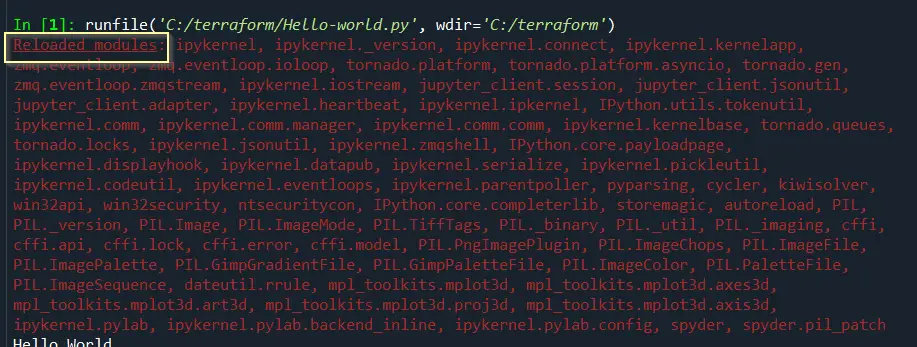
How to Disable «Reloaded modules» (UMR) messages in Spyder
If you are getting messy «Reloaded module <Module name> message. I will get this solved for you. Actually, it occurs due to UMR <user module reloader>. UMR forces python to reload deeply modules during import while running a python script using an inbuilt runfile.
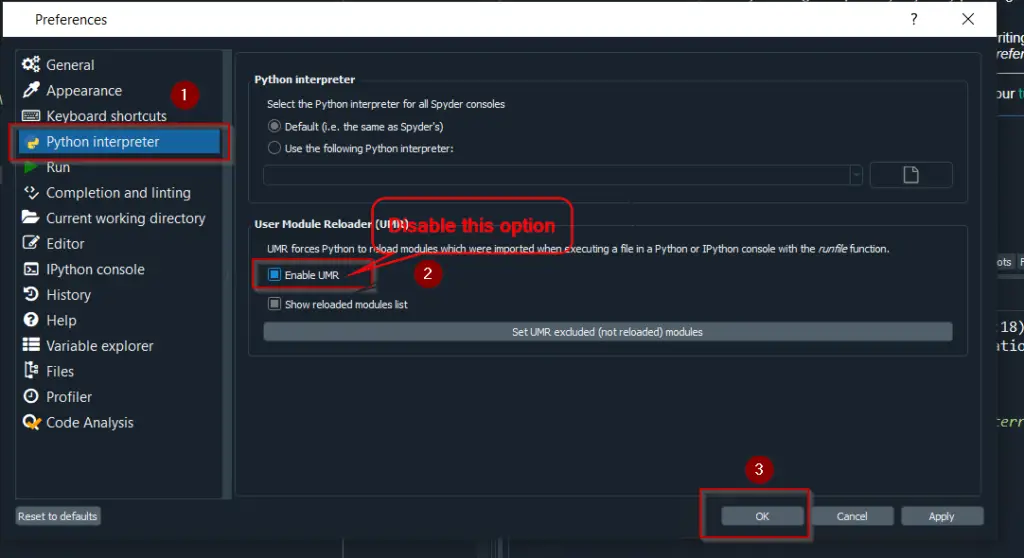
To avoid this «Reloaded Module> extra information in output follow these steps —
- Go to Tools -> Preferences -> Python Interpreter > User Module Reloader.
- Here, Deselect the checkbox with text as «Enable UMR» to completely disable it. Alternatively, you can only deselect «Show reloaded module list«. The choice is yours. I keep UMR disabled.
- Close and launch Spyder again to make changes effective.
You will not get any Reloaded_modules issue now. 🙂
How to Uninstall Spyder 4 in Windows 10
If you want to uninstall Spyder 4 python from Windows 10 due to any reason. You can follow this process to easily clean it from your system.
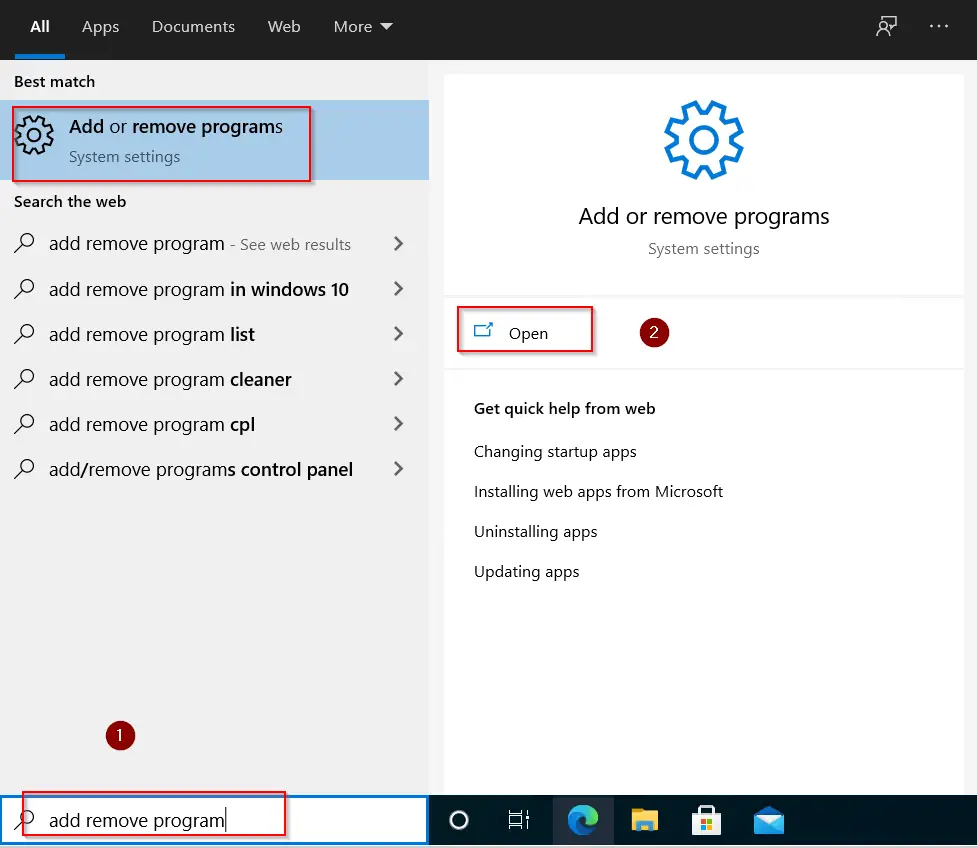
Step3.1 — Open «Add remove programs»
Type «Add remove programs» in <Windows search> bar.
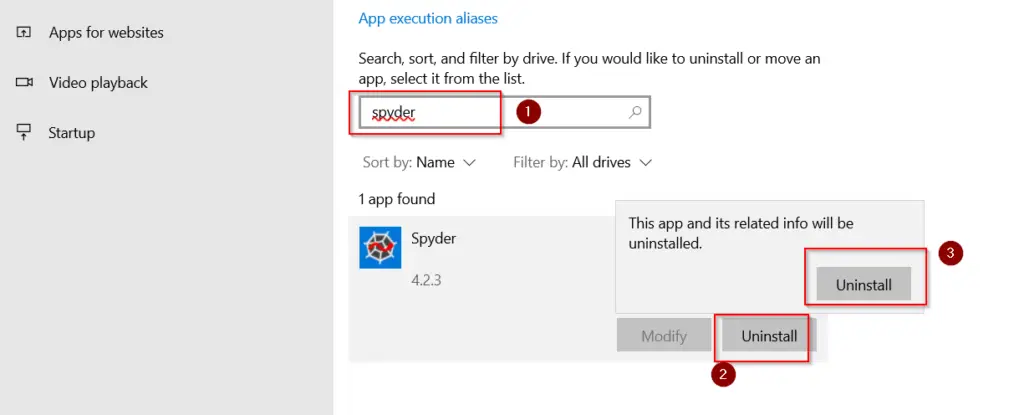
Step3.2 — Uninstall Spyder python
- Type and search for «Spyder» in App list
- Select uninstall and Again click on Uninstall.
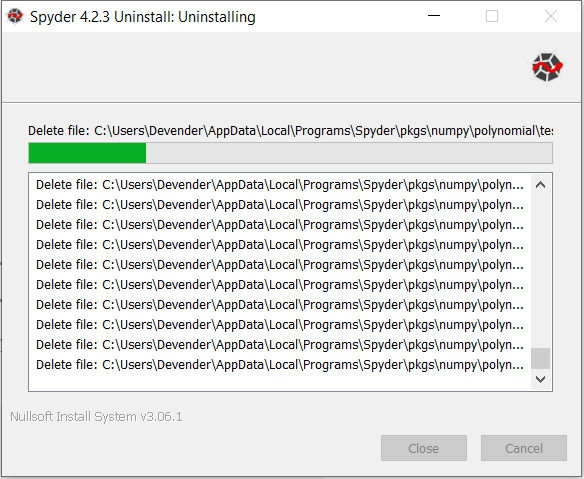
- Select «Yes» in the User access control dialogue box.
- It will take some time to uninstall Spyder 4.2.3. Then Click Close.
Fix: Assertion failed: Protocol wrong type for socket [10041], python stopped working
If your Spyder doesn’t launch and getting an «Error : Assertion failed: Protocol wrong type for socket [10041] (Ccizeromq 154902559 4292worksrcip.cpp:417) in spyder» . There may be n number of reason behind this error. I have jotted down a few for you. To fix this issue, try the below-mentioned methods. I hope it will help —
Method 1- Try disabling your Antivirus and Windows Firewall
First and foremost, Disable your Antivirus and Windows firewall. Then try to launch Spyder. Because sometimes, the firewall or Antivirus doesn’t allow it to launch.
Method 2 — Check for Anaconda and Python compatibility
If you have installed Anaconda and Python in your system. Check for the compatibility of these two. Visit this link and check for the Python package included in Anaconda.
For example — Packages included in Anaconda 4.4.0 for Python version 3.6. Make sure you have these versions are same, otherwise you may encounter an Assertion failed error. If your Python version is different then Anaconda. Install the Correct version. For legacy or old versions.
Method 3- Install Spyder without Anaconda
You can install Spyder without anaconda by following steps 2.1 to 2.10 as mentioned in this post. Also Python will get installed automatically with spyder. You don’t need to worry on version compatibility.
Video Tutorial
If you still have any doubts. Checkout this amazing Video on How to install Spyder 4 with Python in Windows 10.
Conclusion
If you are new to Spyder IDE. I hope you will be able to install and run your first code in Spyder Python. If you run into an issue. You can just leave your comment. I will try to help you to the best of my knowledge.

Copyright © 2009–2023 Spyder Project Contributors
Some source files and icons may be under other authorship/licenses; see
NOTICE.txt.
Project status
Build status
Try Spyder online
:point_left: By clicking on this link you’ll be able to test the latest Spyder version in your browser.
:point_left: By clicking on this link you’ll be able to test the latest Spyder 5.x development version.
:point_left: By clicking on this link you’ll be able to test the latest Spyder 6.x development version.
How Spyder looks
Help support Spyder, the community-developed scientific IDE!
Spyder development is made possible by contributions from our global user
community, along with organizations like NumFOCUS
and Quansight.
There are numerous ways you can help, many of
which don’t require any programming. If you’d like to make a donation to help fund further improvements,
we’re on OpenCollective.
Thanks for all you do to make the Spyder project thrive! More details
Overview
Spyder is a powerful scientific environment written in Python, for Python,
and designed by and for scientists, engineers and data analysts. It offers a
unique combination of the advanced editing, analysis, debugging, and profiling
functionality of a comprehensive development tool with the data exploration,
interactive execution, deep inspection, and beautiful visualization
capabilities of a scientific package.
Beyond its many built-in features, its abilities can be extended even further
via its plugin system and API. Furthermore, Spyder can also be used as a PyQt5
extension library, allowing you to build upon its functionality and embed
its components, such as the interactive console, in your own software.
For more general information about Spyder and to stay up to date on the
latest Spyder news and information, please check out our new website.
Core components
-
Editor
Work efficiently in a multi-language editor with a function/class browser,
real-time code analysis tools (pyflakes,pylint, andpycodestyle),
automatic code completion (jediandrope),
horizontal/vertical splitting, and go-to-definition. -
Interactive console
Harness the power of as many IPython consoles as you like with full
workspace and debugging support, all within the flexibility of a full
GUI interface. Instantly run your code by line, cell, or file,
and render plots right inline with the output or in interactive windows. -
Documentation viewer
Render documentation in real-time with Sphinx for any class or function,
whether external or user-created, from either the Editor or a Console. -
Variable explorer
Inspect any variables, functions or objects created during your session.
Editing and interaction is supported with many common types, including
numeric/strings/bools, Python lists/tuples/dictionaries, dates/timedeltas,
Numpy arrays, Pandas index/series/dataframes, PIL/Pillow images, and more. -
Development tools
Examine your code with the static analyzer, trace its execution with the
interactive debugger, and unleash its performance with the profiler.
Keep things organized with project support and a built-in file explorer, and
use find in files to search across entire projects with full regex support.
Documentation
You can read the Spyder documentation online on the Spyder Docs website.
Installation
For a detailed guide to installing Spyder, please refer to our
installation instructions.
The easiest way to install Spyder on any of our supported platforms
is to download it as part of the Anaconda
distribution, and use the conda package and environment manager to keep it
and your other packages installed and up to date.
If in doubt, you should always install Spyder via this method to avoid
unexpected issues we are unable to help you with; it generally has the
least likelihood of potential pitfalls for non-experts, and we may be
able to provide limited assistance if you do run into trouble.
Other installation options exist, including:
- The WinPython distribution for Windows
- The MacPorts project for macOS
- Your distribution’s package manager (i.e.
apt-get,yum, etc) on Linux - The
pippackage manager, included with most Python installations
However, we lack the resources to provide individual support for users who
install via these methods, and they may be out of date or contain bugs outside
our control, so we recommend the Anaconda version instead if you run into issues.
Troubleshooting
Before posting a report, please carefully read our Troubleshooting Guide
and search the issue tracker
for your error message and problem description, as the great majority of bugs
are either duplicates, or can be fixed on the user side with a few easy steps.
Thanks!
Contributing and Credits
Spyder was originally created by Pierre Raybaut, and is currently maintained by
Carlos Córdoba and an international
community of volunteers.
You can join us—everyone is welcome to help with Spyder!
Please read our contributing instructions
to get started!
Certain source files are distributed under other compatible permissive licenses
and/or originally by other authors.
The icons for the Spyder 3 theme are derived from Font Awesome 4.7 (© 2016 David Gandy; SIL OFL 1.1).
Most Spyder 2 theme icons are sourced from the Crystal Project icon set (© 2006-2007 Everaldo Coelho; LGPL 2.1+).
Other Spyder 2 icons are from Yusuke Kamiyamane (© 2013 Yusuke Kamiyamane; CC-BY 3.0),
the FamFamFam Silk icon set
(© 2006 Mark James; CC-BY 2.5), and the KDE Oxygen icons (© 2007 KDE Artists; LGPL 3.0+).
See NOTICE.txt
for full legal information.
Running from a git clone
Please see the instructions in our
Contributing guide
to learn how to do run Spyder after cloning its repo from Github.
Dependencies
Important Note: Most or all of the dependencies listed below come
with Anaconda and other scientific Python distributions, so you don’t need
to install them separately in those cases.
Build dependencies
When installing Spyder from its source package, the only requirement is to have
a Python version equal or greater than 3.7.
Runtime dependencies
The basic dependencies to run Spyder are:
- Python 3.7+: The core language Spyder is written in and for.
- PyQt5 5.9+: Python bindings for Qt, used for Spyder’s GUI.
The rest our dependencies (both required and optional) are declared in
this file.
Sponsors
Spyder is funded thanks to the generous support of
and the donations we have received from our users around the world through Open Collective:
More information
Main Website
Download Spyder (with Anaconda)
Online Documentation
Spyder Github
Troubleshooting Guide and FAQ
Development Wiki
Gitter Chatroom
Google Group
@Spyder_IDE on Twitter
@SpyderIDE on Facebook
Support Spyder on OpenCollective
I downloaded spyder using the
pip install spyder
in my windows 10 32-bit operating system, but i dont see any desktop icons or exe files to start running the IDE. I downloaded spyder 3, any my python is 3.6.
I even tried creating a shortcut of spyder.exe from the Python3.6/Scripts folder, but it won’t open.
![]()
asked Jul 6, 2017 at 18:25
![]()
5
The name of the spyder executable was changed to spyder3.exe in python version 3.
I install pyqt5 and spyder via pip and was able to launch spyder3. I first tried without installing pyqt5 and nothing happened. Once I installed pyqt5, then spyder 3 opened.
Try the following from a windows cmd.exe prompt:
    C:Users..>pip install pyqt5
    C:Users..>pip install spyder
    C:Users..>spyder3
answered Nov 27, 2017 at 3:54
![]()
CharlieCharlie
3693 silver badges2 bronze badges
1
I had the same problem after setting up my environment on Windows 10. I have Python 3.6.2 x64 installed as my default Python distribution and is in my PATH so I can launch from cmd prompt.
I installed PyQt5 (pip install pyqt5) and Spyder (pip install spyder) which both installed w/out error and included all of the necessary dependencies.
To launch Spyder, I created a simple Python script (Spyder.py):
# Spyder Start Script
from spyder.app import start
start.main()
Then I created a Windows batch file (Spyder.bat):
@echo off
python c:<path_to_Spyder_py>Spyder.py
Lastly, I created a shortcut on my desktop which launches Spyder.bat and updated the icon to one I downloaded from the Spyder github project.
Works like a charm for me.
![]()
Tonechas
13.2k15 gold badges43 silver badges78 bronze badges
answered Jul 27, 2017 at 16:35
![]()
3
Try these commands in order
pip3 install spyder
spyder3
answered Jun 4, 2018 at 18:03
![]()
Try the command spyder3
If you check the scripts folder you’ll find spyder3.exe
answered Dec 9, 2017 at 4:20
![]()
As stated in the documentation of Spyder, you need to install PyQt5 first.
Open a Command Prompt as Administrator, then run:
pip install pyqt5
pip install spyder
Then you can find the spyder3.exe in the Python3.6/Scripts folder. You can also make a shortcut to it. No need for Anaconda.
answered Dec 17, 2017 at 7:59
![]()
Louis YangLouis Yang
3,3921 gold badge25 silver badges24 bronze badges
method 1:
spyder3
method 2:
python -c "from spyder.app import start; start.main()"
method 3:
python -m spyder.app.start
answered Jul 24, 2019 at 9:37
![]()
T.ToduaT.Todua
51.2k19 gold badges224 silver badges225 bronze badges
Open a command prompt. Enter the command spyder. Does anything appear? If an exception is preventing it from opening, you would be able to see the reason here. If the command is not found, update your environment variables to point to the Python3.6/Scripts folder, and run spyder again (in a new cmd prompt).
answered Jul 6, 2017 at 18:29
![]()
TheoretiCALTheoretiCAL
18.6k8 gold badges39 silver badges64 bronze badges
1
If you are using Anaconda execute the following commands and your life will be saved!
conda update qt pyqt
conda update spyder
answered Aug 29, 2017 at 16:02
![]()
Amy21Amy21
2911 silver badge11 bronze badges
In case if you want the desktop icon
In desktop, create a new shortcut, in Location paste this
%comspec% /k spyder3
then type the name Spyder,
Now you may have Desktop Icon for opening Spyder
answered Nov 22, 2018 at 20:36
![]()
UmerUmer
1,04312 silver badges31 bronze badges
After pip install spyder give this command
pip install --upgrade spyder
This command will update all Spyder dependencies.
Now in command prompt(cmd) navigate to the scripts folder in your python directory. In my system the path is C:Userswin10AppDataLocalProgramsPythonPython36-32Scripts so i use the following command in command prompt.
cd C:Userswin10AppDataLocalProgramsPythonPython36-32Scripts
once you are inside scripts directory type spyder3 and press enter and spyder ide starts.
C:Userswin10AppDataLocalProgramsPythonPython36-32Scripts>spyder3
answered Mar 18, 2018 at 8:25
![]()
K_hollaK_holla
1241 silver badge3 bronze badges
on windows,
-
pip install --upgrade spyder -
in powershell, start python shell, by typing python
from spyder.app import start
start.main()
That’t it.
answered Apr 19, 2018 at 7:39
![]()
1
Install Ananconda packages and within that launch spyder 3 for first time. Then by second time you just click on spyder under anaconda in all programs.
answered Dec 16, 2017 at 11:44
![]()
5 января 2023 г. 14:48
Русский
MIT
Мощная среда разработки для Python, работающая на Windows, Mac OS и GNU/Linux, которая объединяет множество библиотек для научного использования : Matplotlib, NumPy, SciPy и IPython. Spyder написана на Python для Python и разработана учеными, инженерами и аналитиками данных для себя. Она предлагает уникальное сочетание расширенных функций редактирования, анализа, отладки и профилирования комплексного инструмента разработки с исследованием данных, интерактивным выполнением, глубокой проверкой и прекрасными возможностями визуализации научного пакета. Частично переведена на русский язык.
В ранних версиях Spyder IDE называлась Pydee. Она создана и разработана Пьером Рейбо в 2008 году, Spyder с 2012 года поддерживается сообществом разработчиков, которое в целом принадлежит к научному сообществу Python.


Spyder расширяется с помощью подключаемых модулей, имеет поддержку интерактивных инструментов для проверки данных и инструменты обеспечения качества и анализа, специфичные для кода Python, такие как Pyflakes, Pylint и Rope. Также она входит в состав пакета программ Anaconda в качестве основной интегрированной среды разработки.
Среда разработки на Python является кросс-платформенной и имеет открытый исходный код, а также предназначается для научного программирования. Spyder интегрируется с рядом выдающихся пакетов из Python Scientific Stack, включая NumPy, SciPy, Matplotlib, Pandas, IPython, SymPy и Cython.
Она использует инструментарий Qt для собственного графического интерфейса и поэтому доступна на всех платформах в Windows, в MacOS через MacPorts и в Linux.
Особенности spyder ide:
- редактор исходного кода с подсветкой синтаксиса, анализом и автозавершением кода;
- возможность проверки и редактирования переменных из графического интерфейса;
- поддержка нескольких консолей IPython;
- окно справки, которое может автоматически или по мере необходимости извлекать документацию в формате RTF по функциям, классам и методам;
- пошаговый отладчик, подключенный к IPdb;
- профилировщик времени выполнения для тестирования кода;
- статический анализ кода, предоставляемый Pylint;
- сопровождение проекта, позволяющее одновременно работать над несколькими направлениями развития;
- интегрированный файловый менеджер для взаимодействия с файлами проекта;
- функция поиска в файлах, позволяющая выполнять поиск регулярных выражений в определенном диапазоне;
- браузер интерактивной справки, который позволяет пользователям просматривать документацию по пакетам;
- журнал истории, который записывает каждую пользовательскую команду, введенную на каждой консоли;
- внутренняя консоль, которая предоставляет самопроверку и контроль над собственной работой Spyder.
Помимо множества встроенных функций, возможности Python-среды разработки Windows можно расширить еще больше с помощью системы плагинов и API. Кроме того, можно использовать в качестве библиотеки расширений PyQt5, что позволяет использовать его функциональные возможности и встраивать его компоненты, такие как интерактивная консоль, в собственное программное обеспечение.
Основные компоненты Spyder IDE
Редактор исходного кода
Эффективный редактор с многоязычным интерфейсом и браузером функций / классов, инструменты анализа кода в режиме реального времени (pyflakes, pylintи pycodestyle), автоматическое завершение кода (jedi и rope), горизонтальное / вертикальное разделение и переход к определению.
Интерактивная консоль
Поддержка любого количества консолей IPython с полной рабочей областью и поддержкой отладки, и все это в пределах гибкости полного графического интерфейса. Мгновенный запуск кода по строкам, ячейкам или файлам и визуализация графиков прямо в выводе или в интерактивных окнах.
Средство просмотра документации
Визуализация документации в реальном времени с помощью Sphinx для любого класса или функции, будь то внешние или созданные пользователем, либо из редактора, либо из консоли.
Проводник переменных
Проверка любых переменных, функций или объектов, созданных во время сеанса. Редактирование и взаимодействие поддерживаются многими распространенными типами, включая числовые / строковые / булевы, списки / кортежи / словари Python, временные интервалы, массивы Numpy, индекс / серии / кадры данных Pandas, изображения PIL и многое другое.
Инструменты разработки
Возможность изучить свой код с помощью статического анализатора, отслеживание его выполнения с помощью интерактивного отладчика и просмотр его производительности с помощью профилировщика. Упорядочивание вещей с помощью поддержки проектов и встроенного файлового проводника, а также использование функции поиска в файлах для поиска по всем проектам с полной поддержкой регулярных выражений.
Отличие версии Spyder IDE Lite от Full
На странице релизов Spyder IDE также доступны «lite» версии установщиков, которые несколько меньше полных установщиков. В них отсутствует ряд необязательных, но рекомендуемых зависимостей, таких как NumPy, SciPy и Pandas, а это означает, что некоторые функции Variable Explorer, включая мастера импорта графических данных и поддержку расширенного отображения и редактирования массивов NumPy и Pandas DataFrames, будут недоступны. Учитывая, что это экономит лишь скромное количество места и упускает важные функции, разработчики рекомендуют использовать полные установщики, если только минимизация размера загрузки/установки и использования памяти не является приоритетом.
Зависимости среды и её интерфейс
Основные зависимости для запуска Spyder:
- Python 3.6+: основной язык, на котором написан Spyder;
- PyQt5 5.6+: привязки Python для Qt, используемые для графического интерфейса Spyder.
Перевод интерфейса Spyder IDE на русский язык
Настройки языка интерфейса Spyder IDE доступны в меню Tools / Preferences и далее вкладка Advances Settings. Если в пункте Language нет русского языка, значит он был отключен из-за низкого процента перевода. Включить русский язык можно отредактировав файл base.py, который находится Spyderpkgsspyderconfigbase.py. Там необходимо найти строку DISABLED_LANGUAGES = [‘hu’, ‘ru’, ‘pl’] и убрать из неё ru.