В этой статье мы покажем наглядно как установить Microsoft SQL Server 2017 и как произвести первоначальную настройку. На примере будем рассматривать Microsoft SQL Server 2017 Standard, но Вы можете так же аналогично настроить другие редакции SQL Server.
1) Первое, что нужно сделать — это скачать сам дистрибутив. Скачать его можете с нашего сервера.
— Скачать Microsoft SQL Server 2017 Standard
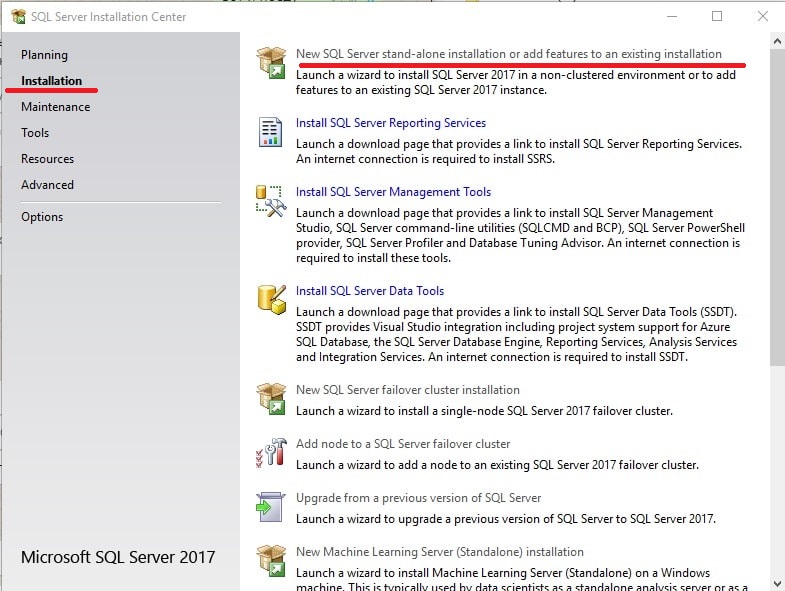
2) Открываете дистрибутив и запускаете установку. В меню слева нажимаете «Installation» => New SQL Server stand-alone installation
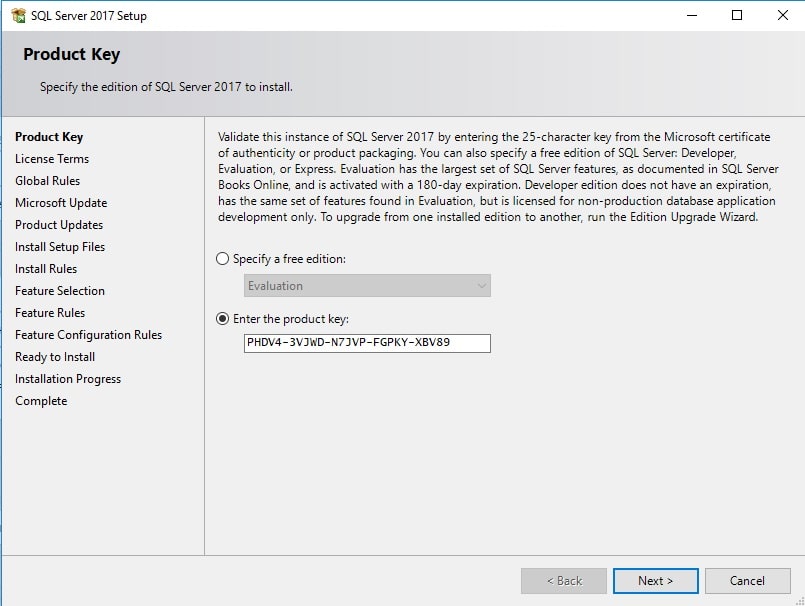
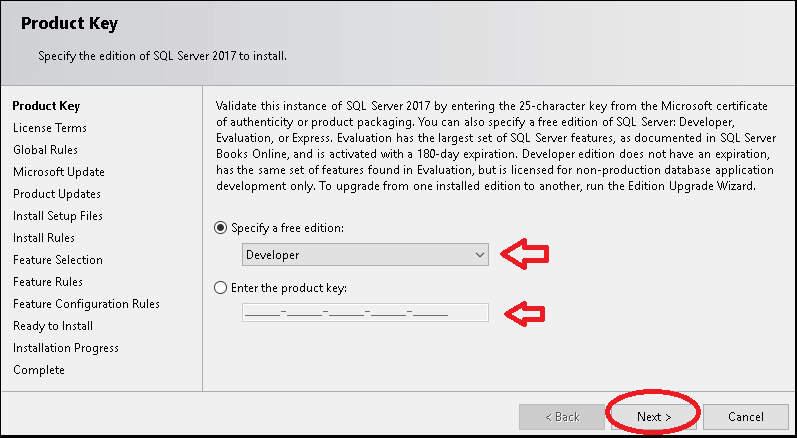
3) В новом открывшемся окне Вас запросят выбрать бесплатную версию установки, к примеру «Ознакомительныя», т.е Evaluation, либо если у Вас есть ключ активации, для SQL Server 2017 Standard, или любой другой полнофункциональный ключ, то вводите его.
При установке SQL Server 2017 сам предложит Вам пробный ключ, он аналогичен Evaluation — PHDV4-3VJWD-N7JVP-FGPKY-XBV89, для теста мы будем использовать его. (Внимание: Пробная версия такого ключа работает только 180 дней, далее без действующего ключа активации приложение закрывает свой функционал. Приобрести полную версию ключа активации Microsoft SQL Server 2017 Standard можете в нашем каталоге на следующей странице Доставка ключа на Вашу электронную почту.) После ввода ключа жмем «Next».
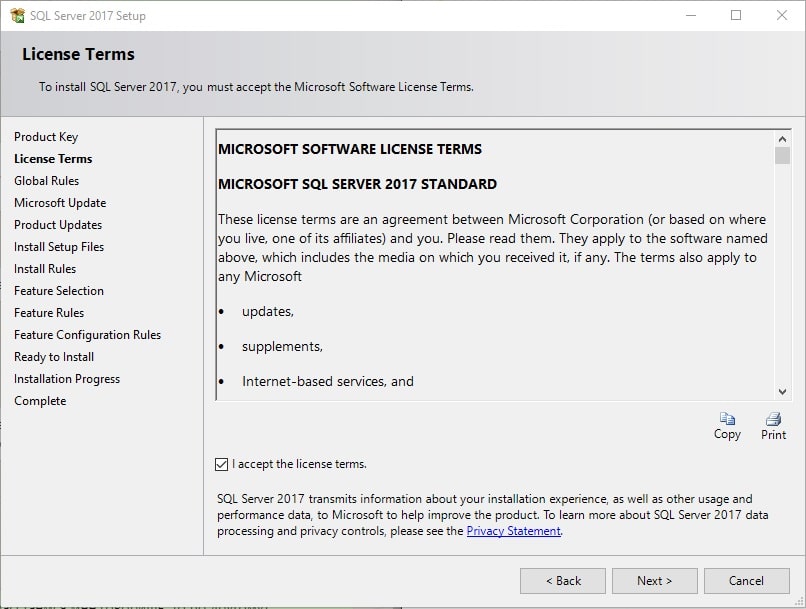
4) Соглашаемся с лицензионным соглашением.
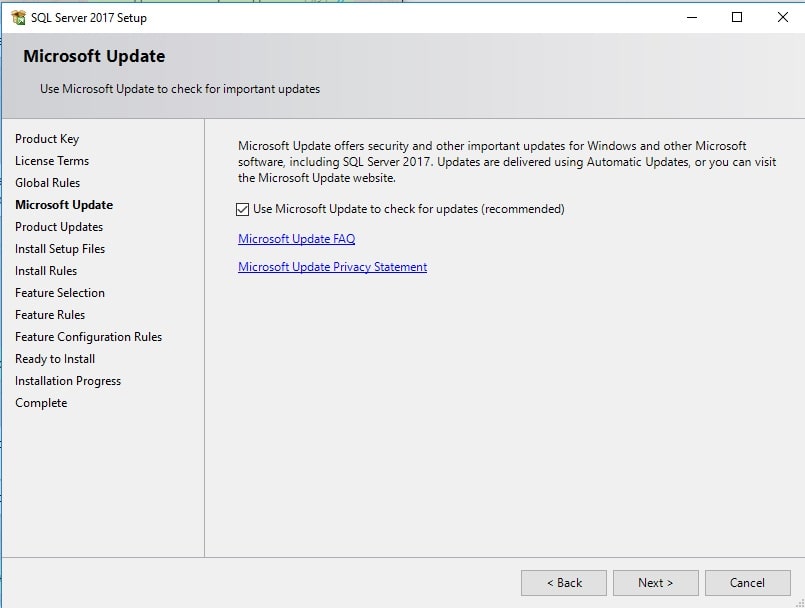
5) Соглашаемся на загрузку обновлений при наличии доступа в интернет. (либо можете отказаться, тут опционально)
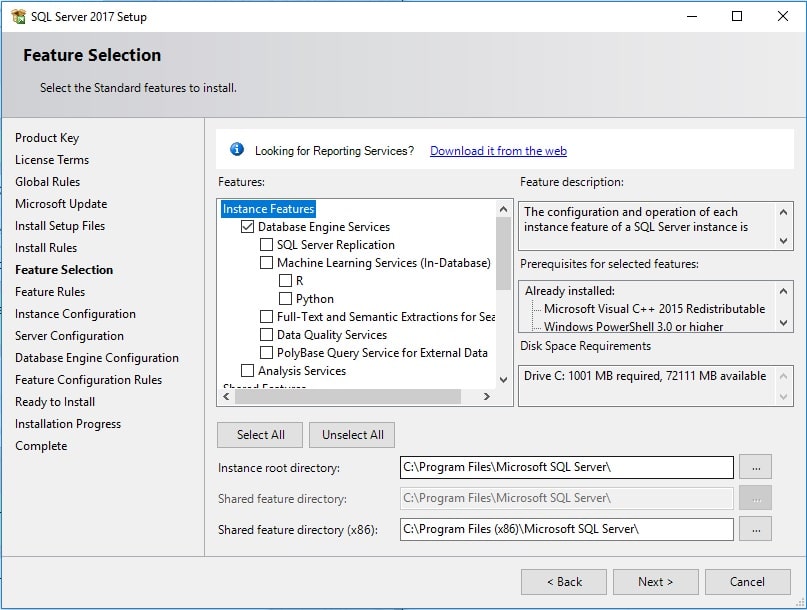
6) В следующем окне нам предлагают выбрать компоненты MS SQL Server, которые Вы хотите установить. Выбираете нужные компоненты под Ваши задачи и идем далее.
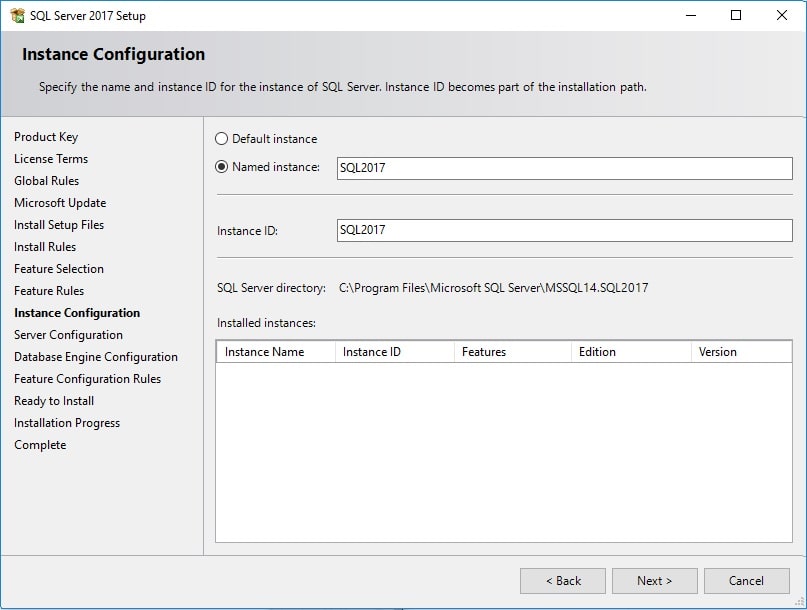
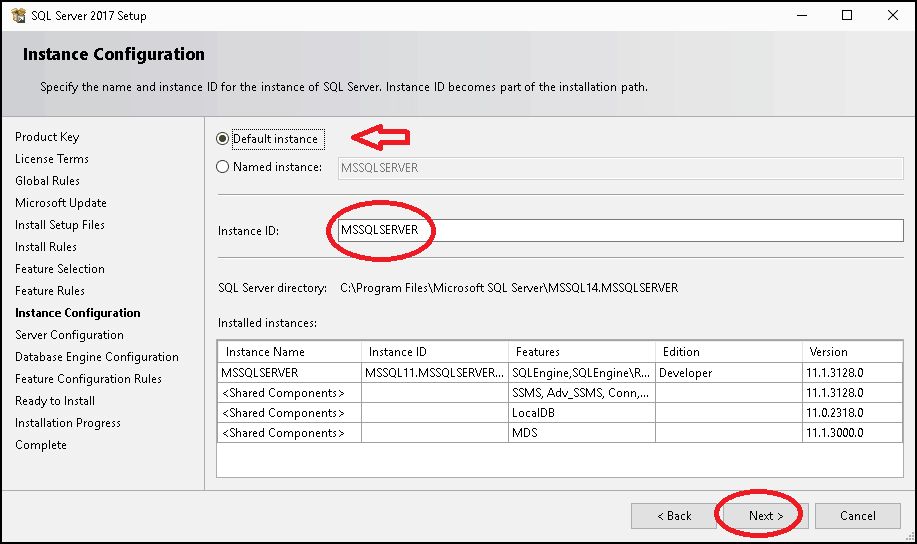
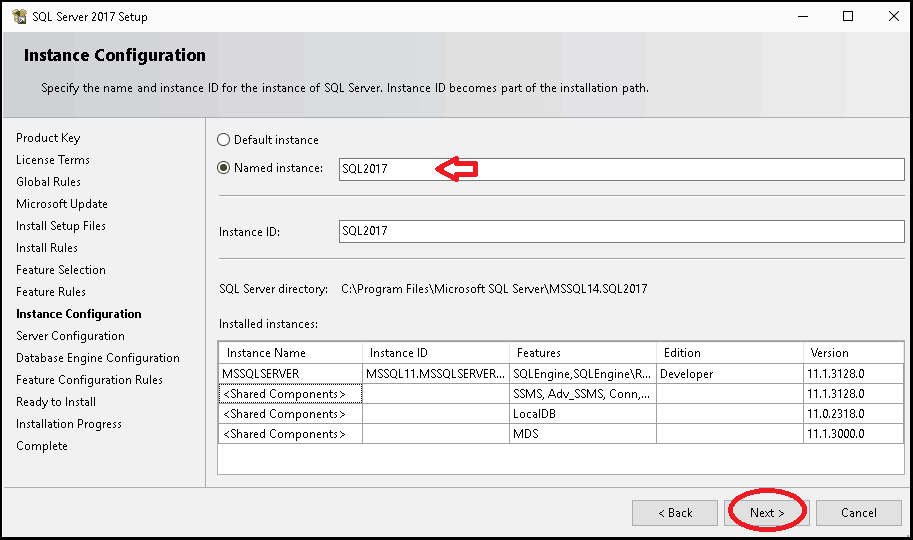
7) Теперь нужно установить экземпляр. Если у на Вашем сервере, или виртуальной машине еще не установлен никакой SQL Server, то можете выбрать «Default instance», если уже SQL Server был установлен ранее и вы поверх его ставите еще один экземпляр, то Вам нужно выбрать «Named instance» и дать ему имя.
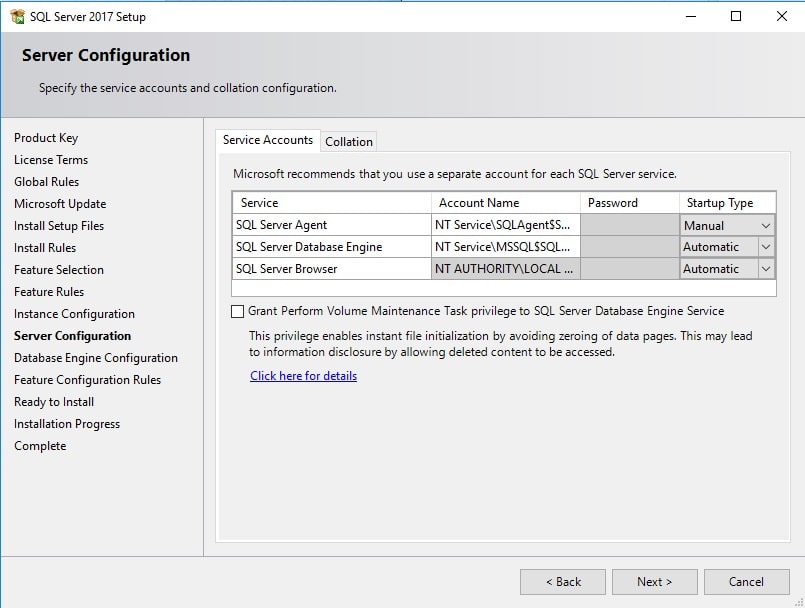
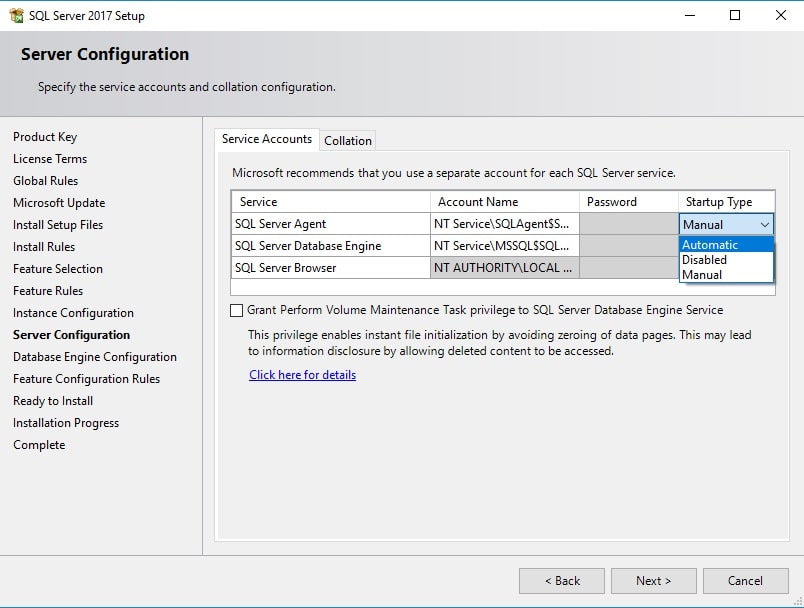
 В следующем окне нам предлагают выбрать сервисные аккаунты, это те учетные записи из под которых будут стартовать службы SQL Server Agent, SQL Server Database, SQL Server Browser. По умолчанию используются персонализированные учетные записи.
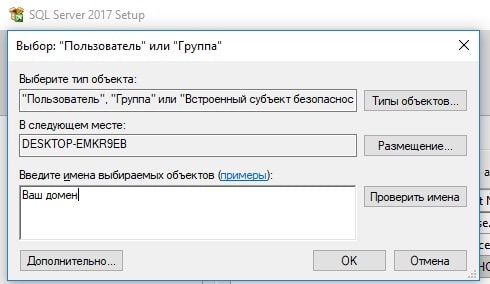
Но вы можете выбрать учетную запись Вашего домена, если Ваша сеть работает на домене (сервер включен в домен).
Не забываем выбрать то, как будут стартовать службы, автоматически, в ручную, либо вообще будут отключены, если они не нужны под Ваши задачи.
 .
.
Хотим отметить, что выбранные учетные записи желательно не должны являться «администраторами» SQL Server.
В том же окне, переходим во вкладку Collation.
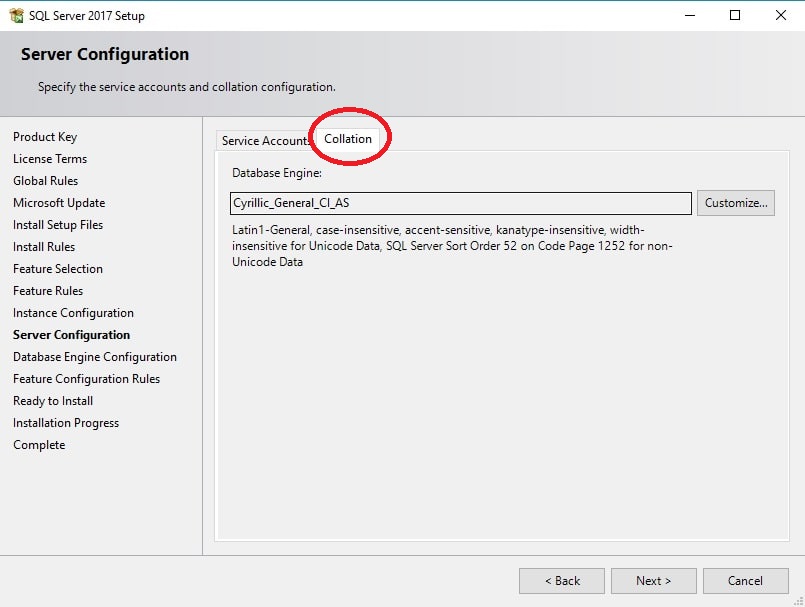
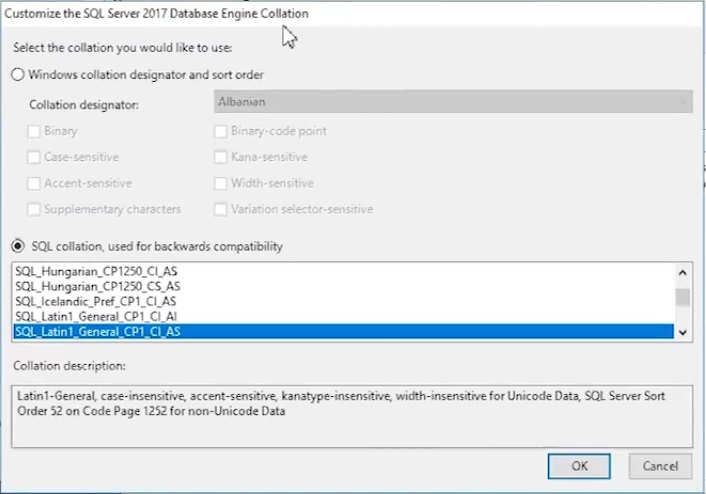
Collation — это настройка таблицы кодировок. А так же, выполнять сортировку, как учитывать верхний и нижний регистр, как реагировать на символы, и т.п.
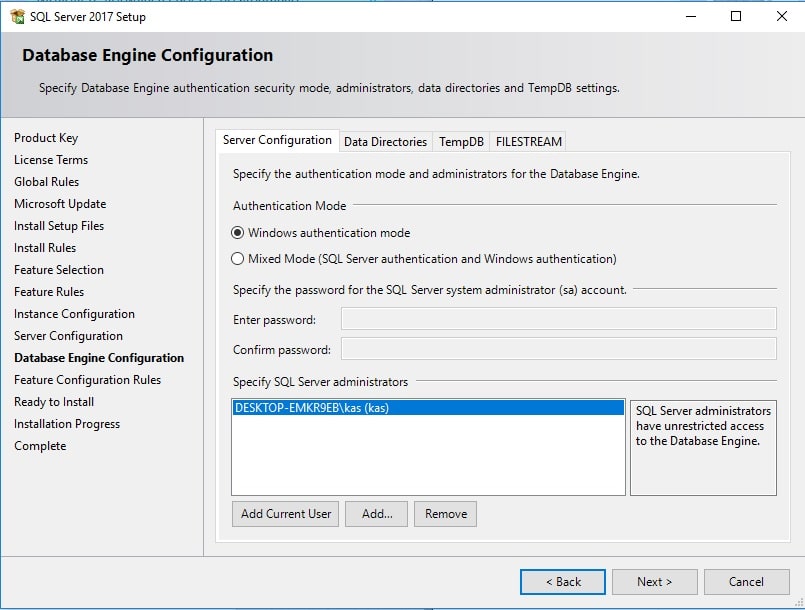
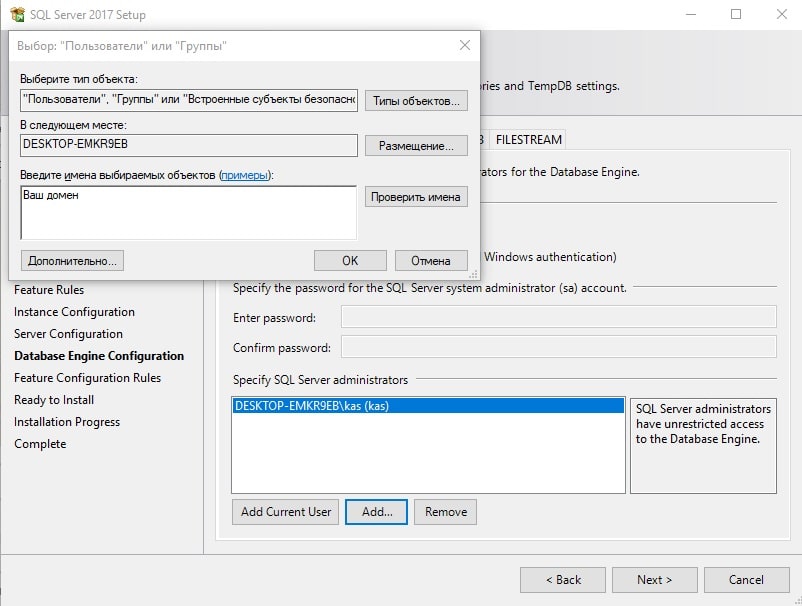
9) Следующим пунктом нам предлагают выбрать серверную конфигурацию. Здесь предлагают выбрать, что вы сможете подключиться только с Windows логинами к SQL Серверу, либо Mixed, что вы сможете еще подключиться внутренними учетными записями SQL Server, создав их в SQL Server.
После на данном этапе имеет смысл нажать кнопку «Add Current User» и добавить текущего пользователя, а так же Вы можете добавить учетную запись Вашего домена.
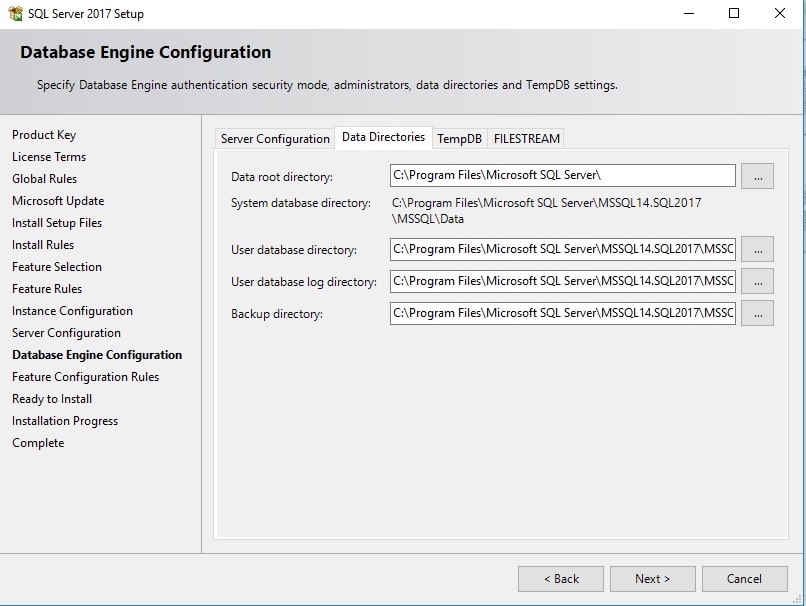
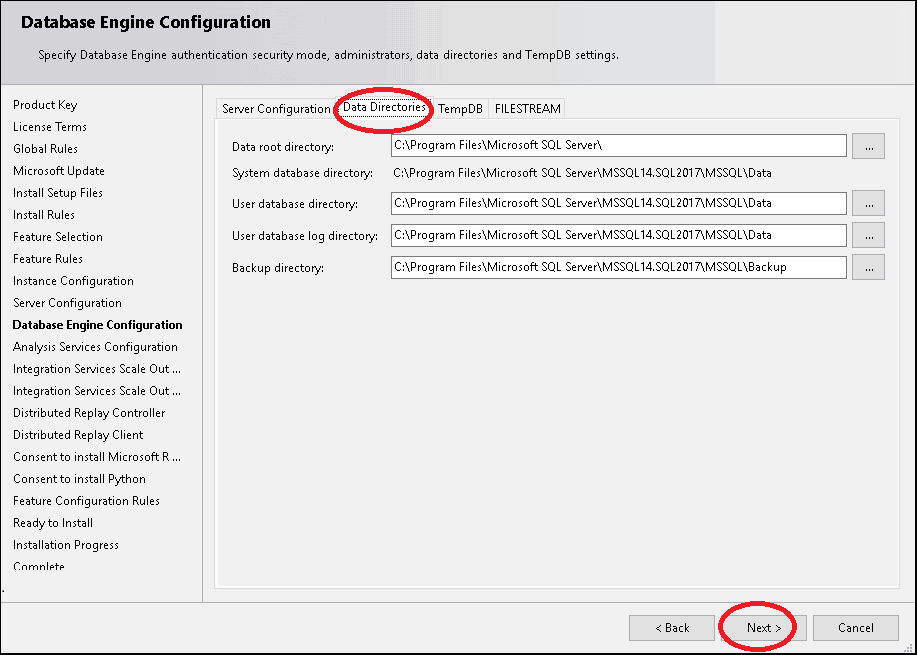
В том же окне переходим во вкладку «Data Directories». В этом пункте Вы можете выбрать Root директорию, директорию куда будут по умолчанию создаваться базы данных, директорию лог файлов и директорию для бекапов. Соответственно желательно, чтобы все директории были на разных жестких дисках.
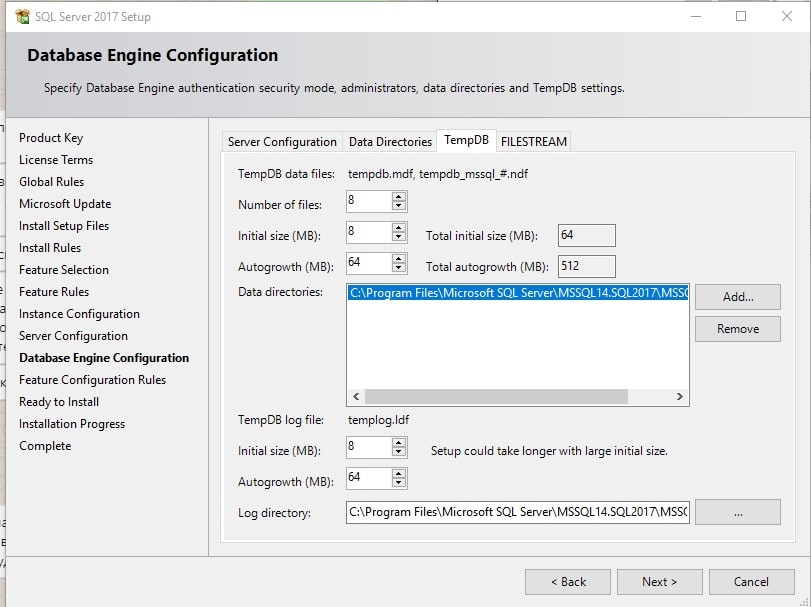
В следующей вкладке переходим к настройках базы TempDB. Это системная база, которая используется для хранения временных объектов.
Количество файлов прописано по умолчанию от кол-ва ядер.
Инициализиционный размер в мегабайтах — здесь имеет смысл прибавить размер хотя бы до 16, или 32 мб.
Autogrowth MB — Это то кол-во мегабайт, которое будет приращиваться, если файл будет заполнен на 100%. Выбираем на свое усмотрение, в зависимости от Ваших задач и размер БД, по умолчанию средний размер 64мб, но лучше, чтобы было не более 1гб, дабы не страдала производительность. Если не знаете какая будет нагрузка на Вашу базу, то оставьте как есть.
Директория для временных файлов в идеале должна быть отдельным диском.
Следующая вкладка это настройки Filestream — это настройка, которая позволяет хранить файлы в файловой системе NTFS, она может быть как активирована, так и нет, опционально.
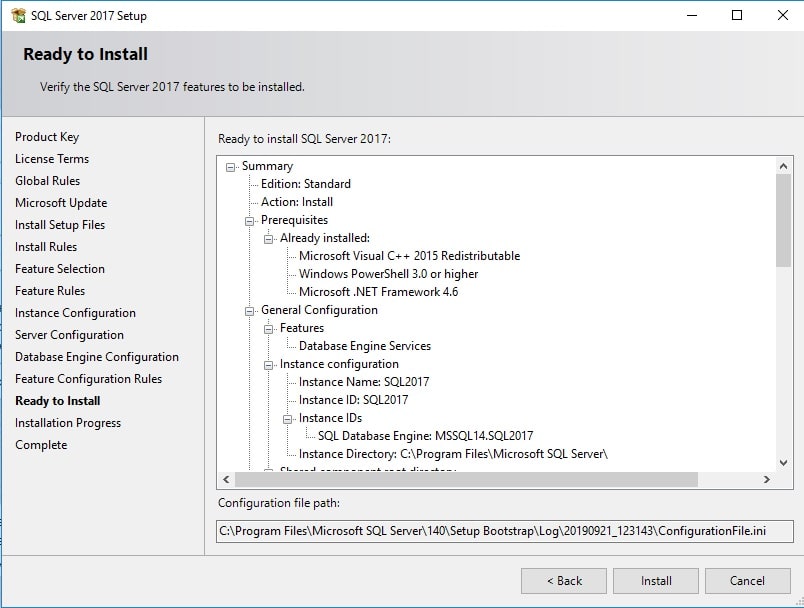
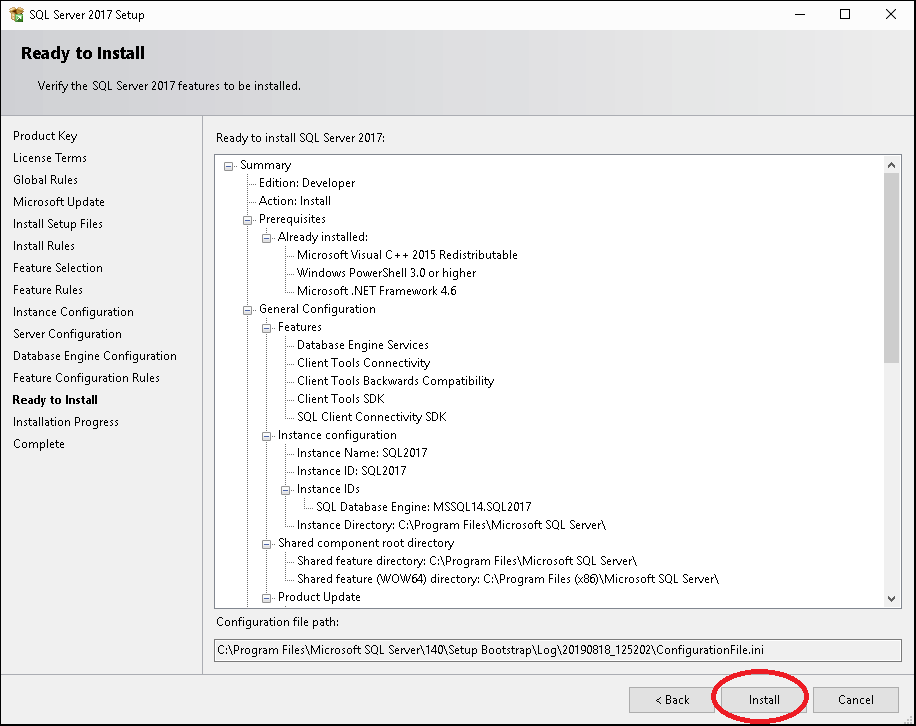
10) В разделе Ready to Install Вы можете наблюдать все те настройки, которые ранее прописали.
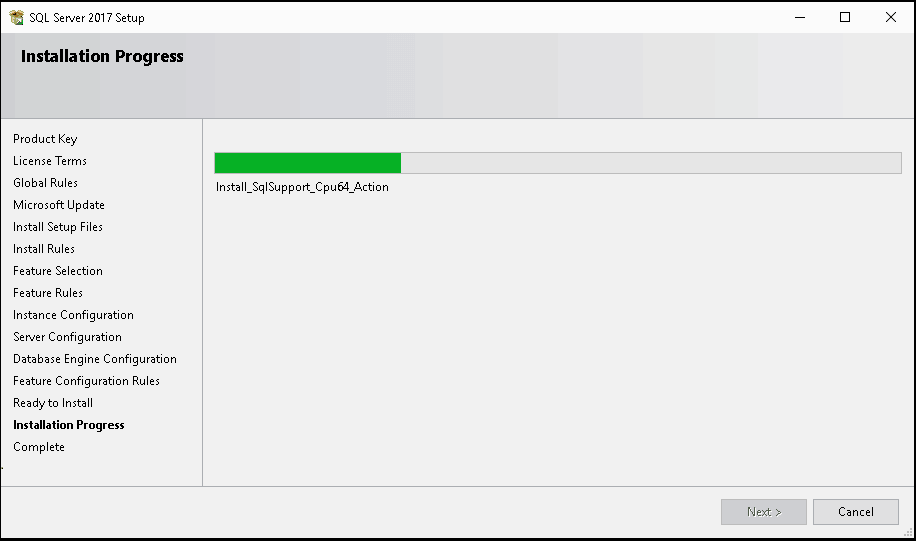
Нажимаем Next и ждем пока все установится.
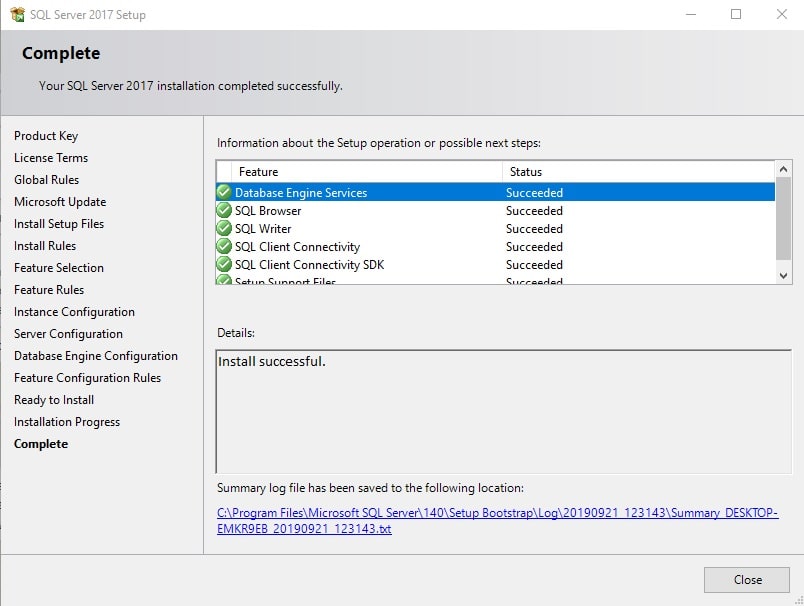
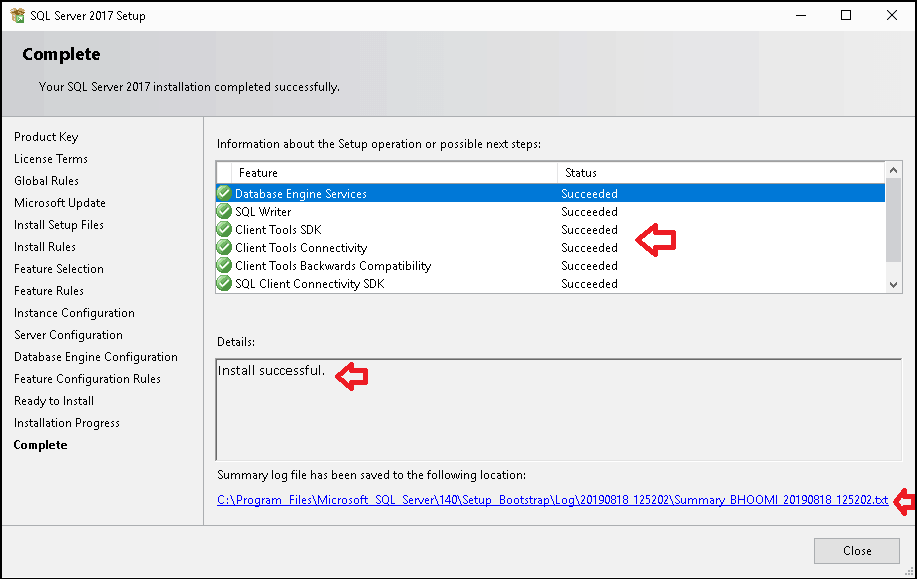
Если все установилось успешно, то в конце все компоненты будут «Succeeded».
В этой инструкции описан процесс установки MS SQL Server 2017 Express на Windows Server 2012 R2/2016/2019. Следуя ей вы получите готовый инструмент для знакомства с языком программирования SQL, для проверок собственных наработок или запуска небольшого ресурса, не требующего больших объемов хранения баз данных.
Ограничения выпуска SQL Server 2017 Express
Данный выпуск является бесплатным и подходит для коммерческого использования, но имеет ряд ограничений:
- Максимальное количество ядер процессора: 4;
- Максимальный размер базы данных: 10 ГБ;
- Максимальный размер пула буфера на экземпляр базы данных: 1410 МБ.
Если у вас есть необходимость выйти за пределы этих ограничений, советуем приобрести лицензию Microsoft SQL Server Standard.
Требования к операционной системе
SQL Server 2017 Express доступен для установки на следующих операционных системах:
- Windows 8/8.1/10 и новее;
- Windows Server 2012, 2012 R2, 2016, 2019 и новее.
Процедура установки
Чтобы установить SQL Server 2017 Express, перейдите по ссылке, выберите язык установки и нажмите Download:

После запуска скачанного файла установщик откроет специальное окно, в котором предложит несколько вариантов установки на выбор. Для контроля за параметрами установки выберите Custom:

Далее выберите место, куда будут скачаны установочные файлы, при необходимости поменяйте его на нужное и нажмите Install:

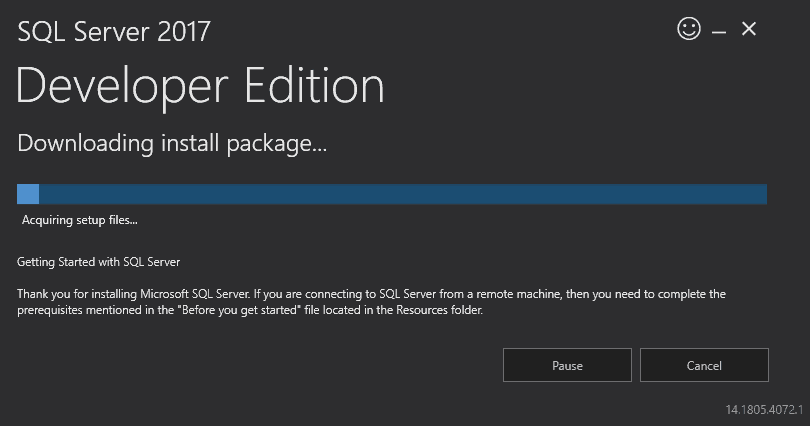
Дождитесь завершения процесса скачивания установочных файлов:

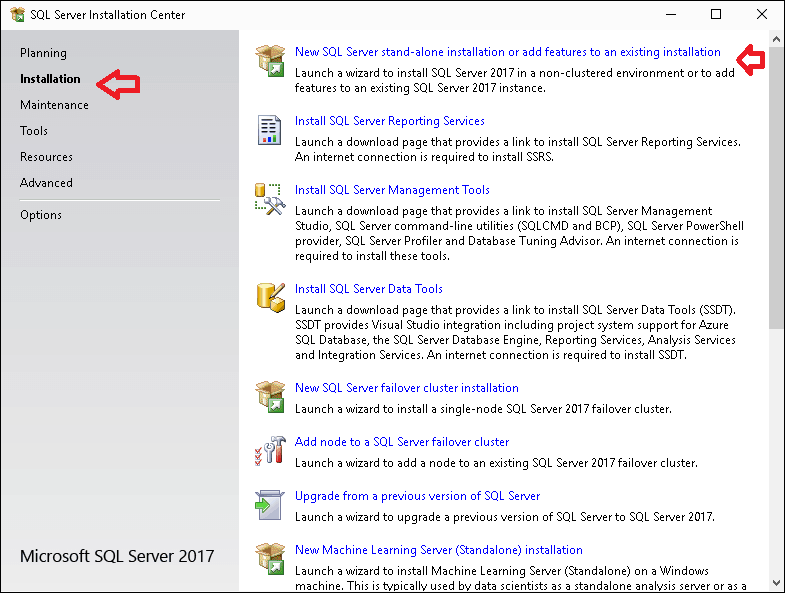
Далее выберите первый пункт установки New SQL Server stand-alone installation:

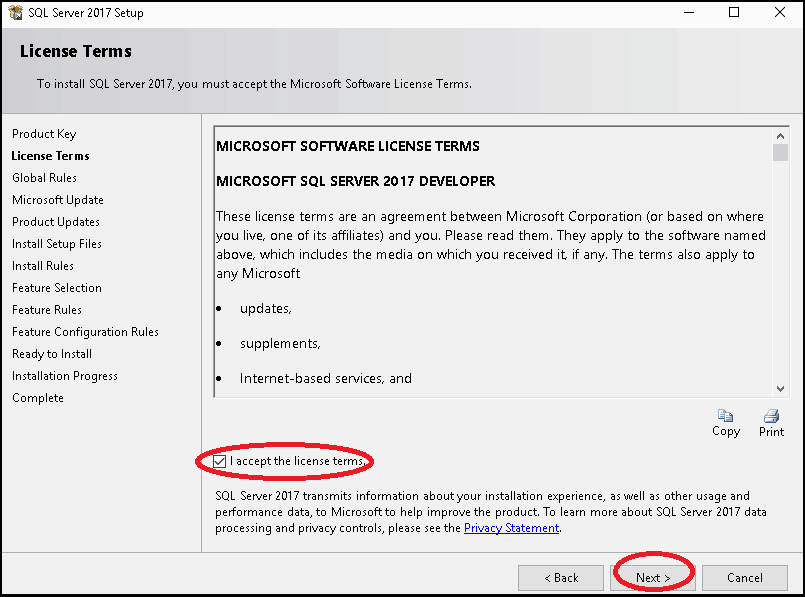
Ознакомьтесь с условиями лицензионного соглашения и нажмите Next:

При необходимости получать обновления из Windows Update поставьте галочку и нажмите Next:

Ознакомьтесь с предупреждением о возможных проблемах, а при их отсутствии нажмите Next:

Перейдите на экран выбора функционала, где можно, при необходимости, выбрать или убрать дополнительные возможности для сервера баз данных, оставьте без изменений и нажмите Next:

Выберите имя и идентификатор сервера. Идентификатор сервера будет включен в путь установки. Оставьте по умолчанию и нажмите Next:

На следующем экране можно указать сервисные аккаунты, отличные от стандартных, и предоставить право на выполнение задач обслуживания тома службе ядра СУБД SQL Server, что повысит скорость инициализации файлов, но СУБД может получить доступ к удаленному контенту. На вкладке Collation можно изменить параметры сортировки движка базы данных. На указанном примере мы предоставим привилегии, оставим по умолчанию параметры сортировки и нажмем Next:

На следующем этапе установки необходимо настроить конфигурацию ядра базы данных. Для этого предусмотрены следующие вкладки:
- Server Configuration — указывается способ авторизации в базу данных: средствами Windows или смешанный режим, включающий в себя авторизацию Windows и собственную авторизацию SQL Server. При выборе второго варианта следует указать пароль администратора SQL Server;
- Data Directories — указывается расположение исполняемых файлов SQL Server и данных;
- TempDB — параметры TempDB, используемой внутренними ресурсами SQL Server, временными объектами пользователей и хранилищем версий;
- User instances — позволяет дать права пользователям, не имеющим прав администратора, запускать отдельные экземпляры баз данных;
- FILESTREAM — включается при необходимости использовать оптимизированные для памяти (Memory Optimized) таблицы.

Так как при установке по умолчанию был выбран пункт Microsoft R (Machine Learning Services) и Python, следует согласиться с условиями его использования на этом и следующем этапе, последовательно нажав Accept и Next:

Запустится процесс установки, после чfего появится окно о завершении работ установщика SQL Server 2017. Нажмите Close:

На этом установка SQL Server 2017 Express завершена.
Аverage rating : 4.4
Оценок: 4
191028
Санкт-Петербург
Литейный пр., д. 26, Лит. А
+7 (812) 403-06-99
![]()
700
300
ООО «ИТГЛОБАЛКОМ ЛАБС»
191028
Санкт-Петербург
Литейный пр., д. 26, Лит. А
+7 (812) 403-06-99
![]()
700
300
ООО «ИТГЛОБАЛКОМ ЛАБС»
![]()
700
300
Table of Contents
- Installing SQL Server 2017 Express
- Installing SQL Server Management Studio
- Configuring the MSSQL Service
- Changing the authentication mode
- Adding the TestMakerFree database
- Adding the TestMakerFree login
- Mapping the login to the database
If you’re a .NET developer working with Visual Studio, you’ll most likely know SQL Server LocalDB: a specialized edition of the well-known Microsoft SQL Server engine — firstly introduced in SQL Server Express 2012 — acting as a minimal, on-demand, version of SQL Server designed for application developers. Since its first introduction LocalDB has proved itself to be a great development tool, especially when used as an «embedded database» to quickly test our Data Model without having to setup a whole DBMS service. We briefly talked about it in a couple posts some months ago, such as when we compared the Entity Framework Data Modeling patterns (Code-first, Model-first and Database-first) and in our ASP.NET MVC 5 Web Application Project Setup Guide.
Although LocalDB proved itself to be a great development choice, it’s not a good idea to use it in a production environment of any kind. The reasons for that are fairly simple to explain and understand:
- Despite having the same performances of a regular SQL Server Express instance — since they share the same database engine — the LocalDb underlying process will shut down itself if it doesn’t have any request for a while. When this happens, the next request(s) will most likely have poor performance and could even get a timeout.
- There are some (minor and fixable) issues with the LocalDB default user profile and permissions that you’ll need to fix to use it with an IIS-based production website: for further info about these problems — and their workarounds — I strongly suggest to take a look to this great two-part MSDN blog post (part 1 | part 2).
The «LocalDB in production» debate is also a recurrent topic on tech sites such as StackOverflow, which hosts some really interesting threads providing a great analysis of the pros and cons, such as:
- Is it normal to use LocalDb in production?
- Since LocalDB is for development purpose, then use what DB for production?
Having read and said all that, here come my 2 cents: although LocalDB is great, for a production machine I would strongly recommend using a standard, full-fledged and service-based instance of SQL Server: as for the chosen edition, we can either go for Express, Web, Standard, or Enterprise, depending on what we need and/or can afford.
In this post we’ll see how to properly setup and configure an instance of Microsoft SQL Server 2017 Express Edition, aka MSSQL2017, which can be downloaded for free from this Microsoft page. Needless to say, we need to install it on a machine that is reachable from our web server via a Local Area Network (LAN) or within the web server itself, although this is definitely not a recommended choice: both IIS and SQL Server are resource-intensive, hence it could be advisable to keep them in two separate environments.
In the following tutorial we’ll take for granted that we’ll have a Windows Server available and accessible either phisically or via Remote Desktop, which would be the case for a server hosted, housed, virtualized or even available as a VPS or within a public, private or hybrid cloud farm.
Installing SQL Server 2017 Express
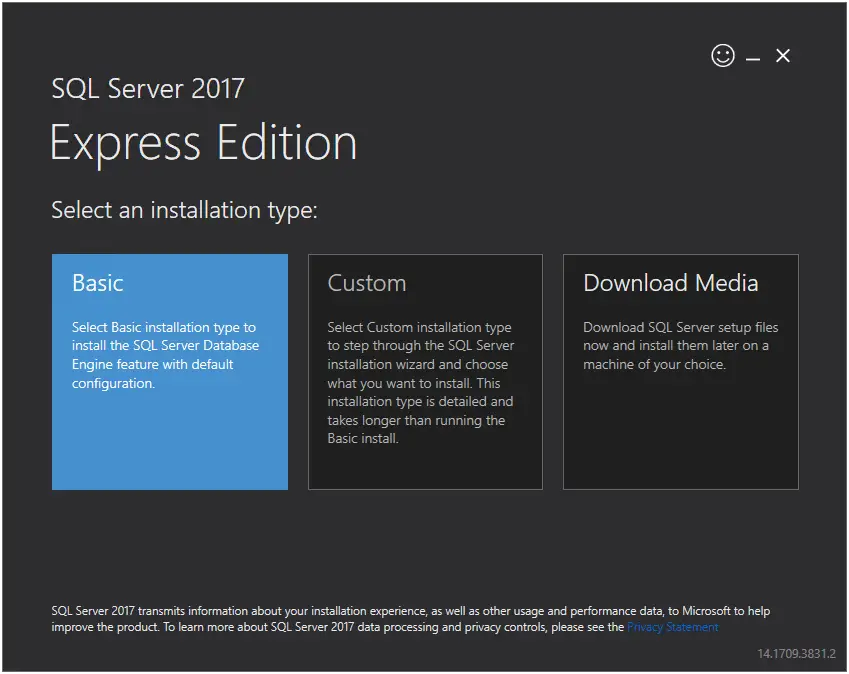
The installation process is pretty straightforward. Unless we don’t need anything specific, we can just go for the basic type:
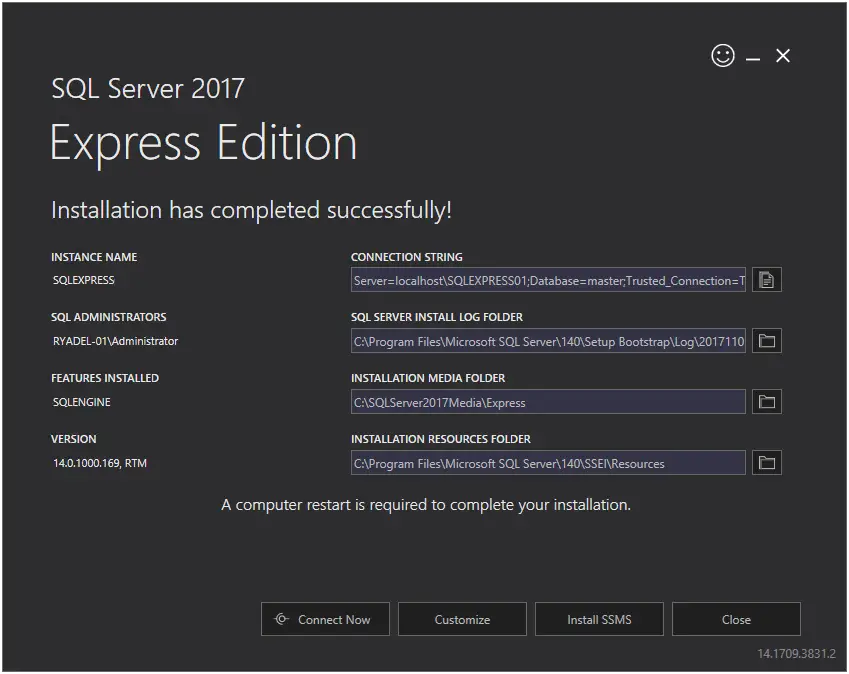
Eventually, we’ll be prompted with the Installation Complete window, which will also give us some useful info, including the database instance name and a default connection string ready for a connection test:
Installing SQL Server Management Studio
From here, we can click the Install SSMS button and download SQL Server Management Studio, a tool that we can use to create our fist sample database and also a dedicated user that can access it.
SQL Server Management Studio is a separate product and can also be retrieved for free download at the following URL.
Configuring the MSSQL Service
Once we’ve downloaded and installed it, we can launch SQL Server Management Studio and start the required steps to create our first database. We will be prompted by a Connect to Server modal window that will allow us to connect to our local SQL Server instance.
To do this, select the Database Engine server type and then, from the Server name combo box, choose <Browse for more…>. Another pop-up window will appear, from which we’ll be able to select the database engine we just installed on our server:

As for the Authentication part, we can leave Windows Authentication for now, being it the default SQL Server authentication mode: however, we’re going to change it soon enough.
When we’re done, click on the Connect button and a Server Explorer window will appear, containing a tree view representing the structure of your SQL Server instance. This is the interface we’ll use to create our database and also the user/password that our application will use to access it.
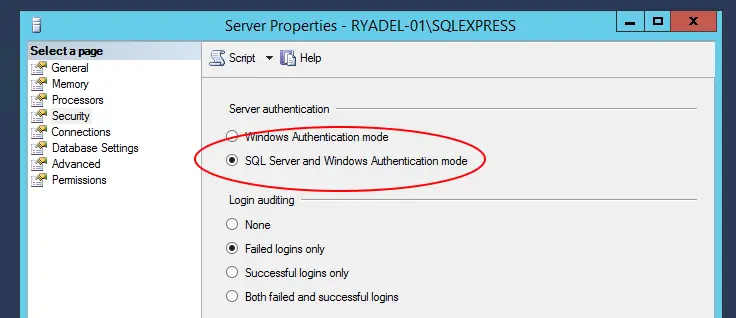
Changing the authentication mode
The first thing we need to do is to change the default SQL Server authentication mode, so we won’t be forced to use an existing Windows account. To do so, right-click on the root tree view node, which represents our SQL Server instance, and select Properties from the contextual menu. From the modal window that appears, select the Security page, then switch from Windows Authentication mode to SQL Server and Windows Authentication mode:
Adding the TestMakerFree database
Now we can create the database that will host our application’s tables. Right-click on the Databases folder and choose Add Database from the contextual menu. Give it the TestMakerFree name and click on OK.
Adding the TestMakerFree login
Go back to the root Databases folders, then expand the Security folder, which should be just below it. From there, right-click on the Logins subfolder and choose New Login. Again, give it the TestMakerFree name. From the radio button list below, select SQL Server Authentication and set a suitable password — for example, SamplePassword123$ — and click on OK. If you want a simpler password you might have to also disable the enforce password policy option. However, we advise against doing that: choosing a weak password is never a wise choice, expecially if we do that in a production-ready environment. Instead, replace the sample password we used above with a custom one and store it carefully: we’re going to need it later on.
Mapping the login to the database
The next thing we need to do is to properly map this login to the TestMakerFree database we added earlier. From the navigation menu to the left, switch to the User Mapping tab. Click on the checkbox right to the TestMakerFree database, then write TestMakerFree in the User cell and assign the db_owner membership role:
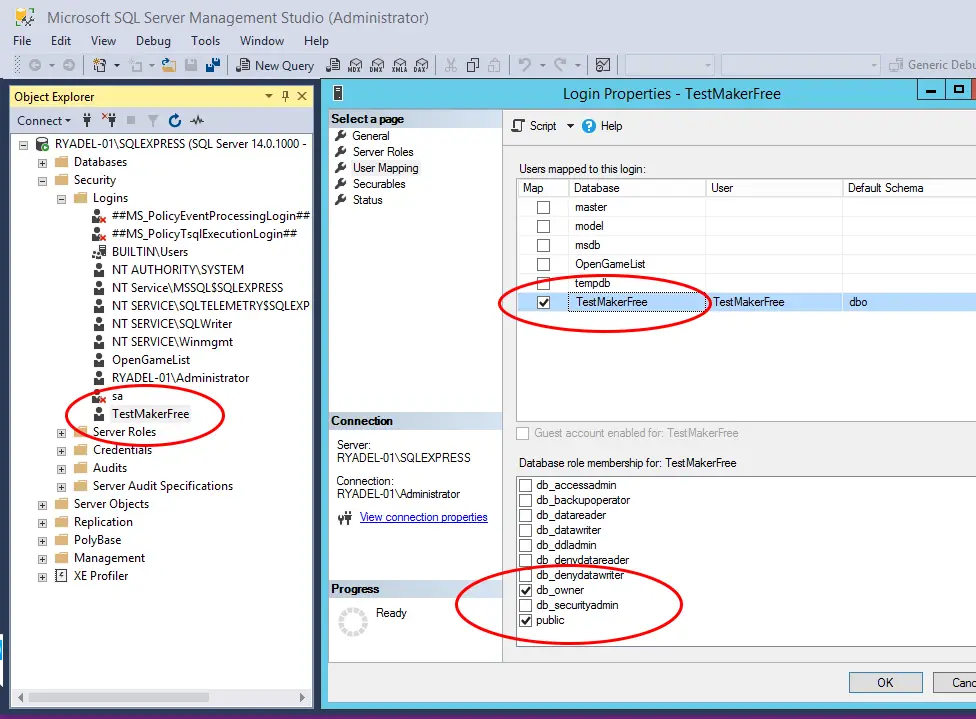
As soon as we click on the OK button, a new TestMakerFree user will be added to the TestMakerFree database with full administrative rights.
We can easily confirm that by going back to the root Databases folder and expanding it to TestMakerFree > Security > Users:
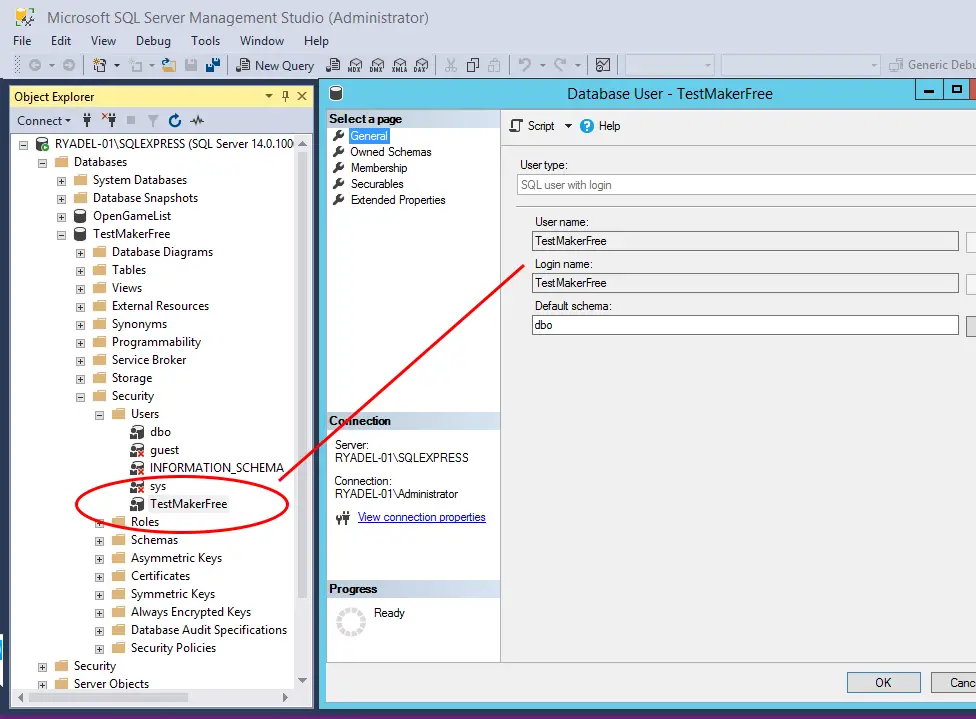
That’s it! Now we’ll be able to access our brand new TestMakerFree database with a standard connection string using the credentials we just created.
This article is part of the ASP.NET Core 2 and Angular 5 book, available as paperback, e-book and as a 26-lessons video-course. Promo Code: ASPCA50 to get it with a 50% discount! The book’s latest edition, updated to ASP.NET Core 5 and Angular 11, is available here.
In this how-to guide, we learn how to download and install SQL Server 2017 step by step. We will download the SQL Server developer edition / SQL Server Express edition and show you how to install it. The guide uses the Windows 10 OS. But you can install it in other editions of windows. The list of Supported OS, Hardware and software requirements are listed below
Other SQL Server Versions
Download & Install SQL Server 2019
Table of Contents
- Download SQL Server 2017
- Hardware & Software Requirements
- Hardware
- Software
- OS Compatibility
- Install SQL Server 2017
- Select an Installation Type
- SQL Server Installation Center
- Product Key
- License Terms
- Global Rules
- Microsoft Update
- Install Rules
- Features Selection
- Instance Features
- Shared Features
- Instance Configuration
- Server Configuration
- Database Engine Configuration
- Windows Authentication
- Mixed Mode ( Windows Authentication and SQL Server authentication Mode)
- Other Configuration
- Ready to Install
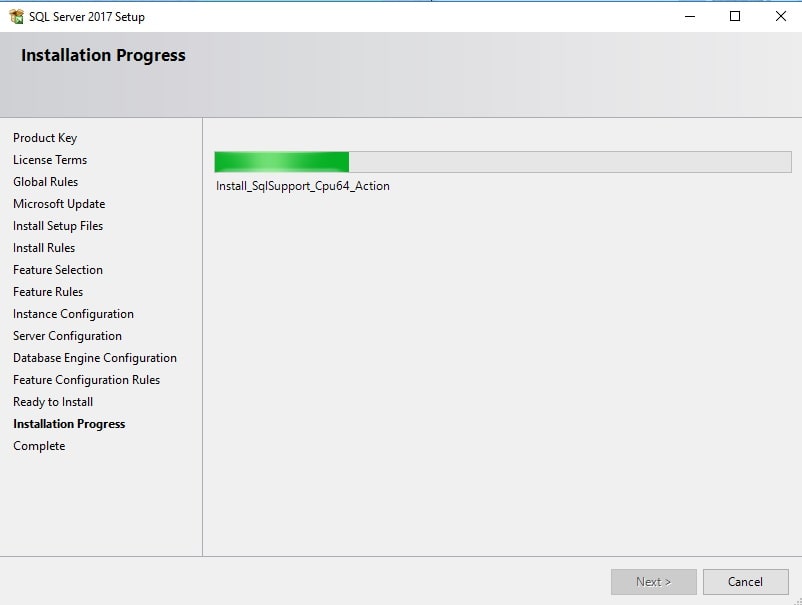
- Installation Progress
- Installation Complete
- Next Steps
SQ: Server is available in five editions. Which download you use depends on your use case.
- Developer Edition
- Express Edition
- Enterprise Edition
- Standard Edition
- Web Edition
If you are a developer and intended to use it to learn/develop/test a database application, then you should use the developer edition.
If you are an end-user and intended to use the SQL server in a production environment and size of your database is less than 10GB, then you can use the express edition.
For all other scenarios, you can use the Trial Version of Enterprise/Standard edition
The following link allows you to download the SQL Server 2017 Developer / Express Edition. Both versions are free to use
| Edition | Download Link | Remarks |
|---|---|---|
| SQL Server 2017 Enterprise/Standard
[Trial Version] |
Download | Registration Required |
| SQL Server 2017 Developer Edition | Download | |
| SQL Server 2017 Express Edition | Download |
You can download the latest version of the following link. https://www.microsoft.com/en-us/sql-server/sql-server-downloads. The Latest version is SQL Server 2019
Hardware & Software Requirements
Before downloading, you should know the software/hardware/OS requirement of the SQL Server
Hardware
Hard disk space: Minimum 6 GB of available hard-disk space.
Monitor: Super-VGA 800X600 Resolution
Memory: 1 GB
Processor Speed: x64 Processor: 2.0 GHz
Processor Type: x64 Processor, AMD Athlon 64, Intel Xeon EM64TT, Pentium 4 with EM64T
Software
NET Framework 4.6 Download link
OS Compatibility
check OS Compatibility from the link
Install SQL Server 2017
Download the SQL Server from the link https://www.microsoft.com/en-us/sql-server/sql-server-downloads. We choose the developer edition for this tutorial.
SQL Server2017-SSEI-Dev.exe, if you had chosen the Developer Edition
SQLServer2017-SSEI-Expr.exe if you had chosen the Express Edition
Double click on the downloaded file to start installing SQL Server 2017.
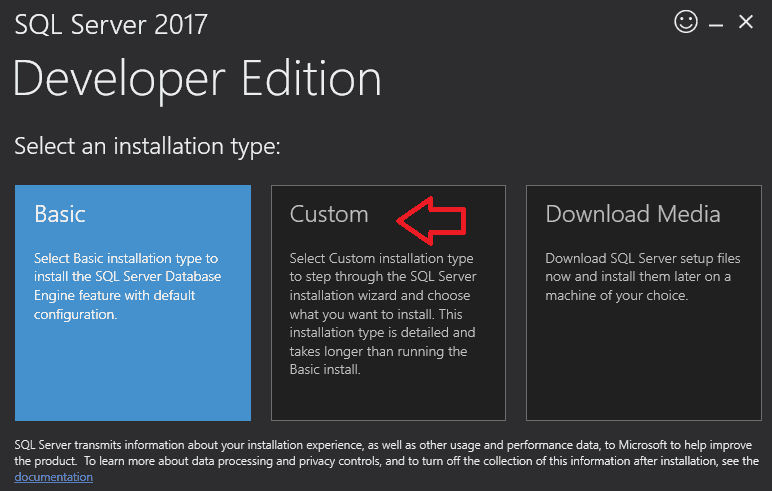
Select an Installation Type
Here, you have three choices.
- Basic
- Custom
- Download Media
Basic option installs only the essential features of SQL Server. It only asks for the License agreement and installation path
Download Media allows you to download all the installation to a local folder. You can then unzip and run the setup and install the SQL Server without needing an internet connection
The custom option allows you to pick and choose the features we wish to install. For this tutorial, let us choose the custom option.
Double click on Custom
This will download the install package. The install package automatically starts the SQL Server installation center
SQL Server Installation Center
Select Installation & then click on “New SQL Server standalone installation or features to an existing instance” to begin the installation
Product Key
Enter the Product Key, if you have one.
Else you can choose the Free Edition like Developer/Express or Evaluation.
License Terms
Accept the License Terms.
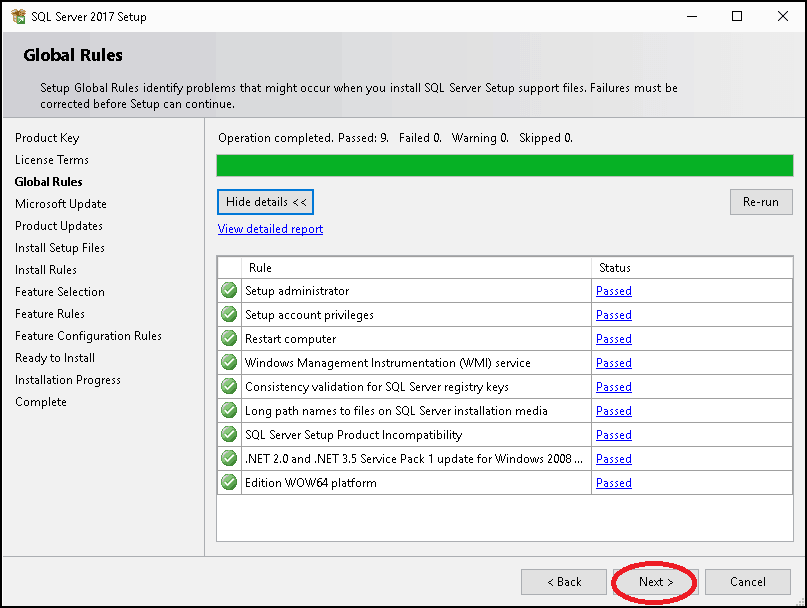
Global Rules
The next window identifies and displays the problems that may occur while installing the SQL server setup support files.
If there is any issue those will be highlighted in red here. The installation will not continue and you will have to take necessary action depending on the issue.
Click next to continue
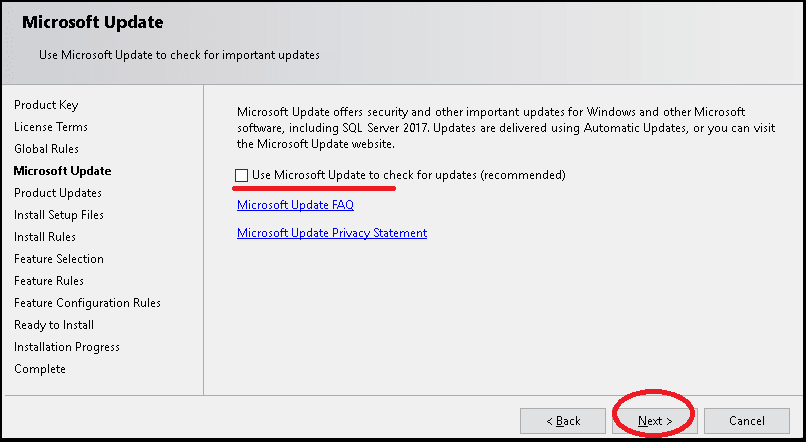
Microsoft Update
Choose yes, if you wish to the installer to check Microsoft update site and download and install the latest updates. Else leave it
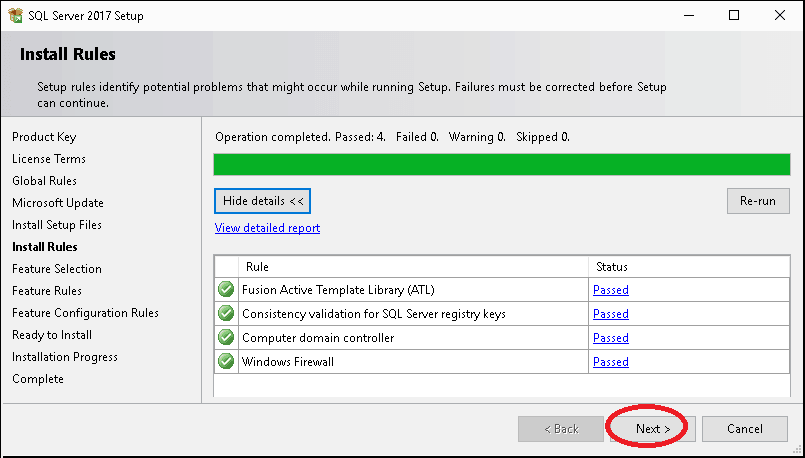
Install Rules
Next, the installer checks for the potential problems that may occur, while running the setup. If any of the rules fail, then you must correct them first. Otherwise, the installer will not continue.
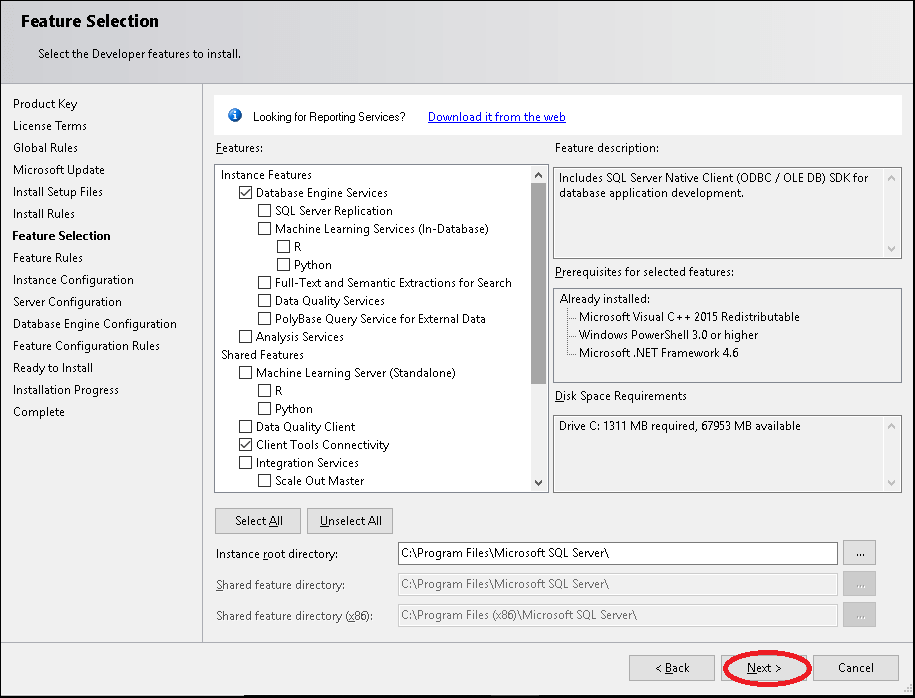
Features Selection
This window displays several features that you install along with the SQL Server.
Instance Features
Data Engine Services: This is the core database engine or database itself. This must be selected
SQL Server Replication: The SQL Server Replication includes a set of technologies for creating an exact replica of the database from one database to another. It also synchronizes the database for consistency.
Machine Learning Services (In-Database) ( R & Python): Includes extensions that enable integration with R and Python languages using standard T-SQL statements.
Full Text and semantic Extractions for search: Includes a Search engine that supports Full-Text Extraction for fast text search as well as Semantic Extraction for keyphrases (likely tags) and similarity search on content stored in SQL Server.
Data Quality Services: Includes Data quality database objects.
Polybase Query Service for external data: Includes PolyBase technology that enables truly integrated querying across Hadoop non-relational data and SQL Server relational data using standard T-SQL statements.
if you select to install PolyBase, the setup will ask for the Oracle JRE. You can obtain the JRE installer from https://www.oracle.com/technetwork/java/javase/downloads/jre8-downloads-2133155.html
Analysis Services: Includes Analysis Services and tools used to support online analytical processing (OLAP) and data mining. Only Database Engine Services and Analysis Services can be clustered.
Shared Features
Machine Learning Server (Standalone) R & python: Includes Microsoft Machine Learning Server for Windows that provides parallelized big data analysis, transformation, modeling and operationalization capabilities.
Data Quality Client: Includes Data quality client objects.
Client Tools Connectivity: Includes components for communication between clients and servers.
Integration Services: Includes the designer, runtime, and utilities that enable Integration Services to move, integrate, and transform data between data stores.
Client Tools backward compatibility: Client Tools for Backwards Compatibility for older versions
Client Tools SDK: Includes the software development kit containing resources for programmers.
Distributed replay controller: Includes the Distributed Replay Controller which orchestrates the actions of the distributed replay clients.
Distributed replay client: Includes the Distributed Replay Client. Multiple Distributed Replay Clients work together to simulate a workload against an instance of SQL Server.
SQL Client Connectivity SDK: SQL Client Connectivity SDK will install SQL Server OLEDB and ODBC connectors that can be used to connect to SQL Server using.NET, Java, PHP or other programming languages. Includes SQL Server Native Client (ODBC / OLE DB) SDK for database application development.
Master Data Services: Includes Master Data Services, the platform for integrating data from disparate systems across an organization into a single source of master data for accuracy and auditing purposes. Installs the Master Data Services Configuration Manager, assemblies, PowerShell snap-in, and folders and files for Web applications and services.
Select the following
- Database Engine Services
- Client Tools Connectivity
- Client Tools for backward compatibility
- SQL Client Connectivity SDK
- Client Tools SDK
Instance Configuration
You can have multiple instances of the SQL Server running in the system. Each must have its own instance name
You can have one default instance. The default instance name is MSSQLSERVER. If you choose this, then you can then use your computer name (or IP address) to connect to that instance
All other instances must be named. You can then use name / to connect to that instance.
Choose the default instance.
Example of creating the Named Instance. You need to use the name /SQL2017 to connect to SQL Server
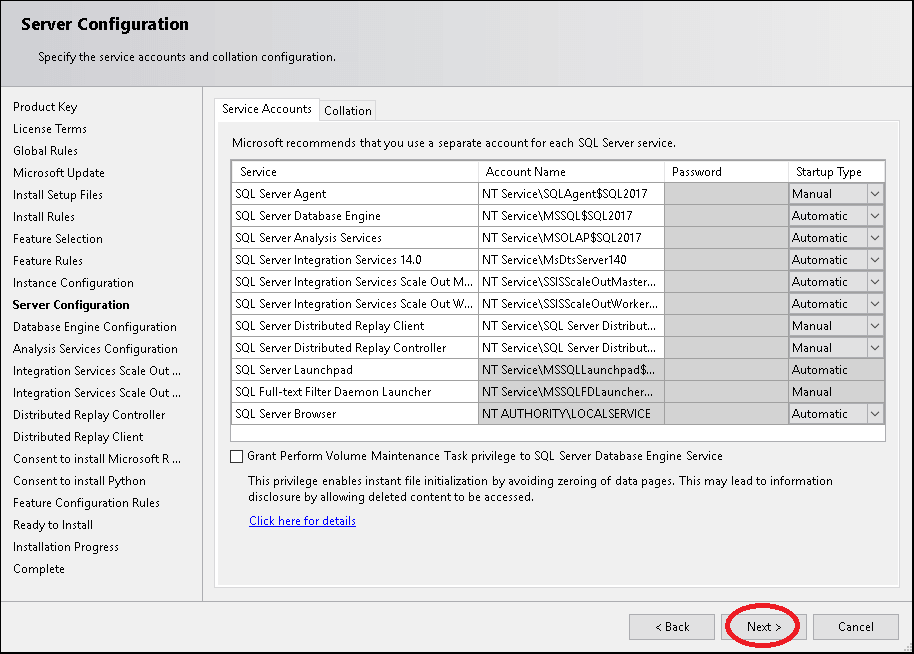
Server Configuration
The Next window list the various services, which you can configure. This list of services displayed here depends on the Features selected.
Here, you need to specify the Account Name, Password and startup type for each service.
Keep the defaults and click on Next
Database Engine Configuration
Here you are asked to configure the database by providing the authentication mode & password for the SA user.
Under Authentication Mode, you have two options.
Windows Authentication
In this mode, the windows user is automatically recognized by SQL Server. The Windows security identifier (SID) is passed from Windows to SQL Server. The SQL Server does not store any user information and trusts the Windows user. The SA user gets disabled when you use this
Mixed Mode ( Windows Authentication and SQL Server authentication Mode)
In this mode, along with the Windows Users, the SQL Server also stores the user name & password in the database. In this scenario, you can connect to SQL Server either using the Windows account and using the user name/password stored in SQL Server itself
Choose Mixed Mode.
You have to enter the SA user password.
Also, click on Add Current User to add the Current Logged in User to SQL Server

You can also change the default folders used by the SQL Server from the tab Data Directories
Other Configuration
Depending on the Features that you have selected, you will be presented with the configuration option for each feature.
Ready to Install
Finally, once all the configurations are done, you will be presented with a summary of the configuration you have selected. If you wish to change any of the configuration, you can click the back button and update.
Click on Install to begin the installation
Installation Progress
The installation will take some time.
Installation Complete
Once the installation is complete, you will see the following window.
If there are any errors in installation, you can open the installation log file to find out what went wrong.
Click on close to continue. Close the SQL Server Installation Center also
You may be asked to restart the computer.
Next Steps
Install the SQL Server Management Studio (SSMS). The SSMS is a GUI tool, which helps us to manage our SQL Server Installations. You can use it to connect to the SQL Server 2017, which we just installed.
Оглавление
- Установка MS SQL Server
- Ключ продукта
- Условия лицензии
- Центр обновлений Майкрософт
- Проверка правил установки
- Выбор компонентов
- Настройка экземпляра
- Конфигурация сервера
- Настройка ядра СУБД
Введение
MS SQL Server – представляет собой систему для управления реляционными базами данных. MS SQL Сервер использует язык запросов Transact-SQL по стандарту ANSI/ISO.
Хватит википедии, данная статья покажет насколько проста установка MS SQL Server. Ниже я приведу пример установки SQL сервера со скриншотами и подробно остановлюсь на каждом шаге.
Я буду рассказывать на примере установки SQL сервера 2017, но установка ничем не отличается от SQL Server 2019 или любых других редакций.
Тут всё однотипно, так что будем считать эту статью универсальной!
Установка MS SQL Server
Для инициализации процесса установки запускаем setup.exe. Выбираем в левом меню центра установки SQL Server пункт Установка. Теперь в правой части запускаем начало установки выбрав Новая установка изолированного
экземпляра SQL Server. Конечно помимо самого сервера нужно будет установить дополнительно средств управления SSMS (SQL Server Management Studio). Но об этом расскажу отдельно.
Ключ продукта
На первом же этапе установки нас попросят ввести лицензионный ключ продукта. Для этого мы отмечаем радиокнопку Введите ключ продукта и указываем ключ под ней в поле для ввода (надеюсь он у вас есть 😈). В сети есть слитые ключи, ищутся на раз. Жмём Далее >
Условия лицензии
Тут нам дают почитать условия лицензионного соглашения на использование продукта, но кто его читает! Просто соглашаемся с условиями использования программы Microsoft SQL Server и переходим Далее >
Центр обновлений Майкрософт
Если мы собираемся получать обновления для ms sql вместе с обновлениями для операционной системы windows, то подтверждаем, что будем использовать Центр обновления Майкрософт для проверки обновлений отметив соответствующий
чекбокс и переходим Далее >
Проверка правил установки
На следующем этапе установщик проверяет нашу систему на наличие ошибок и выдаст статус Выполнено с зелёной галочкой если всё в порядке. В моём случае я получил предупреждение по поводу Брандмаура
Windows. Но это не ошибка установки sql server, давайте посмотрим в чём дело.
На скриншоте выше показано окно с пояснениями. Из него ясно что у нас в Брандмауре не открыты порты для SQL Сервера. Порты сервера SQL по умолчанию:
- TCP 1433 – SQL Server
- TCP 1434 – Порт обычно используется для администрирования MS SQL сервера через командную строку
- Перечень всех портов – на официальном сайте Microsoft https://go.microsoft.com/fwlink/?Linkid=94001
Заодно, если вы уже перешли к настройки прав брандмаура windows, давайте припишем порты для входящих/исходящих подключений, которые использует 1С:
- 1540
- 1541
- 1560-1591
А вообще в брандмауре windows можно задать правило на разрешение трафика по всем портам TCP и UDP для SQL Server.
Выбор компонентов
На этапе выбора компонентов SQL сервера отмечаем чекбокс напротив Службы ядра СУБД. Также мы можем указать каталоги для установки компонентов SQL сервера Microsoft каждый по отдельности.
Настройка экземпляра
Если вы устанавливаете один сервер на систему, то можно оставить как есть: Экземпляр по умолчанию. В противном случае нужно индификатор задать другой, чтобы он отличался от уже существующего и не создавал конфликтов.
Конфигурация сервера
Во вкладке Учётные записи служб нам необходимо для службы Агент SQL Server выбрать тип запуска Авто для того чтобы служба стартовала вместе с запуском системы. При необходимости можно изменить имя
учётной записи под которой будет запускаться служба.
Настройка ядра СУБД
Дальше давайте настроим учётные записи для управления нашим сервером MS SQL. Выбирайте Смешанный режим. Будет активирована учётная запись SQL сервера под именем SA,
для которой ниже нам будет предложено установить пароль. Ещё чуть ниже назначаем администратора SQL Server. Для начала можно добавить текущего пользователя, если вы устанавливаете SQL сервер под подходящей учётной записью. Остальные учётные записи можно добавить нажав кнопку Добавить…
Во вкладке Каталоги данных можно поменять стандартные пути до места создания новых баз данных SQL, журналов и каталогов куда будут сохраняться созданные резервные копии баз данных. Конечно при создании
каждой конкретной базы данных вы спокойно можете указать эти самые пути вручную.
На следующей вкладке указываем расположение служебной базы TempDB и другие параметры. После установки каталоги можно изменить. Для изменения расположения баз TempDB воспользуйтесь моей статьёй
– Как в Microsoft SQL Server перенести tempdb на другой диск
Ход установки
Перейдя на следующий этап мы будем наблюдать за ходом установки MS SQL сервера.
По завершению мы получим окно с дополнительными сведениями о статусе всех шагов установки SQL сервера майкрософт. Надеюсь у вас всё будет такое же зелёное, как и у меня 😏.
В заключение
На этом установку SQL Server считаю завершенной, настройка будет рассмотрена в другой статье отдельно. Как только напишу тут будет размещена ссылка на неё. Всем спасибо!