В этой статье мы расскажем, как работает SSH-клиент, как его установить, а также как подключиться к Ubuntu и Windows 10 по SSH. Но давайте сначала разберёмся, что такое SSH.
Что такое SSH
SSH (Secure Shell) — сетевой протокол прикладного уровня, который позволяет управлять операционной системой и выполнять функцию туннелирования TCP-соединения. Работа SSH построена на взаимодействии 2-х компонентов: SSH-сервера и SSH-клиента. Подробнее читайте в статье Что такое SSH.
SSH-сервер по умолчанию прослушивает соединения на порту 22, а также требует аутентификации сторон. Есть несколько вариантов проверки соединения:
- по паролю. Используется чаще всего. При таком типе аутентификации между клиентом и сервером создаётся общий секретный ключ: он шифрует трафик;
- с помощью ключевой пары. Предварительно генерируется открытый и закрытый ключ. На устройстве, с которого нужно подключиться, хранится закрытый ключ, а на сервере — открытый. При подключении файлы не передаются, система только проверяет, что устройство имеет доступ не только к открытому, но и к закрытому ключу.
- по IP-адресу. При подключении система идентифицирует устройство по IP-адресу. Такой тип аутентификации небезопасен и используется редко.
OpenSSH (Open Secure Shell) — набор программ, который позволяет шифровать сеансы связи в сети. При таких сеансах используется протокол SSH.
OpenSSH включает в себя компоненты:
- ssh,
- scp,
- sftp,
- sshd,
- sftp-server,
- ssh-keygen,
- ssh-keysign,
- ssh-keyscan,
- ssh-agent,
- ssh-add.
Этот набор ПО может аутентифицировать пользователей с помощью таких встроенных механизмов как:
- публичные ключи,
- клавиатурный ввод: пароли и запрос-ответ,
- Kerberos/GSS-API.
Установка OpenSSH на Ubuntu 20.04
В качестве примера мы рассмотрим установку Ubuntu 20.04. Настройка SSH Ubuntu Server 18.04 версии проходит аналогично.
При первой установке Ubuntu подключение по SSH запрещено по умолчанию. Включить доступ по SSH можно, если установить OpenSSH.
Для этого:
-
1.
Откройте терминал с помощью комбинации клавиш Ctrl + Alt + T.
-
2.
Обновите репозиторий командой:
-
3.
Установите SSH с помощью команды:
-
4.
Установите OpenSSH:
sudo apt install openssh-server -
5.
Добавьте пакет SSH-сервера в автозагрузку:
sudo systemctl enable sshd -
6.
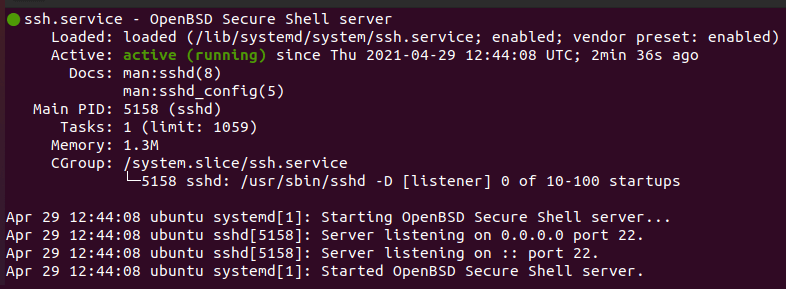
Проверьте работу SSH:
Если установка прошла корректно, в выводе вы увидите настройки по умолчанию:
Настройка SSH Linux
Готово, вы установили OpenSSH на Ubuntu.
Настройка OpenSSH на Ubuntu 20.04
По умолчанию SSH-соединение работает по порту 22. Из соображений безопасности порт лучше изменить. Для этого:
-
1.
Запустите терминал с помощью комбинации клавиш Ctrl + Alt + T.
-
2.
Откройте конфигурационный файл в текстовом редакторе:
sudo nano /etc/ssh/sshd_config -
3.
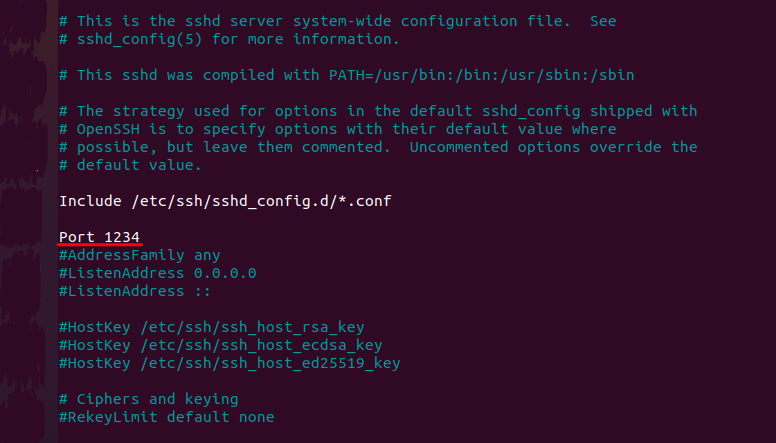
В sshd_config замените порт 22 на другое значение в диапазоне от 1 до 65 535. Важно, чтобы выбранный порт не был занят другой службой:
CentOS 8 настройка SSH -
4.
Чтобы изменения вступили в силу, перезапустите SSH-сервер:
Готово, вы настроили OpenSSH на Ubuntu 20.04. Теперь вы можете внести дополнительные настройки или в Ubuntu разрешить пользователю доступ по SSH.
Установка OpenSSH на Windows 10
-
1.
В меню «Пуск» нажмите Параметры:
-
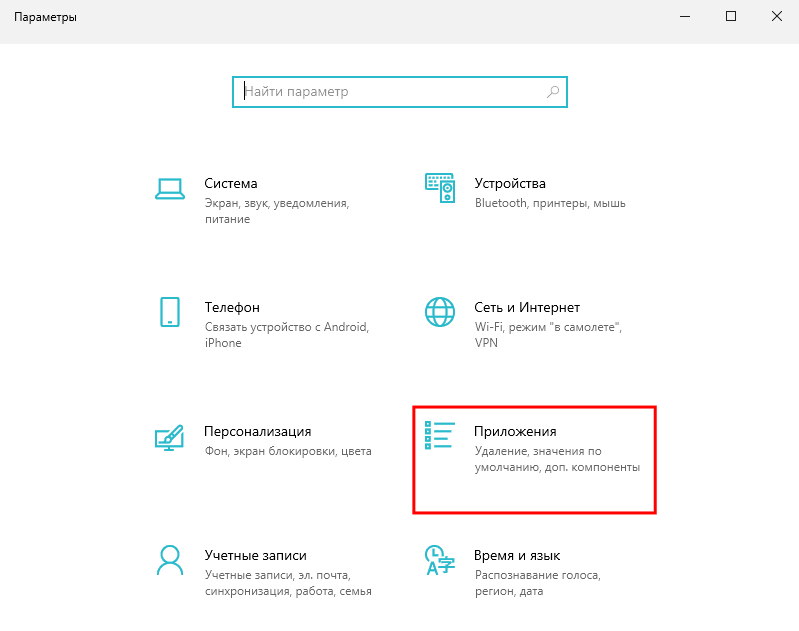
2.
Перейдите в раздел Приложения:
Настройка SSH -
3.
Выберите Приложения и возможности и нажмите Дополнительные компоненты:
-
4.
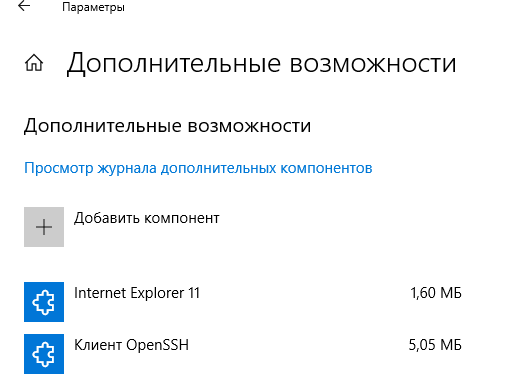
Проверьте, установлен ли компонент «Клиент OpenSSH». Для этого в поисковой строке наберите «OpenSSH». Если компонент уже установлен, переходите к шагу Настройка SSH на Windows 10.
Если компонент ещё не установлен, используйте PowerShell.
Что такое PowerShell
PowerShell — это утилита командной строки в ОС Windows. Она выпущена в составе Windows 7, Windows 8, Windows 8.1 и Windows 10 как неотъемлемая часть системы.
Управлять ОС через PowerShell можно при помощи командлетов — специальных команд. Командлеты работают аналогично с командами в терминале Linux.
Использование командлетов позволяет:
- работать с файловой системой и реестром Windows,
- изменять настройки операционной системы,
- управлять службами и процессами,
- устанавливать программы,
- управлять установленным ПО,
- встраивать исполняемые компоненты в программы,
- создавать сценарии, которые помогут автоматизировать администрирование.
-
5.
Перейдите в меню «Пуск». Правой кнопкой мыши кликните на Windows PowerShell и выберите Запуск от имени администратора:
-
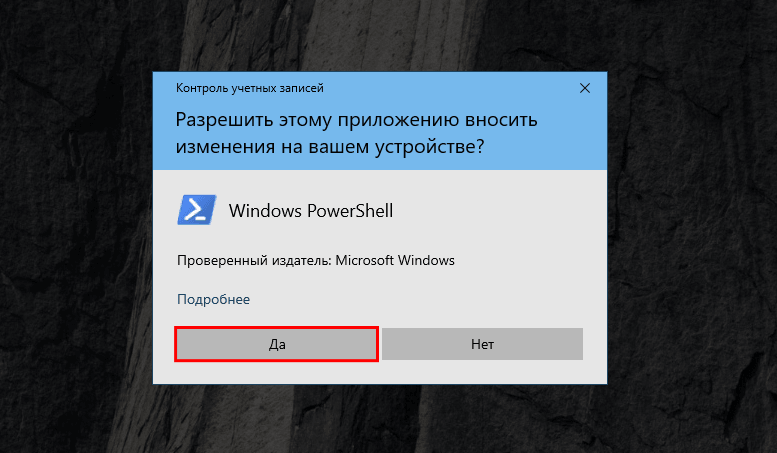
6.
Дайте согласие на запуск программы. Для этого нажмите Да:
-
7.
Введите командлет:
Get-WindowsCapability -Online | ? Name -like 'OpenSSH*'Вы увидите следующее сообщение:
-
8.
Установите OpenSSH с помощью командлета:
Add-WindowsCapability -Online -Name OpenSSH.Client~~~~0.0.1.0После установки вы увидите сообщение. Если для параметра «RestartNeeded» указан статус «True», перезагрузите компьютер.
Готово, вы установили OpenSSH на Windows.
Настройка Open SSH на Windows 10
-
1.
В меню «Пуск» и кликните на Windows PowerShell:
-
2.
Введите командлет:
В выводе отобразится справочная информация о командлетах:
-
3.
Если вам нужно подключиться к серверу по SSH, выполните командлет:
Где:
- username — имя пользователя SSH,
- host — имя удаленного сервера или его IP-адрес.
Например, так выглядит командлет для подключения к хостингу REG.RU:
ssh u1234567@123.123.123.123
Готово, теперь вы можете как открыть доступ по SSH, так и внести дополнительные настройки на сервере.
Как включить и использовать SSH-команды Windows 10

Microsoft объявила о том, что в 2015 году к Windows будет подключен клиент OpenSSH. Они, наконец, сделали это, и внедрили клиент SSH в обновлении Windows 10 Fall Creators. Теперь Вы можете подключиться к серверу Secure Shell из Windows без установки PuTTY или любого другого стороннего программного обеспечения.
Это все еще бета-функция, поэтому Вам может быть лучше пользоваться PuTTY, пока она не станет стабильной. Согласно отслеживанию ошибок проекта на GitHub , интегрированный клиент SSH поддерживает только ключи ed25519.
Как установить клиент SSH для Windows 10
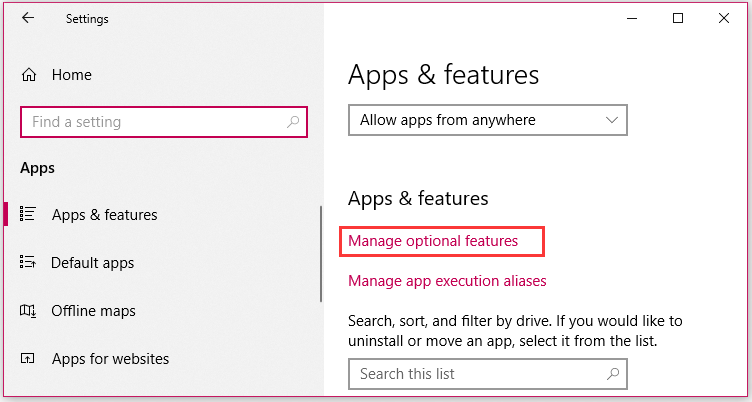
Клиент SSH входит в состав Windows 10, но это «дополнительная функция», которая по умолчанию не установлена. Чтобы установить его, откройте «Параметры» > «Приложения» и нажмите «Управление дополнительными компонентами» в разделе «Приложения и возможности».

Нажмите «Добавить компонент» в верхней части списка установленных функций. Если у Вас уже установлен клиент SSH, он появится в списке.

Прокрутите страницу вниз, нажмите кнопку «OpenSSH Client (Beta)» и нажмите «Установить».
Windows 10 также предлагает сервер OpenSSH, который Вы можете установить, если хотите запустить SSH-сервер на своем ПК. Вы должны установить это только в том случае, если Вы действительно хотите запустить сервер на своем ПК, а не просто подключиться к серверу, работающему в другой системе.

Как использовать SSH-клиент в Windows 10
Теперь Вы можете использовать SSH-клиент, запустив команду ssh . Это работает либо в окне PowerShell, либо в окне командной строки, поэтому используйте то, что Вам нравится.
Чтобы запустить Windows PowerShell откройте поиск и введите «Windows PowerShell» и нажмите на результат поиска.
Чтобы просмотреть синтаксис команды ssh, просто запустите ее:
1
ssh
Если Вы видите сообщение об ошибке, сообщающее, что команда не найдена, Вам нужно будет выйти и снова войти в систему. Перезагрузка компьютера также будет работать. Это не обязательно, но это бета-функция.
Читайте также Следует ли отключать службы Windows для ускорения работы ПК?

Эта команда работает так же, как подключение к SSH-серверу с помощью команды ssh в других операционных системах, таких как macOS или Linux. Его синтаксис или параметры командной строки одинаковы.
Например, чтобы подключиться к SSH-серверу на ssh.example.com с именем пользователя «user», Вы должны запустить:
ssh user@ssh.example.com -p 7777

Как и в случае с другими клиентами SSH, Вам будет предложено принять ключ хоста при первом подключении. Затем Вы получите среду командной строки, которую Вы можете использовать для запуска команд в удаленной системе.
Windows 10
ssh
В Windows 10 и Windows Server 2019 появился встроенный SSH клиент, который вы можете использовать для подключения к *Nix серверам, ESXi хостам и другим устройствам по защищенному протоколу, вместо Putty, MTPuTTY или других сторонних SSH клиентов. Встроенный SSH клиент Windows основан на порте OpenSSH и предустановлен в ОС, начиная с Windows 10 1809.
Содержание:
- Установка клиента OpenSSH в Windows 10
- Как использовать SSH клиенте в Windows 10?
- SCP: копирование файлов из/в Windows через SSH
Установка клиента OpenSSH в Windows 10
Клиент OpenSSH входит в состав Features on Demand Windows 10 (как и RSAT). Клиент SSH установлен по умолчанию в Windows Server 2019 и Windows 10 1809 и более новых билдах.
Проверьте, что SSH клиент установлен:
Get-WindowsCapability -Online | ? Name -like 'OpenSSH.Client*'
В нашем примере клиент OpenSSH установлен (статус: State: Installed).
Если SSH клиент отсутствует (State: Not Present), его можно установить:
- С помощью команды PowerShell:
Add-WindowsCapability -Online -Name OpenSSH.Client* - С помощью DISM:
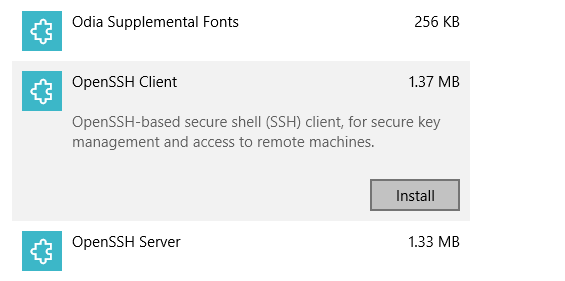
dism /Online /Add-Capability /CapabilityName:OpenSSH.Client~~~~0.0.1.0 - Через Параметры -> Приложения -> Дополнительные возможности -> Добавить компонент. Найдите в списке Клиент OpenSSH и нажмите кнопку Установить.
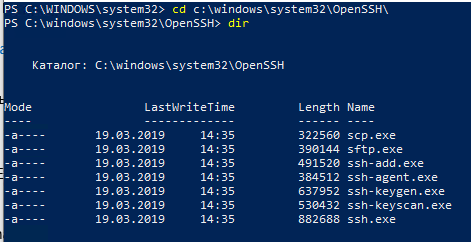
]Бинарные файлы OpenSSH находятся в каталоге c:windowssystem32OpenSSH.
- ssh.exe – это исполняемый файл клиента SSH;
- scp.exe – утилита для копирования файлов в SSH сессии;
- ssh-keygen.exe – утилита для генерации ключей аутентификации;
- ssh-agent.exe – используется для управления ключами;
- ssh-add.exe – добавление ключа в базу ssh-агента.
Вы можете установить OpenSSH и в предыдущих версиях Windows – просто скачайте и установите Win32-OpenSSH с GitHub (есть пример в статье “Настройка SSH FTP в Windows”).
Как использовать SSH клиенте в Windows 10?
Чтобы запустить SSH клиент, запустите командную строку
PowerShell
или
cmd.exe
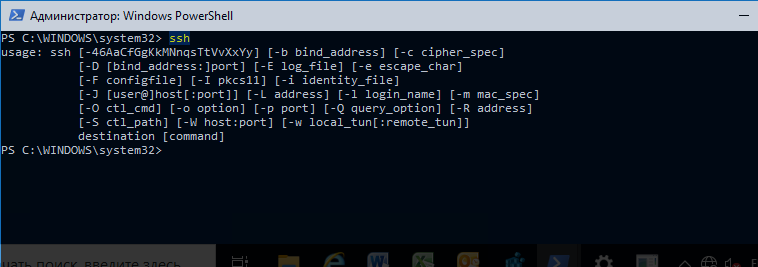
. Выведите доступные параметры и синтаксис утилиты ssh.exe, набрав команду:
ssh
usage: ssh [-46AaCfGgKkMNnqsTtVvXxYy] [-b bind_address] [-c cipher_spec]
[-D [bind_address:]port] [-E log_file] [-e escape_char]
[-F configfile] [-I pkcs11] [-i identity_file]
[-J [[email protected]]host[:port]] [-L address] [-l login_name] [-m mac_spec]
[-O ctl_cmd] [-o option] [-p port] [-Q query_option] [-R address]
[-S ctl_path] [-W host:port] [-w local_tun[:remote_tun]]
destination [command]
Для подключения к удаленному серверу по SSH используется команда:
ssh [email protected]
Если SSH сервер запущен на нестандартном порту, отличном от TCP/22, можно указать номер порта:
ssh [email protected] -p port
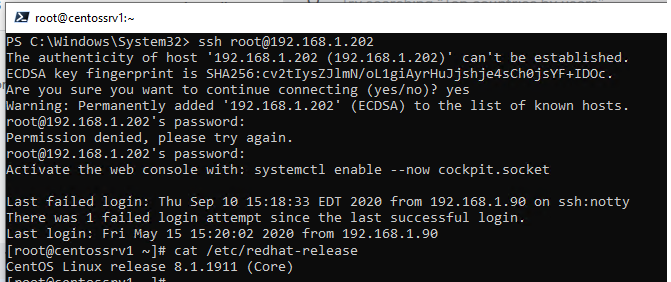
Например, чтобы подключиться к Linux хосту с IP адресом 192.168.1.202 под root, выполните:
ssh [email protected]
При первом подключении появится запрос на добавление ключа хоста в доверенные, наберите yes -> Enter (при этом отпечаток ключа хоста добавляется в файл C:Usersusername.sshknown_hosts).
Затем появится запрос пароля указанной учетной записи, укажите пароль root, после чего должна открытся консоль удаленного Linux сервера (в моем примере на удаленном сервере установлен CentOS 8).
С помощью SSH вы можете подключаться не только к *Nix подобным ОС, но и к Windows. В одной из предыдущих статей мы показали, как настроить OpenSSH сервер на Windows 10 и подключиться к нему с другого компьютера Windows с помощью SSH клиента.
Если вы используете SSH аутентификацию по RSA ключам (см. пример с настройкой SSH аутентификации по ключам в Windows), вы можете указать путь к файлу с закрытым ключом в клиенте SSH так:
ssh [email protected] -i "C:Usersusername.sshid_rsa"
Также вы можете добавить ваш закрытый ключ в SSH-Agent. Сначала нужно включить службу ssh-agent и настроить ее автозапуск:
set-service ssh-agent StartupType ‘Automatic’
Start-Service ssh-agent
Добавим ваш закрытый ключ в базу ssh-agent:
ssh-add "C:Usersusername.sshid_rsa"
Теперь вы можете подключиться к серверу по SSH без указания пути к RSA ключу, он будет использоваться автоматически. Пароль для подключения не запрашивается (если только вы не защитили ваш RSA ключ отдельным паролем):
ssh [email protected]
Еще несколько полезных аргументов SSH:
-
-C
– сжимать трафик между клиентом и сервером (полезно на медленных и нестабильных подключениях); -
-v
– вывод подробной информации обо всех действия клиента ssh; -
-R
/
-L
– можно использовать для проброса портов через SSH туннель.
SCP: копирование файлов из/в Windows через SSH
С помощью утилиты scp.exe, которая входит в состав пакета клиента SSH, вы можете скопировать файл с вашего компьютера на SSH сервер:
scp.exe "E:ISOCentOS-8.1.1911-x86_64.iso" [email protected]:/home
Можно рекурсивно скопировать все содержимое каталога:
scp -r E:ISO [email protected]:/home
И наоборот, вы можете скопировать файл с удаленного сервера на ваш компьютер:
scp.exe [email protected]:/home/CentOS-8.1.1911-x86_64.iso e:tmp
Если вы настроите аутентификацию по RSA ключам, то при копировании файлов не будет появляться запрос на ввод пароля для подключения к SSH серверу. Это удобно, когда вам нужно настроить автоматическое копирование файлов по расписанию.
Итак, теперь вы можете прямо из Windows 10 подключаться к SSH серверам, копировать файлы с помощью scp без установки сторонних приложений и утилит.
-
Partition Wizard
-
Partition Magic
- How to Set up SSH Client and Server on Windows 10 [Full Guide]
By Ariel | Follow |
Last Updated April 23, 2020
What is SSH Client Windows? How to set up SSH client and server on your Windows 10 PC? If you are also trying to figure them out, this post of MiniTool will walk you through detailed steps to use SSH client Windows 10.
About SSH Client Windows 10
What is SSH Windows? SSH was developed with encryption that intends to provide integrity and confidentiality of data via an unsecured network. That indicates when accessing an unsecured network by using a client server architecture, SSH Windows can provide you with a secure channel that connects to an SSH client app with an SSH server.
In order to authenticate the remote computer, SSH usually needs public-key cryptography. There are 2 major ways to use SSH Windows 10, you can use automatically or manually generated public-private key pair.
Right now, I believe that you already have an overall understanding of SSH Windows. Let’s see how to set up SSH client Windows 10.
How to Install SSH Client and Server on Windows 10
The SSH client is an optional feature on Windows 10 that isn’t installed by default. To use Windows 10 SSH client and server smoothly, you need to install OpenSSH client firstly. This is because OpenSSH is set up as a default SSH client on Windows 10 operating system.
The OpenSSH client and OpenSSH server need to be installed separately in Windows 10 1809 and Windows Server 2019. So, please install OpenSSH client and server Windows 10 respectively. For that:
Step 1. Press Win + I keys to open the Settings app and click on the Apps section to go on.
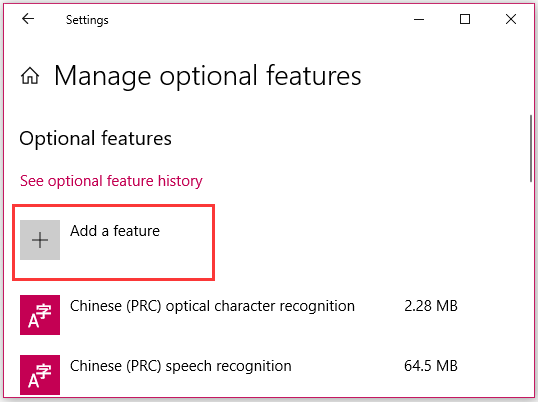
Step 2. Scroll down the right sidebar and click on the Manage optional features under the Apps & features section.
Step 3. In the pop-up window, click on the Add a feature at the top of the list of installed features.
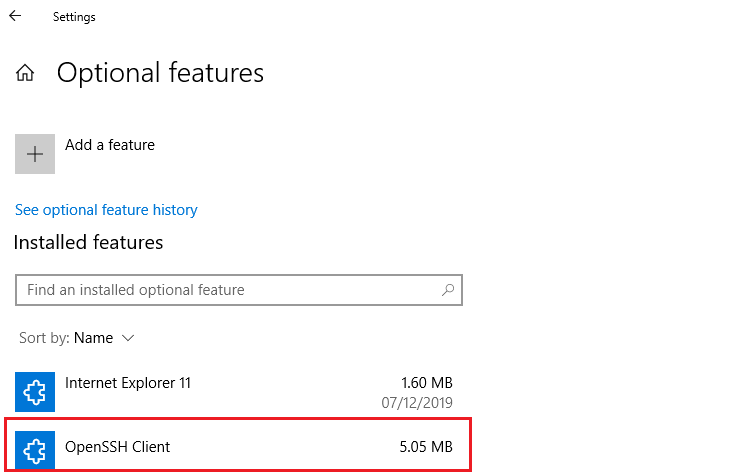
Tip: You can scroll down this list of installed programs to check if the OpenSSH client and server have been installed. If it is, you can skip this step.
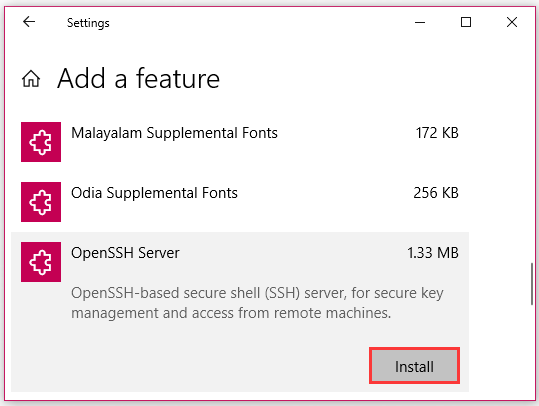
Step 4. Scroll down to find the OpenSSH Client program, double click it and click on the Install button.
Step 5. Then you can follow the same steps to install the OpenSSH server on your Windows 10 PC.
Note: When installing the OpenSHH server, you need to create and enable a firewall rule named “OpenSSH-Server-In-TCP”, which will allow inbound SSH traffic on port 22. You can refer to this post to create the firewall rule.
How to Use SSH Client Windows 10
Once you installed OpenSSH client and server on Windows 10, you can try using the Windows 10 SSH client by running the SSH command. You can run the SSH command in either a PowerShell window or a Command Prompt window.
Here mainly focus on how to use SSH client Windows 10 via PowerShell. To do so, follow the steps below carefully.
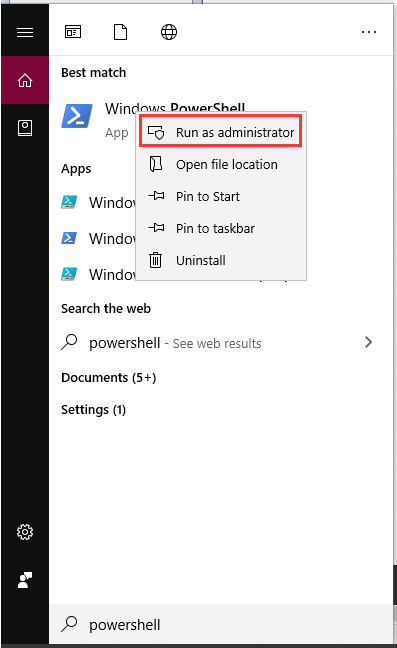
Step 1. Type PowerShell in the search box, and then right-click the Windows PowerShell and select Run as administrator.
Step 2. Type the ssh command and hit Enter.
Tip: If you receive an error message saying the command isn’t found, you need to sign out and sign in again. Then restart your computer.
Step 3. To continue connecting to an SSH server at a ssh.example.com on port 22, you can type the ssh [email protected] command and hit Enter. If you want to run on a different port, you can type a specified port with the –p witch and hit Enter.
About The Author
Position: Columnist
Ariel is an enthusiastic IT columnist focusing on partition management, data recovery, and Windows issues. She has helped users fix various problems like PS4 corrupted disk, unexpected store exception error, the green screen of death error, etc. If you are searching for methods to optimize your storage device and restore lost data from different storage devices, then Ariel can provide reliable solutions for these issues.
-
Partition Wizard
-
Partition Magic
- How to Set up SSH Client and Server on Windows 10 [Full Guide]
By Ariel | Follow |
Last Updated April 23, 2020
What is SSH Client Windows? How to set up SSH client and server on your Windows 10 PC? If you are also trying to figure them out, this post of MiniTool will walk you through detailed steps to use SSH client Windows 10.
About SSH Client Windows 10
What is SSH Windows? SSH was developed with encryption that intends to provide integrity and confidentiality of data via an unsecured network. That indicates when accessing an unsecured network by using a client server architecture, SSH Windows can provide you with a secure channel that connects to an SSH client app with an SSH server.
In order to authenticate the remote computer, SSH usually needs public-key cryptography. There are 2 major ways to use SSH Windows 10, you can use automatically or manually generated public-private key pair.
Right now, I believe that you already have an overall understanding of SSH Windows. Let’s see how to set up SSH client Windows 10.
How to Install SSH Client and Server on Windows 10
The SSH client is an optional feature on Windows 10 that isn’t installed by default. To use Windows 10 SSH client and server smoothly, you need to install OpenSSH client firstly. This is because OpenSSH is set up as a default SSH client on Windows 10 operating system.
The OpenSSH client and OpenSSH server need to be installed separately in Windows 10 1809 and Windows Server 2019. So, please install OpenSSH client and server Windows 10 respectively. For that:
Step 1. Press Win + I keys to open the Settings app and click on the Apps section to go on.
Step 2. Scroll down the right sidebar and click on the Manage optional features under the Apps & features section.
Step 3. In the pop-up window, click on the Add a feature at the top of the list of installed features.
Tip: You can scroll down this list of installed programs to check if the OpenSSH client and server have been installed. If it is, you can skip this step.
Step 4. Scroll down to find the OpenSSH Client program, double click it and click on the Install button.
Step 5. Then you can follow the same steps to install the OpenSSH server on your Windows 10 PC.
Note: When installing the OpenSHH server, you need to create and enable a firewall rule named “OpenSSH-Server-In-TCP”, which will allow inbound SSH traffic on port 22. You can refer to this post to create the firewall rule.
How to Use SSH Client Windows 10
Once you installed OpenSSH client and server on Windows 10, you can try using the Windows 10 SSH client by running the SSH command. You can run the SSH command in either a PowerShell window or a Command Prompt window.
Here mainly focus on how to use SSH client Windows 10 via PowerShell. To do so, follow the steps below carefully.
Step 1. Type PowerShell in the search box, and then right-click the Windows PowerShell and select Run as administrator.
Step 2. Type the ssh command and hit Enter.
Tip: If you receive an error message saying the command isn’t found, you need to sign out and sign in again. Then restart your computer.
Step 3. To continue connecting to an SSH server at a ssh.example.com on port 22, you can type the ssh [email protected] command and hit Enter. If you want to run on a different port, you can type a specified port with the –p witch and hit Enter.
About The Author
Position: Columnist
Ariel is an enthusiastic IT columnist focusing on partition management, data recovery, and Windows issues. She has helped users fix various problems like PS4 corrupted disk, unexpected store exception error, the green screen of death error, etc. If you are searching for methods to optimize your storage device and restore lost data from different storage devices, then Ariel can provide reliable solutions for these issues.
The built-in SSH client appeared in Windows 10 and Windows Server 2019. Ssh.exe can be used to securely connect to Linux/UNIX servers, VMWare ESXi hosts and other devices instead of Putty, MTPuTTY and other third-party SSH clients. The native Windows SSH client is based on the OpenSSH port and is preinstalled in Windows starting from Windows 10 build 1809.
Contents:
- How to Enable (Install) the OpenSSH Client on Windows 10?
- Using a Native SSH Client on Windows 10
- Using SCP.exe to Transfer Files to/from Windows Host Using SSH
How to Enable (Install) the OpenSSH Client on Windows 10?
The OpenSSH client is included in Windows 10 Features on Demand (like RSAT). The SSH client is installed by default on Windows Server 2019, Windows 10 1809 and newer builds.
Check that the SSH client is installed:
Get-WindowsCapability -Online | ? Name -like 'OpenSSH.Client*'

In our example, the OpenSSH client is installed (State: Installed).
If not (State: Not Present), you can install it using:
- The PowerShell command:
Add-WindowsCapability -Online -Name OpenSSH.Client* - With DISM:
dism /Online /Add-Capability /CapabilityName:OpenSSH.Server~~~~0.0.1.0 - Via Settings -> Apps -> Optional features -> Add a feature. Find OpenSSH client in the list and click Install.
OpenSSH binary files are located in c:WindowsSystem32OpenSSH.
ssh.exe– the SSH client executable;scp.exe– tool for copying files in an SSH session;ssh-keygen.exe– tool to generate RSA SSH authentication keys;ssh-agent.exe– used to manage RSA keys;ssh-add.exe– adds a key to the SSH agent database.
You can install OpenSSH on previous Windows versions as well: just download and install the Win32-OpenSSH from GitHub (you can find an example in the article: Configuring SSH FTP on Windows).
Using a Native SSH Client on Windows 10
To start the SSH client, run the PowerShell or cmd.exe prompt. You can list the available options and syntax for ssh.exe:
ssh
usage: ssh [-46AaCfGgKkMNnqsTtVvXxYy] [-b bind_address] [-c cipher_spec]
[-D [bind_address:]port] [-E log_file] [-e escape_char]
[-F configfile] [-I pkcs11] [-i identity_file]
[-J [user@]host[:port]] [-L address] [-l login_name] [-m mac_spec]
[-O ctl_cmd] [-o option] [-p port] [-Q query_option] [-R address]
[-S ctl_path] [-W host:port] [-w local_tun[:remote_tun]]
destination [command]
In order to connect to a remote server using SSH, use the following command:
ssh username@host
If your SSH server is running on a port different from the standard TCP/22, specify the port number:
ssh username@host -p port
For example, to connect to a Linux host with the IP address 192.168.1.102 as root, run this command:
ssh root@192.168.1.102
At the first connection, you will see a request to add the host key to the trusted list. Type yes and press ENTER. Then the host key fingerprint is added to the C:Usersusername.sshknown_hosts file.
You will be prompted for a password. Specify your root password, and your remote Linux server’s console should open (in my example, CentOS is installed on the remote server).
Using SSH, you can connect both to *Nix OSs and Windows. In one of the previous articles, we showed how to configure an OpenSSH server in Windows 10 and connect to it from a Windows host using an SSH client.
If you use the SSH authentication with RSA keys (see an example on how to configure SSH authentication using keys in Windows), you can specify a path to the private key file in your SSH client as follows:
ssh root@192.168.1.102 -i "C:Usersusername.sshid_rsa"
You can also add a private key to SSH-Agent. First, enable the ssh-agent service and configure automatic startup for it.
set-service ssh-agent StartupType 'Automatic'

Start-Service ssh-agent
Add your private key to the ssh-agent database:
ssh-add "C:Usersusername.sshid_rsa"
Then you will be able to connect to your server over SSH without specifying the path to the RSA key. It will be used automatically. Now you can securely connect to your server without a password (if you have not protected your RSA key with a different password):
ssh root@192.168.1.102
Here are some more useful SSH arguments:
-C– used to compress traffic between client and server (it is useful in case of slow or unstable connections)-v– displays detailed information about all SSH client actions-R/-L– can be used to forward ports using an SSH tunnel
Using SCP.exe to Transfer Files to/from Windows Host Using SSH
Using the scp.exe tool (is a part of Windows 10 SSH client package), you can copy a file from your computer to the SSH server:
scp.exe "E:ISOCentOS-8.1.x86_64.iso" root@192.168.1.202:/home
You can copy all directory contents recursively:
scp -r E:ISO root@192.168.1.202:/home
And vice versa, you can transfer a file from a remote server to your computer:
scp.exe root@192.168.1.202:/home/CentOS-8.1.x86_64.iso c:iso
If you configure authentication using RSA keys, you won’t be prompted to enter your password to transfer files. This is useful if you want to configure automatic scheduled file copying.
Thus, you can connect to SSH servers directly from your Windows 10, copy files using scp without any other third-party apps or tools.
— Advertisement —
Hello, how are you? In the previous article, we saw how to enable Telnet in Windows Server. This protocol is very useful, but it has a serious security breach. For that reason, we recommend using the SSH connection. It is a remote administration protocol that allows users to control and modify their remote servers over the Internet. To do this, it uses an authentication mechanism. The protocol works by authenticating a remote user and transferring inputs from the client to the host. It then retransmits the output back to the client. But most importantly, the communication is delivered encrypted so the security is much higher than Telnet. In view of the above, let’s see how to install an SSH client and server in Windows 10.
Prerequisite
In order to enjoy all the benefits of this protocol, it is necessary to have a Windows version equal to or greater than 1803.
Installing the SSH client
First, let’s verify the SSH client installation. With this intention, enter in Windows Settings pressing the combination Win+I. Once there, select Apps
Then click on Optional features.
In the next window, you will see all the optional functions. Then scroll down to find the OpenSSH Client. In this case, the client is already installed, so there is nothing else to do. In case it is not, just click on the install button.
Add SSH server in Windows 10
From the previous screen please click on Add a feature:
Now scroll down and select OpenSSH Server. Press install and wait a few seconds while the function is installed. Once the action is executed, please restart the computer to confirm the changes.
Configure OpenSSH Server to start with Windows.
From now on the client and the SSH server are installed. For the SSH server to be activated every time we start Windows we will have to do the following. Press the Win+R combination and run services.msc
Then scroll down and select OpenSSH SSH Server and OpenSSH Authentication Agent:
Now what we are going to do is to activate them so that they start every time you start Windows. With that intention double-click on OpenSSH Authentication Agent and in the startup type select Automatic. Then press Apply and finally accept.
We will repeat this procedure with the OpenSHH SSH Server Service
As we did in the previous step, restart the computer to set the changes. With these steps, we will be able to install the server and the SSH client in Windows 10.
Testing the SSH client and server
After restarting the computer, it is necessary to verify if the SSH services are active. To do this, open a PowerShell as administrator by pressing the Win+X combination.
Then execute the following command:
Get-Service -Name *ssh*
If all goes well, you will see the next result in the PowerShell, showing the two services running:
Configuring the Windows firewall
In order to have access to our computer through SSH we have to configure the Windows Firewall. To do this we open a PowerShell as administrator and execute the following command:
.netsh advfirewall firewall add rule name="SSHD Port" dir=in action=allow protocol=TCP localport=22
It then tests whether the SSH server is listening on port 22. For this purpose, from a PowerShell with administrator privileges runs the following command:
.netstat -bano | .more.com
Connect to an SSH server from Windows.
From now on we can connect remotely to an SSH server. To execute it, it is necessary to know 3 parameters:
- User name
- Server IP Address
- Know the port where the SSH server is listening. In this case, the port is 22.
- User password
Once this data is known, open a PowerShell and run the following command:
ssh -p 22 [email protected]
Then add the password to access the remote computer. And you will have access via PowerShell to the SSH server.
Conclusion
Finally, we have seen how to install an SSH client and server in Windows 10. This way we will be able to remotely manage any device that uses this protocol. Additionally, security is increased because the communication between host and client is encrypted. In this way, our data remains safe from possible attackers. This is all for the moments, before saying goodbye I want to invite you to see our post about Telnet in Windows Server.
Одним из наиболее распространенных способов связи между компьютерами, в частности машинами Linux и веб-серверами, является SSH. Когда дело доходит до установления такого рода связи в Windows, по умолчанию выбирается установка PuTTY.
Однако благодаря Windows PowerShell вам может больше не понадобиться PuTTY. Давайте посмотрим, как настроить SSH-доступ в Windows 10 и могут ли новые инструменты вытеснить PuTTY.
Установка функциональности SSH в Windows 10 PowerShell достаточно проста, но пункты меню для нее несколько скрыты. Вот что вам нужно сделать:
- Откройте Настройки.
- Просмотр приложений.
- Перейти к управлению дополнительными функциями.
- Нажмите Добавить функцию.
- Выберите OpenSSH Client.
- Подождите, затем перезагрузите компьютер.
После этого вы можете установить SSH-соединение с другими совместимыми компьютерами. Если SSH-сервер был установлен и настроен на удаленном компьютере, можно установить соединение.
Подробная инструкция по установке
Реализация SSH в Windows 10 в PowerShell является версией проекта OpenSSH. Вы можете найти страницу проекта на GitHub.
Вы можете обнаружить, что SSH уже установлен на вашем компьютере с Windows 10 (он был включен в обновление за апрель 2018 года), но если нет, его можно легко добавить.
Чтобы проверить, откройте меню «Опытный пользователь» (щелкните правой кнопкой мыши Пуск или нажмите клавишу Windows + X ) и выберите Windows PowerShell. Здесь введите команду «ssh». Если SSH еще не установлен, вы увидите такой экран:
Исправить это достаточно просто. Нажмите клавишу Windows + I, чтобы открыть представление «Настройки», затем перейдите в «Приложения» и найдите «Управление дополнительными функциями . Нажмите здесь, затем найдите запись с пометкой «OpenSSH».
Если вы не видите его, нажмите Добавить функцию, а затем прокрутите вниз, пока не увидите OpenSSH Client. Нажмите, чтобы развернуть и просмотреть описание.
Когда вы будете готовы, нажмите Установить, чтобы добавить его на свой компьютер. Через несколько мгновений будет установлен новый SSH-клиент для Windows PowerShell. Стоит перезагрузить Windows, чтобы убедиться, что приложение установлено правильно.
Замечание о приложении SSH Server
Стоит подчеркнуть тот факт, что вы также можете установить SSH-сервер. Хотя маловероятно, что Microsoft разрешит любую форму универсального удаленного администрирования через SSH, использование его в качестве опции, тем не менее, полезно.
Чтобы установить это, повторите описанные выше шаги, выбрав OpenSSH Server .
Использование SSH в Windows PowerShell
После того, как SSH установлен и работает, вы можете использовать его для связи с другим компьютером. Например, вы можете использовать его для доступа к Raspberry Pi (один из нескольких вариантов об этом маленьком компьютере).
Использование простое. В PowerShell введите команду ssh, затем имя пользователя для учетной записи на удаленном устройстве и его IP-адрес.
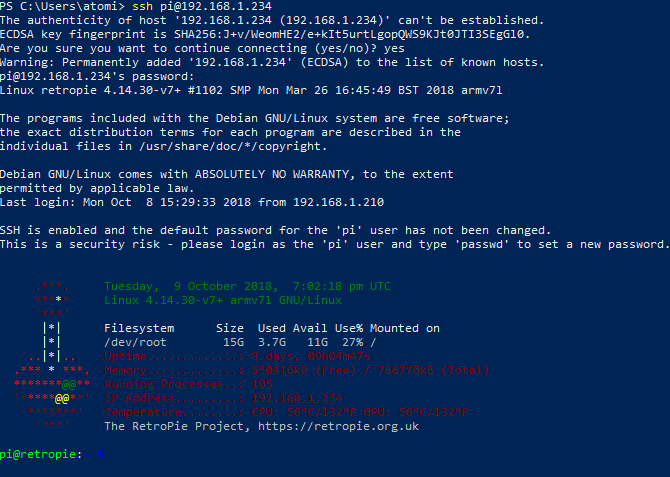
Например, чтобы подключиться к моей коробке Raspberry Pi под управлением RetroPie, я использовал:
ssh [email protected]
На этом этапе удаленное устройство должно предложить вам принять безопасный ключ. Введите Да, чтобы согласиться с этим, затем введите в командной строке пароль для имени пользователя, которое вы использовали.
Через несколько минут вы будете подключены к удаленному устройству Linux, готовому выполнять любые необходимые вам задачи.
SSH-функции PowerShell и PuTTY
PuTTY долгое время был предпочтительным выбором для SSH на Windows. Будь то управление веб-серверами, доступ к Интернету вещей, устройства или удаленное администрирование ПК с Linux, это легкое и простое в использовании приложение.
Одной из причин стойкости PuTTY является широкий выбор функций. Итак, может ли SSH в Windows PowerShell конкурировать с PuTTY?
Ну, с точки зрения обеспечения функциональности SSH, да, это может. Вы можете узнать, как использовать некоторые расширенные функции SSH в Windows 10, введя команду ssh:
ssh
Результирующий список опций обрисовывает в общих чертах особенности. Например, вы можете указать порт:
ssh [username]@[hostname] -p [port]
Возможности хорошие!
Хотя вы можете связать адрес с OpenSSH в Windows, вы ограничены количеством адресов, которые можете сохранить.
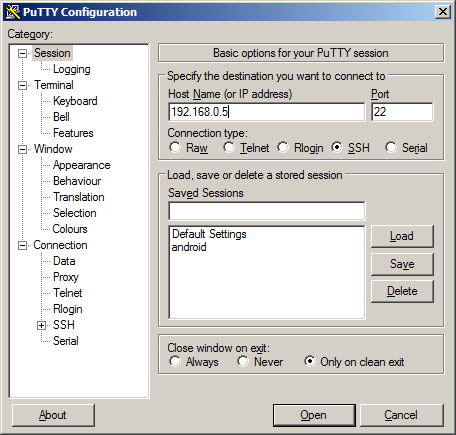
Есть причина, почему PuTTY остается популярным. Приложение не только позволяет сохранять (и называть) ваши соединения, но и поддерживает соединения по Telnet, Serial и другим протоколам. Внешний вид PuTTY также настраивается, его можно быстро запустить с рабочего стола. В общем, PuTTY — это надежная утилита, которая обрабатывает практически все, что вы можете на нее бросить.
Почему SSH, когда вы можете использовать Linux?
Хотя удаленное управление Linux через SSH может быть жизненно важным, вам может даже не понадобиться SSH. В Windows 10 теперь есть подсистема Linux и командная строка в стиле Bash.
Это означает, что вы можете легко вводить команды Linux и получать реалистичные ответы. Хотя это может быть не идеально для всех сценариев, если вам нужен доступ к Linux для обучения в колледже или для обучения и у вас нет доступа по SSH (независимо от приложения) к устройству Linux, это может быть идеальным вариантом.
Конечно, это не единственный вариант. Если вам нужно практиковать команды Bash в Windows, вы всегда можете настроить виртуальную машину. Просто установите дистрибутив Linux в него и (если разрешить аппаратное обеспечение) у вас есть готовая к использованию ОС Linux.
Не пора ли отказаться от PuTTY в Windows 10?
SSH прост в использовании в Windows 10 PowerShell. Тем не менее, отсутствие функций, а также необходимость загрузки еще нескольких щелчков означает, что вы можете предпочесть использовать PuTTY. В любом случае, тот факт, что в Windows 10 есть два хороших варианта SSH, стоит отметить.
When you need to manage a *nix machine from the distance, you will almost always use SSH. Any BSD or Linux-based operating system running on a server will come with the OpenSSH daemon preinstalled. To “talk” to this daemon and interact with the remote machine, you also need an SSH client. PuTTY has long been the most popular SSH client used on Windows, but since the last major update, Windows 10 now comes with an SSH client preinstalled. It’s easier and faster to use this client rather than installing and configuring PuTTY.
First, check if it’s already installed. Press the Windows logo key on your keyboard or click on the Start Menu. Type cmd and open Command Prompt.
Now, type ssh and press Enter. A short summary of command line switches should be displayed. This means the client is installed, and you can skip the rest of this section.
If you get a message that says the command is not recognized, click on the Start Menu and type features. Open “Apps & features” and click on “Manage optional features.”
Next, click on “Add a feature” and scroll down until you find “OpenSSH Client.” Install it and you should be set to go.
How to Use Windows’ Built-in OpenSSH Client
If you are familiar with the ssh command in Linux, you already know how to use it on Windows. It has the same syntax and command line switches. You can read the complete SSH manual on OpenBSD’s website.
The basic syntax to connect to a server is ssh username@IP-address-or-hostname.
Examples:
ssh root@203.0.113.1
ssh john@example.com
When you log in with a password, it’s easy. Just type yes to accept the fingerprint, and then type your password (characters won’t be displayed on screen).
However, it is recommended that instead of passwords you use SSH keys. Zombie computers from botnets constantly scan and try to bruteforce passwords on OpenSSH servers. Keys cannot be bruteforced. They are much more secure than using the commonly recommended scheme of passwords plus fail2ban. Fail2ban blocks multiple attempts from the same IP, but another IP will try different passwords until one of them gets lucky.
How to Log in with SSH Keys
There are many methods to create key pairs for SSH authentication. And you also have ssh-keygen available on Windows, which you can use in the command prompt. After you create the pair, add the public key to your server and disable password logins. Afterwards, save the private key on your Windows computer.
When you log in you can provide the path to this (private) key after the -i parameter in a command such as:
ssh -i C:Usersmtetestkey root@203.0.113.1
Otherwise you can move a private key to its default location. After the first connection, the SSH client creates a directory, .ssh, in your current user directory. You can open the directory by typing this in the command prompt:
explorer %userprofile%.ssh
Now, copy your private key here and name it id_rsa.
From now on, you can log in with this private key without using the -i parameter.
Useful SSH Command Parameters
-p– Use this if your SSH server is listening on a different port (other than 22). Example:ssh -p 4444 root@203.0.113.1-C– Compress traffic between client and server. Only useful on very slow connections-v– Verbose mode, outputs a lot more about what is going on. Can help you debug connection issues.
Example command:
ssh -p 4444 -C -v root@203.0.113.1
Conclusion
Since this is basically the same OpenSSH client you find on Linux machines, some commands such as sftp are also available. This facilitates the upload and download of files to/from remote servers. For those that prefer the command line, this means they don’t need to install FTP clients such as FileZilla anymore. It’s also possible to set up SSH tunnels with the ssh command. We may cover this in a future tutorial, since it makes some “impossible” things possible, like accepting outside connections on your local computer, even if your ISP doesn’t offer you a private external IP address (more clients sit behind the same Internet IP address).
Alexandru Andrei
Fell in love with computers when he was four years old. 27 years later, the passion is still burning, fueling constant learning. Spends most of his time in terminal windows and SSH sessions, managing Linux desktops and servers.
Subscribe to our newsletter!
Our latest tutorials delivered straight to your inbox

