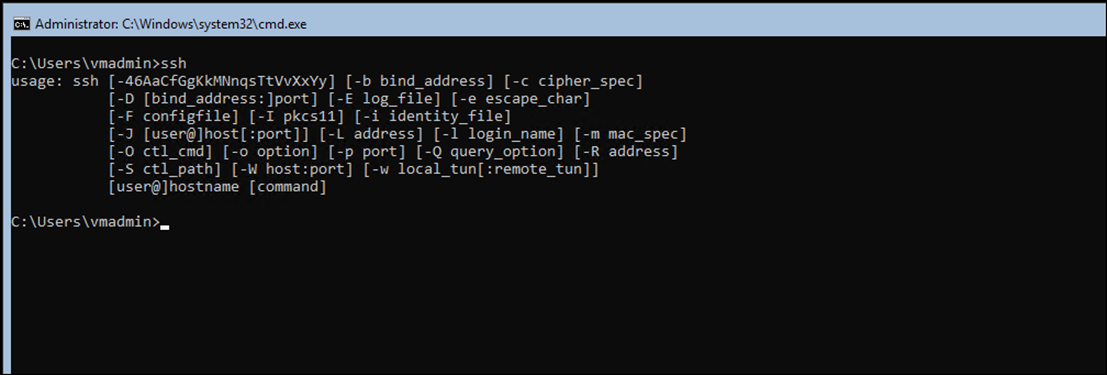
You might find it useful to install OpenSSH on your Windows server. Running SSH on your Windows server means that you can transfer files using Secure Copy (SCP) or SFTP. Aside from SCP and SFTP, you can open a secure Powershell shell or a Bash shell if Windows Subsystem for Linux (WSL) is enabled on your Windows server.
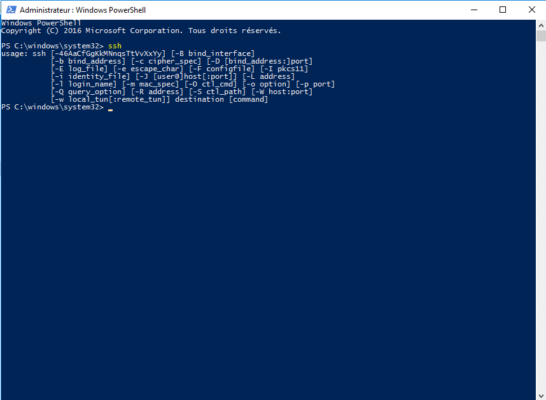
By default, you will enter into a Windows CMD shell when you connect to the server using SSH.
This guide will explain the steps to install and configure OpenSSH in Windows Server 2016. It would be best if you were prepared to log in to your Hostwinds Windows Server to continue with this guide.
Step 1: Download and Install OpenSSH
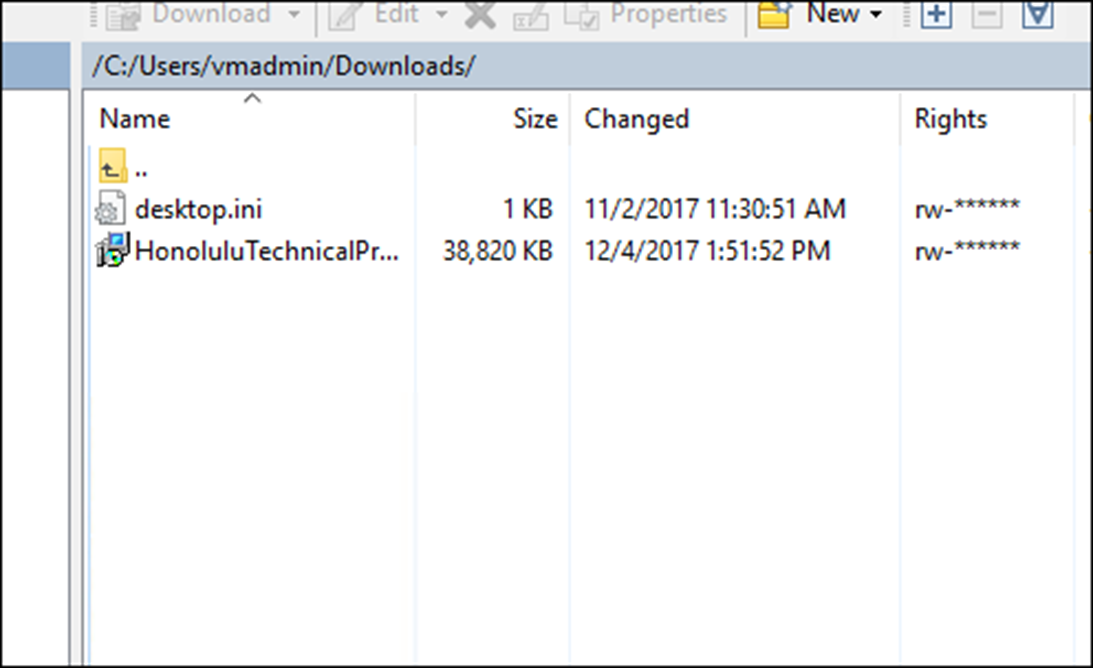
Start by accessing your server via RDP (from Mac), and download the latest release of OpenSSH (OpenSSH-Win64.zip).
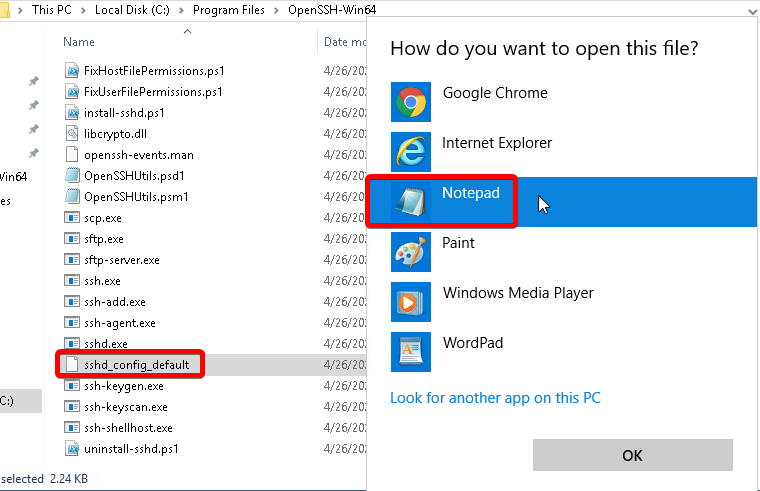
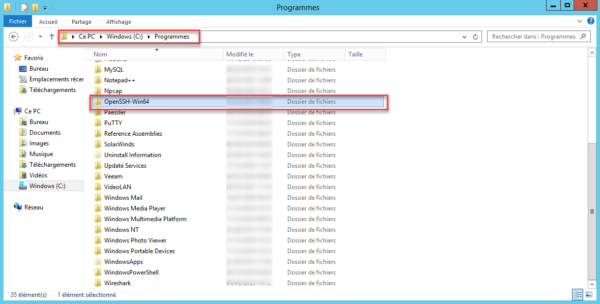
Locate the downloaded file, right-click it, and Extract All to C:Program FilesOpenSSH-Win64.
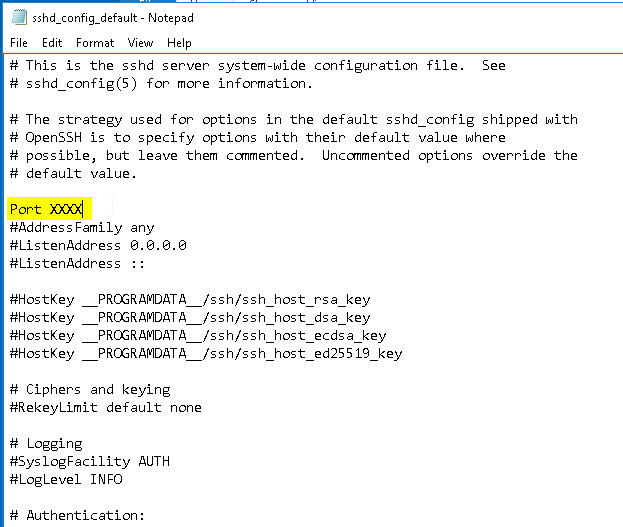
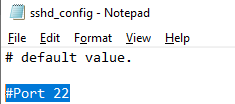
Optional: To change the default SSH port to something other than 22, select the sshd_config_default file in the OpenSSH folder and open with a text editor:
Uncomment Port 22 and change it to your desired port, then save the file:
End optional step.
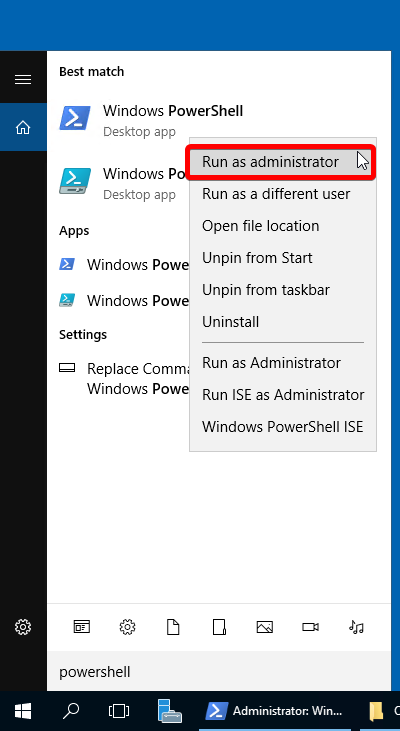
Next, search for and right-click Powershell to Run as administrator:
Modify the Path system environment variable by running the command:
setx PATH "$env:path;C:Program FilesOpenSSH-Win64" -m
You should see the following output:
SUCCESS: Specified value was saved.
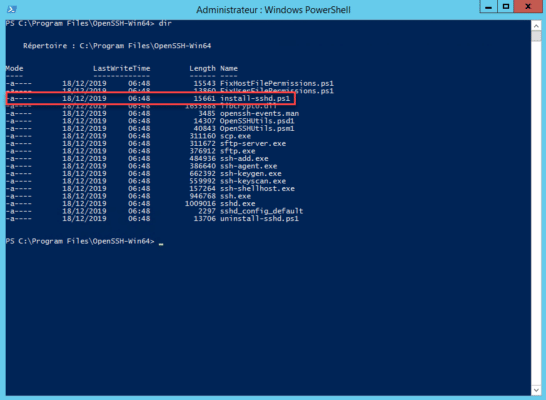
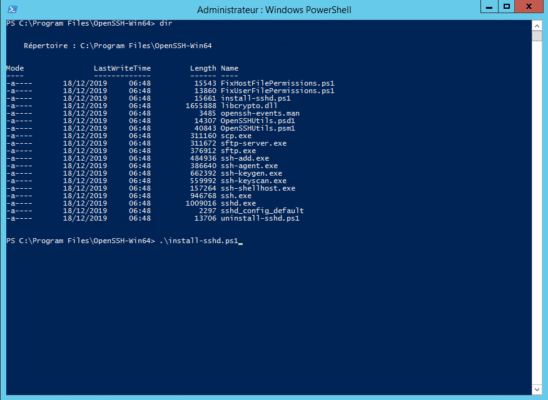
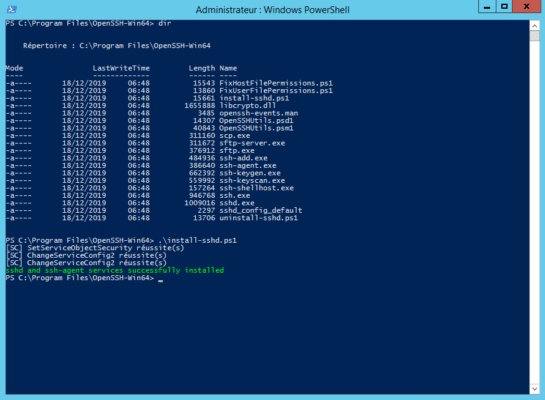
Next, change to the OpenSSH directory:
cd "C:Program FilesOpenSSH-Win64"
Then run the install script:
.install-sshd.ps1
Next, enable automatic startup and start sshd and ssh-agent:
Set-Service sshd -StartupType Automatic; Set-Service ssh-agent -StartupType Automatic; Start-Service sshd; Start-Service ssh-agent
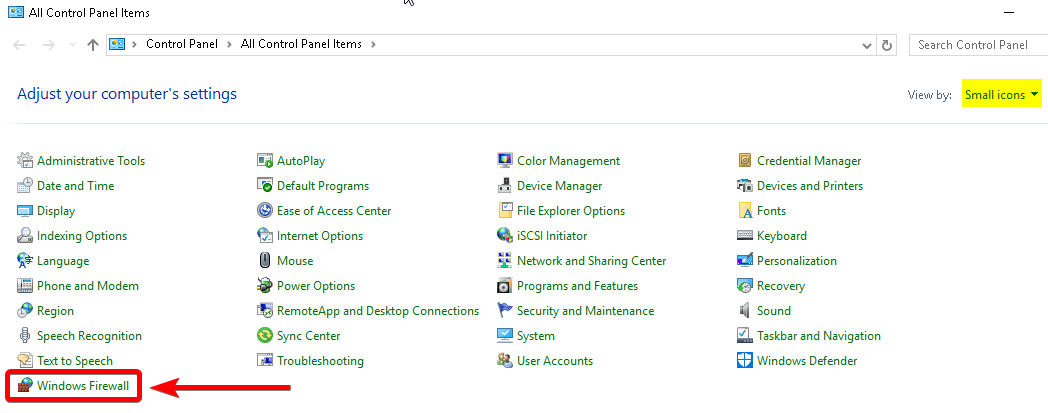
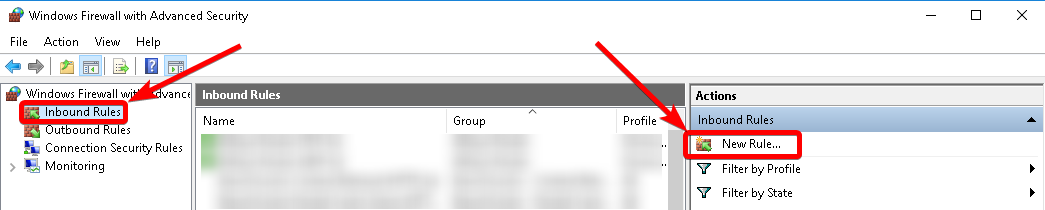
Step 2: Allow Access in Windows Firewall
Start by opening Control Panel > Windows Firewall:
Select Advanced Settings on the left-hand side, then select Inbound Rules > New Rule…:
Under Rule Type, select Custom > Next.
Under Program, select All programs > Next.
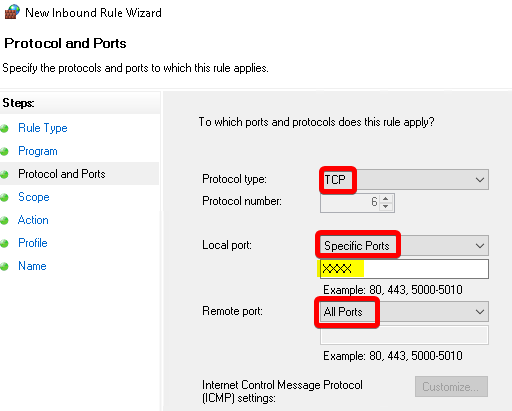
Under Protocols and Ports, enter your desired SSH port with the following selections:
Under Scope, let the rule apply to Any IP address for remote and local IP addresses, then Next.
Under Action, select Allow the connection > Next.
Under Profile, leave Domain, Private, and Public checked > Next.
Lastly, name the rule and select Finish.
Now you can access your Windows server using SSH!
This week, The Windows Insider team announced that OpenSSH has arrived to Windows Server 2016 1709 and Windows 10 1709.
Note: A new version of this article has been published for Windows Server 2019.
In this article, I’ll show you how to Install the new OpenSSH Server and Client and how I configure OpenSSH Server on my Windows Server 2016 1709.
I’ll also show you how to use WinSCP and copy files from my Windows Server 2016 1709 Server using SSH.
I have to say that before doing this article and researching the topic, I saw 10 blogs and non-of them showed how to configure it properly and all articles were wrong.
On this blog, I always make sure that everything that I post works 100% and I’ve tried on real Servers, So you can be sure that If you follow this post thing will work.
Get Started
To get this thing working, I’m using Windows Server 2016 1709 on Microsoft Azure.
In my case, I’ll install both Server and client on 1703 a connect to it using WinSCP and SSH from another Windows Server 2016.
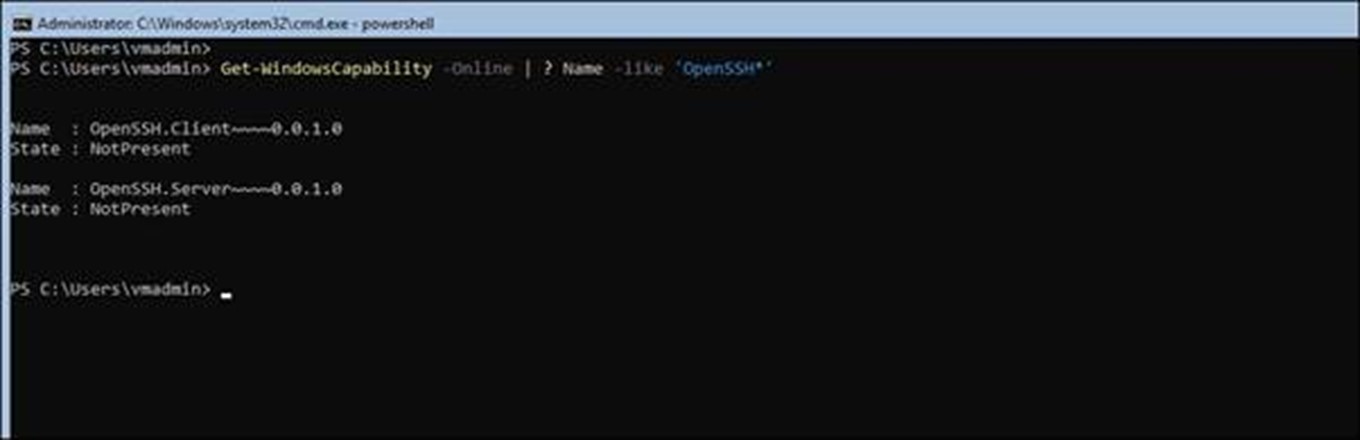
In the line below, I’ll first check that that OpenSSH Is not Installed on my Window Server 2016 1709 Server.
Get-WindowsCapability -Online | ? Name -like 'OpenSSH*'
As you can OpenSSH Is not Installed and I’ll go ahead and install it.
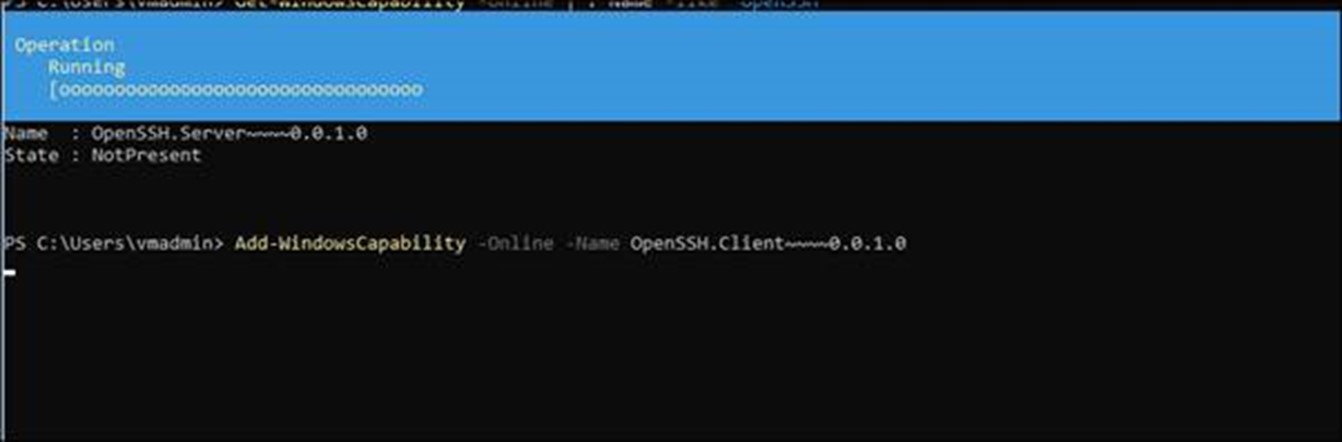
Install Client
To Install the OpenSSH Client, I’ll use the cmdlet below which, If you don’t Install the Server part just restart the server when done.
Add-WindowsCapability -Online -Name OpenSSH.Client~~~~0.0.1.0
Install SSH Server
This is the more important part of this post, and using the line below I’m installing the OpenSSH Server which will allow me to connect to my Windows Server using SSH and copy file using WinSCP.
To Install the OpenSSH Server I’m running the line below.
Add-WindowsCapability -Online -Name OpenSSH.Server~~~~0.0.1.0

Use Client
If you are just Installing the client, just restart the server and you’re ready to connect to other host using SSH with the line below.
Start-service ssh-agent
Once Installed, the two Services below will be Installed on my Server
- OpenSSH Client – SSH-Agent
- OpenSSH Server – sshd
Below, You will see the two Installed Services.
Get-service ssh*

Note – In order for the Server Service to work, I’ll need to configure it first.
Restart-server
Configure SSH Server
To configure the SSH Server to accept the connection, I’ll run the cmdlets below that will create a security key and will allow connections.
cd C:WindowsSystem32OpenSSH

.ssh-keygen -A

.ssh-add ssh_host_ed25519_key

Install-Module -Force OpenSSHUtils
Repair-SshdHostKeyPermission -FilePath
Start-Service sshd
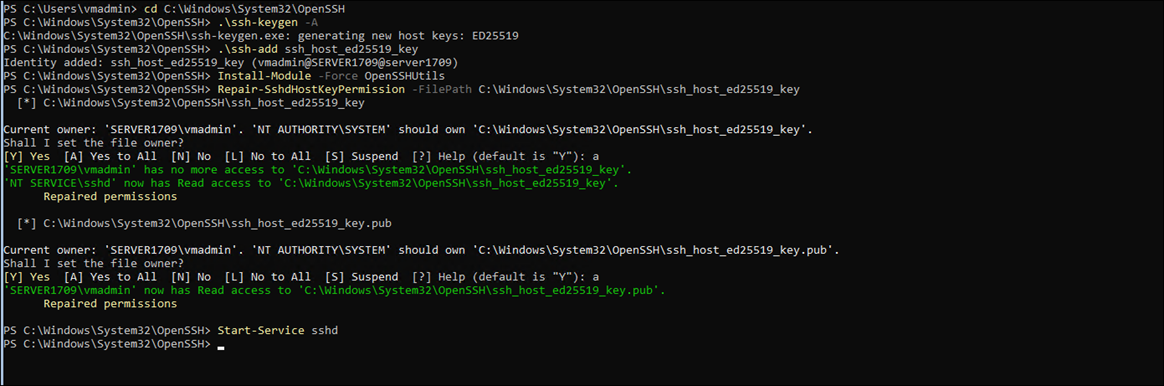
Next, I’ll run the cmdlet below
Install-Module -Force OpenSSHUtils
Repair-SshdHostKeyPermission -FilePath C:WindowsSystem32OpenSSHssh_host_ed25519_key

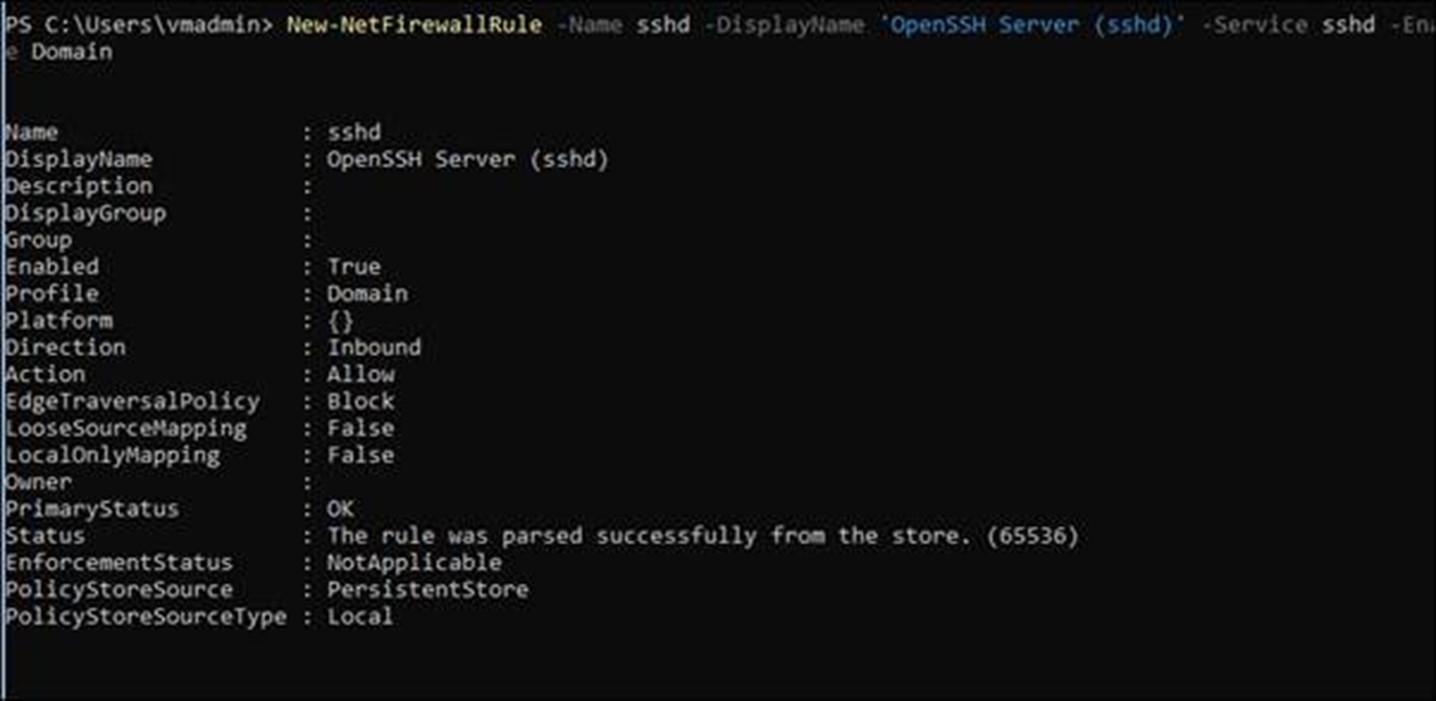
Open Firewall
The last part Is to open the Firewall port and allow SSH connections.
New-NetFirewallRule -Name sshd -DisplayName 'OpenSSH Server (sshd)' -Service sshd -Enabled True -Direction Inbound -Protocol TCP -Action Allow -Profile Domain
Connect
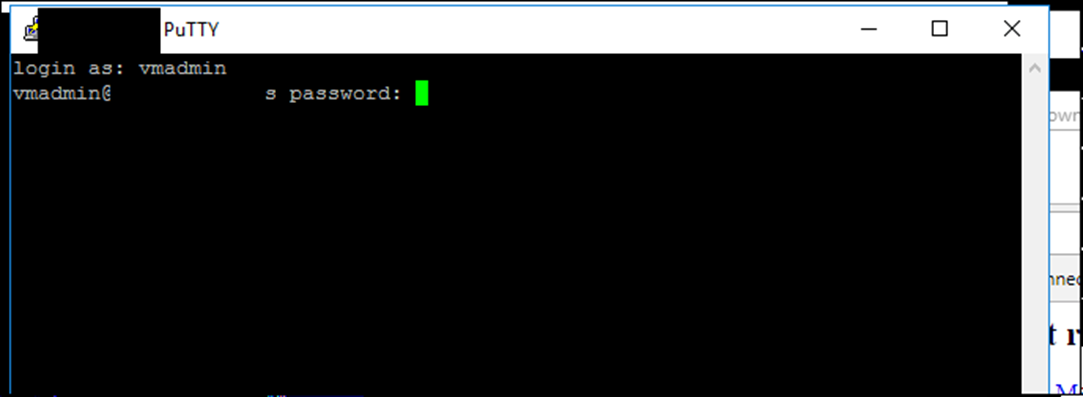
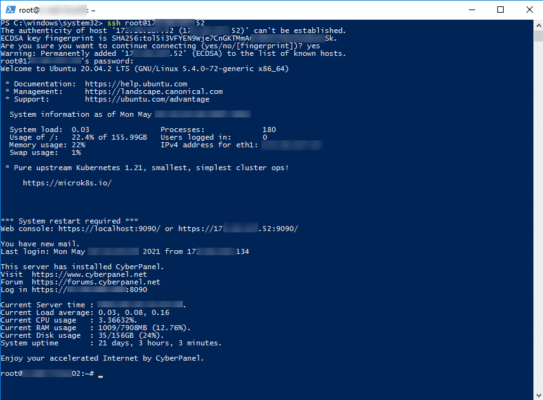
Now that my SSH Server Is up and running I test it by connecting to it from another server using PuTTY


Now, I’ll be asked to supply a username and password.

WinCSP
To use WinSCP to copy a file to and from my Windows Server 2016 1709, I’ll download the WinSCP client from the Internet and use it to connect.
All I need to do Is select a file from and copy
As you can see the file was copied successfully
By clicking submit, you agree to share your email address with the site owner and Mailchimp to receive marketing, updates, and other emails from the site owner. Use the unsubscribe link in those emails to opt out at any time.
Processing…
Success! You’re on the list.
In this tutorial, I will explain how to install the OpenSSH client and Server on Windows Server 2012R2 and 2016.
At the time of writing this tutorial, this feature is native to Windows 10 and Windows Server 2019 and you might also want to have OpenSSH client or server on an earlier version.
Personally, I use the SSH client very regularly through PowerShell or Command Prompt windows, it avoids having to install Putty.
- Recover Win32 OpenSSH
- “Installation” of files on the server
- Adding the environment variable
- Use the SSH client of Windows Server 2012R2 / 2016
- Install the OpenSSH server on Windows Server 2012R2 / 2016
- Connect to Windows on the SSH server
- Conclusion
Recover Win32 OpenSSH
The first step is to retrieve from the GitHub repository PowerShell/Win32-OpenSSH: Win32 port of OpenSSH (github.com), the latest version available.
Go to the realeases page and download the latest version available corresponding to the architecture of the Windows installation (32 or 64 bits).
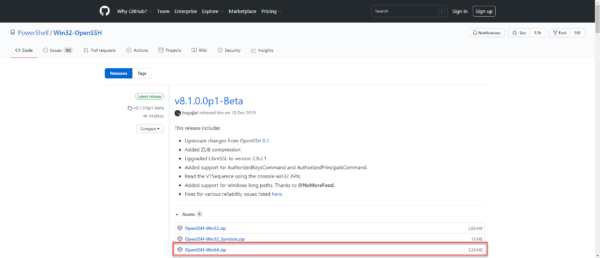
For me, it will be the 64 Bits version.
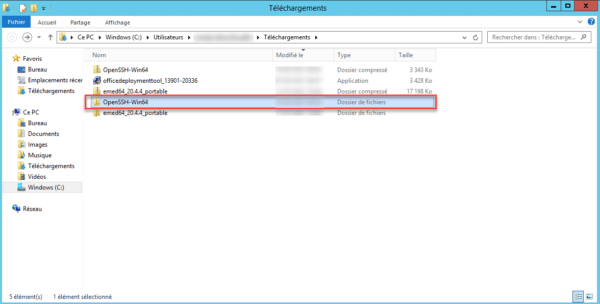
Once the archive has been downloaded, unzip it.
“Installation” of files on the server
Now, we will copy the folder from the unzipped archive to the C: Program Files folder.
The SSH client is now functional, but for ease of use, we will configure its location in the environment variables so as not to have to call the executable by its full path.
Adding the environment variable
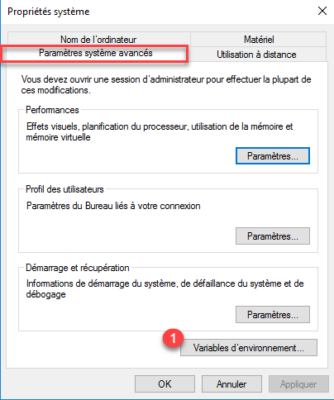
Open the system window and click on Advanced system settings 1.
On the Advanced system parameters tab, click on the Environment variables 1 button.
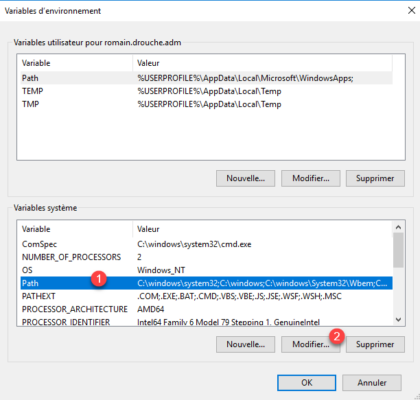
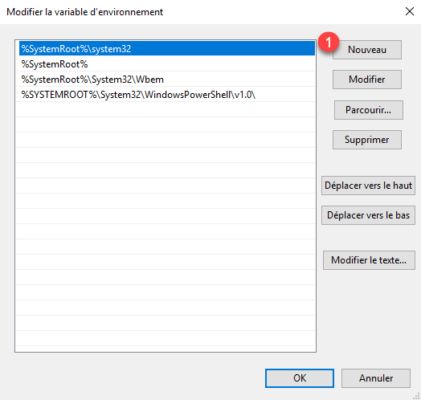
In the System variable part, find the Path 1 variable, once selected, click on the Modify 2 button.
On Windows 2012R2, add at the end; C: Program FilesOpenSSH-Win64
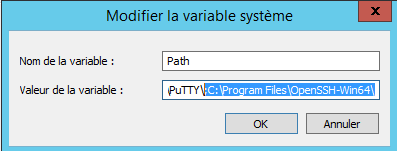
On Windows 2016, click on New 1.
Add the location of the OpenSSH folder: C:Program FilesOpenSSH-Win64 1 and click on OK 2.
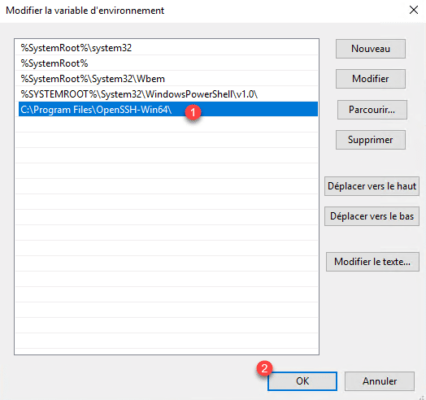
Close the various windows.
Use the SSH client of Windows Server 2012R2 / 2016
Open a command prompt or PowerShell.
The easiest way to find out if it’s okay is to enter the ssh command. This command should return the various parameters of the SSH utility.
To connect to a server (Linux) enter the command ssh USER @ IP_SERVER
It is also possible to configure an OpenSSH server on Windows Server with Win32 OpenSSH which will allow you to connect to the Windows server in the same way as a Linux OS.
From a PowerShell window, go to the C: Program Files OpenSSH-Win64 folder, in the folder is a PowerShell script that will configure the server part.
Run the install-sshd.ps1 PowerShell script
If the installation is successful, the message is displayed: sshd and ssh-agent services successfully installed.
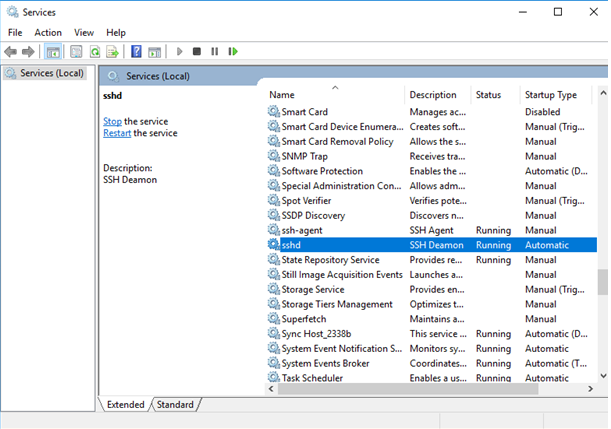
Open Windows Service Manager and search for OpenSSH SSH Server, by default it is stopped. Start the service.
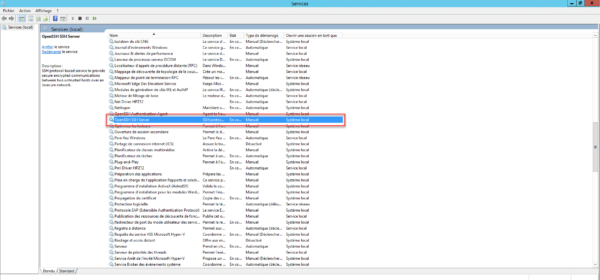
If necessary, configure the service to start automatically
Depending on your configuration, remember to allow incoming connections on port 22.
The server part is operational.
Connect to Windows on the SSH server
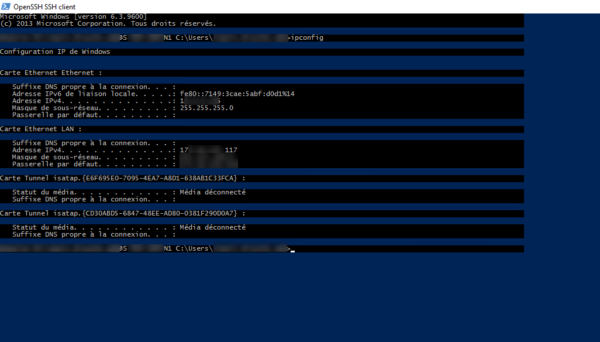
From another computer, use an SSH client to connect, being in an Active Directory environment, I just need to use the ssh IP_SERVER command and then enter my password.

Once connected, enter a command such as ipconfig or hostname to validate that the command has been executed on the remote server.
Conclusion
For the client part, for my part, I find the use in native practical which avoids going through a third-party tool and we quickly get used to when we use Windows 10 and the SSH client I find, missing on Windows 2012R2 and Windows 2016 , the problem is now resolved 🙂
For the server part, I find it useful for non-domain servers, because configuring WinRM and PSSession for connection can quickly become “a headache”.
| title | description | ms.date | ms.topic | ms.author | author | ms.custom |
|---|---|---|---|---|---|---|
|
Get started with OpenSSH for Windows |
Learn how to install and connect to remote machines using the OpenSSH Client and Server for Windows. |
01/11/2023 |
quickstart |
roharwoo |
robinharwood |
contperf-fy21q4 |
Get started with OpenSSH for Windows
Applies to: Windows Server 2022, Windows Server 2019, Windows 10 (build 1809 and later)
OpenSSH is a connectivity tool for remote sign-in that uses the SSH protocol. It encrypts all traffic between client and server to eliminate eavesdropping, connection hijacking, and other attacks.
An OpenSSH-compatible client can be used to connect to Windows Server and Windows client devices.
[!IMPORTANT]
If you downloaded the OpenSSH beta from the GitHub repo at PowerShell/Win32-OpenSSH, follow the instructions listed there, not the ones in this article. Some information in the Win32-OpenSSH repository relates to prerelease product that may be substantially modified before it’s released. Microsoft makes no warranties, express or implied, with respect to the information provided there.
Prerequisites
Before you start, your computer must meet the following requirements:
- A device running at least Windows Server 2019 or Windows 10 (build 1809).
- PowerShell 5.1 or later.
- An account that is a member of the built-in Administrators group.
Prerequisites check
To validate your environment, open an elevated PowerShell session and do the following:
-
Type winver.exe and press enter to see the version details for your Windows device.
-
Run
$PSVersionTable.PSVersion. Verify your major version is at least 5, and your minor version at least 1. Learn more about installing PowerShell on Windows. -
Run the command below. The output will show
Truewhen you’re a member of the built-in Administrators group.(New-Object Security.Principal.WindowsPrincipal([Security.Principal.WindowsIdentity]::GetCurrent())).IsInRole([Security.Principal.WindowsBuiltInRole]::Administrator)
Install OpenSSH for Windows
GUI
Both OpenSSH components can be installed using Windows Settings on Windows Server 2019 and Windows 10 devices.
To install the OpenSSH components:
-
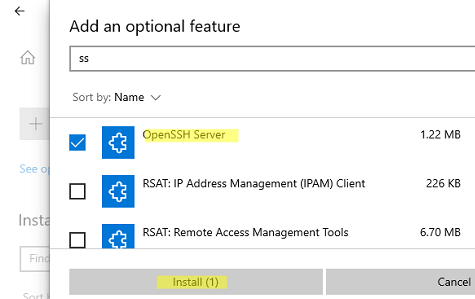
Open Settings, select Apps, then select Optional Features.
-
Scan the list to see if the OpenSSH is already installed. If not, at the top of the page, select Add a feature, then:
- Find OpenSSH Client, then select Install
- Find OpenSSH Server, then select Install
-
Once setup completes, return to Apps and Optional Features and confirm OpenSSH is listed.
-
Open the Services desktop app. (Select Start, type services.msc in the search box, and then select the Service app or press ENTER.)
-
In the details pane, double-click OpenSSH SSH Server.
-
On the General tab, from the Startup type drop-down menu, select Automatic.
-
To start the service, select Start.
[!NOTE]
Installing OpenSSH Server will create and enable a firewall rule namedOpenSSH-Server-In-TCP. This allows inbound SSH traffic on port 22. If this rule is not enabled and this port is not open, connections will be refused or reset.
PowerShell
To install OpenSSH using PowerShell, run PowerShell as an Administrator.
To make sure that OpenSSH is available, run the following cmdlet:
Get-WindowsCapability -Online | Where-Object Name -like 'OpenSSH*'
The command should return the following output if neither are already installed:
Name  : OpenSSH.Client~~~~0.0.1.0
State : NotPresent

Name  : OpenSSH.Server~~~~0.0.1.0
State : NotPresent
Then, install the server or client components as needed:
# Install the OpenSSH Client
Add-WindowsCapability -Online -Name OpenSSH.Client~~~~0.0.1.0

# Install the OpenSSH Server
Add-WindowsCapability -Online -Name OpenSSH.Server~~~~0.0.1.0
Both commands should return the following output:
Path          :
Online        : True
RestartNeeded : False
To start and configure OpenSSH Server for initial use, open an elevated PowerShell prompt (right click, Run as an administrator), then run the following commands to start the sshd service:
# Start the sshd service
Start-Service sshd

# OPTIONAL but recommended:
Set-Service -Name sshd -StartupType 'Automatic'

# Confirm the Firewall rule is configured. It should be created automatically by setup. Run the following to verify
if (!(Get-NetFirewallRule -Name "OpenSSH-Server-In-TCP" -ErrorAction SilentlyContinue | Select-Object Name, Enabled)) {
    Write-Output "Firewall Rule 'OpenSSH-Server-In-TCP' does not exist, creating it..."
    New-NetFirewallRule -Name 'OpenSSH-Server-In-TCP' -DisplayName 'OpenSSH Server (sshd)' -Enabled True -Direction Inbound -Protocol TCP -Action Allow -LocalPort 22
} else {
    Write-Output "Firewall rule 'OpenSSH-Server-In-TCP' has been created and exists."
}
Connect to OpenSSH Server
Once installed, you can connect to OpenSSH Server from a Windows or Windows Server device with the OpenSSH client installed. From a PowerShell prompt, run the following command.
ssh domainusername@servername
Once connected, you get a message similar to the following output.
The authenticity of host 'servername (10.00.00.001)' can't be established.
ECDSA key fingerprint is SHA256:(<a large string>).
Are you sure you want to continue connecting (yes/no)?
Entering yes adds that server to the list of known SSH hosts on your Windows client.
At this point, you’ll be prompted for your password. As a security precaution, your password won’t be displayed as you type.
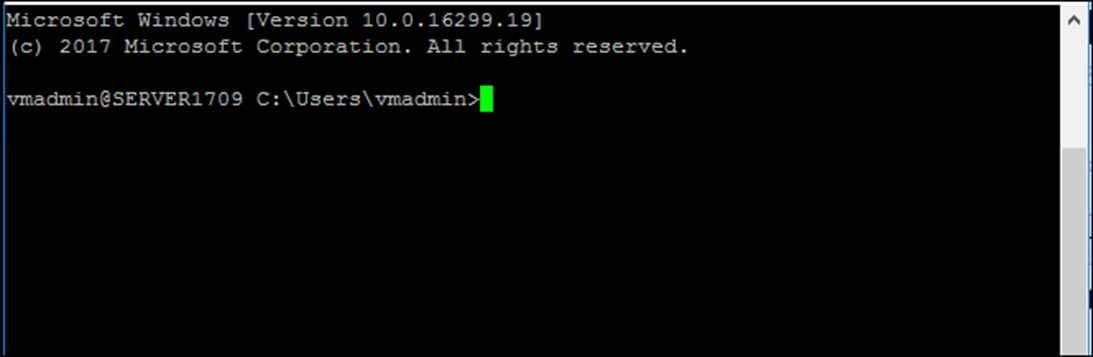
Once connected, you’ll see the Windows command shell prompt:
domainusername@SERVERNAME C:Usersusername>
Uninstall OpenSSH for Windows
GUI
To uninstall OpenSSH using Windows Settings:
- Open Settings, then go to Apps > Apps & Features.
- Go to Optional Features.
- In the list, select OpenSSH Client or OpenSSH Server.
- Select Uninstall.
PowerShell
To uninstall the OpenSSH components using PowerShell, use the following commands:
# Uninstall the OpenSSH Client
Remove-WindowsCapability -Online -Name OpenSSH.Client~~~~0.0.1.0

# Uninstall the OpenSSH Server
Remove-WindowsCapability -Online -Name OpenSSH.Server~~~~0.0.1.0
You may need to restart Windows afterwards if the service was in use at the time it was uninstalled.
Next steps
Now that you’ve installed OpenSSH Server for Windows, here are some articles that might help you as you use it:
- Learn more about using key pairs for authentication in OpenSSH key management
- Learn more about the OpenSSH Server configuration for Windows
В современных версиях Windows уже есть встроенный SSH сервер на базе пакета OpenSSH. В этой статье мы покажем, как установить и настроить OpenSSH сервер в Windows 10/11 и Windows Server 2022/2019 и подключиться к нему удаленно по защищенному SSH протоколу (как к Linux).
Содержание:
- Установка сервера OpenSSH в Windows
- Настройка SSH сервера в Windows
- Sshd_config: Конфигурационный файл сервера OpenSSH
- Подключение по SSH к Windows компьютеру
- Логи SSH подключений в Windows
Установка сервера OpenSSH в Windows
Пакет OpenSSH Server включен в современные версии Windows 10 (начиная с 1803), Windows 11 и Windows Server 2022/2019 в виде Feature on Demand (FoD). Для установки сервера OpenSSH достаточно выполнить PowerShell команду:
Get-WindowsCapability -Online | Where-Object Name -like ‘OpenSSH.Server*’ | Add-WindowsCapability –Online
Или при помощи команды DISM:
dism /Online /Add-Capability /CapabilityName:OpenSSH.Server~~~~0.0.1.0
Если ваш компьютер подключен к интернету, пакет OpenSSH.Server будет скачан и установлен в Windows.
Также вы можете установить сервер OpenSSH в Windows через современную панель Параметры (Settings -> Apps and features -> Optional features -> Add a feature, Приложения -> Управление дополнительными компонентами -> Добавить компонент. Найдите в списке OpenSSH Server и нажмите кнопку Install).
На изолированных от интернета компьютерах вы можете установить компонент с ISO образа Features On Demand (доступен в личном кабинете на сайте Microsoft: MSDN или my.visualstudio.com). Скачайте диск, извлеките его содержимое в папку c:FOD (достаточно распаковать извлечь файл
OpenSSH-Server-Package~31bf3856ad364e35~amd64~~.cab
), выполните установку из локального репозитория:
Add-WindowsCapability -Name OpenSSH.Server~~~~0.0.1.0 -Online -Source c:FOD
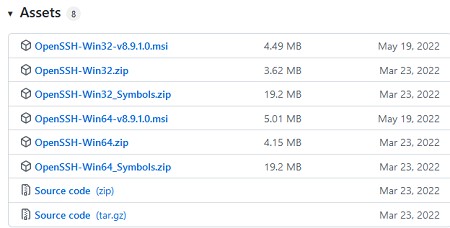
Также доступен MSI установщик OpenSSH для Windows в официальном репозитории Microsoft на GitHub (https://github.com/PowerShell/Win32-OpenSSH/releases/). Например, для Windows 10 x64 нужно скачать и установить пакет OpenSSH-Win64-v8.9.1.0.msi. Следующая PowerShell команда скачает MSI файл и установит клиент и сервер OpenSSH:
Invoke-WebRequest https://github.com/PowerShell/Win32-OpenSSH/releases/download/v8.9.1.0p1-Beta/OpenSSH-Win64-v8.9.1.0.msi -OutFile $HOMEDownloadsOpenSSH-Win64-v8.9.1.0.msi -UseBasicParsing
msiexec /i c:usersrootdownloadsOpenSSH-Win64-v8.9.1.0.msi
Также вы можете вручную установить OpenSSH сервер в предыдущих версиях Windows (Windows 8.1, Windows Server 2016/2012R2). Пример установки Win32-OpenSSH есть в статье “Настройка SFTP сервера (SSH FTP) в Windows”.
Чтобы проверить, что OpenSSH сервер установлен, выполните:
Get-WindowsCapability -Online | ? Name -like 'OpenSSH.Ser*'
State : Installed

Настройка SSH сервера в Windows
После установки сервера OpenSSH в Windows добавляются две службы:
- ssh-agent (OpenSSH Authentication Agent) – можно использовать для управления закрытыми ключами если вы настроили SSH аутентификацию по ключам;
- sshd (OpenSSH SSH Server) – собственно сам SSH сервер.
Вам нужно изменить тип запуска службы sshd на автоматический и запустить службу с помощью PowerShell:
Set-Service -Name sshd -StartupType 'Automatic'
Start-Service sshd

С помощью nestat убедитесь, что теперь в системе запущен SSH сервер и ждет подключений на порту TCP:22 :
netstat -na| find ":22"

Проверьте, что включено правило брандмауэра (Windows Defender Firewall), разрешающее входящие подключения к Windows по порту TCP/22.
Get-NetFirewallRule -Name *OpenSSH-Server* |select Name, DisplayName, Description, Enabled
Name DisplayName Description Enabled
---- ----------- ----------- -------
OpenSSH-Server-In-TCP OpenSSH SSH Server (sshd) Inbound rule for OpenSSH SSH Server (sshd) True

Если правило отключено (состоянии Enabled=False) или отсутствует, вы можете создать новое входящее правило командой New-NetFirewallRule:
New-NetFirewallRule -Name sshd -DisplayName 'OpenSSH Server (sshd)' -Enabled True -Direction Inbound -Protocol TCP -Action Allow -LocalPort 22
Рассмотрим, где храниться основные компоненты OpenSSH:
- Исполняемые файлы OpenSSH Server находятся в каталоге
C:WindowsSystem32OpenSSH
(sshd.exe, ssh.exe, ssh-keygen.exe, sftp.exe и т.д.) - Конфигурационный файл sshd_config (создается после первого запуска службы):
C:ProgramDatassh - Файлы authorized_keys и ssh ключи можно хранить в профиле пользователей:
%USERPROFILE%.ssh
Sshd_config: Конфигурационный файл сервера OpenSSH
Настройки сервере OpenSSH хранятся в конфигурационном файле %programdata%sshsshd_config. Это обычный текстовый файл с набором директив. Для редактирования можно использовать любой текстовый редактор (я предпочитаю notepad++). Можно открыть с помощью обычного блокнота:
start-process notepad C:Programdatasshsshd_config
Например, чтобы запретить SSH подключение для определенного доменного пользователя (и всех пользователей указанного домена), добавьте в конце файле директивы:
DenyUsers winitpro[email protected]
DenyUsers corp*
Чтобы разрешить подключение только для определенной доменной группы:
AllowGroups winitprosshadmins
Либо можете разрешить доступ для локальной группы:
AllowGroups sshadmins
По умолчанию могут к openssh могут подключаться все пользователи Windows. Директивы обрабатываются в следующем порядке: DenyUsers, AllowUsers, DenyGroups,AllowGroups.
Можно запретить вход под учетными записями с правами администратора, в этом случае для выполнения привилегированных действий в SSH сессии нужно делать runas.
DenyGroups Administrators
Следующие директивы разрешают SSH доступ по ключам (SSH аутентификации в Windows с помощью ключей описана в отдельной статье) и по паролю:
PubkeyAuthentication yes
PasswordAuthentication yes
Вы можете изменить стандартный SSH порт TCP/22, на котором принимает подключения OpenSSH в конфигурационном файле sshd_config в директиве Port.
После любых изменений в конфигурационном файле sshd_config нужно перезапускать службу sshd:
restart-service sshd
Подключение по SSH к Windows компьютеру
Теперь вы можете попробовать подключиться к своей Windows 10 через SSH клиент (в этом примере я использую putty).
Вы можете использовать встроенный SSH клиентом Windows для подключения к удаленному хосту. Для этого нужно в командной строке выполнить команду:
ssh [email protected]
В этом примере
alexbel
– имя пользователя на удаленном Windows компьютере, и 192.168.31.102 – IP адрес или DNS имя компьютера.
Обратите внимание что можно использовать следующие форматы имен пользователей Windows при подключении через SSH:
-
[email protected]
– локальный пользователь Windows -
[email protected]@server1
–пользователь Active Directory (в виде UPN) или аккаунт Microsoft/ Azure(Microsoft 365) -
winitpro[email protected]
– NetBIOS формат имени
В домене Active Directory можно использовать Kerberos аутентификацию в SSH. Для этого в sshd_config нужно включить параметр:
GSSAPIAuthentication yes
После этого можно прозрачно подключать к SSH сервер с Windows компьютера в домене из сессии доменного подключается. В этом случае пароль пользователя не указывается и выполняется SSO аутентификация через Kerberos:
ssh -K server1
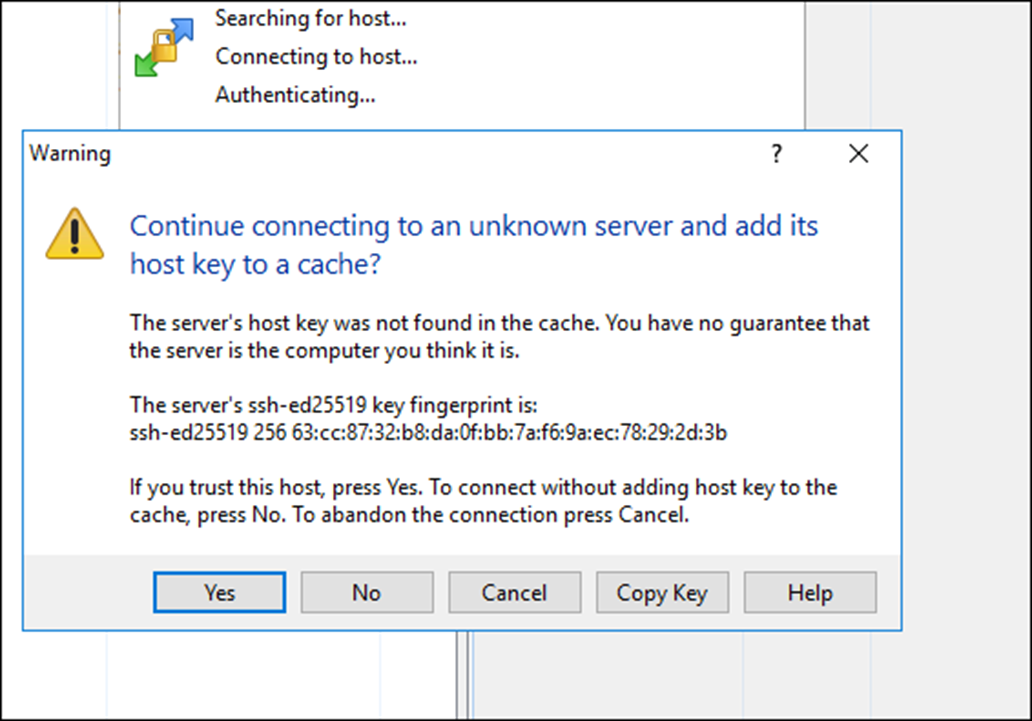
При первом подключении появится стандартный запрос на добавление узла в список известных SSH хостов.
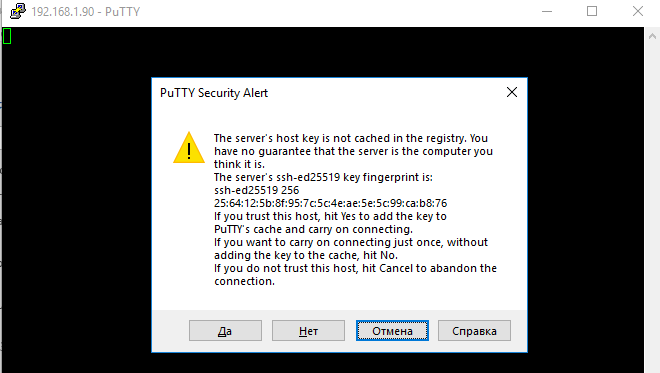
Нажимаем Да, и в открывшееся окне авторизуемся под пользователем Windows.
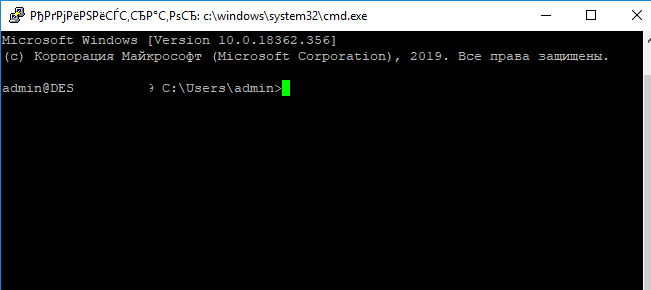
При успешном подключении запускается командная оболочка cmd.exe со строкой-приглашением.
[email protected] C:Usersadmin>
В командной строке вы можете выполнять различные команды, запускать скрипты и программы.
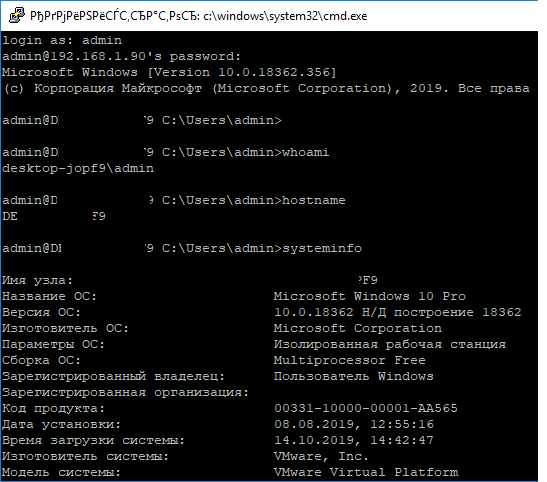
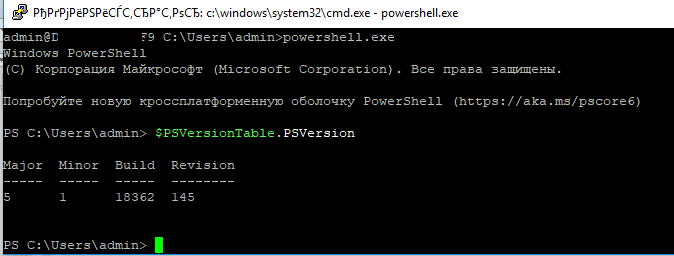
Я предпочитаю работать в командной строке PowerShell. Чтобы запустить интерпретатор PowerShell, выполните:
powershell.exe
Чтобы изменить командную оболочку (Shell) по умолчанию в OpenSSH с cmd.exe на PowerShell, внесите изменение в реестр такой командой:
New-ItemProperty -Path "HKLM:SOFTWAREOpenSSH" -Name DefaultShell -Value "C:WindowsSystem32WindowsPowerShellv1.0powershell.exe" -PropertyType String –Force
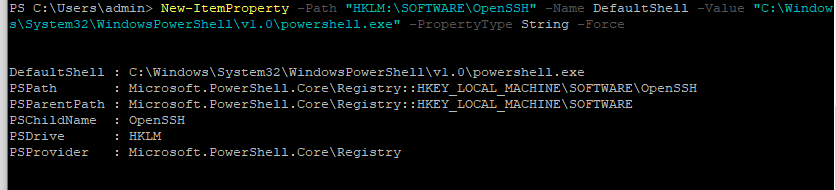
Осталось перезапустить SSH подключение и убедиться, что при подключении используется командный интерпретатор PowerShell (об этом свидетельствует приглашение
PS C:Usersadmin>
).
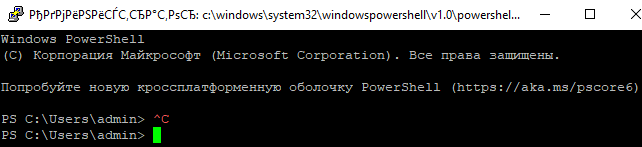
В SSH сессии запустилась командная строка PowerShell, в которой работают привычные функции: авто дополнение, раскраска модулем PSReadLine, история команд и т.д. Если текущий пользователь входит в группу локальных администраторов, то все команды в его сессии выполняются с повышенными правами даже при включенном UAC.
Логи SSH подключений в Windows
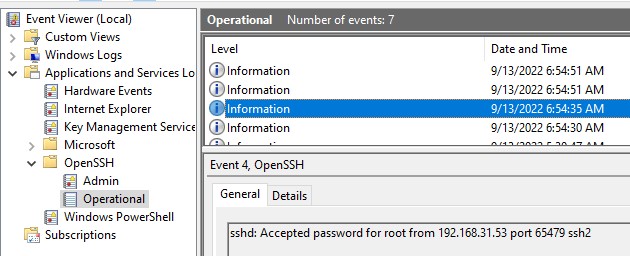
В Windows логи подключений к SSH серверу по-умолчанию пишутся не в текстовые файлы, а в отдельный журнал событий через Event Tracing for Windows (ETW). Откройте консоль Event Viewer (
eventvwr.msc
>) и перейдите в раздел Application and services logs -> OpenSSH -> Operational.
При успешном подключении с помощью к SSH серверу с помощью пароля в журнале появится событие:
EventID: 4
sshd: Accepted password for root from 192.168.31.53 port 65479 ssh2
Если была выполнена аутентификация с помощью SSH ключа, событие будет выглядеть так:
sshd: Accepted publickey for locadm from 192.168.31.53 port 55772 ssh2: ED25519 SHA256:FEHDEC/J72Fb2zC2oJNb45678967kghH43h3bBl31ldPs
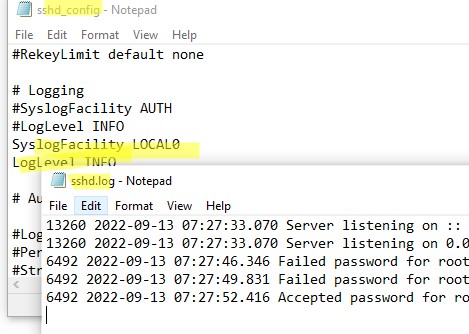
Если вы хотите, чтобы логи писались в локальный текстовый файл, нужно в файле sshd_config включить параметры:
SyslogFacility LOCAL0
LogLevel INFO
Перезапустите службу sshd и провеьте, что теперь логи SSH сервера пишутся в файл C:ProgramDatasshlogssshd.log
OpenSSH is an ideal and secure way of performing remote maintenance & administration on your servers. Even on Windows Server!  Microsoft have released their OpenSSH port for Windows Server and Windows 10 back in 2015. Here is how to install the OpenSSH Server on Windows Server 2022, 2019 and 2016.
In this small tutorial, I’m not using PowerShell’s Add-WindowsCapability cmdlet, because it errors out on unsupported platforms. And I want to be able to customize the sshd installation directory. If you follow this post, you can install Microsoft OpenSSH Server on Windows Server 2022 through even Windows Server 2012 R2, in a folder of your choosing.

Please not that a lot has changed in recent years, like Microsoft releasing .msi Windows Installer installation files, and you no longer have to depend on PowerShell Add-WindowsCapability or .zip files. Wherever possible, use the OpenSSH .msi installation option.
Prerequisites
In order to be able to install OpenSSH on Windows, you need the software. Doh!
- Download the latest release from GitHub: https://github.com/PowerShell/Win32-OpenSSH/releases (OpenSSH-Win64.zip for example).
Install “Windows for OpenSSH” using PowerShell
- Unblock the downloaded OpenSSH archive if necessary:
Unblock-File .DownloadsOpenSSH-Win64.zip - Extract the archive:
Expand-Archive .DownloadsOpenSSH-Win64.zip -DestinationPath . - Copy the OpenSSH-Win64 folder to your desired location, e.g c:
Copy-Item -Recurse .OpenSSH-Win64 'C:' - The libcrypto.dll file has to be accessible for all users:
&icacls C:OpenSSH-Win64libcrypto.dll /grant Everyone:RX - Run
install-sshd.ps1to create the OpenSSH Authentication Agent and OpenSSH SSH Server services. It also sets some permissions and registers an Event Tracing (ETW) provider. - Change the service startup to Automatic. The OpenSSH SSH Server service is set to Manual startup, not automatic:
&sc.exe config sshd start= auto,&sc.exe config ssh-agent start= auto - Start the OpenSSH Authentication Agent and SSH Server services:
&sc.exe start sshd,&sc.exe start ssh-agent - Make sure your Windows Defender Firewall is open for port 22, rule OpenSSH-Server-In-TCP must be enabled. If this rule is not available, manually create it:
Code language: PHP (php)
New-NetFirewallRule -Name sshd -DisplayName 'OpenSSH SSH Server' -Enabled True -Direction Inbound -Protocol TCP -Action Allow -LocalPort 22 -Program "C:WindowsSystem32OpenSSHsshd.exe"
Replace C:WindowsSystem32OpenSSHsshd.exe with the actual path to the sshd.exe (C:OpenSSHsshd.exe, if you followed this instruction). Or go to Control Panel > System and Security > Windows Firewall > Advanced Settings > Inbound Rules and add a new rule for port 22.
![]()
Let’s connect!
PS C:> ssh -l janreilink localhost


Install Win32-OpenSSH Server using MSI Installer
If you have downloaded the .msi Windows Installer MSI-file of Microsoft OpenSSH (OpenSSH-Win64-v8.9.1.0.msi), you can install OpenSSH server and client easily. The following command installs both Server and Client:
msiexec /i path to OpenSSH-Win64-v8.9.1.0.msi
This, however installs OpenSSH in the location C:Program FilesOpenSSH, and doesn’t update your $env:path environment variable and there are some other caveats. You can follow my guide “install Microsoft OpenSSH Client properly in Windows 11 and Windows 10 to support FIDO/U2F security keys” on Windows Server 2022 / 2019 to install and configure OpenSSH Server and Client using .msi installer files.
sshd_config
Often you not only need to install OpenSSH, you also need to configure it. For this, OpenSSH on Windows uses an mechanism where the default sshd_config (called “sshd_config_default“) is located in the directory to where you’ve unpacked the OpenSSH-Win64.zip archive. When you start the service, the file is copied to C:ProgramDatasshsshd_config.
In Windows, sshd reads configuration data from %programdata%sshsshd_config by default, or a different configuration file may be specified by launching sshd.exe with the -f parameter. If the file is absent, sshd generates one with the default configuration when the service is started.
https://docs.microsoft.com/en-us/windows-server/administration/openssh/openssh_server_configuration#windows-configurations-in-sshd_config
So you can either make you configuration in the sshd_config_default file, that is copied when you start the service for the first time, or you start and stop OpenSSH, edit C:ProgramDatasshsshd_config and restart OpenSSH again.
Install OpenSSH on Windows Server 2012
OpenSSH Server on Windows Server 2012 R2, you said? Yes, you can use the same method to install OpenSSH in Windows Server 2012 R2 (version 6.3.9600). Here is a screenshot of connecting to sshd on Windows version 6.3.9600:

Conclusion and giveaway
In this post I showed you how you can install OpenSSH server in various Windows Server versions, using the downloaded .zip file archive and PowerShell. You can use this approach to customize and streamline your Microsoft OpenSSH Server environment. This goes very well with SSH keys stored in Active Directory. If you want to use FIFO/U2F security keys like YubiKey in Windows OpenSSH, follow that guide.
In an other post I’ll show you how to install OpenSSH Client in Windows 11 and Windows 10. Using the OpenSSH-Win64-v8.9.1.0.msi file.
More OpenSSH in Windows Server and Windows 11 / Windows 10, the series
Here on Sysadmins of the North are more posts in a series of posts about OpenSSH in Windows. Whether it’s Windows Server or Windows 11 / 10. You may find these posts interesting:
- Tunnel RDP through SSH & PuTTY
- How to share OpenSSH keys with WSL in Windows 10
- Manually install OpenSSH in Windows Server
- Retrieve SSH public key from Active Directory for SSH authentication
- Windows 11/10 and WSL 2 DevOps environment
- YubiKey support in OpenSSH for Windows 11 and Windows 10
- Connect to a KVM host through an ssh tunnel and arbitrary port in Windows 11 and WSL 2
I hope you like it, let me know.
В этой статье мы рассмотрим, как установить SSH сервер (OpenSSH) на Windows Server и использовать его для удаленного управления сервером с помощью PowerShell по протоколу SSH.
Для удаленного управления компьютерами и серверами через PowerShell можно воспользоваться возможностями протокола WinRM, однако для более гладкого стыка с Linux системами удобнее использовать единый протокол удаленного управления — SSH. Одним из проектов команды Microsoft, занимающейся разработкой функционала PowerShell, является портирование популярного открытого сервера OpenSSH на Windows системы. Проект называется Win32-OpenSSH
- Установка пакета OpenSSH
- SSH авторизация в Windows по паролю
- SSH с аутентфикацией по ключу
- Подключение с клиента через модуль Posh-SSH
Содержание:
Установка пакета OpenSSH
Сервер Win32-OpenSSH для Windows можно установить, скачав дистрибутив с GitHub (https://github.com/PowerShell/Win32-OpenSSH), либо (гораздо проще), установив его через менеджер пакетов Chocolatey.
Если Chocolatey еще не установлен, установить его можно следующими командами PowerShell:
Set-ExecutionPolicy Unrestricted
iwr https://chocolatey.org/install.ps1 -UseBasicParsing | iex
Установка OpenSSH сервера после этого выполняется командой:
choco install openssh -params '"/SSHServerFeature /KeyBasedAuthenticationFeature"' –y
Данная команда выполнит установку как SSH сервера, так и клиента. Если нужно установить только клиент, нужно убрать аргумент param.
Сценарий установки автоматически создаст правило файервола, разрешающее подключение на 22 порт, и запустит службы sshd и ssh-agent.
Примечание. Если правило по каким-то причинам не создалось, вы можете создать его командой:
New-NetFirewallRule -Protocol TCP -LocalPort 22 -Direction Inbound -Action Allow -DisplayName SSH
Для перезагрузки переменных окружения, выполните команду:
refreshenv
SSH авторизация в Windows по паролю
Для удаленного подключения к данному SSH серверу под локальным пользователем user1, воспользуйтесь такой командой:
ssh user1@192.168.1.100
После запуска команды, для авторизации нужно указать пароль пользователя user1. Если SSH-сервер включен в домен, можно авторизоваться и под пользователем Active Directory. Имя пользователя в этом случае указывается в формате domaindomain_user_name или domain_user_name@domain.
ssh –l domain_user_name@domain remotehost
SSH с аутентфикацией по ключу
Для беспарольного входа можно использовать авторизацию на сервере SSH по ключу. Сначала нужно сгенерировать ключ на клиенте (в процессе нужно указать ключевую фразу)
Ssh-keygen.exe
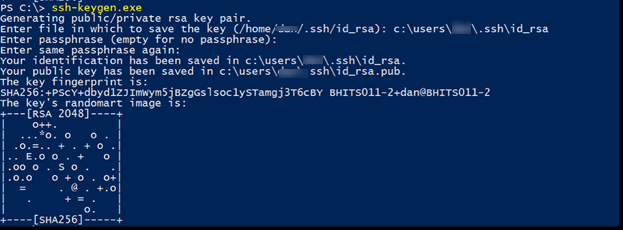
В результате в каталоге пользователя c:usersusername.ssh появится два файла id_rsa и id_rsa.pub.
Теперь нужно запустить службу ssh-agent
Start-Service ssh-agent
И добавить в настройки агента путь к нашему закрытому ключу:
ssh-add.exe C:usersusername.sshid_rsa
Затем нужно разрешить аутентфикацию по этому ключу на стороне сервера. Для этого, скопируйте файл открытого ключа(id_rsa.pub) на SSH сервер в файл C:usersusername.sshauthorized_keys. Либо, при наличии администартивного доступа сразу на обоих системах, скопировать файл можно так:
cat c:usersusername.sshid_rsa.pub | Add-Content '\192.168.1.100c$usersusername.sshauthorized_keys'
Теперь службе сервера SSH нужно дать право на чтение данных их каталога.ssh.
icacls C:usersusername.ssh /grant "NT Servicesshd:R" /T
Теперь можно подключится SSH-клиентом к серверу, указав параметр –i и путь к закрытому ключу:
Ssh –I c:usersusername.sshid_rsa –l user@domain 192.168.1.100![]()
По умолчанию открывается командная строка cmd, но можно запустить и PowerShell:

Подключение с клиента через модуль Posh-SSH
Для удаленного подключения к SSH серверу, модуль Posh-SSH используется следующим образом:
Подключаемся к серверу с сохранением сессии и указанием ключа:
New-SSHSession myclient -KeyFile "c:dataMyKeyPair.pem"
Выполним команду ifconfig в сессии с ID 0.
Invoke-SSHCommandStream "ifconfig" -SessionId 0
Для завершения сеанса, выполните:
Invoke-SSHCommand -SessionId 0 -Command "logout"
Удалим сессию:
Remove-SSHSession 0