By default the telnet client in Microsoft’s Windows operating systems is disabled, this is unfortunate as it is an extremely useful tool which can be used for testing TCP connectivity to external hosts on a specified port.
This is great when you’re trying to troubleshoot network connectivity problems, for example, say we have a web server which should be listening on port 80 to serve HTTP traffic but we are not able to load a web page, by using telnet to connect to the web server on port 80 we can verify the connectivity.
It may be that the connectivity is fine but there is a problem with the web server, or that the web server is stopped and the port is not listening at all, for instance. With telnet we can get a better understanding of what’s going on.
Enabling the Telnet Client
Firstly you need to enable the telnet client, if you don’t enable it you’ll get a result similar to the below message when trying to use it.
C:>telnet google.com 80
'telnet' is not recognized as an internal or external command, operable program or batch file.
C:>
You can enable the telnet client either by command line or through the graphical interface.
Enabling the telnet client through command prompt
Using the command line is the easiest and fastest way to install the telnet client. Run the below command in command prompt with administrator permissions.
dism /online /Enable-Feature /FeatureName:TelnetClient
That’s it, after a few seconds telnet should be ready to use.
Enabling the telnet client through PowerShell
Again we can also do this instead with PowerShell, we can run the below command in a PowerShell console with administrator permissions.
Install-WindowsFeature -name Telnet-Client
Enabling the telnet client through the graphical user interface
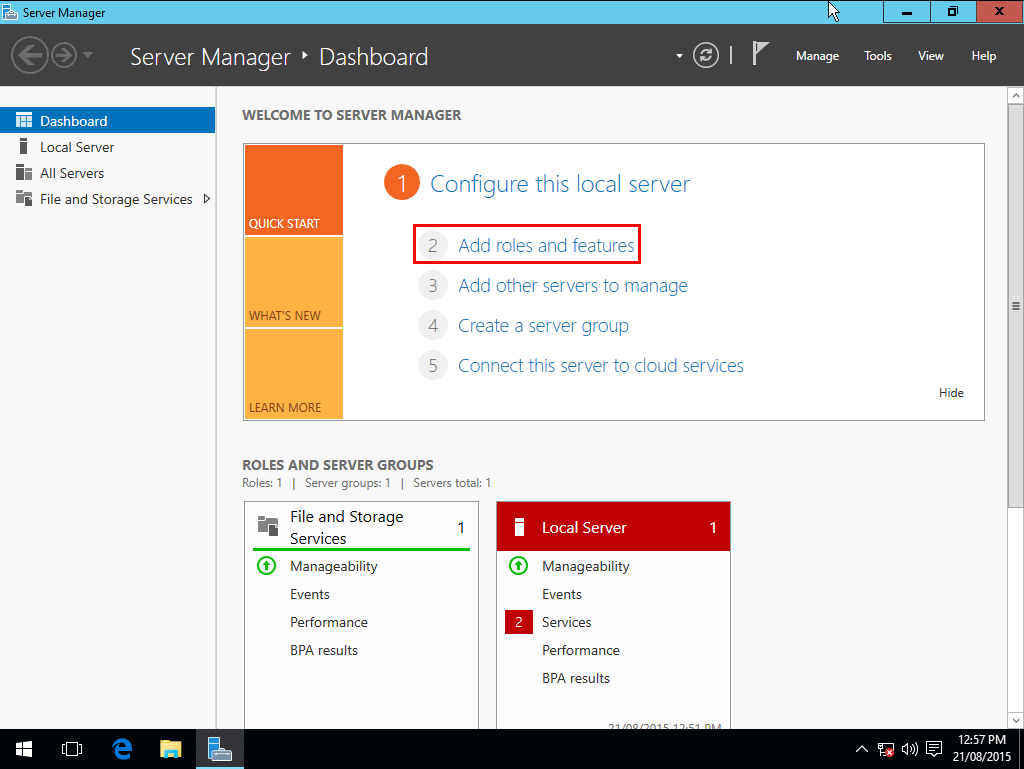
- Open Server Manager.
- From Server Manager click “Add roles and features”.

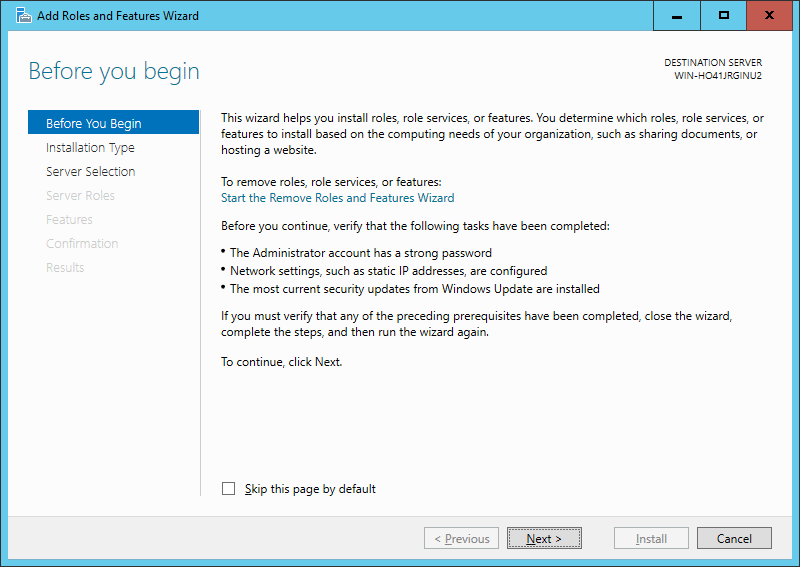
- The Add Roles and Features Wizard opens to the Before you Begin screen, click next.

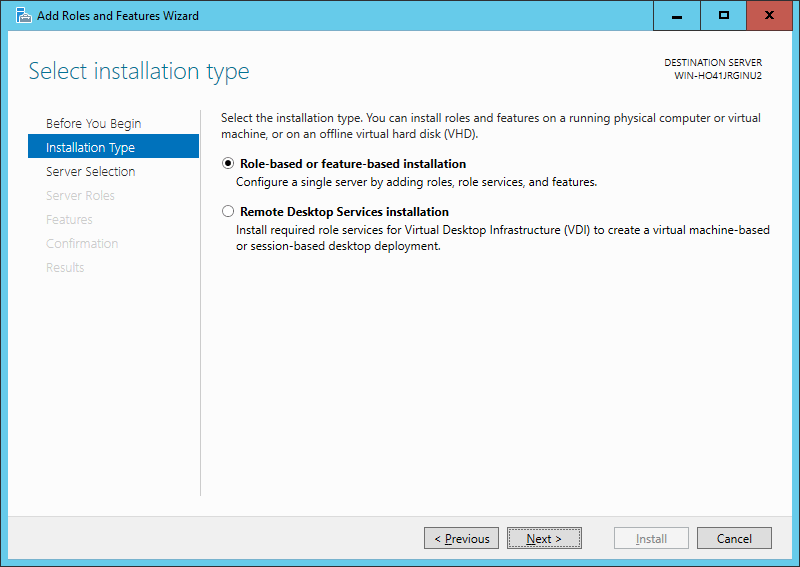
- On the Installation Type screen, leave Role-based or Feature-based installation selected and click next.
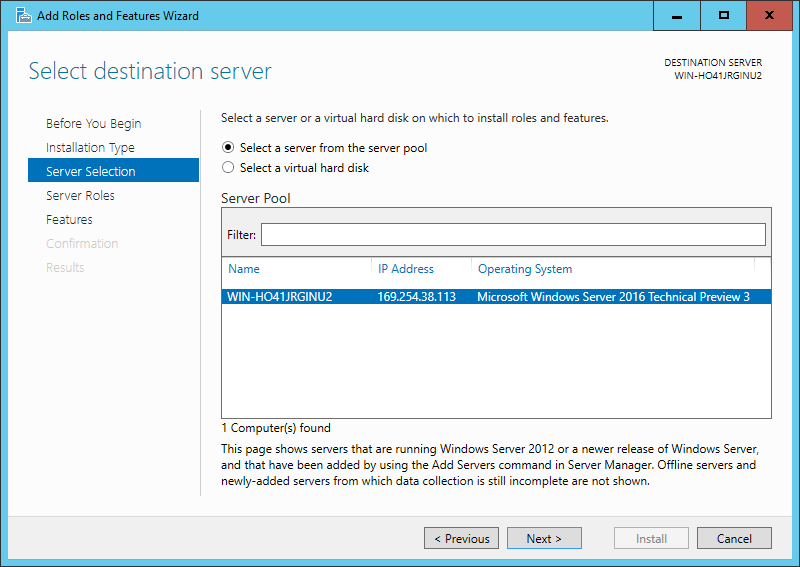
- On the server selection screen, select the server to install on. By default it should be the local server itself, click next.
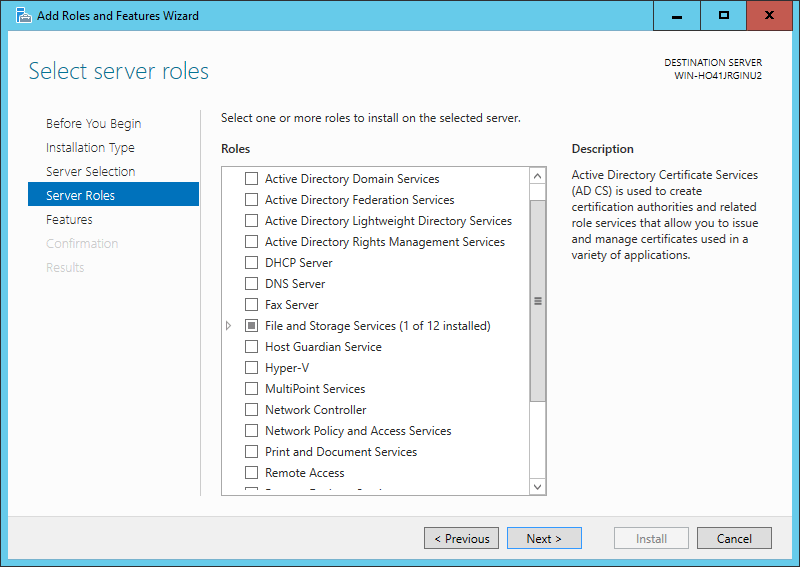
- On the Server Roles screen, click next. We are installing a feature rather than a role so don’t select anything here.
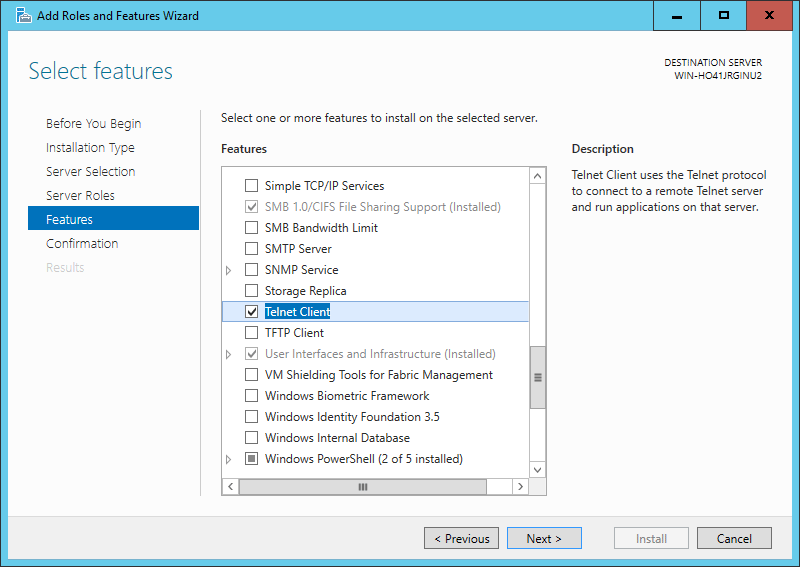
- On the Features screen, tick the check box next to Telnet Client.
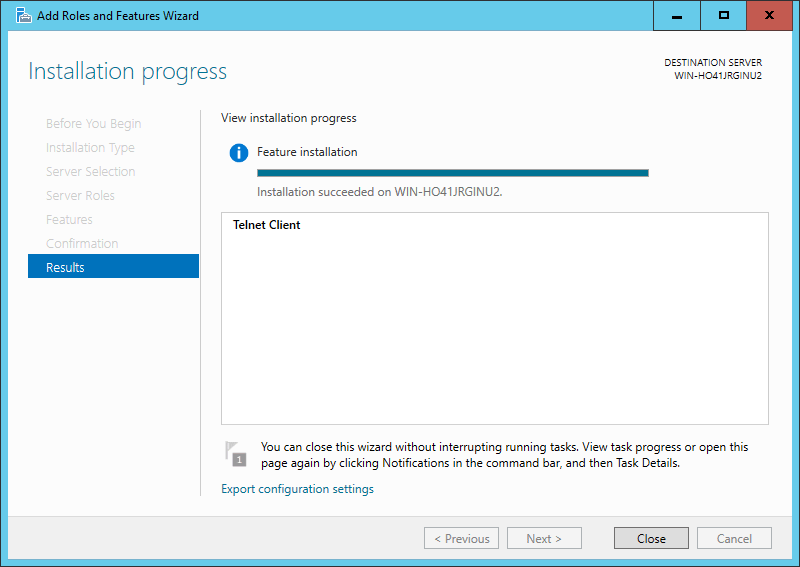
- On the Confirmation screen, click Install.
- Once the installation succeeds, click the Close button. The telnet client is now installed and ready for use.

Verifying that the telnet client is enabled
Simply open command prompt or powershell, type ‘telnet’ and press enter. If this was successful you should have a prompt similar to the below:
Welcome to Microsoft Telnet Client

Escape Character is 'CTRL+]'

Microsoft Telnet>
Already have telnet installed but still failing?
In some cases you must run command prompt or powershell as administrator in order to issue the telnet command, otherwise it will give the same error as if it was not enabled at all.
Summary
Now that you have enabled telnet in Windows Server 2016 you should be able to start issuing commands with it and using it to troubleshoot TCP connectivity problems.
By default, In Windows Server Editions, the Telnet command, «is not recognized as an internal or external command, operable program or batch file». This is happening, because the Telnet client, is disabled by default in n Windows Server 2012/2016 or 2019.

In this article you will find several methods to enable the Telnet client on a Windows Server 2019, 2016 or 2012.
How to Install Telnet Client in Server 2019, Server 2016 or Server 2012.
Method 1. Install Telnet client from PowerShell.
Method 2. Enable Telnet Client from Command Prompt.
Method 3. Add the Telnet Client feature from Server Manager.
Method 1. How Install Telnet Client Feature from PowerShell in Server 2012, 2016 or 2019.
1. Open Windows PowerShell.
2. In PowerShell, give the following command to enable the Telnet client:
- Install-WindowsFeature -name Telnet-Client

3. When the installation is completed, you ‘re ready to use Telnet. *
* Note: If you want to disable the Telnet client, give this command in PowerShell:
- Remove-WindowsFeature -name Telnet-Client
Method 2. How to Install Telnet Client from Command Prompt in Server 2012,2016, 2019, using DISM.
1. Open Command Prompt (or PowerShell)
2. Then, give the following DISM command and press Enter to install the Telnet client.
- dism /online /Enable-Feature /FeatureName:TelnetClient

Method 3. How to Install Telnet client Feature from the Server Manager.
1. To install the Telnet client feature on Windows Server 2016, 2019 r 2012, open ‘Server Manager’ and click on Add Roles and Features.

2. At the first screen of ‘Add Roles and Features wizard’, leave the Role-based or feature-based installation option and click Next.

3. At the next screen, leave the default option «Select server from the server pool» and click Next.

4. At Server Roles options, click Next.

5. At Features options, check the Telnet client and click Next.

6. Finally click Install at the confirmation screen

7. When the installation is completed. click Close.

That’s it! Let me know if this guide has helped you by leaving your comment about your experience. Please like and share this guide to help others.
If this article was useful for you, please consider supporting us by making a donation. Even $1 can a make a huge difference for us in our effort to continue to help others while keeping this site free:

If you want to stay constantly protected from malware threats, existing and future ones, we recommend that you install Malwarebytes Anti-Malware PRO by clicking below (we
do earn a commision from sales generated from this link, but at no additional cost to you. We have experience with this software and we recommend it because it is helpful and useful):
Full household PC Protection — Protect up to 3 PCs with NEW Malwarebytes Anti-Malware Premium!
— Advertisement —
Hello, Today we are going to talk about Telnet. This is a network protocol that allows us to access another machine to operate it remotely as if we were sitting in front of it. It´s also the name of the computer program that the client implements. Its name comes from the acronym Telecommunication Network. In addition, it is used on MSDOS and Windows systems. And also compatible with UNIX-based systems, such as Mac and Linux, and FreeBSD. On the other hand, this protocol and this command are only implemented through commands. However, Telnet has a serious security problem. Indeed, information from one terminal to another travels without any type of encryption, only in plain text. For this reason, safer tools such as SSH are currently preferred. Although it is still useful in internal networks with protection from external traffic. That’s why we’ll see how to enable Telnet in Windows Server.
Enabling Telnet on Windows Server 2016/2019. Using PowerShell
To be able to use Telnet correctly we have to open a session in the destination machine. This session has to be opened with a user with access. As mentioned above, this protocol presents an important security gap. For this reason, it is disabled by default in Windows Server. It is possible to check this by running the telnet command at a command prompt:

To enable it, please open a PowerShell with administrative privileges and add the following command and press Enter:
Install-WindowsFeature -name Telnet-Client
Immediately start the installation:

At the end of the process we will see the following window:

Another way to enable this function is to open a CMD with administrative privileges and run the following command:
dism /online /Enable-Feature /FeatureName:TelnetClient
Enabling Telnet graphical mode.
It is also possible to enable Telnet from the Windows Server 2016/2019 Dashboard. With this in mind, you have to enter the section Add roles and features.

Then press Next to continue.

In the next window, click on Role-based or feature-based installation:

Next, select the server you are going to add to Telnet.

Now, just press Next and skip the roles on this screen. Press Next to continue the installation.

Then scroll down and select the Telnet checkbox. You will see a brief description of the feature.

On the next screen, press Install to start the process.

Just wait a few seconds until Telnet is finally installed.

Testing Telnet.
After the process is finished, you just need to open any CMD and run the next command:
telnet
If everything is correct, you will see the next window:

To view the available subcommands, run the following command:
telnet /h

In the final analysis, we have seen how to install Telnet in Windows 2016/2019. Despite its security limitations, it is still a good option for communicating computers on private networks. That’s all for now, before saying goodbye I invite you to see our post about OrientDB in Windows 10. See you later!
- Remove From My Forums
-
Question
-
Hi All,
Could any one help me ,
I have installed win 2016 Tech Preview 5. I wanted to install telnet server on it. I couldnt find it in «add roll and features», i found only telnet client on it.tried to enable telnet server by cli but failed.
Here the log
====
C:WINDOWSsystem32>dism /online /Enable-Feature /FeatureName:TelnetServer
Deployment Image Servicing and Management tool
Version: 10.0.14342.1000Image Version: 10.0.14342.1000
Error: 0x800f080c
Feature name TelnetServer is unknown.
A Windows feature name was not recognized.
Use the /Get-Features option to find the name of the feature in the image and try the command again.The DISM log file can be found at C:WINDOWSLogsDISMdism.log
=====
Thanks,
Dudo.
Answers
-
-
Proposed as answer by
Thursday, June 2, 2016 6:54 AM
-
Marked as answer by
Amy Wang_
Wednesday, June 8, 2016 6:20 AM
-
Proposed as answer by
There are certain protocols that have been developed to facilitate the lives of administrators, users and anyone who has an impact on the IT world. The Telnet protocol (Teletype Network,) is one of the most used since since its implementation in 1964 it aims to be a protocol that acts as a command line interface towards direct communication with a remote device or server, since either for remote administration tasks or to provide some type of support or configuration of the device or the entire infrastructure of the device.
A connection through Telnet makes use of the Transmission Control Protocol (TCP) as it acts as a connection to transmit data with interconnected Telnet control between the devices. Perhaps one of its shortcomings is security is that we talk about a protocol created in 1694 where security was not as critical as it is today, but there are some defense mechanisms when using Telnet.
To understand a little what Telnet does, we must know that Telnet offers to each of the users a text-oriented interactive bidirectional system communication system that connects through a virtual terminal of more than 8 bytes, the syntax used For Telnet telnet hostname port, this allows the user to execute commands directly on the server through the available Telnet commands.
Telnet Tasks
With this, Telnet is useful in cases such as:
- Access to databases
- Network and server administration
- Interaction with programs hosted on remote application servers
Windows Server 2019 is Microsoft’s latest commitment to cover a wide range of corporate clients with a secure, reliable and scalable system, so Telnet is disabled by default in Windows Server 2019, or 2016, to avoid privacy failures and security, but for administration and connectivity reasons it may be necessary to use Telnet on Windows Server so now we will see how to activate it on Windows Server 2019 or 2016.
Most used commands with Telnet
Some of the commands we can use with Telnet are:
- ?: deploys Telnet help
- Close: close the current Telnet session
- display argument: this option allows you to display the parameters for the current connection (port, terminal type and more)
- environ argument: It allows defining the variables for the operating environment in which we are
- logout: this parameter will close the current session in Telnet
- mode type: allows you to set the transfer mode (text file, binary file)
- open hostname: with this parameter another connection will be opened for the remotely selected host
- quit: so we will leave the Telnet client and all the connections active at the moment
- send argument: this parameter sends Telnet character sequences to the host
- set argument: Adjust the connection parameters
- unset: this value loads the default connection parameters
We also leave you the video tutorial to enable the Telnet command of Windows Server 2019 and 2016.
To keep up, remember to subscribe to our YouTube channel! SUBSCRIBE
1. How to activate Telnet on Windows Server 2019 or Server 2016
Step 1
To verify that Telnet is deactivated in Windows Server we will execute the following:
telnet google.com 80
Step 2
The result will be as follows: 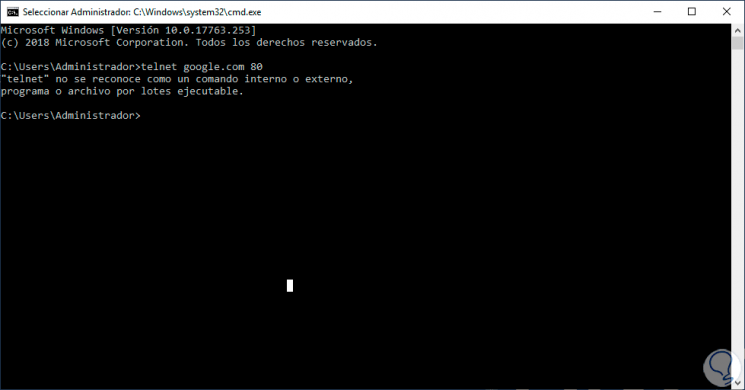
Step 3
To enable the Telnet client we can access Windows PowerShell and there run the following line:
Install-WindowsFeature -name Telnet-Client
Step 4
Press Enter and the process of installing Telnet on Windows Server 2019/2016 will take place: 
Step 5
When this ends we will see the following: 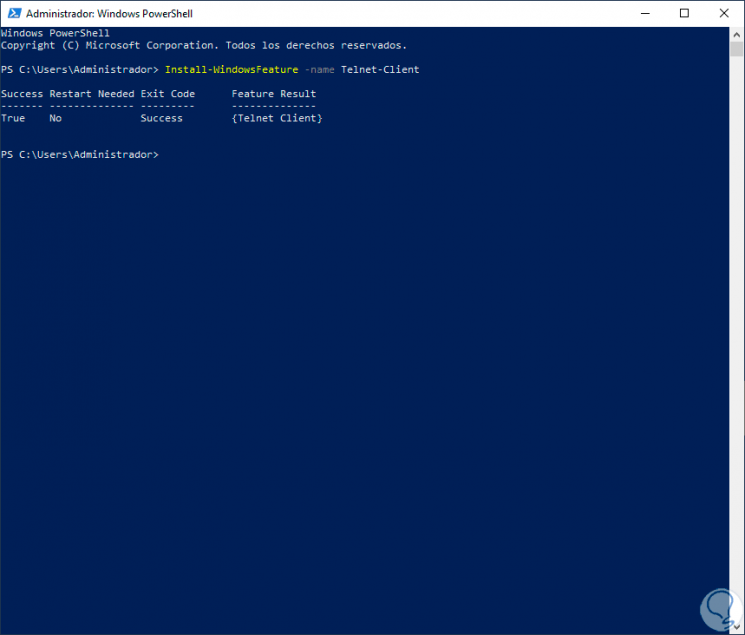
Note
This operation is also possible from the command prompt of the command prompt by executing the following:
dism / online / Enable-Feature / FeatureName: TelnetClient
2. How to add Telnet in Windows Server 2019 or Server 2016
Step 1
Now, once this feature is enabled we must add it from the server administrator, for this we access this functionality: 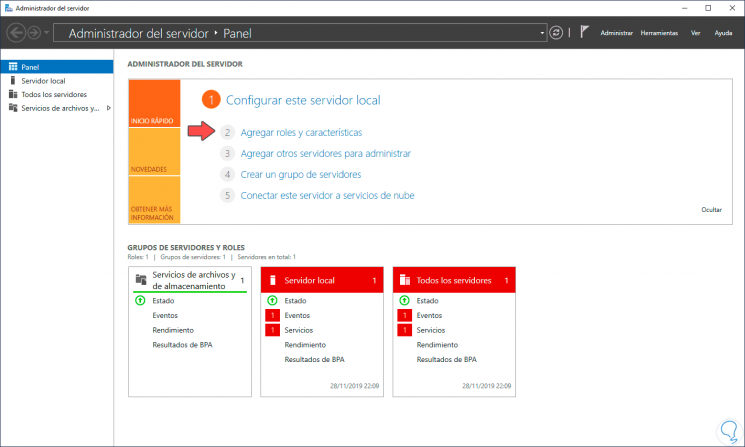
Step 2
We click on the “Add roles and features†line and the following will be displayed: 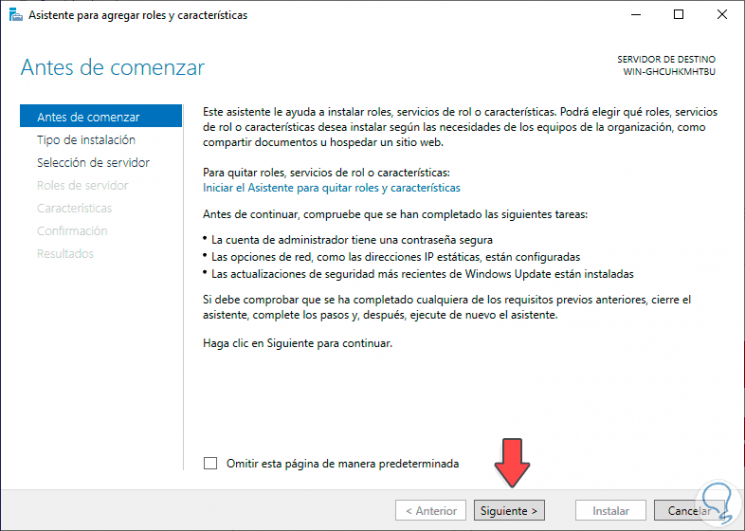
Step 3
We click on Next and in the next window we activate the “Feature or role based installation†box: 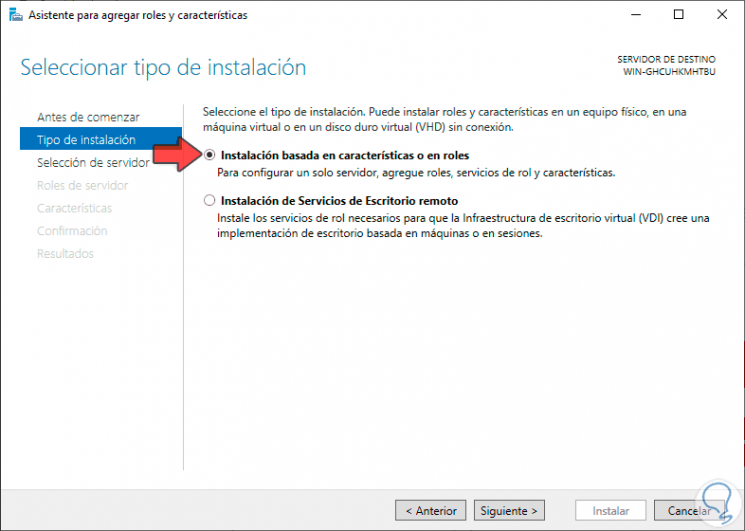
Step 4
In the following window we select the destination server: 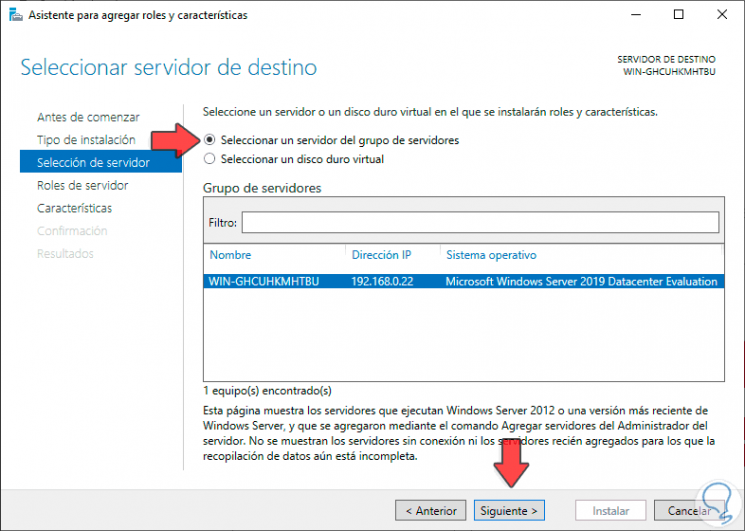
Step 5
We click on Next and we will access the role window, in this case we click on Next since we will not install any role: 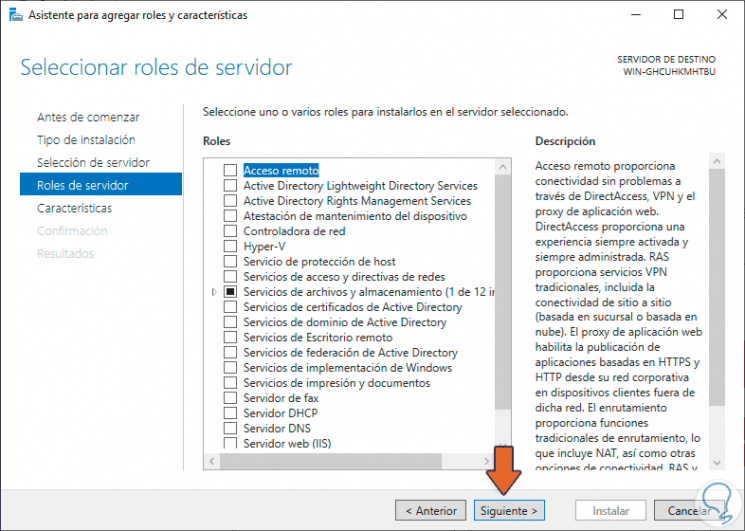
Step 6
Click on Next and in the “Characteristics†window we activate the “Telnet Client†box: 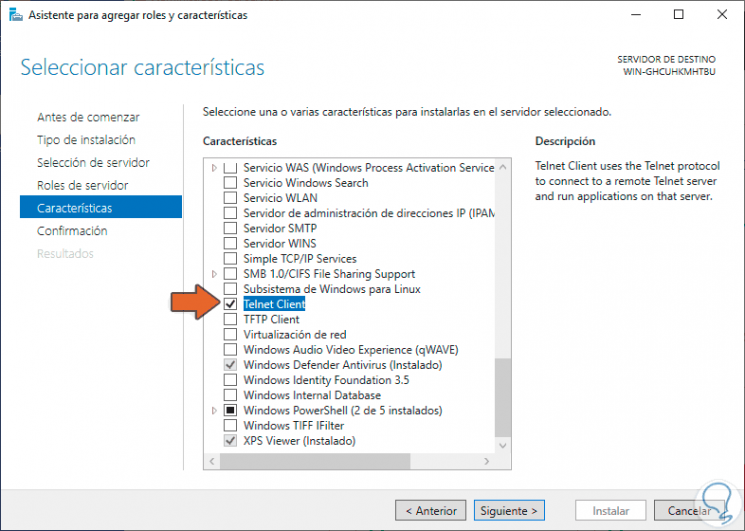
Step 7
Click Next and we will see a summary of the feature to be installed: 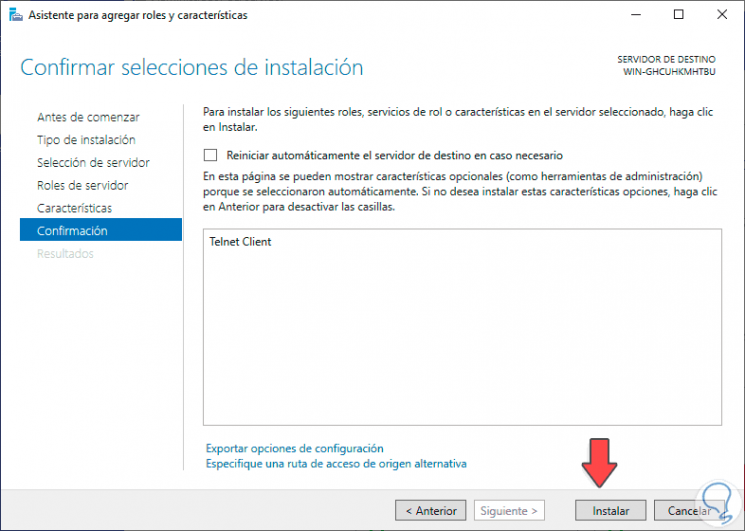
Step 8
To give way to the installation click on the «Install» button: 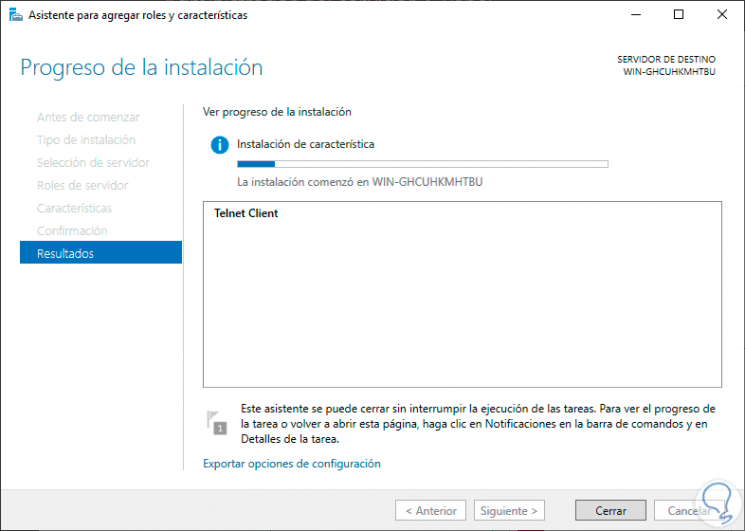
Step 9
When this is over we will see the following. Click Close to exit the installation wizard. 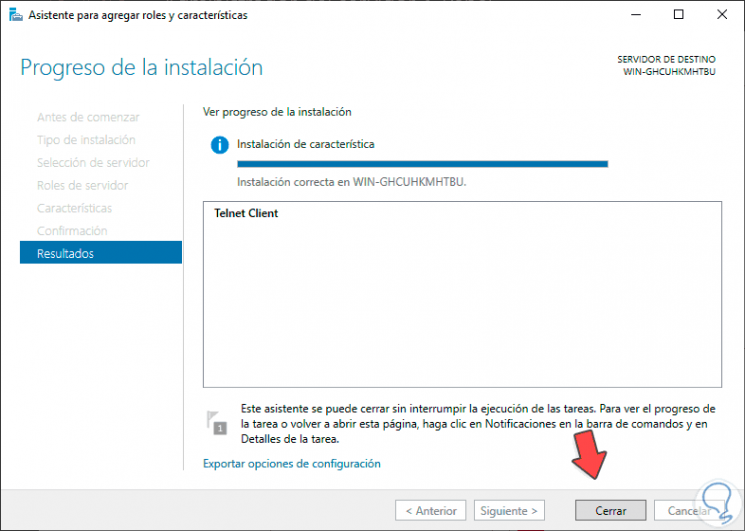
Step 10
To verify that it has been installed correctly, we access the command prompt and execute “telnetâ€, this will allow us to enter the Telnet use console in Windows Server 2019 or 2019: 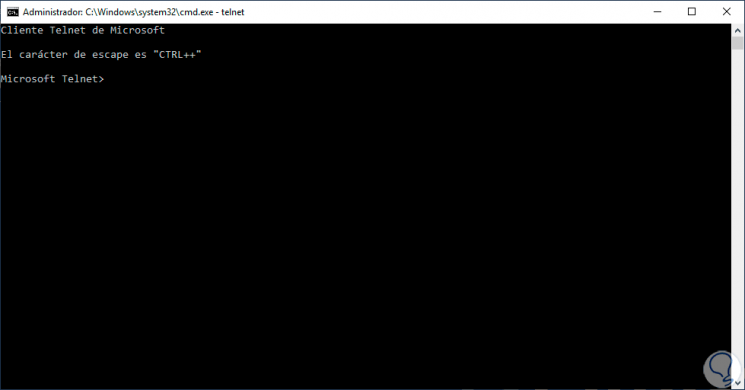
With TechnoWikis you have learned to enable the Telnet client in Windows Server 2019 or 2016 and thus have an additional connectivity option.
- Remove From My Forums
-
Question
-
Hi All,
Could any one help me ,
I have installed win 2016 Tech Preview 5. I wanted to install telnet server on it. I couldnt find it in «add roll and features», i found only telnet client on it.tried to enable telnet server by cli but failed.
Here the log
====
C:WINDOWSsystem32>dism /online /Enable-Feature /FeatureName:TelnetServer
Deployment Image Servicing and Management tool
Version: 10.0.14342.1000Image Version: 10.0.14342.1000
Error: 0x800f080c
Feature name TelnetServer is unknown.
A Windows feature name was not recognized.
Use the /Get-Features option to find the name of the feature in the image and try the command again.The DISM log file can be found at C:WINDOWSLogsDISMdism.log
=====
Thanks,
Dudo.
Answers
-
-
Proposed as answer by
Thursday, June 2, 2016 6:54 AM
-
Marked as answer by
Amy Wang_
Wednesday, June 8, 2016 6:20 AM
-
Proposed as answer by
Нажмите Кнопка Windows , чтобы открыть меню «Пуск». Откройте Панель управления> Программы и компоненты. Теперь нажмите «Включить или выключить компоненты Windows». Найдите в списке клиент Telnet и проверьте его.
Как включить Telnet на Server 2016?
Windows Server 2012, 2016:
Откройте «Диспетчер серверов»> «Добавить роли и компоненты»> нажмите «Далее», пока не дойдете до шага «Функции»> отметьте «Telnet Client»»> Щелкните« Установить »> по завершении установки компонента щелкните« Закрыть ».
Доступен ли telnet в Windows Server 2016?
Резюме. Теперь, когда вы включили telnet в Windows Server 2016, вы должны иметь возможность запускать с его помощью команды и использовать его для устранения проблем с подключением TCP.
Как я узнаю, что телнет работает?
Чтобы выполнить настоящий тест, запустите командную строку Cmd и введите команду telnet, затем пробел, затем имя целевого компьютера, затем еще один пробел и затем номер порта. Это должно выглядеть так: telnet имя_хоста номер_порта. Нажмите Enter, чтобы выполнить telnet.
Что такое команды telnet?
Стандартные команды Telnet
| Command | Описание |
|---|---|
| тип режима | Указывает тип передачи (текстовый файл, двоичный файл) |
| открытое имя хоста | Создает дополнительное соединение с выбранным хостом поверх существующего соединения. |
| выход | Заканчивает Telnet клиентское соединение, включая все активные соединения |
Как проверить, включен порт 443 или нет?
Вы можете проверить, открыт ли порт, попытка открыть HTTPS-соединение с компьютером используя свое доменное имя или IP-адрес. Для этого вы набираете https://www.example.com в строке URL-адреса вашего веб-браузера, используя фактическое доменное имя сервера, или https://192.0.2.1, используя фактический числовой IP-адрес сервера.
Как включить Telnet?
Установить Telnet
- Нажмите кнопку Пуск.
- Выберите Панель управления.
- Выберите «Программы и компоненты».
- Нажмите Включить или отключить функции Windows.
- Выберите опцию Telnet Client.
- Щелкните ОК. Появится диалоговое окно для подтверждения установки. Теперь команда telnet должна быть доступна.
Как включить Telnet в Windows Server 2019?
Щелкните значок «Возможности» в левой части окна. В нем перечислены несколько вариантов подробностей. Справа от параметров нажмите «Добавить функции». Прокрутите список функций Windows и выберите «Сервер Telnet. » Вы также можете активировать telnet-клиент, если решите использовать эту утилиту на своем сервере.
Как проверить, открыт ли порт в окнах?
Откройте меню «Пуск», введите «Командная строка» и выберите «Запуск от имени администратора». Теперь, введите «netstat -ab» и нажмите Enter. Подождите, пока загрузятся результаты, имена портов будут указаны рядом с локальным IP-адресом. Просто найдите номер порта, который вам нужен, и если в столбце State указано LISTENING, это означает, что ваш порт открыт.
Как мне проверить свои порты?
На компьютере с Windows
Нажмите клавиши Windows + R, затем введите «cmd»..exe »и нажмите ОК. Введите «telnet + IP-адрес или имя хоста + номер порта» (например, telnet www.example.com 1723 или telnet 10.17. Xxx. Xxx 5000), чтобы запустить команду telnet в командной строке и проверить состояние порта TCP.
Как проверить, открыт ли порт 3389?
Откройте командную строку. Введите «telnet» и нажмите Enter.. Например, введите «telnet 192.168. 8.1 3389 ”Если отображается пустой экран, порт открыт, и проверка прошла успешно.
В чем разница между Ping и telnet?
PING позволяет узнать, доступна ли машина через Интернет. TELNET позволяет вам протестировать соединение с сервером независимо от всех дополнительных правил почтового клиента или FTP-клиента, чтобы определить источник проблемы. …
Можете ли вы пропинговать определенный порт?
Самый простой способ проверить связь с конкретным портом — это используйте команду telnet, за которой следует IP-адрес и порт, который вы хотите проверить. Вы также можете указать доменное имя вместо IP-адреса, за которым следует конкретный порт для проверки связи.