TensorFlow is a popular library for machine learning modeling. It is an open-source package that allows you to do all deep learning works such as neural networks e.t.c. It can also be referred to as Math and can do computational work on multiple CPUs and GPUs. I have found that many new programmers are unable to install TensorFlow properly. Therefore I have come up with this tutorial. In this entire tutorial, you will know how to install TensorFlow in Pycharm. Just execute the following steps to install it properly.
If you have not installed this package in your Pycharm then you will see a red underline below the statement import tensorflow as tf. It means Pycharm does not have recognized it and you have to install it.

Step 1: Go to File. There you will see Setting click on it.
Step 2: After Clicking on Setting, you will see Project:your_project_name. Click on it. Then you will see two options. One is Project Interpreter and the other Project Structure.
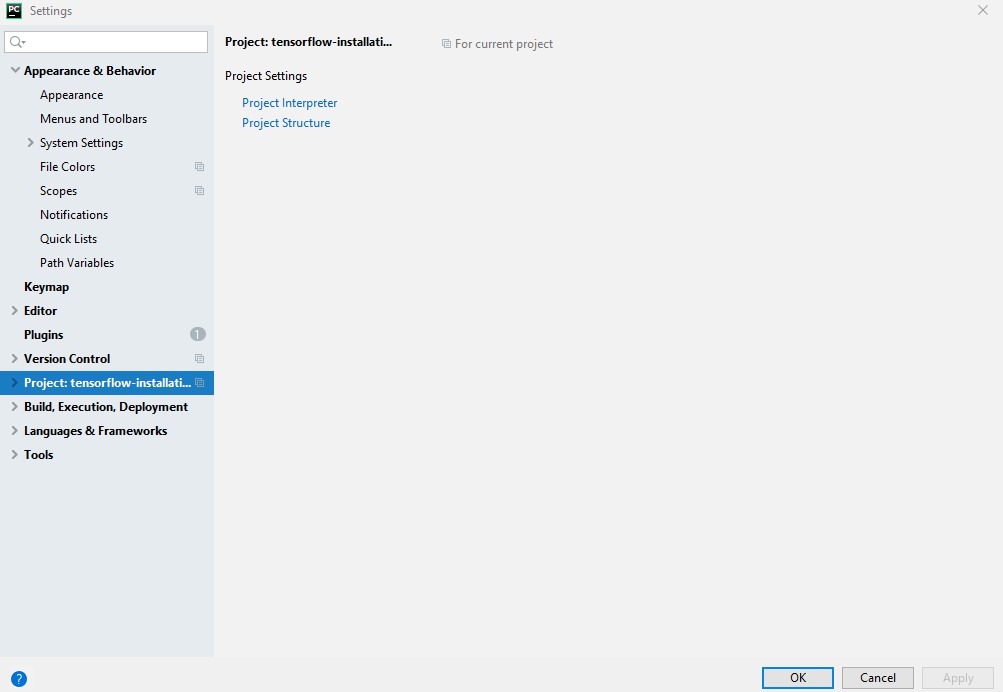
Step 3: Just Click on the Project Interpreter. There you will see all the packages installed.
You can clearly see TensorFlow is not installed.

Step 4: Click on the + Sign. You will see the search field. Go on it and search for TensorFlow. You will see the TensorFlow and its version and descriptions.

Step 5: Choose TensorFlow and click on the install package that you will see on the left bottom. It will successfully install the TensorFlow package.

If you are getting the error and are unable to install it. Then go to your terminal and type the following command.
pip install tensorflow
It will start downloading the TensorFlow package from the pip public directory and will install it.

Hurray!! You have successfully installed the TensorFlow package.
How to test if TensorFlow is installed or not?
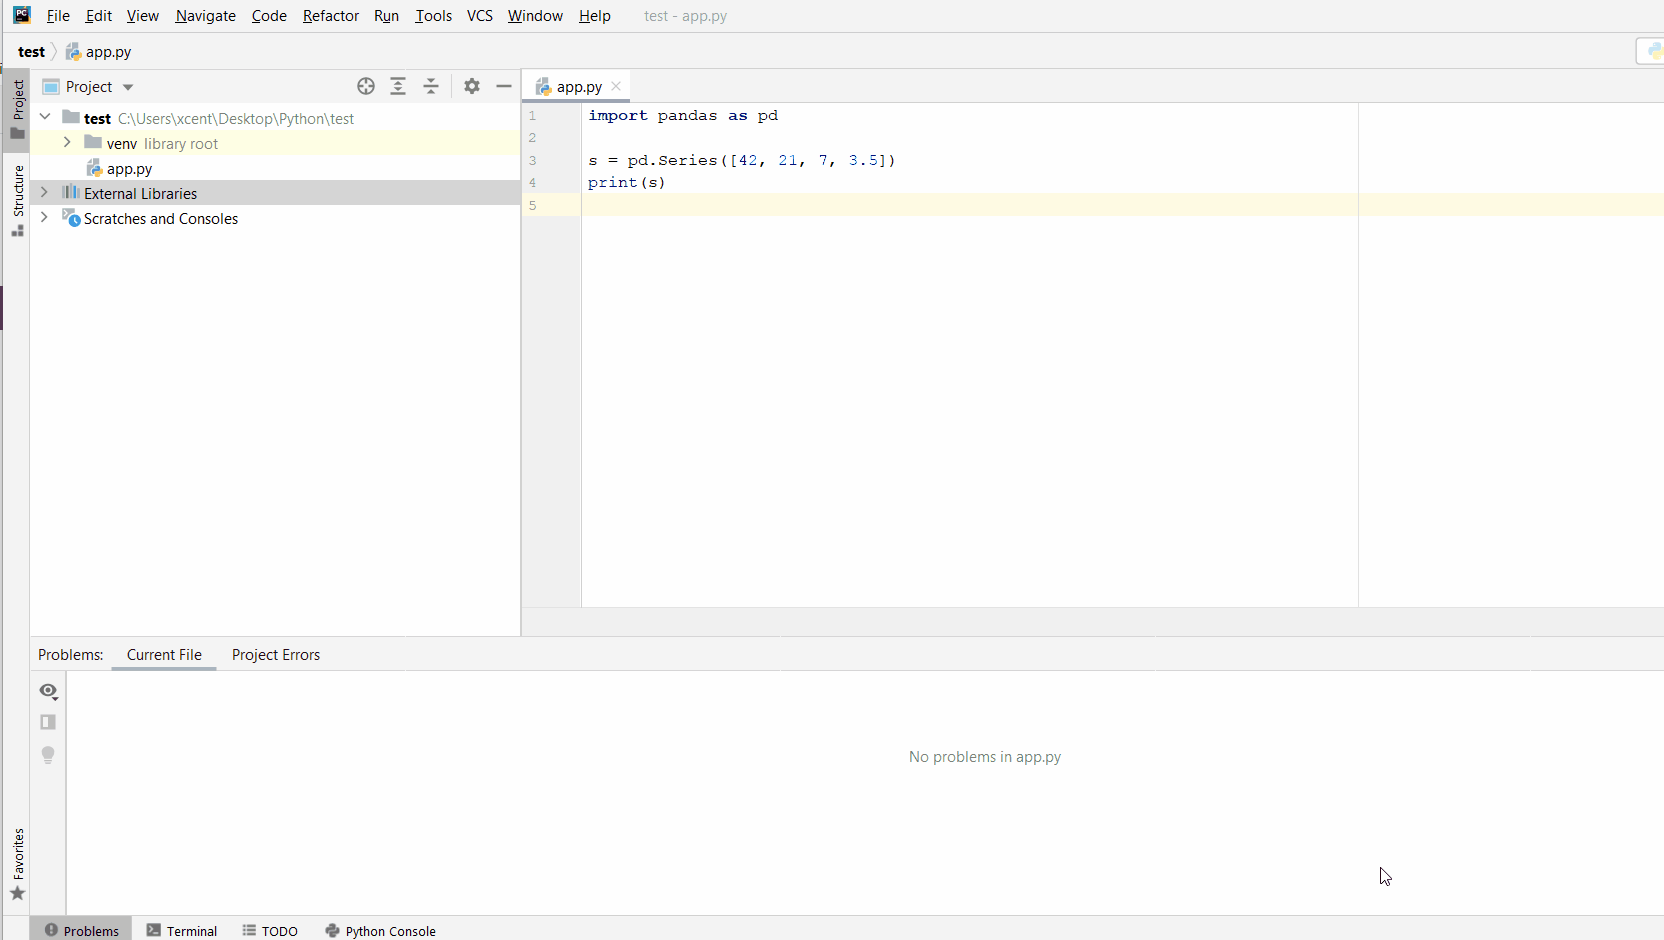
After following all the above steps, you have easily installed the TensorFlow package. Now it’s time to check whether TensorFlow is installed or not. Just run the below code to check it.
import tensorflow as tf
print(tf.__version__)
You will see the version of the TensorFlow as the output. It verifies that it is successfully installed in the Pycharm. Otherwise, you will get the ModuleNotFoundError: No module named ‘tensorflow’
Source:
TensorFlow Offical Documentation

Join our list
Subscribe to our mailing list and get interesting stuff and updates to your email inbox.
We respect your privacy and take protecting it seriously
Thank you for signup. A Confirmation Email has been sent to your Email Address.
Something went wrong.
TensorFlow is an open source computation framework for building machine learning models. Its design make use of lessons learnt from earlier machine learning frameworks — Torch, Theano, Caffe, and Keras. Torch is the earliest machine learning framework that made of the term Tensor. Theano makes use of Graph data structure to store operations and compile them to high-performance code. Caffe is a high performance framework written in C++ and makes feasible to execute applications on different devices. Keras provides an easy to use API to interface with various machine learning frameworks like Theano.
TensorFlow makes use of all the good design decisions made by the earlier four framework TensorFlow name is made up of two words – Tensor and Flow. Tensor means a multi-dimensional array. Flow means a graph of operations. It’s core is written in C++ and CUDA(Nvidia’s language for programming GPUs). It provides a high level API in Python, C, Java, Go,Rust, JavaScript and Swift that programmers can use to build their applications.
TensorFlow is composed of two parts:
- A library to define computational graphs
- A runtime to execute graphs on a variety of different hardware. It supports execution on both CPUs and GPUs.
Installing TensorFlow on your machine with PyCharm
I am going to use PyCharm IDE by JetBrains for working with TensorFlow. PyCharm is a Python IDE that provides code completion, refactoring , and in-built support for running Jupyter notebooks.
Start by downloading Python 3 from the official website.
After installing Python, download and install PyCharm from its official website. We are going to use Community edition of PyCharm.
Open the PyCharm application and you will see following screen.

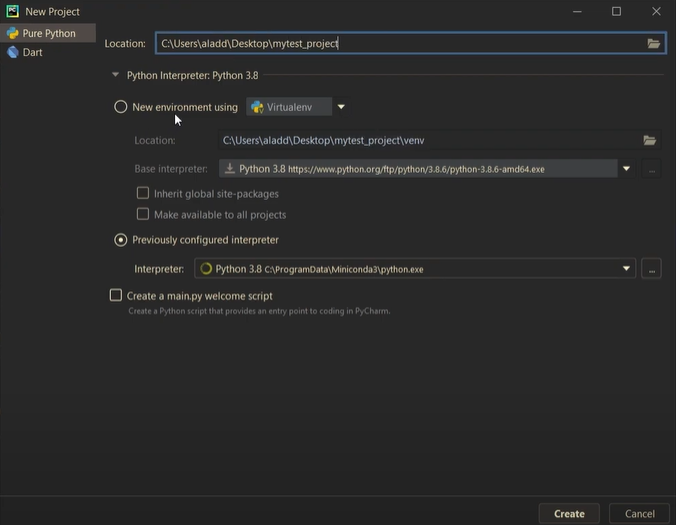
Click on Create New Project and specify location and select New environment using Virtualenv. Virtualenv avoids polluting the global python installation. We can work with different versions of python for different projects.

Press Create after entering the details. It will create the project and open a new window as shown below.

Next, we will install TensorFlow library using PyCharm itself. On Mac, go to PyCharm preferences as shown below.

Once Preferences window is open, go to Project > Project Interpreter as shown below.

Click on the + icon in left bottom and you will get a window in which you can search TensorFlow module as shown below.

Click on Install Package to install TensorFlow. It might take a couple of minutes depending on your internet speed. Once installed you will get Packages installed successfully Installed packages: 'tensorflow'.
Working with TensorFlow API
Create a directory named src inside the 01-tensorflow-intro directory. We will use it to store Python files.
Create a ne Python file 01.py inside the src directory. We will write our first TensorFlow program inside it.
We will start by creating a simple TensorFlow program to add two numbers.
import tensorflow as tf # 1

a = tf.constant(1) # 2
b = tf.constant(2) # 3

c = tf.add(a, b) # 4

with tf.Session() as sess: # 5
    print(sess.run(c)) # 6
The code shown above does the following:
- It imports the
tensorflowmodule and give it an aliastf - We created two constant tensors named a and b. As mentioned before, tensor is a multidimensional array. What might confuse you is that
aandbdoes not refer to arrays. They are constant values represented as unit arrays. If you printa, the output will be followingTensor("Const:0", shape=(), dtype=int32).Const:0is the autogenerated name of the Tensor.()is the shape of the tensor. Andint32is the datatype. - Next, we defined another Tensor
cuses thesumoperator to add bothaandbtensors. - The line 5 creates as instance of
Sessionclass and names itsess. Session provides an environment in which TensorFlow operations are executed. - Using the session created in the line 5, we run the tensor
cthat performed addition ofaandbtensors.
To run the code example above, you can right click anywhere on the file and run the program as shown in the image below.

You will see the output 3 in the console.
Key points about TensorFlow API
The two key points that you should be aware of TensorFlow API are:
- TensorFlow API is by default lazy. It does not perform any computation till you call
sess.run(). If you printcafter line 4 you will get following outputTensor("Add:0", shape=(), dtype=int32). As you can see, we didn’t see the result3in the print statement. Nothing will get executed. We have only defined our computation graph. This is the difference between declarative programming and imperative programming. - TensorFlow will only execute necessary portion of the graph. In the example above, it will evaluate everything but it different example it might execute a sub-portion of the graph.
Conclusion
In the first part of this series, we have set up our TensorFlow environment and written our first TensorFlow program. In the next part, we will get deeper into TensorFlow API covering Tensors and Graphs in detail.
TensorFlow is one of the most popular open-source libraries for machine learning and deep neural networks in Python—initiated by the machine learning engineers at Google!
Problem Formulation: Given a PyCharm project. How to install the TensorFlow library in your project within a virtual environment or globally?
Here’s a solution that always works:
- Open
File > Settings > Projectfrom the PyCharm menu. - Select your current project.
- Click the
Python Interpretertab within your project tab. - Click the small
+symbol to add a new library to the project. - Now type in the library to be installed, in your example
"tensorflow"without quotes, and clickInstall Package. - Wait for the installation to terminate and close all popup windows.
Here’s the installation process as a short animated video—it works analogously for TensorFlow, just type in “tensorflow” in the search field instead:
Make sure to only select the package “tensorflow” because there are many other packages that are not required but also contain the term “tensorflow” (False Positives):

Alternatively, you can run the pip install tensorflow command in your PyCharm terminal view that makes use of the PIP package manager:
$ pip install tensorflow
(venv) C:UsersxcentDesktopPythonpythonProject>pip install tensorflow
Collecting tensorflow
  Downloading tensorflow-2.6.0-cp39-cp39-win_amd64.whl (423.3 MB)
     |██████████████████              | 234.4 MB 3.3 MB/s eta 0:00:58

Feel free to check out the following free email academy with Python cheat sheets to boost your coding skills!
To become a PyCharm master, check out our full course on the Finxter Computer Science Academy available for free for all Finxter Premium Members:

And we also have a course on TensorFlow on the Finxter CS Academy.
TensorFlow – A Hands-On Introduction to Deep Learning and Neural Networks for Beginners
This course gives you a charming introduction into deep learning and neural networks using Google’s TensorFlow library for Python beginners.

Both courses are available for free to all Finxter Premium Members!

While working as a researcher in distributed systems, Dr. Christian Mayer found his love for teaching computer science students.
To help students reach higher levels of Python success, he founded the programming education website Finxter.com. He’s author of the popular programming book Python One-Liners (NoStarch 2020), coauthor of the Coffee Break Python series of self-published books, computer science enthusiast, freelancer, and owner of one of the top 10 largest Python blogs worldwide.
His passions are writing, reading, and coding. But his greatest passion is to serve aspiring coders through Finxter and help them to boost their skills. You can join his free email academy here.
Permalink
Cannot retrieve contributors at this time
Install PyCharm:
We believe PyCharm is one of the best (if not the best) IDEs for python programming. It comes with powerfull tools for code editting, navigating, refactoring, debugging and etc. The community version of this software is free and you can download it through https://www.jetbrains.com/pycharm/download/. If you are student, you also can use the professional edition using your university email (read more here).
After you download and install the PyCharm. You have to show the PyCharm that where is the location of the python file that you have installed your tensorflow environment. You can do so through the interpreter section. When you have an existing project opened (if not, create a new project), go to the setting. In project section, select the project interpreter and all local virtual environment.

Select Conda Environment and give the path to the python executable of existing environment to the interpreter.

*Note: Recall the path that you installed the Anaconda into and find the created environment in the envs folder in the Anaconda path.
I cannot install tensorflow in pycharm on windows 10, though I have tried many different things:
- went to settings > project interpreter and tried clicking the green plus button to install it, gave me the error: non-zero exit code (1) and told me to try installing via pip in the command line, which was successful, but I can’t figure out how to make Pycharm use it when it’s installed there
- tried changing to a Conda environment, which still would not allow me to run tensorflow since when I input into the python command line: pip.main([‘install’, ‘tensorflow’]) it gave me another error and told me to update pip
- updated pip then tried step 2 again, but now that I have pip 10.0.1, I get the error ‘pip has no attribute main’. I tried reverted pip to 9.0.3 in the command line, but this won’t change the version used in pycharm, which makes no sense to me. I reinstalled anaconda, as well as pip, and deleted and made a new project and yet it still says that it is using pip 10.0.1 which makes no sense to me
So in summary, I still can’t install tensorflow, and I now have the wrong version of pip being used in Pycharm. I realize that there are many other posts about this issue but I’m pretty sure I’ve been to all of them and either didn’t get an applicable answer or an answer that I understand.
asked Jun 1, 2018 at 1:04
![]()
nicknicknick111nicknicknick111
691 gold badge2 silver badges11 bronze badges
what worked for is this;
- I installed TensorFlow on the command prompt as an administrator using this command
pip install tensorflow - then I jumped back to my pycharm and clicked the red light bulb pop-up icon, it will have a few options when you click it, just select the one that says install tensor flow. This would not install in from scratch but basically, rebuild and update your pycharm workspace to note the newly installed tensorflow
answered Oct 17, 2021 at 10:48
![]()
Оригинал перепечатан с:https://blog.csdn.net/u012052268/article/details/74202439
- оглавление
- Предисловие:
- 1. Установите Anaconda
- 2. Установите Tensorflow.
- 3. Прочие вопросы
- 4. Используйте тензорный поток в pycharm
оглавление
Предисловие:
В последнее время из-за необходимости использовать TensorFlow для работы могу только дополнять актуальные знания. Изначально блоггер планировал играть на Ubantu, но по некоторым причинам отказался от этой идеи и перешел на Pycharm, чтобы играть. Следующее — хорошее руководство по установке, которое я видел в процессе сбора информации, поделитесь им.
1. Установите Anaconda
Выберите соответствующую Anaconda для установки. Щелкните здесь, чтобы увидеть адрес загрузки, чтобы загрузить соответствующую системную версию Anaconda. Текущая версия официального сайта — Anaconda 4.3.1 для python3.6. Автор установил версию 4.3.0.

аналогична установке обычного программного обеспечения, просто выберите значение по умолчанию.Обратите внимание на то, чтобы добавить python3.6 в переменную окружения.

Затем устанавливается Anaconda. Мы можем использовать следующую команду, чтобы проверить, какие пакеты установлены Anaconda.
Выполнить меню «Пуск» -> Anaconda3—> Подсказка Anaconda:
conda list
Вы можете видеть, что установлены часто используемые пакеты, такие как numpy и sympy.
2. Установите Tensorflow.
В настоящее время TensorFlow поддерживает только версию Python 3.5 под Windows.
(1) Откройте приглашение Anaconda и введите образ хранилища Tsinghua, чтобы обновление было быстрее:

conda config --add channels https://mirrors.tuna.tsinghua.edu.cn/anaconda/pkgs/free/
conda config --set show_channel_urls yes
(2) Также используйте Anaconda в Anaconda Prompt для создания среды python3.5, имя среды — tensorflow, введите следующую команду:
conda create -n tensorflow python=3.5Запустите меню «Пуск» -> Anaconda3 -> Anaconda Navigator, щелкните «Среды» слева, вы увидите, что среда tenorflow создана.


(3) Запустите среду tenorflow в Anaconda Prompt:
activate tensorflow
Примечание: если не используется тензорный поток, закройте среду тензорного потока, команда: деактивировать
(4) Установите версию TensorFlow для процессора.
pip install --upgrade --ignore-installed tensorflowПримечание. Метод установки версии с графическим процессором здесь не описывается. Для версии с графическим процессором необходимо установить cuda8 + cudnn5. При необходимости выполните поиск в других сообщениях блога.
Примечание: он должен быть установлен в среде только что созданного тензорного потока! ! ! !
Таким образом устанавливается версия процессора tensorflow.
(5) Тестовый тензорный поток
Запустите среду tenorflow в Anaconda Prompt и войдите в среду python.

Код теста следующий:
import tensorflow as tf
hello = tf.constant('Hello, TensorFlow!')
sess = tf.Session()
print(sess.run(hello))
результат операции:

3. Прочие вопросы
Возможно, нас здесь не устраивает. Мы терпели неудачу при импорте tenorflow в ipython и Spyder, которые поставляются с Anaconda, подскажитеNo module named ‘tensorflow’, Как показано ниже, это потому, что мы не открывали их в среде tensorflow.

Чтобы иметь возможность использовать тензорный поток в ipython и Spyder, нам необходимо установить эти два плагина в среде тензорного потока.
Откройте Anaconda Navigator, выберите «Не установлено», найдите ipython и Spyder и установите их. Автор уже установил их здесь, поэтому они не отображаются на этой странице.

переключитесь на установленный, вы увидите, что оба они установлены, фактически, вы можете установить их в соответствии с вашими потребностями. На следующем рисунке показан установленный Spyder:

После установки подключаемого модуля нам нужно его протестировать.
Запустите среду tensorflow в Anaconda Prompt и запустите ipython, импорт tenorflow успешно завершен:

Аналогичным образом запустите среду tenorflow в Anaconda Prompt и запустите Spyder. Через некоторое время будет запущена IDE Spyder. Импорт тензорного потока также выполнен успешно:


Примечание. Вы должны запустить Spyder в среде тензорного потока, чтобы импортировать тензорный поток, не переходите в меню «Пуск», чтобы запустить Spyder, где его нельзя запустить, например:

4. Используйте тензорный поток в pycharm
Я привык использовать PyCharm для разработки, конфигурация следующая:
После создания нового проекта
File-Setting – Project Interpreter выберите интерпретатор Python в тензорном потоке,
Например, местонахождение моего переводчика:


После развертывания вы можете запустить HelloWorld
import tensorflow as tf

hello = tf.constant("Hello!TensorFlow")
sess = tf.Session()
print(sess.run(hello))
Запустить его
взлететь!
Преимущество этого метода: нет необходимости каждый раз открывать и закрывать среду.

(activate
tensorflow 、deactivate tensorflow)
Tensorflow is one of the most-used deep-learning frameworks. It’s arguably the most popular machine learning platform on the web, with a broad range of users from those just starting out, to people looking for an edge in their careers and businesses.
Not all users know that you can install the TensorFlow GPU if your hardware supports it. We’ll discuss what Tensorflow is, how it’s used in today’s world, and how to install the latest TensorFlow version with CUDA, cudNN, and GPU support in Windows, Mac, and Linux.
Introduction to TensorFlow
TensorFlow is an open-source software library for machine learning, created by Google. It was initially released on November 28, 2015, and it’s now used across many fields including research in the sciences and engineering.
The idea behind TensorFlow is to make it quick and simple to train deep neural networks that use a diversity of mathematical models. These networks are then able to learn from data without human intervention or supervision, making them more efficient than conventional methods. The library also offers support for processing on multiple machines simultaneously with different operating systems and GPUs.
How to Keep Track of TensorFlow/Keras Model Development with Neptune
Debug and Visualize Your TensorFlow/Keras Model: Hands-on Guide
TensorFlow applications
TensorFlow is a library for deep learning built by Google, it’s been gaining a lot of traction ever since its introduction early last year. The main features include automatic differentiation, convolutional neural networks (CNN), and recurrent neural networks (RNN). It’s written in C++ and Python, for high performance it uses a server called a “Cloud TensorFlow” that runs on Google Cloud Platform. It doesn’t require a GPU, which is one of its main features.
The newest release of Tensorflow also supports data visualization through matplotlib. This visualization library is very popular, and it’s often used in data science coursework, as well as by artists and engineers to do data visualizations using MATLAB or Python / R / etc.
Installing the latest TensorFlow version with CUDA, cudNN, and GPU support
Let’s see how to install the latest TensorFlow version on Windows, macOS, and Linux.
Windows
Prerequisite
- Python 3.6–3.8
- Windows 7 or later (with C++ redistributable)
- Check https://www.tensorflow.org/install/so… For latest version information
Steps
1) Download Microsoft Visual Studio from:
https://visualstudio.microsoft.com/vs…
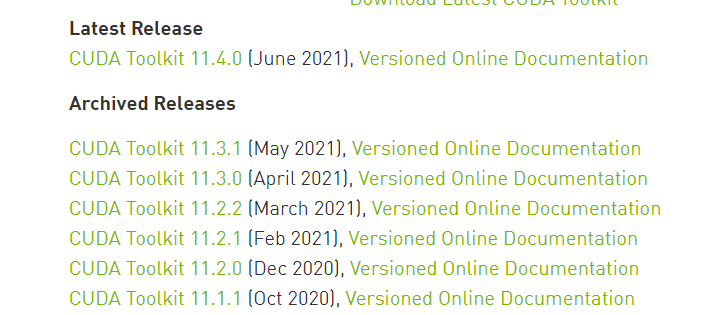
2) Install the NVIDIA CUDA Toolkit (https://developer.nvidia.com/cuda-too…), check the version of software and hardware requirements, we’ll be using :
| Version | Python version | Compiler | Build tools | cuDNN | CUDA |
| tensorflow-2.5.0 | 3.6-3.9 | GCC 7.3.1 | Bazel 3.7.2 | 8.1 | 11.2 |
We will install CUDA version 11.2, but make sure you install the latest or updated version (for example – 11.2.2 if it’s available).
Click on the newest version and a screen will pop up, where you can choose from a few options, so follow the below image and choose these options for Windows.

Once you choose the above options, wait for the download to complete.

Install it with the Express (Recommended) option, it will take a while to install on your machine.
3) Now we’ll download NVIDIA cuDNN, https://developer.nvidia.com/cudnn
Check the version code from the TensorFlow site.
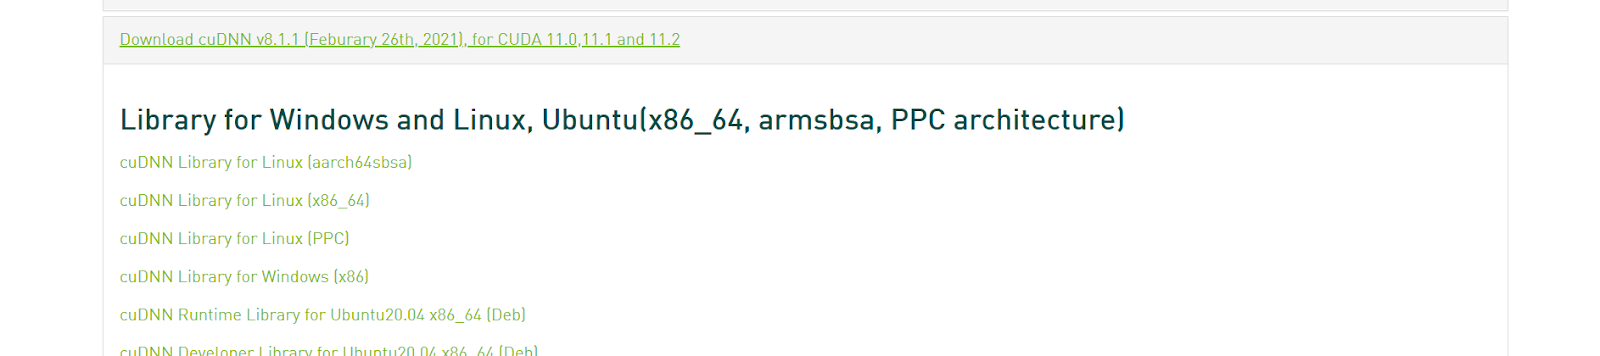
Now, check versions for CUDA and cuDNN, and click download for your operating system. If you can’t find your desired version, click on cuDNN Archive and download from there.
Once the download is complete, extract the files.

Now, copy these 3 folders (bin, include, lib). Go to C Drive>Program Files, and search for NVIDIA GPU Computing Toolkit.

Open the folder, select CUDA > Version Name, and replace (paste) those copied files.
Now click on the bin folder and copy the path. It should look like this: C:Program FilesNVIDIA GPU Computing ToolkitCUDAv11.2bin.
On your PC, search for Environment variables, as shown below.
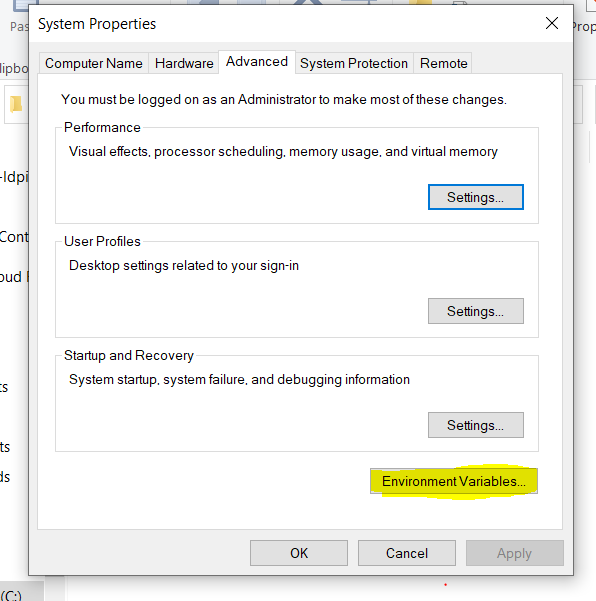
Click on Environment Variables on the bottom left. Now click on the link which states PATH.
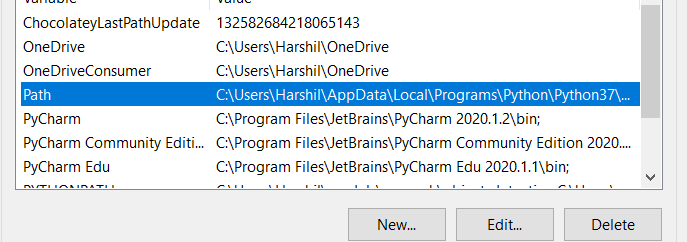
Once you click on the PATH, you will see something like this.

Now click on New (Top Left), and paste the bin path here. Go to the CUDA folder, select libnvvm folder, and copy its path. Follow the same process and paste that path into the system path. Next, just restart your PC.
4) Installing Tensorflow
Open conda prompt. If not installed, get it here → https://www.anaconda.com/products/individual.
Now copy the below commands and paste them into the prompt (Check for the versions).
conda create --name tf2.5 python==3.8
conda activate tf2.5 (version)
pip install tensorflow (With GPU Support) //Install TensorFlow GPU command, pip install --upgrade tensorflow-gpu
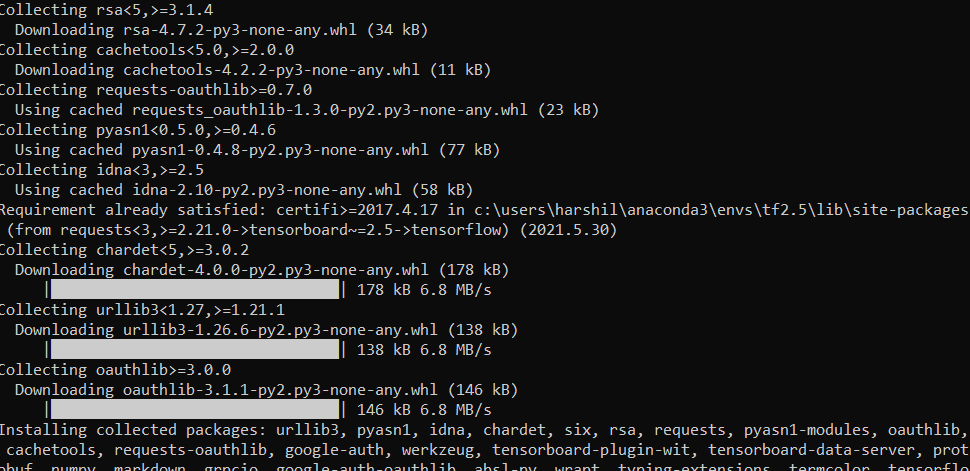
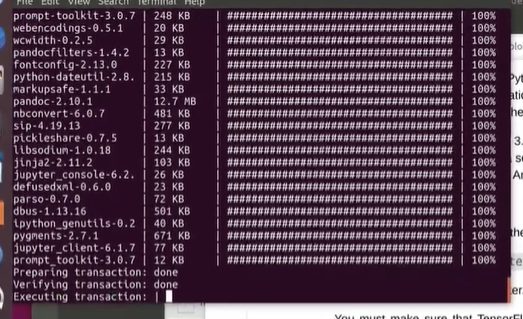
You’ll see an installation screen like this. If you see any errors, Make sure you’re using the correct version and don’t miss any steps.
We’ve installed everything, so let’s test it out in Pycharm.
Test
To test the whole process we’ll use Pycharm. If not installed, get the community edition → https://www.jetbrains.com/pycharm/download/#section=windows.
First, to check if TensorFlow GPU has been installed properly on your machine, run the below code:
import tensorflow as tf
tf.test.is_built_with_cuda()
tf.test.is_gpu_available(cuda_only=False, min_cuda_compute_capability=None)
It should show TRUE as output. If it’s FALSE or some error, look at the steps.
Now let’s run some code.
For a simple demo, we train it on the MNIST dataset of handwritten digits. We’ll see through how to create the network as well as initialize a loss function, check accuracy, and more.
Configure the env, create a new Python file, and paste the below code:
import torch
import torchvision
import torch.nn.functional as F
import torchvision.datasets as datasets
import torchvision.transforms as transforms
from torch import optim
from torch import nn
from torch.utils.data import DataLoader
from tqdm import tqdm
Check the rest of the code here -> https://github.com/aladdinpersson/Machine-Learning-Collection/blob/master/ML/Pytorch/Basics/pytorch_simple_CNN.py.
When you run the code, look for successfully opened cuda(versioncode).

Once the training started, all the steps were successful!
MacOS
MacOS doesn’t support Nvidia GPU for the latest versions, so this will be a CPU-only installation. You can get GPU support on a Mac with some extra effort and requirements.
Prerequisite
- Python 3.6–3.8
- macOS 10.12.6 (Sierra) or later (no GPU support)
- Check https://www.tensorflow.org/install/so… For the latest version information

You can install the latest version available on the site, but for this tutorial, we’ll be using Python 3.8. Also, check with the TensorFlow site for version support.
2) Prepare environment:
After installing Miniconda, open the command prompt.
conda install -y jupyter

This will take some time to install jupyter. Next, install the Mac tensorflow.yml file. You can also create a .yml file to install TensorFlow and dependencies (mentioned below).
dependencies:
    - python=3.8
    - pip>=19.0
    - jupyter
    - scikit-learn
    - scipy
    - pandas
    - pandas-datareader
    - matplotlib
    - pillow
    - tqdm
    - requests
    - h5py
    - pyyaml
    - flask
    - boto3
    - pip:
        - tensorflow==2.4
        - bayesian-optimization
        - gym
        - kaggle
Run the following command from the same directory that contains tensorflow.yml.
conda env create -f tensorflow.yml -n tensorflow
This installation might take a few minutes.
Activate the environment using the following command:
python -m ipykernel install --user --name tensorflow --display-name "Python 3.8 (tensorflow)"
Test
To test the whole process, we’ll use a Jupyter notebook. Use this command to start Jupyter:
jupyter notebook
Cope the below code and run on jupyter notebook.
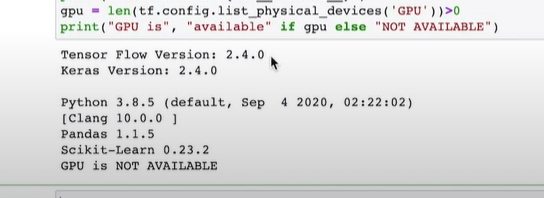
import sys

import tensorflow.keras
import pandas as pd
import sklearn as sk
import tensorflow as tf

print(f"Tensor Flow Version: {tf.__version__}")
print(f"Keras Version: {tensorflow.keras.__version__}")
print()
print(f"Python {sys.version}")
print(f"Pandas {pd.__version__}")
print(f"Scikit-Learn {sk.__version__}")
gpu = len(tf.config.list_physical_devices('GPU'))>0
print("GPU is", "available" if gpu else "NOT AVAILABLE")
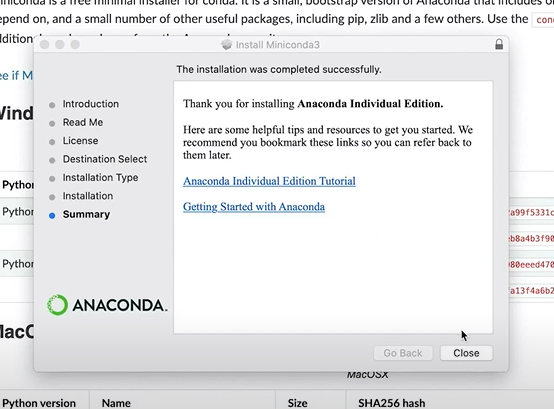
This might take some time, but you’ll see something like this with your installed versions.
Linux
We can install both CPU and GPU versions on Linux.
Prerequisite
- Python 3.6–3.8
- Ubuntu 16.04 or later
- Check https://www.tensorflow.org/install/so… for the latest version information
Steps
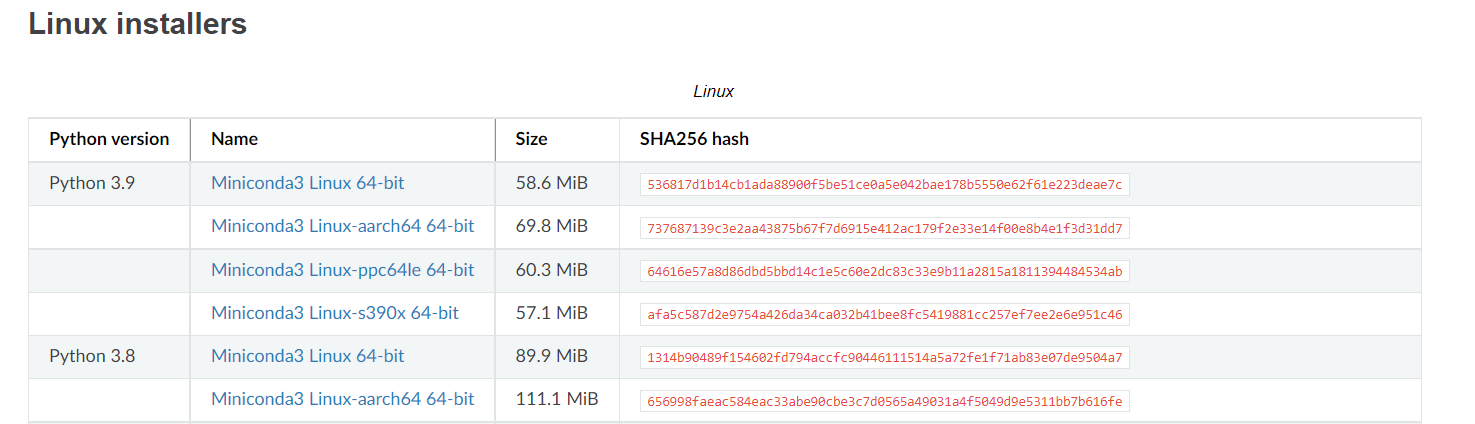
1) First download and install Miniconda from https://docs.conda.io/en/latest/miniconda.html
2) To install CUDA on your machine, you will need:
- CUDA capable GPU,
- A supported version of Linux,
- NVIDIA CUDA Toolkit (https://developer.nvidia.com/cuda-downloads).
You can install CUDA by running,
$ sudo apt install nvidia-cuda-toolkit
After installing CUDA, run to verify the install:
nvcc -V
You’ll see it output something like this:
nvcc: NVIDIA (R) Cuda compiler driver
Copyright (c) 2005-2021 NVIDIA Corporation
Built on Sun_Jul_22_21:07:16_PDT_2019
Cuda compilation tools, release ‘version’
3) Now we’ll download NVIDIA cuDNN, https://developer.nvidia.com/cudnn
Check the version code from the TensorFlow site.
After downloading, extract the files:
tar -xvzf cudnn-10.1-linux-x64-'version'.tgz
Now, we’ll copy the extracted files to the CUDA installation path:
sudo cp cuda/include/cudnn.h /usr/lib/cuda/include/
sudo cp cuda/lib64/libcudnn* /usr/lib/cuda/lib64/
Setting up the file permissions of cuDNN:
$ sudo chmod a+r /usr/lib/cuda/include/cudnn.h /usr/lib/cuda/lib64/libcudnn*
4) Get the environment ready:
Export CUDA environment variables. To set them, run:
$ echo 'export LD_LIBRARY_PATH=/usr/lib/cuda/lib64:$LD_LIBRARY_PATH' >> ~/.bashrc
$ echo 'export LD_LIBRARY_PATH=/usr/lib/cuda/include:$LD_LIBRARY_PATH' >> ~/.bashrc
You can also set the environment with conda and jupyter notebook.
After installing Miniconda, open the command prompt.
conda install -y jupyter
Now, check with TensorFlow site for version, and run the below command:
conda create --name tensorflow python=3.8
To enter the environment:
conda activate tensorflow
Let’s create Jupyter support for your new environment:
conda install nb_conda
This will take some time to get things done.
To Install CPU only, use the following command:
conda install -c anaconda tensorflow
To Install both GPU and CPU, use the following command:
conda install -c anaconda tensorflow-gpu
To add additional libraries, update or create the ymp file in your root location, use:
conda env update --file tools.yml
Below are additional libraries you need to install (you can install them with pip).
dependencies:
    - jupyter
    - scikit-learn
    - scipy
    - pandas
    - pandas-datareader
    - matplotlib
    - pillow
    - tqdm
    - requests
    - h5py
    - pyyaml
    - flask
    - boto3
    - pip
    - pip:
        - bayesian-optimization
        - gym
        - kaggle
Test
There are two ways you can test your GPU.
First, you can run this command:
import tensorflow as tf
tf.config.list_physical_devices("GPU")
You will see similar output, [PhysicalDevice(name=’/physical_device:GPU:0′, device_type=’GPU’)]
Second, you can also use a jupyter notebook. Use this command to start Jupyter.
jupyter notebook
Now, run the below code:
import sys

import tensorflow.keras
import pandas as pd
import sklearn as sk
import tensorflow as tf

print(f"Tensor Flow Version: {tf.__version__}")
print(f"Keras Version: {tensorflow.keras.__version__}")
print()
print(f"Python {sys.version}")
print(f"Pandas {pd.__version__}")
print(f"Scikit-Learn {sk.__version__}")
gpu = len(tf.config.list_physical_devices('GPU'))>0
print("GPU is", "available" if gpu else "NOT AVAILABLE")
You’ll see results something like this:
TensorFlow Version: 'version'
Keras Version: 'version'-tf

Python 3.8.0
Pandas 'version'
Scikit-Learn 'version'
GPU is available
So, when you see a GPU is available, you successfully installed TensorFlow on your machine.
Conclusion
TensorFlow is a free and open-source software library for machine learning created by Google, and it’s most notably known for its GPU accelerated computation speed. We saw how to install TensorFlow on Windows, Mac, and Linux. I hope that this guide helps you get started with TensorFlow!
References and recommended reading:
- https://github.com/aladdinpersson/Machine-Learning-Collection/blob/master/ML/Pytorch/Basics/pytorch_simple_CNN.py
- https://www.youtube.com/watch?v=dj-Jntz-74g
- https://github.com/jeffheaton/t81_558_deep_learning/blob/master/install/tensorflow-install-jul-2020.ipynb
- https://www.tensorflow.org/guide/gpu
- https://www.liquidweb.com/kb/how-to-install-tensorflow-on-ubuntu-18-04/
- https://www.pyimagesearch.com/2019/12/09/how-to-install-tensorflow-2-0-on-macos/
- https://towardsdatascience.com/installing-tensorflow-gpu-in-ubuntu-20-04-4ee3ca4cb75d