This guide is for the latest stable version of TensorFlow. For the
preview build (nightly), use the pip package named
tf-nightly. Refer to these tables for
older TensorFlow version requirements. For the CPU-only build use the pip
package named tensorflow-cpu.
Here are the quick versions of the install commands. Scroll down for the
step-by-step instructions.
Linux
conda install -c conda-forge cudatoolkit=11.2 cudnn=8.1.0
export LD_LIBRARY_PATH=$LD_LIBRARY_PATH:$CONDA_PREFIX/lib/
python3 -m pip install tensorflow
# Verify install:
python3 -c "import tensorflow as tf; print(tf.config.list_physical_devices('GPU'))"
MacOS
# There is currently no official GPU support for MacOS.
python3 -m pip install tensorflow
# Verify install:
python3 -c "import tensorflow as tf; print(tf.reduce_sum(tf.random.normal([1000, 1000])))"
Windows Native
conda install -c conda-forge cudatoolkit=11.2 cudnn=8.1.0
# Anything above 2.10 is not supported on the GPU on Windows Native
python3 -m pip install "tensorflow<2.11"
# Verify install:
python3 -c "import tensorflow as tf; print(tf.config.list_physical_devices('GPU'))"
Windows WSL2
conda install -c conda-forge cudatoolkit=11.2 cudnn=8.1.0
export LD_LIBRARY_PATH=$LD_LIBRARY_PATH:$CONDA_PREFIX/lib/
python3 -m pip install tensorflow
# Verify install:
python3 -c "import tensorflow as tf; print(tf.config.list_physical_devices('GPU'))"
CPU
python3 -m pip install tensorflow
# Verify install:
python3 -c "import tensorflow as tf; print(tf.reduce_sum(tf.random.normal([1000, 1000])))"
Nightly
python3 -m pip install tf-nightly
# Verify install:
python3 -c "import tensorflow as tf; print(tf.reduce_sum(tf.random.normal([1000, 1000])))"
The following NVIDIA® software are only required for GPU support.
Linux
1. System requirements
- Ubuntu 16.04 or higher (64-bit)
TensorFlow only officially support Ubuntu. However, the following
instructions may also work for other Linux distros.
2. Install Miniconda
Miniconda is the
recommended approach for installing TensorFlow with GPU support.
It creates a separate environment to avoid changing any installed
software in your system. This is also the easiest way to install the required
software especially for the GPU setup.
You can use the following command to install Miniconda. During installation,
you may need to press enter and type «yes».
curl https://repo.anaconda.com/miniconda/Miniconda3-latest-Linux-x86_64.sh -o Miniconda3-latest-Linux-x86_64.sh
bash Miniconda3-latest-Linux-x86_64.sh
You may need to restart your terminal or source ~/.bashrc to enable the
conda command. Use conda -V to test if it is installed successfully.
3. Create a conda environment
Create a new conda environment named tf with the following command.
conda create --name tf python=3.9
You can deactivate and activate it with the following commands.
conda deactivate
conda activate tf
Make sure it is activated for the rest of the installation.
4. GPU setup
You can skip this section if you only run TensorFlow on the CPU.
First install the
NVIDIA GPU driver
if you have not. You can use the following command to verify it is
installed.
nvidia-smi
Then install CUDA and cuDNN with conda.
conda install -c conda-forge cudatoolkit=11.2 cudnn=8.1.0
Configure the system paths. You can do it with the following command every time
you start a new terminal after activating your conda environment.
export LD_LIBRARY_PATH=$LD_LIBRARY_PATH:$CONDA_PREFIX/lib/
For your convenience it is recommended that you automate it with the following
commands. The system paths will be automatically configured when you
activate this conda environment.
mkdir -p $CONDA_PREFIX/etc/conda/activate.d
echo 'export LD_LIBRARY_PATH=$LD_LIBRARY_PATH:$CONDA_PREFIX/lib/' > $CONDA_PREFIX/etc/conda/activate.d/env_vars.sh
5. Install TensorFlow
TensorFlow requires a recent version of pip, so upgrade your pip
installation to be sure you’re running the latest version.
pip install --upgrade pip
Then, install TensorFlow with pip.
pip install tensorflow
6. Verify install
Verify the CPU setup:
python3 -c "import tensorflow as tf; print(tf.reduce_sum(tf.random.normal([1000, 1000])))"
If a tensor is returned, you’ve installed TensorFlow successfully.
Verify the GPU setup:
python3 -c "import tensorflow as tf; print(tf.config.list_physical_devices('GPU'))"
If a list of GPU devices is returned, you’ve installed TensorFlow
successfully.
MacOS
1. System requirements
- macOS 10.12.6 (Sierra) or higher (64-bit)
Currently there is no official GPU support for running TensorFlow on
MacOS. The following is instructions are for running on CPU.
2. Check Python version
Check if your Python environment is already configured:
python3 --version
python3 -m pip --version
2. Install Miniconda
Miniconda
is the recommended approach for installing TensorFlow with GPU support.
It creates a separate environment to avoid changing any installed
software in your system. This is also the easiest way to install the required
software especially for the GPU setup.
curl https://repo.anaconda.com/miniconda/Miniconda3-latest-MacOSX-x86_64.sh -o Miniconda3-latest-MacOSX-x86_64.sh
bash Miniconda3-latest-MacOSX-x86_64.sh
You may need to restart your terminal or source ~/.bashrc to enable the
conda command. Use conda -V to test if it is installed successfully.
4. Create a conda environment
Create a new conda environment named tf with the following command.
conda create --name tf python=3.9
You can deactivate and activate it with the following commands.
conda deactivate
conda activate tf
Make sure it is activated for the rest of the installation.
5. Install TensorFlow
TensorFlow requires a recent version of pip, so upgrade your pip
installation to be sure you’re running the latest version.
pip install --upgrade pip
Then, install TensorFlow with pip.
pip install tensorflow
6. Verify install
python3 -c "import tensorflow as tf; print(tf.reduce_sum(tf.random.normal([1000, 1000])))"
If a tensor is returned, you’ve installed TensorFlow successfully.
Windows Native
1. System requirements
- Windows 7 or higher (64-bit)
2. Install Microsoft Visual C++ Redistributable
Install the Microsoft Visual C++ Redistributable for Visual Studio 2015,
2017, and 2019. Starting with the TensorFlow 2.1.0 version, the
msvcp140_1.dll file is required from this package (which may not be
provided from older redistributable packages). The redistributable comes
with Visual Studio 2019 but can be installed separately:
- Go to the
Microsoft Visual C++ downloads. - Scroll down the page to the Visual Studio 2015, 2017 and 2019 section.
- Download and install the Microsoft Visual C++ Redistributable for
Visual Studio 2015, 2017 and 2019 for your platform.
Make sure
long paths are enabled
on Windows.
3. Install Miniconda
Miniconda
is the recommended approach for installing TensorFlow with GPU support.
It creates a separate environment to avoid changing any installed
software in your system. This is also the easiest way to install the
required software especially for the GPU setup.
Download the
Miniconda Windows Installer.
Double-click the downloaded file and follow the instructions on the screen.
4. Create a conda environment
Create a new conda environment named tf with the following command.
conda create --name tf python=3.9
You can deactivate and activate it with the following commands.
conda deactivate
conda activate tf
Make sure it is activated for the rest of the installation.
5. GPU setup
You can skip this section if you only run TensorFlow on CPU.
First install
NVIDIA GPU driver
if you have not.
Then install the CUDA, cuDNN with conda.
conda install -c conda-forge cudatoolkit=11.2 cudnn=8.1.0
6. Install TensorFlow
TensorFlow requires a recent version of pip, so upgrade your pip
installation to be sure you’re running the latest version.
pip install --upgrade pip
Then, install TensorFlow with pip.
# Anything above 2.10 is not supported on the GPU on Windows Native
pip install "tensorflow<2.11"
7. Verify install
Verify the CPU setup:
python3 -c "import tensorflow as tf; print(tf.reduce_sum(tf.random.normal([1000, 1000])))"
If a tensor is returned, you’ve installed TensorFlow successfully.
Verify the GPU setup:
python3 -c "import tensorflow as tf; print(tf.config.list_physical_devices('GPU'))"
If a list of GPU devices is returned, you’ve installed TensorFlow
successfully.
Windows WSL2
1. System requirements
- Windows 10 19044 or higher (64-bit). This corresponds to Windows 10
version 21H2, the November 2021 update.
See the following documents to:
- Download the latest Windows 10 update.
- Install WSL2
- Setup NVIDIA® GPU support in WSL2
2. Install Miniconda
Miniconda is the
recommended approach for installing TensorFlow with GPU support.
It creates a separate environment to avoid changing any installed
software in your system. This is also the easiest way to install the required
software especially for the GPU setup.
You can use the following command to install Miniconda. During installation,
you may need to press enter and type «yes».
curl https://repo.anaconda.com/miniconda/Miniconda3-latest-Linux-x86_64.sh -o Miniconda3-latest-Linux-x86_64.sh
bash Miniconda3-latest-Linux-x86_64.sh
You may need to restart your terminal or source ~/.bashrc to enable the
conda command. Use conda -V to test if it is installed successfully.
3. Create a conda environment
Create a new conda environment named tf with the following command.
conda create --name tf python=3.9
You can deactivate and activate it with the following commands.
conda deactivate
conda activate tf
Make sure it is activated for the rest of the installation.
4. GPU setup
You can skip this section if you only run TensorFlow on the CPU.
First install the
NVIDIA GPU driver
if you have not. You can use the following command to verify it is
installed.
nvidia-smi
Then install CUDA and cuDNN with conda.
conda install -c conda-forge cudatoolkit=11.2 cudnn=8.1.0
Configure the system paths. You can do it with following command everytime
your start a new terminal after activating your conda environment.
export LD_LIBRARY_PATH=$LD_LIBRARY_PATH:$CONDA_PREFIX/lib/
For your convenience it is recommended that you automate it with the following
commands. The system paths will be automatically configured when you
activate this conda environment.
mkdir -p $CONDA_PREFIX/etc/conda/activate.d
echo 'export LD_LIBRARY_PATH=$LD_LIBRARY_PATH:$CONDA_PREFIX/lib/' > $CONDA_PREFIX/etc/conda/activate.d/env_vars.sh
5. Install TensorFlow
TensorFlow requires a recent version of pip, so upgrade your pip
installation to be sure you’re running the latest version.
pip install --upgrade pip
Then, install TensorFlow with pip.
pip install tensorflow
6. Verify install
Verify the CPU setup:
python3 -c "import tensorflow as tf; print(tf.reduce_sum(tf.random.normal([1000, 1000])))"
If a tensor is returned, you’ve installed TensorFlow successfully.
Verify the GPU setup:
python3 -c "import tensorflow as tf; print(tf.config.list_physical_devices('GPU'))"
If a list of GPU devices is returned, you’ve installed TensorFlow
successfully.
A few installation mechanisms require the URL of the TensorFlow Python package.
The value you specify depends on your Python version.
TensorFlow — это опенсорсная библиотека, созданная Google, которая используется при разработке систем, использующих технологии машинного обучения. Эта библиотека включает в себя реализацию множества мощных алгоритмов, рассчитанных на решение распространённых задач машинного обучения, среди которых можно отметить распознавание образов и принятие решений.
Этот материал посвящён основам TensorFlow и рассчитан на читателей, которые ничего не знают о данной библиотеке.
TensorFlow: современная библиотека машинного обучения
Проект TensorFlow был переведён Google в разряд опенсорсных в 2015 году. Его предшественником был проект DistBelief, годы опыта, накопленные в ходе работы с которым, отразились на TensorFlow.
Разработчики библиотеки TensorFlow стремились к тому, чтобы она была бы гибкой, эффективной, расширяемой, переносимой. В результате ей можно пользоваться в самых разных вычислительных средах — от тех, которые формируются мобильными устройствами, до сред, представленных огромными кластерами. Библиотека позволяет быстро готовить к реальной работе обученные модели, что устраняет необходимость в создании особых реализаций моделей для продакшн-целей.
Библиотека TensorFlow, с одной стороны, привлекает к себе внимание опенсорс-сообщества и открыта для инноваций, а с другой — пользуется поддержкой крупной корпорации. Это позволяет говорить о том, что у неё есть все шансы на стабильное развитие.
Эта библиотека, благодаря совместным усилиям всех тех, кто работает над ней, подходит для решения задач самых разных масштабов. От тех, которые возникают перед самостоятельным разработчиком, до тех, которые встают перед стартапами и даже перед крупными компаниями вроде Google. С того момента, как эта библиотека стала опенсорсной, с ноября 2015 года, она стала одной из интереснейших библиотек машинного обучения. Её всё чаще и чаще используют при проведении исследований, при разработке реальных приложений, при обучении.
TensorFlow постоянно улучшается, её постоянно снабжают чем-то новым, оптимизируют. Кроме того, растёт и сообщество, сформированное вокруг этой библиотеки.
О названии TensorFlow
Тензор (tensor) — это стандартный способ представления данных в системах глубокого обучения. Тензоры — это многомерные массивы, расширение двумерных таблиц (матриц) для представления данных, имеющих более высокие размерности. Проще говоря, тензор — это n-мерная матрица.
В целом, если вы привыкли к работе с матрицами, тензоры можно представлять себе так же, как вы представляете себе матрицы.
Начнём с установки TensorFlow.
Установка TensorFlow
Если вы начинаете работу с чистой установки Python (возможно, вы установили Python специально ради изучения TensorFlow), для установки TensorFlow достаточно воспользоваться pip:
pip install tensorflowЭтот подход прост, но у него есть некоторые неприятные особенности. Они заключаются в том, что при установке TensorFlow, вместо уже установленных пакетов, будут установлены определённые версии пакетов-зависимостей этой библиотеки.
Если вы используете существующую установку Python и для других целей, этим методом пользоваться не рекомендуется. Один из способов установки TensorFlow с обходом вышеописанной особенности заключается в использовании виртуального окружения, которым управляет утилита virtualenv. Возможно, у вас уже эта утилита установлена, возможно — нет. Если она у вас не установлена, установить её можно так:
pip install virtualenvЗдесь можно найти подробности о virtualenv.
Для того чтобы установить TensorFlow в виртуальном окружении, сначала нужно такое окружение создать. Мы собираемся разместить его в папке ~/envs, но вы можете выбрать и другую, более подходящую вам папку:
cd ~
mkdir envs
virtualenv ~/envs/tensorflow
Выше мы создали виртуальное окружение tensorflow в папке ~/envs (оно представлено папкой ~/envs/tensorflow). Для того чтобы активировать это окружение, воспользуемся следующей командой:
source ~/envs/tensorflow/bin/activateПосле этого приглашение командной строки должно измениться, указывая на активированное виртуальное окружение:
(tensorflow)
Теперь можно установить TensorFlow в виртуальное окружение с использованием pip:
(tensorflow) pip install tensorflowТакая установка не повлияет на другие пакеты, установленные на компьютере.
Для выхода из виртуального окружения можно воспользоваться такой командой:
(tensorflow) deactivateПосле этого приглашение командной строки примет обычный вид.
До недавних пор TensorFlow было очень сложно использовать в среде Windows. Однако после выхода TensorFlow 0.12 особых проблем в этой сфере больше не наблюдается. А именно, для установки CPU-версии TensorFlow под Windows достаточно выполнить следующую команду:
pip install tensorflowА для установки GPU-версии — следующую:
pip install tensorflow-gpuПри установке такой версии TensorFlow предполагается, что у вас уже есть CUDA 8.
Теперь библиотека TensorFlow на вашем компьютере установлена, а значит, пришло время с ней поработать. Начнём, как это обычно бывает при изучении новых технологий, с «Hello World!».
Уважаемые читатели! Этот материал представляет собой перевод начала данной публикации, посвящённой основам TensorFlow. Как вы думаете, стоит ли переводить её дальше?

Только зарегистрированные пользователи могут участвовать в опросе. Войдите, пожалуйста.
Как вы думаете, стоит ли переводить основы TensorFlow дальше?
Проголосовали 344 пользователя.
Воздержались 24 пользователя.
Table of Contents
In simple words, TensorFlow is an open-source library for numerical computation, which is used to enhance the convenience and ease in machine learning, and it is an entirely Python friendly library. TensorFlow can run and train deep neural networks for image recognition, for handwritten digit classification, recurrent neural networks, word embeddings, and sequence-to-sequence models for natural language processing, PDE (partial differential equation) and machine translation. Most importantly, it supports production prediction at scale with exact models that are used for the training.
 Figure 1 TensorFlow logo
Five main use cases of TensorFlow
- This technology is used for automatic image recognition systems because it consists of algorithms to identify shapes for modeling purposes.
- Voice and sound recognition process can be done through the TensorFlow, and it is also used for sentiment analysis or flaw detection.
- TensorFlow helps to improve the text-based recognition technology, and the best example is Google that supports various languages and the capability to transfer the text from one language to another.
- It is used for analyzing the data and separating the meaningful states of it, and the best example of this use case is online streaming platforms (Netflix, YouTube), it uses statistical data to provide the best user experiences.
- TensorFlow is used for the video detection system, which means it is helpful for motion detection or real-time threat detection systems.
Installing TensorFlow
Before starting the process of installation, let’s learn that TensorFlow supports multiple GPUs and CPUs. It means that the process of computations can be divided according to the devices to enhance the speed of the training with the help of parallelization. It can provide faster training by training algorithms.
There are two versions of TensorFlow available for the Windows user, and these versions are:
CPU supported TensorFlow: If the system does not run on the NVIDIA GPU, then the user has to install this version.
GPU supported TensorFlow: This version is used for faster computation and strong computational capacity.
User can install TensorFlow on both Windows and macOS
For Windows user process is:
- Install Anaconda
- Create a .yml file for installing dependencies
- Use pip for adding the TensorFlow
- Launch Jupyter Notebook
For macOS user process is:
- Install Anaconda
- Create a .yml file for installing dependencies
- Launch Jupyter Notebook
So, for starting the TensorFlow installation process user have to install the Anaconda, hence here is the installation process for both macOS and Windows:
Step 1: Install Anaconda in the device:
Download the Anaconda version 4.3.1 for the required system, and this version is essential for Python 3.6. Now you have to create .yml file to install TensorFlow, and the process is:
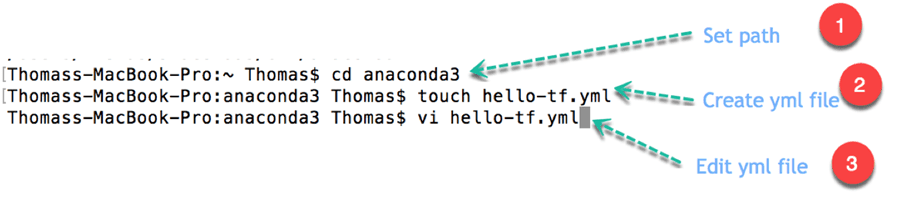
- Locate the path of Anaconda
- Set the working directory to Anaconda
- Create the yml file (For macOS user)
- Edit the yml file
- Compile the yml file
- Activate Anaconda
- Install TensorFlow (it is only for Windows user)
Locating the Anaconda
For the installation of Anaconda, the user has to locate a path for it.
Users can create a new anaconda environment, which includes the essential libraries.
For Windows
For the windows, the user can use the Anaconda type and Prompt:
C:>where Anaconda
For macOS:
For the macOS device, the user can use the type and terminal:
The user has to create a new folder in the Anaconda, which contains Jupyter, TensorFlow, and ipython. There is a fast way to install libraries and software to write a.yml file.

Step 2: Set and select the working directory
The user has to decide an appropriate directory in which the user wants to create a.yml file, and it will be located in the Anaconda.
For macOS:
For the macOS, the default working directory will be Users/USERNAME, path anaconda3, and the working directory are entirely identical. In the macOS devices, the latest folder will be shown right before the $, and the terminal will install the libraries in the working directory.
Users can change the path to cd PATH in case the path on the text editor does not match the working directory. It is essential to wrap the PATH as the ‘PATH’ because this can turn the working directory to PATH.

Open the terminal and type:
cd anaconda3
For Windows user (make sure that the folder placed before Anaconda3):
cd C:UsersAdminAnaconda3

Step 3: Create the yml file for the device:
The user has to create the yml file in the new working directory, and after the process installs the complete dependencies, the user has to run TensorFlow. At last, copy and then paste the code in the terminal.
For macOS devices:
For the macOS users, the file name will appear in the anaconda3:
'touch hello-tf.yml.'
For Windows devices:
The file name for the windows device is:
'echo.>hello-tf.yml.'

Step 4: Edit the yml file
For macOS devices:
Users have to paste the given code in the terminal to edit the file because the yml file is ready to edit or macOS users can use the vim for editing the yml file.
vi hello-tf.yml
User has to enter the edit mode to press the ESC:
Press i to edit
Press w to save
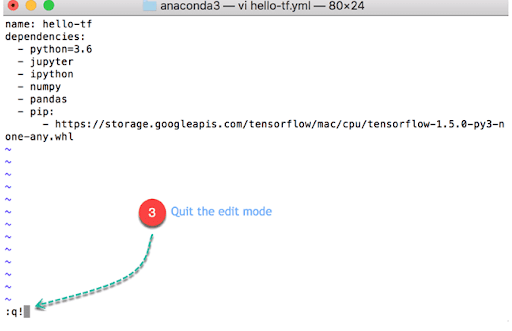
Press q! to quit
Write the above code in the edit mode and then press ESC followed by the:w
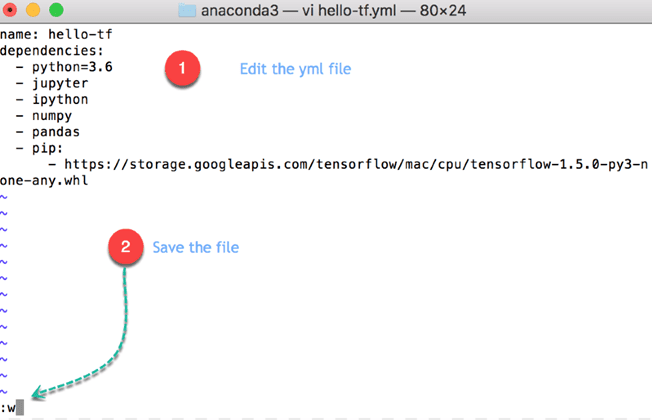
Important: Two spaces are needed after each intent because the file is the case and also intend sensitive.
For macOS devices:
name: hello-tfdependencies:
— python=3.6
— jupyter
— ipython
— pandas
— pip:
— https://storage.googleapis.com/tensorflow/MacOS/cpu/tensorflow-1.5.0-py3-none-any.whl
Here is the code explanation for the above code:
name: hello-tf: Name of the yml file
dependencies:
python=3.6
jupyter
ipython
pandas: Install Python version 3.6, Jupyter, Ipython, and pandas libraries
pip: Install a Python library
https://storage.googleapis.com/tensorflow/MacOS/cpu/tensorflow-1.5.0-py3-none-any.whl: Install TensorFlow from Google APIs.
Then, press the Esc key followed by the:q! to quit the edit mode.
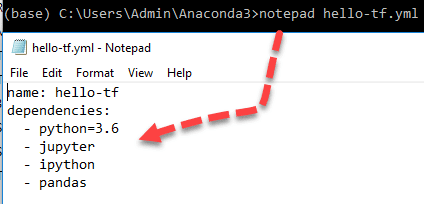
For Windows devices
Notepad is enough for the Windows devices because it doesn’t support the vim program
notepad hello-tf.yml
Enter following into the file
name: hello-of dependencies:
— python=3.6
— jupyter
— ipython
— pandas
Here is the code explanation for the above code
name: hello-tf: Name of the yml file
dependencies:
python=3.6
jupyter
ipython
pandas: Install Python version 3.6, Jupyter, Ipython, and pandas libraries
It will automatically open the notepad; then, the user can edit the file from there.
Step 5: Compile the yml file
User can compile the .yml file with the given code:
conda env create -f hello-tf.yml
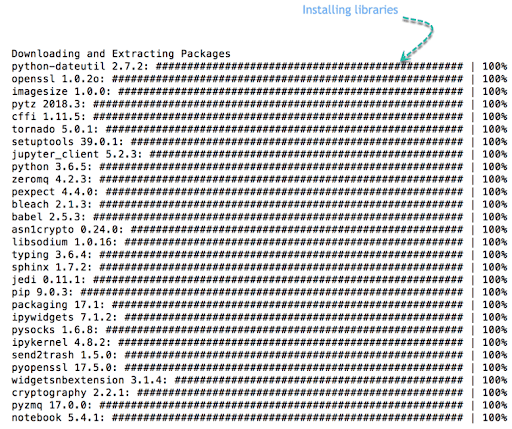
Note: the new environment is automatically created in the current users for Windows devices. This can take almost 1.1 GB of the hard disk.
For Windows user:

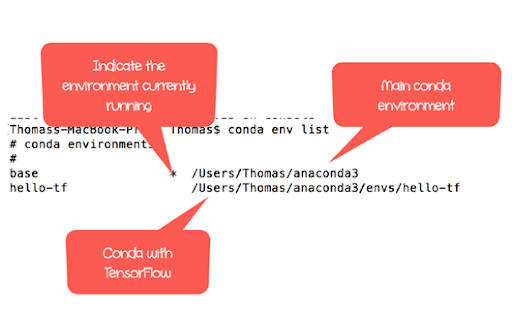
Step 6 Activate the conda environment
Now the user has two conda environments, and the user has created an isolated condo environment with the libraries the user will use during the tutorials. This is required practice because each and every machine learning project requires various libraries.
conda env list
For macOS devices:
source activate hello-tf
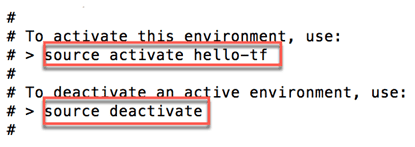
For Windows devices:
activate hello-tf
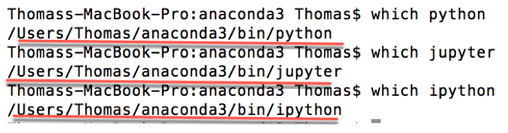
Users can easily check all of the dependencies that are in the same environment. This is essential because it allows Python to use TensorFlow and Jupyter from a similar environment, and in case users don’t see the three, they are located in the same folder; then, the user has to start all over again.
For macOS user:
which Python
which jupyter
which ipython
pip install --upgrade TensorFlow
For Windows devices:
where Python
where jupyter
where ipython
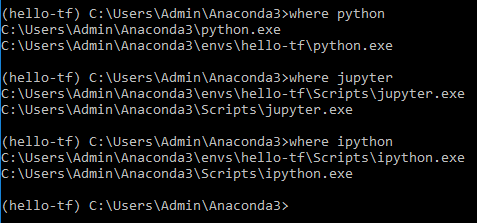
It is clear that there are two python environments first one is the main one, and the other one is created on i.e., hello-tf.
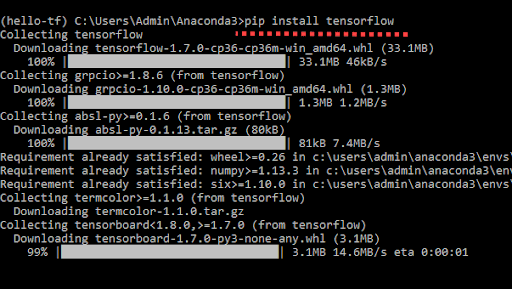
User has to install the Tensorflow with the following command:
pip install TensorFlow
Launch Jupyter Notebook
This process is the same in both Windows and macOS
Users can open TensorFlow with the help of Jupyter.
Note: Users have to initialize the environment for opening the TensorFlow each time.
User can proceed as follow:
Activate hello-tf Conda environment
Open Jupyter
Import TensorFlow
Delete Notebook
Close Jupyter
Activate conda
For macOS devices:
source activate hello-tf
For Windows devices:
conda activate hello-tf

Open Jupyter
After that, the user can open Jupyter from the Terminal
jupyter Notebook
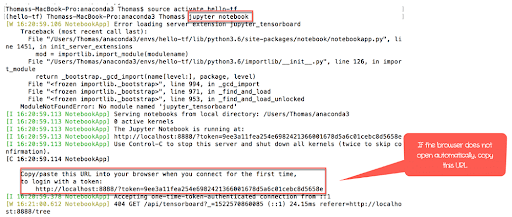
Web browser of the user’s device should automatically open the following link, or the user can copy this link which is provided by the terminal. http://localhost:8888
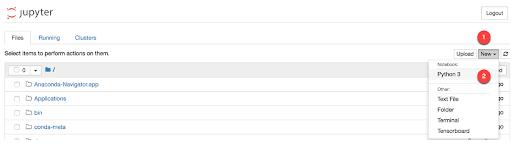
In the Jupyter Notebook, the user can see all of the files in the working directory. Users can click on the Python3 for creating the new Notebook, and this new Notebook will automatically save in the working directory.
Import Tensorflow
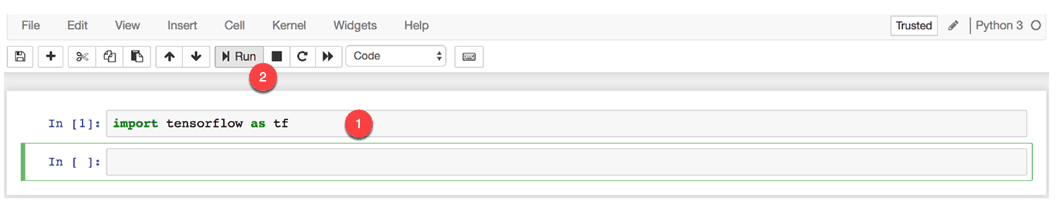
User can import TensorFlow with the tf alias, in the Notebook and then the user can click to run as a new cell is created below
import TensorFlow as tf
Artificial Intelligence — TensorFlow Machine Learning
Write the first code with TensorFlow.
hello = tf.constant('Hello, Guru99!')
hello
A new tensor is created now. Users successfully install TensorFlow with Jupyter in the system.

Delete file:
Users can delete the file, which is named Untitled.ipynb inside Jupyter.

Close Jupyter
There are two ways available to close the Jupyter. The first one is directly closed from the Notebook, and the second one is through the terminal or Anaconda Prompt.
From the Jupyter
Click on the logout in the main panel of Jupyter Notebook:

Users will automatically be redirected to the logout page.

From the terminal
Select the Anaconda prompt or terminal and run twice ctrl+c.
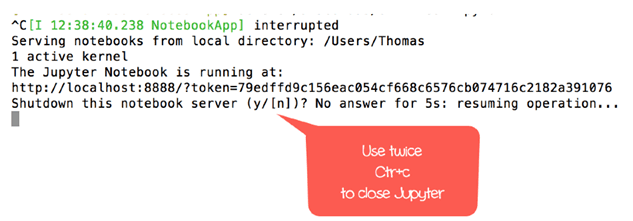
The first time users do ctrl+c and users have to conform regarding the shutdown of the Notebook by repeating ctrl+c to confirm.
The user has successfully logged out.
Conclusion
TensorFlow is a widely developing and beneficial technology at the same time, and it is essential to follow every single step to install the TensorFlow in both Windows and macOS devices. The installation process and coding are different for both OS, and the above steps hold all of the information that is required to install TensorFlow.
People are also reading:
- Best Tensorflow Courses
- AI Books
- Types of AI
- AI Technologies
- Benefits of Artificial Intelligence
- Future of Artificial Intelligence
- AI Applications
- What is Artificial Intelligence?
- Difference between AI vs Machine Learning
- Data Science Projects
- R For Data Science
Table of Contents
In simple words, TensorFlow is an open-source library for numerical computation, which is used to enhance the convenience and ease in machine learning, and it is an entirely Python friendly library. TensorFlow can run and train deep neural networks for image recognition, for handwritten digit classification, recurrent neural networks, word embeddings, and sequence-to-sequence models for natural language processing, PDE (partial differential equation) and machine translation. Most importantly, it supports production prediction at scale with exact models that are used for the training.
Figure 1 TensorFlow logo
Five main use cases of TensorFlow
- This technology is used for automatic image recognition systems because it consists of algorithms to identify shapes for modeling purposes.
- Voice and sound recognition process can be done through the TensorFlow, and it is also used for sentiment analysis or flaw detection.
- TensorFlow helps to improve the text-based recognition technology, and the best example is Google that supports various languages and the capability to transfer the text from one language to another.
- It is used for analyzing the data and separating the meaningful states of it, and the best example of this use case is online streaming platforms (Netflix, YouTube), it uses statistical data to provide the best user experiences.
- TensorFlow is used for the video detection system, which means it is helpful for motion detection or real-time threat detection systems.
Installing TensorFlow
Before starting the process of installation, let’s learn that TensorFlow supports multiple GPUs and CPUs. It means that the process of computations can be divided according to the devices to enhance the speed of the training with the help of parallelization. It can provide faster training by training algorithms.
There are two versions of TensorFlow available for the Windows user, and these versions are:
CPU supported TensorFlow: If the system does not run on the NVIDIA GPU, then the user has to install this version.
GPU supported TensorFlow: This version is used for faster computation and strong computational capacity.
User can install TensorFlow on both Windows and macOS
For Windows user process is:
- Install Anaconda
- Create a .yml file for installing dependencies
- Use pip for adding the TensorFlow
- Launch Jupyter Notebook
For macOS user process is:
- Install Anaconda
- Create a .yml file for installing dependencies
- Launch Jupyter Notebook
So, for starting the TensorFlow installation process user have to install the Anaconda, hence here is the installation process for both macOS and Windows:
Step 1: Install Anaconda in the device:
Download the Anaconda version 4.3.1 for the required system, and this version is essential for Python 3.6. Now you have to create .yml file to install TensorFlow, and the process is:
- Locate the path of Anaconda
- Set the working directory to Anaconda
- Create the yml file (For macOS user)
- Edit the yml file
- Compile the yml file
- Activate Anaconda
- Install TensorFlow (it is only for Windows user)
Locating the Anaconda
For the installation of Anaconda, the user has to locate a path for it.
Users can create a new anaconda environment, which includes the essential libraries.
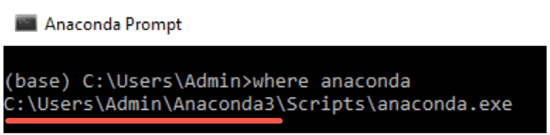
For Windows
For the windows, the user can use the Anaconda type and Prompt:
C:>where Anaconda
For macOS:
For the macOS device, the user can use the type and terminal:
The user has to create a new folder in the Anaconda, which contains Jupyter, TensorFlow, and ipython. There is a fast way to install libraries and software to write a.yml file.
Step 2: Set and select the working directory
The user has to decide an appropriate directory in which the user wants to create a.yml file, and it will be located in the Anaconda.
For macOS:
For the macOS, the default working directory will be Users/USERNAME, path anaconda3, and the working directory are entirely identical. In the macOS devices, the latest folder will be shown right before the $, and the terminal will install the libraries in the working directory.
Users can change the path to cd PATH in case the path on the text editor does not match the working directory. It is essential to wrap the PATH as the ‘PATH’ because this can turn the working directory to PATH.
Open the terminal and type:
cd anaconda3
For Windows user (make sure that the folder placed before Anaconda3):
cd C:UsersAdminAnaconda3
Step 3: Create the yml file for the device:
The user has to create the yml file in the new working directory, and after the process installs the complete dependencies, the user has to run TensorFlow. At last, copy and then paste the code in the terminal.
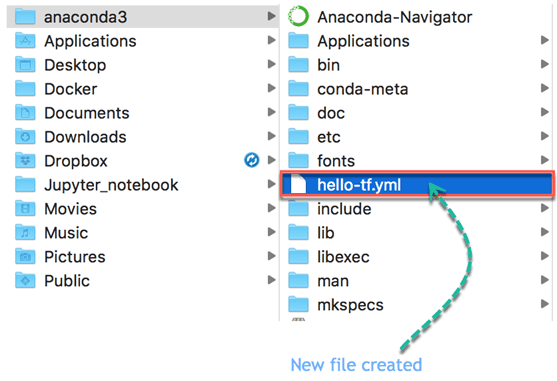
For macOS devices:
For the macOS users, the file name will appear in the anaconda3:
'touch hello-tf.yml.'
For Windows devices:
The file name for the windows device is:
'echo.>hello-tf.yml.'
Step 4: Edit the yml file
For macOS devices:
Users have to paste the given code in the terminal to edit the file because the yml file is ready to edit or macOS users can use the vim for editing the yml file.
vi hello-tf.yml
User has to enter the edit mode to press the ESC:
Press i to edit
Press w to save
Press q! to quit
Write the above code in the edit mode and then press ESC followed by the:w
Important: Two spaces are needed after each intent because the file is the case and also intend sensitive.
For macOS devices:
name: hello-tfdependencies:
— python=3.6
— jupyter
— ipython
— pandas
— pip:
— https://storage.googleapis.com/tensorflow/MacOS/cpu/tensorflow-1.5.0-py3-none-any.whl
Here is the code explanation for the above code:
name: hello-tf: Name of the yml file
dependencies:
python=3.6
jupyter
ipython
pandas: Install Python version 3.6, Jupyter, Ipython, and pandas libraries
pip: Install a Python library
https://storage.googleapis.com/tensorflow/MacOS/cpu/tensorflow-1.5.0-py3-none-any.whl: Install TensorFlow from Google APIs.
Then, press the Esc key followed by the:q! to quit the edit mode.
For Windows devices
Notepad is enough for the Windows devices because it doesn’t support the vim program
notepad hello-tf.yml
Enter following into the file
name: hello-of dependencies:
— python=3.6
— jupyter
— ipython
— pandas
Here is the code explanation for the above code
name: hello-tf: Name of the yml file
dependencies:
python=3.6
jupyter
ipython
pandas: Install Python version 3.6, Jupyter, Ipython, and pandas libraries
It will automatically open the notepad; then, the user can edit the file from there.
Step 5: Compile the yml file
User can compile the .yml file with the given code:
conda env create -f hello-tf.yml
Note: the new environment is automatically created in the current users for Windows devices. This can take almost 1.1 GB of the hard disk.
For Windows user:
Step 6 Activate the conda environment
Now the user has two conda environments, and the user has created an isolated condo environment with the libraries the user will use during the tutorials. This is required practice because each and every machine learning project requires various libraries.
conda env list
For macOS devices:
source activate hello-tf
For Windows devices:
activate hello-tf
Users can easily check all of the dependencies that are in the same environment. This is essential because it allows Python to use TensorFlow and Jupyter from a similar environment, and in case users don’t see the three, they are located in the same folder; then, the user has to start all over again.
For macOS user:
which Python
which jupyter
which ipython
pip install --upgrade TensorFlow
For Windows devices:
where Python
where jupyter
where ipython
It is clear that there are two python environments first one is the main one, and the other one is created on i.e., hello-tf.
User has to install the Tensorflow with the following command:
pip install TensorFlow
Launch Jupyter Notebook
This process is the same in both Windows and macOS
Users can open TensorFlow with the help of Jupyter.
Note: Users have to initialize the environment for opening the TensorFlow each time.
User can proceed as follow:
Activate hello-tf Conda environment
Open Jupyter
Import TensorFlow
Delete Notebook
Close Jupyter
Activate conda
For macOS devices:
source activate hello-tf
For Windows devices:
conda activate hello-tf
Open Jupyter
After that, the user can open Jupyter from the Terminal
jupyter Notebook
Web browser of the user’s device should automatically open the following link, or the user can copy this link which is provided by the terminal. http://localhost:8888
In the Jupyter Notebook, the user can see all of the files in the working directory. Users can click on the Python3 for creating the new Notebook, and this new Notebook will automatically save in the working directory.
Import Tensorflow
User can import TensorFlow with the tf alias, in the Notebook and then the user can click to run as a new cell is created below
import TensorFlow as tf
Artificial Intelligence — TensorFlow Machine Learning
Write the first code with TensorFlow.
hello = tf.constant('Hello, Guru99!')
hello
A new tensor is created now. Users successfully install TensorFlow with Jupyter in the system.
Delete file:
Users can delete the file, which is named Untitled.ipynb inside Jupyter.
Close Jupyter
There are two ways available to close the Jupyter. The first one is directly closed from the Notebook, and the second one is through the terminal or Anaconda Prompt.
From the Jupyter
Click on the logout in the main panel of Jupyter Notebook:
Users will automatically be redirected to the logout page.
From the terminal
Select the Anaconda prompt or terminal and run twice ctrl+c.
The first time users do ctrl+c and users have to conform regarding the shutdown of the Notebook by repeating ctrl+c to confirm.
The user has successfully logged out.
Conclusion
TensorFlow is a widely developing and beneficial technology at the same time, and it is essential to follow every single step to install the TensorFlow in both Windows and macOS devices. The installation process and coding are different for both OS, and the above steps hold all of the information that is required to install TensorFlow.
People are also reading:
- Best Tensorflow Courses
- AI Books
- Types of AI
- AI Technologies
- Benefits of Artificial Intelligence
- Future of Artificial Intelligence
- AI Applications
- What is Artificial Intelligence?
- Difference between AI vs Machine Learning
- Data Science Projects
- R For Data Science
Перевод
Ссылка на автора
TensorFlow 2 собирается изменить ландшафт Deep Learning. Это сделало,
- построение модели проще,
- развертывание производства на любой платформе более надежно, и
- позволяет мощные эксперименты для исследований.
Благодаря этому Deep Learning станет более популярным в различных областях исследований и промышленности.
TensorFlow 2 имеет встроенный API Keras. Keras — чрезвычайно популярный высокоуровневый API для построения и обучения моделей глубокого обучения. Прежде чем идти вперед, важно знать,
- TensorFlow 1.x также поддерживает Keras, но в 2.0 Keras тесно интегрирована с остальной частью платформы TensorFlow. 2.0 обеспечиваетне замужемAPI высокого уровня, чтобы уменьшить путаницу и обеспечить расширенные возможности.
- Keras, обычно используемый в настоящее время, является независимым проектом с открытым исходным кодом, найденным на www.keras.io (Июнь 2019 г.) Однако Keras — это API-спецификация, которая теперь также доступна в TensorFlow (см. [ 1 ] для деталей).
Я рекомендую прочитать [ 1 ] а также [ 2 ] узнать больше информации о преимуществах TensorFlow 2.0. Таким образом, TF 2.0 обеспечил простоту реализации наряду с огромной вычислительной эффективностью и совместимостью с любой платформой, такой как Android, iOS и встроенными системами, такими как Raspberry Pi и Edge TPU.
Достижение этого было трудным прежде и требовало затрат времени на поиск альтернативных путей. Так как TensorFlow 2 привел их всех, необходимо перейти на него раньше, чем позже.
Для этого здесь мы изучим установку и настройку TensorFlow 2.0.
Предпосылки
Вариант 1: Python 3.4+ через Анаконду
Anaconda с Jupyter предоставляет более простой подход для установки Python и работы над ним.
Установка Anaconda относительно проста. Перейдите по этой ссылке с последней версией Python 3.4+: https://jupyter.org/install
Похожий наpipс Анакондой мы имеемcondaдля создания виртуальных сред и установки пакетов.
Вариант 2: Python (без Анаконды)
а. Установите Python 3.4+
Проверьте ваши текущие версии.
$ python --version
или,
$ python3 --version
У меня разные Python на моем Mac (Python 3.6 на Anaconda) и Ubuntu (Python 3.7). Вывод, который я вижу на них,
Python 3.6.8 :: Anaconda custom (x86_64)# MacPython 3.7.1# Ubuntu
Либо Python внутри Анаконды, либо иначе будет работать.
Если ваша версияне3.4+, установите его следующим образом.
$ brew update
$ brew install python # Installs Python 3$ sudo apt install python3-dev python3-pip
б. Установить virtualenv
virtualenvтребуется для создания виртуальной среды. Его требования объяснены в следующем разделе.
Mac OS
$ sudo pip3 install -U virtualenv# system-wide install
Ubuntu
$ sudo pip3 install -U virtualenv# system-wide install
Заметка:pip(вместо тогоpip3) также иногда используется. Если не уверены между двумя, используйтеpip3, Вы не ошибетесь сpip3, Если вы хотите знать, можете ли вы использоватьpip, запустите следующее
$ pip3 --version
pip 19.1.1 from /Users/inferno/anaconda/lib/python3.6/site-packages/pip (python 3.6)$ pip --version
pip 19.1.1 from /Users/inferno/anaconda/lib/python3.6/site-packages/pip (python 3.6)
В моей системе версии одинаковы для обоихpipа такжеpip3, Поэтому я могу использовать любой из них.
Далее мы рассмотрим шаги установки с обоими.
Шаг 1. Создайте виртуальную среду на Python.
Почему мы хотим виртуальную среду?
Виртуальная среда — это изолированная среда для проектов Python. Внутри виртуальной среды у нас может быть совершенно независимый набор пакетов (зависимостей) и настроек, которые не будут конфликтовать ни с чем в другой виртуальной среде или с локальной средой Python по умолчанию.
Это означает, что мы можем хранить разные версии одного и того же пакета, например, мы можем использовать scikit-learn 0.1 для одного проекта и scikit-learn 0.22 для другого проекта в той же системе, но в разных виртуальных средах.
Создание виртуальной среды
Ubuntu / Mac (Python без Анаконды)
$ virtualenv --system-site-packages -p python3 tf_2
Приведенная выше команда создаст виртуальную средуtf_2, Понимание команды,
virtualenvсоздаст виртуальную среду.--system-site-packagesпозволяет проекты в виртуальной средеtf_2доступ к глобальным сайт-пакетам. Настройка по умолчанию не разрешает этот доступ (--no-site-packagesраньше использовался для этой настройки по умолчанию, но теперь устарел.)-p python3используется для установки интерпретатора Python дляtf_2, Этот аргумент можно пропустить, еслиvirtualenvбыл установлен с Python3. По умолчанию это интерпретатор python для виртуальной среды. Другой вариант для установки Python3.x в качестве интерпретатора$ virtualenv --system-site-packages --python=python3.7 tf_2, Это дает больше контроля.tf_2это имя виртуальной среды, которую мы создали. Это создает физический каталог в месте расположения виртуальных сред. это/tf_2Каталог содержит копию компилятора Python и все пакеты, которые мы установим позже.
Конда на Ubuntu / Mac (Python от Анаконды)
Если вы используете Conda, вы можете создать виртуальную среду как,
$ conda create -n tf_2
Приведенная выше команда также создаст виртуальную средуtf_2, В отличие от ранее, нам не требуется устанавливать другой пакет для создания виртуальной среды. ВстроенныйcondaКоманда обеспечивает это.
Понимание команды,
condaможет использоваться для создания виртуальных сред, установки пакетов, вывода списка установленных пакетов в среде и т. д. Короче,condaвыполняет операции, которыеpipа такжеvirtualenvделает Тем не мение,condaне заменяетpipтак как некоторые пакеты доступны наpipно не наconda,createиспользуется для создания виртуальной среды.-nэто аргумент, специфичный дляcreate,-nиспользуется для названия виртуальной среды. Значениеnто есть имя среды, здесьtf_2,- Дополнительные полезные аргументы: аналогично
--system-site-packagesвvirtualenv,--use-localможет быть использован.
Шаг 2. Активируйте виртуальную среду.
Активируйте виртуальную среду.
Ubuntu / Mac (Python без Анаконды)
$ source tf_2/bin/activate
Конда на Ubuntu / Mac (Python от Анаконды)
$ conda activate tf_2
После активации терминал изменится на этот(tf_2) $,
Шаг 3. Установите TensorFlow 2.0.
Следующие инструкции одинаковы для обеих опций Python.
Перед началом установки TensorFlow мы обновимpip,
(tf_2) $ pip install --upgrade pip
Теперь установите TensorFlow.
(tf_2) $ pip install --upgrade tensorflow==2.0.0-beta1
tensorflowПриведенный выше аргумент устанавливает версию 2.0.0-бета1 только для процессора.
Выберите подходящую версию TensorFlow из https://www.tensorflow.org/install/pip,
На момент написания этой статьи у нас был тензор потока 2.0.0-бета1. Это рекомендуется. Мы можем изменить аргумент на один из следующих, основываясь на нашем требовании.
tensorflow==2.0.0-beta1-Preview TF 2.0 Beta build только для процессора (рекомендуемые).tensorflow-gpu==2.0.0-beta1-Preview TF 2.0 Бета-версия с Поддержка GPU,tensorflow-Последний стабильный выпуск только для процессора,tensorflow-gpu— Последний стабильный выпуск с Поддержка GPU,tf-nightly— Предварительный просмотр ночной сборки только для процессора.tf-nightly-gpu-Предыдущий ночной билд с Поддержка GPU,
Примечание: мы будем использовать
pip installи для Конды. TensorFlow не доступен сconda,
Шаг 4. Проверьте установку.
Чтобы быстро проверить установку через терминал, используйте
(tf_2) $ python -c "import tensorflow as tf; x = [[2.]]; print('tensorflow version', tf.__version__); print('hello, {}'.format(tf.matmul(x, x)))"
Вывод будет (игнорируя системные сообщения),
tensorflow version 2.0.0-beta1
hello, [[4.]]
Обратите внимание на вывод версии TensorFlow. Если это не та версия, которую вы установили (в данном случае 2.0.0-бета1), значит, что-то пошло не так. Скорее всего, ранее был установлен TensorFlow и / или текущая установка не удалась.
Пример TensorFlow 2.0
Мы будем тестировать и изучать TensorFlow 2.0 с MNIST (fashion_mnist)Пример классификации изображений.
import matplotlib.pyplot as pltimport tensorflow as tf
layers = tf.keras.layersimport numpy as np
print(tf.__version__)
Убедитесь, чтоtf.__version__выходы 2.х. Если версия старше, проверьте установку или виртуальную среду.
Скачатьfashion_mnistданные изtfоткрыть наборы данных и предварительно обработать его.
mnist = tf.keras.datasets.fashion_mnist(x_train, y_train), (x_test, y_test) = mnist.load_data()
x_train, x_test = x_train / 255.0, x_test / 255.0
Чтобы ознакомиться с данными, мы приведем несколько примеров из них.
class_names = ['T-shirt/top', 'Trouser', 'Pullover', 'Dress', 'Coat', 'Sandal', 'Shirt', 'Sneaker', 'Bag', 'Ankle boot']plt.figure(figsize=(10,10))
for i in range(25):
 plt.subplot(5,5,i+1)
 plt.xticks([])
 plt.yticks([])
 plt.grid(False)
 plt.imshow(x_train[i], cmap=plt.cm.binary)
 plt.xlabel(class_names[y_train[i]])
plt.show()

Теперь мы будем строить модельпослойный,
model = tf.keras.Sequential()
model.add(layers.Flatten())
model.add(layers.Dense(64, activation='relu'))
model.add(layers.Dense(64, activation='relu'))
model.add(layers.Dense(10, activation='softmax'))model.compile(optimizer='adam',
 loss='sparse_categorical_crossentropy',
 metrics=['accuracy'])
model.fit(x_train, y_train, epochs=5)

Обратите внимание, что эта модель предназначена только для демонстрации и, следовательно, обучена всего за пять эпох.
Теперь мы проверим точность модели на тестовых данных.
model.evaluate(x_test, y_test)

Мы представим одно из предсказаний. Мы будем использовать некоторые UDF из [ 3 ].
def plot_image(i, predictions_array, true_label, img):
predictions_array, true_label, img = predictions_array[i], true_label[i], img[i]
plt.grid(False)
plt.xticks([])
plt.yticks([])plt.imshow(img, cmap=plt.cm.binary) predicted_label = np.argmax(predictions_array)
if predicted_label == true_label:
color = 'blue'
else:
color = 'red'plt.xlabel("{} {:2.0f}% ({})".format(class_names[predicted_label],
100*np.max(predictions_array),
class_names[true_label]),
color=color)def plot_value_array(i, predictions_array, true_label):
predictions_array, true_label = predictions_array[i], true_label[i]
plt.grid(False)
plt.xticks([])
plt.yticks([])
thisplot = plt.bar(range(10), predictions_array, color="#777777")
plt.ylim([0, 1])
predicted_label = np.argmax(predictions_array)thisplot[predicted_label].set_color('red')
thisplot[true_label].set_color('blue')
Мы найдем прогноз, то есть вероятность каждого изображения, принадлежащего каждому из 10 классов, для тестовых изображений.
predictions = model.predict(x_test)i = 0
plt.figure(figsize=(6,3))
plt.subplot(1,2,1)
plot_image(i, predictions, y_test, x_test)
plt.subplot(1,2,2)
plot_value_array(i, predictions, y_test)
plt.show()

Как мы можем видеть на графике выше, вероятность предсказания «ботинка лодыжки» самая высокая. Для дальнейшего подтверждения мы выводим прогнозируемую метку как,
predicted_label = class_names[np.argmax(predictions[0])]
print('Actual label:', class_names[y_test[0]])
print('Predicted label:', predicted_label)

Шаг 5. Деактивировать виртуальную среду
Перед закрытием мы отключим виртуальную среду.
Дляvirtualenvиспользование,
(tf_2) $ deactivate
Дляcondaиспользование,
(tf_2) $ conda deactivate
Репозиторий GitHub с примером MNIST на TensorFlow 2.0 Вот,
Вывод
- TensorFlow 2.0 предоставляет простые в использовании возможности keras API, например, послойное моделирование.
- Мы узнали об установке TensorFlow 2.0.
- Мы прошли настоящий пример классификации данных MNIST с TF 2.0.
Ссылки
- Стандартизация на Keras: руководство по API высокого уровня в TensorFlow 2.0
- Что будет в TensorFlow 2.0
- Тренируй свою первую нейронную сеть: базовая классификация
Это сообщение было первоначально размещено на medium.com 13 июня 2019 г.
Сегодня мы разберём, зачем нужна библиотека TensorFlow и как её установить, что такое машинное обучение и как научить компьютер решать уравнения. Всё это — в одной статье.
Фреймворк TensorFlow — это относительно простой инструмент, который позволяет быстро создавать нейросети любой сложности. Он очень дружелюбен для начинающих, потому что содержит много примеров и уже готовых моделей машинного обучения, которые можно встроить в любое приложение. А продвинутым разработчикам TensorFlow предоставляет тонкие настройки и API для ускоренного обучения.
TensorFlow поддерживает несколько языков программирования. Главный из них — это Python. Кроме того, есть отдельные пакеты для C/C++, Golang и Java. А ещё — форк TensorFlow.js для исполнения кода на стороне клиента, в браузере, на JavaScript.
Этим возможности фреймворка TensorFlow не ограничиваются. Библиотеку также можно использовать для обучения моделей на смартфонах и умных устройствах (TensorFlow Lite) и создания корпоративных нейросетей (TensorFlow Extended).
Чтобы создать простую нейросеть на TensorFlow, достаточно понимать несколько основных принципов:
- что такое машинное обучение;
- как обучаются нейросети и какие методы для этого используются;
- как весь процесс обучения выглядит в TensorFlow.
О каждом из этих пунктов мы расскажем подробнее ниже.
В обычном программировании всё работает по заранее заданным инструкциям. Разработчики их прописывают с помощью выражений, а компьютер строго им подчиняется. В конце выполнения компьютер выдаёт результат.
Например, если описать в обычной программе, как вычисляется площадь квадрата, компьютер будет строго следовать инструкции и всегда выдавать стабильный результат. Он не начнёт придумывать новые методы вычисления и не будет пытаться оптимизировать сам процесс вычисления. Он будет всегда следовать правилам — тому самому алгоритму, выраженному с помощью языка программирования.
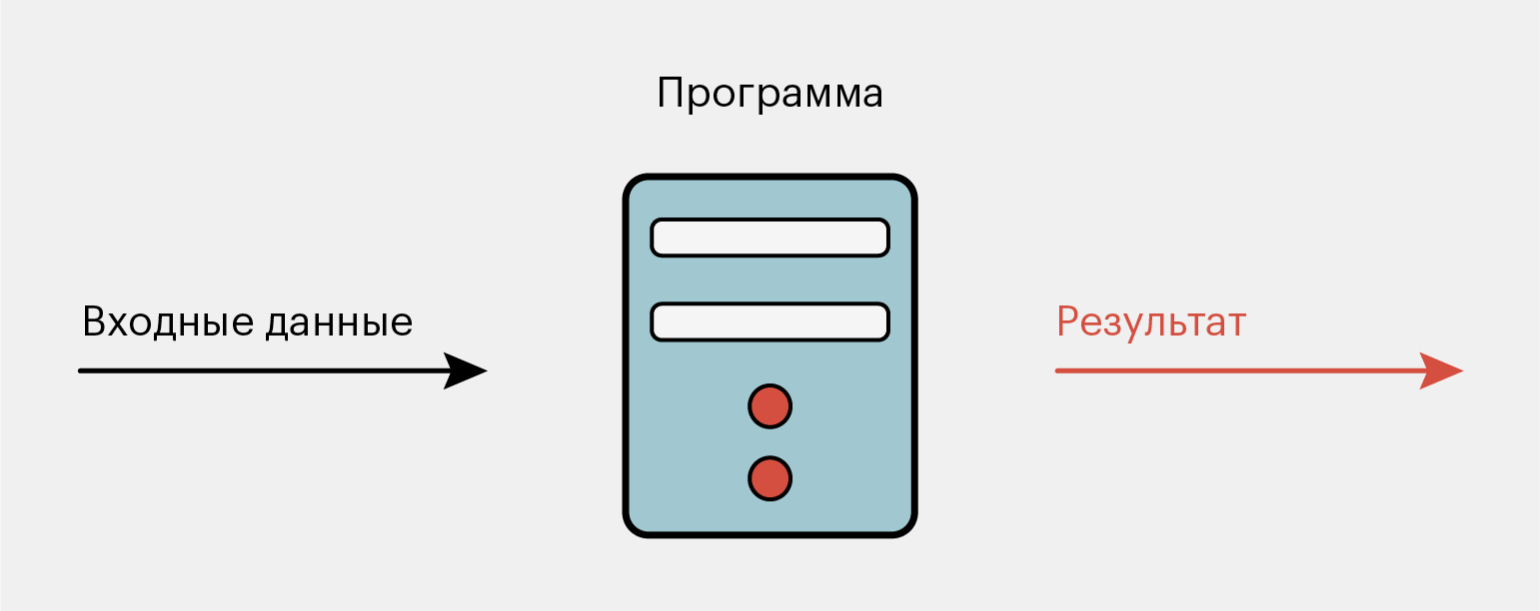
Иллюстрация: Оля Ежак для Skillbox Media
Машинное обучение работает по-другому. Нам нужно отдать компьютеру уже готовые результаты и входные данные и сказать: «Найди алгоритм, который сможет сделать из этих входных данных вот эти результаты». Нам неважно, как он будет это делать. Для нас важнее, чтобы результаты были точными.
Ещё мы должны говорить компьютеру, когда он ответил правильно, а когда — неправильно. Это сделает обучение эффективным и позволит нейросети постепенно двигаться в сторону более точных результатов.
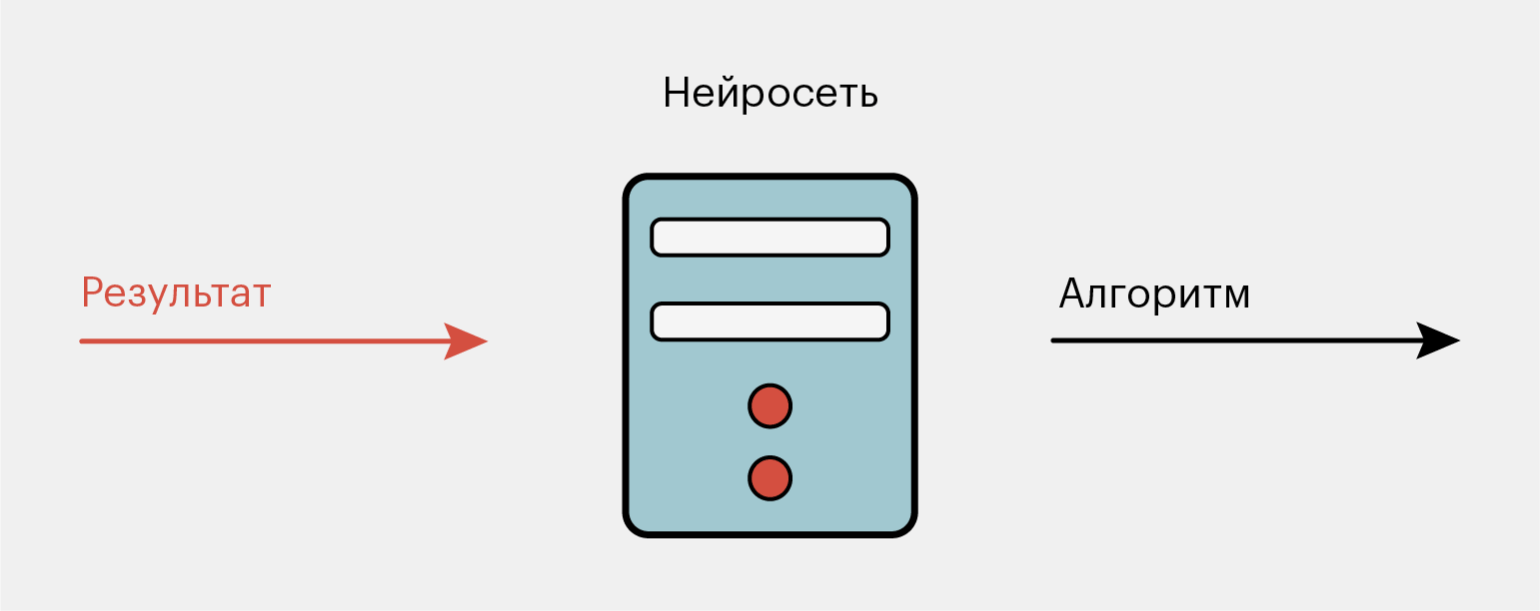
Иллюстрация: Оля Ежак для Skillbox Media
В целом машинное обучение похоже на обучение обычного человека. Например, чтобы различать обувь и одежду, нам нужно посмотреть на какое-то количество экземпляров обуви и одежды, высказать свои предположения относительно того, что именно сейчас находится перед нами, получить обратную связь от кого-то, кто уже умеет их различать, — и тогда у нас появится алгоритм, как отличать одно от другого. Увидев туфли после успешного обучения, мы сразу сможем сказать, что это обувь, потому что по всем признакам они соответствуют этой категории.
Чтобы начать пользоваться фреймворком TensorFlow, можно выбрать один из вариантов:
- установить его на компьютер;
- воспользоваться облачным сервисом Google Colab.
В начале можно попробовать второй вариант, потому что для него не нужно ничего скачивать — всё хранится и работает в облаке. К тому же вычисления не нуждаются в мощностях вашего компьютера, вместо этого используются серверы Google.
Заходим на сайт Google Colab и создаём новый notebook:
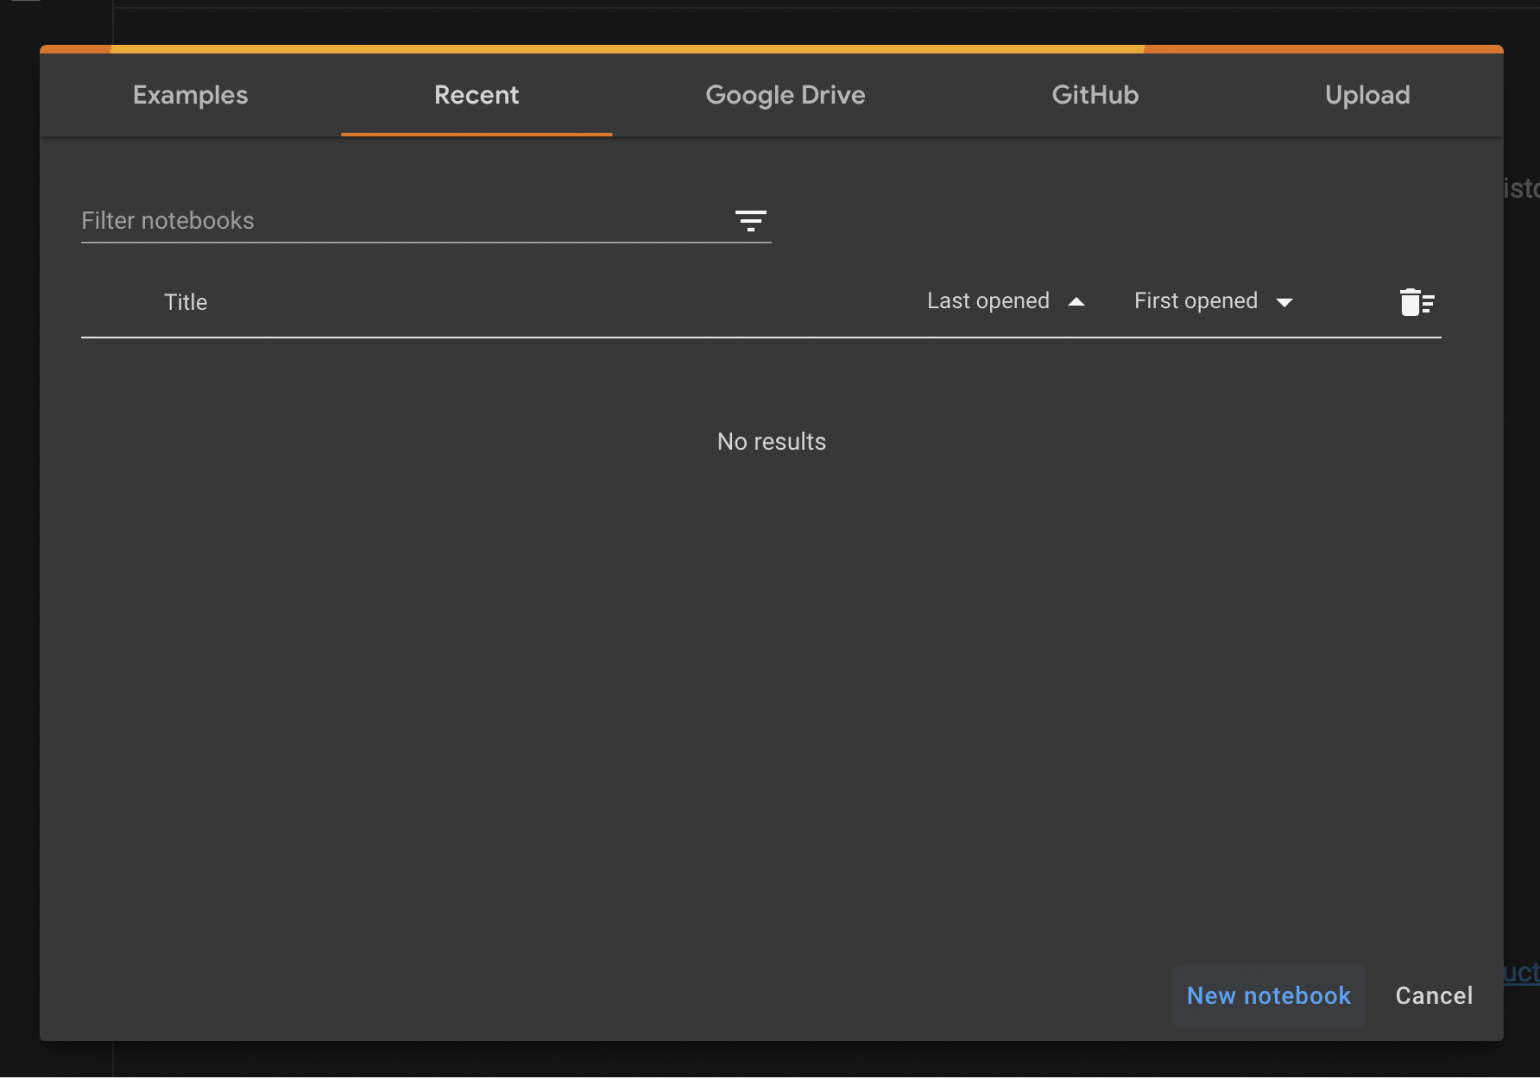
Скриншот: Skillbox Media
У нас появится новое пространство, в котором мы и будем писать весь код. Сверху слева можно изменить название документа:
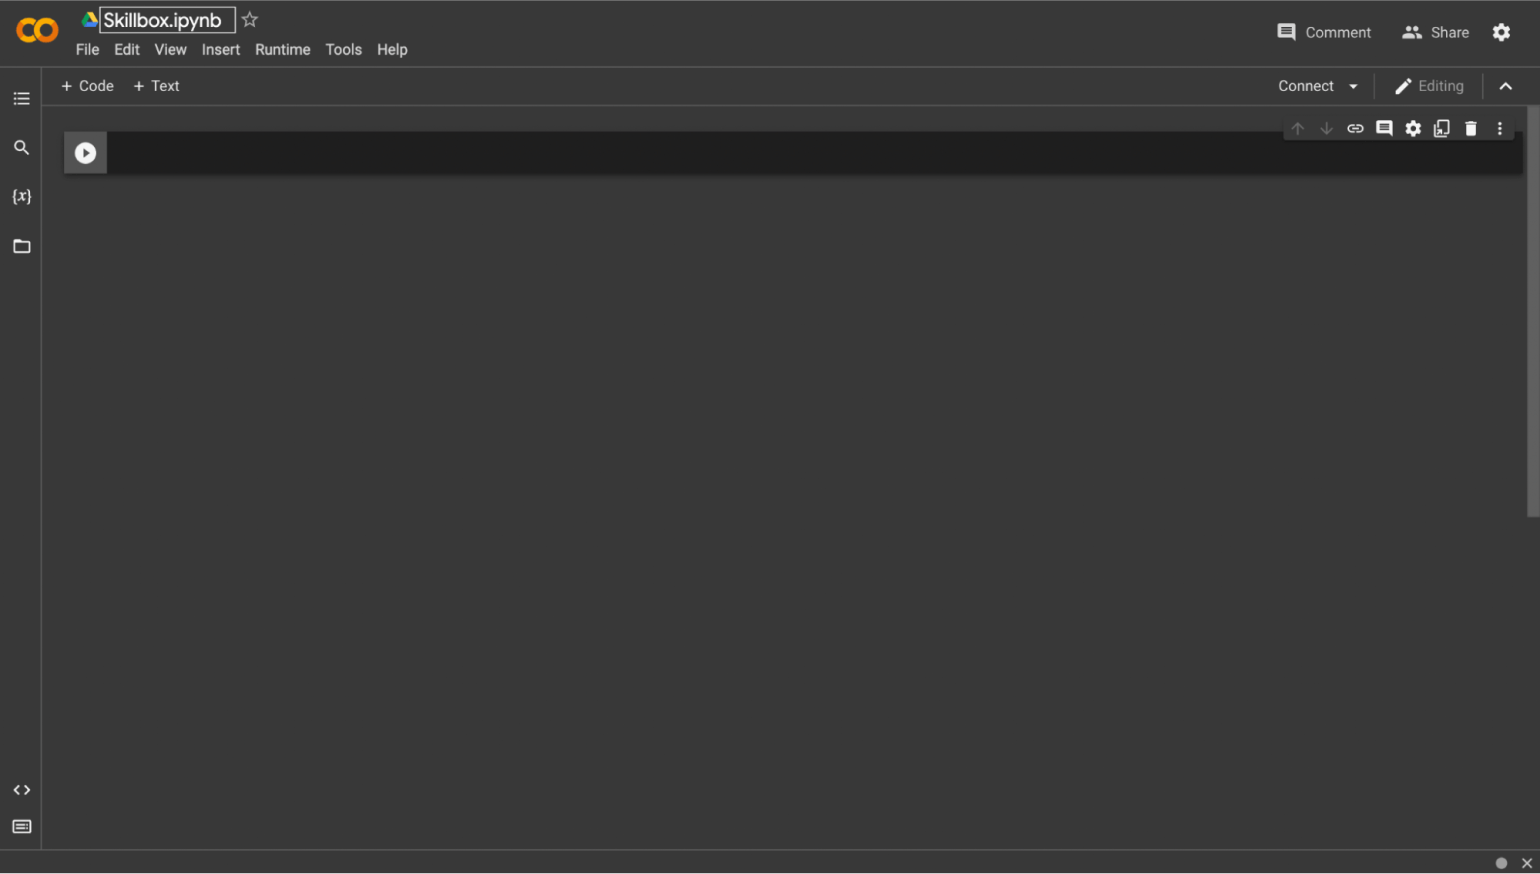
Скриншот: Skillbox Media
Google Colab состоит из ячеек с кодом или текстом. Чтобы создать ячейку с кодом, нужно нажать на кнопку + Code. Ниже появится ячейка, где можно писать Python‑код:
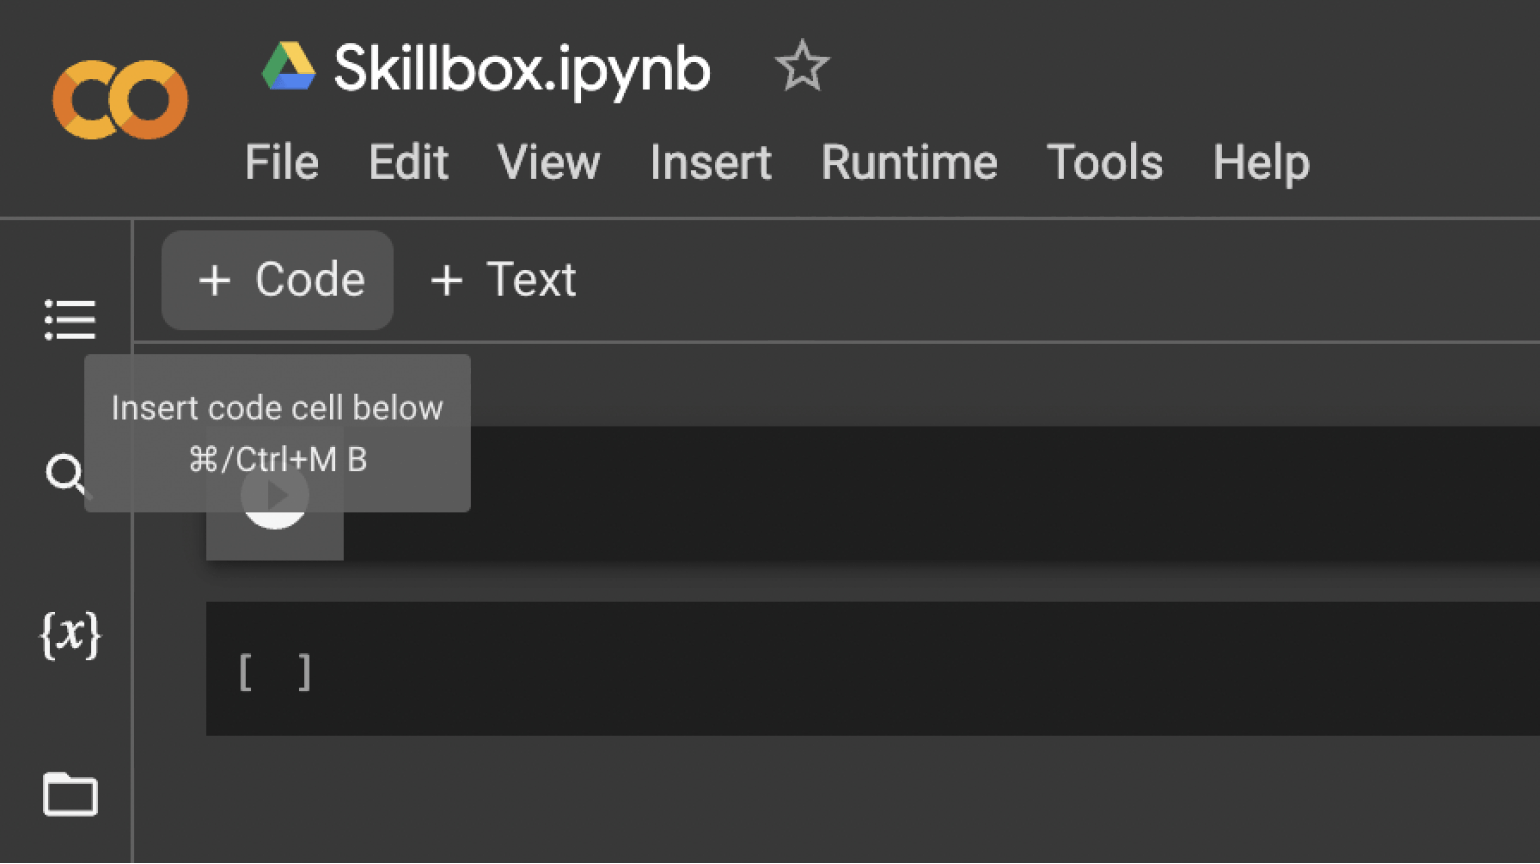
Скриншот: Skillbox Media
Теперь нам нужно проверить, что всё работает. Для этого попробуем экспортировать библиотеку в Google Colab. Делается это через команду import tensorflow as tf:

Скриншот: Skillbox Media
Всё готово. Рассмотрим второй способ, как можно подключить TensorFlow прямо на компьютере.
Чтобы использовать библиотеку TensorFlow на компьютере, её нужно установить через пакетный менеджер PIP.
Открываем терминал и вводим следующую команду:
pip install --upgrade pip
Мы обновили PIP до последней версии. Теперь скачиваем сам TensorFlow:
pip install tensorflow
Если всё прошло успешно, теперь вы можете подключать TensorFlow в Python-коде у вас на компьютере с помощью команды:
import tensorflow as tf
Но если возникли какие-то ошибки, можете прочитать более подробный гайд на официальном сайте TensorFlow и убедиться, что у вас скачаны все нужные пакеты.
Ниже мы будем использовать Google Colab для примеров, но код должен работать одинаково и корректно где угодно.
Допустим, у нас есть два набора чисел X и Y:
X: -1 0 1 2 3 4
Y: -4 1 6 11 16 21
Мы видим, что их значения связаны по какому-то правилу. Это правило: Y = 5X + 1. Но чтобы компьютер это понял, ему нужно научиться сопоставлять входные данные — X — с результатом — Y. У него сначала могут получаться странные уравнения типа: 2X — 5, 8X + 1, 4X + 2, 5X — 1. Но, обучившись немного, он найдёт наиболее близкую к исходной формулу.
Обучается нейросеть итеративно — или поэтапно. На каждой итерации она будет предлагать алгоритм, по которому входные значения сопоставляются с результатом. Затем она проверит свои предположения, вычислив все входные данные по формуле и сравнив с настоящими результатами. Так она узнает, насколько сильно ошиблась. И уже на основе этих ошибок скорректирует формулу на следующей итерации.
Количество итераций ограничено разве что временем разработчика. Главное — чтобы нейросеть на каждом шаге улучшала свои предположения, иначе весь процесс обучения будет бессмысленным.
Теперь давайте создадим модель, которая научится решать поставленную выше задачу. Сперва подключим необходимые зависимости:
import tensorflow as tf
import numpy as np
from tensorflow import keras
Первая зависимость — это наша библиотека TensorFlow, название которой мы сокращаем до tf, чтобы было удобнее её вызывать в программе. NumPy — это библиотека для эффективной работы с массивами чисел. Можно было, конечно, использовать и обычные списки, но NumPy будет работать намного быстрее, поэтому мы берём его. И последнее — Keras, встроенная в Tensorflow библиотека, которая умеет обучать нейросети.
Теперь создадим самую простую модель:
model = tf.keras.Sequential([keras.layers.Dense(units=1, input_shape=[1])])
Разберём код подробнее. Sequential — это тип нейросети, означающий, что процесс обучения будет последовательным. Это стандартный процесс обучения для простых нейросетей: в нём она сначала делает предсказания, затем тестирует их и сравнивает с результатом, а в конце — корректирует ошибки.
keras.layers.Dense — указывает на то, что мы хотим создать слой в нашей модели. Слой — это место, куда мы будем складывать нейроны, которые запоминают информацию об ошибках и которые отвечают за «умственные способности» нейросети. Dense — это тип слоя, который использует специальные алгоритмы для обучения.
В качестве аргумента нашей нейросети мы передали указания, какой именно она должна быть:
- units=1 означает, что модель состоит из одного нейрона, который будет запоминать информацию о предыдущих предположениях;
- input_shape=[1] говорит о том, что на вход будет подаваться одно число, по которому нейросеть будет строить зависимости двух рядов чисел: X и Y.
Модель мы создали, теперь давайте её скомпилируем:
model.compile(optimizer='sgd', loss='mean_squared_error')
Здесь появляются два важных для машинного обучения элемента: функция оптимизации и функция потерь. Обе они нужны, чтобы постепенно стремиться к более точным результатам.
Функция потерь анализирует, насколько правильно нейросеть дала предсказание. А функция оптимизации исправляет эти предсказания в сторону более корректных результатов.
Мы использовали стандартные функции для большинства моделей — sgd и mean_squared_error. sgd — это метод оптимизации, который работает на формулах математического анализа. Он помогает скорректировать формулу, чтобы прийти к правильной. mean_squared_error — это функция, которая вычисляет, насколько сильно отличаются полученные результаты по формуле, предложенной нейросетью, от настоящих результатов. Эта функция тоже участвует в корректировке формулы.
Теперь давайте зададим наборы данных:
xs = np.array([-1.0, 0.0, 1.0, 2.0, 3.0, 4.0], dtype=float)
ys = np.array([-4.0, 1.0, 6.0, 11.0, 16.0, 21.0], dtype=float)
Как видно, это обычные массивы чисел, которые мы передадим модели на обучение:
model.fit(xs, ys, epochs=500)
Функция fit как раз занимается обучением. Она берёт набор входных данных — xs — и сопоставляет с набором правильных результатов — ys. И так нейросеть обучается в течение 500 итераций — epochs=500. Мы использовали 500 итераций, чтобы наверняка прийти к правильному результату. Суть простая: чем больше итераций обучения, тем точнее будут результаты (однако улучшение точности с каждым повтором будет всё меньше и меньше).
На каждой итерации модель проходит следующие шаги:
- берёт весь наш набор входных данных;
- пытается сделать предсказание для каждого элемента;
- сравнивает результат с корректным результатом;
- оптимизирует модель, чтобы давать более точные прогнозы.
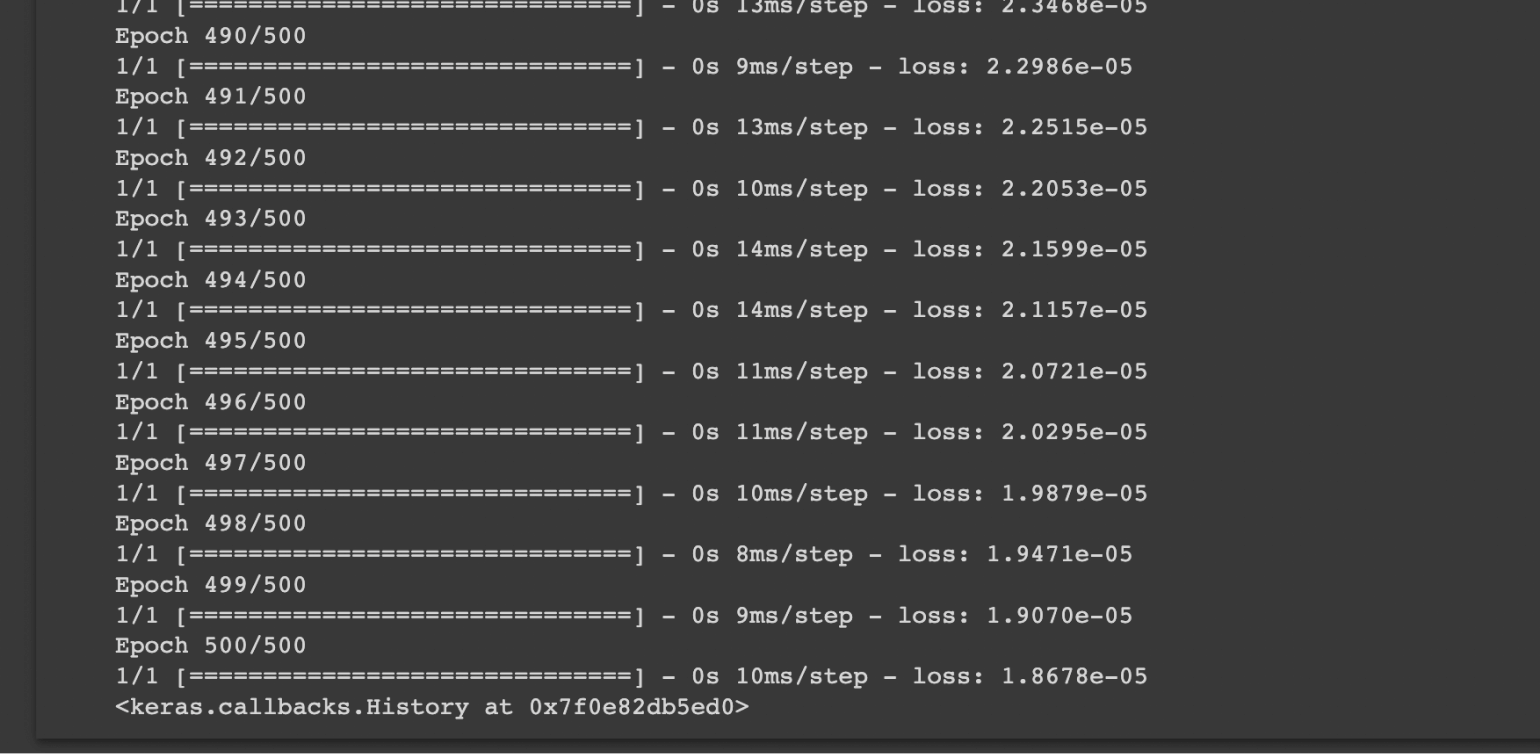
Скриншот: Skillbox Media
Можно заметить, что на каждой итерации TensorFlow выводит, насколько нейросеть сильно ошиблась — loss. Если это число уменьшается, то есть стремится к нулю, значит, она действительно обучается и с каждым шагом улучшает свои прогнозы.
Теперь давайте что-нибудь предскажем и поймём, насколько точно наша нейросеть обучилась:
print(model.predict([10.0]))
Мы вызываем у модели метод predict, который получает на вход элемент для предсказания. Результат будет таким:
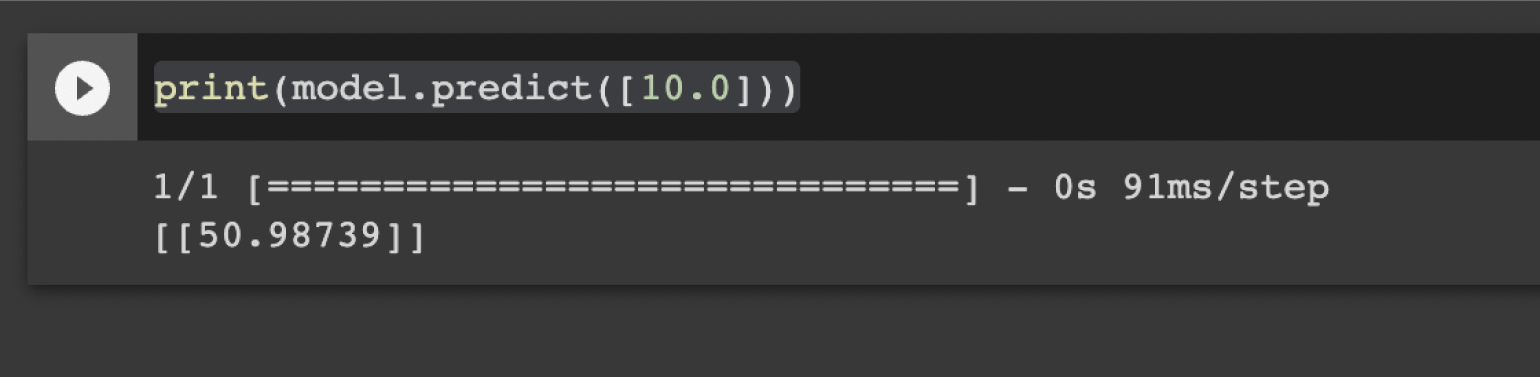
Скриншот: Skillbox Media
Получилось странно — мы ожидали, что будет число 51 (потому что подставили 10 в выражение 5X + 1) — но на выходе нейросеть выдала число 50.98739. А всё потому, что модель нашла очень близкую, но не до конца точную формулу — например, 4.891X + 0.993. Это одна из особенностей машинного обучения.
А ещё многое зависит от выбранного метода оптимизации — то есть того, как нейросеть корректирует формулу, чтобы прийти к нужным результатам. В библиотеке TensorFlow можно найти разные способы оптимизации, и на выходе каждой из них результаты могут различаться. Однако эта тема выходит за рамки нашей статьи — здесь уже необходимо достаточно глубоко погружаться в процесс машинного обучения и разбираться, как именно устроена оптимизация.
Если вы вдруг подумали, что можно просто увеличить число итераций и точность станет выше, то это справедливо лишь отчасти. У каждого метода оптимизации есть своя точность, до которой нейросеть может дойти. Например, она может вычислять результат с точностью до 0.00000001, однако абсолютно верным и точным результат не будет никогда. А значит, и абсолютно точного значения формулы мы никогда не получим — просто из-за погрешности вычислений и особенности функционирования компьютеров. Но если условно установить число итераций в миллиард, можно получить примерно такую формулу:
4.9999999999997X + 0.9999999999991
Она очень близка к настоящей, хотя и не равна ей. Поэтому математики и специалисты по машинному обучению решили, что будут считать две формулы равными, если значения их вычислений меньше, чем заранее заданная величина погрешности — например, 0.0000001. И если мы подставим в формулу выше и в настоящую вместо X число 5, то получим следующее:
5 · 5 + 1 = 26
4.9999999997 · 5 + 0.9999999991 = 25.9999999976
Если мы из первого числа вычтем второе, то получим:
26 — 25.9999999976 = 0.0000000024
А так как изначально мы сказали, что два числа будут равны, если разница между ними меньше 0.0000001, то обе формулы могут считаться идентичными, потому что получившаяся у нас на практике погрешность 0.0000000024 меньше допустимого значения, о котором мы договорились, — то есть 0.0000001. Вот такая интересная математика.
I use windows 10, Anaconda and python 2. A combination of mentioned solutions worked for me:
Once you installed tensorflow using:
C:UsersLaleh>conda create -n tensorflow python=3.5 # use your python version
C:UsersLaleh>activate tensorflow
(tensorflow) C:UsersLaleh>conda install -c conda-forge tensorflow
Then I realized tensorflow can not be imported in jupyter notebook, although it can work in commad windows. To solve this issue first I checked:
jupyter kernelspec list
I removeed the Jupyter kernelspec, useing:
jupyter kernelspec remove python2
Now, the jupyter kernelspec list is pointing to the correct kernel. Again, I activate tensorflow and installed notebook in its environment:
C:UsersLaleh>activate tensorflow
(tensorflow)C:> conda install notebook
Also if you want to use other libraries such as matplotlib, they should be installed separately in tensorflow environment
(tensorflow)C:> conda install -c conda-forge matplotlib
Now everything works fine for me.