Generally, one computer only runs one operating system. In some cases, users might need two operating systems on one computer, and it is more common when users are using Mac computers.
On Mac computers, the built-in Boot Camp has long been an official way to allow users to partition the hard drive and then install Windows. Even so, many people are still looking for alternative ways to install Windows 10 on Mac without Boot Camp. Because the Boot Camp doesn’t work seamlessly in many cases, it is tedious, error-prone, and it slows down installation productivity.
Thankfully, there are numerous third-party tools that help users install Windows systems without Boot Camp. Here in this article, we will introduce how can Mac users apply a tool called EaseUS OS2Go to install Windows. Moreover, virtual machines such as VMware and VirtualBox are also perfect choices to run Windows on macOS.
Preparations
Before starting to install Windows 10 on your Mac, you should prepare the following things:
- A USB stick with at least 64 GB or larger.
- A copy of a Windows 10 ISO image file or a Windows computer.
- A valid Windows 10 license that can legally and properly activate Windows.
- Download the Boot Camp Drivers.
If you prefer not to use Boot Camp, then the easiest method is to create a portable Windows USB so that you can use it on the Mac computer. There are plenty of third-party tools that can help users to create a portable Windows USB, one of such tools is EaseUS OS2Go. All you need is to prepare a larger enough USB drive, then leave the rest to EaseUS OS2Go.
Procedure 1. Create Windows Portable USB
First, you need to download and install EaseUS OS2Go on your computer. Then follow the detailed guide below to create a Windows portable USB.
Step 1. Install EaseUS OS2Go on your Windows computer, it will display your system drive’s used space. Plug in a USB drive that is larger than the system drive used space. Choose the target USB drive and click Next to continue.

Step 2. EaseUS OS2Go will notify you that the following operation would delete all data on your drive. Make sure that you have backed up all the important data. Click the Continue button to proceed.

Step 3. Adjust disk layout. The default disk layout on the target drive will be exactly the same as the resource drive. You could also edit the layout according to your needs. Tick the option there if you’re using a Solid State Drive as the Windows bootable drive. Next, click Proceed.

Step 4. Then EaseUS OS2Go will start to create the portable USB drive. It usually takes a while depending on your OS and Network condition. When the progress reaches 100%, the USB drive should be bootable now.

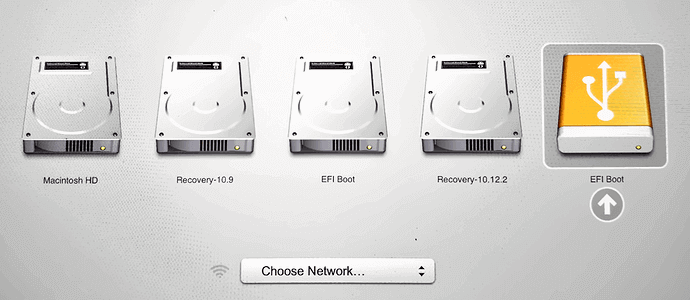
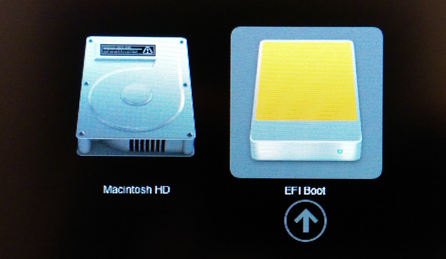
Step 5. Insert the portable Windows USB and start your Mac. Press the Option/Alt key. Choose the yellow EFI Boot icon to boot from the USB drive. Then follow the onscreen instruction to boot your Mac.
Procedure 2. Partition Mac Drives
If you still want to install Windows on your Mac, you can first create a bootable Windows USB with ISO files, then you need to partition the Mac drive and boot the Mac from the USB. Here are the detailed steps of these two procedures. As the Windows OS should be installed on a separated partition, it is an essential step to partition your drive. On Mac computers, you can apply the Disk Utility.
Step 1. Open Disk Utility, select your local drive (SSD or HDD) on the left and click Partition.
Step 2. Click on the small «+», then select the size of the partition, it should be at least 30 GB. You can name it anything as you want, and make sure the format is set to MS-DOS (FAT), then click Apply. Now you can see there are two separated partitions.
Procedure 3. Boot Your Mac from Bootable USB Drive
Now it’s the last step, boot your Mac from the created bootable USB drive.
Step 1. Insert the USB drive into your Mac.
Step 2. Restart the Mac and holding the Option key to enter the installing page.
Step 3. Choose EFI Boot, and the Mac should be boot from USB properly. Follow the Windows setup wizard to install the Windows OS on the created partition. The installing process will take some time, please wait patiently. During the process, the Mac will automatically restart several times.
Step 4. If you have created a portable USB with an activated Windows computer, just wait until the booting process finishes. If you have created the portable USB with Windows ISO files, then you need to activate the Windows system. Enter your Windows product key. If you lost the key, you can click the do it later button.
Step 5. You may find the keyboard or the mouse is not working under the Windows system, that’s because the bootable USB drive only contains basic drivers. You need to download and install Windows support drivers.
Step 6. Download and launch Boot Camp on your Mac, navigate to the USB drive in File Explorer, then go to WindowsSupport > BootCamp. Double-click the setup.exe.
Step 7. Follow the setup wizard, wait until it tells you to reboot the Mac to finish the installation. Now your Mac computer has dual systems.
If you want to switch from Windows system to macOS or vice versa, restart your Mac and holding the Option key to enter the booting page, choose the corresponding drive, you can switch from Windows and macOS.
![]()
Conclusion
It does seem a little bit complicated to install the Windows OS on a Mac computer. However, with EaseUS OS2GO, you have finished the most difficult part — creating a bootable USB. Then you could follow our step-by-step guide to finish the next procedures.
Generally, one computer only runs one operating system. In some cases, users might need two operating systems on one computer, and it is more common when users are using Mac computers.
On Mac computers, the built-in Boot Camp has long been an official way to allow users to partition the hard drive and then install Windows. Even so, many people are still looking for alternative ways to install Windows 10 on Mac without Boot Camp. Because the Boot Camp doesn’t work seamlessly in many cases, it is tedious, error-prone, and it slows down installation productivity.
Thankfully, there are numerous third-party tools that help users install Windows systems without Boot Camp. Here in this article, we will introduce how can Mac users apply a tool called EaseUS OS2Go to install Windows. Moreover, virtual machines such as VMware and VirtualBox are also perfect choices to run Windows on macOS.
Preparations
Before starting to install Windows 10 on your Mac, you should prepare the following things:
- A USB stick with at least 64 GB or larger.
- A copy of a Windows 10 ISO image file or a Windows computer.
- A valid Windows 10 license that can legally and properly activate Windows.
- Download the Boot Camp Drivers.
If you prefer not to use Boot Camp, then the easiest method is to create a portable Windows USB so that you can use it on the Mac computer. There are plenty of third-party tools that can help users to create a portable Windows USB, one of such tools is EaseUS OS2Go. All you need is to prepare a larger enough USB drive, then leave the rest to EaseUS OS2Go.
Procedure 1. Create Windows Portable USB
First, you need to download and install EaseUS OS2Go on your computer. Then follow the detailed guide below to create a Windows portable USB.
Step 1. Install EaseUS OS2Go on your Windows computer, it will display your system drive’s used space. Plug in a USB drive that is larger than the system drive used space. Choose the target USB drive and click Next to continue.
Step 2. EaseUS OS2Go will notify you that the following operation would delete all data on your drive. Make sure that you have backed up all the important data. Click the Continue button to proceed.
Step 3. Adjust disk layout. The default disk layout on the target drive will be exactly the same as the resource drive. You could also edit the layout according to your needs. Tick the option there if you’re using a Solid State Drive as the Windows bootable drive. Next, click Proceed.
Step 4. Then EaseUS OS2Go will start to create the portable USB drive. It usually takes a while depending on your OS and Network condition. When the progress reaches 100%, the USB drive should be bootable now.
Step 5. Insert the portable Windows USB and start your Mac. Press the Option/Alt key. Choose the yellow EFI Boot icon to boot from the USB drive. Then follow the onscreen instruction to boot your Mac.
Procedure 2. Partition Mac Drives
If you still want to install Windows on your Mac, you can first create a bootable Windows USB with ISO files, then you need to partition the Mac drive and boot the Mac from the USB. Here are the detailed steps of these two procedures. As the Windows OS should be installed on a separated partition, it is an essential step to partition your drive. On Mac computers, you can apply the Disk Utility.
Step 1. Open Disk Utility, select your local drive (SSD or HDD) on the left and click Partition.
Step 2. Click on the small «+», then select the size of the partition, it should be at least 30 GB. You can name it anything as you want, and make sure the format is set to MS-DOS (FAT), then click Apply. Now you can see there are two separated partitions.
Procedure 3. Boot Your Mac from Bootable USB Drive
Now it’s the last step, boot your Mac from the created bootable USB drive.
Step 1. Insert the USB drive into your Mac.
Step 2. Restart the Mac and holding the Option key to enter the installing page.
Step 3. Choose EFI Boot, and the Mac should be boot from USB properly. Follow the Windows setup wizard to install the Windows OS on the created partition. The installing process will take some time, please wait patiently. During the process, the Mac will automatically restart several times.
Step 4. If you have created a portable USB with an activated Windows computer, just wait until the booting process finishes. If you have created the portable USB with Windows ISO files, then you need to activate the Windows system. Enter your Windows product key. If you lost the key, you can click the do it later button.
Step 5. You may find the keyboard or the mouse is not working under the Windows system, that’s because the bootable USB drive only contains basic drivers. You need to download and install Windows support drivers.
Step 6. Download and launch Boot Camp on your Mac, navigate to the USB drive in File Explorer, then go to WindowsSupport > BootCamp. Double-click the setup.exe.
Step 7. Follow the setup wizard, wait until it tells you to reboot the Mac to finish the installation. Now your Mac computer has dual systems.
If you want to switch from Windows system to macOS or vice versa, restart your Mac and holding the Option key to enter the booting page, choose the corresponding drive, you can switch from Windows and macOS.
![]()
Conclusion
It does seem a little bit complicated to install the Windows OS on a Mac computer. However, with EaseUS OS2GO, you have finished the most difficult part — creating a bootable USB. Then you could follow our step-by-step guide to finish the next procedures.
Вас интересует новая функция для использования Windows 10 на вашем компьютере Mac OS X или Mac OS? Ответ утвердительный. Да, вы можете использовать Windows 10 на своем компьютере Mac OS, и вам не нужно постоянно переключаться между Mac и Windows. Это сэкономит вам силы и время. Более того, у Apple также есть встроенный инструмент для приветствия Windows 10 у себя дома.
Bootcamp или Bootcamp Assistant в последней версии Mac OS поможет вам установить Windows 10 на компьютер Mac OS. Однако Bootcamp был признан проблемным приложением. Когда вы пытаетесь установить Windows 10 с помощью Bootcamp, появляется сообщение об ошибке установки Bootcamp. Это не единственная проблема.

Причины не доверять Bootcamp:
Несмотря на ошибку, на исправление которой у вас уходит много времени, существуют и другие проблемы, связанные с Bootcamp. Проблемы перечислены ниже.
- Некоторые функции Mac ограничены при использовании Windows 10
- Bootcamp позволяет использовать только один диск с одним разделом
- Звук прекращается из встроенных динамиков
- Веб-камера не работает
- Каждый раз, когда вы запускаете Bootcamp Assistant, он будет повторно загружать драйверы Windows.
Если вы забеспокоились, увидев все эти проблемы, продолжайте читать, потому что мы покажем вам, как установить Windows 10 на Mac без Bootcamp.
Установка Windows в операционной системе Mac без использования Bootcamp:
Отказ от ответственности: Этот процесс может повредить ваши разделы и данные. Итак, действуйте на свой страх и риск.
Следуйте инструкциям ниже —
- Перейти к Панель запуска компьютера Mac OS, а затем щелкните Дисковая утилита.
- Выберите диск (SSD или HDD) и откройте Раздел вкладка
- Дисковая утилита предоставит вам структуру разделов.
- Вы должны нажать на опцию «+», чтобы открыть новый раздел.
- Вы должны выбрать имя, размер и формат для нового раздела.
- Затем щелкните Применять
- Появится предупреждающее сообщение, выберите Раздел опция присутствует в сообщении.
- Для дальнейшего процесса вам понадобится загрузочная флешка с файлом операционной системы Windows 10. Вставьте его в USB-порт вашего компьютера.
- Теперь перезагрузите компьютер и нажмите Ключ опции пока на экране появляется опция Windows.
- Выбрать Windows вариант, а затем вам нужно выбрать Язык а затем нажмите Следующий.
- Вы должны нажать «Установить сейчас»Опция присутствует на экране.
- Затем прочтите условия лицензии и установите флажок рядом с «Я принимаю условия лицензии. » Удар следующий.
- Затем выберите нужный тип установки.
- Затем продолжите и отформатируйте все разделы диска, кроме раздела, который поможет при установке Windows 10.
- Выберите только что созданный раздел и нажмите Установить.
- Этот процесс займет много времени. Ваш компьютер перезагрузится несколько раз.
- Но подождите, пока не откроется другая страница с просьбой ввести ключ продукта Windows 10.
- Вы также можете выбрать «Сделай это позже.”
- Следуйте инструкциям на экране, и процесс установки завершен.
- Создайте свою учетную запись, указав необходимую информацию. Проверьте, все ли работает нормально.
Возможно, вам придется заменить обычную клавиатуру и мышь, которые поставляются с вашим компьютером Mac OS. Итак, держите при себе новую клавиатуру и мышь, прежде чем начинать этот процесс.
Самый простой способ — установить Windows 10 на компьютер Mac OS с помощью Bootcamp. Но каждая легкая вещь в конце концов приносит трудности. Bootcamp вызывает несколько ошибок. Итак, вы должны искать другой путь.
А если вам интересно, то мы предоставили простое и понятное руководство, с помощью которого вы можете установить Windows 10 на свой компьютер Mac OS. Надеюсь, это руководство окажется для вас полезным. Если у вас есть какие-либо вопросы или отзывы, напишите комментарий в поле для комментариев.
Статьи по Теме
- Как исправить ошибку Центра обновления Windows 0x80070490
- Как удалить Win32: BogEnt virus из Windows
- Как исправить, если Windows 10 не воспроизводит файлы MOV?
- Не удается перенести фотографии с iPhone на Windows 10? Как исправить?
Установка Windows на Mac OS возможна и это довольно просто, если подойти к этому делу подготовленным. В этой статье мы расскажем, как установить Windows на Mac OS – возможные способы и варианты, а также дополнительная информация и тонкости процесса.
У пользователей MacOS может возникнуть потребность в использовании операционной системы Windows, по нескольким причин, начиная от привычки использования ОС от Microsoft, заканчивая необходимостью использования специального ПО, которое предназначено только для работы в Windows. Чтобы не приобретать новое устройство, а использовать прелесть отличных характеристик оборудования и использования нужной системы, в MacOS есть возможность использовать несколько систем на одном устройстве.
Что следует выполнить перед установкой другой ОС?
- Узнать про совместимость оборудования и версий ОС (совместимость с Windows 10 и совместимость с 7-й версией системы).
- Выполните проверку наличия обновления для MacOS и утилит и выполните обновление, если они будут найдены.
Boot Camp
Установку Windows 10 на Mac OS Sierra можно выполнить через специальную утилиту BootCamp.
Утилита «Ассистент Boot Camp» — ПО от компании Apple, которая позволяет создать дополнительный раздел на диске, для установки дополнительной ОС и дальнейшего использования.
Перед установкой необходимо загрузить образ нужной системы Windows. Сделать это можно на официальном сайте Microsoft.
- Пройдите на страницу загрузки образа Windows 10 (или 7-й версии, но тут потребуется ключ).
- Выберите нужную систему и язык, после чего начните загрузку образа.

Чтобы запустить Boot Camp, откройте Программы – Утилиты и выберите «Ассистент Boot Camp».

В окне Boot Camp необходимо будет выбрать количество свободного пространства, которое будет отводиться под Windows. При выборе рекомендуем отталкиваться от ваших нужд — будете ли вы играть в игры и устанавливать «тяжелые» приложения или же редко использовать систему.
Стоит заметить, если в Boot Camp выделить 100 GB свободного пространства, после установки системы вам будет доступно около 75 Gb.
В строке ISO-образ диска укажите путь к загруженному образу системы. Нажмите кнопку «Установить» и начнётся загрузка ПО для дальнейшей настройки.

После перезагрузки устройства начнётся стандартный процесс установки Windows. На примере «десятки», рассмотрим основные моменты.
- Первоначально, согласитесь с условиями лиц соглашения.
- Выберите версию и разрядность ОС.
- На этапе выбора раздела, куда будет выполняться копирование файлов, нужно выбрать раздел с названием BootCamp.

- Начнётся процесс копирования файлов и подготовки основных компонентов системы.

- По окончании всех перезагрузок вас встретит окно предварительной настройки системы, где нужно будет указать учетную запись Microsoft для входа в систему, если таковой нету, создайте локальный профиль. Также потребуется указать настройки конфиденциальности, которые рекомендуется отключить – это немного ускорит устройство и Microsoft получит меньше ваших данных.
- По окончании вас встретит рабочий стол Windows и маленькое окно приложения BootCamp. Необходимо будет разрешить приложению выполнить настройку драйверов системы, чтобы разрешение экрана стало корректным и все компоненты, такие как подключение к сети, Bluetooth и другие.

Установка Windows 7 на Mac через BootCamp выполняется таким же образом, единственное отличие в приветственном экране и первоначальном экране. Также стоит знать несколько дополнительных фактов о Boot Camp, если вы хотите узнать, как установить Windows на Mac именно через BootCamp:
- Обновление всех необходимых для корректной работы драйверов устройства выполняется также через Boot Camp.
- Рекомендуется первоначально загрузить пакет необходимых драйверов с сайта Apple.
- Система будет работать быстро и отзывчиво, используя по максимуму ресурсы устройства. Также малая вероятность, что возникнут проблемы со стороны драйверов, так как Apple относится к этому очень важно и внимательно. Но никто не отменял баги и проблемы со стороны «Винды», хотя на 10-й версии, проблем всё меньше и меньше (до выхода крупного обновления).
- Использование MacOS и Windows одновременно невозможно, так как устройство может работать и использовать ресурсы только с одной запущенной системой. И тут на помощь приходят средства виртуализации, о чем пойдет речь далее.
Важно! Иногда при установке Windows на Mac может возникать ошибка no Bootable device. Чтобы решить эту проблему, воспользуйтесь следующими советами:
- Использование легального образа (никаких пиратских сборок).
- Попробуйте изменит приоритет загрузки на MacOS и повторите установку.
- Попробуйте использовать USB-накопители или ISO-файлы при использовании Boot Camp.

Parallels Desktop
Возникают ситуации, когда может потребоваться установка Windows 7 или 10 на Mac без использования BootCamp. Например, когда нужно использовать и MacOS и Windows одновременно, но иметь 2 устройства слишком затратно и неудобно. На помощь придут средства виртуализации, одно из которых Parallels Desktop для Mac.
Parallels Desktop – программное решение для создания виртуальной машины и последующей установки Windows, Linux и других ОС. Позволяет использовать другую операционную систему, без перезагрузки устройства и наслаждаться функциональностью разных ОС одновременно.
На данный момент доступна последняя версия Parallels Desktop 14 по цене от 4 990 рублей.
Перейти на официальный сайт Parallels Desktop
Приложение обладает поистине выдающимся функционалом:
- Общий рабочий стол для «Винды» и MacOS.
- Использование Win-приложений в интерфейсе MacOS без необходимости запуска виртуальной машины.
- Резервное копирование, общий буфер обмена, Drag-n-Drop, огромный инструментарий для работы с «оконной» ОС и многое другое.

Вместе с Parallels Desktop вы узнаете, как быстро поставить Windows 10 на Mac второй системой, лишь нажатием одной кнопки. Что для этого нужно сделать:
- Загрузите и установите пробную версию Parallels Desktop на официальном сайте.
- И нажмите Install для старта

- Автоматически начнётся загрузка образа

- И по окончании всех процедур будет уведомление об успешном завершении инсталяции

Разработчики позаботились о том, чтобы процесс происходил максимально просто и быстро для пользователей Mac. Также разберём, как можно выполнить чистую установку Windows 7 или 10 на Mac OS high sierra или позднее с использованием Parallels, на примере 11 версии:
- Запустите Parallels Desktop и выберите «Install».

- Укажите путь к установочному диску, USB-флешке или образу системы.

- Вы можете выбрать экспресс установку системы, которая потребует от вас только ключ системы и минимум действий. Или же есть снять галочку с экспресс установки, самостоятельно настроить процесс.

- Вы сможете выбрать не только количество активных ядер, оперативной памяти или памяти накопителя, но также и видеопамять, использование системы, приоритет загрузки и многое другое.

- После этого начнётся стандартная процедура инсталяции. Вам потребуется выбрать язык и выбрать место установки.

- После чего, Windows 7 будет успешно установлена. Вам потребуется только дать имя профилю и ПК, создать пароль (если требуется), ввести ключ активации, настроить время и параметры подключения к сети Интернет.
- Система готова к использованию

Приложение действительно очень функциональное и разом решаем множество проблем. Но если у вас нет 5 тысяч рублей на покупку лицензии, покажем еще один способ как установить Windows 7,10 на Mac OS средствами виртуализации VMware.
Oracle Virtualbox
VM VirtualBox – средство виртуализации от компании Oracle. Бесплатное приложение, которое позволит вам запустить Windows 7 или 10 без отдельной установки на Mac или BootCamp. Функционал не такой богатый как у Parallels Desktop, но это решение бесплатно и позволит использовать 2 системы одновременно. Что для этого нужно:
- Загрузите и установите VM VirtualBox для OS X hosts на официальном сайте.
- Загрузите образ нужной системы, например «Десятку»
- Создайте новую виртуальную машину. Введите имя, тип и версию ОС

- Задайте объем оперативной памяти

- Задайте объем накопителя для виртуалки и укажите тип диска как VDI (VirtualBox Disk Image)


- После того, как виртуальная машина будет создана, нажмите на настройки «Settings».

- Во вкладке «Storage» укажите путь к образу загруженной ОС, после чего запустите виртуалку.

- Начнётся стандартная процедура установки системы. С порядком можете ознакомиться в пункте про Boot Camp.
Как видно из это статьи, вместо Mac OS довольно легко поставить Windows 7, 8 или 10, нужно только выбрать удобный для вас вариант. Использование всей мощности устройства, но мириться только с одной активной ОС или же полноценное использование всех преимуществ Винды и MacOS, но с незначительными потерями производительности.
Отличного Вам дня!
Installing Windows on a Mac should be a piece of cake with Bootcamp, but that
rarely is the case. In fact, I would personally say that Boot Camp Assistant
is one of the worst apps that comes with OS X and unlike the rest, it doesn’t
work seamlessly.
A few of its drawbacks:
- It only supports a drive with a single partition.
- It often throws very obscure error messages with limited detail.
- It re-downloads 1.6 GB Windows drivers every single time it runs. These are
placed under/Library/Application Support/BootCamp/WindowsSupport.dmgand
deleted and re-downloaded each time Boot Camp Assistant starts processing.
This post did take a lot of work to complie and I did bone my hard drive a
few times while trying certain ideas, so please throw out a thanks if it
helped you out 
Disclaimer: This guide below contains procedures which can potentially
destroy your partitions and data. I accept no responsibility for such loss so
please proceed at your own risk.
Update (2016-07-20): I have updated this post with further improvements
relating to downloading of Boot Camp drivers and ensuring that a Hybrid MBR is
not used (which would cause issues when installing Windows).
What You Will Need
- An 8 GB or larger USB stick
- A copy of the Windows 10 ISO
- A valid Windows 10 license
- A downloaded copy of unetbootin
Downloading Boot Camp Drivers
- Start Boot Camp Assistant
- Select Action / Download Windows Support Software
- Choose your Downloads directory, enter your password and then click
Save
This will be the only step that we will use Boot Camp Assistant for.
Creating a Bootable USB Windows 10 Installer
Formatting Your USB Stick
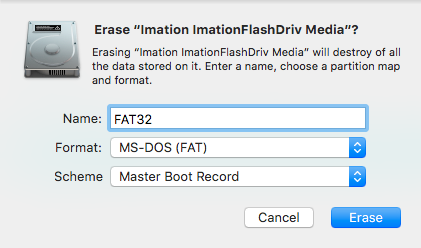
Attach your USB stick and start Disk Utility, select your USB drive in the
left panel under External, click Erase and set the options as follows
(exactly) and click Erase:
Name: FAT32
Format: MS-DOS (FAT)
Scheme: Master Boot Record
Turning Your USB Stick into a Windows Installer
Open unetbootin, enter your password, set the options as follows and
click OK:
Diskimage: checked, set to ISO and browse to your Windows 10 ISO
Type: USB Drive
Drive: Your USB drive (you should only see one entry here)

If you see more than one drive listed, you may confirm which is your USB drive
by opening the Terminal and typing:
You’ll see your USB drive in the output and it should look something like this:
/dev/disk2 (external, physical):
   #:                       TYPE NAME                    SIZE       IDENTIFIER
   0:     FDisk_partition_scheme                        *16.0 GB    disk2
   1:                 DOS_FAT_32 FAT32                   16.0 GB    disk2s1
Once you have kicked off unetbootin, grab a snack while the Windows ISO is
copied to the USB stick. This process takes around 15 minutes to complete.
Finishing Up
When this has completed, you may right click on the USB stick in Finder,
select Rename “FAT32” and rename it as you like (I’ll call mine
“WINDOWS 10”).
Finally, copy the WindowsSupport in your Downloads directory to
the Windows 10 USB stick so it’s easy to get to after our installation.
Partitioning Your Drive
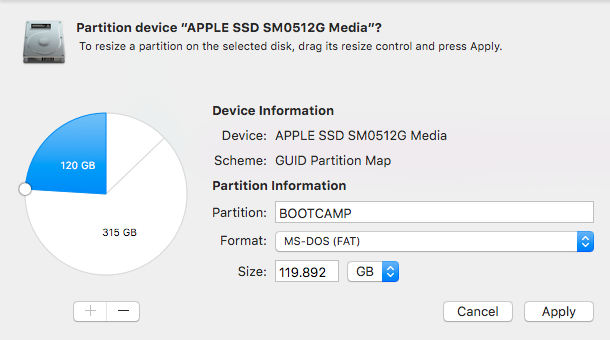
In Disk Utility, select your internal hard drive on the left panel, and
click on Partition.
Click the + button and create a new partition of your desired size for your
Windows installation and name it as you wish (I’ll call mine “BOOTCAMP”). Ensure that the Format is set to MS-DOS (FAT) and click on Apply.
Ensuring that a Hybrid MBR is not used
Huge thanks to Rod’s post from the superuser post titled
Windows detects GPT disk as MBR in EFI boot.
Once you add a FAT32 partition with either Boot Camp Assistant or Disk Utility,
your disk is converted into a hybrid GPT / MBR disk which is actually not
supported by newer versions of Windows. In this step, we revert this
additional change made by Disk Utility by switching back to a pure GPT
partition table.
-
Dowload the latest version of
GPT fdisk
by browsing to the version, then gdisk-binaries and clicking the file
with the *.pkg extension (e.g. gdisk-1.0.1.pkg). -
Install GPT fdisk by running the installer you downloaded
-
Open a Terminal and check the state of your MBR
If your MBR partition is set to hybrid, please continue with step 4,
otherwise if it is set to protective, you may skip the rest of this
section. Simply type q and hit return to exit GPT fdisk. -
Type p to view the existing partition table and verify you’re working
on the correct disk -
Type x to enter the expert menu
-
Type n to create a fresh protective MBR
-
Type w to save your changes and confirm the change when asked
-
Type q to exit GPT fdisk
-
Run GPT fdisk to show your disk layout:
1sudo gdisk -l /dev/disk0Your partition table should look something like this:
 1
 2
 3
 4
 5
 6
 7
 8
 9
10
11
GPT fdisk (gdisk) version 1.0.1 Warning: Devices opened with shared lock will not have their partition table automatically reloaded! Partition table scan: MBR: protective BSD: not present APM: not present GPT: present Found valid GPT with protective MBR; using GPT.
Disconnecting All Devices From USB Ports
This step is critical as I have had rather serious problems during Windows
installation when certain external drives are connected.
Unplug everything from your Mac except your keyboard (if wired) and your
bootable Windows USB stick (which we prepared earlier).
If your Mac contains multiple physical drives, you will need to disconnect
all disks except the one which you intend to install Windows on or you may
encounter the following error:
Windows could not prepare the computer to boot into the next phase of installation. To install Windows, restart the installation.
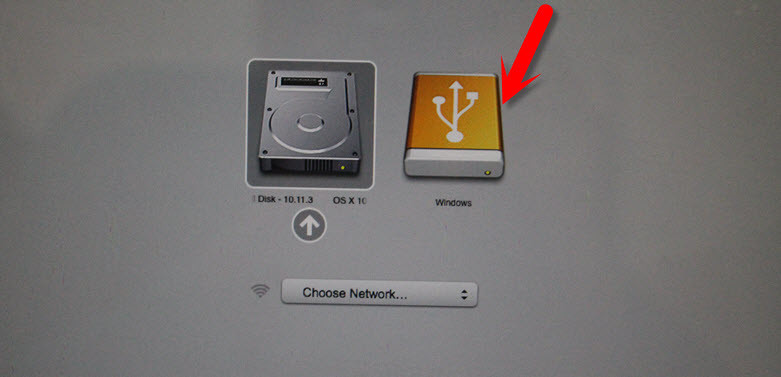
Booting From the USB Stick
Ensure that the USB stick containing the Windows installer is inserted and
then restart your Mac while holding down the option (alt) key.
You should now be presented with a list of bootable drives. Select the USB
drive (usually titled “EFI Boot”) to begin installing Windows.
Correcting Your Windows Hard Disk Partition
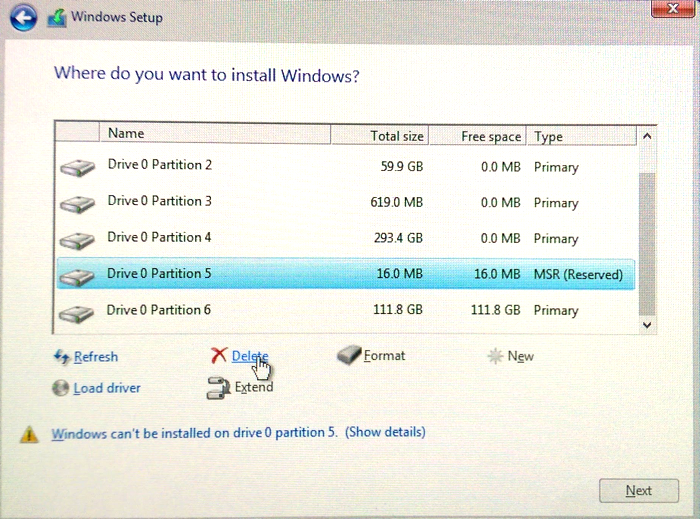
When you are asked Where do you want to install Windows?, select the
Windows partition created earlier (which I called “BOOTCAMP”) and click
Delete.
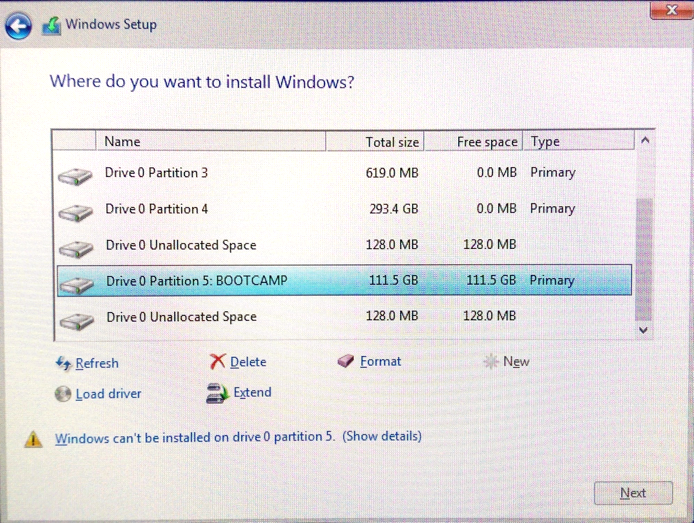
Next, select the chunk of Unallocated Space and click on New to create
a proper Windows NTFS partition.
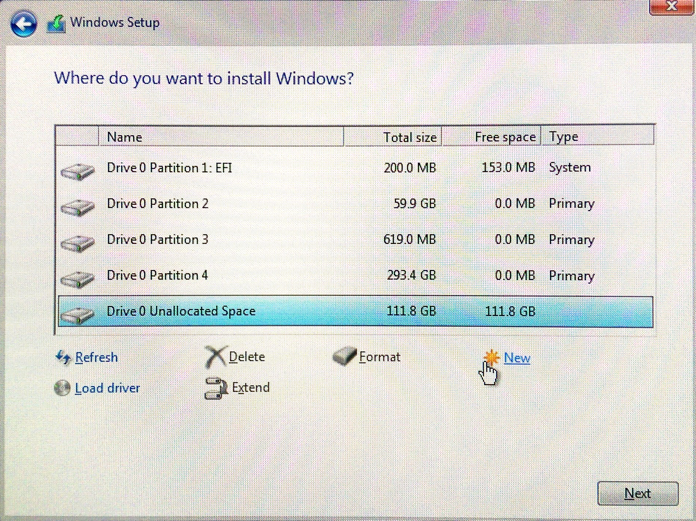
Note: OS X only supports creation of FAT filesystems, so this is why we need
to re-create the partition ourselves during install.
Completing the Installation
Allow the installer to complete and boot into Windows.
Installing Boot Camp Support Software
Once Windows is up and running, install the Boot Camp Support software running
WindowsSupport/BootCamp/Setup.exe on your USB stick.
Note: The installer takes a little while to show up, so please be patient.
You may encounter a known issue whereby the Boot Camp Support Software
installer locks up while installing Realtek audio.
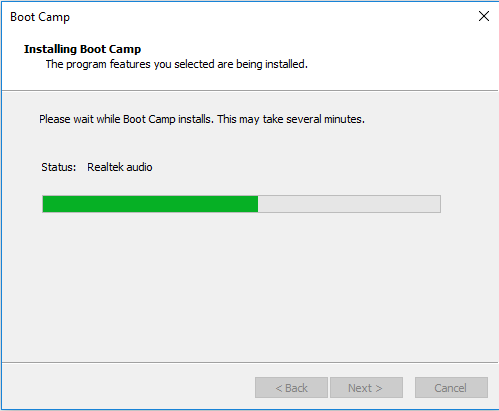
If this occurs, you will need to open Task Manager and kill the
RealtekSetup.exe process.
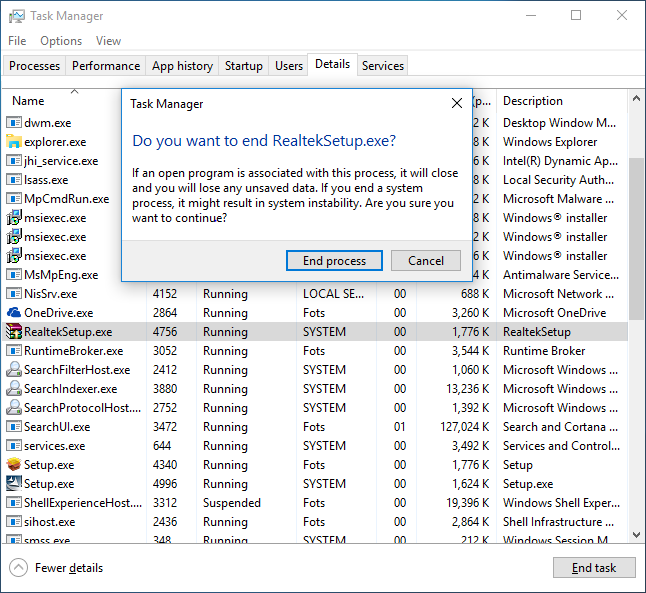
After the installer has completed, answer No when prompted to reboot
and install the Realtek drivers manually by running
%USERPROFILE%AppDataLocalTempRarSFX0BootCampDriversRealTekRealtekSetup.exe.
If you can’t find this file, check any other directories starting with
RARSFX under %USERPROFILE%AppDataLocalTemp.
Once complete, reboot Windows.
What You Will Need to Configure Windows
- The latest version of SharpKeys
- The flipflop-windows-sheel binary (see README for a download link)
Configuring Windows
Mapping Your Mac Keyboard
Install and run SharpKeys and then configure the following mappings to
correct your Mac keyboard so that it behaves like a regular Windows keyboard:
Function: F13 -> Special: PrtSc
Special: Left Alt => Special: Left Windows
Special: Left Windows => Special: Left Alt
Special: Right Alt => Special: Right Windows
Special: Right Windows => Special: Right Alt
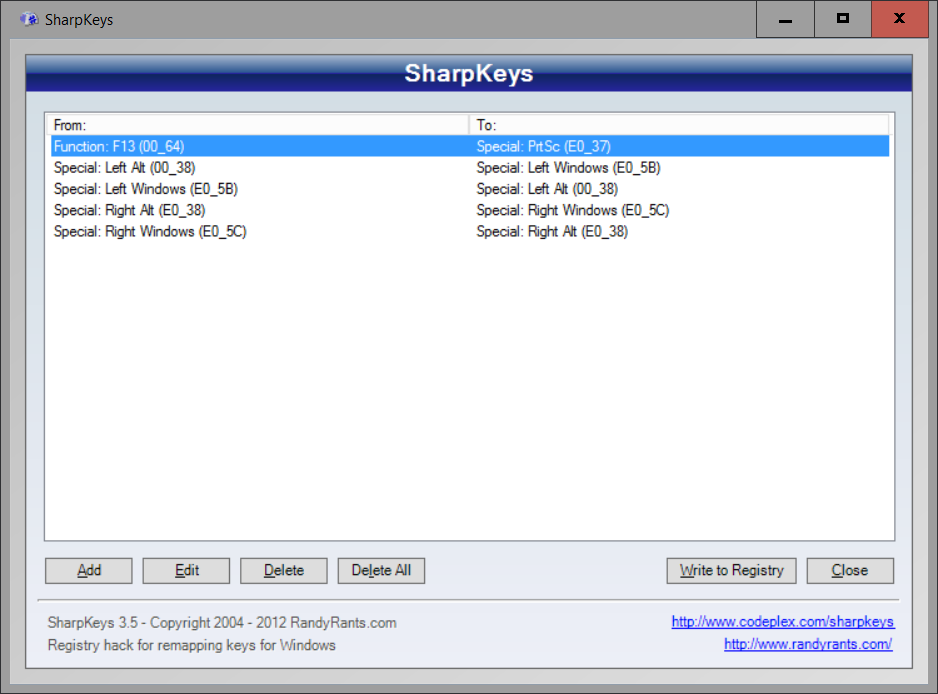
Note: for F13, you’ll need to select Press a key and click F13 on your
keyboard.
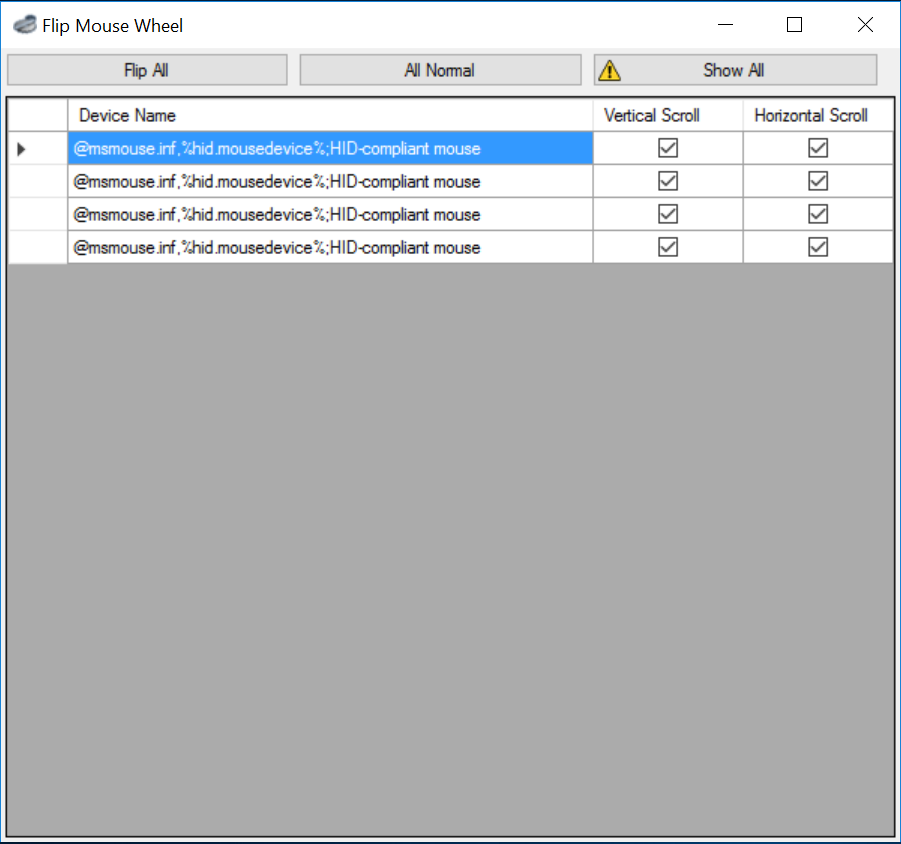
Switching to Natural Scrolling
If you wish to flip scrolling direction to match that on OS X, run
FlipWheel.exe and then click on Flip All.
Enabling Num Lock on Boot
Paste the following into a file named Enable NumLock on Boot.reg then
import this into the registry to enable NumLock when Windows boots up
(it doesn’t by default).
Windows Registry Editor Version 5.00

[HKEY_USERS.DEFAULTControl PanelKeyboard]
"InitialKeyboardIndicators"="80000002"
Completing Configuration
That’s it, give your machine one last reboot and you’ll have a fully working
Windows 10 installation.
Note: I have found Apple’s Magic Mouse to be extremely unreliable using
the Boot Camp drivers from Apple. As such, I recommend purchasing a Logitech
(or similar) mouse for use in Windows. I have no trouble plugging the
wireless receiver for my Logitech mouse into one of the USB ports of my wired
Apple Keyboard and it’s so tiny that you can’t see it at all.
Cleaning up a Windows Installation
Removing the Windows Partitions
If you decide to remove Windows, you may find that Disk Utility doesn’t allow
you to delete the two partitions that have been created by the Windows
installer.
This happens due to the fact that the first small partition created is of a
type called Microsoft Reserved which OS X’s Disk Utility doesn’t support.
The safest way to delete these partitions is through the Windows installer. So
simply boot from your USB stick as we did before and when you reach the
Where do you want to install Windows? question, you may delete your
“BOOTCAMP” partition and the small 16 MB partition of type MSR (Reserved)
just above the BOOTCAMP partition.
Once done, simply quit the installer by clicking the X in the top right corner
of each Window and reboot back into OS X.
Removing the Boot Entry
Even though we have removed the Windows partition, a boot entry will still be
present when holding down option (alt) during boot.
You may remove these items by running the following in your Terminal:
|
|
Содержание
- Как правильно установить Windows 10 на Mac
- На какие компьютеры Mac можно установить Windows 10
- Что нам понадобится
- Как установить Windows 10 по шагам
- Как запускать macOS или Windows
- Как удалить Windows с Mac
- Как можно тремя способами установить Windows на Mac
- Подготовка и установка Bootcamp
- Установка Windows через Bootcamp с помощью флешки
- Установка Windows на Mac и iMac через Parallels Desktop
- Устанавливаем Windows с помощью VirtualBox
- Видео по теме
- Как установить Windows 10 на macOS 11 Big Sur. Пошаговая инструкция
- Что нужно для установки Windows 10 на macOS 11 Big Sur
- Как установить Windows 10 на Mac на macOS 11 Big Sur
- Как переключаться между macOS 11 Big Sur и Windows 10
- Какие нюансы могут возникнуть при установке Windows 10
- Как удалить Windows 10 через macOS 11 Big Sur
- Installing Windows 10 on a Mac without Bootcamp
- What You Will Need
- Downloading Boot Camp Drivers
- Creating a Bootable USB Windows 10 Installer
- Formatting Your USB Stick
- Turning Your USB Stick into a Windows Installer
- Finishing Up
- Partitioning Your Drive
- Ensuring that a Hybrid MBR is not used
- Installing Windows
- Disconnecting All Devices From USB Ports
- Booting From the USB Stick
- Correcting Your Windows Hard Disk Partition
- Completing the Installation
- Installing Boot Camp Support Software
- What You Will Need to Configure Windows
- Configuring Windows
- Mapping Your Mac Keyboard
- Switching to Natural Scrolling
- Enabling Num Lock on Boot
- Completing Configuration
- Cleaning up a Windows Installation
- Removing the Windows Partitions
- Removing the Boot Entry
Как правильно установить Windows 10 на Mac

У многих владельцев Mac часто возникает необходимость в операционной системе Windows. Одним она нужна для запуска любимых игр, вторым – для работы специализированного ПО, а третьим просто для разнообразия.
Мы решили напомнить, как правильно и быстро произвести установку Windows 10 на Mac, чтобы не связываться с виртуальными машинами и подобными решениями, которые не позволяют стабильно работать в Windows и выжимать максимум из возможностей компьютера.
На какие компьютеры Mac можно установить Windows 10
Официально 64-разрядную Windows 10 Home или Pro при помощи утилиты Boot Camp можно установить на следующие модели:
Существует лишь одно ограничение: при использовании macOS Mojave не получится установить ОС Windows через Boot Camp на iMac с жестким диском емкостью 3 ТБ.
Это обусловлено особенностями совмещения разных файловых систем APFS и NTFS на накопителях такой емкости. Подробнее об этом можно узнать на сайте Apple.
Остальные модели без проблем поддерживают установку Windows 10 прямо из коробки.
Что нам понадобится

1. Свободное место на накопителе. Минимальный объем для установки 64 ГБ, а рекомендуемый – 128 ГБ.
На практике можно обойтись и меньшим объемом, но всегда есть вероятность нехватки пространства для нормальной работы системы или установки необходимого ПО.
2. Для настольных компьютеров потребуется клавиатура и манипулятор, чтобы постоянно не переподключать их в разных ОС. Это может быть как проводное решение, так и сторонние модели, которые имеют несколько каналов для сопряжения с несколькими девайсами.
3. USB-накопитель на 16 Гб или более емкий. Такой диск не потребуется владельцам компьютеров 2015 года выпуска либо более новым.
4. Образ установочного диска Microsoft Windows (ISO) или установочный носитель данной операционной системой. Скачать образ можно на сайте Microsoft.
Средняя цена ключа в России – около 3 тыс. рублей, хотя попадаются предложения и дешевле на свой страх и риск.
Как установить Windows 10 по шагам

1. Запустите утилиту Boot Camp через поиск Spotlight, Finder или Launchpad.
2. Укажите программе путь к загруженному образу и выберите, сколько места на установленном накопителе выделить для установки Windows.
Хорошенько подумайте на данном этапе, ведь изменить используемый раздел без переустановки Widows не получится. Если планируете играть в игры или запускать тяжелые приложения, лучше сразу выделите больше места.

3. Дождитесь загрузки необходимых драйверов и данных из сети. После скачивания и перезагрузки компьютера начнется установка Windows 10.
4. Мастер установки попросит произвести базовые настройки и указать раздел, на который следует поставить Windows. Он уже будут назван BOOTCAMP.
5. После окончания установки потребуется произвести окончательную настройку параметров системы.
6. Оказавшись на рабочем столе Windows потребуется запустить утилиту Boot Camp. Она будет храниться на системном диске либо на съемном накопителе, который был создан на этапе подготовки.
7. После установки всех компонентов и перезагрузки Windows нужно подключиться к сети через Wi-Fi или по кабелю и запустить Apple Software Update из панели Пуск.
8. В программе следует указать все доступные обновления. Установить из и перезапустить компьютер.
Как запускать macOS или Windows

Теперь при запуске компьютера автоматически будет стартовать операционная система macOS, а при удержании клавиши Alt/Option увидите меню с выбором раздела для загрузки.
Для быстрого перехода из Windows в macOS можно воспользоваться утилитой в трее (правом нижнем углу), которая позволяет в одно нажатие перезапустить компьютер с другой ОС.

Для обратного перехода следует перейти в Системные настройки – Загрузочный том, ввести пароль разблокировки настроек и выбрать раздел с Windows для загрузки.
Как удалить Windows с Mac
Для удаления достаточно запустить Дисковую утилиту и стереть в ней раздел, который был отведен для Boot Camp с Windows. Затем расширьте основной раздел за счет освободившегося пространства.
Источник
Как можно тремя способами установить Windows на Mac
Установить OS возможно самостоятельно. Сделать это можно несколькими методами, например, через утилиту или с помощью флешки. Рассмотрим на примере приложений, от компании Apple, которые называются Bootcamp, Parallels Desktop и Virtual Box.
Подготовка и установка Bootcamp
Перед установкой дополнительной OS, учитывайте то, что она займёт на жёстком диске много места. Убедитесь, что на нём есть нужные гигабайты. В среднем может понадобиться около 30 Gb.
Перед тем как начать установку операционной системы на iMac или Mac, проверьте и подготовьте программу Boot camp. Для начала убедитесь, что на ней установлены все обновления от Apple. Для этого нужно сделать следующие действия:
Во время запуска утилиты у вас будет возможность выбрать место, на котором будет установлена OS Windows. Перед началом запуска софта следует закрыть все открытые приложения и программы.
После того, как утилита и флешки для копирования информации готовы, можно приступать к первым действиям:


Для установки Windows 8 нужно действовать точно так же. Только в окне «Выбор действий» следует установить галочки напротив пунктов «Загрузить последнее ПО» и «Создать диск для установки Windows 7 или новое».
После того как iMac второй раз перезагрузится, можно начинать установку нужных драйверов. Для этого загрузите их обратно из флешки, установите и запустите программу инсталляции.
Установка Windows через Bootcamp с помощью флешки
Этот вариант установки на Mac и iMac, от предыдущего особо ничем не отличается. Перед началом действий следует так же проверить bootcamp на обновления и сохранить все необходимые данные. Следующая инструкция поможет выполнить задачу:
Но бывает, что когда установочным носителем является флешка, утилита требует вставить диск с программой и отказывается продолжать действия загрузки софта на iMac. В этом случае можно скачать драйвер Daemon Tools Lite iMac. С его помощью монтируем iso-образ Windows, он послужит виртуальным приводом и тогда Bootcamp без проблем завершит процесс установки нашей OS.
Установка Windows на Mac и iMac через Parallels Desktop
Кроме Boot Camp существует ещё несколько вариантов установки дополнительной операционной системы. Например, можно воспользоваться программой Parallels Desktop, которая является виртуальной машиной по установке Windows. Вы сможете запускать программы Windows без перезагрузки ПК.
 Выполнить установку можно следуя инструкции ниже:
Особенность Parallels Desktop — высокая производительность программы. Скачать бесплатную ознакомительную версию, либо купить программу Parallels Desktop вы можете по ссылке ниже:
Устанавливаем Windows с помощью VirtualBox
VirtualBox — одна из популярных программ виртуализации. С её помощью на вашем ПК будут с лёгкостью работать сразу две операционные системы. Установить дополнительную ОС через VirtualBox довольно просто.
Для начала введите в систему поиска запрос VirtualBox, зайдите на официальный сайт и скачайте программу. По завершению установки кликните по значку программы и выберите пункт «Создать». После этого можно приступать к установке Windows.
После всех проведённых действий установка Windows на Mac полностью окончена. Перезапустите программу и всё обязательно заработает.
Видео по теме
Источник
Как установить Windows 10 на macOS 11 Big Sur. Пошаговая инструкция

Для чего может понадобиться Windows 10 на Mac? Прежде всего, для программного обеспечения, которого нет на macOS. Конечно, есть и те, кому внешний вид и функционал операционной системы Microsoft просто нравится больше, но таких в рядах пользователей компьютеров Apple все же не так много.
Для установки Windows 10 на Mac используется фирменная платформа под названием Boot Camp. Она дает возможность не только добавить эту операционную систему на свой компьютер, но и просто переключаться между ней и macOS. Сегодня мы установим детище Microsoft на macOS 11 Big Sur и разберем нюансы.
Что нужно для установки Windows 10 на macOS 11 Big Sur

1. Поддерживаемый Mac. Если не учитывать версию macOS, подойдет любая из этих моделей:
Если Windows 10 хочется использовать вместе с macOS 11 Big Sur, нужны такие компьютеры Apple:

2. Флешка на 16 ГБ или больше. Она понадобится в процессе установки на всех Mac, кроме этих:

3. Последнее обновление macOS. Специалисты Apple настаивают на том, что перед использованием «Ассистента Boot Camp» нужно провести апдейт операционной системы. Это важно с точки зрения закрытия пробелов в ее безопасности — они выпускаются даже для достаточно устаревших Mac.

4. Не меньше 64 ГБ свободного места. Лучше использовать 128 ГБ и больше: в этом случае Windows получит необходимое пространство, которое необходимо для автоматических обновлений операционной системы. Если у Mac 128 ГБ ОЗУ или больше, на загрузочном диске должно быть не меньше места.

5. Дистрибутив Windows в формате ISO. Важно использовать именно полный образ, а не обновление операционной системы. Подойдет вариант 64-разрядной Windows 10 Home или Windows 10 Pro. Про ключ подумайте сами, а необходимый файл получится бесплатно загрузить на официальном сайте Microsoft.
Как установить Windows 10 на Mac на macOS 11 Big Sur

Шаг 1. Откройте приложение «Ассистент Boot Camp».
Шаг 2. Ознакомьтесь с приветственной информацией и нажмите на кнопку «Продолжить».
Если вы используете MacBook любой модели, нужно подключить его к питанию с помощью кабеля.
Если вы используете Mac с чипом T2, «Ассистент Boot Camp» также посоветует определиться с утилитой безопасной загрузки: после установки Windows 10 ее параметры изменить не выйдет. Про этой есть статья на официальном сайте Apple.
Шаг 3. Выберите образ диска (он определится автоматически, если вы недавно его загрузили) и определите пространство, которое будет использоваться для Windows 10.

В стандарте «Ассистент Boot Camp» предлагает 42 ГБ, и этого слишком мало для корректной работы системы. Как я уже писал выше, минимальный объем находится на уровне 64 ГБ. Тем не менее, в этом случае могут возникнуть проблемы с автоматическим обновлением: оптимально — 128 ГБ и выше.

Лично я для Windows 10 обычно использую ровно 100 ГБ. Проблем с обновлениями пока не было.
Изменить объем накопителя после окончания установки уже не получится. Придется удалять Windows 10 со своего Mac и устанавливать заново. Поэтому десять раз подумайте, сколько именно пространства понадобится вам для использования системы, а только потом начинайте инсталляцию.
Шаг 4. Нажмите на кнопку «Установить» и ожидайте дальнейших команд от приложения «Ассистент Boot Camp».


Шаг 5. Определите язык установки.

Шаг 6. Введите лицензионный код или отложите это на потом.

Шаг 7. Выберите тип системы, которую хотите установить.

Чтобы получить все возможности и минимизировать ограничения, лучше всего использовать Windows 10 Pro.
Шаг 8. Ознакомьтесь с лицензионными условиями и нажмите «Далее».


Шаг 9. Определите региональные параметры.


Шаг 10. Подключитесь к сети Wi-Fi.


Шаг 11. Добавьте учетную запись и создайте PIN для аутентификации в Windows 10.


Шаг 12. Задайте параметры конфиденциальности и завершите первоначальную настройку Windows 10.


Шаг 13. Установите драйвера для корректной работы Boot Camp — приложение для этого уже должно быть открыто.


Шаг 14. Наслаждайтесь использованием Windows 10 — на ее установку вряд ли уйдет больше получаса времени.
Когда перезагрузитесь в macOS 11 Big Sur, удалите дистрибутив Windows 10, который использовался для установки. Он больше не нужен, но все еще занимает около 6 ГБ пространства в хранилище. Теперь за данным фактом придется следить более пристально, ведь дополнительная система занимает не мало.
Как переключаться между macOS 11 Big Sur и Windows 10

Шаг 1. Активируйте перезагрузку компьютера.
Шаг 2. Зажмите клавишу Option(⌥) и удерживайте до активации меню выбора системы.
Шаг 3. Выберите систему, которую необходимо запустить.
Вы также можете проделать это же из-под macOS с помощью меню «Системные настройки» > «Загрузочный диск». Здесь нужно выбрать диск для дальнейшего использования и нажать на кнопку «Перезагрузить». Тем не менее, из-под Windows придется использовать именно перезагрузку.
Какие нюансы могут возникнуть при установке Windows 10
? Нужна флешка. Если у вас достаточно старый Mac, о чем я уже писал выше, для установки Windows 10 также понадобится флешка. «Ассистент Boot Camp» обязательно сообщит, когда ее нужно вставить в компьютер. Извлечь ее можно будет после запуска новой операционной системы и драйверов для нее.
? Установщик Boot Camp не запускается. Если после первого запуска Windows 10 инсталляция дополнительных драйверов не открывается автоматически, перейдите в диск OSXRESERVED, разверните папку BootCamp и используйте файл Setup.exe. Это нужно для корректной работы системы.
? Подключен дополнительный монитор. Если вы используете вспомогательный экран, он может быть черным во время непосредственной установки Windows 10. В этом нет ничего страшного, и после окончания процедуры он обязательно заработает на 100% корректно.
Как удалить Windows 10 через macOS 11 Big Sur

Шаг 1. Откройте приложение «Ассистент Boot Camp».
Шаг 2. Ознакомьтесь с приветственной информацией и нажмите на кнопку «Продолжить».
Шаг 3. Нажмите на кнопку «Восстановить», чтобы удалить раздел Windows и вернуть все пространство для использования macOS 11 Big Sur.
Удаление раздел проходит без следа, и освобожденное от него место можно использовать для любых своих нужны уже спустя несколько минут. Тем не менее, если у вас действительно напряжена со свободным пространством в хранилище, лучше попробуйте установить Windows 10 на съемный диск.
Источник
Installing Windows 10 on a Mac without Bootcamp
Installing Windows on a Mac should be a piece of cake with Bootcamp, but that rarely is the case. In fact, I would personally say that Boot Camp Assistant is one of the worst apps that comes with OS X and unlike the rest, it doesn’t work seamlessly.
A few of its drawbacks:
This post did take a lot of work to complie and I did bone my hard drive a few times while trying certain ideas, so please throw out a thanks if it helped you out 🙂
Disclaimer: This guide below contains procedures which can potentially destroy your partitions and data. I accept no responsibility for such loss so please proceed at your own risk.
Update (2016-07-20): I have updated this post with further improvements relating to downloading of Boot Camp drivers and ensuring that a Hybrid MBR is not used (which would cause issues when installing Windows).
What You Will Need
Downloading Boot Camp Drivers
This will be the only step that we will use Boot Camp Assistant for.
Creating a Bootable USB Windows 10 Installer
Formatting Your USB Stick
Attach your USB stick and start Disk Utility, select your USB drive in the left panel under External, click Erase and set the options as follows (exactly) and click Erase:
Name: FAT32
Format: MS-DOS (FAT)
Scheme: Master Boot Record
Turning Your USB Stick into a Windows Installer
Open unetbootin, enter your password, set the options as follows and click OK:
Diskimage: checked, set to ISO and browse to your Windows 10 ISO
Type: USB Drive
Drive: Your USB drive (you should only see one entry here)
If you see more than one drive listed, you may confirm which is your USB drive by opening the Terminal and typing:
You’ll see your USB drive in the output and it should look something like this:
Once you have kicked off unetbootin, grab a snack while the Windows ISO is copied to the USB stick. This process takes around 15 minutes to complete.
Finishing Up
When this has completed, you may right click on the USB stick in Finder, select Rename “FAT32” and rename it as you like (I’ll call mine “WINDOWS 10”).
Finally, copy the WindowsSupport in your Downloads directory to the Windows 10 USB stick so it’s easy to get to after our installation.
Partitioning Your Drive
In Disk Utility, select your internal hard drive on the left panel, and click on Partition.
Click the + button and create a new partition of your desired size for your Windows installation and name it as you wish (I’ll call mine “BOOTCAMP”). Ensure that the Format is set to MS-DOS (FAT) and click on Apply.
Ensuring that a Hybrid MBR is not used
Huge thanks to Rod’s post from the superuser post titled Windows detects GPT disk as MBR in EFI boot.
Once you add a FAT32 partition with either Boot Camp Assistant or Disk Utility, your disk is converted into a hybrid GPT / MBR disk which is actually not supported by newer versions of Windows. In this step, we revert this additional change made by Disk Utility by switching back to a pure GPT partition table.
Dowload the latest version of GPT fdisk by browsing to the version, then gdisk-binaries and clicking the file with the *.pkg extension (e.g. gdisk-1.0.1.pkg).
Install GPT fdisk by running the installer you downloaded
Open a Terminal and check the state of your MBR
If your MBR partition is set to hybrid, please continue with step 4, otherwise if it is set to protective, you may skip the rest of this section. Simply type q and hit return to exit GPT fdisk.
Type p to view the existing partition table and verify you’re working on the correct disk
Type x to enter the expert menu
Type n to create a fresh protective MBR
Type w to save your changes and confirm the change when asked
Type q to exit GPT fdisk
Run GPT fdisk to show your disk layout:
Your partition table should look something like this:
Installing Windows
Disconnecting All Devices From USB Ports
This step is critical as I have had rather serious problems during Windows installation when certain external drives are connected.
Unplug everything from your Mac except your keyboard (if wired) and your bootable Windows USB stick (which we prepared earlier).
If your Mac contains multiple physical drives, you will need to disconnect all disks except the one which you intend to install Windows on or you may encounter the following error:
Windows could not prepare the computer to boot into the next phase of installation. To install Windows, restart the installation.
Booting From the USB Stick
Ensure that the USB stick containing the Windows installer is inserted and then restart your Mac while holding down the option (alt) key.
You should now be presented with a list of bootable drives. Select the USB drive (usually titled “EFI Boot”) to begin installing Windows.
Correcting Your Windows Hard Disk Partition
When you are asked Where do you want to install Windows?, select the Windows partition created earlier (which I called “BOOTCAMP”) and click Delete.
Next, select the chunk of Unallocated Space and click on New to create a proper Windows NTFS partition.
Note: OS X only supports creation of FAT filesystems, so this is why we need to re-create the partition ourselves during install.
Completing the Installation
Allow the installer to complete and boot into Windows.
Installing Boot Camp Support Software
Once Windows is up and running, install the Boot Camp Support software running WindowsSupport/BootCamp/Setup.exe on your USB stick.
Note: The installer takes a little while to show up, so please be patient.
You may encounter a known issue whereby the Boot Camp Support Software installer locks up while installing Realtek audio.
If this occurs, you will need to open Task Manager and kill the RealtekSetup.exe process.
After the installer has completed, answer No when prompted to reboot and install the Realtek drivers manually by running %USERPROFILE%AppDataLocalTempRarSFX0BootCampDriversRealTekRealtekSetup.exe. If you can’t find this file, check any other directories starting with RARSFX under %USERPROFILE%AppDataLocalTemp.
Once complete, reboot Windows.
What You Will Need to Configure Windows
Configuring Windows
Mapping Your Mac Keyboard
Install and run SharpKeys and then configure the following mappings to correct your Mac keyboard so that it behaves like a regular Windows keyboard:
Note: for F13, you’ll need to select Press a key and click F13 on your keyboard.
Switching to Natural Scrolling
If you wish to flip scrolling direction to match that on OS X, run FlipWheel.exe and then click on Flip All.
Enabling Num Lock on Boot
Paste the following into a file named Enable NumLock on Boot.reg then import this into the registry to enable NumLock when Windows boots up (it doesn’t by default).
Completing Configuration
That’s it, give your machine one last reboot and you’ll have a fully working Windows 10 installation.
Note: I have found Apple’s Magic Mouse to be extremely unreliable using the Boot Camp drivers from Apple. As such, I recommend purchasing a Logitech (or similar) mouse for use in Windows. I have no trouble plugging the wireless receiver for my Logitech mouse into one of the USB ports of my wired Apple Keyboard and it’s so tiny that you can’t see it at all.
Cleaning up a Windows Installation
Removing the Windows Partitions
If you decide to remove Windows, you may find that Disk Utility doesn’t allow you to delete the two partitions that have been created by the Windows installer.
This happens due to the fact that the first small partition created is of a type called Microsoft Reserved which OS X’s Disk Utility doesn’t support.
The safest way to delete these partitions is through the Windows installer. So simply boot from your USB stick as we did before and when you reach the Where do you want to install Windows? question, you may delete your “BOOTCAMP” partition and the small 16 MB partition of type MSR (Reserved) just above the BOOTCAMP partition.
Once done, simply quit the installer by clicking the X in the top right corner of each Window and reboot back into OS X.
Removing the Boot Entry
Even though we have removed the Windows partition, a boot entry will still be present when holding down option (alt) during boot.
You may remove these items by running the following in your Terminal:
Источник
Последнее обновление Ноя 12, 2021
- Если вы используете компьютер Mac, но все же хотите увидеть, как выглядит Windows 10, вы можете использовать Parallels Desktop 15 для Mac. Таким образом, вы сможете установить Windows 10 на виртуальную машину Mac.
- Это программное обеспечение предлагает лучшие настройки конфиденциальности для Windows 10 через Parallels 11 на Mac и позволит пользователям тестировать последнюю версию Windows 10 без перезаписи существующего Boot Camp.
- Узнайте все, что нужно знать о виртуализации, в нашем разделе «Виртуальные машины».
- Если вы хотите быть в курсе всех советов и приемов из мира ИТ, приходите в наш Центр технических руководств.
Чтобы исправить различные проблемы с ПК, мы рекомендуем DriverFix: это программное обеспечение будет поддерживать ваши драйверы в рабочем состоянии, тем самым защищая вас от распространенных компьютерных ошибок и сбоев оборудования. Проверьте все свои драйверы сейчас за 3 простых шага:
- Загрузите DriverFix (проверенный файл загрузки).
- Нажмите «Начать сканирование», чтобы найти все проблемные драйверы.
- Нажмите «Обновить драйверы», чтобы получить новые версии и избежать сбоев в работе системы.
- DriverFix в этом месяце скачали 502 786 читателей.
Если вы используете компьютер Mac, но все же хотите посмотреть, как выглядит Windows 10, у нас есть для вас отличные новости.
С Parallels Desktop 15 для Mac вы сможете установить Windows 10 на виртуальную машину на вашем Mac. Parallels объявила, что недавно ее программное обеспечение виртуальных машин для компьютеров Mac, Parallels Desktop 15, получило очень важное обновление в виде экспериментальной поддержки операционной системы Microsoft Windows 10.![Установите Windows 10 на Mac без Bootcamp [Полное руководство]](https://howto.mediadoma.com/wp-content/uploads/2021/03/post-64134-604fe64c6a603.png)
Вы можете использовать Mac и Parallels для переустановки Windows или для работы с Windows.
Это программное обеспечение предлагает лучшие настройки конфиденциальности для Windows 10 через Parallels 11 на Mac и позволяет пользователям тестировать последнюю версию Windows 10.
И все это без перезаписи существующего Boot Camp или создания нового раздела только для системы, а для безопасной установки на виртуальной машине Parallels.
Это обновление даст вам возможность попробовать новую предварительную версию Microsoft Office для Windows 10, которая включает улучшенные версии Word, Excel и PowerPoint, а также другие новые функции Windows 10.
Parallels Desktop 15 также дает пользователям Mac возможность попробовать персонального помощника Microsoft, Cortana, и сравнить его с VA от Apple, Siri, что отлично, если вы хотите поэкспериментировать со своей системой.
В последнее время модно устанавливать операционные системы на виртуальные машины перед их установкой на реальные компьютеры.
Но это действительно более практичный способ определить, какая операционная система вам подходит.
Возможно, использование Microsoft Windows 10 Technical Preview на Parallels Desktop 15 не изменит ваш выбор операционной системы, но, безусловно, даст вам представление о других ОС и обо всех ее достоинствах и недостатках.
Но, к сожалению, Parallels Desktop 15 не является бесплатным, его можно приобрести на веб-сайте Parallels за 79,99 долларов США.
Также существует специальный тарифный план для студентов и пользователей предыдущих версий Parallels Desktop. Но вы всегда можете попробовать бесплатную пробную версию, которую можно скачать отсюда.
Источник записи: windowsreport.com
Let me start the topic with some questions. Is it possible to install Windows 10 on Mac OS? Do you know how to install Windows 10 on Mac OS? Does it need many requirements? I’m going to tell you the answer to all these questions. Yes, it’s possible to install Windows on a Mac operating system. There are two main ways that Windows 10 can be installed on Mac OS.
- Without Boot Camp
- With Boot Camp
If you want to install Windows 10 on Mac OS, there are two ways. First using boot camp and without boot camp. In this article, I’m going to tell you the first way. Install Windows 10 on Mac OS without boot camp. You do not need any software. Only the thing you need a bootable flash drive for Windows with Windows 10 operating system file.
- Download Windows 10
- Download Boot Camp Driver
- A bootable USB Flash Drive
Install Windows 10 on Mac Without Boot Camp
Once you have created a bootable USB flash drive for Windows, then download the “Boot Camp driver” for Windows. For the first time when you install Windows on Mac, so the “Internet, sound, graphics, and other drivers are disabled”, and they are not working. You Have to download it, after installation of Windows 10. You have to install the drivers using boot camp.
Warning: Here I’m going to have a clean installation of Windows 10 on Mac computer. It means that I’m going to remove the full hard drive of my Mac computer if you want to dual boot Windows 10 with Mac so visit the article below.
- How to dual boot Windows 10 with Mac OS X El Capitan?
Now that you have a bootable USB flash drive insert it to the laptop USB port. Restart your device then press and hold the “Option Key” from the keyboard. You have to continue holding the option key until you see the USB flash drive and Mac hard disk.

Press and Hold the Option Key
After holding the option key, a screen will be shown to you. Choose the USB flash drive and hit enter.
Choose USB Flash Drive
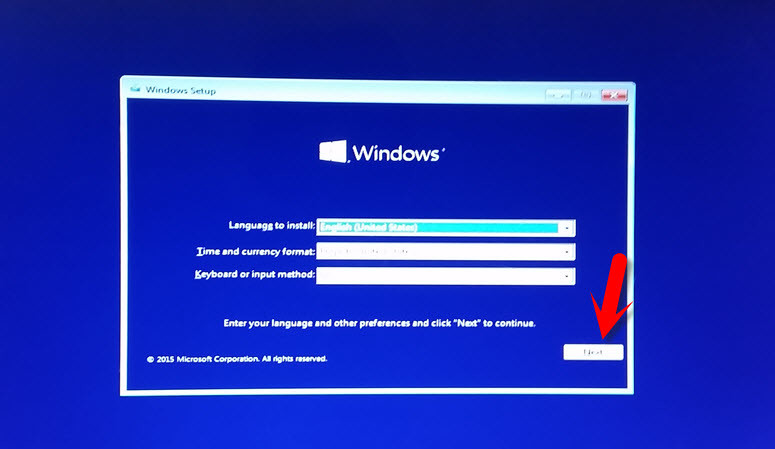
After these steps, it’s elementary and straightforward. If you know the Windows 10 Installation. This is going to work very efficiently. Now, choose the Language and hit the “Next” button.
Choose Language and Keyboard
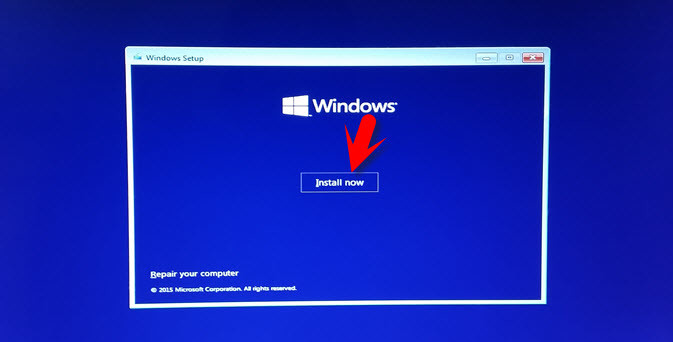
Click “Install Now“.
Installing Windows 10 on Mac
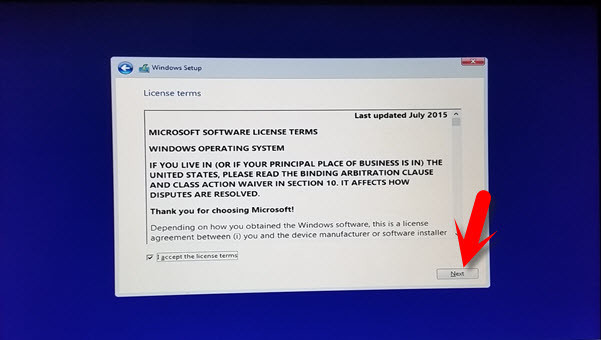
Read the License terms then Check the box “I Accept the License Terms”. Click on the “Next” button.
Accept License Agreement
Now Choose a type of installation that you want. I am going to install Windows 10 on a Mac computer, so I can’t choose an upgrade because I haven’t installed an OS to upgrade it. When you Choose Upgrade, all the files, settings, and application are moved to the next Windows with these options. If you select “Custome” all the data, settings, and applications aren’t moved to the next Windows. All the Windows settings will be removed, and you have to do all the stuff by yourself. Now, I want to click on “Custom Installation”.

Clean Installation of Windows 10 on Mac
Here, I’m going to format all the drives and have a clean installation of Windows 10 on Mac computer. If you format all the drives, so everything inside your computer will be erased. Be careful that you should have a backup of your data. To delete the drive, select it and hit the Delete button.
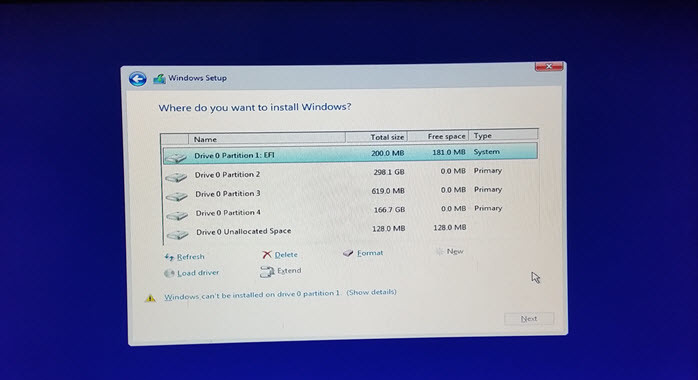
Formatting Drives
As you can see the screenshot below, I have deleted all the drives. Now, I have only a drive to Install Windows 10 on Mac computer.
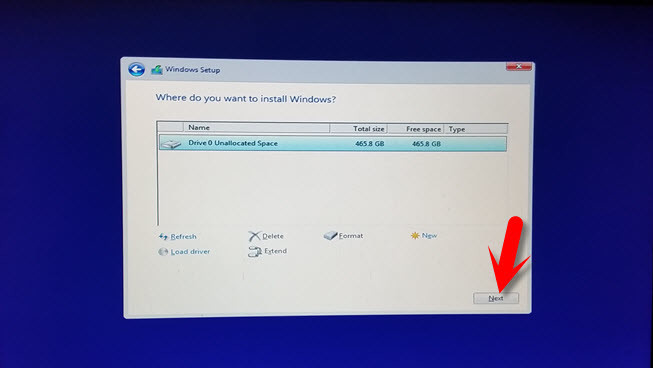
Drivers are Formatted
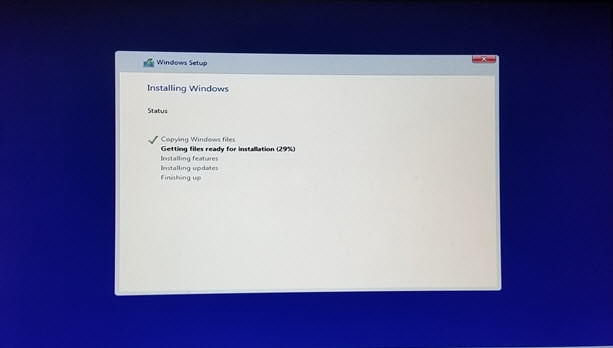
This process is going to take some minutes, and your computer will restart during installation for several times. When all the features installed, choose your USB flash drive off from the computer.
Installing Windows 10
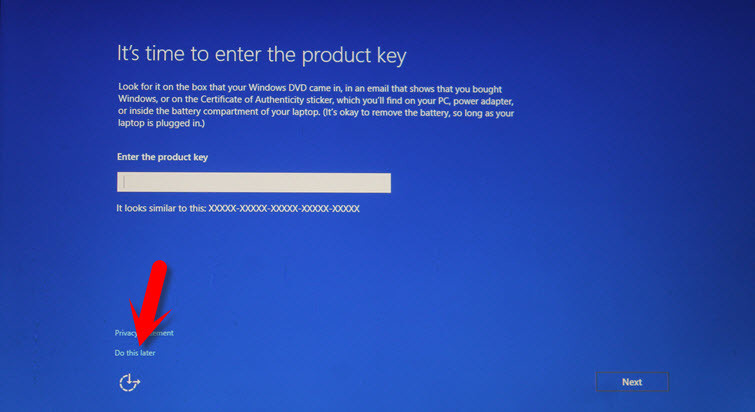
Your computer will restart for several times and don’t worry about it. After restarting your computer for several times, you will see the screenshot below. Here you will be asked to enter the Windows 10 product key. If you have purchased this operating system to enter the product key. Otherwise, choose “Do this later“.
Skip Windows 10 Product Key
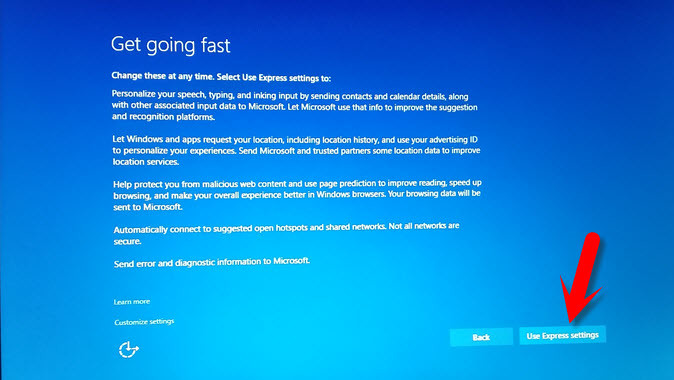
You will be prompted “Get going fast” window. Here you have two ways to do the work. The first way is custom Setting, and the second way is to use express Setting. I prefer to use “Express Setting“.
Use Express Settings
This is the last step for this demonstration. In “Create an account for this PC”, you have to enter your account info like the screenshot below. Finally, click the Next button on the bottom right-hand side.
Create a User Account
How to Install Windows 10 Drivers on Mac OS?
To install Windows 10 Drivers on Mac OS, First, download the Bootcamp software from the link above. Now, wait for some minutes, then the Windows will be installed on your Mac computer. Copy the Bootcamp software that you have to download on the first step of this article. Click on the Bootcamp setup then install.
Install Boot Camp on Windows 10
Once you installed the Bootcamp software, then this software is going to install most of the Windows 10 drivers on Mac computer. These drivers are “Wi-Fi or Internet, Graphic, Sound, Mouse, etc.”.
Installing Windows 10 Drivers on Mac OS
Here is the preview or screenshot of installing Windows 10 on a Mac device.
Installed Windows 10 on Mac OS
Conclusion
This was the simple way of Installing Windows 10 on Mac OS. The next article, I’m going to show you how to install Windows 10 on Mac OS with boot camp. Also, you will get info about boot camp built-in software on Mac computers. I hope that you have gotten anything from this article. If you have a question, feel free to ask us on this post. Thanks for being with us.
Вот как я установил Windows 10 на свой MacBook без Bootcamp
- Шаг 1: Соберите материалы. …
- Шаг 2. Загрузите ISO-образ Windows 10 и WintoUSB. …
- Шаг 3. Отключите функции безопасности Apple T2 Chip в MacBook. …
- Шаг 4: Загрузите драйверы поддержки Bootcamp.
Как установить Windows 10 на неподдерживаемый Mac без USB?
3 ответы
- Загрузите правильное программное обеспечение поддержки Boot Camp для своего Mac. …
- Используйте Дисковую утилиту, чтобы уменьшить размер раздела OS X. …
- Запишите ISO-файл Windows 10 на DVD. …
- Перезагрузите Mac с DVD в оптическом приводе. …
- Установите Windows в раздел Boot Camp.
Вам нужен USB для установки Windows 10 на Mac?
Вам нужно внешний USB-накопитель для установки Windows на старых компьютерах Mac. Чтобы узнать, есть ли у вас Mac, для которого требуется внешний USB-накопитель, см. Раздел «Дополнительные сведения» в статье службы поддержки Apple. Установка Windows 10 на Mac с помощью Boot Camp Assistant.
Как мне установить на мой Mac только Windows 10?
Перезагрузите MacBook и, когда он включится, нажмите и удерживайте другой (опция) на клавиатуре. Когда появится диспетчер загрузки, выберите вариант загрузки EFI или Windows. Это запустит установщик. Подождите несколько минут, и как только появится кнопка для начала установки, нажмите ее.
Можете ли вы стереть Mac и установить Windows?
2 ответа. Нет тебе не нужно Аппаратное обеспечение ПК с момента Да, вы можете полностью удалить OS X после установки драйверов из Boot Camp в OS X. Следуйте инструкциям по созданию USB-ключа bootcamp, который поставляется вместе с bootcamp (вам понадобится ключ на 8 ГБ).
BootCamp замедляет работу Mac?
Нет, установка загрузочного лагеря не замедляет работу Mac. Просто исключите раздел Win-10 из поиска Spotlight в панели управления настройками.
Как установить Windows 10 на неподдерживаемый Mac?
3 ответы
- Загрузите правильное программное обеспечение поддержки Boot Camp для своего Mac. …
- Используйте Дисковую утилиту, чтобы уменьшить размер раздела OS X. …
- Запишите ISO-файл Windows 10 на DVD. …
- Перезагрузите Mac с DVD в оптическом приводе. …
- Установите Windows в раздел Boot Camp.
Выпускает ли Microsoft Windows 11?
Microsoft собирается выпустить Windows 11, последнюю версию своей самой продаваемой операционной системы, на Октябрь 5. Windows 11 включает несколько обновлений для повышения производительности в гибридной рабочей среде, новый магазин Microsoft и является «лучшей Windows для игр».
Стоит ли запускать Windows на Mac?
Установка Windows на ваш Mac делает это лучше для игр, позволяет устанавливать любое необходимое программное обеспечение, помогает разрабатывать стабильные кроссплатформенные приложения и дает возможность выбора операционных систем. … Мы объяснили, как установить Windows с помощью Boot Camp, который уже является частью вашего Mac.
Бесплатная ли Windows 10 для Mac?
Многие пользователи Mac до сих пор не знают, что вы может установить Windows 10 на Mac бесплатно от Microsoft совершенно легально, в том числе на компьютерах Mac M1. На самом деле Microsoft не требует, чтобы пользователи активировали Windows 10 с помощью ключа продукта, если вы не хотите настраивать его внешний вид.
Безопасно ли устанавливать Windows на Mac?
С окончательными версиями программного обеспечения, правильной процедурой установки и поддерживаемой версией Windows, Windows на Mac не должна вызывать проблем с MacOS X. Тем не менее, всегда следует делать резервную копию всей своей системы перед установкой любого программного обеспечения или перед разделением жесткого диска в качестве превентивной меры.
Сколько стоит операционная система Windows 10?
Вы можете выбрать одну из трех версий операционной системы Windows 10. Окна 10.Дом стоит 139 долларов. и подходит для домашнего компьютера или игр. Windows 10 Pro стоит 199.99 долларов и подходит для предприятий или крупных предприятий.
Как полностью установить Windows на мой Mac?
Вот как установить Windows на Mac:
- Выберите свой ISO-файл и нажмите кнопку «Установить».
- Введите свой пароль и нажмите ОК. …
- Выберите свой язык.
- Нажмите «Установить сейчас».
- Введите ключ продукта, если он у вас есть. …
- Выберите Windows 10 Pro или Windows Home и нажмите Далее.
- Щелкните Диск 0, раздел X: BOOTCAMP.
- Нажмите «Далее.
Почему я не могу загрузить Windows на свой Mac?
Если вы не можете загрузить или сохранить программное обеспечение поддержки Windows: Если помощник говорит, что программное обеспечение поддержки Windows не может быть сохранено на выбранный диск или что флэш-накопитель USB нельзя использовать, убедитесь, что ваш USB-накопитель имеет емкость хранения не менее 16 ГБ и правильно отформатирован.