
May 15th 2020

September 16th 2021

Alexenferman
⚠ WARNING:
Alexenferman, Google, Microsoft, XDA Developers, are not responsible for any damages or bricks made to your device. Please do some research if you have any concerns about this installation, the leaked Windows 10 build, features and downsides. You are choosing to make these modifications, you should blame yourself for any mistakes you make. Once installed, the partition 4 of the drive (i.e. C:) will be completely wiped. Make sure you backed up all of your data to another drive or on a computer.
Do not install Windows 10 unless you have followed very carefully the tutorial and have Secureboot disabled! Not disabling Secureboot properly might lead to a unrecoverable soft bricked device as reported by some members.
The download links associated to Yandex Disk are not owned by Alexenferman. The files can be changed at any moment by its owner without further notice. If a file in question is not accessible, please leave a comment below.
BEFORE STARTING
Please read the warning very carefully. You understand that you are responsible for any damages made to your device.
Frequently asked questions
A lot of people have asked the same questions, so here are some of the questions and answers: FAQ: Windows 10 on the Surface RT
You will need:
- Surface RT or Surface 2
- USB Flash drive (Minimum 8GB)
- Keyboard (USB Keyboard or Surface Keyboard
- Basic familiarity with the command prompt (cd / del / file.exe)
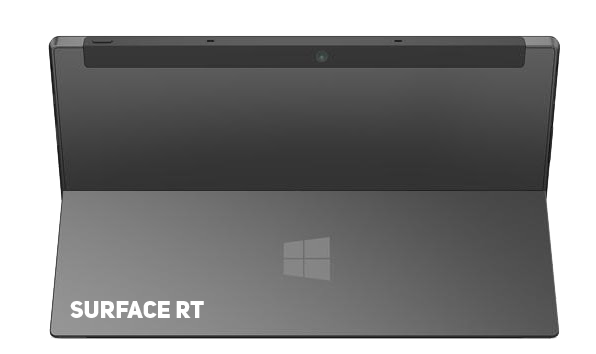
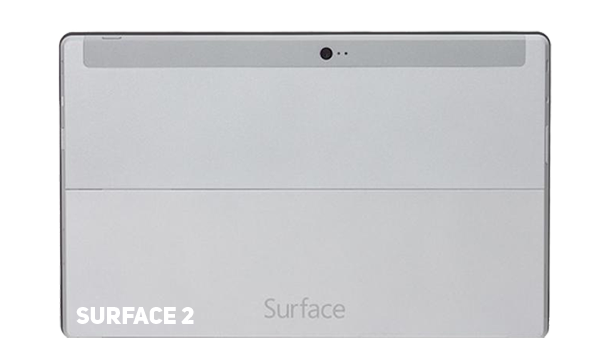
Identifying the Surface tablet generation
There are 2 different models of Surface tablets running Windows RT. You must know the model of your tablet to get the appropriate files for it. Turn your tablet around to see the colour of the metal back cover. The left one is the Surface RT and the right one is the Surface 2.
Download Options
There are different ways to get your files. You don’t have to download them now, as the tutorial will link you to the files when they will be necessary.
Yandex disk: Due to the recent addition of the «Download limit exceeded» message, Yandex Disk is no longer a viable option to download files from. Instead, a Google drive mirror will be offered.

RT Drive (Google Drive)
PART 1: PREPARING THE INSTALLATION
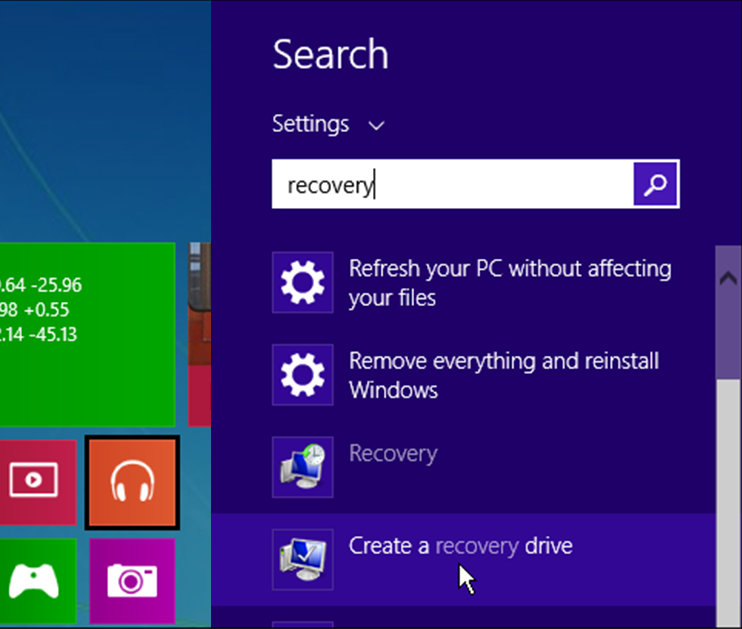
Creating a USB recovery drive
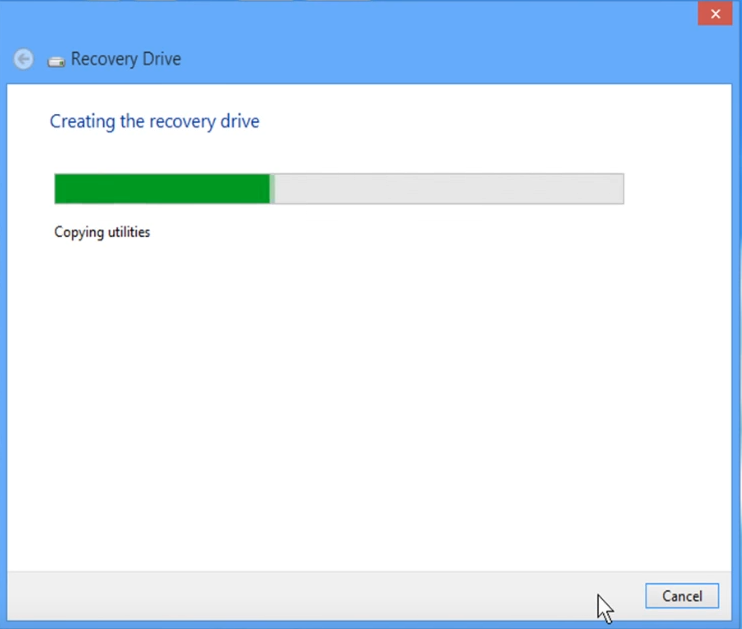
On your Surface RT, Click Start and click on the search icon, type «Create Recovery Drive» and select the search result. You may be asked to enter an administrator password or confirm your choice.
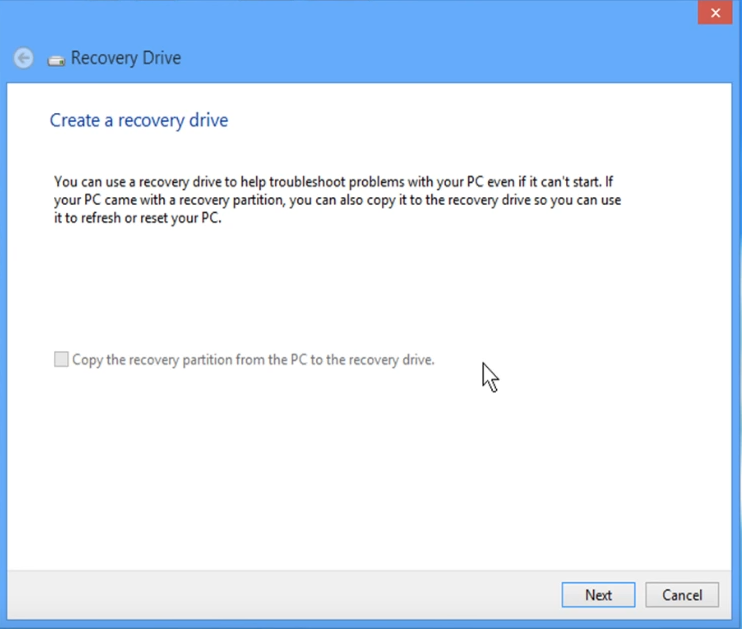
After the tool opens, make sure that «Back up system files to a recovery drive» is not selected, and then select «Next».
Make sure that «Back up system files to a recovery drive» is not selected. If you do not disable this option, it will cause errors in the future.
Connect the USB flash drive to your computer, select it, and then select «Next».
Select «Create». A large number of files need to be copied to the recovery drive, so it may take some time to complete.
It’s time to download the install.wim file. Download the one for your specific device. (Surface RT or Surface 2)
Make sure to download the correct file for your specific device. By installing the wrong image, you will not be able to get past the setup screen.

Windows RT Surface 1 (RT).wim
Windows RT Surface 2.wim
Mega.nz Mirrors: Windows RT Surface 1 (RT).wim and Windows RT Surface 1 (RT).wim
To make the installation process easier, rename the downloaded file to «install.wim».
Copy the install.wim to your flash drive.
PART 2: INSTALLING THE PATCHED WINDOWS RT IMAGE
Basically, this patched Windows image is necessary since it has Bitlocker disabled and updates that patch the secureboot vulnerability are not installed, which allows you to take advantage of the exploit to partially disable secureboot.
Entering Recovery mode
Make sure Surface is turned off.
Plug the USB drive in the USB port of the tablet.
Hold the volume down button and press the Power button once.
When the Microsoft or Surface logo is displayed, release the buttons.
After seeing the prompt, select English US.
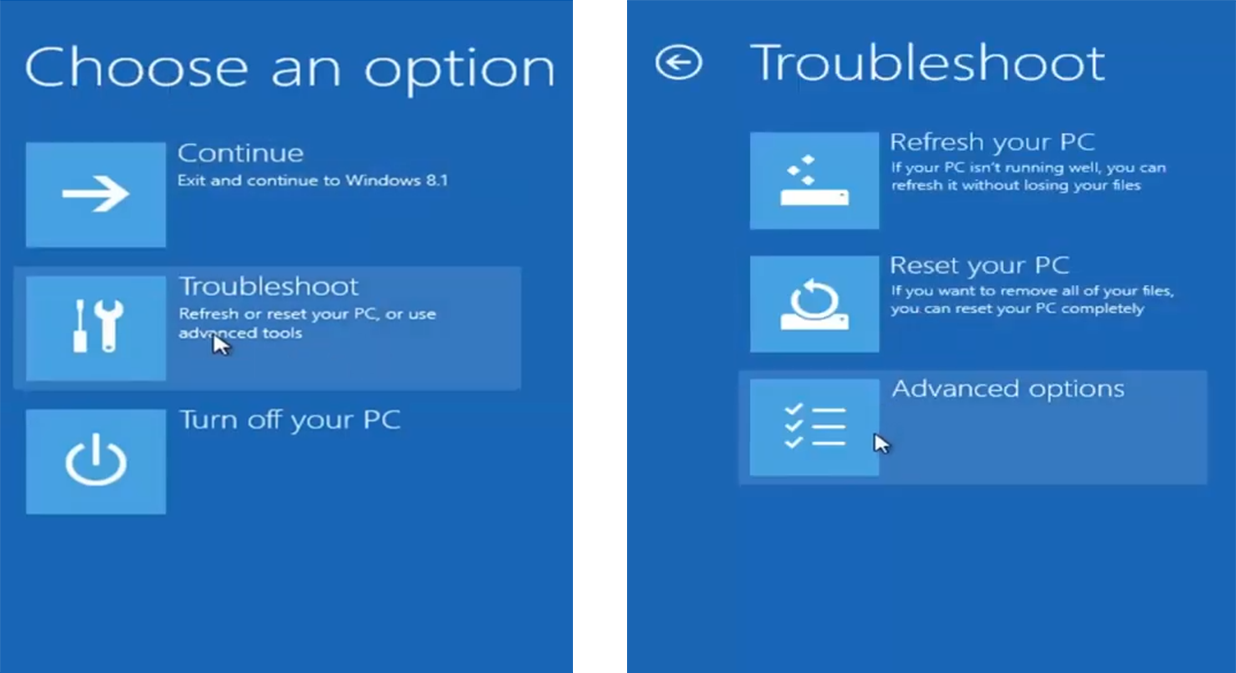
Select «Troubleshooting», «Advanced Options» and «Command Prompt»
If prompted for a recovery key, select «Skip this drive» at the bottom of the screen.

Formatting partition 4
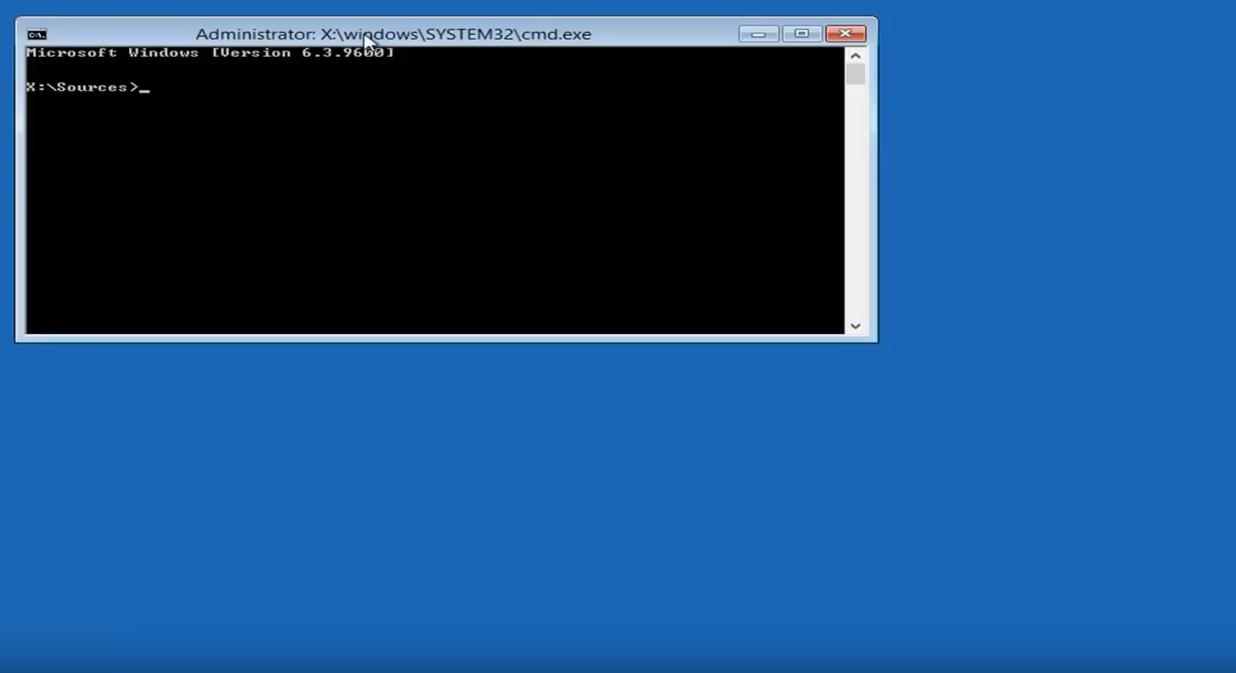
In the command prompt window, type the following commands:
diskpart
sel dis 0
sel par 4
for quick fs = ntfs override
exit
Installing the patched Windows RT image
In the command prompt window, type the following command:
dism /apply-image /imagefile:[DIRECTORY] /applydir:c: /index:1
[DIRECTORY]: Replace this path with the path of the install.wim we copied to the drive.
Example: dism /apply-image /imagefile:d:sourcesinstall.wim /applydir:c: /index:1
Restart your tablet
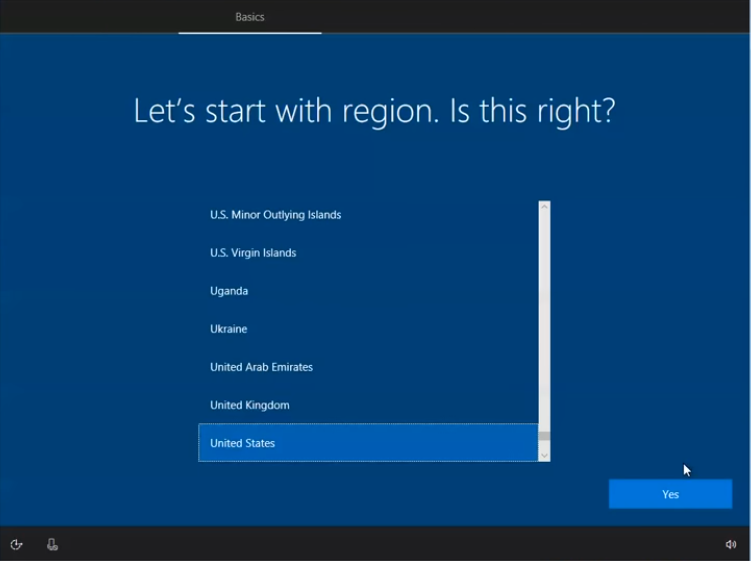
Setup the tablet quickly, do not set any Microsoft account, do not connect to the internet.
For Surface 2 users, Windows will be in Chinese. Use Google translate with the camera function. You can change the Windows language in the Settings app.
Once you are done, open file explorer and click on «This PC»
If the C: drive does not have a lock icon, you successfully cracked Bitlocker and have installed the patched Windows 8.1 image!
PART 3: DISABLING SECUREBOOT
Disabling UAC
Download the disabling_uac.reg file.

Disabling_UAC.reg
Mega.nz Mirrors: Disabling_UAC.reg
On your Surface RT, run this file as an administrator.
Restart your tablet.
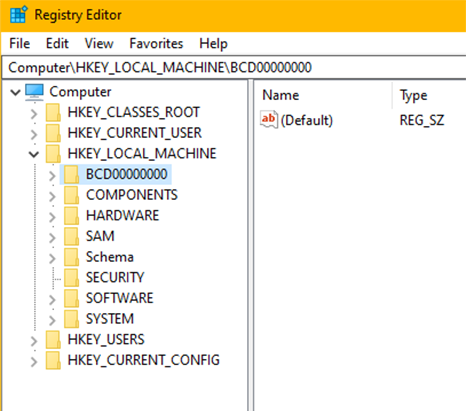
Modifying Registry keys
Open the registry editor
Navigate to HKEY_LOCAL_MACHINE BCD00000000
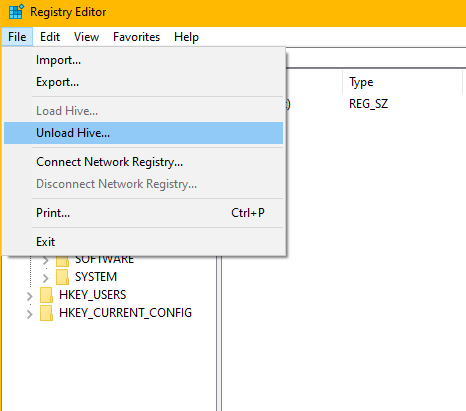
Make sure that the folder BCD00000000 is selected and click [File], [Unload/Uninstall Hive]
Installing the Secure Boot Debug Policy
Download the following file:

SecureBootPatch.zip
Extract the SecureBootPatch.zip and transfer it in the internal storage of the device.
Right-click the InstallPolicy.cmd and click «run as administrator».
Restart your tablet.
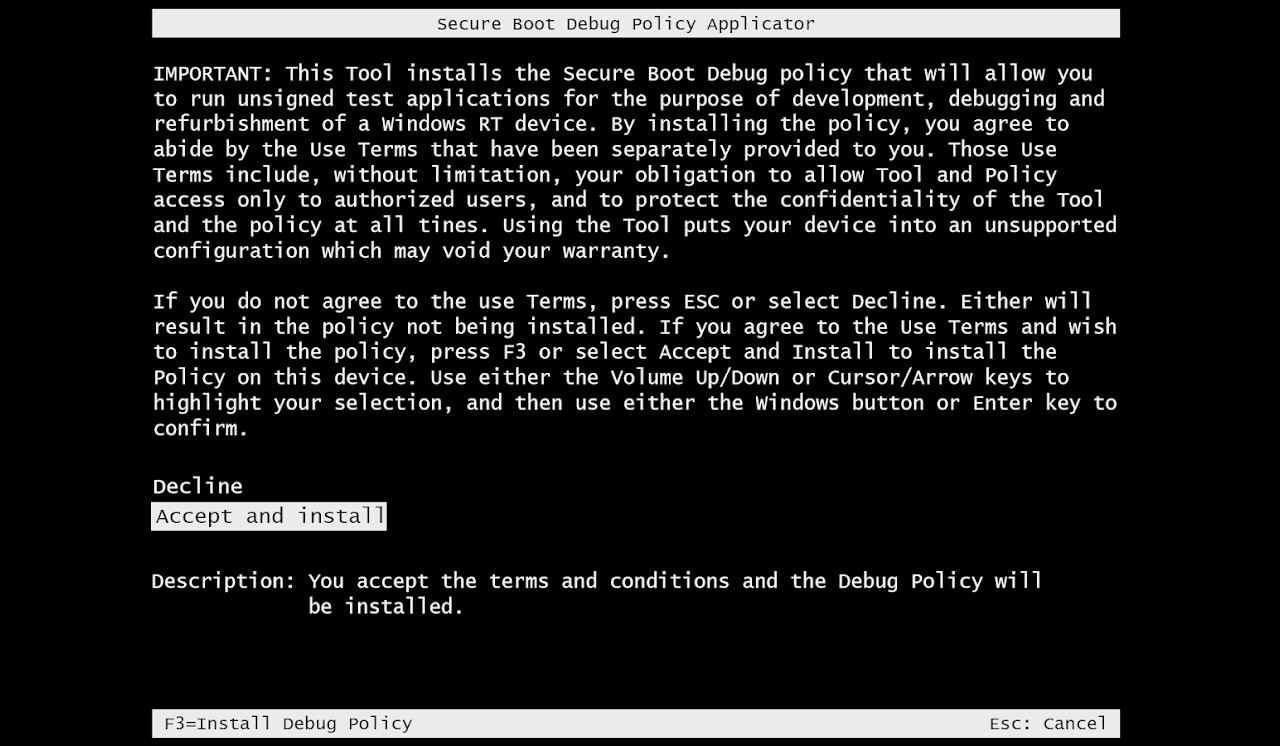
After restarting, you will see a «Secure Boot Debug Policy Applicator» screen.
Using the Volume buttons, select the option «Accept and Install»
Press the Windows button to select the option.
If you see the Windows boot manager error 0xc000000f instead, follow these steps to fix it and come back here
Installing the Secure Boot Debug Policy
Run the command prompt and enter:
bcdedit /set {default} testsigning on
bcdedit /set {bootmgr} testsigning on
bcdedit /set {default} NoIntegrityChecks Yes
Restart your tablet.
If you see an error after applying the commands, follow these steps to fix it and come back here
If your Surface does not turn on anymore, follow these steps to fix it and come back here
To make sure that you have disabled Secure Boot (VERY IMPORTANT)
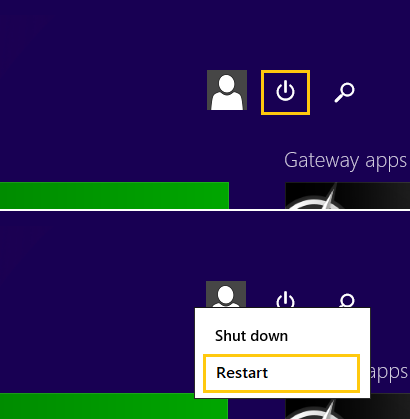
Click Start
Plug in a USB keyboard or your Surface keyboard
Click on the power icon on the top right part of the start menu
Press shift on your keyboard and at the same time click on restart
It will go into the recovery mode on the tablet (not the USB recovery)
Select «Troubleshooting»
Select «Advanced Options»
Select «Command Prompt»
It might ask for a password. Leave it empty and click on next.
You should see this text at the bottom right of the screen:

If you see this, you can now proceed to part 4!
Otherwise, if you don’t know what you did wrong, you can repeat Part 3.
You must make sure that Secure Boot is actually disabled before proceeding! Do not skip this step, otherwise, if you do not disable secureboot, your Surface RT might refuse to boot anything at all! By this stage, Alexenferman, Google, Microsoft, XDA Developers, are not responsible for any permanent damages or bricks made to your device. You are choosing to make these modifications, you should blame yourself for any mistakes you make. You have been warned!
PART 4: INSTALLING WINDOWS 10
It’s time to download the Windows 10 install.wim file. Download the one for your specific device. (Surface RT or Surface 2)
Make sure to download the correct file for your specific device. By installing the wrong image, you will not be able to get past the setup screen.
Windows 10 Surface 1 (RT).wim
Windows 10 Surface 2.wim
Mega.nz Mirrors: Windows 10 Surface 1.wim and Windows 10 Surface 2.wim
To make the installation process easier, rename the downloaded file to «install.wim».
Copy the install.wim to your flash drive.
NOTE: you can delete the old Windows 8 install.wim on your flash drive if the storage space is getting low. You will not need it anymore.
Entering Recovery mode
Make sure Surface is turned off.
Plug the USB drive in the USB port of the tablet.
Hold the volume down button and press the Power button once.
When the Microsoft or Surface logo is displayed, release the buttons.
After seeing the prompt, select English US.
Select «Troubleshooting», «Advanced Options» and «Command Prompt»
If prompted for a recovery key, select «Skip this drive» at the bottom of the screen.
Formatting partition 4
In the command prompt window, type the following commands:
diskpart
sel dis 0
sel par 4
for quick fs = ntfs override
exit
Installing Windows 10 image
In the command prompt window, type the following command:
dism /apply-image /imagefile:[DIRECTORY] /applydir:c: /index:1
[DIRECTORY]: Replace this path with the path of the install.wim we copied to the drive.
Example: dism /apply-image /imagefile:d:sourcesinstall.wim /applydir:c: /index:1
Restart your tablet.
If you see a blue screen with error 0xc000000f or 0xc000428 instead, follow these steps to fix it and come back here
Booting up Windows 10
After waiting for a few minutes, you should see an error message. Don’t worry, this is normal.
Using a keyboard, press the following keys:
External USB keyboard: Press SHIFT + F10
Surface keyboard: Press FN + SHIFT + End
Type «Regedit»
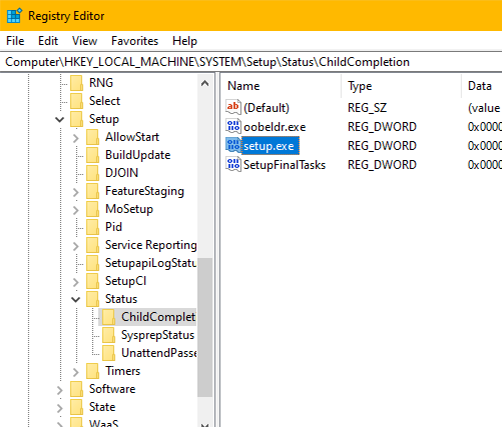
Navigate to HKEY_Local machine/SYSTEM/SETUP/STATUS/ChildCompletion
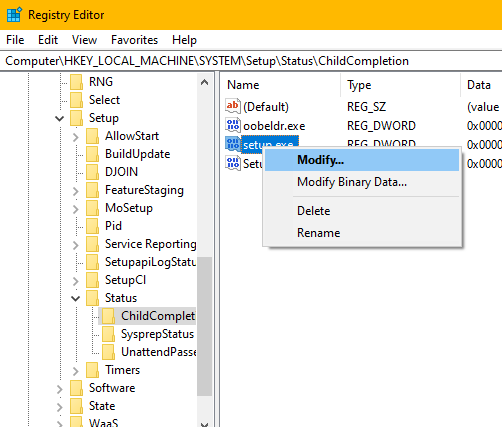
On the right pane, right-click «setup.exe»
Click on «Modify»
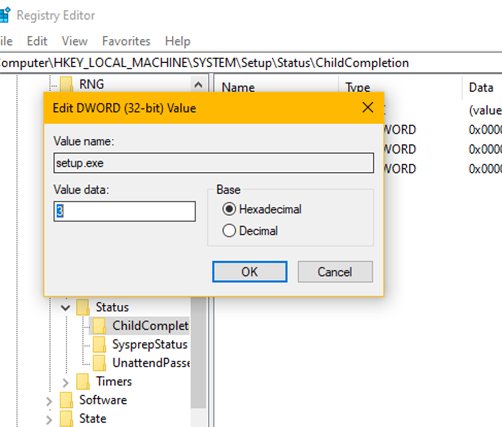
Change the Value to 3
Click OK
On the error message, click on OK.
PART 5: SETTING UP WINDOWS 10
Setting up Windows 10 for the first time
Follow the instructions on the screen to setup Windows 10.

Activating Windows 10
Open Powershell and type:
slmgr.vbs /upk
slmgr /ipk NPPR9-FWDCX-D2C8J-H872K-2YT43
slmgr /skms kms.03k.org
slmgr /ato
slmgr /skms zhang.yt
Installing frameworks and programs
Download the following files:

APPX1.rar

Microsoft.NET.Native.Framework.1.1.appx
Microsoft.NET.Native.Runtime.1.1.appx
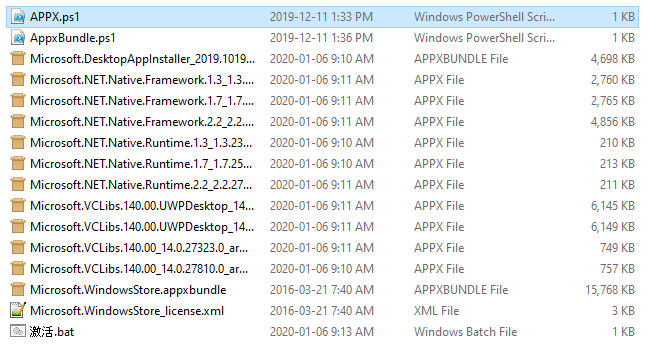
Extract APPX1.zip
Open the APPX1 folder
copy the files on the USB drive and copy them to the Surface RT internal storage.
Right-click Appx.ps1, select «run with powershell».
Right-click AppxBundle.ps1, and select «run with powershell».
From the other files downloaded, install the Microsoft.NET.Native.Runtime.1.1.appx and Microsoft.NET.Native.Runtime.1.1.appx packages by simply running them.
You are done!
EXTRAS
You may notice that the OS is quite bear bones, and might not have all of the Surface features. See this section to install App Updates, Office 2013, and fix a few issues. Visit Extras Section
ALTERNATIVE INSTRUCTIONS
How to install Windows 10 on the Surface RT 💻

YouTube

13:28

Elektrohax
COMMENTS
A handy process for OS installs, settings adjustments, and more
Published on February 28, 2022
What to Know
- Shut down the Surface, and then press Power while holding Volume Down.
- In Windows: Start > Settings > Updates & Security > Advanced Startup > Restart Now > Use a Device > USB Storage.
- Always boot from USB: Shut down > press Power and Volume Up > select Boot Configuration > move USB Storage to top.
In this article, you’ll learn three ways to bypass the Windows boot sequence by starting up your Surface Pro from a USB drive. Booting a Surface Pro from a USB drive can be used to upgrade to a new version of Windows if the default Windows installer fails; it’s also necessary to downgrade from a more recent version of Windows or install an alternate operating system.
How to Boot Your Surface Pro From a USB Drive
The steps below will boot your Surface Pro (or other Surface device) from a bootable USB drive.
-
Shut down your Surface Pro if it’s currently on, in sleep, or hibernating.
-
Plug the bootable USB drive into a USB port on the Surface Pro.
-
Press and hold the volume down button, and then press and release the power button.
-
Continue to hold the volume down button as the Surface Pro turns on and begins to boot.
You can release once the spinning dots animation appears below the Surface logo on the Surface Pro’s screen.
The Surface device will now load the bootable USB drive. It will remain in use until you turn off the Surface. Be careful not to unplug the USB drive while it’s in use, as this will likely cause the Surface to freeze or crash.
How to Boot Your Surface Pro From a USB Drive with Windows
This method will let you boot directly from a bootable USB drive from Windows 10 or Windows 11. It’s slightly quicker than the first method if your Surface Pro is already on.
-
Insert the bootable USB drive into a USB port on your Surface Pro.
-
Open the Start Menu.
-
Tap Settings.
-
Select Updates & Security if using Windows 10. Select System and then Recovery if using Windows 11.
-
Find Advanced Startup and select Restart Now.
-
Your Surface Pro will open a blue screen. Tap Use a Device.
-
Choose USB Storage.
The Surface Pro will immediately restart once you select USB Storage and boot from the drive.
How to Permanently Boot Your Surface Pro From a USB Drive
The methods above pertain to temporarily using a bootable USB drive. The instructions below will permanently configure your Surface Pro to boot from a USB drive if one is connected.
-
With the Surface Pro turned off, press and hold the volume up button, and then press and release the power button.
-
Continue to hold the volume up button as the Surface boots.
-
The Surface UEFI screen will appear. Select Boot configuration.
-
Drag USB Storage to the top of the boot list.
Moving USB Storage to the top of the list can be finicky with a touchpad. Try using the Surface Pro’s touchscreen or a mouse instead.
-
Tap Exit and then Restart Now.
The boot order will now be changed. You can reverse this by opening the Surface UEFI and moving Windows back to the top of the boot list.
Remember, the Surface Pro will only boot from a bootable USB drive. Booting the Surface Pro with a USB drive that is not bootable connected will cause an error.
FAQ
-
How do I screenshot on a Surface Pro?
Microsoft built in several ways to take Surface Pro screenshots. The quickest is to hold the Windows button on the Surface (not the keyboard) and then press Volume Down. Alternatively, search for the Snipping Tool app. If your keyboard has a PrtScn key, press that while holding the Windows key. Double-clicking the top button will also take a screenshot if you have a Surface Pen.
-
How do I reset a Surface Pro?
Whether you’re selling or giving away your Surface Pro or need a fresh install of the operating system, you can reset your Surface Pro. In Windows 11, go to Start > Settings > System > Recovery, and then select Reset PC. In Windows 10, go to Start > Settings > Update & Security > Recovery, and then click Get Started. In either case, you can choose to keep your files or remove everything.
Thanks for letting us know!
Get the Latest Tech News Delivered Every Day
Subscribe
Я, как главред блога Лайфхакер, очень хотел и хочу до сих пор получить свое собственное представление о планшете Surface на Windows RT, но у меня не выходит. Нет, я нашел дистрибьютора, который обещал его предоставить нам, но проблема в том, что как только к планшету прикасается очередной обозреватель, прописывая в нем свой LIVE ID, планшет намертво прирастает к этому аккаунту и я не могу ввести свой. Грубо говоря, Microsoft на аппаратно-программном уровне зашил несовместимость с обозревателями данного планшета. А потому мы опираемся в понимании этого гаджета на чужой опыт ( и ).

Но мне хочется игнорировать кликающие клавиатуры и дверцы-подставки и наконец-то разобраться что мы можем делать на Windows RT на ARM-процессоре, а чего нет.
Сторонние приложения
Когда я жил на Windows я помню главное — любое приложение-аналог стандартно поставляемому от Microsoft — лучше, кроме офиса.
Windows RT работает на архитектуре ARM, а ваши привычные Windows-приложения построены под архитектуру x86. Более того, будет не достаточно, если производитель вашего софта переделает его под ARM-архитектуру. Microsoft обещала строго следить за соблюдением правил интерфейса и рабочих принципов нового софта. Значит это только одно — программу нужно полностью перепроектировать и переписать. Это очень часто длительный процесс.
Сегодня на Windows RT вам доступен Office и браузер Internet Explorer. Любите Open Office, Firefox или Chrome — забудьте. Для редактирования картинок вам дадут Paint, для простого текста — Notepad. Привыкли к Paint.NET и Notepad++ — отвыкайте.
Теперь приложения будут ставиться только из Windows Store, который сегодня выглядит примерно так:

Сравнивать Windows RT с другими изданиями Windows 8 нужно в контексте использования на планшете. Если он планируется в качестве единственного или основного
ПК с Windows, то приобретение устройства с Windows RT может стать не самым мудрым решением.
В качестве же дополнительного ПК планшет предполагает несколько другой круг задач, нежели стационарный компьютер или ноутбук.
Действительно, на моем планшете в папке Program Files было бы пусто, если бы не эксперименты и тесты. А в повседневном использовании устройства мне хватает возможностей современного интерфейса Windows. Обсуждение планшетов показало, что у большинства читателей круг задач не сильно отличается от моего.
По большому счету, вопросы вызывает лишь воспроизведение мультимедиа в Windows RT. Поддержка кодеков зависит исключительно от ОЕМ-производителя. Microsoft обозначила планку, обеспечив в своем Surface RT работу форматов и кодеков, перечисленных в таблице.

Логично предположить, что остальные компании будут снабжать устройства аналогичным набором кодеков. Тем не менее, перед покупкой планшета имеет смысл заглянуть в спецификации, держа в уме свою коллекцию медиафайлов.
Поддержка кодека H.264 операционной системой не означает, что Windows RT сможет «из коробки» воспроизводить HD-видео в формате MKV. Поскольку WMP и современный проигрыватель с этим форматом не справятся, подходящий плеер придется поискать в магазине и, вероятно, заплатить за него.
Дружище Microsoft Office
Замечательно, что W8RT имеет в дефолтной поставке офис — Microsoft Office 2013: Word, Excel, PowerPoint и OneNote.
Но ситуация и тут не такая радужная — тогда как OneNote поставляетсяв современном новом интерфейсе, остальные приложения офисного пакета — в не совсем современном. Очевидно то, что разработчик не успел к выпуску планшета. Для вас как для пользователя это означает только одно — работая в офисном предустановленном окружении, вы будете пользоваться интерфейсом, который не удобно использовать пальцами. И тут есть хак от Microsoft, который работает невнятно — режим Touch Mode.

В нем интерфейс какбы знает что его будут трогать пальцами, а не мышью, но от этого не становится удобнее и крупнее.
С одной стороны Microsoft наседает на «тачевости» новых приложений от сторонних разработчиков, а с другой не понятно почему Word, Excel и PowerPoint выглядят по-старому! Пустите разработчиков офиса к разработчикам новых интерфейсов внутри компании!
Кстати, текущий предустановленный офисный пакет построен на Home и Student версиях. Если вам нужны корпоративные коннекторы, макросы и плагины, то нужно покупать более платную версию 
Так зачем в планшете рабочий стол?
Не совсем понятно зачем, если вы продвигаете полноэкранные тач-интерфейсы, файловую систему высокого уровня, давать пользователю ПЛАНШЕТА Рабочий стол настольного компьютера. Сегодня Рабочий стол «удобно» использовать для двух вещей — измемение настроек, до которых нельзя добраться из моднявого metro-интерфейса, и для работы с офисным пакетом, который компания забила адаптировать для своей же новой концепции.
Microsoft дает понять, что от Рабочего стола пользователям нужно отвыкать. Но проблема в том, что они в это, похоже, сами не верят. Ждем новое будущее, которое Microsoft обещала будет очень солнечным.
А пока расскажите нам какой следующий планшет вы себе купите.
Как восстановить, обновить, сброс устройства Surface Pro
Если оставить в стороне тот факт, насколько удобны системы на базе Windows, все согласятся с тем, что их поддержка не может быть упущена. Мы можем столкнуться с серьезными проблемами, которые требуют немедленного устранения неполадок. Если проблема серьезного уровня, нам может потребоваться выполнить определенные операции, и поэтому всегда полезно знать средства, которые необходимо решить заранее. К счастью, каждая система Windows поставляется с определенными механизмами решения проблем, которые иногда могут быть спасением.
Если вы используете устройство Surface Pro и работаете под управлением ОС Windows 10 , то это руководство основано на рекомендациях Microsoft по восстановлению, сбросу, понижению версии и переустановке Windows 10. на вашем устройстве Surface, обязательно заинтересует вас.
Восстановление Surface Pro из точки восстановления системы
Точка восстановления системы — это сохраненное состояние ваших системных файлов. Если вы столкнулись с проблемой, вы можете восстановить свою систему до предыдущего хорошего времени, используя эту функцию. Хотя Windows время от времени будет автоматически создавать точки восстановления, всегда рекомендуется создавать их вручную, время от времени, особенно если вы вносите некоторые изменения в свою систему.
Вот как вы можете восстановить Surface Pro из точки восстановления системы:
- Нажмите и удерживайте кнопку «Пуск» и выберите «Панель управления».
- Перейдите в окно поиска в правом верхнем углу и введите восстановление .
- Выберите его и перейдите в раздел Восстановление> Открыть восстановление системы> Далее .
- Здесь вы увидите список точек восстановления. Выберите подходящий, нажмите Далее> Готово .
Когда вы делаете это, вы переводите вашу систему в предыдущее состояние, что означает, что любые установки, диски, обновления, выполненные за это время, будут удалены.
Если точки восстановления недоступны
Если вы не можете найти какие-либо точки восстановления в своей системе, тогда вы можете решить свою проблему, перезагрузив устройство Surface . Сразу после сброса Windows убедитесь, что защита системы включена, выполнив следующие действия:
- Щелкните правой кнопкой мыши или нажмите и удерживайте кнопку «Пуск» и выберите «Панель управления».
- Перейдите в окно поиска в правом верхнем углу и введите восстановление .
- Перейдите на страницу Настройка восстановления системы> Настройка .
- Установите флажок Включить защиту системы
Если вы не можете войти в Windows
Если вы не можете войти в свою систему, вы можете восстановить свою систему в среде восстановления Windows.
- На экране входа в Windows выберите Питание .
- Нажмите и удерживайте клавиши Shift и Alt и выберите Перезагрузить .
- Вы увидите экран выбора . Выберите Устранение неполадок .
- Перейдите в раздел Дополнительные параметры> Восстановление системы .
- Введите ключ восстановления, если требуется. Выберите целевую операционную систему и нажмите Далее .
- Выберите точку восстановления, выберите Далее> Готово .
- Когда будет предложено продолжить, выберите Да .
Вы сможете запустить свою систему, как только процесс завершится.
Если вы не можете запустить Windows
Если вы не можете запустить устройство Surface из-за проблемы, вы можете выполнить восстановление системы в среде восстановления Windows, выполнив следующие действия:
- Запустите Surface Pro с USB-накопителя. Для этого вставьте загрузочный USB-накопитель (отформатированный в файловую систему FAT32) в USB-порт. Нажмите и удерживайте клавишу Уменьшение громкости , одновременно нажимая и отпуская кнопку питания. Вы увидите логотип Surface. Затем отпустите кнопку уменьшения громкости.
- Windows предложит вам выбрать язык и раскладку клавиатуры. Выберите их соответствующим образом.
- Перейдите в раздел Устранение неполадок> Дополнительные параметры> Восстановление системы .
- Если запрашивается ключ восстановления, введите его. После этого выберите целевую операционную систему и нажмите Далее .
- Выберите подходящую точку восстановления.
- Выберите Далее> Готово , чтобы завершить работу мастера.
Когда процесс будет завершен, вы сможете запустить вашу поверхность.
Сброс Поверхность Pro
Сброс позволяет переустановить Windows. Вы можете выбрать, сохранять ли ваши файлы или удалять их целиком. Это удобно, когда система не работает должным образом, и вы не устанавливали ничего нового в течение значительного времени. Кроме того, Сброс — это следующий шаг, который вы хотите сделать, когда Восстановление не решает проблему, с которой вы столкнулись.Выполните следующие шаги для сброса настроек Surface Pro:
- Перейдите на страницу Пуск и выберите Настройки> Обновление и безопасность> Восстановление.
- Выберите Сбросить этот компьютер , выберите Начало работы и выберите соответствующую опцию среди отображаемых трех. Вот что делает каждый из них:
- Сохранять мои файлы. Этот параметр переустанавливает Windows 10 на Surface Pro, сохраняя личные файлы и приложения, которые поставлялись на вашем ПК. Но он удаляет изменения, внесенные в настройки и установленные приложения и драйверы.
- Удалить все . Как видно из названия, это все очищает. Если вы выберете это, все ваши личные файлы будут удалены вместе с изменениями, внесенными вами в настройки и приложения/драйверы, которые вы установили. Будьте осторожны при выборе этого, поскольку вы никогда не сможете восстановить/восстановить его.
- Восстановить заводские настройки . Эта опция превращает вашу систему в тот день, когда вы получили ее, переустанавливая ОС и все приложения, поставляемые с ней. Он удаляет личные файлы, изменения настроек и приложений/драйверов, которые вы установили.
Вы должны заметить, что если вы обновились до Windows 10 и сбросили свой Surface Pro в течение месяца после обновления, переход на предыдущую версию невозможен, если вы не предприняли некоторые шаги, которые позволили бы вам выполнить понижение даже через 30 дней.
Подробнее о том, как Сбросить Windows 10 .
Если вы не можете войти в Windows
По какой-то причине, если вы не можете войти в свою Систему, вы можете перезагрузить Surface Pro из среды восстановления.
- Выберите Питание на экране входа в Windows.
- Нажмите и удерживайте клавиши Shift и Alt на клавиатуре и выберите Перезагрузить .
- Вы увидите экран Выберите вариант , выберите Устранение неполадок .
- Выберите Отдых на этом компьютере и выберите соответствующий вариант: Удалить все или Сохранить мои файлы .
Если вы не можете запустить Surface
Если вы вообще не можете запустить Windows на Surface Pro, вы можете сбросить ее из среды восстановления Windows. Следуй этим шагам
- Запустите вашу поверхность Pro с USB-накопителя. Для этого вставьте загрузочный USB-накопитель (отформатированный в файловую систему FAT32) в USB-порт. Нажмите и удерживайте клавишу уменьшения громкости, пока вы нажимаете и отпускаете кнопку питания. Вы увидите логотип поверхности, затем отпустите кнопку уменьшения громкости.
- > Windows запрашивает язык и раскладку клавиатуры. Выберите их соответствующим образом.
- Выберите Устранение неполадок> Сбросить этот компьютер . Выберите Сохранить мои файлы или Удалить все .
После завершения работы мастера вы сможете нормально использовать систему.
Переход на предыдущую версию Windows
Если вы хотите установить предыдущую версию Windows, вы можете выполнить откат с Windows 10. Этот параметр будет доступен только тем, кто обновился до Windows 10 с Windows 8 или Windows 8.1, то есть в течение месяца сразу после обновления. Здесь важно упомянуть, что если вы перезагрузите свою Систему в течение месяца, эта опция также будет вам недоступна — если вы не предпримете некоторые шаги, которые позволят вам понизить рейтинг даже через 30 дней. Другое дело, что некоторые приложения, поставляемые с Windows, такие как Mail и People, могут не работать, если вы вернетесь к Windows 8.1 и вам может потребоваться переустановить их. Выполните следующие шаги, чтобы вернуться —
- Перейдите в Пуск и выберите Настройки> Обновление и безопасность> Восстановление .
Чтобы вернуться к предыдущей версии, вам может потребоваться сделать несколько вещей.
1] Сохраняйте все в папках $ Windows.
WS и Windows.old после обновления.
2] Удалите учетные записи пользователей, которые вы добавили после обновления.
3] Сохраните пароль, который вы использовали для предыдущей версии, чтобы иметь возможность войти, если таковые имеются.
4] Держите флешку, которую вы использовали для обновления, с собой.
Если Вернуться не доступно
Если вы приобрели Surface Pro с Windows 10, то вернуться назад не вариант. Если вы столкнулись с проблемой, все, что вы можете сделать, это сбросить настройки машины до заводских. Обратитесь к разделу выше, чтобы узнать, как это сделать. Если у вас есть диск восстановления до обновления до Windows 10, вы также можете использовать его для восстановления заводских настроек (обсуждается в следующем разделе), даже если этот параметр недоступен в настройках.
Если вы Windows Insider
Если вы являетесь участником программы Windows Insider и запускаете предварительную сборку, если столкнулись с проблемой, перейдите в раздел Пуск> Настройки> Обновление и безопасность> Восстановление . В разделе Вернитесь к предыдущей сборке выберите Начать .
Используйте диск восстановления для переустановки Windows
Вы можете использовать этот механизм, когда диск восстановления доступен вам, и ваша система не запускается из-за проблемы. Выполните следующие действия, чтобы использовать его в Surface Pro под управлением Windows 10.
- Сначала убедитесь, что вы выключили свой Surface и подключили его. Теперь вставьте USB-накопитель в USB-порт.
- Нажав и отпустив кнопку питания, нажмите и удерживайте клавишу уменьшения громкости. Когда вы видите, что на экране появляется логотип Surface, вы можете отпустить кнопку уменьшения громкости.
- Выберите подходящий язык и раскладку клавиатуры. После этого вы увидите экран Выбрать вариант , в котором выберите Устранение неполадок> Восстановить с диска . Если Windows запрашивает ключ восстановления, вы можете просто выбрать Пропустить этот диск в нижней части экрана.
- После этого выберите Полностью очистить диск или Просто удалите мои файлы , если необходимо. Выберите Восстановление .
В зависимости от выбранной вами опции, мастер будет работать несколько минут. Если появится запрос на изменение вашего TPM, просто выберите ОК . Здесь важно упомянуть одну вещь: если вы решите не создавать резервные копии системных файлов при создании диска восстановления в Windows 10, вы не сможете использовать это для переустановки Windows.
Источник
Surface2Setup
Install Windows RT 10 Preview on your Surface 2
Features:
- Support installing both the original Windows RT 8.1 and a customized Windows RT 10 from recovery
- Contains the script to disable Secure Boot (potentially could be run in the recovery directly instead of Windows RT, although untested since my device is already unlocked)
- Post installation setup
Folder structure
USB Drive
├───Boot
├───EFI
├───sources
├───WOA
│   └───Office
└───setup.cmd
Create installation meda
1. Prepare
Go to Microsoft’s Surface Recovery Image Download to download the recovery file.
Go to Alexenferman’s guide to download SecureBootPatch.zip.
Go to Alexenferman’s extra section to download Office 2013 RT. You will need both the installer and the patch.
Go to DA Developer to download Windows 10 Build 15035 Mod Kit. Appx Pack is optional.
2. Assemble
Following Windows 10 Build 15035 Mod Kit to create your own image. When the setup asks for Windows Setup Mode, select Modified WIM Files Only (No Setup). The other 2 options will create unbootable installation media. We will call the output install.wim.
Grab an USB drive that’s at least 4 GiB (you will need to delete and copy file in the middle of the installation), or perferably 8 GiB (can fit the recovery image, Windows 10 image, and patched image mentioned in Alexenferman’s guide part 1). Create a MBR partition table, and create a FAT32 partition.
To do so in diskpart, enter the following commad:
list disk
rem CHANGE THE BELOW X TO YOUR USB DISK!!!
select disk X
clean
convert mbr
create partition primary
format quick fs=fat32
rem Change the below X if you want to mount to another drive letter
assign letter=X
exit
Copy the folowing files and folder from your recovery file to the drive:
.Boot
.EFI
.sources
.bootmgr.efi
The install.wim in .sources is the recovery image. If you are using a 4 GiB drive, you can delete this file afer you have unlocked the Secure Boot.
Now copy setup.cmd from this repo to the drive as well, and create a new folder called WOA to store our own files.
From SecureBotPatch.zip copy SecureBootDebug.efi and SecureBootDebugPolicy.p7b to .WOA.
From Office RT 2013.7z copy Office to .WOAOffice. Makes sure setup.exe is located at .WOAOfficesetup.exe.
From Office RT 2013 patch.zip copy 3 LicenseSetData.*.xrm-ms files to .WOA.
Optionally you can copy the forementioned patched Windows RT image to .WOA now. Our tool currently don’t support this image since we cannot get Secure Boot unlocked using it. If you need to use this image please follow Alexenferman’s guide.
Finally copy generated install.wim from Windows 10 Build 15035 Mod Kit to .WOA.
Install Windows 10
Since I already unlocked my Surface 2, I can no longer test my script on a fresh locked device. As such it is recommended to first folow Alexenferman’s guide.
2 things to note:
1st the patched Windows RT is useless on my Surface 2, and I unlocked my Secure Boot with the recovery image.
2nd from what I heard when you are installing the Secure Boot Debug Policy you have to copy it to the interal storage and you have to use an elevated shell to change directory into it before launching the script.
Now if someone wants to try our script, here are the steps:
-
Boot into Windows RT. Press Win+X, and click
Windows PowerShell (Admin), then typed:setup.cmdand enter, type1and enter. Your Surface 2 will automatically reboot. -
Boot into Windows RT. Press Win+X, and click
Windows PowerShell (Admin), then typed:setup.cmdand enter, type2and enter. Your Surface 2 will automatically reboot. You will then see aSecure Boot Debug Policy Applicatorwindow. Using volume buttons to selectAccept and install, then pressing the Windows key to confirm. You can use the Windows button that’s on the tablet. -
Boot into Windows RT. Press Win+X, and click
Windows PowerShell (Admin), then typed:setup.cmdand enter, type3and enter. Your Surface 2 will automatically reboot. When you see the Windows is rebooting, holdVolume Downbutton, until the Surface is showing the booting logo (whiteSurfaceon black background). You can then release the button and now you are booting into the recovery mode. -
In the recovery mode, select your language and keyboard layout. Then click
Troubleshooting,Advanced Options, andCommand Prompt. -
CHECK CHECK AND DOUBLE CHECK if you have
SecureBoot isn't configured correctlyon your screen’s left bottom corner. Try again from step 2. If it still fails, try Alexenferman’s guide. -
In recovery’s command prompt, type
d:setup.cmdand enter, type4and enter. Once the script is finished, close the command prompt, and clickContinue to Windows RT 10 Preview. -
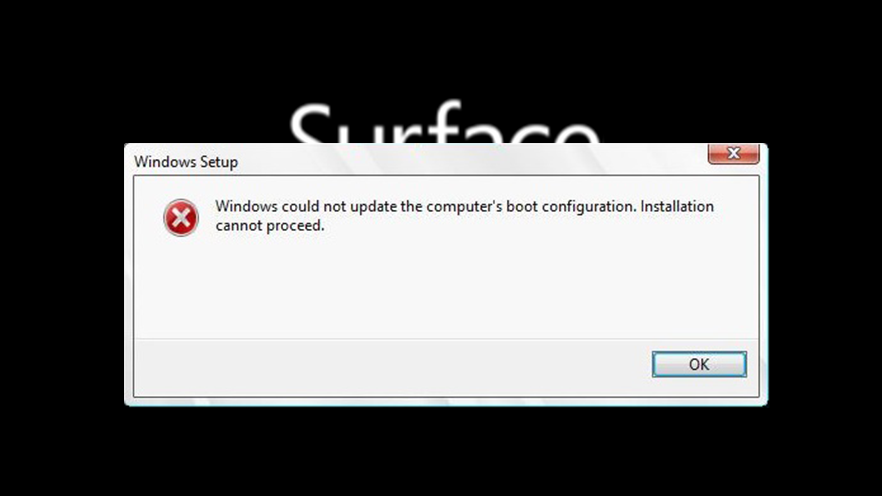
You will see the Windows Setup running, and eventually an error message:
Windows could not update the computer's boot configuration. Installation cannot proceed.
Press Shift+F10 or Fn+Shift+F10 to launch a command prompt, then type d:setup.cmd and enter, type 5 and enter. You will need to click OK on the error message to reboot.
-
You will now boot into Windows RT 10. Finish your setup while ignoring the warnings. You will see 2 errors, one after you connect to the network, and one if you are trying to use a Microsoft account. Just ignore the first one and create a offline account.
-
Once the setup is completed and you are in the desktop, press Win+X, and click
Windows PowerShell (Admin), then typed:setup.cmdand enter, type6and enter. This will finish the Windows installation. Make sure you have the internet connection or activation might fail.
Office activation could fail. I haven’t looked into it yet.
Revert to Windows RT 8.1
Follow step 3 and 4 to enter the recovery mode, then follow step 6 except enter 0 instead of 4 to install Windows RT 8.1. After the script is finished reboot to finish the setup.
TO-DO
Rework option 1, 2, and 3 to install Secure Boot Debug Policy from recovery mode instead of from Windows RT 8.1. This should be possible by simply running option 2 in recovery, reboot, and running 3 and 4 together. However, since my device is unlocked, I can’t test it.
На чтение 3 мин. Просмотров 251 Опубликовано 03.09.2019
Windows 10, как говорят, была установлена в основном на настольных компьютерах и ноутбуках, но мы задаемся вопросом, считается ли новый Surface Pro 3 ноутбуком или планшетом. В этой части мы рассмотрим некоторые проблемы, которые могут возникнуть при установке Windows 10.

Некоторые владельцы Surface Pro 3 решили попробовать Windows 10 и опробовать его на своих устройствах. Однако при этом они столкнулись с множеством досадных проблем, поэтому мы решили их округлить, чтобы вы могли знать, с чем вы можете столкнуться, до выполнения обновления.
С какими проблемами вы можете столкнуться при установке Windows 10 на Surface Pro 3?
По словам одного пользователя, одна из первых проблем связана с тем, что процесс установки не завершается до конца:
Мне не повезло. Установка выполняется примерно до 40%. Затем установщик закрывается, без сообщения об ошибке или что-нибудь. Я не уверен, что не так.
ЧИТАЙТЕ БОЛЬШЕ: Приложение Wikipedia для Windows 8.1 исправляет ошибки в обновлении, бесплатная загрузка
Кроме того, необходимо учитывать, что если вы делаете новую установку Windows 10, не ожидайте, что беспроводные драйверы будут доступны для Surface Pro 3, который уже страдал от множества проблем с WiFi, которые были недавно исправлено.
Если вы делаете новую установку, как, например, старая розничная версия 8.1, в этом предварительном просмотре нет драйверов беспроводной сети для SP3. Либо используйте winreducer и интегрируйте пакет драйверов 9/9/14 в установочный ISO, затем установите USB-накопитель, либо загрузите пакет драйверов, установите Windows через USB-установку, а затем изнутри вручную установите драйвер беспроводной сети.
Вот некоторые другие ошибки, связанные с установкой Windows 10 на Surface Pro 3:
Верхняя кнопка на ручке больше не работает (нельзя дважды щелкнуть, чтобы сделать снимок экрана, и нельзя щелкнуть один раз, чтобы открыть OneNote), и дисплей больше не поворачивается.
Еще несколько проблем, связанных с функциональностью пера, вращением и даже некоторыми проблемами, касающимися функциональности приложения Fitbit:
Кнопки на ручке не работают должным образом. Не могу повернуть экран. Невозможно вызвать меню в FreshPaint пальцем или ручкой, можно с помощью мыши. Fitbit App похожая проблема.
Кто-то также жалуется на функциональность Internet Explorer:
На моем SP3 у меня не может быть Internet Explorer в режиме метро. всегда запускать в режиме рабочего стола.
Больше вопросов, связанных со смахиванием вниз по меню
Сдвиг для меню не поддерживается с новым макетом приложений на рабочем столе. В левом верхнем углу окна есть кнопка меню.
Проблемы с установкой Windows 10 и исправления [обновление 2018 года]
После того, как эта статья была написана, было много других проблем, о которых сообщили пользователи. Мы перечислим здесь общие проблемы, возникающие при попытке установить Windows 10, чтобы вы могли начать устранять неполадки в процессе установки. Вот они:
- Что делать, если вы не можете установить Windows 10 на SSD
- Как очистить Установить Windows 10 после бесплатного обновления?
- ИСПРАВЛЕНИЕ: Убедитесь, что вы готовы установить Windows 10
- Исправлено: ошибка установки «Windows 10 не может быть установлена в разделе GPT»
До сих пор сообщалось о многих других подобных проблемах, но я думаю, что вы получите представление о том, во что вы можете ввязаться. Вот почему вам нужно установить Windows 10 на виртуальную машину или на устройство, которое вы не используете активно. Вы установили Windows 10 на свой Surface Pro 3? Если да, то как это работает?
ЧИТАЙТЕ ТАКЖЕ: Исправлено: Windows 10 не может быть установлена на этот диск