If you’re an amateur Java developer, like I am, you probably know that creating the simplest of GUI driven applications can be challenging. While reading for the final year of my degree, a year or so ago, I came across WindowBuilder which, in short, takes the pain out of building a graphical interface for Java applications. If you’re an Eclipse IDE user, read on.
I currently have Eclipse Neon.3 Release 4.6.3 installed on my home PC. The procedure outlined should however work on older and later releases of Eclipse.

From the Help menu, select Install New Software …

Type http://download.eclipse.org/windowbuilder/WB/integration/4.6/ in the Work With field, check the box next to WindowBuilder and hit the Next button.

Review the items that will be installed and hit Next. I opted to install all the items listed but you can always pick and choose what to install.

Accept the license agreement and hit Finish.

After the installation completes, you will be asked to restart Eclipse.


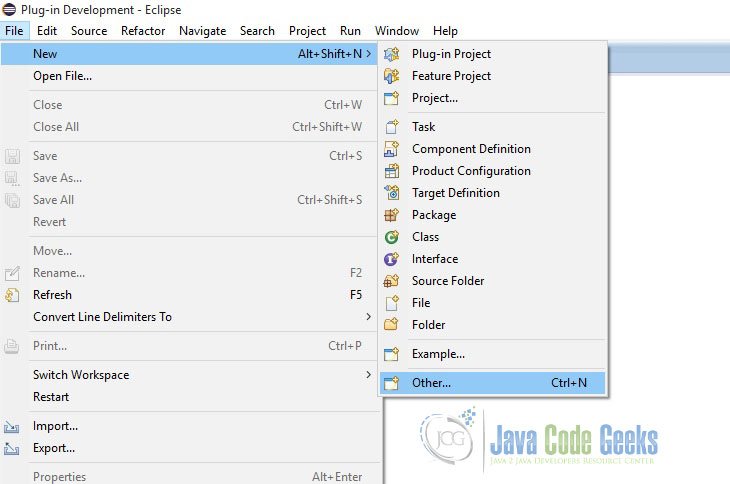
To test WindowsBuilder, create or open an existing Project. From the default package, select Other from the New menu or simply press CTRL-n. Scrolling down to the end of the Wizards list, you should see an entry named WindowBuilder.

As an example, I want to create an application that uses Swing so I simply expand Swing Designer and select Application Window from the list of available options. Click Next.

Type in a name for the new Swing application and click Finish.

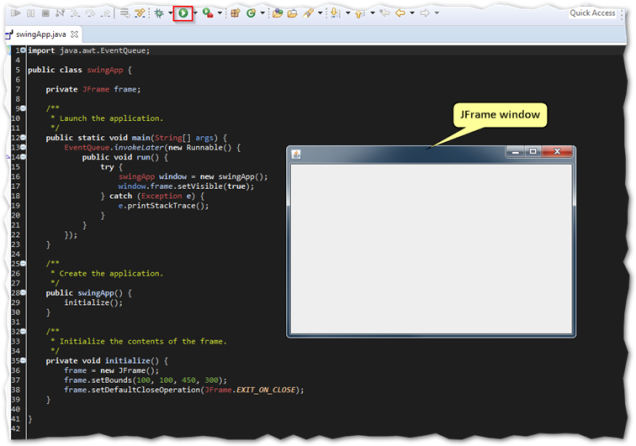
The wizard creates all the required base code for you. If you run it, an empty JFrame window is displayed.
To add elements or components to the JFrame, switch to the Design page by clicking the tab at the bottom of the code page. Once you’re there, you can change the layout, add containers, event handlers and what not. Although all the required code is automatically added for you, you still need to add logic to it to make it all work. So for instance, if you want to add a record to a database by clicking on an Add button, you will add the required logic to an event handler. To do this simply, right-click on a component, a JButton in this case, and select an event handler.

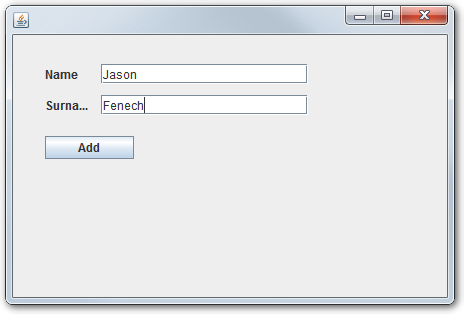
Here’s a more thorough example of what WindowBuilder can do for you. This is a screenshot of an application I wrote as part of my studies.

So, now you know what tool to use when developing an UI driven Java app! To learn more about WindowBuilder, visit the official documentation site here.
Thanks!
I’m using Eclipse Neon, that I installed from Eclipse Installer.The problem is when I want to work with Swing, I did not find it.
And when I tried to installed using this solution, I did not find it in the repository of neon.
Can Anyone help ?
- java
- eclipse
- windowbuilder
![]()
asked Jun 27, 2016 at 16:13
![]()
BilalBilal
2,6355 gold badges34 silver badges56 bronze badges
2
-
Probably in the Eclipse Marketplace.
Jun 27, 2016 at 17:31
-
@greg-449, I tried Marketplace but unfortunately I found nothing

Jun 27, 2016 at 19:06

3 Answers
answered Jul 21, 2016 at 12:47
![]()
MickaelMickael
3,4681 gold badge20 silver badges32 bronze badges
0
answered Sep 18, 2016 at 7:21
![]()
Vijay P RVijay P R
1,1421 gold badge10 silver badges15 bronze badges
3
-
Can this be used with offline computers? Can it be transferred?
Jun 9, 2017 at 20:44
-
Don’t forget to turn on «Group items by category»
Oct 27, 2017 at 20:22
-
I followed the above, but when I go to File -> New -> Other, I couldnt find Windwbbuilders in there. I go to Help -> Installatrion Details, WB is indeed installed. Hope yo have advice
Jun 29, 2022 at 7:50
answered Jun 28, 2016 at 9:45
![]()
MickaelMickael
3,4681 gold badge20 silver badges32 bronze badges
1
-
Thank you, this one worked (at least, as a temporary solution), I just Added a new repository using this Location :
https://dl.bintray.com/zaunerc/p2/org.eclipse.windowbuilder.p2_site/latest/Jun 28, 2016 at 14:39

Eclipse is my favorite IDE for coding especially for Java programming, even though it might be slower than other IDEs or has high RAM usage. Eclipse has different versions for different programming languages (C/C++, PHP, JavaScript, etc.).
For long time, I was using Netbeans to develop Swing applications because it has WYSIWYG feature and to be honest I was not aware (lazy to search) that Eclipse has this feature or not. Finally, lately, I did a simple search on the internet and found out that Eclipse had WindowBuilder which is more or less equal to Netbeans Swing designer and you just need to install the package to be able to create Swing applications.
I have found the following Youtube video tutorial is quite useful and if you want to know how to install Eclipse WindowBuilder I recommend you to watch it. It is also good to subscribe the channel since it is merely dedicated to programming and you can find lots of useful and awesome materials.
Note : If you have already made a Swing application and you just want to open it inside of Eclipse in visual form just right click on your Java file and click on open with WindowBuilder Editor.
1.Introduction
In this example, we will show you how to develop Java GUI Application using Eclipse WindowBuilder plug-in.
Eclipse WindowBuilder is a powerful and easy to use bi-directional Java GUI designer that makes it very easy to create Java GUI applications without spending a lot of time writing code to display simple forms.
The bi-directional Java GUI designer means the developer can seamlessly move between a Drag n’ Drop designer and the generated code.
Using Eclipse WindowBuilder, the developer will enjoy creating Java GUI based applications. One can create complicated windows in minutes using WindowBuilder.
WYSIWYG (What You See Is What You Get) layout tools in WindowBuilder are used to generate back-end java code by drag-and-drop of components to the container.
2.Simple Java Window Application
Now, we will see how fast a simple Java GUI application can be created uisng Eclipse WindowsBuilder.
2.1 System requirements
Tools required to run this example are:
2.1.1 Eclipse
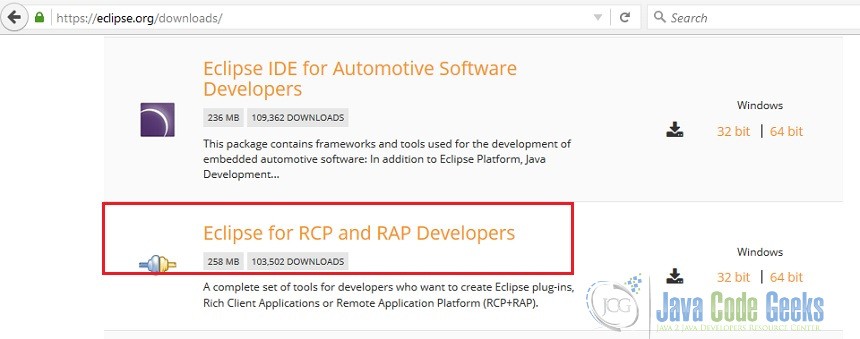
WindowBuilder is built as a plug-in to Eclipse. ‘Eclipse for RCP and RAP Developers’ is the default IDE bundled with ‘Windows Builder’ plug-in. This IDE has a complete set of tools for developers who want to create Eclipse plug-ins, Rich Client Applications (RCA).
Download ‘Eclipse for RCP and RAP Developers’ from here. Please refer the picture given below to identify the correct IDE.
Eclipse IDE for RCP and RAD
2.1.2 Java
- Download Java SE 7 or above from here
3. Open New Project
Let us create a new ‘SWT/JFace Java Project’ to see the usage of WindowBuilder for building GUI components. Open ‘File – New – Other’ and then click ‘SWT/JFace Project’ as depicted below
Open Project

SWT/JFace Java Project
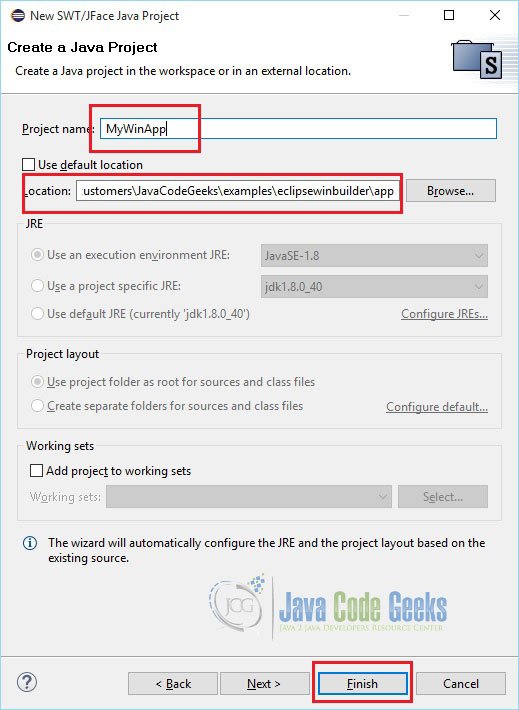
Project Name
The reason for creating new project as ‘SWT/JFace Java Project’ is to have all the necessary JARs and native libraries included by the IDE itself. Otherwise, you have to add all these dependent JARs and native libraries on your own.
The Standard Widget Toolkit (SWT) is a graphical widget toolkit to be used with the Java platform. It provides a portable graphics API independent of the OS but that relies on the native widgets.
JFace is a UI toolkit with classes for handling many common UI programming tasks. JFace is window-system-independent in both its API and implementation, and is designed to work with SWT without hiding it.
JFace is a higher-level user interface toolkit that uses the raw SWT widgets to provide model-driven widgets, and to some extent some functionality that isn’t available in the Swing libraries, such as advanced editors, dialog boxes, and wizards.
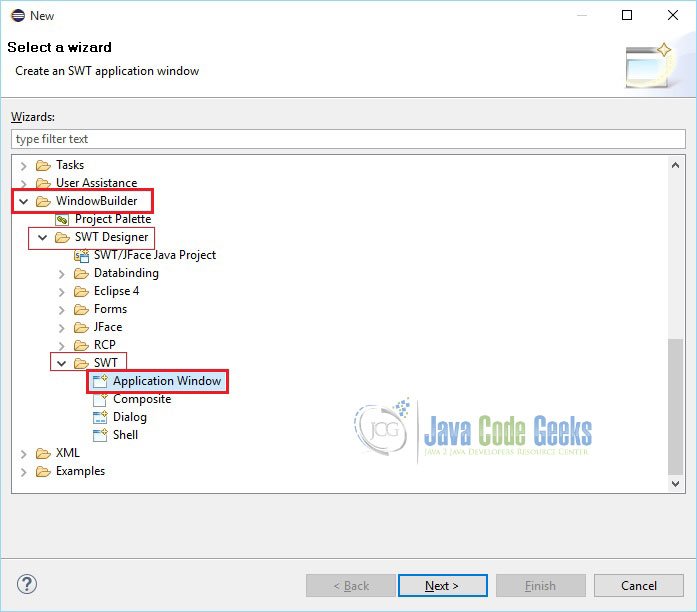
4. New SWT Application
Let us add widget to the project. As a main window, create Application Window as shown below. Right click on the project and select ‘New – Other – Window Builder – SWT Designer – SWT – Application Window’. And then click ‘Next’
Application Window
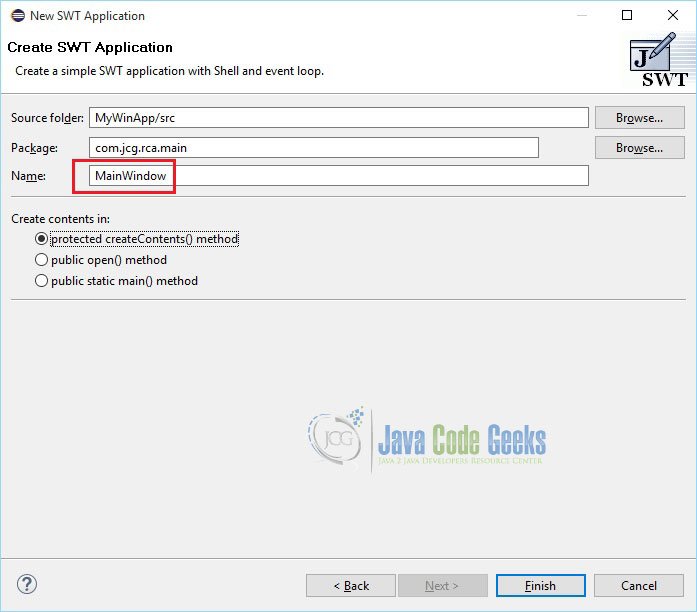
Enter Class Name and click ‘Finish’
Class Name
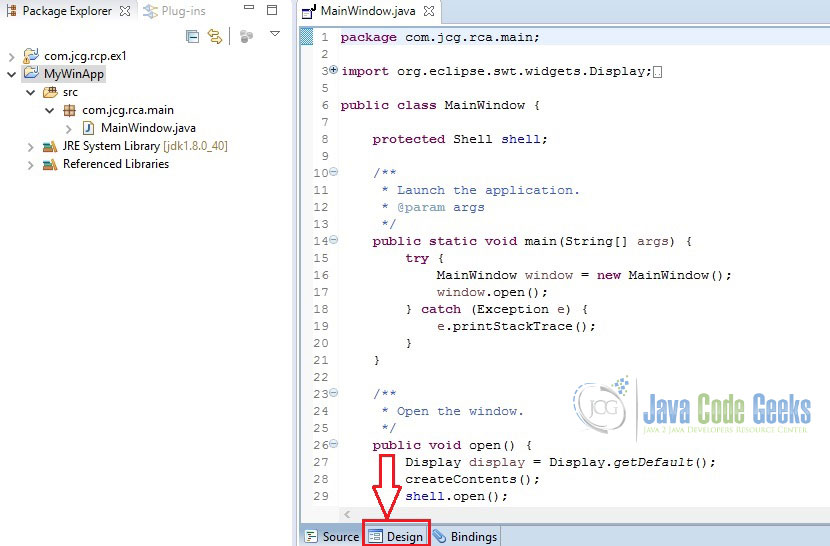
A basic window application has been created. Window Builder can be used to get your UI up and running quickly. Click ‘Design’ tab as shown below.
Basic Window Application
Now, you will see the graphical representation (Design View) of your code.
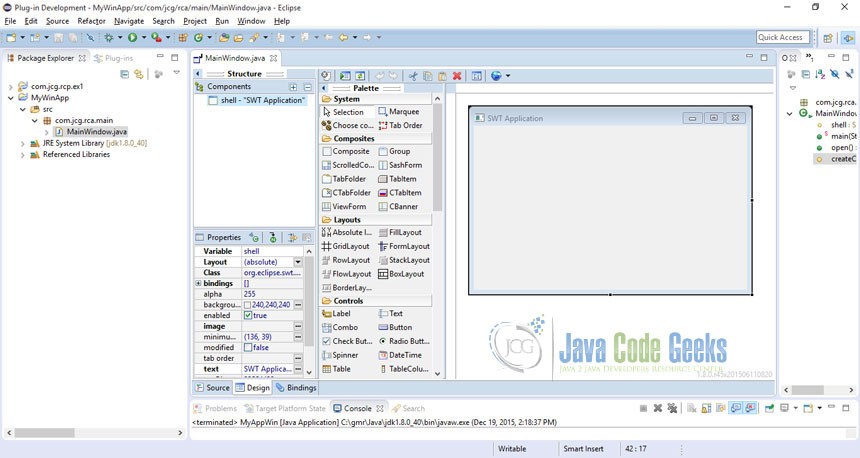
Design View
This application can be simply executed like any other java program with main method. Right click on the class name and ‘Run As – Java Application’
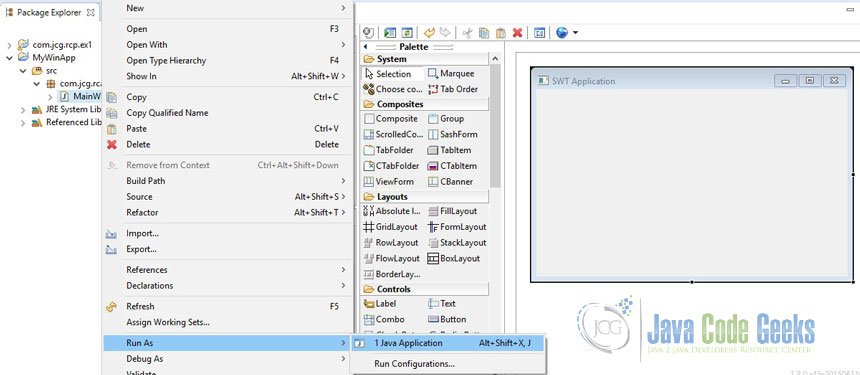
Run Application
As we have not yet added any other elements, you will see a simple window popping-up as a result of the execution.
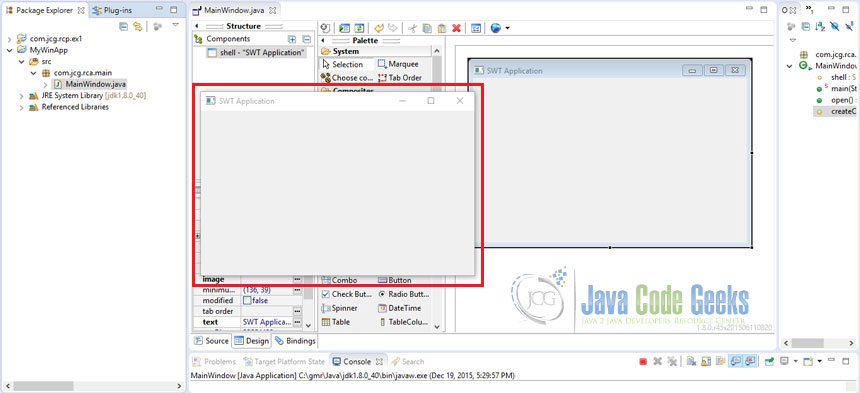
Executed Application
5. Components in the editor
As shown above, the editor is composed of the following major components:
- Design View – the main visual layout area.
- Source View – write code and review the generated code
- Structure View – composed of the Component Tree and the Property Pane.
- Component Tree – shows the hierarchical relationship between all of the components.
- Property Pane – displays properties and events of the selected components.
- Palette – provides quick access to toolkit-specific components.
- Toolbar – provides access to commonly used commands.
- Context Menu – provides access to commonly used commands.
6. Editor Features
The editor supports the following major features;
- Bi-directional Code Generation – read and write almost any format and reverse-engineer most hand-written code
- Internationalization (i18n) / Localization – externalize component strings, create and manage resource bundles.
- Custom Composites & Panels – create custom, reusable components.
- Factories – create custom factory classes and methods.
- Visual Inheritance – create visual component hierarchies.
- Event Handling – add event handlers to your components.
- Menu Editing – visually create and edit menubars, menu items and popup menus.
- Morphing – convert one component type into another.
7. Layouts in SWT
Layouts are non-visible widgets used to give GUI windows a specific look and it helps to control the position and size of children in a Composite.
To make sure the GUI application developed in one environment works perfect in another platform, Java provides a system of portable layout managers. We use these layout managers to specify rules and constraints for the layout of the UI in a way that will be portable.
Layout managers gives you the advantages as given below,
- Correctly positioned components that are independent of fonts, screen resolutions, and platform differences.
- Intelligent component placement for containers that are dynamically resized at runtime.
- Ease of translation. If a string increases in length after translation, the associated components stay properly aligned.
SWT Designer supports the following layout managers.
| Layout Manager | Description |
|---|---|
| AbsoluteLayout | AbsoluteLayout or Null Layout helps to specify the exact position, the width and the height of components. In a generic environment where the size of the screens may vary, this layout manager should be avoided. |
| FillLayout | FillLayout is the simplest layout class. It lays out controls in a single row or column, forcing them to be the same size. |
| RowLayout | Puts the widgets in rows or columns and allows you to control the layout with options, e.g., wrap, spacing, fill and so on. |
| GridLayout | Arranges widgets in a grid. |
| FormLayout | Arranges the widgets with the help of the associated attachments. |
| StackLayout | A StackLayout object is a layout manager for a container. It treats each component in the container as a card. Only one card is visible at a time, and the container acts as a stack of cards. |
| BorderLayout | BorderLayout lays out a container, arranging and resizing its components to fit in five regions: north, south, east, west, and center. Each region may contain no more than one component, and is identified by a corresponding constant: NORTH, SOUTH, EAST, WEST, and CENTER. |
| BoxLayout | BoxLayout allows multiple components to be laid out either vertically or horizontally. The components will not wrap so, for example, a vertical arrangement of components will stay vertically arranged when the frame is resized. Nesting multiple panels with different combinations of horizontal and vertical gives an effect similar to GridBagLayout, without the complexity. |
| FlowLayout | A flow layout arranges components in a left-to-right flow, much like lines of text in a paragraph. Flow layouts are typically used to arrange buttons in a panel. It will arrange buttons left to right until no more buttons fit on the same line. |
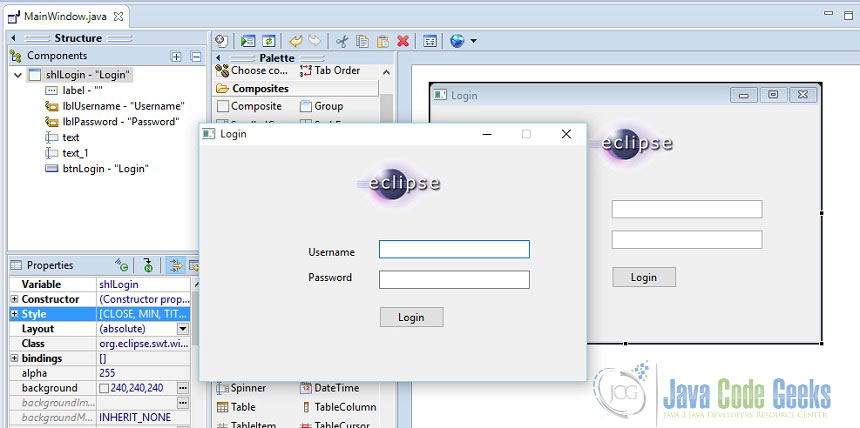
8. New UI Page
We will now design a new Login UI page using Window Builder. For this normal size screen, we will continue with the default (absolute) layout. We are going to have an image, two labels, one text field, one password field and a button on the screen.
To display image use CLabel widget. CLabel supports aligned text and/or an image and different border styles.
As shown below, click ‘CLabel’ once and keep your cursor on the screen and click. Now, the ‘CLabel’ is placed on the screen.
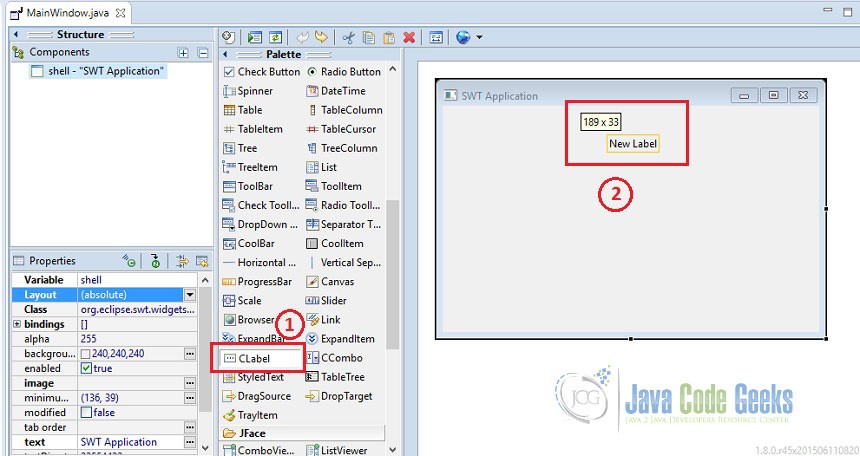
New Login UI
Let us attach an image with ‘CLabel’. For this, you need to have an image in the folder where your ‘MainWindow’ source file is placed. For this example, I have used eclipse logo.
Click on the ‘CLabel’ and then, in the ‘Properties’ window select ‘image’.
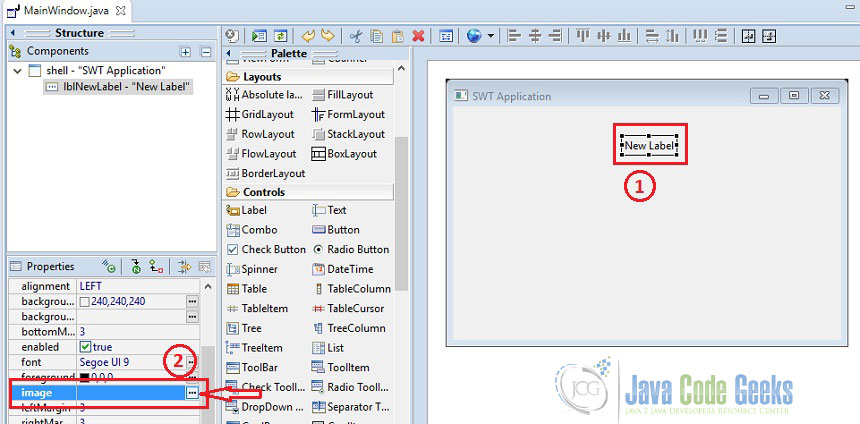
CLabel Image
You will now see the Image chooser window pops up. Select ‘Classpath resource’ option and navigate to the image file, select it and then click ‘OK’.
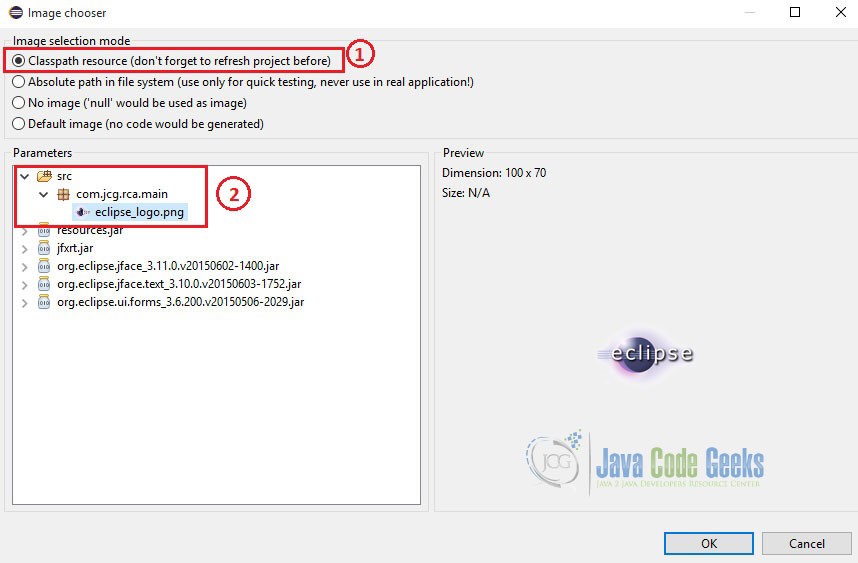
Select Image
Adjust the field bounds according to the size of the logo so that the image is visible on the screen.
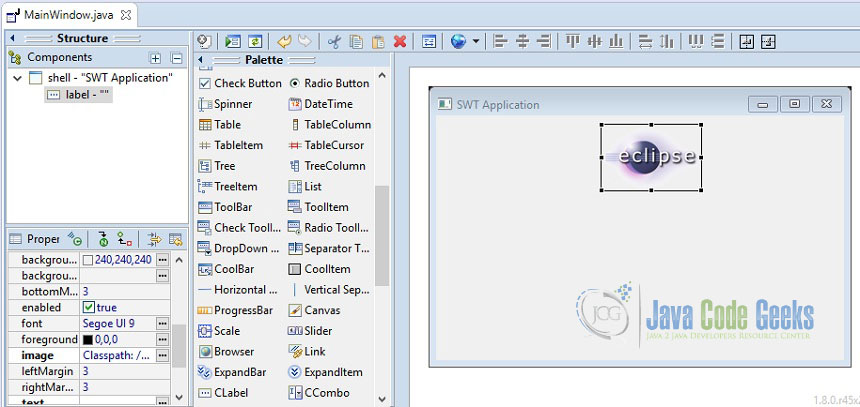
Image Attached
Similarly, add Labels, Text Fields and a Button. Finally the screen will be looking like the one shown below.
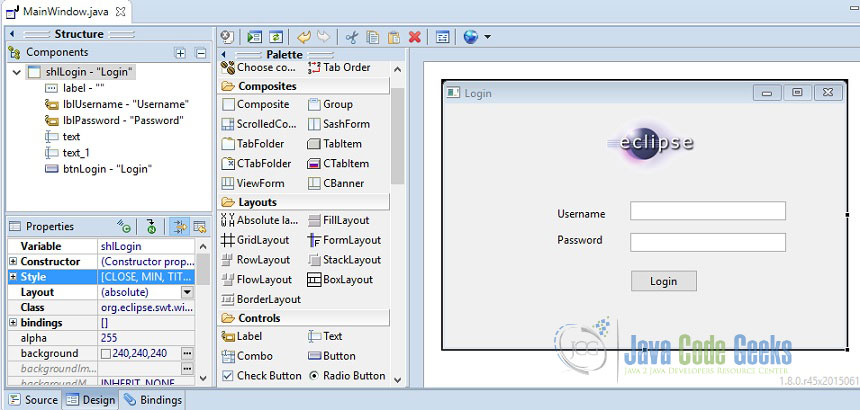
Login UI Page
To test this design, right click on the window and select ‘Test/Preview’ from the popup menu.

Test GUI
Test / Preview
9. Source View
Click ‘Source’ tab to see the code generated by the IDE. Single line of code in this was not written manually.

Source View
10. Button Listener
Attach listener with the button to validate field entries. Refer the source code of the main file given below.
MainWindow.java
package com.jcg.rca.main;

import org.eclipse.swt.SWT;
import org.eclipse.swt.custom.CLabel;
import org.eclipse.swt.widgets.Button;
import org.eclipse.swt.widgets.Display;
import org.eclipse.swt.widgets.Event;
import org.eclipse.swt.widgets.Label;
import org.eclipse.swt.widgets.Listener;
import org.eclipse.swt.widgets.MessageBox;
import org.eclipse.swt.widgets.Shell;
import org.eclipse.swt.widgets.Text;
import org.eclipse.wb.swt.SWTResourceManager;

public class MainWindow {

	protected Shell shlLogin;
	private Text userNameTxt;
	private Text passwordTxt;

	private String userName = null;
	private String password = null;

	/**
	 * Launch the application.
	 *
	 * @param args
	 */
	public static void main(String[] args) {
		try {
			MainWindow window = new MainWindow();
			window.open();
		} catch (Exception e) {
			e.printStackTrace();
		}
	}

	/**
	 * Open the window.
	 */
	public void open() {
		Display display = Display.getDefault();
		createContents();
		shlLogin.open();
		shlLogin.layout();
		while (!shlLogin.isDisposed()) {
			if (!display.readAndDispatch()) {
				display.sleep();
			}
		}
	}

	/**
	 * Create contents of the window.
	 */
	protected void createContents() {
		shlLogin = new Shell(SWT.CLOSE | SWT.TITLE | SWT.MIN);
		shlLogin.setSize(450, 300);
		shlLogin.setText("Login");

		CLabel label = new CLabel(shlLogin, SWT.NONE);
		label.setImage(SWTResourceManager.getImage(MainWindow.class, "/com/jcg/rca/main/eclipse_logo.png"));
		label.setBounds(176, 10, 106, 70);
		label.setText("");

		Label lblUsername = new Label(shlLogin, SWT.NONE);
		lblUsername.setBounds(125, 115, 55, 15);
		lblUsername.setText("Username");

		Label lblPassword = new Label(shlLogin, SWT.NONE);
		lblPassword.setBounds(125, 144, 55, 15);
		lblPassword.setText("Password");

		userNameTxt = new Text(shlLogin, SWT.BORDER);
		userNameTxt.setBounds(206, 109, 173, 21);

		passwordTxt = new Text(shlLogin, SWT.BORDER | SWT.PASSWORD);
		passwordTxt.setBounds(206, 144, 173, 21);

		Button btnLogin = new Button(shlLogin, SWT.NONE);
		btnLogin.setBounds(206, 185, 75, 25);
		btnLogin.setText("Login");

		btnLogin.addListener(SWT.Selection, new Listener() {
			public void handleEvent(Event event) {

				userName = userNameTxt.getText();
				password = passwordTxt.getText();

				if (userName == null || userName.isEmpty() || password == null || password.isEmpty()) {
					String errorMsg = null;
					MessageBox messageBox = new MessageBox(shlLogin, SWT.OK | SWT.ICON_ERROR);

					messageBox.setText("Alert");
					if (userName == null || userName.isEmpty()) {
						errorMsg = "Please enter username";
					} else if (password == null || password.isEmpty()) {
						errorMsg = "Please enter password";
					}
					if (errorMsg != null) {
						messageBox.setMessage(errorMsg);
						messageBox.open();
					}
				} else {
					MessageBox messageBox = new MessageBox(shlLogin, SWT.OK | SWT.ICON_WORKING);
					messageBox.setText("Info");
					messageBox.setMessage("Valid");
					messageBox.open();
				}
			}
		});

	}

}
11. Conclusion
From this example, we learned how quickly a Java GUI application can be developed using Eclipse Window Builder. WindowBuilder Engine provides a rich API for creating UI designers. It supports Java-based UI frameworks such as Swing, SWT/RCP, eRCP, GWT etc. It also supports XML-based UI frameworks like XWT, GWT UiBinder, Android etc.
12. Download the Code Project
This was a Tutorial about Eclipse Window Builder for GUI Creation.
Download
You can download the full source code of this example here: WindowBuilderExample
- Why Do We Use Java Swing
- Windows Builder Eclipse Plugin
- NetBeans Java Swing GUI Builder

A great graphical user interface integrates features such as customization control, split viewing of design code, and an easy-to-use interface and should be clean and lightweight.
In this article, first, we will show how to install the Windows builder GUI development plugin for the Java Swing Designer Application in Eclipse. Second, we will also show you how to use NetBeans Java Swing GUI development.
Why Do We Use Java Swing
Java Swing Class is a compact graphical user interface platform that helps reduce the time and effort to repeat tasks. You can navigate/toggle to choose between gadgets, and your code will be generated automatically.
Note
It is a foundation class in Java that aids in creating window-based applications. Furthermore, you can use GUI developers to construct Java Swing apps because it is open-source.
Classification of Java Swing Class
To understand Java Swing more clearly, please see the following diagram.
Diagram Summary:
The diagram depicts the relationship between a Java object at the top and a JFrame at the bottom.
All of the components we as users frequently interact with, such as Lists, Buttons, Texts, and so on, are inherited by the JComponent class.
Furthermore, we can see that the containers were added higher with the component and lower with our operating system; these extend on frames and dialogue boxes on the user’s operating system.
All key Swing elements are included in the foundation within one’s graphical user interface app.
Windows Builder Eclipse Plugin
This Eclipse plugin integrates SWT Designer and Swing Designer into a single package.
You can develop Java GUI apps without wiring code. Its WYSIWYG visual designer, for example, provides you with layout tools to create simple forms for complex windows.
It’s cool since it helps generate the code for you. Furthermore, you can add controls to your settings by using drag-and-drop capabilities, null layouts, and event handling.
You can also use a properties editor to modify the properties of your settings.
Windows Builder Plugin:
Follow These Steps:
-
Installation: WindowBuilder
-
Add to Eclipse (drag-and-drop):
-
Confirm the installation process:


Install Windows Builder Plugin From Eclipse Marketplace
The following way to download WB is another simple approach for installing Windows Builder in your Eclipse IDE.
You have to start your Eclipse and see what version it is.
Note
We are using Eclipse 2021-12.
-
Then go to
Help. -
Select
Install New Software. -
Search for your Eclipse version.
-
Click on
General Purpose Tools. -
Check all the Windows Builder features you want to install.
-
Once you have checked all the options, confirm and wait for the installation process to finish.
-
Do not forget to restart Eclipse after the installation has finished.
Use Windows Builder for Swing GUI Development
After successfully installing all the resources from the Eclipse marketplace server repository into your local workstation, you should be thinking, how do I create a Java Swing Application using the Windows Builder GUI development platform?
Do the following steps:
-
Go to
File. -
Choose
New. -
Other -
Search
WindowBuilder=>Swing Designer=>Application Window.
Note
You can also select other tools from the WB. We have also created the following demo for you to follow the correct steps.
Summary:
We demonstrated two simple methods for installing a GUI Builder in your IDE. We also categorized a Java Swing class and talked about the significance of GUI-based Swing development.
NetBeans Java Swing GUI Builder
NetBeans GUI Builder supports the production of sophisticated and elegant graphical user interface applications. The best part is that you don’t have to be a pro to do it.
You also don’t need deep expertise in layout management. Even a beginner can try it out and create an excellent Java application using Jforms or other components from the Java Swing Foundation class.
What does this IDE offer?
- Open Source
- Layout Management
- Container-based lightweight development
- Availability of Null layouts
- Powerful customization
- Drag-and-drop features
- Easy to use
Are you already excited?
First, you need to download Apache NetBeans IDE if you have not.
-
Download: NetBeans
-
Once downloaded, launch and create a new project.
-
After that, type your project name and finish.
-
Once you have created a new project, you need to create a class. Right-click on your project >
new>class.


Note
NetBeans will generate the following code dynamically after finishing it.
public class Demo2 extends javax.swing.JFrame {
  public Demo2() {
    initComponents();
  }
  @SuppressWarnings("unchecked")
  // <editor-fold defaultstate="collapsed" desc="Generated Code">
  private void initComponents() {
    setDefaultCloseOperation(javax.swing.WindowConstants.EXIT_ON_CLOSE);
    javax.swing.GroupLayout layout = new javax.swing.GroupLayout(getContentPane());
    getContentPane().setLayout(layout);
    layout.setHorizontalGroup(
      layout.createParallelGroup(javax.swing.GroupLayout.Alignment.LEADING)
      .addGap(0, 400, Short.MAX_VALUE)
    );
    layout.setVerticalGroup(
      layout.createParallelGroup(javax.swing.GroupLayout.Alignment.LEADING)
      .addGap(0, 300, Short.MAX_VALUE)
    );
    pack();
  } // </editor-fold>
  public static void main(String args[]) {
    //<editor-fold defaultstate="collapsed" desc=" Look and feel setting code (optional) ">
    try {
      for (javax.swing.UIManager.LookAndFeelInfo info: javax.swing.UIManager.getInstalledLookAndFeels()) {
        if ("Nimbus".equals(info.getName())) {
          javax.swing.UIManager.setLookAndFeel(info.getClassName());
          break;
        }
      }
    } catch (ClassNotFoundException ex) {
      java.util.logging.Logger.getLogger(Demo2.class.getName()).log(java.util.logging.Level.SEVERE, null, ex);
    } catch (InstantiationException ex) {
      java.util.logging.Logger.getLogger(Demo2.class.getName()).log(java.util.logging.Level.SEVERE, null, ex);
    } catch (IllegalAccessException ex) {
      java.util.logging.Logger.getLogger(Demo2.class.getName()).log(java.util.logging.Level.SEVERE, null, ex);
    } catch (javax.swing.UnsupportedLookAndFeelException ex) {
      java.util.logging.Logger.getLogger(Demo2.class.getName()).log(java.util.logging.Level.SEVERE, null, ex);
    }
    //</editor-fold>
    java.awt.EventQueue.invokeLater(new Runnable() {
      public void run() {
        new Demo2().setVisible(true);
      }
    });
  }
}
Summary:
We’d like you to forget about the code for a moment! It’s just the beauty of GUI builders that you’ll be able to evaluate with more expertise and understanding of the fundamentals.
Can you see the connections now? So it must be a yes.
IDE builders will make your coding more accessible. It is not — however, the best practice for everybody.
Yet, if you can get the job done, custom drag and drop should not compromise your skill sets.
That said, given a few days of continuous effort, you will be able to create essential Windows-based Java Swing apps and others.
If you’re still confused, here’s how to get started with your first Java Swing project in NetBeans.
how to install window builder in eclipse ?
Before we start working on
Eclipse RCP we required the Window builder. Windows builder is not necessary to
create the Eclipse RCP application. Using Windowbuilder, designing the RCP
application will be more easy and comfortable, so Here I explain the steps to
install Window Builder inEclipse environment. It is very easy to add Windw
builder plug-in in it. Following are the steps.
Goto “help” -> “Install
New Software…”

Enter following URLs as per the version of the Eclipse :
Eclipse 3.7 (Indigo)
http://dl.google.com/eclipse/inst/d2wbpro/latest/3.7
Eclipse 3.6 (Helios)
http://dl.google.com/eclipse/inst/d2wbpro/latest/3.6
Eclipse 3.5 (Galileo)
http://dl.google.com/eclipse/inst/d2wbpro/latest/3.5


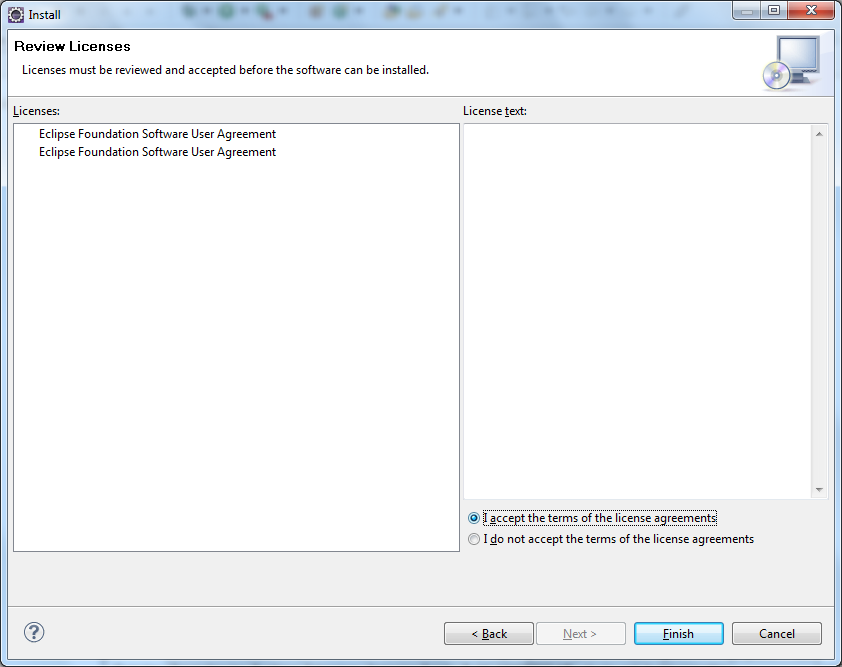
Select radio button for “I accept the terms of the license agreements”.
At the end (after installation completes), it will ask to
restart the Eclipse. Click on Restart option and when it will start again,
Window Builder will be there in the Eclipse environment.
How to
check, the Window Builder is installed or not?
Right click on any Java file. Go to “Open With”. A Menu will
appear, there you can see the option ”WindowBuilder Editor”.

It shows that Window Builder is successfully installed.
Following Books are good to Refer :
Popular posts from this blog
HHH000424: Disabling contextual LOB creation as createClob() method threw error : java.lang.reflect.InvocationTargetException If you get following error while connecting to your Database with Spring boot, try the suggested solution below: 2018 — 11 — 25 15 : 28 : 50.078 INFO 5335 — [ main] o. h . e . j . e . i . LobCreatorBuilderImpl : HHH000424: Disabling contextual LOB creation as createClob() method threw error : java. lang . reflect . InvocationTargetException java. lang . reflect . InvocationTargetException : null at sun. reflect . NativeMethodAccessorImpl . invoke0 (Native Method) ~[na: 1.8 . 0 _161] at sun. reflect . NativeMethodAccessorImpl . invoke (NativeMethodAccessorImpl. java : 62 ) ~[na: 1.8 . 0 _161] at sun. reflect . DelegatingMethodAccessorImpl . invoke (DelegatingMethodAccessorImpl. java : 43 ) ~[na: 1.8 . 0 _161] at java. lang . reflect . Method . invoke (Method. java : 498 ) ~[na: 1.8 . 0 _161] at org. hibernate . engin
If you are seeing following error at the beginning of the Eclipse or any RCP based product then here is the solution: Error Message: «Could not launch the product because the associated workspace is currently in use by another Eclipse application.» or “Workspace in use or cannot be created chose a different one.” Solution : go to workspace location remove file <workspace location>/.metadata/.lock Reason: Through eclipse, user can create multiple Workspace locations. One Workspace location can be edited by one user at a time. A workspace contains the data related to various project configuration and local file storage. To avoid multiple users to access the same workspace, eclipse is maintaining a «.lock» file inside the Workspace. Eclipse will remove this «.lock» file when you will close the Eclipse. But in some cases, the Eclipse will crash due to some error, due to which it could not able to remove «.lock» file from
How to resolve : print() on closed filehandle in perl Error «print() on closed filehandle» generated in the following condition ( it is on of possible cause of it) ————————— BEGIN Code ————————————— my $inputFile = ‘/this/is/path/of/your/input/file.txt’; open(MYINPUTFILE, «>»,»$inputFile»); print MYINPUTFILE «any data»; close(MYINPUTFILE); ————————— END Code ————————————— here if you don’t have permission to access the path ‘/this/is/path/of/your/input/file.txt’ or the path (of parent directory) does not exist then it will throuw the error : print() on closed filehandle To resolve this better to make practice as follow while opening the file: ————————— BEGIN Code ————————————— open(MYINPUTFILE, «>»,»$inputFile») or die «ERROR ::: unable access the file&
Welcome to Eclipse WindowBuilder
WindowBuilder — is a powerful and easy to use bi-directional Java GUI designer for SWT and Swing
WindowBuilder is composed of SWT Designer and Swing Designer and makes it very easy to create
Java GUI applications without spending a lot of time writing code. Use the WYSIWYG visual designer
and layout tools to create simple forms to complex windows; the Java code will be generated for you
. Easily add controls using drag-and-drop, add event handlers to your controls, change various
properties of controls using a property editor, internationalize your app and much more.
Installation
Install the latest version of windowbuilder via the following update site
https://download.eclipse.org/windowbuilder/latest/
- 👔 Eclipse project entry:
- https://projects.eclipse.org/projects/tools.windowbuilder
- 🪲 Bug Tracker
- https://github.com/eclipse/windowbuilder/issues
- ⌨️ How to Contribute and get the latest snapshots:
- CONTRIBUTING.md
- 💬 Discussion channels
- https://github.com/eclipse/windowbuilder/discussions