| title | description | ms.custom | ms.date | ms.topic | ms.devlang | author | ms.author | manager | ms.technology | dev_langs | ms.workload |
|---|---|---|---|---|---|---|---|---|---|---|---|
|
Create a Windows Forms app with C# |
Learn how to create a Windows Forms app in Visual Studio with C#, step-by-step. |
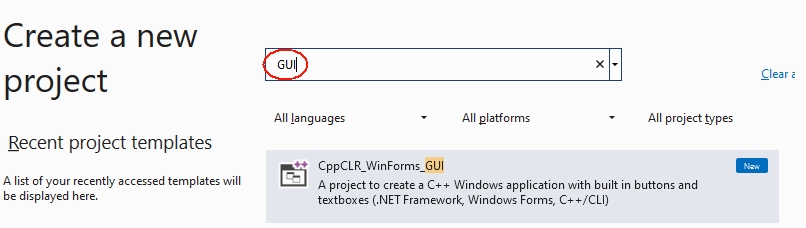
vs-acquisition, get-started |
1/24/2023 |
tutorial |
CSharp |
anandmeg |
meghaanand |
jmartens |
vs-ide-general |
CSharp |
multiple |
Create a Windows Forms app in Visual Studio with C#
[!INCLUDE Visual Studio]
In this tutorial, you’ll create a simple C# application that has a Windows-based user interface (UI).
::: moniker range=»vs-2019″
If you haven’t already installed Visual Studio, go to the Visual Studio downloads page to install it for free.
[!NOTE]
Some of the screenshots in this tutorial use the dark theme. If you aren’t using the dark theme but would like to, see the Personalize the Visual Studio IDE and Editor page to learn how.
::: moniker-end
::: moniker range=»vs-2022″
If you haven’t already installed Visual Studio, go to the Visual Studio 2022 downloads page to install it for free.
::: moniker-end
Create a project
First, you’ll create a C# application project. The project type comes with all the template files you’ll need, before you’ve even added anything.
::: moniker range=»vs-2019″
-
Open Visual Studio.
-
On the start window, choose Create a new project.

-
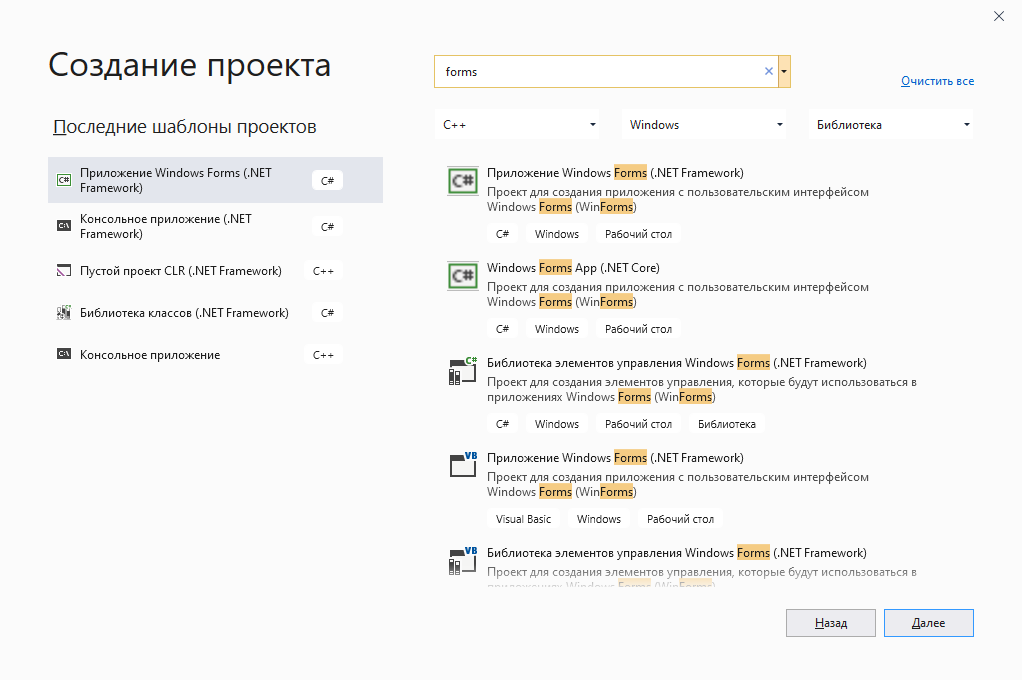
On the Create a new project window, choose the Windows Forms App (.NET Framework) template for C#.
(If you prefer, you can refine your search to quickly get to the template you want. For example, enter or type Windows Forms App in the search box. Next, choose C# from the Language list, and then choose Windows from the Platform list.)
[!NOTE]
If you do not see the Windows Forms App (.NET Framework) template, you can install it from the Create a new project window. In the Not finding what you’re looking for? message, choose the Install more tools and features link.Next, in the Visual Studio Installer, choose the .NET desktop development workload.
After that, choose the Modify button in the Visual Studio Installer. You might be prompted to save your work; if so, do so. Next, choose Continue to install the workload. Then, return to step 2 in this «Create a project» procedure.
-
In the Configure your new project window, type or enter HelloWorld in the Project name box. Then, choose Create.
Visual Studio opens your new project.


::: moniker-end
::: moniker range=»>=vs-2022″
-
Open Visual Studio.
-
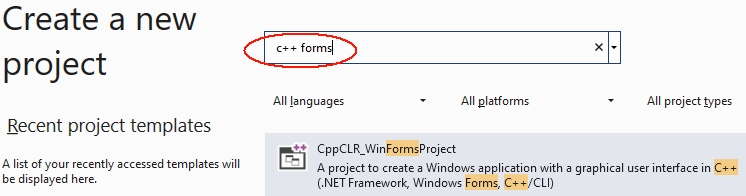
On the start window, select Create a new project.
:::image type=»content» source=»media/vs-2022/create-new-project-dark-theme.png» alt-text=»Screenshot to show the Create a new project window.»:::
-
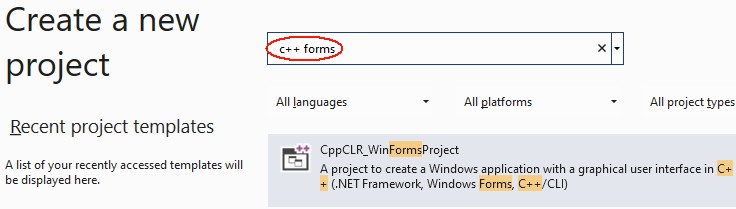
On the Create a new project window, select the Windows Forms App (.NET Framework) template for C#.
(If you prefer, you can refine your search to quickly get to the template you want. For example, enter or type Windows Forms App in the search box. Next, select C# from the Language list, and then select Windows from the Platform list.)
:::image type=»content» source=»media/vs-2022/csharp-winform-create-a-new-project.png» alt-text=»Screenshot to select the C# template for the Windows Forms App (.NET Framework).»:::
[!NOTE]
If you do not see the Windows Forms App (.NET Framework) template, you can install it from the Create a new project window. In the Not finding what you’re looking for? message, select the Install more tools and features link.:::image type=»content» source=»../get-started/media/vs-2019/not-finding-what-looking-for.png» alt-text=»Screenshot to show the The ‘Install more tools and features’ link from the ‘Not finding what you’re looking for’ message in the ‘Create a new project’ window.»:::
Next, in the Visual Studio Installer, select the .NET desktop development workload.
:::image type=»content» source=»media/vs-2022/install-dot-net-desktop-env.png» alt-text=»Screenshot to show the .NET Core workload in the Visual Studio Installer.»:::
After that, select the Modify button in the Visual Studio Installer. You might be prompted to save your work; if so, do so. Next, select Continue to install the workload. Then, return to step 2 in this «Create a project» procedure.
-
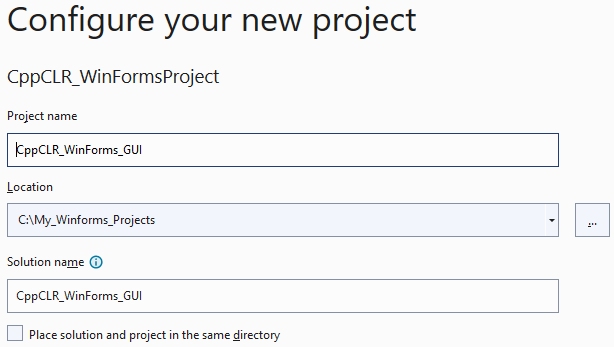
In the Configure your new project window, type or enter HelloWorld in the Project name box. Then, select Create.
:::image type=»content» source=»media/vs-2022/csharp-winform-configure-new-project.png» alt-text=»Screenshot to show the ‘Configure your new project’ window and name your project ‘HelloWorld’.»:::
Visual Studio opens your new project.
Create the application
After you select your C# project template and name your file, Visual Studio opens a form for you. A form is a Windows user interface. We’ll create a «Hello World» application by adding controls to the form, and then we’ll run the app.
Add a button to the form
-
Select Toolbox to open the Toolbox fly-out window.
:::image type=»content» source=»media/vs-2022/csharp-winform-hello-world-project-toolbox.png» alt-text=»Screenshot to select the Toolbox to open the Toolbox window.»:::
(If you don’t see the Toolbox fly-out option, you can open it from the menu bar. To do so, View > Toolbox. Or, press Ctrl+Alt+X.)
-
Expand Common Controls and select the Pin icon to dock the Toolbox window.
:::image type=»content» source=»media/vs-2022/csharp-winform-toolbox-flyout-pin.png» alt-text=»Screenshot to select the Pin icon to pin the Toolbox window to the IDE.»:::
-
Select the Button control and then drag it onto the form.
:::image type=»content» source=»media/vs-2022/csharp-winform-add-button-on-form.png» alt-text=»Screenshot to add a button to the form.»:::
-
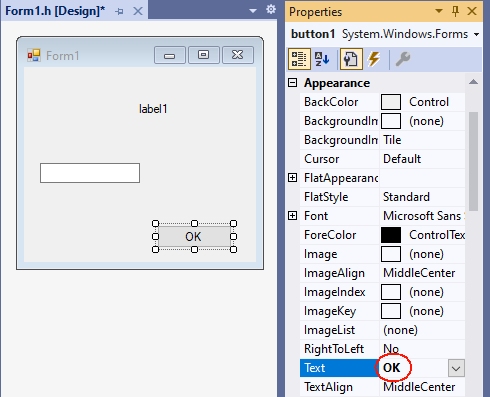
In the Properties window, locate Text, change the name from button1 to
Click this, and then press Enter.:::image type=»content» source=»media/vs-2022/csharp-winform-button-properties-text.png» alt-text=»Screenshot to add text to the button on the form by using the Properties window.»:::
(If you don’t see the Properties window, you can open it from the menu bar. To do so, select View > Properties Window. Or, press F4.)
-
In the Design section of the Properties window, change the name from button1 to
btnClickThis, and then press Enter.:::image type=»content» source=»media/vs-2022/csharp-winform-button-properties-design-name.png» alt-text=»Screenshot to add a function to the button on the form by using the Properties window.»:::
[!NOTE]
If you’ve alphabetized the list in the Properties window, button1 appears in the (DataBindings) section, instead.
Add a label to the form
Now that we’ve added a button control to create an action, let’s add a label control to send text to.
-
Select the Label control from the Toolbox window, and then drag it onto the form and drop it beneath the Click this button.
-
In either the Design section or the (DataBindings) section of the Properties window, change the name of label1 to
lblHelloWorld, and then press Enter.
Add code to the form
-
In the Form1.cs [Design] window, double-click the Click this button to open the Form1.cs window.
(Alternatively, you can expand Form1.cs in Solution Explorer, and then choose Form1.)
-
In the Form1.cs window, after the private void line, type or enter
lblHelloWorld.Text = "Hello World!";as shown in the following screenshot::::image type=»content» source=»media/vs-2022/csharp-winform-button-click-code.png» alt-text=»Screenshot to add code to the form»:::
Run the application
-
Select the Start button to run the application.
:::image type=»content» source=»media/vs-2022/csharp-winform-visual-studio-start-run-program.png» alt-text=»Screenshot to select Start to debug and run the app.»:::
Several things will happen. In the Visual Studio IDE, the Diagnostics Tools window will open, and an Output window will open, too. But outside of the IDE, a Form1 dialog box appears. It will include your Click this button and text that says label1.
-
Select the Click this button in the Form1 dialog box. Notice that the label1 text changes to Hello World!.
:::image type=»content» source=»media/vs-2022/csharp-winform-form.png» alt-text=»Screenshot to show a Form1 dialog box that includes label1 text.»:::
-
Close the Form1 dialog box to stop running the app.
::: moniker-end
::: moniker range=»<=vs-2019″
Create the application
After you select your C# project template and name your file, Visual Studio opens a form for you. A form is a Windows user interface. We’ll create a «Hello World» application by adding controls to the form, and then we’ll run the app.
Add a button to the form
-
Choose Toolbox to open the Toolbox fly-out window.
(If you don’t see the Toolbox fly-out option, you can open it from the menu bar. To do so, View > Toolbox. Or, press Ctrl+Alt+X.)
-
Choose the Pin icon to dock the Toolbox window.
-
Choose the Button control and then drag it onto the form.
-
In the Properties window, locate Text, change the name from Button1 to
Click this, and then press Enter.(If you don’t see the Properties window, you can open it from the menu bar. To do so, choose View > Properties Window. Or, press F4.)
-
In the Design section of the Properties window, change the name from Button1 to
btnClickThis, and then press Enter.[!NOTE]
If you’ve alphabetized the list in the Properties window, Button1 appears in the (DataBindings) section, instead.


Add a label to the form
Now that we’ve added a button control to create an action, let’s add a label control to send text to.
-
Select the Label control from the Toolbox window, and then drag it onto the form and drop it beneath the Click this button.
-
In either the Design section or the (DataBindings) section of the Properties window, change the name of Label1 to
lblHelloWorld, and then press Enter.
Add code to the form
-
In the Form1.cs [Design] window, double-click the Click this button to open the Form1.cs window.
(Alternatively, you can expand Form1.cs in Solution Explorer, and then choose View Code(or press F7) from the right-click menu on Form1.cs.)
-
In the Form1.cs window, after the private void line, type or enter
lblHelloWorld.Text = "Hello World!";as shown in the following screenshot:

Run the application
-
Choose the Start button to run the application.
Several things will happen. In the Visual Studio IDE, the Diagnostics Tools window will open, and an Output window will open, too. But outside of the IDE, a Form1 dialog box appears. It will include your Click this button and text that says Label1.
-
Choose the Click this button in the Form1 dialog box. Notice that the Label1 text changes to Hello World!.
-
Close the Form1 dialog box to stop running the app.


::: moniker-end
Next steps
Congratulations on completing this tutorial. To learn more, continue with the following tutorial:
[!div class=»nextstepaction»]
Tutorial: Create a picture viewer
See also
- More C# tutorials
- Visual Basic tutorials
- C++ tutorials
In Visual Studio up to version 2010, Templates for Windows Forms projects are pre-installed, but not as of Visual Studio 2012. For these newer versions of Visual Studio you have to install an extension.
This tutorial is for Visual Studio 2022, but applies essentially the same to other versions of Visual Studio (2019, 2017, 2015 and earlier).
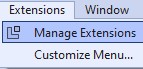
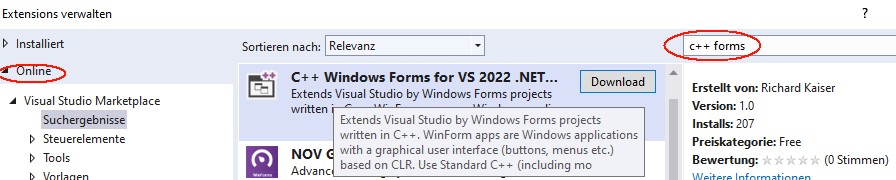
Installing the extension for Windows Forms projects with C++
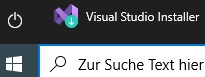
This extension is installed in Visual Studio 2022 under Extensions|Manage Extensions
After clicking Download at “C++ Windows Forms for Visual Studio 2022 .NET Framework”
and closing Visual Studio you get the message
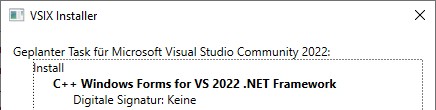

Click Modify to install the extension.
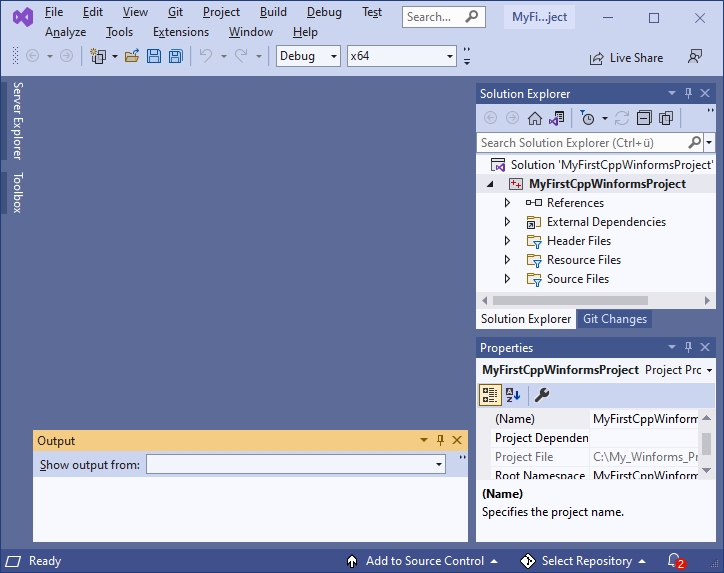
After the next start of Visual Studio under File|New|Project you will find the CppCLR_WinformsProject template:

With this template you can create Windows Forms projects written in C++. Such a project creates a Windows application with a graphical user interface (buttons, menus, etc.), for example:

Standard C++ (including almost all extensions of C++11, C++14, C++17) is used as programming language for the business logic. Only for accessing Windows controls C++/CLI is necessary. This is a simple C++ dialect for the .NET Framework.
The book „C++ mit Visual Studio 2019 und Windows Forms-Anwendungen“
The following is a brief excerpt from my book (in German)
which is still up to date with Visual Studio 2022. All examples and projects can be created and compiled in Visual Studio 2022 as in Visual Studio 2019.
Installing Visual Studio for Windows Forms Projects
In order to create Windows Forms projects in Visual Studio, particular components must be installed during the installation of Visual Studio. If this was forgotten during the installation, start the Visual Studio Installer either under Windows|Start
or in Visual Studio under File|New|Project|Create new project (at the end of the project list)

In the installer, check .NET desktop development, desktop development with C++ and C++/CLI support:

Create a Windows Forms project
After restarting Visual Studio, Windows Forms projects are available under Create New Project or File|New|Project:
Click the Next button. Then you will be prompted to enter the name of the project and a directory:

After clicking the Create button, Visual Studio looks something like this:
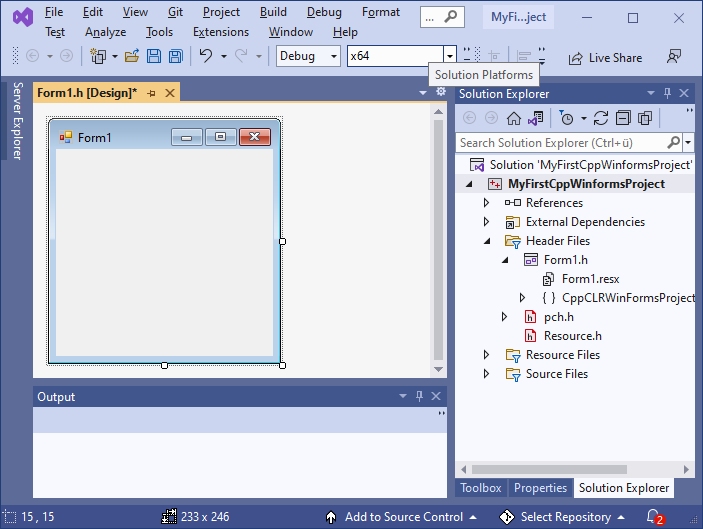
If you now click on Form1.h in the Solution Explorer, the form is displayed:
Normally, everything is done and you can continue with the next section. However, if you get something like this

you have clicked Form1.h too fast. Close this window

and click again on Form1.h in the Solution Explorer.
Visual Programming: A first small program
Now, before we get started with our first little program, let’s rearrange Visual Studio a bit to make it easier to use.
After installing Visual Studio, the Toolbox is offered at the left margin.
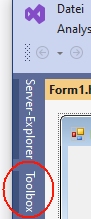
To prevent the toolbox from covering the form, drag the toolbox to the frame with the Solution Explorer (press the left mouse button on the title bar of the toolbox, then move to the title bar of the Solution Explorer with the mouse button pressed and release the mouse button).
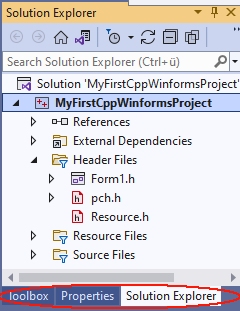
Drag the properties window analogously to the Solution Explorer.
Since we initially only need the Toolbox, Solution Explorer and Properties window, you can close all other windows here (e.g. Git Explorer, etc.). Then the right frame looks something like this:
With the Windows Forms project from Section 1.4, Visual Studio then looks like this:
Next, we will now write a first small program.
The form (here Form1) is the starting point for all Windows Forms applications. It corresponds to the window that is displayed when the program is started:
![]()
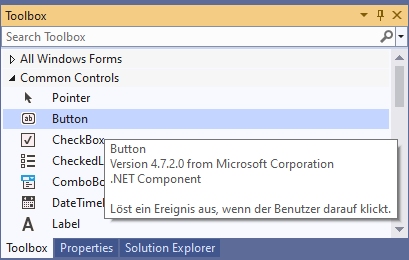
Controls from the Toolbox can be placed on a form. The Toolbox contains essentially all the controls commonly used in Windows. They are located in various groups (e.g. General Controls, Containers, etc.), which can be expanded and collapsed. Most of these controls (such as a button) are displayed on the form while the program is running. If you stop with the mouse pointer briefly on a line of the toolbox, a small hint appears with a short description:
To place an element from the toolbox on the form, simply drag it from the toolbox onto the form. Or click on it in the toolbox first and then click on the position in the form where you want the upper left corner to be.
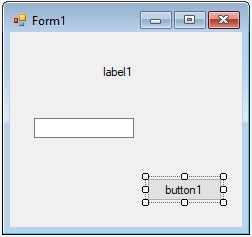
Example: After placing a Label (line seven in Common Controls, with the capital A), a TextBox (fourth line from the bottom, labelled ab) and a Button (second line labelled ab) on the form, it looks something like this:
By playing around like this, you have already created a real Windows program – not a particularly useful one, but still. You can start it as follows:
- with Debug|Start Debugging from the menu, or
- with F5 from any window in Visual Studio or
- by starting the exe file generated by the compiler.
This program already has many features that you would expect from a Windows program: You can move it with the mouse, resize and close it.
Do not forget to close your program before you continue editing it. As long as the program is still running, you cannot restart the compiler or modify the form.
This way of programming is called visual programming. While conventional programming means developing a program solely by writing instructions (text) in a programming language, visual programming means composing it wholly or in part from out-of-the-box graphical controls.
With Visual Studio, the user interface of a Windows Forms program can be designed visually. This allows you to see how the program will look later at runtime as soon as you design it. The instructions that are to take place as a response to user input (mouse clicks, etc.), on the other hand, are written conventionally in a programming language (e.g. C++).
The Properties Window
The control that was clicked last on a form (or in the pull-down menu of the Properties window) is called the currently selected control. You can identify it by the small squares on its edges, the so-called drag handles. You can drag them with the mouse to change to resize the control. A form becomes the currently selected control by clicking on a free position in the form.
Example: In the last example, button1 is the currently selected control.
In the Properties window (context menu of the control on the form, or View|Properties window – do not confuse with View|Property pages).
the properties of the currently selected control are displayed. The left column contains the names and the right column contains the values of the properties. With F1 you get a description of the property.
The value of a property can be changed via the right column. For some properties, you can type the new value using the keyboard. For others, after clicking on the right column, a small triangle is displayed for a pull-down menu, through which a value can be selected. Or an icon with three dots „…“ is displayed, which can be used to enter values.
Example:
- For the Text property, you can enter a text with the keyboard. For a button this text is the inscription on the button (e.g. „OK“), and for a form the title line (e.g. „My first C++ program“).
- For the BackColor property (e.g. from a button) you can select the background color via a pull-down menu.
- If you click the right column of the Font property and then the „…“ icon, you can select the font of the Text property.
A control on the form is not only adjusted to its properties in the Properties panel, but also vice versa: if you resize it by dragging the drag handles on the form, the values of the corresponding properties (Location and Size in the Layout section) in the Properties panel are automatically updated.
First steps in C++
Next, the program from Section 1.5 is to be extended so that instructions are executed in response to user input (e.g., a button click).
Windows programs can receive user input in the form of mouse clicks or keyboard input. All inputs are received centrally by Windows and passed on to the program. This triggers a so-called event in the program.
Such an event can be assigned a function that is called when the event occurs. This function is also called an event handler.
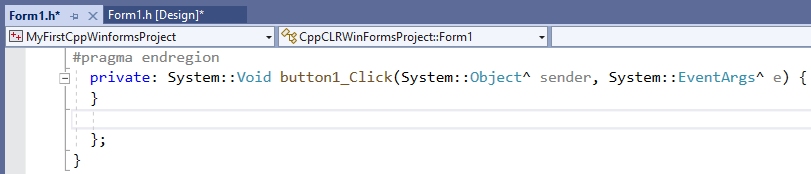
For the time being, our program should only react to the clicking of a button. The easiest way to get the function called for this event is to double-click on the button in the form. The cursor is then placed at the beginning of the function. This causes Visual Studio to generate the following function and display it in the editor:
Between the curly brackets „{“ and „}“ you then write the statements to be executed when the Click event occurs.
Essentially all instructions of C++ are possible here. In the context of this simple tutorial, only some elementary instructions are to be introduced, which is necessary for the basic understanding of Visual Studio. If terms like „variables“ etc. are new to you, read on anyway – from the context you will surely get an intuitive idea which is sufficient for the time being.
A frequently used instruction in programming is the assignment (with the operator „=“), which is used to assign a value to a variable. Initially, only those properties of controls that are also displayed in the properties window are to be used as variables. These variables can then be assigned the values that are also offered in the properties window in the right column of the properties.
For the BackColor property, the allowed values are offered after the pull-down menu is expanded:
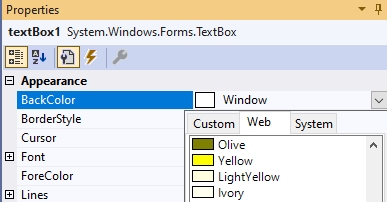
These values can be used in the program by specifying them after Color::. If you now write the statement
textBox1->BackColor = Color::Yellow;between the curly brackets
private: System::Void button1_Click(System::Object^  sender, System::EventArgs^  e)
{
 textBox1->BackColor = Color::Yellow;
}
the BackColor property of textBox1 gets the value Color::Yellow, which stands for the color yellow, when button1 is clicked during the execution of the program. If you now start the program with F5 and then click button1, the TextBox actually gets the background color yellow.
Even if this program is not yet much more useful than the first one, you have seen how Visual Studio is used to develop applications for Windows. This development process always consists of the following activities:
- You design the user interface by placing controls from the Toolbox on the form (drag and drop) and adjusting their properties in the Properties window or the layout with the mouse (visual programming).
- You write in C++ the instructions that should be done in response to user input (non-visual programming).
- You start the program and test whether it really behaves as it should.
The period of program development (activities 1. and 2.) is called design time. In contrast, the time during which a program runs is called the runtime of a program.
A simple Winforms application
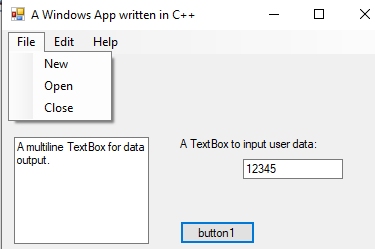
Next, a simple Winforms application is to be created based on the previous explanations. It contains a button and TextBoxes for input and output:

However, you do not have to create this project yourself. If you install the Visual Studio extension

a project template with exactly this project is available in Visual Studio:
You can use this project as a basis for many applications by adding more controls and functions.
The main purpose of this project is to show how the application logic is separated from the user interface:
- The functions, classes, etc. of the application logic are written in standard C++ and are contained in a header file that is added to the project.
- The instructions for the user interface, on the other hand, are written primarily in C++/CLI and are often included in the form class in Form1..
- The functions of the header file are called when clicking a button.
The following is a simplified version of chapter 2.11 from my book „C++ mit Visual Studio 2019 und Windows Forms-Anwendungen“. There I recommend such a project for the solutions of the exercises. In the header file of such a project you can include the solutions of several exercises or distribute them to different header files. For each subtask you can put a button (or menu options) on the form. This way you don’t have to create a new project for each subtask.
Of course, outsourcing your own instructions to an extra file (as in 3.) and accessing the controls via function parameters is somewhat cumbersome: however, it leads to clearer programs than if all instructions are located in the form file within the Form1 class. This saves many programming errors that lead to obscure error messages, and makes it easier to search for errors.
1. Create the project
Create a new project with File|New|Project|CppCLR_WinformsProject (see section 1.1).
The following examples assume a project named CppCLR_Winforms_GUI.
2. Design the user interface (the form)
The form is then designed to contain all the controls needed to input and output information and start actions. This is done by dragging appropriate controls from the toolbox onto the form.
For many projects (e.g. the exercises from my book) the following controls are sufficient:
- A multiline TextBox (see Section 2.3.2 of my book) to display the results.
- A single-line TextBox for entering data
- One or more buttons (or menu options, etc.) to start the instructions
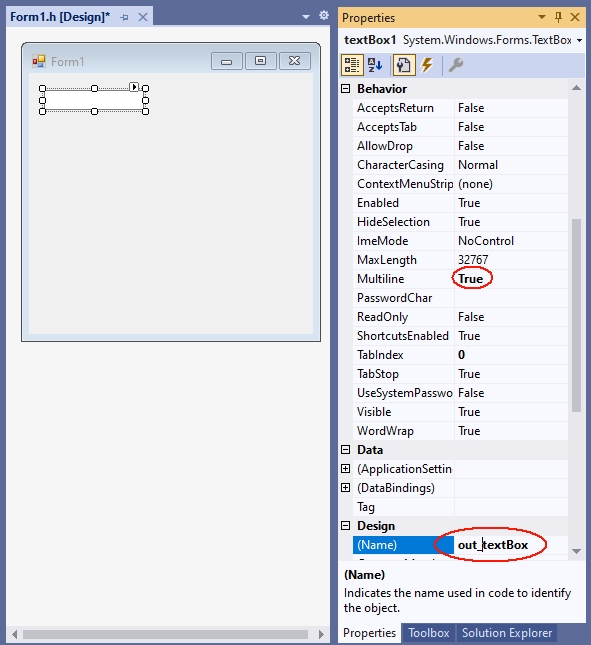
A TextBox becomes multiline TextBox by the value true of the MultiLine property. The TextBox for output is to be named out_textBox:
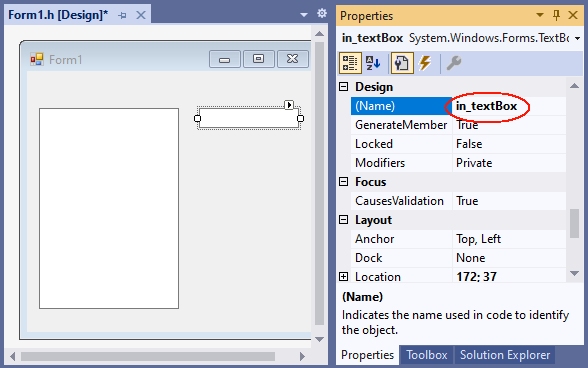
The TextBox for entering data will be named in_textBox:
Since the function plus_1 is called when the button is clicked, it is given the caption „plus 1“ and the name button_plus1:

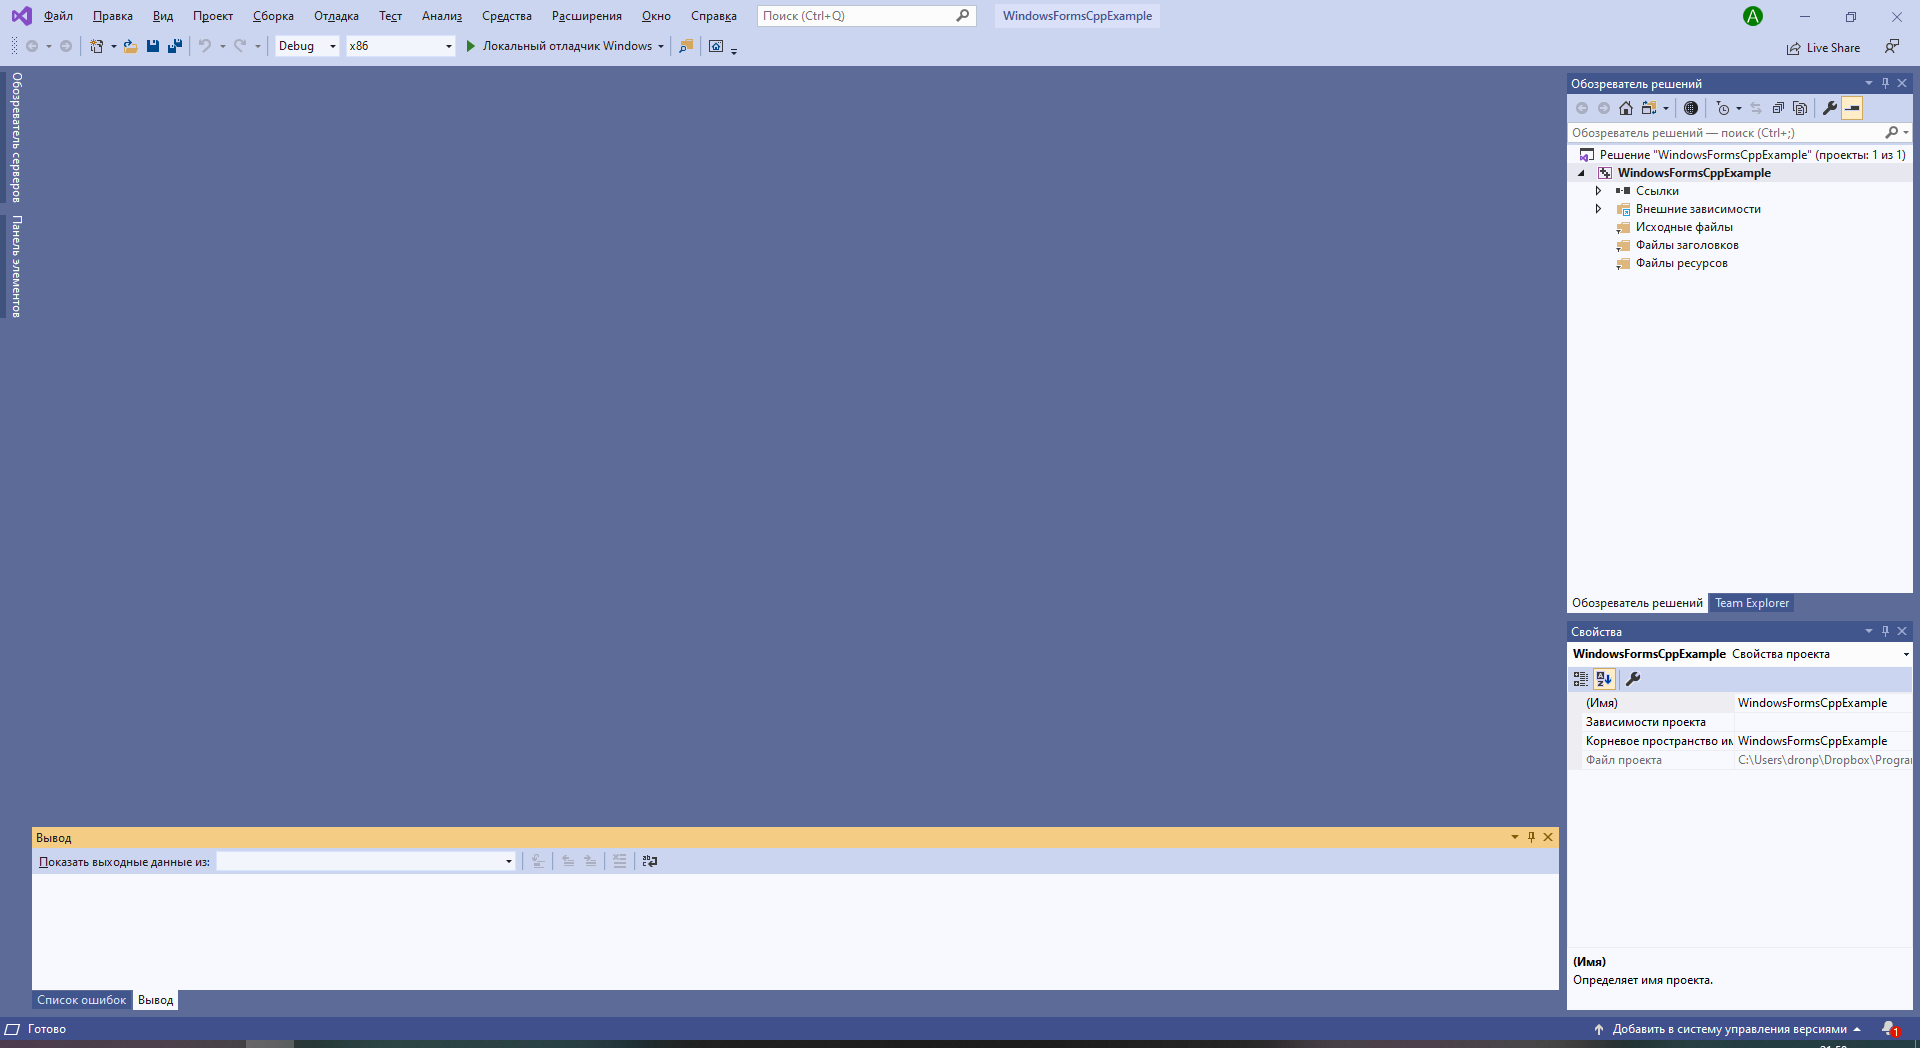
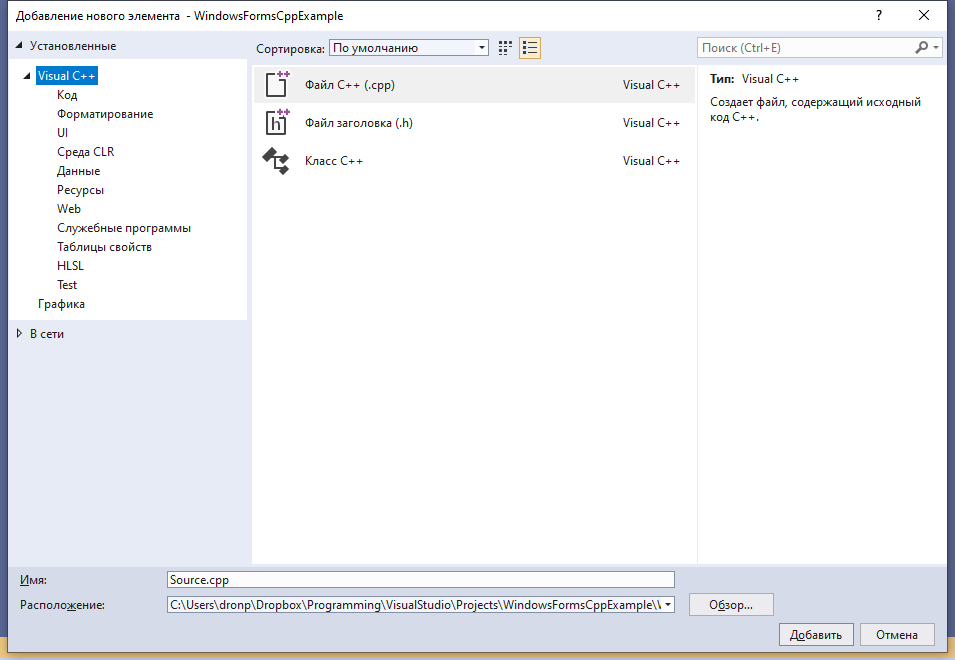
The functions, declarations, classes etc. of the so-called application logic are placed in a separate header file, which is added to the project with Project|Add new element|Visual C++|Code as header file(.h) with the name Header1.h. In practice, however, you should group functions and classes that belong together conceptually in a header file, and then give the header file a more meaningful name than Header.h.
The application logic is then included in the header file. These are mostly functions, classes, etc. written in C++. In our first example, this should be a function with the name plus_1, which returns the value of the argument increased by 1:
In a C++ Windows Forms project, the application logic consists primarily of functions, classes, etc. written in C++, without C++/CLI language elements. In our first example, this should be a function named plus_1, which returns the value of the argument incremented by 1:
int plus_1(int x)
{
  return x + 1;
}
Diese Datei wird dann vor dem namespace des Projekts mit einer #include-Anweisung in die Formulardatei (z.B. Form1.h) aufgenommen:
This file is then included in the form file (e.g. Form1.h) before the namespace of the project with an #include statement:
#pragma once
#include "Header1.h" // <-- manuell einfügen. nach dem Eintippen von
                     // "#include " bietet Visual Studio die Datei an.
namespace CppCLRWinFormsProject {
  using namespace System;
    ...
}
4. Calling the functions
By double-clicking the button on the form, Visual Studio creates the function (the event handler) that will be called when the button is clicked when the program is running:
private: System::Void button_plus_1_Click(System::Object^ sender, System::EventArgs^ e)
{
}
In this event handler you then call the corresponding function. In this simple tutorial this is the function plus_1 from the file Header.h.
- If this function uses user input, you read it in via a TextBox. In this simple tutorial, it will be a number that is read from the in_TextBox.
- If a parameter of the called function does not have type String (the type of the property in_textBox->Text), the string must be converted to the type of the parameter. This is possible with one of the Convert:: functions.
- The results are to be displayed in the out_textBox. This can be done with the function out_textBox->AppendText. The string that AppendText expects can be created with String::Format. In the first argument (a string) you specify {0} for the first value after the string, {1} for the second and so on.
private: System::Void button_plus_1_Click(System::Object^ sender, System::EventArgs^ e)
{
int n = Convert::ToInt32(in_textBox->Text);
int result = plus_1(n);
out_textBox->AppendText(String::Format("plus_1({0})={1}rn",n,result));
}
If you enter a number in the input field after starting this program with F5 and then click on the button, the value incremented by 1 is displayed in the output text box:
For each further function whose result is to be displayed, a button is placed on the form and given a suitable name (Name property) and a suitable label (Text property). This function is then called in the associated event handler.
With this all relevant parts of the ??? CppCLR_Winforms_GUI are presented. You can enhance it as you like with additional controls (buttons, menus, etc.). See chapter 2 of my book for more information.
5. GUI and application logic not so strictly separated
In the version created under 1. to 4. the application logic is strictly separated from the user interface: The access to the user interface with C++/CLI is exclusively done in Form1.h. In Header1.h, however, only standard C++ is used. This has in particular the advantage that one can use this header also in other platforms (e.g. console applications, Qt, Mac).
However, in the early stages of a project, when there is still a lot of experimenting going on, it can be a bit cumbersome if you have to change the calls in another file every time you change a parameter list. And for applications that are not intended to be used for other platforms at all, this strict separation doesn’t help much. This often applies to exercise tasks as well.
This jumping back and forth between different files can be avoided by relaxing the strict separation between the application logic and the user interface by including access to the controls in the header file as well.
Accessing controls in a header file is enabled by inserting
using namespace System;
using namespace System::Windows::Forms;
into the header file at the beginning. Then you can also use the types of the controls in the header file (e.g. as parameters) and include the statements that were in the buttonClick function in Form1.h under 4.
This procedure is implemented in the Header2.h file:
#pragma once
using namespace System;
using namespace System::Windows::Forms;

int plus_2(int x)
{
  return x + 2;
}

void plus_2_Click(TextBox^ in_textBox, TextBox^ out_textBox)
{
int n = Convert::ToInt32(in_textBox->Text);
int result = plus_2(n);
out_textBox->AppendText(String::Format("plus_2({0})={1}rn", n, result));
}
Here you pass a parameter for the control to the function. Please note that you must specify a ^ after the name of a .NET type (e.g. TextBox, Button). In the function you then address the control under the name of the parameter.
This function can be called when a button is clicked:
private: System::Void button_plus_1_Click(System::Object^ sender, System::EventArgs^ e)
{
plus_2_Click(in_textBox, out_textBox);
}
6. Analogy to console applications
Comparing of this Windows Forms project with a corresponding console application shows the analogy of the two types of projects. This analogy shows how to convert a console application into a forms application: If you have a console program like
#include<iostream>
int main()
{
int n;
std::cin >> n;
int result = plus_2(n);
std::cout << "plus_2(" << n << ") = " << result << std::endl;
return 0;
}
you can port it to a form application with relatively little effort. You just need to replace the I/O statements and call the functions in response to a ButtonClick, etc:
private: System::Void button_plus_1_Click(System::Object^ sender, System::EventArgs^ e)
{
int n = Convert::ToInt32(in_textBox->Text);
int result = plus_1(n);
out_textBox->AppendText(String::Format("plus_1({0})={1}rn",n,result));
}
Excerpt from the preface to my book „C++ mit Visual Studio 2019 und Windows Forms-Anwendungen“
The preface to my book (in German)
teaches C++ with Windows Forms applications in more detail.
Preface
The starting point for this book was the desire for a C++ textbook in which programs for a graphical user interface (Windows) are developed from the beginning, and not console applications as is usually the case. Programs in which inputs and outputs are done via a console are like stone-aged DOS programs for many beginners and discourage them from wanting to deal with C++ at all.
Windows Forms applications are an ideal framework for C++ programs with an attractive user interface: access to Windows controls (Buttons, TextBoxes etc.) is easy. The difference to a standard C++ program is mostly only that inputs and outputs are done via a Windows control (mostly a TextBox)
textBox1->AppendText(„Hello World“);
while in standard C++ the console is used with cout:
cout << "Hello world" << endl;
But not only students can benefit from C++ with a graphical user interface. With Windows Forms projects, existing C or C++ programs can be enhanced with a graphical user interface without much effort. And those who know C or C++ and do not want to learn a new language for a GUI can make their existing programs more beautiful and easier to use with simple means.
C++ has developed rapidly in recent years: The innovations of C++11, C++14, C++17 and C++20 have brought many improvements and new possibilities. Much of what was good and recommended in 2010 can be made better and safer today.
As a book author and trainer who has accompanied this whole evolution, you notice this particularly clearly: many things that have been written in the past should be done differently today. True, it would still be compiled. But it is no longer modern C++, which corresponds to the current state of the art and uses all the advantages.
This book introduces C++ at the Visual Studio 2019 level in May 2020. This is the scope of C++17.
Последнее обновление: 11.11.2022
Для создания графических приложений на C# можно использовать .NET CLI, но также можно
использовать бесплатную и полнофункциональную среду разработки — Visual Studio Community 2022, которая в ряде случаев облегчает проектирование
приложения. Так, загрузим установщик Visual Studio по адресу:
https://www.visualstudio.com/en-us/downloads.

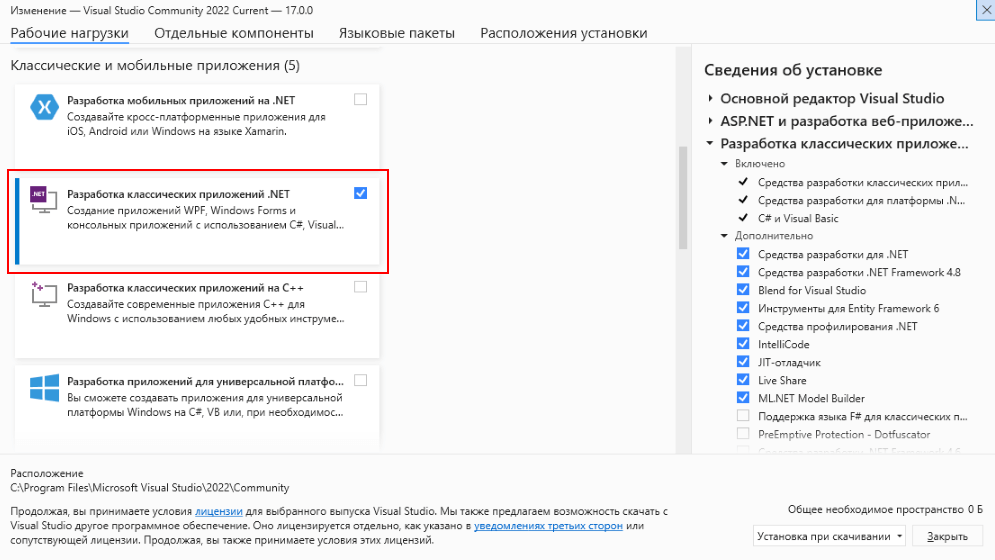
Чтобы добавить в Visual Studio поддержку проектов для Windows Forms и C# и .NET 7, в программе установки среди рабочих нагрузок нужно
выбрать только пункт Разработка классических приложений .NET. Можно выбрать и больше опций или вообще все опции, однако стоит
учитывать свободный размер на жестком диске — чем больше опций будет выбрано, соответственно тем больше места на диске будет занято.
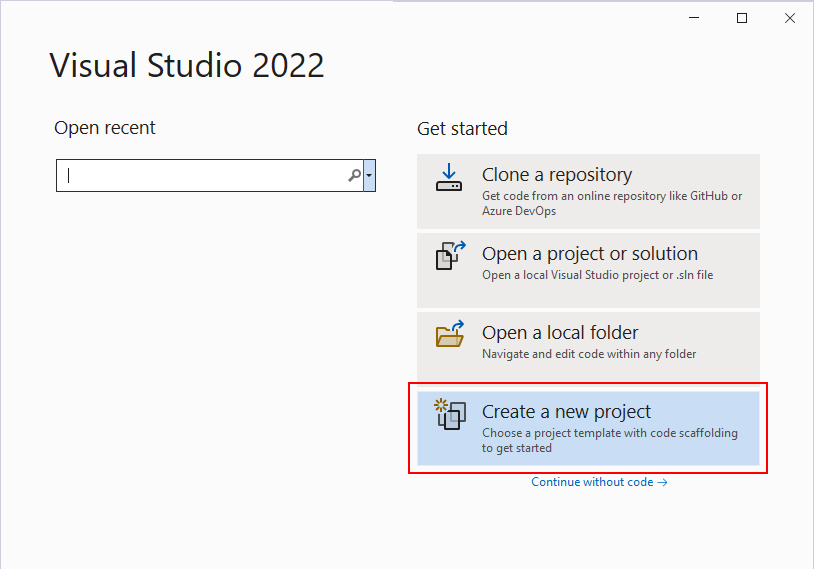
После установки среды и всех ее компонентов, запустим Visual Studio и создадим проект графического приложения.
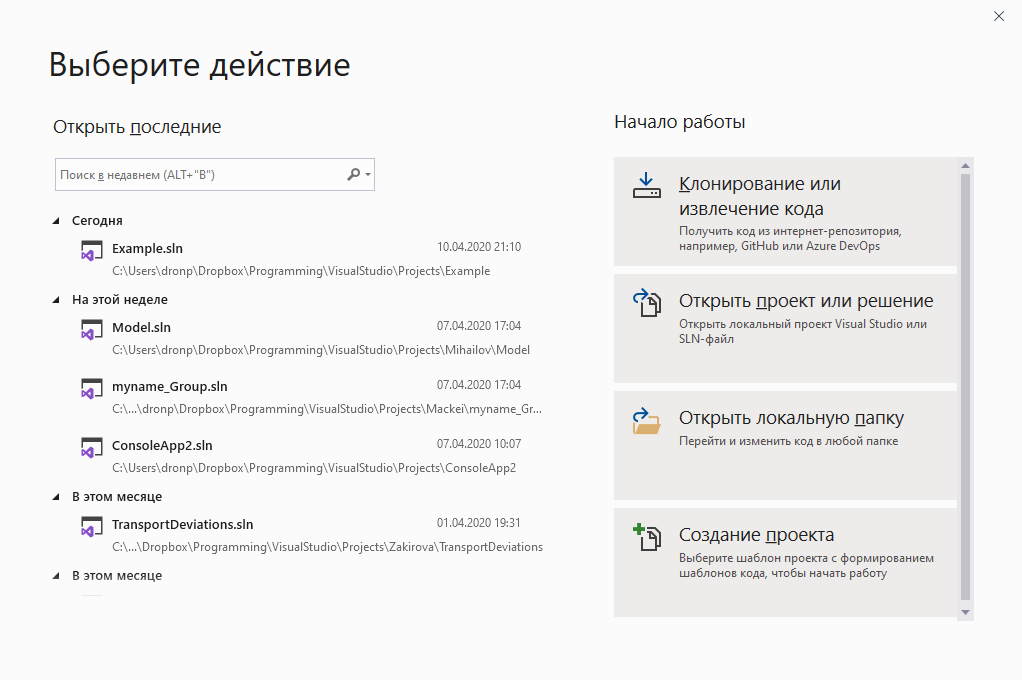
На стартовом экране выберем Create a new project (Создать новый проект)
На следующем окне в качестве типа проекта выберем Windows Forms App:

Стоит отметить, что среди шаблонов можно увидеть еще тип Windows Forms App (.NET Framework) — его НЕ надо выбирать, необходим именно тип
Windows Forms App.
Далее на следующем этапе нам будет предложено указать имя проекта и каталог, где будет располагаться проект.
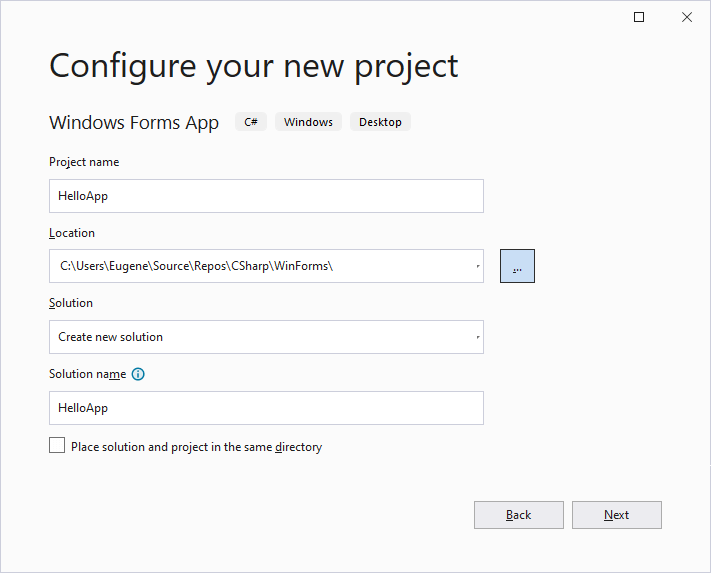
В поле Project Name дадим проекту какое-либо название. В моем случае это HelloApp.
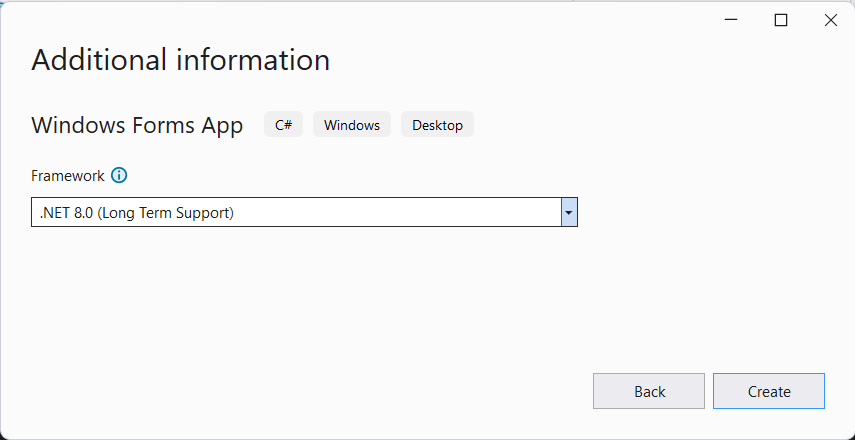
На следующем окне Visual Studio предложит нам выбрать версию .NET, которая будет использоваться для проекта. Выберем последнюю на данный момент версию — .NET 7.0 и нажмен на кнопку Create (Создать) для создания проекта.
После этого Visual Studio откроет наш проект с созданными по умолчанию файлами:
Справа находится окно Solution Explorer, в котором можно увидеть структуру нашего проекта. Практически этот тот же проект, который создается с
помощью .NET CLI:
-
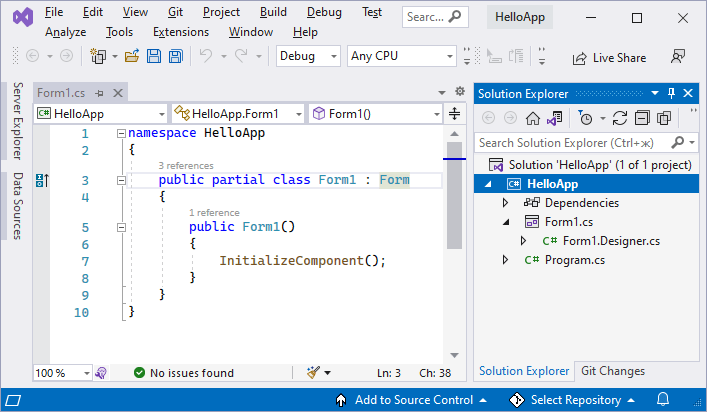
Dependencies — это узел содержит сборки dll, которые добавлены в проект по умолчанию.
Эти сборки как раз содержат классы библиотеки .NET, которые будет использовать C# -
Form1.Designer.cs: он содержит определение компонентов формы, добавленных
на форму в графическом дизайнере -
Далее идет файл единственной в проекте формы — Form1.cs, который по умолчанию открыт в центральном окне.
-
Program.cs определяет точку входа в приложение
Запуск приложения
Чтобы запустить приложение в режиме отладки, нажмем на клавишу F5 или на зеленую стрелочку на панели Visual Studio.
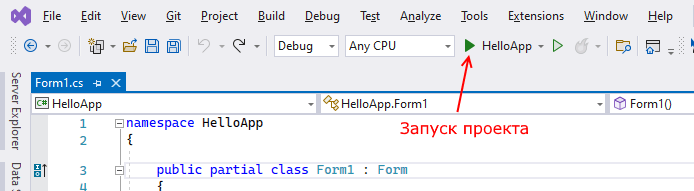
После этого запустится пустая форма Form1 по умолчанию.

После запуска приложения студия компилирует его в файл с расширением exe. Найти данный файл можно, зайдя в папку проекта и далее в каталог
binDebugnet7.0-windows
Рассмотрев вкратце создание проекта графического приложения, мы можем перейти к обзору основных компонентов и начнем мы с форм.
При создании нового проекта в Visual Studio для языка программирования C++ в мастере нет пункта Windows Forms. Но, безусловно, язык C++ поддерживает .NET и, соответственно, Windows Forms. Из этой статьи Вы узнаете, как создать в Visual Studio проект Windows Form на C++.
Сначала необходимо создать новый проект в Visual Studio.
Создание нового проекта C++ в Visual Studio
Запустите Visual Studio. Нажмите «Файл» → «Создать» → «Проект…». Или нажмите сочетание клавиш Ctrl + Shift + N на клавиатуре.

В появившемся окне «Создать проект» слева выберите группу «Visual C++», а в ней пункт «CLR». Щелкните по «Пустой проект CLR», введите имя проекта и нажмите кнопку «OK».

Таким образом мы создали новый проект на языке программирования C++ в Visual Studio.
Добавление Windows Forms в проект C++
Теперь в созданный проект на C++ добавим форму Windows Forms.
Для этого щелкните в «Обозревателе решений» на названии проекта правой кнопкой мыши, выберите пункт «Добавить» и затем «Создать элемент…». Либо просто нажмите на клавиатуре сочетание клавиш Ctrl + Shift + A.

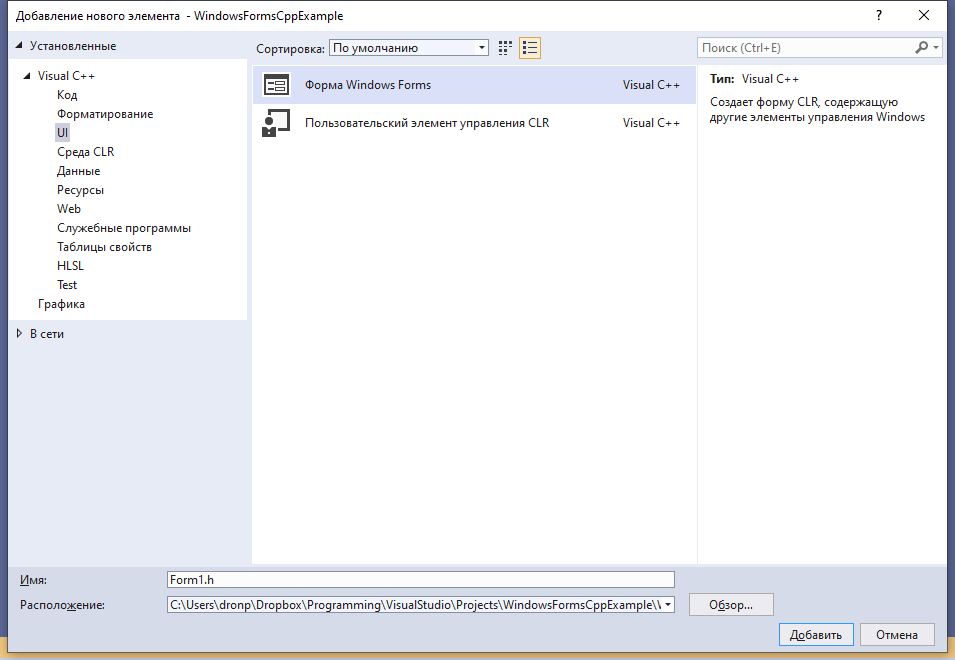
Загрузится окно «Добавление нового элемента». В нём щёлкните левой кнопкой мыши по группе UI в выберите элемент «Форма Windows Forms — Visual C++». Можете изменить имя создаваемой формы. По завершении нажмите кнопку «Добавить».

Далее откройте файл исходного кода «MyForm.cpp» (если вы изменяли название формы, то файл будет иметь другое имя). В него добавьте следующий текст:
|
using namespace System; using namespace System::Windows::Forms; [STAThread] void main(array<String^>^ arg) { Application::EnableVisualStyles(); Application::SetCompatibleTextRenderingDefault(false); WinFormsTest::MyForm form; //WinFormsTest — имя вашего проекта Application::Run(%form); } |
Если Вы указали имя проекта отличное от WinFormsTest, то, соответственно, в коде укажите введённое Вами имя.
Сохраните изменения в файле.
Теперь необходимо произвести ряд настроек проекта в Visual Studio. Приступим.
Щёлкните по названию проекта в «Обозревателе решений» правой кнопкой мыши и затем нажмите кнопку «Свойства». Либо сразу нажмите сочетание клавиш Alt + Enter.

В «Странице свойств» проекта слева выберите группу «Компоновщик» → «Система». В раскрывающемся списке «Подсистема» укажите Windows и нажмите кнопку «Применить».

Далее в разделе «Дополнительно» группы «Компоновщик» в качестве «Точки входа» укажите функцию main (напишите словом). Щелкните кнопку «Применить», а затем «ОК».

На этом настройка и создание проекта Windows Forms на C++ завершены! Чтобы просмотреть результат — запустите проект на выполнение (клавиша F5).

Видеоурок создания проекта WinForms C++
Windows Forms Apps in C++ with Visual Studio 2022
Extend Visual Studio 2022 by Windows Forms projects written in C++. Applications created by such projects have a graphical user interface. They are based on .NET Framework. You can use all common Windows controls like Buttons, Menues, TextBoxes etc.
Click here for a tutorial for Windows Forms Projects in English.
Klicken Sie hier für eine Anleitung für Windows Forms Projekte in Deutsch.
Use Standard C++ (including most of C++11, C++14, C++17) for your business logic. To access GUI controls use C++/CLI (an easy to use C++ dialect). The main difference between a traditional C++ program is, that instead of using the console for user interaction
cout << "Hello world" << endl;
you can use Windows controls, e.g. a TextBox
textBox1->AppendText("Hello World");
C++ Windows forms projects are an easy way to create programs with a graphical user interface in C++.
- Use Windows Forms Projects to enhance your C++ programs with a graphical user interface. You can write serious C++ applications with Windows Forms projects.
- Windows Forms Projects are great for learning C++. I used them in my introductory C++ lectures for years. Since the programs are not restricted to the console for user interaction, they are more attractive, more flexible and much easier to use for the students.
Based on this extension I created another extension that is a very simple Windows Forms Project with a graphical user interace (GUI) written in C++. The form contains a button and textboxes for input and output, but you can easily extend it by adding more controls and functions.
My textbook (in German) teaches C++ from the scratch, using C++ Windows forms. It focuses on standard C++ at the C++17 level, not C++/CLI.
На чтение 7 мин Просмотров 2.8к. Опубликовано 07.04.2022
Освойте Microsoft Visual Studio и разрабатывайте собственные приложения с помощью Windows Forms практически без написания кода.
Windows Forms — это платформа, доступная в Visual Studio, которая позволяет создавать настольные приложения с помощью графического пользовательского интерфейса. Это позволяет вам щелкать и перетаскивать виджеты, такие как кнопки или метки, прямо на холст и управлять свойствами каждого виджета, такими как размер шрифта, цвет или граница.
В этой статье простой конвертер градусов Цельсия в градусы Фаренгейта будет использоваться в качестве примера для изучения основ настройки приложения Windows Form. В этом руководстве используется Visual Studio 2019 Community Edition.
Содержание
- Как создать проект Windows Forms в Visual Studio
- Как добавить элементы на холст проекта
- Как обрабатывать события и писать код в коде программной части
- Как запускать и отлаживать программу Windows Forms
- Отладка программы Windows Forms
- Запуск программы с помощью исполняемого файла
- Добавление дополнительных элементов в форму Windows
Как создать проект Windows Forms в Visual Studio
Сначала создайте проект в Visual Studio.
- Откройте Visual Studio и выберите Создать новый проект.
- Visual Studio предоставит вам список шаблонов проектов, из которых вы можете выбрать.
- Чтобы создать приложение Windows Forms, найдите приложение Windows Formи выберите его из списка шаблонов. Как только это будет выбрано, нажмите » Далее».

- Добавьте имя и местоположение для проекта и нажмите » Далее». Расположение — это каталог, в котором будут храниться файлы кода.
- На следующем экране сохраните выбор по умолчанию.NET Core 3.1.
- Щелкните Создать.
- Когда Visual Studio завершит создание проекта, он откроется.


Как добавить элементы на холст проекта
Холст — это белая область, расположенная в верхнем левом углу экрана. Нажмите и перетащите точки в нижней, правой или нижней правой части холста, чтобы изменить его размер, если это необходимо.
Чтобы создать пользовательский интерфейс приложения, добавьте на холст такие виджеты, как кнопки или текстовые поля.
- Откройте вкладку «Вид» в верхней части окна и выберите » Панель инструментов «.

- Это добавит панель инструментов в левую часть приложения. Выберите значок булавкив правом верхнем углу панели инструментов, чтобы закрепить его там навсегда.
- Здесь вы можете перетащить любой виджет из панели инструментов на холст. Выделите кнопку на панели инструментов и перетащите ее на холст.

- Перетащите на холст еще два текстовых поля вместе с тремя метками (две метки для каждого текстового поля и одна метка для заголовка в верхней части приложения).

- Каждый виджет на холсте имеет связанные с ним свойства. Выделите виджет, чтобы отобразить окно свойствв правом нижнем углу Visual Studio, в котором перечислены все свойства этого виджета. Эти свойства могут включать текст, имя, размер шрифта, границу или выравнивание выделенного виджета.
- На данный момент текст этих виджетов по-прежнему говорит label1, label2или button1. Выберите виджет label1и отредактируйте свойство Text в окне свойств, указав «Цельсий в Фаренгейт». Измените размер шрифта на 22pt.

- Аналогичным образом отредактируйте свойства других виджетов на холсте, чтобы они были следующими:


|
Виджет |
Имущество |
Новое значение |
| метка2 | Текст | Цельсия |
| этикетка3 | Текст | по Фаренгейту |
| кнопка | Текст | Рассчитать |
| Текстовое поле Фаренгейта | Только для чтения | Истинный |
Как обрабатывать события и писать код в коде программной части
Виджеты на холсте можно привязывать к событиям. События могут включать в себя такие вещи, как нажатие кнопки, изменение текста внутри текстового поля или выбор определенного переключателя. Когда происходят эти события, это может привести к срабатыванию части кода в программном коде.
C# — это язык, используемый при создании Windows Forms. Если вы еще не использовали C#, есть много практических причин для изучения программирования на C#.
Для этого конкретного приложения добавьте событие к кнопке » Рассчитать «, чтобы инициировать выполнение части кода при нажатии этой кнопки.
1. Дважды щелкните кнопку » Рассчитать«, чтобы автоматически открыть Form1.cs с новым методом Event:
private void calculateButton_Click(object sender, EventArgs e)
2. Здесь вы добавите код, который будет выполнять расчет градусов Цельсия по Фаренгейту и отображать результат в текстовом поле Фаренгейта. Для этого вам нужно иметь возможность прочитать значение из текстового поля Цельсия и изменить текстовое поле Фаренгейта, чтобы отобразить результат.
3. Вернитесь на холст и повторно отредактируйте свойства, как показано ранее. На этот раз отредактируйте свойство Nameдля текстовых полей Цельсия и Фаренгейта. Эти имена можно использовать для ссылки на текстовые поля в коде.
| Виджет | Имущество | Новое значение |
| Текстовое поле Цельсия | Имя | ЦельсияTextBox |
| Текстовое поле Фаренгейта | Имя | по ФаренгейтуTextBox |
4. Вернитесь к функции calculateButton_Click в Form1.cs.
5. Теперь на текстовое поле Celsius можно ссылаться в коде, используя имя «celsiusTextBox». Введенное пользователем значение Цельсия сохраняется в его свойстве Text. Однако, поскольку это строка, разберите ее на двойную, чтобы включить ее в будущие расчеты по Фаренгейту.
private void calculateButton_Click(object sender, EventArgs e)
{
// Get the value that the user entered in the Celsius Text Box
double celsiusValue = Double.Parse(celsiusTextBox.Text);
}
6. Переменная celsiusValue теперь хранит значение, введенное пользователем в текстовом поле Celsius. Формула для преобразования градусов Цельсия в градусы Фаренгейта: (celsiusValue * 9 / 5) + 32.Таким образом, результат теперь можно рассчитать и сохранить в текстовом поле Фаренгейта.
private void calculateButton_Click(object sender, EventArgs e)
{
// Get the value that the user entered in the Celsius Text Box
double celsiusValue = Double.Parse(celsiusTextBox.Text);
// Apply the calculation
double result = (celsiusValue * 9 / 5) + 32;
// Store the result in the Fahrenheit Textbox
fahrenheitTextBox.Text = result.ToString();
}
Как запускать и отлаживать программу Windows Forms
Запуск программы Windows Forms в Visual Studio
Теперь, когда пользовательский интерфейс и логика кода настроены, запустите программу, чтобы увидеть, как она работает.
1. Чтобы запустить программу, выберите зеленую стрелку вверху панели инструментов в Visual Studio. 
2. После загрузки проекта добавьте значение в текстовое поле Цельсия и нажмите кнопку » Рассчитать». Это добавит результат в текстовое поле по Фаренгейту. 
3 Если программа размыта во время выполнения, вероятно, ваше приложение не поддерживает DPI. Это может вызвать проблемы с масштабированием и разрешением, поэтому его необходимо включить.
4. Щелкните правой кнопкой мыши проект TemperatureConverterв обозревателе решений. Выберите Добавить, затем выберите Новый элемент.
5. Найдите файл манифеста приложения и нажмите » Добавить «. 
6. Скопируйте следующий код в новый файл app.manifest как дочерний элемент тега сборки (если код уже сгенерирован, просто раскомментируйте его).
<application xmlns=»urn:schemas-microsoft-com:asm.v3″>
<windowsSettings>
<dpiAware xmlns=»http://schemas.microsoft.com/SMI/2005/WindowsSettings«>true</dpiAware>
<longPathAware xmlns=»http://schemas.microsoft.com/SMI/2016/WindowsSettings«>true</longPathAware>
</windowsSettings>
</application>
7. Чтобы это изменение вступило в силу, перезапустите программу. Нажмите красную кнопку остановки в верхней части панели инструментов, затем снова нажмите зеленую кнопку воспроизведения.
Отладка программы Windows Forms
Вы можете отладить программу, если логика вашего приложения Windows Forms не работает должным образом.
- Вернитесь к функции calculateButton_Click в Form1.cs и щелкните в любом месте серой полосы в крайнем левом углу экрана. Это добавит точку останова, которая обозначена красным кружком.
- Нажмите кнопку «Рассчитать» еще раз, чтобы запустить этот метод. Программа приостановится, когда достигнет точки останова, чтобы показать все значения, хранящиеся в переменных в этой точке.
- Чтобы продолжить работу программы, нажмите зеленую стрелку » Продолжить» в верхней части панели инструментов.

Запуск программы с помощью исполняемого файла
Если вы не хотите запускать свою программу через Visual Studio, используйте автономный исполняемый файл для программы. Это автоматически генерируется.
Перейдите к исполняемому файлу, который можно найти здесь:
<your-project-folder>/bin/Debug/netcoreapp3.1/TemperatureConverter.exe
Нажмите на исполняемый файл, чтобы запустить программу напрямую.
Добавление дополнительных элементов в форму Windows
Надеюсь, теперь у вас есть общее представление об основной структуре приложения Windows Form. Вы можете продолжить изучение дополнительных функций Windows Forms, поэкспериментировав с новыми виджетами и углубившись в другие различные события, которые можно обрабатывать.
Как только вы лучше познакомитесь с Windows Forms, вы сможете приступить к созданию более сложных приложений. Вы также можете изучить многие другие способы создания приложений на рабочем столе Windows.
10 апреля 2020
Время чтения: 5 минут
Windows Forms — интерфейс программирования приложений, отвечающий за графический интерфейс пользователя. Он является частью .Net Framework и создан для того, чтобы упростить взаимодействие пользователя с элементами Win API. Причём не просто упростить, а буквально полностью скрыть низкоуровневое взаимодействие с графическими элементами путём создания набора базовых компонентов и классов. При этом используемые классы не привязаны к языку разработки, благодаря чему данный проект может использоваться как на родном для Microsoft C#, так и на других языках, например, C++, VB Net и F#. Но не смотря на свою кроссплатформенность в мире языков программирования, Windows Forms проекты легко создаются на C#, однако при попытке создания проекта на C++ возникает множество проблем.
Шаг 0. А вдруг получится сразу?
В настоящее время IDE, поддерживающих Windows forms, не так много — буквально одна только Visual Studio, более известная как просто «студия». Поэтому будем рассматривать создание и решение проблем именно в этой среде разработки. Первым шагом запустим студию, начнём создавать новый проект и попытаемся найти Windows forms проект для C++:
Создаём новый проект в студии
Ищем Winfows Forms для C++
Если у вас более старая версия Visual Studio, то интерфейс будет выглядеть немного иначе, однако данная функциональность будет той же. Также не исключено, что у Вас может быть данный тип проекта для C++ (на некоторых версиях формы для C++ были доступны сразу после установки IDE). Если же у Вас, как и у нас поиск не дал нужных результатов, то переходим к следующему шагу.
Шаг 1. Создание CLR проекта
Поскольку непосредственно Windows Forms проекта у нас не оказалось, мы обхитрим студию и создадим пустой CLR проект на С++. Для этого в том же окне поиска необходимо найти и выбрать Новый CLR проект, ввести имя (если нужно, то поменять директорию расположения проекта) и немного подождать, пока студия сделает свою работу.
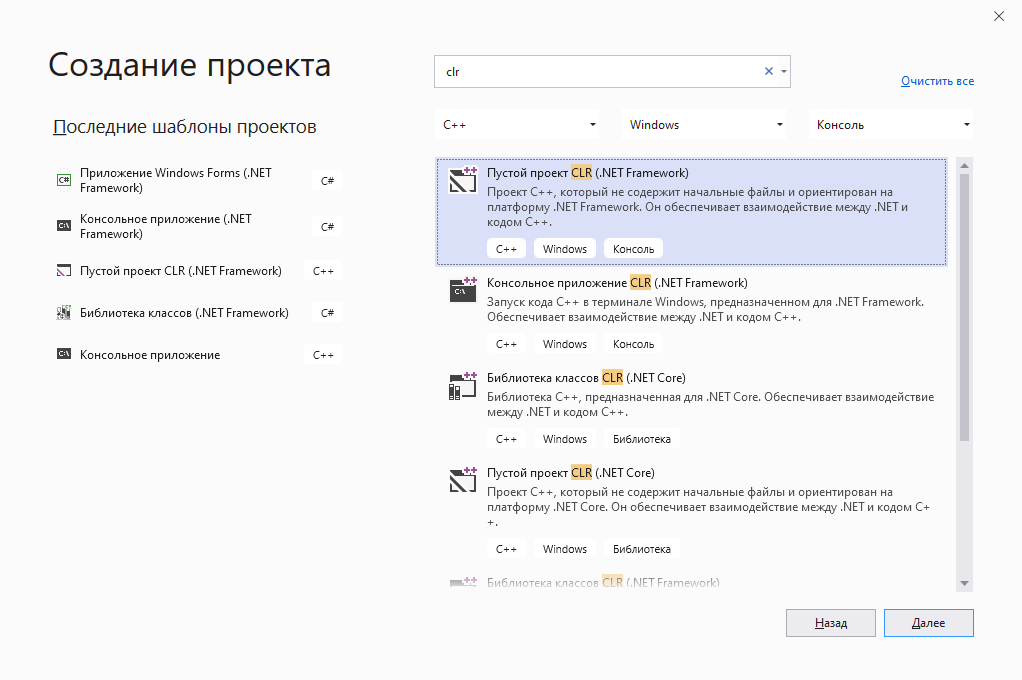
Ищем пустой CLR проект (.Net Framework)
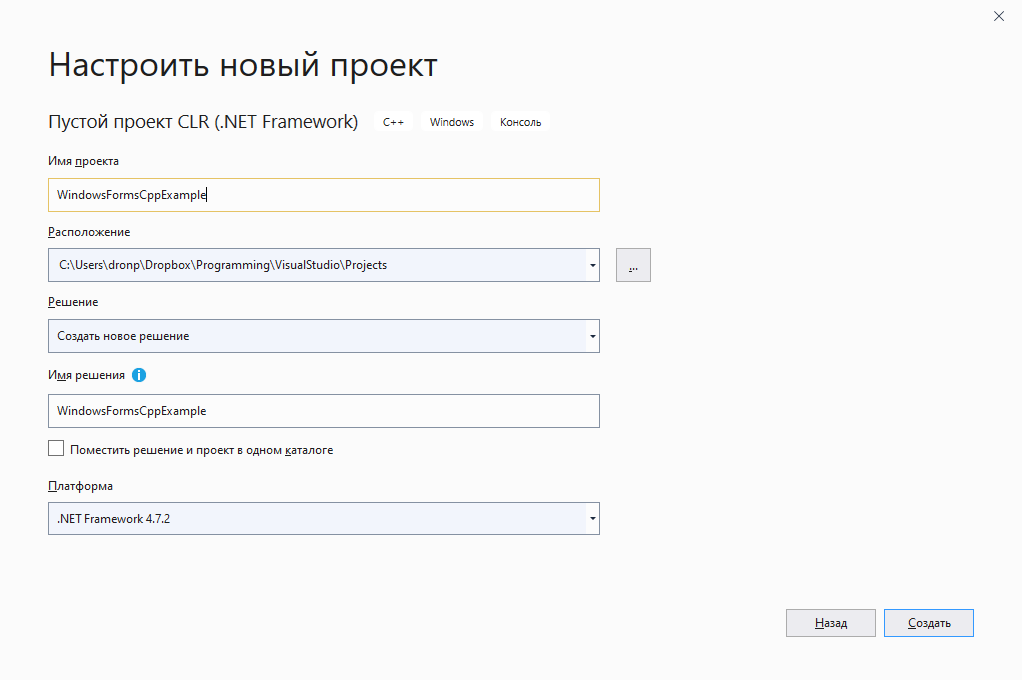
Создаём новый пустой CLR проект
В результате Visual Stido создаст новый C++ CLR проект, который будет выглядеть примерно так:
Результат создания нового CLR проекта
Шаг 2. Добавить форму
Чтобы сделать CLR проект проектом Windows Forms, нужно просто добавить в него форму. Для этого в верхнем меню нужно выбрать Проект — Добавить новый элемент и в появившемся окне выбрать категорию Visual C++ — UI и затем выбрать Форма Windows Forms.
Проект -> Добавить новый элемент
Visual C++ -> UI -> Форма Windows Forms
После данной операции нас ждёт разочарование в виде ошибки Исключение из HRESULT: 0x8000000A:
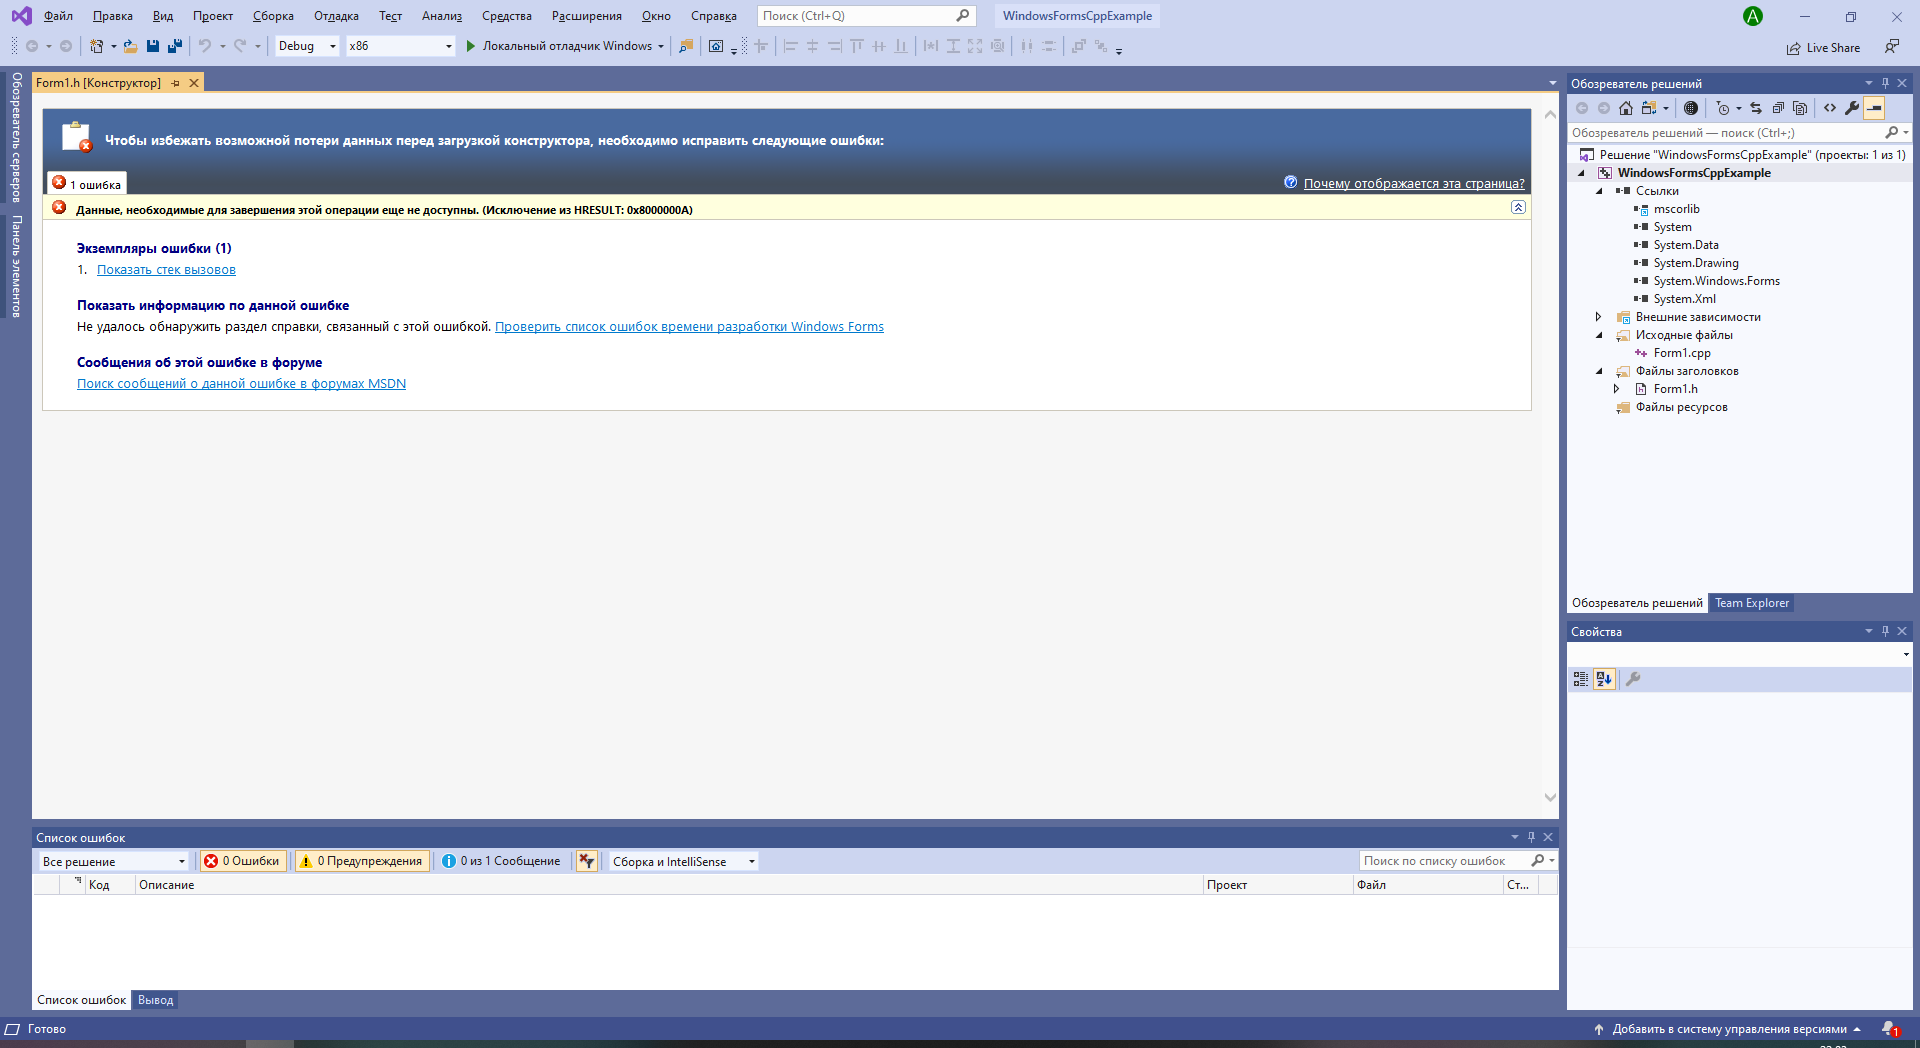
Вместо формы получили ошибку
Шаг 3. Исправляем появившуюся ошибку
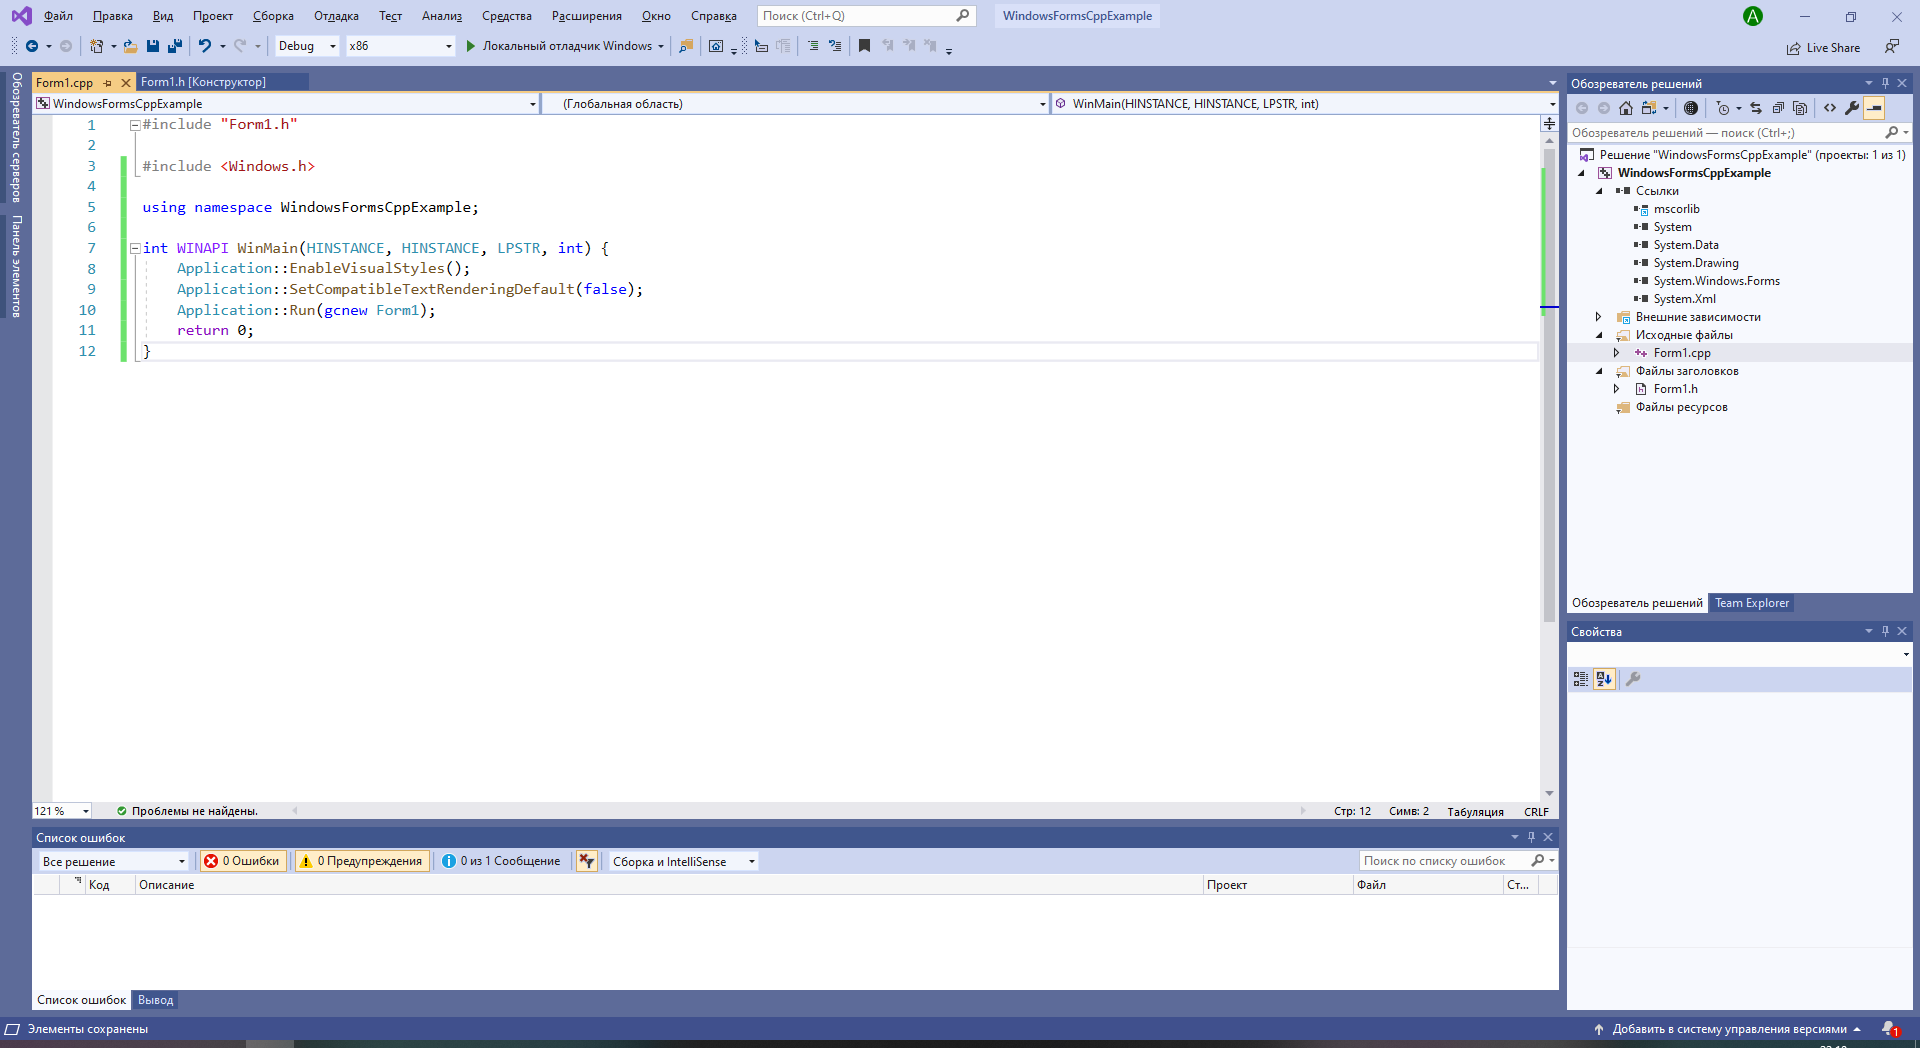
Данная ошибка появляется из-за того, что для создания окна формы приложению необходима основная программа, создающая форму и переключающая управление на неё, однако после добавления новой формы файл Form1.cpp предсказуемо создаётся пустым. Поэтому необходимо добавить основную программу в файл с формой:
#include "Form1.h"

#include <Windows.h>

using namespace имя_вашего_проекта;

int WINAPI WinMain(HINSTANCE, HINSTANCE, LPSTR, int) {
    Application::EnableVisualStyles();
    Application::SetCompatibleTextRenderingDefault(false);
    Application::Run(gcnew Form1);
    return 0;
}
В результате код файла Form1.cpp будет выглядеть следующим образом:
Добавление основной программы к форме
Шаг 4. Переоткрыть проект
Всё, что теперь осталось сделать — это закрыть текущее решение, а затем открыть его снова. Для этого можно закрыть саму студию, а можно выбрать в верхнем меню Файл — Закрыть решение, после чего в появившемся окне выбрать только что созданный проект и открыть его заново.
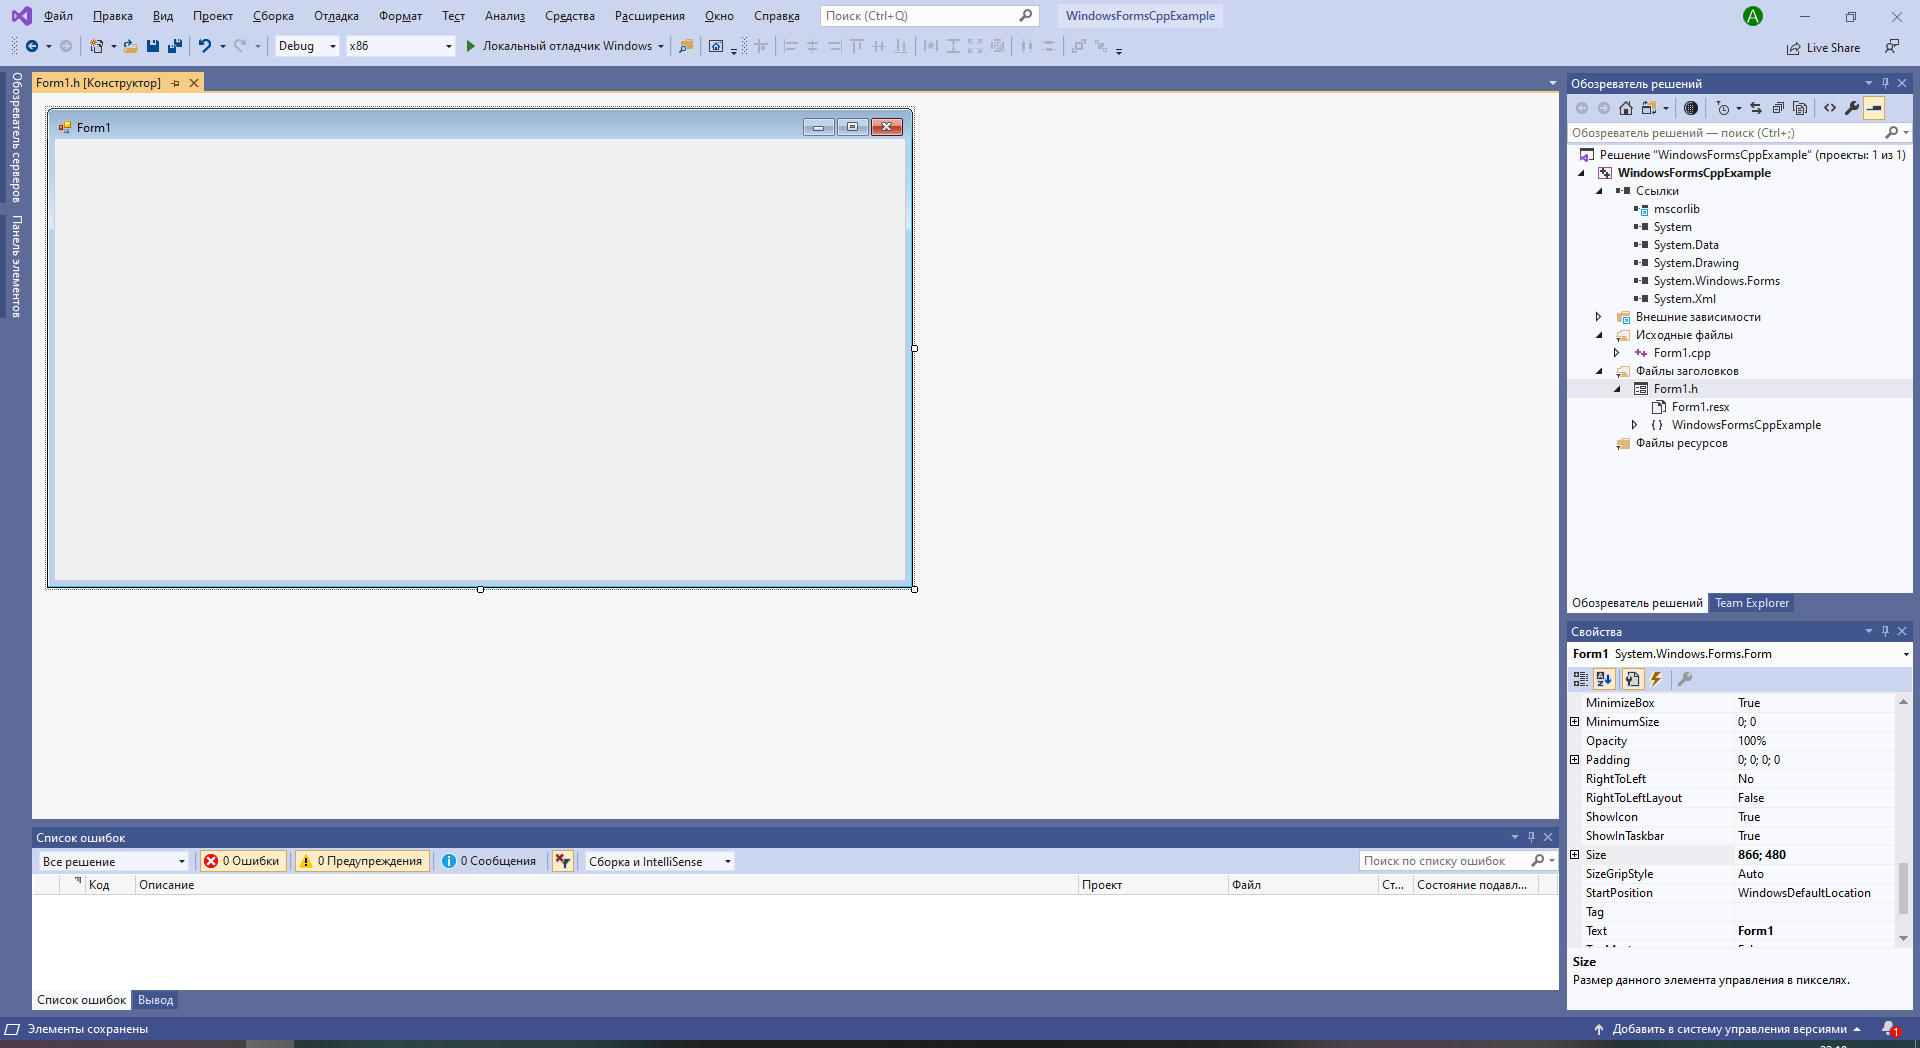
Форма создалась, можно добавлять компоненты
Благодаря добавленному коду основной программы, студия сможет создать форму и на экране появится изображение формы, на которую можно будет добавлять компоненты, задавать их свойства, а также свойства самой формы.

Программист, сооснователь programforyou.ru, в постоянном поиске новых задач и алгоритмов
Языки программирования: Python, C, C++, Pascal, C#, Javascript
Выпускник МГУ им. М.В. Ломоносова
Содержание
- Шаг 1. Создание проекта приложения Windows Forms
- Откройте Visual Studio 2017.
- Открытие Visual Studio
- Сведения о проекте приложения Windows Forms
- Дальнейшие действия
- Step 1: Create a Windows Forms App project
- Open Visual Studio 2017
- Open Visual Studio
- About the Windows Forms App project
- Next steps
- Предварительные требования
- Создание приложения WinForms
- Важные элементы среды Visual Studio
- Добавление элементов управления на форму
- Обработка событий
- Запустите приложение
- Создание приложения Windows Forms на Visual Basic в Visual Studio
- Создание проекта
- Создание приложения
- Добавление кнопки на форму
- Добавление метки на форму
- Добавление кода на форму
- Запуск приложения
- Следующие шаги
- Создание приложения Windows Forms на C# в Visual Studio
- Создание проекта
- Создание приложения
- Добавление кнопки на форму
- Добавление метки на форму
- Добавление кода на форму
- Запуск приложения
- Следующие шаги
Шаг 1. Создание проекта приложения Windows Forms
Первый шаг в создании программы для просмотра изображений — это создание проекта приложения Windows Forms.
Откройте Visual Studio 2017.
В строке меню выберите Файл > Создать > Проект. Диалоговое окно должно выглядеть так же, как на следующем снимке экрана.

Диалоговое окно _ _»Новый проект»
В левой части диалогового окна Новый проект выберите Visual C# или Visual Basic, а затем — Классическое приложение Windows.
В списке шаблонов проектов выберите Приложение Windows Forms (.NET Framework). Назовите новую форму PictureViewer и нажмите кнопку ОК.

Дополнительные сведения см. в разделе Установка Visual Studio.
Открытие Visual Studio
На начальном экране выберите Создать проект.

В поле поиска окна Создание проекта введите Windows Forms. Затем в списке Тип проекта выберите Рабочий стол.
Применив фильтр Тип проекта, выберите шаблон Приложение Windows Forms (.NET Framework) для C# или Visual Basic и нажмите кнопку Далее.

Если шаблон Приложение Windows Forms (.NET Framework) отсутствует, его можно установить из окна Создание проекта. В сообщении Не нашли то, что искали? выберите ссылку Установка других средств и компонентов.


Затем нажмите кнопку Изменить в Visual Studio Installer. Вам может быть предложено сохранить результаты работы; в таком случае сделайте это. Выберите Продолжить, чтобы установить рабочую нагрузку.
В поле Имя проекта окна Настроить новый проект введите PictureViewer. Затем нажмите Создать.
Visual Studio создает решение для приложения. Решение играет роль контейнера для всех проектов и файлов, необходимых приложению. Более подробно эти термины поясняются далее в этом учебнике.
Сведения о проекте приложения Windows Forms
Среда разработки содержит три окна: главное окно, Обозреватель решений и окно Свойства.
Если какое-либо из этих окон отсутствует, можно восстановить макет окон по умолчанию. В строке меню выберите Окно > Сброс макета окна.
Можно также отобразить окна с помощью команд меню. В строке меню выберите Вид > Окно «Свойства» или Обозреватель решений.
Если открыты какие-либо другие окна, закройте их с помощью кнопки Закрыть (x) в верхнем правом углу.
Если выбрать файл, содержимое в окне Свойства изменится. Если открыть файл кода (с расширением .cs в C# и .vb в Visual Basic), откроется сам файл кода или конструктор для него. Конструктор — это визуальная поверхность, на которую можно добавлять элементы управления, такие как кнопки и списки. При работе с формами Visual Studio такая поверхность называется конструктор Windows Forms.
Окно «Свойства». В этом окне производится изменение свойств элементов, выбранных в других окнах. Например, выбрав форму Form1, можно изменить ее название путем задания свойства Text, а также изменить цвет фона путем задания свойства Backcolor.
В верхней строке в обозревателе решений отображается текст Решение «PictureViewer» (1 проект). Это означает, что Visual Studio автоматически создала для вас решение. Решение может содержать несколько проектов, но пока что вы будете работать с решениями, которые содержат только один проект.
В строке меню выберите Файл > Сохранить все.
Другой вариант — нажать кнопку Сохранить все на панели инструментов, как показано на рисунке ниже.
Visual Studio автоматически заполняет имя папки и имя проекта, а затем сохраняет проект в папке проектов.
Дальнейшие действия
Источник
Step 1: Create a Windows Forms App project
When you create a picture viewer, the first step is to create a Windows Forms App project.
Open Visual Studio 2017
On the menu bar, choose File > New > Project. The dialog box should look similar to the following screenshot.

New project dialog box
On the left side of the New Project dialog box, choose either Visual C# or Visual Basic, and then choose Windows Desktop.
In the project templates list, choose Windows Forms App (.NET Framework). Name the new form PictureViewer, and then choose the OK button.
If you don’t see the Windows Forms App (.NET Framework) template, use the Visual Studio Installer to install the .NET desktop development workload.

For more information, see the Install Visual Studio page.
Open Visual Studio
On the start window, choose Create a new project.

On the Create a new project window, enter or type Windows Forms in the search box. Next, choose Desktop from the Project type list.
After you apply the Project type filter, choose the Windows Forms App (.NET Framework) template for either C# or Visual Basic, and then choose Next.

If you don’t see the Windows Forms App (.NET Framework) template, you can install it from the Create a new project window. In the Not finding what you’re looking for? message, choose the Install more tools and features link.

Next, in the Visual Studio Installer, choose the .NET desktop development workload.

After that, choose the Modify button in the Visual Studio Installer. You might be prompted to save your work; if so, do so. Next, choose Continue to install the workload.
In the Configure your new project window, type or enter PictureViewer in the Project name box. Then, choose Create.
Visual Studio creates a solution for your app. A solution acts as a container for all of the projects and files needed by your app. These terms will be explained in more detail later in this tutorial.
About the Windows Forms App project
The development environment contains three windows: a main window, Solution Explorer, and the Properties window.
If any of these windows are missing, you can restore the default window layout. On the menu bar, choose Window > Reset Window Layout.
You can also display windows by using menu commands. On the menu bar, choose View > Properties Window or Solution Explorer.
If any other windows are open, close them by choosing the Close (x) button in their upper-right corners.
If you choose a file, the contents of the Properties window changes. If you open a code file (which ends in .cs in C# and .vb in Visual Basic), the code file or a designer for the code file appears. A designer is a visual surface onto which you can add controls such as buttons and lists. For Visual Studio forms, the designer is called the Windows Forms Designer.
Properties window In this window, you can change the properties of items that you choose in the other windows. For example, if you choose Form1, you can change its title by setting the Text property, and you can change the background color by setting the Backcolor property.
The top line in Solution Explorer shows Solution ‘PictureViewer’ (1 project), which means that Visual Studio created a solution for you. A solution can contain more than one project, but for now, you’ll work with solutions that contain only one project.
On the menu bar, choose File > Save All.
As an alternative, choose the Save All button on the toolbar, which the following image shows.
Visual Studio automatically fills in the folder name and the project name and then saves the project in your projects folder.
Next steps
To go to the next tutorial step, see Step 2: Run your app.
To return to the overview topic, see Tutorial 1: Create a picture viewer.
Источник
Из этого краткого руководства вы узнаете, как создать новое приложение Windows Forms (WinForms) с помощью Visual Studio. После создания первоначального приложения вы научитесь добавлять элементы управления и обрабатывать события. По завершении работы с этим руководством у вас будет простое приложение, добавляющее имена в список.
В этом руководстве описано следующее:
Предварительные требования
Создание приложения WinForms
Первым шагом в создании нового приложения является запуск Visual Studio и создание приложения на основе шаблона.
Запустите Visual Studio.
Выберите Создать новый проект.

В раскрывающемся списке язык кода выберите C# или Visual Basic.
В списке шаблонов выберите Приложение Windows Forms (.NET) и затем щелкните Далее.

В окне Настроить новый проект задайте в качестве имени проекта значение Names и щелкните Создать.
Вы также можете сохранить проект в другую папку, изменив параметр Расположение.

После создания приложения Visual Studio должен открыть панель конструктора для формы по умолчанию Form1. Если конструктор форм не отображается, дважды щелкните форму в области Обозреватель решений, чтобы открыть окно конструктора.
Важные элементы среды Visual Studio
Поддержка WinForms в Visual Studio состоит из четырех важных компонентов, с которыми вы будете взаимодействовать при создании приложения.

Все файлы проекта, код, формы и ресурсы отображаются в этой области.
На этой панели отображаются параметры свойств, которые можно настроить в зависимости от выбранного элемента. Например, если выбрать элемент в Обозревателе решений, отобразятся параметры свойств, связанные с файлом. Если выбрать объект в конструкторе, отобразятся параметры элемента управления или формы.
Это конструктор для формы. Он является интерактивным, и на него можно перетаскивать объекты из панели элементов. Выбирая и перемещая элементы в конструкторе, можно визуально создавать пользовательский интерфейс для приложения.
Панель элементов содержит все элементы управления, которые можно добавить на форму. Чтобы добавить элемент управления на текущую форму, дважды щелкните элемент управления или перетащите его.
Добавление элементов управления на форму
Открыв конструктор форм Form1, используйте панель Область элементов, чтобы добавить на форму следующие элементы управления:
Вы можете расположить и изменить размер элементов управления в соответствии со следующими настройками. Либо визуально перенесите их, чтобы они соответствовали следующему снимку экрана, либо щелкните каждый элемент управления и настройте параметры в области Свойства. Можно также щелкнуть область заголовка формы, чтобы выбрать форму.
| Объект | Параметр | Значение |
|---|---|---|
| Form | Текст | Names |
| Размер | 268, 180 | |
| Label | Расположение | 12, 9 |
| Текст | Names | |
| Listbox | Имя | lstNames |
| Расположение | 12, 27 | |
| Размер | 120, 94 | |
| текстовое поле; | Имя | txtName |
| Расположение | 138, 26 | |
| Размер | 100, 23 | |
| Button | Имя | btnAdd |
| Расположение | 138, 55 | |
| Размер | 100, 23 | |
| Текст | Add Name |
Вы должны получить в конструкторе форму, которая выглядит следующим образом.

Обработка событий
Теперь, когда в форме есть все элементы управления, необходимо обрабатывать события элементов управления, чтобы реагировать на вводимые пользователем данные. Открыв конструктор форм, выполните следующие действия.
Выберите в форме элемент управления «Кнопка».
Найдите событие Click и дважды щелкните его, чтобы создать обработчик событий.
Это действие добавляет следующий код в форму:
Запустите приложение
Теперь, когда у нас есть код события, можно запустить приложение, нажав клавишу F5 или выбрав пункт меню Отладка > Начать отладку. Отобразится форма, и вы можете ввести имя в текстовое поле, а затем добавить его, нажав кнопку.
Источник
Создание приложения Windows Forms на Visual Basic в Visual Studio
В рамках этого краткого знакомства с возможностями интегрированной среды разработки Visual Studio (IDE) вы создадите простое приложение на Visual Basic с пользовательским интерфейсом на основе Windows.
Установите Visual Studio бесплатно со страницы скачиваемых материалов Visual Studio, если еще не сделали этого.
Установите Visual Studio бесплатно со страницы скачиваемых материалов Visual Studio, если еще не сделали этого.
На некоторых снимках экрана в этом учебнике используется темная тема. Если вы не используете темную тему, но хотите переключиться на нее, см. страницу Персонализация интегрированной среды разработки и редактора Visual Studio.
Установите Visual Studio 2022 бесплатно со страницы скачиваемых материалов Visual Studio 2022, если еще не сделали этого.
На некоторых снимках экрана в этом учебнике используется темная тема. Если вы не используете темную тему, но хотите переключиться на нее, см. страницу Персонализация интегрированной среды разработки и редактора Visual Studio.
Создание проекта
Сначала вы создадите проект приложения Visual Basic. Для этого типа проекта уже имеются все нужные файлы шаблонов, что избавляет вас от лишней работы.
Откройте Visual Studio 2017.
В верхней строке меню последовательно выберите Файл > Создать > Проект.
Запустите Visual Studio.
На начальном экране выберите Создать проект.
В окне Создать проект выберите шаблон Приложение Windows Forms (.NET Framework) для Visual Basic.
(При желании вы можете уточнить условия поиска, чтобы быстро перейти к нужному шаблону. Например, введите Приложение Windows Forms в поле поиска. Затем выберите Visual Basic в списке языков и Windows в списке платформ.)

Если шаблон Приложение Windows Forms (.NET Framework) отсутствует, его можно установить из окна Создание проекта. В сообщении Не нашли то, что искали? выберите ссылку Установка других средств и компонентов.
Затем нажмите кнопку Изменить в Visual Studio Installer. Вам может быть предложено сохранить результаты работы; в таком случае сделайте это. Выберите Продолжить, чтобы установить рабочую нагрузку. После этого вернитесь к шагу 2 в процедуре Создание проекта.
В поле Имя проекта окна Настроить новый проект введите HelloWorld. Затем нажмите Создать.

Новый проект открывается в Visual Studio.
Создание приложения
Когда вы выберете шаблон проекта Visual Basic и зададите имя файла, Visual Studio открывает форму. Форма является пользовательским интерфейсом Windows. Мы создадим приложение Hello World, добавив элементы управления на форму, а затем запустим его.
Добавление кнопки на форму
Щелкните Панель элементов, чтобы открыть всплывающее окно «Панель элементов».

(Если параметр для всплывающего окна Панель элементов отсутствует, его можно открыть в строке меню. Для этого выберите Вид > Панель элементов. Либо нажмите клавиши CTRL+ALT+X.)
Щелкните значок Закрепить, чтобы закрепить окно Панель элементов.

Щелкните элемент управления Кнопка и перетащите его на форму.
В разделе Внешний вид (или Шрифты) окна Свойства введите Click this и нажмите клавишу ВВОД.
(Если окно Свойства не отображается, его можно открыть в строке меню.) Для этого щелкните Вид > Окно свойств. Или нажмите клавишу F4.)
Добавление метки на форму
Теперь, когда мы добавили элемент управления »Кнопка» для создания действия, давайте добавим элемент управления «Метка», куда можно отправлять текст.
Выберите элемент управления Метка в окне Панель элементов, а затем перетащите его на форму и расположите под кнопкой Нажмите это.
В разделе Проект или (DataBindings) окна Свойства измените имя Label1 на lblHelloWorld и нажмите клавишу ВВОД.
Добавление кода на форму
В окне Form1.vb [Design] дважды щелкните кнопку Нажмите это, чтобы открыть окно Form1.vb.
(Кроме того, можно развернуть узел Form1.vb в обозревателе решений, а затем выбрать Form1.)

Запуск приложения
Нажмите кнопку Запустить, чтобы запустить приложение.

Будет выполнено несколько операций. В интегрированной среде разработки Visual Studio откроются окна Средства диагностики и Вывод. Кроме того, вне этой среды откроется диалоговое окно Form1. Оно будет содержать вашу кнопку Нажмите это и текст Label1.

Закройте диалоговое окно Form1, чтобы завершить работу приложения.
Следующие шаги
Для получения дополнительных сведений перейдите к следующему руководству:
Источник
Создание приложения Windows Forms на C# в Visual Studio
В рамках этого краткого знакомства с возможностями интегрированной среды разработки Visual Studio (IDE) вы создадите простое приложение на C# с пользовательским интерфейсом на основе Windows.
Установите Visual Studio бесплатно со страницы скачиваемых материалов Visual Studio, если еще не сделали этого.
Установите Visual Studio бесплатно со страницы скачиваемых материалов Visual Studio, если еще не сделали этого.
На некоторых снимках экрана в этом учебнике используется темная тема. Если вы не используете темную тему, но хотите переключиться на нее, см. страницу Персонализация интегрированной среды разработки и редактора Visual Studio.
Установите Visual Studio 2022 бесплатно со страницы скачиваемых материалов Visual Studio 2022, если еще не сделали этого.
На некоторых снимках экрана в этом учебнике используется темная тема. Если вы не используете темную тему, но хотите переключиться на нее, см. страницу Персонализация интегрированной среды разработки и редактора Visual Studio.
Создание проекта
Сначала вы создадите проект приложения на C#. Для этого типа проекта уже имеются все нужные файлы шаблонов, что избавляет вас от лишней работы.
Откройте Visual Studio 2017.
В верхней строке меню последовательно выберите Файл > Создать > Проект.
Запустите Visual Studio.
На начальном экране выберите Создать проект.
В окне Создать проект выберите шаблон Приложение Windows Forms (.NET Framework) для C#.
(При желании вы можете уточнить условия поиска, чтобы быстро перейти к нужному шаблону. Например, введите Приложение Windows Forms в поле поиска. Затем выберите C# в списке языков и Windows в списке платформ.)

Если шаблон Приложение Windows Forms (.NET Framework) отсутствует, его можно установить из окна Создание проекта. В сообщении Не нашли то, что искали? выберите ссылку Установка других средств и компонентов.
Затем нажмите кнопку Изменить в Visual Studio Installer. Вам может быть предложено сохранить результаты работы; в таком случае сделайте это. Выберите Продолжить, чтобы установить рабочую нагрузку. После этого вернитесь к шагу 2 в процедуре Создание проекта.
В поле Имя проекта окна Настроить новый проект введите HelloWorld. Затем нажмите Создать.

Новый проект открывается в Visual Studio.
Создание приложения
Когда вы выберете шаблон проекта C# и зададите имя файла, Visual Studio открывает форму. Форма является пользовательским интерфейсом Windows. Мы создадим приложение Hello World, добавив элементы управления на форму, а затем запустим его.
Добавление кнопки на форму
Щелкните Панель элементов, чтобы открыть всплывающее окно «Панель элементов».

(Если параметр для всплывающего окна Панель элементов отсутствует, его можно открыть в строке меню. Для этого выберите Вид > Панель элементов. Либо нажмите клавиши CTRL+ALT+X.)
Щелкните значок Закрепить, чтобы закрепить окно Панель элементов.
Выберите элемент управления Кнопка и перетащите его на форму.
(Если окно Свойства не отображается, его можно открыть в строке меню.) Для этого выберите Вид > Окно свойств. Или нажмите клавишу F4.)
Добавление метки на форму
Теперь, когда мы добавили элемент управления »Кнопка» для создания действия, давайте добавим элемент управления «Метка», куда можно отправлять текст.
Выберите элемент управления Метка в окне Панель элементов, а затем перетащите его на форму и расположите под кнопкой Нажмите это.
В разделе Проект или (DataBindings) окна Свойства измените имя Label1 на lblHelloWorld и нажмите клавишу ВВОД.
Добавление кода на форму
В окне Form1.cs [Проект] дважды щелкните кнопку Нажмите это, чтобы открыть окно Form1.cs.
(Кроме того, можно развернуть узел Form1.cs в обозревателе решений, а затем выбрать Form1.)

Запуск приложения
Нажмите кнопку Запустить, чтобы запустить приложение.
Будет выполнено несколько операций. В интегрированной среде разработки Visual Studio откроются окна Средства диагностики и Вывод. Кроме того, вне этой среды откроется диалоговое окно Form1. Оно будет содержать вашу кнопку Нажмите это и текст Label1.
Закройте диалоговое окно Form1, чтобы завершить работу приложения.
Следующие шаги
Для получения дополнительных сведений перейдите к следующему руководству:
Источник