Инсталляция каждого нового выпуска Windows выполняется легче предыдущего и требует все меньше усилий от пользователя. С выходом Windows 10 эта задача упростилась дальше некуда: теперь чтобы установить на компьютер операционную систему, не нужно никаких специальных знаний и хитроумных приложений. Не нужен даже дистрибутив «винды» — программа установки «научилась» скачивать его сама. Сама же она создает установочный носитель — DVD-диск или флешку. Пользователю остается лишь отвечать на запросы и выполнять инструкции, которые понятны даже тем, кто делает это в первый раз.
 Сегодня мы расскажем, как проводится чистая установка Windows 10 на любой ноутбук и стационарный ПК. Под чистой установкой понимают инсталляцию ОС на носитель, где нет операционной системы (например, на новый компьютер или отформатированный жесткий диск). Или туда, где она есть, но подлежит полной перезаписи без сохранения установленного софта, учетных записей и настроек. Кстати, о лицензии не переживайте: если вы ставите систему взамен легально активированной, ее можно сохранить. И мы не будем от вас скрывать, что для этого нужно сделать.
Содержание
- Подготовка к установке Windows 10
- Что вам потребуется
- Готовим флешку
- Начинаем установку
- Варианты запуска инсталляции
- Как загрузить ПК или ноутбук с флешки
- Основная часть установки
- Как установить систему с жесткого диска
- Порядок установки
Подготовка к установке Windows 10
Что вам потребуется
- Загрузочный носитель для записи дистрибутива Windows 10. Им может быть USB-флешка на 3 и более Гб, DVD-диск, переносной или внутренний жесткий диск. Поскольку абсолютное большинство пользователей предпочитает устанавливать Windows с флешки, рассмотрим этот способ как основной.
- Дистрибутив Windows 10 в формате образа ISO или набора файлов.
- Утилита для переноса системных файлов на установочный носитель. Если вы собираетесь ставить Windows 10 на ПК с UEFI (усовершенствованным «BIOS»), без нее можно обойтись — файлы и папки дистрибутива достаточно скопировать на флешку. Кстати, в Виндовс 8 и 10 образ ISO можно открыть в проводнике как обычную папку, но в более ранних системах для этого понадобится специальное приложение, например, любая программа-архиватор.
- Компьютер, на котором вы будете готовить загрузочную флешку.
Готовим флешку
Если у вас нет заранее приготовленного дистрибутива «десятки», проще и удобнее поручить его скачивание утилите Microsoft Media Creation Tools и с ее же помощью записать на флешку или DVD.

Утилита не требует инсталляции на ПК, достаточно запустить ее с правами администратора.
После запуска Media Creation Tools:
- В окне «Условия лицензии» нажимаем «Принять».
- На вопрос «Что вы хотите сделать?» отвечаем: «Создать носитель для другого компьютера».
- В разделе «Выбор параметров» определяем язык системы, выпуск («домашний для одного ПК» или «Windows 10») и архитектуру (битность) — 64 или 32. Если опции выбора неактивны, флажок «Использовать рекомендуемые параметры» следует снять.
- Дальше выбираем накопитель: USB — для создания загрузочной флешки, или ISO-файл — для закачки образа, который вы в дальнейшем запишете на DVD.
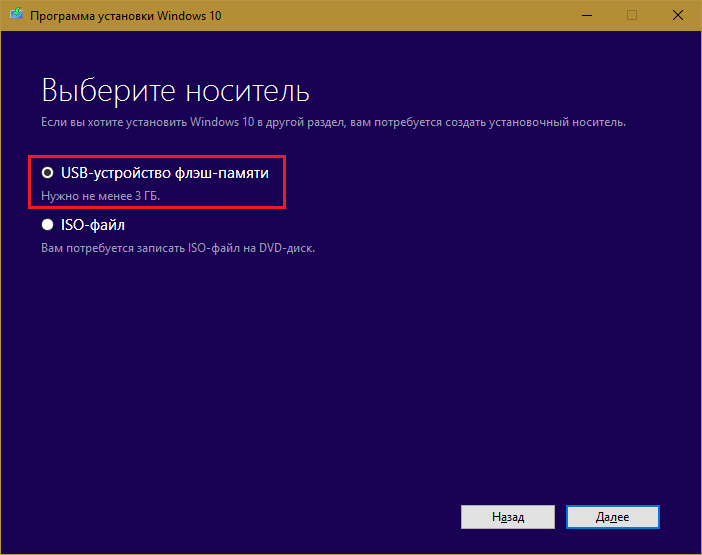
- Выбрав USB-устройство, нажимаем «Далее» и ждем 30-50 минут, пока программа скачивает дистрибутив и создает установочный носитель. В это время компьютер доступен для использования.
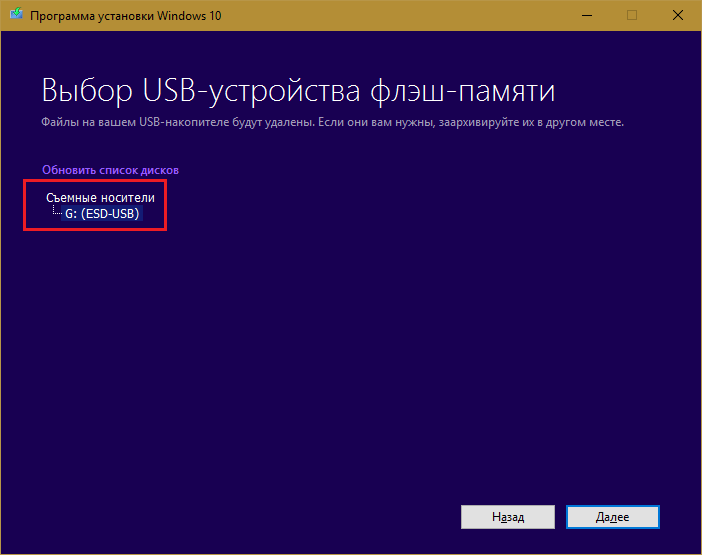
- О том, что пора переходить к установке, вас проинформирует сообщение: «USB-устройство флэш памяти готово».

Если вы скачали дистрибутив заранее или у вас нет стабильного доступа в Интернет, используйте для создания установочного носителя Windows 10 другие инструменты. Например:
- Rufus. Работает без инсталляции. Для записи операционной системы на флешку достаточно указать расположение дистрибутива, а также определить схему раздела и тип системного интерфейса: MBR для компьютеров с BIOS (старых), GPT для компьютеров с UEFI (новых, выпущенных позже 2013 года) или MBR для компьютеров с UEFI (если на ПК с UEFI есть диски, размеченные по стандарту MBR).

- WinSetupFromUSB. Эта утилита так же проста, как и Rufus. В разделе «Add to USB disk» достаточно отметить пункт «Windows Vista/7/8/10 и т. д.», указать путь к образу Винодовс 10 и кликнуть кнопку «Go».

- Windows 7 USB/DVD Download Tool. Эта фирменная утилита Microsoft способна переносить на USB-флешки и DVD-диски все версии Windows, начиная с «семерки», всего в 4 шага.

Помимо этих есть масса других бесплатных утилит для создания установочных носителей. Можете использовать любую — результат будет одинаковым.
Начинаем установку
Варианты запуска инсталляции
Запуск инсталляции Windows 10 возможен двумя способами:
- Из-под работающей системы. Может использоваться, если вы планируете ее переустановить или проинсталлировать «десятку» с нуля в другой раздел диска.
- При загрузке с установочного носителя (через «БИОС»). Универсальный вариант, который пригоден и для установки системы на новый компьютер, и для переустановки старой копии Windows.
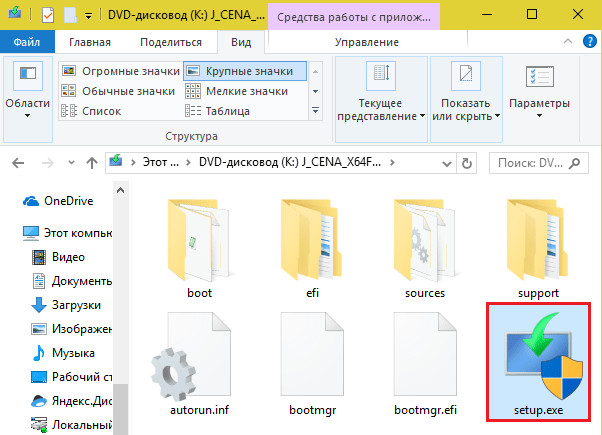
При выборе первого варианта откройте загрузочный диск или флешку в проводнике и запустите файл Setup.exe.
При выборе второго — загрузите компьютер с установочного носителя.
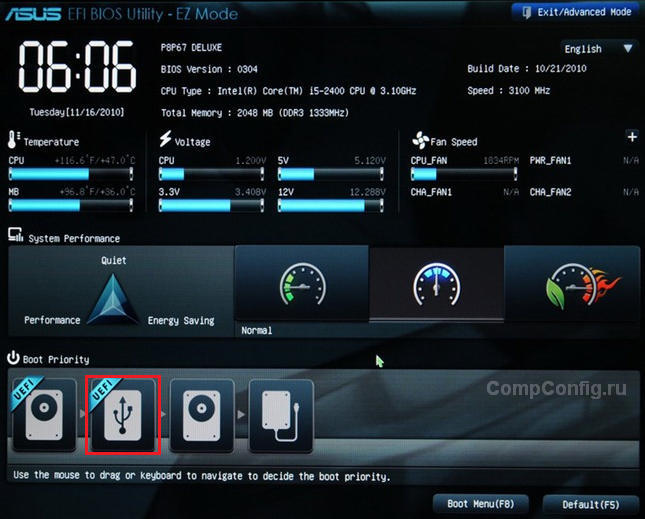
Как загрузить ПК или ноутбук с флешки
Утилита BIOS Setup на разных компьютерах имеет различный интерфейс. Для входа в нее необходимо сразу после включения машины и появления на экране заставки производителя нажать определенную клавишу. Какую — обычно указано внизу окна заставки. Чаще всего это Delete, F2 и Escape, иногда — F1, F3, F10, F12 или комбинация нескольких клавиш.
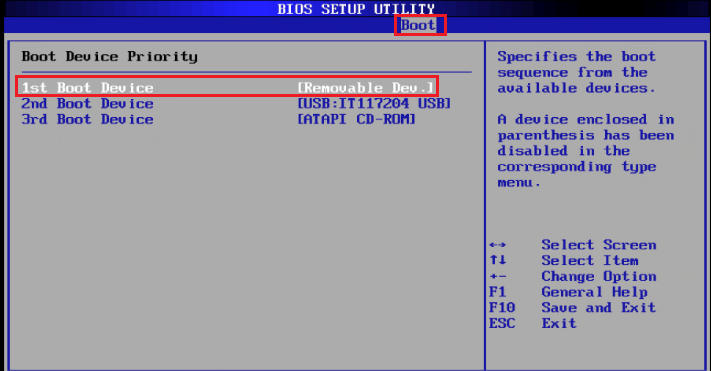
Открыв утилиту, перейдите в раздел «Boot» (Загрузка). В версии BIOS Setup Utility, показанной на скриншоте, это отдельная вкладка в верхнем меню.
В других версиях ее как таковой нет, а нужные настройки собраны в разделе «Advanced Bios Features». Чтобы ничего не перепутать в самый ответственный момент, изучите заранее интерфейс BIOS вашего компьютера и разберитесь, что и где находится.
В разделе «Boot» вы увидите список устройств, с которых машина может загружаться. На первом месте стоит, как правило, жесткий диск. Вам необходимо сделать так, чтобы в первую очередь компьютер проверил загрузочные файлы не на нем, а на флешке. Для этого, используя клавиши со стрелочками, а также F5, F6, плюс и минус (подсказка расположена в правой половине окна BIOS), поднимите USB-устройство наверх списка. Для сохранения настройки и выхода из утилиты нажмите F10.
В графических версиях UEFI порядок устройств менять не нужно, достаточно щелкнуть мышкой по USB-девайсу. После этого ПК перезапустится и начет загрузку с выбранного носителя.
Основная часть установки
Большая часть процесса инсталляции Windows 10 проходит без активного участия пользователя. Поработать придется лишь в начале и немного в конце.
Итак, первое, что вам предстоит сделать, — это выбрать язык операционной системы, форматы времени, денежных единиц и основную раскладку клавиатуры. Если вы скачали русскоязычную версию Виндовс, по умолчанию здесь будет стоять русский язык.

После определения языковых параметров нажмите кнопку «Установить».

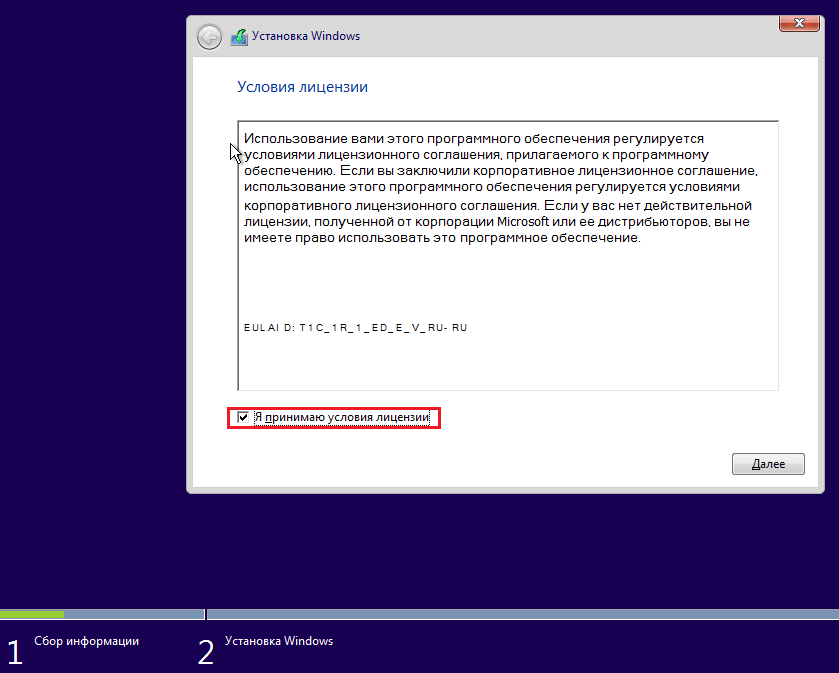
Примите условия лицензии. Для перехода к следующей задаче сейчас и в дальнейшем нажимайте кнопку «Далее».
Теперь предстоит определить тип установки — как обновление или «выборочный» (в предыдущих версиях он назывался «чистый»). Нам, соответственно, нужен второй тип.

Переходим к выбору места, на котором «поселится» новая Windows. Если жесткий диск не разбит на разделы или вы хотите изменить их пропорции, выделите нужную область диска и нажмите «Создать».
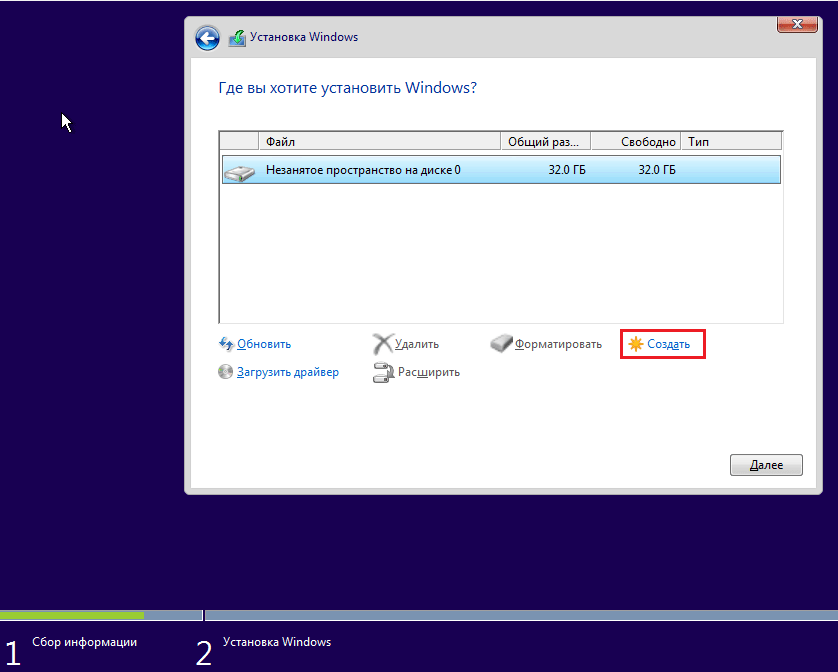
В поле «Размер» укажите количество мегабайт, которое вы отводите для системного раздела. 64-разрядной Windows 10 требуется не меньше 32 Гб. Нажмите «Применить». Если нужно, создайте таким же способом другие разделы, после чего отформатируйте их.
Внимание! Если вы хотите установить систему с сохранением лицензии, не форматируйте диск, а инсталляцию проводите в тот же раздел, где находится предыдущая — активированная копия Windows. Второй важный фактор сохранения активации — новая система должна быть той же версии, что и старая. Если вы установите Windows 10 Ultimate вместо Home, обойтись без потери лицензии не получится!

После окончания работы с диском можете расслабиться — следующие 40-60 минут процесс будет идти без вашего участия. Если хотите, просто наблюдайте за ним.
Примерно 1/4 времени займет копирование файлов.
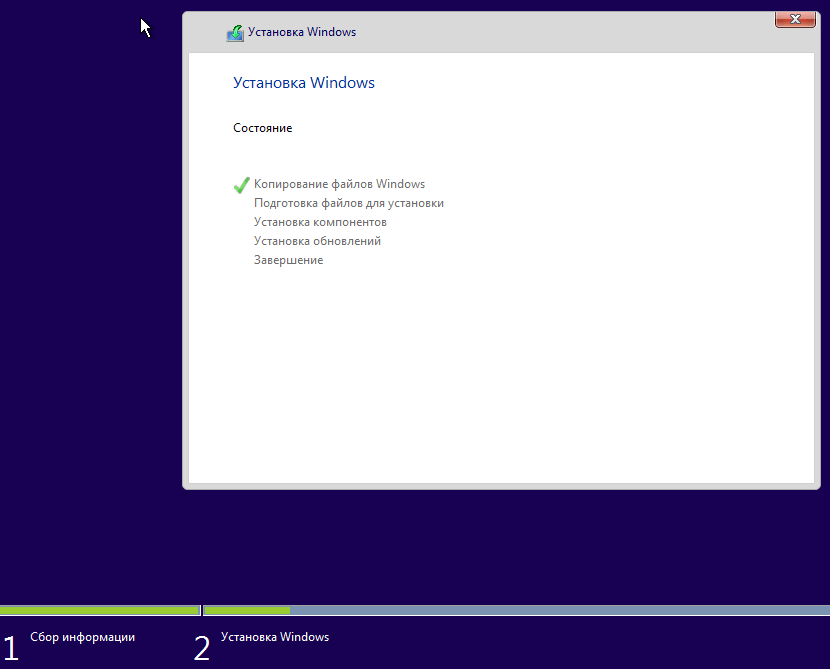
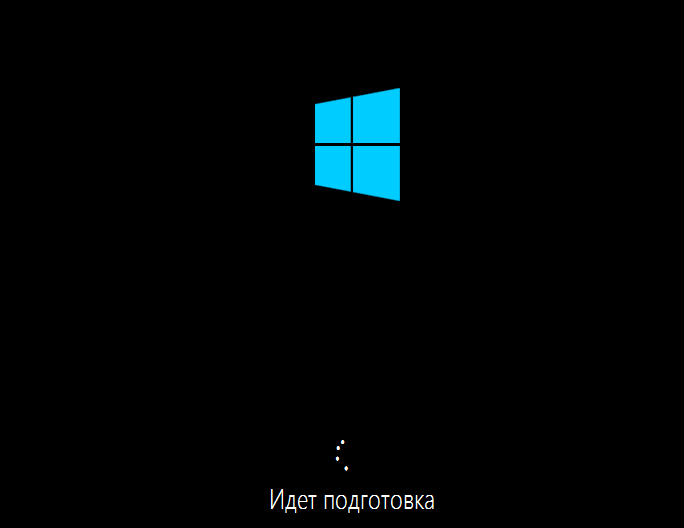
Следом компьютер перезагрузится и продолжит установку. Основную часть времени на экране будет висеть логотип Виндовс и вращаться «колесо». О том, на какой стадии находится процесс, можно понять по сообщениям внизу экрана.
Пришло время снова переходить к активным действиям, ведь близится окончание установки. Когда увидите предложение повысить скорость работы, кликните кнопку «Использовать стандартные параметры». При желании вы сможете изменить их позднее.

Дальше, если компьютер подключен к Интернету, система будет выкачивать критические обновления. Это не слишком долго.

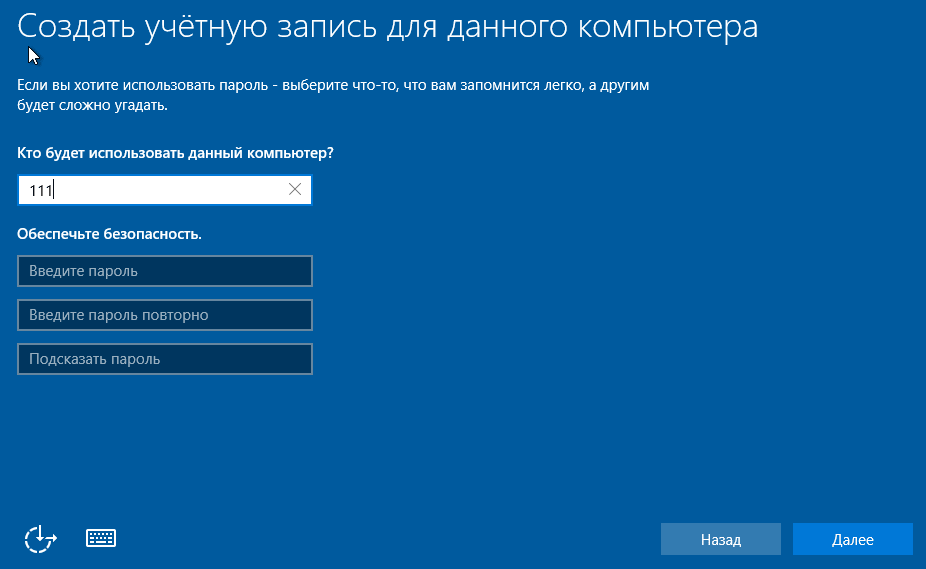
После обновления вам предстоит создать учетную запись первого пользователя. По умолчанию ей будут назначены административные права. Здесь всё просто — укажите имя пользователя и введите, если нужно, пароль.
Дальше — очередной перерыв на чай. Настройка приложений и прочее, что «не займет много времени», на самом деле может занять примерно треть от всего времени установки.

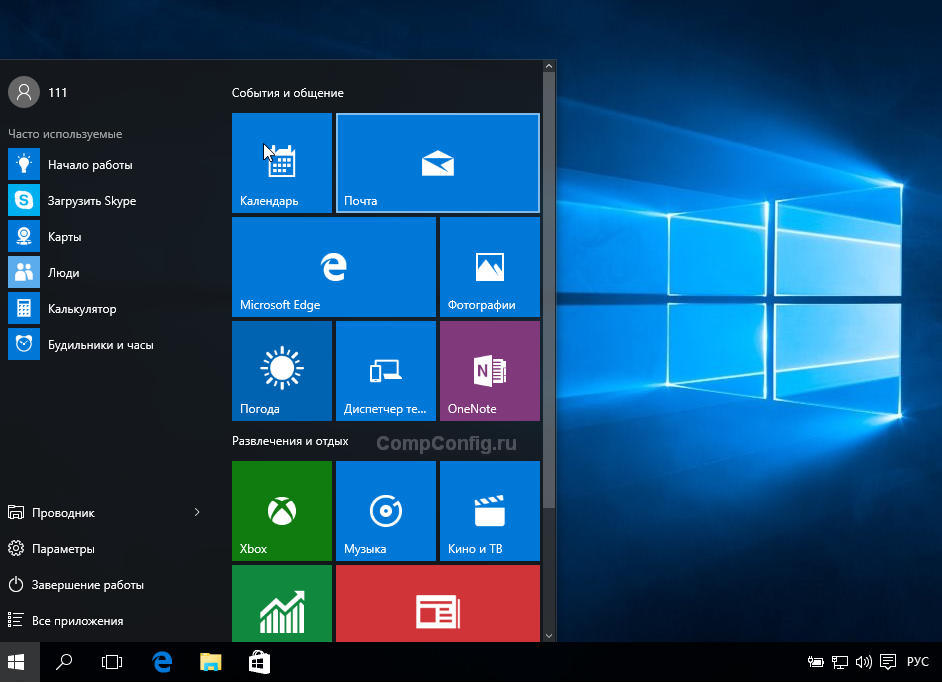
Наконец — долгожданный рабочий стол. Всё готово, инсталляция Windows 10 закончена. Надеемся, она не слишком вас утомила, ведь теперь вам предстоит настройка сети, оформление рабочего стола, установка приложений и другие приятные хлопоты по «обживанию» новой ОС.
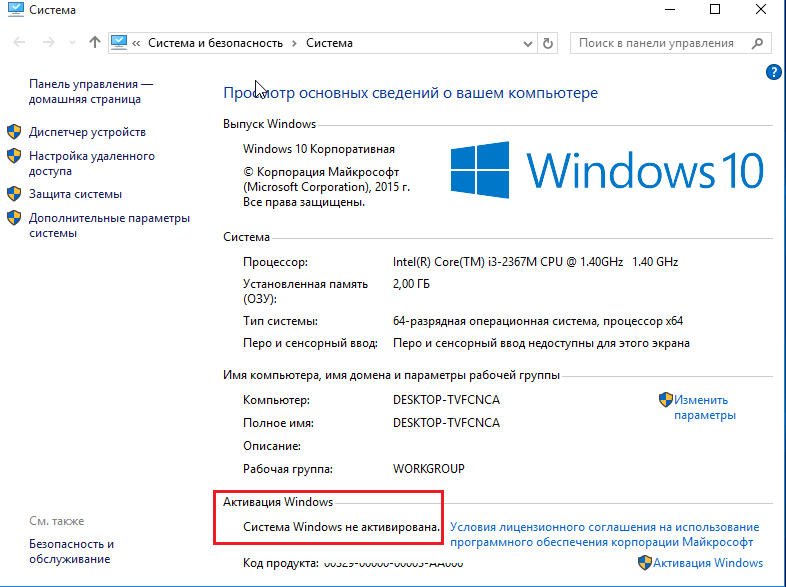
Если в ходе инсталляции Windows не потребовала ввода лицензионного ключа, проверьте, на месте ли активация. Откройте контекстное меню кнопки «Пуск» и зайдите в параметры системы.

Информация об активации находится внизу окна основных сведений о компьютере. В нашем примере она не выполнена, так как «десятка» была установлена в виртуальную машину с полного нуля.
Если вам удалось выполнить переустановку с сохранением лицензии, можете удалить папку C:Windows.old, в которой находятся файлы предыдущей копии системы. Они больше не нужны — сведения об активации успешно перенесены в новую.
Как установить систему с жесткого диска
Бывают ситуации, когда под рукой не отказывается ни флешек, ни DVD. Словом, ничего, кроме жесткого диска того же компьютера, на который необходимо установить Windows 10.
Для установки «десятки» с жесткого диска необходимо соблюсти 3 условия:
- Иметь дистрибутив. Удобнее — в виде набора файлов и папок. Если у вас есть только образ ISO, придется его распаковать, например, с помощью приложения-архиватора (WinRAR, 7-zip и аналогов) или проводника Windows (только в «восьмерке» и «десятке»).
- Иметь дополнительный раздел на жестком диске емкостью от 3 Гб. Желательно свободный.
- Компьютер должен загружаться с этого же диска. Если нет, то вам понадобится носитель c Live CD/Live USB (портабельной операционной системой), вроде BartPE, Alkid Live CD и т. п. Их образы вы без труда найдете в сети.
Носителем установочных файлов будет служить жесткий диск, точнее, его дополнительный раздел. Операционная система вам понадобится для копирования дистрибутива и создания его загрузчика.
Порядок установки
- Загрузите компьютер с жесткого диска или носителя с портабельной ОС.
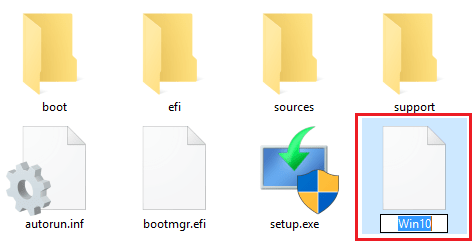
- Скопируйте файлы и папки дистрибутива Windows 10 в корень дополнительного раздела (не того, в который будет установлена система).

- Переименуйте файл загрузки (bootmgr), например, в «Win10». Длина его имени не должна превышать 5 символов.
Теперь вам предстоит создать загрузчик дистрибутива с помощью утилиты BootICE. Вместо нее можно использовать другие инструменты управления загрузкой, но мы выбрали BootICE, так как считаем ее наиболее простым и удобным средством.
- Запустите утилиту (установки она не требует). В разделе «Физический диск» (Physical disk) выберите из списка «Диск назначения» (Destination disc) винчестер компьютера. Нажмите кнопку «Управление MBR» (Process MBR).
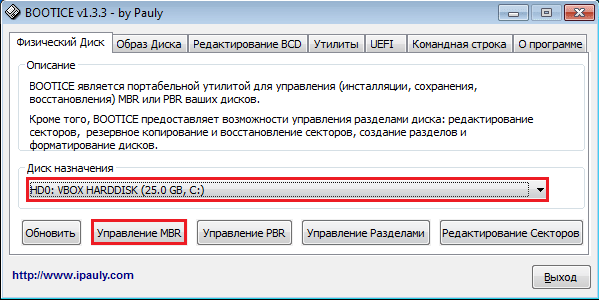
- Отметьте пункт «Grub4DOS» и щелкните «Инсталляция/конфигурация» (Install/Config).

- В разделе «Переименование GRLDR» (Rename GRLDR) пропишите новое имя файла загрузки Виндовс 10 (как вы помните, мы назвали его «Win10») и нажмите «Сохранить на диск» (Save to disk). Щелкните ОК в сообщении об успешном создании загрузчика и закройте утилиту.

Осталось перезагрузить компьютер. При следующем запуске управление получит программа установки Windows 10, а дальше будет то же самое, что и при инсталляции системы с флешки.
Image Credit: Brett Morrison on Flickr
![]()
Загрузить PDF
![]()
Загрузить PDF
Из этой статьи вы узнаете, как установить операционную систему на новом компьютере. Чтобы установить Windows, вставьте установочный диск или USB-накопитель с операционной системой, а затем загрузите компьютер с диска/накопителя. Компьютеры Mac поставляются с установленной операционной системой, но ее можно переустановить в режиме восстановления на чистый жесткий диск.
-

1
Вставьте установочный диск или накопитель. Чтобы установить Windows, понадобится установочный DVD-диск или USB-флеш-накопитель с операционной системой. Вставьте диск или накопитель в компьютер. Если у вас нет нужной версии операционной системы, скачайте ее:
- Windows 10
- Windows 8
- Windows 7
-
2
Перезагрузите компьютер. Нажмите и удерживайте кнопку питания компьютера, чтобы выключить его, подождите несколько секунд, а затем снова нажмите кнопку питания, чтобы включить компьютер.
-
3
Подождите, пока появится экран запуска компьютера. Теперь нужно быстро нажать клавишу для входа в BIOS.
- Лучше нажать клавишу, как только компьютер начнет загружаться.
-
4
Нажмите и удерживайте Del или F2, чтобы войти в BIOS. Имейте в виду, что клавиша может быть другой — в этом случае нажмите соответствующую клавишу. Откроется BIOS, в котором нужно указать основное загрузочное устройство.
- Как правило, чтобы войти в BIOS, нужно несколько раз нажать одну из F-клавиш. Они находятся в верхней части клавиатуры; в некоторых случаях (как правило, на ноутбуках) нужно удерживать клавишу Fn и нажимать соответствующую F-клавишу.
- Почитайте инструкцию (бумажную или онлайн) к компьютеру или материнской плате, чтобы выяснить клавишу для входа в BIOS.
-
5
Найдите раздел «Boot Order» (Порядок загрузки). Обычно он находится на главной странице BIOS; если нет, с помощью клавиш со стрелками перейдите на вкладку «Boot» (Загрузка) или «Advanced» (Дополнительно).
- Название раздела «Порядок загрузки» зависит от версии BIOS. Если вам не удается найти этот раздел, почитайте инструкцию (бумажную или онлайн) к компьютеру или материнской плате, чтобы выяснить, как работать с BIOS.
-
6
Выберите основное загрузочное устройство. Здесь нужно выбрать либо DVD-диск, либо USB-накопитель.
- Опция DVD-привода обычно называется «CD-ROM», а опция USB-накопителя — «Removable Devices» (Съемные устройства).
-
7
Переместите выбранное устройство в начало списка. Для этого нажимайте на «+» до тех пор, пока выбранное устройство не переместится в начало списка «Порядок загрузки».
- Чтобы выяснить, какую клавишу нажать, посмотрите на список клавиш и их функциональность в правом нижнем углу страницы BIOS.
-
8
Сохраните настройки и выйдите из BIOS. Нажмите на клавишу с функцией «Save and Exit» (Сохранить и выйти). Чтобы выяснить, какую клавишу нажать, смотрите список клавиш в правом нижнем углу экрана.
- Возможно, вам придется подтвердить свое решение — выберите «Yes» (Да) и нажмите ↵ Enter.
-
9
Перезагрузите компьютер. Он загрузится с DVD-диска или USB-накопителя и начнется установка операционной системы.
-
10
Следуйте инструкциям на экране, чтобы установить систему. Они зависят от версии Windows.
Реклама


-
1
Перезагрузите компьютер. Нажмите и удерживайте кнопку питания компьютера, чтобы выключить его, подождите несколько секунд, а затем снова нажмите кнопку питания, чтобы включить компьютер.
- Если компьютер уже выключен, просто нажмите кнопку питания, чтобы включить его.
- Этот метод подразумевает, что компьютер подключен к интернету.
-
2
Нажмите и удерживайте клавиши ⌘ Command, ⌥ Option и R. Сделайте это до того, как услышите сигнал запуска компьютера.
-
3
Отпустите клавиши, когда увидите значок в виде земного шара и надпись «Starting Internet Recovery. This may take a while» (Запуск в режиме восстановления. Это займет некоторое время).
- Вам может быть предложено выбрать беспроводную сеть и ввести пароль к сети.
-
4
Подождите, пока загрузится операционная система Mac OS X. Это может занять от нескольких минут до нескольких часов в зависимости от скорости вашего интернет-соединения и версии операционной системы.
- Загрузится система, которая была установлена на компьютере. Например, если на новом компьютере была установлена OS X Yosemite, будет установлена версия Yosemite.
-
5
Выберите диск для установки. На странице операционной системы щелкните по значку жесткого диска компьютера, который выглядит как серый квадрат и находится посередине страницы.
-
6
Щелкните по Install «Установить». Эта опция находится в нижнем правом углу страницы.
-
7
Подождите, пока операционная система установится. На это уйдет от нескольких минут до нескольких часов в зависимости от быстродействия компьютера и версии операционной системы. Когда установка завершится, компьютер перезагрузится с новой операционной системой.
Реклама


Советы
- На компьютер Mac можно установить Windows 10 с помощью Boot Camp.
Реклама
Об этой статье
Эту страницу просматривали 127 274 раза.
Была ли эта статья полезной?
Как установить Windows 10 без операционной системы?
- Шаг 1 — Войдите в BIOS вашего компьютера.
- Шаг 2 — Настройте компьютер на загрузку с DVD или USB.
- Шаг 3. Выберите вариант чистой установки Windows 10.
- Шаг 4 — Как найти лицензионный ключ Windows 10.
- Шаг 5 — Выберите свой жесткий диск или SSD.
Как установить Windows на пустой компьютер?
важно:
- Запустите его.
- Выберите ISO-образ.
- Укажите ISO-файл Windows 10.
- Установите флажок Создать загрузочный диск с помощью.
- В качестве схемы разделов выберите разделение GPT для прошивки EUFI.
- В качестве файловой системы выберите FAT32, а не NTFS.
- Убедитесь, что ваш USB-накопитель находится в списке устройств.
- Нажмите кнопку Пуск.
Как установить Windows 10 на новый жесткий диск без операционной системы?
Как установить Windows 10 на новый жесткий диск?
- Установите новый жесткий диск (или SSD) на свой компьютер.
- Подключите установочный USB-накопитель Windows 10 или вставьте диск Windows 10.
- Измените порядок загрузки в BIOS для загрузки с установочного носителя.
- Загрузитесь с установочного USB-накопителя Windows 10 или DVD.
Можете ли вы использовать компьютер без установленной операционной системы?
Операционная система — одна из самых важных программ, позволяющая компьютеру запускать и выполнять программы. Без операционной системы, компьютер не может быть использован поскольку оборудование компьютера не сможет взаимодействовать с программным обеспечением.
Сколько стоит операционная система Windows 10?
Вы можете выбрать одну из трех версий операционной системы Windows 10. Окна 10.Дом стоит 139 долларов. и подходит для домашнего компьютера или игр. Windows 10 Pro стоит 199.99 долларов и подходит для предприятий или крупных предприятий.
Можно ли установить Windows 10 на ПК без операционной системы?
Лицензия Windows 10 позволяет установить Windows 10 только на один ПК или Mac за раз. . . Если вы действительно хотите установить Windows 10 на этот компьютер, вам нужно будет приобрести лицензию на Windows 10, а затем установить Windows 10 с USB-накопителя, как описано ниже: Щелкните эту ссылку: https://www.microsoft.com/en- us / software-downlo…
Выпускает ли Microsoft Windows 11?
Дата объявлена: Microsoft начнет предлагать Windows 11 на Октябрь 5 к компьютерам, полностью отвечающим его аппаратным требованиям.
Используйте инструмент миграции Windows 10: он может полностью преодолеть недостатки чистой установки. За несколько щелчков мышью вы можете перенести Windows 10 и ее профиль пользователя на целевой диск без переустановки. Просто загрузитесь с целевого диска, и вы увидите знакомую операционную среду.
Как установить Windows 10 на старый компьютер?
Для этого посетите страницу Microsoft «Загрузить Windows 10», нажмите «Загрузить инструмент сейчас» и запустите загруженный файл. Выбирать «Создать установочный носитель для другого ПК». Обязательно выберите язык, выпуск и архитектуру, которые вы хотите установить Windows 10.
Как установить Windows на новый жесткий диск?
Как установить Windows на диск SATA
- Вставьте диск Windows в привод CD-ROM / DVD / флэш-накопитель USB.
- Выключите компьютер.
- Установите и подключите жесткий диск Serial ATA.
- Включите компьютер.
- Выберите язык и регион, а затем установите операционную систему.
- Следуйте инструкциям на экране.
Как установить Windows на новый компьютер?
Шаг 3 — Установите Windows на новый ПК
- Подключите флешку к новому ПК.
- Включите компьютер и нажмите клавишу, которая открывает меню выбора загрузочного устройства для компьютера, например клавиши Esc / F10 / F12. Выберите вариант, при котором компьютер загружается с USB-накопителя. Начнется установка Windows. …
- Извлеките флешку.
Установка операционной системы Windows на пустой жесткий диск (чистая установка) считается идеальным вариантом. Этот способ предполагает удаление всех данных с жесткого диска путем его повторного разбиения на разделы и форматирования.

Вам понадобится
- — установочный диск Windows XP
Инструкция
Включите компьютер и дождитесь появления первого логотипа.
Нажмите клавишу F2 для запуска меню BIOS Setup и перейдите в раздел Advaced Bios Features.
Выберите пункт, отвечающий за очередность загрузочных дисков и выставьте значения:
First Boot Device — CD-Rom;
Second Boot Device — HDD0;
Third Boot Device — оставьте без изменений.
Нажмите функциональную клавишу Esc для возвращения в главное меню BIOS и выберите пункт Exit & Save Chages для выхода из режима BIOS.
Нажмите клавишу Y для применения выбранных изменений и вставьте установочный диск Windows XP в дисковод.
Выберите команду «Установить» в открывшемся окне меню и нажмите клавишу Enter в новом диалоговом окне приветствия для подтверждения начала процесса установки.
Примите лицензионное соглашение нажатием клавиши F8 для продолжения установки операционной системы в следующем диалоговом окне.
Нажмите клавишу С в новом диалоговом окне для выбора нового установочного раздела жесткого диска.
Укажите необходимый объем создаваемого раздела в открывшемся диалоговом окне и нажмите клавишу Enter для подтверждения своего выбора.
Укажите созданный загрузочный раздел для установки Windows и нажмите клавишу Enter для подтверждения применения изменений.
Выберите «Форматировать раздел в системе NTFS» в очередном диалоговом окне и нажмите клавишу Enter для начала процесса форматирования.
Дождитесь завершения операции форматирования и автоматического копирования нужных файлов на жесткий диск.
Дождитесь автоматической перезагрузки компьютера и выполните вход в BIOS Setup описанным ранее способом.
Восстановите изначальные настройки очередности загрузочных дисков и сохраните сделанные изменения.
Выполните выход из BIOS и введите серийный номер в соответствующем окне.
Нажмите кнопку «Далее» в диалоговом окне с выбором установки и выберите язык интерфейса и региональные настройки в следующем диалоговом окне.
Введите желаемое имя в поле «Имя» очередного диалогового окна и оставьте пустым поле «Организация».
Дождитесь окончания установки операционной системы Windows XP.
Видео по теме
Полезный совет
Рекомендуется создать резервную копию всех важных данных перед установкой операционной системы Windows.
Источники:
- Поддержка Microsoft Россия. Установка Windows XP или обновление до Windows XP
![]()
Download Article
![]()
Download Article
- Installing Windows 10
- Setting up Windows 10
- Installing macOS
- Setting up macOS
- Q&A
- Tips
|
|
|
|
|
This wikiHow teaches you how to install a computer operating system on a new, blank computer. You can do this on a Windows computer using a Windows Installation media. Brand new Mac computers will always come with an operating system installed, but you can reinstall your Mac’s default operating system using the macOS recovery feature.
-
1
Create Windows Installation media. If you order Windows 10 for a new PC build, they may send you an installation media. If you don’t have a Windows installation media, you can make one. You’ll need a computer with internet access and an 8 GB USB flash drive (16 GB recommended). You also need to know if the computer you want to install Windows 10 on has 32-bit or 64-bit architecture. You will also need to purchase Windows to get a product key. This can be done before or after the installation. Use the following steps to create a Windows Installation Media:
- Insert a USB drive with at least 8 GB of space into any computer with internet access. This will wipe any existing data on the USB drive, so be sure to back up any data you want to keep.
- Go to https://www.microsoft.com/en-us/software-download/windows10 in a web browser.
- Click Download Tool Now.
- Open the «MediaCreationTool.exe» file in your web browser or Downloads folder.
- Click Accept.
- Select «Create Installation Media (USB drive, DVD, ISO file) for another PC» and click Next.
- Select your language, Windows edition, and PC architecture and click Next.
- Select «USB flash drive» and click Next.
- Select your USB drive and click Next.
-
2
Back up your files (optional). If you already have a Windows installation on your computer, a new Windows installation may overwrite your files. Back up any data you want to keep before beginning a new Windows installation. You can back up your files to OneDrive, Google Drive, Dropbox, or an external hard drive or USB flash drive.
Advertisement
-
3
Insert the Windows Installation Media in the computer you want to install Windows on. You can insert the Windows Installation media into any free USB port.
-
4
Boot the computer. If the PC is already powered on, restart it using the normal restart procedures of the operating system that is installed on the PC. If it is not yet powered on, press the power button to boot it up.
-
5
Enter the Boot menu. Most newer computers have a boot menu you can enter while booting up. The way you enter it is different, depending on your motherboard. The most common way to enter the Boot menu is to press F10, F11, F12, F2, or Esc as the PC boots up. This Boot menu will display a list of drives you can boot from.[1]
- If you are using an older PC that does not have a Boot menu, you will need to Enter the BIOS while booting up. The buttons you press to enter the BIOS is different from one PC manufacturer to another. It will usually say what buttons you need to press while your computer boots up. You typically need to press F1 F2, F3, Esc or Delete to enter the BIOS.[2]
You may need to be quick about it. You can also reboot your PC into the BIOS from inside the Windows Settings menu.
- If you are using an older PC that does not have a Boot menu, you will need to Enter the BIOS while booting up. The buttons you press to enter the BIOS is different from one PC manufacturer to another. It will usually say what buttons you need to press while your computer boots up. You typically need to press F1 F2, F3, Esc or Delete to enter the BIOS.[2]
-
6
Select the USB drive. This is the drive that has the Windows Installation Media. This will boot the PC from the Windows Installation Media. Once the computer boots from the USB drive, press any key to start the Windows installation process.
- If you are inside the BIOS settings. Locate the option that says «Boot», «Boot order», «Priorities» or something similar. Change the boot order so that your PC boots from the USB drive first. Then select the option to save and exit. This will reboot your PC from the USB drive.
-
7
Select your language, time and currency, and keyboard input and click Next. Use the drop-down menus to first select your language. Then select your country or region, and your keyboard input method. Then click Next.
-
8
Click Install Now. It’s the button in the center of the screen.
-
9
Enter your Windows product key and click Next. If you’ve already purchased Windows, you can find your license key in your confirmation email. If you have not purchased Windows, click I don’t have a product key. You’ll need to purchase Windows and activate it later on.
-
10
Select which edition of Windows you want to install and click Next. If you’ve already purchased Windows, check which version of Windows you purchased and make sure you click the right version. If you have not yet purchased Windows, check which version you want to install. Different versions of Windows have a different price.
- If you are not sure which version of Windows to install, Windows Home Edition is the most common version of Windows.
-
11
Click the checkbox next to «I accept the license terms» and click Next. You can read the license terms in the window in the center. Click next when you are ready to continue.
-
12
Click Custom: Install Windows only or Upgrade: Install Windows and keep files, settings, and applications. If your computer already has a Windows installation on it, click Upgrade: Install Windows and keep files, settings, and applications. If your computer does not have a Windows installation or you need to reinstall Windows, click Custom: Install Windows only.
-
13
Select a drive or partition you want to install Windows on and click Delete. If you have multiple hard drives or a hard drive with multiple partitions, select the partition you want to install Windows on and click Delete. Be aware that this will erase all data on the drive. Make sure you have backed up all data you want to keep before continuing. This will leave the drive with unallocated space.
-
14
Select a drive with unallocated space and click Next. This will start installing Windows on the drive you selected. The amount of time it takes will depend on the hardware of your computer.
-
15
Remove the USB flash drive and restart your computer. Once Windows is finished installing, your computer will restart automatically. Remove the USB flash drive so that it does not try to boot from the Flash drive again. The first time Windows boots up, you will need to go through the Setup process.


Advertisement
-
1
Verify your region and keyboard input. When Windows restarts, it will ask you to verify your region and keyboard input. If these are correct, click Yes in the lower-right corner. Otherwise, select the correct region and keyboard input.
- You will also have the option to select another keyboard input. If you want to select another keyboard input, click Add Input and select another input. Otherwise, click Skip.[3]
- You will also have the option to select another keyboard input. If you want to select another keyboard input, click Add Input and select another input. Otherwise, click Skip.[3]
-
2
Connect to your Wireless network. Select your wireless network and click Connect. Then enter your wireless password and click Next.
- If you have a wired internet connection, make sure you are connected to your modem via an Ethernet cable. Windows will automatically detect your wired connection.
-
3
Select Set up for personal use and click Next. This option allows you to sign in with a Microsoft account and use your computer for personal use.
- If you are setting your computer for a business or organization, select Set up for an organization and click Next. You may need the aide of your IT department in order to set up Windows with a company email.
-
4
Sign in to Windows. If you already have a Microsoft account, you can sign in with your Microsoft account to import the digital license from a previous Windows computer. Enter the email address, phone number, or Skype number and password to sign in to your Microsoft account.
- If you do not have a Microsoft account, click Create account and follow the instructions to create a new Microsoft account.
- Alternatively, you can click Offline account in the lower-right corner to create a new local user account for Windows that doesn’t have a Microsoft account associated with it.
-
5
Click Accept to set up Cortana. Cortana is the built-in voice assistant for Windows. If you want to set up Cortana, click Accept and follow the instructions. If you don’t want to do it right now, click Decline.
-
6
Click Yes and follow the instructions to set up the Windows timeline. This feature allows you to continue what you are doing on other Windows devices. If you want to set up this feature click Yes and follow the instructions. If you don’t want to set this feature up, click No to move on to the next step.
-
7
Choose your privacy settings and click Accept. By default, Windows turn on GPS location tracking, Speech recognition, diagnostics, find my device, inking and typing to help Microsoft improve language recognition, and relevant ads. Click the toggle switch to turn off any of these features you don’t want to use. Then click Accept. Windows will do a little more set up and then open your desktop.[4]


Advertisement
-
1
Back up your files. It’s recommended that you back up all files and data you want to keep before installing or reinstalling macOS on a Mac. You can back up your data to iCloud, Google Drive, Dropbox, or an external hard drive or USB drive.
-
2
Restart your Mac. To restart your Mac, click the Apple icon in the upper-right corner and click Restart.
- If your Mac is already off, just press the Power button to turn it on.
- You will need Internet access to reinstall macOS on your Mac.
-
3
Press and hold ⌘ Command+R immediately. You’ll need to start doing this before the Mac start-up sound plays. Continue to hold these buttons until the Mac recovery screen appears.
-
4
Connect to your wireless network
. To connect to your wireless network, click the icon with a dot and three arching lines in the upper-right corner. Click your wireless network. Then enter your wireless password and click Join.
- If you are using a wired connection, make sure you are connected to your modem using an Ethernet cable.
-
5
Reformat the hard drive (optional). Depending on what your needs are, you may want to completely erase the hard drive with macOS on it and start with a new fresh install. Once your hard drive is erased, you cannot recover the data on it. Make sure you back up any data you want to keep before erasing your hard drive. If you don’t want to erase your hard drive, skip this step to reinstall macOS with all your data present on the drive. Use the following steps to reformat the hard drive:
- Click Disk Utility and click Continue.
- Click the hard drive you want to erase in the panel to the right. Make sure it is the correct drive.
- Click Erase at the top.
- Type a new name for the drive (optional).
- Select «Mac OS Extended (Journaled)» or «APFS» as the format.
- Click Erase.
- Close the Disk Utility window.
-
6
Select Reinstall macOS and click Continue. This will start the process of reinstalling macOS.
-
7
Click Continue. It’s the icon with the arrow at the bottom center of the screen.
-
8
Agree to the terms and license agreement. To agree to the terms and license agreement, read the text and click Agree at the bottom. Then click Agree again in the pop-up alert.
-
9
Select the hard drive you want to install macOS on and click Install. This will begin the process of installing macOS on the hard drive. This process may take a while depending on the hardware of your Mac and your internet connection speed. Your Mac will restart when it is finished.


Advertisement
-
1
Select your country and click Continue. Use the menu to select your language and click Continue at the bottom of the screen.
-
2
Sign in to your wi-fi. To sign in to your Wi-fi, select your wireless network, and enter your password. Then click Continue at the bottom of the screen.
-
3
Click Continue. This screen explains a little about privacy and data. You can read the text to learn more or click Continue to move on to the next step.
-
4
Select a method for transferring data to your Mac and click Continue. If you have important data you want to transfer to your mac on another Mac or Time Machine back, or a Windows PC, select the appropriate option and click Continue. Otherwise, select «Don’t transfer any information now» and click Continue.
-
5
Sign in with your Apple ID. To sign in with your Apple ID, enter the email address associated with your Apple ID and click Continue. Then enter your password and click Continue.
- If you don’t have an Apple ID, you can click Create New Apple ID and follow the instructions to create a new Apple ID.
- Alternatively, you can click Set up later and then click Skip to skip this step for now.
-
6
Agree to the terms and conditions. To agree to the terms and conditions, read the text on the page and click Agree at the bottom. Then click Agree again in the pop-up alert window.
-
7
Create a new user account. You’ll need to create a user account in order to sign in to your Mac. Use the following steps to create a new user account.
- Enter your full name in the first two bars at the top.
- Enter your user account name.
- Enter your password in the next two bars.
- Enter a hint for your password.
- Click Continue.
-
8
Confirm your setup and click Continue. Check the information on the Express Setup screen to make sure it sounds good and click Continue to move on to the next step.
- If you want to do a custom setup, click Custom setup at the bottom of the screen.
-
9
Decide if you want to share your analytics with app developers and click Continue. If you want to share your analytics with app developers to help them improve their products, click the checkbox next to «Share crash and usage data with app developers». If you’d rather protect your privacy, leave the checkbox blank. Click Continue to move on to the next step.
-
10
Set up your screen time settings (optional). Your screen time settings allow you to set limits on the amount of time computer users are allowed to use the computer, set up content restrictions, and receive usage reports. If you want to set up these features, click on the options on the screen, and follow the instructions to set up your screen time settings. Click Continue when you are ready to move on to the next step.
-
11
Enable Siri. Siri is Apple’s voice assistant. If you want to set up Siri, click the checkbox next to «Enable Ask Siri» and click Continue.
-
12
Help improve Siri (optional). If you have audio records that you can use to help improve Siri, select the option that says «Share audio recordings». Otherwise, click the option that says «Not now». Click Continue to move on to the next step.
-
13
Choose a look and click Continue. Click one fo the three options to choose a look. Then click Continue to move on to the next step. macOS will take a few minutes to set up and then you will be logged into your Mac. [5]


Advertisement
Add New Question
-
Question
How do I use a computer without a HDD?

You’ll have to use either an SSD or USB drive to load your OS. Be sure to set your BIOS to the proper boot priority.
-
Question
How do I install an operating system onto my new, non-pre built PC without a disk tray?
You have to use an external disc reader, or put your boot media on a flash drive.
-
Question
How do I boot a new desktop that has built-in Windows?
You have to insert the Windows CD or Windows USB Drive into the PC before booting the Computer. If the computer detects the CD Drive or USB Stick automatically before it boots, then it will run the Windows Installation. If this isn’t the case, then the computer boots before it checks the DVD or USB Drive. There are countless tutorials and step by step guides with pictures online.
See more answers
Ask a Question
200 characters left
Include your email address to get a message when this question is answered.
Submit
Advertisement
-
If you don’t like Windows or Mac, you can install Linux based operating systems like Ubuntu or Debian.
Advertisement
References
About This Article
Article SummaryX
1. Create a new Windows Installation Media from the tool at https://www.microsoft.com/en-us/software-download/windows10.
2. Insert the USB Windows installation media and boot up your PC.
3. Press the stated button combination on-screen to boot into the BIOS or Boot menu.
4. Use the Boot order option or Boot menu to boot from the USB drive.
5. Select your language, country, and keyboard input and click Next.
6. Click Install Now.
7. Enter your Windows product key and click Next.
8. Select your Windows Edition and click Next.
9. Agree to the license terms and click Next.
10. Select «Custom Install» and click Next.
11. Select a drive with unallocated space and click Next.
12. Remove the USB drive when Windows is finished installing.
13. Reboot your PC and follow the instructions to complete the setup process.
Did this summary help you?
Thanks to all authors for creating a page that has been read 707,148 times.
Reader Success Stories
-

«All step by step of installing OS, very helpful.»
Is this article up to date?
![]()
Download Article
![]()
Download Article
- Installing Windows 10
- Setting up Windows 10
- Installing macOS
- Setting up macOS
- Q&A
- Tips
|
|
|
|
|
This wikiHow teaches you how to install a computer operating system on a new, blank computer. You can do this on a Windows computer using a Windows Installation media. Brand new Mac computers will always come with an operating system installed, but you can reinstall your Mac’s default operating system using the macOS recovery feature.
-
1
Create Windows Installation media. If you order Windows 10 for a new PC build, they may send you an installation media. If you don’t have a Windows installation media, you can make one. You’ll need a computer with internet access and an 8 GB USB flash drive (16 GB recommended). You also need to know if the computer you want to install Windows 10 on has 32-bit or 64-bit architecture. You will also need to purchase Windows to get a product key. This can be done before or after the installation. Use the following steps to create a Windows Installation Media:
- Insert a USB drive with at least 8 GB of space into any computer with internet access. This will wipe any existing data on the USB drive, so be sure to back up any data you want to keep.
- Go to https://www.microsoft.com/en-us/software-download/windows10 in a web browser.
- Click Download Tool Now.
- Open the «MediaCreationTool.exe» file in your web browser or Downloads folder.
- Click Accept.
- Select «Create Installation Media (USB drive, DVD, ISO file) for another PC» and click Next.
- Select your language, Windows edition, and PC architecture and click Next.
- Select «USB flash drive» and click Next.
- Select your USB drive and click Next.
-
2
Back up your files (optional). If you already have a Windows installation on your computer, a new Windows installation may overwrite your files. Back up any data you want to keep before beginning a new Windows installation. You can back up your files to OneDrive, Google Drive, Dropbox, or an external hard drive or USB flash drive.
Advertisement
-
3
Insert the Windows Installation Media in the computer you want to install Windows on. You can insert the Windows Installation media into any free USB port.
-
4
Boot the computer. If the PC is already powered on, restart it using the normal restart procedures of the operating system that is installed on the PC. If it is not yet powered on, press the power button to boot it up.
-
5
Enter the Boot menu. Most newer computers have a boot menu you can enter while booting up. The way you enter it is different, depending on your motherboard. The most common way to enter the Boot menu is to press F10, F11, F12, F2, or Esc as the PC boots up. This Boot menu will display a list of drives you can boot from.[1]
- If you are using an older PC that does not have a Boot menu, you will need to Enter the BIOS while booting up. The buttons you press to enter the BIOS is different from one PC manufacturer to another. It will usually say what buttons you need to press while your computer boots up. You typically need to press F1 F2, F3, Esc or Delete to enter the BIOS.[2]
You may need to be quick about it. You can also reboot your PC into the BIOS from inside the Windows Settings menu.
- If you are using an older PC that does not have a Boot menu, you will need to Enter the BIOS while booting up. The buttons you press to enter the BIOS is different from one PC manufacturer to another. It will usually say what buttons you need to press while your computer boots up. You typically need to press F1 F2, F3, Esc or Delete to enter the BIOS.[2]
-
6
Select the USB drive. This is the drive that has the Windows Installation Media. This will boot the PC from the Windows Installation Media. Once the computer boots from the USB drive, press any key to start the Windows installation process.
- If you are inside the BIOS settings. Locate the option that says «Boot», «Boot order», «Priorities» or something similar. Change the boot order so that your PC boots from the USB drive first. Then select the option to save and exit. This will reboot your PC from the USB drive.
-
7
Select your language, time and currency, and keyboard input and click Next. Use the drop-down menus to first select your language. Then select your country or region, and your keyboard input method. Then click Next.
-
8
Click Install Now. It’s the button in the center of the screen.
-
9
Enter your Windows product key and click Next. If you’ve already purchased Windows, you can find your license key in your confirmation email. If you have not purchased Windows, click I don’t have a product key. You’ll need to purchase Windows and activate it later on.
-
10
Select which edition of Windows you want to install and click Next. If you’ve already purchased Windows, check which version of Windows you purchased and make sure you click the right version. If you have not yet purchased Windows, check which version you want to install. Different versions of Windows have a different price.
- If you are not sure which version of Windows to install, Windows Home Edition is the most common version of Windows.
-
11
Click the checkbox next to «I accept the license terms» and click Next. You can read the license terms in the window in the center. Click next when you are ready to continue.
-
12
Click Custom: Install Windows only or Upgrade: Install Windows and keep files, settings, and applications. If your computer already has a Windows installation on it, click Upgrade: Install Windows and keep files, settings, and applications. If your computer does not have a Windows installation or you need to reinstall Windows, click Custom: Install Windows only.
-
13
Select a drive or partition you want to install Windows on and click Delete. If you have multiple hard drives or a hard drive with multiple partitions, select the partition you want to install Windows on and click Delete. Be aware that this will erase all data on the drive. Make sure you have backed up all data you want to keep before continuing. This will leave the drive with unallocated space.
-
14
Select a drive with unallocated space and click Next. This will start installing Windows on the drive you selected. The amount of time it takes will depend on the hardware of your computer.
-
15
Remove the USB flash drive and restart your computer. Once Windows is finished installing, your computer will restart automatically. Remove the USB flash drive so that it does not try to boot from the Flash drive again. The first time Windows boots up, you will need to go through the Setup process.
Advertisement
-
1
Verify your region and keyboard input. When Windows restarts, it will ask you to verify your region and keyboard input. If these are correct, click Yes in the lower-right corner. Otherwise, select the correct region and keyboard input.
- You will also have the option to select another keyboard input. If you want to select another keyboard input, click Add Input and select another input. Otherwise, click Skip.[3]
- You will also have the option to select another keyboard input. If you want to select another keyboard input, click Add Input and select another input. Otherwise, click Skip.[3]
-
2
Connect to your Wireless network. Select your wireless network and click Connect. Then enter your wireless password and click Next.
- If you have a wired internet connection, make sure you are connected to your modem via an Ethernet cable. Windows will automatically detect your wired connection.
-
3
Select Set up for personal use and click Next. This option allows you to sign in with a Microsoft account and use your computer for personal use.
- If you are setting your computer for a business or organization, select Set up for an organization and click Next. You may need the aide of your IT department in order to set up Windows with a company email.
-
4
Sign in to Windows. If you already have a Microsoft account, you can sign in with your Microsoft account to import the digital license from a previous Windows computer. Enter the email address, phone number, or Skype number and password to sign in to your Microsoft account.
- If you do not have a Microsoft account, click Create account and follow the instructions to create a new Microsoft account.
- Alternatively, you can click Offline account in the lower-right corner to create a new local user account for Windows that doesn’t have a Microsoft account associated with it.
-
5
Click Accept to set up Cortana. Cortana is the built-in voice assistant for Windows. If you want to set up Cortana, click Accept and follow the instructions. If you don’t want to do it right now, click Decline.
-
6
Click Yes and follow the instructions to set up the Windows timeline. This feature allows you to continue what you are doing on other Windows devices. If you want to set up this feature click Yes and follow the instructions. If you don’t want to set this feature up, click No to move on to the next step.
-
7
Choose your privacy settings and click Accept. By default, Windows turn on GPS location tracking, Speech recognition, diagnostics, find my device, inking and typing to help Microsoft improve language recognition, and relevant ads. Click the toggle switch to turn off any of these features you don’t want to use. Then click Accept. Windows will do a little more set up and then open your desktop.[4]
Advertisement
-
1
Back up your files. It’s recommended that you back up all files and data you want to keep before installing or reinstalling macOS on a Mac. You can back up your data to iCloud, Google Drive, Dropbox, or an external hard drive or USB drive.
-
2
Restart your Mac. To restart your Mac, click the Apple icon in the upper-right corner and click Restart.
- If your Mac is already off, just press the Power button to turn it on.
- You will need Internet access to reinstall macOS on your Mac.
-
3
Press and hold ⌘ Command+R immediately. You’ll need to start doing this before the Mac start-up sound plays. Continue to hold these buttons until the Mac recovery screen appears.
-
4
Connect to your wireless network
. To connect to your wireless network, click the icon with a dot and three arching lines in the upper-right corner. Click your wireless network. Then enter your wireless password and click Join.
- If you are using a wired connection, make sure you are connected to your modem using an Ethernet cable.
-
5
Reformat the hard drive (optional). Depending on what your needs are, you may want to completely erase the hard drive with macOS on it and start with a new fresh install. Once your hard drive is erased, you cannot recover the data on it. Make sure you back up any data you want to keep before erasing your hard drive. If you don’t want to erase your hard drive, skip this step to reinstall macOS with all your data present on the drive. Use the following steps to reformat the hard drive:
- Click Disk Utility and click Continue.
- Click the hard drive you want to erase in the panel to the right. Make sure it is the correct drive.
- Click Erase at the top.
- Type a new name for the drive (optional).
- Select «Mac OS Extended (Journaled)» or «APFS» as the format.
- Click Erase.
- Close the Disk Utility window.
-
6
Select Reinstall macOS and click Continue. This will start the process of reinstalling macOS.
-
7
Click Continue. It’s the icon with the arrow at the bottom center of the screen.
-
8
Agree to the terms and license agreement. To agree to the terms and license agreement, read the text and click Agree at the bottom. Then click Agree again in the pop-up alert.
-
9
Select the hard drive you want to install macOS on and click Install. This will begin the process of installing macOS on the hard drive. This process may take a while depending on the hardware of your Mac and your internet connection speed. Your Mac will restart when it is finished.
Advertisement
-
1
Select your country and click Continue. Use the menu to select your language and click Continue at the bottom of the screen.
-
2
Sign in to your wi-fi. To sign in to your Wi-fi, select your wireless network, and enter your password. Then click Continue at the bottom of the screen.
-
3
Click Continue. This screen explains a little about privacy and data. You can read the text to learn more or click Continue to move on to the next step.
-
4
Select a method for transferring data to your Mac and click Continue. If you have important data you want to transfer to your mac on another Mac or Time Machine back, or a Windows PC, select the appropriate option and click Continue. Otherwise, select «Don’t transfer any information now» and click Continue.
-
5
Sign in with your Apple ID. To sign in with your Apple ID, enter the email address associated with your Apple ID and click Continue. Then enter your password and click Continue.
- If you don’t have an Apple ID, you can click Create New Apple ID and follow the instructions to create a new Apple ID.
- Alternatively, you can click Set up later and then click Skip to skip this step for now.
-
6
Agree to the terms and conditions. To agree to the terms and conditions, read the text on the page and click Agree at the bottom. Then click Agree again in the pop-up alert window.
-
7
Create a new user account. You’ll need to create a user account in order to sign in to your Mac. Use the following steps to create a new user account.
- Enter your full name in the first two bars at the top.
- Enter your user account name.
- Enter your password in the next two bars.
- Enter a hint for your password.
- Click Continue.
-
8
Confirm your setup and click Continue. Check the information on the Express Setup screen to make sure it sounds good and click Continue to move on to the next step.
- If you want to do a custom setup, click Custom setup at the bottom of the screen.
-
9
Decide if you want to share your analytics with app developers and click Continue. If you want to share your analytics with app developers to help them improve their products, click the checkbox next to «Share crash and usage data with app developers». If you’d rather protect your privacy, leave the checkbox blank. Click Continue to move on to the next step.
-
10
Set up your screen time settings (optional). Your screen time settings allow you to set limits on the amount of time computer users are allowed to use the computer, set up content restrictions, and receive usage reports. If you want to set up these features, click on the options on the screen, and follow the instructions to set up your screen time settings. Click Continue when you are ready to move on to the next step.
-
11
Enable Siri. Siri is Apple’s voice assistant. If you want to set up Siri, click the checkbox next to «Enable Ask Siri» and click Continue.
-
12
Help improve Siri (optional). If you have audio records that you can use to help improve Siri, select the option that says «Share audio recordings». Otherwise, click the option that says «Not now». Click Continue to move on to the next step.
-
13
Choose a look and click Continue. Click one fo the three options to choose a look. Then click Continue to move on to the next step. macOS will take a few minutes to set up and then you will be logged into your Mac. [5]
Advertisement
Add New Question
-
Question
How do I use a computer without a HDD?
You’ll have to use either an SSD or USB drive to load your OS. Be sure to set your BIOS to the proper boot priority.
-
Question
How do I install an operating system onto my new, non-pre built PC without a disk tray?
You have to use an external disc reader, or put your boot media on a flash drive.
-
Question
How do I boot a new desktop that has built-in Windows?
You have to insert the Windows CD or Windows USB Drive into the PC before booting the Computer. If the computer detects the CD Drive or USB Stick automatically before it boots, then it will run the Windows Installation. If this isn’t the case, then the computer boots before it checks the DVD or USB Drive. There are countless tutorials and step by step guides with pictures online.
See more answers
Ask a Question
200 characters left
Include your email address to get a message when this question is answered.
Submit
Advertisement
-
If you don’t like Windows or Mac, you can install Linux based operating systems like Ubuntu or Debian.
Advertisement
References
About This Article
Article SummaryX
1. Create a new Windows Installation Media from the tool at https://www.microsoft.com/en-us/software-download/windows10.
2. Insert the USB Windows installation media and boot up your PC.
3. Press the stated button combination on-screen to boot into the BIOS or Boot menu.
4. Use the Boot order option or Boot menu to boot from the USB drive.
5. Select your language, country, and keyboard input and click Next.
6. Click Install Now.
7. Enter your Windows product key and click Next.
8. Select your Windows Edition and click Next.
9. Agree to the license terms and click Next.
10. Select «Custom Install» and click Next.
11. Select a drive with unallocated space and click Next.
12. Remove the USB drive when Windows is finished installing.
13. Reboot your PC and follow the instructions to complete the setup process.
Did this summary help you?
Thanks to all authors for creating a page that has been read 707,148 times.
Reader Success Stories
-
«All step by step of installing OS, very helpful.»
Is this article up to date?
Привет, друзья. В этой статье затронем такой вопрос: купил ноутбук без операционной системы, что дальше? Что нужно предпринять в случае покупки ноутбука без предустановленной операционной системы? Если вы новичок в компьютерном деле и, возможно, сомневаетесь, покупать вам ноутбук с предустановленной операционной системой или без неё, и если вы хотите купить устройство не для коммерции, а для личных дел, без раздумий берите его без системы, либо с предустановленными DOS, Linux или другими бесплатными. Такие ноутбуки стоят дешевле за счёт того, что в их стоимость не включена лицензия на Windows. Ну а с ней самой и с её лицензией мы сейчас разберёмся. Давайте поговорим о том, какую выбрать операционную систему для ноутбука, как её установить, как активировать, и что нужно сделать после установки системы.
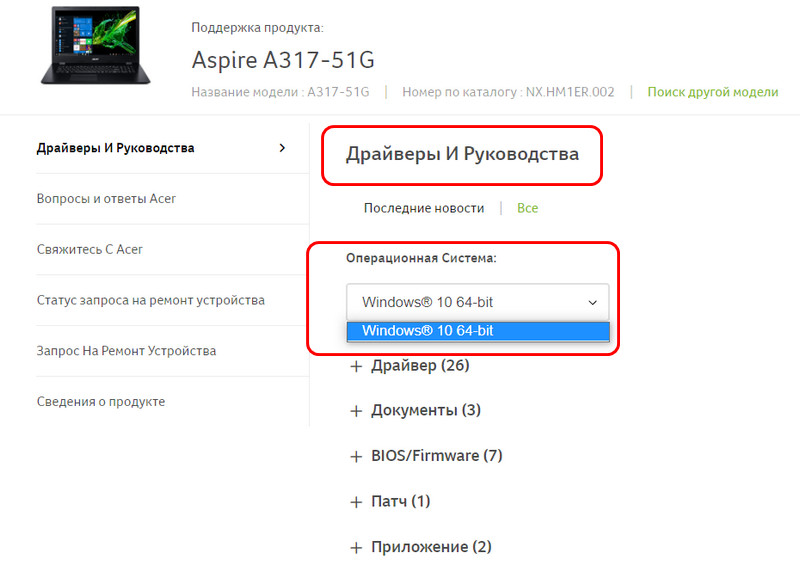
Итак, друзья, новый ноутбук без операционной системы. Для начала необходимо определиться с операционной системой, которую мы будем устанавливать на него. Есть только две полноценные десктопные системы, которые мы законно и без танцев с бубном можем устанавливать на ПК и ноутбуки – Linux и Windows. Если Linux вам не нужна для определённых целей, ставьте, конечно же, Windows. На сегодняшний день существует две поддерживаемые разработчиком версии Windows – Windows 8.1 и 10, так что в плане версий выбор невелик. Но в 2023 году поддержка Windows 8.1 прекратится. Тогда как Windows 10 – это постоянно поддерживаемая, обновляемая и развиваемая операционная система. Поэтому массовый вариант выбора системы для ноутбука – это Windows 10. Более того, в большинстве случаев это вариант гарантировано нормальной работы операционной системы. Друзья, если вы купили ноутбук без операционной системы, зайдите на его страничку спецификаций на сайте производителя и посмотрите для какой операционной системы производитель поставляет драйверы комплектующих.
 Если у вашего ноутбука нет такой странички, поищите его характеристики на сайтах типа НИКС.
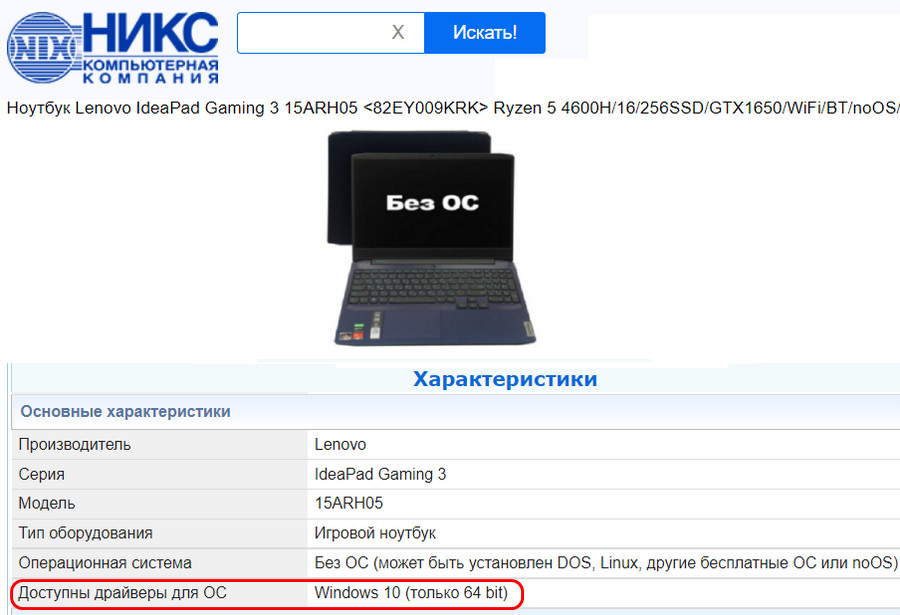 Это не значит, что ваш ноутбук не будет работать с Linux, Windows 8.1 или даже Windows 7. Это значит, что производитель не гарантирует нормальную работу ноутбука в этих операционных системах. А для большинства современных ноутбуков производителем будет заявлена поддержка только Windows 10.
Теперь давайте разберёмся с разновидностями самой Windows 10. Есть 2 вида Windows 10 в зависимости от архитектуры – 32-битная и 64-битная. Первую нужно устанавливать на ноутбуки с оперативной памятью до 3 Гб включительно, вторую – с оперативной памятью 4 Гб и более. Современные ноутбуки поставляются в основном с «оперативкой» 4 Гб и более, так что в большей части случаев выбирать нужно Windows 10 64 бита.
И есть разные редакции Windows 10, для обычного пользователя это Pro и Home. Также обычные пользователи при необходимости могут использовать специфическую корпоративную редакцию LTSC. Какая разница между этими редакциями, и какую лучше выбрать в вашем конкретно случае, смотрите в статье сайта «Какую Windows 10 лучше установить».
Итак, мы разобрались, что в ситуации типа «купил ноутбук без операционной системы, что дальше» выбор системы устройства в большинстве случаев будет Windows 10. Теперь необходимо, собственно, её установить. Этот процесс одинаков для всех разновидностей «Десятки», нам нужно создать её установочный носитель и выполнить процесс установки. Всё это пошагово и в деталях расписано в статье сайта «Как установить Windows 10».
Друзья, примечательность Windows 10 заключается ещё и в том, что, поскольку это обновляемая операционная система, её база может предусматривать драйверы даже для новейших компьютерных комплектующих, которыми может быть укомплектован приобретённый вами ноутбук. «Десятка» сама может установить драйверы на сеть, видео, звук, камеру и прочие устройства. Но в любом случае вам необходимо сразу же после установки Windows 10 отправиться в системный диспетчер устройств, посмотреть, на все ли устройства ноутбука установлены драйверы, и, если на какие-то не установлены, то нужно установить их нам самим. В подробностях об этом процессе читайте в статье «Как установить драйвера».
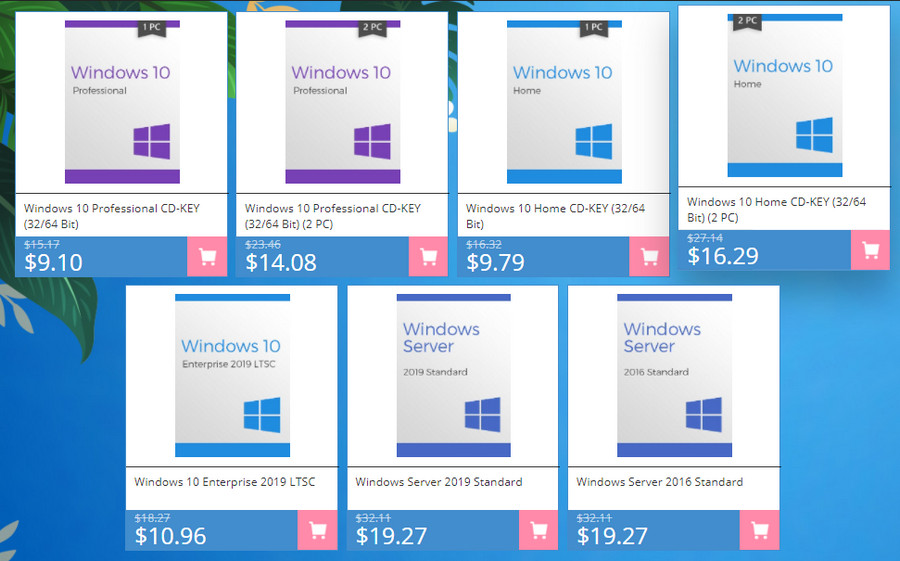
Теперь давайте разберёмся с активацией Windows 10. Выше упоминалось о том, что идея купить ноутбук без предустановленной операционной системы хороша, если только вы покупаете устройство с целью использования в личной некоммерческой деятельности. Под коммерческой деятельностью имеется в виду таковая, что предусматривает нахождение ноутбука в помещении, где вы официально ведёте предпринимательскую или любую иную самозанятую деятельность. И куда могут прийти с проверкой компетентные органы по защите лицензирования продуктов. Почему так? Друзья, вы можете купить для коммерции ноутбук без Windows, но тогда вам придётся приобретать на него Retail-лицензию, которая у компании Microsoft стоит, к примеру, для Windows 10 Home $199, а для Windows 10 Pro — $289. Гораздо дешевле вам обойдётся покупка ноутбука с OEM-лицензией на предустановленную Windows 10. И OEM-ноутбук с предустановленной лицензионной Windows 10 вы сможете использовать в коммерции, поскольку это предусмотрено условиями лицензирования Microsoft. Но ещё дешевле купить OEM-лицензию на Windows 10 вы сможете отдельно от ноутбука. Однако в этом случае в коммерции ноутбук использовать нежелательно, ведь это противоречит воле Microsoft.
OEM-лицензия на Windows ограничена привязкой только к одному компьютеру, тогда как Retail-лицензию можно убрать с одного компьютера и перенести на другой. Однако ключ OEM-лицензии на любые редакции Windows 10 в разгар скидок в интернет-магазинах цифровых лицензий можно купить как минимум в 20 раз дешевле, чем ключ Retail-лицензии — по цене до $10. Так что если вы купили ноутбук без операционной системы, и не будете использовать его в коммерции, можете смело покупать дешёвый OEM-ключ к Windows 10 и активировать им систему. В перечне статей сайта о лицензировании программных продуктов вы найдёте выгодные промо от различных интернет-магазинов, и по актуальным из них сможете купить OEM-ключ на Windows 10 по акционным ценам.
 Ещё один плюс покупки ноутбука без операционной системы – вы в принципе у себя дома можете пользоваться Windows какое-то время без активации. И приобрести лицензионный ключ позднее. В Windows 10 вы лишь будете ограничены невозможностью использовать настройки персонализации. Подробнее о работе с «Десяткой» без активации читайте в статье «Как долго можно пользоваться Windows 10 без активации».
Купив лицензионный ключ Windows 10, активируйте им систему. Детали смотрим в статье «Как активировать Windows 10».
И ещё один, друзья, плюс Windows 10 – на борту этой операционной системы есть свой антивирус Защитник Windows, значительно улучшенный по сравнению со своей реализацией в ранних версиях Windows. Тем не менее даже Защитник Windows 10 обеспечивает лишь базовую защиту компьютера. Если вы хотите большую степень защиты, используйте сторонние антивирусы с эффективными антивирусными технологиями и функционалом, которого нет в Защитнике, и который, возможно, вам пригодится. Какой эффективный сторонний антивирус использовать? Лучшие решения будут в числе платного софта, их обзор смотрите в статье сайта «Какой антивирус самый лучший». Если вы хотите антивирус из числа бесплатного софта, можете присмотреть себе какой-то из подборки в статье «10 лучших бесплатных антивирусов». А если вы хотите эффективный платный антивирус бесплатно, юзайте лайфхаки по бесплатному использованию Eset Nod32.
Браузер – важнейшая программа любой операционной системы, это наше окно в Интернет, он должен быть быстрым, обновляемым разработчиками, с технологиями веб-защиты, с функционалом синхронизации пользовательских данных. Присутствующий в составе Windows 10 штатный браузер Microsoft Edge в принципе соответствует этим требованиям, но в числе сторонних браузеров есть гораздо лучше него — Google Chrome, Opera, Яндекс.Браузер. Если с выбором браузера вы ещё не определились, возможно, вам в этом деле поможет статья сайта «Какой браузер быстрее для Windows 10».
Вот это, друзья, основное из того, что необходимо сделать при покупке ноутбука без операционной системы. Далее уже вам самим нужно разобраться, какие установить пользовательские программы.