-
Windows
-
help2site

В этой статье будет подробно описано, как установить Windows Server 2008 на виртуальную машину . Установка Windows Server 2008 мало чем отличается от установки Windows 7. Но многие вещи, о которых пойдет речь в данной статье требуют отдельного внимания. По этой причине, для того чтобы быть последовательным, я и решил начать серию статей по настройке и администрированию Windows Server именно с этой инструкции по установке и начальной настроеке. Итак:
Что понадобится
- Установочный DVD диск Microsoft Windows 2008 R2 или ios образ установочного диска.
- Рабочий код, для активации Microsoft Windows 2008 R2.
- Виртуальная машина (для экспериментов я выбрал Oracle VM VirtualBox)
Настройка виртуальной среды
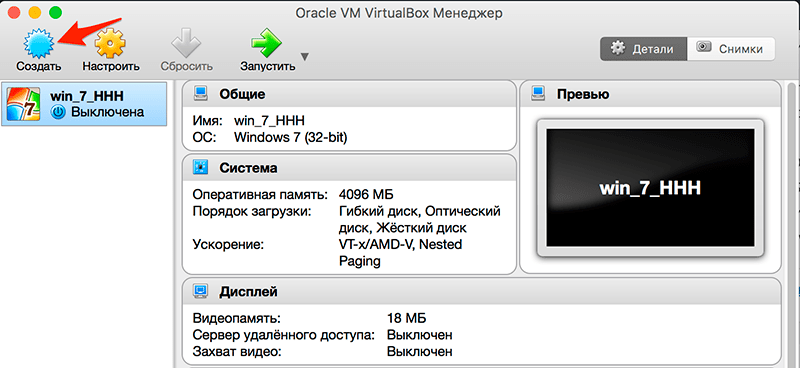
Скачайте с официального сайта последнюю версию Oracle VM VirtualBox и установите на свой компьютер, после установки откройте программу и выберете опцию Создать
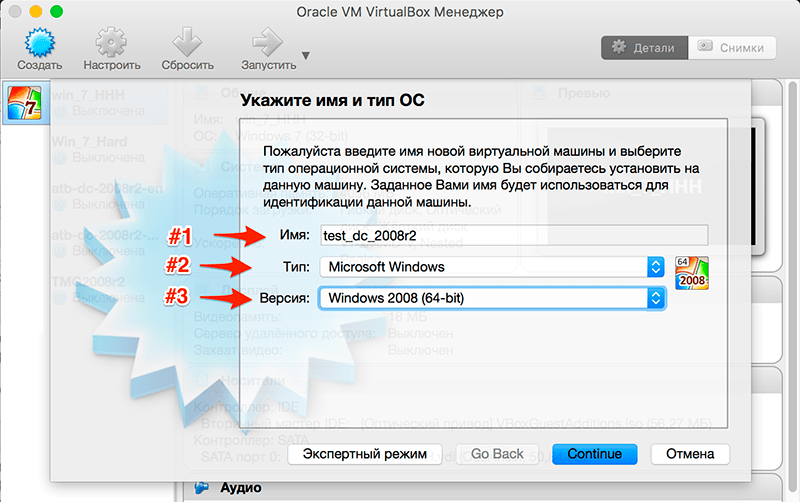
В открывшемся окне водим следующие параметры:
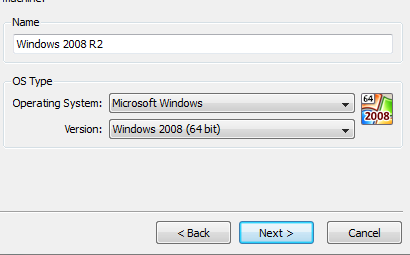
- Произвольное имя новой виртуальной машины
- Тип виртуальной машины: Microsoft Windows
- Версия операционной системы для виртуальной машины: Windows 2008 (64-bit)
для продолжения нажимаем кнопку Continue
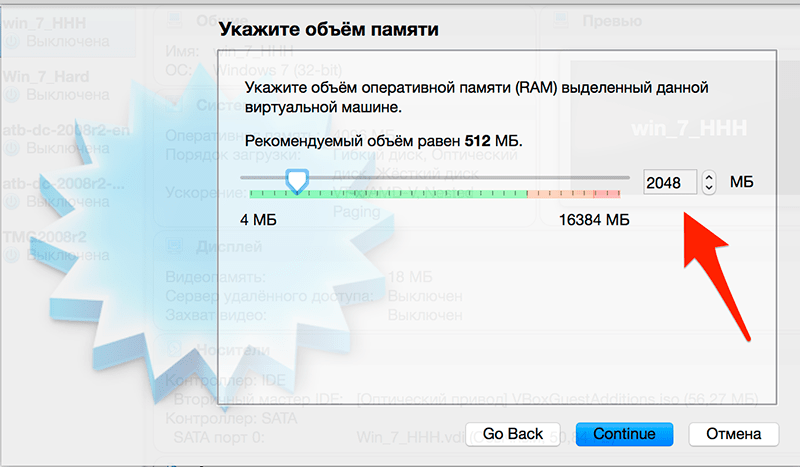
На следующем этапе нужно определить размер оперативной памяти для виртуальной машины (рекомендуется выбирать не мение 2 gb), для продолжения нажимаем кнопку Continue
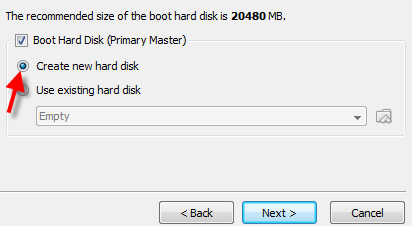
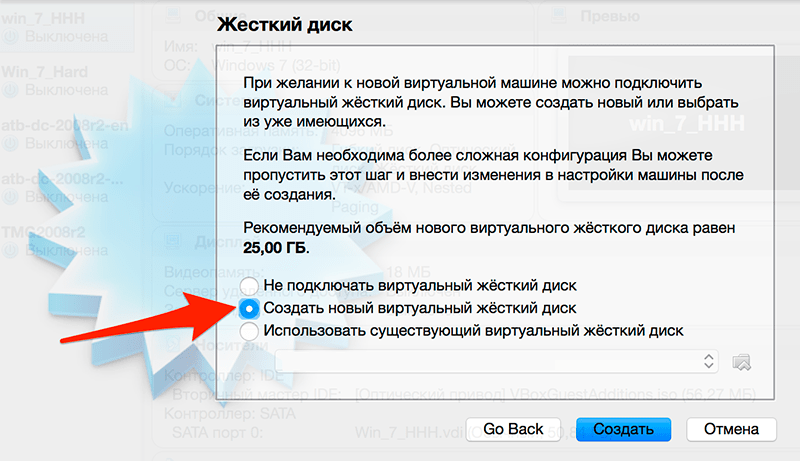
В настройках параметров жесткого диска выбираем: Создать новый виртуальный жесткий диск
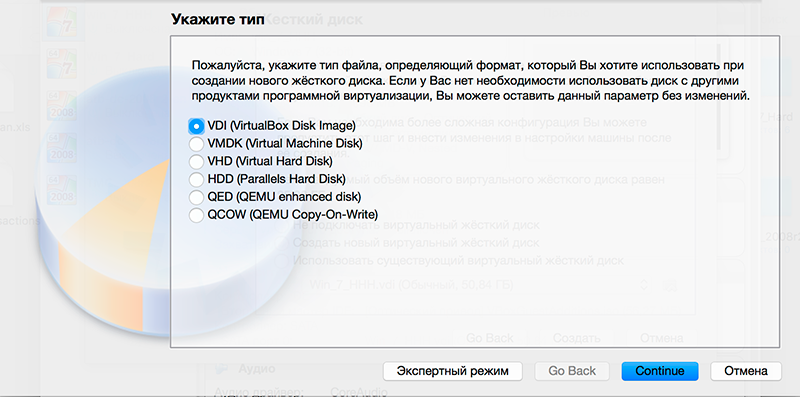
На следующем этапе вам будет предложено выбрать тип формата для файла (я оставил тип по умолчанию .vdi)
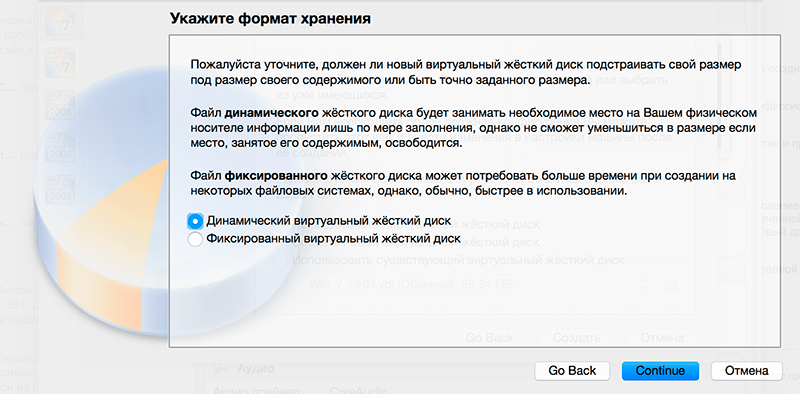
Формат хранения файла я предпочел динамический для экономии места
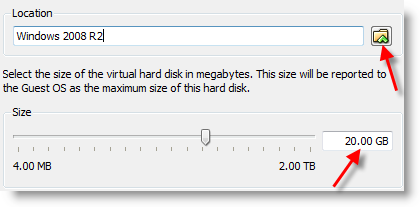
перед завершающим этапом вам будет предложено выбрать место хранения файла виртуальной машины и его размер, на этом настройку виртуальной среды можно считать законченной, следующим этапом будет установка Windows Server 2008 R2 на только что созданную нами виртуальную машину.
Установка Windows Server
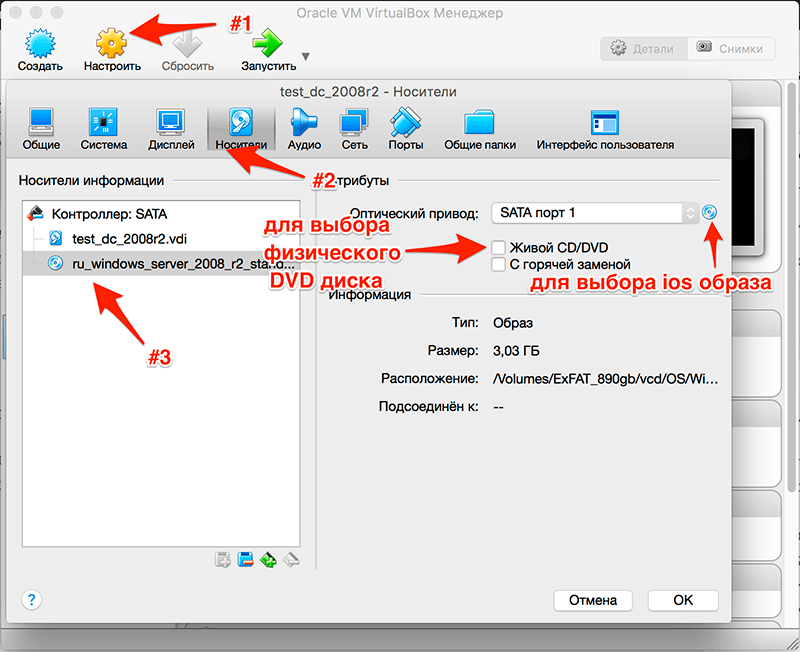
Первым делом нам нужно вставить установочный диск с операционной системой Windows Server 2008 R2 в нашу виртуальную машину, для этого перейдите в Настройки/Носители и выберете ваш установочный диск с операционной системой как обозначено на скриншоте ниже:
После включаем нашу виртуальную машину, для этого нажимаем кнопку Запустить. После непродолжительной загрузки мы попадем на окно с выбором языка:

Выбираем нужные вам параметры и нажимаем «Далее» .
В следующем окне нажимаем кнопку «Установить»:

в меню выбора редакций операционной системы выбираем нужный нам пункт (в данном примере выбираем Windows Server 2008 R2 Enterprise (полная установка)) и жмем «Далее»

В следующем окне вам придется согласиться с условиями лицензионного соглашения, для этого ставим галочку «Я принимаю условия лицензии» и нажимаем «Далее»

Выбираем «Полная установка»

Если вы следовали всем советам описаным выше то в следующем окне выбора раздела для установки выбора как такового у вас нет, т.к. мы создали всего один диск, куда мы и установим операционную систему.

Нажимаем «Далее» и наблюдаем как установщик выполняет все необходимые операции.
Начальная настройка
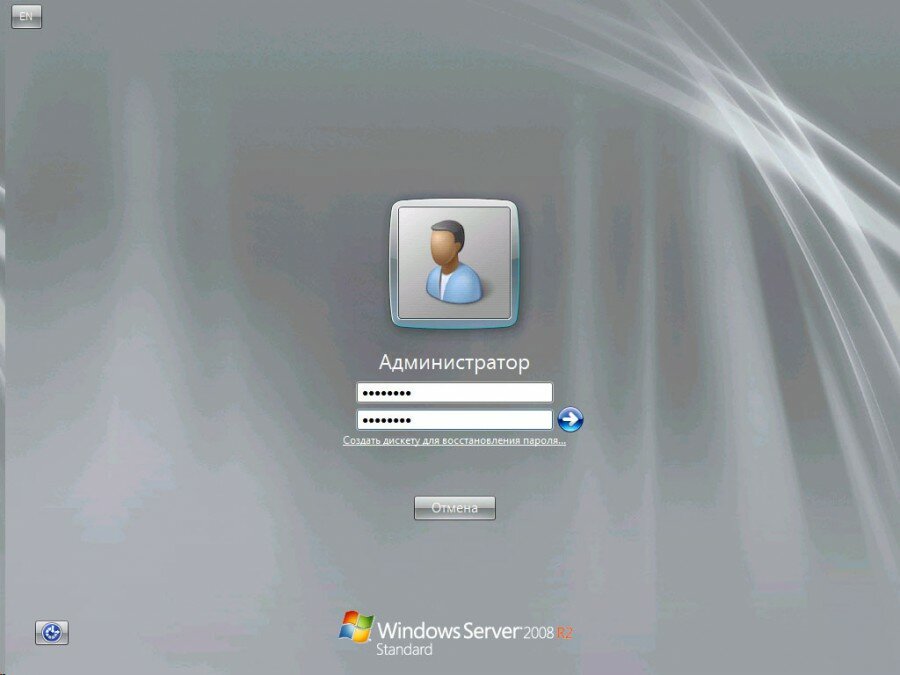
После автоматической перезагрузки виртуальной машины по завершению этапа установки, нам будет предложено авторизоваться, потребуется ввести пароль Администратора и подтвердить его. Новый пароль должен отвечать требованиям сложности, а именно:
- Не содержать имени учетной записи пользователя или частей полного имени пользователя длиной более двух рядом стоящих знаков
- Иметь длину не менее 6 знаков
- Содержать знаки трех из четырех перечисленных ниже категорий:
- Латинские заглавные буквы (от A до Z)
- Латинские строчные буквы (от a до z)
- Цифры (от 0 до 9)
- Отличающиеся от букв и цифр знаки (например, !, $, #, %)
после загрузки откроется окно «Задачи начальной настройки»
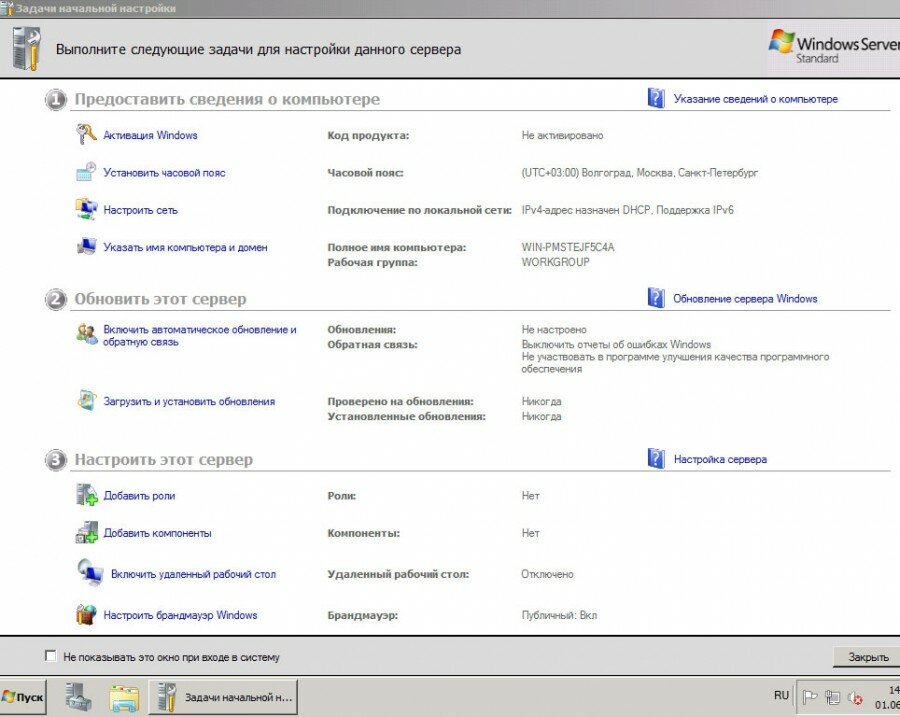
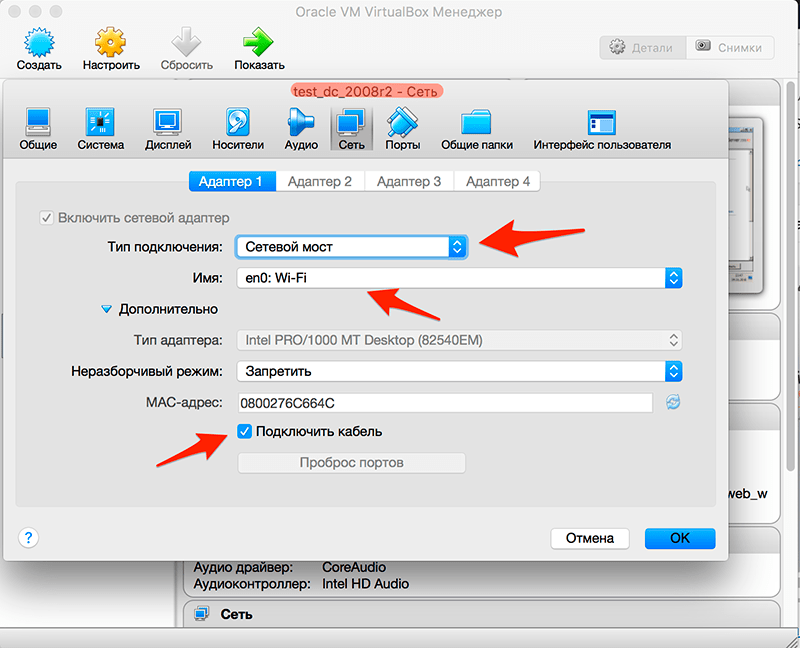
Давайте пройдемся по некоторым пунктам этого окна. Начнем мы с сети. Но прежде нам нужно будет сделать некоторые настройки в нашей виртуальной машине. Заходим в Настроить/Сеть и выбираем следующие параметры:
- в Типе подключения выбираем: Сетевой мост
- в пункте Имя: выберете имя сетевой платы физического компьютера с подключением к сети интернет
- и убедитесь что стоит галочка на против пункта Подключить кабель
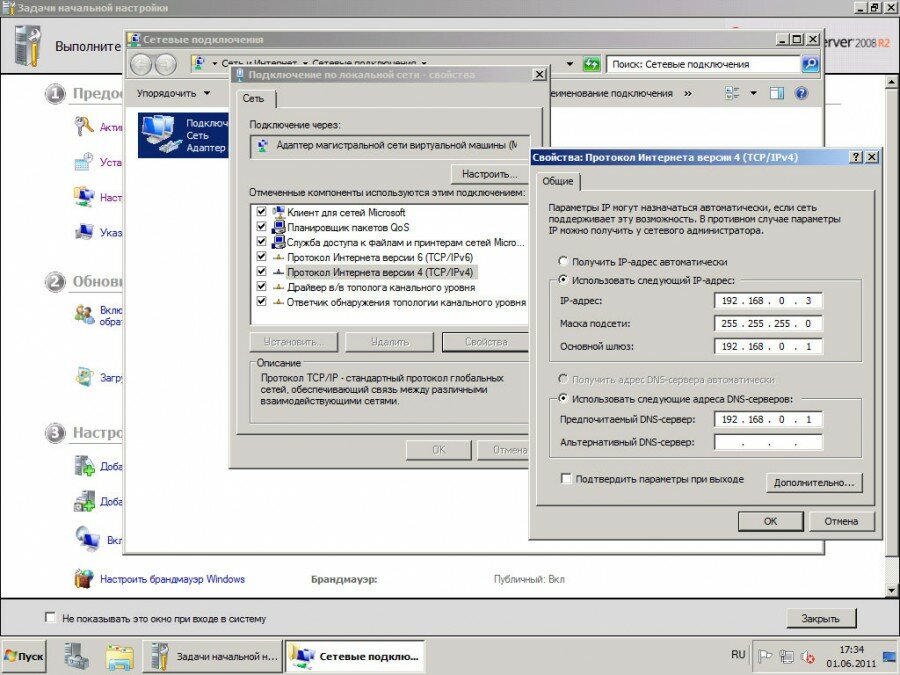
А теперь можно перейти к настройкам сети непосредственно в Windows. Нажимаем на «Настроить сеть» . Откроются «Сетевые подключения», кликаем 2 раза по активному подключению, в появившемся списке выделяем «Протокол Интернета версии 4 (TCP/IPv4)» и нажимаем «Свойства». Вводим необходимые для подключения параметры и через «ОК» закрываем окна.
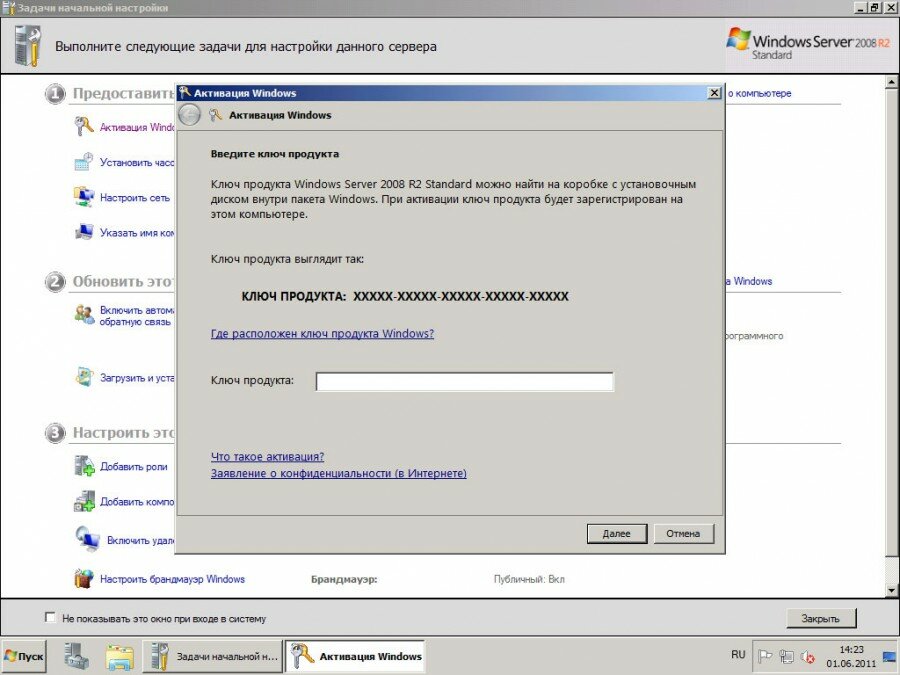
Теперь когда у нас есть подключение к сети интернет мы можем перейти к следующим настройкам, давайте начнем с активации Windows, для этого в окне «Задачи начальной настройки» нажимаем «Активировать Windows». В появившемся окне введите ваш ключ активации.
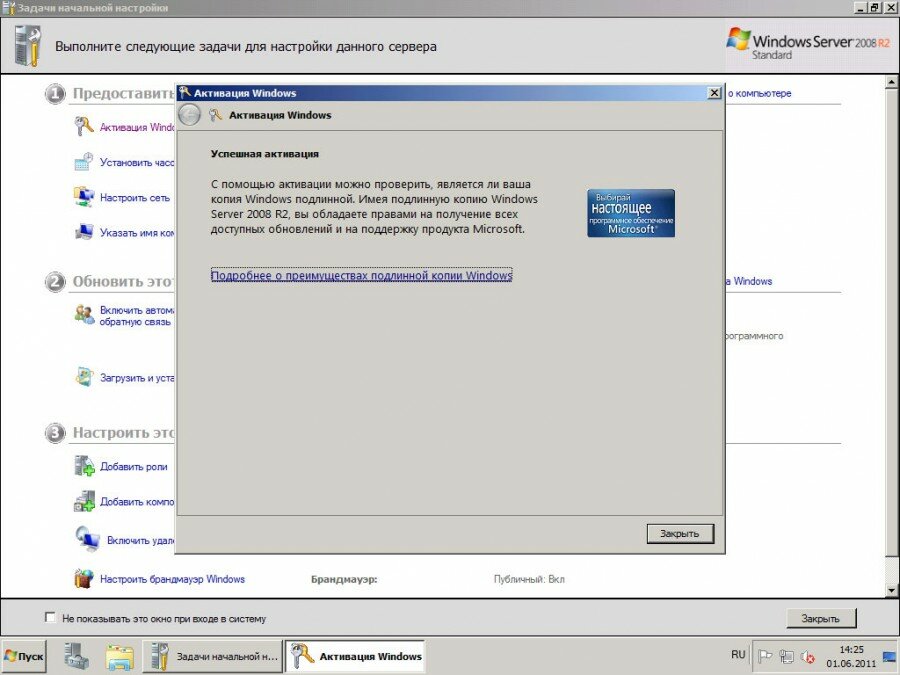
Нажмите 2 раза «Далее» и, если все прошло успешно, то вы увидите подтверждение о успешной активации Windows. Которое выглядит следующим образом:
Возвращаемся к окну «Задачи начальной настройки» нажимаем на «Изменить имя компьютера», в открывшемся окне нажимаем на «Изменить» и вводим новое имя компьютера.
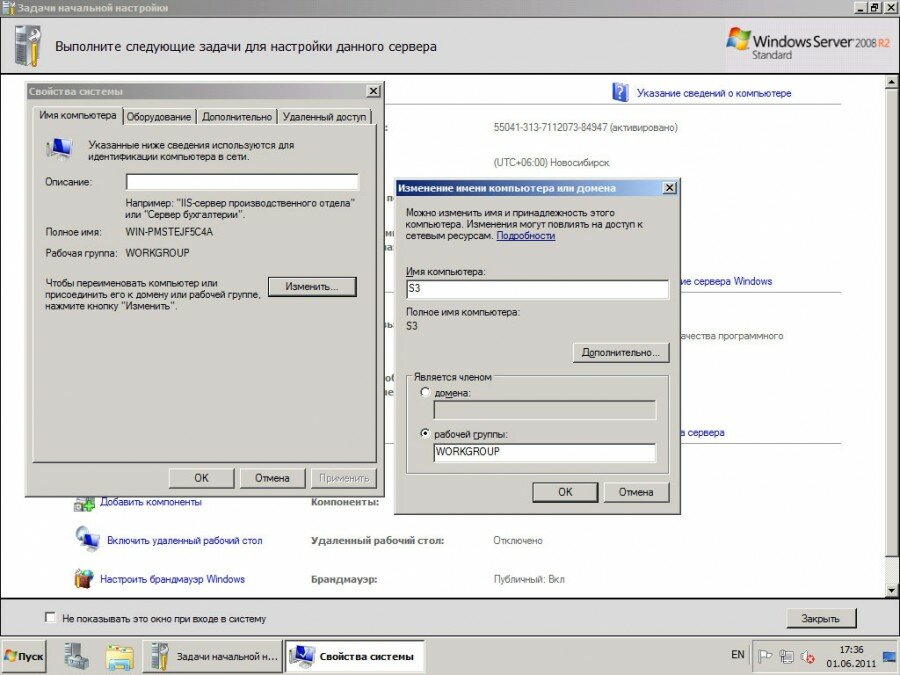
Вот мы и закончили с основными настройками и в итоге мы имеем виртуальную машину с установленной на ней операционной системой Windows Server 2008 R2. В следующей статьях мы сделаем виртуальную сеть при помощи VirtualBox и создадим тестовый контроллер домена.
При покупке компьютера с предустановленной ОС Windows 8 можно заметить
Термин автозагрузка говорит сам за себя, то есть при загрузки
Для того чтобы комфортно ремонтировать компьютер требуется определённая материальная база
В этом разделе собран полный список CMD команд Windows от
Очень расстраивает, когда привычные, много раз выполняемые манипуляции, вдруг, в
Для начала давайте разберемся что такое Postfix? Postfix — это
DroidWall — это первая программа для Android для контролирование доступа
Входим в Bill manager, переходим в пункт меню Клиент—> Клиенты
CommentLuv — это дополнительные комментарии на вэб-ресурсах. СommentLuv – это
Оглавление Как выбрать хостинг для сайта. Как выбрать хостинг для
Windows
Большинство пользователей у которых установлен Windows 7 не обновляют его потому что боятся что после установки обновлений у них слетит активация Windows, но это не
Web-Дизайн
BuddyPress — это плагин который пользуется большой популярностью во всём мире, есть своё сообщество и программисты, которые делают свои расширения и дополнения к плагину. Присутствуют
Windows
Если при загрузке windows, загружается только картинка рабочего стола, а дальнейшее появление иконок и меню пуск не происходит, то это явный признак, что explorer автоматически
Web-Дизайн
Стандартный поиск в Drupal довольно ограничен и имеет минимум настроек. Модуль Custom Search способен немного расширить арсенал настроек для стандартного поиска , но некоторые вещи не под силу даже ему,
Оборудование
Оглавление Каждый второй пользователь рано или поздно задается этим вопросом. Как узнать какая у меня видеокарта? Вот верные способы, которые помогут Вам понять какая видеокарта
Ремонт
Ремонт компьютеров – очень перспективная профессия, которую можно освоить самостоятельно и превратить в источник постоянного немалого дохода. Можно начать свое дело, можно работать частным мастером,
Оборудование
Мобильный компьютер потому и назван мобильным, что может работать без подключения к розетке. Это в идеале. В суровой же реальности аккумуляторные батареи часто «живут» отдельной
iOS
Существует много вариантов обновления прошивки iPad. Это устройство, работающее при помощи известной операционной системы названная как iOS, которая частенько доделывается работниками Apple. Прошивку можно обновить
This article shows how to install Windows Server 2008 R2 on VirtualBox. Windows 2008 R2 server is available in 64-bit version only, so your computer processor and motherboard should support 64-Bit architecture and VT (Virtualization Technology) to carry out this installation.
Even if you are using the 32-bit version of Operating Systems such as Windows 7, Vista and XP on the host computer, still it’s possible to use 64 Bit operating systems as a guest on VirtualBox. To make sure your computer processor and motherboard support this feature read this post where you will find relevant tools for AMD and Intel processors. Once the result confirms that your PC is 64-bit ready then you can proceed with the installation of Windows Server 2008 R2 on VirtualBox.
Follow the steps to Install Windows Server 2008 R2 on VirtualBox.
1) Create New Machine.
2) Select Windows 2008 R2 as the guest OS version.
3) Set memory size to 1024MB, and create a new hard disk with 20GB space. You can increase the RAM and hard disk size if your physical computer has enough resources.
Select the Dynamically Expanding storage option. Set the disk size and location of the disk file on the next screen.
4) Press Finish to complete disk and virtual machine creation.
5) Click on the storage option in virtual machine configuration settings.
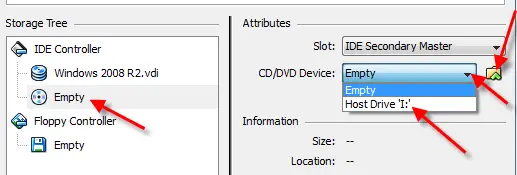
6) Press ‘Empty’ IDE controller as mentioned below to insert the installation DVD or ISO image. If you have an installation DVD, then insert it into the host DVD drive and select the ‘Host Drive- Drive letter’ mentioned below. So when you boot the Windows 2008 R2 virtual machine, it will read your host physical DVD drive. Since I have an ISO file, I’m mounting it by clicking on the Folder arrow button.
7) Make sure the following options are correct under system setting of the virtual machine. You can click on System to view the settings.
Processor – 1 and Enable PAE/NX enabled.
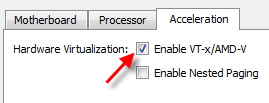
Hardware Virtualization Enable VT-x/AMD-V should be enabled.

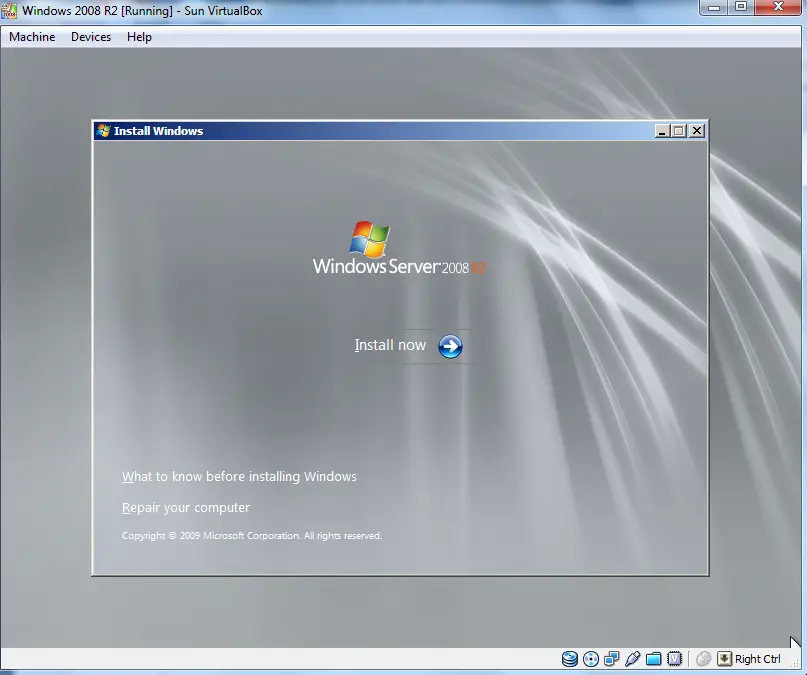
The installation will go smoothly if all settings are correct. No need to explain every installation step.
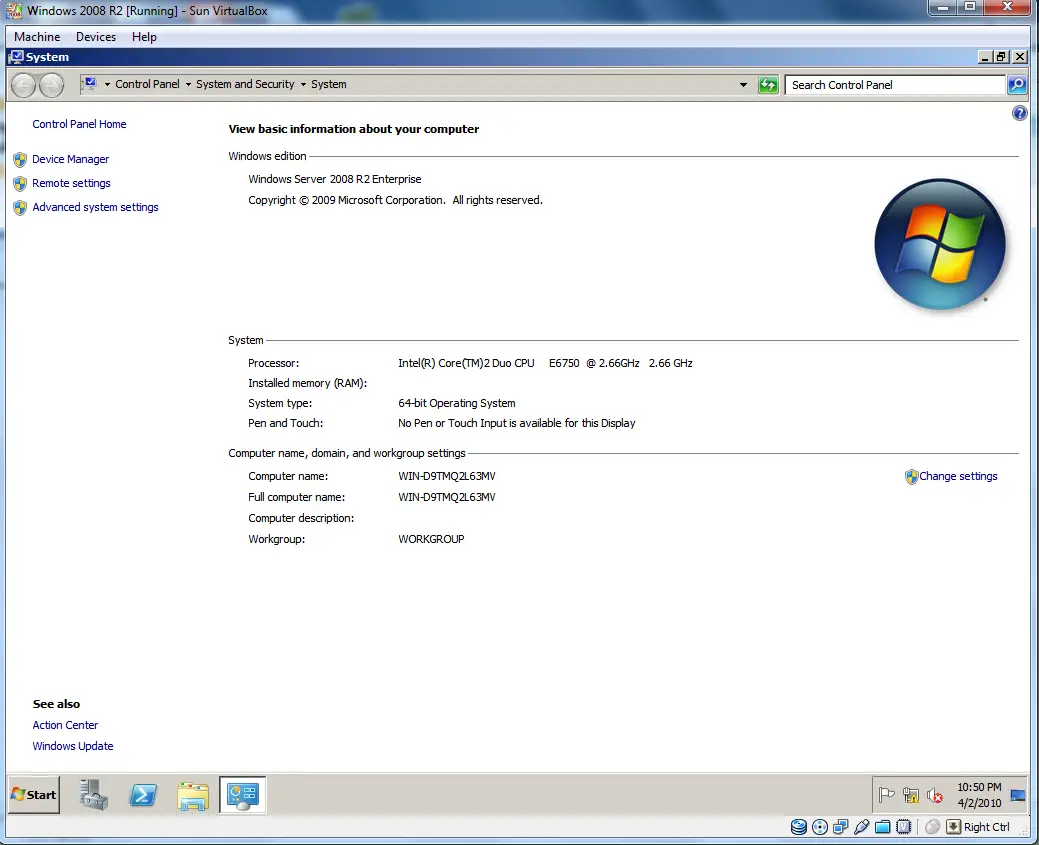
9) Here is the working Windows server 2008 R2 on VirtualBox below.
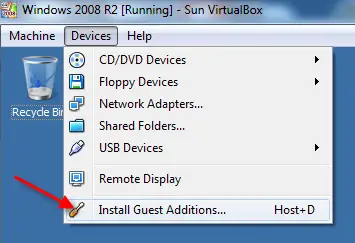
10) It is essential to install VirtualBox guest additions to get better mouse integration, display settings, folder share and improved network performance. You can mount the built-in guest additions ISO file inside the guest VM from the menu bar.
Restart the virtual machine after the installation to see the changes & improvements.
There you go, you have the working Windows 2008 R2 64-bit Server OS on your X86 host OS and VirtualBox. You can enable the seamless mode of the virtual machine to work on Windows 2008 R2 VM from the host OS desktop.
NOTE: Since Windows 2008 R2 is a pretty outdated server operating system currently, it is not recommended to use in the production environment. In case, you need to do some testing and development on this older server OS, you can use this guide to install it on a dedicated VirtualBox environment.
We highly recommend using the latest Windows Server Operating Systems, such as Windows 2022 or Windows 2019 servers.

Windows Server 2008 R2 is a widely used enhanced version of Windows Server 2008 and had improvements on REMOTE DESKTOP SERVICES, an improved version of HYPER-V, ACTIVE DIRECTORY and more! It is server side operating system that can be used for many use cases such as a FILE STORAGE & FTP server, a web server for hosting asp.net web pages, a database server for hosting Microsoft SQL Server databases, a network operations server for handling network functions such as DNS and DHCP, a PRINT SERVER for sharing and managing printers on a network. If you would like to learn how to use and configure Windows Server for any use case, you may need to purchase a computer. However a much simpler solution would be to install Windows Server as a virtual machine on a computer that you already have. Read this tutorial to learn how to install Windows Server Standard or Enterprise edition on Oracle VM VirtualBox 6.1. We have also included links to where you can download everything that is needed to complete this tutorial successfully. You can also watch a free video tutorial hosted on youtube as many times as you like and at any point in time. Click on the button below to watch it now!
REQUIREMENTS
In order to complete this tutorial successfully the following is a list of items that may be needed. Please ensure to have these items available before taking implementation action on this tutorial:
1) A desktop or laptop with a dual core processor, 4GB of RAM and atleast 50GB of free disk space
2) Windows 7, Windows 8, Windows 10 , MacOS 10.13 High Sierra or newer, or any linux based distro with a graphic user interface
3) Oracle VM VirtualBox 6.1 or newer
4) VirtualBox Extension pack
5) The Windows Server 2008 R2 standard or enterprise edition disk image file (ISO file)
OVERVIEW
1) Download the Windows Server 2008 from the internet archive.
2) Download and install VirtualBox 6.1 on to your computer
3) Open VirtualBox and create a new Windows Server virtual machine
4) Power on the virtual machine and install Windows Server 2008 R2
5) Install virtual box guest additions for Windows Server 2008 R2 and configure a VirtualBox shared folder.
Step 1: Download The Windows Server 2008 R2 Disk Image File From The Internet Archive
1) Windows Server 2008 R2 is no longer officially supported by Microsoft and this means that end users will no longer get free security updates, non security updates and free support options. Microsoft also no longer offers most download options and you would have to obtain Windows Server from alternative sources.
The internet archive is a website that keeps an archive of the web and you can find out of date and out of support downloads there. Click HERE to go to the Windows Server 2008 R2 download page.

2) An alternative would be to purchase a Windows Server 2008 R2 dvd or USB drive from a local IT SOFTWARE reseller near you or on e-commerce stores such as the amazon online store and ebay

Step 2: Download And Install VirtualBox 6.1 On To Your Computer.
3) VirtualBox can be download for free from the official virtualbox website. Go to virtualbox.org and click on the DOWNLOAD VIRTUALBOX button on the home page.
Your web browser will redirect to a download page and just below the VIRTUALBOX PLATFORM PACKAGES section, there are download links for all supported operating systems. Click on the link for your operating system to start downloading virtualbox.

4) The installation process of virtualbox is not the same for all operating systems however in this tutorial we shall demonstrate the installation of virtualbox on MacOS.
Open FINDER and go to the downloads folder, or the folder were VIRTUALBOX was downloaded to. Double click on the virtualbox.dmg file and double click on the VIRTUALBOX.pkg file.

5) A popup message will be displayed notifying you that MACOS will run a check to determine if VIRTUALBOX can be installed. Click on CONTINUE to run the check.
If no error message is returned the popup message will close and you can click on the CONTINUE button to the VIRTUALBOX installer to proceed.

6) Click on the INSTALL button and a system security popup message will be displayed requesting that you enter your password to authorize the virtualbox software installation.
Enter your password on the PASSWORD field and click on the INSTALL SOFTWARE button.

7) The virtualbox installer will display a message notifying that the software installation has been successful. Click on the CLOSE button, go to the applications folder and launch the VIRTUALBOX application.

Step 3: Create A New Windows Server Virtual Machine.


9) The virtual machine creation wizard supports two modes for virtual machine creation, GUIDED MODE and EXPERT MODE. The EXPERT MODE is a much faster way of creating a virtual machine and to use it, click on the EXPERT MODE button.
Enter a name for the virtual machine on the NAME text box, select a folder to save virtual machine files on the MACHINE FOLDER file selection box and set the TYPE to MICROSOFT WINDOWS.
Set VERSION to WINDOWS 2008 (64 BIT) and use the MEMORY SIZE slider to allocate 2048MB (2GB) of RAM to the virtual machine.
Click on the CREATE A VIRTUAL HARD DISK NOW radio button and click on CREATE.

10) A popup box will be displayed prompting you to set the size and file type of the virtual hard disk. Set the FILE SIZE to 30GB and the HARD DISK TYPE to VDI (VIRTUALBOX DISK IMAGE) and click on the CREATE button.

Step 4: Power On The Virtual Machine And Install Windows Server 2008 R2
10) Right click on the virtual machine and click on START > NORMAL START. When the virtual machine starts a popup message will be displayed prompting you to select a virtual optical disk or physical optical drive.
Click on the yellow file selection button, browse to the folder where the Windows Server disk image file and click on OPEN

11) Select the disk image file for the NOT ATTACHED list and click on the CHOOSE button.

12) Click on the START button to allow the virtual machine to boot up using the Windows Server disk image file.

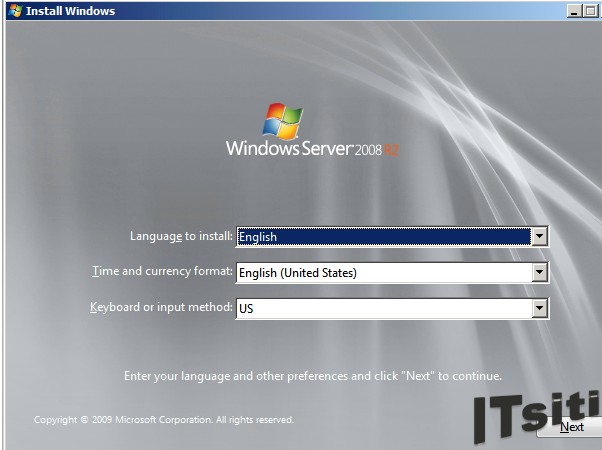
13) When the boot up process completes a INSTALL WINDOWS program will open, select ENGLISH on the LANGUAGE TO INSTALL drop down menu, set the TIME AND CURRENCY FORMAT to ENGLISH (UNITED STATES), set the KEYBOARD OR INPUT METHOD to US and click on NEXT

14) Next, you will see a list of Windows Server editions that you can choose, there should be Standard, Enterprise and Datacenter editions. Select WINDOWS SERVER 2008 R2 STANDARD ( FULL INSTALLATION) or WINDOWS SERVER 2008 R2 ENTERPRISE (FULL INSTALLATION) and click on NEXT

15) Microsoft requires that you accept the SOFTWARE LICENSE TERMS for Windows Server 2008 before you start the installation process. Click on the I ACCEPT THE LICENSE TERMS check box and click on NEXT

16) Next, the INSTALL WINDOWS program will request that you select the type of installation that you would like to do. Since this is a new installation of Windows Server click on the CUSTOM (ADVANCED) option.

17) Select the virtual hard drive labelled as DISK 0: UNALLOCATED SPACE and click on NEXT

18) The INSTALL WINDOWS program will display the installation progress. Wait for the installation process to complete. The virtual machine may restart several times during installation.

19) Next, set a password for the Windows Server Administrator account on the password fields provided and click on the blue arrow button.

Step 5: Install Virtual Box Guest Additions For Windows Server 2008 R2 And Configure A VirtualBox Shared Folder.
20) The next step is to install virtual box guest additions for Windows Server 2008 R2. This will add features such as FULL SCREEN mode and shared folders.
On the virtualbox menu bar, click on DEVICES > INSERT GUEST ADDITIONS CD IMAGE.
Open the windows file explorer, click on COMPUTER and double click on CD DRIVE (D): VIRTUALBOX GUEST ADDITIONS.

21) Double click on the VBOXWINDOWSADDITIONS-AMD64 to open the VIRTUALBOX GUEST ADDITIONS SETUP program.

22) Next, the setup program will ask that you choose a installation location. We recommend that you leave it to the default location and click on NEXT.

23) On the CHOOSE COMPONENTS step, you choose to install DIRECT3D SUPPORT and START MENU ENTRIES. We also recommend that you leave the default selections as they are and click on INSTALL.

24) During the installation progress a popup message will be displayed prompting you to confirm if you would like to install the device software. Click on the ALWAYS TRUST SOFTWARE FROM ORACLE CORPORATION checkbox and click on INSTALL.

25) Once the installation is complete, click on the REBOOT NOW radio button and click on FINISH.

26) Avirtualbox shared folder allows you can access files of your host system from within a vitual machine. The shared files physically reside on the host and are then shared with a VM, which uses a special file system driver in the VirtualBox Guest Additions Software to talk to the host.
Shutdown the virtual machine, right click on it and select SETTINGS. Click on the SHARED FOLDERS tab and click on the ADD FOLDER button.

27) Choose a folder on your computer that you would like to be able to access from with the Windows Server virtual machine on the FODLER PATH file selection box. Click on the AUTO MOUNT check box and click on OK. Click on OK on the SETTINGS window to apply changes.

28) Start the virtual machine and open the windows server file explorer, and click on NETWORK. You should see a network folder name VBOXSVR and if you double click on the folder you should see the files saved on your host computer.

Приступим к установке:
Запустим приложение Oracle VM VirtualBox, жмем «создать», откроеться «Мастер создания новой виртуальной машины»:
Нажимаем кнопку «Next» и видим новое окно, предлагающее выбрать имя операционной системы, выбираем windows 2008(64bit) и называем предположим «webserver»:
После нажатия кнопки «Next » Вам будет предложено определить размер оперативной памяти, выделяемой виртуальной машине . Я выбираю 2048мб, чтобы ускорить процес установки:
Далее потребуется создать виртуальный жесткий диск. Подтвердим, что создаваемый нами жесткий диск загрузочный, поставим флажок «Создать новый жесткий диск» и нажмем кнопку «Next».
Нужно выбрать тип файла жесткого диска:
В новом окне Вам будет предложено выбрать тип создаваемого диска – «динамически расширяющийся образ» или «образ фиксированного размера». Разница объясняется в справке данного окна:
В следующем окне от Вас потребуется выбрать расположение создаваемого виртуального жесткого диска и его размер. Для загрузочного жесткого диска с системой Windows Server 2008 достаточно размера установленного по умолчанию (25 Гб), а вот расположить его лучше вне Вашего системного раздела, т.к. не стоит не стоит перегружать Ваш реальный загрузочный диск и создавать на нем файлы такого размера:
После этого появится окно «Итог», в котором будет указан тип, расположение и размер создаваемого Вами жесткого диска. Если Вы согласны создать диск с такими параметрами, нажмите «Создать»:
По завершения создания жесткого диска появится новое окно «Итог» , в котором будут указаны параметры создаваемой Вами виртуальной машины. Если Вы не передумали ни по одному из описанных пунктов, нажимайте «Create» и переходите к настройке аппаратной части Вашей виртуальной машины:
Далее возвращаемся к главному окну VirtualBox и выделив созданную виртуальную машину, нажимаем на свойства, появится новое окно:
На первой вкладке раздела «Общие» мы видим основные параметры нашей виртуальной машины.
Перейдем на вкладку дополнительно и посмотрим, какие настройки системы мы можем произвести:
«Папка для снимков». Если Вы разместили Ваш жесткий в собственном расположении, то лучше и эту папку перенести туда же, т.к. снимки имеют большой вес и, опять-таки, не стоит перегружать Ваш системный диск. Моя рекомендация – создавать снимки перед каждым значительным изменением, которые Вы хотите произвести в виртуальной системе, причем даже на одну виртуальную машину Вы можете создать несколько снимков, содержащих отличные друг от друга настройки и установленные приложения;
«Общий буфер обмена» – определение того, как будет работать буфер обмена между Вашей host-системой и виртуальной машиной. Вариантов работы буфера предоставлено четыре – «выключено», «только из гостевой ОС в основную», «только из основной ОС в гостевую», «двунаправленный». Мы выберем последний вариант, т.к. это обеспечит нам максимальное удобство в работе;
«Сменные носители информации запоминать изменения в процессе работы», тут мы ставим флажок в знак согласия, т.к. данная опция позволит системе запомнить состояние CDDVD-приводов;
«Мини тулбар» – это небольшая консоль, содержащая элементы управления виртуальной машиной. Её лучше применять только в полноэкранном режиме, т.к. она полностью дублируется главным меню рабочего окна виртуальной машины. Располагать её действительно лучше сверху просто потому, что можно случайно нажать на какой-нибудь элемент управления, пытаясь, например, развернуть окно из панели задач виртуальной машины.
Перейдем к разделу система и на первой вкладке материнская плата произведем следующие настройки:
если нужно, откорректируем размер оперативной памяти Вашей виртуальной машины, хотя окончательно убедится в правильности выбранного объема Вы сможете только после запуска виртуальной машины. Выбирать размер Вы можете, исходя из объема доступной физической памяти, установленной на Вашем ПК. Например, при наличии 4ГБ ОЗУ оптимальным будет выделение 1ГБ, т.е. одной четвертой части, что позволит Вашей виртуальной машине работать без малейших зависаний;
откорректируем порядок загрузки — дисковод гибких дисков («дискета) можно вообще отключить, а первым обязательно поставьте CD/DVD-ROM, чтобы обеспечить возможность установки ОС с загрузочного диска. При этом в роли загрузочного диска может выступать как и компакт-диск, так и образ ISO;
все остальные настройки описаны в динамической справке снизу, и их применение зависит от аппаратной части вашего реального ПК, причем если Вы выставите настройки неприменимые к Вашему ПК система виртуальной машины просто не запуститься.
Перейдем к вкладке «Процессор», тут Вы можете выбрать количество процессоров, установленных на Вашу виртуальную материнскую плату(Я выбрал 3 прцессора на время установки, потом можно изменить). Обратите внимание, что это опция будет доступна только при условии поддержки аппаратной виртуализации AMD-V или VT-x , а также включенной опции OI APIC на предыдущей вкладке.
Перейдем к разделу «Дисплей» . В данном разделе на вкладке «Видео» Вы можете установить размер памяти виртуальной видео карты, а также включить 2D и 3D ускорение, причем включение 2D ускорения желательно, а 3D необязательно.
На вкладке «Удаленный дисплей» Вы можете включить опцию, при которой Ваша виртуальная машина будет работать как сервер удаленного рабочего стола (RDP).
Переходим к разделу носители . Тут Вы можете увидеть созданной ранее виртуальный жесткий диск и позицию с надписью пусто. Выделяем эту позицию и осуществляем настройку.
Для настройки виртуального привода компакт-дисков можно пойти двумя путями:
первый вариант — в раскрывающемся меню «Привод» выбираем Ваш реальный или виртуальный CD/DVD-ROM (существующие в реальной системе) и загружаем в него физический диск с дистрибутивом Windows Server 2008 R2 или ISO-образ, если это эмулятор;
второй вариант — щелкаем значок справа, воткрывшемся меню нажимаем»выбрать образ оптического диска» и в отрывшемся окне добавляем ISO-образ загрузочного диска Windows Server 2008 R2, этим путем мы и пойдем.
Настройка сети и сетевого взаимодействия мы рассмотрим немного позже, пока замечу лишь то, что сетевой адаптер типа NAT включен по умолчанию, а этого уже достаточно для предоставления Вашей виртуальной машине доступа в Интернет.
На этом настройка аппаратной части Вашей виртуальной машины закончена, и можно перейти к установке операционной системы.
Возвращаемся к главному окну VirtualBox, выделяем созданную виртуальную машину и нажимаем кнопку «Старт».
Нажимаем Next.
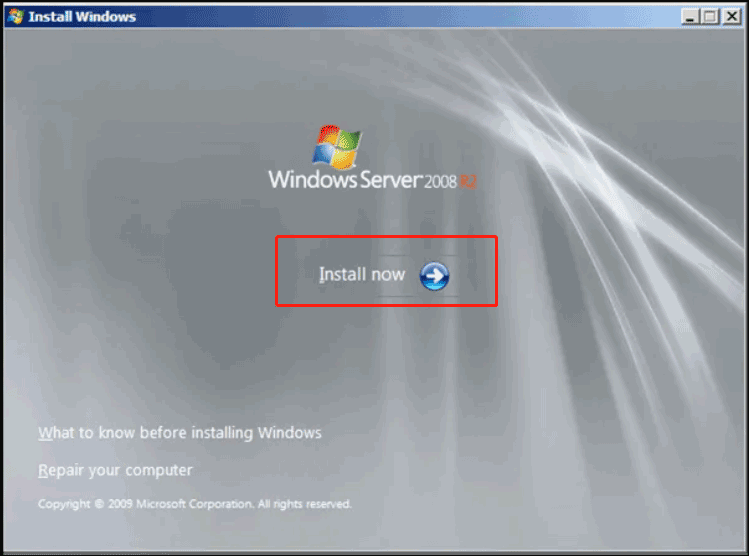
Нажимаем Install now.
Выбираем: Windows Server 2008 R2 Enterprise (Full Installation), после чего жмем next.
Принимаем лицензионное соглашение.
Выбираем метод установки, выбираем Custom (advanced) для новой установки.
Выбираем на какой жесткий диск будем устанавливать систему, в данном случае в системе только один жесткий диск объемом 25 гигабайт.
На этом этапе происходит установки системы.
После перезагрузки будет появляться такое окно:
Ничего не делаем,установка продолжиться самостоятельно.
Необходимо создать пароль для Администратора. Жмем OK.
Вводим стойкий пароль, если пароль будет по мнению Windows не совсем стойкий, будет выскакивать ошибка (желательно что-бы присудствовали
буквы, знаки и числа).
Если пароль устраивает Windows, увидим следующее:
Жмем Ok.
После старта запустится окно начальной конфигурации. Пока закроем его.
Следом откроеться окно управления сервером, мы его тоже пока закроем.
Для начала нам нужно установить драйверы для всех виртуальных аппаратных компонентов нашего виртуального ПК. Для этого в главном меню выбираем пункт «Устройства» и нажимаем «Установить дополнения гостевой ОС…»
Откроеться окно автозапуска, нажимаем «выполнить»:
Начнеться процес установки. В последнем окне процесса инсталляции Вам будет предложено перезагрузить виртуальную машину — соглашайтесь, после перезагрузки Вы увидите, что изображение стало четче, размер окна виртуальной машины изменяется динамически, включена функция интеграции мыши и есть доступ в Интернет.
После перезагрузки появится окно входа в систему. Открываем остновное меню и нажимаем «Послать Ctrl-Alt-Del».
Вводим пароль.
Появится окно свойств виртуальной машины. Справа нажимаем на»+».
Откроется диалог выбора общей папки. Указываете папку, куда Вы скачали Пакет русского интерфейса пользователя Windows Server 2008 R2.
Далее нажимаете «Start», Netvork.
Откроется проводник, вверху будет предупреждение «Netvork discjvery and file sharing are turned off. Netvork computers and devices are not visible. Click to change…»
Нажимаем «Turn on netvork discovery and file sharing».
Выбираем «No,make the netvork that I am connected to a private netvork».
В проводнике появится наша общая папка. Копируем пакет русского интерфейса пользователя Windows Server 2008 R2 на рабочий стол и запускаем инсталятор с правами администратора.
Когда процес инсталяции закончиться, открываем:»Start»,»Control Panel»,»Clok.Langruage,and Region»,»Region and Langruage»:
В открывшемся окне на вкладке «Formats», выбираем «Russian»,и переходим на вкладку «Lokation», выбираем «Russia»:
Переходим на последнюю вкладку, нажимаем «Change system lokale…», выбираем «Russian», жмем Ok :
На этом установка завершена. С сетевыми настройками мы разберемся в следующей статье.
Preparation
1. Download the VirtualBox& Windows Server 2008 R2 (ISO) installation files.
VirtualBox Installation & Virtual Machine Configuration
1. Install the VirtualBox & configure the Virtual Machine. Below are settings for this installation,
General:
• Type: Microsoft Windows
• Version: Windows 2008 (64 bit)
System
• Base Memory: 1GB
• Processor: 1CPU
Storage
• HDD: 30GB
Network
• Enable Network Adapter (Bridged Adapter)
2. Mount the Windows Server 2008 R2 (ISO) file onto your Storage settings. Save and you can start the virtual machine.
3. Select the installation language.
4. Choose Install Now.
5. Select the operating system version. In this example, we have choose the Windows Server 2008 R2 Standard (Full Installation).
6. Next, you will be prompted with the Microsoft Software License Terms. Please read (huh!) and accept the license terms. Then, click Next.
7. Choose Custom (advanced) for fresh installation.
8. Define the installation location. Click Next.
9. The installation starting now.
10. Once the installation is completed, you may need to change the Administrator password for first time login.
11. Set the initial configuration tasks. Some of the configurations are,
• Windows Activation
• Set Time Zone
• Networking
• Computer Name & Domain
• Automatic Updates
• Windows Firewall
• Remote Desktop Connection
12. Once the configuration is done, you can access the Windows Server 2008 R2!
2008 r2 virtualbox
This article shows how to install Windows server 2008 R2 on VirtualBox. Normally, Windows 2008 R2 server available for 64 Bit only, so obviously your computer processor andmother board shoud support 64 Bit architecture and VT.
Even though you are running 32 Bit Operating Systems, such as 32 Bit Windows 7 ,Vista and XP as host, still it’s possible to run 64 Bit operating systems as guest on X86 VirtualBox. To make sure your computer processor and motherboard support this feature read this post. The mentioned post is having tools to check AMD and Intel processors. Once result shows that your PC is 64 Bit is ready then you can proceed the installation of Windows server 2008 R2 on VirtualBox.
1) Create New Machine.
2) If you are using VirtualBox 3.1.0 or earlier versions, then you can’t find Windows 2008 R2 OS as guest OS, so select Windows 2008 64 Bit. Later versions have 2008 R2 64 Bit selection.
3) Set memory size to 1024MB, and create a new hard disk with 20GB space.
Select Dynamically Expanding storage option. Set the disk size and location of disk file in next screen.
4) Press Finish to complete disk creation and virtual machine creation.
5) Click on storage option in virtual machine configuration settings.
6) Press ‘Empty’ IDE controller as mentioned below to insert Installation DVD or ISO image. If you have installation DVD, then insert it to host DVD drive select ‘Host Drive- Drive letter’ mentioned below. So when you boot Windows 2008 R2 virtual machine, it will read your host physical DVD drive. Here, I have ISO file and mounting it by clicking on Folder arrow button.
7) Make sure following settings are correct under system setting of virtual machine. Click on System to view the settings.
Processor – 1 and Enable PAE/NX enabled.
Hardware Virtualization Enable VT-x/AMD-V should be enabled.

Installation will go smoothly if all settings are correct. I’m not explaining any installation steps.
9) As usual, VirtualBox worked very faster and installation finished very quickly. The working Windows server 2008 R2 on VirtualBox is below.
10) Install VirtualBox additions to get better mouse integration, display settings, folder share, network speed and more. It’s always recommended to install or update VirtualBox additions in virtual machines. Restart the virtual machine after VirtualBox additions installation.
There you go, R2 64 Bit Server operating is now on your computer by X86 Sun VirtualBox.
-
MiniTool
-
MiniTool News Center
- Windows Server 2008 R2 ISO Download for VirtualBox/PC & Install!
By Vera | Follow |
Last Updated October 18, 2022
How to download Windows Server 2008 R2 ISO 64-bit and install the system on VirtualBox or your PC? Find some direct download links from this post and then use the ISO file to install it by following the steps below. Let’s go to look through the detailed guide from MiniTool.
Windows Server 2008 R2
Windows Server 2008 R2 is the fifth version of the Windows Server operating system from Microsoft and it is the second iteration of Windows Server 2008. Server 2008 R2 is succeeded by Windows Server 2012.
Server 2008 is based on the 6.0 kernel (the same as Windows Vista) and is available for 32-bit and 64-bit while Windows Server 2008 R2 is based on the 6.1 kernel (the same as Windows 7) and is only available for 64-bit.
Server 2008 R2 brings some features to enable organizations to increase the flexibility and reliability of server infrastructures. To install this OS, your machine should meet the minimum system requirements:
- CPU: 1.4 GHz 64-bit processor
- RAM: 512 MB
- Disk space: 32 GB
- Super VGA (800 x 600) or higher-resolution monitor
The maximum memory is 32 GB (for Windows Server 2008 R2 Standard) or 2 TB (for Windows Server 2008 R2 for Itanium-Based Systems, Windows Server 2008 R2 Datacenter, and Windows Server 2008 R2 Enterprise).
Then, you need to download Windows 11 Server 2008 R2 ISO file for installation.
Windows Server 2008 R2 ISO Download for VirtualBox/PC
Windows Server 2008 R2 ISO Free Download Direct Links
When searching for “Windows Server 2008 R2 ISO 64-bit download” in Google Chrome, you can see many search results. You can click some pages to get some free download direct links.
If you want to download Windows Server 2008 ISO, you can also get one from the archive.org website. Of course, you can download some other ISO files of Server 2008 and Server 2008 R2. Just search for the one you need.
Windows Server 2008 R2 ISO Download from Microsoft Website
Microsoft gives you a link to download Windows Server 2008 R2 with Service Pack 1 for Itanium-Based Systems Evaluation (180 days). This ISO is only available for Windows Server 2008 R2 for Itanium-based Systems.
This download file is for testing and evaluation purposes. A product key is not required but you need to activate it within 10 days. After activation, you can only run it for 180 days. After this time, you need to get a fully-licensed version of Windows Server R2 SP1 for Itanium-Based Systems.
- Visit the Microsoft website.
- Select a language and click the Download button.
How to Install Windows Server 2008 R2
After getting an ISO file of Windows Server 2008 R2, you can install this system on VirtualBox/VMware or your PC. To create a new virtual machine of Server 2008 R2, click New Virtual Machine or New and follow the on-screen wizards for the setup. The related post may be helpful for you — Step-by-Step Guide: How to Setup a Virtual Machine.
If you want to install this server OS to your PC, you can choose to burn the ISO file to a USB drive or CD/DVD, insert it into your computer, run the machine from that drive and then start the setup.
If you need to get a Windows Server 2012 R2 ISO file for the installation, you can visit this post to find download links — Windows Server 2012 R2 ISO Download for VMware, VirtualBox, etc.
Final Words
Downloading Windows Server 2008 R2 ISO is easy, just click the download links mentioned above to get an ISO file. Then, you can use it to install the server system on a virtual machine or your computer for businesses.
About The Author
Position: Columnist
Vera is an editor of the MiniTool Team since 2016 who has more than 5 years’ writing experiences in the field of technical articles. Her articles mainly focus on disk & partition management, PC data recovery, video conversion, as well as PC backup & restore, helping users to solve some errors and issues when using their computers. In her spare times, she likes shopping, playing games and reading some articles.
причина
Сначала объясните причину виртуальной машины, поскольку система сервера является Win2012, если установлена база данных Oracle11G, потому что Oracle11G включает в себя среду, такую как .NE3.5 (в роли добавления, но …), да, я пытался Установочный пакет, я также пытался добавить роль, но нет ничего, он не может пойти, я хочу подумать, просто установить виртуальную машину.
Установить программное обеспечение
Программное обеспечение для виртуальной машины:
VirtualBox (версия бесплатна, никакой разницы не отличается)
ссылка для скачивания:https://www.virtualbox.org/wiki/Downloads
Есть много монтажных учебных пособий, мне также не нужно обращать внимание, но я все еще говорю.
Установите систему:
В верхнем левом углу появится новый, который вы можете нажать после нажатия.
Точки, которые нужно внимание:
Где размер памяти отправляется, см. Ваши собственные потребности.
Тогда вы все можете быть по умолчанию, где:
Выбор VDI заключается в том, что когда вы дважды щелкните новую виртуальную машину, вы сможете выбрать диск.
«Хранить в физическом жестком диске» на этой странице выберите «Динамическое назначение».
Это имеет следующие 2 балла:
1. Когда наша виртуальная машина составляет менее 10 г, используется динамическое задание, и пространство физического жесткого диска занята, а фиксированный размер будет заниматься пространством 10 г. Это легко отработает отходы пространства жесткого диска.
2. Скорость создания динамического выделения является быстрее, чем фиксированный размер.
Тем не менее, существует также много преимуществ фиксированного размера. Это также обеспечивает хорошую операционную эффективность, занимая пространство жесткого диска. Создание создания этого способа часто быстрые, особенно в хранении файлов.
В странице местоположения файлов и размера мы можем установить место хранения данных по умолчанию виртуальной машины. Рекомендуется разместить большое пространство.
Здесь все еще изменяется, потому что файл будет храниться в диске C после установки по умолчанию, которая принесет нагрузку на работу хоста.
В основном, нечего обратить внимание.
Дважды щелкните на виртуальной машине слева, откройте его:
Это сделает вещи, которые позволяют вам выбрать CD и выбрать зеркальный файл Win 2008 R2, должен выбрать,
В противном случае, «Fatal, без загрузочной среды не найдено!» Есть ли там, потому что нет системы установки, 2008 R2 64 обычно понравится
Хорошо, файл слишком велик, я не квалифицирован для загрузки, поэтому мои товарищи находят его. Вероятно 3G
Шаги установки ничто не отличают систем безопасности.
Точки, которые нужно внимание:
Точечные стрелки могут быть
Я выбрал полную установку версии начала, вы можете использовать ее.
Настройка не подключена к Интернету, без способа обновления
Я предполагаю, что он не разделен, потому что я разделил, я не могу показать, что нет выбора, в любом случае, я не влияю на него, поэтому я не нашел его.
Затем следующий шаг, затем установите пароль.
Пароль здесь является прописными буквами + строчные буквы + номера, в противном случае всегда есть проблема, так что это все еще нравится.
Тогда это хорошо.


