Home
> Microsoft Windows, Server, VMware > Configuring Windows 2008 R2 Core on VMware ESXi
Pre-Requisites
- ESX(i) 4.1 or higher (as we will use the PVSCSI controller as the boot device. I use ESX 5.0 in this example.
- Microsoft Windows Server 2008 R2 iso image on a datastore.
- The Core Configuration 2.0 (x64) iso image– This simplifies updating the drivers.
Installation Steps
Create a new Virtual Machine.
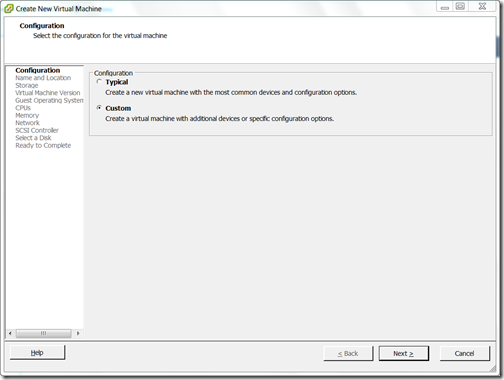
- Create a new VM.
- Select Configuration ‘Custom’.
- Name the virtual machine.
- Select a suitable datastore.
- Select ‘Virtual Machine Version: 8’
- Select Guest Operating System ‘Windows’, Version ‘Windows Server 2008 R2 (64-bit)
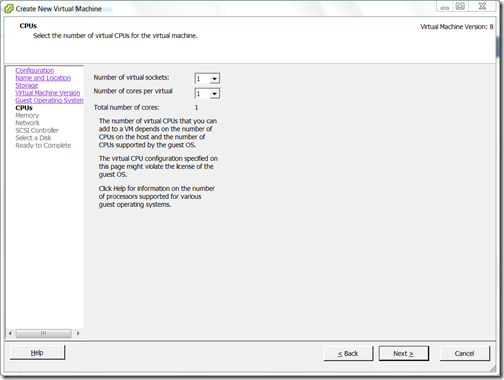
- Select the number of CPU virtual sockets and cores according to your needs.
- Select the amount of memory according to your needs.
- Set ‘How many NICs do you want to’ to how many NICs you require. Select the network and set the adapter to ‘VMXNET3’.
- Set the SCSI controller to ‘VMware Paravirtual’
- Select to create a new disk. Choose the capacity of the new virtual disk and the Disk provisioning type.
- Leave the advanced options to the default values.
- Click the ‘Edit the virtual machine settings before’ and press Continue.
- Go into the options tab, Advanced –> Boot Options. Select ‘EFI’ Firmware type.
- In the Hardware tab, select ‘New CD/DVD (adding)’. . Tick the ‘Connect at power on’. Check the ‘Datastore ISO file:’ and press Browse. Select your ISO image.
- Select ‘New Floppy (adding)’. Tick the ‘Connect at power on’. Check the ‘Use existing floppy image in datastore:’ and press Browse.
- Look in the ‘Datastoresvmimagesfloppies’ folder and select ‘pvscsi-Windows2008.flp’
- Click Finish.
Install Windows 2008 R2 Core
- Open the VM’s console.
- Power on the VM.
- Press any key to boot from the DVD. If you miss it (it can be too quick for the console to react), press Ctrl+Alt+Insert (that sends a ctrl+alt+del to the VM. Try again.
- When setup has started, select you regional settings. Press Install Now.
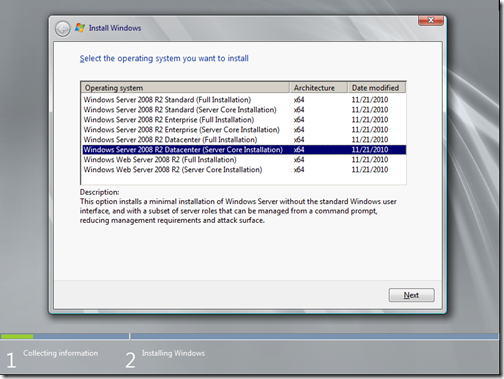
- Select the Windows version.
- Accept the EULA.
- Choose a ‘Custom (advanced)’ installation.
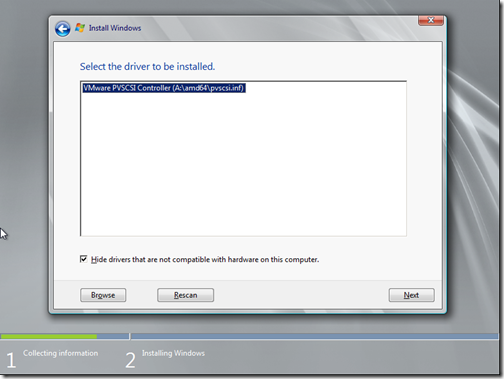
- On the ‘Where do you want to install Windows?’ page, click the ‘Load Driver’ link. Press the OK button.
- On the ‘Select a driver to be installed.’ dialog, ensure ‘VMware PVSCSI Controller (A:amd64pvscsi.inf)’ and press ‘Next’ .
- Back in the ‘Where do you want to install Windows?’ page, ‘Disk 0’ should appear. Click ‘Next’
- Windows will install.
Configure Windows 2008 R2 Core
- Once Windows is installed, confirm the Administrator password and log on.
- You will be presented with a command prompt. From the VM console’s toolbar, select the ‘Connect/disconnect the CD/DVD device of the virtual machine’ button and select ‘CD/DVD drive 1’ –> ‘Disconnect from the datastore image’
- From the VM console’s menu bar, choose ‘VM’ –> ‘Guest’ –> ‘Install/Upgrade VMware Tools’.
- Run the setup program from the command prompt. Type ‘D:’ press enter, type ‘setup’ and press enter again.
- Install the VMware Tools using all of the default options. Allow setup to reboot the operating system once installation has completed. The NIC drivers, VMware keyboard and VMware mouse will be installed.
- Log back in.
- Select the ‘Connect/disconnect the CD/DVD device of the virtual machine’ button and choose ‘Connect to ISO image on a datastore’. Locate and choose the Microsoft Core Configuration iso image.
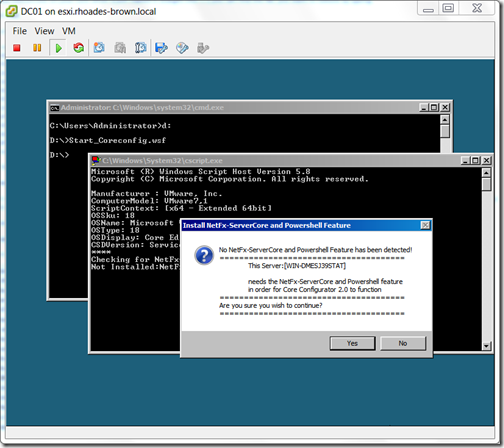
- Start Core Config by typing ‘D:’ and pressing enter, type ‘Start_Coreconfig.wsf’ and press enter.
- A dialog asking to install the .NET Framework and Microsoft PowerShell appears, press the ‘Yes’ button.
- Press the ‘Control Panel’ button, press ‘Add drivers’.
- Press the ‘Have Disk…’ button. Navigate to ‘C:Program FilesCommon FilesVMwareDriverswddm_video’ and select ‘vm3d.inf’.
- The updated driver driver will be installed. Exit the Core Configuration and restart the VM again. The VM restart at a higher resolution, with better mouse precision and you will be able to pass the edges of the window. The Core Configurator tool is very useful for configuring a Windows Core server, you can use it to install and remove features, configure and perform Windows updates, Remote Desktop and Remote management, computer name, domain membership, DC Promo and licensing.
Categories: Microsoft Windows, Server, VMware
Tags: core, ESX, ESXi, PVSCSI, server core, VMware, VMXNET3, vSphere, Windows Server
Abstract: recently engaged in the server know, last carried out a server 2003 server system, the results of various sad, because the 2003 version is too low, so many environmental ah, all aspects are not installed. Staged four days or so, yesterday, I broke a MMP ,, so do a virtual machine to install Windows Server 2008 R2 version of the test sit down! ! ! !
First, download the image file
a) Windows Server 2008 R2 Standard Edition
b) Windows Server 2008 R2 Enterprise Edition
Baidu network disk, if you fail, you can leave a message to me. You can also directly add me qq, 582 871 072
- This is my go to Baidu network disk address: link:Password: 9hi3
Two, VMware to create virtual machines
Click to create a new virtual machine
Select the installation mode
I am here to choose the operating point of the operation of the block, directlyTypical installationA.
Select a guest operating system
Naming a virtual machine
Specify the size of the disk capacity
I usually recommend to follow, so fast A0A
carry out
This is done
Above basic is complete, a newVMware to create virtual machines
Third, the installation system
Set file system
Select just downloadediso file
Then you can run a virtual machine
First select your language and other good, Click: Next.
This is the real beginning the installation, Oh, click on: now installed. As shown in FIG.
Here, and select the version you want to install, of course I want to install the full version of the Enterprise version of it. As shown in FIG.
Tick: accepted, then the next step. As shown in FIG.
Select the installation of this according to your needs, if you are upgrading from a lower version to 2008, you would click on to upgrade it, the other of course is the custom it as. Because I was newly installed, the hard disk without any data yet.
Before installing, you must first partition, this we know everything, and as shown in FIG.
Here I was all on theC drive, Anyway, this isWeb Hosting, Test, so I took all the space allocated toC drive
Start the installation, the installation is a lengthy process ……
This process is shown. . About half an hour more. May be repeated several times to restart
Finally completed the installation, and then automatically restarts …… figure.
See this, a bit activated, as shown. Of course, still have to set a password. Click: OK.
Some password is required: Requirements and length requirement has historical claims (more than 4 characters), complexity (must be sensitive and digital).
Set up, click on: right arrow, as shown.
It will prompt: password successfully modified, please keep your password oh.
For the first time into the desktop, it will first be ready to configure user information, etc. Please wait, as shown.
This, the official system installation is complete, come try the new features it.
Activate Windows Server 2008 R2
Just to complete the installation of Windows Server 2008 R2 is not activated, you also need to activate the implementation of the program. Download Windows Loader.exe activation program
original:Script House
-
Windows
-
help2site

В этой статье будет подробно описано, как установить Windows Server 2008 на виртуальную машину . Установка Windows Server 2008 мало чем отличается от установки Windows 7. Но многие вещи, о которых пойдет речь в данной статье требуют отдельного внимания. По этой причине, для того чтобы быть последовательным, я и решил начать серию статей по настройке и администрированию Windows Server именно с этой инструкции по установке и начальной настроеке. Итак:
Что понадобится
- Установочный DVD диск Microsoft Windows 2008 R2 или ios образ установочного диска.
- Рабочий код, для активации Microsoft Windows 2008 R2.
- Виртуальная машина (для экспериментов я выбрал Oracle VM VirtualBox)
Настройка виртуальной среды
Скачайте с официального сайта последнюю версию Oracle VM VirtualBox и установите на свой компьютер, после установки откройте программу и выберете опцию Создать
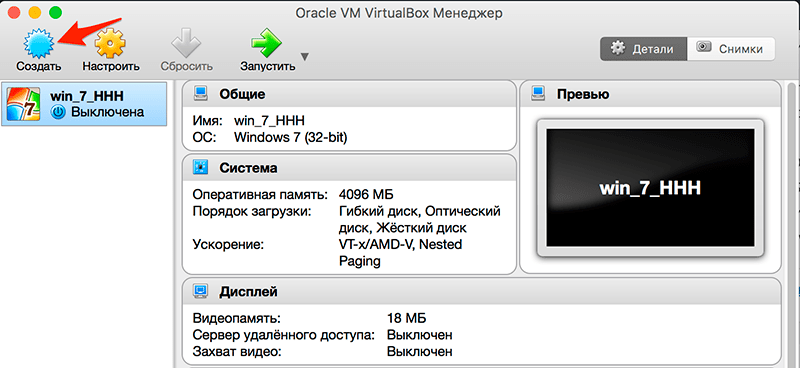
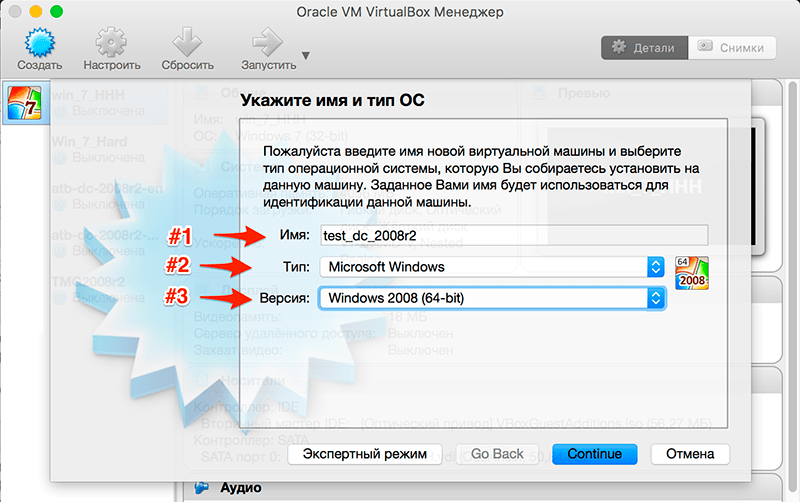
В открывшемся окне водим следующие параметры:
- Произвольное имя новой виртуальной машины
- Тип виртуальной машины: Microsoft Windows
- Версия операционной системы для виртуальной машины: Windows 2008 (64-bit)
для продолжения нажимаем кнопку Continue
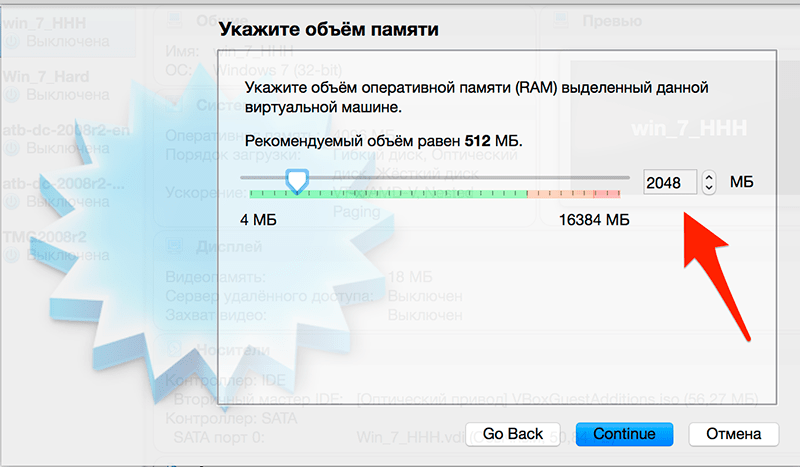
На следующем этапе нужно определить размер оперативной памяти для виртуальной машины (рекомендуется выбирать не мение 2 gb), для продолжения нажимаем кнопку Continue
В настройках параметров жесткого диска выбираем: Создать новый виртуальный жесткий диск
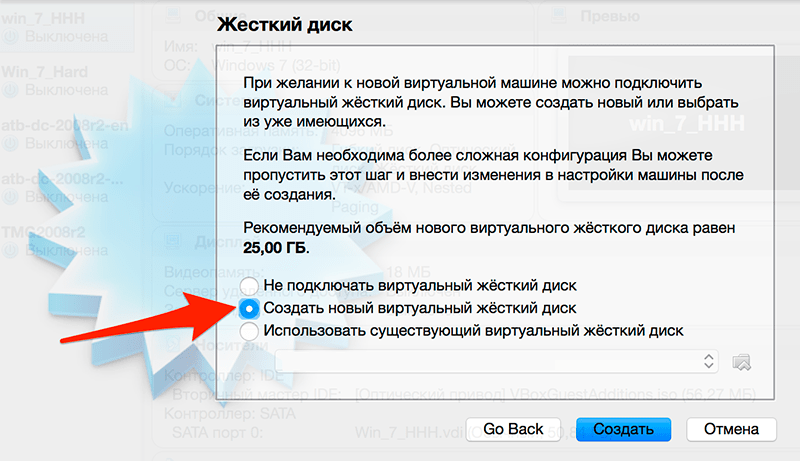
На следующем этапе вам будет предложено выбрать тип формата для файла (я оставил тип по умолчанию .vdi)
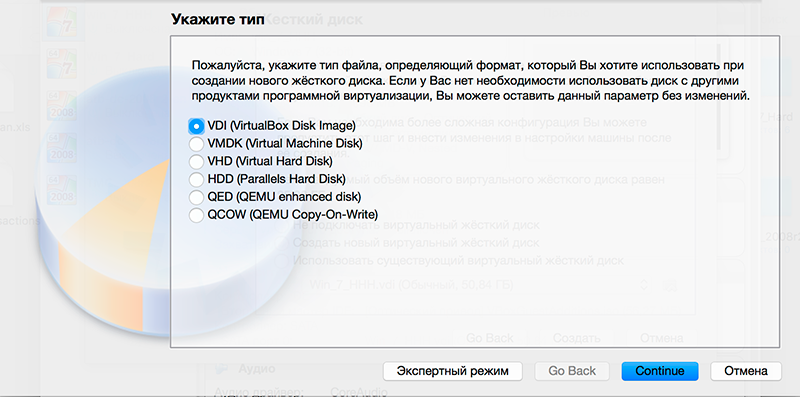
Формат хранения файла я предпочел динамический для экономии места
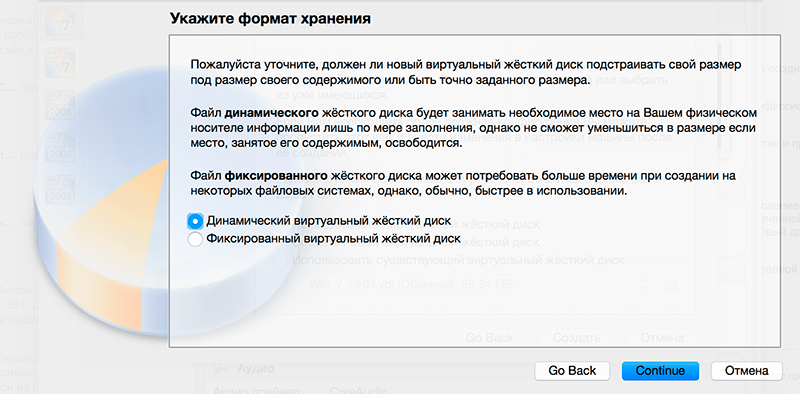
перед завершающим этапом вам будет предложено выбрать место хранения файла виртуальной машины и его размер, на этом настройку виртуальной среды можно считать законченной, следующим этапом будет установка Windows Server 2008 R2 на только что созданную нами виртуальную машину.
Установка Windows Server
Первым делом нам нужно вставить установочный диск с операционной системой Windows Server 2008 R2 в нашу виртуальную машину, для этого перейдите в Настройки/Носители и выберете ваш установочный диск с операционной системой как обозначено на скриншоте ниже:
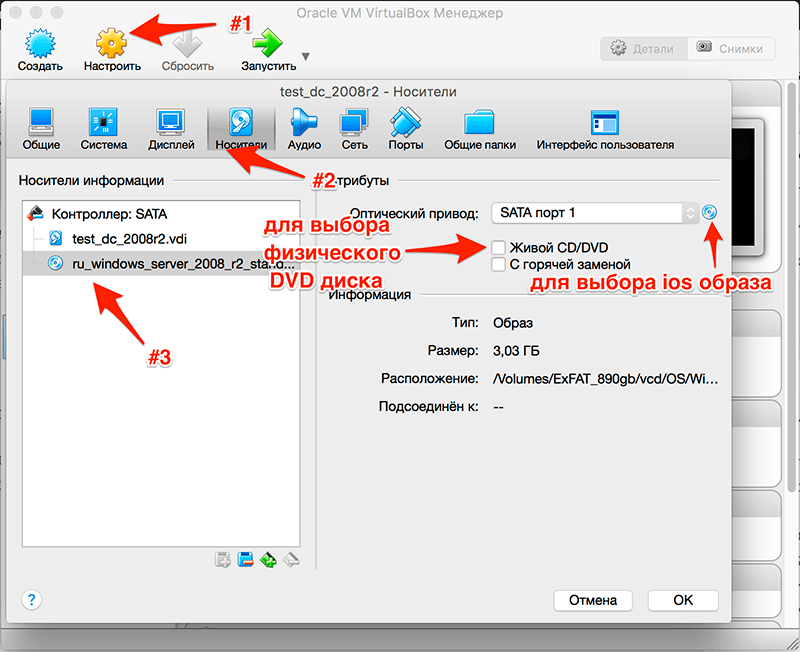
После включаем нашу виртуальную машину, для этого нажимаем кнопку Запустить. После непродолжительной загрузки мы попадем на окно с выбором языка:

Выбираем нужные вам параметры и нажимаем «Далее» .
В следующем окне нажимаем кнопку «Установить»:

в меню выбора редакций операционной системы выбираем нужный нам пункт (в данном примере выбираем Windows Server 2008 R2 Enterprise (полная установка)) и жмем «Далее»

В следующем окне вам придется согласиться с условиями лицензионного соглашения, для этого ставим галочку «Я принимаю условия лицензии» и нажимаем «Далее»

Выбираем «Полная установка»

Если вы следовали всем советам описаным выше то в следующем окне выбора раздела для установки выбора как такового у вас нет, т.к. мы создали всего один диск, куда мы и установим операционную систему.

Нажимаем «Далее» и наблюдаем как установщик выполняет все необходимые операции.
Начальная настройка
После автоматической перезагрузки виртуальной машины по завершению этапа установки, нам будет предложено авторизоваться, потребуется ввести пароль Администратора и подтвердить его. Новый пароль должен отвечать требованиям сложности, а именно:
- Не содержать имени учетной записи пользователя или частей полного имени пользователя длиной более двух рядом стоящих знаков
- Иметь длину не менее 6 знаков
- Содержать знаки трех из четырех перечисленных ниже категорий:
- Латинские заглавные буквы (от A до Z)
- Латинские строчные буквы (от a до z)
- Цифры (от 0 до 9)
- Отличающиеся от букв и цифр знаки (например, !, $, #, %)
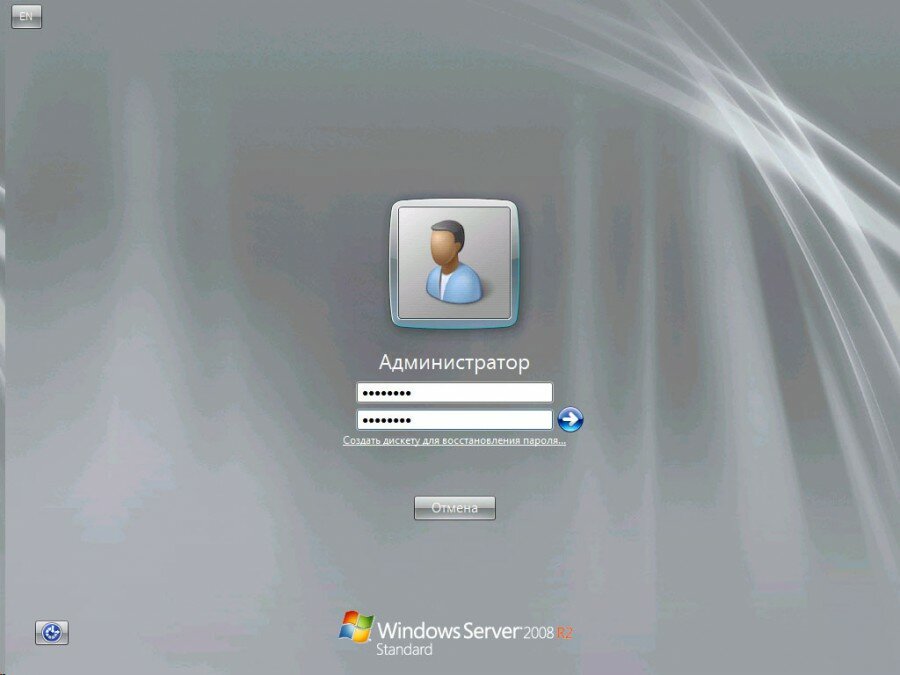
после загрузки откроется окно «Задачи начальной настройки»
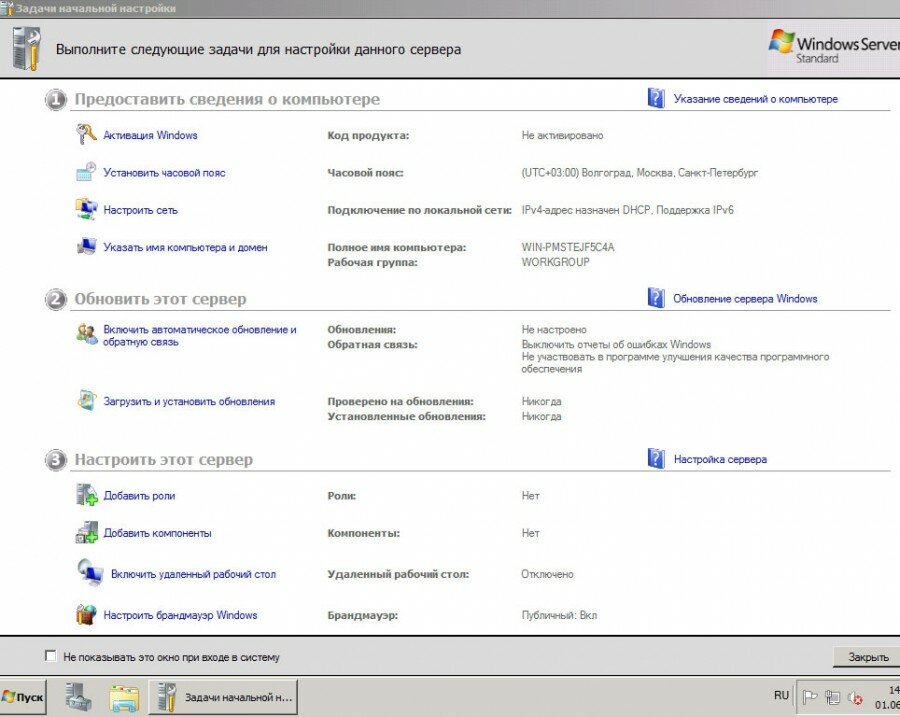
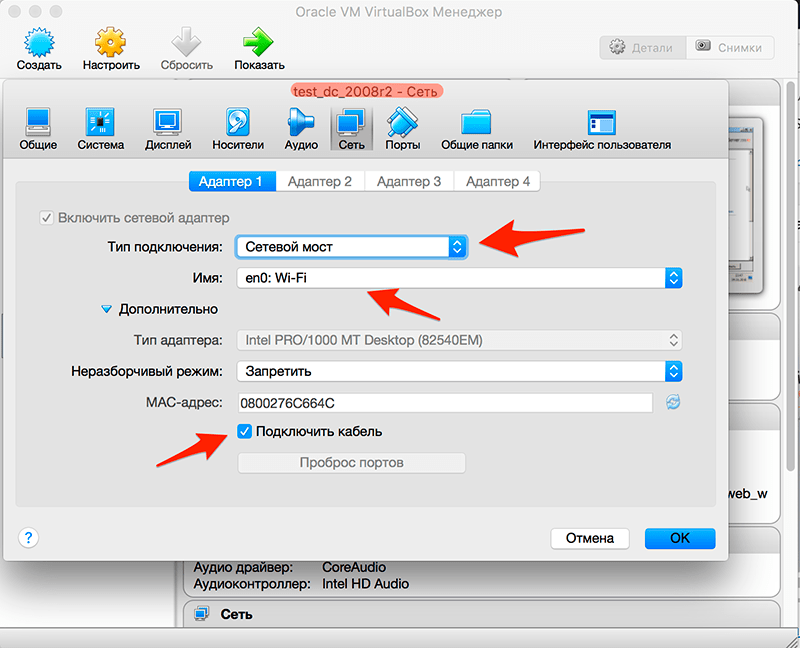
Давайте пройдемся по некоторым пунктам этого окна. Начнем мы с сети. Но прежде нам нужно будет сделать некоторые настройки в нашей виртуальной машине. Заходим в Настроить/Сеть и выбираем следующие параметры:
- в Типе подключения выбираем: Сетевой мост
- в пункте Имя: выберете имя сетевой платы физического компьютера с подключением к сети интернет
- и убедитесь что стоит галочка на против пункта Подключить кабель
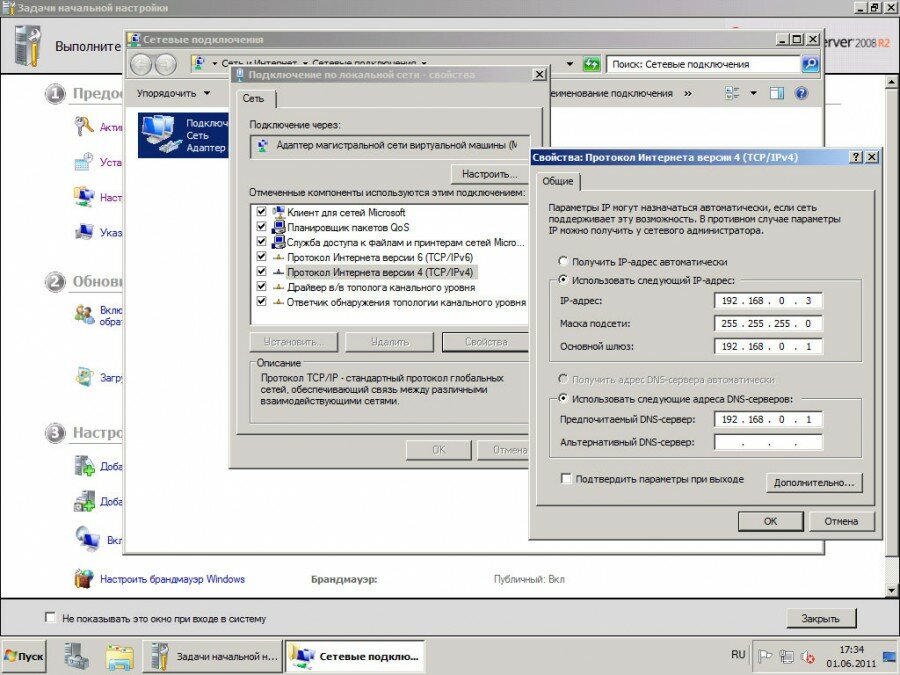
А теперь можно перейти к настройкам сети непосредственно в Windows. Нажимаем на «Настроить сеть» . Откроются «Сетевые подключения», кликаем 2 раза по активному подключению, в появившемся списке выделяем «Протокол Интернета версии 4 (TCP/IPv4)» и нажимаем «Свойства». Вводим необходимые для подключения параметры и через «ОК» закрываем окна.
Теперь когда у нас есть подключение к сети интернет мы можем перейти к следующим настройкам, давайте начнем с активации Windows, для этого в окне «Задачи начальной настройки» нажимаем «Активировать Windows». В появившемся окне введите ваш ключ активации.
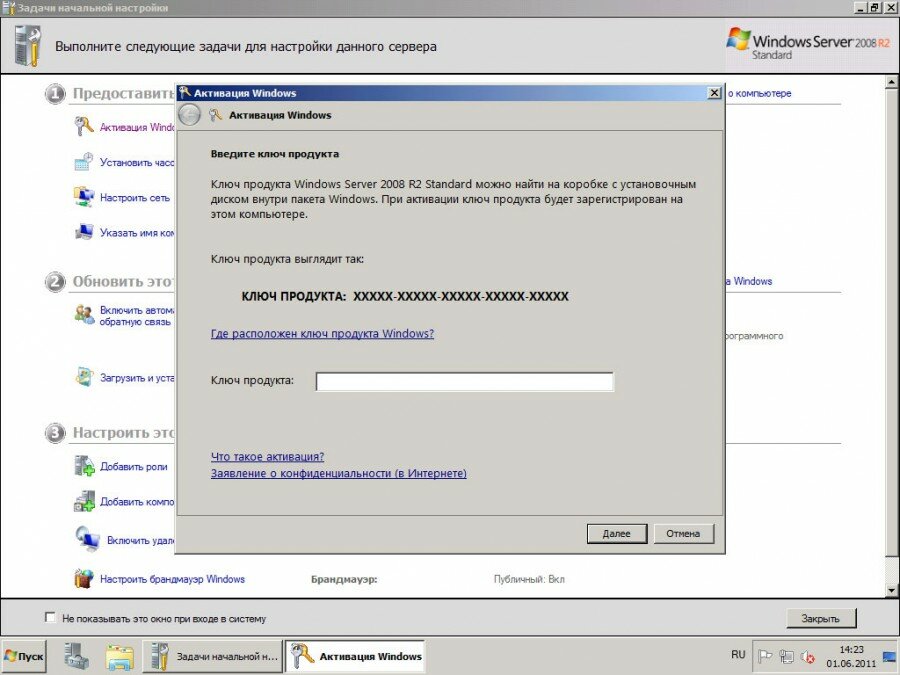
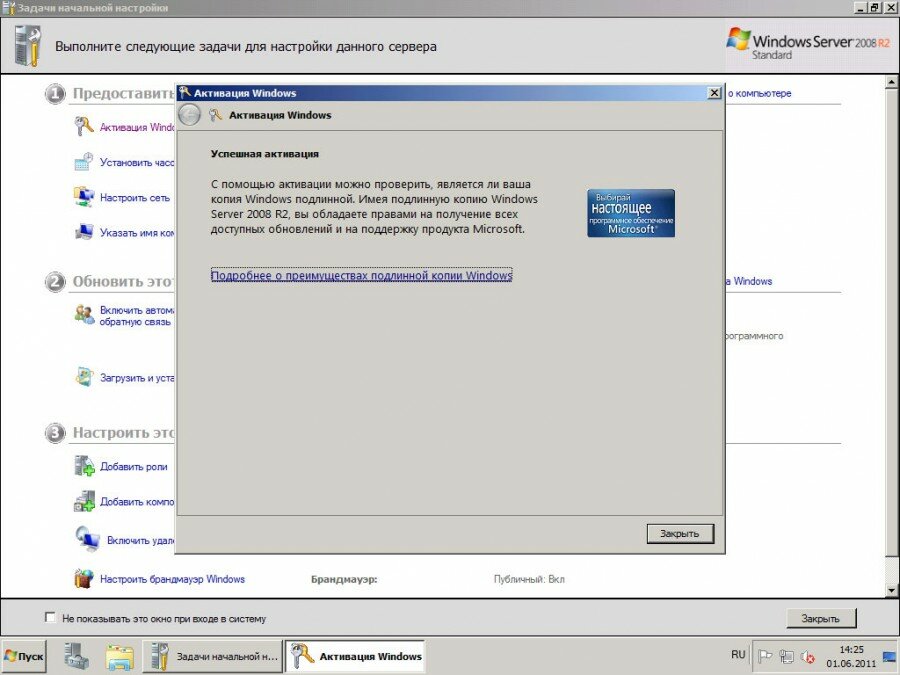
Нажмите 2 раза «Далее» и, если все прошло успешно, то вы увидите подтверждение о успешной активации Windows. Которое выглядит следующим образом:
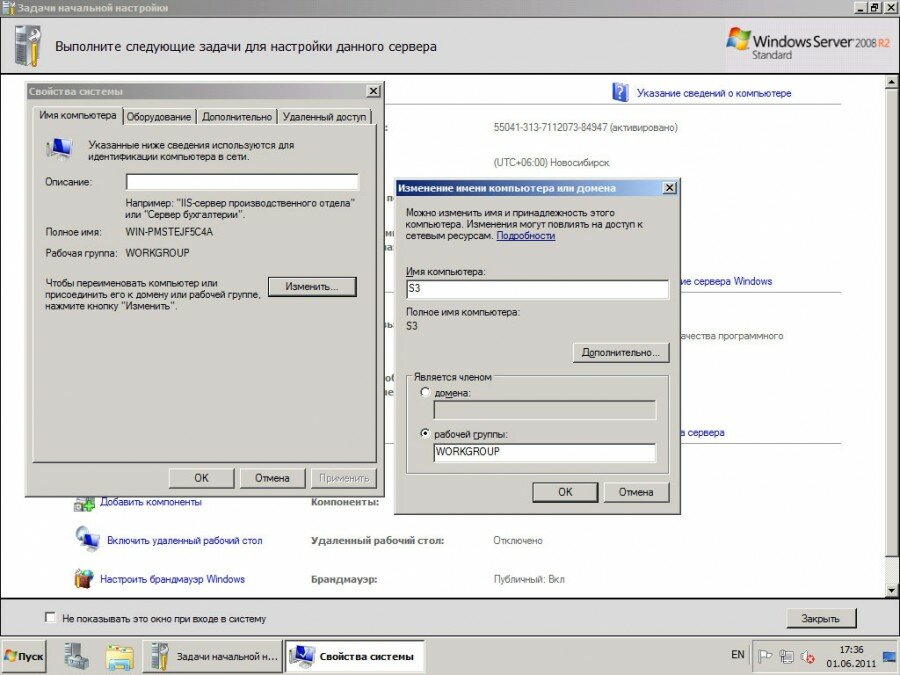
Возвращаемся к окну «Задачи начальной настройки» нажимаем на «Изменить имя компьютера», в открывшемся окне нажимаем на «Изменить» и вводим новое имя компьютера.
Вот мы и закончили с основными настройками и в итоге мы имеем виртуальную машину с установленной на ней операционной системой Windows Server 2008 R2. В следующей статьях мы сделаем виртуальную сеть при помощи VirtualBox и создадим тестовый контроллер домена.
При покупке компьютера с предустановленной ОС Windows 8 можно заметить
Термин автозагрузка говорит сам за себя, то есть при загрузки
Для того чтобы комфортно ремонтировать компьютер требуется определённая материальная база
В этом разделе собран полный список CMD команд Windows от
Очень расстраивает, когда привычные, много раз выполняемые манипуляции, вдруг, в
Для начала давайте разберемся что такое Postfix? Postfix — это
DroidWall — это первая программа для Android для контролирование доступа
Входим в Bill manager, переходим в пункт меню Клиент—> Клиенты
CommentLuv — это дополнительные комментарии на вэб-ресурсах. СommentLuv – это
Оглавление Как выбрать хостинг для сайта. Как выбрать хостинг для
Программы
VirtualBox (Oracle VM VirtualBox) — программный продукт виртуализации для операционных систем Microsoft Windows, Linux, FreeBSD, Mac OS X, Solaris/OpenSolaris, ReactOS, DOS и других, разработанный компанией Innotek, в настоящее
Web-Дизайн
Движок wordpress (вордпресс) – это тема сегодняшнего урока по курсу как сделать сайт на wordpress. В первом знакомстве с системой вордпресс мы поговорим только о функционале,
Web-Дизайн
Табы на мой взгляд являются одним из лучших решений для тематического структурирования информации, а также для компактного предоставления контента пользователю на одной странице. Сегодня мы разберемся как создать такую
Оборудование
Сейчас на рынке представлен очень большой выбор корпусов для персонального компьютера (ПК), от чего у неопытных пользователей просто разбегаются глаза, и они не знают, что
Аndroid
Концепция Material Design стала основополагающим элементом политики развития Android на ближайшие годы. Кому-то интерфейс в подобном стиле может показаться упрощенным, несерьезным, однако большинство сходится во мнении: это лучшее,
Windows
При покупке компьютера с предустановленной ОС Windows 8 можно заметить то, что в ней установлен только один язык. По этому поводу конечно же беспокоиться не
Игры
Начиная с операционной системы Windows Vista присутствует такое полезное приложение, как «Обозреватель игр» (Games Explorer). Эта программная оболочка создана для управления играми, ( это касается не
Windows
Сегодня мы настроим PPTP VPN на сервере под управлением Windows Server 2008R2. Те действия которые мы сегодня будем производить для настройки VPN на сервере под управлением Windows Server 2008R2,
Hi,
Thx for your help
I got this when selecting Host only and Custom
Ethernet adapter Local Area Connection:
Connection-specific DNS Suffix . :
Description . . . . . . . . . . . : Intel(R) PRO/1000 MT Network Connection
Physical Address. . . . . . . . . : 00-0C-29-1D-CC-10
DHCP Enabled. . . . . . . . . . . : Yes
Autoconfiguration Enabled . . . . : Yes
Link-local IPv6 Address . . . . . : fe80::d9ea:cd73:15b6:ce69%11(Preferred)
Autoconfiguration IPv4 Address. . : 169.254.206.105(Preferred)
Subnet Mask . . . . . . . . . . . : 255.255.0.0
Default Gateway . . . . . . . . . :
DHCPv6 IAID . . . . . . . . . . . : 234884137
DHCPv6 Client DUID. . . . . . . . : 00-01-00-01-1A-32-E4-C2-00-0C-29-9D-CC-89
DNS Servers . . . . . . . . . . . : fec0:0:0:ffff::1%1
fec0:0:0:ffff::2%1
fec0:0:0:ffff::3%1
NetBIOS over Tcpip. . . . . . . . : Enabled
Tunnel adapter isatap.{8C55690A-A123-488A-9705-B3D3FE1168E3}:
Media State . . . . . . . . . . . : Media disconnected
Connection-specific DNS Suffix . :
Description . . . . . . . . . . . : Microsoft ISATAP Adapter
Physical Address. . . . . . . . . : 00-00-00-00-00-00-00-E0
DHCP Enabled. . . . . . . . . . . : No
Autoconfiguration Enabled . . . . : Yes
It has connected this far but not fully.
Its showing Unidentified Network.
So, you have to build a Windows Server 2008 R2 VM Template ESX/ESXi? Â Theres a lot of folks out there that give their 2 cents on the matter, and a few walkthroughs but everytime you read one thing you come across something new…So I decided to put my procedure online and I also added some notes about each task with reasoning for why I do each task.
Remember to setup vCenter for Guest Customizations by placing the sysprep files for all the various versions of Windows in the proper locations, refer to this VMware KB Article for locations and instructions: VMware KB: 1005593
Things you may need to keep out of your templates: (research your particular product)
| Task | Notes/Reasoning |
| Mount Windows 2008 R2 ISO | How else are you going to install? (anyone still using RIS out there?) |
| Boot to CD Drive | … |
| Install Windows 2008 R2 (Full) | Select full, we aren’t doing a core edition template… |
| Set Admin Password when prompted | yes… |
| Log in | Setup will have rebooted the machine and you’ll be looking at the login screen |
| Set Time Zone | Time is important |
| Install VMware Tools | Fix that laggy mouse and gain the additional benefits |
| Enable Remote Desktop w/ NLA | Allow Secure RDP |
| Install Telnet Client | Nice to have it installed before you need it your netadmin will <3 you for this |
| Install SNMP Services feature (SNMP Service, SNMP WMI Provider) | Most people have some kind of network monitoring that will take advantage of the additional info SNMP will provide |
| Configure SNMP: Contact: Help Desk Location: VMware Services: Physical, Applications, End-to-end |
This is SysContact, SysLocation and SysServices (as defined by RFC1213)- these are picked up by alot of network monitoring tools, letting them know it’s virtual without having to nmap or otherwise find the NICs mac and see it’s VMware is nice |
| Disable Windows Firewall on all 3 profiles | You can turn it back on and punch your holes later |
| Disable Indexing on C: | This is really a performance thing, and is augmented further by virtualization, imagine your VMs sitting idle indexing the C: drive, awesome use of CPU cycles! |
Configure IE:
|
These are what I like, home pages slow down IE loading, when I’m just going to navigate elsewhere, Google > Bing, Kill Bing, Remove accelerators–because we aren’t mapping or blogging from our servers…, and advanced settings, ensure temp files are cleared when you exit IE, and turn off those friendly HTTP errors |
| Configure systray to always show icons/notifications | Personal preference, I don’t want to have to unhide icons when I’m looking for something… |
| Configure IE ESC to be disabled for Administrators | Admins are going to do this anyway… |
| Adjust visual effects for performance | Save some CPU, removes the unnoticable fancy stuff, window shadows, cursor shadows, etc. |
| Lower Boot Menu timeout to 5 seconds | In case something else ends up in the boot menu, don’t want reboots to take longer then they have to…oh and this won’t survive sysprep anyway… |
Modify Folder Options to:
|
This is all self explanatory no? |
| Set Control Panel to Large Icons | Not even sure if this survives sysprep |
| Set Windows Update to Never check for updates | This won’t survive sysprep but is required so you can check for updates |
| Windows Update -> Check for updates | |
| Apply Updates | |
| Restart (required for Windows Updates) | |
| Log in | |
| Windows Update -> Check for updates | |
No more updates required to apply–Did not apply:
|
I don’t put any of these updates into images (.NET 4.0 can present problems, you can always install it if required on a per machine basis, but not hose up the works on every other VM that likely won’t need it. |
| Install BGInfo to C:BGInfo Create Shortcut with switches in C:ProgramDataMicrosoftWindowsStart MenuProgramsStartup |
BGInfo is your friend! – click here for more info on BGInfo |
| Rename Computer to Win2k8-R2-E-Template | This is just personal preference, when you deploy the VM your guest customization will rename it to whatever you want anyway |
| Add Description: “VMware Template†| Let AD know this is a VM |
| Delete desktop.ini file on desktop | House keeping before defrag |
| Empty C:UsersAdministratorAppDataLocalTemp | House keeping before defrag |
| Disable Hibernation via powercfg.exe -h off (deletes hiberfile.sys) | Our servers aren’t going to hibernate |
| Disable Paging | Don’t be afraid, this is to defrag as much as possible |
| Restart (required for disabling paging) | |
| Defrag C: | Optimize everything |
| Renable Paging | self explanatory… |
| Set Power Plan to High Performance & Never Turn off the display | Ensure that the server never sleeps or anything |
| Create temp user and add to local administrators group | This is the beginning of the h4x! |
| Log out | because your going to login with the temp account |
| Log in as temp user | mkay… |
| Copy Administrator Profile to Default Profile | Now you see why we made that temp account, some people use sysprep to do this, I like to use Windows Enabler since this option is grayed out in Windows Server 2008 |
| Log out | |
| Delete temp user | |
| Restart | required to delete locked temp user profile bits |
| Log in as Administrator | |
| Delete temp user profile | |
| Delete ntuser.dat.* files from Default Profile | |
| Test IE and verify settings | An update may have botched your IE settings, so double check! |
| Shutdown | Bye guys |
| Detach ISO | Ya… |
| Convert to Template | Mkay… |
1. Подготовка
ПК с установленной VMware 12
Подготовьте файлы операционной системы ISO для windows server 2008 R2 Адрес официального сайта:https://www.microsoft.com/zh-cn/download/details.aspx?id=19994
Во-вторых, VMware настраивает процесс установки Windows Server 2008 .ISO.
1. VMware 12 новая виртуальная машина
2. Просто выберите типичную установку, в Интернете много пользовательских установок, вы можете сами обратиться к ней.
3. Выберите «Установить операционную систему позже».
4. Выберите установку «windows server 2008» в «Microsoft Windows», 64-разрядная версия находится в 32-разрядной версии, чтобы увидеть свой собственный выбор файла iso.
5. Выберите папку для установки и назовите виртуальную машину для будущего использования.
6. Выберите размер диска, по умолчанию 40 ГБ, и сохраните файл на диске как один файл (чисто личная привычка).
7. Настройте оборудование, выберите файл образа iso, xxxxxxxxxx.iso
1) НажмитеИзготовленное на заказ оборудование
2) Настроить файл образа ios
3) Нажмите Готово
На этом процесс загрузки конфигурации VMware для server 2008 завершен, и следующий процесс формально входит в процесс настройки установки AsteriskNow. Если есть что-то необоснованное, укажите на это.
В-третьих, процесс установки Windows Server 2008
1. Запустите виртуальную машину server 2008 и войдите в интерфейс установки, который совпадает с интерфейсом для установки системы win7. Фактически, установка каждой системы — это, по сути, следующий шаг.
2. Выберите версию для установки и перейдите к следующему шагу. С таким большим количеством версий, какую из них выбрать? С таким большим количеством онлайн-материалов Сяобай не станет носильщиком.
3. После выборочной установки, поскольку системы нет, обновлять нечего и выбора нет.
4、можешь выбратьрасширенные настройки, Назначьте жесткий диск 40 ГБ в соответствии с инструкциями
5. После долгого процесса установки моя машина стала мусорной и медленной.
В-четвертых, установите VMware Tools
1. Выберите «Виртуальная машина» — «Установить VMware Tools». Здесь лучше всего выключить установленную виртуальную машину 2008, а затем изменить ISO-файл на CD / DVD, чтобы «использовать физический диск» в конфигурации.
2. После входа в систему откройте мой компьютер, вы увидите загруженный DVD-привод виртуальной машины, затем щелкните, чтобы открыть, и тогда любимый «следующий шаг» — ОК.

