Skip to content
— Загружаемся с DVD
— Выбираем региональные настройки. Формат даты и времени лучше выбрать — Russian. Любые из этих настроек можно будет поменять после установки ОС.
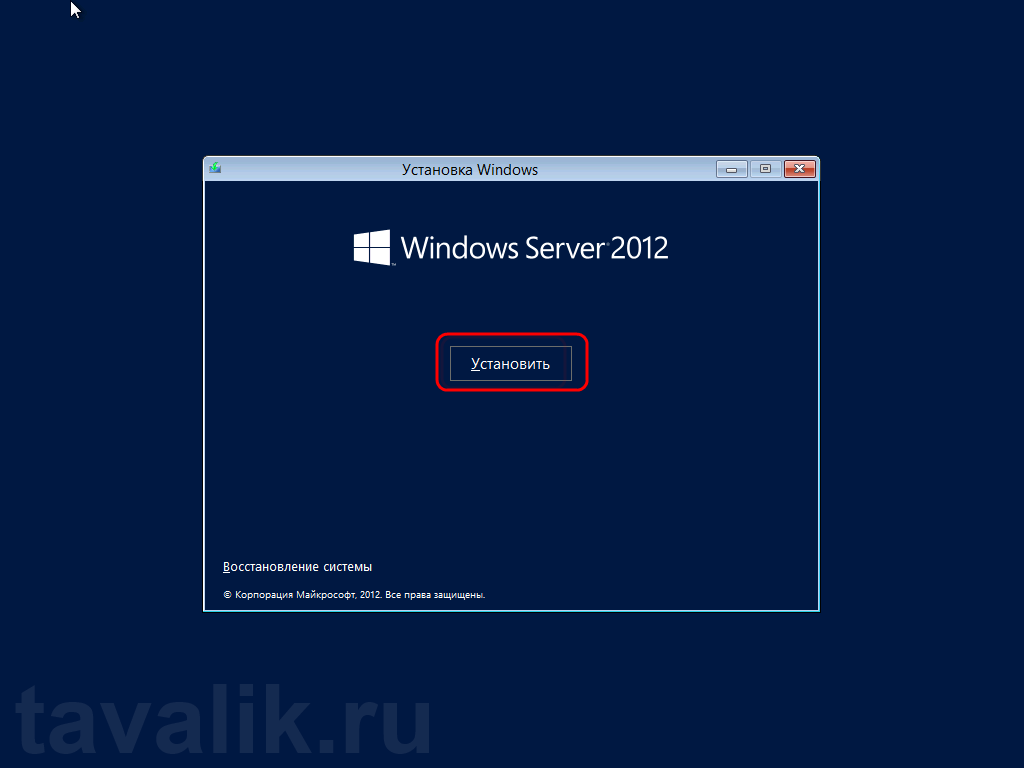
— Запускаем установку
— Вводим ключ. Можно взять по ссылке (см.ниже). Эти ключи подойдут только для установки, для активации — нет. Если у вас Volume License (VL) тогда этого шага не будет (но потом все равно придется активировать ОС).
Automatic Virtual Machine Activation — http://technet.microsoft.com/en-us/library/dn303421.aspx
Edition
AVMA key
Datacenter
Y4TGP-NPTV9-HTC2H-7MGQ3-DV4TW
Standard
DBGBW-NPF86-BJVTX-K3WKJ-MTB6V
Essentials
K2XGM-NMBT3-2R6Q8-WF2FK-P36R2
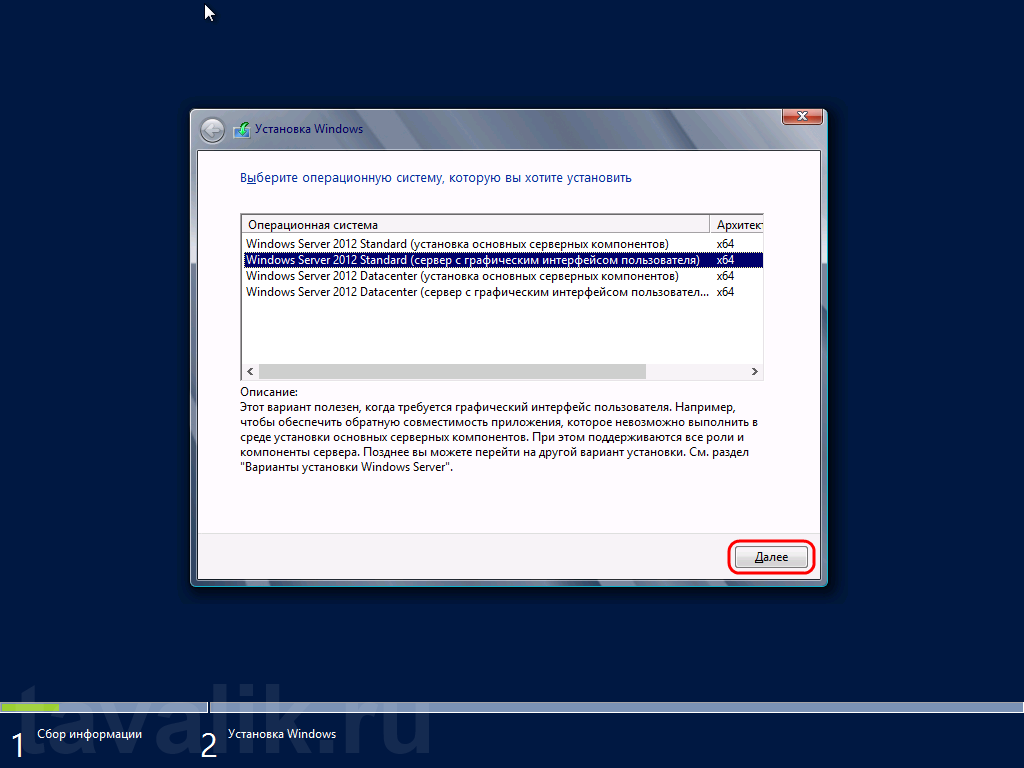
— Выбираем редакцию ОС. Standart и Datacenter отличаются количеством виртуальных машин, которые могут быть созданы в ОС и политикой лицензирования таких машин. Для Oracle — Standart вполне подойдет.
— Принимаем лицензионное соглашение
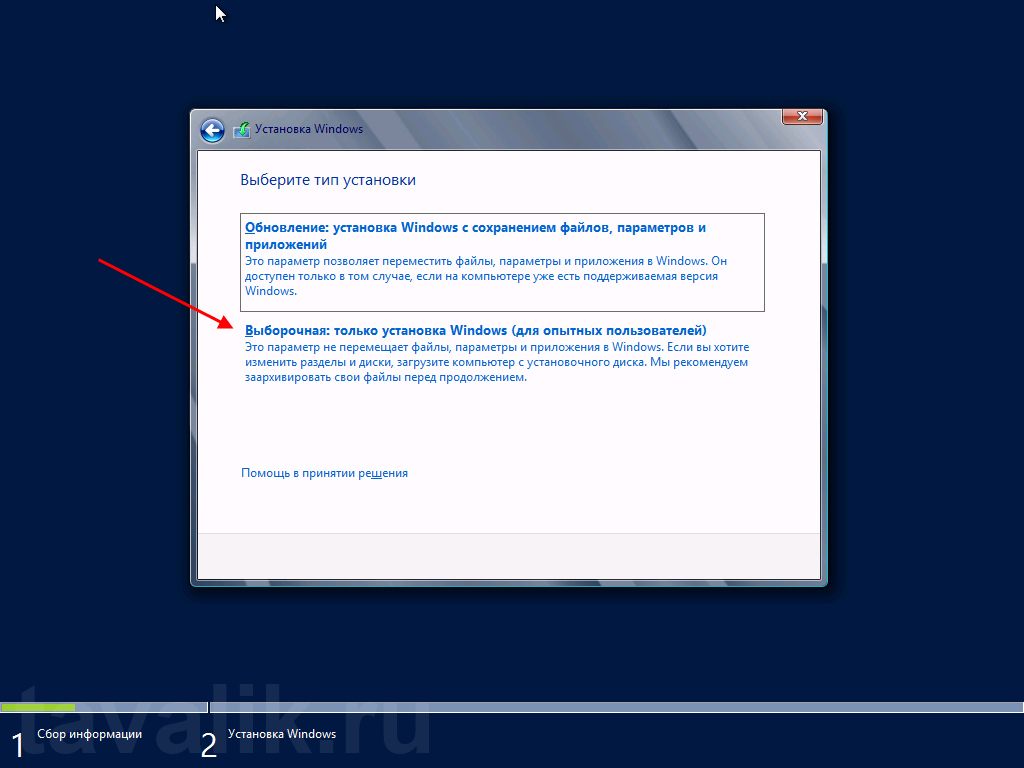
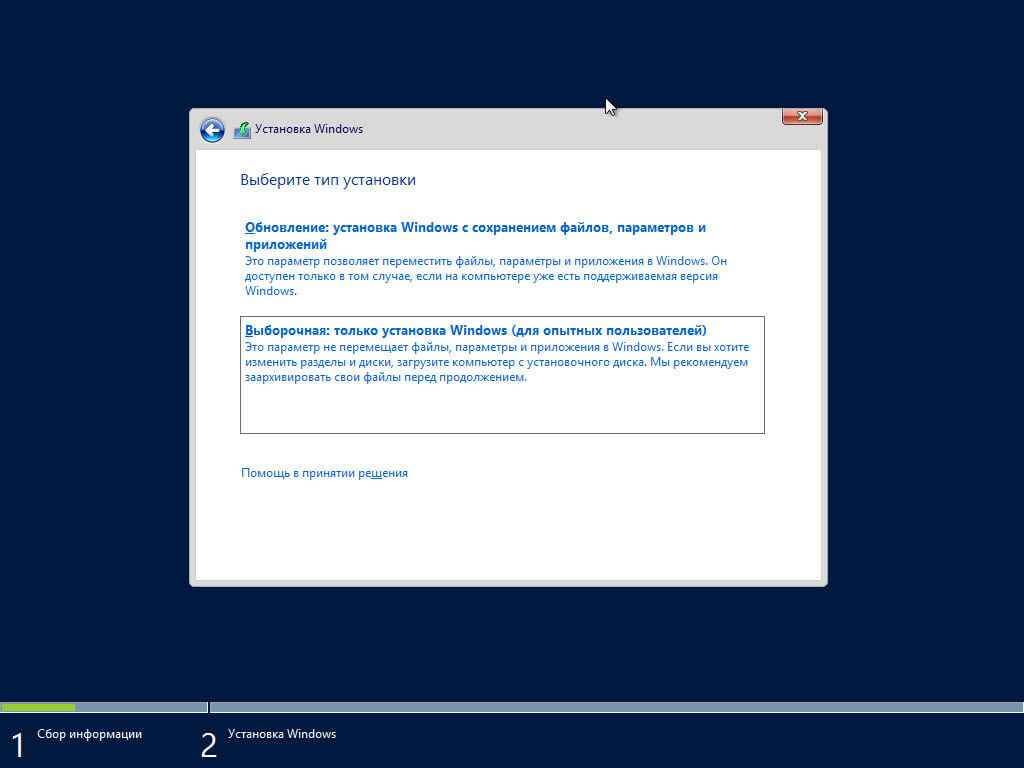
— Выбираем установку (НЕ обновление уже установленной ОС).
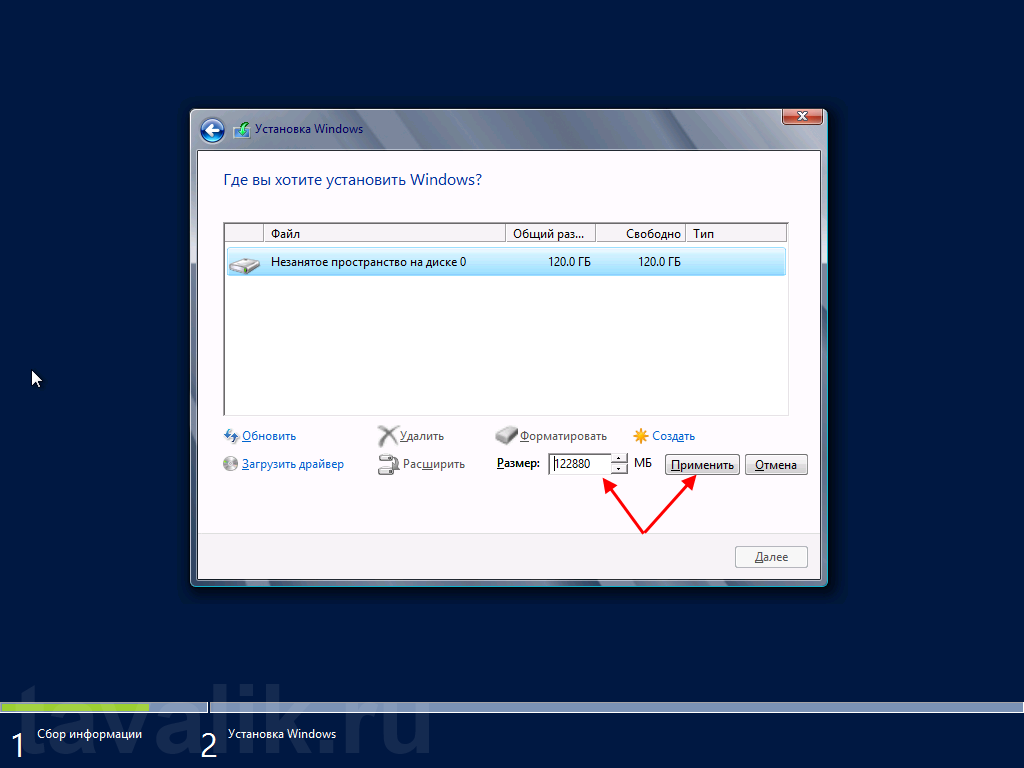
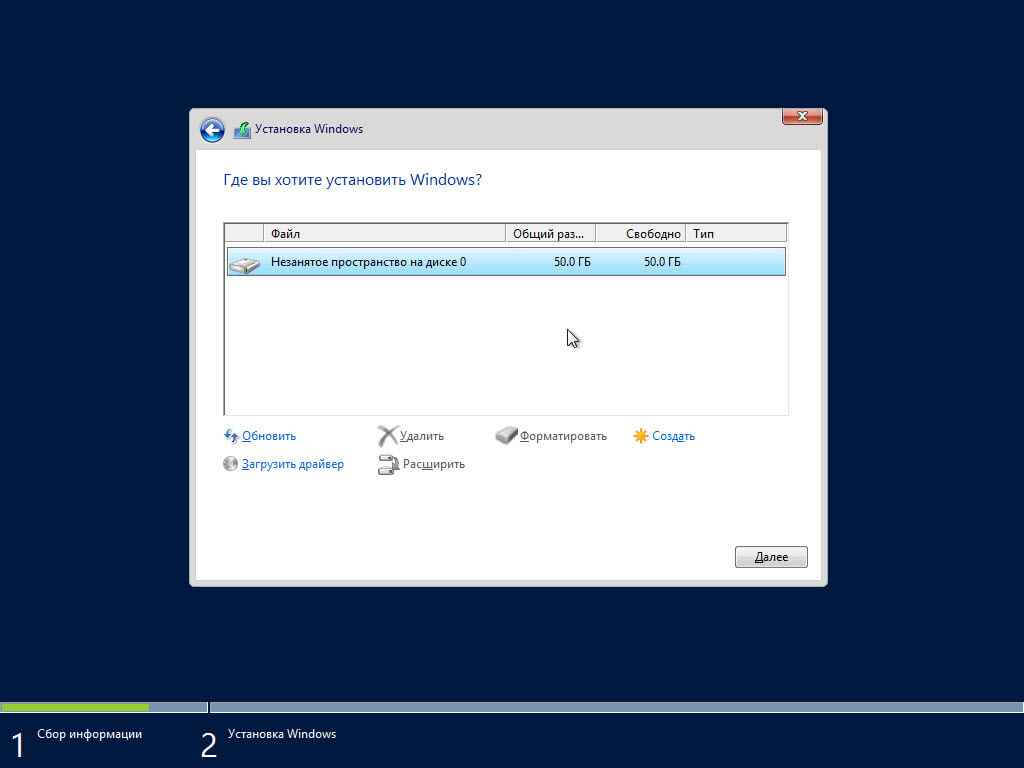
— Создаем разделы на диске. В данном примере всего один раздел.
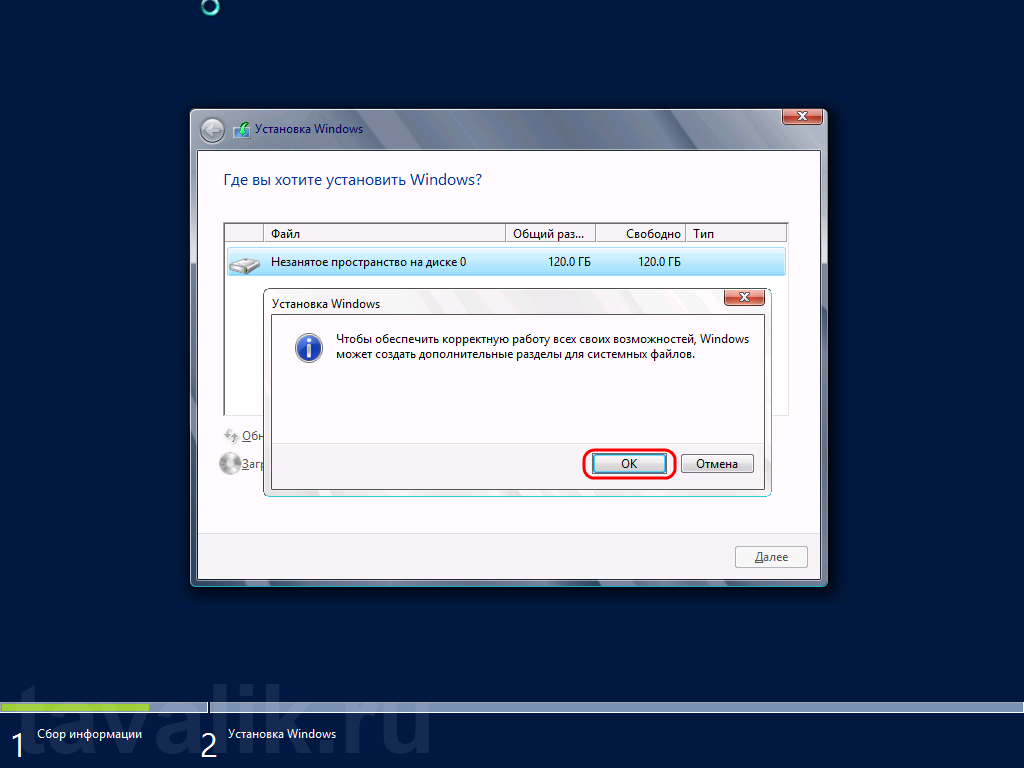
— Предупреждение о том, что Windows создаст еще один раздел для своих системных файлов.
— Выбираем на какой раздел устанавливать ОС.
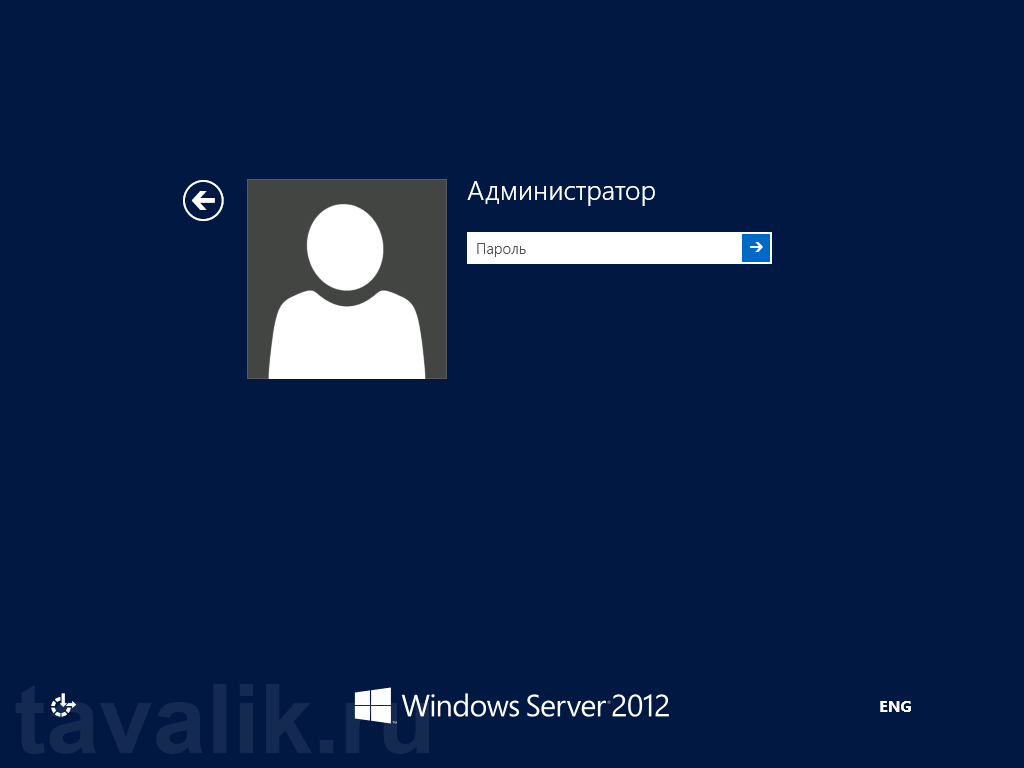
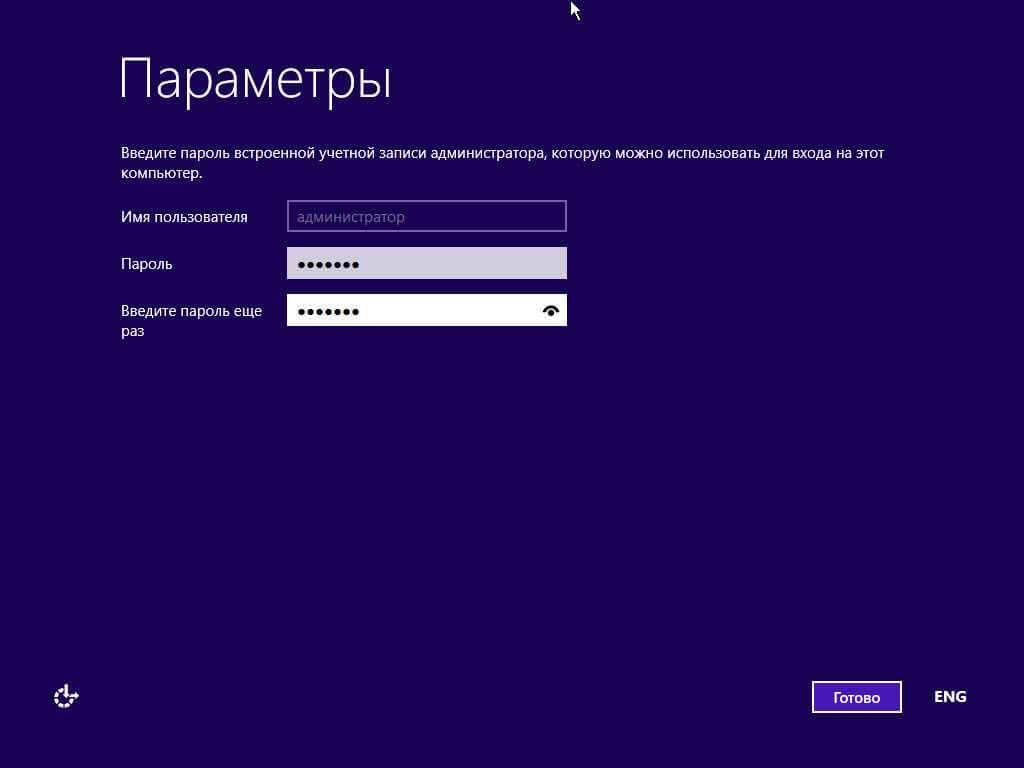
— Задаем пароль для пользователя Administrator.
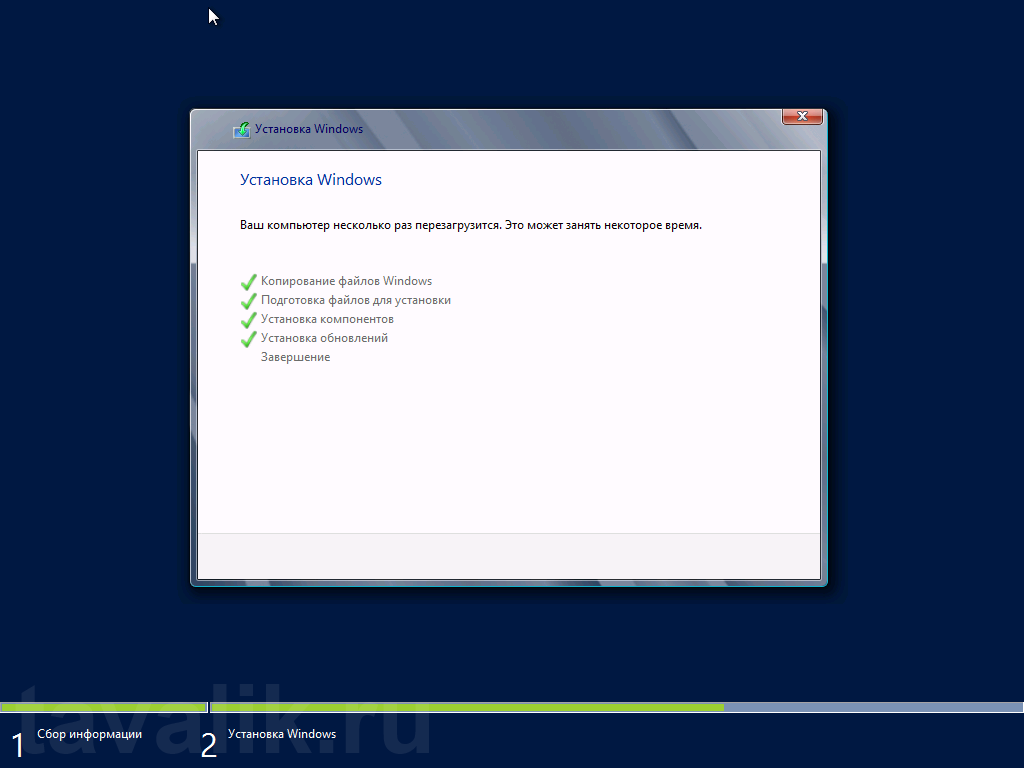
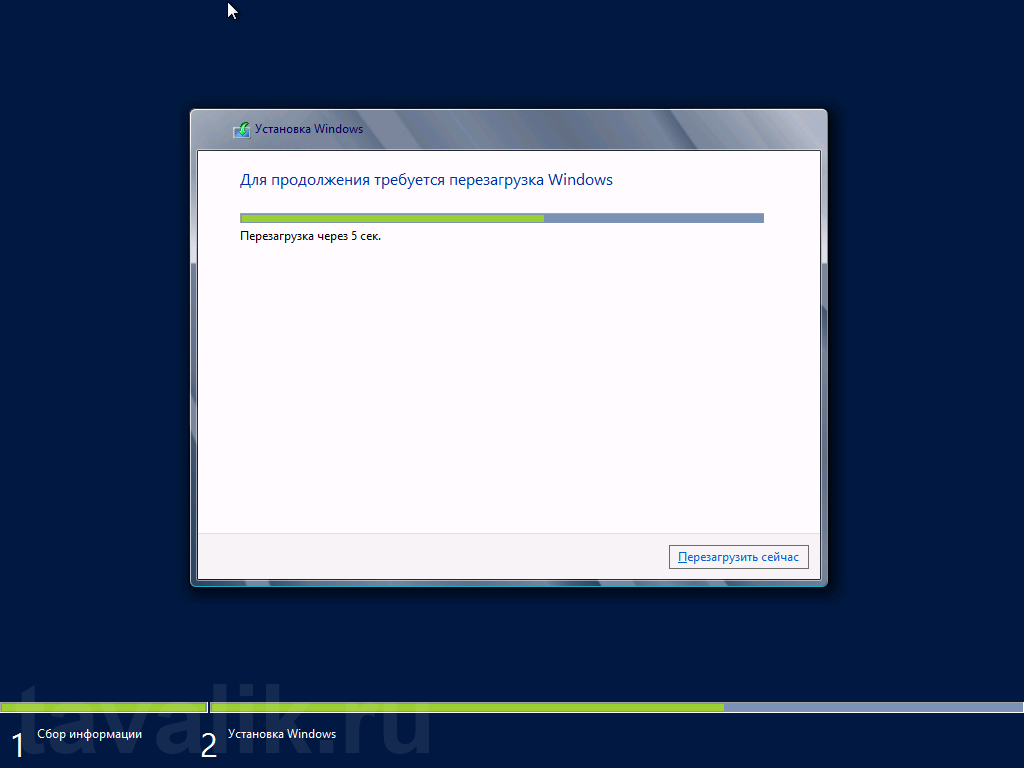
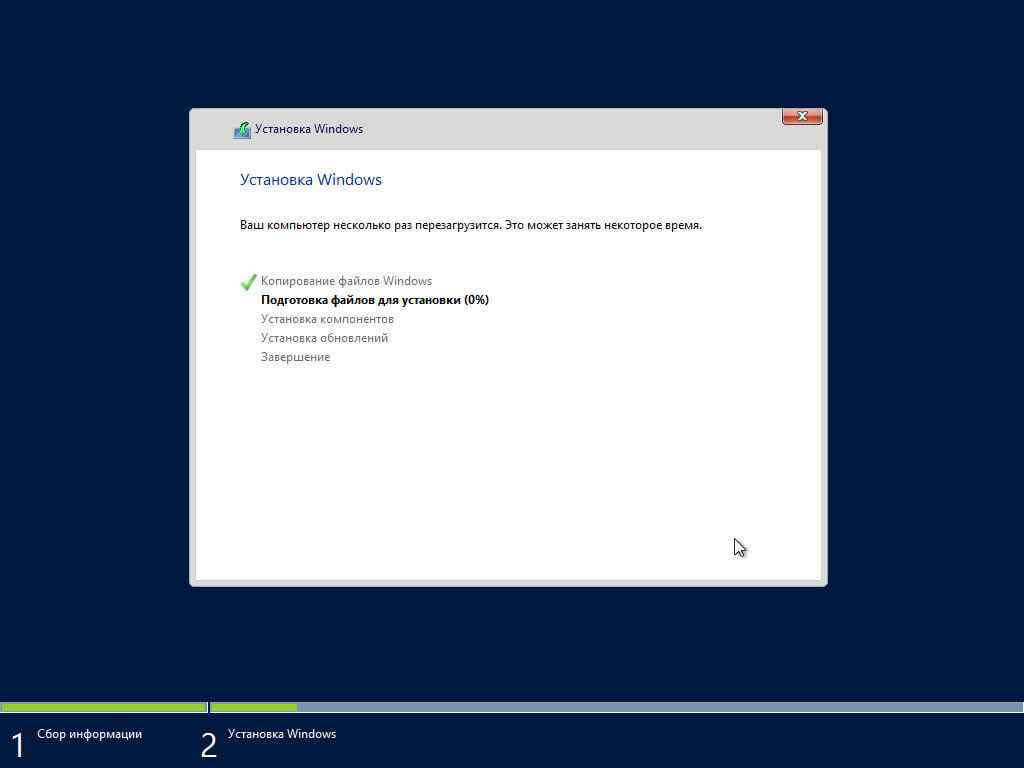
После копирования файлов система готова к работе.
Windows Server 2012-шестая версия операционной системы Windows Server от Microsoft, как часть семейства операционных систем Windows NT. Windows Server 2012-это серверная версия Windows, основанная на Windows 8, и пришедшая на смену Windows Server 2008 R2, производная от кодовой базы Windows 7, выпущенной почти тремя годами ранее. Во время разработки были выпущены две предварительные версии: предварительная версия для разработчиков и бета-версия. Программное обеспечение было общедоступным для клиентов начиная с 4 сентября 2012 г. корпорацией Майкрософт. Преемник был выпущен 18.10.2013 под названием Windows Server 2012 R2. Корпорация Майкрософт прекратила основную поддержку Windows Server 2012 10 сентября 2018 г., а расширенная поддержка завершится 10 октября 2023 г.
Чтобы загрузить Windows Windows Server 2012 R2 от Microsoft, вы посетите здесь
После установки у вас есть 180 дней для использования пробной версии Windows Server 2012 R2. W indows Server 2012 R2 Evaluation не может изменить ключ продукта. Итак, вы прочитали эту статью, чтобы узнать, как обновить пробную версию Windows Server 2012 до полной версии
После обновления Windows Server 2012 R2 Evaluation до полной версии вам понадобится ключ продукта Windows Server 2012 R2 для его активации.
Я также продаю ключ продукта Windows Server 2012 R2 по цене 30 долларов США за ключ здесь: https://saleproductkey.com/product/windows-server-2012-r2-product-key/
Windows Server 2012 R2 Product Key Free 2021
- MH37W-N47XK-V7XM9-C7227-GCQG9
- VK7JG-NPHTM-C97JM-9MPGT-3V66T
- XGVPP-NMH47-7TTHJ-W3FW7-8HV2C
- X4XQN-VMKJH-7TCVD-TB3QT-KTPKM
Затем вы копируете и вставляете этот ключ
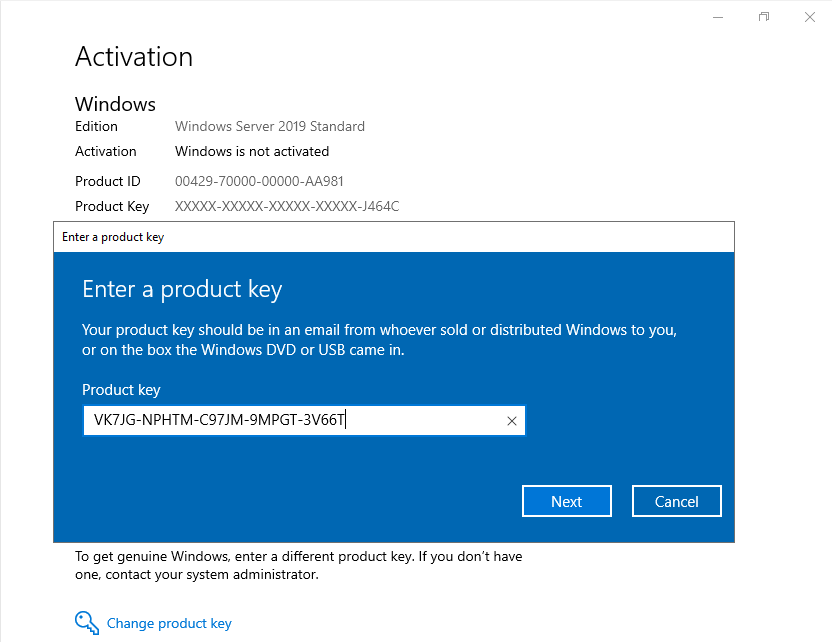
Если эти ключи не работают, вы можете использовать новую версию, чтобы бесплатно активировать Windows Server 2012 в 2021 году:
Как активировать Windows Server 2012 R2 без ключа продукта бесплатно 2021 (180 дней)
Вы можете прочитать эти статьи, чтобы узнать:
Шаг 1. Вы выбираете правильный ключ для используемого вами выпуска Windows Server 2012.
Вот список Windows Server 2012 R2 KMS-ключи:
- Ключ центра обработки данных Windows Server 2012 R2: W3GGN-FT8W3-Y4M27-J84CP-Q3VJ9
- Стандартный ключ Windows Server 2012 R2: D2N9P-3P6X9-2R39C-7RTCD-MDVJX
- Ключ Windows Server 2012 R2 Essentials: KNC87-3J2TX-XB4WP-VCPJV-M4FWM
Если вы используете Windows Server 2012 , вы получите ключи KMS здесь:
- Ключ Windows Server 2012: BN3D2-R7TKB-3YPBD-8DRP2-27GG4
- Ключ Windows Server 2012 N: 8N2M2-HWPGY-7PGT9-HGDD8-GVGGY
- Одноязычный ключ Windows Server 2012: 2WN2H-YGCQR-KFX6K-CD6TF-84YXQ
- Ключ для конкретной страны в Windows Server 2012: 4K36P-JN4VD-GDC6V-KDT89-DYFKP
- Стандартный ключ Windows Server 2012 Server: XC9B7-NBPP2-83J2H-RHMBY-92BT4
- Стандартный ключ Windows Server 2012 MultiPoint: HM7DN-YVMH3-46JC3-XYTG7-CYQJJ
- Ключ Windows Server 2012 MultiPoint Premium: XNH6W-2V9GX-RGJ4K-Y8X6F-QGJ2G
- Ключ центра обработки данных Windows Server 2012: 48HP8-DN98B-MYWDG-T2DCC-8W83P
Шаг 2: щелкните правой кнопкой мыши кнопку”Пуск”и откройте Командную строку (запуск от имени администратора)
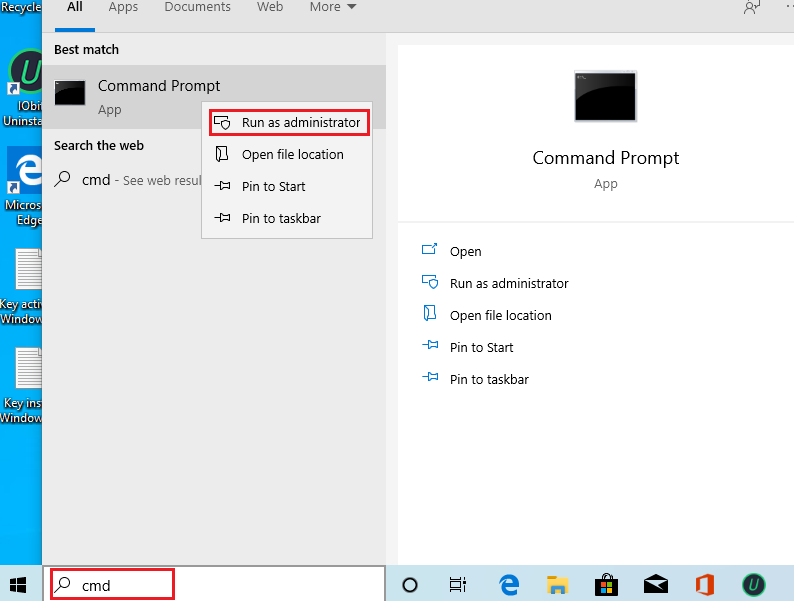
Шаг 3: используйте команду « slmgr.vbs/ipk yourlicensekey » для установки лицензионного ключа (yourlicensekey-это ключ активации, который вы получили на шаге 1).
Например, у меня Windows Server 2012-это Windows Server 2012 R2 Standard. Поэтому я набираю:
slmgr.vbs/ipk D2N9P-3P6X9-2R39C-7RTCD-MDVJX

( * Примечание *: вам нужно нажать клавишу [Enter] для выполнения команд.)
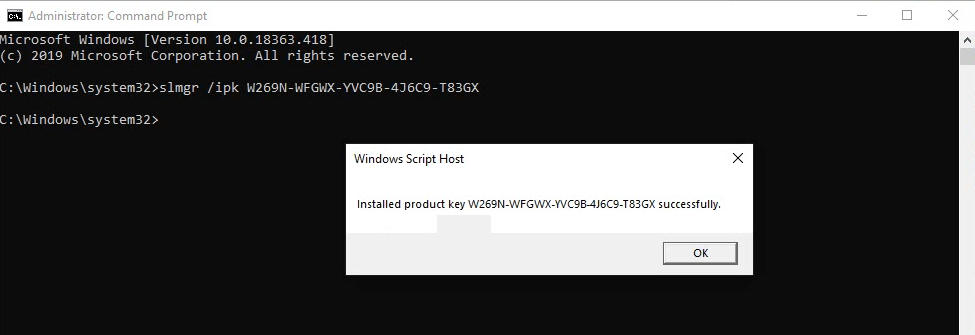
Шаг 4. Вы используете команду « slmgr.vbs/skms kms8.msguides.com » для подключения к моему серверу KMS.


Шаг 5: Последний шаг-активировать Windows с помощью команды « slmgr.vbs/ato ».

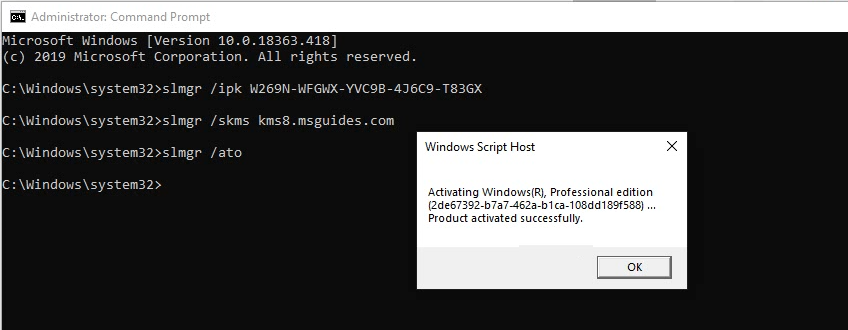
Вы снова проверяете статус активации.
Готово.
С помощью этого метода вы можете активировать как 32-разрядную, так и 64-разрядную версию Windows Server 2012 в течение 180 дней.
Тег: ключ продукта Windows Server 2012 r2 бесплатно 2021, Универсальный ключ продукта Windows Server 2012, 180-дневная пробная версия Windows Server 2012 r2 ключ
Подробнее:
5
/
5
(
1
проголосовать
)
В статье подробно описан и продемонстрирован процесс создания загрузочной USB флешки с Windows Server 2012 R2, а также процесс активации Windows Server 2012 R2.
Процесс создания загрузочной USB флешки, установки операционной системы и активации показан на примере Windows Server 2012 R2 Datacenter, однако данное руководство также полностью подходит для установки версий Windows Server 2012 R2 Foundation/Essentials/Standard.
ВАЖНО! Прежде чем переустанавливать Windows Server 2012 R2, скопируйте всю ценную для Вас информацию на сторонние носители. Если имеется такая возможность, желательно скачать драйверы сетевой карты для компьютера на который Вы будете устанавливать Windows Server 2012 R2.
Для установки Windows Server 2012 R2 понадобятся:
1. USB флешка объемом 8Гб или больше. Имейте ввиду, что в процессе создания загрузочной USB флешки с Windows Server 2012 R2 вся информация находящаяся на флешке будет удалена;
2. Оригинальный образ (ISO-образ) Windows Server 2012 R2;
Скачать Windows Server 2012 R2
.
3. Утилита Rufus для создания загрузочной USB флешки из ISO-образа Windows Server 2012 R2;
Скачать Rufus
.
4. Утилита Activator KMSAuto для активации Windows Server 2012 R2;
Скачать Activator KMSAuto
.
I. Создание загрузочной флешки с Windows Server 2008 R2
1. Вставьте USB флешку в USB разъем.
2. Запустите скачанную утилиту Rufus.
Перед Вами откроется окно:
Рис.1
.
3. На Рис.1 видно USB флешку, которую Вы вставили в USB разъем.
4. Нажмите на иконку, после чего откроется окно выбора ISO-образа. Выберите скачанный Вами ранее ISO-образ с Windows Server 2012 R2 (прим. вспомните куда Вы его сохраняли).
5. Нажимаем Открыть.
6. Нажимаем Старт.
Рис.2
.
7. Появится окно предупреждения, информирующее о том, что все данные на USB флешке будут удалены. Нажимаем ОК, после чего начнётся установка ISO-образа. После окончания установки ISO-образа (Рис.2) нажмите Закрыть.
.
II. Добавление активатора Windows на USB флешку
1. Откройте созданную загрузочную USB флешку с Windows Server 2012 R2.
2. Распакуйте (прим. с помощью WinRAR или просто открыть через Проводник) скачанную Вами ранее утилиту Activator KMSAuto. Полученную папку Activator KMSAuto переместите на загрузочную USB флешку с Windows Server 2012 R2 (Рис.3).
Рис.3
.
III. Установка Windows Server 2012 R2
1. Вставьте загрузочную USB флешку с Windows Server 2012 R2 в разъём USB.
2. Сразу после запуска компьютера необходимо вызвать Boot menu. Т.к. на разных материнских платах и ноутбуках клавиши вызова Boot menu отличаются, ниже приведена таблица (Рис.4) в соответствии с которой Вам необходимо нажать соответствующую клавишу (прим. если у Вас стационарный компьютер, и Вы не знаете какая материнская на нём стоит, обесточьте компьютер, откройте боковую крышку системного блока и посмотрите модель материнской платы).
Рис.4
.
3. Boot menu незначительно отличается на разных моделях и приблизительно выглядит следующим образом (Рис.5, Рис.6, Рис.7).
Рис.5
.
Рис.6
.
Рис.7
.
4. Выберите загрузку с USB флешки и нажмите Enter.
5. Далее на дисплее появится надпись «Press any key to boot from CD or DVD…», нажмите любую клавишу на клавиатуре (Рис.8).
Рис.8
.
6. В появившемся окне установки Windows Server 2012 R2 выберите нужный язык и нажмите Далее (Рис.9).
Рис.9
.
7. Для начала установки нажмите Установить (Рис.10).
Рис.10
.
8. Выбираем необходимую нам операционную систему (прим. в данном руководстве установка показана на примере Windows Server 2012 R2 Datacenter (сервер с графическим интерфейсом)).
Примечание! Windows Server 2012 R2 включает вариант облегченной установки Windows Server 2012 R2 в которую не включена графическая оболочка. Вся настройка и обслуживание выполняется при помощи интерфейса командной строки Windows, или подключением к серверу удалённо посредством Консоли управления. При этом доступны Блокнот и некоторые элементы панели управления, к примеру, Региональные Настройки.
После того как вы выбрали нужную Вам операционную систему нажмите Далее (Рис.11).
Рис.11
.
9. В появившемся окне поставьте галочку напротив Я принимаю условия лицензии, затем нажмите Далее (Рис.12).
Рис.12
.
10. В разделе тип установки выберите Выборочная: только установка Windows (для опытных пользователей) (Рис.13).
Рис.13
.
11. Выберите опцию Создать (Рис.14).
Рис.14
.
12. Появится строка, в которой нужно указать размер создаваемого логического диска, затем нажмите Применить (прим. если Вам необходимо создать два и более разделов — сначала задайте размер первого логического диска, затем, из оставшегося незанятого пространства, аналогичным образом, создайте другие разделы) (Рис.15).
Рис.15
.
13. Откроется окно, в котором сообщается, что Windows необходимо создать дополнительные разделы для системных файлов. Нажмите ОК (Рис.16).
Рис.16
.
14. Выберите раздел для установки Windows Server 2012 R2 (прим. в данном руководстве это Диск 0 Раздел 2), затем нажмите Далее (Рис.17).
Рис.17
.
15. Начнется установка Windows Server 2012 R2, в процессе которой компьютер перезагрузится (Рис.18).
Рис.18
.
16. Придумайте и введите новый пароль для учётной записи администратора (прим. пароль, как минимум, должен содержать буквы разного регистра и цифры), затем нажмите Готово (Рис.19).
Рис.19
.
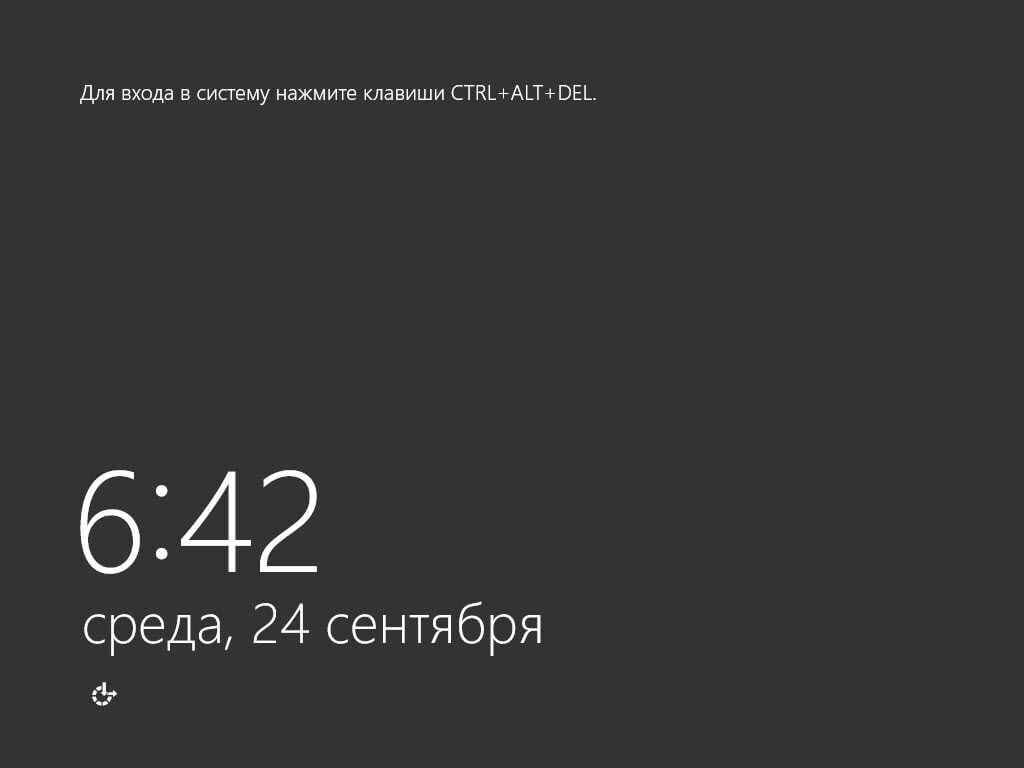
17. После окончания установки, для входа в систему, нажмите Ctrl + Alt + Delete (Рис.20).
Рис.20
.
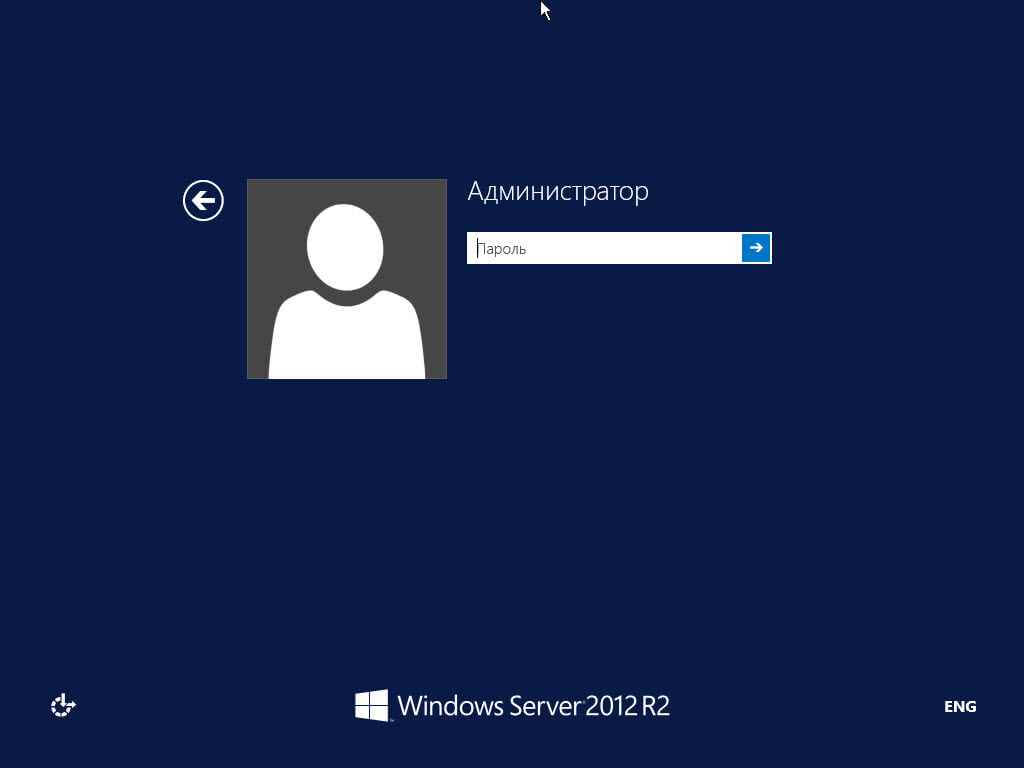
18. Введите пароль администратора, затем нажмите Enter (или синюю иконку со стрелочкой) (Рис.21).
Рис.21
.
19. После запуска системы появится рабочий стол Windows Server 2012 R2 (Рис.22).
Рис.22
.
IV. Активация Windows Server 2012 R2
1. На установленной Windows Server 2012 R2 откройте загрузочную USB флешку с Windows Server 2012 R2, в ней откройте папку Activator KMSAuto и запустите файл KMSAuto (Рис.23).
Рис.23
.
2. В открывшемся окне нажмите Активация Windows, после окончания активации внизу появится надпись Completed (Рис.24).
Рис.24
.
3. После активации откройте Пуск > Компьютер (пр. кнопкой мыши) > Свойства (Рис.25).
Рис.25
.
4. Откроется окно, внизу которого будет написано, что активация Windows выполнена (Рис.26).
Рис.26
.
Установка и активация Windows Server 2012 R2 завершена! Надеемся, что данное руководство помогло Вам!
.

0. Оглавление
- Что понадобится
- Установка Microsoft Windows Server 2012
- Первоначальная настройка Microsoft Windows Server 2012
1. Что понадобится
- Установочный диск Microsoft Windows Server 2012 (скачать можно здесь)
- Рабочий ключ для активации Windows Server 2012
2. Установка Microsoft Windows Server 2012
Вставляем установочный диск Microsoft Windows Server 2012 в DVD-привод компьютера и загружаемся с него (для этого в BIOS компьютера необходимо поставить первичную загрузку с CD-ROM). После непродолжительной загрузки попадаем на окно выбора языка. Выбираем нужные параметры (по умолчанию язык, формат времени и денежных единиц и раскладку клавиатуры оставляем русскую) и нажимаем «Далее» (Next) .
В следующем окне, для первичной установки Windows Server нажимаем «Установить» (Install now) .
Теперь необходимо выбрать выпуск операционной системы, который будем устанавливать (об отличии различных выпусков Windows Server 2012 можно прочитать, например, здесь). Выбрав нужный выпуск, жмем «Далее» (Next) .
Соглашаемся с условиями лицензионного соглашения, установив флаг «Я принимаю условия лицензии» (I accept the license terms) и жмем «Далее» (Next) .
На следующем шаге необходим выбрать тип установки. Для чистой установки Windows Server 2012 выбираем «Выборочная: только установка Windows…» (Custom: Install Windows only) .
Теперь разметим жесткий диск для установки, если это не было сделано раннее. Для этого выберем незанятое пространство на каком-либо физическом жестком диске в списке и нажмем «Создать» (New).
Введем размер создаваемого логического диска (по умолчанию полный объем) и нажмем «Применить» (Apply).
Также согласимся на создание дополнительных разделов для системных файлов, нажав «ОК» в появившемся окне.
После вышеописанных действий, вместо неразмеченной области должны появиться 2 раздела: Системный (System) и Основной (Primary). Выбираем основной раздел для установки Windows и жмем «Далее» (Next).
Дожидаемся завершения установки компонент Windows Server 2012.
По завершении установки компьютер будет перезагружен.
После перезагрузки система предложит ввести пароль для учетной записи «Администратор» (Administrator) . По умолчанию пароль должен отвечать требованиям безопасности паролей, а именно:
- Не содержать имени учетной записи пользователя или частей полного имени пользователя длиной более двух рядом стоящих знаков
- Иметь длину не менее 6 знаков
- Содержать знаки трех из четырех перечисленных ниже категорий:
- Латинские заглавные буквы (от A до Z)
- Латинские строчные буквы (от a до z)
- Цифры (от 0 до 9)
- Отличающиеся от букв и цифр знаки (например, !, $, #, %)
(О том, как потом изменить политику паролей, можно прочитать в статье Изменение политики паролей в Windows Server 2012 R2)
Рекомендую сразу записать пароль в отведенное для хранения паролей место. Для этого удобно использовать различные менеджеры паролей, например бесплатную программу KeePass.
Вводим пароль администратора и жмем «Готово» (Finish) .
Далее попадем на стартовое окно Windows Server 2012. Нажимаем одновременно CTRL, ALT и DEL
и входим в Windows под учетной записью Администратора, введя установленный на предыдущем шаге пароль.
3. Первоначальная настройка Microsoft Windows Server 2012
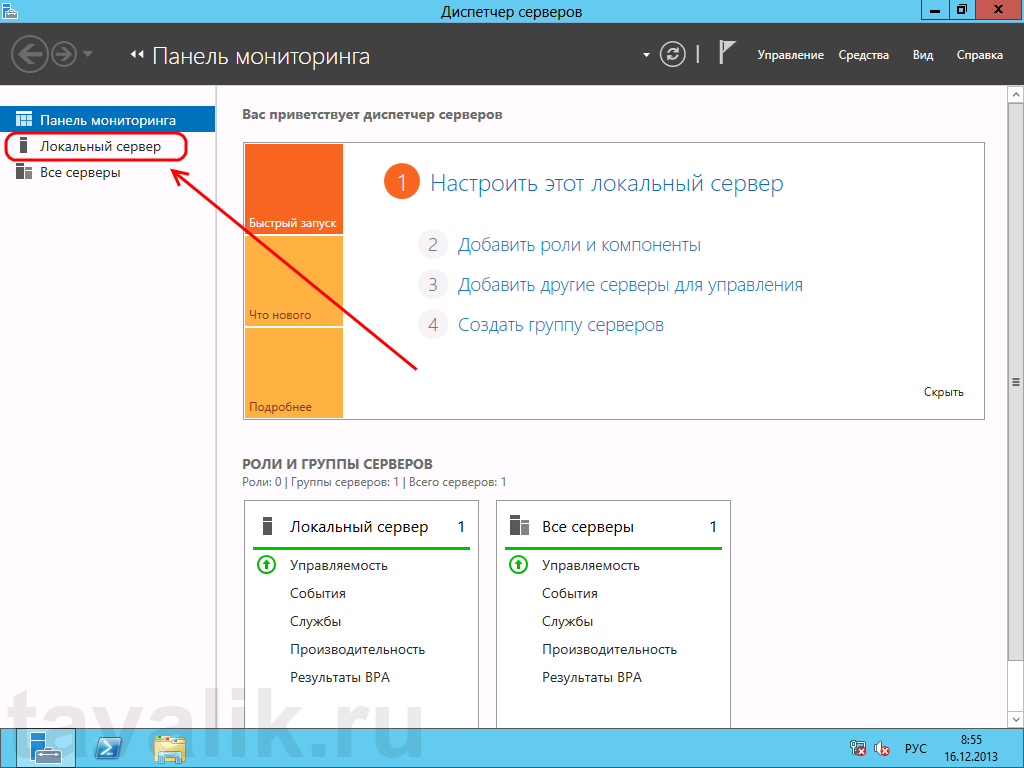
Первое, что мы увидим после входа в систему будет заметно модифицированный со времен Windows Server 2008 R2 диспетчер серверов (Server Manager). Для настройки текущего локального сервера выберем вкладку «Локальный сервер» (Local Server) в панели вкладок слева.
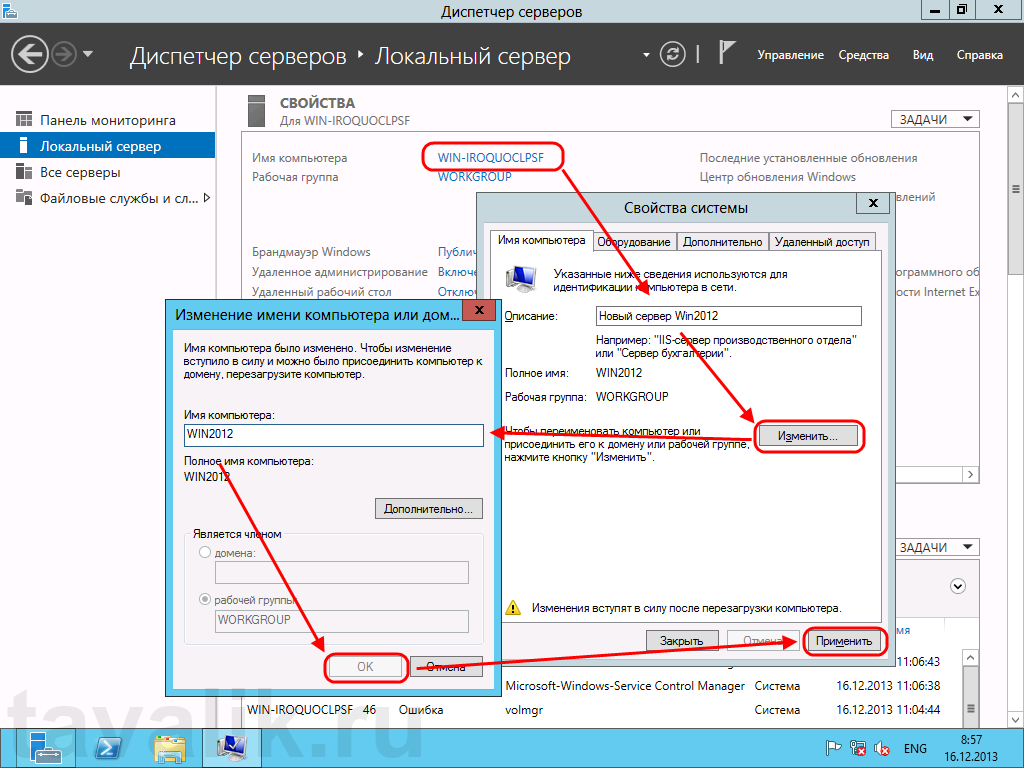
Начнем изменение параметров локального сервера с изменения имени компьютера. Для этого кликнем по текущему имени компьютера в окне «Свойства» (Properties) . Откроется окно «Свойства системы» (System Properties) на закладке «Имя компьютера» (Computer Name) . Нажмем кнопку «Изменить…» (Change…) и введем новое имя сервера в появившемся окне. После чего закроем все окна нажав последовательно «ОК» и «Применить» (Apply) .
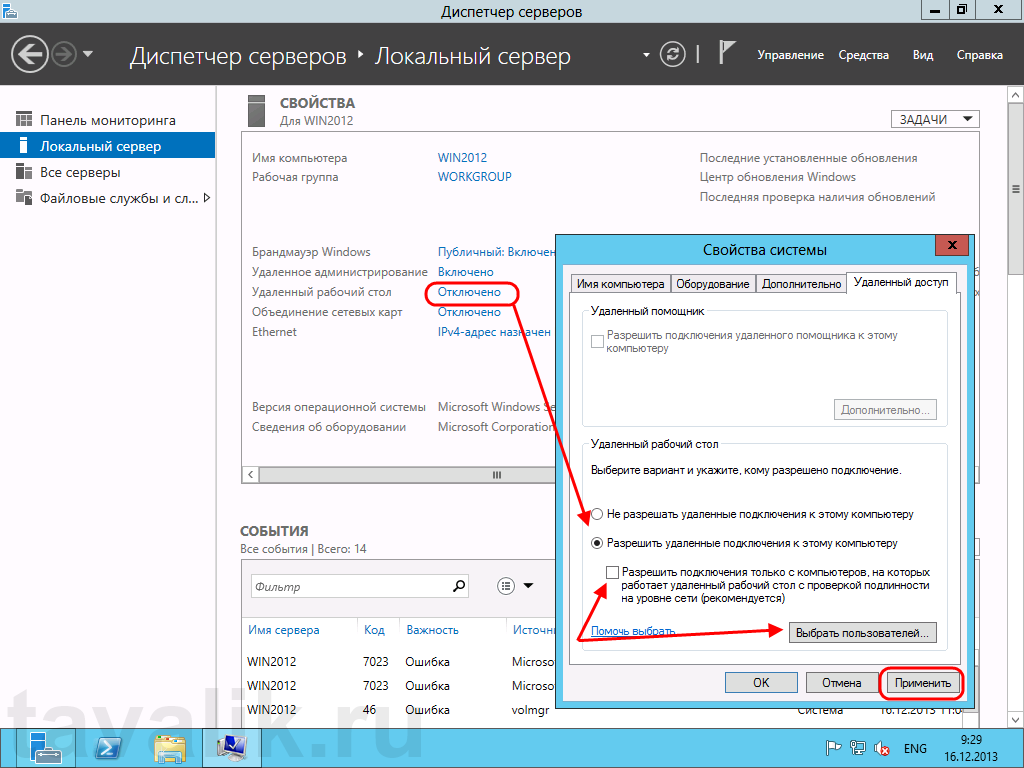
Далее, разрешим удаленный доступ к текущему серверу. Для этого кликнем по ссылке напротив «Удаленный рабочий стол» (Remote Desktop) в окне свойств. Откроется уже знакомое окно «Свойства системы» (System Properties) на вкладке «Удаленный доступ» (Remote) . Установим переключатель в «Разрешить удаленное подключение к этому компьютеру» (Allow remote connections to this computer) . По умолчанию только пользователи группы «Администраторы» (Administrators) имеет доступ к удаленному рабочему столу (для добавления пользователей необходимо нажать на «Выбрать пользователей…» (Select Users) и добавить пользователей системы из списка), после чего нажимаем «Применить» (Apply) . Подключение к серверу осуществляется с помощью встроенного в Windows RDP-клиента.
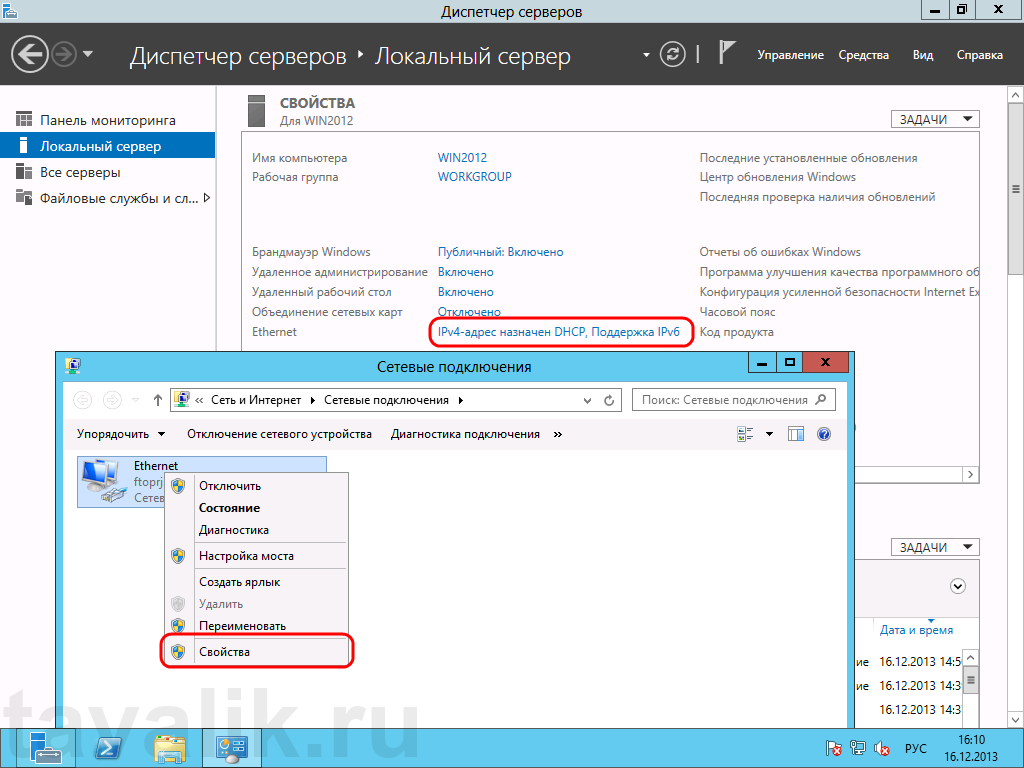
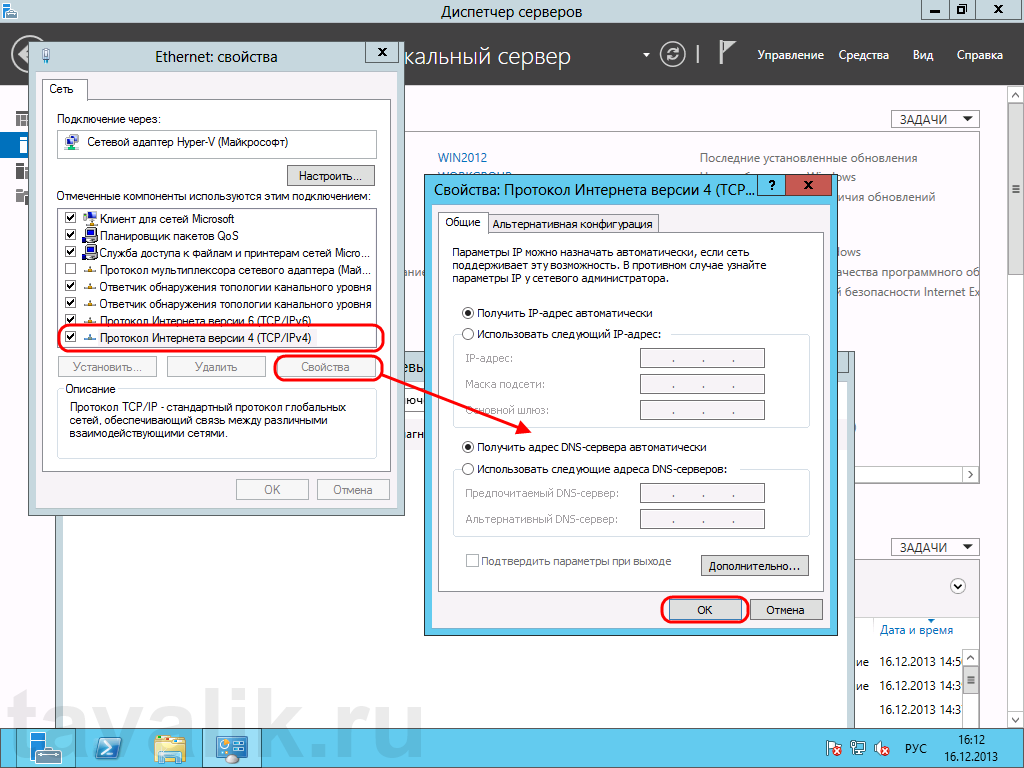
Настроим параметры сети. Для этого кликнем по ссылке напротив пункта «Ethernet» . Откроются сетевые подключения текущего компьютера. Кликаем правой кнопкой мыши по текущему активному сетевому адаптеру и в контекстном меню выбираем «Свойства» (Properties) .
Откроются свойства сетевого соединения. Выберем в списке компонент «Протокол интернета версии 4 (TCP/IPv4)» (Internet Protocol Version 4 (TCP/IPv4)) (и снова нажмем «Свойства» (Properties) . В открывшемся окне можно задать нужные параметры IP. Это может быть динамический IP, если в сети есть DHCP-сервер, либо статический IP, который можно задать самостоятельно. Когда параметры IP установлены, жмем «ОК» для сохранения настроек.
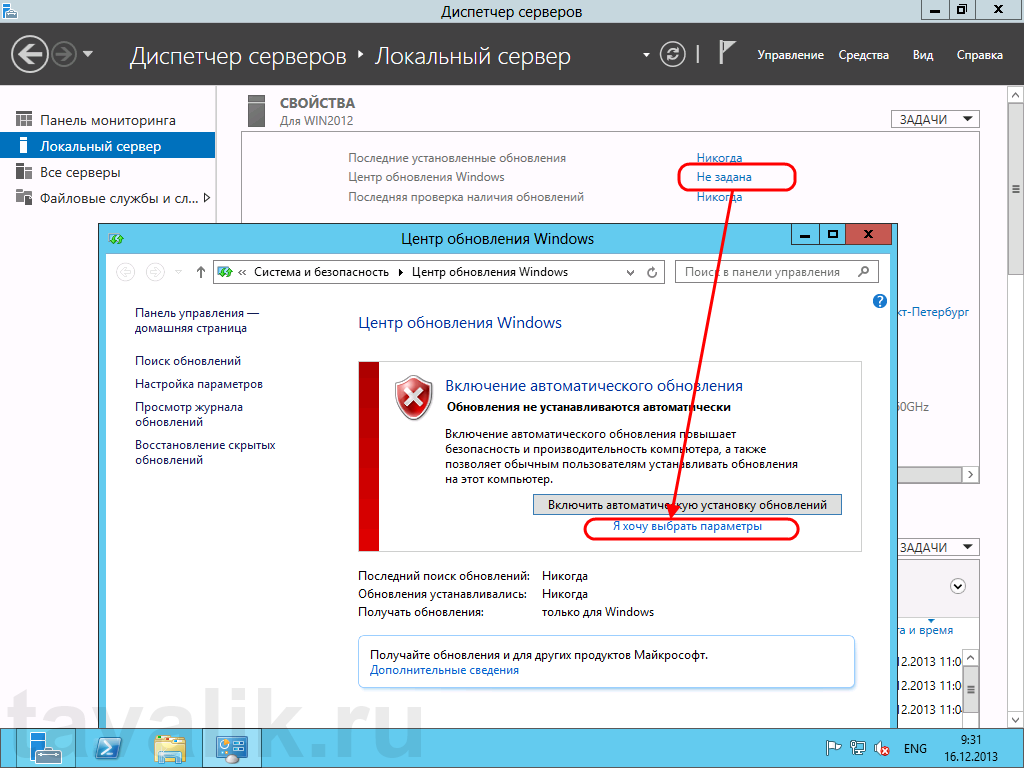
На следующем шаге выберем параметры обновления Windows Server 2012. Для этого пройдем по ссылке напротив пункта «Центр обновления Windows» (Windows Update), чтобы открыть соответствующую оснастку. Здесь кликнем на «Я хочу выбрать параметры» (Let me choose my settings) .
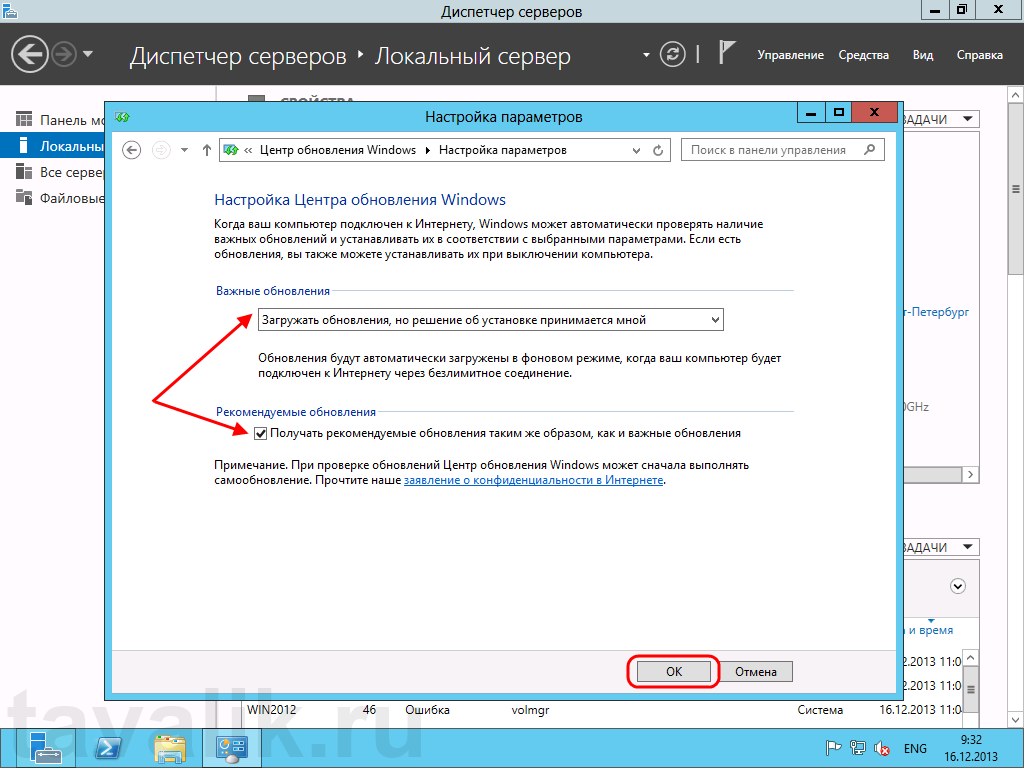
В открывшемся окне выберем необходимые параметры центра обновлений Windows. Я обычно устанавливаю:
- Важные обновления: «Загружать обновления, но решение об установке принимается мной» (Check for updates but let me choose whether to download and install them).
- Рекомендованные обновления: «Получать рекомендованные обновления таким же образом, как и важные обновления» (Give me recommended updates the same way I recieve important updates) .
После того, как параметры установлены, жмем «ОК» для сохранения настроек.
После чего Windows выполнит поиск доступных обновлений. Отметим все обновления в списке и нажмем «Установить» (Install) для запуска процесса установки.
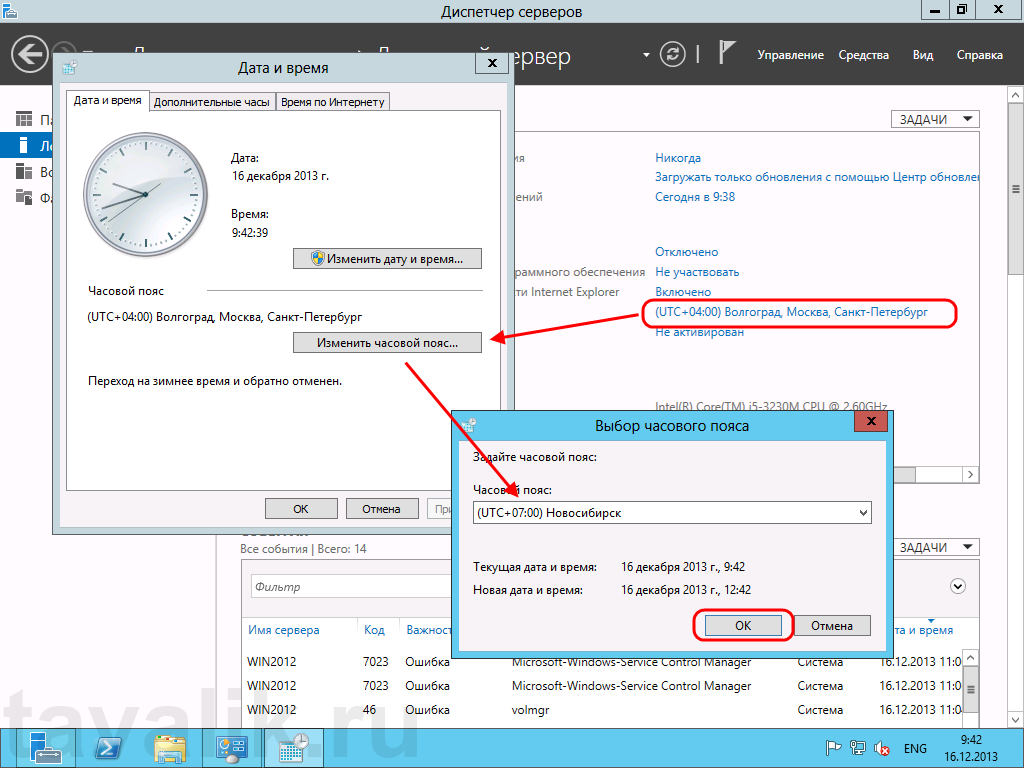
Пока происходит загрузка и установка обновлений продолжим настройку сервера. Пройдем по ссылке напротив пункта «Дата и время» (Time zone) для установки этих параметров. Для изменения даты и времени нажмем «Изменить дату и время…» (Change date and time…) в открывшемся окне, и «Изменить часовой пояс…» (Change time zone…) для изменения часового пояса соответственно. Определившись с настройками закрываем все окна кнопкой «ОК» .
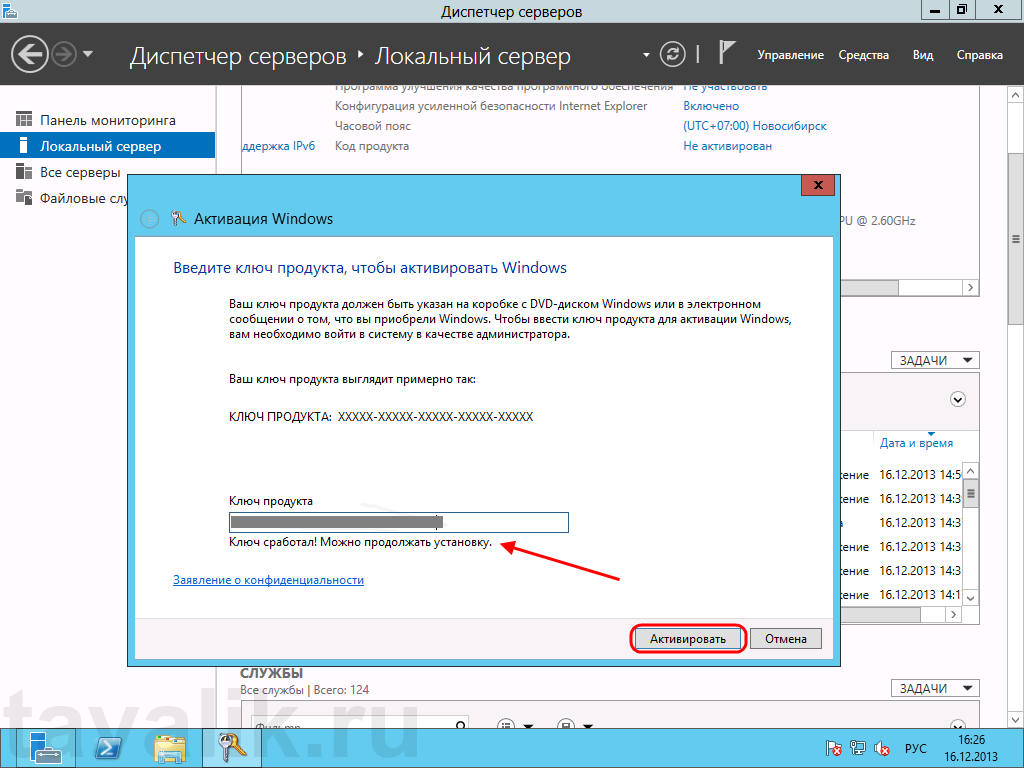
Ну и напоследок нам осталось только активировать Windows Server 2012. Для этого жмем на ссылку в пункте «Код продукта» (Product ID). Откроется окно «Активация Windows» (Windows Activation) (в котором необходимо ввести текущий ключ продукта и нажать кнопку «Активировать» (Activate).
Если код соответствует выбранной версии Windows Server 2012, через некоторое время появится сообщение об успешной активации Windows, а напротив пункта «Код продукта» (Product ID) мы должны увидеть текущий код и статус «(активировано)» (activated) .
Вот и все. На этом установка и первоначальная настройка Microsoft Windows Server 2012 закончена. Осталось только дождаться установки текущих обновлений, перезагрузить сервер, затем повторить процедуру снова, до тех пор, пока все необходимые обновления не будут установлены.
- 03.03.2020
В данной статье пошагово со скриншотами рассмотрим процесс установки Windows Server 2012r2, в зависимости от версии Standard или Datacenter процесс установки не отличается.
Первое, что нам нужно сделать — это скачать сам дистрибутив. Скачать оригинальный дистрибутив Windows Server 2012r2 версий Standard и Datacenter можете в нашем каталоге.
Далее, данный дистрибутив нужно записать на флешку, сделав ее загрузочной. Ознакомиться с инструкцией как это сделать можете на следующей странице.
После загружаемся на загрузочную флешку из под Bios/UEFI и начинаем установку. Первое окно установки будет с выбором языка и пр. языковых настроек.
Нажимаем «Установить».
Далее, при установке у Вас запросят ввести лицензионный ключ активации. Если у Вас нет ключа активации, то приобрести его можете в нашем интернет-магазине, версии Standard и Datacenter, менее чем за 2 тыс. рублей. Доставка ключа активации на Вашу электронную почту в течении нескольких часов. Ознакомиться со всеми версиями Windows Server в продаже можете в нашем каталоге.
После ввода ключа (в нашем случае автоматически определилось, что ключ был Standard версии), у Вас будет выбор установки. С графическим интерфейсом, или без. Выбираем для удобства «С графическим».
Соглашаемся с лицензионным соглашением.
Далее выбираем пункт «Выборочная установка». Т.к мы устанавливаем с нуля, чистую операционную систему.
Выбираем Ваш целевой жесткий диск, на который будет установлена система. В нашем случае диск один, выбираем его и жмем «Далее».
Ждем завершения копирования файлов и установки. Во время установки, Ваш ПК перезагрузится несколько раз.
После установки у Вас запросят в обязательном порядке придумать Ваш пароль администратора. Вводите его два раза и нажимаете «Готово».
После будет последняя подготовка параметров, которая занимает несколько минут.
На этом все. Теперь можете зайти в меню «Свойства системы» и проверить Вашу ОС. А так же, проверить активирована ли она. Если Вы в начале установки системы ввели Ваш ключ корректно, то все должно пройти успешно.
А так же, после завершения установки рекомендуем сразу найти, загрузить и установить все актуальные обновления для Windows Server 2012r2. Сделать это можете в меню «Панель управления» => Система и безопасность => Центр обновления Windows.
Обновлено 27.08.2018
Установка windows server 2012 r2, пошаговая инструкция
Перед нами «Черный квадрат Малевича» с белым ползунком, обычно он пробегает быстро, но если у вас медленный USB носитель, то придется подождать.
Как установить windows server 2012R2-01
Когда ползунок пробежит, появится модный логотип от Microsoft.
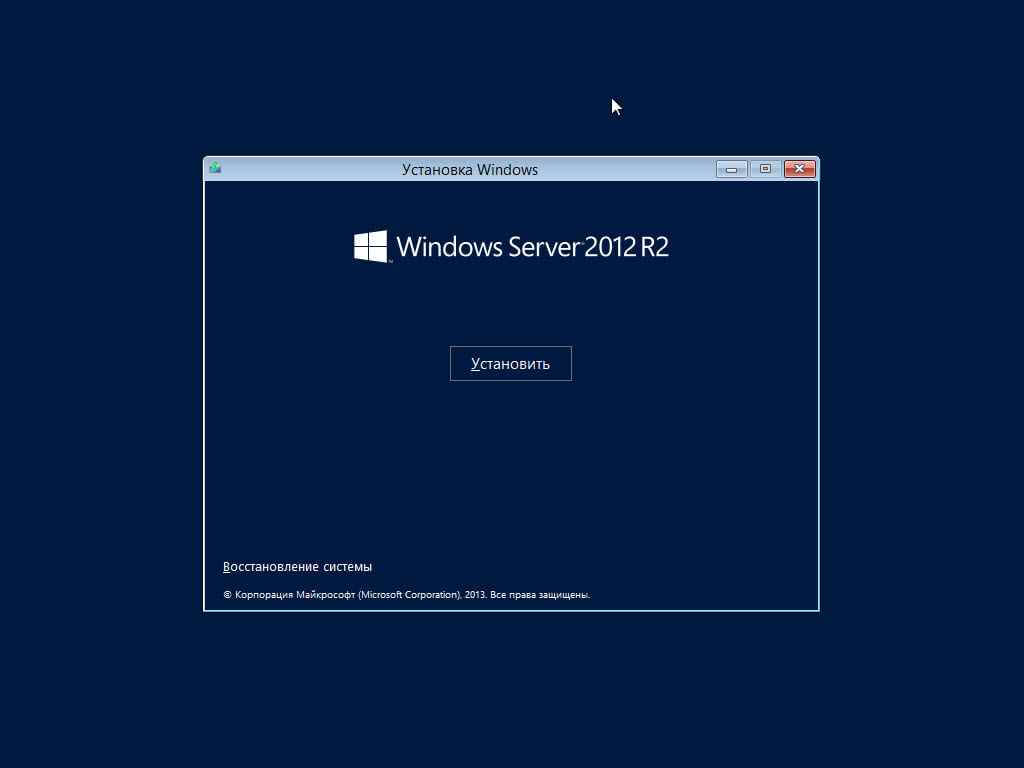
Чтобы продолжилась установка windows server 2012 r2, нажмите кнопку по центру «установить».
Как установить windows server 2012R2-03
Как установить windows server 2012R2-04
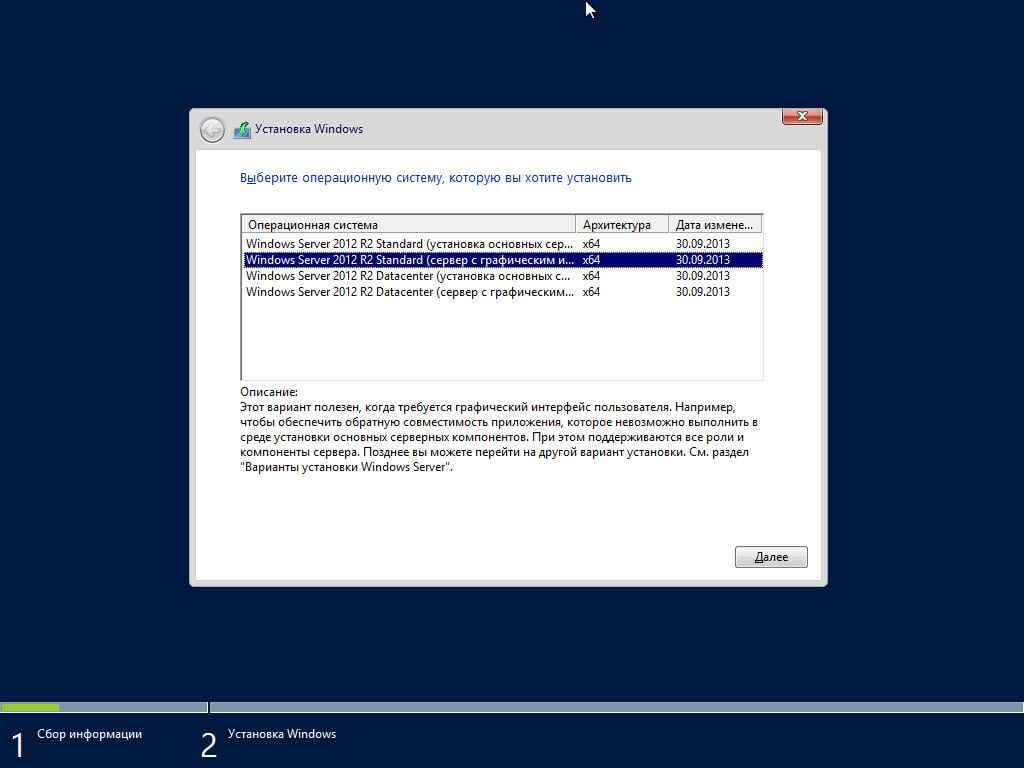
Выбираем нужную редакцию и жмем далее. Тут представлены версии:
- Имеющие графический интерфейс (рабочий стол и все остальное)
- Core версия, состоящая из одной командной строки.
Как установить windows server 2012R2-05
Соглашаемся с лицензионным соглашением.
Как установить windows server 2012R2-06
Выбираем «Выборочная: только установка Windows».
Как установить windows server 2012R2-07
Выбираем нужный диск, задаем ему нужный размер и жмем Далее.
Как установить windows server 2012R2-08
Начнется установка Windows Server 2012 R2.
Как установить windows server 2012R2-09
После перезагрузки, первое что нам нужно, это задать пароль локального администратора. Задавайте сложный пароль, в котором должна быть:
- Большая буква
- Маленькая буква
- Цифра
- Спецсимвол
Как установить windows server 2012R2-10
Логинимся и видим наш рабочий стол, на этом установку можно считать выполненной.
Как установить windows server 2012R2-11
Как установить windows server 2012R2-12
При первом входе у вас откроется «Диспетчер серверов», новая консоль от Microsoft,
Как установить windows server 2012R2-13
Вот так вот просто установить windows server 2012R2, для этого даже не нужно быть инженером Microsoft. Далее производится базовая настройка Windows Server 2012 R2, советую почитать.
Материал сайта pyatilistnik.org
Download Article
Download Article
Windows Server 2012 R2 operating system has features that support domain enterprise networks of varying sizes, but to realize the benefits of these features, you must first install, configure, and test it.
-
1
Create the operating system media.
- Create the operating system media, if you do not already have a DVD with Windows Server 2012 R2; however, if you download it, be sure to copy the product key, because you will need it for the installation.
- Download Windows Server 2012 R2 from Microsoft and save it onto your hard drive.
- Make a backup copy of the .iso file by copying it onto a DVD from the hard disk.
-
2
Start operating system installation.
- Place the Windows Server 2012 R2 DVD in the CD/DVD drive.
- Power on the machine to boot the operating system from the DVD.
- Watch the screen as the system boots from the Windows Server 2012 R2 DVD. After booting begins, you will see the display Loading files… followed by the Windows Server 2012 R2 Setup screen.
- Expand the drop down and review optional preferences; they include the language you can select for the installation.
- Click Next to display the options, Install now or Repair your computer.
Advertisement
-
3
Install or Upgrade.
- Observe that with these Windows Setup options, you choose either first time install or repair an existing operating system.
- Click Install now to display the product key request.
-
4
Type OS installation key.
- Take note that if you are using a DVD from a textbook, you may not need a key.
- Type the installation key.
- Click Next so you can choose the operating system version to install.
-
5
Select the OS version to install.
- Notice that depending on the DVD you are using, you may see a slightly different set of options. However, regardless of which DVD, Windows Server 2012 R2 Server Cores is the default.
- Select Windows Server 2012 R2 Standard (GUI installation), with the arrow key or mouse.
- Click Next to display the license agreement.
-
6
Select license terms.
- Review the Microsoft license agreement.
- Click the checkbox next to I accept the license terms.
- Click Next to display options, upgrade or custom install.
-
7
Configure upgrade or custom install.
- Review the notes for these options because they are very different; upgrade lets you upgrade a qualified Windows OS. Whereas with custom, you can install the OS on a newly created space.
- Click Custom to manage disk space and display the disk configuration.
- Highlight where you would like to install the operating system; you can use the arrow key, or mouse.
- Click Next to display Installing Windows screen followed by password Settings.
-
8
Create password.
- Create Administrator password at Windows Setup Settings prompt..
- Type the password, such as Passworda10.
- Click Finish to display the Sign in screen.
-
9
Log on to the server.
- Note that this action, display the password prompt, will depend on the installed environment, real or virtual.
- Click Ctrl+Alt+Delete to display the password prompt.
- Observe that this is the password you created earlier.
- Type the password for Administrator.
- Click the arrow to display Networks so you can tell setup how to configure network parameters.
-
10
Configure Network Settings.
- Configure network visibility is needed even if you plan to isolate the server; your intentions must be know to network settings.
- Click Yes so your computer is visible to other network devices.
-
11
Verify Installation complete.
- Verify the display of Server Manager indicating the installation is complete.
- Continue to learn more.
Advertisement
- These steps demonstrate how to configure TCP/IP settings, which are needed to verify network connectivity with another machine, such as Windows 7.
-
1
Minimize Server Manager.
- Click Minimize to minimize Server Manager, which is displayed when the OS completes booting.
-
2
Display menu items.
- Notice that when Server Manager is minimized, you will see the Recycle Bin and Taskbar; there are also menu items, such as Start, that are visible when the mouse is located at the bottom right.
- Move your mouse along the taskbar to the right and hover it to the right of the time and date; this action displays a number of icons, and to see their names, such as Search, Start, and Settings move the mouse straight up. If the icons are not shown, slightly move the mouse in any direction to display them.
- Click Start to display its contents.
-
3
Display Control Panel contents.
- Notice that Start shows a number of icons, such as Control Panel.
- Click Control Panel to display its contents.
-
4
Display Network and Internet links.
- Notice that items are shown in categories, but you can change how they are displayed.
- Click Network and Internet to display the screen containing their links.
-
5
Display Network and Sharing links.
- Notice there are two options, but only the first lets you configure the network adapter.
- Click Network and Sharing Center to display its options.
-
6
Display Network Connections (Ethernet) Properties.
- Notice there are several options in the left pane, but your main interest is on the adapter settings.
- Click Change adapter settings to display Network Connections.
- Notice that this computer has one NIC.
- Right click Ethernet and click Properties to display its properties.
-
7
Display TCP/IP Properties.
- Notice there are a number of protocol options for configuring network settings.
- Highlight Internet Protocol Version 4 (TCP/IPv4).
- Click Properties to display TCP/IP Properties.
- Notice that the default TCP/IPv4 configuration for network interface is DHCP client.
- Click Use the following IP address.
- Notice that the boxes are no longer grayed.
-
8
Configure TCP/IP settings.
- Notice there are a number of textboxes, but to test connectivity, only the IP address and subnet mask are needed.
- Type 172.16.150.10 in IP address field.
- Change the entry in Subnet mask to 255.255.255.0.
- Click OK.
- Click Close.
- Click close (X) to close both Network Connections and Network and Sharing Center.
Advertisement
- After the OS is installed and network parameters configured, it is time to test both activities; an important test is to verify the server can communicate with another machine, such as a Windows 7 client, and the client can communicate with the server; you can do this using the Command Prompt, and after testing is complete, you can shutdown the server.
-
1
Verify Connectivity.
- Display Start.
- Click the down arrow to display several Apps.
- Scroll right.
- Click the Command Prompt.
- Ping the second machine.
- From the second machine, ping the server.
-
2
Shutdown server.
- Display Start.
- Click Settings to display its contents.
- Click Power.
- Click Shutdown.
- Follow the displayed instructions to complete the shutdown.
Advertisement
Ask a Question
200 characters left
Include your email address to get a message when this question is answered.
Submit
Advertisement
-
Installation: Since it is unlikely you are dual booting a virtual machine, the following bullets apply only if you are installing the server on a physical machine.
- If an OS is already installed on the machine, you may see Press any key to boot from CD/DVD; this is your opportunity to boot from the CD/DVD drive.
- If an OS is already installed on the machine, and you do not see Press any key to boot from CD/DVD, you will have to reconfigure the boot process to boot form the CD/DVD drive.
- If an OS it not on the machine, the boot process goes directly to the CD/DVD drive and begins booting.
- If you are installing from a DVD that came with a textbook, you may not need a product key.
- Depending on the DVD you are using, such as one that came with a textbook, or one from Microsoft, you may see a slightly different selection menu; be sure not to select Server Core but GUI instead.
-
If you have an existing operating system that you want to upgrade, when prompted, you would select Upgrade, but in this case select Custom so you can customize the disk for installation.
-
The configuration shown will depend on the partition and unallocated space on your disk(s). Notice that you are given a number of disk options, but they are not always enabled; it depends on whether a partition or unallocated space is highlighted; if a partition is highlighted all except New are enabled, and if an unallocated space is highlighted, all are grayed, except New.
Show More Tips
Thanks for submitting a tip for review!
Advertisement
-
When partitioning the disks, Next does not depend on a selection; this means whichever space is highlighted, partition or unallocated, and you click Next, setup formats the space, copy the necessary operating system files, and install the operating system. Everything on that partition will be lost.
-
When partitioning the disks, if you select Delete, setup will delete the highlighted partition and label it unallocated; you will then have to use New to create a partition for the install, or click Next to install. Also, note that if you click Next, setup uses the entire highlighted space for the install, but if you do not want to use the entire space, to install the operating system, use New to create the partition size from the unallocated space.
Advertisement
Things You’ll Need
- DVD you created with the .iso for Windows Server 2012 R2.
- DVD with a Windows client, such as Windows 7.
- One physical machine on which you can install and configure two virtual machines: one server and one client.
- Virtual machine software, such as VirtualBox.
References
- Microsoft. (2013, June 24). System Requirements and Installation Information for Windows Server 2012 R2. Retrieved from TechNet: http://technet.microsoft.com/en-us/library/dn303418.aspx
- Microsoft. (2013, June 24). Windows Server Installation Options. Retrieved from TechNet: http://technet.microsoft.com/en-us/library/hh831786.aspx
About This Article
Thanks to all authors for creating a page that has been read 56,241 times.
Is this article up to date?
Download Article
Download Article
Windows Server 2012 R2 operating system has features that support domain enterprise networks of varying sizes, but to realize the benefits of these features, you must first install, configure, and test it.
-
1
Create the operating system media.
- Create the operating system media, if you do not already have a DVD with Windows Server 2012 R2; however, if you download it, be sure to copy the product key, because you will need it for the installation.
- Download Windows Server 2012 R2 from Microsoft and save it onto your hard drive.
- Make a backup copy of the .iso file by copying it onto a DVD from the hard disk.
-
2
Start operating system installation.
- Place the Windows Server 2012 R2 DVD in the CD/DVD drive.
- Power on the machine to boot the operating system from the DVD.
- Watch the screen as the system boots from the Windows Server 2012 R2 DVD. After booting begins, you will see the display Loading files… followed by the Windows Server 2012 R2 Setup screen.
- Expand the drop down and review optional preferences; they include the language you can select for the installation.
- Click Next to display the options, Install now or Repair your computer.
Advertisement
-
3
Install or Upgrade.
- Observe that with these Windows Setup options, you choose either first time install or repair an existing operating system.
- Click Install now to display the product key request.
-
4
Type OS installation key.
- Take note that if you are using a DVD from a textbook, you may not need a key.
- Type the installation key.
- Click Next so you can choose the operating system version to install.
-
5
Select the OS version to install.
- Notice that depending on the DVD you are using, you may see a slightly different set of options. However, regardless of which DVD, Windows Server 2012 R2 Server Cores is the default.
- Select Windows Server 2012 R2 Standard (GUI installation), with the arrow key or mouse.
- Click Next to display the license agreement.
-
6
Select license terms.
- Review the Microsoft license agreement.
- Click the checkbox next to I accept the license terms.
- Click Next to display options, upgrade or custom install.
-
7
Configure upgrade or custom install.
- Review the notes for these options because they are very different; upgrade lets you upgrade a qualified Windows OS. Whereas with custom, you can install the OS on a newly created space.
- Click Custom to manage disk space and display the disk configuration.
- Highlight where you would like to install the operating system; you can use the arrow key, or mouse.
- Click Next to display Installing Windows screen followed by password Settings.
-
8
Create password.
- Create Administrator password at Windows Setup Settings prompt..
- Type the password, such as Passworda10.
- Click Finish to display the Sign in screen.
-
9
Log on to the server.
- Note that this action, display the password prompt, will depend on the installed environment, real or virtual.
- Click Ctrl+Alt+Delete to display the password prompt.
- Observe that this is the password you created earlier.
- Type the password for Administrator.
- Click the arrow to display Networks so you can tell setup how to configure network parameters.
-
10
Configure Network Settings.
- Configure network visibility is needed even if you plan to isolate the server; your intentions must be know to network settings.
- Click Yes so your computer is visible to other network devices.
-
11
Verify Installation complete.
- Verify the display of Server Manager indicating the installation is complete.
- Continue to learn more.
Advertisement
- These steps demonstrate how to configure TCP/IP settings, which are needed to verify network connectivity with another machine, such as Windows 7.
-
1
Minimize Server Manager.
- Click Minimize to minimize Server Manager, which is displayed when the OS completes booting.
-
2
Display menu items.
- Notice that when Server Manager is minimized, you will see the Recycle Bin and Taskbar; there are also menu items, such as Start, that are visible when the mouse is located at the bottom right.
- Move your mouse along the taskbar to the right and hover it to the right of the time and date; this action displays a number of icons, and to see their names, such as Search, Start, and Settings move the mouse straight up. If the icons are not shown, slightly move the mouse in any direction to display them.
- Click Start to display its contents.
-
3
Display Control Panel contents.
- Notice that Start shows a number of icons, such as Control Panel.
- Click Control Panel to display its contents.
-
4
Display Network and Internet links.
- Notice that items are shown in categories, but you can change how they are displayed.
- Click Network and Internet to display the screen containing their links.
-
5
Display Network and Sharing links.
- Notice there are two options, but only the first lets you configure the network adapter.
- Click Network and Sharing Center to display its options.
-
6
Display Network Connections (Ethernet) Properties.
- Notice there are several options in the left pane, but your main interest is on the adapter settings.
- Click Change adapter settings to display Network Connections.
- Notice that this computer has one NIC.
- Right click Ethernet and click Properties to display its properties.
-
7
Display TCP/IP Properties.
- Notice there are a number of protocol options for configuring network settings.
- Highlight Internet Protocol Version 4 (TCP/IPv4).
- Click Properties to display TCP/IP Properties.
- Notice that the default TCP/IPv4 configuration for network interface is DHCP client.
- Click Use the following IP address.
- Notice that the boxes are no longer grayed.
-
8
Configure TCP/IP settings.
- Notice there are a number of textboxes, but to test connectivity, only the IP address and subnet mask are needed.
- Type 172.16.150.10 in IP address field.
- Change the entry in Subnet mask to 255.255.255.0.
- Click OK.
- Click Close.
- Click close (X) to close both Network Connections and Network and Sharing Center.
Advertisement
- After the OS is installed and network parameters configured, it is time to test both activities; an important test is to verify the server can communicate with another machine, such as a Windows 7 client, and the client can communicate with the server; you can do this using the Command Prompt, and after testing is complete, you can shutdown the server.
-
1
Verify Connectivity.
- Display Start.
- Click the down arrow to display several Apps.
- Scroll right.
- Click the Command Prompt.
- Ping the second machine.
- From the second machine, ping the server.
-
2
Shutdown server.
- Display Start.
- Click Settings to display its contents.
- Click Power.
- Click Shutdown.
- Follow the displayed instructions to complete the shutdown.
Advertisement
Ask a Question
200 characters left
Include your email address to get a message when this question is answered.
Submit
Advertisement
-
Installation: Since it is unlikely you are dual booting a virtual machine, the following bullets apply only if you are installing the server on a physical machine.
- If an OS is already installed on the machine, you may see Press any key to boot from CD/DVD; this is your opportunity to boot from the CD/DVD drive.
- If an OS is already installed on the machine, and you do not see Press any key to boot from CD/DVD, you will have to reconfigure the boot process to boot form the CD/DVD drive.
- If an OS it not on the machine, the boot process goes directly to the CD/DVD drive and begins booting.
- If you are installing from a DVD that came with a textbook, you may not need a product key.
- Depending on the DVD you are using, such as one that came with a textbook, or one from Microsoft, you may see a slightly different selection menu; be sure not to select Server Core but GUI instead.
-
If you have an existing operating system that you want to upgrade, when prompted, you would select Upgrade, but in this case select Custom so you can customize the disk for installation.
-
The configuration shown will depend on the partition and unallocated space on your disk(s). Notice that you are given a number of disk options, but they are not always enabled; it depends on whether a partition or unallocated space is highlighted; if a partition is highlighted all except New are enabled, and if an unallocated space is highlighted, all are grayed, except New.
Show More Tips
Thanks for submitting a tip for review!
Advertisement
-
When partitioning the disks, Next does not depend on a selection; this means whichever space is highlighted, partition or unallocated, and you click Next, setup formats the space, copy the necessary operating system files, and install the operating system. Everything on that partition will be lost.
-
When partitioning the disks, if you select Delete, setup will delete the highlighted partition and label it unallocated; you will then have to use New to create a partition for the install, or click Next to install. Also, note that if you click Next, setup uses the entire highlighted space for the install, but if you do not want to use the entire space, to install the operating system, use New to create the partition size from the unallocated space.
Advertisement
Things You’ll Need
- DVD you created with the .iso for Windows Server 2012 R2.
- DVD with a Windows client, such as Windows 7.
- One physical machine on which you can install and configure two virtual machines: one server and one client.
- Virtual machine software, such as VirtualBox.
References
- Microsoft. (2013, June 24). System Requirements and Installation Information for Windows Server 2012 R2. Retrieved from TechNet: http://technet.microsoft.com/en-us/library/dn303418.aspx
- Microsoft. (2013, June 24). Windows Server Installation Options. Retrieved from TechNet: http://technet.microsoft.com/en-us/library/hh831786.aspx
About This Article
Thanks to all authors for creating a page that has been read 56,241 times.


