In today’s post, I’ll be showing you how to install Windows Server 2016 on VMware ESXi with Desktop Experience on an ESXi 6.5 U1 host managed by a vCSA 6.5 U1 instance. This step-by-step how-to install Windows Server 2016 on VMware vSphere guide is aimed at readers who have yet to install a Windows OS on a VMware hypervisor. For something a little bit more advanced in relation to installing Windows Server on VMware, you can take your pick from the complete list of published posts to date.
Windows Server Flavors and Requirements
Windows Server 2016 comes in 3 flavors; Server Core (no GUI), Server with Desktop Experience (with GUI) and Nano Server. The latter is Microsoft’s headless server, one that is completely managed remotely with no local logon capabilities making it a perfect solution cloud deployments. Nano server has recently been refactored to primarily support and run containers.
Windows Server 2016 also comes in 3 editions; Essentials, Standard, and Datacenter. Have a look at this link to learn how each edition differs from the rest.
As far as hardware requirements go, Microsoft’s documentation suggests the following.
-
- Processor: 1.4 GHz 64-bit. The CPU must support NX, DEP, CMPXCHG16b, LAHF/SAHF, PrefetchW and second-level address translation.
-
- RAM: 512MB or 2GB for a Desktop Experience installation. 800 MB is the required minimum when installing Windows Server 2016 as a VM.
-
- Storage: 32GB absolute minimum
-
- NIC: 1 Gigabit
As often is the case, the minimum hardware requirements quoted by Microsoft rarely come close to mirror what’s actually needed to run production boxes. With that in mind, consider increasing the resources allocated in accordance with the role(s) assigned to the server and its anticipated workload.
Some optional requirements are;
-
- UEFI firmware to support secure boot where applicable.
-
- Trusted Platform Module (TPM) capabilities to enable encryption features such as BitLocker.
Creating the base VM
I’ll be using the new vSphere client (HTML5) to create the base VM. Here are the steps.
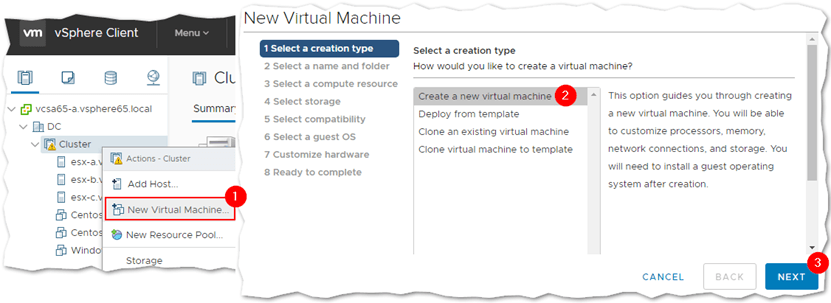
Step 1 – Right-click on a cluster, or host, and select New Virtual Machine (1). Select Create a new virtual machine (2) from the wizard. Click Next.
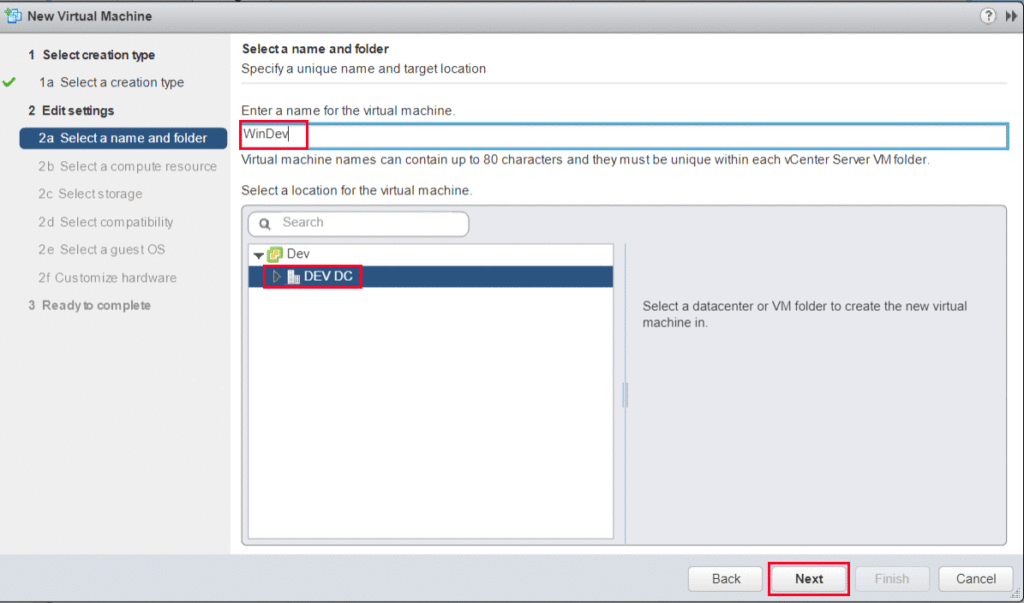
Step 2 – Type in a name for the virtual machine (1) and select a location (2), such as a datacenter, where you want it installed. The Windows folder shown is something I created.

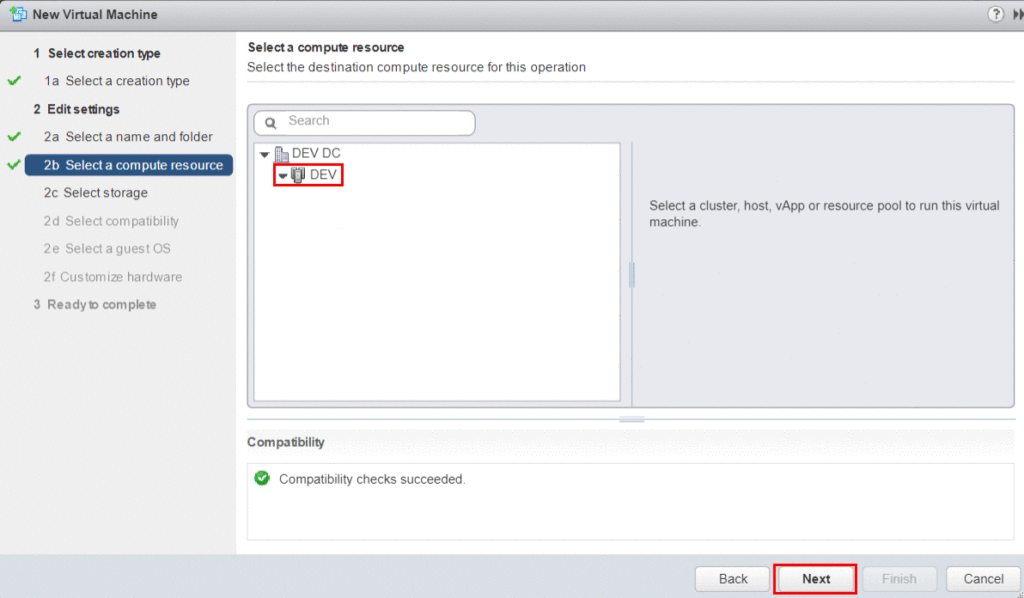
Step 3 – Select the ESXi host where the VM will be deployed to. In the example, I selected a DRS enabled cluster (1) so placement is done automatically.

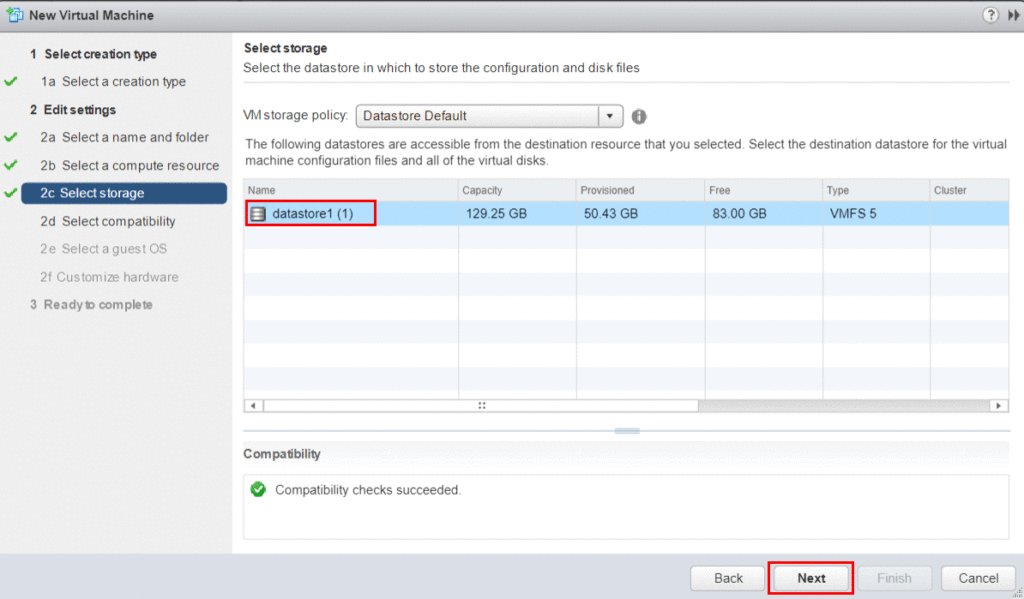
Step 4 – Select a datastore (2) where the VM will be created. If you’re using storage policies, make sure to select the correct one from the VM Storage Policy drop-down box (1).

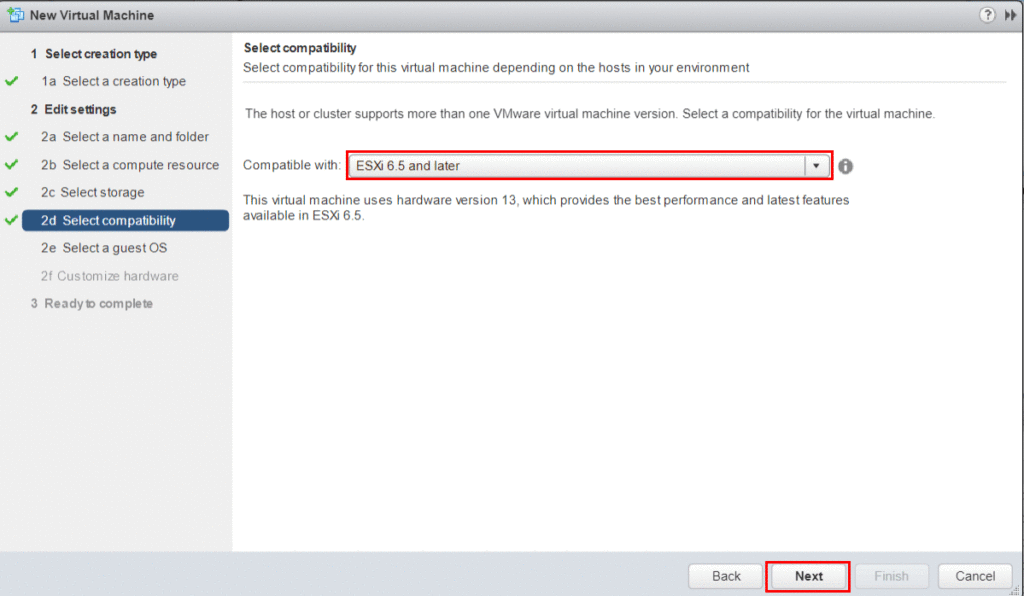
Step 5 – Select the correct compatibility mode according to the ESXi version installed. In my case, I’ve selected ESXi 6.5 or later.

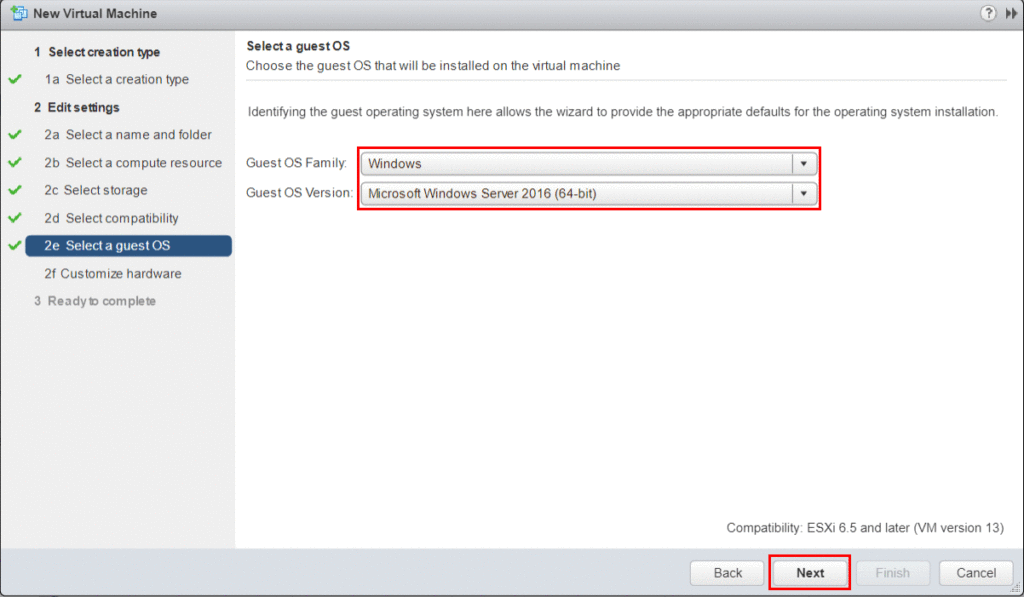
Step 6 – Select Microsoft Windows Server 2016 (64bit) guest OS Family and Version types. If you’re running this on older versions of ESXi, select Microsoft Windows Server 2012 (64 bit) instead.

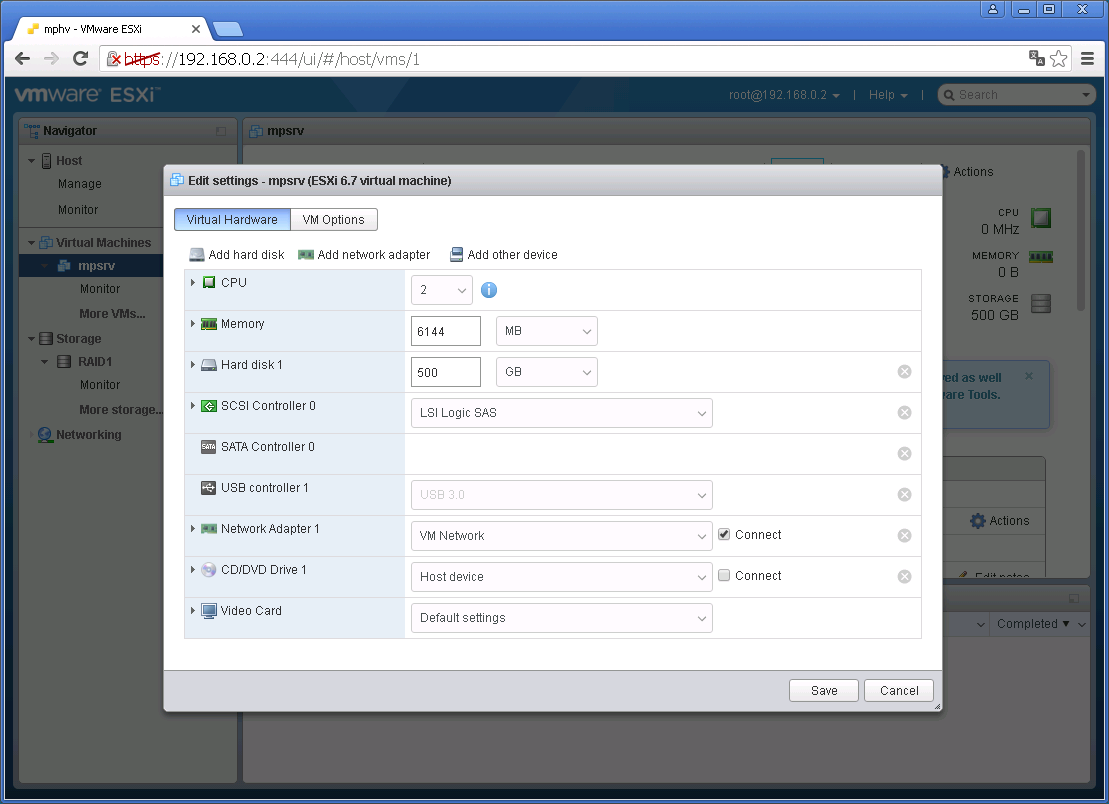
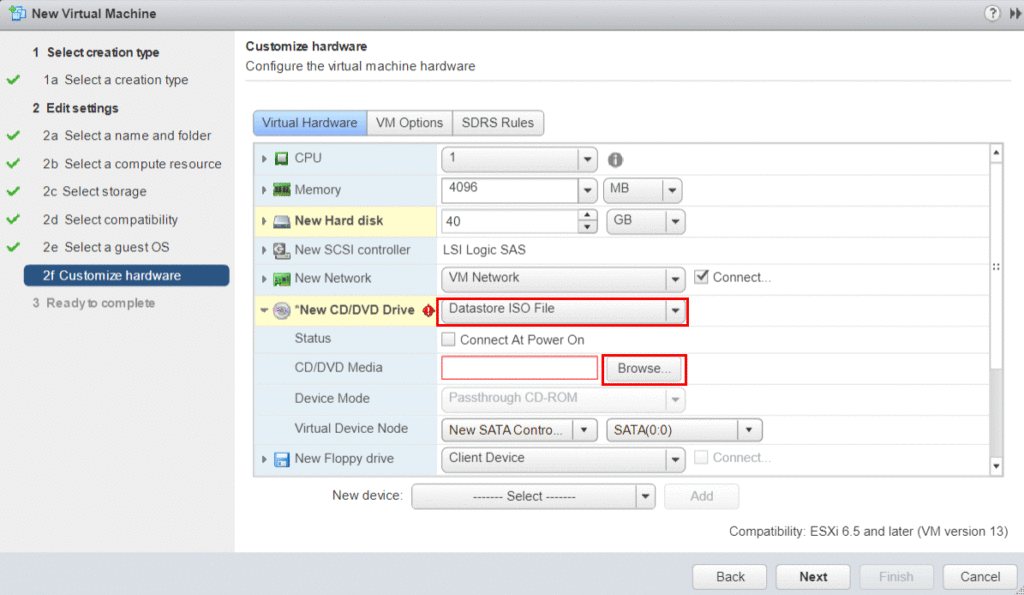
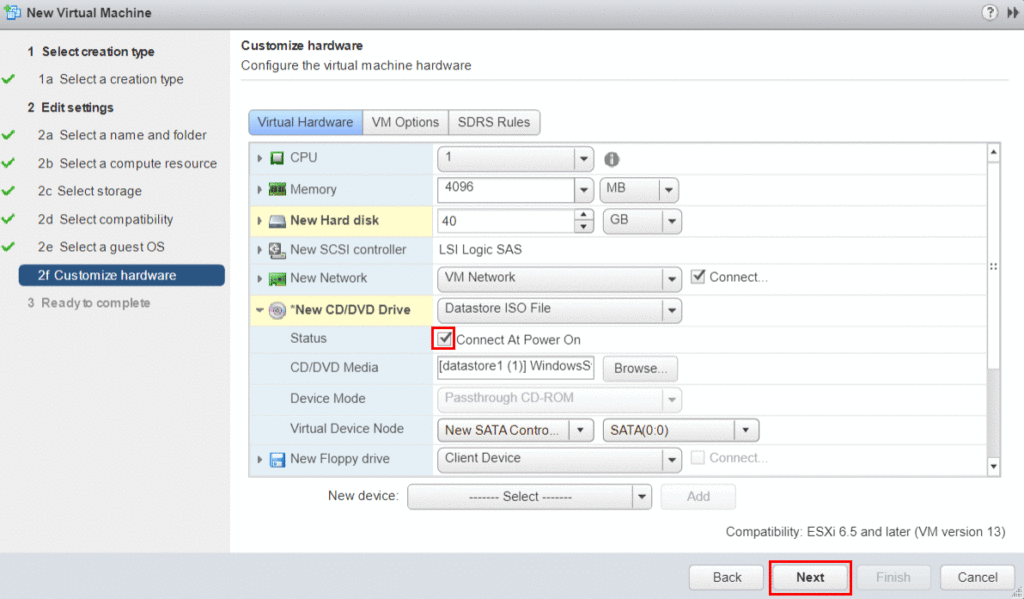
Step 7 – For the hardware requirements, I’m sticking with the values suggested to me by the wizard. The only hardware settings I changed are the ones for the SCSI controller, which I set to VMWare Paravirtual, and the vNIC driver which I set to vmxnet3. This should improve the overall performance of the virtual machine. I also set the VMDK type to thin since I’m a bit short on storage space.

To use the Secure Boot feature, change the BIOS firmware setting to EFI by navigating to Boot Options -> Firmware under the VM Options tab.

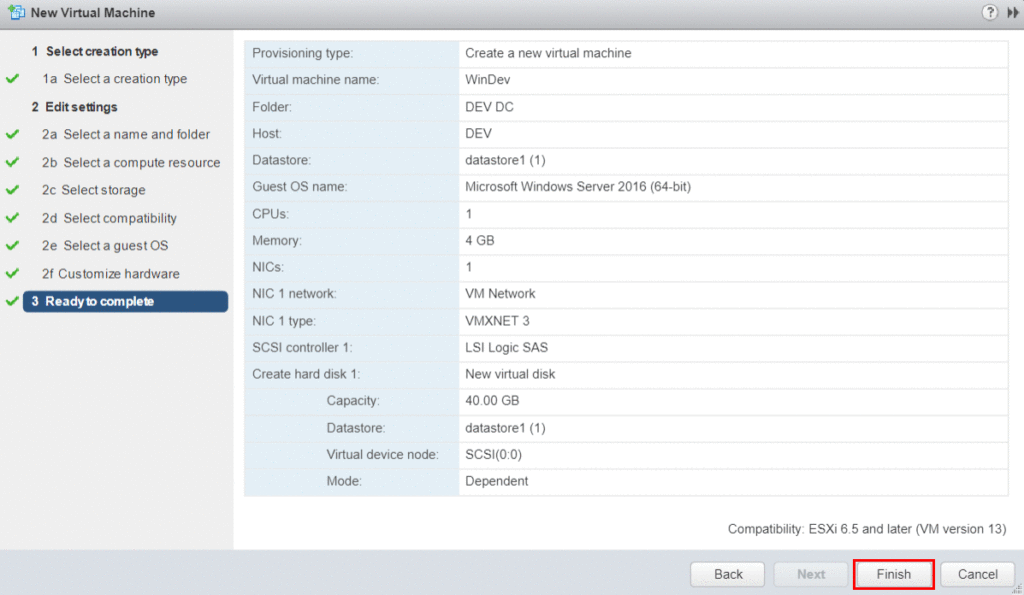
Step 8 – Review the configuration and press Finish to create the VM.

Installing Windows Server 2016
Now that the VM has been created, it’s time to install the guest OS. For this task, I’ll be using the Remote Console client as I find it easier to use when mounting ISOs on VMs and such.
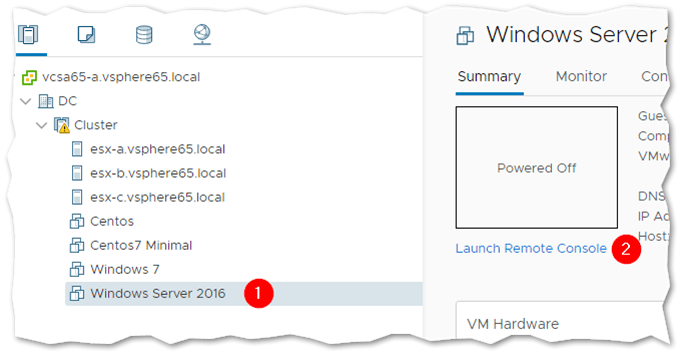
Step 1 – Highlight the VM just created and click on Launch Remote Console link.
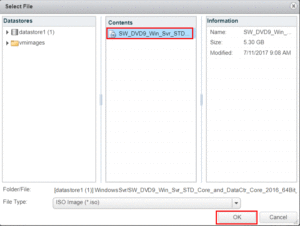
Step 2 – Power up the VM and select Connect to Disk Image File (iso) from the VMRC -> Removable Devices -> CD/DVD drive 1. Navigate to the folder containing the Windows Server 2016 ISO image and select it.

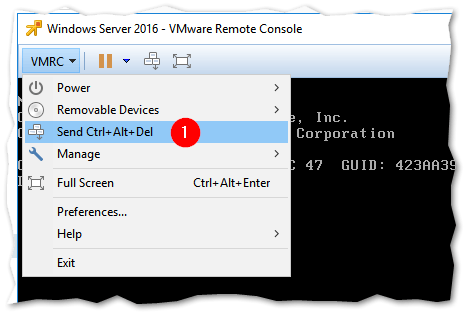
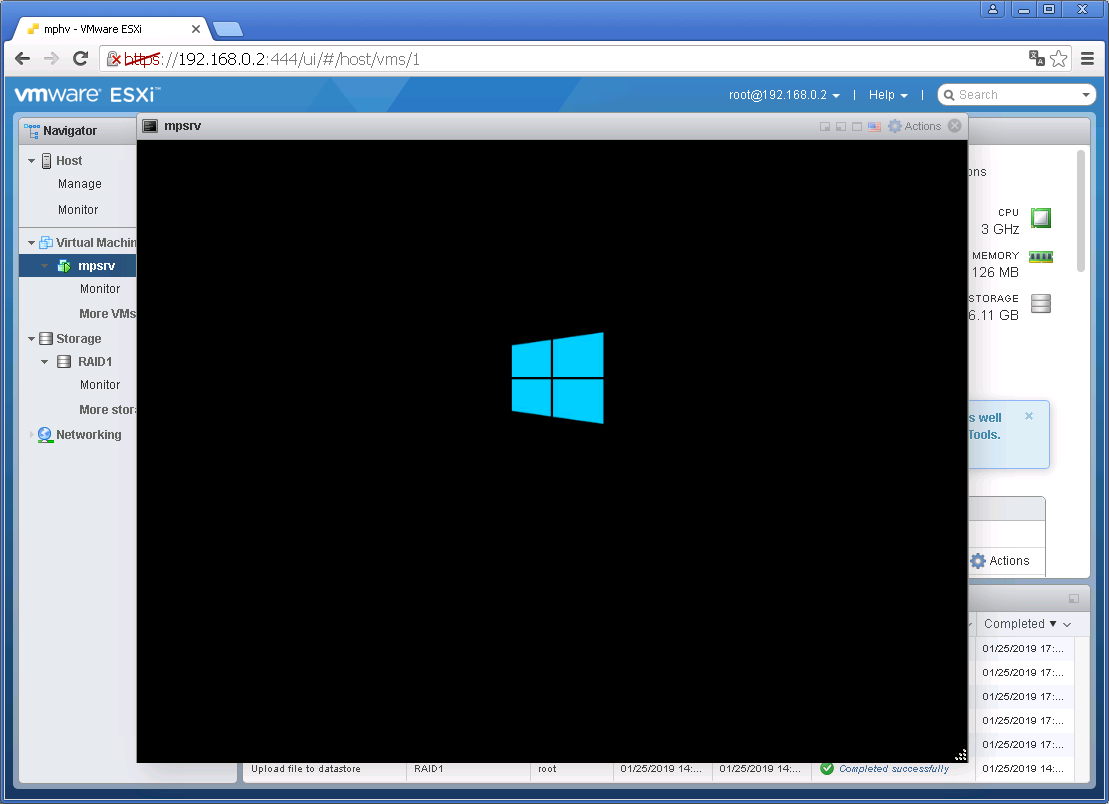
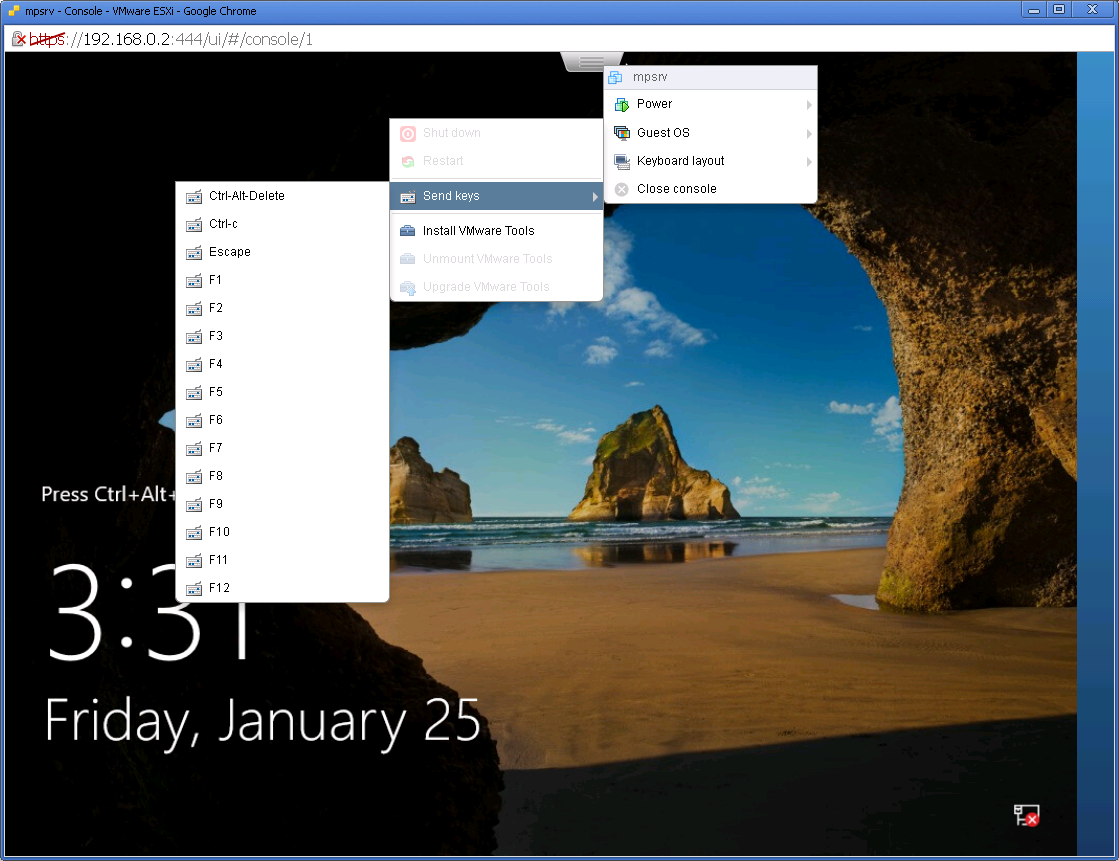
Step 3 – Select Send Ctrl+Alt+Del from the VMRC drop-down menu. You should see the Windows installer booting up.
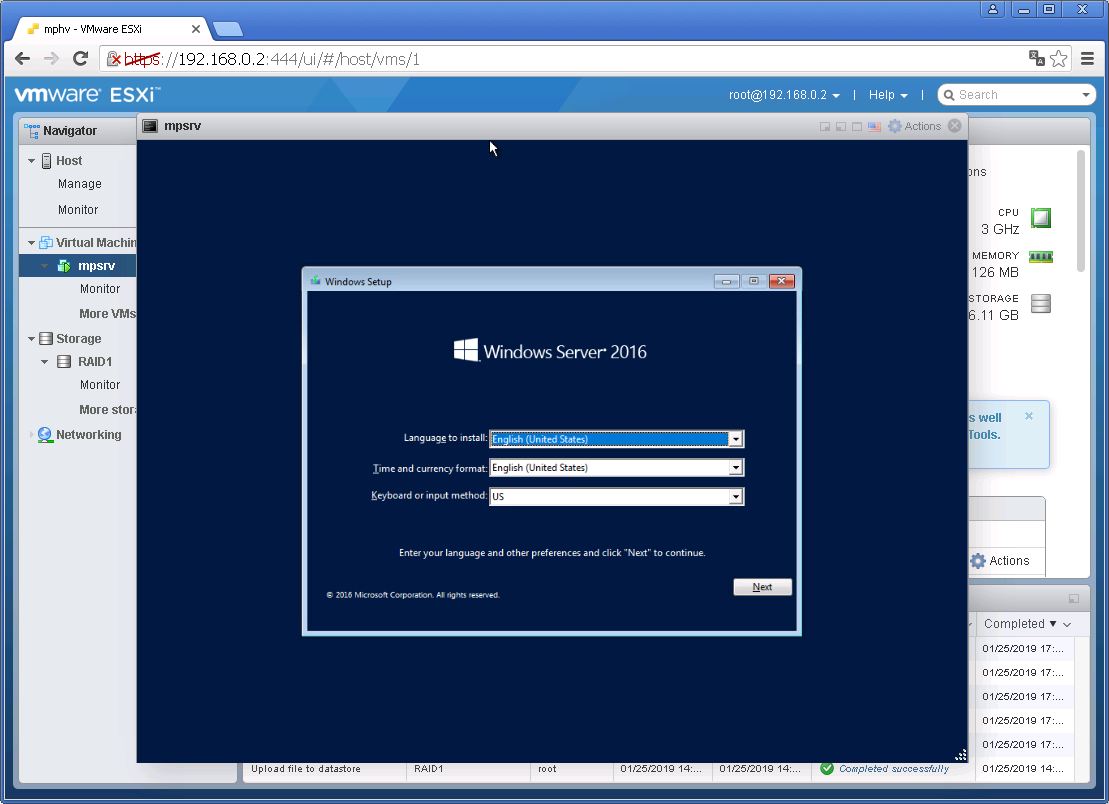
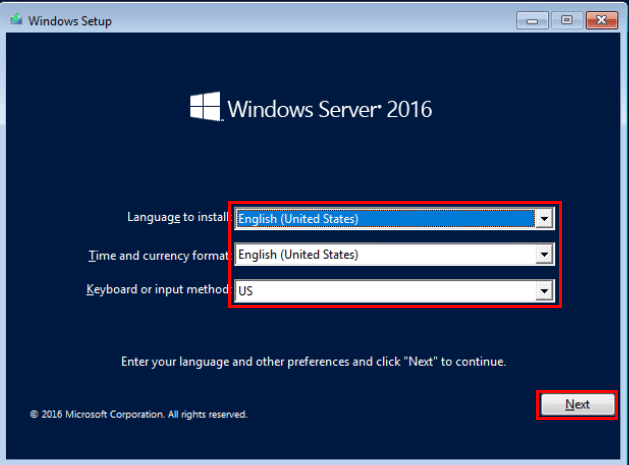
Step 4 – Select the language and localization settings matching your time zone and country and click Next.

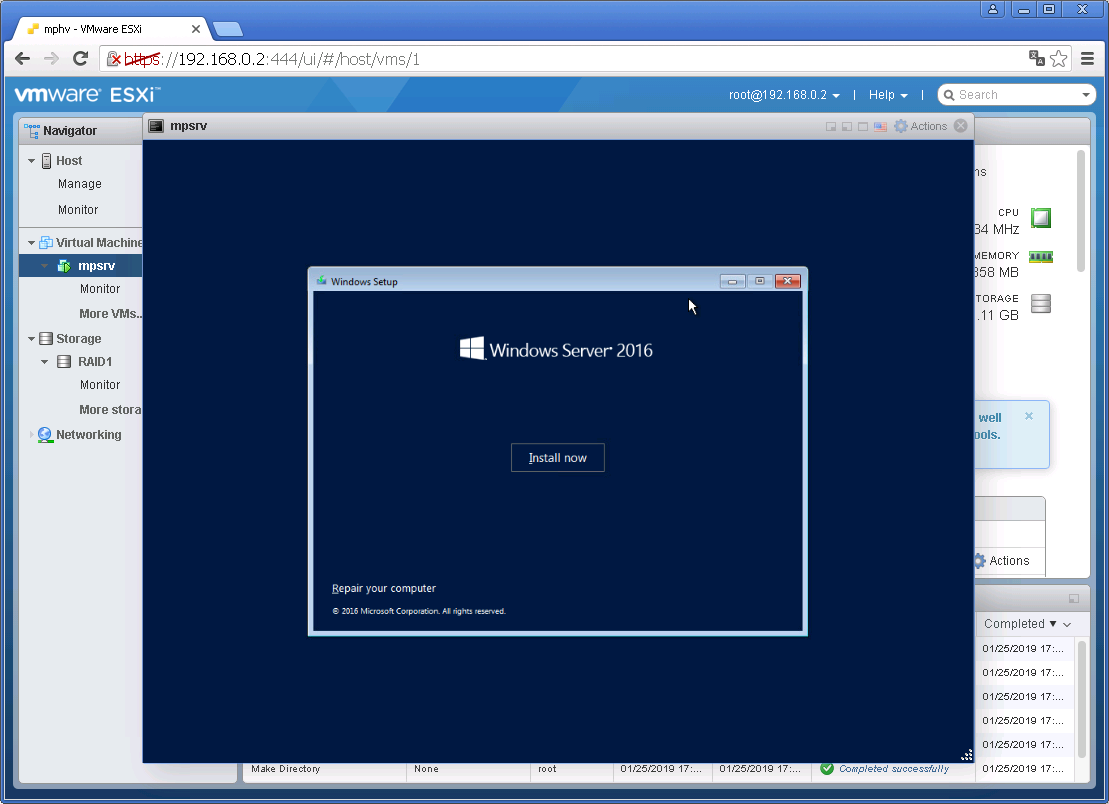
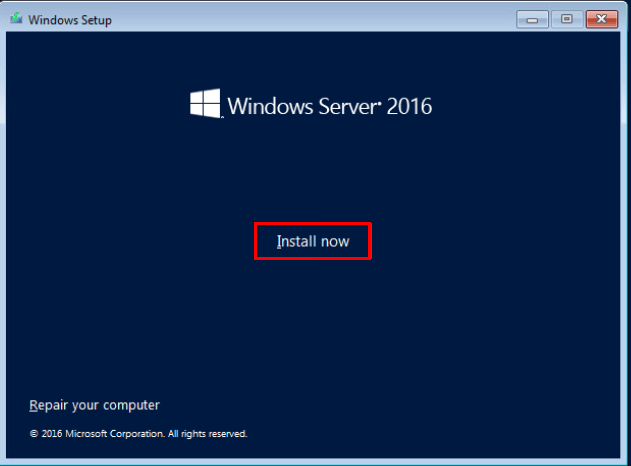
Step 5 – Click on Install now to kick off the installation.

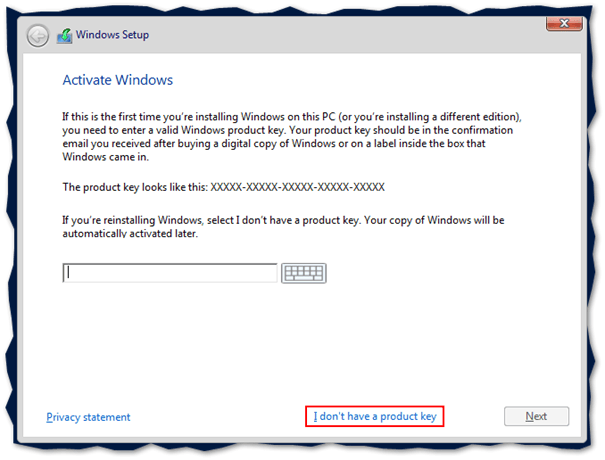
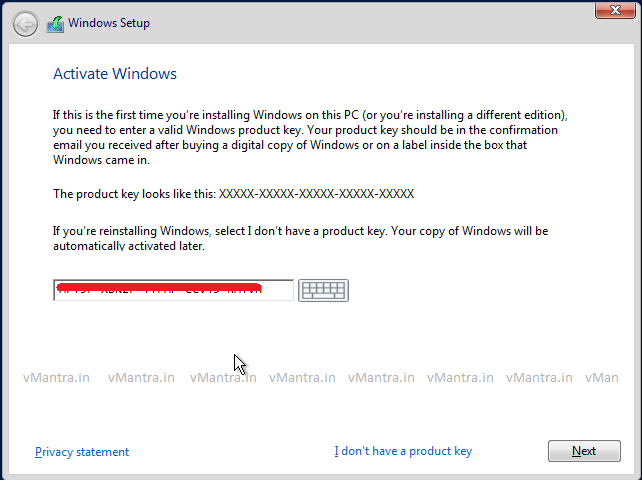
Step 6 – Type in the product key, if you have one, and press Next. If you don’t, just click on the I don’t have a product key link to install Windows Server in evaluation mode.
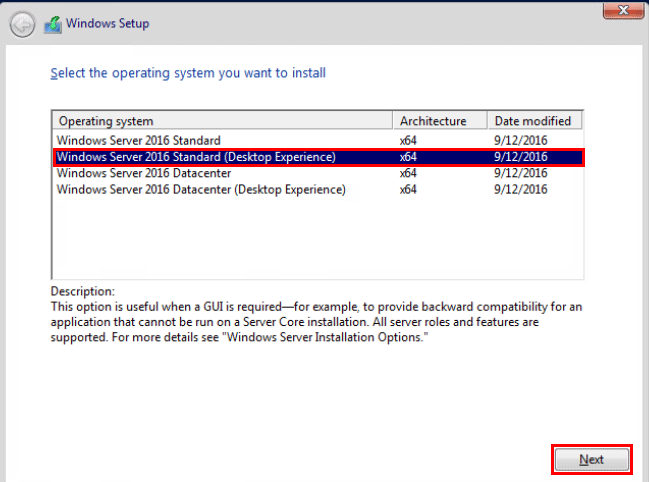
Step 7 – Select the Windows Server edition and deployment type. For this example, I’ve selected Windows Server 2016 Standard (Desktop Experience). Press Next.

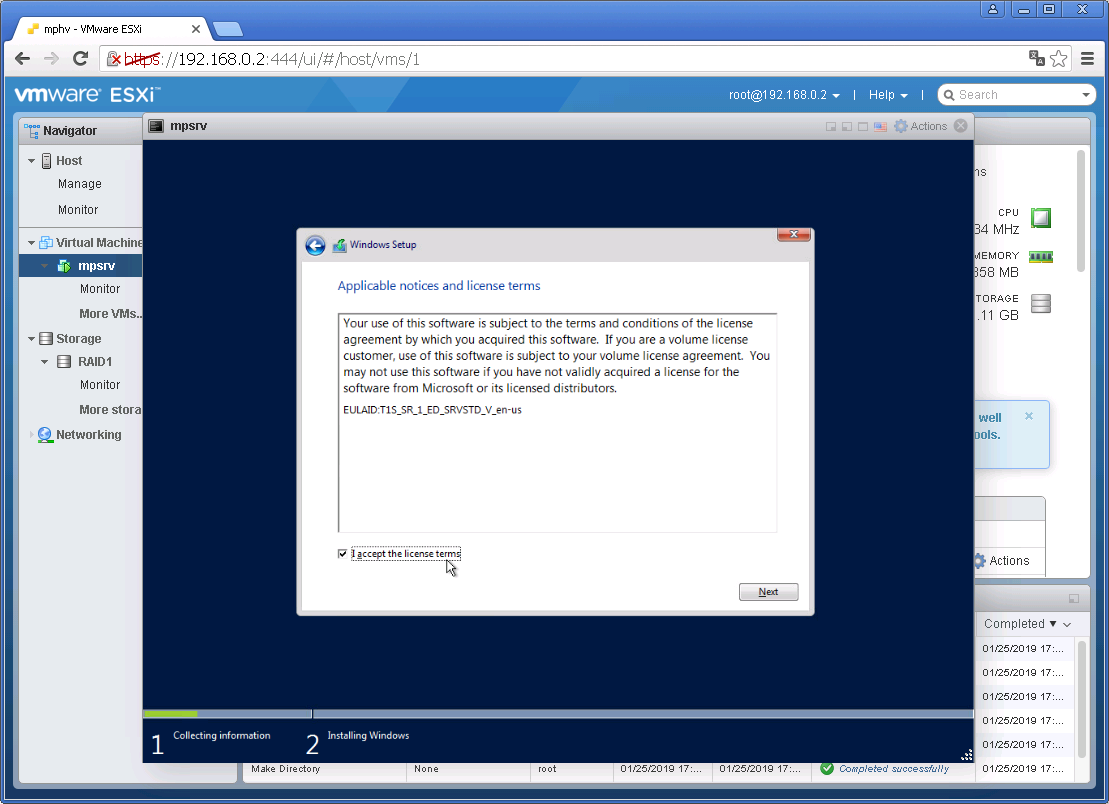
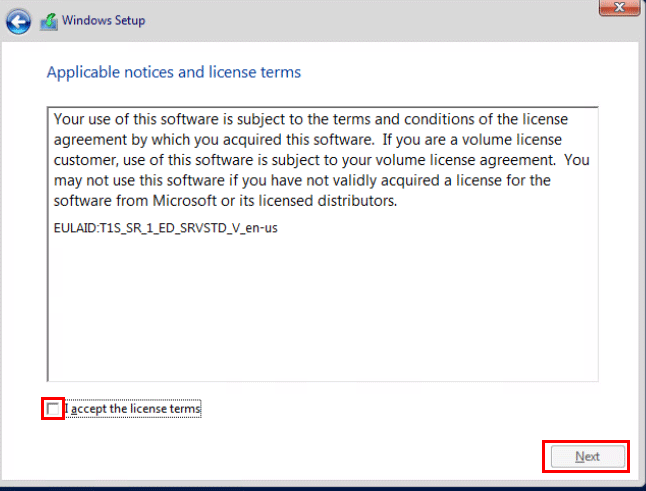
Step 8 – Accept the license terms by ticking on the option at the bottom and press Next.

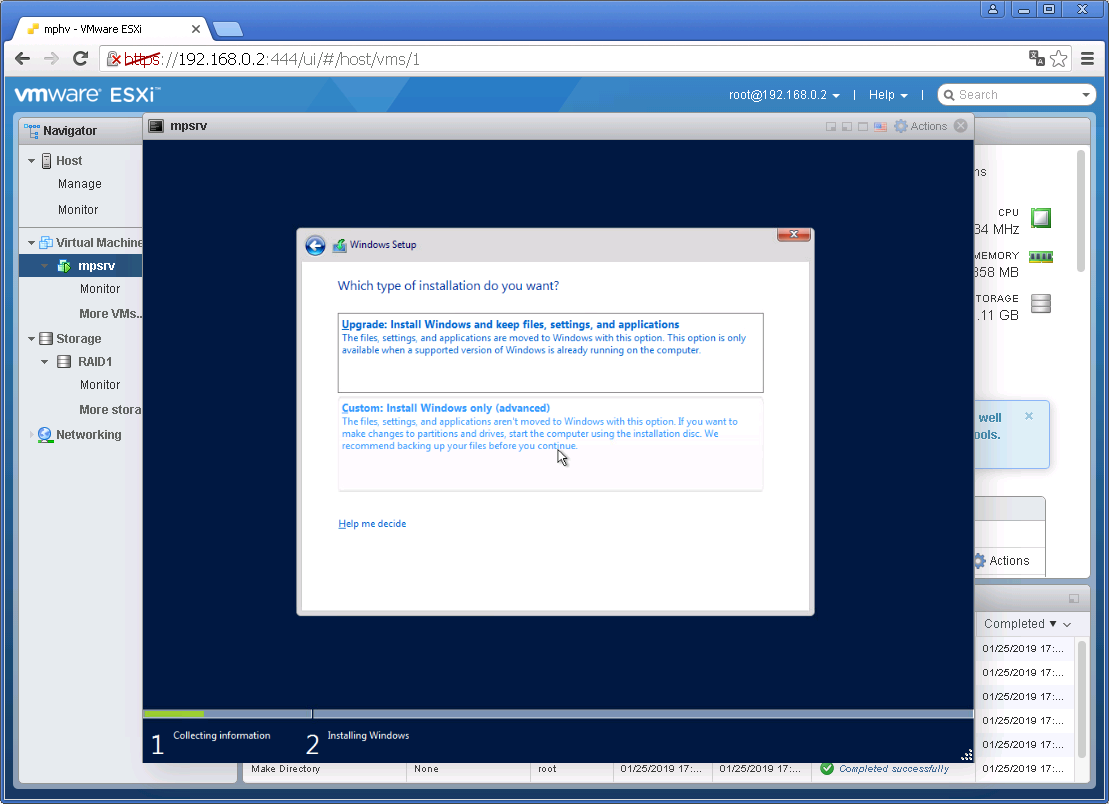
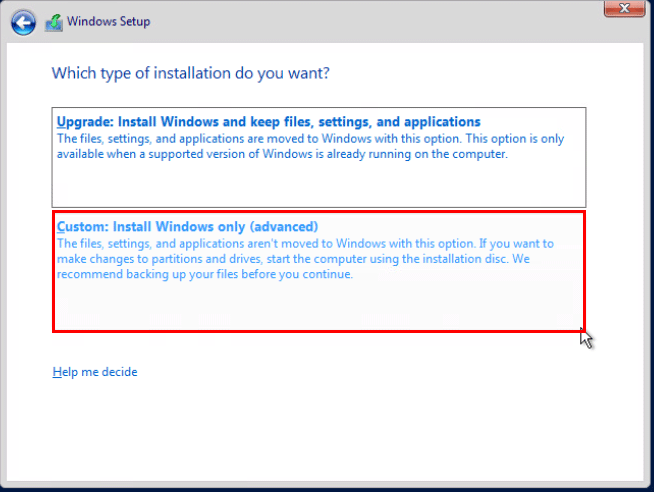
Step 9 – Select Custom: Install Windows only (advanced)

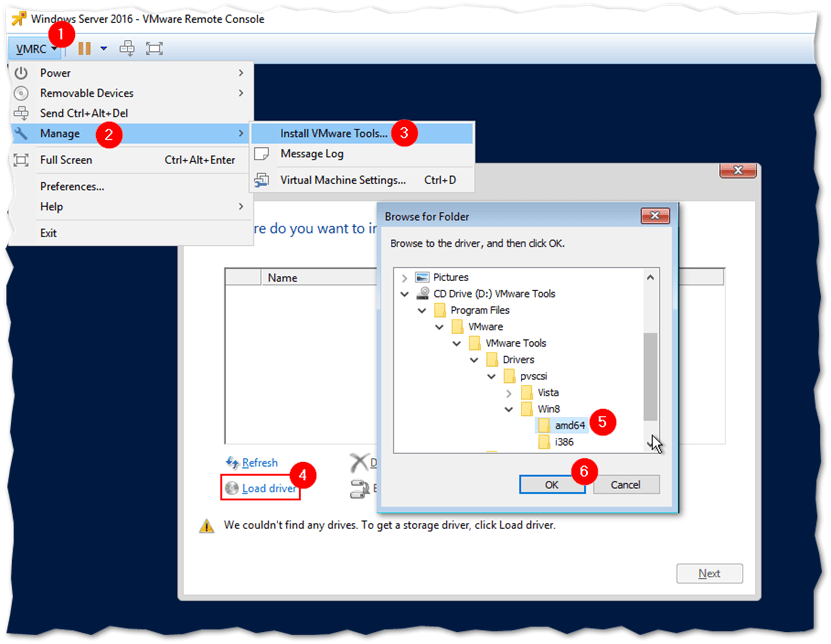
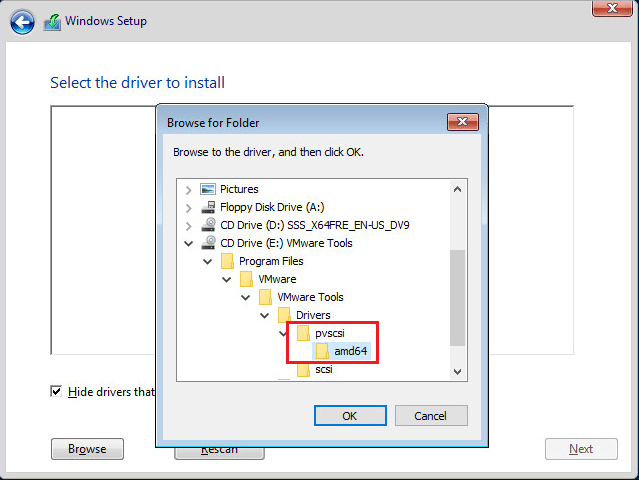
Step 10a – At this point on how to install Windows Server 2016 on VMware vSphere, I must mount the vmtools ISO image since I selected VMware Paravirtual as the SCSI controller. This step is not required if you stick by the default setting (LSI Logic SAS). To this, we simply select Install VMware Tools from VMRC -> Manage. This will mount the corresponding ISO image on the VM. Once you do, click on Load driver, select the CD drive labelled VMware Tools and drill down to the /Program Files/VMware/VMware Tools/Drivers/pvscsi/Win8/amd64 folder as shown next.
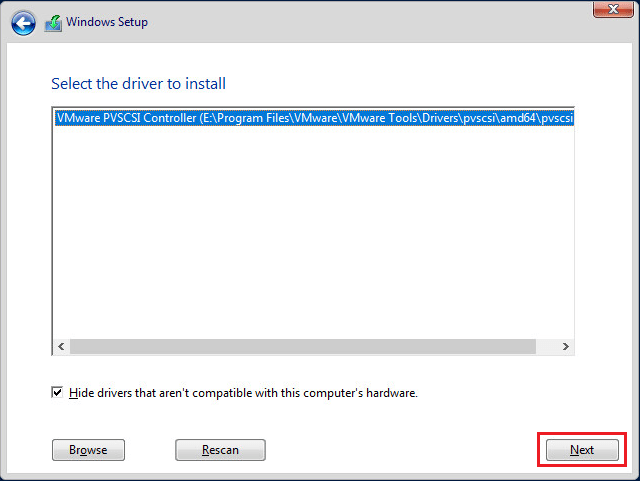
Step 10b – The VMware PVSCSI Controller driver is automatically selected for you. Click Next to continue.

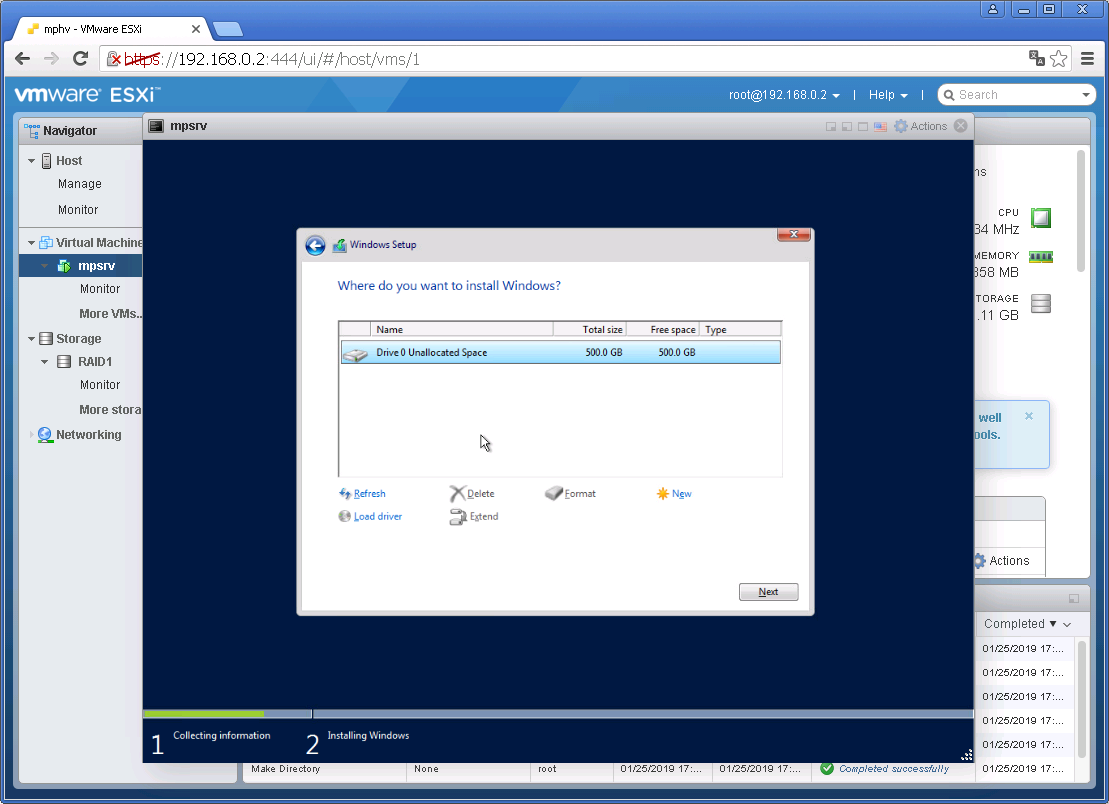
Step 11 – If you see Drive 0 Unallocated Space listed, it means that the paravirtual driver has correctly detected the VMDK specified for the VM.
Before pressing Next, disconnect the VMware Tools ISO image and reconnect the one for Windows Server 2016. You won’t be able to proceed with the process of installing Windows Server on VMware unless you do this.

Once you reconnect the Windows Server ISO, press Refresh and make sure that the Windows can’t be installed … at the bottom clears. Press Next to use the entire disk for the Windows Server installation.

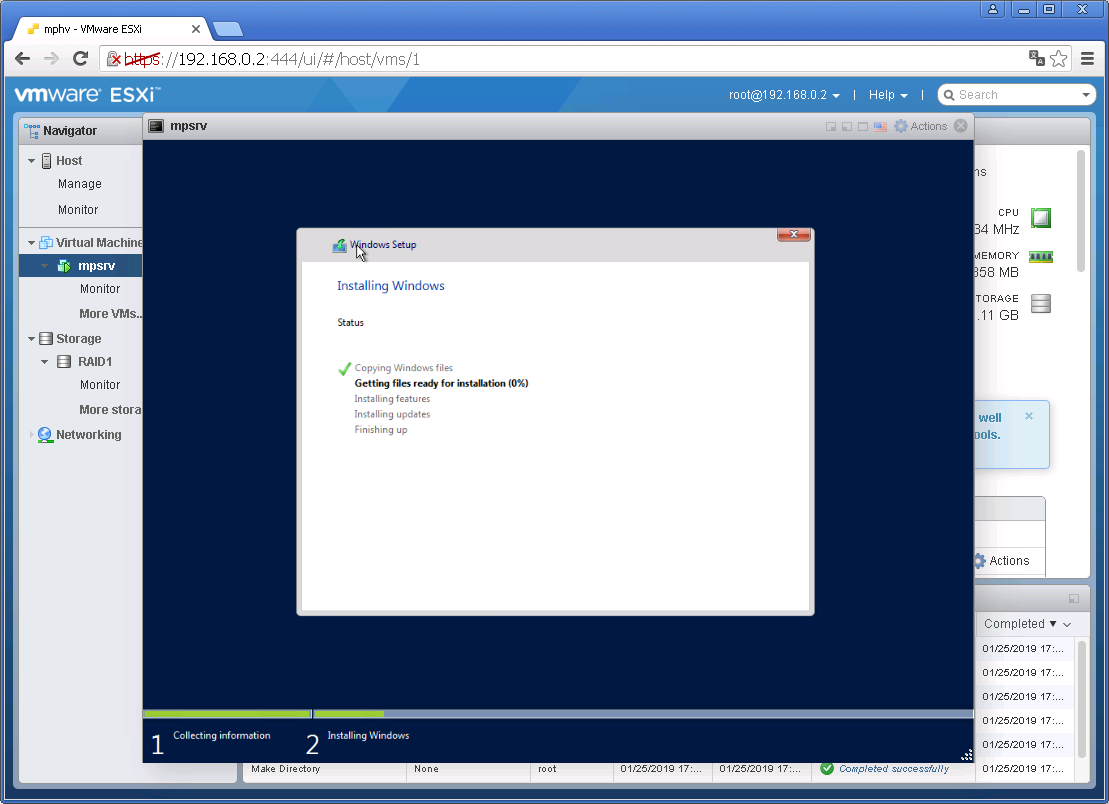
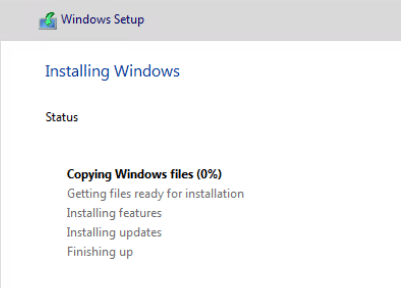
Step 12 – Wait for the installation of Windows to finish.

Step 13 – Set a password for the administrator account and press Finish.

Step 14 – Log in and install the VMware Tools. Disconnect the Windows Server ISO image as described and mount the VMware Tools ISO image still using the VMware Remote Console client (VMRC -> Manage -> Install VMware Tools). Click on the mounted DVD Drive or taskbar notification to run the vmtools installer. Follow the instructions and reboot the VM when done.

Congratulations! You now have Windows Server 2016 with Desktop Experience running on VMware. For production environments, you should go for the Server Core version for better performance and improved security. Also, note that the steps covered today apply to installing Windows Server 2016 on both physical ESXi hosts as well as nested ones. If you wish to learn how to set up a nested vSphere environment, have a look at this post.
What to do next?
Although these were easy steps, they were rather time-consuming, especially if you deploy several VMs a week. This is why installing Windows Server in a VM is usually done with the aim to convert it to a template afterwards. That way you can simply deploy a new VM from the template and ensure consistency in terms of custom configuration and installed applications.
Once you’ve installed Windows Server and the VMware Tools, it is usually a good measure to set whatever settings you want across the board when deploying a new VM.
A lot of these can be done via GPO or deployment tools but you may get the odd change you want to be done locally. For instance:
-
- Add a specific local user
-
- Add specific user in the remote desktop group
-
- Install agents for monitoring, backup, antivirus…
-
- Install tools such as BGInfo
-
- Run Windows Update and clean up files
-
- …
You can find interesting resources on how to prep a Windows environment with the VMware OS Optimization Tool that is used for Horizon Desktops.
Conclusion
Note that the steps on how to install Windows Server 2016 on VMware ESXi covered today also apply to installing Windows Server 2016 on both physical ESXi hosts as well as nested ones.
Installing Microsoft Windows Server 2016 on a virtual machine hosted on VMware ESXi is straightforward if you follow our steps and perform the operations explained above with illustrations.
The illustrated practices show how you can build a virtual machine for Windows hosted by VMware ESXi.
It is a fantastic opportunity for anyone willing to get started with virtualization.
If you wish to learn how to set up a nested vSphere environment, have a look at this post.
Installing Windows Server 2016 upgrades us once again from Windows Server 2012/R2 that provides the latest and the essential updates we need. As well as this time, it has includes lots of new and features. In this lesson, you will learn about installing Windows Server 2016 step by step. Also, before installing, make sure you have pre-planned for selecting which edition to install and what to do in it.
Before installing Windows Server 2016 you need to plan for the installation. Making plan means you should choose an appropriate edition of Windows server. You should think of Hyper-v server you need for your network. You must choose an edition which have enough the Hyper-v license. Also think of more licenses you may need in the future.
Every edition of Windows server may support limited number of users. Choose the edition that meets your needs. When we talk about limitations, we don’t talk about software limitations. If you want more license you should pay for. You can upgrade from one edition to another edition. And you can buy more license for physical and virtual servers also users.
Windows server 2016 editions
- Datacenter: Highly virtualized, enterprise network and cloud environment.
- Standard: Only different with Datacenter edition is the number of Virtual servers. Datacenter edition supports more virtual servers.
- Essential: For small business up to 25 users and 50 devices.
Hardware Requirements
- Processor: 1GHZ
- RAM memory: Minimum of 2GB
- Hard Drive Space: 20GB free space
Installing Windows Server 2016 on VMware
Like the previous versions (Windows Server 2012…), the Windows Server 2016 installation is simple, what’s new is the editions that you can choose them wisely during installation.
In order to install Windows Server 2016, first, you must have an ISO image file of it and also make sure you have pre-planned choosing which edition of Windows Server 2016 and have fulfilled the system requirements.
Download Now: Windows Server 2016
Create and Customize the Virtual Machine
1. Open VMware and click on the Create a New Virtual Machine(Ctrl+N) icon. If you don’t have VMware installed on your computer, click here to download one.

2. Now select Custom (Advanced) option to specify the virtual machine with advance options. If you want you can create virtual with less options, click on Typical option. When you are finished here, click on Next button.

3. Leave the Virtual Machine Hardware Compatibility settings as default. If you want you can select your VMware version. Then click Next button.

4. Here you should add an installer image into the virtual machine. Select the Installer disc image file (ISO) option and click on the Browse button. Specify .iso file path and import it. Then click on Next button.
Note: Make sure that you are using an ISO image file, otherwise unzipped file won’t boot.

5. Specify which operating system type you want to install on the virtual machine. Select Windows Server 2016 version from the dropdown menu and click on Next button.

6. Enter a name for the virtual machine and browse a place where you want to store the installation files. For the purpose click on Browse button and specify the place. When finished, click on Next button.

7. On the Processor Configuration specify then number of processors your server need to use and click on Next button. Also notice that it refers to your virtual machine speed that how much speed the server should be.

8. Specify the amount of the memory for the virtual machine (based on MB) and click on Next button.

9. Select Use Network Address Translation(NAT) or Use bridged networking to directly connect and use internet, as a network type. Then hit Next.

10. Let the I/O Controller types by default because you don’t have the option to change the SCSI type. just hit Next.

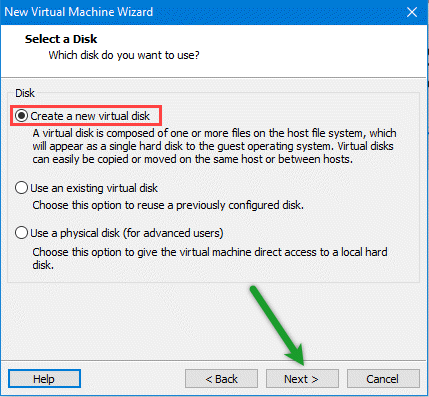
11. Now to create new virtual disk, select create a new virtual disk for the virtual machine.
12. Specify the disk amount by typing the disk size(Recommended 60 GB) and click on Next button.

13. At this point, just check out the settings you’ve done or you can customize if you want and click Next.

Step 2. Install Windows Server 2016
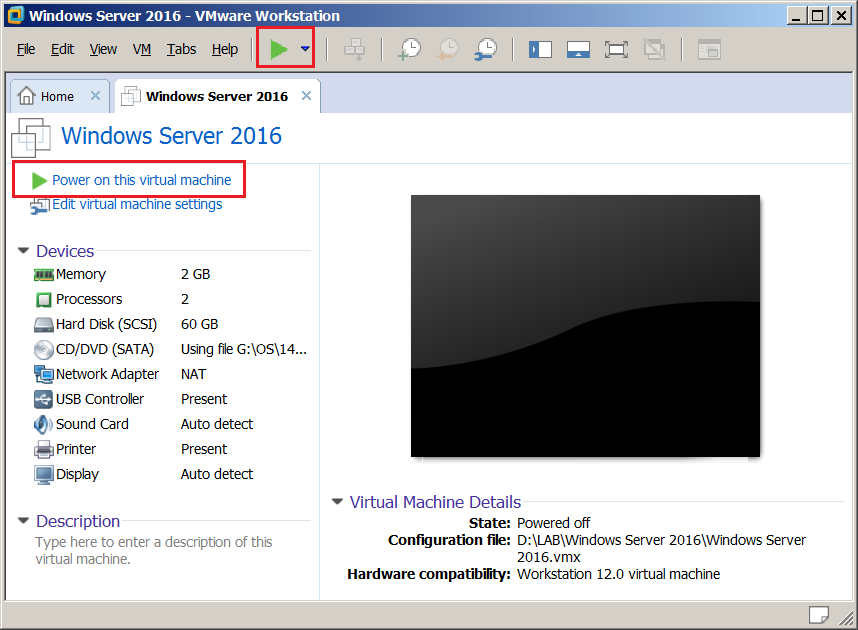
Now it’s time to boot up and start the virtual machine, just click on Power on this virtual machine then wait until it boots.
1. Open VMware Workstation on your host computer. Click on Power on this virtual machine in top left.

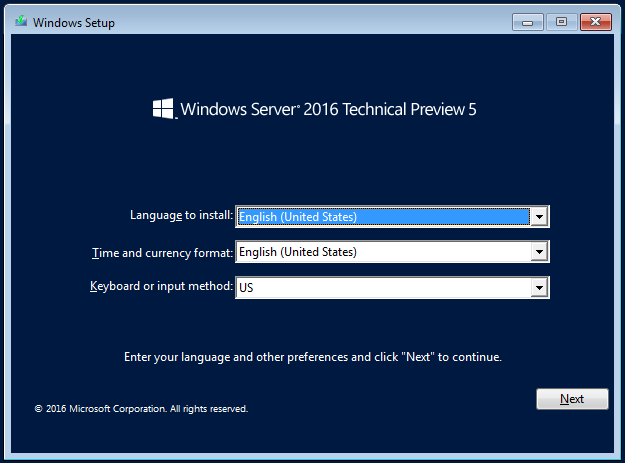
2. When the virtual machine powered on, specify the language, time zone and keyboard then click Next.

3. Install now to install the windows server 2016 on virtual machine.

4. Select one the Windows Server editions you’ve decided and click on Next button.

5. Put a mark in the box next to I accept the license terms, then click on the Next button.

6. Go on and click on the Custom: Install Windows only (Advanced) option for installing the server custom.

7. Select the disk, you want to install the widows on and select the disk, click on New, then specify the amount (based on MB) and click on Apply button then click on Next button.

8. Now the server copies all the files to the disk, amount the files from the windows image, install features, updates, so it will take time and when finished it will reboot.

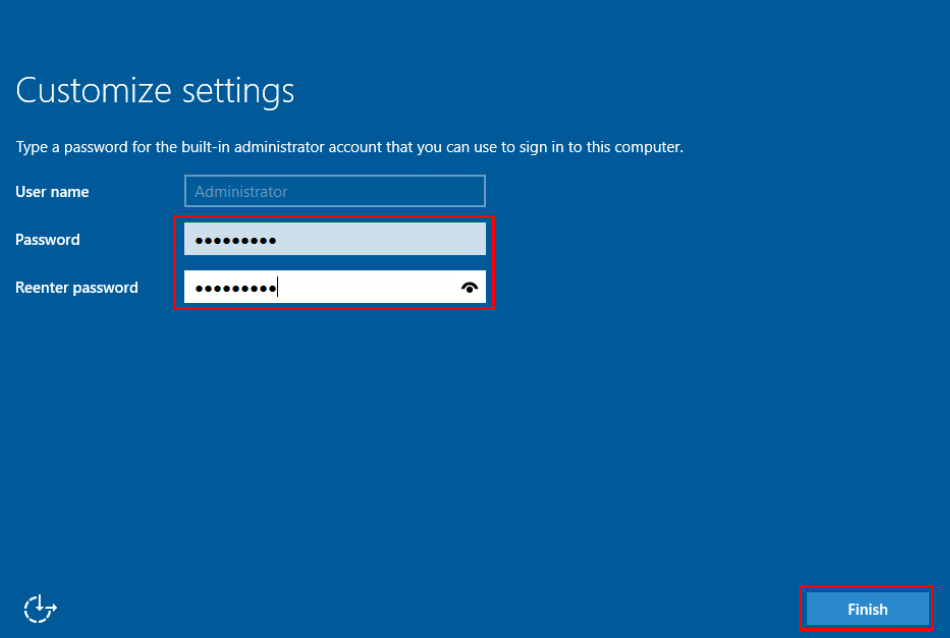
9. After the reboot, type a complex password composed of (uppercase, lowercase, symbols and numbers) and click on Finish button.

10. When the customization finished, now you’ll need to sign in, but first click on the button that is composed of three buttons (ctrl+alt+del) shown in image below or simply press Ctrl+Alt+Del and sign in to Windows Server.

And that’s it, after you have signed in, your windows server installation is completed like the shot below.

Conclusion
The Windows server 2016 is installed successfully and your server is now ready to work now. But before doing that don’t forget to install VMware tools + do initial configuration of Windows Server from the article below. For any questions, leave a comment.
Check out: Install Active Directory on Windows Server 2016 step by step
If you find it helpful, let your friends know it too by sharing this article on social media.
Для лучшей производительности дисков виртуальных машин VMware рекомендует использовать для виртуальных дисков контроллер VMware Paravirtual SCSI. Однако, при попытке установить на чистую ВМ с адаптером VMware Paravirtual SCSI операционную систему Windows Server 2016, вы будете удивлены, т.к. установщик Windows не увидит в системе ни одного диска, в дистрибутиве просто нет подходящего драйвера для контроллера. В этой статье мы рассмотрим, как установить Windows Server 2016 на ВМ с контроллером VMware Paravirtual SCSI.
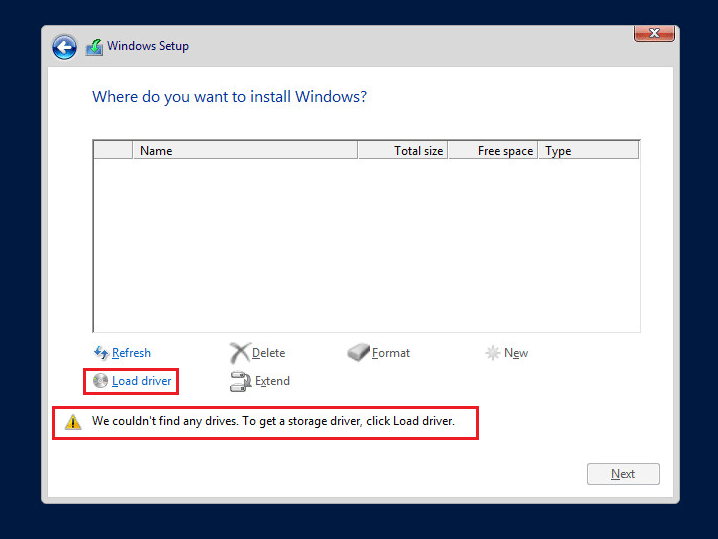
Как вы видите, установщик Windows Server 2016 не увидел на ВМ с контроллером VMware Paravirtual SCSI controller ни одного диска (We couldn’t find any drives. To get a storage driver, click Load Driver) из за отсутствующего драйвера. Однако драйвер можно установить вручную, для этого нужно нажать на кнопку Load Driver.
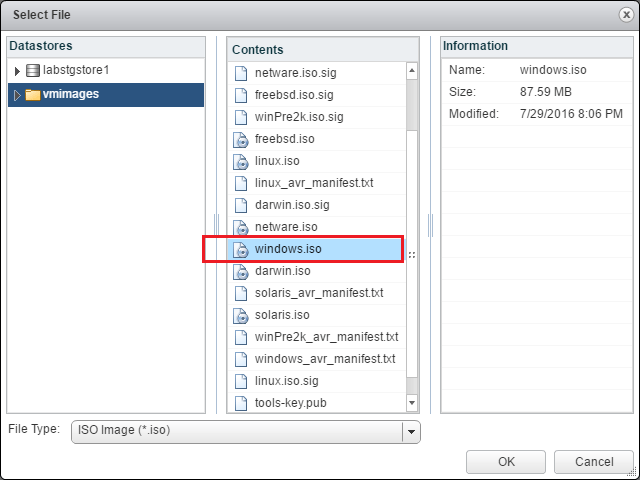
Драйвер SCSI можно установить с ISO образа VMware tools. Самый простой способ подключить данный образ к ВМ — воспользоваться возможностью подключения дополнительных CD/DVD дисков в настройках виртуальной машины. Добавьте в настройках новый виртуальный CD/DVD драйв (в первом у вас скорее всего подключен установочный образ Windows Server).

В настройках второго привода нам нужно смонтировать образ windows.iso (находится в корне в папке vmimages).
Теперь нужно найти на диске нужный драйвер. Нажмите кнопку Browse. 
Теперь нужно указать путь к каталогу: VMware Tools -> Program Files -> VMware -> VMware Tools -> Drivers -> pvscsi -> amd64.
Убедитесь, что VMware PVSCSI контроллер определен как совместимый драйвер.
После установки драйвера, установщик Windows увидит все подключенные виртуальные диски.
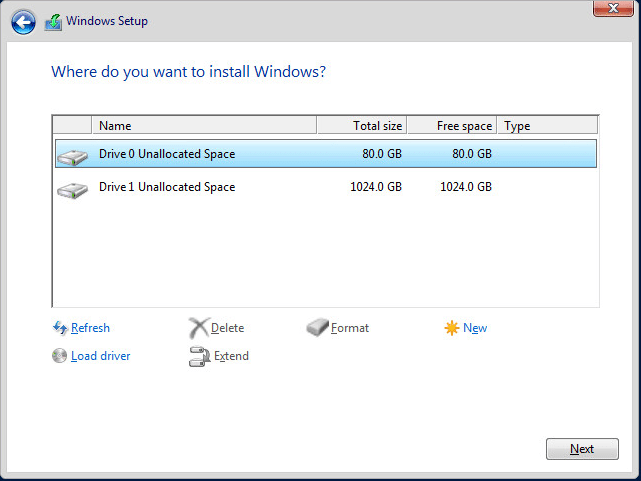
Можно продолжить обычную установку Windows Server 2016.

![]()
Инструкция в картинках по установке операционной системы Windows Server 2016 на виртуальную машину, которая находится на гипервизоре ESXi 6.7.
Для начала создадим саму виртуальную машину, если её у нас ещё нет:
ESXi 6.7 — создаём виртуальную машину
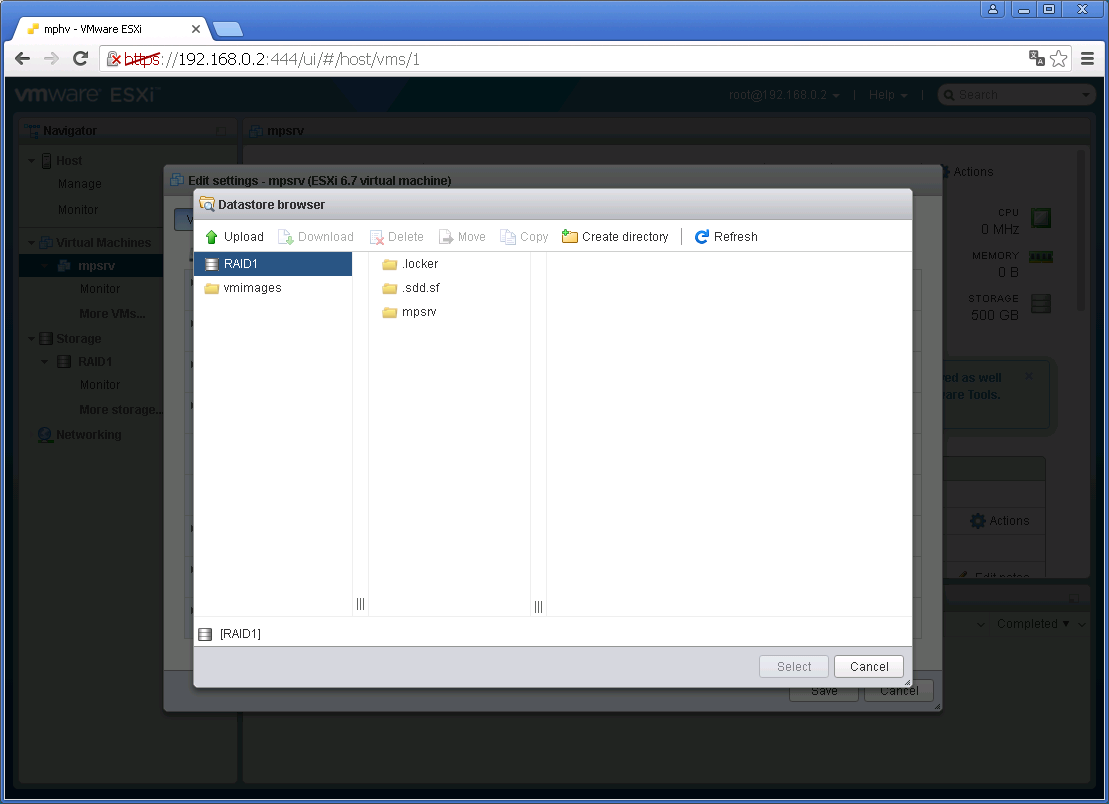
В UI гипервизора ESXi 6.7 кликаем на нашу виртуалку. Edit:
Наша задача, воткнуть ISO образ инсталлятора Windows в дисковод. В CD/DVD Drive 1 выбираем Datastore ISO file, откроется Datastore browser:
Образ у меня не загружен в хранилище, создам папочку для ISO файлов. Create directory:
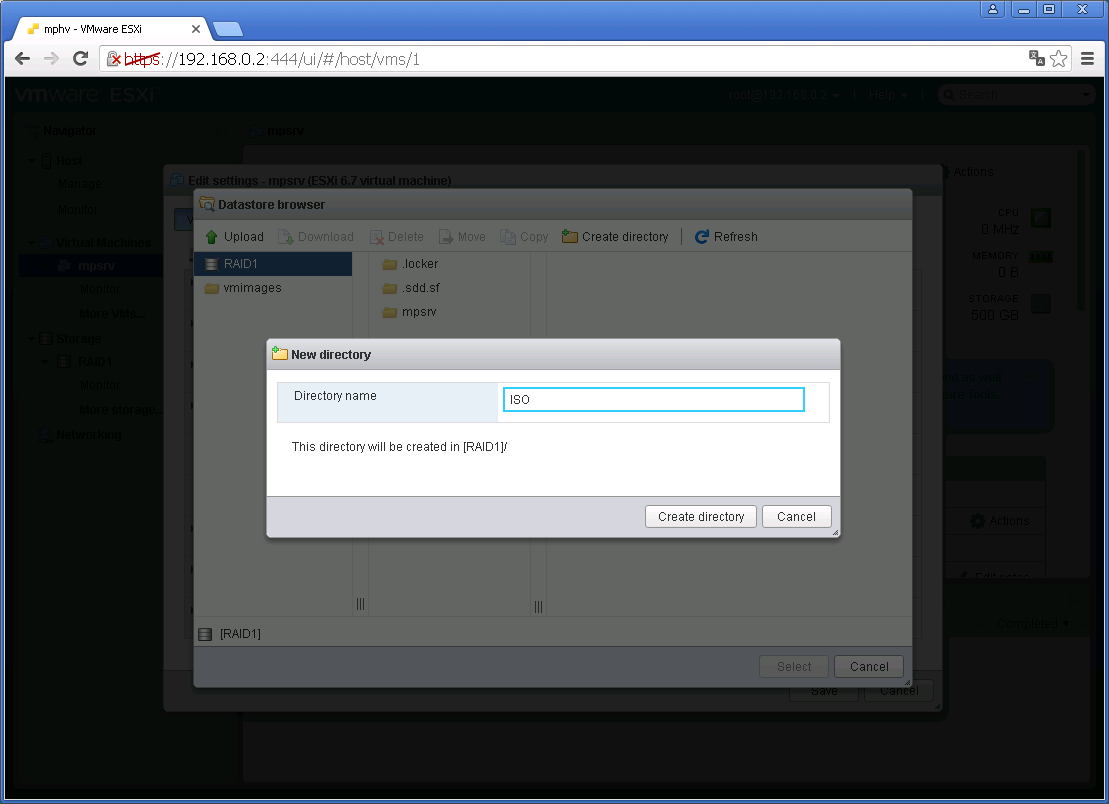
Указываем название директории, у меня будет ISO, Create directory:
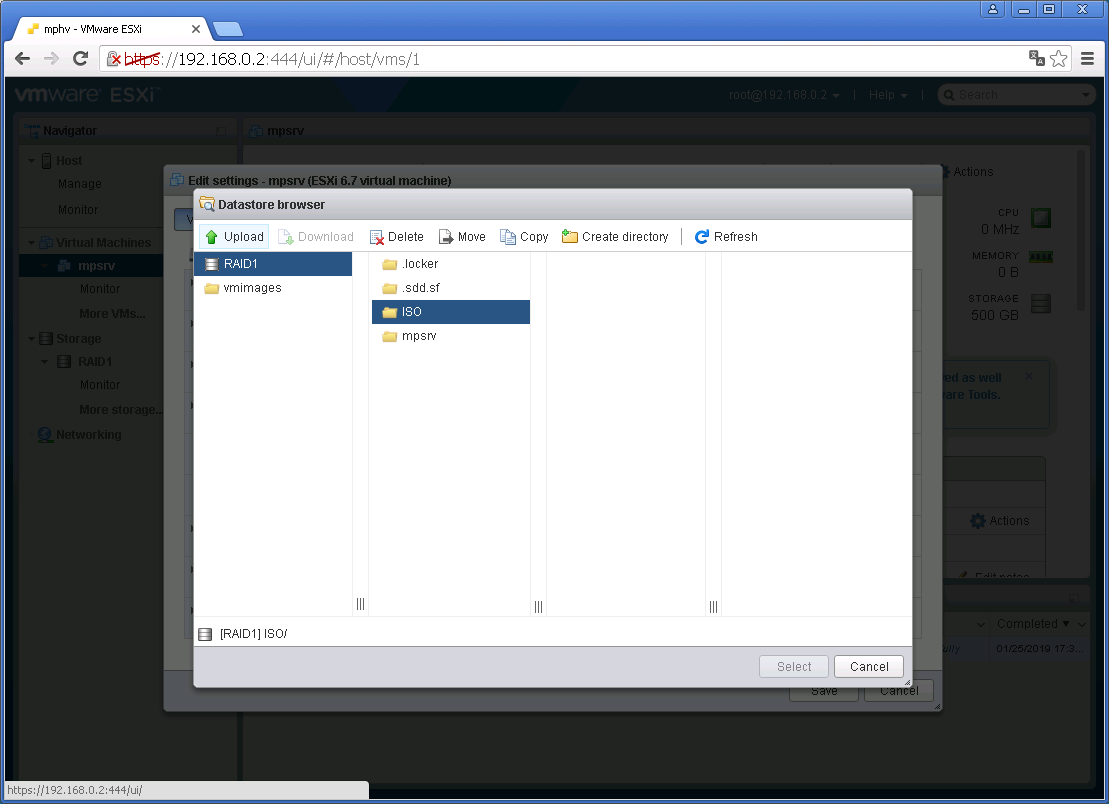
Папочка создалась. Кликаем на неё, потом Upload, выбираем ISO образ инсталлятора Windows Server 2016:
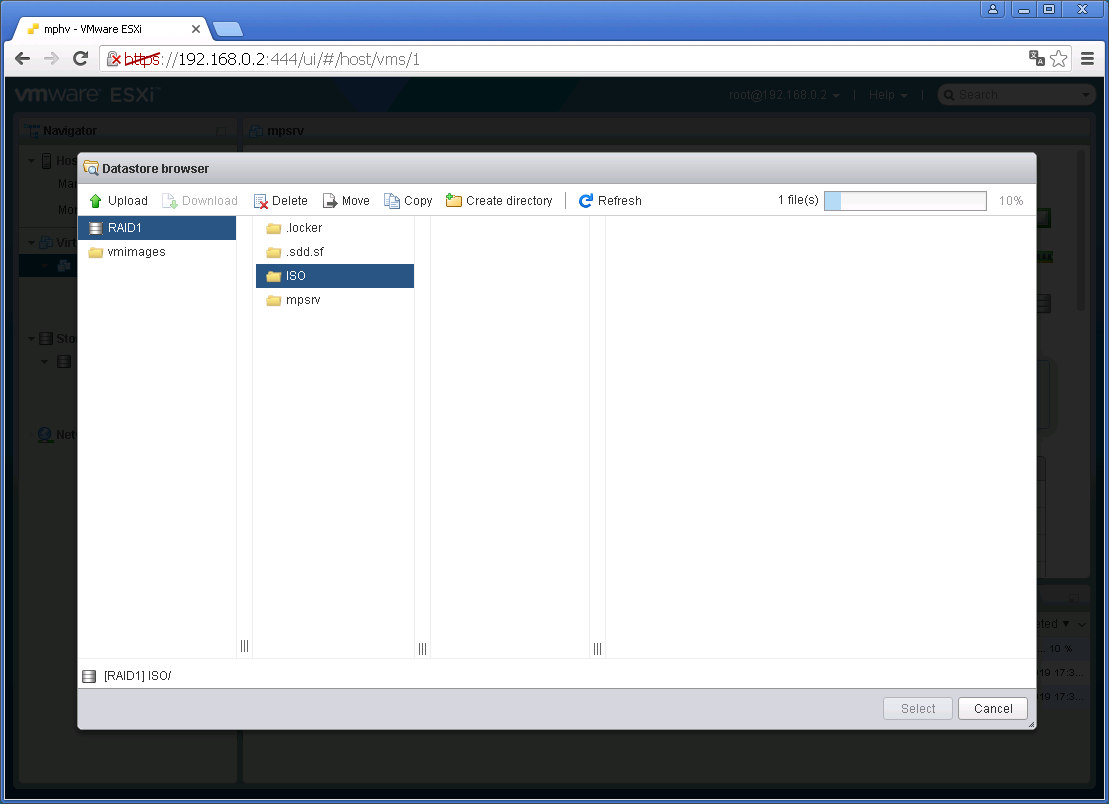
В правом верхнем углу показывается прогрусс загрузки файла. Итак, файл загрузился в хранилище, кликаем на него, потом Select:
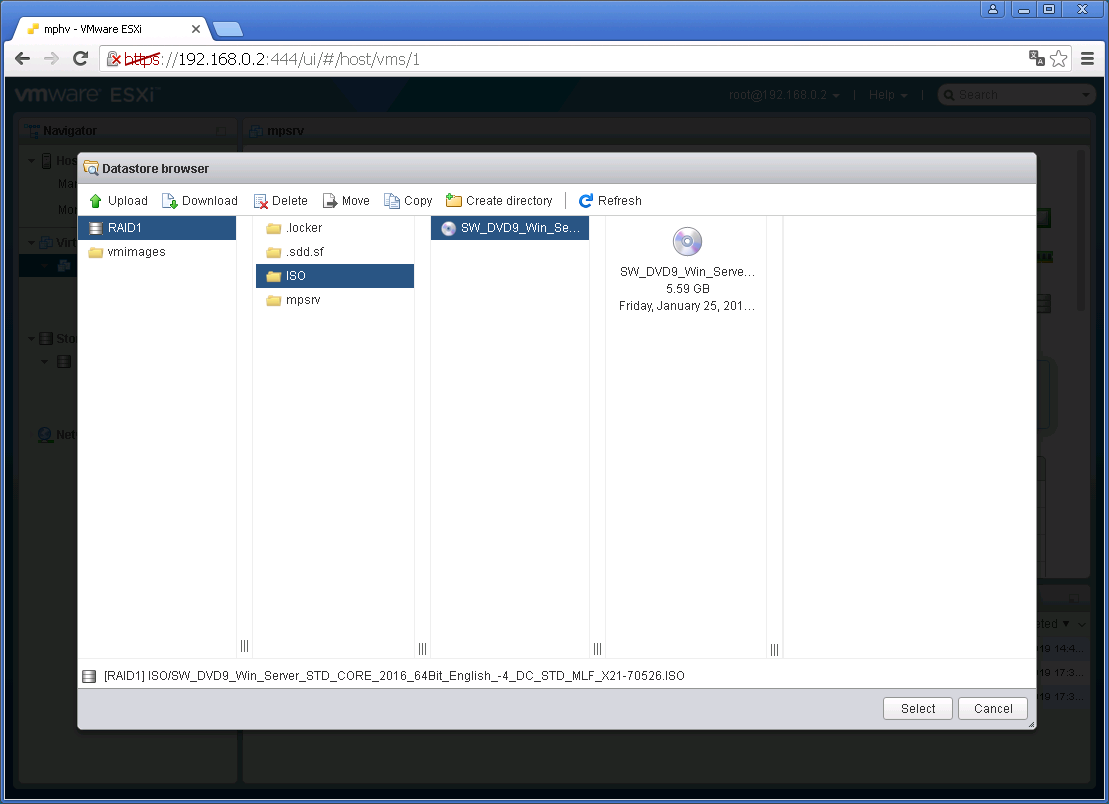
ISO образ цепляется к дисководу виртуалки:

Устанавливаем две галки. Connect at power on и Connect. Save. Включаем виртуалку:
Для начала установки нужно будет успеть нажать любую клавишу. Выбираем язык, время, клавиатуру. Next.
Install now:
Setup is starting:

Выбираем тип установки.
- Standard без GUI
- Standard с GUI
- Datacenter без GUI
- Datacenter с GUI
Next:

Принимаем лицензионное соглашение, Next:
Выбираем Custom: Install Windows only (advanced):
Выбираем винт, у меня он уже выбран, поскольку один. Next:
Потекло по трубам:
Через несколько минут нам предложат указать пароль от пользователя Administrator. Указываем, Finish:

Винда поставилась. Очень напоминает десятку.
Посылаем Ctrl+Alt+Del:
Логинимся.
Внутри смесь десятки, метро и 2012-го сервера.
Historically, the adoption rate on major server releases is slow. With Windows Server 2016 about to hit one year in the release cycle, more organizations are gearing up to deploy the operating system in their environments. That being the case, it seemed appropriate to walk through an install of Microsoft Windows Server 2016 as the guest OS in a vSphere 6.5 environment.
NOTE – Server 2016 is fully supported from ESXi 5.5 and up, as per the VMware Compatibility Guide.
Create New Windows Server 2016 Virtual Machine
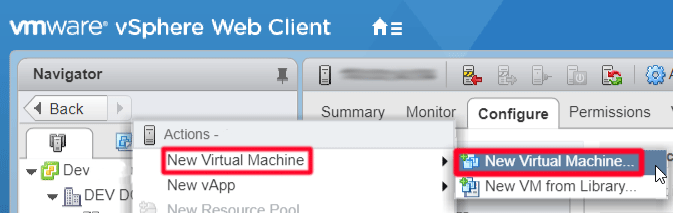
From the vSphere Web Client, right-click the designated host or cluster, and select New Virtual Machine.
The New Virtual Machine Wizard will begin. First, select the creation type. For this tutorial, we chose to Create a new virtual machine.

Enter the virtual machine name and select the target folder location.
Next, select the ESXi host or cluster to run the virtual machine.
Select the datastore to store the virtual machine files.
For compatibility, select ESXi 6.5 and later.
For the Guest OS Family and Version, select Windows and Microsoft Windows Server 2016 (64-bit), respectively.
Next, configure the virtual machine hardware as necessary. For this tutorial, the install will utilize a Server 2016 ISO located on a local datastore. To connect the file, select Datasore ISO File from the CD/DVD drop down. Click the Browse button to locate the ISO file.
Select the Server 2016 ISO from the datastore.
Lastly, check the Connect at Power On check box to ensure the VM boots into the server installer.
Review the configuration and select Finish to deploy the virtual machine.
After deployed, Power On the virtual machine.

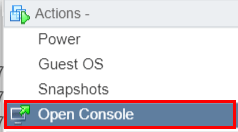
Open the virtual machine’s console to begin setting up Windows.
Install Windows Server 2016
From the Windows Setup screen, select the pertinent language, time, and keyboard.
Next, click Install Now.
Select the operating system to install. The Desktop Experience option includes the standard GUI.
Read the notices and terms. Accept to continue.
Select Custom for the installation type. This option is for new installs.
Choose the drive to install Windows. Click Next to begin the installation.

The installation of Windows will now begin.
Finally, set the password for the administrator account and click Finish.
Windows Server Guest OS Install – VMware Documentation
If you are looking to upgrade your VMware environment to 6.5, check out this tutorial.

Install Windows Server 2016 VM on VMware Workstation :
In the previous post I have described the step by step procedure of Creating Windows Server 2016 VM. so now its turn to install Windows server 2016 on VM.
First of all open the VMware Workstation and select Windows Server 2016 virtual machine. Click on the Power on this virtual machine and VM will start on the right side of window. Please wait till its boot up completely.
- After booting the VM, on the first page where you can specify Language, Time Zone and the Keyboard.
- Click Install now to start the installation.

- Activate the Windows by entering the Product Key and click on Next
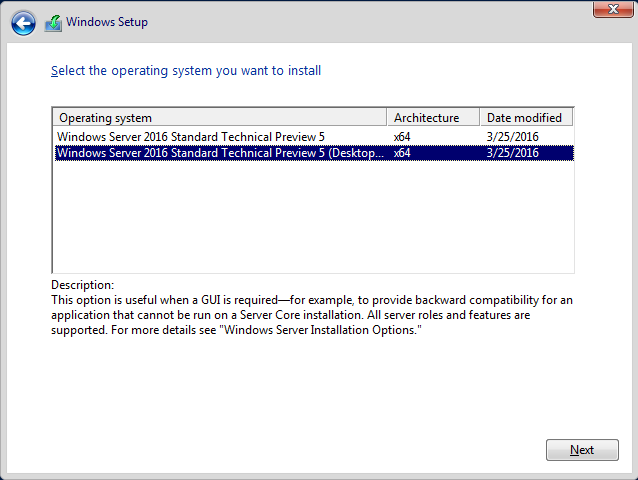
- On the next window select Windows Server 2016 Technical Preview 5 (Desktop Experience) to install GUI then click on Next
- Accept the license terms by check the checkbox next to I accept the license terms, then click on the Next button.
- Click on the Custom: Install Windows only (Advanced) option to install a fresh OS, furthermore you can also upgrade existing installed Windows server by selecting another (Upgrade) option.

- Select the disk and click Next to install the windows, it will automatically create the required partitions using whole virtual disk, However if you want to create partition table manually then select the disk, click on New and create desired partitions.

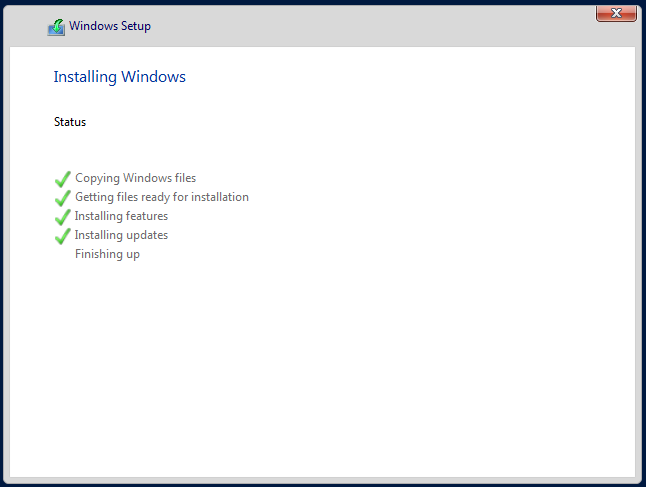
- Windows will now start the installation process including Copies all the files to the disk, Install features and updates. Windows will finally reboot when installation will be completed.
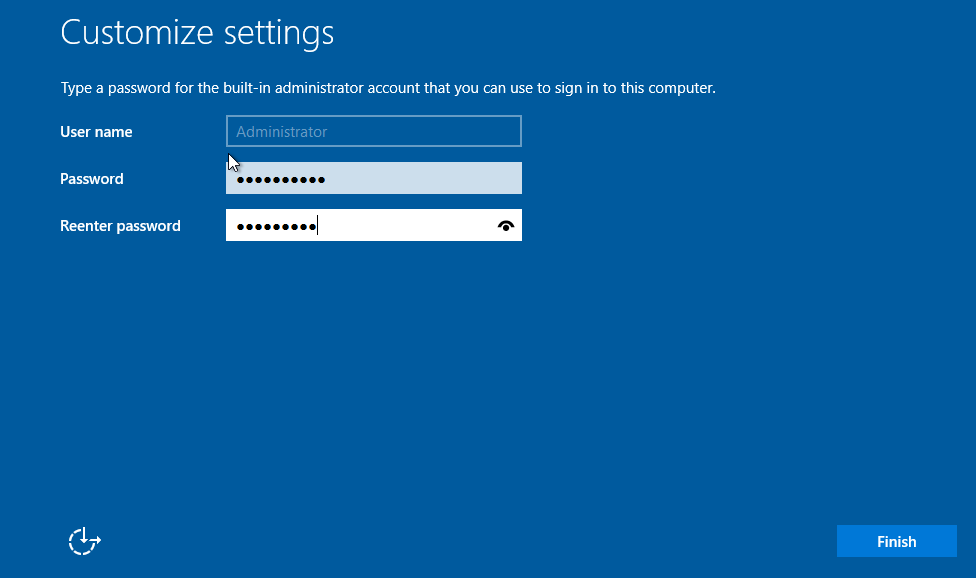
- After reboot assign the password and click Finish button.
Window server 2016 is installed now and you can enjoy it’s features. You can find the step by step procedures like How to promoting Windows server 2016 to Domain Controller, deploying the DNS server etc. in my next blog.
Note:
Please do not forget to install VM tools after installing the Windows Server.
Enjoy 🙂
[GUIDE] Install Windows Server through VMware ESXi Web Client (step by step)
What is VMware ESXi?
Technical term :
VMware ESXi is an enterprise-class, type-1 hypervisor developed by VMware for deploying and serving virtual computers.
As a type-1 hypervisor, ESXi is not a software application that is installed on an operating system; instead,
it includes and integrates vital OS components, such as a kernel.
In common words:
Using VMware ESXi, one can create virtual machines. And its virtualization technique allow users to install own custom OS, for example Windows OS trail copy or macOS or any other OS.
Requirements:
-
A dedicated server with ESXi installed as Operation system
-
A Web Browser
-
Good Internet speed
Guide to Install Windows Server 2016 using VMware ESXi(6.5 Web Client)
Through out this Tutorial, I am going to use https://oneprovider.com dedicated server [https://oneprovider.com/dedicated-servers] & Windows Server 2016 Datacenter edition (free evaluation copy)
Oneprovider is a world leading company for web servers. And one of the cheapest DEDI/BOX provider in the industry(with 0 setup fee).
Also their support system is very helpful.
Their payment method includes Paypal with many other familiar payment methods.
In maximum cases, their servers comes with «one click installer», which includes VMware ESXi Web Client.
After receiving server information from Oneprovider, go to «Server manage» page and click on ‘reinstall’ tab
From there you can choose to install ESXi. [Remember- server re-installation would take 45 to 60 minutes]
Every server comes with an IP(ipv4) address. So, when installation of ESXi is finished, one can access the server on WMware ESXI web interface, simply through a web browser.
Just open
https://SERVER_IP_ADDRESS
And use your credential to log into it. [Note- use credential, which you had created during ESXi installation]
Anyway, you are welcome to choose any other Dedicated provider, which can allow you to install ESXi on your server.
For step-by-step guide, please watch the Youtube Video
Video Tutorial
![[Tutorial Video] How to Install Windows Server 2016 using VMware ESXi 6.5 Web Client](data:image/svg+xml,%3Csvg%20xmlns='http://www.w3.org/2000/svg'%20viewBox='0%200%20480%20360'%3E%3C/svg%3E)
Download the OS
you can have your own iso copies from Microsoft Official site here: https://www.microsoft.com/en-us/evalcenter/evaluate-windows-server
OR
Download from my Archive below:
Widows Server 2016 (evaluation copy/180 days free trial)
https://archive.org/download/windowsserver2016datacenterevaluationcopy/Windows_Server_2016_Datacenter%28EVALUATION-copy%29.ISO
Widows Server 2012 R2 (evaluation copy/180 days free trial)
https://archive.org/download/WS2012R2/WS2012R2.ISO
Widows Server 2008 R2 (evaluation copy/180 days free trial)
https://archive.org/download/windowsserver2008r2evaluationcopy/WS2008R2.iso
Download extra dependent server software
https://archive.org/download/extradependentsoftwares/Extra-Dependent-Softwares.iso
Server Speedtest
Tested on 1Gbps France(Paris) Server
https://www.speedtest.net/result/8743894889

Conclusion
VMware ESXi trial license only valid for 60 days. So it is recommended to backup your server files before its free trial get expired.
If VMware ESXi is not running, that means your VM(Virtual Machine) is also not running. So your Windows Server would not be accessible.
However, you should register a legit account at vmware.com and may ask for a free license key.
Following the previous article about Guest OS deployment we are now ready to install Windows Server 2016 on VMware vSphere. The steps we’ll review here apply pretty much to both physical and virtual installations. The purpose of this exercise is to learn about the latest features of Windows Server 2016 operating system and also use this one as a template for the deployment of custom images based on this version of Windows Server.
There are multiple solutions that we can adopt to achieve this. Probably the easiest and the cleanest would be leveraging the setup through a SysPrep utility built into Windows and it’s unattended file. We’ll couple this technology with Customization Specification Manager utility available in vCenter. More to cover in a separate article.
With regards to the process to install Windows Server 2016 let’s make sure we meet at least the minimum requirements:
| Description | Minimal System Requirements |
|---|---|
| CPU architecture | x64 |
| CPU clock rate | 1.4 GHz |
| RAM | 512 MB (with ECC or similar technology) |
| Disk space | 32 GB |
| Network adapter | 1x Ethernet (1Gb or faster) |
And of course adjusting them where required.
If not done already as part of the previous step let’s download the installation file from the Microsoft website. Let’s go for the ISO option and connect it to the Virtual Machine CD/DVD device.
At this point we are ready to start.
Install Windows Server 2016 on VMware vSphere
As soon as the ISO file is mounted and after starting the VM the Windows Server 2016 will boot and start loading the drivers for the Virtual Hardware.

After a few seconds we are ready with the main installation option to select the input locale and language settings.

At this point we are ready to start the installation. As a side note we can also use this procedure to repair a computer which will follow a different wizard.

From this screen we can select the desired Windows Server 2016 operating system flavor. For this instance we’ll go for the Full Desktop Experience. Alternatively we can also select the installation with no GUI. Everything is available through command line.

We are now ready to accept the license agreement to proceed with the installation.

In this step since this is the first installation let’s go for the custom option.

In this screen we can now select the Drive where to install the operating system therefore creating the “system drive” For physical installations using scsi storage it is also possible to load the vendor specific drivers to access the intended drives. In this case with a default Virtual Hardware this step is not required.

Upon confirmation the wizard installer has now all the required information to carry on with the installation process. This process is fairly quick. In my case it takes only a few minutes.

Let’s provide a Password for the Local Administrator user and click on Finish.

The installation process will now present the Desktop form where we can carry on with the configuration setup.

This concludes this quick step about the install Windows Server 2016 on VMware vSphere. On a final note there are a few things I configure generally to make the machines in my environment more responsive:
- Disable all graphic effects but leave “Smooth Edge for Screen Fonts”
- Use a custom Virtual Paging File Size with 1.5 rule (Set min/max to allocated RAM x1.5)
- Enable Data Execution Prevention (DEP) only for Windows essential Programs
- Install VMware Tools for Virtual Machines Guests
In the next article the steps to install Windows Server 2016 VMware Tools.