В этой заключительной статье цикла, описывающего развертывание веб-сайта на базе IIS с поддержкой PHP и MySQL, мы опишем типовой сценарий установки на нашем сервере «движка» сайта на примере самой популярной на данный момент системы управления контентом (CMS) блогового типа — WordPress.
Итак, предполагается, что на нашем сервере уже установлены:
- IIS с поддержкой PHP (Установка IIS с PHP на Windows)
- Система управления БД MySQL (Установка MySQL на Windows)
- Опционально, для удобства работы с базами данных MySQL можно установить скрипт phpMyAdmin.
Автоматическая установка WordPress
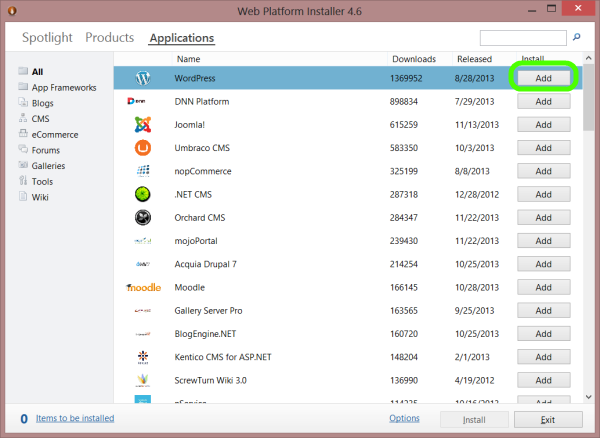
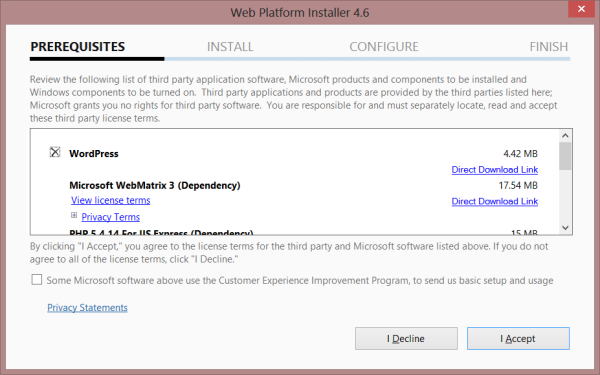
Проще всего развернуть сайт с WordPress с помощью, уже знакомого нам по предыдущим статьям цикла, универсального установщика Microsoft Web Platform Installer (Web PI). Запускаем его и в поле поиска вбиваем wordpress.
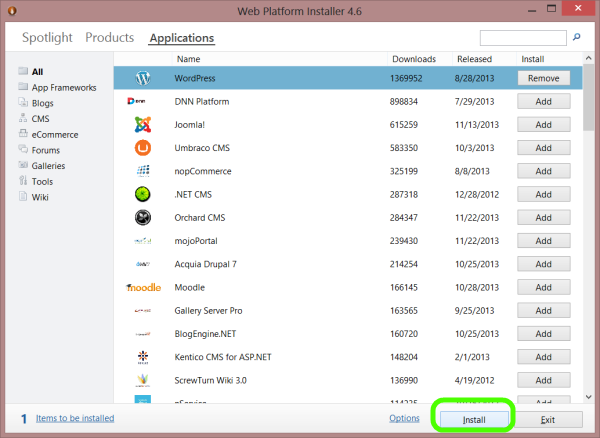
Находим в списке продуктов WorpPress, нажимаем Add, а затем Install.

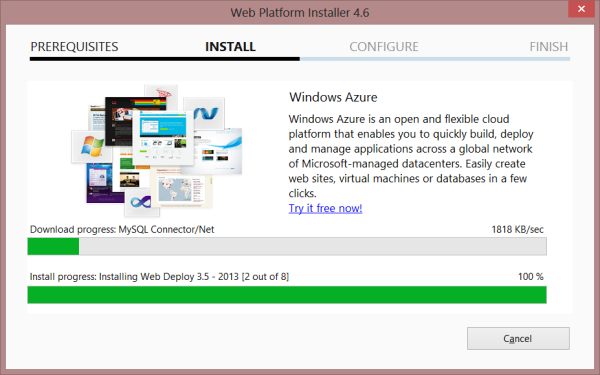
В процессе развертывания сайта WordPress, Web PI автоматически создаст новую базу данных MySQL и пользователя (имя БД, пользователя и его пароль будут отображены на экране установки, в случае необходимости их можно сохранить).

Также будет создан отдельный сайт IIS, живущий на определенном порту (номер порта генерируется установщиком). В нашем примере был создан сайт на порту 30205 с адресом http://localhost:30205 .
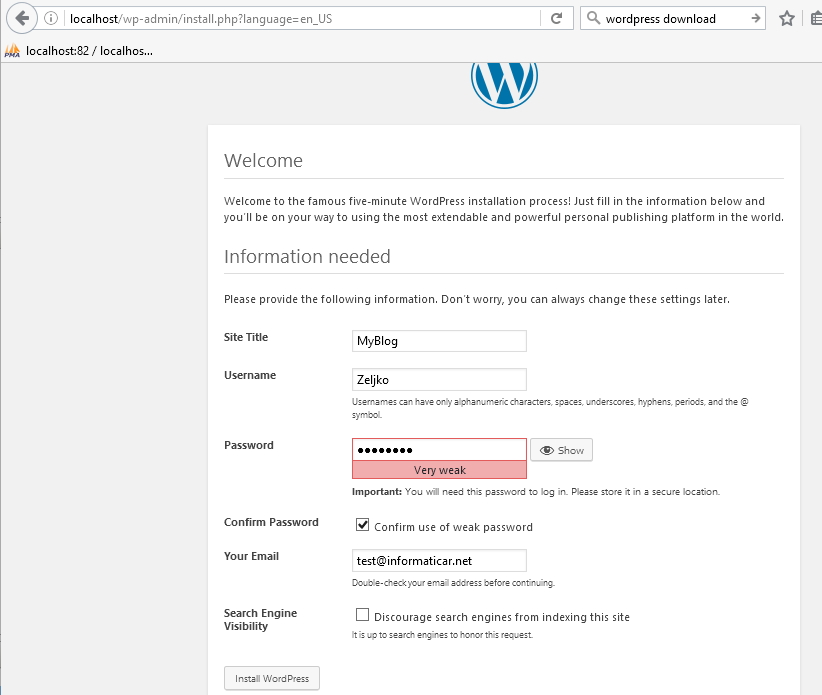
После завершения установки в браузере автоматически откроется новое окно, в котором необходимо заполнить следующие поля: заголовок сайта, имя администратора сайта, пароль и e-mail администратора сайта WordPress.

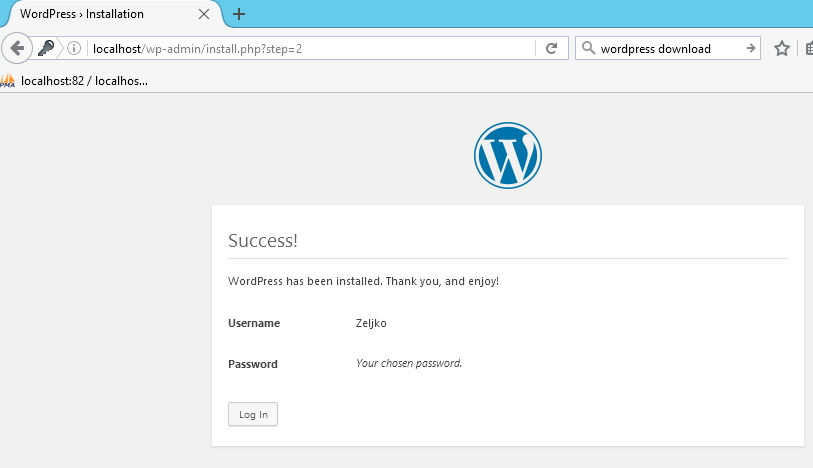
Для завершения установки осталось нажать кнопку Install Wordpress. Дождитесь выполнения скрипта, после чего можно перейти в панель управления WordPress по адресу http://localhost:30205/wp-login.php

Итак, перед нами открылась административная панель WordPress (админка) и можно приступать непосредственно к настройке и наполнению сайта.
")
Существенный недостаток установки WordPress с помощью WebPI – большое количество «лишних» компонентов, которые устанавливаются вместе с ним.
На скриншоте выделены компоненты, которые были установлены вместе с CMS WordPress. Как видите, их не мало.
И самое главное, вместо нашего «родного» сервера IIS для установленного сайта будет использоваться отдельный инстанс IIS Express 8.0.

Ручная установка WordPress на IIS
Прежде, чем приступить к ручной установке WordPress на Windows 8, нужно выполнить ряд подготовительных операций.
В первую очередь необходимо создать базу данных для хранения данных WordPress и пользователя с правами доступа к этой базе данных. Создать базу и пользователя можно через phpMyAdmin, либо непосредственно из командной строки MySQL.
Открываем командную оболочку MySQL (MySQL Command Line Shell), указываем пароль администратора сервера MySQL (root) и последовательно выполняем такие команды:
mysql> CREATE DATABASE wordpressdb;
mysql> CREATE USER 'wordpressdb_user'@'localhost' IDENTIFIED BY '[email protected]';
mysql> GRANT ALL ON wordpressdb.* TO 'wordpressdb_user'@'localhost' IDENTIFIED BY '[email protected]';
Итак, мы создали БД wordpressdb и дали на нее полные права пользователю wordpressdb_user.
Следующий этап — создание отдельного сайта на IIS. Создадим новый каталог (например, с именем MyWordPress) в папке C:inetpubwwwroot .
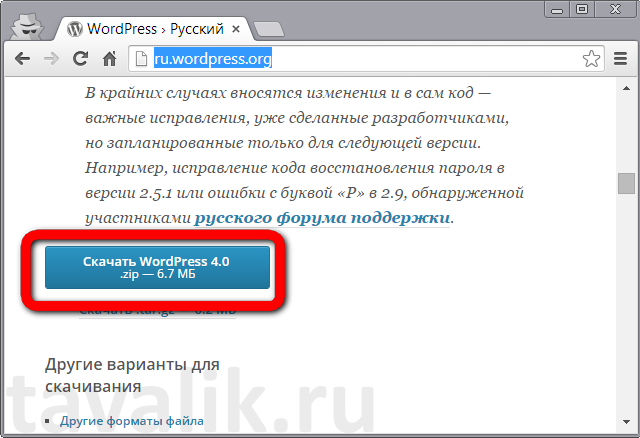
Качаем архив с последней версией WordPress с этой страницы https://wordpress.org/download/ (на момент написания статьи это WordPress 4.0) и распаковываем его содержимое в каталог C:inetpubwwwrootMyWordPress.

Примечание. Не обязательно устанавливать WordPress на отдельный сайт, можно установить его в отдельный подкаталог уже существующего сайта.
Откроем консоль управления IIS (Internet Informations Services Manager — C:WINDOWSsystem32inetsrviis.msc) и щелкнув по разделу Sites, выберем Add Website.
 В окне указываем имя сайта, путь к каталогу сайта и порт (мы запустим сайт на порту 8080).

Затем в консоли перейдем на созданный сайт (MySitePress) и дважды щелкнем по пункту Authentication.

В разделе аутентификации выберем пункт Anonymous Authentication и в панели Actions нажмите Edit..

В открывшемся окне изменить настройку на Application Pool Identity.

Далее предоставим нашему пулу приложения права записи на каталог, в котором находится сайт WordPress. Сделать это можно с помощью утилиты icacls:
icacls "C:inetpubwwwrootMyWordPress" /grant "IIS APPPOOLMySitePress":(OI)(CI)(RX,W)

Итак, мы настроили IIS, и можно переходить непосредственно к установке «движка» WordPress.
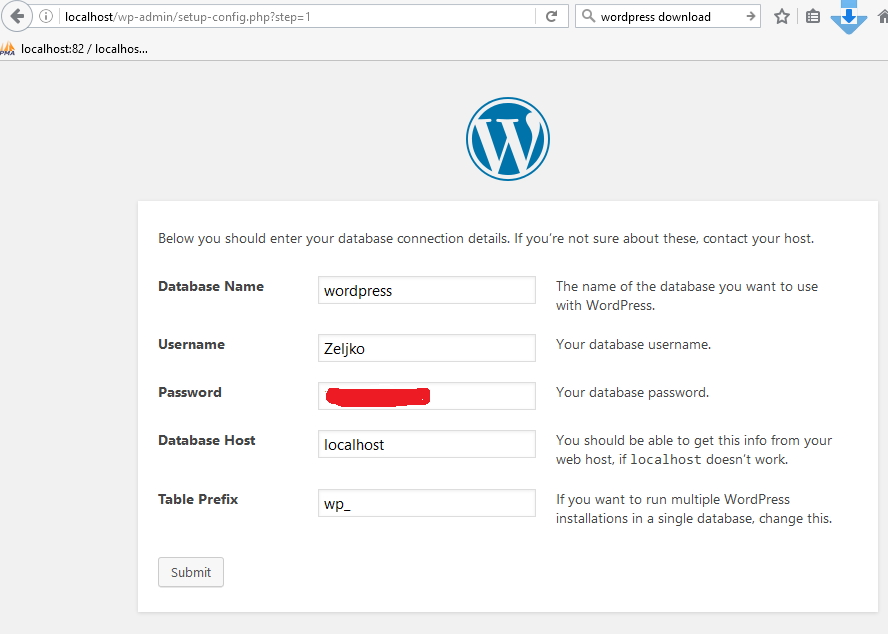
Откроем наш сайт в браузере (http://localhost:8080) В открывшемся окне заполним параметры подключения к БД:
Database name : wordpressdb
Database username : wordpressdb_user
Database password : [email protected]
Database host : localhost
Table prefix : mywp_ (префикс в общем-то произвольный и нужен, если в дальнейшем в этой же базе будут находится таблицы других сайтов WordPress )

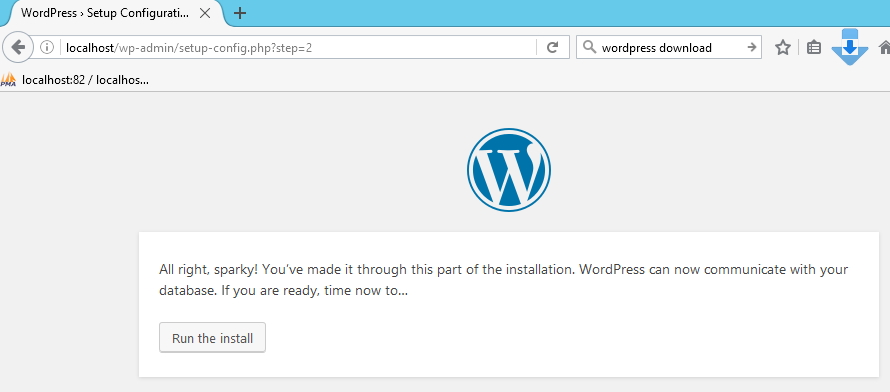
После этого должно открыться окно, аналогичное представленному на 3 скриншоте. Далее все по аналогии.
Советы
- Для ускорения выполнения скриптов PHP в IIS рекомендуется установить специальный модуль-акселератор – Windows Cache Extension (или аналог)
- Для формирования SEO-friendly URL адресов нужно установить модуль IIS URL Rewrite
This tutorial will cover setting up WordPress on Windows Server 2012 R2 with IIS, PHP and MySQL. Topic is only installation procedure (since it can be tricky on Windows Server 2012R2) not the security or WordPress configuration.
You can use xampp or lamp bundles, but I find this better and more secure.
First, let’s install IIS.
IIS
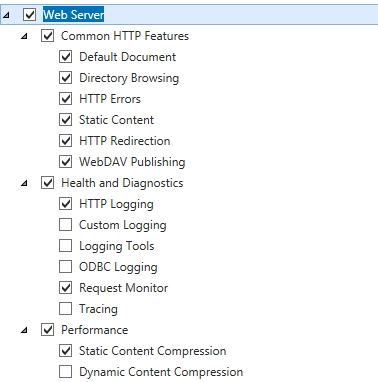
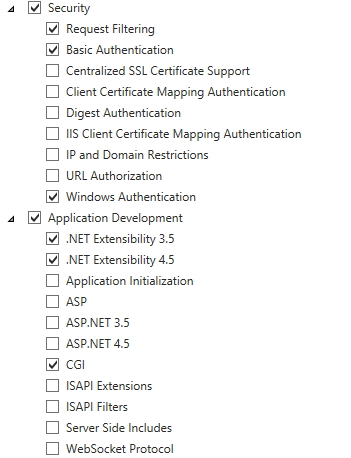
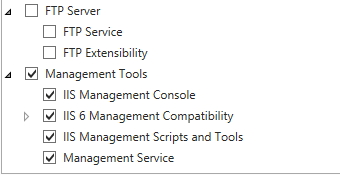
Server Manager |Manage | Add Roles and Features | Next |Next |Under Server Roles choose Web Server (IIS) |choose all options from the screenshots | Next | Install |After setup is done – Close

Next installation
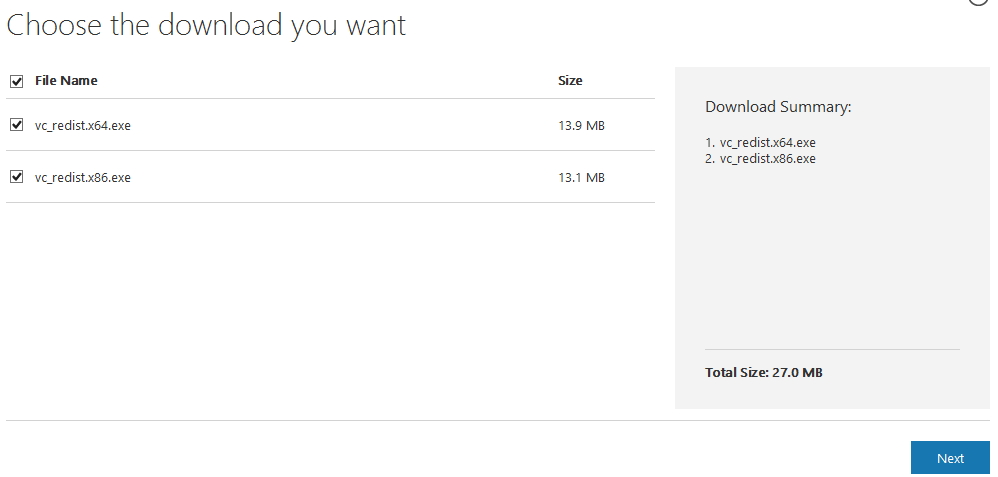
Visual C++ Redistributable for Visual Studio 2015 – we need both x32 and x64 versions installed
https://www.microsoft.com/en-us/download/details.aspx?id=48145
Installation is simple (Next – Next) and I won`t be covering it.
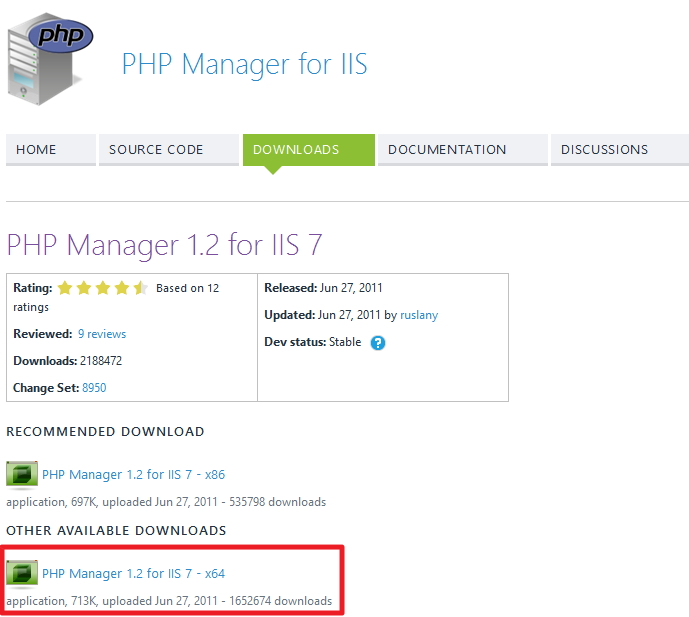
PHP Manager for IIS – installation is also pretty simple and I won`t be covering it. You only need x64bit version of installation
https://phpmanager.codeplex.com/
PHP
PHP 7.0 is current version. We need VC14 x64 Non Thread Safe in ZIP version
http://windows.php.net/download/
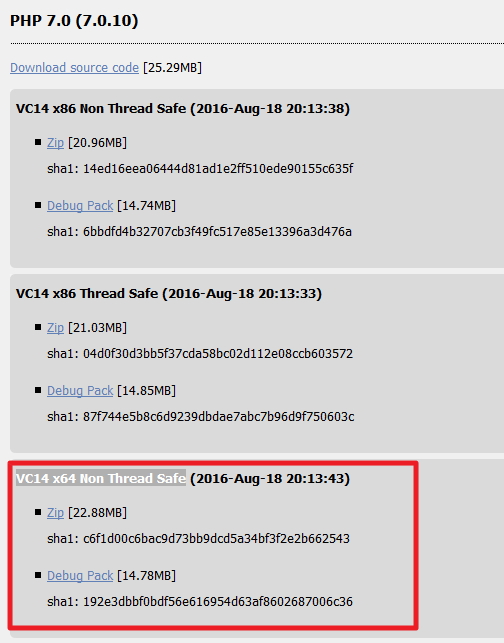
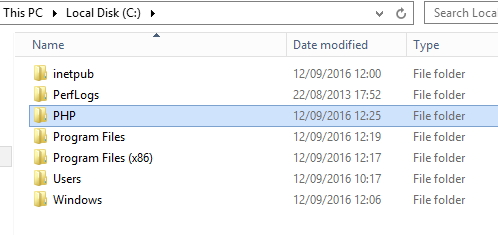
After downloading ZIP, extract it to your disk (root or sub directory it is up to you) I`ll be extracting mine to C:PHP
MySQL
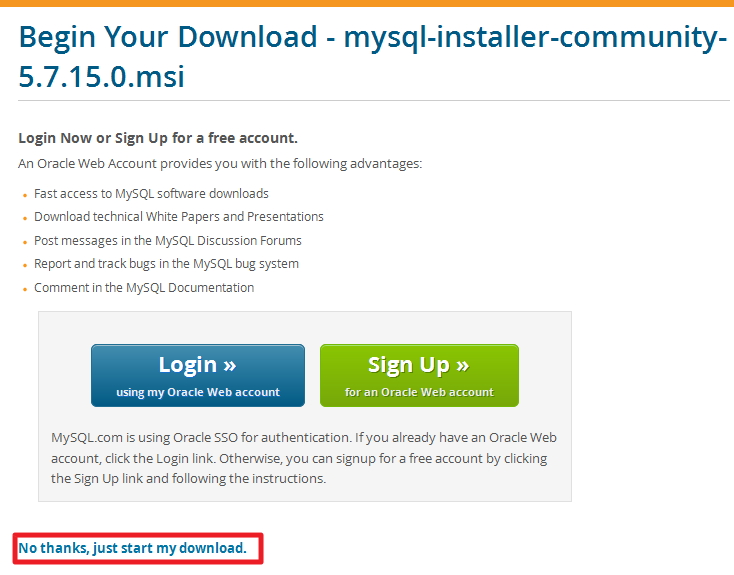
Choose MYSQL Community Server | MySQL Installer MSI
http://dev.mysql.com/downloads/
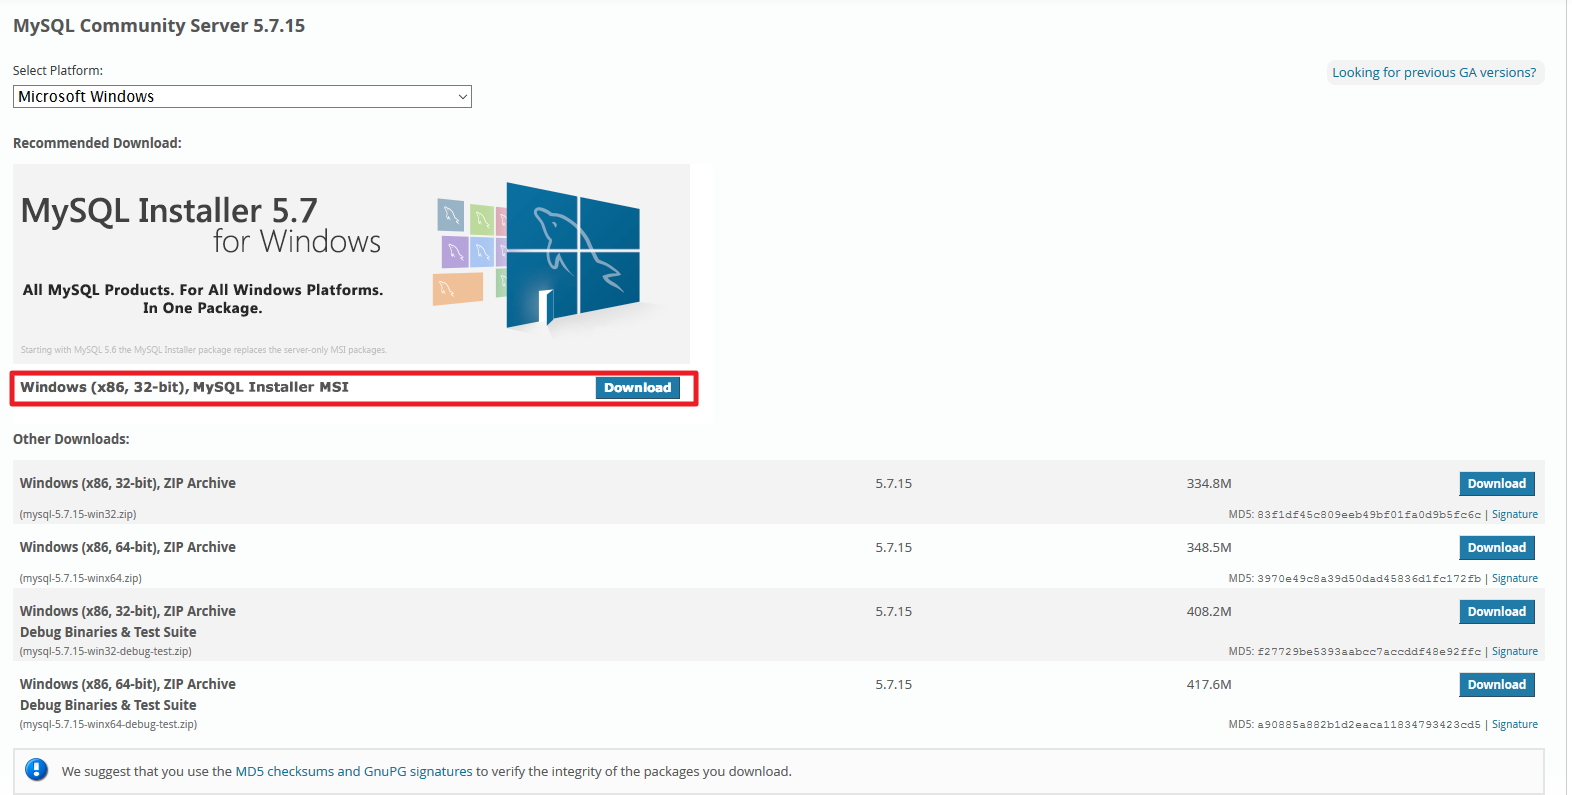
Before download starts, you`ll be asked to Login or Sign UP. Don`t bother, there is smaller text bellow that says “No thanks, just start my download.”
I won`t be going through whole install procedure, I will just mention important things.
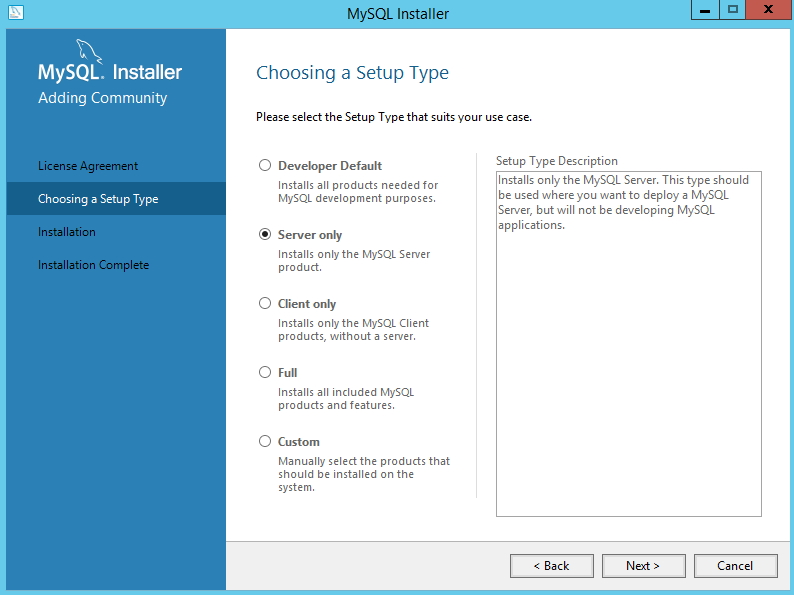
For this tutorial I choose Server only install |Next
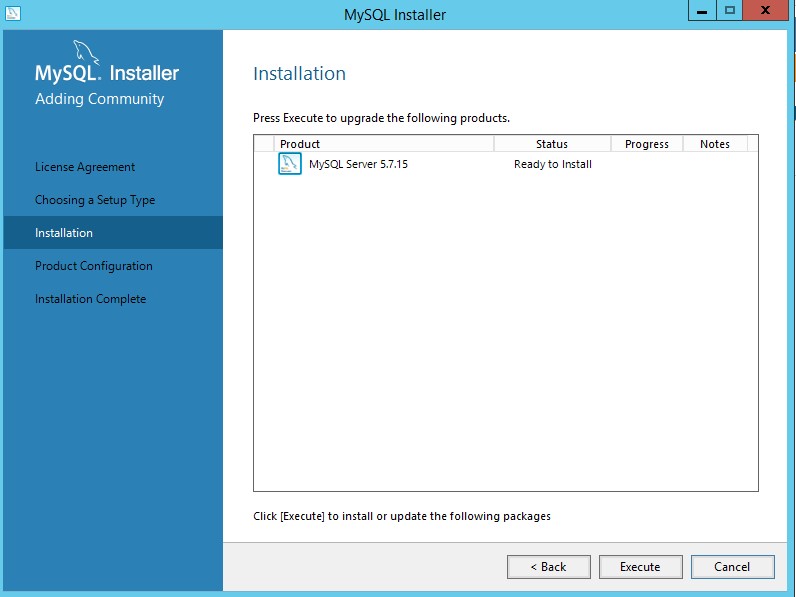
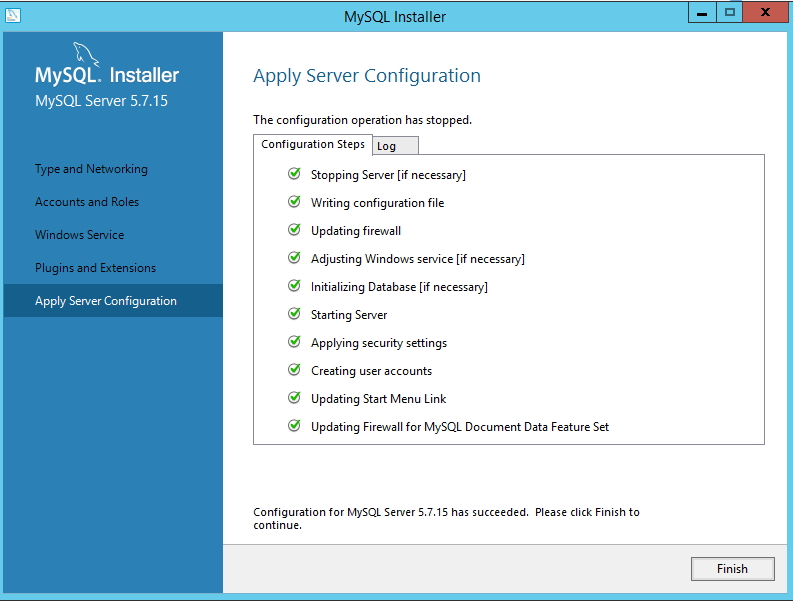
Execute
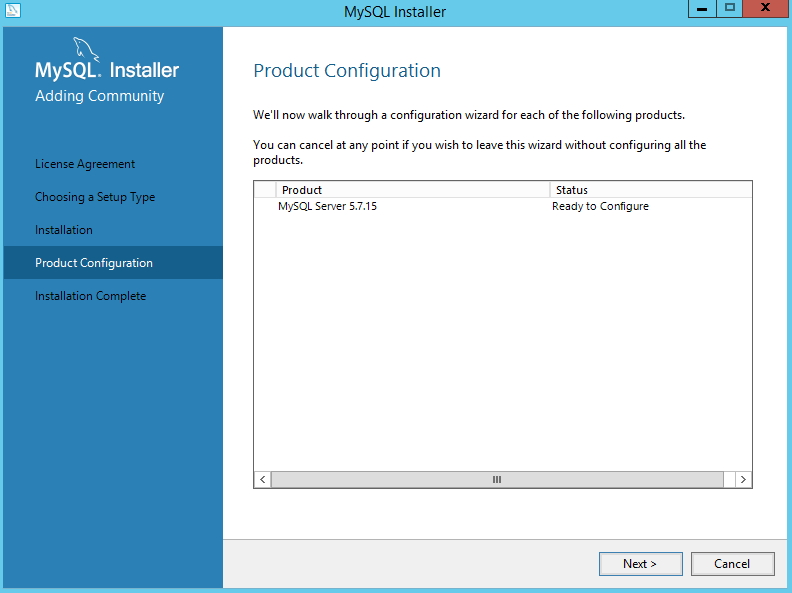
Next

Next
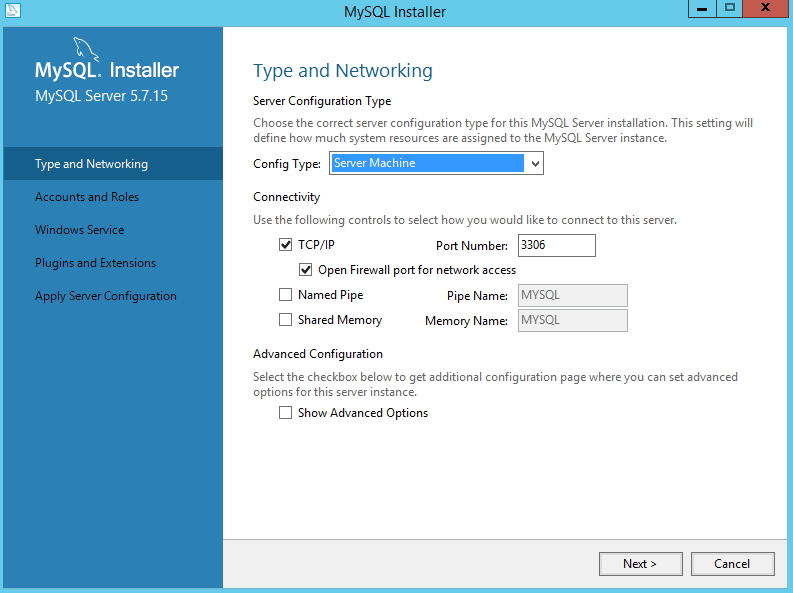
Config Type – Server Machine | Connectivity – TCP/IP – Port Number 3306 |Next
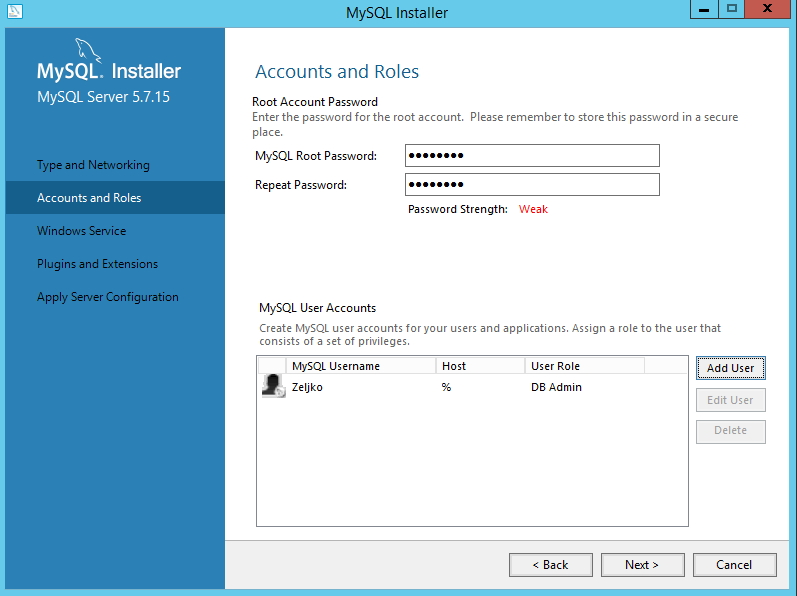
You need to define root account password. Under MySQL User Accounts field define other accounts for your DB so that you don`t have to use root account for your DBs.
Ignore my password strength – it is easier and faster in the lab environment with simple password, but for your production environment you should always use strong passwords.
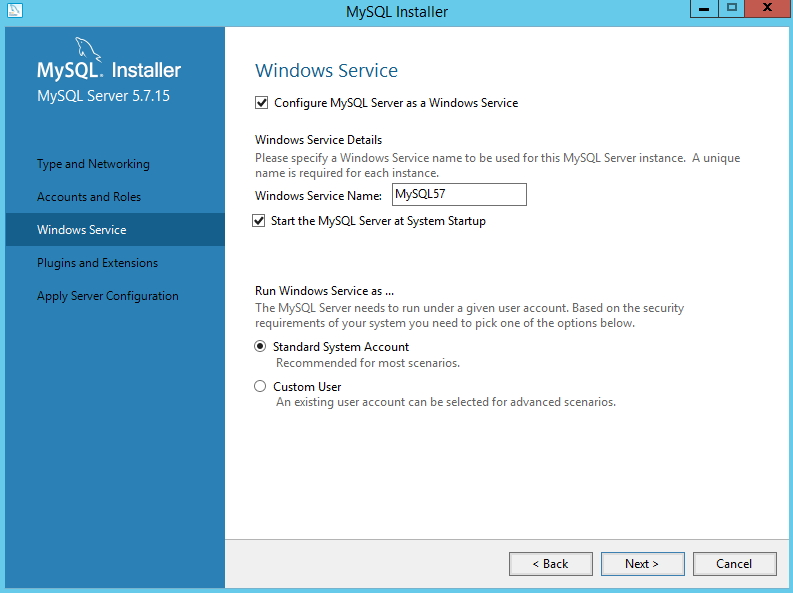
I recommend that you Configure MySQL Server as a Windows Service. You can also define custom user account for that service (recommended).
Next
Execute
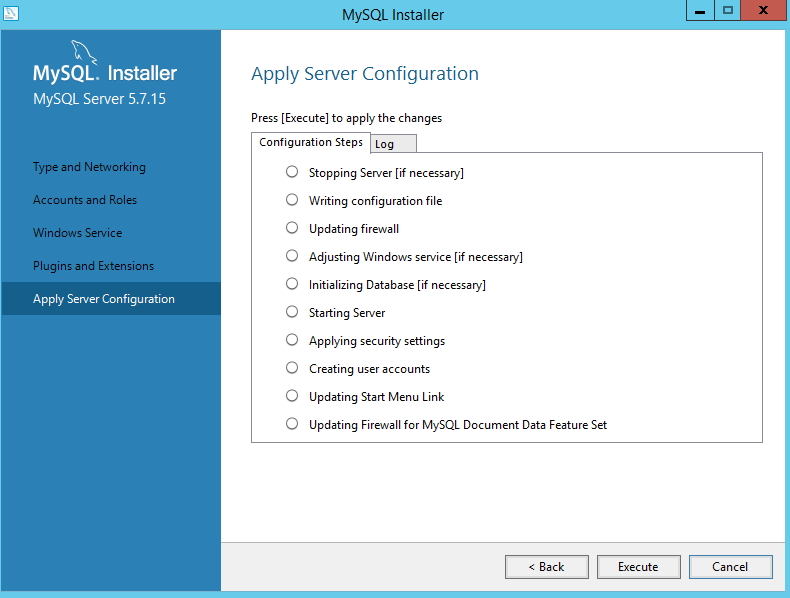
Success | Finish
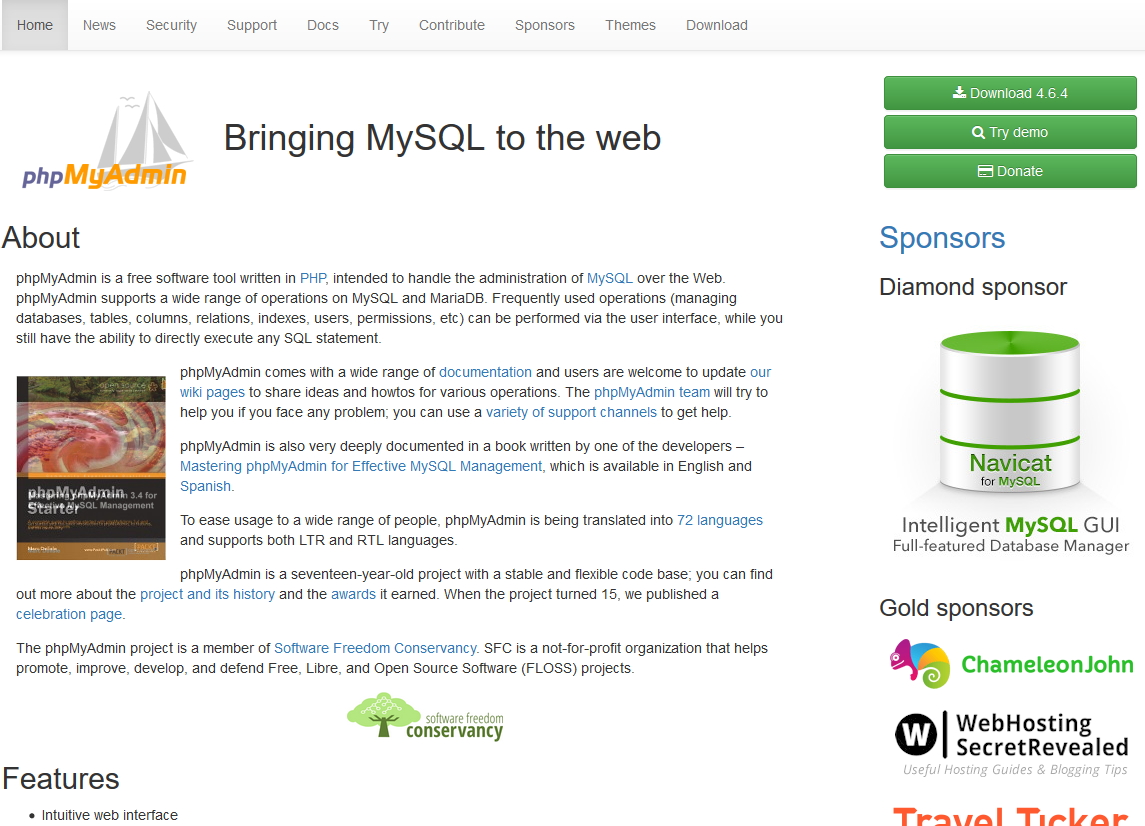
For easier management of MySQL I installed phpMyAdmin
https://www.phpmyadmin.net/
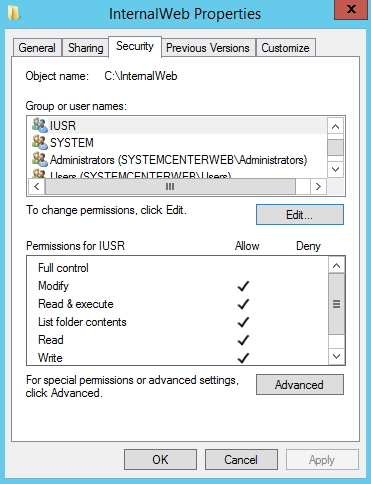
I don`t want my phpMyAdmin to be accessible from the internet so I done following:
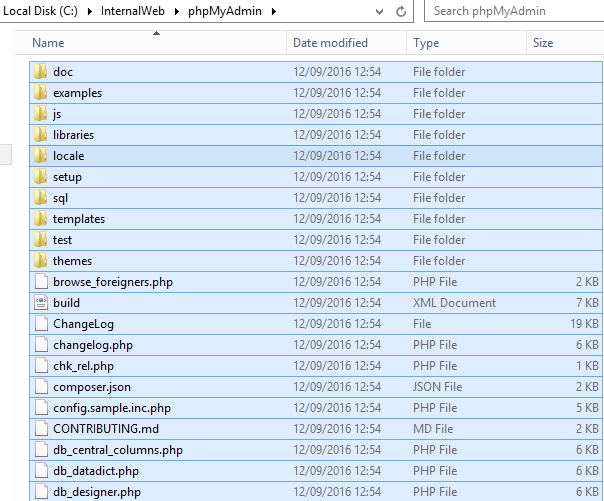
In the root of my C disk I created new folder called InternalWeb. In InternalWeb folder I created subfolder phpMyAdmin
I copied all from downloaded phpMyAdmin.zip into created folder.
I gave Modify permissions to user IUSR to folder InternalWeb and subfolder myPhpAdmin
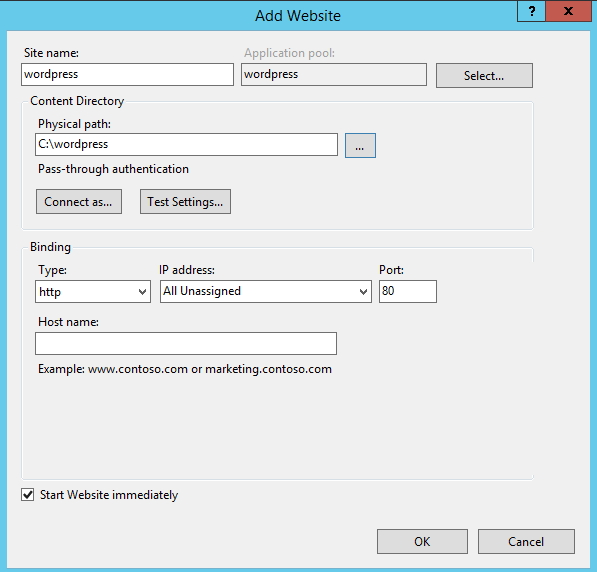
Open IIS Manager |expand Server |right click on Sites |Add Website
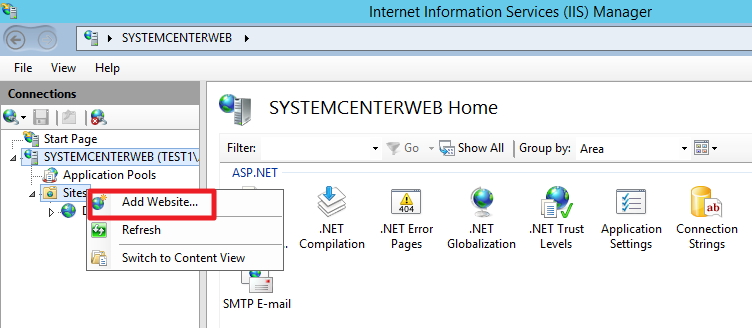
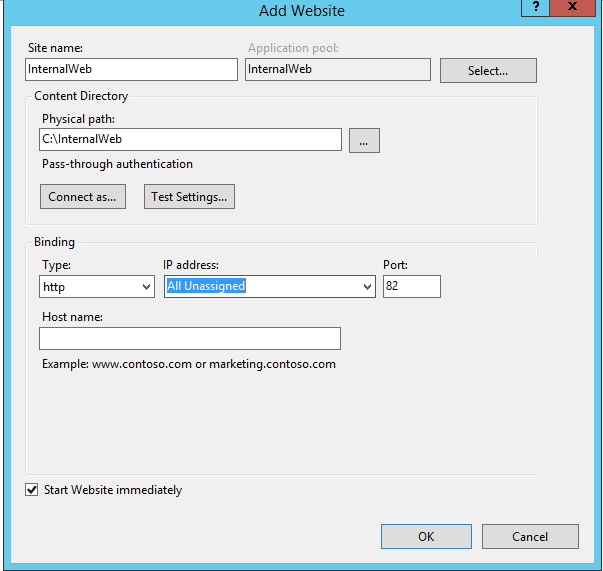
I added Site name, path to site and changed port to 82. That port is closed on firewall and phpMyAdmin will only be accessible for management on server. You can also choose IP address instead of All Unassigned |OK
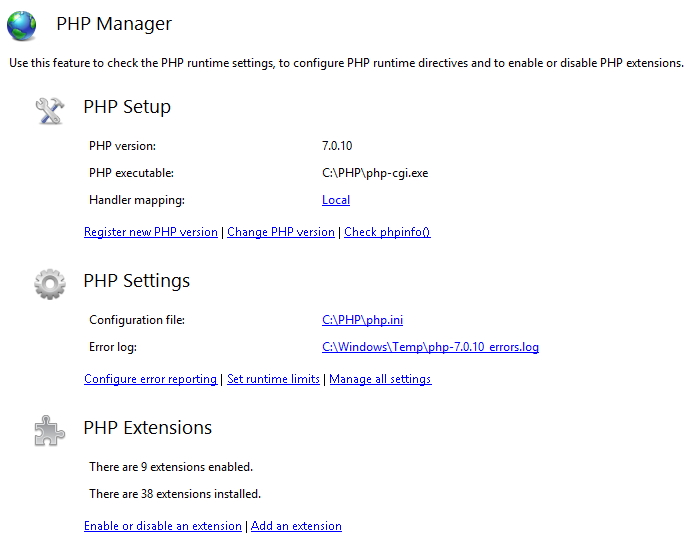
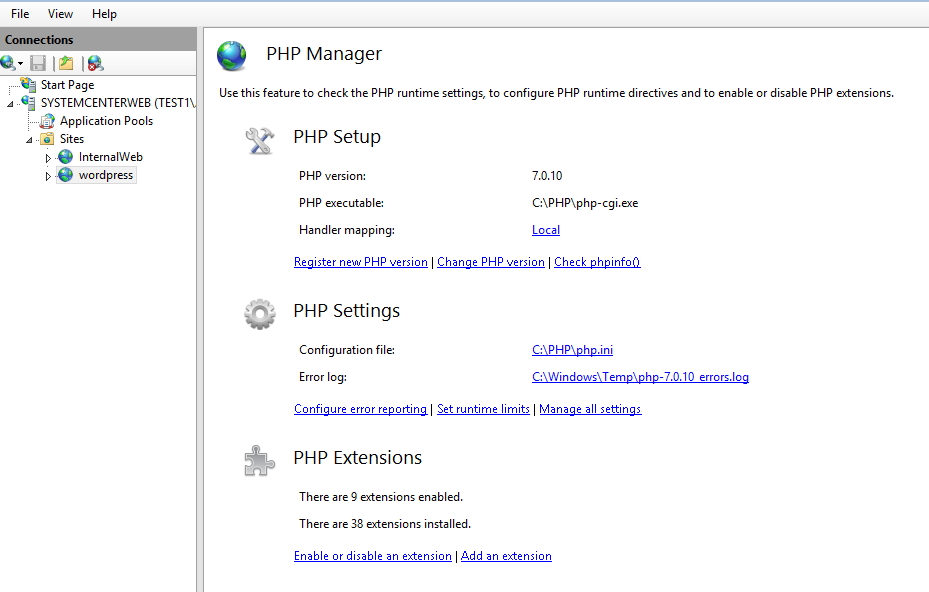
New website is created | Click on it and choose PHP manager from the middle

PHP is not enabled. We have to enable it.
Choose Register new PHP version
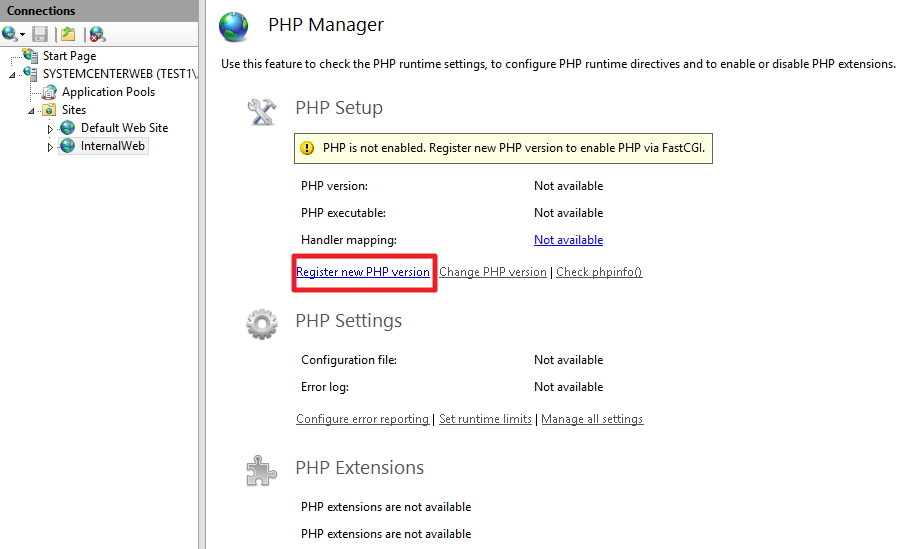
Choose php-cgi.exe from the folder you extracted PHP installation in the beginning
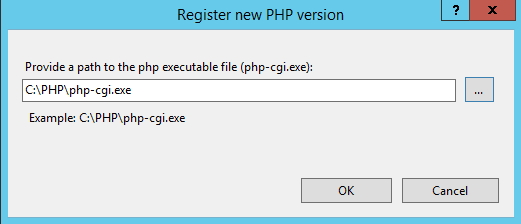
We registered PHP
After this step, head on to your web browser and depending on where and how you put your phpmyadmin enter address in URL
Mine is http://localhost:82/phpmyadmin
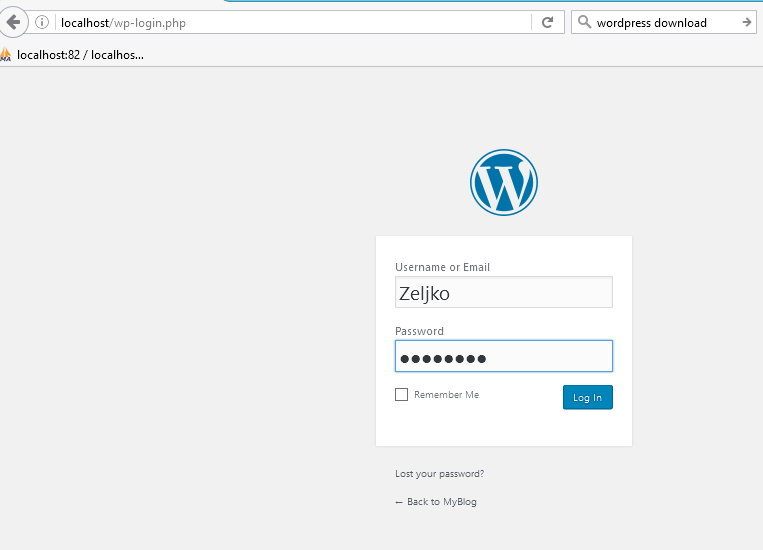
Enter username and password you created during MySQL installation |GO
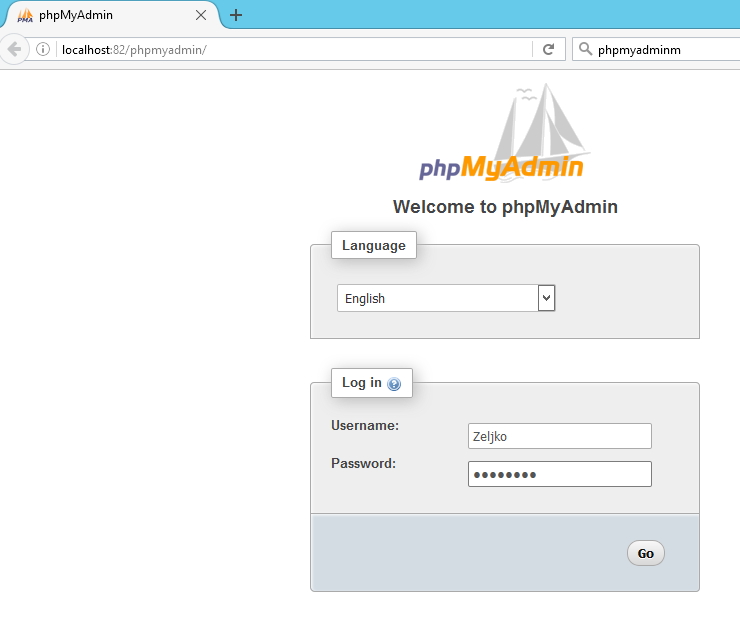
If you done everything exactly as described in this tutorial so far you`ll be able to login
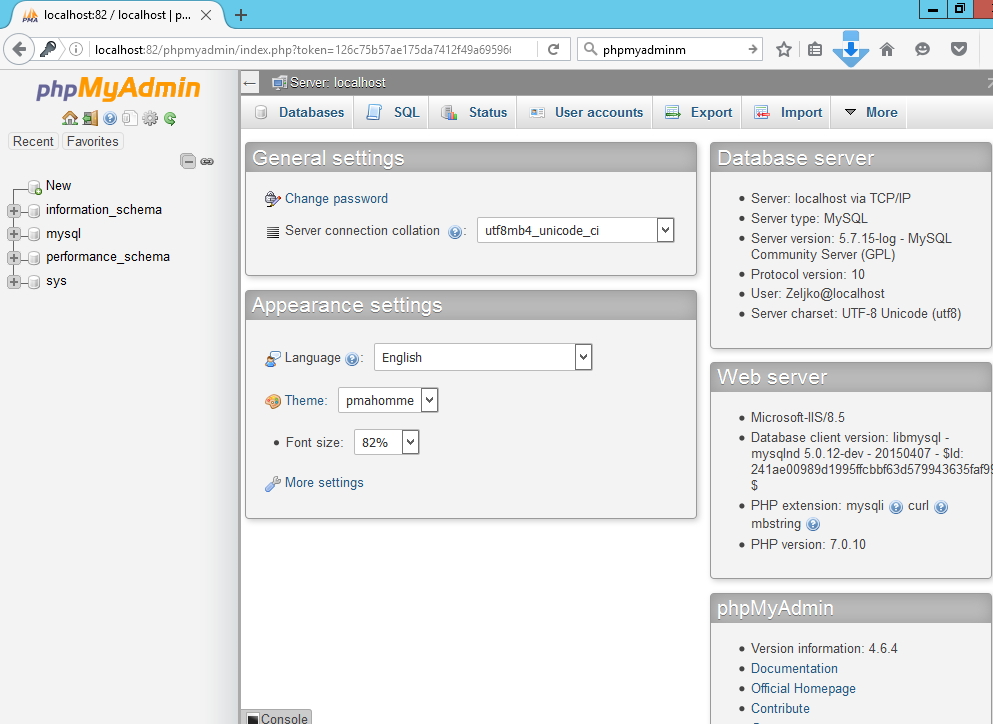
Now, while we are still here let`s create database for our WordPress installation
New
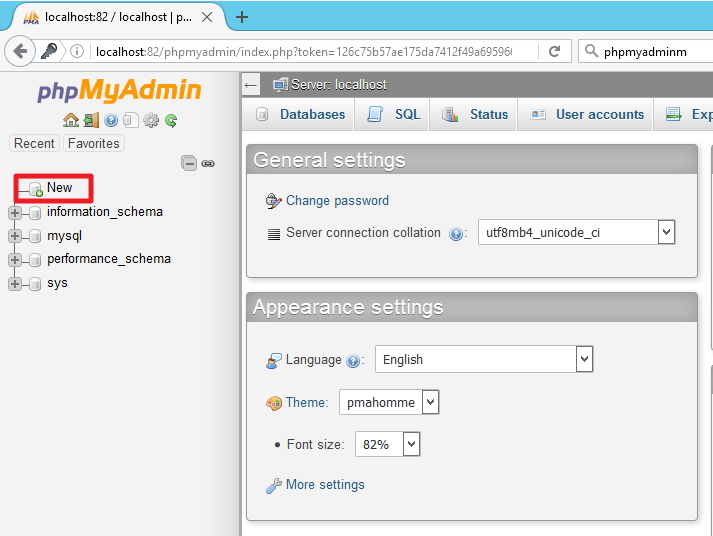
I entered “wordpress” for DB name and left all other settings as default (you can of course adapt settings to your needs) |Create
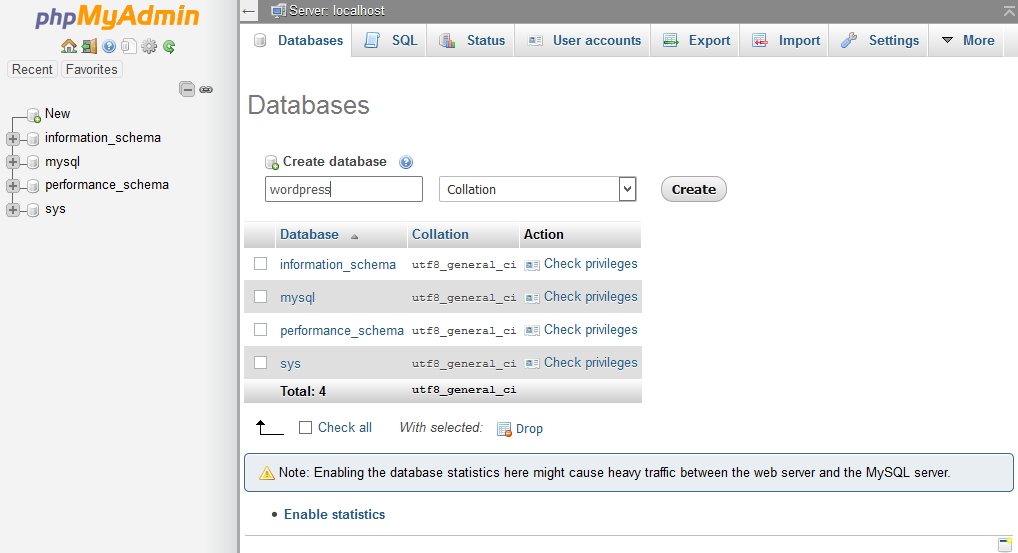
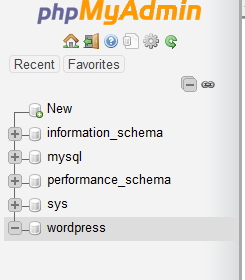
Database wordpress is created
WordPress
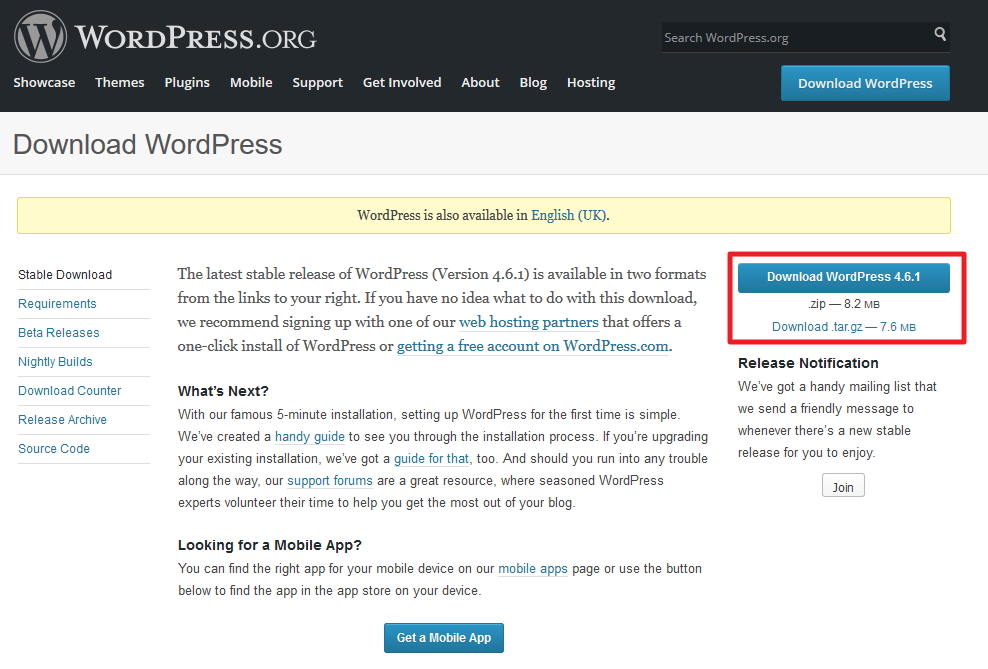
Download latest ZIP from here
Generally, I don`t user inetpub folder (supplied by IIS) for my websites. It is old habit I have since Server 2003 when it was vulnerability and all the attacks were usually pointed to that folder.
I will create folder in the root of C: named wordpress and extract wordpress install files into it. User IUSR should have permissions on it (see phpMyAdmin directory example above).
This time before creating new website in IIS I`ll do something else first.
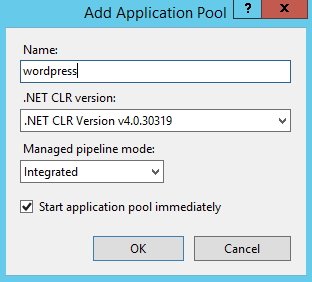
Open IIS Manager |expand Server |right click on Application Pools |Add Application Pool
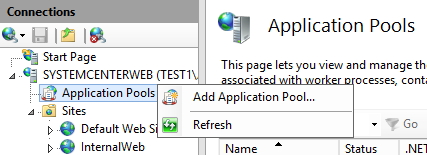
I just entered name and left all the other options as default | OK
Application Pool “wordpress” should be created and Started
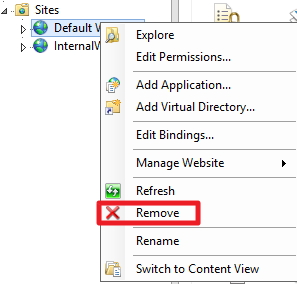
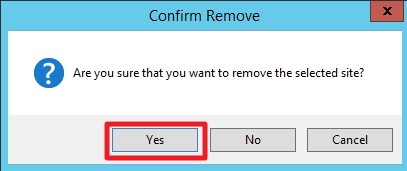
Before creating new website go to Sites |Default Web Site |right click | Remove |Yes . I don`t usually want default website to be active. Be sure to check if you have any webs or apps in it already before deleting it.
Now, follow procedure for creating new website that I already covered in this tutorial (phpmyadmin). Be sure to select “wordpress” Application Pool (or however you called it) – you can also choose IP address instead of All Unassigned |OK
Check once again PHP Manager and enable it for new website in case you already haven`t (see IIS settings for myphpadmin above).
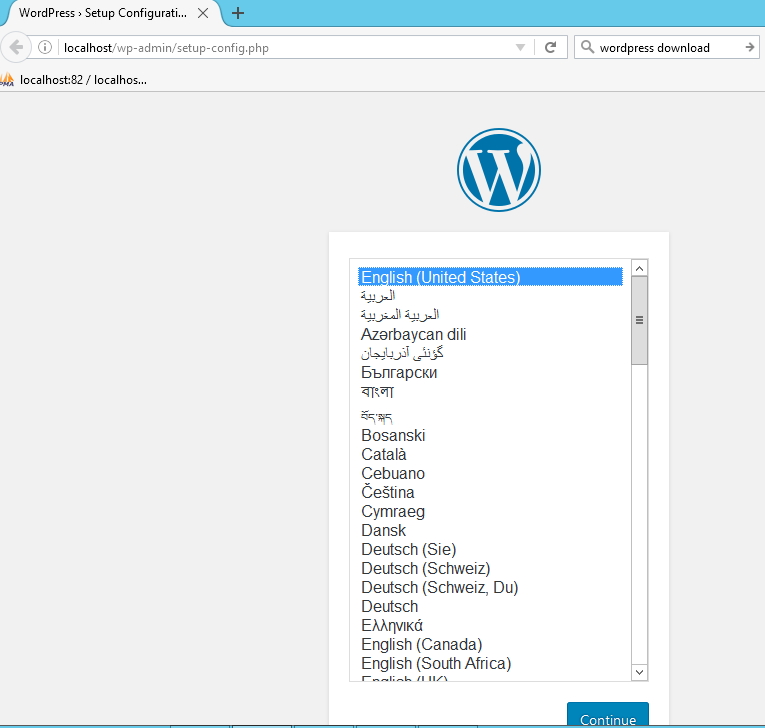
And now final step – in your web browser enter localhost – you should be greeted with setup procedure | choose language | Continue
Let`s go
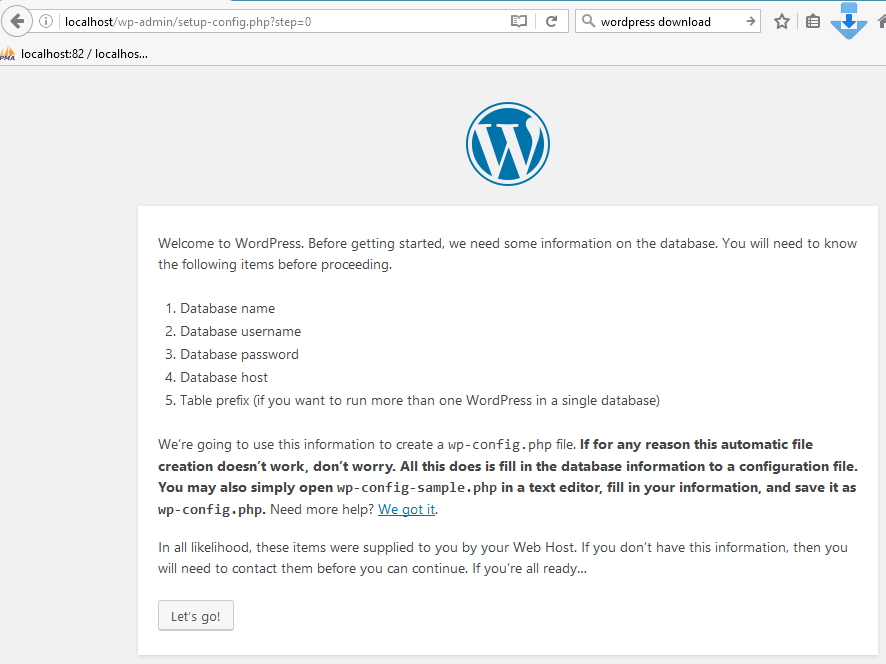
Enter DB name (you already created database in phpmyadmin) username and password for DB (created in MySQL setup) |Submit
Run the install
Enter parameters for your new website – username and password are for wordpress administration. Use only strong passwords (long with special characters included) because this part is accessible from the internet. |Install WordPress
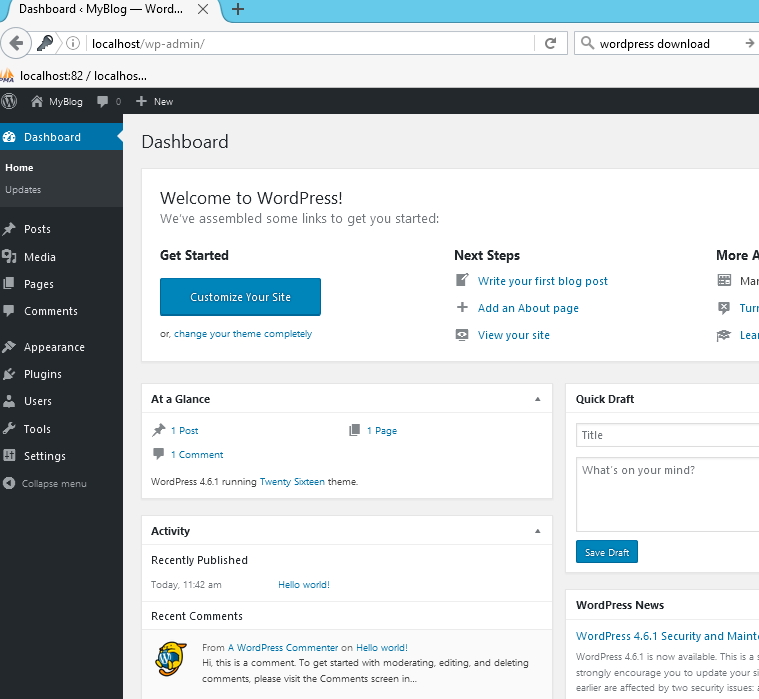
Success |Log in
You are now taken to the administration part of your WordPress installation (login with user and pass just defined)
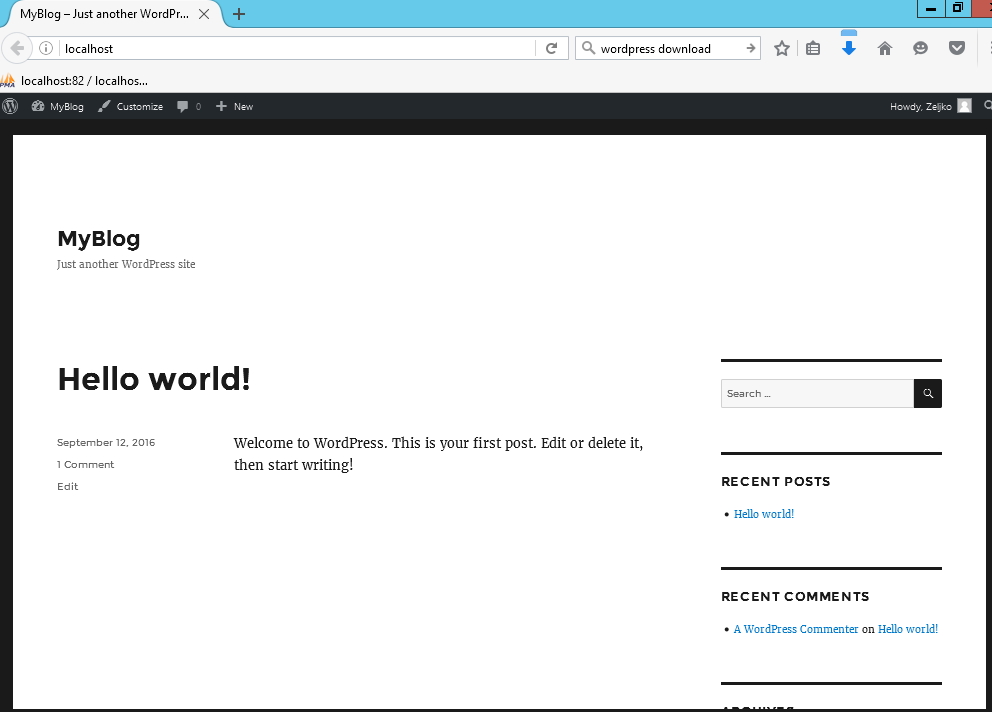
And If you enter just localhost you`ll be greeted with your new shiny website
Delete install.php from your wordpress/wp-admin folder after install finishes.
Conclusion:
There you go, WordPress is installed and working on your Windows Server 2012 R2. Security and configuration is another topic and I haven`t touched it here in details. Be sure to always stay up to date with all your installs, have AV installed, firewall in place and remember – always use strong passwords. There is no absolute security, but this with these little security measures you`ll be better protected.
Disclaimer
Microsoft’s Web Platform Installer (Web PI) makes installing applications a breeze. In a recent blog post I covered just how easy installing IIS has become using Web PI. In this walkthrough I’m going to cover installing WordPress, PHP, and MySQL using Web PI. I remember the days when installing these applications was a manual process. Depending on your level of expertise it was quite a challenge to get everything working properly. If you’ve ever tried to uninstall and then reinstall MySQL you know what I mean. Now thanks to Web PI with just a few clicks of your mouse you can have WordPress, PHP, and MySQL installed on Windows Server 2012 R2 in a few short minutes.
Setting up Your Site
On my test server I have a new installation of Windows Server 2012 R2 with IIS 8. Using the default site you’ll see the familiar IIS 8 welcome page called IISStart.htm. This page is automatically created for the default site when you install IIS. Be sure to delete it once you deploy your files.

Launching Web Platform Installer
After installing the IIS role on your server you’ll be able to launch Web PI directly from IIS Manager by clicking on Get New Web Platform Components . The real power and ease of using Web PI to install WordPress, PHP, and MySQL is evident after you choose WordPress and Click Install. Web PI will automatically select the other application dependencies and include them in the installation.

Choosing MySQL Root Password
Web PI will prompt you to choose a password for the root administrator user for MySQL. Be sure to make a note of this password because it will be needed later and resetting the MySQL root password manually can be challenge.

Click Accept. The installation will start running.

Web PI will download and install all the necessary applications. It will complete within a few minutes.

Configuring the site for IIS
At this stage of the installation Web PI will prompt you to choose a few settings for the IIS configuration. You can either install WordPress on an existing site or select New Web Site. I am going to install WordPress into the root of my site so I am using “/” for the application name. If you plan on running WordPress from a subfolder then enter a name for the application. Once the required parameters have been entered you will be able to click Continue.

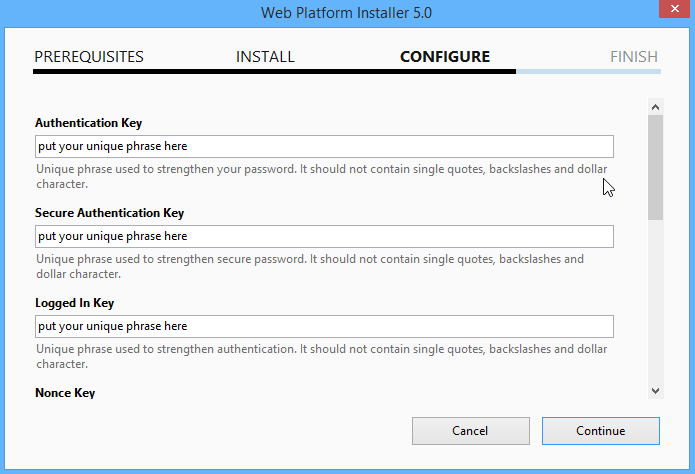
You will be prompted to enter a few unique phrases to strengthen the password security.

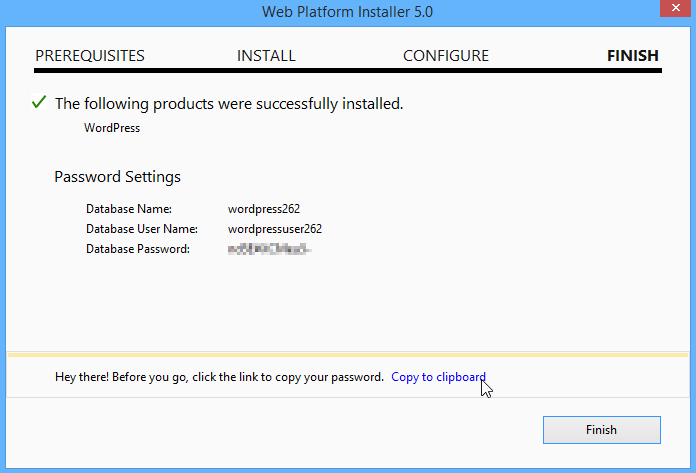
Once Web PI completes the installation process your new MySQL Database Name, Database User Name, and Database Password will be displayed on the screen. Make a note of these settings. You will need them later to log into the database.

Installing WordPress
Once Web PI completes its installation process the WordPress installer will be launched. This final step of installing WordPress completes quite quickly. Enter the Site Title, the admin username and password, and your email address. Click Install WordPress to finish setting it up.

WordPress is now ready for use. Click Log In to go to the WordPress Dashboard.


Securing WordPress
Any serious web developer or server admin knows how important it is to secure your web site. So after I install WordPress the very next thing I do is secure it. There’s a great WordPress plugin called Limit Login Attempts which can help block automated brute force attacks to your login page. If you wanted to take it a step further you could even use Url Rewrite to block requests except for your own IP which I chose to do when my site was once targeted by brute force attacks. One other plugin you may want to consider is called Bad Behavior. This is a great plugin for mitigating link spam and the robots that deliver it. Combined with Akismet your site’s blog post comments will be spam free.
Summary
WordPress is one of the most widely used free CMS products. Installing WordPress on Windows Server 2012 R2 also requires PHP and MySQL. Now thanks to Web PI installing WordPress, PHP, and MySQl has never been easier. Your site will be up and running in mere minutes. After installation take some extra time to secure the login page and prevent comment spam. Thanks for reading.
![]() С пятёркой главных составляющих процесса создания сайта наверняка знакомы те, кто не единожды задумывался о создании своего интернет-проекта. Это тематика, домен, хостинг, движок сайта (он же CMS), ну и, собственно, сам контент (статьи, картинки, видео, подкасты и т.д.). Часто причиной откладывания в долгий ящик реализации своей задумки у многих становится отсутствие точки сборки. Без удачно выбранной тематики и умения грамотно писать уникальные статьи все креативные идеи оформления сайта с помощью инструментария движка так и останутся нереализованными фантазиями, а заранее прикупленные доменное имя и хостинг лишь бессмысленно пополнят статьи расходов личного бюджета.
С пятёркой главных составляющих процесса создания сайта наверняка знакомы те, кто не единожды задумывался о создании своего интернет-проекта. Это тематика, домен, хостинг, движок сайта (он же CMS), ну и, собственно, сам контент (статьи, картинки, видео, подкасты и т.д.). Часто причиной откладывания в долгий ящик реализации своей задумки у многих становится отсутствие точки сборки. Без удачно выбранной тематики и умения грамотно писать уникальные статьи все креативные идеи оформления сайта с помощью инструментария движка так и останутся нереализованными фантазиями, а заранее прикупленные доменное имя и хостинг лишь бессмысленно пополнят статьи расходов личного бюджета.
Чтобы сконцентрироваться сугубо на творческом процессе создания сайта, отбросим такие технические моменты, как покупка домена и хостинга. И создадим сайт на локальном веб-сервере IIS с помощью популярного движка для блогов – WordPress.
Созданный на локальном веб-сервере сайт можно постепенно пополнять статьями и иллюстрациями, формировать рубрики и разделы. Можно экспериментировать с дизайном сайта и изучать функционал движка. А уже после того, как сайт будет более-менее готов, чтобы его можно было представить широкой публике, останется только перенести его с локального веб-сервера на платный (или бесплатный) хостинг и зарегистрировать домен. Подробней об этой процедуре можно прочитать в статье «Сайт своими руками».
Как создать сайт на локальном веб-сервере IIS? Весь процесс создания сайта локально на компьютере в отдельных подготовительных этапах и рассмотрим ниже.
0. Оглавление:
- Запуск веб-сервера IIS
- Установка и настройка PHP
- Установка и настройка MySQL
- Скачивание и распаковка WordPress
- Подключение к базе данных MySQL
- Установка и настройка WordPress
1. Запуск веб-сервера IIS
Веб-сервер IIS поставляется в числе штатного функционала в каждой версии Windows, начиная с ХР. Чтобы запустить веб-сервер IIS, необходимо активировать эту штатную службу, ведь в системах Windows она предусматривается, но изначально находится в не активированном состоянии. Об установке веб-сервера IIS можно прочитать в статьях:
- Установка веб-сервера IIS 8 в Windows Server 2012 (R2)
- Установка веб-сервера IIS 7 в Windows Server 2008 (R2)
- Установка веб-сервера IIS 8 в Windows 8/8.1
Последней статьёй можно руководствоваться для активации веб-сервера IIS в Windows 7, поскольку принципиальных отличий в этом процессе между версиями операционной системы 7 и 8/8.1 нет.
Если тестовая веб-страница при введении в адресную строку браузера локального адреса
http://localhost
отображает приветственный веб-интерфейс IIS, значит, веб-сервер работает корректно.

И можно приступать к следующему этапу процесса установки WordPress на веб-сервер IIS.
2. Установка и настройка PHP
Для работы с веб-проектами на базе WordPress необходим компонент, который бы обрабатывал скрипты PHP и преобразовывал бы их в код HTML, понятный браузеру. Процесс установки компоненты PHP для веб-сервера IIS подробно рассмотрен в статье «Установка и настройка компоненты PHP для веб-сервера IIS».
3. Установка и настройка MySQL
Следующим этапом создания сайта на локальном веб-сервере будет установка СУБД MySQL и её настройка. После запуска службы MySQL необходимо создать на сервере базу данных, дав ей имя, соответствующее названию сайта, например testsite. Подробная инструкция по установке сервера MySQL и созданию новой базы данных в данной СУБД изложена в статье «Установка и настройка MySQL + HeidiSQL».
4. Скачивание и распаковка WordPress
После установки MySQL и создания базы данных можно приступать к следующему этапу создания сайта на своем компьютере. Для начала скачиваем дистрибутив WordPress с официального сайта. На момент написания статьи, актуальной была версия 4.0.
Архив с WordPress распаковываем в системный каталог C:inetpubwwwroot, в котором по умолчанию хранятся файлы веб-сервера IIS. Затем необходимо переименовать папку с файлами WordPress с соответствием с именем создаваемого сайта. Пусть это будет, аналогично созданной на предыдущем шаге базе данных, каталог с именем testsite. Далее необходимо настроить параметры безопасности для каталога с сайтом. Для этого вызовем свойства данного каталога, кликнув по нему правой кнопкой мыши и выбрав пункт «Свойства» в контекстном меню.
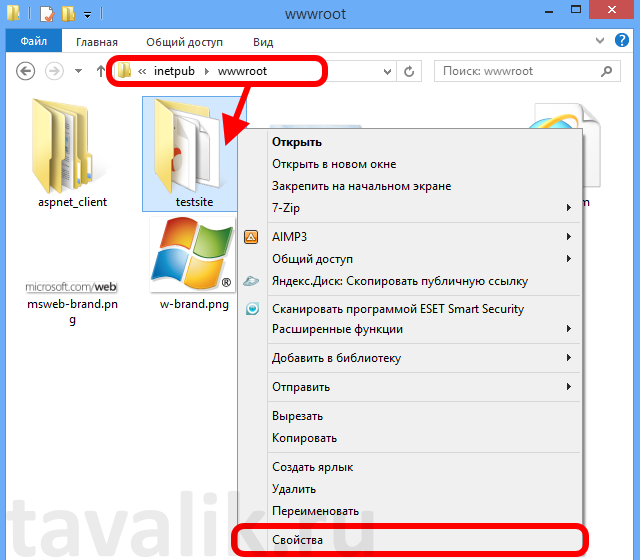
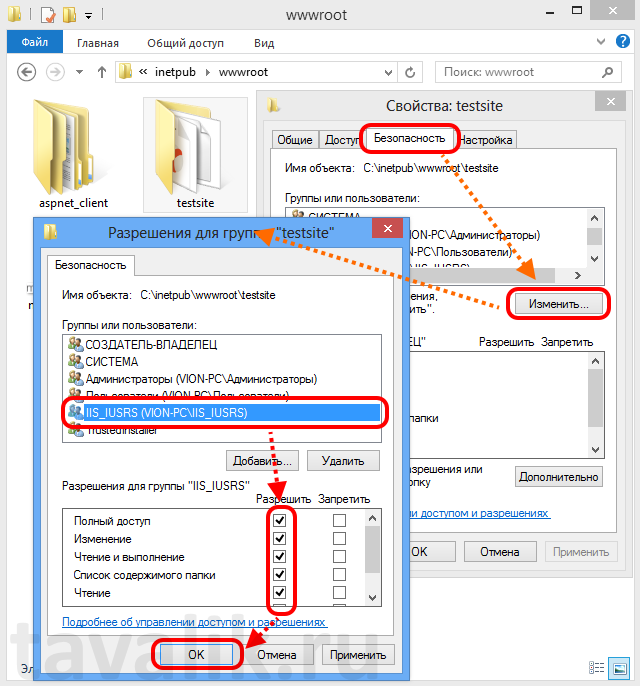
В окне свойств каталога перейдем на вкладку «Безопасность» и нажмем кнопку «Изменить…», расположенную под таблицей «Группы или пользователи». В открывшемся окне настройки безопасности найдем пользователя «IIS_IUSRS» и, выделив его в таблице, дадим полный доступ к каталогу установив соответствующие флажки в таблице ниже. После чего закроем открытые окна с помощью кнопки «ОК».
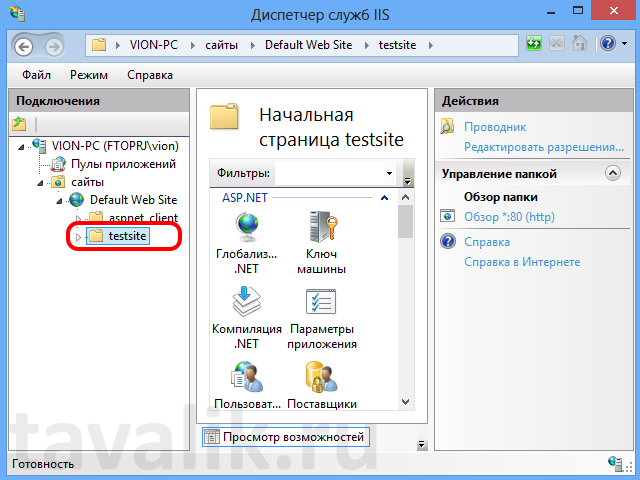
Далее открываем «Диспетчер служб IIS», раскрываем вкладки «Сайты» — «Default Web Site» где должны увидеть созданный на предыдущем шаге каталог с именем сайта, в нашем случае с именем testsite. Если это так, то все сделано правильно, а наш сайт станет доступен по адресу
http:\localhosttestsite.
5. Подключение к базе данных MySQL
Теперь, когда мы добавили наш сайта в место расположения файлов веб-сервера IIS и он появился в «Диспетчере служб IIS», мы можем обратиться к нашему сайту в любом браузере по адресу:
http:\localhosttestsite
И в нашем случае для сайта testsite это будет страница приветствия WordPress. Жмём «Вперёд».
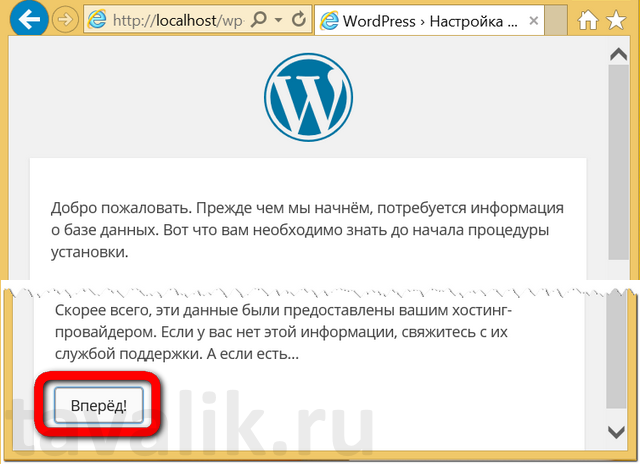
В следующем окне WordPress необходимо указать имя базы данных, которую мы создавали в пункте 3, имя пользователя — по умолчанию root, и пароль для данного пользователя MySQL. Жмём «Отправить».

Если все данные введены корректно, мы попадем на окно конечной установки WordPress. Далее жмём «Запустить установку» и переходим к следующему шагу.

Если по какой-то причине движок сайта не смог подключиться к базе данных, параметры соединения можно настроить и вручную. Для этого в папке, ранее называвшейся «wordpress», а теперь, как в нашем случае, «testsite», необходимо отыскать файл «wp-config-sample.php». Этот файл открываем любым текстовым редактором. Можно штатным блокнотом Windows или более удобной программой «Notepad++».
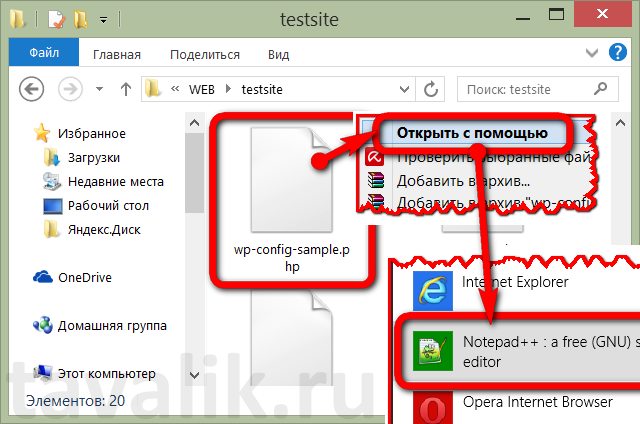
В открытом файле «wp-config-sample.php» вносим такие изменения:
Строка:
define(‘DB_NAME’, ‘database_name_here’)
Здесь заменяем шаблонную надпись ‘database_name_here’ названием базы данных MySQL. В нашем случае это ‘testsite’.
Строка:
define(‘DB_USER’, ‘username_here’)
Здесь заменяем шаблонную надпись ‘username_here’ именем пользователя. В нашем случае при настройке MySQL мы не меняли предустановленное имя пользователя ‘root’.
Строка:
define(‘DB_PASSWORD’, ‘password_here’)
Здесь заменяем шаблонную надпись ‘password_here’ паролем, заданным при установке MySQL.

Изменённый в текстовом редакторе файл «wp-config-sample.php» сохраняем под именем «wp-config.php» в этот же каталог.

6. Установка и настройка WordPress
Если все предыдущие шаги выполнены верно, то при переходе по ссылке
http:\localhosttestsite
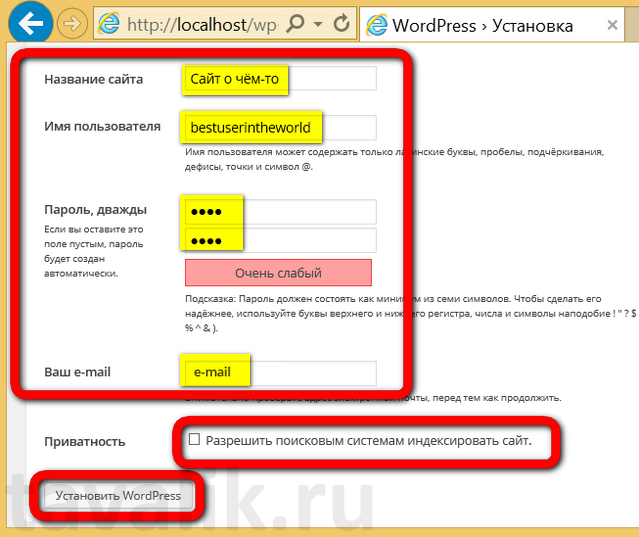
попадаем в окно создания профиля WordPress. Здесь называем сайт, придумываем латиницей логин и пароль, вводим адрес электронной почты. В графе «Приватность» имеется опция индексации сайта поисковыми системами. На стадии подготовки сайта к более-менее читабельному виду, и тем более, пока нет доменного имени и не куплен хостинг, как в нашем случае, это совершенно ни к чему. Однако позднее, когда сайт уже будет готов для его представления читателям, эту опцию необходимо обязательно выставить в настройках WordPress. Иначе поисковики сайт не проиндексируют, и читатели просто не смогут на него попасть. Жмём «Установить WordPress».
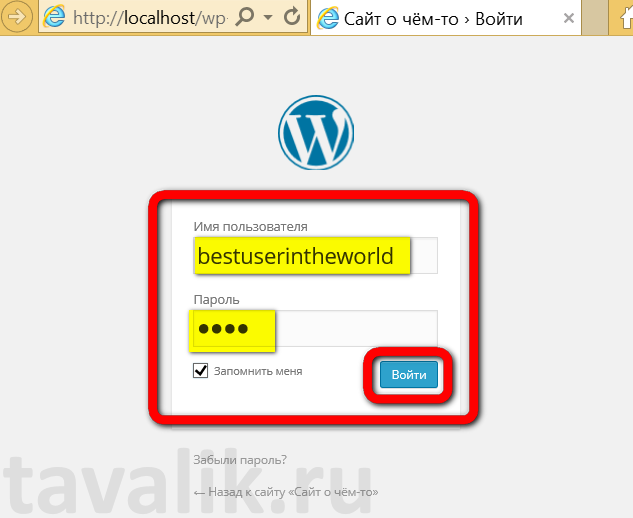
Попадаем в приветственное окно WordPress и жмём «Войти».

Вводим логин и пароль для WordPress.
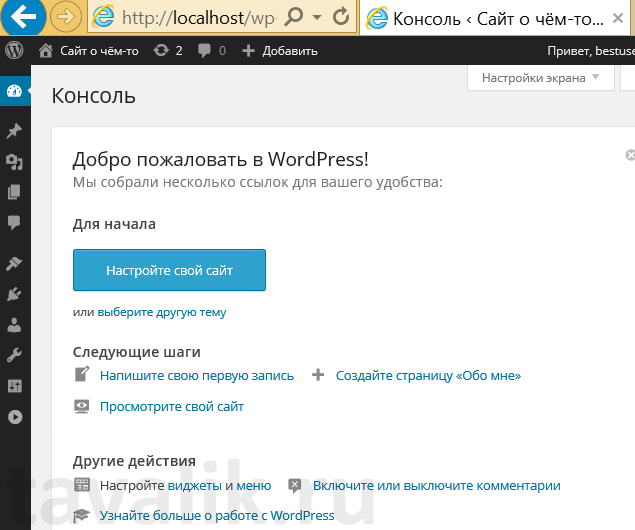
Цель достигнута – находимся уже в консоли WordPress и можем проводить первые шаги по ознакомлению с возможностями движка. А можно и сразу приступать уже к созданию сайта.
Languages:
English •
IIS サーバーへのインストール 日本語
(Add your language)
Contents
- 1 Install Internet Information Services 8.5 and WordPress 3.x by Using the Microsoft Web Platform Installer 5.0
- 2 Prerequisites
- 3 Step 1. Install Microsoft Web Platform Installer 5.0
- 4 Step 2. Select the products and applications to install
- 5 Step 3. Review and configure the selected products and applications
- 6 Step 4. Complete the installation and configuration
- 7 Step 5. Enable clean URLs (Pretty Permalinks)
- 8 Step 6. Running Microsoft WebMatrix with WordPress
- 9 Additional Information
Install Internet Information Services 8.5 and WordPress 3.x by Using the Microsoft Web Platform Installer 5.0
NOTE: As of 12.02.2020. Microsoft WPI (5.1) does not install PHP support correctly on Windows 10, thus the WordPress installation fails.
This article describes how to install and configure WordPress 3.x on Windows clients and servers (see Prerequisites) using the Microsoft Web Platform Installer (Web PI) version 5.0. As of May 28, 2014, the latest version of WordPress is 3.9.1.
The Web PI is a free tool that makes getting the latest components of the Microsoft Web Platform—including Internet Information Services (IIS), MySQL, PHP, the Microsoft .NET Framework, and Visual Web Developer—quick and easy. The Web PI also lets you install web applications such as WordPress with the built-in Windows Web App Gallery.
To install WordPress on IIS 8.5 by using the Web PI 5.0, follow these steps:
Prerequisites
Step 1. Install Microsoft Web Platform Installer 5.0
Step 2. Select the products and applications to install
Step 3. Review and configure the selected products and applications
Step 4. Complete the installation and configuration
Step 5. Enable clean URLs (Pretty Permalinks)
Step 6. Running Microsoft WebMatrix with WordPress
Prerequisites
The supported operating systems for the Microsoft Web Platform Installer (Web PI) 5.0 are Windows 8.1, Windows 8, Windows 7, Windows Vista Service Pack 1 (SP1), Windows Vista, Windows XP Service Pack 2 (SP2), and later versions, Windows Server 2012 R2, Windows Server 2012, Windows Server 2008 R2, Windows Server 2008, and Windows Server 2003 Service Pack 1 (SP1) and later versions.
For this guide, it is assumed that you have either Windows Server 2012 R2 or Windows 8.1 Pro client installed on your computer. You will also need an Internet connection and administrator privileges for your computer.
It is a good idea to confirm that your system meets the hardware requirements for IIS 8.5. See http://technet.microsoft.com/en-us/library/dn303418.aspx for more information.
Step 1. Install Microsoft Web Platform Installer 5.0
In this step, you download, install, and launch the MS Web Platform Installer (Web PI 5.0, which is a 1.4 MB download).
- Log into your Windows machine as a user with administrative privileges.
- Launch Internet Explorer (other browsers work too).
- Go to http://www.microsoft.com/web/downloads/platform.aspx, and then click the Free Download button.

- Click Run.

- Click Run again.

- Wait a few seconds for the Web PI 5.0 to start.

Step 2. Select the products and applications to install
In this step, you select the version of WordPress that you want to install. WordPress 3.9.1 is used in this guide.
- On the «Web Platform Installer» start screen click the Applications tab, and then click the Add button associated to the right with «WordPress».

- Click Install.
Step 3. Review and configure the selected products and applications
In this step, you review and configure what you have added. Additionally, you add the database and configure the password for it.
- When you are asked which type of database you want to use, leave MySQL (Not installed) selected.
Note: This will install MySQL 5.1 for Windows to handle all the database transactions that are required by WordPress. - In password fields, type in a password for your database, and then click Continue.

- Review the files to be downloaded and installed, as well as the license agreements, and then click I Accept.
- Allow the Web PI installation to complete.
- Configure Security Keys.
The WordPress Security Keys section describes what these keys are and how they’re used.
The keys don’t need to be remembered, they should just be long, random, and complicated. An easy way to generate the keys is to use the online key generator. Each time you click browser refresh, the online key generator creates a new set of keys.Note: The online key generator produces keys that may contain dollar signs (‘$’) which cannot be used with keys entered into Web-PI. Until this Web-PI issue is resolved, a simple solution is to check for dollar sign characters and simply replace ‘$’ with ‘S’ (any alpha character will work).
Here’s an example set of keys — don’t use these, use the online key generator to create your own unique keys!

- Finish.
On the FINISH dialog click the copy to clipboard link (this copies your database settings and password to the clipboard), paste and save this information in a file for future reference, and then click the Finish button.
- Microsoft WebMatrix will open, allowing you to configure additional settings related to your WordPress site:


Step 4. Complete the installation and configuration
In this step, you complete the installation.
- Switch to Internet Explorer.
- Go to your WordPress website. For example, go to http://localhost/myWordPress.
- In the Site Title box, type the name of your site.
- In the Password, twice boxes, type a password for the admin account.

- In the Your E-mail box, type the email address for the admin account.
- Click Install WordPress.

- Click Log In.

- Type admin, type the password, and then click Log In.


Step 5. Enable clean URLs (Pretty Permalinks)
In this step, you enable Pretty Permalinks now that WordPress has been installed.
- In the Dashboard menu, click Settings.

- Scroll down, and then click Permalinks.

- Under Common settings, select a common Permalink setting or select Custom Structure to create your own Permalink, and then click Save Changes.


The installation is now complete, and you are ready to use WordPress!
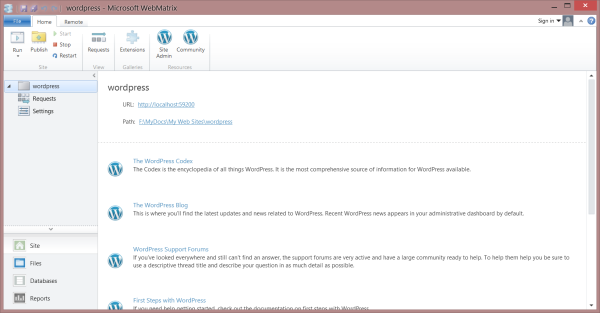
Step 6. Running Microsoft WebMatrix with WordPress
The Microsoft Web Platform Installer (Web PI) installs WordPress to run in a localhost configuration in combination with Microsoft WebMatrix (which was also installed as part of the Web PI installation). When WebMatrix is not running (e.g., after a reboot or if you terminate WebMatrix) you will not be able to access your localhost WordPress site until WebMatrix is restarted. Use the following steps to start WebMatrix and launch your localhost WordPress site.
- Click Start, click All Programs, click-open the Microsoft WebMatrix folder, and then click to launch the Microsoft WebMatrix app.

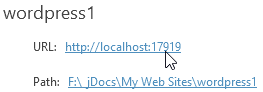
- On the WebMatrix start page, click the My Sites button to display the installed sites, and then click your wordpress site that displays in the pop-up context menu.

- After the site opens, click the lower-left Site tab to display links for the WordPress launch URL and file Path.

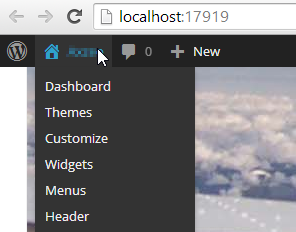
- Click on the site URL link to launch your localhost WordPress site.

- At this point WebMatrix will open a browser window to your localhost WordPress site which you can customize and add content to.


Remember: WebMatrix must be left running while you interact with your localhost WordPress site.
Additional Information
- WordPress is free, open-source content management system (CMS) software that lets individuals or communities of users easily publish, manage, and organize a wide variety of content on a website. For more information about WordPress, visit these websites:
- http://www.wordpress.org/
- http://codex.wordpress.org/Main_Page
- IIS URL Rewrite 2.0 lets you create powerful rules to implement URLs that are easier for users to remember and easier for search engines to find. For more information, visit these websites:
- http://www.iis.net/download/urlrewrite
- http://learn.iis.net/page.aspx/734/url-rewrite-module/
- Windows Cache Extension for PHP is a PHP accelerator that is used to increase the speed of PHP applications that are running on Windows and on Windows Server. After Windows Cache Extension for PHP is enabled and loaded by the PHP engine, PHP applications can take advantage of the functionality without any code modifications. For more information, visit this website:
- http://www.iis.net/download/wincacheforphp
- PHP Manager for IIS is a tool for managing one or many PHP installations on IIS 7.0 servers. For more information, visit these websites:
- http://www.iis.net/community/default.aspx?tabid=34&g=6&i=2007
- http://learn.iis.net/page.aspx/944/using-php-manager-for-iis-to-setup-and-configure-php/
- For more general information about PHP, visit these websites:
- http://www.php.net/manual/en/install.windows.manual.php
- http://www.php.net/manual/en/install.windows.iis6.php
- http://www.php.net/manual/en/install.windows.iis7.php
- Other useful links:
- http://php.iis.net/
- http://windows.php.net/
- http://forums.iis.net/1102.aspx
- For information on media upload permission errors, or 500 errors when loading uploaded images, visit these sites:
- https://www.bluevalleytech.com/techtalk/blog/iis-500-errors-when-loading-a-static-image-in-wordpress.aspx
- http://www.amixa.com/blog/2011/04/29/iis-wordpress-images-500-error/
Configuration
IIS Configuration
Create a new website in IIS, and fill out the fields appropriately:
- Site Name: MyDomain WP Site (arbitrary, just make it identifiable)
- Physical path: C:inetpubwwwrootwordpress (the folder we extracted earlier)
- IP address: Depends on the IP’s on your server, I have one so all unassigned is fine.
- Host name: www.mydomain.com
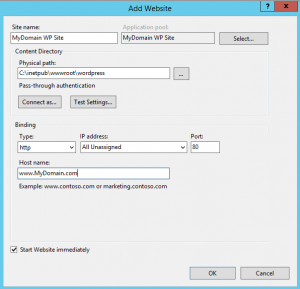
Add in an additional binding for non-www: http, All Unassigned, Port 80, and mydomain.com
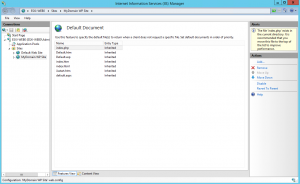
Move the Default Document for index.php to the to of the list:
Create a URL Rewrite rule as follows:
- Rule Name: WordPress (or whatever you want, this is arbitrary)
- Match URL:
- Requested URL: Matches the Pattern
- Using: Wildcards
- Pattern: *
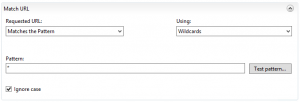
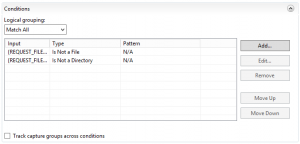
- Conditions:
- Is Not a File
- Is Not a Directory
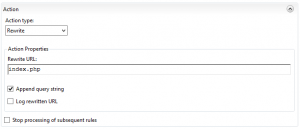
- Action:
- Action type: Rewrite
- Rewrite URL: index.php
- Append Query String: Check
Create another URL Rewrite rule as follows:
- Type: Canonical domain name
- Select the primary host name: www.mydomain.com
After both rules have been entered, your URL Rewrites should look similar to the following:

Additional, recommended configutations:
- Stop your site, there is no reason to have it running.
- Set up Recycling for App Pool:
- Time: 4:00 AM (or whenever your site is least active, and remove the check for Regular Time Intervals)
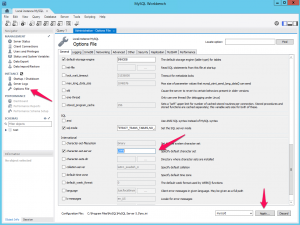
- Edit PHP.ini file (C:Program Files (x86)PHPv5.4php.ini):
- Old Line: post_max_size = 8M
- New Line: post_max_size = 1024M
- Old Line: ;upload_tmp_dir =
- New Line: upload_tmp_dir = C:inetpubtemp
- Old Line: upload_max_filesize = 2M
- New Line: upload_max_filesize = 1000M
- Old Line: max_file_uploads = 20
- New Line: max_file_uploads = 200
- Add Modify Permission the C:inetpubtemp
- Old Line: post_max_size = 8M
MySQL Configuration
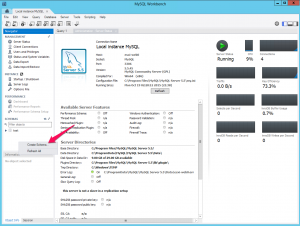
Open MySQL and log into the instance we created previously.
First thing you will want to do is change the default character-set-server variable to UTF8 as UTF-8 supports any language.
Restart MySQL for the settings to take, or just make sure you manually set the collation of you DB to UTF8 in the next step. (Powershell command: Restart-Service MySQL)
Next we are going to create your WordPress Database.
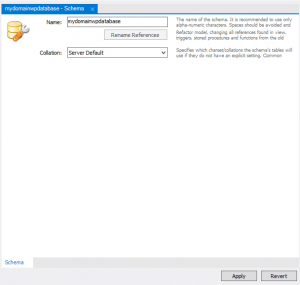
Right-click on the blank space under the test DB and choose Create Schema…
Give your Schema/DB an appropriate name, I will use mydomainwpdatabase
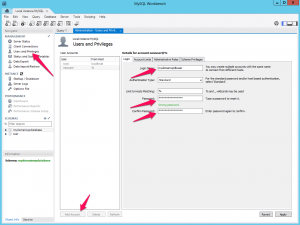
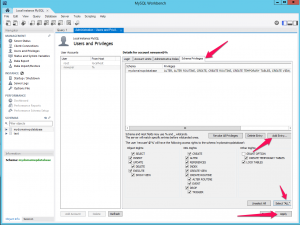
Next, create a user for that database. I will use mydomainwpdbuser, and give that user full permissions to the Schema/DB that you just created. It will look similar to the following:
And that concludes the database configuration, we are almost done, just a couple more steps.
WordPress Connection Configuration
Navigate to C:inetpubwwwrootwordpress and copy your wp-config-sample.php in the same folder, then rename it wp-config.php
Then you will need to make the following changes to that file to allow your WP site to connect to the database.
========================================
// ** MySQL settings – You can get this info from your web host ** //
/** The name of the database for WordPress */
define(‘DB_NAME’, ‘mydomainwpdatabase‘);
/** MySQL database username */
define(‘DB_USER’, ‘mydomainwpdatabaseuser‘);
/** MySQL database password */
define(‘DB_PASSWORD’, ‘mydomainwpdatabaseuerpsswd‘);
/** MySQL hostname */
define(‘DB_HOST’, ‘localhost’);
/** Database Charset to use in creating database tables. */
define(‘DB_CHARSET’, ‘utf8’);
/** The Database Collate type. Don’t change this if in doubt. */
define(‘DB_COLLATE’, ”);
========================================