Project description

xlrd is a library for reading data and formatting information from Excel
files in the historical .xls format.
The following are also not supported but will safely and reliably be ignored:
-
Charts, Macros, Pictures, any other embedded object, including embedded worksheets.
-
VBA modules
-
Formulas, but results of formula calculations are extracted.
-
Comments
-
Hyperlinks
-
Autofilters, advanced filters, pivot tables, conditional formatting, data validation
Password-protected files are not supported and cannot be read by this library.
Quick start:
import xlrd
book = xlrd.open_workbook("myfile.xls")
print("The number of worksheets is {0}".format(book.nsheets))
print("Worksheet name(s): {0}".format(book.sheet_names()))
sh = book.sheet_by_index(0)
print("{0} {1} {2}".format(sh.name, sh.nrows, sh.ncols))
print("Cell D30 is {0}".format(sh.cell_value(rowx=29, colx=3)))
for rx in range(sh.nrows):
    print(sh.row(rx))
From the command line, this will show the first, second and last rows of each sheet in each file:
python PYDIR/scripts/runxlrd.py 3rows *blah*.xlsDownload files
Download the file for your platform. If you’re not sure which to choose, learn more about installing packages.
Source Distribution
Built Distribution
Improve Article
Save Article
Improve Article
Save Article
The xlrd module in python is used to retrieve information from a spreadsheet. In this article, we will look into the process of installing the xlrd module in a Windows machine.
Pre-requisites:
The only thing that you need for installing the xlrd module on Windows are:
- Python
- PIP or Conda (depending upon user preference)
Installing xlrd Module on Windows:
For Conda Users:
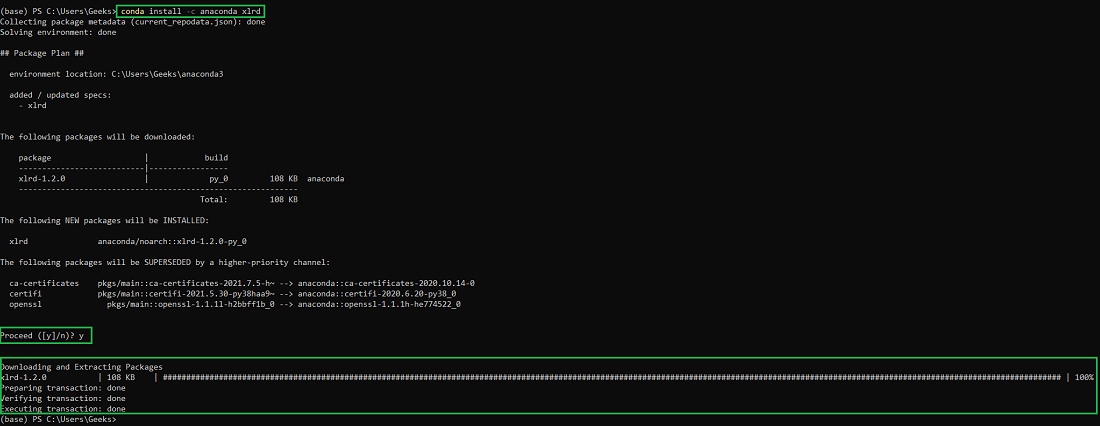
If you want the installation to be done through conda, open up the Anaconda Powershell Prompt and use the below command:
conda install -c anaconda xlrd
Type y for yes when prompted.
You will get a similar message once the installation is complete:
Make sure you follow the best practices for installation using conda as:
- Use an environment for installation rather than in the base environment using the below command:
conda create -n my-env
conda activate my-env
Note: If your preferred method of installation is conda-forge, use the below command:
conda config --env --add channels conda-forge
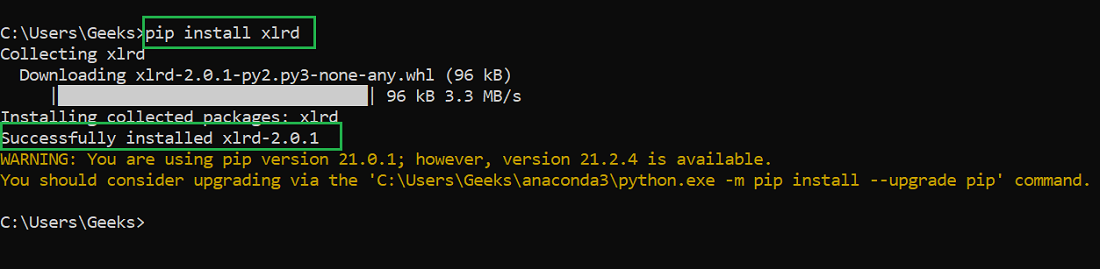
For PIP Users:
Users who prefer to use pip can use the below command to install the xlrd package on Windows:
pip install xlrd
You will get a similar message once the installation is complete:
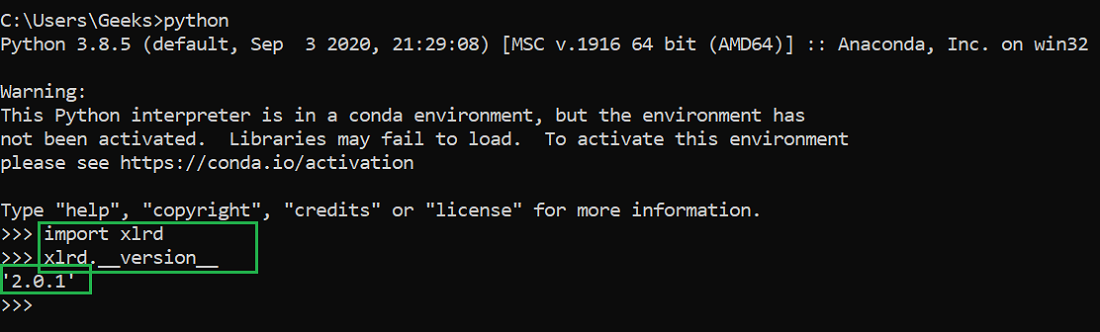
Verifying xlrd Installation on Windows:
Use the below code in your Python ide to verify successful installation of the xlrd package:
Python3
import xlrd
xlrd.__version__
If successfully installed you will get the following output:
Improve Article
Save Article
Improve Article
Save Article
The xlrd module in python is used to retrieve information from a spreadsheet. In this article, we will look into the process of installing the xlrd module in a Windows machine.
Pre-requisites:
The only thing that you need for installing the xlrd module on Windows are:
- Python
- PIP or Conda (depending upon user preference)
Installing xlrd Module on Windows:
For Conda Users:
If you want the installation to be done through conda, open up the Anaconda Powershell Prompt and use the below command:
conda install -c anaconda xlrd
Type y for yes when prompted.
You will get a similar message once the installation is complete:
Make sure you follow the best practices for installation using conda as:
- Use an environment for installation rather than in the base environment using the below command:
conda create -n my-env
conda activate my-env
Note: If your preferred method of installation is conda-forge, use the below command:
conda config --env --add channels conda-forge
For PIP Users:
Users who prefer to use pip can use the below command to install the xlrd package on Windows:
pip install xlrd
You will get a similar message once the installation is complete:
Verifying xlrd Installation on Windows:
Use the below code in your Python ide to verify successful installation of the xlrd package:
Python3
import xlrd
xlrd.__version__
If successfully installed you will get the following output:
xlrd
xlrd is a library for reading data and formatting information from Excel
files in the historical .xls format.
Warning
This library will no longer read anything other than .xls files. For
alternatives that read newer file formats, please see http://www.python-excel.org/.
The following are also not supported but will safely and reliably be ignored:
- Charts, Macros, Pictures, any other embedded object, including embedded worksheets.
- VBA modules
- Formulas, but results of formula calculations are extracted.
- Comments
- Hyperlinks
- Autofilters, advanced filters, pivot tables, conditional formatting, data validation
Password-protected files are not supported and cannot be read by this library.
Quick start:
import xlrd
book = xlrd.open_workbook("myfile.xls")
print("The number of worksheets is {0}".format(book.nsheets))
print("Worksheet name(s): {0}".format(book.sheet_names()))
sh = book.sheet_by_index(0)
print("{0} {1} {2}".format(sh.name, sh.nrows, sh.ncols))
print("Cell D30 is {0}".format(sh.cell_value(rowx=29, colx=3)))
for rx in range(sh.nrows):
    print(sh.row(rx))
From the command line, this will show the first, second and last rows of each sheet in each file:
python PYDIR/scripts/runxlrd.py 3rows *blah*.xls
.xlsx – это расширение документа Excel, который может хранить большой объем данных в табличной форме. Более того, в электронной таблице Excel можно легко выполнять многие виды арифметических и логических вычислений.
Иногда программистам требуется прочитать данные из документа Excel. В Python для этого есть множество различных библиотек, например, xlrd, openpyxl и pandas. Сегодня мы поговорим о том, как читать excel-файлы (xlsx) при помощи Python, и рассмотрим примеры использования различных библиотек для этих целей.
Для начала
Для проверки примеров этого руководства потребуется какой-нибудь файл Excel с расширением .xlsx, содержащий какие-либо исходные данные. Вы можете использовать любой существующий файл Excel или создать новый. Мы создадим новый файл с именем sales.xlsx со следующими данными:
sales.xlsx
| Sales Date | Sales Person | Amount |
|---|---|---|
| 12/05/18 | Sila Ahmed | 60000 |
| 06/12/19 | Mir Hossain | 50000 |
| 09/08/20 | Sarmin Jahan | 45000 |
| 07/04/21 | Mahmudul Hasan | 30000 |
Этот файл мы и будем читать с помощью различных библиотек Python в следующей части этого руководства.
Чтение Excel-файла с помощью xlrd
Библиотека xlrd не устанавливается вместе с Python по умолчанию, так что ее придется установить. Последняя версия этой библиотеки, к сожалению, не поддерживает Excel-файлы с расширением .xlsx. Поэтому устанавливаем версию 1.2.0. Выполните следующую команду в терминале:
pip install xlrd == 1.2.0
После завершения процесса установки создайте Python-файл, в котором мы будем писать скрипт для чтения файла sales.xlsx с помощью модуля xlrd.
Воспользуемся функцией open_workbook() для открытия файла xlsx для чтения. Этот файл Excel содержит только одну таблицу. Поэтому функция workbook.sheet_by_index() используется в скрипте со значением аргумента 0.
Затем используем вложенный цикл for. С его помощью мы будем перемещаться по ячейкам, перебирая строки и столбцы. Также в скрипте используются две функции range() для определения количества строк и столбцов в таблице.
Для чтения значения отдельной ячейки таблицы на каждой итерации цикла воспользуемся функцией cell_value() . Каждое поле в выводе будет разделено одним пробелом табуляции.
import xlrd

# Open the Workbook
workbook = xlrd.open_workbook("sales.xlsx")

# Open the worksheet
worksheet = workbook.sheet_by_index(0)

# Iterate the rows and columns
for i in range(0, 5):
    for j in range(0, 3):
        # Print the cell values with tab space
        print(worksheet.cell_value(i, j), end='t')
    print('')
Запустим наш код и получим следующий результат.

Чтение Excel-файла с помощью openpyxl
Openpyxl – это еще одна библиотека Python для чтения файла .xlsx, и она также не идет по умолчанию вместе со стандартным пакетом Python. Чтобы установить этот модуль, выполните в терминале следующую команду:
pip install openpyxl
После завершения процесса установки можно начинать писать код для чтения файла sales.xlsx.
Как и модуль xlrd, модуль openpyxl имеет функцию load_workbook() для открытия excel-файла для чтения. В качестве значения аргумента этой функции используется файл sales.xlsx.
Объект wookbook.active служит для чтения значений свойств max_row и max_column. Эти свойства используются во вложенных циклах for для чтения содержимого файла sales.xlsx.
Функцию range() используем для чтения строк таблицы, а функцию iter_cols() — для чтения столбцов. Каждое поле в выводе будет разделено двумя пробелами табуляции.
import openpyxl

# Define variable to load the wookbook
wookbook = openpyxl.load_workbook("sales.xlsx")

# Define variable to read the active sheet:
worksheet = wookbook.active

# Iterate the loop to read the cell values
for i in range(0, worksheet.max_row):
    for col in worksheet.iter_cols(1, worksheet.max_column):
        print(col[i].value, end="tt")
    print('')
Запустив наш скрипт, получим следующий вывод.

Чтение Excel-файла с помощью pandas
Если вы не пользовались библиотекой pandas ранее, вам необходимо ее установить. Как и остальные рассматриваемые библиотеки, она не поставляется вместе с Python. Выполните следующую команду, чтобы установить pandas из терминала.
pip install pandas
После завершения процесса установки создаем файл Python и начинаем писать следующий скрипт для чтения файла sales.xlsx.
В библиотеке pandas есть функция read_excel(), которую можно использовать для чтения .xlsx-файлов. Ею мы и воспользуемся в нашем скрипте для чтения файла sales.xlsx.
Функция DataFrame() используется для чтения содержимого нашего файла и преобразования имеющейся там информации во фрейм данных. После мы сохраняем наш фрейм в переменной с именем data. А дальше выводим то, что лежит в data, в консоль.
import pandas as pd

# Load the xlsx file
excel_data = pd.read_excel('sales.xlsx')
# Read the values of the file in the dataframe
data = pd.DataFrame(excel_data, columns=['Sales Date', 'Sales Person', 'Amount'])
# Print the content
print("The content of the file is:n", data)
После запуска кода мы получим следующий вывод.

Результат работы этого скрипта отличается от двух предыдущих примеров. В первом столбце печатаются номера строк, начиная с нуля. Значения даты выравниваются по центру. Имена продавцов выровнены по правому краю, а сумма — по левому.
Заключение
Программистам довольно часто приходится работать с файлами .xlsx. Сегодня мы рассмотрели, как читать excel-файлы при помощи Python. Мы разобрали три различных способа с использованием трех библиотек. Все эти библиотеки имеют разные функции и свойства.
Надеемся, теперь у вас не возникнет сложностей с чтением этих файлов в ваших скриптах.

Definition of Python xlrd
Python xlrd retrieves data from a spreadsheet using the xlrd module. It is used to read, write, or modify data. Furthermore, the user may be required to navigate sheets on certain criteria, as well as modify some rows, and columns and perform other tasks. This module is used to extract data from the sheet. And it is basically used to read and write and extract data from sheets.
What is Python xlrd?
- Furthermore, the user may be required to navigate through several sheets and extract data based on certain criteria.
- The attributes can be used to determine rows in the sheet. By default, all rows are padded with same size, but if we want to skip the empty columns at the end, use the ragged rows parameter when calling the open workbook function.
- We need to install xlrd package by using the pip command. Without installing the xlrd package we cannot use the same in our code. It is very useful and important in python.
How to Use Python xlrd?
We need to install xlrd package by using the pip command. Xlrd module is not coming by default at the time of installing the python package in our system.
1. In the first step, we are installing the xlrd module by using the pip command. We can install the xlrd module in any operating system on which python is installed. In the below example, we are installing the xlrd module on UNIX systems.
Code:
pip install xlrd Output:

2. After installing all the modules we are opening the python shell by using the python3 command.
Code:
python3Output:

3. After login into the python shell in this step, we are checking xlrd package is installed in our system. To use the xlrd module in our program we need to import the same in our code by using the import keyword. Without importing the xlrd module we cannot use the same in our code.
Code:
import xlrd
print (xlrd)
Output:

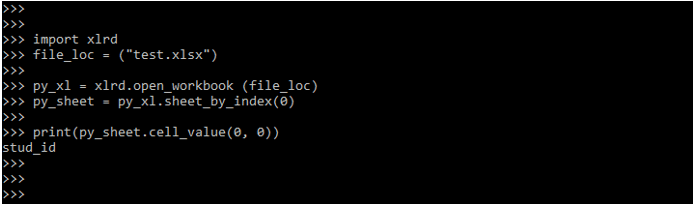
4. After checking the installation of the xlrd package in this step we are creating the spreadsheet file name as test.xlsx.

5. After creating the spreadsheet in this step we are extracting the specific cell from the sheet as follows. To extract the cell first we imported the xlrd module by using the import keyword. After importing the xlrd module in the next step we are opening the spreadsheet file by using the open workbook method.
After opening the sheet we extract the cell as per the spreadsheet index, we are retrieving the 0 index cell as follows.
Code:
import xlrd
file_loc = ("test.xlsx")
py_xl = xlrd.open_workbook (file_loc)
py_sheet = py_xl.sheet_by_index (0)
print (py_sheet.cell_value (0, 0))
Output:
How to Install XLRD in Python?
We are installing by using the pip command. In the below example, we are installing it on the windows system as follows. The below steps show how to install the xlrd module on the windows system.
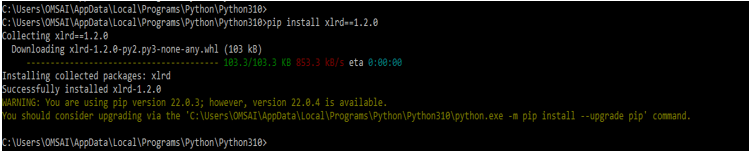
1. In the first step, we are installing the xlrd module by using the pip command. We are installing the xlrd version as xlrd==1.2.0
Code:
pip install xlrd==1.2.0Output:
2. After installing the modules, we are opening the python shell by using the python command to check xlrd package is installed on our system.
Code:
pythonOutput:

3. After login into the python shell in this step, we are checking xlrd package is installed in our windows system.
Code:
import xlrd
print (xlrd)
Output:

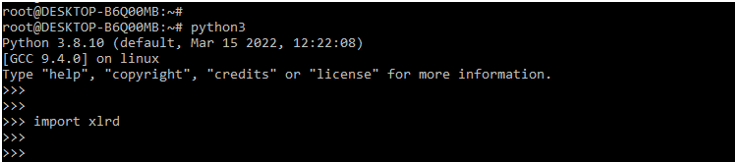
In the below example, we are installing it on the Ubuntu system as follows. The below steps shows how to install the xlrd module on the ubuntu system.
1. In the first step, we are installing the xlrd module by using the pip command. We are installing the xlrd version as 2.0.1.
Code:
pip install xlrdOutput:

2. After installing the xlrd modules we are opening the python shell by using the python3 command as follows.
Code:
python3Output:

After login into the python shell in this step, we are checking xlrd package is installed in our Ubuntu system.
Code:
import xlrdOutput:
Python xlrd in Excel Files
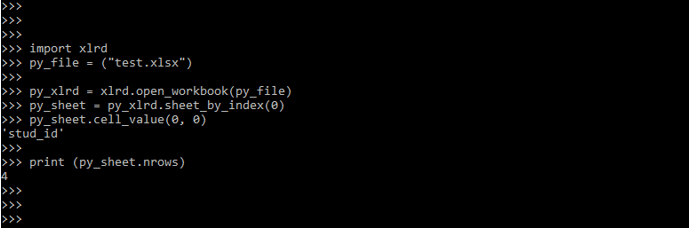
We can also extract the data from an excel file by using python xlrd modules. The below example shows extracting the number of rows from the excel file as follows. In the below example, we are using the excel file name test.xlsx.
Code:
import xlrd
py_file = ("test.xlsx")
py_xlrd = xlrd.open_workbook (py_file)
py_sheet = py_xlrd.sheet_by_index (0)
py_sheet.cell_value (0, 0)
print (py_sheet.nrows)
Output:
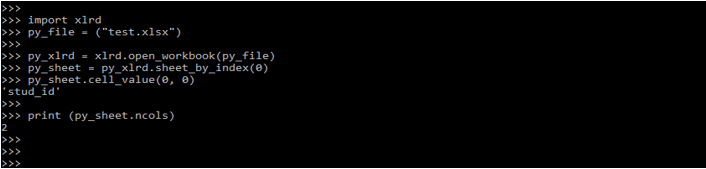
The below example shows extract of the number of columns from the excel file as follows. In the below example, we are using the excel file name test.xlsx.
Code:
import xlrd
py_file = ("test.xlsx")
py_xlrd = xlrd.open_workbook (py_file)
py_sheet = py_xlrd.sheet_by_index (0)
py_sheet.cell_value (0, 0)
print (py_sheet.ncols)
Output:
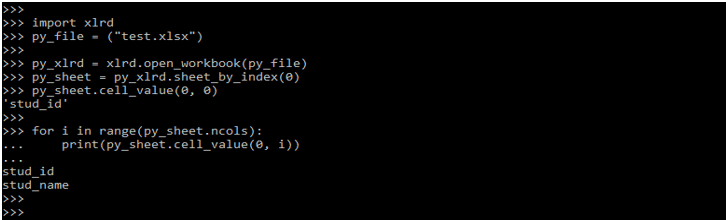
The below example shows extract all column names from the excel file as follows.
Code:
import xlrd
py_file = ("test.xlsx")
py_xlrd = xlrd.open_workbook (py_file)
py_sheet = py_xlrd.sheet_by_index (0)
py_sheet.cell_value (0, 0)
for i in range (py_sheet.ncols):
    print (py_sheet.cell_value(0, i))
Output:
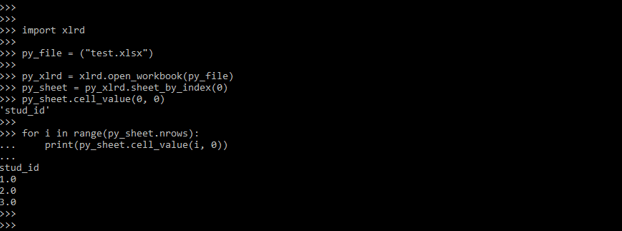
The below example shows extract the first column from the excel file as follows.
Code:
import xlrd
py_file = ("test.xlsx")
py_xlrd = xlrd.open_workbook(py_file)
py_sheet = py_xlrd.sheet_by_index(0)
py_sheet.cell_value(0, 0)
for i in range(py_sheet.nrows):
    print(py_sheet.cell_value(i, 0))
Output:
Conclusion
To use python xlrd we need to install xlrd package by using the pip command. Without installing the xlrd package we cannot use the same in our code. It retrieves data from a spreadsheet using the xlrd module. It is also used to read, write or modify data from excel files.
Recommended Article
This is a guide to Python xlrd. Here we discuss the definition, What is python xlrd, How to use python xlrd, examples along with code implementation and output. You may also have a look at the following articles to learn more –
- Python UUID
- f String in Python
- Binary tree in Python
- Abstraction in Python
xlrd is a module that allows Python to read data from Excel files.
This tutorial explains where to get it and how to install it.
Downloading the Python Xlrd Module
- The Python xlrd (short for «Excel Read») module can be found here. After downloading it, you can extract the contents (twice) with 7 Zip.
- Copy the path of the folder that holds «setup.py».
- Note that there’s also a Python module for writing MS Excel files. It’s called xlwt («Excel Write») and can be found here.
- The installation process is basically identical to installing xlrd as explained below.
Adding an Environment Variable
 Add Python to Path under Environment Variables in Windows

- At the end of the path, add the path to the folder in which «python.exe» is located. For most SPSS versions this will be something like
;C:Python27. However, for more recent versions of SPSS, Python is installed in the SPSS installation folder, for example C:Program FilesIBMSPSSStatistics22Python - Confirm by clicking «Ok». At a later step, we’ll call Python from the Windows Command Line. This step ensures that
pythonis recognized as an existing application when this is done.
Installing the Python Xlrd Module
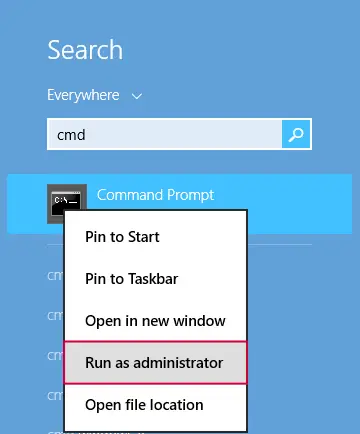
Now we’ll access the MS Windows Command Prompt. On recent Windows versions, you may need to run the command prompt as an administrator. If you search your programs for cmd, the command prompt should come up. Right-click it and select «Run as administrator».
Now we’ll first set the folder where «setup.py» is located as the default directory, for example by chdir /D D:Downloadsxlrd-0.9.2.tardistxlrd-0.9.2xlrd-0.9.2. Note that the path can be pasted into the window with a right mouse click. All that’s now left to do is the actual installation by running python setup.py install. After doing so, you should be good to go.

Python Xlrd Installation — Final Step
The XLRD python module for reading excel spreadsheets — Installation
In the last post we have seen the introduction of the xlrd module. If you have missed it, you can see it from here: The XLRD python module for reading spreadsheets files — Introduction. We have seen the problems xlrd development team faced with the dates stored in the spreadsheets and the encoding.
In this post on Installation we will see how to install the module using pip, easy_install, virtualenv and manual installation.
xlrd module doesn’t depend on any third party libraries other than python standard library.
pip
If you want to use pip to install the xlrd package then you can do as follows:
$ pip install xlrd
easy_install
You can also install the xlrd package using easy install as follows:
$ easy_install xlrd
virtualenv
You might sometimes have experienced that you want to install two libraries with same name or different versions of the same library. Also you don’t want to install certain package to the whole computer but to a certain extent. In these cases virtualenv comes to your rescue. What actually virutalenv does is that it creates an isolated python environment and you can install a given module or package in that isolated place rather than your whole computer. If you want to know more about virtualenv then you can have a look at the official documentation: Virtualenv
If you want to install xlrd package using virtual environment, then you can do as follows:
cd to the required directory where you want to create virtual environment.
$ cd path/for/installation
Create a directory here if you want:
$ mkdir xlrd
cd into the new directory:
$ cd xlrd
Now create the virtualenv here:
$ virtualenv xlrd-venv
Now we will activate the virtual environment so that we can install our xlrd package:
- If you are on windows:
$ xlrd-testScriptsactivate
- If you are on OSX or any other linux distribution then:
$ . xlrd-test/bin/activate
You will see «(xlrd-test)» at the start of the prompt and this indicates that the virutal environment has been activated.
Now you can simply install the module using pip or easy_install as we have seen previously:
$ pip install xlrd
Manual Installation
You can also install the module by downloading the package from pypi or any other source. First unzip the folder if it is zipped, cd into the folder where the setup.py file is located and do the following:
$ python setup.py install
We have come to an end of this post, I am assuming that you should have used any of the options below and have installed the xlrd module so that we can use it in our further posts. If you are facing any problem installing the xlrd module then you can see more options from here: Installing python Modules
As always I have tried to explain each and every part in this post in such a way that it is easy for everyone to understand. But if you have any doubt or didn’t understand anything you can comment in the comment box below or contact me. I will respond to your query as soon as possible. You can contact me from here: Contact me
Please do comment on how I can improve this post so that it will be useful even for beginners. Also comment if I have made any typo or you want me to add any section in this post.
«Knowledge has to be shared, improved, challenged and increased constantly or it will vanish»— Peter F drucker
Thank you, have a nice day!
References:
Webfaction community
Knowledge quotes
installation Flask
The xlrd module
Installing python modules
Popular posts from this blog
Edit : When you are creating a web app with h tml templates, then y ou will have to sa ve the html file in templates folder in the Current Wor ki ng Directory( CWD). If you save the file in the C W D directl y you will get a TemplateNotFound error. Thank you Udhay for pointing it out. In this post we will create a quiz website using python . I will be using the flask framework . After reading this tutorial you will learn form submission , flask templates , python code in flask templates , shuffling the questions and options with the random module and few others. Please note that this tutorial is not big as it seems to be. Some of the code has been rewritten to maintain consistency and also font size is somewhat big so that your eyes won’t get stressed reading this tutorial. Also the content has not occupied the full width of the page. In this tutorial I am assuming that you are having a very basic understanding of the flask framework . Please refer the documentation
Largest product in a grid In the 20×20 grid below, four numbers along a diagonal line have been marked in red. 08 02 22 97 38 15 00 40 00 75 04 05 07 78 52 12 50 77 91 08 49 49 99 40 17 81 18 57 60 87 17 40 98 43 69 48 04 56 62 00 81 49 31 73 55 79 14 29 93 71 40 67 53 88 30 03 49 13 36 65 52 70 95 23 04 60 11 42 69 24 68 56 01 32 56 71 37 02 36 91 22 31 16 71 51 67 63 89 41 92 36 54 22 40 40 28 66 33 13 80 24 47 32 60 99 03 45 02 44 75 33 53 78 36 84 20 35 17 12 50 32 98 81 28 64 23 67 10 26 38 40 67 59 54 70 66 18 38 64 70 67 26 20 68 02 62 12 20 95 63 94 39 63 08 40 91 66 49 94 21 24 55 58 05 66 73 99 26 97 17 78 78 96 83 14 88 34 89 63 72 21 36 23 09 75 00 76 44 20 45 35 14 00 61 33 97 34 31 33 95 78 17 53 28 22 75 31 67 15 94 03 80 04 62 16 14 09 53 56 92 16 39 05 42 96 35 31 47 55 58 88 24 00 17 54 24 36 29 85 57 86 56 00 48 35 71 89 07 05 44 44 37 44 60 21 58 51 54 17 58 19 80 81 68 05 94 47 69 28 73 92 13 86 52 17 77 04 89 55 40 04 52 08 83 97 35 99 16 07
Program Write a program to generate Multiplication tables of a given number using Matlab. Also generate Multiplication table for all numbers at once, like the one below: Multiplication Table 20 x 20 To know more about the multiplication tables you can refer: Multiplication Table/Chart — Ncalculators Multiplication Table — Wikipedia Solution Program 1: We will ask the user to give input of a number. Then we will use a for loop to print out the multiplication table of the corresponding number. Program 2: We will write a program using functions. Program 3: We will create 10×10 multiplication table using the solution given here: Stack Overflow . Program 4: Generate 10×10 multiplication table using the nested for loops. You can refer to the explanation section for better understanding of the program. Some of the concepts you need to know to solve this problem are as follows: 1) input function in Matlab 2) for loop in Matlab — This website has a very good explana