Как правило, при установке Windows и сама система, и загрузчик размещаются на одном физическом накопителе независимо от того, сколько имеется на компьютере жестких дисков. Но бывают и исключения, когда установщик создает загрузочную запись на другом диске либо же из каких-то соображений загрузчик переносится пользователем. С одной стороны, такое решение может повысить общую отказоустойчивость, с другой — создать дополнительные проблемы с загрузкой.
Если вы столкнетесь с необходимостью извлечь второй диск, тот самый, на котором располагается загрузчик, то по вполне понятным причинам Windows не сможет загрузиться.
Чтобы запустить систему без загрузчика, вам понадобится помощь стороннего программного обеспечения — загрузочного диска на базе Windows, того же WinPE 10-8 Sergei Strelec.
Загружаете компьютер с записанным на флешку дистрибутивом LiveCD, выбираете в меню опцию загрузки «Search & Start Windows 7/8», после чего система стартует.
Если такого LiveCD под рукой нет, зато у вас имеется рабочий второй физический диск с загрузчиком, вы можете скопировать с него загрузочные файлы на диск с системой.
Делается это элементарно, одной командой.
Если вы уже извлекли второй диск, вставьте его обратно и загрузите Windows в обычном режиме.
Откройте командную строку либо PowerShell с правами администратора и выполните команду:
bcdboot C:windows /s C: /l ru-ru
Обратите внимание, что в этой команде есть два пути: C:windows — это источник, из которого копируются файлы загрузки, а C: — это основной жесткий диск с операционной системой, на который копируются файлы загрузки.
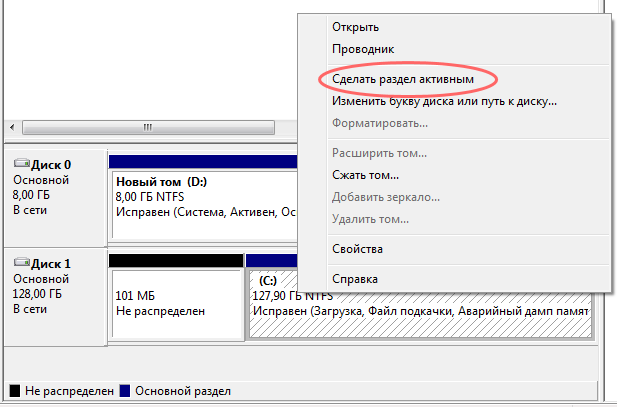
Также вам обязательно нужно будет сделать раздел, на который были скопированы загрузочные файлы, активным.
Зайдите в управление дисками, кликните по системному разделу правой кнопкой мыши и выберите в меню опцию «Сделать раздел активным».
Это всё, теперь можете извлекать второй диск со старым загрузчиком и включать компьютер.
Windows загрузится как обычно.
Загрузка…
|
1 / 1 / 0 Регистрация: 27.11.2014 Сообщений: 24 |
|
|
1 |
|
Как перенести загрузчик на другой диск09.11.2020, 12:22. Показов 2508. Ответов 10
здравствуйте! Проблема с переносом загрузчика Вин10. ссд 120 гиг (система) Биос UEFI. В биосе загрузка выглядит так: 1. Windows boot loader(WD 320) 2. SSD 120 3. WD 1000gb Обычная вроде проблема получилась , система Вин10 на диске С: а загрузчик остался на старом диске 320 гб. Я если отключаю его то: в списке загрузки БИОСа: ПК не стартует. Прочитал несколько тем тут и делал следующее: 1. писал bcdboot c:windows /s C: /l ru-ru ответ Файлы успешно загружены. Результат отрицательный. 2. с помощью бесплатной программы BootIce Запускать от имени администратора. На первой вкладке программы выбрать ваш 55 Гб диск —> Process MBR —> Windows NT 5.x/6.x MBR —> Install / Config —> Windows NT 6.x MBR —> OK Пишет ок, на диске пишет что теперь есть Windows NT 6.x MBR. Результат отрицательный. 2а. кроме этого там же в BootIce пропишите в бутсектор раздела c системой (Записать PBR) bootmgr. при нажатии ОК пишет ошибку записи чтото про том не открыт или т.п. соотвественно в биосе список загрузки так и выглядит Помогите пожалуйста! Спасибо.
__________________
0 |
|
4475 / 2155 / 439 Регистрация: 09.09.2017 Сообщений: 7,816 |
|
|
09.11.2020, 13:41 |
2 |
|
0 |
|
Андрей1224 8447 / 2969 / 494 Регистрация: 14.04.2011 Сообщений: 7,362 |
||||||||
|
09.11.2020, 15:24 |
3 |
|||||||
|
Решение 1. В Управлении дисками ПКМ на разделе С -> Сжать том. Уменьшить размер раздела на 100 МБ Кликните здесь для просмотра всего текста
Diskpart завершит работу, ком.строка останется открытой, в ней выполнить
Команду можно скопировать и вставить в ком.строку. Если будете вводить вручную, то перед ru-ru буква «L». Должно будет появиться сообщение, что файлы загрузки созданы. В зависимости от Вашего UEFI запись Windows Boot Manager будет или перезаписана или будет создана вторая такая запись. Пробовать загрузку.
1 |
|
211 / 115 / 15 Регистрация: 20.03.2015 Сообщений: 917 |
|
|
09.11.2020, 16:33 |
4 |
|
ПС Ктото писал что с помощью acronis-disk-director Акронис -архивация дисков-нужный диск-восстановление куда угодно. Я делаю так….Когда возникают проблемы с запуском, для начала восстанавливаю загрузку….и если не желает запускаться винда ..её тоже из архива…так и работаем.
0 |
|
1 / 1 / 0 Регистрация: 27.11.2014 Сообщений: 24 |
|
|
10.11.2020, 05:46 [ТС] |
5 |
|
Спасибо вечером попробую. «1. В Управлении дисками ПКМ на разделе С -> Сжать том. Уменьшить размер раздела на 100 МБ» У сжатого тома/диска нет какито побочных эффектов типа снижения производительности и т.п.? Как то так? Заблуждение или устаревшая информация? Спасибо
0 |
|
20 / 19 / 2 Регистрация: 16.06.2020 Сообщений: 118 |
|
|
10.11.2020, 08:27 |
6 |
|
Я делал так
«1. В Управлении дисками ПКМ на разделе С -> Сжать том. Уменьшить размер раздела на 100 МБ» + форматировал в FAT32 (можно и не форматировать) Сейчас спициально для вас проэксперементировал (давно этим не занимался), на 1 скрине перенёс загрузчик на «новое» место, «старый» удалил. Грузиться без проблем.
1 |
|
20 / 19 / 2 Регистрация: 16.06.2020 Сообщений: 118 |
|
|
10.11.2020, 08:31 |
7 |
|
[ATTACH] [/ATTACH] Миниатюры
1 |
|
8447 / 2969 / 494 Регистрация: 14.04.2011 Сообщений: 7,362 |
|
|
10.11.2020, 09:41 |
8 |
|
У сжатого тома/диска нет какито побочных эффектов типа снижения производительности и т.п.? Сжать том это в «переводе на русский» — уменьшить размер тома. Размер тома просто уменьшается на указанную величину, никакого сжатия информации или чего-то подобного, не происходит.
1 |
|
1 / 1 / 0 Регистрация: 27.11.2014 Сообщений: 24 |
|
|
10.11.2020, 12:05 [ТС] |
9 |
|
Сжать том это в «переводе на русский» — уменьшить размер тома. Ааа! Теперь всё понятно! Подмена понятий произошла! Добавлено через 14 минут 534 мб (Раздел восстановления) — он мне нужен вообще?- это раздел Вин10 сделала для восстановления штатными средствами? можно его стереть и туда загрузчик поместить? Добавлено через 2 минуты
Сейчас спициально для вас проэксперементировал (давно этим не занимался), на 1 скрине перенёс загрузчик на «новое» место, «старый» удалил. Грузиться без проблем. Спасибо за эмпирический опыт и картинки! Отпишусь по результатам!
0 |
|
Андрей1224 8447 / 2969 / 494 Регистрация: 14.04.2011 Сообщений: 7,362 |
||||
|
10.11.2020, 14:58 |
10 |
|||
|
534 мб (Раздел восстановления) — он мне нужен вообще? Это можете решить только Вы. Среда восстановления (которая находится на разделе восстановления) есть на установочном диске или флешке. Скажу больше, если Вы создадите раздел EFI перед разделом восстановления, то есть вероятность, что раздел восстановления перестанет выполнять свои функции (я об этом писАть не стал, так как перенести загрузчик это более важноенужное дело). После переноса загрузчика можно уже заниматься разделом восстановления, проверять работает ли он, возможно отключать и прописывать новый путь к среде восстановления. Если решите раздел восстановления удалить, то это нужно будет делать через diskpart или сторонним софтом. Если раздел восстановления решите удалить, то после его удаления я бы увеличил размер раздела С на 434 МБ, чтобы осталось 100 МБ не распределённого места и на этом месте создать раздел EFI. В этом случае получится чинно и красиво. Если будете удалять раздел восстановления, то советую предварительно его отключить (точней отключить среду восстановления)
1 |
|
1 / 1 / 0 Регистрация: 27.11.2014 Сообщений: 24 |
|
|
13.11.2020, 09:31 [ТС] |
11 |
|
Вопрос решён! Спасибо за помощь:
0 |
|
IT_Exp Эксперт 87844 / 49110 / 22898 Регистрация: 17.06.2006 Сообщений: 92,604 |
13.11.2020, 09:31 |
|
11 |
Are you planning to change boot drive Windows 10? Don’t worry if you are confused about what to do. In this post, MiniTool Partition Wizard provides a detailed tutorial and you can refer to it to change boot drive according to your needs.
What Is a Boot Drive
A boot drive is a hardware device that contains the operating system for booting a computer. It could be a hard drive, floppy disk drive, CD-ROM drive, DVD drive, and USB flash drive.
A hard drive is the most commonly used boot drive. When you buy a new computer, an operating system is pre-installed on the hard drive and you can boot it directly.
As long as a computer has been used, users usually need to change boot drive. In other words, they want to replace the system disk with another one, and they often do it due to one of the following reasons:
- They want to move boot drive to a new SSD for better performance.
- Their old boot drive is running out of space and they need a larger one.
- There are signs of hard drive failure and they plan to replace their boot drive before it damages.
It might be a little difficult for most common users to change boot drives by themselves, especially for the first time. If you are one of them, don’t worry. There is a detailed tutorial on how to change boot drive in the following contents.
How to Change Boot Drive Windows 10
Generally speaking, there are three stages in the process of changing boot drive:
- Back up data.
- Migrate OS from the old to the new boot drive or clean install Windows 10.
- Replace the old hard drive.
Now, let’s see more detailed information about them one by one.
Stage 1: Back up Data Before You Change Boot Drive Windows 10
It is elementary to back up data before you change the boot drive. In this way, you can avoid unexpected system failure or data loss. And it is better than rescuing data after a crash.
You can back up your computer with a USB flash drive or external hard drive. And for the backup software, you can use MiniToolShadowMaker, a reliable backup program designed by MiniTool. This tool helps users to make an image as the backup method, which means the backup won’t take much storage space. Now, let’s see how to use this tool to back up your original hard drive.
Step 1: Connect a USB flash drive or an external hard drive to your computer.
Step 2: Download, install, and launch MiniToolShadowMaker.
Free Download
Step 3: Choose the local computer to manage and enter the main interface.
Step 4: Go to the Backup tab and click the Source selection. Then select your system disk and check all the partitions to back up the whole disk. Click OK to continue.
Step 5: Click the Destination section and select your USB drive or external hard drive to store the backup. Then click OK.
Step 6: Click Back up Now to start the backup process.
Then you just need to wait patiently until the process is finished. After that, you can disconnect your USB flash drive or external hard drive, and then move on to the next stage.
Stage 2:Migrate OS or Clean Install Windows 10
After backing up data, you can change the boot drive without any worries. As mentioned, a boot drive needs to contain files required for a computer to start. If you want to boot from another hard drive, you need to install an operating system on the drive at first.
You have two options now: the first is to migrate OS from your old boot drive to the new hard drive with a third-party program; the second is to clean install Windows 10 on the new hard drive.
Option 1: Migrate OS to SSD/HD via MiniTool Partition Wizard
MiniTool Partition Wizard is a professional and reliable disk partition management tool. It can help you a lot in your daily life. For example, you can use it to resize partition, recover lost partition or data, check for hard drive errors, and clone disk.
If you migrate OS with this tool when you decide to change boot drive, you don’t need to spend time reinstalling Windows 10, and you can also choose to copy your non-system data or not during the process.
Tip: This might not be the best option when the operating system on your old hard drive is corrupted, as you could also encounter problems even after changing the boot drive.
Now, let’s see how to use MiniTool Partition Wizard.
Step 1: Connect your new hard drive to your computer.
Tip: If your computer has a compatible slot for your new hard drive, you can install it directly as a second hard drive. Otherwise, you would need a USB adapter to connect the new hard drive to your computer.
Step 2: Click the following button to download MiniTool Partition Wizard. Then install and launch the program.
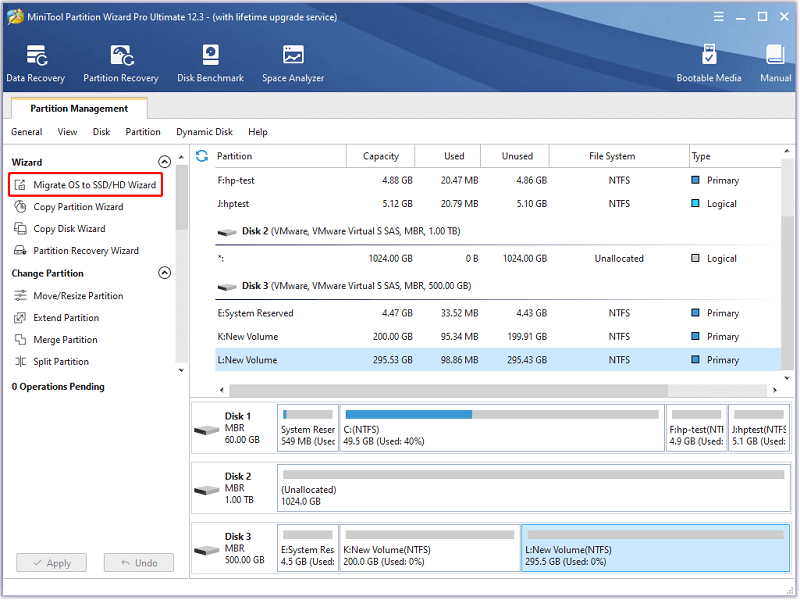
Step 3: Register to the Pro Ultimate edition with your license key and click the Migrate OS to SSD/HD Wizard feature from the left action panel.
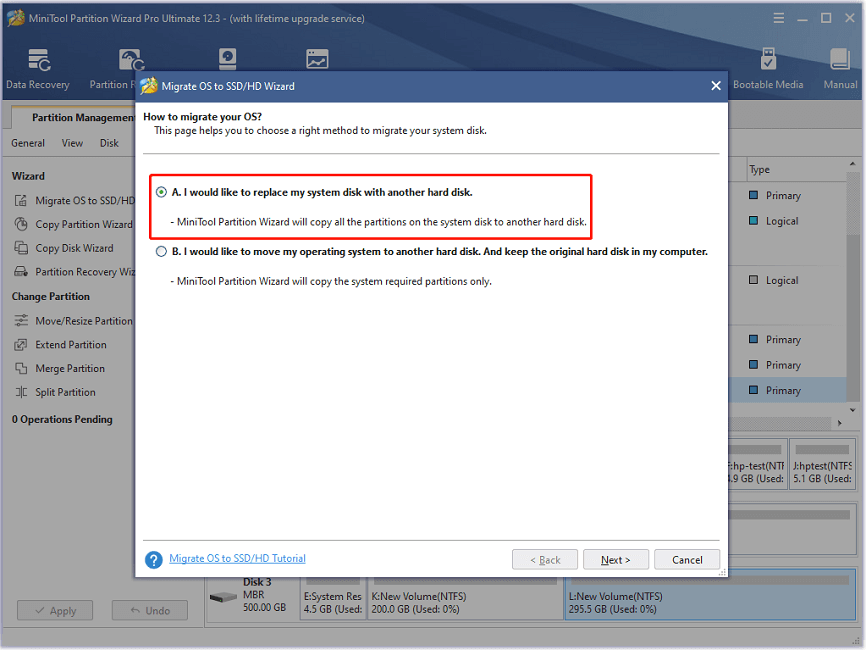
Step 4: In the pop-up window, select option A if you plan to copy the entire disk. Choose B if you just need to migrate the operating system. Then click Next to continue.
Step 5: Select your new hard drive as the destination disk to save migrated data.
Warning: If you select a hard drive that contains data as the destination disk, all the data on it will be removed in the process.
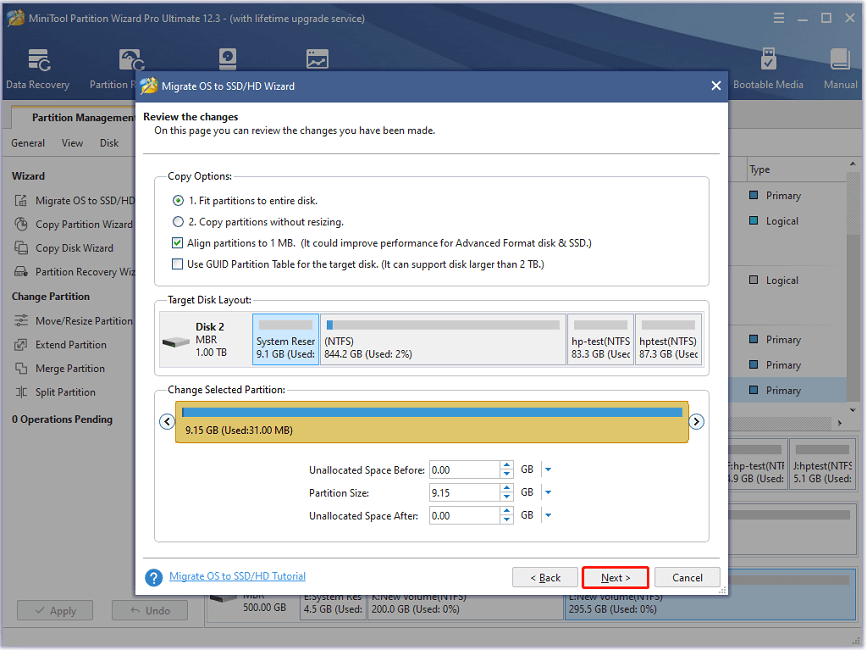
Step 6: Review the changes you have made and click Next. On this page, you can select the copy options and target disk layout according to your preferences. There are two tips for you:
- If your destination disk is an SSD, you’d better check the Align partition to 1MB to improve the performance.
- If your destination disk is larger than 2TB, you should check Use GUID Partition Table for the target disk to take advantage of the storage space.
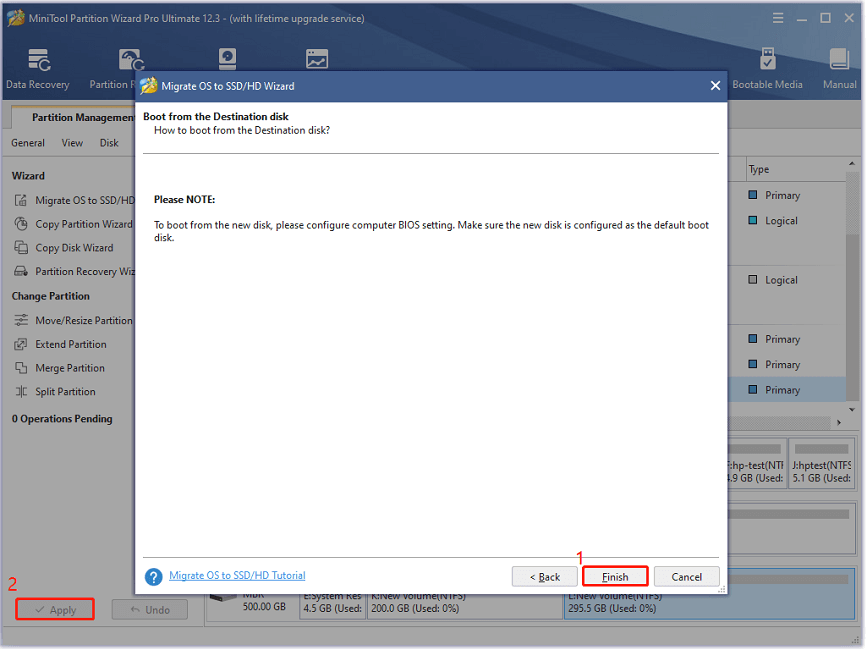
Step 7: Read the note that tells you how to boot from the new hard drive and click Finish. Then click Apply to start the data migration process.
The process would take some time, and you should wait patiently. Don’t shut down your computer during the process. When the data migration is finished, you can shut down your computer and change the boot order to boot from your new hard drive. If it works properly, you can go to the next stage.
Option 2: Clean Install Windows 10
If you expect a fresh system without any hidden corruption or you don’t need to move your data to the new boot drive, you can clean install Windows 10. To do this, you need to download the latest Windows 10 installation ISO file from the Microsoft website and burning it to a USB drive or CD/DVD, and then use the USB drive or CD/DVD to install Windows 10.
Here are the detailed steps about how to clean install Windows 10.
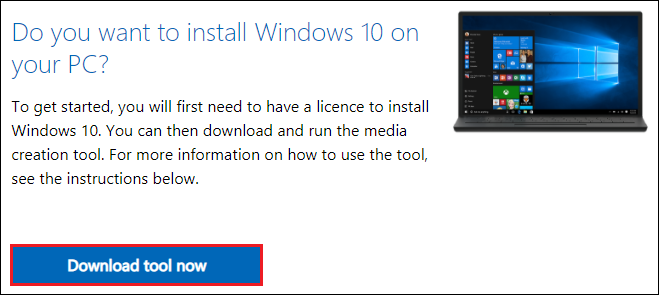
Step 1: Connect an empty USB flash drive to your computer. Then search for Windows 10 download in your web browser and visit the official website of Microsoft to download Windows 10 Media Creation Tool.
Step 2: Open the downloaded file and accept the applicable notices and license terms.
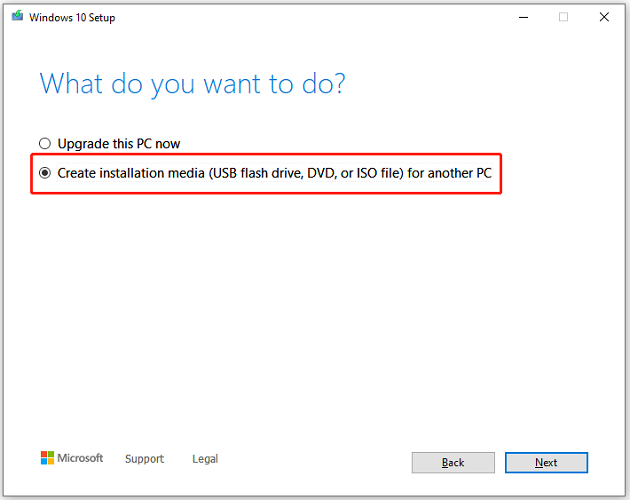
Step 3: On the window of “What do you want to do”, select Create installation media (USB flash drive, DVD, or ISO file) for another PC and click Next.
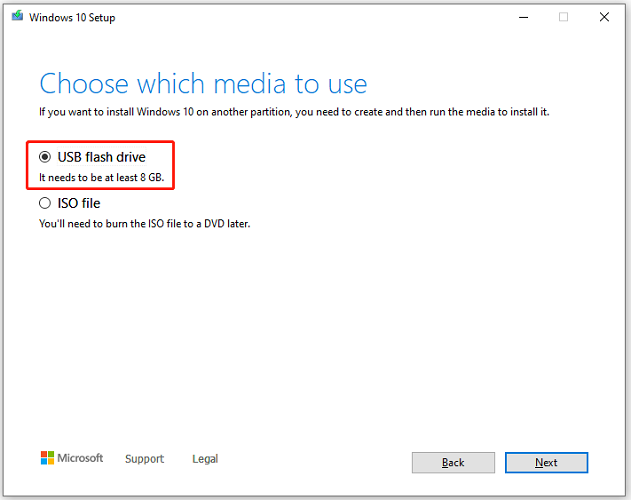
Step 4: Select language, architecture, and edition. Then click Next to continue. In the following window, select USB flash drive and click Next.
Step 5: Choose your USB flash drive and click Next. Wait until the process is finished.
Step 6: Shut down your computer and connect your new hard drive to your computer. Then turn on your computer and change the boot order to boot from your USB flash drive.
Then you just need to follow the onscreen instructions to install Windows 10 on your new hard drive.
After installing Windows 10, you can disconnect the USB flash drive and try booting from the new hard drive. If your computer boots successfully, move on to the next stage.
Stage 3: Replace Your Old Boot Drive with the New One
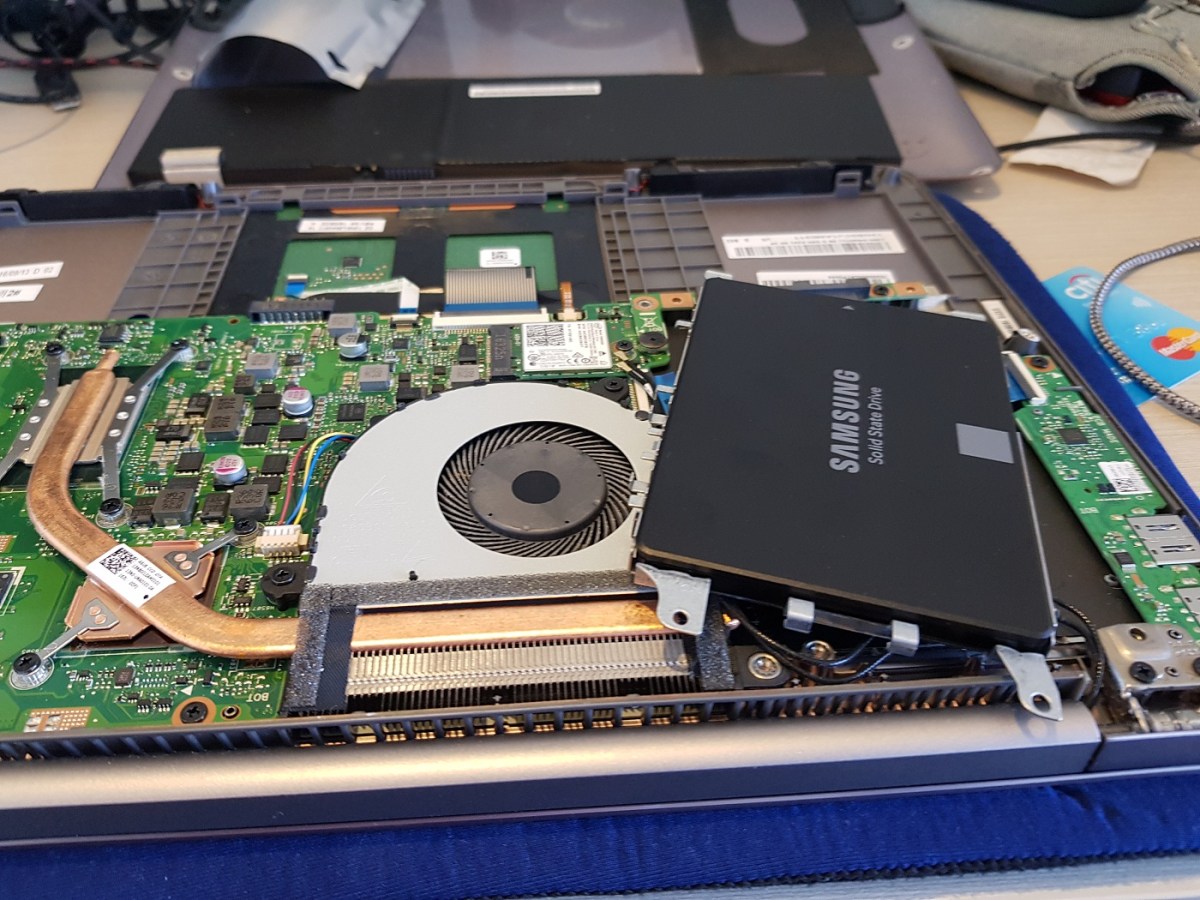
Once you migrate OS or reinstall Windows 10 successfully, you can remove your old boot drive and install the new one. However, if your computer has enough hard drive slots which support you to keep both hard drives, you can also keep the old one installed. In this case, you can format it and use it to store data as a second hard drive.
Tip: If you don’t know how to remove the old hard drive, this post might be helpful for you: 7 Steps: How to Remove Hard Drive from Laptop.
Are you planning to move boot drive to a new SSD? How to change boot drive Windows 10? Don’t worry. Here is a detailed tutorial for you!Click to Tweet
Bottom Line
Don’t vex if you are confused about how to change boot drive Windows 10. You can get a detailed guide in this post. If you have any questions, you can post them in the comment section below. For any problems you encountered while using MiniTool Partition Wizard, you can contact [email protected] for solutions.
Change Boot Drive Windows 10 FAQ
How do I choose which drive to boot Windows 10?
- Restart your computer and access BIOS.
- Go to the Boot
- Use the + and – keys to change the boot order.
- Select Save & Exit
According to the manufacturer of a computer, the detailed steps might be different.
What is the boot menu key for Windows 10?
The boot menu key on computers from different manufactures could be different. Common keys are Esc, F2, Del, or F12. Usually, you can see how to enter BISO when the logo of the manufacture appears during the start process. You can also check the user manual or search on the internet to get the information.
Can’t boot from USB Windows 10?
Резервное копирование Windows 10 на другой жесткий носитель можно проводить несколькими способами. Но это действие невозможно выполнить без сторонних программ. В сети можно найти массу ПО, созданных для переноса системы на твердый накопитель. Некоторые из них отличаются сложным интерфейсом, разобраться в котором непросто даже опытному юзеру. Рассмотрим, как безопасно, не допуская ошибок, перенести загрузчик Windows 10 на другой жесткий диск.
Что надо знать перед копированием?
Оснований для переноса загрузчика Windows 10 на другой жесткий диск может быть несколько. Факторы, вынуждающие прибегнуть к клонированию:
- Перенос Windows 10 на SSD оправдан тем, что скорость работы стандартного жесткого диска на порядок ниже энергонезависимого запоминающего устройства. Особенно это заметно при загрузке обновлений. После копирования она возрастает в несколько раз. Большой недостаток SSD-носителя – ограниченное число циклов перезаписи. Поэтому обоснованно производить его, когда процедура будет осуществляться наименьшее число раз.
- Перенос Windows 10 на HHD накопитель производится, если у пользователя есть 2 винчестера. При этом на одном из них объем памяти порядком ограничен. В таком случае копирование ОП выполняется на HHD, дополнительно освобождая свободное пространство на жестком диске.
Большинство юзеров после завершения манипуляций не избавляются от первоначально установленной ОС. Это позволяет воспользоваться дубликатом операционной системы, если что-то пойдет не так.
Копирование загрузчика Windows с одного диска на другой
Чтобы осуществить задуманное, кроме накопителя, на который будет осуществляться перенос, понадобится специальная программа. Ее стоимость доступна рядовому пользователю, но встречаются и бесплатные варианты.
Acronis True Image
Пакет программ Acronis True Image обеспечивает безопасность информации на устройстве. Пробный период данного ПО ограничен 30 днями, чтобы продолжить пользование следует приобретать лицензию. Как провести перенос:
- Скачайте лицензионную версию, установите на компьютер.
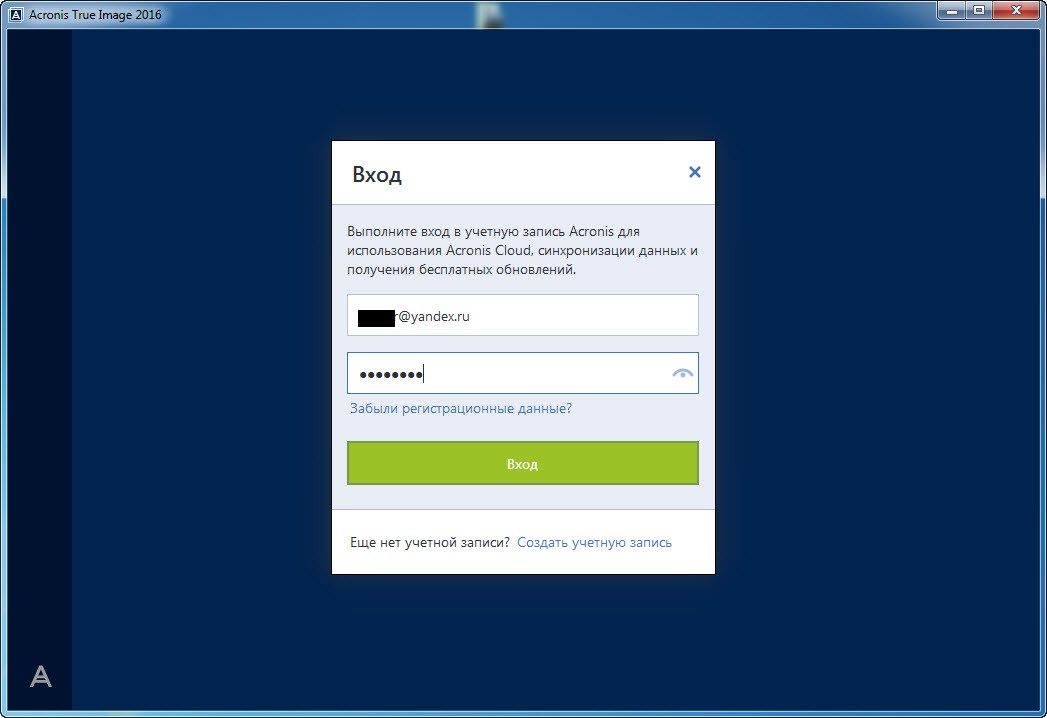
- Создание учетной записи обеспечит доступ к резервным копиям с любого устройства.
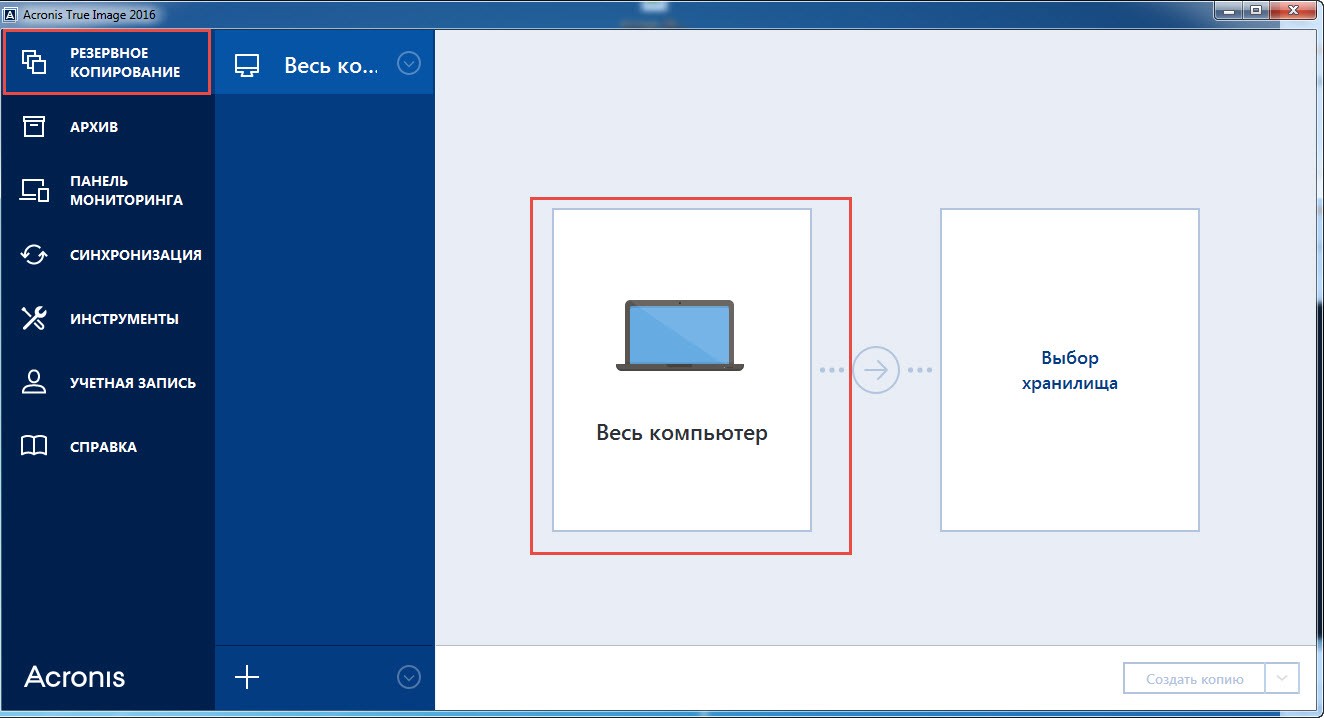
- Щелкните на окно «Резервное копирование», кликните на раздел «Весь компьютер».
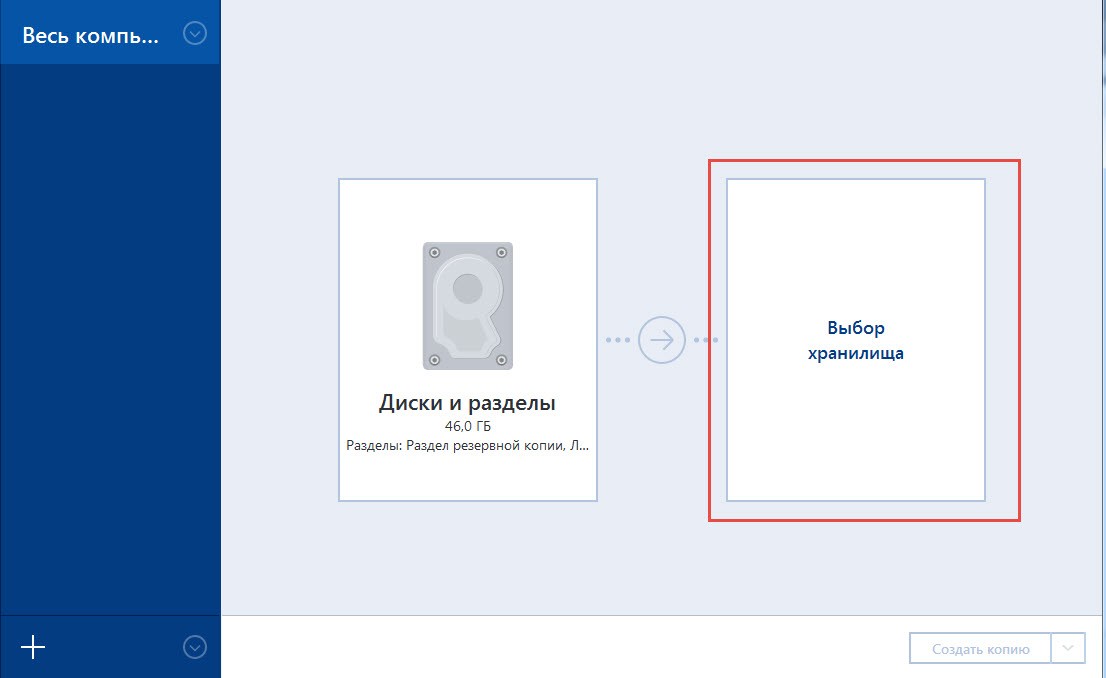
- Нажмите на «Диски и разделы».
- Для проведения резервного копирования выберите загрузочный диск (стандартно – это носитель С:/).
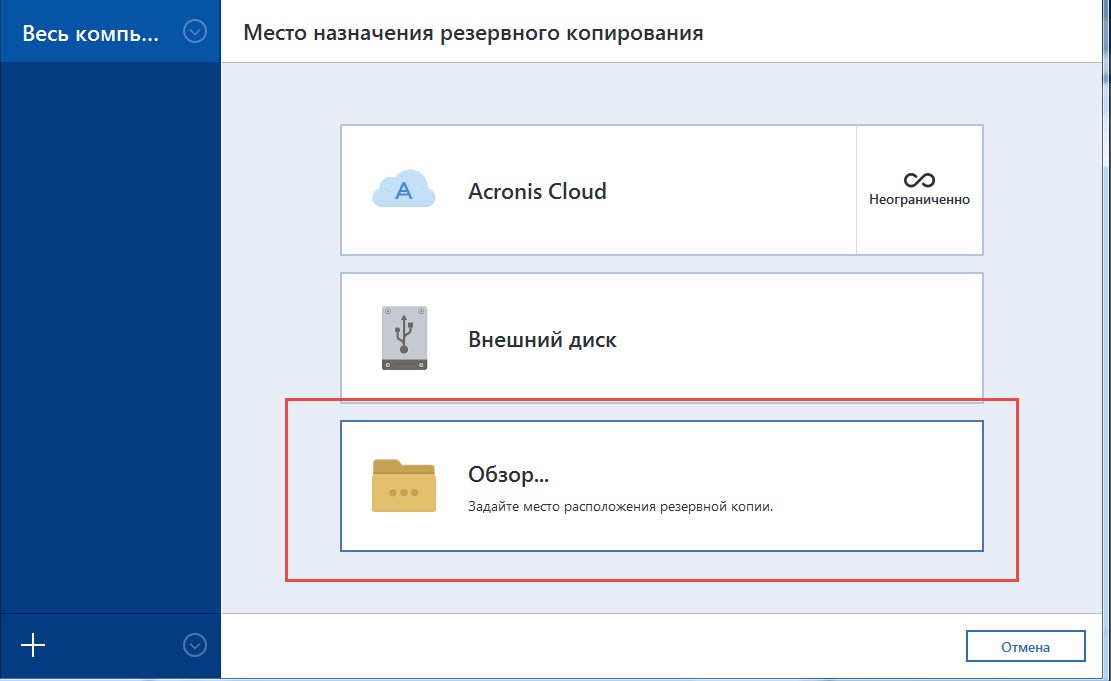
- Щелкните на «Выбор хранилища». Чтобы обозначить, куда сохранять копии, кликните на раздел «Обзор».
- Сначала выберите «Сеть», затем сетевое хранилище и папку, в которой будут сохраняться запасные копии.
- В открывшемся окне введите имя и пароль хранилища.
В нижней части экрана всплывет клавиша «Параметры». Кликнув на нее, можете назначить вспомогательные настройки. Такие, как периодичность и схема резервного копирования.
AOMEI Partition Assistant Standard Edition
Самая простая, удобная, русскоязычная версия программы для работы с дисками. Алгоритм переноса загрузчика Windows 10 с помощью AOMEI Partition Assistant Standard Edition:
- Скачайте лицензионную копию программы.
- Войдите в «Мастер копирования дисков», кликните на раздел «Быстро скопировать диск».
- Создайте задачу, указав исходный и диск назначения.
- Обозначьте, нужно ли подгонять размеры исходного накопителя под размеры целевого диска.
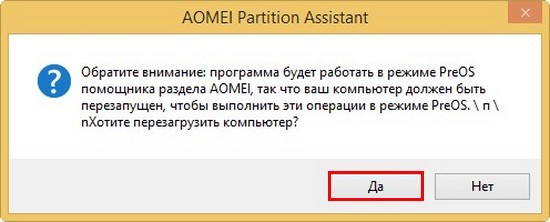
- Щелкните по клавише «Готово». В главном окне программы тапните на пункт «Применить».
После автоматической перезагрузки компьютер запустит программу клонирования, на это может понадобиться время. После завершения процесса перезапустите устройство снова.
Bcdboot.exe
Программа Bcdboot.exe используется для восстановления загрузчика Windows 10, для переноса и копирования файлов, создания резервного хранилища.
Для восстановления загрузчика Windows 10 загрузите устройство с оригинального установочного диска. Откройте окно текстового редактора.
Командная строка для пересоздания хранилища: BCDboot.exe Е:windows/ l en-us / s M: / f ALL
- параметр Е:windows необходимо заменить на тот, где хранятся файлы Виндовс;
- f ALL указывает на то, что копированию подлежат все файлы загрузки;
- l en-us данные указывающие тип системной локализации. Стандартно используется английский язык. Если используется русскоязычная версия, команда приобретает такой вид:
BCDboot.exe Е:windows/ L ru-ru S M:/ F ALL.
После проведения операции перезагрузите компьютер.
Специалисты предупреждают, что работать с Bcdboot.exe рекомендуется только «продвинутым» юзерам. Пользователям, которые имеют лишь общие представления о работе ПК, от этого способа лучше отказаться.
Windows, Windows 10, Windows 7, Windows 8, Windows Server, Windows Vista
- 01.06.2020
- 37 422
- 9
- 50
- 46
- 4
- Содержание статьи
- Копирование загрузчика Windows с одного диска на другой
- Комментарии к статье ( 9 шт )
- Добавить комментарий
Бывают такие ситуации, что установщик Windows устанавливая систему на один жесткий диск, ставит загрузчик на другой. И, когда по какой-то надобности, необходимо второй диск извлечь, то можно получить нерабочий компьютер, так как загрузчик на первом диске отсутствует. К счастью, подобное недоразумение очень легко исправить.
Копирование загрузчика Windows с одного диска на другой
Для начала, нужно вернуть второй жесткий диск в компьютер, и загрузится в Windows. В ней выполняем следующую команду в командной строке (обязательно запущенную от имени администратора):
bcdboot c:windows /s C: /l ru-ruПосле того, как появится сообщение о успешном завершении работы, выключаем компьютер, отключаем диск со старым загрузчиком и включаем компьютер.
Содержание:
Здравствуйте админ! На моём ноутбуке не загружается Windows 10. Статью на вашем сайте о восстановлении загрузчика читал, но она к сожалению мне не помогла, хотя испробовал все приведённые в ней способы. В комментариях к статье один пользователь посоветовал мне создать загрузчик Windows 10 заново, но подробностей не привёл. Скажите, как это можно сделать?
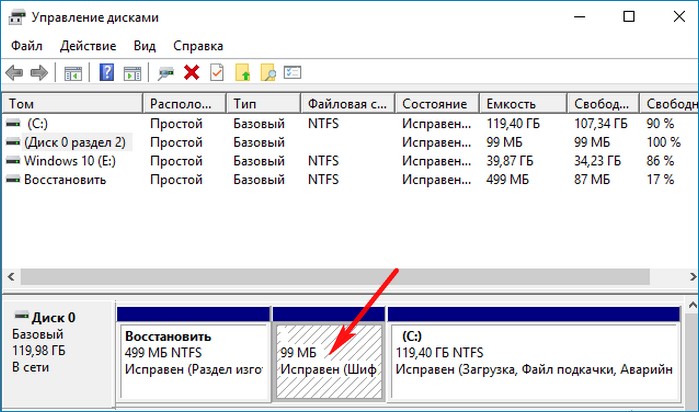
Привет друзья! Если ваша Windows 10 не загружается из-за проблем с файлами, ответственными за загрузку операционной системы, располагающимися на скрытом шифрованном (EFI) системном разделе FAT32 (размер 99 Мб), то можно удалить этот раздел и затем создать заново. В результате файлы загрузчика обновятся и вполне возможно такое решение приведёт к успешной загрузке Windows. Здесь не лишним будет заметить, что за загрузку Windows отвечают файлы конфигурации хранилища загрузки (BCD) в папке Boot и менеджер загрузки системы (файл bootmgr).
Шифрованный (EFI) системный раздел FAT32, размер 99 Мб, можно увидеть в «Управлении дисками» вашего компьютера. Нам также придётся удалить первый раздел со средой восстановления (499 Мб), так как после пересоздания загрузчика она перестанет функционировать (среду восстановления можно будет позже создать заново).
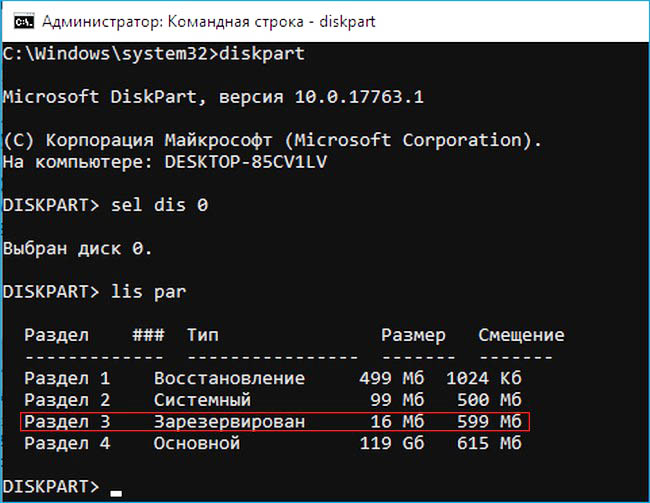
Ещё мы создадим заново не отображаемый в Управлении дисками служебный раздел MSR, обязателен для разметки GPT в системах UEFI (размер 16 Мб).
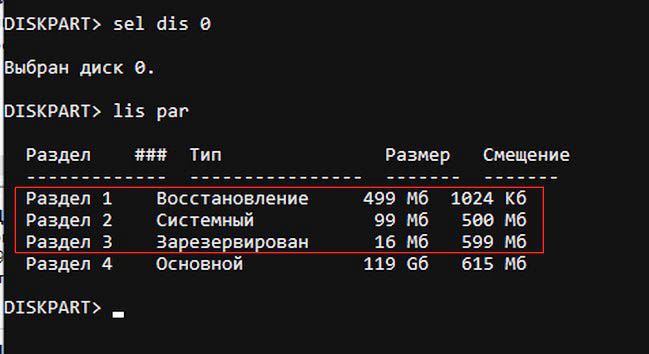
Итак, перед работой ещё раз уточним, какие именно разделы мы будем удалять и затем создавать заново:
1. Раздел (499 Мб) содержащий среду восстановления Windows 10 (от данного раздела можно избавиться и пользоваться при необходимости средой восстановления, находящейся на загрузочном носителе с Win 10).
2. Раздел (99 Мб), шифрованный (EFI) системный раздел, содержащий все файлы загрузчика Windows 10.
3. Служебный раздел MSR (Microsoft System Reserved) 16 Мб, обязательный для разметки дисков GPT.
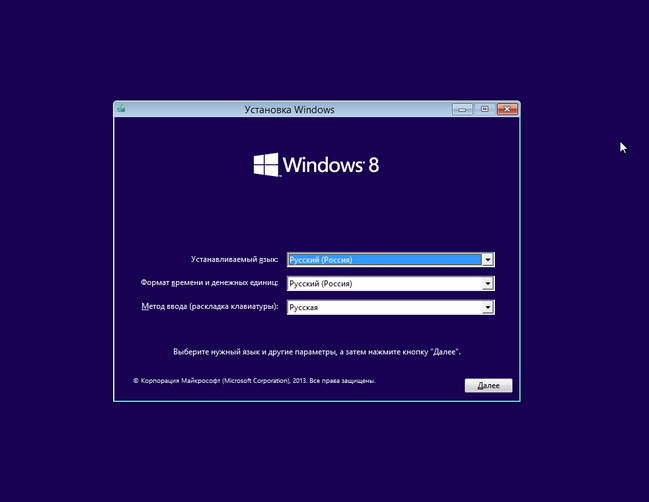
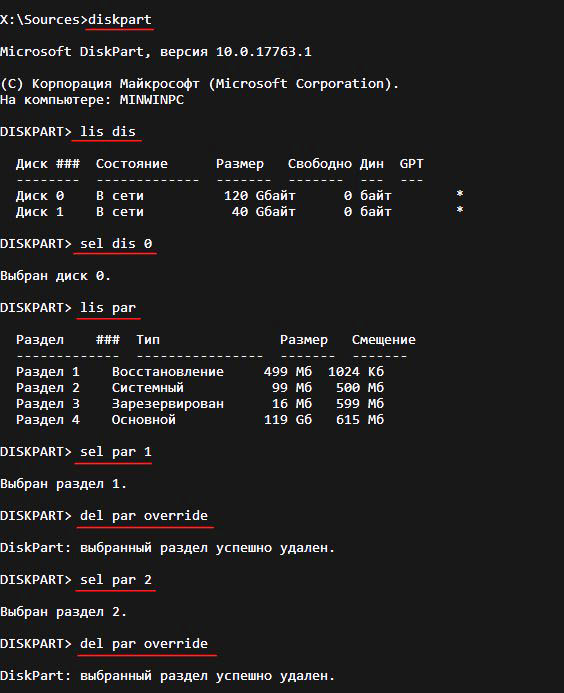
Загружаем ноутбук с загрузочной флешки с Windows 10 и в начальном окне установки системы жмём клавиатурное сочетание Shift + F10,
открывается окно командной строки, вводим команды:
diskpart
lis dis (выводит список физических дисков).
sel dis 0 (выбираем жёсткий диск ноутбука 120 Гб).
lis par (показ всех разделов выбранного диска, первые три раздела будем удалять).
sel par 1 (выбираем первый раздел
del par override (удаляем раздел, для удаления раздела ESP и MSR или раздела OEM-изготовителя ноутбука, необходимо указать параметр override)
sel par 2
del par override
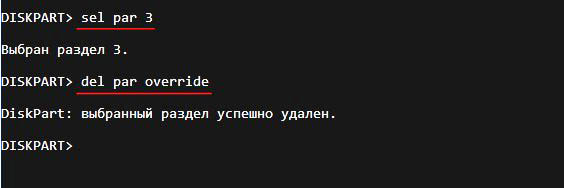
sel par 3
del par override
Всё, все три скрытых раздела мы удалили.
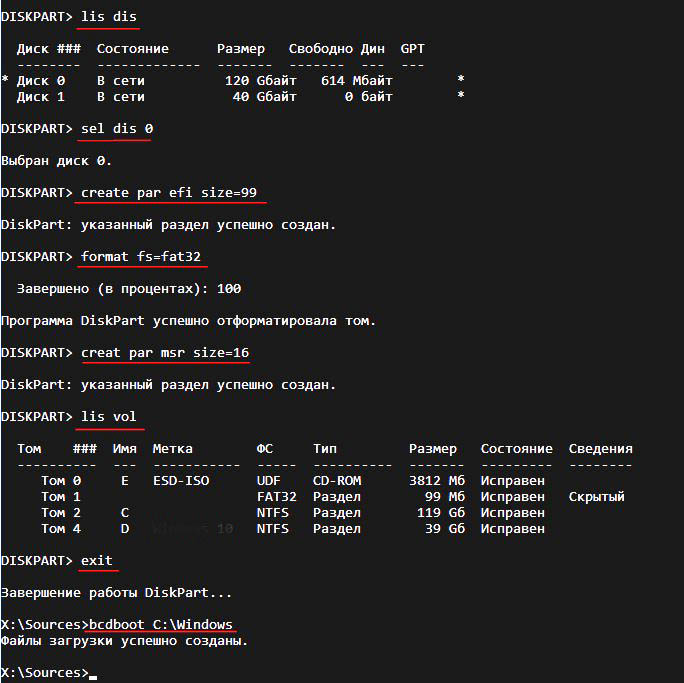
Вводим команды:
diskpart
lis dis (выводим список дисков).
sel dis 0 (выбираем жёсткий диск ноутбука).
create par efi size=99 (создаём шифрованный (EFI) системный раздел 99 Мб).
format fs=fat32 (форматируем его в файловую систему FAT32).
creat par msr size=16 (создаём раздел MSR 16 Мб)
lis vol (выводятся все разделы жёсткого диска).
exit (выходим из diskpart)
Создаём загрузчик командой
bcdboot C:Windows, так как буква диска операционной системы в среде восстановления (C:).
Файлы загрузки успешно созданы.
Перезагружаемся и Windows 10 должна загрузиться.
Рекомендуем другие статьи по данной теме
Заметили ошибку
Выделите и нажмите Ctrl+Enter


 Сообщение было отмечено fanatf1 как решение

