The accepted answer does not work well with multiple networks per container:
> docker inspect -f '{{range .NetworkSettings.Networks}}{{.IPAddress}}{{end}}' cc54d96d63ea
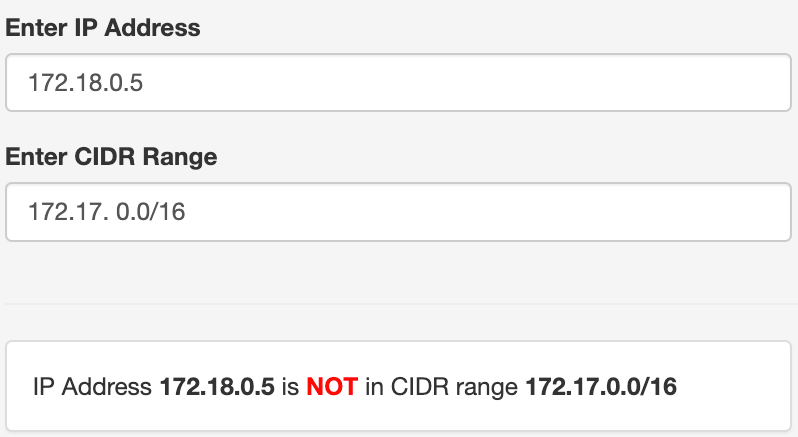
172.20.0.4172.18.0.5
The next best answer is closer:
> docker inspect cc54d96d63ea | grep "IPAddress"

"SecondaryIPAddresses": null,
"IPAddress": "",
    "IPAddress": "172.20.0.4",
    "IPAddress": "172.18.0.5",
I like to use jq to parse the network JSON:
> docker inspect cc54d96d63ea | jq -r 'map(.NetworkSettings.Networks) []'

{
  "proxy": {
    "IPAMConfig": null,
    "Links": [
      "server1_php_1:php",
      "server1_php_1:php_1",
      "server1_php_1:server1_php_1"
    ],
    "Aliases": [
      "cc54d96d63ea",
      "web"
    ],
    "NetworkID": "7779959d7383e9cef09c970c38c24a1a6ff44695178d314e3cb646bfa30d9935",
    "EndpointID": "4ac2c26113bf10715048579dd77304008904186d9679cdbc8fcea65eee0bf13b",
    "Gateway": "172.20.0.1",
    "IPAddress": "172.20.0.4",
    "IPPrefixLen": 24,
    "IPv6Gateway": "",
    "GlobalIPv6Address": "",
    "GlobalIPv6PrefixLen": 0,
    "MacAddress": "02:42:ac:14:00:04",
    "DriverOpts": null
  },
  "webservers": {
    "IPAMConfig": null,
    "Links": [
      "server1_php_1:php",
      "server1_php_1:php_1",
      "server1_php_1:server1_php_1"
    ],
    "Aliases": [
      "cc54d96d63ea",
      "web"
    ],
    "NetworkID": "907a7fba8816cd0ad89b7f5603bbc91122a2dd99902b504be6af16427c11a0a6",
    "EndpointID": "7febabe380d040b96b4e795417ba0954a103ac3fd37e9f6110189d9de92fbdae",
    "Gateway": "172.18.0.1",
    "IPAddress": "172.18.0.5",
    "IPPrefixLen": 24,
    "IPv6Gateway": "",
    "GlobalIPv6Address": "",
    "GlobalIPv6PrefixLen": 0,
    "MacAddress": "02:42:ac:12:00:05",
    "DriverOpts": null
  }
}
To list the IP addresses of every container then becomes:
for s in `docker ps -q`; do
  echo `docker inspect -f "{{.Name}}" ${s}`:
  docker inspect ${s} | jq -r 'map(.NetworkSettings.Networks) []' | grep "IPAddress";
done

/server1_web_1:
    "IPAddress": "172.20.0.4",
    "IPAddress": "172.18.0.5",
/server1_php_1:
    "IPAddress": "172.20.0.3",
    "IPAddress": "172.18.0.4",
/docker-gen:
    "IPAddress": "172.18.0.3",
/nginx-proxy:
    "IPAddress": "172.20.0.2",
    "IPAddress": "172.18.0.2",
Хотите узнать, какой IP-адрес у вашего запущенного контейнера?
Вы можете проверить работающий контейнер, чтобы получить эту информацию.
sudo docker container inspect container_name_or_IDКоманда inspect предоставляет много подробностей о проверяемом контейнере.
Пролистайте к концу вывода и загляните в раздел Networks, чтобы получить IP-адрес контейнера.
Вы также можете использовать команду grep, чтобы вывести только строки, соответствующие шаблону «IPAddress».
Не знаете название или идентификатор контейнера? Используйте команду sudo docker ps.
Не пугайтесь, если у вашего контейнера более одного IP-адреса.
В этом нет ничего необычного.
Чтобы понять это, вам нужно разобраться, как контейнеры взаимодействуют друг с другом.
Я объясню вам это в следующем разделе, а затем расскажу о некоторых других методах получения IP-адреса запущено контейнера Docker.
Содержание
- Как общаются Docker контейнеры?
- Docker network
- Проверка IP-адреса Docker контейнера
- Метод 1: Inspect
- Метод 2: Использование оболочки контейнера
- Метод 3: проверив саму сеть
- Какой метод выбрать?
Как общаются Docker контейнеры?
Docker – это инструмент для упаковки и доставки программного обеспечения с использованием технологии контейнеризации.
Программное обеспечение может иметь множество целей, от, возможно, простой обработки текста до полноценного веб-сервера, на котором размещаются ваши файлы.
Каждое из этих программ разбивается на микросервисы, а затем упаковывается в контейнеры.
В зависимости от назначения программного обеспечения одной службе может потребоваться взаимодействие с другой.
Например, рассмотрим WordPress.
Есть две службы: одна – это веб-сервер, фронтенд, а другая – бэкэнд, база данных.
Интерфейс должен взаимодействовать с базой данных, иначе он просто не будет работать.
Эта связь достигается за счет наличия по крайней мере двух сетевых интерфейсов, связанных с каждым из этих двух контейнеров, причем оба интерфейса подключены к одной и той же сети.
Эта сеть называется «docker network».
Docker network
Считайте Docker network пулои доступных IP-адресов.
Если два контейнера получат IP-адреса из одного пула, они смогут обмениваться данными друг с другом.
В основном есть два типа сетей: сети по умолчанию или предварительно определенные сети и сети, определяемые пользователем.
Вы можете получить список сетей, используя следующую команду:
 docker network ls
NETWORK ID NAME DRIVER SCOPE
03451ee164fe bridge bridge local
047550573b63 host host local
cec416104436 none null local
Проигнорируйте последние две записи и сосредоточьтесь на первой сети.
Сеть bridge – это сеть по умолчанию, к которой будет подключаться каждый контейнер, если не другое указан явно.
Вы можете получить более подробную информацию об этой сети, выполнив команду docker network inspect bridge.
Я собираюсь отфильтровать вывод, так как для этой демонстрации мне не нужны все данные, которые мы можем вывести.
❯ docker network inspect -f '{{json .IPAM.Config}}' bridge | jq -r .[].Subnet
172.17.0.0/16
Если у вас не установлен jq, установите его с помощью диспетчера пакетов вашего дистрибутива.
У каждой из этих сетей есть подсеть, в случае сети bridge это подсеть 172.17.0.0/16.
Это означает, что всего имеется 65534 – 1 = 65533 используемых хостов или IP-адресов.
Я отминусовал один, так как для шлюза выделен 172.17.0.1.
Вы также можете увидеть это, используя следующую команду:
docker network inspect -f '{{json .IPAM.Config}}' bridge | jq -r .[].Gateway
Проверка IP-адреса Docker контейнера
Есть несколько способов проверить IP-адрес[а], связанный с вашим контейнером, вот их список, включая примеры команд.
Метод 1: Inspect
Подкоманда inspect чрезвычайно полезна.
Контейнер можно проверить с помощью команды docker container inspect [CONTAINER ID] | [CONTAINER NAME].
Проверка контейнера означает получение как можно большего количества информации о контейнере, от портов, переменных среды до точек монтирования, данных контрольной группы и т. д.
Из вывода можно извлечь IP-адрес.
Если вы запустите команду inspect для контейнера, вы получите кучу информации в формате JSON.
Прокрутите вниз, пока не найдете ключ NetworkSettings, там найдите IPAddress.
Это и есть IP-адрес вашего контейнера.
Команда выглядит следующим образом:
docker run --rm --name ubuntu-ip -d ubuntu:20.04 sleep 1d
Чтобы контейнер работал, я использовал команду sleep 1d.
Теперь запустите процесс оболочки внутри контейнера и прикрепите свой stdin|stdout вот таким образом:
docker exec -ti ubuntu-ip sh
Оказавшись в этом контейнере, попробуйте запустить ip или ifconfig.
Вы увидите что-то вроде следующего:
❯ docker exec -ti ubuntu-ip sh
# ip
sh: 1: ip: not found
# ifconfig
sh: 2: ifconfig: not found
Чтобы эти команды работали, вам необходимо установить соответствующие пакеты.
Чтобы получить команду ip, установите пакет iproute2 и повторно запустите команду ip a.
# apt update -qq
6 packages can be upgraded. Run 'apt list --upgradable' to see them.
# apt install iproute2 -yqq
# ip a
1: lo: <LOOPBACK,UP,LOWER_UP> mtu 65536 qdisc noqueue state UNKNOWN group default qlen 1000
    link/loopback 00:00:00:00:00:00 brd 00:00:00:00:00:00
    inet 127.0.0.1/8 scope host lo
       valid_lft forever preferred_lft forever
4: eth0@if5: <BROADCAST,MULTICAST,UP,LOWER_UP> mtu 1500 qdisc noqueue state UP group default
    link/ether 02:42:ac:11:00:02 brd ff:ff:ff:ff:ff:ff link-netnsid 0
    inet 172.17.0.2/16 brd 172.17.255.255 scope global eth0
       valid_lft forever preferred_lft forever
Теперь вы можете увидеть, что IP-адрес, связанный с интерфейсом eth0@if5, равен 172.17.0.2.
Обратите внимание на сеть, частью которой является этот контейнер.
Поскольку я не создавал и не подключал пользовательскую сеть к этому контейнеру, он был подключен к сети bridge, поэтому сеть этого IP-адреса 172.17.0.0.
Этот метод, безусловно, работает, хотя он более трудоемкий и не очень воспроизводимый, он интуитивно понятен.
Следующий метод должен быть намного лучше по сравнению с этим.
Метод 3: проверив саму сеть
Всякий раз, когда контейнер подключается к сети, этот подключенный контейнер также виден из сети вместе с IP-адресом, назначенным этим контейнерам.
Поскольку мой контейнер подключен к сети bridge, я могу проверить сеть с помощью следующей команды:
docker network inspect [NETWORK NAME][NETWORK ID]
Здесь вместо идентификатора я буду использовать имя, bridge
❯ docker network inspect bridge | jq '.[].Containers."1c76f35ce42ca0d31cfcc79da80eadfa4f69cb82e292e249ee1bd75d83a8e4ba".IPv4Address' -r
172.17.0.2/16
В большинстве случаев вы не можете вспомнить идентификатор контейнера, поэтому, если вы хотите получить IP-адрес только из имени контейнера, вам потребуется некоторое знание jq (или просто повторно используйте следующую команду).
docker network inspect -f '{{json .Containers}}' bridge |
    jq '..|if type == "object" and has("Name") then select(.Name=="[CONTAINER NAME]") | .IPv4Address else empty end' -r
Поместите имя контейнера в функцию select и вы увидите, как происходит волшебство.
❯ docker network inspect -f '{{json .Containers}}' bridge |
    jq '..|if type == "object" and has("Name") then select(.Name=="ubuntu-ip") | .IPv4Address else empty end' -r

172.17.0.2/16
Какой метод выбрать?
Это были все методы, с помощью которых вы можете получить IP-адрес [а] контейнеров.
Второй метод, хотя и интуитивно понятен, не воспроизводится.
В большинстве случаев первый метод самый простой и хорошо выполняет свою работу.
Но может наступить время, когда вы захотите проверить, какие контейнеры подключены к определенной сети, и получить IP-адреса в этой сети.
В этом случае имеет смысл проверить сеть и подсветить IP-адреса.
Вы можете получить все имена контейнеров и назначенные им IP-адреса из сети вот так:
❯ docker network inspect -f '{{json .Containers}}' bridge |
    jq '.. | if type=="object" and has("Name") then {(.Name): .IPv4Address} else empty end'

{
  "ubuntu-ip": "172.17.0.2/16"
}
{
  "ip": "172.17.0.3/16"
} 
Docker provides the ability to package and run an application in a loosely isolated environment called a container.
I know what you might be thinking – come on, not another post explaining what Docker is, it’s everywhere these days!

But don’t worry, we are skipping that basic introduction. The target audience for this article should already have a basic understanding of what Docker and Containers are.
But have you ever wondered how to get a Docker Container IP Address?
Docker network explained
First, let’s understand how the Docker network works. For that we are going to focus on the default bridge network. When you are using Docker, if you don’t specify a driver this is the type of network you are using.
The bridge network works as a private network internal to the host so containers on it can communicate. External access is granted by exposing ports to containers.
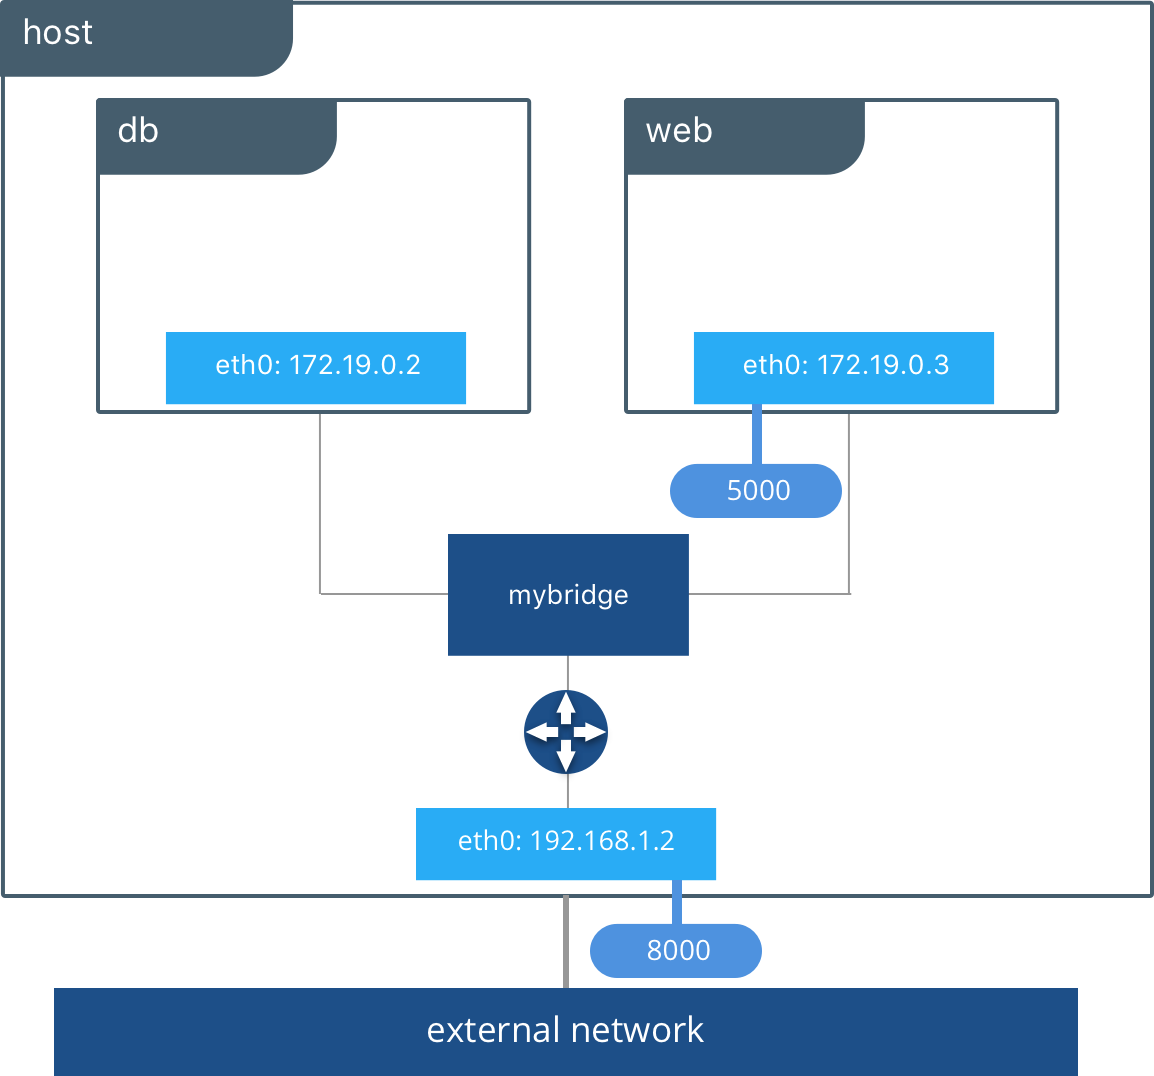
Bridge networks are used when your applications run in standalone containers that need to communicate.
In the picture above db and web can communicate with each other on a user created bridge network called mybridge.
If you’ve never added a network in Docker you should see something similar to this:
$ docker network ls

NETWORK ID          NAME                  DRIVER              SCOPE
c3cd46f397ce        bridge                bridge              local
ad4e4c24568e        host                  host                local
1c69593fc6ac        none                  null                local
The default bridge network is listed, along with host and none. We will ignore the other two, and use the bridge network when we get to the examples.
By default, the container is assigned an IP address for every Docker network it connects to. And each network is created with a default subnet mask, using it as a pool later on to give away the IP addresses.
Usually Docker uses the default 172.17. 0.0/16 subnet for container networking.
Now to better understand it, we will execute a real use case.

Docker Example
To illustrate this, we will use a Hive and Hadoop environment, containing 5 Docker Containers.
Check out the docker-compose.yml file we are about to execute:
version: "3"

services:
  namenode:
    image: bde2020/hadoop-namenode:2.0.0-hadoop2.7.4-java8
    volumes:
      - namenode:/hadoop/dfs/name
    environment:
      - CLUSTER_NAME=test
    env_file:
      - ./hadoop-hive.env
    ports:
      - "50070:50070"
  datanode:
    image: bde2020/hadoop-datanode:2.0.0-hadoop2.7.4-java8
    volumes:
      - datanode:/hadoop/dfs/data
    env_file:
      - ./hadoop-hive.env
    environment:
      SERVICE_PRECONDITION: "namenode:50070"
    ports:
      - "50075:50075"
  hive-server:
    image: bde2020/hive:2.3.2-postgresql-metastore
    env_file:
      - ./hadoop-hive.env
    environment:
      HIVE_CORE_CONF_javax_jdo_option_ConnectionURL: "jdbc:postgresql://hive-metastore/metastore"
      SERVICE_PRECONDITION: "hive-metastore:9083"
    ports:
      - "10000:10000"
  hive-metastore:
    image: bde2020/hive:2.3.2-postgresql-metastore
    env_file:
      - ./hadoop-hive.env
    command: /opt/hive/bin/hive --service metastore
    environment:
      SERVICE_PRECONDITION: "namenode:50070 datanode:50075 hive-metastore-postgresql:5432"
    ports:
      - "9083:9083"
  hive-metastore-postgresql:
    image: bde2020/hive-metastore-postgresql:2.3.0

volumes:
  namenode:
  datanode:
From docker-hive GitHub
No one wants to read a HUGE config file, right? So here’s a picture:
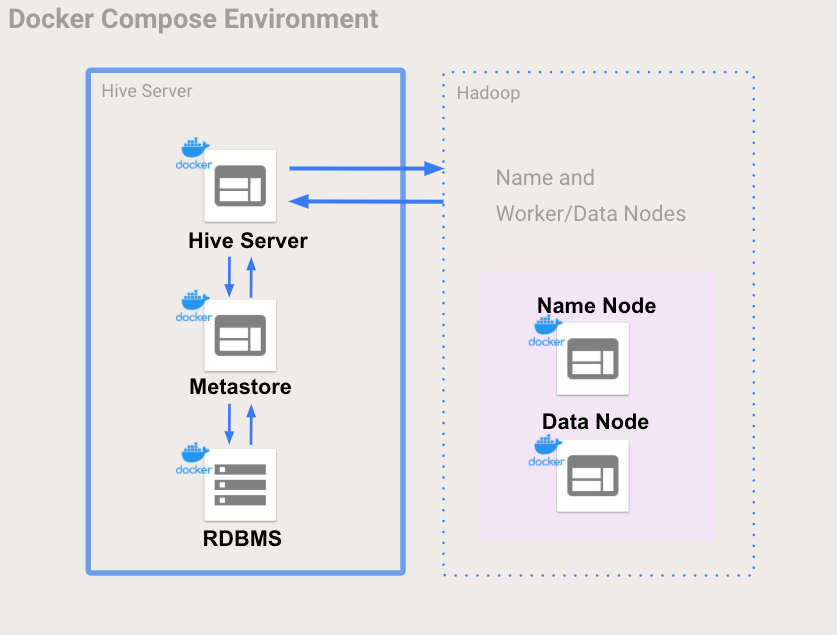
Much better! Now let’s start up those containers:
docker-compose up -d
We can see 5 containers:
$ docker ps --format
"table {{.ID}}t{{.Status}}t{{.Names}}"

CONTAINER ID        STATUS                   NAMES
158741ba0339        Up 1 minutes             dockerhive_hive-metastore-postgresql
607b00c25f29        Up 1 minutes             dockerhive_namenode
2a2247e49046        Up 1 minutes             dockerhive_hive-metastore
7f653d83f5d0        Up 1 minutes (healthy)   dockerhive_hive-server
75000c343eb7        Up 1 minutes (healthy)   dockerhive_datanode
Next let’s check our Docker networks:
$ docker network ls

NETWORK ID          NAME                  DRIVER              SCOPE
c3cd46f397ce        bridge                bridge              local
9f6bc3c15568        docker-hive_default   bridge              local
ad4e4c24568e        host                  host                local
1c69593fc6ac        none                  null                local
Wait a minute… there’s a new network called docker-hive_default!
By default docker compose sets up a single network for your app. And your app’s network is given a name based on the “project name”, originated from the name of the directory it lives in.
So since our directory is named docker-hive, this explains the new network.
Next some examples on how to get the Docker IP Address.
How to Get A Docker Container IP Address — examples
And now that I have your attention, we are going to unveil the mystery.

1. Using Docker Inspect
Docker inspect is a great way to retrieve low-level information on Docker objects. You can pick out any field from the returned JSON in a fairly straightforward manner.
So shall we use it to get the IP Address from the dockerhive_datanode?
$ docker inspect -f
'{{range .NetworkSettings.Networks}}{{.IPAddress}}{{end}}'
75000c343eb7

172.18.0.5
Didn’t you say that Docker uses the default 172.17. 0.0/16 subnet for container networking? Why is the returned IP Address: 172.18.0.5 outside it?
To answer that we have to look at our network settings:
$ docker network inspect -f
'{{range .IPAM.Config}}{{.Subnet}}{{end}}'  9f6bc3c15568

172.18.0.0/16
We executed this example in a Compute Engine VM, and in this test, the docker network was assigned a different subnet: 172.18.0.0/16. That explains it!
Furthermore, we can also lookup all IP Addresses inside the docker-hive_default network.
So we don’t need to look up each Container’s IP individually:
$ docker network inspect -f
'{{json .Containers}}' 9f6bc3c15568 |
jq '.[] | .Name + ":" + .IPv4Address'

"dockerhive_hive-metastore-postgresql:172.18.0.6/16"
"dockerhive_hive-metastore:172.18.0.2/16"
"dockerhive_namenode:172.18.0.3/16"
"dockerhive_datanode:172.18.0.5/16"
"dockerhive_hive-server:172.18.0.4/16"
If you didn’t notice, we used jq help to parse the Containers map object.
2. Using Docker exec
In the following example we will work with the dockerhive_namenode.
$ docker exec dockerhive_namenode cat /etc/hosts

127.0.0.1       localhost
::1     localhost ip6-localhost ip6-loopback
fe00::0 ip6-localnet
ff00::0 ip6-mcastprefix
ff02::1 ip6-allnodes
ff02::2 ip6-allrouters
172.18.0.3      607b00c25f29
3. Inside the Docker Container
$ docker exec -it dockerhive_namenode /bin/bash

# running inside the dockerhive_namenode container
ip -4 -o address

7: eth0    inet 172.18.0.3/16 brd 172.18.255.255 scope global eth0
We can even find other containers’ IP Addresses that are inside a container in the same network:
Data node
# running inside the dockerhive_namenode container
ping dockerhive_datanode

PING dockerhive_datanode (172.18.0.5): 56 data bytes
64 bytes from 172.18.0.5: icmp_seq=0 ttl=64 time=0.092 ms
Hive mestastore
# running inside the dockerhive_namenode container
ping dockerhive_hive-metastore

PING dockerhive_hive-metastore_1 (172.18.0.2): 56 data bytes
64 bytes from 172.18.0.2: icmp_seq=0 ttl=64 time=0.087 ms
Hive server
# running inside the container
ping dockerhive_hive-server

PING dockerhive_hive-server (172.18.0.4): 56 data bytes
64 bytes from 172.18.0.4: icmp_seq=0 ttl=64 time=0.172 ms
Wrap up
All examples were executed in a linux distribution Compute Engine VM. If you execute them in macOS or Windows environments the sample commands might change a bit.
Also bear in mind that those IP Addresses in the examples given are internal to the sample docker-hive_default network. So if you have a use case to connect to those containers externally, you would need to use the host machine’s external IP (assuming that you are exposing the containers ports correctly).
Or if you are using kubernetes, for instance, to manage your Docker containers, let it handle the IP Addresses for you kubernetes-expose-external-ip-address ?.
* Illustrations from icons8.com by Murat Kalkavan.
Learn to code for free. freeCodeCamp’s open source curriculum has helped more than 40,000 people get jobs as developers. Get started
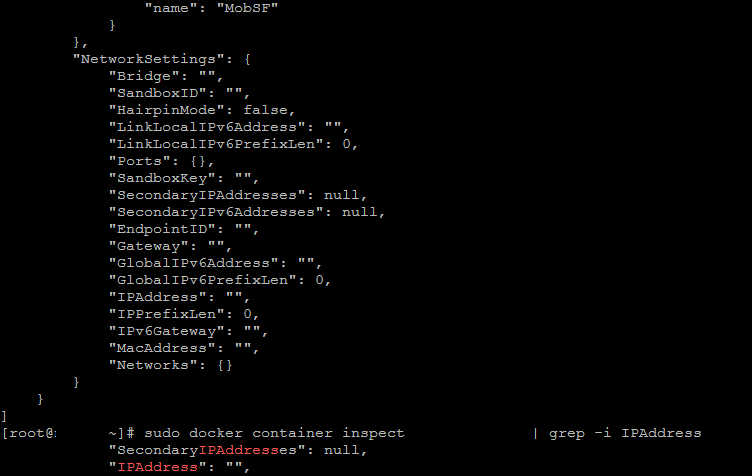
Для начала нужно получить id контейнера либо его имя. Можно воспользоваться командой:
docker-compose psЗатем получаем информацию и фильтруем нужные значения:
docker inspect service_name | grep "IPAddress"Результат будет примерно таким:
"SecondaryIPAddresses": null,
            "IPAddress": "",
                    "IPAddress": "172.19.0.3",
Теперь чтобы посмотреть через какой бридж выполняется соединение:
ip a | grep '172.19.0'На выходе:
inet 172.19.0.1/16 brd 172.19.255.255 scope global br-f5b483d2e488Существуют и более правильные решения, например, с использованием опции —format. Если контейнер подключен к дефолтной сети:
docker inspect --format {{.NetworkSettings.IPAddress}} portainerЧтобы показать ip-адреса из всех сетей:
docker inspect mycontainer -f '{{range .NetworkSettings.Networks}}{{.IPAddress}}{{end}}'Или из конкретной сети mycontainer_default:
docker inspect --format {{.NetworkSettings.Networks.mycontainer_default.IPAddress}} mycontainerТакже можно указать имена нескольких контейнеров через пробел. Подробнее о синтаксисе форматирования можно почитать здесь: https://docs.docker.com/engine/reference/commandline/inspect/
Post Views:
15 456
If you are working with Docker for a long time now, you might already have lots of containers running in your host machine. At times, it becomes really difficult to keep track of all these containers. Moreover, if you are on a network or using compose, there might be several containers running inside the network. In such a case, determining which container is actively running and which has failed, is very difficult. You might need to ping these containers periodically to check their status. For this, you need to have the IP addresses of the containers.
You can easily get the IP address of any container if you have the name or ID of the container. You can get the container names using the «Docker ps -a» command. This will list all the existing containers. There are several methods to get the IP address of a container from the host machine. In this article, we will discuss some easy and frequently used methods to do so.
Method 1. Using the Inspect Command along with Format Option
The first method is using the Docker inspect command to inspect containers and using the format option to print out the IP address of the container only. Let’s check out how to do so.
$ docker inspect -f '{{range.NetworkSettings.Networks}}{{.IPAddress}}{{end}}' <container-ID>
This command uses the -f flag which stands for —format and uses a Go-template to print only the IP of the container. You need to specify the container name or ID at the end.
Method 2. Using the GREP pipe with Inspect Command
Another variant of the above Docker inspect command can be used instead of using the format option. You can simply pipe the output of the Docker inspect command with the pattern matching grep command with the pattern “IPAddress”. Let’s see how to do so.
$ docker inspect myubuntu | grep "IPAddress"
This command will print the IP address of the container successfully.
Method 3. Getting IP Address of all Containers
If you want to print the IP addresses of all the containers along with their container names, you can use the same Docker inspect command with the format option. But instead of the container name, you can include a sub-command which returns the container IDs of all the existing containers.
$ docker inspect -f '{{.Name}}-{{.NetworkSettings.IPAddress }}' $(docker ps -aq)
The sub-command docker ps -aq lists the container IDs of all the containers. This is passed as an argument to the parent Docker inspect command.
Method 4. Listing IP Addresses of all Containers in a Docker Compose
If you are using Docker compose, you can use the following commands to list the IP addresses of all the existing containers in your compose network.
docker inspect -f '{{.Name}} - {{range .NetworkSettings.Networks}}{{.IPAddress}}{{end}}' $(docker ps -aq)
Method 5. Listing IP Addresses using a Bash Script
You can also use a bash script to create a function that will list the IP addresses of all the containers. Just add the below snippet in your ~/.bashrc file.
docker-ip() {
   docker inspect --format '{{ .NetworkSettings.IPAddress }}' "$@"
}
Now, if you want to get the IP address, you can use the following command inside your terminal.
$ docker-ip <container-name>
Method 6. Listing IPs in tabular format
If you want to list the IP addresses in a tabular format, use the command mentioned below.
$ docker inspect -f '{{range .NetworkSettings.Networks}}{{.IPAddress}}{{end}} %tab% {{.Name}}' $(docker ps -aq
) | sed 's#%tab%#t#g' | sed 's#/##g' | sort -t . -k 1,1n -k 2,2n -k 3,3n -k 4,4n
To sum up, in this article, we discussed how to retrieve the IP addresses of one or all containers in a host machine or a compose network using 6 different methods. You can use any of these as per your requirements.
There are some possibilities to check whether your app is running.
Remote API
As JimiDini said, one possibility is the Docker remote API. You can use it to see all running containers (which would be your use case, right?), inspect a certain container or start and stop containers. The API is a REST-API with several binding for programming languages (at https://docs.docker.io/reference/api/remote_api_client_libraries/). Some of them are very outdated. To use the Docker remote API from another machine, I needed to open it explicitly:
docker -H tcp://0.0.0.0:4243 -H unix:///var/run/docker.sock -d &
Note that the API is open to the world now! In a real scenario you would need to secure it in some way (e.g. see the example at http://java.dzone.com/articles/securing-docker%E2%80%99s-remote-api).
Docker PS
To see all running containers run docker ps on your host. This will list all running containers. If you do not see your app, it is not running. It also shows you the ports your app is exposing. You can also do this via the remote API.
Logs
You can also check the logs. You can run docker attach <container id> to attach to a certain container an see its stdout. You can run also run docker logs <container id> to receive the Docker logs. What I prefer is to write the logs to a certain directory, e.g. all logs to /var/log and mount this folder to my host machine. Then all your logs will end up in /home/ubuntu/docker-logs on your host.
docker run -p 80:8080 -v /home/ubuntu/docker-logs:/var/log:rw my/application
One word to ports and IP
Every container will get its own IP address. You can check this IP address via the remote API or via Docker on the host machine directly. You can also specify a certain host name for the container (by passing the --hostname="test42" to the run command). However, you mostly did not need that.
To access the application in the container, you need to open the port in the container and bind to a port on the host.
In your Dockerfile you need to EXPOSE the port your app runs on:
FROM ubuntu
...
EXPOSE 8080
CMD run-my-app.sh
When you start your container, you need to bind this port to a port of the host:
docker run -p 80:8080 my/application
Now you can access your app on http://localhost:80 or http://127.0.0.1:80.
If you app does not response, check if the container is running by typing docker ps or the remote API. If it is not running, check the logs for the reason.
(Note: If you run your Ubuntu VM in something like VirtualBox and you try to access it from your Windows machine, make sure you opened the ports in VirtualBox too!).
- tl;dr
- Why would you need the IP address of a Docker container?
- Understand your networks
- Get the IP address of your containers
- A note on Swarm mode
Let’s shed some light on a questions that readers often ask me in email or comments.
How do I get the IP address of a Docker container?
tl;dr
This is a tricky point, because the solution itself is short and simple, but in real life you don’t use the IP address of a Docker container unless you want to test or try something on an exceptional basis.
For the above reason, I think it’s useful to read the whole post, but in case you don’t have the time, here you have the one-liner to solve the issue.
$ docker inspect -f "{{ .NetworkSettings.Networks.<network_name>.IPAddress }}" <container_name||container_id>
With a specific example to check the IP of a container called boring_noyce on the default bridge network the command looks like this:
docker inspect -f "{{ .NetworkSettings.Networks.bridge.IPAddress }}" boring_noyce

172.17.0.4
Let’s come back to the main point now; why and when you might want to use the IP address of a Docker container?
Why would you need the IP address of a Docker container?
When you work with Docker in real projects, you may work on various levels, namely:
- the container level
- with Docker Compose or
- Swarm or another orchestrator
The idea behind containerization is that your containers are meant to be ephemeral by design. What does this mean?
The meaning of empheral is something short-lived, the Docker documentation explains it like this:
“By “ephemeral”, we mean that the container can be stopped and destroyed, then rebuilt and replaced with an absolute minimum set up and configuration.”
You can read about this in the Docker docs or in my in my Dockerfile best practices tutorial.
The real meaning of this is that your containers are just temporary workers that can be destroyed and recreated as you need them.
The mechanism to construct a complex application with containers that you can throw away and replace any time is built into Docker. You use user defined networks, Compose and Swarm configuration to drive your application stack.
On the abstract orchestration levels of Compose and Swarm, you don’t work with IP addresses directly. You rather work with your definition of the desired state of your entire stack.
This is why I said in the beginning that you are supposed to work with IP adrersses directly on an exceptional basis only; like tracking down a bug or testing out something new while you are building your configuration.
It’s important that you build your production system with the Compose file to be used with Compose or Swarm, or deployment descriptors for other orhestrators like Kubernetes rather than relying on container IPs.
Having said all this, let’s see how to get the IP address of a Docker container.
Understand your networks
The IP address of a container only makes sense in the context of the network your container is connected to.
When you start out with Docker, you probably use one of the default networks of Docker. These are the default networks:
$ docker network ls

NETWORK ID          NAME                DRIVER              SCOPE
248f5cb44dc3        bridge              bridge              local
446b31652653        host                host                local
134a57be5cac        none                null                local
These networks are created by the Docker engine when it starts up on the host machine.
The meaning of these networks is the following:
- The bridge network is the default network; if you create a new container, it will be connected to the bridge network by default. The bridge network provides isolation from your host machine, thus your containers are isolated from the host network. The containers can refer each other by IP address on the bridge network. (They cannot however refer each other by container name.)
- If you connect a container to the host network, then your container will share your host machine’s network. This is benefitial if you containerise a legacy system that is heavily dependent on the host IP. The host network configuration only works as expected on Linux systems, beacuase Docker uses a virtual machine under the hood on Mac and Windows, thus the host network in these cases refers to the VM rather than the real host itself. (I have not used a host network on a Windows machine with a Windows based container, so I cannot comment on that scenario.)
- If you connect your container to the none network, this means that your contaienr is not connected to any network.
In order to create a good design for your application, you usually create user defined networks. You use these networks to isolate parts of your application architecture and you define contianers that serve as gateways between these networks. This implies that some of your containers are connected to one user defined network, while other containers are connected to two networks, or even more depending on your design.
So it’s important to understand the network context of your application before going after the IP address.
You use the docker network commands or the Compose file to define your networks. Please refer to the Compose tutorial, the Swarm tutorial for more details, or get the book for an in-depth learning experience.
Please note that Swarm mode adds further networks to the list. If you create a service in Swarm mode, requests are routed to the right node and right container by the default overlay network. You can, of course create user defined overlay networks.
Get the IP address of your containers
Let’s create a few containers to experiment with. I created 3 Nginx containers running the below commands.
$ docker container run --rm -d nginx:1.15.12
$ docker container run --rm -d nginx:1.15.12
$ docker container run --rm -d nginx:1.15.12

1215e561f363f8064cb013e224d48d71cc8dfd1308b652729c56a740d1c74136
fd235de73345ee4a2c4aab8a04dfc5db773e09804dc9fa75ec61e74946d656d4
66c03e31131f79336f7c87722b9bbe1aee203270e2ec696bac04d4fe3f5114c9
Now these containers are connected to the default bridge network. If you use use docker-compose to start containers from a Compose file, you can use the same methods that I desribe here.
Let’s examine the bridge network now.
$ docker network inspect bridge

[
    {
        "Name": "bridge",
        "Id": "248f5cb44dc3d6dc44eabb17110a3a318ef903e5c936bfeb6029d6fcb1188624",
        "Created": "2019-04-22T17:05:43.146582559Z",
        "Scope": "local",
        "Driver": "bridge",
        "EnableIPv6": false,
        "IPAM": {
            "Driver": "default",
            "Options": null,
            "Config": [
                {
                    "Subnet": "172.17.0.0/16",
                    "Gateway": "172.17.0.1"
                }
            ]
        },
        "Internal": false,
        "Attachable": false,
        "Ingress": false,
        "ConfigFrom": {
            "Network": ""
        },
        "ConfigOnly": false,
        "Containers": {
            "365f0c943761ab12d47db51cc97bffcb4206c9c299bf5f4deb4d9ec865f6f609": {
                "Name": "heuristic_panini",
                "EndpointID": "1bf0aab8eadbf437bd361f14b7a179dcbc9b002d204777f53e425b30792ee59b",
                "MacAddress": "02:42:ac:11:00:03",
                "IPv4Address": "172.17.0.3/16",
                "IPv6Address": ""
            },
            "485a8401ff947ffbc1e0cf3f972c7a03c7bbebaeb55e00a9e726913fcd983828": {
                "Name": "boring_noyce",
                "EndpointID": "0728c437aafa9b5b48eaed9ff8726cc69b2c322181eabd30305696ed30b35647",
                "MacAddress": "02:42:ac:11:00:04",
                "IPv4Address": "172.17.0.4/16",
                "IPv6Address": ""
            },
            "f877cb919685ebd3676513e51ca25139251e3c3a469b4edd7032b35ab97fcd60": {
                "Name": "gracious_pare",
                "EndpointID": "52e1197d7a6563e61ffa92b1c658b0442909c31a24cff49de36e7f741ac38c6a",
                "MacAddress": "02:42:ac:11:00:02",
                "IPv4Address": "172.17.0.2/16",
                "IPv6Address": ""
            }
        },
        "Options": {
            "com.docker.network.bridge.default_bridge": "true",
            "com.docker.network.bridge.enable_icc": "true",
            "com.docker.network.bridge.enable_ip_masquerade": "true",
            "com.docker.network.bridge.host_binding_ipv4": "0.0.0.0",
            "com.docker.network.bridge.name": "docker0",
            "com.docker.network.driver.mtu": "1500"
        },
        "Labels": {}
    }
]
As you can see the bridge network (I mean the network called bridge) has three containers connected now. If you want to casually see the IP address of the containers on a network, you can always inpect the network and see the IPs.
You can get the IP address of a single container inspecting the container itself and using GO templates to filter the results with the -f (filter) flag.
$ docker inspect -f "{{ .NetworkSettings.Networks.bridge.IPAddress }}" boring_noyce

172.17.0.4
This one-liner may look elegant, but I think it’s impractical, because it’s too long and you need to enter the network name (bridge) in the middle manually.
You may think now that the one-liner is better, because you can use it in scripts. Please remember that you are not supposed to do that. If you need the IP address in production scripting, your should probably improve your network design.
Let’s add a user defined network to the picture and see what happens.
$ docker network create mynet
$ docker network connect mynet boring_noyce

9ec39d6cbaabd62c3092b110e56610b5001cdd77a07725f984331fb82b139795

$ docker network inspect mynet

[
    {
        "Name": "mynet",
        "Id": "9ec39d6cbaabd62c3092b110e56610b5001cdd77a07725f984331fb82b139795",
        "Created": "2019-05-13T09:13:32.0337693Z",
        "Scope": "local",
        "Driver": "bridge",
        "EnableIPv6": false,
        "IPAM": {
            "Driver": "default",
            "Options": {},
            "Config": [
                {
                    "Subnet": "172.22.0.0/16",
                    "Gateway": "172.22.0.1"
                }
            ]
        },
        "Internal": false,
        "Attachable": false,
        "Ingress": false,
        "ConfigFrom": {
            "Network": ""
        },
        "ConfigOnly": false,
        "Containers": {
            "485a8401ff947ffbc1e0cf3f972c7a03c7bbebaeb55e00a9e726913fcd983828": {
                "Name": "boring_noyce",
                "EndpointID": "f20220041b7f2dc07de6e2d29820db7907e1b7df54eb824af4ad4ad07c09aba3",
                "MacAddress": "02:42:ac:16:00:02",
                "IPv4Address": "172.22.0.2/16",
                "IPv6Address": ""
            }
        },
        "Options": {},
        "Labels": {}
    }
]
Now our container called boring_noyce is connected to mynet, too. Let’s inspect the container’s network settings.
$ docker container inspect -f "{{ .NetworkSettings }}" boring_noyce

{{ f7e683369c04398e325c677559c4c9e392c1ea9482387fcec6e2e5d5da108368 false  0 map[80/tcp:[]] /var/run/docker/netns/f7e683369c04 [] []} {0728c437aafa9b5b48eaed9ff8726cc69b2c322181eabd30305696ed30b35647 172.17.0.1  0 172.17.0.4 16  02:42:ac:11:00:04} map[bridge:0xc4205da000 mynet:0xc4205da0c0]}
We can try again to find out the IP address of this container on the various networks.
$ docker inspect -f "{{ .NetworkSettings.Networks.bridge.IPAddress }}" boring_noyce

172.17.0.4

$ docker inspect -f "{{ .NetworkSettings.Networks.mynet.IPAddress }}" boring_noyce

172.22.0.2
The main point I’m trying to make with this post is to learn the art of architecture design and spend time on your networks definition rather than hacking with IPs. Nevertheless you have the tools here to find out your container IPs.
Having said this, I think we can get a bit more funky with this command. We can, for example, list the IPs of all containers on the bridge network.
docker inspect -f "{{ .NetworkSettings.Networks.bridge.IPAddress }}" $(docker container ls -qa)

172.17.0.4
172.17.0.3
172.17.0.2
The same command on the user defined network gives only one IP, because only one of the containers is connected.
docker inspect -f "{{ .NetworkSettings.Networks.mynet.IPAddress }}" $(docker container ls -qa)

172.22.0.2
<no value>
<no value>
A note on Swarm mode
If you are in Swarm mode, you work with services directly. You are not supposed to touch containers. If you need to work with a container (on an exceptional basis) to check something, your best option is to ssh into one of the nodes in the Swarm and use docker container ls and the commands I showed you in this post.