Настройка будет состоять из пунктов:
- Настройка Брандмауэра
- Создание пользователей
- Настройка FTP-сайта
- Изоляция пользователей
Установка FTP-сервера
Для начала нужно установить FTP-сервер.
Открываем Пуск в нижнем левом углу, Диспетчер серверов (Server Manager), плитка которого закреплена по умолчанию. Далее все основные действия по настройке будем совершать здесь.

Находим пункт Добавить Роль и Функции (Add roles and features).

Появится мастер добавления ролей, для продолжения нажимаем Далее (Next).

В качестве типа установки выбираем Базовая Роль или Базовая Функция (based-roles or feature-based installation).

Далее из списка серверов, выбираем нужный сервер, в качестве примера он один, поэтому жмём Далее (Next).

На этапе выбора ролей отмечаем роль Веб-сервер (IIS) (Web Server (IIS)).

Откроется окно и предложит установить Консоль управления службами IIS (IIS Management Console), жмем Добавить компоненты (Add Featues), они понадобятся, чтобы администрировать FTP-сервер, жмем Далее (Next).

Следующие 2 шага пропускаем, нажимая Далее (Next).
Дойдя до пункта Службы ролей (Role Services), снимаем все галочки и выбираем Служба FTP (FTP Service) и Консоль управления службами IIS (IIS Management Console), жмем Далее (Next).

На следующем пункте проверяем все компоненты и жмём Установить (Install).
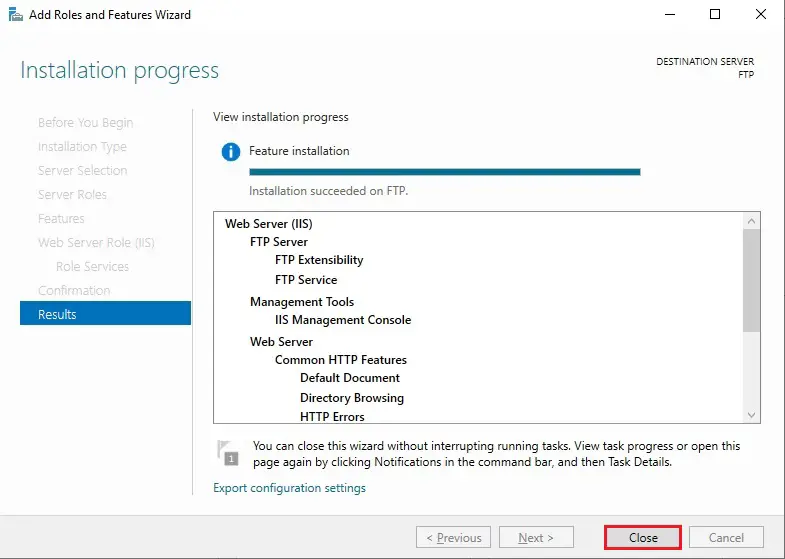
Дожидаемся окончания установки, после чего жмём Закрыть (Close).
Далее ещё нужно настроить пару моментов, не торопитесь перезагружать сервер.
Настройка Брандмауэра
Для подключения к FTP-серверу необходимо настроить Firewall. Для этого откройте Брандмауэр Windows в режиме повышенной безопасности (Windows Firewall with Advanced Security).

В вертикальном меню слева выберите Правила для входящих подключений (Inbound rules), затем в вертикальном меню справа Создать правило (New Rule).

В открывшемся окне отмечаем тип Предопределенные (Predefined) и в выпадающем списке выберите FTP-сервер (FTP Server). Нажмите Далее (Next).

Отмечаем все галочки, Далее (Next), Готово (Finish). Перезагружаем сервер для применения всех настроек.
Создание пользователей
Теперь нужно создать пользователей, которым дадим право подключаться к FTP-серверу.
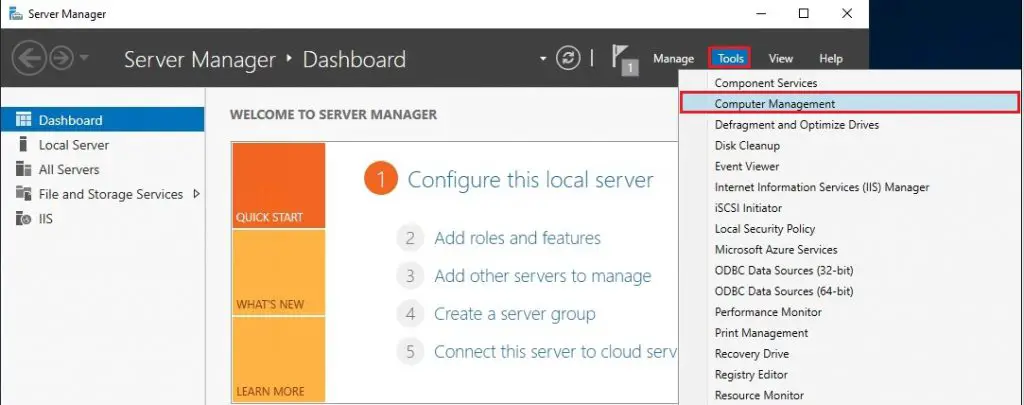
Открываем Управление компьютером (Computer Management).

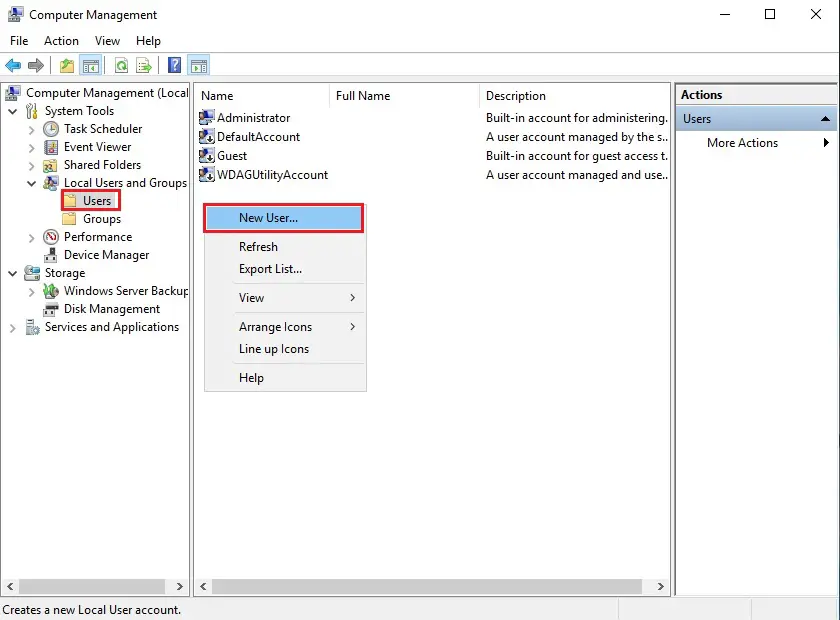
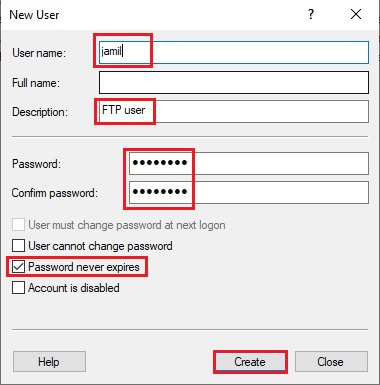
Открываем пункт Локальные пользователи и группы (Local Users and Groups), щелкаем правой кнопкой мыши по пункту Пользователи (Users) и выбираем Новый пользователь (New User). Заполняем необходимые поля, снимаем все галочки и жмем Создать (Create).

Если появилась следующая ошибка при создании пользователя, значит пароль не соответствует нужным требованиям:

Пароль должен соответствовать как минимум трём условиям из списка перечисленного ниже:
- Наличие прописных букв английского алфавита от A до Z;
- Наличие строчных букв английского алфавита от a до z;
- Наличие десятичных цифр (от 0 до 9);
- Наличие неалфавитных символов (например, !, $, #, %).
Настройка FTP-сайта
Открываем Диспетчер служб IIS (Internet Information Server (IIS) Manager).

В окне Подключения (Connections), кликаем правой кнопкой мыши по нашему сайту, выбираем Добавить FTP-сайт (Add FTP Site).

В открывшемся окне Добавить FTP-сайт (Add FTP Site) вводим название нашего FTP-сайта, указываем нужную директорию и жмём Далее (Next).

Далее указываем IP-адрес из выпадающего списка, или указываем Все свободные (All Unassigned). Отмечаем галочку ниже. Указываем настройки SSL, если нужно чтобы использовалось шифрование, устанавливаем SSL-сертификат, если нет, то выбираем первый вариант, как показано в примере. Жмём Далее (Next).

Выбираем проверку подлинности как Обычную (Basic). Из выпадающего списка выбираем Указанные пользователи (Specified users), и вводим имя ранее созданного пользователя. Ставим галочки напротив необходимых разрешений: Чтение (Read) или Запись (Write). Нажимаем Готово (Finish).

Изоляция пользователей
Чтобы после подключения к FTP-серверу пользователь попадал в свою директорию и не имел доступ к чужим файлам других пользователей, необходимо настроить их изоляцию. Для этого откройте настройки вашего ftp сайта и выберите Изоляция пользователей (FTP User Isolation).

Выберите Каталог имени пользователя (User name directory) и Примените (Apply).

Кликаем правой кнопкой мыши по нашему FTP-сайту, выбираем Добавить виртуальный каталог (Add Virtual Directory).

В первой строке указываем имя FTP-пользователя, ниже полный путь к директории пользователя. Её нужно создать заранее. Для понимания какая директория кому принадлежит, лучше создавать директорию с именем пользователя.

Необходимо настроить права на виртуальный каталог, кликаем правой кнопкой мыши по нему, выбираем Редактировать разрешения (Edit Permission).

Переходим во вкладку Безопасность (Security) и жмём кнопку Дополнительно (Advanced).

В окне жмём кнопку Отключение наследования (Disable inheritance), в новом окне выбираем первый вариант, затем Применить (Apply) и ОК.

Жмём кнопку Изменить (Edit).

Удаляем группу пользователей Users, и добавляем нового пользователя.

В новом окне, нужно ввести имя FTP-пользователя, для проверки нажмите Проверить имена (Check Names). Если пользователь есть, строка, где вводили имя, дополнится, нажмите ОК.

Даём все права пользователю на его директорию, отметив все галочки в первой колонке, жмём Применить (Apply) — ОК.

На этом все настройки завершены. Чтобы подключиться к серверу, используйте следующие доступы:
- Хост: IP сервера
- Пользователь: FTP-пользователь, которого вы создали
- Пароль: Пароль от FTP-пользователя
Подключиться можно через разное ПО, например FileZilla или, если вы используете Windows — Проводник, введя в адресной строке ftp://IP-сервера, после чего откроется окно для входа.
-
Главная
-
Инструкции
-
Windows
-
Как настроить FTP-сервер на Windows Server 2019
Настройка FTP Server состоит из нескольких этапов. Сначала нужно установить сам сервер, затем — создать и изолировать пользователей, настроить брандмауэр и FTP-соединение. Рассмотрим все этапы подробно в этом руководстве.
Но сначала быстро вспомним, что такое FTP-сервер. Фактически это только часть инфраструктуры, которая позволяет передавать данные между хостами. Вторая часть — клиент. Между ними устанавливается соединение, которое использует File Transfer Protocol.
Главный плюс такого подключения — кроссплатформенность. Минусов хватает: скорость обмена файлами не очень высокая, есть проблемы с безопасностью. Но протокол все равно пользуется популярностью.
Нам нужен хост с установленной и настроенной ОС Windows Server 2019. Заказать его можно на cloud.timeweb.com.
Вот инструкция, которая поможет организовать FTP-сервер. Названия всех разделов будут на русском. Но если у вас англоязычный интерфейс, вы тоже без проблем разберетесь.
- Вызовите меню «Пуск» и запустите «Диспетчер серверов». Основные настройки вы будете выбирать через эту утилиту.
- Нажмите «Добавить роли и функции».
- Запустится мастер добавления. Чтобы продолжить работу с ним, щелкните «Далее».
- Выберите опцию «Базовая роль или Базовая функция».
- Укажите сервер, где должен появиться FTP on Windows.
- Отметьте роль — «Веб-сервер (IIS)».
- Появится окно с предложением добавить консоль администрирования служб IIS. Щелкните «Добавить компоненты».
- Пропустите следующие два шага, менять ничего не следует.
- В «Службах ролей» выделите пункты «Служба FTP» и «Консоль управления службами IIS».
- Проверьте список компонентов, готовых к инсталляции, и нажмите «Установить».
После завершения инсталляции закройте окно мастера. Win Server FTP готов к дальнейшей регулировке.
Настройка файрвола
Для конфигурирования файрвола, который защищает FTP сервер на Windows, зайдите в меню Tools в диспетчере и запустите Windows Firewall with Advanced Security. Далее:
- В левом меню перейдите к настройке правил входящих соединений.
- В правом меню выберите добавление правила.
- В настройках правила выделите тип «Предопределенные» и укажите значение «FTP-сервер».
- Выделите все предложенные опции и завершите конфигурирование правила.
Чтобы применить новую конфигурацию, перезагрузите сервер.
Управление пользователями
Одна из главных проблем протокола — низкий уровень безопасности. Поэтому нужно очень строго относиться к списку тех, кому можно подключаться, а кому — нет. Для этого настраиваются группы или отдельные пользователи.
- Откройте в диспетчере инструмент «Управление компьютером».
- Перейдите в «Локальные пользователи и группы».
- Вызовите правой кнопкой контекстное меню пункта «Пользователи» и перейдите к созданию новой учетной записи.
- Укажите имя и пароль. Выберите параметры учетной записи. Например, можно включить требование изменить пароль при первом подключении. Или наоборот – запретить менять пароли.
Чтобы система приняла пароль, он должен отвечать требованиям безопасности:
- Есть строчные и прописные латинские буквы.
- Есть цифры.
- Есть специальные символы вроде ! или #.
Никакой кириллицы — если пароль не проходит хотя бы одной характеристике, при попытке сохранить учетную запись появится сообщение об ошибке.
Добавление сайта
Для дальнейшей работы нам нужно поднять FTP-сайт. После создания юзеров возвращаемся к диспетчеру серверов. Вся настройка FTP-сервера будет проходить здесь. Затем:
- Запустите инструмент «Диспетчер служб IIS».
- В разделе «Подключения» вызовите контекстное меню нужного сервера и выберите добавление FTP-сайта.
- Укажите название сайта и выберите папку, в которой хранится его содержимое.
- Укажите IP-адрес для подключения или установите режим «Все доступные».
- Настройте параметры SSL. Можно не использовать шифрование или включить его и добавить свой сертификат.
- Выберите базовую проверку подлинности. Выдайте разрешение на аутентификацию «Указанным пользователям».
- Введите имя созданной учетки.
- Выдайте нужные разрешения — например, только чтение, чтение и запись.
- Нажмите «Готово».
Это только один из примеров конфигурации. Можно выдать разрешения не конкретным юзерам, а сразу целым группам. Подключать или не подключать SSL, менять разрешения и адрес для подключения. Финальная конфигурация зависит от того, какие задачи вы решаете.
Изолирование каталогов
На одном из предыдущих шагов мы создали учетные записи, через которые можно подключаться к серверу. Но обычно этого недостаточно для того, чтобы обеспечить даже минимальную безопасность. Еще один важный момент — изоляция.
Допустим, мы поднимаем сервер для телевизионной компании. Он нужен для того, чтобы обмениваться видео между разными отделами. Операторы загрузили, монтажеры забрали, корреспонденты посмотрели.
Изолирование позволяет сделать так, чтобы каждый тип пользователей имел доступ только к конкретным директориям.
У нас есть FTP-сайт. Переходим в параметры и начинаем делить зоны доступности между разными учетными записями.
- Откройте «Изоляцию пользователей».
- Выберите «Каталог имени пользователя» и кликните «Применить».
- Вызовите контекстное меню FTP-сайта и создайте виртуальный каталог.
- Укажите логин, а в строке ниже — полный путь к папке, которой он будет пользоваться. Чтобы было проще разобраться, кому куда можно, лучше сразу в имени директории использовать логин.
У нас есть один виртуальный каталог. Изменим права доступа.
- Вызовите контекстное меню виртуального каталога и перейдите к редактированию разрешений.
- Откройте параметры безопасности и нажмите «Дополнительно».
- Запретите наследование и сохраните изменения.
- Вернитесь к параметрам безопасности.
- Щелкните «Изменить» под списком групп/пользователей.
- Удалите группу Users и добавьте нового пользователя.
- Впишите имя FTP-пользователя и запустите проверку имен.
- Щелкните «ОК» для сохранения изменений.
- Выдайте новому пользователю нужные права и сохраните конфигурацию.
Организация FTP-сервера завершена.
Подключение через FTP
Мы разобрались, как создать FTP-сервер и настроить учетные записи пользователей. Напоследок посмотрим, как соединиться с нашим файловым хранилищем.
Для установки соединения требуется клиент. Один из самых известных — FileZilla. Можно также использовать WinSCP.
Для подключения потребуется:
- IP-адрес FTP-сервера.
- Имя и пароль от созданной учетной записи.
После установки соединения пользователь будет попадать в ту директорию, которую вы указали в настройках сайта. Если вы настроили изоляцию, то он будет попадать в виртуальный каталог и не сможет переместиться в чужие папки.
Содержание
- Настройка FTP-сервера на Windows Server 2019
- Настройка Брандмауэра
- Создание пользователей
- Настройка FTP-сайта
- Изоляция пользователей
- How to Install FTP Server on Windows Server 2019
- How to Install FTP Server using Server Manager
- Step 1: Launch Server Manager
- Step 2: Proceed with the installation
- Step 3: Select the Installation Type
- Step 4: Select the Destination Server
- Step 5: Select Server Roles to be Installed
- Step 6: Select Server Features
- Step 7: Web IIS overview
- Step 8: Select Role Services
- Step 9: Confirm Installation
- Step 10: Create and FTP directory
- Step 11: Create an FTP Site
- Step 12: Configure the Firewall
- Step 13: Test FTP server
- Conclusion
Настройка FTP-сервера на Windows Server 2019
Настройка будет состоять из пунктов:
Для начала нужно установить FTP-сервер.
Открываем Пуск в нижнем левом углу, Диспетчер серверов (Server Manager) , плитка которого закреплена по умолчанию. Далее все основные действия по настройке будем совершать здесь.

Находим пункт Добавить Роль и Функции (Add roles and features) .

Появится мастер добавления ролей, для продолжения нажимаем Далее (Next) .

В качестве типа установки выбираем Базовая Роль или Базовая Функция (based-roles or feature-based installation) .

Далее из списка серверов, выбираем нужный сервер, в качестве примера он один, поэтому жмём Далее (Next) .

На этапе выбора ролей отмечаем роль Веб-сервер (IIS) (Web Server (IIS)) .

Откроется окно и предложит установить Консоль управления службами IIS (IIS Management Console) , жмем Добавить компоненты (Add Featues) , они понадобятся, чтобы администрировать FTP-сервер, жмем Далее (Next) .

Следующие 2 шага пропускаем, нажимая Далее (Next) .
Дойдя до пункта Службы ролей (Role Services) , снимаем все галочки и выбираем Служба FTP (FTP Service) и Консоль управления службами IIS (IIS Management Console) , жмем Далее (Next) .

На следующем пункте проверяем все компоненты и жмём Установить (Install) .
Дожидаемся окончания установки, после чего жмём Закрыть (Close) .
Далее ещё нужно настроить пару моментов, не торопитесь перезагружать сервер.
Настройка Брандмауэра
Для подключения к FTP-серверу необходимо настроить Firewall. Для этого откройте Брандмауэр Windows в режиме повышенной безопасности (Windows Firewall with Advanced Security) .

В вертикальном меню слева выберите Правила для входящих подключений (Inbound rules) , затем в вертикальном меню справа Создать правило (New Rule) .

В открывшемся окне отмечаем тип Предопределенные (Predefined) и в выпадающем списке выберите FTP-сервер (FTP Server) . Нажмите Далее (Next) .

Отмечаем все галочки, Далее (Next) , Готово (Finish) . Перезагружаем сервер для применения всех настроек.
Создание пользователей
Теперь нужно создать пользователей, которым дадим право подключаться к FTP-серверу.
Открываем Управление компьютером (Computer Management) .

Открываем пункт Локальные пользователи и группы (Local Users and Groups) , щелкаем правой кнопкой мыши по пункту Пользователи (Users) и выбираем Новый пользователь (New User) . Заполняем необходимые поля, снимаем все галочки и жмем Создать (Create) .

Если появилась следующая ошибка при создании пользователя, значит пароль не соответствует нужным требованиям:

Пароль должен соответствовать как минимум трём условиям из списка перечисленного ниже:
- Наличие прописных букв английского алфавита от A до Z;
- Наличие строчных букв английского алфавита от a до z;
- Наличие десятичных цифр (от 0 до 9);
- Наличие неалфавитных символов (например, !, $, #, %).
Настройка FTP-сайта
Открываем Диспетчер служб IIS (Internet Information Server (IIS) Manager) .

В окне Подключения (Connections) , кликаем правой кнопкой мыши по нашему сайту, выбираем Добавить FTP-сайт (Add FTP Site) .

В открывшемся окне Добавить FTP-сайт (Add FTP Site) вводим название нашего FTP-сайта, указываем нужную директорию и жмём Далее (Next) .

Далее указываем IP-адрес из выпадающего списка, или указываем Все свободные (All Unassigned) . Отмечаем галочку ниже. Указываем настройки SSL, если нужно чтобы использовалось шифрование, устанавливаем SSL-сертификат, если нет, то выбираем первый вариант, как показано в примере. Жмём Далее (Next) .

Выбираем проверку подлинности как Обычную (Basic) . Из выпадающего списка выбираем Указанные пользователи (Specified users) , и вводим имя ранее созданного пользователя. Ставим галочки напротив необходимых разрешений: Чтение (Read) или Запись (Write) . Нажимаем Готово (Finish) .

Изоляция пользователей
Чтобы после подключения к FTP-серверу пользователь попадал в свою директорию и не имел доступ к чужим файлам других пользователей, необходимо настроить их изоляцию. Для этого откройте настройки вашего ftp сайта и выберите Изоляция пользователей (FTP User Isolation) .

Выберите Каталог имени пользователя (User name directory) и Примените (Apply) .

Кликаем правой кнопкой мыши по нашему FTP-сайту, выбираем Добавить виртуальный каталог (Add Virtual Directory) .

В первой строке указываем имя FTP-пользователя, ниже полный путь к директории пользователя. Её нужно создать заранее. Для понимания какая директория кому принадлежит, лучше создавать директорию с именем пользователя.

Необходимо настроить права на виртуальный каталог, кликаем правой кнопкой мыши по нему, выбираем Редактировать разрешения (Edit Permission) .

Переходим во вкладку Безопасность (Security) и жмём кнопку Дополнительно (Advanced) .

В окне жмём кнопку Отключение наследования (Disable inheritance) , в новом окне выбираем первый вариант, затем Применить (Apply) и ОК .

Жмём кнопку Изменить (Edit) .

Удаляем группу пользователей Users , и добавляем нового пользователя.

В новом окне, нужно ввести имя FTP-пользователя, для проверки нажмите Проверить имена (Check Names) . Если пользователь есть, строка, где вводили имя, дополнится, нажмите ОК .

Даём все права пользователю на его директорию, отметив все галочки в первой колонке, жмём Применить (Apply) — ОК .

На этом все настройки завершены. Чтобы подключиться к серверу, используйте следующие доступы:
- Хост: IP сервера
- Пользователь: FTP-пользователь, которого вы создали
- Пароль: Пароль от FTP-пользователя
Источник
How to Install FTP Server on Windows Server 2019
FTP, an acronym for File Transfer Protocol, is a standard protocol for sharing files over the internet or a simple LAN. FTP servers have existed for over 30 years and have facilitated file sharing in a simple, yet effective manner.
Nowadays, FTP has been replaced by more secure options, such as SFTP (Secure File Transfer Protocol) and FTPS (FTP over SSL), that encrypt data sent to and from the servers. Nonetheless, it’s prudent that we appreciate the basics of installing an FTP server and see how it can be configured for simple file sharing.
In this guide, we take you through the installation and configuration of the FTP server on Windows Server 2019. There are two ways you can install the FTP server. You can use the Server Manager graphical tool, or use Windows Powershell if you enjoy working on the terminal. We will cover each of these in turn.
How to Install FTP Server using Server Manager
Server Manager is a graphical console that was introduced in Windows Server 2008. The objective was to help System Administrators easily install and manage various features and roles on the server. To install the FTP server using Server Manager, follow the steps as illustrated.
Step 1: Launch Server Manager
Usually, the server manager utility launches automatically upon logging in. Alternatively, you can click on the ‘Start’ menu button and select ‘Server Manager’ from the pull-up menu that appears.
Once launched, click on the ‘Add roles and features’ option as shown.
Step 2: Proceed with the installation
Clicking the ‘Add roles and features’ option launches the installation wizard. The Wizard gives you a summary of the tasks you can perform such as adding/removing roles and features. You will be required to have a few prerequisites in order before proceeding.
Once you have gone over the summary, simply click ‘Next’.
Step 3: Select the Installation Type
In the next step choose ‘Role-based or feature-based’ installation and click ‘Next’.
Step 4: Select the Destination Server
You will thereafter be required to select the server upon which you will install the roles and features. By default, the server you are working on will be selected. Just accept the defaults and hit ‘Next’.
Step 5: Select Server Roles to be Installed
In the next step, a list of server roles will be listed. Click on the ‘Web Server IIS’ option.
This launches a pop-up window that lists the roles to be installed as shown.
Click on ‘Add features’ and hit the ‘Next’ button to proceed to the next step.
Step 6: Select Server Features
Nothing much is required in this step, so once again, click on the ‘Next’ button.
Step 7: Web IIS overview
The next step gives you a glance about what a web server is and the role it plays. So, once again, simply click ‘Next’ to proceed to the next step.
Step 8: Select Role Services
This is the quintessential step where we shall select the FTP feature. Simply scroll and check off the ‘FTP Server’ checkbox and the corresponding FTP sub-options (FTP service and FTP extensibility). Then click ‘Next’.
Step 9: Confirm Installation
Finally, you will be presented with a summary of the roles and features that you have selected to be installed. To confirm and initiate the installation process, click on the ‘Install’ button.
The installation will take a while, so some patience will come in handy. Once the installation is complete, reboot your server for the roles and features to be fully enabled.
As we mentioned, we can install FTP using Windows Powershell. All the steps that we have just gone through can be summarized in one single command on Windows Powershell as follows:
Install-WindowsFeature Web-FTP-Server -IncludeManagementTools
Step 10: Create and FTP directory
To this point, we have installed the FTP server feature on the system, and a root default directory is created to that effect. The path of the root directory is at C:inetpub.
We are going to create a custom FTP directory where we are going to place files and directories which can be accessed by authorized users across the network.
Therefore, navigate to the C:inetpub path. Right click and select ‘New’ then ‘Folder’. Give the folder your preferred name. In this case, we have created a folder called myFTPdirectory.
We need to assign this directory the required permissions so that an authorized user can read from its contents. To achieve this, right-click on the directory and select ‘Properties’.
In the ‘Properties’ window pop-up, click on the ‘Security’ tab to adjust the permissions. Select the group which you want to allow access to the directory. In this case, I have selected the ‘Users’ group. Then click on the ‘Edit’ button to assign permissions to the group.
For our example, we clicked on ‘Full control’ and hit the ‘Apply’ button.
Then click ‘Ok’. This takes you back to the Properties window where, once again, you will click on the ‘Ok’ button.
Step 11: Create an FTP Site
We have assigned all permissions on our FTP directory to the Users group. The next step will be to create an FTP site which we shall map to the FTP directory.
On the Server manager, click on ‘Tools’ then select ‘Internet Services Information (IIS) Manager’ option.
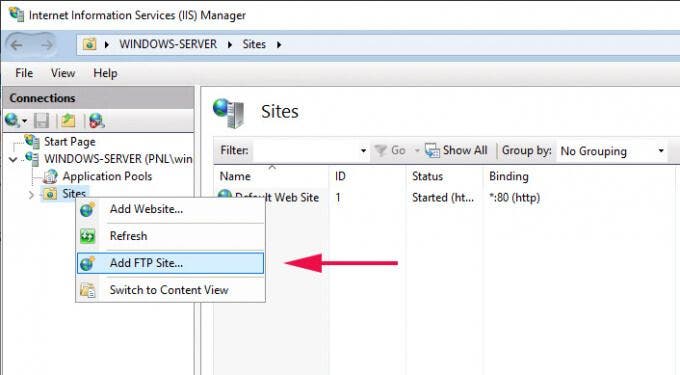
On the IIS Manager window that appears, click the server name at the left pane to reveal more options. Right-click on the ‘Sites’ option and select ‘Add FTP site’.
In the next step, provide the FTP site name and the Physical Path by clicking on the adjacent button with three dots and navigating to the FTP directory that we created in the previous step.
Then click ‘Ok’ then ‘Next’ to go to the next step.
In the ‘Binding and SSL settings’ step, provide your server’s IP address, FTP port. Be sure to select the -‘No SSL’ option since we are not using an SSL certificate to secure the site.
The final step requires you to select the authentication type and configure which users will have access to the FTP site. Select ‘Basic’ authentication.
Under authorization, click on the ‘Specified users’ option – if you want a single user to access the site – and right below that specify the username of the user.
Alternatively, you can allow a group of users by selecting ‘Specified roles or user groups’ and specifying the user group in the ‘text field’ provided. Then check off ‘Read’ and ‘Write’ permissions and hit ‘Finish’.
Up until this point, we have successfully configured the FTP server. The only bit remaining is to configure the firewall to allow remote users to access the FTP site.
Step 12: Configure the Firewall
FTP listens on port 21, and therefore, we need to allow this port across the firewall. To start off, click on the ‘Start’ menu button and search for ‘Firewall with Advanced security’
On the left pane, click on ‘Inbound rules’ and the head over to the extreme right and click on ‘New rule’.
On the ‘Rule Type’ window, select the ‘Predefined’ option and select ‘FTP server’ in the drop-down menu. Click ‘Next’.
Ensure that all the firewall rules are checked off and click ‘Next’.
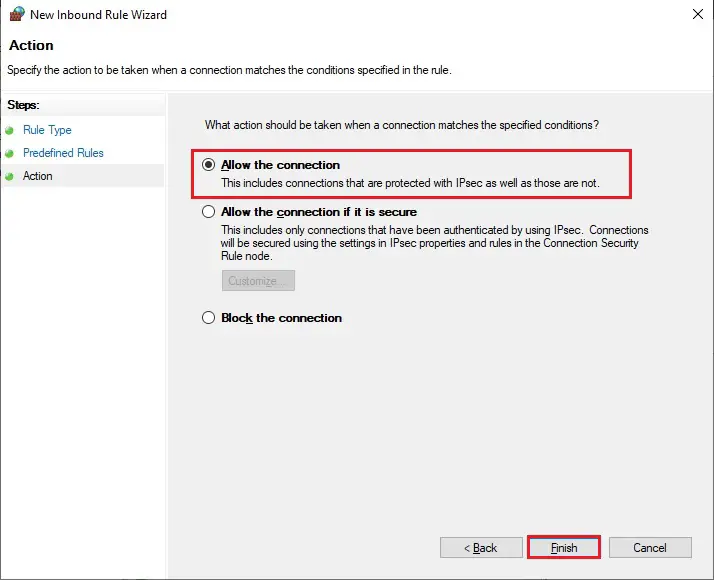
Finally, click on ‘Allow the connection’ and click ‘Finish’.
Our FTP server can now be accessed remotely from either a Windows or Linux/UNIX system. The only thing remaining is to test if we can make a connection to the server.
Step 13: Test FTP server
To test if your FTP server is working as expected, head over to a remote system and launch command prompt. Next, type the command below:
ftp server-ip
You will be required to authenticate, so provide your username and password.
The output above confirms that we have been able to successfully log in.
Let’s try something more ambitious. We are going to create a directory and navigate into it using the commands shown:
ftp> mkdir reports
ftp> cd reports
To verify the existence of the directory, use the ls command , just as you would in a Linux system when listing files.
ftp> ls
Alternatively, You can head over to your browser and head over to the URL shown:
ftp://server-ip
In the authentication pop-up, provide your username and password and click on the ‘Sign In’ button.
And voila! There goes your directory!
This confirms that our FTP server is working as expected.
Conclusion
This brings to an end our topic today. We have successfully installed and configured FTP server on Windows Server 2019. An FTP server provides a convenient way of hosting and sharing files and directories across a network to specific users or groups of users in Active directory.
However, as we pointed out earlier, FTP is now considered unsafe and extra steps are needed to secure it using an SSL certificate to keep malicious users from eavesdropping on the communication between the FTP server and the client PC. Let us know your thoughts in the comments. Enjoy!
Hey, I’m Winnie, a passionate Linux enthusiast and tech writer who loves working away on command-line and keeping tabs on the latest developments in the ever-evolving tech space. When not busy behind my laptop, catch me taking a hike or having a great time swimming. Read Winnie’s Full Bio
Источник
FTP, an acronym for File Transfer Protocol, is a standard protocol for sharing files over the internet or a simple LAN. FTP servers have existed for over 30 years and have facilitated file sharing in a simple, yet effective manner.
Nowadays, FTP has been replaced by more secure options, such as SFTP (Secure File Transfer Protocol) and FTPS (FTP over SSL), that encrypt data sent to and from the servers. Nonetheless, it’s prudent that we appreciate the basics of installing an FTP server and see how it can be configured for simple file sharing.

In this guide, we take you through the installation and configuration of the FTP server on Windows Server 2019. There are two ways you can install the FTP server. You can use the Server Manager graphical tool, or use Windows Powershell if you enjoy working on the terminal. We will cover each of these in turn.
How to Install FTP Server using Server Manager
Server Manager is a graphical console that was introduced in Windows Server 2008. The objective was to help System Administrators easily install and manage various features and roles on the server. To install the FTP server using Server Manager, follow the steps as illustrated.
Step 1: Launch Server Manager
Usually, the server manager utility launches automatically upon logging in. Alternatively, you can click on the ‘Start’ menu button and select ‘Server Manager’ from the pull-up menu that appears.
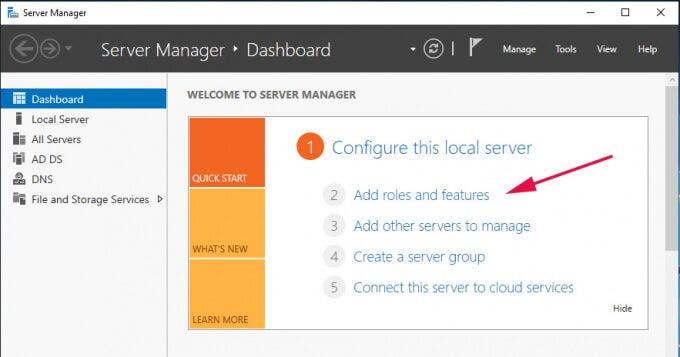
Once launched, click on the ‘Add roles and features’ option as shown.
Step 2: Proceed with the installation
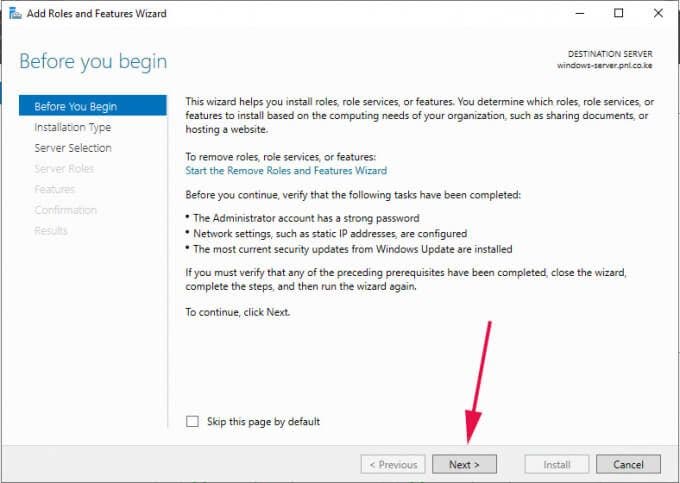
Clicking the ‘Add roles and features’ option launches the installation wizard. The Wizard gives you a summary of the tasks you can perform such as adding/removing roles and features. You will be required to have a few prerequisites in order before proceeding.
Once you have gone over the summary, simply click ‘Next’.
Step 3: Select the Installation Type
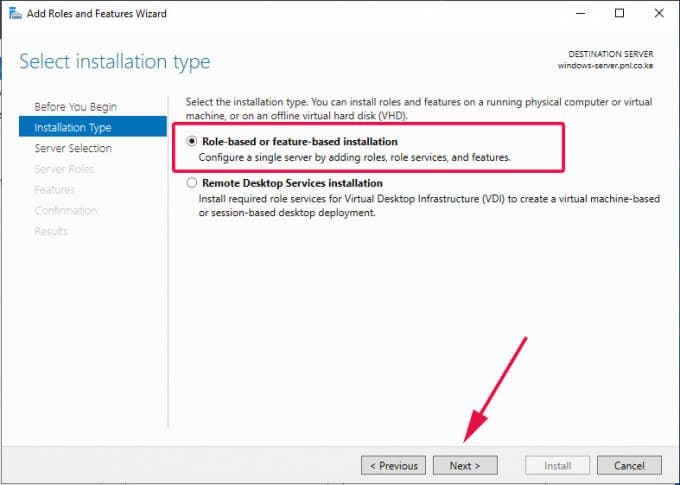
In the next step choose ‘Role-based or feature-based’ installation and click ‘Next’.
Step 4: Select the Destination Server
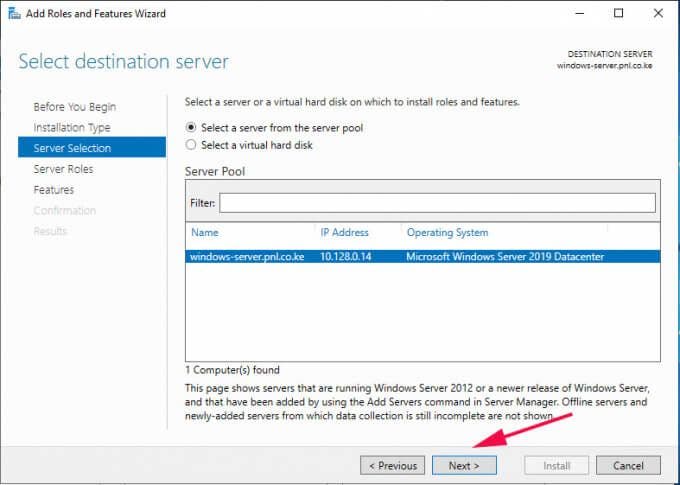
You will thereafter be required to select the server upon which you will install the roles and features. By default, the server you are working on will be selected. Just accept the defaults and hit ‘Next’.
Step 5: Select Server Roles to be Installed
In the next step, a list of server roles will be listed. Click on the ‘Web Server IIS’ option.

This launches a pop-up window that lists the roles to be installed as shown.
Click on ‘Add features’ and hit the ‘Next’ button to proceed to the next step.

Step 6: Select Server Features
Nothing much is required in this step, so once again, click on the ‘Next’ button.
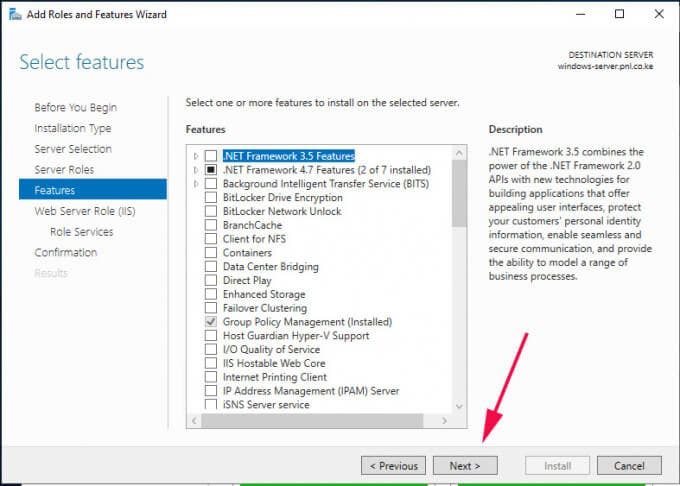
Step 7: Web IIS overview
The next step gives you a glance about what a web server is and the role it plays. So, once again, simply click ‘Next’ to proceed to the next step.
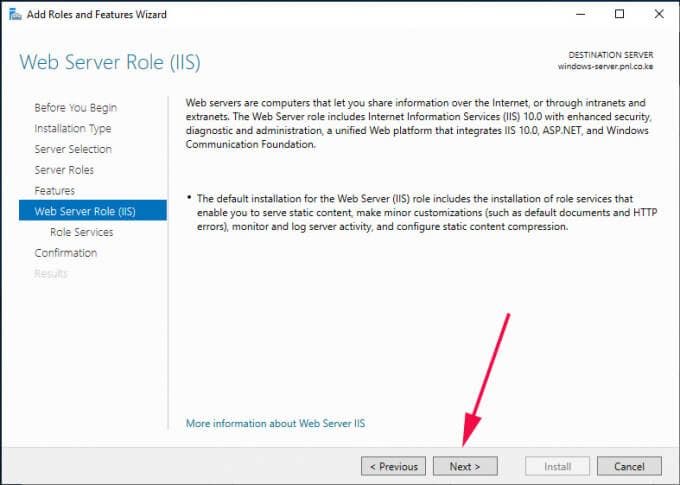
Step 8: Select Role Services
This is the quintessential step where we shall select the FTP feature. Simply scroll and check off the ‘FTP Server’ checkbox and the corresponding FTP sub-options (FTP service and FTP extensibility). Then click ‘Next’.

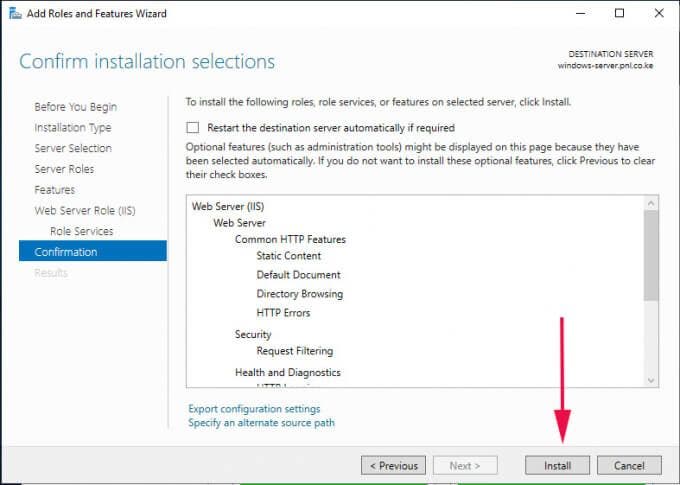
Step 9: Confirm Installation
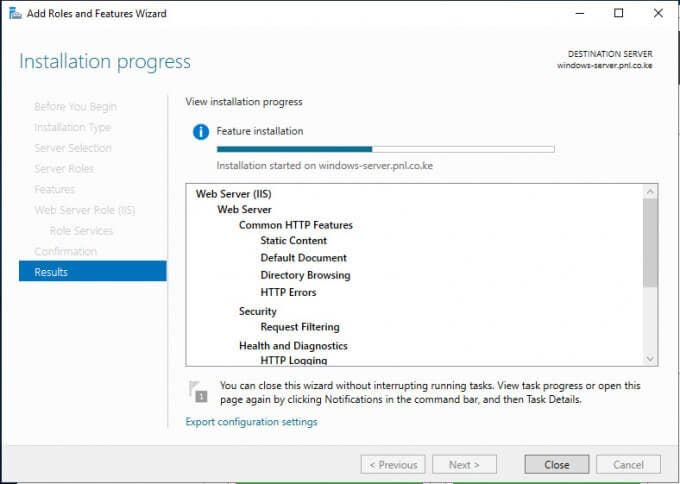
Finally, you will be presented with a summary of the roles and features that you have selected to be installed. To confirm and initiate the installation process, click on the ‘Install’ button.
The installation will take a while, so some patience will come in handy. Once the installation is complete, reboot your server for the roles and features to be fully enabled.
As we mentioned, we can install FTP using Windows Powershell. All the steps that we have just gone through can be summarized in one single command on Windows Powershell as follows:
Install-WindowsFeature Web-FTP-Server -IncludeManagementTools
Step 10: Create and FTP directory
To this point, we have installed the FTP server feature on the system, and a root default directory is created to that effect. The path of the root directory is at C:inetpub.
We are going to create a custom FTP directory where we are going to place files and directories which can be accessed by authorized users across the network.
Therefore, navigate to the C:inetpub path. Right click and select ‘New’ then ‘Folder’. Give the folder your preferred name. In this case, we have created a folder called myFTPdirectory.
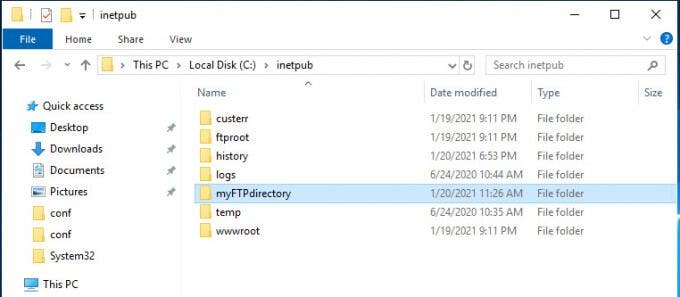
We need to assign this directory the required permissions so that an authorized user can read from its contents. To achieve this, right-click on the directory and select ‘Properties’.
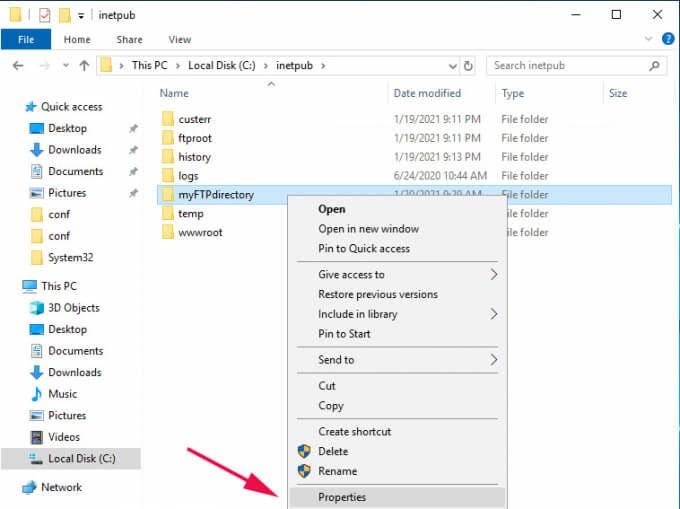
In the ‘Properties’ window pop-up, click on the ‘Security’ tab to adjust the permissions. Select the group which you want to allow access to the directory. In this case, I have selected the ‘Users’ group. Then click on the ‘Edit’ button to assign permissions to the group.
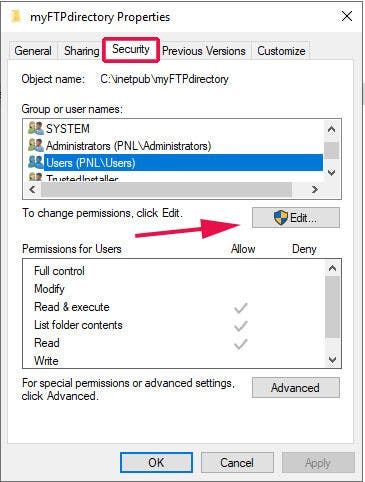
For our example, we clicked on ‘Full control’ and hit the ‘Apply’ button.

Then click ‘Ok’. This takes you back to the Properties window where, once again, you will click on the ‘Ok’ button.
Step 11: Create an FTP Site
We have assigned all permissions on our FTP directory to the Users group. The next step will be to create an FTP site which we shall map to the FTP directory.
On the Server manager, click on ‘Tools’ then select ‘Internet Services Information (IIS) Manager’ option.
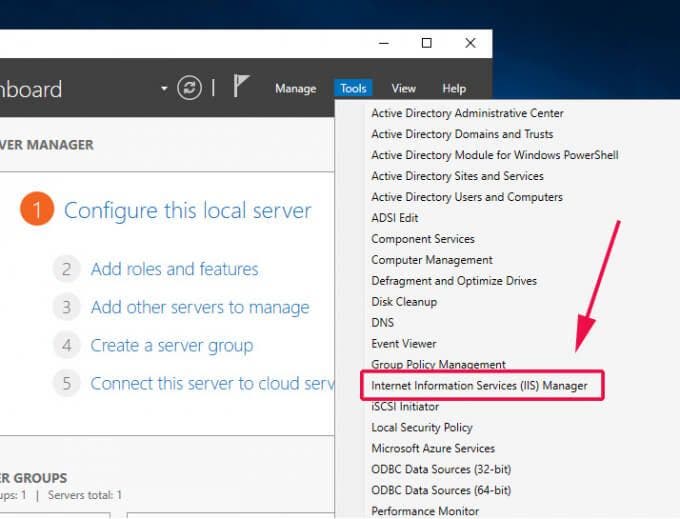
On the IIS Manager window that appears, click the server name at the left pane to reveal more options. Right-click on the ‘Sites’ option and select ‘Add FTP site’.
In the next step, provide the FTP site name and the Physical Path by clicking on the adjacent button with three dots and navigating to the FTP directory that we created in the previous step.
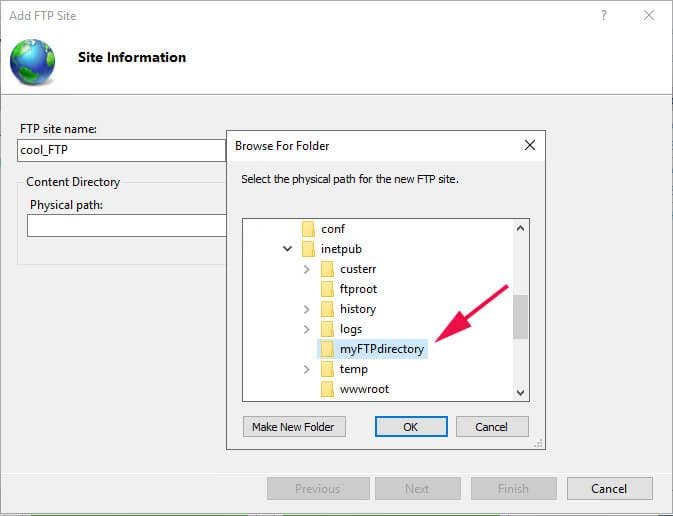
Then click ‘Ok’ then ‘Next’ to go to the next step.
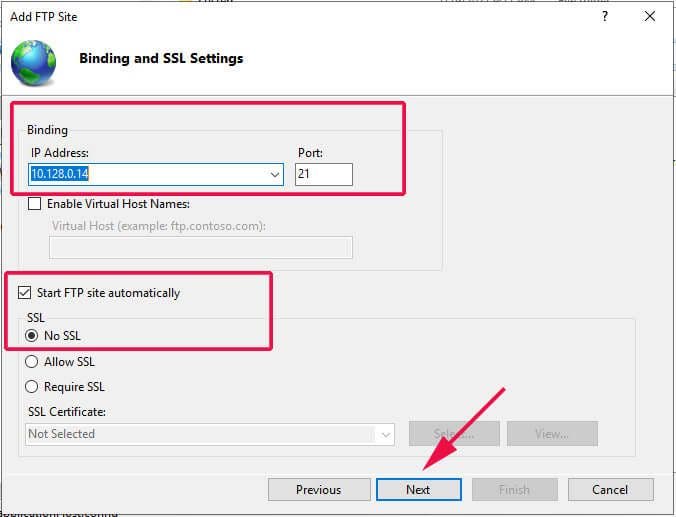
In the ‘Binding and SSL settings’ step, provide your server’s IP address, FTP port. Be sure to select the -‘No SSL’ option since we are not using an SSL certificate to secure the site.
The final step requires you to select the authentication type and configure which users will have access to the FTP site. Select ‘Basic’ authentication.
Under authorization, click on the ‘Specified users’ option – if you want a single user to access the site – and right below that specify the username of the user.
Alternatively, you can allow a group of users by selecting ‘Specified roles or user groups’ and specifying the user group in the ‘text field’ provided. Then check off ‘Read’ and ‘Write’ permissions and hit ‘Finish’.

Up until this point, we have successfully configured the FTP server. The only bit remaining is to configure the firewall to allow remote users to access the FTP site.
Step 12: Configure the Firewall
FTP listens on port 21, and therefore, we need to allow this port across the firewall. To start off, click on the ‘Start’ menu button and search for ‘Firewall with Advanced security’

On the left pane, click on ‘Inbound rules’ and the head over to the extreme right and click on ‘New rule’.

On the ‘Rule Type’ window, select the ‘Predefined’ option and select ‘FTP server’ in the drop-down menu. Click ‘Next’.

Ensure that all the firewall rules are checked off and click ‘Next’.
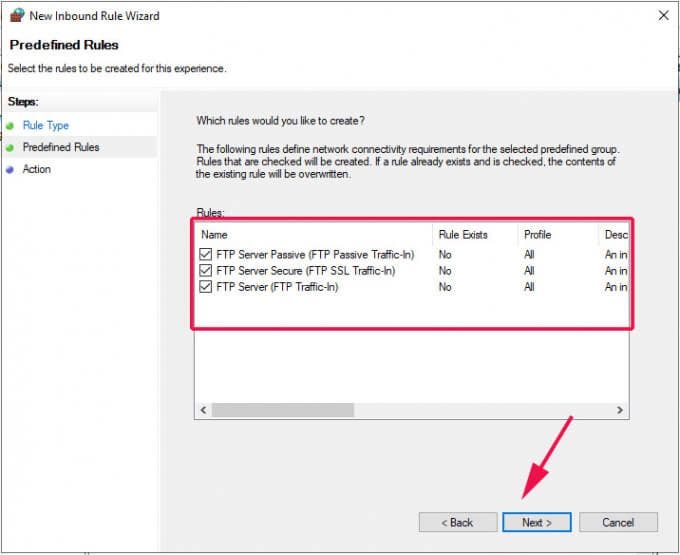
Finally, click on ‘Allow the connection’ and click ‘Finish’.
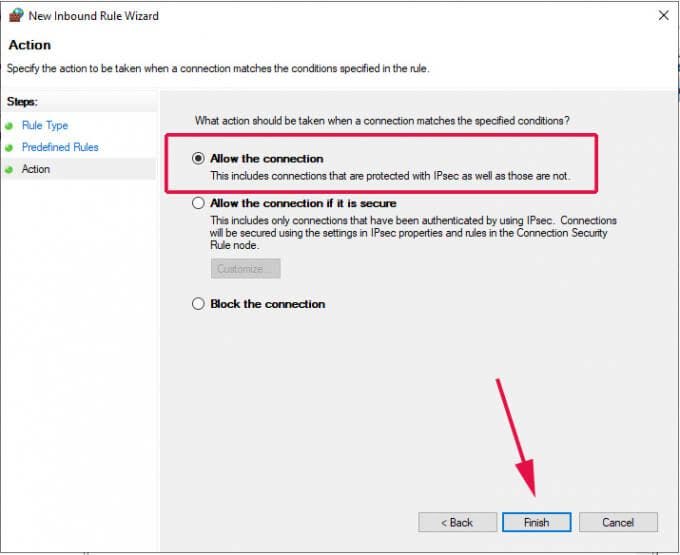
Our FTP server can now be accessed remotely from either a Windows or Linux/UNIX system. The only thing remaining is to test if we can make a connection to the server.
Step 13: Test FTP server
To test if your FTP server is working as expected, head over to a remote system and launch command prompt. Next, type the command below:
ftp server-ip
You will be required to authenticate, so provide your username and password.
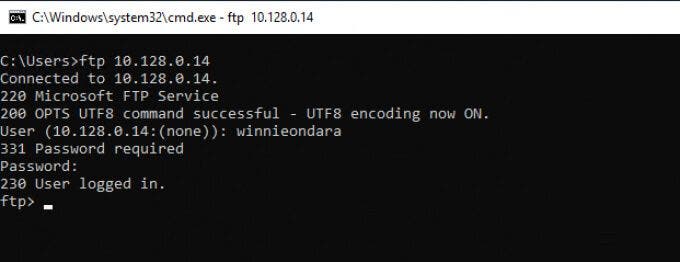
The output above confirms that we have been able to successfully log in.
Let’s try something more ambitious. We are going to create a directory and navigate into it using the commands shown:
ftp> mkdir reports
ftp> cd reports

To verify the existence of the directory, use the ls command , just as you would in a Linux system when listing files.
ftp> ls

Alternatively, You can head over to your browser and head over to the URL shown:
ftp://server-ip
In the authentication pop-up, provide your username and password and click on the ‘Sign In’ button.
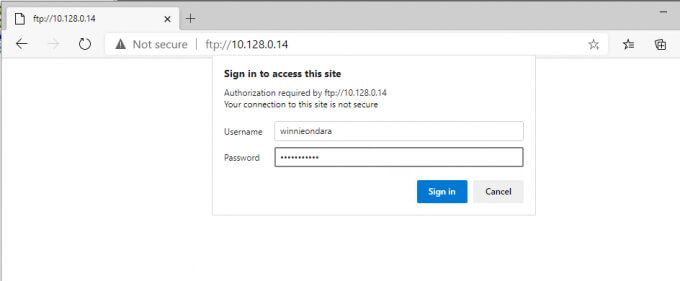
And voila! There goes your directory!

This confirms that our FTP server is working as expected.
Conclusion
This brings to an end our topic today. We have successfully installed and configured FTP server on Windows Server 2019. An FTP server provides a convenient way of hosting and sharing files and directories across a network to specific users or groups of users in Active directory.
However, as we pointed out earlier, FTP is now considered unsafe and extra steps are needed to secure it using an SSL certificate to keep malicious users from eavesdropping on the communication between the FTP server and the client PC. Let us know your thoughts in the comments. Enjoy!
Настройка будет состоять из пунктов:
- Настройка Брандмауэра
- Создание пользователей
- Настройка FTP-сайта
- Изоляция пользователей
Установка FTP-сервера
Для начала нужно установить FTP-сервер.
Открываем Пуск в нижнем левом углу, Диспетчер серверов (Server Manager), плитка которого закреплена по умолчанию. Далее все основные действия по настройке будем совершать здесь.
Находим пункт Добавить Роль и Функции (Add roles and features).
Появится мастер добавления ролей, для продолжения нажимаем Далее (Next).
В качестве типа установки выбираем Базовая Роль или Базовая Функция (based-roles or feature-based installation).
Далее из списка серверов, выбираем нужный сервер, в качестве примера он один, поэтому жмём Далее (Next).
На этапе выбора ролей отмечаем роль Веб-сервер (IIS) (Web Server (IIS)).
Откроется окно и предложит установить Консоль управления службами IIS (IIS Management Console), жмем Добавить компоненты (Add Featues), они понадобятся, чтобы администрировать FTP-сервер, жмем Далее (Next).
Следующие 2 шага пропускаем, нажимая Далее (Next).
Дойдя до пункта Службы ролей (Role Services), снимаем все галочки и выбираем Служба FTP (FTP Service) и Консоль управления службами IIS (IIS Management Console), жмем Далее (Next).
На следующем пункте проверяем все компоненты и жмём Установить (Install).
Дожидаемся окончания установки, после чего жмём Закрыть (Close).
Далее ещё нужно настроить пару моментов, не торопитесь перезагружать сервер.
Настройка Брандмауэра
Для подключения к FTP-серверу необходимо настроить Firewall. Для этого откройте Брандмауэр Windows в режиме повышенной безопасности (Windows Firewall with Advanced Security).
В вертикальном меню слева выберите Правила для входящих подключений (Inbound rules), затем в вертикальном меню справа Создать правило (New Rule).
В открывшемся окне отмечаем тип Предопределенные (Predefined) и в выпадающем списке выберите FTP-сервер (FTP Server). Нажмите Далее (Next).
Отмечаем все галочки, Далее (Next), Готово (Finish). Перезагружаем сервер для применения всех настроек.
Создание пользователей
Теперь нужно создать пользователей, которым дадим право подключаться к FTP-серверу.
Открываем Управление компьютером (Computer Management).
Открываем пункт Локальные пользователи и группы (Local Users and Groups), щелкаем правой кнопкой мыши по пункту Пользователи (Users) и выбираем Новый пользователь (New User). Заполняем необходимые поля, снимаем все галочки и жмем Создать (Create).
Если появилась следующая ошибка при создании пользователя, значит пароль не соответствует нужным требованиям:
Пароль должен соответствовать как минимум трём условиям из списка перечисленного ниже:
- Наличие прописных букв английского алфавита от A до Z;
- Наличие строчных букв английского алфавита от a до z;
- Наличие десятичных цифр (от 0 до 9);
- Наличие неалфавитных символов (например, !, $, #, %).
Открываем Диспетчер служб IIS (Internet Information Server (IIS) Manager).
В окне Подключения (Connections), кликаем правой кнопкой мыши по нашему сайту, выбираем Добавить FTP-сайт (Add FTP Site).
В открывшемся окне Добавить FTP-сайт (Add FTP Site) вводим название нашего FTP-сайта, указываем нужную директорию и жмём Далее (Next).
Далее указываем IP-адрес из выпадающего списка, или указываем Все свободные (All Unassigned). Отмечаем галочку ниже. Указываем настройки SSL, если нужно чтобы использовалось шифрование, устанавливаем SSL-сертификат, если нет, то выбираем первый вариант, как показано в примере. Жмём Далее (Next).
Выбираем проверку подлинности как Обычную (Basic). Из выпадающего списка выбираем Указанные пользователи (Specified users), и вводим имя ранее созданного пользователя. Ставим галочки напротив необходимых разрешений: Чтение (Read) или Запись (Write). Нажимаем Готово (Finish).
Изоляция пользователей
Чтобы после подключения к FTP-серверу пользователь попадал в свою директорию и не имел доступ к чужим файлам других пользователей, необходимо настроить их изоляцию. Для этого откройте настройки вашего ftp сайта и выберите Изоляция пользователей (FTP User Isolation).
Выберите Каталог имени пользователя (User name directory) и Примените (Apply).
Кликаем правой кнопкой мыши по нашему FTP-сайту, выбираем Добавить виртуальный каталог (Add Virtual Directory).
В первой строке указываем имя FTP-пользователя, ниже полный путь к директории пользователя. Её нужно создать заранее. Для понимания какая директория кому принадлежит, лучше создавать директорию с именем пользователя.
Необходимо настроить права на виртуальный каталог, кликаем правой кнопкой мыши по нему, выбираем Редактировать разрешения (Edit Permission).
Переходим во вкладку Безопасность (Security) и жмём кнопку Дополнительно (Advanced).
В окне жмём кнопку Отключение наследования (Disable inheritance), в новом окне выбираем первый вариант, затем Применить (Apply) и ОК.
Жмём кнопку Изменить (Edit).
Удаляем группу пользователей Users, и добавляем нового пользователя.
В новом окне, нужно ввести имя FTP-пользователя, для проверки нажмите Проверить имена (Check Names). Если пользователь есть, строка, где вводили имя, дополнится, нажмите ОК.
Даём все права пользователю на его директорию, отметив все галочки в первой колонке, жмём Применить (Apply) — ОК.
На этом все настройки завершены. Чтобы подключиться к серверу, используйте следующие доступы:
- Хост: IP сервера
- Пользователь: FTP-пользователь, которого вы создали
- Пароль: Пароль от FTP-пользователя
Подключиться можно через разное ПО, например FileZilla или, если вы используете Windows — Проводник, введя в адресной строке ftp://IP-сервера, после чего откроется окно для входа.
Содержание
- DATAENGINER
- Настройка FTP-сервера в Windows Server 2019
- ШАГ 1
- ШАГ 2
- ШАГ 3
- ШАГ 4
- ШАГ 5
- ШАГ 6
- ШАГ 7
- ШАГ 8
- ШАГ 9
- ШАГ 10
- Создаём и настраиваем пользователя для FTP-сервера.
- DATAENGINER
- Настройка FTP-сервера на IIS Windows Server 2019
- Как создать ftp-сайт Windows Server 2019
- Как добавить группу пользователю Windows Server 2019
- Изоляция пользователей для FTP-Сервера Windows Server 2019
- Добавить правило для ftp-server Windows Server 2019
- Как подключиться к ftp серверу
- Как подключиться к FTP — Серверу, через FileZilla.
- Как подключиться к FTP — Серверу, используя WinSCP.
- Как подключиться к FTP — Серверу, используя Проводник Windows.
- DATAENGINER
DATAENGINER
Добрый день! Мы продолжаем рубрику про установку и настройку сетевого хранилища в небольшом офисе. Сегодня мы начнем рассматривать установку и настройку ftp-serverа в операционной системе windows server 2019. Так же — эту инструкцию, вы можете использовать для установки и настройки windows 10.
Шаг 1. Открываем панель управления Windows Server, найдем пункт Добавить Роль и Функции (Add roles and features).
Шаг 2. Перед нами появится меню установки, где необходимо нажать Next, чтобы перейти к следующему шагу.
Шаг 3. В качестве типа установки выбираем Базовая Роль или Базовая Фукнция (based-roles or feature-based installation).
Шаг 4. Из списка Серверов, выбираем наш сервер.
Шаг 5. В следующем окне отметим веб сервер IIS.
И принимаем добавление новой функции (add feature). Нажимаем Next.
Шаг 6. В следующем окне компонентов, ничего не выбираем
Шаг 7. Появится информация о том, что нам необходимо выбрать компоненты. А также о том, что будет установлен IIS Web-Server.
Шаг 8. Далее отмечаем ftp-server и все его компоненты.
Шаг 9. Далее будут показаны все компоненты, которые будут установлены. Нажмем Install для начала установки.
Дожидаемся окончания установки всех компонентов и служб, которые необходимы для работы ftp-servera.
По окончании установки, закроем окно нажав на кнопку close.
После установки Ftp – Servera, нам необходимо создать Ftp сайт об этом вы прочитаете в следующей статье.
Источник
Настройка FTP-сервера в Windows Server 2019
В данной статье мы будем рассматривать пример установки и настройки FTP(File Transfer Protocol) сервера на ОС Windows Server 2019.
ШАГ 1
Первым делом нам необходимо открыть Server Manager. В открывшемся окне выбираем «Добавить роли и компоненты«(Add roles and features).

ШАГ 2
На первом шаге мастера Добавления ролей и компонентов можно сразу жать «Далее»(Next):

ШАГ 3
При выборе «Типа установки«(Installation Type) указываем «Установка ролей и компонентов«(Role-based or feature-based installation).

ШАГ 4
Из списка «Пул серверов«(Server Pool) выбираем необходимый нам сервер и жмём Далее.

ШАГ 5
Нам необходимо выбрать Роли, которые требуются для развертывания FTP-сервера. В нашем случае это Web Server(IIS).

После установки чекбокса, всплывёт окно. Жмём «Добавить компоненты«(Add features).

ШАГ 6
На данном этапе нам необходимо просто нажать Далее, так как никакие дополнительные компоненты нам не нужны.

ШАГ 7
Здесь также нажимаем Далее.

ШАГ 8
На данном этапе мы снимаем все ненужные чекбоксы. Отмечаем только «Служба FTP«(FTP Service) и «Консоль управления службами IIS«(IIS Management Console) и жмём далее.

ШАГ 9
Подтверждаем установку ролей и компонентов. Ставим чекбокс, чтобы по завершении установки сервер самостоятельно перезагрузился.

ШАГ 10
Ожидаем окончания процесса установки.

На этом процесс установки FTP-сервера завершен.
Следующим этапом будет создание FTP-пользователя и FTP-cайта.
Создаём и настраиваем пользователя для FTP-сервера.

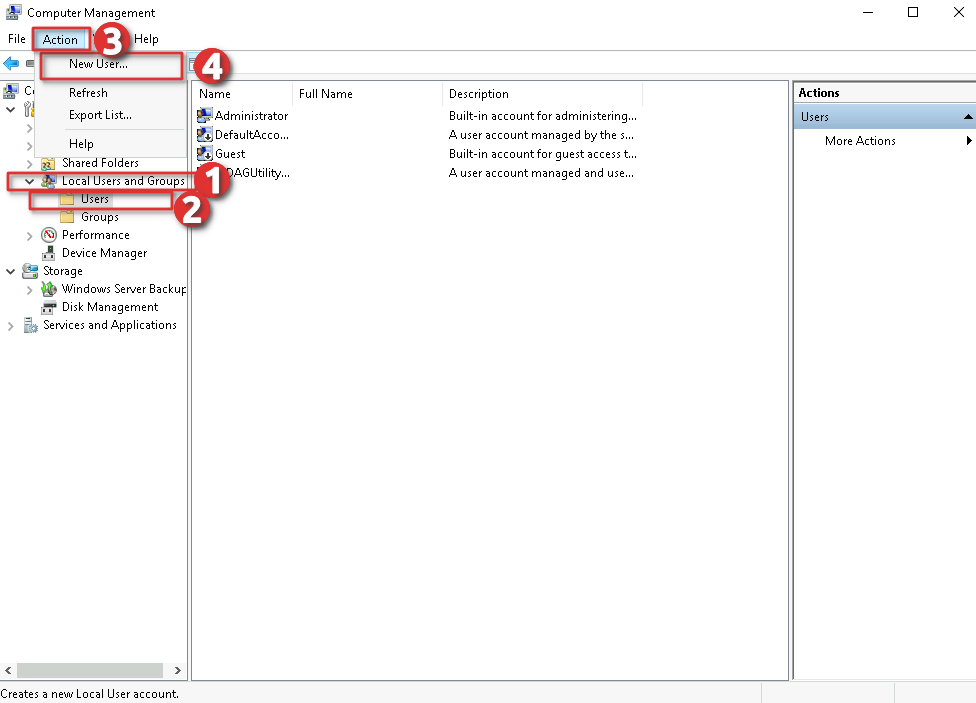
Присваиваем нашему новому пользователю имя и пароль, и кликаем «Создать«(Create).

На этом создание пользователя завершено.
Далее нам требуется расшарить каталог для FTP пользователей. Для этого переходим в «Диспетчер серверов«(Server Manager) и во вкладке «Средства«(Tools) выбираем «Диспетчер служб IIS«(Internet Information Services (IIS)Manager).

В новом окне нам необходимо раскрыть ветку с названием нашего сервера и правым кликом мыши щелкнуть по пункту «Сайты«(Sites).

Заполняем поле «Имя FTP-сайта» и указываем каталог, к которому мы будем предоставлять доступ по FTP. И жмём кнопку «Далее».

На следующем этапе необходимо выбрать IP адрес. В нашем случае сервер имеет один IP, по этому данное поле можно не изменять. Порт вы можете указать любой свободный. Я буду использовать порт 4040.
В разделе SSL выбираем «Без SSL«(No SSL). Жмём «Далее»

Теперь нам требуется указать «Проверку подлинности«(Autentification). Выбираем «Обычная«(Basic), так как Анонимные подключения нам не нужны. Далее в разделе «Авторизация» выбираем с выпадающего списка «Указанные пользователи» и указываем нашего созданного пользователя. Ставим чекбоксы для разрешения чтения и записи в нашем расшареном каталоге.

После нажатия кнопки Готово, наш FTP сервер будет создан.
Источник
DATAENGINER
Добрый день! Публикую полную подробную инструкцию, о том как создать свой ftp-сервер на ОС Windows/Windows Server.
Настройка FTP-сервера на IIS Windows Server 2019
Шаг 1. Открываем панель управления Windows Server, найдем пункт Добавить Роль и Функции (Add roles and features).
Шаг 2. Перед нами появится меню установки, где необходимо нажать Next, чтобы перейти к следующему шагу.
Шаг 3. В качестве типа установки выбираем Базовая Роль или Базовая Фукнция (based-roles or feature-based installation).
Шаг 4. Из списка Серверов, выбираем наш сервер.
Шаг 5. В следующем окне отметим веб сервер IIS.
И принимаем добавление новой функции (add feature). Нажимаем Next.
Шаг 6. В следующем окне компонентов, ничего не выбираем
Шаг 7. Появится информация о том, что нам необходимо выбрать компоненты. А также о том, что будет установлен IIS Web-Server.
Шаг 8. Далее отмечаем ftp-server и все его компоненты.
Шаг 9. Далее будут показаны все компоненты, которые будут установлены. Нажмем Install для начала установки.
Дожидаемся окончания установки всех компонентов и служб, которые необходимы для работы ftp-servera.
По окончании установки, закроем окно нажав на кнопку close.
Как создать ftp-сайт Windows Server 2019
Шаг 1. Откроем панель управления сервером Windows 2019, в боковом меню выбираем IIS.
Шаг 2. Перед нами dashboard (рабочий стол) IIS Windows Server 2019, где будет указан наш сервер. Выделяем его и нажимаем правой кнопкой мыши, в появившемся меню выбираем Internet Information Server Manager.
Шаг 3. Перед нами появится консоль управления IIS Manager.Нажмем на наш сервер и перед нами появятся настройки и конфигурация нашего IIS 10.
Как видите – это довольное большое меню с различными значками и множеством настроек.
Шаг 4. Для дальнейшей работы, нам необходимо создать сайт Ftp. Нажмем в боковом меню на наш сервер и выберем Добавить ftp – сайт (Add ftp – site)
Шаг 5. Укажем имя сайта и путь к директории ftp-сайта(где будут храниться файлы). Я уже предварительно создал папку Ftp на локальном диске C. Сайт назовем «FtpTest».
Шаг 6. Далее в выпадающем списке выбираем наш ip-адрес, а также отмечаем NoSSL. No SSL значит, что мы не будем использовать SSL шифрование.
Шаг 7. Далее в качестве аутентификации, выбираем «Basic», а на вопрос кому предоставлять доступ в выпадающем списке выбираем «Specified roles or user groups». В качестве группы, указываем группу ftp-test. Разрешаем запись и чтение установив галочки «Read» и «Write». Нажимаем Finish.
Теперь наш новый Ftp-сайт появится в боковом меню IIS Manager.
Как добавить группу пользователю Windows Server 2019
Шаг 1. Открываем меню пуск и указываем mmc в строке поиска (консоль управления windows).
Ранее мы уже рассмотрели, как добавить оснастку локальных пользователей и групп, с тем как это сделать вы можете ознакомиться тут.
Шаг 2. Открываем папку пользователей и в списке пользователей выбираем необходимого нам пользователя.
Шаг 3. Нажимаем правой кнопкой на пользователя и выбираем Properties.
Шаг 4. Откроется меню свойств, где мы перейдем на вкладку Member of. В списке будут указаны группы в которых состоит наш пользователь.
Шаг 5. Нажмем кнопку Add. Появится окно, где мы можем указать имя группы. Для того, чтобы найти необходимую группу необходимо нажать Advanced.
Шаг 6. После этого появится окно поиска групп. Для того, чтобы отобразить весь список нажмем Find Now. Windows отобразит все существующие группы.
Шаг 7. В появившемся списке я выберу Remote Desktop Users. Эта группа предоставляет разрешение на подключение пользователям к удаленному рабочему столу. Нажмем ОК.
Шаг 8. После этого в окне выбора групп появится название группы. Здесь тоже нажмем ОК.
Шаг 9. Далее в свойствах пользователя появится новая группа. Нажмем Apply и OK.
После этого, выбранная группа будет добавлена к пользователю.
Изоляция пользователей для FTP-Сервера Windows Server 2019
Шаг 1. Открываем панель управления IIS Manager. В левом боком меню выбираем наш текущий Windows Server.
Шаг 2. В основном меню выбираем Ftp User Location. Выбираем использовать User name directory (директория имени пользователя) и нажимаем применить(apply).
Шаг 3. Далее в левом боковом меню выбираем наш ftp-site и нажимаем по нему правой кнопкой мыши, выбираем add virtual directory (добавить виртуальную директорию).
Шаг 4. В поле Alias (псевдоним) указываем поддиректорию сайта, а в Physical Path (физический путь) местоположение заранее созданной подпапке, где будут создаваться папки по именам пользователя.
Шаг 5. Теперь отредактируем права нашего нового подкаталога. Для этого в левом боковом меню выбираем наш новый подкаталог и нажимаем правой кнопкой мыши, выбираем Edit Permission.
Шаг 6. Откроем вкладку Security, выбираем Creator Owner и нажмем кнопку Advanced.
Шаг 7. Нажимаем Disable inheritance, это отключит наследование прав для создателя каталога и владельца каталога.
В появившемся окне выбираем Convert inherit permissions into explicit permissions on this object.
Чтобы сохранить внесенные изменения нажмем Apply.
Шаг 8. Далее нажмем кнопку Edit.
Далее выбираем Users и нажмем кнопку Remove, после чего примем изменение. Это необходимо, чтобы к родительской директории FtpCloud имел доступ только владелец.
Если вам необходимы полные права, вы всегда можете воспользоваться пользователем Administrator, как видите у него есть полные права.
Добавить правило для ftp-server Windows Server 2019
Для того, чтобы мы могли подключиться к нашему ftp-серверу необходимо в брандмауэре открыть соответствующие порты. Как правило Ftp-сервер использует 21 порт, а sftp 22.
Шаг 1. Для того чтобы открыть порт, для нашего ftp-сервера, нам необходимо открыть firewall windows. Поэтому открываем меню пуск и пишем в поиске firewall.
Шаг 2. Открываем приложение Windows Defender Firewall.
Шаг 3. В левом боковом меню выберем inbound Rules. Далее в правом боковом меню выбираем New Rules.
Шаг 4. В появившемся окне добавления новой роли выбираем Predefined (предопределенные), и в выпадающем списке выбираем ftp-server.
Шаг 5. Отмечаем галочкой все предложенные роли.
Шаг 6. Теперь на следующей странице выбираем разрешить все подключения (Allow Connection) и нажимаем финиш.
Теперь у нас появится три новых правила, для входящих подключений к ftp-серверу.
Вот мы и рассмотрели как добавить правило для работы ftp — сервера.
Как подключиться к ftp серверу
Давайте теперь рассмотрим, как подключиться к ftp — серверу. Подключаться будем посредством двух популярных решений FileZilla, WinSCP, а также посредством Проводника Windows. Итак, приступим к подключению.
Как подключиться к FTP — Серверу, через FileZilla.
Шаг 1. Открываем клиент FileZilla. Перед нами появится окно программы, разбитое на несколько частей. С левой стороны находится список каталогов и файлов находящихся на нашем текущем ПК. С правой стороны список каталогов и файлов находящихся на сервере.
Шаг 2. Откроем в верхнем меню Файл-> Менеджер сайтов. Перед нами появится окно менеджера сайта. Здесь хранится информация о подключенных ftp — серверах, а также мы можем добавить новое подключение к ftp — серверу. Давайте добавим подключение к ранее созданному нами ftp — серверу на Windows Server 2019.
Шаг 3. Нажмем новый сайт и укажем в качестве имени подключения testftp.
Шаг 4. Укажем учетные данные для подключения пользователя: в качестве хоста, укажем ipadress нашего ftp – сервера, пользователь и пароль указываем от пользователя test. В качестве типа входа, необходимо указать запросить пароль.
После этого с правой стороны в окне удаленного каталога отобразится папка ftp – cloud, которую мы делали ранее.
Перейдем в каталог FtpCloud и из левой части окна перенесем какой–нибудь файл в каталог FtpCloud.
Переместим выбранный файл после перемещения он отобразиться в правой части окна.
Как подключиться к FTP — Серверу, используя WinSCP.
Шаг 1. Откроем приложение WinSCP. Перед нами появится окно клиента, где с левой стороны так же находится наш текущий компьютер, а с правой стороны будет находится ftp — сервер Windows. Так же перед нами появится окно, где с лева будет список подключений, а в правой части будет содержаться информация о текущем подключении.м
Шаг 2. Указываем учетные данные: ipaddress, имя пользователя и пароль.
Шаг 3. Подключаемся к нашему ftp – серверу.
Скопируем файл, который мы заливали через FileZilla, чтобы проверить работу.
Как подключиться к FTP — Серверу, используя Проводник Windows.
Если вы подключаетесь единоразово или крайне редко, Вам далеко не обязательно использовать сторонний софт, Вы можете воспользоваться встроенными средствами Windows. ОС Windows позволяет подключиться по ftp, используя штатные средства Проводника.
Шаг 1. Откроем обычный проводник Windows
Шаг 2. В адресной строке укажем адрес ftp – сервера и перед адресом в явном виде укажем протокол, который будет использоваться для подключения (в моем случае ftp://192.168.174.131). Появится окно входа, где мы указываем имя пользователя и пароль.
После этого перед нами снова появится файлик, который мы копировали в прошлых примерах.
В данной статье мы рассмотрели три способа как можно подключиться к ftp — серверу. Лично я использую WinSCP для этих целей, ну что использовать Вам, решите Вы сами.
Источник
DATAENGINER
Добрый день! Сегодня мы продолжаем создавать наш ftp-server на ОС Windows Server 2019. В данной статье мы подробно рассмотрим создание своего первого ftp-сайта.
Итак, приступим к установке.
Шаг 1. Откроем панель управления сервером Windows 2019, в боковом меню выбираем IIS.
Шаг 2. Перед нами dashboard (рабочий стол) IIS Windows Server 2019, где будет указан наш сервер. Выделяем его и нажимаем правой кнопкой мыши, в появившемся меню выбираем Internet Information Server Manager.
Шаг 3. Перед нами появится консоль управления IIS Manager.Нажмем на наш сервер и перед нами появятся настройки и конфигурация нашего IIS 10.
Как видите – это довольное большое меню с различными значками и множеством настроек.
Шаг 4. Для дальнейшей работы, нам необходимо создать сайт Ftp. Нажмем в боковом меню на наш сервер и выберем Добавить ftp – сайт (Add ftp – site)
Шаг 5. Укажем имя сайта и путь к директории ftp-сайта(где будут храниться файлы). Я уже предварительно создал папку Ftp на локальном диске C. Сайт назовем «FtpTest».
Шаг 6. Далее в выпадающем списке выбираем наш ip-адрес, а также отмечаем NoSSL. No SSL значит, что мы не будем использовать SSL шифрование.
Шаг 7. Далее в качестве аутентификации, выбираем «Basic», а на вопрос кому предоставлять доступ в выпадающем списке выбираем «Specified roles or user groups». В качестве группы, указываем группу ftp-test. Разрешаем запись и чтение установив галочки «Read» и «Write». Нажимаем Finish.
Теперь наш новый Ftp-сайт появится в боковом меню IIS Manager.
Источник
In this article, I will discuss How to set up FTP Server on Windows. I will be able to describe the method of putting in and configuring the FTP server in Windows Server 2019.
How to install FTP Server 2019 (IIS)
1- Open the Server Manager > Left side select Dashboard option and click on Add roles and features under welcome to server manager.
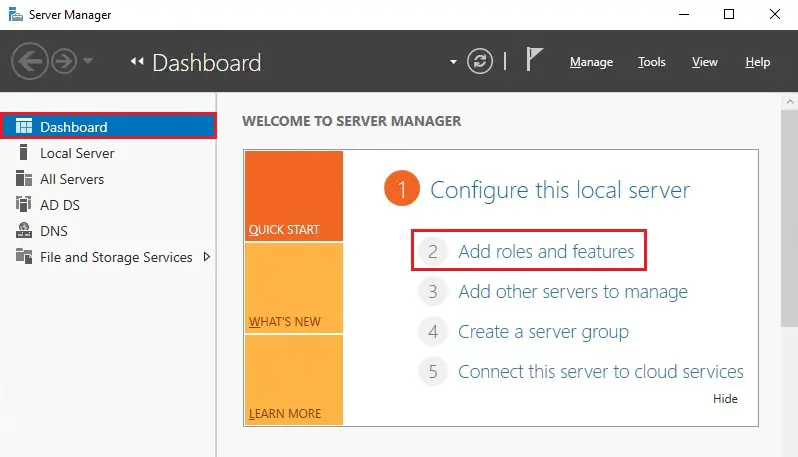
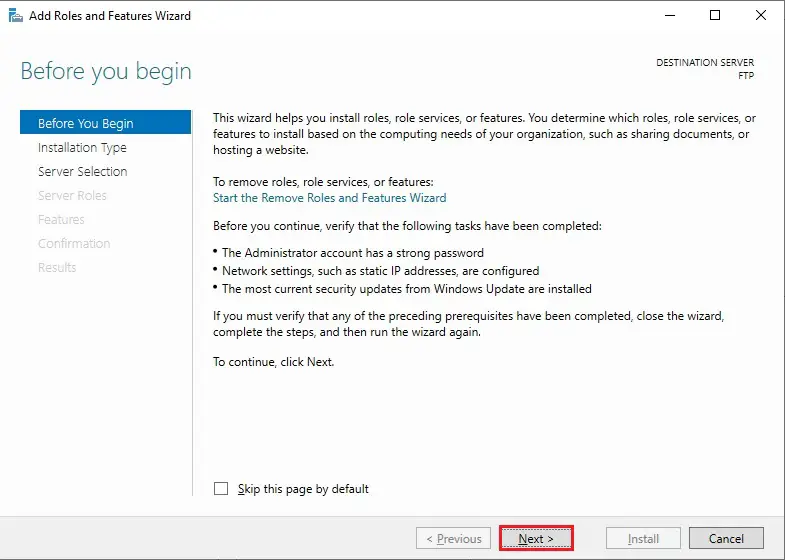
2- Click next.
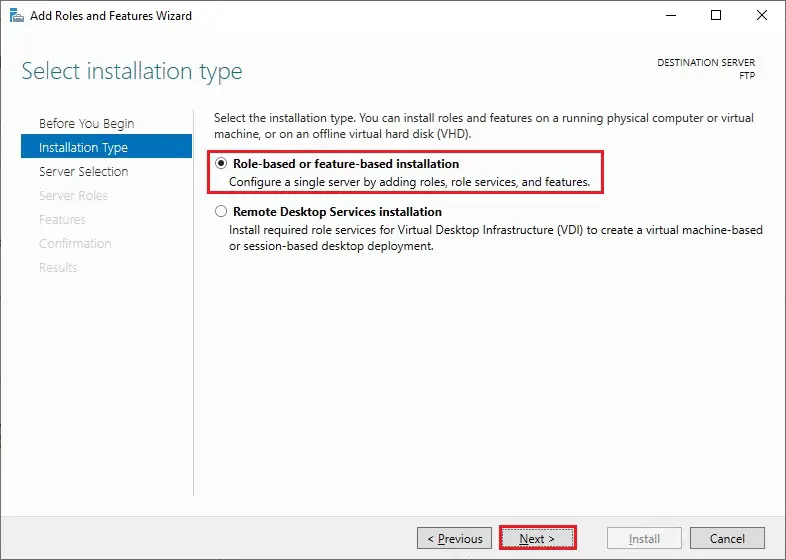
3- Select Role-based or feature-based installation and click on next because of the installation type.
4- Select the server from the server pool and click on next.

5- In the server roles, check the IIS web server role.
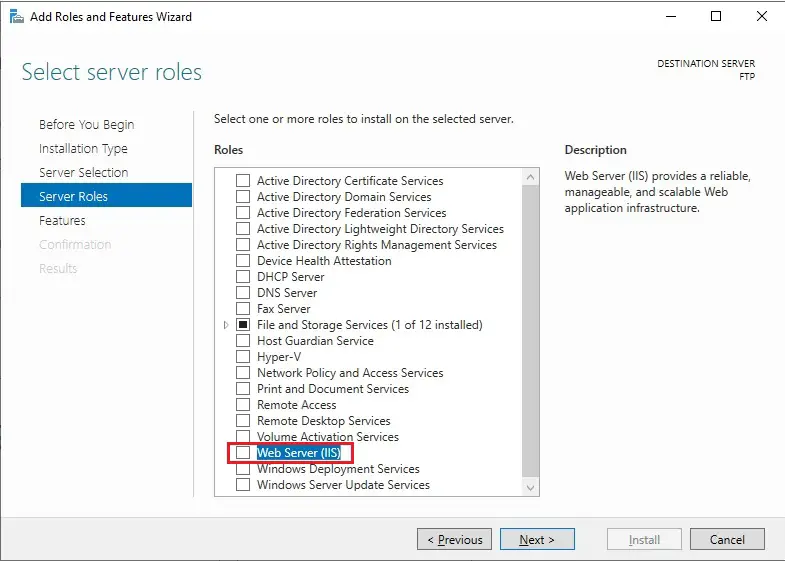
6- Click Add features required for Web Server (IIS).
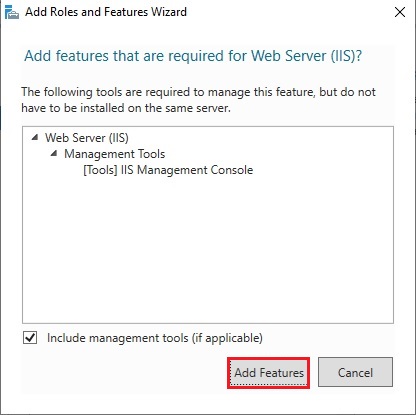
7- After selecting the Web Server (IIS) role, click next.
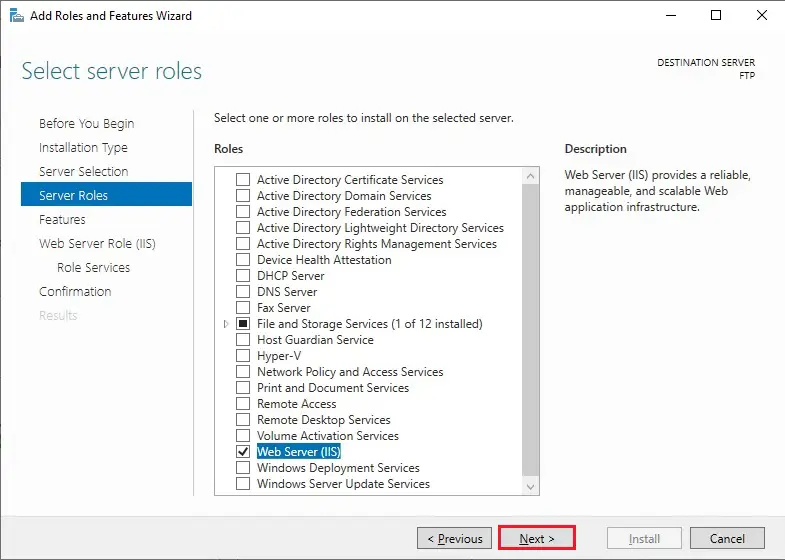
8- On the features option page, click next.
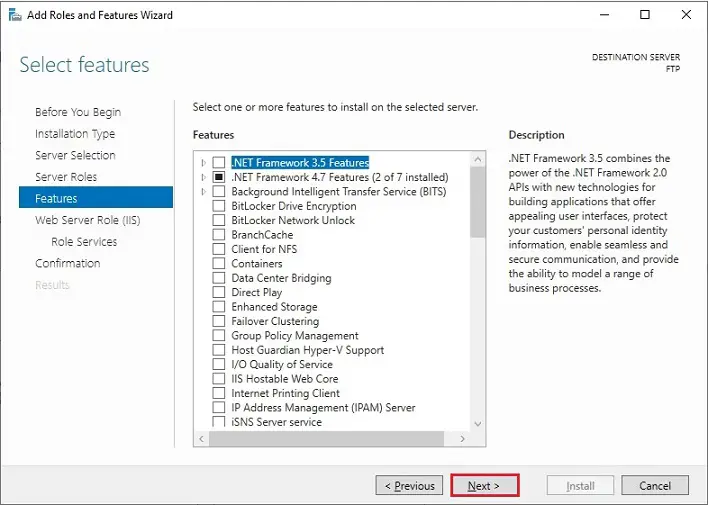
9- Click next.
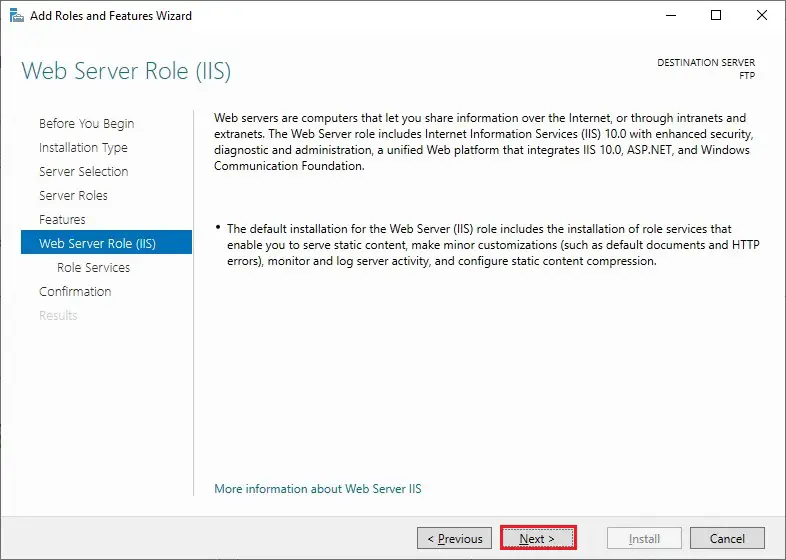
10- In the Role Services window, check the FTP server and FTP Extensibility and click next.

11- Review the confirm installation summary and click install.

12- Server role installation installed successfully. Click close.
Step by step, create FTP users and groups to access an FTP server in 2019
1- Create a replacement user to access the FTP server > open Server Manager > select tools and click on Computer Management.
2- Under computer management > Expand Local Users and Groups > select Users > right-click and select New User.
3- Type user name, Description, and Password, select Password never expires, and click create.
4- Now, a new user has been created.
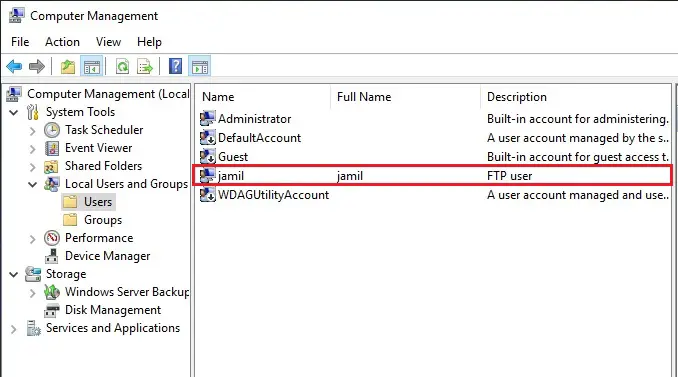
How to Create a replacement Group for local users and computers.
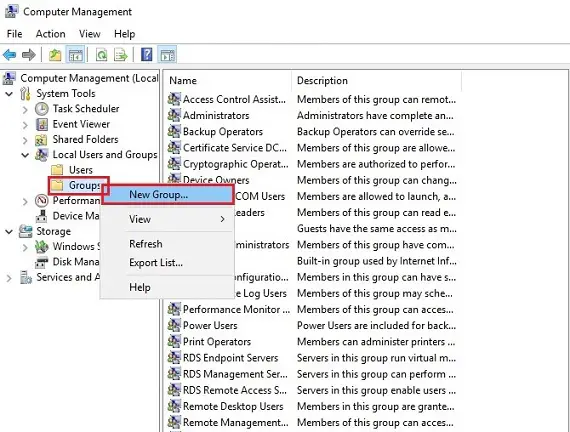
1- After creating a user,> Now right-click on Groups under Users and Groups and click new group.
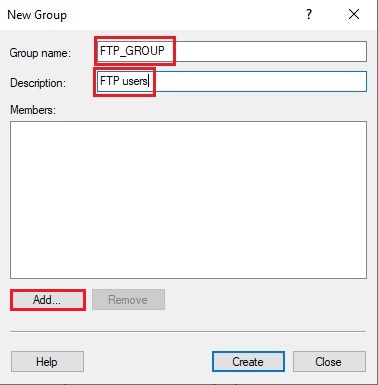
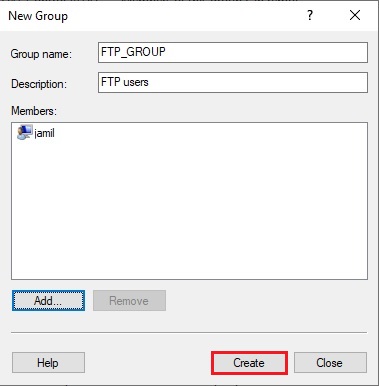
2- In the Group Name field, type the group’s name> a Description and click the Add button to add a user.
3- Enter a character under the object names to select field > click Check Names If Windows users exist > then click Ok.
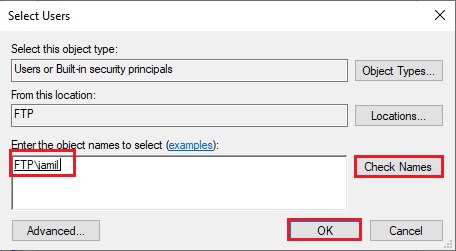
4- After the user is added > Select Create button to create a group.
Step by step Creates an FTP site in the IIS Manager server 2019.
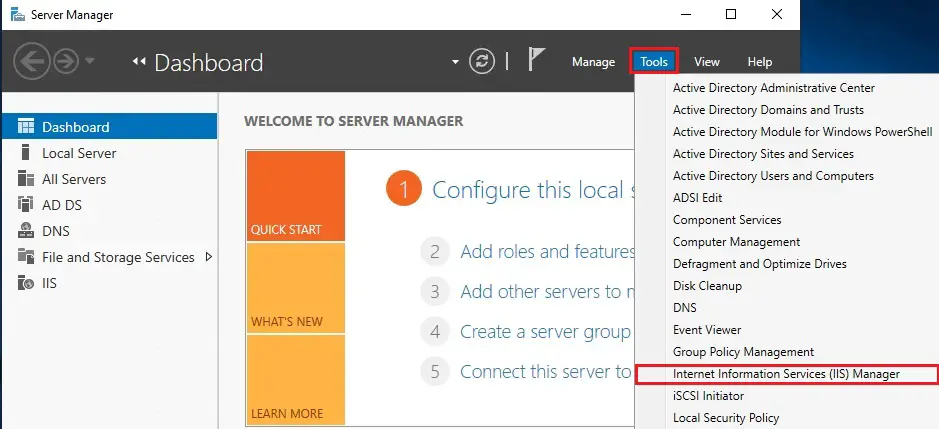
1- Open IIS Manager > select Tools and Internet Information Service (IIS) Manager.
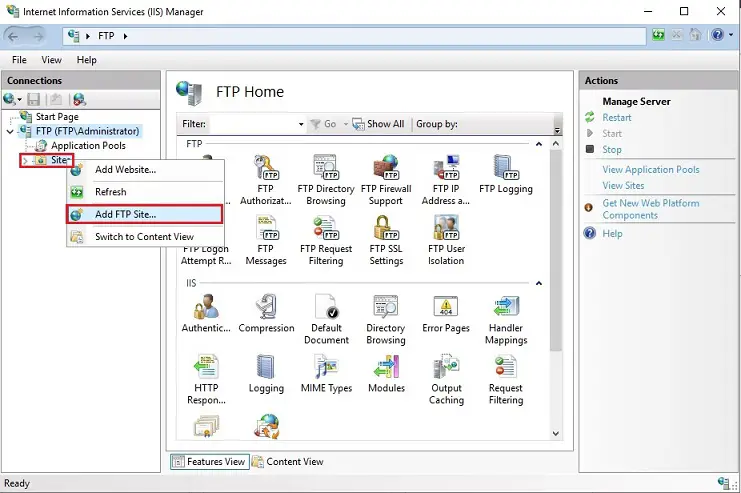
2- Expand your FTP server, right-click Sites, and Add FTP Site.
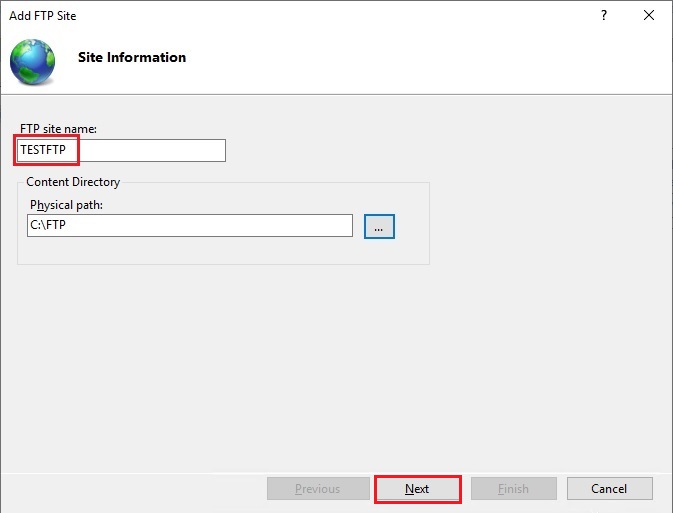
3- Enter the FTP site name and path to the directory and click next.
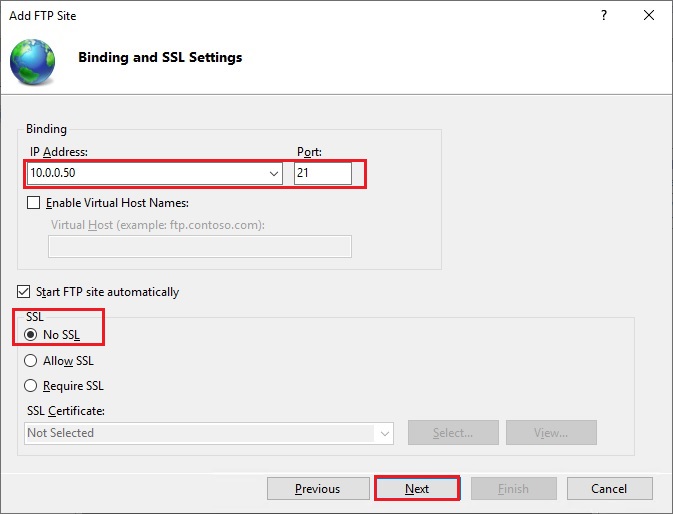
4- type your IP address in the IP Address field, Port, for encryption, select No SSL and click next.
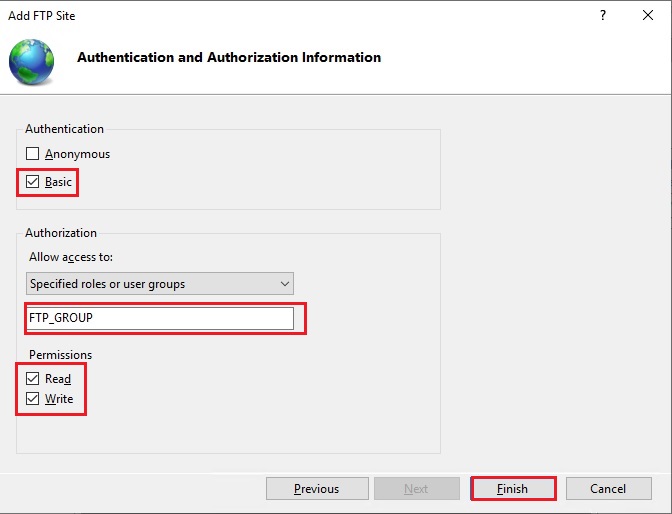
5- Under Authorization, select Basic > Specified roles or groups > type your FTP group name for users > choose read and write permissions and click Finish.
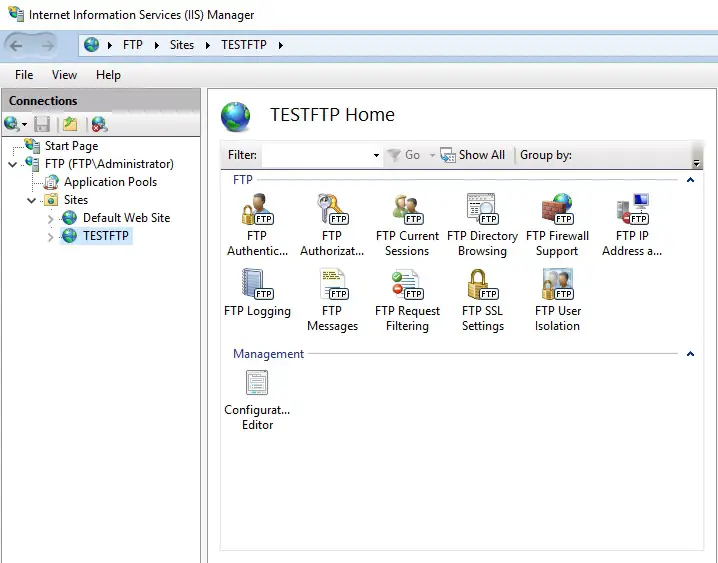
6- Now, my website is showing in the tree structure of the Windows web server.
How to add FTP virtual directory and add permission
1- Open This PC > open Local Disk (C) > open FTP directory > right-click, select New and click Folder to create a subdirectory.
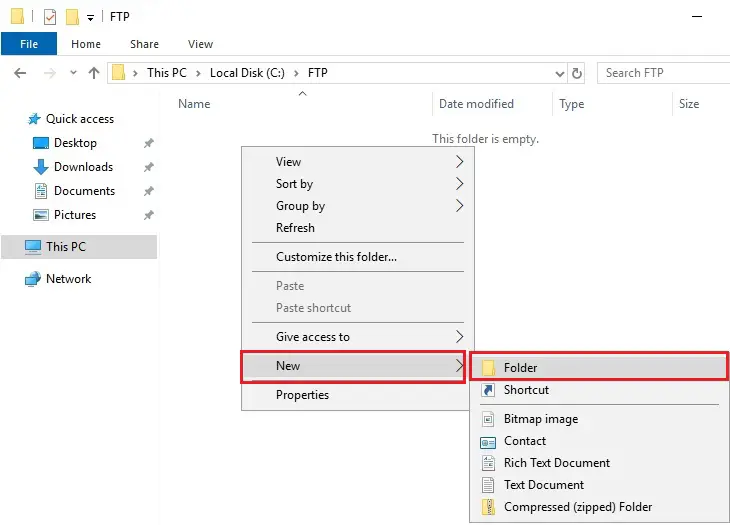
2- Type a subdirectory name and press enter.
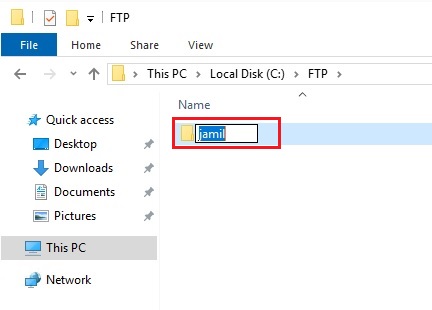
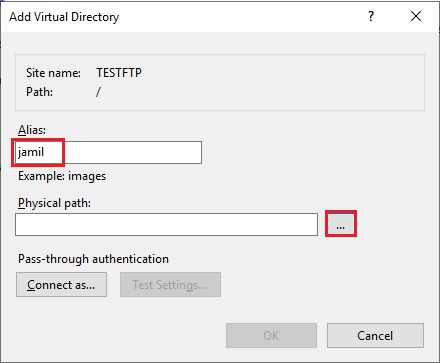
3- Right-click on your FTP site and select Add Virtual Directory.

4- In the Alias field, type a name and select … to add the user directory path,
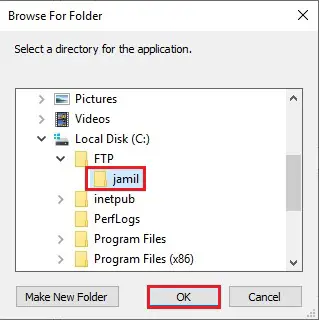
5- Expand Local Drive (C) > FTP directory > select the subdirectory the one you have created and click ok.
6- After adding a virtual directory path, click ok.
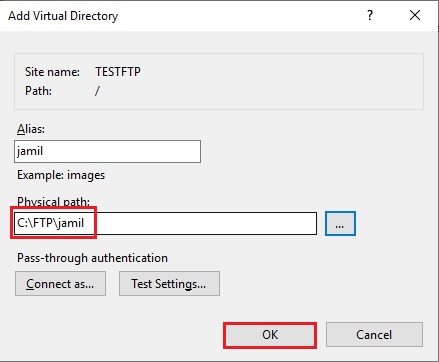
7- To configure permissions in IIS Manager > right-click on a subdirectory (for example, Jamil) and select edit Permission.
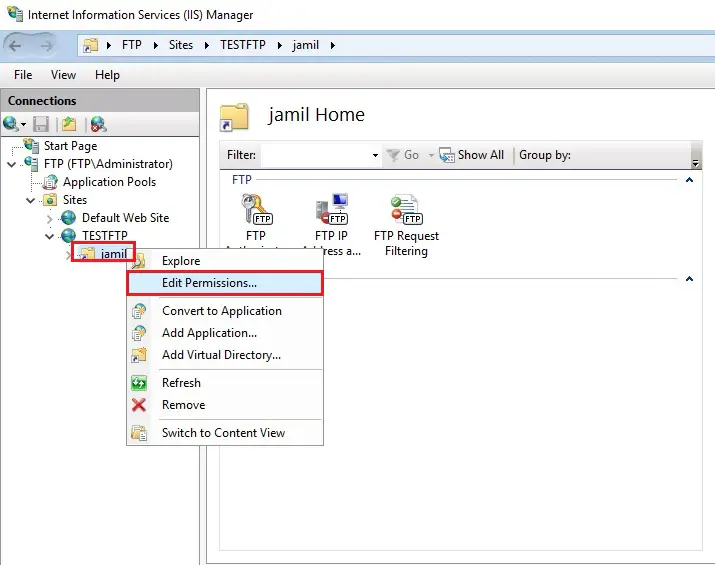
8- Click on the Security tab and click the Advanced button.
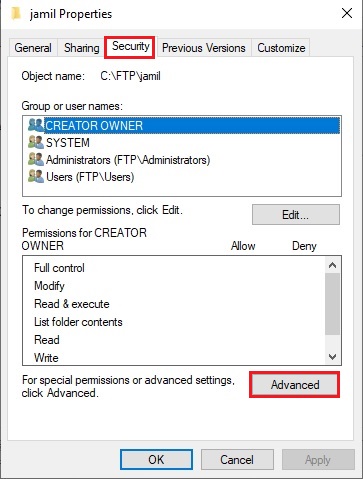
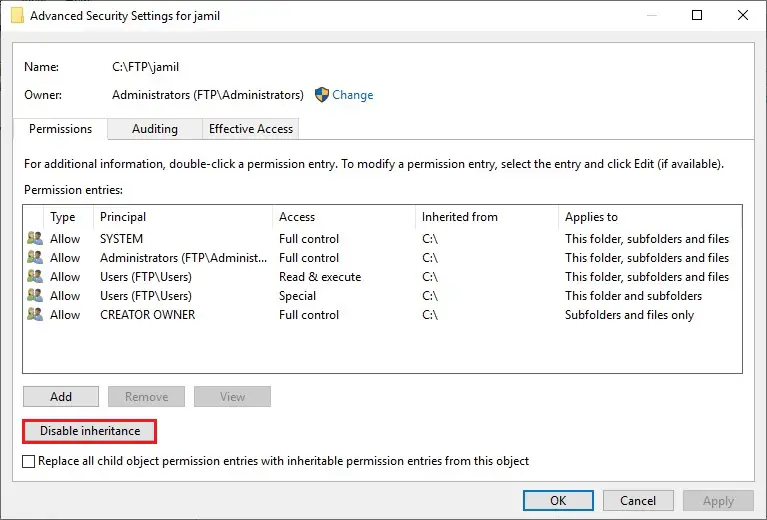
9- Under advanced security settings and click the Disable inheritance button.
10- Select convert inherited permissions into explicit permission on the object.
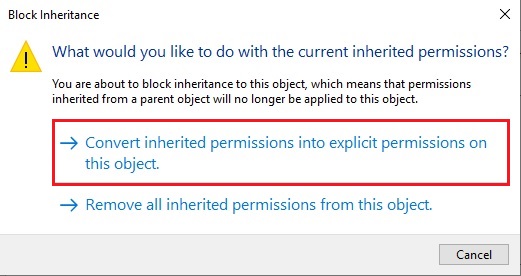
11- After enabling inheritance, click ok.
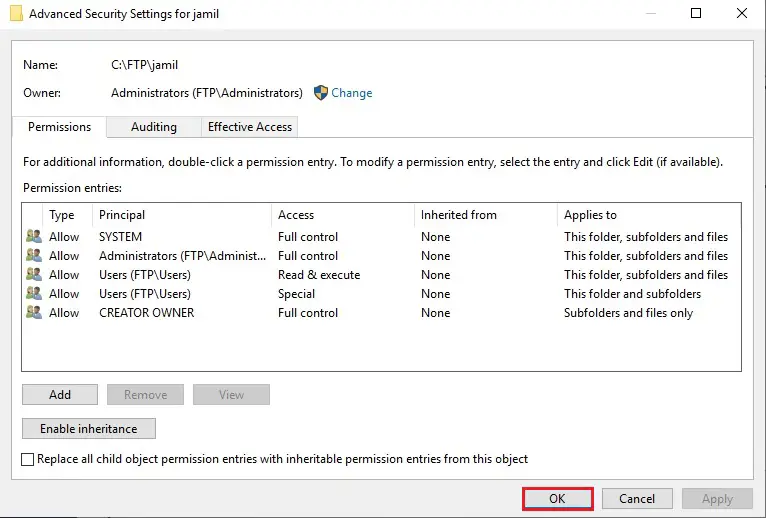
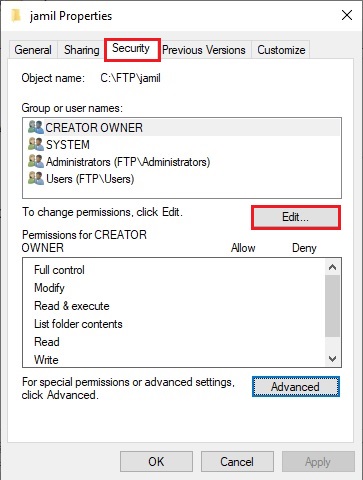
12- Go back to the Security tab and click on the Edit button.
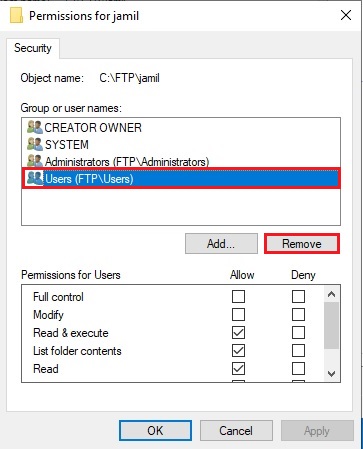
13- Select the Users group in which all users are located and click the Remove button. After removing all users, only the directory owner has access to it.
14- We need to add a Windows user with full access to the directory. Click the Add button.

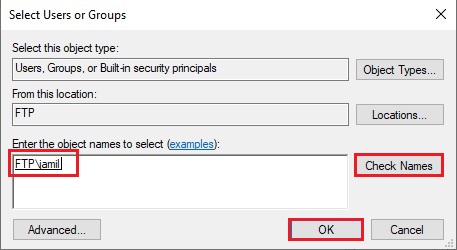
15- Type the username of the virtual directory > click Check Names and click Ok.
16- Next, we need to permit complete control of the guide> Select the created user, check all fields Allow (Permissions), and click ok.
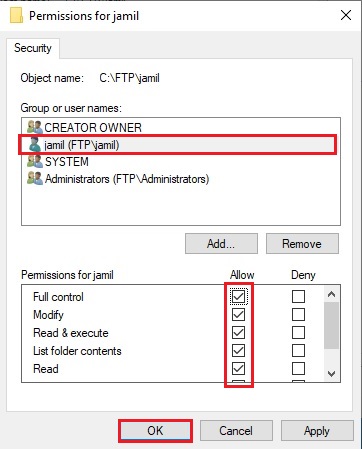
17- Click Ok.
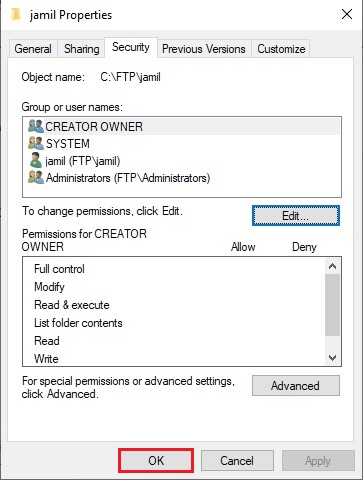
How to set up FTP User Isolation
1- Now, we need to set up an isolation FTP For each user to get to their directory and not have access to other files after connecting to the server and selecting FTP User Isolation.
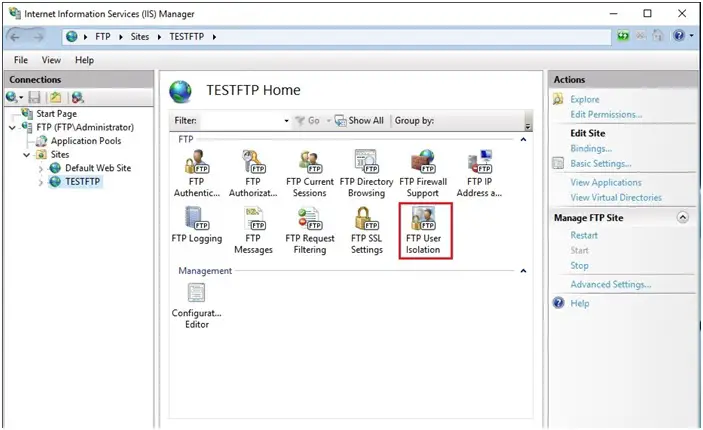
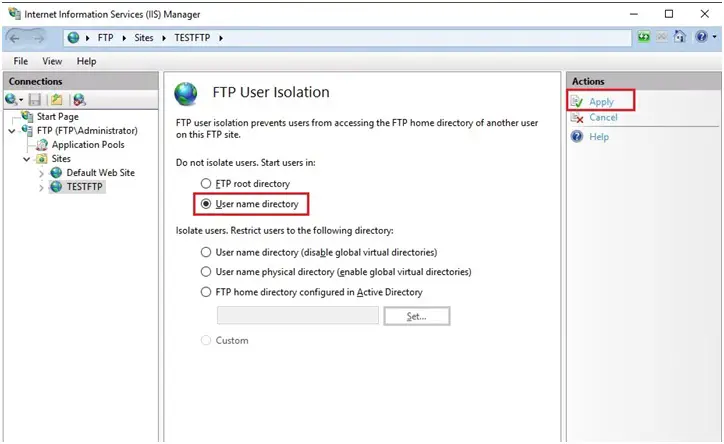
2- Select the user name directory and click Apply under the Action menu.
How to allow FTP port in windows firewall
You need to configure the firewall for an external connection to the FTP server.
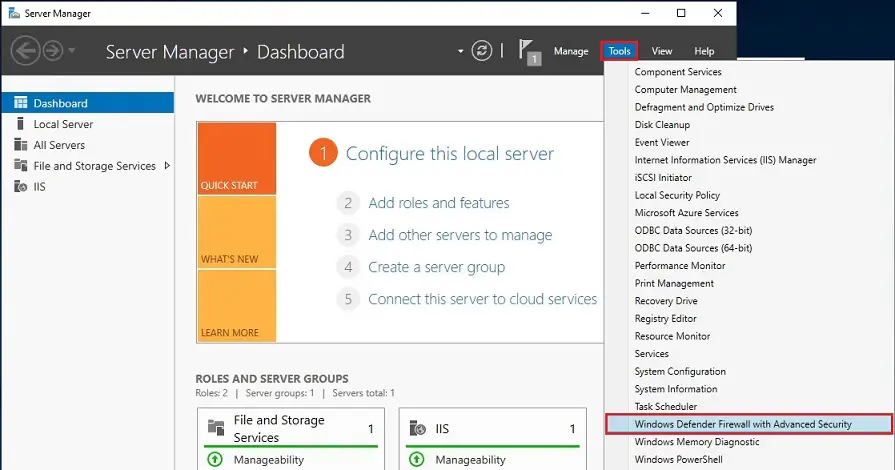
1- Open Server Manager > select Tools and Windows Defender Firewall with Advanced Security.
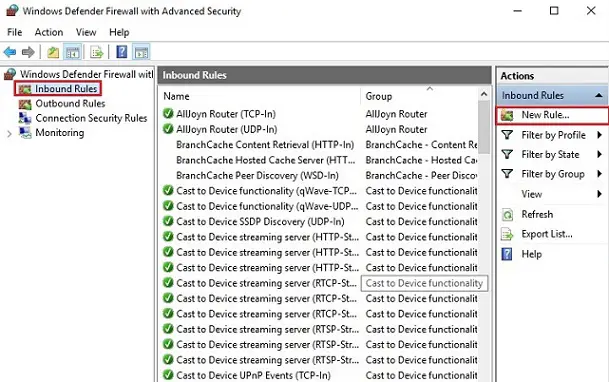
2- Select Inbound Rules and a particular New Rule under the Action menu.
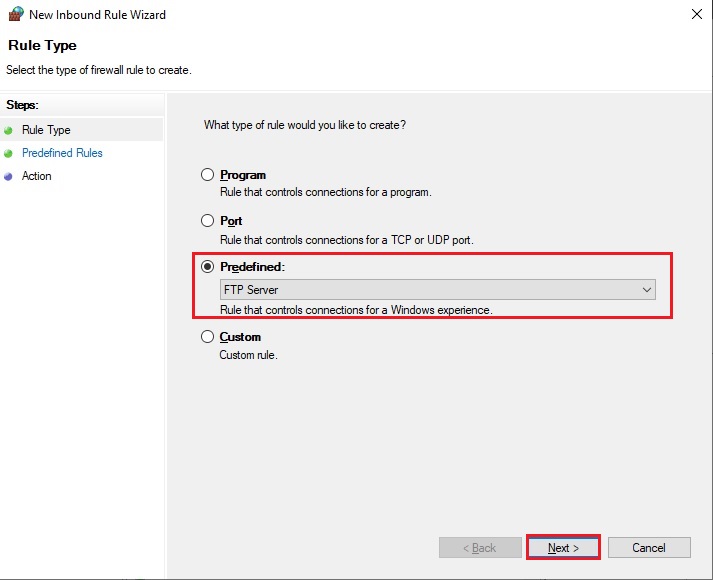
3- Select Predefined, select FTP Server from the drop-down list and click next.
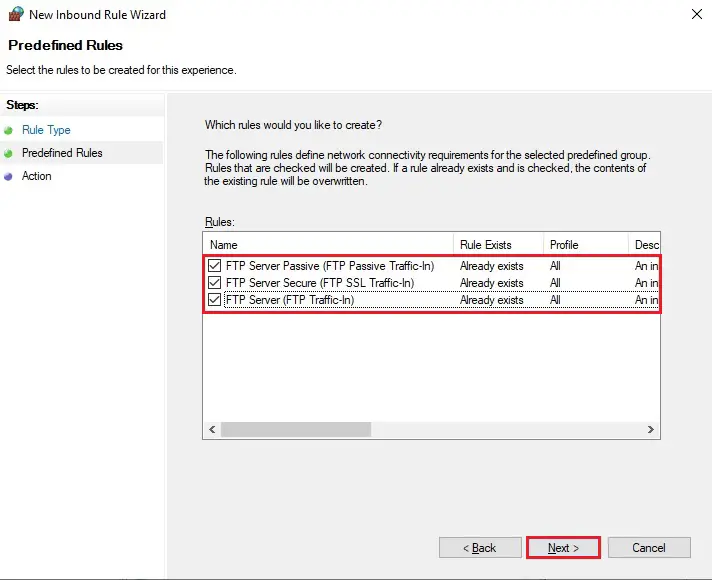
4- Check all the predefined rules and click next.
5- Select Allow the connection, and click Finish. For these rules to take effect and restart the server.
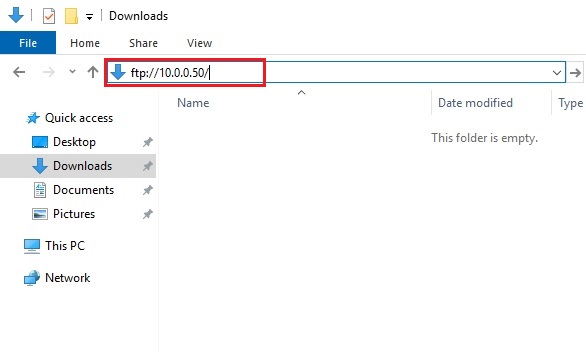
How to Access an FTP Server in Windows Explorer and Internet Explorer
You can set up an FTP server in many ways, for example, through the standard Windows utility, Explorer, or the FileZilla program.
1- I am connecting through Windows Explorer. Type FTP address in the address bar and press enter: For example, (my FTP server address is – ftp://10.0.0.50)
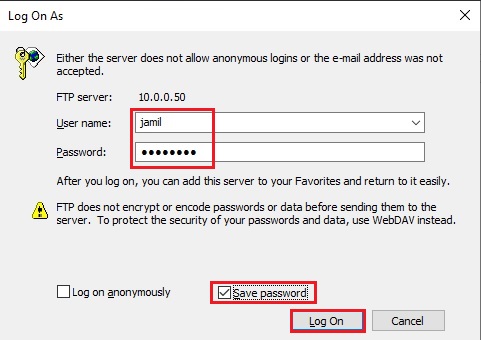
2- Type user name, Password, check the save password box, and click Log On.
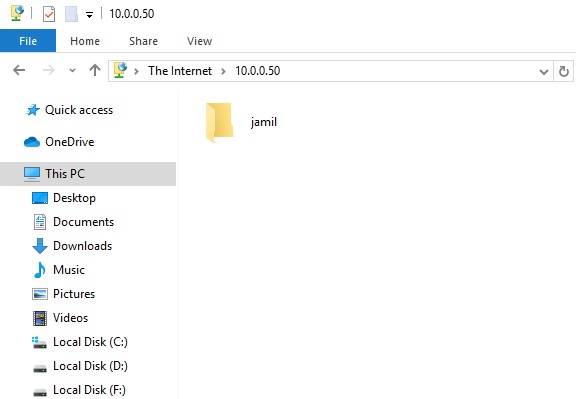
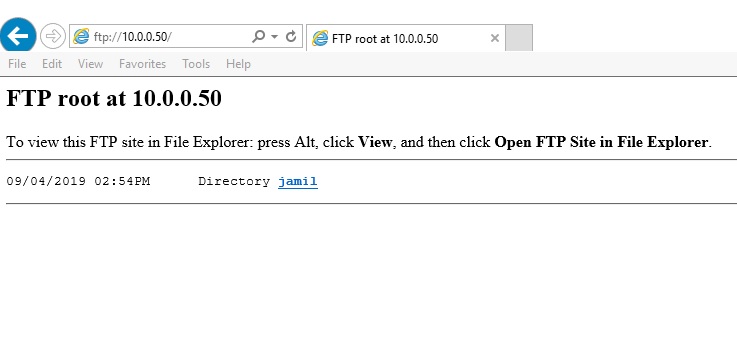
3- You will see the contents of the FTP server folder.
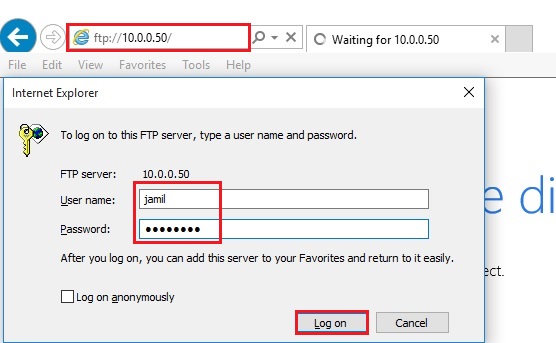
4- Now, I am connecting through Internet Explorer. Type FTP address in the address bar and press enter: For example, (my FTP server address is – ftp://10.0.0.50).
Type a user name, Password and click Log On.
5- You will see the contents of the FTP server folder.
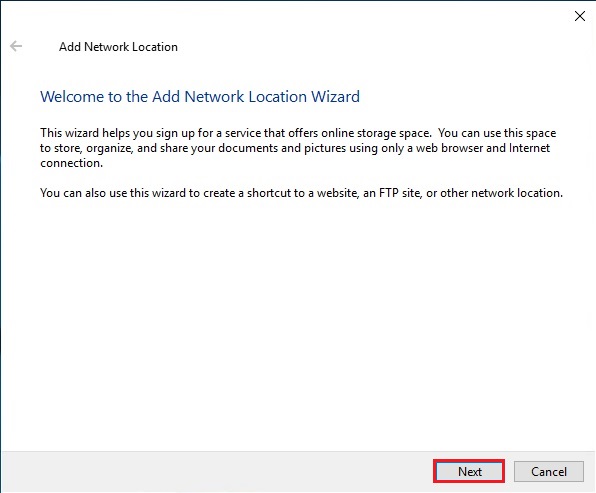
1- Open This PC in Windows Explorer, and select Add a network location to open the Add Network Location Wizard.

2- Click Next.
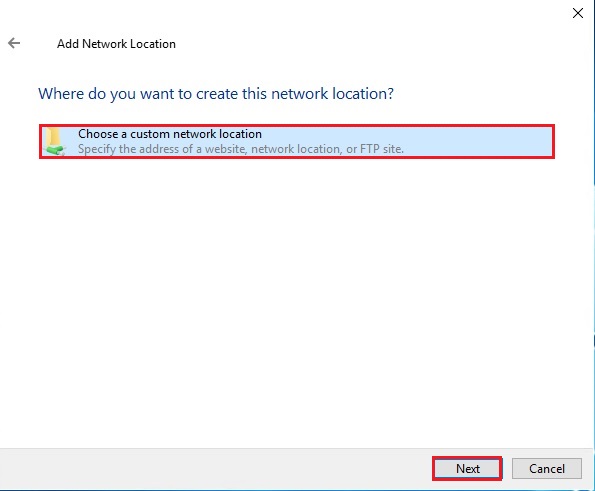
3- Select Choose a custom network location and click on Next.
4- Type your FTP address (Ex. ftp://10.0.0.50) and click next.

5- Uncheck Log on anonymously, type your user name provided as your FTP login credentials, and then click next.
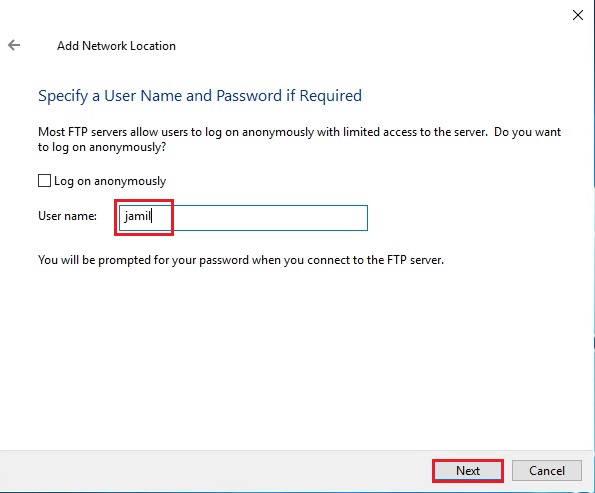
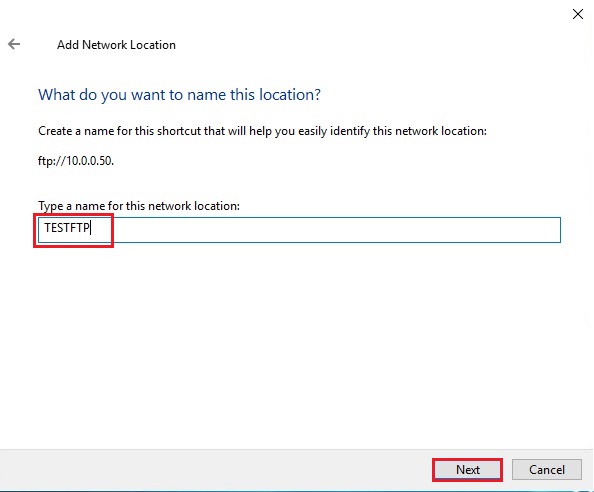
6- Type a name for the Network location and click Finish.
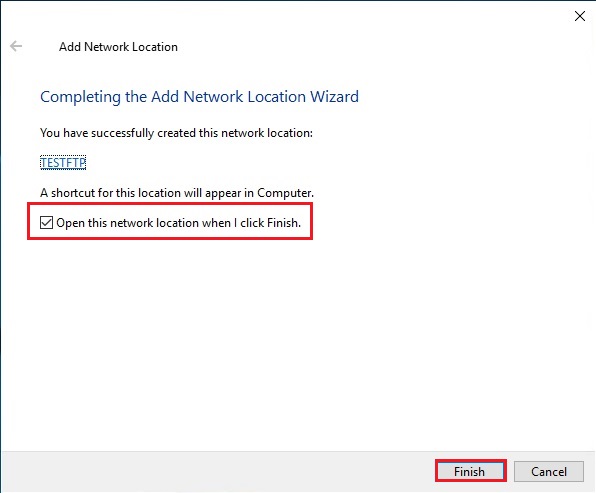
7- Check the box Open this network location when I click Finish.
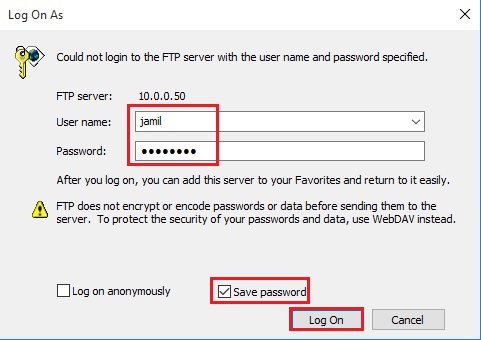
8- Type your Password in the password field, click on Save Password and click Log On to test your connection. This is the second last step in FTP setup.
9- After setting up FTP Server, you can see the FTP folder.

I think I did my best to Provide valuable information to you about How to set up FTP Server on Windows Server. I assure you that if you read this article entirely, You will be able to set up FTP on Windows Server.
For more information, click here
The file transfer is one of the activities that remain active in any environment and thanks to this we can share different items between users on a network . To help make this process effective there is the FTP protocol..
What is FTP
The FTP protocol (File Transfer Protocol) has been developed with the aim of defining the way in which one or more files must be shared both in the tasks of sending and receiving, as well as their management that involves creating , rename and delete on a TCP / IP network. FTP works in both passive and active modes.
When using FTP, one connection will be used for data transfer and another connection must be destined for the control connection.
FTP
With FTP it is possible to:
- Make use of file sharing effectively
- Transfer data reliably and efficiently
- Implement the use of remote computers
When we implement FTP, two types of connections will be used, which are:
Control connection
This is a connection with which we are able to transfer a command line, the control connection is carried out between the control processes and will be connected during the entire interactive FTP session.
Data connection
This connection is activated between data transfer processes
FTP client
In addition to the FTP configuration on the server, an FTP client is required with which it is possible:
- It gives a user the possibility to connect to a remote host and upload or download the necessary files.
- It implements a file transfer protocol thanks to which we can transfer files between two computers on the network.
- It integrates commands with which it is possible to connect to a host, transfer files or close the connection.
Now we are going to see how to install and configure this FTP protocol in Windows Server 2019..
To stay up to date, remember to subscribe to our YouTube channel! SUBSCRIBE
1. How to install and configure FTP on Windows Server 2019
Step 1
FTP is presented as a role in Windows Server 2019 and we must install it from the Server Administrator, for this we will click on «Add roles and characteristics»:
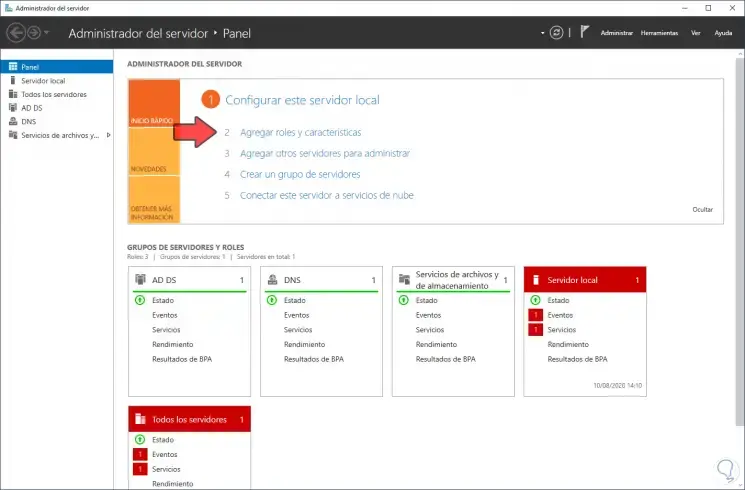
Step 2
This will launch the following wizard:
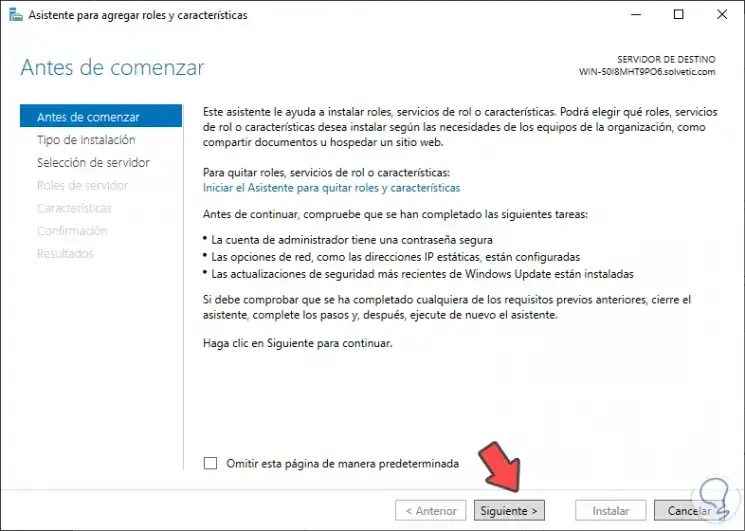
Step 3
We click on Next and in the next window we activate the box «Installation based on characteristics or roles»:
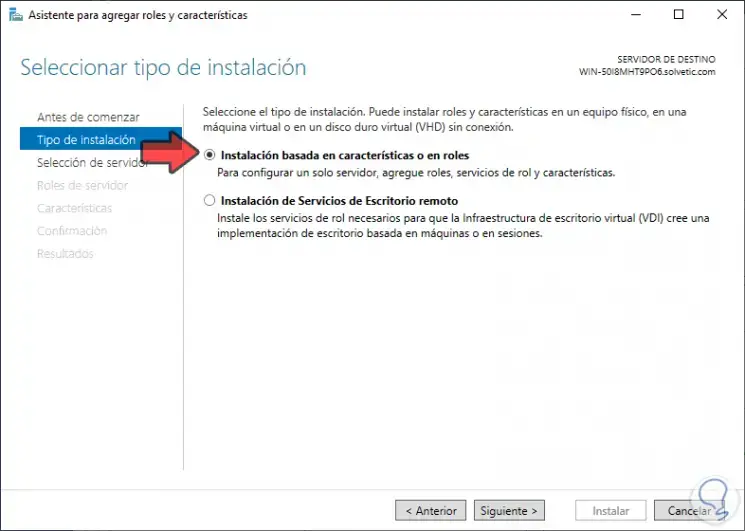
Step 4
We click Next and now we select the server where the FTP role will be installed:
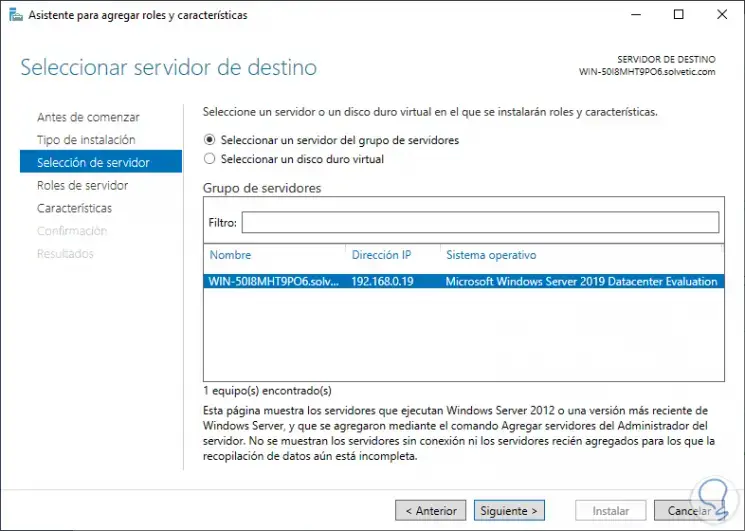
Step 5
In the next window we find the server roles, there we locate the option «Web server (IIS)»:
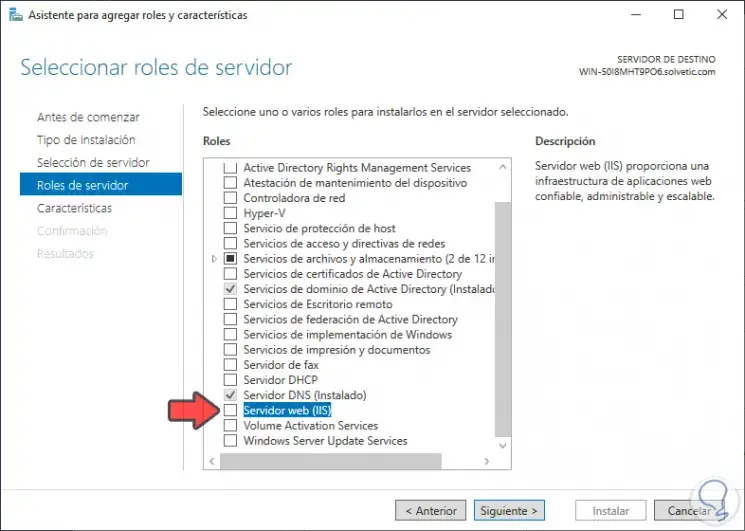
Step 6
When activating its box we will see the following window:
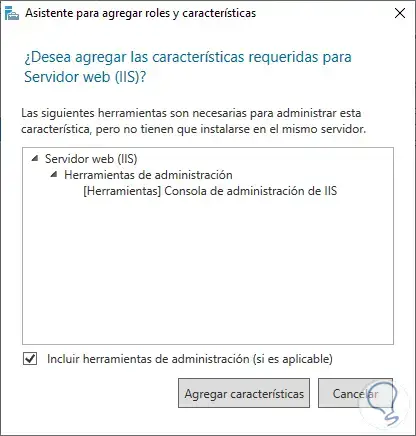
Step 7
We click on «Add features» and this will activate said role option:
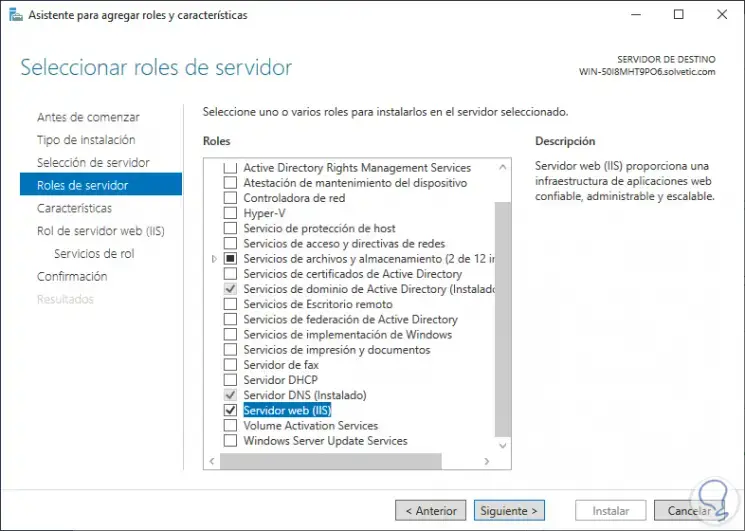
Step 8
We click on «Next» and we will see the characteristics section in which we will not apply any changes:
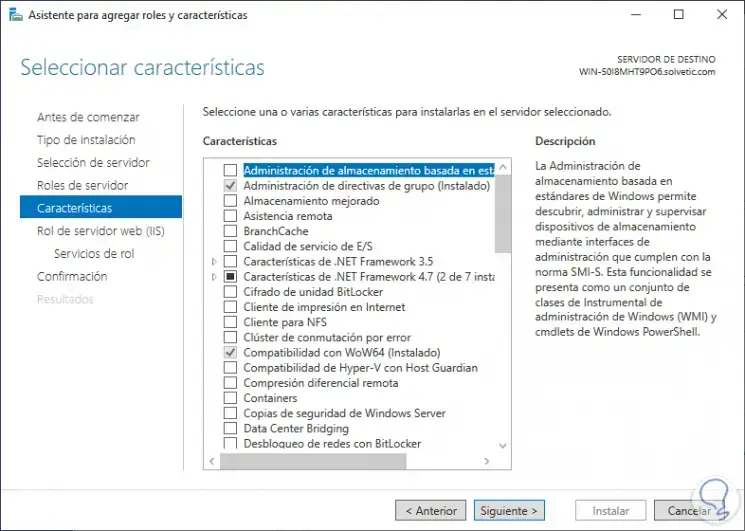
Step 9
Again we click Next and we will see a brief summary about the role that we are going to install in Windows Server 2019:
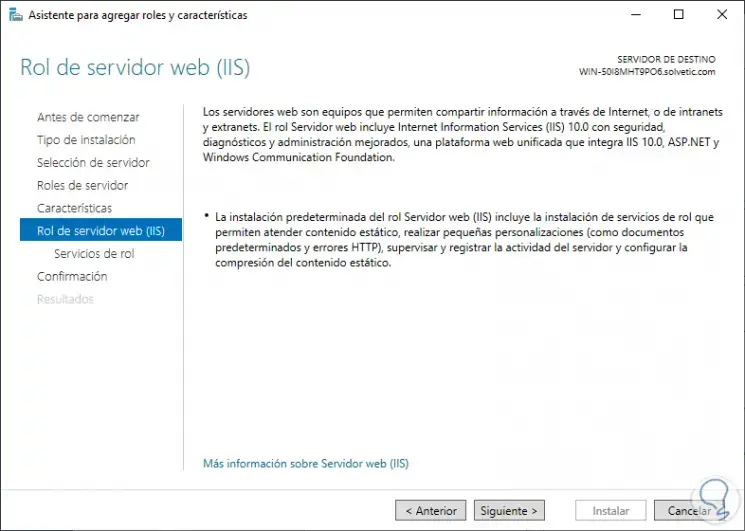
Step 10
Click on Next and in the «Role Services» section we activate the «FTP Server» box:
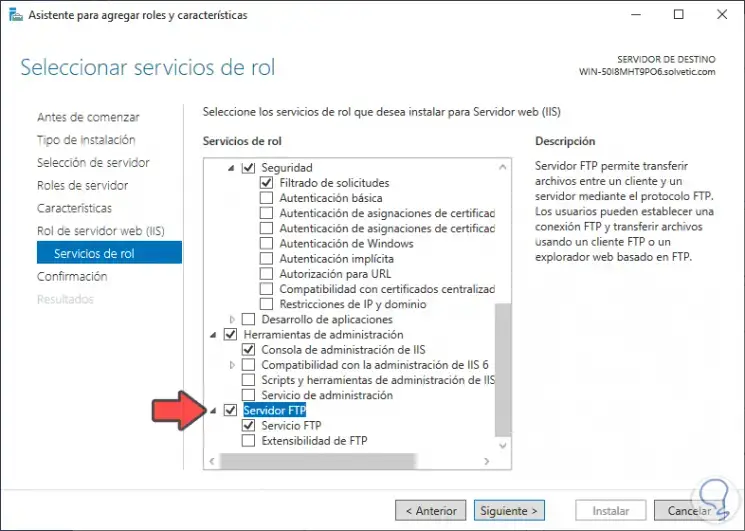
Step 11
We click Next and we will see a summary of what has to be installed on the server:
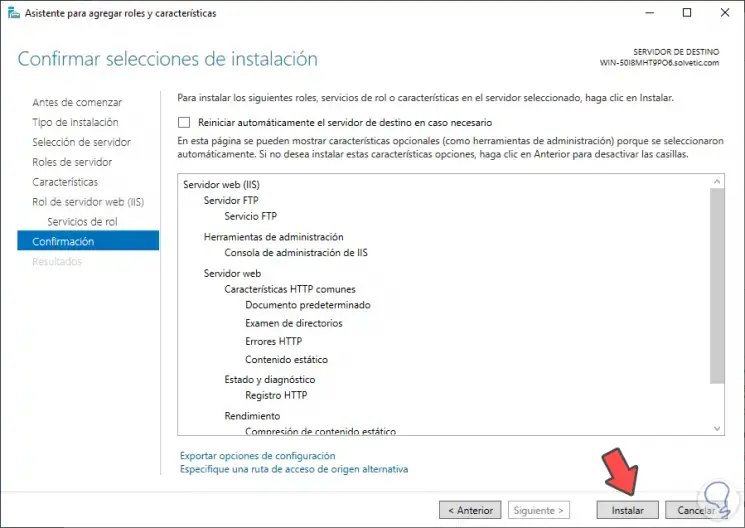
Step 12
Finally, we click on «Install» to start the installation process of the FTP role on the computer:
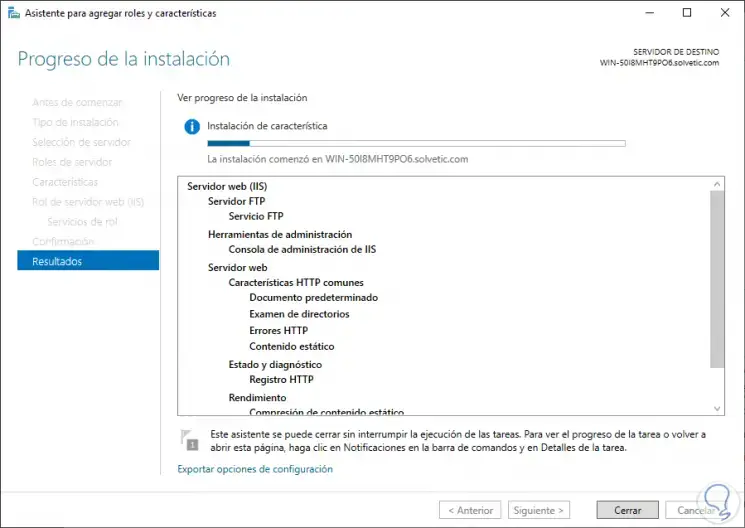
Step 13
When this process comes to an end we will see the following:
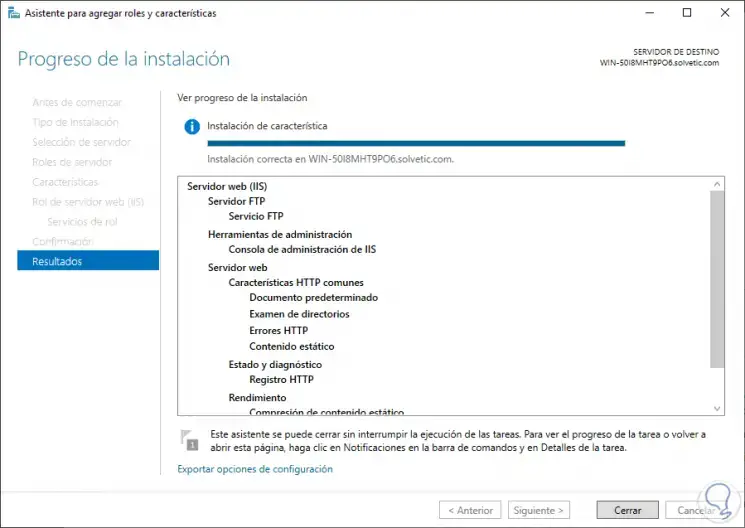
Note
In case you want to install the FTP role from PowerShell, you must execute the following command:
Install-WindowsFeature Web-FTP-Server -IncludeManagementTools
2. How to manage IIS console in Windows Server 2019
Step 1
When the FTP role has been installed on the server, we will go to Tools / Internet Information Services (IIS) Manager from the Server Manager to access the console where we will manage the FTP:
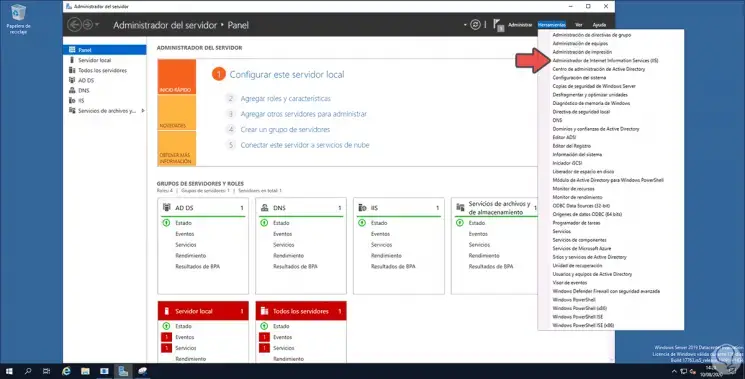
Step 2
When accessing we will see the following:
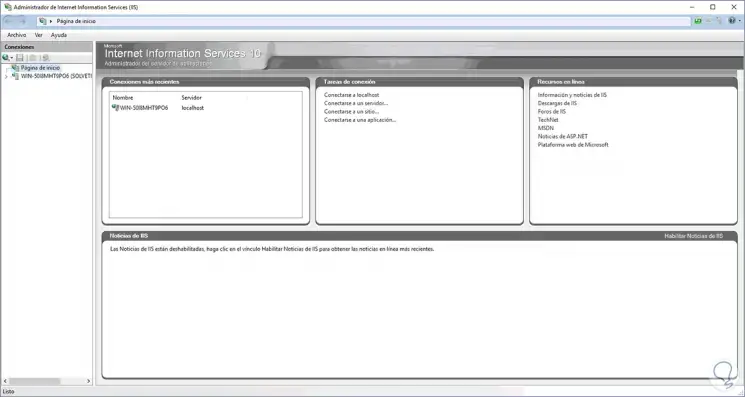
Step 3
In the left column we will display our server, and there we select the option Sites to create access to the FTP site there. Before this we have created a group and a user for FTP access.
For this, from «Active Directory Users and Computers» we create the user in Users, in this case called FTP_TechnoWikis and the group TechnoWikis_FTP:
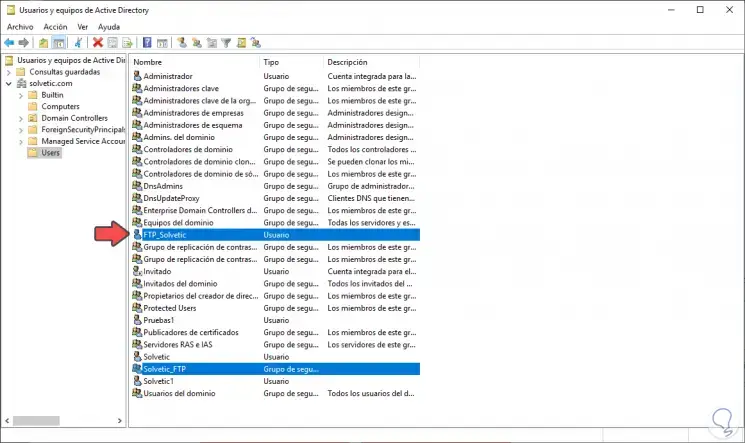
Step 4
Before creating the site, we must create the repository, which is the place where the FTP information will be available. We create a folder on drive C with the desired name and then we click on it and select Properties and then select the Security tab:
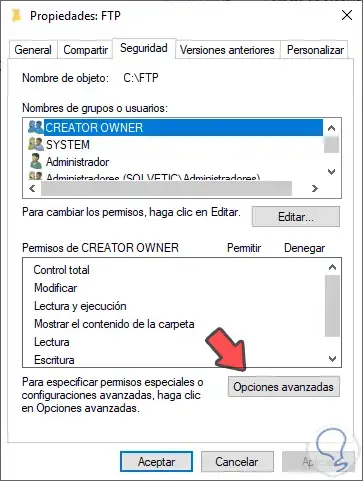
Step 5
We click on «Advanced Options» and we will see the following:
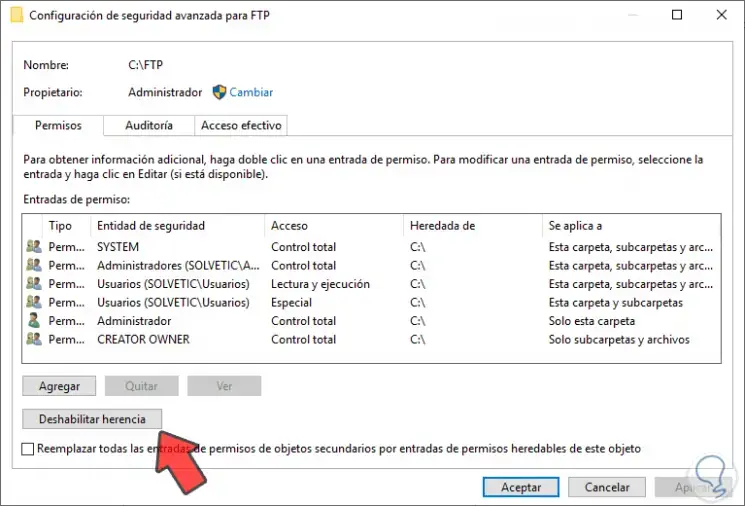
Step 6
We click on the «Disable inheritance» button and the following message will be displayed. We click on «Convert inherited permissions into explicit permissions on this object», click on Apply and then OK.
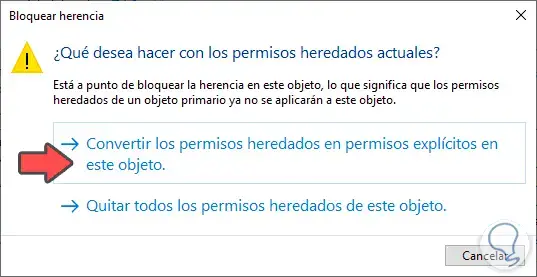
Step 7
Now we select the Users group in the pop-up window:
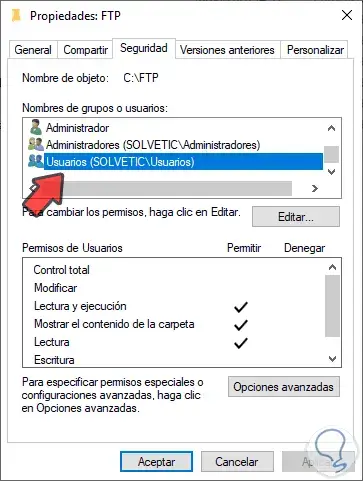
Step 8
We click on Edit and again select this group to see the following:
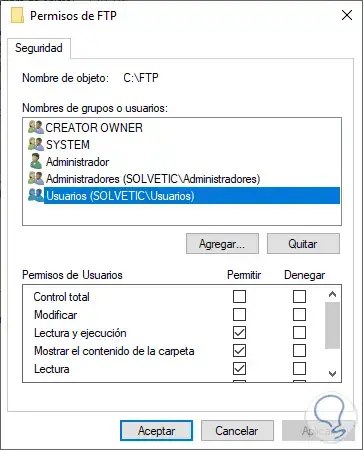
Step 9
We click on «Remove» and click on «Add» and we will enter the name of the FTP group that has been created:
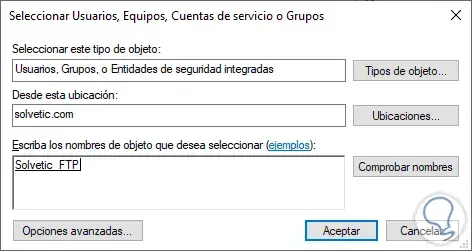
Step 10
We click on Accept and grant the permissions that we consider necessary:
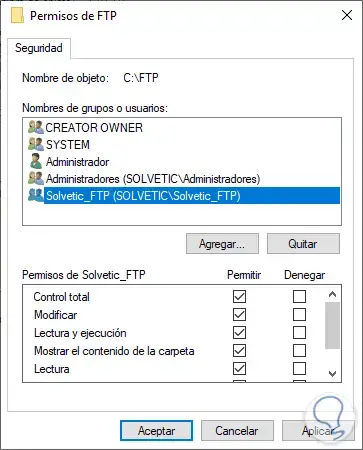
We click on Apply and OK to save the changes.
Step 11
Now we are ready to create the FTP site, for this we go back to the FTP console, we extend the name of the server and we right click on «Sites» to select «Add FTP site»:
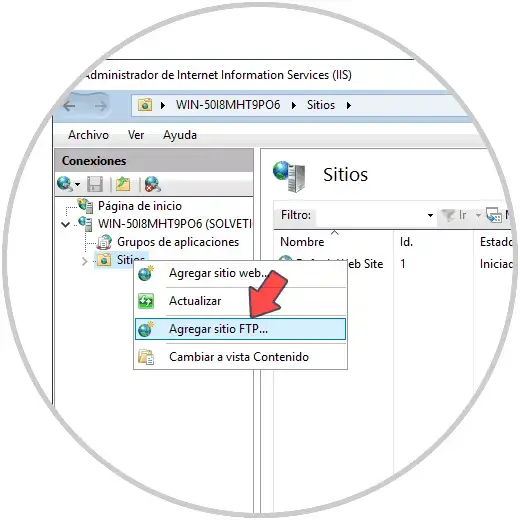
Step 12
By clicking there we will define the name of the FTP site and the physical path, this is the folder that we have created on drive C previously:
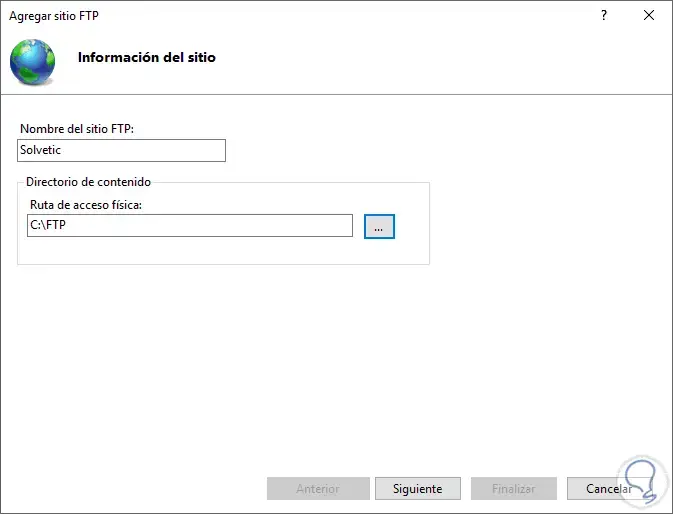
Step 13
We click Next and now we select the server’s IP, the port we leave the default value 821) and at the bottom it is possible to configure additional security aspects:
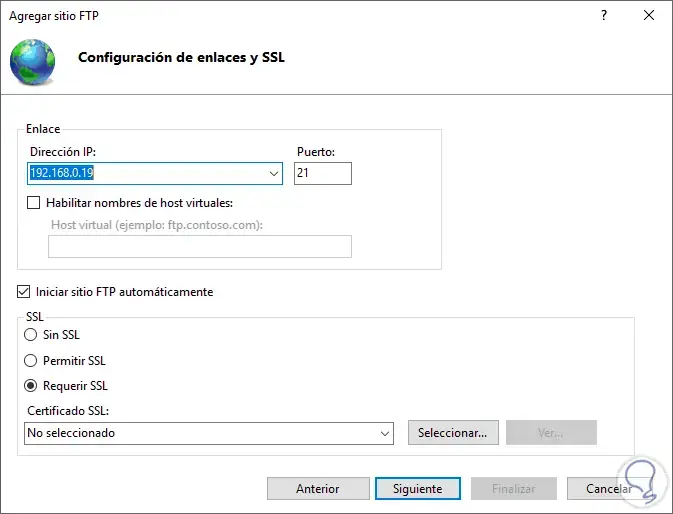
Step 14
We click on Next and now we define the type of authentication which can be:
- Anonymous: this allows access without credentials
- Basic: requires the use of credentials
In the field «Allow access to» we can define:
- All users
- Anonymous Users
- Specific roles or groups, etc.
In this case we select a specific group and enter its name, at the bottom we configure the type of permission to use:
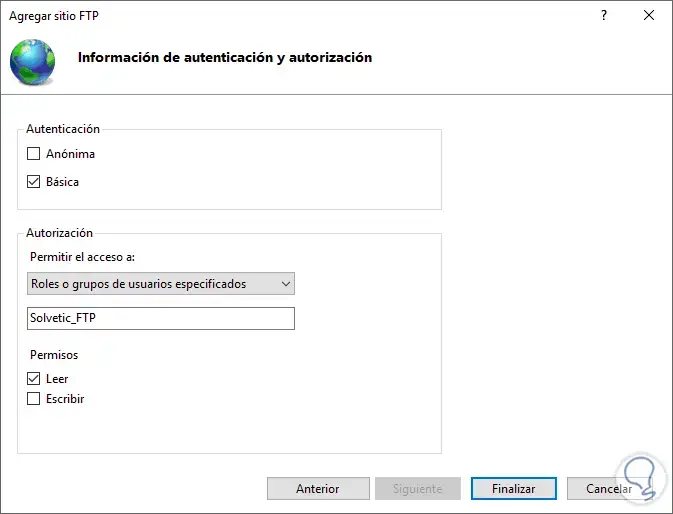
Step 15
We click Finish and we will see the FTP site created in Windows Server 2019:
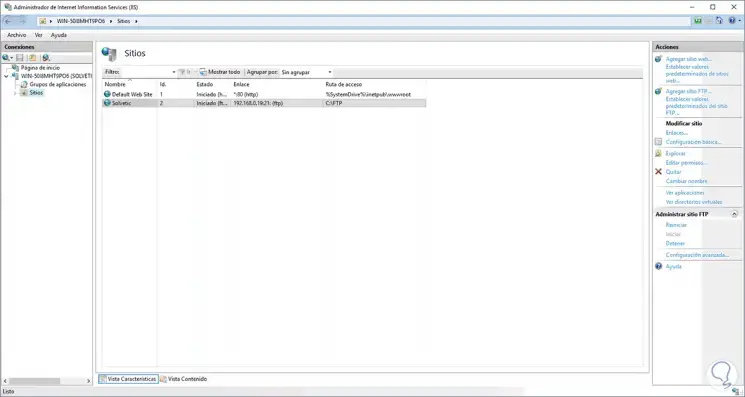
3. How to validate FTP in Windows Server 2019
Once this is done we can create more users if we wish, we access the command prompt console in Windows Server 2019 and there we enter the following syntax:
ftp "IP Server"
This will require entering the user name and password to access FTP:
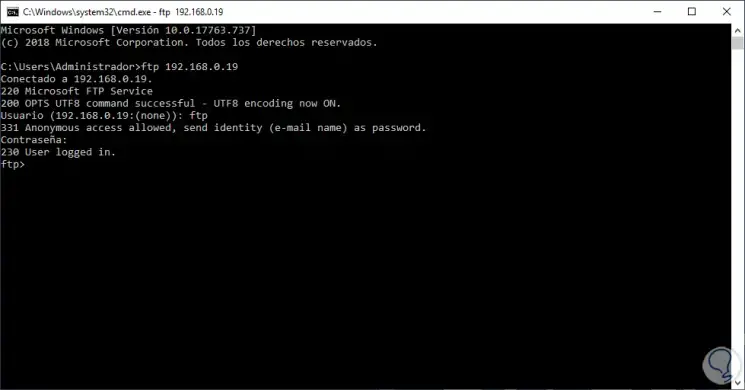
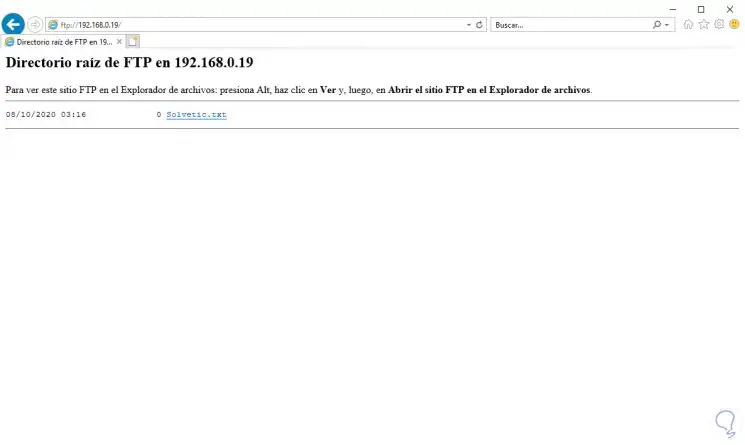
We access from the local browser and we can validate the FTP content:
Accessing FTP in passive mode
The previous steps allow us to access FTP locally either from the console or from the browser, but if we need to access from outside we must activate the passive mode. This mode allows the firewall rules at the client level to be more flexible..
Step 1
To achieve this we access the IIS administrator and there we select our server:
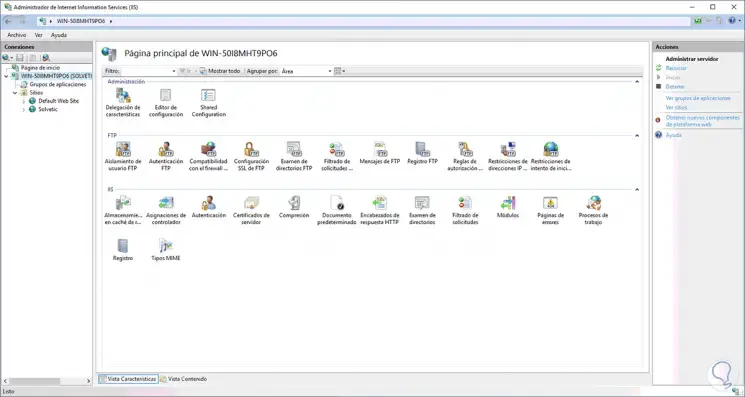
Step 2
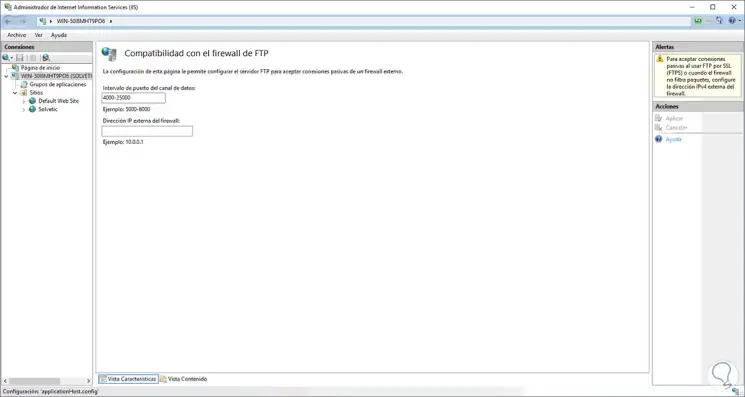
We click on the option «Compatibility with the firewall» and in the pop-up window we enter the range of ports to use:
Step 3
This range allows some of the ports used there to serve for passive mode in FTP, we apply the changes and now we go to the Windows Server 2019 Firewall and create a new rule. Activate the «Ports» box:
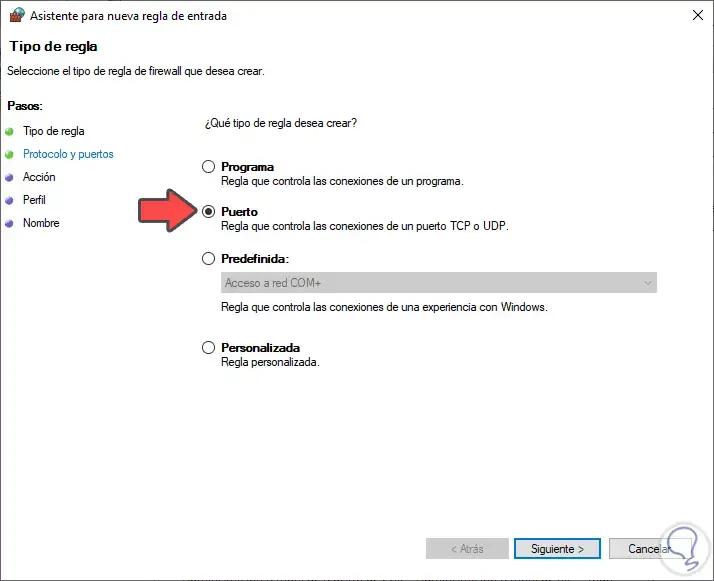
Step 4
We click Next and then select TCP and enter the desired range or ports:
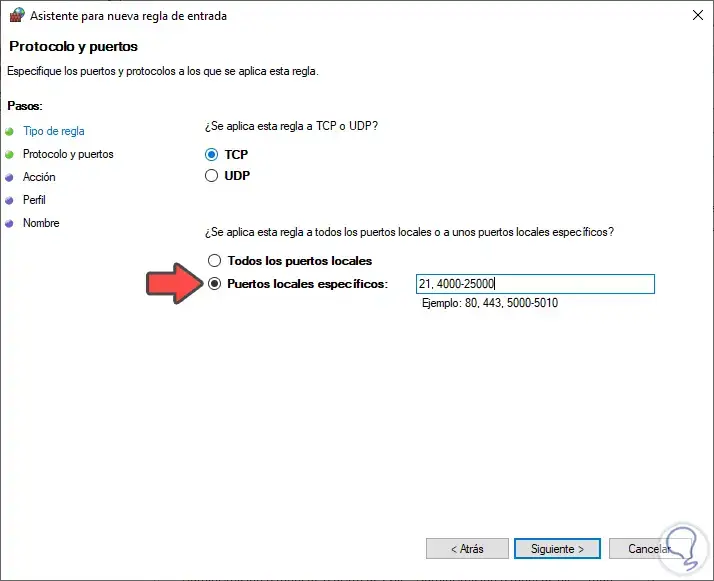
Step 5
We click Next and allow the connection:
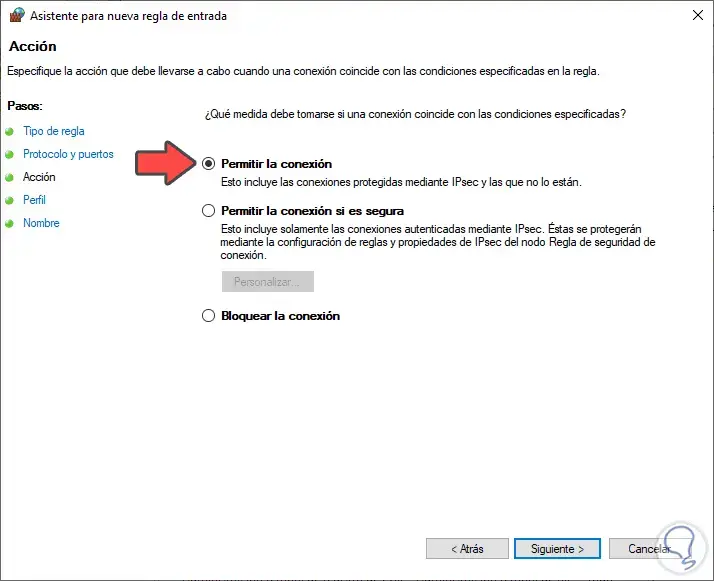
Step 6
Then we define in which network profiles this rule will apply:
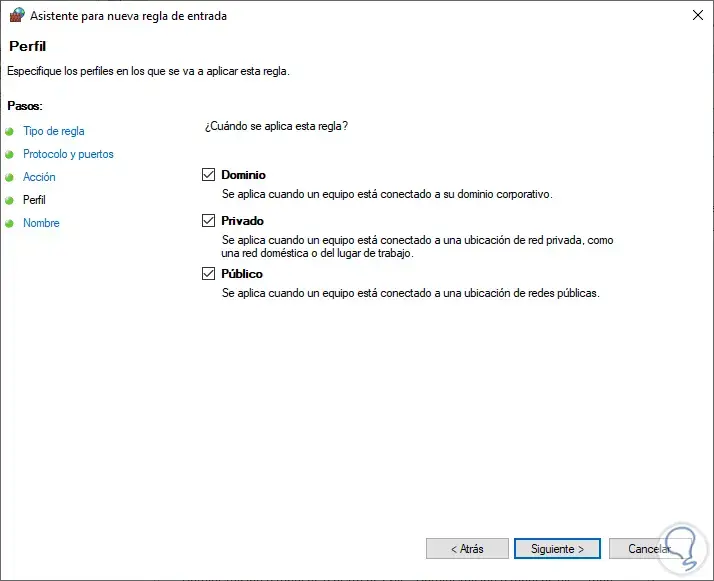
Step 7
Finally we assign a name:
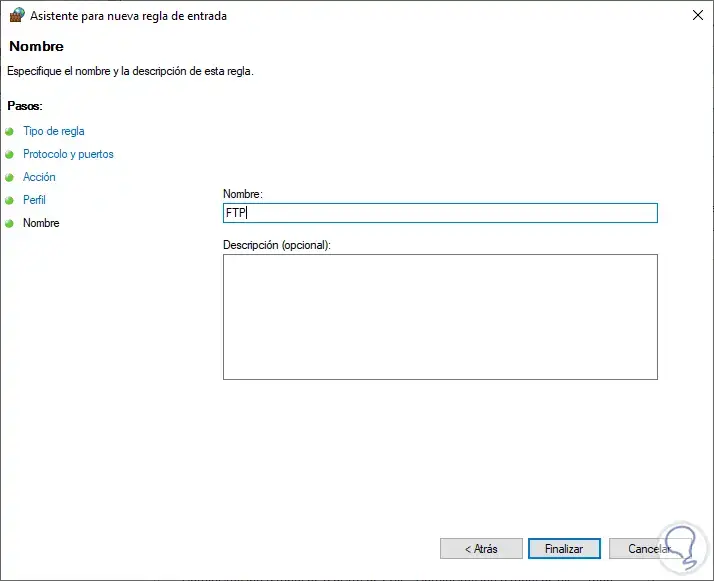
Step 8
After this we right click on the FTP site and select «Manage FTP site — Restart»:
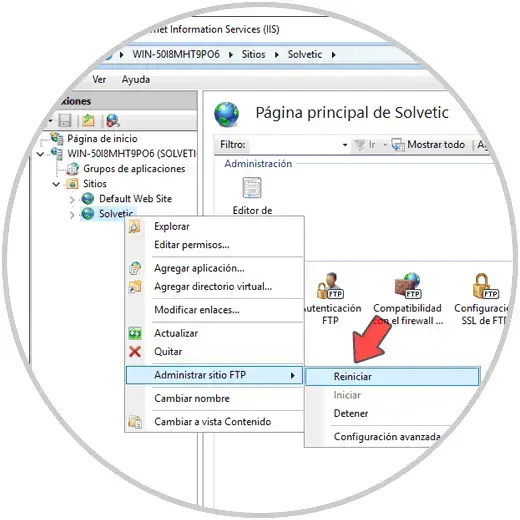
Step 9
With this we can access the FTP content from an external FTP client or from a browser:
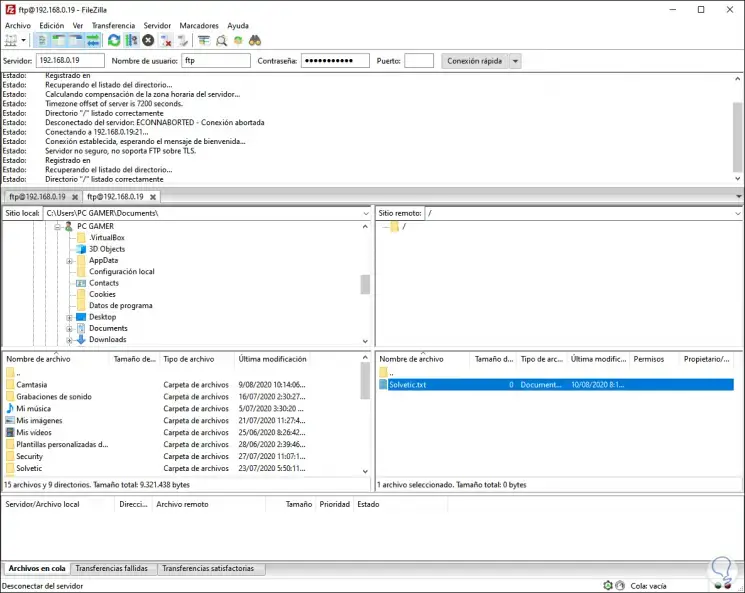
With the implementation of FTP in Windows Server 2019, we will have the opportunity to allow access to authorized elements in a comprehensive and secure way.
How to Install and Configure the FTP server with PowerShell. We have examined how to install FTP Server in Windows Server 2019 graphically in the previous tutorials, and in this article, we are going to teach you how to do this with PowerShell.
We will show you how to configure the site name, port, and root folders. Then we will explain how to create FTP users, how to authenticate users, and how to configure the SSL policy and NTFS permissions.
Available VPS Servers in Eldernode
How to Install the FTP feature
Before you can begin configuring your FTP server, you first need to install the required Windows features:
1) FTP
2) Web Server (IIS)
3) Management Tools to administer it with PowerShell
# Install the Windows feature for FTP Install-WindowsFeature Web-FTP-Server -IncludeAllSubFeature Install-WindowsFeature Web-Server -IncludeAllSubFeature IncludeManagementToolsAfter the installation completes, import the WebAdministration module.
This will map an Internet Information Services (IIS) drive (IIS:) through which we will configure our FTP site later in this article.
# Import the module Import-Module WebAdministrationHow to Configuring the site name, port, and root folder
You can create a new FTP site using the New-WebFtpSite cmdlet by providing an FTP site name, root folder for your FTP site, and port number.
Note: We are choosing port 21, which is the default FTP port, but you can also specify any custom port for your FTP site.
# Create the FTP site $FTPSiteName = 'Default FTP Site' $FTPRootDir = 'D:FTPRoot' $FTPPort = 21 New-WebFtpSite -Name $FTPSiteName -Port $FTPPort -PhysicalPath $FTPRootDirAfter running the cmdlet, you’ll see the FTP site and bindings in IIS Manager.
How to Create FTP users
After creating a new FTP site, you can create a Windows user or group through which you can control the access to the FTP server.
First, create the Windows local group:
# Create the local Windows group $FTPUserGroupName = "FTP Users" $ADSI = [ADSI]"WinNT://$env:ComputerName" $FTPUserGroup = $ADSI.Create("Group", "$FTPUserGroupName") $FTPUserGroup.SetInfo() $FTPUserGroup.Description = "Members of this group can connect through FTP" $FTPUserGroup.SetInfo()Then we will create a new local FTP user with a username and password:
# Create an FTP user $FTPUserName = "FTPUser" $FTPPassword = '[email protected]' $CreateUserFTPUser = $ADSI.Create("User", "$FTPUserName") $CreateUserFTPUser.SetInfo() $CreateUserFTPUser.SetPassword("$FTPPassword") $CreateUserFTPUser.SetInfo()Add the FTP user to the Windows group:
# Add an FTP user to the group FTP Users $UserAccount = New-Object System.Security.Principal.NTAccount("$FTPUserName") $SID = $UserAccount.Translate([System.Security.Principal.SecurityIdentifier]) $Group = [ADSI]"WinNT://$env:ComputerName/$FTPUserGroupName,Group" $User = [ADSI]"WinNT://$SID" $Group.Add($User.Path)How to Authenticate FTP users to access FTP server data
Now enable basic authentication on the FTP site and authorize the Windows group that contains the FTP user so it can access the FTP site.
# Enable basic authentication on the FTP site $FTPSitePath = "IIS:Sites$FTPSiteName" $BasicAuth = 'ftpServer.security.authentication.basicAuthentication.enabled' Set-ItemProperty -Path $FTPSitePath -Name $BasicAuth -Value $True # Add an authorization read rule for FTP Users. $Param = @{ Filter = "/system.ftpServer/security/authorization" Value = @{ accessType = "Allow" roles = "$FTPUserGroupName" permissions = 1 } PSPath = 'IIS:' Location = $FTPSiteName } Add-WebConfiguration @paramYou can also check these settings under IIS Manager >> FTP Site >> FTP Authorization Rules.
SSL policy and NTFS permissions to the FTP root folder
Change the SSL policy from Require SSL to Allow SSL connections.
$SSLPolicy = @( 'ftpServer.security.ssl.controlChannelPolicy', 'ftpServer.security.ssl.dataChannelPolicy' ) Set-ItemProperty -Path $FTPSitePath -Name $SSLPolicy[0] -Value $false Set-ItemProperty -Path $FTPSitePath -Name $SSLPolicy[1] -Value $falseThe commands below set the NTFS permissions on the FTPRoot folder to allow the FTP user group to access the files:
$UserAccount = New-Object System.Security.Principal.NTAccount("$FTPUserGroupName") $AccessRule = [System.Security.AccessControl.FileSystemAccessRule]::new($UserAccount, 'ReadAndExecute', 'ContainerInherit,ObjectInherit', 'None', 'Allow' ) $ACL = Get-Acl -Path $FTPRootDir $ACL.SetAccessRule($AccessRule) $ACL | Set-Acl -Path $FTPRootDirYou can verify this from the FTP root folder properties under the Security tab.
# Restart the FTP site for all changes to take effect Restart-WebItem "IIS:Sites$FTPSiteName" -VerboseYou can test the FTP server, which should allow you to access files, content, and directories under the FTP root folder.
Also, see:
Tutorial add FTP Site on Windows Server 2019
How to Create FTP in XAMPP
How to install FTP Server on windows server 2019
Dear user, we hope you would enjoy this tutorial, you can ask questions about this training in the comments section, or to solve other problems in the field of Eldernode training, refer to the Ask page section and raise your problem in it as soon as possible. Make time for other users and experts to answer your questions.
How to Install and Configure the FTP server with PowerShell
Goodluck.


