Панель задач, одна из главных фишек интерфейса Windows 11, подверглась значительным изменениям в новой ОС. Не все из новшеств получили одобрение пользователей. Например, сейчас недоступно контекстное меню таскбара и возможность поменять расположение панели задач, не переходя в настройки. Кроме того, базовая, и очень востребованная, функция перетаскивания файлов, используя иконку приложения, на данный момент недоступна в новой ОС.
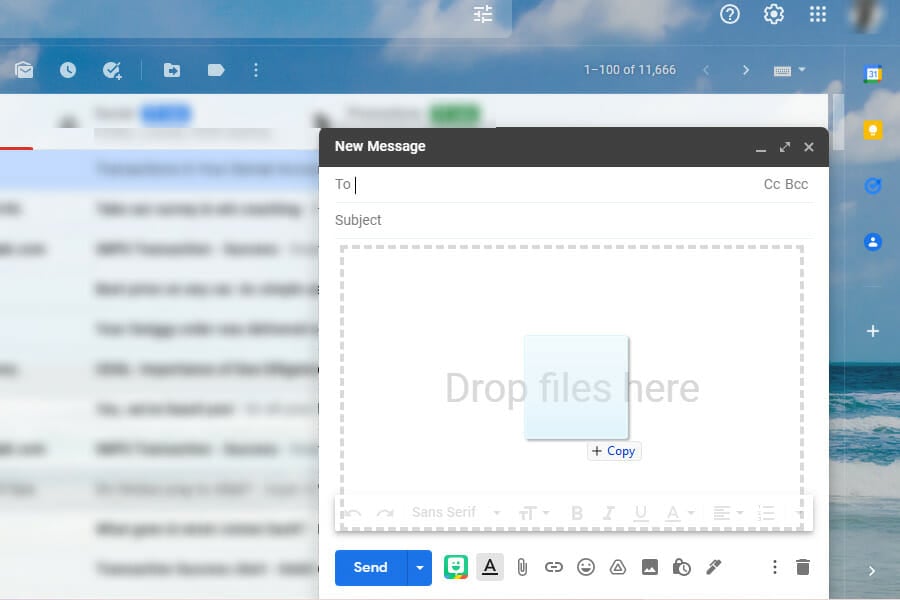
Пожалуй, именно невозможность перетаскивания файлов (привычным способом) раздражает больше всего. В той же Windows 10 вы могли перетащить файлы из проводника в программу, перетянув файлы на соответствующую иконку. Сейчас же нужно держать оба окна в развернутом состоянии, чтобы перетащить файлы. Или использовать контекстное меню, чтобы выделить файл и выбрать команду.
Содержание:
Можно ли вернуть перетаскивание в Windows 11
Конечно, есть вероятность, что привычное перетаскивание вернется в последующих сборках Windows 11, по мере выхода обновлений (по крайней мере, Microsoft внимательно относится к пожеланиям пользователей).
На данный момент перетаскивание работает только хитрыми способами. О них – далее.
Полезно: Как изменить расположение папки Загрузки в Windows 11
Способы, как переместить файлы в приложение
Итак, давайте рассмотрим способы, как сейчас можно перетаскивать файлы в Windows 11 и можно ли вернуть перетаскивание через модификацию системы.
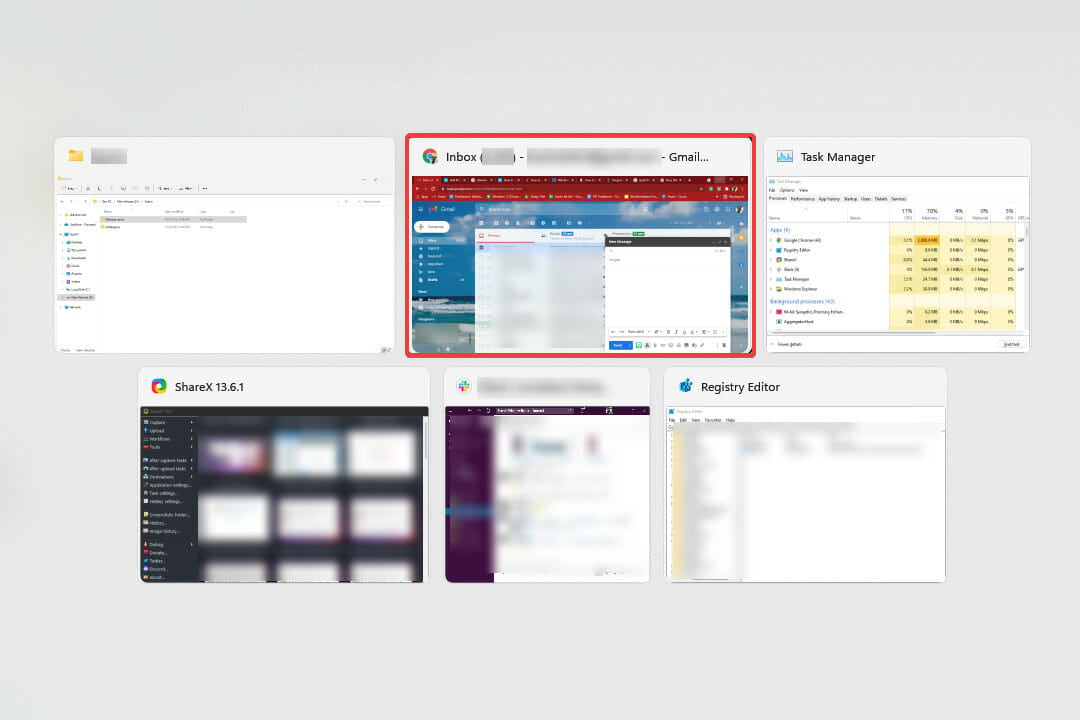
Способ 1. Использование комбинации (Ctrl + ) Alt + Tab
Можно воспользоваться оконным менеджером, чтобы перетащить файлы. Делается следующим образом.
- Начните перетаскивать файл.
- Одновременно зажмите Alt+Tab, чтобы появился список окон. Если не сработает, попробуйте зажать Ctrl + Alt+Tab.
- Перетяните файлы в нужное окошко программы.
Способ 2. Перетаскивание между папками
Перетаскивание между двумя каталогами, директориями осуществляется тем же способом, что и в Windows 10. Опишем данный метод в пошаговой форме.
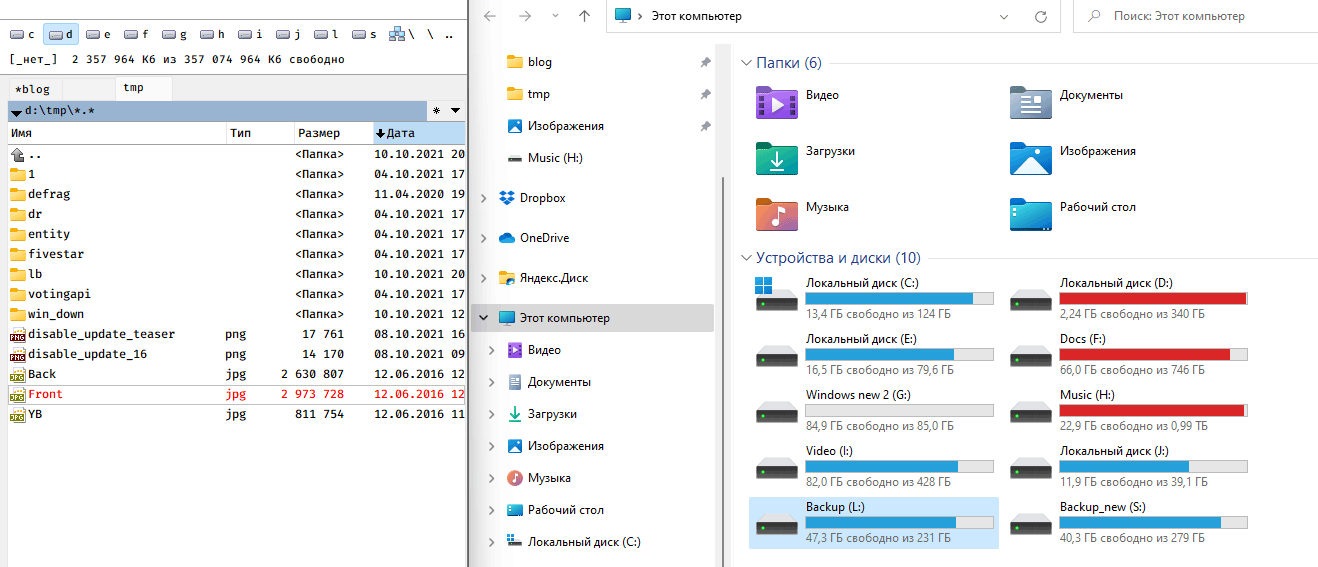
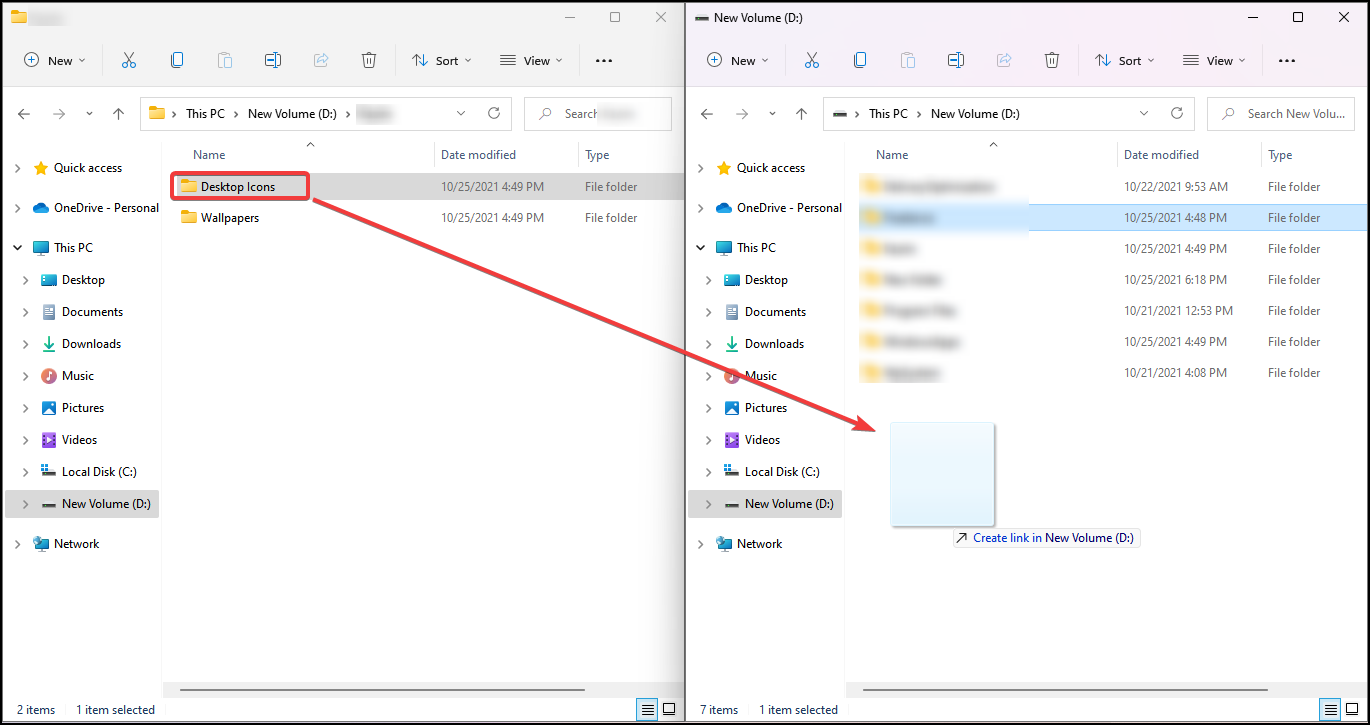
- Откройте 2 окна: то, из которого нужно перетащить (источник) и то, куда надо отправить данные (преемник). Расположите окна рядом для удобства.
- Нажмите левой кнопкой на файл, который хотите перетянуть.
- Перетяните файл во второе окно-преемник, зажав левую кнопку мыши и не отпуская ее.
- Отпустите левую кнопку, перетянув файл в окно – преемник.
Способ 3. Редактирование файлов Реестра
Далее описываемый метод активации drag & drop имеет свои недостатки. После редактирования Реестра кнопка Пуск, поисковая строка и голосовой ассистент будут недоступны для запуска из панели задач, хотя и будут присутствовать в виде иконок. Нужно вам это или нет – решать вам.
Через редактор реестра доступны всевозможные твики, в том числе вы можете исправить перетаскивание в Windows 11. Перед началом работы советуем создать точку восстановления, чтобы в случае неудачи вернуться к прежним системным настройкам.
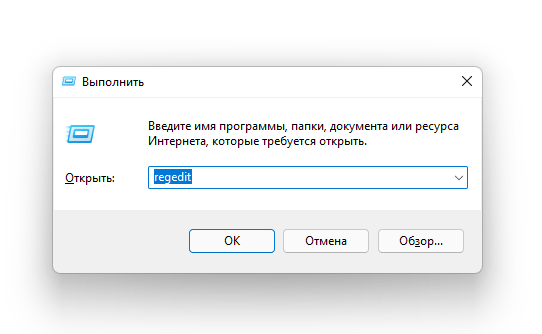
- Вызовите диалог “Выполнить”, нажав Windows + R.
- Введите в текстовое поле regedit и нажмите Enter (программа запускается от имени администратора).

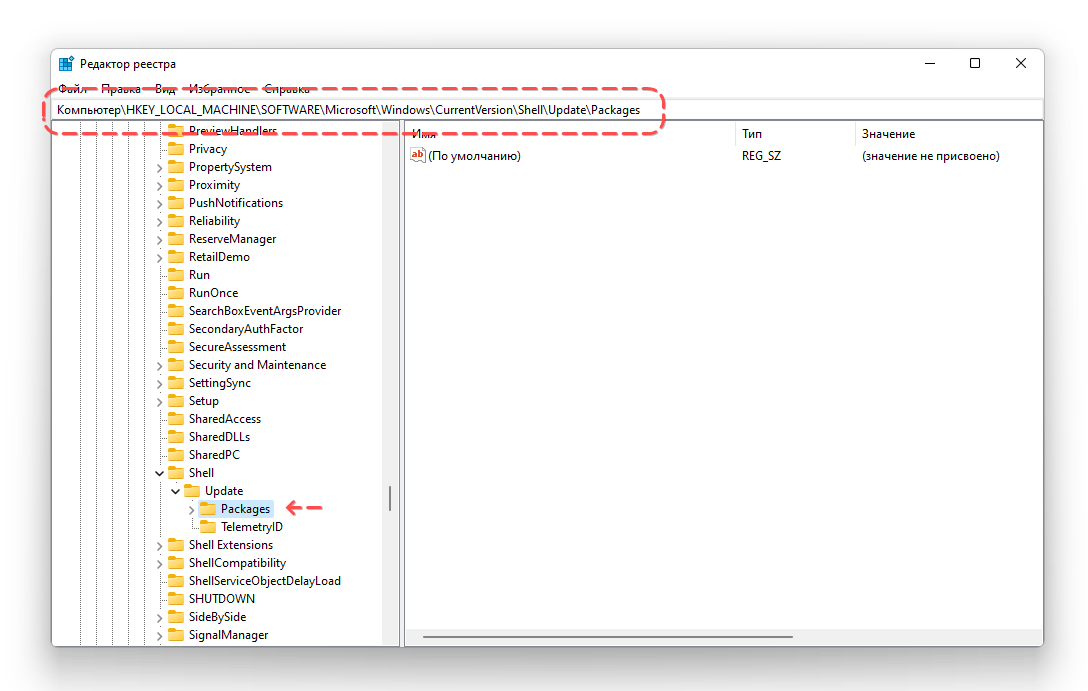
- Перейдите по адресу HKEY_LOCAL_MACHINE > SOFTWARE > Microsoft > Windows > CurrentVersion > Shell > Update > Packages.

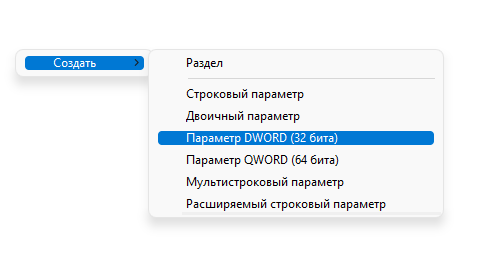
- Кликните на пустом пространстве правой кнопкой мыши, чтобы вызвать контекстное меню.
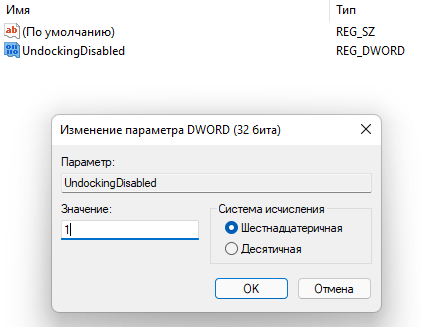
- Создайте новый ключ: Создать > Параметр DWORD (32 бита). Переименуйте его в UndockingDisabled.

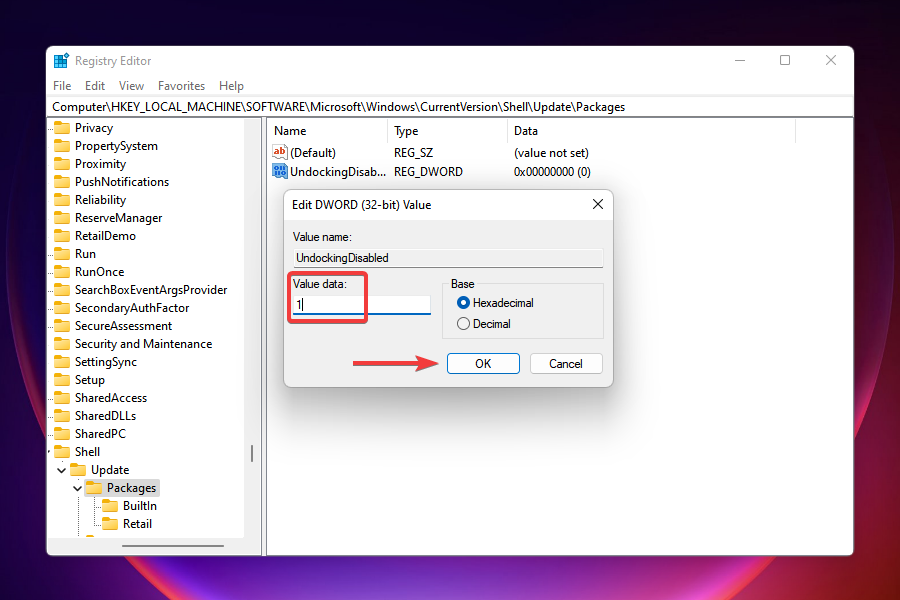
- Выставьте значение как «1». Нажмите ОК

- Для применения настройки перезагрузите ПК.
Как уже говорилось, некоторые функции будут недоступны после данного фикса. Чтобы вернуться к системным настройкам по умолчанию, измените значение ключа UndockingDisabled на 0 в реестре Windows 11, пройдя по шагам мини-инструкции выше (или просто удалите ключ с названием UndockingDisabled). Перезагрузите компьютер.
Заключение
Как видите, на данный момент нет нормальных способов заменить функцию перетаскивания, доступную ранее во всех версиях графического интерфейса Windows – 8, 10 и даже XP. Мы советуем дождаться крупного обновления Windows 11: скорее всего, разработчики пойдут навстречу пользователям и вернут интуитивно привычное перетаскивание на Панель задач.
К слову, вы также можете оставить свой отзыв, перейдя по ссылке или воспользовавшись обратной связью средствами Windows 11.
Панель задач, одна из главных фишек интерфейса Windows 11, подверглась значительным изменениям в новой ОС. Не все из новшеств получили одобрение пользователей. Например, сейчас недоступно контекстное меню таскбара и возможность поменять расположение панели задач, не переходя в настройки. Кроме того, базовая, и очень востребованная, функция перетаскивания файлов, используя иконку приложения, на данный момент недоступна в новой ОС.
Пожалуй, именно невозможность перетаскивания файлов (привычным способом) раздражает больше всего. В той же Windows 10 вы могли перетащить файлы из проводника в программу, перетянув файлы на соответствующую иконку. Сейчас же нужно держать оба окна в развернутом состоянии, чтобы перетащить файлы. Или использовать контекстное меню, чтобы выделить файл и выбрать команду.
Содержание:
Конечно, есть вероятность, что привычное перетаскивание вернется в последующих сборках Windows 11, по мере выхода обновлений (по крайней мере, Microsoft внимательно относится к пожеланиям пользователей).
На данный момент перетаскивание работает только хитрыми способами. О них – далее.
Полезно: Как изменить расположение папки Загрузки в Windows 11
Способы, как переместить файлы в приложение
Итак, давайте рассмотрим способы, как сейчас можно перетаскивать файлы в Windows 11 и можно ли вернуть перетаскивание через модификацию системы.
Способ 1. Использование комбинации (Ctrl + ) Alt + Tab
Можно воспользоваться оконным менеджером, чтобы перетащить файлы. Делается следующим образом.
- Начните перетаскивать файл.
- Одновременно зажмите Alt+Tab, чтобы появился список окон. Если не сработает, попробуйте зажать Ctrl + Alt+Tab.
- Перетяните файлы в нужное окошко программы.
Способ 2. Перетаскивание между папками
Перетаскивание между двумя каталогами, директориями осуществляется тем же способом, что и в Windows 10. Опишем данный метод в пошаговой форме.
- Откройте 2 окна: то, из которого нужно перетащить (источник) и то, куда надо отправить данные (преемник). Расположите окна рядом для удобства.
- Нажмите левой кнопкой на файл, который хотите перетянуть.
- Перетяните файл во второе окно-преемник, зажав левую кнопку мыши и не отпуская ее.
- Отпустите левую кнопку, перетянув файл в окно – преемник.
Способ 3. Редактирование файлов Реестра
Далее описываемый метод активации drag & drop имеет свои недостатки. После редактирования Реестра кнопка Пуск, поисковая строка и голосовой ассистент будут недоступны для запуска из панели задач, хотя и будут присутствовать в виде иконок. Нужно вам это или нет – решать вам.
Через редактор реестра доступны всевозможные твики, в том числе вы можете исправить перетаскивание в Windows 11. Перед началом работы советуем создать точку восстановления, чтобы в случае неудачи вернуться к прежним системным настройкам.
- Вызовите диалог “Выполнить”, нажав Windows + R.
- Введите в текстовое поле regedit и нажмите Enter (программа запускается от имени администратора).
- Перейдите по адресу HKEY_LOCAL_MACHINE > SOFTWARE > Microsoft > Windows > CurrentVersion > Shell > Update > Packages.
- Кликните на пустом пространстве правой кнопкой мыши, чтобы вызвать контекстное меню.
- Создайте новый ключ: Создать > Параметр DWORD (32 бита). Переименуйте его в UndockingDisabled.
- Выставьте значение как «1». Нажмите ОК
- Для применения настройки перезагрузите ПК.
Как уже говорилось, некоторые функции будут недоступны после данного фикса. Чтобы вернуться к системным настройкам по умолчанию, измените значение ключа UndockingDisabled на 0 в реестре Windows 11, пройдя по шагам мини-инструкции выше (или просто удалите ключ с названием UndockingDisabled). Перезагрузите компьютер.
Заключение
Как видите, на данный момент нет нормальных способов заменить функцию перетаскивания, доступную ранее во всех версиях графического интерфейса Windows – 8, 10 и даже XP. Мы советуем дождаться крупного обновления Windows 11: скорее всего, разработчики пойдут навстречу пользователям и вернут интуитивно привычное перетаскивание на Панель задач.
К слову, вы также можете оставить свой отзыв, перейдя по ссылке или воспользовавшись обратной связью средствами Windows 11.
 Одним из самых неприятных для меня «нововведений» Windows 11 стало отключение возможности перетаскивать файлы (Drag and Drop) на значки открытых программ в панели задач. Если ранее, отыскав в проводнике нужный файл, я мог перетащить его на значок свёрнутой программы, и она открывалась, готовая «принять» этот файл, теперь это не работает.
В предварительных сборках это можно было исправить в редакторе реестра, но этот способ больше не работает. Есть информация, что в будущих версиях ОС эту функциональность вернут. Однако для того, чтобы включить поддержку перетаскивания файлов уже сейчас, придётся прибегнуть к сторонним средствам — бесплатной утилите Windows11DragAndDropToTaskbarFix.
Включение поддержки Drag and Drop для панели задач в Windows11DragAndDropToTaskbarFix
Единственная задача бесплатной программы Windows11DragAndDropToTaskbarFix — вернуть прежнее поведение панели задач Windows 11 при перетаскивании файлов на значки открытых программ. Использование очень простое:
- Скачайте последнюю версию утилиты с официальной страницы разработчика и сохраните файл в удобное вам расположение. Учитывайте, что фильтр SmartScreen в Microsoft Edge и Windows могут блокировать загрузку и запуск файла как малоизвестного.
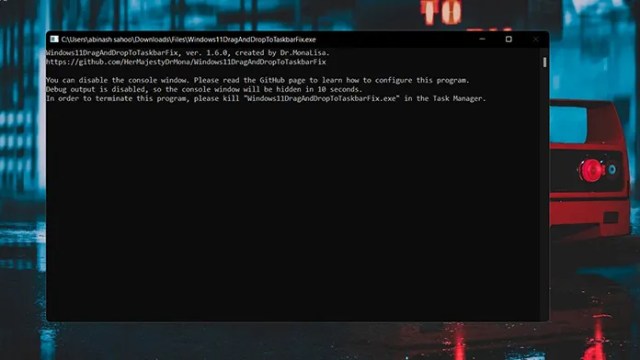
- Запустите программу (при сообщениях о том, что система не обнаружила файлы VCRUNTIME140_1.DLL и другие, используйте эту инструкцию). После запуска откроется окно командной строки, которое через короткое время само закроется.

- Сразу после этого вы сможете перетаскивать файлы и другие элементы на значки открытых программ в панели задач Windows 11.


Дополнительно, в папке с программой вы можете создать файл конфигурации с именем Windows11DragAndDropToTaskbarFixConfig.txt и добавить в него параметры, такие как включение автоматического запуска Windows11DragAndDropToTaskbarFix при входе в систему. Подробнее о файле конфигурации можно прочитать на официальной странице.
В моем тесте утилита исправно работает, из замеченных нюансов:
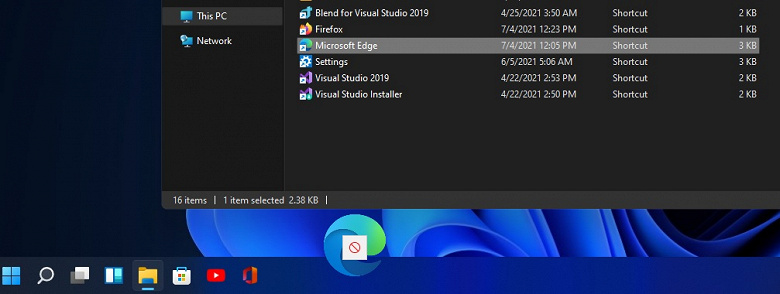
- При перетаскивании файлов всё так же отображается красный перечеркнутый значок «запрета действия» (но на работоспособность не влияет).
- В отзывах о проблемах с программой на GitHub есть информация о том, что при использовании нескольких мониторов, на втором монитора программа может работать неправильно.
При работе утилита не показывает своих значков в панели задач или области уведомлений: если вам требуется закрыть её, используйте диспетчер задач.
Прошло больше месяца с момента официального выпуска Windows 11. Со временем мы увидели множество улучшений, включая возможность даже устанавливать приложения Android в вашу систему. Хотя все это звучит хорошо, в Windows 11 все еще есть несколько проблем, над которыми нужно работать. По какой-то причине возможность перетаскивания файлов для открытия запущенным приложением отсутствует. С самого начала инсайдерской сборки Windows 11 до текущей стабильной версии эта функция отсутствовала.
К счастью, есть несколько способов вернуть эту функцию. Продолжайте читать, чтобы узнать, как включить функцию перетаскивания файлов для панели задач Windows 11.
Так же, как кнопка «Пуск» и меню «Пуск», которые продолжают существовать, пользователи также считают, что функция перетаскивания файлов на панель задач не должна быть удалена. Это всегда была удобная функция и продолжает использоваться. Однако Microsoft решила вернуть эту функцию и представит ее сначала инсайдерам к концу года, а затем широкой публике к началу следующего года. Итак, на данный момент есть несколько обходных путей, которые можно использовать для имитации перетаскивания файлов на панель задач в Windows 11.
Включение перетаскивания файлов на панели задач Windows 11
Сообщество, как всегда, быстро предложит решение, чтобы вернуть эту важную функцию, пока Microsoft не выпустит ее в качестве обновления. В любом случае, есть два простых способа вернуть эту удобную функцию. Давайте взглянем.
Метод 1 —
Первый способ — использовать простой инструмент, доступный на GitHub. Этот инструмент под названием Windows11DragAndDropToTaskbarFix помогает вернуть полезную функцию в Windows 11. Настройка для включения этой функции довольно проста. Следуйте инструкциям ниже.
- Прежде всего, вам нужно будет перейти на эту страницу GitHub, чтобы загрузить инструмент.

- Чтобы загрузить установочный файл, просто щелкните ссылку exe, которая находится прямо под заголовком Assets.
- Установка весит всего 109 КБ. Файл должен быть скачан мгновенно.
- Загрузив файл, дважды щелкните его, чтобы запустить. Windows может выдать предупреждение о том, что у файла есть непроверенный издатель.
- Просто нажмите кнопку «Выполнить».
- Теперь программа откроет окно консоли.
- Вам вообще ничего не нужно делать. Окно также автоматически закроется.
- Вот и все. Вот как вы можете включить перетаскивание файлов на панель задач в Windows 11.
- Если вы хотите закрыть приложение, просто откройте диспетчер задач и щелкните вкладку «Процесс».
- Теперь найдите процесс Windows 11 Drag and Drop Taskbar Fix и щелкните его правой кнопкой мыши.
- В контекстном меню выберите опцию «Завершить процесс». Функция будет закрыта сразу.
- Чтобы восстановить его, просто запустите exe-файл, и все готово.


Способ 2
Второй способ — это еще один простой способ включить эту функцию. Для этого вам необходимо загрузить приложение из Microsoft Store. Итак, если у вас нет учетной записи Microsoft, входящей в вашу систему, пришло время сделать это, поскольку Магазин требует, чтобы у вас была учетная запись Microsoft для загрузки приложений и даже публикации отзывов.
- Откройте Microsoft Store и перейдите к окну поиска, которое находится посередине вверху экрана.
- Введите перетаскивание. Нажмите клавишу ввода, чтобы выполнить поиск в приложении.
- В результате вы увидите первое приложение с надписью Drag and Drop Toolbar для Windows 11. Нажмите здесь.
- Теперь нажмите синюю кнопку Get в левой части экрана. Приложение начнет загружаться на ваш компьютер.
- Приложение весит всего 1,1 МБ. Итак, это должна быть быстрая загрузка.
- После загрузки нажмите кнопку «Открыть» в Microsoft Store.
- В тот момент, когда вы откроете приложение, вы получите уведомление о том, что приложение настроено на запуск при запуске Windows.
- Кроме того, вы увидите небольшой лоток в верхней части экрана.
- Чтобы перетащить файлы в любую запущенную программу, просто перетащите файл вверх и наведите указатель мыши на панель. Затем вы можете просто перетащить файл в открытую программу, и все готово.
- Конечно, он не помещается внизу, где находится панель задач, но он все равно выполняет свою работу.


Заключение
Итак, вот оно. Вы можете использовать два разных способа переноса файлов D5ag и Drop на панель задач на вашем ПК с Windows 11. Если вы все еще используете Windows 10, вам следует придерживаться ее до тех пор, пока функция не будет развернута с помощью обновления для Windows 11. После того, как функция будет официально интегрирована в ОС, для ее использования не потребуется использовать сторонние приложения..
Какой из двух методов вам больше подходит? Сообщите нам об этом в комментариях ниже. Также поделитесь этой статьей со своими друзьями.
Windows 11 представила массу новых функций, а также обновление дизайна во время своего выпуска. Например, вы можете пакетно переименовывать файлы и защищать папки паролем в Windows 11. Но, похоже, отсутствует одна важная функция — перетаскивание.

Сложно перетаскивать файлы на панель задач на компьютерах с Windows 11. В этом посте мы представляем вам три лучших способа включить перетаскивание в Windows 11, чтобы ваше использование стало более плавным.
1. Обновите до Windows 11 22H2.
После того, как многие пользователи выразили обеспокоенность по поводу этой функции, Microsoft выпустила Windows 11 22H2 обновление для всех. Это обновление содержит множество новых функций, в том числе столь востребованную функцию перетаскивания на панель задач. Вот как вы можете обновить свой ПК с Windows 11, чтобы воспользоваться этой функцией.
Шаг 1: Щелкните значок Windows на панели задач, введите Настройки в строке поиска и нажмите Enter.

Шаг 2: Нажмите «Центр обновления Windows» в правом верхнем углу.

Шаг 3: Если вы видите обновление для Windows 11 22H2, загрузите и установите его.

Шаг 4: После завершения установки вы можете перетаскивать файлы на панель задач.
Если вы не хотите устанавливать это новое обновление, но по-прежнему включаете перетаскивание, продолжайте читать следующие решения.
2. Используйте сочетание клавиш Alt + Tab
Alt + Tab — это команда для переключения между окнами приложений и папками на вашем компьютере с Windows. Эта функция существует уже довольно давно, и вы можете разумно использовать ее для перетаскивания файлов в Windows 11. Вот как.
Шаг 1: Откройте папку с файлом, откуда вы хотите его перетащить.

Шаг 2: Выберите, перетащите и продолжайте нажимать кнопку мыши.

Шаг 3: Нажмите и удерживайте Alt + Tab на клавиатуре, чтобы перемещаться между разными окнами. Продолжайте нажимать кнопку мыши, чтобы удерживать выбранный файл.

Шаг 4: Отпустите Alt + Tab, когда вы находитесь в нужном месте файла.
Шаг 5: Отпустите кнопку мыши, чтобы поместить файл в это место.
Редактор реестра — это централизованная база данных на вашем компьютере с Windows, в которой хранится важная информация, параметры, настройки и сведения обо всех приложениях. Вы можете проверить и исправить многие системные ошибки, изменив несколько параметров в редакторе реестра. Вы можете изменить настройки чувствительности к перетаскиванию, если хотите включить функцию перетаскивания на своем компьютере с Windows 11.
Обратите внимание, что изменение редактора реестра может привести к необратимому повреждению вашего компьютера с Windows. Мы рекомендуем выполнять шаги, указанные ниже, только если вы хорошо знакомы с редактором реестра.
Шаг 1: Нажмите Windows + R, чтобы открыть диалоговое окно «Выполнить».
Шаг 2: Введите regedit и нажмите Ок.

На вашем экране откроется окно редактора реестра. Мы настоятельно рекомендуем внимательно следить за каждым шагом.
Шаг 3: Нажмите «HKEY_LOCAL_MACHINE» на левой панели.

Шаг 4: Выберите Программное обеспечение из списка параметров папки.

Шаг 5. В разделе «Программное обеспечение» прокрутите вниз и нажмите Microsoft.

Шаг 6: Прокрутите вниз и нажмите Shell.

Шаг 7: Нажмите «Обновить».

Шаг 8: В разделе «Обновление» нажмите «Пакеты».

Если вы не видите папки во время процесса, введите следующий патч файла в строке поиска вверху:
HKEY_LOCAL_MACHINESOFTWAREMicrosoftWindowsCurrentVersionShellUpdatePackages
Шаг 9: В папке «Пакеты» щелкните правой кнопкой мыши пустое место с правой стороны.

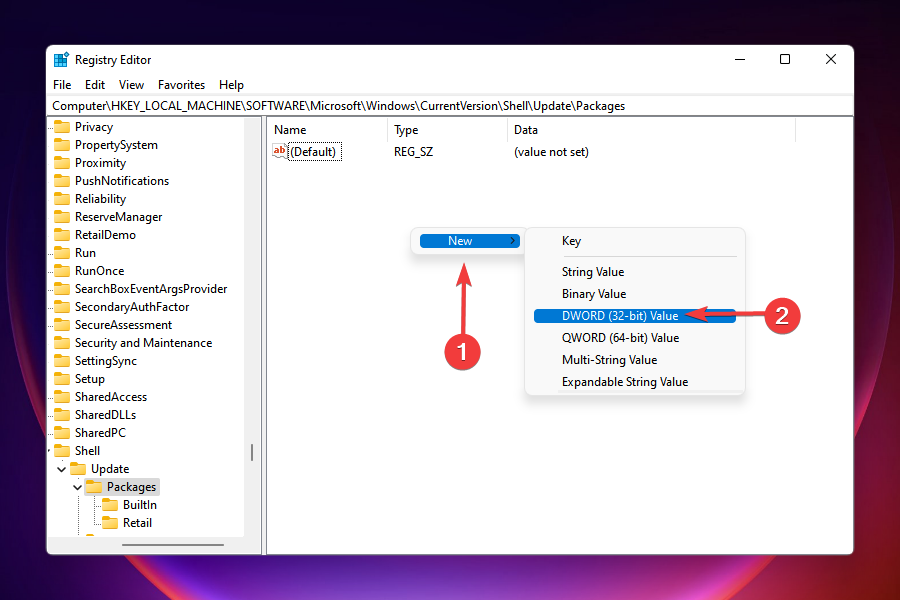
Шаг 10: Нажмите «Создать». Затем нажмите «Параметр DWORD (32-разрядное)».

Это создаст ключ «Новое значение» в редакторе реестра.

Шаг 11: Щелкните правой кнопкой мыши новое значение и выберите «Переименовать».

Шаг 12: Переименуйте новое значение в UndockingDisabled.

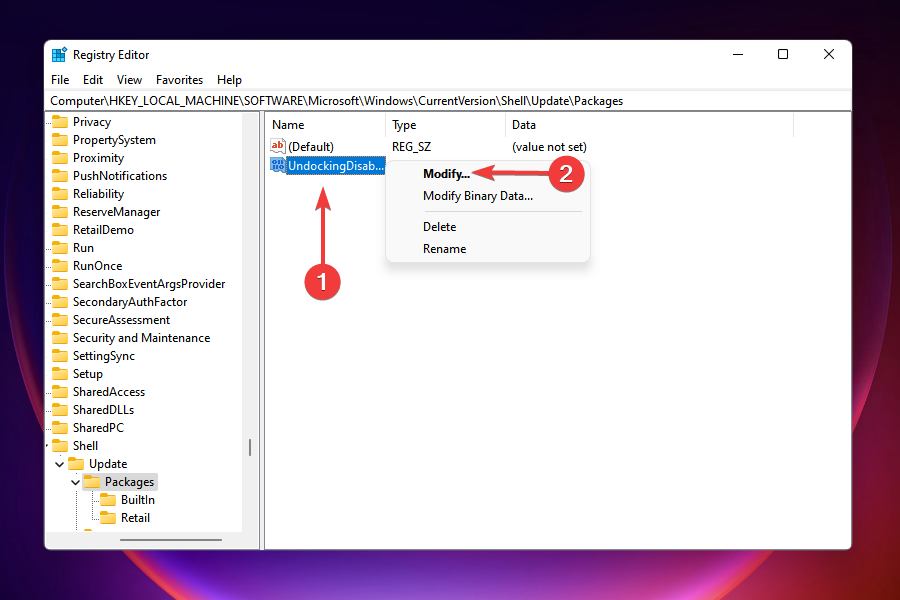
Шаг 13: Щелкните правой кнопкой мыши переименованное значение и выберите «Изменить».

Шаг 14: Измените значение данных с 0 на 1. Затем нажмите «ОК».

Шаг 15: Закройте окно и перезагрузите компьютер, щелкнув правой кнопкой мыши значок «Пуск» и выбрав «Перезагрузить».

После перезагрузки компьютера вы заметите, что панель задач выглядит так же, как в Windows 10. Но обратите внимание, что «Пуск», «Поиск» и «Кортана» не будут открываться с панели задач. Остальное все на панели задач откроется как обычно.
Теперь вы можете легко перетаскивать файлы на панель задач.
Если вы хотите восстановить панель задач Windows 11 по умолчанию, вот как это сделать.
Шаг 1: снова откройте редактор реестра, набрав regedit в окне команды «Выполнить».
Шаг 2: Перейдите в папку Packages, в которой вы сохранили значение UndockingDisabled.
Шаг 3: Щелкните правой кнопкой мыши UndockingDisabled и выберите «Удалить».

Шаг 4: Нажмите «Удалить» еще раз, чтобы подтвердить свой выбор.

Шаг 5: Закройте окно и перезагрузите компьютер, щелкнув значок «Пуск» на панели задач.
Панель задач Windows 11 по умолчанию будет восстановлена. Вы можете проверить наш пост, предлагающий решения для редактора реестра, не работающего в Windows 11, если у вас возникнут какие-либо проблемы.
Перетаскивание файлов
Эти методы помогут вам включить функцию перетаскивания на ПК с Windows 11. Хотя это полностью ваш выбор, мы рекомендуем обновить ваш компьютер до последней версии Windows 11 22H2, чтобы воспользоваться этой функцией.
Post Views: 137
А ещё по нажатию правой клавиши мыши на панель задач больше не открывается традиционное контекстное меню
Microsoft обещала много новшеств в Windows 11, и их действительно немало. Но не все из них к лучшему. Например, новая ОС Microsoft утратила удобнейшую функцию перетаскивания ярлыков приложений для закрепления их на панели задач.
Чтобы закрепить приложение на панели задач Windows 10, достаточно просто перенести на неё ярлык. То же самое касалось и открытия файлов в приложениях, закреплённых на панели задач: например, если у пользователя открыт Photoshop, в Windows 10 достаточно выбрать изображения, которые нужно отредактировать, перетащить их курсором мышки на ярлык запущенной программы — и все они откроются в графическом редакторе. Но в Windows 11 ни первая, ни вторая функции не работают.
Естественно, пользователей, которые привыкли к этой возможности, такое положение дел не устраивает: в Feedback Hub хватает отзывов, в которых многие высказали разочарование в исчезновении из Windows 11 удобной функции. Сама компания отмечает, что «в настоящее время перетаскивание файла в приложение на панели задач, чтобы открыть его в этом приложении, не поддерживается в Windows 11, но мы ценим все ваши отзывы, и мы продолжим использовать их, чтобы в будущем улучшить эти функции».
22 июля 2021 в 07:20
| Теги: Microsoft, Windows
| Источник: Windows Latest
Get back to dragging files in no time!
by Kazim Ali Alvi
Kazim has always been fond of technology, be it scrolling through the settings on his iPhone, Android device, or Windows. And at times, unscrewing the device to take… read more
Updated on January 31, 2023
Reviewed by
Vlad Turiceanu

Passionate about technology, Windows, and everything that has a power button, he spent most of his time developing new skills and learning more about the tech world. Coming… read more
- The Windows 11 drag and drop feature is not working properly for many users.
- Upgrading to Windows 11 22H2 is likely to fix this, but the update comes with many bugs right now.
- We have found a workaround to make your tasks easier.
- You can use the split-screen option, modify the Registry, or opt for a third-party tool, amongst others, to combat the problem.
XINSTALL BY CLICKING THE DOWNLOAD FILE
- Download Restoro PC Repair Tool that comes with Patented Technologies (patent available here).
- Click Start Scan to find Windows 11 issues that could be causing PC problems.
- Click Repair All to fix issues affecting your computer’s security and performance
- Restoro has been downloaded by 0 readers this month.
Of all the changes that users noticed in Windows 11, drag and drop not working was something that struck them the most. This feature has been a part of the Windows ecosystem for a long time and going by the comments, users are not pleased with its discontinuation.
A feature that we all heavily relied on is absent from Windows 11. Users thought of it to be a bug in the initial version but Microsoft was quick to acknowledge that the feature has been removed.
Other changes pertaining to the taskbar include the inability to launch the Task Manager from the right-click context menu, and dropping apps in the taskbar to create their shortcut.
So, what do you do when the Windows 11 drag and drop not working issue occurs?? There are a few workarounds that could get you similar results and we have listed them all in the following sections. Else, you can get used to the new interface and execute tasks accordingly.
4 Solutions when you can’t drag and drop in Windows 11
It has been reported that users who upgraded to Windows 11 22H2 can now use the drag-and-drop feature properly.
However, at the time of writing this article, the Windows 11 22H2 update is full of bugs, so it may be recommended to wait a bit more before trying it out. In case you decide to skip the update for now, you should use the solutions below:
- 4 Solutions when you can’t drag and drop in Windows 11
- 1. Use the Alt + Tab shortcut
- 2. Open the two windows in split screen
- 3. Use the cut and paste operation
- 4. Modify the Registry
- Is drag and drop available in Windows 11?
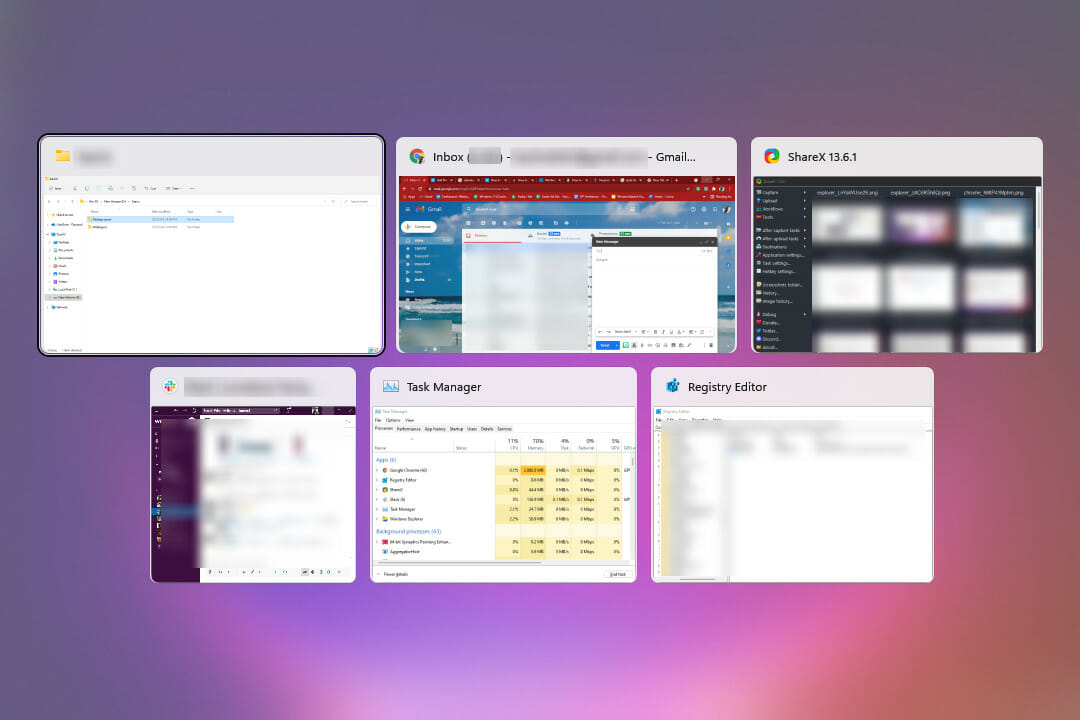
1. Use the Alt + Tab shortcut
- Navigate to the location where the file/folder that you want to move is saved.
- Select it, press and hold the left mouse button, and drag the file a little.

- With the file still grabbed, press the Alt + Tab keys to view all the apps open in the taskbar.

- This will launch a new screen where all the open apps will be listed as separate tiles. The currently open window or the one that was last opened will be listed first, the one before it would be listed next, and the same sequence will be followed.
- Now, while holding the Alt key, press Tab to navigate through the open windows.
- Release Alt when the desired destination is selected.
- Once the destination window launches, release the left click to drop the file.
This way you can easily move files between apps and get rid of the Windows 11 drag and drop feature not working problem.
Although it will take you some time to get acquainted with the process, once that phase is over, you will find this method convenient and quick. Just practice for a while until you get a knack for it.
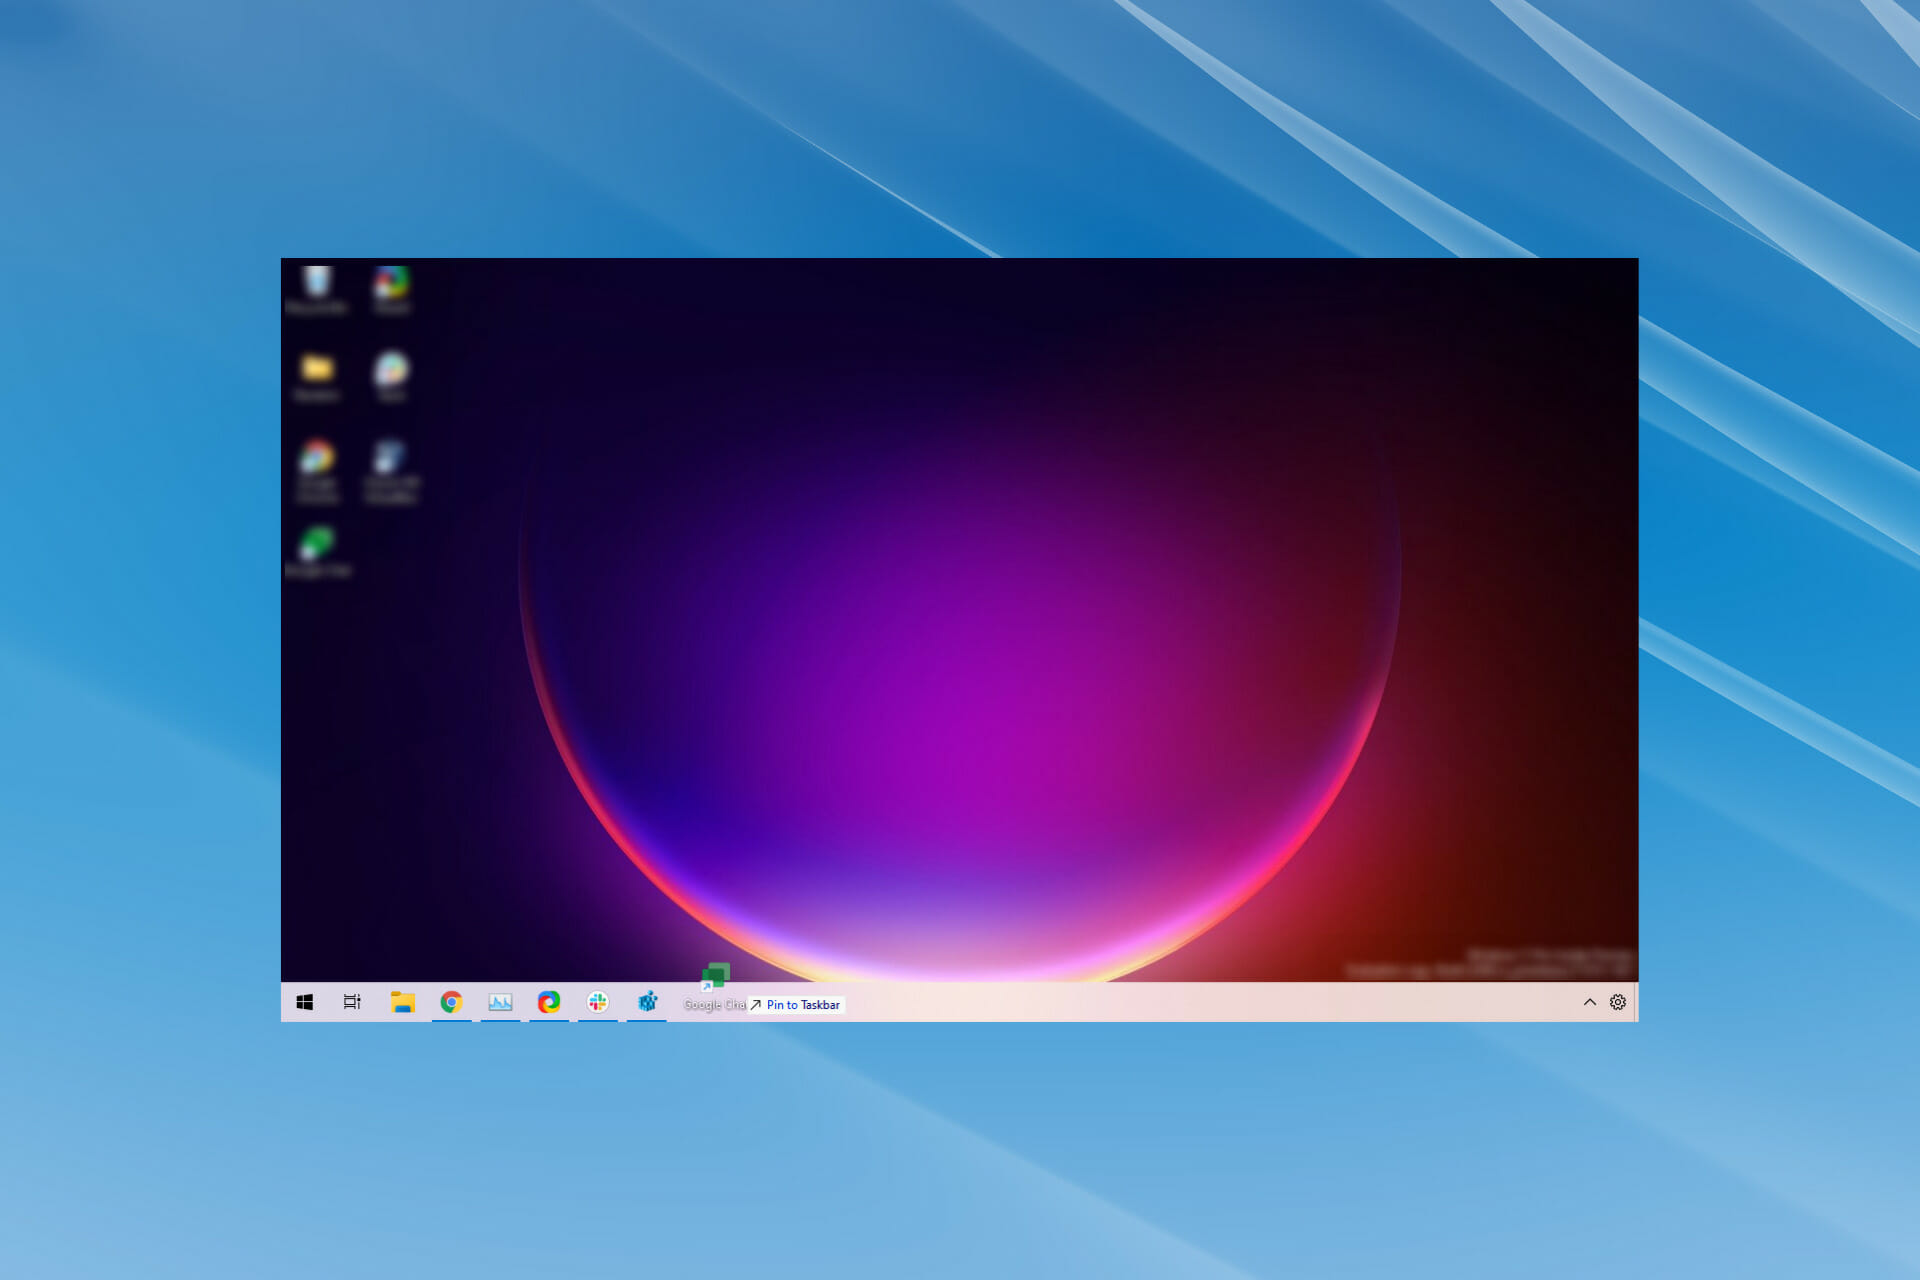
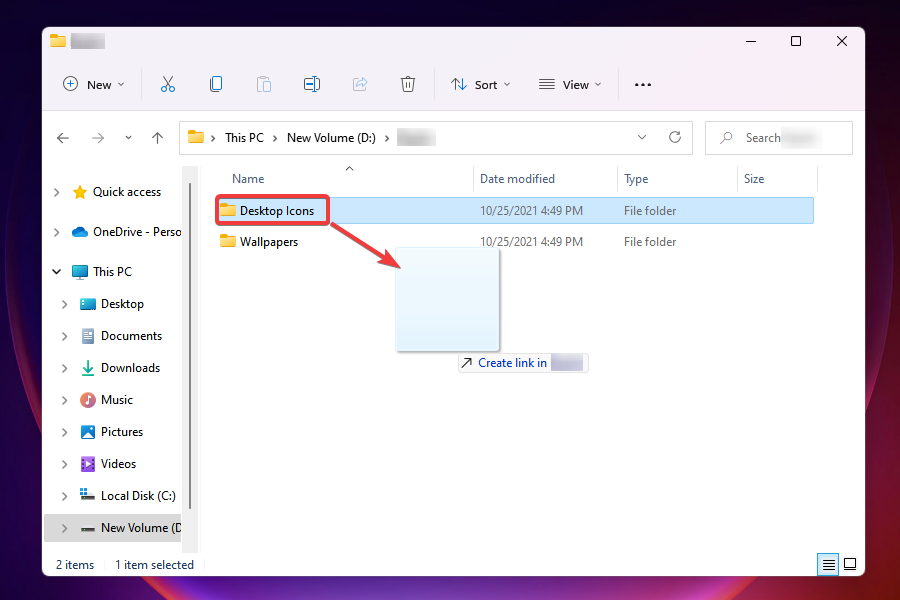
2. Open the two windows in split screen
- Launch both the windows amongst which you want the drag and drop the file or folder.
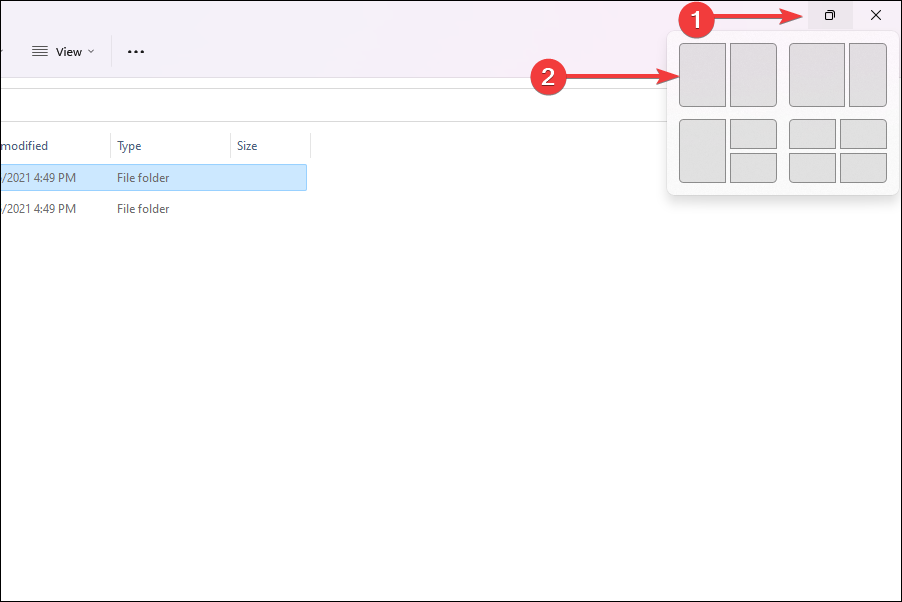
- Open the one where the file to be dragged and dropped is saved, hover the cursor over the maximize button, and select the first option to snap the current window into half of the screen.

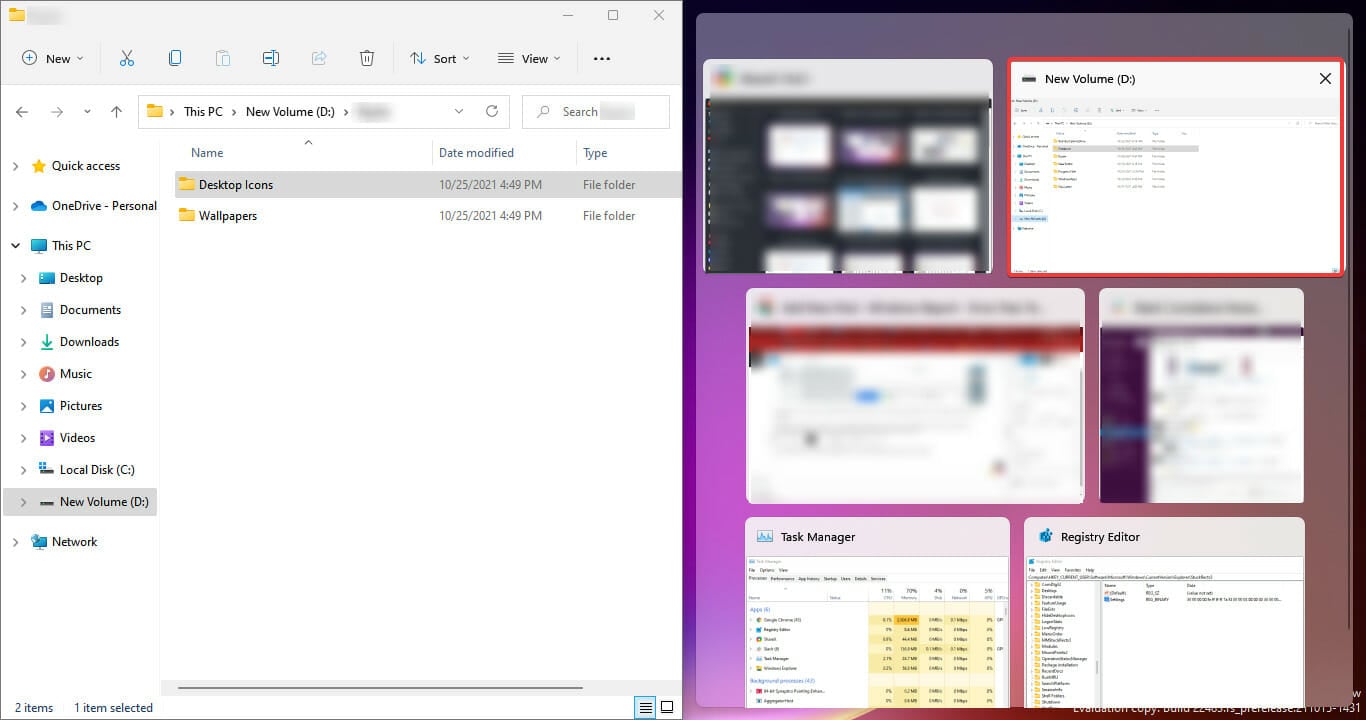
- In the other half, you will find listed all the additonal open apps. Select the one where you want to drop the file/folder.

- Now, select the file that is to be moved. Press and hold the left mouse button, drag the file across windows and release the click when you reach the other one.

- The file will now be moved to the destination.
The split-screen method in Windows 11 works great if you just have to move files between two locations. In the above case, we took two File Explorer windows, however, you can replace one or both of them with other apps. This is a quick solution to the annoying drag and drop problem.
For some apps, there may be an additional confirmation box to complete the drag and drop procedure. Choose the appropriate response and get done with it.
3. Use the cut and paste operation
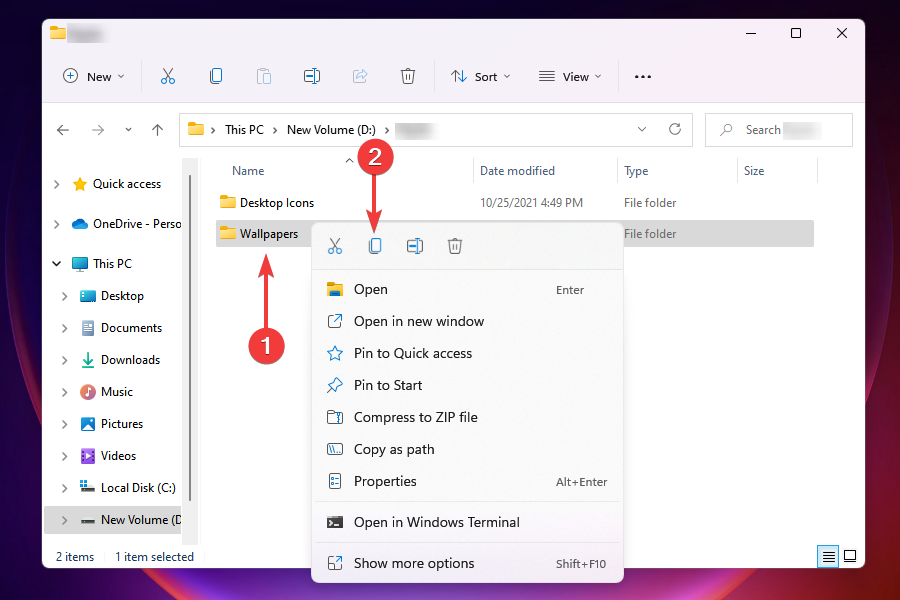
- Launch the program where the file to be moved is stored.
- Right-click on it and select Cut, or as the procedure may be for that particular program.
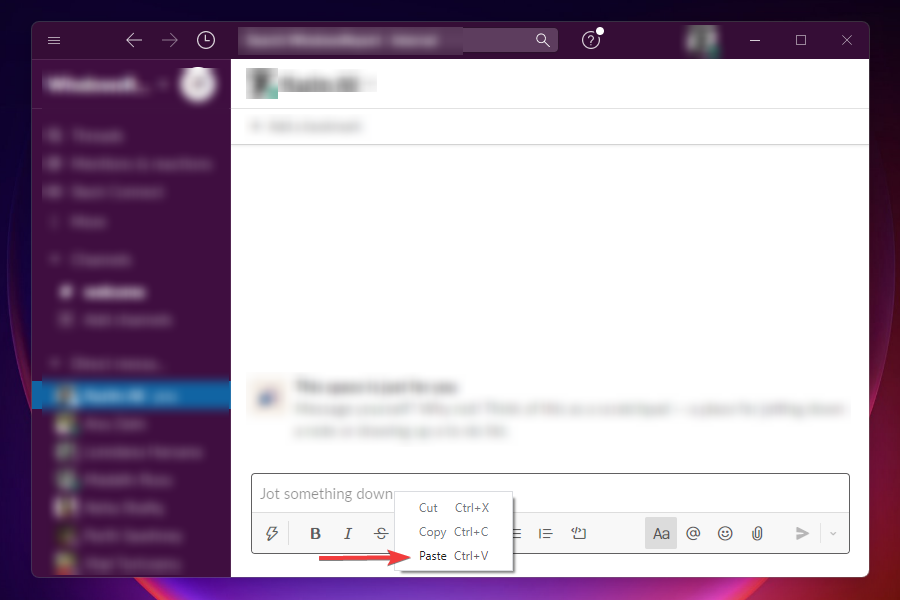
- Now, navigate to the destination, i.e., the program where you want to move the file/folder.
- Right-click and select Paste, or according to the procedure for that particular program.
Again, a simple workaround for drag and drop not working in Windows 11. However, it’s not as effective as the other two since it requires a tad more time and effort.
Also, some apps don’t support the Cut operation, in which case, you will have to copy the file/folder and move it to the desired location. Once done, go to the source and delete the concerned file.
Some PC issues are hard to tackle, especially when it comes to corrupted repositories or missing Windows files. If you are having troubles fixing an error, your system may be partially broken.
We recommend installing Restoro, a tool that will scan your machine and identify what the fault is.
Click here to download and start repairing.
Those who prefer the keyboard shortcuts can use Ctrl + X to Cut, Ctrl + C to Copy, and Ctrl + V to Paste.
4. Modify the Registry
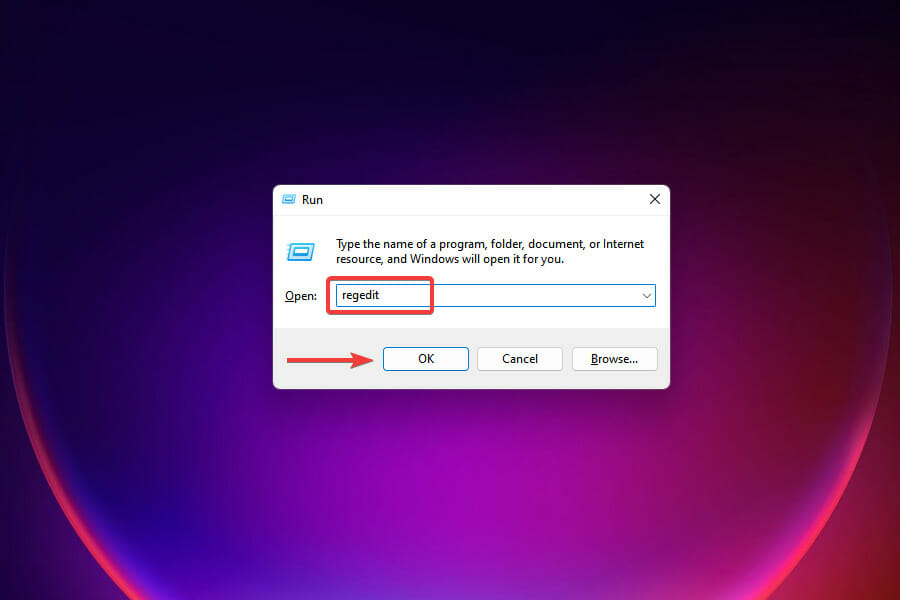
- Press Windows + R to launch the Run command.
- Type regedit in the text field, and either click on OK or press Enter to launch the Registry Editor.
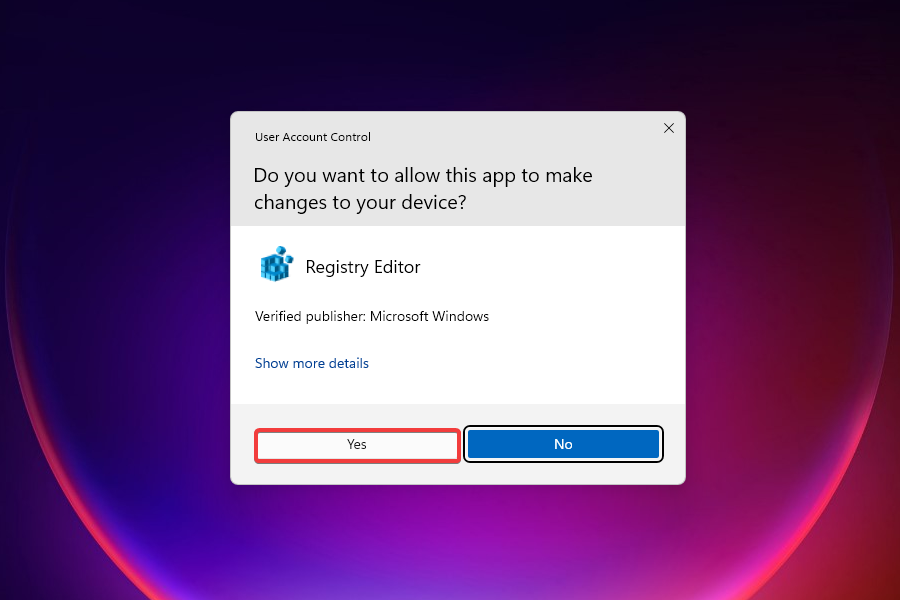
- Click Yes on the UAC prompt that appears.
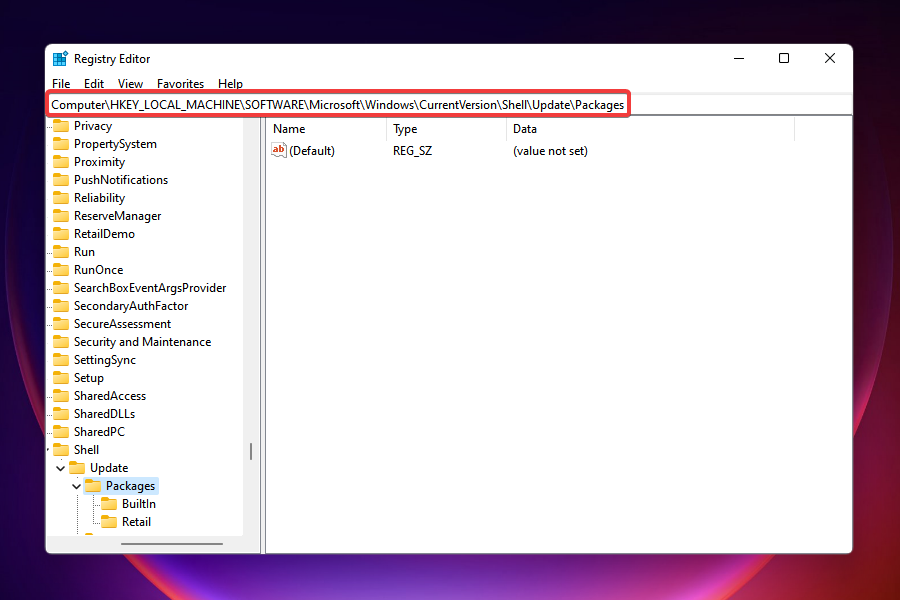
- Now either navigate to the following path using the pane on the left, or paste it in the address bar at the top and hit Enter:
HKEY_LOCAL_MACHINESOFTWAREMicrosoftWindowsCurrentVersionShellUpdatePackages - Right-click on the empty space, hover the cursor over New, select DWORD (32-bit) Value, and name it as UndockingDisabled. This key will fix the problem in no time.
- Right-click on it and select Modify from the context menu.
- Enter 1 in the field under Value data and click on OK to save the changes.
- Close the Registry Editor.
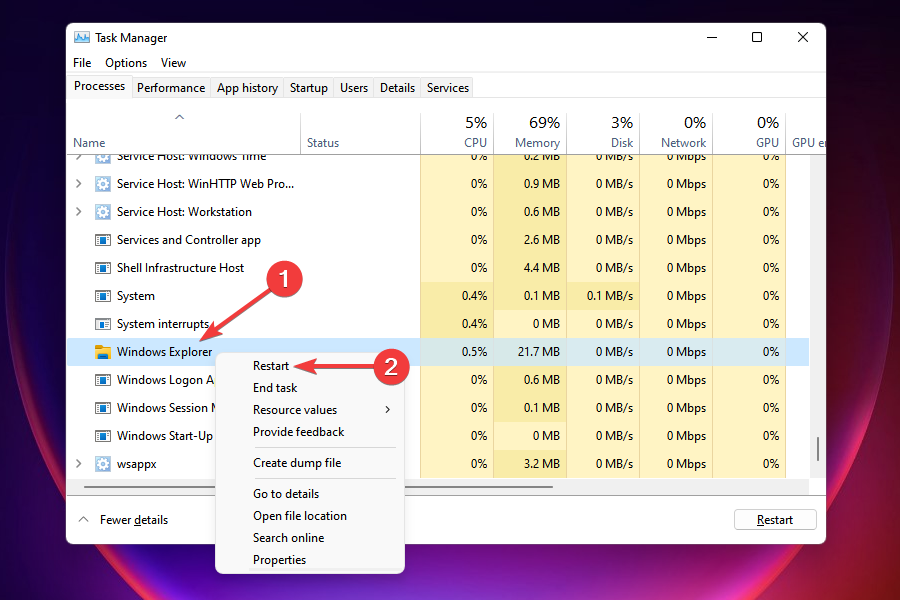
- You wouldn’t notice any immediate change, since it requires restarting Windows Explorer. There are two ways to do that, either restart the computer or the process itself from Task Manager. We will go with the latter.
- Press Ctrl + Shift + Esc to launch Task Manager.
- Locate the Windows Explorer process, right-click on it, and select Restart from the context menu.
The taskbar may disappear for a few moments and once it reappears, you will notice that the icons are all aligned to the left. You can now easily pin items to the taskbar as we did in the previous iterations of Windows.
- Copy paste not working on Windows 10/11 [Full Fix]
- Fix: Cannot Change Temporary Internet Files Cache Size
- Volume is Stuck at 100: How to Quickly Fix It
- Fix: File Explorer Preview Pane Not Working on Windows 11
But, there’s a major downside to this method. After making changes to the registry, you wouldn’t be able to launch the Start or Search menu, and Cortana if it’s enabled, by clicking the respective buttons in the taskbar. However, they can still be accessed via other methods.
In case you are willing to make the sacrifice, no other method mentioned above can match the effectiveness of this one.
- Fix: Cannot Change Temporary Internet Files Cache Size
- Volume is Stuck at 100: How to Quickly Fix It
- Fix: File Explorer Preview Pane Not Working on Windows 11
Is drag and drop available in Windows 11?
After the drag and drop not working in Windows 11 problem was raised by several users, Microsoft issued a response a couple of years ago:
Currently, dragging a file onto an app in the taskbar to open it in that app is not supported in Windows 11, but we appreciate all your feedback, and we’ll continue to use it to help guide the future of features like this.
Based on this statement, we had expected the drag and drop feature somewhere down the line from Microsoft. Luckily, it did go live and Windows 11 22H2 users can now use it.
If the above solutions don’t meet your requirements or some critical functionalities are still left out, you can find a way to bring back the old taskbar and Start menu.
These are all the methods you can go for when the drag and drop function is not working in Windows 11. Although they aren’t as good as the built-in functionality, they do the trick until Microsoft releases a similar feature.
Once you have the drag and drop working in Windows 11, pin as many apps to the taskbar. Or, drop files to the processes in the taskbar to launch in that particular app.
Even more, apply these useful tips if the left mouse button drag doesn’t work. Even though it is a Windows 10 guide, rest assured they are the same as in Windows 11.
And if you change your mind and roll back to the previous OS, take a look at these quick fixes if you can’t drag and drop items in Windows 10. Moving paragraphs, files, or folders around will work like a charm once again.
Let us know your thoughts on Microsoft killing the drag and drop operation and the method you opted for in the comments section below.
Still having issues? Fix them with this tool:
SPONSORED
If the advices above haven’t solved your issue, your PC may experience deeper Windows problems. We recommend downloading this PC Repair tool (rated Great on TrustPilot.com) to easily address them. After installation, simply click the Start Scan button and then press on Repair All.
![]()
Newsletter
Get back to dragging files in no time!
by Kazim Ali Alvi
Kazim has always been fond of technology, be it scrolling through the settings on his iPhone, Android device, or Windows. And at times, unscrewing the device to take… read more
Updated on January 31, 2023
Reviewed by
Vlad Turiceanu
Passionate about technology, Windows, and everything that has a power button, he spent most of his time developing new skills and learning more about the tech world. Coming… read more
- The Windows 11 drag and drop feature is not working properly for many users.
- Upgrading to Windows 11 22H2 is likely to fix this, but the update comes with many bugs right now.
- We have found a workaround to make your tasks easier.
- You can use the split-screen option, modify the Registry, or opt for a third-party tool, amongst others, to combat the problem.
XINSTALL BY CLICKING THE DOWNLOAD FILE
- Download Restoro PC Repair Tool that comes with Patented Technologies (patent available here).
- Click Start Scan to find Windows 11 issues that could be causing PC problems.
- Click Repair All to fix issues affecting your computer’s security and performance
- Restoro has been downloaded by 0 readers this month.
Of all the changes that users noticed in Windows 11, drag and drop not working was something that struck them the most. This feature has been a part of the Windows ecosystem for a long time and going by the comments, users are not pleased with its discontinuation.
A feature that we all heavily relied on is absent from Windows 11. Users thought of it to be a bug in the initial version but Microsoft was quick to acknowledge that the feature has been removed.
Other changes pertaining to the taskbar include the inability to launch the Task Manager from the right-click context menu, and dropping apps in the taskbar to create their shortcut.
So, what do you do when the Windows 11 drag and drop not working issue occurs?? There are a few workarounds that could get you similar results and we have listed them all in the following sections. Else, you can get used to the new interface and execute tasks accordingly.
4 Solutions when you can’t drag and drop in Windows 11
It has been reported that users who upgraded to Windows 11 22H2 can now use the drag-and-drop feature properly.
However, at the time of writing this article, the Windows 11 22H2 update is full of bugs, so it may be recommended to wait a bit more before trying it out. In case you decide to skip the update for now, you should use the solutions below:
- 4 Solutions when you can’t drag and drop in Windows 11
- 1. Use the Alt + Tab shortcut
- 2. Open the two windows in split screen
- 3. Use the cut and paste operation
- 4. Modify the Registry
- Is drag and drop available in Windows 11?
1. Use the Alt + Tab shortcut
- Navigate to the location where the file/folder that you want to move is saved.
- Select it, press and hold the left mouse button, and drag the file a little.
- With the file still grabbed, press the Alt + Tab keys to view all the apps open in the taskbar.
- This will launch a new screen where all the open apps will be listed as separate tiles. The currently open window or the one that was last opened will be listed first, the one before it would be listed next, and the same sequence will be followed.
- Now, while holding the Alt key, press Tab to navigate through the open windows.
- Release Alt when the desired destination is selected.
- Once the destination window launches, release the left click to drop the file.
This way you can easily move files between apps and get rid of the Windows 11 drag and drop feature not working problem.
Although it will take you some time to get acquainted with the process, once that phase is over, you will find this method convenient and quick. Just practice for a while until you get a knack for it.
2. Open the two windows in split screen
- Launch both the windows amongst which you want the drag and drop the file or folder.
- Open the one where the file to be dragged and dropped is saved, hover the cursor over the maximize button, and select the first option to snap the current window into half of the screen.
- In the other half, you will find listed all the additonal open apps. Select the one where you want to drop the file/folder.
- Now, select the file that is to be moved. Press and hold the left mouse button, drag the file across windows and release the click when you reach the other one.
- The file will now be moved to the destination.
The split-screen method in Windows 11 works great if you just have to move files between two locations. In the above case, we took two File Explorer windows, however, you can replace one or both of them with other apps. This is a quick solution to the annoying drag and drop problem.
For some apps, there may be an additional confirmation box to complete the drag and drop procedure. Choose the appropriate response and get done with it.
3. Use the cut and paste operation
- Launch the program where the file to be moved is stored.
- Right-click on it and select Cut, or as the procedure may be for that particular program.
- Now, navigate to the destination, i.e., the program where you want to move the file/folder.
- Right-click and select Paste, or according to the procedure for that particular program.
Again, a simple workaround for drag and drop not working in Windows 11. However, it’s not as effective as the other two since it requires a tad more time and effort.
Also, some apps don’t support the Cut operation, in which case, you will have to copy the file/folder and move it to the desired location. Once done, go to the source and delete the concerned file.
Some PC issues are hard to tackle, especially when it comes to corrupted repositories or missing Windows files. If you are having troubles fixing an error, your system may be partially broken.
We recommend installing Restoro, a tool that will scan your machine and identify what the fault is.
Click here to download and start repairing.
Those who prefer the keyboard shortcuts can use Ctrl + X to Cut, Ctrl + C to Copy, and Ctrl + V to Paste.
4. Modify the Registry
- Press Windows + R to launch the Run command.
- Type regedit in the text field, and either click on OK or press Enter to launch the Registry Editor.
- Click Yes on the UAC prompt that appears.
- Now either navigate to the following path using the pane on the left, or paste it in the address bar at the top and hit Enter:
HKEY_LOCAL_MACHINESOFTWAREMicrosoftWindowsCurrentVersionShellUpdatePackages - Right-click on the empty space, hover the cursor over New, select DWORD (32-bit) Value, and name it as UndockingDisabled. This key will fix the problem in no time.
- Right-click on it and select Modify from the context menu.
- Enter 1 in the field under Value data and click on OK to save the changes.
- Close the Registry Editor.
- You wouldn’t notice any immediate change, since it requires restarting Windows Explorer. There are two ways to do that, either restart the computer or the process itself from Task Manager. We will go with the latter.
- Press Ctrl + Shift + Esc to launch Task Manager.
- Locate the Windows Explorer process, right-click on it, and select Restart from the context menu.
The taskbar may disappear for a few moments and once it reappears, you will notice that the icons are all aligned to the left. You can now easily pin items to the taskbar as we did in the previous iterations of Windows.
- Copy paste not working on Windows 10/11 [Full Fix]
- Fix: Cannot Change Temporary Internet Files Cache Size
- Volume is Stuck at 100: How to Quickly Fix It
But, there’s a major downside to this method. After making changes to the registry, you wouldn’t be able to launch the Start or Search menu, and Cortana if it’s enabled, by clicking the respective buttons in the taskbar. However, they can still be accessed via other methods.
In case you are willing to make the sacrifice, no other method mentioned above can match the effectiveness of this one.
- Fix: Cannot Change Temporary Internet Files Cache Size
- Volume is Stuck at 100: How to Quickly Fix It
- Fix: File Explorer Preview Pane Not Working on Windows 11
Is drag and drop available in Windows 11?
After the drag and drop not working in Windows 11 problem was raised by several users, Microsoft issued a response a couple of years ago:
Currently, dragging a file onto an app in the taskbar to open it in that app is not supported in Windows 11, but we appreciate all your feedback, and we’ll continue to use it to help guide the future of features like this.
Based on this statement, we had expected the drag and drop feature somewhere down the line from Microsoft. Luckily, it did go live and Windows 11 22H2 users can now use it.
If the above solutions don’t meet your requirements or some critical functionalities are still left out, you can find a way to bring back the old taskbar and Start menu.
These are all the methods you can go for when the drag and drop function is not working in Windows 11. Although they aren’t as good as the built-in functionality, they do the trick until Microsoft releases a similar feature.
Once you have the drag and drop working in Windows 11, pin as many apps to the taskbar. Or, drop files to the processes in the taskbar to launch in that particular app.
Even more, apply these useful tips if the left mouse button drag doesn’t work. Even though it is a Windows 10 guide, rest assured they are the same as in Windows 11.
And if you change your mind and roll back to the previous OS, take a look at these quick fixes if you can’t drag and drop items in Windows 10. Moving paragraphs, files, or folders around will work like a charm once again.
Let us know your thoughts on Microsoft killing the drag and drop operation and the method you opted for in the comments section below.
Still having issues? Fix them with this tool:
SPONSORED
If the advices above haven’t solved your issue, your PC may experience deeper Windows problems. We recommend downloading this PC Repair tool (rated Great on TrustPilot.com) to easily address them. After installation, simply click the Start Scan button and then press on Repair All.
![]()
Newsletter
Прошло больше месяца с момента официального выпуска Windows 11. Со временем мы увидели множество улучшений, включая возможность даже устанавливать приложения Android в вашу систему. Хотя все это звучит хорошо, в Windows 11 все еще есть несколько проблем, над которыми нужно работать. По какой-то причине возможность перетаскивания файлов для открытия запущенным приложением отсутствует. С самого начала инсайдерской сборки Windows 11 до текущей стабильной версии эта функция отсутствовала.
К счастью, есть несколько способов вернуть эту функцию. Продолжайте читать, чтобы узнать, как включить функцию перетаскивания файлов для панели задач Windows 11.
Так же, как кнопка «Пуск» и меню «Пуск», которые продолжают существовать, пользователи также считают, что функция перетаскивания файлов на панель задач не должна быть удалена. Это всегда была удобная функция и продолжает использоваться. Однако Microsoft решила вернуть эту функцию и представит ее сначала инсайдерам к концу года, а затем широкой публике к началу следующего года. Итак, на данный момент есть несколько обходных путей, которые можно использовать для имитации перетаскивания файлов на панель задач в Windows 11.
Включение перетаскивания файлов на панели задач Windows 11
Сообщество, как всегда, быстро предложит решение, чтобы вернуть эту важную функцию, пока Microsoft не выпустит ее в качестве обновления. В любом случае, есть два простых способа вернуть эту удобную функцию. Давайте взглянем.
Метод 1 —
Первый способ — использовать простой инструмент, доступный на GitHub. Этот инструмент под названием Windows11DragAndDropToTaskbarFix помогает вернуть полезную функцию в Windows 11. Настройка для включения этой функции довольно проста. Следуйте инструкциям ниже.
- Прежде всего, вам нужно будет перейти на эту страницу GitHub, чтобы загрузить инструмент.
- Чтобы загрузить установочный файл, просто щелкните ссылку exe, которая находится прямо под заголовком Assets.
- Установка весит всего 109 КБ. Файл должен быть скачан мгновенно.
- Загрузив файл, дважды щелкните его, чтобы запустить. Windows может выдать предупреждение о том, что у файла есть непроверенный издатель.
- Просто нажмите кнопку «Выполнить».
- Теперь программа откроет окно консоли.
- Вам вообще ничего не нужно делать. Окно также автоматически закроется.
- Вот и все. Вот как вы можете включить перетаскивание файлов на панель задач в Windows 11.
- Если вы хотите закрыть приложение, просто откройте диспетчер задач и щелкните вкладку «Процесс».
- Теперь найдите процесс Windows 11 Drag and Drop Taskbar Fix и щелкните его правой кнопкой мыши.
- В контекстном меню выберите опцию «Завершить процесс». Функция будет закрыта сразу.
- Чтобы восстановить его, просто запустите exe-файл, и все готово.
Способ 2
Второй способ — это еще один простой способ включить эту функцию. Для этого вам необходимо загрузить приложение из Microsoft Store. Итак, если у вас нет учетной записи Microsoft, входящей в вашу систему, пришло время сделать это, поскольку Магазин требует, чтобы у вас была учетная запись Microsoft для загрузки приложений и даже публикации отзывов.
- Откройте Microsoft Store и перейдите к окну поиска, которое находится посередине вверху экрана.
- Введите перетаскивание. Нажмите клавишу ввода, чтобы выполнить поиск в приложении.
- В результате вы увидите первое приложение с надписью Drag and Drop Toolbar для Windows 11. Нажмите здесь.
- Теперь нажмите синюю кнопку Get в левой части экрана. Приложение начнет загружаться на ваш компьютер.
- Приложение весит всего 1,1 МБ. Итак, это должна быть быстрая загрузка.
- После загрузки нажмите кнопку «Открыть» в Microsoft Store.
- В тот момент, когда вы откроете приложение, вы получите уведомление о том, что приложение настроено на запуск при запуске Windows.
- Кроме того, вы увидите небольшой лоток в верхней части экрана.
- Чтобы перетащить файлы в любую запущенную программу, просто перетащите файл вверх и наведите указатель мыши на панель. Затем вы можете просто перетащить файл в открытую программу, и все готово.
- Конечно, он не помещается внизу, где находится панель задач, но он все равно выполняет свою работу.
Заключение
Итак, вот оно. Вы можете использовать два разных способа переноса файлов D5ag и Drop на панель задач на вашем ПК с Windows 11. Если вы все еще используете Windows 10, вам следует придерживаться ее до тех пор, пока функция не будет развернута с помощью обновления для Windows 11. После того, как функция будет официально интегрирована в ОС, для ее использования не потребуется использовать сторонние приложения..
Какой из двух методов вам больше подходит? Сообщите нам об этом в комментариях ниже. Также поделитесь этой статьей со своими друзьями.
Windows 11 представила массу новых функций, а также обновление дизайна во время своего выпуска. Например, вы можете пакетно переименовывать файлы и защищать папки паролем в Windows 11. Но, похоже, отсутствует одна важная функция — перетаскивание.
Сложно перетаскивать файлы на панель задач на компьютерах с Windows 11. В этом посте мы представляем вам три лучших способа включить перетаскивание в Windows 11, чтобы ваше использование стало более плавным.
1. Обновите до Windows 11 22H2.
После того, как многие пользователи выразили обеспокоенность по поводу этой функции, Microsoft выпустила Windows 11 22H2 обновление для всех. Это обновление содержит множество новых функций, в том числе столь востребованную функцию перетаскивания на панель задач. Вот как вы можете обновить свой ПК с Windows 11, чтобы воспользоваться этой функцией.
Шаг 1: Щелкните значок Windows на панели задач, введите Настройки в строке поиска и нажмите Enter.
Шаг 2: Нажмите «Центр обновления Windows» в правом верхнем углу.
Шаг 3: Если вы видите обновление для Windows 11 22H2, загрузите и установите его.
Шаг 4: После завершения установки вы можете перетаскивать файлы на панель задач.
Если вы не хотите устанавливать это новое обновление, но по-прежнему включаете перетаскивание, продолжайте читать следующие решения.
2. Используйте сочетание клавиш Alt + Tab
Alt + Tab — это команда для переключения между окнами приложений и папками на вашем компьютере с Windows. Эта функция существует уже довольно давно, и вы можете разумно использовать ее для перетаскивания файлов в Windows 11. Вот как.
Шаг 1: Откройте папку с файлом, откуда вы хотите его перетащить.
Шаг 2: Выберите, перетащите и продолжайте нажимать кнопку мыши.
Шаг 3: Нажмите и удерживайте Alt + Tab на клавиатуре, чтобы перемещаться между разными окнами. Продолжайте нажимать кнопку мыши, чтобы удерживать выбранный файл.
Шаг 4: Отпустите Alt + Tab, когда вы находитесь в нужном месте файла.
Шаг 5: Отпустите кнопку мыши, чтобы поместить файл в это место.
Редактор реестра — это централизованная база данных на вашем компьютере с Windows, в которой хранится важная информация, параметры, настройки и сведения обо всех приложениях. Вы можете проверить и исправить многие системные ошибки, изменив несколько параметров в редакторе реестра. Вы можете изменить настройки чувствительности к перетаскиванию, если хотите включить функцию перетаскивания на своем компьютере с Windows 11.
Обратите внимание, что изменение редактора реестра может привести к необратимому повреждению вашего компьютера с Windows. Мы рекомендуем выполнять шаги, указанные ниже, только если вы хорошо знакомы с редактором реестра.
Шаг 1: Нажмите Windows + R, чтобы открыть диалоговое окно «Выполнить».
Шаг 2: Введите regedit и нажмите Ок.
На вашем экране откроется окно редактора реестра. Мы настоятельно рекомендуем внимательно следить за каждым шагом.
Шаг 3: Нажмите «HKEY_LOCAL_MACHINE» на левой панели.
Шаг 4: Выберите Программное обеспечение из списка параметров папки.
Шаг 5. В разделе «Программное обеспечение» прокрутите вниз и нажмите Microsoft.
Шаг 6: Прокрутите вниз и нажмите Shell.
Шаг 7: Нажмите «Обновить».
Шаг 8: В разделе «Обновление» нажмите «Пакеты».
Если вы не видите папки во время процесса, введите следующий патч файла в строке поиска вверху:
HKEY_LOCAL_MACHINESOFTWAREMicrosoftWindowsCurrentVersionShellUpdatePackages
Шаг 9: В папке «Пакеты» щелкните правой кнопкой мыши пустое место с правой стороны.
Шаг 10: Нажмите «Создать». Затем нажмите «Параметр DWORD (32-разрядное)».
Это создаст ключ «Новое значение» в редакторе реестра.
Шаг 11: Щелкните правой кнопкой мыши новое значение и выберите «Переименовать».
Шаг 12: Переименуйте новое значение в UndockingDisabled.
Шаг 13: Щелкните правой кнопкой мыши переименованное значение и выберите «Изменить».
Шаг 14: Измените значение данных с 0 на 1. Затем нажмите «ОК».
Шаг 15: Закройте окно и перезагрузите компьютер, щелкнув правой кнопкой мыши значок «Пуск» и выбрав «Перезагрузить».
После перезагрузки компьютера вы заметите, что панель задач выглядит так же, как в Windows 10. Но обратите внимание, что «Пуск», «Поиск» и «Кортана» не будут открываться с панели задач. Остальное все на панели задач откроется как обычно.
Теперь вы можете легко перетаскивать файлы на панель задач.
Если вы хотите восстановить панель задач Windows 11 по умолчанию, вот как это сделать.
Шаг 1: снова откройте редактор реестра, набрав regedit в окне команды «Выполнить».
Шаг 2: Перейдите в папку Packages, в которой вы сохранили значение UndockingDisabled.
Шаг 3: Щелкните правой кнопкой мыши UndockingDisabled и выберите «Удалить».
Шаг 4: Нажмите «Удалить» еще раз, чтобы подтвердить свой выбор.
Шаг 5: Закройте окно и перезагрузите компьютер, щелкнув значок «Пуск» на панели задач.
Панель задач Windows 11 по умолчанию будет восстановлена. Вы можете проверить наш пост, предлагающий решения для редактора реестра, не работающего в Windows 11, если у вас возникнут какие-либо проблемы.
Перетаскивание файлов
Эти методы помогут вам включить функцию перетаскивания на ПК с Windows 11. Хотя это полностью ваш выбор, мы рекомендуем обновить ваш компьютер до последней версии Windows 11 22H2, чтобы воспользоваться этой функцией.
Post Views: 140
Если вы хотите включить или отключить перетаскивание в Windows 11, вот как вы можете это сделать. Вам нужно использовать редактор реестра, чтобы включить или выключить функцию перетаскивания в угол для привязки на ПК с Windows 11.
Что такое функция перетаскивания в Windows 11?
Как и в Windows 10, в Windows 11 есть удобная функция, позволяющая привязать окно к определенной области экрана с помощью мыши. Вы можете щелкнуть строку заголовка окна программы, перетащить ее в угол или край экрана, найти возможное положение перетаскивания и отпустить мышь. Окно будет размещено в определенной области, которую вы выбрали.
Однако, если вы не хотите использовать эту функцию, эта статья будет вам полезна. В Windows 11 можно включить или выключить функцию «Перетащить в привязку» с помощью мыши с помощью редактора реестра. Поскольку вы собираетесь изменить или удалить значения реестра, рекомендуется сделать резервную копию всех файлов реестра или создать точку восстановления системы, чтобы быть в безопасности.
Чтобы отключить перетаскивание в Windows 11, выполните следующие действия:
- Нажмите Win + R, чтобы открыть окно «Выполнить».
- Введите regedit> нажмите кнопку Enter.
- Нажмите на опцию Да.
- Перейдите на рабочий стол в HKCU.
- Дважды щелкните значение DWORD DockMoving.
- Установите значение Value как 0.
- Щелкните кнопку ОК.
- Дважды щелкните значение DWORD WindowArrangementActive.
- Установите значение данных как 0.
- Щелкните кнопку ОК.
- Перезагрузите компьютер или выйдите из системы и войдите в свою учетную запись.
Для начала вам нужно открыть редактор реестра на вашем компьютере. Для этого нажмите Win + R, чтобы открыть командную строку «Выполнить», введите regedit и нажмите кнопку «Ввод». Если появится запрос UAC, выберите вариант Да.
После открытия редактора реестра на вашем компьютере перейдите по следующему пути:
HKEY_CURRENT_USER Панель управления Рабочий стол
Здесь вы можете найти два значения REG_DWORD с именами DockMoving и WindowArrangementActive. По умолчанию они должны иметь значение 1. Вам нужно дважды щелкнуть по каждому из них, чтобы установить для параметра Value значение 0.
Нажмите кнопку ОК, чтобы сохранить изменения. Затем вы должны перезагрузить компьютер или выйти из своей учетной записи и повторно войти в нее, чтобы получить изменения.
После этого вы не сможете использовать мышь, чтобы закрепить окно на экране.
Прочтите: объяснение Smart Layouts, Snap Layouts и Snap Groups в Windows 11.
Как включить перетаскивание для привязки в Windows 11
Чтобы включить перетаскивание в Windows 11, выполните следующие действия:
- Найдите regedit в поле поиска на панели задач.
- Щелкните индивидуальный результат поиска.
- Нажмите кнопку «Да», чтобы открыть редактор реестра.
- Перейдите на рабочий стол в HKCU.
- Дважды щелкните значение DWORD DockMoving.
- Установите значение Value как 1.
- Щелкните кнопку ОК.
- Дважды щелкните значение DWORD WindowArrangementActive.
- Установите значение Value как 1.
- Щелкните кнопку ОК.
- Выйдите из системы и войдите в свою учетную запись пользователя.
Откройте редактор реестра. Для этого вы можете найти regedit в поле поиска на панели задач и щелкнуть по отдельному результату поиска. После этого вы можете найти на экране приглашение UAC. Если да, нажмите кнопку «Да».
Далее вам нужно перейти по этому пути:
HKEY_CURRENT_USER Панель управления Рабочий стол
в Рабочий стол key, вы можете найти два значения REG_DWORD, которые называются ДокПеремещение а также WindowArrangementActive. Дважды щелкните значение DWORD DockMoving и установите для параметра Value значение 1.
Щелкните кнопку ОК. Точно так же дважды щелкните значение DWORD WindowArrangementActive, установите для параметра Value значение 1 и нажмите кнопку OK.
Однако, если вы не можете найти эти два значения REG_DWORD, вам необходимо создать их вручную. Для этого щелкните правой кнопкой мыши Рабочий стол> Создать> Значение DWORD (32-бит) и назовите их ДокПеремещение а также WindowArrangementActive.
После этого вам необходимо перезагрузить компьютер или выйти и войти в свою учетную запись.
Читайте: Как включить или отключить Snap Layouts в Windows 11.
Как отключить привязку в Windows?
Чтобы отключить функцию перетаскивания для привязки с помощью мыши в Windows 11, вы можете использовать редактор реестра. Для этого откройте редактор реестра, перейдите в HKEY_CURRENT_USER Control Panel Desktop, дважды щелкните значок ДокПеремещение REG_DWORD и установите для данных значения 0. Точно так же дважды щелкните значок WindowArrangementActive REG_DWORD и установите для параметра Value значение 0. Затем нажмите кнопку OK и перезагрузите компьютер.
Как изменить настройки Snap в Windows?
Чтобы изменить настройки Snap в Windows 11, вы можете использовать панель настроек Windows. Для этого нажмите Win + I, чтобы открыть настройки Windows, и убедитесь, что вы находитесь на вкладке «Система». Если да, нажмите на Многозадачность меню справа. Затем переключите Привязать окна возможность включить его. Щелкните по нему, чтобы развернуть этот раздел, где вы можете найти несколько вариантов изменения функций привязки для различных целей.
Читайте: Как включить или отключить Snap Layouts в Windows 11.
.
Если в Windows 10 закрепление на панели задач файл или иконку приложения было чем-то само собой разумеющимся, то в Windows 11 с этим возникли серьезные проблемы. В новой версии системы разработчики отключили эту функцию, недоступной стала также возможность открытия файлов путем их перетаскивания на иконки запущенных программ на той же панели задач. Восстановить отключенную функцию перетаскивания в инсайдерских сборках системы можно было с помощью несложного твика реестра.
Но сейчас этот способ более не работает.
Чтобы включить перетаскивание файлов на ярлыки запущенных приложений, в текущей версии Windows 11 вам понадобиться помощь стороннего инструмента — тулзы Windows11DragAndDropToTaskbarFix.
Эта весящая всего 100 килобайт утилита служит единственной цели — восстановлению функции перетаскивания файлов на расположенные на панели задач значки запущенных приложений. Утилита лишена графического интерфейса, при запуске тулзы откроется командная строка, которая через короткое время сама же закроется.

Если при запуске исполняемого файла Windows11DragAndDropToTaskbarFix вы получите сообщение об отсутствии библиотеки VCRUNTIME140_1.DLL, скачайте с официальной страницы:
docs.microsoft.com/ru-RU/cpp/windows/latest-supported-vc-redist?view=msvc-160
Компонент Microsoft Visual C++ 2015-2019 64-бит и установите.
После этого утилита должна запуститься без ошибок.
Изменения вступят в силу немедленно, и сразу после запуска инструмента вы сможете перетаскивать файлы и прочие элементы на значки запущенных приложений на панели задач.
Учтите, однако, что в многомониторных системах тулза может работать некорректно, также при перетаскивании объектов вы по-прежнему будете видеть красный значок, указывающий на запрет действия.
Обращать на него внимание не нужно, его появление никак не влияет на функциональность утилиты.
Кроме того, если вы хотите, чтобы перетаскивание работало на постоянной основе, исполняемый файл утилиты необходимо будет забросить в папку автозагрузки, так как Windows11DragAndDropToTaskbarFix не является патчем и не вносит изменений в файлы операционной системы.
Если вы вдруг захотите завершить работу утилиты, сделать это можно будет через Диспетчер задач, закрыв ее процесс принудительно.
Страница проекта: github.com/HerMajestyDrMona/Windows11DragAndDropToTaskbarFix/releases
![]() Загрузка…
Загрузка…
Get back to dragging files in no time!
by Kazim Ali Alvi
Kazim has always been fond of technology, be it scrolling through the settings on his iPhone, Android device, or Windows. And at times, unscrewing the device to take… read more
Updated on January 31, 2023
Reviewed by
Vlad Turiceanu
Passionate about technology, Windows, and everything that has a power button, he spent most of his time developing new skills and learning more about the tech world. Coming… read more
- The Windows 11 drag and drop feature is not working properly for many users.
- Upgrading to Windows 11 22H2 is likely to fix this, but the update comes with many bugs right now.
- We have found a workaround to make your tasks easier.
- You can use the split-screen option, modify the Registry, or opt for a third-party tool, amongst others, to combat the problem.
XINSTALL BY CLICKING THE DOWNLOAD FILE
- Download Restoro PC Repair Tool that comes with Patented Technologies (patent available here).
- Click Start Scan to find Windows 11 issues that could be causing PC problems.
- Click Repair All to fix issues affecting your computer’s security and performance
- Restoro has been downloaded by 0 readers this month.
Of all the changes that users noticed in Windows 11, drag and drop not working was something that struck them the most. This feature has been a part of the Windows ecosystem for a long time and going by the comments, users are not pleased with its discontinuation.
A feature that we all heavily relied on is absent from Windows 11. Users thought of it to be a bug in the initial version but Microsoft was quick to acknowledge that the feature has been removed.
Other changes pertaining to the taskbar include the inability to launch the Task Manager from the right-click context menu, and dropping apps in the taskbar to create their shortcut.
So, what do you do when the Windows 11 drag and drop not working issue occurs?? There are a few workarounds that could get you similar results and we have listed them all in the following sections. Else, you can get used to the new interface and execute tasks accordingly.
4 Solutions when you can’t drag and drop in Windows 11
It has been reported that users who upgraded to Windows 11 22H2 can now use the drag-and-drop feature properly.
However, at the time of writing this article, the Windows 11 22H2 update is full of bugs, so it may be recommended to wait a bit more before trying it out. In case you decide to skip the update for now, you should use the solutions below:
- 4 Solutions when you can’t drag and drop in Windows 11
- 1. Use the Alt + Tab shortcut
- 2. Open the two windows in split screen
- 3. Use the cut and paste operation
- 4. Modify the Registry
- Is drag and drop available in Windows 11?
1. Use the Alt + Tab shortcut
- Navigate to the location where the file/folder that you want to move is saved.
- Select it, press and hold the left mouse button, and drag the file a little.
- With the file still grabbed, press the Alt + Tab keys to view all the apps open in the taskbar.
- This will launch a new screen where all the open apps will be listed as separate tiles. The currently open window or the one that was last opened will be listed first, the one before it would be listed next, and the same sequence will be followed.
- Now, while holding the Alt key, press Tab to navigate through the open windows.
- Release Alt when the desired destination is selected.
- Once the destination window launches, release the left click to drop the file.
This way you can easily move files between apps and get rid of the Windows 11 drag and drop feature not working problem.
Although it will take you some time to get acquainted with the process, once that phase is over, you will find this method convenient and quick. Just practice for a while until you get a knack for it.
2. Open the two windows in split screen
- Launch both the windows amongst which you want the drag and drop the file or folder.
- Open the one where the file to be dragged and dropped is saved, hover the cursor over the maximize button, and select the first option to snap the current window into half of the screen.
- In the other half, you will find listed all the additonal open apps. Select the one where you want to drop the file/folder.
- Now, select the file that is to be moved. Press and hold the left mouse button, drag the file across windows and release the click when you reach the other one.
- The file will now be moved to the destination.
The split-screen method in Windows 11 works great if you just have to move files between two locations. In the above case, we took two File Explorer windows, however, you can replace one or both of them with other apps. This is a quick solution to the annoying drag and drop problem.
For some apps, there may be an additional confirmation box to complete the drag and drop procedure. Choose the appropriate response and get done with it.
3. Use the cut and paste operation
- Launch the program where the file to be moved is stored.
- Right-click on it and select Cut, or as the procedure may be for that particular program.
- Now, navigate to the destination, i.e., the program where you want to move the file/folder.
- Right-click and select Paste, or according to the procedure for that particular program.
Again, a simple workaround for drag and drop not working in Windows 11. However, it’s not as effective as the other two since it requires a tad more time and effort.
Also, some apps don’t support the Cut operation, in which case, you will have to copy the file/folder and move it to the desired location. Once done, go to the source and delete the concerned file.
Some PC issues are hard to tackle, especially when it comes to corrupted repositories or missing Windows files. If you are having troubles fixing an error, your system may be partially broken.
We recommend installing Restoro, a tool that will scan your machine and identify what the fault is.
Click here to download and start repairing.
Those who prefer the keyboard shortcuts can use Ctrl + X to Cut, Ctrl + C to Copy, and Ctrl + V to Paste.
4. Modify the Registry
- Press Windows + R to launch the Run command.
- Type regedit in the text field, and either click on OK or press Enter to launch the Registry Editor.
- Click Yes on the UAC prompt that appears.
- Now either navigate to the following path using the pane on the left, or paste it in the address bar at the top and hit Enter:
HKEY_LOCAL_MACHINESOFTWAREMicrosoftWindowsCurrentVersionShellUpdatePackages - Right-click on the empty space, hover the cursor over New, select DWORD (32-bit) Value, and name it as UndockingDisabled. This key will fix the problem in no time.
- Right-click on it and select Modify from the context menu.
- Enter 1 in the field under Value data and click on OK to save the changes.
- Close the Registry Editor.
- You wouldn’t notice any immediate change, since it requires restarting Windows Explorer. There are two ways to do that, either restart the computer or the process itself from Task Manager. We will go with the latter.
- Press Ctrl + Shift + Esc to launch Task Manager.
- Locate the Windows Explorer process, right-click on it, and select Restart from the context menu.
The taskbar may disappear for a few moments and once it reappears, you will notice that the icons are all aligned to the left. You can now easily pin items to the taskbar as we did in the previous iterations of Windows.
- Copy paste not working on Windows 10/11 [Full Fix]
- Fix: Cannot Change Temporary Internet Files Cache Size
- Volume is Stuck at 100: How to Quickly Fix It
- Fix: File Explorer Preview Pane Not Working on Windows 11
But, there’s a major downside to this method. After making changes to the registry, you wouldn’t be able to launch the Start or Search menu, and Cortana if it’s enabled, by clicking the respective buttons in the taskbar. However, they can still be accessed via other methods.
In case you are willing to make the sacrifice, no other method mentioned above can match the effectiveness of this one.
- Fix: Cannot Change Temporary Internet Files Cache Size
- Volume is Stuck at 100: How to Quickly Fix It
- Fix: File Explorer Preview Pane Not Working on Windows 11
Is drag and drop available in Windows 11?
After the drag and drop not working in Windows 11 problem was raised by several users, Microsoft issued a response a couple of years ago:
Currently, dragging a file onto an app in the taskbar to open it in that app is not supported in Windows 11, but we appreciate all your feedback, and we’ll continue to use it to help guide the future of features like this.
Based on this statement, we had expected the drag and drop feature somewhere down the line from Microsoft. Luckily, it did go live and Windows 11 22H2 users can now use it.
If the above solutions don’t meet your requirements or some critical functionalities are still left out, you can find a way to bring back the old taskbar and Start menu.
These are all the methods you can go for when the drag and drop function is not working in Windows 11. Although they aren’t as good as the built-in functionality, they do the trick until Microsoft releases a similar feature.
Once you have the drag and drop working in Windows 11, pin as many apps to the taskbar. Or, drop files to the processes in the taskbar to launch in that particular app.
Even more, apply these useful tips if the left mouse button drag doesn’t work. Even though it is a Windows 10 guide, rest assured they are the same as in Windows 11.
And if you change your mind and roll back to the previous OS, take a look at these quick fixes if you can’t drag and drop items in Windows 10. Moving paragraphs, files, or folders around will work like a charm once again.
Let us know your thoughts on Microsoft killing the drag and drop operation and the method you opted for in the comments section below.
Still having issues? Fix them with this tool:
SPONSORED
If the advices above haven’t solved your issue, your PC may experience deeper Windows problems. We recommend downloading this PC Repair tool (rated Great on TrustPilot.com) to easily address them. After installation, simply click the Start Scan button and then press on Repair All.
![]()
Newsletter
Get back to dragging files in no time!
by Kazim Ali Alvi
Kazim has always been fond of technology, be it scrolling through the settings on his iPhone, Android device, or Windows. And at times, unscrewing the device to take… read more
Updated on January 31, 2023
Reviewed by
Vlad Turiceanu
Passionate about technology, Windows, and everything that has a power button, he spent most of his time developing new skills and learning more about the tech world. Coming… read more
- The Windows 11 drag and drop feature is not working properly for many users.
- Upgrading to Windows 11 22H2 is likely to fix this, but the update comes with many bugs right now.
- We have found a workaround to make your tasks easier.
- You can use the split-screen option, modify the Registry, or opt for a third-party tool, amongst others, to combat the problem.
XINSTALL BY CLICKING THE DOWNLOAD FILE
- Download Restoro PC Repair Tool that comes with Patented Technologies (patent available here).
- Click Start Scan to find Windows 11 issues that could be causing PC problems.
- Click Repair All to fix issues affecting your computer’s security and performance
- Restoro has been downloaded by 0 readers this month.
Of all the changes that users noticed in Windows 11, drag and drop not working was something that struck them the most. This feature has been a part of the Windows ecosystem for a long time and going by the comments, users are not pleased with its discontinuation.
A feature that we all heavily relied on is absent from Windows 11. Users thought of it to be a bug in the initial version but Microsoft was quick to acknowledge that the feature has been removed.
Other changes pertaining to the taskbar include the inability to launch the Task Manager from the right-click context menu, and dropping apps in the taskbar to create their shortcut.
So, what do you do when the Windows 11 drag and drop not working issue occurs?? There are a few workarounds that could get you similar results and we have listed them all in the following sections. Else, you can get used to the new interface and execute tasks accordingly.
4 Solutions when you can’t drag and drop in Windows 11
It has been reported that users who upgraded to Windows 11 22H2 can now use the drag-and-drop feature properly.
However, at the time of writing this article, the Windows 11 22H2 update is full of bugs, so it may be recommended to wait a bit more before trying it out. In case you decide to skip the update for now, you should use the solutions below:
- 4 Solutions when you can’t drag and drop in Windows 11
- 1. Use the Alt + Tab shortcut
- 2. Open the two windows in split screen
- 3. Use the cut and paste operation
- 4. Modify the Registry
- Is drag and drop available in Windows 11?
1. Use the Alt + Tab shortcut
- Navigate to the location where the file/folder that you want to move is saved.
- Select it, press and hold the left mouse button, and drag the file a little.
- With the file still grabbed, press the Alt + Tab keys to view all the apps open in the taskbar.
- This will launch a new screen where all the open apps will be listed as separate tiles. The currently open window or the one that was last opened will be listed first, the one before it would be listed next, and the same sequence will be followed.
- Now, while holding the Alt key, press Tab to navigate through the open windows.
- Release Alt when the desired destination is selected.
- Once the destination window launches, release the left click to drop the file.
This way you can easily move files between apps and get rid of the Windows 11 drag and drop feature not working problem.
Although it will take you some time to get acquainted with the process, once that phase is over, you will find this method convenient and quick. Just practice for a while until you get a knack for it.
2. Open the two windows in split screen
- Launch both the windows amongst which you want the drag and drop the file or folder.
- Open the one where the file to be dragged and dropped is saved, hover the cursor over the maximize button, and select the first option to snap the current window into half of the screen.
- In the other half, you will find listed all the additonal open apps. Select the one where you want to drop the file/folder.
- Now, select the file that is to be moved. Press and hold the left mouse button, drag the file across windows and release the click when you reach the other one.
- The file will now be moved to the destination.
The split-screen method in Windows 11 works great if you just have to move files between two locations. In the above case, we took two File Explorer windows, however, you can replace one or both of them with other apps. This is a quick solution to the annoying drag and drop problem.
For some apps, there may be an additional confirmation box to complete the drag and drop procedure. Choose the appropriate response and get done with it.
3. Use the cut and paste operation
- Launch the program where the file to be moved is stored.
- Right-click on it and select Cut, or as the procedure may be for that particular program.
- Now, navigate to the destination, i.e., the program where you want to move the file/folder.
- Right-click and select Paste, or according to the procedure for that particular program.
Again, a simple workaround for drag and drop not working in Windows 11. However, it’s not as effective as the other two since it requires a tad more time and effort.
Also, some apps don’t support the Cut operation, in which case, you will have to copy the file/folder and move it to the desired location. Once done, go to the source and delete the concerned file.
Some PC issues are hard to tackle, especially when it comes to corrupted repositories or missing Windows files. If you are having troubles fixing an error, your system may be partially broken.
We recommend installing Restoro, a tool that will scan your machine and identify what the fault is.
Click here to download and start repairing.
Those who prefer the keyboard shortcuts can use Ctrl + X to Cut, Ctrl + C to Copy, and Ctrl + V to Paste.
4. Modify the Registry
- Press Windows + R to launch the Run command.
- Type regedit in the text field, and either click on OK or press Enter to launch the Registry Editor.
- Click Yes on the UAC prompt that appears.
- Now either navigate to the following path using the pane on the left, or paste it in the address bar at the top and hit Enter:
HKEY_LOCAL_MACHINESOFTWAREMicrosoftWindowsCurrentVersionShellUpdatePackages - Right-click on the empty space, hover the cursor over New, select DWORD (32-bit) Value, and name it as UndockingDisabled. This key will fix the problem in no time.
- Right-click on it and select Modify from the context menu.
- Enter 1 in the field under Value data and click on OK to save the changes.
- Close the Registry Editor.
- You wouldn’t notice any immediate change, since it requires restarting Windows Explorer. There are two ways to do that, either restart the computer or the process itself from Task Manager. We will go with the latter.
- Press Ctrl + Shift + Esc to launch Task Manager.
- Locate the Windows Explorer process, right-click on it, and select Restart from the context menu.
The taskbar may disappear for a few moments and once it reappears, you will notice that the icons are all aligned to the left. You can now easily pin items to the taskbar as we did in the previous iterations of Windows.
- Copy paste not working on Windows 10/11 [Full Fix]
- Fix: Cannot Change Temporary Internet Files Cache Size
- Volume is Stuck at 100: How to Quickly Fix It
- Fix: File Explorer Preview Pane Not Working on Windows 11
- How to Make Sticky Notes Stay on Top in Windows 11
But, there’s a major downside to this method. After making changes to the registry, you wouldn’t be able to launch the Start or Search menu, and Cortana if it’s enabled, by clicking the respective buttons in the taskbar. However, they can still be accessed via other methods.
In case you are willing to make the sacrifice, no other method mentioned above can match the effectiveness of this one.
- Fix: Cannot Change Temporary Internet Files Cache Size
- Volume is Stuck at 100: How to Quickly Fix It
Is drag and drop available in Windows 11?
After the drag and drop not working in Windows 11 problem was raised by several users, Microsoft issued a response a couple of years ago:
Currently, dragging a file onto an app in the taskbar to open it in that app is not supported in Windows 11, but we appreciate all your feedback, and we’ll continue to use it to help guide the future of features like this.
Based on this statement, we had expected the drag and drop feature somewhere down the line from Microsoft. Luckily, it did go live and Windows 11 22H2 users can now use it.
If the above solutions don’t meet your requirements or some critical functionalities are still left out, you can find a way to bring back the old taskbar and Start menu.
These are all the methods you can go for when the drag and drop function is not working in Windows 11. Although they aren’t as good as the built-in functionality, they do the trick until Microsoft releases a similar feature.
Once you have the drag and drop working in Windows 11, pin as many apps to the taskbar. Or, drop files to the processes in the taskbar to launch in that particular app.
Even more, apply these useful tips if the left mouse button drag doesn’t work. Even though it is a Windows 10 guide, rest assured they are the same as in Windows 11.
And if you change your mind and roll back to the previous OS, take a look at these quick fixes if you can’t drag and drop items in Windows 10. Moving paragraphs, files, or folders around will work like a charm once again.
Let us know your thoughts on Microsoft killing the drag and drop operation and the method you opted for in the comments section below.
Still having issues? Fix them with this tool:
SPONSORED
If the advices above haven’t solved your issue, your PC may experience deeper Windows problems. We recommend downloading this PC Repair tool (rated Great on TrustPilot.com) to easily address them. After installation, simply click the Start Scan button and then press on Repair All.
![]()
Newsletter
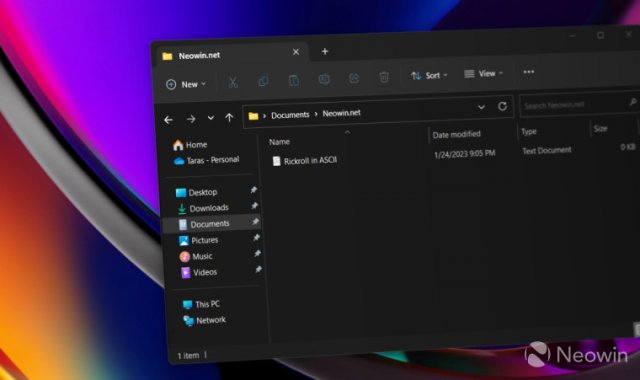
В последней предварительной сборке Windows 11 есть пара новых виджетов, одно сомнительное изменение в меню «Пуск» и длинный список различных исправлений. Тем не менее, самые интересные изменения скрываются внутри ОС и требуют некоторых умений, чтобы их обнаружить. Как отмечает пользователь под ником «PhantomOcean3», сборка Windows 11 Build 25290 имеет очень необходимое улучшение для проводника.
Microsoft работает над крупными обновлениями проводника, и часть этих обновлений сделает вкладки более удобными и менее ущербными. На данный момент проводник страдает от низкой производительности и отсутствия функций, таких как возможность перетаскивания вкладки для создания нового окна или перемещения вкладки между окнами. Пользователи сборки Windows 11 Build 25290 теперь могут включить идентификатор функции, отвечающий за перетаскивание вкладок и создание новых окон проводника.
Важно: Сделайте резервную копию важных данных перед включением скрытых функций в ранних сборках Windows 11. Вы можете столкнуться с ошибками, нестабильностью или потерей данных после принудительного включения функций, которые Microsoft скрывает от общественности.
Как включить перетаскивание вкладок проводника в сборке Windows 11 Build 25290
1. Загрузите ViveTool из
репозитория GitHub
.
2. Извлеките файлы в удобное для вас место — например, C:Vive.
3. Запустите Windows Terminal от имени администратора и переключитесь на профиль командной строки.
4. Перейдите в папку ViveTool с помощью команды CD. Например, CD C:Vive.
5. Введите vivetool /enable /id:39661369 и нажмите Enter$
6. Перезагрузите компьютер.
Если вы хотите вернуть всё назад, повторите шаги, описанные выше, и замените /enable на /disable в команде на шаге 5.