I was looking for a way to pass through GPU acceleration to virtual machines for some processing tasks. However, most methods (such as DDA or VMware ESXi) requires specific server hardware, server hypervisor OS, support CPU & motherboard firmware. Sadly, I don’t have matching specification to use those methods.
Then I come across RemoteFX. While it’s not a full feature GPU pass through, it serves my current needs with my limited availability for other methods. Unfortunately Microsoft is disabling (updates after July 14, 2020) and removing RemoteFX support by February 9, 2021.
Based on your Windows 10 version and your updates, you may find that RemoteFX is disabled. But there’s still ways to make it work.
Moreover, if you have trouble with sound or connecting using remote desktop, I have a solution for you.
RemoteFX for Windows 10 version 1803 or earlier
RemoteFX is supported in these versions:
- start Hyper-V manager
- go to Hyper-V Settings > Physical GPUs
- select your GPU
- check the box Use this GPU with RemoteFX
- click OK

- select your virtual machine
- click Settings…
- click Add Hardware > RemoteFX 3D Video Adapter
- click Add
- update RemoteFX settings for your needs
- click OK

That is. Start the virtual machine and you should have RemoteFX working for your VM.
RemoteFX for Windows 10 version after 1803 without Windows update after July 14, 2020
In this case, RemoteFX still works if your virtual machine already have RemoteFX adapter added. But you don’t have the option to add new RemoteFX adapter from the Hyper-V Manager:

It’s dimmed and you won’t be able to add RemoteFX. Moreover, The Physical GPUs option is no longer shown in Hyper-V Settings.
But you can still add RemoteFX adapter using PowerShell:
- note the name of your virtual machine
- start PowerShell as Administrator
- run command: Add-VMRemoteFx3dVideoAdapter -VMname <name>

Now check your virtual machine settings at Hyper-V manager and you should see RemoteFX adapter added.
RemoteFX for Windows 10 version with Windows update after July 14, 2020
You will start to receive the following error if you try to start a virtual machine with RemoteFX adapter:

This is because Microsoft’s updates after July 14, 2020 would disable RemoteFX due to a vulnerability.
All hope is not lost. You can re-enable it using Powershell:
- start PowerShell as Administrator
- run command: Get-VMRemoteFXPhysicalVideoAdapter

- note the name of the graphic card
- run command: Enable-VMRemoteFXPhysicalVideoAdapter -Name “<graphic card name>”

Now try again and your virtual machine with RemoteFX adapter should be starting ok.
If you want to add new RemoteFX adapter, check out powershell command Add-VMRemoteFx3dVideoAdapter discussed in last section.
Troubleshooting
Video remoting was disconnected

If you have this error, you need to update a setting in your virtual machine using Group Policy Editor.
- you can sign in to your virtual machine by not using Enhanced Session Mode or remove the RemoteFX adapter for now
- run gpedit.msc (Group Policy Editor) as Administrator
- go to Computer Configuration > Administrative Templates > Windows Components > Remote Desktop Services > Remote Desktop Session Host > Remote Session Environment
- double click on Use WDDM graphics display driver for Remote Desktop Connections (note: this config is only available Windows 10 version 1903 or after. Update your VM if needed)
- select Disabled
- click Apply
- reboot your VM

You should now be able to connect using Enhanced Session Mode.
RDP failed to connect

If you receive this error, you need to disable Use WDDM graphics display driver for Remote in your virtual machine as discussed in the last troubleshooting section.
Disable Windows Automatic Update
Microsoft has scheduled to remove RemoteFX by February 2021. If you want to continue to use RemoteFX after that, you would need to avoid Windows Update at that time.
One way is to disable Windows Automatic Update.
IMPORTANT: continue using Windows without security updates pose security risk to your system. Do not disable unless necessary.
To disable Windows Automatic Update, follow the steps below:
- type services in search box
- run App Services
- scroll to Windows Update
- double click to bring up Properties screen
- select Disabled for Startup type
- click Stop
- click Apply

Security Risk
RemoteFX has a remote code execution vulnerability (CVE-2020-1036) that has no patch to fix. As a result, Microsoft decides to remove the RemoteFX feature to eliminate the risk.
IMPORTANT: continue using RemoteFX poses security risk to your system. Use it at your own risk or stop using RemoteFX to avoid the risk.
A useful feature that was introduced not too long ago for Windows 10 has now been disabled. The RemoteFX vGPU feature lets the users of Virtual Machines (VMs) running Windows Server 2008 R2, Server 2012, Server 2016, and Windows 10 running on Hyper-V use the physical Graphics Processing Unit (GPU) of the host machine to render its graphic output.
As of the most recent update by Microsoft for Windows 10, KB4571757, Microsoft has decided to discontinue this feature due to a critical vulnerability discovered in Remote Code Execution.
Let’s look into the details of the feature, why it was discontinued, and whether or not we can find a way for it to still work.
Table of contents
- What is RemoteFX vGPU?
- Why did Microsoft remove RemoteFX vGPU feature?
- How to enable RemoteFX vGPU on Hyper-V running on Windows 10
- Alternative for RemoteFX vGPU
- Configure the VM for DDA
- Dismount the GPU from the host computer
- Assign the GPU to the VM
- Closing words
What is RemoteFX vGPU?
The VMs running on Hyper-V can use the physical GPU on the host computer to run their tasks concerning video rendering and image processing, using the RemoteFX vGPU feature. This allows users to take the load off of their CPU and run heavy image processing on their VMs using the shared GPU.
With this feature, a dedicated GPU for each VM is not required and simultaneously provides enhanced scalability and usability of the GPU, as well as the VMs. Head on to Microsoft’s web page to learn more about the feature.
Why did Microsoft remove RemoteFX vGPU feature?
Although the RemoteFX vGPU feature is old as it was introduced in Windows 7, it is now being exploited by hackers to execute remote commands on the host machine. This feature is not capable of authenticating the input of a valid user on the VM. A hacker can exploit this vulnerability to run modified applications on the VM to exploit the drivers of the host GPU and gain access. Once they have access to the host machine, they are able to execute remote commands and scripts.
Although Microsoft addresses such vulnerabilities through their regular updates, they were unable to do so as the flaw is architectural.
Microsoft started removing this feature for different versions of the OS back in July 2020. However, the Windows 10 cumulative update for September 2020 disabled the feature in all editions of Windows 10 version 2004.
Microsoft states that users will still be able to re-enable the feature until February 2021 through special commands, but should start working on alternative methods which will be discussed further down the article. Here is a notification by Microsoft on disabling RemoteFX vGPU.
How to enable RemoteFX vGPU on Hyper-V running on Windows 10
Although Microsoft has greyed out the feature to enable RemoteFX vGPU through Hyper-V on Windows 10, it can still be enabled through a command using PowerShell. Moreover, the Group Policy Settings are still there within the guest Operating Systems (VMs) which can be used to enable the feature on the VM just as before.

- First, turn on the VM you wish to configure this feature on and open the Group Policy Editor by typing in gpedit.msc in Run.
- In the Group Policy Editor, navigate to the following from the left pane:
- Computer Configuration -> Administrative Templates -> Windows Components -> Remote Desktop Services -> Remote Desktop Session Host -> Remote Session Environment -> RemoteFX for Windows Server
- In the right pane, double-click on Configure RemoteFX.
- In the Configure RemoteFX properties window, select Enabled, and then click Apply and Ok.

- Now open the Command Prompt and type in gpupdate /force to update the Group Policies.

- Download and install the recommended GPU driver according to your physical GPU. Here is a detailed review of GPUs and how to manage them.
- Now shut down the VM and navigate back to the hosting computer running Hyper-V.
- Since the RemoteFX 3D Video Adapter option is greyed out in the settings of the VM, we shall enable it through PowerShell. Run PowerShell with Administrative Rights. Here is a complete guide on how to always run PowerShell in Administrative Mode.
- Enter the following command while replacing (name) with the name of your virtual machine:
Add-VMRemoteFX3dVideoAdapter -VMName (name)
- Now open the VM Settings through the Hyper-V control panel and you will find the RemoteFX ED Video Adapter under the Processor tab. Click on it and then make the configurations according to your needs.


You can now start and connect to the virtual machine and it will now use the host machine’s GPU to process its workload. You may also configure multiple VMs to run on a shared physical GPU.
Alternative for RemoteFX vGPU
Microsoft is permanently planning on removing the feature by February 2021. However, they have not left their users stranded. Microsoft has also proposed an alternative solution to directly mount the physical GPU on the PCIe port to a VM through the Discrete Device Assignment (DDA).
This method has three phases which need to be completed in order to provide a VM with a dedicated GPU:
- Configure the VM for DDA
- Dismount the GPU from the host computer
- Assign the GPU to the VM
Configure the VM for DDA
On the host computer, run the following commands one after the other to configure its settings. Replace (name) with the name of the VM:
Set-VM -Name (name) -AutomaticStopAction TurnOffSet-VM -GuestControlledCacheTypes $true -VMName (name)Set-VM -LowMemoryMappedIoSpace 3Gb -VMName (name)Set-VM -HighMemoryMappedIoSpace 33280Mb -VMName (name)
Dismount the GPU from the host computer
Firstly, you need to disable the GPU on the PCIe port, and then dismount it. But before that, you are going to need the port’s physical address. This can be determined by performing the following:
- Head to the Device Manager by typing in devmgmt.msc in Run.
- Now expand Display Adapters and right-click on the GPU. Select Properties from the Context Menu.

- Go to the Details tab and select Location Paths from the drop-down menu under Property.
- Note that the entry starts with “PCIROOT” as this will be required when dismounting the GPU from the host device.


Now perform the following to dismount the device:
- Head to the Properties window of the GPU from the Device Manager.
- Go to the Driver tab and then click on Disable device.


Now that the device has been disabled, you need to dismount it.
Enter the following command in Command Prompt:Dismount-VMHostAssignableDevice -force -LocationPath $(LocationPath)
Replace (LocationPath) with the PCIe path you had noted earlier.
Once done, you may proceed to the next phase.
Assign the GPU to the VM
Now all you need to do is program Hyper-V to let the specified VM use the physical GPU. This can be done by running the command below in Command Prompt:Add-VMAssignableDevice -LocationPath $locationPath -VMName (name)
Replace (name) with the name of the VM.
You may now start the guest operating system and see that the video adapter it is now using will be the physical one on your host computer.
If at any time you wish to return the GPU back to the host device, simply run the following two commands in the same order, one after the other, in the Command Prompt while replacing (name) with the name of the VM:Remove-VMAssignableDevice -LocationPath $locationPath -VMName VMName<br>Mount-VMHostAssignableDevice -LocationPath $locationPath
Closing words
The RemoteFX vGPU hasn’t been around much for the version 2004. However, people liked the idea of it. Seeing it go might not be as troublesome as anticipated unless you put in the cost factor.
Although Microsoft has given an alternative for using designated GPUs for each virtual machine, it would not be ideal to place as many GPUs on the motherboard of the host computer as the virtual machines. The costs would be too high, and power consumption would not be ideal.
Microsoft needs to find a workaround for the issue as the solution provided is not feasible for most users.
Also see:
Subhan Zafar is an established IT professional with interests in Windows and Server infrastructure testing and research, and is currently working with Itechtics as a research consultant. He has studied Electrical Engineering and is also certified by Huawei (HCNA & HCNP Routing and Switching).
Корпорация Майкрософт выпустила обновление безопасности — KB4571756, которое отключит RemoteFX vGPU функция из-за уязвимости системы безопасности. Это применимо к Windows 10 версии 2004 и всем выпускам Windows Server версии 2004.
Опубликуйте это обновление, любая виртуальная машина, на которой включен RemoteFX vGPU, выйдет из строя со следующими сообщениями об ошибках:
- Невозможно запустить виртуальную машину, поскольку все графические процессоры с поддержкой RemoteFX отключены в диспетчере Hyper-V.
- Невозможно запустить виртуальную машину, поскольку на сервере недостаточно ресурсов графического процессора.
Даже если конечный пользователь попытается повторно включить RemoteFX vGPU, виртуальная машина отобразит сообщение об ошибке:
Мы больше не поддерживаем видеоадаптер RemoteFX 3D. Если вы все еще используете этот адаптер, вы можете подвергнуться риску безопасности.
Что такое функция vGPU RemoteFX?
При запуске виртуальных машин функция RemoteFX vGPU позволяет вам совместно использовать физический графический процессор. Эта функция хорошо подходит, когда физический графический процессор является слишком большим ресурсом, но вместо этого все виртуальные машины могут динамически совместно использовать графический процессор для своей рабочей нагрузки. Преимущество, конечно же, в удешевлении GPU и уменьшении нагрузки на CPU. Если вы хотите представить, это похоже на одновременное выполнение нескольких приложений DirectX на одном физическом графическом процессоре. Таким образом, вместо покупки 4 графических процессоров, может помочь один графический процессор, в зависимости от рабочей нагрузки. Также были предусмотрены контрмеры, ограничивавшие чрезмерное использование физического графического процессора.
В чем заключается уязвимость системы безопасности RemoteFX vGPU?
RemoteFX vGPU устарел. Он был представлен в Windows 7 и теперь сталкивается с уязвимостью удаленного выполнения кода. Уязвимость удаленного выполнения кода существует, когда Hyper-V RemoteFX vGPU на хост-сервере не может должным образом проверить ввод от аутентифицированного пользователя в гостевой операционной системе. Это происходит, когда vGPU Hyper-V RemoteFX на хост-сервере не может должным образом проверить ввод от аутентифицированного пользователя в гостевой операционной системе, когда злоумышленник запускает созданное приложение в гостевой ОС, которое атакует отдельные сторонние видеодрайверы, работающие на Hyper. -V хозяин.
Как только злоумышленник получит доступ, он может запустить любой код в ОС хоста. Поскольку это архитектурная проблема, исправить ее невозможно.
Альтернативные варианты для RemoteFX vGPU
Единственный вариант — использовать альтернативный vGPU, который может быть из сторонних приложений или Microsoft предлагает использовать Discrete Device Assignment (DDA). Это позволяет объединить все устройство PCIe в виртуальную машину. Вы можете не только разрешить доступ к графическим автомобилям, но и совместно использовать хранилище NVMe.
Самым большим преимуществом DDA, помимо того, что он безопасен, нет необходимости устанавливать драйверы на хосте до того, как устройство будет подключено к виртуальной машине. Пока виртуальная машина может определить местоположение устройства PCIe, можно определить путь, по которому виртуальная машина смонтирует его. Короче говоря, DDA, передающий графический процессор в виртуальную машину, позволяет использовать собственный драйвер графического процессора в виртуальной машине и все возможности. Это включает DirectX 12, CUDA и т. Д., Что было невозможно с RemoteFX vGPU.
Microsoft четко предупреждает, что вам не следует использовать RemoteFX vGPU, но если вам нужно, есть способ снова включить его на свой страх и риск.
Предполагая, что вы уже настроили 3D-адаптер RemoteFX vGPU, вот подробности, которые будут работать только в Windows 10 версии 1803 и более ранних версиях.
Настройте RemoteFX vGPU с помощью Hyper-V Manager
Чтобы настроить RemoteFX vGPU 3D с помощью диспетчера Hyper-V, выполните следующие действия:
- Остановить виртуальную машину
- Откройте диспетчер Hyper-V и перейдите к параметрам виртуальной машины.
- Щелкните Добавить оборудование.
- Выберите адаптер 3D-графики RemoteFX, а затем нажмите «Добавить».
Настройте RemoteFX vGPU с помощью командлетов PowerShell
- Enable-VMRemoteFXPhysicalVideoAdapter
- Добавить VMRemoteFx3dVideoAdapter
- Get-VMRemoteFx3dVideoAdapter
- Set-VMRemoteFx3dVideoAdapter
- Get-VMRemoteFXPhysicalVideoAdapter
Вы можете прочитать больше об этом здесь, в Microsoft.
The use cases for a hypervisor on the desktop are quite different from those for hypervisors in the datacenter and can involve using high-performance graphics implementations made possible by technologies such as Hyper-V RemoteFX Windows 10. Datacenter virtual machines run around the clock, quietly providing services behind the scenes. They aren’t logged onto very often, and when they are it’s usually only for administrative purposes. If a virtual machine is running on the desktop at all, it’s also typically open in a window and seeing regular interaction. It’s reasonable to expect more from that experience than might be typical for server-side virtualization. However, even with data center workstations and power users using VDI desktops, high-performance video adapters may be needed. One of the technologies historically that could help Client Hyper-V to meet that expectation is Hyper-V RemoteFX Windows 10.
The server editions of Hyper-V also offer RemoteFX. It’s not used as frequently as Hyper-V RemoteFX Windows 10, is disabled by default, and has more requirements. The complete RemoteFX experience on the server requires the Remote Desktop Services stack to be employed, and server-class accelerated GPUs are quite expensive and uncommon, unlike Hyper-V RemoteFX Windows 10. It’s a different story for Hyper-V RemoteFX Windows 10 because desktops commonly contain accelerated graphics adapters. Beyond having such an adapter, there are no particular requirements for Client Hyper-V’s RemoteFX.
I once undertook a journey to enumerate the features of RemoteFX, and gave up after a while. RemoteFX is an umbrella term for several technologies designed to enhance the Remote Desktop/VMConnect experience for Hyper-V guests. Most commonly, we think of video capability because that is the most obvious component, but it is not the only one. If you’re interested in the other RemoteFX technologies, I’ll leave you to perform your own quest. What we’re most concerned with is video. Hyper-V RemoteFX Windows 10 provides strong support for RemoteFX video, which mostly means 3D acceleration. It is available by default, but you must specifically configure a RemoteFX video adapter for each virtual machine that you intend to use it with. I would strongly recommend that you proceed with caution when adding this adapter to any virtual machine whose guest operating system is not explicitly supported by Hyper-V. This TechNet article shows the supported Windows guests and there are menu items at the left that will take you to the lists of supported Linux guests.
Note that Hyper-V RemoteFX Windows 10 video might not be required for a satisfactory Client Hyper-V experience. Some 2D acceleration is available without a RemoteFX adapter. It’s not great, but only your needs can determine if it is acceptable. Also note that RemoteFX video will not magically transform your Client Hyper-V guest into a video gaming powerhouse, regardless of the capabilities of your graphics adapter.
You usually do not need to take any particular steps to enable RemoteFX video for your hosting Windows 10 RemoteFX system. If your video adapter has a DirectX 11.1-compatible driver, it will almost certainly work. In Hyper-V Manager, access the properties of your Hyper-V RemoteFX Windows 10 system and look on the Physical GPUs tab for something like the following screenshot. If you can’t select Use this GPU with RemoteFX, then you have an adapter that won’t work. If your adapter is capable, Hyper-V will have already enabled it.

Basic Configuration – RemoteFX Adapter
Adding and Configuring a RemoteFX Video Adapter to a VM in Hyper-V Manager
It’s quick and simple to Hyper-V enable RemoteFX video adapter to a virtual machine with Hyper-V Manager. It does not matter what Generation the guest is. You just need to enable client Hyper-V and set up RemoteFX. These screenshots are for a Generation 1 virtual machine, but the instructions are the same for Generation 2 Windows 10 Hyper-V RemoteFX.
- In Hyper-V Manager, verify that the target virtual machine is Off. If it isn’t, you’ll need to get it into that state. If it’s online, shut it off. If it’s saved or paused, resume it and then shut it down.
- Right-click on the target virtual machine and click Settings...
- The Add Hardware tab should already be active. Highlight RemoteFX 3D Adapter and click Add. If the item is disabled, the virtual machine isn’t off or your adapter does not meet the requirements for RemoteFX.
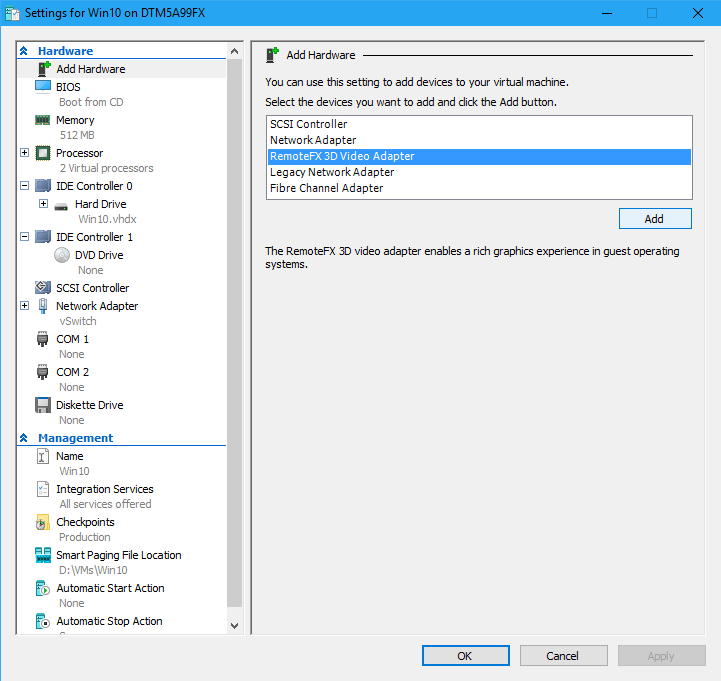
Adding a RemoteFX Adapter
4. A new tab will be added to the VM’s settings dialog named RemoteFX 3D Video Adapter. You can configure the settings as suits you.
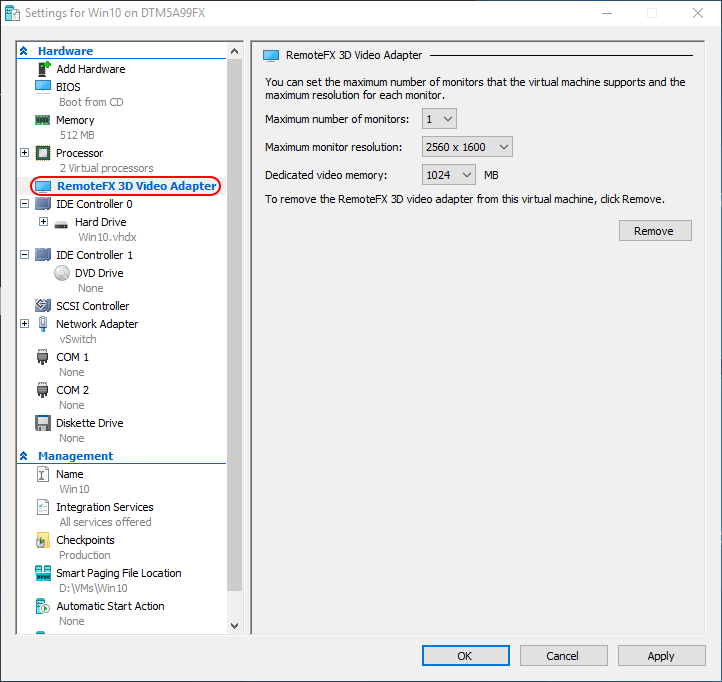
RemoteFX Adapter Settings
5. The adapter is not truly added until you click OK or Apply, but you can return to this dialog any time that the virtual machine is off to adjust the settings. You can also use the Remove button if you’d rather just use the 2D acceleration. There is a finite number of active virtual machines that your video card will support, so you may find that you need to remove it from some guests if you are running several simultaneously.
Adding and Configuring a RemoteFX Video Adapter to a VM in PowerShell
Adding a Microsoft RemoteFX adapter in PowerShell is trivial in Windows 10 client Hyper-V. Configuring it can be a bit tricky.
To add the RemoteFX adapter:
Add-VMRemoteFx3dVideoAdapter -VMName Win10
A -VM parameter is also available, and it will accept piped virtual machine objects or names for bulk operations.
To configure the adapter, use Set-VMRemoteFx3dVideoAdapter. You can use -VM or -VMName just as you did with Add-VMRemoteFx3dVideoAdapter. You can also pipe in the output from a Get-VMRemoteFx3dVideoAdapter run to select an adapter. The three parameters of interest are -MaximumResolution, -MonitorCount, and -VRamSizeBytes. As far as I can tell, there’s no way to know in advance what the valid options are (unless you look in Hyper-V Manager or something). So, you can just feed it some gibberish. The error messages will tell you what you can use:
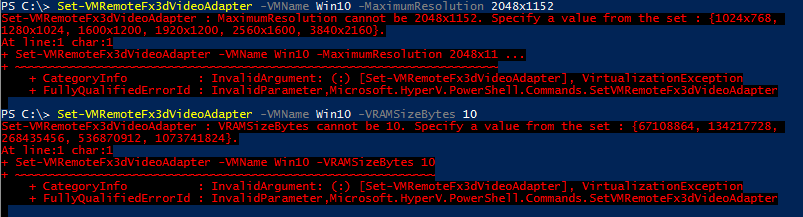
Set RemoteFX 3D Adapter Errors
With valid values (for my card):
Set-VMRemoteFx3dVideoAdapter -VMName Win10 -MaximumResolution 2560x1600 -VRAMSizeBytes 1073741824
Using the RemoteFX Video Adapter
As soon as you boot up the guest, the RemoteFX video adapter is ready to go. If it doesn’t boot or it won’t show a screen, then your guest operating system probably doesn’t support RemoteFX. Here’s a screen shot of the newly-installed Microsoft RemoteFX Graphics Device – WDDM from within a Windows 10 guest’s Device Manager:
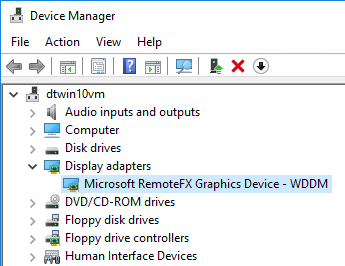
RemoteFX Adapter in Device Manager
I would not get excited that you can now start running a bunch of 3D games in Client Hyper-V. That’s not really what RemoteFX is for. A game might work, but it might not. More “run-of-the-mill” applications, like web browsers and operating system GUIs are incorporating 3D, and that’s where you’ll see the most differences with a RemoteFX adapter. As you can see in Device Manager, you’re not getting a direct projection of your video adapter, which means that you’re not going to be able to load the manufacturer’s specific hardware driver, which means that you cannot expose its full capabilities to the guest.
Hyper-V RemoteFX is now Deprecated
It is important to note, Hyper-V RemoteFX is now a deprecated technology. Microsoft started to deprecate the technology in July 2020, when the July 2020 security release effectively disabled the feature. The April 2021 security update removed the RemoteFX virtual hardware. Why has Microsoft removed the RemoteFX functionality?
Security vulnerabilities were discovered with the architecture, allowing an attacker to remotely execute code when Hyper-V RemoteFX vGPU on a host server fails to properly validate input from an authenticated user on a guest operating system. The path to exploit involves the attacker running a specially crafted application on a guest operating system that allows attacking third-party video drivers running on the Hyper-V host. It then leads to being able to execute arbitrary code. You can read more specific on the vulnerability here:
- CVE-2020-1032 – Security Update Guide – Microsoft – Hyper-V RemoteFX vGPU Remote Code Execution Vulnerability
What technology is replacing the RemoteFX vGPU hardware? Starting with Windows Server 2016, you can now use Discrete Device Assignment, or DDA, to pass an entire PCIe video device through to a guest virtual machine running in a Hyper-V virtual machine. It is not limited to display adapters, but also includes passing high performance device access through to VMs such as NVMe storage or other high-performance devices. You can read the process to configure Discrete Device Assignment here:
- Deploy graphics devices using Discrete Device Assignment | Microsoft Docs
Wrapping Up
There are many current use cases for users to have discrete hardware graphics and other high-performance devices passed through to virtual machines. Virtual Desktop Infrastructure (VDI) can provide a great platform to allow remote or hybrid workers to use discrete graphics resources, while still working in a virtual machine. Hyper-V RemoteFX Windows 10 was a technology early on that provided a great way to expose discrete hardware graphics devices in client Hyper-V and Hyper-V running in the data center.
However, with Hyper-V RemoteFX Windows 10 now deprecated along with RemoteFX in Windows Server versions due to security issues, newer technologies such as Discrete Device Assignment allow organizations and home users alike to still make use of passing through discrete hardware devices to virtual machines. With Hyper-V RemoteFX Windows 10 now part of the history books, the new modern technologies still allow taking advantage of all that client and server virtualization has to offer.
How to Deploy Graphics Devices Using RemoteFX vGPU
Hardware virtualization allows you to share hardware resources between virtual machines to achieve flexible and rational usage of resources. If one VM is idle, another VM running heavy applications can consume more CPU and memory resources. Sometimes you may need to run applications that require hardware video acceleration and a graphics card. While installing a video card on a physical computer is not a problem, it’s not as straightforward on a virtual machine. Virtual machines use only basic video functionality to display data by default. However, you can configure a virtual machine to use a video card and 3D acceleration. Hyper-V RemoteFX is a feature that helps you with this task. This blog post covers Hyper-V RemoteFX and explains how to configure RemoteFX on Windows machines.
What Is RemoteFX
RemoteFX is a feature that allows Hyper-V virtual machines to share a physical GPU (graphics processing unit). The resources of a video card are shared among multiple VMs. This is the optimal scenario for high-burst workloads when the dedicated resources of a video card are not required at all times. Hyper-V RemoteFX can be used to deploy a VDI (virtual desktop infrastructure). A RemoteFX GPU is a virtual device attached to a virtual machine that shares the resources of a physical video card installed on a Hyper-V host (shares the GPU and video memory).
RemoteFX was introduced in Windows 7 and has been available in Windows 8, Windows 10, Windows Server 2008 R2 SP1, Windows Server 2012, and Windows Server 2016. This feature is not present in Hyper-V Manager in the latest version of Windows Server 2019 – you cannot enable Hyper-V RemoteFX in the graphical user interface (GUI). Using RemoteFX decreases CPU (central processing unit) load and increases scalability in a virtual environment. You don’t need to attach a dedicated GPU for each VM when using Hyper-V RemoteFX because virtual machines can dynamically share the GPU for the workload.
Video rendering, processing heavy images, working with CAD applications, and 3D modeling are some of the cases when you may need 3D acceleration and a RemoteFX GPU in a VM. A modern GPU is better adapted for parallel processing than the CPU, handles more threats simultaneously, and has more processing cores. The number of monitors and used resolutions depends on the video memory and the GPU performance of a video card. Use Remote Desktop, not VMConnect (Virtual Machine Connection), to connect to VMs using RemoteFX.
The advantage of RemoteFX is that it can be used on desktop and server Windows versions. While buying a supported video card that is compatible with server hardware may not be easy, most desktop computers that usually run client Windows operating systems have PCI Express graphics adapters installed.
End of Support
There is a vulnerability (CVE-2020-1036) that can be used by cybercriminals for remote code execution. Hackers can execute remote code on a host machine by using specially crafted applications on a VM with RemoteFX GPU to attack video drivers on a Hyper-V host. A host server cannot properly validate input from an authenticated user on a guest OS in this case. Microsoft doesn’t provide a patch to fix this vulnerability and says that this is an architectural issue. Due to these security concerns, Microsoft decided to disable and remove RemoteFX from all Windows versions using automatic updates:
- RemoteFX vGPU was disabled on July 14, 2020, for all Windows versions.
- RemoteFX vGPU was removed on April 13, 2021.
RemoteFX works on Windows 10 version 1803 and earlier Windows versions (can be configured in a few clicks in the GUI of Hyper-V Manager). After the KB4571756 update (a cumulative update released in September 2020), this feature is disabled in the GUI. As a result, Windows 10 RemoteFX configuration is not available in the GUI of the Hyper-V Manager in Windows 10, version 1809, because the feature was disabled. Until the updates in April 2021, RemoteFX GPU had to be enabled in PowerShell with special commands.
RemoteFX Requirements
- A supported Windows version on a Hyper-V host (Windows 7 Ultimate/Enterprise, Windows 8 Ultimate/Enterprise, Windows 10; Windows Server 2008 R2 SP1, Windows Server 2012, Windows Server 2016, Windows Server 2019). Updates removing Hyper-V RemoteFX must not be installed.
- A GPU must be compatible with DirectX 11 on a host machine (DirectX 10 can be used on Windows Server 2008 and Windows 7 installed on a physical machine). If multiple video cards are installed on the Hyper-V host, they must be identical. DirectX 11 is available on Windows 8.1 and newer Windows versions on guest VMs.
- A CPU must support SLAT (Second Level Address Translation). The name of this feature is Extended Page Tables (EPT) for Intel processors and Nested Page Tables (NPT) for AMD processors.
- Supported guest operating systems are Windows 7 SP1, Windows 8 and 8.1, Windows 10 1703 or later, Windows Server 2008 R2, Windows Server 2012, Windows Server 2016 (in a single-session deployment only).
Prepare the physical machine that is the Hyper-V host. Make sure that you have installed graphics drivers for a graphics adapter on the Hyper-V host. It is recommended that you install the latest stable version of drivers provided by your GPU vendor (for example, NVIDIA or AMD).
Prepare a virtual machine that is running a supported version of Windows to use Hyper-V RemoteFX. In my example, the name of the VM is Windows-VM, and the name of the Hyper-V host is Hyper-V-prim.
Installing the needed features
Install the Remote Desktop Virtualization Host service on the Hyper-V host.
Open Server Manager, and click Manage > Add Roles and Features.
The Add Roles and Features Wizard opens.
Installation Type. Select Role-based or feature-based installation. Hit Next at each step of the wizard to continue.

Server Selection. Select a server from the server pool. Make sure that your Hyper-V host is selected.

Server Roles. Select Remote Desktop Services in the list of roles. If the Hyper-V role is not installed, select and install the Hyper-V role.

Features. Skip this step.
Remote Desktop Services. Read the explanation, and go to the next step.
Role Services. Select Remote Desktop Virtualization Host. You can read the description in the right pane.

Reboot the Hyper-V host when the installation of the role is finished.
Configuring Hyper-V Settings
Open Hyper-V Manager by running virtmgmt in the command line or using the Windows GUI. Then open Hyper-V Settings.
In the navigation pane of the Hyper-V Settings window, click Physical GPUs. In the drop-down menu, select your video card, and then select the Use this GPU with RemoteFX checkbox.

If you cannot select this checkbox, then your video adapter cannot be used for RemoteFX, or RemoteFX is disabled.
Stop the virtual machine.
Open Hyper-V Manager, select your VM, right-click the VM, and open VM Settings.
In the VM Settings window, click Add Hardware in the left pane (the navigation pane). In the right pane, you see a list of devices that you can add to a virtual machine. The workflow is similar for Generation 1 and Generation 2 VMs.
If a RemoteFX 3D Video Adapter is active (a black font is used), select this adapter and click Add. This option is active in Windows versions until July 14, 2020, updates are installed.
If your Windows was updated, the RemoteFX 3D Video Adapter option is inactive (a grey font is used), and you cannot add this adapter in the GUI of Hyper-V Manager. At the same time, the Physical GPUs option is no longer displayed in Hyper-V Settings.

You can fix this in PowerShell.
Run the command in PowerShell on the Hyper-V host to add a RemoteFX 3D video adapter to a VM:
Add-VMRemoteFx3dVideoAdapter -VMName your_VM_name
If the command is executed successfully, a warning message is displayed.
WARNING: We no longer support the RemoteFX 3D video adapter. If you are still using this adapter, you may become vulnerable to security risks.
If you see the error: Add-VMRemoteFx3dVideoAdapter: To enable this device, use Server Manager to install the Remote Desktop Virtualization Host role service
The Remote Desktop Virtualization service is not installed on the Hyper-V host. See Installing the needed features earlier in this post.
Enabling Windows 10 RemoteFX after installing updates
As I mentioned earlier, if the Windows updates of July 14, 2020, are installed, Microsoft RemoteFX is disabled. If you have VMs configured to use RemoteFX, they won’t start. The following Windows 10 RemoteFX error for Windows 10 with the July 14, 2020, update is displayed when trying to start a VM:
An error occurred while attempting to start the selected virtual machine(s):
‘VM-name’ failed to start.
Synthetic 3D Display Controller (Instance ID xxxxxxxx-xxxx-xxxx-xxxx-xxxxxxxxxxxx): Failed to Power on with Error ‘Insufficient system resources exist to complete the requested service.’.
The virtual machine cannot be started because all the RemoteFX-capable GPUs are disabled in Hyper-V Manager. You must enable at least one GPU.
Another variant of the error:
The virtual machine cannot be started because the server has insufficient GPU resources.
You can fix this in PowerShell. This method is applicable for Windows 10 and the appropriate Windows Server versions. Use commands in PowerShell to fix this error and enable RemoteFX. Run this command to check information about the video adapter on the Hyper-V host:
Get-VMRemoteFXPhysicalVideoAdapter
Find this string:
Enabled: False
It means that RemoteFX is disabled. Change this value to True.

Copy the name of the video card (in my example, NVIDIA GeForce GTX 1060).
Run the command:
Enable-VMRemoteFXPhysicalVideoAdapter -Name «video_card_name»
Enter your graphic card name.
Try to start your VM using RemoteFX again. The VM should start now.
Note also these PowerShell cmdlets to manage a RemoteFX 3D video adapter:
Set-VMRemoteFx3dVideoAdapter
Get-VMRemoteFXPhysicalVideoAdapter
After adding a RemoteFX 3D video adapter to a VM, this adapter should be visible in the list of VM hardware with options to set resolution, the number of monitors, and dedicated video memory.
If you don’t see these options in the GUI of Hyper-V Manager, use additional parameters when adding a RemoteFX video adapter to a VM in PowerShell, for example:
Set-VMRemoteFx3dVideoAdapter -VMName Windows-VM -MaximumResolution 1024×768 -VRAMSizeBytes 536870912
If Microsoft RemoteFX was configured successfully, in the guest Windows that is running on the VM, you see a Microsoft RemoteFX Graphics Device – WDDM device in the Display Adapters section of Device Manager. This RemoteFX 3D video adapter is a virtual device that shares the resources of the physical video card installed on the physical Hyper-V host by using RemoteFX.
Troubleshooting
Sometimes additional errors may occur. Let me explain a common error when a user cannot connect to a running VM using Remote desktop RemoteFX.
Symptoms:
- Video remoting was disconnected and the appropriate message is displayed.
- RDP failed to connect: Your Remote Desktop session has been ended, possibly for one of the following reasons.
If this error occurred on your VM, edit a group policy in the guest Windows on the VM.
Click Start > Run > gpedit.msc to open the Group Policy Editor for a local machine.
In the left pane of the Group Policy Editor window, navigate to
Computer Configuration > Administrative Templates > Windows Components > Remote Desktop Services > Remote Desktop Session Host > Remote Session Environment > RemoteFX for Windows Server. Double-click Configure RemoteFX in the right pane of the window.
A window with Configure RemoteFX properties opens. Select Enabled, and hit OK to save settings.
Double-click Use WDDM graphics display driver for Remote Desktop Connections (available for Windows 10 version 1903 and newer Windows versions).
In the window that opens, select Disabled, and hit OK.
Update configuration of group policies to apply new settings with the command:
gpupdate /force
Reboot your virtual machine. Try to connect to your VM using the Enhanced Session Mode.
How to Prevent Disabling RemoteFX on a Hyper-V host
After the Windows update released in April 2021 is installed, VMs using a RemoteFX 3D video adapter fail to start. You can disable automatic updates on Windows computers at your own risk to continue using RemoteFX. Note that security patches are not installed automatically on Windows machines if Windows updates are disabled. Unpatched vulnerabilities are a threat for your computers, which are then at risk of getting infected with ransomware, viruses, and other malware. You can download Windows updates (patches) manually from the Microsoft site and install them. Learn which Window updates are intended to remove RemoteFX and don’t install them. Consider deploying WSUS (Windows Server Update Services) in your organization and deselect the updates that you don’t need.
Don’t forget to back up your Windows servers and Hyper-V virtual machines. In case of a disaster or ransomware attack, having a backup allows you to recover your data, restore workloads, and resume operations in a short time. Use NAKIVO Backup & Replication to back up your physical and virtual machines.
Alternatives to Hyper-V RemoteFX
Microsoft recommends that customers use DDA instead of using RemoteFX after April 2021.
DDA (Discrete Device Assignment) is a feature that allows you to attach a device (in my case, a PCI Express device) directly to a VM. In the case of a graphics card, the card should be disconnected from the host machine and connected to a VM. Only one VM can use a video card with DDA at any given time.
A video driver for a GPU must be installed on the guest OS of a VM, not on a host machine. In this case, features such as DirectX 12 and CUDA (Compute Unified Device Architecture) are available on a VM (CUDA is not available on a VM when using RemoteFX). When using Direct Device Assignment, VM migration between Hyper-V hosts is not possible.
Consider using VMware alternatives for servers and desktops running VMs. Use Virtual Shared Graphics Acceleration (vSGA) and Virtual Shared Pass-Through Graphics Acceleration in VMware vSphere to share GPU with multiple VMs. Use compatible video cards that support GPU virtualization and have the appropriate hardware features:
- nVidia GRID vGPU
- AMD Multiuser GPU
You can enable accelerated 3D graphics for a VM in VMware Workstation if you use a desktop machine rather than a server.
Conclusion
Hyper-V RemoteFX is a useful feature that allows VMs to share hardware resources of a physical video adapter installed on a Hyper-V host and use 3D acceleration for applications on virtual machines. To configure RemoteFX on a virtual machine, install the Remote Desktop Virtualization Host service on the Hyper-V host, edit general Hyper-V settings to select the GPU that must be used for video acceleration, and add a RemoteFX 3D video adapter in the virtual hardware options of the VM. Unfortunately, Hyper-V RemoteFX is deprecated by Microsoft, and using RemoteFX is possible only until you install Windows updates of April 2021.
Содержание
- Windows 10 Hyper-V: RemoteFX 3D
- Развертывание графических устройств с помощью дискретного назначения устройств
- Настройка виртуальной машины для DDA
- Для графических устройств требуется подготовка дополнительных виртуальных машин.
- Отключение устройства от раздела узла
- Необязательно. Установка драйвера секционирования
- Поиск пути к расположению устройства
- Отключение устройства
- Отключение устройства
- Назначение устройства гостевой виртуальной машине
- Дальнейшие действия
- Удаление устройства и его возврат на узел
- Пример
- Подключение графического процессора к виртуальной машине
- Устранение неполадок
- Развертывание графических устройств с помощью vGPU RemoteFX
- Требования к RemoteFX vGPU
- включение RemoteFXного видеопроцессора
- Настройка трехмерного адаптера vGPU RemoteFX
- настройка RemoteFX виртуального устройства с помощью диспетчера Hyper-V
- настройка RemoteFXного gpu с помощью командлетов PowerShell
- Мониторинг производительности
- Память системы узла
- Видеопамять основного GPU узла
- ЦП узла
- Вычислительная мощность процессора
- Виртуальный сервер Windows с видеокартой на борту
- Как из домашнего ПК средствами виртуализации сохранить игровую систему
- Введение
- Требования к железу
- Установка и настройки
Windows 10 Hyper-V: RemoteFX 3D
С чем связаны мои восторги от отличного гипервизора Hyper-V восьмого поколения (считаем: Windows Server 2008 — 1.0, Windows Server 2008 SP1 — 2.0, Windows Server 2008 R2 — 3.0, Windows Server 2012 — 4.0, Windows Server 2012 R2 — 5.0, Windows 10 builds earlier than 10565 — 6.2, Windows 10 build 10565 or later — 7.0, Windows Server 2016 Technical Preview — 7.1, Windows 10 Anniversary Update/Windows Server 2016 — 8.0)?
Конструкторы и технологи используют тяжелые CAD-системы, требующие высокой производительности для отрисовки моделей изделий. Зачастую им приходится работать в разных средах — промышленной и опытной, а также с разными версиями ПО. Для исключения конфликтов доходит до использования 2 компьютеров на одном рабочем месте.
В связи с вышесказанным возникла потребность рассмотреть запуск тестового ПО CAD в виртуальной машине на Hyper-V.
Попытка протестировать на пятилетнем домашнем ноутбуке оказалась неудачной: 
Зато определился первый самый простой тест — запустить dxdiag для определения версии WDDM и уровня поддержки DirectX:
Для нашей задачи должны выполняться следующие требования, ключевое — DX 11.0 совместимый GPU с драйвером WDDM 1.2.
Так как нам нужен OpenGL, то из гостевых подходят только Windows 10/Windows Server 2016. Чтобы не вставать на разнообразные грабли, а их есть миллион у MS, я выбрал мой любимый Microsoft Windows 10 Enterprise LTSB 1607 в качестве хостовой и клиентской ОСей. Более смелым рекомендую таблицу «совместимости» ОС(раздел Support for GPU Acceleration with Hyper-V).
Переходим к тестированию на инженерной рабочей станции. Первым шагом запускаем dxdiag: Результат нас устраивает — WDDM 2.1/DirectX11_0. Это подтверждается в консоли Hyper-V:
 Для тестирования запускаем классический российский/международный тест Unigine Heaven, чтобы 3 раза не вставать решил протестировать DirectX 9,11 и OpenGL одновременно:

Конечным результатом тестов является запуск NX в Hyper-V: 
Источник
Развертывание графических устройств с помощью дискретного назначения устройств
применимо к: Windows Server 2022, Microsoft Hyper-V Server 2016, Windows Server 2016, Windows Server 2019, Microsoft Hyper-V Server 2019
Использование устройства с дискретным назначением устройств состоит из трех этапов:
все команды могут выполняться на узле в консоли Windows PowerShell с правами администратора.
Настройка виртуальной машины для DDA
Отдельное назначение устройств накладывает некоторые ограничения на виртуальные машины, и необходимо выполнить следующий шаг.
Для графических устройств требуется подготовка дополнительных виртуальных машин.
Некоторое оборудование работает лучше, если виртуальная машина настроена определенным образом. Дополнительные сведения о том, требуются ли для оборудования следующие конфигурации, вы можете получить у поставщика оборудования. Дополнительные сведения можно найти в плане по планированию развертывания устройств с помощью дискретного назначения устройств и в этой записи блога.
Отключение устройства от раздела узла
Необязательно. Установка драйвера секционирования
Отдельное назначение устройств предоставляет поставщикам оборудования возможность предоставлять драйвер защиты с помощью устройств. Обратите внимание, что этот драйвер не совпадает с драйвером устройства, который будет установлен на гостевой виртуальной машине. Однако необходимо, чтобы поставщик оборудования предоставил этот драйвер, но если он предоставил его, установите его перед отключением устройства от раздела узла. Обратитесь к поставщику оборудования за дополнительными сведениями о том, есть ли у них драйвер по устранению рисков.
Поиск пути к расположению устройства
Отключение устройства
С помощью диспетчер устройств или PowerShell убедитесь, что устройство отключено.
Отключение устройства
В зависимости от того, предоставил ли поставщик драйвер по устранению рисков, необходимо использовать параметр «-Force».
Назначение устройства гостевой виртуальной машине
Последний шаг — сообщить Hyper-V, что виртуальная машина должна иметь доступ к устройству. Помимо пути к расположению, приведенному выше, необходимо знать имя виртуальной машины.
Дальнейшие действия
После успешной установки устройства в виртуальной машине теперь можно запустить эту виртуальную машину и взаимодействовать с устройством, как обычно при работе в системе без операционной системы. Это означает, что теперь вы можете установить драйверы поставщика оборудования на виртуальной машине, и приложения смогут увидеть это оборудование. Это можно проверить, открыв диспетчер устройств на гостевой виртуальной машине и просмотрев, что оборудование теперь отображается.
Удаление устройства и его возврат на узел
Если вы хотите вернуть устройство в исходное состояние, необходимо будет закрыть виртуальную машину и выдать следующее:
Затем можно снова включить устройство в диспетчере устройств, и операционная система узла сможет снова взаимодействовать с устройством.
Пример
Подключение графического процессора к виртуальной машине
В этом примере мы используем PowerShell для настройки виртуальной машины с именем «ddatest1», чтобы взять первый GPU, доступный изготовителем NVIDIA, и назначить его виртуальной машине.
Устранение неполадок
Если вы передали графический процессор в виртуальную машину, но удаленный рабочий стол или приложение не распознает GPU, проверьте наличие следующих распространенных проблем.
Источник
Развертывание графических устройств с помощью vGPU RemoteFX
применимо к: Windows server 2022, Windows server 2019, Windows Server 2016, Microsoft Hyper-V Server 2016
Из соображений безопасности процессор RemoteFX vGPU по умолчанию отключен для всех версий Windows, начиная с обновления для системы безопасности за 14 июля 2020 г., и удален, начиная с обновления для системы безопасности за 13 апреля 2022 г. См. KB 4570006.
функция gpu для RemoteFX позволяет нескольким виртуальным машинам совместно использовать физический GPU. визуализация и вычисление ресурсов совместно используются виртуальными машинами, что делает RemoteFXные виртуальные машины подходящими для высокопроизводительных рабочих нагрузок, когда выделенные ресурсы GPU не требуются. например, в службе VDI RemoteFX виртуальный графический процессор можно использовать для разгрузки затрат на визуализацию приложений в GPU, что приводит к снижению нагрузки на цп и улучшению масштабируемости служб.
Требования к RemoteFX vGPU
Требования к системе узла:
Требования к гостевым виртуальным машинам:
Дополнительные рекомендации для гостевых виртуальных машин:
включение RemoteFXного видеопроцессора
чтобы настроить RemoteFXный виртуальный жесткий процессор на узле Windows Server 2016:
по умолчанию RemoteFX виртуальный графический процессор будет использовать все доступные и поддерживаемые gpu. чтобы ограничить количество gpu, используемых RemoteFXным виртуальным графическим процессором, выполните следующие действия.
Настройка трехмерного адаптера vGPU RemoteFX
Вы можете использовать пользовательский интерфейс диспетчера Hyper-V или командлеты PowerShell, чтобы настроить трехмерный графический адаптер vGPU RemoteFX.
настройка RemoteFX виртуального устройства с помощью диспетчера Hyper-V
Останавливает виртуальную машину, если она выполняется в данный момент.
откройте диспетчер Hyper-V, перейдите к Параметры вм, а затем выберите добавить оборудование.
выберите RemoteFX трехмерная графическая плата, а затем нажмите кнопку добавить.
Задайте максимальное число мониторов, максимальное разрешение монитора и используемой видеопамяти, либо оставьте значения по умолчанию.
настройка RemoteFXного gpu с помощью командлетов PowerShell
Используйте следующие командлеты PowerShell для добавления, проверки и настройки адаптера:
Мониторинг производительности
производительность и масштабирование RemoteFX службы с поддержкой виртуальных gpu определяется различными факторами, такими как количество gpu в системе, общая память gpu, объем системной памяти и скорость памяти, число ядер цп и тактовая частота цп, скорость хранения и реализация NUMA.
Память системы узла
для каждой виртуальной машины, поддерживающей виртуальный графический процессор, RemoteFX использует системную память как в гостевой операционной системе, так и на сервере узла. Гипервизор гарантирует доступность системной памяти для гостевой операционной системы. На узле каждому виртуальному рабочему столу с поддержкой виртуальных рабочих столов необходимо объявить требования к системной памяти гипервизору. Когда запускается виртуальный рабочий стол с поддержкой виртуальных рабочих столов, гипервизор резервирует дополнительный объем системной памяти на узле.
требования к памяти для сервера с поддержкой RemoteFX являются динамическими, так как объем памяти, потребляемой на сервере с поддержкой RemoteFX, зависит от числа мониторов, связанных с виртуальными рабочими столами с поддержкой виртуальных рабочих столов, и максимального разрешения этих мониторов.
Видеопамять основного GPU узла
Каждый виртуальный рабочий стол с поддержкой виртуальных рабочих столов использует аппаратную видеопамять GPU на сервере узла для подготовки к просмотру рабочего стола. Кроме того, кодек использует видео-память для сжатия отображаемого экрана. Объем памяти, необходимый для отрисовки и сжатия, непосредственно зависит от количества мониторов, подготовленных для виртуальной машины. Объем зарезервированной видеопамяти зависит от разрешения экрана системы и количества мониторов. Некоторым пользователям требуется более высокое разрешение экрана для определенных задач, но существует большая масштабируемость с более низкими параметрами разрешения, если все остальные параметры остаются постоянными.
ЦП узла
Гипервизор планирует размещение и виртуальные машины на ЦП. дополнительная нагрузка на узел с поддержкой RemoteFX увеличивается, так как система запускает дополнительный процесс (rdvgm.exe) на виртуальном рабочем столе с поддержкой виртуальных рабочих столов. Этот процесс использует драйвер графического устройства для выполнения команд GPU. Кодек также использует ЦП для сжатия данных экрана, которые необходимо отправить обратно клиенту.
Большее число виртуальных процессоров означает лучшее взаимодействие с пользователем. Мы рекомендуем выделить не менее двух виртуальных процессоров на виртуальный рабочий стол с поддержкой виртуальных рабочих столов. Мы также советуем использовать архитектуру x64 для виртуальных рабочих столов с поддержкой GPU, так как производительность виртуальных машин x64 лучше по сравнению с виртуальными машинами x86.
Вычислительная мощность процессора
У каждого виртуального рабочего стола с поддержкой виртуальных рабочих столов есть соответствующий процесс DirectX, выполняемый на сервере узла. этот процесс воспроизводит все команды графики, полученные от RemoteFX виртуального рабочего стола, на физический графический процессор. Это аналогично одновременному запуску нескольких приложений DirectX на одном физическом GPU.
как правило, графические устройства и драйверы настроены на выполнение только нескольких приложений на рабочем столе, но RemoteFX растягивает графические процессоры, чтобы продолжить работу. вгпус поставляются со счетчиками производительности, которые измеряют ответ GPU на запросы RemoteFX и позволяют убедиться, что gpu не растягиваются слишком далеко.
Когда GPU не хватает ресурсов, операции чтения и записи выполняются длительное время. Администраторы могут использовать счетчики производительности, чтобы выяснить, когда следует настраивать ресурсы и предотвращать время простоя для пользователей.
дополнительные сведения о счетчиках производительности для мониторинга RemoteFX поведения виртуальных gpu см. в статье диагностика проблем производительности графики в удаленный рабочий стол.
Источник
Виртуальный сервер Windows с видеокартой на борту

Виртуальный сервер уже давно перестал быть чем-то IT-шным и все чаще данной услугой интересуются люди с совершено различными и повседневными рабочими задачами: от размещения бухгалтерских программ до программ по автоматизации рутинных SEO-задач, от игровых серверов до самих игр (самых современных!), от общего файлового сервера небольшой организации до полноценных удалённых рабочих столов крупных компаний.
Вовсе не обязательно играть в игры, чтобы вам потребовалась видеокарта, сейчас ресурсы видеокарт активно используют разработчики популярного программного обеспечения: любой современный браузер будет отрисовывать страницы сайтов значительно быстрее если сможет использовать графический ускоритель, не говоря уже о том, что 3D игры могут быть в самих браузерах, которые работают на платформе WebGL.
Возможность виртуализации ресурсов видеокарт не нова и присутствует во всех популярных средах: Hyper-V, KVM, XEN, VirtualBox и собственная среда от самого популярного производителя чипсетов – NVIDIA GRID.
В данной статье мы будем говорить о RemoteFX – возможностях видеокарт на виртуальных серверах под управлением Hyper-V, именно на этой платформе они работают на VPS.house с видеокартами профессионального уровня NVIDIA Quadro P6000.
В качестве простой демонстрации поведем тест, взяв конфигурацию VPS с 2 ядрами процессора и 2 ГБ оперативной памяти с виртуальной видеокартой 256МБ памяти и без. В обоих случаях мы откроем в браузере Internet Explorer пример на WebGL одной и той же страницы.
Результат на виртуальном сервере, где установлена видеокарта:
Если видеокарту с этого же сервера убрать:
Итак, с видеокартой мы получаем 42 кадра в секунду, без нее – всего 3 кадра, которые отчаянно рендерит процессор.
В качестве гостевой операционной системы использовалась Windows 10 PRO, так как, к сожалению, в серверной версии Windows 2016 браузеры не начинают использовать графический ускоритель, несмотря на то, что он фактически присутствует.
Технология RemoteFX впервые была внедрена в Windows Server 2008 R2 SP1 и включала в себя некоторое базовые возможности:
Тест производительности видеокарты на VPS в популярном бенчмарке FurMark
Подключённая к современному VDS (виртуальному серверу) видеокарта под управлением Windows Server 2016 превращает его в полноценный домашний ПК. Данная операционная система обладает привычным пользовательским интерфейсом, мало отличимым от Windows 10. На таком сервере вы можете свободно запускать практически любое программное обеспечение и решать самые разносторонние задачи.
Без долгих ожиданий запускается самые тяжёлые графические приложения. Пример работы Autodesk 3ds Max 2019 на виртуальном сервере VPS.house:
И конечно же современные игры, в Battlefield 1 видео игры будет таким же плавным, как если бы вы запустили её на своём домашнем ПК (при хорошем интернет-соединении):
Источник
Как из домашнего ПК средствами виртуализации сохранить игровую систему
Благодаря конкуренции и развитию НТП современные ПК позволяют выполнять множество простых и сложных задач одновременно, например играть и воспроизводить видео на ТВ, рендерить графику и читать новости в интернете, раздавая торренты параллельно, и т.д. и т.п. Многие идут дальше и используют несколько ПК для работы и развлечений. Однако при помощи технологий виртуализации можно с одной стороны расширить возможности своего ПК, а с другой сэкономить, т.к. по сути можно запустить несколько операционных систем на одном железе в одно и то же время.

Введение
Виртуализа́ция — предоставление набора вычислительных ресурсов или их логического объединения, абстрагированное от аппаратной реализации, и обеспечивающее при этом логическую изоляцию друг от друга вычислительных процессов, выполняемых на одном физическом ресурсе.
Достигается как при помощи приложений (например VirtualBox, VMware) так и на уровне систем, поддерживающих аппаратную виртуализацию (например KVM, ESXi, Hyper-V). В последнем случае потери производительности по сравнению с нативными системами минимальна.
Здесь и далее в статье будет описание настроек системы виртуализации с открытым исходным кодом Proxmox потому что она в меру дружелюбна, есть легкий доступ к консоли через веб форму, а так же базируется на связке Debian + kvm, по которым очень много гайдов и описаний в сети, т.е. документации в т.ч. и на русском языке.
Требования к железу
— процессор и материнская плата с поддержкой VT-x, VT-d от Интел или AMD-Vi, IOMMU от АМД. Не поленитесь и уточните поддерживает ли именно Ваш экземпляр данные требования.
Что касается материнских плат. Категорически не рекомендую гнать железо при посредственной разводке на плате питания. По Z270 и Z390 игнорировать оранжевую зону или оставлять работать в стоке.
Установка и настройки
Мною было использована следующая игровая конфигурация:
— ПК для хоста конфиг был собран на далеко не лучшей материнской плате, но на англоязычных форумах очень часто хвалят эту фирму за то, что ее железо чаще всего подходит для таких вещей:
Процессор — i7 8700k
Мать — ASRock Z390M Pro4
Видеокарта — INNO3D GeForce GTX 1070 iChill X4
— второй ПК (Мини-ПК Morefine-M1s),
— 2 мыши,
— 1 клавиатуру на хосте, на остальных устройствах использовал софтварную,
— 3 подключения к монитору Dell U2713HM (VGA — для интегрированной видеокарты, HDMI — для GTX1070, на DVI находится Мини-ПК. Переключения между видеосигналами осуществлял через меню монитора)
0й этап — На материнской плате включаем VT-d:Enable, Intel Vitrualization Technology:Enable, Primary Graphx adapter:VGA, Above 4G Decoding:Enable. Если есть возможность обязательно выбираем основным графическим адаптером тот, на котором будет работать хост, т.е. более слабую видеокарту и переключаемся на нее.
1й этап — Устанавливаем Proxmox на хост. Для этого:
1.1. Скачиваем образ диска с официального сайта
1.2. Пишем образ на флешку при помощи специальных программ
1.3. Загружаемся с флешки, и производим инсталляцию с указанием на какой жесткий диск ставить, вводим пароль для будущего пользователя root, а так же настройки сети прописываем явно.
2й этап — Подключаемся по сети через веб интерфейс при помощи второго ПК или
планшета (в моем случае это был Мини-ПК) к хосту и настраиваем Proxmox по этому гайду через текстовую консоль.
Есть маленький нюанс, который возможно обходится программно, но я решил что поменять предыдущую материнскую плату будет проще, т.к. плата от Gigabyte этому требованию не соответствовала:
1) Run the «dmesg | grep ecap» command.
2) On the IOMMU lines, the hexadecimal value after «ecap» indicates whether interrupt remapping is supported. If the last character of this value is an 8, 9, a, b, c, d, e, or an f, interrupt remapping is supported. For example, «ecap 1000» indicates there is no interrupt remapping support. «ecap 10207f» indicates interrupt remapping support, as the last character is an «f».
Interrupt remapping will only be enabled if every IOMMU supports it.
Если условие выполняется — продолжаем.
Открываем файл командой из консоли (символ двойной решетки вводить не надо, так я буду разделять в тексте команды от того что необходимо внести в файл)
для процессоров Интел
для процессоров АМД
следом даем команду
после чего перезагружаем хост через веб интерфейс
Добавляем в файл конфигурации загрузку необходимых драйверов
Прописываем в консоли
На экран будет выведен список устройств доступных для проброса, находим интересующий нас блок с видеокартой, в моем случае это 2 устройства в группе видеокарта и звук по адрсам 01:00.0 и 01:00.1, поэтому я прописываю сразу группу.
Прописываем в консоли команду для того что бы определить модель и ее id
Теперь правим файл под нашу видеокарту (в Вашем случае id будут иные)
Заносим в черный лист драйвера
Теперь создаем через веб интерфейс и правим через консоль файл настроек виртуальной машины. Здесь строка «args:» решает, т.к. без нее драйвер видеокарты обнаружит виртуализацию, но путем подмены наименования оборудования, точнее hv_vendor_id=willitwork, мы снимаем проблему с ошибкой 43, которую может выдать видеодрайвер устройства. Здесь есть номер виртуальной машины в proxmox используемый в качестве имени.
Теперь перезагружаем хост и запускаем виртуальную машину.
3й этап — Через Удаленную видеоконсоль установим Windows и драйвера. В моем случае Windows распознал сперва видео драйвер proxmox для работы через видеоконсоль, потом нашел драйвер для GTX1070, а после обновления через интернет (принудительный поиск драйверов в сети) скачал и установил нужный мне драйвер для игровой видеокарты.
4й этап — Перезапустим Виртуальную машину, переключаем отображение видеопотока на мониторе на разъем видеокарты и… в моем случае все заработало сразу, никаких ошибок 43… При этом рабочий стол определяется как №2.
я попробовал запустить видео Blue-ray — без проблем, задержек и фризов с видеорядом нет, запустил Warhammer online — он завелся и в PvP играть было комфортно, запустил GTA5 у мя выскочила сюжетка, вполне комфортно пострелял. Визуально потерь в производительности нет.
Если нам необходимо пробросить жесткий диск целиком, то в файле настроек виртуальной машины необходимо добавить строку:
Конкретно какой именно sda/sdb/sdc/и т.п. можно уточнить в веб интерфейсе.
К бочке меда есть и ложка дегтя. Интегрированный звук отдельно прокинуть нельзя, т.к. в его группе находятся другие устройства, которые после проброса звуковой карты в виртуальную машину пропадают для хоста до следующей перегрузки хоста. В моем случае это
00:1f.0 ISA bridge: Intel Corporation Device a305 (rev 10)
00:1f.3 Audio device: Intel Corporation Device a348 (rev 10)
00:1f.4 SMBus: Intel Corporation Device a323 (rev 10)
00:1f.5 Serial bus controller [0c80]: Intel Corporation Device a324 (rev 10)
00:1f.6 Ethernet controller: Intel Corporation Device 15bc (rev 10)
Т.е. звук или через видеокабель на монитор или внешняя звуковая карта. Порты USB пробрасываюся без проблем. К сожалению на текущий момент нерешаемо. Есть вариант удаленного подключения с другого ПК к игровому, через RDP или SPICE. В этом случае все будет нормально
Не всегда проброс видеокарты проходит идеально как в моем случае, мешается или ошибка 43 или что-то еще. Здесь описаны и другие настройки, которые могут помочь. В идеале нужно искать в сети удачные сетапы и ориентироваться на них, каким для меня явился этот, кроме того есть еще список железа, позволяющий достичь того же что и я, но он не полный.
Для мыши — аналогично.
2. По USB:
Что касается USB устройств там все проще, устройства прокидываются прямо из веб формы по ID или же целиком можно прокинуть порт. Однако есть нюанс — если Вы по каким-либо причинам не можете как и я прокинуть аудиоустройство в ВМ, т.к. оно содержится в группе с ключевыми контроллерами без которых хост не может полноценно работать, то проброс порта/устройства через USB решает эту проблему, но звук может начать отваливаться через некоторое время работы, шипеть/гудеть и прочие… прочее, в то же время на нативной системе все будет замечательно. В этом случае необходимо пробрасывать не порт/устройство, а сам контроллер USB как PCIe устройство по методу указанному в статье. И все резко наладится. Но в то же время через хост после запуска ВМ с такими настройками пробросить другие устройства с этого контроллера больше не получится.
3. Жесткие диски можно пробрасывать как через проброс контроллера как PCIe устройство по методу указанному в статье (не рекомендую пробрасывать контроллер интегрированный в материнскую плату, только подключенные к PCIe), либо напрямую:
заходим в
## cd /dev/disk/by-id
через dir смотрим листинг…
копируем строки вида ata-WDC_WD40EFRX-68WT0N6_WD-WCC4E1АС9SХ9, в которой прописан интерфейс подключения, марка и номер серии жесткого диска. Затем открываем Файл конфигурации ВМ и пишем:
sata1: volume=/dev/disk/by-id/ata-WDC_WD40EFRX-68WT0N6_WD-WCC4E1АС9SХ9
и все работает, при этом учитывайте, что sata0-sata5, т.е. для одной ВМ число подключаемых таким образом дисков, включая виртуальных, не может превышать 6шт.
UPDATE 2
1. На этом видео видно, что для обхода ошибки 43 помогает обманка со следующей строкой в конфигурационном файле ВМ:
www.youtube.com/watch?v=fgx3NMk6F54
Однако там проброс ВК организован с использованием rom файла, что отличается от моего варианта.
2. В связи с тем, что была обновлена версия ProxMox с 5й на 6ю, то что бы система работала с UEFI БИОСом, то необходимо добавить в оборудовании ВМ EFI-диск, иначе не взлетит и не заведется, на 5й версии ProxMox’а этой фичи не было.
Источник
Hi all,
I have to be able to add the «RemoteFX 3D Video adapter» to VMs in order to run certain software. However, it seems that in Windows 10 1809 which I just updated a few days ago. Has removed the ability to add this. It’s greyed out saying «We
no longer support the RemoteFX 3D video adapter…»
I found some articles on this
https://www.brianmadden.com/opinion/RemoteFX-vGPU-put-out-to-pasture-as-Microsoft-RDP-grows-up
Tucked away in this list of features to be deprecated was:
- “RemoteFX vGPU: We’re developing new graphics acceleration options for virtualized environments. You can also use Discrete Device Assignment (DDA) as an alternative.”
and we must now use Discrete Device Assignment (DDA):
https://docs.microsoft.com/en-us/windows-server/virtualization/hyper-v/plan/plan-for-deploying-devices-using-discrete-device-assignment
https://docs.microsoft.com/en-us/windows-server/virtualization/hyper-v/deploy/deploying-graphics-devices-using-dda
However, you need a compatible graphics card. Using
this script mentioned in the articles above I found out that mine is not compatible:
NVIDIA GeForce GTX 1050 Ti
Old-style PCI device, switch port, etc. Not assignable.
Is there any way around this?
Thanks for any ideas
m
Продолжаем тему Windows 10 Hyper-V.
С чем связаны мои восторги от отличного гипервизора Hyper-V восьмого поколения (считаем: Windows Server 2008 — 1.0, Windows Server 2008 SP1 — 2.0, Windows Server 2008 R2 — 3.0, Windows Server 2012 — 4.0, Windows Server 2012 R2 — 5.0, Windows 10 builds earlier than 10565 — 6.2, Windows 10 build 10565 or later — 7.0, Windows Server 2016 Technical Preview — 7.1, Windows 10 Anniversary Update/Windows Server 2016 — 8.0)?
А радость вот от чего — стало доступно аппаратное ускорение DX 11.1, OpenGL 4.4, OpenCL 1.1 в гостевых ОС виртуальных машин.
Конструкторы и технологи используют тяжелые CAD-системы, требующие высокой производительности для отрисовки моделей изделий. Зачастую им приходится работать в разных средах — промышленной и опытной, а также с разными версиями ПО. Для исключения конфликтов доходит до использования 2 компьютеров на одном рабочем месте.
В связи с вышесказанным возникла потребность рассмотреть запуск тестового ПО CAD в виртуальной машине на Hyper-V.
Попытка протестировать на пятилетнем домашнем ноутбуке оказалась неудачной:
Зато определился первый самый простой тест — запустить dxdiag для определения версии WDDM и уровня поддержки DirectX:
Для нашей задачи должны выполняться следующие требования, ключевое — DX 11.0 совместимый GPU с драйвером WDDM 1.2.
Так как нам нужен OpenGL, то из гостевых подходят только Windows 10/Windows Server 2016. Чтобы не вставать на разнообразные грабли, а их есть миллион у MS, я выбрал мой любимый Microsoft Windows 10 Enterprise LTSB 1607 в качестве хостовой и клиентской ОСей. Более смелым рекомендую таблицу «совместимости» ОС(раздел Support for GPU Acceleration with Hyper-V).
Переходим к тестированию на инженерной рабочей станции. Первым шагом запускаем dxdiag:Результат нас устраивает — WDDM 2.1/DirectX11_0. Это подтверждается в консоли Hyper-V:
Для тестирования запускаем классический российский/международный тест Unigine Heaven, чтобы 3 раза не вставать решил протестировать DirectX 9,11 и OpenGL одновременно:
Конечным результатом тестов является запуск NX в Hyper-V: