На чтение 6 мин. Просмотров 2.9k. Опубликовано 27.04.2021
Невозможность изменить яркость экрана с панели задач или из Центра уведомлений является большим неудобством для пользователей Windows 10, поскольку им в качестве альтернативы придется каждый раз искать настройки яркости глубоко внутри приложения «Настройки». изменить яркость экрана. 
Если вы не можете найти возможность изменить яркость В любом месте на панели задач или в Центре уведомлений вы попали в нужное место, поскольку мы собрали несколько отличных методов, которые помогут решить эту проблему как можно скорее! Ползунок, очевидно, был представлен в обновлении функций 1903.
Содержание
- Что вызывает отсутствие ползунка яркости в Windows 10?
- Решение 1. Включите устройство в диспетчере устройств
- Решение 2. Обновите драйвер видеокарты
- Решение 3. Верните настройку яркости к быстрым действиям
- Решение 4. Обновите Windows до последней версии
Что вызывает отсутствие ползунка яркости в Windows 10?
Новые обновления Windows 10 часто вносят изменения в дизайн панели задач и Центра уведомлений, но ползунок яркости по-прежнему должен быть доступен где-то в этой области. Существует довольно много вещей, которые могут быть причиной пропажи, и мы решили перечислить наиболее важные причины, по которым вы должны проверить ниже:
- Драйвер монитора отключен в диспетчере устройств. Если этот драйвер отключен, Windows переключается на более старые версии, которые не позволяют изменять яркость таким образом. Убедитесь, что вы снова включили его.
- Старые графические драйверы . Наличие старых и устаревших драйверов видеокарты также может привести к нестабильности настроек яркости, и мы настоятельно рекомендуем Рекомендуем как можно скорее установить последние версии драйверов.
- Настройки яркости удалены из Центра уведомлений . Возможно, кто-то или кто-то удалил этот параметр из Центра уведомлений, а вы просто нужно снова включить его в настройках.
Решение 1. Включите устройство в диспетчере устройств
Этот простой метод был предложен пользователем на форуме, и многие другие пользователи смогли извлечь выгоду из этого метода, даже если он, похоже, совершенно не связан с проблемой. Ключ состоит в том, чтобы включить устройство, которое у вас есть в разделе «Мониторы» в диспетчере устройств. Включение этого устройства должно решить проблему и вернуть ползунок яркости на место!
- Нажмите кнопку меню «Пуск», введите « Диспетчер устройств ”На клавиатуре и выберите инструмент из списка доступных результатов, щелкнув первую запись в списке. Вы также можете нажать комбинацию клавиш Windows + R , чтобы открыть окно «Выполнить». Введите в поле « devmgmt. msc » и нажмите OK, чтобы запустить его.

- Для правильного выполнения этого метода разверните раздел Мониторы в диспетчере устройств, щелкнув стрелку рядом с ним, щелкните правой кнопкой мыши значок только устройство, которое вы найдете там, и выберите параметр Включить устройство , если он доступен.

- Если он уже включен, выберите вместо этого параметр Свойства в контекстном меню и перейдите к пункту Проверка драйвера . чтобы узнать, является ли поставщик драйверов кем-либо, кроме Microsoft (например, TeamViewer). Если это так, нажмите кнопку Удалить на той же вкладке и подтвердите свой выбор в следующем диалоговом окне.
- Теперь вы можете вернуться в Диспетчер устройств и нажать Действие в верхнем меню. Выберите параметр Сканировать на предмет изменений оборудования , и он проверит устройства без драйверов и автоматически переустановит их.

- Подтвердите все диалоговые окна или подсказки, в которых вас могут попросить подтвердить ваш выбор, и проверьте, не ползунок яркости по-прежнему отсутствует в Windows 10!
Решение 2. Обновите драйвер видеокарты
Это это довольно простой способ решить проблему, и вы определенно должны попробовать его немедленно. Переустановка драйвера не причинит вам вреда, и рекомендуется всегда устанавливать последние версии драйверов. Выполните следующие действия, чтобы выполнить чистую установку последней версии драйвера NVIDIA.
- Нажмите кнопку меню «Пуск», затем введите « Диспетчер устройств » и выберите его из списка доступных результатов поиска, просто щелкнув первый. Вы также можете использовать комбинацию клавиш Windows + R , чтобы вызвать Выполнить. Введите « devmgmt.msc »в диалоговом окне и нажмите OK, чтобы запустить его.
- Чтобы установить драйвер видеокарты, который вы хотите обновить на свой компьютер, разверните раздел Видеоадаптеры , щелкните правой кнопкой мыши свою видеокарту и выберите Удалить устройство

- Подтвердить любое всплывающее сообщение -up диалоговые окна или подсказки, которые могут попросить вас подтвердить удаление текущего драйвера графического устройства и дождаться завершения процесса.
- Найдите драйвер видеокарты на NVIDIA или AMD. Введите необходимую информацию. информацию о карте и вашей операционной системе и нажмите Search или

- Должен появиться список всех доступных драйверов.. Обязательно прокрутите вниз, пока не дойдете до нужной записи, затем нажмите ее имя и кнопку Загрузить . Сохраните его на свой компьютер, откройте и следуйте инструкциям на экране .
- Когда вы дойдете до Параметры установки . экрана, выберите параметр Пользовательский (Расширенный) , прежде чем нажимать Далее . Вам будет представлен список компонентов, которые будут установлены. Установите флажок рядом с полем Выполнить чистую установку и нажмите Далее и установите драйвер.

- Проверьте, решена ли проблема и вернулся ли ползунок яркости!
Решение 3. Верните настройку яркости к быстрым действиям
Также возможно, что кто-то или что-то удалили параметр управления яркостью из меню быстрых действий в Центре уведомлений. Вернуть параметры яркости очень легко, просто используя приложение “Настройки Windows 10”.
- Найдите Настройки в Меню “Пуск” и нажмите на первый всплывающий результат. Вы также можете нажать непосредственно на кнопку cog в нижней левой части меню «Пуск» или использовать комбинацию клавиш Windows + I .

- Найдите раздел Система в нижней части окна настроек и щелкните по нему. Перейдите на вкладку Уведомления и действия и установите флажок в разделе Быстрые действия
- Найдите Добавить или удалить быстрые действия внизу и нажмите на нее, чтобы открыть список всех быстрых действий. Прокрутите вниз, пока не найдете яркость и установите ползунок рядом с ней на

- Убедитесь, что проблема решена и ползунок яркости вернулся на свое место!
Решение 4. Обновите Windows до последней версии
Похоже, что последние версии Windows 10 окончательно решили эту проблему, если только она не была вызвана третьей стороной. партийные программы. Обновление вашей операционной системы до последней версии всегда полезно, когда дело доходит до устранения подобных ошибок, и пользователи сообщают, что последние версии Windows 10 действительно решают эту проблему конкретно.
- Используйте комбинацию клавиш Windows + I , чтобы открыть Настройки на вашем ПК с Windows. Кроме того, вы можете выполнить поиск « Настройки », используя панель поиска, расположенную на панели задач.

- Найдите и откройте раздел« Обновление и безопасность »в Настройках. Оставайтесь в Windows Update и нажмите кнопку Проверить наличие обновлений под Статус обновления , чтобы проверить, есть ли новая версия Доступна Windows.

- Если он есть, следует установить Windows обновление немедленно, и вам будет предложено перезагрузить компьютер позже.
Примечание. Если у вас возникла эта проблема после обновления BIOS или после внесения изменений в BIOS рекомендуется сбросить до заводских настроек по умолчанию.
Правильная настройка яркости экрана очень важна. Если вы много работаете за компьютером, неправильный уровень яркости экрана может негативно влиять на глаза или быстро разрядить аккумулятор устройства, если он не работает от сети.
К счастью, Windows 10 предлагает несколько простых способов быстрой настройки яркости экрана, в отличие от предыдущих версий Windows. Давайте рассмотрим их
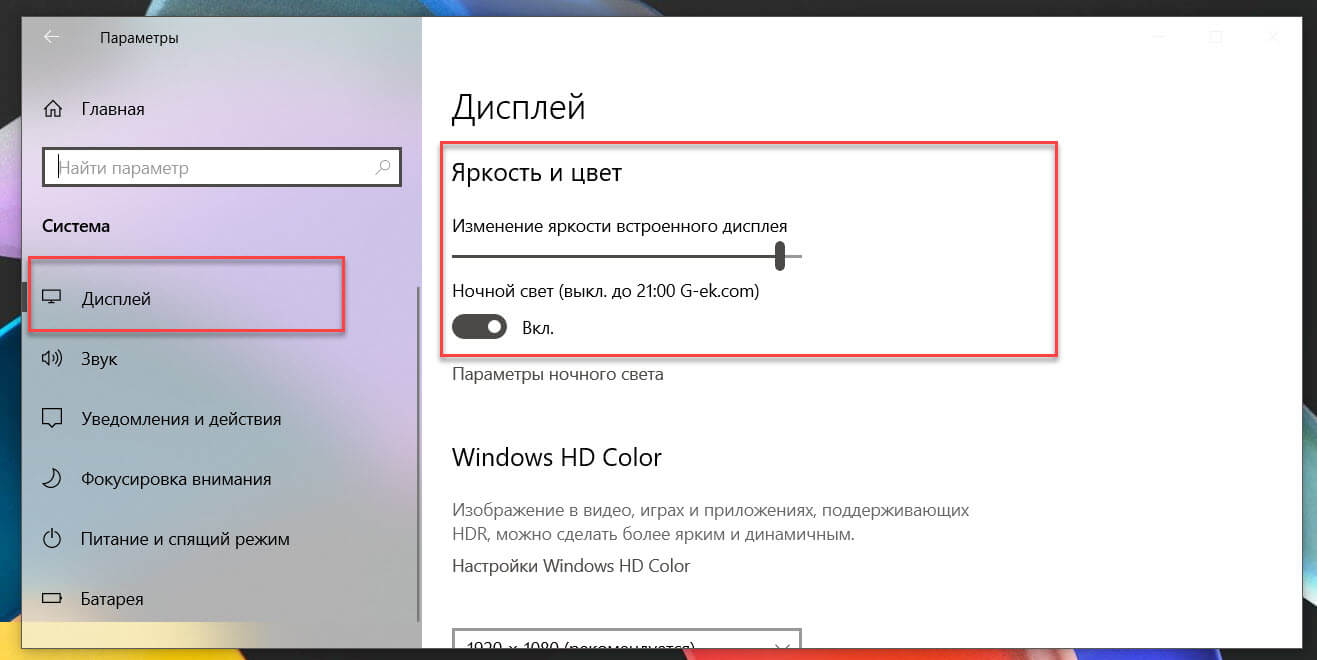
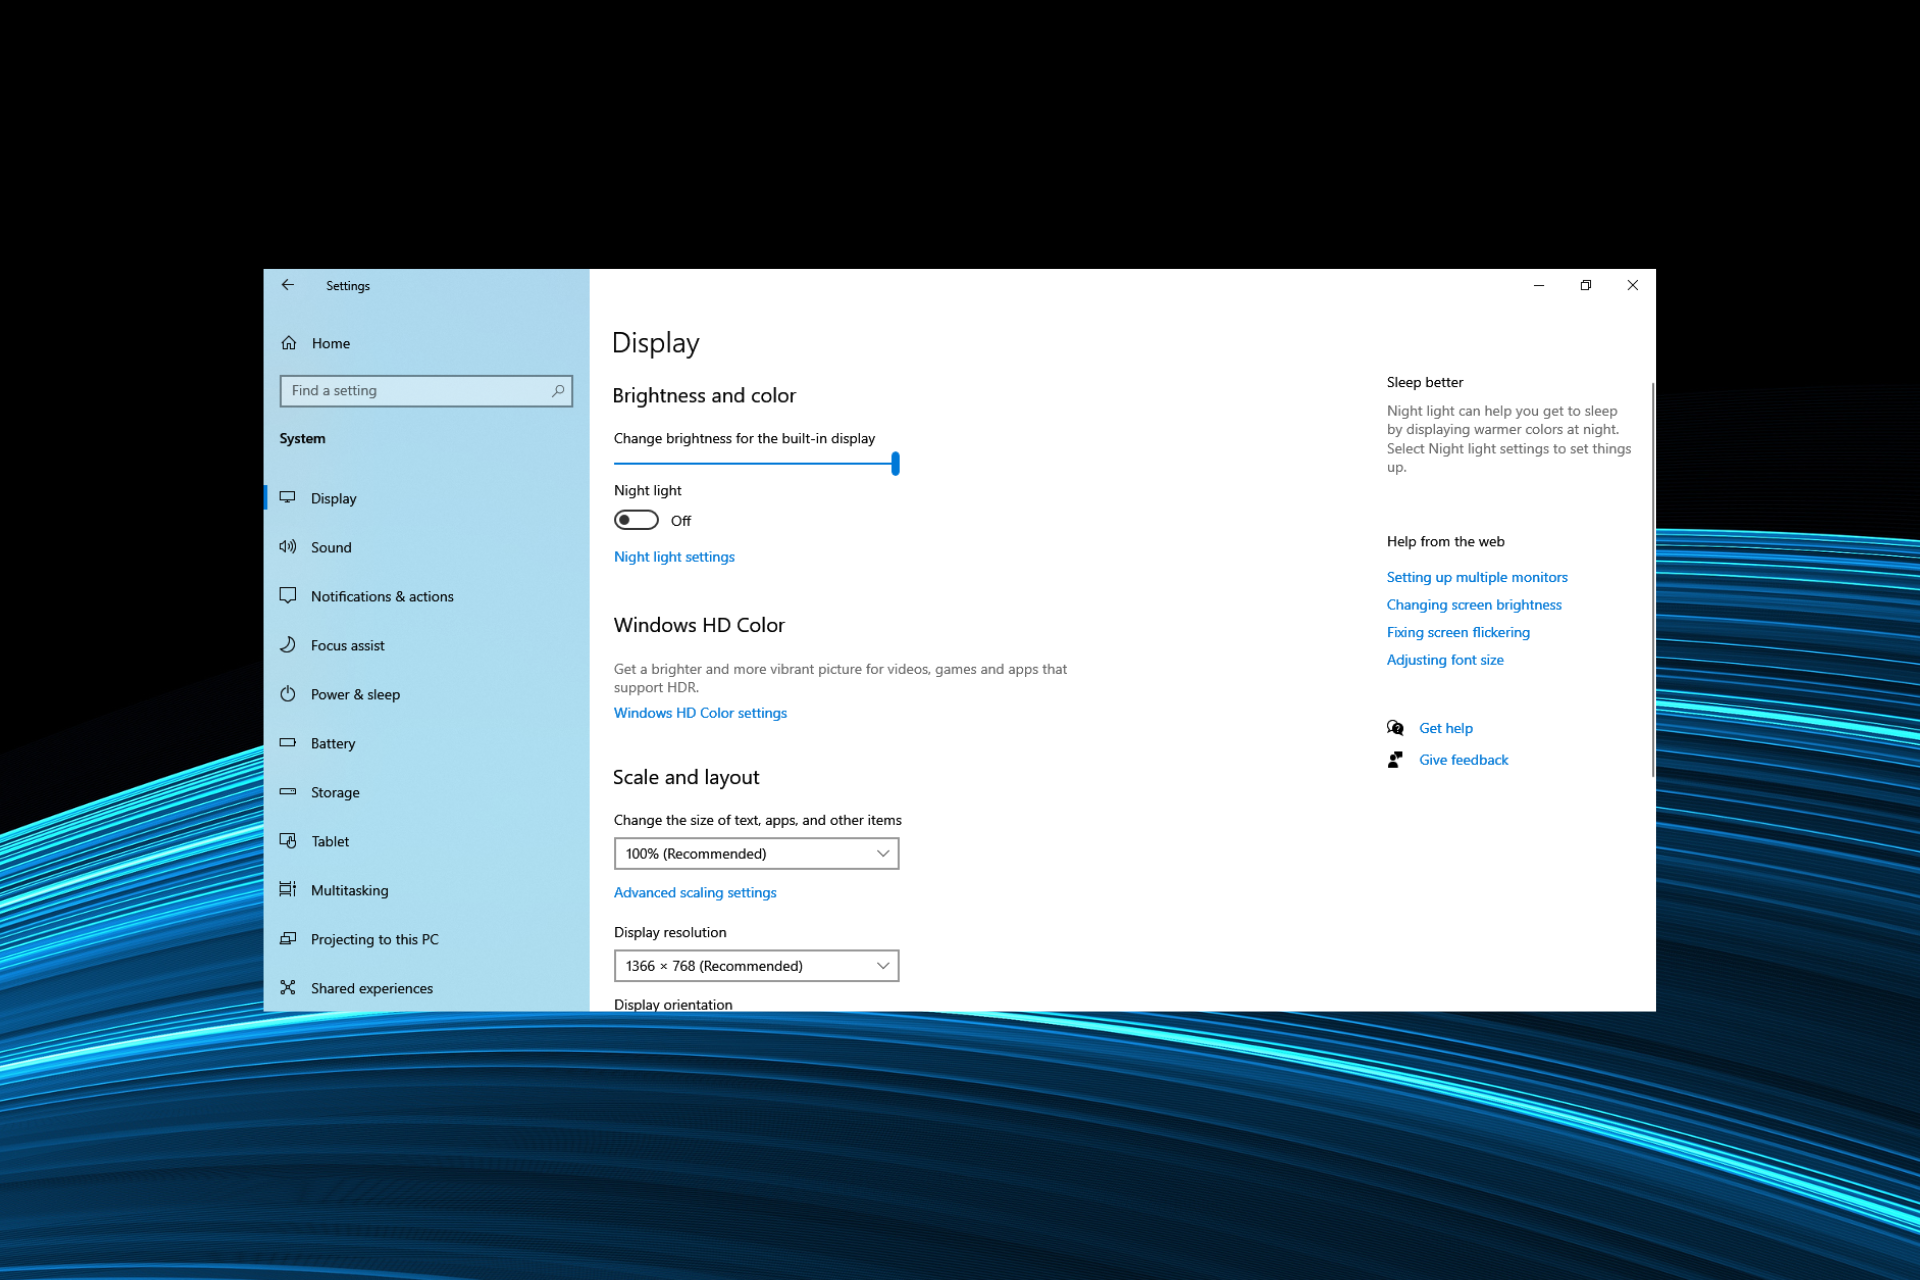
Изменение яркости экрана Windows 10 в приложении Параметры
Параметры — это современная замена панели управления, чтобы изменить яркость экрана в Windows 10, выполните следующие действия.
- Откройте Параметры Windows, нажав сочетание клавиш Win + I, или нажмите на значок шестеренки в меню Пуск.
- Перейдите «Система» → «Дисплей».
- С права, отрегулируйте положение ползунка «Изменение яркости», чтобы установить желаемый уровень подсветки экрана.
Изменение яркости экрана в Windows 10 с помощью горячих клавиш.
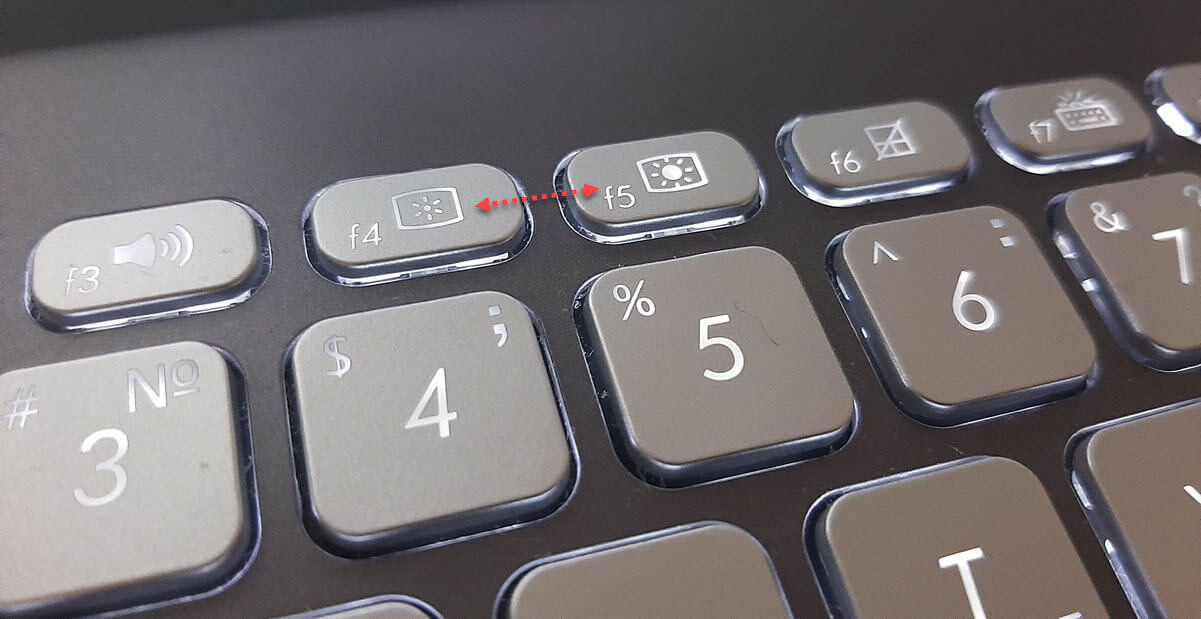
Некоторые устройства оснащены функциональными клавишами клавиатуры, которые позволяют пользователю настраивать яркость дисплея. Например, если вы используете ноутбук, он может иметь клавишу Fn, которая вместе с другими кнопками клавиатуры может использоваться для настройки яркости экрана.
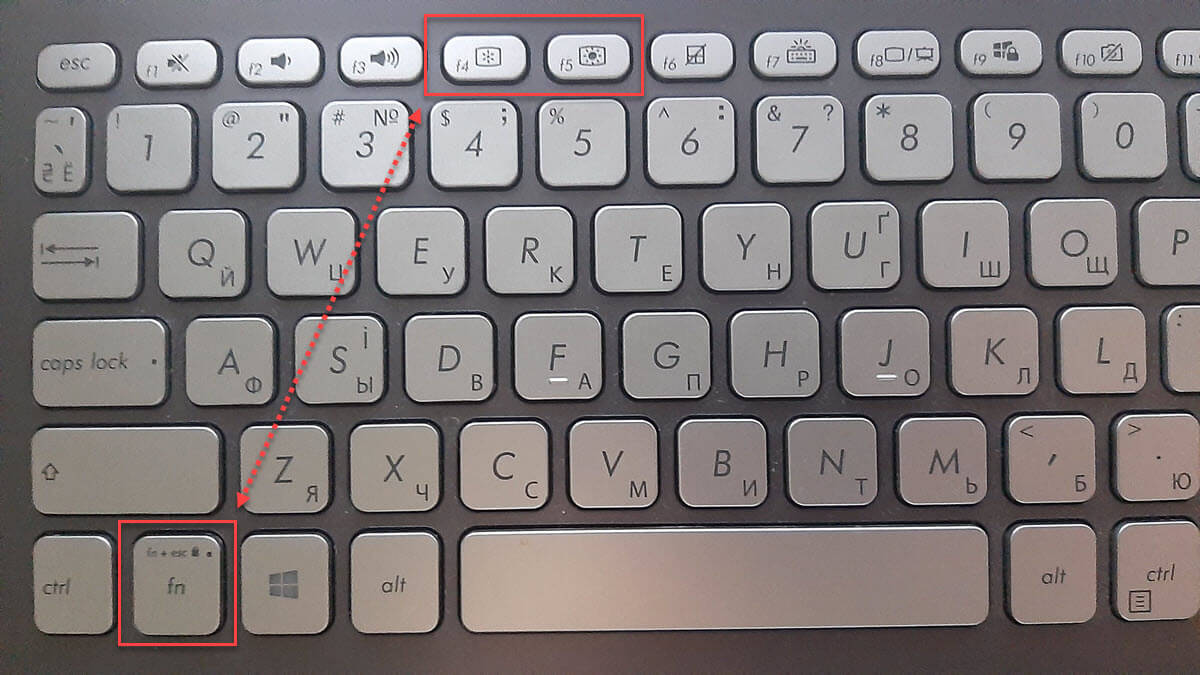
Посмотрите на клавиатуру, чтобы увидеть символ яркости на функциональных клавишах.
И если горячие клавиши для регулировки яркости не работают, убедитесь, что установлены необходимые драйверы дисплея и клавиатуры.
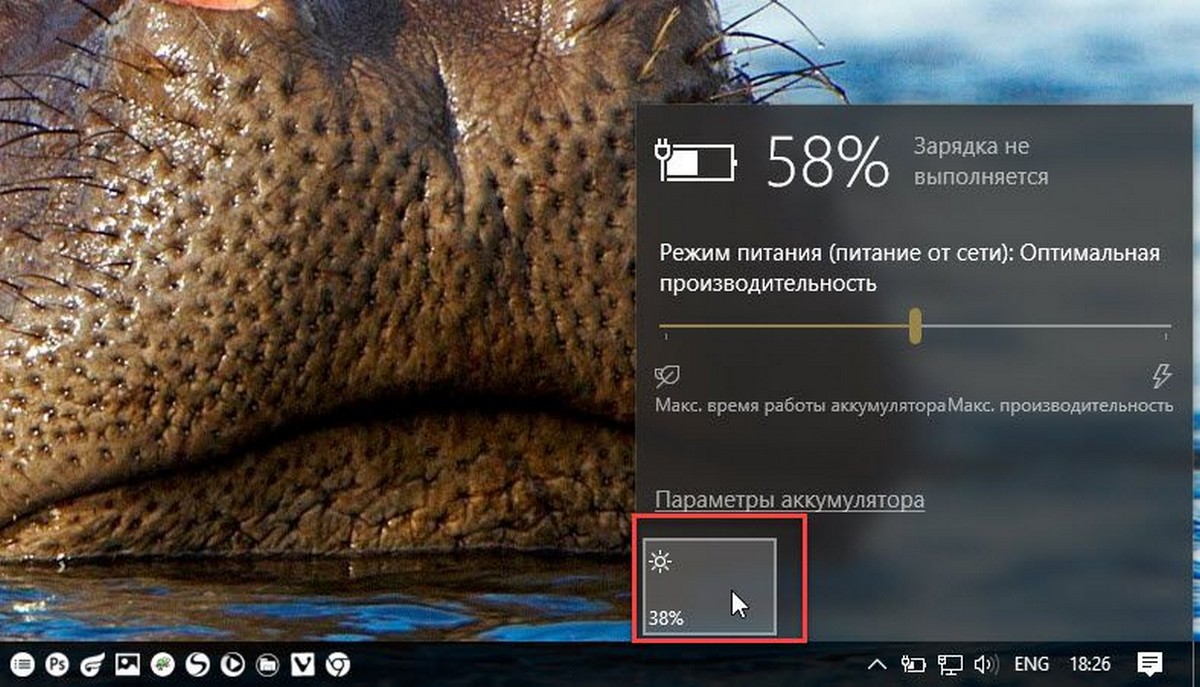
Изменение яркости экрана в Windows 10 с помощью индикатора батареи
На поддерживаемых устройствах в старых сборках Windows 10, вы можете использовать «Всплывающее меню батареи», чтобы изменить яркость экрана.
- Нажмите на значок аккумулятора в области уведомлений панели задач, чтобы открыть всплывающее окно батареи. Это выглядит следующим образом.
- Здесь вы найдете кнопку регулировки яркости. Нажмите ее, чтобы изменить уровень яркости на желаемое значение.
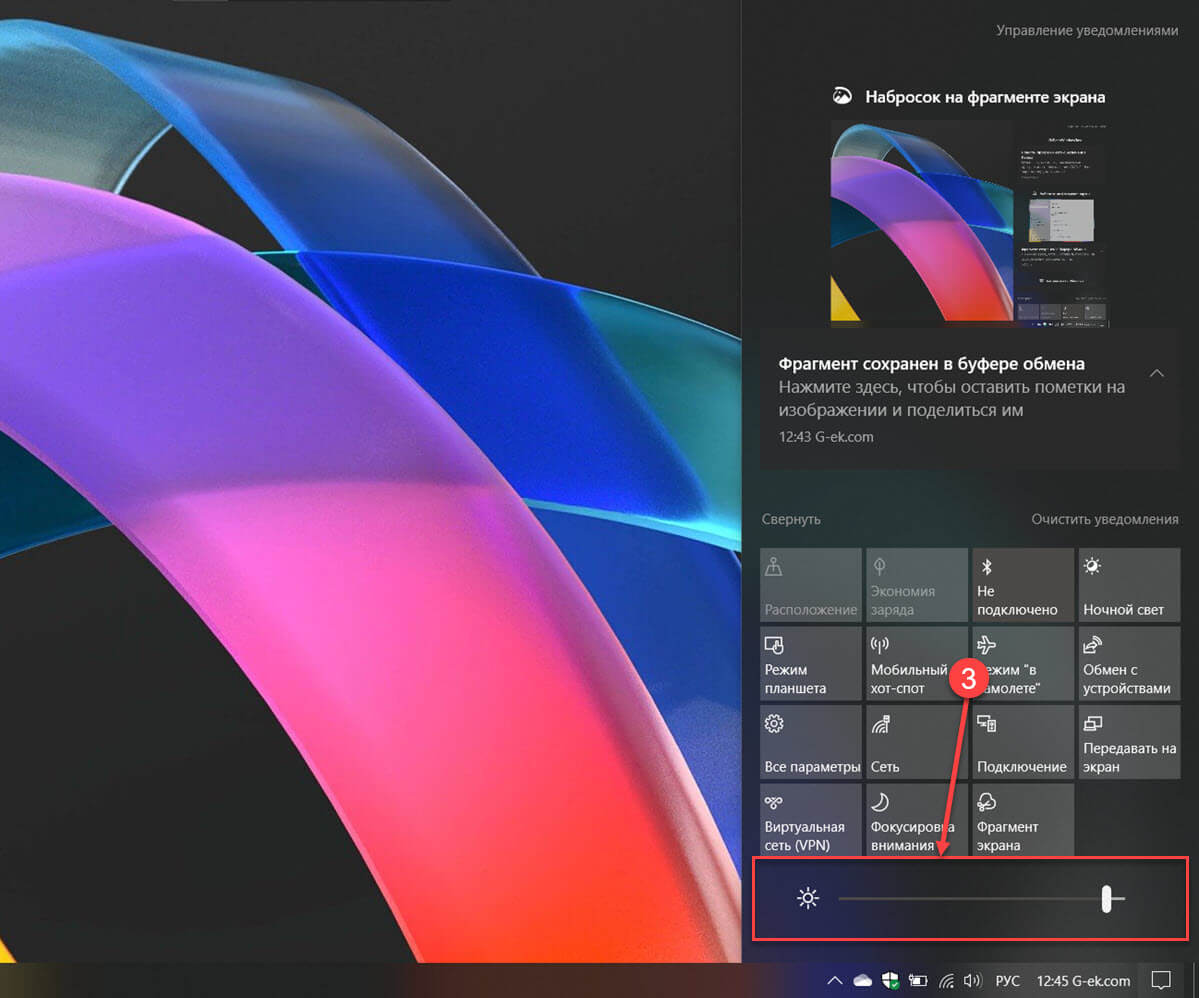
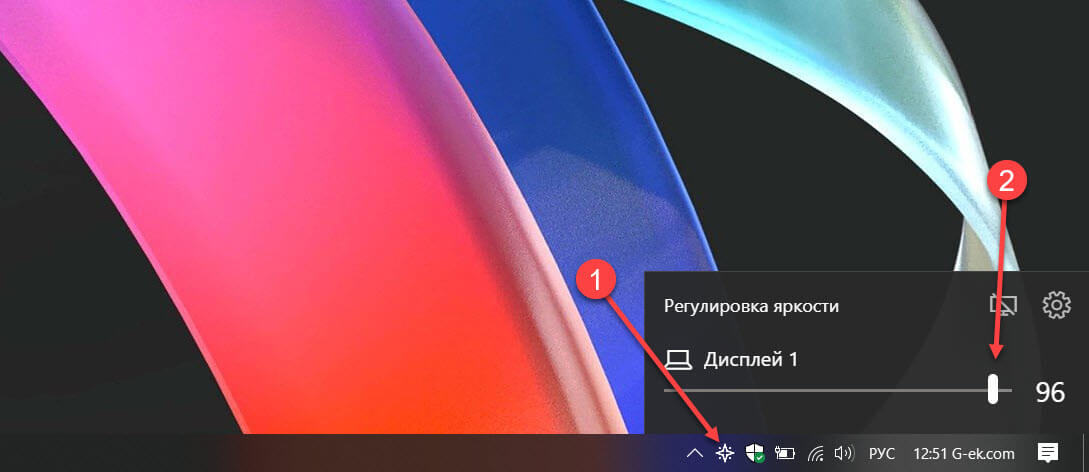
Использовать Центр действий для изменения яркости в Windows 10.
- Нажмите значок «Центра действий и уведомлений» на панели задач.
- В «Центре действий и уведомлений» нажмите на ссылку «Развернуть».
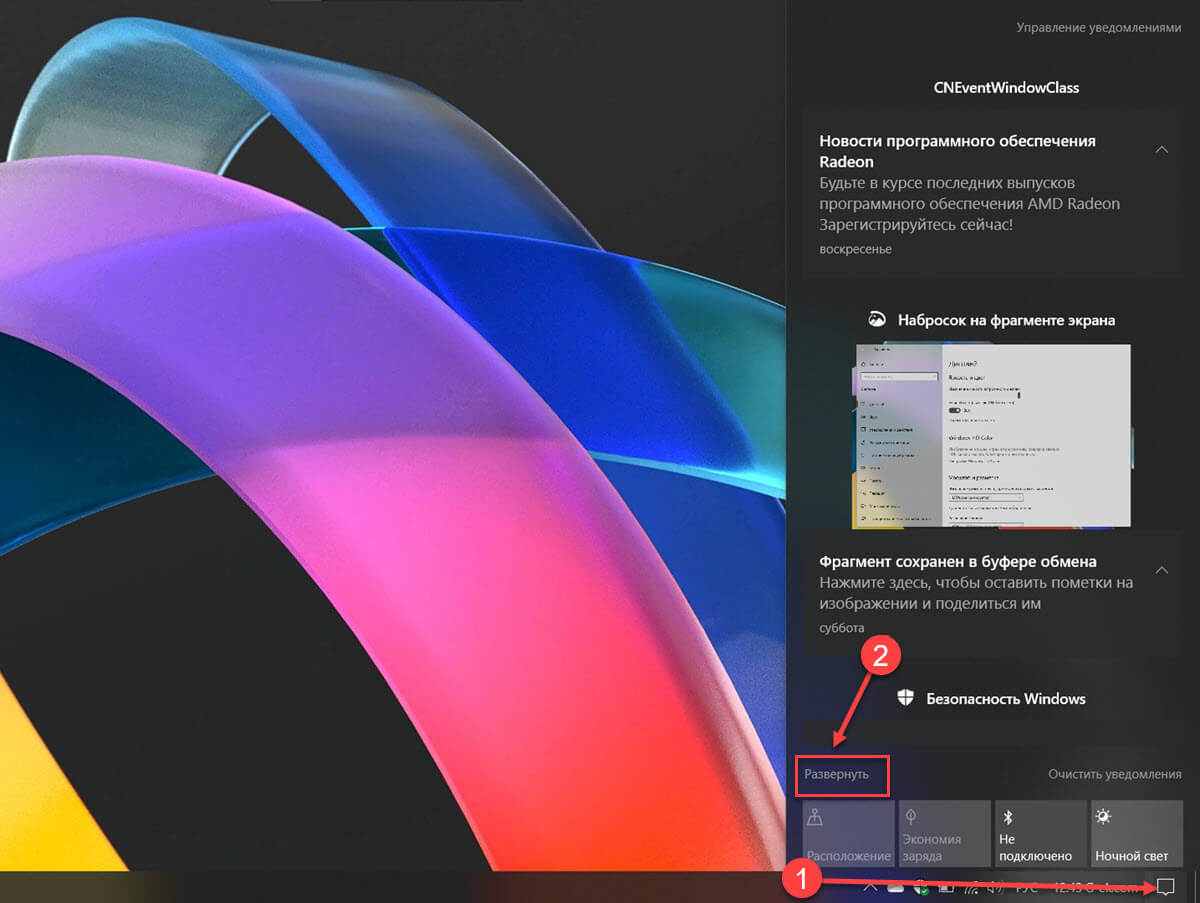
- В разделе «Быстрые действия», найдите ползунок яркость, передвиньте его чтобы увеличить / уменьшить подсветку дисплея.
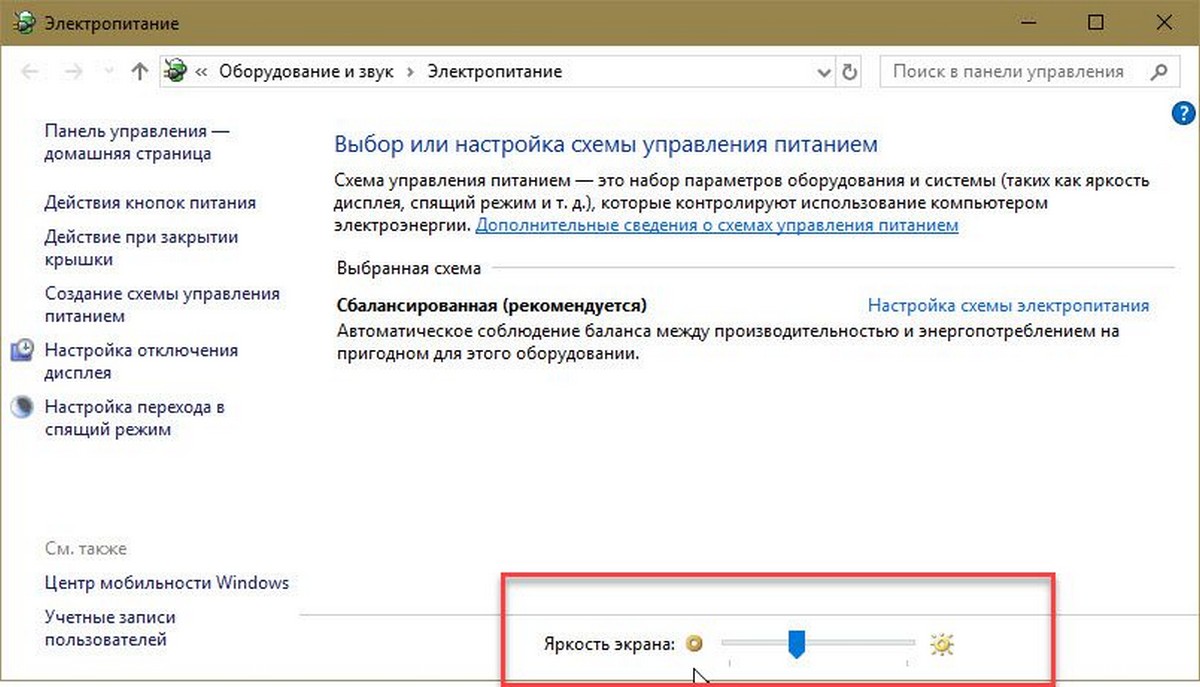
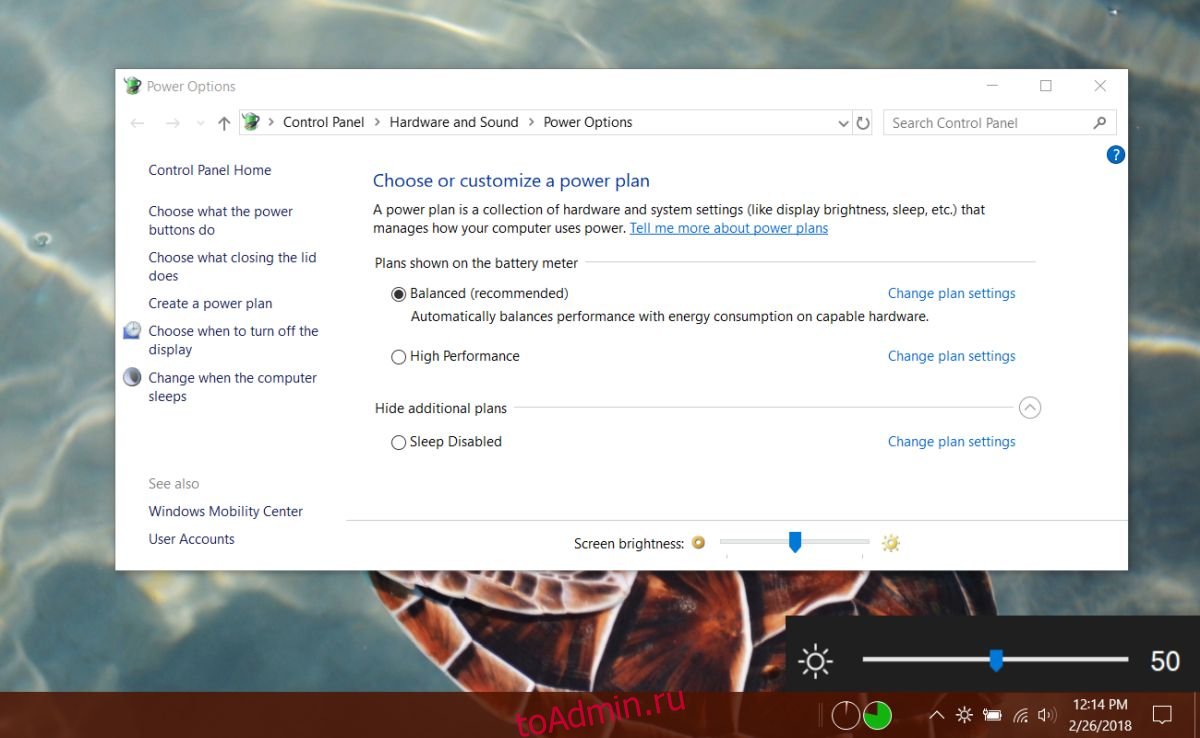
Изменение яркости экрана настройках питания.
- Откройте классическую «Панель управления» и перейдите по следующему пути:
- «Панель управления» → «Оборудование и звук» → «Электропитание»
- В правом нижнем углу отрегулируйте положение ползунка яркости экрана.
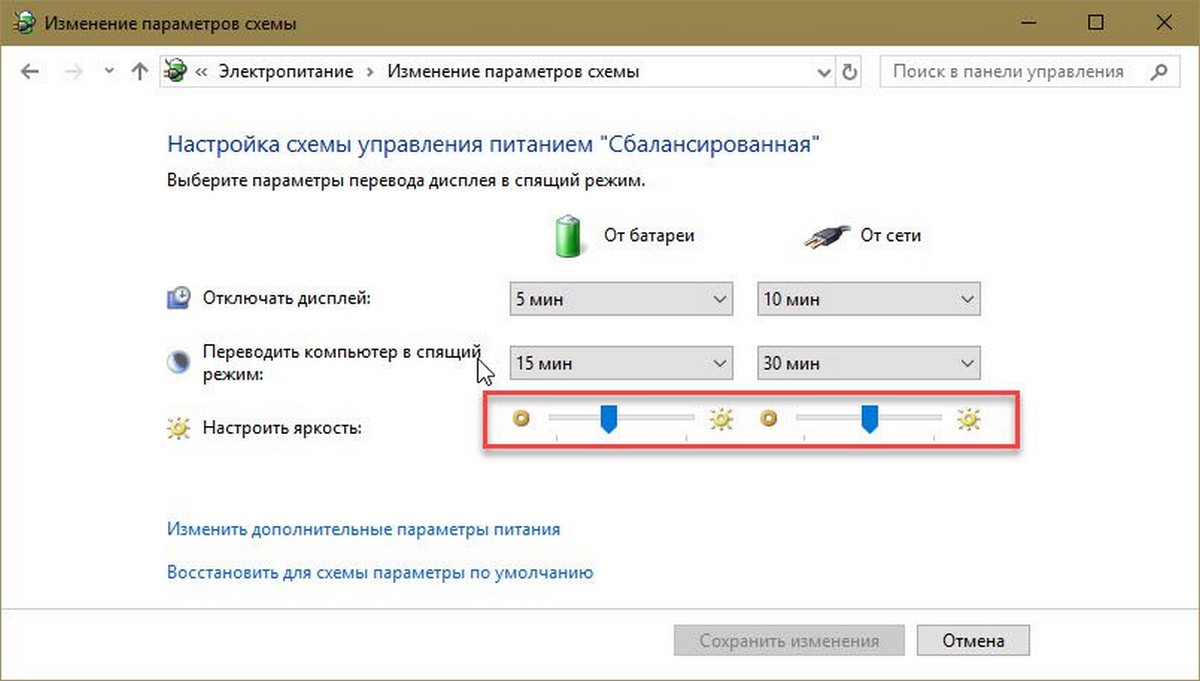
Если вы нажмете ссылку «Настройка схемы электропитания», вы сможете индивидуально настроить уровень яркости как для режима «От Батареи», так и «От Сети».
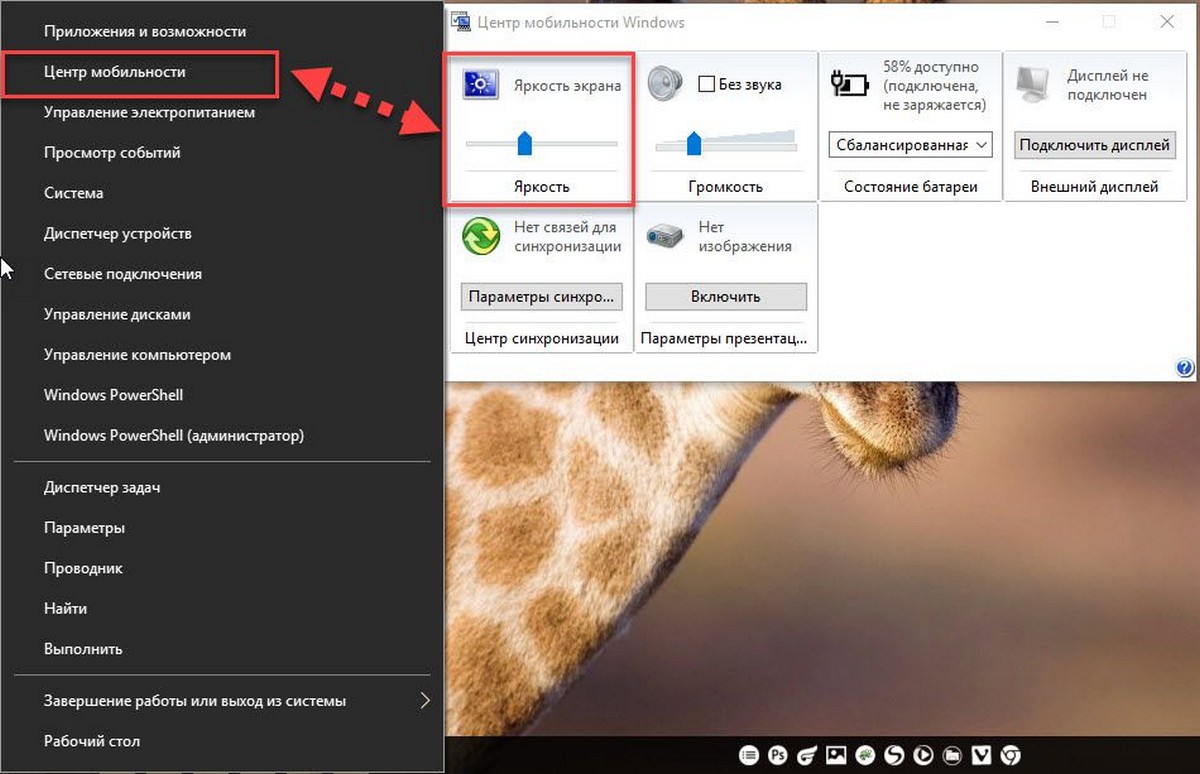
Изменение яркости экрана с помощью Центра мобильности.
- Нажмите сочетание клавиш Win + X
- В открывшимся меню выберите «Центр мобильности» Windows.
- Теперь с помощью ползунка, отвечающего за яркость, установите нужный уровень яркости экрана.
Изменение яркости экрана с помощью PowerShell.
Вы можете использовать PowerShell для изменения уровня яркости дисплея в Windows 10. Вот как это сделать.
- Откройте PowerShell.
- Введите или скопируйте следующую команду:
(Get-WmiObject -Namespace root/WMI -Class WmiMonitorBrightnessMethods).WmiSetBrightness(1,BRIGHTNESS_LEVEL)
Примечание: В приведенной выше команде замените часть BRIGHTNESS_LEVEL на процентное значение от 0 до 100. Например, команда ниже, устанавливает яркость экрана 100%:
(Get-WmiObject -Namespace root/WMI -Class WmiMonitorBrightnessMethods).WmiSetBrightness(1,100)
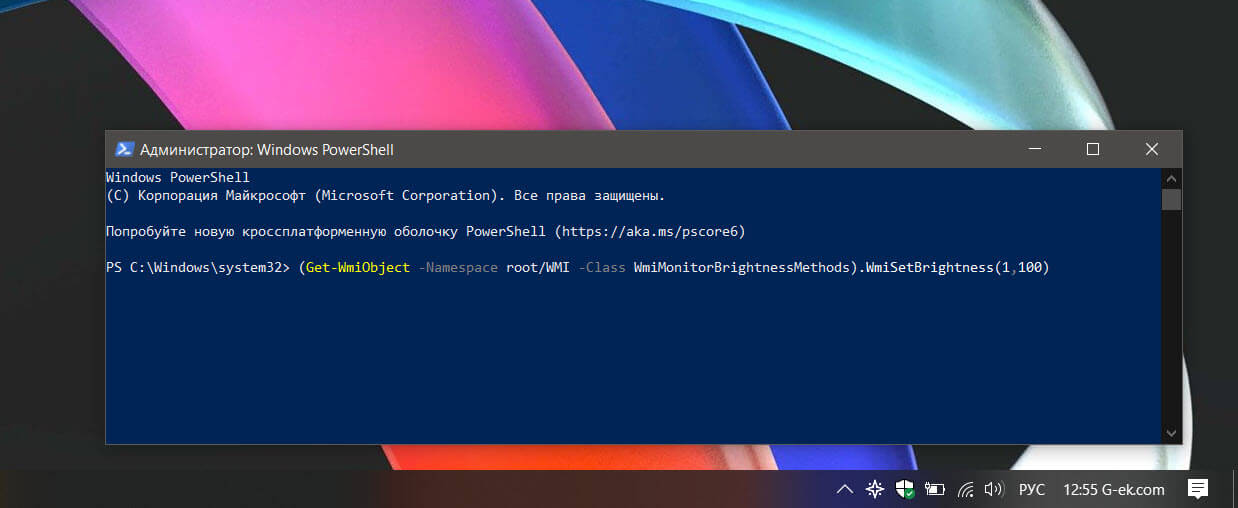
- Нажмите клавишу Enter, готово.
С помощью приложения Twinkle Tray.
Хотя все эти методы хороши, было бы неплохо, если бы был способ настроить яркость дисплея вашего ПК с внешним монитором или ноутбука прямо из панели задач так же, как мы регулируем громкость?
По умолчанию Windows 10. не поддерживает настройку яркости внешнего монитора. Но теперь есть небольшой инструмент Twinkle Tray, который позволяет вашей Windows 10 регулировать яркость экрана, как в ноутбуке. Twinkle Tray использует DDC / CI и WMI для синхронизации яркости с дисплеем. Большинство мониторов обеспечивают совместимость с DDC / CI. Убедитесь, что соответствующая опция включена в вашем мониторе.
Это бесплатный инструмент для регулировки яркости дисплея. Для установки приложения перейдите по ссылке в Магазин Microsoft Store.
Особенности:
- Добавляет ползунки яркости в системный трей, аналогично встроенной панели громкости Windows 10.
- Возможность управления яркостью нескольких мониторов
- Нормализует подсветку на разных мониторах.
- Может автоматически изменять яркость монитора в зависимости от времени суток.
- Безупречно сочетается с Windows 10. Использует ваши параметры персонализации, чтобы соответствовать вашей теме.
- Запускается с Windows.
После загрузки и запуска значок приложения — появится в меню «Пуск» и в области уведомлений на панели задач.
Вот и все.
Если ни один из вариантов регулировки яркости вам не помог, ознакомьтесь с нашей статьей: Как Восстановить яркость на ноутбуке Windows 10.

В Windows 10 есть ползунок яркости, который скрыт глубоко внутри параметров электропитания. Пользователи обычно используют функциональные клавиши для управления яркостью экрана. HUD в Windows 10 дает некоторое представление о том, насколько яркий или тусклый ваш экран. Так было уже много лет. Даже в Windows 7 не было ползунка яркости, который был бы легко доступен для пользователей. У него тоже был только тот, который был похоронен внутри Power Options на панели управления. С ползунком намного проще управлять, но в Windows 10 нет ползунка яркости, которым вы могли бы легко управлять. Win 10 Brightness Slider — бесплатное приложение с открытым исходным кодом, которое исправляет это.
Ползунок яркости Win10 портативный. Устанавливать его не нужно. Просто скачайте приложение и запустите его. Он добавит значок яркости на панель задач, который идеально сочетается с элементами управления питанием / аккумулятором, WiFi и громкостью.
Щелкните значок яркости, и появится ползунок. Вы можете перетащить ползунок и увеличить или уменьшить яркость. Как и ползунок громкости в Windows 10, ползунок яркости дает вам числовые значения того, насколько тусклый или яркий ваш экран, то есть у вас есть шкала от 1 до 100.
По сравнению с ползунком, HUD яркости Windows 10 по умолчанию не дает вам такого точного контроля. Функциональные клавиши на вашем ноутбуке управляют HUD и регулируют яркость с фиксированным шагом.
На скриншоте ниже вы можете увидеть HUD яркости по умолчанию слева и ползунок, который добавляет слайдер яркости Win10 справа. Управлять слайдером намного проще.
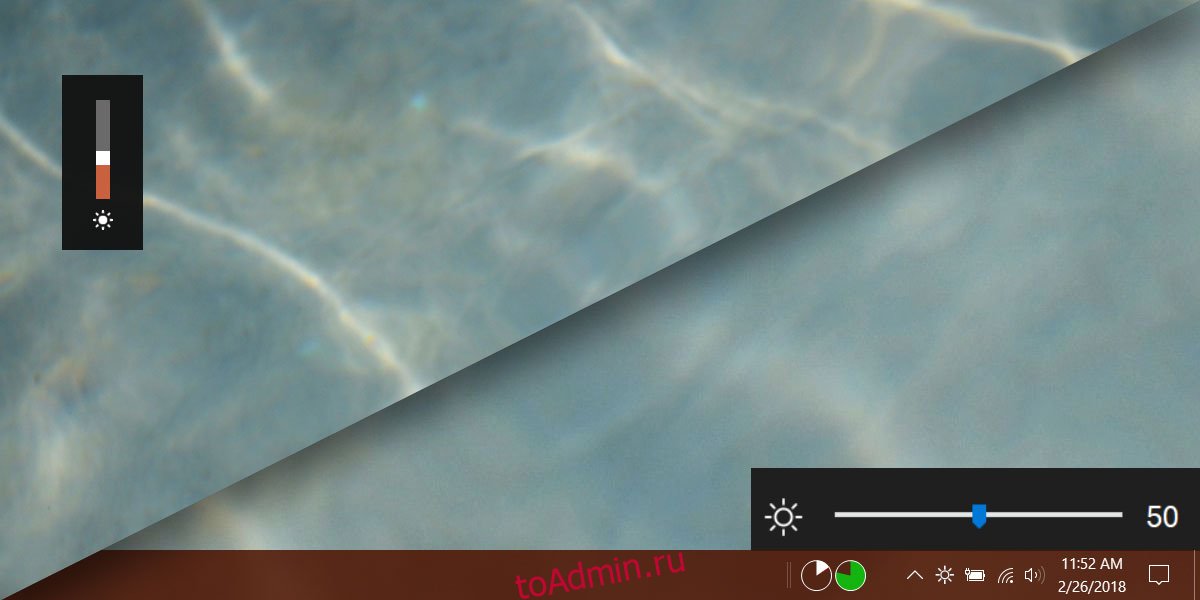
На самом деле это небольшое улучшение ползунка яркости на панели управления, поскольку он дает вам числовые значения для текущих уровней яркости.
Ограничения
Хотя Win10 Brightness Slider работает отлично, но у него есть одно ограничение. Если вы используете ползунок яркости на панели управления или если вы используете функциональные клавиши для изменения яркости экрана, ползунок не будет обновляться для отображения новых уровней яркости. Это не мешает настройкам яркости по умолчанию, а настройки яркости по умолчанию не мешают работе приложения. Единственное ограничение — приложение не обновляется, когда вы используете элементы управления по умолчанию для изменения яркости экрана.
Однако, если вы используете ползунок яркости Win10 для изменения яркости экрана, как ползунок панели управления, так и HUD яркости по умолчанию в Windows 10 будут отражать новый установленный уровень.
Вы можете запустить Win10 Brightness Slider при запуске системы. При попытке запустить приложение может отображать ошибку «Не поддерживается». Если вы получаете эту ошибку, разработчик советует вам выполнить следующую команду в PowerShell;
$monitor = Get-WmiObject -ns root/wmi -class wmiMonitorBrightNessMethods$monitor.WmiSetBrightness(80,10)
Если это не сработает, возможно, необходимо обновить драйверы дисплея. За исключением этих двух решений, если приложение не работает, у вас нет выхода.
Что вы думаете об этой статье?
Несмотря на то, что в Windows 10 предусмотрены быстрые способы настройки практически всех общих настроек, быстрого способа регулировки яркости экрана нет, если у вас нет выделенных клавиш ноутбука.
Но хотите ли вы увеличить время автономной работы или просто хотите увеличить полезность своей задач , есть простой способ добавить ползунок яркости: простой инструмент под названием Brightness Slider.
Во-первых, посетите страницу GitHub Brightness Slider и нажмите ссылку для скачивания в нижней части страницы. Там нет ничего, чтобы установить, поэтому, когда вы нажимаете, чтобы открыть его, программа запускается сразу. Может появиться предупреждение SmartScreen Защитника Windows чтобы он не смог проверить приложение, нажмите « Подробнее», а затем « Запустите в любом случае», чтобы запустить его.
Как только он запустится, вы увидите маленький значок солнца в системном трее. Если вы этого не видите, нажмите маленькую стрелку рядом с рядом значков, чтобы найти его. Вы можете предпочесть перетащить его вниз, рядом со своим томом, сетью и другими значками, для быстрого доступа

Нажмите на значок солнца, и вы получите ползунок яркости, который позволяет регулировать яркость по своему вкусу. Это все, что нужно сделать. Обратите внимание, что это приложение не будет работать при запуске по умолчанию. Если вы хотите, чтобы он всегда был доступен, щелкните правой кнопкой мыши значок солнца и выберите Запуск при запуске, чтобы вам не приходилось запускать его вручную все время.
Очевидно, что если вы используете рабочий стол, вам не нужно много использовать этот инструмент. Но для тех, кто работает на ноутбуках и особенно на планшетах, слайдер удобнее, чем копаться в нескольких меню для регулировки яркости.
Какой ваш предпочтительный метод регулировки яркости? Этот инструмент помог вам решить проблему? Скажите нам, если вам это нравится в комментариях!
Кредит изображения: lucadp / Depositphotos
Выберите центр действий в правой части панели задач, а затем переместите ползунок Яркость, чтобы настроить яркость. (Если ползунка нет, см. Раздел «Примечания» ниже.)
Если ползунок яркости Windows 10 отсутствует, возможно, вы застряли на неправильном уровне. Причиной этой проблемы может быть проблемный драйвер или приложение TeamViewer. Решение проблемы с отсутствующей яркостью: для обновления драйверов с помощью специального инструмента.
Как мне вернуть ползунок яркости?
Найдите кнопку «Добавить или удалить быстрые действия» ниже и нажмите на нее, чтобы открыть список всех быстрых действий. Прокрутите вниз, пока не найдете яркость и установите ползунок рядом с ним на Вкл.
Почему исчезла полоса яркости?
Зайдите в Настройки> Дисплей> Панель уведомлений> Регулировка яркости. Если полоса яркости по-прежнему отсутствует после внесения необходимых изменений, попробуйте перезагрузить телефон, чтобы убедиться, что изменения будут применены правильно. В противном случае обратитесь к производителю телефона за дополнительной помощью и рекомендациями.
Какое сочетание клавиш используется для регулировки яркости в Windows 10?
Используйте сочетание клавиш Windows + A, чтобы открыть Центр поддержки., открывая ползунок яркости внизу окна. Перемещение ползунка в нижней части Центра уведомлений влево или вправо изменяет яркость дисплея.
Как мне избавиться от полосы яркости в Windows 10?
a) Щелкните / коснитесь значка системы питания в области уведомлений на панели задач, затем щелкните / коснитесь параметра «Настроить яркость экрана». б) Внизу окна параметров электропитания переместите ползунок яркости экрана вправо (ярче) и влево (тусклее), чтобы отрегулировать яркость экрана до желаемого уровня.
Как исправить яркость в Windows 10?
Почему это проблема?
- Исправлено: не удается отрегулировать яркость в Windows 10.
- Обновите драйверы адаптера дисплея.
- Обновите драйверы вручную.
- Обновите драйвер автоматически.
- Отрегулируйте яркость в параметрах электропитания.
- Повторно включите PnP Monitor.
- Удалите скрытые устройства под мониторами PnP.
- Исправьте ошибку ATI с помощью редактора реестра.
Как включить клавишу Fn для яркости?
Клавиша Fn обычно находится слева от пробела. Функциональные клавиши яркости могут быть расположены в верхней части клавиатуры или на клавишах со стрелками. Например, на клавиатуре ноутбука Dell XPS (на фото ниже) удерживая клавишу Fn, нажмите F11 или F12 для регулировки яркости экрана.
Как получить ползунок яркости на панели уведомлений?
Как добавить ползунок яркости на панель уведомлений
- Проведите вниз от верхнего края экрана, чтобы открыть панель уведомлений.
- Коснитесь значка шестеренки, чтобы открыть меню «Настройки».
- Коснитесь «Дисплей», а затем выберите «Панель уведомлений».
Почему у моего компьютера не работает яркость?
Когда яркость Windows не меняется, проверьте настройки параметров питания. Если у вас есть проблемы с настройками отображения в вашей системе, вы можете попробовать изменить реестр. Если яркость вашего ноутбука не может быть отрегулирована, убедитесь, что у вас установлены последние версии драйверов.
Есть ли в Windows 10 автояркость?
Чтобы включить или отключить эту функцию в Windows 10, откройте приложение «Настройки», выберите «Система» и «Дисплей». Включите параметр «Автоматически изменять яркость при изменении освещения». включен или выключен. … Вы можете регулировать яркость экрана как автоматически, так и вручную, и у обоих есть свое время и место.
Explore some of the best fixes for this issue
by Ivan Jenic
Passionate about all elements related to Windows and combined with his innate curiosity, Ivan has delved deep into understanding this operating system, with a specialization in drivers and… read more
Updated on December 8, 2022
Reviewed by
Vlad Turiceanu

Passionate about technology, Windows, and everything that has a power button, he spent most of his time developing new skills and learning more about the tech world. Coming… read more
- If the Windows 10 brightness slider is missing, you may be stuck with an unacceptable level.
- This problem might be a problematic driver or the TeamViewer app.
- A solution for the missing brightness option is to update your drivers using a dedicated tool.
- Checking your graphics card software settings might also help you fix this problem.
XINSTALL BY CLICKING THE DOWNLOAD FILE
- Download Restoro PC Repair Tool that comes with Patented Technologies (patent available here).
- Click Start Scan to find Windows 10 issues that could be causing PC problems.
- Click Repair All to fix issues affecting your computer’s security and performance
- Restoro has been downloaded by 0 readers this month.
An annoying issue that users have reported is that the brightness option is not available on Windows 10, and fortunately for everyone, we might have a solution.
Adjusting the brightness of your PC can be pretty valuable, especially when you multitask and require different brightness levels for various programs. Also, the change in your surroundings is a good reason to modify the brightness.
Speaking of brightness option issues, here are some problems that users reported:
- Brightness option unavailable Windows 10, grayed out – Many users reported that the brightness option isn’t available on Windows 10. If that’s the case, update your graphics card drivers and check if that helps.
- Adjust plan brightness missing Windows 10 – Being able to control your brightness using a slider can be pretty helpful, but many users claim this feature isn’t available. If that’s the case, remove TeamViewer and similar software from your PC and check if that solves the issue.
- My laptop brightness not showing brightness option – Sometimes, you might have issues with laptop brightness on your laptop. To enable this feature, ensure your power settings are correctly configured.
- Screen brightness option not showing up disappeared – If this option isn’t available, you can constantly adjust brightness using your driver software or by downloading a third-party application.
- Can’t adjust brightness or brightness slider missing in Windows 11, 8, 7 – If you can’t adjust brightness on Windows 8 or 7, feel free to try some of our solutions. Most of our solutions are fully compatible with older versions of Windows, so feel free to try them.
- Brightness bar not showing in Windows 10 – Reinstall the monitor driver in order to effectively and quickly fix this issue.
So, let’s find out about the problem and check the solutions that work for most users when the brightness control option is not showing in Windows 10.
Why is there no brightness setting on Windows 10?
This is usually the case when the Adaptive Brightness setting is turned on. Most users were able to fix things by simply disabling them.
Also, check your graphics and monitor the driver for corruption. Besides, ensure you have the latest version of the two installed. Running an outdated driver version often affects the device’s functioning.
For some users, the third-party apps conflicted with the OS, leading to the Windows brightness slider not showing.
Many users are puzzled by this mysterious and sudden disappearance. For some, the brightness slider is greyed out, or perhaps it’s just the brightness option not available in Windows 10. Meanwhile, most users reported that the brightness setting disappeared altogether.
So, why is there no brightness setting on Windows 10? One possible explanation is that this option is simply disabled. Here’s how you can enable it:
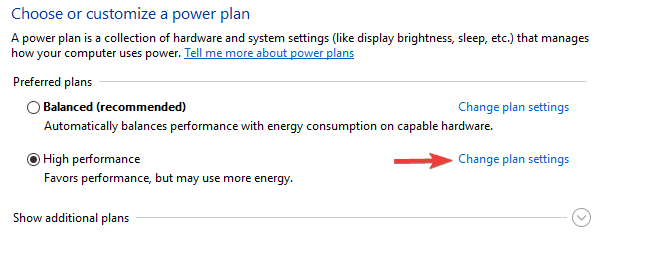
How to add a brightness slider in Windows 10?
- First, press Windows + I to open the Settings app and select System.

- Now, select Power & sleep from the left and click on Additional power settings on the right.
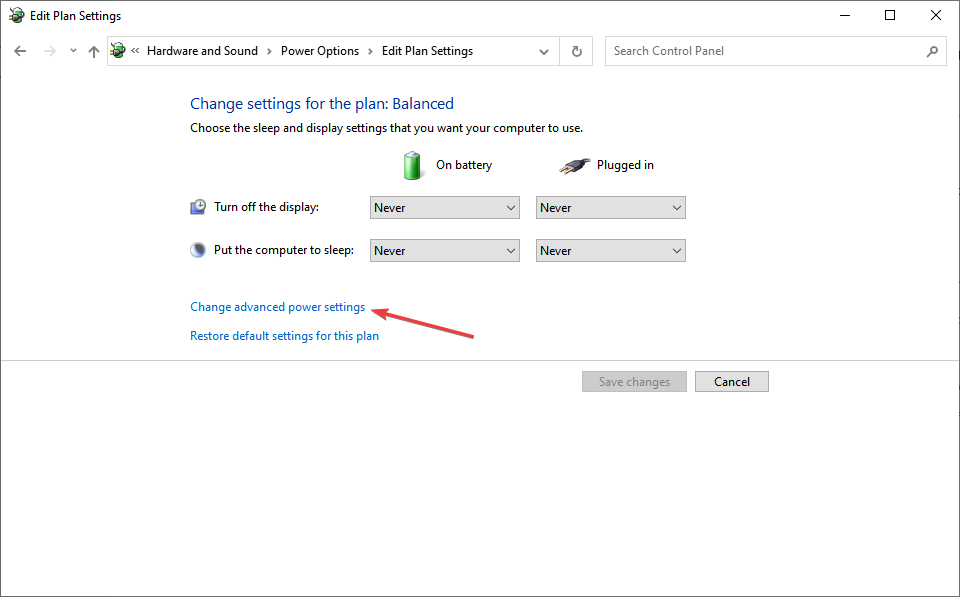
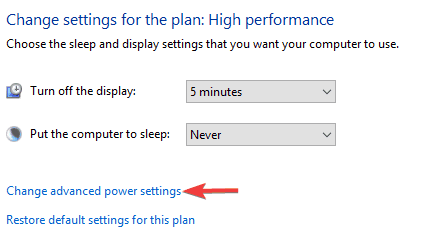
- Then, click on Change plan settings.

- Next, select Change advanced power settings.
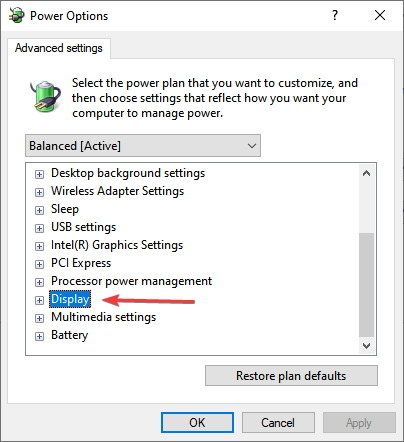
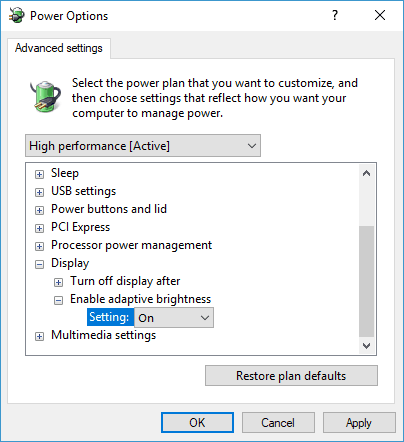
- Finally, double-click to expand the Display section and disable Enable adaptive brightness under it.

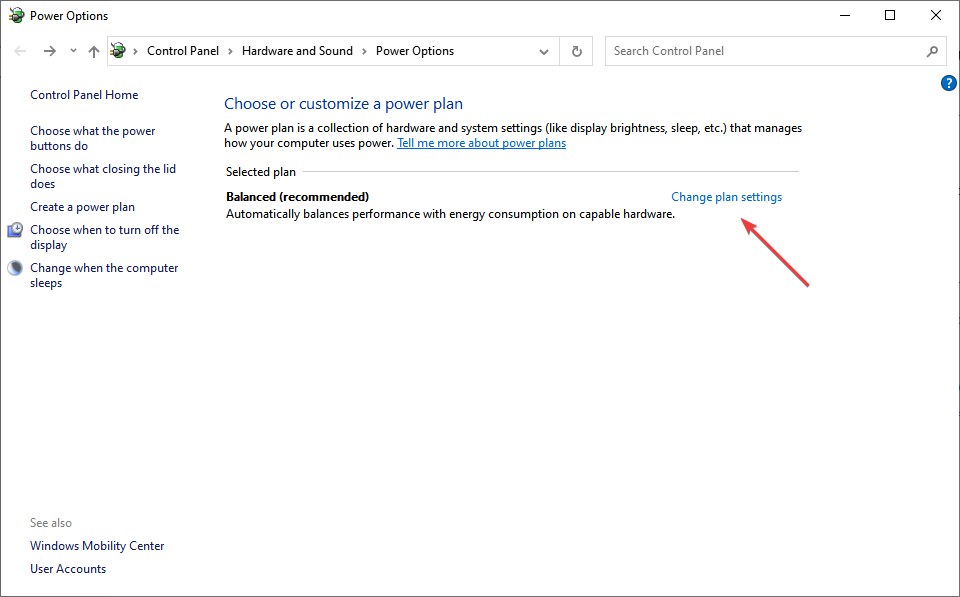
This will reveal the brightness slider at the bottom of the Action Center. If the brightness option is still unavailable in Windows 10, you can try the following solutions to get things up and to run.
Where is the brightness option in Windows 10?
The brightness option is available in the Settings and the Action Center in Windows 10. To adjust the brightness through the Action Center, press Windows + A, and use the slider to make the necessary modifications.

If you want to make adjustments through the Settings, head to System, and then go to the Display settings. You will now find the slider to change the brightness of the display.
How do I get my brightness slider back on Windows 10?
- Why is there no brightness setting on Windows 10?
- How to add a brightness slider in Windows 10?
- How do I get my brightness slider back on Windows 10?
- 1. Uninstall the monitor driver and install the default one
- 1.1 Reinstall the monitor driver
- 1.2 Check if the monitor driver is disabled
- 2. Check your graphics card software
- 4. Try third-party applications
- 5. Change your power settings
- 6. Install a Generic PnP monitor driver
- 7. Remove TeamViewer
- 8. Use your keyboard or monitor buttons to adjust the brightness
- 9. Install the latest updates
- What can I do if the brightness bar not showing on Windows 11?
1. Uninstall the monitor driver and install the default one
1.1 Reinstall the monitor driver
If you run intro trouble regarding the brightness option on Windows 10, you can bring it back just by reinstalling your display driver or update the old version. See how to proceed with the next steps.
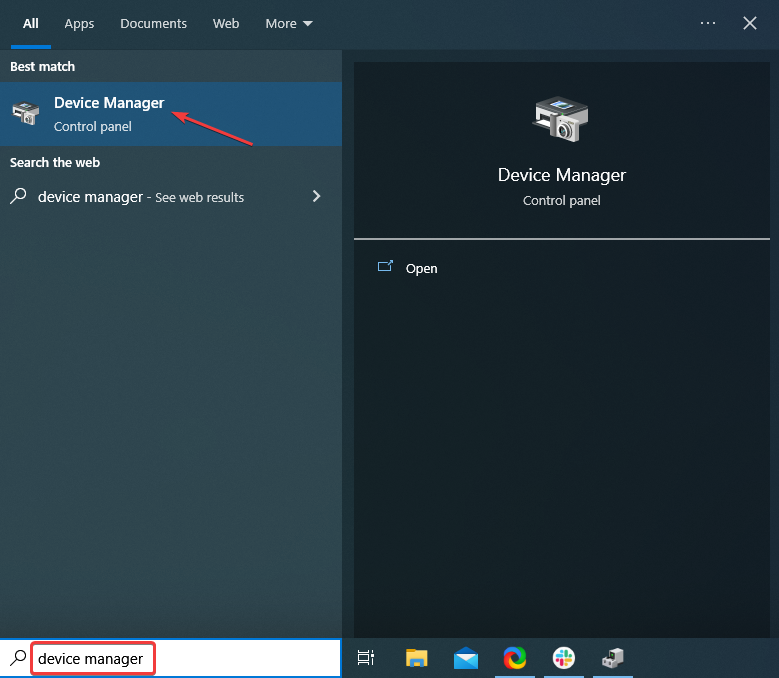
1. Press Windows + X to open the Power User menu, and choose Device Manager from the list.

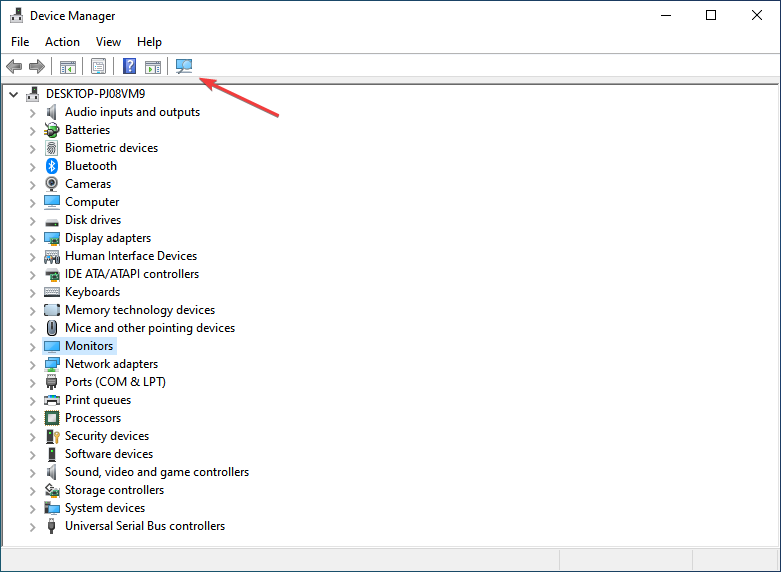
2. Go to the Monitors section and expand it.
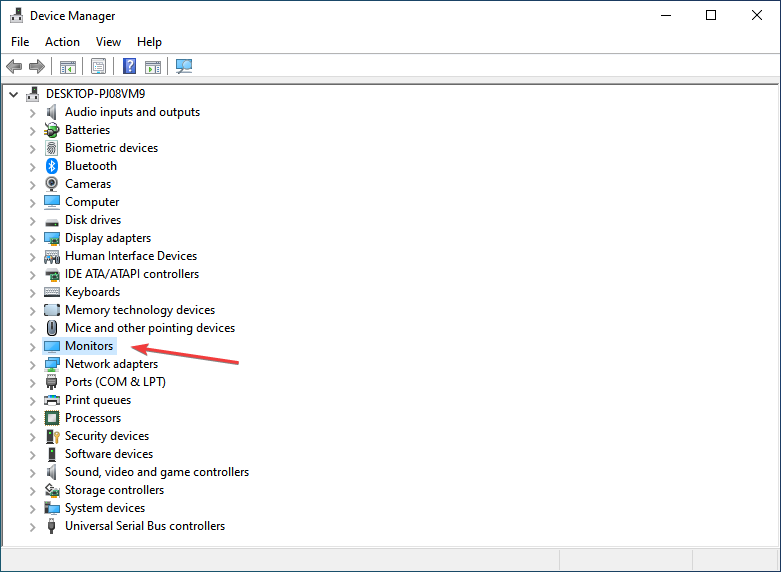
3. Find your monitor driver, right-click it and choose Uninstall device.
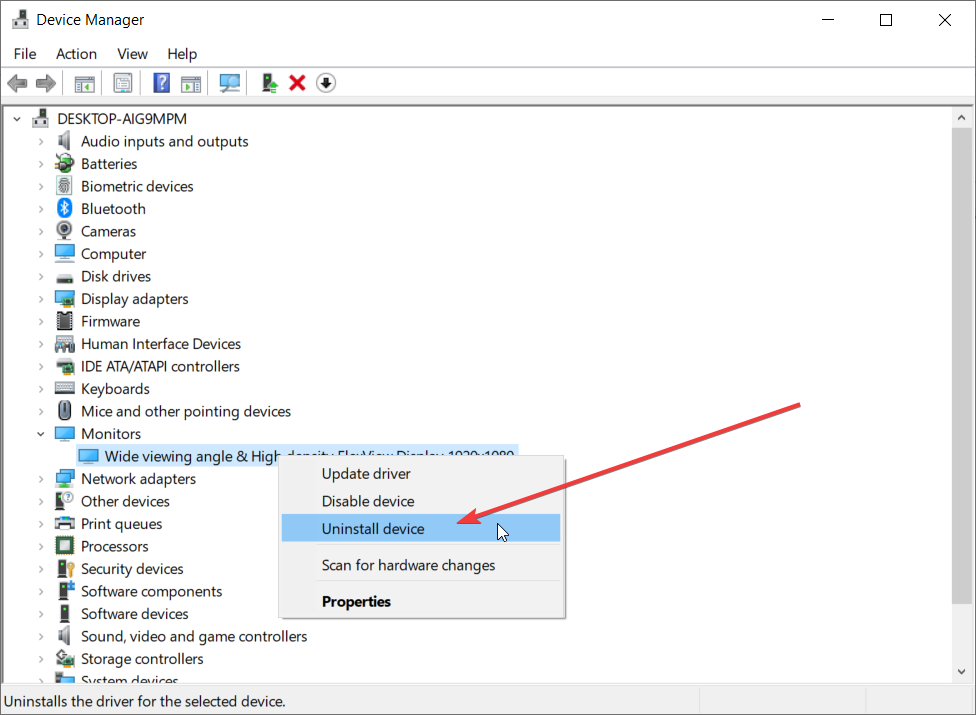
4. Check Delete the driver software for this device and click OK if the option appears.
5. Your monitor driver is uninstalled. Now, click the Scan for hardware changes icon.
6. This will install the default monitor driver, and your brightness settings should work now.
The issue might be your monitor driver if the brightness option is unavailable on your Windows 10 PC. However, you can fix the problem simply by reinstalling the monitor driver.
1.2 Check if the monitor driver is disabled
- In the Device Manager, expand the Monitors section, and locate the problematic device.
- Right-click it and if you find the Enable device option listed, click on it.

- If the option reads Disable device, the driver is already running, and you can head to the next solution.

After installing the default monitor driver, check if the problem is still there. This issue can also occur if your monitor driver is disabled. To check if that’s the case, perform the steps above.
You can also manually update the driver by visiting the graphics card manufacturer’s website and downloading the latest version of it.
2. Check your graphics card software
Many users reported that the brightness option isn’t available on their PC, which can be a problem for some users. However, your graphics card driver software can change the brightness option.
Applications such as Catalyst Control Center and Nvidia Control Panel allow you to change various options related to your graphics card. Among these options is the ability to adjust your screen brightness.
All graphics cards come with driver software, so if you can’t find the brightness option on your PC, check your graphics card driver software and adjust the screen brightness from there.
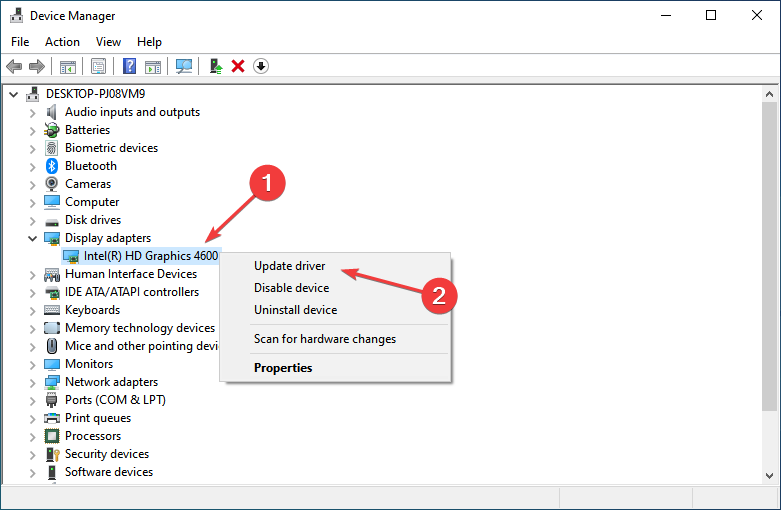
3. Update your display adapter driver
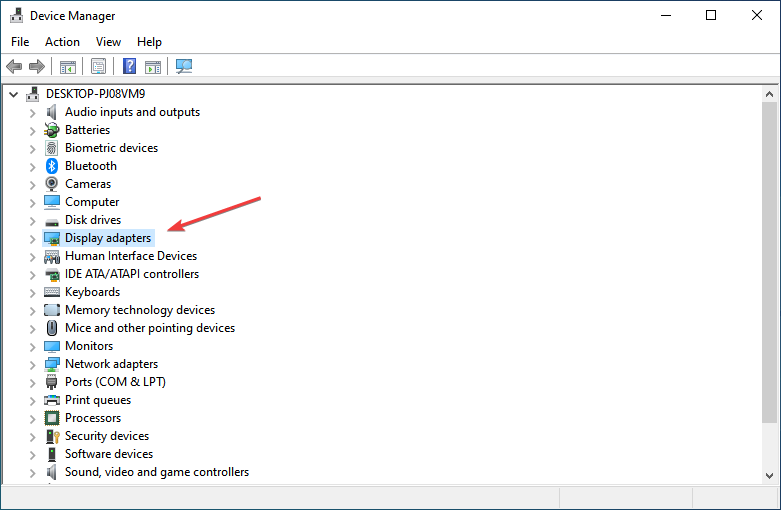
- Enter Device Manager in the Search bar, and click on the relevant search result.

- Double-click on Display adapters.

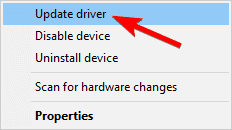
- Right-click on your graphics card and select Update driver
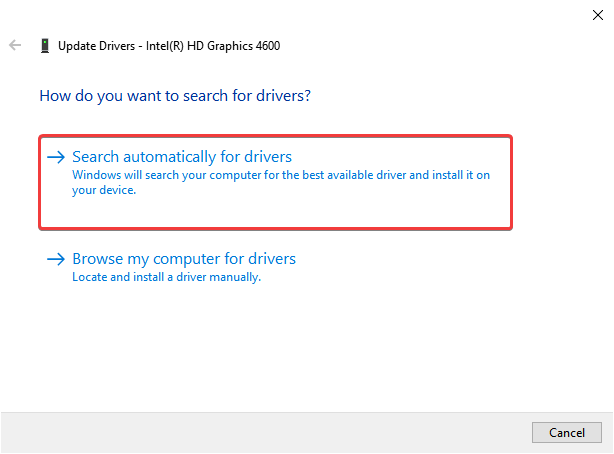
- Now, select Search automatically for drivers.

- Wait for your computer to locate and install the best available drivers.
Follow these steps to update your display adapter drivers. This process is the simplest, but if you want to update all your drivers and fix any related problems automatically, we recommend using a professional third-party tool.

DriverFix
Update the display adapter driver and all the other drivers safely and fast.
4. Try third-party applications
If you don’t have a brightness option available, you might be able to change the brightness using a third-party application.
Many applications allow you to adjust hue, saturation, and brightness, so do a quick search and try one of these apps.
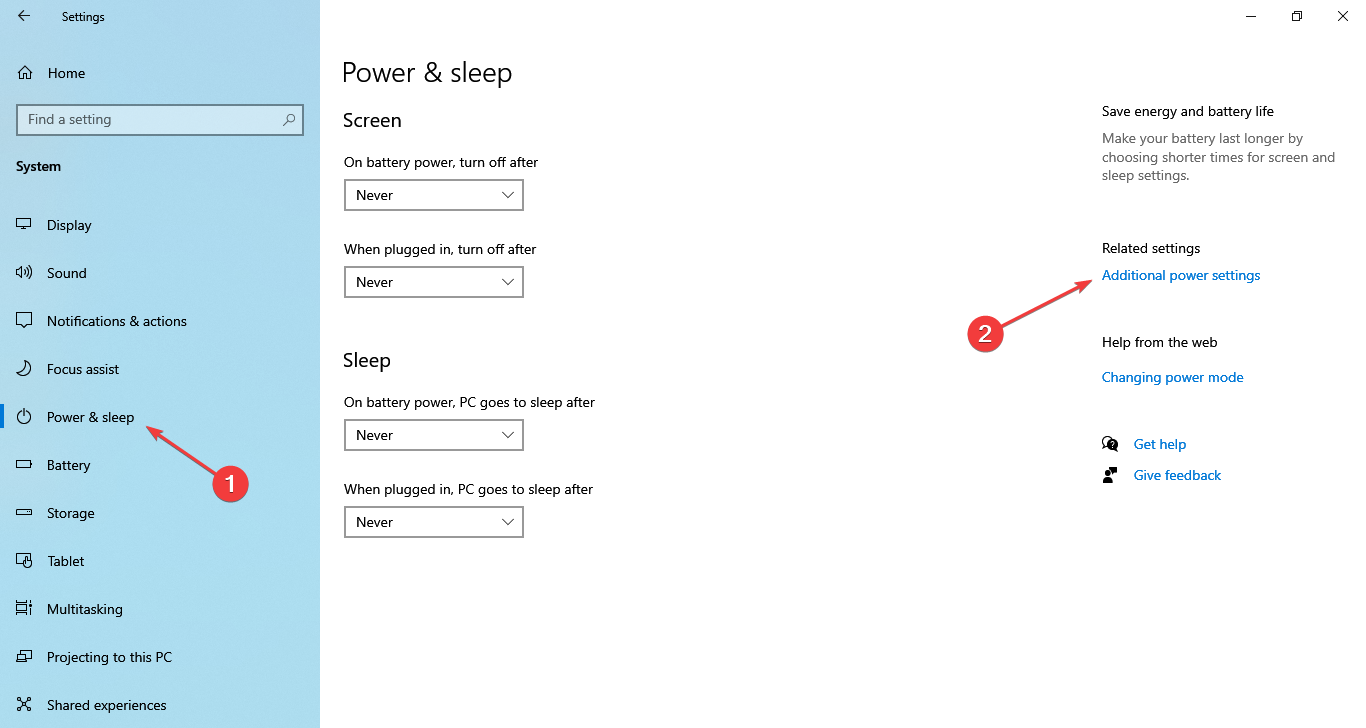
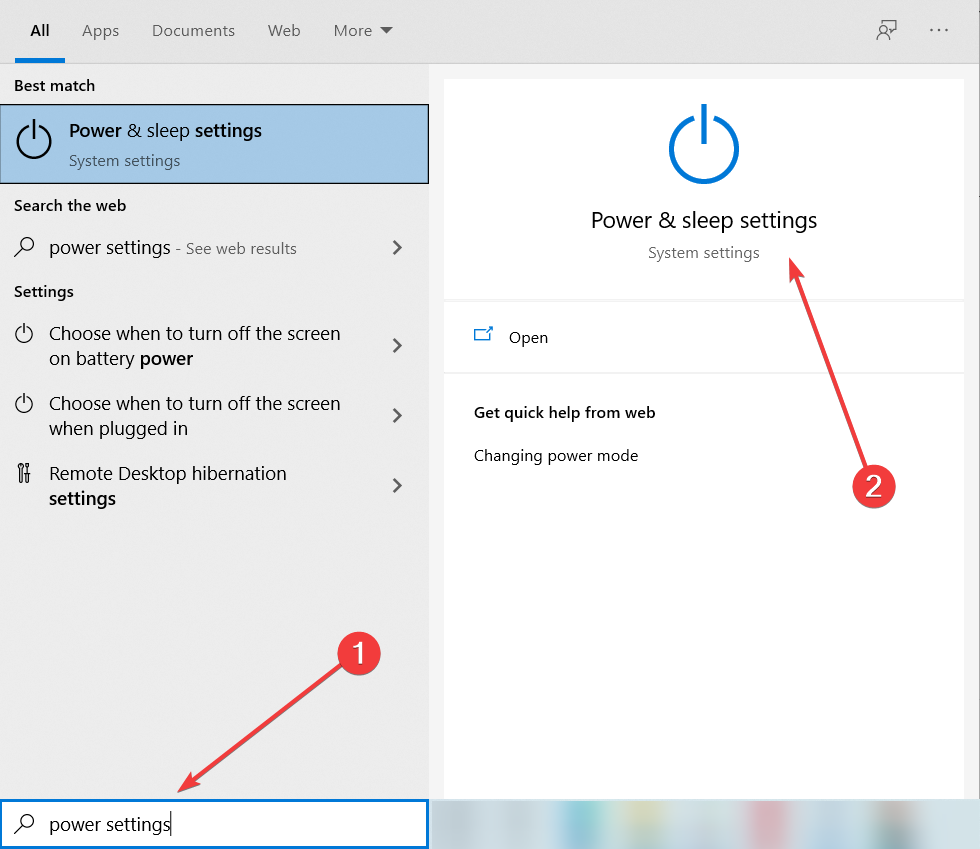
5. Change your power settings
- Press Windows + S and enter power settings. Now choose Power & sleep settings from the list of results.

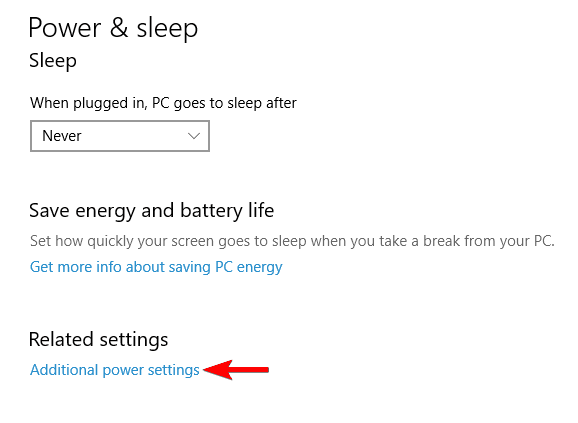
- Click Additional power settings in the right pane.

- Locate your currently selected play and click Change plan settings.

- Now click Change advanced power settings.

- Locate and enable the following options: Display brightness, Dimmed display brightness, and Enable adaptive brightness.
According to users, if Windows 10 brightness setting is missing on your PC, the issue might be your power settings.
To fix the problem, you must make a few changes to your power plan settings. After enabling these options, save the changes, and you should be able to adjust your screen brightness again without any issues.
Here’s what you should do if the power plans are missing in Windows 10.
- Windows 10 brightness not working
- Is brightness not working in Windows 11?
- How to configure content adaptive brightness on Windows 11
- Why is my screen so dark on full brightness?
- My laptop brightness is stuck on high
6. Install a Generic PnP monitor driver
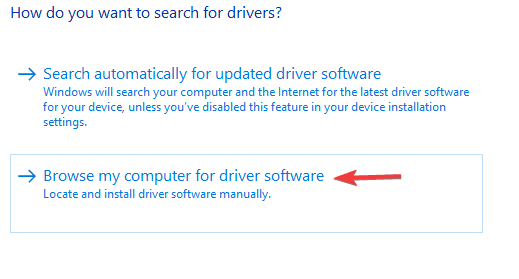
- Open Device Manager, expand the Monitors section, right-click your monitor, and choose Update driver from the menu.

- Choose Browse my computer for the driver software option.

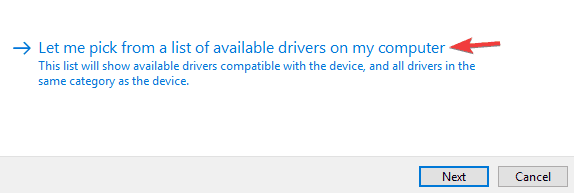
- Now, select Let me pick from a list of available drivers on my computer.

- Select Generic PnP Monitor from the list and click Next.

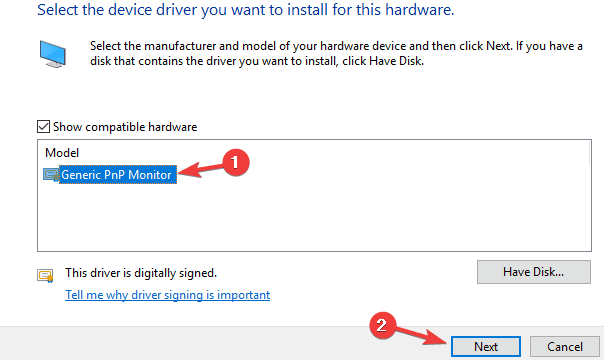
According to users, this issue can occur if you don’t have a Generic PnP Monitor driver installed; however, once you install the driver, the problem should be resolved, and the brightness option will now be available in Windows 10.
7. Remove TeamViewer
Although TeamViewer can be a helpful application, some users reported that it caused issues with the brightness option.
If you can’t adjust the brightness on your screen, be sure to uninstall TeamViewer and check if that solves your problem.
In case you’re not familiar, uninstaller software is a unique application that will altogether remove the problematic application and all its files and registry entries.
By using efficient uninstaller software, you’ll ensure that there aren’t any leftover files that can cause the issue to reappear in the future.
8. Use your keyboard or monitor buttons to adjust the brightness
If the brightness option isn’t available, you might be able to fix the problem by manually changing the brightness.
Most laptops have a keyboard shortcut to adjust the screen brightness easily. To see which shortcut changes the intellect, we advise you to check your laptop manual.
Even desktop users can manually change the brightness using the dedicated buttons. In addition, almost all monitors have configuration buttons next to the power button, and using these; you can easily adjust your screen settings, such as hue, brightness, and contrast.
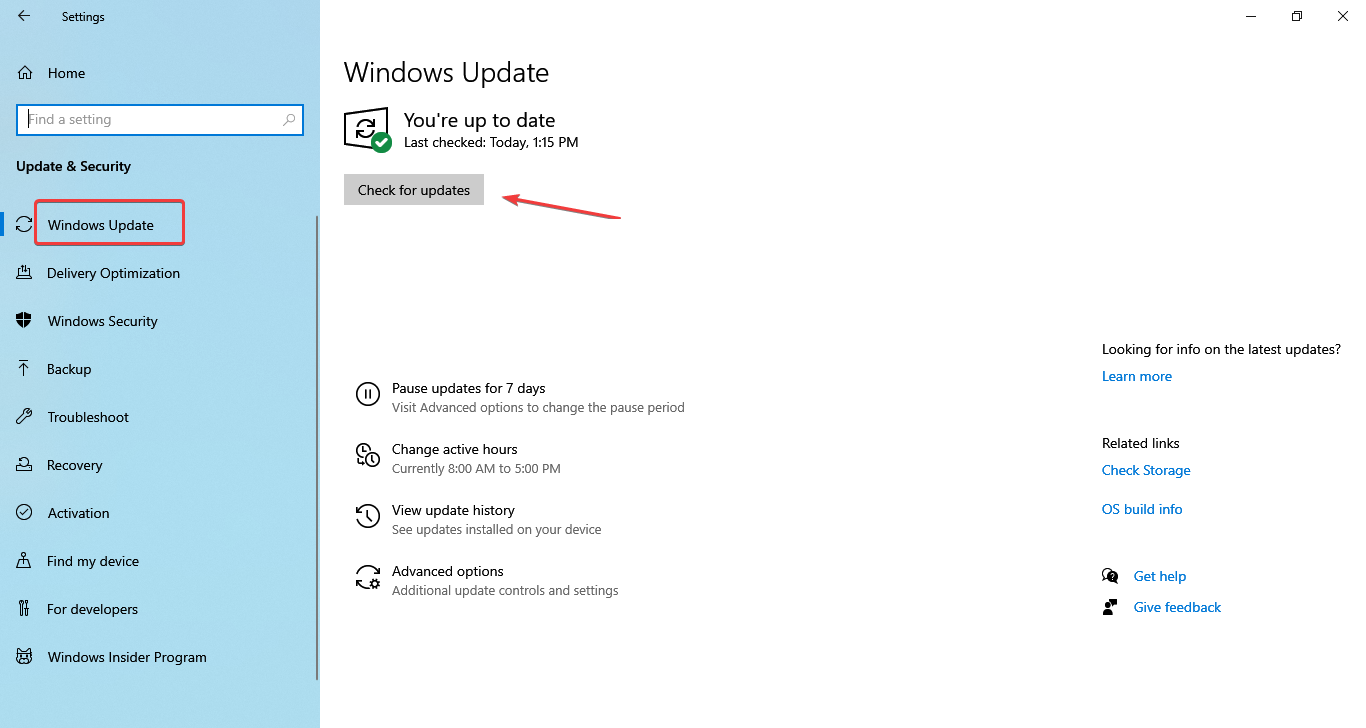
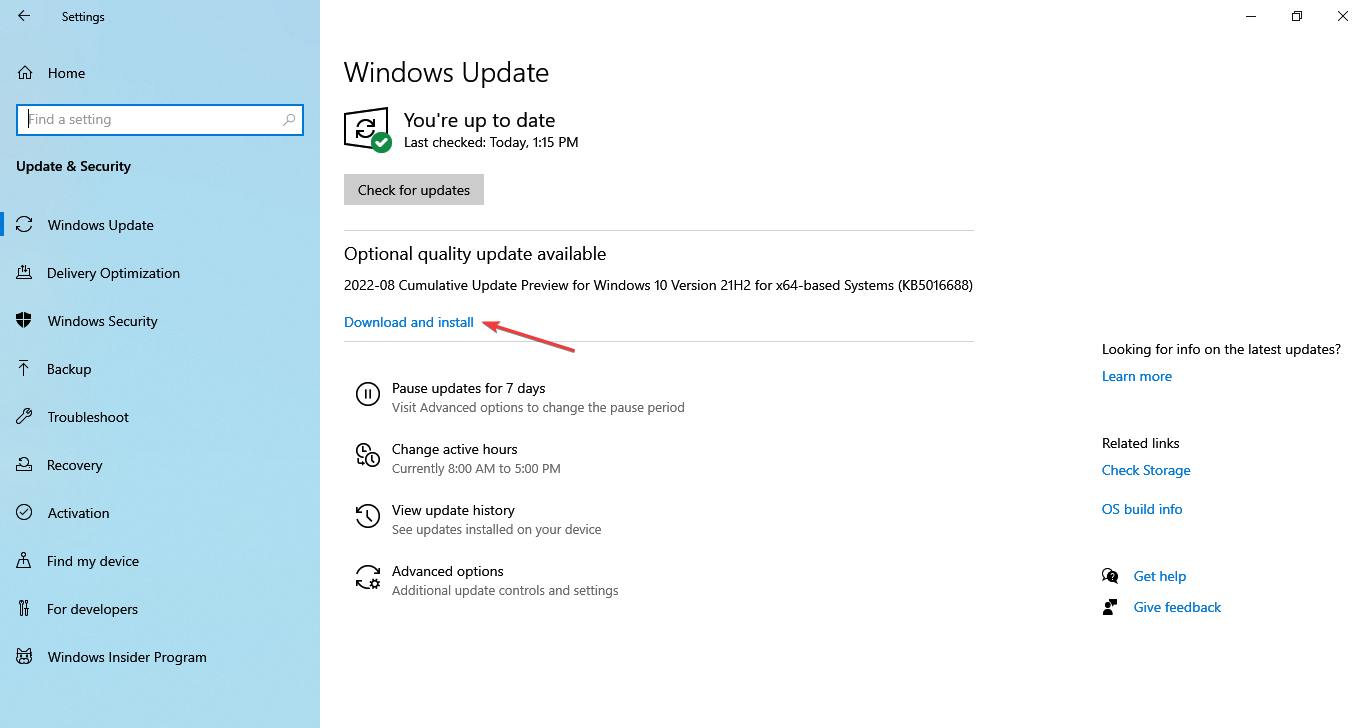
9. Install the latest updates
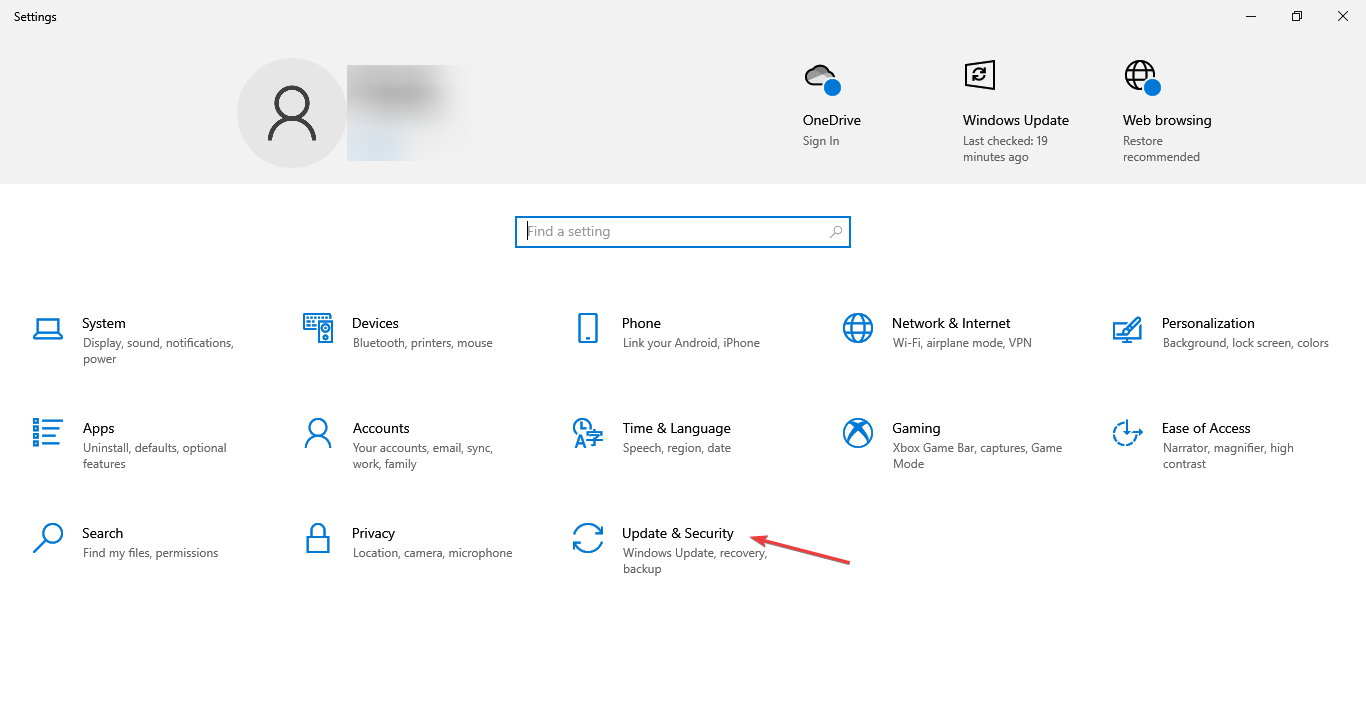
- Press Windows + I to open the Settings app and select Update & Security.
- Click on the Check for updates button right in the Windows Update section.
- If an update is listed after the scan, click on Download and install.
If the brightness option is not available on the Windows 10 PC, it’s possible that you don’t have the latest system updates.
Usually, Windows 10 downloads the necessary updates automatically, but sometimes you might miss an update or two. So, it’s recommended that you manually check for them every once in a while.
After the updates are installed, the problem with the brightness setting should be fixed.
What can I do if the brightness bar not showing on Windows 11?
Here, you could try executing the steps in the previous section, and things should work out in most cases. However, if the problem persists after that, performing a system restore should do the trick.
Also, you could look for other apps that might conflict with the OS’s functioning and lead to the brightness option not being available in Windows 11. If any are found, uninstall the apps right away.
In case nothing else works, resetting Windows 11 to its factory settings would come to your aid and will fix the problem. Though, you would lose the stored data, installed apps, and configured settings on the PC.
This concludes our guide, and we hope you managed to fix the brightness problem on Windows 10.
Also, find out what to do if Adaptive Brightness won’t turn off in Windows 10.
If you have any other suggestions, leave them in the comments section below.
![]()
Newsletter
Explore some of the best fixes for this issue
by Ivan Jenic
Passionate about all elements related to Windows and combined with his innate curiosity, Ivan has delved deep into understanding this operating system, with a specialization in drivers and… read more
Updated on December 8, 2022
Reviewed by
Vlad Turiceanu
Passionate about technology, Windows, and everything that has a power button, he spent most of his time developing new skills and learning more about the tech world. Coming… read more
- If the Windows 10 brightness slider is missing, you may be stuck with an unacceptable level.
- This problem might be a problematic driver or the TeamViewer app.
- A solution for the missing brightness option is to update your drivers using a dedicated tool.
- Checking your graphics card software settings might also help you fix this problem.
XINSTALL BY CLICKING THE DOWNLOAD FILE
- Download Restoro PC Repair Tool that comes with Patented Technologies (patent available here).
- Click Start Scan to find Windows 10 issues that could be causing PC problems.
- Click Repair All to fix issues affecting your computer’s security and performance
- Restoro has been downloaded by 0 readers this month.
An annoying issue that users have reported is that the brightness option is not available on Windows 10, and fortunately for everyone, we might have a solution.
Adjusting the brightness of your PC can be pretty valuable, especially when you multitask and require different brightness levels for various programs. Also, the change in your surroundings is a good reason to modify the brightness.
Speaking of brightness option issues, here are some problems that users reported:
- Brightness option unavailable Windows 10, grayed out – Many users reported that the brightness option isn’t available on Windows 10. If that’s the case, update your graphics card drivers and check if that helps.
- Adjust plan brightness missing Windows 10 – Being able to control your brightness using a slider can be pretty helpful, but many users claim this feature isn’t available. If that’s the case, remove TeamViewer and similar software from your PC and check if that solves the issue.
- My laptop brightness not showing brightness option – Sometimes, you might have issues with laptop brightness on your laptop. To enable this feature, ensure your power settings are correctly configured.
- Screen brightness option not showing up disappeared – If this option isn’t available, you can constantly adjust brightness using your driver software or by downloading a third-party application.
- Can’t adjust brightness or brightness slider missing in Windows 11, 8, 7 – If you can’t adjust brightness on Windows 8 or 7, feel free to try some of our solutions. Most of our solutions are fully compatible with older versions of Windows, so feel free to try them.
- Brightness bar not showing in Windows 10 – Reinstall the monitor driver in order to effectively and quickly fix this issue.
So, let’s find out about the problem and check the solutions that work for most users when the brightness control option is not showing in Windows 10.
Why is there no brightness setting on Windows 10?
This is usually the case when the Adaptive Brightness setting is turned on. Most users were able to fix things by simply disabling them.
Also, check your graphics and monitor the driver for corruption. Besides, ensure you have the latest version of the two installed. Running an outdated driver version often affects the device’s functioning.
For some users, the third-party apps conflicted with the OS, leading to the Windows brightness slider not showing.
Many users are puzzled by this mysterious and sudden disappearance. For some, the brightness slider is greyed out, or perhaps it’s just the brightness option not available in Windows 10. Meanwhile, most users reported that the brightness setting disappeared altogether.
So, why is there no brightness setting on Windows 10? One possible explanation is that this option is simply disabled. Here’s how you can enable it:
How to add a brightness slider in Windows 10?
- First, press Windows + I to open the Settings app and select System.
- Now, select Power & sleep from the left and click on Additional power settings on the right.
- Then, click on Change plan settings.
- Next, select Change advanced power settings.
- Finally, double-click to expand the Display section and disable Enable adaptive brightness under it.
This will reveal the brightness slider at the bottom of the Action Center. If the brightness option is still unavailable in Windows 10, you can try the following solutions to get things up and to run.
Where is the brightness option in Windows 10?
The brightness option is available in the Settings and the Action Center in Windows 10. To adjust the brightness through the Action Center, press Windows + A, and use the slider to make the necessary modifications.
If you want to make adjustments through the Settings, head to System, and then go to the Display settings. You will now find the slider to change the brightness of the display.
How do I get my brightness slider back on Windows 10?
- Why is there no brightness setting on Windows 10?
- How to add a brightness slider in Windows 10?
- How do I get my brightness slider back on Windows 10?
- 1. Uninstall the monitor driver and install the default one
- 1.1 Reinstall the monitor driver
- 1.2 Check if the monitor driver is disabled
- 2. Check your graphics card software
- 4. Try third-party applications
- 5. Change your power settings
- 6. Install a Generic PnP monitor driver
- 7. Remove TeamViewer
- 8. Use your keyboard or monitor buttons to adjust the brightness
- 9. Install the latest updates
- What can I do if the brightness bar not showing on Windows 11?
1. Uninstall the monitor driver and install the default one
1.1 Reinstall the monitor driver
If you run intro trouble regarding the brightness option on Windows 10, you can bring it back just by reinstalling your display driver or update the old version. See how to proceed with the next steps.
1. Press Windows + X to open the Power User menu, and choose Device Manager from the list.
2. Go to the Monitors section and expand it.
3. Find your monitor driver, right-click it and choose Uninstall device.
4. Check Delete the driver software for this device and click OK if the option appears.
5. Your monitor driver is uninstalled. Now, click the Scan for hardware changes icon.
6. This will install the default monitor driver, and your brightness settings should work now.
The issue might be your monitor driver if the brightness option is unavailable on your Windows 10 PC. However, you can fix the problem simply by reinstalling the monitor driver.
1.2 Check if the monitor driver is disabled
- In the Device Manager, expand the Monitors section, and locate the problematic device.
- Right-click it and if you find the Enable device option listed, click on it.
- If the option reads Disable device, the driver is already running, and you can head to the next solution.
After installing the default monitor driver, check if the problem is still there. This issue can also occur if your monitor driver is disabled. To check if that’s the case, perform the steps above.
You can also manually update the driver by visiting the graphics card manufacturer’s website and downloading the latest version of it.
2. Check your graphics card software
Many users reported that the brightness option isn’t available on their PC, which can be a problem for some users. However, your graphics card driver software can change the brightness option.
Applications such as Catalyst Control Center and Nvidia Control Panel allow you to change various options related to your graphics card. Among these options is the ability to adjust your screen brightness.
All graphics cards come with driver software, so if you can’t find the brightness option on your PC, check your graphics card driver software and adjust the screen brightness from there.
3. Update your display adapter driver
- Enter Device Manager in the Search bar, and click on the relevant search result.
- Double-click on Display adapters.
- Right-click on your graphics card and select Update driver
- Now, select Search automatically for drivers.
- Wait for your computer to locate and install the best available drivers.
Follow these steps to update your display adapter drivers. This process is the simplest, but if you want to update all your drivers and fix any related problems automatically, we recommend using a professional third-party tool.
DriverFix
Update the display adapter driver and all the other drivers safely and fast.
4. Try third-party applications
If you don’t have a brightness option available, you might be able to change the brightness using a third-party application.
Many applications allow you to adjust hue, saturation, and brightness, so do a quick search and try one of these apps.
5. Change your power settings
- Press Windows + S and enter power settings. Now choose Power & sleep settings from the list of results.
- Click Additional power settings in the right pane.
- Locate your currently selected play and click Change plan settings.
- Now click Change advanced power settings.
- Locate and enable the following options: Display brightness, Dimmed display brightness, and Enable adaptive brightness.
According to users, if Windows 10 brightness setting is missing on your PC, the issue might be your power settings.
To fix the problem, you must make a few changes to your power plan settings. After enabling these options, save the changes, and you should be able to adjust your screen brightness again without any issues.
Here’s what you should do if the power plans are missing in Windows 10.
- Windows 10 brightness not working
- Is brightness not working in Windows 11?
- How to configure content adaptive brightness on Windows 11
- Why is my screen so dark on full brightness?
- My laptop brightness is stuck on high
6. Install a Generic PnP monitor driver
- Open Device Manager, expand the Monitors section, right-click your monitor, and choose Update driver from the menu.
- Choose Browse my computer for the driver software option.
- Now, select Let me pick from a list of available drivers on my computer.
- Select Generic PnP Monitor from the list and click Next.
According to users, this issue can occur if you don’t have a Generic PnP Monitor driver installed; however, once you install the driver, the problem should be resolved, and the brightness option will now be available in Windows 10.
7. Remove TeamViewer
Although TeamViewer can be a helpful application, some users reported that it caused issues with the brightness option.
If you can’t adjust the brightness on your screen, be sure to uninstall TeamViewer and check if that solves your problem.
In case you’re not familiar, uninstaller software is a unique application that will altogether remove the problematic application and all its files and registry entries.
By using efficient uninstaller software, you’ll ensure that there aren’t any leftover files that can cause the issue to reappear in the future.
8. Use your keyboard or monitor buttons to adjust the brightness
If the brightness option isn’t available, you might be able to fix the problem by manually changing the brightness.
Most laptops have a keyboard shortcut to adjust the screen brightness easily. To see which shortcut changes the intellect, we advise you to check your laptop manual.
Even desktop users can manually change the brightness using the dedicated buttons. In addition, almost all monitors have configuration buttons next to the power button, and using these; you can easily adjust your screen settings, such as hue, brightness, and contrast.
9. Install the latest updates
- Press Windows + I to open the Settings app and select Update & Security.
- Click on the Check for updates button right in the Windows Update section.
- If an update is listed after the scan, click on Download and install.
If the brightness option is not available on the Windows 10 PC, it’s possible that you don’t have the latest system updates.
Usually, Windows 10 downloads the necessary updates automatically, but sometimes you might miss an update or two. So, it’s recommended that you manually check for them every once in a while.
After the updates are installed, the problem with the brightness setting should be fixed.
What can I do if the brightness bar not showing on Windows 11?
Here, you could try executing the steps in the previous section, and things should work out in most cases. However, if the problem persists after that, performing a system restore should do the trick.
Also, you could look for other apps that might conflict with the OS’s functioning and lead to the brightness option not being available in Windows 11. If any are found, uninstall the apps right away.
In case nothing else works, resetting Windows 11 to its factory settings would come to your aid and will fix the problem. Though, you would lose the stored data, installed apps, and configured settings on the PC.
This concludes our guide, and we hope you managed to fix the brightness problem on Windows 10.
Also, find out what to do if Adaptive Brightness won’t turn off in Windows 10.
If you have any other suggestions, leave them in the comments section below.
![]()