Как записать диск без специальной программы
Пользователям ПК часто приходится переносить определенное количество информации с одного компьютера на другой. Есть множество способов это сделать. Например, если компьютеры соединены в локальную сеть — скопируйте файл по сети. Передавать данные легко и быстро по интернету. Переносить данные можно и с помощью различных носителей: флеш-памяти, компакт дисков. Для последнего информацию необходимо записать на диск с помощью специальных программ. Но если они не установлены на ваш ПК, можно обойтись и теми средствами, которые предлагает операционная система.
Инструкция
Необходимо, чтобы на вашем компьютере был привод, поддерживающий запись компакт-дисков. Вставьте чистый диск в дисковод. Найдите файл, который вы хотите записать на носитель. Правой кнопкой мыши нажмите на файл и в выпадающем меню выберите пункт «копировать».
Далее откройте диск, подготовленный для записи. Правой кнопкой мыши кликните на белом поле, в появившемся меню выберите пункт «вставить». Вы увидите, как на вашем носителе появится нужный вам файл, однако он только лишь подготовлен для записи и ещё не перенесен на диск.
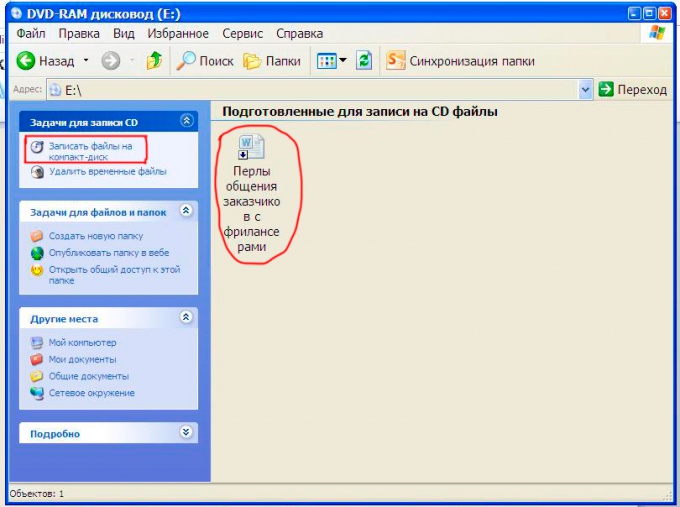
Далее, в левом меню выберите пункт «Записать файлы на компакт-диск». Появится окно мастера записи компакт-дисков. Здесь вы можете указать название диска.
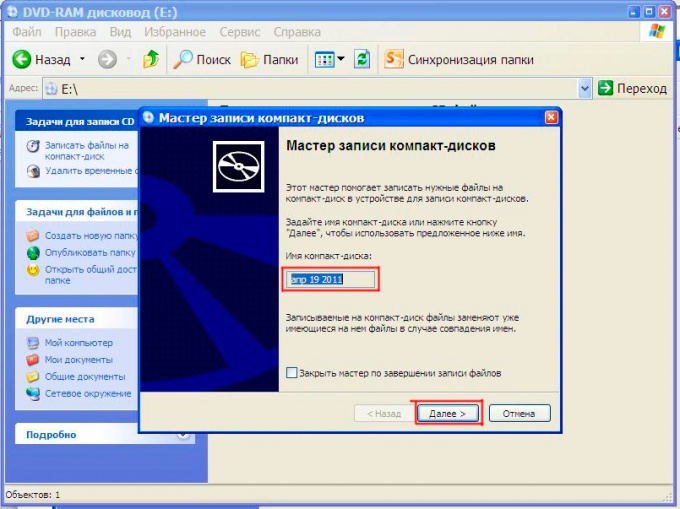
Нажмите «далее». Начнется процесс записи информации. Через некоторое время программа закончит свою работу и вернет вам диск с уже записанными файлами. Вставьте диск в дисковод и проверьте, появились ли нужные вам файлы на носителе. Если все было сделано правильно, информация будет записана.
Видео по теме
Войти на сайт
или
Забыли пароль?
Еще не зарегистрированы?
This site is protected by reCAPTCHA and the Google Privacy Policy and Terms of Service apply.
Как записать файлы на диск без установки дополнительных программ
Опубликовано
30 октября 2015 г.
Категория:
Windows- Прочитали 5 077 человек
Это достаточно старая проблема, появившаяся вместе с компакт-, а потом и DVD дисками. Раньше в Windows для записи файлов на диск нужно было устанавливать сторонние программы. Например, Nero или аналогичные, которые позволяли записывать диски гораздо удобнее, чем встроенные средства Windows.
Смотрите видео после статьи
видео может дополнять статью или содержать её полностью
Установка дополнительных программ всегда представляет проблему для большинства пользователей, поэтому вопрос «как записать файлы на диск без установки дополнительных программ» всё ещё остаётся актуальным. Однако в новых версиях Windows есть очень удобный способ записывать диски без всяких дополнительных программ. Сейчас я покажу как это делается на примере Windows 8.
Вы можете записывать файлы на диск так же, как на флешку
Именно так и есть. Причём можно не только записывать файлы на диск, но и удалять их, как вы это делаете на жёстком диске или Flash-карте. Чтобы воспользоваться этим преимуществом, следует предварительно отформатировать записываемый диск.
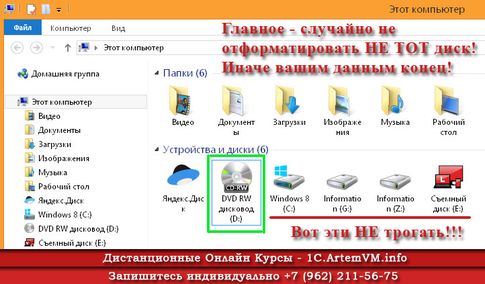
Форматирование — это разметка диска, то есть специальная процедура, необходимая перед тем, как вы будете записывать на диск файлы. Сложного тут ничего нет, времени занимает немного и делается только один раз для каждого диска. Чтобы отформатировать диск, подготовленный для записи файлов, нужно открыть Проводник (Мой компьютер или WIN+E) или любой другой файловый менеджер и найти там этот диск. Заходить на диск при этом не нужно.
[нажмите на картинку для увеличения]
Справка: как сохранять фото с сайтов
Выше показан Проводник и список дисков в папке «Мой компьютер». Вызовите меню правой кнопкой для дисковода, в который уже вставлен диск для записи файлов, после чего кликните «Форматировать».

[нажмите на картинку для увеличения]
Справка: как сохранять фото с сайтов
Внимание: не ошибитесь диском!
Если вы случайно отформатируете не тот диск, то потеряете все данные на нём!
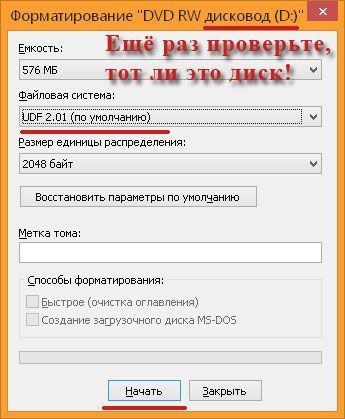
В любом случае далее появится вот такое окошко.
[нажмите на картинку для увеличения]
Справка: как сохранять фото с сайтов
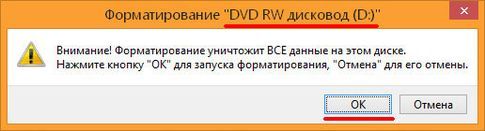
На всякий случай ещё раз проверьте, тот ли диск вы выбрали. Буква диска указана в заголовке окна. Параметры окна можно оставить как есть и нажать кнопку «Начать», при этом система ещё раз спросит подтверждение операции. Если диск выбран правильно, нажмите OK.
[нажмите на картинку для увеличения]
Справка: как сохранять фото с сайтов
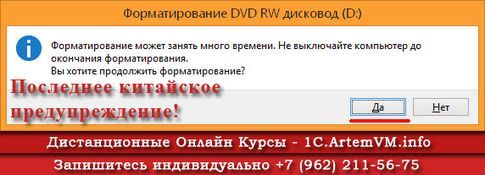
А вот и ещё одно предупреждение. Если нажать «Да», то начнётся процесс форматирования диска.
[нажмите на картинку для увеличения]
Справка: как сохранять фото с сайтов
Такого рода операции нельзя прерывать, в том числе и с помощью принудительного извлечения диска кнопкой на дисководе. Это может привести к дальнейшей негодности диска для использования! Обязательно дождитесь окончания процесса форматирования.
Вот и всё! Теперь вы можете считать ваш диск подобием флешки и записывать на него файлы без установки дополнительных программ. Описание процесса подготовки диска смотрите на видео.
Подведём итоги
Прежде чем использовать компакт диск или DVD диск подобно флешке, следует его отформатировать соответствующим образом. Далее копирование файлов на диск выполняется так же, как и для любого другого диска.
Уникальная метка публикации: 3143F8D6-B70F-EDDB-294A-547703033AF9
Источник: //artemvm.info/information/uchebnye-stati/windows/kak-zapisat-fajly-na-disk-bez-ustanovki-dopolnitelnyh-programm/
Смотреть видео
Как записать файлы на диск без установки дополнительных программ


Авторы публикации

![]()
Операционная система Windows 7 позволяет записывать информацию на болванки CD или DVD. То есть специализированные программы типа Nero можно не устанавливать, если не хочется. Записать диск в Windows 7 достаточно просто.
Выделите необходимые файлы и папки для записи и кликните по ним правой кнопкой. Выберите пункт «Отправить – DVD RW дисковод»

Далее необходимо выбрать, в каком формате записывать диск. Нам предлагают 2 варианта:
1. Как флеш-накопитель USB. Вариант, при котором ваша болванка будет использоваться как флешка, то есть вы сможете удалять, перемещать и переименовывать файлы.
2. С проигрывателем CD/DVD. Стандартный вариант, при котором вы записываете файлы один раз и больше на самой болванке вы никаких операций производить не сможете, разве что только стереть и заново записать.
Я выбираю второй вариант, потому что он более надёжным мне кажется и читается практически на всех компьютерах.

Спустя некоторое время перед нами появится окошко, где подгрузятся все наши добавленные файлы и папки. Нам необходимо будет нажать на кнопку «Запись на компакт-диск»

В следующем окошке можно указать название диска и выбрать скорость записи.

Всё, запись диска началась и через некоторое время выскочит уведомление, что все файлы успешно записаны на компьютер. Нажмите кнопку «Готово».

Смотрим видео по теме:
![]() Загрузка…
Загрузка…

Об авторе: Олег Каминский
Вебмастер. Высшее образование по специальности «Защита информации». Создатель портала comp-profi.com. Автор большинства статей и уроков компьютерной грамотности
![]()
Download Article
![]()
Download Article
Burning DVDs used to require a bunch of special software, Windows 7 includes the tools to burn data DVDs with ease. Windows 7 also includes the ability to burn ISO files without the need of a third-party program. If you want to burn a video DVD that will play in a DVD player, you’ll need a DVD authoring program like the open-source DVD Styler.
-

1
Insert a blank DVD into your computer. Make sure that your computer can actually burn DVDs, as older computers may not have the capability.
-
2
Select «Burn files to disc» from the AutoPlay window. If the AutoPlay window doesn’t appear, click the Start menu and select Computer. Right-click on the DVD drive and select «Open».
Advertisement
-
3
Give the disc a name. This can help you identify what’s on this disc later. Including the date in the name can help organize your discs.
-
4
Choose your format. There are two options when it comes to burning a data disc: Live File System or Mastered.
- Using the Live File System allows you to add, edit, and delete files on the disc as long as you’re using it with other Windows computers. If you select this option, the disc will be formatted before you can start adding files to it. This formatting process may take a few minutes.
- Mastered finalizes the disc when you’re done adding files so that it can’t be changed, but will allow you to use the disc in any computer or device that supports data DVDs.
-
5
Add files to the disc. Once you’ve selected your disc format, you can start adding files to the disc. Single-layer DVDs can fit 4.7 GB of data. There are a couple of different ways that you can add files to your blank disc:
- Click and drag files into the blank DVD’s window.
- Right-click on a file or folder and select «Send to» and then your disc drive.
-
6
Wait for the files to be burned (Live File System). If you’re using the Live File System format, the files will be burned to the disc as soon as you copy them. This may take a few moments for larger files.
-
7
Finish the disc. When you’re done adding files to your disc, you can finish the process by either closing the session (Live File System) or by burning the disc (Mastered).
- Live File System — Click the Close session button at the top of the disc’s window. This will finalize the disc which allows you to continue using it like a USB drive in other Windows computers.
- Mastered — Click the Burn to disc button at the top of the disc’s window. You’ll be given the opportunity to name the disc again and select your recording speed. The burn process may take several minutes to complete. At the end of the burning process, you’ll be given the opportunity to burn the same data to another blank disc if you need copies.
-
8
Add more files to completed discs. You can continue to add files to your burned DVDs as long as there is still free space available. You can do this regardless of which format you created the disc in. Follow the processes above to add more files.
- Live File System — Every time you open a new session on a disc, you lose about 20 MB of usable space.
- Mastered — Files added to an already-burned disc cannot be deleted.
-
9
Erase a DVD-RW. DVD-RW discs are rewritable, and can be erased even if you chose the Mastered format. To erase the disc, insert it and open Windows Explorer. Select your DVD-RW in your list of devices, but don’t open it. Click the Erase this disc button at the top of the window.


Advertisement
-
1
Download and install DVD Styler. If you want to burn a movie file so that it plays on any DVD player, you’ll need special «DVD authoring» software. There are lots of these programs available, but DVD Styler is free and open-source. You can download it from dvdstyler.org/en/downloads.[1]
- Chrome may report the DVDStyler installation file as malware. If you get this warning, use a different browser to download the installer.
- Pay attention when installing the program. As of 6/6/2015, the Windows 64-bit installer did not bundle any adware, but this may change in the future. Read every installation screen carefully.
-
2
Start a new project with DVD Styler. When you launch DVD Styler for the first time, you’ll be taken to the New Project window. There are a few settings you can adjust here before adding your video file(s):
- Disc label — This is the name that will appear when the disc is inserted in a computer.
- Disc capacity — Most DVDs are DVD-5 (4.7 GB). If you have Dual Layer (DL) discs, select DVD-9 (8.5 GB).
- Video/Audio bitrate — This affects the quality of the video and audio. Most users can leave these at their defaults.
- Video Format — Choose PAL if you live in a PAL region (Europe, Asia, Brazil) or NTSC for NTSC regions (Americas, Japan, Korea). You will be prompted to change this if you add media that is in a different format.
- Aspect Ratio — Choose 4:3 if you’re going to play the DVD on a standard definition television. Choose 16:9 if you’re going to play the DVD on an HDTV. Note that this will not affect the aspect ratio of the actual video file.
- Audio Format — You can choose between AC3 or MP2. Most users can leave this on AC3.
-
3
Choose a menu template. DVD Styler comes with several menu templates that you can choose from. You can also select «No template», which will just start playing the video as soon as the disc is inserted.
-
4
Drag and drop your video file into the bottom frame. This will add the video to your project. DVD Styler supports most video formats so you won’t need to convert before adding.
- The bar at the bottom of the window will display how many minutes of video you have used and how many you still have free.
- Depending on the type of video you’re adding, you may be able to add multiple files. For example, you can usually fit 4-6 episodes of a TV show onto a single DVD, or a single full-length movie and some extras.
-
5
Edit your menus. Once you’ve added your video files, you can edit your menus to your liking. Double-click on any of the elements to edit them, and you can click and drag objects to move them around the menu.
- Double-clicking on button objects in the menu editor will allow you to change their navigation commands.
-
6
Burn your DVD when you’re satisfied. Once you’ve set all of your options, you can start burning the DVD. Insert a blank disc and click the «Burn» button at the top of the window. This will give you several different options. Click Start when you’re ready:
- «Temp directory» — You can set the folder that you want DVD Styler to store the temporary files during the burning process. These will be deleted once the burn is complete. You will need enough free space for about twice the size of the disc.
- «preview» — Check this box if you want to preview the disc in your media player program before burning it.
- «just generate» — This saves the project to your hard disk in the DVD Folder format, which can then be burned later.
- «create iso image» — This saves an image of the disc to your hard drive in ISO format. You can then burn or share this ISO file.
- «burn» — This will burn the project to a blank DVD. You can then use this DVD in any DVD player that supports DVD-R/RW discs.


Advertisement
-
1
Insert a blank DVD. ISO files are disc image files. These are essentially exact copies of a disc, and burning them to a DVD will make the DVD act as if it was the source of the ISO. ISO files cannot be burned as data files if you want the disc to be a copy.
- Windows 7 has ISO-burning capabilities built-in.
-
2
Right-click on the ISO file and select «Burn disc image». This will open the «Burn Disc Image» window.
-
3
Select the drive that contains the blank disc. If you have more than one disc drive, make sure that the correct one is displayed in the «Disc burner» drop-down menu.
-
4
Click .Burn to begin burning the ISO. You can choose to verify the disc after burning, but this will take extra time and there’s nothing that can be done with a disc that doesn’t work anyway. The burn process will likely take a few minutes, depending on the size of the ISO and the speed of your burner.[2]
-
5
Use the burned disc. Once the ISO has been burned, the disc will act as an exact copy of the source of the ISO. For example, if the ISO file is for a Linux installation disc, your burned disc will now be bootable and can be used to install Linux or run it from the disc.


Advertisement
Add New Question
-
Question
How do I pull videos off my Google drive?

Just tap and hold on the file and tap the option to download. It will likely be a down-arrow symbol.
-
Question
Can I delete movies from a DVD and rewrite with other files?
You can only delete from a DVD-RW, which is re-writable.
-
Question
Does it work with Windows Movie Maker?
Masonbcoolr
Community Answer
If you export (save) the video as an mp4, you can then burn it to the DVD. So, yes, it does work.

See more answers
Ask a Question
200 characters left
Include your email address to get a message when this question is answered.
Submit
Advertisement
Thanks for submitting a tip for review!
About This Article
Article SummaryX
1. Insert a blank DVD.
2. Click Burn files to disc.
3. Enter a disc title.
4. Select a disc type.
5. Add files to the disc.
6. Select either Close session or Burn to disc.
Did this summary help you?
Thanks to all authors for creating a page that has been read 190,134 times.
Is this article up to date?
![]()
Download Article
![]()
Download Article
Burning DVDs used to require a bunch of special software, Windows 7 includes the tools to burn data DVDs with ease. Windows 7 also includes the ability to burn ISO files without the need of a third-party program. If you want to burn a video DVD that will play in a DVD player, you’ll need a DVD authoring program like the open-source DVD Styler.
-
1
Insert a blank DVD into your computer. Make sure that your computer can actually burn DVDs, as older computers may not have the capability.
-
2
Select «Burn files to disc» from the AutoPlay window. If the AutoPlay window doesn’t appear, click the Start menu and select Computer. Right-click on the DVD drive and select «Open».
Advertisement
-
3
Give the disc a name. This can help you identify what’s on this disc later. Including the date in the name can help organize your discs.
-
4
Choose your format. There are two options when it comes to burning a data disc: Live File System or Mastered.
- Using the Live File System allows you to add, edit, and delete files on the disc as long as you’re using it with other Windows computers. If you select this option, the disc will be formatted before you can start adding files to it. This formatting process may take a few minutes.
- Mastered finalizes the disc when you’re done adding files so that it can’t be changed, but will allow you to use the disc in any computer or device that supports data DVDs.
-
5
Add files to the disc. Once you’ve selected your disc format, you can start adding files to the disc. Single-layer DVDs can fit 4.7 GB of data. There are a couple of different ways that you can add files to your blank disc:
- Click and drag files into the blank DVD’s window.
- Right-click on a file or folder and select «Send to» and then your disc drive.
-
6
Wait for the files to be burned (Live File System). If you’re using the Live File System format, the files will be burned to the disc as soon as you copy them. This may take a few moments for larger files.
-
7
Finish the disc. When you’re done adding files to your disc, you can finish the process by either closing the session (Live File System) or by burning the disc (Mastered).
- Live File System — Click the Close session button at the top of the disc’s window. This will finalize the disc which allows you to continue using it like a USB drive in other Windows computers.
- Mastered — Click the Burn to disc button at the top of the disc’s window. You’ll be given the opportunity to name the disc again and select your recording speed. The burn process may take several minutes to complete. At the end of the burning process, you’ll be given the opportunity to burn the same data to another blank disc if you need copies.
-
8
Add more files to completed discs. You can continue to add files to your burned DVDs as long as there is still free space available. You can do this regardless of which format you created the disc in. Follow the processes above to add more files.
- Live File System — Every time you open a new session on a disc, you lose about 20 MB of usable space.
- Mastered — Files added to an already-burned disc cannot be deleted.
-
9
Erase a DVD-RW. DVD-RW discs are rewritable, and can be erased even if you chose the Mastered format. To erase the disc, insert it and open Windows Explorer. Select your DVD-RW in your list of devices, but don’t open it. Click the Erase this disc button at the top of the window.
Advertisement
-
1
Download and install DVD Styler. If you want to burn a movie file so that it plays on any DVD player, you’ll need special «DVD authoring» software. There are lots of these programs available, but DVD Styler is free and open-source. You can download it from dvdstyler.org/en/downloads.[1]
- Chrome may report the DVDStyler installation file as malware. If you get this warning, use a different browser to download the installer.
- Pay attention when installing the program. As of 6/6/2015, the Windows 64-bit installer did not bundle any adware, but this may change in the future. Read every installation screen carefully.
-
2
Start a new project with DVD Styler. When you launch DVD Styler for the first time, you’ll be taken to the New Project window. There are a few settings you can adjust here before adding your video file(s):
- Disc label — This is the name that will appear when the disc is inserted in a computer.
- Disc capacity — Most DVDs are DVD-5 (4.7 GB). If you have Dual Layer (DL) discs, select DVD-9 (8.5 GB).
- Video/Audio bitrate — This affects the quality of the video and audio. Most users can leave these at their defaults.
- Video Format — Choose PAL if you live in a PAL region (Europe, Asia, Brazil) or NTSC for NTSC regions (Americas, Japan, Korea). You will be prompted to change this if you add media that is in a different format.
- Aspect Ratio — Choose 4:3 if you’re going to play the DVD on a standard definition television. Choose 16:9 if you’re going to play the DVD on an HDTV. Note that this will not affect the aspect ratio of the actual video file.
- Audio Format — You can choose between AC3 or MP2. Most users can leave this on AC3.
-
3
Choose a menu template. DVD Styler comes with several menu templates that you can choose from. You can also select «No template», which will just start playing the video as soon as the disc is inserted.
-
4
Drag and drop your video file into the bottom frame. This will add the video to your project. DVD Styler supports most video formats so you won’t need to convert before adding.
- The bar at the bottom of the window will display how many minutes of video you have used and how many you still have free.
- Depending on the type of video you’re adding, you may be able to add multiple files. For example, you can usually fit 4-6 episodes of a TV show onto a single DVD, or a single full-length movie and some extras.
-
5
Edit your menus. Once you’ve added your video files, you can edit your menus to your liking. Double-click on any of the elements to edit them, and you can click and drag objects to move them around the menu.
- Double-clicking on button objects in the menu editor will allow you to change their navigation commands.
-
6
Burn your DVD when you’re satisfied. Once you’ve set all of your options, you can start burning the DVD. Insert a blank disc and click the «Burn» button at the top of the window. This will give you several different options. Click Start when you’re ready:
- «Temp directory» — You can set the folder that you want DVD Styler to store the temporary files during the burning process. These will be deleted once the burn is complete. You will need enough free space for about twice the size of the disc.
- «preview» — Check this box if you want to preview the disc in your media player program before burning it.
- «just generate» — This saves the project to your hard disk in the DVD Folder format, which can then be burned later.
- «create iso image» — This saves an image of the disc to your hard drive in ISO format. You can then burn or share this ISO file.
- «burn» — This will burn the project to a blank DVD. You can then use this DVD in any DVD player that supports DVD-R/RW discs.
Advertisement
-
1
Insert a blank DVD. ISO files are disc image files. These are essentially exact copies of a disc, and burning them to a DVD will make the DVD act as if it was the source of the ISO. ISO files cannot be burned as data files if you want the disc to be a copy.
- Windows 7 has ISO-burning capabilities built-in.
-
2
Right-click on the ISO file and select «Burn disc image». This will open the «Burn Disc Image» window.
-
3
Select the drive that contains the blank disc. If you have more than one disc drive, make sure that the correct one is displayed in the «Disc burner» drop-down menu.
-
4
Click .Burn to begin burning the ISO. You can choose to verify the disc after burning, but this will take extra time and there’s nothing that can be done with a disc that doesn’t work anyway. The burn process will likely take a few minutes, depending on the size of the ISO and the speed of your burner.[2]
-
5
Use the burned disc. Once the ISO has been burned, the disc will act as an exact copy of the source of the ISO. For example, if the ISO file is for a Linux installation disc, your burned disc will now be bootable and can be used to install Linux or run it from the disc.
Advertisement
Add New Question
-
Question
How do I pull videos off my Google drive?
Just tap and hold on the file and tap the option to download. It will likely be a down-arrow symbol.
-
Question
Can I delete movies from a DVD and rewrite with other files?
You can only delete from a DVD-RW, which is re-writable.
-
Question
Does it work with Windows Movie Maker?
Masonbcoolr
Community Answer
If you export (save) the video as an mp4, you can then burn it to the DVD. So, yes, it does work.
See more answers
Ask a Question
200 characters left
Include your email address to get a message when this question is answered.
Submit
Advertisement
Thanks for submitting a tip for review!
About This Article
Article SummaryX
1. Insert a blank DVD.
2. Click Burn files to disc.
3. Enter a disc title.
4. Select a disc type.
5. Add files to the disc.
6. Select either Close session or Burn to disc.
Did this summary help you?
Thanks to all authors for creating a page that has been read 190,134 times.
Is this article up to date?
Создание компакт-диска с данными в Windows 7 или Vista
- Вставьте чистый CD или DVD в дисковод.
- В меню «Пуск» откройте «Компьютер».
- Найдите и выберите файлы, которые хотите записать на компакт-диск. На синей панели в верхней части проводника Windows нажмите «Записать».
- Назовите диск и нажмите «Далее». Файлы начнут записываться на диск.
Как записать компакт-диск без Nero?
Записать CD / DVD в Windows
Если диалоговое окно не появляется, просто откройте проводник Windows и дважды щелкните значок привода CD / DVD. Еще одно всплывающее окно спросит вас, как вы хотели бы использовать этот диск. Дайте диску название, а затем выберите, хотите ли вы, чтобы он действовал как USB-накопитель или как мастеринг-диск.
Как записать DVD в Windows 7 без программного обеспечения?
Как записывать DVD с фото и видео в Windows 7 (без дополнительных…
- Шаг первый: загрузите медиафайлы. Откройте DVD-привод и вставьте чистый диск. …
- Шаг второй: установите технические параметры. Щелкните «Параметры» в правом нижнем углу. …
- Шаг третий: выберите меню. …
- Шаг четвертый: сжечь, детка, сжечь.
Как записать компакт-диск с помощью Nero Windows 7?
Как записать компакт-диск с помощью Nero
- Откройте программу записи компакт-дисков Nero.
- Выберите компакт-диск с данными.
- Нажмите «Добавить», чтобы найти свой файл.
- Выберите файл (или файлы), который вы хотите добавить, и затем нажмите «Добавить» (когда вы закончите добавлять файлы, нажмите «Закрыть»).
- Нажмите «Далее.
- Нажмите «Записать» и дождитесь завершения процесса.
- Нажмите «Готово», и ваш компакт-диск будет автоматически извлечен.
Как мне записать файлы на диск?
Чтобы записать файлы на CD или DVD:
- Вставьте пустой диск в пишущий привод CD / DVD.
- В уведомлении о пустом диске CD / DVD-R, которое появляется в нижней части экрана, выберите Открыть с помощью CD / DVD Creator. …
- В поле «Имя диска» введите имя диска.
- Перетащите или скопируйте нужные файлы в окно.
- Щелкните Записать на диск.
Есть ли в Windows 7 программа для записи компакт-дисков?
Начиная с Windows 7, Microsoft добавила возможность записывать CD, DVD и Blu-ray диски прямо из Проводник Виндоус. Поэтому, если ваш компьютер оснащен записывающим устройством для CD, DVD или Blu-ray, вам действительно не нужно какое-либо стороннее программное обеспечение для записи дисков.
Как мне записать компакт-диск без привода компакт-дисков?
Так можно ли воспроизводить или записывать компакт-диски и DVD-диски, если на вашем компьютере нет привода для компакт-дисков или DVD-дисков? Да … Но вам все равно нужен оптический привод. Самый простой способ воспроизвести или записать CD / DVD-диски — это купить внешний оптический привод. Большинство периферийных устройств с оптическим приводом подключаются через USB и работают по принципу plug-and-play.
Как мне скопировать файлы с компакт-диска на мой компьютер?
Скопируйте содержимое компакт-диска в папку на рабочем столе
- Вставьте компакт-диск в дисковод и отмените установку, если она начнется.
- Перейдите в ПУСК> (Мой) компьютер. …
- Щелкните правой кнопкой мыши привод CD / DVD-ROM и выберите «Открыть» или «Обзор». …
- Нажмите CTRL + A на клавиатуре, чтобы выбрать все файлы. …
- Нажмите CTRL + C на клавиатуре, чтобы скопировать файлы и папки.
Почему я не могу записать компакт-диск в Windows 10?
Перейдите в «Конфигурация пользователя»> «Административные шаблоны»> «Компоненты Windows»> «Проводник». Откройте настройку «Удалить функции записи компакт-дисков». Установите для политики значение «Включено», чтобы отключить запись дисков.. Установите для него значение «Отключено» или «Не настроено», чтобы разрешить запись диска.
Есть ли в Windows 10 встроенное программное обеспечение для записи компакт-дисков?
Есть ли в Windows 10 встроенный инструмент для записи дисков? ДаКак и другие версии операционной системы Windows, Windows 10 также включает в себя инструмент для записи дисков. Вы можете использовать встроенную функцию записи дисков проводника, но если вы хотите, например, создавать аудио компакт-диски, вы можете использовать Windows Media Player.
Как записать DVD в Windows?
Записать аудио компакт-диск (или компакт-диск с данными или DVD)
- Откройте Windows Media Player.
- В библиотеке проигрывателя выберите вкладку «Запись» и нажмите кнопку «Параметры записи». …
- Вставьте чистый диск в записывающее устройство для компакт-дисков или DVD-дисков.
Как загрузить DVD в Windows 7?
Вставьте DVD, с которого вы хотите скопировать, в свой компьютер и выберите его как Исходный DVD, затем подключите другой чистый диск, который должен быть выбран как Целевой. Вы также можете рассмотреть возможность сохранения DVD как файла ISO или папки DVD в Windows 7. Затем выберите тип вывода, режим копирования и метку диска в соответствии с вашими потребностями.