|
0 / 0 / 0 Регистрация: 12.01.2017 Сообщений: 1 |
|
|
1 |
|
Запрет на удаление ярлыков с рабочего стола12.01.2017, 11:43. Показов 26758. Ответов 2
Доброго времени суток!
__________________
0 |

|
2 / 2 / 2 Регистрация: 25.09.2015 Сообщений: 11 |
|
|
15.02.2017, 16:28 |
2 |
|
Попробуйте следующие варианты: Второй: Выполнить -> regedit -> HKEY_CURRENT_USERSoftwareMicrosoftWindowsCurre ntVersionPoliciesExplorer -> новый параметр DWORD -> задать имя NoSaveSettings и присваивоить этому параметру значение 1 -> перезагрузка. Третий: Изменить владельца ярлыка. Либо через Свойства -> Безопасность -> Дополнительно -> Владелец, либо через CMD посредством утилиты iCACLS.EXE
1 |
|
11 / 11 / 4 Регистрация: 10.09.2015 Сообщений: 66 |
|
|
16.02.2017, 13:45 |
3 |
|
Lony, А не проще прописать/создать ярлыки(ссылки) на необходимые ресурсы через Функцию «Для всех пользователей» и тогда, чтобы удалить/изменить свойство ярлыка/ссылки необходимы будут права Администратора.
0 |
Windows, Windows 10, Windows 7, Windows 8, Windows Server, Windows Vista
- 22.09.2020
- 5 533
- 2
- 13
- 12
- 1
- Содержание статьи
- Описание проблемы
- Отключение автоматического удаления «неисправных» ярлыков
- Комментарии к статье ( 2 шт )
- Добавить комментарий
Описание проблемы
Некоторые пользователи Windows могут замечать, что периодически на их рабочих столах внезапно начинают сами по себе пропадать ярлыки. Это может происходить с ярлыками на удаленные или отсутствующие файлы, или с ярлыками на VPN подключения. Происходит это потому, что в операционной системе Windows существует задача по поиску и устранению проблем, которая среди прочего следит за ярлыками на рабочем столе — и если на нем находятся ярлыки, которые по каким-либо причинам система считает не рабочими (т. е. ярлыки ссылающиеся на отсутствующие файли или папки), то они удаляются. Microsoft предлагает два варианта решения данной проблемы:
- Сократить количество таких ярлыков до 4 или меньше.
- Отключить поиск и исправление проблем.
Первый вариант в описании не нуждается, а выполнение второго рассмотрим поподробнее ниже.
Отключение автоматического удаления «неисправных» ярлыков
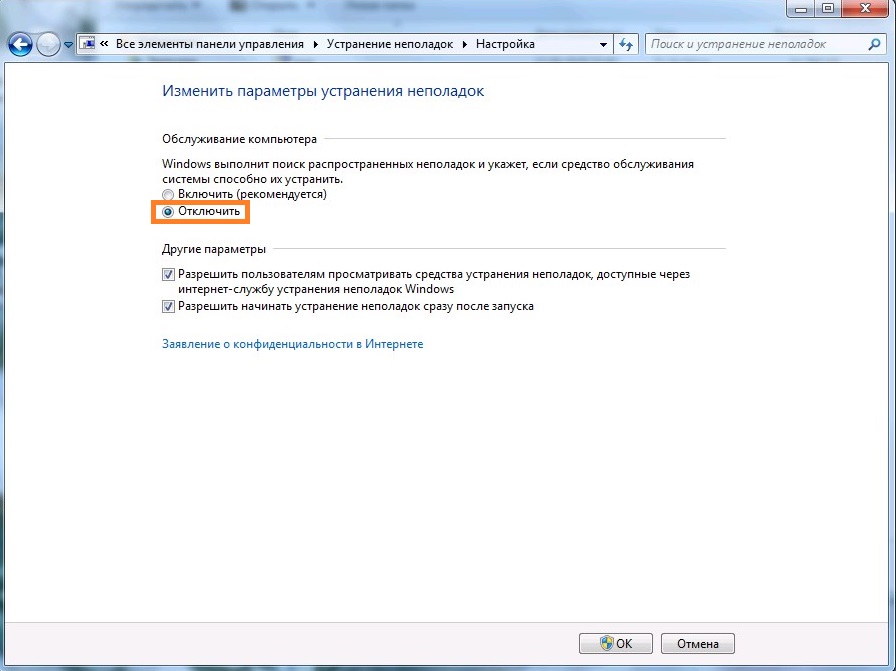
Отключается это с помощью отключения обслуживания компьютера в Панели управления:
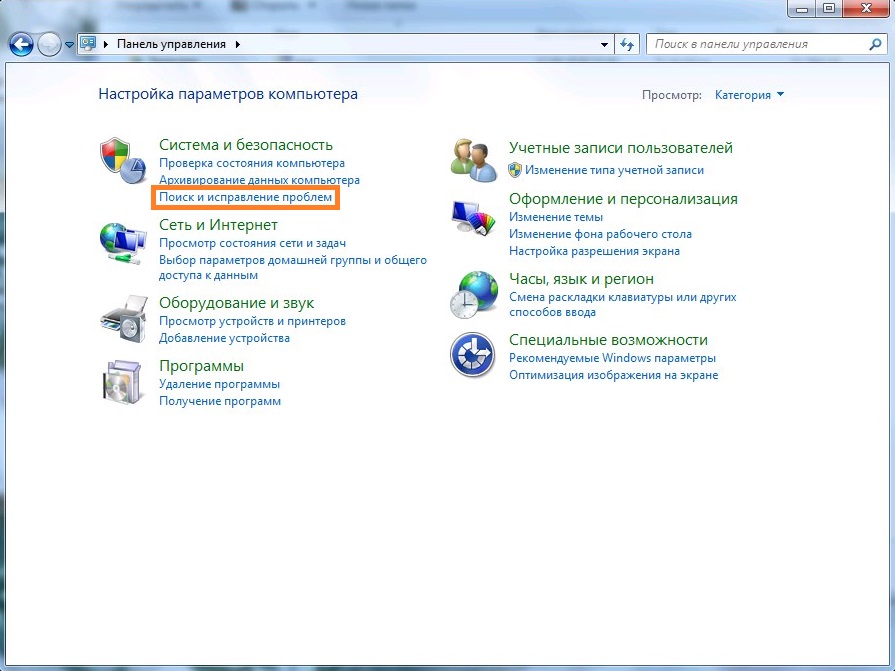
- В Панели управления, при используемом виде «Категории» нужно в разделе «Система и безопасность» выбрать пункт «Поиск и исправление проблем».

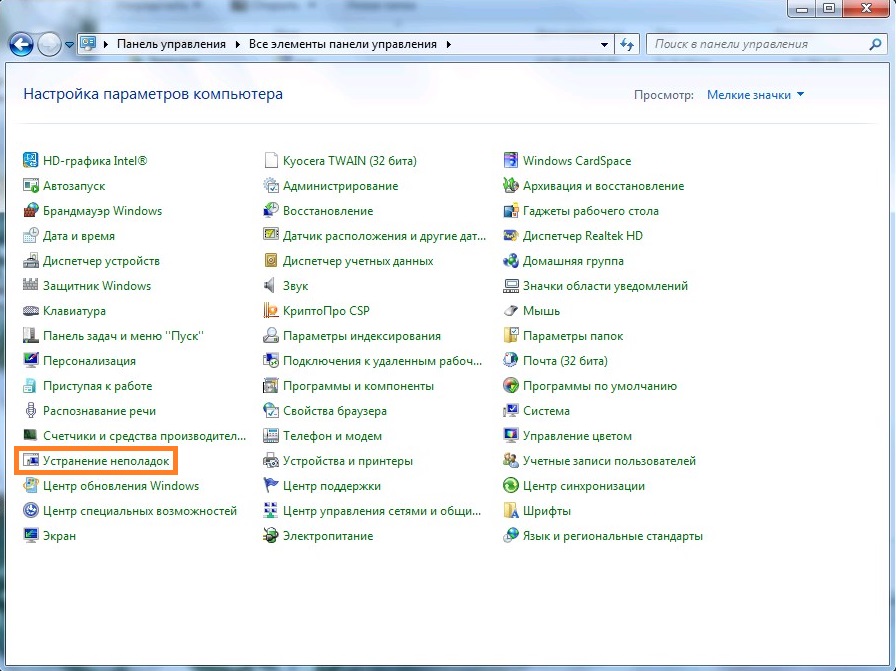
Если включен вид значками, то необходимо найти пункт «Устранение неполадок».

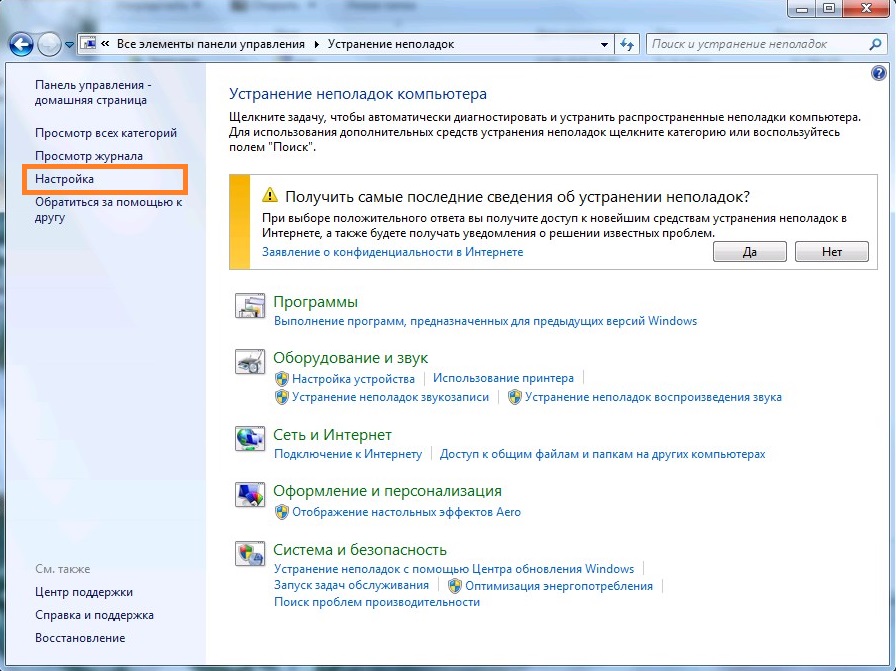
- В данном разделе нужно найти в боковом меню пункт «Настройка».
- В разделе «Обслуживание компьютера» — «Windows выполнит поиск распространенных неполадок и укажет, если средство обслуживания системы способно их устранить» необходимо выбрать пункт «Отключить», после чего нажать на кнопку «ОК».
- После этого, Windows должна перестать удалять ярлыки с рабочего стола.
| Автор | Сообщение | ||
|---|---|---|---|
|
|||
|
|
Помогите |
| Реклама | |
|
Партнер |
|
Hynix |
|
|
Member Статус: Не в сети |
а с какой целью? может бумажка на мониторе поможет? |
|
gans_karder077 |
|
|
|
Да нет не поможет. Есть важные ярлыки нада сделать так что бы люди их не могли удалить. |
|
Megagad |
|
|
Member Статус: Не в сети |
gans_karder077 Создаёш папку денить скрытую и скидываеш туда все ярлыки, а на папку пароль — и всё. |
|
gans_karder077 |
|
|
|
Нет нада что бы были ярлыки на рабочем столе |
|
Freeman_only |
|
|
Member Статус: Не в сети |
C:Documents and Settings%username% смотришь папку desktop, правой кнопкой на нее sharing and security, запрещаешь всем (кроме себя) все кроме list folder content и read. |
|
Megagad |
|
|
Member Статус: Не в сети |
gans_karder077 А если не секрет — для чего такое??? gans_karder077 писал(а): Нет нада что бы были ярлыки на рабочем столе Ну — папку на рабочем столе с паролью. |
|
gans_karder077 |
|
|
|
Freeman_only писал(а): C:Documents and Settings%username% смотришь папку desktop, правой кнопкой на нее sharing and security, запрещаешь всем (кроме себя) все кроме list folder content и read. а по русски можно плиссс Megagad писал(а): gans_karder077 А если не секрет — для чего такое??? gans_karder077 писал(а): Нет нада что бы были ярлыки на рабочем столе Ну — папку на рабочем столе с паролью. НЕТ НАДА ЯРЛЫКИ ИМЕННО ЧТО БЫ РАБОТНИКИ НЕ УДАЛЯЛИ ПО ОШИБКЕ |
|
Megagad |
|
|
Member Статус: Не в сети |
gans_karder077 Ну самы простой способ — штраф 10$ за каждый ярлык — вмиг перестанут удалать |
|
Mysterio |
|
|
Member Статус: Не в сети |
gans_karder077 кинь их C:Documents and SettingsAll usersdesktop |
—
Кто сейчас на конференции |
|
Сейчас этот форум просматривают: нет зарегистрированных пользователей и гости: 8 |
| Вы не можете начинать темы Вы не можете отвечать на сообщения Вы не можете редактировать свои сообщения Вы не можете удалять свои сообщения Вы не можете добавлять вложения |
Лаборатория
Новости
- Remove From My Forums

Удаление ярлыков с рабочего стола — Пользователю запрещено ????
-
Вопрос
-
доменный пользователь, регится как пользователь, у пользователя работает — настроено UAC, SRP
Удаление ярлыков с рабочего стола — Пользователю запрещено ????
ярлыки

windows server 2008R2 standart AD+DNS+DHCP , клиенты W7 pro
-
Изменено
15 апреля 2012 г. 8:15
-
Изменено
Ответы
-
Всё зависит от того, где размещен ярлык. Если в папке «C:UsersPublicDesktop», то прав на удаления ярлыков из неё у обычного пользователя не будет, так как содержимое этой папки влияет (т.е. отображается на рабочих
столах) на всех пользователей данного компьютера. А если ярлык создан непосредственно в профиле самого пользователя т.е. по пути
«C:UsersИмя пользователяDesktop», то его можно спокойно удалить.-
Изменено
Evgenii Alekseev
15 апреля 2012 г. 14:41 -
Помечено в качестве ответа
Михаил П
16 апреля 2012 г. 2:54
-
Изменено
![]()
Download Article
![]()
Download Article
- Disabling Auto-Arrange on Windows
- Using DeskLock on Windows
- Using a Mac
|
|
This wikiHow teaches you how to prevent Windows and macOS from rearranging your desktop icons without your permission. If you’re using Windows, you can turn off the auto-arrangement feature to keep your desktop icons in your preferred order, or try a third-party app called DeskLock that actually prevents your icons from moving at all. If you have a Mac, you can keep your icons organized to your liking by setting your desktop sorting method to «None.»
Things You Should Know
- If you’re using Windows, disable ‘auto-arrange’ and enable ‘align icons to grid’ on the desktop.
- Try the DeskLock program if you want an app you can toggle on and off to lock desktop icons in place.
- If you’re using macOS, change your desktop ‘Sort By’ setting to ‘None.’
-
1
Right-click on an empty space on your Windows desktop. This will open a small drop-down window.
- Windows does not come with a feature that locks the desktop icons in place. You can, however, turn off «Auto-Arrange» option so that Windows doesn’t reorganize your desktop icons automatically each time you add files to the desktop.[1]
- Windows does not come with a feature that locks the desktop icons in place. You can, however, turn off «Auto-Arrange» option so that Windows doesn’t reorganize your desktop icons automatically each time you add files to the desktop.[1]
-
2
Click the View menu. It’s the first option at the top.
Advertisement
-
3
Remove the checkmark from «Auto arrange icons.» If you remove the checkmark from this option, Windows will not be able to automatically change the order of your icons.[2]
- If you place a checkmark next to «Auto arrange icons,» Windows will manage the order of your icons for you as you install new programs and save files to the desktop. This could cause your desktop icon order to shift when you don’t expect it to.
-
4
Select «Align icons to grid» so there is a checkmark next to it. Choosing this option will keep your icons neatly spaced and lock them to a grid layout.
-
5
Arrange your icons how you want. Now that you’ve disabled auto arrange, you can click and drag your icons anywhere on your desktop without worrying that Windows will rearrange them.
- If you want Windows to organize your icons alphabetically by name, date modified, size, or type, you can easily sort your icons. Just right-click the desktop, select Sort by, and choose a pattern.
Advertisement
-
1
Download DeskLock from https://www.majorgeeks.com/files/details/desklock.html. DeskLock is a free, lightweight tool that keeps your Windows desktop icons in place. You can easily toggle the app on and off using its icon on the system tray. To download the app, just click the Download Now button near the top of the page and save the ZIP file to your computer.
-
2
Install DeskLock. You should now have a file called DeskLock.zip in your downloads folder. Here’s how to install DeskLock from that file:
- Press Windows key + E on the keyboard to open File Explorer.
- Double-click the Downloads folder.
- Right-click DeskLock.zip and choose Extract All…
- Choose a location to store the new DeskLock files. You can keep the default location in your Downloads folder if you’d like.
- Click Extract.
- Double-click the DeskLock folder to open it.
-
3
Arrange your icons how you want them to stay. You can do this by clicking and dragging the icons to the desired positions.
- If your icons keep switching back to their previous positions, right-click the desktop, select View, and remove the checkmark from «Auto arrange icons.»
-
4
Double-click DeskLock.exe to run DeskLock. The app will start immediately. You’ll know the app is running when you see an icon of a computer screen with a padlock on it in the system tray (near the clock).
- If you don’t see this icon in the system tray, click the up-arrow (^) left of the clock and volume icons to see those which are hiding.
- If you restart your computer, you’ll need to restart DeskLock, as it won’t start up immediately.
-
5
Right-click the DeskLock icon in your taskbar. It’s that computer screen with a padlock near the clock at the bottom-right.
- DeskLock should be enabled by default. If it’s disabled you’ll see a green icon with an «S» inside instead of the computer screen with padlock. If that’s what you see, right-click that instead.
-
6
Click Enabled toggle DeskLock on or off. If there is a checkmark next to «Enabled,» the icons on your desktop are locked. If you remove the checkmark, DeskLock will disable and you’ll be able to move your desktop icons.
Advertisement
-
1
Right-click a blank area of the desktop. A menu will expand. If you’ve found that the icons on your Mac are changing positions or are completely rearranged each time you reboot, you can correct the issue by changing your sorting preferences.[3]
- There is no way to completely lock your icons in one position on a Mac—you’ll always be able to click and drag your icons to another position. However, if you choose to sort your icons in a particular order, they’ll remain in that order unless you change your sorting preferences.
-
2
Select the Sort by menu. Now you’ll see options for sorting your icons.
-
3
Select None to prevent your Mac from automatically sorting your icons. If you choose this option, your Mac will not try to rearrange your icons automatically.[4]
- To keep your icons arranged neatly into a grid, select Snap to Grid under «None» at the top of the menu.
- If you’d rather your Mac sort your icons in a particular order and keep them in that order indefinitely, you can choose another sorting method, such as Name (which keeps your icons in alphabetical order) or Date added (which will always add newest icons to the last position on the desktop). Keep in mind that if you add new icons to the desktop, macOS will move them into the sorting order automatically.
-
4
Arrange your icons how you’d like them to appear. Now that your Mac won’t rearrange your icons automatically, the order you choose will stay in that order.
Advertisement
Ask a Question
200 characters left
Include your email address to get a message when this question is answered.
Submit
Advertisement
Thanks for submitting a tip for review!
About This Article
Article SummaryX
1. Right-click the desktop.
2. Select View.
3. Remove the checkmark from «Auto arrange icons.»
Did this summary help you?
Thanks to all authors for creating a page that has been read 144,262 times.
Is this article up to date?
![]()
Download Article
![]()
Download Article
- Disabling Auto-Arrange on Windows
- Using DeskLock on Windows
- Using a Mac
|
|
This wikiHow teaches you how to prevent Windows and macOS from rearranging your desktop icons without your permission. If you’re using Windows, you can turn off the auto-arrangement feature to keep your desktop icons in your preferred order, or try a third-party app called DeskLock that actually prevents your icons from moving at all. If you have a Mac, you can keep your icons organized to your liking by setting your desktop sorting method to «None.»
Things You Should Know
- If you’re using Windows, disable ‘auto-arrange’ and enable ‘align icons to grid’ on the desktop.
- Try the DeskLock program if you want an app you can toggle on and off to lock desktop icons in place.
- If you’re using macOS, change your desktop ‘Sort By’ setting to ‘None.’
-
1
Right-click on an empty space on your Windows desktop. This will open a small drop-down window.
- Windows does not come with a feature that locks the desktop icons in place. You can, however, turn off «Auto-Arrange» option so that Windows doesn’t reorganize your desktop icons automatically each time you add files to the desktop.[1]
- Windows does not come with a feature that locks the desktop icons in place. You can, however, turn off «Auto-Arrange» option so that Windows doesn’t reorganize your desktop icons automatically each time you add files to the desktop.[1]
-
2
Click the View menu. It’s the first option at the top.
Advertisement
-
3
Remove the checkmark from «Auto arrange icons.» If you remove the checkmark from this option, Windows will not be able to automatically change the order of your icons.[2]
- If you place a checkmark next to «Auto arrange icons,» Windows will manage the order of your icons for you as you install new programs and save files to the desktop. This could cause your desktop icon order to shift when you don’t expect it to.
-
4
Select «Align icons to grid» so there is a checkmark next to it. Choosing this option will keep your icons neatly spaced and lock them to a grid layout.
-
5
Arrange your icons how you want. Now that you’ve disabled auto arrange, you can click and drag your icons anywhere on your desktop without worrying that Windows will rearrange them.
- If you want Windows to organize your icons alphabetically by name, date modified, size, or type, you can easily sort your icons. Just right-click the desktop, select Sort by, and choose a pattern.
Advertisement
-
1
Download DeskLock from https://www.majorgeeks.com/files/details/desklock.html. DeskLock is a free, lightweight tool that keeps your Windows desktop icons in place. You can easily toggle the app on and off using its icon on the system tray. To download the app, just click the Download Now button near the top of the page and save the ZIP file to your computer.
-
2
Install DeskLock. You should now have a file called DeskLock.zip in your downloads folder. Here’s how to install DeskLock from that file:
- Press Windows key + E on the keyboard to open File Explorer.
- Double-click the Downloads folder.
- Right-click DeskLock.zip and choose Extract All…
- Choose a location to store the new DeskLock files. You can keep the default location in your Downloads folder if you’d like.
- Click Extract.
- Double-click the DeskLock folder to open it.
-
3
Arrange your icons how you want them to stay. You can do this by clicking and dragging the icons to the desired positions.
- If your icons keep switching back to their previous positions, right-click the desktop, select View, and remove the checkmark from «Auto arrange icons.»
-
4
Double-click DeskLock.exe to run DeskLock. The app will start immediately. You’ll know the app is running when you see an icon of a computer screen with a padlock on it in the system tray (near the clock).
- If you don’t see this icon in the system tray, click the up-arrow (^) left of the clock and volume icons to see those which are hiding.
- If you restart your computer, you’ll need to restart DeskLock, as it won’t start up immediately.
-
5
Right-click the DeskLock icon in your taskbar. It’s that computer screen with a padlock near the clock at the bottom-right.
- DeskLock should be enabled by default. If it’s disabled you’ll see a green icon with an «S» inside instead of the computer screen with padlock. If that’s what you see, right-click that instead.
-
6
Click Enabled toggle DeskLock on or off. If there is a checkmark next to «Enabled,» the icons on your desktop are locked. If you remove the checkmark, DeskLock will disable and you’ll be able to move your desktop icons.
Advertisement
-
1
Right-click a blank area of the desktop. A menu will expand. If you’ve found that the icons on your Mac are changing positions or are completely rearranged each time you reboot, you can correct the issue by changing your sorting preferences.[3]
- There is no way to completely lock your icons in one position on a Mac—you’ll always be able to click and drag your icons to another position. However, if you choose to sort your icons in a particular order, they’ll remain in that order unless you change your sorting preferences.
-
2
Select the Sort by menu. Now you’ll see options for sorting your icons.
-
3
Select None to prevent your Mac from automatically sorting your icons. If you choose this option, your Mac will not try to rearrange your icons automatically.[4]
- To keep your icons arranged neatly into a grid, select Snap to Grid under «None» at the top of the menu.
- If you’d rather your Mac sort your icons in a particular order and keep them in that order indefinitely, you can choose another sorting method, such as Name (which keeps your icons in alphabetical order) or Date added (which will always add newest icons to the last position on the desktop). Keep in mind that if you add new icons to the desktop, macOS will move them into the sorting order automatically.
-
4
Arrange your icons how you’d like them to appear. Now that your Mac won’t rearrange your icons automatically, the order you choose will stay in that order.
Advertisement
Ask a Question
200 characters left
Include your email address to get a message when this question is answered.
Submit
Advertisement
Thanks for submitting a tip for review!
About This Article
Article SummaryX
1. Right-click the desktop.
2. Select View.
3. Remove the checkmark from «Auto arrange icons.»
Did this summary help you?
Thanks to all authors for creating a page that has been read 144,262 times.
Is this article up to date?
Во всплывающем меню выберите «Персонализировать». В окне «Персонализировать внешний вид и звуки» щелкните ссылку «Изменить значки рабочего стола» слева. Снимите флажок рядом со значками, которые нужно удалить, нажмите Применить, а затем ОК.
Как удалить наложение значка со стрелкой на ярлык Windows 7
- Щелкните сферу меню «Пуск», введите regedit в поле поиска и нажмите Enter.
- Перейдите к следующему разделу реестра:…
- На правой панели клавиши «Значки оболочки» щелкните правой кнопкой мыши любую пустую область и выберите «Создать»> «Строковое значение». …
- Щелкните правой кнопкой мыши запись 29 или дважды щелкните ее, чтобы изменить ее.
25 ночей. 2010 г.
Как остановить удаление значков на рабочем столе?
Могу ли я предотвратить удаление значков на рабочем столе пользователем? да. В WINSelect Administrator на узле «Рабочий стол и панель задач Windows» вы должны установить флажок «Предотвратить щелчок правой кнопкой мыши на рабочем столе» и скрыть корзину. В узле «Горячие клавиши» установите флажок «Удалить», а в узле «Система» установите флажок «Отключить перетаскивание».
Удаление программы из меню «Пуск» или панели задач:
Найдите значок программы, который вы хотите удалить, в меню «Пуск» или на панели задач 2. Щелкните значок программы правой кнопкой мыши 3. Выберите «Открепить с панели задач» и / или «Открепить из меню« Пуск »» 4. Выберите «Удалить из этого списка», чтобы удалить полностью из меню «Пуск».
Как удалить ярлыки без удаления программ?
Откройте проводник, если значок представляет собой реальную папку и вы хотите удалить значок с рабочего стола, не удаляя его. Удерживая нажатой клавишу Windows на клавиатуре, нажмите клавишу «X».
Как отключить опцию удаления в групповой политике?
Все ответы
- Выберите Добавить файл….
- Добавьте C: WindowsUsers (Предположим, что это папка Users).
- Используйте всплывающий пользовательский интерфейс безопасности для настройки разрешений.
- Нажмите кнопку Дополнительно.
- Выберите группу «Пользователи» и нажмите кнопку «Изменить».
- Измените значение в раскрывающемся списке «Применить к» на «Эта папка, подпапки и файлы».
29 ночей. 2018 г.
Как очистить рабочий стол?
В Windows отсортируйте файлы по имени или дате, щелкнув правой кнопкой мыши пустую область рабочего стола и выбрав «Сортировать по». Вы также можете щелкнуть правой кнопкой мыши и выбрать «Просмотр»> «Автоматически упорядочить значки», чтобы привязать значки на экране в виде сетки. В macOS откройте Finder и нажмите «Просмотр»> «Очистить по», чтобы упорядочить файлы по дате или типу.
Как очистить рабочий стол?
Как почистить компьютер изнутри
- Шаг 1. Выключите компьютер и отсоедините его от электрической розетки или сетевого фильтра.
- Шаг 2: Откройте корпус вашего компьютера.
- Шаг 3. Используя сжатый воздух, удалите пыль с внутренних компонентов компьютера короткими струями воздуха. …
- Шаг 4: Удалите скопившуюся пыль с вентиляторов корпуса баллончиком со сжатым воздухом.
23 сред. 2011 г.
Щелкните правой кнопкой мыши кнопку «Пуск» и выберите «Свойства». Вы увидите диалоговое окно свойств панели задач и меню «Пуск». На вкладке меню «Пуск» нажмите кнопку «Настроить». Windows 7 показывает диалоговое окно «Настройка меню« Пуск »».
В Windows 7, Vista и XP меню «Пуск» появляется при нажатии кнопки «Пуск», которая находится на одном конце панели задач, обычно в нижнем левом углу рабочего стола.
Удалить элементы из меню «Пуск» очень просто, так что вы можете начать с него. Чтобы удалить ненужную или неиспользуемую плитку из меню «Пуск», щелкните ее правой кнопкой мыши и выберите «Открепить от начала» во всплывающем меню. Нелюбимая плитка ускользает без суеты. На сенсорном экране удерживайте палец на ненужной плитке.