I know that everyone uses an IDE nowadays, but I just find it simpler to write my code in notepad++, compile it using a command prompt command, and run it from there too. At least that works for Java and Python. I’ve tried to get my head around how to do that with C++, and haven’t been able to find anything good. Is there any compiler (like Java’s JDK) that I can stick into my path and use the C++ equivalent of javac and java to run and compile my code from CMD?
Note: please don’t post answers and comments about how IDEs are better — I know they are. I’m just used to doing it the old way 
![]()
sepp2k
360k52 gold badges670 silver badges673 bronze badges
asked Jul 6, 2012 at 16:07
![]()
4
Steps to perform the task:
-
First, download and install the compiler.
-
Then, type the C/C++ program and save it.
-
Then, open the command line and change directory to the particular one where the source file is stored, using
cdlike so:cd C:Documents and Settings... -
Then, to compile, type in the command prompt:
gcc sourcefile_name.c -o outputfile.exe -
Finally, to run the code, type:
outputfile.exe
![]()
ib.
27.1k10 gold badges78 silver badges100 bronze badges
answered Jul 6, 2012 at 16:19
![]()
codeDEXTERcodeDEXTER
1,1417 silver badges14 bronze badges
7
If you’re running Windows then make use of this:
g++ -o program program.cpp
g++ is the name of the compiler and -o is the option needed for creating a .o file. Program (without .cpp suffix) is the exe file and program.cpp is your source file that you want to compile.
g++ -o program program.cpp&program.exe
Use this shortcut to run the .exe file of the program. This might run in Linux but you may have to use .out suffix instead of .exe. Use this handy batch script to execute your programs on Windows:
@echo off&&cls
set /p pathName=Enter The Path where the file is located:%=%
cd %pathName%
REM set /p exec=Enter The Name of the executable you want to make:%=%
set /p file=Enter The Name of the file you want to compile:%=%
g++ -o %file% %file%.cpp
%file%.exe
save it as cppExecutor.bat
Also you could use the following commands on Unix (Linux and Mac) OS:
CC program.cc
If you want to use gcc:
gcc -o program program.cpp
With the shortcut:
gcc -o program program.cpp&program.exe
answered May 31, 2016 at 13:56
![]()
JedaiCoderJedaiCoder
6267 silver badges12 bronze badges
2
It depends on what compiler you’re using.
For example, if you are using Visual C++ .NET 2010 Express, run Visual C++ 2010 Express Command Prompt from the start menu, and you can simply compile and run the code.
> cl /EHsc mycode.cpp
> mycode.exe
or from the regular command line, you can run vcvars32.bat first to set up the environment. Alternatively search for setvcvars.cmd (part of a FLOSS project) and use that to even locate the installed VS and have it call vcvars32.bat for you.
Please check your compiler’s manual for command lines.
![]()
0xC0000022L
20.2k9 gold badges82 silver badges149 bronze badges
answered Jul 6, 2012 at 16:17
![]()
RangoRango
1,0777 silver badges5 bronze badges
1
Sure, it’s how most compilers got started. GCC is probably the most popular (comes with most flavors of *nix). Syntax is just gcc my_source_code.cpp, or gcc -o my_executable.exe my_source_code.cpp. It gets more complicated, of course, when you have multiple source files (as in implementation; anything #included works automatically as long as GCC can find it).
MinGW appears to be a version of GCC for Windows, if that’s what you’re using. I haven’t tried it though.
Pretty sure most IDEs also include a command line interface. I know Visual Studio does, though I have never used it.
answered Jul 6, 2012 at 16:15
![]()
KRyanKRyan
7,0992 gold badges39 silver badges66 bronze badges
1
I really don’t see what your problem is, the question is rather unspecific. Given Notepad++ I assume you use Windows.
You have so many options here, from the MinGW (using the GCC tool chain and GNU make) to using a modern MSVC. You can use the WDK (ddkbuild.bat/.cmd or plain build.exe), the Windows SDK (nmake.exe), other tools such as premake and CMake, or msbuild that comes with MSVC and the Windows SDK.
I mean the compiler names will differ, cl.exe for MSVC and the WDK and Windows SDK, gcc.exe for MinGW, but even from the console it is customary to organize your project in some way. This is what make and friends were invented for after all.
So to know the command line switches of your particular compiler consult the manual of that very compiler. To find ways to automate your build (i.e. the ability to run a simple command instead of a complex command line), you could sift through the list on Wikipedia or pick one of the tools I mentioned above and go with that.
Side-note: it isn’t necessary to ask people not to mention IDEs. Most professional developers have automated their builds to run from a command line and not from within the IDE (as during the development cycle for example), because there are so many advantages to that approach.
answered Jul 6, 2012 at 16:13
![]()
0xC0000022L0xC0000022L
20.2k9 gold badges82 silver badges149 bronze badges
2
- Download MinGW form : https://sourceforge.net/projects/mingw-w64/
- use notepad++ to write the C++ source code.
- using command line change the directory/folder where the source code is saved(using notepad++)
- compile: g++ file_name.cpp -o file_name.exe
- run the executable: file_name.exe
answered Mar 12, 2019 at 1:32
![]()
3
- first Command is :
g++ -o program file_name.cpp
- Second command is :
.program.exe
Let us Check this image
![]()
SCouto
7,6685 gold badges34 silver badges49 bronze badges
answered Jul 12, 2020 at 4:06
![]()
A better alternative to MinGW is bash for powershell. You can install bash for Windows 10 using the steps given here
After you’ve installed bash, all you’ve got to do is run the bash command on your terminal.
PS F:cpp> bash
user@HP:/mnt/f/cpp$ g++ program.cpp -o program
user@HP:/mnt/f/cpp$ ./program
answered Mar 25, 2020 at 7:01
![]()
1
This is what I used on MAC.
Use your preferred compiler.
Compile with gcc.
gcc -lstdc++ filename.cpp -o outputName
Or Compile with clang.
clang++ filename.cpp -o outputName
After done compiling. You can run it with.
./outputFile
answered Dec 21, 2020 at 17:32
![]()
JoeJoe
7831 gold badge7 silver badges14 bronze badges
Open cmd and go In Directory where file is saved. Then,
For compile,
g++ FileName. cpp
Or
gcc FileName. cpp
For Run,
FileName. exe
This Is For Compile & Run Program.
Make sure, gcc compiler installed in PC or Laptop.
And also path variable must be set.
answered Feb 26, 2020 at 14:54
![]()
have MinGW compiler bin directory added to path.
use mingw32-g++ -s -c source_file_name.cpp -o output_file_name.o to compile
then mingw32-g++ -o executable_file_name.exe output_file_name.o to build exe
finally, you run with executable_file_name.exe
answered Feb 21, 2020 at 1:53
![]()
emma-eaemma-ea
1441 silver badge4 bronze badges
0
[Working 100%] from a Windows user.
Open the terminal(powershell) where your file.cpp is created.
g++ file.cpp//it will compile the file into a.exe.a.exe//this will run the program.
answered Feb 7, 2022 at 11:01
![]()
There are few ways:
Using GNU Compiler Collection (GCC):
gcc -lstdc++ filename.cpp -o outputName
Using g++ command:
g++ -o outputName filename.cpp
Using clang++:
clang++ filename.cpp -o outputName
answered Jun 24, 2022 at 21:36
![]()
Yadab SdYadab Sd
5734 silver badges9 bronze badges
Я знаю, что сейчас все используют IDE, но мне проще написать код в блокноте ++, скомпилировать его с помощью команды командной строки и запустить оттуда. По крайней мере, это работает для Java и Python. Я пытался понять, как это сделать с помощью C ++, и не смог найти ничего хорошего. Есть ли какой-нибудь компилятор (например, Java JDK), который я могу вставить в свой путь и использовать эквивалент C ++ для javac и java для запуска и компиляции моего кода из CMD?
Примечание: пожалуйста, не публикуйте ответы и комментарии о том, чем IDE лучше — я знаю, что это так. Просто привык по старинке: D
11 ответов
Это зависит от того, какой компилятор вы используете.
Например, если вы используете Visual C ++ .NET 2010 Express, запустите командную строку Visual C ++ 2010 Express из меню «Пуск», и вы можете просто скомпилировать и запустить код.
Или из обычной командной строки вы можете сначала запустить vcvars32.bat , чтобы настроить среду. В качестве альтернативы найдите setvcvars.cmd (часть проекта FLOSS) и используйте его, чтобы даже найти установленный VS и вызвать для вас vcvars32.bat .
См. Командные строки в руководстве к вашему компилятору.
Это то, что я использовал на MAC.
Используйте предпочитаемый вами компилятор.
Скомпилируйте с помощью gcc.
Или скомпилировать с помощью clang.
После компиляции. Вы можете запустить его с помощью.
Добавить в путь каталог bin компилятора MinGW.
Используйте mingw32-g++ -s -c source_file_name.cpp -o output_file_name.o для компиляции
Затем mingw32-g++ -o executable_file_name.exe output_file_name.o для сборки exe
Наконец, вы бежите с executable_file_name.exe
Откройте cmd и перейдите в каталог, где сохранен файл. Затем для компиляции g ++ FileName. cpp или gcc FileName. cpp
Для «Выполнить» укажите FileName. исполняемый
Это для программы компиляции и запуска.
Убедитесь, что компилятор gcc установлен на ПК или ноутбуке. Также должна быть установлена переменная пути.
Лучшая альтернатива MinGW — это bash для powershell. Вы можете установить bash для Windows 10, выполнив следующие действия: здесь
После того, как вы установили bash, все, что вам нужно сделать, это запустить команду bash на своем терминале.
- первая команда:
- Вторая команда:
- Загрузите форму MinGW: https://sourceforge.net/projects/mingw-w64/
- используйте блокнот ++ для написания исходного кода C ++.
- с помощью командной строки измените каталог / папку, в которой сохранен исходный код (с помощью блокнота ++)
- скомпилировать: g ++ имя_файла.cpp -o имя_файла.exe
- запустите исполняемый файл: file_name.exe
Я действительно не понимаю, в чем ваша проблема, вопрос довольно неконкретный. Учитывая Notepad ++, я предполагаю, что вы используете Windows.
Здесь у вас так много вариантов, от MinGW (с использованием цепочки инструментов GCC и GNU make ) до использования современного MSVC. Вы можете использовать WDK ( ddkbuild.bat/.cmd или простой build.exe ), Windows SDK ( nmake.exe ), другие инструменты, такие как premake и CMake или msbuild , который поставляется с MSVC и Windows SDK.
Я имею в виду, что имена компиляторов будут отличаться, cl.exe для MSVC и WDK и Windows SDK, gcc.exe для MinGW, но даже из консоли принято каким-то образом организовать свой проект. В конце концов, это то, для чего были изобретены make и его друзья.
Итак, чтобы узнать параметры командной строки вашего конкретного компилятора, обратитесь к руководству этого самого компилятора. Чтобы найти способы автоматизировать сборку (т.е. возможность запускать простую команду вместо сложной командной строки), вы можете просмотреть list в Википедии или выберите один из инструментов, упомянутых выше, и примените его.
Примечание: необязательно просить людей не упоминать IDE. Большинство профессиональных разработчиков автоматизировали свои сборки для запуска из командной строки, а не из среды IDE (как, например, во время цикла разработки), потому что у такого подхода очень много преимуществ.
Конечно, именно так начиналось большинство компиляторов. GCC, вероятно, самый популярный (поставляется с большинством разновидностей * nix). Синтаксис — это просто gcc my_source_code.cpp или gcc -o my_executable.exe my_source_code.cpp . Конечно, это усложняется, когда у вас есть несколько исходных файлов (как в реализации; все #include d работает автоматически, пока GCC может это найти).
MinGW, по-видимому, является версией GCC для Windows, если это то, что вы используете. Но я не пробовал.
Совершенно уверен, что большинство IDE также включают интерфейс командной строки. Я знаю, что Visual Studio умеет, но никогда не использовал.
Если вы используете Windows, воспользуйтесь этим:
g++ — это имя компилятора, а -o — это параметр, необходимый для создания файла .o . Программа (без суффикса .cpp ) — это файл exe , а program.cpp — ваш исходный файл, который вы хотите скомпилировать.
Используйте этот ярлык для запуска файла программы .exe . Это может работать в Linux, но вам, возможно, придется использовать суффикс .out вместо .exe . Используйте этот удобный пакетный скрипт для выполнения ваших программ в Windows:
Сохранить как cppExecutor.bat
Также вы можете использовать следующие команды в ОС Unix (Linux и Mac):
Если вы хотите использовать gcc :
С помощью ярлыка:
Шаги по выполнению задачи:
Сначала загрузите и установите компилятор.
Затем введите программу C / C ++ и сохраните ее.
Затем откройте командную строку и смените каталог на тот, в котором хранится исходный файл, используя cd следующим образом:
Компиляция исходников (cpp, cs) компилятором Visual Studio без запуска IDE в Windows
2) в разделе «Пути к Boost» можно задать BOOST_ROOT — путь к коревому каталогу библиотеки Boost (если она у вас установлена).
3) в разделе «Настройка путей к подключаемым файлам» при необходимости можно задать пути к заголовочным файлам Qt, WinDDK.
4) в разделе «Настройка путей к библиотечным (.lib) файлам» задаются пути к файлам библиотек (в частности для WinDDK).
Реже может возникнуть необходимость настроить следующие параметры под конкретный проект:
iCompVer — версия используемого компилятора (6 — для VC6, 8 — VC8 (2005), 9 — VC9, 10 — VC10 (2010), 11 — VC11 (2012).
gavLibFilesQtShared — имена .lib-файлов для динамически подключаемой библиотеки Qt;
gavLibFilesQtStatic — имена .lib-файлов для статически линкуемой библиотеки Qt.
gavLibFilesCrt — имена .lib-файлов для стандартных динамических библиотек, используемых в Windows.
iModeQt — режим линковки библиотеки Qt.
gavCompMode — флаги режима компиляции (однопоточные, многопоточные и т.п.).
gavOptimize — флаги оптимизации кода компилятором.
Чаще всего приходится менять параметры:
gavSrc — имена файлов с исходным кодом, разделённые пробелом (если их несколько).
bLibQt — флаг (0/1) необходимости использовать библиотеку Qt при сборке приложения.
bLibCrt — флаг (0/1) необходимости использовать стандартные CRT-библиотеки Windows при сборке приложения.
bLibBoost — флаг (0/1) необходимости использовать библиотеку Boost при сборке приложения.
gavSubsystem — подсистема создаваемого приложения: CONSOLE — консольное, WINDOWS — с графическим интерфейсом.
Запуск C++ в командной строке-Windows
Я знаю, что в настоящее время все используют IDE, но мне просто проще написать свой код в notepad++, скомпилировать его с помощью команды командной строки и запустить его оттуда. По крайней мере, это работает для Java и Python. Я пытался понять, как это сделать с C++, и не смог найти ничего хорошего. Есть ли компилятор (например, JDK Java), который я могу вставить в свой путь и использовать эквивалент c++ javac и java для запуска и компиляции моего кода из CMD?
Примечание: пожалуйста, не публикуйте ответы и комментарии о том, как IDEs лучше — я знаю, что они есть. Я просто привык делать это по-старому: D
5 ответов
Это зависит от того, какой компилятор вы используете.
например, если вы используете Visual C++ .NET 2010 Express, Запустите командную строку Visual C++ 2010 Express из меню Пуск, и вы можете просто скомпилировать и запустить код.
или из обычной командной строки, вы можете запустить vcvars32.bat сначала настройте среду. Как вариант искать setvcvars.cmd (часть проекта FLOSS) и используйте это, чтобы даже найти установленный VS и вызвать его vcvars32.bat для вы.
пожалуйста, проверьте руководство вашего компилятора для командной строки.
шаги для выполнения задачи:
Да, сначала установите компилятор: скачать здесь
затем введите программу C, сохраните ее.
затем откройте командную строку и измените каталог, используя » cd » в конкретный каталог, где хранится исходный файл.
как: cd C:Documents и настройки.
затем для компиляции/запуска тип в командная строка,
«sourcefile_name ССЗ.C «или» GCC-o outputfile.EXE-файл»
Я действительно не понимаю, в чем ваша проблема, вопрос довольно неопределенный. Учитывая Notepad++ я предполагаю, что вы используете Windows.
у вас так много вариантов здесь, из MinGW (используя цепочку инструментов GCC и GNU make ) для использования современного MSVC. Вы можете использовать WDK ( ddkbuild.bat/.cmd или обычный build.exe ), то Windows SDK ( nmake.exe ), другие инструменты, такие как premake и CMake или msbuild это поставляется с MSVC и Windows пакет SDK.
Я имею в виду, что имена компиляторов будут отличаться, cl.exe для MSVC и WDK и Windows SDK, gcc.exe для MinGW, но даже с консоли принято каким-то образом организовывать свой проект. Это make и друзья были изобретены в конце концов.
чтобы узнать параметры командной строки вашего конкретного компилятора, обратитесь к руководству этого самого компилятора. Чтобы найти способы автоматизации сборки (т. е. возможность запуска простой команды вместо сложной командная строка), вы можете просеять список в Википедии или выберите один из инструментов, о которых я упоминал выше, и идите с этим.
боковое Примечание: нет необходимости просить людей не упоминать Иды. Большинство профессиональных разработчиков автоматизировали свои сборки для запуска из командной строки, а не из среды IDE (например, во время цикла разработки), потому что у этого подхода так много преимуществ.
если вы используете windows, то используйте это:
g++ — это имя компилятора, а-o-команда для создания a .o файл. программа (без .cpp суффикс) является exe-файл и программа.ЧГК-это ваш файл, который вы хотите скомпилировать.
используйте этот ярлык для запуска .EXE-файл программы. Это может работать в Ubuntu, но вы можете использовать .вместо суффикса .исполняемый. Используйте этот удобный пакетный скрипт, который я сделал для выполнения ваших программ на windows:
сохраните его как cppExecutor.летучая мышь!—7—>
также вы можете использовать следующие команды в ОС unix (Linux и Mac):
если вы хотите использовать GCC:
конечно, так начиналось большинство компиляторов. GCC, вероятно, самый популярный (поставляется с большинством ароматов *nix). Синтаксис просто gcc my_source_code.cpp или gcc -o my_executable.exe my_source_code.cpp . Конечно, это становится сложнее, когда у вас есть несколько исходных файлов (как в реализации; что-нибудь #include d работает автоматически, пока GCC может найти его).
MinGW похоже, это версия GCC для Windows, если это то, что вы используете. Я не пробовала хотя.
довольно уверен, что большинство IDEs также включают интерфейс командной строки. Я знаю, что Visual Studio делает, хотя я никогда не использовал его.
| title | description | ms.custom | ms.date | helpviewer_keywords | ms.assetid | ||||
|---|---|---|---|---|---|---|---|---|---|
|
Walkthrough: Compiling a Native C++ Program on the Command Line |
Use the Microsoft C++ compiler from a command prompt. |
conceptual |
03/25/2021 |
|
b200cfd1-0440-498f-90ee-7ecf92492dc0 |
Walkthrough: Compiling a Native C++ Program on the Command Line
Visual Studio includes a command-line C and C++ compiler. You can use it to create everything from basic console apps to Universal Windows Platform apps, Desktop apps, device drivers, and .NET components.
In this walkthrough, you create a basic, «Hello, World»-style C++ program by using a text editor, and then compile it on the command line. If you’d like to try the Visual Studio IDE instead of using the command line, see Walkthrough: Working with Projects and Solutions (C++) or Using the Visual Studio IDE for C++ Desktop Development.
In this walkthrough, you can use your own C++ program instead of typing the one that’s shown. Or, you can use a C++ code sample from another help article.
Prerequisites
To complete this walkthrough, you must have installed either Visual Studio and the optional Desktop development with C++ workload, or the command-line Build Tools for Visual Studio.
Visual Studio is an integrated development environment (IDE). It supports a full-featured editor, resource managers, debuggers, and compilers for many languages and platforms. Versions available include the free Visual Studio Community edition, and all can support C and C++ development. For information on how to download and install Visual Studio, see Install C++ support in Visual Studio.
The Build Tools for Visual Studio installs only the command-line compilers, tools, and libraries you need to build C and C++ programs. It’s perfect for build labs or classroom exercises and installs relatively quickly. To install only the command-line tools, look for Build Tools for Visual Studio on the Visual Studio Downloads page.
Before you can build a C or C++ program on the command line, verify that the tools are installed, and you can access them from the command line. Visual C++ has complex requirements for the command-line environment to find the tools, headers, and libraries it uses. You can’t use Visual C++ in a plain command prompt window without doing some preparation. Fortunately, Visual C++ installs shortcuts for you to launch a developer command prompt that has the environment set up for command line builds. Unfortunately, the names of the developer command prompt shortcuts and where they’re located are different in almost every version of Visual C++ and on different versions of Windows. Your first walkthrough task is finding the right one to use.
[!NOTE]
A developer command prompt shortcut automatically sets the correct paths for the compiler and tools, and for any required headers and libraries. You must set these environment values yourself if you use a regular Command Prompt window. For more information, see Use the MSVC toolset from the command line. We recommend you use a developer command prompt shortcut instead of building your own.
Open a developer command prompt
-
If you have installed Visual Studio 2017 or later on Windows 10 or later, open the Start menu and choose All apps. Scroll down and open the Visual Studio folder (not the Visual Studio application). Choose Developer Command Prompt for VS to open the command prompt window.
If you have installed Microsoft Visual C++ Build Tools 2015 on Windows 10 or later, open the Start menu and choose All apps. Scroll down and open the Visual C++ Build Tools folder. Choose Visual C++ 2015 x86 Native Tools Command Prompt to open the command prompt window.
You can also use the Windows search function to search for «developer command prompt» and choose one that matches your installed version of Visual Studio. Use the shortcut to open the command prompt window.
-
Next, verify that the Visual C++ developer command prompt is set up correctly. In the command prompt window, enter
cland verify that the output looks something like this:C:Program Files (x86)Microsoft Visual Studio2017Enterprise>cl Microsoft (R) C/C++ Optimizing Compiler Version 19.10.25017 for x86 Copyright (C) Microsoft Corporation. All rights reserved. usage: cl [ option... ] filename... [ /link linkoption... ]There may be differences in the current directory or version numbers. These values depend on the version of Visual C++ and any updates installed. If the above output is similar to what you see, then you’re ready to build C or C++ programs at the command line.
[!NOTE]
If you get an error such as «‘cl’ is not recognized as an internal or external command, operable program or batch file,» error C1034, or error LNK1104 when you run theclcommand, then either you are not using a developer command prompt, or something is wrong with your installation of Visual C++. You must fix this issue before you can continue.If you can’t find the developer command prompt shortcut, or if you get an error message when you enter
cl, then your Visual C++ installation may have a problem. Try reinstalling the Visual C++ component in Visual Studio, or reinstall the Microsoft Visual C++ Build Tools. Don’t go on to the next section until theclcommand works. For more information about installing and troubleshooting Visual C++, see Install Visual Studio.[!NOTE]
Depending on the version of Windows on the computer and the system security configuration, you might have to right-click to open the shortcut menu for the developer command prompt shortcut and then choose Run as administrator to successfully build and run the program that you create by following this walkthrough.
Create a Visual C++ source file and compile it on the command line
-
In the developer command prompt window, enter
md c:helloto create a directory, and then entercd c:helloto change to that directory. This directory is where both your source file and the compiled program get created. -
Enter
notepad hello.cppin the command prompt window.Choose Yes when Notepad prompts you to create a new file. This step opens a blank Notepad window, ready for you to enter your code in a file named hello.cpp.
-
In Notepad, enter the following lines of code:
#include <iostream>
using namespace std;
int main()
{
    cout << "Hello, world, from Visual C++!" << endl;
}
This code is a simple program that will write one line of text on the screen and then exit. To minimize errors, copy this code and paste it into Notepad.
-
Save your work! In Notepad, on the File menu, choose Save.
Congratulations, you’ve created a C++ source file, hello.cpp, that is ready to compile.
-
Switch back to the developer command prompt window. Enter
dirat the command prompt to list the contents of the c:hello directory. You should see the source file hello.cpp in the directory listing, which looks something like:c:hello>dir Volume in drive C has no label. Volume Serial Number is CC62-6545 Directory of c:hello 05/24/2016 05:36 PM <DIR> . 05/24/2016 05:36 PM <DIR> .. 05/24/2016 05:37 PM 115 hello.cpp 1 File(s) 115 bytes 2 Dir(s) 571,343,446,016 bytes freeThe dates and other details will differ on your computer.
[!NOTE]
If you don’t see your source code file,hello.cpp, make sure the current working directory in your command prompt is theC:hellodirectory you created. Also make sure that this is the directory where you saved your source file. And make sure that you saved the source code with a.cppfile name extension, not a.txtextension. Your source file gets saved in the current directory as a.cppfile automatically if you open Notepad at the command prompt by using thenotepad hello.cppcommand. Notepad’s behavior is different if you open it another way: By default, Notepad appends a.txtextension to new files when you save them. It also defaults to saving files in your Documents directory. To save your file with a.cppextension in Notepad, choose File > Save As. In the Save As dialog, navigate to yourC:hellofolder in the directory tree view control. Then use the Save as type dropdown control to select All Files (*.*). Enterhello.cppin the File name edit control, and then choose Save to save the file. -
At the developer command prompt, enter
cl /EHsc hello.cppto compile your program.The cl.exe compiler generates an .obj file that contains the compiled code, and then runs the linker to create an executable program named hello.exe. This name appears in the lines of output information that the compiler displays. The output of the compiler should look something like:
c:hello>cl /EHsc hello.cpp
Microsoft (R) C/C++ Optimizing Compiler Version 19.10.25017 for x86
Copyright (C) Microsoft Corporation.  All rights reserved.

hello.cpp
Microsoft (R) Incremental Linker Version 14.10.25017.0
Copyright (C) Microsoft Corporation.  All rights reserved.

/out:hello.exe
hello.obj
[!NOTE]
If you get an error such as «‘cl’ is not recognized as an internal or external command, operable program or batch file,» error C1034, or error LNK1104, your developer command prompt is not set up correctly. For information on how to fix this issue, go back to the Open a developer command prompt section.[!NOTE]
If you get a different compiler or linker error or warning, review your source code to correct any errors, then save it and run the compiler again. For information about specific errors, use the search box to look for the error number. -
To run the hello.exe program, at the command prompt, enter
hello.The program displays this text and exits:
Hello, world, from Visual C++!Congratulations, you’ve compiled and run a C++ program by using the command-line tools.
Next steps
This «Hello, World» example is about as simple as a C++ program can get. Real world programs usually have header files, more source files, and link to libraries.
You can use the steps in this walkthrough to build your own C++ code instead of typing the sample code shown. These steps also let you build many C++ code sample programs that you find elsewhere. You can put your source code and build your apps in any writeable directory. By default, the Visual Studio IDE creates projects in your user folder, in a sourcerepos subfolder. Older versions may put projects in a DocumentsVisual Studio <version>Projects folder.
To compile a program that has additional source code files, enter them all on the command line, like:
cl /EHsc file1.cpp file2.cpp file3.cpp
The /EHsc command-line option instructs the compiler to enable standard C++ exception handling behavior. Without it, thrown exceptions can result in undestroyed objects and resource leaks. For more information, see /EH (Exception Handling Model).
When you supply additional source files, the compiler uses the first input file to create the program name. In this case, it outputs a program called file1.exe. To change the name to program1.exe, add an /out linker option:
cl /EHsc file1.cpp file2.cpp file3.cpp /link /out:program1.exe
And to catch more programming mistakes automatically, we recommend you compile by using either the /W3 or /W4 warning level option:
cl /W4 /EHsc file1.cpp file2.cpp file3.cpp /link /out:program1.exe
The compiler, cl.exe, has many more options. You can apply them to build, optimize, debug, and analyze your code. For a quick list, enter cl /? at the developer command prompt. You can also compile and link separately and apply linker options in more complex build scenarios. For more information on compiler and linker options and usage, see C/C++ Building Reference.
You can use NMAKE and makefiles, MSBuild and project files, or CMake, to configure and build more complex projects on the command line. For more information on using these tools, see NMAKE Reference, MSBuild, and CMake projects in Visual Studio.
The C and C++ languages are similar, but not the same. The MSVC compiler uses a simple rule to determine which language to use when it compiles your code. By default, the MSVC compiler treats files that end in .c as C source code, and files that end in .cpp as C++ source code. To force the compiler to treat all files as C++ independent of file name extension, use the /TP compiler option.
The MSVC compiler includes a C Runtime Library (CRT) that conforms to the ISO C99 standard, with minor exceptions. Portable code generally compiles and runs as expected. Certain obsolete library functions, and several POSIX function names, are deprecated by the MSVC compiler. The functions are supported, but the preferred names have changed. For more information, see Security Features in the CRT and Compiler Warning (level 3) C4996.
See also
C++ Language Reference
Projects and build systems
MSVC Compiler Options
|
хАЛЕКСЕЙх 9 / 9 / 3 Регистрация: 11.10.2012 Сообщений: 118 |
||||
|
1 |
||||
|
12.10.2012, 09:01. Показов 81215. Ответов 79 Метки нет (Все метки)
Допустим я написал этот код в стандартном виндовском блокноте
и назвал я его «main.cpp» Как мне его скомпилировать через командную строку, или подскажите мне код ( .bat )
__________________
0 |

|
5493 / 4888 / 831 Регистрация: 04.06.2011 Сообщений: 13,587 |
|
|
12.10.2012, 09:27 |
2 |
|
Каким компилятором?
2 |
|
9 / 9 / 3 Регистрация: 11.10.2012 Сообщений: 118 |
|
|
12.10.2012, 09:28 [ТС] |
3 |
|
alsav22, через командную строку, или подскажите мне код ( .bat ) — чтобы в результате получить exe — файл
1 |
|
5493 / 4888 / 831 Регистрация: 04.06.2011 Сообщений: 13,587 |
|
|
12.10.2012, 09:32 |
4 |
|
Имя компилятора и main.cpp. Например, g++ main.cpp Добавлено через 55 секунд
alsav22, через командную строку, или подскажите мне код ( .bat ) — чтобы в результате получить exe — файл Я понял, что через командную, но нужен компилятор в системе. Добавлено через 1 минуту
1 |

|
9 / 9 / 3 Регистрация: 11.10.2012 Сообщений: 118 |
|
|
12.10.2012, 09:45 [ТС] |
5 |
|
alsav22, а без IDE нельзя? Добавлено через 4 минуты Добавлено через 47 секунд
Имя компилятора и main.cpp. Например, g++ main.cpp да вроде того
0 |
|
5493 / 4888 / 831 Регистрация: 04.06.2011 Сообщений: 13,587 |
|
|
12.10.2012, 09:48 |
6 |
|
Можно. Без компилятора нельзя. ОС какая? Скачайте компилятор. Если Windows, то, например, mingv. Добавлено через 3 минуты
у меня есть Visual Studio 2008, Visual Studio 2012, Dev-C++, Code::Block Если есть и компиляторы прописаны в переменных среды (папка bin с компилятором), то переходите в папку с main.cpp и делаете, как я писал в 4 посте.
0 |
|
9 / 9 / 3 Регистрация: 11.10.2012 Сообщений: 118 |
|
|
12.10.2012, 09:50 [ТС] |
7 |
|
ОС какая? Windows 7
Скачайте компилятор. Если Windows, то, например, mingv. кинь ссылку пожалуйста ,и если можно, то обьясни в пару слов, зачем он нужен
0 |
|
5493 / 4888 / 831 Регистрация: 04.06.2011 Сообщений: 13,587 |
|
|
12.10.2012, 09:54 |
8 |
|
Если есть среды (Dev-C++, Code::Blocks), то можно их компиляторы использовать. Это то же самое, что если скачать. Добавлено через 45 секунд
,и если можно, то обьясни в пару слов, зачем он нужен Чтобы из main.cpp exe сделать. Добавлено через 1 минуту
0 |
|
9 / 9 / 3 Регистрация: 11.10.2012 Сообщений: 118 |
|
|
12.10.2012, 09:57 [ТС] |
9 |
|
alsav22, я так и не понял, я где-то видел или читал, что люди писали код на стандартном блокноте потом через командную сроку компилировали этот файл в exe
сли есть среды (Dev-C++, Code::Blocks) они долго компилируют + они на английском + они походу битые ( тоесть в самой программе ошибки в коде, я такую скачал ) Добавлено через 57 секунд
С командной строкой умеете работать? нет, но я и хочу научится
1 |
|
5493 / 4888 / 831 Регистрация: 04.06.2011 Сообщений: 13,587 |
|
|
12.10.2012, 10:04 |
10 |
|
alsav22, я так и не понял, я где-то видел или читал, что люди писали код на стандартном блокноте потом через командную сроку компилировали этот файл в exe Всё правильно. Для этого и нужен компилятор. В каждой среде он присутствует. Но в средах есть ещё много чего. Какой компилятор использовать, из среды или отдельно скачанный, значения не имеет. Компилятор из среды использовать — это не значит среду использовать.
1 |
|
9 / 9 / 3 Регистрация: 11.10.2012 Сообщений: 118 |
|
|
12.10.2012, 10:06 [ТС] |
11 |
|
Где у вас файл main.cpp находится? на рабочем столе
0 |
|
527 / 344 / 12 Регистрация: 05.11.2010 Сообщений: 1,076 Записей в блоге: 1 |
|
|
12.10.2012, 10:10 |
12 |
|
кинь ссылку пожалуйста ,и если можно, то обьясни в пару слов, зачем он нужен Чем, по-твоему, преобразуют исходный код в исполняемый файл? + они походу битые ( тоесть в самой программе ошибки в коде, я такую скачал ) Не может такого быть
1 |

|
9 / 9 / 3 Регистрация: 11.10.2012 Сообщений: 118 |
|
|
12.10.2012, 10:18 [ТС] |
13 |
|
Герц, Мне нужно чтобы я в командной строке ( Пуск -> Все програмы -> Стандартные -> Командная строка ) прописал что-то(что мне нужно прописать????????) и потом началась компиляция моего «main.cpp» Добавлено через 4 минуты
Не может такого быть Может, поверь мне
0 |
|
5493 / 4888 / 831 Регистрация: 04.06.2011 Сообщений: 13,587 |
|
|
12.10.2012, 10:22 |
14 |
|
Помещаете файл main.cpp в C:UsersИмя>. Запускаете командную строку от имени администратора. Набираете: g++ main.cpp Пишите о результате.
1 |
|
527 / 344 / 12 Регистрация: 05.11.2010 Сообщений: 1,076 Записей в блоге: 1 |
|
|
12.10.2012, 10:37 |
15 |
|
Ты просто не умеешь ими пользоваться
1 |

|
9 / 9 / 3 Регистрация: 11.10.2012 Сообщений: 118 |
|
|
12.10.2012, 13:53 [ТС] |
16 |
|
Ты просто не умеешь ими пользоваться ты прав, может я что-то непонимаю в этих компиляторах на английском языке. Помещаете файл main.cpp в C:UsersИмя>. Запускаете командную строку от имени администратора. Набираете: g++ main.cpp Пишите о результате. Результат на картинке
0 |
|
5225 / 3197 / 362 Регистрация: 12.12.2009 Сообщений: 8,101 Записей в блоге: 2 |
|
|
12.10.2012, 13:58 |
17 |
|
Пиши полный путь до g++ или пропиши его в PATH. И имя файла можно без кавычек.
0 |
|
5053 / 3114 / 271 Регистрация: 11.11.2009 Сообщений: 7,045 |
|
|
12.10.2012, 13:58 |
18 |
|
хАЛЕКСЕЙх, вам надо в переменную среды окружения PATH прописать путь к папке bin вашего компилятора. Добавлено через 14 секунд Не по теме: Kastaneda, не успел опять я((
1 |
|
5225 / 3197 / 362 Регистрация: 12.12.2009 Сообщений: 8,101 Записей в блоге: 2 |
|
|
12.10.2012, 13:59 |
19 |
|
Но знать как компилировать программу спомощью командной строки, посуди что это + к уровню программиста Это не плюс, это базовый навык.
1 |
|
9 / 9 / 3 Регистрация: 11.10.2012 Сообщений: 118 |
|
|
12.10.2012, 14:06 [ТС] |
20 |
|
Это не плюс, это базовый навык. Темболее, а я и этого незнаю.
Пиши полный путь до g++ Я не понял примерно вот так ( C:UsersАлексейg++ C:UsersАлексейmain.cpp )
или пропиши его в PATH. и
вам надо в переменную среды окружения PATH прописать путь к папке bin вашего компилятора. поподробнее пожалуйста, я этого не знаю
0 |
Последнее обновление: 30.01.2023
Установка компилятора
Рассмотрим создание первой простейшей программы на C++ с помощью компилятора g++, который на сегодняшний день является одим из
наиболее популярных компиляторов для C++, доступен для разных платформ и который распространяется в рамках пакета компиляторов GCC. Более подробную информацию о g++ можно получить на официальном сайте проекта https://gcc.gnu.org/.
Набор компиляторов GCC распространяется в различных версиях. Для Windows одной из наиболее популярных версий является пакет средств для разработки от
некоммерческого проекта MSYS2. Следует отметить, что для MSYS2 требуется 64-битная версия Windows 7 и выше (то есть Vista, XP и более ранние версии не подходят)
Итак, загрузим программу установки MSYS2 с официального сайта MSYS2:
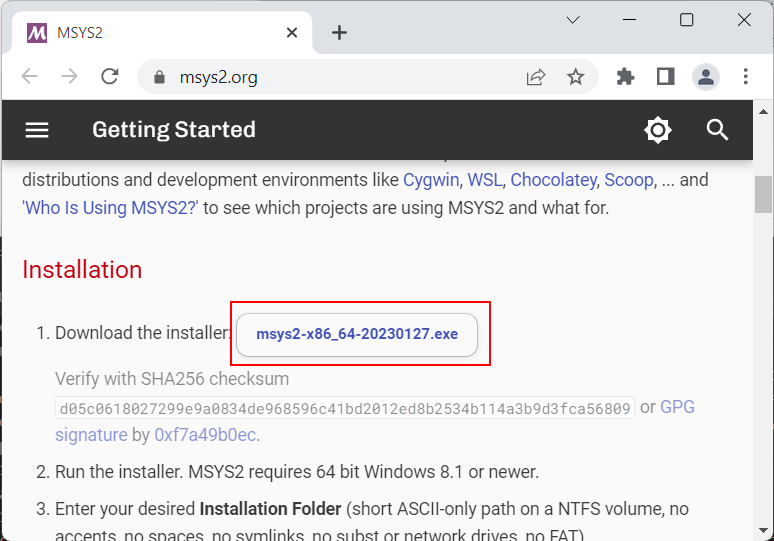
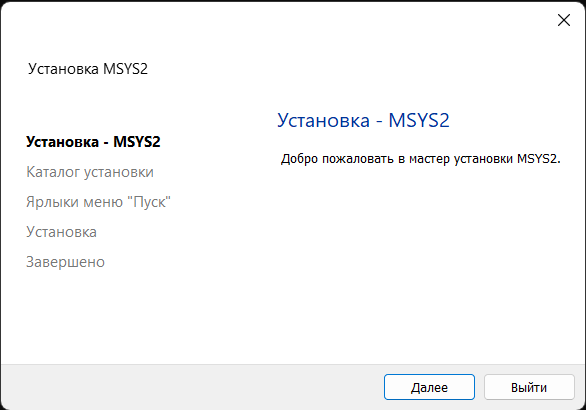
После загрузки запустим программу установки:
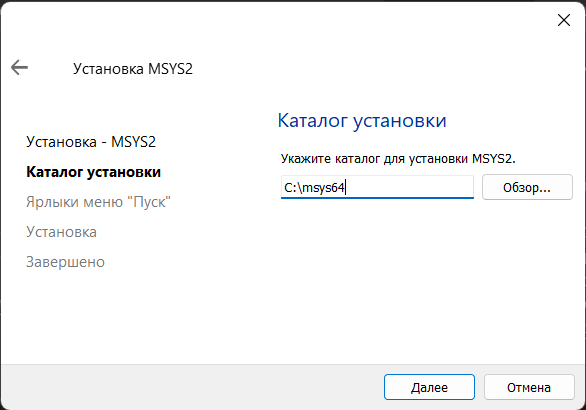
На первом шаге установки будет предложено установить каталог для установки. По умолчанию это каталог C:msys64:
Оставим каталог установки по умолчанию (при желании можно изменить). На следующем шаге устанавливаются настройки для ярлыка для меню Пуск, и затем собственно будет произведена установка.
После завершения установки нам отобразить финальное окно, в котором нажмем на кнопку Завершить

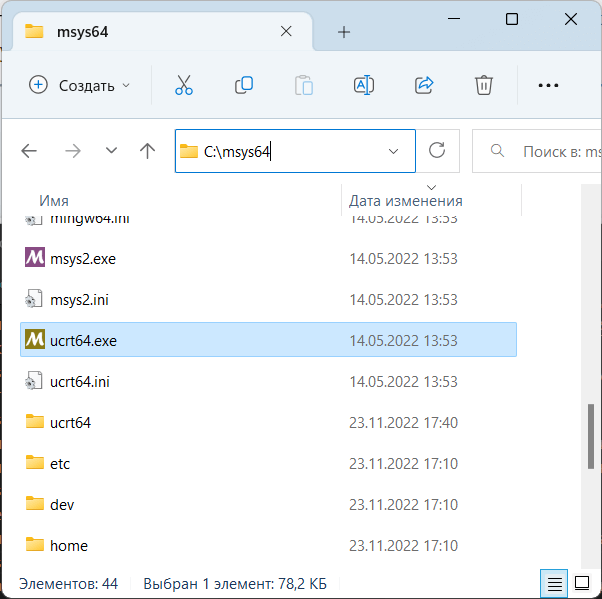
После завершения установки запустится консольное приложение MSYS2.exe. Если по каким-то причинам оно не запустилось,
то в папке установки C:/msys64 надо найти файл usrt_64.exe:
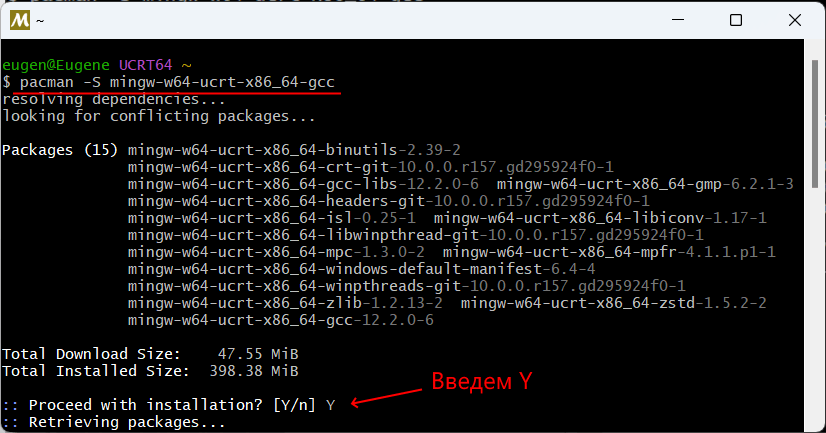
Теперь нам надо установить собственно набор компиляторов GCC. Для этого введем в этом приложении следующую команду:
pacman -S mingw-w64-ucrt-x86_64-gcc
Для управления пакетами MSYS2 использует пакетный менеджер Packman. И данная команда говорит пакетному менелжеру packman установить пакет mingw-w64-ucrt-x86_64-gcc,
который представляет набор компиляторов GCC (название устанавливаемого пакета указывается после параметра -S).
и после завершения установки мы можем приступать к программированию на языке C++. Если мы откроем каталог установки и зайдем в нем в папку C:msys64ucrt64bin,
то найдем там все необходимые файлы компиляторов:
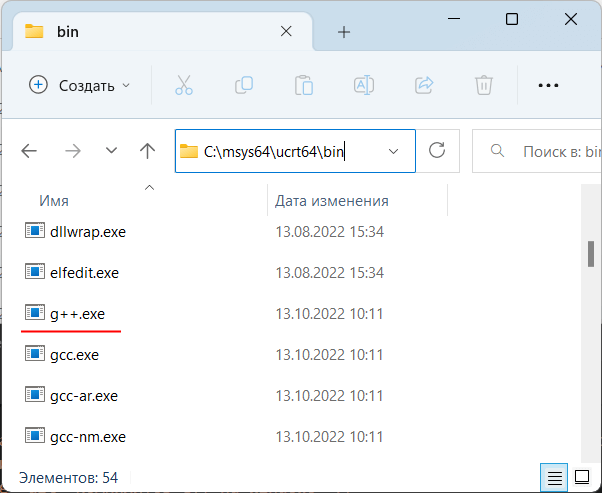
В частности, файл g++.exe как раз и будет представлять компилятор для языка С++.
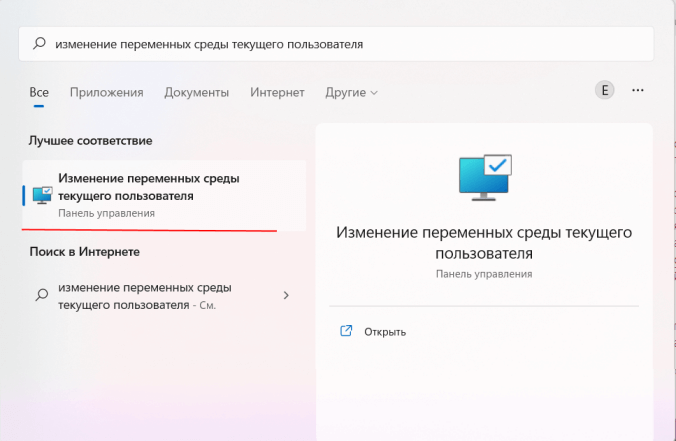
Далее для упрощения запуска компилятора мы можем добавить путь к нему в Переменные среды. Для этого можно в окне поиска в Windows ввести «изменение переменных среды текущего пользователя»:
Нам откроется окно Переменныех среды:
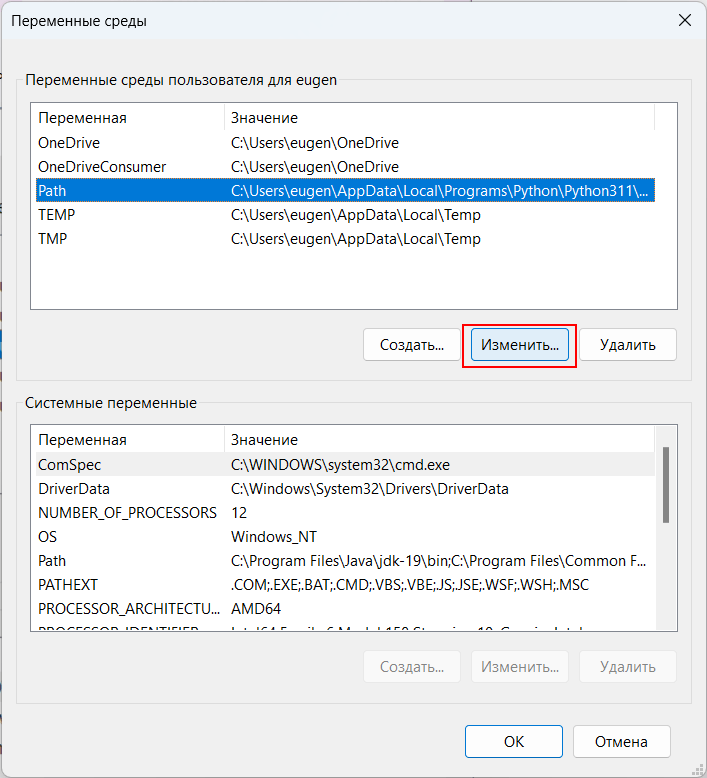
И добавим путь к компилятору C:msys64ucrt64bin:

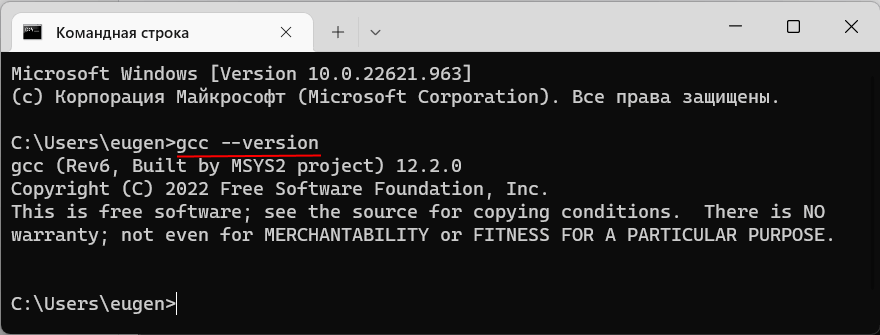
Чтобы убедиться, что набор компиляторов GCC успешно установлен, введем следующую команду:
В этом случае нам должна отобразиться версия компиляторов
Создание первой программы
Итак, компилятор установлен, и теперь мы можем написать первую программу. Для этого потребуется любой текстовый редактор для набора исходного кода.
Можно взять распространенный редактор Visual Studio Code или даже обычный встроенный Блокнот.
Итак, создадим на жестком диске С папку для исходных файлов. А в этой папке создадим новый текстовый файл, который переименуем в
hello.cpp. То есть по сути файлы исходного кода на С++ — это обычные текстовые файлы, которые, как правило, имеют расширение
cpp.
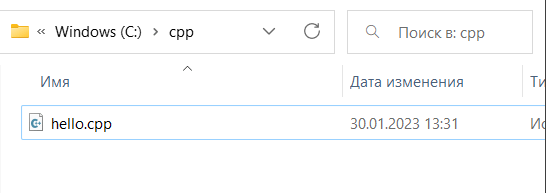
В моем случае файл hello.cpp находится в папке C:cpp.
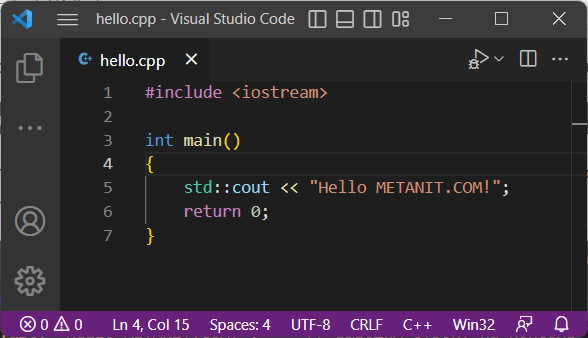
Теперь определим в файле hello.cpp простейший код, который будет выводить строку на консоль:
#include <iostream>        		// подключаем заголовочный файл iostream

int main()							// определяем функцию main
{									// начало функции
	std::cout << "Hello METANIT.COM!";	 // выводим строку на консоль
	return 0;						// выходим из функции
}									// конец функции
Для вывода строки на консоль необходимо подключить нужный функционал. Для этого в начале файла идет строка
#include <iostream>
Данная строка представляет директиву препроцессора, которая позволяет подключить библиотеку iostream. Эта библиотека нужна для вывода строки на консоль.
Далее идет определение функции main. Функция main должна присутствовать в любой программе на С++, с нее
собственно и начинается выполнение приложения.
Функция main состоит из четырех элементов:
-
Тип возвращаемого значения. В данном случае это тип int. Этот тип указывает, что функция должна
возвращать целое число. -
Имя функции. В данном случае функция называется main.
-
Список параметров. После имени функции в скобках идет список параметров. Но в данном случае скобки пустые, то есть
функция main не принимает параметров. -
Тело функции. После списка параметров в фигурных скобках идет тело функции. Здесь и определяются собственно те
действия, которые выполняет функция main.{ std::cout << "Hello METANIT.COM!"; return 0; }
В теле функции происходит вывод строки на консоль. Для обращения к консоли используется стандартный поток вывода std::cout.
С помощью оператора << в этот поток (в данном случае фактически на консоль) передается строка символов, которую надо вывести на консоль, то есть «Hello METANIT.COM!».
В конце осуществляем выход из функции с помощью оператора return. Так как функция должна возвращать целое число, то после return указывается число 0.
Ноль используется в качестве индикатора успешного завершения программы.
После каждой инструкции в языке C++ ставятся точка с запятой.
Каждая строка снабжена комментарием. Все, что написано после двойного слеша // представляет комментарий. Комментарий не учитывается при компиляции приложения, и
не является частью программного кода, а служат лишь для его описания. Комментарий позволяет понять, что делает программа.
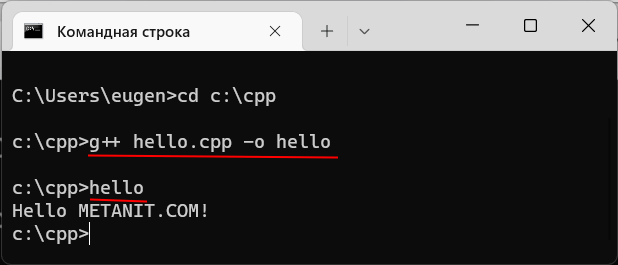
Теперь скомпилируем этот файл. Для этого откроем командную строку Windows и вначале с помощью команды cd перейдем к папке с исходным файлом:
Чтобы скомпилировать исходный код, необходимо компилятору gcc передать в качестве параметра файл hello.cpp:
Дополнительный необязательный параметр -o hello указывает, что скомпилированный файл будет называться hello.exe. Если не указать этот параметр, то файл будет называться по умолчанию — a.exe.
После выполнения этой команды будет скомпилирован исполняемый файл, который в Windows по умолчанию называется hello.exe. И мы можем обратиться к этому файлу, и в этом случае консоль выведет
строку «Hello METANIT.COM!», собственно как и прописано в коде.
Если вместо командной строки используется оболочка PowerShell, то для запуска файла надо прописать «./hello».
Стоит отметить, что мы можем совместить компиляцию и выполнение следующей командой:
g++ hello.cpp -o hello.exe & hello.exe
![]()
Загрузить PDF
![]()
Загрузить PDF
В этой статье рассказывается, как скомпилировать программу из исходного кода на языке C с помощью компилятора GNU Compiler (GCC) для Linux или Minimalist Gnu (MinGW) для Windows.
-

1
В Unix-системе откройте терминал.
-
2
Введите gcc --version и нажмите ↵ Enter. Отобразится версия компилятора C. Если команда не сработала, скорее всего, GCC не установлен.[1]
- Если компилятор не установлен, почитайте документацию к своему дистрибутиву Linux, чтобы узнать, как скачать соответствующий пакет.
- Если вы компилируете программу, написанную на языке C++, вместо «gcc» введите «g++».
-
3
Перейдите в каталог, в котором хранится исходный код.
- Например, если файл с исходным кодом «main.c» находится в каталоге /usr/wikiHow/source, введите cd /usr/wikiHow/source.
-
4
Введите gcc main.c -o HelloWorld. Замените «main.c» на имя файла с исходным кодом, а «HelloWorld» замените на имя конечной программы. Программа будет скомпилирована.
- Если на экране появились сообщения об ошибках, введите gcc -Wall -o errorlog file1.c, чтобы получить дополнительную информацию. Затем в текущем каталоге откройте файл «errorlog»; для этого введите cat errorlog.
- Чтобы скомпилировать одну программу из нескольких файлов с исходным кодом, введите gcc -o outputfile file1.c file2.c file3.c.
- Чтобы скомпилировать сразу несколько программ из нескольких файлов с исходными кодами, введите gcc -c file1.c file2.c file3.c.
-
5
Запустите скомпилированную программу. Введите &# 46;/HelloWorld, где «HelloWorld» замените именем программы.
Реклама


-
1
Скачайте Minimalist GNU для Windows (MinGW). Эту версию GCC для Windows довольно легко установить. Установочный файл можно скачать на этом сайте.[2]
-
2
Запустите установочный файл MinGW.
- Если файл не запустился автоматически, дважды щелкните по нему в папке для загрузок, а затем нажмите «Установить».
-
3
Задайте параметры установки и нажмите Continue (Далее).
- Рекомендуем установить MinGW в папку по умолчанию, а именно в (C:MinGW). Если нужно поменять папку, не выбирайте папку, в названии которой присутствуют пробелы, такую как «Program Files».[3]
- Рекомендуем установить MinGW в папку по умолчанию, а именно в (C:MinGW). Если нужно поменять папку, не выбирайте папку, в названии которой присутствуют пробелы, такую как «Program Files».[3]
-
4
Выберите компиляторы, которые нужно установить.
- На левой панели рекомендуем нажать «Basic Setup» (Обычная установка). Затем на правой панели поставьте флажки рядом со всеми перечисленными компиляторами.
- Более опытные пользователи могут выбрать опцию «All packages» (Все пакеты) и отметить дополнительные компиляторы.
-
5
Откройте меню Installation (Установка). Оно находится в верхнем левом углу MinGW.
-
6
Нажмите Apply Changes (Применить изменения).
-
7
Нажмите Apply (Применить). Компиляторы будут загружены и установлены.
-
8
В путь к MinGW вставьте системные переменные среды. Сделайте следующее:
- Нажмите ⊞ Win+S, чтобы открыть строку поиска, и введите среда.
- В результатах поиска щелкните по «Изменение системных переменных среды».
- Нажмите «Переменные среды».
- Нажмите «Изменить» (под «Пользовательские переменные»).
- Прокрутите вниз информацию в поле «Значение переменной».
- Непосредственно под последней записью введите ;C:MinGWbin. Обратите внимание, что если вы установили MinGW в другую папку, введите ;C:путь-к-папкеbin.
- Дважды нажмите «OK». Еще раз нажмите «OK», чтобы закрыть окно.
-
9
Откройте командную строку в качестве администратора. Для этого:
- Нажмите ⊞ Win+S и введите строка.
- В результатах поиска щелкните правой кнопкой мыши по «Командная строка» и в меню выберите «Запуск от имени администратора».
- Нажмите «Да», чтобы разрешить внесение изменений.
-
10
Перейдите в папку, в которой хранится файл с исходным кодом.
- Например, если файл с исходным кодом «helloworld.c» находится в папке C:SourcePrograms, введите cd C:SourcePrograms.
-
11
Введите gcc helloworld.c -o helloworld.exe. Замените «helloworld» на имя файла с исходным кодом и имя программы. По завершении компиляции программы вы вернетесь в командную строку, при этом не будет никаких сообщений об ошибках.[4]
- Любые ошибки программирования должны быть устранены перед компиляцией программы.
-
12
Чтобы запустить программу, введите ее имя. Если программа называется helloworld.exe, введите это имя, чтобы запустить программу.
Реклама


Советы
- Компиляция кода с помощью флага -g приведет к созданию отладочной информации, которая может быть использована соответствующим отладчиком, например, GDB.
- Создайте сборочный файл проекта (make-файл), чтобы упростить компиляцию больших программ.
- Если вы активно используете оптимизацию, помните, что оптимизация по скорости может привести к снижению размера и, иногда, качества (и наоборот).
- При компиляции программы на языке C++ используйте G++ так же, как вы используете GCC. Помните, что файлы с исходным кодом на языке C++ имеют расширение .cpp, а не .c.
Реклама
Что вам понадобится
- Компьютер под управлением Linux или Windows
- Базовые знания GNU/Linux и знание того, как устанавливать приложения
- Программный код
- Текстовый редактор (например, Emacs)
Об этой статье
Эту страницу просматривали 72 864 раза.