| title | description | ms.topic | ms.assetid | ms.author | author | manager | ms.date |
|---|---|---|---|---|---|---|---|
|
Manage the Local Server and the Server Manager Console |
Learn how to manage both the local server and remote servers that are running Windows Server 2008 and newer releases of the Windows Server operating system. |
article |
eeb32f65-d588-4ed5-82ba-1ca37f517139 |
jgerend |
JasonGerend |
mtillman |
10/16/2017 |
Manage the Local Server and the Server Manager Console
Applies to: Windows Server 2022, Windows Server 2019, Windows Server 2016, Windows Server 2012 R2, Windows Server 2012
In Windows Server, Server Manager lets you manage both the local server (if you are running Server Manager on Windows Server, and not on a Windows-based client operating system) and remote servers that are running Windows Server 2008 and newer releases of the Windows Server operating system.
The Local Server page in Server Manager displays server properties, events, service and performance counter data, and Best Practices Analyzer (BPA) results for the local server. Event, service, BPA, and performance tiles function as they do on role and server group pages. For more information about configuring the data that is displayed in these tiles, see View and Configure Performance, Event, and Service Data and Run Best Practices Analyzer Scans and Manage Scan Results.
Menu commands and settings in the Server Manager console heading bars apply globally to all servers in your server pool, and let you use Server Manager to manage the entire server pool.
This topic contains the following sections.
-
Shut down the local server
-
Configure Server Manager properties
-
Manage the Server Manager console
-
Customize tools that are displayed in the Tools menu
-
Manage roles on role home pages
Shut down the local server
The Tasks menu in the local server Properties tile lets you start a Windows PowerShell session on the local server, open the computer Management mmc snap-in, or open mmc snap-ins for roles or features that are installed on the local server. You can also shut down the local server by using the Shut Down Local Server command in this Tasks menu. The Shut Down Local Server command is also available for the local server in the Servers tile on the All Servers page, or on any role or group page in which the local server is represented.
Shutting down the local server by using this method, unlike shutting down Windows Server 2016 from the start screen, opens the Shut Down Windows dialog box, which lets you specify reasons for shutdown in the shutdown Event Tracker area.
[!NOTE]
Only members of the Administrators group can shut down or restart a server. Standard users cannot shut down or restart a server. Clicking the Shut Down Local Server command logs standard users off server sessions. This matches the experience of a standard user running the Alt+F4 shutdown command from the server desktop.
Configure Server Manager properties
You can view or change the following settings in the Properties tile on the Local Server page. To change a setting’s value, click the hypertext value of the setting.
[!NOTE]
Typically, the properties displayed in the Local Server Properties tile can only be changed on the local server. You cannot change the local server properties from a remote computer by using Server Manager because the Properties tile can only get information about the local computer, not remote computers.Because many properties displayed in the Properties tile are controlled by tools that are not part of Server Manager (Control Panel, for example), changes to Properties settings are not always displayed in the Properties tile immediately. By default, data in the Properties tile is refreshed every two minutes. To refresh Properties tile data immediately, click Refresh in the Server Manager address bar.
| Setting | Description |
|---|---|
| computer name | Displays the computer friendly name, and opens the System Properties dialog box, which lets you change the server’s name, domain membership, and other system settings such as user profiles. |
| Domain (or Workgroup, if the server is not joined to a domain) | Displays the domain or workgroup of which the server is a member. Opens the System Properties dialog box, which lets you change the server’s name, domain membership, and other system settings such as user profiles. |
| Windows Firewall | Displays Windows Firewall status for the local server. Opens Control PanelSystem and SecurityWindows Firewall. For more information about configuring Windows Firewall, see Windows Firewall with Advanced Security and IPsec. |
| remote management | Displays Server Manager and Windows PowerShell remote management status. Opens the Configure remote Management dialog box. For more information about remote management, see Configure remote Management in Server Manager. |
| Remote Desktop | Shows whether users can connect to the server remotely by using Remote Desktop sessions. Opens the remote tab of the System Properties dialog box. |
| NIC Teaming | Shows whether the local server is participating in NIC teaming. Opens the NIC Teaming dialog box, and lets you join the local server to a NIC team if desired. For more information about NIC Teaming, see the NIC Teaming white paper. |
| Ethernet | Displays the networking status of the server. Opens Control PanelNetwork and InternetNetwork Connections. |
| Operating system version | This read-only field displays the version number of the Windows operating system that the local server is running. |
| Hardware information | This read-only field displays the manufacturer and model name and number of the server hardware. |
| Last installed updates | Displays the day and time that Windows updates were last installed. Opens Control PanelSystem and SecurityWindows Update. |
| Windows Update | Displays Windows Update settings for the local server. Opens Control PanelSystem and SecurityWindows Update. |
| Last checked for updates | Displays the day and time that the server last checked for available Windows updates. Opens Control PanelSystem and SecurityWindows Update. |
| Windows Error Reporting | Displays Windows Error Reporting opt-in status. Opens the Windows Error Reporting Configuration dialog box. For more information about Windows Error Reporting, its benefits, privacy statements, and opt-in settings, see Windows Error Reporting. |
| Customer Experience Improvement Program | Displays Windows Customer Experience Improvement Program opt-in status. Opens the Customer Experience Improvement Program Configuration dialog box. For more information about Windows Customer Experience Improvement Program, its benefits, and opt-in settings, see Windows Customer Experience Improvement Program. |
| Internet Explorer (IE) Enhanced Security Configuration | Shows whether IE Enhanced Security Configuration (also known as IE hardening or IE ESC) is turned on or off. Opens the Internet Explorer Enhanced Security Configuration dialog box. IE Enhanced Security Configuration is a security measure for servers that prevents web pages from opening in Internet Explorer. For more information about IE Enhanced Security Configuration, its benefits, and settings, see Internet Explorer: Enhanced Security Configuration. |
| time zone | Displays the local server’s time zone. Opens the date and time dialog box. |
| Product ID | Displays the Windows activation status and product ID number (if Windows has been activated) of the Windows Server 2016 operating system. This is not the same number as the Windows product key. Opens the Windows Activation dialog box. |
| Processors | This read-only field displays manufacturer, model name, and speed information about the local server’s processors. |
| Installed memory (RAM) | This read-only field displays the amount of available RAM, in gigabytes. |
| Total disk space | This read-only field displays the amount of available disk space, in gigabytes. |
Manage the Server Manager console
Global settings that apply to the entire Server Manager console, and to all remote servers that have been added to the Server Manager server pool, are found in the heading bars at the top of the Server Manager console window.
add servers to Server Manager
The command that opens the add Servers dialog box, and lets you add remote physical or virtual servers to the Server Manager server pool, is in the Manage menu of the Server Manager console. For detailed information about how to add servers, see add Servers to Server Manager.
Refresh data that is displayed in Server Manager
You can configure the refresh interval for data that is displayed in Server Manager on the Server Manager Properties dialog box, which you open from the Manage menu.
To configure the refresh interval in Server Manager
-
On the Manage menu in the Server Manager console, click Server Manager Properties.
-
In the Server Manager Properties dialog box, specify a time period, in minutes, for the amount of elapsed time you want between refreshes of the data that is displayed in Server Manager. The default is 10 minutes. Click OK when you are finished.
Refresh limitations
Refresh applies globally to data from all servers that you have added to the Server Manager server pool. You cannot refresh data or configure different refresh intervals for individual servers, roles, or groups.
When servers that are in a cluster are added to Server Manager, whether they are physical computers or virtual machines, the first refresh of data can fail, or display data only for the host server for clustered objects. Subsequent refreshes show accurate data for physical or virtual servers in a server cluster.
Data that is displayed in role home pages in Server Manager for Remote Desktop Services, IP address Management, and File and Storage Services does not refresh automatically. Refresh data that is displayed in these pages manually, by pressing F5 or clicking Refresh in the Server Manager console heading while you are on those pages.
add or remove roles or features
The commands that open the add Roles and Features Wizard and remove Roles and Features Wizard, and let you add or remove roles, role services, and features to servers in your server pool, are in the Manage menu of the Server Manager console, and the Tasks menu of the Roles and Features tile on role or group pages. For detailed information about how to add or remove roles or features, see Install or Uninstall Roles, Role Services, or Features.
In Server Manager, role and feature data is displayed in the base language of the system, also called the system default GUI language, or the language selected during installation of the operating system.
create server groups
The command that opens the create Server Group dialog box, and lets you create custom groups of servers, is in the Manage menu of the Server Manager console. For detailed information about how to create server groups, see create and Manage Server Groups.
Prevent Server Manager from opening automatically at logon
The Do not start Server Manager automatically at logon check box in the Server Manager Properties dialog box controls whether Server Manager opens automatically at logon for members of the Administrators group on a local server. This setting does not affect Server Manager behavior when it is running on Windows 10 as part of Remote Server Administration Tools. For more information about configuring this setting, see Server Manager.
Zoom in or out
To zoom in or out on your view of the Server Manager console, you can either use the Zoom commands on the View menu, or press Ctrl+Plus (+) to zoom in and Ctrl+Minus (-) to zoom out.
Customize tools that are displayed in the Tools menu
The Tools menu in Server Manager includes soft links to shortcuts in the Administrative Tools folder in Control Panel/System and Security. The Administrative Tools folder contains a list of shortcuts or LNK files to available management tools, such as mmc snap-ins. Server Manager populates the Tools menu with links to those shortcuts, and copies the folder structure of the Administrative Tools folder to the Tools menu. By default, tools in the Administrative Tools folder are arranged in a flat list, sorted by type and by name. In the Server ManagerTools menu, items are sorted only by name, not by type.
To customize the Tools menu, copy tool or script shortcuts that you want to use to the Administrative Tools folder. You can also organize your shortcuts in folders, which create cascading menus in the Tools menu. additionally, if you want to restrict access to the custom tools on the Tools menu, you can set user access rights on both your custom tool folders in Administrative Tools, or directly on the original tool or script files.
We recommend against reorganizing system and administrative tools, and any management tools associated with roles and features that are installed on the local server. Moving role and feature management tools can prevent successful uninstallation of those management tools, when necessary. After uninstallation of a role or feature, a nonfunctional link to a tool whose shortcut has been moved might remain in the Tools menu. If you reinstall the role, a duplicate link to the same tool is created in the Tools menu, but one of the links will not work.
Role and feature tools that are installed as part of Remote Server Administration Tools on a Windows client-based computer can be organized into custom folders, however. Uninstalling the parent role or feature has no effect on the tool shortcuts that are available on a remote computer that is running Windows 10.
The following procedure describes how to create an example folder called MyTools, and move shortcuts for two Windows PowerShell scripts into the folder that are then accessible from the Server Manager Tools menu.
To customize the Tools menu by adding shortcuts in Administrative Tools
-
create a new folder called MyTools in a convenient location.
[!NOTE]
Because of restrictive access rights on the Administrative Tools folder, you are not allowed to create a new folder directly in the Administrative Tools folder; you must create a new folder elsewhere (such as on the Desktop), and then copy the new folder to the Administrative Tools folder. -
move or copy MyTools to Control Panel/System and Security/Administrative Tools. By default, you must be a member of the Administrators group on the computer to make changes to the Administrative Tools folder.
-
if you do not need to restrict user access rights to your custom tool shortcuts, go on to step 6. Otherwise, right-click either the tool file (or the MyTools folder), and then click Properties.
-
On the Security tab of the file’s Properties dialog box, click edit.
-
for users for whom you want to restrict tool access, clear check boxes for Read & execute, Read, and Write permissions. These permissions are inherited by the tool shortcut n the Administrative Tools folder.
if you edit access rights for a user while the user is using Server Manager (or while Server Manager is open), then your changes are not shown in the Tools menu until the user restarts Server Manager.
[!NOTE]
if you restrict access to an entire folder that you have copied to Administrative Tools, restricted users can see neither the folder nor its contents in the Server ManagerTools menu.edit permissions for the folder in the Administrative Tools folder. Because hidden files and folders in Administrative Tools are always displayed in the Server ManagerTools menu, do not use the Hidden setting on a file or folder’s Properties dialog box to restrict user access to your custom tool shortcuts.
Deny permissions always overwrite Allow permissions.
-
Right-click the original tool, script, or executable file for which you want to add entries on the Tools menu, and then click create shortcut.
-
move the shortcut to the MyTools folder in Administrative Tools.
-
Refresh or restart Server Manager, if necessary, to see your custom tool shortcut in the Tools menu.
Manage roles on role home pages
After you add servers to the Server Manager server pool, and Server Manager collects inventory data about servers in your pool, Server Manager adds pages to the navigation pane for roles that are discovered on managed servers. The Servers tile on role pages lists managed servers that are running the role. By default, Events, Best Practices Analyzer, Services, and Performance tiles display data for all servers that are running the role; selecting specific servers in the Servers tile limits the scope of events, services, performance counters, and BPA results to selected servers only. Management tools are typically available in the Server Manager console Tools menu, after a role or feature has been installed or discovered on a managed server. You can also right-click server entries in the Servers tile for a role or group, and then start the management tool that you want to use.
In Windows Server 2016, the following roles and feature have management tools that are integrated into Server Manager console as pages.
-
File and Storage Services. File and Storage Services pages include custom tiles and commands for managing volumes, shares, iSCSI virtual disks, and storage pools. When you open the File and Storage Services role home page in Server Manager, a retracting pane opens that displays custom management pages for File and Storage Services. For more information about deploying and managing File and Storage Services, see File and Storage Services.
-
Remote Desktop Services. Remote Desktop Services pages include custom tiles and commands for managing sessions, licenses, gateways, and virtual desktops. For more information about deploying and managing Remote Desktop Services, see Remote Desktop Services (rdS).
-
IP address Management (IPAM). The IPAM role page includes a custom Welcome tile containing links to common IPAM configuration and management tasks, including a wizard for provisioning an IPAM server. The IPAM home page also includes tiles for viewing the managed network, configuration summary, and scheduled tasks.
There are some limitations to IPAM management in Server Manager. Unlike typical role and group pages, IPAM has no Servers, Events, Performance, Best Practices Analyzer, or Services tiles. There is no Best Practices Analyzer model available for IPAM; Best Practices Analyzer scans on IPAM are not supported. To access servers in your server pool that are running IPAM, create a custom group of those servers that are running IPAM, and access the server list from the Servers tile on the custom group page. Alternatively, access IPAM servers from the Servers tile on the All Servers group page.
Dashboard thumbnails also display limited rows for IPAM, compared to thumbnails for other roles and groups. By clicking the IPAM thumbnail rows, you can view events, performance data, and manageability status alerts for servers that are running IPAM. IPAM-related services can be managed from pages for server groups that contain IPAM servers, such as the page for the All Servers group.
for more information about deploying and managing IPAM, see IP address Management (IPAM).
See Also
Server Manager
add Servers to Server Manager
create and Manage Server Groups
View and Configure Performance, Event, and Service Data
File and Storage Services
Remote Desktop Services (rdS)
IP address Management (IPAM)
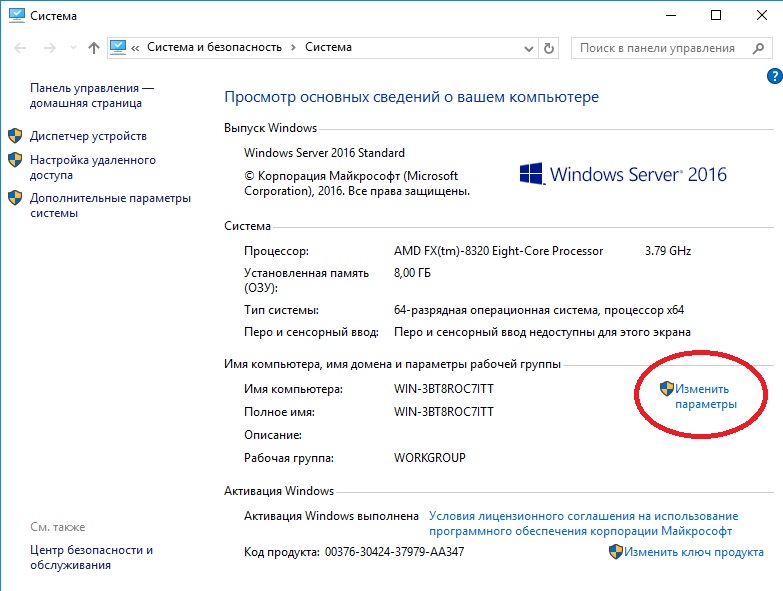
В данной статье мы рассмотрим базовые настройки Windows Server 2016, которые осуществляются сразу после установки системы и которые обычно обязательные к использованию. Как установить Windows Server 2016 можете ознакомиться в нашей прошлой статье.
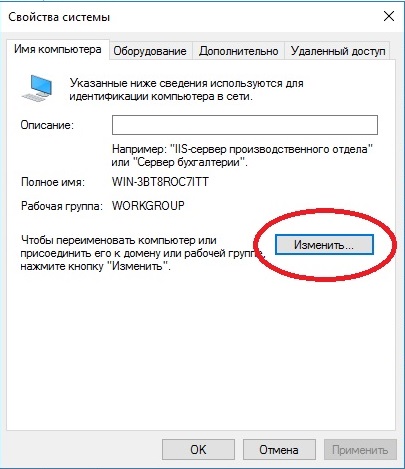
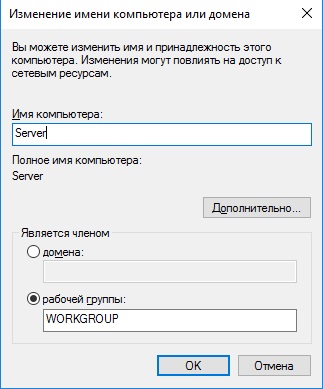
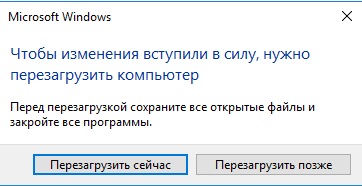
Итак, приступим. Для начала нам нужно задать имя нашему серверу, для этого заходим в свойства системы => изменить параметры => изменить. Задаем «Имя компьютера», и если нужно, то имя рабочей группы. После изменения параметров нужно перезагрузиться.
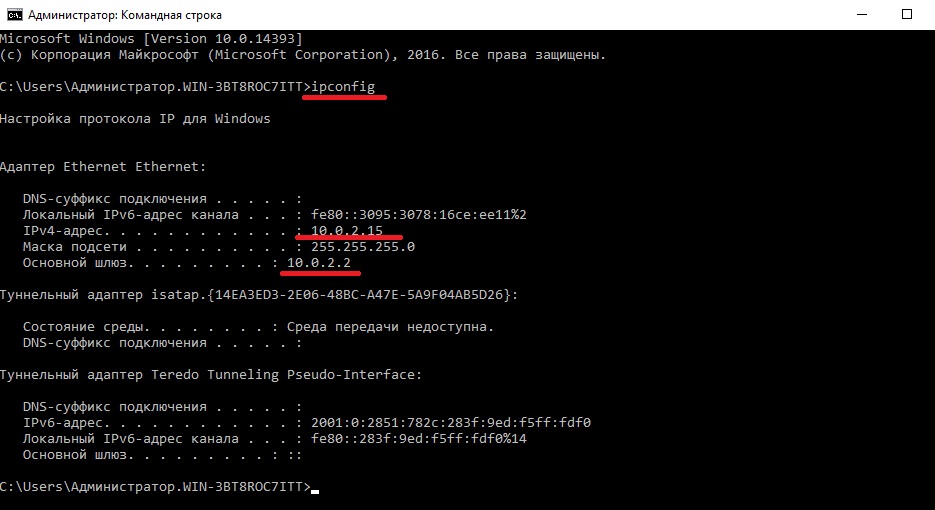
После нам нужно задать сетевые настройки. Если у Вас сервер подключен к маршрутизатору, то задаем IP шлюза, вводим статический адрес, это обязательно для сервера и маску подсети. Информацию об IP адресах в Вашей локальной сети можно посмотреть через командную строку командной «ipconfig». Ниже на скриншотах указаны примеры, у Вас IP адреса будут отличаться.
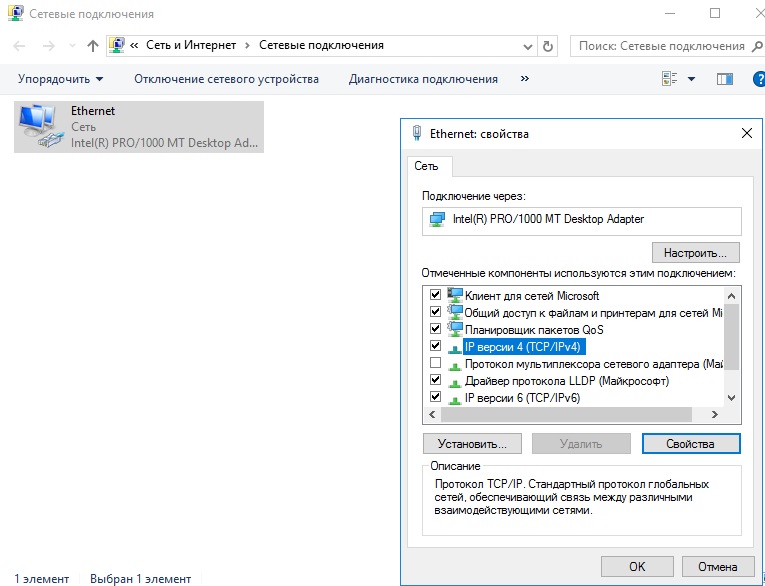
Заходим в настройки сетевых подключений:

Заходим в свойства пункта IPv4.
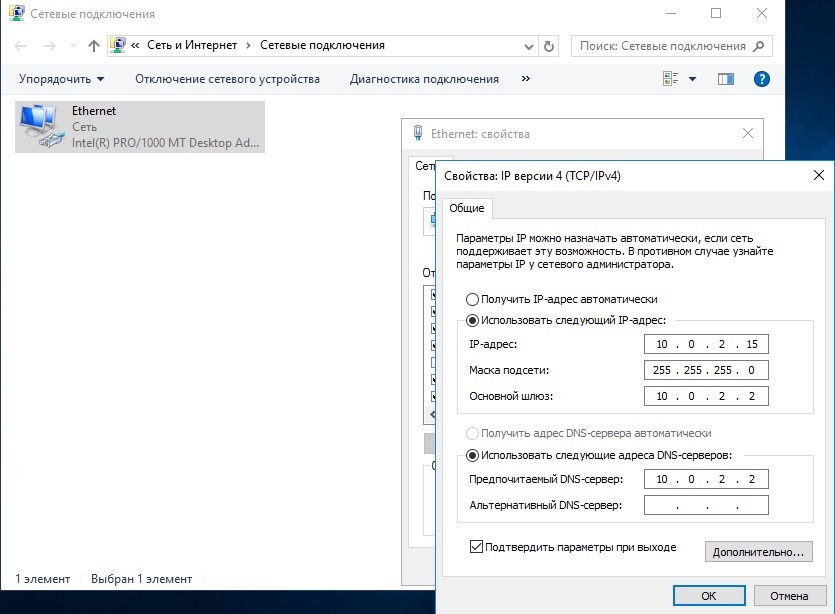
И вводим задаем здесь статические IP адреса. После ставим галку «Подтвердить параметры при выходи», тем самым сохраняя настройки.
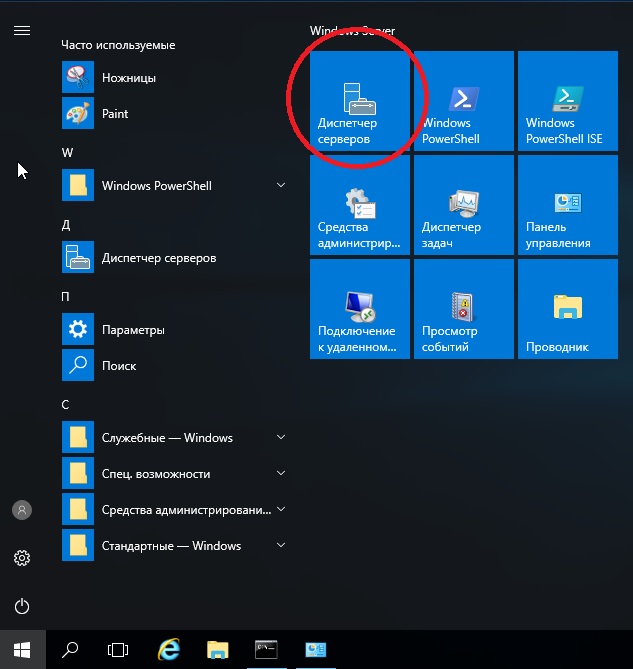
Перейдем наконец к самым главным настройкам, к Active Directory. Меню «Пуск» => Диспетчер серверов.
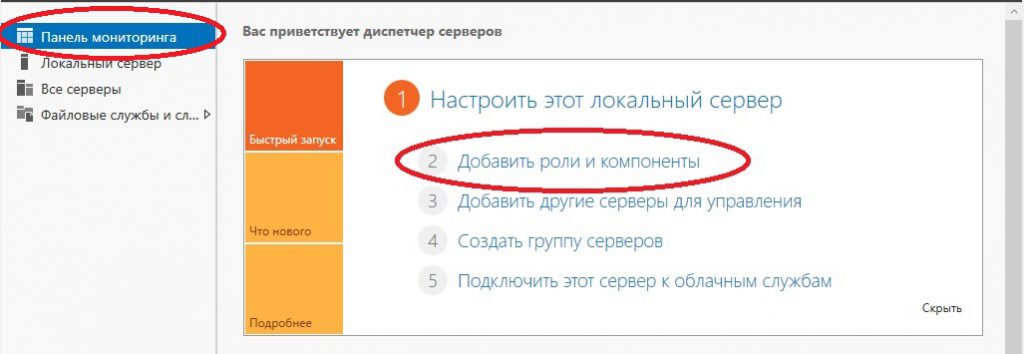
В панели мониторинга => Добавить роли и компоненты.
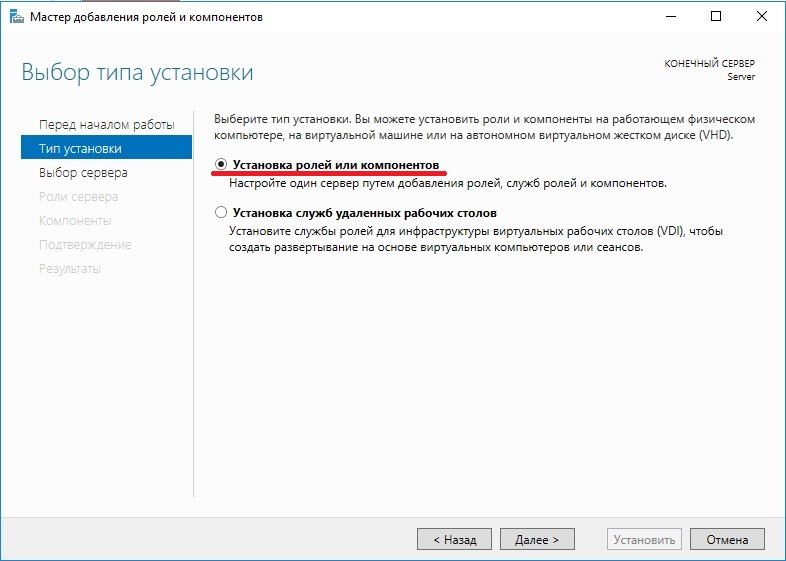
В типе установки выбираем «Установка ролей или компонентов».
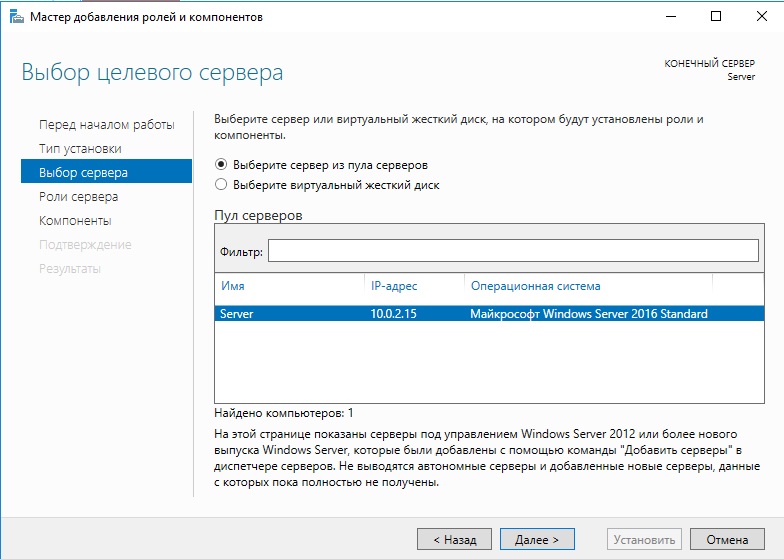
Выбираем нужный сервер в пуле, он будет с именем, который Вы назначили по инструкции выше.
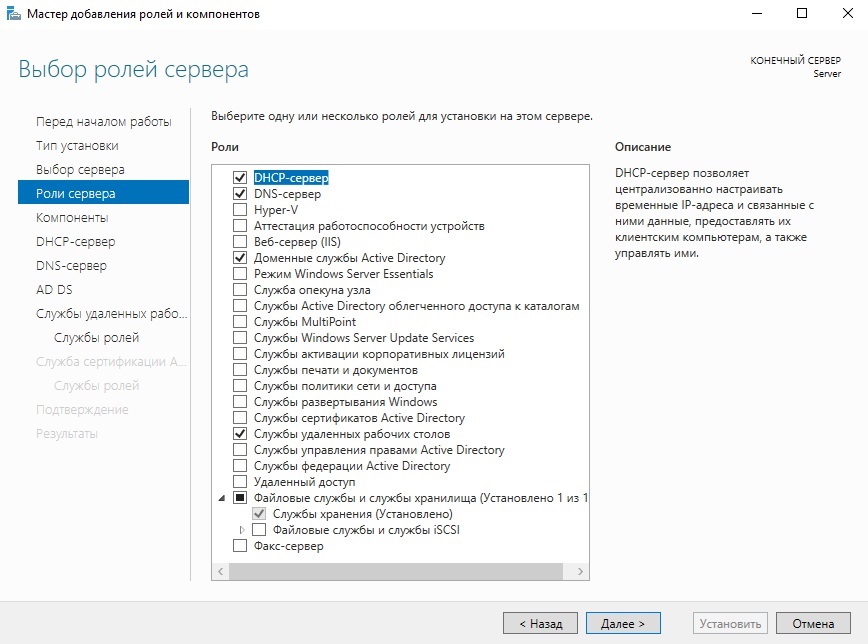
В ролях сервера мы выбираем следующие стандартные роли. Вы можете выбрать что-то еще, если Вам необходимо под Ваши задачи.
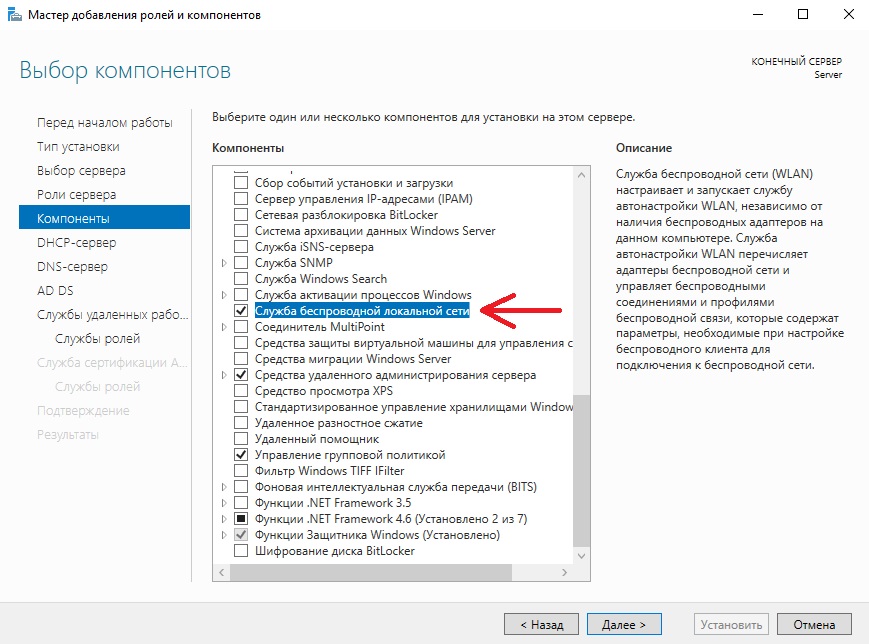
В компонентах оставляем по стандарту следующие пункты. Мы рекомендуем вам дополнительно установить «Службу беспроводной локальной сети», т.к без этой службы на сервер нельзя будет поставить Wi-Fi адаптер и производить настройку беспроводной сети.
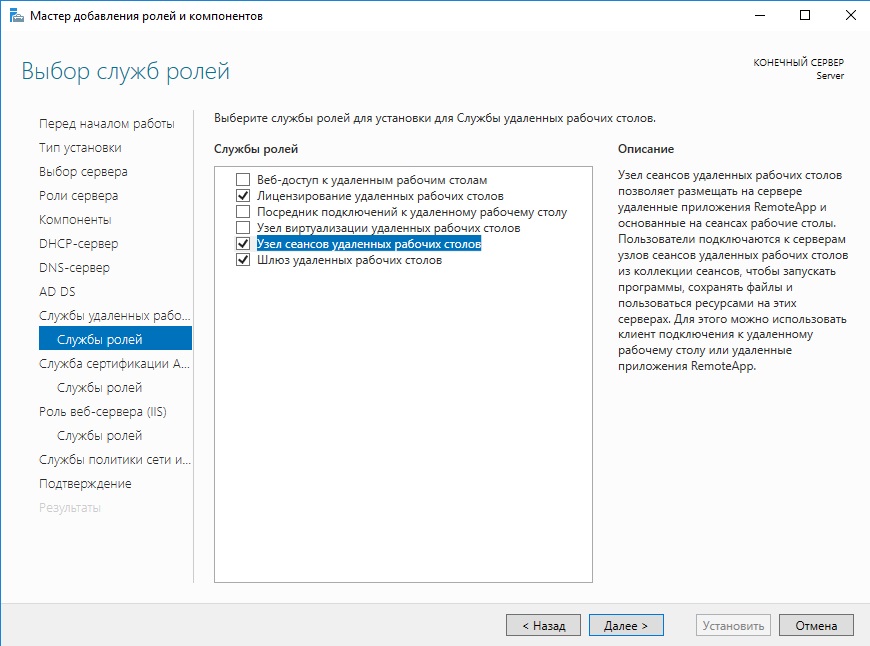
В службе ролей мы выбираем следующие пункты. Далее в инструкции мы будем лицензировать терминальный сервер.
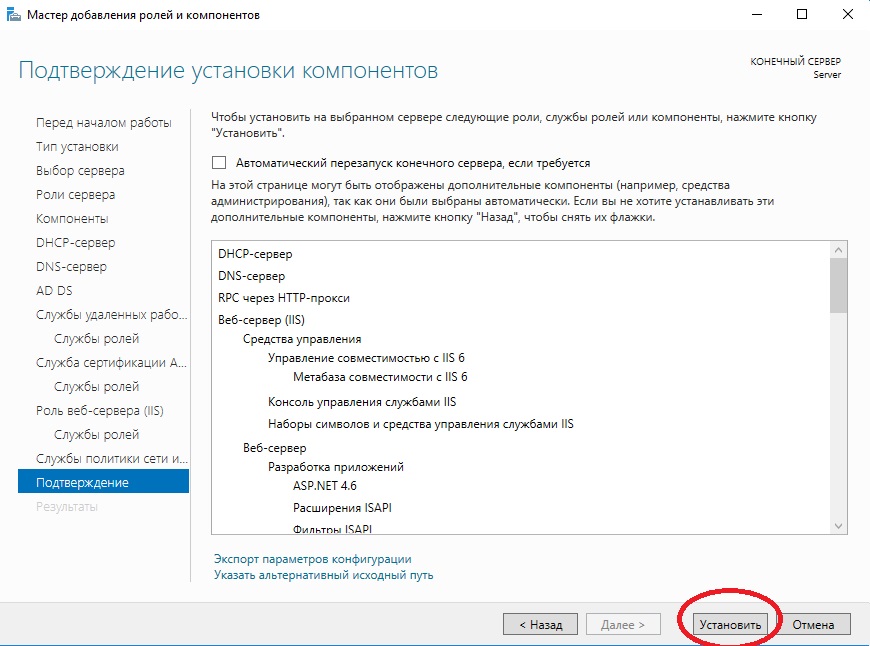
Далее оставляем все по стандарту (если Вам не нужно самим, что-то дополнительно установить). Доходим до пункта «Подтверждение» и устанавливаем.
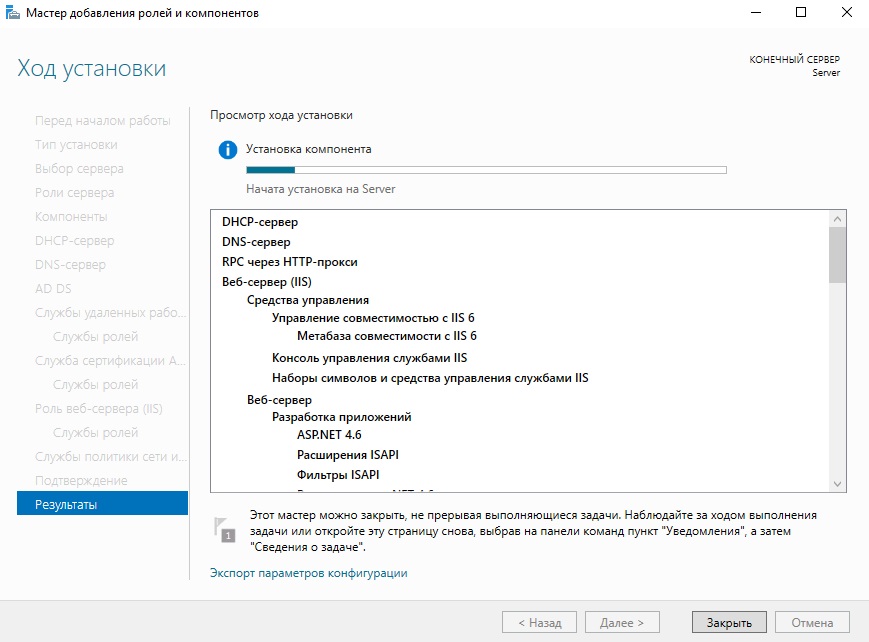
После установки служб нужно перезагрузиться.
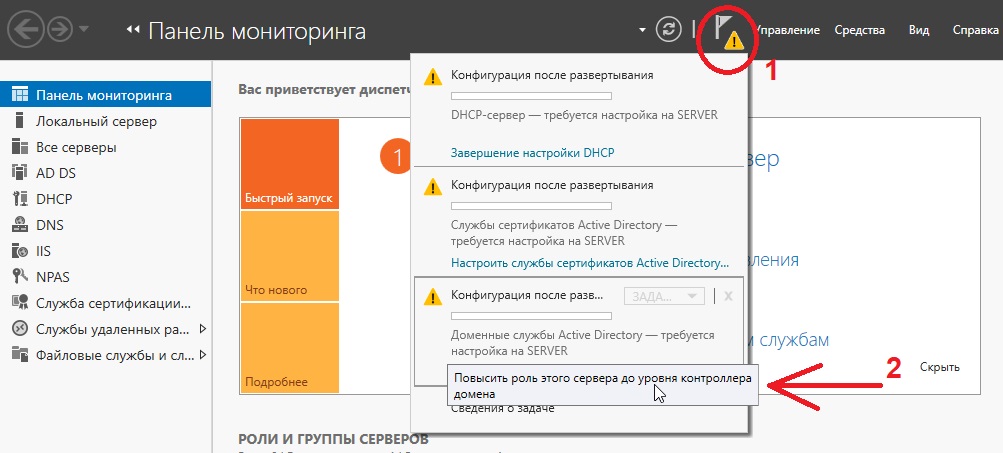
Приступаем к настройкам DNS. В Active Directory нажимаем на флажок справа на верху и после заходим в настройки повышения роли этого сервера до контроллера домена.
Выбираем пункт «Добавить новый лес» и придумываем имя Вашему домену. На нашем примере это будет «softcomputers».
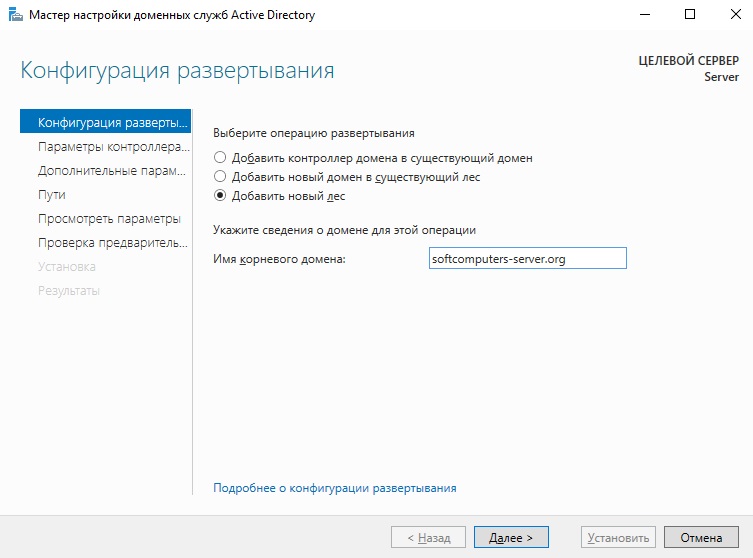
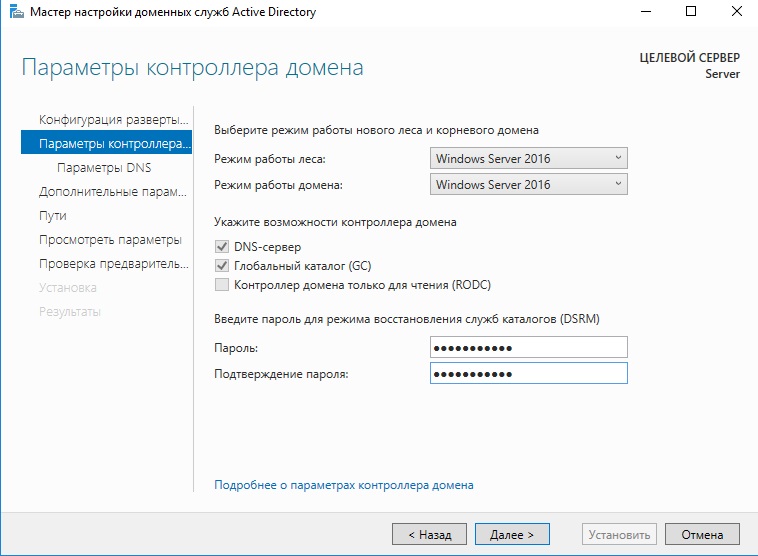
Настройки оставляем по стандарту. Вы должны только придумать пароль для Вашего домена.
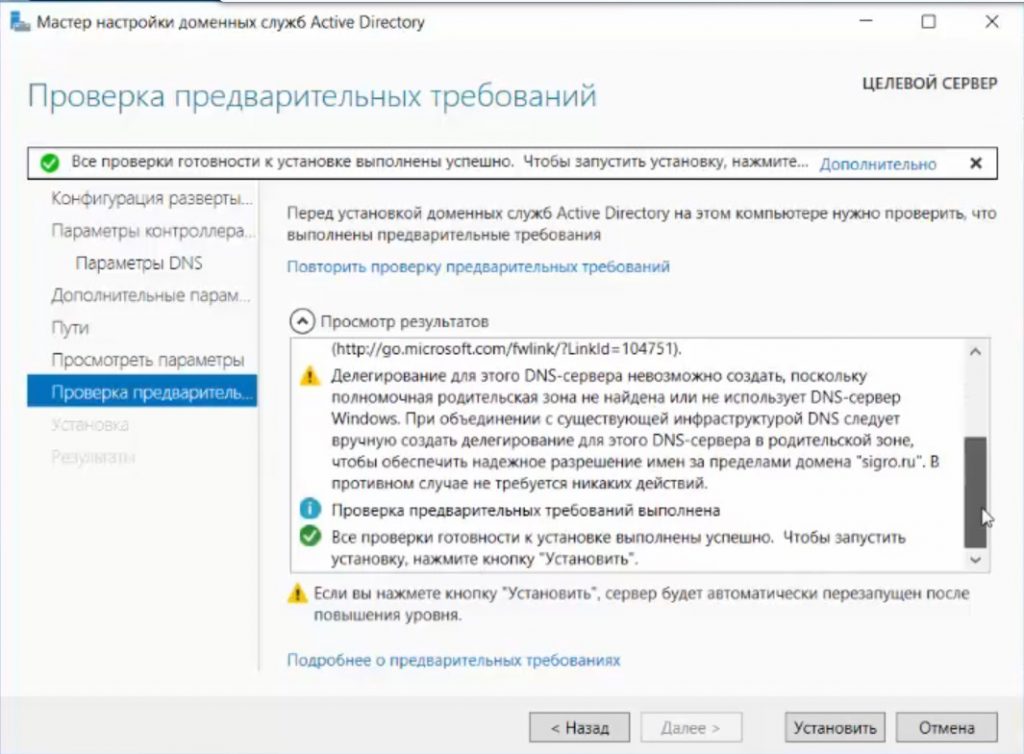
Проходим проверку. Если вы все сделали правильно, то должно установиться все корректно
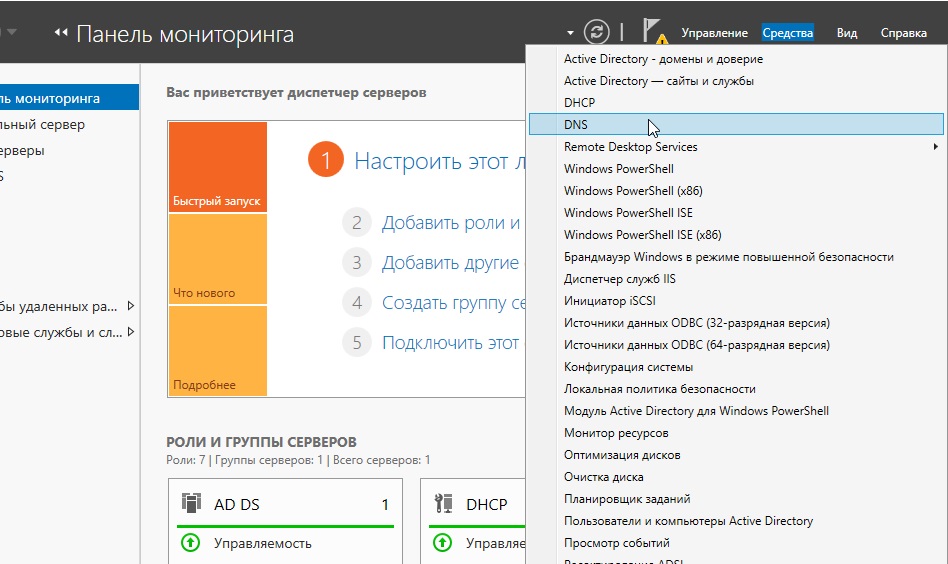
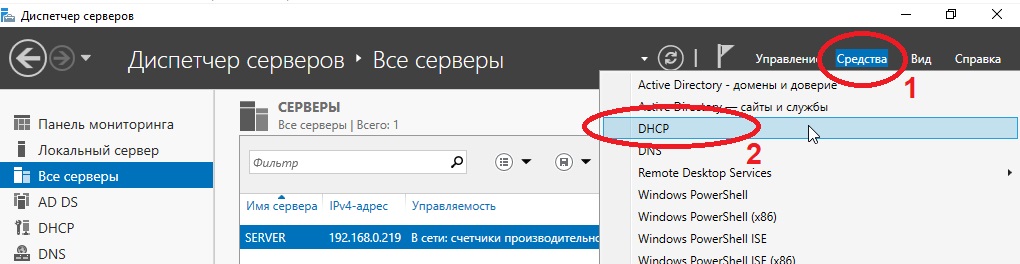
После установки и перезагрузки заходим в меню «Средства» => DNS.
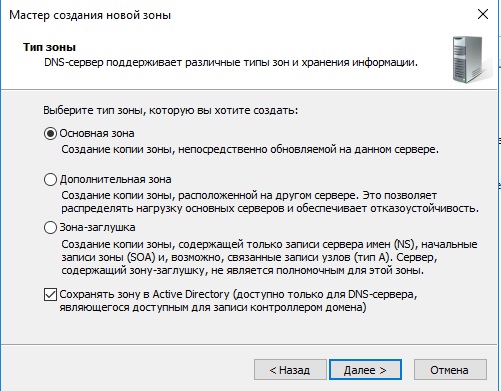
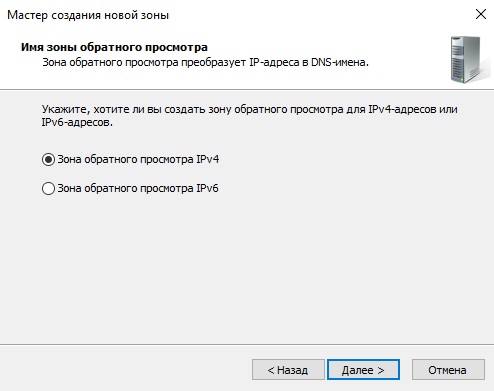
Раскрываем древо DNS => «Имя вашего сервера» => Зоны прямого просмотра => Зоны обратного просмотра => Правой кнопкой мыши на данный пункт и «Создать новую зону».

Выбираем «Основная зона» и далее по скриншотам ниже.
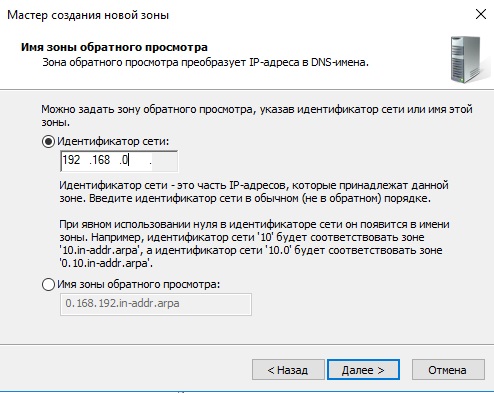
На этом пункте выбираете диапазон Вашей локальной сети. У нас на примере она будет 192.168.0. у Вас она может будет своя (см. cmd => ipconfig).
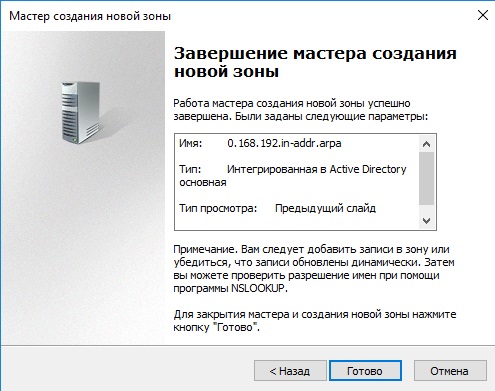
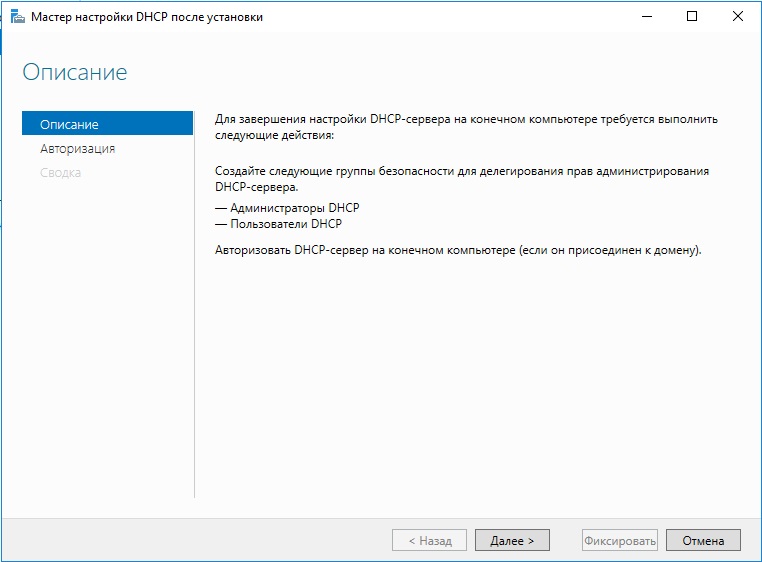
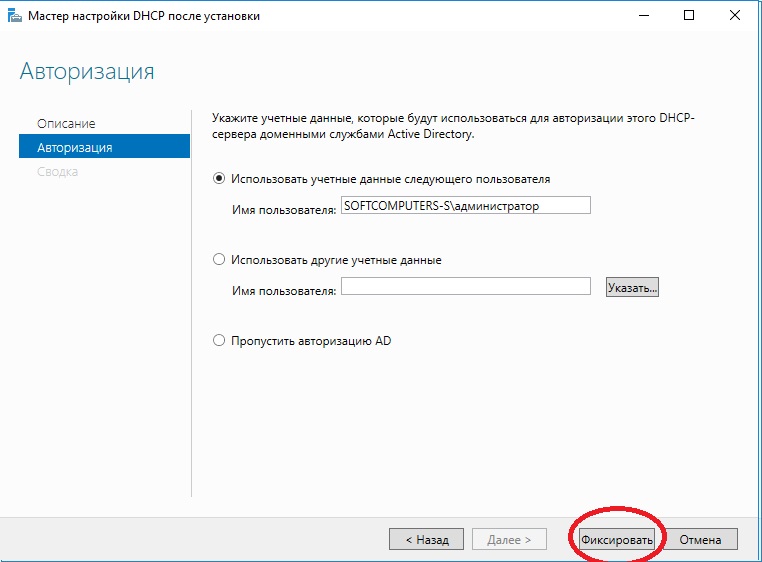
На этом настройки DNS закончены. Приступим к настройкам DHCP. Так же заходим в Active Directory и во флажке справа на верху выбираем соответствующую настройку.
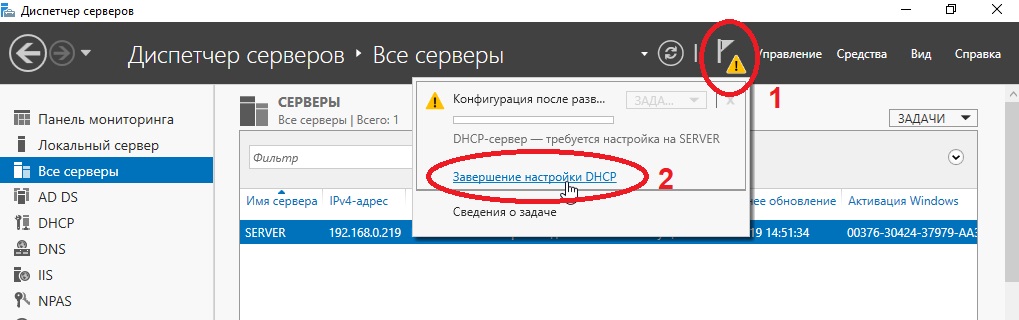
После создания DHCP переходим в меню средства => DHCP для его настройки.
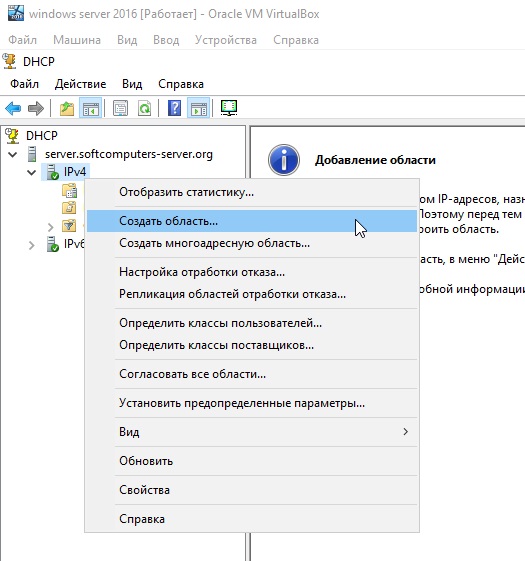
В древе DHCP => Ваш сервер => IPv4 => Правой кнопкой мыши => Создать область.
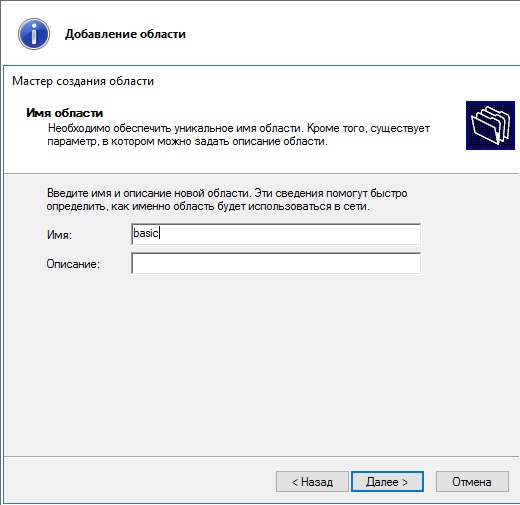
Задаем имя новой области, у нас это будет «basic».
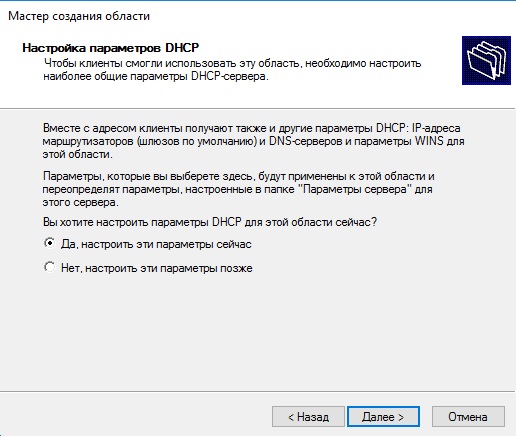
Далее будет меню для исключения диапазона, если нужно исключить что-то можете сделать в этом меню, если не нужно, то пропускаете.

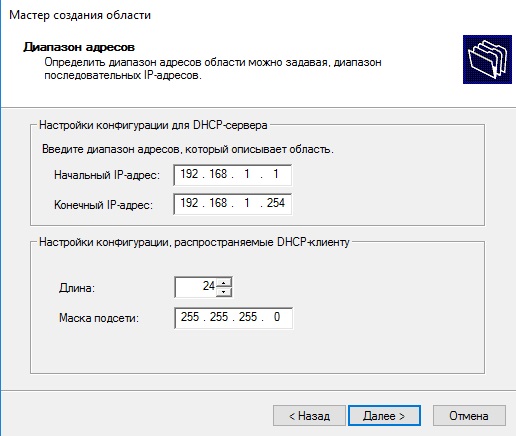
Далее создаем новый диапазон IP адресов, который будет раздавать сервер в локальную сеть. У нас на примере это новый диапазон 192.168.1
Вы можете создать любой другой диапазон на свое усмотрение.
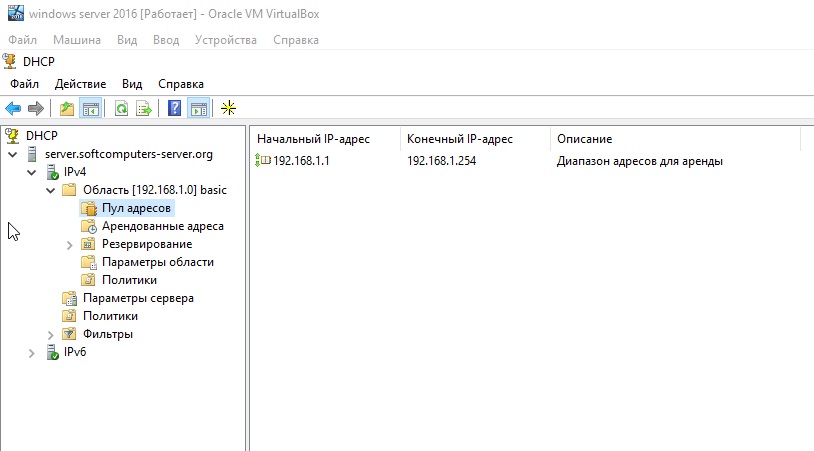
Далее в древе DHCP => Имя сервера => Область => Пул адресов — будет создан новый диапазон.
Дальше по списку настроек перейдем к созданию терминального сервера и его лицензирования. Это нужно для того, чтобы пользователи могли подключаться по RDP к серверу по своей учетной записи. (Учетную запись для пользователей будем рассматривать в этой инструкции ниже).
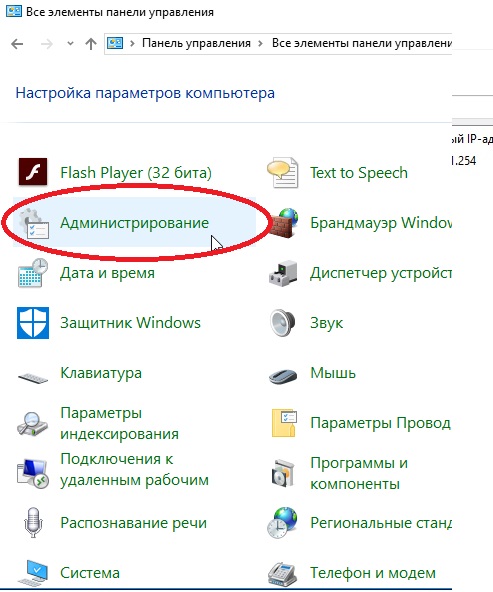
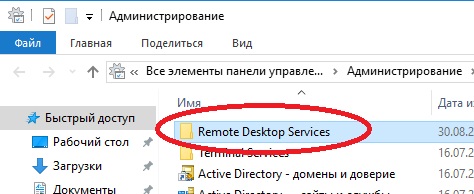
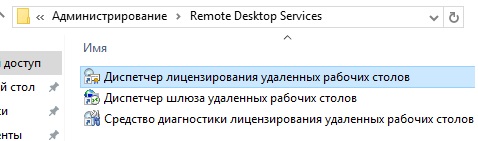
Переходим в «Панель управления» => Администрирование => Remote Desktop Services => Диспетчер лицензирования удаленных рабочих столов.
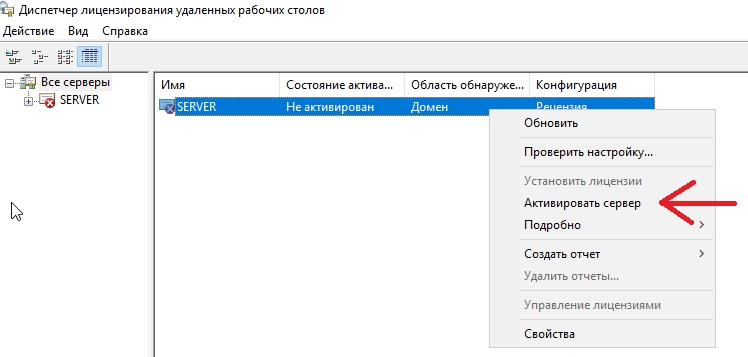
Выбираем пункт во «Все серверы», далее в списке видим имя вашего сервера => правой кнопкой мыши на этот пункт => Активировать сервер.
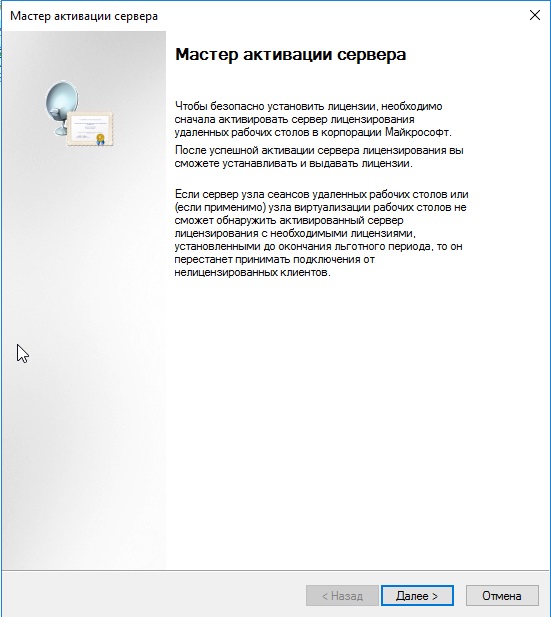
Переходим в «Мастер активации».
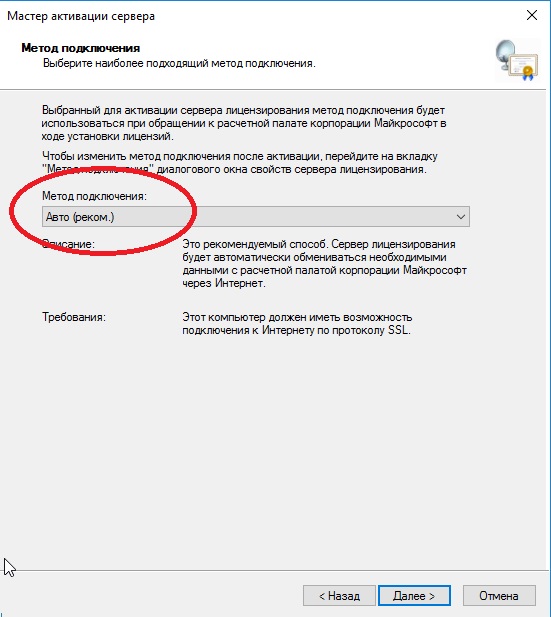
Выбираем «Авто».
Далее вводите опционально имя и фамилию, название Вашей организации и страну размещения сервера.

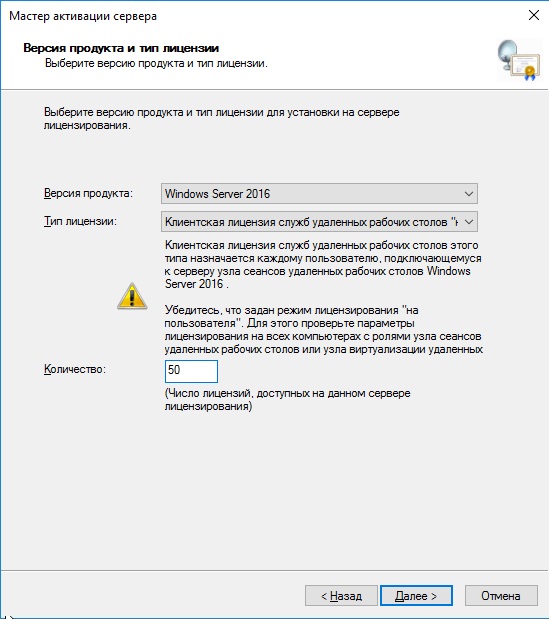
Приступаем к самому лицензированию после регистрации выше. Вам нужен ключ активации для лицензирования терминального сервера — CAL (Client Access Licence) будет в нашем случае. Он обеспечивает подключение 50 пользователей (клиентов) по RDP к серверу Приобрести ключ активации для данной функции можете в нашем интернет-магазине на следующей странице.
Выбираем «Пакет лицензий в розницу» => Далее.
Вводим ключ активации, который Вы приобрели.
Далее в зависимости от лицензии она может определиться сразу на 50 пользователей, либо Вам нужно будет это указать самим как на скриншоте ниже. (указав больше пользователей, чем позволяет лицензия — данная настройка просто не активируется). Тип лицензии соответственно выбираем «По пользователю».
Далее заходим в редактор локальной групповой политики поиск => gpedit.msc => Конфигурация компьютера => Административные шаблоны => Компоненты Windows => Службы удаленных рабочих столов => Узел сеансов удаленных рабочих столов => Лицензирование.
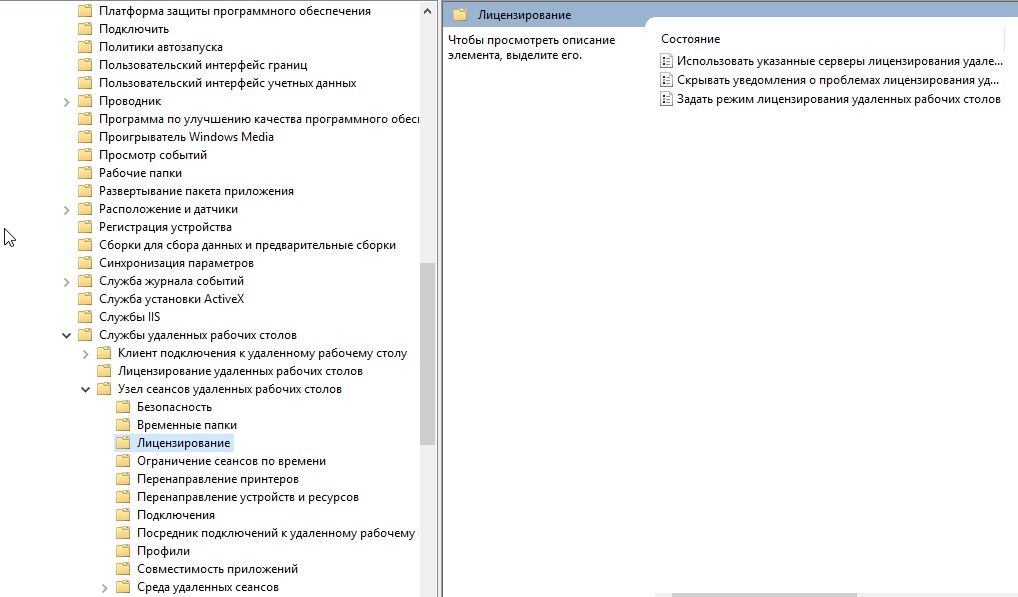
Переходим в меню «Использовать указанные серверы лицензирования удаленных рабочих столов» и вводим в поле имя Вашего сервера, либо его IP.
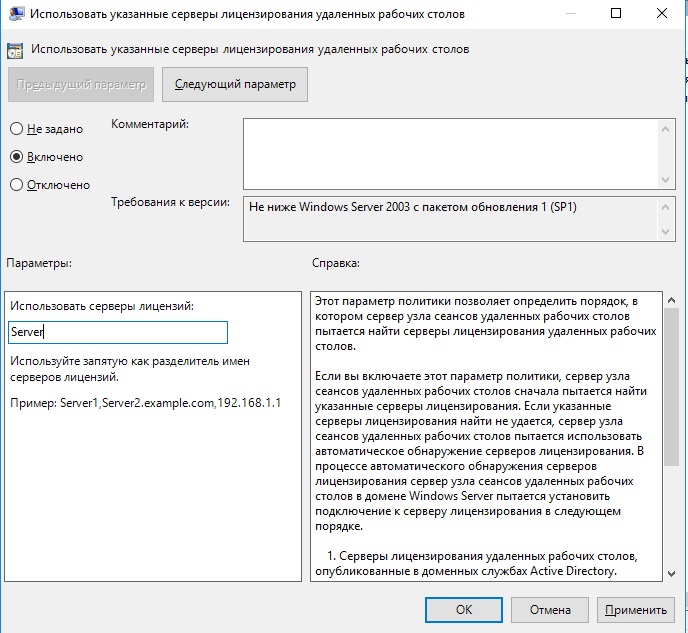
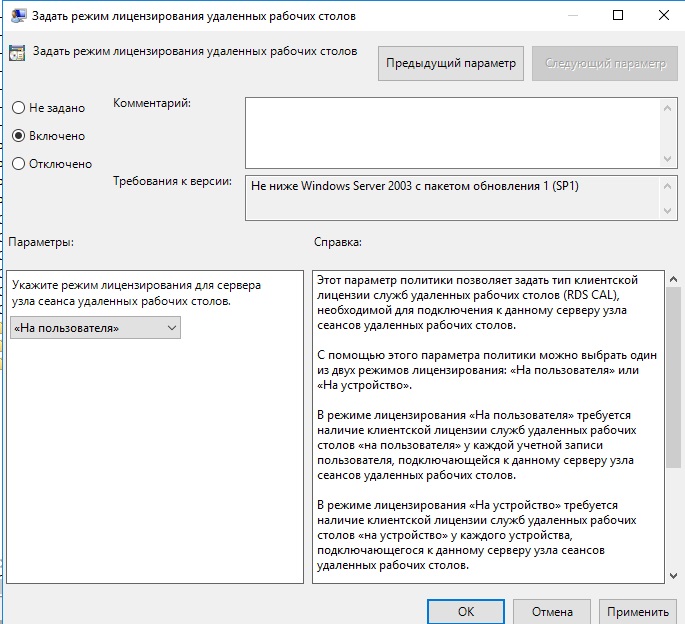
После переходим в меню «Задать режим лицензирования удаленных рабочих столов», в раскрывающемся меню выбираем «На пользователя».
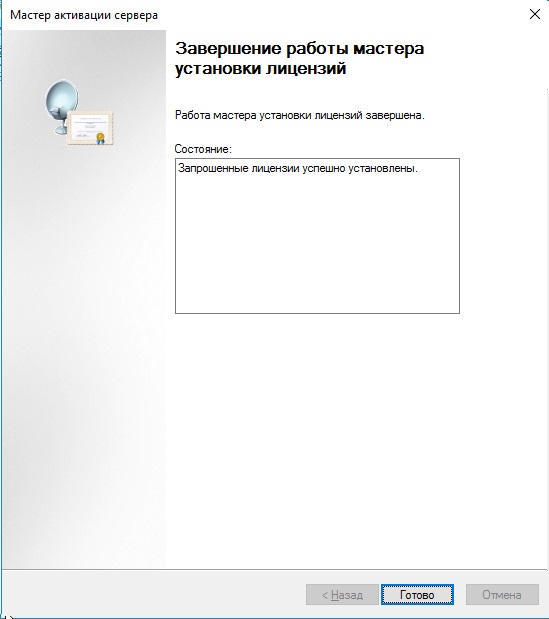
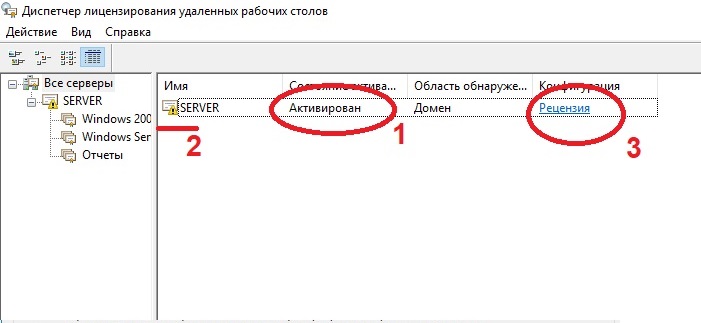
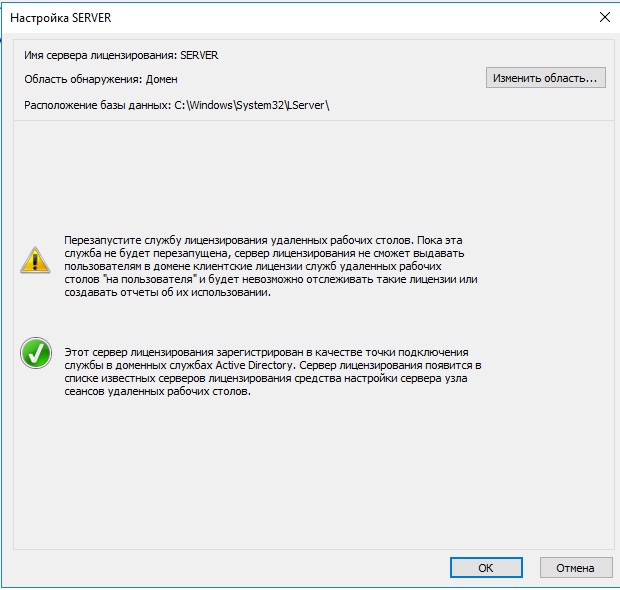
После возвращаемся в диспетчер лицензирования удаленных рабочих столов. И смотрим активирован ли сервер. Если да, то все ок. Но у Вас еще может быть «желтое предупреждение» на иконке сервера. Чтобы устранить проблемы переходим в «Рецензия». В меню данной «Рецензии» могут быть пункты которые нужно отметить, нажмите соответствующие кнопки, если они у вас будут.
На настройках RDP все. Теперь нам осталось создать первого пользователя, который будет подключен по RDP к этому серверу.
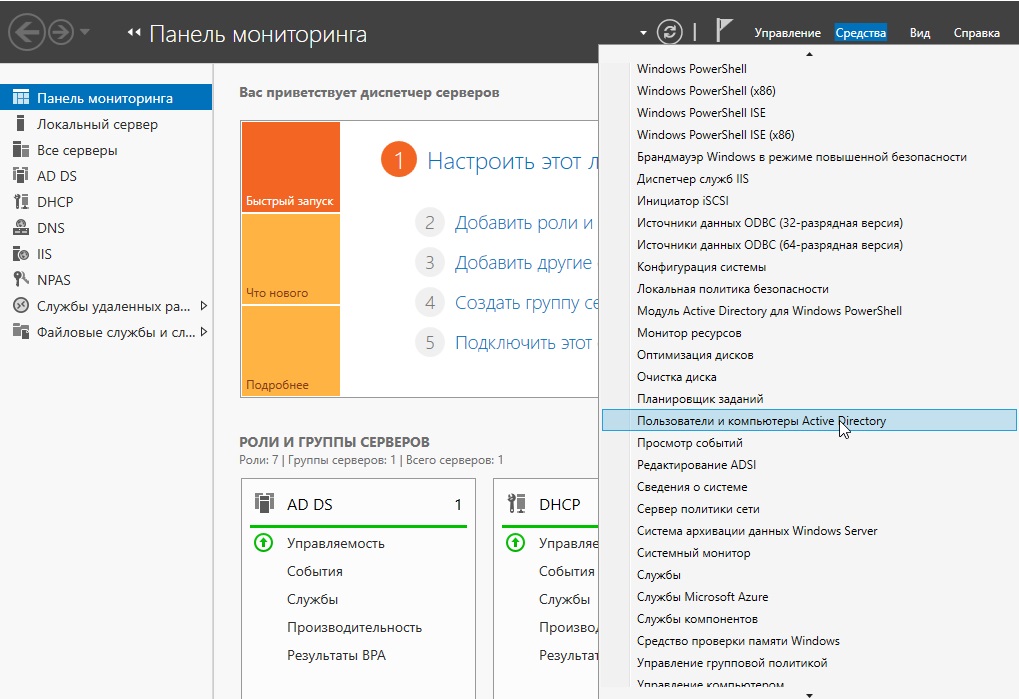
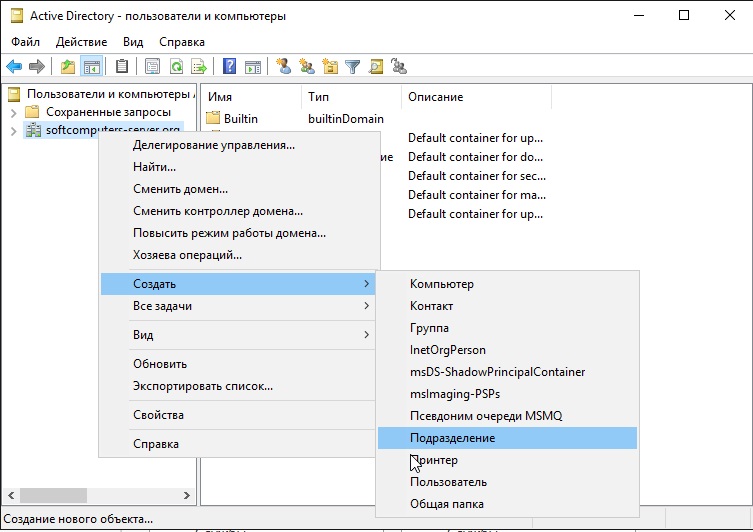
Active Directory => Средства => Пользователи и компьютеры Active Directory.
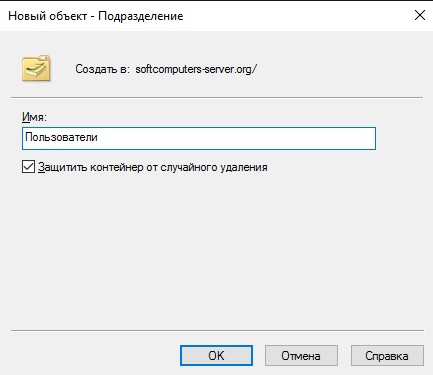
В правом списке выбираете Ваш сервер => Правой кнопкой мыши => Создать => Подраздаление. В этом меню мы создадим пул, в котором будет содержаться список наших пользователей.
Задаем ему соответствующее имя. На всякий случай поставьте галку для защиты от случайного удаления.
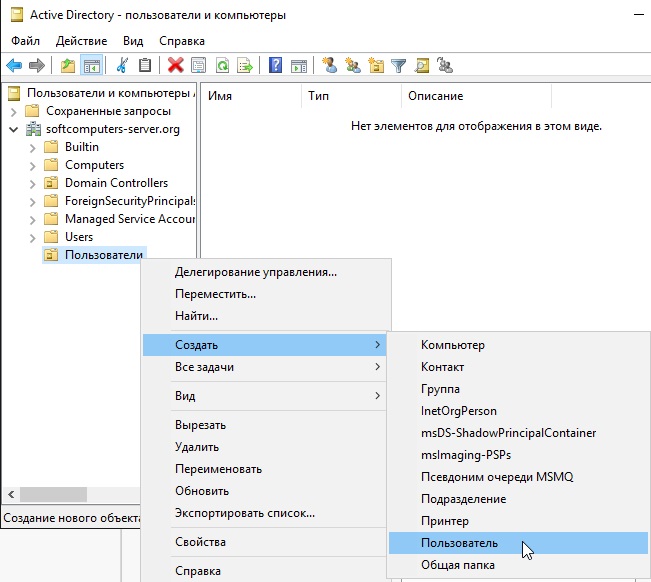
Далее в новой созданной папке слева в списке => Правой кнопкой мыши => Создать => Пользователь.
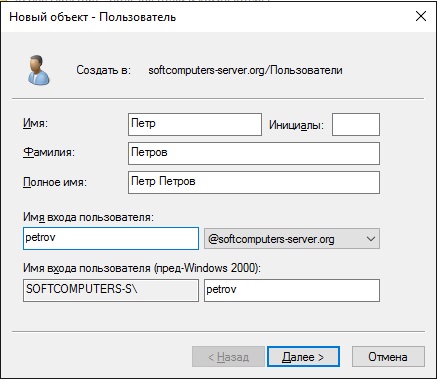
Опционально вводим ФИО пользователя и обязательно имя для входа, желательно это делать на латинице.
В следующем окне задаем пароль для пользователя поставив соответствующие галки.
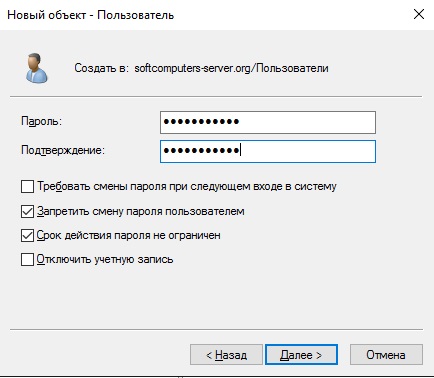
В списке в меню «Пользователи» Вы можете управлять пользователями, удалять их, менять им пароль и т.п. Теперь наш новый пользователь «Петр Петров» может зайти по IP сервера, или по его имени в RDP находясь в одной локальной сети с сервером, либо если он добавлен в домен сервера.
На этом с настройками все. Мы рассмотрели самые важные аспекты в настройки и лицензирования Windows Server 2016. Следите за нашим блогом SoftComputers, у нас еще много всего полезного! 🙂
Оглавление
- Добавление ролей и компонентов
- Активация лицензии удалённых рабочих столов
- Изменение стандартного порта подключения
- Возможные проблемы
- Подключение было запрещено
- CredSSP
- Отсутствуют доступные серверы лицензирования удаленных рабочих столов
Добавление ролей и компонентов
Установка самой оси Microsoft Windows Server 2016 в рамках данной статьи рассматриваться не будет, только отдельно сама установка терминального сервера.
На будущем терминальном сервере открываем диспетчер сервера через Панель управления (Win + R Control) — Администрирование — Диспетчер серверов (Server Manager)
или через команду «Выполнить» (Win + R ServerManager). После чего переходим по вкладке Локальный сервер (Local Server)
Открываем мастер добавления ролей и компонентов, жмём далее, в типе установки отмечаем радиокнопкой пункт Установка ролей или компонентов (Role-based or feature-based installation),
выбираем сервер, жмём далее, чекбоксом отмечаем Службы удаленных рабочих столов. В службах ролей отмечаем для установки две службы: Лицензирование удаленных рабочих столов (Remote Desktop Licensing) и Узел сеансов удаленных рабочих столов (Remote Desktop Session Host),
жмём далее и потом установить. Дожидаемся конца установки и перезагружаем сервер, если это не было сделано автоматически по завершению установки.
Активация лицензии удалённых рабочих столов
Средства — Remote Desktop Services — Диспетчер лицензирования удаленных рабочих столов (RD Licensing Manager).
Раскрываем древо, правой кнопкой по нашему серверу вызываем выпадающее меню и выбираем пункт активировать сервер.
В мастер активации сервера вначале заполняем сведения об организации, а после устанавливаем саму лицензию. При выборе программы лицензии указываем Другое соглашение,
и указываем ключи активации купленной лицензии 6565792 (или любой другой. Для тестового сервера нагуглите за 2 минуты:»номер соглашения windows server 2016«. Ключ 6565792 — также является результатом выдачи поисковика google).
Выбираем версию продукта Windows Server 2016и тип лицензии Клиентская лицензия служб удаленных рабочих столов (на пользователя). Готово!
Но Средство диагностики лицензирования удаленных рабочих столов сообщает нам, что сервер лицензирования не включён. Чтож, поправим это дело через политики. Вызываем
командное меню «Выполнить» Win + R gpedit.msc. Переходим: Конфигурация компьютера (Computer Configuration) — Административные шаблоны (Administrative Templates) — Компоненты Windows (Windows Components) — Службы удаленных рабочих столов (Remote Desktop Services) — Узел сеансов удаленных рабочих столов (Remote Desktop Session Host) — Лицензирование (Licensing).
Тут поправим Использовать указанные серверы лицензирования удаленных рабочих столов (Use the specified Remote Desktop license servers) и Задать режим лицензирования удаленных рабочих столов (Set the Remote licensing mode).
Обновляем сведения в оснастке Средство диагностики лицинзирования удаленных рабочих столов (Win + R lsdiag.msc). Теперь всё ок!
Изменение стандартного порта подключения
Стандартный порт для RDP подключения: 3389
Открываем реестр (Win + R regedit), переходим по ветке:
HKEY_LOCAL_MACHINESystemCurrentControlSetControlTerminal ServerWinStationsRDP-Tcp
Находим ключ PortNumber, меняем систему исчисления на Десятичную и задаем необходимый номер порта.
Так же это можно сделать через командную строу:
reg add "HKLMSystemCurrentControlSetControlTerminal ServerWinStationsRDP-Tcp" /v PortNumber /t REG_DWORD /d НОВЫЙ_НОМЕР_ПОРТА /f
А чтобы вы потом смогли подключиться по новому порту, то вам в фаервол нужно прописать правило
netsh advfirewall firewall add rule name="RDP PORT НОВЫЙ_НОМЕР_ПОРТА" dir=in action=allow protocol=TCP localport=НОВЫЙ_НОМЕР_ПОРТА
И перезапустить службу
net stop TermService && net start TermService
Возможные проблемы
Подключение было запрещено
Скорее всего вы при попытке подключиться увидите сообщение:»Подключение было запрещено, так как учетная запись пользователя не имеет прав для удаленного входа в систему«,
а всё из-за того, что 1 — терминальный сервер не настроен в домене на разрешение подключения к нему определённых пользователей; 2 — вы не добавили в группу Пользователи удаленного рабочего стола ни одного пользователя.
Возможно вам будет полезна статья о том как из Windows 10 сделать Терминальный сервер.
CredSSP
Ещё можете столкнуться с такой вот ошибкой: An authentication error has occurred. The function is not supported. This could be due to CredSSP encryption oracle remediation.
О ней я писал ранее в статье:»Ошибка RDP подключения: CredSSP encryption oracle remediation. Как исправить?».
А возникновение этой ошибки связано с тем, что на терминальном Windows сервере, на который идёт подключение, не установлены последние обновления безопасности (CredSSP обновления для CVE-2018-0886). После обновления система по умолчанию запрещает подключаться к удалённым серверам по RDP со старой версией протокола CredSSP.
Отсутствуют доступные серверы лицензирования удаленных рабочих столов
После настройки сервера всё шло хорошо, но только 120 дней. Потом случилось следущее:
Удаленный сеанс отключен, поскольку отсутствуют доступные серверы лицензирования удаленных рабочих столов.
Обратитесь к администратору сервера
А это означает что у вас установлен ключ льготного периода (grace period licensing), который необходимо удалить. Для этого вам нужно залогиниться на сервер локально.
Где удалять ключ льготного периода? В реестре под именем L$RTMTIMEBOMB. Идём по ветке реестра:
HKEY_LOCAL_MACHINESYSTEMCurrentControlSetControlTerminal ServerRCMGracePeriod
Но не тут то было! У вас недостаточно прав, но и это нас не остановит. Жмём правой кнопкой мыши и меняем владельца на ветку реестра и даём полные права самому себе, после чего спокойно удаляем эту гадость).
Если не поможет, то советую переустановить роли и компоненты.
Если нужно создать удаленное подключение для нескольких пользователей, то сперва необходимо настроить терминальный сервер на Windows Server. Он позволит предоставлять ровно такое количество мощностей, которое требуется для решения конкретной задачи – например, для работы с 1С или CRM.
Настройка в версиях Windows Server 2012, 2016, 2019 выполняется по одному алгоритму.
Базовая настройка терминального сервера
Сначала проверим имя рабочей группы и описание компьютера.
- Открываем «Панель управления», переходим в раздел «Система».
- Нажимаем «Изменить параметры».
- На вкладке «Имя компьютера» смотрим, как он идентифицируется в сети. Если имя компьютера или рабочей группы слишком сложное, нажимаем «Изменить» и задаем другие идентификаторы. Для применения нужно перезагрузить систему.
После проверки имени смотрим и при необходимости меняем сетевые настройки. В «Панели управления» открываем раздел «Сетевые подключения».

Переходим в свойства используемого подключения, открываем свойства «IP версии 4». Указываем настройки своей сети. IP, маска и шлюз должны быть статичными.
Комьюнити теперь в Телеграм
Подпишитесь и будьте в курсе последних IT-новостей
Подписаться
Добавление ролей и компонентов
Открываем меню «Пуск» и запускаем «Диспетчер серверов». Далее:
- Нажимаем «Добавить роли и компоненты».
- Выбираем пункт «Установка ролей или компонентов».

- Выбираем сервер из пула серверов.
- В разделе «Роли сервера» отмечаем DHCP-сервер, DNS-сервер, доменные службы Active Directory, службы удаленных рабочих столов.
- В разделе «Службы ролей» отмечаем лицензирование удаленных рабочих столов, узел сеансов удаленных рабочих столов и шлюз удаленных рабочих столов.
- Нажимаем «Далее» до раздела «Подтверждение». Здесь нажимаем «Установить».


После завершения установки выбираем повышение роли этого сервера до уровня контроллера доменов.

Настройка конфигурации развертывания
Теперь нужно настроить корневой домен:
- В мастере настройки доменных служб Active Directory выбираем операцию добавления нового леса и указываем имя корневого домена. Оно может быть любым.
- В разделе «Параметры контроллера» придумываем и подтверждаем пароль.
- Проходим до раздела «Дополнительные параметры». Указываем имя NetBIOS, если его там нет.
- Проходим до раздела «Проверка предварительных требований». Если проверка готовности пройдена, нажимаем «Установить». Если нет, устраняем недостатки.

После завершения установки необходимо перезагрузиться.
Настройка зоны обратного просмотра
В «Диспетчере серверов» раскрываем список средств и выбираем DNS. Далее:
- Нажимаем «Зона обратного просмотра» – «Создать новую зону».
- Выделяем пункт «Основная зона».
- Выбираем режим «Для всех DNS-серверов, работающих на контроллере домена в этом домене».
- Выбираем зону обратного просмотра IPv4.
- Указываем идентификатор сети – часть IP адресов, которые принадлежат этой зоне.
- Нажимаем «Готово» для применения конфигурации.
Проверить, что все установилось, можно в «Диспетчере DNS».
Настройка DHCP
Возвращаемся в «Диспетчер серверов». Здесь нужно завершить настройку DHCP.
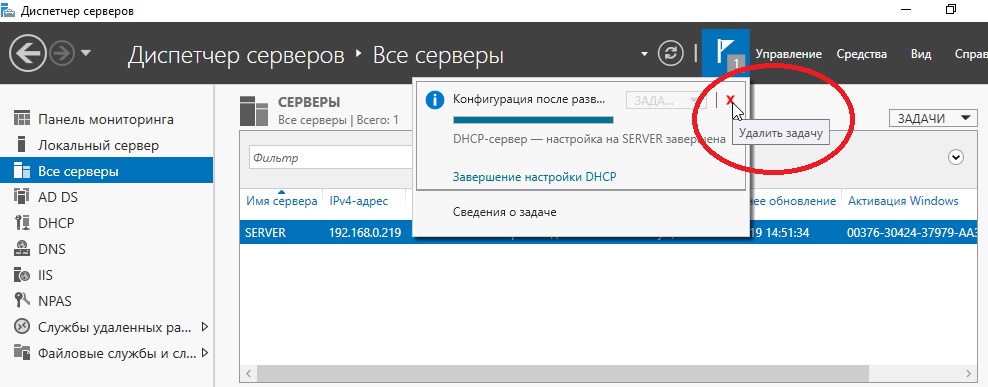
- Указываем данные для авторизации.
- Проверяем сводку и нажимаем «Закрыть».
- После завершения установки снова открываем «Диспетчер серверов» – «Средства» – DHCP.
- В окне DHCP проходим по пути «Имя сервера» – «IPv4» – «Создать область».
- Задаем любое имя DHCP.
- Указываем начальный и конечный IP-адреса для интервала, который будет раздавать сервер.
- Выбираем настройку этих параметров сейчас.
- В окне DHCP переходим по пути «Имя сервера» – «Область» – «Пул адресов». Проверяем, что в списке указан тот диапазон IP-адресов, который мы задали в настройках.

Установка служб удаленных рабочих столов
После настройки DHCP снова открываем «Диспетчер серверов».
- Нажимаем «Управление» – «Добавить роли и компоненты».
- Выбираем установку служб удаленных рабочих столов.
- В разделе «Тип развертывания» выбираем «Быстрый запуск».
- В разделе «Сценарий развертывания» выбираем развертывание рабочих столов на основе сеансов.
- Отмечаем пункт «Автоматически перезапускать конечный сервер, если это потребуется» и нажимаем «Развернуть».

Настройка лицензирования удаленных рабочих столов Windows
Чтобы сервер работал корректно, нужно настроить службу лицензирования.
- Открываем «Диспетчер серверов».
- Переходим по пути «Средства» – «Remote Desktop Services» – «Диспетчер лицензирования удаленных рабочих столов».
- Выбираем в списке сервер, кликаем по нему правой кнопкой и нажимаем «Активировать сервер».
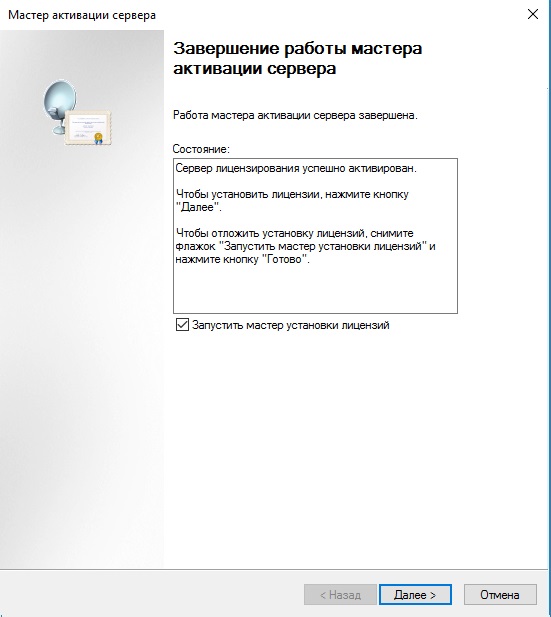
- Нажимаем «Далее» несколько раз, снимаем отметку «Запустить мастер установки лицензий» и затем – «Готово».
- Снова открываем «Диспетчер серверов».
- Переходим в «Службы удаленных рабочих столов».
- В обзоре развертывания нажимаем на меню «Задачи» и выбираем «Изменить свойства развертывания».
- Переходим в раздел «Лицензирование».
- Выбираем тип лицензии.
- Прописываем имя сервера лицензирования – в данном случае это локальный сервер localhost. Нажимаем «Добавить».
- Нажимаем «ОК», чтобы применить настройки.


Добавление лицензий
Осталось добавить лицензии.
- Открываем «Диспетчер серверов».
- Переходим по пути «Средства» – «Remote Desktop Services» – «Диспетчер лицензирования удаленных рабочих столов».
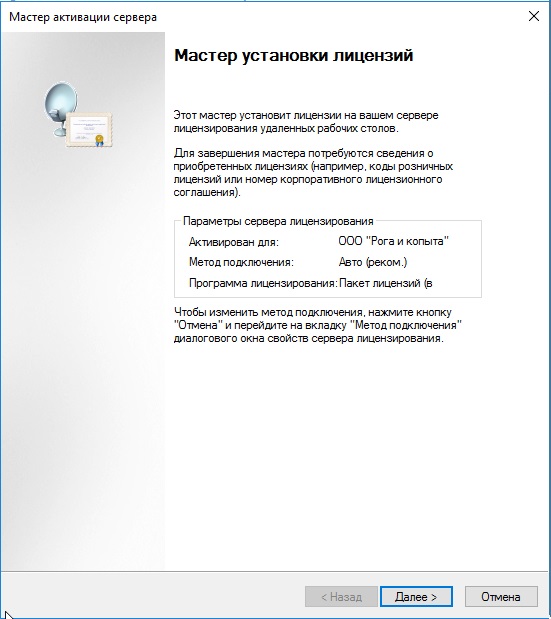
- Кликаем по серверу правой кнопкой и выбираем пункт «Установить лицензии».
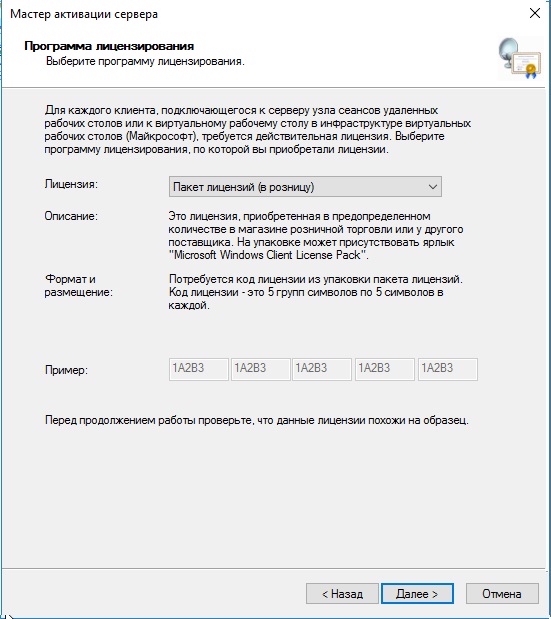
- В мастере установки лицензий выбираем программу, по которой были куплены лицензии.
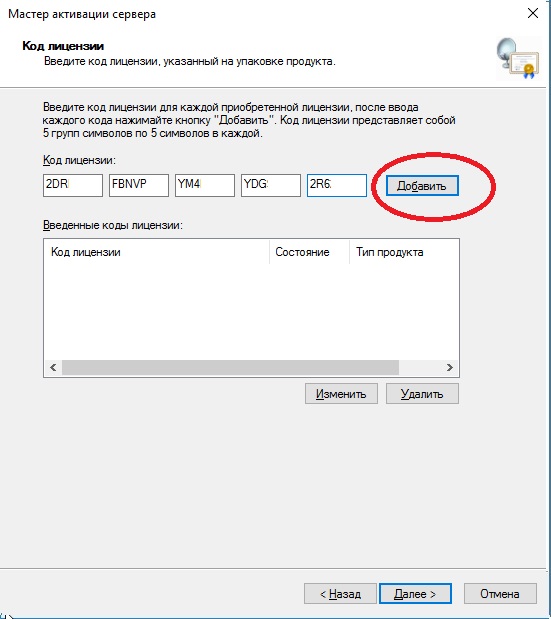
- Указываем номер соглашения и данные лицензии.
- Применяем изменения.

Чтобы проверить статус лицензирования, открываем «Средства» – «Remote Desktop Services» – «Средство диагностики лицензирования удаленных рабочих столов».
На этом настройка терминального сервера на Windows Server завершена. Теперь к серверу могут подключаться удаленные пользователи для выполнения разных задач.

Для настройки терминального сервера к нему распространяются ниже представленные требования исходя из ПО, которое будет запускаться пользователями и количества пользователей:
- Процессор: от 4 ядер
- Оперативная память : 1 ГБ на каждого пользователя + 4 ГБ для работы ОС + 4 ГБ запас
- Дисковая система: для большей отказоустойчивости нужно настроить RAID-массив
Для установки выделить два диска: первый логический диск от 50 ГБ. До 100 ГБ выделить для установки ОС, второй логический диск выделить под пользовательские профили с расчетом минимум 1 ГБ на пользователя - Ширина канала для терминального сервера: 250 Кбит/с на пользователя
У нас вы можете взять терминальный сервер 1С в аренду с бесплатными индивидуальными настройками.
Первоначальные настройки Windows Server 2016:
- Настроить статический IP-адрес сервера
- Проверить правильность настройки времени и часового пояса
- Установить все обновления системы
- Задать понятное имя для сервера и, при необходимости, ввести его в домен
- Включить доступ до сервера по удаленному рабочему столу для удаленного администрирования
- Настроить запись данных профилей пользователей на второй логический диск
- Активировать лицензию Windows Server 2016
Настройка терминального сервера
Начиная с Windows 2012 терминальный сервер должен работать в среде Active Directory.
Если в вашей локальной сети есть контроллер домена, просто присоединяйте к нему сервер терминалов, иначе установите на сервер роль контроллера домена.
Установка роли и компонентов
В панели быстрого запуска открываем Диспетчер серверов:

Нажимаем Управление — Добавить роли и компоненты:

Нажимаем Далее до «Выбор типа установки». Оставляем Установка ролей и компонентов и нажимаем Далее дважды:

В окне «Выбор ролей сервера» выбираем Службы удаленных рабочих столов:

Кликаем Далее, пока не появится окно «Выбор служб ролей» и выбираем следующие:
- Лицензирование удаленных рабочих столов
- Узел сеансов удаленных рабочих столов

Нажимаем Далее, при появлении запроса на установку дополнительных компонентов соглашаемся.
При необходимости, также выставляем остальные галочки:
- Веб-доступ к удаленным рабочим столам — возможность выбора терминальных приложений в браузере.
- Посредник подключений к удаленному рабочему столу — для кластера терминальных серверов посредник контролирует нагрузку каждой ноды и распределяет ее.
- Узел виртуализации удаленных рабочих столов — для виртуализации приложений и запуска их через терминал.
- Шлюз удаленных рабочих столов — центральный сервер для проверки подлинности подключения и шифрования трафика. Позволяет настроить RDP внутри HTTPS.
Нажимаем Далее и в следующем окне Установить. Дожидаемся окончания процесса установки и перезагружаем сервер.
Установка служб удаленных рабочих столов
После перезагрузки открываем Диспетчер серверов и нажимаем Управление — Добавить роли и компоненты:

В окне «Выбор типа установки» выбираем Установка служб удаленных рабочих столов и нажимаем Далее:

В окне «Выбор типа развертывания» выбираем Быстрый запуск и нажимаем Далее:

В «Выбор сценария развертывания» — Развертывание рабочих столов на основе сеансов — Далее:

Еще раз Далее — при необходимости, ставим галочку «Автоматически перезапускать конечный сервер, если это потребуется» и кликаем по Развернуть.
Настройка лицензирования удаленных рабочих столов
Для корректной работы сервера, необходимо настроить службу лицензирования. Для этого открываем диспетчер серверов и кликаем по Средства — Remote Desktop Services — Диспетчер лицензирования удаленных рабочих столов:

В открывшемся окне кликаем правой кнопкой мыши по нашему серверу и выбираем Активировать сервер:

В открывшемся окне дважды кликаем Далее — заполняем форму — Далее — Далее — Снимаем галочку «Запустить мастер установки лицензий» — Готово.
Снова открываем диспетчер серверов и переходим в «Службы удаленных рабочих столов»:

В «Обзоре развертывания» кликаем по Задачи — Изменить свойства развертывания:

В открывшемся окне переходим в Лицензирование — Выбираем тип лицензий — прописываем имя сервера лицензирования (в данном случае локальный сервер) и нажимаем Добавить:

Применяем настройки, нажав OK.
Добавление лицензий
Открываем диспетчер серверов и кликаем по Средства — Remote Desktop Services — Диспетчер лицензирования удаленных рабочих столов:
В открывшемся окне кликаем правой кнопкой мыши по нашему серверу и выбираем Установить лицензии:
В открывшемся окне нажимаем Далее:

Выбираем программу, по которой куплены лицензии, например, Enterprise Agreement:

Нажимаем Далее — вводим номер соглашения и данные лицензии — выбираем версию продукта, тип лицензии и их количество:

Нажимаем Далее — Готово.
Проверить статус лицензирования можно в диспетчере серверов: Средства — Remote Desktop Services — Средство диагностики лицензирования удаленных рабочих столов.

Мы также готовы оказать помощь в установке и настройке терминального сервера.
Нашим клиентам мы предлагаем реализацию данного проекта и его последующее обслуживание в рамках ИТ-аутсорсинга.
Server Core 2016, установка и настройка.
В сегодняшней статье рассмотрим установку Windows Server 2016 в режиме Server Core, то есть, без графического интерфейса. Отсутствие графики позволит сэкономить ресурсы на серверах и уменьшит количество уязвимостей, количество обновлений и перезагрузок, к тому же графика там не особо и нужна, ведь управлять сервером можно через оснастки или Диспетчер серверов.
Установка Server Core 2016
Установка Server Core 2016 мало чем отличается от стандартной, графической версии, единственное, при установке выбираем режим без графики.
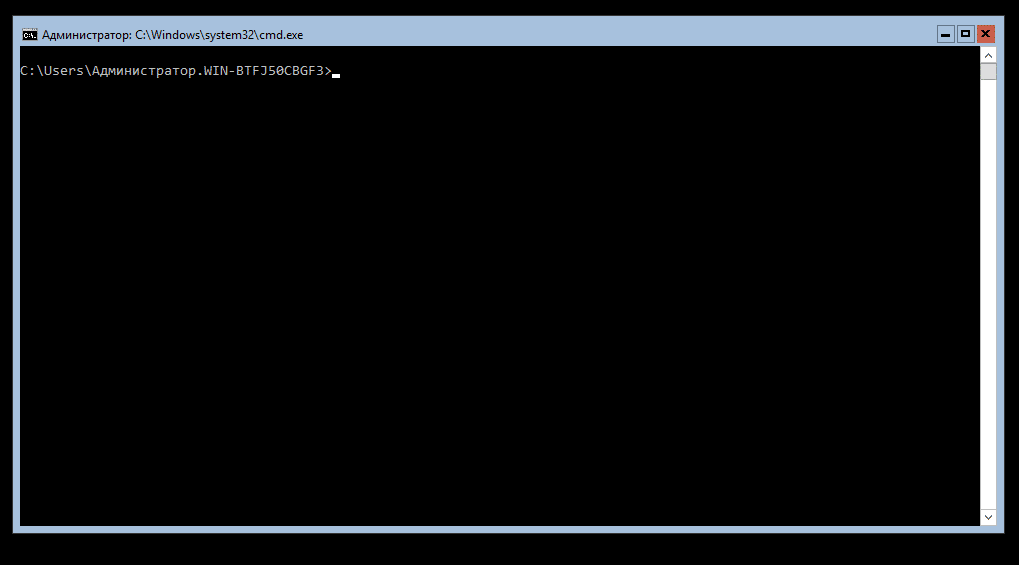
После установки системы вас встретит аскетичный интерфейс командной строки.
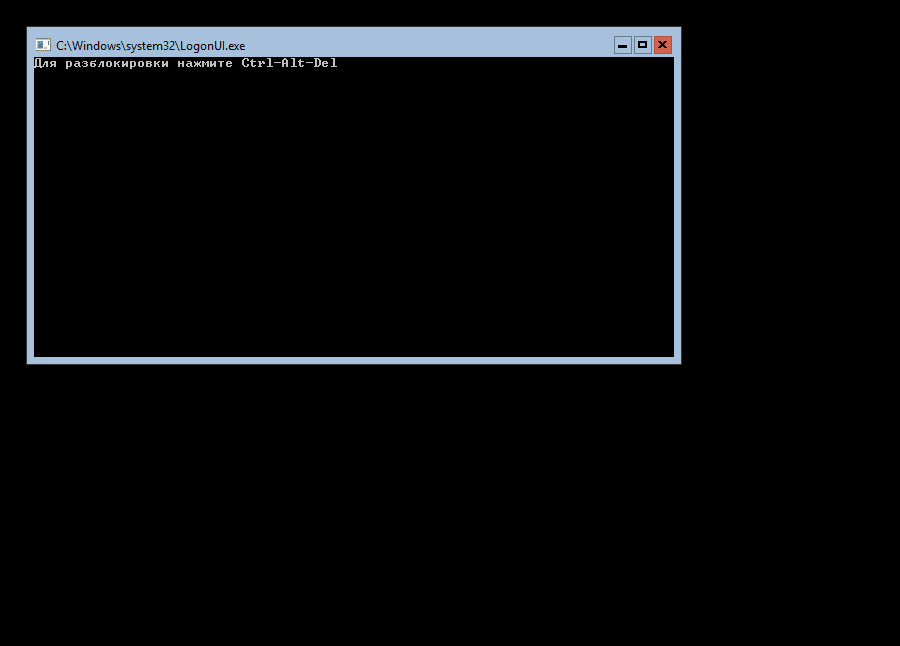
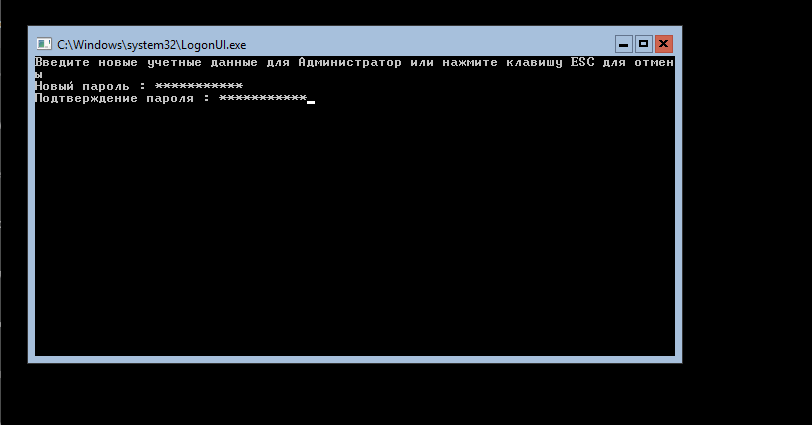
Первым делом установим пароль Администратора:
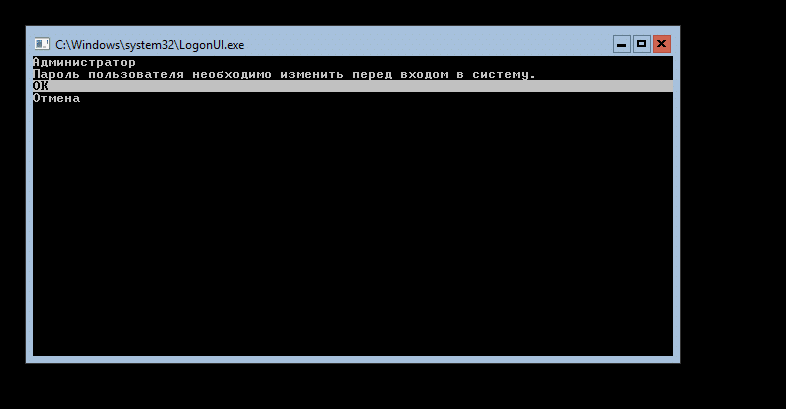
После ввода и подтверждения пароля
нам напишут об успешной смене пароля
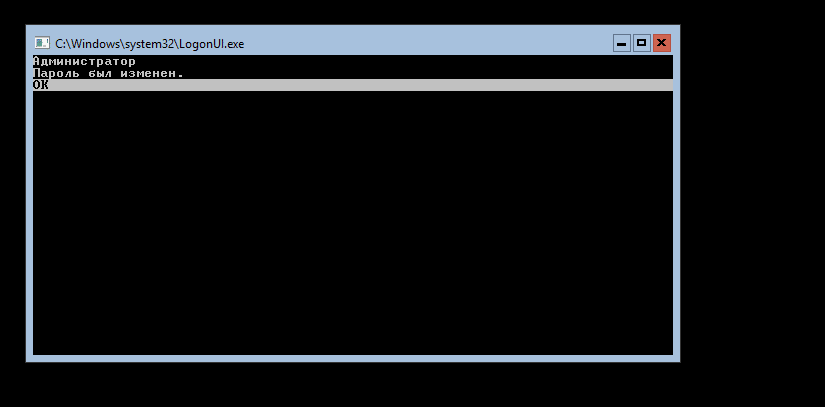
и мы войдем в систему.
Здесь я сделаю «лирическое отступление» и установлю Vmtools, поскольку устанавливаю Server Core на виртуальную машину VMware, и включу буфер обмена для виртуалки.
Установка Vmtools(при установке на vmware):
Подключить к виртуалке диск с Vmtools и выполнить команду <путь>setup64.exe
Дальше всё, как в графическом интерфейсе, стандартная установка Vmtools.
После того, как сервер перезагрузится, можно приступать к настройке.
Настройка Server Core 2016.
Заходим на сервер и вводим в командной строке sconfig.
Откроется окно настройки сервера.
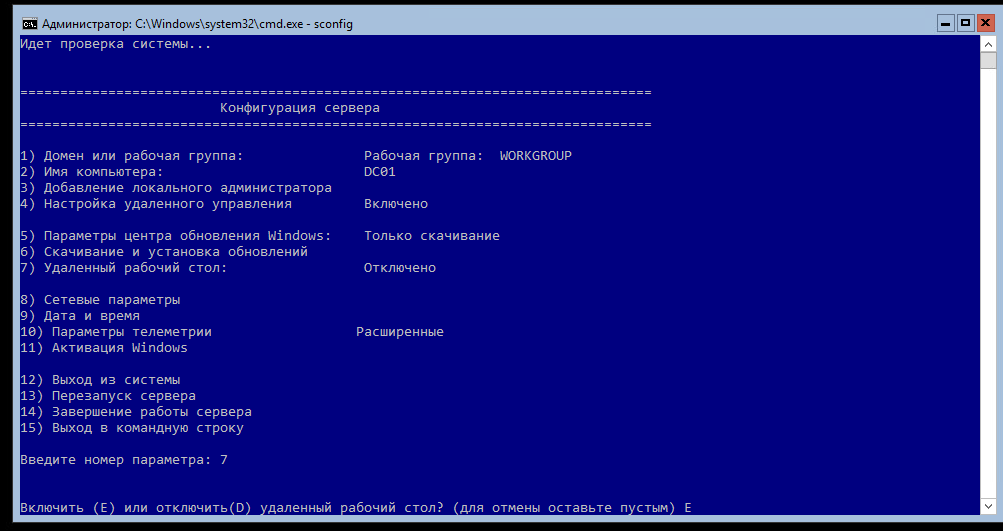
Здесь можно изменить имя сервера, сетевые настройки, включить доступ по РДП и т.д. Подробно описывать не буду — там все интуитивно понятно.
После изменения настроек, если требуется, перезагружаемся и продолжаем.
Замечу, что Powershell уже установлен в системе, и все действия можно выполнять через него, запустив его командой powershell.exe
Для того, чтобы разрешить удаленное управление нашим «ядерным» сервером, нужно выполнить на нем команду

Теперь переходим на компьютер, с которого вы собираетесь управлять сервером Server Core, и на котором установлен Диспетчер серверов.
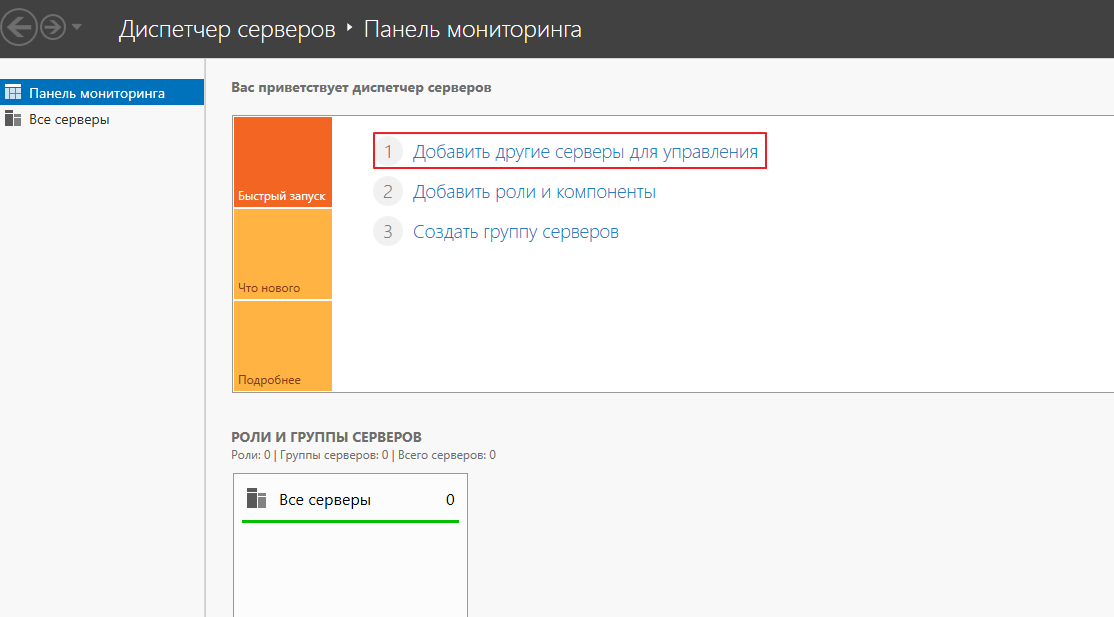
Откройте Диспетчер серверов и выберите «Добавить другие серверы для управления»:
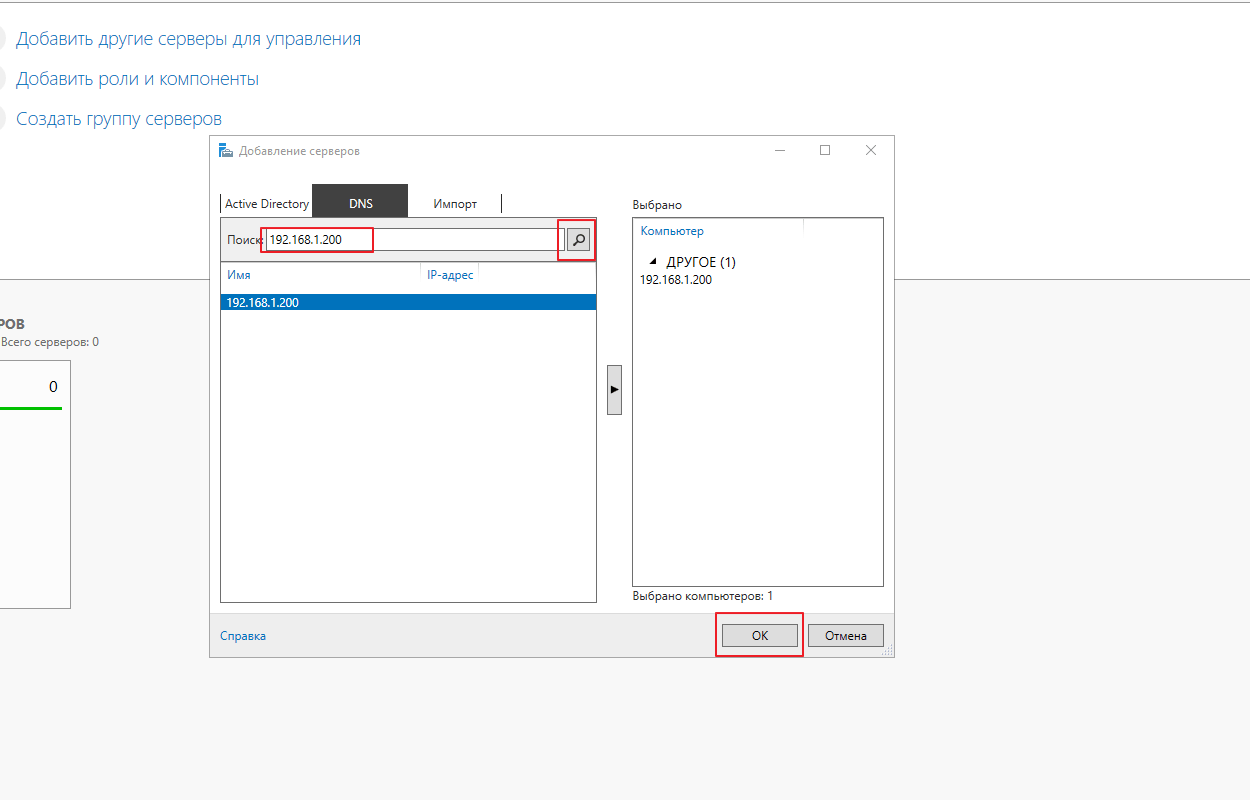
После этого, в открывшемся окне, выберите вкладку DNS и в поисковой строке вбейте имя или адрес вашего сервера Server Core
Если сервер у вас, как и у меня, не в домене, то, скорее всего, будут ошибки типа:
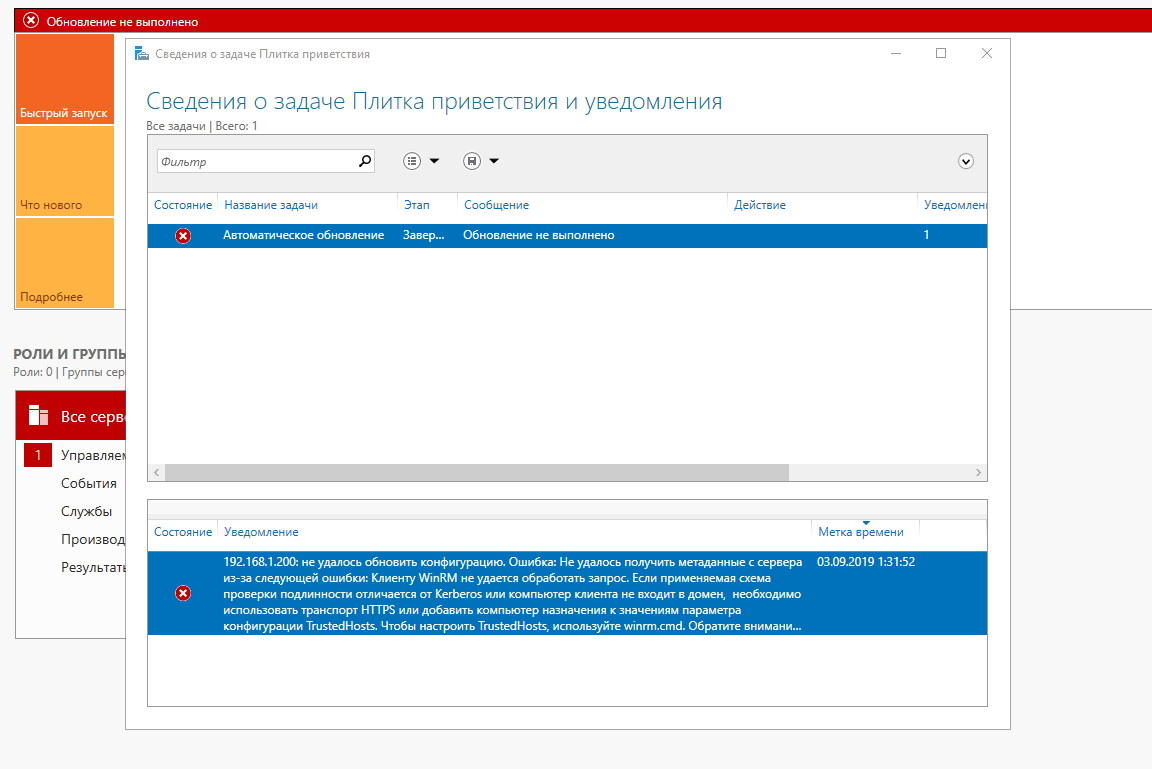
Для устранения ошибки, на компьютере, с которого подключаетесь, выполните команду:
|
winrm set winrm/config/client ‘@{TrustedHosts=»DC01″}’ |
— вместо DC01 введите имя или адрес вашего Server Core 2016
Другой вариант настройки Trusted Hosts — с помощью WSMan:
Посмотреть список доверенных хостов:
|
Get-Item WSMan:localhostClientTrustedHosts |
Указать доверенные хосты:
|
Set-Item WSMan:localhostClientTrustedHosts -Value ‘machineA,machineB’ |
Разрешить все хосты:
|
Set-Item WSMan:localhostClientTrustedHosts -Value ‘*’ |
Добавить хост к списку:
|
Set-Item WSMan:localhostClientTrustedHosts -Value ‘machineC’ -Concatenate |
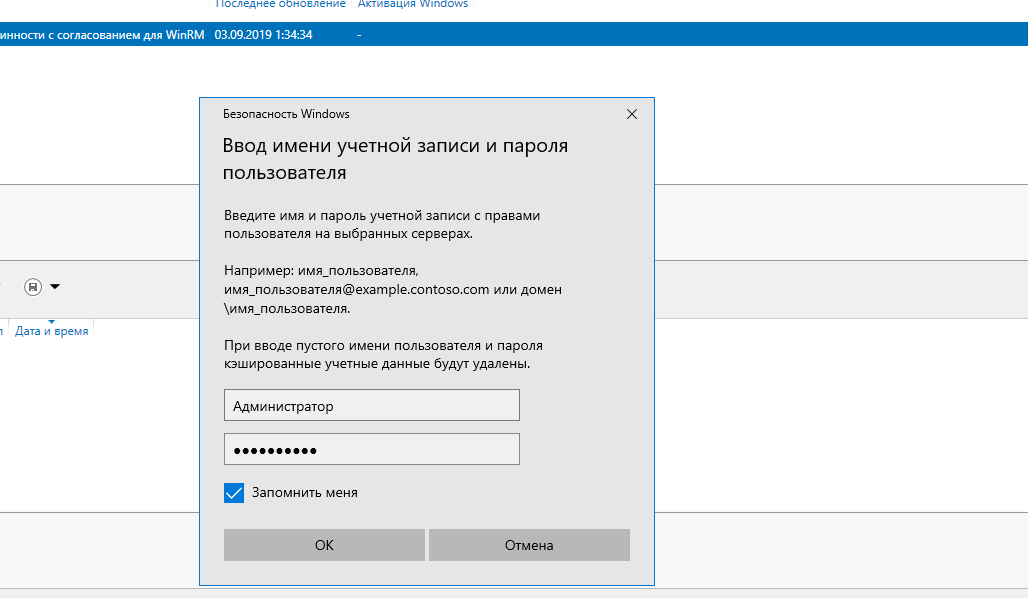
И для того, чтобы управлять сервером вне домена, нужно указать учетную запись с правами администратора на нем. Для этого щелкните правой кнопкой на вашем сервере в диспетчере серверов и выберите пункт «Управлять как…»
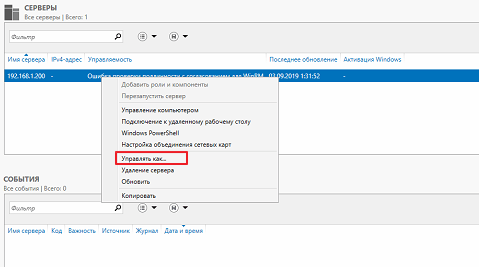
После этого введите учетные данные пользователя с правами администратора.
После всех проделанных манипуляций, ваш сервер в Диспетчере серверов должен выглядеть примерно так:
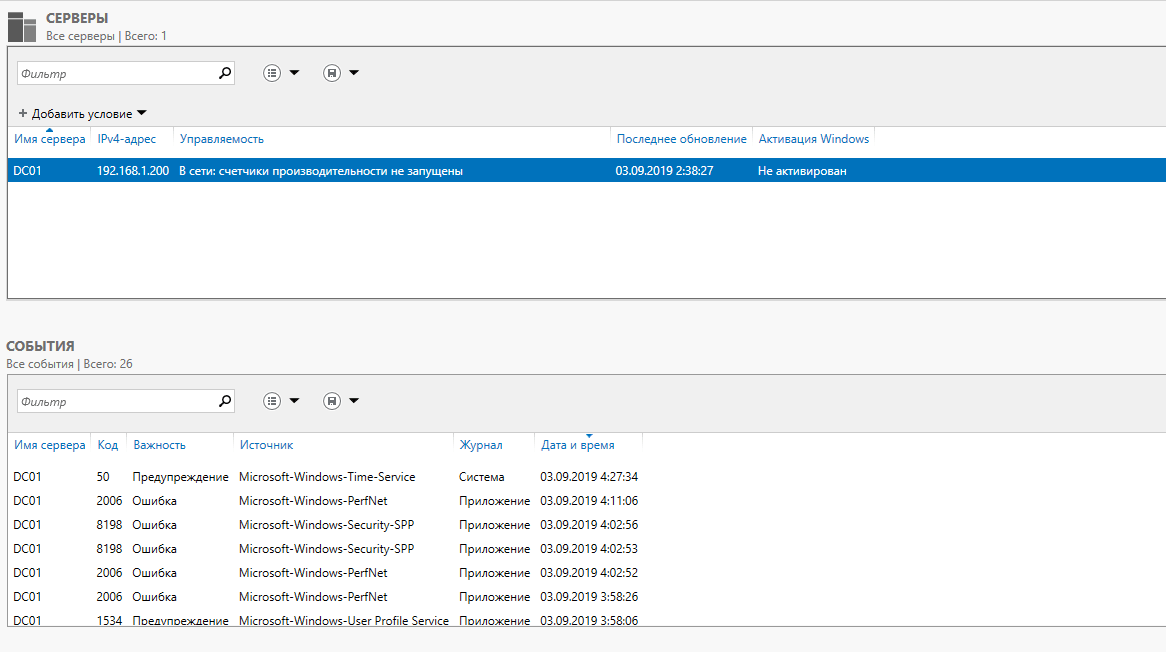
Подробнее о добавлении сервера в Диспетчер серверов: https://docs.microsoft.com/ru-ru/windows-server/administration/server-manager/add-servers-to-server-manager
На этом установку и первичную настройку Windows Server Core можно считать законченной. Теперь можно устанавливать на сервер нужные роли и администрировать его, практически, как обычный сервер.
P.S
С сожалением узнал, что в 2016 Server Core недоступны фишки, как в 2012, которые позволяли устанавливать и удалять графику:
Install-WindowsFeature Server-Gui-Mgmt-Infra,Server-Gui-Shell –Restart –Source c:mountdirwindowswinsxs
Install-WindowsFeature Server-Gui-Mgmt-Infra,Server-Gui-Shell –Restart
Uninstall-WindowsFeature Server-Gui-Mgmt-Infra -Restart